

Page 1
4-265-636-43(1)
Digital Still Camera / Instruction Manual GB
Цифровой фотоаппарат / Инструкция по эксплуатации
Цифровий фотоапарат / Посібник з експлуатації UA
RU
DSC-TX10
Page 2

English
Owner’s Record
The model and serial numbers are located on the bottom. Record the serial number in the
space provided below. Refer to these numbers whenever you call your Sony dealer
regarding this product.
Model No. DSC-TX10
Serial No. ______________________________
Model No. AC-UB10/UB10B
Serial No. ______________________________
WARNING
To reduce fire or shock hazard, do not expose the unit to rain or
moisture.
IMPORTANT SAFETY INSTRUCTIONS
-SAVE THESE INSTRUCTIONS
DANGER
TO REDUCE THE RISK OF FIRE OR ELECTRIC
SHOCK, CAREFULLY FOLLOW THESE
INSTRUCTIONS
If the shape of the plug does not fit the power outlet, use an attachment plug adaptor of the
proper configuration for the power outlet.
CAUTION
[ Battery pack
If the battery pack is mishandled, the battery pack can burst, cause a fire or even chemical
burns. Observe the following cautions.
• Do not disassemble.
• Do not crush and do not expose the battery pack to any shock or force such as
hammering, dropping or stepping on it.
• Do not short circuit and do not allow metal objects to come into contact with the battery
terminals.
• Do not expose to high temperature above 60°C (140°F) such as in direct sunlight or in a
car parked in the sun.
GB
• Do not incinerate or dispose of in fire.
2
Page 3

• Do not handle damaged or leaking lithium ion batteries.
• Be sure to charge the battery pack using a genuine Sony battery charger or a device that
can charge the battery pack.
• Keep the battery pack out of the reach of small children.
• Keep the battery pack dry.
• Replace only with the same or equivalent type recommended by Sony.
• Dispose of used battery packs promptly as described in the instructions.
[ AC Adaptor
Connect the AC Adaptor to the nearest wall outlet (wall socket).
If some trouble occurs while using the AC Adaptor, immediately shut off the power by
disconnecting the plug from the wall outlet (wall socket).
The power cord (mains lead), if supplied, is designed specifically for use with this camera
only, and should not be used with other electrical equipment.
For Customers in the U.S.A. and Canada
[ RECYCLING LITHIUM-ION BATTERIES
Lithium-Ion batteries are recyclable.
You can help preserve our environment by returning your used
rechargeable batteries to the collection and recycling location nearest
you.
For more information regarding recycling of rechargeable batteries,
call toll free
1-800-822-8837, or visit http://www.rbrc.org/
Caution: Do not handle damaged or leaking Lithium-Ion batteries.
[ Battery pack
This device complies with Part 15 of the FCC Rules. Operation is subject to the following
two conditions:
(1) This device may not cause harmful interference, and (2) this device must accept any
interference received, including interference that may cause undesired operation.
This Class B digital apparatus complies with Canadian ICES-003.
GB
For Customers in the U.S.A.
UL is an internationally recognized safety organization.
The UL Mark on the product means it has been UL Listed.
If you have any questions about this product, you may call:
Sony Customer Information Center
1-800-222-SONY (7669).
The number below is for the FCC related matters only.
GB
3
Page 4

[ Regulatory Information
Declaration of Conformity
Trade Name: SONY
Model No.: DSC-TX10
Responsible Party: Sony Electronics Inc.
Address: 16530 Via Esprillo,
Telephone No.: 858-942-2230
This device complies with Part15 of the FCC Rules. Operation is subject to the
following two conditions: (1) This device may not cause harmful interference, and (2)
this device must accept any interference received, including interference that may cause
undesired operation.
San Diego, CA 92127 U.S.A.
[ CAUTION
You are cautioned that any changes or modifications not expressly approved in this manual
could void your authority to operate this equipment.
[ Note:
This equipment has been tested and found to comply with the limits for a Class B digital
device, pursuant to Part 15 of the FCC Rules.
These limits are designed to provide reasonable protection against harmful interference in
a residential installation. This equipment generates, uses, and can radiate rad io frequency
energy and, if not installed and used in accordance with the instructions, may cause
harmful interference to radio communications. However, there is no guarantee that
interference will not occur in a particular installation. If this equipment does cause harmful
interference to radio or television reception, which can be determined by turning the
equipment off and on, the user is encouraged to try to correct the interference by one or
more of the following measures:
– Reorient or relocate the receiving antenna.
– Increase the separation between the equipment and receiver.
– Connect the equipment into an outlet on a circuit different from that to which the
receiver is connected.
– Consult the dealer or an experienced radio/TV technician for help.
The supplied interface cable must be used with the equipment in order to comply with the
limits for a digital device pursuant to Subpart B of Part 15 of FCC Rules.
GB
4
Page 5

For Customers in Europe
[ Notice for the customers in the countries applying EU Directives
The manufacturer of this product is Sony Corporation, 1-7-1 Konan Minato-ku Tokyo,
108-0075 Japan. The Authorized Representative for EMC and product safety is Sony
Deutschland GmbH, Hedelfinger Strasse 61, 70327 Stuttgart, Germany. For any service or
guarantee matters please refer to the addresses given in separate service or guarantee
documents.
This product has been tested and found compliant with the limits set out in the EMC
Directive for using connection cables shorter than 3 meters (9.8 feet).
[ Attention
The electromagnetic fields at the specific frequencies may influence the picture and sound
of this unit.
[ Notice
If static electricity or electromagnetism causes data transfer to discontinue midway (fail),
restart the application or disconnect and connect the communication cable (USB, etc.)
again.
[ Disposal of Old Electrical & Electronic Equipment (Applicable in
the European Union and other European countries with separate
collection systems)
please contact your local Civic Office, your household waste disposal service or the shop
where you purchased the product.
This symbol on the product or on its packaging indicates that this product
shall not be treated as household waste. Instead it shall be handed over to
the applicable collection point for the recycling of electrical and electronic
equipment. By ensuring this product is disposed of correctly, you will help
prevent potential negative consequences for the environment and human
health, which could otherwise be caused by inappropriate waste handling
of this product. The recycling of materials will help to conserve natural
resources. For more detailed information about recycling of this product,
GB
GB
5
Page 6

[ Disposal of waste batteries (applicable in the European Union
and other European countries with separate collection systems)
This symbol on the battery or on the packaging indicates that the battery
provided with this product shall not be treated as household waste.
On certain batteries this symbol might be used in combination with a
chemical symbol. The chemical symbols for mercury (Hg) or lead (Pb) are
added if the battery contains more than 0.0005% mercury or 0.004% lead.
potentially negative consequences for the environment and human health which could
otherwise be caused by inappropriate waste handling of the battery. The recycling of the
materials will help to conserve natural resources.
In case of products that for safety, performance or data integrity reasons require a
permanent connection with an incorporated battery, this battery should be replaced by
qualified service staff only. To ensure that the battery will be treated properly, hand over
the product at end-of-life to the applicable collection point for the recycling of electrical
and electronic equipment.
For all other batteries, please view the section on how to remove the battery from the
product safely.
Hand the battery over to the applicable collection point for the recycling of waste batteries.
For more detailed information about recycling of this product or battery, please contact
your local Civic Office, your household waste disposal service or the shop where you
purchased the product.
By ensuring these batteries are disposed of correctly, you will help prevent
Notice for customers in the United Kingdom
A moulded plug complying with BS 1363 is fitted to this equipment for your safety and
convenience.
Should the fuse in the plug supplied need to be replaced, a fuse of the same rating as the
supplied one and approved by ASTA or BSI to BS 1362, (i.e., marked with an or
mark) must be used.
If the plug supplied with this equipment has a detachable fuse cover, be sure to attach the
fuse cover after you change the fuse. Never use the plug without the fuse cover. If you
should lose the fuse cover, please contact your nearest Sony service station.
GB
6
Page 7
About water-proof, dust-proof, and shock-proof performance of the camera
This camera is equipped to be water-proof, dust-proof and shock-proof.
Damage caused from misuse, abuse or failure to properly maintain the camera
is not covered by the limited warranty.
• This camera is water-proof/dust-proof equivalent to IEC60529 IP58. The
camera is operable up to a water depth of 5 m for 60 minutes.
• Do not subject the camera to pressurized water, such as from a tap.
• Do not use in hot springs.
• Use the camera in the recommended operating water temperature range of
–10°C to +40°C (14°F to 104°F).
• Conforming to MIL-STD 810F Method 516.5-Shock standards, this product
has passed testing when dropped from a height of 1.5 m above a 5-cm thick
plywood board
*Depending on use conditions and circumstances, no guarantee is made regarding
damage to, malfunction of, or the water-proof performance of this camera.
• As for dust-proof/shock-proof performance, there is no guarantee that the
camera will not become scratched or dented.
• Sometimes water-proof performance is lost if the camera is subjected to a
strong shock such as from being dropped. We recommend the camera be
inspected at an authorized repair shop for a fee.
• Accessories supplied do not meet water-proof, dust-proof, and shock-proof
specifications.
Notes before using the camera under/near water
• Make sure that no foreign matter such as
sand, hair, or dirt gets inside the battery/
memory card cover or multi-connector
cover. Even a small amount of foreign
matter may lead to water entering the
camera.
*
.
GB
GB
7
Page 8

• Confirm that the sealing gasket and its
mating surfaces have not become scratched.
Even a small scratch may lead to water
entering the camera. If the sealing gasket or
its mating surfaces become scratched, take
the camera to an authorized repair shop to
have the sealing gasket replaced for a fee.
• If dirt or sand gets on the sealing gasket or
its mating surfaces, wipe the area clean with
1 Sealing gasket
2 Surface contacting the
sealing gasket
a soft cloth that will not leave behind any
fibers. Prevent the sealing gasket from becoming scratched by touching it
while charging a battery or using a cable.
• Do not open/close the battery/memory card cover or multi-connector cover
with wet or sandy hands or near water. There is a risk this will lead to sand or
water getting inside. Before opening the cover, perform the procedure
described in “Cleaning after using the camera under/near water”.
• Open the battery/memory card cover and multi-connector cover with the
camera completely dry.
• Always confirm that the battery/memory card cover and multi-connector
cover have been securely locked.
Notes on using the camera under/near water
• The touch panel may be activated by water splashes on the screen icons.
When using the camera under/near water, it is recommended that you hide
the icons by touching on the right side of the screen. Touch for a few
seconds to display the icons again.
• The touch panel cannot be operated underwater. Use the buttons of the
camera to perform shooting or playback operations.
• Do not subject the camera to shock such as from jumping into water.
• Do not open and close the battery/memory card cover or multi-connector
cover while under/near water.
• Use a separately available housing (Marine Pack) if going more than
5 meters under water.
• This camera sinks in water. Place your hand through the wrist strap to
prevent the camera from sinking.
• Faint, white, circular spots may appear in under-water flash photos due to
reflections off of floating objects. This is not a malfunction.
• Select (Underwater) in Scene Selection to shoot underwater with less
distortion.
• If water drops or other foreign matter is present on the lens, you will be
GB
unable to record clear images.
8
Page 9

• Do not open the lens cover where the sand is whirling.
Cleaning after using the camera under/near
water
• Always clean the camera with water after use
within 60 minutes, and do not open the battery/
memory card cover before cleaning is finished.
Sand or water may get inside places where it
cannot be seen. If not rinsed, water-proof
performance will be degraded.
• Allow the camera to sit in pure water poured into a cleaning bowl for about 5
minutes. Then, gently shake the camera, press each button, slide the zoom
lever or the lens cover inside the water, to clean away any salt, sand or other
matter lodged around the buttons or the lens cover.
• After rinsing, wipe away water drops with a soft cloth. Allow the camera to
dry completely in a shady location with good ventilation. Do not blow dry
with a hair dryer as there is a risk of deformation and/or degraded waterproof performance.
• Wipe away water drops or dust on the memory card/battery cover or terminal
cover with a soft dry cloth.
• This camera is constructed to drain water. Water will drain from openings
around the ON/OFF (Power) button, zoom lever, and other controls. After
removing from water, place the camera on a dry cloth for a while to allow
water to drain.
• Bubbles may appear when the camera is placed under water. This is not a
malfunction.
• The camera body may become discolored if it comes in contact with
sunscreen or suntan oil. If the camera does come in contact with sunscreen or
suntan oil, quickly wipe it clean.
• Do not allow the camera to sit with salt water inside or on the surface. This
may lead to corrosion or discoloration, and degradation of water-proof
performance.
• To maintain the water-proof performance, we recommend that once a year
you take the camera to your dealer, or to an authorized repair shop, to have
the sealing gasket of the battery/memory card cover, or of the multiconnector cover replaced for a fee.
GB
GB
9
Page 10

Refer to “Cyber-shot User Guide” (HTML) on supplied CD-ROM
For details on advanced operations, please read “Cyber-shot User Guide”
(HTML) on the CD-ROM (supplied) using a computer.
Insert the CD-ROM into the CD-ROM drive.
For Windows users:
1 Click [User Guide] t [Install].
2 Start “User Guide” from the shortcut on the desktop.
For Macintosh users:
1 Select the [User Guide] folder and copy [eng] folder stored in [User Guide]
folder to your computer.
2 After copying is complete, double-click “index.html” in [eng] folder.
Checking the supplied items
• Camera (1)
• Rechargeable battery pack NP-BN1 (1)
• Multi-use terminal USB cable (1)
• AC Adaptor AC-UB10/UB10B (1)
• Power cord (mains lead) (not supplied in the USA and Canada) (1)
• Paint pen (1)
• Wrist strap (1)
•CD-ROM (1)
– Cyber-shot application software
– “Cyber-shot User Guide”
• Instruction Manual (this manual) (1)
• Notes on the water-proofing (1)
10
GB
Page 11
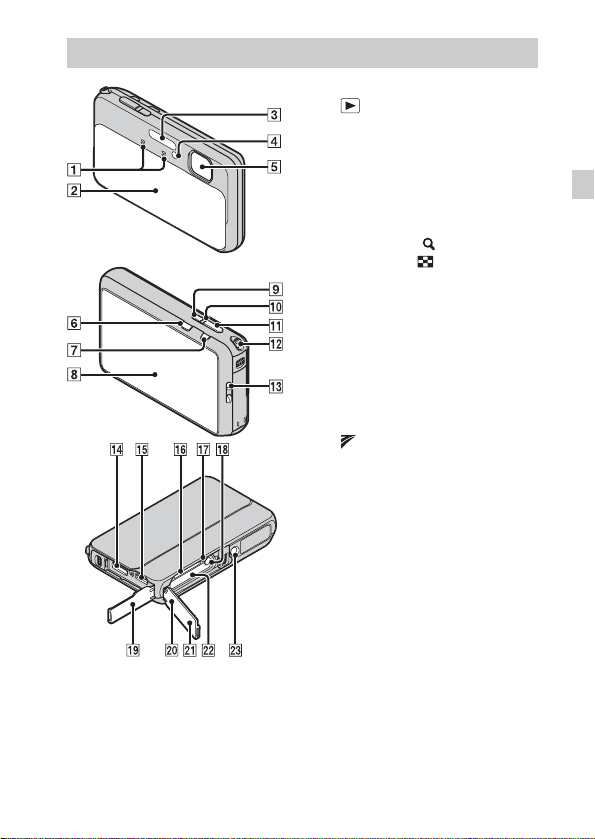
Identifying parts
E Lens
F (Playback) button
G MOVIE (Movie) button
H Screen/Touch panel
I ON/OFF (Power/Charge) button
J ON/OFF (Power/Charge) lamp
K Shutter button
L For shooting: W/T (Zoom) lever
For viewing: (Playback
zoom) lever/ (Index) lever
M Hook for wrist strap
N HDMI connector
O Multi connector (Type3b)
P Memory card slot
Q Access lamp
R Battery eject lever
S Connector cover
T Battery/memory card cover
U (TransferJet™) mark
V Battery insertion slot
W Tripod receptacle
• Use a tripod with a screw less
than 5.5 mm (7/32 inches) long.
Otherwise, you cannot firmly
secure the camera, and damage to
the camera may occur.
GB
A Microphone
B Lens cover
C Flash
D Self-timer lamp/Smile Shutter
lamp/AF illuminator
GB
11
Page 12
Inserting the battery pack
Eject lever
Open the cover.
1
Insert the battery pack.
2
• While pressing the battery eject lever, insert the battery pack as
illustrated. Make sure that the battery eject lever locks after insertion.
Charging the battery pack
For customers in the USA,
Canada
Power cord
(Mains lead)
For customers in countries/regions
other than the USA and Canada
GB
12
Power/Charge lamp
Lit: Charging
Off: Charging finished
Flash: Charging error
Page 13
Open the connector cover and connect the camera and
1
the AC Adaptor (supplied), using the multi-use terminal
USB cable (supplied).
Connect the AC Adaptor to the wall outlet (wall socket).
2
The Power/Charge lamp lights orange, and charging starts.
• Turn off the camera while charging the battery.
• You can charge the battery pack even when it is partially charged.
• When the Power/Charge lamp flashes and charging is not finished,
remove and re-insert the battery pack.
Notes
• Close the cover securely, so that the yellow mark under the slide lock is hidden.
• When the Power/Charge lamp on the camera does not lit even if the AC Adaptor is
connected to the camera and the wall outlet (wall socket), it indicates that the
charging stops temporarily on standby. The charging stops and enters the standby
status automatically when the temperature is outside of the recommended
operating temperature. When the temperature gets back within the appropriate
range, the charging resumes. We recommend charging the battery pack in an
ambient temperature of between 10°C to 30°C (50ºF to 86ºF).
• Connect the AC Adaptor (supplied) to the nearest wall outlet (wall socket). If any
malfunctions occur while using the AC Adaptor, disconnect the plug from the wall
outlet (wall socket) immediately to disconnect the power source.
• When charging is finished, disconnect the AC Adaptor from the wall outlet (wall
socket).
• Be sure to use only genuine Sony brand battery packs, multi-use terminal USB
cable (supplied) and AC Adaptor (supplied).
x
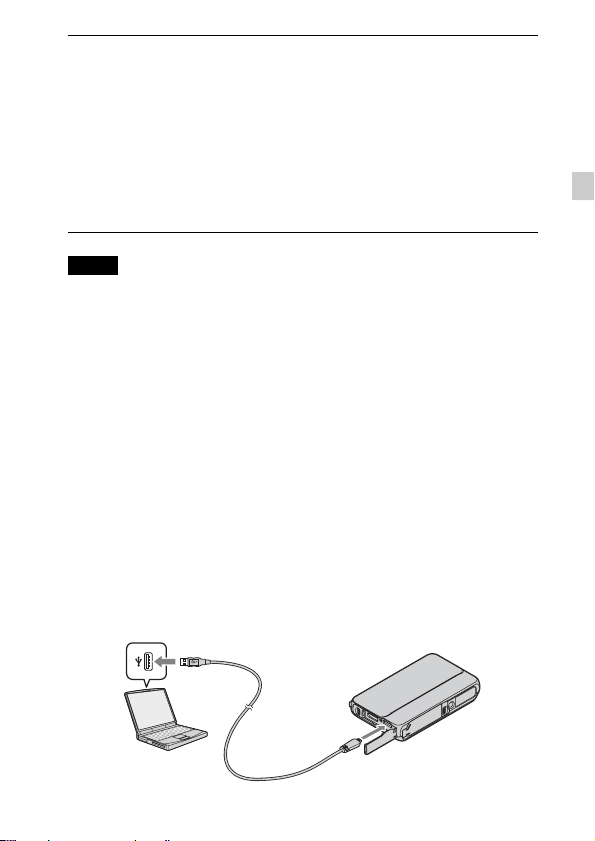
Charging by connecting to a computer
The battery pack can be charged by connecting the camera to a computer using
a multi-use terminal USB cable.
GB
GB
13
Page 14

Note
• Note the following points when charging via a computer:
– If the camera is connected to a laptop computer that is not connected to a power
source, the laptop battery level decreases. Do not charge for an extended period
of time.
– Do not turn on/off or restart the computer, or wake the computer resume from
sleep mode when a USB connection has been established between the computer
and the camera. The camera may cause a malfunction. Before turning on/off, or
restarting the computer or waking the computer from sleep mode, disconnect the
camera and the computer.
– No guarantees are made for charging using a custom-built computer or a
modified computer.
x
Charging time
The charging time is approximately 210 min. using the AC Adaptor
(supplied).
Note
• The above charging time applies when charging a fully depleted battery pack at a
temperature of 25°C (77°F). Charging may take longer depending on conditions of
use and circumstances.
x
Battery life and number of still images you can record
and view
Battery life Number of images
Shooting (still images) Approx. 125 min. Approx. 250 images
Viewing (still images) Approx. 190 min. Approx. 3800 images
Shooting (movies) Approx. 60 min. —
Notes
• The above number of still images applies when the battery pack is fully charged.
The number of still images may decrease depending on the conditions of use.
• The number of still images that can be recorded is for shooting under the following
conditions:
– Using Sony “Memory Stick PRO Duo” (Mark2) media (sold separately)
– The battery pack is used at an ambient temperature of 25°C (77°F).
• The number for “Shooting (still images)” is based on the CIPA standard, and is for
shooting under the following conditions:
(CIPA: Camera & Imaging Products Association)
GB
– [Panel Brightness] is set to [3]
14
Page 15

– Shooting once every 30 seconds.
– The zoom is switched alternately between the W and T ends.
– The flash strobes once every two times.
– The power turns on and off once every ten times.
• The battery life for movies applies shooting under the following conditions:
– Movie quality: AVCHD HQ
– When continuous shooting ends because of set limits (page 24), press the
MOVIE (Movie) button again and continue shooting. Shooting functions such as
the zoom do not operate.
x
Supplying power
The camera can be supplied with power from the wall outlet (wall socket) by
connecting to the AC Adaptor, using the multi-use terminal USB cable
(supplied).
You can import images to a computer without worrying about wearing down
the battery pack by connecting the camera to a computer using the multi-use
terminal USB cable.
Notes
• Power cannot be supplied when the battery pack is not inserted in the camera.
• Power supply from the wall outlet (wall socket) is available only when the camera
is in playback mode or when a connection is made between the camera and a
computer. If the camera is in shooting mode or while you are changing the settings
of the camera, power is not supplied even if you make a USB connection using the
multi-use terminal USB cable.
• If you connect the camera and a computer using the multi-use terminal USB cable
when the camera is in playback mode, the display on the camera is changed from
the playback screen to the USB connection screen. Press (Playback) button to
switch to the playback screen.
GB
GB
15
Page 16
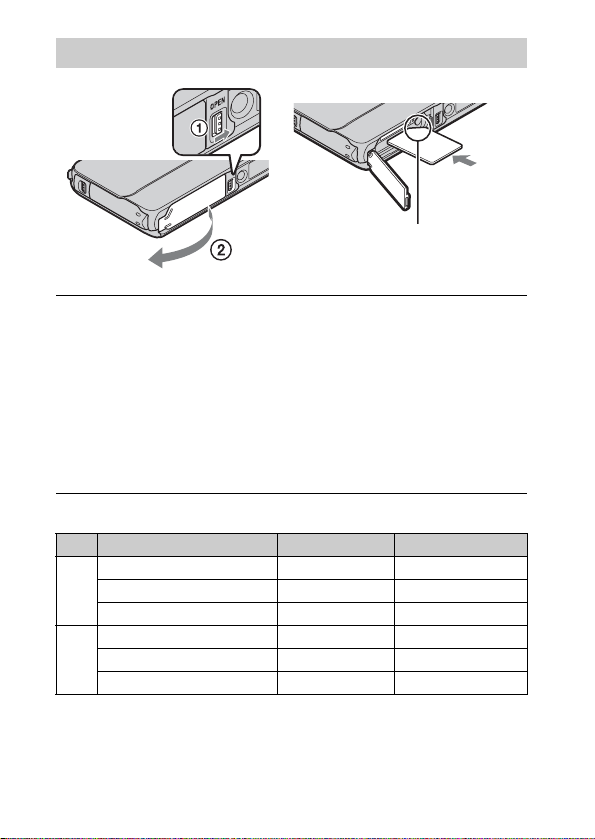
Inserting a memory card (sold separately)
Ensure the notched corner faces
correctly.
Open the cover.
1
Insert the memory card (sold separately).
2
• With the notched corner facing as illustrated, insert the memory card
until it clicks into place.
Close the cover securely, so that the yellow mark under
3
the slide lock is hidden.
• Closing the cover with the battery inserted incorrectly may damage the
camera.
x
Memory cards that you can use
Memory card For still images For movies
Memory Stick PRO Duo aa (Mark2 only)
A
Memory Stick PRO-HG Duo aa
Memory Stick Duo a —
SD memory card aa (Class 4 or faster)
B
SDHC memory card aa (Class 4 or faster)
SDXC memory card aa (Class 4 or faster)
• In this manual, products in A are collectively referred to as “Memory Stick Duo”
media, and products in B are collectively referred to as SD card.
16
GB
Page 17
x
To remove the memory card/battery pack
Memory card: Push the memory card in once.
Battery pack: Slide the battery eject lever. Be sure not to drop the battery pack.
Note
• Never remove the memory card/battery pack when the access lamp (page 11) is lit.
This may cause damage to data in the memory card/internal memory.
Setting the clock
Lens coverON/OFF (Power)
Lower the lens cover.
1
The camera is turned on. The power lamp lights up only when the camera
starts up.
• You can also turn on the camera by pressing the ON/OFF (Power)
button.
• It may take time for the power to turn on and allow operation.
Select a desired language.
2
Select the desired area following the instructions on the
3
screen, then touch [Next].
Set [Daylight Savings] or [Summer Time], [Date & Time
4
Format] and [Date & Time], then touch [Next].
• Midnight is indicated as 12:00 AM, and noon as 12:00 PM.
Touch [OK].
5
GB
GB
17
Page 18
Select the desired display color, following the
6
instructions on the screen, then touch [OK].
When an [In-Camera Guide] introductory message is
7
appeared on the screen, touch [OK].
Read the waterproof precautions, then touch [OK].
8
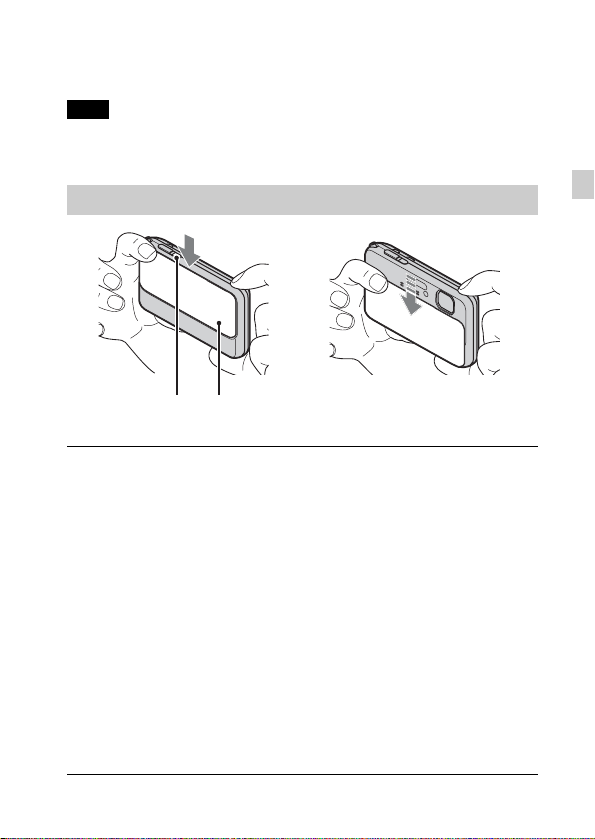
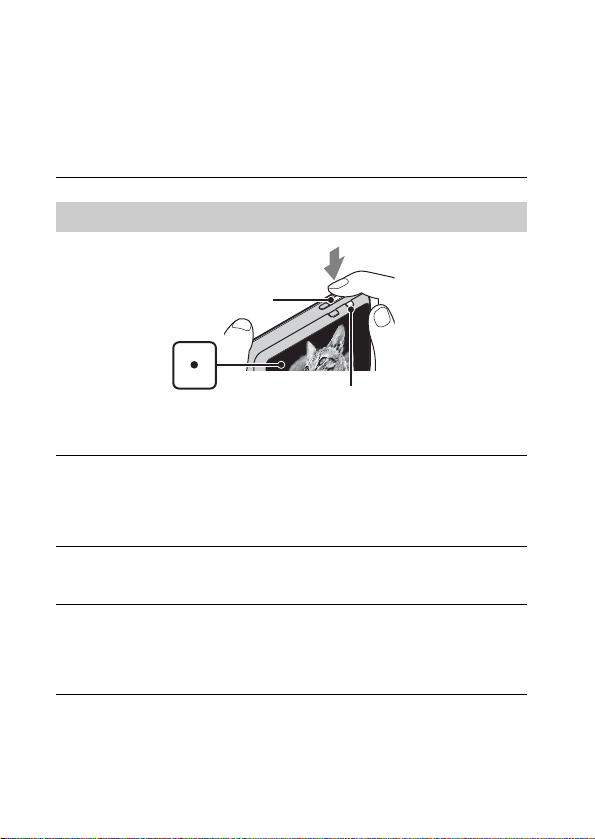
Shooting still images/movies
Shutter button
MOVIE (Movie) button
Shooting still images
Press the shutter button halfway down to focus.
1
When the image is in focus, a beep sounds and the z indicator lights.
Press the shutter button fully down.
2
Shooting movies
Press the MOVIE (Movie) button to start recording.
1
• Use the W/T (zoom) lever to change the zoom scale.
Press the MOVIE button again to stop recording.
2
18
GB
Page 19
Notes
• The sound of the lens and lever operating will be recorded when the zoom function
operates while shooting a movie. The sound of the MOVIE button operating may
also be recorded when movie recording is finished.
• Continuous shooting is possible for approximately 29 minutes at one time at the
camera’s default settings and when the temperature is approximately 25°C (77°F).
When movie recording is finished, you can restart recording by pressing the
MOVIE button again. Recording may stop to protect the camera depending on the
ambient temperature.
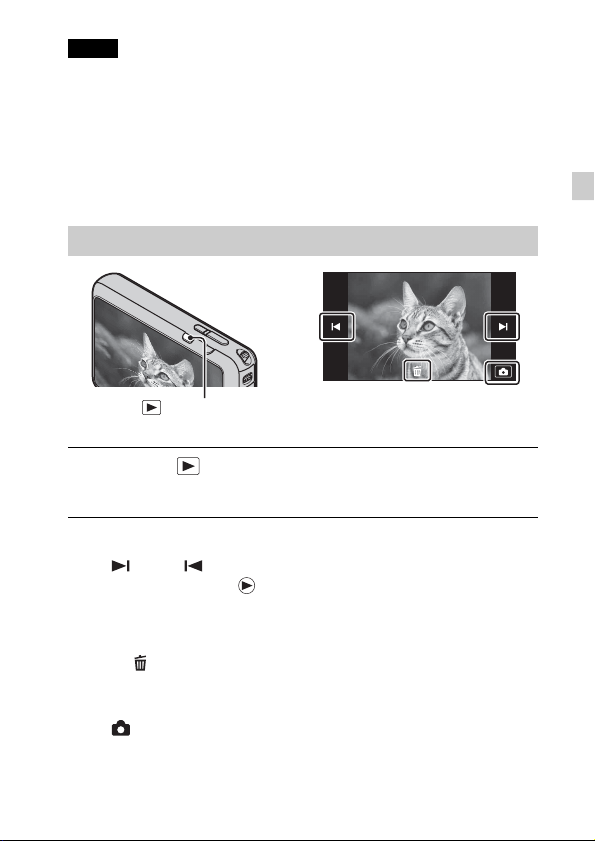
Viewing images
(Playback)
Press the (Playback) button.
1
• When images on a memory card recorded with other cameras are played
back on this camera, the registration screen for the data file appears.
x
Selecting next/previous image
Touch (Next)/ (Previous) on the screen.
• To play back movies, touch (Playback) in the center of the screen.
• To zoom in, touch the still image being played back.
GB
x
Deleting an image
1 Touch (Delete) t [This Image].
x
Returning to shooting images
Touch on the screen.
• You can also return to shooting mode by pressing the shutter button halfwaydown.
GB
19
Page 20
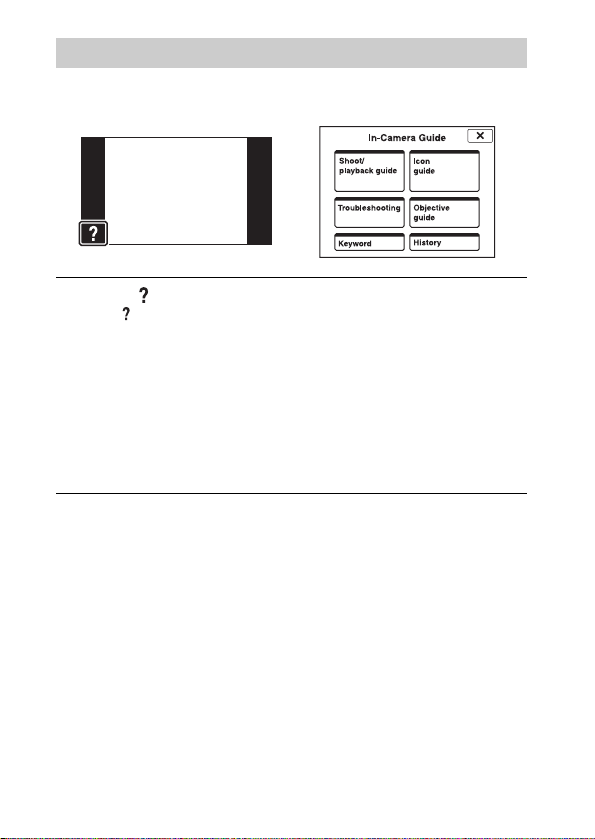
In-Camera Guide
This camera contains an internal function guide. This allows you to search the
camera’s functions according to your needs.
Touch (In-Camera Guide).
1
• The mark will appear on the bottom right of the screen while viewing.
Select a search method from [In-Camera Guide].
2
Shoot/playback guide: Search for various operation functions in
shooting/viewing mode.
Icon guide: Search the function and meaning of displayed icons.
Troubleshooting: Search common problems and their solution.
Objective guide: Search functions according to your needs.
Keyword: Search functions by key words.
History: Display the last 10 items displayed in [In-Camera Guide].
20
GB
Page 21
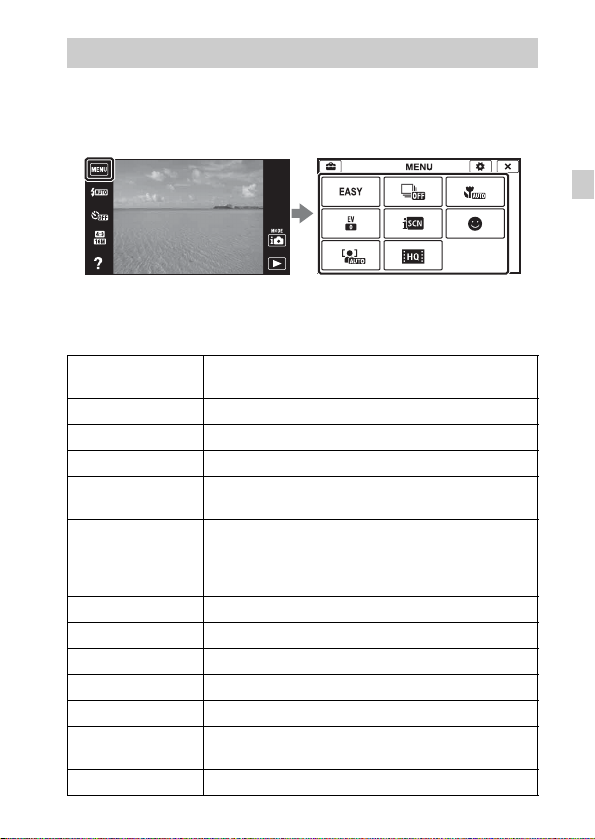
Introduction of other functions
Other functions used when shooting or playing back can be operated touching
the MENU on the screen. This camera is equipped with a Function Guide that
allows you to easily select from the functions. While displaying the guide, try
the other functions.
x
Menu Items
Shooting
Movie shooting
scene
Easy Mode Shoot still images using minimal functions.
Flash Sets the flash settings.
Self-Timer Sets the self-timer settings.
Defocus Effect
Still Image Size/
Panorama Image
Size/Movie Size/
Movie Quality
Burst Settings Sets the burst shooting settings.
Macro Shoots beautiful close-up images of small subjects.
EV Adjust the exposure manually.
ISO Adjust the luminous sensitivity.
White Balance Adjust color tones of an image.
Underwater White
Balance
Focus Select the focus method.
Select movie recording mode.
Set the level of background defocus effect when
shooting in Background Defocus mode.
Select the image size and the quality for still images,
panoramic images or movie files.
Adjusts the colors when shooting underwater.
GB
GB
21
Page 22

Metering Mode
Scene Recognition Set to automatically detect shooting conditions.
Soft Skin Effect Set the Soft Skin Effect and the effect level.
Smile Shutter
Smile Detection
Sensitivity
Face Detection
Anti Blink
In-Camera Guide Search the camera’s functions according to your needs.
Select the metering mode that sets which part of the
subject to measure to determine the exposure.
Set to automatically release the shutter when a smile is
detected.
Set the Smile Shutter function sensitivity for detecting
smiles.
Select to detect faces and adjust various settings
automatically.
Set to automatically shoot two images and select image
in which the eyes are not blinking.
Viewing
Easy Mode Increase the text size on the screen for ease of use.
Date Select Selects the desired image to view by date.
Calendar Selects the date to be played back on Calendar.
Image Index Displays multiple images at the same time.
Slideshow Select a method of continuous playback.
Delete Delete an image.
Send by
TransferJet
Paint Paints on a still image and saves it as a new file.
Retouch Retouch an image using various effects.
3D Viewing Set to play back images shot in 3D mode on a 3D TV.
View Mode Select the display format for images.
Display Burst
Group
Protect Protect the images.
Print (DPOF) Add a print order mark to a still image.
GB
Rotate Rotate a still image to the left or right.
22
Transfer data by closely aligning two products equipped
with TransferJet.
Select to display burst images in groups or display all
images during playback.
Page 23
Volume Adjusts the volume.
Exposure data
Number of images
in index
In-Camera Guide Search the camera’s functions according to your needs.
x
Setting items
Sets whether or not to display the shooting data (Exif
data) of the currently displayed file on the screen.
Sets the number of images displayed in the index screen.
If you touch the MENU while shooting or during playback, (Settings) is
provided as a final selection. You can change the default settings on the
(Settings ) screen.
Shooting Settings
Main Settings
Memory Card
*
Tool
Clock Settings
* If a memory card is not inserted, (Internal Memory Tool) will be displayed and
only [Format] can be selected.
Movie format/AF Illuminator/Grid Line/Digital Zoom/
Wind Noise Reduct./Scene Recog. Guide/Red Eye
Reduction/Blink Alert/Write Date
Beep/Panel Brightness/Language Setting/Display color/
Demo Mode/Initialize/CTRL FOR HDMI/Housing/USB
Connect Setting/USB Power Supply/LUN Setting/
Download Music/Empty Music/TransferJet/Eye-Fi/
Power Save
Format/Create REC.Folder/Change REC.Folder/Delete
REC.Folder/Copy/File Number
Area Setting/Date & Time Setting
GB
GB
23
Page 24
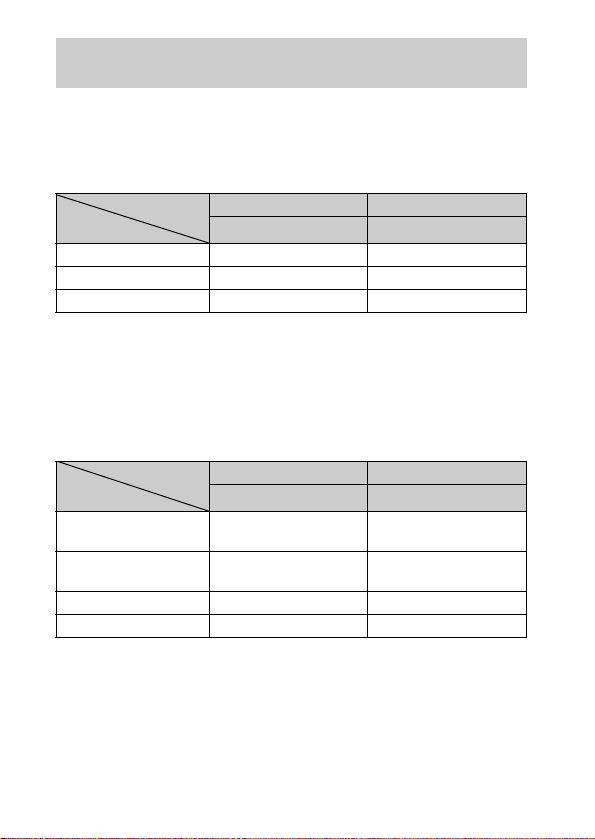
Number of still images and recordable time of movies
The number of still images and recordable time may vary depending on the
shooting conditions and the memory card.
x
Still images
(Units: Images)
Capacity
Size
16M 3 335
VGA 98 9600
16:9(12M) 3 355
x
Movies
Internal memory Memory card
Approx. 19 MB 2 GB
The table below shows the approximate maximum recording times. These are
the total times for all movie files. Continuous shooting is possible for
approximately 29 minutes. The maximum size of an MP4-format movie file is
up to approximately 2 GB.
(h (hour), m (minute))
Capacity
Size
AVC HD 24M (FX) — 10 m
AVC HD 9M (HQ) — 25 m
MP4 12M — 15 m
MP4 3M — 1 h 10 m
The number in ( ) is the minimum recordable time.
• The recordable time of movies varies because the camera is equipped with VBR
(Variable Bit Rate), which automatically adjusts image quality depending on the
shooting scene. When you record a fast-moving subject, the image is clearer but
the recordable time is shorter because more memory is required for recording.
The recordable time also varies depending on the shooting conditions, the subject
or the image quality/size settings.
GB
Internal memory Memory card
Approx. 19 MB 2 GB
(10 m)
(15 m)
24
Page 25

Notes on using the camera
Functions built into this camera
• This manual describes each of the functions of TransferJet compatible/
incompatible devices, 1080 60i-compatible devices and 1080 50i-compatible
devices.
To check if your camera supports the TransferJet function, and whether it is a
1080 60i-compatible device or 1080 50i-compatible device, check for the
following marks on the bottom of the camera.
TransferJet-compatible device:
1080 60i-compatible device: 60i
1080 50i-compatible device: 50i
• Do not watch 3D images shot with this camera for extended periods of time on
3D-compliant monitors.
• When you view 3D images shot with this camera on a 3D-compliant monitors, you
may experience discomfort in the form of eye strain, fatigue, or nausea. To prevent
these symptoms, we recommend that you take regular breaks. However, you need
to determine for yourself the length and frequency of breaks you require, as they
vary according to the individual. If you experience any type of discomfort, stop
viewing the 3D images until you feel better, and consult a physician as necessary.
Also refer to the operating instructions supplied with the device or software you
have connected or are using with this camera. Note that a child's eyesight is still at
the development stage (particularly children below the age of 6).
Consult a pediatrician or ophthalmologist before letting your child view 3D
images, and make sure he/she observes the above precautions when viewing such
images.
On use and care
Avoid rough handling, disassembling, modifying, physical shock, or impact such as
hammering, dropping, or stepping on the product. Be particularly careful of the lens.
Notes on recording/playback
• Before you start recording, make a trial recording to make sure that the camera is
working correctly.
• Do not aim the camera at the sun or other bright light. It may cause the
malfunction of the camera.
• If moisture condensation occurs, remove it before using the camera.
• Do not shake or strike the camera. It may cause a malfunction and you may not be
able to record images. Furthermore, the recording media may become unusable or
image data may be damaged.
Do not use/store the camera in the following places
• In an extremely hot, cold or humid place
In places such as in a car parked in the sun, the camera body may become
deformed and this may cause a malfunction.
(TransferJet)
GB
GB
25
Page 26

• Under direct sunlight or near a heater
The camera body may become discolored or deformed, and this may cause a
malfunction.
• In a location subject to rocking vibration
• Near a location that generates strong radio waves, emits radiation or is strongly
magnetic place. Otherwise, the camera may not properly record or play back
images.
On carrying
Do not sit down in a chair or other place with the camera in the back pocket of your
trousers or skirt, as this may cause malfunction or damage the camera.
Carl Zeiss lens
The camera is equipped with a Carl Zeiss lens which is capable of reproducing sharp
images with excellent contrast. The lens for the camera has been produced under a
quality assurance system certified by Carl Zeiss in accordance with the quality
standards of Carl Zeiss in Germany.
Notes on the screen and lens
• The screen is manufactured using extremely high-precision technology so over
99.99% of the pixels are operational for effective use. However, some tiny black
and/or bright dots (white, red, blue or green) may appear on the screen. These dots
are a normal result of the manufacturing process, and do not affect the recording.
• The touch panel is less likely to react when gloves are worn.
On camera’s temperature
Your camera and battery may get warm due to continuous use, but it is not a
malfunction.
On the overheat protection
Depending on the camera and battery temperature, you may be unable to record
movies or the power may turn off automatically to protect the camera.
A message will be displayed on the screen before the power turns off or you can no
longer record movies. In this case, leave the power off and wait until the camera and
battery temperature goes down. If you turn on the power without letting the camera
and battery cool enough, the power may turn off again or you may be unable to
record movies.
26
GB
Page 27

On charging the battery
If you charge a battery that has not been used for a long time, you may be unable to
charge it to the proper capacity.
This is due to the battery characteristics, and is not a malfunction. Charge the battery
again.
Warning on copyright
Television programs, films, videotapes, and other materials may be copyrighted.
Unauthorized recording of such materials may be contrary to the provisions of the
copyright laws.
No compensation for damaged content or recording failure
Sony cannot compensate for failure to record or loss or damage of recorded content
due to a malfunction of the camera or recording media, etc.
Cleaning the camera surface
Clean the camera surface with a soft cloth slightly moistened with water, then wipe
the surface with a dry cloth. To prevent damage to the finish or casing:
– Do not expose the camera to chemical products such as thinner, benzine, alcohol,
disposable cloths, insect repellent, sunscreen or insecticide.
GB
GB
27
Page 28

Specifications
Camera
[System]
Image device: 7.77 mm (1/2.3 type)
Exmor R CMOS sensor
Total pixel number of camera:
Approx. 16.8 Megapixels
Effective pixel number of camera:
Approx. 16.2 Megapixels
Lens: Carl Zeiss Vario-Tessar 4× zoom
lens
f = 4.43 mm – 17.7 mm (25 mm –
100 mm (35 mm film equivalent))
F3.5 (W) – F4.6 (T)
While shooting movies (16:9):
27 mm – 108 mm
While shooting movies (4:3):
33 mm – 132 mm
SteadyShot: Optical
Exposure control: Automatic exposure,
Scene Selection (16 modes)
White balance: Automatic, Daylight,
Cloudy, Fluorescent 1/2/3,
Incandescent, Flash, One Push
Underwater White Balance: Auto,
Underwater 1/2
Signal format:
For 1080 50i: PAL color, CCIR
standards HDTV 1080/50i
specification
For 1080 60i: NTSC color, EIA
standards HDTV 1080/60i
specification
File format:
Still images: JPEG (DCF Ver. 2.0,
Exif Ver. 2.3, MPF Baseline)
compliant, DPOF compatible
3D still images: MPO (MPF
Extended (Disparity Image))
compliant
GB
28
Movies (AVCHD format):
AVCHD
Video: MPEG-4 AVC/H.264
Audio: Dolby Digital 2ch,
equipped with Dolby Digital Stereo
Creator
• Manufactured under license from
Dolby Laboratories.
Movies (MP4 format):
Video: MPEG-4 AVC/H.264
Audio: MPEG-4 AAC-LC 2ch
Recording media: Internal Memory
(Approx. 19 MB), “Memory Stick
Duo” media, SD cards
Flash: Flash range (ISO sensitivity
(Recommended Exposure Index)
set to Auto):
Approx. 0.08 m to 3.7 m
(3 1/4 inches to 12 ft 1 3/4 inches)
(W)
Approx. 0.5 m to 2.7 m
(1 ft 7 3/4 inches to 8 ft
10 3/8 inches) (T)
[Input and Output connectors]
HDMI connector: HDMI mini jack
Multi connector: Type3b
(AV-out/USB/DC-in):
Video output
Audio output (Stereo)
USB communication
USB communication: Hi-Speed USB
(USB 2.0)
Page 29

[Screen]
Panel:
Wide (16:9), 7.5 cm (3.0 type) TFT
drive
Total number of dots:
921 600 (1 920 × 480) dots
[Power, general]
Power: Rechargeable battery pack
NP-BN1, 3.6 V
AC Adaptor AC-UB10/UB10B,
5V
Power consumption (during shooting):
1.0 W
Operating temperature: –10 °C to
40 °C (14 °F to 104 °F)
Storage temperature: –20 °C to +60 °C
(–4 °F to +140 °F)
Dimensions (CIPA compliant):
95.6 mm × 56.1 mm × 17.9 mm
(3 7/8 inches × 2 1/4 inches ×
23/32 inches) (W/H/D)
Mass (CIPA compliant) (including NP-
BN1 battery pack, “Memory Stick
Duo” media):
Approx. 133 g (4.7 oz)
Microphone: Stereo
Speaker: Monaural
Exif Print: Compatible
PRINT Image Matching III:
Compatible
Water-proof/dust-proof performance:
Equivalent to IEC60529 IP58 (The
camera is operable up to a
waterdepth of 5 m for 60 minutes.)
Shock-proof performance:
Conforming to MIL-STD 810F
Method 516.5-Shock standards,
this product has passed testing
when dropped from a height of
1.5 m above a 5-cm thick plywood
board.
Water-proof, dust-proof, and shockproof performance is based on standard
testing by Sony.
AC Adaptor AC-UB10/UB10B
Power requirements: AC 100 V to
240 V, 50 Hz/60 Hz, 70 mA
Output voltage: DC 5 V, 0.5 A
Operating temperature: 0 °C to 40 °C
(32°F to 104°F)
Storage temperature: –20 °C to +60 °C
(–4 °F to +140 °F)
Dimensions:
Approx. 50 mm × 22 mm × 54 mm
(2 inches × 7/8 inches ×
2 1/4 inches) (W/H/D)
Mass:
For the USA and Canada: Approx.
48 g (1.7 oz)
For countries or regions other than
the USA and Canada: Approx. 43 g
(1.5 oz)
Rechargeable battery pack
NP-BN1
Used battery: Lithium-ion battery
Maximum voltage: DC 4.2 V
Nominal voltage: DC 3.6 V
Maximum charge voltage: DC 4.2 V
Maximum charge current: 0.9 A
Capacity:
typical: 2.3 Wh (630 mAh)
minimum: 2.2 Wh (600 mAh)
Design and specifications are subject to
change without notice.
GB
GB
29
Page 30
Trademarks
• The following marks are trademarks
of Sony Corporation.
, “Cyber-shot,”
“Memory Stick PRO Duo,”
“Memory Stick PRO-HG Duo,”
“Memory Stick Duo”
• Windows is registered trademark of
Microsoft Corporation in the United
States and/or other countries.
• Macintosh is registered trademark of
Apple Inc.
• SDXC logo is a trademark of SD-3C,
LLC.
• “ ” and “PlayStation” are
registered trademarks of Sony
Computer Entertainment Inc.
• In addition, system and product
names used in this manual are, in
general, trademarks or registered
trademarks of their respective
developers or manufacturers.
However, the ™ or ® marks are not
used in all cases in this manual.
• Add further enjoyment with your
PlayStation®3 by downloading the
application for PlayStation®3 from
PlayStation®Store (where available.)
• The application for PlayStation®3
requires PlayStation®Network
account and application download.
Accessible in areas where the
PlayStation®Store is available.
Additional information on this
product and answers to frequently
asked questions can be found at
our Customer Support Website.
Printed on 70% or more recycled paper
using VOC (Volatile Organic
Compound)-free vegetable oil based
ink.
30
GB
Page 31

Page 32

Русский
ПРЕДУПРЕЖДЕНИЕ
Для уменьшения опасности возгорания или поражения
электрическим током не подвергайте аппарат воздействию
дождя или влаги.
ВАЖНЫЕ ИНСТРУКЦИИ ПО
ТЕХНИКЕ БЕЗОПАСНОСТИ
-СОХРАНИТЕ ЭТИ ИНСТРУКЦИИ
ОПАСНОСТЬ
ДЛЯ УМЕНЬШЕНИЯ ОПАСНОСТИ
ВОЗГОРАНИЯ ИЛИ ПОРАЖЕНИЯ
ЭЛЕКТРИЧЕСКИМ ТОКОМ СТРОГО
СОБЛЮДАЙТЕ ЭТИ ИНСТРУКЦИИ
Если форма штепсельной вилки не соответствует сетевой розетке, используйте
для сетевой розетки переходник соответствующей конфигурации.
RU
2
Page 33

ПРЕДУПРЕЖДЕНИЕ
[ Батарейный блок
Неправильное обращение с батарейным блоком может стать причиной его
взрыва, возгорания, а также химических ожогов. Соблюдайте следующие
меры предосторожности.
• Не разбирайте блок.
• Не подвергайте батарейный блок каким бы то ни было механическим
воздействиям: ударам, падениям или попаданиям под тяжелые предметы.
• Во избежание короткого замыкания не допускайте контакта металлических
предметов с контактами батарейного блока.
• Не допускайте нагрева батарейного блока до температуры выше 60 °C:
избегайте воздействия на него прямых солнечных лучей, а также не
оставляйте в припаркованном на солнце автомобиле.
• Запрещается сжигать блок или бросать его в огонь.
• Не следует использовать поврежденные и протекшие литий-ионные батареи.
• Для зарядки батарейного блока используйте оригинальное зарядное
устройство Sony или другое совместимое зарядное устройство.
• Храните батарейный блок в недоступном для детей месте.
• Храните батарейный блок в сухом месте.
• Замену следует выполнять только на батарейный блок того же или
аналогичного типа, рекомендованный Sony.
• Утилизация использованных батарейных блоков должна производиться
надлежащим образом в соответствии с инструкциями.
[ Адаптер переменного тока
Подсоедините адаптер переменного тока к ближайшей сетевой розетке.
Если при использовании адаптера переменного тока возникнут какие-либо
проблемы, немедленно отключите питание, вынув штепсельную вилку из
сетевой розетки.
Сетевой шнур (провод питания), если он прилагается, предназначен
специально для использования только с данным фотоаппаратом, и не должен
использоваться с другим электрическим оборудованием.
RU
RU
3
Page 34

[ Дата изготовления изделия.
Вы можете узнать дату изготовления изделия, взглянув на обозначение “P/D:”,
которое находится на этикетке со штрих кодом картонной коробки.
Знаки, указанные на этикетке со штрих кодом картонной коробки.
P/D:XX XXXX
1 2
1. Месяц изготовления
2. Год изготовления
A-0, B-1, C-2, D-3, E-4, F-5, G-6,
H-7, I-8, J-9.
Дата изготовления литий-ионного батарейного блока указаны на боковой
стороне или на поверхности с наклейкой.
RU
4
Page 35

Для покупателей в Европе
[ Примечание для покупателей в странах, где действуют
директивы ЕС
Производителем данного устройства является корпорация Sony Corporation, 17-1 Konan Minato-ku Tokyo, 108-0075 Japan. Уполномоченным представителем
по электромагнитной совместимости (EMC) и безопасности изделия является
компания Sony Deutschland GmbH, Hedelfinger Strasse 61, 70327 Stuttgart,
Germany. По вопросам обслуживания и гарантии обращайтесь по адресам,
указанным в соответствующих документах.
Данное изделие прошло испытания и соответствует ограничениям,
установленным в Директиве EMC в отношении соединительных кабелей,
длина которых не превышает 3 метров.
[ Внимание
Электромагнитные поля определенных частот могут влиять на изображение и
звук данного аппарата.
[ Уведомление
Если статическое электричество или электромагнитныe силы приводят к сбою
в передачe данных, перезапустите приложение или отключите и снова
подключите коммуникационный кабель (USB и т.д.).
[ Утилизация отслужившего электрического и электронного
оборудования (директива применяется в странах Евросоюза
и других европейских странах, где действуют системы
раздельного сбора отходов)
специальные требования по утилизации этого изделия. Переработка данных
материалов поможет сохранить природные ресурсы. Для получения более
подробной информации о переработке этого изделия обратитесь в местные
органы городского управления, службу сбора бытовых отходов или в магазин,
где было приобретено изделие.
Данный знак на устройстве или его упаковке обозначает, что
данное устройство нельзя утилизировать вместе с прочими
бытовыми отходами. Его следует сдать в соответствующий
приемный пункт переработки электрического и электронного
оборудования. Неправильная утилизация данного изделия
может привести к потенциально негативному влиянию на
окружающую среду и здоровье людей, поэтому для
предотвращения подобных последствий необходимо выполнять
RU
RU
5
Page 36

[ Утилизация использованных элементов питания
(применяется в странах Евросоюза и других европейских
странах, где действуют системы раздельного сбора отходов)
Данный знак на элементе питания или упаковке означает, что
элемент питания, поставляемый с устройством, нельзя
утилизировать вместе с прочими бытовыми отходами.
На некоторых элементах питания данный символ может
комбинироваться с символом химического элемента. Символы
данных металлов более 0,0005% (для ртути) и 0,004% (для свинца)
соответственно.
Обеспечивая правильную утилизацию использованных элементов питания, вы
предотвращаете негативное влияние на окружающую среду и здоровье людей,
возникающее при неправильной утилизации. Вторичная переработка
материалов, использованных при изготовлении элементов питания,
способствует сохранению природных ресурсов.
При работе устройств, для которых в целях безопасности, выполнения какихлибо действий или сохранения имеющихся в памяти устройств данных
необходима подача постоянного питания от встроенного элемента питания,
замену такого элемента питания следует производить только в
специализированных сервисных центрах. Для правильной утилизации
использованных элементов питания, после истечения срока службы, сдавайте
их в соответствующий пункт по сбору электронного и электрического
оборудования.
Об использовании прочих элементов питания, пожалуйста, узнайте в разделе, в
котором даны инструкции по извлечению элементов питания из устройства,
соблюдая меры безопасности.
Сдавайте использованные элементы питания в соответствующие пункты по
сбору и переработке использованных элементов питания.
Для получения более подробной информации о вторичной переработке
данного изделия или использованного элемента питания, пожалуйста,
обратитесь в местные органы городского управления, службу сбора бытовых
отходов или в магазин, где было приобретено изделие.
ртути (Hg) или свинца (Pb) указываются, если содержание
RU
6
Page 37

О характеристиках влагонепроницаемости, пыленепроницаемости и противоударности фотоаппарата
Фотоаппарат имеет водонепроницаемую, пыленепроницаемую и
противоударную конструкцию. На повреждения, вызванные
неправильным использованием, халатностью или несоблюдением
требований к обслуживанию фотоаппарата, не распространяется
действие ограниченной гарантии.
• Характеристики водонепроницаемости и пыленепроницаемости
фотоаппарата эквивалентны стандарту IEC60529 IP58.
Фотоаппарат можно использовать под водой на глубине до 5 м в
течение 60 минут.
• Не подвергайте фотоаппарат воздействию воды под давлением,
например водопроводной воды.
• Не используйте в горячих источниках.
• Рекомендуемый диапазон температур при использовании
фотоаппарата в воде: от –10°C до +40°C.
• В соответствии со стандартами MIL-STD 810F Method 516.5-Shock
это изделие прошло испытание падением с высоты 1,5 м на лист
фанеры толщиной 5 см
*В зависимости от условий и обстоятельств отсутствие повреждений и
неисправностей, а также сохранение водонепроницаемости
фотоаппарата не гарантируется.
• Пыленепроницаемая и противоударная конструкция
фотоаппарата не является гарантией невозможности образования
на его корпусе царапин или вмятин.
• В некоторых случаях, если фотоаппарат подвергся сильному
удару, как при падении, водонепроницаемость корпуса
нарушается. Рекомендуется отдать фотоаппарат для проверки в
авторизованную ремонтную мастерскую за дополнительную
плату.
• Прилагаемые дополнительные принадлежности не обладают
водонепроницаемыми, пыленепроницаемыми или
противоударными характеристиками.
*
.
RU
RU
7
Page 38

Примечания перед использованием фотоаппарата под водой
или вблизи воды
• Убедитесь, что под крышку отсека
батареи/карты памяти или под
крышку многофункционального
разъема не попали такие инородные
тела, как песок, волосы или грязь.
Даже малое инородное тело может
привести к попаданию воды внутрь
фотоаппарата.
• Убедитесь в отсутствии царапин на
уплотнительной прокладке и
прилегающих к ней поверхностях.
Даже небольшая царапина может
привести к попаданию воды внутрь
фотоаппарата. При обнаружении
царапин на уплотнительной
прокладке или прилегающих к ней
поверхностях отдайте фотоаппарат в
авторизованную ремонтную
мастерскую для замены
уплотнительной прокладки за
дополнительную плату.
1 Уплотнительная
прокладка
2 Поверхность,
соприкасающаяся с
уплотнительной
прокладкой
• Если на уплотнительную прокладку
или соприкасающуюся с ней поверхность попал мусор или песок,
начисто протрите это место мягкой тканью, не оставляющей
ворса. Во избежание появления царапин на уплотнительной
прокладке старайтесь не касаться ее во время зарядки батареи или
использования кабеля.
• Не открывайте/закрывайте крышку отсека батареи/карты памяти
или крышку многофункционального разъема мокрыми или
испачканными в песке руками, а также вблизи воды. Песок или
вода может попасть внутрь фотоаппарата. Перед тем как открыть
крышку, выполните процедуру, описанную в разделе “Очистка
после использования фотоаппарата под водой или вблизи воды”.
• Открывайте крышку отсека батареи/карты памяти и крышку
многофункционального разъема, только если фотоаппарат
полностью сухой.
• Всегда проверяйте надежность закрытия крышки отсека батареи/
RU
карты памяти и крышки многофункционального разъема.
8
Page 39

Примечания относительно использования фотоаппарата под
водой или вблизи воды
• Сенсорная панель может сработать от брызг воды, попавших на
экранные значки. При использовании фотоаппарата под водой
или вблизи воды рекомендуется скрыть значки, нажав кнопку в
правой части экрана. Для повторного отображения значков
удерживайте в течение нескольких секунд.
• Не удастся пользоваться сенсорной панелью под водой. Для
выполнения съемки или для просмотра используйте кнопки на
фотоаппарате.
• Не подвергайте фотоаппарат воздействию ударов, как при
прыжках в воду.
• Не открывайте/закрывайте крышку отсека батареи/карты памяти
или крышку многофункционального разъема, находясь в воде или
вблизи воды.
• При погружении под воду на глубину более 5 метров используйте
приобретаемый отдельно корпус (морской футляр).
• Фотоаппарат может утонуть в воде. Проденьте руку в ремень на
запястье, чтобы фотоаппарат не утонул.
• При подводной фотосъемке со вспышкой на снимках могут
присутствовать неяркие белые круглые пятна из-за отражения
плавающих объектов. Это не является неисправностью.
• Выберите параметр (Под водой) в режиме выбора сцены,
чтобы уменьшить искажения при подводной фотосъемке.
• Если на объективе имеются капли воды или инородные тела, не
удастся получить отчетливые изображения.
• Не открывайте крышку объектива во время песчаного вихря.
Очистка после использования
фотоаппарата под водой или вблизи
воды
• В течение 60 минут после использования
фотоаппарата всегда выполняйте его
очистку и не открывайте крышку отсека
батареи/карты памяти до завершения
очистки. Песок или вода могут попасть в такие места, где они
будут незаметны. Если не выполнить промывку, характеристики
водонепроницаемости ухудшатся.
RU
RU
9
Page 40

• Налейте чистую воду в емкость для очистки, опустите в нее
фотоаппарат и оставьте его в воде приблизительно на 5 минут.
Затем, не вынимая фотоаппарат из воды, осторожно встряхните
его, нажмите каждую кнопку, переместите рычаг увеличения или
крышку объектива из стороны в сторону, чтобы вычистить
остатки соли, песка или прочих инородных тел, скопившихся
вокруг кнопок или крышки объектива.
• Промыв фотоаппарат, удалите с него капли воды мягкой тканью.
Дайте фотоаппарату полностью высохнуть, оставив его в темном
хорошо проветриваемом месте. Не используйте для сушки фен,
так как при этом может возникнуть деформация и/или ухудшение
характеристик водонепроницаемости.
• Удаляйте капли воды или пыль с крышки отсека карты памяти/
батареи или крышки разъема сухой мягкой тканью.
• В конструкции этого фотоаппарата предусмотрен сток воды. Вода
будет вытекать из отверстий вокруг кнопки ON/OFF (питание),
рычага увеличения и других органов управления. После
извлечения из воды положите фотоаппарат на сухую ткань и
оставьте его на некоторое время, чтобы дать воде стечь.
• При погружении фотоаппарата в воду могут образоваться
пузырьки. Это не является неисправностью.
• При контакте с солнцезащитным кремом или маслом для загара
корпус фотоаппарата может обесцветиться. При попадании
солнцезащитного крема или масла для загара на фотоаппарат
незамедлительно удалите его, протерев корпус.
• Если внутри фотоаппарата или на его поверхности осталась
соленая вода, не оставляйте его надолго в таком состоянии. Это
может привести к коррозии или обесцвечиванию, а также
ухудшению характеристик водонепроницаемости.
• Для сохранения характеристик водонепроницаемости
рекомендуется один раз в год передавать фотоаппарат дилеру или
в авторизованную ремонтную мастерскую для замены
уплотнительной прокладки или крышки многофункционального
разъема за дополнительную плату.
10
RU
Page 41

См. “Руководство пользователя Cyber-shot” (HTML) на прилагаемом диске CD-ROM
Для получения дополнительной информации об
усовершенствованных операциях прочитайте “Руководство
пользователя Cyber-shot” (HTML) и на диске CD-ROM
(прилагается) на компьютере.
Вставьте диск CD-ROM в дисковод CD-ROM.
Для пользователей Windows:
1 Нажмите кнопку [Руководство пользователя] t [Установка].
2 Запустите “Руководство пользователя” с помощью ярлыка на
рабочем столе.
Для пользователей Macintosh:
1 Выберите папку [Руководство пользователя] и скопируйте папку
[ru], сохраненную в папке [Руководство пользователя], на
компьютер.
2 После завершения копирования дважды щелкните “index.html” в
папке [ru].
Прилагаемые компоненты
• Фотоаппарат (1)
• Перезаряжаемый батарейный блок NP-BN1 (1)
• Многофункциональный кабель USB (1)
• Адаптер переменного тока AC-UB10/UB10B (1)
• Шнур питания (не прилагается в США и Канаде) (1)
• Перо (1)
• Ремень на запястье (1)
• Диск CD-ROM (1)
– Программное обеспечение Cyber-shot
– “Руководство пользователя Cyber-shot”
• Инструкция по эксплуатации (данное руководство) (1)
• Примечания относительно водонепроницаемости (1)
RU
RU
11
Page 42

Обозначение частей
A Микрофон
B Крышка объектива
C Вспышка
D Индикатор автоспуска/
Индикатор Smile Shutter/
RU
Подсветка AF
12
E Объектив
F Кнопка
(воспроизведение)
G Кнопка MOVIE
(видеосъемка)
H Экран/сенсорная панель
I Кнопка ON/OFF (питание/
зарядка)
J Индикатор ON/OFF
(питание/зарядка)
K Кнопка затвора
L Для съемки: рычаг
W/T (увеличение)
Для просмотра: рычаг
(воспроизведение при
увеличении)/рычаг
(индекс)
M Крючок для ремня на
запястье
N Разъем HDMI
O Многофункциональный
разъем (Type3b)
P Гнездо для карты памяти
Q Индикатор обращения
R Рычаг выталкивания
батарейного блока
S Крышка разъема
T Крышка отсека батареи/
карты памяти
U Значок (TransferJet™)
V Разъем для батарейного
блока
W Гнездо штатива
• Используйте штатив с
винтом длиной менее 5,5 мм.
В противном случае не
удастся устойчиво закрепить
фотоаппарат, кроме того,
это может привести к
повреждению фотоаппарата.
Page 43

Установка батарейного блока
Рычаг выталкивания
Откройте крышку.
1
Установите батарейный блок.
2
• Нажимая на рычаг выталкивания батареи, вставьте батарейный
блок, как показано на рисунке. Убедитесь, что рычаг
выталкивания батареи зафиксирован после установки батареи.
Зарядка батарейного блока
Для пользователей в США
и Канаде
RU
Шнур питания
Для пользователей, живущих в странах/
регионах за пределами США и Канады
Индикатор питания/зарядки
Горит: зарядка
Не горит: зарядка окончена
Мигает: ошибка зарядки
RU
13
Page 44

Откройте крышку разъема и подсоедините
1
фотоаппарат к адаптеру переменного тока
(прилагается) с помощью многофункционального
кабеля USB (прилагается).
Подсоедините адаптер переменного тока к
2
электрической розетке.
Индикатор питания/зарядки загорится оранжевым цветом, и
начнется зарядка.
• Выключите фотоаппарат на время зарядки батареи.
• Можно выполнять зарядку батарейного блока, даже если он
частично заряжен.
• Если индикатор питания/зарядки мигает и зарядка не
завершена, выньте и снова вставьте батарейный блок.
Примечания
• Надежно закройте крышку, чтобы желтая метка под фиксатором была
скрыта.
• Если индикатор питания/зарядки на фотоаппарате не загорается даже
после подключения адаптера переменного тока к фотоаппарату и
электрической розетке, значит зарядка временно прекратилась и
находится в режиме ожидания. Зарядка прекратилась и переходит в
режим ожидания автоматиче ски, если температура выходит за пределы
рекомендуемой рабочей температуры. Когда значение температуры
будет снова в допустимом рабочем диапазоне, зарядка будет
возобновлена. Рекомендуется заряжать батарейный блок при
температуре окружающей среды от 10°C до 30°C.
• Подсоедините адаптер переменного тока (прилагается) к ближайшей
электрической розетке. Если при использовании адаптера
переменного тока обнаружена какая-либо неисправность, немедленно
отсоедините вилку от электрической розетки, чтобы отключить
источник питания.
• По окончании зарядки отключите адаптер переменного тока от
электрической розетки.
• Используйте только оригинальные батарейные блоки,
многофункциональный кабель USB (прилагается) и адаптер
переменного тока (прилагается) производства компании Sony.
14
RU
Page 45

x
Зарядка при подсоединении к компьютеру
Батарейный блок можно зарядить, подсоединив фотоаппарат к
компьютеру с помощью многофункционального кабеля USB.
Примечание
• Обратите внимание на следующие особенности при зарядке с помощью
компьютера.
– Если фотоаппарат подсоединен к ноутбуку, не подключенному к
источнику питания, уровень зарядки батареи ноутбука будет
уменьшаться. Не заряжайте батарейный блок таким способом
продолжительное время.
– Когда установлено соединение USB фотоаппарата с компьютером, не
рекомендуется выключать, запускать, перезагружать компьютер и
выходить из спящего режима. Это может привести к неполадкам
фотоаппарата. Перед запуском, выключением, перезагрузкой
компьютера и выходом из спящего режима отсоедините фотоаппарат
от компьютера.
– При подсоединении к самостоятельно собранным или
модифицированным компьютерам зарядка не гарантируется.
x
Время зарядки
Время зарядки составляет приблизительно 210 мин. с помощью
адаптера переменного тока (прилагается).
Примечание
• Указано время зарядки, необходимое для зарядки полностью
разряженного батарейного блока при температуре 25°C. Зарядка
может занять более длительное время в зависимости от условий
использования.
RU
RU
15
Page 46

x
Продолжительность работы от батареи и
количество фотоснимков, которые можно
записать и просмотреть
Время работы от
батареи
Съемка
(неподвижные
изображения)
Просмотр
(неподвижные
изображения)
Съемка (видео) Прибл. 60 мин. —
Примечания
• Указано количество фотоснимков при полностью заряженном
батарейном блоке. Количество фотоснимков может уменьшиться в
зависимости от условий использования.
• Указано количество фотоснимков, которые можно записать, выполняя
съемку в следующих условиях.
– Используется карта памяти “Memory Stick PRO Duo” (Mark2) Sony
(продается отдельно)
– Батарейный блок используется при температуре окружающей среды
25°C.
• Значение для графы “Фотосъемка” основано на стандарте CIPA и
относится к съемке в следующих условиях.
(CIPA: Camera & Imaging Products Association)
– Для параметра [Яркость экрана] установлено значение [3].
– Съемка через каждые 30 секунд.
– Увеличение поочередно переключается между предельными
значениями W и T.
– Вспышка срабатывает каждый второй раз.
– Питание включается и выключается через каждые десять раз.
• Указано время работы от батареек при выполнении съемки в
следующих условиях.
– Качество фильма: AVCHD HQ
– Если непрерывная съемка завершается при достижении
установленных пределов (стр. 27), нажмите кнопку MOVIE
(видеосъемка) еще раз, чтобы продолжить съемку. Функции съемки,
например увеличение, не работают.
RU
Прибл. 125 мин. Прибл. 250
Прибл. 190 мин. Прибл. 3800
Количество
изображений
изображений
изображений
16
Page 47

x
Подача питания
Питание на фотоаппарат может поступать от электрической
розетки при подсоединении адаптера переменного тока с помощью
многофункционального кабеля USB (прилагается).
Можно импортировать изображения на компьютер, не беспокоясь о
снижении заряда батарейного блока, подсоединив фотоаппарат к
компьютеру с помощью многофункционального кабеля USB.
Примечания
• Питание не подается, если батарейный блок не установлен в
фотоаппарате.
• Питание от электрической розетки подается, только если фотоаппарат
работает в режиме воспроизведения или при подсоединении
фотоаппарата к компьютеру. Если фотоаппарат работает в режиме
съемки, а также во время изменения настроек фотоаппарата питание
не подается, даже если установлено соединение USB с помощью
многофункционального кабеля USB.
• При подсоединении фотоаппарата с помощью многофункционального
кабеля USB, если фотоаппарат работает в режиме воспроизведения,
вместо экрана воспроизведения на дисплее отображается экран
соединения USB. Чтобы перейти к экрану воспроизведения, нажмите
кнопку (воспроизведение).
Установка карты памяти (продается отдельно)
RU
Убедитесь, что срезанный
уголок расположен правильно.
RU
17
Page 48

Откройте крышку.
1
Вставьте карту памяти (продается отдельно).
2
• Вставьте карту памяти до щелчка, чтобы срезанный уголок
был направлен, как показано на рисунке.
Надежно закройте крышку, чтобы желтая метка
3
под фиксатором была скрыта.
• Закрытие крышки при неправильно вставленной батарее
может привести к повреждению фотоаппарата.
x
Карты памяти, которые можно использовать
Карта памяти
Memory Stick PRO Duo aa (только для
A
Memory Stick PRO-HG
Duo
Memory Stick Duo a —
Карта памяти SD aa (класс 4 или
Карта памяти SDHC aa (класс 4 или
B
Карта памяти SDXC aa (класс 4 или
• В данном руководстве для изделий в графе A используется
собирательное название “Memory Stick Duo”, а для изделий в графе B
используется собирательное название “карта SD”.
x
Извлечение карты памяти/батарейного блока
Карта памяти: надавите один раз на карту памяти.
Батарейный блок: сдвиньте рычаг выталкивания батареи. Будьте
осторожны, чтобы не уронить батарейный блок.
Примечание
• Ни в коем случае не извлекайте карту памяти/батарейный блок, когда
горит индикатор обращения (стр. 12). Это может привести к
RU
повреждению данных на карте памяти/во внутренней памяти.
18
Для
фотосъемки
aa
Для видеосъемки
модели Mark2)
выше)
выше)
выше)
Page 49

Установка часов
ON/OFF (питание)
Опустите крышку объектива.
1
Фотоаппарат включится. Индикатор питания загорается только
при включении фотоаппарата.
• Фотоаппарат можно также включить, нажав кнопку ON/OFF
(питание).
• Потребуется некоторое время, прежде чем фотоаппарат
включится и его можно будет использовать.
Выберите требуемый язык.
2
Выберите требуемую область, следуя указаниям на
3
экране, и нажмите [Дал.].
Настройте параметры [Летнее время], [Формат
4
даты и вр.] и [Дата и время] и нажмите [Дал.].
• Полночь отображается как 12:00 AM, а полдень – как 12:00
PM.
Нажмите [OK].
5
Крышка объектива
RU
Выберите требуемый цвет дисплея, следуя
6
указаниям на экране, и нажмите [OK].
При отображении на экране приветственного
7
сообщения [Встроенная справка] нажмите [OK].
RU
19
Page 50

Ознакомьтесь с мерами предосторожности
8
относительно водонепроницаемости, а затем
нажмите [OK].
Фотосъемка/видеосъемка
Кнопка затвора
Кнопка MOVIE
(видеосъемка)
Фотосъемка
Нажмите кнопку затвора наполовину, чтобы
1
выполнить фокусировку.
После выполнения фокусировки раздается звуковой сигнал и
загорается индикатор z.
Нажмите кнопку спуска затвора до конца.
2
Видеосъемка
Нажмите кнопку MOVIE (видеосъемка) для начала
1
записи.
• Поверните рычажок W/T (увеличение) в сторону T.
Нажмите кнопку MOVIE еще раз, чтобы остановить
2
запись.
20
RU
Page 51

Примечания
• При видеосъемке с использованием функции увеличения, возможно,
будет записан звук работы объектива и рычага увеличения. При
завершении видеосъемки, возможно, будет также записан звук работы
кнопки MOVIE.
• Непрерывная видеосъемка возможна в течение приблизительно 29
минут за один раз при выбранных настройках по умолчанию и
температуре приблизительно 25°C. По завершении видеосъемки
можно ее запустить снова, нажав кнопку MOVIE еще раз. В
зависимости от температуры окружающей среды запись может быть
приостановлена для защиты фотоаппарата.
Просмотр изображений
(воспроизведение)
Нажмите кнопку (воспроизведение).
1
• Если с карты памяти этого фотоаппарата воспроизводятся
изображения, записанные на других фотоаппаратах, появится
экран регистрации файла данных.
x
Переход к следующему/предыдущему
изображению
Нажмите (следующее)/ (предыдущее) на экране.
• Для просмотра видеофрагментов нажмите (воспроизведение) в
центре экрана.
• Для увеличения нажмите на просматриваемый фотоснимок.
RU
x
Удаление изображения
1 Нажмите (удалить) t [Данный снимок].
RU
21
Page 52

x
Переход к съемке изображений
Нажмите на экране.
• Вернуться в режим съемки можно также, нажав кнопку затвора
наполовину.
Встроенная справка
Фотоаппарат оснащен встроенной функциональной справкой. Это
позволяет выполнять поиск требуемых функций фотоаппарата.
Нажмите (Встроенная справка).
1
• Знак появится в нижней правой части экрана при съемке.
Выберите способ поиска в разделе [Встроенная
2
справка].
Рук. по съемке/ воспроиз.: поиск различных функций
управления в режиме съемки/просмотра.
Значок руководства: поиск функций и описаний отображаемых
значков.
Поиск и устр. неисправн.: поиск распространенных проблем и
их решение.
Руководство по задаче: поиск функций по требованию.
Ключевое слово: поиск функций по ключевым словам.
История: отображение последних 10 элементов, отображенных
в пункте [Встроенная справка].
22
RU
Page 53

Краткое описание прочих функций
Управление прочими функциями, используемыми во время съемки
или воспроизведения, можно выполнять с помощью кнопки MENU
на экране. Этот фотоаппарат оснащен справкой по функциям, с
помощью которой можно легко выбирать нужные функции. При
отображении справки попробуйте использовать прочие функции.
x
Элементы меню
Съемка
Сцена
видеосъемки
Простой режим
Вспышка Настройка параметров вспышки.
Автоспуск Настройка параметров таймера автоспуска.
Эффект
расфокус.
Размер фотосн./
Разм. панорам.
изобр./Размер
фильма/Качество
фильма
Установ.
серийной съемки
Макро
EV Настройка экспозиции вручную.
Выбор режима видеосъемки.
Фотосъемка с использованием минимальных
функций.
Установка уровня эффекта расфокусировки
фона во время съемки в режиме расфокусировки
фона.
Выбор размера и качества изображения для
фотоснимков, панорамных изображений и
видеофайлов.
Настройка параметров серийной съемки.
Выполнение прекрасных изображений
маленьких объектов с близкого расстояния.
RU
RU
23
Page 54

ISO
Баланс белого Настройка цветовых тонов изображения.
Баланс бел при
подв съем
Фокус Выбор способа фокусировки.
Режим измер.
экспозиции
Распознавание
сцен
Эффект мягкой
кожи
Распознавание
улыбки
Чувствительность
к улыбке
Распознавание
лиц
Минимиз. закр.
глаз
Встроенная
справка
Настройка чувствительности к световому
потоку.
Настройка цветов при подводной съемке.
Выбор режима экспозамера, устанавливающего,
какую часть объекта следует использовать для
определения экспозиции.
Установка автоматического определения
условий съемки.
Применение эффекта мягкой кожи и настройка
уровня этого эффекта.
Установка автоматического срабатывания
затвора при обнаружении улыбки.
Настройка чувствительности функции
“Распознавание улыбки” для определения
улыбок.
Установка автоматического обнаружения лиц и
выполнения различных настроек.
Установка автоматической съемки двух
изображений и сохранение изображения, на
котором не обнаружены закрытые глаза.
Поиск функций фотоаппарата по требованию.
Просмотр
Простой режим
Выбор даты
Календарь
Индекс
изображений
RU
Увеличение размера текста на экране для
упрощения использования.
Выбор требуемого изображения для просмотра
по дате.
Выбор даты календаря, по которой требуется
выполнить воспроизведение.
Одновременное воспроизведение нескольких
изображений.
24
Page 55

Cлайд-шоу Выбор способа непрерывного воспроизведения.
Удалить Удаление изображения.
Отпр. с пом.
TransferJet
Рисунок
Ретуширование
3D-просмотр
Режим просмотра
Отображ. серийн.
группы
Защитить Защита изображений.
Печать (DPOF)
Поворот. Поворот фотоснимка влево или вправо.
Объем Регулировка громкости.
Данные
экспозиции
Кол. изобр. в
индекс. реж.
Встроенная
справка
Передача данных между двумя близко
расположенными устройствами с функцией
TransferJet.
Рисование на фотоснимке и сохранение его в
виде нового файла.
Ретуширование изображения с помощью
различных эффектов.
Выбор воспроизведения изображений, снятых в
режиме 3D, на 3D-телевизоре.
Выбор формата дисплея для просмотра
изображений.
Выбор отображения серии изображений в
группах или всех изображений во время
воспроизведения.
Добавление значка команды печати к
фотоснимку.
Включение и выключение отображения даты
съемки (данные Exif) текущего отображаемого
на экране файла.
Установка количества изображений,
отображаемых на индексном экране.
Поиск функций фотоаппарата по требованию.
RU
RU
25
Page 56

x
Настройка элементов
При нажатии кнопки MENU во время съемки или воспроизведения
отобразится меню (Настройки). Установки по умолчанию
можно изменить на экране (Настройки).
Настройки
съемки
Основные
настройки
Инструмент
“Карта памяти”
Настройки часов
* Если карта памяти не установлена, отобразится значок
(Инструмент “Внутр. память”), можно будет выбрать только
значение [Формат].
Форм.видеосъем./Подсветка АF/Линия сетки/
Цифров увелич/Умен. шума ветра/Спр.по
расп.сцен/Ум. эфф. кр. глаз/Пред.о закр.глаз./
Запись даты
Звук/Яркость экрана/Language Setting/Цвет
индикаторов/Демонстр. режим/Инициализац./
КОНТР. ПО HDMI/Корпус/Настр. USB соедин./
USB питание/Настройка LUN/Загруз. музык/
Очистить музыку/TransferJet/Eye-Fi/Экономия
питания
Формат/Созд.папк.ЗАПИС/Изм папк.ЗАПИСИ/
Удал. папки ЗАП./Копировать/Номер файла
*
Устан. вр.пояса/Устан.даты и вр.
26
RU
Page 57

Количество фотоснимков и возможное время записи при видеосъемке
Количество фотоснимков и время записи может зависеть от
условий съемки и карты памяти.
x
Фотоснимки
(Единицы: изображения)
Емкость
Размер
16M 3 335
VGA 98 9600
16:9(12M) 3 355
x
Фильмы
В следующей таблице представлена приблизительная максимальная
продолжительность записи. Это общее время для всех видеофайлов.
Непрерывная съемка может выполняться в течение
приблизительно 29 минут. Максимальный размер видеофайла в
формате MP4 составляет приблизительно 2 ГБ.
Емкость
Размер
AVC HD 24M (FX) — 10 мин
AVC HD 9M (HQ) — 25 мин
MP4 12M — 15 мин
MP4 3M — 1 ч 10 мин
Число в скобках ( ) указывает минимальное время записи.
• Время записи для видеофайлов может изменяться, так как
фотоаппарат оснащен функцией VBR (переменная скорость передачи
битов), которая автоматически настраивает качество изображения в
зависимости от условий записываемой сцены. При записи
быстродвижущегося объекта изображение четче, но время записи
будет меньше, так как для записи требуется больше места в памяти.
На время записи также влияют условия съемки, объект или настройки
качества/размера изображения.
Внутренняя память Карта памяти
Прибл. 19 МБ 2 ГБ
(ч (часы), мин (минуты))
Внутренняя память Карта памяти
Прибл. 19 МБ 2 ГБ
(10 мин)
(15 мин)
RU
RU
27
Page 58

Примечания относительно использования фотоаппарата
Функции, встроенные в фотоаппарат
• В этом руководстве описаны все функции устройств, совместимых и не
совместимых с TransferJet, 1080 60i-совместимых устройств и 1080 50iсовместимых устройств.
Чтобы определить, поддерживает ли фотоаппарат функцию
TransferJet и является ли он 1080 60i-совместимым или 1080 50iсовместимым устройством, найдите следующие обозначения снизу
фотоаппарата.
TransferJet-совместимое устройство:
1080 60i-совместимое устройство: 60i
1080 50i-совместимое устройство: 50i
• Не просматривайте 3D-изображения, выполненные с помощью
фотоаппарата, в течение длительного времени на 3D-совместимых
мониторах.
• При просмотре 3D-изображений, выполненных с помощью
фотоаппарата, на 3D-совместимых мониторах может появиться
чувство дискомфорта в форме напряжения глаз, усталости или
тошноты. Для предотвращения этих симптомов рекомендуется делать
регулярные перерывы. Тем не менее, продолжительность и частота
перерывов определяется самостоятельно исходя из собственных
потребностей, так как для каждого человека они индивидуальны. При
появлении любой формы дискомфорта прекратите просмотр 3Dизображений до улучшения самочувствия и при необходимости
обратитесь к врачу. См. также инструкции по эксплуатации,
прилагаемые к устройству и программному обеспечению,
подсоединенному к фотоаппарату или используемому на нем.
Обратите внимание, что зрение детей находится на стадии развития
(особенно в возрасте до 6 лет).
Перед тем как разрешить ребенку просмотр 3D-изображений,
обратитесь к педиатру или офтальмологу и убедитесь, что ребенок
соблюдает указанные выше меры предосторожности при просмотре
подобных изображений.
(TransferJet)
Использование фотоаппарата и уход за ним
Избегайте неаккуратного обращения с фотоаппаратом, не разбирайте,
не модифицируйте его, оберегайте от ударов и падений, не наступайте на
него. Будьте особенно осторожны с объективом.
Примечания относительно записи/воспроизведении
• Перед началом съемки выполните пробную запись, чтобы убедиться в
RU
правильной работе фотоаппарата.
28
Page 59

• Не направляйте фотоаппарат на солнце или другой яркий свет. Это
может привести к неисправности фотоаппарата.
• При возникновении конденсата его необходимо удалить перед
использованием фотоаппарата.
• Не трясите фотоаппарат и не стучите по нему. Помимо неисправности,
возможно, не удастся выполнить запись изображений. Более того, это
может привести к непригодности носителя информации или
повреждению данных.
Не используйте и не храните фотоаппарат в следующих
местах
• В очень жарких, холодных или влажных местах
Например, в автомобиле, припаркованном под прямыми лучами
солнца, корпус фотоаппарата может деформироваться, что может
привести к неисправности.
• Под прямыми лучами солнца или рядом с обогревателем
Корпус фотоаппарата может обесцветиться или деформироваться, что
может привести к неисправности.
• В местах, подверженным маятниковым колебаниям
• Вблизи генераторов сильных радиоволн, источников излучения или в
местах с сильным магнитным полем. В противном случае фотоаппарат
может не выполнить запись или воспроизведение надлежащим
образом.
Ношение фотоаппарата
Не садитесь, если фотоаппарат находится в заднем кармане брюк или
юбки, так как это может привести к возникновению неисправности или
повреждению фотоаппарата.
Объектив Carl Zeiss
Фотоаппарат оснащен объективом Carl Zeiss, который позволяет
воспроизводить четкие изображения с отличной контрастностью.
Объектив данного фотоаппарата изготовлен в Германии в соответствии
с системой обеспечения качества, сертифицированной компанией Carl
Zeiss, согласно стандартам Carl Zeiss.
Примечания относительно экрана и объектива
• Экран изготовлен с применением высокоточной технологии, что
обеспечивает эффективное использование более 99,99% точек.
Однако на экране могут появляться мелкие черные и/или яркие точки
(белого, красного, синего или зеленого цвета). Эти точки появляются в
результате обычного производственного процесса и не влияют на
запись.
• Сенсорная панель становится менее чувствительной, если на руках
надеты перчатки.
RU
RU
29
Page 60

Температура фотоаппарата
Этот фотоаппарат и батарея при длительной работе могут нагреваться,
однако это не является неисправностью.
Защита от перегрева
В зависимости от температуры фотоаппарата и батареи выполнить
видеосъемку, возможно, не удастся; кроме того, питание может
отключиться автоматически для защиты фотоаппарата.
Прежде чем отключится питание или будет отключена функция
видеосъемки, на экране отобразится сообщение. В этом случае не
включайте питание и дождитесь, пока температура фотоаппарата и
батареи снизится. Если включить питание, не дав фотоаппарату и
батарее достаточно остыть, питание может снова отключиться, или не
удастся выполнить видеосъемку.
Зарядка батареи
При выполнении зарядки батареи, которая не использовалась
длительное время, возможно, не удастся зарядить ее на полную
мощность.
Это явление относится к характеристикам батареи и не является
неисправностью. Зарядите батарею еще раз.
Предупреждение об авторских правах
На телевизионные программы, фильмы, видеоленты и другие
материалы может распространяться авторское право.
Несанкционированная перезапись таких материалов может
противоречить положениям закона об авторском праве.
Компенсация за поврежденное содержимое или сбой при
записи не выплачивается
Корпорация Sony не возмещает убытки за сбои при записи либо за
потерю или повреждение записанного содержимого из-за неисправности
фотоаппарата или носителя информации и т.д.
Чистка поверхности фотоаппарата
Очищайте поверхность фотоаппарата мягкой тканью, слегка смоченной
водой, а затем протирайте поверхность сухой тканью. Чтобы не
повредить покрытие корпуса:
– Не подвергайте фотоаппарат воздействию таких химических веществ,
как растворитель, бензин, спирт, одноразовые салфетки, средство от
насекомых, солнцезащитный крем или инсектицид.
30
RU
Page 61

Технические характеристики
Фотоаппарат
[Система]
Формирователь изображения:
7,77 мм (тип 1/2,3) с датчиком
Exmor R CMOS
Общее количество пикселов
фотоаппарата:
прибл. 16,8 мегапиксела
Количество эффективных
пикселов фотоаппарата:
прибл. 16,2 мегапикселя
Объектив: Carl Zeiss Vario-Tessar
4-кратное увеличение
f = 4,43 мм – 17,7 мм (25 мм –
100 мм (эквивалентно
фотоаппарату для пленки
35 мм))
F3,5 (W) – F4,6 (T)
При видеосъемке (16:9): 27 мм
– 108 мм
При видеосъемке (4:3): 33 мм –
132 мм
SteadyShot: Оптический
Управление экспонированием:
автоматическая экспозиция,
выбор съемочного плана
(16 режимов)
Баланс белого: Автоматический,
Дневной свет, Облачный,
Флуоресцент. 1/2/3, Лампа
накалив, Вспышка, Одно
касание
Баланс белого при подводной
съемке: Авто, Под водой 1/2
Формат сигнала:
Формат файла:
Фильмы (формат MP4):
Носитель информации:
Вспышка: диапазон вспышки
Для 1080 50i: PAL цветной,
CCIR спецификация HDTV
1080/50i по стандартам
Для 1080 60i: NTSC цветной,
EIA спецификация HDTV
1080/60i по стандартам
Фотоснимки: поддержка JPEG
(DCF верс. 2,0, Exif версии 2,3,
MPF Baseline), DPOFсовместимый
3D-фотоснимки: поддержка
MPO (MPF Extended
(диспаратное изображение))
Фильмы (формат AVCHD):
AVCHD
Видео: MPEG-4 AVC/H.264
Аудио: Dolby Digital 2канальный, оснащен системой
Dolby Digital Stereo Creator
• Изготовлено по лицензии
компании Dolby
Laboratories.
Видео: MPEG-4 AVC/H.264
Аудио: MPEG-4 AAC-LC 2канальный
внутренняя память
(прибл. 19 МБ), карты
“Memory Stick Duo”, SD
(значение чувствительности
ISO (рекомендованный
показатель экспозиции)
установлено в положение
“Авто”):
прибл. от 0,08 м до 3,7 м (W)
прибл. от 0,5 м до 2,7 м (T)
RU
RU
31
Page 62

[Входные и выходные
разъемы]
Разъем HDMI: миниразъем
HDMI
Многофункциональный разъем:
Type3b
(AV-out/USB/DC-in):
Видеовыход
Аудиовыход (стерео)
Cоединение USB
Соединение USB: Hi-Speed USB
(USB 2.0)
[Экран]
Панель:
широкая (16:9), 7,5 см (тип 3,0)
TFT
Общее количество точек:
921 600 (1 920 × 480) точек
[Питание, общая
информация]
Питание: перезаряжаемый
батарейный блок
NP-BN1, 3,6 В
адаптера переменного тока
AC-UB10/UB10B, 5 В
Потребляемая мощность (во
время съемки): 1,0 Вт
Рабочая температура: от –10 °C до
40 °C
Температура хранения: от –20 °C
до +60 °C
Размеры (в соответствии с CIPA):
95,6 мм × 56,1 мм × 17,9 мм
(Ш/В/Г)
Масса (в соответствии с CIPA)
(включая батарейный блок
NP-BN1, “Memory Stick Duo”):
прибл. 133 г
Микрофон: стерео
Динамик: монофонический
RU
Exif Print: поддерживает
32
PRINT Image Matching III:
поддерживает
Характеристики
водонепроницаемости/
пыленепроницаемости:
эквивалентны IEC60529 IP58
(фотоаппарат можно
использовать под водой на
глубине до 5 м в течение 60
минут.)
Характеристики
противоударности:
в соответствии со стандартами
MIL-STD 810F Method 516.5Shock это изделие прошло
испытание падением с высоты
1,5 м на лист фанеры
толщиной 5 см.
Характеристики
водонепроницаемость,
пыленепроницаемости и
противоударности получены на
основе стандартного
тестирования Sony.
Адаптер переменного тока
AC-UB10/UB10B
Требования к питанию: 100 В до
240 В переменного тока, 50 Гц/
60 Гц, 70 мА
Выходное напряжение: 5 В
постоянного тока, 0,5 А
Рабочая температура: от 0 °C до
40 °C
Температура хранения: от –20 °C
до +60 °C
Размеры:
прибл. 50 мм × 22 мм × 54 мм
(Ш/В/Г)
Page 63

Масса:
модели для США и Канады:
прибл. 48 г
модели для стран и регионов,
кроме США и Канады: прибл.
43 г
Класс защиты от поражения
электрическим током II
Перезаряжаемый
батарейный блок
NP-BN1
Используемая батарея: литий-
ионная батарея
Максимальное напряжение: 4,2 В
постоянного тока
Номинальное напряжение: 3,6 В
постоянного тока
Максимальное напряжение
зарядки: 4,2 В постоянного
тока
Максимальный ток зарядки: 0,9 A
Емкость:
обычная: 2,3 Втч (630 мАч)
минимальная: 2,2 Втч
(600 мАч)
Конструкция и характеристики
могут изменяться без
предварительного уведомления.
Товарные знаки
• Следующие знаки являются
товарными знаками Sony
Corporation.
, “Cyber-shot”,
“Memory Stick PRO Duo”,
“Memory Stick PRO-HG Duo”,
“Memory Stick Duo”
• Windows является
зарегистрированным товарным
знаком Microsoft Corporation в
США и/или других странах.
• Macintosh является
зарегистрированным товарным
знаком Apple Inc.
• Логотип SDXC является
товарным знаком SD-3C, LLC.
• “ ” и “PlayStation” являются
зарегистрированными
товарными знаками корпорации
Sony Computer Entertainment
Inc.
• Кроме того, названия систем и
изделий, исполь зуемые в данном
руководстве, являются
товарными знаками или
зарегистрированными
товарными знаками
соответствующих
разработчиков или
производителей. Однако знаки
™ или ® в данном руководстве
используются не во всех
случаях.
RU
• Получите больше удовольствия
от использования PlayStation®3,
загрузив приложение для
PlayStation®3 в службе
PlayStation®Store (если
доступна).
RU
33
Page 64

• Для использования приложения
PlayStation®3 необходимо
создать учетную запись
PlayStation®Network и за грузить
приложение. Доступ к
приложению предоставляется в
регионах, для которых доступна
служба PlayStation®Store.
Дополнительная информация
по данному изделию и ответы
на часто задаваемые вопросы
могут быть найдены на нашем
Web-сайте поддержки
покупателей.
Hапечатано на бумаге,
изготовленной на 70% и более из
бумажных отходов, с
использованием печатной краски
на основе растительного масла без
примесей ЛОC (летучиx
органическиx соединений).
34
RU
Page 65

Page 66

Українська
ПОПЕРЕДЖЕННЯ
Щоб знизити ризик займання або ураження електричним
струмом, не піддавайте виріб впливу дощової води або
вологи.
ВАЖЛИВІ ВКАЗІВКИ З ТЕХНІКИ
БЕЗПЕКИ
-ЗБЕРЕЖІТЬ ЦЮ ІНСТРУКЦІЮ
НЕБЕЗПЕКА
ЩОБ ЗМЕНШИТИ РИЗИК
ВИНИКНЕННЯ ПОЖЕЖІ АБО
УРАЖЕННЯ ЕЛЕКТРИЧНИМ
СТРУМОМ, СЛІД РЕТЕЛЬНО
ВИКОНУВАТИ ЦІ ВКАЗІВКИ
Якщо форма штекера не відповідає розміру розетки, користуйтеся
перехідником потрібної конфігурації.
УВАГА!
[ Акумуляторна батарея
Якщо неправильно поводитися з акумуляторною батареєю, вона може
вибухнути, спричинити пожежу або навіть викликати хімічні опіки.
Дотримуйтеся наведених нижче застережень.
• Не розбирайте акумуляторну батарею.
• Не роздавлюйте, не бийте та не прикладайте силу до акумуляторної батареї.
Не бийте її молотком, не кидайте та не наступайте на неї.
• Не замикайте контакти акумуляторної батареї та запобігайте потраплянню
між ними металевих предметів.
• Не піддавайте акумуляторну батарею дії температури понад 60 °C, наприклад
під впливом прямих сонячних променів у припаркованому автомобілі.
• Не підпалюйте акумуляторну батарею та не кидайте її у вогонь.
• Не торкайтеся пошкодженої літій-іонної батареї або такої, з якої витікає
UA
рідина.
2
Page 67

• Заряджайте акумуляторну батарею, лише використовуючи оригінальний
зарядний пристрій Sony або пристрій, який може заряджати акумуляторні
батареї.
• Тримайте акумуляторну батарею поза досяжністю маленьких дітей.
• Тримайте акумуляторну батарею сухою.
• Замінюйте акумуляторну батарею лише на таку саму або еквівалентну, яку
рекомендує компанія Sony.
• Швидко утилізуйте використані акумуляторні батареї, як описано в
інструкціях.
[ Адаптер змінного струму
Підключіть адаптер змінного струму до найближчої настінної розетки.
Якщо під час користування адаптером змінного струму виникне якась
проблема, негайно відключіть живлення, вийнявши штепсель із розетки.
За наявності в комплекті кабелю живлення його слід використовувати лише з
цим фотоапаратом. Він не призначений для використання з іншими
електронними пристроями.
[ Дата виготовлення виробу.
Дата виготовлення виробу зазначена на позначці «P/D:», яка знаходиться на
етикетці зі штрих-кодом на картонній коробці.
Знаки, зазначені на етикетці зі штрих-кодом на картонній коробці.
P/D:XX XXXX
1 2
1. Місяць виготовлення
2. Рік виготовлення
A-0, B-1, C-2, D-3, E-4, F-5, G-6, H-7, I-8, J-9.
Рік та місяць виробництва літієво-іонного батарейного блоку проштамповані
на боковій поверхні або на поверхні з етикеткою.
XXXXXXXXXXX
UA
Місяць виготовлення (з 01 до 12)
Рік виготовлення
UA
3
Page 68

Для споживачів з Європи
[ Примітка для покупців у країнах, де діють директиви ЄС
Цей виріб виготовлено компанією Sony Corporation, 1-7-1 Konan Minato-ku
Tokyo, 108-0075 Japan (Японія). Уповноваженим представником з питань
електромагнітної сумісності та безпеки виробу є компанія Sony Deutschland
GmbH, Hedelfinger Strasse 61, 70327 Stuttgart, Germany (Німеччина). З будьяких питань стосовно обслуговування або гарантії звертайтеся за адресами,
наданими в окремій сервісній та гарантійній документації.
Результати випробувань цього виробу демонструють його відповідність
вимогам щодо обмежень, зазначених у директиві EMC, які стосуються
використання з’єднувальних кабелів коротших за 3 м.
[ Увага
На відповідних частотах електромагнітні поля можуть впливати на якість
зображення і звука, відтворюваних виробом.
[ Примітка
Якщо під впливом статичної електрики або електромагнітного поля процес
передачі даних буде перерваний, перезапустіть пристрій або від’єднайте та
повторно приєднайте кабель, що використовується для передачі даних (USB,
тощо).
[ Утилізація старого електричного та електронного
обладнання (застосовується в Європейському союзі та
інших європейських країнах із системами роздільного
збирання сміття)
Вторинна переробка матеріалів допоможе зберегти природні ресурси. Щоб
отримати докладнішу інформацію щодо вторинної переробки цього виробу,
зверніться до місцевих органів влади, до служби утилізації побутових відходів
або до магазину, де було придбано цей виріб.
Цей символ на виробі або на упаковці означає, що цей виріб не
можна утилізувати як побутове сміття. Замість цього його
потрібно здати до відповідного приймального пункту для
вторинної обробки електричного та електронного обладнання.
Забезпечивши належну утилізацію цього виробу, ви
допоможете запобігти негативним наслідкам для
навколишнього середовища та людського здоров‘я, до яких
могла б призвести неправильна утилізація цього виробу.
UA
4
Page 69

[ Переробка використаних елементів живлення (директива
діє у межах країн Європейського Союзу та інших країн
Європизі системами роздільного збору відходів)
Даний знак на елементі живлення або упаковці означає, що
елемент живлення, який використовується для роботи цього
пристрою, не можна утилізувати разом з іншими побутовими
відходами.
На деяких елементах живлення цей знак може
елементу. Якщо елемент живлення містить більше ніж 0,0005% ртуті або
0,004% свинцю, наводиться відповідне позначення хімічного елементу ртуті
(Hg) або свинцю (Pb).
Забезпечивши належну переробку використаних елементів живлення, ви
допоможете запобігти потенційно негативним наслідкам впливу на зовнішнє
середовище та людське здоров’я, які спричиняються невідповідною
переробкою елементів живлення. Вторинна переробка матеріалів сприяє
збереженню природних ресурсів.
При роботі пристроїв, для якихіз метою безпеки, виконання яких-небудь дій
або збереження наявних у пам’яті пристроїв даних необхідна подача
постійного живлення від вбудованого елемента живлення, заміну такого
елемента живлення варто робити тільки в уповноважених сервісних центрах.
Для правильної переробки використаних елементів живлення, після
закінчення терміну їх служби, здавайте їх у відповідний пункт збору
електронного й електричного обладнання.
Стосовно використання інших елементів живлення дивіться інформацію в
розділі, у якому дані інструкції з безпечного витягнення елементів живлення із
пристрою.
Здавайте використані елементи живлення у відповідні пункт збору й
переробки використаних елементів живлення.
Для одержання більш докладної інформації про вторинну переробку даного
виробу або використаного елемента живлення, будь ласка, звертайтесь до
органу місцевої адміністрації, служби збору побутових відходів або до
магазину, в якому ви придбали виріб.
використовуватись у комбінації з позначенням хімічного
UA
UA
5
Page 70

Про властивості фотоапарата щодо захисту від води, пилу й динамічного впливу
За власною конструкцією цей фотоапарат є водонепроникним,
пилонепроникним і протиударним. Умови обмеженої гарантії не
розповсюджуються на ушкодження, спричинені нецільовим
використанням, неналежним поводженням або неможливістю
забезпечити відповідний догляд за фотоапаратом.
• Цей фотоапарат є водо-/пилонепроникним у відповідності до
IEC60529 IP58. Допускається оперування цим фотоапаратом у воді
на глибині до 5 м протягом 60 хвилин.
• Не піддавайте фотоапарат впливу води під тиском, приміром води,
що тече з-під крана.
• Не користуйтеся фотоапаратом у воді термальних джерел.
• Користуйтеся фотоапаратом за температури води в межах
рекомендованого робочого діапазону - від –10°C до +40°C.
• У відповідності до стандартів MIL-STD 810F Method 516.5-Shock
цей виріб пройшов тестування на падіння з висоти 1,5 м на фанерну
плитку товщиною 5 см
*Гарантійні положення на випадок ушкодження, несправності, а також
щодо ефективності водонепроникних властивостей фотоапарата
діють з обов’язковим урахуванням умов і обставин його
використання.
• Пилонепроникні/протиударні властивості фотоапарата не
гарантують захист фотоапарата від можливих подряпин або
вибоїв на його корпусі.
• Іноді фотоапарат може втратити водонепроникні властивості,
зазнавши потужного динамічного впливу, приміром через падіння.
У такому випадку рекомендовано перевірити стан фотоапарата в
уповноваженій майстерні за відповідну платню.
• Приладдя, що додається, не відповідає технічним характеристикам
щодо водо-, пилонепроникності та захисту від динамічного впливу.
*
.
UA
6
Page 71

Перед використанням фотоапарата під водою/біля води
• Слідкуйте за тим, аби не допустити
потрапляння під кришку батарейного
відсіку/відсіку для карти пам’яті та під
кришку універсального роз’єму
сторонніх речовин, наприклад піску,
волосся або бруду. Навіть незначна
кількість сторонніх речовин може
спричинити потрапляння води
всередину фотоапарата.
• Переконайтеся в тому, що
ущільнююча прокладка та поверхні, з
якими вона контактує, не є
подряпаними. Наявність навіть
незначної подряпини може призвести
до потрапляння води всередину
фотоапарата. Якщо ущільнююча
прокладка та поверхні, з якими вона
контактує, є подряпаними, замініть
1 Ущільнююча прокладка
2 Поверхні, з якими
контактує ущільнююча
прокладка
ущільнюючу прокладку в
уповноваженій майстерні за відповідну платню.
• У разі потрапляння бруду або піску на ущільнюючу прокладку або
на поверхні, з якими вона контактує, начисто протріть відповідну
зону м’якою тканиною, яка не втрачає волокон. Не торкайтеся
ущільнюючої прокладки під час заряджання акумулятора або
використання кабелю, аби запобігти дряпанню ущільнюючої
прокладки.
• Не відкривайте/не закривайте кришку батарейного відсіку/відсіку
для карти пам’яті та кришку універсального роз’єму вогкими або
забрудненими піском руками або ж біля води. Існує ризик
потрапляння піску або води всередину фотоапарата. Перед
відкриттям кришки виконайте порядок дій, описаний у розділі
«Чищення після використання фотоапарата під водою/біля води».
• Перед тим, як відкрити кришку батарейного відсіку/відсіку для
карти пам’яті або кришку універсального роз’єму, переконайтеся в
тому, що фотоапарат є абсолютно сухим.
• Завжди слідкуйте за тим, аби кришка батарейного відсіку/відсіку
для карти пам’яті та кришка універсального роз’єму були надійно
зафіксовані в закритому стані.
UA
UA
7
Page 72

Примітки щодо використання фотоапарата під водою/біля
води
• Сенсорна панель може реагувати на дотики крапель води, що
потрапляють на екранні піктограми. Використовуючи фотоапарат
під водою/біля води, рекомендовано приховати піктограми,
торкнувши у правій частині екрана. Аби знову відобразити
піктограми, торкніть і притримайте декілька секунд.
• Оперування сенсорною панеллю під водою неможливе. Щоб
виконувати операції в рамках зйомки або відтворення,
скористайтеся відповідними кнопками, наявними на фотоапараті.
• Не піддавайте фотоапарат динамічному впливу, приміром,
плигаючи у воду.
• Знаходячись під водою/біля води, не відкривайте й не закривайте
кришку батарейного відсіку/відсіку для карти пам’яті або кришку
універсального роз’єму.
• Якщо підводну зйомку планується проводити на глибіні, більшої за
5 метрів, скористайтеся спеціальним корпусом (Marine Pack), що
продається окремо.
• Цей фотоапарат тоне у воді. Аби фотоапарат не утонув, надягніть
на зап’ясток ремінець.
• У результаті відбиття об’єктів, що плавають під водою, під час
застосування спалаху на зображеннях, знятих під водою, можуть
з’являтися бліді й білі круглі плями. Це не є несправністю.
• Аби зменшити спотворення зображень, для підводної зйомки в
розділі вибору сцени оберіть (Під водою).
• Присутність водяних бризок або інших сторонніх речовин на
поверхні об’єктива унеможливить зйомку чітких зображень.
• Не відкривайте кришку об’єктива, якщо навколо вітер здіймає в
повітря пісок.
Чищення після використання
фотоапарата під водою/біля води
• Після використання під водою протягом 60
хвилин обов’язково чистіть фотоапарат та
не відкривайте батарейний відсік/відсік для
карти пам’яті до завершення чищення.
Пісок та вода можуть потрапити в певні
місця, де їх неможливо побачити. Якщо фотоапарат не мити, його
водонепроникні властивості погіршаться.
UA
8
Page 73

• Залиште фотоапарат у ванночці для чищення з чистою водою
щонайменше на 5 хвилин. Потім обережно потрясіть фотоапарат,
натисніть на кожну кнопку, посуньте важілець масштабування та
кришку об’єктива у воді, аби змити з фотоапарата сіль, пісок та
інші речовини, які осіли довкола кнопок або кришки об’єктива.
• Вимивши фотоапарат, зітріть рештки води м’якою тканиною.
Забезпечте повне висихання фотоапарата в добре вентильованому
затіненому місці. Не сушіть фотоапарат феном для волосся через
ризик деформації та/або погіршення водонепроникних
властивостей фотоапарата.
• Витирайте м’якою сухою тканиною краплі води або пил з кришки
батарейного відсіку/відсіку для карти пам’яті або кришки роз’єму.
• Конструкція фотоапарата забезпечує злиття води. Злиття води
здійснюється через отвори довкола кнопки ON/OFF (живлення),
важільця масштабування та інших органів керування. Діставши
фотоапарат із води, положіть його на суху тканину на деякий час,
забезпечивши можливість злиття води.
• Занурення фотоапарата у воду може супроводжуватися
виникненням бульбашок. Це не є несправністю.
• Контакт фотоапарата із кремом або маслом для засмаги може
спричинити знебарвлення його корпусу. У разі потрапляння крему
або масла для засмаги на фотоапарат, негайно й повністю зітріть
його з корпусу фотоапарата.
• Не залишайте фотоапарат із солоною водою всередині або на
корпусі. Це може призвести до корозії або знебарвлення
фотоапарата, а також до погіршення його водонепроникних
властивостей.
• Аби тривалий час забезпечувати ефективні водонепроникні
властивості фотоапарата, рекомендовано раз на рік відносити
фотоапарат до місцевого дилера або до уповноваженої майстерні з
метою заміни ущільнюючої прокладки кришки батарейного
відсіку/відсіку для карти пам’яті або кришки універсального
роз’єму за відповідну платню.
UA
UA
9
Page 74

Зверніться до «Посібника користувача Cyber-shot» (HTML) на компакт-диску, який додається
Детальна інформація щодо розширених операцій наведена в
«Посібнику користувача Cyber-shot» (HTML) на компакт-диску
(додається), доступ до якого забезпечується за допомогою
комп’ютера.
Вставте компакт-диск у дисковод.
Користувачам, що працюють з ОС Windows:
1 Клацніть [Посібник користувача] t [Установка].
2 Запустіть «Посібник користувача», клацнувши відповідну
піктограму на робочому столі.
Користувачам, що працюють із комп’ютерами Macintosh:
1 Виберіть папку [Посібник користувача] і скопіюйте папку [ua] із
папки [Посібник користувача] в пам’ять комп’ютера.
2 Після завершення копіювання двічі клацніть «index.html» у папці
[ua].
Перевірка комплектації, що постачається
• Фотоапарат (1)
• Акумуляторний блок NP-BN1 (1)
• Кабель USB для універсального термінала (1)
• Адаптер змінного струму AC-UB10/UB10B (1)
• Шнур живлення (не додається у США й Канаді) (1)
• Перо (1)
• Ремінець на зап’ясток (1)
• Компакт-диск (1)
– Програмне забезпечення Cyber-shot
– «Посібник користувача Cyber-shot»
• Посібник з експлуатації (цей посібник) (1)
• Примітки щодо водонепроникності (1)
10
UA
Page 75

Компоненти фотоапарата
A Мікрофон
B Кришка об’єктива
C Спалах
D Індикатор автоспуску/
Індикатор режиму Зйомка
посмішки/Підсвічування AF
E Об’єктив
F Кнопка (відтворення)
G Кнопка MOVIE (відео)
H Екран/сенсорна панель
I Кнопка ON/OFF (живлення/
заряджання)
J Світловий індикатор ON/
OFF (живлення/заряджання)
K Кнопка затвора
L Режим зйомки: важілець
W/T (масштаб)
Режим перегляду: важілець
(масштабування під час
відтворення)/важілець
(режим мініатюр)
M Гачок для ремінця на
зап’ясток
N Роз’єм HDMI
O Універсальний роз’єм
(Type3b)
P Гніздо для карти пам’яті
Q Індикатор доступу
R Важілець вилучення
акумулятора
S Кришка роз’єму
T Кришка батарейного
відсіку/відсіку для карти
пам’яті
U Позначка (TransferJet™)
V Гніздо для акумулятора
W Кріплення для штатива
• Використовуйте штатив із
гвинтом, довжиною не
більше 5,5 мм. Інакше
надійно зафіксувати
фотоапарат буде
неможливо; крім того,
фотоапарат може бути
пошкоджено.
UA
UA
11
Page 76

Вставлення акумуляторного блока
важілець вилучення акумулятора
Відкрийте кришку.
1
Вставте акумуляторний блок.
2
• Натискаючи на важілець вилучення акумулятора, вставте
акумуляторний блок, як зазначено на ілюстрації.
Переконайтеся в тому, що важілець вилучення акумулятора
зафіксовано після вставлення акумуляторного блока.
Заряджання акумуляторного блока
Для клієнтів зі США й Канади
Шнур живлення
Для покупців з усіх країн і регіонів,
окрім США й Канади
UA
12
Індикатор живлення/заряджання
Світиться: триває заряджання
Вимкнений: заряджання
закінчено
Блимає: помилка
заряджання
Page 77

Відкрийте кришку роз’єму й з’єднайте фотоапарат
1
з адаптером змінного струму (додається) кабелем
USB для універсального термінала (додається).
Підключіть адаптер змінного струму до електричної
2
розетки.
Індикатор живлення/заряджання засвітиться помаранчевим, і
розпочнеться заряджання.
• Заряджаючи акумулятор, вимкніть фотоапарат.
• Допускається заряджання частково розрядженого
акумуляторного блока.
• Якщо індикатор живлення/заряджання блимає, а заряджання
ще не закінчилося, вийміть акумуляторний блок і вставте його
ще раз.
Примітки
• Надійно закрийте кришку таким чином, аби приховати жовту позначку
під клямкою.
• Якщо індикатор живлення/заряджання фотоапарата не світиться навіть
після підключення адаптера змінного струму до фотоапарата та
електричної розетки, це означає, що заряджання тимчасово припинене
(перебуває в режимі очікування). Заряджання припиняється й
автоматично переходить до режиму очікування, якщо температура
виходить за межі рекомендованого діапазону. Заряджання
відновлюється після повернення температури до робочого діапазону.
Рекомендовано заряджати акумуляторний блок за навколишньої
температури від 10°C до 30°C.
• Підключіть адаптер змінного струму (додається) до найближчої
електричної розетки. Якщо під час використання адаптера змінного
струму трапиться будь-яка несправність/перебій, негайно від’єднайте
адаптер від мережі живлення, вийнявши вилку з електричної розетки.
• Після закінчення заряджання від’єднайте адаптер змінного струму від
настінної розетки.
• Обов’язково використовуйте оригінальні акумуляторні блоки, кабель
USB для універсального термінала (додається) і адаптер змінного
струму (додається) виробництва Sony.
UA
UA
13
Page 78

x
Заряджання через під’єднання до комп’ютера
Щоб зарядити акумуляторний блок, можна під’єднати фотоапарат
до комп’ютера кабелем USB для універсального термінала.
Примітка
• Виконуючи заряджання через під’єднання до комп’ютера, пам’ятайте
про таке:
– Якщо фотоапарат під’єднаний до портативного комп’ютера типу
«ноутбук», який не підключено до мережі живлення, рівень заряду
батареї комп’ютера знизиться. Не заряджайте фотоапарат протягом
тривалого часу.
– Не вмикайте/не вимикайте, не перезапускайте комп’ютер та не
виводьте комп’ютер зі сплячого режиму в той час, коли між
комп’ютером і фотоапаратом встановлено з’єднання USB. Наявність
під’єднаного фотоапарата може спричинити несправність. Перед тим,
як ввімкнути/вимкнути, перезапустити комп’ютер або вивести
комп’ютер зі сплячого режиму від’єднайте фотоапарат від
комп’ютера.
– Ефективність заряджання від саморобного або модифікованого
комп’ютера не гарантується.
x
Тривалість заряджання
Приблизна тривалість заряджання за допомогою адаптера змінного
струму (додається) складає 210 хвилин.
Примітка
• Зазначена вище тривалість заряджання застосовна до заряджання
повністю розрядженого акумуляторного блока за температури 25°C.
Заряджання може тривати довше залежно від умов використання й
обставин.
14
UA
Page 79

x
Тривалість роботи від акумулятора й кількість
фотознімків, яку можна записати й переглянути
Тривалість роботи від
акумулятора
Зйомка (фото) Приблизно 125 хвилин Приблизно 250
Перегляд (фото) Приблизно 190 хвилин Приблизно 3800
Зйомка (відео) Приблизно 60 хвилин —
Примітки
• Вказана вище кількість фотознімків є застосовною за умови
використання повністю зарядженого акумуляторного блока. Кількість
фотознімків може зменшитися залежно від умов користування
фотоапаратом.
• Кількість фотознімків, яку можна записати, розрахована за таких умов
зйомки:
– Використовується Sony «Memory Stick PRO Duo» (Mark2)
(продається окремо);
– Акумуляторний блок використовується за навколишньої
температури 25°C.
• Кількість зображень у рядку «Зйомка (фото)» розрахована у
відповідності до стандарту CIPA для зйомки за таких умов:
(CIPA: Camera & Imaging Products Association)
– [Яскравість екрану] має значення [3]
– Частота зйомки — 1 кадр на 30 секунд.
– Масштаб почергово переключається між кінцевими положеннями W
і T.
– Спалах надсилає один проблисковий світловий сигнал під час зйомки
кожного другого кадру.
– Живлення вмикається й вимикається через кожні 10 кадрів.
• Розрахована тривалість роботи від акумулятора під час відеозйомки
застосовна, якщо зйомка здійснюється за таких умов:
– Якість відео: AVCHD HQ
– Після завершення безперервної зйомки через задані обмеження
(стор. 27), повторно натисніть MOVIE (відео), аби продовжити
зйомку. Функції зйомки, такі як масштабування, не діють.
Кількість зображень
зображень
зображень
UA
UA
15
Page 80

x
Живлення
Постачання живлення до фотоапарата може здійснюватися від
електричної розетки за умови під’єднання фотоапарата до адаптера
змінного струму кабелем USB для універсального термінала
(додається).
Імпортувати зображення в комп’ютер, не хвилюючись про залишок
заряду акумуляторного блока, можна, під’єднавши фотоапарат до
комп’ютера кабелем USB для універсального термінала.
Примітки
• Постачання живлення за відсутності акумуляторного блока у
фотоапараті не є можливим.
• Постачання живлення від електричної розетки можливе лише тоді,
коли фотоапарат перебуває в режимі відтворення, або якщо
фотоапарат під’єднано до комп’ютера. Якщо фотоапарат перебуває в
режимі зйомки, а також під час змінення налаштувань фотоапарата
постачання живлення не відбувається, навіть за наявності з’єднання
USB за допомогою кабелю USB для універсального термінала.
• У результаті під’єднання фотоапарата до комп’ютера кабелем USB для
універсального термінала в той час, коли фотоапарат перебуває в
режимі відтворення, представлення режиму відтворення на екрані
фотоапарата змінюється на представлення режиму з’єднання USB.
Щоб перейти на екран режиму відтворення, натисніть кнопку
(відтворення).
16
UA
Page 81

Вставлення карти пам’яті (продається окремо)
Правильно зорієнтуйте
скошений кут карти.
Відкрийте кришку.
1
Вставте карту пам’яті (продається окремо).
2
• Вставляйте карту пам’яті, зорієнтувавши скошений край
карти, як зазначено на ілюстрації, до клацання.
Надійно закрийте кришку таким чином, аби
3
приховати жовту позначку під клямкою.
• Якщо акумуляторний блок вставлено невірно, закриття
кришки відсіку може призвести до пошкодження
фотоапарата.
UA
UA
17
Page 82

x
Сумісні типи карт пам’яті
Карта пам’яті Для фотознімків Для відео
Memory Stick PRO Duo aa (тільки Mark2)
Memory Stick PRO-HG
A
Duo
Memory Stick Duo a —
Карта пам’яті SD aa (класу 4 чи
Карта пам’яті SDHC aa (класу 4 чи
B
Карта пам’яті SDXC aa (класу 4 чи
• У цьому посібнику вироби в рядках A мають умовну спільну назву
«Memory Stick Duo», вироби в рядку B мають умовну спільну назву
«карта SD».
x
Вилучення карти пам’яті й акумуляторного блока
aa
швидша)
швидша)
швидша)
Карта пам’яті: один раз натисніть на карту пам’яті.
Акумуляторний блок: посуньте важілець вилучення акумулятора.
Слідкуйте за тим, аби акумуляторний блок не впав.
Примітка
• Не виймайте карту пам’яті або акумуляторний блок, якщо світиться
індикатор доступу (стор. 11). У такому випадку можливе пошкодження
даних, наявних на карті пам’яті/у внутрішній пам’яті.
18
UA
Page 83

Налаштування годинника
(живлення)
Опустіть кришку об’єктива.
1
Фотоапарат увімкнеться. Індикатор живлення засвітиться лише
після ввімкнення фотоапарата.
• Фотоапарат також можна ввімкнути натисканням кнопки
ON/OFF (живлення).
• Перехід до використання функцій фотоапарата після
ввімкнення живлення може передбачати певну часову
затримку.
Виберіть бажану мову.
2
Виберіть бажаний регіон, дотримуючись інструкцій,
3
які відображаються на екрані, а потім торкніть
[Далі].
Установіть значення параметрів [Літній час],
4
[Формат дати і часу] і [Дата і час], а потім торкніть
[Далі].
• «12:00 AM» — це північ, а «12:00 PM» — це полудень.
Торкніть [OK].
5
Виберіть бажаний колір дисплея, дотримуючись
6
інструкцій, які відображаються на екрані, а потім
торкніть [OK].
Кришка об’єктиваON/OFF
UA
UA
19
Page 84

Коли на екрані з’являється ввідне повідомлення
7
[Довідн. функ. фотоап.], торкніть [OK].
Прочитайте застережні повідомлення щодо
8
водонепроникності, потім торкніть [OK].
Фото- й відеозйомка
Кнопка затвора
Кнопка MOVIE (відео)
Фотозйомка
Натисніть кнопку затвора наполовину, щоб
1
забезпечити фокусування фотоапарата.
Вдале фокусування фотоапарата на зображенні відзначається
звуковим сигналом і вмиканням світлового індикатора z.
Натисніть кнопку затвора до кінця.
2
Відеозйомка
Натисніть кнопку MOVIE (відео), щоб розпочати
1
запис.
• Відрегулюйте масштаб важільцем W/T (масштаб).
Щоб зупинити запис, ще раз натисніть кнопку
2
MOVIE.
20
UA
Page 85

Примітки
• У режимі відеозйомки фотоапарат може записувати робочій звук
об’єктива й важільця під час використання функції масштабування.
Фотоапарат також може записати звук спрацьовування кнопки MOVIE
наприкінці відеозйомки.
• Під керуванням налаштувань фотоапарата, заданих за замовчуванням,
та за приблизної температури 25°C безперервна зйомка можлива
впродовж 29 хвилин. Аби поновити відеозапис після його завершення,
повторно натисніть кнопку MOVIE. За певної навколишньої
температури можлива зупинка запису з метою захисту фотоапарата.
Перегляд зображень
(відтворення)
Натисніть на кнопку (відтворення).
1
• Спроба відтворити відзняті іншими фотоапаратами
зображення, що містяться на карті пам’яті, на цьому
фотоапараті призведе до відображення екрана реєстрації
файлу даних.
x
Вибір наступного/попереднього зображення
Торкніть (наступне)/ (попереднє) на екрані.
• Щоб відтворити відеофрагменти, торкніть (відтворення) в центрі
екрана.
• Аби збільшити масштаб, торкніть фотознімок, що відтворюється.
x
Видалення зображень
1 Торкніть (видалення) t [Це зображення].
UA
UA
21
Page 86

x
Повернення до режиму зйомки
Торкніть на екрані.
• Також, аби повернутися до режиму зйомки, можна натиснути кнопку
затвора наполовину.
Довідн. функ. фотоап.
У фотоапараті передбачений інтегрований довідник функцій. Він
дозволяє відшукувати функції фотоапарата, які потрібні
користувачеві.
Торкніть (Довідн. функ. фотоап.).
1
• Під час перегляду позначка відобразиться у правій нижній
частині екрана.
Оберіть спосіб пошуку у вікні [Довідн. функ.
2
фотоап.].
Д-дка щодо з-ки/відтвор.: Пошук різних функцій, що
застосовуються в режимі зйомки / перегляду.
Довідка щодо піктограм: Пошук функцій і значення піктограм,
що відображаються.
Усунення несправностей: Пошук способів рішення проблемних
ситуацій загального характеру.
Довідка щодо об’єктива: Пошук функцій у відповідності до
побажань користувача.
Ключове слово: Пошук функцій за ключовим словом.
Історія: Відображення останніх 10 пунктів, що відображалися в
[Довідн. функ. фотоап.].
22
UA
Page 87

Введення в інші функції
Оперування іншими функціями в режимі зйомки або відтворення
можливе торканням MENU на екрані. У цьому фотоапараті
передбачений довідник функцій, який дає змогу легко вибирати
потрібні функції. Під час відображення підказки спробуйте
використати інші функції.
x
Пункти меню
Зйомка
Сцена
відеозйомки
Спрощений
режим
Спалах Налаштування спалаху.
Автоспуск Налаштування автоспуску.
Ефект розмитості
Розмір фотозн./
Розмір панор.
зображення/
Розмір фільму/
Якість фільму
Налашт. серійної
зйомки
Макро
EV Настроювання експозиції вручну.
ISO Настроювання світлової чутливості.
Вибір режиму відеозапису.
Фотозйомка з використанням мінімальної
кількості функцій.
Встановлення рівня розмитості заднього плану
під час зйомки в режимі розмитого фону.
Вибір розміру та якості зображення для
фотознімків, панорамних зображень або
відеофайлів.
Налаштування серійної зйомки.
Зйомка із близької відстані красивих малих за
розміром об’єктів.
UA
UA
23
Page 88

Баланс білого Настроювання колірних тонів зображення.
Баланс білого під
водою
Фокус Вибір режиму фокусування.
Режим виміру
експозиції
Розпізнавання
сцен
Вирівнювання
тону шкіри
Зйомка посмішки
Чутливість до
посмішки
Розпізнавання
обличчя
Уникн. закрит.
очей
Довідн. функ.
фотоап.
Налаштування кольорів для підводної зйомки.
Вибір режиму виміру для призначення частини
об’єкта, яку фотоапарат аналізуватиме під час
визначення експозиції.
Призначення автоматичного розпізнання умов
зйомки.
Активація функції Вирівнювання тону шкіри й
визначення ефекту застосування цієї функції.
Автоматичне спрацьовування затвора в разі
виявлення посмішки.
Установлення чутливості функції зйомки
посмішки в рамках виявлення посмішок.
Розпізнання облич і автоматичне налаштування
різних параметрів.
Автоматична зйомка двох зображень і вибір
зображення, очі об’єкта на якому не блимають.
Пошук функцій фотоапарата у відповідності до
ваших побажань.
Перегляд
Спрощений
режим
Вибір дати
Календар Вибір дати для відтворення на календарі.
Мініатюра Одночасно відображаються кілька зображень.
Показ слайдів Вибір способу безперервного відтворення.
Видалити Видалення зображення.
Надісл. через
TransferJet
UA
Збільшення розміру тексту на екрані для
зручності користування.
Вибір бажаного зображення для перегляду за
датою.
Передання даних між двома зіставленими
пристроями, що підтримують TransferJet.
24
Page 89

Малюнок
Ретушування
3D-перегляд
Режим перегляду Вибір формату відтворення зображень.
Відобразити
серійну групу
Захистити Захист зображень.
Друк (DPOF)
Поворот Повертання фотознімка ліворуч або праворуч.
Об’єм Регулювання гучності.
Дані експозиції
К-ть зобр. в реж.
мініат.
Довідн. функ.
фотоап.
Малювання на фотознімку та збереження його
як нового файлу.
Ретушування зображення за допомогою
різноманітних ефектів.
Відтворення зображень, відзнятих у режимі 3D,
на 3D-телевізорі.
Вибір способу відтворення кадрів серійної
зйомки групами або відображення всіх
зображень
Додавання позначки завдання друку до
фотознімка.
Відображення або приховування даних зйомки
(дані Exif) для файлу, що наразі відображається
на екрані.
Визначення кількості зображень, які
відображаються на екрані режиму перегляду
мініатюр.
Пошук функцій фотоапарата у відповідності до
ваших побажань.
UA
UA
25
Page 90

x
Налаштування
Якщо торкнути MENU під час зйомки або відтворення, розділ
(Налаштування) відобразиться як останній варіант вибору.
Значення за замовчуванням можна змінити на екрані
(Налаштування).
Налаштування
зйомки
Основні
налаштування
Інструмент
«Карта пам’яті»
Налаштування
годинника
* Якщо карту пам’яті не вставлено, відобразиться (Інструмент
«Внутр. пам’ять»); можна вибрати лише пункт [Формат].
Формат відео/Підсвітка AF/Лінія сітки/Цифр.
масштабув./Зменш. шуму вітру/Дов. розпізн.
сцени/Зменш. черв. очей/Спов. про закр. очі/
Запис дати
Сигнал/Яскравість екрану/Language Setting/
Колір відображ./Демонстр. режим/Ініціалізація/
КОНТРОЛЬ HDMI/Футляр/Налашт. USB з’єдн./
USB живлення/Налаштуван. LUN/Завантаж.
музики/Спорожн. музику/TransferJet/Eye-Fi/
Економія живл.
Формат/Створ. папку ЗАП./Змін. папку ЗАПИС/
Вид. пап. ЗАПИС/Копіювати/Номер файлу
*
Налаштув. зони/Налашт. дати/часу
26
UA
Page 91

Кількість фотознімків і тривалість відеозйомки
Кількість відзнятих фотознімків і тривалість зйомки може залежати
від умов зйомки та властивостей карти пам’яті, що
використовується.
x
Фотозйомка
(Одиниця виміру: зображення)
Місткість
Розмір
16M 3 335
VGA 98 9600
16:9(12M) 3 355
x
Відеозйомка
У наступній таблиці вказана приблизна максимальна тривалість
запису. Це загальна тривалість для всіх відеофайлів. Приблизна
тривалість безперервної зйомки - 29 хвилин. Максимальний розмір
відеофайлу формату MP4 приблизно складає 2 ГБ.
Місткість
Розмір
AVC HD 24M (FX) — 10 хв
AVC HD 9M (HQ) — 25 хв
MP4 12M — 15 хв
MP4 3M — 1 год 10 хв
Цифри в дужках ( ) вказують на мінімальний час запису.
• Тривалість відеозапису є змінною, оскільки у фотоапараті передбачена
функція підтримки змінної швидкості передання даних (VBR), яка
автоматично корегує якість зображення у відповідності до сцени
зйомки. При зйомці об’єктів, що швидко рухаються, зображення
виходять чіткішими, але тривалість запису при цьому скорочується,
оскільки запис потребує розширених ресурсів пам’яті.
Тривалість запису також залежить від умов зйомки, стану об’єкта та
налаштувань щодо якості/розміру зображення.
Внутрішня пам’ять Карта пам’яті
Прибл. 19 МБ 2 ГБ
(год. (година), хв. (хвилина))
Внутрішня пам’ять Карта пам’яті
Прибл. 19 МБ 2 ГБ
(10 хв)
(15 хв)
UA
UA
27
Page 92

Примітки щодо використання фотоапарата
Інтегровані функції цього фотоапарата
• У цьому посібнику наведений опис кожної функції моделей, що
підтримують та не підтримують технологію TransferJet, моделей, що
підтримують формат 1080 60i та моделей, що підтримують формат 1080
50i.
Аби визначити, чи підтримує фотоапарат технологію TransferJet, а
також формати 1080 60i або 1080 50i, перевірте такі позначки на донній
панелі.
Пристрій підтримує технологію TransferJet:
Пристрій підтримує формат 1080 60i: 60i
Пристрій підтримує формат 1080 50i: 50i
• Тривалий перегляд тривимірних зображень, відзнятих цим
фотоапаратом, на моніторах, які підтримують формат 3D, не
рекомендований.
• Перегляд тривимірних зображень, відзнятих цим фотоапаратом, на
моніторі, що підтримує формат 3D, може супроводжуватись
дискомфортом, а саме напруженням очей, відчуттям втомленості або
нудоти. Аби запобігти цим симптомам, впродовж перегляду
рекомендовано робити періодичні перерви. При цьому, ви самі маєте
визначити тривалість і періодичність таких перерв, виходячи з
індивідуальних особливостей власного організму. Відчувши будь-який
дискомфорт, припиніть переглядати 3D-зображення, поки добре
самопочуття не відновиться; за потреби зверніться до лікаря. Також
зверніться до інструкцій з експлуатації, що додаються до пристрою або
програмного забезпечення фотоапарата й обладнання, до якого
під’єднано фотоапарат. Пом’ятайте, що зір дітей ще перебуває у стані
розвитку (зокрема це стосується дітей віком до 6 років).
Проконсультуйтеся з педіатром або офтальмологом перед тим, як
дозволити дітям переглядати тривимірні зображення, і забезпечте
дотримання дитиною отриманих порад під час перегляду таких
зображень.
Використання та догляд
Уникайте недбалого поводження, розбирання, модифікації та поштовхів,
наприклад, не стукайте, не впускайте та не наступайте на виріб.
Особливу обережність необхідно виявляти при поводженні з об’єктивом.
(TransferJet)
28
UA
Page 93

Примітки щодо записування та відтворення
• Перед початком зйомки робіть пробні кадри, щоб переконатися, що
фотоапарат правильно функціонує.
• Не наводьте фотоапарат на сонце або інше яскраве джерело світла. Це
може призвести до пошкодження фотоапарата.
• Перед використанням фотоапарата видаліть сконденсовану вологу.
• Не трясіть і не бийте фотоапарат. Ви можете його пошкодити й не
будете мати змоги виконувати зйомку. Крім того, існує небезпека, що
вийде з ладу носій запису або пошкодяться дані.
Не використовуйте й не зберігайте фотоапарат у таких умовах
• У надмірно гарячих, холодних або вологих місцях.
Наприклад у салоні автомобіля, припаркованого на сонці, корпус
фотоапарата може деформуватися, що призведе до поломки
фотоапарата.
• Під прямим сонячним промінням або поблизу нагрівальних приладів.
Корпус фотоапарата може знебарвитися або деформуватися, що
призведе до поломки фотоапарата.
• У зоні дії маятникових коливань
• Поблизу сильних джерел радіохвиль і радіації або сильних магнітних
полів. Фотоапарат може записувати й відтворювати знімки
неправильно.
Коли ви носите фотоапарат із собою
Не сідайте на стільці тощо, якщо фотоапарат знаходиться в задній
кишені штанів або спідниці; це може спричинити несправність або
пошкодження фотоапарата.
Об’єктив Carl Zeiss
Цей фотоапарат обладнано об’єктивом Carl Zeiss, який дозволяє
відтворювати чіткі зображення з чудовою контрастністю. Об’єктив для
цього фотоапарата виготовлено відповідно до системи забезпечення
якості, сертифікованої компанією Carl Zeiss згідно зі стандартами
компанії Carl Zeiss у Німеччині.
Примітки щодо дисплея та об’єктива
• Дисплей виготовлений із застосуванням високоточної технології,
завдяки чому ефективно використовується понад 99,99 % пікселів.
Однак на дисплеї можуть з’являтися крихітні чорні та яскраві цятки
(білого, червоного, синього або зеленого кольору). Ці точки є
нормальним результатом виробничого процесу й не впливають на
якість записаних зображень.
• Здатність сенсорної панелі реагувати на дотики рук у рукавичках може
бути зниженою.
UA
UA
29
Page 94

Про температуру фотоапарата
В результаті тривалого використання фотоапарат і батарея можуть
нагріватися, що не є несправністю.
Захист від перегріву
У фотоапараті передбачена захисна функція, яка може
унеможливлювати відеозапис або спричиняти автоматичне вимкнення
фотоапарата за певної температури фотоапарата або акумулятора.
Перед вимкненням живлення/припиненням відеозапису на екрані
фотоапарата відобразиться відповідне попередження. У такому разі
відкладіть фотоапарат із вимкненим живленням і дочекайтеся зниження
температури фотоапарата й акумулятора. Увімкнення живлення за
недостатньо низької температури фотоапарата та акумулятора може
призвести до повторного вимкнення живлення/блокування відеозапису.
Про заряджання акумулятора
Зарядна ємність акумулятора, який не використовувався протягом
тривалого часу, може знизитися.
Це обумовлено властивостями акумулятора й не є ознакою несправності.
Зарядіть акумулятор повторно.
Попередження про авторські права
Телевізійні передачі, кінофільми, відеоплівки та інші матеріали можуть
бути захищені авторськими правами. Несанкціонований запис таких
матеріалів може суперечити положенням законів про авторські права.
Компенсація за пошкодження даних або неможливість
виконати зйомку
Sony не надає компенсації за неможливість виконати зйомку й втрату або
пошкодження записаних даних через несправність фотоапарата чи носія
запису або з іншої причини.
Чищення поверхні фотоапарата
Витирайте поверхню фотоапарата м’якою, трохи вологою ганчіркою, а
потім витріть насухо. Для запобігання пошкоджень поверхні або
корпуса:
– Не піддавайте фотоапарат дії хімічних речовин, наприклад
розчинників, спирту, бензину, одноразових тканин, засобів від комах,
сонцезахисних кремів або інсектицидів.
30
UA
Page 95

Технічні характеристики
Фотоапарат
[Система]
Датчик зображення: 7,77 мм
(тип 1/2,3), датчик зображень
Exmor R CMOS
Загальна кількість пікселів, що
забезпечується фотоапаратом:
прибл. 16,8 мегапікселів
Ефективна кількість пікселів, що
забезпечується фотоапаратом:
прибл. 16,2 мегапікселів
Об’єктив: Carl Zeiss Vario-Tessar,
з чотирикратним (4×)
збільшенням
f = 4,43 мм – 17,7 мм (25 мм –
100 мм (у перерахунку для
фотоапарата із плівкою
35 мм))
F3,5 (W) – F4,6 (T)
Відеозйомка у форматі (16:9):
27 мм – 108 мм
Відеозйомка у форматі (4:3):
33 мм – 132 мм
SteadyShot: оптичний режим
Налаштування експозиції:
автоматична експозиція,
функція «Вибір сцени» (16
режимів)
Баланс білого: автоматично,
Денне світло, Хмарно,
Флуоресцентне світло 1/2/3,
Лампа розжарювання, Спалах,
Одне натискання
Баланс білого під водою: Авто,
Підводний 1/2
Формат сигналу:
Для 1080 50i: колірна система
PAL, специфікація згідно
стандартів CCIR щодо HDTV
для 1080/50i
Для 1080 60i: колірна система
NTSC, специфікація згідно
стандартів EIA щодо HDTV
для 1080/60i
Формат файлів:
Фотознімки: формат, сумісний
із JPEG (DCF Ver. 2.0, Exif
Ver. 2.3, MPF Baseline),
сумісний із DPOF
3D-фотознімки: формат,
сумісний із MPO (MPF
Extended (диспарантне
зображення))
Відеофрагменти (формат
AVCHD): AVCHD
Відео: MPEG-4 AVC/H.264
Аудіо: Dolby Digital, 2 канали,
і застосуванням Dolby Digital
Stereo Creator
• Створено по ліцензії
компанії Dolby Laboratories.
Відеофрагменти (формат MP4):
Відео: MPEG-4 AVC/H.264
Аудіо: MPEG-4 AAC-LC, 2
канали
Носій запису: внутрішня пам’ять
(прибл. 19 МБ), «Memory Stick
Duo», карти SD
Спалах: діапазон спалаху
(чутливості ISO
(рекомендований індекс
експозиції) надане значення
«Авто»):
Прибл. 0,08 м - 3,7 м (W)
Прибл. 0,5 м - 2,7 м (T)
UA
UA
31
Page 96

[Вхідні й вихідні роз’єми]
З’єднувач HDMI: мініатюрний
роз’єм HDMI
Універсальний роз’єм: Type3b
(аудіо/відеовихід/USB/вхід для
підключення зовнішнього
джерела постійного струму):
Відеовихід
Аудиовихід (стереофонічний)
Підключення USB
Підключення USB: Hi-Speed USB
(USB 2.0)
[Екран]
Панель:
широка (16:9), привід TFT,
7,5 см (тип 3,0)
Загальна кількість точок:
921 600 (1 920 × 480) точок
[Живлення й загальні
характеристики]
Живлення: акумуляторний блок
NP-BN1, 3,6 В,
адаптер змінного струму
AC-UB10/UB10B, 5 В
Споживана потужність (під час
зйомки): 1,0 Вт
Робоча температура: від –10 °C до
40 °C
Температура зберігання: від
–20 °C до +60 °C
Габаритні розміри (відповідно до
CIPA):
95,6 мм × 56,1 мм × 17,9 мм
(Ш/В/Г)
Вага (у відповідності до CIPA) (з
акумуляторним блоком NPBN1, «Memory Stick Duo»):
прибл. 133 г
Мікрофон: стереофонічний
Динамік: монофонічний
UA
Exif Print: підтримується
32
PRINT Image Matching III:
підтримується
Водонепроникні/пилонепроникні
властивості: відповідно до
IEC60529 IP58 (допускається
оперування цим
фотоапаратом у воді на
глибині до 5 м протягом 60
хвилин).
Протиударні властивості:
у відповідності до стандартів
MIL-STD 810F Method 516.5Shock цей виріб пройшов
тестування на падіння з висоти
1,5 м на фанерну плитку
товщиною 5 см.
Водонепроникні, пилонепроникні
та протиударні властивості
фотоапарата визначені за
результатами стандартного
тестування Sony.
Адаптер змінного струму ACUB10/UB10B
Вимоги до джерела живлення:
100 В - 240 В змінного струму,
50 Гц/60 Гц, 70 мА
Вихідна напруга: DC 5 В, 0,5 A
Робоча температура: від 0 °C до
40 °C
Температура зберігання: від
–20 °C до +60 °C
Габаритні розміри:
прибл. 50 мм × 22 мм × 54 мм
(Ш/В/Г)
Вага:
для США й Канади: прибл.
48 г
Для інших країн і регіонів,
окрім США й Канади: прибл.
43 г
Page 97

Акумуляторний блок
NP-BN1
Тип акумулятора: літієво-іонний
Максимальна напруга: DC 4,2 В
Номінальна напруга: DC 3,6 В
Максимальна напруга
заряджaння: DC 4,2 В
Максимальний струм заряджaння:
0,9 A
Ємність:
стандартна: 2,3 Вт-год
(630 мА-год)
мінімальна: 2,2 Вт-год
(600 мА-год)
Конструкція та технічні
характеристики можуть бути
змінені без оповіщення.
Торгові знаки
• Наведені нижче марки є
торговими знаками Sony
Corporation.
, «Cyber-shot»,
«Memory Stick PRO Duo»,
«Memory Stick PRO-HG Duo»,
«Memory Stick Duo»
• Windows є торговим знаком
Microsoft Corporation у
Сполучених Штатах Америки й/
або інших країнах.
• Macintosh є зареєстрованою
торговельною маркою Apple
Inc.
• Логотип SDXC є торговим
знаком SD-3C, LLC.
• « » та «PlayStation» є
зареєстрованими торговими
знаками Sony Computer
Entertainment Inc.
• Крім того, наявні в цьому
посібнику назви систем і
продуктів, як правило, є
торговими знаками або
зареєстрованими торговими
знаками відповідних
розробників або виробників. У
відповідних місцях позначки ™
та ® використовуються в цьому
посібнику не завжди.
UA
• Збільшіть задоволення від
користування PlayStation®3,
завантаживши прикладну
програму для PlayStation®3 з
PlayStation®Store (якщо
доступно).
UA
33
Page 98

• Аби користуватися прикладною
програмою для PlayStation®3,
необхідно зареєструватися у
PlayStation®Network та
завантажити прикладну
програму. Для регіонів, у яких
PlayStation®Store є доступним.
Додаткову інформацію
стосовно цього виробу та
відповіді на часті запитання
можна знайти на веб-сайті
Служби підтримки
споживачів компанії Sony.
Надруковано на папері з
можливістю переробки 70% чи
більше, з використанням чорнила
без летких органічних сполук, а
виготовленого на основі рослинної
олії.
34
UA
Page 99

Page 100

©2011 Sony Corporation Printed in China
 Loading...