

Sony DSC-T70W, DSC-T70B Owner’s Manual
C ot
Digital Still Camera
Cyber-shot Handbook
DSC- T70/T75/'I'200
Before operating the unit, please read this
Handbook thoroughly together with the
"'Instruction Manual" and the "'Cyber-shot
Step-up Guide", and retain them for future
reference.
_'CLICK!
© 2007 Sony Corporation 3-219-480-11 (1) ©
Notesonusingyourcamera
Notesonthetypesof "Memory Stick"
thatcanheused(notsupplied)
_o_ "Memory Stick Duo":
you can use a "Meulery
Stick Duo" wilh your
CauleFa.
"Memory Stick":
you cannot use a
"Memory Stick"
with your camera.
Othermemorycardscannotbeused.
• For details on "Memory Stick Duo"_ see
page ]2 l,
Whenusinga "Memory Stick Duo"with
"Memory Stick" compatible equipment
You c:m use the "Memory Stick Duo" by
inserting it into the Memory Stick Duo
Adaptor (not supplied).
Memory Stick Duo Adaptor
Notes on the battery pack
• Charge tile battery pack (supplied) belore using
tile cinllera lot lbe lirsl lime,
• The bauery pack can be charged even if it is not
complelely discharged. Also, even if the bauel T
pack is nol flllly charged, you can use lhe
paldally charged capacily of the baltery pack as
is,
• If you do nol intend to use the balte W pack lot a
long lime, use up tile existing charge and
relnove it hom your camera, then store it in a
cool, dry place. This is to maintain the battery
pack hmctions.
• For details on the usable bauery pack, see
page 123.
CarlZeisslens
This camera is equipped with a C:uq Zeiss
lens which is capable of reproducing sharp
images with excellent contrast.
The lens for this camera has been produced
under a quality assurance system certified
by Carl Zeiss in accordance with the quality
standards of Carl Zeiss in Germany.
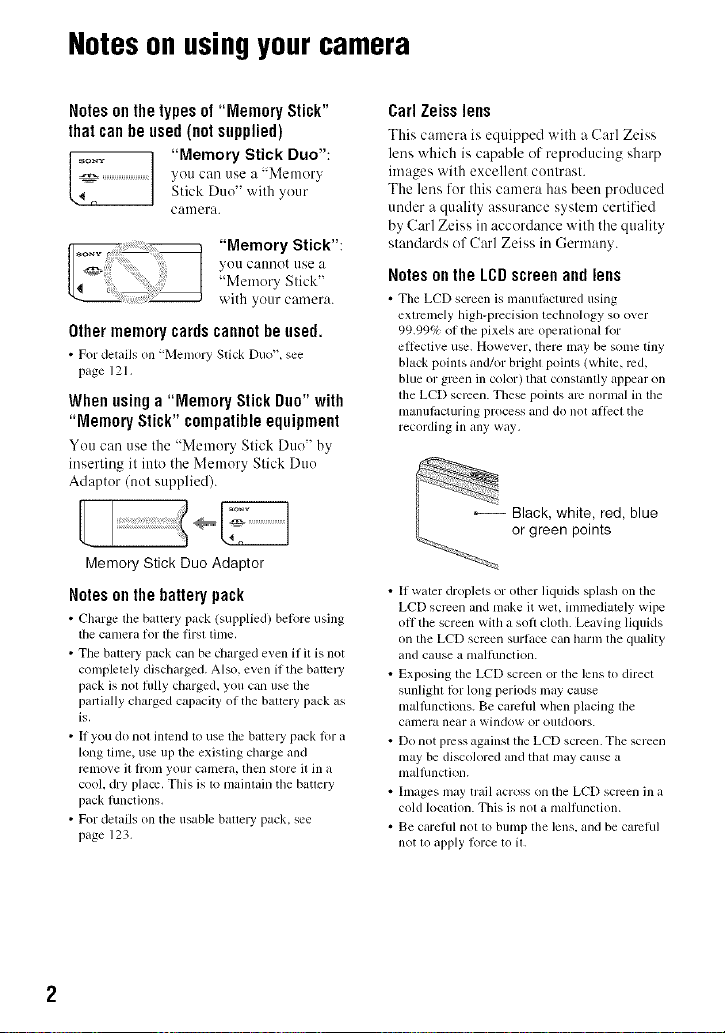
Notesonthe LCDscreenandlens
• Tile LCD screen is manul,tctured using
extremely high-precision teclmology so o_er
99.99% of the pixels am operational 1or
ellcclive use. However, there may be some tiny
black points and/or brigbl points (white, rod,
blue or green in color) that constantly appear on
lhe LCD semen. Tbese poinls am normal in the
manulacturing process and do not allect tbe
recording in any way.
: !ii
IIi _ Black, white, red,
_._.><.i_" or green points
• If waler droplets or other liquids splash on lhe
LCD screen and make it wet, inunediatcly wipe
oil the screen with a soft cloth. Leaving lkluids
on the LCD semen surlace can harm the quality
and cause a nlalhlnction.
• Exposing lhe LCD screen or the lens to direcl
sunlight for long periods may cause
nlallhnctions. Be carehll when placing lhe
camera near a window or oludoors.
• Do not prcss against the LCD screen. The screen
may be discolored and tbal may cause a
malflmction.
• Images may trail across on the LCD screen in a
cold location. This is nol a malfunction.
• Be careful nol to bump the lens. and be carchll
not tOapply Iorce to il.
blue

Thepictures usedinthis Handbook
Tile photographs used _lsexmnples oi pictures in
this Handbook am reproduced images, and are nol
actual images shot using this camera.
On illustrations
lllustralions used in lifts H_uldbook arc oi
DSC-T200 unless holed otherwise.
Table of contents
Notes on using your camera ..................................................................... 2
Basic techniques for better images ........................................................... 8
Focus Focusing on a subject successfully ..................................................... 8
Exposure Adjusting the light intensity ........................................................... 10
Color On the effects of lighting ..................................................................... 11
Quality On "image quality" and "image size". .............................................. 12
Flash On using the flash ............................................................................... 14
Identifying parts ....................................................................................... 15
Indicators on the screen .......................................................................... 17
Operate the touch panel ......................................................................... 22
Changing the screen display ................................................................... 23
Using the internal memory ...................................................................... 25
Shooting images easily (Auto Adjustment mode) ................................... 26
Setting Image size/Self-timer/Flash mode/Macro recording ........................... 28
Setting Focus/Metering Mode/ISO/EV ............................................................. 30
Viewing images ....................................................................................... 35
Deleting images ...................................................................................... 37
Learning the various functions - HOME/Menu ....................................... 39
Menu items ............................................................................................. 42
Switching the shooting mode .................................................................. 43
Shooting images using Scene Selection ................................................. 44
Shooting menu ........................................................................................ 47
REC Mode: Selecting the continuous shooting method
EV: Adjusting the light intensity
Focus: Changing the focus method
Metering Mode: Selecting the metering mode
White Balance: Adjusting the color tones
Color Mode: Ch raging the vividness of the image or adding special effects
Flash Level: Adjusting the amount of flash light
Red Eye Reduction: Reducing the red-eye phenomenon
Face [)election: Detecting the li_ce of subject
SteadyShot: Selecting the anti-blur mode
Setup: Selecting the shooting settings
Playing back images from the HOME screen .............................54
[] (Single Image): Playing back a single image
mmmm(Ira ige Index): Playing back a list of images
Slideshow : Playing back a series of ilnages
Viewing menu ......................................................................................57
(Retouch): Retouching slill im iges
¢e_' (Paint): Painling on still images
(Mul 1 Reslzmg : (hanging the image size according to usage
(Wide Zoom Display): Displa} ing still images in 16:9
(Slideshow): Playing back a series of images
(Delete): Deleling images
d e (Protect): Preventing iccidental erasure
0POF: Adding a Prinl order mark
,h, (Print): Printing ilnages using a printer
(Rotate): Relating a still image
(Select Folder : Selecling Ihe folder for viewing images
(Vohlme Settings): Acljusting the vohlme
Painting or puttingstamps on still images (Paint) ...................... 65
Customizing the Manage Memory feature and the Settings ........67
Manage Memory ..........................................................................68
_,m Memory Tool -- Memory Stick Tool .................................................. 68
Formal Change REC.Folder
Create REC.Folder Copy
@,m Memory Tool -- Internal Memory Tool ............................................. 70
FOl'lllal
"_ Settings 71
_,1" Main Settings -- Main Settings 1 ...................................................... 71
Beep Calibralion
Function Guide Housing
hlitialize
_1' MainSettings -- Main Settings 2 ...................................................... 78
USB Connect Video Oul
COMPONENT TV TYPE
6 Shooting Settings -- Shooting Settings 1......................................... 75
AF Illuminator AF Mode
Grid Line DiLzital Zoom
6 Shooting Settings -- Shooting Settings 2 ......................................... 78
Auto Orientation Smile Level
Auto Review
(_) Clock Settings ................................................................................... 79
[m Language Setting ............................................................................. 80
Viewing images on a TV ......................................................................... 81
Viewing images by connecting your camera to a TV with the supplied cable for
multi-use terminal ............................................................................................ 81
Viewing an image by connecting your camera to a HD TV............................. 83
Enjoying your Windows computer ........................................................... 85
Installing the software (supplied) ............................................................ 87
On the "Picture Motion Browser" (supplied) ............................................ 89
Copying images to your computer using the "Picture Motion Browser" .... 90
Copying images to a computer without "Picture Motion Browser". ......... 94
Viewing image files stored on a computer with the camera copying to the
"Memory Stick Duo". ............................................................................... 96
Using the "Music Transfer" (supplied) ..................................................... 97
Using your Macintosh computer ............................................................. 98
Viewing "Cyber-shot Step-up Guide". ................................................... 100
How to print still images ........................................................................ 101
Printing images directly using a PictBridge compliant printer ............... 102
Printing at a shop .................................................................................. 105
Troubleshooting.....................................................................................107
Warningindicatorsandmessages........................................................117
[i]l_
Using your camera abroad -- Power sources ....................................... 120
On the "Memory Stick Duo". .................................................................. 121
On the battery pack ............................................................................... 123
On the battery charger .......................................................................... 124
On Cyber-shot Station ........................................................................... 125
IITIII_B
Index ...................................................................................................... 127
Basictechniquesfor betterimages
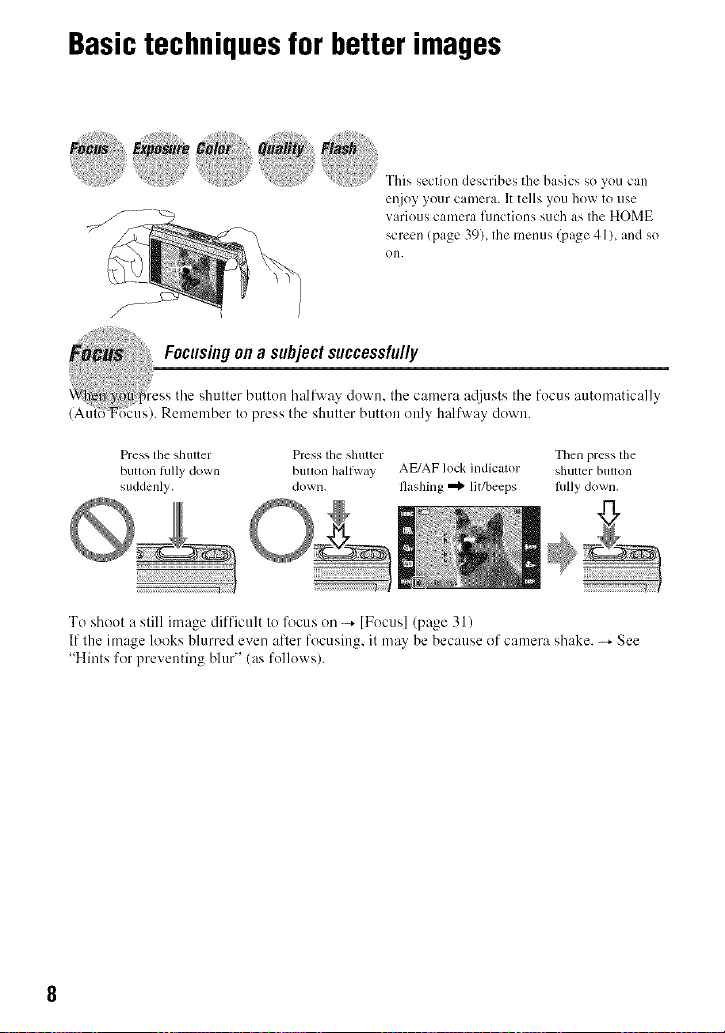
This section describes the hasics so you can
enjoy your camera. It tells you how to use
various camera functions such as the HOME
screen {page 39), the menus (page 41 ), and so
on.
Focusingona subjectsuccessful/y
the shutter butlon halfway down, the camera atljusts the focus automatically
Remember to press the shutter butlou ouly halfway down.
Press tile shuuer Press tile slluuer Then press tile
button tully down bllUOll Ilalfway AE/AF lock indicator shuuer blulon
suddenly, dowll. I]asllillg _ lit/beeps lully dowll.
To shoot a slill image difficult Io focus on _ [Focus] (page 31)
If the image looks blurred even after focusing, it may be because of camera shake. _ See
"Hints for preventing blur" (as follows;).
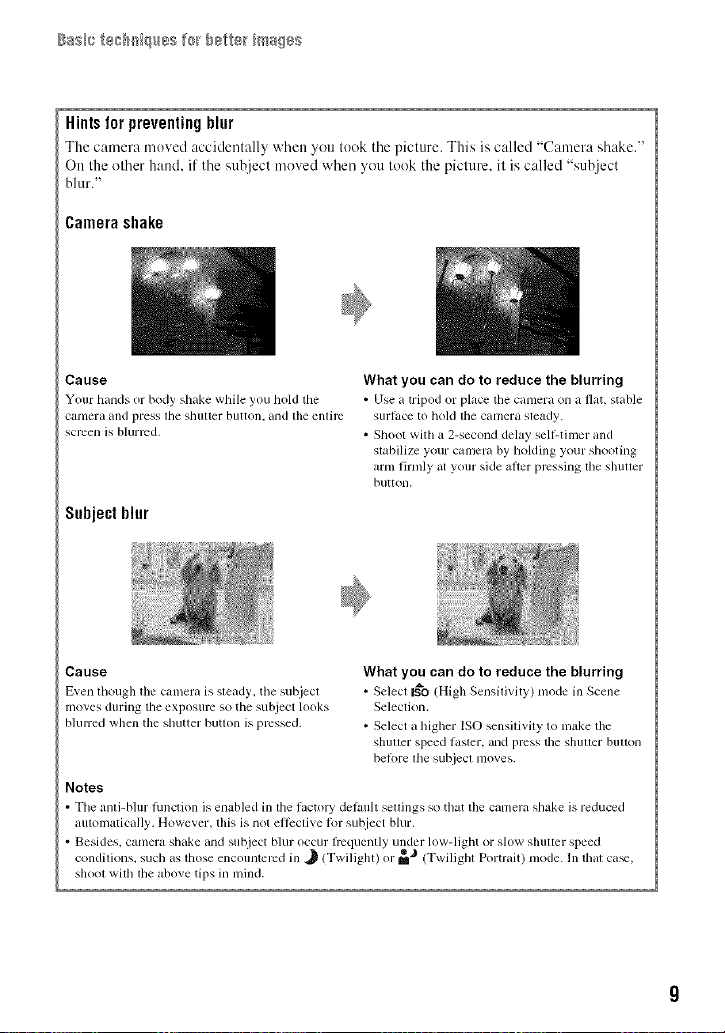
Hintsfor preventingblur
The camera moved accidentally when _ou took the picture. This is called "C:nnera shake."
On the other hand. if the subject moved when you took the picture, it is called "subject
blur."
Camerashake
Cause
Your hands or body shake while you hold tile
Catllelu and press tile sbuuer button, alld tile enlh'c
screen is blurred.
What you can do to reduce the blurring
• Use a tripod or place tile camera on a flat, stable
surlace to hoM tile cmnel"a steady.
• Shoot with a 2-second delay sell-tinier and
stabilize your cmllera by holding your shooting
ann firmly at your side after ,mvssing tile shuuer
button.
Subjectblur
Cause
E_en though tile CUlnera is steady, the subjecl
lno_/es durillg tile exposure so tile subject looks
blulred when tile shutter button is pressed.
Notes
The anti-blur hmction is enabled in tile hactory delault seUings so that tile camera shake is reduced
automatically. However, this is not ellcctive lor su_!iect blur.
Besides, camera shake and subject blur occur hequently under low-light or slow slmtter speed
condl ions, such as hose encoun ered m ._ (Twdlgh) or m (Twfllgh Pot rm ) mode. In lla ca_,
sllool wilh lhe above tips in mind.
What you can do to reduce the blurring
• Select N_O (High Sensilivity) mode in Scene
Selection.
• Select a higher ISO sensilivity to nlake tile
shuuer speed luster, and press file shuuer buuon
belbre file subjecl moves.
. e.ib .
Basi_} te_H_iqll_eS f_[ b_tle_ i_/_s¢}s$
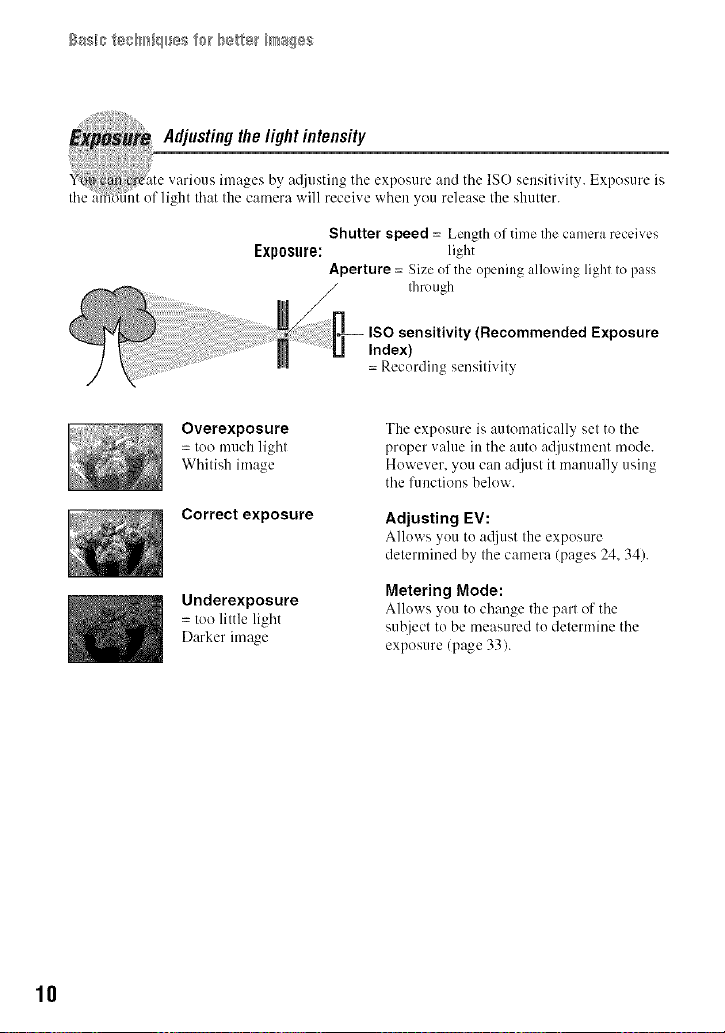
Adjustingthelight intensity
_i.m ricre tte various images bv adiustiug tile exposure :rod tile ISO sensitivity. Exposure is
the _iffii tint ( f light that the camera will receive when you release the shutter.
Exposure:
Overexposure
= too much light
Whitish image
Correct exposure
Underexposure
= too little light
Darker image
Shutter speed = Length of time the camera receives
light
Aperture = Size of the opening allowing light to pass
tim) ugh
ISO sensitivity (Recommended Exposure
Index)
= Recurding seusitivit_
The expusure is automatically set tu the
pruper value in the auto adjustment mode.
However, you can adjust it manually using
the l)mctions below.
Adjusting EV:
Alluws you tu adjust the exposure
determined by the camera (pages 24, 34).
Metering Mode:
Allows you to change the part of the
subject to be measured tu determine the
exposure (page 33).
10
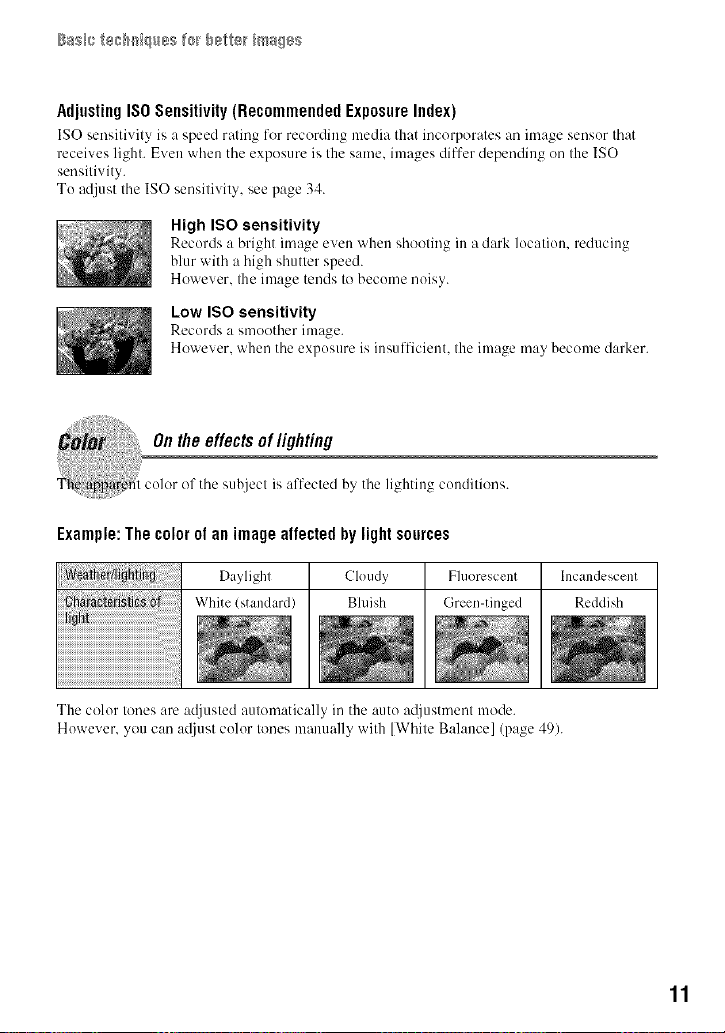
Adjusting ISO Sensitivity (Recommended Exposure Index)
IS() sensitivity is a speed rating for recording media that incorporates an image sensor that
receives light. Even when the exposure is the same, images differ depending on the ISO
sensitivity.
To adjust the ISO sensitivity, see page 34.
High ISO sensitivity
Records a bright image even when shooting in a dark location, reducing
blur with a high shutter speed.
However. the image tends to become noisy.
Low ISO sensitivity
Records a smoother image.
However. when the exposure is insufficient, the image may become darker.
Example: The color ol an image alfected by light sources
Daylight Cloudy Fluorescent Incandescent
White (standard) Bluish Green-tinged Reddish
The color tones are acUusted automatically in the auto adjustment mode.
However, you can ac[iust color tones manually with [White Balance] (page 49).
11
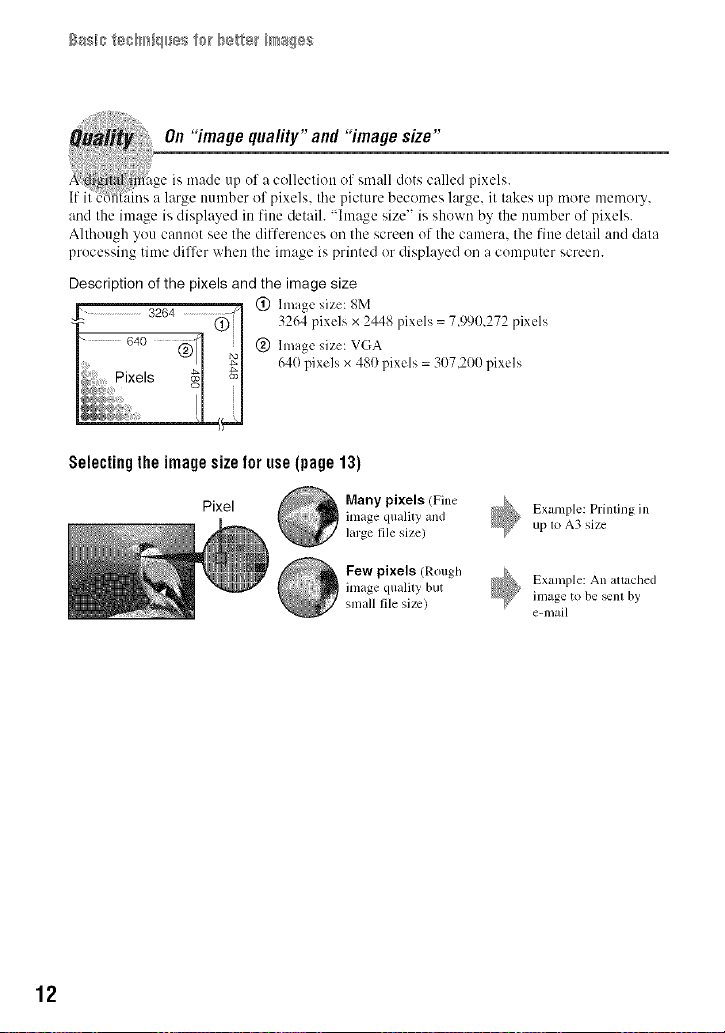
On"imagequality"and "imagesize"
i
A di_ilal re]age ts made up ul a celleclten el small dots called ptxels.
It ii l.'bh_ {ins a large number of pixels, tile picture becomes large, it lakes up mere memory.
and the image is displayed in fine detail. "hnage size" is shown by the number of pi×els.
Although you cannot see the differences on the screen of the can]era, the fine detail and data
processing time differ when the image is printed or displayed on a computer screen.
Description of the pixels and the image size
j_" ..........................3264 ................._ (_ hnagc size: 8M
L Pixels _l NI 64(1pixels x 480 pixels = 307,200 pixels
Selectingthe imagesizefor use(page13)
12
Pixel
Many pixels (Fine
image quality and
large file size)
Few pixels (Rough
inlage quality but
small file size)
Example: Printing in
up t_ A3 size
Example: An attached
in]age to be _nl by
e-mail
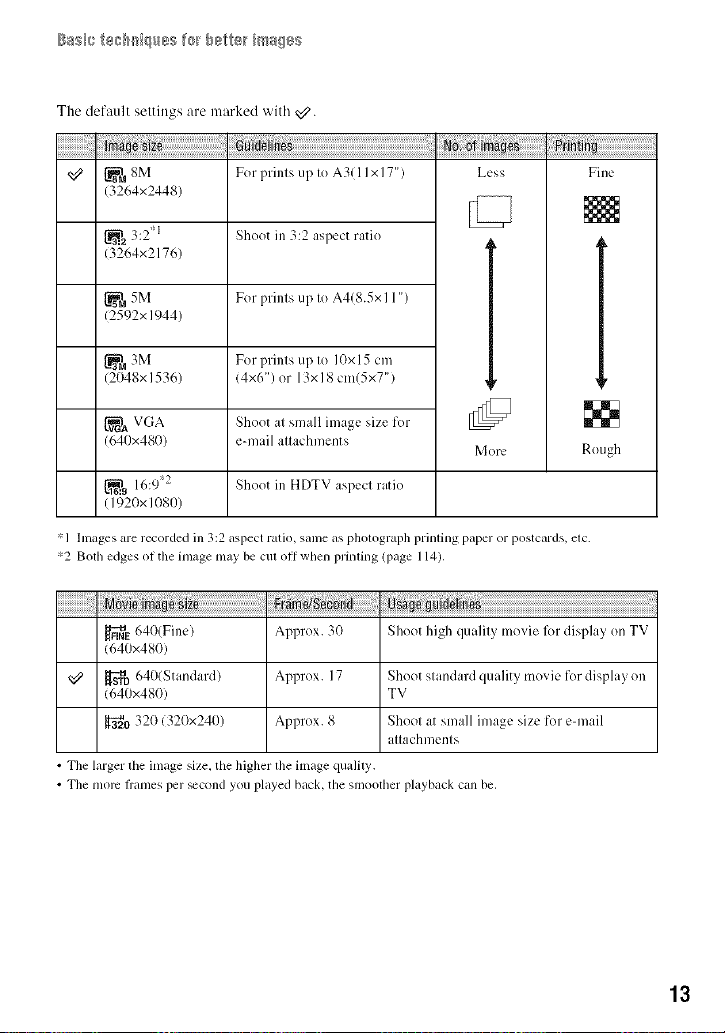
The default settings are marked with _.
_8M
(3264×2448)
_1.,2 3:2 1
13264×2176)
5M
(2592× 1944)
_'_ 3M
(2048x 1536)
{-_t, VGA
(640x480)
_...9 16:9'2
(I 920x 1080)
*1 hnages are recorded in 3:2 aspect ratio, same as photograph printing paper or postcards, etc.
*2 Bolh edges ol tile image may be cul oll when prinling (page 114).
v[_ 640(Fine)
(640x480)
_'_D 640(Standard) Shoot standard quality movie for display on
(640x480) TV
a_0 320 (320x240) Shoot at small image size for e-mail
• The larger lhe image size. the higher file image quality.
• Tile more lrames per _cond you i?layed back. tile smoolher playback can be,
For prints up to A3( I I x 17")
Shoot in 3:2 aspect ratio
For prints up to A4(8.5x I 1")
For prints up to 10x 15 cm
(4x6") or 13x 18 cm(5xT')
Shoot at small image size for
e-mail attachments
Shoot in HDTV aspect ratio
Shoot high qualily movie |X)l display on TVApprox. 3(1
Approx. 17
Approx. 8
attachments
Less Fine
[]
[]
RoughMore
13
BaSilSteS_lr_i¢lSeSf_ b_tl@_ i_/_s¢}s$
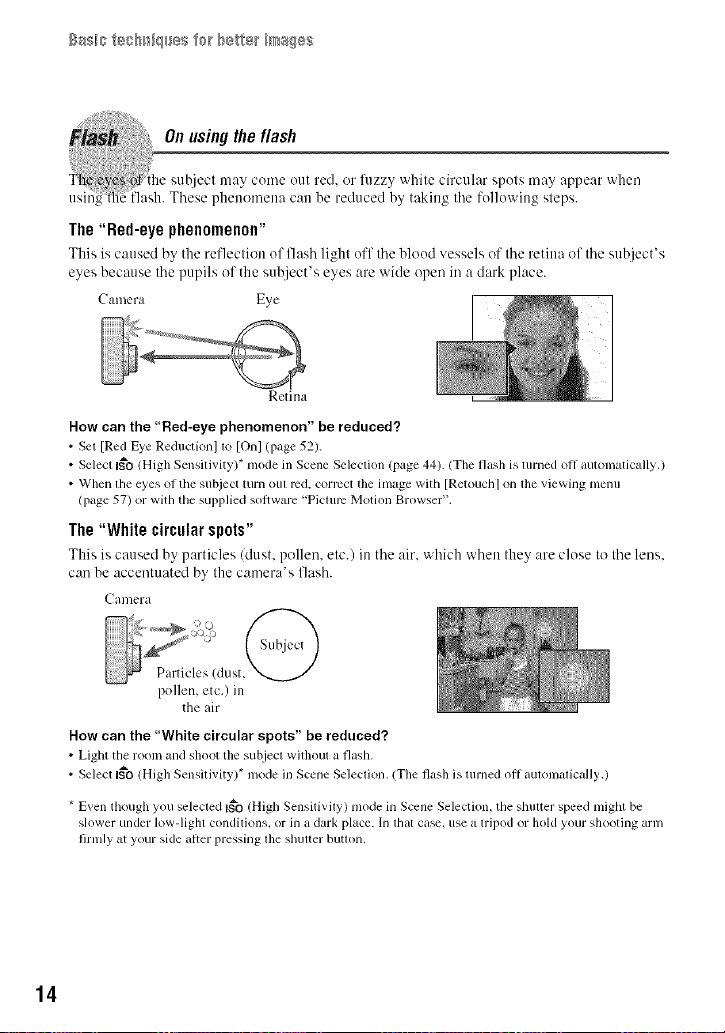
The"Red-eye phenomenon"
This is caused by the reflection of flash |ight off the Nood vesse|s of the retina of the subject's
eyes because the pupils of the subject's eyes are _ide open in a dark place.
Camera Eye
Retina
How can the "Red-eye phenomenon" be reduced?
• Set [Red Eye Reductkml lo [Onl (page 52)
• Select I_'O (High Sensitivity)* mode in Scene Selection (page 44) (The flash is turned oil automatically.)
• When file eyes of the subject turn oul red. correct the image with [Retouch] on lhe viewing menu
(page 57) or with the supplied sol}ware "Piclurc Motion Browser"
The"White circularspots"
This is caused by partMes (dust, pollen, etc.) in the air. which when they are close to the lens.
can be accentuated by the camera's flash.
Camera
poUen, etc.) in
the air
How can the "White circular spots" be reduced?
• Light tile room mid shoot the subject without a flash
• Select I_'O (High Sensitivity)* mode in Scene Selection (The flash is turned oil aulonlulically )
* Even though you selected I_o (High Sensitivily) mode in Scene Selection. the shulter speed might be
slower under low-light condilions, or in a dark place In lhal ca_, use a lripod or hold your shooting arm
firnlly at your side alter pressing lhe shulter butlon
14
Identifyingparts
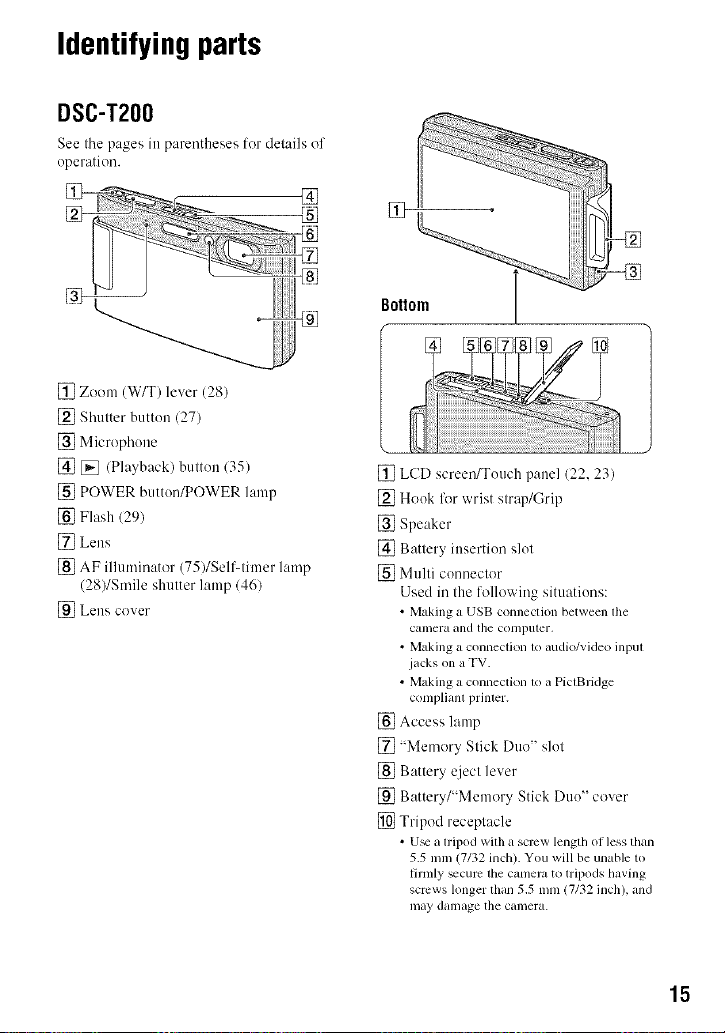
DSC-T200
See the pages in parentheses lor details of
operation.
[] Zoom (W/T) lever (28)
[] Shutter button (27)
[] Microphone
[] D_ (Playback) button (35)
[] POWER button/POWER lamp
[] Flash 129)
[] Lens
[] AF illuminator (75)/Self-timer lamp
(28)/Smile shutter lamp 1461
[_1 Lens cover
[] LCD screen/Touch panel (22, 23)
[] Hook fllr wrist strap/Grip
[] Speaker
[] Battery insertion slot
[] Multi connector
Used in the following situations:
• Making a USB conneclion between lhe
camera and the colnputer.
• Making a connection 1o audio/video inpul
jacks on a TV.
• Making a connection 1o a PictBridge
complianl prinler.
[] Access lamp
[] "Memory Stick Duo" slot
[] Battery q}ect lever
[] Battery/"Memory Stick Duo" cover
[] Tripod receptacle
• U_ a tripod with a screw length of less than
5.5 mm (7132 inch). You will be unable to
firmly _cum the camera to tripods having
screws longer than 5.5 mm 17132 inch), and
may damage the camera.
15
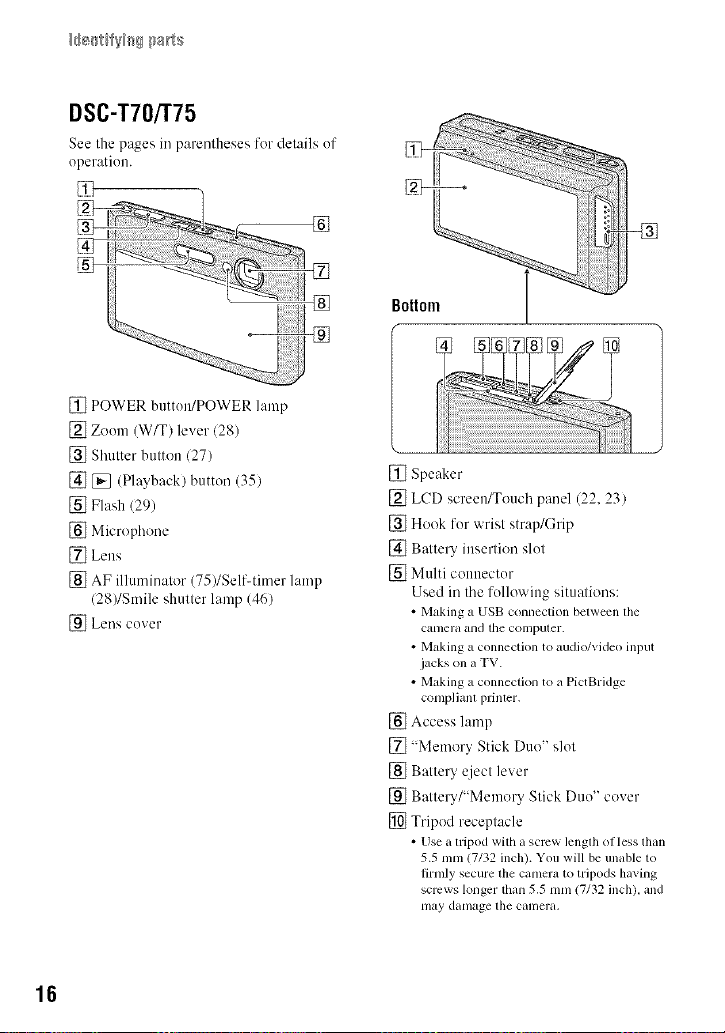
DSC-T70[r75
See the pages in pm'entheses for details of
operation.
[] POWER button/POWER lamp
[] Zoom (W/T) lever 128)
[] Shutter button (27)
[] [_ (Playbackl button (35)
[] Flash 129)
[] Microphone
[] Lens
[] AF illuminator (751/SellLtimer lamp
/28)/Smile shutter lamp (46)
[_ Lens cover
[] Speaker
[] LCD screen/Touch panel (22, 23)
[] Hook for wrist strap/Grip
[] Battery insertion slot
[] Multi connector
Used in the following situalions:
• Making a USB connection betweenthe
camera and tile COlnputer.
• Making a connection to audio/video input
jacks on a TV.
• Making a connection to a PictBridge
complianl prinler.
[] Access lamp
[] "Memory Stick Duo" slot
[] Battery eject lever
[] Battery/"Memory Stick Duo" cover
[] Tripod receptacle
• Use a tripod with a screw lenglh of less than
5.5 mm (7/32 inch). Youwill be unable to
firnflysecure the camen_to tripods having
screws longer than5.5 mm (7132inch), and
may damage file canlera,
16
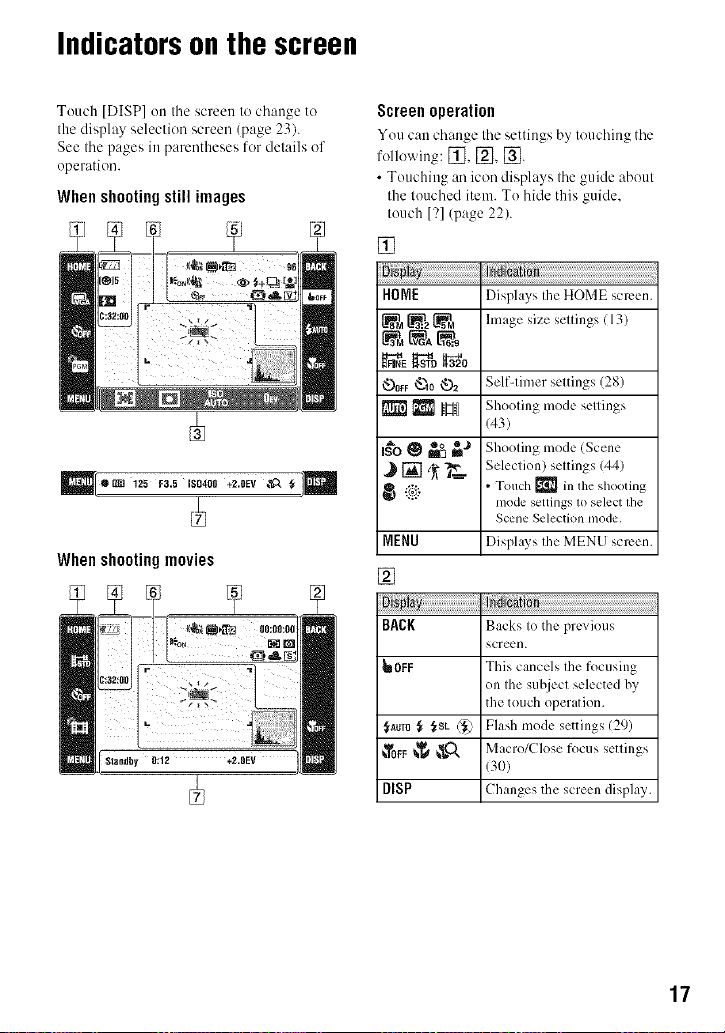
Indicators onthe screen
Touch [DISP] on the screen to change to
the display selection screen (page 23).
See the pages in parentheses for details of
operation.
Whenshootingstill images
_[*_ 12_Fa._Iso4oo+_.0Ev,_a_]Q
When shooting movies
÷
_m
Screen operation
You c:m change tile settings by touching the
following: [_, [_, [_.
• Touching an icon displays the guide about
the touched item. To hide this guide,
touch [?1(page 22).
[]
HOME
.f_ _o _o
_OFF'_o _2
I_'o0 "° _J
MENU
Displays Ihe HOME screen.
hnage size sellings (13)
Self-timer settings (28)
Shooting mode settings
(43)
Shooting mode (Scene
m_
Selection) settings (44)
• Touch [] in the shooting
mode settings to select lhe
Scene Selection mode.
Displays the MENU screen.
[]
Ind
BACK
_OFF
._Auro_ f_sL('_
DISP
Backs to the previous
screen.
This cancels the focusing
on the subject selected by
the touch operation.
Flash mode settings (29)
Macro/Close focus settings
(3O)
Changes the scrc*-'ndisplay.
17
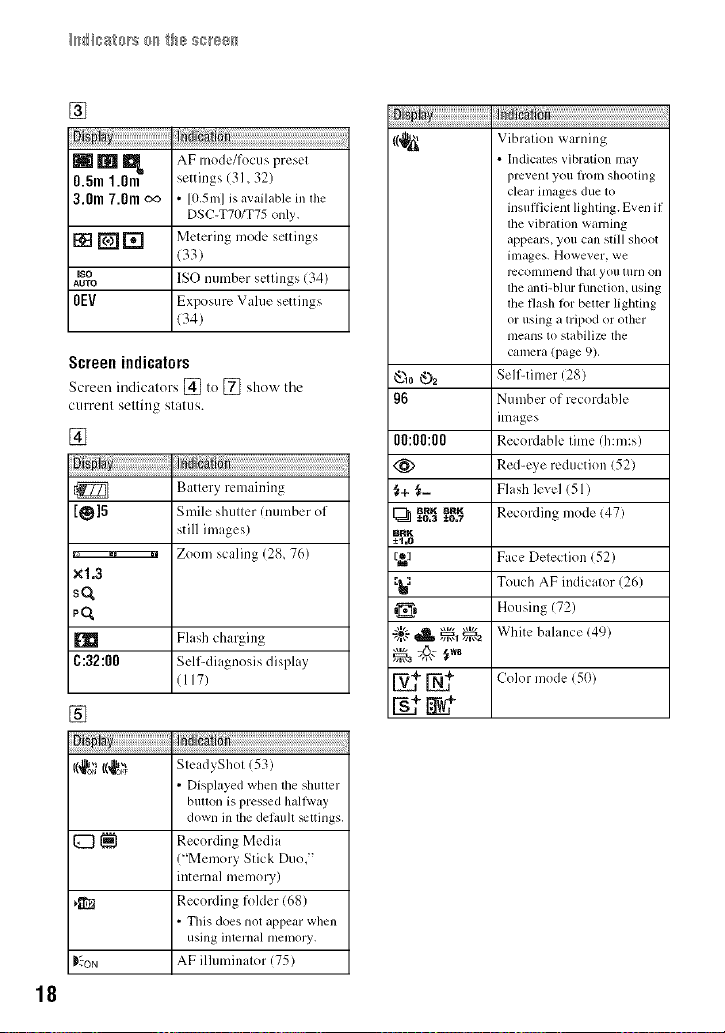
[]
ndication ..................................................................
mm_
0.5m 1.Ore
3.0m 7.0m oo
[][][]
Iso
AUTO
0EV
AF mode/focus preset
settings (31,32)
• [0,5m] is available in file
DSC-TT0/T75 only,
Metering mode settings
(33)
ISO number settings (34)
Exposure Value settings
(34)
Screenindicators
Screen indicators [] to [] sho_x the
current setting status.
[]
_ndicati n
Battery remaining
[O]5
×1.3
Smile shutter/number of
still images)
Zoom scaling (28, 76)
sO,
pO,
Flash charging
C:32:00 Self-diagnosis display
1117)
[]
_i_iii__ji@!i!i!i!i!i!i!i!i!i!i!i!i!i!i!i!i!i!i!i!i!i!i!i!i!i!i!i!i!i!i!i!i
g6
00:00:00
;f+ {'--
BRK _RK
[_ ±0.3 _0.7
BRK
±t,0
[_] Face Deleclion/52)
_1 Touch AF indicalor 126)
=_ Housing 172
,_,_. .....,,_,,1,,,r-2 White bahmce (49)
_ndication
Vibration _ arning
• Indicates vibration may
prevent you fiom shooting
clear images due to
insufficient lighting. Even if
tile vibration warning
appears, you can slill shoot
illlages. However, we
rccolnnlend lhal you [urll Oll
the anti-blur hlnction, using
the flash lor better lighting
or using a tripod or other
nleans to stabili/c tile
camera (page 9).
Self-timer (28)
Number of recordable
images
Recordable time/h:m:s)
Red-c) e reduction (52)
Flash level (51 )
Recording mode (47)
Coh, 50)
18
SteadyShot (53)
• Displayed when the shuttcr
button is pressed hall\ray
down ill tile delault _ttings,
Recording Media
('Memory Stick Duo,"
internal memory)
Recording [okler (68)
• This does not appear when
using internal nlemory.
_ON
AF ilhmdnator 175)

I_isste_s e_ the ser88_
[]
AF rangefinderframe (31)
r
Low battery warning (117)
Histogram (24)
[]
Indication
AE/AF lock (27)
RN
125
F3.5
IS0400
+2.0EV
{gSL @
Standby
REC
0:12
NR slow shutter
• When the shutter speed
drops below a certain speed
in low light conditions, the
NR (Noise Reduction) slow
shutlcr fllnction is activated
automatically to reduce the
picturc noise.
Shutter speed
Apmlure value
ISO number (34)
Exposure Vahle 134)
Macro/Close l_)cus (30)
• When [Display Setupl is set
1o[Image Only], lhe currcnl
settings arc displayed,
Flash mode (29)
• When [Display Setupl is set
1o[Image Onlyl, lhe currcnl
setlings am displayed.
Standby a movie/Recording
a movie
Recording time (re:s)
lg
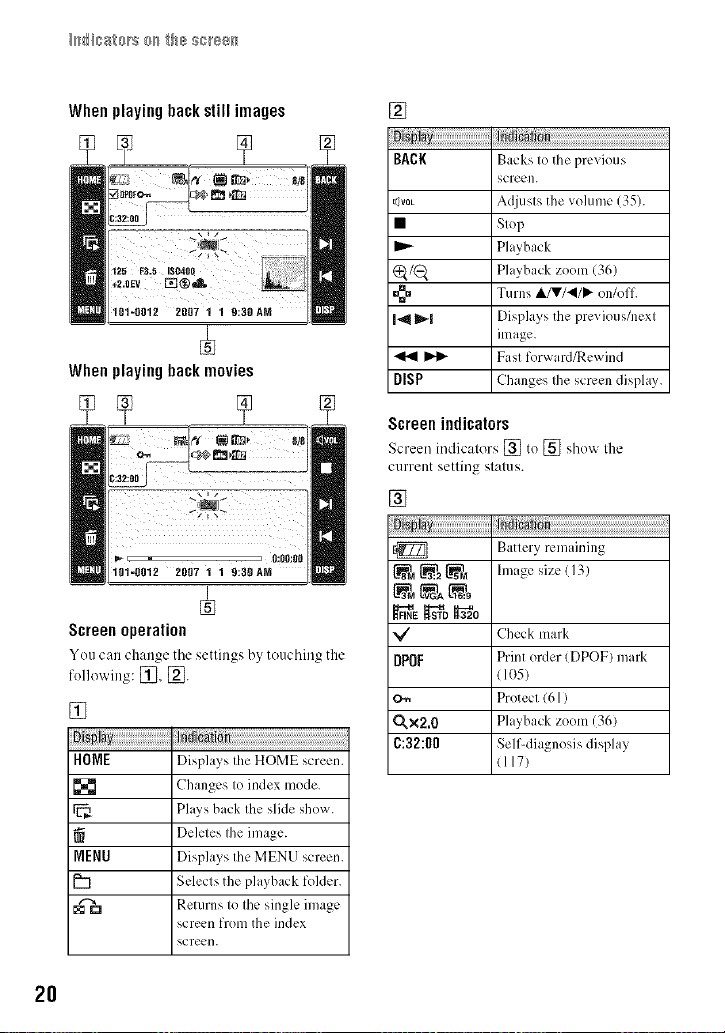
Whenplayingbackstillimages
[]
When playing back movies
÷
101-8012 2G07 1 1 9:3OAM
Screen operation
You can change tile settings by touching the
following: [_, [_3.
[]
ii iiiiiiiiiiiiiiiiiiiiiiiiiiiiiii_
HOME
MENU
b
Displays the HOME screen.
Changes to index mode.
Plays back the slide show.
Deletes the image.
Displays the MENU screen.
Selects the playback folder.
Returns to the single image
screen from the index
screen.
BACK
t_VOL
,,>
141_|
4141I_
DISP
Screen indicators
Screen indicators [] to [] sho_x the
current setting status.
Backs to the previous
screen.
Adjusts the volume (35).
Stop
Playback
Playback zoom (36)
Turns A/T/_I/I,- (711/o11.
Displays the prcxious/next
image.
Fast forward/Rewind
Changes the screen disphLv.
[]
@22_
DPOF
O._ Protect (61)
Q.X2,O Playback zoom(36)
C:32:00 Self-diagnosis display
Battery remaining
hnage size (13)
Check mark
Print order (DPOF) mark
(105)
(117)
2O
I_isste_s e_ the ser88_
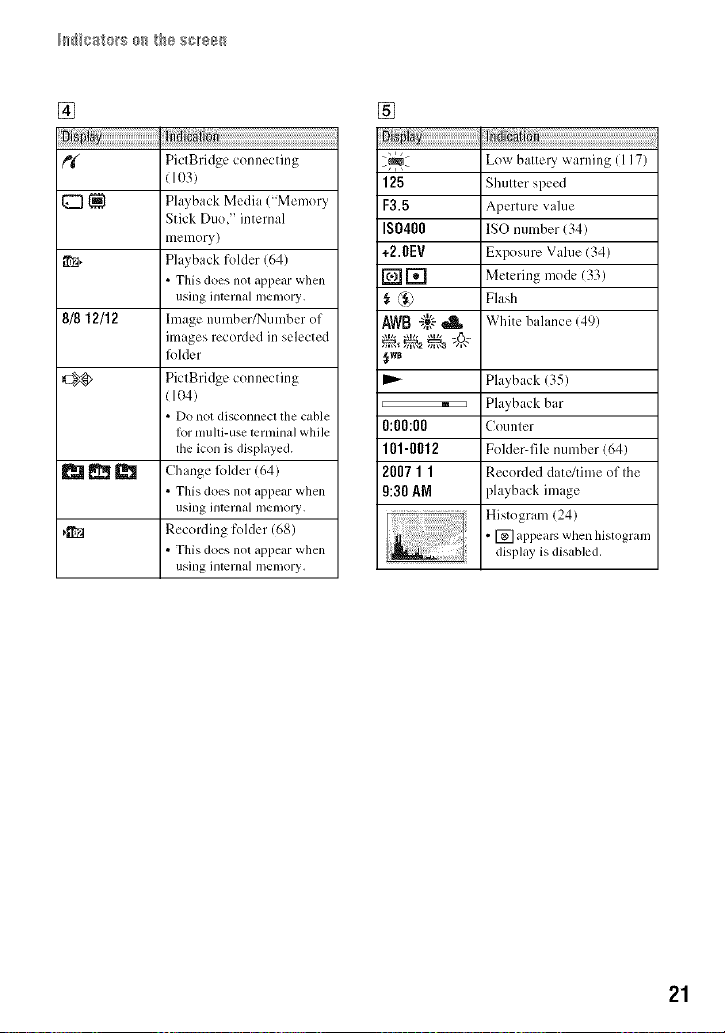
[]
q:3_
8/8 12/12
o_
PictBridge connecting
(103)
Playback Media ("Memory
Stick Duo," internal
memory)
Playback folder (64)
• This does not appear when
using internal memory,
hnage number/Number of
images recorded in selected
lblder
PictBridge connecting
(104)
• Do not disconnect the cable
R)rmulti-use terminal while
file icon is displayed.
Change lkdder (64)
• This does not appear when
using internal memory,
Recording folder (68)
• This does not appear when
using internal memory,
[]
Ind
Lm_ batte U warning (117)
125
F3.5
IS0400
+2.0EV
_D
AW8"g'-,_
{_wB
,_ , Playback bar
0:00:00 Counter
101-0012 Folder-file number (64)
2007 1 1 Recorded date/time of the
9:30 _,N playback image
Shutter speed
Aperture value
ISO number (34)
Exposure Vahle (34)
Metering mode (33)
Flash
White balance (49)
Playback (35)
Histogram (24)
• [] appears when histogram
display is disabled.
21
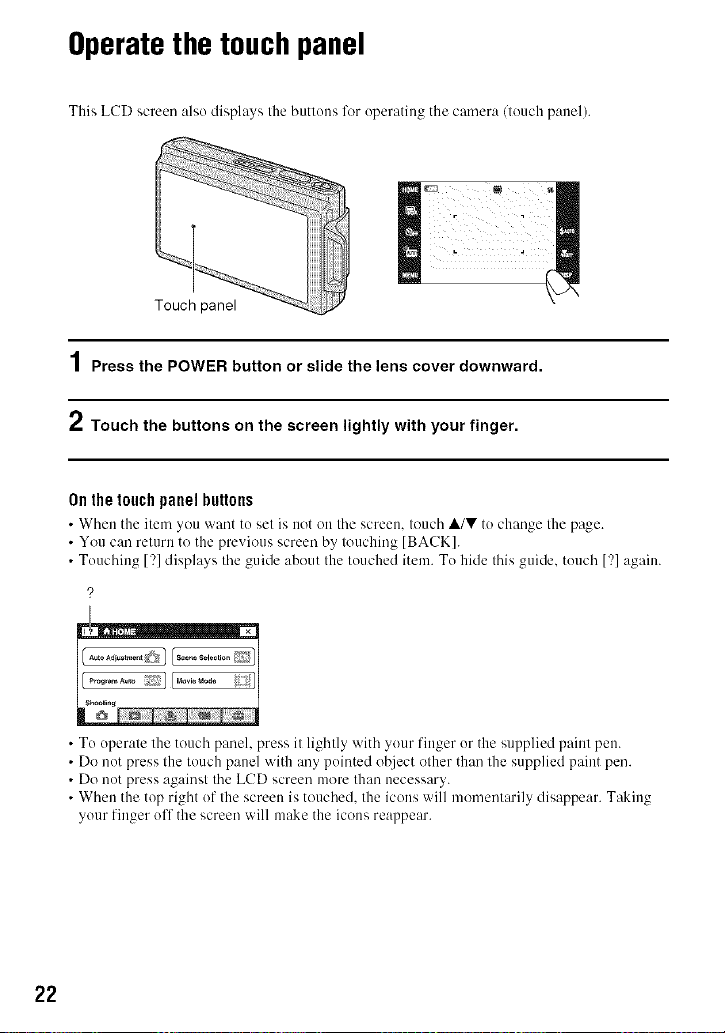
Operatethe touchpanel
This LCD screen also displays Ihe butlons for operating the camera/louch panel).
1Press the POWER button or slide the lens cover downward.
2 Touch the buttons on the screen lightly with your finger.
0n the touch panel buttons
• When the item you vxant to set is oot oo the screen, touch A/V to change the page.
• You can return to the previous screen by touching [BACK].
• Touching [?] displays the guide about the touched item. To hide this guide, touch [?] again.
?
• To operate the touch panel, press it lightly with your finger or the supplied paint pen.
• Do not press the touch panel with any pointed object other than the supplied paint pen.
• Do not press against the LCD screen more than necessary.
• When the top right of the screen is touched, the icons will momentarily disappear. Taking
your finger off the screen will make the icons reappear.
22
Changingthe screendisplay
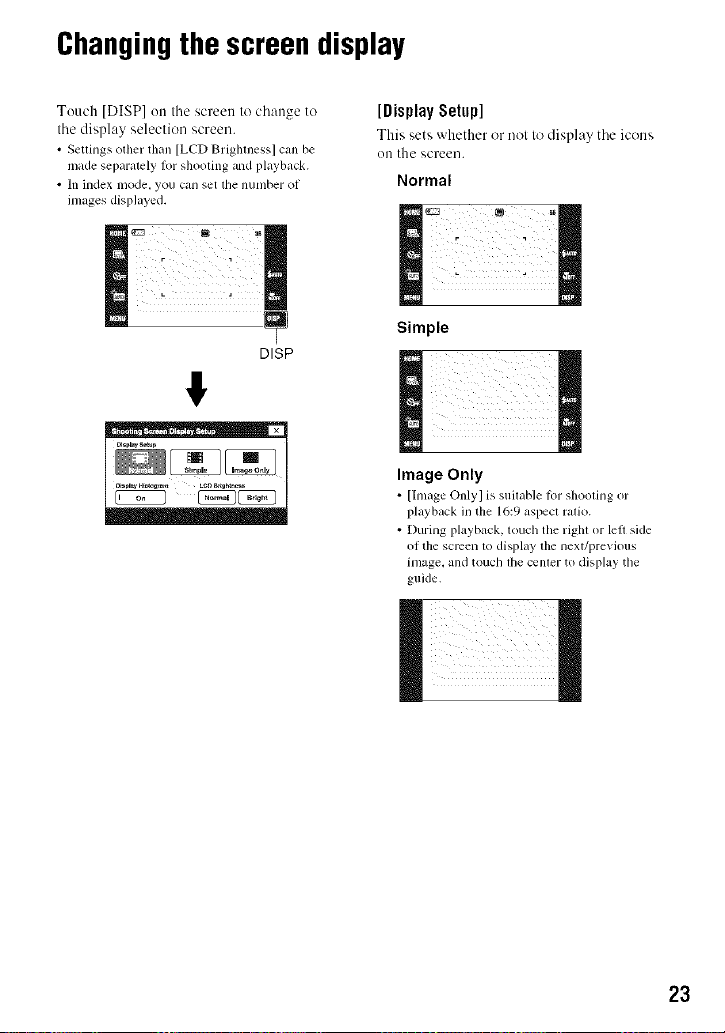
Touch [DISP] on the screen to change to
tile display selection screen.
• Settings <)tiler tllan [LCD Briglaness] call be
made separately klr shooling and playback.
• Ill index mode, yo/i call set tile n/inlber of
images displayed.
DISP
#
[Display Setup]
This sets whether or not 1odisplay tile icons
on the screen.
Normal
Simple
Image Only
• [Image Only] is suitable tor sllooting or
playback in the 16:9 aspecl ralio.
• During playback, touch the right or left side
of the screen to display the next/prevk)us
inlage, and touch llle cenler to display the
guide,
23
[LCDBrightness]
This sets the backlight brightness.
• When viewing images in bright outside light if
[LCD Brighmess] is set to [Normal], rcsel 1o
[Brightl.
However. the baltery power may decrease lhster
under such conddion,
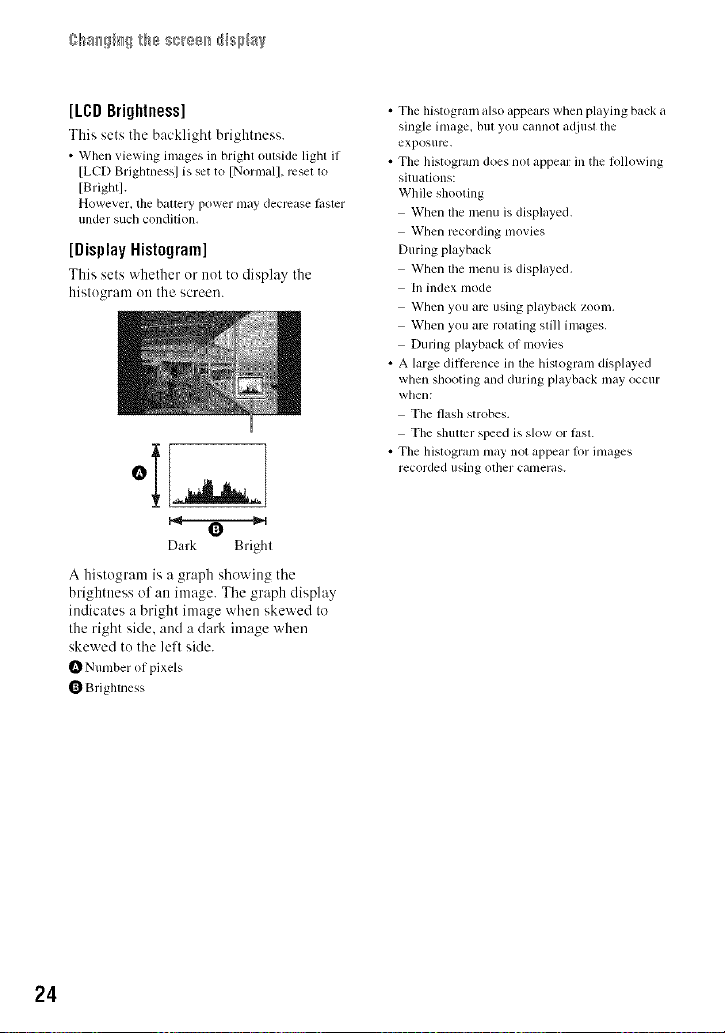
[Display Histogram]
This sets v_hether or not to display the
histogram on the screen.
[)ark Bright
A histogram is a graph showing the
brightness of an image. The graph display
indicates a bright image when skewed to
the right side, and a dark image when
skewed to the left side.
I_ N umber of pixels
Brighmess
• The histogram also appears when playing back a
single inlage, bill you cannot adjusl lhe
exposure,
• The histogram does nol appeal: in the lbllowing
situalkms:
While shooting
When lhe menu is displayed.
When recording movies
During playback
When the menu is displayed.
In index mode
When you am using playback zoom.
When you arc rolating still ilnages,
During playbilck of movies
• A large diRcmnce in lhe histogram displayed
when shooting and during playback may occur
when:
The flash strobes.
The shutter speed is slow or lZlSl.
• The histogram may not appeal lot inmges
recorded using other canleras.
24
Usingthe internalmemory
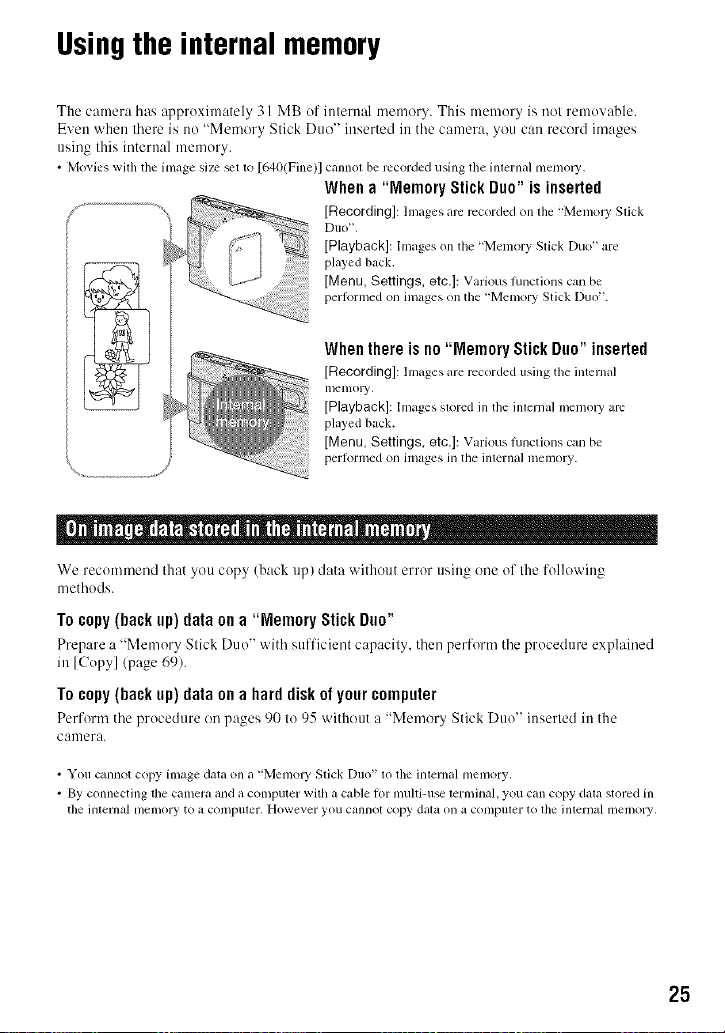
The camera has approximately 31 MB ef internal memory. This memery is not removable.
Even when there is no "Memory Stick Duo" inserted intile camera, you can record images
using this internal memory.
• Movies wilh the image size _etto [640(Fine)] cannolbe recorded using file inlernal memoU.
Whena "Memory StickDuo"isinserted
[Recording]: hnages are recorded on lhe ffVlemoJT Slick
DIIO _,
[Playback]: Images on the "Memory Slick Duo" are
played back.
[Menu, Settings, etc,]: Various hlnctions call be
perlormed on inlages on the "Memory Stick Duo".
Whenthereis no "Memory Stick Duo"inserted
[Recording]: hnages are recorded using the internal
lllelllOly,
[Playback]: Images stored in the internal memoly are
played back.
[Menu, Settings, etc.]: Various ILinctions can be
perJornled Oll images ill the inlelnaJ illelilory.
We recommend that yott copy (back up) data without error using one of the following
tnetheds.
Tocopy(backup)data ona "Memory StickDuo"
Prepare a "Memory Stick Duo" 'aith sufficient capacity, then perform tile procedure explained
in [Copy](page 69).
To copy (hackup)data on a hard disk of your computer
Perform tile procedure on pages 90 to 95 without a "Memory Stick Duo" inserted in tile
camera.
• You cannot copy image data on a "Memoly Slick Duo" lo the inlernal menlory.
• By connecting the Calllera and a COli/puler with a cable for illulli-tlse lelli/illab you can copy dala stored in
the inlel_nal l/leli/Oly to a COli/ptuer. However you cannot copy dala on _t COl/lptuer to lh¢ inlernal ii/¢1i/ory.
25
Shootingimageseasily(AutoAdjustment
mode)
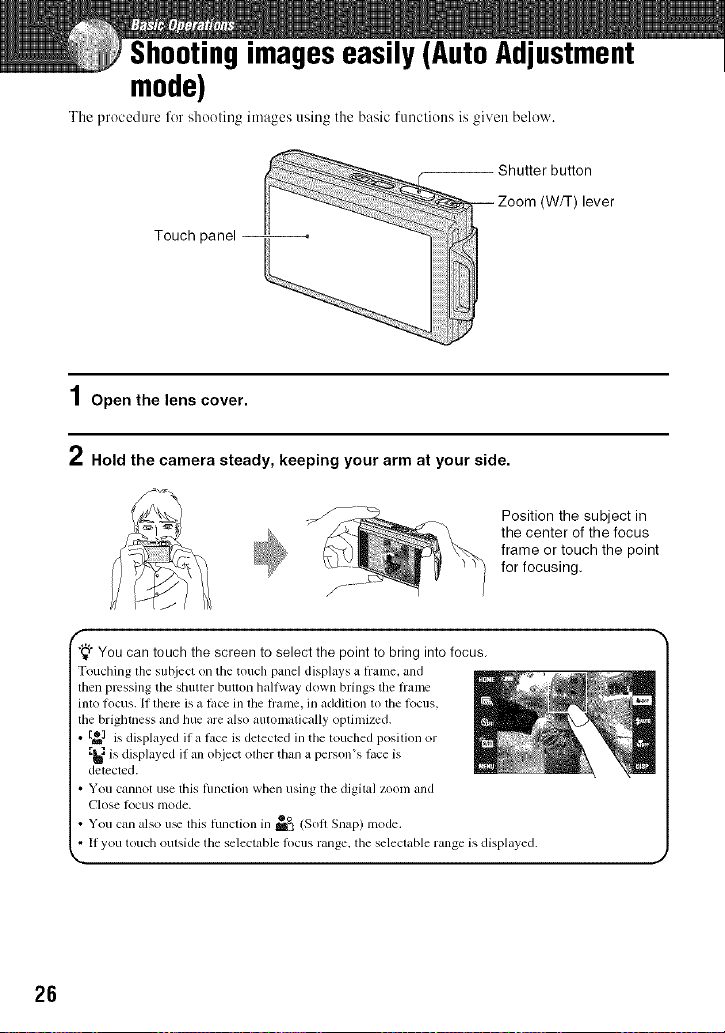
The procedure for shooting images using the basic funcliolls is given below.
Touch panel
1Open the lens cover.
2 Hold the camera steady, keeping your arm at your side.
Position the subject in
the center of the focus
frame or touch the point
for focusing.
f
"_"You can touch the screen to select the point to bring into focus.
Touching the subject on the touch panel displays a hame, and
then pressing tile shutter button halfway down brings tile flame
into focus. II there is a lace ill tile h'allle, ill addition to tile l_>cus.
the brightness and hue are also automatically optimized.
o or
[_1 is displayed ifa lace is detected ill the touched position
E_1is displayed il all object olher than a person's lace is
detecled.
• You cannot use this ftlllclion when using the digilal zoom and
(_'lose locus lnode.
• You can al_o tl_ his lunc Ion m m'k (Soil Snap) mode.
• I1 you touch outside the selectable locus range, tile selectable range is displayed.
s " @o
blever
26
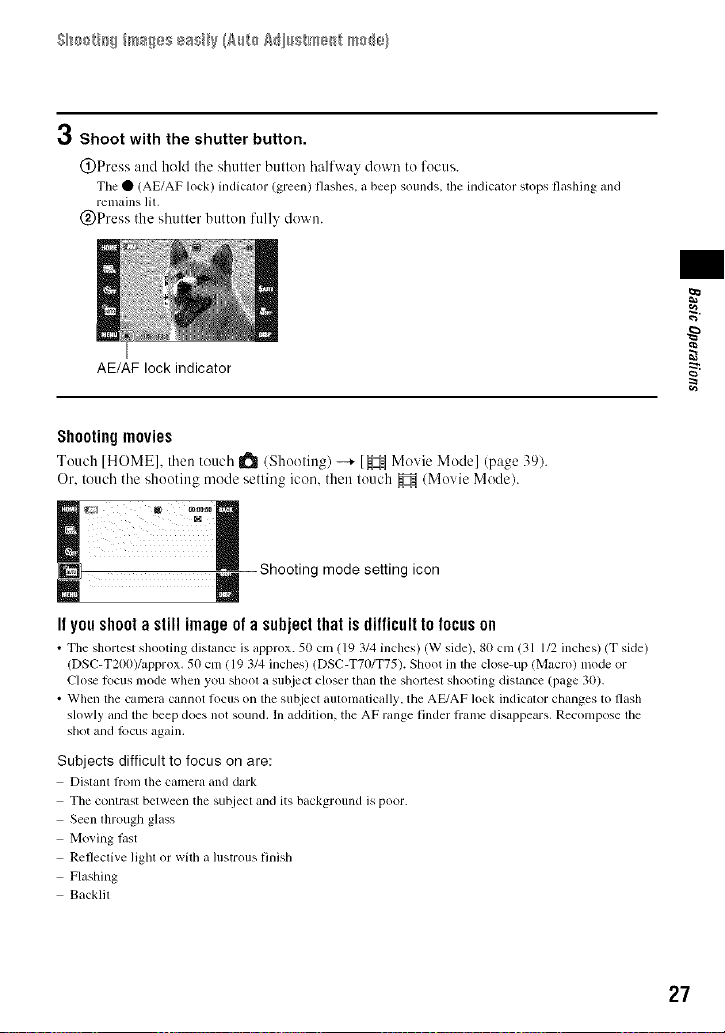
3 Shoot with the shutter button.
(_)Press and hekl Ibe sb/ltler bullen balfway down to focus.
The • (AE/AF lock) indicator (green) flashes, abeep sounds, the indicator stops flashing and
rell'4tins lit.
(&)Press the sbuller button folly down.
AE/AF lock indicator
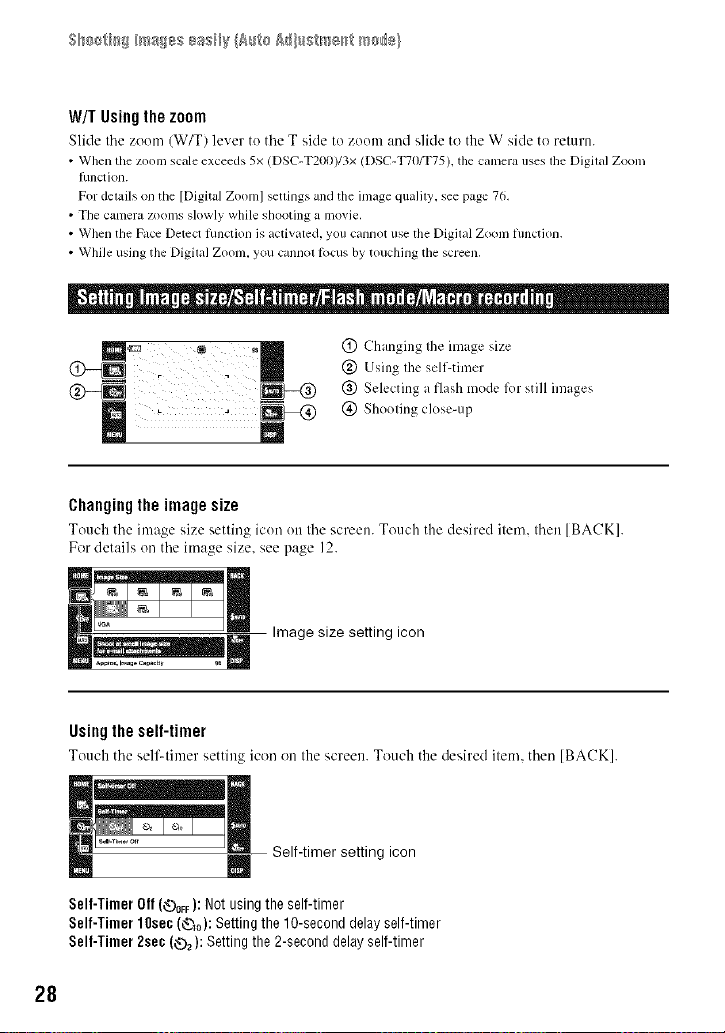
Shooting movies
Touch [HOME], then teucb I_ (Shoeting) --+ [_ZH Movie Model (page 39).
Or. toucb tbe shooting mode setting icon. then touch _ (Movie Mode).
Shooting mode setting icon
It yon shoot a still image of a subject that is difficult to focus on
• The shortest shooting distance is approx. 50 cm (19 3/4 inches) (W side). 80 cm (31 1/2 inches) (T side)
(DSC-T200)/approx. 50 cm ( 19 3/4 inches) (DSC-T70/T75). Shoot in the dose-up (Macro) mode or
Close locus mode when you shool a subject closer than the sholtesl shooting distance (page 30).
• When the camera cannot locus on the subject automalically, the AE/AF lock indicalor changes to flash
slowly and the beep does not sound. In addition, the AF range finder lrame disappears. Recompose lhe
shot and focus again.
Subjects difficult to focus on are:
Dislanl fi'om the camera and dark
The contrast belween the su_iect and its background is poor.
Seen lhrough glass
Moving last
Refleclive light or with a hIstFous finish
Flashing
Backlit
_aa
27
W/TUsingthezoom
Slide tile zoom (W/T) lever to tile T side to zoom and slide to tile W side to return.
• When the zoom scale exceeds 5x (DSC-T200)/3x (DSC-T70/T75), the canlera uses lhe Digilal Zoom
Ihnction.
For details on the [Digital Zoom] settings and the image qualily, see page 76,
• The canleru zoon/s slowly while shooting a Inovie,
• When the Face Detect lunction is activated, you cannot use the Digilal Zoonl fimction.
• While using the Digital Zoom, you cannol R_cus by touching the screen,
(_) Changing the image size
@ Using the self-timer
@ Selecting a flash mode lbr still images
(_) Shooting close-up
Changingthe imagesize
Touch tile image size setting icon on tile screen. Totlch tile desired item, then [BACK].
For details on tile image size, see page 12.
Image size setting icon
Usingtheself-timer
To/lch tile self-tinier setting icon on tile screen. Touch the desired item, then [BACK].
Self-timer setting icon
Self-Timer Olf(_OFF):Not usingthe self-timer
Self-Timer 10se¢(_o): Settingthe 1O-seconddelayself-timer
Self-Timer 2sec(_2): Setting the2-seconddelayself-timer
28
Press tile shutter button, tile selfqimer lamp flashes, and a beep sounds lmtil file shutter
operates.
To cancel, touch _V)0FF"
• U_ die 2-second delay self-tinier to prevent bhu" ol an image made by the shaking ol the camera when
pressing lhe shutler bulton.
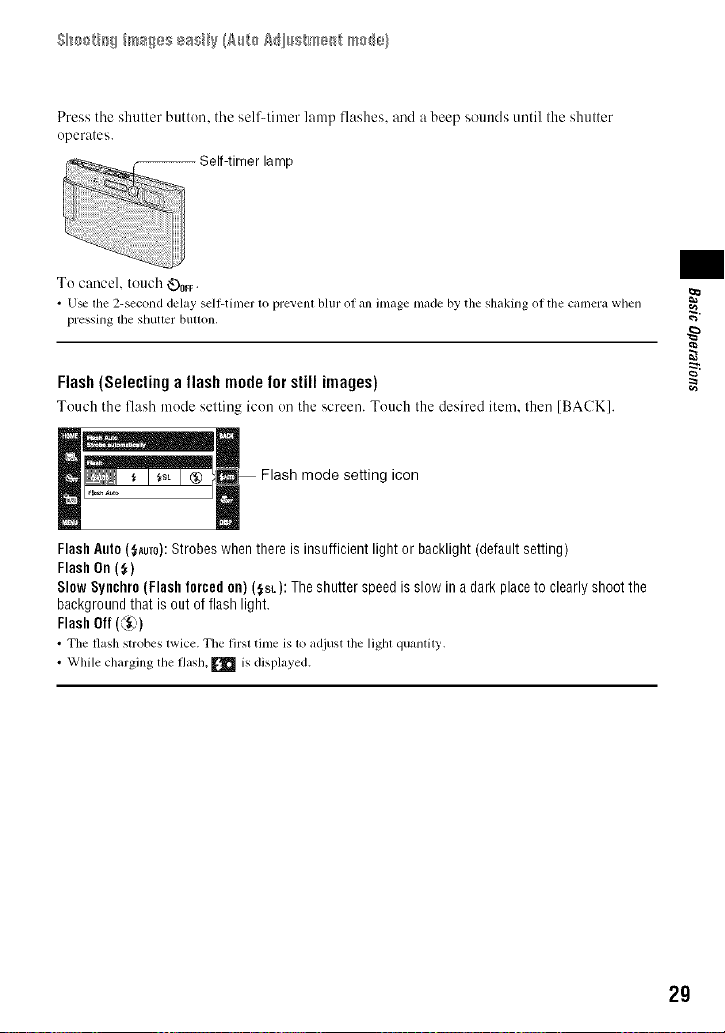
Flash (Selecting a flash mode for still images)
Touch tile flash m( de ellin_, icon on tile screen. Touch tile desired item. then [BACK].
FlashAuto($Aum):Strobeswhenthereis insufficient light or backlight (defaultsetting)
FlashOn($)
Slow Syuchro (Flashforced on) ($st): The shutterspeedis slow in adark placeto clearlyshootthe
backgroundthat is out offlash light.
FlashOff(C'_)
• The flash strobes twice.Tile lirsl time is to adjust the lighl quantity.
• While charging the flash, _ is displayed.
) s L, ,
Flash mode setting icon
2g
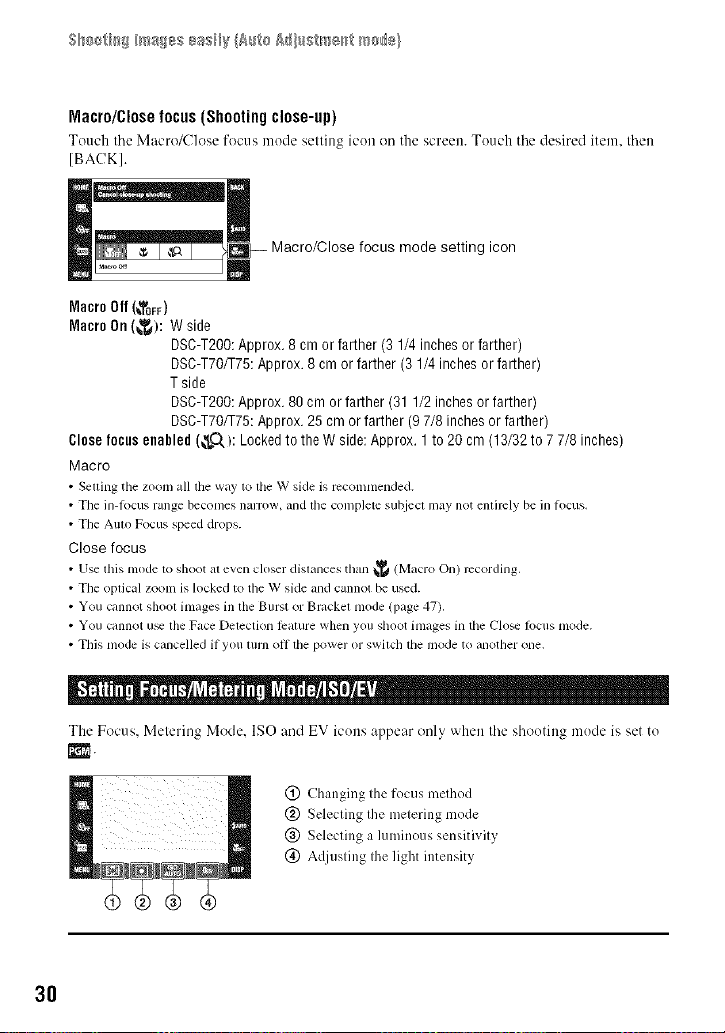
Macro/Close focus (Shooting close-up)
Touch tile Macro/Close focus mode setting icon on the screen. Touch tile desired item then
[BACK].
Macro/Close focus mode setting icon
Macro Off (_OFF)
Macro On(_): W side
DSC-T200:Approx.8 cm or farther(3 1/4inchesor farther)
DSC-T70fT75:Approx. 8cm or farther (3 1/4 inchesorfarther)
Tside
DSO-T200:Approx.80 cm orfarther (31 1/2 inchesor farther)
DSC-T70/T75:Approx. 25cm or farther (97/8 inchesor farther)
Closefocusenabled(_Q,): Lockedto the W side:Approx. 1 to 20 cm (13/32to 7 7/8 inches
Macro
• Setting tile zoomall tile way to tileW skle is rccomnlended.
• Tile in-locus range becomes nanx)w,and the completesut_ieclmay notentirely be in h)cus.
• The Auto Focus speed drops.
Close focus
• Use this mode 1o shoot al even closer dislallces thall _ (Macro On) recording.
• Tile oplical zo(nn is locked to tile W sMe and cannot be used.
• You cannot shoot images ill tile Burst or Bruckel mode (page 47).
• You cnnnot u_ file Face Delection lizature when you shoot images in tile Clo_ focus mode.
• This mode is cancelled if you mrn oil lhe power or swilch die mode to another one.
The Focus. Metering Mode. ISO and EV icons appear only when the shooting mode is set to
rl'¢_.
(_) Changing the focus method
@ Selecting the metering mode
@ Selecting a luminous sensitivity
(_) Adjusting the light intensity
30
 Loading...