

Sony DSC-S700, DSC-S650 Owner’s Manual

SON'
Cuber-shot
Digital Still Camera
C&mara fotografia digital
Instruction Manual
Manual de instrucciones
DSC-$650/$700
_EMORY5TI[K
For details on the advanced operations, please access
"Cybev-shef Handbook" contained on the supplied
.. Para obtener m_ts informaci6n acerca de las operaciones
CD-ROM via a computer.
avanzadas, consulte en un ordenador la "Gu[a pt#ctica
de Cyber-shot" que se incluye en el CD-ROM
suministrado.
Operating Instructions
Before operating the unit, please read this manual thoroughly, mid retain it for futttre reference.
Manual de instrucciones
Antes de utilizar la tmidod, lea detenidamente este m_alual y cons6rvelo para consultarlo ell el futttro.
© 2007 Sony Corporation 2-897-956-62(1)
Owner's Record
Tile model and seri_d numbers are located on tile
botlom. Record the serial nuinber in file spao:
plm ided below. Refer lo fllese numbers whene_ er
you call upon your Sony dealer regarding this
pl'oducl.
Model No. DSC-$650/$700
Serial No.
D
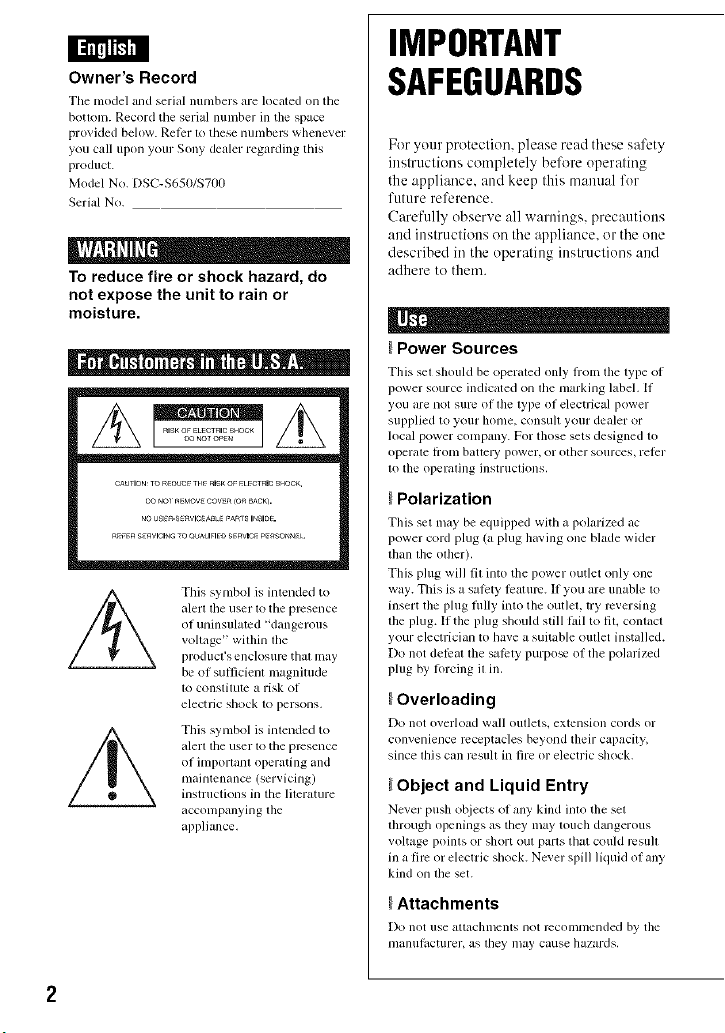
To reduce fire or shock hazard, do
not expose the unit to rain or
moisture.
IMPORTANT
SAFEGUARDS
For your protection, please read these safety
instructions completely before uperating
the appliance, and keep this manual fur
future reference.
Carefully observe all wan[ings, precautiuus
and instructions on the appliance, or the one
described in the operating instructions and
adhere to them.
I Jl|" I I" !
CAUTION¸TOR_a_CF TI_ RISKOr ELECmlC SHOCK
NOUS_Ta-S_VlC_A_ _ PARTSIN,_10e.
This symbol is intended to
alerl lhe user to tile presence
of uninsulatcd "dangerous
voltage" within the
prodllc['s enclosure thai may
be of sulficienl magnilude
1oconslilutc a risk of
electric shock 1o persons.
This symbol is intended to
alerl tile user to the pi'esence
of imporlant operating and
maintenance (servicing)
instructions in tile lilerature
acconlpanying lhe
appliance.
Power Sources
This sel should be operaled only lrolu tile lype oI
power source indicated on lhe marking label, It
you are llOt sure oI IJle type oI eleclrical power
siipplied Io yollr holne, consulI yollr dealer or
local power company. For those sets designed lo
operate _lOlll battery power, or olher sources, reler
to tile operaling instructions.
Polarization
This set inay be equipped with a polarized ac
power cord plug (a plug having one blade wider
lhan lhe illher),
This plug will fil into the power outlet only one
way. This is a salety leature. If you are unable to
insert tile plug lully into the outlel, try' reversing
lhe plug. If tile plug should still Atil to fit, conlact
your electrician to have a suitable outlet installed.
Do hilt del_al file salcly purpo_ ol the p<)larized
plug by' R)lcing it ill,
Overloading
Do not o's'elload w_lll ()lille[s, eXtellSion cords or
convenience receptacles beyond their capacity,
since lhis can iesllll hi fire or electric shock.
_Object and Liquid Entry
Never push ot_iects of any kind into the set
through openings as they may touch dangerous
voltage poinls or shorI ouI paFls that COIIld restl]I
ill a tire or elecu'ic shock. Never spill ]k]u]d oI any
kind on tile set.
Attachments
[)o llO[ use _at£tC]llllelltS lIO[ recollll/lellded by the
l/lanlllacturer, as lhey may cause hazards,
Cleaning
Unplug tile set h'om tile wall outlet before
cleaning or polishing it. Do not use liquid cleaners
or aerosol cleaners. U_ a cloth lightly dampened
with "_valer |(11" clei/nillg die exterior of tile set.
long periods of time. unplug it ftom tile wall
outlet and disconnect file antenna or cable '4yslellL
This will prevent damage to file set due to
lighming and power-line surges.
, , J
Water and Moisture
Do not /ise povvel'-lhle operated sets llear water
lor example, near a badmlb, washbo,,vl, kitcfien
sink. or laundry tub. in a wet basemenl, or nero a
swhnndng pool, etc.
Power-Cord Protection
Roule the power cord so tllat it is llOIlikely to be
walked on or pinched by items placed upon or
againsl them, paying particular attenlion 1o lhe
plugs, receptacles, and the poim where the cord
exits from tile appliance.
Accessories
Do Hot place tile set OH all /lllSlable ctlr[, stand,
tripod, brackeL or lane. Tile _t may lidl, causing
serious injury to a child or an adult, and serious
danlage to tile set. Use only a carl stand, lripod.
bracket, or table recommended by the
inanllfitclurer,
Ventilation
The slots and openings in the cubinet are pro_ ided
lor necessary ventilation. To ensure reliable
operalion of tile sel, and 1(5 protect il fi'olll
overheating, these slots and openings illUS[never
be blocked or covered.
Never cover file slots and openings with a cloth
or oilier nlatcrials.
Never block the slols and openings by placing
tile set on a bed, solz,, trig, or otller sinlilar
surl_lce,
Never place the set in a confined space, such as a
bookcase, or buill-in cabinel, unless proper
ventilation is provided.
Do not place tile set near or over a radiator or
Ileal mgisler, (51:where il is exposed 1(5direct
sunlighl.
Lightning
For added protection lor this set during a lighming
storm. (51:when il is left unattended and unused ftsr
Damage Requiring Service
Unplug tile _t ft'om tile wall outlet and rcli:r
servicing to qualified service personnel under tile
tollowing conditions:
When tile power cord (51"plug is damaged or
Dayed.
If liquid has been spilled or objects have hdlen
hllo the sel,
Iflfie set has been exposed to rain or waler.
Iflhe sel has been subjecl lo excessive shock by
being dropped, or the cabinet has been damaged.
If lhe set does not opelale normally when
fdhswing the operaling instructions. Adjust only
lhose controls that am specifed in file operaling
instructions. Improper a(liuslmenl of olher
conlrols may result in damage and will often
require exlensive work by a qualified lecbnician
lo rcslore tile sel 1onormal operalion,
When tile sel exhibits a distinct change ill
perlormance this indicales a need lot selwice.
Servicing
Do not attempt to service tile set yoursell as
opening or rclno_, illg cox,'erslnay expose yo/i 1o
dangerous voltage or otfier hazards.
Relcr all selvicing to qualified _lvicc personneh
Replacement parts
x3/'tlellreplacement parts iu'e required, be sure tile
service technician has used replacement parts
specified by the lnanul, tcturer that have the same
characteristics as the original parts.
Uilauthorized substitutions may result ill fire.
electric sllock, or ot]ler ]lazards.
Safety Check
Upon colnplelion oI any selvice or repairs 1otile
set, ask tile selwice technician to perlorm rouline
salcty checks (as specified by the manufi_cmrcr)
to detcrnline thal file set is in salP operaling
COlldJlion.
Readthis first
This device complies with Part 15 of the FCC
Rules. Operation is subject to the lollowing two
conditions: (1) This device lnay not cause harmful
interlPrence, and (2) this device must accept any
interlPrence received, including interlcrcnce that
inay cause undesired operation.
CAUTION
You are clmtioned that any changes or
modifications not expressly approved in this
manual could _oid your authority to opel'_tte this
equipment,
Note:
This equipment has been tested and lound to
COlnp]y wifll the ]ilnJts lor a ClassB digital
device, pursuant to Part 15 ol tile FCC Rules.
These limits are designed to provMe reasonable
protectkm against harlnlul intertPrencc in a
residential mstalbaion. This equipment generate,<
uses,and can radiate n_dio hequency energy and,
it not installedand used in accordance with the
inslruclions, ulay c_luse h_ll-lllllll illtcrl_rcllCe Io
radio colntllunications. However, there is no
guarantee thai interlcrence will not occ/ir in a
particular installation. If this equipment does
cause harlnflfl interlcrence to radio or television
reception, which can be determined by turning the
equipment oil and on, the user is encouraged to
try to correct tile interllrrence by one or nlore of
the lollowing lneasures:
Reorient or relocate the receiving antennm
Increase the separation between the
equipment and receiver.
Connect tile equipment into an outlet on a
circuit dillPrent h-Olllthat to whidl the
receiver is connected.
Consult file dealer or an experienced radio/TV
technician lor help.
Tile supplied interlace cable must be used with tile
equiplnent in order to comply with the limits lot a
digital device pursuant to Subpart B of Part 15 of
FCC Rules.
Perchlorate Material - special handling may apply,
See www.dtsc.ca.gov/hazardouswaste/perchlorate
Percldorate Material : Lithium battery contains
perchlorate

J J - jj +
This product has been tested and lound compliant
with the limits set out in the EMC Directive lor
using connection cables sborter than 3 meters (9.8
leet).
Attention
The electromagnetic lields tit tile specific
hequencies may influence the picture and sound
of ttds unit.
Notice
If static e]ectricity or electrolllngnelism causes
data translPr to discontinue midway (l, dl), restart
the applict_tion or disconnect and connect tile
colnmunication ct_ble (USB, etc.) again.
Disposal of Old Electrical &
Electronic Equipment (Applicable
in the European Union and other
European countries with separate
collection systems)
This symbol on file product or on its packaging
indicates that this product shall not be treated as
household waste. Instead it shall be banded over
to tile applicable collection point lk_r tile rccycling
of electrical and electronic equipment. By
ensuring this product is disposed of corrcctly, you
will help prevent potential negative con_quences
lor the environment and human health, wbich
could otherwise be caused by inappropriate waslc
bandling of this product. The recycling of
materials will help to conselwe natural resources.
For more detailed inli_rmation about recycling of
this producK please contact your local Civic
Office, your household waste disposal _rvice or
the sllop where you purcba_d the product.
Notes onusingyourcamera
Internal memory and "Memory
Stick Duo" back up
DO not tIIFO (!1"[' the camera ()r remoYe the
batteries or "Memory Stick Duo" while the
access lamp is lighted, as the internal
memory data or "Memory Stick Duo" data
tnay be destroyed. Always protect your data
by making a back up copy.
Notes on recording/playback
• This camera is neither dust-proot, nor splash-
proof, nor watcr-prooh Read "Precautions"
(page 29) belore operating tile canlcra.
• Betorc you record one-time events, nlake a nial
recording to make sure that tile camera is
working correctly.
• Be careflll not to get the camera wet. Waler
enlering the inside of the camera may cause
malfunctions which in some cases may not be
repairable.
• Do not aim lhe camera al tile sun or other brigbl
light. It may cau_ file malflmction of your
cginlera.
• Do nol u_ the camera near a locatkm thal
generales strong radio waves or emits radialion,
The camera may not be able to record or play
back properly.
• Using the camera in sandy or dusty h)calions
nlay cause lnalltlnclions.
• If lllOiStllrc condensation occurs, remove it
beffwe using tile camera (page 291.
• Do not shake or strike file camera. In addition to
malfunctions and an inability to record images.
this may rcnder file recording medium unusable,
or cau_ image data blvakdown, danlage or h)ss.
• Clean the flash surlacc belore use. The heat of
flash emission nlay cause dirt on the flash
surlace 1o becolne discolored or to stick to the
flash surlace, resulting in insullicient ligla
enlission,
Notes on the LCD screen
• Tile LCD screen is manul, tctured using
extrenlcly high-precision tcchnoh)gy so o_er
99.99% (if the pixels are opermional till"
effective use. However, there may be some tiny
black points and/or bright points (white, rod.
blue or green in color) that constantly appear on
file LCD semen. These poinls arc normal in the
manuIacluring process and do not aflecl tile
recording in any way.
On image data compatibility
• This camera conlorms with DCF (Design rule
lot Camera File system) universal standard
established by JEITA (Japan Electronics and
Inlormation Technology Industries
Associalion).
• Playback of images recorded with your camera
on other equipmenl and playback of images
recorded or ediled with other equipment on your
camera arc not guaranteed.
_Warning on copyright
Television programs, fihns, videotapes, mid odler
materials nlay be copyrighted. Unauthorized
recording of such materials may be conlraly to tile
prm isions ol tile copyrighl laws.
No compensation for contents of
the recording
The contents of the recoMing cannot be
compensated for if recording or playback is
not possible due to a malfunction of your
camera or recording media, etc.
On illustrations
Illustrations used in this manual are ol tile DSC-
$6511unless noted otherwise.
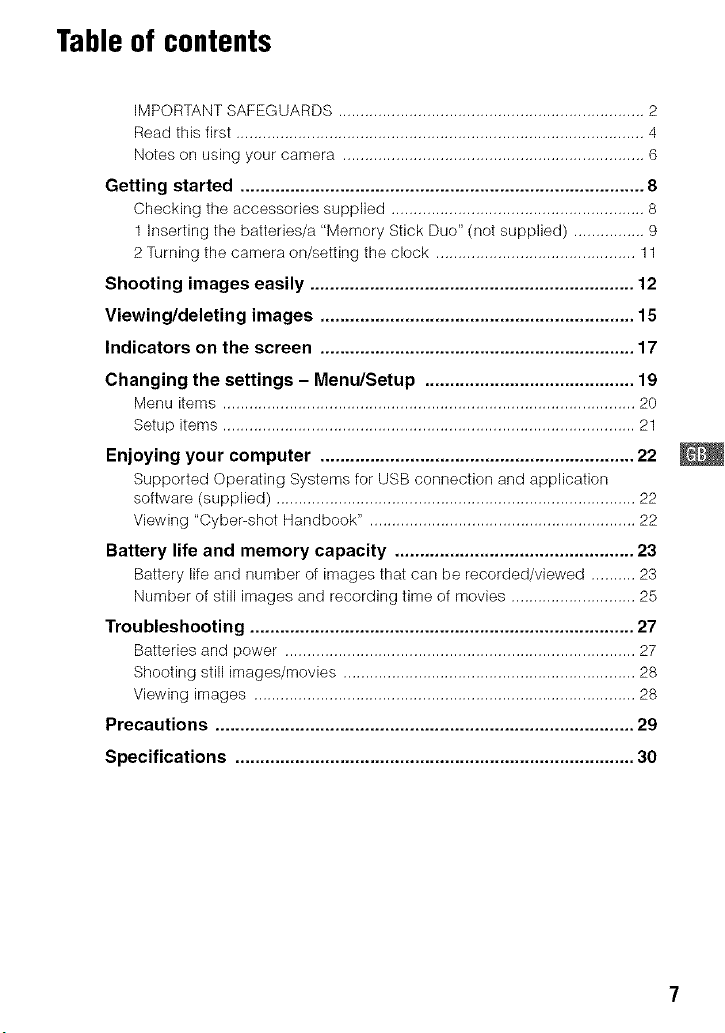
Table of contents
IMPORTANT SAFEGUARDS ..................................................................... 2
Read this first ............................................................................................ 4
Notes on using your camera .................................................................... 6
Getting started ................................................................................. 8
Checking the accessories supplied ......................................................... 8
1 inserting the batteries/a "Memory Stick Duo" (not supplied) ................ 9
2 Turning the camera on/setting the clock ............................................. 11
Shooting images easily ................................................................. 12
Viewing/deleting images ............................................................... 15
Indicators on the screen ............................................................... 17
Changing the settings - Menu/Setup .......................................... 19
Menu items ............................................................................................. 20
Setup items ............................................................................................. 21
Enjoying your computer ............................................................... 22
Supported Operating Systems for USB connection and application
software (supplied) ................................................................................. 22
Viewing "Cyber=shot Handbook" ............................................................ 22
Battery life and memory capacity ................................................ 23
Battery life and number of images that carl be recorded/viewed .......... 23
Number of still images and recording time of movies ............................ 25
Troubleshooting ............................................................................. 27
Batteries and power ............................................................................... 27
Shooting still images/movies .................................................................. 28
Viewing images ...................................................................................... 28
Precautions .................................................................................... 29
Specifications ................................................................................ 30

Getting started
Checkingtheaccessoriessupplied
• LR6 (size AA) alkaline balleries (2)
• Dedicaled USB cable (1)
• Dedicated A/V cable (1)
Attach the strap to prevent the camera
from damage by being dropped, etc.
• Wrist strap (1)
• CD-ROM (Cyber-shot application soltware/
'_Cyber-shot Handbook") (1)
• [llslJxlctioll Manual (this mallual) (1)
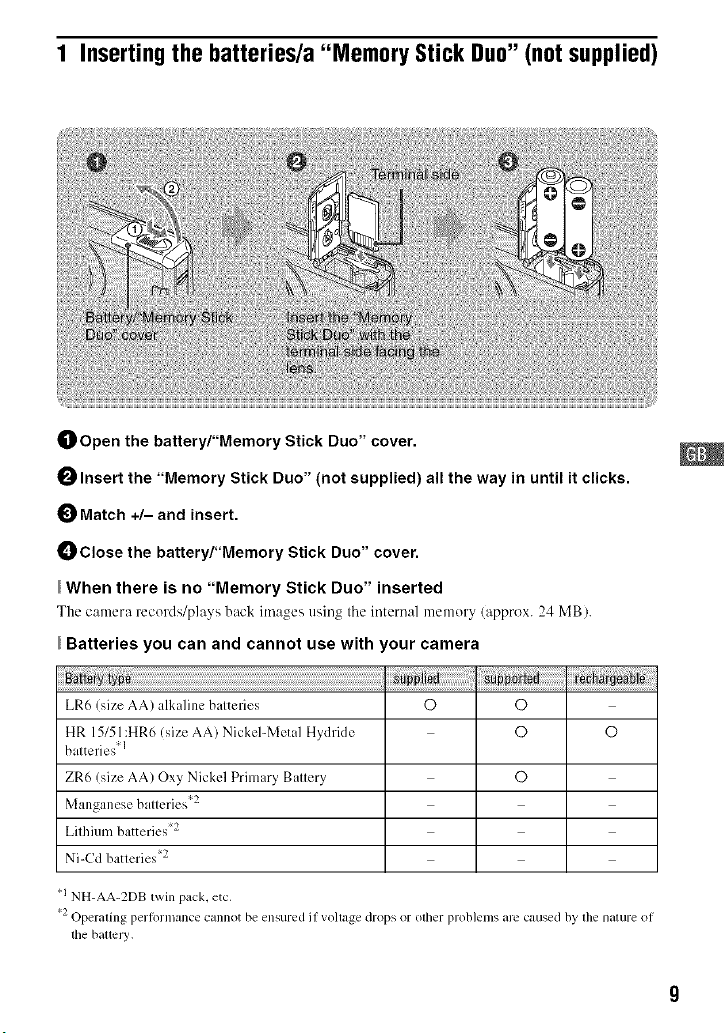
1 Inserting the batteries/a "Memory Stick Duo" (not supplied)
O Open the battery/"Memory Stick Duo" cover.
O Insert the "Memory Stick Duo" (not supplied) all the way in until it clicks.
Match +/- and insert.
O Close the battery/"Memory Stick Duo" cover.
When there is no "Memory Stick Duo" inserted
The camera records/plays back images using tile internal memory (approx. 24 MB).
Batteries you can and cannot use with 'our camera
LR6 (size AA) alkaline balteries O O
HR 15/51:HR6 (size AA) Nickel-Metal Hydride
balteries 1
ZR6 (size AA) Oxy Nickel Primary Ballery
manganesL, ba L'FIL'S _
LI hmm batteries
0 0
0
Ni-Cd batlenes
'q NH-AA-2DB wm pack, e c,
o ....
- Operating per Ol'll3ance c_tnnot be engul'ed I vollage drops or olher prob]el/IS are caused by l]le 13atul'e o
the baltel)',
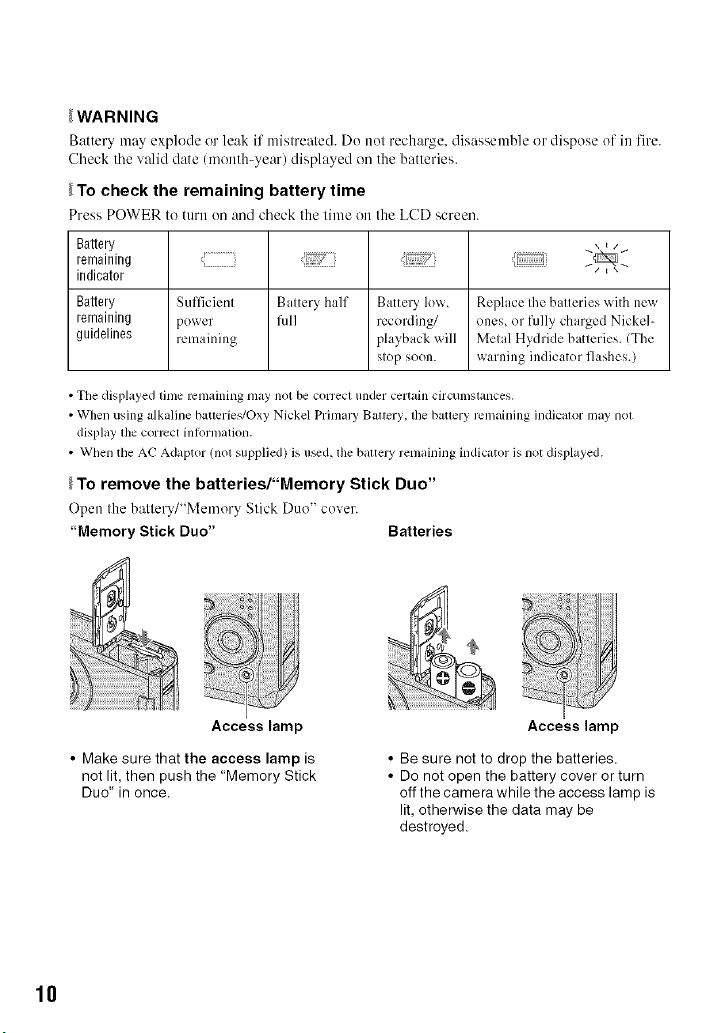
_WARNING
Batter_ may explode or leak if mistreated. Do not recharge, disassemhle or dispose of in fire.
Check tile wdid date (month-year) displayed on the batteries.
_To check the remaining battery time
Press POWER to turn on and check the time on the LCD screen.
Battery
remaining "................. ..... J_................
indicator
Battery Sufficicnl Baltcry ball: Battet3t low, Replace Ihe ballcries with new
remaining power fill recording/ ones, or fully charged Nickel-
guidelines remaining playback will Melal Hydride batleries. (The
slop soon. warning indicator flashes.)
• The displayed time remaining may not be correct under certain circumstances.
• When using alkaline batterieq/Oxy Nickel Primal T Battery. the batlery remaining indicator may nol
display the correct inlormation.
• When the AC Adaptor (not supplied) is u_d, lhe battel T remaining indicator is not displayed.
To remove the batteries/"Memory Stick Duo"
Open the battery/"Memory Stick Duo" cover.
"Memory Stick Duo" Batteries
Access lamp
• Make sure that the access lamp is
not lit, then push the "Memory Stick
Duo' in once.
10
Access lamp
• Be sure not to drop the batteries.
• Do not open the battery cover or turn
off the camera while the access lamp is
lit, otherwise the data may be
destroyed.
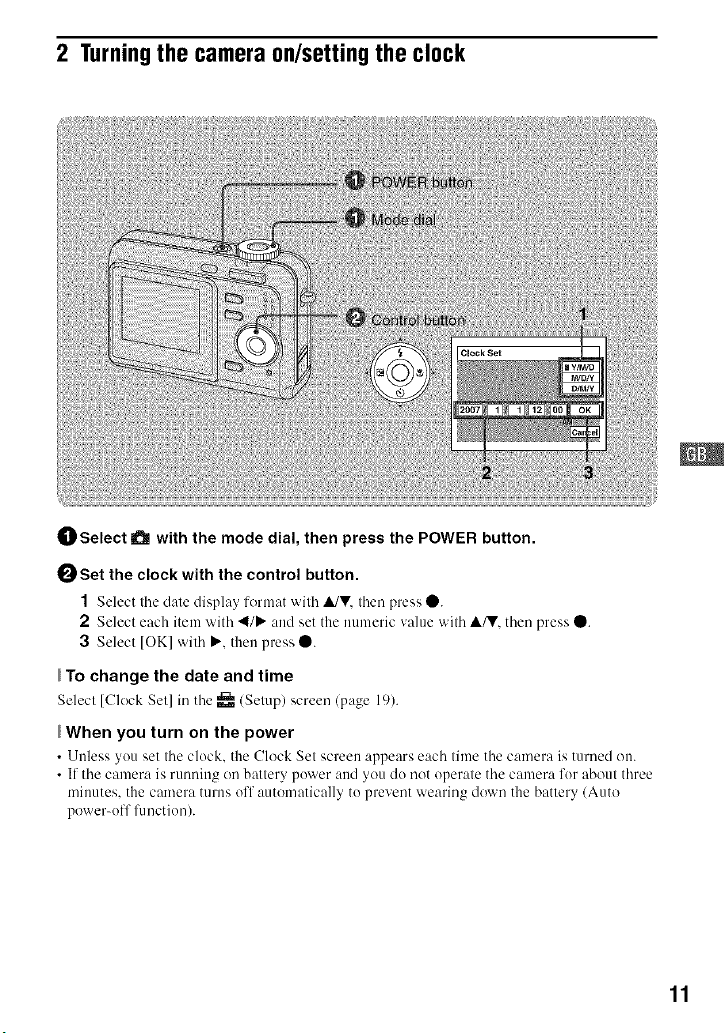
2 Turningthe camera on/setting the clock
_]_ Select a with the mode dial, then press the POWER button.
0 Set the clock with the control button.
1 Select the date display lormat _ith it/V, then press 0.
2 Select each item with 41P" and set the numeric value with A/V. then press 0.
3 Select [OK] with P.'. then press 0.
To change the date and time
Select [Clock Set] in tile _ (Setup) screen (page 19).
When you turn on the power
• Unless you set tile clock, the Clock Set screen appears each time the camera is turned on.
• If the camera is running on battery power and you do not operate the camera for about three
minutes, the camera turns off"automatically to prevent wearing down the battery/Auto
power-off fimction).
11
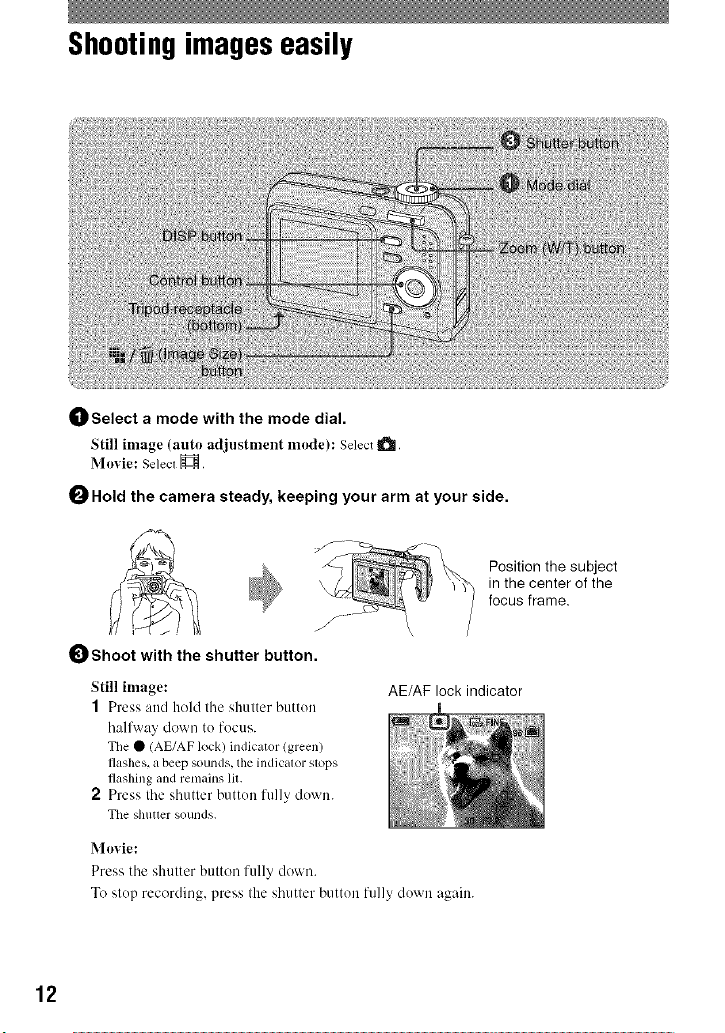
Shootingimageseasily
0 Select a mode with the mode dial.
Still image (auto adjustnlent nlode): Select _.
Movie: Select H.
0 Hold the camera steady, keeping your arm at your side.
J
Shoot with the shutter button.
Still image:
1 Press attd hold tile shutter button
hall\ray down to focus.
Tile • (AE/AF lock) indicator (green)
flashes, a beep sounds, tile indicator stops
flashing and renlains lit.
2 Press tileshutter buttonfully down.
Tile shuuer sounds.
Movie:
Press tile shutter button fully down.
Toslop recording, press the shutler buttou fully dowu agaiu.
AE/AF lock indicator
Position the subject
in the center of the
focus frame.
12
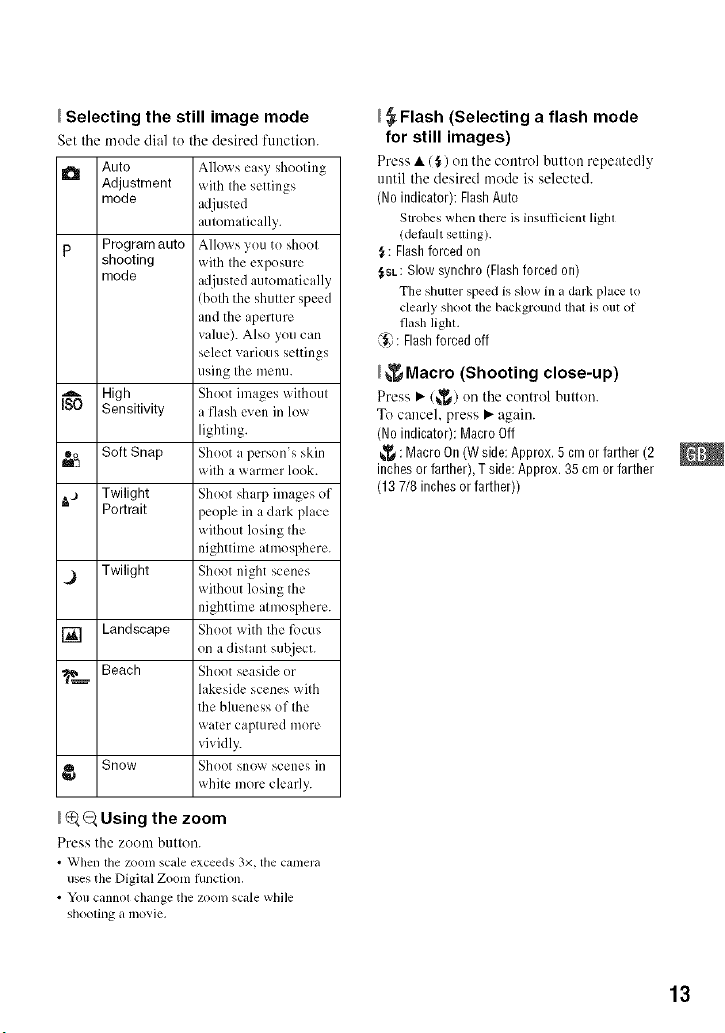
Selecting the still image mode
Set tile mode dial to tile desired fintclion.
l_[ Auto Alles_ s elsy sheeling
Adjustment wilh Ihe seltings
mode adjusted
aulemalically.
p Program auto Alles_s yeu te sheel
shooting x_irtt Ihe exposure
mode adjusted automatically
(belh the shuller speed
and the iperture
value). Alse yeu can
select various seltings
using Ihe menu.
High Sheet images witheul
Sensitivity a flash even in low
lighting.
®o Soft Snap Sheet a person's skin
m'3
.a, Twilight Sheet shaq_ images ef
Portrait peeple in a dark place
wilh a warmer look.
x_ilheut losing Ihe
nighttime almesphere.
._ Twilight Sheet night scenes
wilheut losing Ihe
nighttime almesphere.
[] Landscape Sheet with Ihe focus
-_ Beach Sheet seaside er
en a dislanl sut_ject.
lakeside scenes wilh
the blueness eP Ihe
water captured n/ore
vividly.
Snow Sheet snow scenes in
while mere clearly.
_ Flash (Selecting a flash mode
for still images)
Press • ($) on tile control button repeatedly
until tile desired ntode is selected.
(No indicator): Flash Auto
Strobes when there is insufficient light
(delault setting).
: Flash forced on
_sL: Slow synchro (Flashforced on)
The shutter speed is slow in a dark place to
clearly shool tile background thai is out of
flash ligla.
_3 : Flashforced off
_ Macro (Shooting close-up)
Press • (_) on tile control button.
To cancel, press • again.
(No indicator): Macro Off
: Macro On(W side:Approx. 5 crn or farther (2
inches or farther), T side: Approx. 35 crn or farther
(13 7/8 inches or farther))
_ Using the zoom
Press the ZOOln ballon.
• When the ZOOlllscale exceeds 3x, the camera
uses the Digital Zoom lullction,
• _rOU canno[ challge the zoonl scale while
shoolillg a movie,
13
_<_)Using the self-timer
Press •/_) on the control button
repeatedly until the desired mode is
selected.
(No indicator): Not using tire self-timer
_0: Setting the 10-second delay self-timer
_.'2: Setting the 2-second delay self-timer
Press the shutter button, tile sell'timer lamp
flashes, and a beep soands until the shutter
operates.
_ EV (Adjusting the exposure)
Press • ([_) on the control button, then
press A/V to aljust the exposure.
Toward +: Brightens an image.
Toward -: Darkens an image.
To turn off the EV adjustment bar. press the
• button again.
P{="/'_To change the still image
size
Press the |__./-_/lmage Size) button, then
press A/V to select the size.
To turn off the hnage Size menu, press the
"_1/'_ button again.
1_TM:7M Up te A3/I lxlT' print
I_a..2:3:2 Match 3:2 Aspect Ratio
I_ssN: 5M Up te A4/gx 10" print
L-'_: 3M LIp te 13x Igcm/5 x7" print
: 2M Up te 10x 15cm/4 x6" print
I_aA: VGA Fer E-mail
_.9:16:9 Display On 16:9 HDTV
On the recordable number of still
images and recordable time of
movies
Recordable number of still images vary
depending on the selected image size.
Still images
Maximum number of recordable images
Movies
Maximum recordable time
• The nun/bet of recordab]e inlages and fin/e can
dill_r according 1o shooling condilions.
14
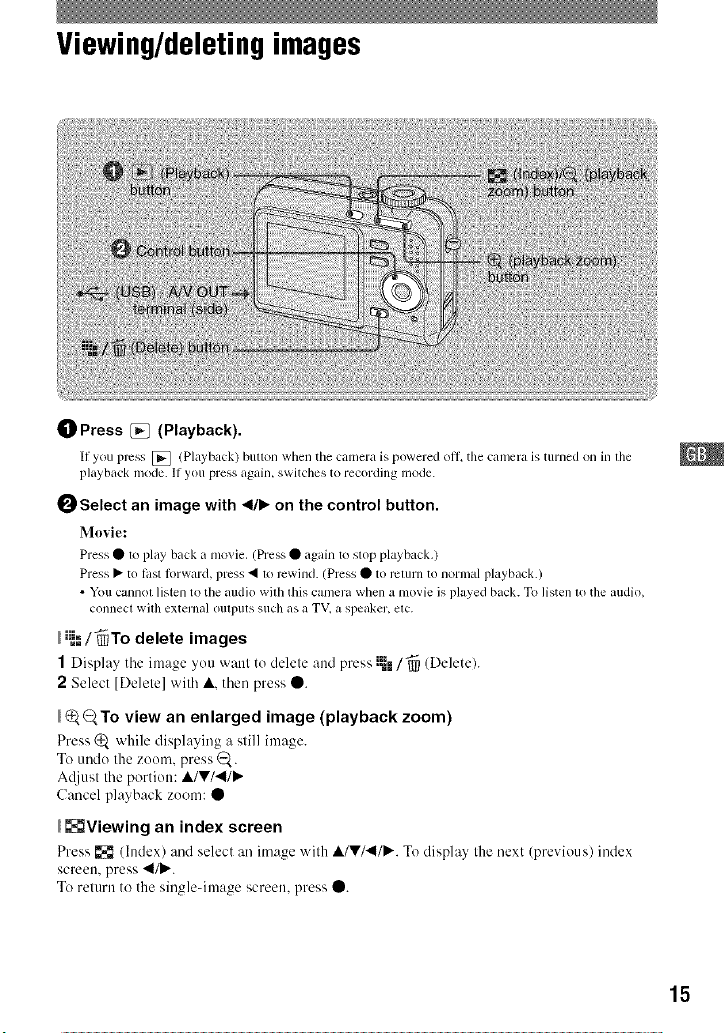
Viewing/deletingimages
_]_Press [_ (Playback).
11you press [] (Playback) button when the camera is powered oil tile camera is turned on in lhe
playback mode. If you press again, switches to recording mode.
OSelect an image with <lib. on the control button.
Movie:
Press • to pl_ly back n movie. (Press • _lgain to slop playback.)
Press • to last lorward, press • to rcwind. (Press • to return to norm_d playback.)
• You cannot listen to the audio with this camera when a movie is played back. To listen to the audio,
connect wilb external oulputs sucll as a TV. a speaker, elc.
•"{-"i'_To delete images
1Display the image _ou vx:.nt to delete :rod press :_I/"_ (Delete).
2 Select [Delete] with A. then press O.
_Q, To view an enlarged image (playback zoom)
Press _ _ hile displaying a still image.
To undo the zoom. press _.
Atliust the portion: A/V/41/P,.
Cancel playback zoom: •
_Viewing an index screen
Press [] (Index) and select an imagewithA/V/.,II/P,..To display thenext (previous) index
screen, press 41/_.
Toreturn to the single-imagescreen, press O.
15
_To delete images in index mode
1 While an index screen is displayed, press ::=."==/_(Delete) and select ISelect] with A/V on
the control button, then press •.
2 Select the image you want to delete with A/V/4/I_, then press • to disphly the _ (Delete)
indicator on tile selected image.
3 Press:__*/'_ (Delete).
4 Select [OK] with P". then press •.
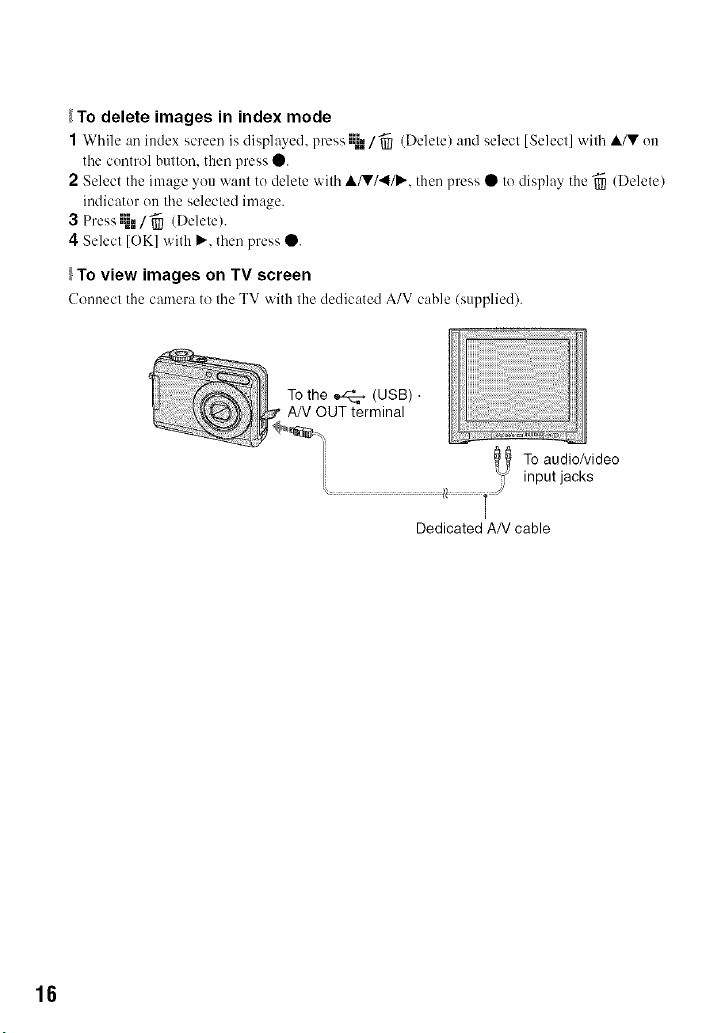
To view images on TV screen
Connect the camera to theTV with the dedicated A/V cable/supplied).
To the _ (USB) •
AN OUT terminal
16
, To audio/video
Dedicated AN cable
input jacks
!

Indicators onthe screen
Every lime you press tile DISP bulton, Ihe display dala and indicalor is lurned on and oil.
_When shooting still images
]_ Q _;_l_vv_FINE_ ]I
m-
When shooting movies
m-
_When playing back
I / 00:00:1;
[]
_H
J.÷
STBY
REC
P
_SL _
H_
_c::::::::_:==+ ×1.3
_o, pjo,
[]
RICH
NATURAL
SEPIAB&W
CLx1.3
Battm3 remaining
AE/AF lock
Recording mode
White bahmce
Standby/Recording a movie
Mode dial (Scene
Selection)
Mode dial (Progran_Auto)
Camera mode
Playback mode
Flash mode
Flash charging
Zoon_scaling
Red-eye reduction
Sharpness
Metering mode
Color mode
Protect
Print order (DPOF) mark
Zoom scaling
Playback
_:o0,-_-2_ _, -
__'BACWNEXT
17
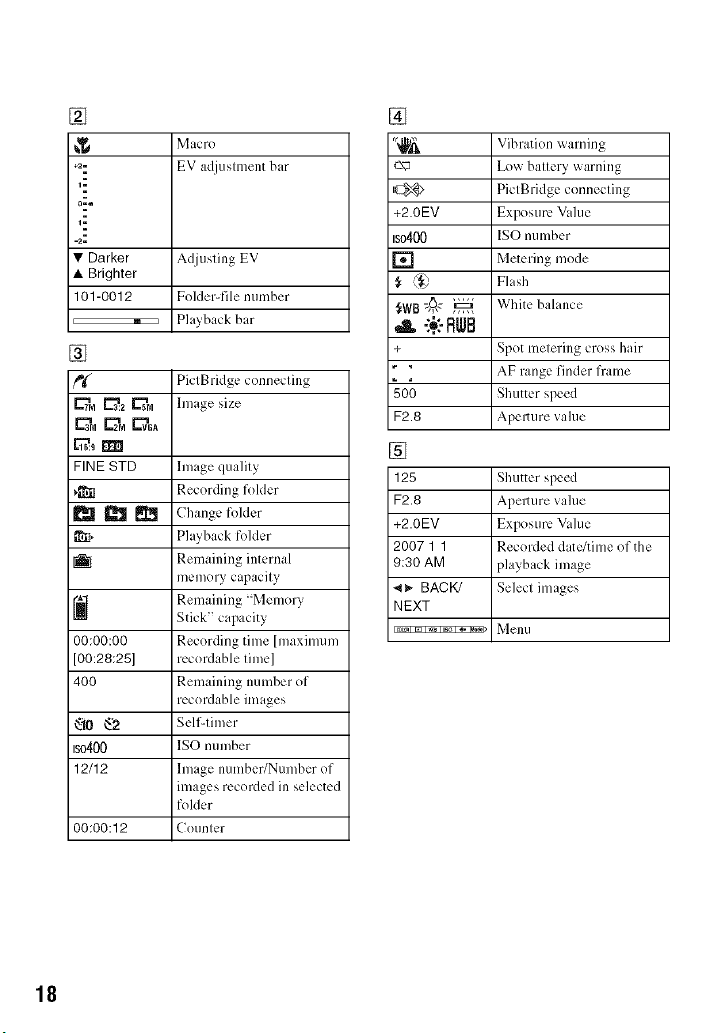
[]
Macro
+a: EV adjustment bar
1:
-2:
• Darker Adjusth_g EV
• Brighter
101-0012 Felder-file number
i _ i Pla)back bar
[]
_t( PictBridge connecting
C?M_..z _ss_a Image size
FINE STD Image quality
_i1 Recording feldcr
_[_ _ Change [elder
[_I, Playback fekler
I_ Remaining internal
_] Remaining "Memory
00:00:00 Recerding time [maximum
[00:28:25] rccerdable time]
400 Remaining number ef
'_'[0 _..'2 Self-timer
ISO400 ISO number
12/12 linage number/Number of
00;00:12 Counter
memory capacity
Stick" capacity
recerdable images
images rccerded in selected
felder
[]
+2.0EV
Iso400
[]
,_, -1._1-RWB
+
50O
F2.8
[]
125
F2.8
+2.0EV
2007 1 1
9:30 AM
_. BACK/
NEXT
Vibration _ arning
Low battery warning
PictBridge connecting
Expesurc Value
ISO number
Metering mode
Flash
White balance
Spet metering cress hair
AF range finder frame
Shutter speed
Apem]re value
Shutter speed
Apem]re value
Expesurc Value
Recerded d itc/time of the
playback image
Select images
Menu
18
 Loading...