

Sony DSC-H55 Handbook

contents
Search
Search
Table of
Operation
MENU/Settings
Cyber-shot Handbook
DSC-H55
Index
© 2010 Sony Corporation 4-172-679-12(1)
GB

How to use this handbook
Click on a button at upper right to jump to the corresponding page.
This is convenient when searching for a function you want to view.
contents
Table of
Search for information by function.
Operation
Search
MENU/Settings
Search
Index
Marks and notations used in this handbook
Search for information by operation.
Search for information in a listing of
MENU/Settings items.
Search for information by keyword.
In this handbook, the sequence of
operations is shown by arrows (t).
Operate the camera in the order indicated.
Marks are shown as they appear in the
camera’s default setting.
contents
Search
Search
Table of
Operation
MENU/Settings
Index
The default setting is indicated by .
Indicates cautions and limitations relevant
to the correct operation of the camera.
z Indicates information that is useful to
know.
GB
2

Notes on using the camera
contents
Table of
Notes on the types of memory card
that you can use (sold separately)
The following memory cards are compatible
with this camera: “Memory Stick PRO Duo”
media, “Memory Stick PRO-HG Duo”
media, “Memory Stick Duo” media, SD
memory cards, SDHC memory cards and
SDXC memory cards. MultiMediaCard is not
compatible.
In this handbook, “Memory Stick PRO Duo”
media, “Memory Stick PRO-HG Duo” media
and “Memory Stick Duo” media are called
“Memory Stick Duo” media and SD memory
cards, SDHC memory cards and SDXC
memory cards are called SD memory cards.
• “Memory Stick Duo” media of up to 32 GB and
SD memory cards of up to 64 GB have been
tested and proven to operate with your camera.
When recording movies, it is recommended
that you use the following memory cards:
– (Mark2) (“Memory
Stick PRO Duo” (Mark2) media)
– (“Memory Stick PRO-
HG Duo” media)
– SD memory card, SDHC memory card or
SDXC memory card (Class 4 or faster)
• For details on “Memory Stick Duo” media, see
page 125.
Notes on the battery pack
• Charge the battery pack (supplied) before using
the camera for the first time.
• You can charge the battery pack even if it is not
completely discharged. In addition, even if the
battery pack is not fully charged, you can use the
partially charged capacity of the battery pack as
is.
• If you do not intend to use the battery pack for a
long time, use up the existing charge and
remove it from the camera, then store it in a
cool, dry place. This is to maintain the battery
pack functions.
• For details on the usable battery pack, see
page 127.
Notes on the LCD screen and lens
• The LCD screen is manufactured using
extremely high-precision technology so over
99.99% of the pixels are operational for
effective use. However, some tiny black and/or
bright dots (white, red, blue or green) may
appear on the LCD screen. These dots are a
normal result of the manufacturing process and
do not affect the recording.
Black, white, red, blue or
green dots
Search
Search
Operation
MENU/Settings
Index
When using a “Memory Stick Duo”
media with standard sized “Memory
Stick” media slot
You can use the “Memory Stick Duo” media
by inserting it into the “Memory Stick Duo”
media Adaptor (sold separately).
“Memory Stick
Duo” media
Adaptor
• Exposing the LCD screen or the lens to direct
sunlight for long periods may cause
malfunctions. Be careful when placing the
camera near a window or outdoors.
• Do not press against the LCD screen. The screen
may be discolored and that may cause a
malfunction.
• Images may trail across on the LCD screen in a
cold location. This is not a malfunction.
• Be careful not to bump the movable lens, and be
careful not to apply force to it.
Continued r
GB
3

On moisture condensation
• If the camera is brought directly from a cold to a
warm location, moisture may condense inside or
outside the camera. This moisture condensation
may cause a malfunction of the camera.
• If moisture condensation occurs, turn off the
camera and wait about an hour for the moisture
to evaporate. Note that if you attempt to shoot
with moisture remaining inside the lens, you
will be unable to record clear images.
The images used in this Handbook
The images used as examples in this Handbook are
reproduced images, and are not actual images shot
using this camera.
contents
Search
Search
Table of
Operation
MENU/Settings
Index
GB
4

Table of contents
Notes on using the camera
How to use this handbook····································· 2
Notes on using the camera ··································· 3
Operation Search·················································· 8
MENU/Settings Search ······································· 10
Identifying parts··················································· 14
List of icons displayed on the screen ·················· 15
Using the mode dial ············································ 17
Using the internal memory ·································· 18
Shooting
Intelligent Auto Adjustment ································· 19
Easy Shooting····················································· 20
Program Auto ······················································ 22
Manual Exposure Shooting································· 23
Sweep Panorama················································ 24
Scene Selection ·················································· 26
Movie Mode························································· 28
Zoom ··································································· 29
DISP (Screen Display Settings) ····························30
Flash ··································································· 32
Smile Shutter······················································· 33
Self-Timer···························································· 34
contents
Search
Search
Table of
Operation
MENU/Settings
Index
GB
5

Viewing
Viewing still images············································· 35
Playback zoom···················································· 36
Image Index ························································ 37
Delete·································································· 38
Viewing movies ··················································· 39
MENU (Shooting)
contents
Search
Table of
Operation
MENU
Settings
TV
MENU items (Shooting) ······································ 10
(Viewing)
MENU items (Viewing) ········································ 11
Setting items ······················································· 12
Viewing an image on a TV ································ 100
MENU/Settings
Search
Index
Computer
Using with your computer·································· 103
Using the software ············································ 104
Connecting the camera to the computer···············106
Uploading images to a media service ···················108
GB
6

Printing
Printing still images ··········································· 110
Troubleshooting
Troubleshooting ················································ 112
Warning indicators and messages ···················· 120
contents
Search
Table of
Operation
Others
Index
“Memory Stick Duo” media································ 125
Battery pack ······················································ 127
Battery charger·················································· 128
Index ································································· 129
MENU/Settings
Search
Index
GB
7

Operation Search
contents
Table of
Leaving the settings to
the camera
Shooting portraits
Shooting in manual
mode
Shooting panoramic
images
Intelligent Auto Adjustment······························· 19
Scene Selection··················································· 26
Scene Recognition ·············································· 55
Soft Snap ······························································· 26
Twilight Portrait ···················································· 26
Smile Shutter ························································ 33
Scene Recognition ·············································· 55
Face Detection····················································· 58
Anti Blink ································································ 61
Red Eye Reduction ············································· 78
Manual Exposure Shooting ······························ 23
Sweep Panorama················································ 24
Search
Search
Operation
MENU/Settings
Index
Shooting best shots of
your pet
Shooting moving
objects
Shooting without blur
Shooting with backlight
Pet············································································ 26
Movie Mode··························································· 28
Advanced Sports Shooting······························· 26
Burst Settings ······················································· 45
High Sensitivity····················································· 26
2-second delay self-timer·································· 34
ISO··········································································· 48
SteadyShot ···························································· 62
Forced Flash························································· 32
Scene Recognition ·············································· 55
DRO········································································· 60
GB
8

Shooting in dark places
High Sensitivity····················································· 26
Slow Synchro························································ 32
ISO··········································································· 48
contents
Table of
Adjusting exposure
Changing focus
position
Changing image size
Deleting images
Displaying enlarged
images
Editing images
Playing back a series of
images in order
EV ············································································ 47
Focus ······································································ 52
Face Detection····················································· 58
Image Size····························································· 41
Delete································································ 38, 68
Format ···································································· 92
Playback zoom····················································· 36
Trimming (Resize)··············································· 67
Retouch ·································································· 67
Slideshow ······························································ 63
Search
Search
Operation
MENU/Settings
Index
Shooting/Viewing with
easy-to-see indicators
Printing images with
the date
Changing date and
time settings
Initializing settings
Printing images
Viewing on TVs
Easy Shooting ······················································ 20
Using the “PMB (Picture Motion Browser)”
················································································ 104
Area Setting ·························································· 98
Date & Time Setting············································ 99
Initialize··································································· 84
Print ······································································· 110
Viewing an image on a TV······························ 100
GB
9

MENU/Settings Search
MENU items (Shooting)
You can select the various shooting functions easily from the MENU button.
contents
Table of
1 Press the ON/OFF (Power) button and set the
camera to shooting mode.
ON/OFF (Power)
button
2 Press the MENU button to display the Menu
screen.
3 Select the desired menu item with v/V/b/B on
the control button.
4 Press the MENU button to turn off the Menu
screen.
In the table below, indicates settings that can be changed, while — indicates settings that
cannot be changed. A setting may be fixed or restricted depending on the shooting mode. For
details, see the page for each item. The icons below indicate the available modes.
Mode dial
Menu items
Scene Selection
Shooting Direction
Image Size
Flash
Burst Settings
Bracket Settings
EV
ISO
White Balance
Focus
Metering Mode
Scene Recognition
Smile Detection Sensitivity
Face Detection
DRO
Anti Blink
SteadyShot
(Settings)
————— —
———— — —
——————
—— —
—— — —
——
—— — —
——
—— — —
—— —
———— — —
—— —
—— —
—— — — —
————— —
————— —
—
MENU button
Control button
Search
Search
Operation
MENU/Settings
Index
Note
• Only the items that are available for each mode are displayed on the screen.
10
GB
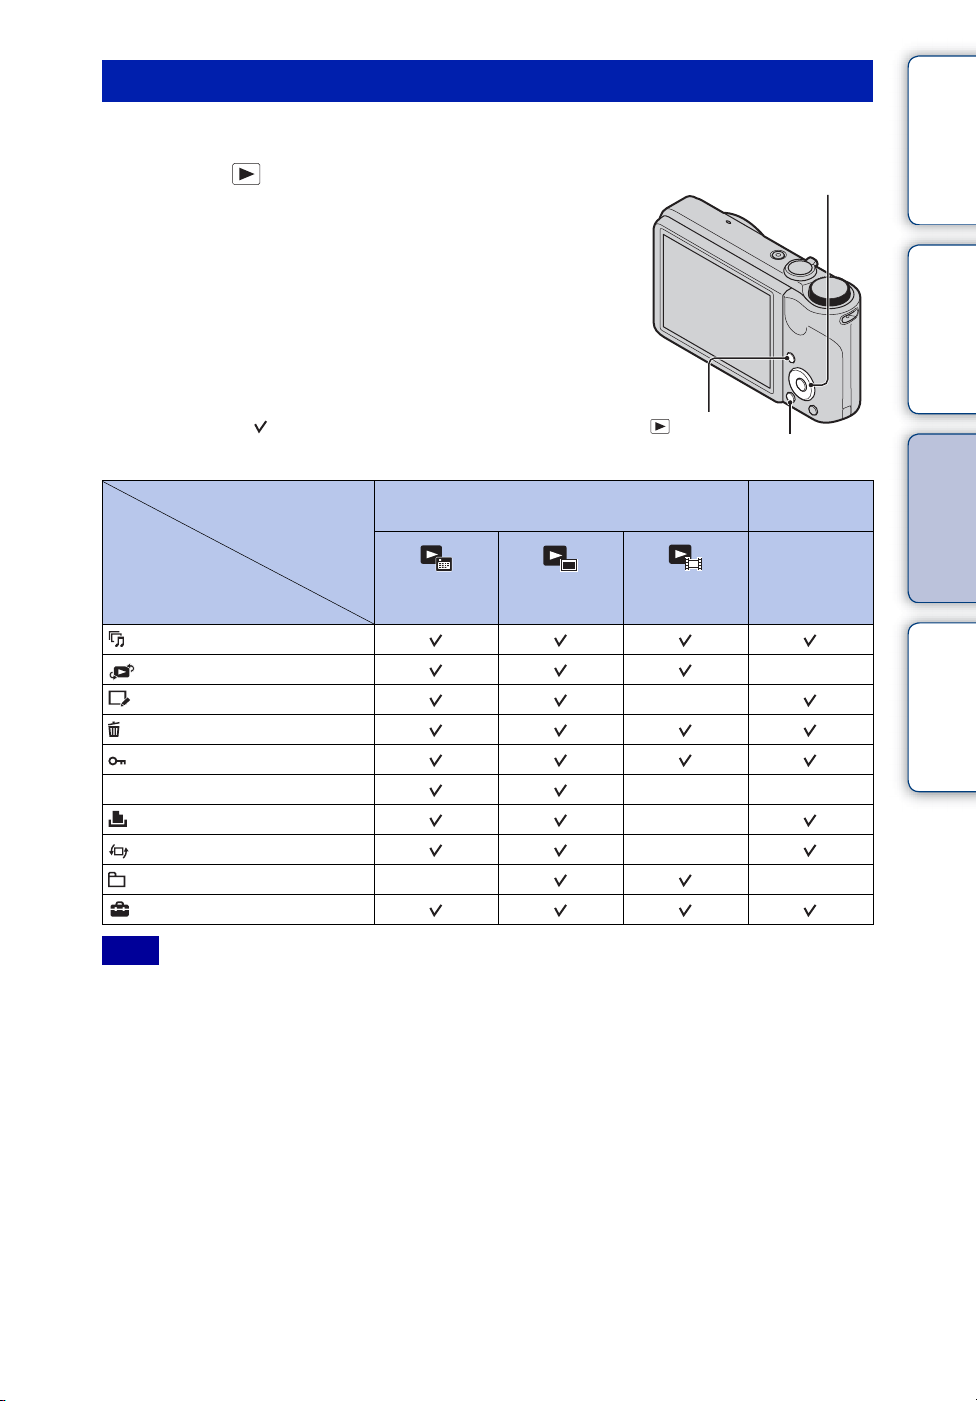
MENU items (Viewing)
You can select the various viewing functions easily from the MENU button.
contents
Table of
1 Press the (Playback) button to switch to
Control button
playback mode.
2 Press the MENU button to display the Menu
screen.
Search
Operation
3 Select the desired menu item with v/V/b/B on
the control button.
4 Press z on the center of the control button.
In the table below, indicates settings that can be changed, while
— indicates settings that cannot be changed.
(Playback)
button
MENU button
MENU/Settings
Search
View Mode
Menu items
(Slideshow)
(View Mode)
(Retouch) —
(Delete)
(Protect)
DPOF
(Print) —
(Rotate) —
(Select Folder) ——
(Settings)
Date View Folder view
Memory card
(Still)
Folder view
(Movie)
——
Internal
Memory
Folder View
—
Index
Note
• Only the items that are available for each mode are displayed on the screen.
11
GB

Setting items
You can change the settings on the (Settings) screen.
contents
Table of
1 Press the MENU button to display the Menu
screen.
2 Select (Settings) with V on the control button,
then press z on the center of the control button to
display the setup screen.
3 Select each item with v/V/b/B, then press z.
4 Select the desired setting, then press z.
Categories Items
Shooting Settings
Main Settings
Memory Card Tool
Internal Memory Tool
AF Illuminator
Grid Line
Disp. Resolution
Digital Zoom
Auto Orientation
Red Eye Reduction
Blink Alert
Beep
Language Setting
Function Guide
Demo Mode
Initialize
COMPONENT
Video Out
USB Connect
LUN Settings
Download Music
Format Music
Power Save
Format
Create REC.Folder
Change REC.Folder
Delete REC.Folder
Copy
File Number
Format
File Number
Control button
MENU button
Continued r
12
Search
Search
GB
Operation
MENU/Settings
Index

Categories Items
Clock Settings
Notes
• [Shooting Settings] appears only when settings have been entered from shooting mode.
• [Memory Card Tool] appears only when a memory card is inserted in the camera, while [Internal
Memory Tool] appears only when a memory card is not inserted.
Area Setting
Date & Time Setting
contents
Search
Search
Table of
Operation
MENU/Settings
Index
13
GB

Identifying parts
A Shutter button
B Mode dial (17)
C For shooting: W/T (zoom) lever (29)
For viewing: (Playback zoom) lever/
(Index) lever (36, 37)
D Flash
E ON/OFF (Power) button
F Microphone
G Self-timer lamp/Smile Shutter lamp/AF
illuminator
H Lens
I LCD screen
J Hook for wrist strap*
K (Playback) button (35)
L (Delete) button (38)
M MENU button (10)
N Control button
Menu on: v/V/b/B/z
Menu off: DISP/ / /
O Tripod receptacle
P Speaker
Q Multi connector
R Battery/Memory card cover
S Access lamp
T Battery insertion slot
U Battery eject lever
V Memory card slot
contents
Search
Search
Table of
Operation
MENU/Settings
Index
* Using the wrist strap
The wrist strap is already attached to the camera at
the factory. Place your hand through the loop to
prevent the camera from damage by being
dropped.
Hook
14
GB

List of icons displayed on the screen
Icons are displayed on the screen to indicate the camera status.
You can change the screen display using DISP (Screen Display Settings) on the control button.
contents
Table of
When shooting still images
• The icons are limited in Easy Shooting mode.
When shooting movies
When playing back
A
Display Indication
Battery remaining
Low battery warning
Mode dial (Intelligent Auto
Metering Mode
Bracket Settings
Image Size
Scene Selection
Adjustment/Movie Mode/Sweep
Panorama/Manual Exposure
Shooting/Program Auto)
Scene Recognition icon
White Balance
Vibration warning
Scene Recognition
Burst Settings
Bracket Shooting
Search
Search
Operation
MENU/Settings
Index
DRO
Smile Detection Sensitivity
indicator
Continued r
15
GB

Display Indication
Zoom scaling
PictBridge connecting
Protect
Print order (DPOF)
Playback zoom
B
View Mode
Display Indication
z
ISO400
125
F3.5
+2.0EV
Focus
REC
Standby
0:12
101-0012
2010 1 1
9:30 AM
C
AE/AF lock
ISO number
NR slow shutter
Shutter speed
Aperture value
Exposure value
Recording a movie/Standby a
movie
Recording time (m:s)
Folder-file number
Recorded date/time of the
playback image
Display Indication
Recording folder
Playback folder
96
12/12
100Min
Recording/Playback Media
Changing folder
Metering Mode
Flash mode
Number of recordable images
Image number/Number of
images recorded in date range,
selected folder
Recordable time
(Memory card, internal memory)
AF Illuminator
Red-eye reduction
Flash charging
Display Indication
ISO 400
Database file full/Database file
D
White Balance
ISO number
error
Display Indication
Self-timer
C:32:00
Face Detection
Database file full/Database file
+2.0EV
500
F3.5
N
00:00:12
35° 37’ 32” N
139° 44’ 31” E
Self-diagnosis display
Destination
Overheating warning
error
AF range finder frame
Spot metering cross hair
Exposure value
Shutter speed
Aperture value
Playback
Playback bar
Counter
Direction
GPS information
Latitude and Longitude display
Histogram
• appears when histogram
display is disabled.
Volume
contents
Search
Search
Table of
Operation
MENU/Settings
Index
16
GB

Using the mode dial
Set the mode dial to the desired function.
Mode dial
contents
Search
Table of
Operation
(Movie Mode)
(Sweep Panorama)
(Manual Exposure
Shooting)
(Program Auto)
(Intelligent Auto
Adjustment)
(Easy Shooting)
(Scene Selection)
Allows you to record movies (page 28).
Allows you to shoot a panoramic image after composing images
(page 24).
Allows you to shoot after adjusting the exposure manually (both the
shutter speed and the aperture (F value)) (page 23).
Allows you to shoot with the exposure adjusted automatically (both
the shutter speed and the aperture (F value)) (page 22). You can set
various functions using the menu.
Allows you to shoot with the settings adjusted automatically
(page 19).
Allows you to shoot/view still images with easy-to-see indicators
(page 20).
Allows you to shoot with preset settings according to the scene
(page 26).
MENU/Settings
Search
Index
17
GB

Using the internal memory
The camera has approximately 45 MB of internal memory. This memory is not removable.
You can record images on the internal memory when there is no memory card inserted in the
camera.
When a memory card is inserted
[Recording]: Images are recorded on the memory card.
[Playback]: Images on the memory card are played back.
B
B
Internal
memory
On image data stored in the internal memory
[Menu, Settings, etc.]: Various functions can be
performed on images on the memory card.
When there is no memory card inserted
[Recording]: Images are recorded using the internal
memory.
[Playback]: Images stored in the internal memory are played
back.
[Menu, Settings, etc.]: Various functions can be
performed on images in the internal memory.
contents
Search
Search
Table of
Operation
MENU/Settings
We recommend that you copy (back up) data without error using one of the following methods.
To copy (back up) data on a hard disk of your computer
Perform the procedure on pages 106 without a memory card inserted in the camera.
To copy (back up) data on a memory card
Prepare a memory card with sufficient free capacity, then perform the procedure explained in
[Copy] (page 96).
Notes
• You cannot transfer image data on a memory card to the internal memory.
• By making a USB connection between the camera and a computer with a cable for multi-use terminal,
you can transfer data stored in the internal memory to a computer. However you cannot transfer data on a
computer to the internal memory.
Index
18
GB

Intelligent Auto Adjustment
Allows you to shoot still images with the setting adjusted automatically.
1 Set the mode dial to (Intelligent Auto Adjustment).
2 Shoot with the shutter button.
contents
Table of
Note
• Flash mode is set to [Auto] or [Off].
zOn Scene Recognition
Scene Recognition operates in Intelligent Auto Adjustment mode. This function lets the
camera automatically recognize the shooting conditions and shoot the image.
Scene Recognition icon and guide
• The camera recognizes (Twilight), (Twilight Portrait), (Twilight using a tripod),
(Backlight), (Backlight Portrait), (Landscape), (Macro) or (Portrait), and displays
the corresponding icon and guide on the LCD screen when the scene is recognized.
For details, see page 55.
zIf you shoot a still image of a subject that is difficult
to focus on
• The shortest shooting distance is approximately 5 cm (2 inches) (W)/100 cm (3 ft 3 3/8 inches) (T).
• When the camera cannot focus on the subject automatically, the AE/AF lock indicator changes to
slowly flashing and the beep does not sound. Either recompose the shot or change the focus setting
(page 52).
• Focusing may be difficult in the following situations:
– It is dark and the subject is distant.
– The contrast between the subject and the background is poor.
– The subject is seen through glass.
– The subject is moving quickly.
– There is reflective light or shiny surfaces.
– The subject is backlit or there is a flashing light.
Search
Search
Operation
MENU/Settings
Index
19
GB

Easy Shooting
Allows you to shoot still images using the minimum necessary functions.
The text size increases and indicators become easier to see.
1 Set the mode dial to (Easy Shooting).
2 Shoot with the shutter button.
Note
• The battery charge is used up more quickly because the screen brightness increases automatically.
zFunctions available in Easy Shooting mode
contents
Search
Table of
Operation
Image Size: MENU t [Image Size] t z on the control button t desired
mode t z
Select between [Large] or [Small] size.
Self-Timer: on the control button t desired mode
Select between [10sec] or [Off] mode.
Flash: on the control button t desired mode
Select between [Auto] or [Off] mode.
MENU t [Flash] t z on the control button t desired mode
t z
Select between [Auto] or [Off] mode.
Smile Shutter: on the control button
zOn Scene Recognition
Scene Recognition operates in Easy Shooting mode. This function lets the camera
automatically recognize the shooting conditions and shoot the image.
Scene Recognition icon
MENU/Settings
Search
Index
• The camera recognizes (Twilight), (Twilight Portrait), (Twilight using a tripod),
(Backlight), (Backlight Portrait), (Landscape), (Macro) or (Portrait), and displays
an icon on the LCD screen when the scene is recognized.
For details, see page 55.
Continued r
20
GB

zOn Easy Viewing mode
When you press the (Playback) button with the mode dial set to (Easy Shooting),
the playback screen text becomes larger and easier to see. In addition, only the deletion
function becomes available.
(Delete) button You can delete the currently displayed image.
Select [OK] t z on the control button.
MENU button You can delete the currently displayed image with [Delete Single
Image] and delete all images in the selected date range or internal
memory (if selected) with [Delete All Images].
• [View Mode] is set to [Date View] when using a memory card.
contents
Search
Search
Table of
Operation
MENU/Settings
Index
21
GB

Program Auto
Allows you to shoot with the exposure adjusted automatically (both the shutter speed and the
aperture value). Also you can select various settings using the menu.
1 Set the mode dial to (Program Auto).
2 Shoot with the shutter button.
contents
Search
Search
Table of
Operation
MENU/Settings
Index
22
GB

Manual Exposure Shooting
You can shoot at your favorite exposure by manually setting the shutter speed and aperture
value.
1 Set the mode dial to (Manual Exposure Shooting).
2 Press z on the control button.
3 Select the shutter speed and aperture (F value) using control button.
Control button Feature
z Return
v V Shutter speed
b B Aperture (F value)
• Select a shutter speed from 1/1600 to 30 seconds.
• When zoom is set fully to W, you can select an aperture of F3.5 or F8 (when used with the Internal
ND (Neutral Density) Filter).
When zoom is set fully to T, you can select an aperture of F5.5 or F13 (when used with the Internal
ND (Neutral Density) Filter).
4 Press the shutter button to shoot the image.
Notes
• If proper exposure is not obtained by your settings, the setting value indicators on the screen will flash
when the shutter button is pressed halfway down. You can shoot in this condition, but exposure
readjustment is recommended.
• The flash is set to [On] or [Off].
• You cannot select the shutter speed and aperture (F value) when the self-timer is set to [Self-portrait One
Person] or [Self-portrait Two People].
contents
Search
Search
Table of
Operation
MENU/Settings
Index
zSetting the shutter speed and aperture (F value)
The difference between the settings and proper exposure judged by the camera appears as an
EV value on screen.
Shutter speed/aperture (F value)
Exposure value
0EV is the value judged as the most suitable by the camera.
• When the shutter speed is one second or slower, the shutter speed is indicated by [”], for example,
[1”].
• When you set the shutter speed slower, using a tripod is recommended to prevent the effects of
vibration.
• When the shutter speed becomes slower than a certain speed, the NR slow shutter function is
activated automatically to reduce image noise, and [NR] appears on the screen.
• If you select slow shutter speeds, it takes time to process the data.
23
GB

Sweep Panorama
Allows you to create a panoramic image from composed images.
1 Set the mode dial to (Sweep Panorama).
2 Point the camera at the edge of the subject, then
press the shutter button fully down.
contents
Search
Table of
Operation
MENU/Settings
This part will not be taken
3 Pan the camera to the end, following the
guidance on the LCD screen.
Guidance
bar
Notes
• If you cannot pan the camera across the entire subject within the given time, a gray area occurs in the
composed image. If this happens, move the camera fast to record a full panoramic image.
• Since several images are stitched together, the stitched part will not be recorded smoothly.
• Under low light conditions, panoramic images may be blurred.
• Under lights that flicker such as fluorescent light, the brightness or color of the combined image is not
always the same.
• When the whole angle of panoramic shooting and the angle in which you fixed the focus and exposure
with AE/AF lock are extremely different in brightness, color and focus, the shooting will not be
successful. If this happens, change the lock angle and shoot again.
• Sweep Panorama is not suitable for the following situations:
– Objects are moving
– Objects are too close to the camera
– Image with a repeating pattern such as tiles and image with little contrast such as sky, sandy beach, or
lawn
– Image with constant change such as waves or water falls
– Image with the sun or electric lights, etc. that are much brighter than surroundings
• You cannot create panoramic images in the following situations:
– You pan the camera too fast or too slow
– There is too much camera shake
Search
Index
Continued r
24
GB

zChanging the shooting direction or image size of a
panoramic image
Shooting Direction: MENU t [Shooting Direction] t select [Right], [Left], [Up]
and [Down] t z on the control button
Image Size: MENU t [Image Size] t select [Standard] or [Wide] t z
zTips for shooting a panoramic image
Pan the camera in an arc with a constant velocity and in the same direction as the indication
on the LCD screen. Sweep Panorama is better suited for still subjects, rather than moving
ones.
Radius as short
Vertical direction Horizontal direction
as possible
contents
Search
Search
Table of
Operation
MENU/Settings
Index
• Determine the scene and press the shutter button halfway, so that you can lock the focus exposure
and white balance.
• Adjust the frame composition so that a portion with greatly varied scenery is in the center of the
image.
zPlaying back scrolling panoramic images
You can scroll panoramic images by pressing z on the control button while panoramic
images are being displayed. Turn the W (zoom) lever to display the whole image again.
Operation button/
lever
z Plays back scrolling images/Stops
b/B/v/V Scrolls images
W Displays the whole image
Shows the displayed area of
the whole panoramic image
• Panoramic images are played back with the supplied software “PMB” (page 104).
• Panoramic images shot with other cameras may not be scrolled correctly.
Description
25
GB

Scene Selection
Allows you to shoot with preset settings according to the scene.
1 Set the mode dial to (Scene Selection).
2 Select the desired mode t z on the control button.
If you want to switch to another scene, press the MENU button.
(High Sensitivity)
Allows you to shoot images without a
flash under low light conditions,
reducing blur.
contents
Search
Table of
Operation
(Soft Snap)
(Advanced
Sports Shooting)
(Landscape)
(Twilight Portrait)
(Twilight)
(Gourmet)
Allows you to shoot images with a softer atmosphere for
portraits and flowers, etc.
Allows you to shoot subjects with fast movements such
as sports. While the shutter is pressed halfway, the
movement of the subject is predicted and the focus will
be adjusted.
Allows easy shooting of distant scenes by focusing in
the distance. Shoots vivid blue sky and flora colors.
Allows you to shoot sharp images of people with the
night view in the background without compromising the
atmosphere.
Allows you to shoot night scenes at far distance without
losing the dark atmosphere of the surroundings.
Shifts to Macro mode, allowing you to shoot food
arrangements in delicious and bright color.
MENU/Settings
Search
Index
(Pet)
(Beach)
(Snow)
Allows you to shoot images of your pet with the best
settings.
Allows you to record the blue of the water clearly when
shooting seaside or lakeside scenes.
Allows you to record clear images preventing sunken
colors in snowy scenes or other places where the whole
screen appears white.
Continued r
26
GB

(Fireworks)
Allows you to record fireworks in all their splendor.
Note
• When you shoot images using (Twilight Portrait), (Twilight) or (Fireworks) mode, the shutter
speed is slower and the images tend to blur. To prevent blurring, the use of a tripod is recommended.
Functions you can use in Scene Selection
For shooting an image appropriately according to the scene condition, a combination of
functions is determined by the camera. indicates an available function, — indicates an
unavailable function. The icons below [Flash] and [Self-Timer] indicate the available modes.
Some functions are not available, depending on the Scene Selection mode.
contents
Search
Table of
Operation
MENU/Settings
Flash
*1[Flash] for [White Balance] cannot be selected.
2
*
[Off] for [Face Detection] cannot be selected.
3
[White Balance] for [Bracket Settings] cannot be selected.
*
Face Detection/
Smile Shutter
2
*
—— *
— *
— ————
— —— —
— —— —
*
*
— ————
Self-Timer
Burst Settings/
Bracket
Settings
——*1—
3
*
3
3
————
3
3
ISO
——
—— —
—— —
—— —
White
Balance
——
Anti Blink
Search
Index
27
GB

Movie Mode
Allows you to record movies.
1 Set the mode dial to (Movie Mode).
2 Press the shutter button fully down.
contents
Table of
3 To stop recording, press the shutter button fully down again.
Search
Search
Operation
MENU/Settings
Index
28
GB

Zoom
You can enlarge the image when shooting. The camera’s optical zoom function can enlarge
images up to 10×.
contents
Table of
1 Turn the W/T (zoom) lever.
Turn the W/T (zoom) lever to (T) to zoom in, and to (W) to
zoom out.
• Turn the W/T (zoom) lever lightly for a slower zoom. Move it
further for a faster zoom.
• When the zoom scale exceeds 10×, see page 76.
Notes
• Zoom is fixed to the W side when shooting in Sweep Panorama mode.
• The operating sound of the lens is recorded when the zoom function operates while shooting a movie.
T side
W side
Search
Search
Operation
MENU/Settings
Index
29
GB

DISP (Screen Display Settings)
1 Press DISP (Screen Display Settings) on the control button.
2 Select the desired mode with the control button.
contents
Table of
(Bright +
Image Only)
(Bright +
Exposure Data)
(Bright) Sets screen brighter and displays the
(Normal) Sets screen to standard brightness and displays
Note
• If you view images in bright outside light, adjust the screen brightness up. However, the battery power
may decrease faster under such condition.
Sets screen brighter and displays only images.
Sets screen brighter and displays the
information.
Displays a recorded image.
A histogram is also displayed.
information.
the information.
Search
Search
Operation
MENU/Settings
Index
30
GB
 Loading...