

Page 1
4-445-021-52(1)
DSC-H200
Digital Still Camera / Instruction Manual GB
Appareil photo numérique / Mode d’emploi FR
Fotocamera digitale / Istruzioni per l’uso IT
Cámara fotografía digital / Manual de instrucciones ES
Câmara fotográfica digital / Manual de instruções PT
Digitale Fotokamera / Gebrauchsanleitung DE
Digitale camera / Gebruiksaanwijzing NL
Cyfrowy aparat fotograczny / Instrukcja obsługi PL
Digitální fotoaparát / Návod k obsluze CZ
Digitális fényképezőgép / Használati útmutató HU
Digitálny fotoaparát / Návod na používanie SK
Digital stillbildskamera / Handledning SE
Digitaalikamera / Käyttöopas FI
Digitalt stillkamera / Bruksanvisning NO
Digitalt stillbilledkamera / Betjeningsvejledning DK
Digitalni fotoaparat / Priručnik za upotrebu HR
Aparat foto digital / Manual de instrucţiuni RO
GR
©2013 Sony Corporation Printed in China
DSC-H200
Page 2

English
Learning more about the camera (“Cyber-shot User Guide”)
“Cyber-shot User Guide” is an on-line manual. Refer to it for
in-depth instructions on the many functions of the camera.
1 Access the Sony support page.
http://www.sony.net/SonyInfo/Support/
2 Select your country or region.
3 Search for the model name of your camera within the
support page.
• Check the model name on the bottom of your camera.
Checking the supplied items
The number in parentheses indicates the number of pieces.
• Camera (1)
• LR6 (size AA) alkaline batteries (4)
• Dedicated USB cable (1) (Sony Corporation 1-837-783-)
• Shoulder strap (1)
• Lens cap (1)/Lens cap strap (1)
• Instruction Manual (this manual) (1)
GB
2
Page 3

Owner’s Record
The model and serial numbers are located on the bottom. Record the serial number in the
space provided below. Refer to these numbers whenever you call your Sony dealer
regarding this product.
Model No. DSC-H200
Serial No. _____________________________
WARNING
To reduce fire or shock hazard, do not expose the unit to rain or
moisture.
For Customers in the U.S.A.
UL is an internationally recognized safety organization.
The UL Mark on the product means it has been UL Listed.
If you have any questions about this product, you may call:
Sony Customer Information Center
1-800-222-SONY (7669)
The number below is for the FCC related matters only.
[ Regulatory Information
Declaration of Conformity
Trade Name: SONY
Model No.: DSC-H200
Responsible Party: Sony Electronics Inc.
Address: 16530 Via Esprillo,
Telephone No.: 858-942-2230
This device complies with Part15 of the FCC Rules. Operation is subject to the
following two conditions: (1) This device may not cause harmful interference, and (2)
this device must accept any interference received, including interference that may cause
undesired operation.
[ CAUTION
You are cautioned that any changes or modifications not expressly approved in this manual
could void your authority to operate this equipment.
San Diego, CA 92127 U.S.A.
GB
GB
3
Page 4

[ Note:
This equipment has been tested and found to comply with the limits for a Class B digital
device, pursuant to Part 15 of the FCC Rules.
These limits are designed to provide reasonable protection against harmful interference in
a residential installation. This equipment generates, uses, and can radiate radio frequency
energy and, if not installed and used in accordance with the instructions, may cause
harmful interference to radio communications. However, there is no guarantee that
interference will not occur in a particular installation. If this equipment does cause harmful
interference to radio or television reception, which can be determined by turning the
equipment off and on, the user is encouraged to try to correct the interference by one or
more of the following measures:
– Reorient or relocate the receiving antenna.
– Increase the separation between the equipment and receiver.
– Connect the equipment into an outlet on a circuit different from that to which the
receiver is connected.
– Consult the dealer or an experienced radio/TV technician for help.
The supplied interface cable must be used with the equipment in order to comply with the
limits for a digital device pursuant to Subpart B of Part 15 of FCC Rules.
For Customers in Europe
[ Notice for the customers in the countries applying EU Directives
This product has been manufactured by or on behalf of Sony Corporation, 1-7-1 Konan
Minato-ku Tokyo, 108-0075 Japan. Inquiries related to product compliance based on
European Union legislation shall be addressed to the authorized representative, Sony
Deutschland GmbH, Hedelfinger Strasse 61, 70327 Stuttgart, Germany. For any service or
guarantee matters, please refer to the addresses provided in the separate service or
guarantee documents.
This product has been tested and found compliant with the limits set out in the EMC
regulation for using connection cables shorter than 3 meters (9.8 feet).
[ Attention
The electromagnetic fields at the specific frequencies may influence the picture and sound
of this unit.
[ Notice
If static electricity or electromagnetism causes data transfer to discontinue midway (fail),
restart the application or disconnect and connect the communication cable (USB, etc.)
again.
GB
4
Page 5

[ Disposal of Old Electrical & Electronic Equipment (Applicable in
the European Union and other European countries with separate
collection systems)
This symbol on the product or on its packaging indicates that this product
shall not be treated as household waste. Instead it shall be handed over to
the applicable collection point for the recycling of electrical and electronic
equipment. By ensuring this product is disposed of correctly, you will help
prevent potential negative consequences for the environment and human
health, which could otherwise be caused by inappropriate waste handling
of this product. The recycling of materials will help to conserve natural
please contact your local Civic Office, your household waste disposal service or the shop
where you purchased the product.
resources. For more detailed information about recycling of this product,
[ Disposal of waste batteries (applicable in the European Union
and other European countries with separate collection systems)
This symbol on the battery or on the packaging indicates that the battery
provided with this product shall not be treated as household waste.
On certain batteries this symbol might be used in combination with a
chemical symbol. The chemical symbols for mercury (Hg) or lead (Pb) are
added if the battery contains more than 0.0005% mercury or 0.004% lead.
potentially negative consequences for the environment and human health which could
otherwise be caused by inappropriate waste handling of the battery. The recycling of the
materials will help to conserve natural resources.
In case of products that for safety, performance or data integrity reasons require a
permanent connection with an incorporated battery, this battery should be replaced by
qualified service staff only.
To ensure that the battery will be treated properly, hand over the product at end-of-life to
the applicable collection point for the recycling of electrical and electronic equipment.
For all other batteries, please view the section on how to remove the battery from the
product safely. Hand the battery over to the applicable collection point for the recycling of
waste batteries.
For more detailed information about recycling of this product or battery, please contact
your local Civic Office, your household waste disposal service or the shop where you
purchased the product.
By ensuring these batteries are disposed of correctly, you will help prevent
GB
GB
5
Page 6

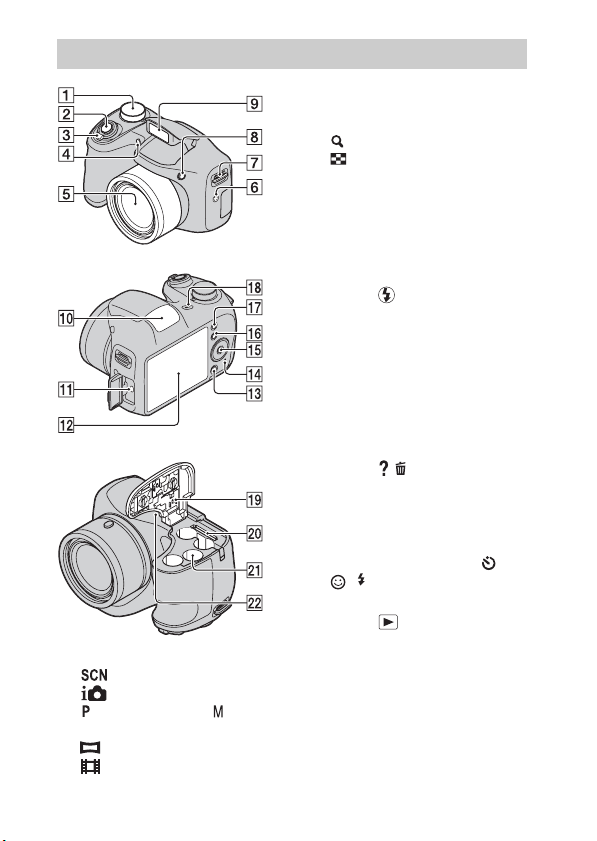
Identifying parts
A Mode dial: (Scene
Selection)/ (Intelligent
Auto)/ (Program Auto)/
(Manual Exposure Shooting)/
(Sweep Panorama)/
GB
(Movie Mode)
B Shutter button
6
C For shooting: W/T (Zoom) lever
For viewing: (Playback
zoom) lever/ (Index) lever
D Self-timer lamp/Smile Shutter
lamp/AF illuminator
E Lens
F Speaker
G Hook for shoulder strap
H (flash pop-up) button
• When you do not want to fire
the flash, push the flash unit
down by hand to retract it.
I Flash
J Microphone
K USB / A/V OUT jack
L LCD screen
M / (In-Camera Guide/Delete)
button
N Access lamp
O Control button
MENU on: v/V/b/B
MENU off: DISP/ / /
P MENU button
Q (Playback) button
R ON/OFF (Power) button/
ON/OFF (Power) lamp
S Battery/memory card cover
T Memory card slot
U Battery insertion slot
V Tripod receptacle
• Use a tripod with a screw less
than 5.5 mm (7/32 inches)
long. Otherwise, you cannot
firmly secure the camera, and
damage to the camera may
occur.
Page 7

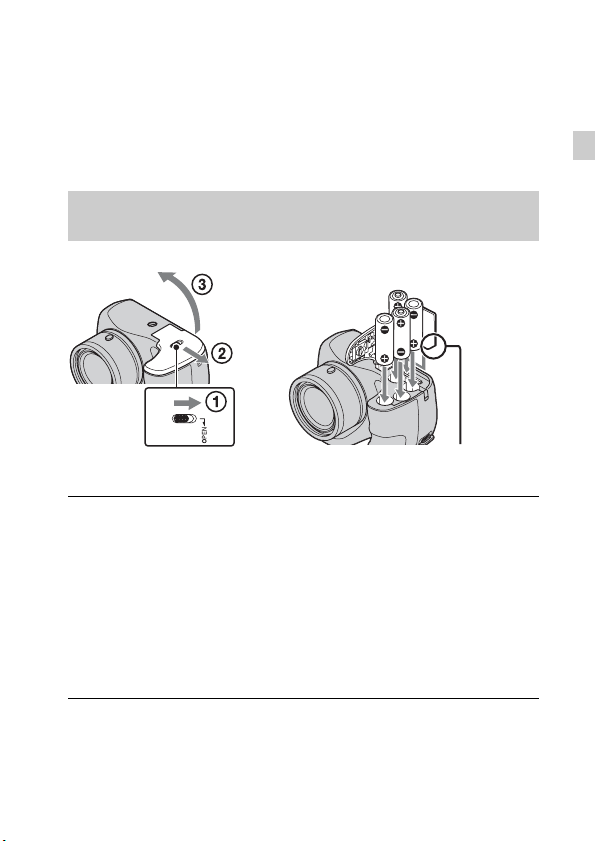
Inserting the batteries/a memory card (sold separately)
Ensure the notched corner faces correctly.
Open the cover.
1
Insert the memory card (sold separately).
2
• With the notched corner facing as illustrated, insert the memory card
until it clicks into place.
Match +/– and insert the batteries.
3
Close the cover.
4
x
Memory cards that you can use
Memory Card For still images For movies
Memory Stick PRO Duo (Mark2 only)
A
Memory Stick PRO-HG Duo
Memory Stick Duo —
B Memory Stick Micro (M2) (Mark2 only)
SD memory card (Class 4 or faster)
C
SDHC memory card (Class 4 or faster)
microSD memory card (Class 4 or faster)
D
microSDHC memory card (Class 4 or faster)
GB
GB
7
Page 8

In this manual, the products in the table are collectively referred to as
followings:
A: “Memory Stick Duo” media
B: “Memory Stick Micro” media
C: SD card
D: microSD memory card
Notes
• When using “Memory Stick Micro” media or microSD memory cards with this
camera, make sure to use with the appropriate adaptor.
x
To remove the memory card/batteries
Memory card: Push the memory card in once.
Batteries: Be sure not to drop the batteries.
Notes
• Never open the battery/memory card cover or remove the batteries/memory card
when the access lamp (page 6) is lit. This may cause damage to data in the
memory card/internal memory.
x
Batteries you can and cannot use with your camera
In the table below, indicates the battery can be used, while — indicates the
one cannot be used.
Battery type Supplied Supported Rechargeable
LR6 (size AA) alkaline
batteries
HR15/51: HR6 (size AA)
Nickel-Metal Hydride
batteries
Lithium batteries* — — —
Manganese batteries* — — —
Ni-Cd batteries* — — —
* Operating performance cannot be ensured if voltage drops or other problems are
caused by the nature of the battery.
—
—
GB
8
Page 9
Notes
• The performance of your camera differs depending on the manufacturer and the
type of battery you use. Also, battery-performance may decline dramatically under
low temperatures. Especially, at temperatures below 5 °C (41 °F), your camera
may get turned off unexpectedly as you turn it on or switch the playback mode to
the shooting mode.
For more details on batteries, see “Batteries” in “Cyber-shot User Guide”.
• Please note that we cannot guarantee full performance of your camera when using
the batteries not indicated as “supported” in the above table.
x
Battery life and number of images you can record/
view
Battery life Number of images
Shooting (still images) Approx. 175 min. Approx. 350 images
Actual shooting (movies) Approx. 85 min. —
Continuous shooting (movies) Approx. 150 min. —
Viewing (still images) Approx. 400 min. Approx. 8000 images
Notes
• The number of images that can be recorded is an approximate number when
shooting with new batteries. The number may be less depending on the
circumstances.
• The number of images that can be recorded is when shooting under the following
conditions:
– Using Sony “Memory Stick PRO Duo” (Mark2) media (sold separately).
– New batteries are used at an ambient temperature of 25°C (77°F).
• The number of still images that can be recorded is based on the CIPA standard,
and is for shooting under the following conditions.
(CIPA: Camera & Imaging Products Association)
– Shooting once every 30 seconds.
– The zoom is switched alternately between the W and T ends.
– The flash strobes once every two times.
– The power turns on and off once every ten times.
• The battery life for movies is based on the CIPA standard, and is for shooting
under the following conditions:
– Recording mode: 1280 × 720 (Fine)
– “Actual shooting (movies)”: Indicates the approximate shooting time as a
guideline when you repeatedly perform shooting, zooming, standby for
shooting, and turning on and off the camera.
GB
GB
9
Page 10

– “Continuous shooting (movies)”: When continuous shooting ends because of set
limits (29 minutes), press the shutter button again to continue shooting. Shooting
functions such as the zoom do not operate.
• The values shown for alkaline battery are based on commercial norms, and do not
apply to all alkaline batteries in all conditions. The values may vary, depending on
the battery manufacturer/type, environmental conditions, product setting, etc.
Setting the clock
ON/OFF (Power)
Control button
Select items: v/V/b/B
Set: z
Press the ON/OFF (Power) button.
1
Date & Time setting is displayed when you press the ON/OFF (Power)
button for the first time.
• It may take time for the power to turn on and allow operation.
Select a desired language.
2
Select a desired geographic location by following the
3
on-screen instructions, then press z.
Set [Date & Time Format], [Summer Time] and
4
[Date & Time], then press [OK].
• Midnight is indicated as 12:00 AM, and noon as 12:00 PM.
Operate following the instructions on the screen.
5
10
GB
Page 11
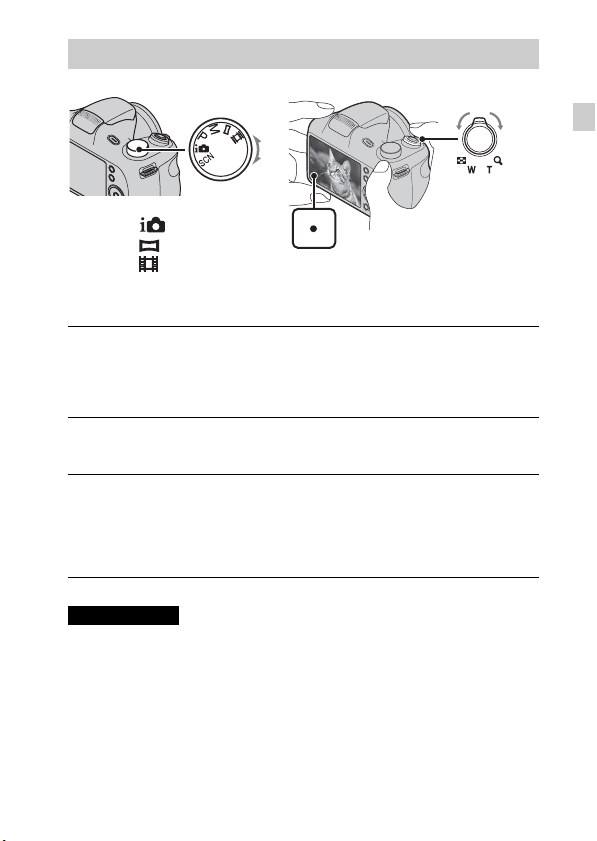
Shooting still images/movies
Shutter
button
GB
Mode dial
: Intelligent Auto
: Sweep Panorama
: Movie Mode
Shooting still images
Press the shutter button halfway down to focus.
1
When the image is in focus, a beep sounds and the z indicator lights.
Press the shutter button fully down.
2
Shooting movies
Press the shutter button fully down to start recording.
1
• Use the W/T (zoom) lever to change the zoom scale.
Press the shutter button fully down again to stop
2
recording.
Notes
• The operating sound of the lens may be recorded when the zoom function operates
while shooting a movie.
• The panoramic shooting range may be reduced, depending on the subject or the
way it is shot. Therefore even when [360°] is set for panoramic shooting, the
recorded image may be less than 360 degrees.
W/T (Zoom)
W: zoom out
T: zoom in
GB
11
Page 12

Viewing images
W: zoom out
T: zoom in
(Playback)
Control button
/ (Delete)
Select images: B (next)/b (previous)
Set: z
Press the (Playback) button.
1
When images on a memory card recorded with other cameras are played
back on this camera, the registration screen for the data file appears.
x
Selecting next/previous image
Select an image with B (next)/b (previous) on the control button. Press z in
the center of the control button to view movies.
x
Deleting an image
1 Press / (Delete) button.
2 Select [This Image] with v on the control button, then press z.
x
Returning to shooting images
Press the shutter button halfway down.
GB
12
Page 13
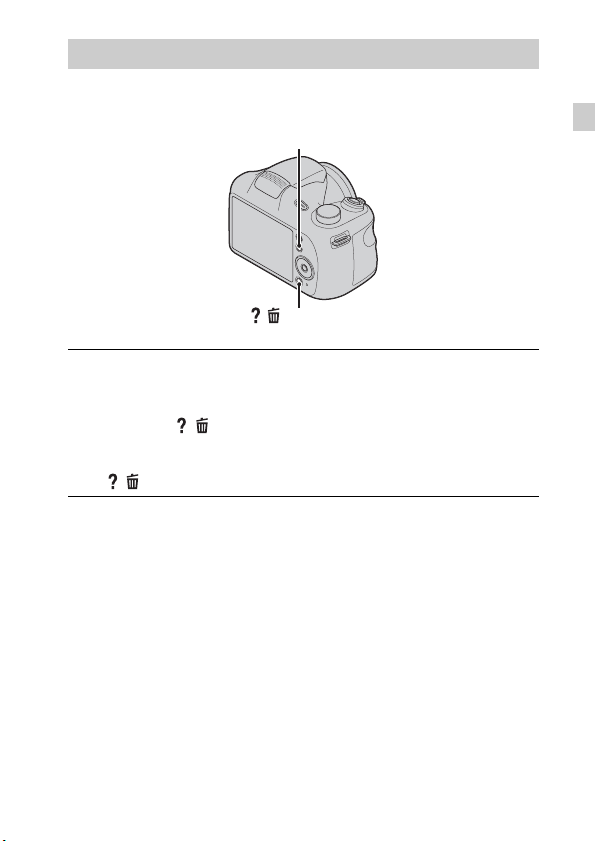
In-Camera Guide
This camera contains an internal function guide. This allows you to search the
camera’s functions according to your needs.
MENU
/ (In-Camera Guide)
Press the MENU button.
1
Select an item whose description you want to view, then
2
press the / (In-Camera Guide) button.
The operation guide for the selected function is displayed.
• You can search for a function by key word(s) or icon, by pressing the
/ (In-Camera Guide) button when MENU is not displayed.
GB
GB
13
Page 14
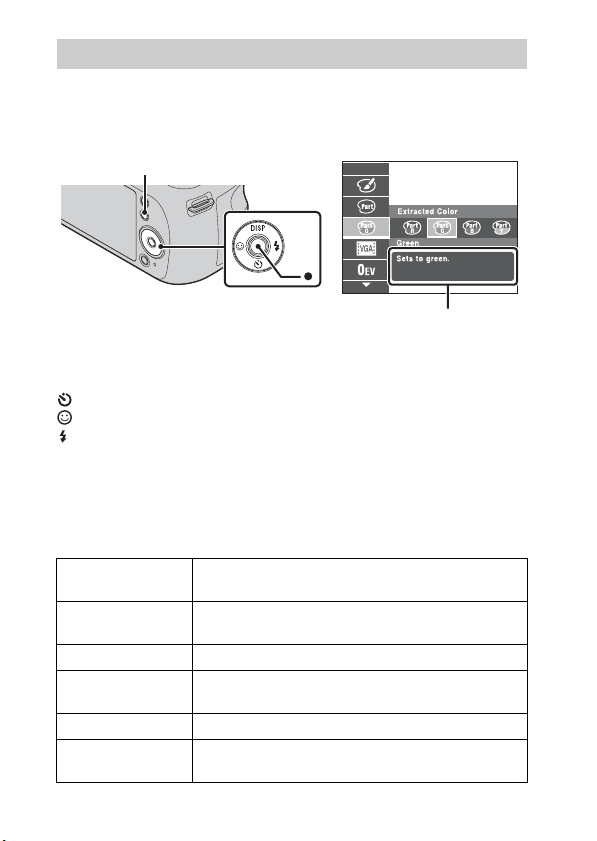
Introduction of other functions
Other functions used when shooting or playing back can be operated using the
control button or MENU button on the camera. This camera is equipped with a
Function Guide that allows you to easily select from the functions. While
displaying the guide, try the other functions.
MENU
x
Control button
DISP (Display Setting): Allows you to change the screen display.
(Self-Timer): Allows you to use the self-timer.
(Smile Shutter): Allows you to use the Smile Shutter mode.
(Flash): Allows you to select a flash mode for still images.
z (Tracking focus): Allows you to continue to focus on a subject even if the
subject moves.
x
Menu Items
Shooting
Movie shooting
scene
Panorama
Shooting Scene
Scene Selection Select pre-set settings to match various scene conditions.
Picture Effect
Easy Mode Shoot still images using minimal functions.
Color hue
GB
Control
button
Function Guide
Select movie recording mode.
Select recording mode when shooting panoramic images.
Shoot still images with an original texture according to
the desired effect.
Set the color hue when [Toy camera] is selected in
Picture Effect.
14
Page 15

Extracted Color
Soft Skin Effect Set the Soft Skin Effect and the effect level.
Still Image Size/
Panorama Image
Size/Movie Size
Exposure
Compensation
ISO Adjust the luminous sensitivity.
White Balance Adjust color tones of an image.
Focus Select the focus method.
Metering Mode
Cont. Shooting
Settings
Bracket Setting Select the bracket shooting mode.
Scene Recognition
Smile Detection
Sensitivity
Face Detection
DRO
Anti Blink
In-Camera Guide Search the camera’s functions according to your needs.
Select the color to extract when [Partial Color] is
selected in Picture Effect.
Select the image size for still images, panoramic images
or movie files.
Adjust the exposure manually.
Select the metering mode that sets which part of the
subject to measure to determine the exposure.
Select single-image mode or burst mode.
Set to automatically detect shooting conditions in
Intelligent Auto mode.
Set the Smile Shutter function sensitivity for detecting
smiles.
Select to detect faces and adjust various settings
automatically.
Set DRO function to correct the brightness and contrast
and improve the image quality.
Set to automatically shoot two images and select image
in which the eyes are not blinking.
GB
GB
15
Page 16
Viewing
Beauty Effect Retouch a face on a still image.
Retouch Retouch an image using various effects.
Delete Delete an image.
Slideshow Select a method of continuous playback.
View Mode Select the display format for images.
Protect Protect the images.
Print (DPOF) Add a print order mark to a still image.
Rotate Rotate a still image to the left or right.
In-Camera Guide Search the camera’s functions according to your needs.
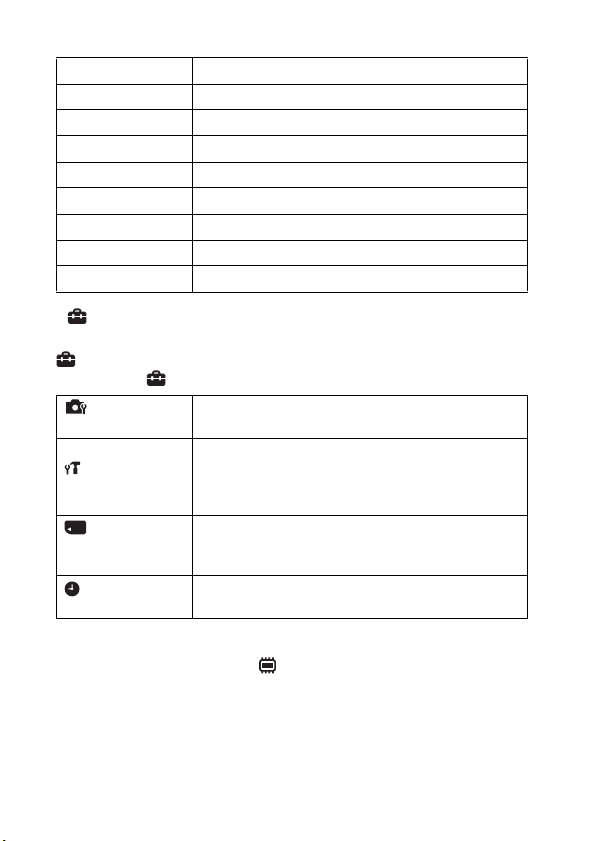
x
Setting items
If you press the MENU button while shooting or during playback,
(Settings) is provided as a final selection. You can change the default
settings on the (Settings) screen.
Shooting Settings
Main Settings
Memory Card
2
*
Tool
Clock Settings
*1 [Eye-Fi] is displayed only when a compatible memory card is inserted to the
camera.
*2 If a memory card is not inserted, (Internal Memory Tool) will be displayed
and only [Format] can be selected.
AF Illuminator/Grid Line/Disp. Resolution/Digital
Zoom/Red Eye Reduction/Blink Alert/Write Date
Beep/Panel Brightness/Language Setting/Display color/
Initialize/Function Guide/Video Out/USB Connect
Setting/LUN Setting/Download Music/Empty Music/
1
Eye-Fi*
/Power Save
Format/Create REC.Folder/Change REC.Folder/Delete
REC.Folder/Copy/File Number
Area Setting/Date & Time Setting
16
GB
Page 17

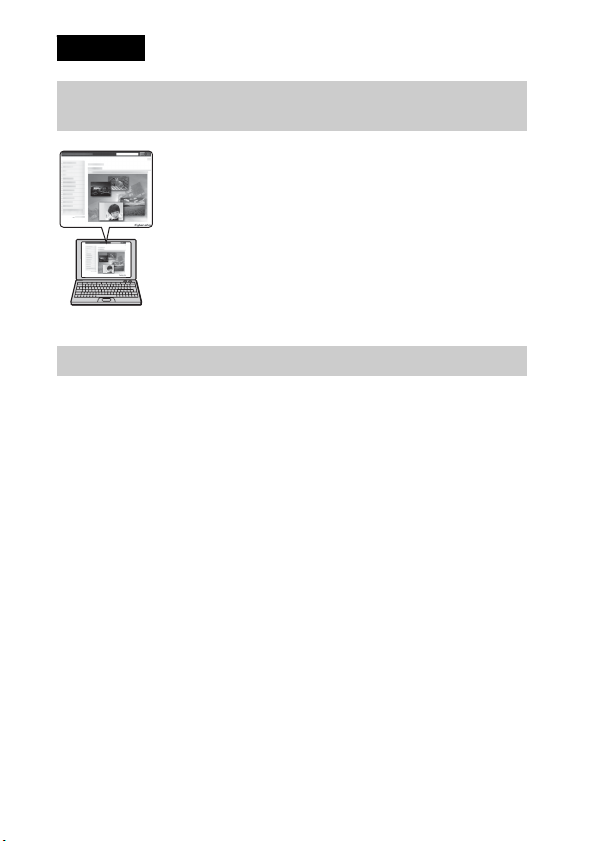
Features of “PlayMemories Home”
The software “PlayMemories Home” allows you to import still images and
movies to your computer and use them.
Importing
images from
your camera
Viewing images
on Calendar
Uploading images to
network services
z Downloading “PlayMemories Home” (for Windows only)
You can download “PlayMemories Home” from the following URL:
www.sony.net/pm
Notes
• An Internet connection is required to install “PlayMemories Home”.
• An Internet connection is required to use “PlayMemories Online” or other network
services. “PlayMemories Online” or other network services may not be available
in some countries or regions.
• “PlayMemories Home” is not compatible with Macs. Use the applications that are
installed on your Mac. For details, visit the following URL:
http://www.sony.co.jp/imsoft/Mac/
Sharing images on
“PlayMemories Online”
GB
GB
17
Page 18

x
Installing “PlayMemories Home” on a computer
Using the Internet browser on your computer, go to the
1
following URL, then click [Install] t [Run].
www.sony.net/pm
Follow the instructions on
2
the screen to complete the
installation.
• When the message to connect the
camera to a computer is displayed,
connect the camera and computer
using the dedicated USB cable
(supplied).
x
Viewing “PlayMemories Home Help Guide”
For details on how to use “PlayMemories Home”, refer to the “PlayMemories
Home Help Guide”.
Double-click the [PlayMemories Home Help Guide] icon
1
on the desktop.
• To access the “PlayMemories Home Help Guide” from the start menu:
Click [Start] t [All Programs] t [PlayMemories Home] t
[PlayMemories Home Help Guide].
• For Windows 8, select the [PlayMemories Home] icon on the Start
screen, then launch “PlayMemories Home” and select [PlayMemories
Home Help Guide] from the [Help] menu.
• For details on “PlayMemories Home”, you can also see the “Cyber-shot
User Guide” (page 2) or the following PlayMemories Home support
page (English only):
http://www.sony.co.jp/pmh-se/
To a USB
jack
To the USB / A/V
OUT jack
18
GB
Page 19
Number of still images and recordable time of movies
The number of still images and recordable time may vary depending on the
shooting conditions and the memory card.
x
Still images
(Units: Images)
Capacity
Size
20M 5 265
VGA 350 11500
16:9(15M) 7 330
x
Movies
The table below shows the approximate maximum recording times. These are
the total times for all movie files. Continuous shooting is possible for
approximately 29 minutes (limited by product specifications). For [1280 × 720
(Fine)] size movies, continuous shooting is possible for approximately
20 minutes (limited by 2 GB file size).
Capacity
Size
1280 × 720 (Fine) — 25 m (20 m)
1280 × 720 (Standard) — 35 m (30 m)
VGA 2m (1m) 1h 5m (1h 5m)
The number in ( ) is the minimum recordable time.
• The recordable time of movies varies because the camera is equipped with VBR
(Variable Bit Rate), which automatically adjusts image quality depending on the
shooting scene. When you record a fast-moving subject, the image is clearer but
the recordable time is shorter because more memory is required for recording.
The recordable time also varies depending on the shooting conditions, the subject
or the image size setting.
Internal memory Memory card
Approx. 55 MB 2 GB
(h (hour), m (minute))
Internal memory Memory card
Approx. 55 MB 2 GB
GB
GB
19
Page 20

Notes on using the camera
On use and care
Avoid rough handling, disassembling, modifying, physical shock, or impact such as
hammering, dropping or stepping on the product. Be particularly careful of the lens.
Notes on recording/playback
• Before you start recording, make a trial recording to make sure that the camera is
working correctly.
• The camera is neither dust-proof, nor splash-proof, nor water-proof.
• Avoid exposing the camera to water. If water enters inside the camera, a
malfunction may occur. In some cases, the camera cannot be repaired.
• Do not aim the camera at the sun or other bright light. It may cause the
malfunction of the camera.
• If moisture condensation occurs, remove it before using the camera.
• Do not shake or strike the camera. It may cause a malfunction and you may not be
able to record images. Furthermore, the recording media may become unusable or
image data may be damaged.
Do not use/store the camera in the following places
• In an extremely hot, cold or humid place
In places such as in a car parked in the sun, the camera body may become
deformed and this may cause a malfunction.
• Storing under direct sunlight or near a heater
The camera body may become discolored or deformed, and this may cause a
malfunction.
• In a location subject to rocking vibration
• Near a location that generates strong radio waves, emits radiation or is strongly
magnetic place. Otherwise, the camera may not properly record or play back
images.
• In sandy or dusty places
Be careful not to let sand or dust get into the camera. This may cause the camera to
malfunction, and in some cases this malfunction cannot be repaired.
20
GB
Page 21

On the battery
• Avoid rough handling, disassembling, modifying, physical shock, or impact such
as hammering, dropping or stepping on the battery.
• Do not use a deformed or damaged battery.
• Do not mix a used battery together with a new battery or different types of
batteries.
• Remove the batteries from the camera when you do not operate the camera for
long periods, or when the batteries are dead.
Notes on the screen and lens
The screen is manufactured using extremely high-precision technology so over
99.99% of the pixels are operational for effective use. However, some tiny black
and/or bright dots (white, red, blue or green) may appear on the screen. These dots
are a normal result of the manufacturing process, and do not affect the recording.
On camera’s temperature
Your camera and battery may get hot due to continuous use, but it is not a
malfunction.
Warning on copyright
Television programs, films, videotapes, and other materials may be copyrighted.
Unauthorized recording of such materials may be contrary to the provisions of the
copyright laws.
No compensation for damaged content or recording failure
Sony cannot compensate for failure to record or loss or damage of recorded content
due to a malfunction of the camera or recording media, etc.
Cleaning the camera surface
Clean the camera surface with a soft cloth slightly moistened with water, then wipe
the surface with a dry cloth. To prevent damage to the finish or casing:
– Do not expose the camera to chemical products such as thinner, benzine, alcohol,
disposable cloths, insect repellent, sunscreen or insecticide.
Maintaining the LCD monitor
• Hand cream or moisturizer left on the screen may dissolve its coating. If you get
any on the screen, wipe it off immediately.
• Wiping forcefully with tissue paper or other materials can damage the coating.
• If fingerprints or debris are stuck to the screen of the LCD monitor, we
recommend that you gently remove any debris and then wipe the screen clean with
a soft cloth.
GB
GB
21
Page 22

Specifications
Camera
[System]
Image device: 7.76 mm (1/2.3 type)
CCD, Primary color filter
Total pixel:
Approx. 20.4 Megapixels
Effective pixel:
Approx. 20.1 Megapixels
Lens: 26× zoom lens
f = 4.0 mm – 104.0 mm (22.3 mm
– 580 mm (35 mm film
equivalent))
F3.1 (W) – F5.9 (T)
While shooting movies (16:9):
28 mm – 748 mm
While shooting movies (4:3):
22.3 mm – 580 mm
SteadyShot: Optical
Exposure control: Automatic exposure,
Manual Exposure, Scene Selection
White balance: Automatic, Daylight,
Cloudy, Fluorescent 1/2/3,
Incandescent, Flash, One Push
Burst shooting (when shooting with the
largest pixel number):
Approx. 0.8 images/second (up to
100 images)
File format:
Still images: JPEG (DCF, Exif,
MPF Baseline) compliant, DPOF
compatible
Movies: MPEG-4 AVC/H.264
Recording media: Internal Memory
(Approx. 55 MB), “Memory Stick
Duo” media, “Memory Stick
Micro” media, SD cards, microSD
memory cards
Flash: Flash range (ISO sensitivity
(Recommended Exposure Index)
set to Auto):
Approx. 0.4 m to 6.8 m (1 ft. 1/3
inches to 22 ft. 3 3/4 inches) (W)
Approx. 1.5 m to 3.6 m (5 ft. to
11 ft. 9 3/4 inches) (T)
[Input and Output connectors]
USB / A/V OUT jack:
Video output
Audio output
USB communication
USB communication: Hi-Speed USB
(USB 2.0)
[Screen]
LCD screen:
7.5 cm (3.0 type) TFT drive
Total number of dots:
460 800 dots
[Power, general]
Power: LR6 (size AA) alkaline
batteries (4), 6 V
HR15/51: HR6 (size AA) NickelMetal Hydride batteries (4) (sold
separately), 4.8 V
Power consumption (during shooting):
Approx. 1.6 W
Operating temperature:
0°C to 40°C (32°F to 104°F)
Storage temperature:
–20°C to +60°C (–4°F to +140°F)
22
GB
Page 23

Dimensions (CIPA compliant):
122.9 mm × 83.2 mm × 87.2 mm
(4 7/8 inches × 3 3/8 inches ×
3 1/2 inches)
(W/H/D)
Mass (CIPA compliant) (including four
batteries and “Memory Stick Duo”
media):
Approx. 530 g (1 lb 2.7 oz)
Microphone: Monaural
Speaker: Monaural
Exif Print: Compatible
PRINT Image Matching III:
Compatible
Design and specifications are subject to
change without notice.
Trademarks
• The following marks are trademarks
of Sony Corporation.
, “Cyber-shot,”
“Memory Stick PRO Duo,”
“Memory Stick PRO-HG Duo,”
“Memory Stick Duo,” “Memory
Stick Micro”
• Windows is registered trademark of
Microsoft Corporation in the United
States and/or other countries.
• Mac and Mac OS are registered
trademarks of Apple Inc.
• SDHC logo is a trademark of SD-3C,
LLC.
• Eye-Fi is a trademark of Eye-Fi Inc.
• Facebook and the “f” logo are
trademarks or registered trademarks
of Facebook, Inc.
• YouTube and the YouTube logo are
trademarks or registered trademarks
of Google Inc.
• In addition, system and product
names used in this manual are, in
general, trademarks or registered
trademarks of their respective
developers or manufacturers.
However, the ™ or ® marks are not
used in all cases in this manual.
Additional information on this
product and answers to frequently
asked questions can be found at
our Customer Support Website.
GB
Printed on 70% or more recycled paper
using VOC (Volatile Organic
Compound)-free vegetable oil based
ink.
GB
23
Page 24
m
Français
Mieux connaître votre appareil (« Guide de l’utilisateur du Cyber-shot »)
Le « Guide de l’utilisateur du Cyber-shot » est un manuel en
ligne. Reportez-vous y pour des instructions approfondies sur
les nombreuses fonctions de l’appareil.
1 Accédez à la page de support Sony.
http://www.sony.net/SonyInfo/Support/
2 Sélectionnez votre pays ou région.
3 Recherchez le nom de modèle de votre appareil sur la
page de support.
• Vérifiez le nom de modèle sur la face inférieure de votre
appareil.
Vérification des éléments fournis
Le nombre entre parenthèses indique le nombre d’unités.
• Appareil photo (1)
• Piles alcalines LR6 (taille AA) (4)
• Câble USB dédié (1) (Sony Corporation 1-837-783-)
• Bandoulière (1)
• Capuchon d’objectif (1)/Attache du capuchon d’objectif (1)
• Mode d’emploi (ce manuel) (1)
FR
2
Page 25

Aide-mémoire
Les numéros de modèle et de série se situent sous l’appareil. Prendre en note le numéro de
série dans l’espace prévu ci-dessous. Se reporter à ces numéros lors des communications
avec le détaillant Sony au sujet de ce produit.
Modèle no DSC-H200
No de série ____________________________
AVERTISSEMENT
Afin de réduire les risques d’incendie ou de décharge électrique,
n’exposez pas cet appareil à la pluie ou à l’humidité.
À l’intention des clients aux É.-U.
UL est une organisation de sécurité reconnue internationalement.
La marque UL sur le produit signifie que celui-ci est listé par UL.
Pour toute question au sujet de cet appareil, appeler :
Sony Centre d’information à la clientèle
1-800-222-SONY (7669).
Le numéro ci-dessous concerne seulement les questions relevant de la Commission
fédérale des communications des États-Unis (FCC).
[ Information réglementaire
Déclaration de conformité
Nom commercial : SONY
No de modèle : DSC-H200
Responsable : Sony Electronics Inc.
Adresse : 16530 Via Esprillo, San Diego, CA 92127 É.-U.
No de téléphone : 858-942-2230
Cet appareil est conforme à la Partie 15 de la réglementation de la FCC des États-Unis.
Son utilisation est sujette aux deux conditions suivantes : (1) Cet appareil ne doit pas
générer d’interférences nuisibles et (2) il doit être en mesure d’accepter toute
interférence reçue, y compris les interférences pouvant générer un fonctionnement
indésirable.
FR
[ AVERTISSEMENT
Par la présente, vous êtes avisé du fait que tout changement ou toute modification ne
faisant pas l’objet d’une autorisation expresse dans le présent manuel pourrait annuler
votre droit d’utiliser l’appareil.
FR
3
Page 26

[ Note :
L’appareil a été testé et est conforme aux exigences d’un appareil numérique de Classe B,
conformément à la Partie 15 de la réglementation de la FCC.
Ces critères sont conçus pour fournir une protection raisonnable contre les interférences
nuisibles dans un environnement résidentiel. L’appareil génère, utilise et peut émettre des
fréquences radio ; s’il n’est pas installé et utilisé conformément aux instructions, il pourrait
provoquer des interférences nuisibles aux communications radio. Cependant, il n’est pas
possible de garantir que des interférences ne seront pas provoquées dans certaines
conditions particulières. Si l’appareil devait provoquer des interférences nuisibles à la
réception radio ou à la télévision, ce qui peut être démontré en allumant et éteignant
l’appareil, il est recommandé à l’utilisateur d’essayer de corriger cette situation par l’une
ou l’autre des mesures suivantes :
– Réorienter ou déplacer l’antenne réceptrice.
– Augmenter la distance entre l’appareil et le récepteur.
– Brancher l’appareil dans une prise ou sur un circuit différent de celui sur lequel le
récepteur est branché.
– Consulter le détaillant ou un technicien expérimenté en radio/téléviseurs.
Le câble d’interface fourni doit être utilisé avec l’appareil pour que celui-ci soit conforme
aux critères régissant les appareils numériques, conformément à la sous-partie B de la
Partie 15 de la réglementation de la FCC.
Note pour les clients européens
[ Avis aux consommateurs des pays appliquant les Directives UE
Ce produit a été fabriqué par ou pour le compte de Sony Corporation, 1-7-1 Konan Minatoku Tokyo, 108-0075 Japon. Toutes les questions relatives à la conformité des produits
basées sur la législation européenne doivent être adressées à son représentant, Sony
Deutschland Gmbh, Hedelfinger Strasse 61, 70327 Stuttgart, Allemagne.
Pour toute question relative au Service Après-Vente ou à la Garantie, merci de bien vouloir
vous référer aux coordonnées qui vous sont communiquées dans les documents « Service
(SAV) » ou Garantie.
Cet appareil a été testé et jugé conforme aux limites établies par la réglementation EMC
visant l’utilisation de câbles de connexion de moins de 3 mètres (9,8 pi.).
[ Attention
Le champ électromagnétique à des fréquences particulières peut avoir une incidence sur
l’image et le son de cet appareil.
[ Avis
Si l’électricité statique ou les champs électrostatiques entraînent une interruption lors du
transfert des données (échec), redémarrez l’application ou débranchez, puis rebranchez le
câble de connexion (USB, etc.).
FR
4
Page 27

[ Traitement des appareils électriques et électroniques en fin de
vie (Applicable dans les pays de l’Union Européenne et aux
autres pays européens disposant de systèmes de collecte
sélective)
Ce symbole, apposé sur le produit ou sur son emballage, indique que ce
produit ne doit pas être traité avec les déchets ménagers. Il doit être remis
à un point de collecte approprié pour le recyclage des équipements
électriques et électroniques. En vous assurant que ce produit sont mis au
rebut de façon appropriée, vous participez activement à la prévention des
conséquences négatives que leur mauvais traitement pourrait provoquer
sur l’environnement et sur la santé humaine. Le recyclage des matériaux
toute information complémentaire au sujet du recyclage de ce produit, vous pouvez
contacter votre municipalité, votre déchetterie locale ou le point de vente où vous avez
acheté le produit.
contribue par ailleurs à la préservation des ressources naturelles. Pour
[ Elimination des piles et accumulateurs usagés (Applicable dans
les pays de l’Union Européenne et aux autres pays européens
disposant de systèmes de collecte sélective)
Ce symbole, apposé sur les piles et accumulateurs ou sur les emballages,
indique que les piles et accumulateurs fournis avec ce produit ne doivent
pas être traités comme de simples déchets ménagers.
Sur certains types de piles, ce symbole apparaît parfois combiné avec un
symbole chimique. Les symboles pour le mercure (Hg) ou le plomb (Pb)
0,004% de plomb.
En vous assurant que ces piles et accumulateurs sont mis au rebut de façon appropriée,
vous participez activement à la prévention des conséquences négatives que leur mauvais
traitement pourrait provoquer sur l’environnement et sur la santé humaine. Le recyclage
des matériaux contribue par ailleurs à la préservation des ressources naturelles.
Pour les produits qui pour des raisons de sécurité, de performance ou d’intégrité de
données nécessitent une connexion permanente à une pile ou à un accumulateur, il
conviendra de vous rapprocher d’un service technique qualifié pour effectuer son
remplacement.
En rapportant votre appareil électrique en fin de vie à un point de collecte approprié vous
vous assurez que la pile ou l’accumulateur incorporé sera traité correctement.
Pour tous les autres cas de figure et afin d’enlever les piles ou accumulateurs en toute
sécurité de votre appareil, reportez-vous au manuel d’utilisation. Rapportez les piles ou
accumulateurs usagés au point de collecte approprié pour le recyclage.
Pour toute information complémentaire au sujet du recyclage de ce produit ou des piles et
accumulateurs, vous pouvez contacter votre municipalité, votre déchetterie locale ou le
point de vente où vous avez acheté ce produit.
sont rajoutés lorsque ces piles contiennent plus de 0,0005% de mercure ou
FR
FR
5
Page 28
Identification des pièces
A Sélecteur de mode :
(Sélection scène)/
(Mode Auto Intelligent)/
(Programme Auto)/ (Prise
de vue expo manuelle)/
(Panorama par balayage)/
FR
6
(Mode Film)
B Déclencheur
C Pour la prise de vue : Manette
W/T (Zoom)
Pour la visualisation : Levier
(Zoom de lecture)/Levier
(Index)
D Témoin de retardateur/Témoin
de détection de sourire/
Illuminateur AF
E Objectif
F Haut-parleur
G Crochet pour bandoulière
H Touche (déploiement du
flash)
• Quand vous ne souhaitez pas
utiliser le flash, repliez-le en le
rabattant manuellement.
I Flash
J Micro
K Prise USB / A/V OUT
L Écran LCD
M Touche / (Guide intégré à
l’appareil/Supprimer)
N Témoin d’accès
O Touche de commande
MENU activé : v/V/b/B
MENU désactivé : DISP/ /
/
P Touche MENU
Q Touche (Lecture)
R Touche ON/OFF (Marche/
Arrêt)/Témoin ON/OFF
(Marche/Arrêt)
S Couvercle de piles/carte
mémoire
T Fente de carte mémoire
U Fente d’insertion des piles
Page 29
V Douille de trépied
• Utilisez un trépied ayant une
longueur de vis de moins de
5,5 mm (7/32 po). Sinon vous
ne pouvez pas fixer fermement
l’appareil et celui-ci pourrait
être endommagé.
Insertion des piles/d’une carte mémoire (vendue séparément)
FR
Assurez-vous que le coin entaillé est
Ouvrez le couvercle.
1
Insérez une carte mémoire (vendue séparément).
2
• Le coin entaillé étant dans le sens illustré, insérez la carte mémoire
jusqu’à ce qu’elle se mette en place avec un déclic.
Faites correspondre les symboles +/– et insérez les
3
piles.
Fermez le couvercle.
4
correctement orienté.
FR
7
Page 30

x
Cartes mémoire que vous pouvez utiliser
Carte mémoire
Memory Stick PRO Duo (Mark2 seulement)
A
Memory Stick PRO-HG Duo
Memory Stick Duo —
B Memory Stick Micro (M2) (Mark2 seulement)
Carte mémoire SD (Classe 4 ou plus
C
Carte mémoire SDHC (Classe 4 ou plus
Carte mémoire microSD (Classe 4 ou plus
D
Carte mémoire microSDHC (Classe 4 ou plus
Pour des images
fixes
Pour des films
rapide)
rapide)
rapide)
rapide)
Dans le présent manuel, les produits répertoriés dans le tableau sont désignés
collectivement comme suit :
A : « Memory Stick Duo »
B : « Memory Stick Micro »
C : Carte SD
D : Carte mémoire microSD
Remarques
• Lors de l’utilisation d’un « Memory Stick Micro » ou d’une carte mémoire
microSD avec cet appareil, assurez-vous de l’utiliser avec l’adaptateur approprié.
x
Pour retirer la carte mémoire/les piles
Carte mémoire : Enfoncez une fois la carte mémoire.
Piles : Veillez à ne pas laisser tomber les piles.
Remarques
• N’ouvrez jamais le couvercle du logement des piles/de la carte mémoire ni ne
retirez les piles/la carte mémoire lorsque le témoin d’accès (page 6) est allumé.
Cela pourrait endommager les données dans la carte mémoire/mémoire interne.
FR
8
Page 31

x
Piles compatibles et incompatibles avec votre
appareil photo
Dans le tableau ci-dessous, identifie les piles compatibles et —, les piles
incompatibles.
Type de piles Fournies Compatibles Rechargeables
Piles alcalines LR6 (taille
AA)
Piles nickel-hydrure
métallique HR15/51 : HR6
(taille AA)
Piles au lithium* — — —
Piles au manganèse*———
Piles Ni-Cd* ———
* Les performances de fonctionnement ne peuvent pas être garanties en cas de chute
de tension ou d’autres problèmes dus à la nature de la pile.
Remarques
• Les performances de votre appareil photo varient selon le fabricant et le type de
pile utilisé. Les performances de la pile peuvent également diminuer de manière
significative à basse température. En particulier, lorsque la température est
inférieure à 5 °C (41 °F), votre appareil photo peut s’éteindre de manière
inattendue lorsque vous le mettez sous tension ou que vous basculez du mode de
lecture au mode de prise de vue.
Pour plus d’informations sur les piles, reportez-vous à la section « Piles » du
« Guide de l’utilisateur du Cyber-shot ».
• Veuillez noter que nous ne pouvons pas garantir les performances optimales de
l’appareil photo si vous utilisez des piles non spécifiées comme « compatibles »
dans le tableau ci-dessus.
—
—
FR
FR
9
Page 32

x
Autonomie des piles et nombre d’images que vous
pouvez enregistrer/visualiser
Autonomie des piles Nombre d’images
Prise de vue (images fixes) Environ 175 min Environ 350 images
Prise de vue effective (films) Environ 85 min —
Prise de vue en continu (films) Environ 150 min —
Visualisation (images fixes) Environ 400 min Environ 8000 images
Remarques
• Le nombre d’images pouvant être enregistrées est approximatif et s’applique à une
prise de vue avec des piles neuves. Selon les circonstances, ce nombre peut être
inférieur.
• Le nombre d’images pouvant être enregistrées s’applique à la prise de vue dans les
conditions suivantes :
– Utilisation d’un Sony « Memory Stick PRO Duo » (Mark2) (vendu séparément).
– Les piles neuves sont utilisées à une température ambiante de 25 °C (77 °F).
• Le nombre d’images fixes pouvant être enregistrées est basé sur la norme CIPA et
il correspond à une prise de vue dans les conditions suivantes.
(CIPA: Camera & Imaging Products Association)
– Prise de vue une fois toutes les 30 secondes.
– Zoom commuté alternativement entre le côté W et le côté T.
– Flash déclenché toutes les deux fois.
– Mise sous et hors tension toutes les dix fois.
• La durée de vie de la batterie pour les vidéos est basée sur la norme CIPA et est
prévue pour la prise de vue dans les conditions suivantes :
– Mode d’enregistrement : 1280×720(Fine)
– « Prise de vue effective (films) » : Fournit à titre indicatif la durée
d’enregistrement approximative en cas de prises de vue répétées, zoom, pause
avant la prise de vue et mise sous/hors tension de l’appareil photo.
– « Prise de vue en continu (films) » : Si la prise de vue en rafale prend fin en
raison des limites définies (29 minutes), appuyez de nouveau sur le déclencheur
pour continuer la prise de vue. Les fonctions de prise de vue telles que le zoom
ne sont pas opérantes.
• Les valeurs indiquées pour des piles alcalines sont basées sur des normes
commerciales et ne s’appliquent pas à toutes les piles alcalines dans toutes les
conditions. Les valeurs peuvent varier, en fonction du type/fabricant de piles, des
conditions environnementales, de la configuration du produit, etc.
10
FR
Page 33

Réglage de l’horloge
ON/OFF (Marche/Arrêt)
Touche de commande
Sélection des paramètres : v/V/b/B
Réglage : z
Appuyez sur la touche ON/OFF (Marche/Arrêt).
1
Le réglage Date & Heure s’affiche la première fois que vous appuyez sur
la touche ON/OFF (Marche/Arrêt).
• La mise sous tension peut prendre un certain temps avant que
l’utilisation soit possible.
Sélectionnez la langue souhaitée.
2
Sélectionnez la zone géographique souhaitée en
3
suivant les instructions affichées à l’écran, puis
appuyez sur z.
Sélectionnez [Format date&heure], [Heure été] et
4
[Date&heure], puis appuyez sur [OK].
• Minuit est indiqué par 12:00 AM et midi par 12:00 PM.
Suivez les instructions affichées à l’écran.
5
FR
FR
11
Page 34

Prise de vue d’images fixes/films
Déclencheur
Sélecteur de
mode
: Mode Auto Intelligent
: Panorama par balayage
: Mode Film
Prise de vue d’images fixes
Enfoncez le déclencheur à mi-course pour effectuer la
1
mise au point.
Lorsque l’image est mise au point, un bip se fait entendre et l’indicateur
z s’allume.
Enfoncez complètement le déclencheur.
2
Enregistrement de films
Enfoncez complètement le déclencheur pour
1
commencer l’enregistrement.
• Utilisez la manette W/T (zoom) pour modifier le facteur de zoom.
Enfoncez à nouveau complètement le déclencheur pour
2
arrêter l’enregistrement.
Remarques
• Le bruit de fonctionnement de l’objectif peut être enregistré si vous utilisez le
zoom quand vous filmez.
• En mode de prise de vue panoramique, il est possible que la plage de prise de vue
soit réduite, en fonction du sujet ou de la manière dont la prise de vue est
effectuée. Il peut donc arriver que l’image enregistrée ne couvre pas 360 degrés,
FR
même si vous avez défini la prise de vue panoramique sur [360°].
W/T (Zoom)
W : zoom arrière
T : zoom avant
12
Page 35

Visualisation d’images
W : zoom arrière
T : zoom avant
(Lecture)
Touche de commande
/ (Supprimer)
Sélection des images : B (Suivante)/b (Précédente)
Réglage : z
Appuyez sur la touche (Lecture).
1
Lorsque des images sur une carte mémoire enregistrées avec un autre
appareil sont lues sur cet appareil, l’écran d’enregistrement pour le fichier
de données apparaît.
x
Sélection de l’image suivante/précédente
Sélectionnez une image avec B (suivante)/b (précédente) de la touche de
commande. Appuyez sur z au centre de la touche de commande pour
visualiser des films.
x
Suppression d’une image
1 Appuyez sur la touche / (Supprimer).
2 Sélectionnez [Cette img] avec v de la touche de commande, puis appuyez
sur z.
x
Retour à la prise d’images
Enfoncez le déclencheur à mi-course.
FR
FR
13
Page 36

Guide intégré à l’appareil
Cet appareil photo renferme un guide de fonctions interne. Ce qui vous permet
de rechercher les fonctions de l’appareil selon vos besoins.
MENU
/ (Guide intégré à l’appareil)
Appuyez sur la touche MENU.
1
Sélectionnez un élément dont vous souhaitez afficher la
2
description, puis appuyez sur la touche / (Guide
intégré à l’appareil).
Le mode d’emploi de la fonction sélectionnée s’affiche.
• Vous pouvez rechercher une fonction au moyen d’un mot-clé ou de son
icône, en appuyant sur la touche / (Guide intégré à l’appareil)
lorsque MENU n’est pas affiché.
14
FR
Page 37

Introduction d’autres fonctions
D’autres fonctions employées lors de la prise de vue ou la lecture peuvent être
utilisées à l’aide de la touche de commande ou de la touche MENU de
l’appareil. Cet appareil est équipé d’un Guide de fonction qui vous permet de
sélectionner facilement parmi les fonctions. Pendant que le guide est affiché,
essayez les autres fonctions.
MENU
x
Touche de commande
DISP (Réglage affichage) : Vous permet de changer l’affichage sur écran.
(Retardateur) : Vous permet d’utiliser le retardateur.
(Détection de sourire) : Vous permet d’utiliser le mode Détection de
sourire.
(Flash) : Vous permet de sélectionner un mode de flash pour les images
fixes.
z (Mise au point continue) : Vous permet de poursuivre la mise au point sur
un sujet, même s’il se déplace.
x
Paramètres du menu
Prise de vue
Scène Enreg. film Sélection du mode d’enregistrement de film.
Scène enreg. en
panorama
Sélection scène
Effet de photo
Mode Facile
Touche de
commande
Guide de fonction
Sélection du mode d’enregistrement lors de la prise de
vue d’images panoramiques.
Pour sélectionner des paramètres prédéfinis
correspondant aux diverses conditions de scène.
Pour enregistrer des images fixes avec une texture
originale en fonction de l’effet souhaité.
Pour prendre des images fixes en utilisant les fonctions
minimales.
FR
FR
15
Page 38

Teinte de la
couleur
Couleur Extraite
Effet peau douce Pour régler l’Effet peau douce et le niveau de l’effet.
Taille image fixe/
Taille d’image
panoramique/Taille
film
Correction
d’exposition
ISO Pour régler la sensibilité lumineuse.
Bal blanc Pour régler les tonalités de couleur d’une image.
Mise au P Pour sélectionner la méthode de mise au point.
Mode de mesure
Réglag. prise d. v.
en continu
Réglages
bracketing
Reconnaissance
de scène
Sensibilité sourire
Détection de
visage
DRO
Attén. yeux fermés
Guide intégré à
l’appareil
FR
Pour régler la teinte de la couleur lorsque [Caméra jouet]
est sélectionné dans Effet de photo.
Pour sélectionner la couleur à extraire lorsque [Couleur
partielle] est sélectionné dans Effet de photo.
Permet de sélectionner la taille des images fixes, des
images panoramiques et des fichiers de film.
Pour régler manuellement l’exposition.
Pour sélectionner le mode de mesure qui définit la partie
du sujet à mesurer pour déterminer l’exposition.
Pour sélectionner le mode Une seule image ou le mode
Rafale.
Pour sélectionner le mode de prise de vue par bracketing.
Pour régler la détection automatique des conditions de
prise de vue en mode Auto intelligent.
Pour régler la sensibilité de la fonction Détection de
sourire pour détecter des sourires.
Pour sélectionner automatiquement la détection de
visages et le réglage de divers paramètres.
Sélectionnez la fonction DRO pour corriger la
luminosité et le contraste, ainsi que pour améliorer la
qualité d’image.
Pour régler la prise de vue automatique de deux images
et la sélection de l’image sur laquelle les yeux ne sont
pas fermés.
Pour rechercher les fonctions de l’appareil selon vos
besoins.
16
Page 39

Visualisation
Effet beauté Permet de retoucher un visage sur une image fixe.
Retoucher Pour retoucher une image à l’aide de divers effets.
Supprimer Pour supprimer une image.
Diaporama Pour sélectionner une méthode de lecture continue.
Mode Visualisation Pour sélectionner le format d’affichage pour les images.
Protéger Pour protéger les images.
Impression (DPOF)
Pivoter
Guide intégré à
l’appareil
x
Paramètres de réglage
Pour ajouter une marque d’ordre d’impression à une
image fixe.
Pour faire pivoter une image fixe vers la gauche ou la
droite.
Pour rechercher les fonctions de l’appareil selon vos
besoins.
Si vous appuyez sur la touche MENU pendant la prise de vue ou pendant la
lecture, (Réglages) est indiqué comme sélection finale. Vous pouvez
modifier les réglages par défaut sur l’écran (Réglages).
Réglages prise de
vue
Réglages
principaux
Outil Carte
Mémoire
Réglages horloge
*1 [Eye-Fi] s’affiche uniquement lorsqu’une carte mémoire compatible est insérée
*2 Si une carte mémoire n’est pas insérée, (Outil Mémoire Interne) s’affiche et
2
*
dans l’appareil photo.
seul [Formater] peut être sélectionné.
Illuminat. AF/Quadrillage/Résolut. affichage/Zoom
numérique/Attén. yeux roug/Alerte yeux fermés/Inscrire
date
Bip/Luminosité écran/Language Setting/Couleur
d’affichage/Initialiser/Guide fonct/Sortie Vidéo/Régl.
connexion USB/Réglage LUN/Téléch musi/Musique
vide/Eye-Fi*
Formater/Créer dos ENR./Chg doss ENR./Supprim. doss
ENR/Copier/Numéro de fichier
Réglage zone/Régl. date&heure
1
/Économie d’énergie
FR
FR
17
Page 40

Fonctions de « PlayMemories Home »
Le logiciel « PlayMemories Home » vous permet d’importer et d’utiliser des
images fixes et des films sur votre ordinateur.
Partage des images sur
« PlayMemories Online »
Importation
d’images
depuis votre
appareil
Affichage des
images sur un
calendrier
Transfert des images
vers des services réseau
z Télécharger « PlayMemories Home » (pour Windows
uniquement)
Vous pouvez télécharger « PlayMemories Home » à partir de l’URL suivante :
www.sony.net/pm
Remarques
• L’installation de « PlayMemories Home » nécessite une connexion Internet.
• Une connexion Internet est également nécessaire pour utiliser « PlayMemories
Online » ou d’autres services réseau. Il est possible que « PlayMemories Online »
ou d’autres services réseau ne soient pas disponibles dans certains pays ou régions.
• « PlayMemories Home » n’est pas compatible avec les ordinateurs Mac. Veuillez
utiliser les applications fournies avec votre Mac. Pour en savoir plus, visitez
l’URL suivante :
http://www.sony.co.jp/imsoft/Mac/
18
FR
Page 41

x
Installation de « PlayMemories Home » sur un
ordinateur
Saisissez l’URL ci-dessous dans votre navigateur
1
Internet, puis cliquez sur [Installation] t [Exécuter].
www.sony.net/pm
Suivez les instructions sur
2
l’écran pour terminer
l’installation.
• Au message d’invite, connectez
l’appareil photo à l’ordinateur via le
câble USB dédié (fourni).
Vers un port
USB
x
Affichage du « Guide d’assistance de PlayMemories
Vers la prise
USB / A/V OUT
Home »
Pour obtenir des informations détaillées sur l’utilisation de « PlayMemories
Home », reportez-vous au « Guide d’assistance de PlayMemories Home ».
Sur le bureau, double-cliquez sur l’icône [Guide
1
d’assistance de PlayMemories Home].
• Pour accéder au « Guide d’assistance de PlayMemories Home » depuis
le menu Démarrer : Cliquez sur [Démarrer] t [Tous les programmes]
t [PlayMemories Home] t [Guide d’assistance de PlayMemories
Home].
• Pour Windows 8, sélectionnez l’icône [PlayMemories Home] sur
l’écran Démarrer, puis lancez « PlayMemories Home » et sélectionnez
[Guide d’assistance de PlayMemories Home] depuis le menu [Aide].
• Pour en savoir plus sur « PlayMemories Home », vous pouvez
également consulter le « Guide de l’utilisateur du Cyber-shot » (page 2)
ou la page de support suivante PlayMemories Home (disponible en
anglais uniquement) :
http://www.sony.co.jp/pmh-se/
FR
FR
19
Page 42

Nombre d’images fixes et durée enregistrable de films
Le nombre d’images fixes et la durée enregistrable peuvent différer en
fonction des conditions de prise de vue et de la carte mémoire.
x
Images fixes
(Unité : images)
Capacité
Taille
20M 5 265
VGA 350 11500
16:9(15M) 7 330
x
Films
Le tableau ci-dessous indique les durées d’enregistrement maximum
approximatives. Ce sont les durées totales pour tous les fichiers de film. La
prise de vue en continu est possible pendant environ 29 minutes (limitée par
les spécifications du produit). Pour les films de taille [1280×720(Fine)], la
prise de vue en continu est possible pendant environ 20 minutes (limitée par la
taille de fichier de 2 Go).
Capacité
Taille
1280×720(Fine) — 25 m (20 m)
1280×720(Standard) — 35 m (30 m)
VGA 2m (1m) 1h 5m (1h 5m)
Les valeurs entre ( ) sont les durées enregistrables minimum.
• La durée enregistrable des films varie car l’appareil est équipé d’une fonction
VBR (Variable Bit Rate (débit binaire variable)), qui ajuste automatiquement la
qualité d’image selon la scène de prise de vue. Lorsque vous enregistrez un sujet
se déplaçant rapidement, l’image est plus claire mais la durée enregistrable est
plus courte car plus de mémoire est nécessaire pour l’enregistrement. La durée
d’enregistrement varie également en fonction des conditions de prise de vue, du
sujet et des paramètres de taille d’image.
FR
Mémoire interne Carte mémoire
Environ 55 Mo 2Go
(h (heures), m (minutes))
Mémoire interne Carte mémoire
Environ 55 Mo 2Go
20
Page 43

Remarques sur l’utilisation de l’appareil
Utilisation et l’entretien
Évitez toute manipulation brusque, tout démontage, toute modification, tout choc
physique ou impact tel qu’en frappant l’appareil avec un marteau, en le laissant
tomber ou en le piétinant. Prenez tout particulièrement soin de l’objectif.
Remarques sur l’enregistrement/lecture
• Avant de commencer à enregistrer, effectuez un essai d’enregistrement pour être
sûr que l’appareil fonctionne correctement.
• L’appareil n’est ni étanche à la poussière, ni étanche aux projections liquides, ni
étanche à l’eau.
• Évitez d’exposer l’appareil à l’eau. Si de l’eau pénètre dans l’appareil, il peut se
produire un dysfonctionnement. Dans certains cas, l’appareil ne pourra pas être
réparé.
• Ne dirigez pas l’appareil vers le soleil ou une forte lumière. Ceci pourrait entraîner
un dysfonctionnement de l’appareil.
• Si une condensation d’humidité se produit, éliminez-la avant d’utiliser l’appareil.
• Ne secouez pas et ne heurtez pas l’appareil. Ceci pourrait provoquer un
dysfonctionnement et empêcher l’enregistrement des images. En outre, le support
d’enregistrement pourrait devenir inutilisable ou les données d’image être
endommagées.
N’utilisez/ne rangez pas l’appareil dans les endroits suivants
• Endroits très chauds, très froids ou très humides
Dans des endroits tels qu’un véhicule stationné en plein soleil, le boîtier de
l’appareil peut se déformer et ceci peut provoquer un dysfonctionnement.
• En plein soleil ou près d’une source de chaleur
Le boîtier de l’appareil risquerait de se décolorer ou se déformer et ceci pourrait
provoquer un dysfonctionnement.
• Endroits soumis à des vibrations oscillantes
• Près d’un endroit qui génère de fortes ondes radio, émet des radiations ou est
fortement magnétique. À défaut, l’appareil risquerait de ne pas pouvoir enregistrer
ou lire correctement les images.
• Endroits sablonneux ou poussiéreux
Veillez à ce que du sable ou de la poussière ne pénètre pas dans l’appareil. Ceci
risquerait d’entraîner un dysfonctionnement de l’appareil pouvant dans certains
cas être irréparable.
FR
FR
21
Page 44

A propos des piles
• Evitez toute manipulation brusque, tout démontage, toute modification des piles,
tout choc mécanique et tout impact tel que celui d’un marteau, ne laissez pas
tomber les piles et ne les piétinez pas.
• N’utilisez pas de piles déformées ou endommagées.
• N’utilisez pas ensemble des piles usées et des piles neuves ou des piles de types
différents.
• Retirez les piles de l’appareil photo lorsque vous ne l’utilisez pas pendant une
période prolongée ou lorsque les piles sont épuisées.
Remarques sur l’écran et l’objectif
L’écran est fabriqué avec une technologie d’extrêmement haute précision et plus de
99,99 % des pixels sont donc opérationnels pour une utilisation effective. Il se peut
toutefois que de minuscules points noirs et/ou brillants (blancs, rouges, bleus ou
verts) apparaissent sur l’écran. Ces points sont un résultat normal du procédé de
fabrication et n’affectent pas l’enregistrement.
Température de l’appareil
En cas d’utilisation continue, votre appareil photo et la batterie peuvent chauffer,
mais il ne s’agit pas d’un dysfonctionnement.
Avertissement sur les droits d’auteur
Les émissions de télévision, films, cassettes vidéo et autres œuvres peuvent être
protégés par des droits d’auteur. L’enregistrement non autorisé de telles œuvres peut
constituer une infraction à la loi sur les droits d’auteur.
Pas d’indemnisation en cas de contenu endommagé ou
d’enregistrement manqué
Sony ne saurait offrir d’indemnisation dans le cas où l’enregistrement serait
impossible ou que le contenu enregistré serait perdu ou endommagé, en raison d’un
dysfonctionnement de l’appareil ou d’une anomalie du support d’enregistrement,
etc.
Nettoyage de l’extérieur de l’appareil
Nettoyez l’extérieur de l’appareil avec un chiffon doux légèrement imbibé d’eau,
puis essuyez-le avec un chiffon sec. Afin d’éviter d’endommager la finition ou le
boîtier :
– N’exposez pas l’appareil à des produits chimiques tels que diluants, benzine,
alcool, lingettes nettoyantes jetables, insectifuges, écrans solaires ou insecticides.
22
FR
Page 45

Entretien de l’écran LCD
• Si vous utilisez des produits cosmétiques tels que de la crème hydratante et que
vous touchez l’écran, de tels produits risquent d’endommager le revêtement de
l’écran. Auquel cas, essuyez-le immédiatement.
• Évitez d’essuyer vigoureusement l’écran à l’aide d’un mouchoir en papier ou d’un
essuie-tout : cela risque d’en endommager le revêtement.
• Pour essuyer des traces de doigts ou des impuretés de l’écran LCD, nous vous
recommandons de retirer toute impureté avec précaution, puis d’essuyer l’écran à
l’aide d’un tissu doux.
FR
FR
23
Page 46

Spécifications
Appareil photo
[Système]
Dispositif d’image : CCD de 7,76 mm
(type 1/2,3), filtre de couleurs
primaires
Nombre total de pixels :
Environ 20,4 mégapixels
Nombre de pixels effectifs :
Environ 20,1 mégapixels
Objectif : Objectif zoom 26×
f = 4,0 mm – 104,0 mm
(22,3 mm – 580 mm (équivalant à
un film 35 mm))
F3,1 (W) – F5,9 (T)
Pendant la prise de vue de films
(16:9) : 28 mm – 748 mm
Pendant la prise de vue de films
(4:3) : 22,3 mm – 580 mm
SteadyShot : Optique
Contrôle de l’exposition : Exposition
automatique, Exposition manuelle,
Sélection scène
Balance des blancs : Automatique,
Lumière jour, Nuageux,
Fluorescent 1/2/3, Incandescent,
Flash, Pression unique
Prise de vue en rafale (lorsque vous
sélectionnez le nombre maximal de
pixels) :
Environ 0,8 images/seconde
(jusqu’à 100 images)
Format de fichier :
Images fixes : Conformes à JPEG
(DCF, Exif, MPF Baseline),
compatibles DPOF
Films : MPEG-4 AVC/H.264
FR
24
Support d’enregistrement : Mémoire
interne (environ 55 Mo),
« Memory Stick Duo », « Memory
Stick Micro », cartes SD, cartes
mémoire microSD
Flash : Portée du flash (sensibilité ISO
(Indice de lumination
recommandé) réglée sur Auto) :
Environ 0,4 m à 6,8 m (1 pi 1/3 po
à 22 pi 3 3/4 po) (W)
Environ 1,5 m à 3,6 m (5 pi à 11 pi
9 3/4 po) (T)
[Connecteurs d’entrée et de sortie]
Prise USB / A/V OUT :
Sortie vidéo
Sortie audio
Communication USB
Communication USB : Hi-Speed USB
(USB 2.0)
[Ecran]
Écran LCD :
Matrice active TFT 7,5 cm
(type 3,0)
Nombre total de points :
460 800 points
[Alimentation, caractéristiques
générales]
Alimentation : Piles alcalines LR6
(taille AA) (4), 6 V
Piles nickel-hydrure métallique
HR15/51 : HR6 (taille AA) (4)
(vendues séparément), 4,8 V
Consommation (pendant la prise de
vue) : Environ 1,6 W
Température de fonctionnement :
0 °C à 40 °C (32 °F à 104 °F)
Température de stockage :
–20 °C à +60 °C (–4 °F à +140 °F)
Page 47

Dimensions (conformes à CIPA) :
122,9 mm × 83,2 mm × 87,2 mm
(4 7/8 po × 3 3/8 po × 3 1/2 po)
(L/H/P)
Poids (conforme CIPA) (quatre piles et
« Memory Stick Duo » compris) :
Environ 530 g (1 lb 2,7 oz)
Micro : Monaural
Haut-parleur : Monaural
Exif Print : Compatible
PRINT Image Matching III :
Compatible
La conception et les spécifications sont
susceptibles de modifications sans
préavis.
Marques
• Les marques suivantes sont des
marques commerciales de Sony
Corporation.
, « Cyber-shot »,
« Memory Stick PRO Duo »,
« Memory Stick PRO-HG Duo »,
« Memory Stick Duo », « Memory
Stick Micro »
• Windows est une marque déposée de
Microsoft Corporation aux ÉtatsUnis et/ou dans d’autres pays.
• Mac et Mac OS sont des marques
déposées de Apple Inc.
• Le logo SDHC est une marque
commerciale de SD-3C, LLC.
• Eye-Fi est une marque commerciale
de Eye-Fi Inc.
• Facebook et le logo « f » sont des
marques commerciales ou des
marques déposées de Facebook, Inc.
• YouTube et le logo YouTube sont
des marques commerciales ou des
marques déposées de Google Inc.
• Les noms de système et de produit
utilisés dans ce manuel sont
généralement des marques
commerciales ou des marques
déposées de leurs créateurs ou
fabricants respectifs. Notez que les
marques ™ ou ® ne sont pas toujours
utilisées dans ce manuel.
Des informations complémentaires
sur ce produit et des réponses à des
questions fréquemment posées
sont disponibles sur notre site Web
d’assistance client.
Imprimé sur papier recyclé à 70 % ou
plus avec de l’encre à base d’huile
végétale sans COV (composés
organiques volatils).
FR
FR
25
Page 48

Italiano
Come ottenere maggiori informazioni sulla fotocamera (“Cyber-shot Manuale dell’utente”)
“Cyber-shot Manuale dell’utente” è un manuale on-line.
Consultarlo per istruzioni dettagliate sulle numerose funzioni
della fotocamera.
1 Accedere alla pagina per l’assistenza della Sony.
http://www.sony.net/SonyInfo/Support/
2 Selezionare la propria nazione o regione.
3 Cercare il nome del modello della propria fotocamera
all’interno della pagina per l’assistenza.
• Controllare il nome del modello sul fondo della fotocamera.
Verifica degli accessori in dotazione
Il numero fra parentesi indica il numero dei pezzi.
• Fotocamera (1)
• Batterie alcaline LR6 (formato AA) (4)
• Cavo USB dedicato (1) (Sony Corporation 1-837-783-)
• Tracolla (1)
• Copriobiettivo (1)/Cordino del copriobiettivo (1)
• Istruzioni per l’uso (questo manuale) (1)
IT
2
Page 49

AVVERTENZA
Per ridurre il pericolo di incendi o scosse elettriche, non esporre
l’apparecchio alla pioggia o all’umidità.
Attenzione per i clienti in Europa
[ Avviso per i clienti residenti nei paesi che applicano le direttive
UE
Questo prodotto è stato fabbricato da o per conto di Sony Corporation, 1-7-1 Konan
Minato-ku Tokyo, 108-0075 Japan. Eventuali richieste in merito alla conformità del
prodotto in ambito della legislazione Europea, dovranno essere indirizzate al
rappresentante autorizzato, Sony Deutschland GmbH, Hedelfinger Strasse 61, 70327
Stuttgart, Germany. Per qualsiasi informazione relativa al servizio o la garanzia, si prega di
fare riferimento agli indirizzi riportati separatamente sui documenti relativi all’assistenza o
sui certificati di garanzia.
Questo prodotto è stato testato ed è risultato conforme ai limiti stabiliti nella regolazione
EMC relativa all’uso dei cavi di collegamento di lunghezza inferiore a 3 metri.
[ Attenzione
Il campo elettromagnetico alle frequenze specifiche può influenzare l’immagine e il suono
di questa unità.
[ Nota
Se l’elettricità statica o interferenze elettromagnetiche causano l’interruzione del
trasferimento dei dati, che pertanto non avviene, è necessario riavviare l’applicazione
oppure scollegare, quindi ricollegare il cavo di comunicazione (USB e così via).
[ Trattamento del dispositivo elettrico o elettronico a fine vita
(applicabile in tutti i paesi dell’Unione Europea e in altri paesi
europei con sistema di raccolta differenziata)
dettagliate circa il riciclaggio di questo prodotto, potete contattare l’ufficio comunale, il
servizio locale di smaltimento rifiuti oppure il negozio dove l’avete acquistato. In caso di
smaltimento abusivo di apparecchiature elettriche e/o elettroniche potrebbero essere
applicate le sanzioni previste dalla normativa applicabile (valido solo per l’Italia).
Questo simbolo sul prodotto o sulla confezione indica che il prodotto non
deve essere considerato come un normale rifiuto domestico, ma deve
invece essere consegnato ad un punto di raccolta appropriato per il riciclo
di apparecchi elettrici ed elettronici. Assicurandovi che questo prodotto
sia smaltito correttamente, voi contribuirete a prevenire potenziali
conseguenze negative per l’ambiente e per la salute che potrebbero
altrimenti essere causate dal suo smaltimento inadeguato. Il riciclaggio dei
materiali aiuta a conservare le risorse naturali. Per informazioni più
IT
IT
3
Page 50

[ Trattamento delle pile esauste (applicabile in tutti i paesi
dell’Unione Europea e in altri paesi Europei con sistema di
raccolta differenziata)
Questo simbolo sul prodotto o sulla confezione indica che la pila non deve
essere considerata un normale rifiuto domestico.
Su alcuni tipi di pile questo simbolo potrebbe essere utilizzato in
combinazione con un simbolo chimico. I simboli chimici del mercurio
(Hg) o del piombo (Pb) sono aggiunti, se la batteria contiene più dello
Assicurandovi che le pile siano smaltite correttamente, contribuirete a prevenire potenziali
conseguenze negative per l’ambiente e per la salute che potrebbero altrimenti essere
causate dal loro inadeguato smaltimento.
Il riciclaggio dei materiali aiuta a conservare le risorse naturali.
In caso di prodotti che per motivi di sicurezza, prestazione o protezione dei dati richiedano
un collegamento fisso ad una pila interna, la stessa dovrà essere sostituita solo da personale
di assistenza qualificato.
Consegnare il prodotto a fine vita al punto di raccolta idoneo allo smaltimento di
apparecchiature elettriche ed elettroniche; questo assicura che anche la pila al suo interno
venga trattata correttamente.
Per le altre pile consultate la sezione relativa alla rimozione sicura delle pile. Conferire le
pile esauste presso i punti di raccolta indicati per il riciclo.
Per informazioni più dettagliate circa lo smaltimento della pila esausta o del prodotto,
potete contattare il Comune, il servizio locale di smaltimento rifiuti oppure il negozio dove
l’avete acquistato.
0,0005% di mercurio o dello 0,004% di piombo.
IT
4
Page 51

Identificazione delle parti
A Manopola del modo:
(Selezione scena)/
(Intelligente autom.)/
(Programm. automatica)/
(Ripresa con esposizione
man.)/ (Panorama in
movimento)/ (Modo filmato)
B Pulsante di scatto
C Per la ripresa: leva W/T (Zoom)
Per la visione: leva (Zoom di
riproduzione)/leva (Indice)
D Spia dell’autoscatto/
Spia dell’Otturatore sorriso/
Illuminatore AF
E Obiettivo
F Altoparlante
G Gancio per tracolla
H Tasto (fuoriuscita del flash)
• Quando non si desidera
azionare il flash, spingere giù a
mano l’unità del flash per
ritrarla.
I Flash
J Microfono
K Presa USB / A/V OUT
L Schermo LCD
M Tasto / (Guida nella
fotocamera/Cancellazione)
N Spia di accesso
O Tasto di controllo
MENU attivato: v/V/b/B
MENU disattivato: DISP/ /
/
P Tasto MENU
Q Tasto (Riproduzione)
R Tasto ON/OFF (Alimentazione)/
Spia ON/OFF (Alimentazione)
IT
IT
5
Page 52

S Coperchio della batteria/della
scheda di memoria
T Slot della scheda di memoria
U Slot di inserimento della batteria
V Attacco per treppiede
• Usare un treppiede con una
vite di lunghezza inferiore a
5,5 mm. Altrimenti non è
possibile fissare saldamente la
fotocamera e potrebbe
verificarsi un danno alla
fotocamera.
Inserimento delle batterie/di una scheda di memoria (in vendita separatamente)
Assicurarsi che l’angolo dentellato
Aprire il coperchio.
1
Inserire la scheda memoria (in vendita separatamente).
2
• Con l’angolo dentellato rivolto come è illustrato, inserire la scheda
memoria finché scatta in posizione.
Abbinare +/– e inserire le batterie.
3
Chiudere il coperchio.
4
IT
sia rivolto correttamente.
6
Page 53

x
Schede memoria utilizzabili
Scheda di memoria
Memory Stick PRO Duo (Solo Mark2)
A
Memory Stick PRO-HG Duo
Memory Stick Duo —
B Memory Stick Micro (M2) (Solo Mark2)
Scheda memoria SD (Classe 4 o più
C
Scheda memoria SDHC (Classe 4 o più
Scheda memoria microSD (Classe 4 o più
D
Scheda memoria microSDHC (Classe 4 o più
Per i fermi
immagine
Per i filmati
veloce)
veloce)
veloce)
veloce)
In questo manuale, si fa riferimento collettivamente ai prodotti nella tabella nel
seguente modo:
A: “Memory Stick Duo”
B: “Memory Stick Micro”
C: Scheda SD
D: Scheda memoria microSD
Note
• Quando si usano le schede di memoria “Memory Stick Micro” o microSD con
questa fotocamera, accertarsi di usarle con l’adattatore appropriato.
x
Per rimuovere la scheda di memoria/le batterie
Scheda di memoria: Spingere dentro una volta la scheda memoria.
Batterie: Assicurarsi di non far cadere le batterie.
Note
• Non aprire mai il coperchio delle batterie/della scheda di memoria né rimuovere le
batterie/la scheda di memoria quando la spia di accesso (pagina 5) è accesa. Ciò
potrebbe causare danni ai dati nella scheda memoria/memoria interna.
IT
IT
7
Page 54

x
Batterie utilizzabili e non utilizzabili con la fotocamera
Nella seguente tabella, indica la batteria che può essere usata, mentre —
indica quella che non può essere usata.
Tipo di batteria In dotazione Supportata Ricaricabile
Batterie alcaline LR6
(formato AA)
Batterie al nichel-metallo
idruro HR15/51: HR6
(formato AA)
Batterie al litio* — — —
Batterie al manganese* — — —
Batterie al nichel-cadmio* — — —
* Le prestazioni operative non possono essere garantite se i cali di tensione o altri
problemi sono causati dalla natura della batteria.
Note
• Le prestazioni della fotocamera variano a seconda del produttore e del tipo di
batteria in uso. Inoltre, le prestazioni della batteria potrebbero diminuire
drasticamente a basse temperature. In particolar modo, a temperature al di sotto di
5 °C, la fotocamera potrebbe spegnersi inaspettatamente quando la si accende o si
cambia il modo di riproduzione al modo di ripresa.
Per maggiori dettagli sulle batterie, vedere “Batterie” in “Cyber-shot Manuale
dell’utente”.
• Osservare che non è possibile garantire la prestazione massima della fotocamera
quando si usano le batterie non indicate come “supportata” nella tabella sopra.
—
—
IT
8
Page 55

x
Durata delle batterie e numero di immagini che è
possibile registrare/guardare
Durata della batteria Numero di immagini
Ripresa (Fermi immagine) Circa 175 min. Circa 350 immagini
Ripresa effettiva (filmati) Circa 85 min. —
Ripresa continua (filmati) Circa 150 min. —
Visione (Fermi immagine) Circa 400 min. Circa 8000 immagini
Note
• Il numero di immagini che è possibile registrare è un numero approssimativo
quando si riprende con le batterie nuove. Il numero potrebbe essere inferiore a
seconda delle circostanze.
• Il numero di immagini registrabili, quando si riprende nelle seguenti condizioni, è:
– Usando il Sony “Memory Stick PRO Duo” (Mark2) (in vendita separatamente).
– Le batterie nuove sono usate a una temperatura ambiente di 25°C.
• Il numero di fermi immagine che è possibile registrare si basa sullo standard CIPA
ed è per la ripresa nelle seguenti condizioni.
(CIPA: Camera & Imaging Products Association)
– Si riprende una volta ogni 30 secondi.
– Lo zoom viene cambiato alternamente tra le estremità W e T.
– Il flash lampeggia una volta ogni due.
– La fotocamera si accende e si spegne una volta ogni dieci.
• La durata della batteria per i filmati si basa sullo standard CIPA ed è per la ripresa
nelle seguenti condizioni:
– Modo di registrazione: 1280×720(Fine)
– “Ripresa effettiva (filmati)”: Mostra il tempo approssimativo di ripresa come
indicazione quando si esegue ripetutamente la ripresa, la zumata, l’attesa per la
ripresa, l’accensione e lo spegnimento della fotocamera.
– “Ripresa continua (filmati)”: Quando la ripresa continua termina a causa dei
limiti impostati (29 minuti), premere di nuovo il pulsante di scatto per continuare
la ripresa. Le funzioni di ripresa come lo zoom non funzionano.
• I valori mostrati per la batteria alcalina sono basati su norme commerciali e non si
applicano a tutte le batterie alcaline in tutte le condizioni. I valori potrebbero
variare, a seconda del produttore/tipo della batteria, delle condizioni ambientali,
dell’impostazione del prodotto, ecc.
IT
IT
9
Page 56

Impostazione dell’orologio
ON/OFF (Alimentazione)
Tasto di controllo
Selezionare le voci: v/V/b/B
Impostare: z
Premere il tasto ON/OFF (Alimentazione).
1
Impost. data & ora si visualizza quando si preme il tasto ON/OFF
(Alimentazione) la prima volta.
• La fotocamera potrebbe impiegare un pòdi tempo per accendersi e
consentire il funzionamento.
Selezionare una lingua desiderata.
2
Selezionare una posizione geografica desiderata
3
seguendo le istruzioni sullo schermo, quindi premere z.
Impostare [Formato data & ora], [Ora legale] e [Data &
4
ora], quindi premere [OK].
• Mezzanotte è indicata con 12:00 AM e mezzogiorno con 12:00 PM.
Azionare seguendo le istruzioni sullo schermo.
5
10
IT
Page 57

Ripresa di fermi immagine/filmati
Pulsante
di scatto
Manopola del modo
: Intelligente autom.
: Panorama in movimento
: Modo filmato
Ripresa di fermi immagine
Premere parzialmente il pulsante di scatto per mettere
1
a fuoco.
Quando l’immagine è a fuoco, un segnale acustico suona e l’indicatore z
si illumina.
Premere completamente il pulsante di scatto.
2
Si riprendono i filmati
Premere completamente il pulsante di scatto per
1
avviare la registrazione.
• Usare la leva W/T (zoom) per cambiare la scala dello zoom.
Premere di nuovo completamente il pulsante di scatto
2
per interrompere la registrazione.
Note
• Il suono di funzionamento dell’obiettivo potrebbe essere registrato quando la
funzione dello zoom è operativa durante la ripresa di un filmato.
• Il campo di ripresa panoramica potrebbe ridursi, secondo il soggetto o il modo in
cui viene ripreso. Perciò anche quando [360°] è impostato per la ripresa
panoramica, l’immagine registrata potrebbe essere inferiore a 360 gradi.
W/T (Zoom)
W: zumare
all’indietro
T: zumare
IT
IT
11
Page 58

Visione delle immagini
Tasto di controllo
/ (Cancellazione)
W: zumare all’indietro
T: zumare
(Riproduzione)
Selezionare le immagini:
Impostare: z
Premere il tasto (Riproduzione).
1
Quando le immagini su una scheda memoria che sono state registrate con
altre fotocamere vengono riprodotte su questa fotocamera, appare la
schermata di registrazione per il file dati.
x
Selezione dell’immagine successiva/precedente
Selezionare un’immagine con B (successivo)/b (precedente) sul tasto di
controllo. Premere z al centro del tasto di controllo per guardare i filmati.
x
Cancellazione di un’immagine
1 Premere il tasto / (Cancellazione).
2 Selezionare [Qs. imm.] con v sul tasto di controllo, quindi premere z.
x
Ritorno alla ripresa delle immagini
Premere parzialmente il pulsante di scatto.
IT
B (successivo)/b (precedente)
12
Page 59

Guida nella fotocamera
La fotocamera contiene una guida delle funzioni interna. Ciò consente di
cercare le funzioni della fotocamera secondo le proprie necessità.
MENU
/ (Guida nella fotocamera)
Premere il tasto MENU.
1
Selezionare una voce di cui si desidera visualizzare la
2
descrizione, quindi premere il tasto / (Guida nella
fotocamera).
Si visualizza la guida operativa per la funzione selezionata.
• È possibile cercare una funzione tramite la(e) parola(e) chiave o l’icona,
premendo il tasto / (Guida nella fotocamera) quando MENU non si
visualizza.
IT
IT
13
Page 60

Introduzione di altre funzioni
È possibile utilizzare altre funzioni usate quando si riprende o si riproduce
usando il tasto di controllo o il tasto MENU sulla fotocamera. Questa
fotocamera è dotata di una Guida delle funzioni che consente di selezionare
facilmente dalle funzioni. Quando si visualizza la guida, provare le altre
funzioni.
MENU
x
Tasto di controllo
DISP (Impostazione visualizzazione): Consente di cambiare il display dello
schermo.
(Autoscatto): Consente di usare l’autoscatto.
(Otturatore sorriso): Consente di usare il modo dell’otturatore sorriso.
(Flash): Consente di selezionare un modo del flash per i fermi immagine.
z (Messa a fuoco con inseguim.): Consente di continuare a mettere a fuoco un
soggetto anche se il soggetto è in movimento.
x
Voci di menu
Ripresa
Scena di ripresa
film.
Scena di ripresa
panorama
Selezione scena
Effetto immagine
IT
Modo facile Riprende i fermi immagine usando le funzioni minime.
14
Tasto di
controllo
Guida delle funzioni
Seleziona il modo di registrazione dei filmati.
Selezionare il modo di registrazione quando si
riprendono le immagini panoramiche.
Seleziona le impostazioni preimpostate per adattarle alle
varie condizioni della scena.
Riprendere fermi immagine con una struttura originale
secondo l’effetto desiderato.
Page 61

Tonalità del colore
Colore estratto
Effetto pelle
morbida
Dim. fermo imm./
Dimens. imm.
panorama/
Dimensioni filmato
Compensazione
esposizione
ISO Regola la sensibilità luminosa.
Bil. bianco Regola i toni di colore di un’immagine.
Mes. fuoco Seleziona il metodo di messa a fuoco.
Modo mis. esp.
Impostazioni
Scatto Multiplo
Impostazioni
bracketing
Identificazione
scena
Sensibilità sorrisi
Rilevamento visi
DRO
Riduz. occhi chiusi
Guida nella
fotocamera
Impostare la tonalità del colore quando [Toy camera] è
selezionato in Effetto immagine.
Selezionare il colore da estrarre quando [Colore parziale]
è selezionato in Effetto immagine.
Imposta l’effetto di pelle morbida e il livello dell’effetto.
Seleziona la dimensione dell’immagine per i fermi
immagine, le immagini panoramiche o i file di filmato.
Regola manualmente l’esposizione.
Seleziona il modo di misurazione esposimetrica che
imposta quale parte del soggetto da misurare per
determinare l’esposizione.
Seleziona il modo dell’immagine singola o il modo di
raffica.
Selezionare il modo di ripresa con bracketing.
Imposta per rilevare automaticamente le condizioni di
ripresa nel modo intelligente automatico.
Imposta la sensibilità della funzione Otturatore sorriso
per rilevare i sorrisi.
Seleziona per rilevare i visi e regolare automaticamente
le varie impostazioni.
Impostare la funzione DRO per correggere la luminosità
e il contrasto e migliorare la qualità dell’immagine.
Imposta per riprendere automaticamente due immagini e
seleziona l’immagine in cui gli occhi non si chiudono.
Cerca le funzioni della fotocamera secondo le proprie
necessità.
IT
IT
15
Page 62

Visione
Effetto Bellezza Ritocca un viso su un fermo immagine.
Ritocco Ritocca un’immagine usando vari effetti.
Canc. Cancella un’immagine.
Diapo Seleziona un metodo di riproduzione continua.
Modo visione Seleziona il formato del display per le immagini.
Proteggi Protegge le immagini.
Stampa (DPOF)
Ruota Ruota un fermo immagine a sinistra o a destra.
Guida nella
fotocamera
x
Voci di impostazione
Aggiunge un contrassegno per ordine di stampa a un
fermo immagine.
Cerca le funzioni della fotocamera secondo le proprie
necessità.
Se si preme il tasto MENU durante la ripresa o la riproduzione, viene fornito
(Impostazioni) come una selezione finale. È possibile cambiare le
impostazioni predefinite sulla schermata (Impostazioni).
Impostazioni
Ripresa
Impostazioni
principali
Strumento Scheda
memoria
Impostazioni
Orologio
*1 [Eye-Fi] si visualizza solo quando una scheda di memoria compatibile è inserita
*2 Se una scheda memoria non è inserita, si visualizzerà (Strumento Memoria
IT
2
*
nella fotocamera.
interna) ed è possibile selezionare solo [Formatta].
Illuminat. AF/Linea griglia/Risoluzione display/Zoom
digitale/Rid.occhi rossi/Allarme occhi chiusi/Scrittura
data
Segn. ac./Luminos. pannello/Language Setting/Colore
del display/Inizializza/Guida funz./Uscita video/Impost.
colleg. USB/Impostazione LUN/Scar. musica/Svuota
Musica/Eye-Fi*
Formatta/Crea cart.REG./Camb. cart. REG./Cancella
cart. REG./Copia/Numero file
Impost. fuso orario/Impost. data & ora
1
/Risparmio energia
16
Page 63

Funzioni di “PlayMemories Home”
Il software “PlayMemories Home” consente di importare i fermi immagine e i
filmati sul computer e di usarli.
Condivisione delle immagini
su “PlayMemories Online”
sui servizi di rete
Importazione
delle immagini
dalla fotocamera
Visualizzazione delle
immagini sul calendario
Caricamento delle immagini
z Scaricamento di “PlayMemories Home” (solo per Windows)
È possibile scaricare “PlayMemories Home” dal seguente URL:
www.sony.net/pm
Note
• È necessario un collegamento Internet per installare “PlayMemories Home”.
• È necessario un collegamento Internet per usare “PlayMemories Online” o altri
servizi di rete. “PlayMemories Online” o altri servizi di rete potrebbero non essere
disponibili in alcune nazioni o regioni.
• “PlayMemories Home” non è compatibile con i Mac. Usare le applicazioni che
sono installate sul Mac. Per i dettagli, visitare il seguente URL:
http://www.sony.co.jp/imsoft/Mac/
IT
IT
17
Page 64

x
Installazione di “PlayMemories Home” su un
computer
Usando il browser di Internet sul computer, andare al
1
seguente URL, quindi cliccare su [Installa] t [Esegui].
www.sony.net/pm
Seguire le istruzioni sulla
2
schermata per completare
l’installazione.
• Quando si visualizza il messaggio
per collegare la fotocamera ad un
computer, collegare la fotocamera e
il computer usando il cavo USB
dedicato (in dotazione).
x
Visualizzazione di “Guida d’aiuto PlayMemories
Ad una
presa USB
Alla presa USB /
Home”
Per i dettagli sul modo di usare “PlayMemories Home”, consultare la “Guida
d’aiuto PlayMemories Home”.
Fare doppio clic sull’icona di [Guida d’aiuto
1
PlayMemories Home] sul desktop.
• Per accedere alla “Guida d’aiuto PlayMemories Home” dal menu di
avvio: Cliccare su [start] t [Tutti i programmi] t [PlayMemories
Home] t [Guida d’aiuto PlayMemories Home].
• Per Windows 8, selezionare l’icona [PlayMemories Home] sulla
schermata di avvio, quindi lanciare “PlayMemories Home” e
selezionare [Guida d’aiuto PlayMemories Home] dal menu [Guida].
• Per i dettagli su “PlayMemories Home”, è anche possibile vedere la
“Cyber-shot Manuale dell’utente” (pagina 2) o la seguente pagina di
supporto di PlayMemories Home (solo in inglese):
http://www.sony.co.jp/pmh-se/
IT
18
A/V OUT
Page 65

Numero di fermi immagine e tempo registrabile dei filmati
Il numero di fermi immagine e il tempo registrabile potrebbero variare a
seconda delle condizioni di ripresa e della scheda memoria.
x
Fermi immagine
(Unità: Immagini)
Capacità
Dimensione
20M 5 265
VGA 350 11500
16:9(15M) 7 330
x
Filmati
La seguente tabella indica i tempi massimi approssimativi di registrazione.
Questi sono i tempi totali per tutti i file di filmato. La ripresa continua è
possibile per circa 29 minuti (limitata dalle specifiche del prodotto). Per i
filmati di dimensione [1280×720(Fine)], la ripresa continua è possibile per
circa 20 minuti (limitata dalla dimensione di file da 2 GB).
Capacità
Dimensione
1280×720(Fine) — 25 m (20 m)
1280×720(Standard) — 35 m (30 m)
VGA 2m (1m) 1h 5m (1h 5m)
Il numero in ( ) è il tempo minimo registrabile.
• Il tempo registrabile dei filmati varia perché la fotocamera è dotata di VBR
(Variable Bit Rate = Velocità di trasmissione variabile), che regola
automaticamente la qualità dell’immagine a seconda della scena di ripresa.
Quando si registra un soggetto in movimento rapido, l’immagine è più nitida ma il
tempo registrabile è minore perché maggiore memoria è necessaria per la
registrazione. Il tempo registrabile varia anche a seconda delle condizioni di
ripresa, del soggetto o dell’impostazione della dimensione immagine.
Memoria interna Scheda di memoria
Circa 55 MB 2 GB
(h (ore), m (minuti))
Memoria interna Scheda di memoria
Circa 55 MB 2 GB
IT
IT
19
Page 66

Note sull’uso della fotocamera
Uso e manutenzione
Evitare di maneggiare in modo approssimativo, smontare, modificare, gli urti o gli
impatti quali colpi, cadute o calpestamenti sul prodotto. Fare particolare attenzione
all’obiettivo.
Note sulla registrazione/riproduzione
• Prima di iniziare a registrare, effettuare una registrazione di prova per accertarsi
che la fotocamera funzioni correttamente.
• La fotocamera non è né a tenuta di polvere, né di spruzzi e non è neanche
impermeabile.
• Evitare di sottoporre la fotocamera all’acqua. Se l’acqua penetra nella fotocamera,
si verifica un malfunzionamento. In alcuni casi, la fotocamera non può essere
riparata.
• Non puntare la fotocamera verso il sole o un’altra luce luminosa. Ciò può causare
un malfunzionamento della fotocamera.
• Se si forma della condensa, eliminarla prima di usare la fotocamera.
• Non scuotere né urtare la fotocamera. Potrebbe causare un malfunzionamento e si
potrebbe non essere in grado di registrare le immagini. Inoltre, il supporto di
registrazione potrebbe diventare inutilizzabile o i dati di immagine potrebbero
essere danneggiati.
Non usare/conservare la fotocamera nei seguenti luoghi
• In un luogo molto caldo, freddo o umido
In luoghi come in un’auto parcheggiata al sole, il corpo della fotocamera potrebbe
deformarsi e ciò può causare un malfunzionamento.
• Conservazione alla luce diretta del sole o vicino ad un radiatore
Il corpo della fotocamera potrebbe scolorirsi o deformarsi e ciò può causare un
malfunzionamento.
• In un luogo soggetto a forti vibrazioni
• Vicino ad un luogo che genera forti radioonde, emette radiazioni o è un posto
molto magnetico. Altrimenti la fotocamera potrebbe non registrare o riprodurre
correttamente le immagini.
• In luoghi sabbiosi o polverosi
Fare attenzione a non lasciar entrare la sabbia o la polvere nella fotocamera. Ciò
può causare il malfunzionamento della fotocamera e in alcuni casi questo
inconveniente non può essere riparato.
20
IT
Page 67

Batteria
• Evitare il trattamento rude, lo smontaggio, la modifica, i colpi fisici o gli urti come
il martellamento, la caduta o quando si calpesta la batteria.
• Non usare una batteria deformata o danneggiata.
• Non mischiare una batteria usata insieme ad una batteria nuova o a diversi tipi di
batterie.
• Rimuovere le batterie dalla fotocamera quando non si usa la fotocamera per lunghi
periodi o quando le batterie sono scariche.
Note sullo schermo e sull’obiettivo
Lo schermo è stato fabbricato usando la tecnologia ad altissima precisione perciò
oltre il 99,99% dei pixel sono operativi per l’uso effettivo. Tuttavia, dei minuscoli
punti neri e/o luminosi (bianchi, rossi, blu o verdi) potrebbero apparire sullo
schermo. Questi punti sono un risultato normale del processo di fabbricazione e non
influiscono sulla registrazione.
Temperatura della fotocamera
La fotocamera e il pacco batteria potrebbero riscaldarsi a causa dell’uso continuo,
ma non si tratta di un malfunzionamento.
Avvertimento sui diritti d’autore
I programmi televisivi, i film, le videocassette ed altri materiali possono essere
protetti dai diritti d’autore. La registrazione non autorizzata di tali materiali può
essere contraria ai provvedimenti di legge sui diritti d’autore.
Nessuna compensazione per il contenuto danneggiato o la
mancata registrazione
Sony non può compensare per la mancata registrazione, la perdita o i danni al
contenuto registrato a causa di un malfunzionamento della fotocamera o del
supporto di registrazione, ecc.
Pulizia della superficie della fotocamera
Pulire la superficie della fotocamera con un panno morbido leggermente inumidito
con l’acqua, quindi asciugare la superficie con un panno asciutto. Per evitare danni
alla finitura o al rivestimento:
– Non esporre la fotocamera a prodotti chimici quali solvente, benzina, alcol, panni
monouso, insettifugo, crema solare o insetticida.
Conservazione del monitor LCD
• La crema per mani o idratante lasciata sullo schermo potrebbe far scomparire il
suo rivestimento. Se c’è della crema sullo schermo, pulirla strofinando
immediatamente.
• Se si strofina energicamente con un fazzoletto di carta o altri materiali si può
danneggiare il rivestimento.
• Se le impronte digitali o i detriti sono presenti sullo schermo del monitor LCD, si
consiglia di rimuovere delicatamente qualsiasi detrito e poi di pulire lo schermo
con un panno morbido.
IT
IT
21
Page 68

Dati tecnici
Fotocamera
[Sistema]
Dispositivo per immagine: CCD da
7,76 mm (di tipo 1/2,3), Filtro a
colori primari
Pixel totali:
Circa 20,4 megapixel
Pixel effettivi:
Circa 20,1 megapixel
Obiettivo: Obiettivo con zoom 26×
f = 4,0 mm – 104,0 mm
(22,3 mm – 580 mm (equivalente
ad una pellicola da 35 mm))
F3,1 (W) – F5,9 (T)
Durante la ripresa dei filmati
(16:9): 28 mm – 748 mm
Durante la ripresa dei filmati (4:3):
22,3 mm – 580 mm
SteadyShot: Ottico
Controllo dell’esposizione:
Esposizione automatica,
esposizione manuale, selezione
scena
Bilanciamento del bianco: Automatico,
Luce del giorno, Nuvoloso,
Fluorescente 1/2/3, Incandescente,
Flash, Singola pressione
Ripresa a raffica (quando si riprende
con il numero massimo di pixel):
Circa 0,8 immagini/al secondo
(fino a 100 immagini)
Formato di file:
Fermi immagine: Conforme a
JPEG (DCF, Exif, MPF Baseline),
compatibile con DPOF
Filmati: MPEG-4 AVC/H.264
Supporto di registrazione: Memoria
interna (circa 55 MB), “Memory
Stick Duo”, “Memory Stick
Micro”, schede SD, schede di
memoria microSD
Flash: Raggio d’azione del flash
(sensibilità ISO (indice di
esposizione consigliato) impostata
su Autom.):
Da circa 0,4 m a 6,8 m (W)
Da circa 1,5 m a 3,6 m (T)
[Connettori di ingresso e uscita]
Presa USB / A/V OUT:
Uscita video
Uscita audio
Comunicazione USB
Comunicazione USB:
Hi-Speed USB (USB 2.0)
[Schermo]
Schermo LCD:
Drive TFT da 7,5 cm (di tipo 3,0)
Numero totale di punti:
460 800 punti
[Alimentazione, generali]
Alimentazione: Batterie alcaline LR6
(formato AA) (4), 6 V
Batterie al nichel-metallo idruro
HR15/51: HR6 (formato AA) (4)
(in vendita separatamente), 4,8 V
Consumo (durante la ripresa):
Circa 1,6 W
Temperatura di utilizzo:
0°C a 40°C
Temperatura di deposito:
–20°C a +60°C
22
IT
Page 69

Dimensioni (compatibile con CIPA):
122,9 mm × 83,2 mm × 87,2 mm
(L/A/P)
Peso (compatibile con CIPA) (incluse
le quattro batterie e il “Memory
Stick Duo”):
Circa 530 g
Microfono: Monofonico
Altoparlante: Monofonico
Exif Print: Compatibile
PRINT Image Matching III:
Compatibile
Il formato e i dati tecnici sono soggetti
a modifiche senza preavviso.
Marchi di fabbrica
• I seguenti marchi sono marchi di
fabbrica della Sony Corporation.
, “Cyber-shot”,
“Memory Stick PRO Duo”,
“Memory Stick PRO-HG Duo”,
“Memory Stick Duo”, “Memory
Stick Micro”
• Windows è un marchio di fabbrica
registrato della Microsoft
Corporation negli Stati Uniti e/o in
altri paesi.
• Mac e Mac OS sono marchi di
fabbrica registrati di Apple Inc.
• Il logo di SDHC è un marchio di
fabbrica di SD-3C, LLC.
• Eye-Fi è un marchio di fabbrica di
Eye-Fi Inc.
• Facebook e il logo “f” sono marchi di
fabbrica o marchi di fabbrica
registrati di Facebook, Inc.
• YouTube e il logo di YouTube sono
marchi di fabbrica o marchi di
fabbrica registrati di Google Inc.
• Inoltre i nomi del sistema e dei
prodotti usati in questo manuale sono
generalmente marchi di fabbrica o
marchi di fabbrica registrati dei loro
rispettivi elaboratori o produttori.
Tuttavia, i simboli ™ o ® non sono
usati in tutti i casi in questo manuale.
Ulteriori informazioni su questo
prodotto e risposte alle domande
più comuni sono reperibili sul
nostro sito Web di Assistenza
Clienti.
Stampato su carta riciclata al 70% o
più con inchiostro a base di olio
vegetale senza COV (composto
organico volatile).
IT
IT
23
Page 70

Español
Para saber más sobre la cámara (“Guía del usuario de Cyber-shot”)
La “Guía del usuario de Cyber-shot” es un manual on-line.
Consúltela para ver instrucciones exhaustivas sobre las
muchas funciones de la cámara.
1 Acceda a la página de atención al cliente de Sony.
http://www.sony.net/SonyInfo/Support/
2 Seleccione su país o región.
3 Busque el nombre del modelo de su cámara en la página
de atención al cliente.
• Compruebe el nombre del modelo en la parte inferior de su
cámara.
Comprobación de los artículos suministrados
El número entre paréntesis indica el número de piezas.
• Cámara (1)
• Pilas alcalinas LR6 (tamaño AA) (4)
• Cable USB exclusivo (1) (Sony Corporation 1-837-783-)
• Correa de bandolera (1)
• Tapa del objetivo (1)/Correa de la tapa del objetivo (1)
• Manual de instrucciones (este manual) (1)
ES
2
Page 71

Nombre del producto: Cámara Digital
Modelo: DSC-H200
POR FAVOR LEA DETALLADAMENTE ESTE MANUAL DE INSTRUCCIONES
ANTES DE CONECTAR Y OPERAR ESTE EQUIPO.
RECUERDE QUE UN MAL USO DE SU APARATO PODRÍA ANULAR LA
GARANTÍA.
AVISO
Para reducir el riesgo de incendio o descarga eléctrica, no
exponga la unidad a la lluvia ni a la humedad.
Atención para los clientes en Europa
[ Aviso para los clientes de países en los que se aplican las
directivas de la UE
Este producto ha sido fabricado por, o en nombre de Sony Corporation, 1-7-1 Konan
Minato-ku Tokyo, 108-0075 Japón. Las consultas relacionadas con la conformidad del
producto basadas en la legislación de la Unión Europea deben dirigirse al representante
autorizado, Sony Deutschland GmbH, Hedelfinger Strasse 61, 70327 Stuttgart, Alemania.
Para cualquier asunto relacionado con el servicio o la garantía, por favor diríjase a la
dirección indicada en los documentos de servicio o garantía adjuntados con el producto.
Este producto ha sido probado y cumple con los límites estipulados por el reglamento
EMC para utilizar cables de conexión de menos de 3 metros de longitud.
[ Atención
Los campos electromagnéticos a frecuencias específicas podrán influir en la imagen y el
sonido de esta unidad.
[ Aviso
Si la electricidad estática o el electromagnetismo interrumpen la transmisión de datos
(fallo), reinicie la aplicación o desconecte el cable de comunicación (USB, etc.) y vuelva a
conectarlo.
ES
ES
3
Page 72

[ Tratamiento de los equipos eléctricos y electrónicos al final de
su vida útil (aplicable en la Unión Europea y en países europeos
con sistemas de tratamiento selectivo de residuos)
Este símbolo en el equipo o en su embalaje indica que el presente
producto no puede ser tratado como residuos doméstico normal. Debe
entregarse en el correspondiente punto de recogida de equipos eléctricos y
electrónicos. Al asegurarse de que este producto se desecha
correctamente, usted ayuda a prevenir las consecuencias potencialmente
negativas para el medio ambiente y la salud humana que podrían derivarse
de la incorrecta manipulación en el momento de deshacerse de este
naturales. Para recibir información detallada sobre el reciclaje de este producto, póngase en
contacto con el ayuntamiento, el punto de recogida más cercano o el establecimiento donde
ha adquirido el producto.
producto. El reciclaje de materiales ayuda a conservar los recursos
[ Tratamiento de las baterías al final de su vida útil (aplicable en la
Unión Europea y en países europeos con sistemas de
tratamiento selectivo de residuos)
Este símbolo en la batería o en el embalaje indica que la batería
proporcionada con este producto no puede ser tratada como un residuo
doméstico normal.
En algunas baterías este símbolo puede utilizarse en combinación con un
símbolo químico. El símbolo químico del mercurio (Hg) o del plomo (Pb)
0,004% de plomo.
Al asegurarse de que estas baterías se desechan correctamente, usted ayuda a prevenir las
consecuencias potencialmente negativas para el medio ambiente y la salud humana que
podrían derivarse de la incorrecta manipulación en el momento de deshacerse de la batería.
El reciclaje de materiales ayuda a conservar los recursos naturales.
En el caso de productos que por razones de seguridad, rendimiento o mantenimiento de
datos sea necesaria una conexión permanente con la batería incorporada, esta batería solo
deberá ser reemplazada por personal técnico cualificado para ello.
Para asegurarse de que la batería será tratada correctamente, entregue el producto al final
de su vida útil en un punto de recogida para el reciclado de aparatos eléctricos y
electrónicos.
Para las demás baterías, consulte la sección donde se indica cómo extraer la batería del
producto de forma segura. Deposite la batería en el correspondiente punto de recogida para
el reciclado de baterías.
Para recibir información detallada sobre el reciclaje de este producto o de la batería,
póngase en contacto con el ayuntamiento, el punto de recogida más cercano o el
establecimiento donde ha adquirido el producto.
se añadirá si la batería contiene más del 0,0005% de mercurio o del
ES
4
Page 73

Identificación de las partes
A Dial de modo: (Selección
escena)/ (Inteligente Auto)/
(Programa automático)/
(Toma con exposición)/
(Barrido panorámico)/
(Modo película)
B Botón del disparador
C Para tomar imagen: Palanca W/T
(Zoom)
Para visualizar: Palanca
(Zoom de reproducción)/
Palanca (Índice)
D Lámpara del autodisparador/
Lámpara del captador de
sonrisas/Iluminador AF
E Objetivo
F Altavoz
G Gancho para correa de bandolera
H Botón (extracción de flash)
• Cuando no quiera que destelle
el flash, empuje la unidad de
flash hacia abajo a mano para
replegarlo.
I Flash
J Micrófono
K Toma USB / A/V OUT
L Pantalla LCD
M Botón / (Guía en la cámara/
Eliminar)
N Lámpara de acceso
O Botón de control
MENU activado: v/V/b/B
MENU desactivado: DISP/ /
/
P Botón MENU
Q Botón (Reproducción)
R Botón ON/OFF (Alimentación)/
Lámpara ON/OFF
(Alimentación)
ES
ES
5
Page 74

S Tapa de las pilas/tarjeta de
memoria
T Ranura de tarjeta de memoria
U Ranura de inserción de la pila
V Rosca para trípode
• Utilice un trípode con un
tornillo de menos de 5,5 mm
de largo. De lo contrario, no
podrá sujetar firmemente la
cámara, y es posible que la
cámara se dañe.
Inserción de las pilas/una tarjeta de memoria (se vende por separado)
Asegúrese de que la esquina cortada
está orientada correctamente.
Abra la tapa.
1
Inserte la tarjeta de memoria (se vende por separado).
2
• Con la esquina cortada orientada como en la ilustración, inserte la tarjeta
de memoria hasta que encaje en su sitio con un chasquido.
Haga coincidir +/– e inserte las pilas.
3
Cierre la tapa.
4
ES
6
Page 75

x
Tarjetas de memoria que puede utilizar
Tarjeta de memoria Para imágenes fijas Para películas
Memory Stick PRO Duo (Mark2
A
Memory Stick PRO-HG Duo
Memory Stick Duo —
Memory Stick Micro (M2) (Mark2
B
Tarjeta de memoria SD (Clase 4 o más
C
Tarjeta de memoria SDHC (Clase 4 o más
Tarjeta de memoria microSD (Clase 4 o más
D
Tarjeta de memoria
microSDHC
solamente)
solamente)
rápida)
rápida)
rápida)
(Clase 4 o más
rápida)
En este manual, los productos de la tabla se conocen colectivamente como se
indica a continuación:
A: “Memory Stick Duo”
B: “Memory Stick Micro”
C: Tarjeta SD
D: Tarjeta de memoria microSD
Notas
• Cuando utilice “Memory Stick Micro” o tarjetas de memoria microSD con esta
cámara, asegúrese de utilizar el adaptador apropiado.
x
Para extraer la tarjeta de memoria/pilas
Tarjeta de memoria: Empuje la tarjeta de memoria hacia dentro una vez.
Pilas: Asegúrese de no dejar caer las pilas.
Notas
• No abra nunca la tapa de las pilas/tarjeta de memoria ni extraiga las pilas/tarjeta de
memoria cuando la lámpara de acceso (página 5) esté encendida. Esto podría
ocasionar daño a los datos en la tarjeta de memoria/memoria interna.
ES
ES
7
Page 76

x
Pilas que puede y que no puede utilizar con su
cámara
En la tabla de abajo, indica las pilas que se pueden utilizar, mientras que —
indica las que no se pueden utilizar.
Tipo de pilas Suministradas Admitidas Recargables
Pilas alcalinas LR6 (tamaño
AA)
Pilas de hidruro de metal de
níkel HR15/51: HR6
(tamaño AA)
Pilas de litio* — — —
Pilas de manganeso* — — —
Pilas de níkel y cadmio* — — —
* El rendimiento operativo no se puede asegurar si la tensión cae o se producen otros
problemas debido a la naturaleza de las pilas.
Notas
• El rendimiento de su cámara variará dependiendo del fabricante de las pilas y el
tipo de pilas que utilice. Además, el rendimiento de las pilas puede disminuir
drásticamente a temperaturas bajas. Especialmente, a temperaturas por debajo de
los 5 °C su cámara podrá apagarse inesperadamente al momento de encenderla o al
cambiar de modo de reproducción a modo de toma de imagen.
Para más detalles sobre las pilas, consulte “Pilas” en la “Guía del usuario de
Cyber-shot”.
• Tenga en cuenta que no podemos garantizar el rendimiento total de su cámara
cuando utilice las pilas que no están indicadas como “admitidas” en la tabla de
arriba.
—
—
ES
8
Page 77

x
Duración de las pilas y número de imágenes que se
pueden grabar/ver
Duración de las pilas Número de imágenes
Tomar (imágenes fijas) Aprox. 175 minuto Aprox. 350 imágenes
Toma actual (películas) Aprox. 85 minuto —
Toma continua (películas) Aprox. 150 minuto —
Ver (imágenes fijas) Aprox. 400 minuto Aprox. 8000 imágenes
Notas
• El número de imágenes que se puede grabar es un número aproximado cuando las
tomas se hacen con pilas nuevas. El número podrá ser inferior dependiendo de las
circunstancias.
• El número de imágenes que se puede grabar es cuando las tomas se hacen en las
condiciones siguientes:
– Utilizando el Sony “Memory Stick PRO Duo” (Mark2) (se vende por separado).
– Se utilizan pilas nuevas a una temperatura ambiente de 25 °C
• El número de imágenes fijas que se pueden grabar está basado en el estándar
CIPA, y es para tomar imágenes en las condiciones siguientes.
(CIPA: Camera & Imaging Products Association)
– Tomando una imagen cada 30 segundo.
– Se cambia el zoom alternativamente entre los extremos W y T.
– El flash destella una de cada dos veces.
– La alimentación se activa y desactiva una vez cada diez veces.
• La duración de las pilas para películas está basada en el estándar CIPA, y es
tomando película en las condiciones siguientes:
– Modo de grabación: 1 280×720(Fina)
– “Toma actual (películas)”: Indica el tiempo de toma aproximado para utilizar
como guía cuando se realizan repetidamente las operaciones de toma de imagen,
zoom, puesta en espera de toma, y encendido y apagado de la cámara.
– “Toma continua (películas)”: Cuando finalice la toma continua debido a los
límites establecidos (29 minuto), pulse el botón del disparador otra vez para
continuar tomando. Las funciones de toma tal como el zoom no responderán.
• Los valores mostrados para pilas alcalinas están basados en normas comerciales, y
no son aplicables a todas las pilas alcalinas en todas las condiciones. Es posible
que los valores varíen dependiendo del fabricante/tipo de pilas, condiciones
ambientales, ajustes del producto, etc.
ES
ES
9
Page 78

Ajuste del reloj
ON/OFF (Alimentación)
Botón de control
Seleccione elementos: v/V/b/B
Ajuste: z
Pulse el botón ON/OFF (Alimentación).
1
Cuando pulse el botón ON/OFF (Alimentación) por primera vez se
visualizarán los ajustes de Fecha y Hora.
• Es posible que lleve algún tiempo en conectarse la alimentación y
permitir realizar operaciones.
Seleccione un idioma deseado.
2
Seleccione un lugar geográfico deseado siguiendo las
3
instrucciones en pantalla, después pulse z.
Ajuste [Format fecha y hora], [Hora verano] y [Fecha y
4
hora], después pulse [OK].
• Medianoche se indica como 12:00 AM, y mediodía como 12:00 PM.
Realice las operaciones siguiendo las instrucciones de
5
la pantalla.
10
ES
Page 79

Toma de imágenes fijas/películas
Botón del
disparador
Dial de modo
: Inteligente Auto
: Barrido panorámico
: Modo película
Toma de imágenes fijas
Pulse el botón del disparador hasta la mitad para
1
enfocar.
Cuando la imagen está enfocada, suena un pitido y se ilumina el indicador
z.
Pulse el botón del disparador a fondo.
2
Toma de películas
Pulse el botón del disparador a fondo para iniciar la
1
grabación.
• Utilice la palanca W/T (zoom) para cambiar la escala del zoom.
Pulse el botón del disparador a fondo otra vez para
2
detener la grabación.
Notas
• El sonido de operación del objetivo podrá grabarse cuando se accione la función
de zoom mientras se toma una película.
• La amplitud de la toma panorámica podrá reducirse, dependiendo del motivo o la
manera en que éste sea tomado. Por lo tanto, aun cuando [360°] esté ajustado para
toma panorámica, la imagen grabada podrá ser de menos de 360 grados.
W/T (Zoom)
W: alejar con
zoom
T: acercar
con zoom
ES
ES
11
Page 80

Visualización de imágenes
W: alejar con zoom
T: acercar con zoom
(Reproducción)
Botón de control
/ (Borrar)
Seleccione imágenes: B (siguiente)/b (anterior)
Ajuste: z
Pulse el botón (Reproducción).
1
Cuando se reproduzcan en esta cámara imágenes de una tarjeta de
memoria grabadas con otras cámaras, aparecerá la pantalla de registro
para el archivo de datos.
x
Selección de la imagen siguiente/anterior
Seleccione una imagen con B (siguiente)/b (anterior) del botón de control.
Pulse z en el centro del botón de control para ver películas.
x
Eliminación de una imagen
1 Pulse el botón / (Borrar).
2 Seleccione [Esta ima] con v del botón de control, después pulse z.
x
Para volver a la toma de imágenes
Pulse el botón del disparador hasta la mitad.
ES
12
Page 81

Guía en la cámara
Esta cámara contiene una guía de funciones interna. Esto le permite buscar las
funciones de la cámara de acuerdo con sus necesidades.
MENU
/ (Guía en la cámara)
Pulse el botón MENU.
1
Seleccione un elemento cuya descripción quiera ver,
2
después pulse el botón / (Guía en la cámara).
Se visualiza la guía de operación para la función seleccionada.
• Puede buscar una función por palabra(s) clave o icono, pulsando el
botón / (Guía en la cámara) cuando MENU no está visualizado.
ES
ES
13
Page 82

Presentación de otras funciones
Utilizando el botón de control o el botón MENU de la cámara se puede hacer
uso de otras funciones durante la toma o reproducción de imágenes. Esta
cámara está equipada con una guía de funciones que le permite seleccionar
fácilmente entre las funciones. Mientras visualiza la guía, pruebe las otras
funciones.
MENU
x
Botón de control
DISP (Ajuste pantalla): Le permite cambiar la visualización en la pantalla.
(Contador automát.): Le permite utilizar el autodisparador.
(Captador de sonrisas): Le permite utilizar el modo Captador de sonrisas.
(Flash): Le permite seleccionar un modo de flash para imágenes fijas.
z (Enfoque seguido): Le permite continuar enfocando un motivo aunque el
motivo se mueva.
x
Elementos del menú
Toma de imagen
Escena toma
película
Escena de toma
panorámica
Selección escena
Efecto de foto
Modo fácil Toma imágenes fijas utilizando el mínimo de funciones.
ES
Botón de
control
Guía de funciones
Selecciona el modo de grabación de película.
Selecciona el modo de grabación cuando se toman
imágenes panorámicas.
Selecciona ajustes preajustados para corresponder con
varias condiciones de escena.
Toma imágenes fijas con una textura original de acuerdo
con el efecto deseado.
14
Page 83

Tono de color
Color Extraído
Efecto piel suave Ajusta el Efecto piel suave y el nivel del efecto.
Tamaño img fija/
Tamaño imagen
panorámica/
Tamaño película
Compensar la
exposición
ISO Ajusta la sensibilidad luminosa.
Balance Blanco Ajusta los tonos de color de una imagen.
Enfoque Selecciona el método de enfoque.
Modo medición
Ajustes de captura
continua
Ajustes de
Variación
Reconocimiento de
escena
Sensibilidad de
sonrisa
Detección de cara
DRO
Reducc ojos
cerrados
Guía en la cámara
Ajusta el tono de color cuando está seleccionado
[Cámara juguete] en Efecto foto.
Selecciona el color a extraer cuando está seleccionado
[Color parcial] en Efecto foto.
Selecciona el tamaño de imagen para imágenes fijas,
imágenes panorámicas o archivos de película.
Ajusta la exposición manualmente.
Selecciona el modo de medición que establece qué parte
del motivo se mide para determinar la exposición.
Selecciona el modo de una sola imagen o el modo ráfaga.
Selecciona el modo de toma con variación.
Ajusta para detectar automáticamente las condiciones de
la toma en el modo Automático inteligente.
Ajusta la sensibilidad de la función Captador de sonrisas
para detectar sonrisas.
Selecciona la detección de caras y hace varios ajustes
automáticamente.
Ajusta la función DRO para corregir el brillo y el
contraste y mejorar la calidad de la imagen.
Ajusta para tomar automáticamente dos imágenes y
selecciona la imagen en la que los ojos no están
parpadeando.
Busca funciones de la cámara de acuerdo con sus
necesidades.
ES
ES
15
Page 84

Visionado
Efecto belleza Retoca una cara en una imagen fija.
Retocar Retoca una imagen utilizando varios efectos.
Borrar Elimina una imagen.
Diapositivas Selecciona un método de reproducción continua.
Modo visualización Selecciona el formato de visualización para imágenes.
Proteger Protege las imágenes.
Impresión (DPOF)
Rotar Gira una imagen fija hacia la izquierda o derecha.
Guía en la cámara
x
Elementos de ajuste
Añade una marca de orden de impresión a una imagen
fija.
Busca funciones de la cámara de acuerdo con sus
necesidades.
Si pulsa el botón MENU mientras toma una imagen o durante la reproducción,
se proveerá (Ajustes) como selección final. Puede cambiar los ajustes
predeterminados en la pantalla (Ajustes).
Ajustes de Toma
Ajustes Principales
Herramienta Tarjeta
Memoria
Ajustes de Reloj
*1 [Eye-Fi] se visualiza solamente cuando hay insertada en la cámara una tarjeta de
*2 Si no hay insertada una tarjeta de memoria, se visualizará (Herramienta
ES
2
*
memoria compatible.
Memoria Interna) y solamente se podrá seleccionar [Formatear].
Iluminador AF/Cuadrícula/Resolución visualiz./Zoom
digital/Reduc. ojos rojos/Aviso ojos cerrados/Inscribir
fecha
Pitido/Luminosidad panel/Language Setting/Color
visualización/Inicializar/Guía funciones/Salida vídeo/
Ajuste conexión USB/Ajuste LUN/Desc música/Vaciar
música/Eye-Fi*
Formatear/Crear Carpeta Grab/Camb. Carp. Grab/
ElimCarpGrabación/Copiar/Número Archivo
Configuración área/Config.fecha y hora
1
/Ahorro de energía
16
Page 85

Características de “PlayMemories Home”
El software “PlayMemories Home” le permite importar imágenes fijas y
películas a su ordenador y utilizarlas.
Compartir imágenes en
“PlayMemories Online”
Subir imágenes a
servicios de la red
Importar
imágenes desd e
su cámara
Visionar imág enes
en calendario
z Descarga de “PlayMemories Home” (para Windows solamente)
Puede descargar “PlayMemories Home” de la URL siguiente:
www.sony.net/pm
Notas
• Para instalar “PlayMemories Home” se necesita una conexión a Internet.
• Para utilizar “PlayMemories Online” u otros servicios de la red se necesita una
conexión a Internet. Es posible que “PlayMemories Online” u otros servicios de la
red no estén disponibles en algunos países o regiones.
• “PlayMemories Home” no es compatible con ordenadores Mac. Utilice las
aplicaciones que hay instaladas en su Mac. Para más detalles, visite la URL
siguiente:
http://www.sony.co.jp/imsoft/Mac/
ES
ES
17
Page 86

x
Instalación de “PlayMemories Home” en un
ordenador
Utilizando el explorador de Internet de su ordenador,
1
vaya a la URL siguiente, después haga clic en
[Instalación] t [Ejecutar].
www.sony.net/pm
Siga las instrucciones de la
2
pantalla para completar la
instalación.
• Cuando se visualice el mensaje para
conectar la cámara a un ordenador,
conecte la cámara y el ordenador
utilizando el cable USB exclusivo
(suministrado).
x
Visionado de la “Guía de ayuda de PlayMemories
A una toma
USB
USB / A/V OUT
Home”
Para más detalles sobre cómo utilizar “PlayMemories Home”, consulte la
“Guía de ayuda de PlayMemories Home”.
Haga doble clic en el icono de [Guía de ayuda de
1
PlayMemories Home] en el escritorio.
• Para acceder a la “Guía de ayuda de PlayMemories Home” desde el
menú de inicio: Haga clic en [Inicio] t [Todos los programas] t
[PlayMemories Home] t [Guía de ayuda de PlayMemories Home].
• Para Windows 8, seleccione el icono [PlayMemories Home] en la
pantalla de Inicio, después inicie “PlayMemories Home” y seleccione
[Guía de ayuda de PlayMemories Home] en el menú [Ayuda].
• Para más detalles sobre “PlayMemories Home”, también puede
consultar la “Guía del usuario de Cyber-shot” (página 2) o la página de
soporte de PlayMemories Home siguiente (Inglés solamente):
http://www.sony.co.jp/pmh-se/
ES
18
A la toma
Page 87

Número de imágenes fijas y tiempo grabable de películas
El número de imágenes fijas y el tiempo que se puede grabar podrán variar
dependiendo de las condiciones de la toma y de la tarjeta de memoria.
x
Imágenes fijas
(Unidades: Imágenes)
Capacidad
Tamaño
20M 5 265
VGA 350 11500
16:9(15M) 7 330
x
Películas
La tabla de abajo muestra los tiempos de grabación máximos aproximados.
Estos son los tiempos totales para todos los archivos de película. Se puede
tomar continuamente durante aproximadamente 29 minuto (limitado por
especificaciones del producto). Para películas de tamaño [1 280×720(Fina)],
se puede tomar continuamente durante aproximadamente 20 minuto (limitado
por tamaño de archivo de 2 GB)
Capacidad
Tamaño
1 280×720(Fina) — 25 m (20 m)
1 280×720(Estándar) — 35 m (30 m)
VGA 2m (1m) 1h 5m (1h 5m)
El número dentro de ( ) es el tiempo grabable mínimo.
• El tiempo grabable de películas varía porque la cámara está equipada con VBR
(Velocidad de bits variable), que ajusta automáticamente la calidad de imagen
dependiendo de la escena que se está tomando. Cuando grabe un motivo que se
mueve rápidamente, la imagen será más clara pero el tiempo grabable será más
corto porque se requiere más memoria para grabar. El tiempo grabable también
varía dependiendo de las condiciones de la toma, el motivo o el ajuste de tamaño
de imagen.
Memoria interna Tarjeta de memoria
Aprox. 55 MB 2 GB
(h (hora), m (minuto))
Memoria interna Tarjeta de memoria
Aprox. 55 MB 2 GB
ES
ES
19
Page 88

Notas sobre la utilización de la cámara
Uso y cuidados
Evite un manejo brusco, desmontaje, modificación, golpes físicos, o impactos tales
como golpear, dejar caer o pisar el producto. Sea especialmente cuidadoso con el
objetivo.
Notas sobre la grabación/reproducción
• Antes de comenzar a grabar, haga una grabación a modo de prueba para
asegurarse de que la cámara está funcionando correctamente.
• La cámara no está hecha a prueba de polvo, ni a prueba de salpicaduras, ni a
prueba de agua.
• Evite exponer la cámara al agua. Si entra agua dentro de la cámara, podrá ocurrir
un mal funcionamiento. En algunos casos, la cámara no podrá ser reparada.
• No dirija la cámara hacia el sol ni hacia otras luces intensas. Podrá ocasionar un
mal funcionamiento de la cámara.
• Si se produce condensación de humedad, elimínela antes de utilizar la cámara.
• No agite ni golpee la cámara. Podría ocasionar un mal funcionamiento y no poder
grabar imágenes. Además, el soporte de grabación podría quedar inutilizable o
dañarse los datos de imagen.
No utilice o almacene la cámara en los siguientes lugares
• En un lugar muy caluroso, frío o húmedo
En lugares tales como en un automóvil aparcado al sol, es posible que el cuerpo de
la cámara se deforme y esto podrá ocasionar un mal funcionamiento.
• Bajo la luz solar directa o cerca de una estufa
El cuerpo de la cámara podrá decolorarse o deformarse, y esto podrá ocasionar un
mal funcionamiento.
• En un lugar expuesto a vibración basculante
• Cerca de un lugar que genera ondas de radio intensas, emite radiación o tiene
magnetismo fuerte. De lo contrario, es posible que la cámara no pueda grabar o
reproducir imágenes correctamente.
• En lugares arenosos o polvorientos
Tenga cuidado de no dejar entrar dentro de la cámara arena o polvo. Esto podrá
ocasionar un mal funcionamiento en la cámara, y en algunos casos este mal
funcionamiento no podrá repararse.
Acerca de las pilas
• Evite un manejo brusco, desmontaje, modificación, golpes físicos, o impactos
tales como golpear, dejar caer o pisar las pilas.
• No utilice una pila deformada o dañada.
• No mezcle una pila usada junto con una pila nueva ni diferentes tipos de pilas.
• Extraiga las pilas de la cámara cuando no vaya a utilizar la cámara durante
periodos de tiempo largos, o cuando las pilas estén agotadas.
ES
20
Page 89

Notas sobre la pantalla y el objetivo
La pantalla está fabricada utilizando tecnología de muy alta precisión por lo que más
del 99,99 % de los píxeles son operativos para uso efectivo. Sin embargo, es posible
que aparezcan algunos puntos diminutos negros y/o brillantes (de color blanco, rojo,
azul o verde) en la pantalla. Estos puntos son un resultado normal del proceso de
fabricación, y no afectan a la grabación.
Acerca de la temperatura de la cámara
Es posible que la cámara y la batería se sobrecalienten debido al uso continuo, pero
no se trata de un fallo de funcionamiento.
Aviso sobre los derechos de autor
Los programas de televisión, películas, cintas de vídeo y demás materiales pueden
estar protegidos por copyright. La grabación no autorizada de tales materiales puede
ir en contra de los artículos de las leyes de copyright.
No hay compensación por daño del contenido o fallo de grabación
Sony no compensará por no poder grabar o por la pérdida o daño del contenido
grabado debido a un mal funcionamiento de la cámara o el soporte de grabación, etc.
Limpieza de la superficie de la cámara
Limpie la superficie de la cámara con un paño suave ligeramente humedecido con
agua, después limpie la superficie con un paño seco. Para evitar dañar el acabado o
la envoltura:
– No exponga la cámara a productos químicos tales como diluyente, bencina,
alcohol, paños desechables, repelente de insectos, bronceador o insecticida.
Mantenimiento del monitor LCD
• La crema para las manos o hidratante dejada en la pantalla podrá disolver su
recubrimiento. Si deja algo de estas cremas en la pantalla, límpiela
inmediatamente.
• Si limpia con un pañuelo de papel u otros materiales empleando fuerza podrá
dañar el recubrimiento.
• Si se adhieren huellas dactilares o suciedad a la pantalla del monitor LCD, le
recomendamos que retire con cuidado cualquier suciedad y que después limpie la
pantalla con un paño suave.
ES
ES
21
Page 90

Especificaciones
Cámara
[Sistema]
Dispositivo de imagen: CCD de
7,76 mm (tipo 1/2,3), Filtro de
color primario
Total de píxeles:
Aprox. 20,4 Megapíxeles
Píxeles efectivos:
Aprox. 20,1 Megapíxeles
Objetivo: Objetivo zoom 26×
f = 4,0 mm – 104,0 mm
(22,3 mm – 580 mm (equivalente a
película de 35 mm))
F3,1 (W) – F5,9 (T)
Mientras se toman películas (16:9):
28 mm – 748 mm
Mientras se toman películas (4:3):
22,3 mm – 580 mm
SteadyShot: Óptico
Control de exposición: Exposición
automática, Exposición manual,
Selección escena
Balance del blanco: Automático, Luz
diurna, Nublado, Fluorescente
1/2/3, Incandescente, Flash, Una
pulsación
Toma con ráfaga (cuando se toma con
el mayor número de píxeles):
Aprox. 0,8 imágenes/segundo
(hasta 100 imágenes)
Formato de archivo:
Imágenes fijas: Cumple con JPEG
(DCF, Exif, MPF Baseline),
compatible con DPOF
Películas: MPEG-4 AVC/H.264
Soporte de grabación: Memoria interna
(Aprox. 55 MB) “Memory Stick
Duo”, “Memory Stick Micro”,
tarjetas SD, tarjetas de memoria
ES
microSD
22
Flash: Alcance del flash (sensibilidad
ISO (Índice de exposición
recomendado) ajustada a Auto):
Aprox. 0,4 m a 6,8 m (W)
Aprox. 1,5 m a 3,6 m (T)
[Conectores de entrada y salida]
Toma USB / A/V OUT:
Salida de vídeo
Salida de audio
Comunicación USB
Comunicación USB: Hi-Speed USB
(USB 2.0)
[Pantalla]
Pantalla LCD:
7,5 cm (tipo 3,0) unidad TFT
Número total de puntos:
460 800 puntos
[Alimentación, general]
Alimentación: Pilas alcalinas LR6
(tamaño AA) (4), cc 6 V
Pilas de hidruro de metal de níkel
HR15/51: HR6 (tamaño AA) (4)
(se vende por separado), cc 4,8 V
Consumo (durante la toma de imagen):
Aprox. 1,6 W
Temperatura de funcionamiento:
0°C a 40°C
Temperatura de almacenamiento:
–20 °C a +60 °C
Dimensiones (cumple con CIPA):
122,9 mm × 83,2 mm × 87,2 mm
(An/Al/Pr)
Peso (cumple con CIPA) (incluyendo
cuatro pilas y un “Memory Stick
Duo”):
Aprox. 530 g
Page 91

Micrófono: Monoaural
Altavoz: Monoaural
Exif Print: Compatible
PRINT Image Matching III:
Compatible
El diseño y las especificaciones están
sujetos a cambios sin previo aviso.
Marcas comerciales
• Las marcas siguientes son marcas
comerciales de Sony Corporation.
, “Cyber-shot”,
“Memory Stick PRO Duo”,
“Memory Stick PRO-HG Duo”,
“Memory Stick Duo”, “Memory
Stick Micro”
• Windows es una marca comercial
registrada de Microsoft Corporation
en los Estados Unidos y/u otros
países.
• Mac y Mac OS son marcas
comerciales registradas de Apple Inc.
• El logotipo de SDHC es una marca
comercial de SD-3C, LLC.
• Eye-Fi es una marca comercial de
Eye-Fi Inc.
• Facebook y el logotipo de “f” son
marcas comerciales o marcas
comerciales registradas de Facebook,
Inc.
• YouTube y el logotipo de YouTube
son marcas comerciales o marcas
comerciales registradas de Google
Inc.
• Además, los nombres de sistemas y
productos utilizados en este manual
son, en general, marcas comerciales o
marcas comerciales registradas de sus
respectivos desarrolladores o
fabricantes. Sin embargo, las marcas
™ o ® no se utilizan en todos los
casos en este manual.
En la página Web de atención al
cliente puede encontrar
información adicional sobre este
producto y respuesta a las
preguntas hechas con más
frecuencia.
Impreso en papel reciclado en un 70%
o más utilizando tinta hecha con aceite
vegetal exento de compuesto orgánico
volátil (COV).
ES
ES
23
Page 92

Português
Aprender mais acerca da câmara (“Manual do utilizador da Cyber-shot”)
“Manual do utilizador da Cyber-shot” é um manual on-line.
Consulte-o para instruções aprofundadas sobre as muitas
funções da câmara.
1 Aceda à página de apoio da Sony.
http://www.sony.net/SonyInfo/Support/
2 Selecione o seu país ou região.
3 Pesquise o nome de modelo da sua câmara na página de
apoio.
• Verifique o nome do modelo na parte inferior da sua
câmara.
Verificar os itens fornecidos
O número entre parênteses indica o número de peças.
• Câmara (1)
• Pilhas alcalinas LR6 (tamanho AA) (4)
• Cabo USB dedicado (1) (Sony Corporation 1-837-783-)
• Correia de transporte a tiracolo (1)
• Tampa da objetiva (1)/correia da tampa da objetiva (1)
• Manual de instruções (este manual) (1)
PT
2
Page 93

AVISO
Para reduzir o risco de incêndio ou choque elétrico, não exponha
a unidade à chuva ou à humidade.
Aviso para os clientes na Europa
[ Nota para os clientes nos países que apliquem as Diretivas da
UE
Este produto foi fabricado por ou em nome da Sony Corporation, 1-7-1 Konan Minato-ku
Tokyo, 108-0075 Japan. As questões relativas à conformidade dos produtos com base na
legislação da União Europeia devem ser dirigidas ao representante autorizado, Sony
Deutschland GmbH, Hedelfinger Strasse 61, 70327 Stuttgart, Alemanha. Para quaisquer
assuntos de serviço ou garantia, consulte os endereços fornecidos nos documentos de
serviço ou de garantia.
Este produto foi testado e está em conformidade com os limites estabelecidos no
regulamento EMC relativamente à utilização de cabos com comprimento inferior a
3metros.
[ Atenção
Os campos magnéticos em frequências específicas podem influenciar a imagem e o som
desta unidade.
[ Nota
Se a transferência de dados for interrompida a meio (falhar) devido a interferências
eletromagnéticas ou eletricidade estática, reinicie a aplicação ou desligue e volte a ligar o
cabo de comunicação (USB, etc.) de novo.
[ Tratamento de Equipamentos Elétricos e Eletrónicos no final da
sua vida útil (Aplicável na União Europeia e em países Europeus
com sistemas de recolha seletiva de resíduos)
informação mais detalhada sobre a reciclagem deste produto, por favor contacte o
município onde reside, os serviços de recolha de resíduos da sua área ou a loja onde
adquiriu o produto.
Este símbolo, colocado no produto ou na sua embalagem, indica que este
não deve ser tratado como resíduo urbano indiferenciado. Deve sim ser
colocado num ponto de recolha destinado a resíduos de equipamentos
elétricos e eletrónicos. Assegurando-se que este produto é corretamente
depositado, irá prevenir potenciais consequências negativas para o
ambiente bem como para a saúde, que de outra forma poderiam ocorrer
pelo mau manuseamento destes produtos. A reciclagem dos materiais
contribuirá para a conservação dos recursos naturais. Para obter
PT
PT
3
Page 94

[ Tratamento de pilhas no final da sua vida útil (Aplicável na União
Europeia e em países Europeus com sistemas de recolha
seletiva de resíduos)
Este símbolo, colocado na pilha ou na sua embalagem, indica que estes
produtos não devem ser tratados como resíduos urbanos indiferenciados.
Em determinadas pilhas este símbolo pode ser usado em combinação com
um símbolo químico. Os símbolos químicos para o mercúrio (Hg) ou
chumbo (Pb) são adicionados se a pilha contiver mais de 0,0005% em
Devem antes ser colocados num ponto de recolha destinado a resíduos de pilhas e
acumuladores.
Assegurando-se que estas pilhas são corretamente depositadas, irá prevenir potenciais
consequências negativas para o ambiente bem como para a saúde, que de outra forma
poderiam ocorrer pelo mau manuseamento destas pilhas. A reciclagem dos materiais
contribuirá para a conservação dos recursos naturais.
Se por motivos de segurança, desempenho ou proteção de dados, os produtos necessitarem
de uma ligação permanente a uma pilha integrada, esta só deve ser substituída por
profissionais qualificados.
Acabado o período de vida útil do aparelho, coloque-o no ponto de recolha de produtos
elétricos/eletrónicos de forma a garantir o tratamento adequado da bateria integrada.
Para as restantes pilhas, por favor, consulte as instruções do equipamento sobre a remoção
da mesma. Deposite a bateria num ponto de recolha destinado a resíduos de pilhas e
baterias.
Para informações mais detalhadas sobre a reciclagem deste produto, por favor contacte o
município onde reside, os serviços de recolha de resíduos da sua área ou a loja onde
adquiriu o produto.
mercúrio ou 0,004% em chumbo.
PT
4
Page 95

Identificação das partes
A Marcador de modo:
(Seleção de cena)/
(Auto inteligente)/
(Programar Automático)/
(Foto de exposição)/
(Varrer panorama)/
(Modo de Filme)
B Botão do obturador
C Para filmagem:
Alavanca W/T (zoom)
Para ver: Alavanca (Zoom de
reprodução)/Alavanca
(Índice)
D Luz do temporizador
automático/Luz do Obturador de
Sorriso/Iluminador AF
E Lente
F Altifalante
G Presilha para correia de
transporte a tiracolo
H Botão (subida do flash)
• Quando não pretender disparar
o flash, pressione manualm ente
para baixo a unidade do flash,
de modo a recolhê-la.
I Flash
J Microfone
K Tomada USB / A/V OUT
L Ecrã LCD
M Botão / (Manual da Câmara/
Apagar)
N Luz de acesso
O Botão de controlo
MENU ligado: v/V/b/B
MENU desligado: DISP/ / /
PT
P Botão MENU
PT
5
Page 96

Q Botão (Reprodução)
R Botão ON/OFF (Alimentação)/
Indicador ON/OFF
(Alimentação)
S Tampa da bateria/cartão de
memória
T Ranhura do cartão de memória
U Ranhura de inserção da bateria
V Recetáculo para o tripé
• Use um tripé com um parafuso
com menos de 5,5 mm de
comprimento. Caso contrário,
não consegue prender
firmemente a câmara, e podem
ocorrer danos a esta.
Inserir as pilhas/um cartão de memória (vendido separadamente)
Certifique-se de que o canto recortado
Abra a tampa.
1
Insira o cartão de memória (vendido separadamente).
2
• Insira o cartão, com o canto recortado virado na direção indicada na
figura, até ouvir um estalido.
Faça corresponder as marcas +/– e insira as pilhas.
3
Feche a tampa.
4
PT
está virado corretamente.
6
Page 97

x
Cartões de memória que pode utilizar
Cartão de memória Para imagens fixas Para filmes
Memory Stick PRO Duo (Mark2 apenas)
A
Memory Stick PRO-HG Duo
Memory Stick Duo —
B Memory Stick Micro (M2) (Mark2 apenas)
Cartão de memória SD (Classe 4 ou
C
Cartão de memória SDHC (Classe 4 ou
Cartão de memória microSD (Classe 4 ou
D
Cartão de memória
microSDHC
superior)
superior)
superior)
(Classe 4 ou
superior)
Neste manual, os produtos indicados na tabela são coletivamente referidos
como:
A: “Memory Stick Duo”
B: “Memory Stick Micro”
C: Cartão SD
D: Cartão de memória microSD
Notas
• Quando utilizar os cartões de memória “Memory Stick Micro” ou microSD com
esta câmara, certifique-se de que utiliza o adaptador apropriado.
x
Para retirar o cartão de memória/as pilhas
Cartão de memória: Empurre o cartão de memória para dentro uma vez.
Pilhas: Tenha cuidado para não deixar cair as pilhas.
Notas
• Nunca abra a tampa do compartimento das pilhas/do cartão de memória, nem
retire as pilhas/o cartão de memória enquanto o indicador de acesso (página 5)
estiver aceso. Isso pode provocar danos aos dados no cartão de memória/memória
interna.
PT
PT
7
Page 98

x
Pilhas que pode e não pode utilizar com a câmara
Na tabela abaixo, indica que a pilha pode ser utilizada, ao passo que —
indica que essa não pode ser utilizada.
Tipo de pilha Fornecida Suportada Recarregável
Pilhas alcalinas LR6
(tamanho AA)
Pilhas de níquel-hidreto
metálico HR15/51: HR6
(tamanho AA)
Pilhas de lítio* — — —
Pilhas de manganês* — — —
Pilhas Ni-Cd* — — —
* Não é possível garantir o desempenho operacional se houver uma queda de tensão
ou se ocorrerem outros problemas provocados pela natureza das pilhas.
Notas
• O desempenho da sua câmara pode variar, dependendo do fabricante e do tipo de
pilha que utilizar. Além disso, o desempenho das pilhas pode diminuir
significativamente sob temperaturas baixas. Especialmente, em temperaturas
abaixo dos 5 °C, a sua câmara pode desligar-se inesperadamente ao ligá-la ou ao
passar do modo de reprodução para o modo de fotografia.
Para obter mais detalhes sobre as pilhas, consulte “Pilhas” no “Manual do
utilizador da Cyber-shot”.
• Tenha em atenção que não podemos garantir o desempenho integral da sua câmara
quanto utilizar pilhas que não sejam indicadas como “suportadas” na tabela acima
mencionada.
—
—
PT
8
Page 99

x
Vida útil da pilha e número de imagens que pode
gravar/ver
Duração da bateria Número de imagens
Fotografar (imagens fixas) Aprox. 175 min. Aprox. 350 imagens
Filmagem real (filmes) Aprox. 85 min. —
Filmagem contínua (filmes) Aprox. 150 min. —
Visualizar (imagens fixas) Aprox. 400 min. Aprox. 8000 imagens
Notas
• O número de imagens que podem ser gravadas é um número aproximado para a
gravação com pilhas novas. O número poderá ser inferior, consoante as
circunstâncias.
• O número de imagens que podem ser gravadas aplica-se à gravação nas seguintes
condições:
– Utilizando o Sony “Memory Stick PRO Duo” (Mark2) (vendido
separadamente).
– Utilizando pilhas novas a uma temperatura ambiente de 25 °C.
• O número de imagens fixas que podem ser gravadas baseia-se na norma CIPA e é
para fotografar nas seguintes condições.
(CIPA: Camera & Imaging Products Association)
– Fotografar uma vez em cada 30 segundos.
– O zoom muda alternadamente entre os lados W e T.
– O flash dispara uma vez em cada duas.
– A alimentação liga-se e desliga-se uma vez em cada dez.
• A duração da pilla, para filmes, tem por base a norma CIPA e destina-se a
filmagens nas seguintes condições:
– Modo de gravação: 1280×720(Qualidad. )
– “Filmagem real (filmes)”: Indica o tempo de filmagem aproximado como
referência para quando filmar, fizer zoom, fizer pausa para filmar e ligar ou
desligar continuamente a câmara.
– “Filmagem contínua (filmes)”: Quando a filmagem contínua termina devido aos
limites definidos (29 minutos), volte a carregar no botão do obturador para
continuar a filmar. As funções de filmagem tal como o zoom não funcionam.
• Os valores apresentados para pilhas alcalinas baseiam-se em normas comerciais e
não se aplicam a todas as pilhas alcalinas em todas as circunstâncias. Os valores
podem variar, consoante o tipo/fabricante das pilhas, condições ambientais,
definição do produto, etc.
PT
PT
9
Page 100

Acertar o relógio
ON/OFF (Alimentação)
Botão de controlo
Selecionar itens: v/V/b/B
Regular: z
Carregue no botão ON/OFF (Alimentação).
1
Visualiza-se a definição de Data e Hora quando carrega no botão ON/
OFF (Alimentação) pela primeira vez.
• Pode demorar algum tempo para a alimentação ligar e permitir a
operação.
Selecione um idioma desejado.
2
Selecione uma localização geográfica pretendida,
3
seguindo as instruções apresentadas no ecrã e, em
seguida, carregue em z.
Defina [Format Data e Hora], [Hora de verão] e [Data e
4
Hora] e, em seguida, carregue em [OK].
• Meia-noite é indicada como 12:00 AM e meio-dia como 12:00 PM.
Efetue operações, seguindo as instruções
5
apresentadas no ecrã.
10
PT
 Loading...