

Page 1

3-079-664-11(1)
_
_
_
_
_
_
_
_
Getting started_______________________
Digital Still Camera
Bluetooth Function Operating Instructi ons
Before operating the unit, please read this manual thoroughly, and
retain it for future reference.
Owner’s Record
The model and seria l nu mbers are located on the bottom. Record the
serial number in the spa ce provided below. Refer to these numbers
whenever you call upon your Son y dea l er regarding this product.
Model No. DSC-FX77
Serial No.
DSC-FX77
© 2002 Sony Corporation
Sending images ______________________
Receiving images ____________________
Using your camera as the remote camera ______
Printing images________________________
Authentication/Deleting the record
Additional information________________
Index_____________________________
See also the op erating instructions.
________
Page 2

Introduction
This camera is designed to connect with
a device eq uipped with the Bluetooth
function, such as a digital still camera, a
computer, or a printe r. You can send/
receive images without a cable. You can
use your camera as a remote camera of
your computer to perform remote
shooting from the computer.
Printing images with a
printer (page 16)
• Sending/receiving images with a
Sony VAIO (pages 10, 13)
• Using your camera as a remote
camera (page 14)
Sending/receiving
images with another
digital still camera
(pages 8, 12)
To connect with yo ur digit al still camera,
the Bluetooth devic e must be c ompatible
with the “Image Push Feature” or the
“Remote Came ra Feature” of the “Basic
Imaging Profile” (BIP). For details, see
2
page 4.
Page 3

Table of contents
Getting started
Introduction ...............................................2
The Bluetooth wireless technology...........4
The “Basic Imaging Profile”.................4
Bluetooth operation...................................4
Naming your camera.................................5
Sending images
Discovering devices (New search)........... 7
Sending images to a camera......................8
On the single screen..............................8
On the Index (nine-image) screen.........9
On the Index (tripl e-image) screen.....10
Sending images to a Sony VAIO............10
Receiving images
Receiving images from a camera............12
Receiving images from a Sony V AIO ....13
Preparing your camera........................13
Preparing the VAIO ............................13
Using your camera as the
remote camera
Using your camera as the r emote camer a of
a Sony VAIO ..................................14
Preparing your camera........................14
Preparing the VAIO............................15
Printing images
Printing images .......................................16
Sending images to a printer................16
Authentication/Deleting the
record
Authentication.........................................17
Entering the passkey.................. ......... 17
Deleting the record.................. ...............18
Additional information
File types that can be sent/received ........19
Sending...............................................19
Receiving............................................19
Troubleshooting......................................20
Warnings and messages..........................29
Menu items ..................... ................. .......31
SET UP items .......................... ...............32
Bluetooth specifications..........................33
The LCD screen......................................34
Index
Index.......................................................36
3
Page 4

The Bluetooth
Getti
d
wireless technology
The Bluetooth wi reless technology allo w s
communication between va ri ous Bluetooth
devices without using cables. Devices
which can use this technology include PCs,
computer peri p heral devices , PDAs , and
mobile phones. This omnidirectional
communication syst em en ables
communication even if the Bluetooth
device is in a bag or if there are obstacles
between the device s.
Also, the Bluetooth wireless technology has
advanced security functions, such as
scrambled frequencies and data e nc rypt io n.
The “Basic Imaging Profile”
The “Basic Imaging Profile” (BIP) is the
specification used when sendi ng or
receiving images bet w een Bluetooth
devices. The main features of the BIP
enable sen d ing or receiv in g images, us e o f
the remote shutter feature of a di gi ta l still
camera.
To connect with your camera, the Bluetooth
device must be compatible with the “Image
Push Feature” or the “Remote Camera
Feature” of the “Basic Imaging Profile”
(BIP).
Before using the Bluetooth device, check
the BIP specificatio ns of the device.
ng starte
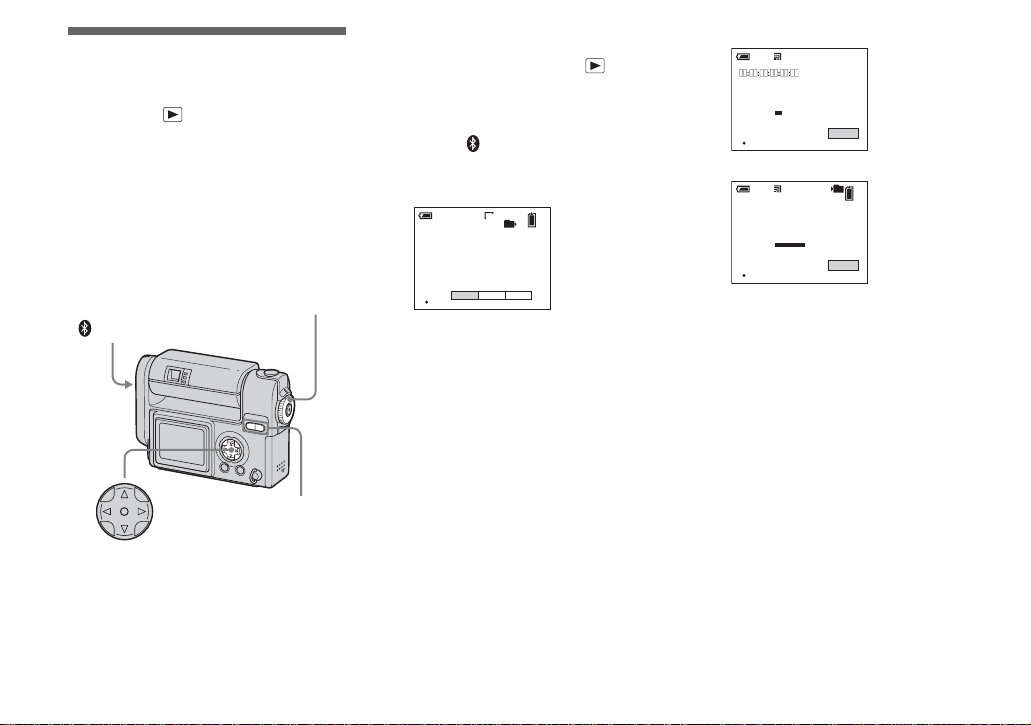
Bluetooth operation
Pressing the Bluetooth button opens the
Bluetooth menu. The Bluetooth lamp
turns blue during Bluetooth ope rat i ons.
Antenna
portion
Bluetooth
lamp
Bluetooth
button
• When using the Bluetooth function, the
distance between the camera and the device you
intend to connect must be within 10 m (3.3 feet)
without obstacles.
• When using the Bluetooth function, actual
remaining time and time indicated with the
battery remaining indicator may be different.
4
• Do not cover the antenna portion during a
Bluetooth connection.
• Removing the battery pack during a Bluetooth
connection may cause a malfunction.
Page 5

Naming your camera
MODE dial: SET UP
You can name your camera with a name
containing up to 24 characters. This name is
used when the camera is searched for and
discovered by other Bluetooth devices.
“SONY Cyber-shot” is the default name.
We recommend you rena me your camera
with an easy-to-understan d name.
Control button
MODE dial
MENU
• Be sure to enter one or more characters when
naming your camera.
a Set the MODE dial to SET UP.
b Select (Bluetooth SETUP)
with V, select [CHANGE
NAME] with V/B, select [OK]
with v/B, then press z.
The following screen appears.
INPUT DEVICE NAME
SONY Cyber–shot
~
}
01234
56789
MENU
OK CHARACTER SELECT
O K
BACK SPACE
DELETE ALL
EXIT
c When renaming the camera f or
the first time, select [DELETE
ALL] with v/V/B, then press z.
The default name is deleted.
INPUT DEVICE NAME
~
}
01234
56789
MENU
OK CHARACTER SELECT
O K
BACK SPACE
DELETE ALL
EXIT
d Select the desired characte r
with v/V/b/B, then pres s z.
The selected character is entered.
INPUT DEVICE NAME
a
56789
abcd
fghij
MENU
OK CHARACTER SELECT
BACK SPACE
e
DELETE ALL
O K
EXIT
e Repeat Step 4 as many times
as needed to name the
camera.
f Select [OK] with v/B, then
press z.
Renaming is completed and the
(Bluetooth SETUP) screen appears
again. Confirm the name on the screen.
Bluetooth SETUP
SECURITY LEVEL
:
EDIT RECORD
CHANGE NAME
dsc
00:0C:3E:3A:4B:69
PAGE SELECT
• Identify the camera with a name and device
address so that it can be located during a device
discovery.
LOW
:
0
:
Name
Device
address
Getting started
5
Page 6

To change the character type
Each time you press the MENU button, the
character type changes as follows: number
t lowercase letters t uppercase letters
t symbols
To delete one character
Select [BACK SPACE], then press z. The
last character is delete d. Only the last
charater in a seri es c an be deleted using
[BACK SPACE].
To delete all the characters
Select [DELETE ALL], then press z. All
the characters are deleted.
To cancel the renaming
operation
Select [EXIT], then press z. The previous
name is not changed.
6
Page 7

Discovering devices
Sendi
– New search
MODE dial:
You have to discover a Blu et ooth device
when the camera has n ot b een co nnec ted to
the device previously or when the camera
does not have informat ion on the device in
the record for the connected device.
Before operation
Be sure to set the Bluetooth device to allow
it to be connected.
MODE dial
Bluetooth
Control butt on
a Set the MODE dial to and
display the image you want to
send.
b Press Bluetooth.
The Bluetooth menu ap pears.
<Your camera>
min
60
2272
101
1/1
SEND RECEIVE PRINT
OK
c Select [SEND] with b, then
press z.
The Bluetooth function sta rt s up and
the SELECT THE RECEIVER screen
appears.
<Your camera>
SELECT THE RECEIVER
NO RECORD FOR CONNECTED DEVICE
TRY A NEW SEARCH
CONNECT
EXIT
OK
NEW SEARCH
d Select [NEW SEARCH] with V,
then press z.
“SEARCHING Bluetooth DEVICE” is
indicated and the number of Bluetooth
devices discovered is indicated.
ng images
<Your camera>
min
60
1 UNIT(S) FOUND
SEARCHING Bluetooth DEVICE
OK
STOP
The device discovery operation is
completed, the SELECT THE
RECEIVER screen appears again.
<Your camera>
SELECT THE RECEIVER
NAME :
[
SONY Cyber–shotX
ADDRESS :
TYPE :
SUPPORTED :
SEARCH :
OK
]
CAMERA
UNKNOWN
NEW
1/1
CONNECT
EXIT
NEW SEARCH
To cancel the new search
Select [STOP], then press z in Step 4.
The devices discovered up to the point you
stop the discovery operati on a re added to
the SELECT THE RECEIVER screen.
• You may not be able to discover the desired
device if the setting of the device is not
discoverable. If you cannot discover the desired
device by repeating a new search, check the
setting of the device.
• The maximum number of devices that can be
discoverable during a new search is 10 devices.
• The result of new search is displayed along
with the record.
Sending images
7
Page 8
Sending images to a camera
MODE dial:
You can send im ages to a c amera eq uip ped
with the BIP-compat ib le Bluetooth
function.
Before operation
Be sure to se t the receiving camera to
enable it to receive images (page 12).
MODE dial
Bluetooth
SMART ZOOM
Control button
• This explanation is given using the DSC-FX77
model.
• For the image types you can send, see page 19.
On the single screen
a Set the MODE dial to and
display the image you want to
send.
b Press Bluetooth.
The Bluetooth menu appears.
<Sending camera>
min
60
2272
101
1/1
SEND RECEIVE PRINT
OK
c Select [SEND] with b, then
press z.
The Bluetooth function starts up and
the SELECT THE RECEIVER screen
appears.
d Display the record of t he
receiving camera with b/B or
perform a new search (page 7).
e Select [CONNECT] with v, then
press z.
“SENDING” is indica ted and the
selected image is sent to the receiving
camera.
<Sending camera>
min
60
SONY Cyber–shotX
SENDING
OK
EXIT
<Receiving camera>
0/0
RECEIVING
101
EXIT
min
60
SONY Cyber–shot
00:0C:3E:3A:4B:69
OK
• If passkey entry is required on the sending
and receiving cameras, enter the passkey
(page 17).
• If you run past the time limit for the
passkey entry (30 seconds), connect again.
f To send other images, display
the desired image with b/B,
then press z.
To cancel the sending operation
Sending camera
Select [EXI T], then press z in Step 5 or
6. The Bluetooth func ti on is turned off
and the Bluetooth menu appears again.
8
Page 9

On the Index (nine-image) screen
a Set the MODE dial to , then
press the SMART ZOOM W
button once to switch to the
Index (nine-image ) sc reen.
b Press Bluetooth.
The Bluetooth menu appears.
<Sending camera>
SEND RECEIVE PRINT
c Select [SEND] with b, then
press z.
d Select [SELECT] with B, then
press z.
e Select the image you want to
send with v/V/b/B, then press
z.
A mark is attached on the selected
image.
<Sending camera>
SELECT MOVE TO NEXT
Bluetooth
At this time, the image has not been
sent.
f To send other images at the
same time, repeat Step 5.
• The maximum number of images you can
send at a time is 54.
g Press Bluetooth.
h Select [OK] with B, then press
z.
The Bluetooth function sta rt s up and
the SELECT THE RECEIVER screen
appears.
i Display the record of the
receiving camera with b/B or
perform a new search (page 7).
j Select [CONNECT] with v, then
press z.
“SENDING” is indicated and the
selected image is sent to the receiving
camera.
<Sending camera>
min
60
SONY Cyber–shotX
0/1
SENDING
OK
EXIT
<Receiving camera>
0/0
RECEIVING
101
EXIT
min
60
SONY Cyber–shot
00:0C:3E:3A:4B:69
OK
• If passkey entry is required on the sending
and receiving cameras, enter the passkey
(page 17).
• If you run past the time limit for the
passkey entry (30 seconds), connect again.
When the images have been sent,
“SENT” is indicated on t he sending
camera.
k Select [EXIT], then press z.
The Bluetooth function turns off and
the Bluetooth menu appears again.
To cancel the sending operation
Sending camera
Select [EXI T ] , then press z in S tep 0.
The Bluetooth function is turned off and the
Bluetooth menu appears again.
Sending images
9
Page 10

On the Index (triple-image) screen
a Set the MODE dial to , then
press the SMART ZOOM W
button twice to switch to the
Index (triple-image) scr een.
b Move the image you want to
send to the center with b/B.
c Press Bluetooth.
The Bluetooth menu ap pears.
<Sending camera>
PRINT
RECEIVE
SEND
101-0012 2003 10:30AM74
OK BACK/NEXT
d Select [SEND] with V, then
press z.
The Bluetooth function start s up and
the SELECT THE RECEIVER screen
appears.
e Display the record of the
receiving camera with b/B or
perform a new search (page 7).
f Select [CONNECT] with v, then
press z.
“SENDING” is indica ted and the
selected image is sent to the receiver
camera.
<Sending camera>
min
60
SONY Cyber–shotX
SENDING
OK
EXIT
<Receiving camera>
0/0
RECEIVING
101
EXIT
min
60
SONY Cyber–shot
00:0C:3E:3A:4B:69
OK
• If passkey entry is required on the sending
and receiving cameras, enter the passkey
(page 17).
• If you run past the time limit for the
passkey entry (30 seconds), connect again.
g To send other images, move
the desired image to the center
with b/B, then press z.
To cancel the sending operation
Sending Camera
Select [EXI T ] , then press z in S tep 6 or
7. The Bluetooth func ti on is turned off
and the Bluetooth menu app ea rs aga in .
Sending images to a Sony VAIO
MODE dial:
You can send images to a VAIO equipped
with the BIP-compatible Bluetooth
function.
MODE dial
Bluetooth
Control butt on
• For the latest information about
connection using a VAIO, see the
following URL: http://www.sonyimaging.com/support/
• You can also operate with the index (nine- or
triple-image) screen.
• For the image types you can send, see page 19.
10
Page 11

a Turn on your VAIO and turn on
the Bluet ooth function.
b Start up “BlueSpace.”
For details o n this operati on , refer to
the HELP of the VAIO.
c Set the MODE dial on the
camera to and display the
image you want to send.
d Press Bluetooth on the
camera.
The Bluetooth menu appears.
e Select [SEND] with b, then
press z.
The Bluetooth functi on sta rt s up and
the SELECT THE RECEIVER screen
appears.
f Display the record of the
receiver with b/B or perform
new search (page 7).
g Select [CONNECT] with v, then
press z.
“SENDING” is indicated on the
camera and the select ed image is sent
to the VAIO.
<Sending camera>
min
60
VAIO
SENDING
OK
• If passkey entry is required on your
camera and the V AI O, enter the passkey
(page 17).
• If you run past the time limit for the
passkey entry (30 seconds), connect again.
EXIT
h To send other images, display
the desired image with b/B,
then press z.
To cancel the sending operation
Your camera
Select [EXIT], then press z in Step 7 or
8. The Bluetooth function is turned off
and the Bluetooth menu appea rs aga i n.
Sending images
11
Page 12

Receiving images
R
from a camera
MODE dial:
You can receive images from a cam era
equipped with the BIP- co mp atible
Bluetooth function.
MODE dial
Bluetooth
Control butt on
• You can also perform this operation with the
index (nine- or triple-image) screen.
• For the image types you can receive, see
page 19.
a Set the MODE dial to .
b Press Bluetooth.
The Bluetooth menu appears.
<Receiving camera>
min
60
2272
101
1/1
SEND RECEIVE PRINT
OK
c Select [RECEIVE] with b/B,
then press z.
The Bluetooth function starts up and
“WAITING FOR CONNECTION” is
indicated. The camera is then
connectable.
<Receiving camera>
min
60
WAITING FOR CONNECTION
OK
101
0/0
EXIT
d Discover the receiving camera
with the sending camera, and
send images.
“RECEIVING” i s indi cated and the
image is sent to the receiving camera.
After recor ding the ima g e in the
receiving ca mera, the rece iving cam era
turns back t o be r ec ei vable (WAITING
TO RECEIVE).
eceiving images
<Receiving camera>
min
60
SONY Cyber–shotX
WAITING TO RECEIVE
OK
101
1/1
EXIT
To cancel the receiving
operation
When [EXIT] is indicated on the screen,
you can cancel the rec eiving operation at
any time. Select [EXI T], t hen pr ess z. The
Bluetooth function is turned off and the
Bluetooth menu appears again. The file
currently being received is not saved.
When the sending camera turns
off the Bluetooth function
The following screen appe ars.
<Receiving camera>
min
60
1/1
RECEIVED
OK
If you want to receive other images, select
[EXIT] to turn off the Bluetooth func tion.
Then, repeat Steps 3 and 4.
EXIT
12
Page 13

Receiving images from a Sony VAIO
MODE dial:
You can receiv e im ages from a VAIO
eqquiped with the BIP - compatible
Bluetooth function.
MODE dial
Bluetooth
Control butt on
• For the latest information about
connection using a VAIO, see the
following URL: http://www.sonyimaging.com/support/
• For the image types you can receive, see
page 19.
Preparing your camera
a Set the MODE dial to .
b Press Bluetooth.
The Bluetooth menu ap pears.
<Your camera>
min
60
2272
101
1/1
SEND RECEIVE PRINT
OK
c Select [RECEIVE] with b/B,
then press z.
The Bluetooth function sta rt s up and
“WAITING FOR CONNECTION” is
indicated. The camera is th en
connectable.
<Your camera>
min
60
WAITING FOR CONNECTION
OK
101
0/0
EXIT
Preparing the VAIO
a Turn on the VAIO and turn on
the Bluetooth function.
b Start up “BlueSpace.”
For details on the fol lowing
operations, refer to the HELP of the
VAI O or URL: http ://www.sonyimaging.com/support/
Receiving images
13
Page 14

Using your camera as
Usi
the remote camera of
a Sony VAIO
MODE dial: / P/SCN
You can perform remote shooting from a
VAIO equipped with th e BI P - co mpatible
Bluetooth function.
The maximum time you can use
the camera as a remote camera is
three hours. The camera
automatically turns off after three
hours.
Do not use the camera for hours as
a surveillance camera and such.
This may cause a malfunction.
MODE dial
Bluetooth
Control butt on
• For the latest information about
connection using a VAIO, see the
following URL: http://www.sonyimaging.com/support/
• When [SECURITY LEVEL] of your camera is
set to [HIGH], passkey entry may be required
(page 17).
ng your camera as the remote camera
Preparing your camera
a Set the MODE dial on the
camera to , P, or SCN.
b Press Bluetooth.
The Bluetooth menu ap pea rs.
<Your camera>
2272
101
min
60
REMOTE CAMERA
OK
c Press z to execute [REMOTE
CAMERA].
The Bluetooth function starts up and
“WAITING FOR CONNECTION” is
indicated. The camera is then
connectable.
<Your camera>
min
60
WAITING FOR CONNECTION
OK
• When [MODE] (R EC MODE) is set to
[VOICE], you cannot select [REMOTE
CAMERA].
• You cannot use the self-timer function.
101
0/0
EXIT
14
Page 15

Preparing the VAIO
a Turn on the VAIO and turn on
the Bluet oo th func ti on .
b Start up “BlueSp ace.”
For details o n the following
operations, refer to the HELP of the
VAIO or URL : http:www.sonyimaging.com/support/
Using your camera as the remote camera
15
Page 16

Printing images
Printi
MODE dial:
You can send images to a printer equipped
with the BIP-compat ible Bluetooth fu nction
and print images.
Before operation
Turn on the printer, and be sure to set the
printer to a llow it to be connected.
MODE dial
Bluetooth
Control butt on
• You can also perform this operation with the
index (nine- or triple-image) screen.
• For the image types you can send, see page 19.
Sending images to a printer
a Set the MODE dial on the
camera to and display the
image you want to print.
b Press Bluetooth.
The Bluetooth menu appears.
min
60
2272
101
1/1
SEND RECEIVE PRINT
OK
c Select [PRINT], then press z.
The Bluetooth function starts up and
the SELECT THE PRINTER screen
appears.
d Display the record of t he
printer with b/B or perform a
new search (page 7).
e Select [CONNECT] with v, then
press z.
“PRINTING” is indicated on the
camera and the selected ima ge is sent
to the printer.
min
60
Printer
ng images
• If passkey entry is required, enter the same
passkey as that of the printer (page 17).
• If you run past the time limit for the
passkey entry (30 seconds), connect again.
• The printer may have a predetermined
passkey or its passkey may have been set
beforehand. For details on the passkey
setting of the printer, refer to the operating
instructions supplied with the printer.
f To send other images, display
the image you want to print
with b/B, then press z.
• The number of images you can send in a
row depends on the printer.
To cancel the sending operation
Select [EXI T], then press z in Step 5 or
6. The Bluetooth func ti on is turned off
and the Bluetooth menu appears again.
• The camera cannot cancel the printing
operation after the image has been sent to the
printer. For details to stop the printing, refer to
the operating instructions supplied with the
printer.
• The edges of the image may not be printed
depending on the printer setting.
• It may take a lot of time to print images,
depending on the image size or the printer.
16
PRINTING
OK
EXIT
Page 17

Authentication
Authentication/Deleti
d
What’s a passkey
Passkey is u s ed to authenticate two
Bluetooth devices that have not previously
connected to e ach oth er an d crea te a t rust ed
relationship between them.
You need to enter the same characters
(passkey) to each device on passkey
authentication process.
Once authentication of the device has been
confirmed, the cam era register ed the device
as a record. Since then you can connect the
device without entering a passkey.
• To ensure proper security, the passkey
entry has a time limit (30 seconds),
based on the Bluetooth standards.
• The passkey entry may be required when the
authentication valid period of the camera on
other device is expired, the record is deleted, or
the security setting is changed.
• Passkey entry may be required, depending on
devices, each time you intend to connect.
• This “Passkey” is also referred to as a
“Bluetooth passkey” etc. “PIN” is also used
with the same meaning.
When the passkey entry screen
appears on your camera before it
appears on the other device
Enter the desir ed passkey on your camera.
Then, enter the same passkey on the othe r
device.
When the passkey entry screen
appears on the other device
before it appears on you r camera
Enter the desired passkey on the other
device. Then, enter the same passkey on
your camera.
When the passkey entry screen
appears on your camera an d the
other device at the same time
You can enter the passkey on either one.
Enter the same passkey on your camera and
the other device.
ng the recor
Entering the passkey
Enter the passkey when the passkey entry
screen appears.
a Select the desired characte r
with v/V/b/B, then pres s z.
The selected character is entered.
INPUT THE PASSKEY WITHIN 30 SECS.
~
}
01234
56789
MENU
OK CHARACTER SELECT
O K
BACK SPACE
DELETE ALL
EXIT
b Repeat Step 1 as many times
as needed to enter the de sired
passkey.
c Select [OK] with v/B, then
press z.
The passkey entry is completed.
• You can enter a passkey with up to 16
characters, however, you have to enter the
passkey within the time limit (30 seconds). Due
to the time limit, we recommend you use about
a four-character passkey.
• The character types and the number of
characters available depend on the device.
Authentication/Deleting the record
17
Page 18

To change the character type
Each time you press the MENU button, the
character type changes as follows: number
t lowercase letters t uppercase letters
t symbols
To delete one character
Select [BACK SPACE], then press z. The
last character is delete d. Only the last
character in a series can be de le te d usi ng
[BACK SPACE].
To delete all the characters
Select [DELETE ALL], then press z. All
the characters are deleted.
• If you select [EXIT], authent ic ation is
canceled and the connection is not
established.
If you fail to enter the passkey
If you run past the time limit for the p asskey
entry (30 seconds) or enter a differe nt
passkey, confirm error messages then
connect again.
18
Deleting the record
Your camera stores access history and
information about the devices on ce
connected as an item called the record.
Since you can select a desired device from
the record, you do not have to perform a
new search each tim e you connect. The
camera can store records on up to seven
devices, and when you try to sto re a not her
record on a device, th e ol dest item is
automatically deleted from the list.
MODE dial
Control button
a Set the MODE dial to SET UP.
b Select (Bluetooth SETUP)
with V, [EDIT RECORD] with v/
V/B, [OK] with v/B, then press
z.
The SELECT RECORD screen
appears.
SELECT RECORD
NAME :
SONY Cyber–shotX
ADDRESS :
TYPE :
OK BACK/NEXT
CAMERA
DELETE
EXIT
1/1
c Display the record you want to
delete with b/B.
d Select [DELETE] with v, then
press z.
e Select [OK] with v, t hen press
z.
The selected record is deleted.
f To delete other records,
display the record you want to
delete with b/B, select
[DELETE], then press z.
To cancel the deletion
Select [CANCEL] in Step 5 or [EXIT] in
Step 6, then press z.
Page 19

File types that can be
Additi
sent/received
Sending
The types of files you can send using your
camera are as follows:
• Still image files shot normally.
– In Multi Burst mode
• Still image files shot in
–E-MAIL mode
– VOICE mode.
• The files you can send using your camera are
only JPEG files.
• The image may be resized or only the
thumbnail file may be sent depending on the
connected device.
• The settings for DPOF and protect are not valid
in received images.
• File name and storage destination depend on
the connected device.
Received image file storage
destinations and file names on a
VAIO
For details, refer to the HELP of the VAIO.
onal information
Receiving
• The only files you can receive using your
camera are JPEG files.
• Received images are recorded in the
recording folder. The file name format
used is as follows:
“NET0ssss.JPG”* and used it
depends also on the setting of [FILE
NUMBER] in (SETUP 2).
* ssss stands for any number within the
range from 0001 to 9999.
• The settings for DPOF and protect are not
valid in received images.
Additional informati o n
19
Page 20

For details on your VAIO, refer to the
Troubleshooting
If you have trouble with yo ur camera, try
the following solutions.
HELP of the VAIO or the following
URL: http://www.sony-imaging.com/
support/
Sending/Printing images
Symptom Cause Solution
The Bluetooth button
does not work.
[SEND] or [PRINT] in the
Bluetooth menu cannot be
selected.
The desired Bluetooth
device cannot be
discovered.
• The MODE dial is not set to .
• The playback zoom function is being use d.
• The MODE dial is not set to .
• No “Memory Stick” is inserted.
• No images are in the selected folder.
• A movie or Clip Motion file is selected.
• The device is not turned on.
• The device is not connectable.
• The device ran past the time limit.
• The device is placed outside of radi o wave range
• The antenna portion of your camera o r the
device is covered with your hand etc.
• The desired device is now connecting to another
device.
• The name of the device has been changed.
• More than 10 Bluetooth devices are found
around your camera.
• The name of the device is not found.
20
p Set the MOD E dia l to (see the ope rating instructions ).
p Cancel the playback zoo m f unc tion (see the operating
instructions).
p Set the MOD E dia l to (see the ope rating instructions ).
p Insert a “Memory Stick” ( se e the ope r at ing instructions).
p Select the folder where the image is stored (see the operating
instructions).
p Select an image file other than Movie or Clip Motion files.
p Turn on the device. For details, see the operating instructions
supplied with the device.
p Check that the Bluetooth function of the device is started up and
the device is connectable.
p Set the device so that it is connec table and per form a n ew search
(page 7).
p Move the device closer to your camera.
p Do not cover the antenna por ti on ( pa ge 4).
p Wait until the connection is finished and perform a new search
(page 7).
p Check the name of the device.
p The maximum number of devi ces discoverable using a new
search is 10. The order in which devices are discovered depends
on existing conditions. Turn off all devic e s ex ce pt the desired
device, or repeat new searches until the desired device is found.
p When a new search is canceled, the name of the d evice you are
searching for may not be found. A substitute name (e.g.,
Device1) may be displayed instead. Identify the device address
and type (page 35) and select it again or perform the new search
again.
Page 21

Symptom Cause Solution
You cannot connect to the
desired device.
You cannot select the
desired image.
• The device is not turned on.
• The device is not connectable.
• The device ran past the time lim it.
• The device is placed outside of radio wave
range.
• The antenna portion of your cam era or th e
device is covered with your hand etc.
• The desired device is now connecting to another
device.
• Passkey authenticatio n failed.
• You did not enter the passkey on the devic e .
• The device you intend to connec t to is di ffe r en t.
• The connection has been rejected .
• Since passkey authentication has faile d
repeatedly, the connect ion ma y be reject ed for a
while.
• The device is not BIP-compa tible.
• A movie or Clip Motion file has been selecte d.
• No images in the selected folder.
p Turn on the device . For details, refer to the operating
instructions supplied with the device.
p Check that the Bluetooth function of the device is started up and
the device is connecta bl e.
p Set the device so that it is connectable and perform a new search
(page 7).
p Move the device closer to your camera.
p Do not cover the antenna portion ( pa ge 4).
p Wait until the connection is fin ish ed and p erfo rm a ne w search
(page 7).
p Connect again and enter the same passkey both on your camera
and the device (page 17).
p Whether the passkey entry screen first appears on your camera
or the device you intend to connect depends on the setting and
the device. Connect again and enter the same passkey (page 17).
p Check the name on the SEL ECT THE R ECEIVER screen.
p Set the device so that it is connectable. For details, ref e r to the
operating instructions suppli ed with the device.
p Try to connect again after a while.
p The camera can connect to only a BIP-compat ib le device
(page 4).
p Select an image other than Movie or Clip Motion file.
p Select the folder where the image is stored (see the operating
instructions).
Additional informati o n
21
Page 22

Symptom Cause Solution
You cannot send an image
to the desired device.
DPOF or protect setting is
not valid.
• The capacity of the media of the device (e.g., a
“Memory Stick” or hard disk ) is ful l.
• The device disconnected th e conne c ti on.
• The device is placed outside of radio wave
range.
• The antenna portion of your camera o r the
device is covered with your hand etc.
• The application of the device sudde nly stops.
• The MODE dial is not set to .
• Your camera has been turned off by rotating t he
lens portion or for some other reas on.
• The number of jobs to be printed by the pr int er
is over the limit.
• There is no paper in the printer.
• There is no in k in the printer.
• The settings for DPOF or protect are not valid in
the received images.
p Delete data from the medi a (e.g . , a “M emor y St ic k” or har d
disk) or replace it with a new one (see the operating
instructions).
p Check the status of the device and tr y to co nnect to the device
again. For details on the device, refer to the ope r at ing
instructions supplied with the devi c e.
p Move the device closer to your camera.
p Do not cover the antenna por ti on ( pa ge 4).
p Check the status of the device. For details on the device, refer to
the operating instructions supplied with the device.
p Set the MODE dial to and connect again (pages 8, 10).
p Turn on your camera and connect to the dev ice again (pages 8,
10).
p The number of images acceptable at one time depends on the
printer. Wait until th e p rinter is ready to accept images , th en
send images. For details, refer to the operating instructions
supplied with the printer.
p Supply the printer with paper. For details, refer to the operating
instructions supplied with the printer.
p Change the printer wit h ink. For de ta ils, refer to the operating
instructions supplied with the printer.
—
Receiving
Symptom Cause Solution
The Bluetooth button
does not work.
• The MODE dial is not set to .
• The playback zoom function is being use d.
p Set the MOD E dia l to (see the ope rating instructions ).
p Cancel the playback zoo m f unc tion (see the operating
instructions).
22
Page 23

Symptom Cause Solution
[RECEIVE] in the
Bluetooth menu cannot be
selected.
You cannot receive an
image from the desired
device.
• The MODE dial is not set to .
• No “Memory Stick” is inserted.
• The write-protect switch on the “Memory Stick”
is set to the LOCK position.
• The capacity of the “Memory Stick” is
insufficient.
• The sent file is not a JPEG file.
• The capacity of the “Memory Stick” is
insufficient.
• The sent file is too large.
• The device is placed outside of radio wa ve
range.
• The antenna portion of your cam era or th e
device is covered with your hand etc.
• The desired device is now connecting to another
device.
• Passkey authentication has fai led.
• The device you intend to connec t to is di ffe r en t
from the currently select ed .
p Set the MO D E d ia l to (see the operating instru ctions).
p Insert a “Memory Stick” (see the operating instructions).
p Set the write-protect switch to the recording positio n (s ee the
operating instructions).
p Delete the images save d in the “M em or y S tic k, ” or for mat it
(see the operating instructions ).
p Replace the “Memory Stick” (see the operat in g in stru ctions).
p Send the JPE G f ile.
p Delete the images save d in the “M em or y S tic k, ” or for mat it
(see the operating instructions ).
p Replace the “Memory Stick” (see the operat in g in stru ctions).
p Large size files may not be a cce pta ble.
p Move the device closer to your camera.
p Do not cover the antenna portion ( pa ge 4).
p Wait until the connection is fin ish ed and p erfo rm a ne w search
(page 7).
p Connect again and enter the same passkey both on your camera
and the device (page 17).
p Check the name on the SEL ECT THE R ECEIVER screen.
Additional informati o n
23
Page 24

Symptom Cause Solution
You cannot receive an
image from the desired
device (disconnected).
No request from the
sending device.
You cannot play back
received images.
Thumbnail files on the
index screen are
displaced in blue.
DPOF or protect settings
are not valid.
Black bands surround the
image.
• The capacity of the “Memory Stick” is
insufficient.
• The device disconnected th e conne c ti on.
• The device is placed outside of radio wave
range.
• The antenna portion of your camera o r the
device is covered with your hand etc.
• The device disconnected the B lue tooth
connection.
• The MODE dial is not set to .
• The “Memory Stick” was removed.
• The camera has been turned off by r ota ting the
lens portion or for some other reas on.
• The device is now connecting to another device.
• The camera ran past the time limit (about five
minutes).
• Incompatible JPEG files or files shot using other
cameras may not be properly played back on
your camera.
• The image is corrupted.
• The received file has no thumbnai l. p There are some cases that JPE G file s recei ved from a VAIO or
• The settings for DPOF or protect are not valid in
the received images.
• The image size does not correspond to that of
your camera.
p Delete images saved in the “Memory Stick,” or format it (see
the operating instruct io n s ).
p Replace the “Memory Stick” (see the oper at in g in structions).
p Check the status of the device and tr y to co nnect to the device
again. For details on the device, refer to the ope r at ing
instructions supplied with the devi c e.
p Move the device closer to your camera.
p Do not cover the antenna por ti on ( pa ge 4).
p Set the devic e so tha t it is connectable . F or deta ils, refer to the
operating instructions suppli ed with the de vic e .
p Set the MODE dial to and connect again (pages 12, 13).
p Insert the Memory Stick” and connect again (pages 12, 13).
p Turn on the camera and connect to the device again (pages 12,
13).
p Make a connection with you r came ra.
p Set the camera so that it is connectable again (pages 12, 13).
—
—
other devices have no thumbnails. Such files are displayed in
blue on the index screen. However, this does not a ffec t the
actual image received .
—
p When the image size does not corresponds to that of your
camera, black bands may appear around the image.
24
Page 25

Remote camera
Symptom Cause Solution
The Bluetooth button
does not work.
[REMOTE CAMERA] in the
Bluetooth menu cannot be
selected.
No request from the
desired device.
• The MODE dial is not set to , P, or SCN.
• The camera is in quick review mode .
• The MODE dial is not set to , P, or SCN.
• No “Memory Stick” is inserted.
• The write-protect switch on the “Memory Stick”
is set to the LOCK position.
• The capacity of the “Memory Stick” is
insufficient.
• [MODE] (REC MODE) is set to [VOICE].
• The device (controller) is now conne c ti ng to
another device.
• You did not enter the passkey on the devic e .
• The device you intend to connec t to is di ffe r en t
from the one selected.
• The device is not a BIP-compati ble .
• The device is placed outside of radio wa ve
range.
• The antenna portion of your cam era or th e
device is covered with your hand etc.
• The camera ran past the tim e li mi t (a bout five
minutes).
p Set the MO D E d ial to , P, or SCN (see the operating
instructions).
p Exit the quick review mode (see the operating instructions).
p Set the MO D E d ial to , P, or SCN (see the operating
instructions).
p Insert a “Memory Stick” (see the operating instructions).
p Set the write-protect switch to the recording positio n (s ee the
operating instructions).
p Delete the images save d in the “M em or y S tic k, ” or for mat it
(see the operating instructions ).
p Replace the “Memory Stick” (see the operat in g in stru ctions).
p Set [MODE] (REC MODE) to a position other than [VOICE]
(see the operating instructions ).
p Connect the controll er to your c ame ra.
p Connect again and enter the correct passkey.
p Check the name on the SEL ECT THE R ECEIVER screen.
p The camera can connect to only a BIP-compat ib le device
(page 4).
p Move the device closer to your camera.
p Do not cover the antenna portion ( pa ge 4).
p Set the cam e r a so that it is connectable again (page 14).
Additional informati o n
25
Page 26

Symptom Cause Solution
The connect i on is
disconnected.
The shutter clicks even if
you set it not to click.
The buttons do not
function.
The self-timer is can ce led. • The self-timer cannot be used in the remote
You cannot perform
remote shooting.
• The capacity of the “Memory Stick” is
insufficient.
• The MODE dial is not set to , P, or SCN.
• The “Memory Stick” was removed.
• The camera has been turned off by r ota ting the
lens portion or for some other reas on.
• The device disconnected th e conne c ti on.
• The device is placed outside of radio wave
range.
• The antenna portion of your camera o r the
device is covered with your hand etc.
• The device is disconnecte d the Blu et ooth
connection.
• The camera ran past the time limit of the remote
camera time limit (about three hours).
• The shutter always clicks during the remote
camera mode.
• The buttons do not function during the remote
camera mode except for SMART ZOOM,
POWER, and the MODE dial .
camera mode.
• The flash is being charged.
• The capacity of the “Memory Stick” is
insufficient.
p Delete images saved in the “Memory Stick,” or format it (see
the operating instruct io n s ).
p Replace the “Memory Stick” (see the oper at in g in structions).
p Set the MODE dial to , P, or SCN (see the operating
instructions).
pInsert the Memory Stick” and connect again (page 14).
p Turn on the camera and connect to the device again (page 14).
p Check the status of th e de vic e and connect to the device again.
For details on the device, ref e r to the op er a ting instructions
supplied with the device.
p Move the device closer to your camera.
p Do not cover the antenna por ti on ( pa ge 4).
p Set the devic e so tha t it is connectable . F or deta ils, refer to the
operating instructions suppli ed with the de vic e .
p The maximum time y ou ca n use the cam era as a remot e c amer a
is three hours. The camera automatically turns off after three
hours.
—
—
—
p Wait until the charging is finished and perform remote shooting
(see the operating instructions).
p Delete the images sa ved in the “M em ory St ic k,” or format it
(see the operating instructions).
p Replace the “Memory Stick” (see the oper at in g in structions).
26
Page 27

Entering a passkey
Symptom Cause Solution
The passkey entry is
requested.
The connect ion is
disconnected from the
desired device.
Authentication failed. • You ran past the authentication time limit (30
• The security level of the camera or the device
has been changed.
• The record has been delet ed from the camera or
the device to which you intend to connect.
• The authentication val id per iod of your cam era
is expired on the device you intend to connect to.
• The device you intend to connec t to is di ffe r en t
from the one selected.
• You ran past authen tication time limit (30
seconds).
• The same passkey is not entered .
• The device disconnected or ended the
connection.
• You did not enter the passkey on the other
device.
• The camera is turned off by rotating the lens
portion or for some other reasons.
seconds).
• The same passkey was not entered.
• The device disconnected or ended the
connection.
• The device you intend to connect to use d a
character not valid fo r the camera as a part of
passkey.
p When raising the security level, passkey entry may be required
even if you have connected to the device before . Enter the
passkey (page 17).
p When deleting the reco rd , the passkey entry may be required
even if you have connected to the device before . Enter the
passkey (page 17).
p When the authentication valid perio d of your camera is expire d,
passkey entry may be required even if you have connected to the
device. Enter the passkey (page17).
p Check the name on the SEL ECT THE R ECEIVER screen.
p Enter the same passkey both in the camera and the device within
30 seconds (page 17).
p Enter the same passkey both in the camera and the device within
30 seconds (page 17).
p Set the device so that it is connectable. For details, ref e r to the
operating instructions suppli ed with the device (page 17).
p Whether the passkey entry screen first app ears on t he came ra or
the device depends on the setting and the device. Connect again
and enter the passkey.
p Turn on the camera and conn ect to the device again.
p Enter the same passkey both in the camera and the device within
30 seconds (page 17).
p Enter the same passkey both in the camera and the device within
30 seconds (page 17).
p Check the status of the devi ce an d try to co nne ct to the device
again. For details, refer to the operating instructions supplied
with the device (page 17).
p Enter only valid chara c te rs (page 17).
Additional informati o n
27
Page 28

Others
Symptom Cause Solution
Data transmission speed
is too slow.
Since the distance
between the camera and
the desired device is
within 10 m (3.3 feet), the
connection cannot be
established.
• The antenna portion of your camera o r the
connected device is covered with your ha nd et c .
—
• The antenna portion of your camera o r the
device is covered with your hand etc.
—
• The desired device is now connecting to another
device.
• The device is not connectable.
p Do not cover the antenna por ti on ( pa ge 4).
p Data transmission speed depends on the distance between your
camera and the device, obstacles, radio wave conditions,
application software, or the OS. Change the posi tion of your
camera or set your camera closer to the de vic e.
p Do not cover the antenna por ti on ( pa ge 4).
p Data transmission speed depends on the distance between the
camera and the device, obstacles, radio wave conditions,
application software, or the OS. Change the posi tion of your
camera or set your camera closer to the de vic e.
p When the device is connec ti ng to an othe r de vic e , the de vice
may not be displayed as an available de vic e or be connectable
at that time.
p Set the devic e so tha t it is connectable . F or deta ils, refer to the
operating instructions suppli ed with the de vic e .
28
Page 29

Warnings and messages
The following messages appear on the LCD screen.
Message Meaning/ Corrective Action
FAIL TO CERTIFICATE
INPUT THE SAME LETTERS INTO
THE DEVICE TO BE CONNECTED AND
THIS DEVICE WITHIN 30 SECS.
NO REQUEST FROM THE SENDER • If the camera does not receive any requests of connection or sending images from the device for
NO REQUEST FROM THE CONTROL
NO RESPONSE FROM THE RECEIVER • If the camera does not rece ive any responses from a receiver/pr int er fo r 10 minu tes, the
NO RESPONSE FROM THE PRINTER
DISCONNECTED
REFUSED TO CONNECT
REFUSED BY THE RECEIVER • The request to send an image, or the image itself was rejected.
REFUSED BY THE PRINTER
RECEIVER’S SERVICE IS
NOT SUPPORTED
PRINTER’S SE R V IC E IS
NOT SUPPORTED
NOT FOUND
ENABLE THE RECEIVER
NOT FOUND
ENABLE PRINTER TO RECEIVE
• You did not enter the passkey wit hin 30 seconds. Enter it within 30 seconds (page 17).
five minutes, the connecti on is disconnected or the camera becomes non-connectable. Connec t
again.
connection is disconnecte d. Che c k the de vic e stat us.
• Since the device disconnected for some reason or the distance between the camera and the device
is too great far, the connection was disconnected.
• The connection was rejected by the device you intend to connect to by the setting or operations of that
device. Change the setting of the device.
• You are trying to send or print an incompatible image.
• The device is not compatible with BIP feat ures (page 4).
• The camera could not dis co ve r th e desir e d de vic e . S et the devi ce to be connectable .
Additional informati o n
29
Page 30

Message Meaning/ Corrective Action
FAIL TO CERTIFICATE
INPUT THE SAME LETTERS INTO
THE DEVICE TO BE CONNECTED
AND THIS DEVICE
COMMUNICATIONS ERROR • Communication error occurred. Connect again.
UNABLE TO CONNECT
ENABLE THE RECEIVER
UNABLE TO CONNECT
ENABLE PRINTER TO RECEIVE
NOT ENOUGH MEMORY • The file size of the selected image is too large.
NOT ENOUGH MEMORY
ENABLE THE RECEIVER • The camera could not discover the desired device. Set the device to be connectable.
ENABLE PRINTER TO RECEIVE
NO RECORD FOR CONNECTED DEVICE
TRY A NEW SEARCH
• The connection failed because a wrong passkey was entered. Enter the same passkey both on the
camera and on the device you intend to co nne ct to (p ag e 17).
• The desired device cannot be dis co v ered because the device is turned of f, is too far away to be
discovered, or other reasons.
• There is no record. Perform a new search (page7).
30
Page 31

Menu items
Additi
Menu items of the Bluetooth function to
make changes depend on the position of the
MODE dial. The LCD screen shows only
the items you can use bas ed on the current
position of the MODE dial .
When the MODE dial is set to , P or SCN
Item Description
REMOTE CAMERA Uses the camera as a remote camera.
When the MODE dial is set to
Item Description
SEND Sends an image to a BIP-compatible Bluetooth device (page 8).
RECEIVE Receives an image from a BIP-co m patible Bluetooth device (pag e 12).
PRINT Sends an image to a BIP-compatible B lue tooth printer to print the image (page 16).
When the MODE dial is set to or SET UP, the Bluetooth menu is not displayed.
onal information
Additional informati o n
31
Page 32

SET UP items
Set the MODE dial to SET UP. The SET UP screen appears.
Factory setti ngs are indicated by x.
(Bluetooth SETUP)
Item Setting Description
SECURITY LEVEL HIGH
EDIT RECORD OK
CHANGE NAME OK
• The dev ice a ddress (page 5) is unique for each device. You can not change this address.
/ xLOW Sets the security level for a Bluetooth connection. When set to [HIGH], passkey entry
is required for connecting to oth er de vices for the first time (page 17).
/ CANCEL Deletes the record (p age 18).
/ CANCEL Renames the camera (page 5).
32
Page 33

Bluetooth specifications
Communication type
Maximum transmission speed
Output Bluetooth standards, Power Class 2
Communication distance
Compatible Bluetooth profile
Frequency band
Bluetooth standards, ver. 1.1
About 723 Kbps
About 10 m (3.3 feet) without
obstacles
Basic Imaging Profile (Image Push
Initiator, Image Push Responder,
Remote Camera Responder)
2.4 GHz (2.400 to 2.4835 GHz)
1)
2)
3)
1) Maximum data transmission speed based on
Bluetooth standards, ver. 1.1.
This speed depends on the distance between the
devices, obstacles, radio wave conditions,
application software, or the OS.
2) This distance depends on the obstacles between
the devices, radio wave conditions, application
software, or the OS.
3) This specification is in accordance with the
intended use between two Bluetooth devices.
This is defined by the Bluetooth standards.
Additional informati o n
33
Page 34

The LCD screen
6
Sending/receiving/printing/
using as a remote camera
1
2
3
min
4
5
60
Sony Cyber-shot
00:0C:3E:3A:4B:69
640
SENDING
FINE
101
101
12/12
L Playback folder indicator
M Change folder indicator
N Message area
7
8
9
q;
qa
qs
A Recording mode indicator
B Radi o wave indicator
( , , ) (Use this as a guide)
C Battery remaining indicator
D Device name of the connected
device (5)
E Device address of the connected
device (5)
34
OK
EXIT
F Image size indicator
G Image quality indicator
H Recording folder indicator
I Remaining “Memory Stick”
capacity indicator (4)
J Number of images recorded in
the playback folde r
K Image number
qd
qf
Page 35

Selecting the receiver/editing
2
the record
SELECT THE RECEIVER
NAME :
1
A Device name (5)
B Record number/Total number of
records
C Device address (5)
D Device type
E Sup porte d ser v ic e
“UNKNOWN” is indicated when a
device has not been connected.
F Search result (7)
After you perform a new se a rch,
“SEARCH” is added. A newly
discovered device is indicated as
“NEW.”
Sony Cyber-shotX
ADDRESS :
TYPE :
SUPPORTED :
SEARCH :
OK
CAMERA
UNKNOWN
NEW
NEW SEARCH
1/4
CONNECT
EXIT
3
4
5
6
Additional informati o n
35
Page 36

Index
Ind
A
Antenna portion ................................................. 4
B
BIP
Image Push Feature ....................... ...............4
Remote Camera Feature ............................... 4
Bluetooth button ................................................ 4
Bluetooth lamp ..................................................4
Bluetooth wireless technology .......................... 4
C
Changing the name .................... ............. ......... 32
Communication distance ................................. 33
D
Device address ...................................................5
Device name .............. ............. ...........................5
F
File
File name .................................................... 19
Storage destination ..................................... 19
Frequency band ............................................... 33
I
Image Push Feature ................ .............. .............4
JPEG ................................................................ 19
N
Naming your camera ................................ .........5
New search ....... ..................................................7
O
Output .............................................................. 33
P
Passkey
Passkey entry ..............................................17
Print ............................................................. 1 6
Time limit ................................................... 17
R
Receive
Image file types ....... ........................... .........19
Receiving .................................................... 1 2
Record ..............................................................1 8
Remote camera ................................................14
Remote Camera Feature ....................................4
S
Search result .................................................... 35
Security level ................................................... 32
Send
Image file types ....... ........................... .........19
New search ....................................................7
Sending to a camera ........................... ...........8
Sending to a VAIO ......................................10
ex
T
Thumbnail image .................................. ...........19
Time limit
Passkey entry ...............................................17
Using as a remote camera ...........................14
Type .................................................................35
W
Warning messages ............................................29
J
36
Page 37

Page 38

Page 39

Page 40

307966411
Printed on 100% recycled paper
using VOC (Volatile Organic
Compound)-free vegetable oil
based ink.
Sony Corporation Printed in Japan
Additional information on this product and answers to frequent
asked questions can be found at our Custo mer Support Websit e.
 Loading...