

Page 1
DSC-F77A
SERVICE MANUAL
Ver 1.0 2003. 08
Revision History
Revision History
Link
Link
SELF DIAGNOSIS FUNCTION
SELF DIAGNOSIS FUNCTION
LEVEL 1
E Model
Hong Kong Model
Korea Model
Tourist Model
Japanese Model
ORNAMENTAL PARTSSPECIFICATIONS
ORNAMENTAL PARTSSPECIFICATIONS
• INSTRUCTION MANUAL is shown at the end of this document.
DIGITAL STILL CAMERA
Page 2

DSC-F77A
COVER
COVER
SPECIFICATIONS
System
Image device 8.98 mm (1/1.8 type) color
Total pixels number of camera
Effective pixels number of camera
Lens f=7.65 mm
Exposure control
White balance
File format (DCF compliant)
Recording media
Flash Recommended distance
Input/output connectors
Multi connector
CCD
Primary color filter
Approx. 4 130 000 pixels
Approx. 3 950 000 pixels
(35 mm camera conversion: 37mm
15
(1
/32 inches))
F2.8
Automatic,
Scene selection (four modes)
Automatic, Daylight, Cloudy,
Fluorescent, Incandescent
Still images: Exif Ver. 2.2, JPEG
compliant, GIF (for Clip Motion),
DPOF compatible
Audio with still image: MPEG1
compliant (Monaural)
Movies: MPEG1 compliant (Monaural)
“Memory Stick”
0.5 to 1.7 m (1 feet 7
5 feet 7 inches)
(when ISO sensitivity is set to Auto)
3
/4 inches to
LCD screen
LCD panel used
Total number of dots
Power, general
Used battery pack
Power requirements
Power consumption (when shooting)
Operating temperature range
Storage temperature range
Dimensions 92.6 × 71 × 27 mm
Mass Approx. 180 g (6.3 oz)
Microphone Electret condenser microphone
Speaker Dynamic speaker
AC-LM5 AC power adaptor
Power requirements
Rated output voltage
Operating temperature range
Storage temperature range
Dimensions 47 × 30 × 80 mm (1
Mass Approx. 170 g (6.0 oz)
3.8 cm (1.5 type) TFT drive
123 200 (560×220) dots
NP-FC11
3.6 V
1.9 W
0º to +40ºC (32º to +104ºF)
–20º to +60ºC (–4º to +140ºF)
3
(3
/4 × 2 7/8 × 1 1/8 inches)
(W/H/D, protruding portions not included)
(NP-FC11 battery pack, “Memory Stick” and
wrist strap included)
AC 100 to 240 V, 50/60 Hz
DC 4.2 V, 1.5 A
0º to +40ºC (32º to +104ºF)
–20º to +60ºC (–4º to +140ºF)
(W/H/D, protruding parts not included)
(adaptor only)
7
/8 × 1 3/16 × 3 1/4 inches)
NP-FC11 battery pack
Used battery Lithium ion battery
Maximum voltage
Nominal voltage
Capacity 2.8 Wh (780 mAh)
Accessories
• NP-FC11 battery pack (1)
•AC-LM5 AC power adaptor (1)
• USB multi connecting cable (1)
• A/V multi connecting cable (1)
•Power cord (mains lead) (1)
• Wrist strap (1)
• “Memory Stick” (16MB) (1)
• CD-ROM (USB driver: SPVD-008) (1)
• Operating Instructions (1)
Design and specifications are subject to change
without notice.
DC 4.2 V
DC 3.6 V
SAFETY-RELATED COMPONENT WARNING!!
COMPONENTS IDENTIFIED BY MARK 0 OR DOTTED LINE WITH
MARK 0 ON THE SCHEMATIC DIAGRAMS AND IN THE PARTS
LIST ARE CRITICAL TO SAFE OPERATION. REPLACE THESE
COMPONENTS WITH SONY PARTS WHOSE PART NUMBERS
APPEAR AS SHOWN IN THIS MANUAL OR IN SUPPLEMENTS
PUBLISHED BY SONY.
SAFETY CHECK-OUT
After correcting the original service problem, perform the following
safety checks before releasing the set to the customer.
1. Check the area of your repair for unsoldered or poorly-soldered
connections. Check the entire board surface for solder splashes
and bridges.
2. Check the interboard wiring to ensure that no wires are
"pinched" or contact high-wattage resistors.
3. Look for unauthorized replacement parts, particularly
transistors, that were installed during a previous repair . Point
them out to the customer and recommend their replacement.
4. Look for parts which, through functioning, show obvious signs
of deterioration. Point them out to the customer and
recommend their replacement.
5. Check the B+ voltage to see it is at the values specified.
6. Flexible Circuit Board Repairing
•Keep the temperature of the soldering iron around 270˚C
during repairing.
• Do not touch the soldering iron on the same conductor of the
circuit board (within 3 times).
• Be careful not to apply force on the conductor when soldering
or unsoldering.
— 2 —
Page 3

DSC-F77A
COVER
COVER
[Description on Self-diagnosis Display]
SELF-DIAGNOSIS FUNCTION
Self-diagnosis display
• C: ss: ss
You can reverse the camera
malfunction yourself. (However,
contact your Sony dealer or local
authorized Sony service facility
when you cannot recover from the
camera malfunction.)
• E: ss: ss
Contact your Sony dealer or local
authorized Sony service facility.
Display Code
C:32:ss
C:13:ss
E:61:ss
E:91:ss
E:92:ss
Countermeasure
Turn the power off and on again.
Format the “Memory stick”.
Insert a new “Memory Stick”.
Checking of lens drive circuit.
Checking of flash unit or replacement
of flash unit.
Insert a battery pack correctly. Battery pack is not inserted correctly.
Turn the power off and on again.
Trouble with hardware.
Unformatted memory stick is inserted.
Memory stick is broken.
When failed in the focus and zoom
initialization.
Abnormality when flash is being
charged.
Battery pack was installed or removed
when using the AC adaptor.
Cause
Caution Display During Error
SYSTEM ERROR
FORMAT ERROR
MEMORY STICK ERROR
—
— 3 —
Page 4
DSC-F77A
COVER
COVER
Note:
• Items marked “*” are not stocked since they are seldom required for routine service.
Some delay should be anticipated when ordering these items.
• The parts numbers of such as a cabinet are also appeared in this section.
Refer to the parts number mentioned below the name of parts to order.
•Abbreviation
HK : Hong Kong model
J: Japanese model
• Color variation
color E HK KR JE J
Silver zzzzz
Blue zzzzz
Red zzz
JE : Tourist model
KR : Korea model
1. MAIN PARTS
1. ORNAMENTAL PARTS
LCD window
3-078-131-01
The components identified by
mark 0 or dotted line with mark
0 are critical for safety.
Replace only with part number
specified.
Adhesive sheet (LCD)
3-078-111-01
— 4 —
Page 5

Checking supplied accessories.
DSC-F77A
Power cord (1)
0 1-769-608-11 (E)
0 1-783-374-11 (HK)
0 1-776-985-11 (KR)
0 1-790-732-12 (JE)
0 1-791-637-13 (J)
"Memory Stick" (16MB) (1)
Conversion adaptor 2P (1)
0 1-569-007-12 (E, JE)
AC adaptor
AC-LM5 (1)
0 1-477-488-12
CD-ROM
(SPVD-008 USB driver) (1)
3-077-012-03 (J)
3-077-023-03 (EXCEPT J)
Conversion adaptor 2P (1)
0 1-569-008-12 (E)
Battery pack
NP-FC-11 (1)
USB multi connecting
cable (1)
Wrist strap (1)
3-076-646-01
A/V multi connecting
cable (1)
Other accessories
3-065-665-05 MANUAL, INSTRUCTION (for SAFETY)
3-086-183-01 MANUAL, INSTRUCTION (JAPANESE) (J)
3-086-183-11 MANUAL, INSTRUCTION (ENGLISH)
3-086-183-21 MANUAL, INSTRUCTION
(SPANISH, PORTUGUESE) (E, JE)
3-086-183-31 MANUAL, INSTRUCTION
(TRADITIONAL CHINESE,
SIMPLIFIED CHINESE) (E, HK, JE)
3-086-183-41 MANUAL, INSTRUCTION (ARABIC) (E)
3-086-183-51 MANUAL, INSTRUCTION (KOREAN) (KR)
3-086-184-01 MANUAL (ADVANCE), INSTRUCTION
(JAPANESE) (J)
(E, HK, JE)
(JAPANESE) (J)
9-876-277-41
Sony EMCS Co.
— 5 —
The components identified by
mark 0 or dotted line with mark
0 are critical for safety.
Replace only with part number
specified.
2003H0500-1
Published by DI CS Strategy Div
©2003.8
Page 6
3-086-183-11(1)
_
_
_
_
_
_
_
_
_
_
_
_
_
Getting started_______________________
Digital Still Camera
Operating Instructions
Before operating the unit, please read this manual thoroughly, and
retain it for future reference.
DSC-F77A
© 2003 Sony Corporation
Shooting still images _________________
Viewing still images __________________
Deleting still images__________________
Before advanced oper at ions ____________
Advanced still image shooting___________
Advanced still image viewing____________
Still image editing _____________________
Enjoying movies_______________________
Enjoying images on you r co m put er ______
Troubleshooting_______________________
Additional information__________________
Index_____________________________
Page 7

WARNING
Before using your camera
To prevent fire or shock hazard, do
not expose the unit to rain or
moisture.
Notice
If static electr icity o r elec tromagn etism cau ses
data transfer to discont inue midway (fail),
restart the application or disc onnect and
connect the USB multi connecting cable
again.
Certain countries or regions may regulate
disposal of the battery used to power this
product. Please consult with your local
authority.
2
Trial recording
Before you record one-time events, you may
want to make a tr ial recording to mak e su r e
that the camera is working correc tl y.
No compensation for contents of the
recording
Contents of the recording cannot be
compensated for if recording or playback is
not possible due to a malfunctio n of you r
camera or recording medium, etc.
Back up recommendation
To av oid the potential risk of data loss, always
copy (back up) data to a disk.
Notes on image data compatibility
• This camera conforms with the Design rule
for Camera File system universal standard
established by the JEITA (Japan Electronics
and Information T echnology Industries
Association).
• Playback of im ag es reco rded with your
camera on other equipment and playback of
images recorded or edited with o the r
equipment on your camera are not
guaranteed.
Precaution on copyright
Television programs, films, video tapes, and
other materials may be copyrighted.
Unauthorized record ing of s uch ma terials may
be contrary to the provision of the copyright
laws.
Do not shake or strike the camera
In addition to malfunc tions and inability to
record images, this may render the “Memory
Stick” unusable or image data brea kdown,
damage or loss may occur.
LCD screen, LCD finder (only models
with a LCD finder) and lens
• The LCD screen and the LCD finder are
manufactured using extremely highprecision technology so over 99.99% of the
pixels are operational for effective use.
However, there may be some tiny black
points and/or bright points (w hite, red, blue
or green in color) that constantly ap pe ar on
the LCD screen and the LCD finder. These
points are normal in the manufacturing
process and do not affect the recording in
any way.
• Be careful when placing the camera near a
window or outdoors. Exposing the LCD
screen, the finder or the lens to direct
sunlight for long periods may c au se
malfunctions.
• Close the lens portion when not using the
camera.
Page 8
Do not get the camera wet
When taking pictures outdoors in the rain or
under similar conditions, be careful not to get
the camera wet. If moisture conde nsa tion
occurs, see page 100 and follow the
instructions on how to remove it before using
the camera.
The pictures used in this manual
The photographs used as examples of pictures
in this manual are reproduced images, and are
not actual images shot using this camera.
Do not aim the camera at the sun or
other bright light
This may cause irrecoverable damage to your
eyes.
Trademarks
• “Memory Stick,” , “MagicGate
Memory Stick,” and , are trademarks of
Sony Corporation.
• “Memory S tic k Duo” and
Corporation.
• “Memory S tic k P RO” and
Corporation.
• “MagicGate” and are
trademarks of Sony Corporation.
• “InfoLIT HIUM” is a trade mar k of Sony
Corporation.
• Microsoft and Windows are registered
trademarks of the U.S. Microsoft
Corporation in the United States and other
countries.
• Macintosh, Mac OS, QuickTime, iBook, and
Power Mac are trademarks or registered
trademarks of Apple Computer, Inc.
• “Pentium” is a trademark or a registered
trademark of Intel Cor por a tion.
• In addition, system and product names used
in this manual are, in general, trademarks or
registered trademarks of their respective
developers or manufacturers. However, the
™
or ® marks are not used in all cases in this
manual.
are tradem arks of Sony
are trademarks of Sony
About the Carl Zeiss lens
This camera is equi ppe d w ith a Carl Zeiss
lens which is capable of reproduc ing fine
images. The lens for this camera uses the
MTF* measurement system for came ras
developed jointly by Carl Zeiss, in
Germany, and Sony Corporation, and offers
the same quality as other Carl Zeiss lenses.
∗ MTF is an abbreviation of Modulation
Transfer Function, a numeric value
indicating the amount of light from a
specific part of t he sub ject g ath ered at t he
corresponding position in the image .
3
Page 9

Table of contents
Before using your camera.........................2
Identifying the parts..................................6
Getting started
Charging the battery pack......................... 8
Using an external power source..............11
Using your camera abroad......................11
Turning on/off your camera....................12
How to use the control button.................13
Setting the date and time.........................14
Shooting still images
Inserting and removing a “Memory Stick”
........................................................16
Setting the still image size......................17
Basic still image shooting
– using auto mode...........................18
Checking the last image shot
– Quick Review..............................19
Using the smart zoom.........................20
Shooting close-ups – Macro............. ..21
Using the self-timer............................22
Rotating the lens – Mirror mode......... 22
Selecting a flash mode........................23
Shooting with the finder.....................25
Inserting the date and time on a still
image..............................................26
Shooting according to scene conditions
(scene selection) .............................27
4
Deciding the still image quality.............. 29
Image size and quality............................30
Viewing still images
Viewing images on the LCD screen of your
camera............................................ 31
Viewing on the single-image screen .. 31
Viewing on the index
(nine- or triple-image) screen.........32
Viewing images on a TV screen............. 33
Deleting still images
Deleting images........................... ........... 35
Deleting on the Index (nine-image)
screen .............................................36
Deleting on the Index (triple-image)
screen .............................................37
Formatting a “Memory Stick”................ 39
Before advanced operations
How to setup and operat e your camera .. 40
Changing menu settings.....................40
Changing item s in the SET UP screen
........................................................40
Advanced still image
shooting
Choosing a focus method..................... ...41
AF lock shooting using Center AF.....42
Setting the distance to the subject
(Focus preset).................................43
Adjusting the exposure
(EV adjustment)............. .................43
Spot light-metering.................................44
Adjusting color tones (White Balance)...45
Adjusting the flash level .........................46
Shooting multiple fra mes
(Clip Motion)..................................47
Shooting in Multi Burst mode
(Multi Burst)...................................48
Shooting still images for e-mail
(E-MAIL) .......................................49
Shooting still images with au di o files
(VOICE) .........................................50
Adding special effects (Picture Effect) ...51
Selecting a Folder....................................51
Creating a new folder..........................52
Changing the recording folder............52
Advanced still image viewing
Selecting the folder for playback
(Folder)...........................................53
Enlarging a p ortion of a still image.........54
Page 10

Enlarging an image
– Playback zoom.............................54
Recording an enlarged image
– Trimming.....................................55
Playing back successive images
(Slide show)....................................55
Rotating still images................................56
Still image editing
Protecting images (Protect).....................57
On the single screen............................57
On the Index (nine-imag e) screen.......57
On the Index (tripl e-image) screen.....58
Changing image size (Resize).................59
Choosing im ages to print
(Print (DPOF) mark).......................60
On the single screen............................60
On the Index (nine-imag e) screen.......60
On the Index (tripl e-image) screen.....61
Enjoying movies
Shooting movies......................................62
Viewing movies on the L CD screen.......63
Deleting movies ......................................64
On the single screen............................64
On the Index (nine-imag e) screen.......64
On the Index (tripl e-image) screen.....65
Editing movies...................... ..................66
Cutting movies....................................66
Deleting unnecessary portions of movies
........................................................ 67
Enjoying images on your
computer
Copying ima ges to your computer
– For Windows users...................... 68
Installing the USB driver....................69
Installing “Image Transfer”................69
Installing “ImageMixer”.....................71
Connecting your cam era to your
computer......................................... 71
Copying images using “Image Tra nsfer”
........................................................ 73
Changing “Image Transfer” settings.. 73
Copying images without using “Image
Transfer” ........................................74
Viewing the images on yo ur computer
........................................................ 75
Image file storage destinations and file
names..............................................76
Viewing an image previously copied to a
computer......................................... 78
Copying ima ges to your computer
– For Macintosh users....................79
Troubleshooting
Troubleshooting......................................81
Warnings and messages..........................89
Self-diagnosis display .............................91
Additional information
The number of images that can be saved/
shooting time...................................92
Menu items................................. .............93
SET UP items.............. ............................98
Precautions............................................100
The “Memory Stick”.............................101
The “InfoLITHIUM” ba ttery pack........102
Specifications........................................103
The LCD screen ....................................104
Index
Index......................................................107
5
Page 11
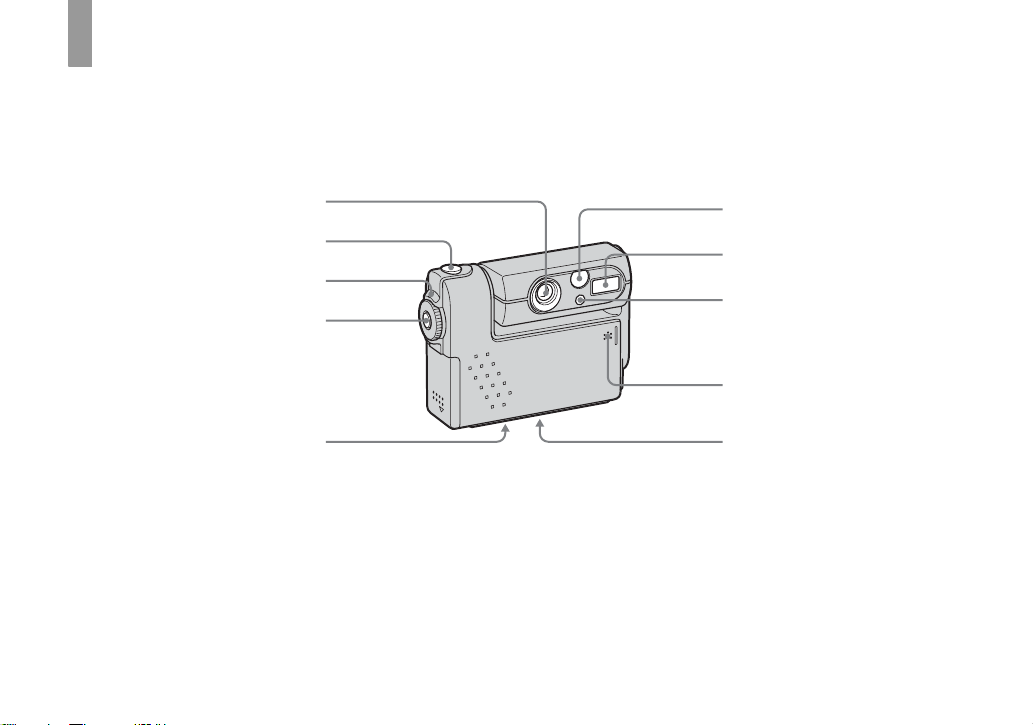
Identifying th e pa rts
1
See the pages in parentheses for details of opera ti on.
Camera
2
3
4
6
7
8
9
A Lens
B Shutter button (18)
C POWER lamp (12)
D POWER button (12)
E Tripod receptacle (bottom
surface)
6
5
F Finde r window
G Flash (23)
H Self-timer lamp (22)/
AF illumina tor (24, 98)
I Microphone
J Speaker (bottom surface)
0
• Use a tripod with a screw length of less than
5.5 mm (7/32 inch). You will be unable to
firmly secure the camera to tripods having
longer screws, and may damage the camera.
• Do not touch the microphone while recording.
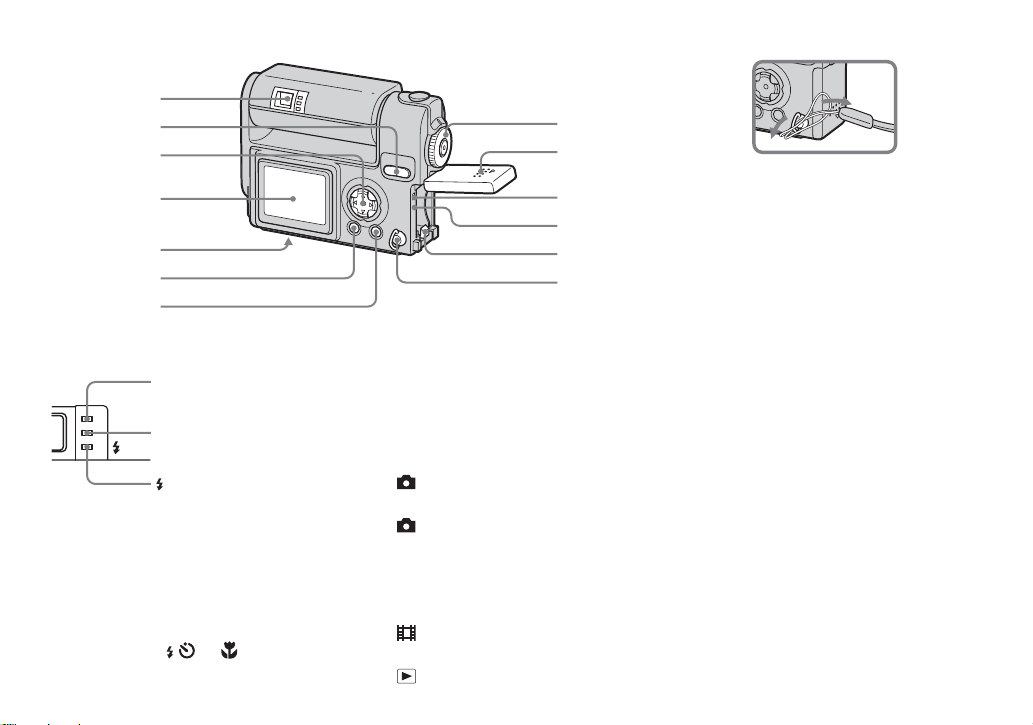
Page 12
1
2
3
4
5
6
7
8
9
q;
qa
qs
qd
Attaching the wrist strap
I Battery/“Memory Stick” cover
J Access lamp (16)
K RESET button (81)
L Battery eject lever (9)
M Wrist s tra p hook
A Finder (25)
Self-timer/recording
lamp (red)
AE/AF lock lamp
(green)
/CHG
/CHG lamp (orange)
(9, 23)
B SMART ZOOM buttons (during
shooting) (20)/Index buttons
(during playback) (32)
C Control button
(Menu on) (v/V/b/B/z) (13)/
(Menu off) ( / /7/) (23/22/19/
21)
D LCD screen
E Multi connector (bottom surface)
(8, 11, 33, 72)
F DSPL/L CD ON/O FF button (25)
G MENU button (17)
H MODE dial (14)
: To s hoot still images in auto
mode
P: To shoot still images in
program mode
SCN: To s hoot in the Scene
Selection mode
SET UP: To set the SET UP items
: To shoot movies/Clip Motion
images/Multi Burst mode images
: To view or edit images
7
Page 13
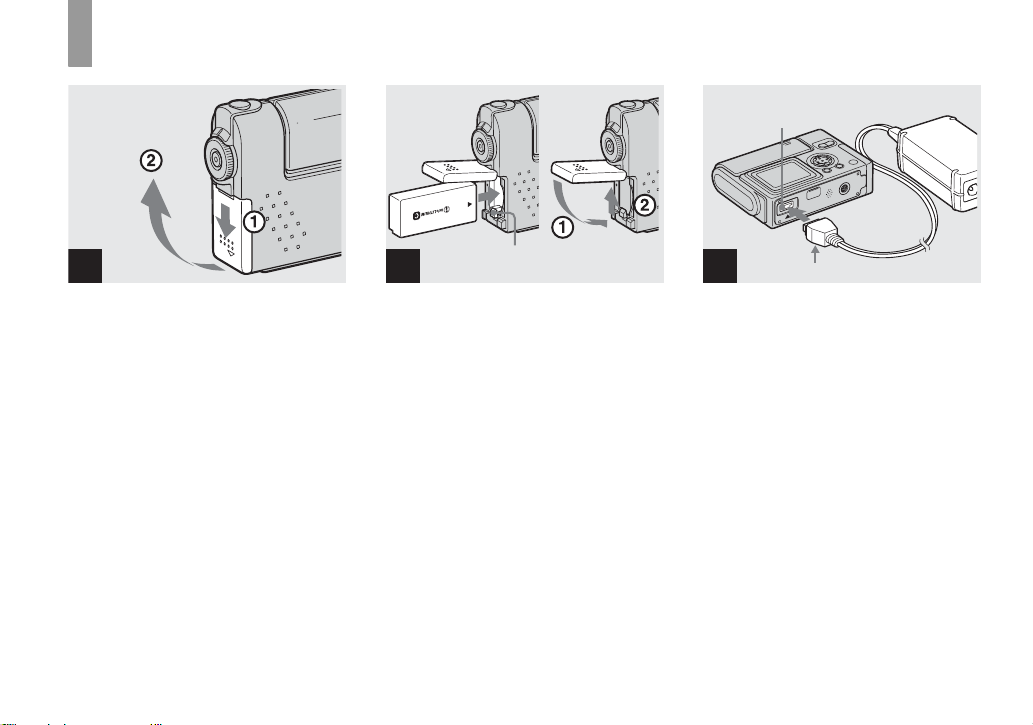
Charging the battery pa ck
Getti
d
ng starte
O
P
E
N
1
, Open the battery/“Memory
Stick” cover.
Slide the cover in the direction of the arrow.
• When charging the battery pack, make
sure the camera is not turned on
(page 12).
• The camera operates only with the
“InfoLITHIUM” battery NP-FC11 battery pack
(C type) (supplied). You cannot use any other
battery pack (page 102 ).
2
Battery eject lever
, Insert the battery pack, and
close the cover.
Insert the battery pack with the v mark
facing toward the battery compartment as
illustrated above. Make sure the battery
pack is properly inserted, then close the
cover.
• While pushing the battery eject lever down
using the front edge of the battery pack, you
can easily insert the battery pack.
Multi connector
3
AC power adaptor
v mark
, Connect the AC-LM5 AC power
adaptor (supplied) to the mult i
connector of the camera.
When placing the camera, make sure the
LCD screen is facing up.
• Do not short the DC plug on the AC power
adaptor with a piece of metal. This may cause a
malfunction.
8
Page 14
AC power adaptor
2 To a wall outlet
(wall socket)
To remove the battery pack
Battery remaining indicator
The battery remaining indi ca to r show s th e
remaining shooting or viewing time .
Getting started
1
Power cord
(mains lead)
4
, Connect the power cord (mains
lead) to the AC power adap tor
and to a wall outlet (wall
socket).
/CHG
/CHG lamp
When the /CHG lamp goes out, charging is
finished.
• After charging the battery pack, disconnect the
AC power adaptor from the multi connector of
the camera.
Battery eject lever
Open the battery/“Memory Stick” cover,
and push down the battery eject lever in the
arrow direction as illustrated above.
• Be careful not to drop the battery pack when
removing it.
min
60
• When turning the LCD screen off and on, it
takes about one minute to calculate the proper
remaining time.
• A proper remaining time may not be indicated
depending on conditions of use or
circumstances.
2272
101
8
Charging time
Approximate time to charge a co mpletely
discharged battery pack using the AC-LM5
AC power adap tor at a te mperat ure o f 25°C
(77°F).
Battery pack Full charge
NP-FC11 (supplied) Approx.150
(min.)
9
Page 15
Charging the battery pack (continued)
Battery life and the number of
images that can be recorded/
viewed
The tables show approximate guidelines for
the length of time the camera can be used
when you shoot in Normal mode in an
environment where the ambient
temperature is 25°C (77°F), and the
supplied battery pack is fully charged. The
guidelines for the number of images that
can be recorded or viewed allow for
changing the “Memory Stick” as necessary.
Actual results may differ slightly from
these, depending on t he c onditions of use.
Shooting still images
In normal shooting
Image size
2272×1704
1) Shooting at 30-second intervals with [P.
QUALITY] set to [FINE], LCD screen turned
on, flashed every two shootings and turned on/
off every ten shootings.
1)
NP-FC11 (supplied)
No. of
images
Approx. 170 Approx. 85
Battery life
(min.)
Viewing still images
NP-FC11 (supplied)
Image size
2272×1704
640×480
2) Playing back images in order at about 3-second
intervals on the single-image screen.
No. of
images
Approx. 3800
Approx. 3800
Shooting movies
NP-FC11 (supplied)
LCD screen ON
(min.)
Approx. 90 min Approx. 120 min
3) Continuous shooting with an image size of
160×112
• The battery life and the number of images
recordable or playable are decreased under the
following conditions:
– At low temperature.
– Using the flash.
– Turning on and off frequently.
– When [LCD BACKLIGHT] is set to
[BRIGHT]
– When [POWER SAVE] is set to [OFF].
– Using the battery pack that was used
repeatedly or the battery capacity decreases
as time passed (page 102).
2)
Battery life
(min.)
Approx. 190
Approx. 190
3)
LCD screen OFF
(min.)
The POWER SAVE function
When the POWER SAVE functi on i s
activated, you can shoot for a longer period
of time.
Set the MODE d ial to SET UP, and set
[POWER SAVE] in (SETUP 1) to
[ON]. The factory setting is [ON] (page 99).
• The [POWER SAVE] item is only shown when
using the battery pack.
When the POWER SAVE function is
activated
• The LCD screen will be darker than it is when
[POWER SAVE] is set to [OFF]. You cannot
change the settings for [LCD BACKLIGHT] at
this time (page 99).
• When shooting sill images, the focus works
only while the shutter button is pressed down
halfway.
10
Page 16
Using an external power source
AC power adaptor
Multi connector
2 To a wall outlet
(wall socket)
1
Using your camera
abroad
Power sources
You can use your camera in any country or
area with the supplied AC power adaptor
within 100 V to 240 V AC, 50/60 Hz. Use a
commercially available AC plug adaptor
[a], if necessary, depending on the design of
the wall out let (wall socket) [b].
Getting started
1
v mark
, Connect the AC-LM5 AC power
adaptor (supplied) to th e multi
connector of the camera.
When placing the camera, make sure the
LCD screen is facing up.
• Remove the battery pack when using an
external power source.
• Connect the AC power adaptor to an easily
accessible wall outlet (wall socket) close by. If
some trouble occurs while using the adaptor,
immediately shut off the power by
disconnecting the plug from the wall outlet
(wall socket).
Power cord
(mains lead)
2
, Connec t the power co rd (mains
lead) to the AC power adaptor
and to a wall outlet (wall
socket).
• When you have finished using the AC power
adaptor, disconnect it from the multi connector
of the camera.
• The set is not disconnected from the AC power
source as long as it is connected to the wall
outlet (wall socket), even if the unit itself has
been turned off.
AC-LM5
• Do not use an electrical transformer (travel
converter), as this may cause a malfunction.
11
Page 17
Turning on/off your camera
There are following two ways to turn on the
camera.
1 Press POWER.
MODE
POWER lamp
POWER
POWER
The POWER lamp lights in gree n an d the
power is on. When you turn on t he camera
for the first time, the CLOCK SET screen
appears (page14).
To turn off the power
Press POWER again, the POWER lamp
goes out, and the cam era turns off.
• To turn off the start-up sound, set [BEEP] to
[OFF] in (SETUP 1) in the SET UP
settings (page 99).
2 Rotate the lens portion.
Rotating the lens portion in the arrow
direction turns on the camera. To turn off
the power, rotate it back.
The Auto Power Off function
If no tasks are performed for a while* when
shooting, viewing images, or setting up th e
camera while using the battery pack, power
is automatically shut off to preserve battery
power.
However, in the following ci rc umstances,
even if the battery pa ck i s bei ng used to
power the camera, the Auto Power Off
function will not work.
• Movies are being played back
• A slide show is being shown
• During USB connection
* When [P OWER SAVE] is set to [ON]:
approximately 90 seconds
When [POWER SAVE] is set to [OFF]:
approximately three minutes
12
Page 18

How to use the contro l button
2272
2272x1704
2272(3:2)
1600x1200
1280x 960
640 x 480
MODE
IMAGE SIZE
VOICE
E-MAIL
NORMAL
REC MODE
To change the current settings of the
camera, bring up the menu or the SET UP
screen (page 40), and use the control button
to make the changes.
For each item, press v/V/b/B to select the
desired value, then press z or b/B to make
the setting.
Getting started
13
Page 19
Setting the date and time
MODE
MODE dial
POWER
1
, Set the MODE dial to .
• You can carry out this operation even when the
MODE dial is set to P
• To set the time and the date again, set the
MODE dial to SET UP, select [CLOCK SET]
in (SETUP 2) (page99), then proceed from
Step 3.
, SCN, , or .
MODE
POWER
/M/
D
12 00
Y
/D/
M
D/M/Y
O K
AM
CANCEL
Y
CLOCK SET
2003
1
/:
/
1
OK
POWER
2
, Press POWER to turn on the
power.
The POWER lamp lights in green and the
CLOCK SET screen appears on the LCD
screen.
/M/
D
12 00
Y
/D/
M
D/M/Y
O K
AM
CANCEL
Y
CLOCK SET
1
2003
/
/:
1
OK
3
, Select the desi re d dat e forma t
with v/V on the control button,
then press z.
You can select from [Y/M/D] (year/mon th/
day), [M/D/Y], and [D/M/Y].
• If the rechargeable button battery, which
provides the power for saving the time data,
ever loses its charge (page100), the CLOCK
SET screen automatically reappear s. If this
happens, start from Step 3 to set up the date
and time again.
14
Page 20
CLOCK SET
2003
1
/:
/
12 00
1
OK
/M/
Y
M
/D/
D/M/Y
O K
AM
CANCEL
Y
10 30
/M/
/D/
M
D/M/Y
O K
AM
CANCEL
D
Y
CLOCK SET
1
2003
/
/:
1
OK
12 00
Y
/M/
M
/D/
D/M/Y
O K
AM
CANCEL
D
Y
CLOCK SET
2003
4
/:
/
7
OK
Getting started
D
Y
4
, Select the year, month, day,
hour, or minute item you want
to set with b/B on the control
button.
A v will be shown above, and a V will be
shown below the item currently selected to
be set.
5
, Set the desired numerical
value with v/V on the control
button, then press z.
After setting the current numerical value,
set the next item. Repeat the above process
until all of th e items have been set.
• If you select [D/M/Y] in Step 3, set the time
on a 24- hour cycle.
6
, Select [OK] with B on the
control button, then press z.
The date and ti me are set and the cl oc k w ill
start to keep time.
• To cancel the setting process, select
[CANCEL], then press z.
15
Page 21
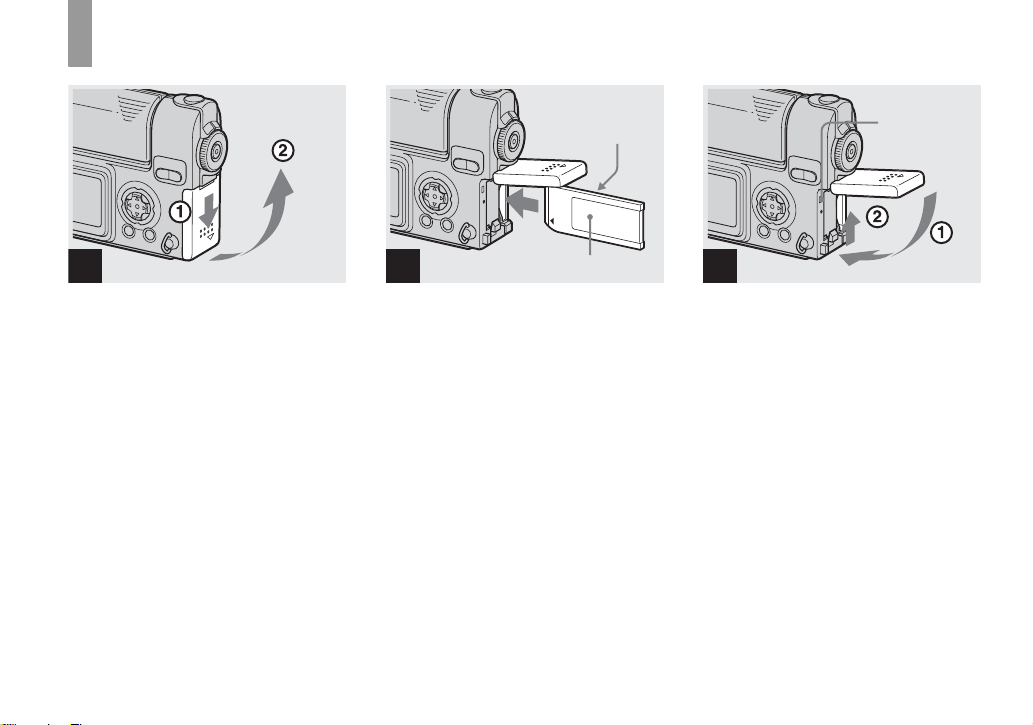
Inserting and removing a “Memory Stick”
Shooti
till i
s
ng s
mage
16
1 2
, Open the battery/“Memory
Stick” cover.
Slide the cover in the direction of the arrow.
Connector side
Label side
, Insert the “Memory Stick.”
Insert the “M emory Stick” all th e w ay in
until it clic ks as shown in the illus tration.
• Whenever you insert a “M emory Stick,” push it
as far as it can go. If you do not insert it
correctly, a proper recording or playback may
not be carried out.
Access lamp
3
, Close the battery/“Memory
Stick” cove r.
To remove the “Memory Stick”
Open the battery/“Mem ory Stick” cover,
then push the “Memory Stick” to pop it out.
• Whenever the Access lamp is lit, the
camera is recording or reading out an
image. Never remove the “Memory
Stick” or turn off the power at this time.
The data may be corrupted.
Page 22
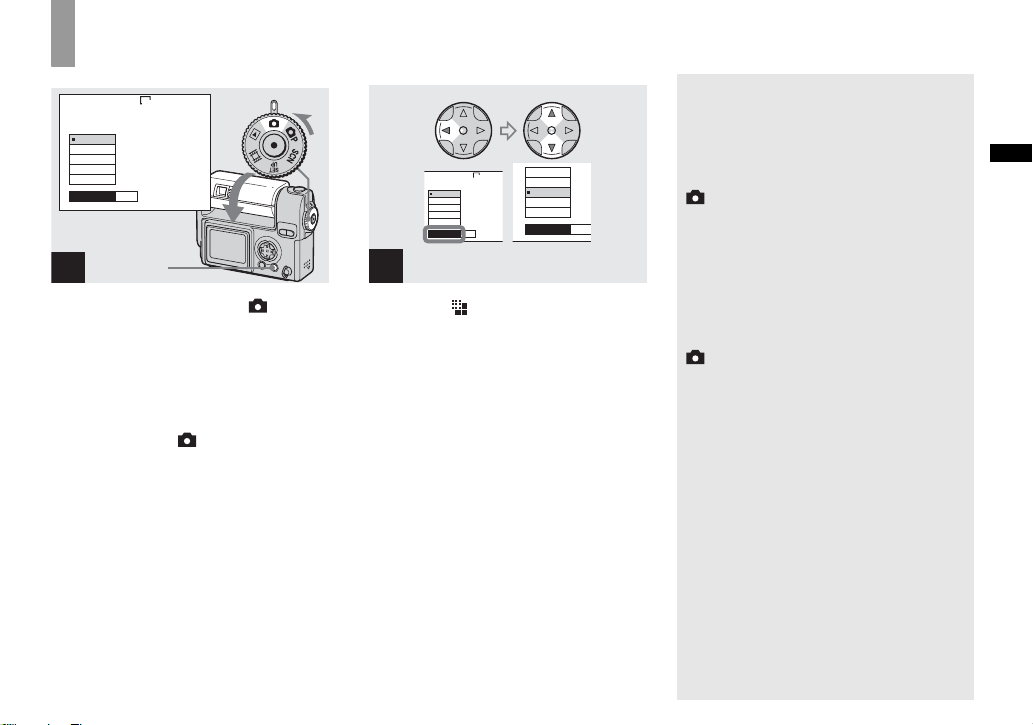
Setting the still ima ge size
E
2272
2272x1704
2272(3:2)
1600x1200
1280x 960
640 x 480
MODE
IMAGE SIZE
1
MENU
, Set the MODE di al to , rotate
the lens portion to turn on the
power, then press MENU.
The menu appears.
• You can carry out this operation even when the
MODE dial is set to P
• For more information about the image size, see
page 30.
or SCN.
2272x1704
2272
2272(3:2)
2272x1704
2272(3:2)
1600x1200
1280x 960
640 x 480
IMAGE SIZE
MODE
1600x1200
1280x 960
640 x 480
IMAGE SIZE
MOD
2
, Select (IMAGE SIZE) with b
on the control button.
Select the desired image size
with v/V.
The image size is set.
After the setting is completed, press
MENU. The menu disappears from the
screen.
• The image size value selected here is preserved
even when the camera is turned off.
The MODE dial position during
still image shooting
When shooting still images, the selectable
shooting modes are as follows:
(Auto mode shooting)
You can perform an easy shooting since this
mode automatically adjusts the focus,
exposure, and white balance. In this mode,
[P. QUALITY] is set to [FINE] and the AF
range finder is set to the Multipo int AF
(page 18).
P (Program mode shooting)
You can set the shooting funct ion s in th e
menu settings according to yo ur shooting
condition (page 93).
SCN (Scene selection)
This mode is effective when shooting night
scenes, peop le at night, landscapes, or
portraits (page 27).
Shooting still images
17
Page 23
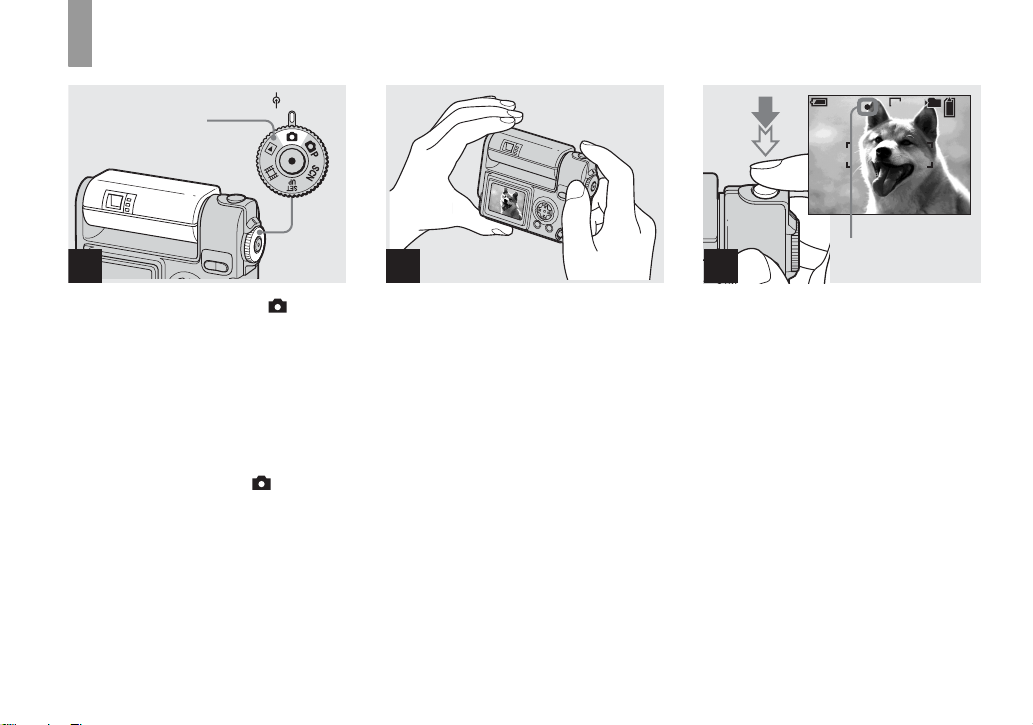
Basic still image shooting – using auto mode
MODE
MODE dial
POWER
1
, Set the MODE dial to , and
rotate the lens portion to turn
on your camera.
When a “Memory Stick” is ins er ted, the
recording folder nam e i s indi cated on the
LCD screen for about five seconds
(page 51).
• When the MODE dial is set to , the
exposure, white balance and focus are adjusted
automatically.
2 3
, Hold the camera steadily with
both hands and position a
subject in the center of the
focus frame.
Do not cover the lens, flash, or microphone
(page 6) with your fi nge rs.
min
60
AE/AF lock indicator
Flashes in green t
Remains on
101
FINE
640
98
F2.8
30
, Press and hold the shutter
button halfway down.
The camera beeps. Whe n the A E/A F lock
indicator stops flashing and remains on, the
camera is ready for shooting . (T he scre en
may be frozen for a split second depending
on the subject.)
• If you release your finger from the shutter
button, shooting will be canceled.
• The minimum focal distance to a subject is
50 cm (19
distances closer than this, use the Macro mode
(page 21).
• The frame appearing on the LCD screen shows
the focus adjustment range. (For more details
on the AF range finder, see page41.)
11
/16 inches). To shoot subjects at
18
Page 24
Checking the last image
shot – Quick Review
min
60
101
640
97
4
, Press the shutter button fully
down.
The shutter clicks, the shootin g is
completed, and the still image is saved in
the “Memory Stick.” When the recording
lamp goes out, you can shoot the next
image.
• When you are shooting with the battery pack, if
no tasks are performed for a while with the
camera turned on, power is automatically shut
off to preserve battery power (page 12).
About Auto Focus
When you try to s hoo t a sub ject t hat is har d
to focus on, the AE/AF lock indicator will
change to flashing slowly.
The Auto Focus functi on may be difficu lt to
use with in the following subjects. In such
cases, release the shutter b utton, then try to
recompose the shot an d focus again.
• The subject is distant from the camera and dark
• The contrast between the subject and its
background is poor
• The subject is seen through glass, such as a
window
• A fast-moving subject
• The subject has a reflection, such as th at from a
mirror, or there is a luminous body and a
lustrous subject
• A flashing subject.
• A backlit subject
There are two method for Auto Focus
function: Multipoint AF and Center AF
(page 41). When the MODE dial is set to
, The Multip o int AF is automatica lly
selected.
min
60
REVIEW
640
8/8
101
10:30
2003 7 4101-0008
PM
, Press b (7) on the control
button.
To return to shooting mode, pr ess the
shutter button lightly or press b (7) on the
control button again.
To delete the image displayed on the
LCD screen
1 Pre s s MENU to display th e menu.
2 Select [DELETE] with B on the control
button, then press z.
3 Select [OK] with v on the control
button, then press z.
The image is d eleted.
Shooting still images
19
Page 25
Using the smart zoom
W (wide-angle) T (telephoto)
min
60
640
min
101
98
101
60
640
98
, Press the SMART ZOOM to
choose the desired zoom
position, and shoot your
image.
You can zoom in the ima ge using digital
process, with very little deterioration.
The maximum zoom scale depends on the
image size.
1600×1200: 1.4×
1280×960: 1.7×
640×480: 3.5×
When the image size is 2272×1704 or 2272
(3:2), the smart zoom does not work.
• If the LCD screen is tur ned off, the smart zoom
function does not work. Turn on the LCD
screen when using the smart zoom function.
• AF range finder is not shown when using the
smart zoom. When 9 (FOCUS) is set to
[MULTI AF] or [CENTER AF], or
flashes and the centrally-located subject has
priority to focus on.
• The smart zoom cannot be used while shooting
movies (page 62).
• When using the smart zoom, the image on the
LCD screen may look rough. However, this
phenomenon has no effect on the recorded
image.
20
Page 26
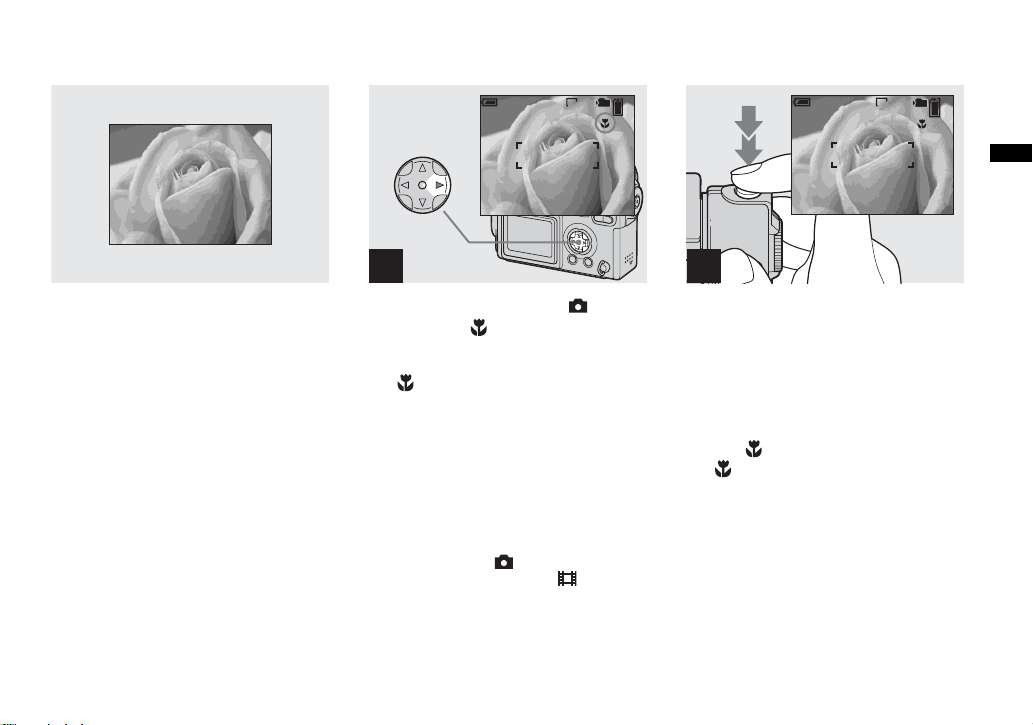
Shooting close-ups – Macro
For close-ups of small subjects like flowers
or insects, s hoot using the mac ro feature.
You can use this feature for clo s e-ups of
subjects up to approximately 10 cm
15
/16 inches) from the end of the lens.
(3
min
60
101
640
98
1
, Set the MODE dial to , and
press B ( ) on the control
button.
The (Macro) indicator appears on the
LCD screen.
• When the [POWER SAVE] (page 99) is set to
[ON], the focus will be achieved only while the
shutter button is pressed and held halfway
down.
• If the menu is currently displayed, press MENU
first to make the menu disappear.
• You can carry out this operation even when the
MODE dial is set to P
Landscape mode) (page 27), or .
, SCN (other than the
min
60
101
640
97
2
, Center the subject in the frame,
and press and hold the shutter
button halfway down, then
press the shutter button fully
down.
To return to normal shooting
Press B ( ) on the c ont rol button again.
The indicator disappears from the LCD
screen.
• Use the LCD screen to shoot when
using the Macro feature. If you use the
finder, the limits of what you see and
what you actually shoot may be
different.
Shooting still images
21
Page 27
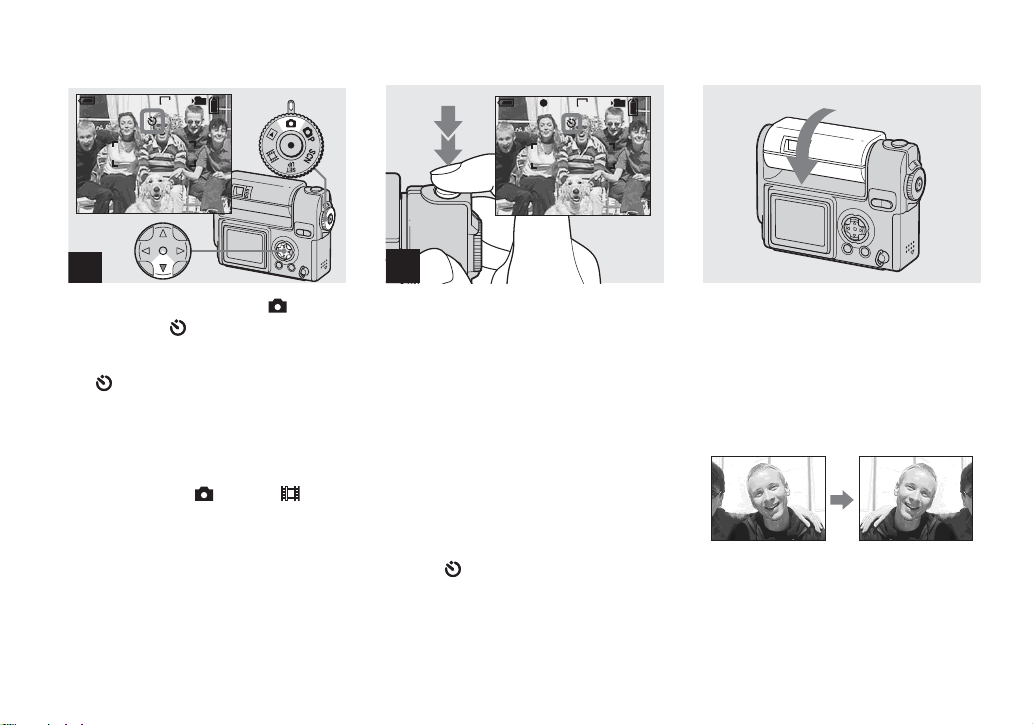
Using the self-timer
Rotating the lens
– Mirror mode
min
60
101
640
98
1
, Set the MODE dial to , and
press V ( ) on the control
button.
The (Self-timer) indicator appears on the
LCD screen.
• If the menu is currently displayed, press MENU
first to make the menu disappear.
• You can carry out this operation even when the
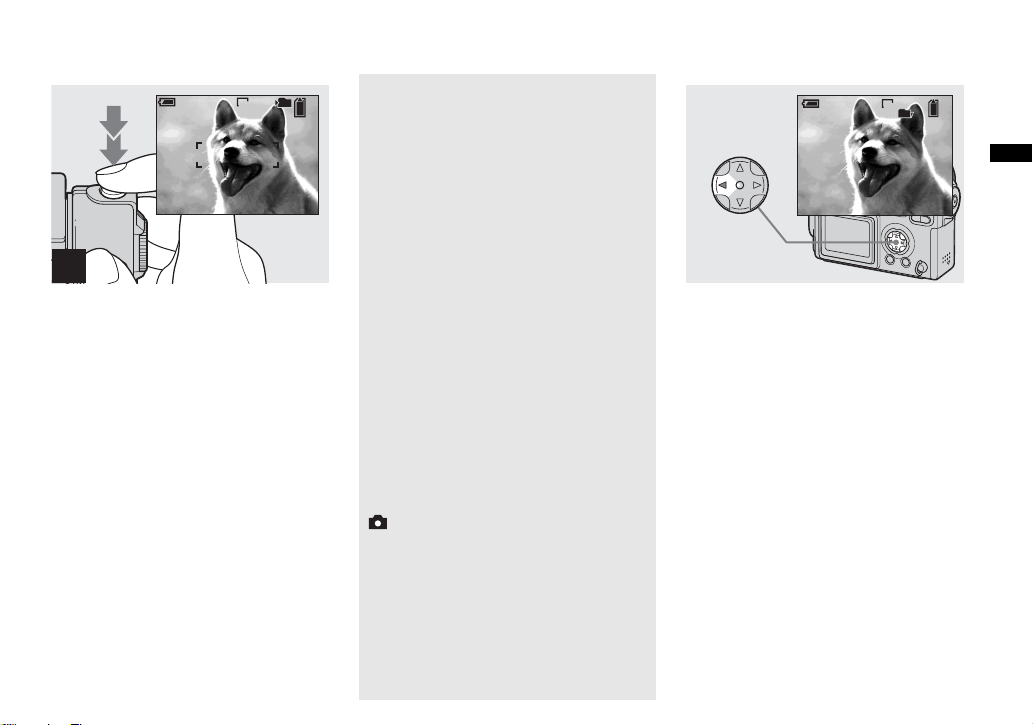
MODE dial is set to P
, SCN, or .
min
60
101
FINE
640
98
F2.8
30
2
, Center the subject in the frame,
and press and hold the shutter
button halfway down, then
press the shutter button fully
down.
The Self-timer lamp (page6) will flash in
orange, and you will hear a beeping sound.
The image will be s hot afte r appr oxi matel y
10 seconds.
To cancel the self-timer during the
operation
Press V ( ) on the control button again.
• If you stand in front of the camera and press the
shutter button, the focus and the exposure may
not be correctly set.
, Adjust the lens portion angle.
When shooting in mirror mode, tu rn over
the lens portion as illustrated above. The
image on the LCD sc reen is a mirr or-image.
However, the image can be normal when
recorded.
Image on the
LCD screen
Recorded image
22
Page 28
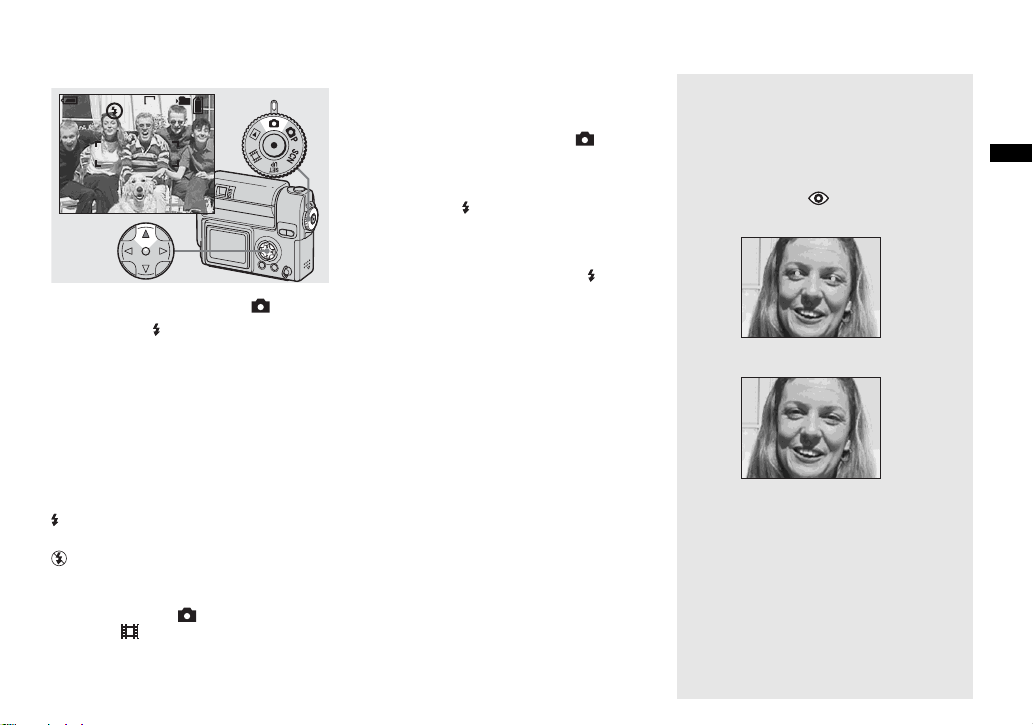
Selecting a flash mode
min
60
101
640
98
, Set the MODE dial to , and
press v ( ) on the control
button repeatedly to select a
flash mode.
The flash mode has the foll owing features.
No indicator (Auto): Based on the
lighting condi tions, the camera will decid e
if there is enough light , a nd w i ll use th e
flash accordingly.
(Forced flash): The flash will be used
regardless of the amount of ambient li ght .
(No flash): The flash will not be used.
• You can carry out this operation even when the
MODE dial is set to P
mode), or (Clip motion).
, SCN (Soft snap
• The recommended distance using the flash is
about 0.5 m to 1.7 m (1 foot 7
5 feet 7 inches) when [ISO] is set to [AUTO].
(When the MODE dial is not set to P, [ISO]
is set to [AUTO].)
•
If the menu is currently displayed, press MENU
first to make the menu disappear.
• In the Auto or (Forced flash) mode, you look
at the LCD screen in a dark place, you may
notice some “noise” in the image, but this will
have no effect on the image you shoot.
• While the flash is being charged, the /CHG
lamp flashes. After charging is completed, the
lamp goes out.
3
/4 inches to
To reduce “red-eye” when
shooting live subjects
The flash pre-strobes before shooting to
reduce the red-eye phe nom enon. Set [RED
EYE REDUCTION] to [ON] in the SET UP
settings (page 98). appears on the LCD
screen.
m
• The amount of red-eye reduction possible
varies according to the individual. In addition,
the distance to the subject, and whether or not
the subject has seen pre-strobe light begin to
strobe may also reduce the effectiveness of the
red-eye reduction process.
Shooting still images
23
Page 29
Selecting a flash mode (continued)
Shooting with the AF
illuminator
This is additional lighting provided to assist
in focusing when shooting in dark plac es.
Set [AF ILLUMINATOR] to [AUTO] in
the SET UP settings (page 98). If you try to
shoot under insufficient lighting conditions,
appears the LCD screen; the AF
ON
illuminator will flash automatically during
the time between when the sh utter bu tton is
pressed halfway down and the focus loc ks.
640
ON
101
FINE
98
F2.8
30
1
/8 inches), or the
min
60
• Even when the AF illuminator flashes, but
sufficient light does not reach the subject (the
recommended distance for this feature is up to
approx. 1.5 m (4 feet 11
subject has weak contrast, the camera may not
focus properly.
• If AF illuminator light misses the center of the
image somewhat, the camera will focus
properly as long as it reaches the subject.
• When the focus preset distance is set, the AF
illuminator does not function.
• When 9 (FOCUS) is set to [MULTI AF] or
[CENTER AF], the AF range finder is not
24
displayed. or flashes and the centrallylocated subject has priority to focus on.
• In the following Scene selection modes
(page 27), the AF illuminator will not function.
– When shooting in Twilight mode
– When shooting in
Landscape mode
• The AF illuminator is a bright light. There are
no safety hazards, but when shooting at short
distances, do not aim it directly at the subject’s
eyes.
Page 30
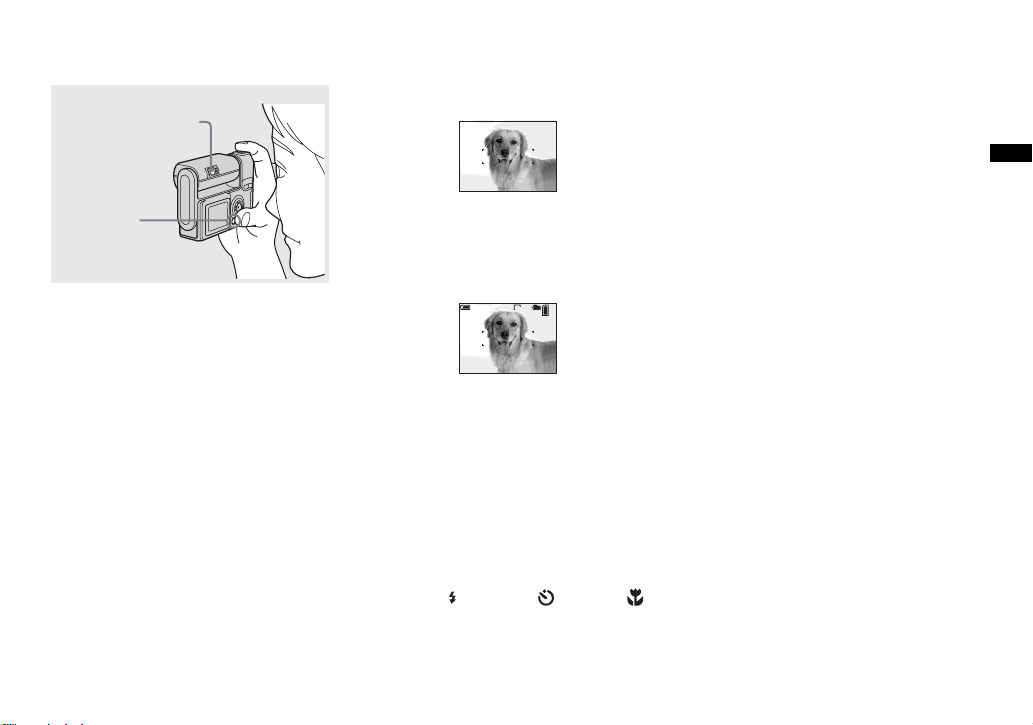
Shooting with the finder
Finder
All of the indicators are turned off
Shooting still images
DSPL/LCD
ON/OFF
The finder is convenient when you want to
save battery power, or when it is difficult to
confirm th e image using the LCD screen.
Each time you press DSPL/LCD ON/OFF,
the display c hanges in the fol lowing order.
The LCD screen is turned off.
r
All of the available indicators
r
are turned on.
101
min
60
640
98
• The image through the finder does not
indicate the actual recordable range. To
confirm the recordable range, use the
LCD screen.
• For details on the items displayed, see
page 104.
• Just as with the AE/AF lock indicator on the
LCD screen, when the AE/AF lock lamp of the
finder section stops flashing and remains on,
you can start shooting (page 18).
• When the LCD screen is turned off, the smart
zoom does not function (page 20).
• If you press (Flash mode)/ (Self-timer)/
(Macro) with the LCD screen turned off, the
image will be displayed on the screen for
approximately two seconds so you can check or
change the setting.
25
Page 31

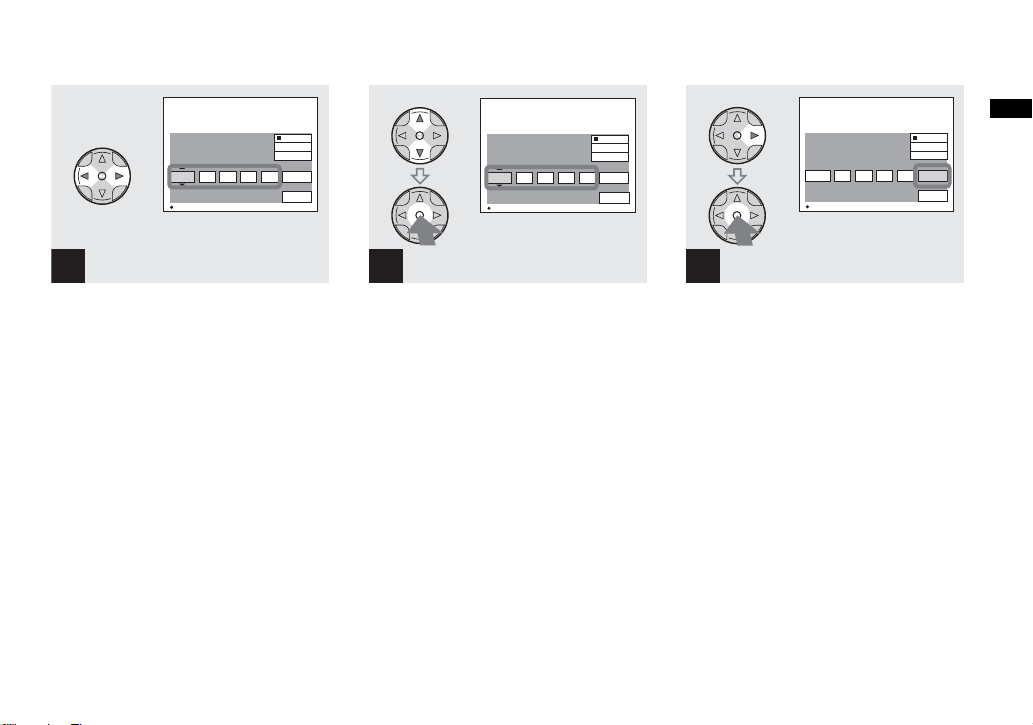
Inserting the date and time on a still image
CAMERA
MOVING IMAGE:
DATE/TIME:
RED EYE REDUCTION
AF ILLUMINATOR:
SELECT
:
MPEG MOVIE
OFF
OFF
AUTO
1
, Set the MODE dial to SET UP.
The SET UP screen appears.
• When images are shot with the date and time
inserted, the date and time cannot be removed
later.
• When shooting images with the date and time
inserted, the actual date and time are not
displayed on the LCD screen, instead, is
displayed in the upper left portion of the LCD
screen. The actual date and time are indicated
in red in the lower-right corner when the image
is played back.
26
CAMERA
MOVING IMAGE:
DATE/TIME:
RED EYE REDUCTION
AF ILLUMINATOR:
OK
:
DAY&TIME
DATE
OFF
2
, Select (CAMERA) with v on
the control button, then press
B.
Select [DATE/TIME] with v/V,
then press B.
CAMERA
MOVING IMAGE:
DATE/TIME:
RED EYE REDUCTION
AF ILLUMINATOR:
PAGE SELECT
:
MPEG MOVIE
DATE
OFF
AUTO
3
, Select the date and time setting
with v/V on the control button,
then press z.
DAY&TIME: Inserts the date and the time
of shooting into the image
DATE: Inserts the year, the month and the
date of shooting into the image
OFF: Does not insert date/time data into the
image
After the setting has been completed, set the
MODE dial to , and continue your shooting.
• When you chose [DATE] in Step 3, the date
will be inserted in the order set in “Setting the
date and time” (page 14).
• You can insert the date and time even when the
MODE dial is set to P
• This setting is maintained even when the power
is turned off.
or SCN.
Page 32

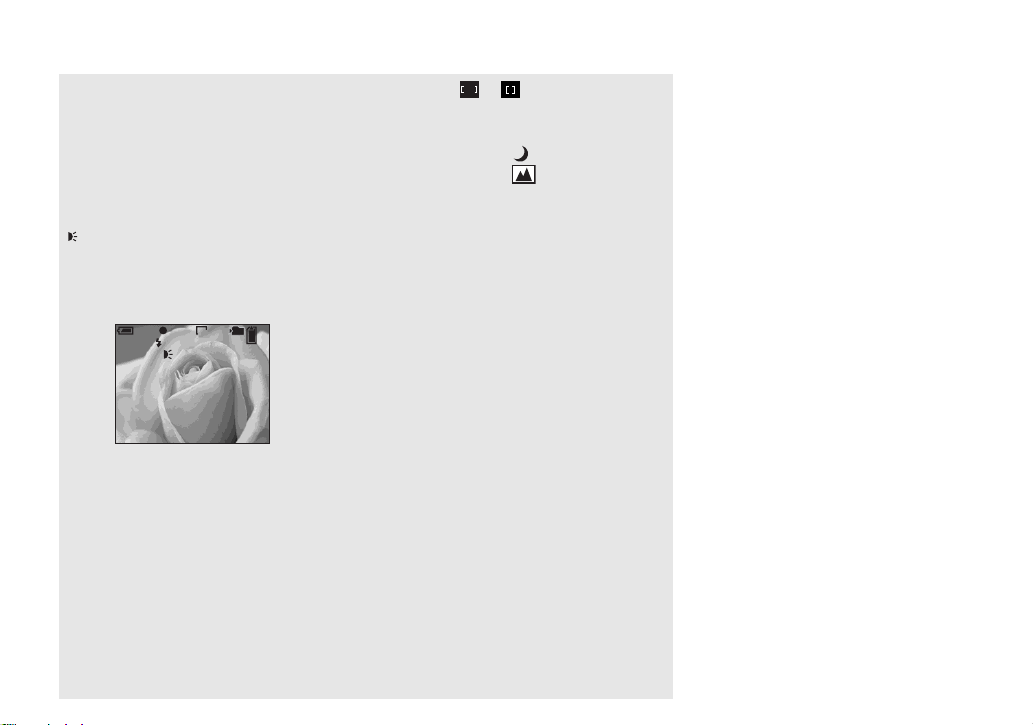
Shooting according to scene conditions
(scene selection)
Twilight mode
Twilight portrait mode
Landscape mode Soft snap mode
Shooting still images
When shooting night scenes, shoot ing
people at night, shooting landscapes, or
shooting portraits, use the modes listed
below to increase the quality of your
images.
Twilight mode
Under dark lighting co nditions, you can
shoot using the Twilight mode, and still get
good images. Howe ver, b ecaus e the s hutter
speed is slower under these c onditions, we
recommend you use a tripod.
• The flash cannot be used.
Twilight portrait mode
Use this mode when shooting people in the
foreground at night.
Because the shutter speed is slow, it is
recommended that you use a tripod.
• Allows you to shoot images of people in the
foreground with distinct outlines without losing
the feeling that you are shooting at night.
• The flash forcely strobes.
Landscape mode
Focuses on images far away, so is
convenient for shooting landscapes at a
distance.
• You cannot shoot in Macro mode.
• The flash auto mode cannot be selected.
Soft snap mode
The soft snap mode lets you shoot skin
colors in brighter and warmer tones for
more beautiful pictures. In addition, the soft
focus effect creates a ge ntle atm osph ere fo r
portraits of people, flowers, etc.
27
Page 33

Shooting according to scene conditions (scene selection) (continued)
0EV
0EV
WB
EVSCN
MENU
1
, Set the MODE dial to SCN, and
press MENU.
The menu appears.
28
SCN
WB
2
, Select [SCN] with b on t he
control button.
SCN
WB
3
, Select the desired mode with
v/V on the control button.
The mode is set to your choice.
When the setting is completed, press
MENU. The menu disappears from the
screen.
To cancel the scene selection
Set the MODE dial to another position.
• The setting is maintained even when the power
is turned off.
Page 34

Deciding the still i m age quality
NR slow shutter
The NR slow shutter mode removes noise from
recorded images, providing clear images.
scene selection mode and shutter speed value are
as follows, the camera automatically enters the
NR slow shutter mode and “NR” is indicated next
to the shutter speed indicator.
Mode Twilight/Twiligh t por tr a it
Shutter
1/2 sec./slower than 1/2 sec.
speed
Press the shutter button fully
F2.8
down.
NR2''
r
CAPTURING
r
PROCESSING
• To eliminate the effects of vibration, use of a
tripod is recommended.
Then the screen turns black.
Finally, when
“PROCESSING” disappears,
the image has been recorded.
When the
0EV
0EV
WB
EV
1
ISO
MENU
, Set the MODE dial to P,
rotate the lens portion to turn
on the power, then press
MENU.
The menu appears.
• You can carry out this operation even when the
MODE dial is set to SCN.
FINE
FINE
STANDARD
P.QUALITY
MODE
PFX
2
, Select (P. QUALITY) with b/
B on the control button.
Select the desired image
quality with v/V.
The image quality is set.
After the setting is completed, press
MENU. The menu disappears from the
screen.
• For image quality, you can choose either
[FINE] or [STAND ARD] .
• The image quality value selected here is
preserved even when the camera is turned off.
Shooting still images
29
Page 35

Image size and quality
You can choose image size (number of
pixels) and image quality (comp ressi on
ratio) based on the kind of images you want
to shoot. The larger you make the image
size and the higher you make the image
quality, the better your image, b ut also the
larger the am ount of data needed to pres erve
your image. This means you can save fewer
images in your “Memory Stick.”
Choose an image size and qu al it y le ve l
appropriately for the kind of ima ges you
want to shoot.
You can resize the images later (Resize
function, see page 59).
You can choose image size from among the
five options in the following tables.
Image size Examples
2272×1704 Very fine prints
2272 (3:2) 3:2 prints
1600×1200 Printing A5 size images
1280×960 Printing postcard size images
640×480 Creating your home page
1) This option records images in a horizontal to
vertical proportion of 3:2 to match the size of
the print paper used.
1)
The number of images that can be saved in a “Memory Stick”
2)
The number of images that can be saved in FINE (STANDARD) mode are shown below.
(Units: number of images)
Capacity
Image size
2272×1704
2272 (3:2) 8 (14) 16 (30) 32 (60) 65 ( 121) 119 (216) 242 (440) 494 (898)
1600×1200
1280×960
640×480
2) When [REC MODE] is set to [NORMAL]
For the number of images that can be saved in
other modes, see page 92.
• When the images are viewed on the LCD
screen of the camera, they all look the same
size.
• Number of shooting images can differ from
these values according to shooting conditions.
• The image size value (e.g., 2272×1704) is the
number of pixels displayed.
• When the remaining number of images
recordable is more than 9999, “>9999” is
indicated.
16MB 32MB 64MB 128MB MSX-256 MSX-512 MSX-1G
8 (14) 16 (30) 32 (60) 65 (121) 119 (216) 242 (440) 494 (898)
16 (30) 33 (61) 66 (123) 133 (246) 238 (446) 484 (907) 988 (1852)
24
(46)
97
(243)
50
(93)
196
(491)
101
(187)
394
(985)
202
(376)
790
(1975)
357
(649)
1428
(3571)
726
(1320)
2904
(7261)
1482
(2694)
5928
(14821)
30
Page 36

Viewing images on the LCD scr een of your
Viewi
till i
s
camera
ng s
mage
Viewing on the single-image
screen
Single
(single-image) scree n
min
60
640
101
8/9
10:30
2003 7 4101-0008
BACK/NEXT VOLUME
PM
Index
(nine-image) screen
You can view images shot with the camera
almost immediate ly on t he scr e en. Yo u can
select the fo llowing three methods for
viewing images.
Single (single-image) screen
You can view one image at a time,
occupyin g th e entire screen.
Index (nine-image) screen
Nine images are displaye d simultaneously
in separate panels on the screen.
Index (triple-image) screen
Three images are d ispl ayed si mult aneo usly
in separate panels on the screen. V ari ous
image information items are also displayed.
Index
(triple-image) screen
APERTURE VALUE:
SHUTTER SPEED:
EXPOSURE VALUE:
ISO:
MOVESINGLE DISPLAY
SINGLE DISPLAY
F2.8
1/30
0.0
100
2003 7 4101-0002
• For details on the movies, see page 63.
• For a detailed description of the screen
indicators, see page 106.
10:30
min
60
640
101
8/9
10:30
VOLUME
PM
Viewing still images
2003 7 4101-0008
BACK/NEXT
PM
1
, Set the MODE dial to , and
turn on the power.
The newest image in the sel ected re cordi ng
folder (page 51) is displ ay ed .
31
Page 37

Viewing on the single-image
screen (continued)
min
60
640
101
3/9
10:30
BACK/NEXT
2003 7 4101-0003
VOLUM E
PM
2
Viewing on the index (nine- or triple-image) screen
APERTURE VALUE:
SHUTTER SPEED:
EXPOSURE VALUE:
ISO:
MOVESINGLE DISPLAY
SINGLE DISPLAY
F2.8
1/30
0.0
100
10:30
2003 7 4101-0002
PM
, Select the desired still image
with b/B on the control button.
b : Displays the previous im age .
B : Displays the next image.
32
, Press the SMART ZOOM W
button once.
The display switches to the Index (nineimage) screen.
To display the next (previous) Index
screen
Press v/V/b/B on the control but ton to
move the yellow frame up /do w n/left/right.
, Press the SMART ZOOM W
button once more.
The display s w itches to the Index (tripleimage) screen.
Pressing v/V on the control button shows
the remaining image information.
To display the next (previous) Index
screen
Press b/B on the control button.
To return to the single-image screen
Press the SMART ZOOM T button
repeatedly, or press z on the control button.
Page 38

Viewing images on a TV screen
A/V multi connecting
cable (supplied)
Multi connector
BACK/NEXT
640
101
2/9
10:30
PM
2003 7 4101-0002
VOLUME
Viewing still images
1
v mark
, Connect the A/V multi
connecting cable to the multi
connector of the camera and
the audio/video input jacks of
the TV.
If your TV has stereo type input jacks,
connect the audio pl ug (black) of the A/V
multi connectin g cable to the Lch audio
input jack.
When placing the camera, make sure the
LCD screen is facing up.
• Turn off both the camera and the TV before
connecting the camera and the TV with the A/V
multi connecting cable.
2
TV/Video switch
, Turn on the TV, and set the TV/
Video switch to “Video.”
• The name and location of this switch may differ
depending on your TV.
3
, Set the MODE dial to , and
turn on the camera.
Press b/B on the control button to select the
desired image.
• When using the camera abroad, it may be
necessary to switch the video output signal to
match that of your TV system (page 99).
33
Page 39

Watching images on a TV screen
If you want to view images on a TV, you
need a TV having a video input jack and the
A/V multi connecting c ab le (suppl ie d).
The color system of the TV must match as
that of your digital still camera . C heck the
following list:
NTSC system
Bahama Islands, Bolivia, Canada, Central
America, Chile, Colombia, Ecuador,
Jamaica, Japan, Korea, Mexico, Peru,
Surinam, Taiwan, the Philippines, the
U.S.A., Venezuela, etc.
PAL system
Australia, Austria, Belg iu m, Ch ina, Czech
Republic, Denmark, Finland, Germany,
Holland, Hong Kong, Italy, Kuwait,
Malaysia, New Zealand, Norway, Portugal,
Singapore, Slovak Republi c, Spai n,
Sweden, Switzerland, Thailand, United
Kingdom, etc.
PAL-M system
Brazil
PAL-N system
Argentina, Paragua y, Ur uguay
SECAM system
Bulgaria, France, Guiana, Hungary, Iran,
Iraq, Monaco, Pola nd, R ussi a, Ukrai ne, etc.
34
Page 40

Deleting images
Deleti
till i
s
min
60
640
101
2/9
10:30
BACK/NEXT
2003 7 4101-0002
VOLUME
PM
60
FOLDER
OK
min
DELETE
640
PROTECT
ng s
min
101
2/9
DPOF
60
OK
640
mage
101
2/9
DELETE
O K
EXIT
1
, Set the MODE dial to , and
turn on the camera.
Select the image you want to
delete with b/B on the control
button.
2
MENU
, Press MENU.
Select [DELETE] with b/B on
the control button, then press
z.
The image has not yet been deleted at this
point.
• You cannot delete protected images (page 57).
3
Deleting still images
, Select [OK] with v on t he
control button, then press z.
“MEMORY STICK ACCESS” appears on
the screen. When this mess age disappears,
the image has been deleted.
To delete other images c ontinuously
Select the image you wa nt to delete with b/
B on the control butt on. Sele ct [ DEL ETE],
then press z. Next, select [OK] with v on
the control button, then press z.
To cancel the deletion
Select [EXIT] with V on the control button,
then press z.
35
Page 41

Deleting on the Index (nine-image) screen
FOLDER
DELETE
PROTECT
DPOF
DELETE
SELECTCANCEL ALL IN FOLDER
MENU
TO NEXT
MOVESELECT
1
MENU
, While an Index (nine-image)
screen (page 32) is displayed,
press MENU.
Select [DELETE] with b/B on
the control button, then press
z.
36
2
, Select [SELECT] with b/B on
the control button, then press
z.
To delete all the images in the folder
Select [ALL IN FOLDER] with B on the
control button, then press z. Next, select
[OK], then press z. All of the unprotected
images in the folder are deleted. To cancel
the deletion, select [EXIT], then press z.
3
, Select the image you want to
delete with v/V/b/B on the
control button, then press z.
The (Delete) mark is indicated on the
selected image. At this poi nt, the ima ge has
not yet been deleted. Put the mark on all
of the images you want to delete.
• To cancel your selection, select images you
want to cancel and press z again. The mark
disappears.
Page 42

Deleting on the Index (triple-image) screen
EXITDELETE OK
4
, Press MENU.
Select [OK] with B on the
control button, then press z.
“MEMORY STICK ACCESS” appears on
the screen. When this message disappears,
the images have been deleted.
To cancel the deletion
Select [EXIT] with b on the control button,
then press z.
APERTURE VALUE:
SHUTTER SPEED:
EXPOSURE VALUE:
ISO:
SINGLE DISPLAY
F2.8
1/30
0.0
100
10:30
2003 7 4101-0002
PM
1
, While an Index (triple-image)
screen (page 32) is displayed,
move the image you wan t to
delete to the center with b/B on
the control button.
DPOF
PROTECT
DELETE
FOLDER
10:30
2003 7 4101-0002
BACK/NEXTOK
2
MENU
PM
, Press MENU.
Select [DELETE] with the v/V
on the control button, then
press z.
At this point, the image has not yet been
deleted.
Deleting still images
37
Page 43

Deleting on the Index (triple-image) screen (continued)
DELETE
O K
CANCEL
10:30
2003 7 4101-0002
BACK/NEXTOK
PM
3
, Select [OK] with v on the
control button, then press z.
“MEMORY STICK ACCESS” appears on
the screen. When this message disappears,
the image has been deleted.
To cancel the deletion
Select [CANCEL] with
button, th en press z.
V on the control
38
Page 44

Formatting a “Memory Stick”
1
, Insert the “Memory Stick” you
want to format into the camera.
Set the MODE dial to SET UP,
and turn on the power.
• The term “formatting” means preparing a
“Memory Stick” to record images; this process
is also called “initialization.” The supplied
“Memory Stick” and those available
commercially, are already formatted, and can
be used immediately.
• When you format a “Memory Stick,” be
aware th at all of t he d ata in the “M emory
Stick” will be permanently erased.
Protected images are also erased.
MEMORY STICK TOOL
FORMAT:
CREATE REC. FOLDER:
CHANGE REC. FOLDER:
OK
O K
CANCEL
2
, Select (MEMORY STICK
TOOL) with v/V on the control
button.
Select [FORMAT] with B, then,
press B.
Select [OK] with v , then press
z.
To cancel the formatting
Select [CANCEL] with V on the control
button, th en press z.
• Use the fully charged battery pack. Formatting
using the low level battery pack may cause a
format error by battery shutoff.
FORMAT
ALL DATA WILL BE ERASED
OK
READY?
O K
CANCEL
3
, Select [OK] with v on t he
control button, then press z.
The “FORMATTING” mess age appears.
When this message disappears, the format
is complete.
Deleting still images
39
Page 45

How to setup and
Bef
operate your camera
This section describes the most frequently
used menus and the SET UP screen.
Control button
MODE dial
MENU
Changing menu settings
a Press MENU.
The menu appears.
2272
2272x1704
2272(3:2)
1600x1200
1280x 960
640 x 480
MODE
IMAGE SIZE
b Select the setting item you
want to change with b/B on
the control button.
VOICE
E-MAIL
NORMAL
REC MODE
The letters and symbols of the item
you select turn yellow.
ore advanced operations
Changing items in the SET
UP screen
a Set the MODE dial to SET UP.
The SET UP screen appears.
CAMERA
MOVING IMAGE:
DATE/TIME:
RED EYE REDUCTION
AF ILLUMINATOR:
SELECT
:
MPEG MOVIE
OFF
OFF
AUTO
b Select the setting item you
want to change with v/V/b/B
on the control button.
The frame of the item you select turns
yellow.
SETUP 1
LCD BRIGHTNESS
:
LCD BACKLIGHT
BEEP:
POWER SAVE
SHUTTER
:
O N
OFF
:
40
c Select the desired setting with
v/V on the control button.
The frame of the selected setting turns
yellow, and the setting is entered.
To turn off the menu display
Press MENU.
OK
c Press z on the control button
to enter the setting.
To turn off the SET UP screen
display
Set the MODE dial to anythin g ot her than
SET UP.
Page 46

Choosing a focus
Ad
till i
method
MODE dial: P/SCN/
Multipoint AF
The AF range finder frame widen s.
You can do auto fucus shootin g not
depending on com posi ti on. The number of
AF range finders, the positio n or th e w i dth
of the AF ra nge f ind er diffe rs depen din g on
the subject.
Center AF
The AF range finder frame is only the
center of the frame.
Control button
MODE dial
MENU
b Press MEN U.
The menu appears.
c Select 9 (FOCUS) with b/B,
then select [MULTI AF] or
[CENTER AF] with v/V.
The focus is adjusted automati cally.
The color of the AF range finder frame
changes from white to green.
Multipoint AF
min
60
101
FINE
640
98
Center AF
min
60
101
FINE
640
98
vanced s
• When you are shooting movies (MPEG movie)
and you choose Multipoint AF, the distance to
the center of the screen is estimated as an
average, so t he AF works even with a certain
amount of vibration. The Center AF
automatically focuses only on the center of the
image, so it is convenient when you want to
focus only on what you aim at.
• When you use the smart zoom or AF
illuminator, priority AF movement is given to
subjects in or near the center of the frame. In
this case, or flashes and the AF range
finder is not displayed.
mage shooting
Advanced still image shooting
a Set the MODE dial to P,
SCN, or .
41
Page 47

AF lock shooting using
Center AF
Even if it is difficu lt to focus in AF shoot ing
because the subject is not in the center of the
frame, you can focus in this situation using
Center AF. For example, when you are
shooting two h uman s ubjec ts, and th ere is a
gap between them, the camera may focus on
the background visible in the gap. In a case
like this, use AF lock to ensu re t he subj ects
are in correct focus.
Shutter button
• When you are using AF lock, you can capture
an image with the correct focus even if the
subject is at the edge of the frame.
a Compose the shot so t h at the
subject is centered in the AF
range finder, and press the
shutter button halfway down.
First, the focus for the subject you are
aiming at will be adjusted. When the
AE/AF lock indicator stops flashing
and remains on, and there is a be eping
sound, focus adjustment is completed.
min
60
AF range finder
AE/AF lock
indicator
101
FINE
640
98
F2.8
30
b Return to the fully composed
shot, and press the shutter
button fully down.
The shutter clicks, the image will be
recorded with the proper foc us for the
human subjects.
min
60
• You can carry out the AF lock adjustment
process before you press the shutter button fully
down.
101
FINE
640
97
42
Page 48

Setting the distance
to the subject
– Focus preset
MODE dial: P/SCN/
When shooting an image using a previously
set distance to the subject, or when shooting
a subject through a net or through window
glass, it is difficult to get the proper focus in
auto focus mode. In these cases, use of the
Focus preset is convenient.
Control button
MODE dial
MENU
a Set the MODE dial to P,
SCN, or
b Press MEN U.
The menu appears.
.
c Select 9 (FOCUS) with b/B,
then select the distan ce t o the
subject with v/V.
You can select from the following
distance settings.
0.5m, 1.0m, 3.0m, 7.0m,
∞ (unlimited
distance)
7.0m
3.0m
1.0m
0.5m
CENTER AF
MULTI AF
FOCUS ISO
1.0m
WB
To return to auto focus mode
In step 3, select 9 (FOCUS), then select
[MULTI AF] or [CENTER AF].
• Focal point information may not show the exact
distance.
Adjusting the
exposure
– EV adjustment
MODE dial: P/SCN/
Used when you want to change the
automatic exposure to one of your own
choice. The value can be set a range from
+2.0EV to –2.0EV, in 1/3EV increments.
Control button
MODE dial
MENU
a Set the MODE dial to P,
SCN, or
b Press MENU.
The menu appears.
.
Advanced still image shooting
43
Page 49

c Select (EV) with b/B.
The value of the exposure adjustment
is displayed.
0EV
0EV
WB
EV ISO
d Select th e exp osure
adjustment value.
Select the exposure adjustment value
with
v/V.
Make your adjustment whi le
confirming the brightness of the
background of the subject on the LCD
screen.
To return to auto adjust mode
Return the exposure adjustment value to
0EV.
Shooting te c h niques
In normal shooting, the camera makes
automatic exposure adjustments. Check the
image to be shot, if it looks like the image
below, you should make manual adjustments.
If you are shooting a back-lit person or a
snowy scene, make your adjustments in the +
plus direction; if you are shooting a dark
subject that fills the screen, making your
adjustments in the – direction should give the
best results.
Underexposured
t Adjust in the + direction
Spot light-metering
MODE dial: P/SCN/
Spot light-metering lets you adjust the
exposure to the subject even when the
subject is backlit or there is strong contrast
between the subject and t he background.
You can aim at a particular point, and meter
the light to adjust the exposure for that
point.
Control button
MODE dial
Shutter button
MENU
• When the subject is extremely bright or
extremely dark, or when you are using the
flash, the adjustment may not work.
44
Appropriate exposure
a Set the MODE dial to P,
SCN, or .
b Press MENU.
The menu appears.
Overexposed t Adjust in
the – direction
Page 50

c Select (SPOT METER)
with b/B, then select [ON] with
v.
The Spot light-mete ring aiming point
is displayed.
Spot light-
ISO
metering
aiming
point
WB
ON
OFF
SPOT METER
d Aim the spot light-me te ring
aiming point at the spot you
want to shoot, then shoot your
image.
To cancel spot light-metering
In Step 3, select [OFF]. The spot lightmetering aiming point disa ppe ars, and the
camera returns to normal light-metering.
Adjusting color tones
– White Balance
MODE dial: P/SCN/
When the white balanc e is set to AUTO, the
white balan ce is set automatically in
response to the condition of the subject, and
the overall color balance is adjusted
accordingly. When you want to fix the
conditions under which the image is
captured, or when shooting under special
lighting conditions, you can select the
settings manually.
(Incandescent)
• Used when shooting, for example, at a
party, where the lighti ng conditions
change often
• Used in a studio, or under video lights
(Fluorescent)
Used when shooting under fluo re sce nt
lights.
(Cloudy)
Used when shooting under a cl oudy sky.
(Daylight)
Used when shooting outdoors, and for
shooting at night, under neon ligh ts, for
fireworks, sunrise/sunset and twilight.
AUTO (no display)
The white balance is adju sted
automatically.
Control button
MODE dial
Shutter button
MENU
a Set the MODE dial to P,
SCN, or .
b Press MENU.
The menu appears.
c Select [WB] (WHITE BAL) with
b/B, then select the desi r ed
setting with v/V.
To return to automatic settings
In Step 3, select [AUTO].
• Under fluorescent lights that flicker, e ven if you
choose , the overall color of the image may
show differences from the actual color.
• When the flash is triggered, the manual setting
of white balance is cancelled, and the shooting
of the image is done in AUTO mode.
Advanced still image shooting
45
Page 51

Shooting techniques
The color of the subject that you see will be
captured according to the lighting
conditions. Under the bright summer sun,
everything will appear bluish, under a light
sources like a light bulb, white objects will
appear reddish. The human eye has an
excellent ability to adjust. Even when
lighting conditions change, the eye can
adjust and recognize the correct color almost
instantly. However, digital still cameras are
greatly influenced by light. Normally, this
camera adjusts automatically, but if you
notice that the color of the entire image
seems to be a bit unnatural when replaying
an image on t h e LCD screen, it i s
recommended that you adjust the white
balance.
Adjusting the flash
level
MODE dial: P
You can adjust the amou t of fl ash light.
Control button
MODE dial
MENU
a Set the MODE dial to P.
b Press MENU.
The menu appears.
c Select [ ] (FLASH LEVEL)
with b/B, then select the
desired setting with v/V.
HIGH: Makes the flash level higher
than normal.
NORMAL: Normal setting.
LOW: Makes the flash level lower
than normal.
• You can carry out this operation even when the
MODE dial is set to SCN or (C lip M otion
only).
46
Page 52

Shooting multiple
frames
– Clip Motion
MODE dial:
You can shoot a number of still images
consecutivel y (GIF animation) . Because the
file size is small, these images are id eal for
use on a home page, or for attaching to an email message.
• Clip Motion images are restricted to color
levels of 256 colors and below. This is a
characteristic of GIF format recording. For this
reason, the image quality of some images may
deteriorate.
NORMAL (160×120)
The maximum number of fra m es yo u can
shoot in one Clip Motion shot is 10. This is
suitable for use on a home page.
MOBILE (120×108)
Two frames is the maximum number that
can be shot in Clip Motion in this mode.
This is suitable for use with portable data
terminals.
• MOBILE mode has strict file size limits, so
picture quality falls accordingly.
• For the number of images you can record using
Clip Motion, see page 92.
Before operation
Set [MOVING IMAGE] to [CLIP
MOTION] in the SET UP settings ( p ages
40, 98).
Control button
MODE dial
Shutter button
MENU
a Set the MODE dial to .
b Press MEN U.
The menu appears.
c Select (IMAGE SIZE) with b/
B, then select the desired
mode with v/V.
d Shoot one frame.
MAKING"CLIP MOTION"
e Shoot the next frame.
Press the shutter button once to shoot
the next frame, then repea t th is
operation until you have shot th e
desired number of frames.
f Press z.
All of the frames will be saved in the
“Memory Stick.”
To delete shot images in the
midst of shooting
1 In Steps 4 or 5 , pre ss b (7).
Shot images will be played back in
order, playback stops when the last
image is reached.
2 Press MENU, and select either
[DELETE LAST] or [DELETE ALL],
then press z.
3 Select [OK], then press z. If you chose
[DELETE LAST] in S tep 2, repeat Step s
1 to 3 to delete the image s in order, from
the latest on e s h ot.
Advanced still image shooting
47
Page 53

• If you do not complete Step 6, the image will
not be saved in the “Memory Stick.” Up to that
point, the image is saved temporarily in the
camera.
• In Clip Motion, the date and time cannot be
inserted.
• When you view Clip Motion images using the
Index screen, the images may appear different
from the actual image recorded.
• GIF files made on other cameras may not be
displayed correctly on this camera.
Shooting in Multi
Burst mode
– Multi Burst
MODE dial:
Pressing the shutter button once records 16
frames in a row. This is convenient fo r
checking your form in sports, for example.
Before operation
Set [MOVING IMAGE] to [MULTI
BURST] in the SET UP settings (pag es 40,
98).
Control button
MODE dial
Shutter button
MENU
a Set the MODE dial to .
b Press MENU.
The menu appears.
c Select (INTERVAL) with b/
B, then select the desired
between-frame interval with v/
V.
You can choose the between-frame
interval from among the foll owing.
NTSC: 1/7.5 sec., 1/15 sec., 1/30 sec.
PAL: 1/6.3 sec., 1/12.5 sec., 1/25 sec.
48
Page 54

(For information on NTSC/PAL, see
page 96.)
1/30
1/7.5
1/15
1/30
WB
INTERVAL
d Press the shutter button.
16 frames will be recorded as one
image (image size: 1280×9 60).
To delete shot images
When using this mode, you cannot delete
only certain frames. When you delete
images, all 16 of the frames are deleted at
the same time.
1 Set the MODE dial to .
2 Press MENU and select [DELETE], then
press z.
3 Select [OK], then press z.
All of the frames are deleted.
• When you play back images recorded in Multi
Burst mode on the camera, the 16 frames will
be played back in order, with a fixed interval
between them.
• If you rotate the lens portion during shooting,
the shot images may be upside down.
• When the images are played back on a
computer, the 16 frames you shot will all be
displayed at the same time as part of one image.
• When Multi Burst images are played back on a
camera without the Multi Burst feature, the 16
frames will all be displayed at the same time, as
part of one image, just as they are on a
computer.
• For the number of images that can be recorded,
see page92.
• The flash cannot be used.
• In Multi Burst, the date and time cannot be
inserted.
Shooting still images
for e-mail
– E-MAIL
MODE dial: / P/SCN
You can shoot images and save them in a
file that is small enough (320×240) to attach
to an e-mail message. The no r mal mode
image that was selected using the
(IMAGE SIZE) item (page 17) i s also
recorded.
Control button
a Set the MODE dial to , P,
or SCN.
b Press MENU.
The menu appears.
MODE dial
Shutter button
MENU
Advanced still image shooting
49
Page 55

c Select [MODE] (REC MODE)
with b/B, then select [E-MAIL]
with v/V.
d Shoot your image.
To return to normal mode
In Step 3, select [NORMAL].
• For instructions on how to attach your images
to an e-mail message, refer to the Help files of
the e-mail software you are using.
Shooting still images
with audio files
–VOICE
MODE dial: / P/SCN
You can record stil l images wi th audio f iles.
Control button
a Set the MODE dial to , P,
or SCN.
b Press MENU.
The menu appears.
c Select [MODE] (REC MODE)
with b/B, then select [VOICE]
with v.
MODE dial
Shutter button
MENU
d Shoot your image.
If you press and release the
shutter button, sound is recorded
for five seconds.
If you hold down the shutter
button, sound is recorded until you
release the shutter button for up to 40
seconds.
To return to normal mode
In Step 3, select [NORMAL].
• Be careful not to touch the microphone (page 6)
during shooting.
• To view images recorded in VOICE mode,
carry out the same procedure described in
“Viewing movies on the LCD screen”
(page 63).
50
Page 56

Adding special effects
– Picture Effect
MODE dial: P/SCN/
You can add special effects to bring out the
contrast in your images.
SOLARIZE B&W
Control button
MODE dial
Shutter button
MENU
Selecting a Folder
MODE dial: SET UP
Your camera can create multiple folders
within a “Memory Stick.” When y ou store a
lot of images in the “Memory Stick,” you
can sort out images by creating a new
folder. When not creating a new folder,
“101MSDCF” folder is selected as the
recording folder.
You can create folders up to “999MSDCF.”
Like an illustration
with clearly delineated
bright and dark
portions
SEPIA NEG.ART
Colored to look like an
old photograph
In black and white
Made to look like a
negative image
a Set the MODE dial to P,
SCN, or .
b Press MEN U.
The menu appears.
c Select [PFX] (P.EFFECT) with
b/B, then select the desired
mode with v/V.
To cancel Picture Effect
In Step 3, select [OFF].
• Up to 4000 images can be stored in one folder.
When the folder capacity is exceeded, a new
folder is automatically created.
Control button
MODE dial
MENU
Advanced still image shooting
51
Page 57

Creating a new folder
a Set the MODE dial to SET UP.
b Select (MEMORY STICK
TOOL) with v/V, [CREATE
REC. FOLDER] with B/v/V, and
[OK] with B/v , then press z.
The following screen appears.
min
60
CREATE REC. FOLDER
CREATING REC. FOLDER 102MSDCF
OK
READY?
O K
CANCEL
c Select [OK] with v , then press
z.
A new folder is c r eated with a number
one higher than the largest number in
the “Memory Stick,” and th e folder
becomes the record ing folder.
To cancel folder creation
Select [CANCEL] in step 2 or 3.
• Once you create a new folder , you cannot delete
the new folder with the camera.
• Recorded images are recorded in the newly
created folder until a different folder is created
or selected.
Changing the recording
folder
a Set the MODE dial to SET UP.
b Select (MEMORY STICK
TOOL) with v/V, [CHANGE
REC. FOLDER] with B/v/V, and
[OK] with B/v , then press z.
The recording folder selectio n screen
appears.
SELECT REC. FOLDER 2/2
102
102MSDCF
FOLDER NAME:
0
NO. OF FILES:
2003 7 5
CREATED:
1:05:34
AM
O K
OK BACK/NEXT
CANCEL
c Select the desired folder with
b/B, and [OK] with v , then
press z.
To cancel changing the
recording folder
Select [CANCEL] in step 2 or 3.
• You cannot select the “100MSDCF” folder as a
recording folder.
• The image is stored in the newly selected
folder.
52
Page 58

Selecting the folder
Ad
till i
for playback
– Folder
MODE dial:
Select the folder that images you want to
play back are stored .
Control button
MODE dial
MENU
a Set the MODE dial to .
b Press MEN U.
The menu appears.
c Select [FOLDER] with b, then
press z.
d Select the desired folder with
b/B.
SELECT FOLDER 2/2
102
102MSDCF
FOLDER NAME:
9
NO. OF FILES:
2003 7 5
CREATED:
1:05:34
AM
O K
CANCEL
BACK/NEXTOK
e Select [OK] with v , then press
z.
To cancel the selection
In step 5, sele ct [CANCEL].
When a “Memory Stick” contains
multiple folders
If the first or last image in the folder is
displayed, the foll owing icons are indicate d
on the screen.
: Moves to the p revious folder.
: Moves to the next folder.
: Moves to both the previous and n ext
folders.
vanced s
mage viewing
On the single screen
min
60
640
101
9/9
10:30
2003 7 4101-0009
BACK/NEXT VOLUME
PM
On the Index (nine-image) screen
MOVESINGLE DISPLAY
On the Index (triple-image) screen
APERTURE VALUE:
SHUTTER SPEED:
EXPOSURE VALUE:
ISO:
SINGLE DISPLAY
F2.8
1/30
0.0
100
10:30
2003 7 4101-0001
PM
• When no images are stored in the folder, “NO
FILE IN THIS FOLDER” appears.
Advanced still image viewing
53
Page 59

Enlarging a portion of
a still image
MODE dial:
You can enlarge an image up to five times
the size of the o rig inal im age. You ca n also
record the enlarg ed image as a new file.
Control button
SMART ZOOM buttons
MODE dial
Enlarging an image
– Playback zoom
a Set the MODE dial to .
b Display the image you want to
enlarge.
c Press the SMART ZOOM T
button to en large the image.
d Press v/V/b/B repeatedly to
select a portion of the image to
enlarge.
e Press the SMART ZOOM T
button repeatedly, the portion
of the image selected in Step
4 will be enlarged.
54
Press v
Press
b
Press V
v:To view a portion of the top of the
image
V:To view a portion of the bottom of
the image
b:To view a portion of the left side
of the image
B:To view a portion of the right side
of the image
Press
B
To cancel enlarged viewing
Press z.
• You cannot use Playback zoom with movies
(MPEG movie), or images recorded in Clip
Motion/Multi Burst modes.
• If you press the SMART ZOOM W button
when you are viewing images that have not
been enlarged, the Index screen will appear
(page 32).
• The images displayed in Quick Review
(page 19) can be enlarged using the procedures
outlined in Steps 3 to 5.
Page 60

Recording an enlarged
image – Trimming
a After you have viewed an
image using playback zoom,
press MENU.
b Select [TRIMMING] with B,
then press z.
c Select the image size with v/V,
then press z.
The image is recorded, and the screen
image returns to the size it was before
enlargement.
• The trimmed image is recorded in the recording
folder as the newest file, and the original image
is retained.
• The trimmed image may suffer some
deterioration in image quality
• You cannot trim to 3:2-sized image.
Playing back
successive images
– Slide show
MODE dial:
You can play back rec orded images in
succession, one after another. This is useful
for checking your images, or for giving a
presentation.
Control button
MODE dial
MENU
c Select [SLIDE] with b/B, then
press z.
Set the follow ing it ems wi th v/V/b/B.
INTERVAL settings
3 sec/5 sec/10 sec/30 sec/1 min
IMAGE
FOLDER:Plays back all the images in
the selected folder.
ALL:Plays back all the images in the
“Memory Stick.”
REPEAT
ON:Plays the images back repeatedly.
OFF:Plays through the images one
time and then stops.
d Select [START] with V/B, then
press z.
The slide show begins.
To cancel the slide show setting
In Step 3, sele ct [CANCEL].
Advanced still image viewing
a Set the MODE dial to .
b Press MEN U.
The menu appears.
To stop slide show playback
Press z, select [EXIT] with B, then press
z.
55
Page 61

To skip to the next/previous
image during slide show
Press B (next), or b (previous).
• The interval settings are just guidelines. The
actual intervals differ, based on factors like the
size of the image.
Rotating still images
MODE dial:
Images shot when holding the camera
vertically can be rotate d and displayed
horizontally.
Control button
MODE dial
MENU
a Set the MODE dial to , and
display the image you want to
rotate.
b Press MENU.
The menu appears.
c Select [ROT ATE] with b/B,
then press z.
d Select with v , and rotate
the image with b/B.
e Select [OK] with v/V, then
press z.
To cancel the rotation
In Step 4, select [CANCEL].
• Protected images, movies (MPEG movie), or
images recorded in Clip Motion/Mul ti Burst
modes cannot be rotated.
• You may not be able to rotate images shot with
other cameras.
• Also, when viewing images on a computer, the
image rotation information may not be
reflected depending on the application
software.
56
Page 62

Protecting images
Still i
diti
– Protect
MODE dial:
To prevent accidental erasure of an
important image, you can pr ote c t it.
Control butt on
MODE dial
MENU
On the single screen
a Set the MODE dial to .
b Display the image you want to
protect with b/B.
c Press MEN U.
The menu appears.
d Select [PROTECT] with b/B,
then press z.
The image currently being displayed is
now protect ed , and the - (Protect)
mark is indicated on the scre en.
min
60
640
101
2/9
PROTECT
OK BACK/NEXT
EXIT
e To protect other images,
display the image you want to
protect with b/B, then press
z.
To cancel the protection
In Step 4 or 5, press z again. The mark disappears.
mage e
On the Index (nine-image)
screen
a Set the MODE dial to , press
the SMAR T ZO OM W button
once to switch to the Index
(nine-image) sc reen.
b Press MENU.
The menu appears
c Select [PROTECT] with b/B,
then press z.
d Select [SELECT] with b/B,
then press z.
e Select the imag e you wan t to
protect with v/V/b/B, then
press z.
The green - (Protect) mark is
indicated on the sele cted image.
MENU
TO NEXT
MOVESELECT
ng
Still image editing
57
Page 63

f To protect other images,
repeat Step 5.
g Press MEN U .
h Select [OK] with B, then press
z.
The - mark turns white and the
selected image is protected.
To cancel the protection
Select [CANCEL] in Step 4 or select
[EXIT] in Step 8, then press z.
To release protection
In Step 5, with v/V/b/B, select an imag e
for which you want to releas e protection,
and press z. The - mark turns gray and
repeat this o peration for all the im ages for
which you want to release protection. Then,
press MENU, select [OK], and press z.
To protect all the images in
folder
In Step 4, select [ALL IN FOLDER], then
press z. Next, sele ct [ON], then pr ess z.
To release protection of all the
images in the folder
In Step 4, select [ALL IN FOLDER], a nd
press z. Then select [OFF], and press z.
On the Index (triple-image)
screen
a Set the MODE dial to , press
the SMAR T ZO OM W button
twice to switch to the Index
(triple-image) screen.
b Move the image you want to
protect to the center with b/B.
c Press MENU.
The menu appears
d Select [PROTECT] with v/V,
then press z.
The center image is protected, and the
- (Protect) mark is indicated on tha t
image.
DPOF
PROTECT
DELETE
FOLDER
10:30PM2003 7 4101-0002
BACK/NEXTOK
e To protect other images, move
the image you want to protect
to the center with b/B, and
repeat Step 4.
To release protection
In Step 4, select the image from which
you want to release protection, and press z.
To release protection from all of your
images, repea t this pr ocess f or each of them.
58
Page 64

Changing image size
– Resize
MODE dial:
You can change the im ag e siz e of a
recorded image, and save it as a new file.
You can resize to the following size s.
2272×1704, 1600×1200, 1280×960,
640×480
The original image is retained even after
resizing.
Control button
MODE dial
MENU
a Set the MODE dial to .
b Display the imag e you wan t to
resize with b/B.
c Press MEN U.
The menu appears
d Select [RESIZE] with b/B, then
press z.
e Select the new size with v/V,
then press z.
The resized image is recorded in the
recording folder as the newe s t file.
To cancel the resizing
In Step 5, select [CANCEL].
• Movies (MPEG movie), or images recorded in
Clip Motion/Multi Burst modes cannot be
resized.
• When images are resized from a smaller to a
larger size, the image quality will deteriorate.
• You cannot resize to 3:2-sized image.
• If you try to resize a 3:2-sized image, black
bands will appear at the top and bottom of the
image.
Still image editing
59
Page 65

Choosing images to
print
– Print (DPOF) mark
MODE dial:
You can mark still images shot with your
camera that you want to have pri nte d. This
function is convenient when you have
images printed at a shop or using a pr inter
that conforms with the DPOF (Digital Print
Order Format) standard.
Control button
MENU
• You cannot mark movies (MPEG movie) or
images recorded in Clip Motion mode.
• In E-MAIL mode, the print (DPOF) mark is
marked on the normal size image that was
recorded at the same time.
• When you mark images shot in Multi Burst
mode, all the images are printed on one sheet
divided into 16 panels.
60
MODE dial
On the single screen
a Set the MODE dial to .
b Display the image you want to
print with b/B.
c Press MENU.
The menu appears.
d Select [DPOF] with b/B, then
press z.
The mark is indicated on this
image.
min
60
640
101
2/9
DPOF
EXIT
BACK/NEXTOK
e To mark other images, display
the image you want to mark
with b/B, then press z.
To delete the mark
In Step 4 or 5, press z again. The
mark disappears.
On the Index (nine-image)
screen
a Set the MODE dial to and
press the SMART ZOOM W
button once to switch to the
Index (nine-image) scree n.
b Press MENU.
The menu appears.
c Select [DPOF] with B, then
press z.
d Select [SELECT] with b/B,
then press z.
• You cannot mark using the [ALL IN
FOLDER] option.
e Select the imag es you want to
print with v/V/b/B, then press
z.
The green mark is indicated on the
selected image.
MENU
TO NEXT
MOVESELECT
f To mark other images, repeat
Step 5 for each of them.
Page 66

g Press MEN U.
h Select [OK] with B, then press
z.
The setting of the mark is
completed.
To delete the mark
In Step 5, select the image y o u want to
delete the mark with v/V/b/B, and
press z.
To delete all the marks from
the images in the folder
In Step 4, select [ALL IN FOLDER], then
press z. Next, select [OFF], then press z.
To cancel the marking
In Step 4, select [CANCEL], or select
[EXIT] in Step 8.
On the Index (triple-image)
screen
a Set the MODE dial to , press
the SMAR T ZO OM W button
twice to switch to the Index
(triple-images) screen.
b Move the image you want to
print to the center with b/B.
c Press MEN U.
The menu appears.
d Select [DPOF] with v , then
press z.
The mark is indicated on the
center image.
DPOF
PROTECT
DELETE
FOLDER
10:30PM2003 7 4101-0002
BACK/NEXTOK
e To mark other images, move
the image you want to print to
the center with b/B, and repeat
Step 4.
To delete the mark
In Step 4, press z again.
The mark disappears.
Still image editing
61
Page 67

Shooting movies
Enjoyi
MODE dial:
You can shoot movies (MPEG movi es).
Before operation
Set [MOVING IMAGE] to [MPEG
MOVIE] in the SET UP settings (pages 40,
98).
Control button
DSPL/LCD ON/OFF
a Set the MODE dial to .
b Press MEN U .
The menu appears.
MODE dial
Shutter button
MENU
c Select (IMAGE SIZE) with b/
B, and select the desired mode
with v/V.
You can choose from 320 (HQX),
320×240, or 160×112.
See page 92 for the recording time
allowed for each image size .
d Press the shu tter button fully
down.
“REC” appears on the screen and the
camera starts recording the image and
sound.
min
60
REC
• When the capacity of the “Mem or y Stick”
is used up, recording stops.
160
00:00:02[00:10:48
101
]
e Press the shu tter button fully
down again to stop recording.
ng movies
Indicators on the screen while
you are shooting movies
These indicators ar e not recorded.
Each time you press DSPL/LCD ON/OFF,
the status of the LCD screen changes as
follows: Indicators OFF t LCD OFF t
Indicators ON. See page 105 for a detailed
description of the indica ted it ems.
To shoot close-ups (Macro)
Set the MODE dial to and follo w th e
procedure on page 21.
To shoot with a self-timer
Set the MODE dial to and follo w th e
procedure on page 22.
• Be careful not to touch the microphone (page 6)
during shooting.
• You cannot use a flash.
• In MPEG movie, the date and time cannot be
inserted.
• You cannot use the smart zoom while shooting
movies.
62
Page 68

Viewing movies on
the LCD screen
MODE dial:
You can view movies on the LCD screen of
the camera and hear sou nd s from the
speaker of the camera.
Control button
MODE dial
MENU
Speaker
DSPL/LCD ON/OFF
a Set the MODE dial to .
b Select the desired movie with
b/B.
Movies are displayed a size sma ll er
than still images.
min
60
160
101
10/10
00:00:00
PLAY BACK/NEXT VOLUME
10:30PM2003 7 4101_0010
c Press z.
The movie images and sound are
played back.
B (playback) appears on the LCD
screen while a movie is playing back.
min
60
160
101
10/10
00:00:03
Playback
STOP REV/CUE VOLUME
10:30PM2003 7 4101_0010
bar
To stop playback
Press z.
To adjust the volume
Press v/V.
To rewind / fast-forward
Press b/B while playing back a mo vie.
To return to normal playback, press z.
High quality movies
Movies with the image size “320 (HQX)”
appear on the full screen.
Indicators on the screen while
you are viewing movies
Each time you press DSPL/LCD ON/OFF,
the status of the L CD s creen changes as
follows: Indicators OFF t LCD OFF t
Indicators ON. See page 106 for a detailed
description of the indicat ed i te m s.
• The procedure for viewing movies on a TV is
the same as that for viewing still images
(page 33).
Enjoying movies
63
Page 69

Deleting movies
MODE dial:
You can delete unwant ed movies.
Control button
MENU
MODE dial
On the single screen
a Set the MODE dial to .
b Select the movie you want to
delete with b/B.
c Press MENU.
The menu appears.
d Select [DELETE] with b/B,
then press z.
The movie has not been deleted yet.
e Select [OK] with v , then press
z.
“MEMORY STICK ACCESS”
appears on the screen.
The movie has been deleted when the
message disappears.
f To delete other movies, display
the movie you want to delete
with b/B, then press z.
To cancel the deletion
In Step 5 or 6, select [EXIT].
On the Index (nine-image)
screen
a Set the MODE dial to and
press the SMART ZOOM W
button once to display an
Index (nine-image) scree n.
b Press MENU.
The menu appears.
c Select [DELETE] with b/B,
then press z.
d Select [SELECT] with b/B,
then press z.
e Select the movies you want to
delete with v/V/b/B, then
press z.
The (Delete) mark is indicated on
the selected movie.
MENU
TO NEXT
MOVESELECT
The movie has not been deleted yet.
64
Page 70

f Repeat Step 5 to delete other
movies.
g Press MEN U.
h Select [OK] with B, then press
z.
The movies are de leted when the
“MEMORY STICK ACCESS”
message disappears.
To cancel the deletion
In Step 8, select [EXIT].
To delete all the images in the
folder
In Step 4, select [ALL IN FOLDER], then
press z. Next, select [OK], then press z.
To cancel the deletion, select [EXIT] with
b, then press z.
On the Index (triple-image)
screen
a Set the MODE dial to and
press the SMART ZOOM W
button twice to switch to the
Index (triple-image) scr een.
b Move the movie you want to
delete to the center with b/B.
c Press MEN U.
The menu appears.
d Select [DELETE] with v/V, then
press z.
The movie has not been deleted yet.
DELETE
O K
CANCEL
10:30
PM
2003 7 4101_0010
BACK/NEXTOK
e Select [OK] with v , then press
z.
The movie is deleted whe n the
“MEMORY STICK ACCESS”
message disappears.
To cancel the deletion
In Step 5, sele ct [CANCEL].
Enjoying movies
65
Page 71

Editing movies
MODE dial:
You can cut movies, or dele te unnecessary
portions of movies. This is the
recommended mode to use when the
“Memory Stick” capacity is insufficient, or
when you attach movies to your e-mail
messages.
The file numbers assigned w hen
movies are cut
The cut movies are assigned new numbers
and recorded as the newest files in the
recording folder. The original movie is
deleted and its file number is sk ipped.
<Example> Cutting the movie numbered
101_0002
101_0005
2
101_0003
DIVIDE
point
101_0001
1
1. Cutting scene A.
1
DIVIDE point
2. Cutting scene B.
123 BA
3. Deleting scenes A and B if they are
unnecessary.
13
4. Only the desired scenes remain.
2
101_0002
2
101_0002
101_0004
101_0004 101_0007
AB
DELETE DELETE
101_0006
Cutting movies
3
3AB
a Set the MODE dial to .
b Select the movie you want to
c Press MENU.
d Select [DIVIDE] with B, then
Control button
MODE dial
MENU
cut with b/B.
The menu appears.
press z. Next, select [OK] with
v , then press z.
The playback of the movie st art s .
66
13
2
101_0006
Page 72

e Decide on a cut t in g poi nt .
Press z at the desired cutting point.
min
60
160
101
DIVIDE
OK
10/10
00:00:02
DIVIDING
POINT
c C
O K
CANCEL
EXIT
When you want to adjust the cutting
point, select [c/C] (frame
forward/ rewind) and adjust the cutting
point with b/ B. If you want to change
the cutting point, select [CANCEL].
The playback of the movie starts again.
f When you have decided on a
cutting point, select [OK] with
v/V, and press z.
g Select [OK] with v , then press
z.
The movie is cut.
To cancel cutting
In Step 5, select [EXIT]. The movie
appears on the screen again.
• You cannot cut the following images.
– Clip Motion
– Multi Burst
– Still image
– Movies not long enough to cut
– Protected movie
• You cannot restore movies once you cut them.
• The original movie is deleted when you cut it.
• The cut movie is recorded in the recording
folder.
Deleting unnecessary
portions of movies
a Cut an unnecessary portion of
a movie (see t he previous
page).
b Display the po rtion of the
movie you want to delete.
c Press MENU.
The menu appears.
d Select [DELETE] with b/ B,
then press z.
e Select [OK] with v , then press
z.
The movie currently displaye d on the
screen is deleted.
Enjoying movies
67
Page 73

68
Enjoyi
Copying images to
your computer
– For Windows users
Recommended computer
environment
OS: Microsoft Windows 98, Windows
98SE, Windows 2000 Professional,
Windows Millennium Edition, Windows
XP Home Edition, or Windows XP
Professional
The above OS must be installed at the
factory. Operation is not assured in an
environment upgraded to the operating
systems described above or in a multi-boot
environment.
CPU: MMX Pentium 200 MHz or faster
USB connector: Provided as standard
Display: 800 × 600 dots or more
High Color (16-bit color, 65 000 colors) or
more
• If you connect two or more USB equipment to
a single computer at the same time, some
equipment, including your camera, may not
operate depending on the type of USB
equipment.
• Operations are not guaranteed when using a
USB hub.
• Operations are not guaranteed for all the
recommended computer environments
mentioned above.
USB mode
There are two modes for a USB connection,
[NORMAL] and [PTP]* modes. The
factory setting is the [NORMA L ] m ode.
* Compatible only with Windows XP. When
connected to a computer, only the data in the
folder selected by the camera is copied to the
computer.
Communication with your
computer
When your computer resum es fro m the
suspend or sleep mode, communication
between your camera and your computer
may not recover at the same time .
When a USB connector is not
provided on your computer
When neither a USB conn ector nor a
“Memory Stick” slot is provided, you c an
copy images using an additional device. See
the Sony Website for details.
http://www.sony.net/
Contents of the CD-ROM
x USB Driver
This driver is n eeded in order to c onnect th e
camera to a computer.
When using Windows XP, you need not
install the USB driver.
ng images on your computer
x Image Transfer
This application is used to easily transfer
images from the camera to a computer.
x PIXELA ImageMixer
This application is used to display and edit
images that are stored in a computer.
• This section describes the procedures
using Windows Me as an exampl e. The
required operations may differ depending
on your OS.
• Close down all applications
running on the c omputer before
installing the USB driver and
application.
• When using Windows XP or Windows
2000, log on as Administrators.
• The display settings should be 800 × 600
dots or more and High Color (16-bit
color, 65 000 colors) or more. When set
to less than 800 × 600 dots or 256 colors
or less, the install title screen does not
appear.
Page 74

Installing the USB driver
When using Windows XP, you need not
install the U SB driver.
Once the USB driver is insta ll ed , yo u nee d
not install the USB driver.
a Turn on your computer, and
insert the supplied CD-ROM
into the CD-ROM drive.
Do not connect your camera to
your computer at this time.
The title sc r een appears. If it does not
appear, double-click (My
Computer) t [ImageMixer] in that
order.
b Click [USB Driver] on the title
screen.
c Click [Next]. When the
“Information” screen appears,
click [Next].
The USB driver installation starts.
When the installation is completed, the
screen informs you of compl et ion .
d Click [Yes, I want to restart my
computer now], then click
[Finish].
Installing “Image Transfer”
You can use the “I mage Tra nsfer ” softw are
to copy images to your com puter
automatically when you conn ect the came ra
to your computer.
a Click [Image Transfer] on the
title screen.
Select the desired language,
then click [OK].
The “Welcome to the InstallShield
Wizard” screen appears.
• This section describes the English screen.
Enjoying images on your computer
The “Install S hield wizard” screen
appears.
Your computer restarts. Then, you can
establish US B co nnection.
69
Page 75

b Click [Next]. When “License
Agreement” screen appears,
click [Yes].
Read the agreement carefully. You
must accept the terms of the agreement
in order to proceed with instal lati on.
c Click [Next].
d Select the folder to be
installed, then click [Next].
Select th e pr ogra m fo lder, then
click [Next].
e Confirm if the check box is
checked on the “Image
Transfer Settings” screen,
then click [Next].
When the installation is completed, the
screen informs you of completion.
f Click [Finish].
The “InstallShi eld Wizard” screen
closes.
If you wish to continue with the
installation of “ImageMixer,” click
[PIXELA ImageMixer] on the title
screen and then follow the procedure.
• The USB driver is needed in order to use
“Image Transfer.” If the necessary driver is not
already installed on your computer, a screen
that asks if you want to install the driver will
appear. Follow the instructions that appear on
the screen.
70
Page 76

Installing “ImageMixer”
a Click [PIXELA ImageMixer] on
the title screen.
The “Choose Se tup Language” screen
appears.
• You can use the “PIXELA ImageMixer for
Sony” software to copy, view and edit images.
For details, see the software’s help files.
b Select the desired language,
then click [OK].
The “Welcome to the InstallS hield
Wizard” screen appears.
c Follow instructions on each
succeeding screen .
When installation is complete, the
“Read Me” text app ears. Read the tex t,
then close the window by clicking
at the upper right corner of the screen.
After that, click [Finish] in the install
screen to close the install scre en .
• If DirectX8.0a or a later version is not installed
in your computer, the “Information” screen
appears. Follow the procedure on the screen.
d Remove the CD- ROM .
Connecting your camera to
your computer
a Turn on your computer.
b Insert the battery pack and the
“Memory Stick” with the
images you want to copy into
the camera.
Enjoying images on your computer
• Be sure to use the fully charged battery pack. If
you copy images using an insufficient battery,
copying images may be aborted or the data may
be corrupted due to battery shutoff.
• For further details on the battery pack, see page
8.
• For further details on the “Memory Stick,” see
page 16.
• This section describes the English screen.
71
Page 77

c Connect the supplied USB
multi connecting cable to the
multi connector of the camera.
Multi connector
v mark
• When placing the camera, make sure the
LCD screen is facing up.
d Connect the USB multi
connecting cable to your
computer.
• When using a desktop computer, connect the
USB multi connecting cable to the USB
connector on the rear panel.
72
e Turn on the camera.
• When using Windows XP, the AutoPlay
wizard automatically appears on the
desktop. Proceed to page 75.
USB MODE
NORMAL
Access
indicators*
“USB MODE NORMAL” appears on
the LCD screen o f th e camer a. Wh en a
USB connection is established for the
first time, your computer automatically
runs the used program to recognize the
camera. Wait for a while.
• If “USB MODE NORMAL” does not appear,
confirm that [USB CONNECT] is set to
[NORMAL] in the SET UP settings (page 99).
* During communication, the access indicators
turn red.
P
Disconnect in g th e U S B mu lti
connecting cable from your
computer, removing the
“Memory Stick” from the camera,
or turning off the camera
Disconnecting the US B multi connecting
cable from your computer/removing the
“Memory Stick” from the came ra/turning
off the camera
For Windows 2000, Me, or XP users
1 Double-click on the task tray.
Double-click
2 Click (Sony DSC), then click [Stop].
3 Confirm the device on the confirmation
window, then click [OK].
4 Click [OK].
This step is unnecessary for Wi ndows
XP users.
5 Disconnect the USB multi connecting
cable from your comput er, remove the
“Memory Stick” from the camera, or
turn off the camera.
For Windows 98 or 98SE users
Confirm that the access indicators on the
LCD screen are turned white and carry out
only Step 5 above.
Page 78

Copying images using
“Image Transfer”
– Windows 98/98SE/2000/Me
Connect the camera and your
computer with the USB multi
connecting cable.
“Image Trans f er” launches and the imag es
are automati cally copied to the computer.
• Normally “Image Transfer ” and “Date” folders
are created inside the “My Documents” folder,
and all of the image files recorded with the
camera are copied into these folders.
• You can change the “Image Transfer” settings
(page 73).
• When “ImageMixer” (page 7 1) is installed,
image copying is completed using “Image
Transfer,” “ImageMixer” automatically
launches and images appear.
– Windows XP
Connect the camera and your
computer with the USB multi
connecting cable.
“Image Tran s f er” starts up automatically
and the images are automatically copied to
the computer.
Windows XP is set so that the OS AutoPlay
Wizard activates.
If you want to cancel the setting, follow the
procedure below.
a Click [Start], then click [My
Computer].
b Right-click [Sony
MemoryStick], then click
[Properties].
c Cancel the setting.
1 Click [AutoPlay].
2 Set [Content type] to [Pictures].
3 Check [Select an action to perform]
under [Actions], select [Take no
action], then click [Apply].
4 Set [Content type] to [Video files]
and proceed step 3. Set [Content
type] to [Mixed content] and
proceed step 3.
5 Click [OK].
The [Properties] screen closes.
The OS AutoPlay Wizard does not
start up automatically even if the
USB connection is made.
Changing “Image Transfer”
settings
You can change “Image Transfer” settings.
Right-click the “Image Tra nsfe r” ic on on
the task tray, select [Open Settings]. The
settings you can set are as follows: [Basic],
[Copy], and [Delete].
Right-click here
Enjoying images on your computer
When the “Image Transfer” starts, the
below window appears.
When you select [Settings] from the above
window, you can only cha nge the [Basic]
setting.
73
Page 79

Copying images without
using “Image Transfer”
– Windows 98/98SE/2000/Me
If you do not set to launch “Image Transfer”
automatically, you can copy images as
following procedur e.
a Double-click [My Computer],
then double-click [Removable
Disk].
The contents of the “Memory Stick”
inserted in your camera appear.
• This section describes an example of copying
images to the “My Documents” folder.
• When the “Removable Disk” icon is not shown,
see the right column.
• When using Windows XP, see page 75.
b Double-click [DCIM], then
double-click the folder that the
image files you want to copy
are stored.
The folder opens.
c Right-click the image file , then
click [Copy].
d Double-click the “My
Documents” folder and rightclick on the “My Documents”
window, then click [Paste ].
The image file is copied to the “My
74
Documents” folder.
When you try to copy an image
to a folder in which an image
with the same file name is stored
The overwrite conf irmation message
appears. When you over write the existing
image with the new one, the original file
data is deleted.
Changing a file name
When you want to copy an imag e file to
your computer without overwriting a file
with the same name, change the file name.
Once you change the name, the imag e
cannot be played bac k on your camera. If
you want to play back the im ag e on your
camera. follow the proce dures on page 78.
When a removable disk icon is
not shown
1 Right-cli ck [My Computer], then click
[Properties].
The “System Pro perti es” scr een ap pears .
• For Windows 2000 users, click the [Hardware]
tab on the “System Properties” screen.
2 Confir m if other devices are already
installed.
1 Click [Device Manager].
2 Confirm if there is a “ Sony
DSC” under [ Other Devices].
3 If you find eithe r of the devices above,
follow the steps below to delete them.
1 Click [ Sony DSC]. (For
Windows 2000 users, right-click
[ Sony DSC].)
2 Click [Remove]. (In case of
Windows 2000, click [Uninstall].)
The “Confirm Device Removal”
screen appears.
3 Click [OK].
The device is deleted.
Try the USB driver installation again using
the supplied CD-ROM (page 69).
Page 80

– Windows XP
Copying images using the
Windows XP AutoPlay wizard
a Make a USB connection
(pages 71 to 72). Click [Copy
pictures to a folder on my
computer using Microsoft
Scanner and Camera Wizard],
then click [OK].
The “Scanner and Camera Wizard”
screen appears .
b Click [Next].
The images stored on the “Memory
Stick” are displayed.
c Click the checkbox of images
that you do not want to copy to
your computer to remove the
checkmark, then click [Next].
The “Picture Name and Destination”
screen appears .
d Select a nam e and destination
for your pictures, then click
[Next].
Image copying starts. When the
copying is completed, the “Other
Options” screen appears.
e Select [Nothing. I’m finished
working with these pictures],
then click [Next].
The “Completing the Scanner and
Camera Wizard” screen appears.
f Click [Finish].
The wizard closes.
• To continue copying other images, follow the
procedure given under P on page 72 to
disconnect the USB multi connecting cable and
reconnect it. Then, perform the procedure from
step 1 again.
Viewing the images on your
computer
– Windows 98/98SE/2000/Me/XP
a Click [Start] t [My
Documents].
The “My Documents” folder contents
are displayed.
• This section describes the procedure for
viewing images copied in the “My Documents”
folder.
• When not using Windows XP, double-click
[My Documents] on the desktop.
• You can use the “PIXELA ImageMixer for
Sony” software to view and edit images on your
computer. For details, see the software’s help
files.
b Double-click the desired folder
and image file.
The image is dis p layed.
Enjoying images on your computer
75
Page 81

Image file storage destinations and file names
The image files recorded with your camera
are grouped as folders in the “Memory
Stick.”
Example: For Windows XP
Folder containing image data which was
recorded using the camera no t equipped
with the folder creating function.
Folder containing image data which was
recorded using your camera. When not
creating any folders, there is only the
“101MSDCF” folder.
Folder containing E-MAIL mode image
data/movie data/ VOICE mode audio data
which was recorded using the camera not
equipped with the folder creating function.
• Data in the “100MSDCF” or “MSSONY”
folder is for playback only, and your camera
cannot record images in these folders.
• For more information about the folder, see
pages 51, 53.
76
Page 82

Folder File name File meaning
101MSDCF to
999MSDCF
Note on the table
DSC0ssss.JPG • Still image files shot normally
• M ulti Burst mode files (page 48)
• Still image files shot in
– E-MAIL mode (page 49)
– VOICE mode (page 50)
DSC0ssss.JPE • Small-size im ag e fi les sh o t in E -M A IL mode. Wh en vi ewin g th es e fi les on the devices not
equipped with the folder creating func tion, its corresponding JPEG file is opened.
DSC0ssss.MPG • Audio files shot in VOICE mode. When viewing these files on the devices not equipped with
the folder creating function, its corresponding JPEG file is opened.
CLP0ssss.GIF • Clip Motion files shot in NORMAL mode (page 47)
CLP0ssss.THM • Ind ex image files of Clip Motion files shot in NOR MA L mode
MBL0ssss.GIF • Clip Motion files shot in MOBILE mode (page 47)
MBL0ssss.THM • Index image files of Clip Motion files shot in MOBILE mode
MOV0ssss.MPG • Movie files shot in MPEG MOVIE mode (page 62)
• The meanings of the file names are as
above:
ssss stands for any number within
the range from 0001 to 9999.
• The numerical portions of t he following
files are the same.
– A small-size image file shot in E-
MAIL mode and its corresp onding
image file
– An audio file shot in VOICE mode and
its corresponding image file
– An image file sho t with Clip Motion
and its corresponding index image file
Enjoying images on your computer
77
Page 83

Viewing an image previously
copied to a computer
This operation is required for viewing
image files that have been copied
previously to a computer and already
deleted from the “Memory Stick” using the
camera.
Copy the image files stored on your
computer to a recor d ing medium and view
them on the camera
• Skip Step 1 if you did not change the file
name.
• You may not be able to view the image
depending on the image size.
• Images modified with a computer may not be
able to be played back on the camera.
a Right-click the image file , then
click [Rename]. Change the file
name to “DSC0ssss”.
ssss stands for any number within
the range from 0001 to 9999.
• A file extension may be indicated
depending on the setup of the computer.
The extension of a still image is “JPG”
and that of a movie is “MPG”. Do not
change the extension.
b Copy the image file to a folder
on the “Memory Stick.”
1 Right-click the image file, then
click [Copy].
2 Select the [DCIM] folder from
[Removable Disk] or [Sony
MemoryStick] in [My Computer ].
3 Right-click the [sssMSDCF]
folder, then click [Paste].
sss stands for any number
within the range from 100 to 99 9.
• If the warning message for overwriting the data
appears, enter other numbers in Step 1.
• If there is no folder to store the image file,
create a new folder, then copy the image file.
For details on how to create the folder, see page
51.
78
Page 84

Copying images to
your computer
– For Macintosh users
Recommended computer
environment
OS: Mac OS 8.5.1, 8.6, 9.0, 9.1, 9.2, or
Mac OS X (v10.0/v10.1)
The above OS must be installed at the
factory. For the following models, update
your OS to Mac OS 9.0 or 9.1.
– iMac with Mac OS 8.6 installed at the
factory, and a slot loading type CD-ROM
drive
– iBook or Power Mac G4 with the Mac OS
8.6 installed at the factory
USB connector: Provided as standard
Display: 800 × 600 dots or more
32 000-color mode or more
• If you connect two or more USB equipment to
a single computer at the same time, some
equipment, including your camera, may not
operate depending on the type of USB
equipment.
• Operations are not guaranteed when using a
USB hub.
• Operations are not guaranteed for all the
recommended computer environments
mentioned above.
USB mode
There are two modes for a USB connection,
[NORMAL] and [PTP]* modes. The
factory setting is the [NORMAL] m ode.
* Compatible only with Mac OS X. When
connected to a computer, only the data in the
folder selected by the camera is copied to the
computer.
Communication with your
computer
When your computer resum es from the
suspend or sleep mode, communication
between your camera and your computer
may not recover at the same time .
When a USB connector is not
provided on your computer
When neither a USB connector nor a
“Memory Stick” slot is provided, you can
copy images using an additional device. See
the Sony Website for details.
http://www.sony.net/
Steps your OS requires
Follow the steps below, according to you r
OS.
OS Steps
Mac OS 8.5.1/8.6/9.0 Steps 1 to 4
Mac OS 9.1/9.2/Mac OS X
(v 10.0/v 10.1)
Steps 2 to 4
a Installing the USB driver
1 Turn on your c om puter, and set the
supplied CD-ROM into the CD-ROM
drive.
The “PIXELA ImageMixer for Sony”
screen appears.
2 Double-cli ck (Setup Menu).
3 Click (USB Driver).
The “USB Driver” screen appears.
4 Double-click the icon of the hard disk
containing th e O S to open the screen.
5 Drag and drop the following two files
from the screen o pened in step 3 in to th e
System Folder icon in the screen opened
in step 4.
• Sony USB Driver
• Sony USB Shim
6 When the message for confirmation is
shown, click “OK.”
7 Restart the computer and remove the
CD-ROM from the CD-ROM driv e.
b Connecting your camera to
your computer
For details, see pages 71 to 72.
Enjoying images on your computer
79
Page 85

Disconnecting the USB multi
connecting cable from yo ur
computer, removing the “Memory
Stick” from the camera, or turning off
the camera
Drag and drop the drive icon or the ic on of
the “Memory Stick” to the “T ra sh” icon,
then disconnect the USB multi connecting
cable, remove the “Memory Stick” from the
camera, or turn off the camera
• If you are using Mac OS X, remove the USB
multi connecting cable, etc., after you have
turned your computer off.
c Copying images
1 Double-click the newly recognized icon
on the desktop.
The contents of the “Memory Stick”
inserted in your camer a ap pear.
2 Double-click “DCIM.”
3 Double-click the folder that the images
you want to copy are stored.
4 Drag and drop the image files to the hard
disk icon.
The image files are copied to your hard
disk.
For details on the storage location of the
images and file names, see page 76.
d Viewing the images on your
computer
1 Double-click th e hard disk icon.
2 Dou b le-click the desire d image file in
the folder containing the copied files.
The image file opens.
• You can use the “PIXELA ImageMixer for
Sony” software to copy images to your
computer and to view images on your
computer. For details on installing, see
operating instructions supplied with the CDROM. For details on operation, see the
software’s help files.
• “PIXELA ImageMixer for Sony” cannot be
used with Mac OS X.
• “Image Transfer” cannot be used with
Macintosh.
For Mac OS X users
When you click an E-MAIL mode image
file, “There is no applica ti on available to
open the document "DSC0ssss.JPE".”
may be shown. In this case, carry out the
following setup. The screen m ay differ
depending on your OS version.
1 Click [Choose Application...] on the
screen “There is no applica tion availa ble
to open the docume nt
"DSC0ssss.JPE".”.
2 Change [Recommended Applications]
to [All Applications].
3 Select [QuickTime Player] from the
application lis t, th en click [Open].
80
Page 86

2 Press the RESET button located inside
T
Troubleshooting
If you have trouble with your camera, try
the following solutions.
1 Check the items on pages 81 to 88. If the
screen shows “C:ss:ss”, the
the battery/“Memory Stick” cover, then
turn on the power again. (This will clear
the date and time settings, etc.)
RESET
self-diagnosis function is
working. Please see page 91.
Battery and power
Symptom Cause Solution
The battery pack is not
charged.
The battery pack cannot
be installed .
/CHG lamp flashes. • The battery pack is not properly installed.
While charging the batter y
pack, the /CHG lamp
does not light.
The battery remaining
indicator is incorrect. Or
the sufficient battery
remaining indicator is
displayed but the power
runs out soon.
• The camera is turned on.
• T he conne c ti on is not correct.
• T he battery pack is not properly installed. p Install the battery pack while pushing the battery eject lever
• T he battery pack malfunctions.
• The AC power adaptor is disconnected.
• T he battery pack is not properly installed.
• The charging is complete.
• You have used the camera for a long time in a n
extremely hot or an extremely cold location.
• T he battery pack is dead (page 102).
• T he battery pack is discharged.
• A mismatch has occurred in the remaining
battery time information.
p Turn the power off (page 12).
p Check the connection (page 8).
down using the front edge of the battery pa ck (page 8).
p Properly install the battery pack (page8).
p Consult your So ny de al er or loc al author iz e d Sony service
facility.
p Prop er ly connect the AC power adap tor ( p a g e 8).
p Properly install the battery pack (page8).
—
—
p Replace the battery pack with a new one.
p Replace the battery pack with a charged one (page8).
p Fully cha r ge the battery pack (page 8).
roubleshooting
3 Consult you r Sony dealer or local
authorized S o n y service facility .
Troubleshooting
81
Page 87

Symptom Cause Solution
The battery pack runs
down too quickly.
The power cannot be
turned on.
The power turns off
suddenly.
• You are shooting/viewing images in an
extremely cold loc ation.
• Th e batt ery pa c k is not char ge d enou gh.
• Th e battery pack is dead (page 102).
• Th e ba tt ery pa ck is not installed properly.
• The AC power adaptor is disconnected.
• Th e battery pack is dead (page 102).
• Th e batt ery pa c k is not char ge d enou gh.
• If you do not operate the camera for about 90
seconds while the power is on, the camera turns
off automatically to pr event wearing down the
battery (when [POWER SAVE] is [OFF], after
three minutes.) (page 12).
• Th e battery pack is discharged.
—
p Fully charge the battery pack (page 8).
p Replace the battery pack with a new one.
p Properly install the battery pack (page8).
p Connect the AC power adaptor securely to the camera
(page 11).
p Replace the battery pack with a new one.
p Fully charge the battery pack (page 8).
p Turn on the power again (page 12).
p Replace the battery pack with a charged one (page 8).
Shooting still images / movies
Symptom Cause Solution
The LCD screen is not
turned on even when the
power is turned on.
The subject is not visible
on the LCD screen.
The image is out of focus. • The subject is too close.
• The power was turned off with the LCD screen
turned off the last time you use d the camera.
• The MODE dial is not set to ,
.
• The Landscape mode is selected for Scene
selection.
• You set the focus preset distance.
• [P O W E R SAV E ] is se t to [ O N] .
P, SCN, or
p Turn on the LCD screen (page 25).
p Set the MODE dial to , P, SCN, or, (pages 18, 27, 62).
p Set the macro recording mode when you shoot a subject that is
within 50 cm (19
the lens farther away from the s ubject than the sho rtest shoot ing
distance when shooting (page 21).
p Cancel the mode (page 27).
p Set to the a u to focus mode (page 43).
p Press and hold the shutter button halfway down or set [POWER
SAVE] to [OFF] (page 99).
11
/16 inches) from the lens. Make sure to place
82
Page 88

Symptom Cause Solution
Unable to smart zoom. • You cannot use smart zoom while shooting a
The image is too dark. • Y ou are shooting a subject with a light source
The image is too br igh t . • You are shooting a spot lighted subject in a dark
The image is
monochrome (black and
white).
Vertical streaks appear
when you are shooting a
very bright subject.
You cannot shoot images. • No “Memory Stick” is inserted.
movie (MPEG movie).
• The LCD screen is turned off.
• The (IMAGE SIZE) is set to [2272×1704] or
[2272 (3:2)].
behind the subject.
• T he brightness of the LCD screen is too low.
• [POWER SAVE] is set to [ON].
location such as on a stage.
• T he LCD sc ree n is too bright.
• [PFX] (P. EFFECT) is set to [B &W ]. p Cancel the B&W mode (page 51).
• T he sm e ar phenomenon is occurring. p This is not a malfunction.
• T he ca paci ty of the “M em or y Stic k” is
insufficient.
• The write-protect switch on the “Memory Stick”
is set to the LOCK position.
• Yo u ca nnot shoot while the flash is charging.
• T he MODE dia l is not set to
when you want to shoot a still image.
• The MODE dial is not set to
to shoot a movie.
, P, or SCN
when you want
—
p Turn on the LCD screen (page 2 5).
p Set (IMAGE SIZE) to other settings except [2272×1704]
and [2272 (3:2)] (page 20).
p Adjust the ex posure (page 43) .
p Adjust the br ightness of the LCD screen (pages 40, 99).
p Set [POWER SAVE] to [OFF] (pages 40, 99) .
p Adjust the ex posure (page 43) .
p Adjust the br ightness of the LCD screen (pages 40, 99).
p Insert a “Memory Stick” (page 16).
p Delete the image s sa ve d in the “M em or y S tic k, ” or for ma t it .
p Change the “Memory Stick.”
p Set the w r ite-protect switch to the recording position
(page 101).
—
p Set th e MODE dial to , P
p Set th e MODE dial to (page 6 2).
Troubleshooting
, or SCN (pages 18, 27).
83
Page 89

Symptom Cause Solution
Cannot shoot images with
the flash.
The eyes of the subject
come out red.
The date and time are
recorded incorrectly.
• The MODE dial is set to or SET UP.
• Th e fla sh is set to (No flash).
• When shooting still images, scene selection is
set to the Twilight mode.
• [MOVING IMAGE] is not set to [CLIP
MOTION] in the SET UP settings.
— p Set [RED EYE REDUCTION] to [ON] (page 23).
• Th e date an d tim e ar e not set cor rectly. p Set th e c o r re c t da te and time (page 14).
p Set it to a se tting other than , or SE T U P
p Set the flash to “ A uto” (No indicator) or (Forced flash)
(page 23).
p Cancel the Twilight mode (page 27).
p Set it to [CLIP MOTION] (page 47).
Viewing images
Symptom Cause Solution
The image cannot be
played back.
The image is coarse right
after being played back.
The images cannot be
played back on a TV.
The images cannot be
played back on a
computer.
Unknown beeps are heard
from the camera while
viewing a movie.
• The MODE dial is not set to .
• You cannot play back the image on the camera,
if it is modified on a computer or its folder/file
name is changed.
— p This is not a malfunction.
• The [VIDEO OUT] setting for the camera in
SET UP is incorrect.
• Th e conne c ti on is not correct.
— p See page 85.
• These beeps are heard when the auto focus is
working.
p Set th e MO DE dial to (page 31).
—
p Set [VIDEO OUT] to [NTSC] or [PAL] (pages 40, 99).
p Check the connection (page 33).
p This is not a malfunction. Set the focus preset dist an ce
(page 43).
(page 23).
84
Page 90

Deleting/editing an image
Symptom Cause Solution
Your camera cannot
delete an image.
You have deleted the
image by mistake.
The resizing function
does not work.
You cannot attach a print
(DPOF) mark.
You cannot cut a movie. • The movie is not long enough to cut.
• The image is protected.
• The write-protect switch on the “Memory Stick”
is set to the LOCK position.
• On ce you ha ve del e te d an im ag e , you ca nnot
restore it.
• Movie (MPEG movie)/Clip Motion/Multi Burst
files cannot be resized.
• Print (DPOF) marks cannot be attached to movie
(MPEG movie)/Clip Motion files.
• Protected movie (MPEG movie), Clip Motion,
Multi Burst files a nd still images cannot be cut.
p Cancel the pr ote c tion (page 57) .
p Set it to the recording position (page 101).
p The write-protect switch on the “Memory Stick ” will prevent
you from deleting images by mist a ke (pa ge 101).
p Protecting the image can prevent accidental erasure (page 57).
—
—
—
—
Computers
Symptom Cause Solution
You do not know whether
or not your OS can be
used with the camera.
You cannot install the
USB driver.
— p Check “Recommended computer enviro nment ” (pages 68, 79).
— p In Windows 2000, log on as Administrator (authorized
Administrators).
Troubleshooting
85
Page 91

Symptom Cause Solution
Your computer does not
recognize your camera.
You cannot copy images. • The camera is not correctly connected to your
After making a USB
connection, “Image
Transfer” does not
automatically start.
The image cannot be
played back on a
computer.
• The camera is turned off.
• The battery level is too low.
• Yo u are not using the supplied USB multi
connecting cable.
• The USB multi connecting cable is not
connected securely.
• [USB CONNECT] is set to [PTP] in the SET UP
settings.
• Th e USB conne ctor s on your computer are
connected to other equipment bes ide s the
keyboard and the mouse.
• Th e USB driver is not installed.
• Yo ur com puter does not properly recognize the
device because you connected the came ra a nd
your computer with the USB multi connecting
cable before you installed the “USB Driver”
from the supplied CD-RO M.
computer.
• Th e copy proc e dur e dif fers de pe nding on your
OS.
—
—
—
—
—
p Turn on the camera (page 12).
p Fully charge the battery pack (page 8).
p Use the supplied USB multi connecting cable (page72).
p Disconnect the USB multi connecting cable, and securely
connect it again. Mak e sure that “USB M ODE” is dis play ed on
the LCD screen (page72).
p Set it to [NORMAL] (page 99).
p Disc on nect the USB cables except for those conne cted to the
keyboard and the mouse.
p Install the USB driver (page 69).
p Delete the erroneously recognized device from your computer,
then install the USB dr iver (pages 69, 74).
p Connect the came r a and your c omputer correctly (page 71).
p Follow the copy proce dur e for your OS (page s 73, 74, 75, an d
79).
p If you are using the “PIXELA ImageMixer for Sony” software,
click on HELP.
p If you are using the “Im ag e Tra nsf e r” software, see page 73.
p Select [Launch Image Transfer automatically when your
camera, etc., is connected.] at [Basic] setting (page 73).
p Make a USB connection when the computer is turned on
(page 71).
p If you are using the “PIXELA ImageMixer for Sony” software,
click on HELP.
p Consult the computer or software manufacturer.
86
Page 92

Symptom Cause Solution
The image and sound are
affected by noise when
you play back a movie on
a computer.
You cannot print an
image.
The error message
appears when loading the
supplied CD-ROM.
• You are playing back the movie directly from
the “Memory Stick.”
— p Check the printer settings.
— p Set the displa y mode of your computer as follows:
p Copy the movie to the hard disk of the computer an d then pl ay
the movie file back from the hard disk (pages 73, 74, 75, and
79).
p See “Choosing images to print” (page 60), or if you are using
the “PIXELA ImageMixer for Sony” software, click on HELP.
For Windows, 800 × 600 dots or more, high color (16-bit color,
65 000 colors) or more.
For Macintosh, 800 × 600 dots or more, 32 000 colors or mo re.
“Memory Stick”
Symptom Cause Solution
You cannot insert a
“Memory Stick.”
You cannot record on a
“Memory Stick.”
You cannot format a
“Memory Stick.”
You have formatted a
“Memory Stick” by
mistake.
• You are inserting it backward s. p Insert it from the right side (page 16).
• The write-protect switch on the “Memory Stick”
is set to the LOCK position.
• The “Memory Stick” is full.
• The write-protect switch on the “Memory Stick”
is set to the LOCK position.
• All the data on the “Memory Stick” are erased by
formatting.
p Set it to the recording position (page 101).
p Delete unnecessary images (pages 35, 64).
p Set it to the recording position (page 101).
p We recomm end tha t you se t the “M e mor y S ti ck” wr ite - pr ote c t
switch to the LOCK position to protect a ccidental erasure
(page 101).
Troubleshooting
87
Page 93

Others
Symptom Cause Solution
The camera does not
work, no operations can
be performed.
The power is on, but the
camera does not work.
You cannot identify the
indicator on the LCD
screen.
The lens gets fogged. • Condensation is occurring. p Turn off the camera, leave the camera for about an hour and then
The camera gets hot if you
use it for a long time.
• Yo u are not usi ng an “I nf oLI THI UM” ba tte r y
pack.
• Th e battery level is low or zero (The
indicator appears.).
• The AC power adaptor is not connected
securely.
• Th e in te rn al syste m is not working properly. p Disconnec t, an d the n, afte r one mi nute, reconnect all power
— p Check the indi cator (pages 104 to 106).
— p This is not a malfunction.
p Use an “InfoLITHIUM” battery pack only (page 102).
p Charge the battery (page 8).
p Connect it securely to the multi connector of the camera and to
a wall outlet (wall soc ke t) (page 11).
sources and turn on the camera. If this does not work, press the
RESET button located inside the battery/“Memory Stick” cover
with a pointed object, then turn th e power on again. (This will
clear the date and time settings, etc.)
try to use it again (page 100).
88
Page 94

Warnings and
messages
The following messages appear on the LCD screen.
Message Meaning/ Corrective Action
NO MEMORY STICK • Insert a “Memory Stick” (page 16).
SYSTEM ERROR • T urn the power off and on again (page 12).
MEMORY STICK ERROR • Insert the “Memory Stick” correctly (page 16).
MEMORY STICK TYPE
ERROR
FORMAT ERROR • The “Memory Stick” format failed. Format the “Memory Stick” again (page 39).
MEMORY STICK LOCKED
NO MEMORY SPACE
NO FILE IN THIS FOLDER • No images have been recorded in this folder.
FOLDER ERROR • A folde r w ith the same first three digits number already exist s in the “M em ory Stick.” (For example: 123MSDCF
CANNOT CREATE MORE
FOLDER
CANNOT RECORD • You attempt to select the folder that is available only for viewing with your camera. Select other folders (page 51).
FILE ERROR • An error occurred while playing back the image.
FILE PROTECT • The image is protected against erasure.
IMAGE SIZE OVER • You are playing back an image of a size that c a nnot be play e d ba ck on your camer a .
CAN NOT DIVIDE • The movie is not long enough to be divided.
INVALID OPERATION • You are playing back a file that was created on equ ipm en t othe r tha n your cam era .
For "InfoLITHIUM"
BATTERY ONLY
• The “Memory Stick” is damaged, or the terminal sectio n of th e “ Me mo ry Sti ck ” is dirty.
• T he ins erte d “ Memory Stick” cannot be used with your camera (page 101).
• The write-protect switch on the “Memory Stick” is set to the LOCK pos ition. S et it to the re cor ding pos ition
(page 101).
• The capacity of the “Memory Stick” is insufficient. You cannot record images. Delete unnecessary images (pages 35, 64).
and 123ABCDE) Select other folders, or create a new folde r.
• You cannot create any folders.
• The file is not a movie (MPEG movie).
• The battery pack is not the “InfoLITHIUM” type.
Troubleshooting
89
Page 95

Message Meaning/ Corrective Action
• The ba tte r y le vel is low or zero. Charge the battery (page 8). Depending o n the cond iti ons of use o r the type of
battery pack, the indicator ma y fl as h ev en though there are still 5 to 10 minutes of remaining batte r y time left.
• You ar e not holding the camera steadily enough. Use the flash, mount the ca m era on a tripod, or otherwise secure
the camera in place.
ROTATE THE LENS
PORTION
• The le ns por tion is falling downward. Rotate the lens portion.
90
Page 96

Self-diagnosis display
Your camera has a self-diagnosis disp la y.
This function displays the condition of the
camera on the LCD screen using a
combination of a letter and four numerical
digits. If this occurs, check the following
code chart and take the corr esponding
countermeasure. The la st t w o dig it s
(indicated by ss)will differ depending on
the state of the camera.
Code Cause Countermeasure
C:32: ss There is trouble with your
C:13: ss The camera cannot read or write
E:61: ss
E:91: ss
E:92: ss
camera’s hardware, or with the
lens.
data on the “Memory Stick.”
An unformatted “Memory Stick”
is inserted.
The inserted “Memory Stick”
cannot be used with your camera,
or the data is damaged.
A camera malfunction that you
cannot reverse has occurred.
• T urn the power off and on again
(page 12).
• Re-insert the “Memory Stick” several
times.
• Format the “Memory Stick” (page 39).
• I nse r t a new “M e mory S ti ck” ( pa ge 16).
• Press the RESET button (page 81) located
inside the battery/“Memory Stick” cover,
then turn the power on again.
C:32:ss
Self-diagnosis display
If your camera is not still functioning well
after trying the countermeasure a couple of
times, contact your Sony deal er or l ocal
autholized Sony service facility and inform
them of the 5-digit code.
Troubleshooting
91
Page 97

The number of images
Additi
that can be saved/
shooting time
The number of images that can be saved and
the shooting time are differ en t, depending
on the capacity of the “Memory S tick,” the
image size, and the image qual ity. Refer to
the following charts when you choose a
“Memory Stick.”
• The number of images is listed in FINE
(STANDARD) order.
• The values for the number of images that
can be saved and the shooting tim e ma y
vary, depending on the shooti ng
conditions.
• For normal shooting times and num bers
of images that can be saved, see page 30.
• Wh en the remaining number of images
recordable is more than 9999, “>9999” is
indicated.
onal information
E-mail (Units: ima g es )
16MB 32MB 64MB 128MB MSX-256 MSX-512 MSX-1G
2272×1704
2272 (3:2)
1600×1200
1280×960
640×480
8 (14) 16 (29) 32 (59) 65 (119) 117 (210) 238 (427) 485 (871)
8 (14) 16 (29) 32 (59) 65 (119) 117 (210) 238 (427) 485 (871)
16 (29) 32 (59) 65 (119) 131 (239) 230 (420) 468 (854) 956 (1743)
24 (44) 49 (89) 98 (179) 197 (359) 340 (595) 691 (1210) 1411 (2470)
88 (194) 178 (392) 358 (788) 718 (1580) 1190 (2381) 2420 (4841) 4940 (9881)
VOICE (Units: ima g es )
16MB 32MB 64MB 128MB MSX-256 MSX-512 MSX-1G
2272×1704
2272 (3:2)
1600×1200
1280×960
640×480
7 (14) 15 (28) 31 (57) 63 (114) 115 (204) 234 (414) 478 (846)
7 (14) 15 (28) 31 (57) 63 (114) 115 (204) 234 (414) 478 (846)
15 (26) 31 (54) 62 (109) 125 (219) 223 (396) 453 (806) 926 (1646)
22 (38) 45 (78) 91 (157) 183 (316) 324 (549) 660 (1117) 1347 (2280)
69 (121) 140 (245) 281 (492) 564 (987) 1020 (1785) 2074 (3630) 4234 (7410)
Clip Motion (Units: ima g es )
16MB 32MB 64MB 128MB MSX-256 MSX-512 MSX-1G
NORMAL
MOBILE
NORMAL: When 10 frames are shot
MOBILE: When two frames are shot
88 178 358 718 1190 2420 4940
486 982 1971 3951 3571 7261 14821
MPEG movie (Units: seconds)
16MB 32MB 64MB 128MB MSX-256 MSX-512 MSX-1G
320 (HQX)
320×240
160×112
42 87 176 354 641 1304 2663
174 352 708 1419 2567 5221 10657
673 1363 2740 5494 9935 20203 41239
92
Multi Burst (Units: ima g es )
16MB 32MB 64MB 128MB MSX-256 MSX-512 MSX-1G
1280×960
24 (46) 50 (93) 101 (187) 202 (376) 357 (649) 726 (1320) 1482 (2694)
Page 98

Menu items
Menu items that can be changed differ
depending on the position of the MOD E
dial. The LCD screen sho ws on ly the it ems
you can operate based on the current
position of the MODE di al. Facto ry setti ngs
are indicated with x.
When the MODE dial is set to
Item Setting Description
(IMAGE SIZE) x2272×1704 / 2272 (3:2) /
1600×1200 / 1280×960 / 640×480
MODE (REC MODE) VOICE
E-MAIL
xNORMAL
Selects the image size u sed when shooting still images ( pa ge17).
– Records an audio file (with a still image ) in addi tion to the JPEG file (page 50).
– Records a small-size (320×240) JPEG file in addition to the selected image size
(page 49).
– Records an image using the normal recording mode.
When the MODE dial is set to P or SCN
Item Setting Description
SCN x / /
(EV) +2.0EV / +1.7EV / +1.3EV /
9 (FOCUS) ∞ / 7.0m / 3.0m / 1.0 m / 0. 5m /
WB (WHITE BAL) / / / / xAUTO Sets the white balance (page45).
(
SPOT METER
+1.0EV / +0.7EV / +0.3EV / x0EV
/ −0.3EV / −0.7EV / −1. 0EV /
−1.3EV / −1.7EV / −2.0EV
CENTER AF / x MULTI AF
)
ON / x OFF Matches the exposure to the subjec t you wa nt to shoot (page 44).
/ Selects one of the Scen e selecti ons. (When the MODE dia l is set to P, this setting
cannot be carried out.) (page 27)
Adjusts the exposure (page 43).
Chooses the auto focus method (page 41), or sets the focus preset distance (page 43).
Additional information
93
Page 99

Item Setting Description
ISO 400 / 200 / 100 / xAUTO Selects the ISO sensitivity. When shooting under dark conditions or shooting a fast-
(IMAGE SIZE) x2272×1704 / 2272 (3:2) /
1600×1200 / 1280×960 / 640×480
(P.QUALITY) xFINE / STANDARD Records images with fine image quality mode. / Records images in the standard
MODE (REC MODE) VOICE
E-MAIL
xNORMAL
(FLASH LEVEL) HIGH
xNORMAL
LOW
PFX (P.EFFECT) SOLARIZE / B&W / SEPIA /
NEG.ART / xOFF
(SHARPNESS) +2 / +1 / x0 / –1 / –2 Adjusts the sharpness of t he imag e. The
moving subject, use a high-number setting. When recording high-quality images, use
a low-number setting (When the MODE dial is set to SCN, this setting cannot be
carried out.).
Selects the image size u se d when shoo ting still images (page17).
image quality mode (page 29).
– Records an audio file (with a still imag e) in a ddition to the JPEG file (page 50).
– Records a small-size (320×240) JPEG file in a ddition to the selected image size
(page 49).
– Records an image using the normal recording mode.
– Makes the flash level higher than normal.
– Norma l setting.
– Makes the flash level lower than nor mal.
Sets the special effects for the image (page 51).
indicator appears (except when the
setting is 0).
When the MODE dial is set to (when [MOVING IMAGE] is set to [MPEG MOVIE] in the SET UP
settings)
Item Setting Description
(EV) +2.0EV / +1.7EV / +1.3EV /
9 (FOCUS) ∞ / 7.0m / 3.0m / 1.0m / 0.5m /
WB (WHITE BAL) / / / / xAUTO Sets the w h ite ba lance (page 45).
(
SPOT METER)ON / x OFF Matches the exposure to the subject you want to shoot (page 44).
+1.0EV / +0.7EV / +0.3EV / x0EV
/ −0.3EV / −0.7EV / −1.0EV /
−1.3EV / −1.7EV / −2.0EV
CENTER AF / x MULTI AF
Adjusts the exposure (page 43).
Chooses the auto focus method (pag e 41), or sets the focus preset distance (page 43).
94
Page 100

Item Setting Description
(IMAGE SIZE) 320 (HQX) / 320×240 / x160×112 Selects the MPEG image size when recording movies (page 62).
PFX (P.EFFECT) SOLARIZE / B&W / SEPIA /
NEG.ART / xOFF
Sets the special effects for the image (page 51).
When the MODE dial is set to (when [MOVING IMAGE] is set to [CLIP MOTION] in the SET UP settings)
Item Setting Description
(EV) +2.0EV / +1.7EV / +1.3EV /
9 (FOCUS) ∞ / 7.0m / 3.0m / 1.0 m / 0. 5m /
WB (WHITE BAL) / / / / xAUTO Sets the white balance (page45).
(
SPOT METER
(IMAGE SIZE) xNORMAL / MOBILE Selects the Clip Moti o n imag e si ze (page 47).
(FLASH LEVEL) HIGH
PFX (P.EFFECT) SOLARIZE / B&W / SEPIA /
(SHARPNESS) +2 / +1/ x0 / –1 / –2 Adju s ts the sharpness of the image. The indicator appears (except when the
+1.0EV / +0.7EV / +0.3EV / x0EV
/ −0.3EV / −0.7EV / −1. 0EV /
−1.3EV / −1.7EV / −2.0EV
CENTER AF / x MULTI AF
)
ON / x OFF Matches the exposure to the subjec t you wa nt to shoot (page 44).
xNORMAL
LOW
NEG.ART / xOFF
Adjusts the exposure (page 43).
Chooses the auto focus method (page 41) or sets the focus preset distance (page 43).
– Makes the flash level higher than norma l.
– Norma l setting.
– Makes the flash level lower tha n nor mal.
Sets the special effects for the image (page 51).
setting is 0).
Additional information
95
 Loading...