

Page 1
Digital Still
Camera
3-866-309-12 (1)
Operating Instructions
Before operating the unit, please read this manual thoroughly, and
retain it for future reference.
Manual de instrucciones
Antes de utilizar la unidad, lea detenidamente este manual de
instrucciones y consérvelo para futuras referencias.
Owner‘s Record
The model and serial numbers are located on the bottom. Record the
serial number in the space provided below. Refer to these numbers
whenever you call upon your Sony dealer regarding this product.
Model No. DSCSerial No. ________________________
DSC-F55/F55E
1999 by Sony Corporation
GB
ES
Page 2
English
WARNING
To prevent fire or shock
hazard, do not expose the
unit to rain or moisture.
This symbol is intended
to alert the user to the
presence of uninsulated
“dangerous voltage”
within the product’s
enclosure that may be of
sufficient magnitude to
constitute a risk of
electric shock to persons.
This symbol is intended
to alert the user to the
presence of important
operating and
maintenance (servicing)
instructions in the
literature accompanying
the appliance.
For the Customers in the
U.S.A. and CANADA
CAUTION
TO PREVENT ELECTRIC SHOCK, DO
NOT USE THIS POLARIZED AC PLUG
WITH AN EXTENSION CORD,
RECEPTACLE OR OTHER OUTLET
UNLESS THE BLADES CAN BE FULLY
INSERTED TO PREVENT BLADE
EXPOSURE.
You are cautioned that any changes or
modifications not expressly approved in
this manual could void your authority to
operate this equipment.
2-GB
Declaration of Conformity
Trade Name: SONY
Model No.: DSC-F55
Responsible Party: Sony Electronics Inc.
Address: 1 Sony Drive, Park
Ridge, NJ.07656 USA
Telephone No.: 201-930-6970
This device complies with Part 15 of the
FCC Rules. Operation is subject to the
following two conditions: (1) This device
may not cause harmful interference, and
(2) this device must accept any
interference received, including
interference that may cause undesired
operation.
Note:
This equipment has been tested and found
to comply with the limits for a Class B
digital device, pursuant to Part 15 of the
FCC Rules. These limits are designed to
provide reasonable protection against
harmful interference in a residential
installation. This equipment generates, uses,
and can radiate radio frequency energy and,
if not installed and used in accordance with
the instructions, may cause harmful
interference to radio communications.
However, there is no guarantee that
interference will not occur in a particular
installation. If this equipment does cause
harmful interference to radio or television
reception, which can be determined by
turning the equipment off and on, the user
is encouraged to try to correct the
interference by one or more of the following
measures:
— Reorient or relocate the receiving
antenna.
— Increase the separation between the
equipment and receiver.
— Connect the equipment into an outlet on
a circuit different from that to which the
receiver is connected.
— Consult the dealer or an experienced
radio/TV technician for help.
The shielded interface cable recommended
in this manual must be used with this
equipment in order to comply with the
limits for a digital device pursuant to
Subpart B of Part 15 of FCC Rules.
Page 3

For the customers in the
U.S.A. and Canada
DISPOSAL OF LITHIUM ION
BATTERY.
LITHIUM ION BATTERY.
DISPOSE OF PROPERLY.
You can return your unwanted lithium ion
batteries to your nearest Sony Service
Center or Factory Service Center.
Note: In some areas the disposal of lithium
ion batteries in household or business
trash may be prohibited.
For the Sony Service Center nearest you call
1-800-222-SONY (United States only)
For the Sony Factory Service Center nearest
you call 416-499-SONY (Canada only)
Caution: Do not handle damaged or
leaking lithium ion battery.
NOTICE FOR THE CUSTOMERS
IN THE UNITED KINGDOM
A moulded plug complying with BS 1363 is
fitted to this equipment for your safety and
convenience.
Should the fuse in the plug supplied
need to be replaced, a 5 AMP fuse
approved by ASTA or BSI to BS 1362, (i.e.
marked with 2 or @ mark) must be
used.
If the plug supplied with this equipment
has a detachable fuse cover, be sure to
attach the fuse cover after you change the
fuse. Never use the plug without the fuse
cover. If you should lose the fuse cover,
please contact your nearest Sony service
station.
Attention
The electromagnetic fields at the specific
frequencies may influence the picture and
sound of this camera.
Memory Stick
N50
For the Customers in CANADA
This Class B digital apparatus complies
with Canadian ICES-003.
For the Customers in the
U.S.A.
This device complies with Part 15 of
the FCC Rules. Operation is subject to
the following two conditions: (1) This
device may not cause harmful
interference, and (2) this device must
accept any interference received,
including interference that may cause
undesired operation.
For the Customers in Germany
Directive: EMC Directive 89/336/
EEC.92/31/EEC
This equipment complies with the EMC
regulations when used under the
following circumstances:
• Residential area
• Business district
• Light-industry district
(This equipment complies with the EMC
standard regulations EN55022 Class B.)
Battery Pack
For the Customers in the U.S.A.
and Canada
THIS CLASS B DIGITAL DEVICE
COMPLIES WITH PART 15 OF THE
FCC RULES AND THE CANADIAN
ICES-003. OPERATION IS SUBJECT
TO THE FOLLOWING TWO
CONDITIONS: (1) THIS DEVICE
MAY NOT CAUSE HARMFUL
INTERFERENCE, AND (2) THIS
DEVICE MUST ACCEPT ANY
INTERFERENCE RECEIVED,
INCLUDING INTERFERENCE
THAT MAY CAUSE UNDESIRED
OPERATION.
3-GB
Page 4

About the Carl Zeiss lens
This camera is equipped with a Carl
Zeiss lens which can reproduce a fine
image.
The lens for this camera was
developed jointly by Carl Zeiss, in
Germany, and Sony Corporation. It
adopts the MTF* measurement
system for camera and offers a quality
as the Carl Zeiss lens.
* MTF is an abbreviation of
Modulation Transfer Function/
Factor.
The value number indicates the
amount of light of a subject
penetrating into the lens.
• IBM PC/AT is a registered trademark
of International Business Machines
Corporation of the U.S.A.
• MS-DOS and Windows are registered
trademarks licensed to Microsoft
Corporation, registered in the U.S.A.
and other countries.
• Macintosh is a trademark licensed to
Apple Computer, Inc., registered in the
U.S.A. and other countries.
• All other product names mentioned
herein may be the trademarks or
registered trademarks of their
respective companies.
Furthermore, “™‘” and “®” are not
mentioned in each case in this manual.
4-GB
Page 5

Table of contents
Parts identification .......... 7
Preparation
1 Charging the battery pack .... 9
2 Installing the battery pack .. 10
3 Inserting a Memory Stick.... 11
4 Setting the date and time .... 12
Recording
1 Recording still images ......... 14
2 Recording moving images
............................................... 15
Playing back
1 Playing back still images.....17
2 Playing back moving images
............................................... 18
3 Viewing images using a
personal computer ............. 21
Various ways of recording
Changing the lens orientation
– Face to face recording ........... 24
Using the self-timer ....................... 24
Selecting brightness of the flash
(FLASH LEVEL) ....................... 25
Recording images in macro..........25
Recording enlarged images
– Zoom recording.....................26
Enjoying Picture Effect..................26
Selecting image quality
(QUALITY) ............................... 27
Selecting image size.......................28
Selecting recording mode
(REC MODE) ............................ 29
Adjusting exposure
(EXPOSURE)............................. 31
Adjusting the white balance ........32
Various ways of playback
Playing back multiple images at a
time (INDEX) ............................ 33
Enlarging a part of the image
– Zoom and trimming ............. 34
Rotating image (ROTATE) ........... 35
Playing back images in a continuous
loop (SLIDE SHOW)................ 36
Preventing accidental erasure
(PROTECT) ............................... 37
Deleting images (DELETE) .......... 38
Formatting (initializing) a Memory
Stick ............................................ 40
Changing the menu setting
Changing the menu setting .......... 41
Setting the mode of each item......42
Using image data with
other equipment
Using the house current (mains)
.................................................... 45
Watching images on a TV screen
.................................................... 45
Printing the recorded images.......46
Marking a print mark on an image
.................................................... 46
Additional information
Precautions ..................................... 48
Troubleshooting............................. 50
Self-diagnosis display ................... 52
Warning and notice messages ..... 53
Specifications.................................. 54
Index ................................................ 55
GB
5-GB
Page 6

Be sure to read the following before using your camera
LCD screen
The LCD screen is manufactured using high-precision technology. However, there
may be some tiny black points and/or bright points (red, blue or green in color) that
constantly appear on the LCD screen. These points are normal in the manufacturing
process and do not affect the recorded image in any way. Over 99.99 % are operational
for effective use.
Trial recording
Before you record one-time events, you may want to make a trial recording to make
sure that the camera is working correctly.
No compensation for contents of the recording
Contents of the recording cannot be compensated for if recording or playback is not
made due to a malfunction of the camera, etc.
Note on image data compatibility
Image data files recorded on Memory Sticks by your camera conform with the Design
Rules for Camera File Systems universal standard established by the JEIDA (Japan
Electronic Industry Development Association).
You cannot play back on your camera still images recorded on other equipment (DCRTRV890E/TRV900/TRV900E, DSC-D700) that does not conform with this universal
standard. (These models are not sold in some areas.)
Precaution on copyright
Television programs, films, video tapes, and other materials may be copyrighted.
Unauthorized recording of such materials may be contrary to the provision of the
copyright laws.
Before using your camera
This digital still camera uses a Memory Stick as a medium for recording images.
Do not shake or strike the unit
Malfunctions, inability to record images as well as inability to use Memory Sticks or
image and memory data breakdown, damage or loss may occur.
Do not get the unit wet
When taking pictures outdoors in the rain or under similar conditions, be careful not to
get the unit wet.
If moisture condensation occurs, refer to page 48 and follow instructions on how to
remove it before using.
Back up recommendations
To avoid the potential risk of data loss always copy (back up) data to disk.
Supplied accessories
AC-VF10 AC power adaptor/charger (1)
A/V connecting cable (1)
NP-F10 Battery pack (1)
DK-115 DC connecting cable (1)
Hand strap (1)
Lens cap (1)
Lens cap strap (1)
Your dealer may not handle some of the above listed accessories. Please ask the dealer for
detailed information about the accessories in your country.
Memory Stick (4 MB) (1)
PC serial cable (1)
Power cord (1)
Sony PictureGear 3.2 Lite (1)
Operating instructions (1)
6-GB
Page 7
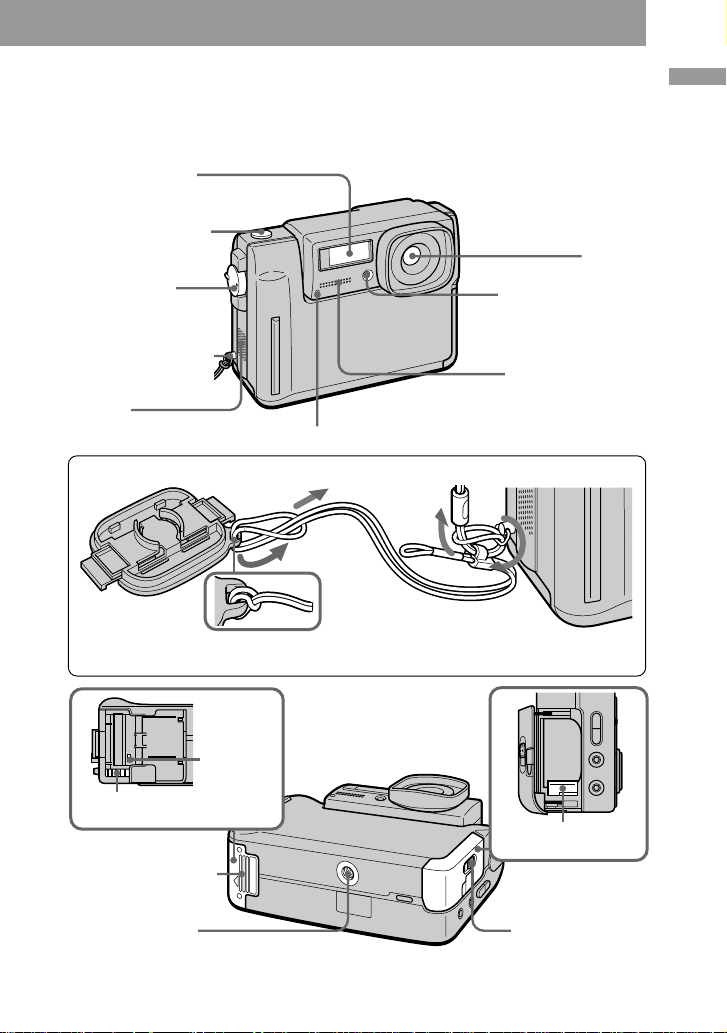
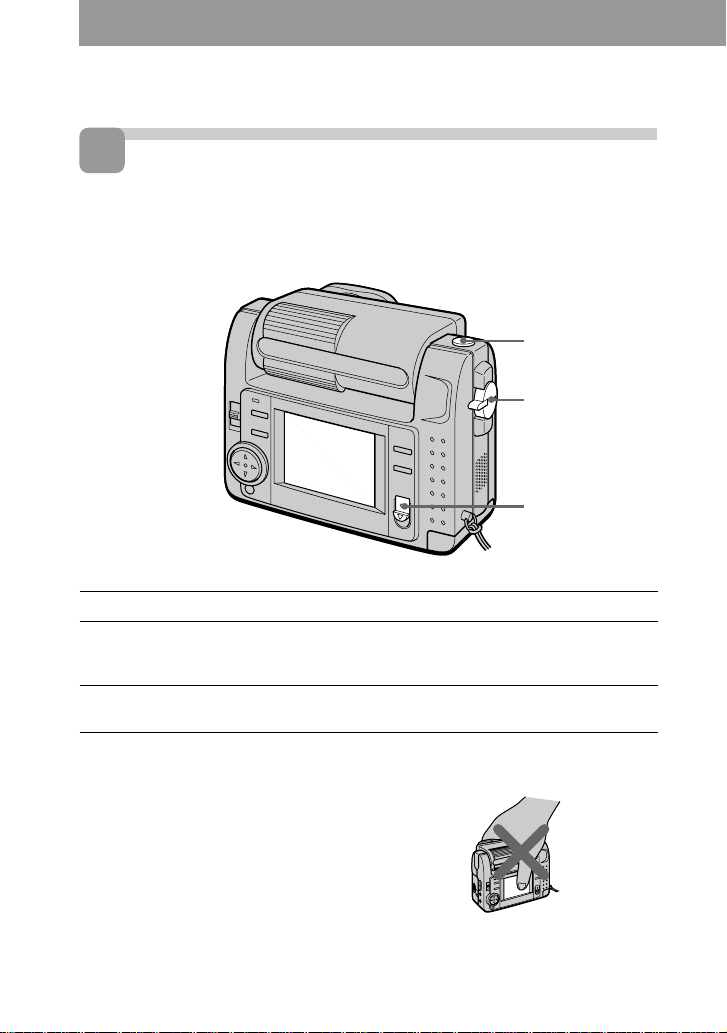
Parts identification
See pages in parentheses for more details.
Flash emitter (25)
Shutter button (14)
Lens
MODE selector
(PLAY/STILL/MOVIE)
(14)
Hook for hand strap
Speaker
Recording lamp
Attaching the lens cap (supplied) and the hand strap (supplied).
Lens cap
Be careful that the lens cap strap does not touch the projections on both sides of the
lens cap hole.
Hand strap
Lens cap strap
Photocell window
for flash
Do not block when
recording.
MIC (Microphone)
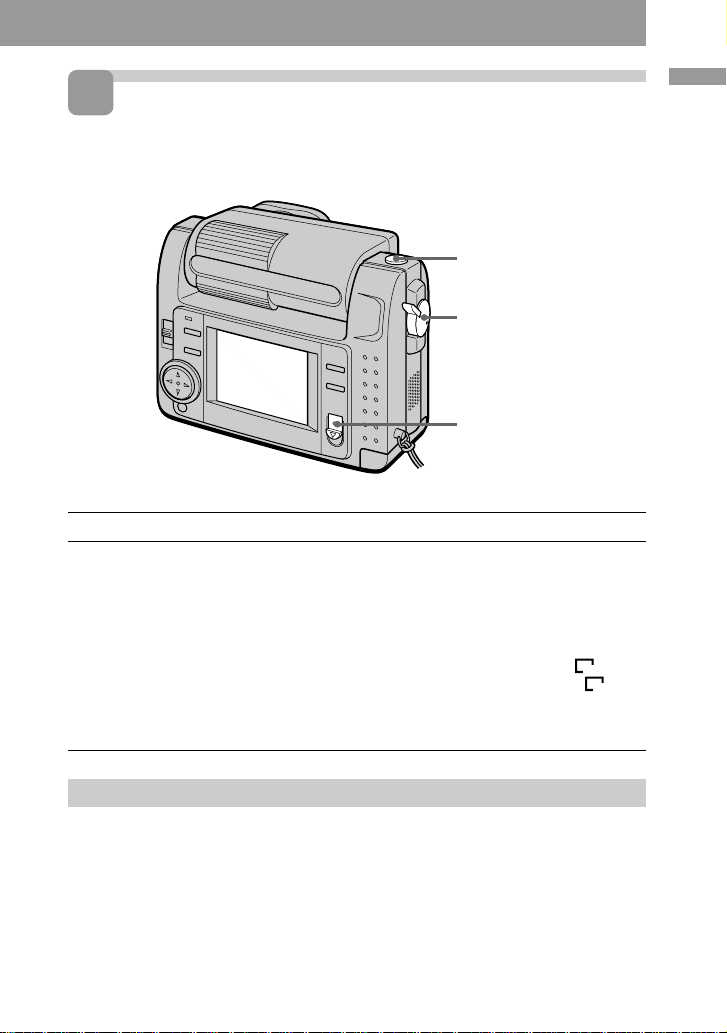
Parts identification
Access
lamp (11)
Memory Stick eject
button (11)
Memory Stick cover
(11)
Tripod receptacle
Make sure that the length of the tripod
screw is less than 7/32 inch (6.5 mm).
Battery eject
switch (10)
OPEN (BATT)
switch (10)
7-GB
Page 8
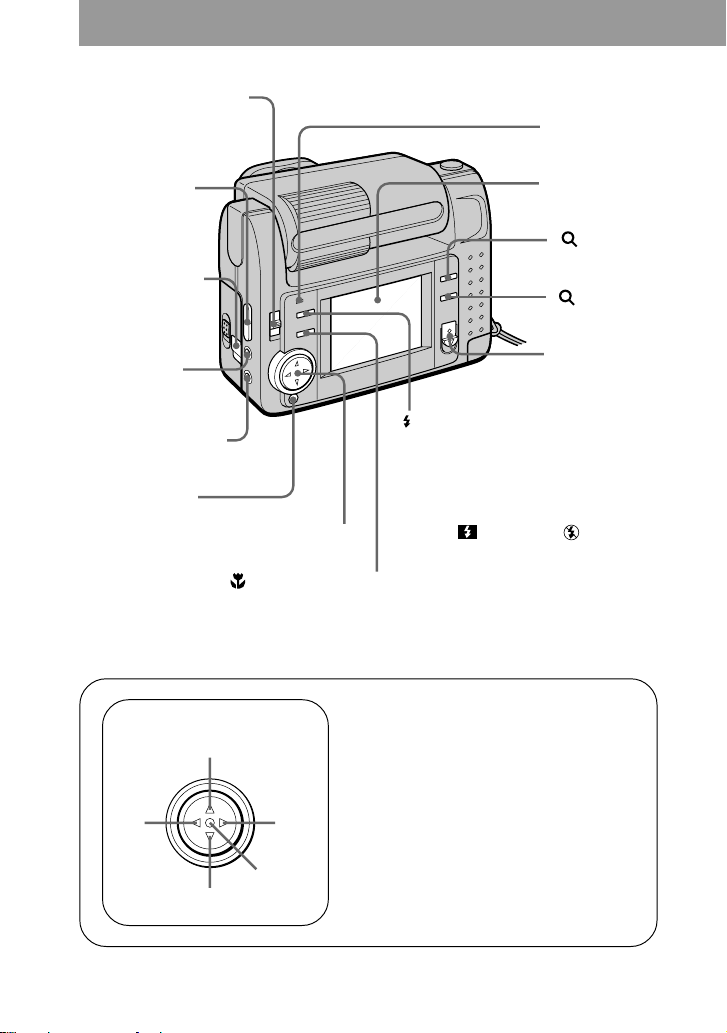
LCD BACK LIGHT switch
Normally set to ON.
Set to OFF to save the
battery if you use the
camera in bright place.
LCD BRIGHT +/–
buttons
Press to adjust the
brightness of the
LCD screen.
Slot cover for AC
power adaptor/
charger (45)
A/V OUT jack
(45, 46)
Audio is monaural.
DIGITAL I/O jack (22)
DISPLAY button
Press to display or turn
off the indicators on the
LCD screen.
Control button
(Macro) button (25)
Flash lamp (25)
LCD screen
(16, 19)
+ (Zoom)
button (26, 34)
– (Zoom)
button (26, 34)
POWER switch/
POWER lamp
(12)
(Flash) button (25)
AUTO (no indication) is set at the
factory.
Each time you press the button, the
flash mode changes as follows:
AUTO (no indication) t forced-
flash t no flash t AUTO.
In AUTO mode, flashes automatically
according to the brightness of the
surroundings.
The subject must be 11 7/8 inches to
8 1/3 feet (0.3 m to 2.5 m) away.
8-GB
Control button
Upper side
Left
side
Lower
side
Right
side
Press to
execute
Function of the control button
You can execute the functions by
pressing the upper, lower, left, or right
side of the control button. When an
item is selected in the menu, the color
of the item changes from blue to
yellow. To enter your selection, press
the center of the control button.
Page 9
Preparation
1
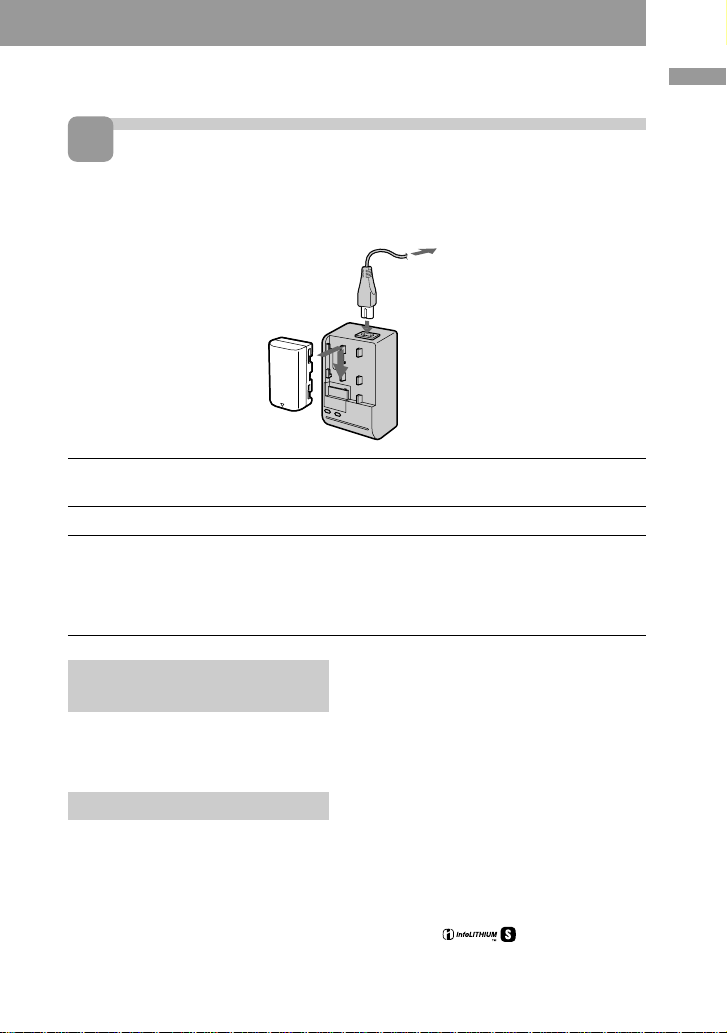
Charging the battery pack
To charge the battery pack, use the AC power adaptor/charger.
Your camera operates only with the “InfoLITHIUM” battery pack (S series).
“InfoLITHIUM” is a trademark of Sony Corporation.
3
2
1
1 Insert the battery pack in the direction of the V mark. Slide the
battery pack in the direction of the arrow.
2 Connect the power cord to the AC power adaptor/charger.
3 Connect the power cord to a wall outlet.
The CHARGE lamp (orange) lights up when charging begins.
When the CHARGE lamp goes off, normal charge is completed. For full charge,
which allows you to use the battery longer than usual, leave the battery pack
attached for about one hour after normal charge is completed.
Preparation
To remove the battery
pack
Slide the battery pack in the opposite
direction of the arrow as illustrated
above.
Charging time
Battery Full charge* Normal charge**
NP-F10 145 min. 85 min.
Approximate minutes to charge a
discharged battery pack using the AC
power adaptor/charger AC-VF10.
(Lower temperature require a longer
charging time.)
* Charging for about one hour after
the CHARGE lamp goes out.
** Charging just until the CHARGE
lamp goes out.
For details on battery life, see page 20.
What is “InfoLITHIUM”?
The ”InfoLITHIUM” is a lithium ion
battery pack which can exchange data
such as battery consumption with
compatible video equipment. This unit is
compatible with the “InfoLITHIUM”
battery pack (S series). Your camera
operates only with the “InfoLITHIUM”
battery. “InfoLITHIUM” battery packs
have the
“InfoLITHIUM” is a trademark of Sony
Corporation.
mark.
9-GB
Page 10

2
Installing the battery pack
12 3
1 Open the battery cover.
Open the cover while sliding the OPEN (BATT) switch in the direction of the
arrow.
2 Install the battery pack.
While sliding down the battery eject switch, insert the battery pack with the v mark
facing toward the battery compartment.
3 Close the cover.
Press the cover until it clicks.
To remove the battery
pack
Open the battery cover. Slide down
the battery eject switch, and remove
the battery pack.
Be careful not to drop the battery pack
when removing.
10-GB
Battery remaining indicator
This camera shows on the LCD screen
how many minutes you can still keep on
recording or playing back images.
Auto power-off function
During recording if you leave the camera
inactivate for about three minutes while
the power is on, the camera turns off
automatically to prevent wearing down
the battery.
Auto power-off does not function when
you use the AC power adaptor/charger.
Page 11
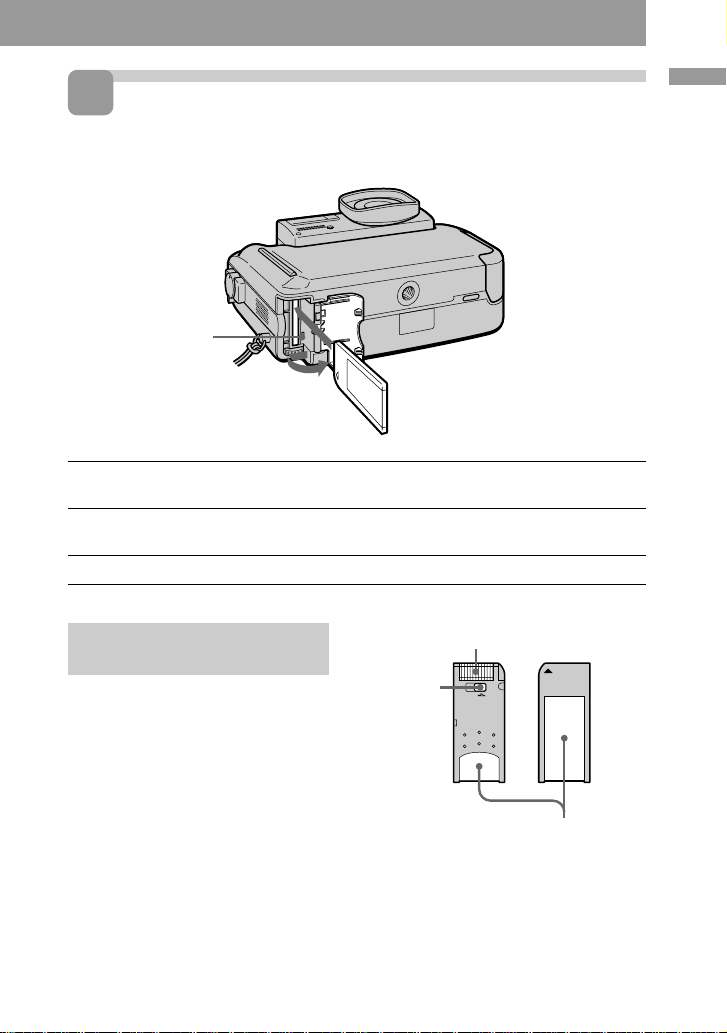
3
Inserting a Memory Stick
“Memory Stick” is a trademark of Sony Corporation.
Access lamp
1 Open the Memory Stick cover.
Slide it in the direction of the arrow mark on the cover.
2 Insert the Memory Stick.
Insert it with the v mark pointing inward.
3 Close the Memory Stick cover.
Preparation
To remove the Memory
Stick
Open the Memory Stick cover, then
press the Memory Stick eject button.
PNote
When the access lamp lights up, be
sure not to remove the Memory Stick
or turn off the power.
Connector
LOCK
switch
PNote on Memory Stick
You cannot record on a Memory Stick
if the LOCK switch is set to LOCK
position.
LOCK
Label space
11-GB
Page 12
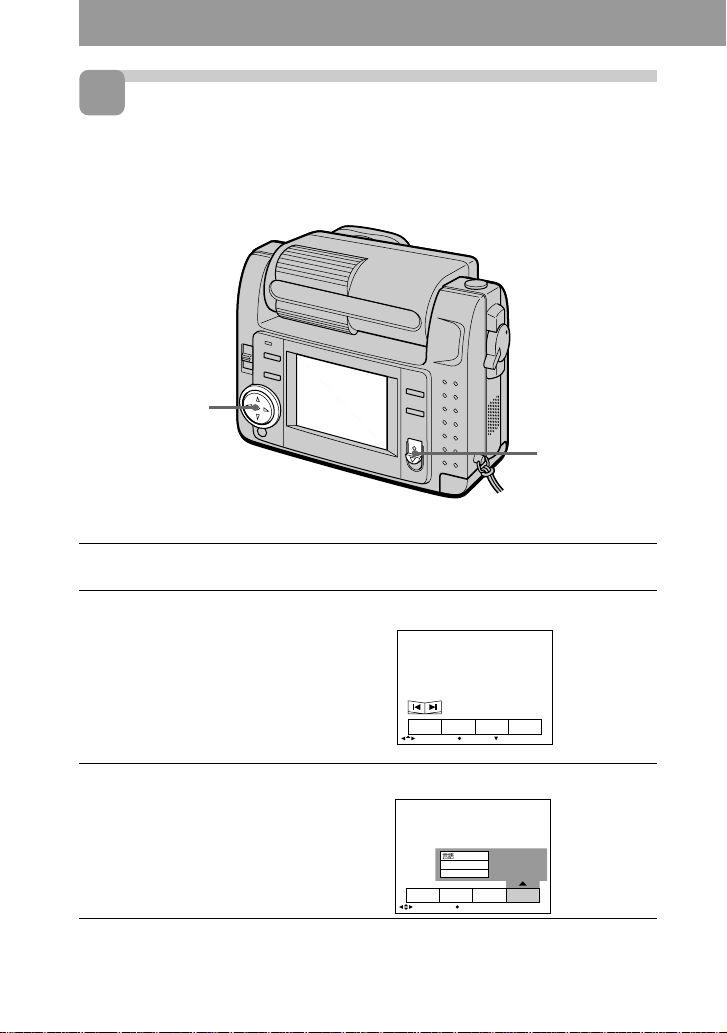
4
Setting the date and time
When you use the camera first, set the date and time. If they are not set, incorrect date
and time are recorded, and CLOCK SET screen in the step 5 appears whenever you
turn on the camera in STILL/MOVIE mode.
Control button
POWER switch
1 Slide the POWER switch down to turn on the power.
The POWER lamp lights up.
2 Press v of the control button.
The menu bar appears on the LCD screen.
INDEX FILEDELETE SETUP
SELECT OK
3 Select “SETUP” with the control button, then press it.
/LANGUAGE
CLOCK SET
BEEP
INDEX FILEDELETE SETUP
SELECT OK
12-GB
MENU BAR OFF
Page 13
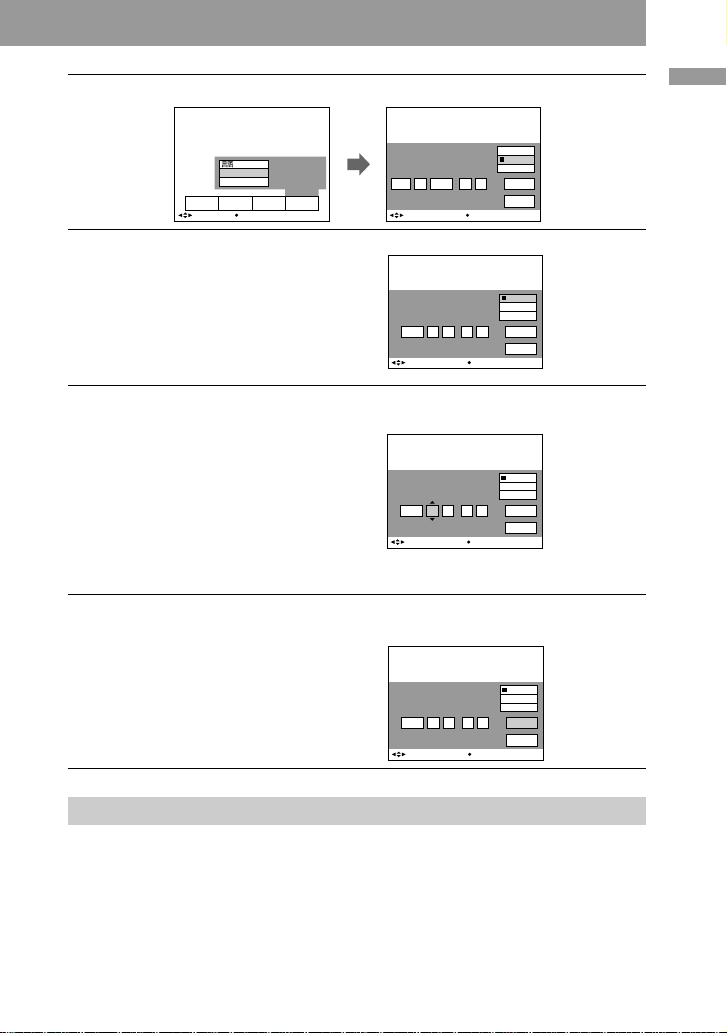
4 Select “CLOCK SET” with the control button, then press it.
Preparation
/LANGUAGE
CLOCK SET
BEEP
INDEX FILEDELETE SETUP
SELECT OK
CLOCK SET
1999JAN AM// : 1 12 00
SELECT/ADJUST OK
Y/M/D
M/D/Y
D/M/Y
ENTER
CANCEL
5 Select the desired display of the date with the control button,
then press it.
Y/M/D (year/month/day)
M/D/Y (month/day/year)
D/M/Y (day/month/year)
CLOCK SET
1999 AM// : 1 1 12 00
SELECT/ADJUST OK
Y/M/D
M/D/Y
D/M/Y
ENTER
CANCEL
6 Select the date and time with the control button, then press it.
The item to be changed is indicated with
v/V. Select number by pressing v/V of
the control button, then press it to enter
the number.
After entering the number, v/V moves
to the next item.
When “D/M/Y” is selected, set the time
on a 24-hour cycle.
CLOCK SET
1999 AM// : 1 1 12 00
SELECT/ADJUST OK
Y/M/D
M/D/Y
D/M/Y
ENTER
CANCEL
7 Select “ENTER” with the control button, then press it at the
desired moment to begin clock movement.
CLOCK SET
1999 PM// : 7 4 10 30
SELECT/ADJUST OK
Y/M/D
M/D/Y
D/M/Y
ENTER
CANCEL
To cancel the date and time setting
Select “CANCEL” with the control button, then press it.
13-GB
Page 14
Recording
1
Recording still images
To record images, slide the POWER switch down to turn on the power (The POWER
lamp lights up) and insert the Memory Stick.
Shutter button
MODE selector
POWER switch
1 Set the MODE selector to STILL.
2 Press the shutter button halfway down.
When AE (auto exposure), AWB (auto white balance) and AF (auto focus) are
frozen, the AE lock indicator z (green) lights up.
3 Press the shutter button fully down.
The image is recorded on the Memory Stick.
PNote
When the image is recorded on the
Memory Stick, “RECORDING” appears
on the LCD screen. When this indication
appears, never shake or strike the unit.
Also, do not turn the power off, or
remove the battery pack or Memory Stick.
Otherwise, an image data breakdown
may occur and the Memory Stick may
become unusable.
14-GB
Do not hold the camera by the LCD
screen.
Page 15
2
Recording moving images
To record images, slide the POWER switch down to turn on the power (The POWER
lamp lights up) and insert the Memory Stick.
Shutter button
MODE selector
POWER switch
1 Set the MODE selector to MOVIE.
2 Press the shutter button fully down momentarily.
The image and sound are recorded for five seconds, 10 seconds, or 15 seconds. (The
time is set at “REC TIME SET” in the menu.) (page 43)
Hold the shutter button fully down.
The image and sound are recorded until you release it.
Video mail mode: maximum 60 seconds when recording 160 × 112 size
Presentation mode: maximum 15 seconds when recording 320 × 240 size
However, the minimum recording time depends on the “REC TIME SET” setting
above.
Moving images will be softer than still images.
160
320
Recording
Checking the last recorded image (Review)
When you want to check the last
recorded image, press b of the control
button. The last recorded image is
displayed on the LCD screen. To
return to normal mode, press the
shutter button or select “RETURN”
with the control button, then press it.
15-GB
Page 16
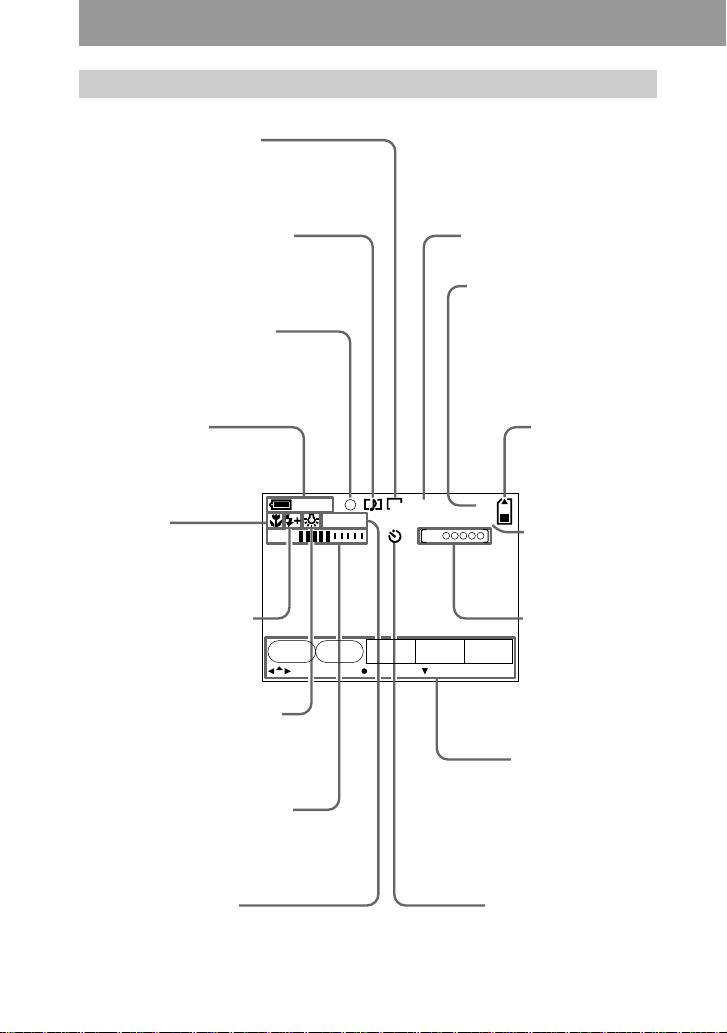
The indicators during recording
The indicators on the LCD screen are not recorded.
Image size indicator (28)/
Zoom indicator (26)
Recording mode indicator (29)
AE/Focus lock indicator (14)
Battery remaining
indicator (10)
Focus mode
indicator (25)
Flash level indicator (25)
SELF
TIMER
White balance indicator (32)
Picture effect indicator (26)/
LCD bright level indicator* (8)/
Volume level indicator* (18)
60
min
+1.0
Image quality indicator (27)
Number of stored images
When “FILE NUMBER” is
set to “SERIES,” the
numbers are put to files in
sequence even if the
Memory Stick is changed.
Remaining
memory capacity
indicator
FINE
1600
EV
REC
15sBRT
0:10
48
Self-diagnosis
function indicator
(52)/Recording
time indicator (43)
Recording time
indicator (43)
FILE
SETUPCAMERAEFFECT
MENU BAR OFFSELECT OK
Menu bar and
guide menu
They appear by
pressing v of the
control button and
disappear by
pressing V of it.
EV level indicator (31)
* Only displayed during operation.
16-GB
Self-timer indicator (24)
Page 17
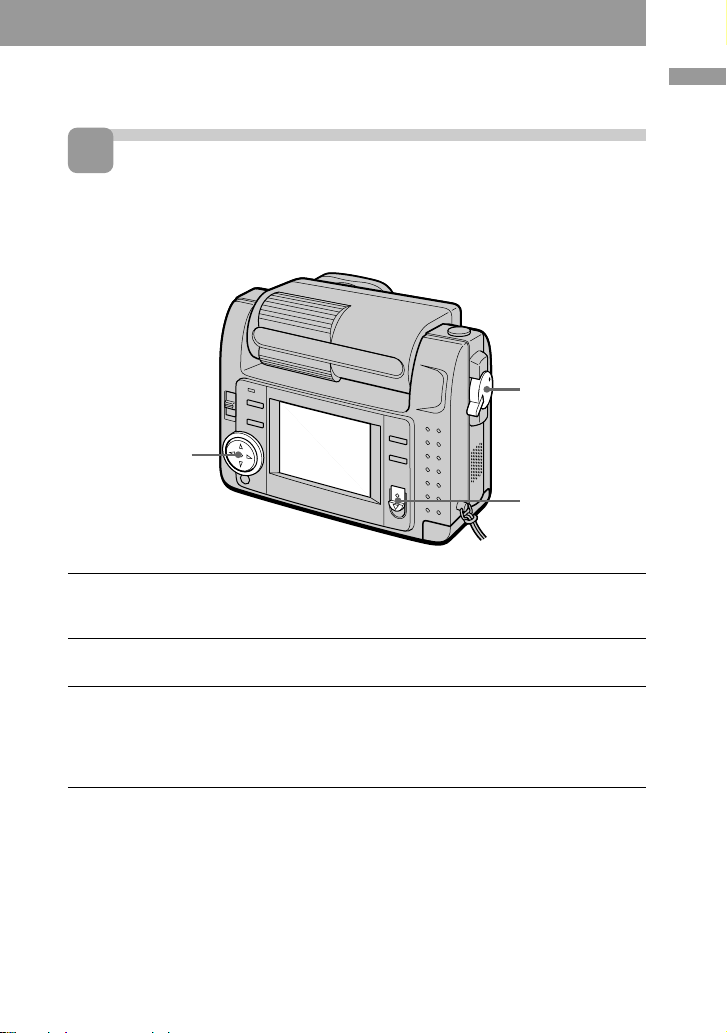
Playing back
1
Playing back still images
To play back images, slide the POWER switch down to turn on the power (The
POWER lamp lights up) and insert the Memory Stick.
MODE selector
Control button
POWER switch
1 Set the MODE selector to PLAY.
The last recorded image appears on the LCD screen.
“NO FILE” indicator appears on the LCD screen when there is no image.
2 Press v of the control button to display the menu bar on the LCD
screen.
3 Select the recorded image with the control button.
Select the button on the LCD screen with the control button, then press it.
'b: To display the preceding recorded image.
B': To display the next image.
INDEX: To display six recorded images at a time (INDEX screen).
Playing back
z When the menu bar is not
displayed
You can directly select the image with b
or B of the control button.
17-GB
Page 18

2
Playing back moving images
To play back moving images, slide the POWER switch down to turn on the power (The
POWER lamp lights up) and insert the Memory Stick.
MODE selector
Control button
POWER switch
1 Set the MODE selector to PLAY.
The last recorded image appears on the LCD screen.
The image recorded in MOVIE mode is displayed one-size smaller than the other
normal-sized images.
2 Press v of the control button to display the menu bar on the LCD
screen.
3 Select the recorded moving image with the control button.
Select the button on the LCD screen with
the control button, then press it.
'b: To display the preceding recorded
image.
B': To display the next image.
INDEX: To display six recorded
images at a time (INDEX screen).
VOL.
INDEX FILEDELETE SETUP
SELECT OK
160
6/8
MENU BAR OFF
4 Select the B (playback) button on the screen with the control
button, then press it.
Moving images and sound are played back.
Adjusting the volume
Select the VOL. +/– buttons on the
screen with the control button, then
adjust the volume with b or B of it.
18-GB
z When the menu bar is not
displayed
You can directly select the image with b
or B of the control button, and play back
the image with z of it.
Page 19

The indicators during playback
During playback still images (STILL)
Zoom scaling indicator (34)
Recording mode indicator (29)
Image size indicator (28)
Image number
60
min
2.0
640
DSC00007
During playback moving images (MOVIE)/still images with sounds (VOICE)
10/48
12:00AM1999 7 4
Remaining memory capacity
indicator
Number of stored images in Memory
Stick
Print mark indicator (46)
Protect indicator (37)
Recording date of the playback
image (12)/Menu bar and guide
menu (41)
File name
VOL. (Volume) buttons (18)
Moving image file indicator (18)
Image size indicator (28)
Playing back
min
VOL.
INDEX FILEDELETE SETUP
SELECT OK
320
6/860
0:10
MENU BAR OFF
Image number/number of stored
images in Memory Stick
Remaining memory capacity
indicator
Counter
Playback image (18)
Play bar (18)
Menu bar and guide menu (41)
Fast-forward/rewind buttons (18)
Search buttons (18)
B is displayed during stop, and X
during playback.
19-GB
Page 20

Battery life/the number of images that can be recorded/
played back
STILL mode
Continuous recording
LCD BACK LIGHT Battery life (min.) Number of images (record/playback)
ON 50 (45) 1000 (900)
OFF 60 (55) 1200 (1100)
Continuous playing*
LCD BACK LIGHT Battery life (min.) Number of images (record/playback)
ON 65 (60) 1000 (900)
OFF 75 (70) 1200 (1100)
Approximate battery life and the number of images that can be recorded/played back
at a temperature of 77°F (25°C), 640 × 480 image size, in NORMAL recording and
STANDARD quality mode. Shooting without the flash. Numbers in parentheses
indicate the time when you use a normally charged battery.
* Playing back single image at about 3-second intervals
MOVIE mode
Continuous recording
LCD BACK LIGHT Battery life (min.)
ON 40 (35)
OFF 50 (45)
Approximate minutes that can be recorded at a temperature of 77°F (25°C) and 160 ×
112 image size. Numbers in parentheses indicate the time when you use a normally
charged battery.
• Battery life and the number of images will be decreased if you use the camera while
you repeat turning the power on/off.
• The capacity of a Memory Stick is limited. The above figures are a guide when
continuously recording/playing back while replacing Memory Sticks.
• The battery life will be shorter when you carry out recording in a cold place. When
using the battery pack in a cold place, keep it warm by putting it into your pocket
and install it in the camera just before recording.
20-GB
Page 21

3
Viewing images using a
personal computer
With this camera, the still image data is compressed in JPEG format and moving image
data is compressed with MPEG-1 format.
These data can be viewed using a personal computer which installed JPEG and MPEG
browsing software as Sony PictureGear 3.2 Lite (supplied). For further information to
use the browsing software, refer to the software and the personal computer instruction
manual.
Using the optional PC card adaptor
PC card adaptor (not supplied)
Playing back
Memory Stick
Personal computer
Example: personal computer with Windows 95 installed
1 Start up personal computer and insert the optional PC card
adaptor (with the Memory Stick inside) into the PC card drive of
your personal computer.
2 Open “My computer” and double-click “PC card drive.”
Double-click folders in the following order as described below:
Recording mode STILL MOVIE VOICE E-MAIL
Folder 1 Dcim 1 Mssony 1 Mssony 1 Mssony
2 100msdcf 2 Moml0001 2 Momlv100 2 Imcif100
3 Double-click the desired data file.
21-GB
Page 22

Using the supplied accessories
You can send image data from the camera to an IBM PC/AT compatible PC (via the
serial port), using the supplied PC serial cable and Sony PictureGear 3.2 Lite.
Personal computer
PC serial cable
to the serial port
Digital still camera
to the DIGITAL I/O jack
1 Install the supplied application software Sony PictureGear 3.2 Lite
into the personal computer.
For details, refer to the instruction manual of the Sony PictureGear 3.2 Lite.
2 Connect one end of the PC serial cable to the DIGITAL I/O jack, and
other end to the serial port of IBM PC/AT compatible PC.
3 Turn on the power of the camera, and check that the PC serial
cable is connected to the DIGITAL I/O jack of the camera. Set the
MODE selector to PLAY.
“PC MODE” appears on the LCD screen, and the camera turns to standby for
communication.
4 Operate the personal computer to receive and use image file from
the camera.
For details on the operation of the personal computer, refer to the instruction
manual of personal computer and Sony PictureGear 3.2 Lite.
22-GB
Page 23

P Notes
• While you are operating the personal
computer, you cannot operate the
camera.
• Before making connections, turn off
each equipment. After connections are
completed, turn on each equipment.
• When you use the camera with
connecting to other equipment for a
long time, use the AC power adaptor/
charger.
Recommended OS/
applications example
OS
Windows 3.1
Windows 95 or later
Mac OS system 7.5 or later
Applications
Sony PictureGear 3.2 Lite
Microsoft Internet Explorer 4.0
Netscape Navigator, etc.
P Notes
• To play back an MPEG file, install
Active Movie Player (Direct Show).
• For playing back a file recorded in
MOVIE or VOICE mode, first copy it to
the hard disk of the personal computer.
If you play back the file from a Memory
Stick, the picture and sound may break
off.
• You cannot play back an MPEG file
with Windows 3.1.
• For Macintosh, you can use the Memory
Stick recorded with this camera using
the PC Exchange with Mac OS system
7.5 or later. A viewing application for
Macintosh is also necessary for viewing
images. To play back an MPEG file,
install Quick Time 3.2.
• For details on system requirements,
refer to the operating instructions of
your application software.
• Information on image rotating and faceto-face recording may not be sent to a
personal computer.
Notes on sending a
sound file with a still
image recorded in VOICE
mode to a personal
computer
• You cannot send a sound file with a
still image recorded in VOICE mode
to a personal computer connected
with the supplied PC serial cable.
• A sound file with a still image
recorded in VOICE mode can be
played back with the DSC-F55/F55E
Digital Still Camera.
• You can send a sound file with a still
image recorded in VOICE mode to a
personal computer if you use the
optional PC card adaptor.
Playing back
23-GB
Page 24

zVarious ways of
recording
Using the self-timer
Changing the lens
orientation – Face to
face recording
You can shoot yourself by placing
yourself and the LCD screen face to
face.
Lens part
MODE
selector
1 Set the MODE selector to MOVIE
or STILL.
2 Adjust the lens angle.
Rotate the lens part at about 180
degrees when face to face
recording.
With the self-timer about 10 seconds
after you press the shutter button, the
subject is recorded.
Shutter button
MODE
selector
Control button
1 Set the MODE selector to MOVIE
or STILL.
2 Press v of the control button.
The menu bar appears on the LCD
screen.
3 Select “SELFTIMER” with the
control button, then press it.
Self-timer indicator ( ) appears
on the screen.
4 Press the shutter button halfway
down.
The AE lock indicator (z) appears
on the screen.
Image on the
LCD screen
Recorded image
3 Start recording.
PNote
The images displayed on the LCD screen
are mirror images. But they are stored in
Memory Stick in the same way as you see
through the lens.
24-GB
5 Press the shutter button fully.
The recording lamp and the selftimer indicator ( ) flashes, then
the shutter is released in about 10
seconds and the image is recorded.
Page 25

Selecting brightness
of the flash (FLASH
LEVEL)
You can select brightness of the flash.
MODE
selector
5 Select the brightness of flash with
the control button.
SELF
TIMER
SELECT OK
WHITE BALANCE
FLASH LEVEL
EXPOSURE
HIGH
SETUPCAMERAEFFECT
FILE
6 Press V of the control button
repeatedly.
The menu bar disappears from the
screen.
Various ways of recording
Control button
1 Set the MODE selector to STILL.
2 Press v of the control button.
The menu bar appears on the LCD
screen.
3 Select “CAMERA” with the
control button, then press it.
The CAMERA menu appears on
the screen.
WHITE BALANCE
FLASH LEVEL
EXPOSURE
SELF
TIMER
SELECT OK
SETUPCAMERAEFFECT
FILE
4 Select “FLASH LEVEL” with the
control button, then press it.
HIGH
NORMAL
LOW
SETUPCAMERAEFFECT
FILE
SELF
TIMER
SELECT OK
WHITE BALANCE
FLASH LEVEL
EXPOSURE
z Hints for setting the flash
adjustment
When the subject or background is dark,
the flash adjustment may become too
high. In this case, set FLASH LEVEL to
LOW (
–). On the other hand, when the
subject or background is bright, the flash
adjustment may become too low. In this
case, set FLASH LEVEL to HIGH (
+). To
set the flash level properly, we
recommend you to do a trial recording.
Recording images in
macro
Press the (macro) button. The macro
indicator ( ) appears on the LCD
screen. You can shoot a subject that is
about 4 inches (10 cm) away from the
lens surface in macro mode.
If you press the (macro) button
again, macro mode is released and you
can record images in normal mode.
25-GB
Page 26

Recording enlarged
images – Zoom
recording
– button
+ button
MODE
selector
Control button
1 Set the MODE selector to STILL.
2 Press the + button.
The image on the LCD screen is
enlarged by 2.5 times.
The zoom indicator (
on the screen.
640
) appears
3 Press the shutter button fully.
The image is recorded at 640 × 480
size on a Memory Stick.
To return to the original
size
Press the – button. The zoom
indicator (
screen.
P Note
The image displayed on the screen is
degraded than the one to be recorded on
the Memory Stick.
z On zoom scaling
Zoom scaling fixes by 2.5 times and the
zoom indicator appears as (
640
) disappears from the
640
).
Enjoying Picture Effect
You can make pictures like those of
television with the Picture Effect
function.
MODE
selector
Control button
1 Set the MODE selector to MOVIE
or STILL.
2 Press v of the control button.
The menu bar appears on the LCD
screen.
3 Select “EFFECT” with the control
button, then press it repeatedly
until the desired picture effect is
displayed.
❐ NEG. ART: The color and
brightness of the picture is
reversed.
❐ SEPIA: The picture is sepia.
❐ B&W: The picture is
monochrome (black and
white).
❐ SOLARIZE: The light intensity
is more clear, and the picture
looks like an illustration.
4 Press V of the control button.
The menu bar disappears from the
screen.
To cancel the picture effect
Select “EFFECT” in the step 3, then
press the control button repeatedly
until the picture effect indicator
disappears.
26-GB
Page 27

Selecting image
quality (QUALITY)
You can select one of two available
image quality modes. The number of
images you can record is different
depending on which image quality
mode you select.
MODE
selector
Control button
1 Set the MODE selector to STILL.
2 Press v of the control button.
The menu bar appears on the LCD
screen.
3 Select “FILE” with the control
button, then press it.
The FILE menu appears on the
screen.
FORMAT
FILE NUMBER
IMAGE SIZE
QUALITY
REC MODE
SELF
TIMER
SELECT OK
SETUPCAMERAEFFECT
FILE
❐ FINE (FINE): Use this mode
when giving priority to image
quality.
❐ STANDARD (STD): Use this
mode as a standard image
quality.
5 Select the image quality with the
control button, then press it.
FORMAT
FILE NUMBER
SELF
TIMER
SELECT OK
IMAGE SIZE
QUALITY
REC MODE
FINE
SETUPCAMERAEFFECT
FILE
6 Press V of the control button
repeatedly.
The menu bar disappears from the
screen.
z What is the difference in the
image quality mode?
An image is compressed in the JPEG
format before recording. The memory
capacity allocated to each image is
different depending on the image
quality.
P Note
Depending on the image, changing the
image quality may not affect the image
appearance on the screen.
Various ways of recording
4 Select “QUALITY” with the
control button, then press it.
FORMAT
FILE NUMBER
SELF
TIMER
SELECT OK
IMAGE SIZE
QUALITY
REC MODE
FINE
STANDARD
SETUPCAMERAEFFECT
FILE
27-GB
Page 28

Selecting image size
You can change the image size
according to your recording
conditions.
MODE
selector
Control button
1 Set the MODE selector to MOVIE
or STILL.
2 Press v of the control button.
The menu bar appears on the LCD
screen.
3 Select “FILE” with the control
button, then press it.
The FILE menu appears on the
screen.
FORMAT
FILE NUMBER
IMAGE SIZE
QUALITY
REC MODE
SELF
TIMER
SELECT OK
SETUPCAMERAEFFECT
FILE
Items for STILL mode
❐ 1600 × 1200: Records a 1600 ×
1200 JPEG file.
❐ 1024 × 768: Records a 1024 × 768
JPEG file.
❐ 640 × 480: Records a 640 × 480
JPEG file.
Items for MOVIE mode
❐ 320 × 240: Records a 320 × 240
MPEG file.
❐ 160 × 112: Records a 160 × 112
MPEG file.
5 Select the desired image size with
the control button, then press it.
FORMAT
SELF
TIMER
SELECT OK
FILE NUMBER
IMAGE SIZE
QUALITY
REC MODE
1600×1200
SETUPCAMERAEFFECT
FILE
6 Press V of the control button
repeatedly.
The menu bar disappears from the
screen.
4 Select “IMAGE SIZE” with the
control button, then press it.
FORMAT
FILE NUMBER
IMAGE SIZE
QUALITY
REC MODE
28-GB
SELF
TIMER
SELECT OK
FILE
1600
×
1024×768
640×480
1200
SETUPCAMERAEFFECT
Page 29

Selecting recording
mode (REC MODE)
You can record a still image and sound
together, or a still image which is
suitable for e-mail transmission.
MODE
selector
Control button
1 Set the MODE selector to STILL.
2 Press v of the control button.
The menu bar appears on the LCD
screen.
❐ VOICE: Records a still image
and sound together besides a
JPEG file.
❐ E-MAIL: Records a 320 × 240
JPEG file besides a 1600 ×
1200, 1024 × 768, or 640 × 480
JPEG file. E-mail files are
suitable for e-mail
transmission, etc. because they
contain compressed data.
❐ NORMAL: Records a JPEG file
in selected image size.
5 Select the desired recording mode
with the control button, then press
it.
FORMAT
FILE NUMBER
IMAGE SIZE
SELF
TIMER
SELECT OK
QUALITY
REC MODE
E-MAIL
SETUPCAMERAEFFECT
FILE
Various ways of recording
3 Select “FILE” with the control
button, then press it.
The FILE menu appears on the
screen.
FORMAT
FILE NUMBER
IMAGE SIZE
QUALITY
REC MODE
SELF
TIMER
SELECT OK
SETUPCAMERAEFFECT
FILE
4 Select “REC MODE” with the
control button, then press it.
FORMAT
FILE NUMBER
SELF
TIMER
SELECT OK
IMAGE SIZE
QUALITY
REC MODE
VOICE
E-MAIL
NORMAL
SETUPCAMERAEFFECT
FILE
6 Press V of the control button
repeatedly.
The menu bar disappears from the
screen.
29-GB
Page 30

The MODE selector is set to “STILL”
Recording
mode
NORMAL
E-MAIL
VOICE
Image
size
1600 × 1200
1024 × 768
640 × 480
1600 × 1200
1024 × 768
640 × 480
1600 × 1200
1024 × 768
640 × 480
Recording
file
JPEG (1600 × 1200)
JPEG (1024 × 768)
JPEG (640 × 480)
JPEG (1600 × 1200)
JPEG (320 × 240)
JPEG (1024 × 768)
JPEG (320 × 240)
JPEG (640 × 480)
JPEG (320 × 240)
JPEG (1600 × 1200)
MPEG audio with
still image (320 × 240)
JPEG (1024 × 768)
MPEG audio with
still image (320 × 240)
JPEG (640 × 480)
MPEG audio with
still image (320 × 240)
The MODE selector is set to “MOVIE”
Mode
Presentation
Video mail
* Continuous recording time
Image
size
320 × 240
160 × 112
Recording
file
MPEG (320 × 240)
MPEG (160 × 112)
File name
(ex.)
Dsc
00001.jpg
00001.jpg
00001.jpg
00001.jpg
00001.jpg
00001.jpg
00001.jpg
00001.mpg
00001.jpg
00001.mpg
00001.jpg
00001.mpg
File name
(ex.)
Mov
00001.mpg
00001.mpg
No. of images that
can be recorded on a
Memory Stick
STANDARD FINE
10 – 15 5 – 8
27 – 49 14 – 27
47 – 63 27 – 38
10 – 14 5 – 8
24 – 48 13 – 24
38 – 48 24 – 32
9 – 12 5 – 7
19 – 27 11 – 19
27 – 32 19 – 24
Maximum recording
time on a Memory
Stick (sec.) *
40
160
z On directory
The directory of the file depending on
the recording mode is as follows:
NORMAL: ¥Dcim¥100msdcf
E-MAIL: ¥Mssony¥Imcif100
VOICE: ¥Mssony¥Momlv100
Moving image: ¥Mssony¥Moml0001
30-GB
Page 31

Adjusting exposure
(EXPOSURE)
You can adjust the exposure according
to your conditions.
When
to use?
The subject is too dark or
bright against the
background because of
backlighting, a light source
near by, etc.
MODE
selector
Control button
1 Set the MODE selector to MOVIE
or STILL.
2 Press v of the control button.
The menu bar appears on the LCD
screen.
3 Select “CAMERA” with the
control button, then press it.
The CAMERA menu appears on
the screen.
5 Select the desired exposure value
with the control button, then press
it.
You can select values ranging
from – 1.5EV to + 1.5EV in steps of
0.5EV.
WHITE BALANCE
SELF
TIMER
SELECT OK
FLASH LEVEL
0 EVEXPOSURE
SETUPCAMERAEFFECT
FILE
6 Press V of the control button
repeatedly.
The menu bar disappears from the
screen.
Various ways of recording
WHITE BALANCE
FLASH LEVEL
EXPOSURE
SELF
TIMER
SELECT OK
SETUPCAMERAEFFECT
FILE
4 Select “EXPOSURE” with the
control button, then press it.
WHITE BALANCE
SELF
TIMER
SELECT OK
FLASH LEVEL
EXPOSURE
+
1.5EV
SETUPCAMERAEFFECT
FILE
31-GB
Page 32

Adjusting the white
balance
White balance adjustment allows more
natural color balance for camera
recording. Normally white balance is
automatically adjusted.
MODE
selector
Control button
1 Set the MODE selector to MOVIE
or STILL.
2 Press v of the control button.
The menu bar appears on the LCD
screen.
3 Select “CAMERA” with the
control button, then press it.
The CAMERA menu appears on
the screen.
❐ IN DOOR (n):
• Lighting condition changes
quickly
• Too bright place such as
photography studios
• Under sodium lamps or
mercury lamps
❐ OUT DOOR ( ):
• Recording a sunset/sunrise,
just after sunset, just before
sunrise, neon signs, or
fireworks
• Under a color matching
fluorescent lamp
❐ HOLD (HOLD): Recording a
single-colored subject or
background
❐ AUTO: Adjusting the white
balance automatically
5 Select the desired white balance
mode with the control button, then
press it.
OUT DOOR
SETUPCAMERAEFFECT
FILE
SELF
TIMER
SELECT OK
WHITE BALANCE
FLASH LEVEL
EXPOSURE
WHITE BALANCE
FLASH LEVEL
EXPOSURE
SELF
SELECT OK
FILE
TIMER
4 Select “WHITE BALANCE” with
the control button, then press it.
IN DOOR
OUT DOOR
HOLD
AUTO
FILE
32-GB
SELF
TIMER
SELECT OK
WHITE BALANCE
FLASH LEVEL
EXPOSURE
6 Press V of the control button
repeatedly.
The menu bar disappears from the
SETUPCAMERAEFFECT
SETUPCAMERAEFFECT
screen.
To return to automatic
adjustment
Select “AUTO” in the step 5 with the
control button, then press it.
Page 33

zVarious ways of
playback
Playing back multiple
images at a time
(INDEX)
You can play back six recorded images
at a time. You can also select a specific
image from the six images and enlarge
it to full-size.
When
to use?
To search for an image you
want from all the recorded
images.
MODE
selector
Control button
1 Set the MODE selector to PLAY.
2 Press v of the control button.
The menu bar appears on the LCD
screen.
: Moving image file
: Still image with sound file
: E-mail mode file
: Print mark
To display the other six images
Select “v/V” at the lower left on the
screen with the control button, then
press v/V of the control button.
v Displays preceding six images
V Displays following six images
To return to the normal
playback
• Select the desired image with the
control button, then press it.
• Select “RETURN” with the control
button, then press it.
PNote
You cannot clear the menu bar in INDEX
mode.
Various ways of playback
3 Select “INDEX” with the control
button, then press it.
Six images are displayed at a time
(INDEX screen).
1999 7 4 10:30PMDSC00100
RETURN
SELECT SINGLE DISPLAY
Showing the position of an image
whose number is displayed
FILEDELETE SETUP
33-GB
Page 34

Enlarging a part of the
image – Zoom and
trimming
You can enlarge and display a part of
the recorded image.
– button
+ button
MODE
selector
Control button
1 Set the MODE selector to PLAY.
2 Display the image to enlarge.
3 Zoom in/out the image by
pressing the + or – button
repeatedly.
The zoom scaling indicator ( ×
2.0) appears on the LCD screen.
To record an enlarged
image (trimming)
1Enlarge the image.
2Press the shutter button. The image
is recorded at 640 × 480 size.
PNotes
•You cannot use this function on moving
images.
•Zoom scaling is up to 5× regardless of
the original size.
• The enlarged image is recorded at 640 ×
480 size.
4 Press the control button repeatedly
to trim the image.
v : Image moves downward
V : Image moves upward
b : Image moves rightward
B : Image moves leftward
To return to the normal
size
Press the – button repeatedly, until
the zoom scaling indicator ( × 2.0)
disappears from the screen, or simply
press the control button.
The zoom scaling indicator ( × 2.0)
disappears from the screen.
34-GB
Page 35

Rotating image
(ROTATE)
You can rotate the playback picture.
Information on the direction of the
rotated image is written to the data
file.
When
to use?
To play back vertical
images recorded to
horizontal images.
MODE
selector
Control button
1 Set the MODE selector to PLAY.
2 Display the image to rotate.
3 Press v of the control button.
The menu bar appears on the LCD
screen.
4 Select “FILE” with the control
button, then press it.
The FILE menu appears on the
screen.
5 Select “ROTATE (90°)” with the
control button, then press it.
ROTAT E
SELECT OK
❐ : Rotates the image clockwise
by 90 degrees
❐ : Rotates the image counter-
clockwise by 90 degrees
RETURN
6 Rotate the image, and select
“RETURN” with the control
button, then press it.
To return to the original
image
Select or in the step 6 until the
image returns to the original image.
Select “RETURN” with the control
button, then press it.
PNotes
• The image recorded with other
equipment may not be rotated.
• If the write protect tab on the Memory
Stick is set to LOCK, or the image is
protected, you cannot rotate the image.
• Information on image rotating may not
be sent to a personal computer.
Various ways of playback
FORMAT
ROTATE (90°)
SLIDE SHOW
PRINT MARK
PROTECT
INDEX FILEDELETE SETUP
SELECT OK
35-GB
Page 36

Playing back images
in a continuous loop
(SLIDE SHOW)
Plays back all recorded images in
succession automatically.
When
For a presentation, etc.
to use?
MODE
selector
Control button
1 Set the MODE selector to PLAY.
2 Press v of the control button.
The menu bar appears on the LCD
screen.
3 Select “FILE” with the control
button, then press it.
The FILE menu appears on the
screen.
FORMAT
ROTATE (90°)
SLIDE SHOW
PRINT MARK
PROTECT
INDEX FILEDELETE SETUP
SELECT OK
4 Select “SLIDE SHOW” with the
control button, then press it.
10/48
5 Set “INTERVAL” with the control
button.
Set it with b/B of the control
button.
You can select from 1 MIN (one
minute), 30 SEC (30 seconds), 10
SEC (10 seconds), 5 SEC (five
seconds), or 3 SEC (three seconds).
6 Set “REPEAT” with the control
button.
❐ ON: Plays back images in a
continuous loop until
“RETURN” is selected.
❐ OFF: After all images played
back, slide show ends.
7 Select “START” with the control
button.
Slide show begins.
To cancel the setting
Select “CANCEL” with the control
button, then press it.
PNote
Interval time may not stay in adjustment
depending on setting of image size and
quality.
To operate the slide show
• Playback pause
Select “X” with the control button,
then press it.
• Playback pause release
Select “B” with the control button,
then press it.
• Search
Select “'b/B'” with the control
button, then press b/B of it. You
can also operate with the control
button only.
• Cancel
Select “RETURN ” with the control
button, then press it.
36-GB
SELECT OK
SLIDE SHOW
INTERVAL
REPEAT
30 SEC
CANCELSTART
OFFON
Page 37

Preventing accidental
erasure (PROTECT)
5 Select “ON” with the control
button, then press it.
The displayed image is protected.
To prevent accidental erasure, you can
protect all or selected images.
MODE
selector
Control button
In single mode
1 Set the MODE selector to PLAY,
then display the image to protect.
2 Press v of the control button.
The menu bar appears on the LCD
screen.
3 Select “FILE” with the control
button, then press it.
The FILE menu appears on the
screen.
FORMAT
ROTATE (90°)
SLIDE SHOW
PRINT MARK
PROTECT
INDEX FILEDELETE SETUP
SELECT OK
4 Select “PROTECT” with the
control button, then press it.
6 Press V of the control button
repeatedly.
The menu bar disappears from the
screen.
“-” appears on the protected
image.
To release protection
Select “OFF” with the control button in
the step 5, then press it.
In INDEX mode
1 Display the INDEX screen.
2 Select “PROTECT” of the FILE
menu with the control button,
then press it.
The FILE menu appears on the
LCD screen.
3 Select “ALL” to protect (or
unprotect) all images, or
“SELECT” to protect (or
unprotect) selected images with
the control button, then press it.
When selecting “ALL”
PROTECT: ALL
ON
FORMAT
OFF
PRINT MARK
CANCEL
PROTECT
SELECT
To protect all images
Select “ON” with the control
button, then press it.
FILEDELETE SETUPRETURN
SINGLE DISPLAY
Various ways of playback
FORMAT
ROTATE (90°)
SLIDE SHOW
PRINT MARK
PROTECT
INDEX FILEDELETE SETUP
SELECT OK
ON
OFF
To release protection of all
images
Select “OFF” with the control
button, then press it.
Continue to the next page c
37-GB
Page 38

When selecting
“SELECT”
0001-0006/0100
SELECT OK
To protect images
1 Select the image to protect
with the control button, then
press it.
The protect indicator (-)
appears on the selected image.
ENTERPROTECT CANCEL
Deleting images
(DELETE)
You can delete all or selected images
that you no longer want to keep.
MODE
selector
2 After selecting all images to
protect, select “ENTER” with
the control button, then press
it.
The protect indicator (-)
changes from green to white.
To release protection
Select the images to unprotect in
the step 1, then select “ENTER”
with the control button then press
it.
Control button
In single mode
1 Set the MODE selector to PLAY,
then display the image to delete.
2 Press v of the control button.
The menu bar appears on the LCD
screen.
3 Select “DELETE” with the control
button, then press it.
DELETE
OK
SELECT OK
CANCEL
4 Select “OK” with the control
button, then press it.
The image is deleted.
PNote
Once you delete an image, you cannot
restore it. Check the image to delete
carefully before deleting.
38-GB
Page 39

In INDEX mode
1 Display the INDEX screen.
2 Select “DELETE” with the control
button, then press it.
3 Select “ALL” to delete all images,
or “SELECT” to delete selected
images with the control button,
then press it.
When selecting “ALL”
DELETE ALL ?
OK
ALL
SELECT
CANCEL
FILEDELETE SETUPRETURN
OK
SELECT
Select “OK” with the control
button, then press it.
When selecting
“SELECT”
0001-0006/0100
SELECT OK
1 Select the image to delete with
the control button, then press
it.
The delete indicator (green)
( ) appears on the selected
image.
ENTERDELETE CANCEL
To cancel deleting
Select “CANCEL” with the
control button, then press it.
PNotes
• Even if you select “ALL,” you cannot
delete the protected image.
• When you select “SELECT,” you
cannot select a protected image.
Various ways of playback
2 After selecting all the images
to delete, select “ENTER” with
the control button, then press
it.
The selected images are
deleted.
39-GB
Page 40

Formatting
(initializing) a
Memory Stick
MODE
selector
Control button
1 Press v of the control button.
The menu bar appears on the LCD
screen.
2 Select “FILE” with the control
button, then press it.
The FILE menu appears.
FORMAT
FILE NUMBER
IMAGE SIZE
QUALITY
REC MODE
SELF
TIMER
SELECT OK
SETUPCAMERAEFFECT
FILE
3 Select “FORMAT” with the control
button, then press it.
PNote
If you initialize the Memory Stick, all the
images stored in Memory Stick are lost
even if the image is protected. Before
initialization, make sure to copy the
images you want to store on your
computer, etc.
FORMAT
FILE NUMBER
IMAGE SIZE
QUALITY
REC MODE
SELF
TIMER
SELECT
FILE
OK
4 Select “OK” with the control
button, then press it.
To cancel formatting
Select “CANCEL” with the control
button in the step 4, then press it.
40-GB
OK
CANCEL
SETUPCAMERAEFFECT
Page 41

BChanging the menu
setting
Changing the menu
setting
2 Select the desired item with the
control button, then press it.
The color of the item changes from
blue to yellow.
1 Press v of the control button.
The menu bar appears on the LCD
screen.
MOVIE/STILL
SELF
TIMER
PLAY (single mode)
INDEX FILEDELETE SETUP
SELECT OK
PLAY (INDEX mode)
SELECT
FILE
MENU BAR OFFSELECT OK
MENU BAR OFF
1999 7 4 10:30PMDSC00100
FILEDELETE SETUPRETURN
SINGLE DISPLAY
SETUPCAMERAEFFECT
/LANGUAGE
CLOCK SET
BEEP
INDEX FILEDELETE SETUP
OK
SELECT
3 Select the desired setting with the
control button, then press it.
The screen returns to the menu in
the step 2.
To clear the menu
Press V of the control button
repeatedly until the menu bar
disappears.
Changing the menu setting
41-GB
Page 42

Setting the mode of each item
Menu items that can be modified differ depending on the setting of the MODE
selector. The LCD screen shows only the items you can operate at the moment.
Initial settings are indicated in bold letters.
Items in STILL/MOVIE mode
SELF TIMER
Select this item to record with the self-timer. (page 24)
EFFECT
<NEG. ART/SEPIA/B&W/SOLARIZE>
• Select NEG. ART to record the image color reversed.
• Select SEPIA to record sepia image.
• Select B&W to record monochrome image.
• Select SOLARIZE to record illustrational image.
FILE
FORMAT
<OK/CANCEL>
• Select OK to format a Memory Stick.
• Select CANCEL to cancel formatting a Memory Stick.
FILE NUMBER <SERIES/NORMAL>
• Select SERIES to put numbers to files in sequence even if the Memory Stick is
changed.
• Select NORMAL to reset the numbering of files each time the Memory Stick is
changed.
IMAGE SIZE (during STILL mode) <1600 × 1200/1024 × 768/640 × 480>
• Select 1600 × 1200 to record a 1600 × 1200 JPEG image.
• Select 1024 × 768 to record a 1024 × 768 JPEG image.
• Select 640 × 480 to record a 640 × 480 JPEG image.
(during MOVIE mode) <320 × 240/160 × 112>
• Select 320 × 240 to record a 320 × 240 MPEG image.
• Select 160 × 112 to record a 160 × 112 MPEG image.
QUALITY (only in STILL mode) <FINE/STANDARD>
• Select FINE when giving priority to image quality.
• Select STANDARD as a standard image quality.
REC MODE (only in STILL mode) <VOICE/E-MAIL/NORMAL>
• Select VOICE to record a still image and sound together besides a JPEG file.
• Select E-MAIL to record a 320 × 240 JPEG file besides a 1600 × 1200, 1024 × 768,
or 640 × 480 JPEG file.
• Normally select NORMAL. A JPEG file is recorded in selected image size.
42-GB
Page 43

REC TIME SET (only in MOVIE mode) <15 SEC/10 SEC/5 SEC>
Adjust the recording time of the moving image.
CAMERA
WHITE BALANCE <IN DOOR/OUT DOOR/HOLD/AUTO>
• Select IN DOOR to record images inside.
• Select OUT DOOR to record images outside.
• Select HOLD to record single colored subject or background.
• Select AUTO to adjust the white balance automatically.
FLASH LEVEL (only in STILL mode) <HIGH/NORMAL/LOW>
• Select HIGH to make the flash level higher than normal.
• Normally select NORMAL.
• Select LOW to make the flash level lower than normal.
EXPOSURE <+1.5EV to –1.5EV>
Select this item to adjust exposure.
SETUP
DEMO <STBY/ON or OFF>
Only when you use the AC power adaptor/charger during MOVIE or STILL
mode, DEMO appears in the menu.
To stop the demonstration, turn off the camera.
• Select ON to make the demonstration appear. The demonstration will start
about 10 minutes after the power is turned on if the camera has not been
operated.
• Select OFF to deactivate the demonstration mode.
/LANGUAGE <ENGLISH or /JPN>
• Select ENGLISH to display all items in English.
• Select /JPN to display all items in Japanese.
Changing the menu setting
CLOCK SET
Select this item to set the date and time.
BEEP <SHUTTER/ON/OFF>
• Select SHUTTER to turn off the beep only.
• Normally set to ON.
• Select OFF to turn off the beep/shutter sound.
Items in PLAY (single) mode
INDEX
Select this item to display six recorded images at a time.
43-GB
Page 44

DELETE
<OK/CANCEL>
• Select OK to delete displayed image.
• Select CANCEL to cancel deleting image.
FILE
FORMAT
<OK/CANCEL>
• Select OK to format a Memory Stick.
• Select CANCEL to cancel formatting a Memory Stick.
ROTATE (90°)
Select this item to rotate an image.
SLIDE SHOW
Select this item to play back images in a continuous loop.
PRINT MARK <ON/OFF>
• Select ON to mark the print mark on the image.
• Select OFF to unmark the mark.
PROTECT <ON/OFF>
• Select ON to protect displayed image.
• Select OFF to release protection of the image.
Items in PLAY (INDEX) mode
DELETE
<ALL/SELECT>
• Select ALL to delete all images.
• Select SELECT to delete selected images.
FILE
FORMAT
<OK/CANCEL>
• Select OK to format a Memory Stick.
• Select CANCEL to cancel formatting a Memory Stick.
PRINT MARK <ALL/SELECT/CANCEL>
• Select ALL to unmark the print marks on all images.
• Select SELECT to mark or unmark the print mark on the selected images.
• Select CANCEL to cancel the setting.
PROTECT <ALL/SELECT/CANCEL>
• Select ALL to protect all images.
• Select SELECT to protect or unprotect selected images.
• Select CANCEL to cancel the setting.
44-GB
Page 45

z
Using image data with
other equipment
Using the house
current (mains)
Power cord (mains
lead) (supplied)
AC power adaptor/
charger AC-VF10
(supplied)
DK-115 DC
connecting cable
(supplied)
Slot cover for AC
power adaptor/charger
1 Open the battery cover.
2 Insert the one end of the DK-115
DC connecting cable to the battery
terminal, and close the cover.
When inserting the cable, open the
slot cover for AC power adaptor/
charger and be careful not to pinch
the cable.
3 Connect the other end of the DC
connecting cable to the AC power
adaptor/charger.
4
Connect the power cord (mains
lead) to the AC power adaptor/
charger, and to a wall outlet (mains).
Watching images on a
TV screen
Connect the camera to the TV that has
a video input jack. You can enjoy a
“SLIDE SHOW“ on the TV screen.
When shooting an image in macro, you
can adjust the focus more easily on the
TV screen.
Set the TV/video
input selector to
the video position
A/V connecting
cable (supplied)
to A/V OUT
1 Connect the A/V OUT jack of the
camera to the video input jack of
the TV.
2 Start playback on the camera.
Playback picture appears on the
TV screen.
PNotes
•Before making connections, turn off
each equipment. After connections are
completed, turn on each equipment.
• When you use the camera with
connecting other equipment for a long
time, use the AC power adaptor/charger.
• You cannot use a TV that has an
antenna (aerial) connector only.
• When the MODE selector is set to
MOVIE or STILL and the lens is rotated
to the same side as the LCD screen (face
to face shooting), the mirror image
appears upside-down on the TV screen.
• Beep does not sound when connecting
with the A/V connecting cable. The
image does not appear on the LCD
screen.
45-GB
Using image data with other equipment
Page 46

Printing the recorded
images
Marking a print mark
on an image
Using a printer, you can print images
recorded on this camera.
You can send the image data to the
printer that has video input jack. For
details on printing, refer to the
instruction manual of the printer.
TV
Watching an image
Color video
printer
Printing images
to video input
A/V connecting
cable (supplied)
to A/V OUT
1 Connect the A/V OUT jack of the
camera to the video input jack of
the printer.
2 Start playback on the camera.
Playback picture appears on the
TV screen.
You can mark a print mark on images
recorded with this camera. This mark
is convenient for checking the images
to print.
Your camera conforms with the DPOF
(Digital Print Order Format) standard
for specifying the still images to print
out.
MODE
selector
Control button
In single mode
1 Set the MODE selector to PLAY
and display the image to mark.
2 Press v of the control button.
The menu bar appears on the LCD
screen.
3 Select “FILE” with the control
button, then press it.
The FILE menu appears on the
screen.
3 The printer receives image data
from the camera and starts
printing.
For the detailed procedures, refer
to the instruction manual of the
printer.
46-GB
FORMAT
ROTATE (90°)
SLIDE SHOW
PRINT MARK
PROTECT
INDEX FILEDELETE SETUP
SELECT OK
Page 47

4 Select “PRINT MARK” with the
control button, then press it.
FORMAT
ROTATE (90°)
SLIDE SHOW
PRINT MARK
PROTECT
INDEX FILEDELETE SETUP
SELECT
ON
OFF
OK
5 Select “ON” with the control
button, then press it.
The print mark is marked on an
image.
6 Press V of the control button
repeatedly.
The menu bar disappears from the
screen.
“ ” is marked on the image.
To unmark the print mark
Select “OFF” with the control button in
the step 5, then press it.
In INDEX mode
To unmark the all print
marks
Select “OFF” with the control
button, then press it.
When selecting
“SELECT”
0001-0006/0100
SELECT OK
To mark the print mark
1 Select the image to mark with
the control button, then press
it. “ ” appears on the
selected image.
2 After selecting all the images
to mark, select “ENTER” with
the control button, then press
it.
“ ” changes from green to
white.
ENTERPRINT MARK CANCEL
Using image data with other equipment
1 Display the INDEX screen.
2 Select “PRINT MARK” of “FILE”
with the control button, then press
it.
3 Select “ALL” to unmark all
images, or “SELECT” to mark (or
unmark) selected images with the
control button, then press it.
When selecting “ALL”
PRINT MARK: ALL
OFF
FORMAT
CANCEL
PRINT MARK
PROTECT
SELECT
FILEDELETE SETUPRETURN
OK
To unmark the selected print
mark
Select the images to unmark in the step
1, then select “ENTER” with the
control button, then press it.
47-GB
Page 48

z
Additional information
Precautions
On Memory Stick
• Do not remove the battery or the AC
power adaptor/charger during
recording or playback. Always turn off
the power before you remove the
battery or disconnect the AC power
adaptor/charger.
• Do not touch the terminal of the
Memory Stick by your hand or a metal
object.
• Do not attach any other material than
the supplied label on the label space of
the Memory Stick.
• Do not strike, bend, or drop the
Memory Stick.
• Do not disassemble or convert the
Memory Stick.
• Do not wet the Memory Stick.
• Do not use or store the Memory Stick in
the following areas:
– Hot locations such as the inside of a
car or the outdoors under hot weather.
– Humid or corrosive locations.
• Carry or store the Memory Stick in its
supplied case.
• Setting the write-protect switch to
“LOCK” disables you to record, delete,
or format data.
• We recommend that you make a
backup copy important data.
• Do not remove the Memory Stick while
reading or writing data.
• Recorded data may be lost or damaged
in the following situations:
– When you remove the Memory Stick
or turn off the camera while reading
or writing data.
– When you use the Memory Stick in
the locations subject to static
electricity or noise.
• This camera is not guaranteed to
properly play back images shot with
other equipment. The images shot with
this camera are not guaranteed to be
played back properly with other
equipment.
On moisture condensation
If the camera is brought directly from a
cold to a warm location, or is placed in
a very damp room, moisture may
condense inside or outside the camera.
Should this occur, the camera will not
operate properly. In this case, remove
the battery pack and open the battery
cover and wait about an hour for the
moisture to evaporate.
How to prevent moisture
condensation
When bringing the camera from a cold
place to a warm place, put the camera
in a plastic bag and allow it to adapt to
room conditions over a period of time.
1 Be sure to tightly seal the plastic
bag containing the camera.
2 Remove the bag when the air
temperature inside it has reached
the temperature surrounding it
(about an hour).
On cleaning
Cleaning the LCD screen
Wipe the screen surface with the
cleaning cloth (not supplied) or a LCD
cleaning kit (not supplied) to remove
fingerprints, dust, etc.
Cleaning the camera surface
Clean the camera surface with a soft
cloth slightly moistened with water.
Do not use any type of solvent such as
alcohol or benzene as it may mar the
finish of the casing.
If you have any questions or problems
concerning your camera, please
consult your nearest Sony dealer.
48-GB
Page 49

About the lithium battery
Your camera is supplied with a
rechargeable lithium battery installed
so as to retain the date and time, etc.,
regardless of the setting of the POWER
switch. The lithium battery is always
charged as long as you are using the
camera. The battery, however, will get
discharged gradually if you do not use
the camera. It will be completely
discharged in about six months if you
do not use the camera at all. Even if the
lithium battery is not charged, it will
not affect the camera operation. To
retain the date and time, etc., charge
the battery if the battery is discharged.
The following are charging methods:
• Connect the camera to a wall outlet
(mains) using the supplied AC
power adaptor/charger, and leave
the camera with the POWER switch
turned off for more than 24 hours.
• Or, install the fully charged battery
pack in the camera, and leave the
camera with the POWER switch
turned off for more than 24 hours.
Using your camera abroad
Power sources
You can use your camera in any
country or area with the supplied
battery charger within 100 V to 240 V
AC, 50/60 Hz. Use a commercially
available AC plug adaptor [a], if
necessary, depending on the design of
the wall outlet (mains) [b].
Watching the playback picture on TV
If you want to view the playback
picture on a TV, you need a TV having
a video input jack and a video
connecting cable.
The color system of the TV must be the
same as that of your digital still
camera. TV color systems differ from
country to country. Check the
following list:
NTSC system countries
Bahama Islands, Bolivia, Canada,
Central America, Chile, Colombia,
Ecuador, Jamaica, Japan, Korea,
Mexico, Peru, Surinam, Taiwan, the
Philippines, the U.S.A., Venezuela, etc.
PAL system countries
Australia, Austria, Belgium, China,
Denmark, Finland, Germany, Great
Britain, Holland, Hong Kong, Italy,
Kuwait, Malaysia, New Zealand,
Norway, Portugal, Singapore, Spain,
Sweden, Switzerland, Thailand, etc.
PAL-M system country
Brazil
PAL-N system countries
Argentina, Paraguay, Uruguay
SECAM system countries
Bulgaria, Czech Republic, France,
Guiana, Hungary, Iran, Iraq, Monaco,
Poland, Russia, Slovak Republic,
Ukraine, etc.
Additional information
AC-VF10
[a] [b]
49-GB
Page 50

Troubleshooting
Should any problem persist after you have made these checks, consult your nearest
Sony dealer. If warning and notice messages appear on the LCD screen, see page 52.
Symptom
The camera does not
work.
You cannot record
images.
The picture is out of
focus.
The picture is noisy.
The picture is too
dark.
Cause/Solution
•The battery is weak (the indicator appears on the
LCD screen).
b
Charge the battery. (page 9)
•The AC power adaptor/charger is not connected
securely.
b
Connect it to the battery terminal of the camera
and a wall outlet (mains) firmly. (page 45)
•The built-in micro computer does not work properly.
b
Disconnect any power sources and reconnect it
after one minute. Then turn the power on by
sliding the POWER switch down.
•The MODE selector is not set to MOVIE or STILL.
b
Set it to MOVIE or STILL. (pages 14, 15)
•Memories are full.
b
Delete certain images you do not want to keep,
and then start recording. (page 38)
•No Memory Stick has been inserted into this camera.
b
Insert a Memory Stick. (page 11)
•The write protect tab on the Memory Stick is set to
LOCK.
b
Set it to recording position.
•The battery is weak (the indicator appears on the
LCD screen).
b
Charge the battery. (page 9)
•The camera is not in macro recording mode if you
shoot a subject that is about 4 to 19 3/4 inches (10 to
50 cm) away from the lens.
b
Press the (macro) button to be in macro
recording mode. (page 25)
•The camera is placed near a TV or other equipment
that uses strong magnets.
b
Place the camera away from the TV, etc.
•You are shooting a subject with the light source
behind the subject or light is insufficient.
b
Adjust exposure. (page 31)
b
Adjust brightness of the LCD screen. (page 8)
50-GB
Page 51

Symptom
Vertical streaks
appear when shooting
a very bright subject.
Black points and/or
bright (red, blue or
green) points appear
on the LCD screen.
The battery life
deteriorates too fast.
You cannot play back
the images.
You cannot delete an
image.
Cause/Solution
• The smear phenomenon.
b
The camera is not malfunctioning.
•These points are normal with the LCD screen and do
not affect the recorded image in any way.
b
The camera is not malfunctioning.
•The battery is not charged enough.
b
Charge the battery fully. (page 9)
•The battery is dead.
b
Replace the battery with a new one. (page 10)
•The MODE selector is not set to PLAY.
b
Set it to PLAY. (pages 17, 18)
•No Memory Stick has been inserted, or no image has
been recorded on the Memory Stick.
b
Insert the recorded Memory Stick. (page 11)
•The battery is discharged.
b
Charge the battery. (page 9)
•The image is protected.
b
Cancel the protection of the image . (page 37)
•The write protect tab on the Memory Stick is set to
LOCK.
b
Set it to recording position.
Additional information
51-GB
Page 52

Self-diagnosis display
The camera has a self-diagnosis
display. This function displays the
camera condition with five-digits (a
combination of a letter and figures) on
the LCD screen. If this occurs check the
following code chart. The five-digits
display informs you of the camera’s
current condition. The last two digits
(indicated by ss) will differ
depending on the state of the camera.
C:32:
Self-diagnosis display
•C:ss:ss
You can reverse the camera
malfunction yourself.
•E:ss:ss
Contact your Sony dealer or local
authorized Sony service facility.
First three digits
C:32:ss
C:13:ss
E:61:ss
E:91:ss
52-GB
Cause and/or Corrective Action
• Trouble is with the hardware.
t Turn the power off and on again.
• An unformatted Memory Stick is inserted.
t Format the Memory Stick. (page 40)
• A Memory Stick is broken.
t Insert a new Memory Stick. (page 11)
• A camera malfunction which you can not reverse
has occurred.
t Contact your Sony dealer or local authorized
Sony service facility and inform them of the
five digits. (example: E:61:10)
Page 53

Warning and notice messages
Various messages appear on the LCD screen. Check them with the following list.
Message
NO MEMORY STICK
SYSTEM ERROR
MEMORY STICK
ERROR
FORMAT ERROR
MEMORY STICK
LOCKED
NO MEMORY SPACE
FILE ERROR
FILE PROTECT
NO FILE
for “InfoLITHIUM”
BATTERY ONLY
Meaning/Remedy
• No Memory Stick has been inserted.
b
Insert a Memory Stick. (page 11)
•Abnormal conditions are encountered with the
hardware.
b
Turn on the power again.
•An inserted Memory Stick is broken.
•An inserted Memory Stick is malfunction.
b
Insert the proper Memory Stick. (page 11)
•Failed to format the Memory Stick.
b
Format the Memory Stick. (page 40)
•The tab on the Memory Stick is set to LOCK position.
b
Set it to recording position.
•The capacity of the Memory Stick is full.
b
Delete images you do not want to keep, or insert a
new Memory Stick, then start recording. (pages 11,
38)
•The file is broken down.
b
Delete the broken file. (page 38)
•The image is protected.
b
Cancel the protection using the menu. (page 37)
•No image has been recorded on the Memory Stick.
b
Insert the recorded Memory Stick.
•An inserted Memory Stick does not usable with this
camera.
b
Insert the proper Memory Stick.
•The battery is not the “InfoLITHIUM” type.
b
Use the “InfoLITHIUM” battery. (page 9)
•The battery is weak.
b
Charge the battery. (page 9)
Additional information
53-GB
Page 54

Specifications
System
Recording format
Digital (JPEG based)/Field
recording
Video signal
NTSC color, EIA standards
(DSC-F55)
PAL colour CCIR standards
(DSC-F55E)
Image device
1/2-inch CCD (total number
of square pixels: 1636 ×
1236), square grid, primary
color filter, Interlace format
Lens
f = 6.85 mm (37 mm, when
converted into a 35 mm still
camera)
(0.5 m – ∞)
Macro (0.1 m – ∞)
F = 2.8
Photometric system
TTL system
Exposure control
Automatic exposure
White balance
Automatic, Indoor,
Outdoor, Hold
Data compression system
Movie: MPEG-1
Still: JPEG
Audio (with still image):
MPEG AUDIO (Monaural)
Data format
Still: 1600 × 1200, 1024 × 768,
640 × 480
Movie: 320 × 240, 160 × 112
E-mail: 320 × 240
Memory
Memory Stick
Flash
Recording distance
limitations: 11 7/8 inches to
8 1/3 feet (0.3 m to
2.5 m), automatic flash
control system
Shutter speed
Automatic (1/30 - 1/1000)
(DSC-F55)
Automatic (1/25 - 1/1000)
(DSC-F55E)
LCD screen
Screen size
2 inches (559 wide × 220
long)
LCD panel
TFT
Total dot number
122,980 dots
Input and output
connectors
A/V OUT (Monaural)
Minijack
Video: 1Vp-p, 75 ohms,
unbalanced, sync negative
Audio: monaural, 327 mV
(at output, impedance more
than 47 kilohms)
Output impedance with less
than 2.2 kilohms
Digital I/O
Minijack
RS-232C based, 9.6 Kbps to
115.2 Kbps
General
Power consumption
Using the AC power
adaptor/charger:
Recording: 3.6 W
Playback: 3.1 W
Using the rechargeable
NP-F10 lithium ion
battery:
Recording: 3.3 W
Playback: 2.7 W
Operation temperature
32°F to 104°F (0°C to 40°C)
Storage temperature
–4°F to +140°F (–20°C to
+60°C)
Dimensions
Approx. 4
(103 × 79.1 × 48 mm) (w/h/
d)
Mass
Approx. 9 oz (250 g)
(excluding batteries)
Approx.1 lb 11 oz (300 g)
(including batteries,
Memory Stick, and Lens cap
etc.)
1
⁄8 × 3 1⁄8 × 1 15⁄16 in.
AC-VF10 AC power
adaptor/charger
Power requirements
100 to 240 V AC, 50/60 Hz
Power consumption
13 W
Output voltage
DC OUT: 4.2 V, 1.8 A in
operating mode
Battery charge terminal:
4.2 V, 1.5 A in charge mode
Operation temperature
32°F to 104°F (0°C to 40°C)
Storage temperature
–4°F to +140°F (–20°C to
+60°C)
Dimensions
Approx. 1
3
(49 × 39 × 85 mm) (w/h/d)
Mass
Approx. 4.2 oz (120 g)
(excluding batteries)
3
⁄8 in.
15
⁄16 × 1 9⁄16 ×
NP-F10 battery pack
Voltage
DC 3.6 V
Capacity
3.6 Wh
Type
Lithium ion type
Design and specifications
are subject to change
without notice.
54-GB
Page 55

Index
A
Access lamp 11
Adjusting
flash 25
image 32
LCD screen 8
AE (Automatic
Exposure) 14
Auto power-off function
10
AWB (Automatic White
Balance) 14
B
Battery 9
Battery charger 9
Battery life 20
Battery remaining
indicator 16
C
Charging 9
Cleaning 48
Connecting
TV 45
personal computer 22
printer 46
D
Deleting 38
E
Exposure 31
I, J, K, L
Image quality 27
Indicators on the LCD
screen 16, 19
M
Menu 41
Messages 53
Moisture condensation
48
Multi screen 33
N, O
NTSC system 49
P, Q
PAL system 49
Personal computer 21
Playback 33
Power sources
battery 9
house current (mains)
45
Printing 46
Protect 37
R
Recording 14
Recording mode 30
Recording in macro 25
Rotating an image 35
S
SECAM system 49
Self-timer 24
Setting the date and time
12
Slide show 36
T
Tripod 7
Troubleshooting 50
TV color system 49
U
Using abroad 49
V
VOICE 29
W
Warning messages 53
Z
Zoom 34
Additional information
F, G
Face to face recording 24
Flash adjustment 25
H
Hand strap 7
55-GB
 Loading...