

Page 1
Help Guide
Search
Digital Paper System
DPT-RP1/DPT-CP1
Getting Started
Turning the power on/off
About the battery
Security
Setting the screen lock
Disabling the screen lock via
FeliCa card/FeliCa-compatible
device
Digital Paper screen
Refer to this manual whenever you are having problems or are
uncertain while using the Digital Paper.
Home menu
Document screen
Digital Paper App (dedicated
app) screen
Transferring/managing
documents
Connecting to a computer
Connecting via Wi-Fi/Connecting
using a USB cable
Connecting via Bluetooth
Connecting a second and
subsequent Digital Paper
Transferring documents to the
Digital Paper
Transferring a document from a
computer
This is the help guide for Ver. 1.4.
For customers using a version earlier than Ver. 1.2, make sure
to update the Digital Paper App and then update the firmware of
the Digital Paper.
For how to update, see the following;
https://www.sony.net/dpapp/
For details about the Help Guide of Digital Paper App for mobile
which can easily transfer the document file between smartphone
and digital paper, see the following;
http://www.sony.net/dpt-rp1/mobile/help
The screens and illustrations that appear in this Help Guide may
differ from the actual product.
Changes may be made without prior notice, to improve the
design and specifications.
The illustration of DPT-RP1 is used for the explanations.
Go to Page Top
Using the print operation to
transfer and display data on the
Digital Paper
Transferring documents from the
Digital Paper
Transferring a document to a
Page 2
computer
Creating a back up
Syncing the Digital Paper with a
computer
Searching with the Digital Paper
App
Searching for a document or
folder (Digital Paper App)
Searching for documents that
contain a specific written mark
(Digital Paper App)
Displaying the screen of the
Digital Paper on the computer
via Digital Paper App
Changing the organization of
documents/folders on the Digital
Paper
Adding/editing a note template
Reading
Opening a document
Opening a document
Selecting and opening from a
folder
Opening a different document
from the quick access list
Turning pages
Turning the page
Changing how to turn pages
Displaying the page specifying
the page number
Zooming in on a document
Display page thumbnails
Displaying left and right pages in
a two-page spread
Displaying documents side-by-
side
Searching with the Digital Paper
Searching for a string of text
within a document
Searching for a handwritten mark
within a document
Page 3
Searching using document
information and other information
Searching for documents that
contain a specific mark
Viewing a sticky note attached in
“DPT-S1”
Displaying a document on the
computer
Writing
Handwriting on a document
Adding a highlight
Using the eraser
Copying/cutting and moving
handwritten items
Displaying the annotation list
Limiting edits to annotations
Calibrating the pen
Using the PDF form
Using notes
Creating a new note
Opening a note
Using side-notes on a document
Creating a side-note on an open
document
Opening a side-note
Adding/deleting a page from a
note
Selecting defaults for the note
template
Adding/editing a note template
Various settings
Changing the settings on the
Digital Paper
Changing the Digital Paper
settings using the Digital Paper
App
Updating the software
Page 4
Setting up the Digital Paper App
Troubleshooting
Digital Paper issues
Cannot turn on the power
Cannot charge the Digital Paper
The battery seems to drain
quickly
It takes time for a screen to be
displayed
The screen is not appearing
The touch panel is reacting
slowly
Pen does not work
The position of the pen tip is not
aligned with the actual writing
Network issues
Cannot set up/connect to a
network
The network connection suddenly
stopped working
Regarding documents
Cannot display a document
Characters are not being
displayed
Cannot add annotations
Cannot edit or delete annotations
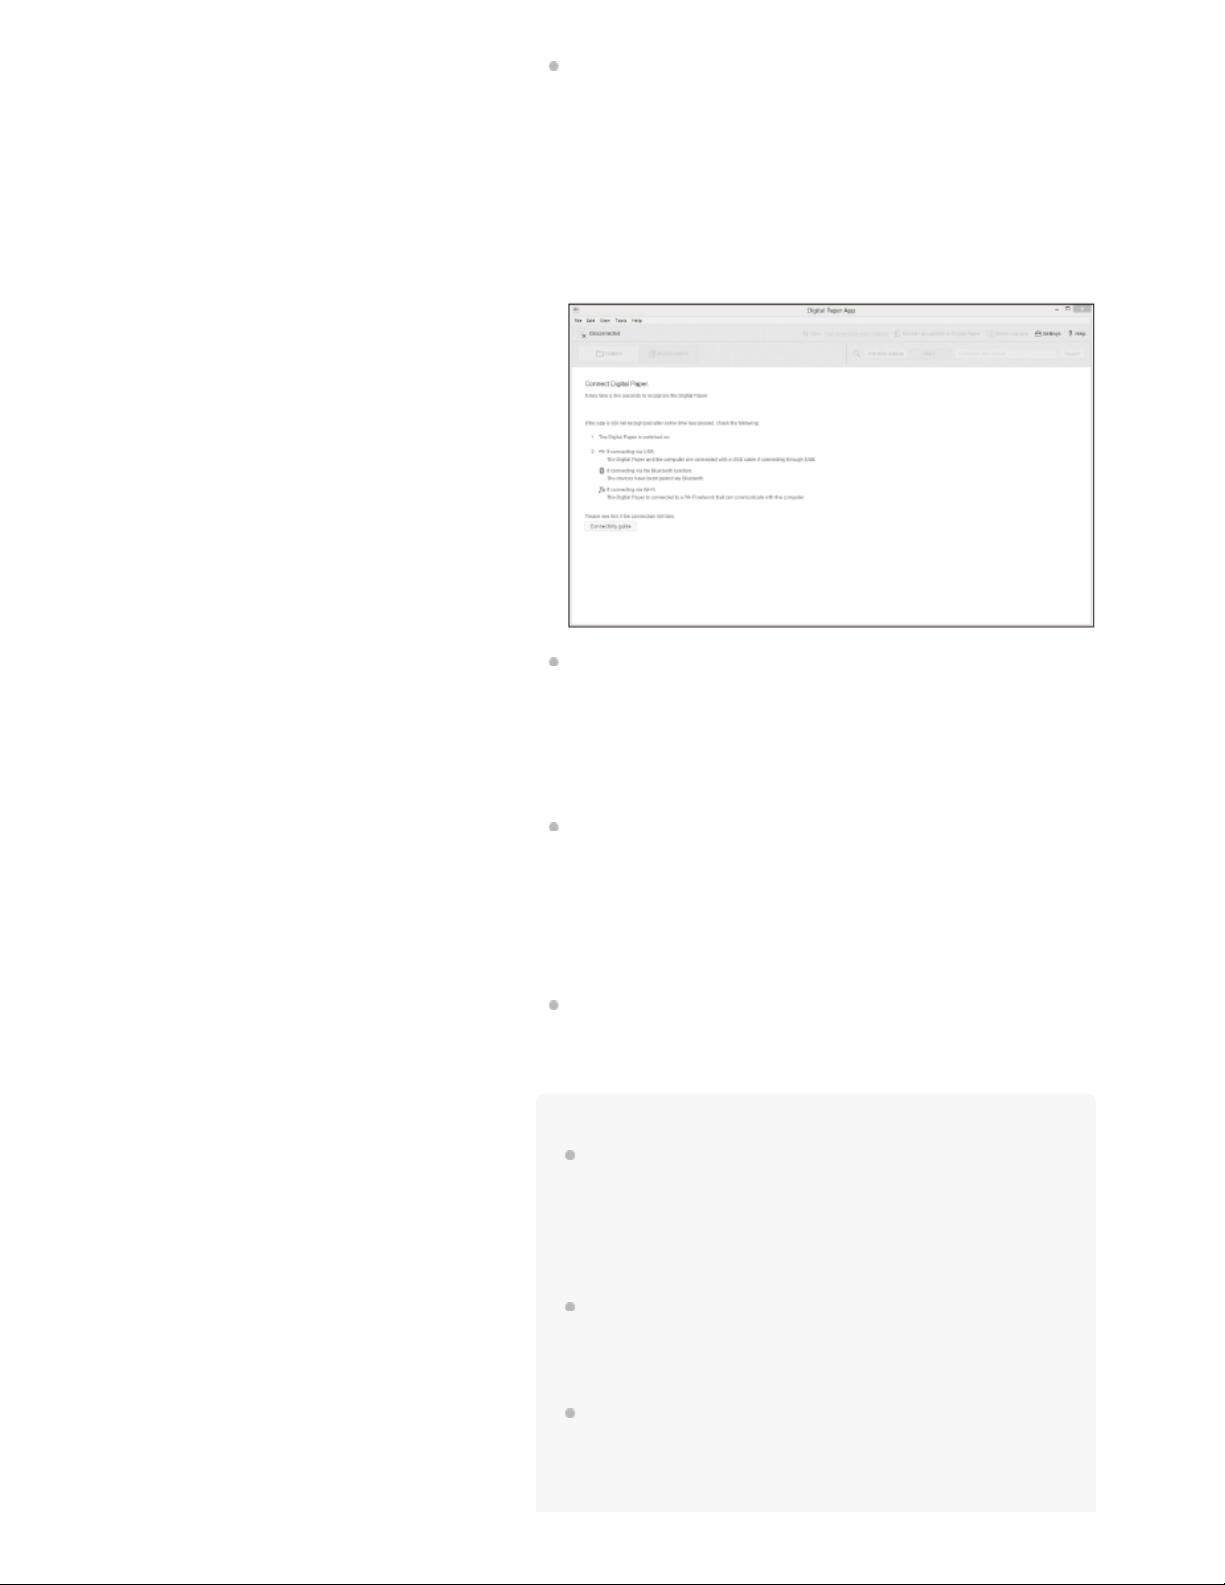
Computer connection issues
The computer does not recognize
the Digital Paper
Cannot transfer documents from
a computer to the Digital Paper
Other
Legal Notice
Specifications
4-597-942-14(1)
Page 5

Table Of Contents
TOC-1
DPT-RP1/DPT-CP1 Help Guide i
Turning the power on/off 1
About the battery 3
Setting the screen lock 5
Disabling the screen lock via FeliCa card/FeliCa-compatible device 7
Home menu 10
Document screen 12
Digital Paper App (dedicated app) screen 14
Connecting via Wi-Fi/Connecting using a USB cable 16
Connecting via Bluetooth 18
Connecting a second and subsequent Digital Paper 20
Transferring a document from a computer 21
Using the print operation to transfer and display data on the Digital Paper 23
Transferring a document to a computer 25
Creating a back up 27
Syncing the Digital Paper with a computer 29
Searching for a document or folder (Digital Paper App) 31
Searching for documents that contain a specific written mark (Digital Paper
App) 33
Displaying the screen of the Digital Paper on the computer via Digital Paper
App 35
Changing the organization of documents/folders on the Digital Paper 36
Adding/editing a note template 38
Opening a document 40
Selecting and opening from a folder 42
Opening a different document from the quick access list 43
Turning the page 45
Changing how to turn pages 46
Displaying the page specifying the page number 47
Zooming in on a document 48
Display page thumbnails 50
Displaying left and right pages in a two-page spread 52
Displaying documents side-by-side 53
Searching for a string of text within a document 55
Searching for a handwritten mark within a document 57
Searching using document information and other information 59
Page 6

Searching for documents that contain a specific mark 60
TOC-2
Viewing a sticky note attached in “DPT-S1” 61
Displaying a document on the computer 62
Handwriting on a document 63
Adding a highlight 64
Using the eraser 65
Copying/cutting and moving handwritten items 67
Displaying the annotation list 69
Limiting edits to annotations 70
Calibrating the pen 71
Using the PDF form 73
Creating a new note 74
Opening a note 75
Creating a side-note on an open document 76
Opening a side-note 78
Adding/deleting a page from a note 79
Selecting defaults for the note template 80
Changing the settings on the Digital Paper 81
Changing the Digital Paper settings using the Digital Paper App 84
Updating the software 86
Setting up the Digital Paper App 88
Cannot turn on the power 91
Cannot charge the Digital Paper 92
The battery seems to drain quickly 93
It takes time for a screen to be displayed 94
The screen is not appearing 95
The touch panel is reacting slowly 96
Pen does not work 97
The position of the pen tip is not aligned with the actual writing 98
Cannot set up/connect to a network 99
The network connection suddenly stopped working 101
Cannot display a document 103
Characters are not being displayed 104
Cannot add annotations 105
Cannot edit or delete annotations 106
The computer does not recognize the Digital Paper 107
Cannot transfer documents from a computer to the Digital Paper 109
Legal Notice 110
Page 7

Specifications 112
TOC-3
Page 8
Help Guide
1
Search
Digital Paper System
DPT-RP1/DPT-CP1
Back Back to Top Print
4-597-942-14(1)
Copyright 2016 Sony Corporation
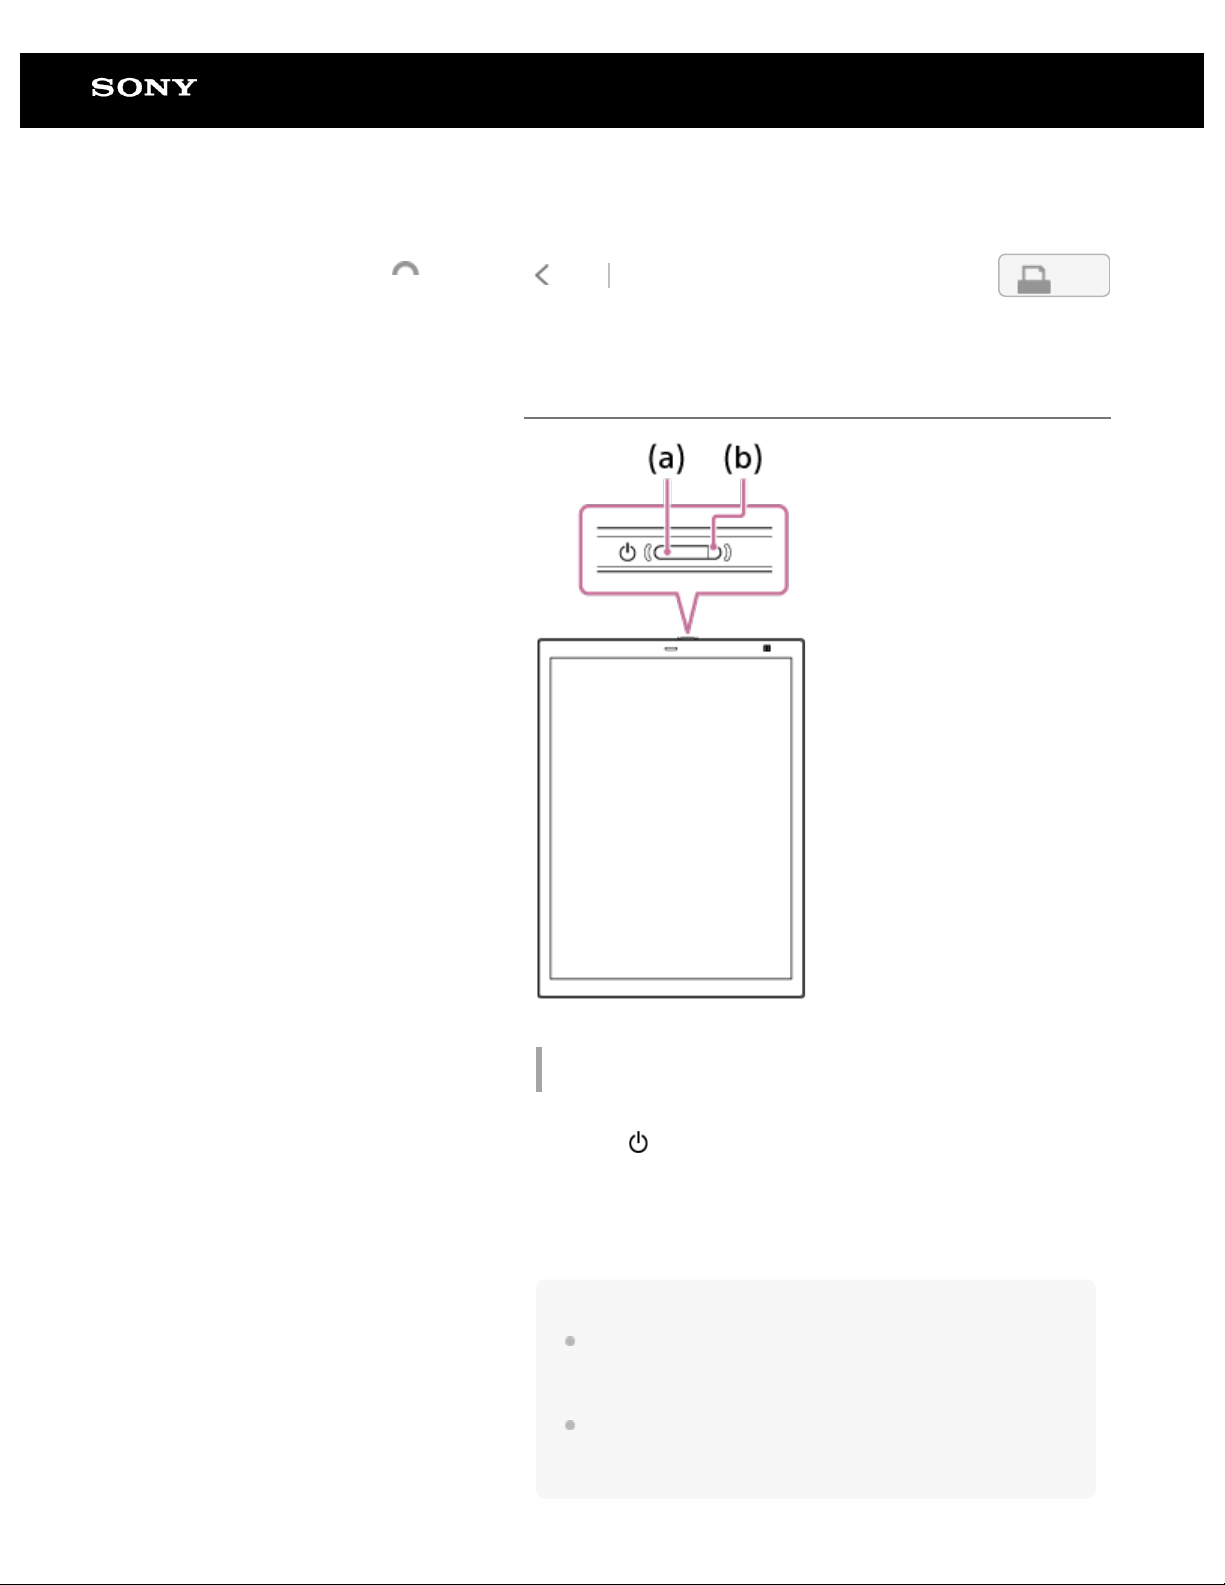
Turning the power on/off
To turn the power on
Press the (power) button (a).
The charge indicator (b) will blink in orange until startup is
complete, at which point the charge indicator turns off.
The charge indicator lights up in red while charging and turns off
when charging is complete.
Hint
When you turn on the power for the first time, instructions for initial
setup are displayed. Refer to the supplied “Quick Start Guide”
when performing initial setup.
If the charge indicator blinks three times in red, the battery is
depleted. Connect the Digital Paper to a computer using the
supplied USB cable to charge it.
Page 9
To turn the power off
2
Press and hold the (power) button (a) for about three
seconds, until the "Turn power off" confirmation screen appears.
Entering sleep mode
Press the (power) button (a) while the power is on. Sleep
mode reduces battery consumption and prevents misoperation
from unintentionally touching the screen.
To cancel sleep mode, press the
Note
[DIGITAL PAPER] is displayed in the middle of the screen during
Sleep mode.
Hint
The Digital Paper is set to automatically enter sleep mode when it
is not operated for 60 minutes, if it has been paired with the Digital
Paper App. Launch the Digital Paper App on the computer, then
click [Settings] — [General Settings] — [Edit], and select a time for
[Auto sleep ].
(power) button.
Related Topic
Setting the screen lock
Go to Page Top
Page 10

Help Guide
3
Search
Digital Paper System
DPT-RP1/DPT-CP1
Back Back to Top Print
4-597-942-14(1)
Copyright 2016 Sony Corporation
About the battery
When you press the (home) button, the battery icon (a)
appears in the top right corner of the home menu, allowing you
to check the remaining battery power and the charging status of
your Digital Paper.
: When the icon contains four bars, the battery is full, and
the number of bars decreases as the battery is depleted
: Charging complete
: Currently charging
Extending the life of the battery
When you will not be using the Digital Paper for a long time,
hold down the
turn off the power.
Do not leave the Digital Paper for an extended period of time
(power) button for about three seconds to
Page 11
without charging it. Doing so may lower battery performance.
Use and store the Digital Paper within the recommended
4
temperature range of 5 to 35 (41 °F to 95 °F).
Turn off the Wi-Fi function and Bluetooth function on the
Digital Paper when you are not using the Digital Paper App
on the computer. Press the
(home) button and tap
[Settings], then tap [Wi-Fi Settings] for the Wi-Fi function and
[Bluetooth Settings] for the Bluetooth function to remove the
check mark.
Hint
The remaining battery power and charging status of the pen
cannot be viewed on the home menu. When the battery becomes
low, a message will appear on the Digital Paper if you move the
pen close to it. Please charge the pen before the battery is
completely drained.
Go to Page Top
Page 12
Help Guide
5
Search
Digital Paper System
DPT-RP1/DPT-CP1
Back Back to Top Print
4-597-942-14(1)
Copyright 2016 Sony Corporation
Setting the screen lock
For security purposes, the Digital Paper can be protected by a
screen lock. When the screen lock is set, a lock password must
be entered after the Digital Paper is turned on or awaken from
sleep mode.
Press the (home) button, and tap
1
[Settings].
Tap [System Settings] — [Screen Lock] —
2
[Screen Lock] — [Enable] — [OK].
Enter a lock password, and tap [OK].
3
The lock password can be any combination of 4 to 20
alphanumeric characters and symbols.
Disabling the screen lock function
Press the (home) button, and tap [Settings] — [System
Settings] — [Screen Lock] — [Screen Lock]. Enter the lock
password, and tap [OK]. Then select [Disable] and tap [OK].
Note
Do not use a lock password that would be easy for third parties to
guess. Also, change the lock password periodically.
Make sure that you do not forget the lock password that you set. If
you forget the lock password, contact the Sony professional
products support center to remove the lock password (not for
free). When the lock password is removed, all documents on the
Digital Paper will be erased.
The Tab key and Space key are inoperable when entering a lock
password.
Page 13

Related Topic
6
Disabling the screen lock via FeliCa card/FeliCacompatible device
Go to Page Top
Page 14
Help Guide
7
Search
Digital Paper System
DPT-RP1/DPT-CP1
Back Back to Top Print
4-597-942-14(1)
Copyright 2016 Sony Corporation
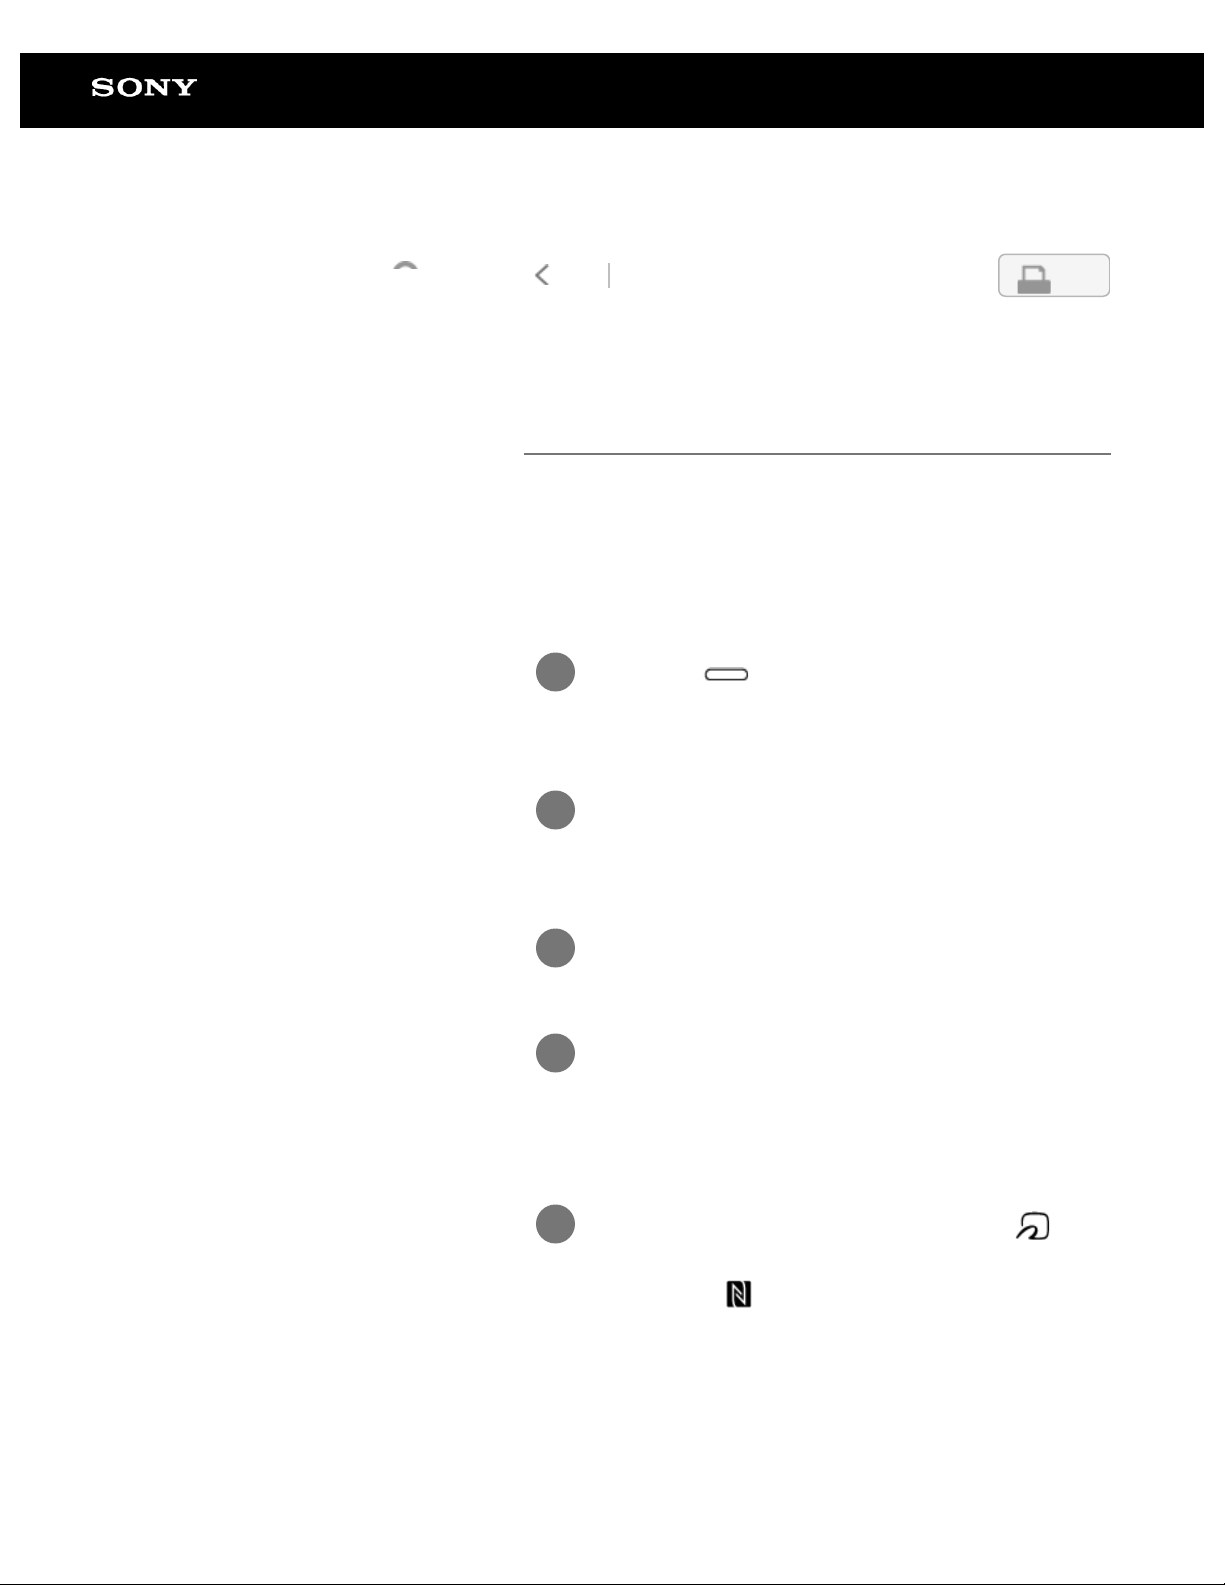
Disabling the screen lock via FeliCa card/FeliCa-compatible device
To waken the Digital Paper from sleep mode, instead of entering
a lock password, a FeliCa card, FeliCa-compatible mobile
phone, smartphone, or similar item can be held against the
Digital Paper to disable the screen lock. After setting a lock
password, follow the steps below to register a FeliCa
card/FeliCa-compatible device to the Digital Paper.
Press the (home) button, and tap
1
[Settings].
Tap [System Settings] — [Screen Lock] —
2
[NFC Card Lock Release Settings].
Enter a lock password, and tap [OK].
3
Tap [Register NFC Card], and if a message
4
asking whether you want to turn on NFC
appears, tap [Yes].
Align the center of the FeliCa card or
5
(FeliCa mark) on the FeliCa-compatible
device with (N mark) on the Digital Paper
for about two seconds.
Page 15
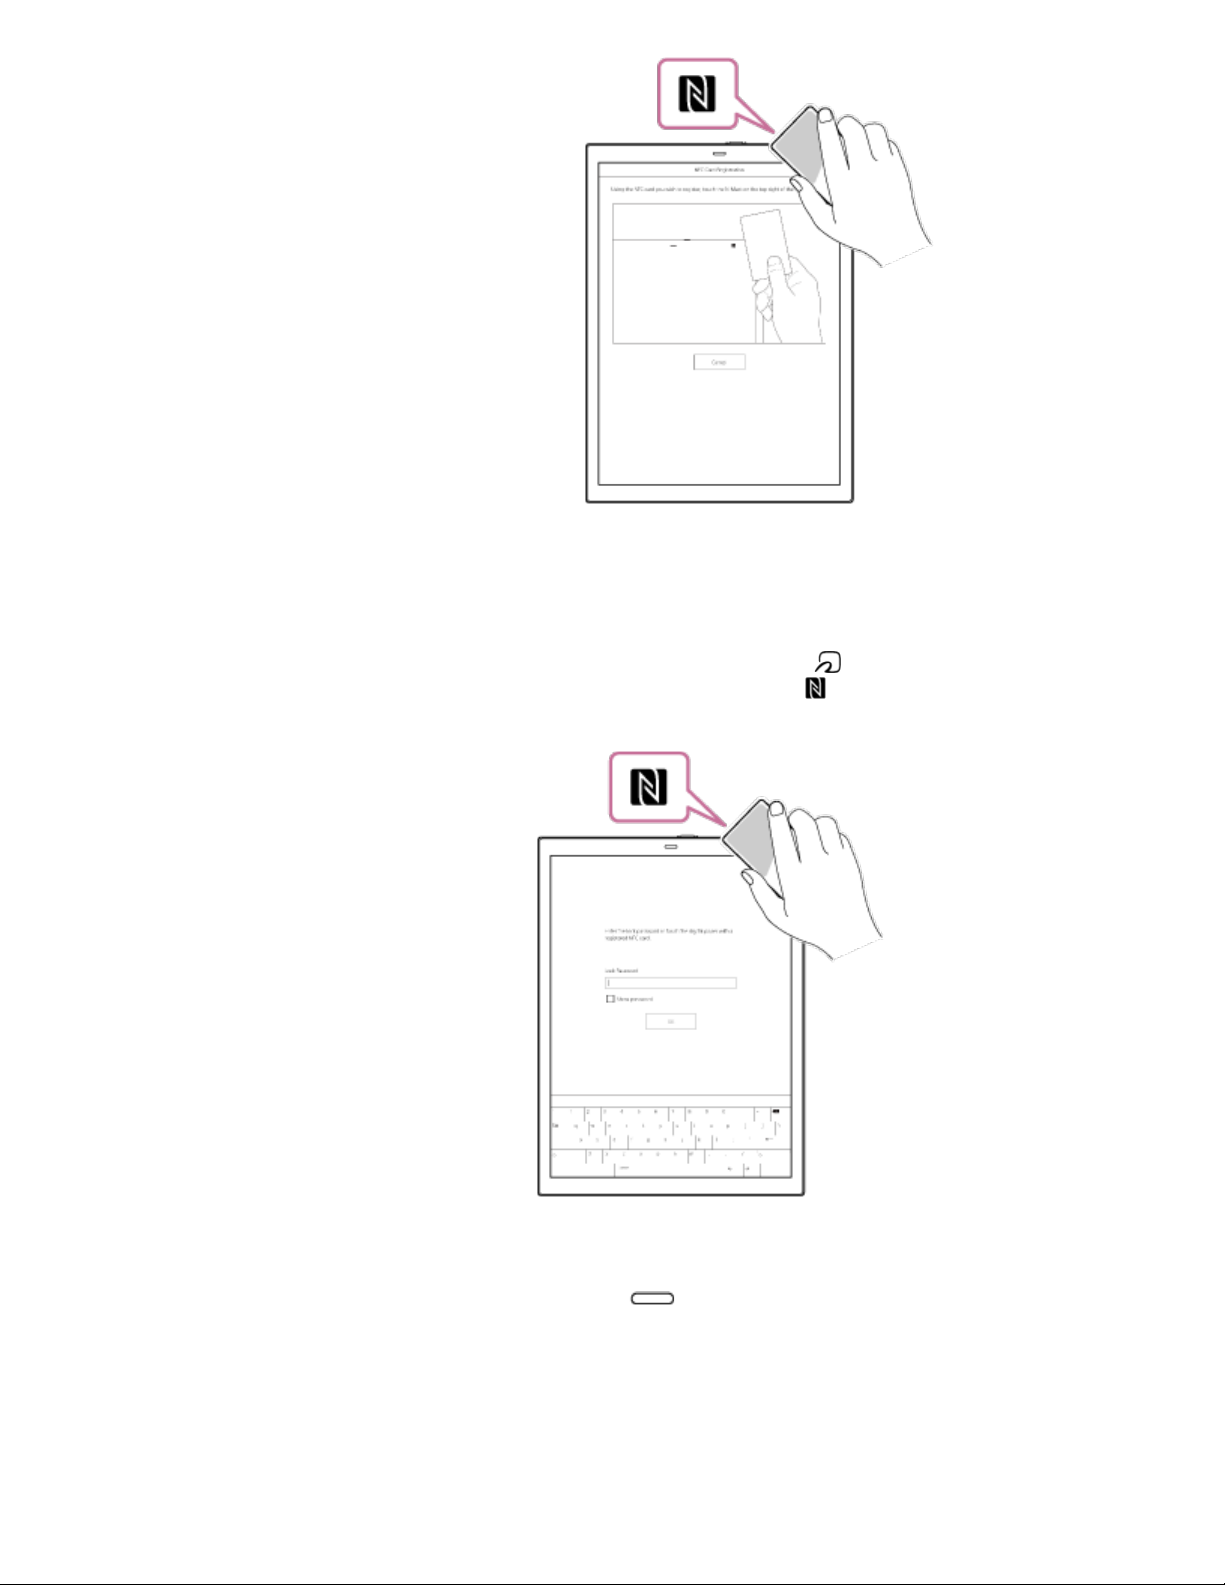
To disable the screen lock
8
When the entry screen for the lock password is displayed, align
the center of the FeliCa card or
FeliCa-compatible device with
for about two seconds.
(FeliCa mark) on the
(N mark) on the Digital Paper
To delete the registered information for a FeliCa
card/FeliCa-compatible device
Press the (home) button, and tap [Settings] — [System
Settings] — [Screen Lock] — [NFC Card Lock Release Settings].
Enter the lock password, and tap [OK] then [Deregister NFC
Card].
To register a different FeliCa card/FeliCa-compatible
device
Only one FeliCa card/FeliCa-compatible device can be
Page 16

registered at a time. Delete the information for the FeliCa
card/FeliCa-compatible device that is currently registered before
9
registering a different FeliCa card/FeliCa-compatible device.
Note
If the device is placed on a metal desk, it may not function
properly, such as failing to communicate with the FeliCa card or
devices that support FeliCa. In this case, keep a few centimeters
between the device and the metal desk.
Go to Page Top
Related Topic
Setting the screen lock
Page 17
Help Guide
and the number of bars decreases as the battery is depleted
10
Search
Digital Paper System
DPT-RP1/DPT-CP1
Back Back to Top Print
4-597-942-14(1)
Copyright 2016 Sony Corporation
Home menu
The home menu is displayed when you press the (home)
button.
Function icons
1.
NFC function status (On/Off)
2.
Connection status when the Bluetooth function is on
3.
: Bluetooth connected
: Bluetooth not connected
Wi-Fi network signal status
4.
: Wi-Fi network connected (number of bars indicates
signal strength)
: Wi-Fi network inaccessible
: Wi-Fi function off
Remaining battery/charge indicator
5.
: When the icon contains four bars, the battery is full,
Page 18

: Charging complete
: Currently charging
11
To close the home menu
Press the (home) button, or tap an area outside of the
home menu.
Go to Page Top
Page 19

Help Guide
12
Search
Digital Paper System
DPT-RP1/DPT-CP1
Back Back to Top Print
4-597-942-14(1)
Copyright 2016 Sony Corporation
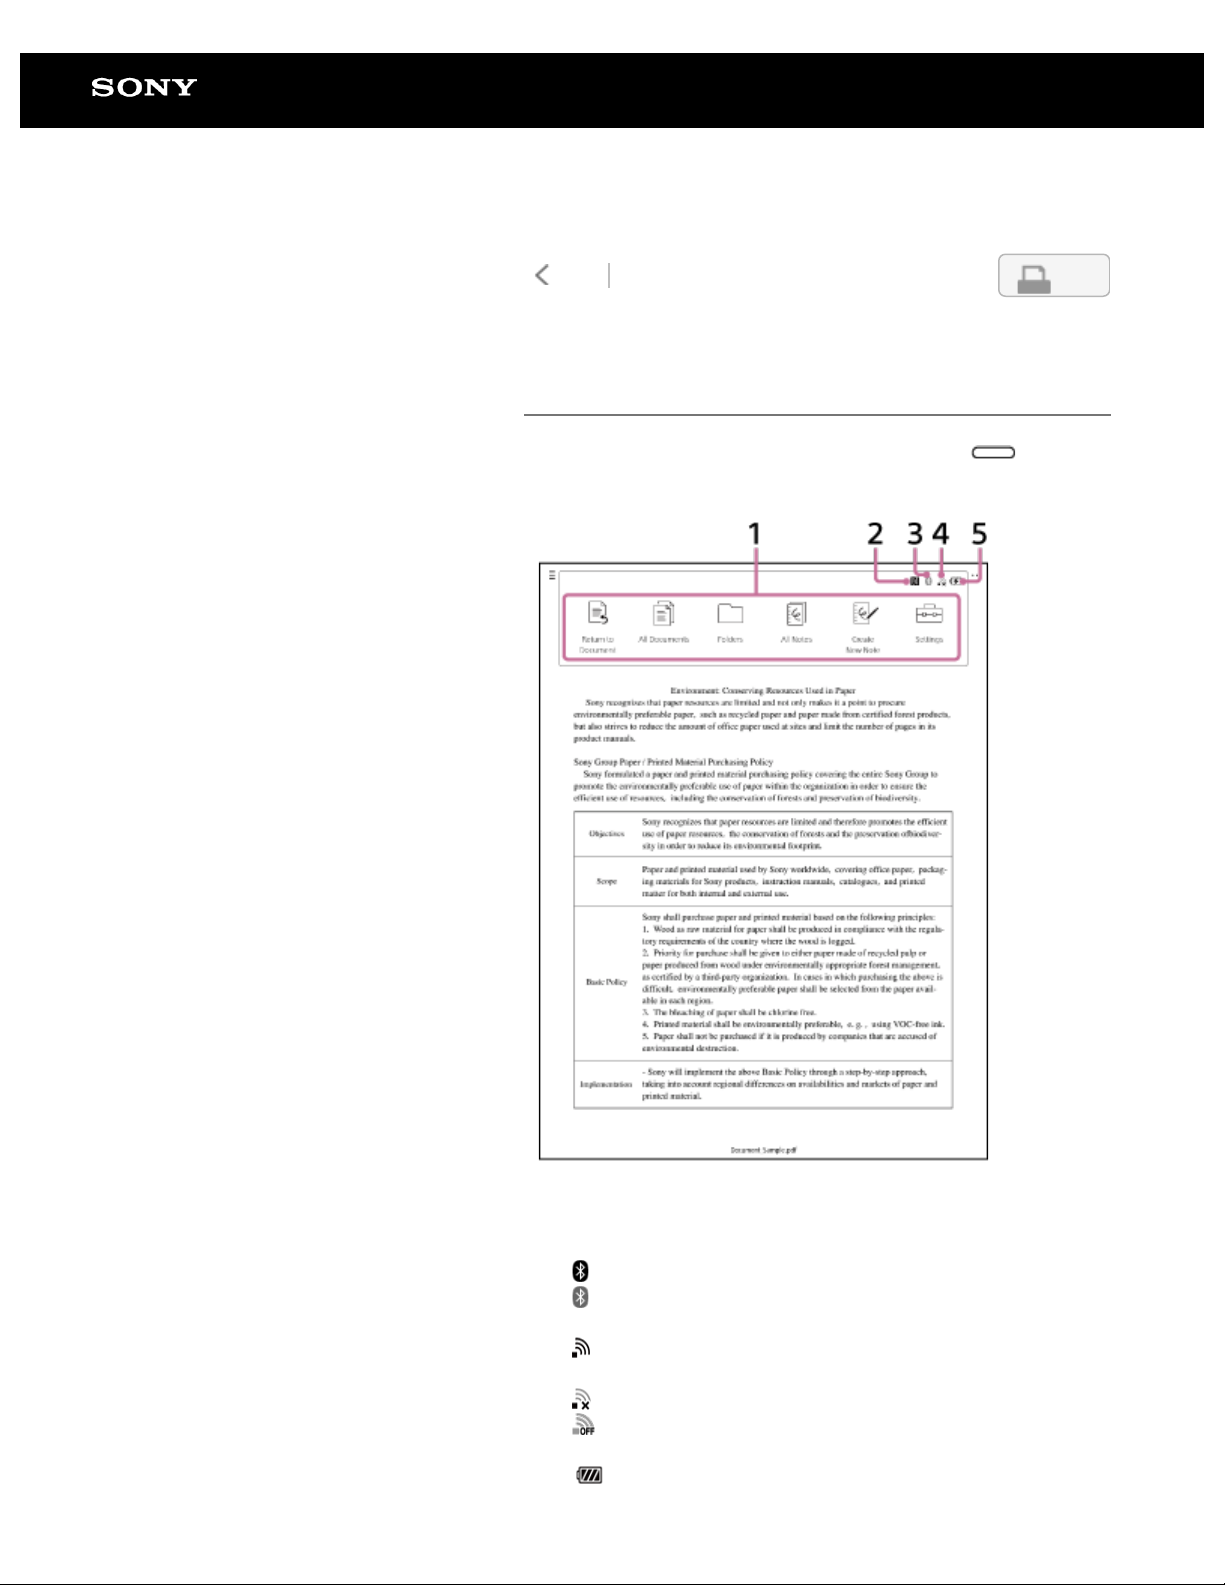
Document screen
Tap anywhere on the screen of an open document to display the
tool bar.
(quick access list)
1.
Select and display a document from Recently Read or
another document from the current folder.
Page position indicator
2.
Tap along the line to change page.
(Paste)
3.
Paste the handwriting that you selected with Copy/Cut.
This icon does not appear if Copy/Cut has not been selected.
(pen settings)
4.
Set the [Pen Color], [Pen Thickness], or [Eraser Size].
(zoom in)
5.
Page 20

Zoom in on part of a document.
(search)
13
6.
Search for the entered text or for the handwritten mark that
you select.
(option)
7.
Display a menu of available operations based on the
situation.
Filename
8.
To hide the tool bar
Tap an area outside of the tool bar.
Go to Page Top
Page 21
Help Guide
14
Search
Digital Paper System
DPT-RP1/DPT-CP1
Back Back to Top Print
4-597-942-14(1)
Copyright 2016 Sony Corporation
Digital Paper App (dedicated app) screen
The Digital Paper App must be used to operate the Digital Paper
with your computer.
After connecting the computer to the Digital Paper, launch the
Digital Paper App on your computer.
Menu
1.
Operate the Digital Paper App from the menu.
Connection status with the Digital Paper and empty
2.
space/total available space
Execute sync. Will not operate if the sync folder is not set.
3.
[Transfer documents to Digital Paper]
4.
Transfer documents from the computer to the Digital Paper.
[Screen capture]
5.
Display the screen of Digital Paper on the computer. Also,
save the screen of Digital Paper as an image on the
computer.
[Settings]
6.
Change the settings.
[Help]
7.
Display this Help Guide or open the product support website.
[Folders]/[All documents]
8.
Switch the screen display on the Digital Paper App.
[File information]/[Mark]/[Search]
9.
Search for documents within the Digital Paper.
10.
(New folder)
Create a new folder on the Digital Paper. Click [Folders] and
open a folder on your Digital Paper before creation.
(Transfer documents to computer)
Page 22
Transfer documents from the Digital Paper to the computer.
(Delete)
15
Delete folders and documents from the Digital Paper.
(Set sync folder)
Set the sync folder.
11.
Documents/Folders* list
You can change the display order of the list by clicking on
an item title.
You can confirm whether a file is a document, note, etc.
based on the icon.
: Document
: Document to sync
: Note
: Note to sync
: Unread document/note
: Folder
: Folder to sync
Right-click on an item to display a menu of available
operations based on the situation.
When you double-click on a folder name, the display
switches to that folder.
*
Folders are only displayed when the Digital Paper App is in Folder view.
Related Topic
Connecting via Wi-Fi/Connecting using a USB cable
Connecting via Bluetooth
Setting up the Digital Paper App
Go to Page Top
Page 23
Help Guide
16
Search
Digital Paper System
DPT-RP1/DPT-CP1
Back Back to Top Print
4-597-942-14(1)
Copyright 2016 Sony Corporation
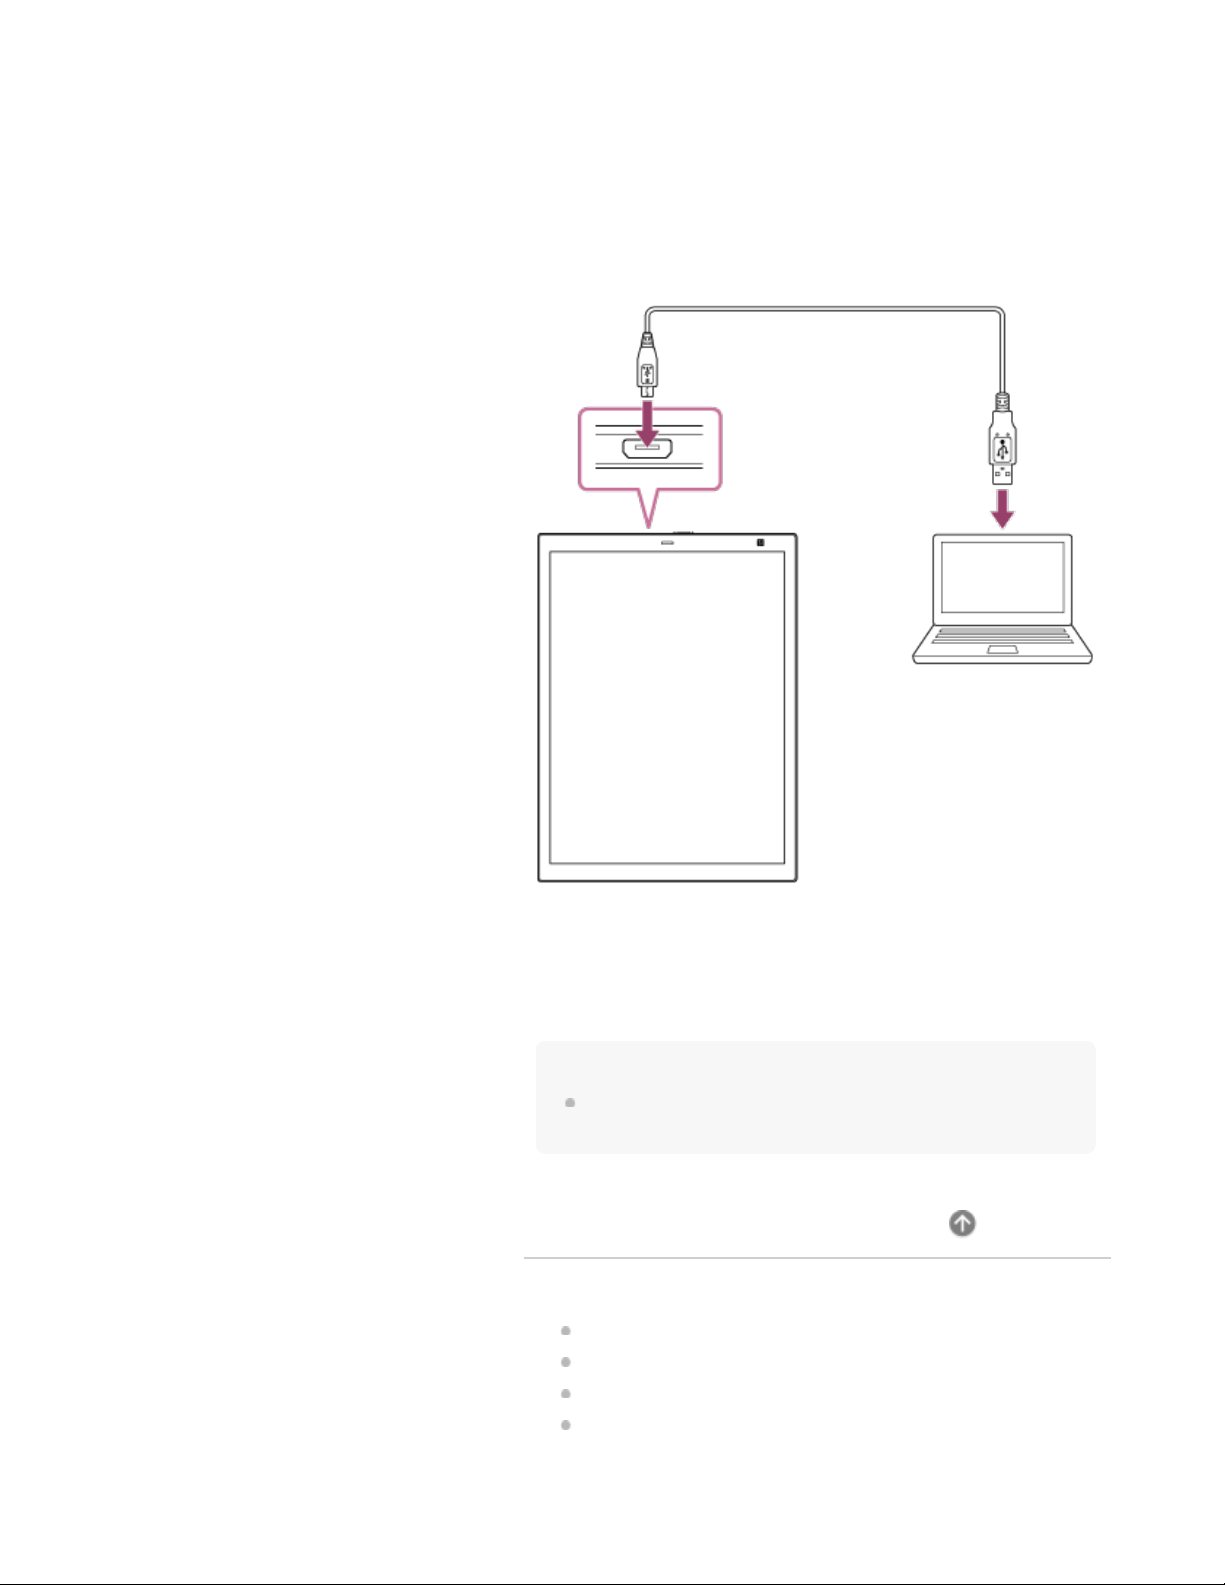
Connecting via Wi-Fi/Connecting using a USB cable
After the Digital Paper has been paired with the Digital Paper
App, documents can be transferred and otherwise operated, by
connecting the Digital Paper to the computer. For how to pair
with the Digital Paper App, see the links in “Related Topics.”
There are three ways to connect to a computer: “connect via WiFi,” “connect via the supplied USB cable,” and “connect via
®
Bluetooth
connect via the supplied USB cable. For how to connect via
Bluetooth, see the links in “Related Topics.”
To connect via Wi-Fi
1
2
.” This section explains how to connect via Wi-Fi and
Press the (home) button on the Digital
Paper, and tap [Settings].
Tap [Wi-Fi] to add a check mark.
Tap [Wi-Fi Settings] and then the SSID of the
3
desired Wi-Fi network from the [Saved
Network List].
If the Wi-Fi network that you want to connect to is not
displayed, use the Digital Paper App to add the Wi-Fi
network. For details, see the links in “Related Topics.”
If you want to connect the Digital Paper to a computer
while the device is in sleep mode, set [Keep Wi-Fi On
During Sleep] to either [Always enabled] or [Enabled
only when plugged in].
Connect the computer to the same network
4
as the Digital Paper.
Page 24
Communication is not possible if you connect the computer
and the Digital Paper to different networks.
17
To connect using a USB cable
Connect the supplied USB cable to the micro USB connector on
the Digital Paper and to a USB connector on the computer.
To check the connection status
Launch the Digital Paper App on the computer. If [Connected] is
displayed in the upper left portion of the screen, the Digital
Paper and the computer are properly connected.
Hint
When removing the USB cable, close the Digital Paper App before
doing so.
Go to Page Top
Related Topic
Connecting via Bluetooth
Connecting a second and subsequent Digital Paper
Setting up the Digital Paper App
Changing the Digital Paper settings using the Digital
Paper App
Page 25
Help Guide
18
Search
Digital Paper System
DPT-RP1/DPT-CP1
Back Back to Top Print
4-597-942-14(1)
Copyright 2016 Sony Corporation
Connecting via Bluetooth
To make a Bluetooth connection with your computer, you must
first complete Bluetooth pairing (device registration). Once
pairing is complete, you can operate the Digital Paper from your
computer the next time you use the Digital Paper if the Bluetooth
function of the Digital Paper is turned on. (When the Digital
Paper App is launched, Windows can automatically connect to
the Bluetooth-paired Digital Paper.)
Perform the steps below to pair.
Press the (home) button and tap
1
[Settings].
Tap [Bluetooth] to add a check mark.
2
Tap [Bluetooth Settings] — [Bluetooth
3
Pairing] to change the Digital Paper to
pairing standby mode.
Turn on the Bluetooth function on the
4
computer and operate the computer to
complete the device registration of the
Digital Paper.
For details, see the instruction manual for your computer.
Tap [Close] in the [Bluetooth Pairing...]
5
dialog box on the Digital Paper to close.
To connect to the Digital Paper from your computer
Page 26
For Windows
When setting [Bluetooth automatic connection] on the Digital
connection] is set to on, reconnection is not required.)
19
Paper App to on:
Automatically connects to the Bluetooth-paired Digital Paper
when the Digital Paper App is launched.
When setting [Bluetooth automatic connection] on the Digital
Paper App to off:
Click [Bluetooth automatic connection] on the screen of the
Digital Paper App to connect the Digital Paper.
For Mac
It is unavailable to connect via Bluetooth automatically.
Connect via Bluetooth using the Mac OS function. For
details, refer to the operating instructions of the Mac.
Notes on Bluetooth auto connection (Windows)
If the Digital Paper is automatically connected to the
computer via Bluetooth when the computer and other
devices are connected via Bluetooth as an access point, the
other devices are disconnected from the computer. When the
computer and other devices keep connecting via Bluetooth,
set [Settings] [Bluetooth automatic connection] of the Digital
Paper App to off.
When multiple Digital Papers are connected via Bluetooth,
Bluetooth connection cannot be performed. Only the
Bluetooth-paired Digital Paper can be connected.
Hint
If [Disabled] is set for [Keep Bluetooth Connection On During
Sleep] on the Digital Paper, the Bluetooth connection is
disconnected when the Digital Paper goes into sleep mode. After
the Digital Paper is awaken from sleep mode, it will need to be
manually reconnected (unless [Bluetooth automatic connection] is
set to on when using a Windows computer).
If you want to maintain the Bluetooth connection even when the
Digital Paper goes into sleep mode, change the setting to
[Settings] — [Bluetooth Settings] — [Keep Bluetooth Connection
On During Sleep] on the Digital Paper.
If your computer enters sleep or hibernate mode, or is turned off,
the Bluetooth connection with the Digital Paper is disconnected.
After resuming or restarting the computer, reconnect. (When your
computer is a Windows computer and [Bluetooth automatic
Page 27
Help Guide
20
Search
Digital Paper System
DPT-RP1/DPT-CP1
Back Back to Top Print
4-597-942-14(1)
Copyright 2016 Sony Corporation
Connecting a second and subsequent Digital Paper
Multiple Digital Paper devices can be registered to 1 user
account.
Click [Tools] - [Switch Digital Paper] in the
1
menu bar of the Digital Paper App.
Click [Add] and connect Digital Paper.
2
To switch the Digital Paper displayed on the Digital
Paper App
Select Digital Paper to be used via [Tools] - [Switch Digital
Paper], and click [Switch].
Note
When multiple Digital Paper devices will be registered, files cannot
be transferred at the same time. Transfer the files by switching the
Digital Paper devices that are displayed on Digital Paper App one
by one.
Go to Page Top
Related Topic
Connecting via Wi-Fi/Connecting using a USB cable
Connecting via Bluetooth
Page 28

Help Guide
21
Search
Digital Paper System
DPT-RP1/DPT-CP1
Back Back to Top Print
4-597-942-14(1)
Copyright 2016 Sony Corporation
Transferring a document from a computer
Use the Digital Paper App to transfer documents. Only PDF files
can be transferred to the Digital Paper.
Connect the computer to the Digital Paper.
1
Launch the Digital Paper App on the
2
computer.
Click [Folders] and open a folder on your
3
Digital Paper (transfer destination).
Select a file/folder on your computer, then
4
drag-and-drop it into the Digital Paper App.
Multiple files/folders can be selected and transferred
together.
Note
If the Wi-Fi function or Bluetooth function is turned off or the USB
cable is removed during the transfer, the data may be corrupted.
The maximum file size for transfers is 1 GB per file.
Data cannot be transferred while [All documents] is selected on
the Digital Paper App or while search results are being displayed.
Click [Folders] and open a folder on your Digital Paper to transfer.
Hint
Files can also be transferred by clicking [Transfer documents to
Digital Paper] on the Digital Paper App.
Page 29

The amount of free space on the Digital Paper is displayed in the
22
top left of the Digital Paper App screen.
Go to Page Top
Related Topic
Connecting via Wi-Fi/Connecting using a USB cable
Connecting via Bluetooth
Transferring a document to a computer
Syncing the Digital Paper with a computer
Changing the organization of documents/folders on the
Digital Paper
Using the print operation to transfer and display data on
the Digital Paper
Page 30
Help Guide
23
Search
Digital Paper System
DPT-RP1/DPT-CP1
Back Back to Top Print
4-597-942-14(1)
Copyright 2016 Sony Corporation
Using the print operation to transfer and display data on the Digital Paper
Use the print operation to transfer open files or web pages from
your computer to the Digital Paper. Files and web pages that are
not in PDF format will be converted into PDF files when
transferred.
Note
This function is only available on computers that use the following
operating systems (OS): Microsoft Windows 10, macOS 10.13
(High Sierra), macOS 10.12 (Sierra), and Mac OS X 10.11 (El
Capitan).
Connect the computer to the Digital Paper.
1
Use a program on your computer to display
2
the file or web page that you want to transfer
to the Digital Paper.
Print to the Digital Paper.
3
For Windows
On the Print screen, select [Digital Paper] from the
Printer list, and print.
For Mac
On the Print screen, select [PDF] — [Print PDF to
Digital Paper].
When you perform the print operation, the Digital Paper
App will open, and the transfer status will be displayed.
Files and web pages that are not in PDF format will be
converted into PDF files and transferred.
When the transfer is complete, the PDF file that was
transferred will open on the Digital Paper. The PDF file that
was transferred will be saved to the [Received] folder in
[System storage].
Page 31

Note
24
If the Wi-Fi function or Bluetooth function is turned off or the USB
cable is removed during the transfer, the data may be corrupted.
The maximum file size for transfers is 1 GB per file.
Related Topic
Connecting via Wi-Fi/Connecting using a USB cable
Connecting via Bluetooth
Transferring a document from a computer
Syncing the Digital Paper with a computer
Changing the organization of documents/folders on the
Digital Paper
Go to Page Top
Page 32

Help Guide
25
Search
Digital Paper System
DPT-RP1/DPT-CP1
Back Back to Top Print
4-597-942-14(1)
Copyright 2016 Sony Corporation
Transferring a document to a computer
Use the Digital Paper App to transfer documents.
Connect the computer to the Digital Paper.
1
Launch the Digital Paper App on the
2
computer.
Select a file/folder on the Digital Paper via
3
the Digital Paper App.
Multiple files/folders can be selected and transferred
together.
4
Click
(Transfer documents to computer),
and select a folder on your computer
(transfer destination).
Note
If the Wi-Fi function or Bluetooth function is turned off or the USB
cable is removed during the transfer, the data may be corrupted.
The maximum file size for transfers is 1 GB per file.
Related Topic
Connecting via Wi-Fi/Connecting using a USB cable
Connecting via Bluetooth
Go to Page Top
Page 33

Transferring a document from a computer
Syncing the Digital Paper with a computer
26
Creating a back up
Page 34

Help Guide
27
Search
Digital Paper System
DPT-RP1/DPT-CP1
Back Back to Top Print
4-597-942-14(1)
Copyright 2016 Sony Corporation
Creating a back up
In preparation for the unlikely event that the data on your Digital
Paper is accidentally erased or that a malfunction causes the
data to be deleted or corrupted, be sure to back up all important
content to your computer.
Connect the computer to the Digital Paper.
1
Launch the Digital Paper App on the
2
computer.
Click [Folders], and open the folder labeled
3
[System storage] at the top of the Digital
Paper.
Select all of the folders and documents
4
within the [System storage] folder.
5
Click
(Transfer documents to computer),
and select a folder on your computer
(transfer destination).
Note
If the Wi-Fi function or Bluetooth function is turned off or the USB
cable is removed during the transfer, the data may be corrupted.
The maximum file size for transfers is 1 GB per file.
Page 35

Related Topic
28
Connecting via Wi-Fi/Connecting using a USB cable
Connecting via Bluetooth
Transferring a document to a computer
Syncing the Digital Paper with a computer
Go to Page Top
Page 36

Help Guide
29
Search
Digital Paper System
DPT-RP1/DPT-CP1
Back Back to Top Print
4-597-942-14(1)
Copyright 2016 Sony Corporation
Syncing the Digital Paper with a computer
Using the Digital Paper App, you can sync PDF files within in a
specific folder on your computer (a) with those within a specific
folder on the Digital Paper (b). Content that is added, changed,
or deleted is done so on your computer and the Digital Paper.
Connect the computer and the Digital Paper.
1
Launch the Digital Paper App on the
2
Page 37

computer.
30
On the Digital Paper App, select the folder
3
you want to sync and click (Set sync
folder).
On the folder selection screen, select the
4
folders of the computer.
When the sync settings are successful, the corresponding
folder/document/note icon changes.
Click
5
The specified folder is synced with the Digital Paper.
(Sync).
To update the contents of the synced folder
Click (Sync).
To delete the sync settings
On the Digital Paper App, right-click the folder configured with
the sync settings and click [Delete sync setting].
Hint
If separately editing the same PDF file on your computer and the
Digital Paper, the PDF file on the Digital Paper is synced on the
computer and the PDF file on the computer is saved with a
different name.
Even if you delete the sync settings, the folders and files saved on
the Digital Paper and computer are not deleted.
Note
Only the designated folders — and only the PDF files in those
folders — are synced. Folders with no PDF files are not synced.
You cannot configure or delete the sync settings while syncing.
Go to Page Top
Related Topic
Connecting via Wi-Fi/Connecting using a USB cable
Connecting via Bluetooth
Page 38

Help Guide
31
Search
Digital Paper System
DPT-RP1/DPT-CP1
Back Back to Top Print
4-597-942-14(1)
Copyright 2016 Sony Corporation
Searching for a document or folder (Digital Paper App)
Using the Digital Paper App, the folder names/file names within
the Digital Paper can be searched, as well as the title/author
listed in the document settings.
Connect the computer to the Digital Paper.
1
Launch the Digital Paper App on the
2
computer.
Set the search parameters.
3
When you want to search all of the documents, click [All
documents].
When you want to search within a specific folder, click
[Folders] and select the folder you want to search.
Click [File information] — [Filename, title,
4
author], then enter the text and click
[Search].
Double-click on one search result.
5
When a folder is selected, the documents within the folder
are displayed in the Digital Paper App.
When a document is selected, the computer will open the
document using a PDF-viewer program.
To close the search results list
Page 39

Click [Close search results].
32
Related Topic
Connecting via Wi-Fi/Connecting using a USB cable
Connecting via Bluetooth
Searching for documents that contain a specific written
mark (Digital Paper App)
Go to Page Top
Page 40

Help Guide
33
Search
Digital Paper System
DPT-RP1/DPT-CP1
Back Back to Top Print
4-597-942-14(1)
Copyright 2016 Sony Corporation
Searching for documents that contain a specific written mark (Digital Paper App)
Select a mark using the Digital Paper App to search for
documents on the Digital Paper which contain the mark.
Connect the computer to the Digital Paper.
1
Launch the Digital Paper App on the
2
computer.
Set the search parameters.
3
When you want to search all of the documents, click [All
documents].
When you want to search within a specific folder, click
[Folders] and select the folder you want to search.
Click [Mark], then select the mark you want
4
to search and click [Search].
The documents that contain the mark will be displayed.
Even when there are multiple hits within a single
document, the search results are displayed as just one
document.
Double-click on one search result.
5
The computer will open the document using a PDF-viewer
program.
Page 41

To close the search results list
Click [Close search results].
34
Note
Depending on the way written, marks may not be recognized.
Related Topic
Connecting via Wi-Fi/Connecting using a USB cable
Connecting via Bluetooth
Searching for a document or folder (Digital Paper App)
Searching for a handwritten mark within a document
Searching for a string of text within a document
Go to Page Top
Page 42

Help Guide
35
Search
Digital Paper System
DPT-RP1/DPT-CP1
Back Back to Top Print
4-597-942-14(1)
Copyright 2016 Sony Corporation
Displaying the screen of the Digital Paper on the computer via Digital Paper App
The Digital Paper screen can be displayed on the computer
using the Digital Paper App.
Connect the computer to the Digital Paper.
1
Launch the Digital Paper App on the
2
computer.
Click [Screen capture].
3
Note
When the Bluetooth connection is established, the display speed
becomes slower compared to USB connection or Wi-Fi
connection.
Go to Page Top
Related Topic
Connecting via Wi-Fi/Connecting using a USB cable
Connecting via Bluetooth
Page 43

Help Guide
36
Search
Digital Paper System
DPT-RP1/DPT-CP1
Back Back to Top Print
4-597-942-14(1)
Copyright 2016 Sony Corporation
Changing the organization of documents/folders on the Digital Paper
Using the Digital Paper App, you can create new folders on the
Digital Paper, as well as rename, move, copy, and delete the
existing folders/documents.
Connect the computer to the Digital Paper.
1
Launch the Digital Paper App on the
2
computer.
Click [Folders] or [All documents] to display
3
the folder/document you want to edit.
To move/copy/create a new folder, click [Folders] to
display the folders.
To create a folder
Click (New folder) at the level where you want to make a
new folder. Then input the name of the folder and click [OK].
To change the folder name/file name
Right-click to select a folder/document, and then click [Rename].
Proceed to enter the folder name/file name, and then click [OK].
To move/copy
Right-click to select a folder/document, and then click [Cut
(within Digital Paper)]/[Copy (within Digital Paper)]. Next, display
the folder that you want to move/copy to and right-click, then
click [Paste (within Digital Paper)].
To delete
Select a folder/document, and then click (Delete).
Page 44

Note
37
Folder names and file names that contain certain special
characters may not be displayed properly.
Folders and documents cut or copied with the Digital Paper App
cannot be pasted anywhere other than in the Digital Paper App. If
copying a folder or document to your computer, copy using the
[Transfer documents to computer] function.
Files and folders cut or copied on your computer cannot be pasted
in the Digital Paper App. If copying to the Digital Paper App, copy
using the [Transfer documents to Digital Paper] function.
When renaming or moving the synced folder, the sync settings are
deleted. If you want to sync continuously, set [Set sync folder]
again.
Related Topic
Connecting via Wi-Fi/Connecting using a USB cable
Connecting via Bluetooth
Go to Page Top
Page 45

Help Guide
registered as a template.
38
Search
Digital Paper System
DPT-RP1/DPT-CP1
Back Back to Top Print
4-597-942-14(1)
Copyright 2016 Sony Corporation
Adding/editing a note template
Using the Digital Paper App, you can add a note template to the
Digital Paper. You can also delete templates and change their
names.
Connect the computer to the Digital Paper.
1
Launch the Digital Paper App on the
2
computer.
Click [Settings] to display the [Settings]
3
screen.
To add a note template
Click [Add] under [Note template].
Click [Select file], and then select the PDF file you want to use
as a template from your computer. Enter a name for the
template, then click [OK].
To delete a note template
Select a template, and click [Delete].
To change the name of a template
Select a template, and click [Rename]. Then enter a name for
the template, and click [OK].
Note
PDF files that are password protected cannot be added as
templates.
Hint
For PDF files that have multiple pages, only the first page will be
Page 46

Related Topic
39
Selecting defaults for the note template
Go to Page Top
Page 47

Help Guide
40
Search
Digital Paper System
DPT-RP1/DPT-CP1
Back Back to Top Print
4-597-942-14(1)
Copyright 2016 Sony Corporation
Opening a document
You can organize the All Documents list by [Date Read] or [Date
Modified] and select a document from there.
Press the (home) button, and tap [All
1
Documents].
Tap [Date Read] or [Date Modified].
2
is displayed to the left of documents, and is
displayed to the left of notes.
For unread files,
Tap the document you want to open.
3
is displayed.
To delete a document
Tap anywhere on the screen of a document to display the tool
bar, and then tap
screen — [Delete This Document].
(option) in the upper right of the document
To change the document name
Tap anywhere on the screen of a document to display the tool
bar, and then tap
screen — [Change Document Name].
Hint
The display direction rotates automatically according to the page
orientation (aspect ratio).
Related Topic
(option) in the upper right of the document
Go to Page Top
Page 48

Selecting and opening from a folder
Opening a different document from the quick access list
41
Page 49

Help Guide
42
Search
Digital Paper System
DPT-RP1/DPT-CP1
Back Back to Top Print
4-597-942-14(1)
Copyright 2016 Sony Corporation
Selecting and opening from a folder
Press the (home) button, and tap
1
[Folders].
Tap to open a folder, and then tap the
2
document you want to display.
To return to a higher tier of folders, tap the name of the
folder at the top of the screen.
is displayed to the left of documents, and is
displayed to the left of notes.
For unread files,
Related Topic
is displayed.
Go to Page Top
Opening a document
Opening a different document from the quick access list
Page 50

Help Guide
43
Search
Digital Paper System
DPT-RP1/DPT-CP1
Back Back to Top Print
4-597-942-14(1)
Copyright 2016 Sony Corporation
Opening a different document from the quick access list
Select and display other documents from the list of the recently
read documents or documents belonging to the same folder as
the document that is currently being displayed on the Digital
Paper.
Tap anywhere on the screen of a document
1
to display the tool bar.
Tap
2
(quick access list) in the top left
corner of the document screen.
Page 51

When you want to switch the display of the
3
44
quick access list, tap [Recently Read] or
[Documents in the Same Folder] at the top
of the quick access list, and then tap the
other item.
Tap the document you want to display.
4
is displayed to the left of documents, and is
displayed to the left of notes.
For unread files,
Related Topic
Opening a document
Selecting and opening from a folder
is displayed.
Go to Page Top
Page 52

Help Guide
45
Search
Digital Paper System
DPT-RP1/DPT-CP1
Back Back to Top Print
4-597-942-14(1)
Copyright 2016 Sony Corporation
Turning the page
Swipe (move your finger) in the direction of the next page.
When [Page Flow] is set to [Right to left], swipe right to left, and
when [Page Flow] is set to [Left to right], swipe left to right.
For a PDF file for which this setting was not designated on a
computer, turn to the next page by swiping right to let by default.
Go to Page Top
Related Topic
Changing how to turn pages
Displaying the page specifying the page number
Page 53

Help Guide
46
Search
Digital Paper System
DPT-RP1/DPT-CP1
Back Back to Top Print
4-597-942-14(1)
Copyright 2016 Sony Corporation
Changing how to turn pages
Tap anywhere on the screen of a document
1
to display the tool bar.
Tap
2
document screen — [Page Flow].
To turn the page by swiping from right to
3
left, tap [Right to left], and to turn by swiping
from left to right, tap [Left to right].
(option) in the upper right of the
Go to Page Top
Page 54

Help Guide
47
Search
Digital Paper System
DPT-RP1/DPT-CP1
Back Back to Top Print
4-597-942-14(1)
Copyright 2016 Sony Corporation
Displaying the page specifying the page number
Tap (option) in the upper right of the
1
document screen - [Page Jump].
Input the page number and tap [OK].
2
The specified page is displayed.
Go to Page Top
Page 55

Help Guide
48
Search
Digital Paper System
DPT-RP1/DPT-CP1
Back Back to Top Print
4-597-942-14(1)
Copyright 2016 Sony Corporation
Zooming in on a document
Zoom in on part of a document. While zoomed in, you can write
using the pen, delete items written with the pen, and highlight
items.
Tap anywhere on the screen of a document
1
to display the toolbar.
Tap
2
document screen.
Tap the location you want to zoom into, or
3
use your finger or the pen to encircle the
area you want to zoom into.
The document is zoomed in.
(zoom in) in the upper right of the
To return to the original size
Tap [Exit] in the upper right of the document screen.
Note
You cannot turn the page while zoomed in.
You cannot zoom again or change the zoom ratio. Cancel
zooming and select the part which you want to zoom into again.
Hint
By dragging while zooming, you can move the displaying part.
Page 56

Go to Page Top
49
Page 57

Help Guide
50
Search
Digital Paper System
DPT-RP1/DPT-CP1
Back Back to Top Print
4-597-942-14(1)
Copyright 2016 Sony Corporation
Display page thumbnails
You can search for a page by displaying a list of 16 pages on a
single screen.
Tap anywhere on the screen of a document
1
to display the tool bar.
Tap
2
(option) in the upper right of the
document screen — [Page Thumbnails].
To return the display to normal size
Tap any one of the pages.
Page 58

Hint
When switching from documents that are being displayed side-by-
51
side, nine pages are displayed in the list.
When you pinch in on the screen while displaying a document, the
page thumbnails can be displayed.
Go to Page Top
Page 59

Help Guide
52
Search
Digital Paper System
DPT-RP1/DPT-CP1
Back Back to Top Print
4-597-942-14(1)
Copyright 2016 Sony Corporation
Displaying left and right pages in a twopage spread
Display the pages of a single document two at a time, as a leftright two-page spread.
Tap anywhere on the screen of a document
1
to display the tool bar.
Tap
2
document screen — [Two-Page Spread].
To change the page settings
Depending on whether the document has a cover page, you can
change whether to start the two-page spread from page one.
Tap
cover] to display the two-page spread from page one, and select
[With cover] to display the spread from page two.
(option) — [Two-Page Spread Settings]. Select [Without
(option) in the upper right of the
To return to a single page display
Tap (option) — [Display Single Page].
Note
When displaying a document as a two-page spread, you cannot
display two documents side-by-side, rotate the document, create a
side-note, or add/delete a page from a note.
You cannot draw across the span of two pages.
Go to Page Top
Related Topic
Displaying documents side-by-side
Page 60

Help Guide
53
Search
Digital Paper System
DPT-RP1/DPT-CP1
Back Back to Top Print
4-597-942-14(1)
Copyright 2016 Sony Corporation
Displaying documents side-by-side
Display the same document twice in a side-by-side arrangement.
You can also display two different documents or notes in a sideby-side arrangement.
Tap anywhere on the screen of a document
1
to display the tool bar.
Tap
2
document screen — [Display Documents
Side-by-Side].
To display different documents or notes in a sideby-side arrangement
Tap (quick access list) on the other document or note you
want to display, and tap the document that you want to display
side-by-side. When you want to switch the display of the quick
access list, tap [Recently Read] or [Documents in the Same
Folder] at the top of the quick access list, and then tap the other
item.
(option) in the upper right of the
To switch which side the documents are displayed
on
Tap (option) on either the left or right — [Swap Screens].
To return to a one-page display of either side
Tap (option) on the document you want to display, and then
tap [Display This Document Only].
Note
When documents are displayed side-by-side, the document
cannot be rotated.
The documents cannot be displayed top and bottom.
The quick access list contains documents that were recently
opened, or documents in the same folder as the document
Page 61

currently being displayed. Documents that do not appear in the
quick access list cannot be displayed in a side-by-side
54
arrangement.
Hint
After you have displayed different documents and notes in a sideby-side arrangement, you can display the most recent
arrangement of documents/notes by tapping
Previous Side-by-Side Documents.
(option) — [Open
Related Topic
Displaying left and right pages in a two-page spread
Creating a side-note on an open document
Go to Page Top
Page 62

Help Guide
55
Search
Digital Paper System
DPT-RP1/DPT-CP1
Back Back to Top Print
4-597-942-14(1)
Copyright 2016 Sony Corporation
Searching for a string of text within a document
Search for a string of text within the document that is currently
being displayed on the Digital Paper.
Tap anywhere on the screen of a document
1
to display the tool bar.
Tap
2
document screen.
Tap the [Search Text] tab — the search term
3
input field. Then use the keyboard to enter a
string of text, and tap [Search].
(search) in the upper right of the
Tap one of the search results.
4
The page that you tapped will be displayed.
To close the search results list
Tap an area outside of the search screen.
Note
There is no differentiation between upper case and lower case
letters.
Handwritten text and text that is embedded in an image cannot be
searched.
Go to Page Top
Page 63

Related Topic
56
Searching for a handwritten mark within a document
Searching for documents that contain a specific written
mark (Digital Paper App)
Page 64

Help Guide
57
Search
Digital Paper System
DPT-RP1/DPT-CP1
Back Back to Top Print
4-597-942-14(1)
Copyright 2016 Sony Corporation
Searching for a handwritten mark within a document
Select a specific mark, and search for the handwritten mark
within the document that is currently being displayed on the
Digital Paper.
Tap anywhere on the screen of a document
1
to display the tool bar.
Tap
2
document screen.
Tap the [Search Mark] tab, and then select
3
the mark and tap [Search].
Even when there are multiple hits for a single page, they
are complied and displayed as a single search result.
(search) in the upper right of the
Tap one of the search results.
4
The page that you tapped will be displayed.
To close the search
Tap an area outside of the search screen.
Note
Depending on the way written, marks may not be recognized
correctly.
Go to Page Top
Page 65

Related Topic
58
Searching for a string of text within a document
Searching for documents that contain a specific written
mark (Digital Paper App)
Page 66

Help Guide
59
Search
Digital Paper System
DPT-RP1/DPT-CP1
Back Back to Top Print
4-597-942-14(1)
Copyright 2016 Sony Corporation
Searching using document information and other information
You can search for file names, titles, or authors of a document
on the Digital Paper.
Press the (home) button and tap [All
1
Documents].
Tap
2
document screen.
Tap the [File Information] tab, insert a string
3
of text, and tap [Search].
The search results are displayed.
(search) in the upper right of the
Tap a search result.
4
The document opens.
To close the search results list
Tap [Return to All Documents].
Go to Page Top
Page 67

Help Guide
60
Search
Digital Paper System
DPT-RP1/DPT-CP1
Back Back to Top Print
4-597-942-14(1)
Copyright 2016 Sony Corporation
Searching for documents that contain a specific mark
Search for documents on the Digital Paper that contain a
handwritten mark by selecting the specific mark.
Press the (home) button and tap [All
1
Documents].
Tap
2
document screen.
Tap the [Mark] tab, select the mark you want
3
to search, and tap [Search].
The documents containing the mark are displayed.
Even if a document contains multiple instances of the
mark, the document is displayed once in the search
results.
(search) in the upper right of the
Tap a search result.
4
The document opens.
To close the search result list
Tap [Return to All Documents].
Note
Depending on the way written, marks may not be recognized
correctly.
Page 68

Help Guide
61
Search
Digital Paper System
DPT-RP1/DPT-CP1
Back Back to Top Print
4-597-942-14(1)
Copyright 2016 Sony Corporation
Viewing a sticky note attached in “DPTS1”
The contents of handwritten sticky notes and text sticky notes
that were added to a document using “DPT-S1,” can be viewed.
Tap (handwritten sticky note) or (text
1
sticky note) on the document with your
finger.
To close the handwritten sticky note/text sticky note
screen
Tap an area outside of the sticky note.
Note
Handwritten sticky notes/text sticky notes cannot be edited on this
device.
Go to Page Top
Page 69

Help Guide
62
Search
Digital Paper System
DPT-RP1/DPT-CP1
Back Back to Top Print
4-597-942-14(1)
Copyright 2016 Sony Corporation
Displaying a document on the computer
Documents that are saved to the Digital Paper can be opened
using a PDF-viewer program on your computer.
Connect the computer to the Digital Paper.
1
Launch the Digital Paper App on the
2
computer.
Double-click on the document you want to
3
display.
The computer will launch a PDF-viewer program and
display the document as read only.
Though the document is temporarily saved to the
computer, it is deleted when the Digital Paper App is
closed.
Go to Page Top
Related Topic
Connecting via Wi-Fi/Connecting using a USB cable
Connecting via Bluetooth
Page 70

Help Guide
63
Search
Digital Paper System
DPT-RP1/DPT-CP1
Back Back to Top Print
4-597-942-14(1)
Copyright 2016 Sony Corporation
Handwriting on a document
Use the pen to write directly on the page.
1
Just like when using a normal pen and paper, you can lay
the side of your palm flat against the screen as you write.
To change the pen type
Tap anywhere on the screen of a document to display the tool
bar. Then, tap
document screen and select an item for [Pen Color] or [Pen
Thickness].
Hint
On the screen of the Digital Paper, the blue pen will appear black,
and the red pen will appear gray. However, when transferred to a
computer they will be displayed as blue and red, respectively.
The contents of your handwriting are saved the moment you finish
writing them.
(pen settings) in the top right corner of the
Go to Page Top
Related Topic
Calibrating the pen
Using the eraser
Displaying the annotation list
Page 71

Help Guide
Using the eraser
64
Search
Digital Paper System
DPT-RP1/DPT-CP1
Back Back to Top Print
4-597-942-14(1)
Copyright 2016 Sony Corporation
Adding a highlight
Trace the text while pressing the highlight
1
button (a) on the pen.
Note
Highlights cannot be added to the following.
A document that was scanned (page contains only image data)
Text that is embedded in an image
An area that was handwritten on the Digital Paper
A note that does not contain text
Go to Page Top
Related Topic
Page 72

Help Guide
65
Search
Digital Paper System
DPT-RP1/DPT-CP1
Back Back to Top Print
4-597-942-14(1)
Copyright 2016 Sony Corporation
Using the eraser
Select handwriting or highlights by passing
1
over them with the pen while holding down
the eraser button (a), and then lift the pen
from the screen.
The handwriting or highlights that were passed over will be
erased.
The eraser for the Digital Paper can erase the entirety of a
line by selecting only a portion of it. It is not necessary to
select the complete area that you want to erase, as you
would when erasing pencil marks from normal paper. By
selecting multiple lines, you can erase them all at once.
When erasing on paper
Page 73

When erasing on Digital Paper
66
To change the size of the eraser
Tap anywhere on the screen of a document to display the tool
bar. Then, tap
document screen and select an item for [Eraser Size].
(pen settings) in the top right corner of the
Go to Page Top
Page 74

Help Guide
5
67
Search
Digital Paper System
DPT-RP1/DPT-CP1
Back Back to Top Print
4-597-942-14(1)
Copyright 2016 Sony Corporation
Copying/cutting and moving handwritten items
You can copy, cut, and move handwritten items in the Digital
Paper.
Tap anywhere in the document screen
1
containing handwritten items you want to
copy/cut to display the toolbar.
Tap
2
document screen — [Area Selection].
The screen changes to the area selection mode screen.
You cannot turn the page in the area selection mode
screen.
(option) in the upper right of the
Use the pen to encircle the handwritten item
3
you want to copy/cut, then select [Copy] or
[Cut].
The handwritten items in the encircled area are selected.
When copying and cutting are complete, the screen returns
to the document screen.
Tap (Paste) in the document screen that
4
you want to paste the handwritten item to.
The screen changes to the paste mode screen.
You cannot turn the page in the paste mode screen.
Tap the location you want to paste.
Page 75

After pasting to the desired location, you can use the pen
68
to adjust the position by dragging the handwritten item.
After adjusting, tap [Done] or tap anywhere other than the
selected handwritten item to confirm the copy/move
location.
To move the item within the same screen
After dragging the selected handwritten item to the location you
want to move, tap [Done] or tap anywhere other than the
selected handwritten item to confirm the copy/move location.
Note
The paste operation is only available once. The (Paste) icon
disappears after pasting once.
If you restart the Digital Paper, the [Copy]/[Cut] content is lost.
If you [Copy]/[Cut] a new item, the previously selected content is
overwritten.
Go to Page Top
Page 76

Help Guide
69
Search
Digital Paper System
DPT-RP1/DPT-CP1
Back Back to Top Print
4-597-942-14(1)
Copyright 2016 Sony Corporation
Displaying the annotation list
Handwritten annotations and highlighted sections can be
displayed in a list and searched for in pages.
Tap anywhere on the screen of a document
1
to display the tool bar.
Tap
2
document screen — [Annotation List].
Tap the [Handwriting List] tab or the
3
[Highlight List] tab.
Tap one item from the list.
4
(option) in the upper right of the
The page that you tapped will be displayed.
To close the annotation list
Tap an area outside of the annotation list.
Note
Depending on the number of annotations within a document, it
may take time for the annotation list to appear.
Related Topic
Viewing a sticky note attached in “DPT-S1”
Limiting edits to annotations
Go to Page Top
Page 77

Help Guide
70
Search
Digital Paper System
DPT-RP1/DPT-CP1
Back Back to Top Print
4-597-942-14(1)
Copyright 2016 Sony Corporation
Limiting edits to annotations
Change the settings so that annotations that were made to a
document outside of your Digital Paper cannot be edited.
Press the (home) button, and tap
1
[Settings].
Tap [System Settings] — [Limit Editing
2
Annotations] — [Enable].
Note
The handwritten sticky notes, text sticky notes, and bookmarks
that were added to a document using the former model, “DPT-S1,”
cannot be edited regardless of the [Limit Editing Annotations]
setting.
Go to Page Top
Page 78

Help Guide
71
Search
Digital Paper System
DPT-RP1/DPT-CP1
Back Back to Top Print
4-597-942-14(1)
Copyright 2016 Sony Corporation
Calibrating the pen
Set the way you hold the pen, and correct any displacement
between where the pen touches the screen and where the
writing appears.
Press the (home) button, and tap
1
[Settings].
Tap [System Settings] — [Pen Calibration].
2
From the four variations of how to hold the
3
pen, select the variation that most
resembles your own grip, and then tap
[Next].
Use the pen to trace the dotted lines as you
4
would normally write.
A line does not appear atop the dotted line as you trace.
When you lift the pen, the line appears.
Displacement in the line that you drew will be corrected on
the following screen. Do not worry if this line is displaced.
Tap [Next].
5
The manual correction screen is displayed.
Tap the arrows that point up, down, left, and
6
right to move the line that you drew and
Page 79

align it with the dotted line.
72
When the lines are in basically the same
7
position, tap [Next].
The confirmation screen is displayed.
Trace the dotted line again, as you did in
8
step 4.
If the line that you drew appears displaced, tap
[Recalibrate] to return to the previous screen. The line that
you drew on the confirmation screen will be displayed, so
correct the placement again, as you did in step 6. After you
finish correcting the position, tap [Next], and trace the
dotted line on the confirmation screen again.
When the dotted line and the line that you
9
drew appear to line up, tap [Save].
Go to Page Top
Page 80

Help Guide
73
Search
Digital Paper System
DPT-RP1/DPT-CP1
Back Back to Top Print
4-597-942-14(1)
Copyright 2016 Sony Corporation
Using the PDF form
This device can use the following PDF form which is made by
Adobe Acrobat.
Checkbox
Radio buttons
Dropdown list
Text field
List box
To use the checkbox/radio buttons/dropdown
list/list box
Check the PDF with your finger or pen, or select the item.
To use the text field
Tap the text field with your finger or pen, and tap [Save] after
inputting letters via keyboard.
Go to Page Top
Page 81

Help Guide
74
Search
Digital Paper System
DPT-RP1/DPT-CP1
Back Back to Top Print
4-597-942-14(1)
Copyright 2016 Sony Corporation
Creating a new note
There are two types of notes: “standalone notes” and “side-notes
on documents.” This section explains how to create a
standalone note. For how to create a side-note, see the links in
“Related Topics.”
Press the (home) button, and tap
1
[Create New Note].
Select a template, and tap [OK].
2
A note is made in the Note folder under a file name that
combines the name of the template with the date of
creation.
Hint
Notes are created as PDF files and can be handled the same way
as documents. After creation, the Digital Paper App can be used
to move the note to a different folder or change the file name.
Note
Even when a document is open, performing the steps above will
not create a side-note on the document.
Related Topic
Adding/editing a note template
Creating a side-note on an open document
Changing the organization of documents/folders on the
Digital Paper
Selecting defaults for the note template
Go to Page Top
Page 82

Help Guide
75
Search
Digital Paper System
DPT-RP1/DPT-CP1
Back Back to Top Print
4-597-942-14(1)
Copyright 2016 Sony Corporation
Opening a note
Press the (home) button, and tap [All
1
Notes].
Tap the note you want to display.
2
Hint
Notes are documents (PDF files) marked with special attributes.
As with documents, notes can also be opened from the All
Documents list or the quick access list.
Related Topic
Go to Page Top
Opening a side-note
Opening a document
Selecting and opening from a folder
Opening a different document from the quick access list
Page 83

Help Guide
76
Search
Digital Paper System
DPT-RP1/DPT-CP1
Back Back to Top Print
4-597-942-14(1)
Copyright 2016 Sony Corporation
Creating a side-note on an open document
There are two types of notes: “standalone notes” and “side-notes
on documents.” This section explains how to create a side-note
on a document. For how to create a standalone note, see the
links in “Related Topics.”
Hint
When a one-to-one relationship is made between a side-note and
a document, simply select
screen of the document to display the side-note alongside the
document. This is convenient for displaying a note without have to
find it in a list.
Tap anywhere on the screen of a document
1
to display the tool bar.
(option) — [Open Side-Note] on the
Tap
2
(option) in the upper right of the
document screen — [Create a New SideNote for This Document].
Select a template, and tap [OK].
3
The document and side-note are displayed side-by-side.
The side-note is given the same file name as the document
with “_Note” attached to the end, and it is located in the
same folder as the document.
To change the side that the document and the sidenote are displayed on
Tap (option) — [Swap Screens].
To display only one document
Page 84

Tap (option) on either the left or right, and then tap [Display
This Document Only].
77
Note
When the document and side-note are displayed side-by-side, the
document cannot be rotated.
The document and side-note cannot be displayed top and bottom.
When you press the
Note], a standalone note is created, not a side-note.
A side-note cannot be created in a note.
(home) button and tap [Create New
Hint
Only one side-note can be created per document. When you want
to create a side-note to replace the existing side-note, after
displaying the existing side-note in side-by-side format with the
document, tap
Document]. The old side-note will become a standalone note.
Side-notes are created as PDF files and can be handled the same
way as documents. After creation, the relationship between the
document and the side-note will be retained, even if the Digital
Paper App is used to move the document or the side-note to
another folder or to change the file name of the side-note.
(option) — [Create a New Side-Note for This
Related Topic
Go to Page Top
Adding/editing a note template
Displaying documents side-by-side
Changing the organization of documents/folders on the
Digital Paper
Creating a new note
Selecting defaults for the note template
Page 85

Help Guide
78
Search
Digital Paper System
DPT-RP1/DPT-CP1
Back Back to Top Print
4-597-942-14(1)
Copyright 2016 Sony Corporation
Opening a side-note
Tap anywhere on the screen of a document
1
to display the tool bar.
Tap
2
document screen — [Open Side-Note].
Hint
Side-notes are documents (PDF files) marked with special
attributes. As with documents and standalone notes, they can be
opened independently.
(option) in the upper right of the
Go to Page Top
Related Topic
Opening a note
Opening a document
Selecting and opening from a folder
Opening a different document from the quick access list
Page 86

Help Guide
79
Search
Digital Paper System
DPT-RP1/DPT-CP1
Back Back to Top Print
4-597-942-14(1)
Copyright 2016 Sony Corporation
Adding/deleting a page from a note
Tap anywhere on the screen of a document
1
to display the tool bar.
Tap
2
document screen — [Insert New Page] or
[Delete Current Page].
When you tap [Insert New Page], one page is inserted
before the page that is currently being displayed.
To add a page after the final page
On the final page of the note, swipe (move your finger) in the
direction that would take you to the next page.
Note
(option) in the upper right of the
After a page is deleted, it cannot be returned.
Pages cannot be added/deleted when viewing the document as a
two-page spread.
Go to Page Top
Page 87

Help Guide
80
Search
Digital Paper System
DPT-RP1/DPT-CP1
Back Back to Top Print
4-597-942-14(1)
Copyright 2016 Sony Corporation
Selecting defaults for the note template
Set whether to select a template when you create a new note or
to use a specific template without the option to select.
Press the (home) button, and tap
1
[Settings].
Tap [System Settings] — [Note Template],
2
then tap either your desired template or
[Select template every time note is created].
Go to Page Top
Related Topic
Adding/editing a note template
Page 88

Help Guide
81
Search
Digital Paper System
DPT-RP1/DPT-CP1
Back Back to Top Print
4-597-942-14(1)
Copyright 2016 Sony Corporation
Changing the settings on the Digital Paper
Press the (home) button, and tap
1
[Settings].
Set the individual items.
2
Setting items
[Wi-Fi]
Switch the Wi-Fi function On/Off.
[Wi-Fi Settings]
[Keep Wi-Fi On During Sleep]
When [Always enabled] or [Enabled only when plugged
in] is selected, the Wi-Fi connection is maintained even
when the Digital Paper enters sleep mode, and
documents can be transferred and operated from the
Digital Paper App.
[Wi-Fi Frequency Bands]
Select the frequency of the Wi-Fi network that you want
to use with the Digital Paper.
[Update Saved Network List]
Update the [Saved Network List].
[Saved Network List]
View the list of Wi-Fi networks that have been added by
the Digital Paper App.
Tap the SSID that is currently connected to display the
[Link Speed], [Frequency], and other connection
information. If the computer that the Digital Paper App is
installed to is connected to a different network, you can
change the connection for the Digital Paper by tapping
an SSID from the [Saved Network List].
[Bluetooth]
Switch the Bluetooth function On/Off.
[Bluetooth Settings]
[Bluetooth Pairing]
Enter standby mode for Bluetooth pairing.
Page 89

[Keep Bluetooth Connection On During Sleep]
When [Always enabled] or [Enabled only when plugged
sure to read this before use.
82
in] is selected, the Bluetooth connection is maintained
even when the Digital Paper enters sleep mode, and
documents can be transferred and operated from the
Digital Paper App.
[Delete Pairing Information for All Bluetooth Devices]
Delete the paring information of all paired Bluetooth
devices.
[NFC]
Switch the NFC function On/Off.
[Start Wi-Fi Access Point]
Make this device function as a Wi-Fi access point.
[Wi-Fi Access Point Information]
Display/edit the SSID and password when this device is used
as a Wi-Fi access point.
[System Settings]
[Pen Calibration]
Set the way you hold the pen, and correct any
displacement between where the pen touches the screen
and where the writing appears.
[Limit Editing Annotations]
Annotations that were made to a document outside of
your Digital Paper cannot be edited.
[Note Template]
Set whether to select a template each time a new note is
created, or to use a specific template by default--without
the option to select--whenever a new note is created.
[Screen Lock]
[Screen Lock]
Set a screen lock on the Digital Paper by setting a
lock password between 4 to 20 alphanumeric
characters and symbols in length.
[Change Lock Password]
Change the lock password for the Digital Paper.
[NFC Card Lock Release Settings]
Register a FeliCa card, FeliCa-compatible mobile
phone, smartphone, etc., which can then be used to
disable the screen lock on the Digital Paper.
[Control Server Settings]
Settings for linking Digital Paper to a system.
[Initialize Digital Paper]
Initialize the system storage, and return all settings to
their factory defaults. After initialization is complete, the
Digital Paper will automatically turn off.
[About This Device]
[Device Details]
Display the amount of available space in system storage,
the [Software Version], [Device ID], [MAC Address], and
[Bluetooth Address].
[End User License Agreement]
Display the software’s End User License Agreement. Be
Page 90

[Regulatory Information]
83
Display the VCCI mark based on the rules for voluntary
control measures and the marks and registration numbers for
the radio wave/radio communication industry acts.
Go to Page Top
Related Topic
Connecting via Wi-Fi/Connecting using a USB cable
Connecting via Bluetooth
Selecting defaults for the note template
Setting the screen lock
Adding/editing a note template
Calibrating the pen
Page 91

Help Guide
84
Search
Digital Paper System
DPT-RP1/DPT-CP1
Back Back to Top Print
4-597-942-14(1)
Copyright 2016 Sony Corporation
Changing the Digital Paper settings using the Digital Paper App
Use the Digital Paper App to change the settings of the Digital
Paper.
Connect the computer to the Digital Paper.
1
When changing the settings for the Wi-Fi network, please
connect via the USB cable.
Launch the Digital Paper App on the
2
computer.
Click [Settings], and set the individual items.
3
Setting items
[Paired Digital Paper]
Display information for the Digital Paper that has been
paired. If pairing with a different Digital Paper, click [Re-pair
with Digital Paper].
[Bluetooth automatic connection]
When launching the Digital Paper App, set whether or not
the Bluetooth-paired Digital Paper is automatically
connected.
[Automatic sync]
When using the Digital Paper App, set whether or not the
connected Digital Paper is automatically synced.
[Interval]
Set the interval to sync automatically.
[Note template]
Add a note template to the Digital Paper, delete a template,
or change the name of a template.
[Wi-Fi of the Digital Paper]
Set whether or not the Digital Paper is connected via Wi-Fi.
Page 92

[Saved Wi-Fi networks]
Add a Wi-Fi network for the Digital Paper to connect to, or
85
edit/delete the settings for a Wi-Fi network that has already
been stored.
A Wi-Fi network can be set only when Wi-Fi is turned on.
[General Settings]
Click [Edit] to edit each item.
[Username ]
The username that is set here will be listed as the author
of annotations.
[Date format ]
Set the display format for the date.
[Time format ]
Set the display format for the time.
[Time zone ]
Set the time zone.
[Auto sleep ]
Set the amount of time before the Digital Paper enters
sleep mode.
Hint
A maximum of 20 Wi-Fi networks can be stored to a Digital Paper
device.
Digital Paper supports the security methods WPA2-PSK (AES)
and 802.1x EAP (TLS/PEAP). See the instruction manual for your
wireless router to confirm whether your router supports the same
security methods.
When this device is connected with the Digital Paper App, the time
is automatically set.
Note
If paired with another Digital Paper, the sync settings are deleted.
To pair multiple Digital Paper devices with Digital Paper App for a
single user account, make sure to set “Connecting a second and
subsequent Digital Paper.”
Go to Page Top
Related Topic
Connecting via Wi-Fi/Connecting using a USB cable
Connecting via Bluetooth
Connecting a second and subsequent Digital Paper
Page 93

Help Guide
86
Search
Digital Paper System
DPT-RP1/DPT-CP1
Back Back to Top Print
4-597-942-14(1)
Copyright 2016 Sony Corporation
Updating the software
Information on software updates for the Digital Paper and the
Digital Paper App is checked automatically via the Internet.
When update information is found, a message appears on the
screen of the Digital Paper App, and you can choose whether to
update. When updating the software of the Digital Paper, use the
supplied USB cable to connect the computer to the Digital
Paper.
Note
For customers using a version earlier than Ver. 1.2, make sure to
update the Digital Paper App and then update the firmware of the
Digital Paper.
For how to update, see the following;
https://www.sony.net/dpapp/
To update the software, connecting the computer to the internet is
required.
If you have skipped an update or want to manually check the
update information, follow the steps below.
Use the supplied USB cable to connect the
1
computer to the Digital Paper.
Connect the computer to the Internet, and
2
launch the Digital Paper App.
From the menu bar click [Help] — [Software
3
update], and follow the screen to update.
To check the software version of the Digital Paper
Press the (home) button on the Digital Paper, and tap
[Settings] — [About This Device] — [Device Details].
Page 94

To check the software version of the Digital Paper
App
87
For Windows
From the menu bar of the Digital Paper App, click [Help] —
[About Digital Paper App].
For Mac
From the menu bar of the Digital Paper App, click [Digital
Paper App] — [About Digital Paper App].
Go to Page Top
Page 95

Help Guide
88
Search
Digital Paper System
DPT-RP1/DPT-CP1
Back Back to Top Print
4-597-942-14(1)
Copyright 2016 Sony Corporation
Setting up the Digital Paper App
To transfer documents to the Digital Paper, it is necessary to
install the dedicated app, “Digital Paper App,” onto your
computer and to set up a connection (perform pairing) between
the Digital Paper and the Digital Paper App on the computer.
By installing the Digital Paper App onto multiple computers in
your home or office, you can pair multiple computers with a
single Digital Paper device. If one computer is set up with
multiple user accounts, each user account must be paired
separately.
The Digital Paper App for a single user account can be
paired with multiple Digital Paper devices. For information on
how to pair with the Digital Paper App, see the links in
“Related Topic.”
Page 96

When multiple user accounts are set to a computer, make
89
sure to set “Connecting a second and subsequent Digital
Paper” for each user account.
If you skipped pairing during the initial setup or if you want to
install the Digital Paper App onto a different computer, follow the
steps below.
Turn on the computer and connect it to the
1
Internet.
If the Digital Paper App has already been installed on the
computer, steps 1 and 2 are not necessary. Please
proceed to step 3.
Download the Digital Paper App from the
2
customer support website, and install it onto
the computer.
Launch the Digital Paper App, and use the
3
supplied USB cable to connect the computer
to the Digital Paper.
The [Connect to Digital Paper] screen is displayed.
Follow the screen of the Digital Paper App,
4
and pair the Digital Paper device with the
Digital Paper App.
Page 97

If a software update is available for the
90
5
Digital Paper, perform the update.
Related Topic
Connecting a second and subsequent Digital Paper
Go to Page Top
Page 98

Help Guide
91
Search
Digital Paper System
DPT-RP1/DPT-CP1
Back Back to Top Print
4-597-942-14(1)
Copyright 2016 Sony Corporation
Cannot turn on the power
If the charge indicator blinks three times in red when the
(power) button is pressed, the battery is depleted. Connect
the Digital Paper to a computer using the supplied USB
cable to charge it.
When the battery is entirely empty, the Digital Paper cannot
turn on. If you connect the Digital Paper to a computer using
the supplied USB cable and charge it, the Digital Paper will
turn on.
When the power does not turn on, even when the Digital
Paper is connected via the supplied USB cable for charging,
press the
empty, it may take five to ten minutes from the time that
charging begins for the power to turn on.
When the Digital Paper experiences condensation, the
power may not turn on. Wait a few hours, and then turn it on.
(power) button. When the battery is entirely
Go to Page Top
Page 99

Help Guide
92
Search
Digital Paper System
DPT-RP1/DPT-CP1
Back Back to Top Print
4-597-942-14(1)
Copyright 2016 Sony Corporation
Cannot charge the Digital Paper
Please use the supplied USB cable for charging. If you use a
USB cable other than the one supplied, the performance and
safety are not guaranteed.
Use the supplied USB cable to connect the computer directly
to the Digital Paper. If connecting to the computer through a
USB hub, functionality is not guaranteed.
When connected to a computer for charging, make sure that
the computer is turned on. If the computer is off, the Digital
Paper cannot be charged. If the power is on but the
computer is in sleep mode, standby mode, or hibernation,
the Digital Paper cannot be charged. Make sure that the
computer will not enter any sort of sleep mode while
charging.
When charging the Digital Paper from a laptop computer, it is
necessary for the laptop to have a sufficient electrical supply.
Please charge the Digital Paper while also charging the
notebook computer.
Charge within the recommended temperature range of 5 °C
to 35 °C (41 °F to 95 °F). When the Digital Paper is outside
of the recommended temperature range and cannot be
charged, remove the USB cable from the Digital Paper. Wait
until the temperature is within the recommended range
before reconnecting the USB cable and charging.
Go to Page Top
Page 100

Help Guide
93
Search
Digital Paper System
DPT-RP1/DPT-CP1
Back Back to Top Print
4-597-942-14(1)
Copyright 2016 Sony Corporation
The battery seems to drain quickly
Check whether the battery finished charging completely.
Press the
the top right corner of the home menu. When the icon
changes from
When using the Digital Paper in an ambient temperature
lower than 5 °C (41°F), the battery may drain quickly, but this
is not a malfunction.
The battery drains even when the Digital Paper is in sleep
mode. We recommend turning the power completely off
when not in use.
Even when the power is off, if the Digital Paper is left alone
for an extended period of time, the battery will drain. Charge
the Digital Paper before use.
Turn off the Wi-Fi function when you are not using the
network. Press the
then tap [Wi-Fi] to remove the check mark.
Turn off the Bluetooth function when you are not using a
Bluetooth connection. Press the
tap [Settings], then tap [Bluetooth] to remove the check
mark.
If your Digital Paper is connected to a computer that is in
sleep mode, standby mode, or hibernation, the battery will
drain without charging. Make sure that the computer will not
enter any sort of sleep mode.
Battery life varies depending on frequency of use, device
settings, and usage environment.
Under the following conditions, the battery will drain more
quickly.
(home) button to display the battery icon in
to , charging is complete.
(home) button and tap [Settings],
(home) button and
Frequent handwriting.
Frequent highlighting.
Frequently searching for documents.
Displaying documents which contain large image files.
Using the Digital Paper while [Wi-Fi] is set to On. Or,
setting up the Wi-Fi connection to remain connected
during sleep mode.
Selecting [Wi-Fi Settings] within [Settings], and then
leaving the display on [Saved Network List].
Using the Digital Paper while [Bluetooth] is set to On. Or,
setting up the Bluetooth connection to remain during
sleep mode.
 Loading...