

Page 1

Digital Photo
Printer
3-205-620-13(1)
Digital Photo Printer
Operating Instructions
Before operating this printer, please read this
manual thoroughly and retain it for future
reference.
Mode d’emploi
Avant d’utiliser cette imprimante, veuillez lire
attentivement ce manuel et le conserver pour toute
référence ultérieure.
Manual de instrucciones
Antes de utilizar esta impresora, lea este manual
atentamente y consérvelo para consultarlo en el
futuro.
GB
FR
ES
DPP--SV77
DPP-SV77
2001 Sony Corporation
Page 2
WARNING
To prevent fire or shock hazard, do
not expose the unit to rain or
moisture.
To avoid electrical shock, do not
open the cabinet. Refer servicing to
qualified personnel only.
ATTENTION
Pictures and/or Sound distortion may occur if
this product is positioned in close proximity to
equipment emitting electromagnetic radiation.
Attention
Sony shall assume no responsibility for any
accidental or consequential damages or loss
of the recording contents which may be
caused by use or malfunction of the printer,
“Memory Stick” or PC card.
For the customers in the U.S.A.
WARNING
This equipment has been tested and found to
comply with the limits for a Class B digital
device, pursuant to Part 15 of the FCC Rules.
These limits are designed to provide
reasonable protection against harmful
interference in a residential installation. This
equipment generates, uses, and can radiate
radio frequency energy and, if not installed
and used in accordance with the instructions,
may cause harmful interference to radio
communications. However, there is no
guarantee that interference will not occur in a
particular installation. If this equipment does
cause harmful interference to radio or
television reception, which can be determined
by turning the equipment off and on, the user
is encouraged to try to correct the interference
by one or more of the following measures:
– Reorient or relocate the receiving antenna.
– Increase the separation between the
equipment and receiver.
– Connect the equipment into an outlet on a
circuit different from that to which the
receiver is connected.
– Consult the dealer or an experienced radio/
TV technician for help.
Owner’s Record
The model and serial numbers are located
on the bottom. Record the serial number
in the space provided below. Refer to this
number whenever you call upon your
Sony dealer regarding this product.
Model No. DPP-SV77
Serial No.
If you have any questions about this product, you
may call:
Sony’s Business Information Center (BIC) at 1800-686-SONY (7669)
or Write to: Sony Customer Information Services
Center
6900-29 Daniels Parkway, PMB 330
Fort Myerts, Florida 33912
Declaration of Conformity
Trade Name: SONY
Model No.: DPP-SV77
Responsible Party:
Sony Electronics Inc.
Address: 680 Kinderkamarck Road,
Oradell NJ 07649 U.S.A.
Telephone No.: 201-930-6972
This device complies with part 15 of the
FCC Rules. Operation is subject to the
following two conditions:
(1) this device may not cause harmful
interference, and (2) this device must
accept any interference received,
including interference that may cause
undesired operation.
2
GB
Page 3
You are cautioned that any changes or
modifications not expressly approved in this
manual could void your authority to operate
this equipment.
The shielded interface cable recommended in
this manual must be used with this
equipment in order to comply with the limits
for a digital device pursuant to Subpart B of
Part 15 of FCC Rules.
CAUTION
To prevent electric shock, match wide blade
of plug to wide slot, fully insert.
CAUTION
The nameplate is located on the bottom
enclosure.
•Microsoft, MS, MS-DOS and Windows
are registered trademarks of Microsoft
Corporation in the United States and
other countries.
•IBM and PC/AT are registered
trademarks of International Business
Machines Corporation.
•MMX and Pentium are registered
trademarks of Intel Corporation.
•Apple, Macintosh, Power Macintosh,
and Mac OS are registered trademarks of
Apple Computer, Inc.
• “Memory Stick,” “MagicGate Memory
Stick” and their logo marks are the
trademarks of Sony Corporation.
•All other companies and product names
mentioned herein may be the
trademarks or registered trademarks of
their respective companies. Furthermore,
“™” and “®” are not mentioned in each
case in this manual.
®
Notice for users
Program © 2001 Sony Corporation
Documentation ©2001 Sony Corporation
A
ll rights reserved. This manual or the software
described herein, in whole or in part, may not
be reproduced, translated or reduced to any
machine readable form without prior written
approval from Sony Corporation.
IN NO EVENT SHALL SONY CORPORATION
BE LIABLE FOR ANY INCIDENTAL,
CONSEQUENTIAL OR SPECIAL DAMAGES,
WHETHER BASED ON TORT, CONTACT, OR
OTHERWISE, ARISING OUT OF OR IN
CONNECTION WITH THIS MANUAL, THE
SOFTWARE OR OTHER INFORMATION
CONTAINED HEREIN OR THE USE THEREOF.
By breaking the seal of the envelope of the CDROM package, you accept all the terms and
conditions of this agreement. If you do not
accept these terms and conditions, please
return this disk envelope unopened, along with
the rest of the package, immediately to the
dealer where you obtained it.
Sony Corporation reserves the right to make
any modification to this manual or the
information contained herein at any time
without notice.
The software described herein may also be
governed by the terms of a separate user license
agreement.
User Registration
To receive customer services, complete and
return the registration card included in your
package.
Any design data such as sample pictures
provided in this software cannot be modified or
duplicated except for the purpose of personal
use. Any unauthorized duplication of this
software is prohibited under copyright law.
Please note that unauthorized duplication or
modification of others’ portraits or copyrighted
work could infringe the rights reserved by right
holders.
GB
3
GB
Page 4

Table of contents
WARNING....................................................... 2
Notice for users .............................................. 3
Table of contents ............................................4
Getting started
What you can do with the printer ................... 5
Unpacking the printer..................................... 7
Identifying the parts ....................................... 8
Using the stylus and operation panel ........... 11
Opening the operation panel ................... 11
Using the stylus ....................................... 12
Setting up
1 Connecting the printer ........................... 14
Inserting a “Memory Stick” or PC card .... 14
Connecting to a television (optional)........ 15
Connecting the AC power cord ................ 16
Connecting to a computer (optional) ....... 16
2 Preparing the printing pack .................... 18
3 Loading the print cartridge .....................19
4 Inserting the print paper......................... 21
Basic printing operations
Printing selected images............................... 23
Printing all images or DPOF preset images at
one time................................................. 27
Advanced printing operations
Adding effects to an image .......................... 29
What you can do with the Effect menu .... 29
Changing the image size and position ..... 31
Adjusting the pictures ............................. 32
Adding a special filter to an image .......... 34
Adding drawings, stamps, or characters (Tool) .
What you can do with the Tool sub menu ....
Drawing freehand line art (
Pasting stamps (
Typing characters (
) ............................... 40
) ............... 38
) ........................... 42
36
36
Making various prints (CREATIVE PRINT) ..... 45
What you can do with the Creative Print
menu ...................................................... 45
Making a card ......................................... 47
Making a calendar .................................. 51
Making a split print ................................. 53
Making a sticker...................................... 55
Making an index print ............................. 57
Setting up the printer (MENU) ...................... 59
What you can do with the Menu.............. 59
Changing the printer preferences (Set Up) ....
Setting video output and LCD screen
contrast .................................................. 63
Viewing a slideshow ..................................... 64
Deleting images............................................ 65
60
Printing from your computer
Using your printer with Windows computers 67
System requirements ............................... 67
Installing the software ............................. 68
Using the reader software ....................... 77
Printing from a software application ........ 78
Using your printer with
Macintosh computers ............................ 81
System requirements ............................... 81
Installing the printer driver ...................... 81
Printing from a software application ........ 83
Additional information
Precautions ................................................... 85
About the “Memory Stick” and
PC card media ........................................87
On “Memory Stick” ................................. 87
To protect “Memory Stick” images .......... 87
Notes on use ........................................... 88
Troubleshooting ........................................... 89
If paper jams ........................................... 91
Specifications ............................................... 92
Index ............................................................ 93
4
GB
Page 5

Getting started
What you can do with the printer
With the Digital Photo Printer DPP-SV77, you can print images stored on a
“Memory Stick” or PC card. You can also print easily from your computer.
Photo-realistic printing
With its sublimation dye transfer printing system, the printer can make
photo-realistic prints meeting a number of different requirements.
Super Coat 2 feature
The Super Coat 2 enables high durability and moisture or fingerprint
resistance, keeping your prints in good picture quality for an extended
period of time.
Easy stylus operations on the color LCD screen
With the color touch-sensitive LCD screen, you can easily perform the
operations with the touch of a stylus and preview the images to be printed.
To select an image or an item, just tap the screen lightly with the stylus
supplied with your printer. A series of screen-activated operations will
navigate you though the printing process.
To view the images on a wider screen, you can also connect your printer to
your television.
Getting started
Auto Fine Print 2 function
Even a dark picture with low contrast can be adjusted and printed as a vivid
and clear picture.
Selection of print sizes and border/borderless print formats
You can select from a large, dynamic Post Card size print or an economical
Small size print. For the Post Card size print, you can also select a borderless
or border print format.
Direct printing of “Memory Stick” or PC card images
Just take a “Memory Stick” or PC card from your digital still camera and
insert it into the printer. You can immediately print any of the images in the
“Memory Stick” or PC card. You can also print all the images in a “Memory
Stick” or PC card or the images preset by a digital still camera at one time.
Selection of print finish
You can select the print finish from either glossy or texture.
Continued
5
GB
Page 6

What you can do with the printer
Printing 25/30 sheets at one time
With the supplied paper tray, you can print up to 25 sheets for Post Card size
and 30 sheets for Small size print paper at one time.
A wide variety of prints available with your printer
You can make various types prints such as a standard print, a date print, or
an index print of the images stored in a “Memory Stick” or PC card. A
variety of image processing functions allow you to magnify/reduce, rotate,
flip, or move the image. You can also add a special effect to the picture to
produce sepia, monochrome, or paint pictures, or use tools to paint freehand
drawings, add stamps, or input characters on an image.
An even wider variety of prints using the Creative Print menu
The Creative Print menu allows you to make even more types of prints such
as a calendar, a card, split images, a sticker with framed images.
Making a convenient USB connection with your computer
By installing the supplied DPP-SV77 printer driver software on your
computer, you can print images from your computer. With the supplied
“Memory Stick/PC card Reader Software,” you can view and handle the
images in a “Memory Stick” or PC card inserted in the printer from your
computer.
On the demonstration mode
You can view the demonstration of the DPP-SV77 features.
Turn on the power of the printer while the “Memory Stick” or PC card is not
inserted. The demonstration button is displayed in the lower-right on the
screen. Tap the button to start the demonstrations. The DPP-SV77 features
will be shown in order. To stop the demonstrations, tap anywhere on the
screen.
GB
6
Page 7
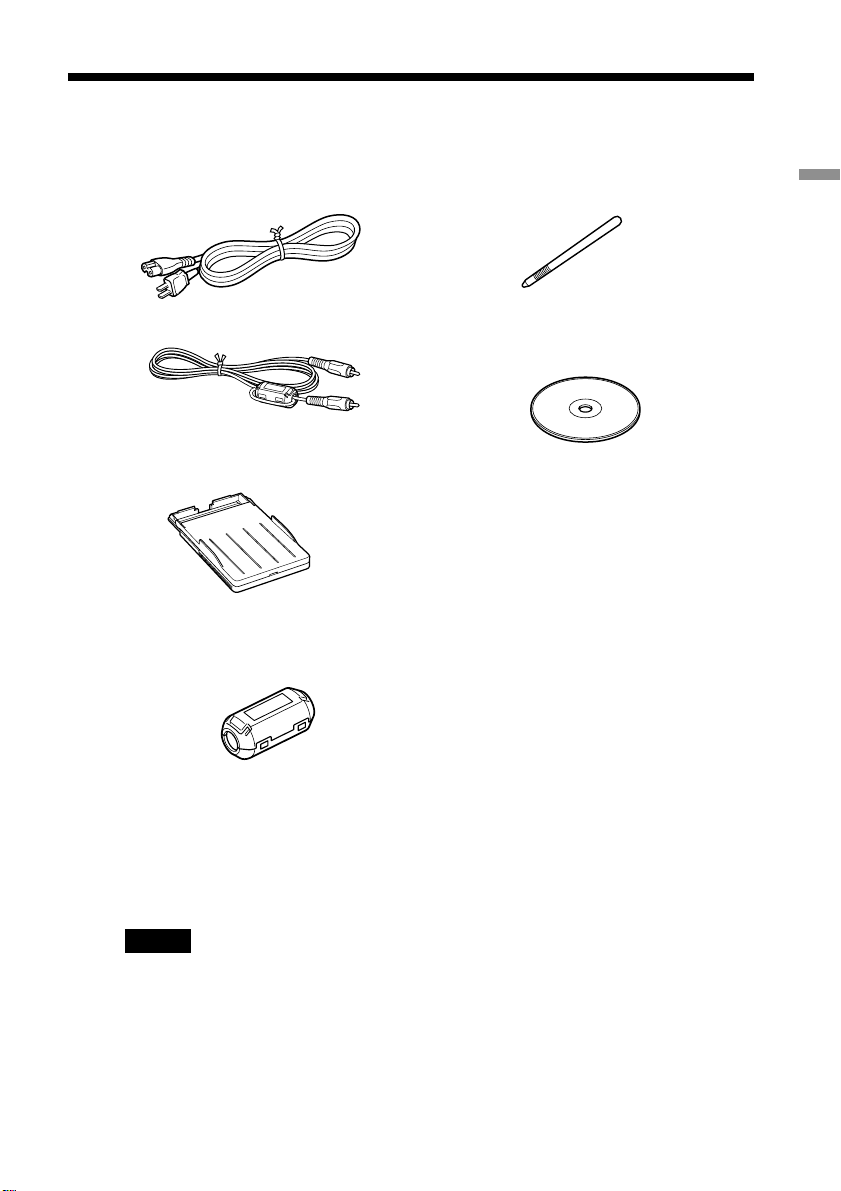
Unpacking the printer
Make sure that the following accessories are supplied with your printer.
• AC power cord (1)*
• Video connection cable (1)
• Paper tray (1)
• Clamp filter (1)
• Stylus (1)
• CD-ROM (1)
–Sony DPP-SV77 Printer Driver
Software for Windows 98/
98SE/Me/2000 Professional
Ver. 1.0
–Sony DPP-SV77 Printer Driver
for Mac OS 8.5.1, 8.6, 9.0/9.1
Ver. 1.0
–Memory Stick/PC card Reader
Software for Windows 98/
98SE/Me/2000 Professional
Ver. 1.0
Getting started
• Operating Instructions (1)
• Warranty (1)
• Sample Printing Pack (1)
• Owner registration card (1)
• Sony End User Software License Agreement (1)
*Note
The AC power cord illustrated is for 120V only. The plug shape and specifications
change depending on the region you use the printer.
7
GB
Page 8
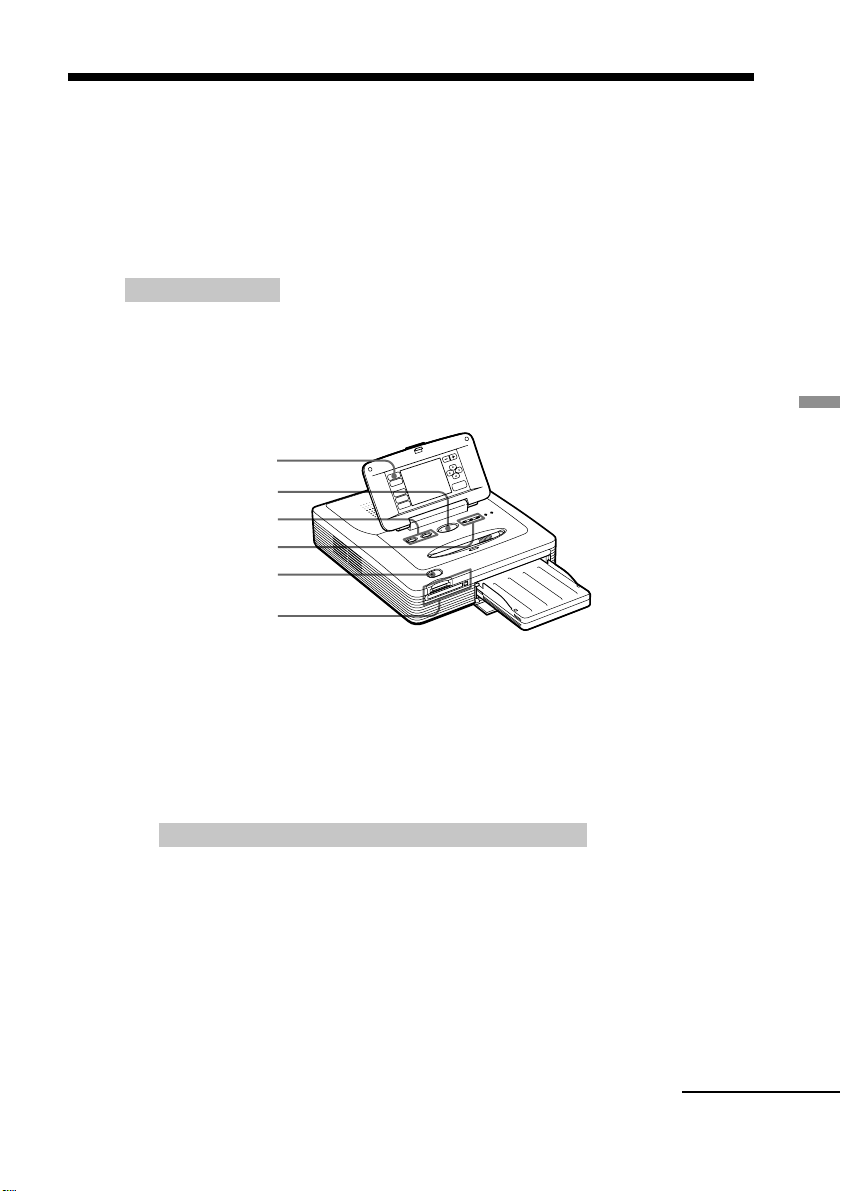
Identifying the parts
For details, see the pages indicated in
the parentheses.
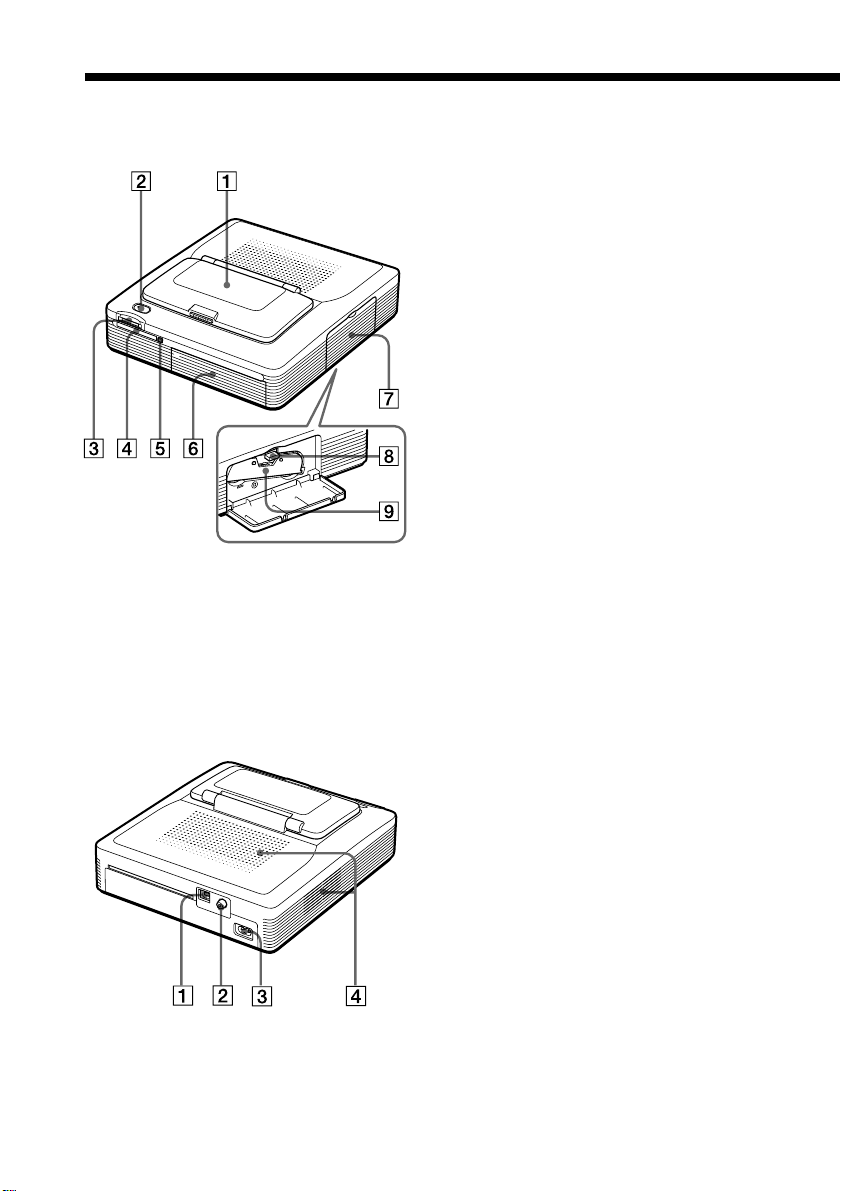
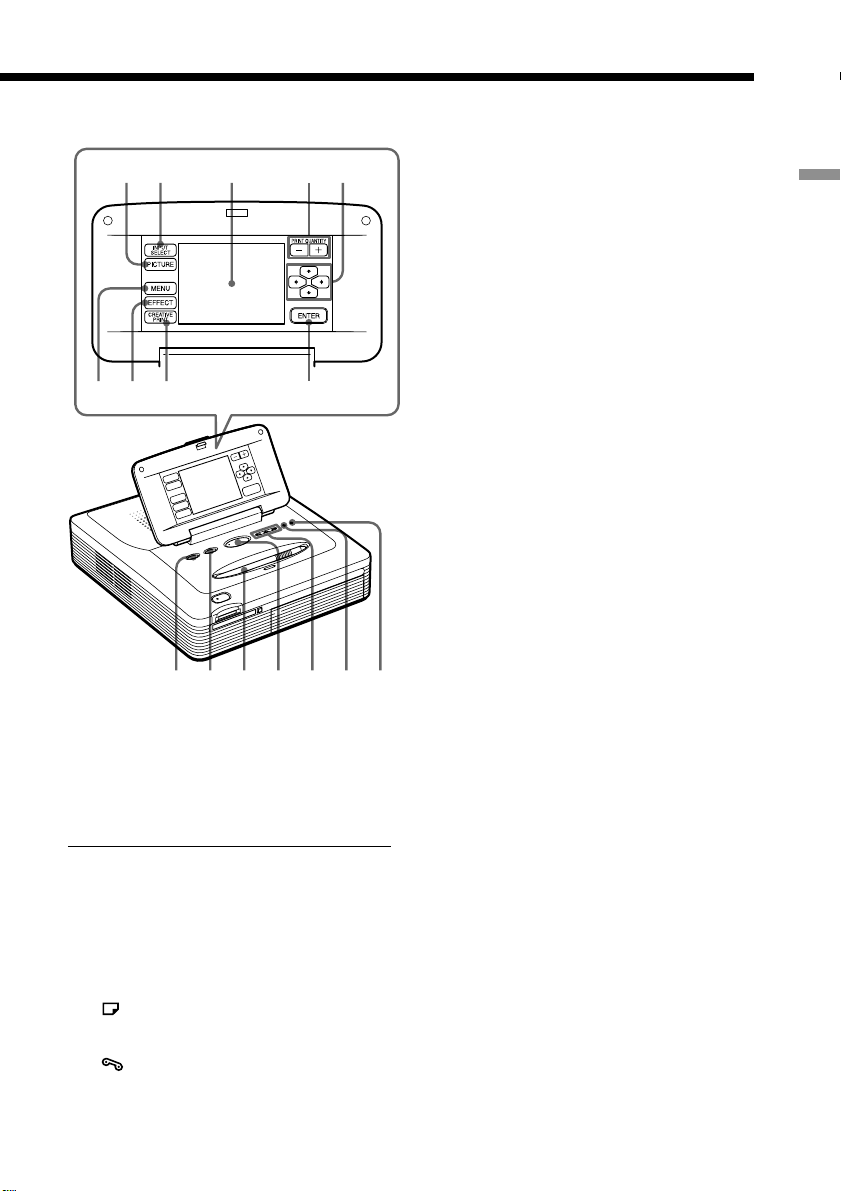
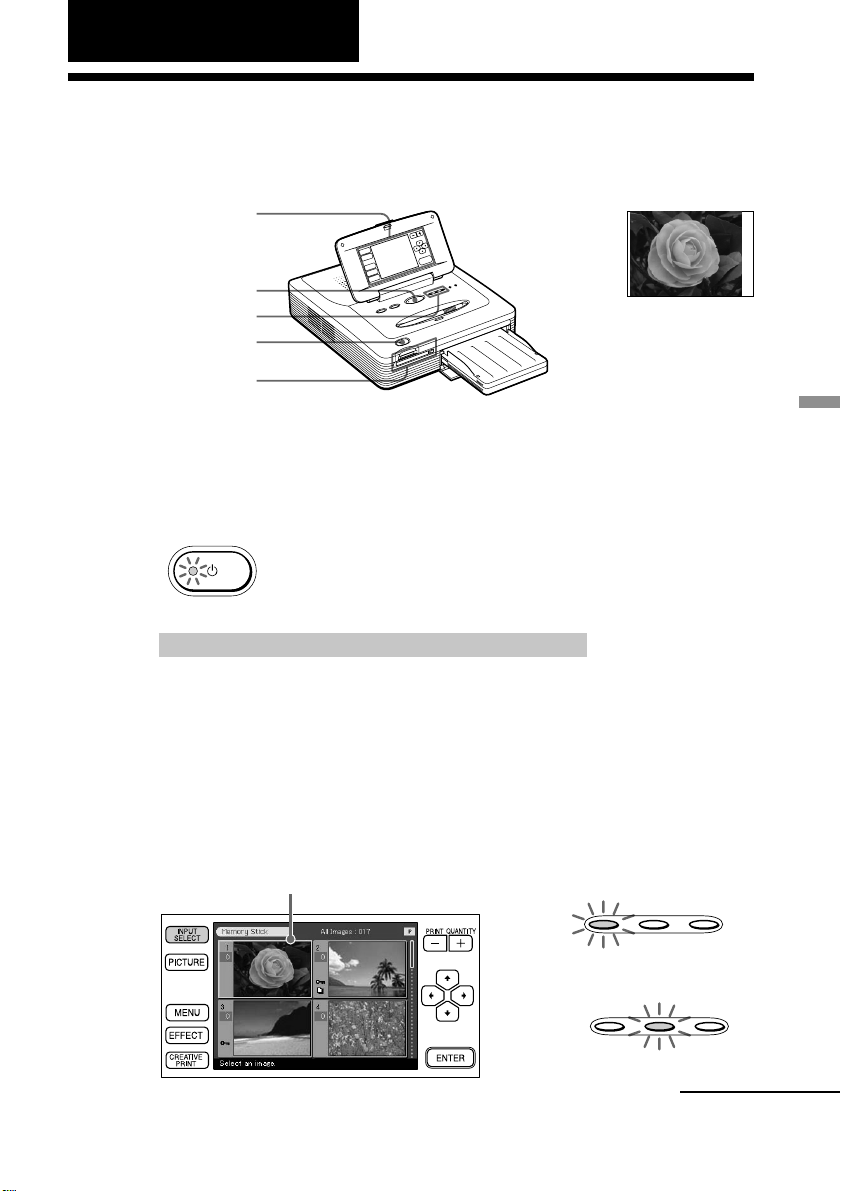
Printer front panel
1 Operation panel (next page)
Push PUSH/OPEN to open the operation
panel (page 11).
2 POWER button (pages 19, 23)
Lights in orange in the standby mode
and lights in green in the power-on
mode.
3 “MEMORY STICK” insertion slot
(page 14)
4 PC CARD insertion slot (page 14)
5 PC card eject button (page 14)
6 Paper tray compartment lid
Insert the supplied paper tray here.
7 Cartridge compartment lid (page
19)
8 Print cartridge eject lever (page
20)
Push up to eject the print cartridge.
9 Print cartridge (pages 18, 19)
(Not supplied)
8
Printer rear panel
1 USB connector (page 16)
Connects to the USB connector of your
computer.
2 VIDEO OUT connector (page 15)
Connects to the VIDEO input of your
television.
3 AC IN connector (page 16)
4 Ventilation holes
GB
Page 9
12 435
67
89
q; qa qs qd qf qg qh
qd PRINT button (pages 26, 28)
qf “MEMORY STICK”/PC CARD/PC
input indicators (pages 17, 23)
The indicator for the current input signal
lights.
qg Paper error indicator (pages 22,
91)
qh
Cartridge error indicator (page
20)
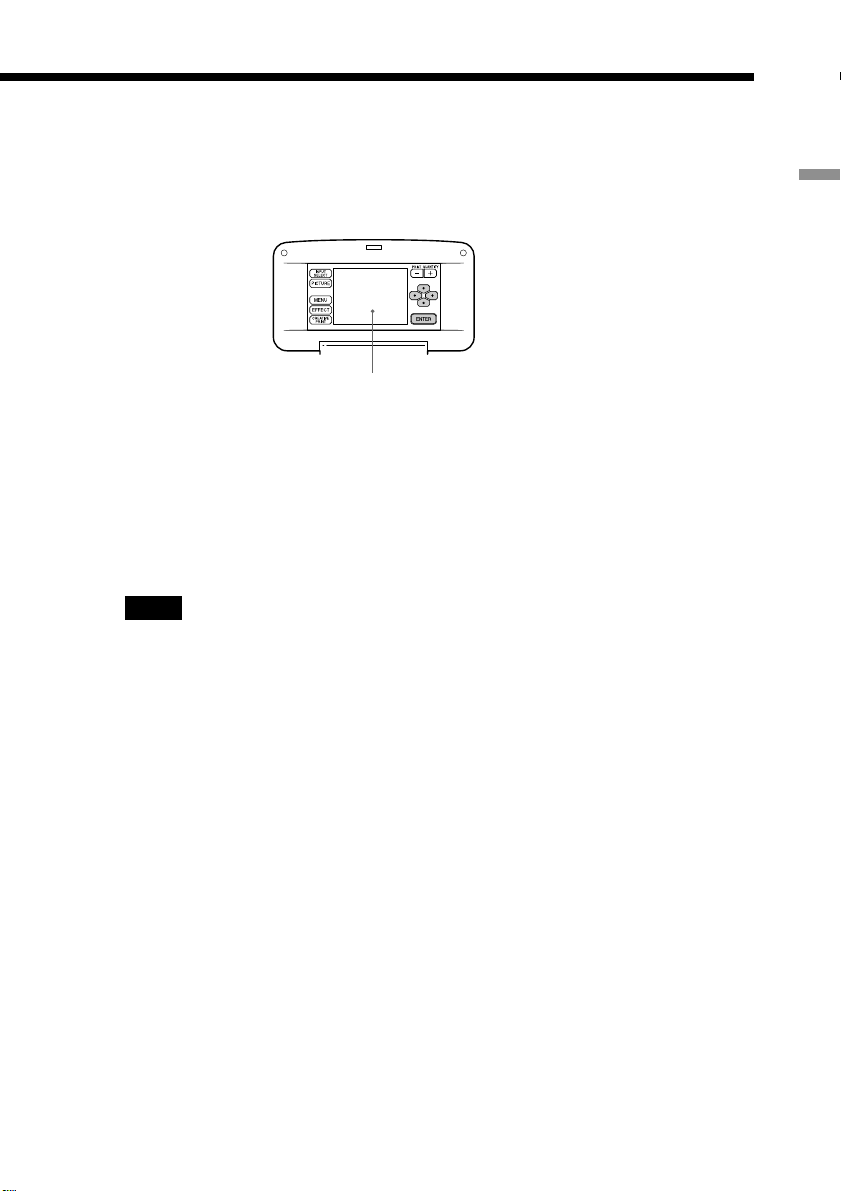
Printer operation panel
The buttons on the LCD touch-sensitive
operation panel (1 through 9) are
designated with square brackets in this
manual (ex. [PICTURE]).
1 PICTURE button (page 24)
Switches the thumbnail list and preview
image.
2 INPUT SELECT button (page 23)
Switches the input. (The selected input
indicator qv lights.)
3 LCD screen (next page)
Displays the images, menu items, or
available options.
4 PRINT QUANTITY (+/–) buttons
(page 25)
Specifies the print quantity.
5 Arrow (B/b/V/v) buttons (page
13)
Moves the cursor to an image or item on
the LCD screen 3.
6 MENU button (pages 59)
Displays the Menu screen.
7 EFFECT button (page 29)
Displays the Effect menu.
8 CREATIVE PRINT button (page 45)
Displays the Creative Print menu.
9 ENTER button (page 13)
Selects the image(s) or item(s) indicated
using the cursor on the screen.
0 ALL button (page 28)
Selects automatic printing of all images.
qa DPOF button (page 28)
Selects automatic printing of all DPOF
images.
qs Stylus (page 12)
Used to select an item on the screen.
Place the stylus in the slot to prevent it
from being lost.
Getting started
9
GB
Page 10
Identifying the parts
1
qa
2
3
4
5
q;
Thumbnail list
6
1
2
7
8
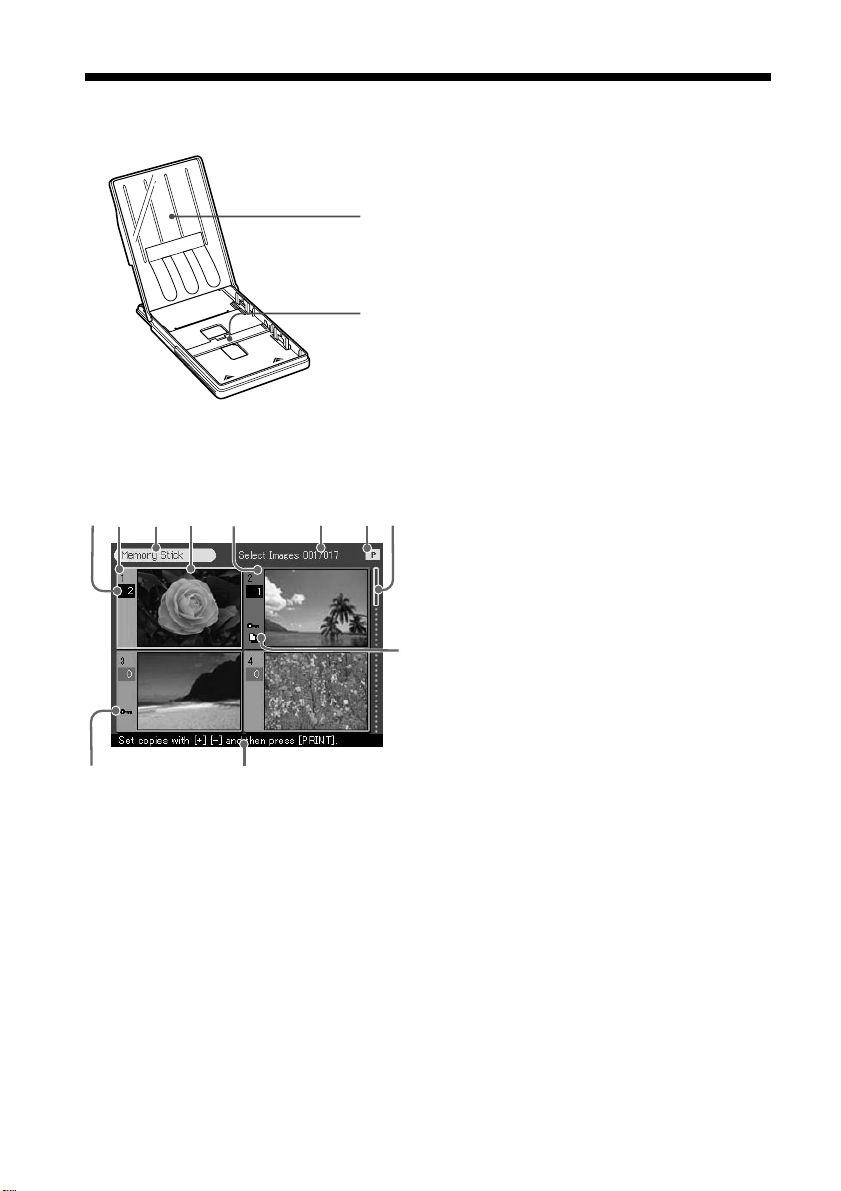
Paper tray
1 lid
2 Partition
Screen
1 Print quantity indication
Indicates the print quantity. (In preview,
no indication appears when the quantity
is set to zero.)
2 Image number
3 “Memory Stick”/PC Card indication
Indicates that the type of media currently
being used.
4 Cursor (yellow frame)
Indicates that the image with the cursor.
5 Selection (orange)
Indicates that the image has been selected.
6 The quantity of selected images/
the total image quantity
When no image is selected, only the total
9
image quantity is displayed.
7 Print cartridge indication
Indicates the type of print cartridge
currently loaded (P: Post Card size/S:
Small size).
8 Scroll bar
Indicates the position of the image
currently displayed or selected from
among the total number of images.
9 Print preset (DPOF) indication
Indicates the image is DPOF preset for
printing from a digital still camera.
0 Guidance message
Displays simplified instructions for the
next step.
qa Protect indication
Indicates the image is protected by a
digital still camera.
10
GB
Page 11
Using the stylus and operation panel
Most operations on the DPP-SV77 are carried out by tapping an item or
button on the touchscreen of the operation panel. This section explains how
to use the stylus and touchscreen.
Note on the LCD screen
The LCD is manufactured using high-precision technology. You may, however, see
brighter points or color shifts on the LCD depending on the viewing angle. This is a
normal result of the manufacturing process and does not indicate a malfunction.
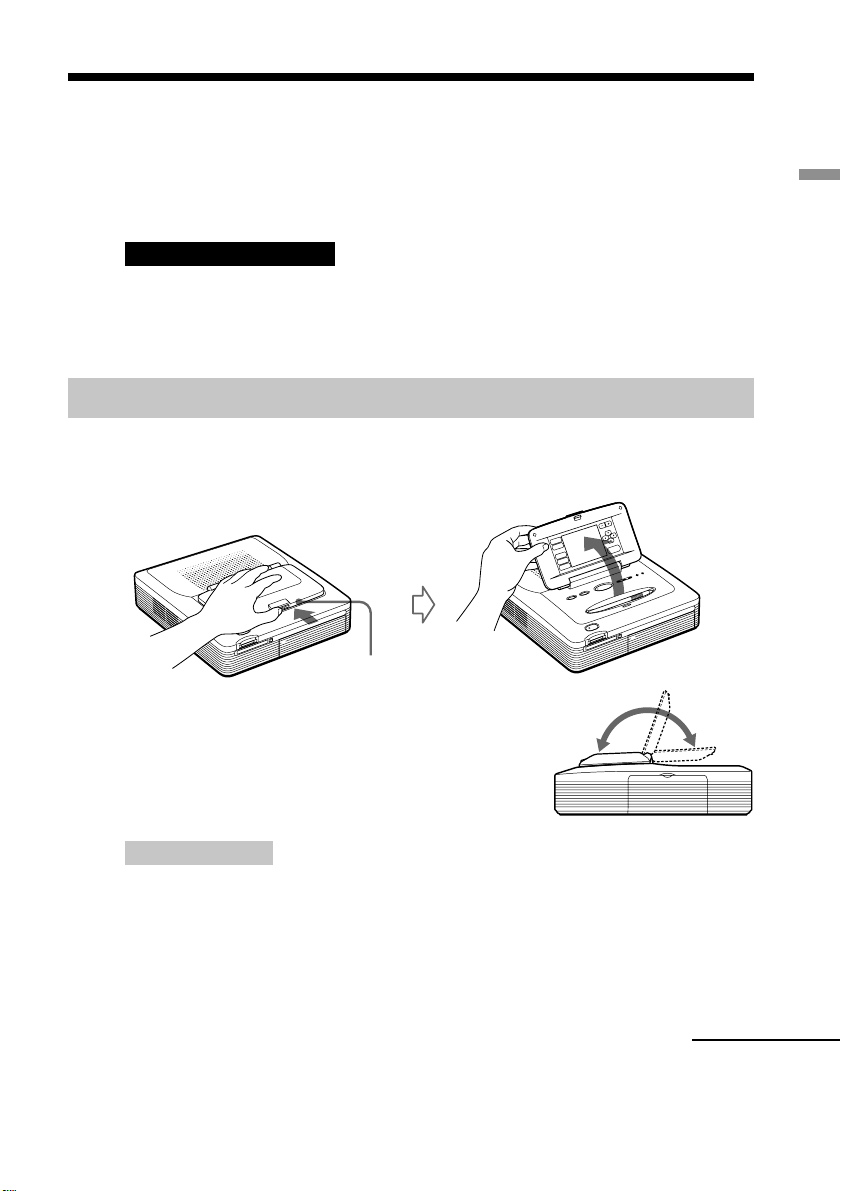
Opening the operation panel
Open the operation panel while pressing PUSH/OPEN.
PUSH/OPEN
Getting started
You can rotate the operation panel up to 180
degrees. Use the panel at an appropriate
angle such that you can view the screen
clearly and can perform the stylus operations
easily.
After you finish
•To keep the touchscreen safe and clean, we recommend you close the operation
panel after you finish using your printer.
•Keep the stylus in the slot on the panel to prevent it from being lost.
•If the screen becomes soiled, wipe it with a soft dry cloth such as a cloth used to
clean your eyeglasses.
Continued
GB
11
Page 12
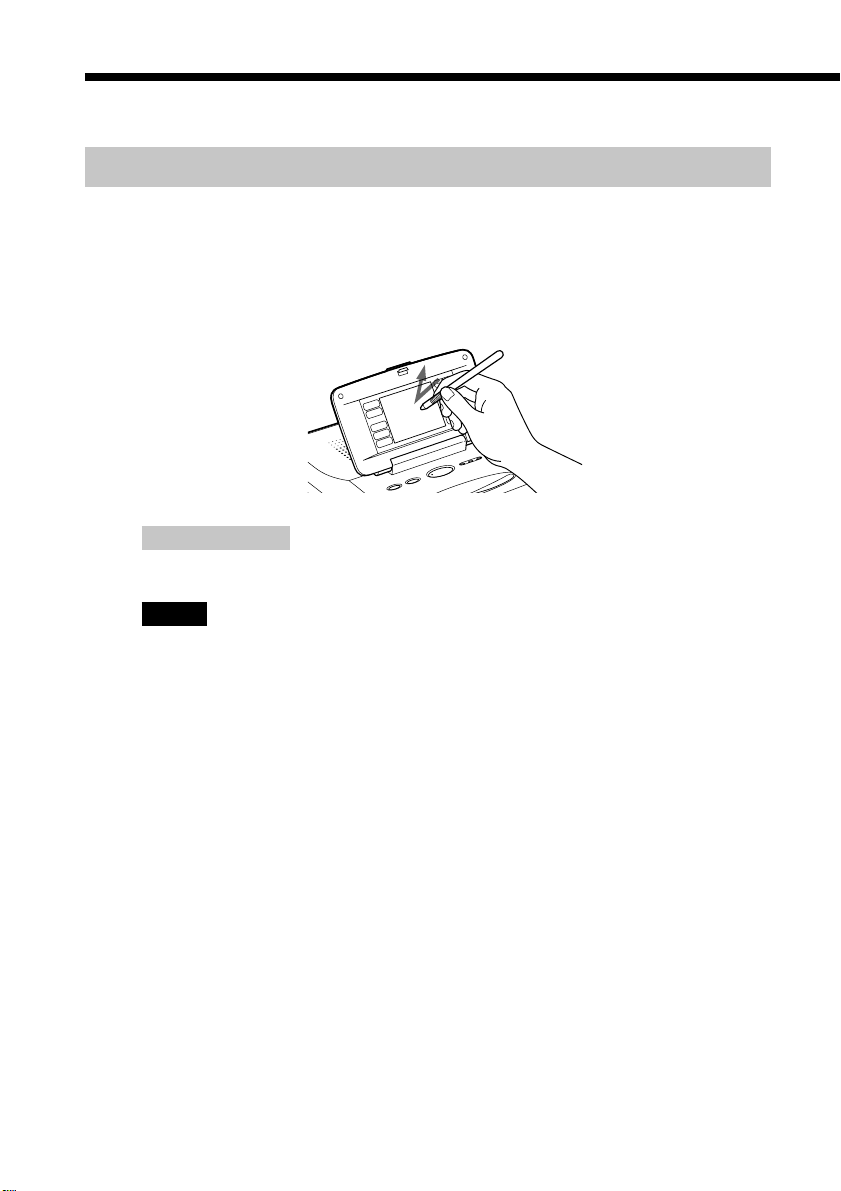
Using the stylus and operation panel
Using the stylus
Press lightly on the button, image or item on the operation panel
screen using the point of the supplied stylus.
This action is referred to as “tapping” in this manual. Tapping allows you to
execute the button function or select an item or image on the screen.
After you finish
Keep the stylus in the slot on the panel to prevent it from being lost.
Notes
•Always use the point of the supplied stylus for tapping the screen. Never use a real
pen, pencil, or other sharp object to write on the screen.
•In case you lost the supplied stylus, you can use Sony optional accessory.
12
GB
Page 13
Selecting an image or item on the screen
You can select an item on the screen using either of the following methods
Operation panel
Screen
x Tap directly on the image or item on the screen.
The image or item is immediately selected. In this manual, this directtapping method is the primary method used to explain the procedures.
x Tap the arrows [B/b/V/v] to move the yellow frame (cursor)
to an item or image on the screen and then tap [ENTER].
The item or image is selected after you tap [ENTER].
Note
In some steps or operations, the following restrictions apply in selecting an item or
image. Follow the guidance message displayed on the screen:
•You can use only arrow [B/b/V/v] or direct tapping to select an item.
•You can use only the vertical arrow [V/v] or horizontal arrow [B/b] buttons.
Getting started
13
GB
Page 14
Setting up
1 Connecting the printer
Inserting a “Memory Stick” or PC card
Notes
•Do not attempt to force a “Memory Stick” or a PC card into or out of the slot. If
you do, the “Memory Stick” or the PC card or the printer may be damaged.
•When the printer is accessing the “Memory Stick” or PC card and the relevant
indicator flashes, do not remove the “Memory Stick” or PC card from the printer. If
you do, the “Memory Stick” or the PC card or the printer may be damaged.
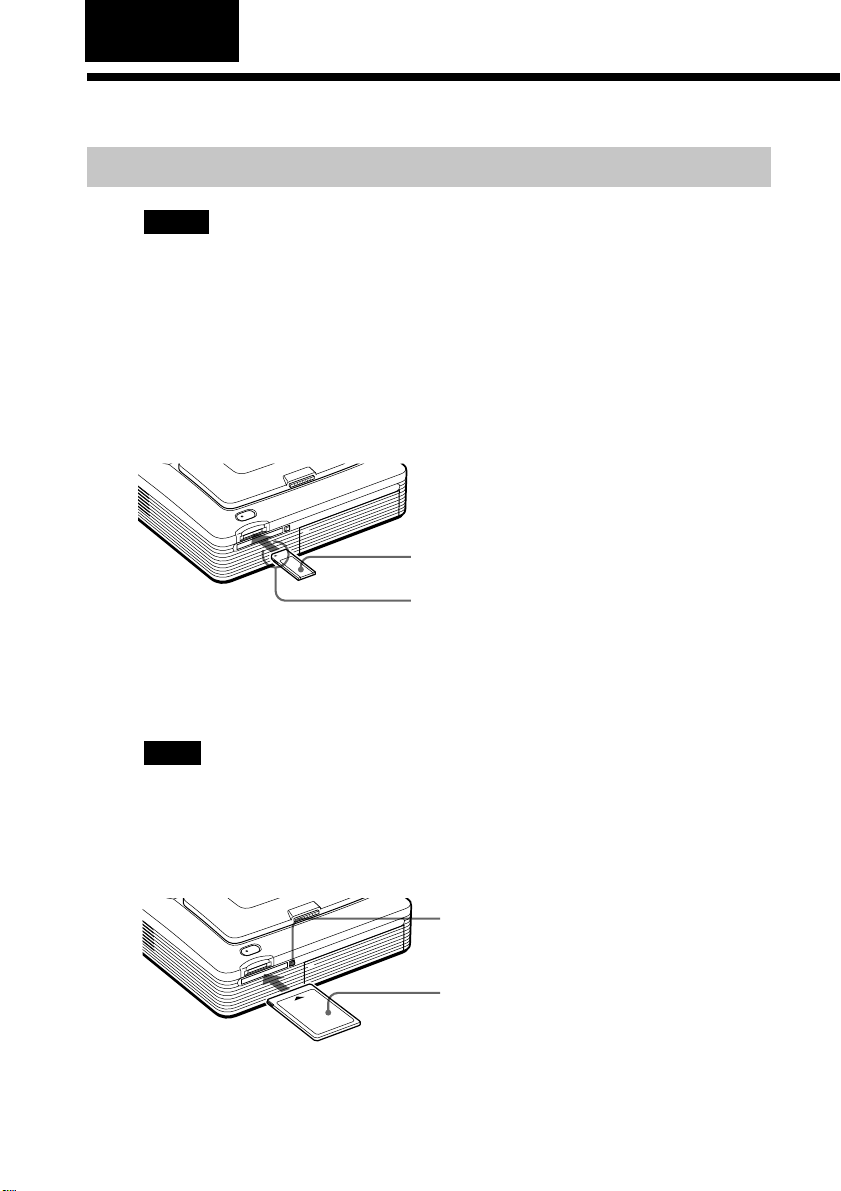
Printing an image from a “Memory Stick”
Insert the “Memory Stick” into the “MEMORY STICK” insertion slot until it
clicks into place.
“Memory Stick”
With the notch facing left and the arrow facing
forward on the left
To eject the “Memory Stick”
Push the “Memory Stick” further into the insertion slot and let it pop out.
Then remove it slowly.
Note
Insert the “Memory Stick” only. Do not insert any other objects.
Printing an image from a PC card
Insert the PC card into the PC CARD insertion slot until it clicks into place.
PC CARD eject button
PC card
To eject the PC card
Press the PC CARD eject button. After it pops out, remove it slowly.
GB
14
Page 15
Note
Insert the PC card only. Do not insert any other objects.
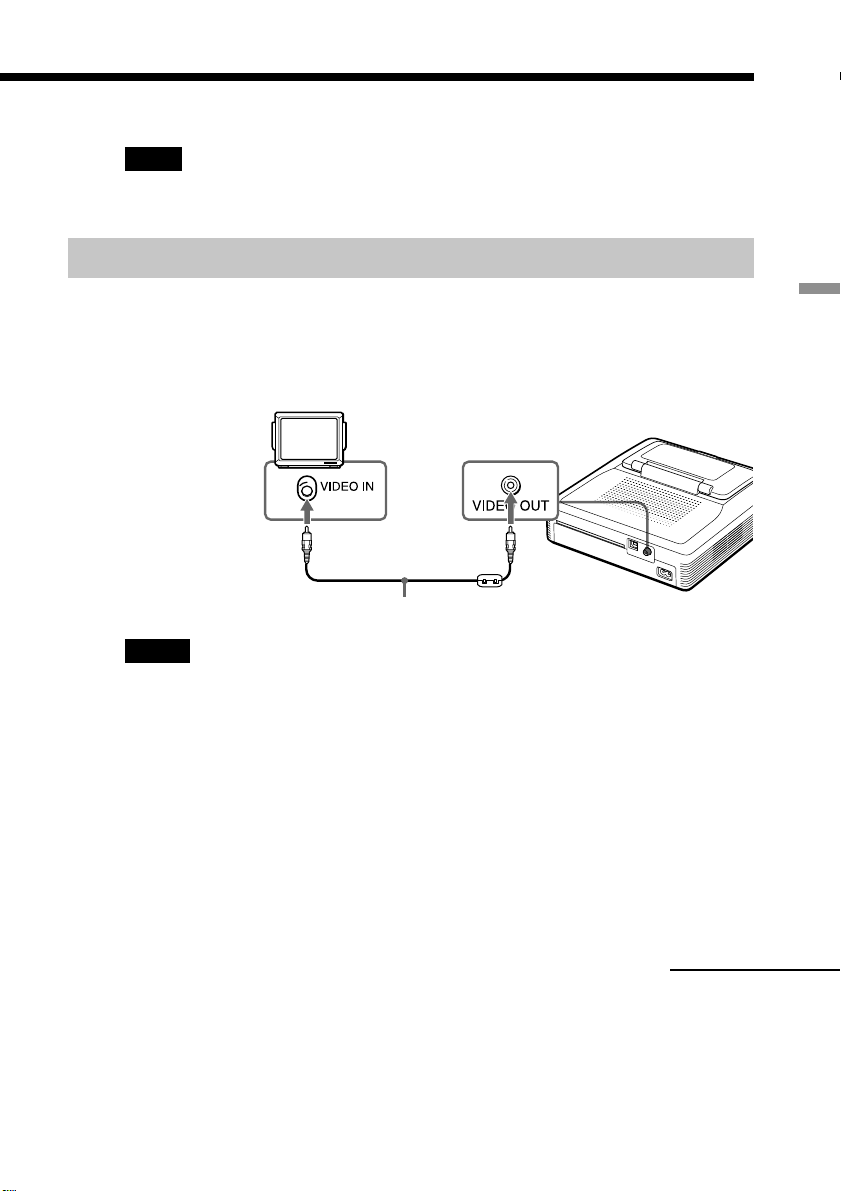
Connecting to a television (optional)
You can use the color LCD screen of the printer to select items or view the
images to be printed. To display images or items on a wider screen, you can
also connect the VIDEO OUT connector of the printer to the video input of a
television.
Television
Set the VIDEO/
TV input
selector to
VIDEO.
Video connecting cable (supplied)
Notes
•The video output to a television is factory-set to Off. To display the image on your
TV screen, set it to On on the MENU screen.
•Depending on the screen, the display output differs between the television and
printer screen.
•Before making connections or plugging in a cable, turn off the power of the printer
and the television.
•When using a commercially available video cable, use a cable 3 m or shorter in
length.
•When you connect your printer to a personal computer, you do not need to connect
your printer to a television.
• You cannot tap to operate on the TV screen.
Setting up
Continued
15
GB
Page 16
1 Connecting the printer
Connecting the AC power cord
After you make the connections, connect the supplied AC power cord to the
AC IN connector of the printer and then to an AC outlet.
The POWER indicator lights in red.
To the wall
outlet
AC power cord
(supplied)
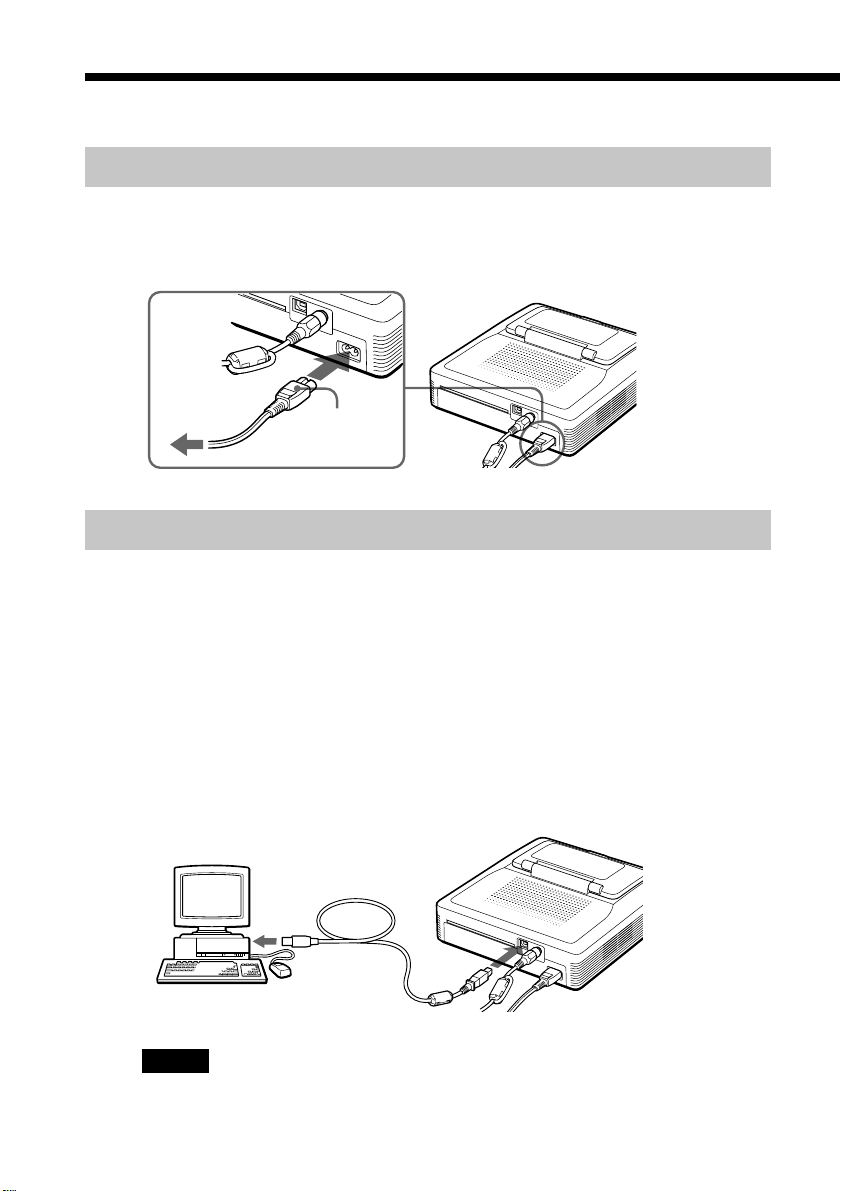
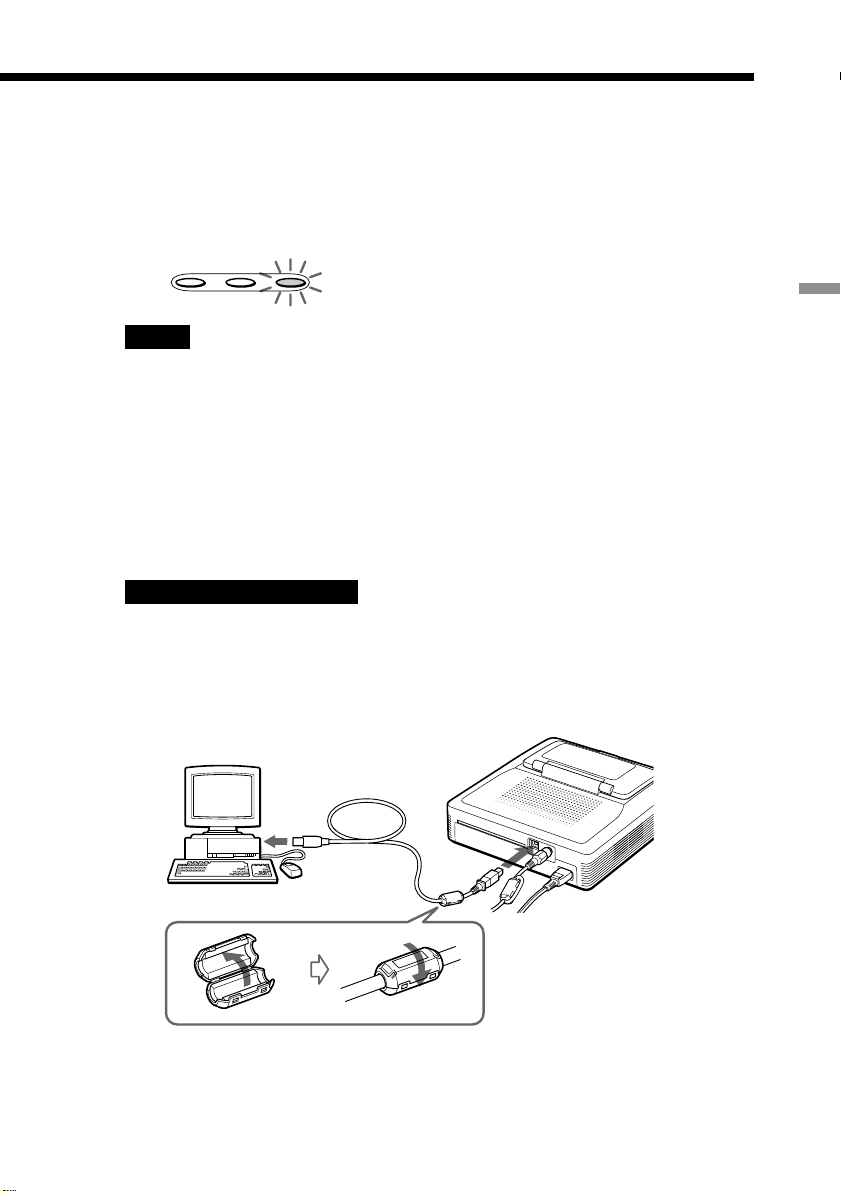
Connecting to a computer (optional)
Connect the USB connectors of the printer and your computer (Windows PC
or Macintosh) with a commercially available USB cable. By installing the
supplied driver software on your computer, you can print an image from your
computer’s hard disk. With the “Memory Stick/PC Card Reader Software,”
you can also transfer images from a “Memory Stick” or PC card to your
computer’s hard disk.
For details on how to install and operate the software, see “Printing from your
computer” (pages 67–84).
Windows/Macintosh
computer*
To USB connector
*Note
The Reader software supports Windows only.
GB
16
To USB connector
Page 17
When you connect a computer that is already powered on to the
USB connector of the printer
The PC input indicator lights and the printer enters the PC mode.
MEMORY
STICKPCCARD PC
Notes
•Use a USB cable 3 m or shorter in length.
•Without connecting a computer that is already powered on to the USB connector,
you cannot switch to the PC mode manually by touching [INPUT SELECT].
•When you connect your printer to a television, no pictures are displayed on the
television in the PC mode. This is not due to trouble with the printer.
•Refer to the instruction manual of your computer for further information.
•You cannot use the printer and the printer driver on a network or with a
commercially available printer buffer.
Note on using a USB cable
If your USB cable is not equipped with a clamp filter, attach the supplied clamp filter
near the printer’s USB connector of the cable .
To attach the clam filter, release the lock of the clamp filter with a screwdriver or a
similar tool, contain the cable, and lock the filter in place as illustrated below. Please
attach the filter as nearest the printer’s USB connector as possible.
Setting up
17
GB
Page 18

2 Preparing the printing pack
You need an optional printing pack designed for the printer. The pack contains
a set of print paper and a print cartridge for either Post Card size (4x6 inch) or
Small size (3.5x4 inch) prints.
Select the printing pack according to the type of printing you intend to do:
Printing pack Contents
SVM-25LS 25 sheets of Post Card size photo paper/Print cartridge for
25 prints
SVM-25LW 25 sheets of Post Card size sticker/Print cartridge for 25
prints
SVM-30SS 30 sheets of Small size photo paper/Print cartridge for 30
prints
SVM-30SW 30 sheets of Small size stickers/Print cartridge for 30 prints
SVM-30SW09 30 sheets of Small size 9-split stickers/Print cartridge for 30
prints
Notes
•Use the printing pack for this printer only.
•Always use the print cartridge designed for the size of the print paper you use. If
you mix cartridges and paper of different types or size, printing may not be
possible, or a paper jam or other trouble may occur.
•Do not rewind the ink ribbon and use the rewound print cartridge for printing.
Otherwise, proper printing result will not be obtained, or even a breakdown may
occur.
•Do not print on the used print paper. Printing an image twice on the same paper
will not make the printed image thicker. This may even cause a malfunction or
breakdown.
•Do not touch the ink ribbon of the print cartridge or the printing surface of the print
paper. If there are fingerprints or dust on the printing surface or the ink ribbon, the
printing quality may deteriorate.
•For high quality prints, avoid placing the printing pack in locations that are subject
to high temperature, high humidity, excessive dust, or direct sunlight.
•When storing a partially-used pack of the print cartridge and print paper, store it in
its original bag or in a similar container.
18
GB
Page 19
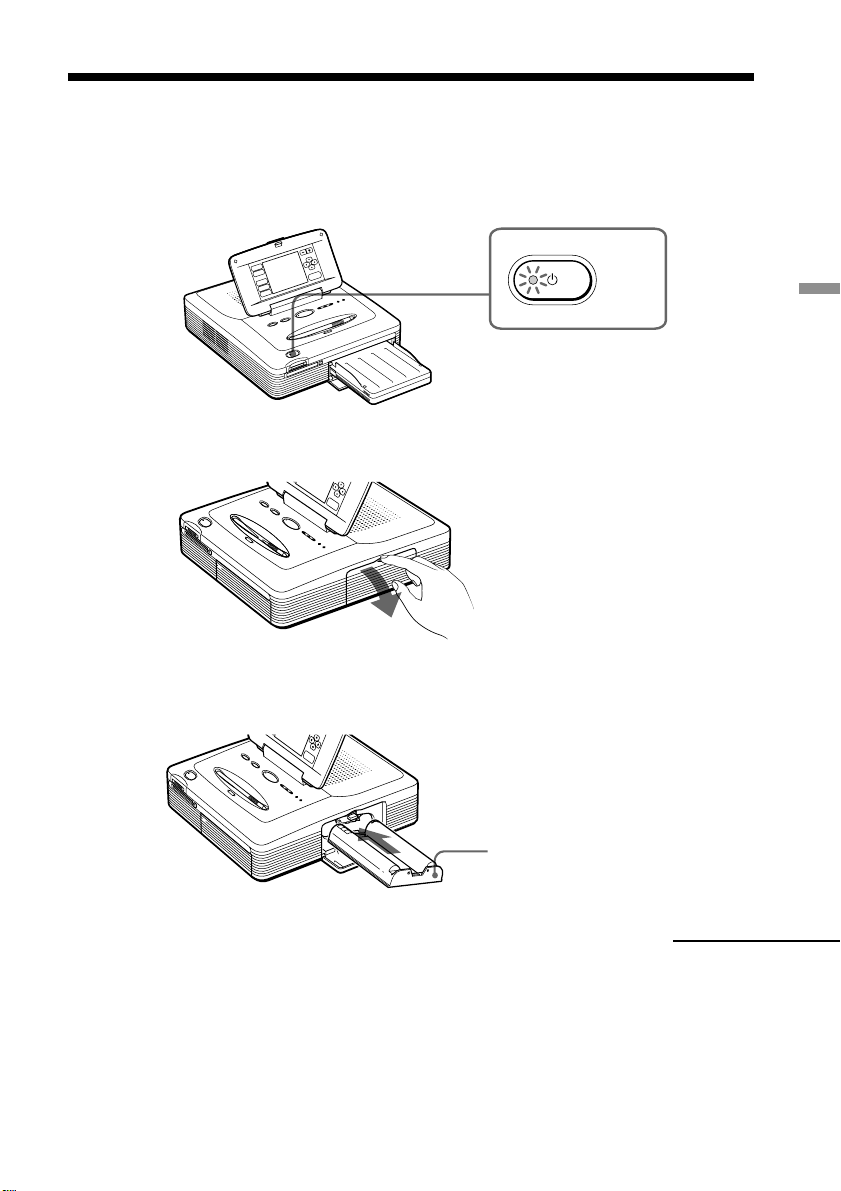
3 Loading the print cartridge
Press the POWER button to turn on the printer.
1
The POWER indicator lights in green.
POWER
2 Pull and open the cartridge compartment lid.
3 Insert the print cartridge into the printer firmly until it clicks
into place and close the cartridge compartment lid.
Setting up
The side with the Sony logo
Continued
19
GB
Page 20
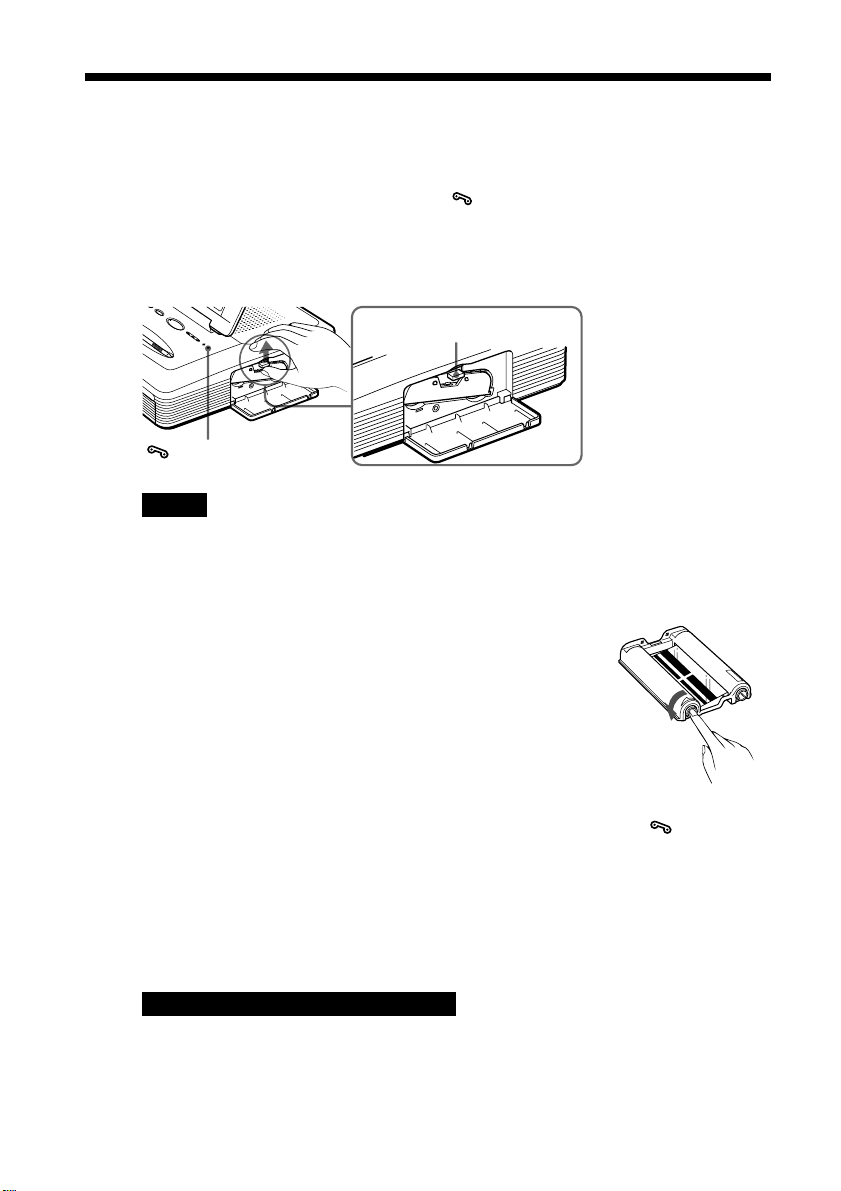
3 Loading the print cartridge
To replace the print cartridge
When the print cartridge runs out, the cartridge error indicator lights and
an error message appears on the screen.
Open the cartridge compartment lid, push up the eject lever, remove the used
print cartridge, and then insert a new cartridge.
Eject lever
cartridge error
indicator
Notes
•Never put your hand into the cartridge compartment. The thermal head reaches
high temperatures, especially after repeated printing.
•Do not rewind the ink ribbon and use the rewound print cartridge for printing.
Otherwise, proper printing result will not be obtained, or even a breakdown may
occur.
•If the print cartridge does not click into place, remove it and
then re-insert it. If the ink ribbon is too slack to be loaded,
wind the ink ribbon in the direction of the arrow to remove
the slack.
20
•If the print cartridge is not loaded when you turn on the printer, the cartridge
error indicator lights up.
•When placing the print cartridge on a desk or other surface, stand it vertically so
that dust will not get on the ink ribbon.
•Do not touch the ink ribbon or place the print cartridge in a dusty location.
Fingerprints or dust on the ink ribbon may result in imperfect printing.
•Do not change the print cartridge while operating the printer.
Notes on storing the print cartridge
•Avoid placing the print cartridge in a location subject to high temperatures, high
humidity, excessive dust or direct sunlight
•When you are going to store a partially-used cartridge, store it in its original bag.
GB
Page 21
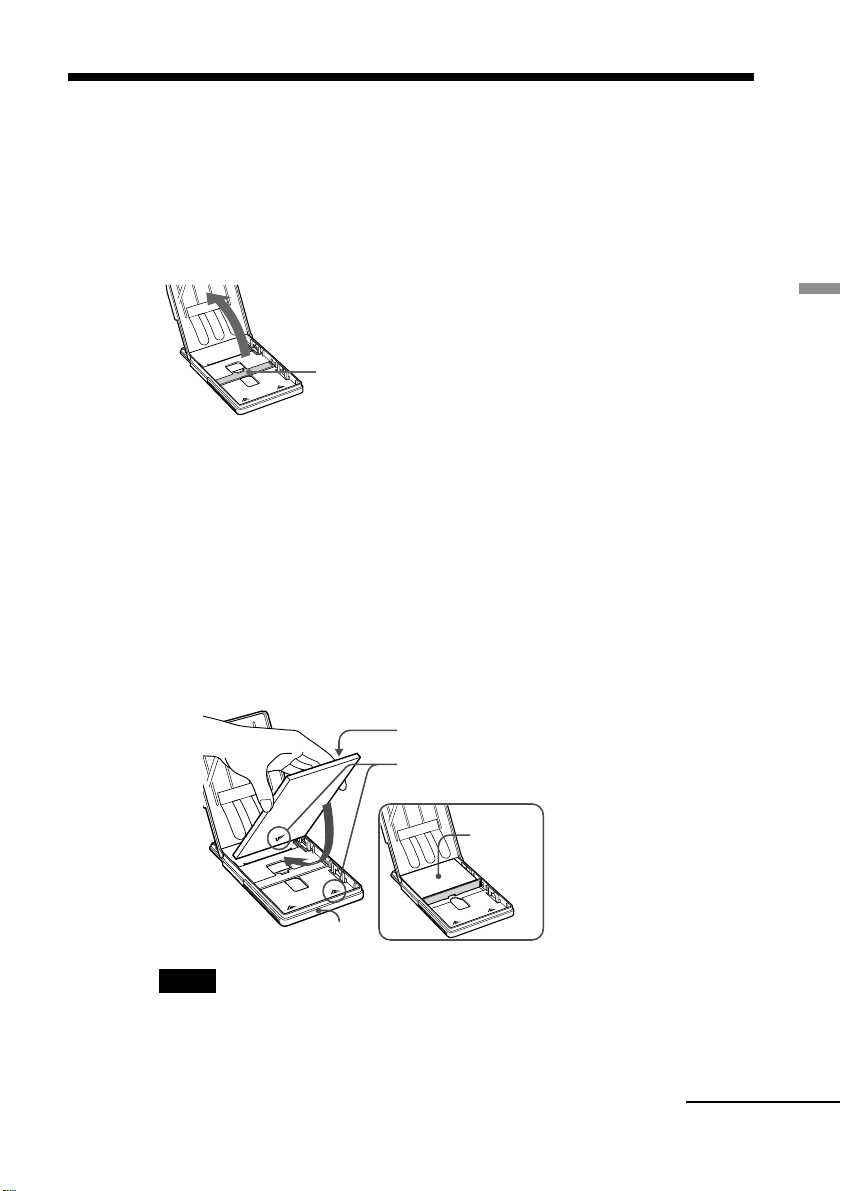
4 Inserting the print paper
1 Open the paper tray lid and set the partition according to the
print paper size you want to use.
To use Post Card size paper, lay the partition down .
To use Small size paper, stand the partition upright.
Partition
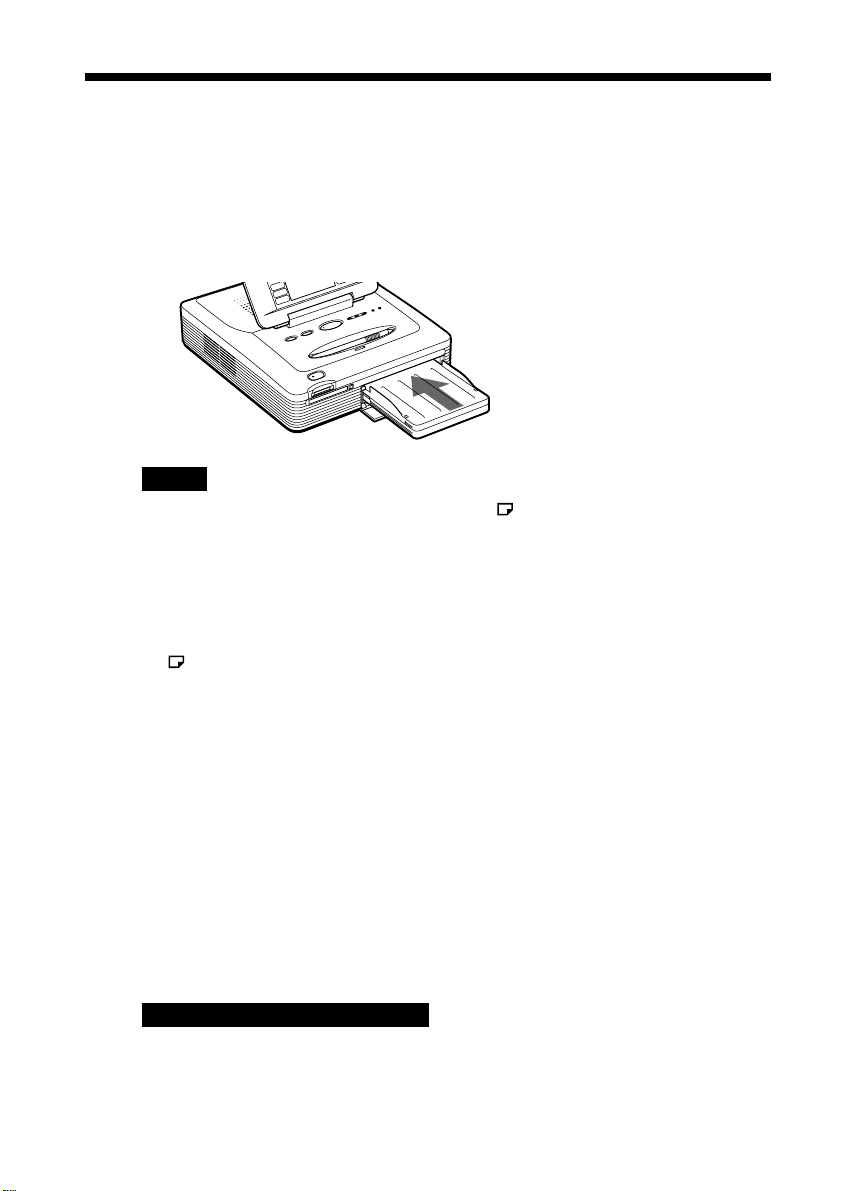
2 Set the print paper into the tray.
Riffle the print paper. Then insert the print paper with its printing surface
(the side with no imprint) facing up and the arrow pointing in the same
direction as the arrow in the tray.
When inserting paper, insert the protective sheet together with paper into
the tray. After you have placed the paper into the tray, remove the
protective sheet.
You can set up to 25 sheets for Post Card size and 30 sheets for Small size
print paper. When inserting Small size print paper, set it behind the
partition.
Setting up
Printing surface
Arrow
Paper
When inserting Small
size print paper
Front side
Note
Do not touch the printing surface. Fingerprints on the printing surface may result
in imperfect printing.
Continued
21
GB
Page 22
4 Inserting the print paper
3 Close the paper tray lid. Then push and open the printer’s
paper tray compartment lid and insert the paper tray into the
printer.
Insert it firmly until it clicks into place.
Notes
•If print paper does not feed automatically, the paper error indicator lights. Pull
out the paper tray and check for a paper jam.
•When adding print paper to a partially full tray, make sure that the total number of
sheets does not exceed 25 for the Post Card size or 30 for the Small size print paper.
Do not place different types or sizes of paper in the tray. Otherwise, a paper jam or
malfunction may occur.
• If the print paper runs out when you press PRINT, a warning sound beeps and the
paper error indicator lights.
•Do not write or type on the printing surface of the paper before printing. If you
want to write greetings or draw on the printed surface after printing, use an oil ink
pen.
•Do not attach stickers or anything else on the printing surface before printing.
•Do not remove the backing from sticker print paper before printing is completed.
Otherwise, jams or printer damage may occur.
•Do not print on the used print paper. Printing an image twice on the same paper
will not make the printed image thicker. This may even cause a malfunction or
breakdown.
•Avoid storing the paper with the printed faces touching each other or in contact
with rubber or plastic products including vinyl chloride or plasticizer for an
extended period of time; color changes or deterioration of the printed image may
occur.
•Before printing, do not fold or bend the print paper.
22
Notes on storing the print paper
•Avoid placing the print paper in a location subject to high temperatures, high
humidity, excessive dust or direct sunlight
•When you are going to store partially-used print paper, store it in its original bag.
GB
Page 23
Basic printing operations
Printing selected images
You can select an image recorded in the “Memory Stick” or PC card and print
it at full-size (standard print).
3–6
7
Input indicators
2
1
Borderless
standard print
Insert a “Memory Stick” or PC card with recorded images into
1
the “Memory Stick” or PC card insertion slot (page 14).
Press the POWER button to turn on the printer.
2
The POWER indicator lights in green.
POWER
When you connect your printer to your television
Turn on the television and set the input selector of the television to “VIDEO.” The
printer images are displayed on the television.
Tap [INPUT SELECT] on the operation panel repeatedly with the
3
supplied stylus until the “MEMORY STICK” or PC CARD
indicator turns on.
Thumbnails of the images stored in the “Memory Stick” or PC card are
displayed on the screen.
Yellow frame (cursor)
MEMORY
STICKPCCARD PC
Or
MEMORY
STICKPCCARD PC
Basic printing operations
Operation panel
Continued
23
GB
Page 24
Printing the selected image
Tap the image you want to print on the screen.
4
The cursor moves to the tapped image. You can also tap the arrows [B/b/
V/v] to move the cursor (page 13).
To display another page
When multiple pages exist, you can switch pages. To display the next page, tap the
lower part of the scroll bar or tap [v] repeatedly. To display the previous page, tap
the upper part of the scroll bar or tap [V] repeatedly.
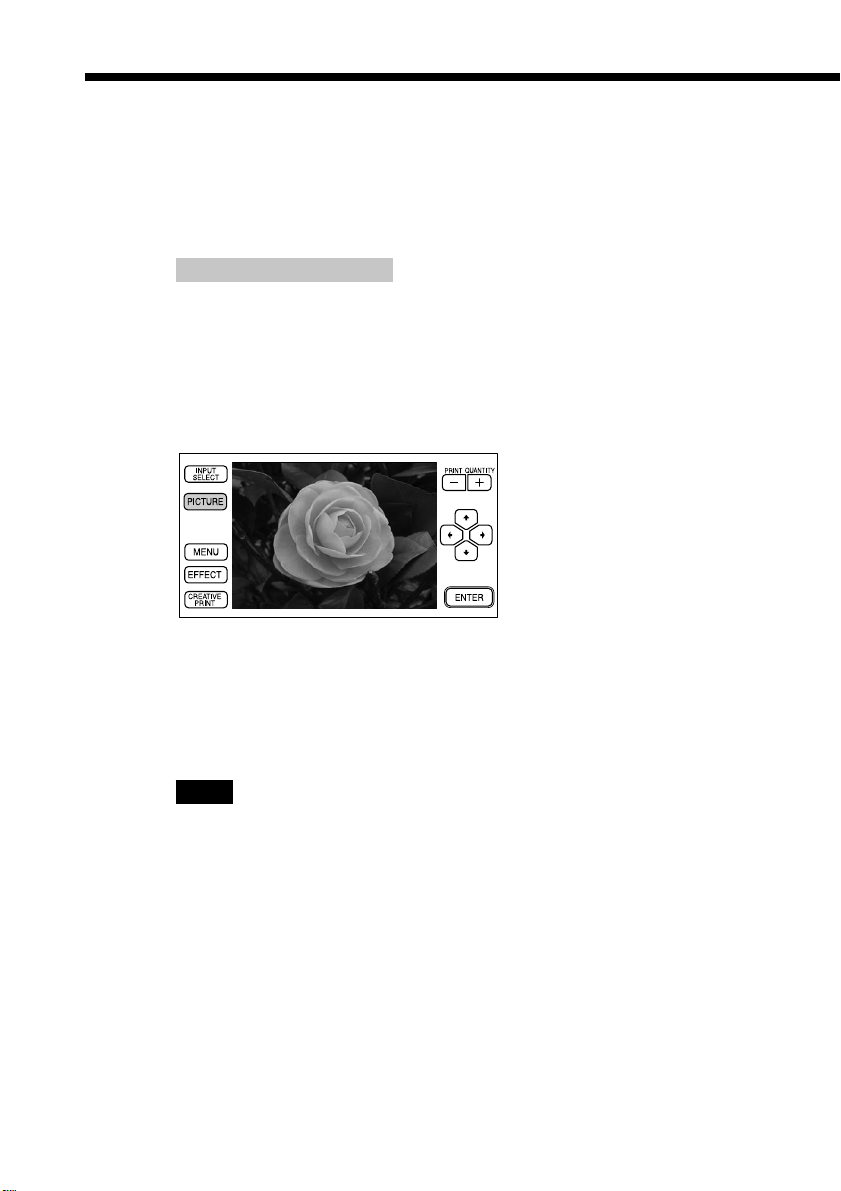
To display a preview image
While the cursor is on the image, tap the image again or tap [PICTURE].
A preview of the selected image is displayed.
To display a preview of different images, tap the arrows [B/b/V/v]. The
preview of the previous (B), next (b), upper (V) or lower (v) image is
displayed.
To display the thumbnails again, tap anywhere on the preview image or
tap [PICTURE].
24
Note
While the screen display is switching or the printer is accessing the “Memory Stick”
or PC card (with the relevant input indicator blinking), do not eject or insert the
“Memory Stick” or PC card. Otherwise, they may crash.
GB
Page 25
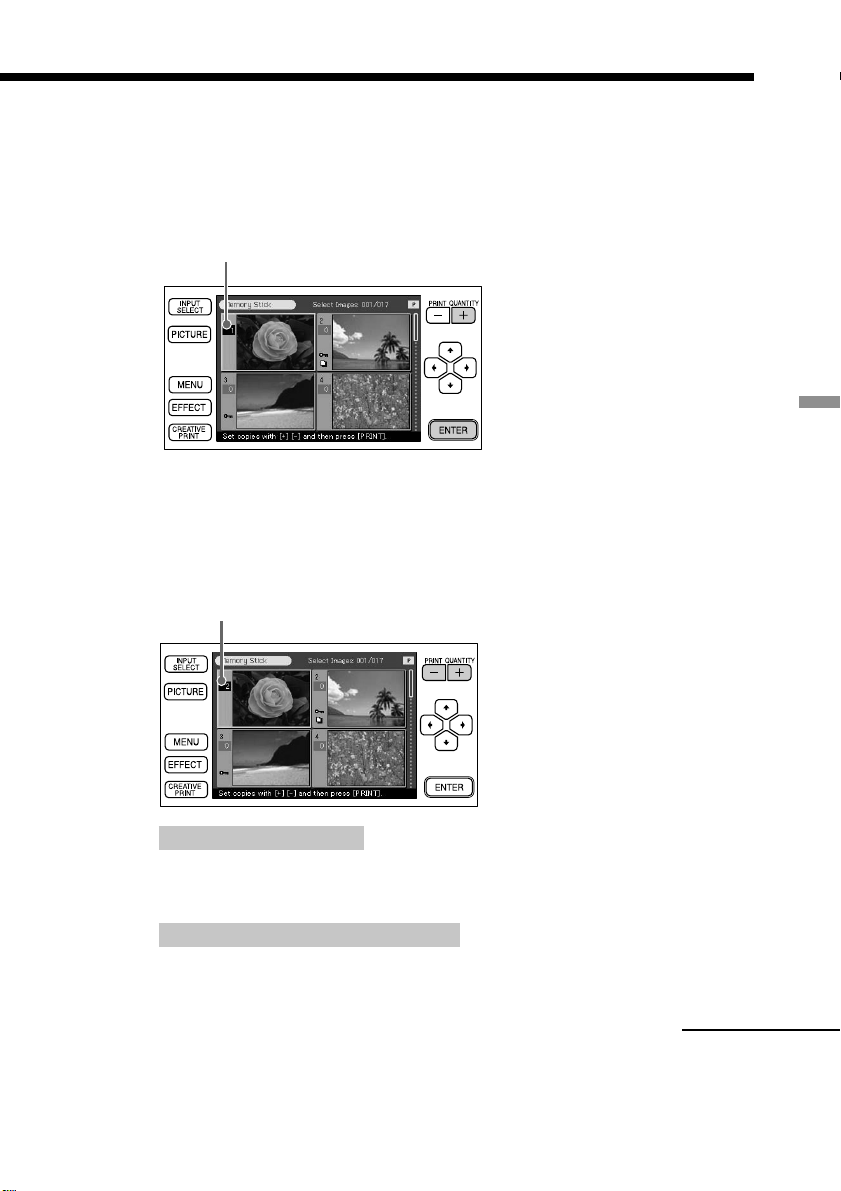
Tap [ENTER] or PRINT QUANTITY [+].
5
The image is selected and its frame turns orange. The print quantity
becomes “1.”
Orange frame (selection)
Tap PRINT QUANTITY [+] or [–] to set the number of copies to
6
be printed.
Each time you tap [+] or [–], the print quantity increases or decreases. You
can set the print quantity from 0 to 30.
Print quantity
Basic printing operations
To cancel the selection
Tap [–] repeatedly until the print quantity becomes “0.” The orange frame
disappears and the selection is canceled.
To print multiple images at a time
Repeat steps 4 through 6 to select other images and set the desired print quantity
for each of them.
Continued
25
GB
Page 26
Printing the selected image
Press the PRINT button.
7
Printing starts. During printing, the PRINT indicator lights. The printing
process bar and the approximate printing time are displayed on the screen.
PRINT
When you start printing while the preview image is displayed
An dialog box appears to ask whether you want to print the image being displayed
or all the selected images. Tap to select either of the two options to start printing.
To stop printing
Tap [Cancel] on the screen or tap [ENTER] on the operation panel. Printing from
the next print will be canceled.
When printing ends and the print paper automatically emerges
8
from the paper outlet, remove the printed paper from the
printer.
Notes
•When the “MEMORY STICK” or PC CARD indicator blinks or the data access message
appears, do not eject the “Memory Stick” or PC card. Otherwise, they may crash.
•While printing, never move or turn off the printer; the print cartridge or paper may
become stuck. If this happens, turn the printer off and on, and resume printing from
the beginning.
•While printing, the print paper is partially ejected from the paper outlet in stages.
Never pull out the paper forcibly until the PRINT indicator turns off and the print
paper emerges automatically.
•When using Small Size stickers, do not leave more than 10 sheets of the ejected
printed paper on the paper tray.
•Depending on the file type and size of an image, it may take from 5 to 60 seconds to
display a preview image on the screen.
•Depending on the type of digital still camera, it may take some time for the
thumbnail list to be displayed.
•When the width or height of an image is smaller than 480 dots, the
image is displayed in a small size. You can print the image but the
printing quality is rough due to its small image size.
•When you view the printer’s images on a large-screen television, the pictures may be
distorted. To view them in better picture quality, display the preview image.
•When using your printer in low ambient temperatures, the black lines may be
displayed on the LCD display, which is not of a printer’s malfunction. You can print
an image without problem.
GB
26
Page 27
Printing all images or DPOF preset images at one time
You can print all the images stored in a “Memory Stick” or PC card at one
time. You can also print multiple images preset by your digital still camera
(DPOF) at one time.
What is “DPOF”?
The “DPOF” (Digital Print Order Format) is a format used to record the information
necessary for automatically printing images shot with a digital still camera at a printing
shop or with a home-use printer. The printer can automatically print the preset number
of copies of the images preset with DPOF. For details, see the operating instructions of
the digital still camera you are using.
3
5
4
Input indicators
2
1
Basic printing operations
Insert the “Memory Stick” or PC card storing the images into
1
the “Memory Stick” or PC card insertion slot (page 14).
Press the POWER button to turn on the printer.
2
The POWER indicator lights in green.
When you connect your printer to your television
Turn on the television and set the input selector of the television to “VIDEO.” The
printer images are displayed on the television.
Tap [INPUT SELECT] on the operation panel repeatedly until the
3
“MEMORY STICK” or PC CARD indicator turns on.
Thumbnails of the images stored in the “Memory Stick” or PC card are
displayed on the screen.
Continued
27
GB
Page 28
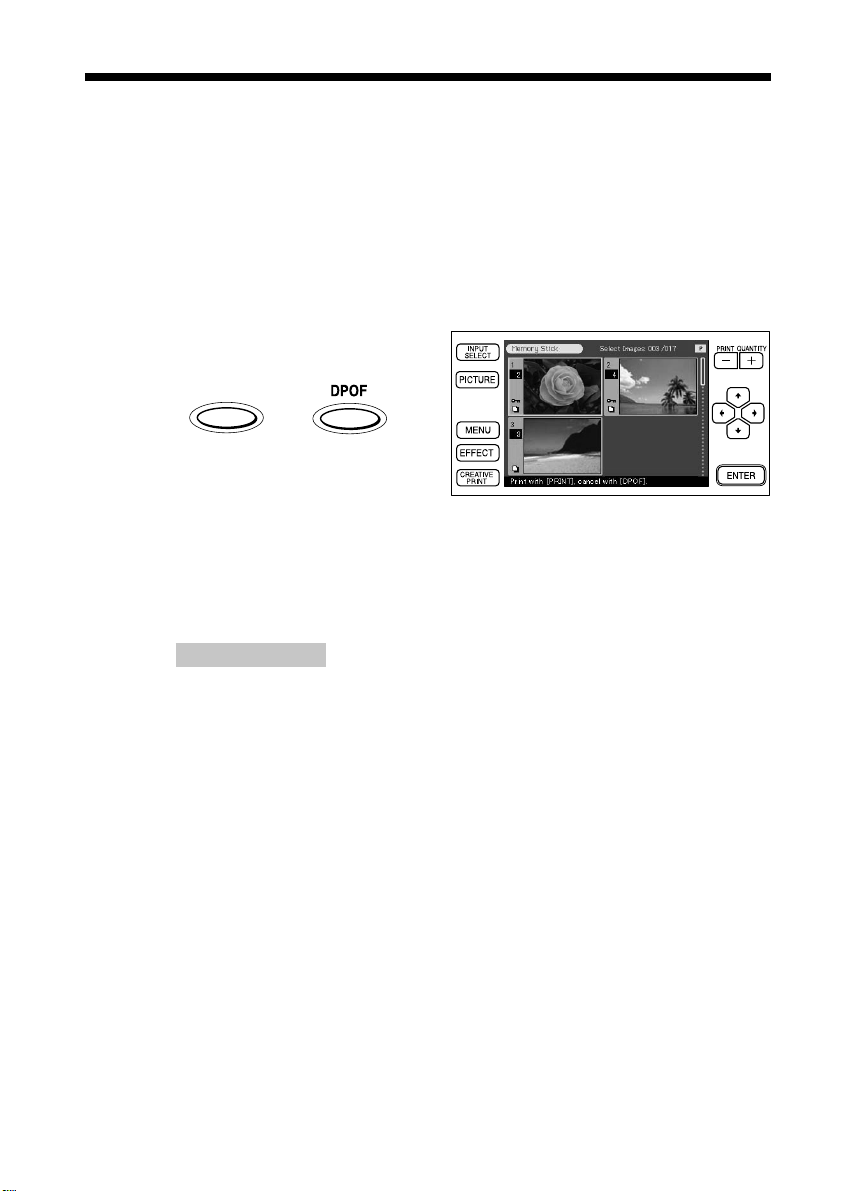
Printing all images or DPOF preset images at one time
Do either of the following:
4
• To print all the images, press the ALL button.
• To print the preset images, press the DPOF button.
When you select All, all the images in the thumbnail list are displayed
with an orange frame. When you select DPOF, only the preset images are
displayed with an orange frame.
ALL
Press the PRINT button.
5
Printing starts. When you select All, all the images in the “Memory Stick”
or PC card are printed one by one in the order of their image numbers.
When you select DPOF, the preset images are printed.
To stop printing
Tap [Cancel] on the screen or tap [ENTER] on the operation panel. Printing will be
canceled from the next print.
When printing ends and the print paper automatically emerges
6
from the paper outlet, remove the printed paper from the
printer.
For notes giving further information during or after printing, see page 26.
To return to the usual printing mode
Press the ALL or DPOF button again.
GB
28
Page 29
Advanced printing operations
Adding effects to an image
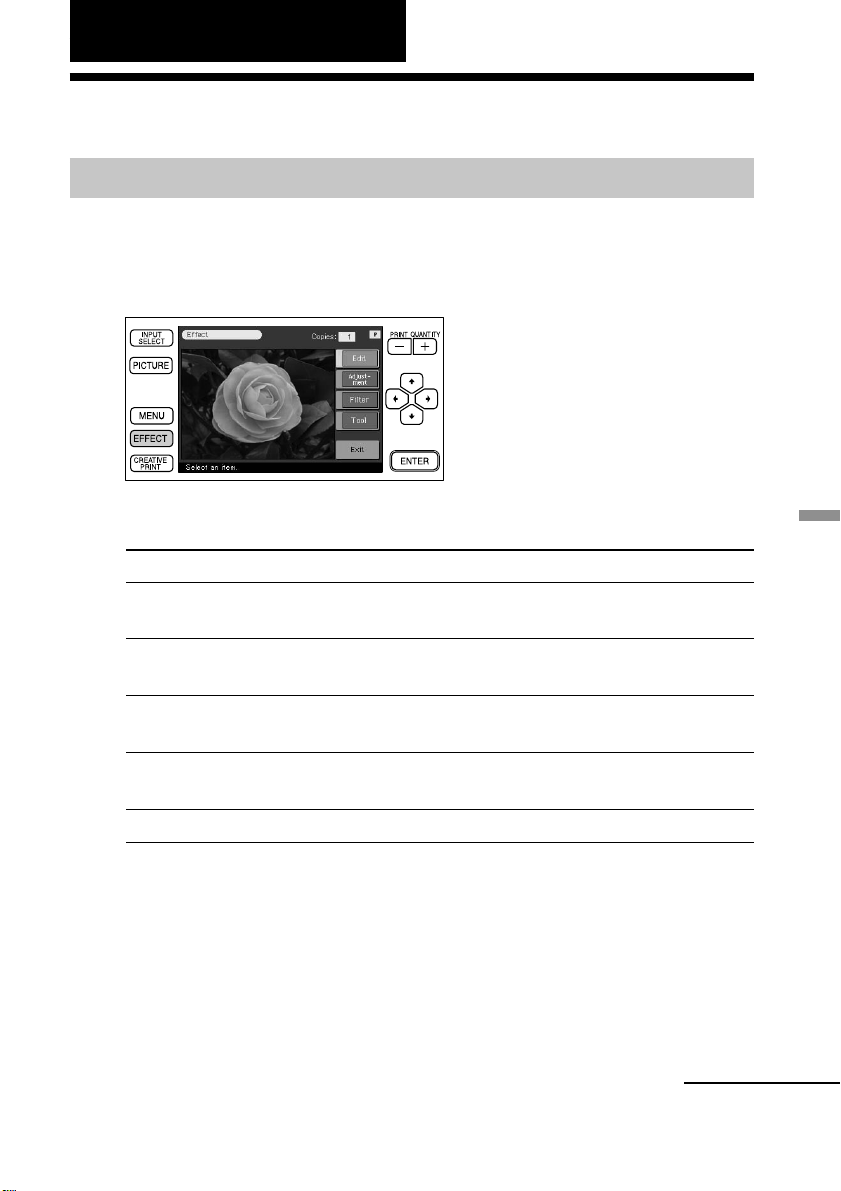
What you can do with the Effect menu
The Effect menu allows you to edit, adjust or add special filters to an image.
To display the main Effect menu, tap [EFFECT] on the operation
panel:
Tap the Effect sub menu item and add an effect to an image.
Sub menu Functions
Edit Enlarges, reduces, rotates, or flips an image horizontally.
(Page 31)
Adjustment Adjusts the brightness, color depth, tint, and sharpness
of the image. (Page 32)
Filter Adds a special filter to an image to print monochrome,
sepia, or painted pictures. (Page 34)
Tool Adds freehand drawings, stamps or input characters to
an image. (Page 36)
Exit Exits the Effect menu.
To save the image with the selected effects
Tap [Exit] in the main Effect menu or [Effect] either in the Effect main or sub
menus. When a dialog box for saving is displayed, tap [Yes] to save the edited
image or [No] to cancel it.
When both a “Memory Stick” and a PC card are inserted, a dialog box to select
the destination is also displayed. Tap the desired destination.
Continued
Advanced printing operations
29
GB
Page 30

Adding effects to an image
Notes
•If the “Memory Stick” or PC card is in write protect status, you cannot save an image
in the “Memory Stick” or PC card.
•While saving the image, do not turn off the power or remove the “Memory Stick” or
PC card from the insertion slot. The “Memory Stick” or PC card may be damaged.
To print the edited image
Tap PRINT QUANTITY [+] or [–] to set the copies to be printed and then press
the PRINT button in the Effect main or sub menus. The currently displayed
image will be printed.
Notes
•It may take longer to process an edited image after you press the PRINT button.
•Do not remove the “Memory Stick” or PC card while in the Effect mode. If you do,
the Effect mode ends forcibly and any editing you have done is canceled.
To change the printer settings midway
You can tap [MENU] and change the settings.
30
GB
Page 31

Changing the image size and position
The Edit sub menu allows you to enlarge, reduce, rotate, or flip an image.
Select the image to be edited in the thumbnail list or tap the
1
selected image or [PICTURE] to display its preview.
Tap [Effect].
2
The main Effect menu is displayed.
Tap [Edit].
3
The Edit sub menu is displayed.
Tap the desired item to edit the image.
4
Item Procedures
Zoom –/+ Each time you tap [+] or [–], the image is enlarged
or reduced.
Move Tap [Move] and then tap the arrows [B/b/V/v] to
move the image in the desired direction. Then tap
[ENTER] to fix the position.
Rotate 90° Each time you tap [Rotate 90°], the image rotates
90° clockwise.
Mirror Each time you tap [Mirror], the image flips
horizontally.
Advanced printing operations
Continued
31
GB
Page 32

Adding effects to an image
Note
The picture quality of an enlarged image may be deteriorated depending on the size
of the image.
Tap [Back].
5
The main Effect menu is displayed again. You can select another Effect sub
menu, save or print the image, or exit the Effect menu (page 29).
Adjusting the pictures
The Adjustment sub menu allows you to adjust brightness, color deepness,
tint, or sharpness levels of the image pictures.
Select the image to be adjusted in the thumbnail list or tap the
1
selected image or [PICTURE] to display its preview.
Tap [Effect].
2
The main Effect menu is displayed.
Tap [Adjustment].
3
The Adjustment sub menu is displayed.
32
GB
Page 33

Tap the desired adjustment item.
4
The adjustment screen of the selected item is displayed.
Tap the upper or lower part on the slider to adjust the image.
5
Items Procedures
Brightness Tap the lower part of the slider to darken the image or
the upper part to brighten the image.
Color Depth Tap the lower part of the slider for light colors, or the
upper part for deep colors.
Tint Tap the lower part of the slider to make the image
reddish, or the upper part to make the image bluish.
Sharpness Tap the lower part of the slider for weaker sharpness, or
the upper part for dark colors.
Tip
To adjust the level, you can also use the arrows [V/v].
Notes
•The dispaly reflects the adjustment only after you tap [Back]. You cannot make
adjustments while viewing the screen.
•The picture quality of the image being displayed on the screen may differ from
that of the printed image.
Continued
Advanced printing operations
33
GB
Page 34

Adding effects to an image
Tap [ENTER] .
6
The Adjustment sub menu is displayed again. You can select another
adjustment item to proceed with further adjustments.
Tap [Back].
7
The main Effect menu is displayed again. You can select another Effect sub
menu, save or print the image, or exit the Effect menu (page 29).
Adding a special filter to an image
The Filter sub menu allows you to add a special effect to an image to print in
monochrome, paint, or sepia tone.
Select the image to be filtered in the thumbnail list or tap the
1
selected image or [PICTURE] to display its preview.
Tap [Effect].
2
The main Effect menu is displayed.
Tap [Filter].
3
The Filter sub menu is displayed.
34
GB
Page 35

Tap a filter you want to add to an image.
4
Items Filters
Paint Makes the image look like a painted picture.
Sepia Makes the image look like an old photograph with faded
colors.
Monochrome Makes the image into a monochrome picture.
Normal Removes any added filter(s) from the image.
Note
The picture of the image being displayed on the screen may differ from that of the
printed image.
Tap [Back].
5
The main Effect menu is displayed again. You can select another Effect sub
menu, save or print the image, or exit the Effect menu (page 29).
Advanced printing operations
35
GB
Page 36

Adding drawings, stamps, or characters (Tool)
What you can do with the Tool sub menu
The Tool sub menu allows you to add freehand drawings, or input selected
stamps or characters to an image.
Follow the procedures below to display the Tool sub menu.
To display the Tool sub menu, tap [Tool] in the main Effect menu
(page 29) or CREATIVE PRINT menu (page 45).
Preview
Tap the desired tool in the Tools box and draw freehand lines, put on stamps,
or input character in the preview.
Icons Tools Functions
Pencil Draws freehand line art on the preview.
Color Displays the color selection screen to apply a color to the
pencil drawings.
/ Weight Tap either of the stroke weights for the pencil drawings:
(thin) or (thick).
Stamp
Type Displays the character input screen to select characters to
/ Size Tap to make the size of typed characters or stamp
Redraw Cancels the drawings, stamps, or input characters.
Done Fixes the drawings, stamps, or input characters.
GB
36
Displays the stamp selection screen showing stamps to be
pasted to the image.
be added to the image.
larger, or tap
Tapping again exits the Tool sub menu.
Tools box
to make it smaller.
Page 37

To exit the Tool sub menu
Tap [Done]. When the dialog box used for saving the image is displayed, tap
[Yes] to save the edits or [No] to cancel them.
When both a “Memory Stick” and a PC card are inserted, a dialog box to select
the destination is also displayed. Tap the desired destination.
To print the edited image
Tap PRINT QUANTITY [+] or [–] to set the copies to be printed and then press
the PRINT button in a Tool sub menu. The currently displayed image will be
printed.
Notes
•Do not change the print cartridge while operating the printer.
•Do not remove the “Memory Stick” or PC card while in the Tool sub menu mode. If
you do, the Tool sub menu mode ends forcibly and any edits you have made are
canceled.
•If the “Memory Stick” or PC card is in write protect status, you cannot save an image
on the “Memory Stick” or PC card.
•During saving the image, do not turn off the power or remove the “Memory Stick” or
PC card from the insertion slot. The “Memory Stick” or PC card may be damaged.
Advanced printing operations
37
GB
Page 38

Adding drawings, stamps, or characters (Tool)
Drawing freehand line art ( )
You can use the pencil tool to draw freehand line art on an image.
In the Tool sub menu (page 36), tap (Pencil tool).
1
The pencil tool mode is selected. The tool button turns orange.
To select the stroke weight for the pencil drawings, tap
2
(thin) or (thick).
To select the color for the pencil drawings, tap (Color).
3
The color selection screen is displayed.
38
Tap the desired color box.
4
The color tapped is selected and the color selection screen is closed.
Tap and draw a freehand line on the preview.
5
The line formed from the point you start drawing to the point you lift the
stylus becomes a stroke.
To erase the drawing
Tap [Redraw]. The drawing just made is erased from the preview.
Note
There may be restrictions on length of a line or/and number of lines. If this occurs,
a warning beep sounds.
GB
Page 39

Tap [ENTER].
6
The drawing you made is fixed and pasted to the image.
Note
Once you tap [ENTER], you cannot delete the drawing.
Repeat steps 2 through 6 to draw other line art.
7
The drawings are pasted on the image in the same manner.
Tap (Pencil tool) to release the pencil tool mode.
8
The tool button turns yellow.
You can use another tool, exit the Tool menu, or print the image (page 36).
Advanced printing operations
39
GB
Page 40

Adding drawings, stamps, or characters (Tool)
Pasting stamps ( )
You can use the stamp tool to paste selected stamp(s) to an image.
In the Tool sub menu (page 36), tap (Stamp tool).
1
The stamp selection screen is displayed. The tool button turns orange.
Tap the desired stamp.
2
The tapped stamp is selected and the stamp selection screen is closed.
Tap on the preview image where you want to paste the stamp.
3
The selected stamp is pasted onto the preview image in an all black
silhouette.
40
To adjust the stamp size, tap to make it larger or to make
4
it smaller.
To erase the stamp
Tap [Redraw]. The stamp just pasted is erased from the preview.
GB
Page 41

To move the stamp
Tap the arrows [B/b/V/v] to move the stamp in the desired direction.
Tap [ENTER].
5
The stamp is fixed to the image.
Note
Once you tap [ENTER], you cannot move or delete the stamp.
To paste the same stamp(s), repeat steps 3 through 6.
6
The stamps are pasted on the image.
Tap (Stamp tool) to release the stamp tool mode.
7
The tool button turns yellow.
You can use another tool, exit the Tool menu, or print the image (page 36).
Advanced printing operations
41
GB
Page 42

Adding drawings, stamps, or characters (Tool)
Typing characters ( )
You can use the type tool to input characters to an image. Characters are input
one line at a time.
In the Tool sub menu (page 36), tap (Type tool).
1
The tool button turns orange. The character input screen is displayed.
Switch the Alphanumeric and Symbolic
input screens.
Character input box
Character table
Select color and font (5 fonts available)
for the characters.
42
To switch the characters input screens
To display the Symbolic input screen, tap [Symbolic]. To return to the
alphanumeric characters input screen, tap [Alphanumeric]. Switch the screens as
you like.
Tap the characters you want to input in the character table.
2
The tapped characters are displayed in highlight in the input box.
To select a capital letter
Tap [Caps] to display the capital letters table. Then tap the desired character. To
enter a small letter, tap [Caps] again.
To select the font
The characters are input in the font displayed next to [Font]. To select a different
font, tap [Font] until the desired font is displayed.
GB
Page 43

To select the color
The characters are input in the color displayed next to [Font Color]. To select a
different color, tap [Font Color] and then tap the desired color box on the color
selection screen.
To delete characters in the input box
•To delete a character before the cursor, tap [Delete]. Each time you tap [Delete],
the character before the cursor is deleted. Input a new character.
•To delete a character in the middle of the input box, tap the space after the
character you want to delete. The [Insert] button turns orange and the orange
cursor appears after the character. (You can also tap [Insert] and then tap the
arrows [B/b] to move the cursor after the character you want to delete.)
Then tap [Delete] to delete the character. Each time you tap [Delete], the
character before the cursor is deleted. You can then input a new character. To
release insertion mode and place the cursor to the end of the line, tap [Insert].
Enter the remaining characters for the line and then tap [Exit].
3
The character input screen is closed.
Tap on the preview where you want to paste the line of input
4
characters.
The line of input characters is pasted onto the preview in a silhouette.
Advanced printing operations
Continued
43
GB
Page 44

Adding drawings, stamps, or characters (Tool)
To adjust the character size, tap to make it larger or to
5
make it smaller.
To erase the characters input
Tap [Redraw]. The characters just pasted are erased from the preview.
To move the characters
Tap the arrows [B/b/V/v] to move the characters in the desired direction.
Tap [ENTER].
6
The characters are fixed to the image.
Note
Once you tap [ENTER], you cannot move or delete the characters.
To input the same character(s), repeat steps 4 through 6.
7
The characters are pasted on the image.
To input different character(s), repeat steps 1 through 6.
8
Tap (Type tool) to release the type tool mode.
9
The tool button turns yellow.
You can use another tool, exit the Tool menu, or print the image (page 36).
44
GB
Page 45

Making various prints (CREATIVE PRINT)
What you can do with the Creative Print menu
The Creative Print menu allows you to make a variety of prints.
To display the main Creative Print menu, tap [CREATIVE PRINT] on
the operation panel:
Tap the Creative Print sub menu item and make a variety of prints.
Sub menu Functions
Card Adds a selected greeting and your input message to
make an original card. (Page 47)
Calendar Add a calendar of selected month(s) to an image or
images to make an original calendar. (Page 51)
Split Images Makes 4-split or 9-split images prints. (Page 53)
Sticker Makes 9-split image sticker. (Page 55)
Index Print Makes an index print of all the images stored in the
“Memory Stick” or PC card. (Page 57)
Exit Exits the Creative Print menu.
During or after the Creative Print procedures
To add drawings, stamps, or characters to the Creative Print image
For all the Creative Print sub menus except the Index Print sub menu, you can
tap [Tool] displayed on the screen and use the Tool menu to add drawings,
stamps, or characters to an image. For details, see “Adding drawings, stamps,
or characters (Tool)” on page 36.
Advanced printing operations
Continued
45
GB
Page 46

Making various prints (CREATIVE PRINT)
To display the preview image only
Tap [PICTURE] on the operation panel.
Only the preview image is displayed. To return to the previous screen, tap
[PICTURE] or tap anywhere on the preview image.
To print the Creative Print image
Tap PRINT QUANTITY [+] or [–] to set the copies to be printed and then press
the PRINT button. The currently displayed Creative Print image will be
printed.
Notes
It may take longer to process a created image after you press the PRINT button.
To exit the Creative Print menu
Tap [Exit] in the main Creative Print menu or [CREATIVE PRINT] both in the
Creative Print main and sub menus. When the dialog box used for saving
images is displayed, tap [Yes] to save the image or [No] to cancel the image.
To save the Creative Print image
Tap [Save] on the screen. When the dialog box used for saving images is
displayed, tap [Yes] to save the edited image or [No] to cancel it.
When both a “Memory Stick” and a PC card are inserted, the dialog box used
to select the destination is also displayed. Tap the desired destination.
Notes
•If the “Memory Stick” or PC card is in write protect status, you cannot save an image
in the “Memory Stick” or PC card.
•While saving the image, do not turn off the power or remove the “Memory Stick” or
PC card from the insertion slot. The “Memory Stick” or PC card may be damaged.
To change the printer settings midway
You can tap [MENU] and change the settings.
GB
46
Page 47

Making a card
You can add a greeting and your own message to images and
make an original card like the one shown on the right.
Tap [Card] in the main Creative Print menu.
1
The print size selection screen is displayed. Select the print paper size you
want to use.
To return to the main Creative Print menu
Tap [Back].
Tap the desired paper size icon.
2
The screen used for selecting a template of the selected paper size is
displayed.
Advanced printing operations
To return to the previous screen
Tap [Back]. You can redo the operations from the previous screen.
Continued
47
GB
Page 48

Making various prints (CREATIVE PRINT)
Tap the desired template.
3
A preview of the selected template is displayed. The preview allows you
to check the preceding procedures.
Greeting area
Image area
Character input area
Tap each area on the preview to enter a greeting, image(s), or
4
characters.
You can choose them in any order.
x Entering a greeting
1 Tap the greeting area.
The screen used for selecting a greeting is displayed.
48
2 Tap the desired greeting.
The color selection window for the greeting is displayed.
3 Tap the desired color box.
A preview reflecting your selections up to the preceding step is
displayed. The greeting is displayed in the selected color.
GB
Page 49

x Entering characters
When you choose a template with characters, you can enter your own
characters. Tap the character input area to display the character input
screen. For how to input characters, see “Typing characters” on page 42.
x Selecting image(s)
1 Insert a “Memory Stick” or PC card into the printer and tap an
image area.
The thumbnail list used for selecting an image is displayed.
2 Tap the desired image.
The screen used to adjust the image size, position, angle, and brightness
is displayed.
Advanced printing operations
3 Tap the desired adjustment button and make your adjustments.
For details, see “Changing the image size and position” (page 31) and
“Adjusting the pictures” (page 32).
Continued
49
GB
Page 50

Making various prints (CREATIVE PRINT)
4 Tap [Done].
A preview reflecting your selections up to the preceding step is
displayed. The selected image is displayed in the image area. When
you choose a template with multiple images, repeat steps 1 through 4 to
select the remaining image(s) for each image area.
Check the preview and perform any of the procedures
5
explained in “During or after the Creative Print procedures” on
page 45.
50
GB
Page 51

Making a calendar
You can add a selected calendar to an image or images
to make an original calendar.
Tap [Calendar] in the main Creative Print menu.
1
The print size selection screen is displayed. Select the print paper size you use.
To return to the main Creative Print menu
Tap [Back].
Tap the desired paper size icon.
2
The screen used for selecting a calendar template for the selected print
paper size is displayed.
Advanced printing operations
To return to the previous screen
Tap [Back]. You can redo the operations from the previous screen.
Tap the desired template.
3
A preview of the selected template is displayed. The preview allows you
to check the preceding procedures.
Image area
Calendar area
Continued
51
GB
Page 52

Making various prints (CREATIVE PRINT)
Tap each area on the preview to set the calendar and add
4
image(s).
You can choose them in any order.
x Selecting image(s)
Tap the image area to select and adjust an image. For details, see
“Selecting image(s)” on page 49.
x Setting the calendar
1 Tap the calendar area.
The screen used for setting the calendar is displayed.
2 In the “Start Month” line, set the year and month to start the
calendar.
Tap the month box and tap v/V above and below the month box to set
the month. Then tap v/V above and below the year box to set the year.
You can also use the arrow [v/V] on the operation panel.
3 In the “Start Date” line, set the day starting the week (placed
furthest left in the calendar).
Tap [Sunday] or [Monday].
4 In the “Color of Day” line, set the color of the days.
Tap [Sunday in red] or [Sunday in red/Saturday in blue].
5 Tap [Done].
A preview of the calendar is displayed. The selected calendar is
displayed in the calendar area.
52
Check the preview and perform any of the procedures
5
explained in “During or after the Creative Print procedures” on
page 45.
GB
Page 53

Making a split print
You can make a print with 4-split, 9-split, or 16-split images.
Tap [Split Images] in the main Creative Print menu.
1
The print size selection screen is displayed. Select the print paper size you
use.
To return to the main Creative Print menu
Tap [Back].
Tap the desired paper size icon.
2
The screen for selecting the split image template for the selected print
paper size is displayed.
Advanced printing operations
To return to the previous screen
Tap [Back]. You can redo the operations from the previous screen.
Continued
53
GB
Page 54

Making various prints (CREATIVE PRINT)
Tap the desired template.
3
The preview of the selected template is displayed. The preview allows
you to check the preceding procedures.
Tap an image area.
4
When you choose a template with multiple images, you can select from
any image area.
Select and adjust an image.
5
For details on selecting an image, see “Selecting image(s)” on page 49.
Check the preview and perform any of the procedures
6
explained in “During or after the Creative Print procedures” on
page 45.
54
GB
Page 55

Making a sticker
You can add a frame to each of the 9-split images to make a
9-split image sticker.
Note
You can make a sticker using Small size print paper only. Before you start making a
sticker, insert Small size print paper into your paper tray.
Making a 9-split image sticker with a frame
Tap [Sticker] in the main Creative Print menu.
1
The screen used for selecting a sticker template for the Small size print
paper is displayed.
Advanced printing operations
To return to the main Creative Print menu
Tap [Back].
Tap the desired 9-split template.
2
A preview of the selected template is displayed. The preview allows you
to check the preceding procedures.
Continued
55
GB
Page 56

Making various prints (CREATIVE PRINT)
Tap an image area.
3
When you choose a template with multiple images, you can select from
any image area. The screen used for selecting a frame is displayed.
Tap the desired frame.
4
The screen used for selecting an image is displayed.
Select and adjust the desired image.
5
For details on selecting an image, see “Selecting image(s)” on page 49.
Repeat steps 3 and 5 to add framed image(s) to the remaining
6
image area(s).
Check the preview and perform any of the procedures
7
explained in “During or after the Creative Print procedures” on
page 45.
Making a 9-split image sticker without a frame
To make a sticker without frames, choose [Split Images] in the Creative Print
menu and choose a Small size and then a 9-split template.
GB
56
Page 57

Making an index print
You can make an index print of the images in the “Memory Stick” or PC card.
Tap [Index Print] in the main Creative Print menu.
1
The print size selection screen is displayed. Select the print paper size you
use.
To return to the main Creative Print menu
Tap [Back].
Tap the desired paper size icon.
2
The title selection screen is displayed.
In the Title line, tap either [On] to add a title or [Off] to add no
3
title.
Advanced printing operations
Note
Patterns differ depending on the paper size and whether you input a title
or not.
Tap the desired pattern of image alignment.
4
When you select [10 x 8], for example, 10 (horizontally) by 8 (vertically)
images are printed on a sheet of print paper.
Continued
GB
57
Page 58

Making various prints (CREATIVE PRINT)
Tap [Done].
5
• When you select [On], the character input screen is displayed. Enter a
title. For how to input characters, see “Typing characters” on page 42.
After you enter your characters, the pattern setting screen is displayed.
• When you select [Off], the pattern setting screen is displayed
immediately.
Check the preview and press the PRINT button.
6
The index list of the “Memory Stick” or PC card images is printed in the
selected pattern along with any input title with corresponding image
numbers. When “Date Print” is selected, the shot date (year, month and
day) is also printed with the image.
Note
An image which is not displayed because it is damaged or has some kind of
problems will not be printed.
Tap [CREATIVE PRINT] to exit the Creative Print menu.
7
58
GB
Page 59

Setting up the printer (MENU)
What you can do with the Menu
The Menu allows you to change the printer settings, set up the screen, perform
slideshow, or delete images.
To display the Menu screen, tap [MENU] on the operation panel:
Tap the Menu sub menu item and add an effect to an image.
Sub menu Functions
Set Up Change the printing preferences including the Auto
Fine Print 2, date print, finish, or borderless print
settings. You can also set clock and beep.
(Page 60)
Screen Setup Sets the video output and adjusts LCD display
contrast. (Page 63)
Slideshow Performs a slideshow of the images in the “Memory
Stick” or PC card. (Page 64)
Delete Image Deletes the selected image in the “Memory Stick” or
PC card. Also formats the “Memory Stick.”
(Page 65)
To exit the Menu
Tap [Exit] in a Menu screen or tap [MENU]. The screen displayed before you
entered the Menu screen returns.
Advanced printing operations
59
GB
Page 60

Setting the printer (MENU)
Changing the printer preferences (Set Up)
The Set Up sub menu allows you to change the printing preferences including
Auto Fine Print 2, date print, finish, or borderless print settings. You can also
set clock and beep.
Tap [MENU].
1
The Menu screen (page 59) is displayed.
Tap [Set Up].
2
The Set Up sub menu is displayed.
60
Tap the setting items you want to select.
3
A green mark indicates the setting item has been selected. (*: Default
settings)
GB
Page 61

Items Settings Contents
Date Print On Prints an image with the date recorded
together with the image shot with your
digital still camera.
Note
You can print the date only when the image’s date
data is recorded in the DCF (Design rule for
Camera File system) format.
Off* Prints an image without the date print data.
Auto Fine Print 2
On* Corrects an image automatically for printing
in better picture quality, especially effective
for a dark or low-contrast image.
Note
• The image on the screen is not corrected.
• When printing from a computer, the Auto Fine
Print 2 function does not work.
Off Prints an image without any corrections.
Beep On* The warning and operation sound beeps.
Off No warning or operation sound beeps.
Select Finish Border Prints an image with borders around the
image. (4:3 and 3:2 pictures will not be cut off
at the top and bottom.)
Borderless*
Prints an image without borders around the
image.
Notes
• You cannot make borderless prints with Small
size print paper.
• When printing a 4:3 picture, the top and bottom
edges of the image are cut and it is printed as a
3:2 picture.
Glossy* Prints an image vividly with glossy finish.
Texture Prints an image softly with a uniform and
uneven finish.
Advanced printing operations
Continued
61
GB
Page 62

Setting the printer (MENU)
Items Settings Contents
Date/Clock You can set the internal clock to record the date you saved
setting the image in the “Memory Stick” or PC card.
1 Tap [Set Up].
2 Tap v/V above and below the day to set the day.
You can also use the arrow [v/V] on the operation
panel.
3 Tap the month box and tap v/V to set the month.
4 Set the year, the hour and minutes in the same way.
5 Tap [Set Up] again to start the internal clock.
Note
Items which cannot be changed are displayed in gray and cannot be selected.
Tap [Back].
4
The Menu screen is displayed again.
62
GB
Page 63

Setting video output and LCD screen contrast
You can set the video output to a television and adjust the LCD screen contrast
of the printer.
Tap [MENU].
1
The Menu screen (page 59) is displayed.
Tap [Screen Setup].
2
The Screen Setup screen is displayed.
Set the video output or LCD screen contrast.
3
A green mark indicates the setting item has been selected. (*: Default
settings)
Item Settings
Video Output Tap either of the following to set the video output to
your television:
[On] : Video signals are output to the connected
television so that you can view the images or menus
on the television.
[Off*]: Video signals are not output to a television
and no printer images are displayed on the television.
Display Contrast Tap b/B or anywhere on the slider to adjust the LCD
level. The adjustment takes effect until you make an
adjustment again.
Advanced printing operations
Tap [Back].
4
The Menu screen is displayed again.
63
GB
Page 64

Viewing a slideshow
You can perform a slideshow of the images saved in a “Memory Stick” or PC
card. When you want to search for an image, you can find it easily using the
slideshow.
Note
Before you begin, make sure that neither the ALL nor the DPOF button is pressed.
Tap [MENU].
1
The Menu screen (page 59) is displayed.
Tap [Slideshow].
2
The Slideshow screen is displayed.
In the Switch Time line, tap [Quick] to switch images quickly or
3
[Slow] to switch them slowly.
Tap [Enter].
4
The images in the “Memory Stick” or PC card are displayed one after
another in the selected switch time like a slideshow.
To stop the slideshow
Tap anywhere on the screen or tap any button on the operation panel.
Notes
•Images will be switched with random effect patterns.
•Depending on the image, it may take time to be displayed.
•You cannot view the slideshow in the Creative Print or Edit mode.
GB
64
Page 65

Deleting images
You can delete images in the “Memory Stick” or PC card. You can also format
the “Memory Stick.”
Notes
•During deleting or formatting, do not turn off the power or remove the “Memory
Stick” or PC card from the insertion slot. The “Memory Stick” or PC card may be
damaged.
•If the “Memory Stick” or PC card is in write protect status, you cannot delete images
or format the “Memory Stick.”
•When you select [Delete Image], you cannot delete an image protected or preset by
DPOF.
•An image, once deleted, will be lost forever. Before deleting an image, double-check
that it is the right one.
•When formatting a “Memory Stick,” all the files including the image files will be
deleted.
•You cannot format a PC card.
•You cannot delete an image in the CREATIVE PRINT or EDIT mode.
Deleting selected image(s)
Tap [MENU].
1
The Menu screen (page 59) is displayed.
Tap [Delete Image].
2
The Delete Image screen is displayed.
Advanced printing operations
Continued
65
GB
Page 66

Deleting images
Tap [Delete Image].
3
The thumbnail list is displayed. When you display a preview image in
step 1, the cursor is set to that image.
To return to the Menu screen
Tap [Back].
Tap the image that you want to delete and tap [ENTER] on the
4
operation panel.
A confirmation dialog box is displayed.
Tap [Yes] to delete the image or [No] to cancel deletion.
5
The selected image is deleted. To delete other images, repeat steps 4 and
5.
To exit the Menu, tap [MENU].
6
The screen displayed before you enter the Menu screen returns.
Formatting a “Memory Stick”
You can format a “Memory Stick.” In step 3, tap [Format Memory Stick].
When the confirmation dialog box is displayed, tap [Yes] to proceed with
formatting or tap [No] to cancel formatting.
The “Memory Stick” is formatted and all the images and other files are deleted
at one time.
GB
66
Page 67

Printing from your computer
Using your printer with Windows computers
The supplied software enables you to print an image stored on your
computer’s hard disk with the Digital Photo Printer DPP-SV77. You can also
view, copy, or transfer images stored in a “Memory Stick” or PC card inserted
in the printer from your computer’s monitor. To print an image from the
computer, you need commercially available printing application software.
System requirements
To use the supplied software, you need a computer that meets the following
system requirements:
OS: Microsoft Windows 98/Windows 98SE/Windows Me/
Windows 2000 Professional should be pre-installed.
Note
We cannot guarantee any operations with a computer where
Windows 3.1 or Windows 95 has been upgraded to Windows 98
or Windows 98 has been upgraded to Windows Me.
CPU: MMX Pentium 200 MHz or above is recommended.
RAM: 32 MB or more (64 MB or more is recommended.)
Hard disk space: 50 MB or more (Depending on the number of copies to
be printed.)
Port: A USB port should be installed as standard.
Drive: CD-ROM drive (for software installation)
Printing from your computer
Notes
• We cannot guarantee printer operations when a hub is used or when two or more
USB devices are connected to your computer.
• If you connect more than one DPP-SV77 printer at the same time, you cannot operate
the printer.
• You cannot operate the printer from another USB device being used simultaneously.
67
GB
Page 68

Using your printer with Windows computers
Installing the software
Install the printer driver and Memory Stick/PC card reader software
contained on the supplied CD-ROM to your
computer’s
hard disk.
When using Windows 98/98SE/Me
Installing the USB driver
1 Turn on your computer and the printer.
2 Start Windows and then connect your computer and the
printer.
When the computer detects the printer, the “Add New Hardware Wizard”
dialog box is displayed.
For the proper connections, refer to “Connecting to a computer (optional)”
on page 16.
Note
Close all programs before running the installer.
3 Click “Next.”
The dialog box to used select searching method appears.
4 Check “Search for the best driver for your device
(Recommended).” and click “Next.”
The dialog box to used specify the driver location is displayed.
GB
68
Page 69

5 Insert the supplied CD-ROM into your CD-ROM drive and check
“CD-ROM drive.” Then click “Next.”
Installation starts. When installation ends, the “Finish Setup” dialog box
appears.
Note
During installation, you may be asked to insert the Windows OS CD-ROM.
6 Click “Finish.”
The Sony DPP-SV77 USB driver is installed.
Note
After you click “Finish,” you may be prompted to restart the computer.
To check the installation
1 Click “Start,” point to “Settings” and then click “Control Panel.”
The “Control Panel” window is displayed.
2 Double-click “System.”
The “System Properties” window is displayed.
3 Click a “Device Manager” tab.
When “Sony DPP-SV77 USB Digital Photo Printer” is listed under “Universal serial
bus controller,” installation is completed successfully.
Printing from your computer
Continued
69
GB
Page 70

Using your printer with Windows computers
Installing the printer driver and reader software
1 Insert the supplied CD-ROM into your CD-ROM drive and click
“Start,” and then click “Run.”
The “Run” dialog box is displayed.
2 Input “D:\Setup.exe” (When your CD-ROM drive is the D: drive)
then click “OK.”
If your CD-ROM drive is not the D: drive, input the appropriate drive name.
You can also input the location of the installer by clicking the “Browse” button.
The installer automatically starts, and the language selection dialog box appears.
3 Select the language for the application, then click “OK.”
The “Welcome” dialog box appears.
4 Click “Next.”
The “Choose Destination Location” dialog box is displayed. The files are
factory-set to install the “C:\Program Files\Sony\DPPSV77” folder. If
you want to install them to another folder, input the destination folder or
specify the destination folder by clicking the “Browse” button.
5 Click “Next.”
6 Click “Next.”
GB
70
“Add Printer Wizard” starts up.
The dialog box used to select the printer connection is displayed.
Page 71

7 Check “Local printer” and click “Next.”
The dialog box used to select the manufacturer and model of the printer is
displayed.
8 Click “Have Disk.”
The “Install From Disk” dialog box is displayed.
9 Click “Browse.”
The following dialog box is displayed.
10
In the Drives box, select the CD-ROM drive.
The following dialog box is displayed.
Printing from your computer
11
In the Folders box, select your language folder and then
“WIN98” folder.
12
Make sure that “DPPSUSB.inf” is selected in the File name box
and then click “OK.”
The dialog box to select the model name is displayed.
Continued
71
GB
Page 72

Using your printer with Windows computers
13
Select “Sony DPP-SV77” and click “Next.”
Copying of files starts. The dialog box used to select the port is displayed.
Note
During installation, you may be asked to insert the Windows OS CD-ROM.
Select “Sony DPPUSB1: Sony Digital Photo Printer” in the list
14
and click “Next.”
The dialog box used to select the printer name is displayed. It is factoryset to “Sony DPP-SV77.” If you want to use another name, input the name
in the text box.
Click “Finish.”
15
The “Setup Complete” dialog box is displayed.
Click “Finish.”
16
The printer driver and reader software are installed. The readme file is
displayed.
“Sony DPP-SV77” is added to the “Printers” window.
Notes
• After installation, the “Sony DPP-SV77” is not set as the default printer. Set the
printer you use for each application.
• After you click “Finish,” you may be prompted to restart the computer.
When using Windows 2000 Professional
To use your DPP-SV77 with a computer which has Windows® 2000
Professional installed, you need to follow the procedures below to install the
USB driver and the printer driver onto your computer.
Start Windows 2000 Professional, and log on your computer as
1
the user name “Administrator”.
72
GB
Page 73

Turn on the printer and then connect the printer and the
2
computer via their USB ports.
Note
Make sure to turn on your printer before connection.
Wait for the USB driver to be installed automatically and for the
3
following dialog box to disappear.
Note
If the “Add New Hardware Wizard” dialog box is displayed instead of the
above window, follow the instructions on the screen to install the “USB
Printing Support.” When the dialog box asking where to search for the
driver files appears, uncheck all the options and click “Next.”
Insert the supplied CD-ROM into the CD-ROM drive of your
4
computer.
Double-click “Setup.exe” on the supplied CD-ROM.
5
The window used to select the driver language is displayed.
Select the language and click “OK.”
6
The “Welcome” dialog box appears.
Printing from your computer
7 Click “Next.”
The dialog box used to choose the destination folder is displayed. The
files are factory-set to install to “C:\Program Files\Sony\DPPSV77”
folder. If you want to install them to another folder, specify the
destination folder by clicking the “Browse” button.
Continued
73
GB
Page 74

Using your printer with Windows computers
8 Click “Next.”
The “Setup Complete” dialog box is displayed.
9 Click “Finish.”
The Readme file is displayed. “Sony DPP-SV77” is added to the “Printers”
window.
Notes
• If you cannot install the printer driver with the supplied setup program, see “About
the Printer Driver for Windows 2000 Professional” in the Readme file contained on the
supplied CD-ROM (“Readme\English\readme.txt).
•
When you connect your printer to another USB port that is different from the port used
at the time of installation, an error message prompting you to input the directory for the
DPPSUSB.sys file may be displayed. If this occurs, type the directory of the folder
where the Reader Software is installed (usually “C:\Program
File\Sony\DPPSV77\Program”) and follow the instructions on the screen to re-install
the files.
• After you click “Finish,” you may be prompted to restart the computer.
Uninstalling the software
When the software becomes unnecessary, you should remove the software
from your computer’s hard disk. Uninstall the software using the following
procedures:
Uninstalling the “Sony DPP-SV77”
1 Disconnect the USB cable from the printer and the computer.
2 Click “Start,” point to “Settings” and then click “Control Panel.”
3 Double-click “Add/Remove Programs” in the “Control Panel” window.
4 On the “Install/Uninstall” tab of the “Add/Remove Programs
Properties” window, select “Sony DPP-SV77” and click “Add/Remove.”
The confirmation dialog box is displayed.
5 Click “Yes.”
The relevant files are removed from your computer’s hard disk.
Uninstalling the printer driver
1 Disconnect the USB cable from the printer and the computer.
2 Click “Start,” point to “Settings” and then click “Printers.”
3 Right-click on “Sony DPP-SV77” in the “Printers” window and select
“Delete” from the short-cut menu.
The confirmation dialog box is displayed.
GB
74
Page 75

4 Click “Yes.”
The relevant files are removed from your computer’s hard disk.
Note on DPP-SV77 software installation for the customers using
Sony DPP-SV55 digital photo printer
When you have already installed the Sony DPP-SV55 printer driver or reader
software onto your computer with Windows 98/98SE/Me operating system,
your computer cannot detect the DPP-SV77 connected via USB port as new
hardware. Follow the procedures below to change the DPP-SV55 USB driver
into the DPP-SV77 USB driver. Then run “Setup.exe” contained in the CDROM supplied with the DPP-SV77 to install the software.
Once you have changed the USB driver, you can connect and use the DPPSV55 as well as DPP-SV77. The DPP-SV55 is displayed as DPP-SV77 on your
computer, which is not problem.
Start Windows, turn on the printer and connect the printer
1
with the computer via USB port.
Click “Start” from the Windows taskbar, point to “Settings”
2
and then click “Control Panel.”
Double-click “System” to open the “System Properties”
3
window.
Open the “Device Manager” tab, select “Sony DPP-SV55 USB
4
Digital Photo Printer” under the “Universal serial bus
controller” and then click “Properties.”
Printing from your computer
Open the “Driver” tab and click “Update driver.”
5
Click “Next.”
6
Click “Display a list of all the drivers in a specific location, so
7
you can select the driver you want” and then click “Next.”
Continued
GB
75
Page 76

Using your printer with Windows computers
Click “Have Disk.”
8
Insert “Sony DPP-SV77” CD-ROM into your CD-ROM drive.
9
10
Click “Browse,” select the CD-ROM drive where you inserted
“Sony DPP-SV77” CD-ROM and then click “OK.”
11
Click “OK.”
12
Click “Next” until “Finish” is displayed.
13
Click “Finish.”
• When the dialog box asking you to restart your computer is displayed,
restart your computer and then execute the “Setup.exe” in the CDROM.
• When the dialog box for restart is not displayed, follow the procedures
below.
1 Click “Close.”
2 Check that the description is changed to “Sony DPP-SV77 USB
Digital Photo Printer” and click “OK.”
76
3 Execute the “Setup.exe” in the CD-ROM.
GB
Page 77

Using the reader software
You can view the “Memory Stick” or PC card inserted in the printer as a drive
on your computer’s monitor.
In the “My Computer” or “Windows Explorer” window,
1
double-click “Sony DPP-SV77.”
Click “Memory Stick” or the PC card icon.
2
The images stored in the “Memory Stick” or PC card inserted in the
printer are displayed. You can copy, transfer or save the “Memory Stick”
or PC card images just as you would any other Windows files.
Note
The reader software does not operate the DPP-SV77 as a completely removable medium.
When using the software, note the following restrictions:
• Before editing an image from the “Memory Stick” or PC card inserted in the printer,
store it on the computer’s hard disk.
If you double-click and open the file in the printer with its associated application and
edit it with the application, you cannot save the edition on the “Memory Stick” or PC
card with the application’s saving command.
• You cannot view or open the file in the printer using the “Open” command of an
application other than the reader software.
• You cannot run an execution file contained in the “Memory Stick” or PC card.
Printing from your computer
77
GB
Page 78

Using your printer with Windows computers
Printing from a software application
You can use the “Print ”command of a software application to print an image
from your computer’s hard disk with the DPP-SV77 Digital Photo Printer.
Notes
• This sections explains the settings and operations with a typical application as an
example. Depending on the application, print settings and operations may differ. For
the details, refer to the manual of your application.
• To get the print you expect, we suggest you use application software that allows you
to check the print preview. Otherwise, make the image size 1664 (dots) x 2466 (dots)
and the resolution 403 dpi.
Start the application software that you use to print with, and
1
select the image to be printed.
Click “Print Setup” from the “File” menu of the application.
2
The “Print Setup” dialog box appears.
Set the printer.
3
Select “Sony DPP-SV77” as the
printer.
78
Select the print paper size.
Select the image orientation.
The dialog box differs depending on the application.
1 Set “Printer” to “Sony DPP-SV77.”
2 Set “Paper Size.”
Choose When you make
Post Card (no margin) Post Card size borderless prints
Post Card Post Card size border prints
Small Small size prints
GB
Page 79

3 Set “Orientation.”
To print in portrait (tall) format, select “Portrait.” To print in landscape
(wide) format, select “Landscape.”
To set properties of the printer
Click “Properties” to display the “Properties” dialog box.
❒ Graphics tab
You can set the used resolution when printing an image. You cannot
specify dithering, intension or color.
❒ Device Options tab
You can select finish from either “Glossy” or “Texture.”
Click “OK” to close the “Print Setup” dialog box.
4
Click “Print” from the “File” menu of the application.
5
The “Print” dialog box appears.
Printing from your computer
Print range Specify the pages to start and end printing. To print all the
pages, select “All.”
Copies Enter the number of copies to be printed.
Set the print range and copies and click “Print.”
6
The printer starts printing. To stop printing, click “Cancel.”
79
GB
Page 80

Using your printer with Windows computers
Stopping printing midway when printing from your computer
When a “printing” dialog box is on the screen
Click the “Stop” button or the “Cancel” button.
The printing job is canceled and the dialog box is closed.
When the data is in the printer queue
1 Click “Start” in the Windows taskbar, point to “Settings,” and click
“Printers.”
The “Printers” window is displayed.
2 Double-click the “Sony DPP-SV77” icon.
The “Sony DPP-SV77” window is displayed. In the window, the
documents in the queue for printing are listed.
3 Click the document you want to stop printing.
4 Click “Stop” or “Cancel” from the “Document” menu.
The document is removed from the list and the printing job is canceled.
For the details, refer to the Windows documentation.
Note
If the printing has already started with the print paper loaded, do not cancel the printing
job. Doing so may cause paper jam. Wait until the printing is completed.
80
GB
Page 81

Using your printer with Macintosh computers
The supplied software enables you to print an image from your Macintosh
with the Digital Photo Printer DPP-SV77. To print an image from the
computer, you need a commercially available printing software application.
System requirements
To use the supplied software, you need a Macintosh computer that must meet
the following system requirements.
OS: Mac OS 8.5.1/8.6/9.0/9.1 should be pre-installed.
Port: A USB port should be installed as standard.
RAM: 32 MB or more (64 MB or more is recommended.)
Hard disk space: 50 MB or more (depending on the number of copies to
be printed.)
Drive: CD-ROM drive (for software installation)
Notes
• We cannot guarantee the printer operations when a hub is used or when two or more
USB devices are connected to your computer.
• If you connect more than one DPP-SV77 printer at the same time, you cannot operate
the printer.
• You cannot operate the printer from another USB device being used simultaneously.
Printing from your computer
Installing the printer driver
Install the Sony DPP-SV77 Printer Driver Software Ver. 1.0 for Mac OS 8.5.1/
8.6/9.0/9.1 (“printer driver” in this manual) into your Macintosh.
1 Connect your Macintosh and the printer.
For the connections, refer to “Connecting to a computer (optional)” on
page 16.
2 Turn on the printer and start your Macintosh.
Note
Close all programs before running the installer.
Continued
81
GB
Page 82

Using your printer with Macintosh computers
3 Insert the supplied CD-ROM into your CD-ROM drive.
4 Select the software language by double-clicking the
corresponding folder on the CD-ROM.
The selected language folder opens.
5 Double-click “Setup Program.”
6 Click “Install.”
Installation starts. Follow the instructions on the screen to complete
installation.
Uninstalling the printer driver
When the software becomes unnecessary, remove the software as follows: In
step 6, click “Uninstall.”
82
GB
Page 83

Printing from a software application
You can use a software application to print images stored in your computer’s
hard disk using the DPP-SV77 Digital Photo Printer.
Notes
• This sections explains the settings and operations using a typical application as an
example. Depending on the application, print settings and operations may differ. For
the details, refer to the manual of your application.
• To get the print you expect, we suggest you use software application that allows you
to check a print preview. Otherwise, set the image size to 1664 (dots) x 2466 (dots)
and the resolution to 403 dpi.
Start the application software that you use to print with, and
1
select the image to be printed.
2 Select “Chooser” from the Apple menu, click “Sony DPP-SV77”
in the “Chooser,” and then close the “Chooser.”
Click “Print Setup” from the “File” menu of the application.
3
The “Print Setup” dialog box appears.
4 Choose the printer
settings.
Printing from your computer
Paper/Margin To make Post Card Size borderless prints, click “Post
Card” and the no margin icon
Card Size print, click “Post Card” and the margin icon
. To make Small Size prints, click “Small.”
Orientation To print a wide image, click the landscape icon .
To print a tall image, click the portrait icon
Overcoat Select the overcoat type (“Glossy”/“Texture”).
Enlarge/Reduce
Select the size to be print: enlarged or reduced.
. To make border Post
.
Continued
83
GB
Page 84

Using your printer with Macintosh computers
5 Click “OK” to close the dialog box and select “Print” from the
“File” menu.
The “Print” dialog box appears.
Print range Specify the pages to start and end printing. To print all the
pages, select “All.”
Copies Enter the number of copies to be printed.
Preview Displays a print preview.
Set the print range and copies and click “Print.”
6
The printer starts printing. To stop printing, click “Cancel.”
84
GB
Page 85

Additional information
Precautions
On safety
• Operate the printer on 120 V AC, 60
Hz (for the 110 to 120V area) or 220
to 240 V AC, 50/60 Hz (for the
models for other areas) only.
• Be careful not to set or drop any
heavy objects on the power cord, or
to damage the power cord in any
way. Never operate this printer with
a damaged power cord.
• Should any solid object or liquid fall
into the cabinet, unplug the printer
and have it checked by qualified
personnel before operating it any
further.
• Never disassemble the printer.
• To disconnect the power cord, pull it
out by the plug. Never pull the
power cord itself.
• When the printer is not going to be
used for an extended period of time,
disconnect the power cord from the
wall outlet.
• Do not handle the printer roughly.
• To reduce the risk of electrical shock,
always unplug the printer from the
electrical outlet before cleaning and
servicing the printer.
• Take care not to scratch or damage
your printer’s LCD screen. Always
use the supplied stylus or a plastictipped pointer to tap on the screen.
Do not use a real pen, pencil, or
other sharp object on the screen.
• Your printer’s screen is made of
glass. Do not drop or submit your
printer to external shock.
On installation
• Avoid placing the printer in a
location subject to:
– vibration
– high humidity
– excessive dust
– direct sunlight
– extremely high or low
temperatures
• Do not use electrical equipment near
the printer. The printer will not work
properly in electromagnetic fields.
• The printer is designed to operate
horizontally. Never attempt to
operate the printer in a tilted
position.
• Do not place heavy objects on the
printer.
• Leave enough room around the
printer so that the ventilation holes
are not blocked. Blocking these holes
may cause internal heat build-up.
On moisture condensation
If the printer is brought directly from a
cold location to a warm location or
placed in an extremely warm or humid
room, moisture may condense inside the
unit. In such cases the printer will
probably not work properly and may
even develop a fault if you persist in
using it. If moisture condensation
occurs, turn off the power and do not
use the printer for at least one hour.
Additional information
85
GB
Page 86

Precautions
On transport
When you transport the printer, remove
the print cartridge, paper tray, the
“Memory Stick” or PC card from the
printer and put the printer and its
peripherals in the original box with the
protective packaging.
If you no longer have the original box
and packing parts, use similar packing
material so that the printer will not be
damaged while being transported.
On cleaning
Clean the cabinet, panel and controls
with a soft dry cloth, or a soft cloth
lightly moistened with a mild detergent
solution. Do not use any type of solvent,
such as alcohol or benzine, which may
damage the finish.
On cleaning of the LCD display, please
see page 11.
On restrictions on duplication
If duplicating documents with the
printer, pay special attention to the
following:
• Duplication of banknotes, coins, or
securities is against the law.
• Duplication of blank certificates,
licenses, passports, private securities,
or unused postal stamps is also
against the law.
• TV program, films, video tapes,
others’ portraits or other materials
may be copyrighted. Unauthorized
video printing of such materials may
infringe the provisions of the
copyright law.
86
GB
Page 87

LOCK LOCK
About the “Memory Stick” and PC card media
The printer can read and write “Memory
Stick” and PC card (PCMCIA ATA
compatible type II flash memory cards
with a power specification of 5V or 3.3/
5V). By using a commercially available
PC card adaptor, you can also use Smart
Media and other types of compact flash
memory cards.
On “Memory Stick”
“Memory Stick” is a removable storage
media used with a digital still camera,
video camera, or PC. You can easily
display, save or delete images using this
medium.
There are two types of “Memory Stick”:
an ordinary “Memory Stick” and
“MagicGate Memory Stick.” The
“MagicGate Memory Stick” is equipped
with the MagicGate copyright protection
technology that uses encryption
technology. You can use both types of
“Memory Stick” with your printer.
However, because the printer does not
support the MagicGate standards, data
recorded with the printer is not subject
to MagicGate copyright protection.
To protect “Memory Stick” images
To prevent accidental erasure of
important image data, use the write
protect switch on the “Memory Stick.”
Slide the switch to the write protect or
write enable position:
xWrite enable position
Slide the switch left to the write
enable position. You can read, write
and delete data on the “Memory
Stick.” Formatting the “Memory
Stick” is also enabled. When storing
images on the “Memory Stick,” set
the switch to the write enable
position.
xWrite protect position
Slide the switch right to the write
protect position. It is now
impossible to write or delete the data
on the “Memory Stick.” We suggest
you set the switch to the write
protect position while just viewing
“Memory Stick” images.
Connector
Write
enable
position
Write
protect
position
Additional information
Place the label here
87
GB
Page 88

About the “Memory Stick” and PC card media
Notes on use
• You cannot use PC cards with a
power specification of 3V only.
• Do not insert other types of PC card
into the printer’s insertion slot. The
printer may be damaged.
• Do not drop, bend, or submit the
“Memory Stick” or PC card to
external shock.
• Do not disassemble or modify the
“Memory Stick” or PC card.
• Avoid getting liquids on the
“Memory Stick” or PC card or using
them in areas subject to high
humidity. Otherwise, data may be
rendered unreadable.
• Avoid using or storing the “Memory
Stick” or PC card in a location
subject to:
– extremely high temperature such as
the hot inside of a car or the
outdoors exposed to a direct
sunlight, or a place near a heater.
– direct sunlight
– high humidity
– corrosive substances
– excessive dust
– electrostatic or electronic noises
– magnetic fields
• When attaching a label to the
“Memory Stick” as specified in the
illustration, use the label supplied
for the “Memory Stick” only. Do not
use any other labels.
• When storing and carrying the
“Memory Stick” or PC card, keep it
in its original case to ensure
protection of important data.
• Avoid removing the “Memory Stick”
or PC card from the insertion slot or
turning off the power of the printer
while the printer is accessing the
“Memory Stick” or PC card.
Otherwise, data may be rendered
unreadable.
• When using a compact flash card or
Smart Media, use a commercially
available PC card adaptor that is
compatible with the card. Insert the
card into the adaptor and then insert
it into the printer. For how to install
the card and adaptor, refer to the
operating instructions of the PC card
adaptor.
• Avoid inserting or removing the
compact flash card or Smart Media
into or out of the PC card adaptor
while the PC card adaptor is inserted
in the printer. The data may be
rendered unreadable or erased.
• Avoid touching the connector of the
“Memory Stick” or contacting it with
a metal object.
GB
88
Page 89

Troubleshooting
If you run into any problems using the
printer, use the following guidelines to
solve the problem. If the problem
persists, consult your Sony dealer.
When you are printing from your
computer, also refer to the computer
manual.
Cannot operate the printer after the
power switch is turned on.
m Connect the AC power cord to an
AC outlet securely.
The LCD screen of the printer
displays no images.
m Insert a “Memory Stick” or PC card
securely. Check that images
recorded by a digital still camera or
other device are recorded.
m Make sure that the PC input
indicator is not lit.
m Tap [INPUT SELECT] to turn on the
“MEMORY STICK” or PC CARD
indicator.
The television displays no images.
m Set the input selector of the
television to “VIDEO.”
m Connect the printer to the television
properly and turn both on.
m Make sure that Video Output is set
to On in the Screen Setup of the
Menu screen.
Cannot print.
m Insert the correct set of print
cartridge and print paper.
m Check that the paper tray has paper.
m The thermal head may be
overheated. Leave the printer until
the head cools down and the printer
resumes printing.
m Remove the jammed paper, if any.
An image in thumbnail list is not
properly displayed or printed.
m If the image is displayed but can not
be printed, the file used for printing
is damaged.
m If the mark shown on
the right is displayed
in the thumbnail list,
the image is a JPEG
file created with your
computer, or the
thumbnail data of the
image is damaged.
Select the mark and press PICTURE.
If a preview image is displayed, you
can print the image. If the same
mark is displayed again as a
preview, the image is stored in an
incompatible file format that the
DPP-SV77 does not support or the
image itself is damaged.
Additional information
89
GB
Page 90

Troubleshooting
m An image which is damaged or has
some kind of problem will not
appear in the image list. A file error
message appears on the display. If
there are no images stored in the
“Memory Stick” or PC card, the no
file message appears on the display.
m If an image is not compatible with
DCF (Design rule for Camera File
system), it may not be printed using
the printer even if it is displayed on
the PC monitor.
m The printer can handle and display
up to 999 image files. If there are
more than 999 images stored in the
“Memory Stick” or PC card, use the
computer to display and handle the
remaining images.
m Depending on the type of digital
still camera used, the aspect ratio of
the recorded image differs, so the
image may not be printed covering
the entire printable area.
m Depending on the type of digital
still camera used, preview images
may be displayed along with the
primary images in the thumbnail
list. The printed quality of the
preview images will not be as good
as the primary images. Note that if
you delete the preview images, the
data for the primary images may be
damaged.
m Depending on the type of digital
still camera used, the image may be
stretched vertically if it has been
rotated or processed using your
digital still camera. This is not
because of trouble with the printer,
but because the image was rewritten
using your digital still camera.
m Some types of PC card adaptor that
are not compatible with PCMCIA
ATA cannot be used with this
printer.
The beeps sound.
m Check that you are following the
correct procedures.
Cannot remove the print cartridge.
m Turn the printer off then on. After
the motor sound stops, try to
remove the cartridge.
The or indicator is lit or an
error message is displayed.
m Follow the instructions on the
screen.
90
GB
Page 91

If paper jams
If the print paper jams, the paper error indicator lights and an error
message is displayed. Printing stops. Turn the printer off and remove the
jammed paper from the paper outlet or take out the paper tray to remove the
jammed paper.
Take out the paper tray
to remove the jammed
paper.
Pull out the jammed paper
slowly.
Note
If you cannot remove the jammed paper, contact your Sony dealer.
91
Additional information
GB
Page 92

Specifications
Printing system
Sublimation dye transfer printing
(Yellow/Magenta/Cyan 3 pass)
Resolution
403 (H) x 403 (V) dpi
Image processing
256 levels (8 bits for each Yellow/
Magenta/Cyan), approx. 16,770,000
colors
Printing size
152.4 (H) x 101.6 (V) mm (maximum,
Post Card Size, borderless) (6 x 4 inches)
Printing time
Approx. 90 seconds per sheet (Post Card
Size Paper)
Approx. 60 seconds per sheet (Small Size
Paper)
(excluding the time for data processing
and data transferring from the personal
computer or “Memory Stick” or PC card)
Input/output connectors
USB connector (1)
VIDEO OUTPUT connector (phono jack
x 1)
1 Vp-p, 75 ohms (unbalanced),
sync negative
Slot
“Memory Stick” insertion slot (1)
PC card insertion slot (PCMCIA II) (1)
Compatible image file formats
JPEG: 4:4:4, 4:2:2, 4:2:0 (baseline JPEG)
BMP: 24 bits full color, Windows format
(Note that some versions of the file
formats may not be compatible.)
Maximum number of files to be handled
999 files
GB
92
Print cartridge/Print Paper
See “Preparing the printing pack” on
page 18.
LCD display
3.2 inch transparent STN color display
960 x 240 dots
Power requirements
120 V AC, 60 Hz, 1.16 A
(for 100 to 120 V users)
220 - 240 V AC, 50/60 Hz, 0.62A
(for 220 to 240 V users)
Power consumption (standby mode)
Approximately 1 W
Operating temperature
5 ˚C to 35 ˚C (41 ˚F to 95 ˚F)
Dimensions
Approx. 242 x 87 x 267 mm
(w/h/d, excluding protruding parts)
(9 5/8 x 3 1/2 x 10 5/8 inches)
(363 mm (14 3/8 inches) of depth when
the paper tray is installed.)
Mass
Approx. 2.4 kg (5 lb 5 oz)
(excluding the 0.1 kg (4 oz) paper tray)
Supplied accessories
See “Unpacking the printer” on page 7.
Design and specifications are subject to
change without notice.
Page 93

Index
A
AC power cord 16
Adding a special filter
to an image 34
Adjusting the picture
quality 32
ALL button 28
Auto Fine Print 61
B
Beep setting 61
C
Cartridge compartment
lid 19
Cartridge error
indicator 20
Changing the image size
and position 31
Clock setting 62
Connecting
AC power cord 16
Computer 16
TV 15
Creative Print menu 45
Cursor 23
D
Date Print 61
Deleting images 65
DPOF 27
Drawing freehand line
art 38
E
Edit 31
Effect menu 29
Entering
A greeting 48
Characters 42
F
Filter 34
Finish
Border/Borderless
print 61
Glossy 61
Texture 61
Formatting the “Memory
Stick” 66
Front panel 8
I
INPUT SELECT
17, 23, 27
Installing the software
Macintosh 81
Windows 68
L
LCD screen contrast
adjustment 63
M
“Memory Stick”
Inserting/removing 14
Notes on use 88
Write protection 87
Menu screen 59
Moisture condensation
85
O
Operation panel
Identifying the parts 9
Opening 11
Overview 5
P
Paper error indicator
22, 91
Paper jams 91
Paper tray 10, 21
Pasting stamps 40
PC Card
Inserting/removing 14
Note on use 88
PC input indicator 17
Pencil tool 38, 39
PICTURE 24
Post Card size 18
POWER button 19, 23
Preview image 24
PRINT button 26
Print cartridge 19
Print pack 18
Print paper 21
PRINT QUANTITY 25
Printing
All images 27, 28
an image 23
Calendar 51
Cards 47
DPOF images 27, 28
From a Macintosh
computer 83
From a Windows
comptuer 78
Index prints 57
Split images 53
Printing surface 21
Additional information
93
GB
Page 94

Index
R
Reader software 77
Rear panel 8
S
Selecting
A frame 56
An item on the screen
13
Image(s) 49
Setting
Calendar 52
Printer details 60
Slideshow 64
Small size 18
Specifications 92
Stamp tool 40
Stylus 12
Supplied accessories 7
System requirements
Macintosh 81
Windows 67
T
Tapping 12
Template 47
Thumbnails 89
Tool menu 36
Troubleshooting 89
Type tool 42, 44
U
Uninstalling the software
74, 82
USB connector 16
V
VIDEO OUT connector
15
Video output setting 63
GB
94
Page 95

95
Additional information
GB
Page 96

AVERTISSEMENT
Pour éviter tout risque d’incendie
ou de choc électrique, n’exposez
pas l’appareil à la pluie ou à
l’humidité.
Pour éviter tout choc électrique,
n’ouvrez pas le boîtier. Confiez
l’entretien à un personnel qualifié
uniquement.
ATTENTION
Pour éviter tout choc électrique, faites
correspondre la lame large de la fiche
avec la fente large et, insérez-la
complètement.
ATTENTION
La plaque d’identification est située sur
la partie inférieure du boîtier.
ATTENTION
Les images et/ou le son peuvent se
déformer si ce produit est installé près
d’un matériel émettant un
rayonnement électromagnétique.
Attention
Sony n’est en aucun cas responsable de
tout dommage ou perte accidentel(le)
ou indirect(e) des enregistrements
pouvant survenir suite à l’utilisation
ou à un dysfonctionnement de
l’imprimante, du “Memory Stick” ou
de la carte PC.
•Microsoft, MS, MS-DOS et Windows
sont des marques déposées de
Microsoft Corporation aux Etats-Unis
et dans les autres pays.
•IBM et PC/AT sont des marques
déposées de International Business
Machines Corporation.
•MMX et Pentium sont des marques
déposées de Intel Corporation.
•Apple, Macintosh, Power Macintosh, et
Mac OS sont des marques déposées de
Apple Computer, Inc.
• “Memory Stick,” “MagicGate Memory
Stick” et leurs logos sont des marques
commerciales de Sony Corporation.
•Toutes les autres sociétés et tous les
autres noms de produits cités dans le
présent document peuvent être des
marques commerciales ou des marques
déposées de leur détenteur respectif.
Les indications “™” and “®” ne sont
pas systématiquement employées dans
le présent manuel.
®
2
FR
Page 97

Notice destinée aux
utilisateurs
Programme © 2001 Sony Corporation
Documentation ©2001 Sony Corporation
Tous droits réservés. Le manuel ou le logiciel
décrit dans ce document ne peut, en partie ou
en totalité, être reproduit, traduit ou réduit
sous une forme lisible par machine sans
l’accord écrit préalable de Sony Corporation.
EN AUCUN CAS, SONY CORPORATION
NE POURRA ETRE TENU RESPONSABLE
DE DOMMAGES ACCIDENTELS,
INDIRECTS OU SPECIFIQUES,
SURVENANT DE OU EN CONNEXION
AVEC CE MANUEL, DU LOGICIEL OU DE
TOUTE AUTRE INFORMATION
CONTENUE DANS CE DOCUMENT OU DE
L’UTILISATION DE CELUI-CI.
En ouvrant l’enveloppe du CD-ROM, vous
vous engagez à accepter tous les termes et
conditions de ce contrat. Si vous n’acceptez
pas ces termes et conditions, veuillez
retourner immédiatement ce disque à
l’endroit où vous vous l’êtes procuré, dans
son enveloppe non ouverte, accompagné du
reste de l’emballage.
Enregistrement utilisateur
Pour bénéficier du service clientèle,
complétez et renvoyez la carte
d’enregistrement incluse dans votre
emballage.
Il est interdit de modifier ou de dupliquer les
données de conception, telles que les
exemples d’illustration fournis dans ce
logiciel, pour des besoins personnels. Toute
copie non autorisée de ce logiciel est interdite
suivant les lois sur les droits d’auteur.
La reproduction ou la modification non
autorisée de portraits ou de travaux protégés
par copyright d’autres personnes peut
enfreindre les droits réservés aux détenteurs
de ces droits.
FR
Sony Corporation se réserve le droit
d’apporter des modifications à ce manuel ou
aux informations qu’il contient à tout
moment et sans préavis.
Le logiciel décrit dans ce document peut
également être régi par les termes d’un
contrat de licence utilisateur distinct.
3
FR
Page 98

Table des matières
Préparatifs
Fonctionnalités de l’imprimante ..................... 5
Déballage de l’imprimante ............................. 7
Identification des composants ........................ 8
Utilisation du crayon optique et du panneau
de commande ........................................ 11
Ouverture du panneau de commande .......... 11
Utilisation du crayon optique ...................... 12
Configuration
1 Raccordement de l’imprimante............... 14
Insertion d’un “Memory Stick” ou d’une
carte PC ..................................................... 14
Raccordement au téléviseur (facultatif) ........ 15
Raccordement du cordon d’alimentation ..... 16
Raccordement à un ordinateur (facultatif) .... 16
2 Préparation du kit d’impression.............. 18
3 Chargement de la cartouche
d’impression .......................................... 19
4 Insertion du papier d’impression ............ 21
Opérations d’impression de base
Impression de l’image sélectionnée ..............23
Impression de toutes les images ou des
images DPOF en une seule fois .............. 27
Opérations d’impression
avancée
Ajout d’effets à une image ........................... 29
Fonctions du menu Effect ............................ 29
Modification de la taille et de la position
d’une image ............................................... 31
Réglage des images .................................... 32
Ajout d’un filtre spécial à une image ........... 34
Ajout de dessins, vignettes ou
caractères (Tool) .................................... 36
Fonctions du sous-menu Tool ...................... 36
Dessiner des lignes à main levée (
Collage de vignettes (
Saisie de caractères (
FR
4
) ........................... 40
) ........................... 42
) ........ 38
Création d’impressions diverses (CREATIVE
PRINT) ....................................................45
Fonctions du menu Creative Print ................ 45
Création d’une carte ................................... 47
Création d’un calendrier.............................. 51
Création d’une impression en plusieurs
portions ...................................................... 53
Création d’un autocollant ........................... 55
Création d’une impression d’index .............. 57
Configuration de l’imprimante (MENU) ........ 59
Fonctions du Menu ..................................... 59
Modification des préférences de l’imprimante
(Set Up) ...................................................... 60
Réglage de la sortie vidéo et du contraste de
l’écran LCD ................................................. 63
Affichage d’un diaporama ............................ 64
Suppression d’images ...................................65
Impression depuis votre
ordinateur
Utilisation de l’imprimante sous Windows ... 67
Configuration du système ........................... 67
Installation du logiciel ................................. 68
Utilisation du logiciel de lecture .................. 77
Impression à partir d’une application........... 78
Utilisation de l’imprimante avec un Macintosh
81
Configuration du système ........................... 81
Installation du pilote d’imprimante .............. 81
Impression à partir d’une application........... 83
Informations complémentaires
Précautions ................................................... 85
A propos du “Memory Stick” et de la
carte PC ................................................. 87
A propos du “Memory Stick” ...................... 87
Pour protéger les images d’un
“Memory Stick” .......................................... 87
Remarques sur l’utilisation .......................... 88
Guide de dépannage .................................... 89
Bourrage de papier ..................................... 91
Spécifications ............................................... 92
Index ............................................................ 93
Page 99

Préparatifs
Fonctionnalités de l’imprimante
L’imprimante photo numérique DPP-SV77 vous permet d’imprimer des
images stockées sur un “Memory Stick” ou une carte PC. Vous pouvez
également imprimer facilement à partir de votre ordinateur.
Impression de qualité photographique
Grâce à son système d’impression à transfert thermique par sublimation,
l’imprimante offre une qualité d’impression quasi photographique pour
toutes vos impressions.
Fonction Super Coat 2
La fonction Super Coat 2 permet d’obtenir une durée de vie étendue et une
bonne résistance à l’humidité ou aux traces de doigts, garantissant une bonne
qualité d’image de vos impressions sur le long terme.
Opérations faciles avec le crayon optique sur l’écran LCD couleur
Grâce à l’écran LCD tactile couleur, vous pouvez réaliser facilement des
opérations à l’aide d’un crayon optique et prévisualiser les images à
imprimer. Pour sélectionner une image ou un élément, touchez légèrement
l’écran à l’aide du crayon fourni. Ces opérations activées par l’écran vont
vous guider tout au long du processus d’impression.
Pour visualiser les images sur un écran plus large, vous pouvez également
raccorder l’imprimante à votre téléviseur.
Préparatifs
Fonction d’impression fine automatique (Auto Fine Print 2)
Même une image sombre possédant peu de contraste sera automatiquement
ajustée et réglée pour produire une image claire et éclatante.
Sélection du format d’impression et des marges d’impression
Vous avez le choix entre un grand format carte postale dynamique et un petit
format économique. Pour le format carte postale, vous pouvez également
choisir un format avec ou sans marge.
Impression directe d’images d’un “Memory Stick” ou d’une carte PC.
Retirez le “Memory Stick” ou la carte PC de votre appareil photo numérique
puis insérez cette unité de stockage dans votre imprimante. Vous pouvez
alors imprimer les images stockées sur le “Memory Stick” ou la carte PC.
Vous pouvez choisir d’imprimer en une seule fois toutes les images stockées
sur un “Memory Stick” ou sur une carte PC ou les images présélectionnées
par un appareil photo numérique.
Suite
5
FR
Page 100

Fonctionnalités de l’imprimante
Sélection de la finition de l’impression
Vous pouvez sélectionner la finition de l’impression (glacé ou texture).
Impression continue de 25/30 feuilles
Le magasin à papier fourni vous permet d’imprimer jusqu’à 25 feuilles de
papier au format carte postale et 30 feuilles de papier petit format de manière
continue.
Grande variété d’impressions
Vous pouvez réaliser diverses impressions telles qu’une impression
standard, une impression avec la date et une impression de l’index des
images stockées sur le “Memory Stick” ou la carte PC. De nombreuses
fonctions de traitement d’image vous permettent d’agrandir ou de réduire,
de faire pivoter, de retourner ou de déplacer l’image. Vous pouvez
également appliquer des effets spéciaux aux images afin de produire des
images sépia, monochromes ou de type peinture ou utiliser des outils pour
tracer des dessins à main levée, ajouter des vignettes ou intégrer des
caractères dans une image.
Variété d’impression étendue grâce au menu Creative Print
Le menu Creative Print vous permet de choisir différents formats
d’impression comme calendrier, carte, images fractionnées, ou autocollant
avec des images encadrées.
Raccordement USB facile avec votre ordinateur
En installant le logiciel du pilote d’imprimante DPP-SV77 fourni sur votre
ordinateur, vous pouvez imprimer des images à partir de votre ordinateur.
Grâce au logiciel de lecture du Memory Stick ou de la carte PC fourni, vous
pouvez visualiser et gérer à partir de votre ordinateur les images d’un
“Memory Stick” ou d’une carte PC inséré(e) dans l’imprimante.
A propos du mode de démonstration
Vous pouvez visualiser la démonstration des fonctions de la DPP-SV77.
Mettez l’imprimante sous tension lorsque le “Memory Stick” ou la carte PC
n’est pas insérée. Le bouton de démonstration est affiché en bas à droite de
l’écran. Appuyez sur le bouton pour lancer les démonstrations. Les fonctions
DPP-SV77 sont indiquées dans l’ordre. Pour arrêter les démonstrations,
appuyez sur un endroit quelconque de l’écran.
FR
6
 Loading...