

Page 1
Digital Photo
Printer
3-866-753-11(2)
Operating Instructions
Before operating this printer, please read this
manual thoroughly and retain it for future
reference. For using the supplied software,
refer to the Sony Digital Photo Printer Utility
for MS300/MS300E User’s Guide.
Mode d’emploi
Avant d’utiliser cette imprimante, veuillez lire
attentivement ce manuel et le conserver pour
toute référence ultérieure. Pour utiliser le
logiciel fourni, reportez-vous au Guide de
l’utilisateur relatif à l’utilitaire d’imprimante
photo numérique (Sony Digital Photo Printer
Utility for MS300/MS300E).
GB
FR
DPP-MS300/MS300E
1999 by Sony Corporation
Page 2
WARNING
To prevent fire or shock hazard, do not
expose the unit to rain or moisture.
To avoid electrical shock, do not open the
cabinet. Refer servicing to qualified
personnel only.
This symbol is intended to alert the
user to the presence of uninsulated
“dangerous voltage” within the
product’s enclosure that may be of
sufficient magnitude to constitute a
risk of electric shock to persons.
This symbol is intended to alert the
user to the presence of important
operating and maintenance
(servicing) instructions in the
literature accompanying the
appliance.
ATTENTION:
Pictures and/or Sound distortion may occur if
this product is positioned in close proximity to
equipment emitting electromagnetic radiation.
Attention
Sony shall assume no responsibility for any
accidental or consequential damages or loss of
the recording contents which may be caused by
use or malfunction of the printer, “Memory
Stick” or PC card.
CAUTION
You are cautioned that any changes or
modifications not expressly approved in this
manual could void your authority to operate this
equipment.
This product conforms with the following
European Directives:
72/73EEC, 93/68/EEC (Low Voltage Directive)
83/336/EEC, 92/31/EEC (EMC Directive)
This equipment complies with EN55022 Class B
and EN50082-1 for use in the following areas:
residential, business, and light-industrial.
This equipment has been tested and found to
comply with the limits set out in the EMC
Directive using a connection cable shorter than
3 meters (9.8 feet).
GB
2
For the customers in the U.S.A.
WARNING
This equipment has been tested and found to
comply with the limits for a Class B digital
device, pursuant to Part 15 of the FCC Rules.
These limits are designed to provide reasonable
protection against harmful interference in a
residential installation. This equipment
generates, uses, and can radiate radio frequency
energy and, if not installed and used in
accordance with the instructions, may cause
harmful interference to radio communications.
However, there is no guarantee that interference
will not occur in a particular installation. If this
equipment does cause harmful interference to
radio or television reception, which can be
determined by turning the equipment off and
on, the user is encouraged to try to correct the
interference by one or more of the following
measures:
– Reorient or relocate the receiving antenna.
– Increase the separation between the
equipment and receiver.
– Connect the equipment into an outlet on a
circuit different from that to which the
receiver is connected.
– Consult the dealer or an experienced radio/
TV technician for help.
CAUTION
To prevent electric shock, match wide blade of
plug to wide slot, fully insert.
CAUTION
The nameplate and graphical symbol are located
on the bottom enclosure.
For the customers in the U.S.A. and Canada
DISPOSAL OF LITHIUM ION BATTERY.
LITHIUM ION BATTERY.
DISPOSE OF PROPERLY.
You can return your unwanted lithium ion
batteries to your nearest Sony Service Center or
Factory Service Center.
Note: In some areas the disposal of lithium ion
batteries in household or business trash
may be prohibited.
For the Sony Service Center nearest you call
1-800-222-SONY (United States only).
For the Sony Factory Service Center nearest you
call 416-499-SONY (Canada only).
Caution: Do not handle damaged or leaking
lithium ion battery.
Page 3

Table of contents
Getting Started
Features ..................................................... 4
Unpacking the printer............................. 5
Identifying the parts................................ 6
Setting Up
Connecting the printer ............................ 8
Inserting a “Memory Stick”
or PC card ........................................... 8
Connecting to video equipment.... 10
Connecting to a computer .............. 11
Connecting the AC power cord ....11
Adjusting the clock ................................ 12
Using print packs (not supplied).........14
Loading the print cartridge .................. 15
Inserting the print paper.......................17
Printing
Printing an image from a
“Memory Stick” or PC card .......... 19
Preparations ..................................... 19
Printing ............................................. 20
Printing an image from video
equipment.........................................23
Preparations ..................................... 23
Printing ............................................. 24
Declaration of Conformity
Trade Name: Sony
Model No.: DPP-MS300
Responsible Party: Sony Electronics Inc.
Address: 1 Sony Drive, MD#2A2,
Park Ridge, New Jersey,
07656, U.S.A.
Telephone No.: 201-930-6970
This device complies with Part 15 of the FCC
Rules. Operation is subject to the following
two conditions: (1) This device may not cause
harmful interference, and (2) this device must
accept any interference received, including
interference that may cause undesired
operation.
Making Various Prints
Printing the date .................................... 26
Making split prints ................................ 27
Printing images from a
“Memory Stick” or PC card ........... 27
Printing images from
video equipment..............................29
Making a calendar ................................. 31
Making an index list of “Memory Stick”
or PC card images ........................... 33
Printing “Memory Stick” or PC card
images preset by a camera ............. 35
Printing “Memory Stick” or PC card
images at one time...........................36
Recording a video picture as a still
image ................................................. 38
Deleting “Memory Stick” or PC card
images ............................................... 40
For Your Information
Precautions ............................................. 42
About “Memory Stick” ......................... 44
About PC cards ...................................... 46
Troubleshooting..................................... 47
If an error message appears ........... 48
If the indicators are on .................... 50
If the print paper is jammed .......... 52
Specifications.......................................... 53
Chart for various print mode............... 54
Index ........................................................ 55
For the customers in the U.S.A.
Owner’s Record
The model and serial numbers are located on the
bottom. Record the serial number in the space
provided below. Refer to this number whenever
you call upon your Sony dealer regarding this
product.
Model No. DPP-MS300
Serial No.
•
Microsoft, MS, MS-DOS and Windows® are
registered trademarks of Microsoft Corporation
in the United States and other countries.
• IBM PC/AT is a registered trademarks of IBM
Corporation of the U.S.A.
GB
GB
3
Page 4

Getting Started
Features
With the Digital Photo Printer DPP-MS300/MS300E,
you can print images from a digital still camera or
video equipment.
Fine printing resolution
With a printing resolution of 306 dpi x 306 dpi, you can
print postcard size pictures and characters at nearphoto quality.
Direct printing of the card images
You can directly print images taken by a digital still
camera or video equipment and stored in a “Memory
Stick” or PC card. You can also print images which are
preset by a digital still camera or video camera.
Printing and saving images from video equipment
You can directly print the input images of video
equipment. The input image can also be saved as a still
image in the “Memory Stick” or PC card.
A wide variety of prints using the printer
You can make various prints such as a standard print,
split images, calendars, and an index print of specified
images.
GB
4
Getting Started
An even wider variety of prints using the supplied
software
With the supplied Sony DPP-MS300/MS300E Printer
Driver for Microsoft Windows
images from your computer’s hard disk. With the
supplied Sony Digital Photo Printer Utility for MS300/
MS300E, you can transfer the images of a “Memory
Stick” or PC card to your computer’s hard disk. You
can also make even more types of prints such as a print
with an original frame, a postcard, and a label. For
details, refer to the User’s Guide for the printer utility.
Durable Super Coat print paper compatible
In addition to standard or sticker print paper, durable
Super Coat print paper is also available. This paper
will keep the printed image in good condition for an
extended period of time.
Printing 25 sheets continuously
With the optional Automatic Feeder VPF-A3, you can
print up to 25 sheets continuously.
®
95/98, you can print
Page 5

Unpacking the printer
Make sure that the following accessories are supplied
with your printer.
• AC power cord (1)
(For the DPP-MS300) (For the DPP-MS300E)
• Video connection cable (1)
• CD-ROM (for Microsoft Windows
• Instruction Manual (1)
• User’s guide for the Sony Digital Photo Printer
Utility for MS300/MS300E (1)
• Warranty (1)
®
95/98) (1)
Getting Started
Getting Started
GB
5
Page 6
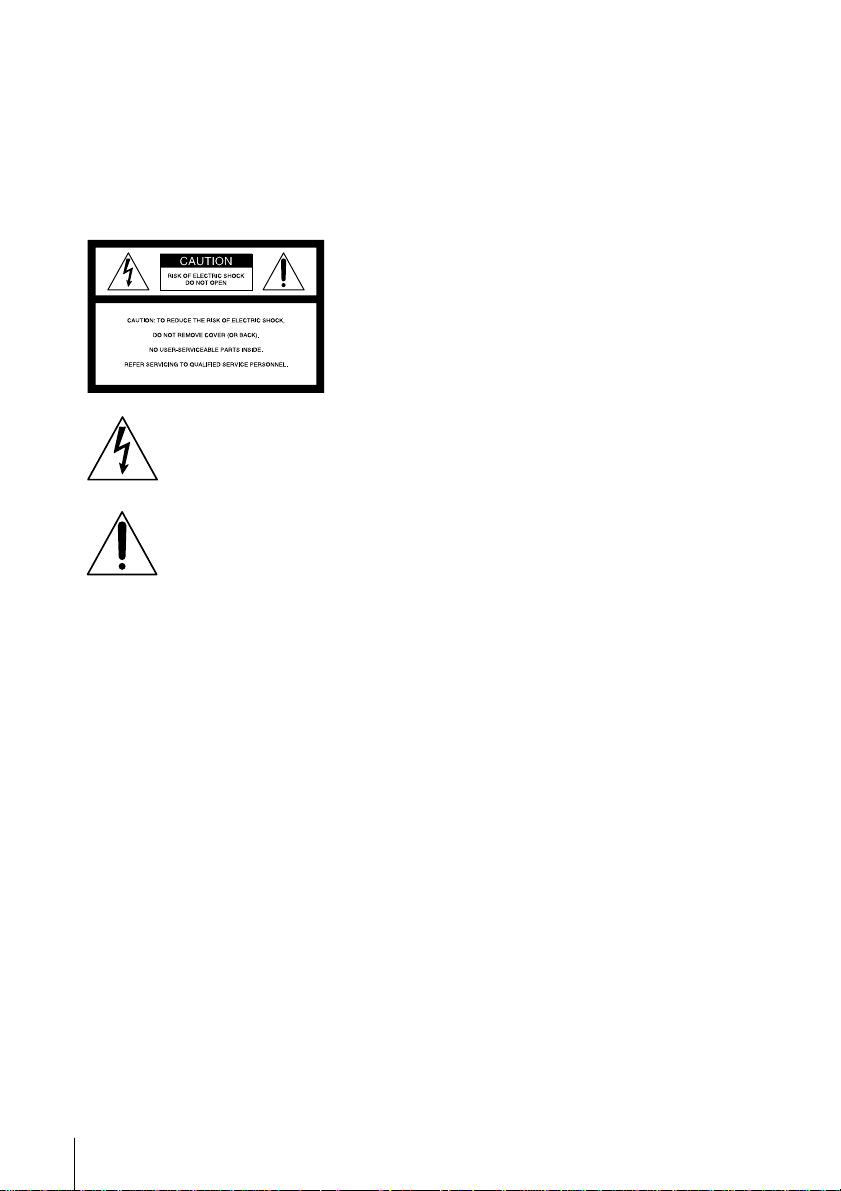
Identifying the parts
See the pages given in parentheses for use of the parts.
1 Paper outlet (page 52)
2 Parallel port (page 11)
3 AC power connector (page 11)
4 POWER switch (page 12)
5 VIDEO OUTPUT connector
(page 8, 9, 10)
6 VIDEO INPUT connector
(page 10)
7 S VIDEO INPUT connector
(page 10)
8 Operation panel (page 7)
9 PC card insertion slot (page 9)
0 “Memory Stick” insertion slot
(page 8)
!¡ “Memory Stick”/PC card selection
switch (page 8, 9)
!™ Cover for the optional automatic
feeder (page 18)
!£ Paper inlet/outlet for manual
feeding (page 17, 52)
!¢ Cartridge compartment lid
(page 15)
!∞ Eject lever (page 16)
!§ Print cartridge (pages 14, 15)
(not supplied)
GB
6
Cartridge compartment
Getting Started
Page 7
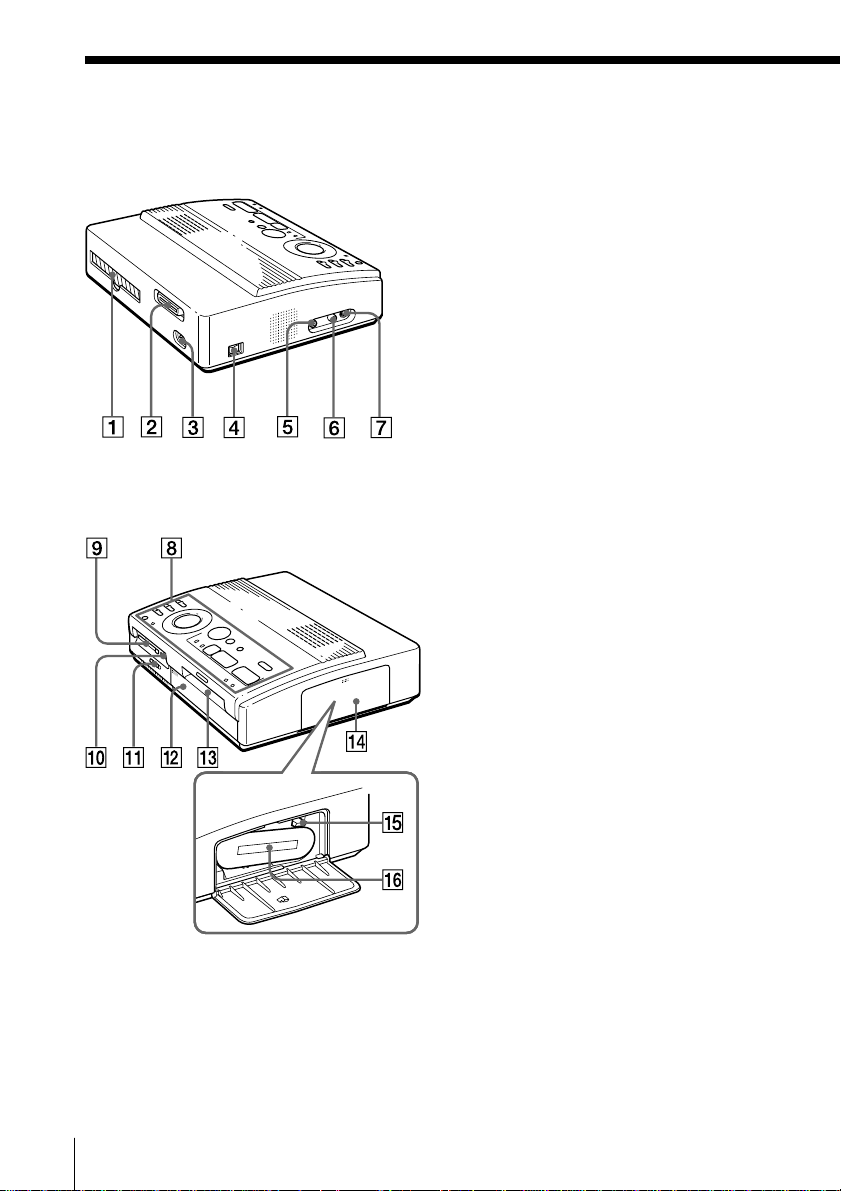
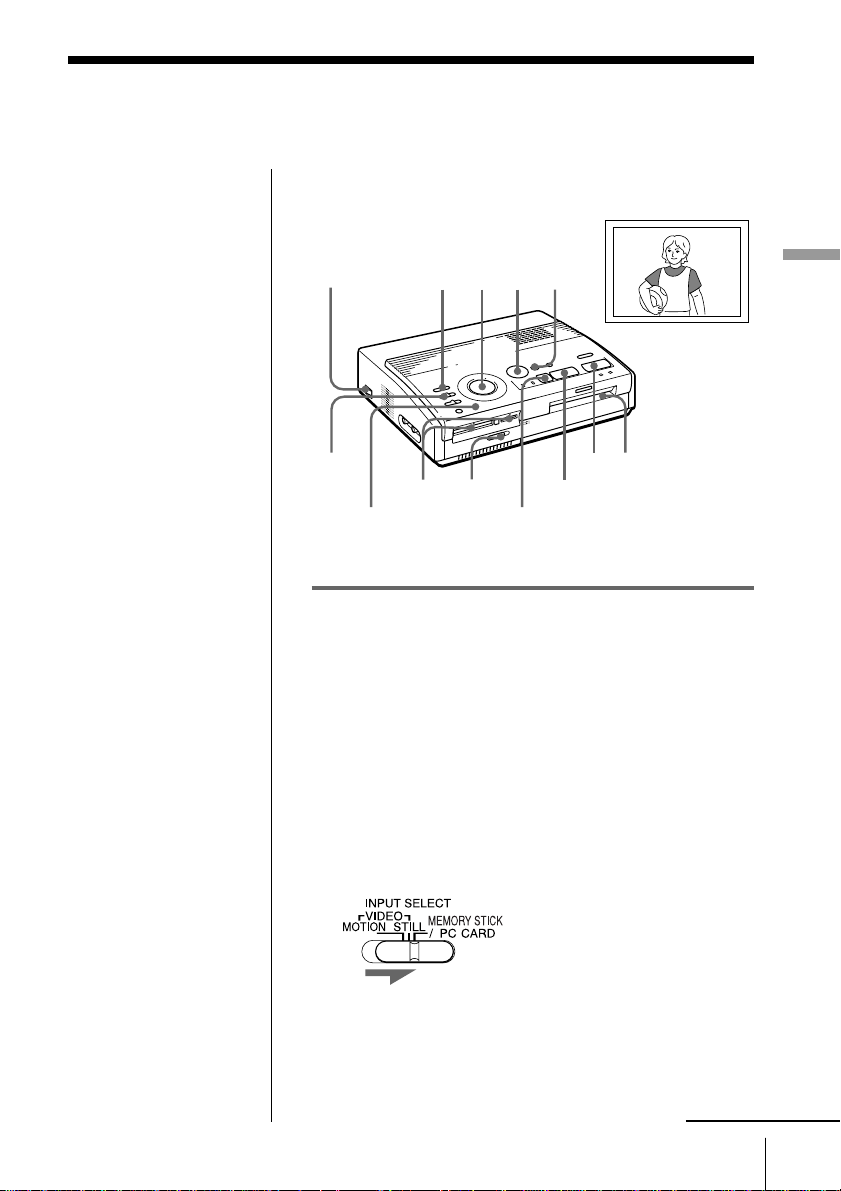
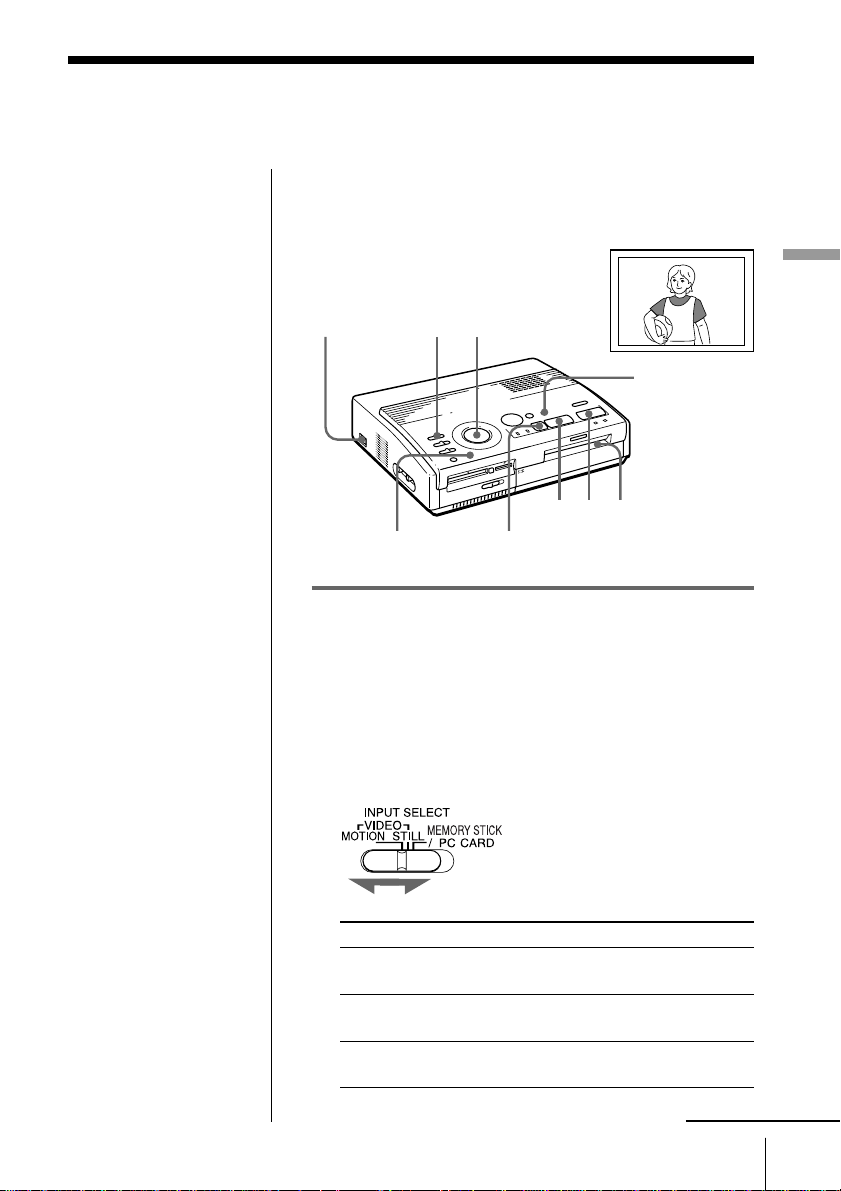
Operation Panel
1 PRESET PRINT switch (page 35)
2 INPUT SELECT switch
(pages 19, 23)
3 Print mode dial
(pages 20, 24, 27, 31, 33)
4 Arrow buttons (B/b/V/v) (page 20)
5 ENTER button (pages 13, 21)
6 CLEAR ALL button (page 24)
7 SAVE button (page 39)
8 MENU button (pages 12, 36, 40)
9 DATE switch (page 26)
!º PICTURE button (pages 21, 24)
!¡ CAPTURE button (pages 21, 24)
!™ PRINT button (pages 21, 25)
Getting Started
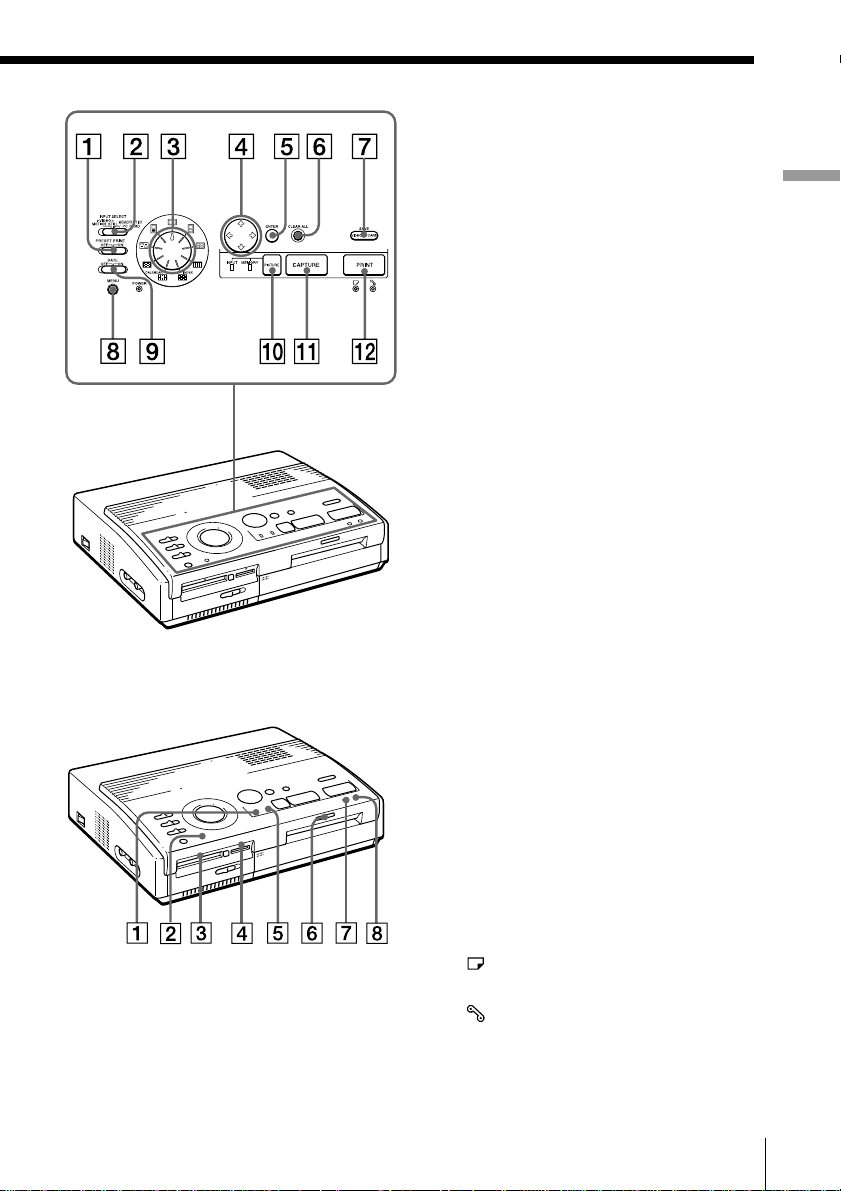
Indicators
1 INPUT indicator (pages 21, 24, 50)
2 POWER indicator (pages 12, 50)
3 PC card access indicator (page 20)
4 “Memory Stick” access indicator
(page 20)
5 MEMORY indicator
(pages 21, 24, 50)
6 Printing indicator (pages 21, 25, 50)
7
Paper supply indicator
(pages 17, 21, 25, 50)
8
Cartridge error indicator
(pages 16, 50)
Getting Started
GB
7
Page 8
Setting Up
Connecting the printer
Notes
• You cannot insert both
the “Memory Stick”
and PC card at the
same time.
• Before making
connections, turn off
the power of both the
printer and television.
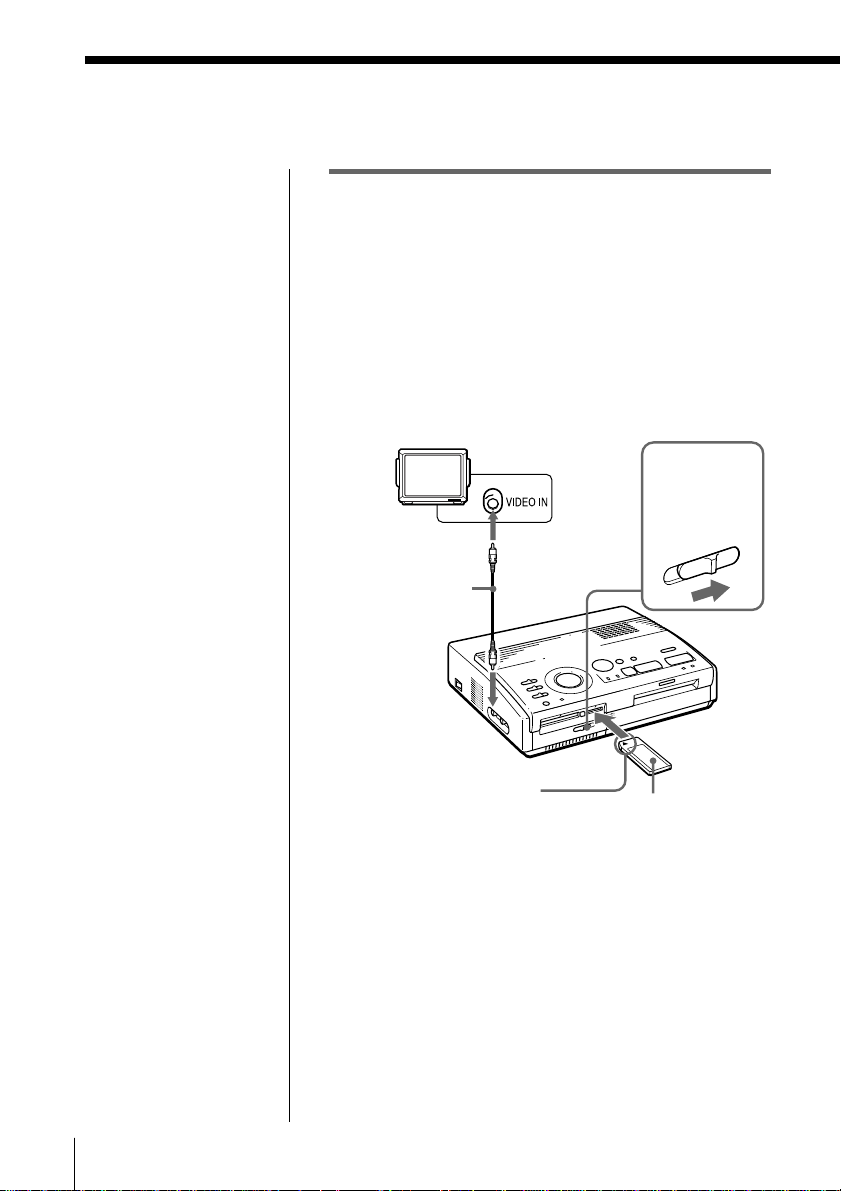
Inserting a “Memory Stick” or PC card
When printing images recorded on a “Memory Stick”
or PC card, insert either the “Memory Stick” or PC card
into its insertion slot on the printer. Also connect the
printer to the television to display the images to be
printed. For using a “Memory Stick,” see page 44, and
for using a PC card, see page 46.
Inserting a “Memory Stick”
Television
Set input selector
to “VIDEO.”
Video connection
cable (supplied)
To VIDEO OUTPUT
Memory
Stick/PC card
selection switch
Notes
• If the “Memory Stick”
does not fit into the slot
properly, confirm the
position of the
“Memory Stick”/PC
card selection switch
and the direction of the
notch and arrow on the
“Memory Stick.” Then
re-insert it into the slot.
• Do not attempt to force
the “Memory Stick”
into or out of the slot.
Otherwise, the
“Memory Stick” or the
printer may be
damaged.
GB
Setting Up
8
With the notch facing
left and the arrow facing
forward on the left
“Memory Stick”
1 Slide the “Memory Stick”/PC card selection switch
to the right so that the “Memory Stick” insertion
slot opens.
2 With the notch facing left and the arrow facing
forward on the left, insert the “Memory Stick” into
the “Memory Stick” insertion slot until it clicks into
place.
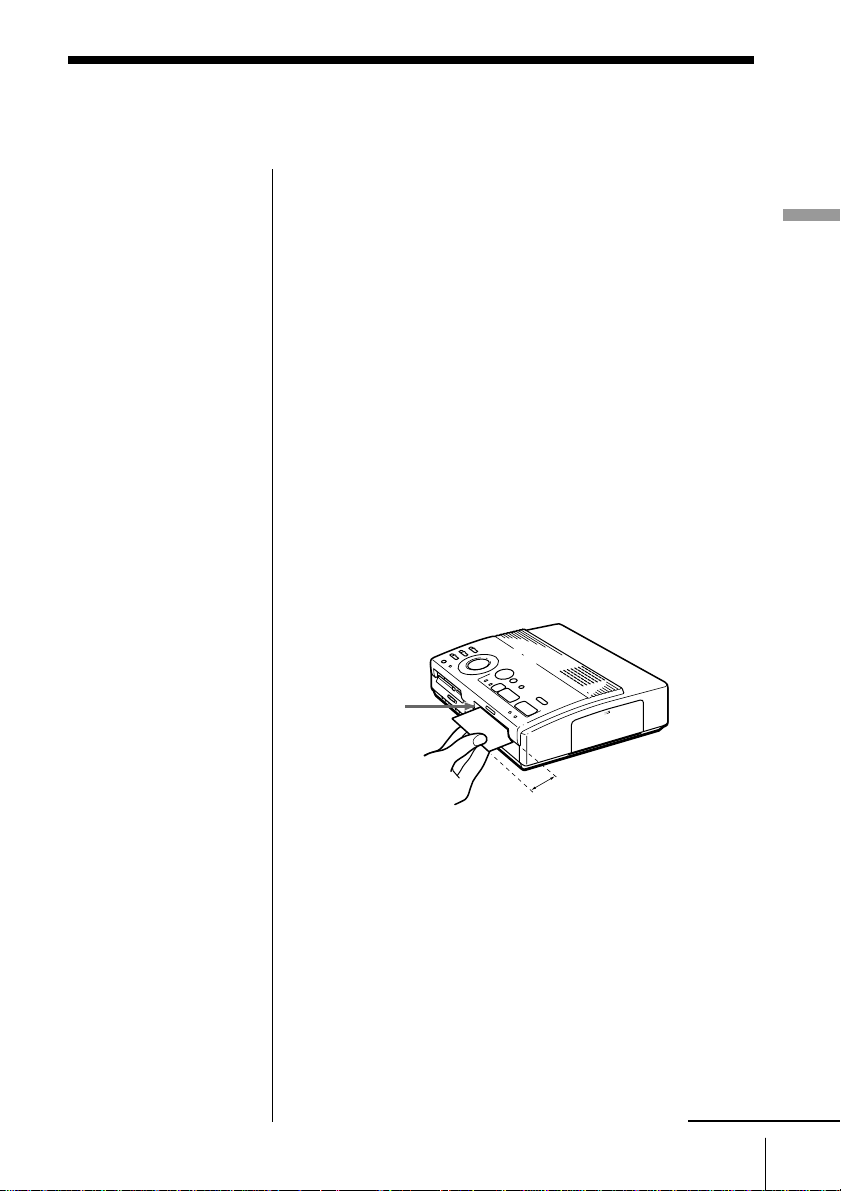
Ejecting the “Memory Stick”
Push the “Memory Stick” further into the insertion slot
and let it pop out. After it pops out, remove it slowly.
Page 9
Tip
By using a commercially
available PC card
adaptor, you can also use
Smart Media or other
types of compact flash
cards (page 46).
Notes
• If the PC card does not
fit into the slot
properly, confirm the
position of the
“Memory Stick”/PC
card selection switch
and the direction of the
arrow on the PC card.
Then re-insert it into
the slot.
• Do not attempt to force
the PC card into or out
of the slot. Otherwise,
the PC card or the
printer may be
damaged.
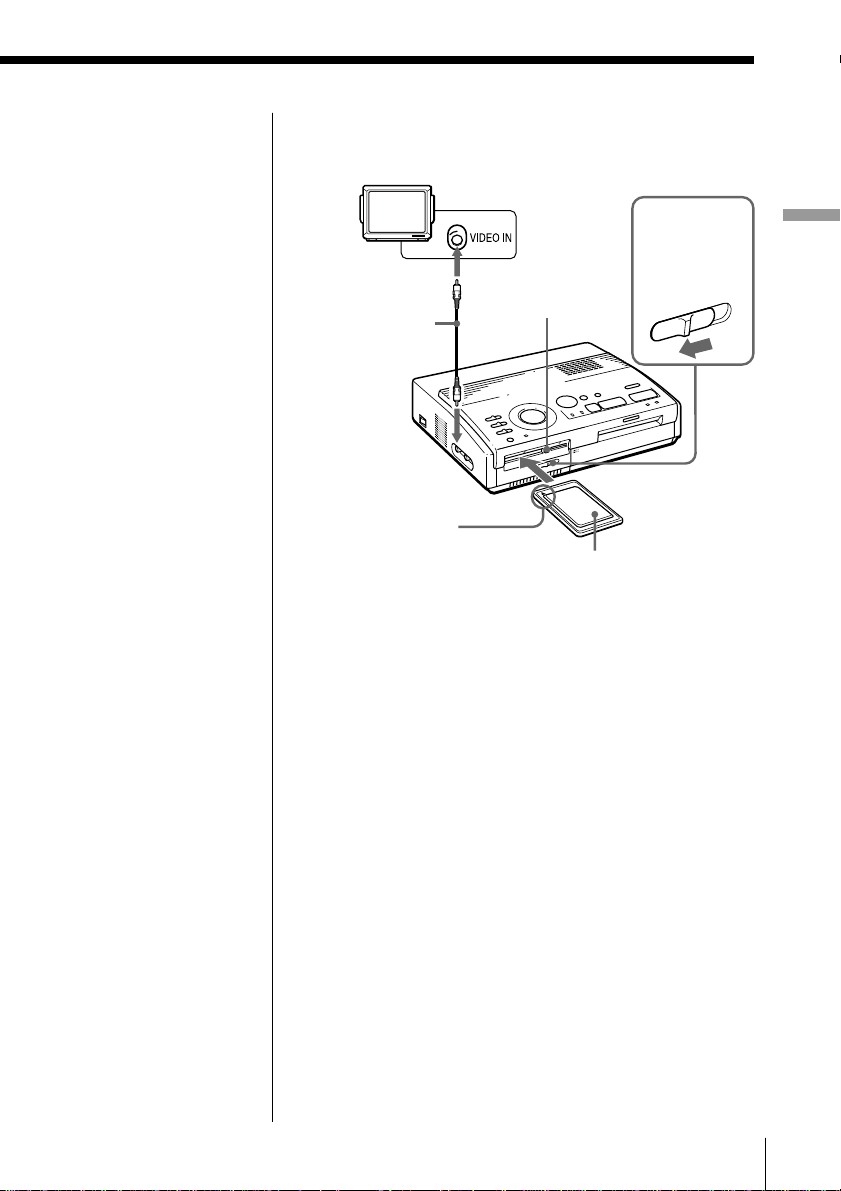
Inserting a PC card
Television
Set input selector
to “VIDEO.”
“Memory
Stick”/PC
card selection
switch
Video connection
cable (supplied)
To VIDEO OUTPUT
With the arrow
facing upward on
the left
PC card
ejection button
PC card
1 Slide the “Memory Stick”/PC card selection switch
to the left so that the PC card insertion slot opens.
2 With the arrow facing upward on the left, insert the
PC card into the PC card insertion slot until it clicks
into place.
Ejecting the PC card
Press the PC card ejection button. After the PC card
pops out, remove it slowly.
Setting Up
Setting Up
GB
9
Page 10
Connecting the printer (continued)
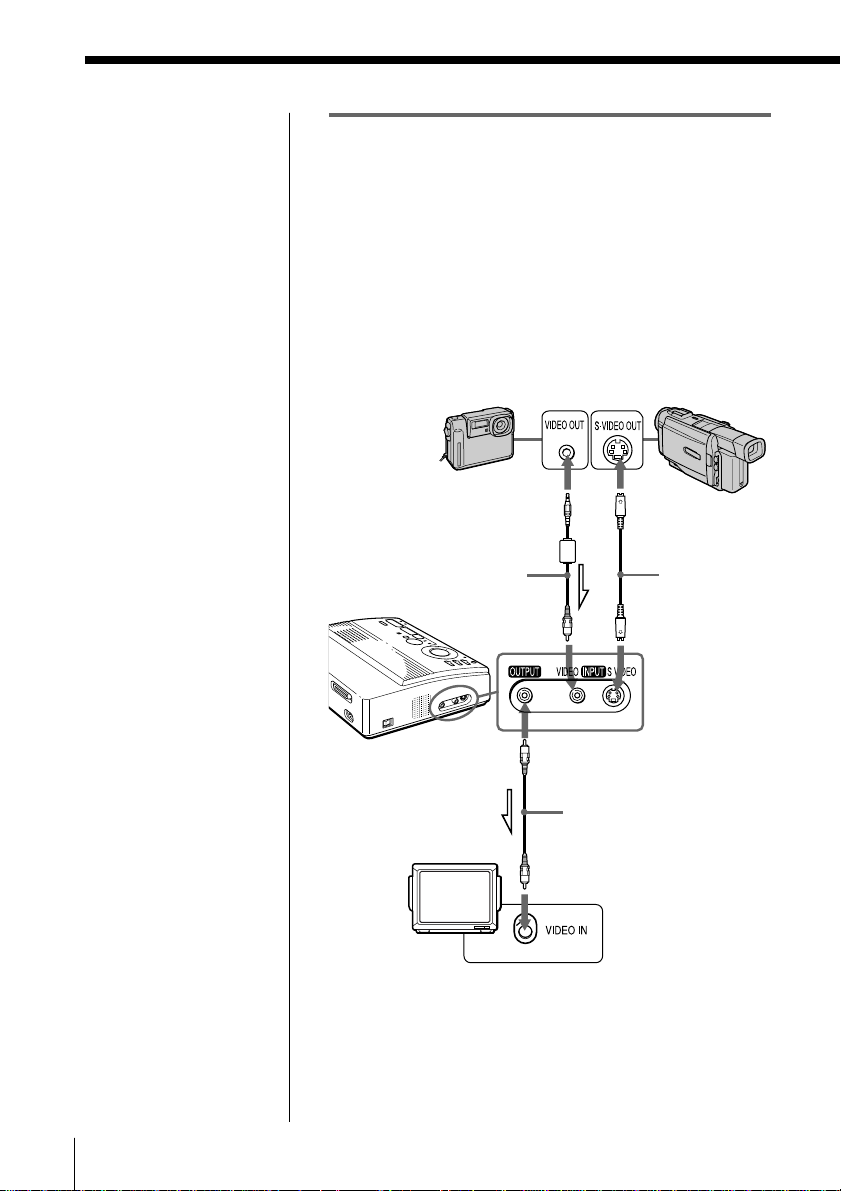
Connecting to video equipment
When printing images from video equipment such as a
digital still camera or video camera, use the supplied
video connection cable to connect the video equipment
and the printer. Also connect the printer to the
television to display the images to be printed.
For printing operations, see page 24.
If the video equipment
has an S-video output
connector
Connect it to the S VIDEO
INPUT connector of the
printer using the optional
S-video connection cable
so that you can get better
picture quality. In this
case, you do not need to
connect the video
connector.
When both the S VIDEO
INPUT and VIDEO INPUT
connectors of the
printer are connected
The input signals from
the S VIDEO INPUT
connector are
automatically selected.
Digital still camera or
video camera
equipped with a
video output
connector
Video connection
cable (not supplied)
To VIDEO
INPUT
Or
To VIDEO OUTPUT
Video connection
cable (supplied)
Video camera or
similar device
equipped with an
S-video output
connector
S-video
connection
cable (not
supplied)
To S VIDEO
INPUT
10
GB
Notes
• Before making
connections, turn off
the power of the
printer, the video
equipment and
television.
• Also refer to the
instruction manual of
the video equipment.
Setting Up
Television
Set input
selector to
“VIDEO.”
ç
: Signal flow
Page 11
Notes
• Before making
connections or
plugging in a cable,
turn off the power of
the printer, your PC,
and the monitor.
• Also refer to the
instruction manual of
your PC.
• Use a shielded printer
cable which is shorter
than 6 feet 6 inches
(2 m).
• You may not be able to
use the printer and the
printer driver on a
network or a
commercially available
printer buffer.
If your computer does
not match the D-sub 25pin plug
Use a commercially
available cable having an
Anfenole full 36-pin plug
for the printer, and a plug
that is compatible with
your computer.
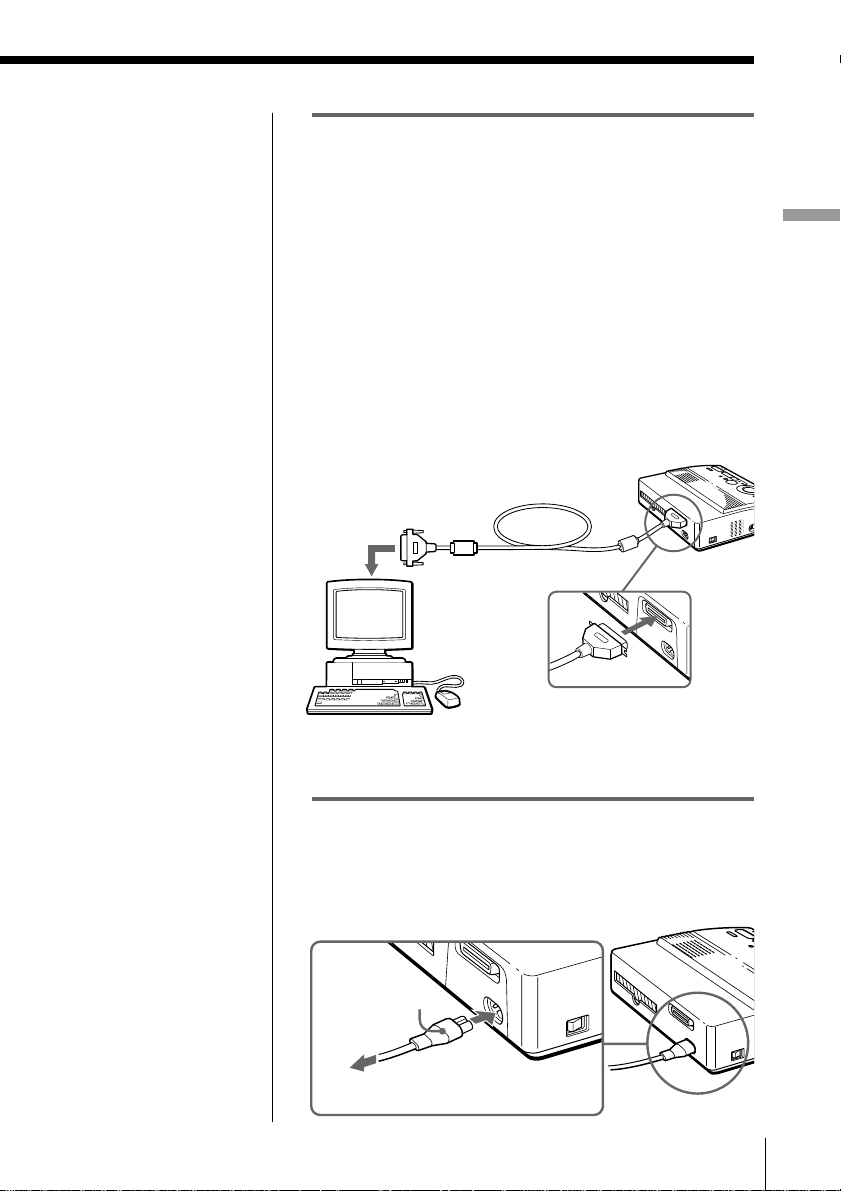
Connecting to a computer
When printing images from an IBM PC/AT compatible
computer, connect the printer’s parallel port to the
printer port of your personal computer (PC) and install
the supplied Sony Digital Photo Printer Utility for
MS300/MS300E. You can transfer the images from a
“Memory Stick” or PC card into your PC hard disk and
make a variety of prints.
For how to install and operate the software including
printing from your PC, refer to the supplied User’s
Guide.
Use a commercially available connection cable with a
D-sub 25-pin plug (male) for your computer and an
Anfenole full 36-pin plug for the printer:
To the printer port
(D-sub 25-pin plug)
Printer cable (not
supplied)
Setting Up
To the parallel port
an IBM PC/AT
compatible
(Anfenole full 36-pin plug)
Connecting the AC power cord
After you make the connections, connect the supplied
AC power cord to the AC power connector of the
printer and then to the AC outlet.
AC Powe r
cord (supplied)
To the AC outlet
Setting Up
11
GB
Page 12
Adjusting the clock
By adjusting the clock of the printer, you can record the
time when the images were captured from your video
equipment. You can also automatically start the
calendar with the current month when making a
calendar print.
Once you adjust the clock, the clock is maintained with
the battery even if you turn off the power.
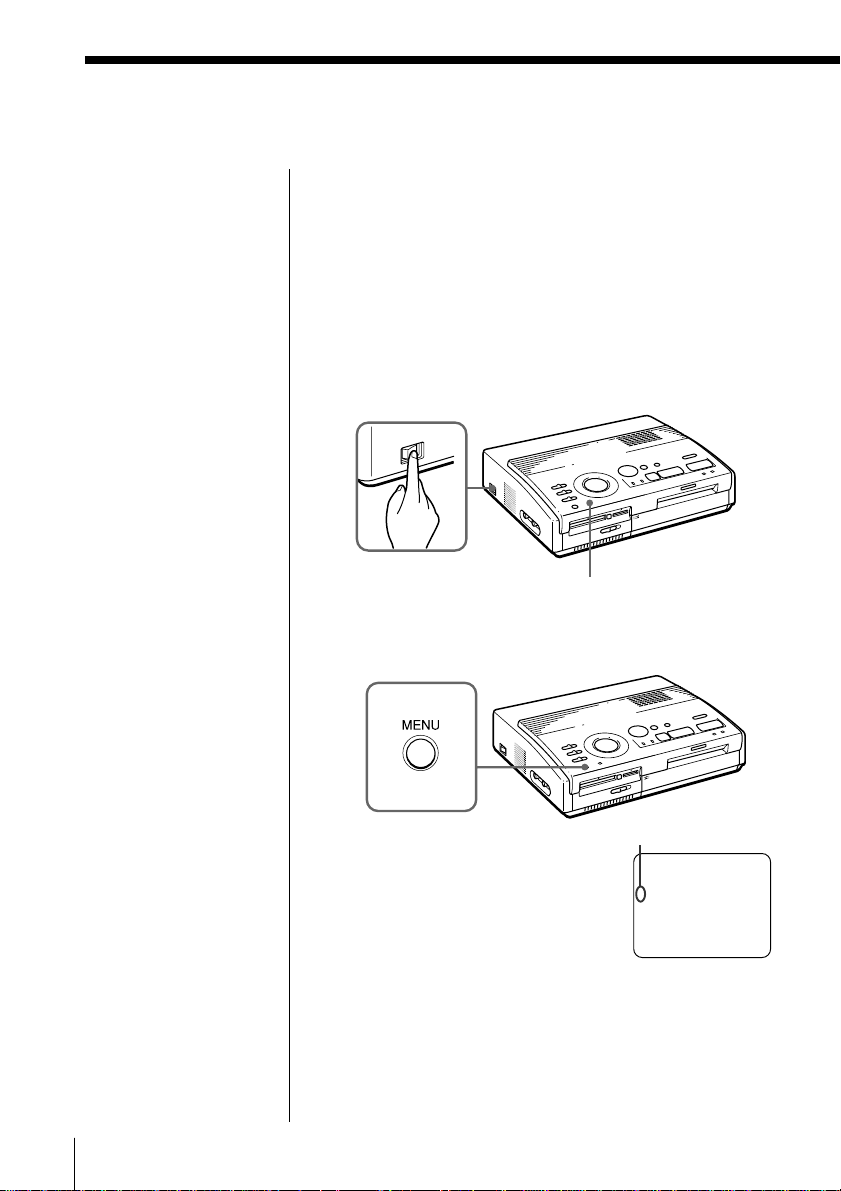
1 Turn on the power of the printer.
The POWER indicator lights up.
12
GB
Setting Up
POWER switch
POWER indicator
2 Press MENU.
The menu appears on your television.
Cursor
SELECT ALL IMAGES
DELETE
FORMAT
” CLOCK SET
Television screen
Page 13
Note
The following CLOCK
SET example shows the
screen for the DPPMS300.
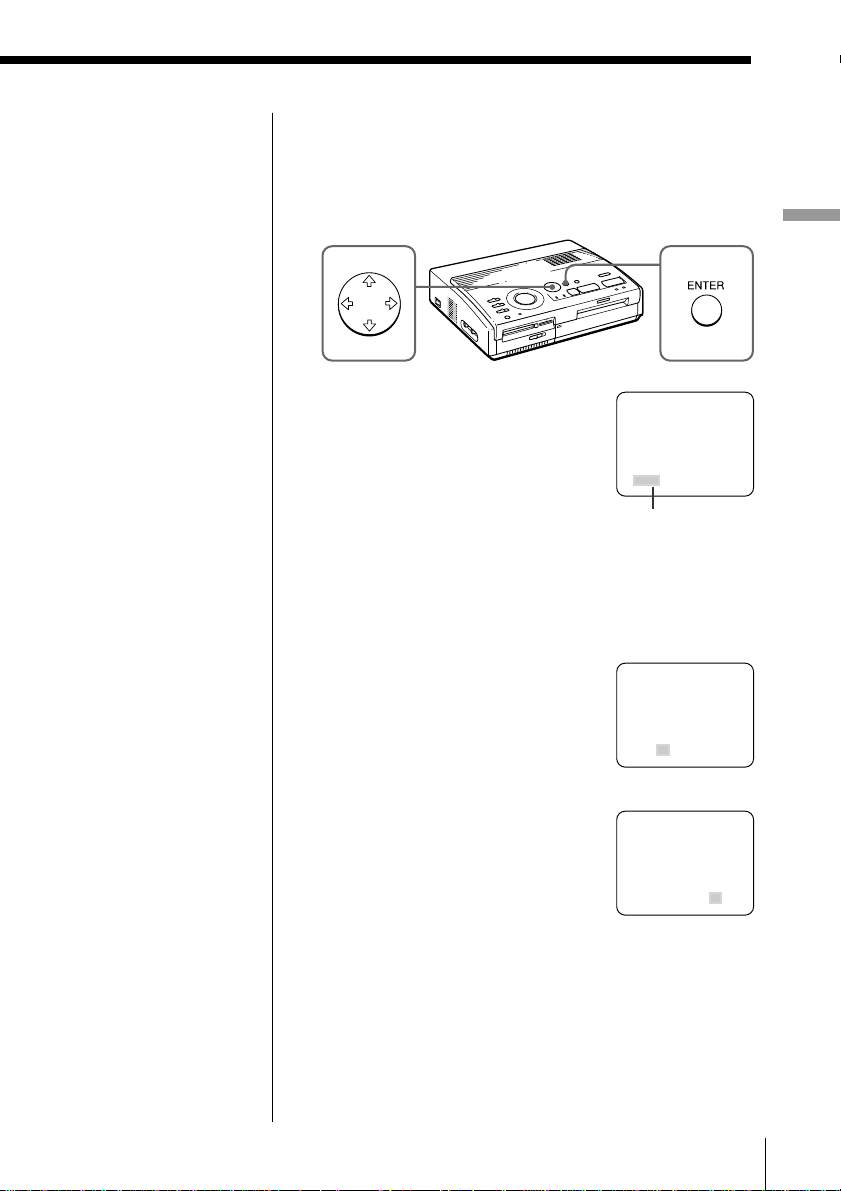
3 If the cursor ( ”) does not appear on “CLOCK SET,”
press V/v to move the cursor to “CLOCK SET” and
press ENTER.
The “CLOCK SET” display turns yellow and the
clock setting display appears.
Setting Up
Cancelling the menu
operations
Press MENU. The menu
display disappears
without saving the
settings. The printer
returns to standby mode.
Confirming the clock
setting
Follow the steps 1
through 3. The current
clock setting appears on
the screen.
To return to the previous
screen, press MENU.
4 Press b.
The cursor appears on the month
SELECT ALL IMAGES
DELETE
FORMAT
CLOCK SET
(for the DPP-MS300) or the day
(for the DPP-MS300E).
JAN 01. 1999 01:00 AM
Cursor
5 Press V/v to set the the month (for the DPP-MS300)
or the day (for the DPP-MS300E).
Pressing V increases the item.
Pressing v decreases the item.
6 Press b.
The cursor moves to the next
SELECT ALL IMAGES
DELETE
FORMAT
CLOCK SET
item.
MAY 01. 1999 01:00 AM
7 Repeat steps 4 and 5 to set all of
the items: month, day, year, hour
and minute (for the DPP-MS300)
or day, month, year, hour and
minute (for the DPP-MS300E).
If you want to set the previous
item, press B.
SELECT ALL IMAGES
DELETE
FORMAT
CLOCK SET
MAY 10. 1999 09:35 AM
8 Press ENTER.
The clock setting display disappears.
9 Press MENU.
The menu disappears and the printer returns to
standby mode.
Setting Up
13
GB
Page 14

Using print packs (not supplied)
Notes
• Use the set of print
paper and print
cartridge supplied
together in the same
carton. If you use them
in a different
combination, proper
printing results may
not be obtained, or a
paper jam or other
trouble may occur.
• If there are fingerprints
or dusts on the printing
surface of the Super
Coat print paper, the
printing quality may
deteriorate.
For good printing
quality, we suggest you
use the automatic
feeder VPF-A3.
About the number of
prints
Each print cartridge
allows you to print only
the same number of prints
as the number of print
paper supplied in the
print pack. If you print
with paper that has
already been printed once
or with left over paper,
the cartridge may run out
prematurely.
You need an optional print pack designed for the
printer. The pack contains print paper and a print
cartridge for printing.
Select the print pack from the following according to
the type of printing you will do:
VPM-P50STA
• Designed for 50 standard prints.
• Contains one print cartridge for printing 50 sheets
and two sets of 25 sheets of standard print paper.
VPM-P50WSA
• Designed for 50 prints of full-screen stickers.
• Contains one print cartridge for printing 50 sheets
and two sets of 25 sheets of adhesive-labels.
VPM-P50S02B
• Designed for 50 prints of 2-split stickers.
• Contains one print cartridge for printing 50 sheets
and two sets of 25 sheets of 2-cut adhesive-labels.
VPM-P50S16A
• Designed for 50 prints of 16-split stickers.
• Contains one print cartridge for printing 50 sheets
and two sets of 25 sheets of 16-cut adhesive-labels.
VPM-P50LAB
• Designed for 50 Super Coat prints.
• Contains one print cartridge for printing 50 sheets
and two sets of 25 sheets of Super Coat print paper.
14
GB
Setting Up
Page 15
Loading the print cartridge
Caution
Never put your hand into
the cartridge
compartment. The
thermal head reaches
high temperatures,
especially after repeated
printing.
Notes
• If the print cartridge is
not loaded when you
turn on the printer, the
warning sound beeps
and the cartridge error
indicator lights up.
• When installing the
print cartridge, stand it
on end as illustrated so
that dust will not get on
the ink ribbon.
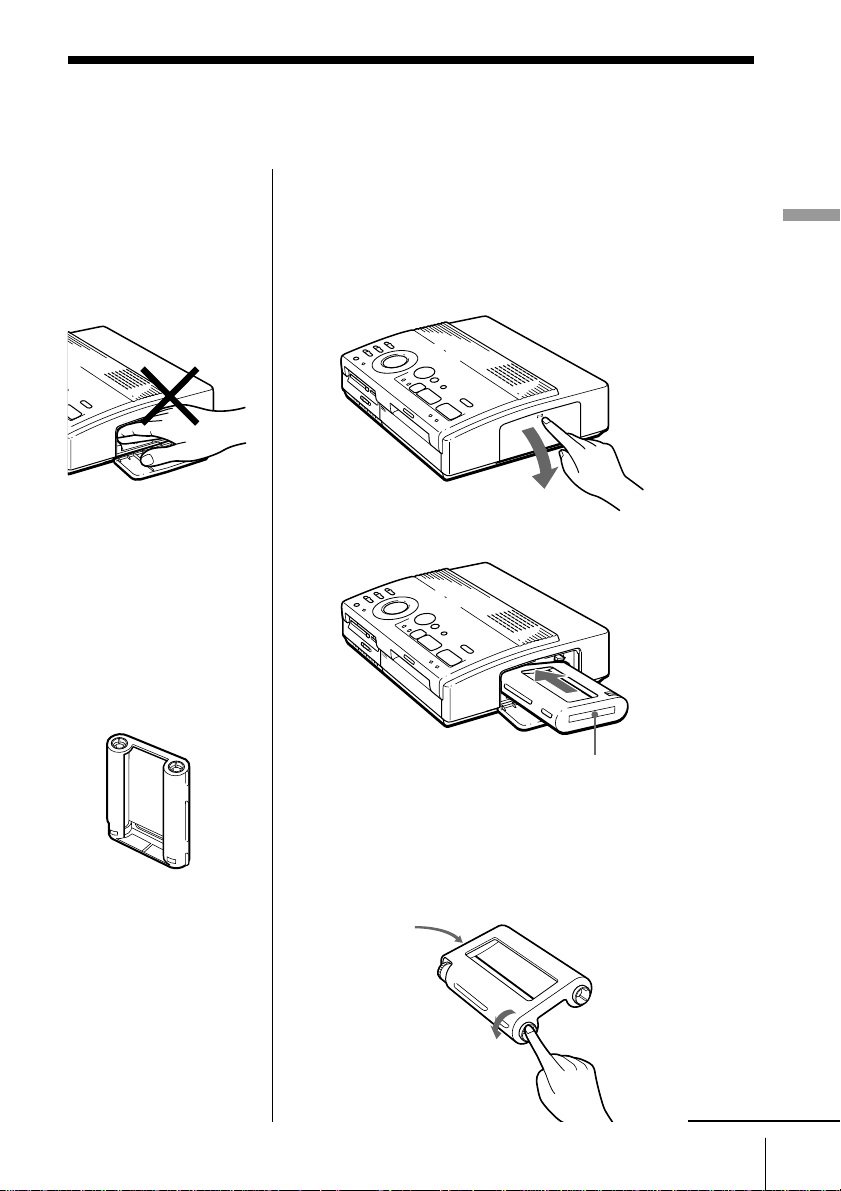
Insert the print cartridge into the printer.
Use only the print cartridge supplied with the print
paper packed in the same carton.
1 Press PUSH to open the cartridge compartment lid.
2 Insert the print cartridge firmly until it clicks into
place and close the cartridge compartment lid.
Setting Up
• Do not touch the ink
ribbon or place the
print cartridge in a
dusty location.
Fingerprints or dust on
the ink ribbon may
result in imperfect
printing.
Labeled side
If the print cartridge does not click into place
Remove the print cartridge, and then re-insert it.
Only when the ink ribbon is too slack to be loaded,
wind the ink ribbon to remove the slack.
Labeled side
While pressing the
center of the reel,
wind the ink
ribbon in the
direction of the
arrow.
continued
Setting Up
15
GB
Page 16
Loading the print cartridge (continued)
If ink ribbon should tear
Repair the ribbon with
transparent tape. There
should be no problem
with using the remaining
portion of the ribbon.
Before loading the print
cartridge into the printer,
turn the reel until the
transparent tape can no
longer be seen.
Repair with
transparent tape.
Notes on storing the
print cartridge
• Avoid placing the
cartridge in a location
subject to:
– high temperatures
– high humidity
– excessive dust
– direct sunlight
• When you are going to
store a partially-used
cartridge for an
extended period of
time, store it in its
original bag.
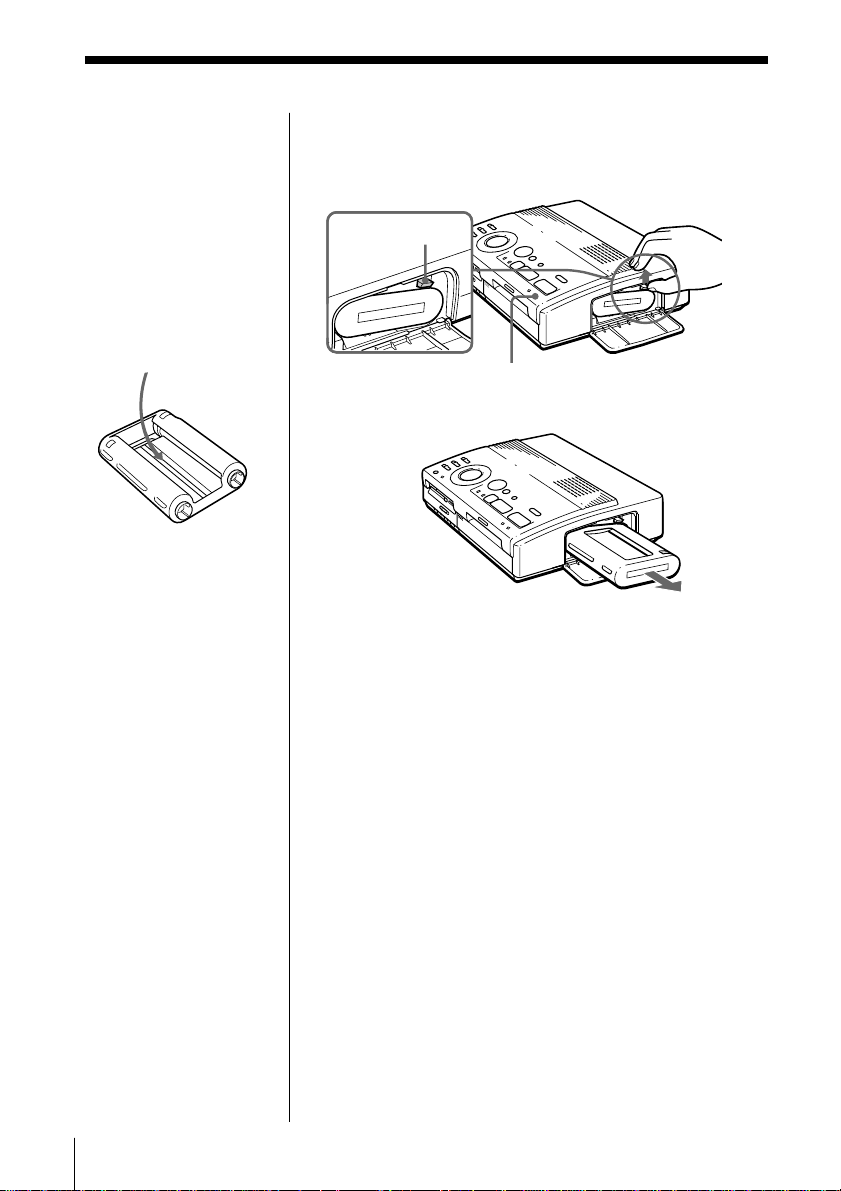
To eject the print cartridge
Open the cartridge compartment lid and push up the
eject lever. Then remove the print cartridge.
Eject lever
Cartridge error indicator
To replace the print cartridge
If you try to print when the ink ribbon of the print
cartridge runs out, the print paper is automatically
loaded and then ejected and the cartridge error
indicator flashes.
Remove the print paper. Then open the cartridge
compartment lid and replace the used print cartridge
with the new one.
The ejected print paper can be used again.
v
Push up the eject lever,
then remove the used
print cartridge.
16
GB
Setting Up
Page 17
Inserting the print paper
Notes
• Insert the print paper
straight along the guide
to the left of the paper
inlet. If the paper is
positioned to the right
or slanted, the printing
area may be out of
position.
• The paper may not be
loaded automatically if
you do not insert the
paper firmly.
• You cannot type on the
printing surface before
printing. If you want to
write greetings or draw
on the printing surface
after printing, use an
oil ink pen.
• Do not attach a sticker
or something on the
printing surface before
printing.
• When handling the
print paper, do not
touch the printing
surface (shiny side
where nothing is
printed). Also, do not
place print paper in a
dusty location.
Fingerprints or dust on
the printing surface
may result in imperfect
printing.
• Do not print on sticker
paper which has
already been peeled off.
• Use the print paper
recommended for this
printer only.
• Do not fold or bend the
print paper.
Insert the print paper sheet by sheet. Use the print
paper designated for this printer only.
Setting Up
1 Turn on the power of the printer.
The POWER indicator lights up.
2 Follow printing procedures.
After pressing PRINT, the paper supply indicator
flashes. For details, see pages 19 to 35.
3 Insert the print paper straight with its blank
printing surface facing up and along the guide to
the left of the paper inlet.
Insert the paper until less than 2 cm (approx. 0.8
inches) remains. The paper is automatically loaded
when printing starts.
Guide
Less than 2 cm
continued
Setting Up
17
GB
Page 18

Inserting the print paper (continued)
Notes on storing the
print paper
• Avoid placing the print
paper in a location
subject to:
– high temperatures
– high humidity
– excessive dust
– direct sunlight
• When you are going to
store partially-used
print paper for an
extended period of
time, store it in its
original bag.
When you use the optional automatic feeder
VPF-A3
You can automatically print up to 25 sheets.
To attach the automatic feeder, press PUSH on the
automatic feeder insertion port cover on the front panel
of the printer.
When you close the cover, press PUSH until it locks.
For details, refer to the operating instructions for the
automatic feeder VPF-A3.
18
GB
Setting Up
Page 19
Printing
Printing an image from a “Memory Stick” or PC card
Notes
• Avoid getting liquids
on the “Memory Stick”
or PC card or using
them in areas subject to
high humidity.
Otherwise, data may be
rendered unreadable.
• The printer can handle
and display up to 256
image files. If there are
more than 256 images
stored in the “Memory
Stick” or PC card, use
the supplied Sony
Printer Utility for
MS300/MS300E to
display and handle the
remaining images.
You can select an image recorded on the “Memory
Stick” or PC card and print it in full-size ( standard
print).
Preparation1Preparation
PRESET
PRINT
POWER indicator PICTURE
Preparation
123
3
Preparation
4
2
Standard print
45
CAPTURE
Preparations
1 Turn on the printer and television and set the input
selector of the television to “VIDEO.”
The POWER indicator lights up.
Printing
Note
Make sure PRESET
PRINT is set to “OFF.”
2 Set the “Memory Stick”/PC card selection switch
so that the desired insertion slot opens.
3 Set INPUT SELECT to “MEMORY STICK/PC
CARD.”
continued
Printing
19
GB
Page 20
Printing an image from a “Memory Stick” or PC card (continued)
Notes
• When the access
indicator is lit, do not
eject the “Memory
Stick” or PC card.
Otherwise, they may
crash.
• An image which is
damaged or has some
kind of trouble does
not appear in the image
list. “FILE ERROR”
appears on the display.
• If there are no images
stored in the “Memory
Stick” or PC card, “NO
FILE” appears on the
display.
• Depending on the type
of digital still camera or
video camera, it may
take some time for the
thumbnail list to be
displayed.
Scrolling the pages
When multiple pages
exist, you can scroll
through the pages. To
display the next page
(when appears at the
bottom-right), move the
white frame to the bottom
line of the image list and
press v. To display to the
previous page (when
appears at the top-right),
move the white frame to
the top line and press V.
The access indicator
flashes and the page
changes.
4 Insert a “Memory Stick” or PC card on which you
recorded images into the “Memory Stick” or PC
card insertion slot. (page 8)
While the printer is accessing the “Memory Stick”
or PC card, the access indicator flashes. When the
printer finishes reading images, recorded images
are displayed as thumbnails.
White
frame
(cursor)
Printing
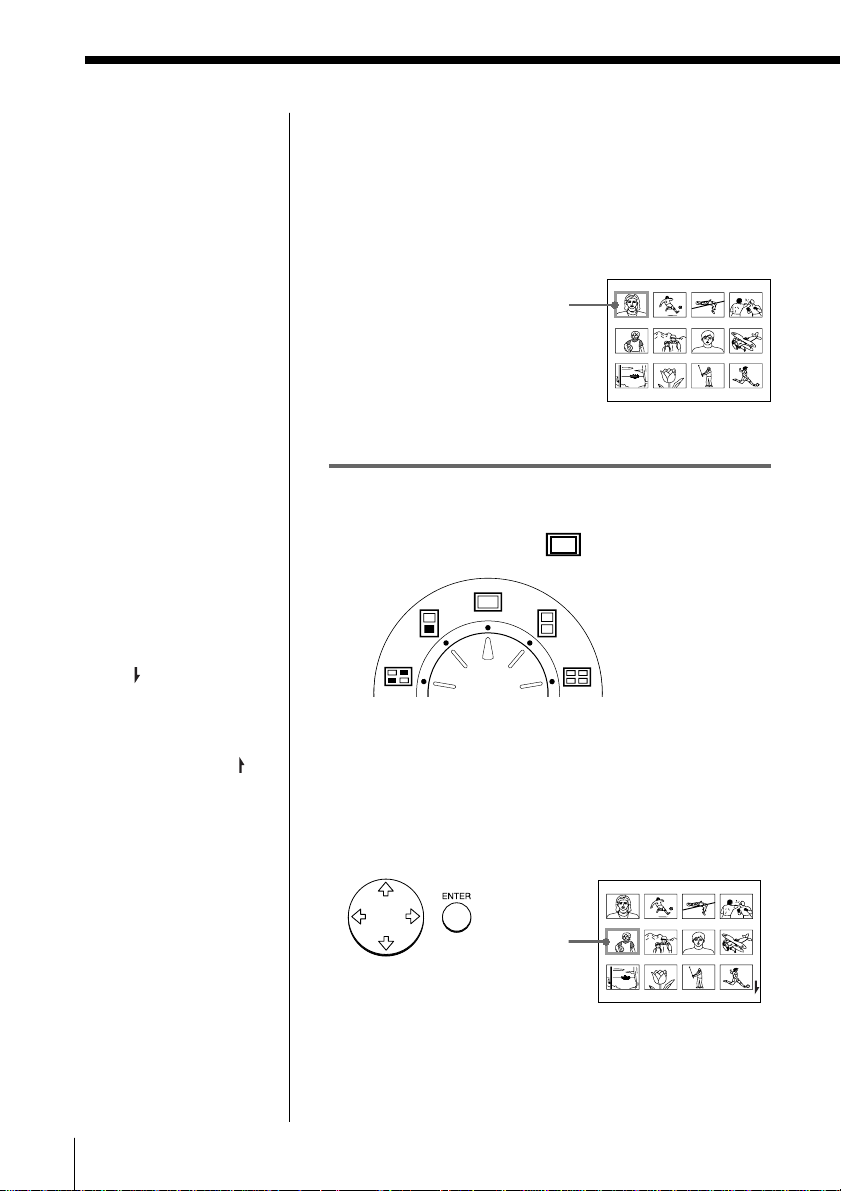
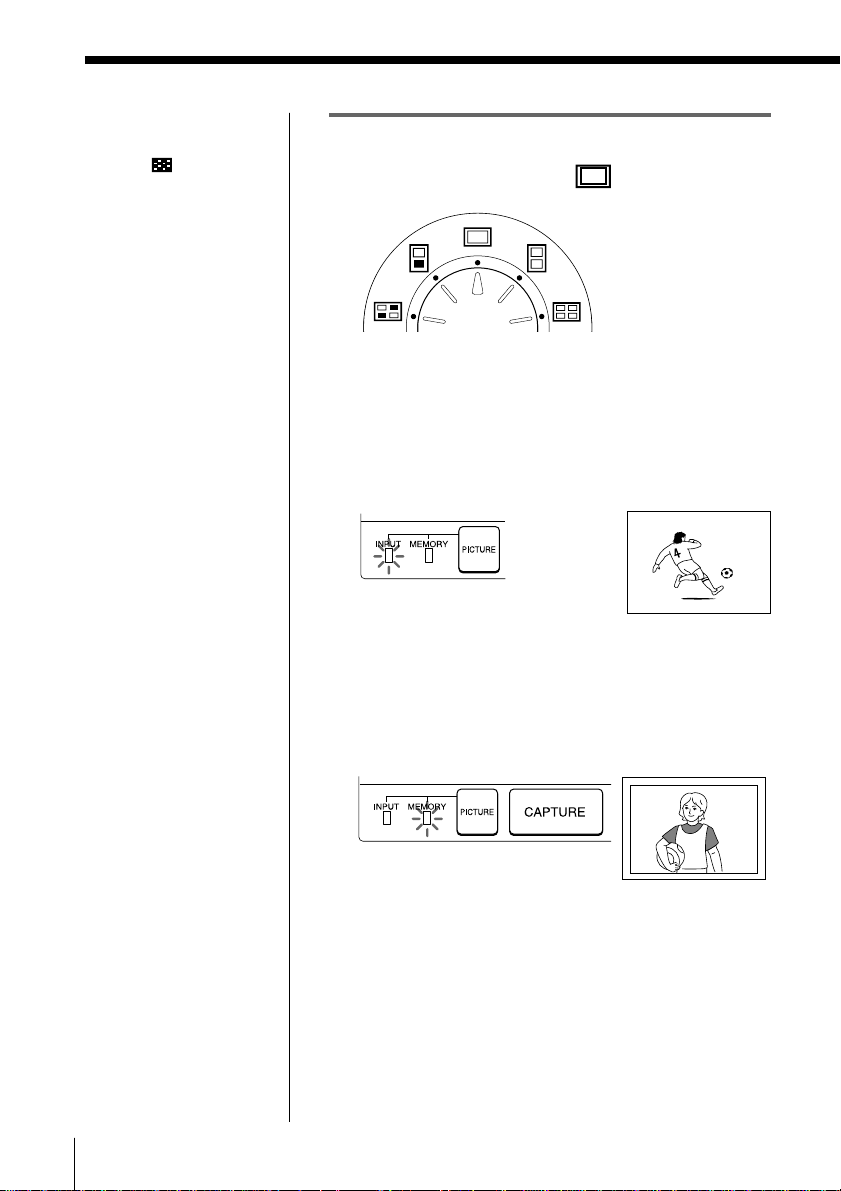
1 Set print mode dial to “ (standard).”
2 Press the arrow ( B/b/V/v) buttons to move the
white frame (cursor) to the image you want to
print.
Move the white frame up ( V), down ( v), right ( b) ,
or left ( B).
20
Move the
white frame.
GB
Printing
Page 21
Cancelling the selection
Move the white frame to
the image you want to
cancel and press ENTER.
The blue frame
disappears and the
selection is canceled.
Selecting multiple
images
Repeat steps 2 and 3 until
you select all images you
want to print.
Notes
• The displayed full-size
image may not
correspond with the
details of the actual
print.
• Depending on the size
of an image, it may take
5 to 60 seconds to
display a full-size
image on the monitor.
• If you press PRINT
while displaying the
actual print image, only
the displayed image is
printed.
• If you press PRINT
while displaying the
thumbnail list, all
images with the blue
frame are printed.
• While printing, never
move or turn off the
printer; the print
cartridge or paper may
become stuck. If this
happens, turn the
printer off and on, and
resume printing from
the beginning.
• Do not insert another
sheet of print paper
until you remove the
printed sheet.
• While printing, the
print paper is partially
ejected from the paper
outlet several times.
Never pull out the
paper forcibly.
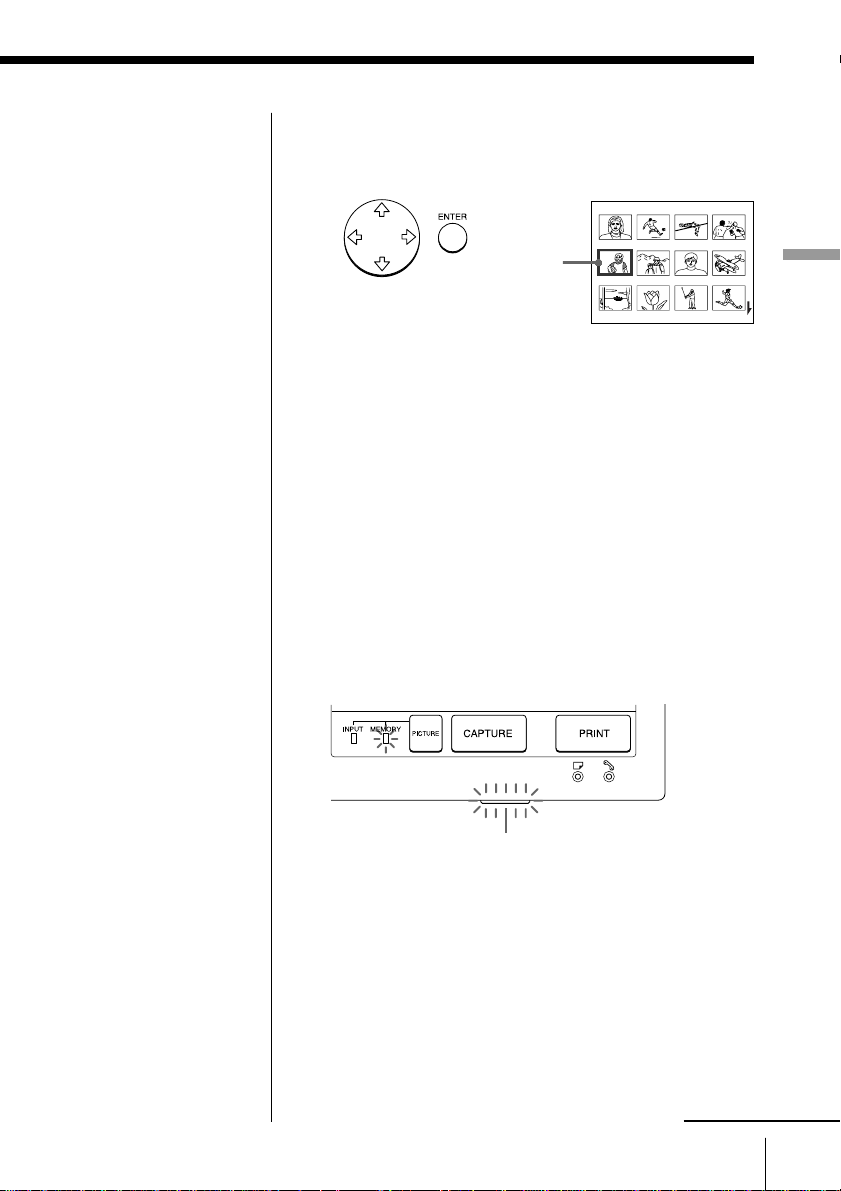
3 Press ENTER.
The blue frame appears inside the white frame and
the selected image is specified to be printed.
The white
frame
changes to
blue.
Displaying the actual print image in full-size
Move the white frame to the desired image, then
press CAPTURE in step 3. The MEMORY indicator
lights. The selected full-size image appears in the
center of the screen. To display the next or previous
full-size image, press
v (next image) or V
(previous
image). If you want to re-select the image, press
PICTURE. The INPUT indicator lights and the
thumbnail list appears again. Repeat steps 2 and 3.
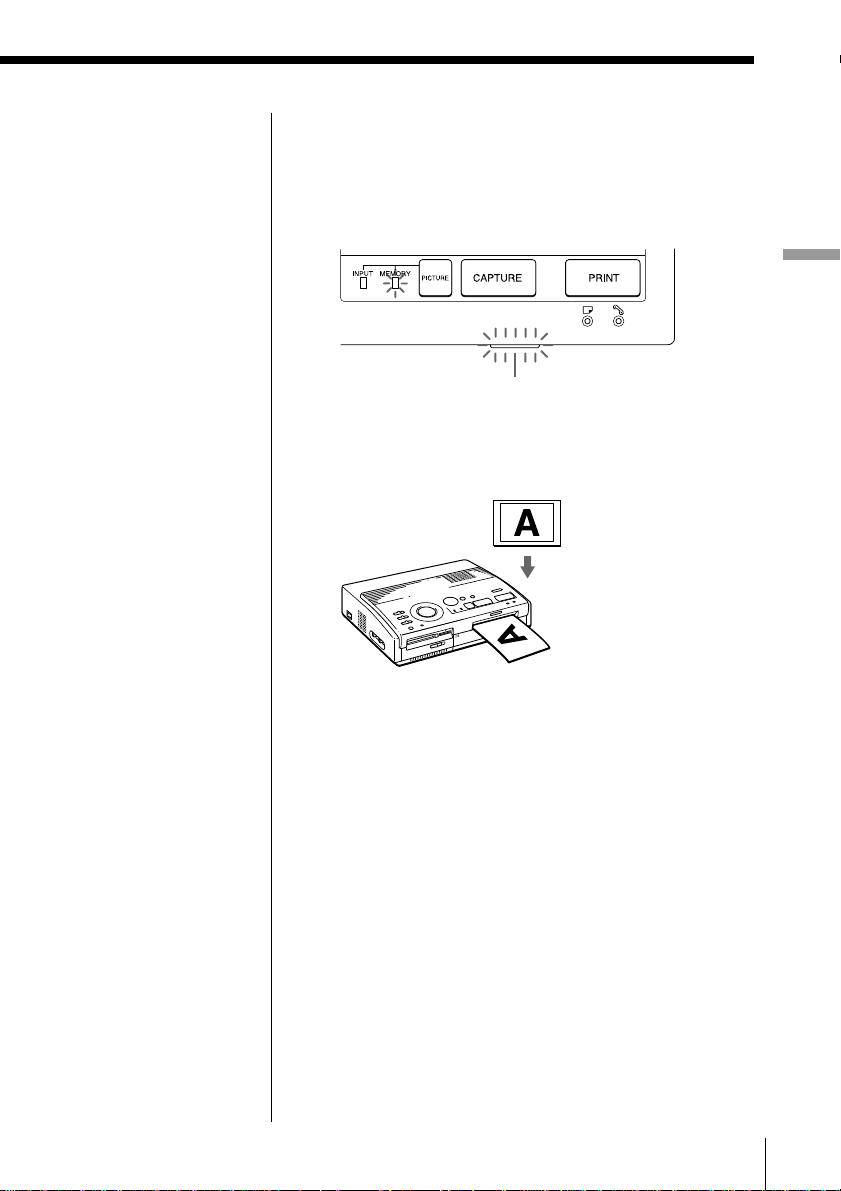
4 Press PRINT.
The printing indicator and the paper supply
indicator flashes. Insert the print paper (page 17).
The print paper is automatically loaded and
printing starts.
Printing indicator
Printing
continued
Printing
21
GB
Page 22
Printing an image from a “Memory Stick” or PC card (continued)
Notes
• Avoid storing the
paper with the printed
faces touching each
other or in contact with
rubber or plastic
products including
vinyl chloride or
plasticizer for an
extended period of
time; the ink may
transfer on to them.
• Depending on the type
of digital still camera or
video camera, the
aspect ratio of a
recorded image differs,
so the image may not
be printed in the entire
printable area.
• Depending on the type
of digital still camera or
video camera, preview
images may be
displayed along with
the primary images in
the thumbnail list. The
printed quality of the
preview images will
not be as good as the
primary images. Note
that if you delete the
preview images (page
40), the data for the
primary images may be
damaged.
• Depending on the type
of digital still camera or
video camera, an image
may be stretched
vertically if it has been
rotated or processed
with your digital still
camera or video
camera. This is not
because of trouble with
the printer, but because
the image was
rewritten with your
digital still camera or
video camera.
Printing direction
The image displayed on your television is printed
in the direction as shown below.
Displayed image
Printed image
5 When printing ends, a beep sounds and the print
paper automatically emerges from the print outlet.
Remove the print from the printer.
After you remove the print paper, t he printing
indicator turns off.
Printing the same image again
Press PRINT.
With the optional automatic feeder VPF-A3, you can
print the same image continuously up to 25 times on
separate sheets.
Printing other images
Press PICTURE so that the thumbnail screen appears,
then perform steps 1 through 5.
Printing multiple images continuously
You can print multiple images continuously for up to
25 sheets using the optional automatic feeder VPF-A3.
Printing all of the images
You can use the menu to select all of the images on
your “Memory Stick” or PC Card. See page 36.
22
GB
Printing
Page 23
Printing an image from video equipment
Notes
•To print a quicklymoving image without
blur, select “VIDEO
MOTION” for blur
compensation*.
• To print a still or
slightly-moving image
in good picture quality,
select “VIDEO STILL”
for no blur
compensation. Blur
compensation for such
an image may
deteriorate printing
resolution.
• It is not recommended
that you select an image
while pausing the video
equipment because the
picture quality will
deteriorate. Select the
image while playing
them back.
• Set INPUT SELECT
before pressing
CAPTURE.
* Blur compensation
When you set INPUT
SELECT to “VIDEO
MOTION,” the selected
image appears on the
screen and a horizontal
red line moves from the
top to the bottom on the
left half of screen, then
moves from the top to the
bottom on the right half of
screen. During this
sequence, if there is
motion blur on the image,
the printer automatically
compensates for the
image (blur
compensation).
When the blur
compensation ends, the
screen becomes dark once
and the print image
appears on the screen.
You can capture the input image from the video
equipment connected to the VIDEO INPUT connector
of the printer and print it in full-size ( standard print).
Standard print
Preparation1Preparation
1
2
CLEAR ALL
34 5
POWER indicator
Preparations
PICTURE
1 Turn on the printer and television and set the input
selector of your television to “VIDEO.”
The POWER indicator turns on.
2 Set INPUT SELECT to “VIDEO MOTION” or
“VIDEO STILL.”
To print Selector position
rapid-motion pictures input VIDEO MOTION
from video camera or deck
still or slightly-moving pictures VIDEO STILL
input from video camera or deck
still pictures input from digital VIDEO STILL
still camera or video camera
continued
Printing
Printing
GB
23
Page 24
Printing an image from video equipment (continued)
Note
When the print mode dial
is set to “ (index),”
you cannot store an image
on the memory by
pressing CAPTURE.
Printing
1 Set the print mode dial to “ (standard).”
2 Start playback on the video equipment.
While the INPUT indicator lights up, the playback
picture appears on the screen ( input picture).
For details on playing back on your video
equipment, refer to the instruction manual of your
equipment.
Input image
When you select “VIDEO
MOTION”
When you set INPUT
SELECT to “VIDEO
MOTION,” the selected
image is blurcompensated in step 3.
Re-selecting the image
Press PICTURE. The
playback picture appears
on the screen.
If you press CLEAR ALL,
the printer is reset to
standby mode.
Perform printing
procedures from the
beginning.
GB
Printing
24
3 Press CAPTURE when the picture you want to
print appears on the screen.
The selected full-size image appears in the center of
the screen, and the MEMORY indicator lights up.
Print image
Page 25
Notes
• While printing, never
move or turn off the
printer; the print
cartridge or paper may
become stuck. If this
happens, turn the
printer off and on, and
resume printing from
the beginning.
• Do not insert another
sheet of print paper
until you remove the
printed sheet.
• While printing, the
print paper is partially
ejected from the paper
outlet several times.
Never pull out the
paper forcibly.
• Avoid storing the
paper with the printed
faces touching each
other or in contact with
rubber or plastic
products including
vinyl chloride or
plasticizer for an
extended period of
time; the ink may
transfer on to them.
4 Press PRINT.
The printing indicator and the paper supply
indicator flashes. Insert the print paper (page 17).
The print paper is automatically loaded and
printing starts.
Printing
Printing indicator
Printing direction
The image displayed your television is printed in
the direction as shown below.
Displayed image
Printed image
5 When printing ends, a beep sounds and the print
paper automatically emerges from the print outlet.
Remove the print from the printer.
After you remove the print paper, the printing
indicator turns off.
Printing the same image again
Make sure that the desired image is displayed on the
screen, then press PRINT.
With the optional automatic feeder VPF-A3, you can
print the same image continuously up to 25 times on
separate sheets.
Printing
25
GB
Page 26
Making Various Prints
Printing the date
Note
You can print the date
only when the image’s
date data is recorded in
the DCF (Design rule for
Camera File system)
format.
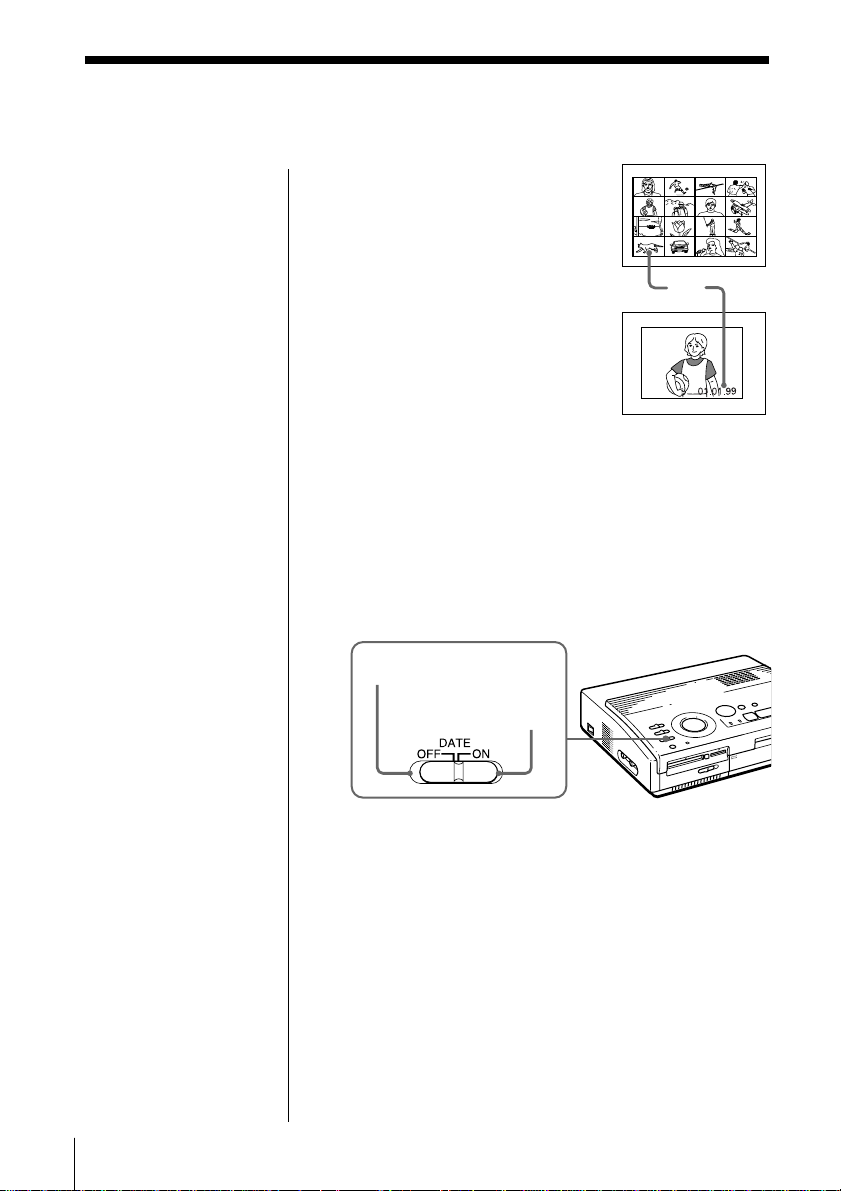
When printing an image in the
“Memory Stick” or PC card, you
can print the date recorded
together with the still image shot
with your digital still camera or
video camera.
Before you begin
1 Turn on the printer and television and set the input
selector of your television to “VIDEO.”
2 Set INPUT SELECT to “MEMORY STICK/PC
CARD.”
3 Set PRESET PRINT to “OFF.”
Date
1 Set DATE to “ON.”
Date is not printed.
Date is printed.
Note
You cannot print the date
when you print an image
directly from your video
equipment.
GB
Making Various Prints
26
2 Select the desired print using the print mode dial.
You can select standard printing (page 20), split
printing (page 27) or index printing (page 33).
3 Insert a “Memory Stick” or PC card and select the
image(s) for printing.
For details of operating procedures, refer to the
pages for the corresponding printing mode.
4 Press PRINT and insert the print paper.
The selected image is printed with the date.
Page 27
Making split prints
Printing images from a “Memory Stick” or PC card
You can make prints divided into multiples of 1/2-,
1/4- or 1/16-size pictures. You can select the same
image, or different images for the split print.
Before you begin
1 Turn on the printer and television and set the input
selector of your television to “VIDEO.”
2 Set INPUT SELECT to “MEMORY STICK/PC
CARD.”
3 Set PRESET PRINT to “OFF.”
4 Insert a “Memory Stick” or PC card into the
“Memory Stick” or PC card insertion slot.
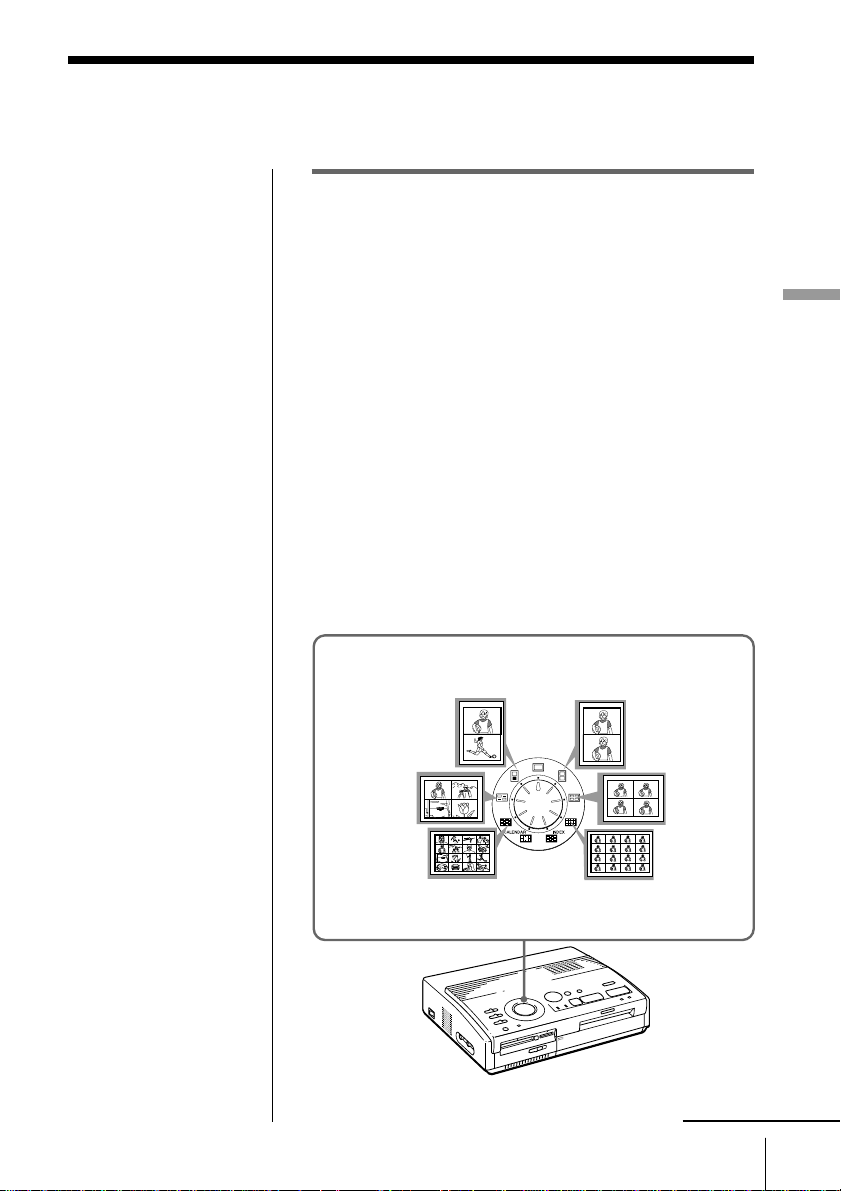
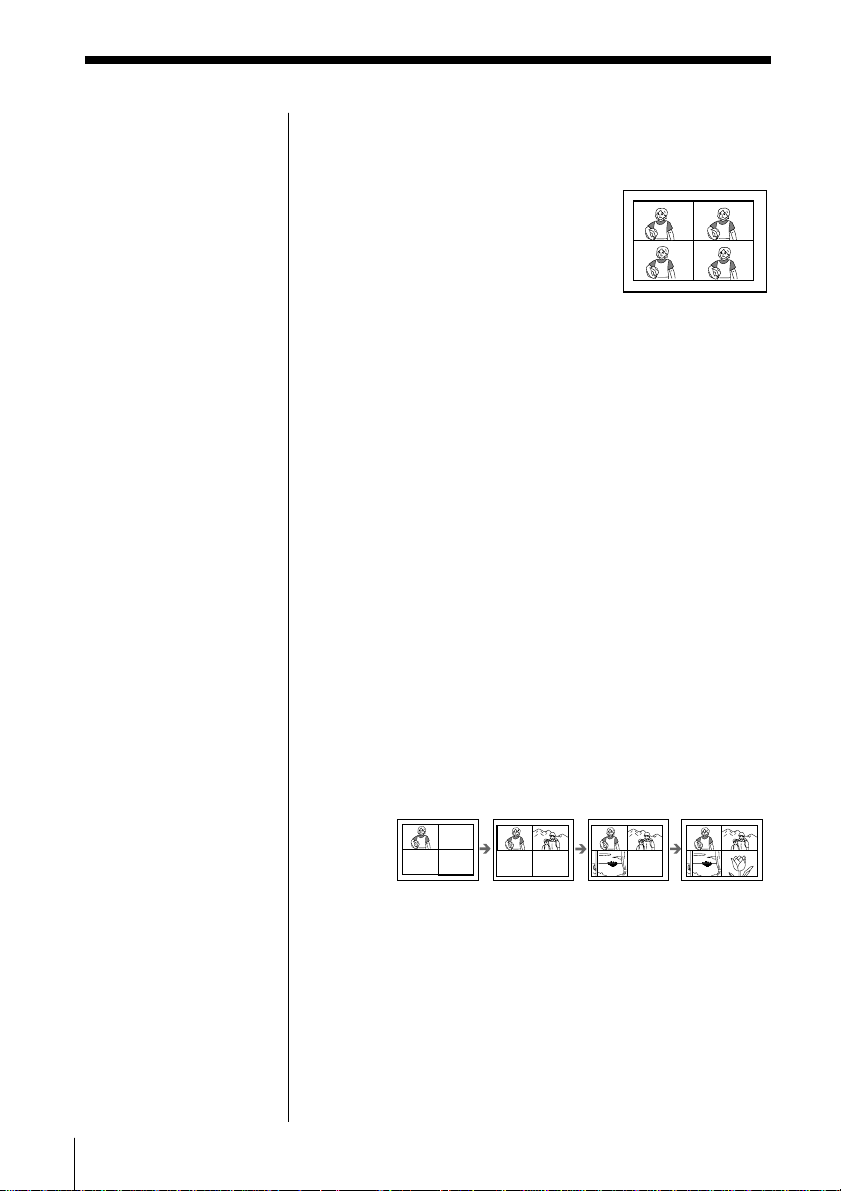
1 Select the type of split using the print mode dial.
You can select 2-split, 4-split, 16-split planes of the
same image or different images.
Making Various Prints
Printing the date
You can print the date
recorded on the image by
setting DATE to “ON.”
2-split printing using
different images
4-split printing
using different
images
16-split printing using
different images
2-split printing using
the same image
4-split printing
using the same
image
16-split printing using
the same image
continued
Making Various Prints
27
GB
Page 28
Making split prints (continued)
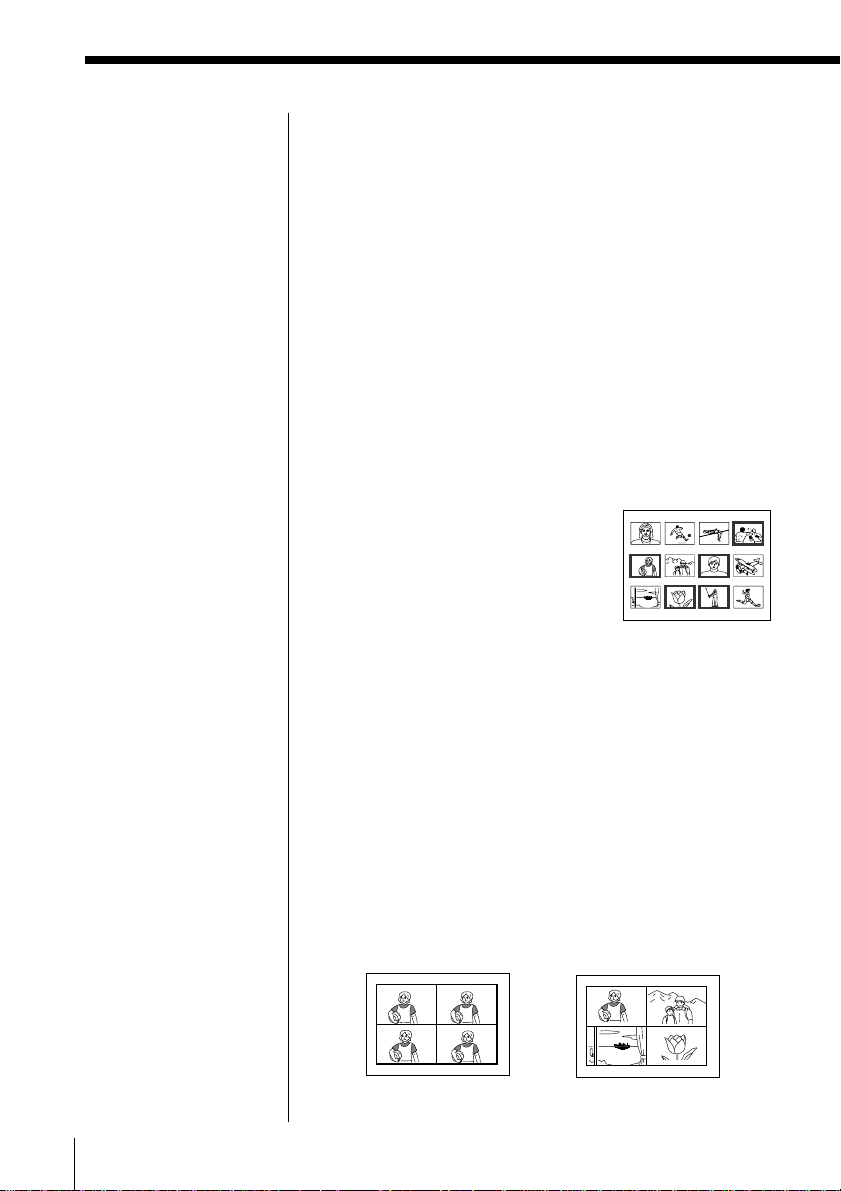
2 Select the image.
• When selecting the same image for all the split
planes:
1 Press the arrow buttons to move the white
2 If you want to make other same image prints,
• When selecting different images for each split
Re-selecting the image
Move the white frame to
the image you want to
cancel and press ENTER.
The blue frame
disappears and the
selection is canceled.
If you want to re-select
the image after displaying
the actual print image,
press PICTURE to return
to the thumbnail screen,
then repeat step 2.
Re-selecting the type of
split
Press PICTURE so that
the thumbnail screen
appears. Re-select the
split type using the print
mode dial. You can use
the selected images, or
change the selection.
Canceling the operation
Press CLEAR ALL. The
selected image is removed
and the printer returns to
standby mode.
Perform printing
procedures from the
beginning.
plane:
1 Press the arrow buttons to move the white
2 Repeat step 1 to select images for the split
Displaying the actual print image
Press CAPTURE.
The actual print image with the white frame (for
the same image split printing) or the blue frame (for
different image split printing) appears in the center
of the screen.
To display multiple split prints, press V or v.
To return to the thumbnail list, press PICTURE.
frame to the image you want to print, then
press ENTER. (The blue frame appears inside
the white frame.)
repeat step 1.
frame to the image you want to print, then
press ENTER. (The blue frame appears inside
the white frame.)
planes in the desired order.
The pictures are placed
from the upper left to the
lower right on the sheet in
order of the selection, not
in order of the image list.
You can also select an image from different
pages.
If you select more images than the number of
split planes, the images are automatically
placed on the next print.
Note
If you press PRINT when
the actual print image is
displayed, only the
displayed image is
printed.
GB
Making Various Prints
28
4-split printing using
the same image
4-split printing using
different images
Page 29
3 Press PRINT and insert the print paper.
The selected images are printed.
Printing images from video equipment
You can make prints divided into multiples of 1/2-, 1/
4- or 1/16-size pictures. You can also select the same
image, or different images for the split print.
Before you begin
1 Turn on the printer and television and set the input
selector of your television to “VIDEO.”
2 Set INPUT SELECT to “VIDEO MOTION” or
“VIDEO STILL.”
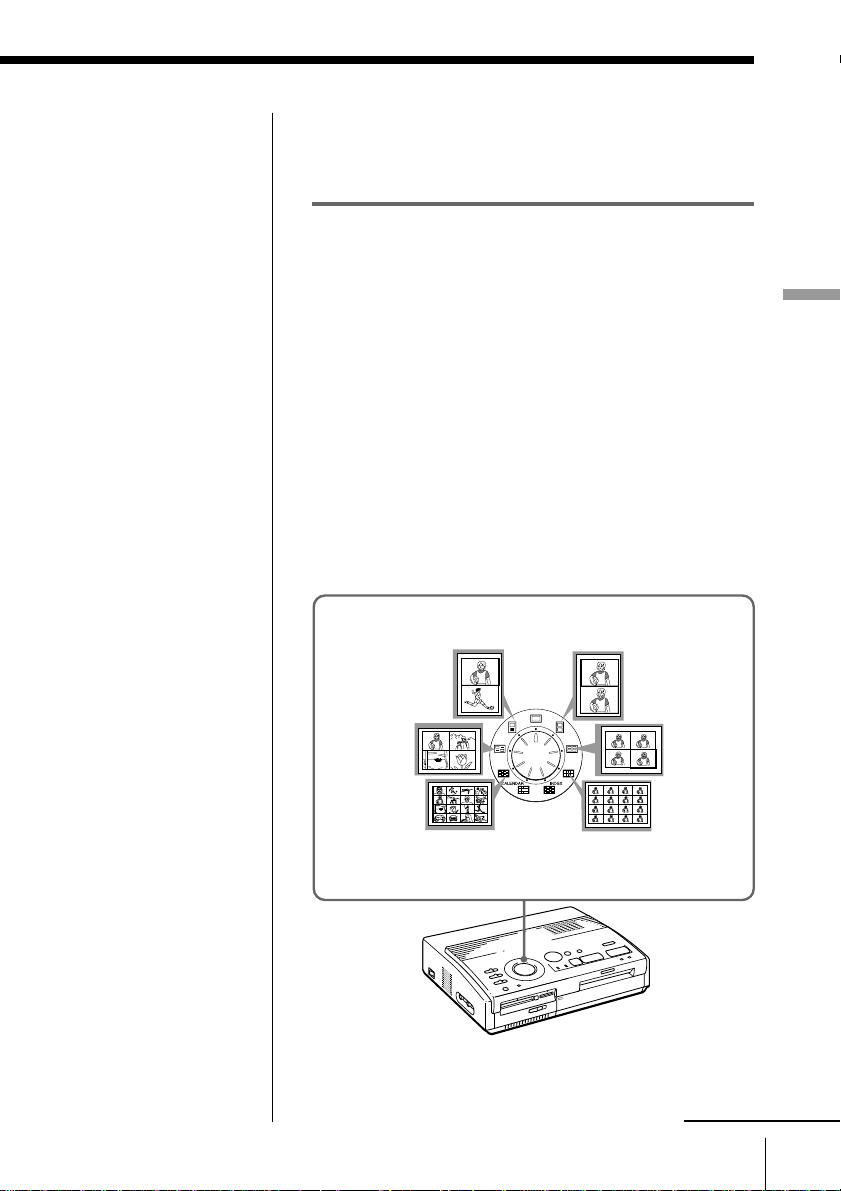
1 Select the type of split using the print mode dial.
You can select 2-split, 4-split, 16-split planes of the
same image or different images.
Making Various Prints
2-split printing using
different images
4-split printing
using different
images
16-split printing using
different images
2-split printing using
the same image
4-split printing
using the same
image
16-split printing using
the same image
continued
Making Various Prints
29
GB
Page 30
Making split prints (continued)
2 Select the image.
• When selecting the same image for all the split
planes:
1 Turn on your video
2 Press CAPTURE when the
• When selecting different images for each split
plane:
1 Turn on your video equipment and start
When you select “VIDEO
MOTION”
When you set INPUT
SELECT to “VIDEO
MOTION,” the selected
image is blurcompensated in step 2.
Re-selecting the image
Press CLEAR ALL. The
selected image is removed
and the printer returns to
standby mode.
Perform printing
procedures from the
beginning. You can also
press CAPTURE again
while the MEMORY
indicator is flashing to reselect the image.
When you select split
printing with the same
image, you can also press
PICTURE to display the
input picture, then reselect a new image.
2 Press CAPTURE when the picture you want to
3 Press PICTURE so that the input picture
4 Repeat steps 2 through 3 until you select
3 Press PRINT and insert the print paper.
The selected images are printed.
equipment and start
playback.
picture you want to print
appears on the screen.
When you select 4split printing
The memory image is
displayed in the split
planes selected in the step
1.
playback.
print appears on the screen.
The memory image is displayed in the first
plane of the split planes selected in the step 1.
appears in the screen.
images for all of the split planes.
The selected pictures are allocated as follows:
upper left n upper right n lower left n
lower right.
When you select 4-split printing
Note
You cannot select a
number of images that
exceeds the number of
selected split planes.
GB
Making Various Prints
30
Page 31

Making a calendar
You can make a 12-month calendar with an image from
a “Memory Stick,” PC card or video equipment.
Before you begin
1 Turn on the printer and television and set the input
selector of your television to “VIDEO.”
2 • When printing from a card, set INPUT SELECT to
“MEMORY STICK/PC CARD.”
• When printing from video equipment, set INPUT
SELECT to “VIDEO MOTION” or “VIDEO
STILL.”
3 Set PRESET PRINT to “OFF.”
1 Select “ (calendar print)” using the print mode
dial.
Calendar print
1 2 3 4
1999
6
5
7
9 10 11 12
8
Making Various Prints
2 Select the image for printing.
•When printing from a “Memory Stick” or PC card
1 Insert a “Memory Stick” or PC card into the
“Memory Stick” or PC card insertion slot.
2 Press the arrow buttons to move the white
frame to the image you want to print, then
press ENTER. (The blue frame appears inside
the white frame.)
3 Press CAPTURE.
Making Various Prints
continued
31
GB
Page 32

Making a calendar (continued)
When you select “VIDEO
MOTION”
When you set INPUT
SELECT to “VIDEO
MOTION,” the selected
image is blurcompensated in step 2.
Selecting a different
image
• When printing from a
“Memory Stick” or PC
card:
Press V or v to display
the next or previous
image in the image
thumbnail list. To
return to the thumbnail
list, press PICTURE.
• When printing from
video equipment:
Press PICTURE to
display the input
images and re-select the
image for printing
again.
You can also press
CAPTURE again while
the MEMORY indicator
is flashing to re-select
the image.
Note
If you do not adjust the
clock correctly, the
calendar does not start
with the current month.
See “Adjusting the clock”
on page 12 to set the
clock.
• When printing from your video equipment:
1 Start playback on your video equipment.
2 Press CAPTURE when the picture you want to
The selected image is placed in the center
surrounded by the calendars for 12 months.
Starting with the current month calendar in the
upper left, the calendars for 12 months are placed
from left to right, upper row to lower row.
The first month
(current month)
3 Press the arrow buttons ( B/b) to select the first
month of the calendar to be placed in the upper left.
Pressing B displays the previous month. (After
January, the December of the previous year is
displayed.)
Pressing b displays the next month. (After
December, the January of the next year is
displayed.)
4 Press PRINT and insert the print paper.
The calendar of the selected image is printed.
print appears on the screen.
1 2 3 4
1999
6
5
7
9 10 11 12
8
The selected image
GB
Making Various Prints
32
Page 33

Making an index list of “Memory Stick” or PC card images
You can make an index list of images saved in a
“Memory Stick” or PC card. When you want to search
for the recorded image, you can find the desired
images immediately with this index list.
About date printing
Regardless of the DATE
setting on the printer, the
date of the image
recorded on the “Memory
Stick” or PC card is
printed along with the
image number above the
index image. However,
the date does not appear
on the displayed image
on the television screen.
Before you begin
1 Turn on the printer and television and set the input
selector of your television to “VIDEO.”
2 Set INPUT SELECT to “MEMORY STICK/PC
CARD.”
3 Set PRESET PRINT to “OFF.”
1 Select “ (Index print)” using the print mode dial.
Index print
2 Insert a “Memory Stick” or PC card into the
“Memory Stick” or PC card insertion slot.
All the images recorded in the “Memory Stick” or
PC card are displayed in a thumbnail list.
If there are multiple pages, press V or v to display
the next or previous page.
Making Various Prints
continued
Making Various Prints
33
GB
Page 34

Making an index list of “Memory Stick” or PC card images (continued)
Note
• If you press PRINT
when the actual print
image is displayed
(with the MEMORY
indicator lit), only the
displayed index list is
printed.
• If you press PRINT
when the thumbnail list
is displayed (with the
INPUT indicator lit),
the index list being
displayed and other
index lists of the
“Memory Stick” or PC
card are printed. When
the number of images is
over 43, image number
43 or higher is printed
on another sheet of
print paper.
• If the number of images
is less than 42, planes
without images remain
blank.
• The printer can handle
up to 256 image files. If
there are more than 256
images stored in the
“Memory Stick” or PC
card, the printer prints
256 images. The
remaining images
cannot be printed.
• The date is printed only
when an image is shot
with a digital still
camera or video camera
supporting the DCF98
format (an image file
format for a digital still
camera).
Displaying the actual print image
Press CAPTURE.
The actual print image of an index list with 42
thumbnails appears on the screen.
If there are multiple pages, press V or v to display
the next or previous page.
To return to the thumbnail list, press PICTURE.
3 Press PRINT and insert the print paper.
The index list of the “Memory Stick” or PC card
images is printed.
The images are made into the size of 42 thumbnails.
Each thumbnail has a corresponding image number
and date (year, month and day) shot with the
digital still camera or video camera.
GB
Making Various Prints
34
Page 35

Printing “Memory Stick” or PC card images preset by a camera
Notes
• If you set PRESET
PRINT to “OFF,” the
images preset by your
digital still camera or
video camera do not
appear as the selected
image. In this case,
perform the normal
printing procedures.
• In this print mode, you
can make only a
standard print
regardless of the
position of the print
mode dial.
• When there is no
specified image in the
“Memory Stick” or PC
card, “NO FILE” is
displayed.
• For details on the
preset print settings,
refer to the operating
instructions of the
digital still camera or
video camera you are
using.
• Depending on the type
of digital still camera
and video camera, the
preset printing function
supported by the
printer, or sometimes
the function itself, is
not available.
• If you press PRINT
while displaying the
actual print image, only
the displayed image is
printed.
• If you press PRINT
while displaying the
thumbnail list, all of the
images in the
thumbnail list are
printed.
You can print images on a “Memory Stick” or PC card
preset by your digital still camera or video camera.
Before you begin
1 Turn on the printer and television and set the input
selector of your television to “VIDEO.”
2 Set INPUT SELECT to “MEMORY STICK/PC
CARD.”
1 Set PRESET PRINT to “ON.”
2 Insert a “Memory Stick” or PC card into the
“Memory Stick” or PC card insertion slot.
The images preset by your
digital still camera or video
camera are displayed in the
thumbnail list.
Displaying the actual print image
Press CAPTURE.
The first print image appears in the center of the
screen. To display the next or previous print
image, press v (next image) or V (previous image).
To return to the thumbnail list, press PICTURE.
3 Press PRINT and insert the print paper.
The preset images are printed in the order they
have been preset.
Tip
The printer can automatically print the images preset with
DPOF (Digital Print Order Format). The “DPOF” is a format
to record the information necessary for automatically printing
images shot with a digital still camera or video camera at a
printing shop or with a home-use printer.
Making Various Prints
Making Various Prints
35
GB
Page 36

Printing “Memory Stick” or PC card images at one time
You can print the images on a “Memory Stick” or PC
card at one time.
Before you begin
1 Turn on the printer and television and set the input
selector of your television to “VIDEO.”
2 Set INPUT SELECT to “MEMORY STICK/PC
CARD.”
3 Set PRESET PRINT to “OFF.”
1 Select the desired print using the print mode dial.
You can select standard printing (page 20), split
printing (page 27), calendar printing (page 31) or
index printing (page 33).
2 Insert a “Memory Stick” or PC card into the
Cancelling the selection
Press b to select
“CANCEL” and press
ENTER. The menu
display remains.
insertion slot.
3 Press MENU.
The menu appears on your
television.
Cursor
” SELECT ALL IMAGES
DELETE
FORMAT
CLOCK SET
Television screen
Cancelling the menu
operations
Press MENU. The menu
display disappears
without saving the
settings. The printer
returns to standby mode.
GB
Making Various Prints
36
4 Press V/v to move the cursor ( ”) to “SELECT ALL
IMAGES” and press ENTER.
The confirmation dialog box
appears.
” SELECT ALL IMAGES
DELETE
FORMAT
CLOCK SET
SELECT?
”OK CANCEL
5 Make sure that “OK” is selected and press ENTER.
All of the images are selected and the menu
reappears.
Page 37

Canceling the selection
Press CLEAR ALL. The
selection of all the images
is canceled. Perform
printing procedures from
the beginning.
Notes
• If you press PRINT
while displaying the
actual print image,
only the displayed
image is printed.
• If you press PRINT
while displaying the
thumbnail list, all of
the images in the
thumbnail list are
printed.
• The printer can handle
up to 256 image files.
If there are more than
256 images stored in
the “Memory Stick” or
PC card, use the
supplied Sony Printer
Utility for MS300/
MS300E to transfer the
images of the “Memory
Stick” or PC card to
your PC hard disk and
then print them.
6 Press MENU.
The menu display disappears and all of the images
in the thumbnail list are displayed with a blue
frame.
Making Various Prints
Displaying the actual print image
Press CAPTURE.
The first print image appears in the center of the
screen. To display the next or previous print
image, press v (next image) or V (previous image).
To return to the thumbnail list, press PICTURE.
7 Press PRINT and insert the print paper.
The specified images are printed in the order of the
image number.
Making Various Prints
37
GB
Page 38

Recording a video picture as a still image
Note
Depending on the type of
digital still camera or
video camera, you cannot
view the still images
recorded by the printer.
Re-selecting the image
Press PICTURE. The
playback picture appears
on the screen. Follow step
2.
If you press CLEAR ALL,
the printer is reset to
standby mode.
Perform printing
procedures from the
beginning.
Notes
• When using the
“Memory Stick,” check
that the write protect
switch is set to the
write enable position.
• When using the PC
card, check the
specifications of the
card and that the card
is in the write enable
status.
• Check that the
“Memory Stick” or PC
card has sufficient free
space for storing image
file(s).
You can record the playback picture from your video
equipment onto a “Memory Stick” or PC card as a still
image.
You can view the image with your digital still camera,
process the image with the Sony Printer Utility for
MS300/MS300E on your PC, or save the image as a
general image file.
Before you begin
1 Turn on the printer and television and set the input
selector of your television to “VIDEO.”
2 Set INPUT SELECT to “VIDEO MOTION” or
“VIDEO STILL.”
1 Set print mode dial to “ (standard).”
2 Select the image to be recorded.
1 Turn on and start playback on the video
equipment.
2 Press CAPTURE when the picture you want to
record appears on the screen.
3 Insert a “Memory Stick” or PC card into the
“Memory Stick” or PC card insertion slot.
GB
Making Various Prints
38
Page 39

About file name of the
recorded image
The image is recorded
with the file name
“MSP0####.jpg.” The
number “####” is
sequentially allocated
following the largest file
number recorded in the
“Memory Stick” or PC
card.
About the number of
images to be saved
The selected image is
compressed and saved in
the JPEG format. The
number of image files that
can be stored in a
“Memory Stick” or PC
card varies depending on
the type of the image.
Generally, a 4 MB
“Memory Stick” or PC
card can store about 40 to
60 images.
Notes
• The printer can save a
maximum of 256 image
files. This includes the
number of images
saved on a “Memory
Stick” or PC card.
• The image recorded by
the printer may not be
viewed with other
devices.
• You cannot save an
image with a file name
with “DCIM” or
“100MSDCF.”
4 Press SAVE.
The access indicator for the “Memory Stick” or PC
card insertion slot lights up, and the displayed
image is recorded onto the “Memory Stick” or PC
card.
Making Various Prints
If an error message appears
Error message Meaning
FORMAT ERROR The inserted “Memory Stick” or PC
card is not formatted.
Insert a formatted “Memory Stick”
or PC card or format it with the
printer.
MS/PC CARD FULL There is not enough space to record
the image or the maximum number
of images are already recorded.
Replace the “Memory Stick” or PC
card with a formatted one.
LOCKED The “Memory Stick” or PC card is
in the write protect status. Set it to
the write enable status.
Making Various Prints
39
GB
Page 40

Deleting “Memory Stick” or PC card images
Notes
• An image, once
deleted, will be lost
forever. Before
deleting an image,
double-check that it is
the right one.
• You can delete up to
256 images.
• If the “Memory Stick”
or PC card is in write
protect status, you
cannot delete the
images.
• If the image is
protected, the protect
mark (H) appears left
above the image of the
thumbnail list on the
screen. “FILE
PROTECT” is
displayed if you try to
delete the image. To
release protection, refer
to the operating
instructions of your
digital still camera or
video camera.
• While “DELETING” is
displayed, do not turn
off the power, remove
the “Memory Stick” or
PC card from the
insertion slot, or press
other operation buttons
on the printer. The
“Memory Stick” or PC
card may be damaged.
Cancelling the deletion
Make sure that
“CANCEL” is selected in
step 3 and press ENTER.
Cancelling the menu
operations
Press MENU. The menu
display disappears
without saving the
settings.
GB
Making Various Prints
40
You can delete the images on a “Memory Stick” or PC
card.
Before you begin
1 Turn on the printer and television and set the input
selector of your television to “VIDEO.”
2 Set INPUT SELECT to “MEMORY STICK/PC
CARD.”
3 Set PRESET PRINT to “OFF.”
4 Insert a “Memory Stick” or PC card into the
“Memory Stick” or PC card insertion slot.
1 Select the image to be deleted.
1Press the arrow buttons to move the white frame
to the image you want to delete, then press
ENTER. (The blue frame appears inside the
white frame.)
2If you want to delete other images, repeat
step 1.
2 Press MENU.
” SELECT ALL IMAGES
The menu appears on the
television.
DELETE
FORMAT
CLOCK SET
Television screen
3 Press V/v to move the cursor ( ”) to “DELETE” and
press ENTER.
The confirmation dialog
appears.
SELECT ALL IMAGES
” DELETE
FORMAT
CLOCK SET
DELETE? OK
”CANCEL
4 Press B to select “OK” and press ENTER.
The selected images are deleted.
5 Press MENU.
The menu display disappears and the printer
returns to standby mode.
Page 41

Notes
• When you format a
“Memory Stick” or PC
card, all the images
including protected
files are deleted.
Before formatting,
double-check the
contents.
• If the “Memory Stick”
or PC card is in write
protect status, you
cannot format the
images. Check that the
“Memory Stick” or PC
card is in the write
enable status.
• While
“FORMATTING” is
displayed, do not turn
off the power, remove
the “Memory Stick” or
PC card from the
insertion slot, or press
other operation buttons
on the printer. The
“Memory Stick” or PC
card may be damaged.
• If a disk error occurred
during formatting or
the formatted card
cannot be read or
written with your
digital still camera,
format it again with the
digital still camera.
Cancelling the
formatting
Make sure that
“CANCEL” is selected in
step 2 and press ENTER.
Formatting the card
You can format a “Memory Stick” or PC card.
Before you begin
1 Turn on the printer and television and set the input
selector of your television to “VIDEO.”
2 Set INPUT SELECT to “MEMORY STICK/PC
CARD.”
3 Set PRESET PRINT to “OFF.”
4 Insert a “Memory Stick” or PC card into the
“Memory Stick” or PC card insertion slot.
1 Press MENU.
The menu appears on the television.
2 Press V/v to move the cursor ( ”) to “FORMAT”
and press ENTER.
The confirmation dialog
appears.
SELECT ALL IMAGES
DELETE
” FORMAT
CLOCK SET
FORMAT? OK ”CANCEL
3 Press B to select “OK” and press ENTER.
The “Memory Stick” or PC card is formatted.
4 Press MENU.
The menu display disappears and the printer
returns to standby mode.
Making Various Prints
Making Various Prints
41
GB
Page 42

For Your Information
Precautions
On safety
• Operate the printer on 110 to 120 V AC (for the DPPMS300) or 220 to 240 V AC (for the DPP-MS300E),
50/60 Hz only.
• Be careful not to set or drop any heavy objects on the
power cord, or to damage the power cord in any
way. Never operate this printer with a damaged
power cord.
• Should any solid object or liquid fall into the cabinet,
unplug the printer and have it checked by qualified
personnel before operating it any further.
• Never disassemble the printer.
• To disconnect the power cord, pull it out by the plug.
Never pull the power cord itself.
• When the printer is not going to be used for an
extended period of time, disconnect the power cord
from the wall outlet.
• Do not handle the printer roughly.
• To reduce the risk of electrical shock, always unplug
the printer from the electrical outlet before cleaning
and servicing the printer.
GB
For Your Information
42
On installation
• Avoid placing the printer in a location subject to:
– vibration
– high humidity
– excessive dust
– direct sunlight
– extremely high or low temperatures
• Do not use electrical equipment near the printer. The
printer will not work properly in electromagnetic
fields.
• The printer is designed to operate horizontally.
Never attempt to operate the printer in a tilted
position.
• Do not place heavy objects on the printer.
• Leave enough room around the printer so that the
ventilation holes are not blocked. Blocking these
holes may cause internal heat build-up.
Page 43

On moisture condensation
If the printer is brought directly from a cold location to
warm location or placed in an extremely warm or
humid room, moisture may condense inside the unit.
In such cases the printer will probably not work
properly and may even develop a fault if you persist in
using it. If moisture condensation occurs, turn off the
power and do not use the printer for at least one hour.
On transport
When you transport the printer, remove the print
cartridge from the printer and put the printer in the
original box with the protective packaging.
If you no longer have the original box and packing
parts, use similar packing material so that the printer
will not be damaged while transporting.
On cleaning
Clean the cabinet, panel and controls with a soft dry
cloth, or a soft cloth lightly moistened with a mild
detergent solution. Do not use any type of solvent,
such as alcohol or benzine, which may damage the
finish.
On restrictions on duplication
If duplicating documents with the printer, pay special
attention to the following:
• Duplication of banknotes, coins, or securities is
against the law.
• Duplication of blank certificates, licenses, passports,
private securities, or unused postal stamps is also
against the law.
• Paintings, photographs, and books under copyright
cannot be duplicated without permission of the
copyright holder, unless you use the duplications for
private purposes.
For Your Information
For Your Information
43
GB
Page 44

About “Memory Stick”
About “Memory Stick”
“Memory Stick” is the removable storage media used
with a digital still camera, video camera, or PC. You
can easily display, save and delete the images.
Notes on using the “Memory Stick”
• Avoid touching the connector of the “Memory Stick”
or contacting it with a metal object.
• When attaching a label to the “Memory Stick” as
specified in the next page, use the label supplied for
the “Memory Stick” only. Do not use any other
labels.
• Do not drop, bent, or submit the “Memory Stick” to
external shock.
• Do not disassemble or modify the “Memory Stick.”
• Avoid getting liquids on the “Memory Stick.”
• Avoid using or storing the “Memory Stick” in a
location subject to:
– extremely high temperature such as the hot inside
of a car or the outdoors exposed to a burning sun,
or a place near a heater.
– direct sunlight
– high humidity
– corrosive substances
– excessive dust
• When storing and carrying the “Memory Stick,” keep
it in its original case to ensure protection of
important data.
• Avoid removing the “Memory Stick” from the
insertion slot while the access indicator is lit—the
printer is reading or writing the data on the
“Memory Stick.”
GB
For Your Information
44
Page 45

• In the following cases, the stored data may be
damaged or erased:
– when turning off the power of the printer or when
removing the “Memory Stick” from the insertion
slot while the printer is accessing the “Memory
Stick.”
– when using the “Memory Stick” near magnets or
magnetic fields
To protect images
To prevent accidental erasure of important image data,
use the write protect switch on the “Memory Stick.”
Slide the switch to the write protect or write enable
position:
❒ Write enable position
Slide the switch left to the write enable position.
You can read, write and delete data on the
“Memory Stick.” Formatting the “Memory Stick” is
also enabled. When storing video pictures on the
“Memory Stick,” set the switch to the write enable
position.
❒ Write protect position
Slide the switch right to the write protect position.
It is now impossible to write or delete the data on
the “Memory Stick.” We suggest you set the switch
to the write protect position while just viewing the
“Memory Stick” images.
Connector
Write enable
position
LOCK LOCK
Write protect
position
For Your Information
Place the
label here
For Your Information
45
GB
Page 46

About PC cards
Notes
• You cannot use the PC
cards with the power
specification of 3V
only.
• Do not insert other
types of PC card into
the printer’s insertion
slot. The printer may
be damaged.
The printer’s PC card insertion slot can read and write
PCMCIA ATA compatible type II flash memory cards
with a power specification of 5V or 3.3/5V. By using a
commercially available PC card adaptor, you can also
use Smart Media and other types of compact flash
cards.
Notes on using the PC card
• Do not drop, bent, or submit the PC card to external
shock.
• Do not disassemble or modify the PC card.
• Avoid getting liquids on the PC card.
• Avoid using or storing the PC card in a location
subject to:
– extremely high temperature such as the hot inside
of a car or the outdoors exposed to a burning sun,
or a place near a heater.
– direct sunlight
– high humidity
– corrosive substances
– excessive dust
– electrostatic or electronic noises
– magnetic fields
• Avoid removing the PC card from the insertion slot
while the printer is accessing the PC card.
Otherwise, data may be rendered unreadable.
• When using a compact flash card or Smart Media,
use a commercially available PC card adaptor that is
compatible with the card. Attach the card into the
adaptor and then insert it into the printer. For how
to install the card and adaptor, refer to the operating
instructions of the PC card adaptor.
• Avoid inserting or removing the compact flash card
or Smart Media into or out of the PC card adaptor
while the PC card adaptor is inserted in the printer.
The data may be rendered unreadable or erased.
• For using the compact flash card or Smart Media,
refer to the operating instructions of both the card
and your digital still camera or video camera.
GB
For Your Information
46
Page 47

Troubleshooting
If you run into any problems using the printer, use the
following table to solve the problem.
If the problem persists, consult your Sony dealer.
When you use the printer with the Sony Printer Utility
for MS300/MS300E, also refer to the User’s Guide.
Cannot operate the printer after the power switch
is turned on.
m Connect the AC power cord to an AC outlet
securely (page 11).
The television displays no images.
m Set the input selector of the television to “VIDEO.”
m Turn on the printer and connected devices,
including the television and the video equipment.
m Connect the printer to the television and video
equipment (page 10).
m Start playback on the video equipment.
m Insert a “Memory Stick” or PC card (pages 8, 9).
Check that images are recorded on the inserted
“Memory Stick” or PC card.
m Set INPUT SELECT to the appropriate position.
Error message appears on the TV screen.
m Refer to “If an error message appears” on page 48.
Cannot remove the print cartridge.
m Turn the printer off then on. After the motor
sound stops, try to remove the cartridge (page 16).
Printing takes longer than usual.
m If the printing indicator is flashing, see “If the
indicators are on” on page 50.
For Your Information
continued
For Your Information
47
GB
Page 48

Troubleshooting (continued)
Cannot print.
m Insert the print paper (page 17).
m Try printing again after removing the print paper
m See ”If the indicators are on” on page 50.
m If you are using the optional automatic feeder,
m Insert the print cartridge (page 15).
m Use the correct set of print cartridge and print
The beeps sound.
m Check that you operate with the correct
m See ”If the indicators are on” on page 50.
If an error message appears
CANNOT READ
m There is no image file recorded on the “Memory
FILE ERROR
m The selected image is broken.
FILE PROTECT
m The selected image is protected.
FORMAT ERROR
m The inserted “Memory Stick” or PC card is not
LOCKED
m The “Memory Stick” or PC card is in the write
MS/PC CARD ERROR
m The inserted “Memory Stick” or PC card is
if the print paper has emerged from the paper
outlet at the rear.
check that the feeder has paper (page 18).
paper (page 14).
procedures.
Stick.” Insert a “Memory Stick” on which
readable images are recorded.
formatted. Format the “Memory Stick” or PC card.
protect status. Set it in the write enable status and
then record the image.
defective or the PC card is not of a compatible
type. Insert the correct “Memory Stick” or PC
card.
GB
For Your Information
48
Page 49

MS/PC CARD FULL
m There is not enough space to record the image, or
the maximum number of image files have already
been stored. Delete unnecessary images, or use a
new “Memory Stick” or PC card.
NO FILE
m There is no image recorded or readable on the
card. Insert a card on which readable images are
recorded.
m There is no image specified with the digital still
camera (when PRESET PRINT is set to “ON”) .
NO MS/PC CARD
m The “Memory Stick” or PC card is not inserted.
Insert either the “Memory Stick” or PC card into
the “Memory Stick” or PC card insertion slot.
SELECT IMAGE
m No image is selected when you select “DELETE” in
the menu. Select the image to be deleted and then
perform the steps in the menu.
For Your Information
For Your Information
49
GB
Page 50

Troubleshooting (continued)
If the indicators are on
If you cannot print, check the indicators on the front
panel.
INPUT indicator
MEMORY indicator
Paper supply indicator
Cartridge error
indicator
Printing indicator
Note
The POWER indicator
always lights up while the
printer is turned on.
POWER indicator
The cartridge error indicator lights.
m The print cartridge is not loaded. Insert the print
cartridge (page 15).
m The print cartridge has run out. Change the print
cartridge (page 16). The printer will start printing
automatically.
Both the cartridge error and paper supply indicators
flash.
m The combination of the print paper and print
cartridge is not proper. Use the correct type of
print paper for the print cartridge you are using
(page 14).
When you use the optional automatic feeder,
remove it the from the printer, then insert the print
paper and reinstall the automatic feeder.
The paper supply indicator and printing indicators
light up.
m No paper is inserted. Insert the print paper (page
17).
When you use the optional automatic feeder,
remove it the from the printer, then insert the print
paper and reinstall the automatic feeder.
GB
For Your Information
50
Page 51

The MEMORY indicator flashes.
m The printer is processing the data for storing to the
internal memory. It takes some time before it can
operate again.
The cartridge error, paper supply and printing
indicators flash.
m Print paper is jammed.
See “If the print paper is jammed” on page 52.
The cartridge error, paper supply, printing, INPUT,
and MEMORY indicators flash.
m An error has occurred. Turn off the printer, then
turn on again.
For Your Information
For Your Information
51
GB
Page 52

Troubleshooting (continued)
If the print paper is jammed
If the print paper is jammed, the cartridge error, paper
supply and printing indicators flash and printing
stops. Turn off the power and remove the jammed
paper.
Remove the jammed paper from the paper outlet on
the rear panel.
Remove the jammed paper from the automatic feeder.
Print paper
Pull out the jammed
paper slowly.
Notes
• When you print from
video equipment,
printing may not
resume automatically
even after you have
removed the jammed
paper.
In this case, turn the
power off and on.
Then, try printing from
the video equipment
after capturing the
desired image again.
• If you cannot remove
the jammed paper,
contact your Sony
dealer.
GB
For Your Information
52
Pull out the jammed
paper slowly.
Page 53

Specifications
Printing system
Sublimation dye transfer printing
(Yellow/Magenta/Cyan 3 pass)
Effective pixels
1,376 (H) x 1,024 (V) dot
Printing size
114 (H) x 85 (V) mm (maximum)
(4 1/2 x 3 3/8 inches)
Gradations
256 levels (8 bits), per color (24
bits)
Approx. 16,770,000 colors
Printing time
Approx. 100 seconds per sheet
(excluding the time for data
processing and data transferring
from the video equipment or
“Memory Stick” or PC card)
Input/output connectors
VIDEO INPUT connector
(phono jack x 1)
1 Vp-p, 75 ohms (unbalanced),
sync negative
S VIDEO INPUT connector
(4-pin mini-DIN x 1)
Y: 1 Vp-p, 75 ohms
(unbalanced), sync
negative
C: 0.286 Vp-p (color burst),
75 ohms (unbalanced)
VIDEO OUTPUT connector
(phono jack x 1)
1 Vp-p, 75 ohms (unbalanced),
sync negative
Parallel Interface (Centronics,
Anfenole full 36-pin x 1)
“Memory Stick” insertion slot (1)/
PC card insertion slot (1)
Writing size into the “Memory Stick” or PC
card (When writing video pictures)
640 (H) x 480 (V) (JPEG)
Compatible image file formats
JPEG • 4:4:4, 4:2:2, 4:2:0 (baseline
JPEG)
• File size of 1Mbyte or
smaller
BMP •24 bit full color
•Windows format
•File size of 1Mbyte or
smaller
(Note that some versions of the file
formats may not be compatible.)
Maximum number of files to be handled
256 files
Print cartridge
See page 15.
Print paper
100 × 140 mm (4 x 5 5/8 inches)
See page 15.
Power requirements
110 - 120 V AC, 50/60 Hz, 0.6 A
(for the DPP-MS300)
220 - 240 V AC, 50/60 Hz (for the
DPP-MS300E)
Power consumption
72W (printing)
13 W (standby mode)
Operating temperature
5 ˚C to 35 ˚C (41 ˚F to 95 ˚F)
Dimensions
Approx. 301 × 83 × 246 mm
(w/h/d, excluding protruding
parts)
(12 × 3 3/8 × 9 7/8 inches)
Mass
Approx. 3 kg (6 lb 10 oz)
Supplied accessories
See page 5.
Design and specifications are subject to change
without notice.
For Your Information
For Your Information
53
GB
Page 54

Chart for various print mode
Split printing using the same image (page 27)
Standard printing
(page 19, 24)
Date printing
(page 26)
4-split printing
16-split printing
2-split printing
Split printing using different images (page 27)
4-split printing 16-split printing
2-split printing
1 2 3 4
1999
6
5
7
9 10 11 12
Calendar printing
(page 31)
8
Index printing
(page 33)
GB
For Your Information
54
Page 55

Index
A, B
AC power connector 11
Adjusting the clock 12
Arrow buttons 20
Automatic feeder
VPF-A3 18
Blur compensation 23
C
CAPTURE button 21, 24
Cartridge compartment
lid 15
Cartridge error indicator
16, 50
Chart for various print
mode 54
CLEAR ALL button 24
Connections
AC power cord 11
“Memory Stick” 8
PC card 9
Personal computer 11
Video equipment 10
D, E, F
DATE switch 26
Deleting images 40
Displaying the print
image 21
DPOF 35
Eject lever 16
ENTER button 13, 21
Error messages 48
Features 4
Formatting the “Memory
Stick” or PC card 41
I
Identifying the parts 6
INPUT indicator
21, 24, 50
INPUT SELECT switch
19, 23
M
MEMORY indicator
21, 24, 50
“Memory Stick”
Inserting 8
Notes on using 44
Setting the write
protect switch 45
“Memory Stick”/PC card
selection switch 8, 9
MENU button 12, 36, 40
P
Paper inlet/outlet 17, 52
Paper jamming 52
Paper supply indicator
17, 21, 25, 50
Parallel port 11
PC card
Inserting 9
Notes on using 46
PICTURE button 21, 24
POWER indicator 12, 50
POWER switch 12
Precautions 42
PRESET PRINT switch
35
PRINT button 21, 25
Print cartridge
Loading 15
Notes on storing 16
Replacing 16
Print mode dial
20, 24, 27, 31, 33
Print packs 14
Print paper
Inserting 17
Notes on storing 18
Printing
All the images of
“Memory Stick” or PC
card 36
An image from
“Memory Stick” or PC
card 19
An image from video
equipment 23
Calendar 31
Images preset by a
camera 35
Index lists of
“Memory Stick” or PC
card images 33
Split prints 27
The date 26
Printing indicator
21, 25, 50
R
Recording the video
pictures as a still image
38
S
S VIDEO INPUT
connector 10
SAVE button 39
Scrolling the pages 20
Specifications 53
T, U, V
Troubleshooting 47
Unpacking 5
VIDEO INPUT
connector 10
VIDEO OUTPUT
connector 8, 9, 10
For Your Information
For Your Information
GB
55
Page 56

WARNING
Pour éviter tout risque d’incendie ou
d’électrocution, n’exposez pas cet
appareil à la pluie ou à l’humidité.
Pour éviter toute électrocution,
n’ouvrez pas le boîtier. Confiez
l’entretien de cet appareil
uniquement à un technicien
compétent.
ATTENTION
Pour éviter tout risque d’électrocution, faites
correspondre la lame large de la fiche avec la
fente large de la prise et enfichez-la
complètement.
ATTENTION
La plaquette signalétique et le symbole
graphique sont situés sur le dessous du
châssis.
ATTENTION:
Une distorsion des images et/ou du son peut
se produire si ce produit est positionné à
proximité d’un appareil émettant des
rayonnements électromagnétiques.
Attention
Sony décline toute responsabilité pour tous
dommages accidentels ou subséquents ou la
perte d’enregistrements pouvant résulter de
l’utilisation ou d’un dysfonctionnement de
l’imprimante, d’un “Memory Stick” ou d’une
carte PC.
Ce produit est conforme aux
directives européennes suivantes:
72/73EEC, 93/68/EEC (directive basse
tension)
83/336/EEC, 92/31/EEC (directive ECM)
Cet appareil est conforme aux normes
EN55022 Classe B et EN 50082-1 permettant
une utilisation dans les lieux suivants:
résidentiel, commercial et industriel léger.
Cet appareil a été testé et déclaré être en
conformité avec les limites imposées par la
directive EMC à l’aide d’un câble de
connexion plus court que 3 mètres.
Pour les clients Etats-Unis et Canada
DEPOT DES BATTERIES AU LITHIUM
IONISE
DEPOSEZ LES BATTERIES AU LITHIUM
IONISE AUX ENDROITS RECOMMANDES.
Vous pouvez rapporter les batteries au
lithium ionisé dans un centre de Service
Sony ou dans un point de ramassage.
Ramarque: Dans certain pays, il est interdit
Pour connaître le centre de Service Sony le
plus proche de chez vous, composez le 1800-222-SONY (Etats-Unis uniquement).
Pour connaître le point de ramassage le plus
proche de chez vous, composez le 416-499SONY (Canada uniquement).
Avertissement:Ne pas utiliser des batteries
de jeter les batteries au lithium
ionisé avec les ordures méngères
ou dans les poubelles de bureau.
au lithium ionisé qui sont
endommagées ou qui fuient.
Déclaration de conformité
Nom commercial: Sony
N° de modèle:
Partie responsable:
Adresse: 1 Sony Drive, MD#2A2, Park
N° de téléphone:
Cet appareil est conforme à la Section 15
du règlement FCC. Son utilisation est
sujette aux deux conditions suivantes: (1)
Cet appareil ne peut pas provoquer
d’interférences nuisibles et (2), cet
appareil doit résister aux interférences
reçues, y compris les interférences
susceptibles de provoquer un
fonctionnement indésiré.
• Microsoft, MS, MS-DOS et Windows
sont des marques de commerce de
Microsoft Corporation déposées aux
Etats-Unis et dans d’autres pays.
• IBM PC/AT est une marque de
commerce déposée de IBM Corporation
of the U.S.A.
DPP-MS300
Sony Electronics Inc.
Ridge, New Jersey, 07656,
U.S.A.
201-930-6970
®
FR
2
Page 57

Table des matières
Préparation
Caractéristiques ....................................... 4
Déballage de l’imprimante ..................... 5
Identification des composants ............... 6
Installation
Raccordement de l’imprimante ............. 8
Insertion d’un “Memory Stick” ou
d’une carte PC.................................... 8
Raccordement à l’appareil vidéo .. 10
Raccordement à un ordinateur...... 11
Branchement du cordon
d’alimentation .................................. 11
Réglage de l’horloge.............................. 12
Utilisation des jeux d’impression
(non fournis)..................................... 14
Chargement de la cassette
d’impression..................................... 15
Introduction du papier
d’impression..................................... 17
Impression
Impression d’une image du “Memory
Stick” ou de la carte PC .................. 19
Préparation ....................................... 19
Impression ........................................ 20
Impression d’une image depuis
l’appareil vidéo ................................ 23
Préparations ..................................... 23
Impression ........................................ 24
Réalisation de différents
tirages
Impression de la date ............................ 26
Réalisation de tirages fractionnés........ 27
Impression des images d’un
“Memory Stick” ou
d’une carte PC.................................. 27
Impression d’images depuis un
appareil vidéo .................................. 29
Création d’un calendrier....................... 31
Réalisation d’un index d’images du
“Memory Stick” ou
de la carte PC ................................... 33
Impression d’images du “Memory
Stick” ou de la carte PC
présélectionnées par un appareil
photo numérique ............................. 35
Impression simultanée des images d’un
“Memory Stick” ou
d’une carte PC.................................. 36
Enregistrement d’une image vidéo
comme image fixe............................ 38
Suppression des images du Memory
Stick et de la carte PC...................... 40
Pour votre information
Précautions ............................................. 42
A propos du “Memory Stick” .............. 44
A propos des cartes PC ......................... 46
Dépannage .............................................. 47
Si un message d’erreur apparaît ... 48
Si les indicateurs sont allumés....... 50
En cas de bourrage du papier
d’impression..................................... 52
Spécifications.......................................... 53
Organigramme des différents modes
d’impression..................................... 54
Index ........................................................ 55
FR
FR
3
Page 58

Préparation
Caractéristiques
FR
Préparation
4
L’imprimante photo numérique DPP-MS300/MS300E vous
permet d’imprimer des images à partir d’un appareil photo
numérique ou d’un appareil vidéo.
Résolution d’impression fine
Grâce à la résolution d’impression de 306 ppp x 306 ppp,
vous pouvez imprimer des images et des caractères de la
taille d’une carte postale avec une qualité proche d’une
photographie.
Impression directe des images cartes
Vous pouvez directement imprimer des images prises par
l’appareil photo numérique ou l’appareil vidéo et
mémorisées dans un “Memory Stick” ou sur une carte PC. Il
vous est également possible d’imprimer des images qui sont
présélectionnées par un appareil photo numérique ou une
caméra vidéo.
Impression et sauvegarde des images d’un appareil vidéo
Vous pouvez imprimer directement les images entrées d’un
appareil vidéo. L’image entrée peut également être stockée
comme image fixe dans le “Memory Stick” ou sur la carte PC.
Grande variété d’impressions
L’imprimante vous permet de réaliser de nombreuses
impressions comme un tirage standard, des plans
fractionnés, des calendriers et un index des images spécifiées.
Multipliez les types d’impressions à l’aide du logiciel fourni
Le pilote d’imprimante Sony DPP-MS300/MS300E (Sony
DPP-MS300/MS300E Printer Driver) pour Microsoft
Windows ® 95/98 fourni vous permet d’imprimer des
images depuis le disque dur de votre ordinateur. Avec
l’utilitaire d’imprimante photo numérique Sony pour
MS300/MS300E (Sony Printer Utility for MS300/MS300E),
vous pouvez transférer les images d’un “Memory Stick” ou
d’une carte PC sur le disque dur de votre ordinateur. Vous
pouvez également réaliser davantage de types d’impression
telles que des impressions avec un cadre original, des cartes
postales et des étiquettes. Pour plus de détails, reportez-vous
au guide de l’utilitaire d’imprimante.
Papier d’impression à Super Coat durable compatible
Outre le papier d’impression standard ou pour étiquette, un
papier Super Coat est également disponible. Ce papier
maintient l’image imprimée dans un excellent état pendant
une longue période.
Impression continue de 25 feuilles
Le chargeur automatique en option VPF-A3 vous permet
d’imprimer jusqu’à 25 feuilles en continu.
Page 59

Déballage de l’imprimante
Vérifiez si les accessoires suivants vous ont été fournis
avec votre imprimante.
• Cordon d’alimentation secteur (1)
(Pour le DPP-MS300) (Pour le DPP-MS300E)
• Câble de connexion vidéo (1)
• CD-ROM (pour Microsoft Windows
• Mode d’emploi (1)
• Guide de l’utilisateur pour l’utilitaire d’imprimante
(Sony Digital Photo Printer Utility for MS300/
MS300E) (1)
• Garantie (1)
®
95/98) (1)
Préparation
Préparation
FR
5
Page 60

Identification des composants
Pour plus de détails sur l’utilisation des composants, reportez-vous aux pages
indiquées entre parenthèses.
1 Sortie du papier (page 52)
2 Port parallèle (page 11)
3 Connecteur d’alimentation (page 11)
4 Commutateur d’alimentation
(POWER) (page 12)
5 Connecteur VIDEO OUTPUT
(pages 8, 9, 10)
6 Connecteur VIDEO INPUT
(page 10)
7 Connecteur S VIDEO INPUT
(page 10)
8 Panneau de commande (page 7)
9 Fente d’insertion de la carte PC
(page 9)
0 Fente d’insertion du “Memory
Stick” (page 8)
!¡ Sélecteur “Memory Stick”/Carte PC
(pages 8, 9)
!™ Couvercle du chargeur automatique
en option (page 18)
!£ Entrée/sortie de papier pour
alimentation manuelle (pages 17, 52)
!¢ Volet du compartiment à cassette
(page 15)
!∞ Levier d’éjection (page 16)
!§ Cassette d’impression (pages 14, 15)
Compartiment à cassette
(non fournie)
FR
6
Préparation
Page 61

Panneau de commande
1 Commutateur PRESET PRINT
(page 35)
2 Commutateur INPUT SELECT
(pages 19, 23)
3 Molette de mode d’impression
(pages 20, 24, 27, 31, 33)
4 Touches fléchées (B/b/V/v)
(page 20)
5 Touche ENTER (pages 13, 21)
6 Touche CLEAR ALL (page 24)
7 Touche SAVE (page 39)
8 Touche MENU (pages 12, 36, 40)
9 Commutateur DATE (page 26)
0 Touche PICTURE (pages 21, 24)
!¡ Touche CAPTURE (pages 21, 24)
!™ Touche PRINT (pages 21, 25)
Indicateurs
1 Indicateur INPUT (pages 21, 24, 50)
2 Indicateur POWER (pages 12, 50)
3 Indicateur d’accès à la carte PC
(page 20)
4 Indicateur d’accès au “Memory
Stick” (page 20)
5 Indicateur MEMORY
(pages 21, 24, 50)
6 Indicateur d’impression
(pages 21, 25, 50)
7
Indicateur d’alimentation de
papier (pages 17, 21, 25, 50)
8
Indicateur d’erreur de cassette
(pages 16, 50)
Préparation
Préparation
FR
7
Page 62

Installation
Raccordement de l’imprimante
Remarques
• Vous ne pouvez pas
insérer le “Memory
Stick” et la carte PC en
même temps.
• Avant de réaliser les
connexions, mettez le
téléviseur et
l’imprimante hors
tension.
Remarques
• Si le “Memory Stick”
n’entre pas
correctement dans la
fente, revérifiez la
position du sélecteur
“Memory Stick”/Carte
PC et le sens de l’ergot
et de la flèche sur le
“Memory Stick”.
Ensuite, réinsérez-le
dans la fente.
• Ne tentez pas de forcer
le “Memory Stick” pour
l’entrer ou le sortir.
Sinon, vous risquez
d’endommager le
“Memory Stick” ou
l’imprimante.
Insertion d’un “Memory Stick” ou
d’une carte PC
Pour l’impression d’images enregistrées dans un
“Memory Stick” ou sur une carte PC, insérez le
“Memory Stick” ou la carte PC dans les fentes prévues
à cet effet dans l’imprimante. Raccordez également
l’imprimante au téléviseur pour pouvoir afficher les
images à imprimer. Pour savoir comment utiliser un
“Memory Stick” ou une carte PC, reportez-vous
respectivement à la page 44 et à la page 46.
Insertion d’un “Memory Stick”
Téléviseur
Mettez le sélecteur
d’entrée sur “VIDEO”.
Câble de connexion
vidéo (fourni)
Vers VIDEO OUTPUT
Tout en orientant l’encoche
vers la gauche et la flèche
vers l’avant à gauche
Sélecteur
“Memory
Stick”/Carte
PC
“Memory Stick”
1 Faites coulisser le sélecteur “Memory Stick”/Carte
PC vers la droite de sorte que la fente d’insertion
du “Memory Stick” s’ouvre.
2
Tout en orientant l’encoche vers la gauche et la flèche
vers l’avant à gauche, introduisez le “Memory Stick”
dans la fente d’insertion pour “Memory Stick”
jusqu’à ce qu’il s’encliquette en position.
FR
8
Installation
Ejection du “Memory Stick”
Enfoncez le “Memory Stick” plus loin dans la fente
d’insertion et laissez-le ressortir. Dès qu’il ressort,
retirez-le délicatement.
Page 63

Conseil
L’utilisation d’un
adaptateur de carte PC
disponible dans le
commerce vous permet
également d’employer
Smart Media ou d’autres
types de cartes à mémoire
flash compactes (page 46).
Remarques
• Si la carte PC ne
s’adapte pas
correctement dans la
fente, vérifiez la
position du sélecteur
“Memory Stick”/Carte
PC et le sens de la
flèche de la carte PC.
Réintroduisez-la
ensuite dans la fente.
• Ne tentez pas de forcer
la carte PC pour l’entrer
ou la sortir de la fente.
Sinon, vous risquez
d’endommager la carte
PC ou l’imprimante.
Insertion d’une carte PC
Téléviseur
Mettez le sélecteur
d’entrée sur “VIDEO”.
Sélecteur
“Memory
Stick”/Carte
Câble de
connexion
vidéo (fourni)
Vers VIDEO
OUTPUT
Tout en orientant
la flèche vers le
haut sur la gauche
Touche
d’éjection de la
carte PC
Carte PC
PC
1 Faites coulisser le sélecteur “Memory Stick”/Carte
PC vers la gauche de sorte que la fente d’insertion
de la carte PC s’ouvre.
2 Tout en orientant la flèche vers le haut sur la
gauche, introduisez la carte PC dans la fente
d’insertion pour carte PC jusqu’à ce qu’elle
s’encliquette en position.
Ejection de la carte PC
Appuyez sur la touche d’éjection de la carte PC. Une
fois que la carte PC sort, retirez-la délicatement.
Installation
Installation
FR
9
Page 64

Raccordement de l’imprimante (suite)
Raccordement à l’appareil vidéo
Pour imprimer des images provenant d’un appareil
vidéo tel qu’un appareil photo numérique ou une
caméra vidéo, utilisez le câble de connexion vidéo
fourni pour raccorder l’appareil vidéo à l’imprimante.
De même, branchez l’imprimante au téléviseur pour
pouvoir afficher les images à imprimer.
Pour les opérations d’impression, reportez-vous à la
page 24.
Si votre appareil vidéo
dispose d'un connecteur
de sortie S VIDEO
OUTPUT
Raccordez-le au
connecteur S VIDEO
INPUT (entrée) de
l’imprimante à l’aide du
câble de connexion Svidéo en option de
manière à obtenir une
meilleure qualité d’image.
Dans ce cas, vous ne
pouvez pas raccorder le
connecteur vidéo.
Lorsque les connecteurs
S VIDEO INPUT et VIDEO
INPUT de l'imprimante
sont tous deux
raccordés
Les signaux d'entrée du
connecteur S VIDEO
INPUT sont
automatiquement
sélectionnés.
Appareil photo
numérique ou
caméra vidéo équipé
d’un connecteur de
sortie vidéo
Câble de connexion
vidéo (non fourni)
Vers VIDEO
INPUT
Caméra vidéo ou
tout autre appareil
Ou
Vers VIDEO OUTPUT
Câble de connexion
vidéo (fourni)
similaire équipé
d’un connecteur
de sortie S-Vidéo
Câble de
connexion SVIDEO (non
fourni)
Vers S VIDEO
INPUT
Remarques
• Avant d’établir quelque
connexion que ce soit,
mettez l’imprimante,
l’appareil vidéo et le
téléviseur hors tension.
• Voir également le mode
d’emploi de l’appareil
vidéo.
FR
Installation
10
Téléviseur
Réglez le
sélecteur
d’entrée sur
“VIDEO”.
ç
: Sens du signal
Page 65

Remarques
• Avant de procéder au
raccordement ou de
brancher le câble,
mettez l’imprimante,
votre PC et le moniteur
hors tension.
• Reportez-vous
également au mode
d’emploi de votre PC.
• Utilisez un câble
d’imprimante blindé
inférieur à 2 mètres de
longueur.
• Il se peut que vous ne
puissiez pas utiliser
l’imprimante et le
pilote d’imprimante en
réseau ainsi qu’une
mémoire tampon
d’imprimante
disponible dans le
commerce.
Si votre ordinateur
n’accepte pas la fiche à
25 broches D-Sub
Utilisez un câble
disponible dans le
commerce doté d’une
prise Amphénol à 36
broches pour
l’imprimante et une fiche
compatible avec votre
ordinateur.
Raccordement à un ordinateur
Pour imprimer des images au départ d’un ordinateur
IBM PC/AT compatible, raccordez le port parallèle de
l’imprimante de votre ordinateur personnel (PC) et
installez l’utilitaire d’imprimante photo numérique Sony
pour MS300/MS300E (Sony Printer Utility for MS300/
MS300E) fourni. Vous pouvez transférer des images
depuis un “Memory Stick” ou une carte PC sur le disque
dur de votre PC et réaliser différents types d’impressions.
Pour savoir comment installer et exploiter le logiciel, y
compris l’exécution d’impressions au départ de votre PC,
reportez-vous au guide de l’utilisateur fourni.
Utilisez un câble de connexion disponible dans le
commerce doté d’une fiche à 25 broches D-sub (mâle)
pour votre ordinateur et d’une prise Amphénol à 36
broches pour l’imprimante:
Vers le port d’imprimante
(fiche à 25 broches D-sub)
Câble d’imprimante
(non fourni)
Vers le port parallèle
IBM PC/AT compatible
(Prise Amphénol à 36
broches)
Installation
Branchement du cordon
d’alimentation
Après avoir établi les connexions, branchez le cordon
d’alimentation secteur fourni sur le connecteur
d’alimentation de l’imprimante et ensuite sur une prise
murale (secteur).
Cordon
d’alimentation
(fourni)
Vers une prise murale (secteur)
Installation
11
FR
Page 66

Réglage de l’horloge
Vous pouvez enregistrer l’heure lorsque les images
sont capturées par l’appareil vidéo en réglant l’horloge
de l’imprimante. Vous pouvez également démarrer
automatiquement le calendrier au mois en cours lors
de l’impression d’un calendrier.
Dès que vous avez réglé l’heure, l’horloge continue à
fonctionner sur les piles même si vous mettez
l’appareil hors tension.
1 Mettez l’imprimante sous tension.
L’indicateur POWER s’allume.
12
FR
Installation
Commutateur
POWER
Indicateur POWER
2 Appuyez sur MENU.
Le menu apparaît sur l’écran du téléviseur.
Curseur
SELECT ALL IMAGES
DELETE
FORMAT
” CLOCK SET
Ecran de télévision
Page 67

Remarque
L’exemple CLOCK SET
suivant représente l’écran
pour le DPP-MS300.
3 Si le curseur ( () n’apparaît pas sur “CLOCK
SET”, appuyez sur V/v pour déplacer le curseur
sur “CLOCK SET” et appuyez ensuite sur ENTER.
Le menu “CLOCK SET” devient jaune et l’écran de
réglage de l’horloge apparaît.
Installation
Annulation de la
sélection du menu
Appuyez sur MENU.
L’écran de menu disparaît
sans sauvegarde des
réglages. L’imprimante
revient en mode de veille.
Confirmation du réglage
de l’heure
Suivez les étapes 1 à 3. Le
réglage de l’heure en
cours apparaît à l’écran.
Pour revenir à l’écran
précédent, appuyez sur
MENU.
4 Appuyez sur b.
Le curseur apparaît sur le mois
(DPP-MS300) ou le jour (DPPMS300E).
5 Appuyez sur V/v pour régler le
mois (DPP-MS300) ou le jour
SELECT ALL IMAGES
DELETE
FORMAT
CLOCK SET
JAN 01. 1999 01:00 AM
Curseur
(DPP-MS300E).
Une pression sur V ajuste le réglage dans l’ordre
croissant.
Une pression sur v ajuste le réglage dans l’ordre
décroissant.
6 Appuyez sur b.
Le curseur se déplace sur le
SELECT ALL IMAGES
DELETE
FORMAT
CLOCK SET
paramètre suivant.
MAY 01. 1999 01:00 AM
7 Répétez les étapes 4 et 5 pour
régler tous les paramètres: mois,
jour, année, heure et minutes
(DPP-MS300) ou jour, mois,
année, heure et minutes (DPPMS300E).
Si vous désirez régler l’élément
précédent, appuyez sur B.
SELECT ALL IMAGES
DELETE
FORMAT
CLOCK SET
MAY 10. 1999 09:35 AM
8 Appuyez sur ENTER.
L’écran de réglage de l’horloge disparaît.
9 Appuyez sur MENU.
Le menu disparaît et l’imprimante revient en mode
de veille.
Installation
13
FR
Page 68

Utilisation des jeux d’impression
(non fournis)
Remarques
• Utilisez le papier et la
cassette à ruban
encreur fournis
ensemble dans le même
carton. Si vous utilisez
une autre combinaison
de papier et de ruban
encreur, il est possible
que vous n’obteniez
pas des résultats
d’impression adéquats
ou alors un bourrage de
papier ou un autre
problème risque de se
produire.
• S’il y a des traces de
doigt ou de la poussière
sur la surface
d’impression du papier
Super Coat résistant, la
qualité d’impression
risque de se détériorer.
Pour une excellente
qualité d’impression,
nous vous
recommandons
d’utiliser le chargeur
automatique VPF-A3.
A propos du nombre de
tirages
Chaque cassette à ruban
encreur vous permet
d’effectuer uniquement le
même nombre de tirages
que le nombre de feuilles
fournies dans le jeu
d’impression. Si vous
désirez imprimer sur du
papier qui a déjà servi
une fois ou sur du papier
restant, il se peut que la
cassette s’use
prématurément.
Vous avez besoin d’un jeu d’impression en option
conçu pour l’imprimante. Le jeu d’impression se
compose d’un papier d’impression et d’une cassette
d’impression.
En fonction de l’impression que vous voulez réaliser,
sélectionnez l’un des jeux d’impression suivants:
VPM-P50STA
• Conçu pour 50 tirages standard.
• Contient une cassette pour 50 feuilles et deux jeux de
25 feuilles de papier d’impression standard.
VPM-P50WSA
• Conçu pour 50 tirages d’étiquettes de grande taille.
• Contient une cassette d’impression pour 50 feuilles et
deux jeux de 25 feuilles d’étiquettes adhésives.
VPM-P50S02B
• Conçu pour 50 tirages de 2 étiquettes.
• Contient une cassette d’impression pour 50 feuilles et
deux jeux de 25 feuilles de 2 étiquettes adhésives.
VPM-P50S16A
• Conçu pour 50 tirages de 16 étiquettes.
• Contient une cassette d’impression pour 50 feuilles et
deux jeux de 25 feuilles de 16 étiquettes adhésives.
VPM-P50LAB
• Conçu pour 50 tirages Super Coat.
• Contient une cassette d’impression pour 50 feuilles et
deux jeux de 25 feuilles de papier d’impression
Super Coat résistant.
14
FR
Installation
Page 69

Chargement de la cassette
d’impression
Introduisez la cassette à ruban encreur dans
Attention
N’introduisez jamais les
doigts dans le
compartiment à cassette. La
tête thermique atteint de
très hautes températures,
en particulier après des
impressions répétées.
l’imprimante.
Utilisez uniquement la cassette à ruban encreur fournie
avec le papier d’impression et emballée dans le même
carton.
1 Appuyez sur PUSH pour ouvrir le couvercle du
compartiment de la cassette.
Installation
Remarques
• Si la cassette
d’impression n’est pas
chargée lorsque vous
mettez l’imprimante sous
tension, un bip
d’avertissement retentit
et l’indicateur d’erreur
de ruban s’allume.
• Pour installer la cassette
à ruban encreur,
présentez-la comme
illustré de façon à ce qu’il
n’y ait pas de poussière
qui se dépose sur le
ruban encreur.
• Ne touchez pas le ruban
encreur et ne placez pas
la cassette à ruban
encreur dans un endroit
poussiéreux. La présence
de traces de doigts ou de
poussière sur le ruban
encreur peut entraîner
des résultats
d’impression imparfaits.
2 Introduisez fermement la cassette à ruban encreur
jusqu’à ce qu’elle s’encliquette en position et
refermez le couvercle du compartiment à cassette.
Face étiquetée
Si la cassette à ruban encreur ne s’engage pas en
faisant un déclic
Retirez-la, puis remettez-la en place.
Si le ruban encreur présente trop de mou pour être
chargé, rembobinez le ruban encreur pour éliminer le
mou.
Face étiquetée
Tout en appuyant sur
le centre de la bobine,
enroulez le ruban
encreur dans le sens
de la flèche.
Installation
suite
15
FR
Page 70

Chargement de la cassette d’impression (suite)
Si le ruban encreur se
déchire
Réparez le ruban à l’aide
de bande adhésive
transparente. Vous ne
devriez pas avoir de
problème pour employer
le reste de ruban de la
cassette. Avant de charger
la cassette à ruban
encreur dans
l’imprimante, tournez la
bobine jusqu’à ce que la
bande transparente ait
disparu.
Réparez à l’aide de
bande adhésive
transparente.
Pour éjecter la cassette à ruban encreur
Ouvrez le volet du compartiment à cassette et poussez
le levier d’éjection vers le haut. Ensuite, retirez la
cassette.
Levier d'éjection
Indicateur d’erreur de
cassette
v
Poussez le levier
d’éjection vers le haut,
puis retirez la cassette à
ruban encreur usagée.
Remarques sur le
rangement des cassettes
d’impression
• Ne placez pas les
cassettes dans des
endroits soumis à:
– de hautes
températures;
– une forte humidité;
– un empoussièrement
excessif;
– au rayonnement
direct du soleil.
• Avant de ranger une
cassette partiellement
employée pour une
longue période, glissezla dans son emballage
d’origine.
FR
Installation
16
Pour remplacer la cassette d’impression
Si vous tentez d’imprimer alors que le ruban encreur
de la cassette est usé, le papier d’impression est
automatiquement chargé, puis éjecté et l’indicateur
d’erreur se met à clignoter.
Enlevez le papier d’impression. Puis ouvrez le volet du
compartiment à cassette et remplacez la cassette à
ruban encreur usagée par une neuve.
Le papier d’impression éjecté peut être réutilisé.
Page 71

Introduction du papier d’impression
Remarques
• Introduisez le papier
d’impression de façon
rectiligne le long du
guide situé à la gauche
du port papier. Si le
papier est positionné sur
la droite ou en oblique,
la zone d’impression
risque d’être décalée.
• Il se peut que le papier
ne se charge pas
automatiquement si
vous n'introduisez pas le
papier convenablement.
• Ne dactylographiez rien
sur la surface
d’impression avant
l’impression. Si vous
voulez écrire un message
ou dessiner sur la
surface d’impression
après l’impression,
utilisez un feutre gras.
• N’apposez pas
d’étiquette ou autre
chose sur la surface
d’impression avant
d’imprimer.
• Lors de la manipulation
du papier
d’impression, ne
touchez pas la surface
d’impression (la face
brillante où rien n’est
imprimé). De même, ne
placez pas le papier
d’impression dans un
endroit poussiéreux.
Les traces de doigt ou
la poussière sur la
surface d’impression
peut entraîner une
impression imparfaite.
• N’imprimez pas sur du
papier d’étiquette qui a
déjà été décollé.
• Utilisez uniquement le
papier d’impression
préconisé pour cette
imprimante.
• Ne pliez pas les feuilles
de papier d’impression.
Introduisez le papier d’impression feuille par feuille.
Utilisez uniquement le papier d’impression
recommandé pour cette imprimante.
1 Mettez l’imprimante sous tension.
L’indicateur d’alimentation (POWER) s’allume.
2 Appliquez la procédure d’impression.
Après avoir appuyé sur PRINT, l’indicateur
d’alimentation du papier se met à clignoter. Pour
plus de détails, reportez-vous aux pages 19 à 35.
3 Introduisez le papier d’impression de façon
rectiligne avec la surface d’impression vierge vers
le haut, le long du guide situé à la gauche du
port papier.
Introduisez le papier jusqu'à ce qu'il reste un peu
moins de 2 cm. Le papier est automatiquement
chargé lorsque l'impression débute.
Guide
Moins de 2 cm
Installation
Installation
FR
17
Page 72

Introduction du papier d’impression (suite)
Remarques sur le
rangement du papier
d’impression
• Ne placez pas le papier
d’impression dans des
endroits soumis à:
– de hautes
températures;
– une forte humidité;
– un empoussièrement
excessif;
– au rayonnement
direct du soleil.
• Avant de ranger du
papier d’impression
partiellement employé
pour une longue
période, glissez-le dans
son emballage
d’origine.
Si vous utilisez le chargeur automatique
VPF-A3 en option
Vous pouvez imprimer automatiquement la même
image en 25 exemplaires.
Pour installer le chargeur automatique, appuyez sur le
repère PUSH du couvercle du port d’insertion du
chargeur automatique sur le panneau frontal de
l’imprimante.
Pour refermer le couvercle, appuyez sur PUSH jusqu’à
ce qu’il s’encliquette.
Pour plus de détails, reportez-vous au mode d’emploi
du chargeur automatique VPF-A3.
18
FR
Installation
Page 73

Impression
Impression d’une image du “Memory
Stick” ou de la carte PC
Remarques
• Evitez de répandre des
liquides sur le “Memory
Stick” ou la carte PC ou
de les utiliser dans des
endroits fort humides,
car cela peut les rendre
illisibles.
• L’imprimante peut gérer
et afficher jusqu’à 256
fichiers d’image. S’il y a
plus de 256 images
sauvegardées dans le
“Memory Stick” ou sur
la carte PC, utilisez
l’utilitaire d’imprimante
(Sony Printer Utility for
MS300/MS300E) pour
afficher et manipuler les
images restantes.
Remarque
Assurez-vous que
PRESET PRINT est mis
sur “OFF”.
Vous pouvez sélectionner une image enregistrée dans
le “Memory Stick” ou sur la carte PC et l’imprimer en
taille maximale ( impression standard ).
Préparation1Préparation
PRESET
PRINT
Préparation4 Préparation
Indicateur
POWER
123
3
2 CAPTURE
PICTURE
impression standard
45
Préparation
1 Mettez l’imprimante et le téléviseur sous tension et
mettez le sélecteur d’entrée du téléviseur sur
“VIDEO”.
L’indicateur d’alimentation (POWER) s’allume.
Impression
2 Réglez le sélecteur “Memory Stick”/Carte PC de
manière à ce que la fente d’insertion souhaitée
s’ouvre.
3 Mettez INPUT SELECT sur “MEMORY STICK/PC
CARD”.
suite
Impression
19
FR
Page 74

Impression d’une image du “Memory Stick” ou de la carte PC (suite)
Remarques
• Lorsque l’indicateur
d’accès est allumé,
n’éjectez pas le “Memory
Stick” ou la carte PC.
Sinon, ils risquent de se
planter.
• Une image
endommagée ou
présentant une
anomalie n’apparaît
pas dans la liste
d’images. L’indication
“FILE ERROR”
apparaît dans la fenêtre
d’affichage.
• S’il n’y a pas d’images
sauvegardées dans le
“Memory Stick” ou sur
la carte PC, “NO FILE”
apparaît sur l’écran
d’affichage.
• Suivant le type de
caméra numérique
pour images fixes ou de
caméra vidéo, il peut
falloir beaucoup de
temps pour afficher les
miniatures.
Défilement des pages
Lorsqu’il y a plusieurs
pages, vous pouvez faire
défiler les pages. Pour
afficher la page suivante
(lorsque apparaît en bas à
droite), déplacez le cadre
blanc sur la ligne du bas de
la liste d’images et appuyez
sur v. Pour afficher la page
précédente (lorsque
apparaît en haut à droite),
déplacez le cadre blanc sur
la ligne du dessus et
appuyez sur V.
L’indicateur d’accès
clignote et la page change.
4 Insérez le “Memory Stick” ou la carte PC sur
lesquels vous avez enregistré les images dans les
fentes d’insertion du “Memory Stick” ou de la carte
PC. (page 8)
Lorsque l’imprimante accède au “Memory Stick”
ou à la carte PC, l’indicateur d’accès se met à
clignoter. Lorsque l’imprimante a fini de lire les
images, les images enregistrées sont affichées en
format pendentif.
Cadre blanc
(curseur)
Impression
1 Réglez la molette du mode d’impression sur “
(standard)”.
2 Appuyez sur les touches fléchées ( B/b/V/v) pour
déplacer le cadre blanc (curseur) sur l’image que
vous voulez imprimer.
Déplacez le cadre blanc vers le haut ( V), le bas ( v),
la droite ( b) ou la gauche ( B).
Déplacez le
cadre blanc.
20
FR
Impression
Page 75

Annulation de la sélection
Déplacez le cadre blanc sur
l’image que vous souhaitez
annuler et appuyez sur
ENTER. Le cadre bleu
disparaît et la sélection est
annulée.
Sélection d’images
multiples
Répétez les étapes 2 et 3
jusqu’à ce que vous ayez
sélectionné toutes les images
que vous désirez imprimer.
Remarques
• Il se peut que l’image de
taille maximale affichée ne
corresponde pas aux
détails de l’impression
réelle.
• Suivant le format de
l’image, il peut falloir de 5
à 60 secondes pour
afficher une image plein
écran sur le moniteur.
• Si vous appuyez sur
PRINT pendant que
l’image d’impression
réelle est affichée, seule
l’image affichée est
imprimée.
• Si vous appuyez sur
PRINT pendant que vous
affichez la liste des images
en pendentif, toutes les
images avec le cadre bleu
sont imprimées.
• Pendant l’impression, ne
déplacez pas l’imprimante
et ne l’éteignez pas; la
cassette d’impression ou
le papier peut rester
bloqué. Dans ce cas,
éteignez et rallumez
l’imprimante, et reprenez
l’impression depuis le
début.
• N’insérez pas une autre
feuille de papier
d’impression tant que
vous n’avez pas retiré la
feuille imprimée.
• Pendant l’impression, le
papier est partiellement
éjecté plusieurs fois par la
fente de sortie du papier.
Ne tirez pas le papier de
force.
3 Appuyez sur ENTER.
Le cadre bleu apparaît à l’intérieur du cadre blanc
et l’image sélectionnée est désignée pour
l’impression.
Le cadre
blanc
devient bleu.
Affichage de l’image d’impression réelle en taille
maximale
Déplacez le cadre blanc sur l’image désirée, puis
appuyez sur CAPTURE à l’étape 3.
L’indicateur MEMORY s’allume. L’image de taille
maximale sélectionnée apparaît au centre de
l’écran. Pour afficher l’image de taille maximale
suivante ou précédente, appuyez sur
suivante) ou V
(image précédente).
v (image
Si vous désirez resélectionner l’image, appuyez sur
PICTURE. L’indicateur INPUT s’allume et la liste
des images en pendentif réapparaît. Répétez les
étapes 2 et 3.
4 Appuyez sur PRINT.
L’indicateur d’impression et l’indicateur
d’alimentation du papier se mettent à clignoter.
Introduisez le papier d’impression (page 17). Le
papier d’impression est automatiquement chargé et
l’impression débute.
Indicateur d’impression
Impression
suite
Impression
FR
21
Page 76

Impression d’une image du “Memory Stick” ou de la carte PC (suite)
Remarques
•
Evitez de stocker le papier
avec les faces imprimées
se touchant ou en contact
avec des produits en
caoutchouc ou en
plastique pendant une
période prolongée, y
compris le chlorure de
vinyle et les plastifiants; il
y a un risque de transfert
de l’encre sur ces surfaces.
• En fonction du type
d’appareil photo
numérique ou de
caméscope, le rapport
d’écran d’une image
enregistrée diffère, si bien
que l’image n’occupera
peut-être pas toute la zone
d’impression.
• Suivant le type d’appareil
photo numérique ou de
caméra vidéo, une image
de contrôle peut être
affichée avec les images
primaires dans la liste de
miniatures. La qualité
d’impression des images
de contrôle n’est pas aussi
bonne que celle des
images primaires.
Attention que si vous
effacez les images de
contrôle (page 40), il se
peut que les données des
images primaires soient
endommagées.
• Suivant le type d’appareil
photo numérique ou de
caméra vidéo, une image
peut être étirée
verticalement si vous
l’avez fait pivoter ou si
vous l’avez traitée avec
votre appareil photo
numérique ou une caméra
vidéo. Ce n’est pas en
raison d’une défaillance
de l’imprimante, mais
parce que l’image a été
réenregistrée avec votre
appareil photo numérique
ou votre caméra vidéo.
Sens d’impression
L’image affichée sur votre téléviseur est imprimée
dans le sens indiqué ci-dessous.
Image affichée
Image imprimée
5 Lorsque l’impression est terminée, un bip sonore
retentit et le papier d’impression est
automatiquement éjecté par la fente de sortie.
Retirez l’impression de l’imprimante.
L’indicateur d’impression s’éteint après que vous
avez retiré le papier d’impression.
Réimpression de la même image
Appuyez sur PRINT.
Le chargeur automatique en option VPF-A3 vous
permet d’imprimer 25 exemplaires de la même image
sur des feuilles séparées.
Impression d’autres images
Appuyez sur PICTURE de sorte que l’écran des images
en pendentif apparaisse, puis effectuez les étapes 1 à 5.
Impression d’images multiples en continu
Vous pouvez imprimer des images multiples en
continu jusqu’à 25 feuilles à l’aide du chargeur
automatique en option VPF-A3.
Impression de toutes les images
Vous pouvez utiliser le menu pour sélectionner toutes
les images de votre “Memory Stick” ou carte PC.
Reportez-vous à la page 36.
22
FR
Impression
Page 77

Impression d’une image depuis
l’appareil vidéo
Remarques
• Pour imprimer une image
animée sans flou,
sélectionnez “VIDEO
MOTION” pour la
compensation du flou*.
• Pour imprimer une
image fixe ou une image
au ralenti avec une
bonne qualité d’image,
sélectionnez “VIDEO
STILL” pour aucune
compensation du flou.
La compensation du flou
pour ce type d’image
risque de détériorer la
résolution d’impression.
• Il est déconseillé de
sélectionner une image
alors que l’appareil
vidéo se trouve en mode
de pause parce que cela
provoque une perte de
qualité de l’image.
Sélectionnez l’image
pendant la lecture des
images.
• Réglez INPUT SELECT
avant d’appuyer sur
CAPTURE.
* Compensation du flou
Lorsque vous réglez
INPUT SELECT sur
“VIDEO MOTION”,
l’image sélectionnée
apparaît à l’écran et une
ligne rouge horizontale se
déplace du dessus vers le
bas dans la moitié gauche
de l’écran, puis se déplace
du dessus vers le bas dans
la moitié droite de l’écran.
Pendant cette séquence, s’il
y a un flou dans l’image dû
au mouvement,
l’imprimante compense
automatiquement l’image
(compensation du flou).
Lorsque la compensation
du flou est terminée, l’écran
s’assombrit une seule fois
et l’image d’impression
apparaît à l’écran.
Vous pouvez capturer l'image entrée de l'appareil
vidéo raccordé au connecteur VIDEO INPUT de
l'imprimante et l'imprimer en format pleine page
(impression standard).
impression standard
Préparation1Préparation
1
2
CLEAR ALL
34 5
Indicateur POWER
Préparations
PICTURE
1 Mettez l’imprimante et le téléviseur sous tension et
réglez le sélecteur d’entrée du téléviseur sur
“VIDEO”.
L’indicateur d’alimentation (POWER) s’allume.
2 Réglez INPUT SELECT sur “VIDEO MOTION” ou
“VIDEO STILL”.
Pour imprimer Position du sélecteur
images animées entrées par la VIDEO MOTION
caméra vidéo ou la platine
images fixes ou au ralenti VIDEO STILL
entrées par la caméra vidéo
ou la platine
images fixes entrées par VIDEO STILL
l’appareil photo numérique
ou la caméra vidéo
suite
Impression
Impression
FR
23
Page 78

Impression d’une image depuis l’appareil vidéo (suite)
Remarque
Lorsque la molette de
mode d’impression est
réglée sur “ (index)”,
vous ne pouvez pas
enregistrer d’image dans
la mémoire en appuyant
sur la touche CAPTURE.
Impression
1 Réglez la molette de mode d’impression sur “
(standard)”.
2 Démarrez la lecture sur l’appareil vidéo.
Pendant que l'indicateur INPUT s'allume, l'image
de lecture apparaît sur l'écran ( image d'entrée).
Pour plus de détails sur la lecture sur l’appareil
vidéo, reportez-vous au mode d’emploi qui
l’accompagne.
Image entrée
Lorsque vous
sélectionnez “VIDEO
MOTION”
Lorsque vous réglez
INPUT SELECT sur
“VIDEO MOTION”, le
flou de l’image
sélectionnée est compensé
à l’étape 3.
Resélection de l'image
Appuyez sur PICTURE.
L’image de lecture
apparaît à l'écran.
Lorsque vous appuyez
sur CLEAR ALL,
l'imprimante revient en
mode de veille.
Recommencez la
procédure d'impression
depuis le début.
FR
Impression
24
3 Appuyez sur CAPTURE lorsque l’image que vous
voulez imprimer apparaît à l’écran.
L’image pleine page sélectionnée apparaît au centre
de l’écran et l’indicateur MEMORY s’allume.
Image d'impression
Page 79

Remarques
• En cours d’impression,
ne déplacez pas
l’imprimante et ne la
mettez pas hors tension;
il se peut sinon que la
cassette d’impression ou
le papier se bloque. Si
cela se produit, mettez
l’imprimante hors et
puis à nouveau sous
tension, et recommencez
ensuite l’impression
depuis le début.
• N’introduisez pas une
autre feuille de papier
d’impression avant
d’avoir retiré la feuille
imprimée.
• Pendant l’impression, le
papier d’impression est
partiellement éjecté à
plusieurs reprises de la
fente de sortie du papier.
Ne tirez pas sur le papier
à ce moment.
• Ne laissez pas des
feuilles de papier avec la
face imprimée l’une
contre l’autre ou en
contact avec des
produits en caoutchouc
ou en plastique (y
compris le chlorure de
vinyle et les plastifiants)
pendant une longue
période; l’encre risque
sinon de se transférer
dessus.
4 Appuyez sur PRINT.
L’indicateur d’impression et l’indicateur
d’alimentation du papier se mettent à clignoter.
Introduisez le papier d’impression (page 17). Le
papier d’impression est automatiquement chargé et
l’impression débute.
Impression
Indicateur d’impression
Sens d’impression
L’image affichée sur votre téléviseur est imprimée
dans le sens illustrée ci-dessous.
Image affichée
Image imprimée
5 Lorsque l’impression est terminée, un bip sonore
retentit et le papier d’impression sort
automatiquement par la fente d’éjection. Retirez
l’impression de l’imprimante.
L’indicateur d’impression s’éteint après que vous
avez retiré le papier d’impression.
Réimpression de la même image
Assurez-vous que l’image désirée est affichée à l’écran,
puis appuyez sur PRINT.
Le chargeur automatique en option VPF-A3 vous
permet d’imprimer 25 exemplaires de la même image
en continu sur des feuilles séparées.
Impression
25
FR
Page 80

Réalisation de différents tirages
Impression de la date
Remarque
Vous ne pouvez imprimer
la date que si les données
de date de l’image sont
enregistrées en format
DCF (Design rule for
Camera File system).
Lors de l’impression d’une image
dans le “Memory Stick” ou sur la
carte PC, vous pouvez imprimer la
date enregistrée avec l’image fixe
prise au moyen de votre appareil
photo numérique ou de votre
caméra.
Avant de commencer...
1 Mettez l’imprimante et le
téléviseur sous tension et réglez
le sélecteur d’entrée du
téléviseur sur “VIDEO”.
2 Mettez INPUT SELECT sur “MEMORY STICK/PC
CARD”.
3 Mettez PRESET PRINT sur “OFF”.
Date
’99.01.01
1 Réglez DATE sur “ON.”
La date n'est pas imprimée.
La date est imprimée.
Remarque
Vous ne pouvez pas
imprimer la date lorsque
vous imprimez une image
directement au départ de
votre appareil vidéo.
FR
Réalisation de différents tirages
26
2 Sélectionnez l’impression désirée à l’aide de la
molette de mode d’impression.
Vous pouvez sélectionner une impression standard
(page 20), un tirage fractionné (page 27), ou une
impression d’index (page 33).
3 Insérez un “Memory Stick” ou une carte PC et
sélectionnez la ou les images à imprimer.
Pour plus de détails sur les procédures
d’utilisation, reportez-vous aux pages relatives au
mode d’impression correspondant.
4 Appuyez sur PRINT et insérez le papier
d’impression.
L’image sélectionnée est imprimée avec la date.
Page 81

Réalisation de tirages fractionnés
Impression des images d’un “Memory
Stick” ou d’une carte PC
Vous pouvez réaliser des tirages fractionnés en 2, 4 ou
16 images. Vous pouvez également désigner
l’impression fractionnée de la même image ou
d’images différentes.
Avant de commencer...
1
Mettez l’imprimante et le téléviseur sous tension et
réglez le sélecteur d’entrée du téléviseur sur “VIDEO”.
2
Mettez INPUT SELECT sur “MEMORY STICK/PC
CARD”.
3 Mettez PRESET PRINT sur “OFF.”
4
Insérez un “Memory Stick” ou une carte PC dans la
fente d’insertion du “Memory Stick” ou de la carte PC.
1 Sélectionnez le type de fractionnement à l'aide de la
molette de mode d'impression.
Vous pouvez sélectionner une impression
fractionnée en 2, 4 ou 16 fois la même image ou des
images différentes.
Impression de la date
Vous pouvez imprimer la
date si l’image a été
sauvegardée en réglant
DATE sur “ON.”
Impression
fractionnée de
2 images
différentes
Impression
fractionnée de
2 fois la même
image
Réalisation de différents tirages
Impression
fractionnée
de 4 images
différentes
Impression fractionnée
de 16 images différentes
Impression
fractionnée
de 4 fois la
même image
Impression fractionnée
de 16 fois la même image
suite
Réalisation de différents tirages
27
FR
Page 82

Réalisation de tirages fractionnés (suite)
2 Sélectionnez l’image.
•Pour sélectionner la même image pour tous les
plans fractionnés:
1 Appuyez sur les touches fléchées pour déplacer
le cadre blanc sur l’image que vous voulez
imprimer et appuyez ensuite sur ENTER. (Le
Resélection d’une image
Déplacez le cadre blanc
sur l'image dont vous
désirez annuler la
sélection et appuyez sur
ENTER. Le cadre bleu
disparaît et la sélection est
annulée.
Si vous désirez
resélectionner l'image
après avoir affiché l'image
d'impression réelle,
appuyez sur PICTURE
pour revenir à l'écran en
pendentif, puis répétez
l'étape 2.
Resélection du type de
fractionnement
Appuyez sur PICTURE
de sorte que l'écran en
pendentif apparaisse.
Resélectionnez le type de
fractionnement à l'aide de
la molette du mode
d'impression. Vous
pouvez utiliser les images
sélectionnées ou modifier
la sélection.
Annulation de
l’opération
Appuyez sur CLEAR
ALL. L'image sélectionnée
est retirée et l'imprimante
revient en mode de veille.
Suivez les procédures
d'impression jusqu'au
début.
cadre bleu apparaît à l'intérieur du cadre blanc.)
2 Si vous voulez réaliser d’autres tirages fractionnés
d’une même image, répétez l’étape 1.
•Pour sélectionner des images différentes pour
chaque plan fractionné:
Appuyez sur les touches fléchées pour déplacer
1
le cadre blanc sur l’image que vous voulez
imprimer et appuyez ensuite sur ENTER. (Le
cadre bleu apparaît à l'intérieur du cadre blanc.)
2 Répétez l’étape 1 pour sélectionner des images
pour les plans fractionnés dans l’ordre de votre
choix.
Les images sont placées à
partir du coin supérieur
gauche de la feuille
jusqu'au coin inférieur droit
dans l'ordre de la sélection,
et non pas dans l'ordre de la
liste d'images.
Vous pouvez également sélectionner une image
de différentes pages.
Si vous sélectionnez plus d’images que le
nombre de plans fractionnés, les images sont
automatiquement désignées pour le tirage
suivant.
Affichage de l’image d’impression réelle
Appuyez sur CAPTURE.
L'image d'impression avec le cadre blanc (pour
l'impression d'une même image en plan fractionné)
ou le cadre bleu (pour l'impression fractionnée de
différentes images) apparaît au centre de l'écran.
Pour afficher plusieurs tirages fractionnés, appuyez
sur V ou v. Pour revenir à la liste des images en
pendentif, appuyez sur PICTURE.
Remarque
Si vous appuyez sur
PRINT lorsque l'image
d'impression est affichée,
seule l'image affichée est
imprimée.
FR
Réalisation de différents tirages
28
Si vous sélectionnez
l’impression fractionnée
de 4 fois la même image
Si vous sélectionnez l’impression
fractionnée de 4 images différentes
Page 83

3 Appuyez sur PRINT et insérez le papier
d’impression.
Les images sélectionnées sont imprimées.
Impression d’images depuis un
appareil vidéo
Vous pouvez réaliser des tirages fractionnés en 2, 4 ou
16 images. Vous pouvez également désigner
l’impression fractionnée de la même image ou
d’images différentes.
Avant de commencer...
1 Mettez l’imprimante et le téléviseur sous tension et
réglez le sélecteur d’entrée du téléviseur sur
“VIDEO”.
2 Réglez INPUT SELECT sur “VIDEO MOTION” ou
“VIDEO STILL”.
1 Sélectionnez le type de fractionnement à l’aide de la
molette de mode d’impression.
Vous pouvez sélectionner l’impression de 2, 4 ou 16
fois la même image ou de 2, 4 ou 16 images
différentes.
Réalisation de différents tirages
Impression
fractionnée de
2 images
différentes
Impression
fractionnée
de 4 images
différentes
Impression fractionnée
de 16 images différentes
Impression
fractionnée de
2 fois la même
image
Impression
fractionnée
de 4 fois la
même image
Impression fractionnée
de 16 fois la même image
suite
Réalisation de différents tirages
29
FR
Page 84

Réalisation de tirages fractionnés (suite)
2 Sélectionnez l’image.
•Pour sélectionner la même image pour tous les
plans fractionnés:
1 Mettez l’appareil vidéo
sous tension et démarrez
la lecture.
2 Appuyez sur CAPTURE
lorsque l’image que vous
voulez imprimer apparaît
sur l’écran.
L’image en mémoire est
Si vous sélectionnez
“VIDEO MOTION”
Lorsque vous mettez
INPUT SELECT sur
"VIDEO MOTION", le
flou de l'image
sélectionnée est corrigé à
l'étape 2.
Resélection de l’image
Appuyez sur CLEAR
ALL. L'image sélectionnée
est retirée et l'imprimante
revient en mode de veille.
Suivez les procédures
d'impression jusqu'au
début. Vous pouvez aussi
appuyer une nouvelle fois
sur CAPTURE pendant
que l’indicateur
MEMORY clignote pour
resélectionner l’image.
Lorsque vous choisissez
l'impression fractionnée
avec les mêmes images,
vous pouvez également
appuyer sur PICTURE
pour afficher l'image
d'entrée afin de
resélectionner une
nouvelle image.
Remarque
Vous ne pouvez pas
sélectionner un nombre
d’images qui dépasse le
nombre de plans
fractionnés sélectionné.
3 Appuyez sur PRINT et insérez le papier
affichée dans les plans
fractionnés sélectionnés à
l’étape 1.
•Si vous sélectionnez des images différentes pour
chaque plan fractionné:
1 Mettez l’appareil vidéo sous tension et
démarrez la lecture.
2 Appuyez sur CAPTURE lorsque l’image que
vous voulez imprimer apparaît sur l’écran.
L’image en mémoire est affichée dans le
premier des plans fractionnés sélectionnés à
l’étape 1.
3 Appuyez sur PICTURE de façon à ce que
l’image d’entrée apparaisse sur l’écran.
4 Répétez les étapes 2 à 3 jusqu’à ce que vous
ayez sélectionné les images pour tous les plans
fractionnés.
Les images sélectionnées sont sélectionnées
comme suit:
supérieur gauche n supérieur droit n
inférieur gauche n inférieur droit.
Si vous sélectionnez une impression fractionnée en 4
d’impression.
Les images sélectionnées sont imprimées.
Si vous sélectionnez
une impression
fractionnée en 4
FR
Réalisation de différents tirages
30
Page 85

Création d’un calendrier
Vous pouvez réaliser un calendrier de 12 mois avec
une image d’un “Memory Stick”, d’une carte PC ou
d’un appareil vidéo.
Avant de commencer
1 Mettez l’imprimante et le téléviseur sous tension et
réglez le sélecteur d’entrée de votre téléviseur sur
“VIDEO”.
2 • Lors de l’impression à partir d’une carte, mettez
INPUT SELECT sur “MEMORY STICK/PC
CARD”.
• Lors de l’impression à partir d’un appareil vidéo,
mettez INPUT SELECT sur “VIDEO MOTION” ou
“VIDEO STILL”.
3 Mettez PRESET PRINT sur “OFF”.
1 Sélectionnez “ (impression d’un calendrier)” à
l’aide de la molette de mode d’impression.
Réalisation de différents tirages
1 2 3 4
1999
6
5
8
7
9 10 11 12
Impression d’un calendrier
2 Sélectionnez l’image à imprimer.
• Lors de l’impression à partir d’un “Memory Stick”
ou d’une carte PC
1 Insérez un “Memory Stick” ou une carte PC
dans la fente d’insertion du “Memory Stick”
ou de la carte PC.
2 Appuyez sur les touches fléchées pour
déplacer le cadre blanc sur l’image que vous
désirez imprimer, puis appuyez sur ENTER.
(Le cadre bleu apparaît à l'intérieur du cadre
blanc.)
3 Appuyez sur CAPTURE.
Réalisation de différents tirages
suite
31
FR
Page 86

Création d’un calendrier (suite)
Si vous sélectionnez
“VIDEO MOTION”
Lorsque vous mettez
INPUT SELECT sur
“VIDEO MOTION”, le
flou de l’image
sélectionnée est compensé
à l’étape 2.
Sélection d’une image
différente
• Pour imprimer d’un
Memory Stick ou
d’une carte PC:
Appuyez sur V ou v
pour afficher l’image
suivante ou précédente
dans la liste des images
en pendentifs. Pour
revenir à la liste des
images en pendentifs,
appuyez sur PICTURE.
• Pour imprimer d’un
appareil vidéo:
Appuyez sur PICTURE
pour afficher les
images entrées et
resélectionnez l’image
à imprimer.
Vous pouvez
également appuyer de
nouveau sur
CAPTURE pendant
que l’indicateur
MEMORY clignote
pour resélectionner
l’image.
•Lors de l’impression à partir de l’appareil vidéo:
1 Lancez la lecture à partir de votre appareil
vidéo.
2 Appuyez sur CAPTURE lorsque l’image que
vous désirez imprimer apparaît sur l’écran.
L’image sélectionnée se place au centre et est
entourée des calendriers pour 12 mois. Le
calendrier du mois en cours s’affiche dans le coin
supérieur gauche, les calendriers pour les 12 mois
viennent se placer de gauche à droite, de la rangée
du dessus vers la rangée du bas.
Le premier mois
(mois en cours)
1 2 3 4
1999
6
5
7
9 10 11 12
8
L’image sélectionnée
3 Appuyez sur les touches fléchées (B/b) pour
sélectionner le premier mois du calendrier à placer
dans le coin supérieur gauche.
Une pression sur B affiche le mois précédent.
(Après janvier, le mois de décembre de l’année
précédente s’affiche.)
Une pression sur b affiche le mois suivant. (Après
décembre, le mois de janvier de l’année suivante
s’affiche.)
Remarque
Si vous n’ajustez pas
l’horloge correctement, le
calendrier ne commence
pas par le mois en cours.
Reportez-vous à “Réglage
de l’horloge” à la page 12
pour régler l’horloge.
FR
Réalisation de différents tirages
32
4 Appuyez sur PRINT et insérez le papier
d’impression.
Le calendrier de l’image sélectionnée s’imprime.
Page 87

Réalisation d’un index d’images du
“Memory Stick” ou de la carte PC
Vous pouvez réaliser un index des images
sauvegardées dans un “Memory Stick” ou sur une
carte PC. Lorsque vous recherchez une image
enregistrée, vous pouvez la retrouver immédiatement
grâce à cet index.
A propos de l’impression
de la date
Quel que soit le réglage
de DATE sur
l’imprimante, la date de
l’image enregistrée sur le
“Memory Stick” ou la
carte PC est imprimée
avec le numéro d’image
au-dessus de l’image
index. La date n’apparaît
cependant pas sur l’image
affichée sur l’écran du
téléviseur.
Avant de commencer
1 Mettez l’imprimante et le téléviseur sous tension et
mettez le sélecteur d’entrée de votre téléviseur sur
“VIDEO”.
2 Mettez INPUT SELECT sur “MEMORY STICK/PC
CARD”.
3 Mettez PRESET PRINT sur “OFF”.
1 Sélectionnez “ (Impression d’index)” à l’aide de
la molette de mode d’impression.
Impression d’index
2 Insérez un “Memory Stick” ou une carte PC dans la
fente d’insertion du “Memory Stick” ou de la carte
PC.
Toutes les images enregistrées dans le “Memory
Stick” ou sur la carte PC s’affichent dans la liste des
images en pendentif.
S’il y a des images multiples, appuyez sur V ou v
pour afficher la page suivante ou précédente.
suite
Réalisation de différents tirages
Réalisation de différents tirages
FR
33
Page 88

Réalisation d’un index d’images du Memory Stick ou de la carte
PC (suite)
Remarque
• Si vous appuyez sur
PRINT lorsque l’image
d’impression réelle est
affichée (l’indicateur
MEMORY est allumé),
seul l’index affiché
s’imprime.
• Si vous appuyez sur
PRINT lorsque la liste
des miniatures est
affichée (l’indicateur
INPUT est allumé), la
liste d’index affichée et
d’autres listes d’index
du “Memory Stick” ou
de la carte sont
imprimés. Si le nombre
d’images dépasse 43,
l’image portant le
numéro 43 ou un
numéro supérieur est
imprimée sur une autre
feuille de papier
d’impression.
• Si le nombre d’images
est inférieur à 42, les
plans sans images
restent vierges.
• L’imprimante peut
traiter jusqu’à 256
fichiers d’image. S’il y
a plus de 256 images
enregistrées sur le
“Memory Stick” ou la
carte PC, l’imprimante
imprime 256 images.
Les autres images ne
peuvent être
imprimées.
• La date n’est imprimée
qu’avec les images
réalisées avec un
appareil photo
numérique ou une
caméra vidéo
supportant le format
DCF98 (format de
fichier d’image pour
appareil photo
numérique).
Affichage de l’image d’impression réelle
Appuyez sur CAPTURE.
L’image d’impression réelle d’un index comprenant
42 images en pendentif apparaît à l’écran.
S’il y a des images multiples, appuyez sur V ou v
pour afficher la page suivante ou précédente.
Pour revenir à la liste des images en pendentif,
appuyez sur PICTURE.
3 Appuyez sur PRINT et insérez le papier
d’impression.
L’index des images du “Memory Stick” ou de la
carte PC s’imprime.
Les images sont réduites au format de 42
miniatures. Chaque miniature est identifiée par un
numéro d’image et la date (année, mois et jour) de
prise de vues avec l’appareil photo numérique ou la
caméra vidéo.
FR
Réalisation de différents tirages
34
Page 89

Impression d’images du “Memory Stick” ou
de la carte PC présélectionnées par un
appareil photo numérique
Remarques
• Si vous mettez PRESET
PRINT sur “OFF”, les
images présélectionnées
par votre appareil photo
numérique ou votre
caméra vidéo
n’apparaissent pas comme
image sélectionnée. Dans
ce cas, appliquez les
procédures d’impression
normale.
• Dans ce mode
d’impression, vous ne
pouvez réaliser qu’un
tirage standard quelle que
soit la position de la
molette de mode
d’impression.
• Lorsqu’il n’y a aucune
image spécifiée dans le
“Memory Stick” ou sur la
carte PC, “NO FILE”
s’affiche.
• Pour plus de détails sur
les réglages d’impression
présélectionnés, reportezvous au mode d’emploi
de l’appareil photo
numérique ou de la
caméra vidéo que vous
utilisez.
• En fonction du type
d’appareil photo
numérique et de caméra
vidéo, la fonction
d’impression sélectionnée
supportée par
l’imprimante, ou parfois
la fonction même, n’est
pas disponible.
• Si vous appuyez sur
PRINT pendant
l’affichage de l’image
d’impression réelle, seule
l’image affichée
s’imprime.
• Si vous appuyez sur
PRINT alors que la liste de
miniatures est affichée,
toutes les images de la
liste de miniatures sont
imprimées.
Vous pouvez imprimer les images d’un “Memory
Stick” ou d’une carte PC présélectionnées par votre
appareil photo numérique ou votre caméra vidéo.
Avant de commencer
1
Mettez l’imprimante et le téléviseur sous tension et mettez
le sélecteur d’entrée de votre téléviseur sur “VIDEO”.
2
Mettez INPUT SELECT sur “MEMORY STICK/PC CARD”.
1 Mettez PRESET PRINT sur “ON”.
2
Insérez un “Memory Stick” ou une carte PC dans la
fente d’insertion du “Memory Stick” ou de la carte PC.
Les images présélectionnées
par votre appareil photo
numérique ou votre caméra
vidéo sont affichées dans la
liste des images en
pendentif.
Affichage de l’image d’impression réelle
Appuyez sur CAPTURE.
La première image d’impression apparaît au centre
de l’écran. Pour afficher l’image d’impression
suivante ou précédente, appuyez sur v (image
suivante) ou V (image précédente).
Pour revenir à la liste des images en pendentif,
appuyez sur PICTURE.
3 Appuyez sur PRINT et insérez le papier
d’impression.
Les images présélectionnées sont imprimées dans
l’ordre de leur présélection.
Conseil
L’imprimante peut imprimer automatiquement les images
prédéfinies en format DPOF (Digital Print Order Format). Le
format “DPOF” sert à enregistrer les informations nécessaires
à l’impression automatique d’images avec un appareil photo
numérique ou une caméra vidéo dans un atelier d’impression
ou avec une imprimante personnelle.
Réalisation de différents tirages
Réalisation de différents tirages
FR
35
Page 90

Impression simultanée des images d’un
“Memory Stick” ou d’une carte PC
Vous pouvez imprimer les images d’un “Memory
Stick” ou d’une carte PC en même temps.
Avant de commencer
1 Mettez l’imprimante et le téléviseur sous tension et
mettez le sélecteur d’entrée de votre téléviseur sur
“VIDEO”.
2 Mettez INPUT SELECT sur “MEMORY STICK/PC
CARD”.
3 Mettez PRESET PRINT sur “OFF”.
1 Sélectionnez l’impression désirée à l’aide de la
molette de mode d’impression.
Vous pouvez sélectionner une impression standard
(page 20), un tirage fractionné (page 27), une
impression de calendrier (page 31) ou une
impression d’index (page 33).
Annulation de la
sélection
Appuyez sur b pour
sélectionner “CANCEL”
et appuyez sur ENTER.
L’affichage du menu
reste.
Annulation des
opérations de menu
Appuyez sur MENU.
L’affichage du menu
disparaît sans sauvegarde
des réglages.
L’imprimante revient en
mode de veille.
FR
Réalisation de différents tirages
36
2 Insérez un Memory Stick ou une carte PC dans la
fente d’insertion.
3 Appuyez sur MENU.
Le menu apparaît sur votre
téléviseur.
Curseur
” SELECT ALL IMAGES
DELETE
FORMAT
CLOCK SET
Ecran de télévision
4 Appuyez sur V/v pour déplacer le curseur (”) sur
“SELECT ALL IMAGES” et appuyez sur ENTER.
La boîte de dialogue de
confirmation apparaît.
” SELECT ALL IMAGES
DELETE
FORMAT
CLOCK SET
SELECT?
”OK CANCEL
5 Assurez-vous que “OK” est sélectionné et appuyez
sur ENTER.
Toutes les images sont sélectionnées et le menu
réapparaît.
Page 91

Annulation de la
sélection
Appuyez sur CLEAR
ALL. La sélection de
toutes les images est
annulée. Commencez les
procédures d’impression
depuis le début.
6 Appuyez sur MENU.
L’écran de menu disparaît et toutes les images de la
liste de miniatures s’affichent avec un cadre bleu.
Remarques
• Si vous appuyez sur
PRINT pendant
l’affichage de l’image
d’impression réelle,
seule l’image affichée
est imprimée.
• Si vous appuyez sur
PRINT alors que la liste
de miniatures est
affichée, toutes les
images de la liste de
miniatures sont
imprimées.
• L’imprimante peut
traiter jusqu’à 256
fichiers d’image. S’il y
a plus de 256 images
enregistrées sur le
“Memory Stick” ou la
carte PC, utilisez
l’utilitaire
d’imprimante fourni
(Sony Printer Utility for
MS300/MS300E) pour
transférer les images du
“Memory Stick” ou de
la carte PC sur le
disque dur de votre PC
et imprimez-les ensuite.
Réalisation de différents tirages
Affichage de l’image d’impression réelle
Appuyez sur CAPTURE.
La première image d’impression apparaît au centre
de l’écran. Pour afficher l’image d’impression
suivante ou précédente, appuyez sur v (image
suivante) ou V (image précédente).
Pour revenir à la liste des images en pendentif,
appuyez sur PICTURE.
7 Appuyez sur PRINT et insérez le papier
d’impression.
Les images spécifiées sont imprimées dans l’ordre
du numéro d’image.
Réalisation de différents tirages
37
FR
Page 92

Enregistrement d’une image vidéo
comme image fixe
Remarque
En fonction du type
d’appareil photo
numérique ou de
caméscope, vous ne
pouvez pas visualiser les
images fixes enregistrées
par l’imprimante.
Resélection de l’image
Appuyez sur PICTURE.
L’image de lecture
apparaît sur l’écran.
Suivez l’étape 2.
Si vous appuyez sur
CLEAR ALL,
l’imprimante revient en
mode de veille.
Commencez les
procédures d’impression
depuis le début.
Remarques
• Lors de l’utilisation du
“Memory Stick”,
vérifiez que la position
du commutateur de
protection contre
l’écriture autorise
l’écriture.
• Lors de l’utilisation de
la carte PC, vérifiez les
spécifications de la
carte et que la carte
autorise l’écriture.
• Vérifiez que le
“Memory Stick” ou la
carte PC dispose de
suffisamment d’espace
pour sauvegarder le ou
les fichiers d’image.
Vous pouvez enregistrer l’image de lecture de votre
appareil vidéo comme image fixe sur un “Memory
Stick” ou une carte PC.
Vous pouvez visualiser l’image au moyen de votre
appareil photo numérique, traiter l’image à l’aide de
l’utilitaire d’imprimante (Sony Printer Utility for
MS300/MS300E) sur votre ordinateur ou sauvegarder
l’image comme un fichier d’image général.
Avant de commencer
1 Mettez l’imprimante et le téléviseur sous tension et
mettez le sélecteur d’entrée de votre téléviseur sur
“VIDEO”.
2 Mettez INPUT SELECT sur “VIDEO MOTION” ou
“VIDEO STILL”.
1 Réglez la molette de mode d’impression sur “
(standard).”
2 Sélectionnez l’image à enregistrer.
1Mettez l’appareil vidéo sous tension et démarrez
la lecture.
2Appuyez sur CAPTURE lorsque l’image que
vous voulez enregistrer apparaît sur l’écran.
3 Insérez un “Memory Stick” ou une carte PC dans la
fente d’insertion du “Memory Stick” ou de la carte
PC.
FR
Réalisation de différents tirages
38
Page 93

A propos du nom de
fichier de l’image
enregistrée
L’image est enregistrée
avec le nom de fichier
“MSP0####.jpg”. Le
numéro “####” est
attribué séquentiellement
suivant le plus grand
numéro de fichier
enregistré dans le
Memory Stick ou sur la
carte PC.
A propos du nombre
d’images à sauvegarder
L’image sélectionnée est
comprimée et
sauvegardée dans le
format JPEG. Le nombre
de fichiers d’image
pouvant être sauvegardé
dans le Memory Stick ou
sur la carte PC varie en
fonction du type d’image.
En général, un “Memory
Stick” ou une carte PC de
4 MB peut mémoriser
approximativement 40 à
60 images.
Remarques
• L’imprimante peut
sauvegarder un
maximum de 256
fichiers d’image, en
comptant les images
déjà mémorisées sur le
“Memory Stick” ou la
carte PC.
• Une image enregistrée
par l’imprimante peut
ne pas être visualisée au
moyen d’un autre
appareil.
• Vous ne pouvez pas
sauvegarder une image
avec un nom de fichier
de type “DCIM” ou
“100MSDCF”.
4 Appuyez sur SAVE.
L’indicateur d’accès de la fente d’insertion du
“Memory Stick” ou de la carte PC s’allume, et
l’image affichée est enregistrée dans le “Memory
Stick” ou sur la carte PC.
Réalisation de différents tirages
Si un message d’erreur apparaît
Message d’erreur Signification
FORMAT ERROR Le “Memory Stick” ou la carte PC
introduit n’est pas formaté.
Insérez un “Memory Stick” ou une
carte PC formaté ou formatez-le avec
l’imprimante.
MS/PC CARD FULL Il n’y a pas suffisamment d’espace
pour enregistrer l’image ou le nombre
maximum d’images est déjà enregistré.
Utilisez un “Memory Stick” ou une
carte PC formatée.
LOCKED Le “Memory Stick” ou la carte PC
n’autorise pas l’écriture. Modifiez la
position du commutateur de
protection.
Réalisation de différents tirages
39
FR
Page 94

Suppression des images du Memory
Stick et de la carte PC
Remarques
• Une image, dès qu’elle
est effacée, est perdue à
tout jamais. Avant de
supprimer une image,
vérifiez bien qu’il s’agit
de la bonne image.
Vous pouvez supprimer
•
jusqu’à 256 images.
• Si le Memory Stick et la
carte PC sont protégés
contre l’écriture, vous
ne pouvez pas
supprimer les images.
Lorsqu’une image est
•
protégée, le repère de
protection (H) est
affiché à gauche audessus de l’image dans la
liste de miniatures. Si
vous essayez d’effacer
une image protégée,
l’indication “FILE
PROTECT” s’affiche et
vous ne pouvez pas
l’effacer. Pour désactiver
la protection, reportezvous aux instructions
d’utilisation de votre
caméra numérique pour
images fixes ou de votre
caméra vidéo.
•
Lorsque “DELETING”
est affiché, ne mettez pas
l’appareil hors tension,
ne retirez pas le Memory
Stick ou la carte PC de la
fente d’insertion et
n’appuyez pas sur
d’autres touches
d’exploitation de
l’imprimante. Vous
risquez d’endommager
le Memory Stick ou la
carte PC.
Annulation de la
suppression
Assurez-vous que
“CANCEL” est sélectionné
à l’étape 3 et appuyez sur
ENTER.
Annulation des
opérations de menu
Appuyez sur MENU.
L’affichage du menu
disparaît sans sauvegarde
des réglages.
FR
Réalisation de différents tirages
40
Vous pouvez supprimer les images d’un Memory
Stick ou d’une carte PC.
Avant de commencer
1 Mettez l’imprimante et le téléviseur sous tension et
mettez le sélecteur d’entrée de votre téléviseur sur
“VIDEO”.
2 Mettez INPUT SELECT sur “MEMORY STICK/PC
CARD”.
3 Mettez PRESET PRINT sur “OFF”.
4 Insérez un Memory Stick ou une carte PC dans la
fente d’insertion du Memory Stick ou de la carte PC.
1 Sélectionnez l’image à supprimer.
1Appuyez sur les touches fléchées pour déplacer
le cadre blanc sur l’image que vous désirez
supprimer, puis appuyez sur ENTER. (Le cadre
bleu apparaît à l’intérieur du cadre blanc.)
2Si vous désirez supprimer d’autres images,
répétez l’étape 1.
2 Appuyez sur MENU.
Le menu apparaît sur l’écran du
” SELECT ALL IMAGES
DELETE
FORMAT
CLOCK SET
téléviseur.
Ecran de télévision
3 Appuyez sur V/v pour déplacer le curseur (”) sur
“DELETE” et appuyez sur ENTER.
La boîte de dialogue de
confirmation apparaît.
SELECT ALL IMAGES
” DELETE
FORMAT
CLOCK SET
DELETE? OK
”CANCEL
4 Appuyez sur B pour sélectionner “OK” et
appuyez sur ENTER.
Les images sélectionnées sont supprimées.
5 Appuyez sur MENU.
L’affichage du menu disparaît et l’imprimante
revient en mode de veille.
Page 95

Remarques
• Lorsque vous formatez
un Memory Stick ou la
carte PC, toutes les
images sont
supprimées, y compris
les fichiers protégés.
Avant de formater,
vérifiez-en bien le
contenu.
• Si le Memory Stick ou
la carte PC sont
protégés contre
l’écriture, vous ne
pouvez pas formater les
images. Vérifiez que le
Memory Stick ou la
carte PC autorise
l’écriture.
• Lorsque
“FORMATTING” est
affiché, ne mettez pas
l’appareil hors tension,
ne retirez pas le
Memory Stick ou la
carte PC de la fente
d’insertion et
n’appuyez pas sur
d’autres touches
d’exploitation de
l’imprimante. Vous
risquez d’endommager
le Memory Stick ou la
carte PC.
• Si une erreur de disque
se produit en cours de
formatage ou si une
carte formatée ne peut
être lue ou enregistrée
au moyen de votre
caméra numérique
pour images fixes,
reformatez-la sur votre
caméra numérique
pour images fixes.
Formatage de la carte
Vous pouvez formater un Memory Stick ou une carte
PC.
Avant de commencer
1 Mettez l’imprimante et le téléviseur sous tension et
mettez le sélecteur d’entrée de votre téléviseur sur
“VIDEO.”
2 Mettez INPUT SELECT sur “MEMORY STICK/PC
CARD”.
3 Mettez PRESET PRINT sur “OFF”.
4 Insérez un Memory Stick ou une carte PC dans la
fente d’insertion du Memory Stick ou de la carte PC.
1 Appuyez sur MENU.
Le menu apparaît sur le téléviseur.
2 Appuyez sur V/v pour déplacer le curseur (”) sur
“FORMAT” et appuyez sur ENTER.
La boîte de dialogue de
confirmation apparaît.
SELECT ALL IMAGES
DELETE
” FORMAT
CLOCK SET
FORMAT? OK ”CANCEL
3 Appuyez sur B pour sélectionner “OK” et appuyez
sur ENTER.
Le Memory Stick ou la carte PC est formaté.
4 Appuyez sur MENU.
L’affichage du menu disparaît et l’imprimante
revient en mode de veille.
Réalisation de différents tirages
Annulation du
formatage
Assurez-vous que
“CANCEL” est
sélectionné à l’étape 2 et
appuyez sur ENTER.
Réalisation de différents tirages
41
FR
Page 96

Pour votre information
Précautions
Sécurité
• Faites uniquement fonctionner l'imprimante sur une
tension de 110 à 120 V CA (pour le modèle DPPMS300) ou 220 à 240 V CA (pour le modèle DPPMS300E), 50/60 Hz.
• Evitez de déposer ou de laisser tomber des objets
lourds sur le cordon d'alimentation ou
d'endommager le cordon par tout autre moyen. Ne
faites en aucun cas fonctionner cet appareil avec un
cordon endommagé.
• Si des liquides ou des solides venaient à pénétrer à
l’intérieur du châssis, débranchez l’imprimante et
faites-la vérifier par le personnel qualifié avant de la
remettre en service.
• Ne démontez en aucun cas l’imprimante.
• Pour débrancher le cordon, saisissez-le par la fiche.
Ne tirez jamais sur le cordon proprement dit.
• Si vous prévoyez de ne pas utiliser l’imprimante
pendant une période prolongée, débranchez le
cordon d’alimentation de la prise murale (secteur).
• Ne manipulez pas l’imprimante avec brusquerie.
• Pour réduire les risques d’électrocution, débranchez
toujours l’imprimante de la prise murale avant les
opérations de nettoyage et d’entretien.
FR
Pour votre information
42
Installation
• N’installez pas l’appareil dans des endroits :
– soumis à des vibrations;
– très humides;
– excessivement poussiéreux;
– exposés au rayonnement direct du soleil;
– extrêmement chauds ou froids.
• N’utilisez pas d’appareil électrique à proximité de
l’imprimante. L’imprimante ne fonctionne pas
correctement lorsqu’elle se trouve dans un champ
électromagnétique.
• L’imprimante est conçue pour fonctionner
horizontalement. Ne tentez pas d’utiliser
l’imprimante en position inclinée.
• Ne posez pas d’objets lourds sur l’imprimante.
Page 97

• Laissez suffisamment d’espace libre autour de
l’imprimante de façon à ne pas obstruer les ouïes de
ventilation. L’obstruction de ces orifices risque de
provoquer une surchauffe interne.
Condensation d’humidité
Si l’imprimante est transportée directement d’un
endroit froid dans un endroit extrêmement chaud ou
humide, de l’humidité risque de se condenser à
l’intérieur de l’appareil. En pareil cas, l’imprimante ne
fonctionnera probablement pas correctement et
risquera de présenter une défaillance si vous persistez
à vouloir l’utiliser. Si de l’humidité se condense, mettez
l’imprimante hors tension et attendez au moins une
heure avant de l’utiliser.
Transport
Avant de transporter l’imprimante, retirez la cassette
d’impression et remballez l’imprimante dans le carton
et les matériaux de conditionnement d’origine.
Si vous ne disposez plus du carton et des matériaux de
conditionnement d’origine, protégez l’imprimante de
façon à ne pas l’endommager durant le transport.
Nettoyage
Nettoyez le châssis, le panneau et les commandes avec
un chiffon doux et sec, ou un chiffon doux légèrement
imprégné d’une solution détergente neutre. N’utilisez
aucun type de solvant comme de l’alcool ou de la
benzine, qui risqueraient de ternir le fini du châssis.
Pour votre information
Restrictions de duplication
Si vous dupliquez des documents avec l’imprimante,
faites particulièrement attention aux points suivants:
• La duplication de billets de banque, de pièces ou de
bons de caisse est contraire à la loi.
• La duplication de certificats vierges, de licences, de
passeports, bons privés ou de timbres inutilisés est
également contraire à la loi.
• Les peintures, photographies et les livres protégés
par des droits d’auteur ne peuvent pas être
dupliqués sans le consentement du détenteur de ces
droits d’auteur, à moins que vous n’utilisiez ces
duplications à des fins strictement privées.
Pour votre information
43
FR
Page 98

A propos du “Memory Stick”
A propos du “Memory Stick”
Le “Memory Stick” est un support d’enregistrement
amovible utilisé avec un appareil photo numérique, un
caméscope ou un PC. Vous pouvez facilement afficher,
sauvegarder et supprimer les images.
Remarques sur l’utilisation du “Memory Stick”
• Evitez de toucher le connecteur du “Memory Stick”
ou de le mettre en contact avec des objets
métalliques.
• Si vous collez une étiquette sur le “Memory Stick”
comme spécifié à la page suivante, utilisez l’étiquette
fournie pour le “Memory Stick” uniquement.
N’utilisez pas d’autres étiquettes.
• Ne laissez pas tomber le “Memory Stick” et évitez de
le plier, ou de le soumettre à des chocs.
• Ne démontez pas et ne modifiez pas le “Memory
Stick”.
• Evitez de renverser des liquides sur le “Memory
Stick”.
• N’utilisez pas et ne stockez pas le “Memory Stick”
dans des endroits:
– extrêmement chauds, comme à l’intérieur d’une
voiture ou à l’extérieur sous les rayons directs du
soleil ou encore à proximité d’un chauffage;
– en plein soleil
– très humides
– contenant des substances corrosives
– excessivement poussiéreux
• Lorsque vous stockez et transportez le “Memory
Stick”, laissez-le dans son boîtier d’origine afin de
protéger les données importantes.
• Evitez de retirer le “Memory Stick” de la fente
d’insertion pendant que l’indicateur d’accès est
allumé–imprimante lit ou écrit des données dans le
“Memory Stick”.
FR
Pour votre information
44
Page 99

• Dans les cas suivants, les données sauvegardées
peuvent être endommagées ou effacées:
– lorsque vous mettez l’imprimante hors tension ou
si vous retirez le “Memory Stick” de la fente
d’insertion pendant que l’imprimante accède au
“Memory Stick”;
– lorsque vous utilisez le “Memory Stick” près
d’aimants ou de champs magnétiques.
Pour protéger les images
Pour éviter une suppression accidentelle de données
d’image importantes, utilisez la protection contre
l’écriture du “Memory Stick”. Faites coulisser le
commutateur dans la position de protection contre
l’écriture ou dans la position autorisant l’écriture:
❒ Position autorisant l’écriture
Faites coulisser le commutateur vers la gauche en
position autorisant l’écriture. Vous pouvez lire,
écrire et supprimer les données du “Memory
Stick”. Le formatage du “Memory Stick” est
également possible. Si vous sauvegardez des
images vidéo dans le “Memory Stick”, mettez le
commutateur dans la position autorisant l’écriture.
❒ Position de protection contre l’écriture
Faites coulisser le commutateur vers la droite en
position de protection contre l’écriture. Il ne vous
est plus possible d’écrire ou de supprimer les
données contenues dans le “Memory Stick”. Nous
vous suggérons de mettre le commutateur en
position de protection contre l’écriture si vous vous
contentez de visualiser les images du “Memory
Stick”.
Connecteur
Position
autorisant
l’écriture
Position de
protection
contre
l’écriture
Pour votre information
Collez l’étiquette ici
LOCK LOCK
Pour votre information
45
FR
Page 100

A propos des cartes PC
Remarques
• Vous ne pouvez pas
utiliser de cartes PC
dont les spécifications
électriques sont de 3V
seulement.
• N’insérez pas d’autres
types de carte PC dans
la fente d’insertion de
l’imprimante. Vous
risquez d’endommager
l’imprimante.
FR
Pour votre information
46
La fente d’insertion de la carte PC de l’imprimante
permet de lire et d’écrire sur les cartes à mémoire flash
II compatibles PCMCIA ATA, dont les spécifications
de puissance sont de 5V ou 3,3/5V. L’utilisation d’un
adaptateur pour carte PC disponible dans le commerce
vous permet également d’employer Smart Media et
d’autres types de cartes à mémoire flash.
Remarques sur l’utilisation de la carte PC
• Ne laissez pas tomber la carte PC et évitez de la plier,
ou de la soumettre à des chocs.
• Ne démontez pas et ne modifiez pas la carte PC.
• Evitez de renverser des liquides sur la carte PC.
• N’utilisez pas et ne stockez pas la carte PC dans des
endroits:
– extrêmement chauds, comme à l’intérieur d’une
voiture ou à l’extérieur sous les rayons directs du
soleil ou encore à proximité d’un chauffage;
– en plein soleil
– très humides
– contenant des substances corrosives
– excessivement poussiéreux
– à proximité de parasites électrostatiques ou
électroniques
– près de champs magnétiques
• Evitez de retirer la carte PC de la fente d’insertion
pendant que l’imprimante accède à la carte PC. Sinon,
vous risquez de rendre les données illisibles.
• Si vous utilisez une carte à mémoire flash compacte ou
la Smart Media, utilisez un adaptateur pour carte PC
disponible dans le commerce et qui est compatible
avec la carte. Placez la carte dans l’adaptateur, puis
insérez-le dans l’imprimante. Pour savoir comment
installer la carte et l’adapteur, reportez-vous au mode
d’emploi de l’adaptateur de la carte PC.
• Evitez d’insérer ou de retirer la carte à mémoire flash
compacte ou la Smart Media de l’adaptateur pour
carte PC pendant que l’adaptateur de carte PC est
inséré dans l’imprimante. Cela peut rendre les
données illisibles ou les effacer.
• Pour savoir comment utiliser la carte à mémoire flash
compacte ou la Smart Media, reportez-vous au mode
d’emploi de la carte et de votre appareil photo
numérique
ou votre caméra vidéo.
 Loading...