

Page 1
Printer Driver
3-206-417-12 (1)
Installation Guide
This guide describes installation and use of the Printer
Drivers for Windows 2000, Windows Me, Windows 98, and
Macintosh.
Before Using this Software
Before using the printer driver, be sure to read the “ReadMe”
file located in the same folder of the printer driver on the
CD-ROM.
DPP-MP1
© 2001 Sony Corporation
Page 2

Table of Contents
Windows 2000 Printer Driver
Installing the Printer Driver .................................4
Removing the Printer Driver ................................5
To remove the printer driver ...............................5
To delete the INF file ..........................................5
Using the Printer Driver ........................................6
[Paper] Tab ..........................................................6
[Graphics] Tab ....................................................7
Windows Me Printer Driver
Installing the Printer Driver ...............................10
Removing the Printer Driver ..............................11
To remove the printer driver .............................11
To remove the Sony USB driver .......................11
Using the Printer Driver ......................................12
[Paper] Tab ........................................................12
[Graphics] Tab ..................................................13
Windows 2000
Microsoft and Windows are registered trademarks of
Microsoft Corporation.
Macintosh, Mac and ColorSync are registered
trademarks of Apple Computer, Inc.
Other company names and product names mentioned in
this guide are also trademarks and registered
trademarks.
Windows 98 Printer Driver
Installing the Printer Driver ...............................16
Removing the Printer Driver ..............................18
To remove the printer driver .............................18
To remove the Sony USB driver .......................18
Using the Printer Driver ......................................19
[Paper] Tab ........................................................19
[Graphics] Tab ..................................................20
Macintosh Printer Driver
Installing the Printer Driver ...............................23
Removing the Printer Driver ..............................23
Making Printer Settings ......................................24
Select the DPP-MP1 with the Chooser .............24
Selecting the Paper Type ...................................24
Making Print Settings .......................................25
2
Page 3

Windows 2000 Printer Driver
DPP-MP1
Page 4
Installing the Printer Driver
Connect the DPP-MP1 to the computer.
1
Switch the DPP-MP1 on.
2
Switch on the computer, and then log in as the
3
system administrator.
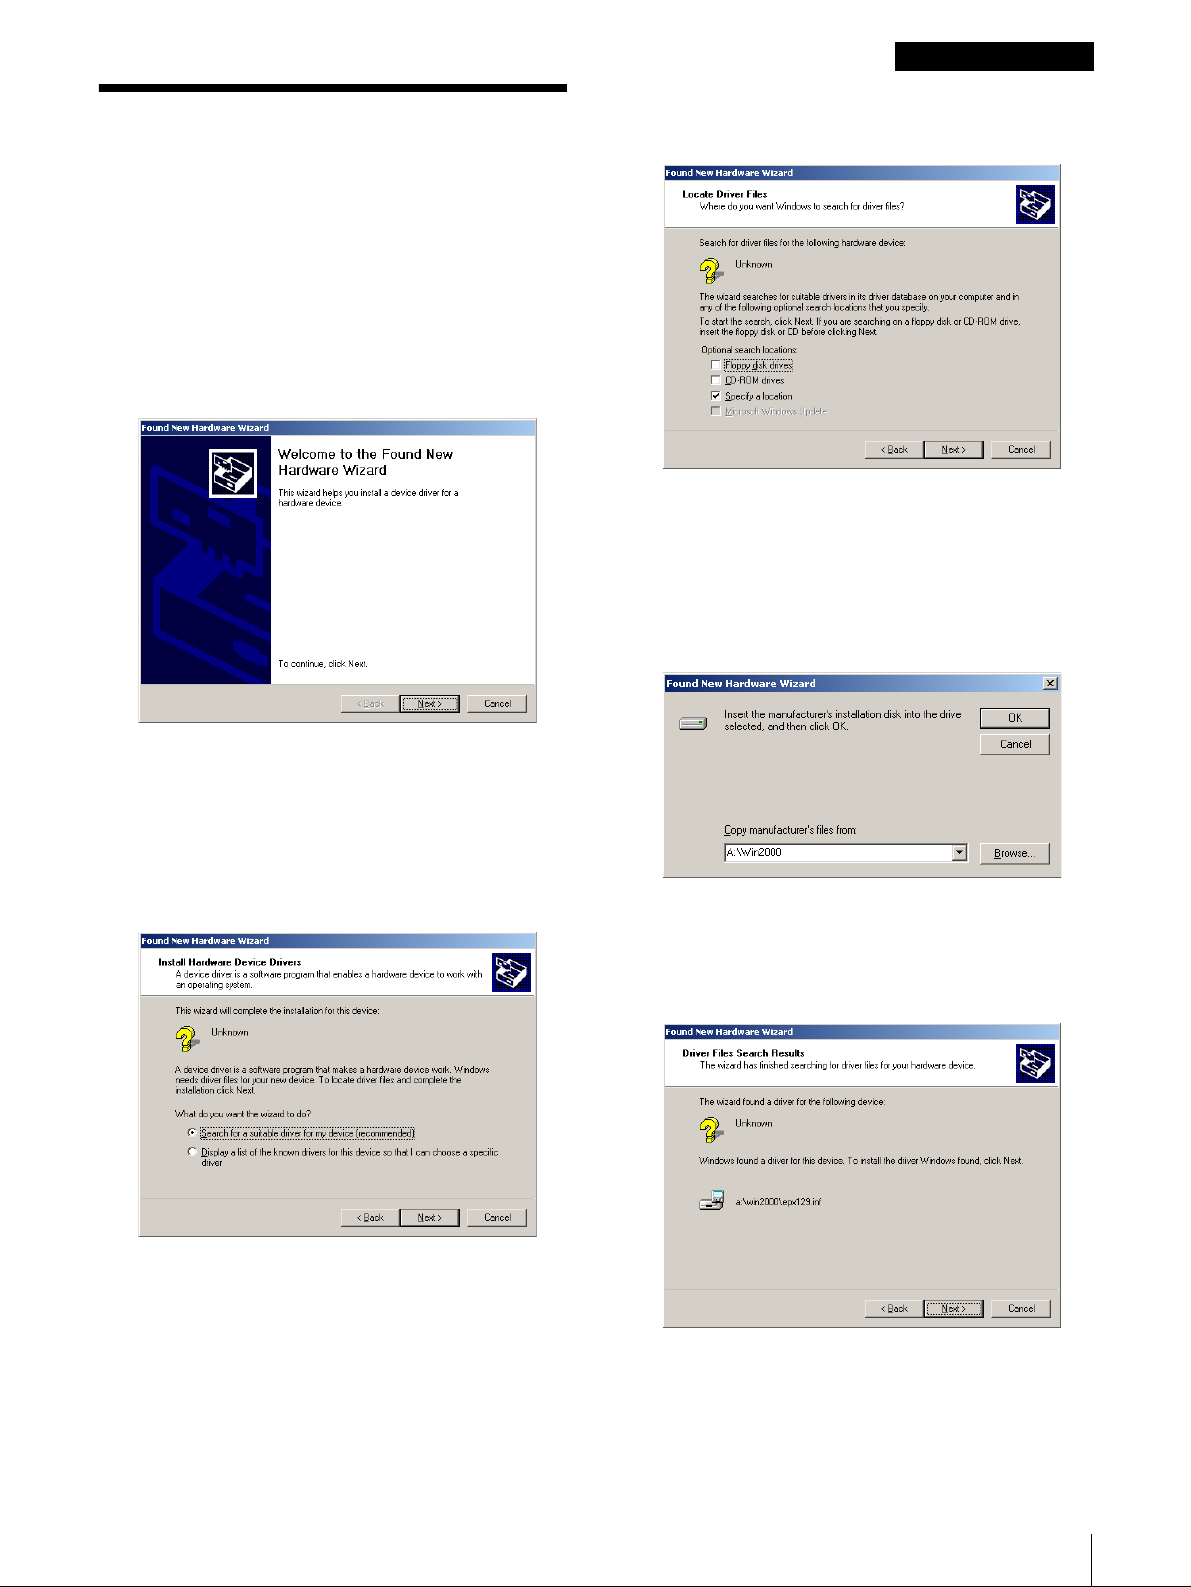
After Windows 2000 starts up, the [Found New
Hardware Wizard] opens.
Windows 2000
Make sure that the [Search for a suitable driver ...]
5
option is selected, and then click the [Next] button.
The next screen opens.
Insert the provided “digital photo printer for DPP-
6
MP1” CD-ROM into the CD-ROM drive.
Click the [Specify a location] check box on, and
7
then click the [Next] button.
The following dialog box opens.
If the [Found New Hardware Wizard] does not
open, open the [Printers] folder in the [Control
Panel], double-click [Add Printer], and then follow
the instructions to install the printer driver.
Click the [Next] button.
4
The next screen opens.
Click the [Browse] button, click the [Win2000]
8
folder on the CD-ROM, and then click the [OK]
button.
The next screen opens.
Installing the Printer Driver
4
Page 5
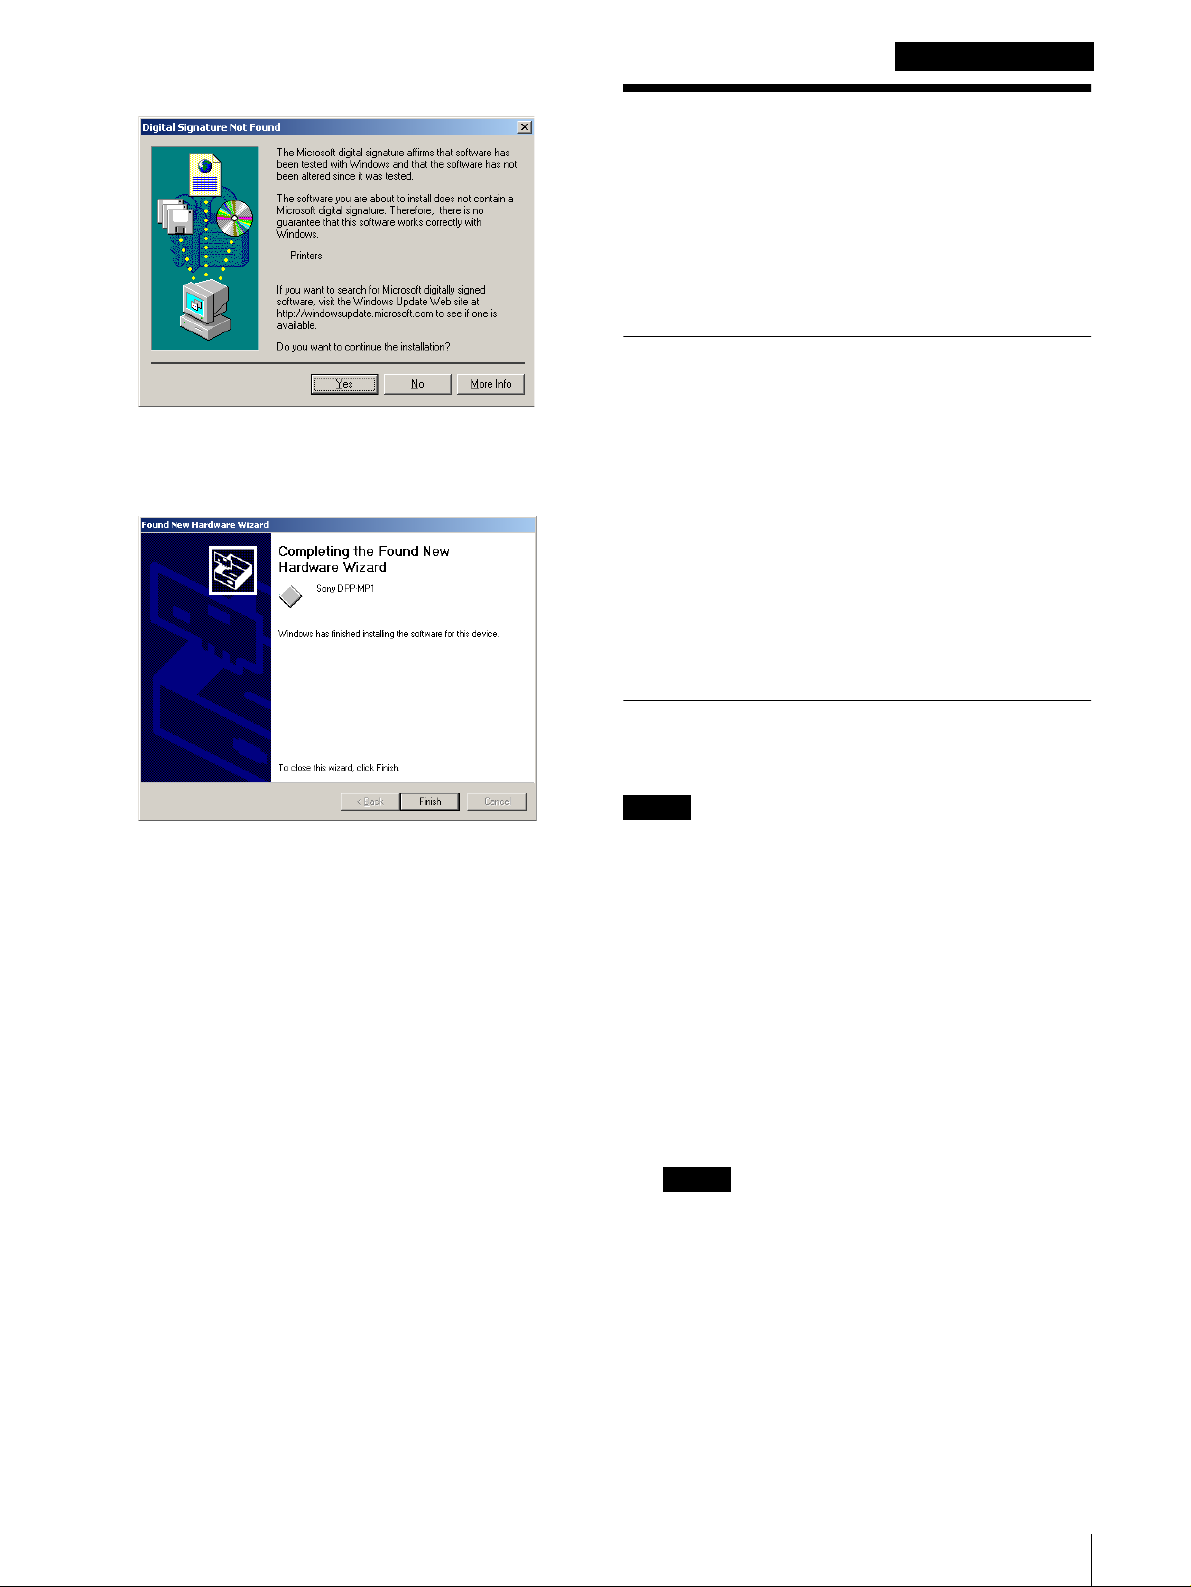
Click the [Next] button.
9
If the [Digital Signature Not Found] dialog box
opens, click the [Yes] button.
The next screen opens.
Windows 2000
Removing the Printer Driver
This section describes the procedure to remove the
printer driver.
After removing the printer driver, delete the INF file as
described further.
To remove the printer driver
Turn on the computer.
1
Select [Printers] from [Settings] in the [Start]
2
menu.
The [Printers] window opens.
Select the printer that you want to remove.
3
On the [File] menu, click [Delete].
4
Click the [Finish] button.
10
The printer driver installation for Windows 2000 is
complete.
The printer driver removal is complete.
To delete the INF file
Delete the DPP-MP1 INF file located in C://WinNT/Inf.
Note
Depending on your Windows settings, the “Inf” folder
may not be displayed. To display the folder, open [My
Computer] and click [Folder Options] on the [Tools]
menu. In the [Folder Options] dialog box, click the
[View] tab, then select [Show hidden files and folders].
In the “Inf” folder, double-click “OemX.inf”
1
(where X is a number). The contents of the INF file
appear.
In the INF file, confirm that the following appears
2
at the top.
SONY DPP-MP1 Printer Driver for Windows 2000
Note
If there is more than one “OemX.inf” file, repeat
steps 1 and 2 as necessary.
Delete all the INF files indicated above.
3
Removing the Printer Driver
5
Page 6
Using the Printer Driver
Windows 2000
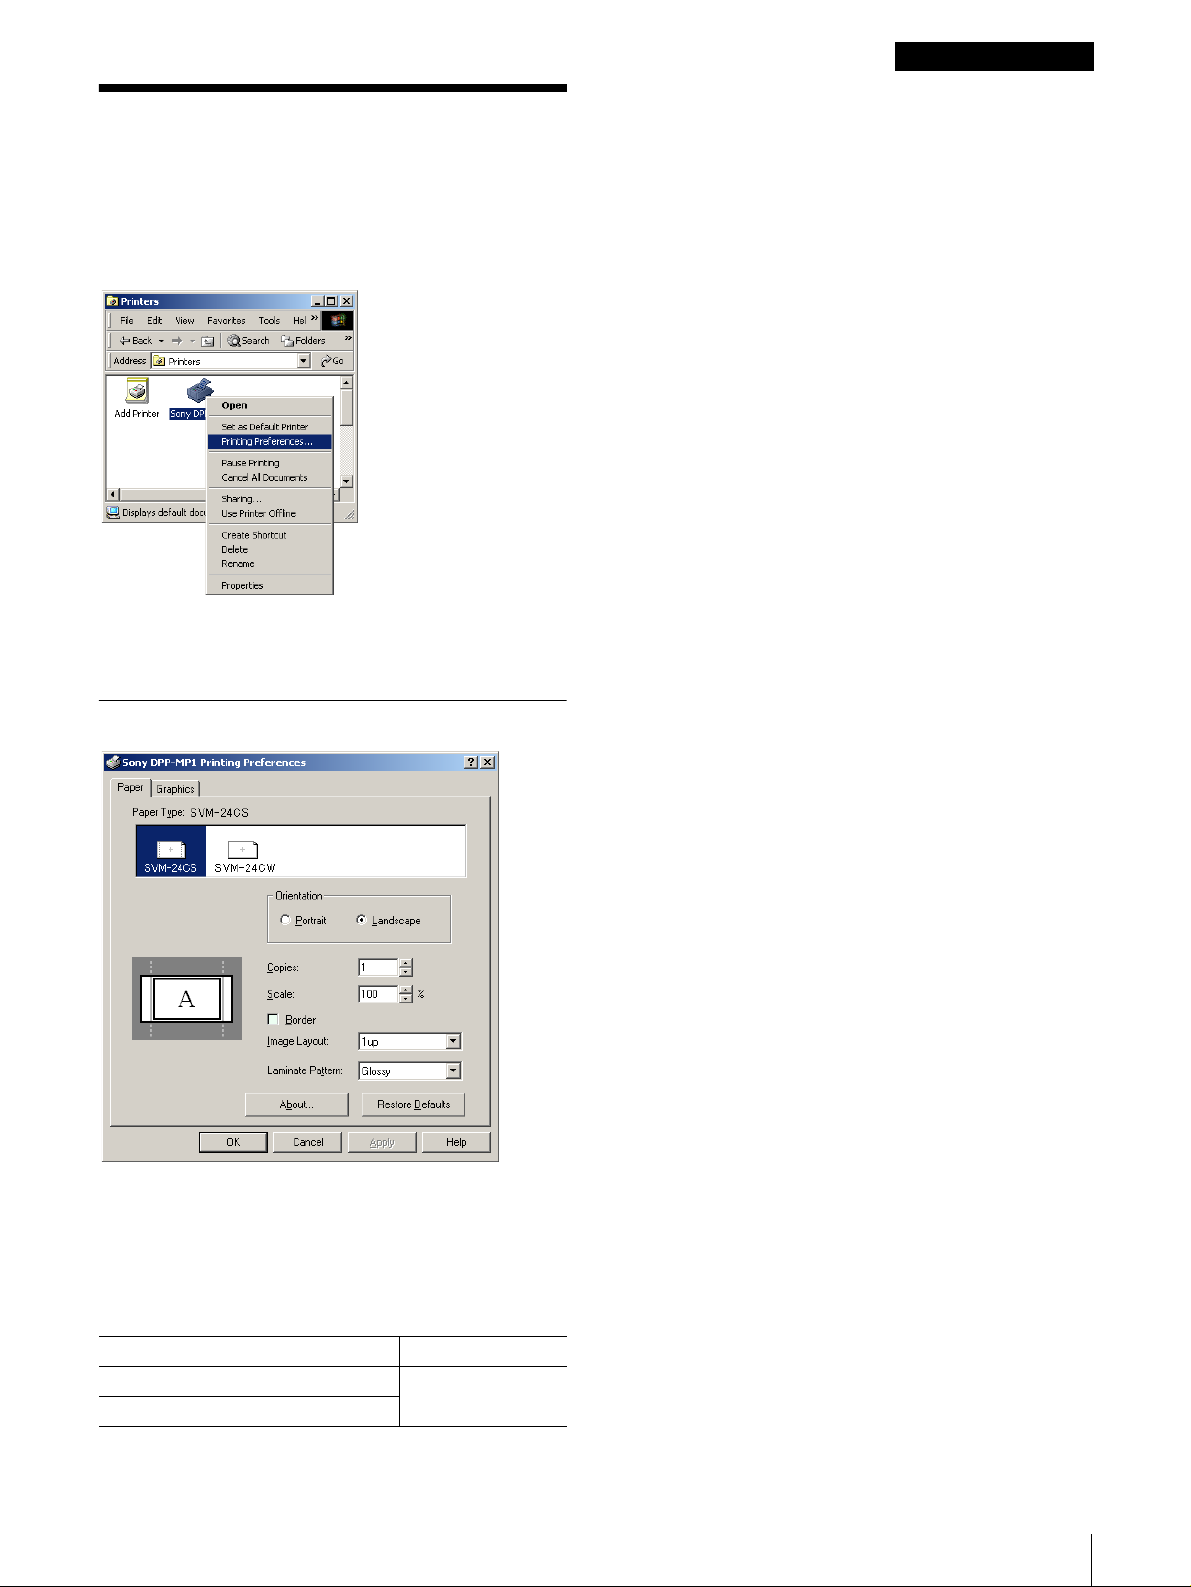
[Orientation]
Select [Portrait] or [Landscape] for the print direction.
You can use the printer driver [Printing Preferences] to
set the default settings for the paper size, orientation,
and other important settings. Open the [Printers] folder
in the [Control Panel], right-click the [Sony DPP-MP1]
icon, and then select [Printing Preferences].
The [Sony DPP-MP1 Printing Preferences] sheet opens
and presents the following tabs and items for setting.
[Paper] Tab
[Copies]
Set the number of copies to print. You can select from 1
to 24 for the number of copies.
[Scale]
Select the rate of enlargement or reduction. You an
select a setting within the range of 10% to 400%.
[Border]
Select this check box to print a border in the margins.
[Image Layout]
Select the number of images to print on one sheet: 1up,
2up, 4up, or 8 up.
[Laminate Pattern]
Select a laminate pattern for the surface of the print from
the three available options:
• [Glossy] The image is printed with a glossy, slick
finish.
• [Texture] The image is printed with a silk screen
finish.
• [Matte] The image is printed with a matte finish.
[Paper Type]
Select the type of paper loaded for printing. Types of
printer packs that can be loaded and maximum image
size settings are as follows,
Print Pack Max. Image Size
SVM-24CS 1010 × 628 pixels
SVM-24CW
Using the Printer Driver
6
Page 7
Windows 2000
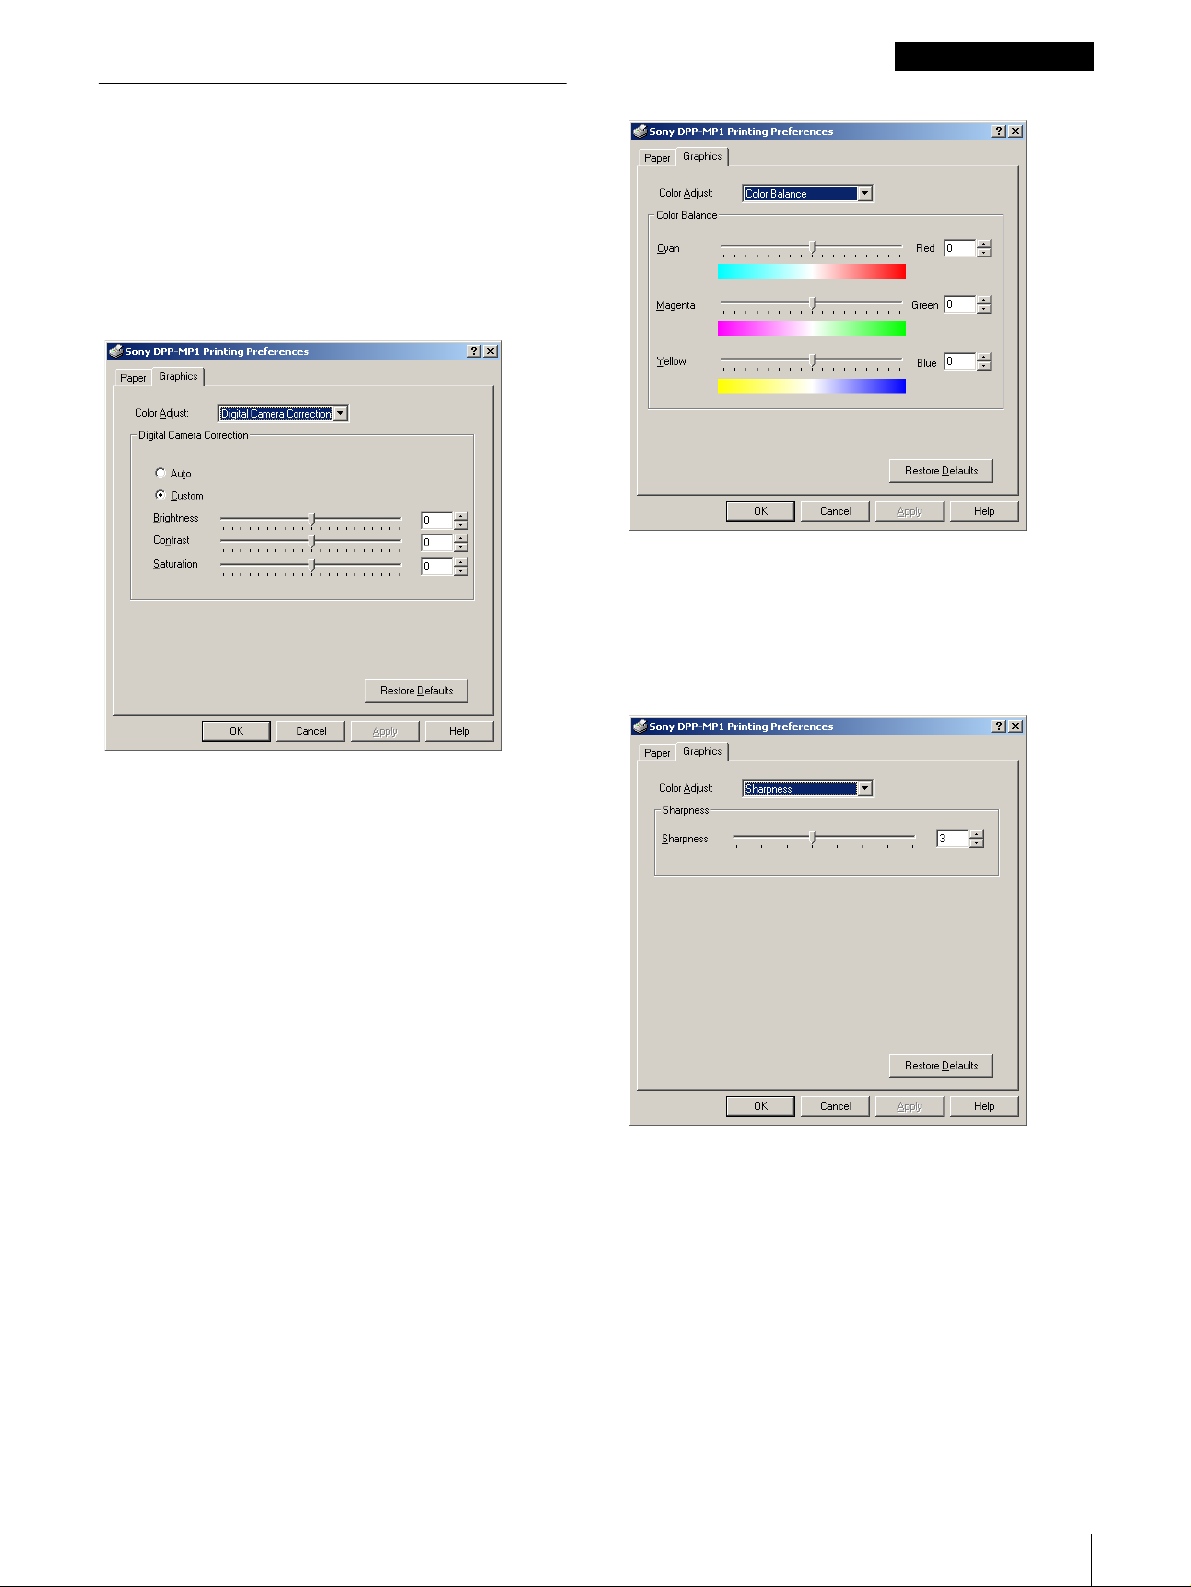
[Graphics] Tab
This tab presents adjustments for image color,
brightness and so forth.
From the [Color Adjust] pull-down list, you can select
[Digital Camera Correction], [Color Balance],
[Sharpness], or [Color Correction], and then adjust the
image with the settings provided for each selection.
[Digital Camera Correction]
[Color Balance]
You can adjust the balance for each color by dragging
the slider to the left or right, entering a value directly
into a box, or clicking the arrows next to a box to
increase or decrease the setting.
When printing an image captured with a digital camera,
you can use the [Brightness], [Contrast] and [Saturation]
settings to adjust the image.
• Select [Auto] to achieve the best possible processing
for a digital image.
• Select [Custom] to manually adjust the [Brightness],
[Contrast], and [Saturation] of the image.
[Sharpness]
You an adjust the sharpness of the image outline by
dragging the slider to the left or right, entering a value
directly into the box, or clicking the arrows next to the
box to increase or decrease the setting.
Using the Printer Driver
7
Page 8
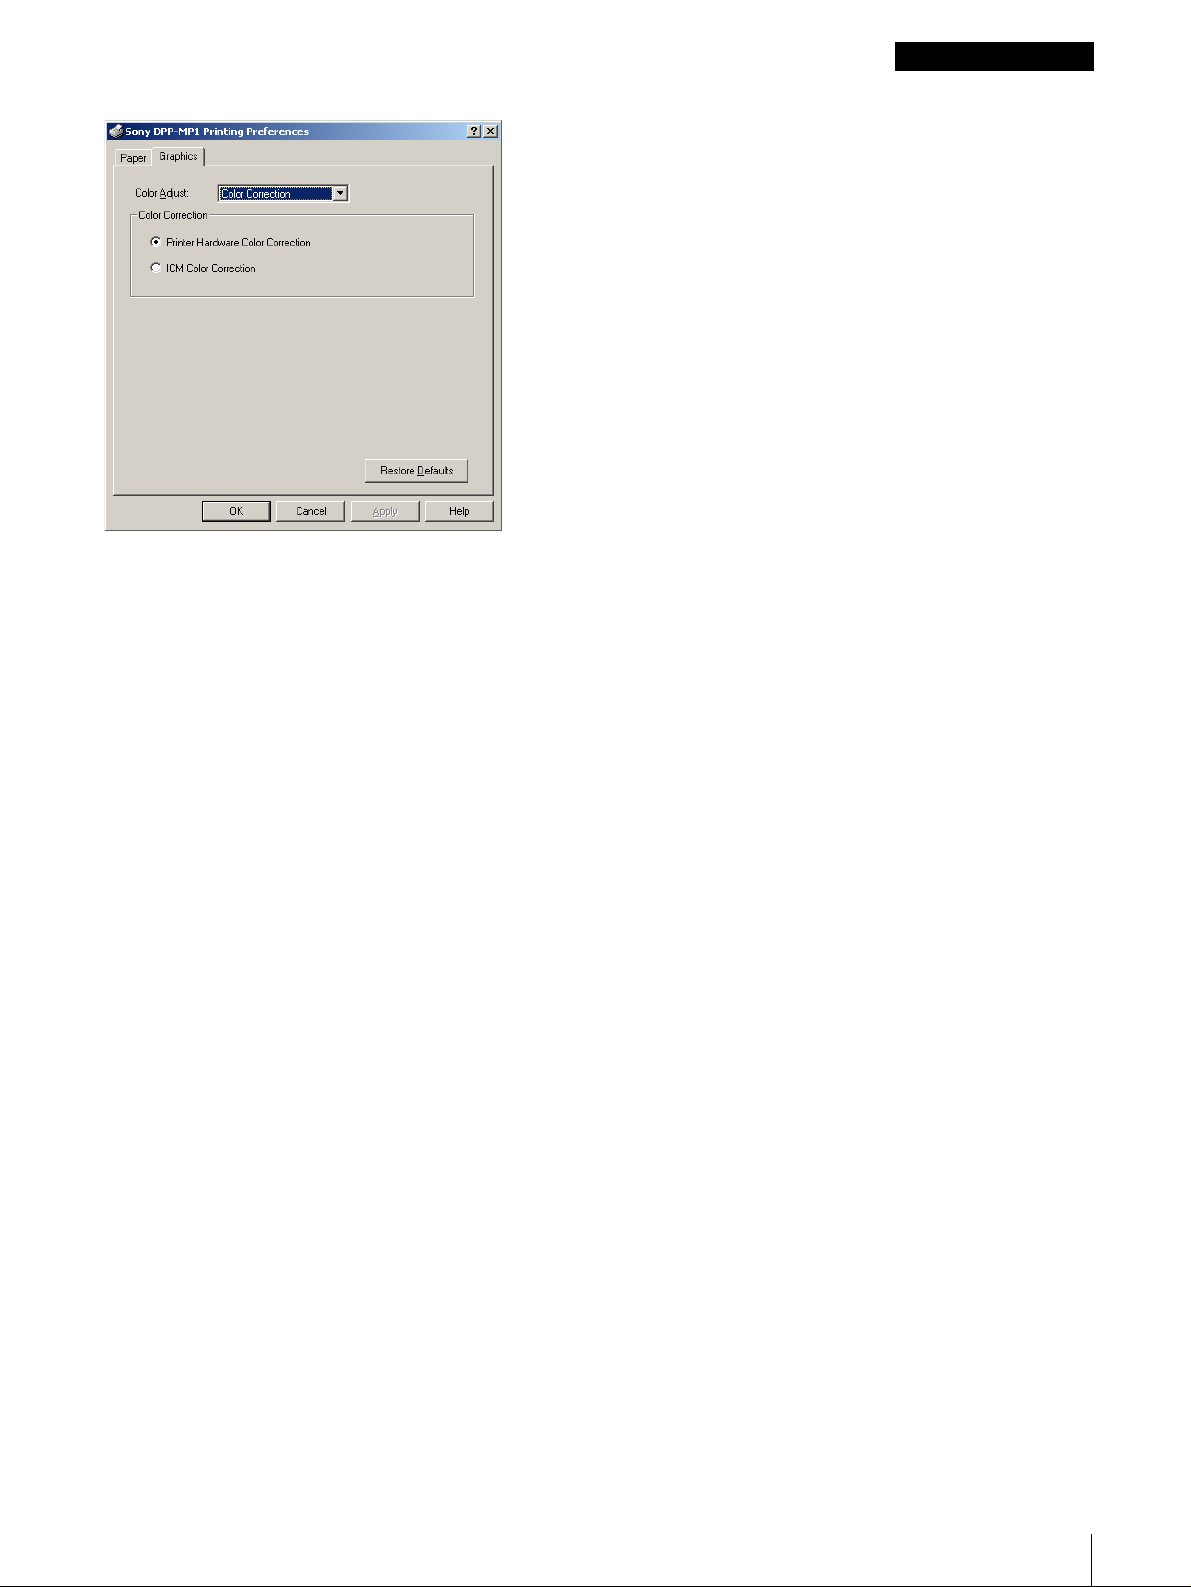
[Color Correction]
Select the color correction method.
• Select [Printer Hardware Color Correction] to have
the printer correct the color automatically.
• Select [ICM Color Correction] to use a color profile
for color correction.
Windows 2000
Using the Printer Driver
8
Page 9

Windows Me Printer Driver
DPP-MP1
Page 10

Installing the Printer Driver
Connect the DPP-MP1 to the computer.
1
Switch the DPP-MP1 on.
2
Switch on the computer.
3
After Windows Me starts, the [Add New Hardware
Wizard] opens.
Windows Me
Click the [Finish] button.
6
A dialog box opens.
Click [Yes] to re-start your computer. If the [System
7
Settings Change] dialog box does not open after the
desktop screen appears, re-start the computer.
After the computer re-starts, the next screen
8
appears.
If the [Add New Hardware Wizard] does not open,
double-click the [My Computer] icon. Then
double-click the [Control Panel] folder, doubleclick the [Printers] folder, and double-click [Add
Printer]. Follow the instructions displayed to install
the printer driver.
Insert the provided “digital photo printer for DPP-
4
MP1” CD-ROM into the CD-ROM drive.
Click the [Next] button.
5
After the files are copied, the next screen appears.
If the [Add New Hardware Wizard] does not open,
double-click the [My Computer] icon. Then
double-click the [Control Panel] folder, doubleclick the [Printers] folder, and double-click [Add
Printer]. Follow the instructions displayed to install
the printer driver.
Click the [Next] button.
9
The next screen opens.
Installing the Printer Driver
10
Page 11

Click the [Finish] button.
10
After the files are copied, the next screen opens.
Click the [Finish] button.
11
The printer driver installation for the USB connection is
complete.
Windows Me
Removing the Printer Driver
This section describes the procedure to remove the
printer driver.
After removing the printer driver, remove the Sony USB
driver.
To remove the printer driver
Turn on the computer.
1
Select [Printers] from [Settings] in the [Start]
2
menu.
The [Printers] window opens.
Select the printer that you want to remove.
3
On the [File] menu, click [Delete].
4
The printer driver removal is complete.
To remove the Sony USB driver
Note
• Exit all programs before you remove the Sony USB
driver.
• Before removing the Sony USB driver, make sure that
all Sony printer drivers that use the USB port have
been removed.
Select [Control Panel] from [Settings] in the [Start]
1
menu.
The [Control Panel] window opens.
Double-click [Add/Remove Programs].
2
The [Add/Remove Programs Properties] dialog box
opens.
In the list that appears on the [Install/Uninstall] tab,
3
select “Sony USB Driver”, and then click the [Add/
Remove] button.
The following dialog box opens.
Removing the Printer Driver
11
Page 12

Click the [OK] button.
4
When the removal procedure finishes, the
following dialog box opens.
Note
If another printer is using the Sony USB driver, the
following dialog box appears.
Click the [OK] button. This stops the removal
procedure.
Click the [OK] button.
5
The computer restarts.
The Sony USB driver removal is complete.
Windows Me
Using the Printer Driver
You can use the printer's [Properties] sheet to set the
default settings for the paper size, orientation, and other
important settings.
Double-click the [My Computer] icon, double-click
[Printers], right-click the [Sony DPP-MP1] icon, and
then click [Properties].
The [SONY DPP-MP1 Properties] sheet opens and
presents the following tabs and items for setting.
[Paper] Tab
[Paper Type]
Select the type of paper loaded for printing. Types of
printer packs that can be loaded and maximum image
size settings are as follows,
Print Pack Max. Image Size
SVM-24CS 1010 × 628 pixels
SVM-24CW
Using the Printer Driver
12
Page 13

Windows Me
[Orientation]
Select [Portrait] or [Landscape] for the print direction.
[Copies]
Set the number of copies to print. You can select from 1
to 24 for the number of copies.
[Scale]
Select the rate of enlargement or reduction. You can
select a setting within the range of 10% to 400%.
[Border]
Select this check box to print a border in the margins.
[Image Layout]
Select the number of images to print on one sheet: 1up,
2up, 4up, or 8 up.
[Laminate Pattern]
Select a laminate pattern for the surface of the print from
the three available options:
• [Glossy] The image is printed with a glossy, slick
finish.
• [Texture] The image is printed with a silk screen
finish.
• [Matte] The image is printed with a matte finish.
[Graphics] Tab
This tab presents adjustments for image color,
brightness and so forth.
From the [Color Adjust] pull-down list, you can select
[Digital Camera Correction], [Color Balance],
[Sharpness], or [Color Correction], and then adjust the
image with the settings provided for each selection.
[Digital Camera Correction]
When printing an image captured with a digital camera,
you can use the [Brightness], [Contrast] and [Saturation]
settings to adjust the image.
• Select [Auto] to achieve the best possible processing
for a digital image.
• Select [Custom] to manually adjust the [Brightness],
[Contrast], and [Saturation] of the image.
Using the Printer Driver
13
Page 14

Windows Me
[Color Balance]
You can adjust the balance for each color by dragging
the slider to the left or right, entering a value directly
into a box, or clicking the arrows next to a box to
increase or decrease the setting.
[Color Correction]
Select the color correction method.
• Select [Printer Hardware Color Correction] to have
the printer correct the color automatically.
• Select [ICM Color Correction] to use a color profile
for color correction.
[Sharpness]
You an adjust the sharpness of the image outline by
dragging the slider to the left or right, entering a value
directly into the box, or clicking the arrows next to the
box to increase or decrease the setting.
Using the Printer Driver
14
Page 15

Windows 98 Printer Driver
DPP-MP1
Page 16

Installing the Printer Driver
Connect the DPP-MP1 to the computer.
1
Switch the DPP-MP1 on.
2
Switch on the computer.
3
After Windows 98 starts, the [Add New Hardware
Wizard] opens.
Windows 98
Make sure the first item, [Search for the best driver
5
...] is selected, and then click the [Next] button.
The next screen opens.
Insert the provided “digital photo printer DPP-
6
MP1” CD-ROM into the CD-ROM drive.
Click the [Specify a location] check box on, click
7
the [Browse] button, open the [Win9X] folder on
the CD-ROM, and then click the [Next] button.
The next screen opens.
If the [Add New Hardware Wizard] does not open,
double-click the [My Computer] icon. Then
double-click the [Control Panel] folder, doubleclick the [Printers] folder, and double-click [Add
Printer]. Follow the instructions displayed to install
the printer driver.
Click the [Next] button.
4
The next screen opens.
Click the [Next] button.
8
After the files are copied, the next screen appears.
Installing the Printer Driver
16
Page 17

Click the [Finish] button.
9
A dialog box opens.
Click [Yes] to re-start your computer. If the [System
10
Settings Change] dialog box does not open after the
desktop screen appears, re-start the computer.
After the computer re-starts, the next screen
11
appears.
Windows 98
Make sure the first item, [Search for the best driver
13
...] is selected, and then click the [Next] button.
The next screen opens.
Click the [Specify a location] check box on, click
14
the [Browse] button, open the [Win9X] folder on
the CD-ROM, and then click the [Next] button.
The next screen opens.
If the [Add New Hardware Wizard] does not open,
double-click the [My Computer] icon. Then
double-click the [Control Panel] folder, doubleclick the [Printers] folder, and double-click [Add
Printer]. Follow the instructions displayed to install
the printer driver.
Click the [Next] button.
12
The next screen opens.
Click the [Next] button.
15
The next screen opens.
Installing the Printer Driver
17
Page 18

Click the [Finish] button.
16
After the files are copied, the next screen opens.
Click the [Finish] button.
17
The printer driver installation for the USB connection is
complete.
Windows 98
Removing the Printer Driver
This section describes the procedure to remove the
printer driver.
After removing the printer driver, remove the Sony USB
driver.
To remove the printer driver
Turn on the computer.
1
Select [Printers] from [Settings] in the [Start]
2
menu.
The [Printers] window opens.
Select the printer that you want to remove.
3
On the [File] menu, click [Delete].
4
The printer driver removal is complete.
To remove the Sony USB driver
Note
• Exit all programs before you remove the Sony USB
driver.
• Before removing the Sony USB driver, make sure that
all Sony printer drivers that use the USB port have
been removed.
Select [Control Panel] from [Settings] in the [Start]
1
menu.
The [Control Panel] window opens.
Double-click [Add/Remove Programs].
2
The [Add/Remove Programs Properties] dialog box
opens.
In the list that appears on the [Install/Uninstall] tab,
3
select “Sony USB driver”, and then click the [Add/
Remove] button.
The following dialog box opens.
Removing the Printer Driver
18
Page 19

Click the [OK] button.
4
When the removal procedure finishes, the
following dialog box opens.
Note
If another printer is using the Sony USB driver, the
following dialog box appears.
Click the [OK] button. This stops the removal
procedure.
Click the [OK] button.
5
The computer restarts.
Windows 98
Using the Printer Driver
You can use the printer's [Properties] sheet to set the
default settings for the paper size, orientation, and other
important settings.
Double-click the [My Computer] icon, double-click
[Printers], right-click the [Sony DPP-MP1] icon, and
then click [Properties].
The Sony USB driver removal is complete.
The [SONY DPP-MP1 Properties] sheet opens and
presents the following tabs and items for setting.
[Paper] Tab
Using the Printer Driver
19
Page 20

Windows 98
[Paper Type]
Select the type of paper loaded for printing. Types of
printer packs that can be loaded and maximum image
size settings are as follows,
Print Pack Max. Image Size
SVM-24CS 1010 × 628 pixels
SVM-24CW
[Orientation]
Select [Portrait] or [Landscape] for the print direction.
[Copies]
Select the number of copies to print (1 to 24).
[Scale]
Select the rate of enlargement or reduction. You an
select a setting within the range of 10% to 400%.
[Border]
Select this check box to print a border in the margins.
[Graphics] Tab
This tab presents adjustments for image color,
brightness and so forth.
From the [Color Adjust] pull-down list, you can select
[Digital Camera Correction], [Color Balance],
[Sharpness], or [Color Correction], and then adjust the
image with the settings provided for each selection.
[Digital Camera Correction]
[Image Layout]
Select the number of images to print on one sheet: 1up,
2up, 4up, or 8 up.
[Laminate Pattern]
Select a laminate pattern for the surface of the print from
the three available options:
• [Glossy] The image is printed with a glossy, slick
finish.
• [Texture] The image is printed with a silk screen
finish.
• [Matte] The image is printed with a matte finish.
[About]
Click to display the number of the installed printer driver
and other information.
[Restore Defaults]
Restores the default selections for these settings.
When printing an image captured with a digital camera,
you can use the [Brightness], [Contrast] and [Saturation]
settings to adjust the image.
• Select [Auto] to achieve the best possible processing
for a digital image.
• Select [Custom] to manually adjust the [Brightness],
[Contrast], and [Saturation] of the image.
Using the Printer Driver
20
Page 21

Windows 98
[Color Balance]
You can adjust the balance for each color by dragging
the slider to the left or right, entering a value directly
into a box, or clicking the arrows next to a box to
increase or decrease the setting.
[Sharpness]
[Color Correction]
Select the color correction method.
• Select [Printer Hardware Color Correction] to have
the printer correct the color automatically.
• Select [ICM Color Correction] to use a color profile
for color correction.
You an adjust the sharpness of the image outline by
dragging the slider to the left or right, entering a value
directly into the box, or clicking the arrows next to the
box to increase or decrease the setting.
Using the Printer Driver
21
Page 22

Macintosh Printer Driver
DPP-MP1
© 2001 Sony Corporation
Page 23

Macintosh
Installing the Printer Driver
Install the printer driver from the CD-ROM provided
with the printer.
Insert the provided “digital photo printer for DPP-
1
MP1” CD-ROM into the CD-ROM drive.
The “PRINTER SOFTWARE” icon is displayed on
the desktop.
Double-click the “Driver” icon to open the folder.
2
Double-click the “Chooser” icon to open the folder.
3
Double-click [DPP-MP1 Install-English].
4
Follow the instructions displayed on the screen.
5
When installation is complete, restart the
6
Macintosh.
Removing the Printer Driver
Remove the printer driver with the following procedure.
Note
Before beginning this procedure, turn off the DPP-MP1
or disconnect it from the Macintosh.
When there is a desktop a desktop printer present,
1
delete the icon.
Note
If spool files remain when you delete the desktop
printer icon, a confirmation dialog box opens. Wait
until all the data is printed or delete it before
continuing the procedure.
In “System Folder”, open the “Extensions” folder.
2
Delete the following four files in the “Extensions”
3
folder.
If you cannot delete the files, restart the Macintosh
after disconnecting the printer and try to delete the
files again.
•DPP-MP1
• DPP-MP1 Printer Class Driver
• UPDP10Lib.PPC
• UPDP10USBLib.PPC
Note
Note
• When using the DPP-MP1 and the UP-DP10 at
the same time, install the printer driver for the
UP-D10 first, and then install the printer driver
for the DPP-MP1.
• Before using the printer driver, be sure to read the
“Readme (English)” file in the “Chooser” folder.
When UP-DP10 is installed, do not delete the
following two files.
• UPDP10Lib.PPC
• UPDP10USBLib.PPC
When you want to delete the printer preferences, in
4
“System Folder”, open the “Preferences” folder,
then delete the “Sony DPP-MP1 Prefs” folder.
Empty the Trash can.
5
If it you cannot empty the Trash can, restart the
Macintosh after disconnecting the printer and try to
empty the trash can again.
When removal is complete, restart the Macintosh.
6
Installing the Printer Driver / Removing the Printer Driver
23
Page 24

Making Printer Settings
Select the DPP-MP1 with the Chooser
Select the DPP-MP1 with the Chooser it use it for the
first time, or whenever you want to use it after using
another printer.
First, make sure that the DPP-MP1 is properly
connected to the Macintosh with the USB cable, and that
the DPP-MP1 is on.
Select [Chooser] on the Apple menu.
1
The “Chooser” window opens.
Macintosh
Selecting the Paper Type
Paper type selection and basic print settings such as
image layout are made through the [Page Setup] dialog
box. Be sure to make these settings before printing.
To display the [Page Setup] dialog box, select [Page
Setup] on the [File] menu. Options available in the [Page
Setup] dialog box are as follows.
Select the DPP-MP1 icon from among those
2
displayed in the “Chooser” window’s left-hand
frame.
[DPP-MP1] appears in the Choose Printer box on
the right.
Select [DPP-MP1] in the list box.
3
Below the list box, select [On] or [Off] for
[Background Printing], as desired.
Close the “Chooser” window.
4
s [Paper Type]
You can print using either [SVM-24CS] or [SVM24CW].
s [Scale]
Select the rate of enlargement or reduction. You can
select a setting within the range of 10% to 400%.
s [Orientation]
Select the print direction.
s [Image Layout]
Select the number of images to print on one sheet: 1up,
2up, 4up, or 8up.
s [Laminate Pattern]
Select a laminate pattern for the surface of the print
from
the three available options:
• [Glossy] The image is printed with a glossy, slick
finish.
• [Texture] The image is printed with a silk screen
finish.
• [Matte] The image is printed with a matte finish.
s [Border]
Select this check box to print a border in the margins.
Selecting this option slightly reduces the size of
images that can be printed.
• After selecting the desired options, click the [Set]
button to save the settings.
• To cancel the settings without saving them, click
the [Cancel] button.
Making Printer Settings
24
Page 25

Making Print Settings
The [Print] dialog box appears when you select [Print]
from the “File” menu. Select [General] or [Color
Adjust] in the pull-down list at the top of the dialog box
and make settings for both.
[General] Settings
s [Copies]
Set the number of copies to print. You can select from
1 to 24 copies.
s [Pages]
Set the range of pages to print.
• When you select [All], all the pages are printed.
• When you enter numbers in the [From] and [To]
boxes, the pages in the specified range are printed.
Enter the numbers with the keyboard.
Macintosh
• After setting options, printing starts when you click
the [Print] button.
• If you click the [Cancel] button, printing is canceled.
• If you click the [Preview] button, a window like the
following appears to show the expected appearance of
the printed image on the Macintosh’s screen.
• If you click the [Print] button in this window, the
image is printed.
• If you click the [Cancel] button, printing is canceled.
• When previewing a multi-page document, you can
view the following or preceding pages by clicking the
[Next] and [Previous] buttons.
These setting are described below.
[Color Adjust] Settings
With the [Color Adjust] settings, you can adjust the
appearance of printed images, such as color and
brightness. Make these settings when you are not
satisfied with the print finish or need to make fine
adjustments.
When you select [Color Adjust] in the [Print] dialog
box, a new pull-down list appears.
s [Digital Camera…]
When printing an image captured with a digital camera,
you can use the [Brightness], [Contrast], and
[Saturation] settings to adjust the image.
• Select [Auto] to achieve the best possible
processing for a digital image.
Making Printer Settings
25
Page 26

• Select [Custom] to manually adjust the
[Brightness], [Contrast], and [Saturation] of the
image.
• Click [Restore Defaults] to restore all custom
changes made to their defaults.
s [Color Balance]
Macintosh
s [Sharpness]
You can adjust the sharpness of the image outline by
dragging the slider left or right. The larger the value, the
more the image outline is emphasized.
• Clicking [Restore Defaults] restores the sharpness
setting to its default.
You can adjust the balance for each color by dragging
the slider left or right.
• Clicking [Restore Defaults] restores the color
balance settings to their defaults.
s [Color Sync]
When “Use ColorSync” is selected, you can select the
following options.
• In the [Profile] pull-down list, you can specify the
DPP-MP1 profile.
• In the [Intent] pull-down list, you can select any of the
following color reproduction mapping.
Perceptual (Images)
Saturation (Graphics)
Relative Colorimetric
Absolute Colormetric
• In the [Quality] pull-down list, you can select the any
of the following for color matching quality.
Best
Normal
Draft
Color adjustment settings are saved for use on the
Macintosh computer on which they are made. (The
settings do not apply to individual jobs or applications
only.) Once the settings have been made, you can print
using them from any application.
Making Printer Settings
26
 Loading...