

Page 1
DPP-FP97
Digital Photo Printer
Read This First
Welcome to the Sony DPP-FP97 Digital Photo Printer.
This leaet explains preparations and basic printing procedures.
To enjoy a variety of printing options or customize your printer, please
refer to the Operating Instructions also supplied.
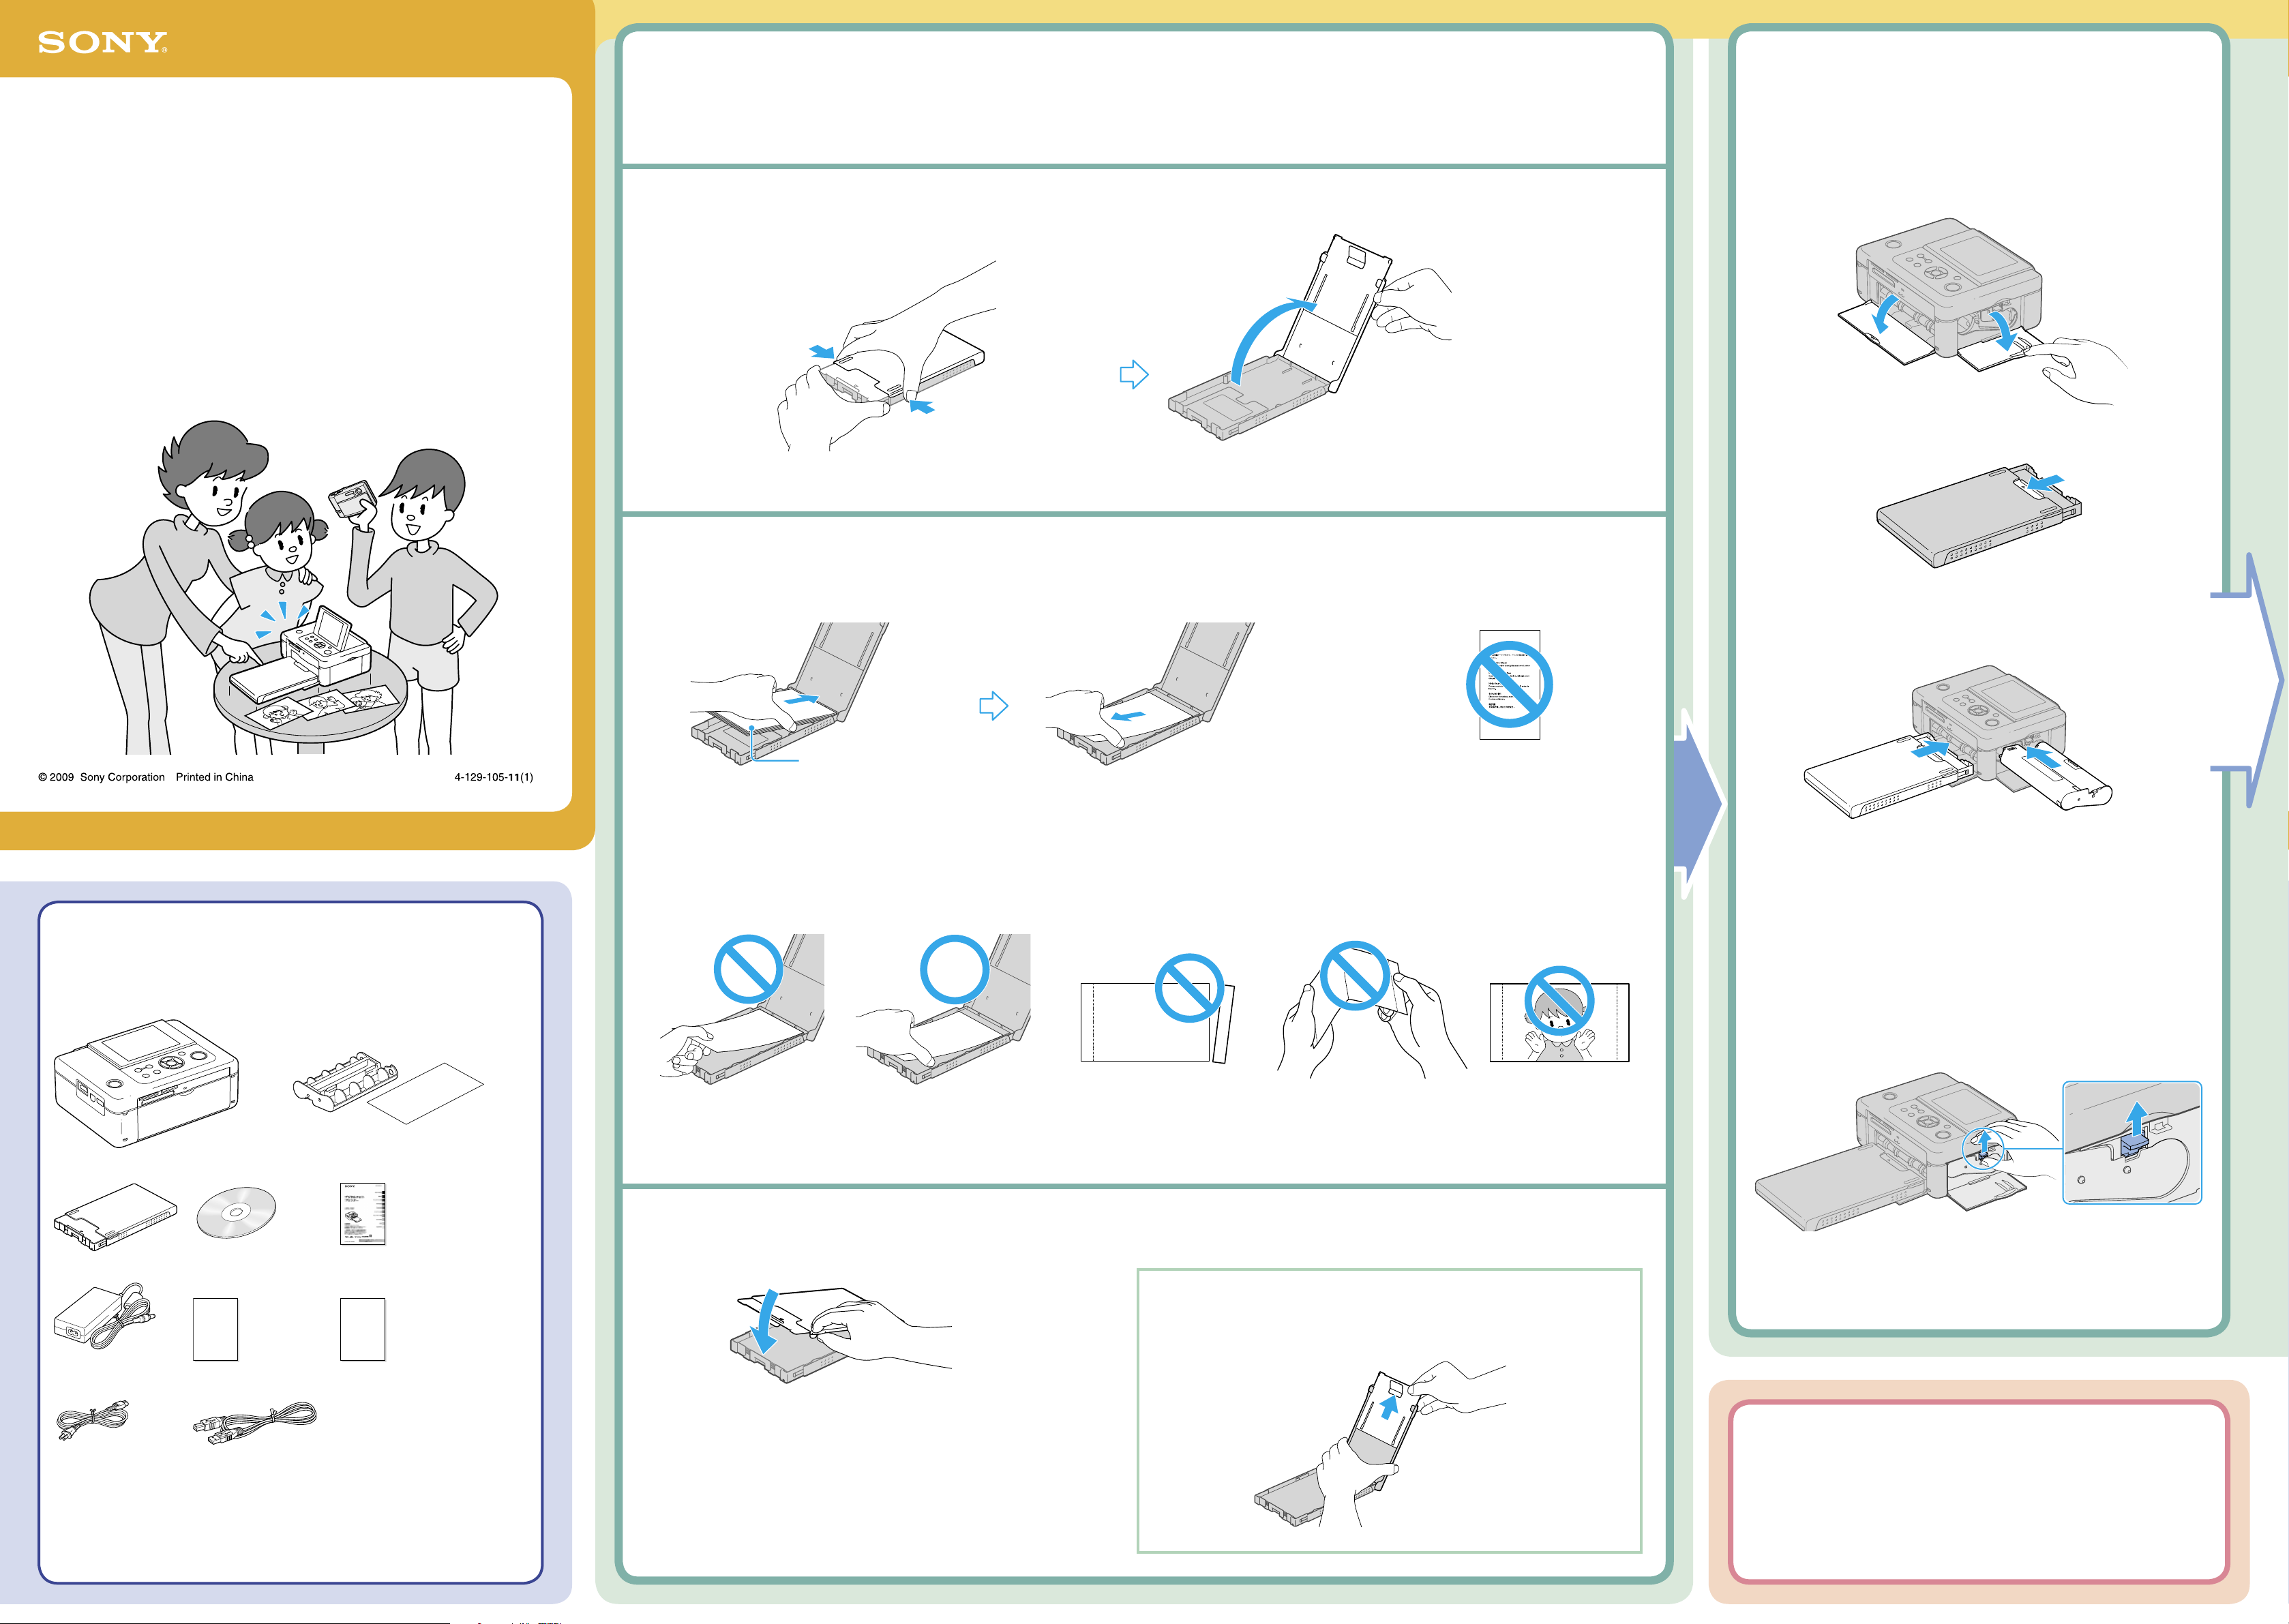
Insert the print paper into the paper tray.
1
1 Open the paper tray cover.
Hold the parts on both sides of the
paper tray cover (shown with arrows)
and open the paper tray cover.
Insert the paper tray and ink ribbon into
2
the printer.
1 Open the doors.
2 Open the slide cover of the paper tray.
Checking the contents of the package
2 Set the print paper into the paper tray.
Insert the print paper into the paper tray with the protective sheet facing up.
Remove the protective sheet from the tray.
Notes
• You can use Sony optional color print packs designed for this printer, only. You cannot use the other print packs.
• For color print packs you can use, refer to the About the Print Packs also supplied.
• You can set up to 20 sheets of print paper.
Protective sheet
(If there is no protective sheet, insert the
print paper into the paper tray with the
printing surface (the side with no imprint)
facing up.)
3 Insert the paper tray and ink ribbon until each
clicks into place.
You cannot print on a
protective sheet. (Doing so
may cause a malfunction.)
Printer (1) Cleaning cartridge (1)/
Cleaning sheet (1)
(Used for cleaning inside the printer.)
Paper tray (1) CD-ROM (1) Operating Instructions (1)
AC adaptor (1) About the Print Packs
(1)
Read This First (this leaet)
(1)
Do not touch the printing surface! Do not cut off from perforated
3 Close the paper tray cover.
Do not bend! Do not use used print
portions!
If you cannot close the tray cover
Stretch out the slide cover, and then close the tray cover.
Removing the ink ribbon
Open the ink ribbon compartment door, push up the blue eject lever,
and remove the used ink ribbon.
paper!
AC power cord (1) USB cable (1) Warranty (1)
(In some regions, the warranty is
not supplied.)
Sony End User Software
License Agreement (1)
Note
e plug shape and specications of the AC power cord dier depending on the
region in which you purchased the printer.
When storing the print paper in the paper tray
Remove the paper tray from the printer and shut the slide
cover.
Page 2
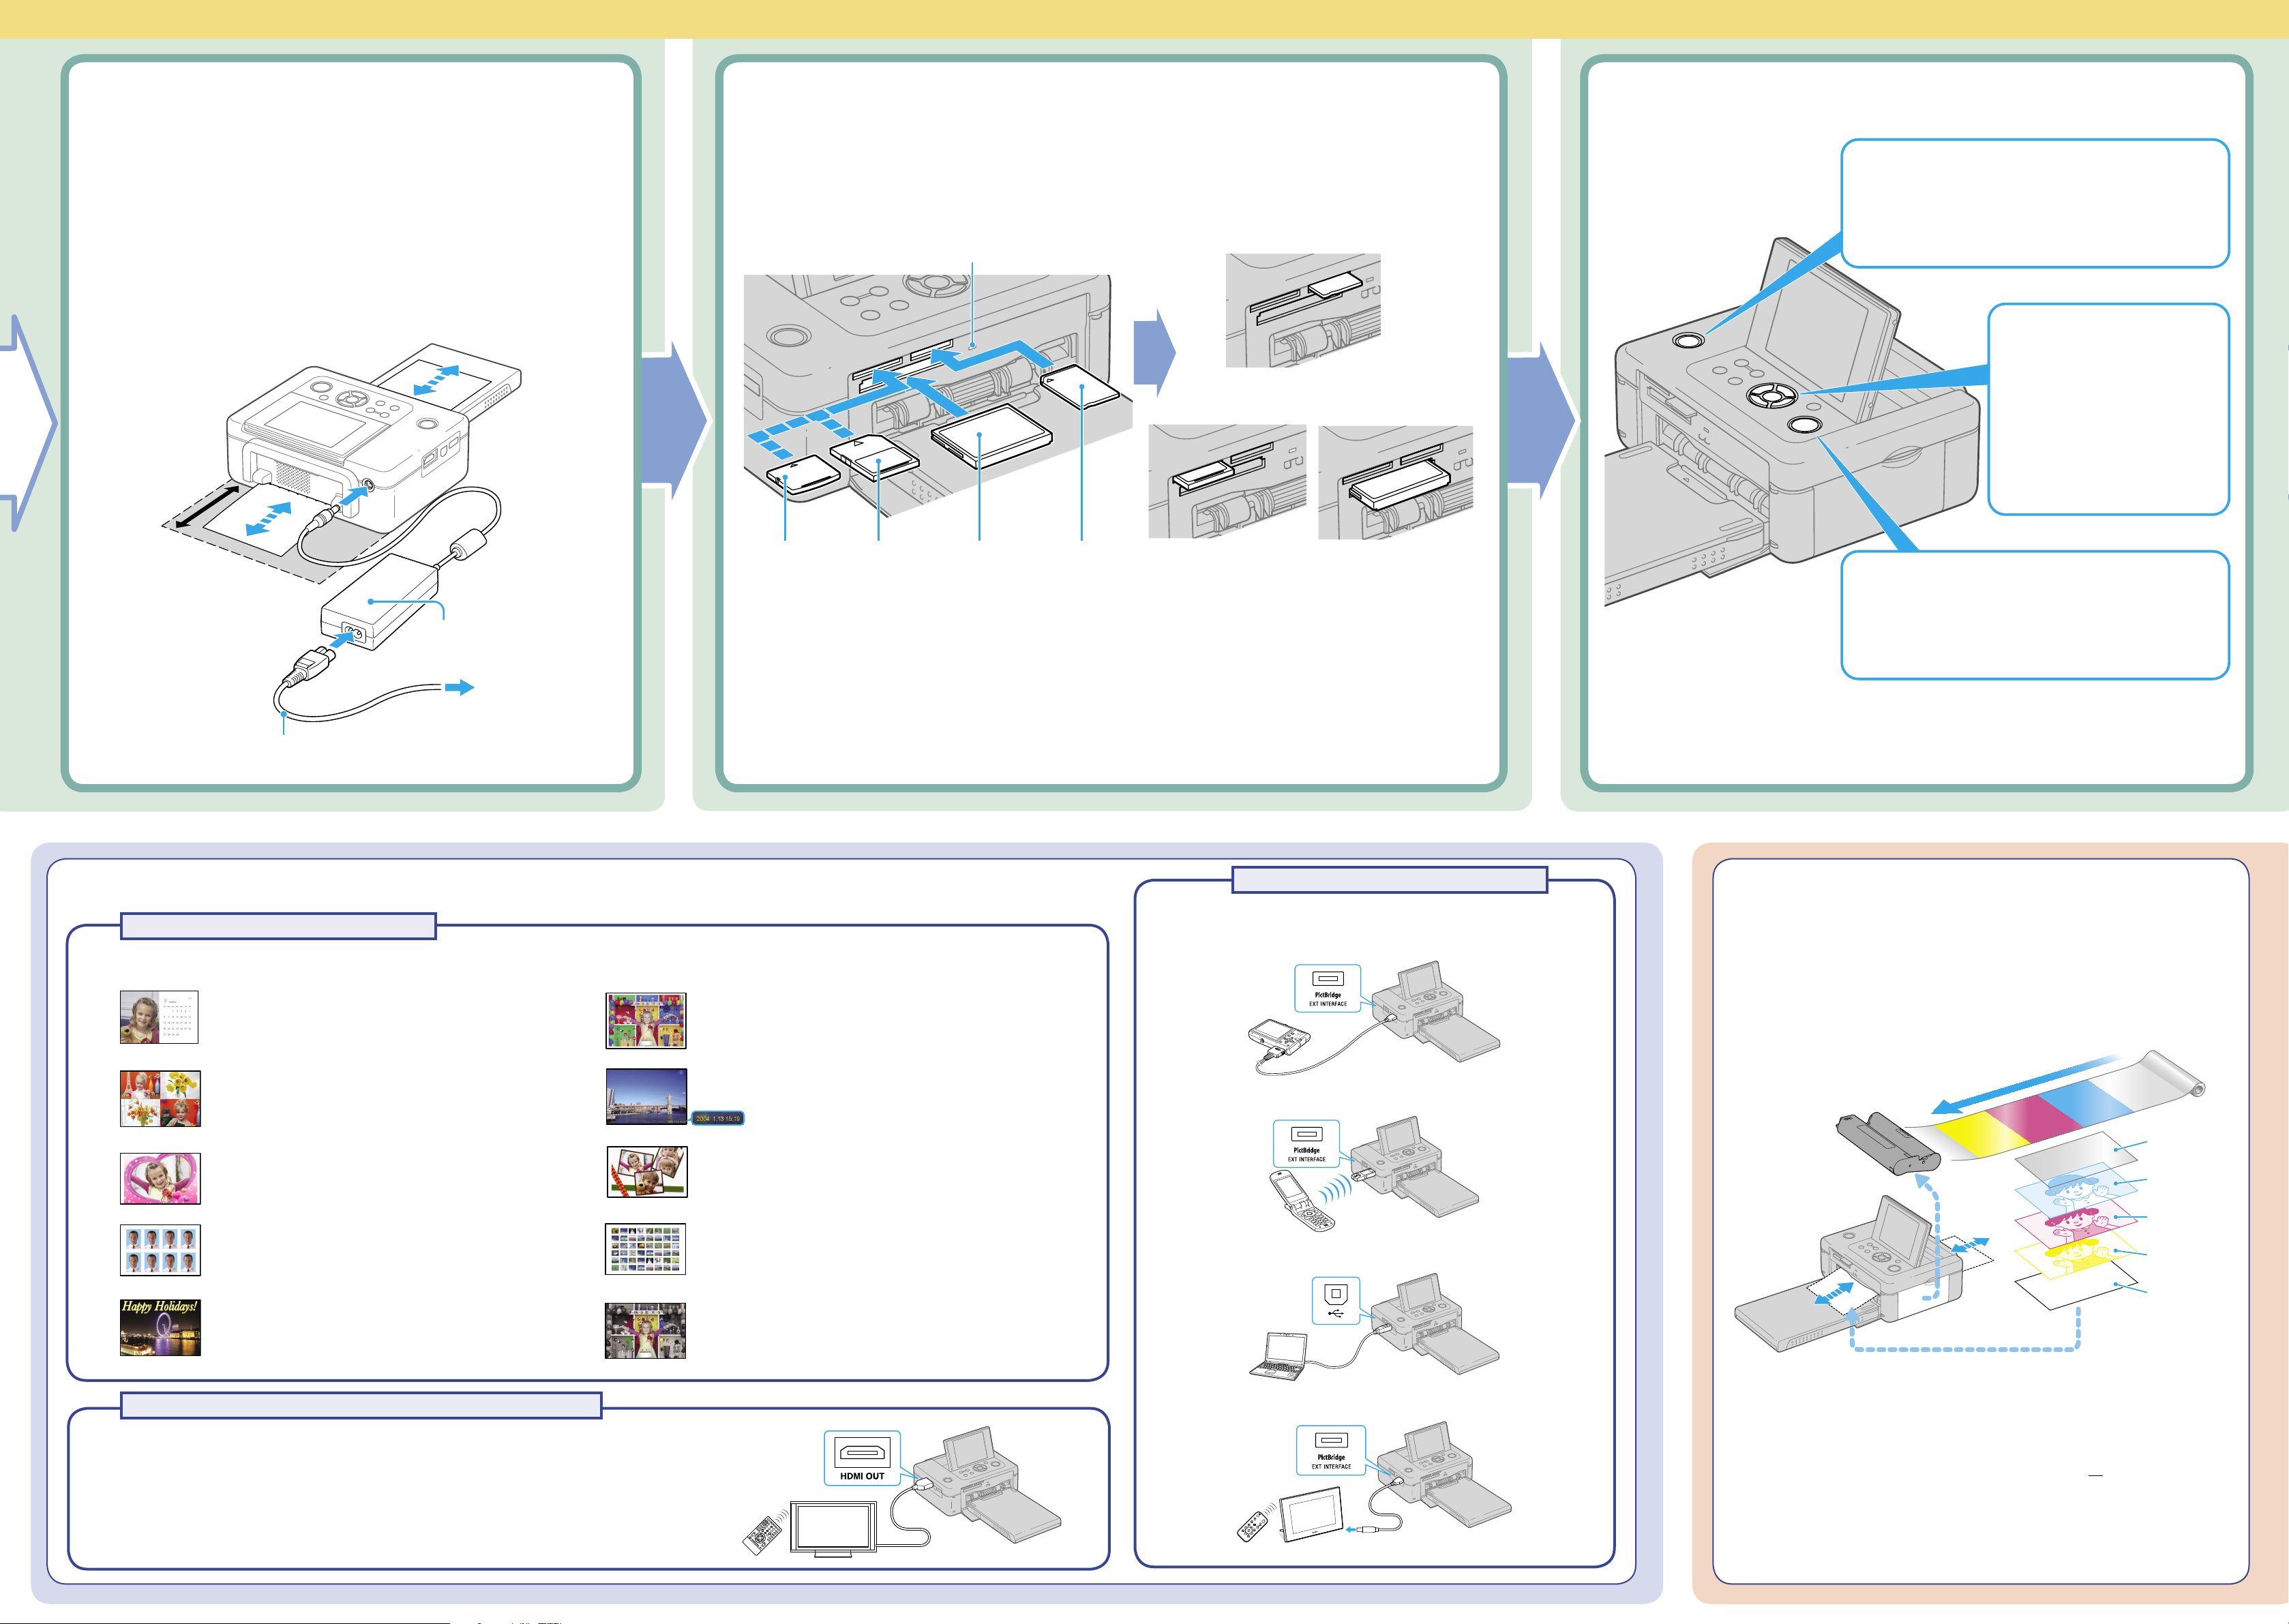
Connect to the AC power source.
3
1 Insert the plug of the AC adaptor into the DC IN 24 V
jack on the back of the printer.
2 Connect one plug of the AC power cord to the connector
of the AC adaptor and the other plug to the wall outlet.
Install the printer in a
location with 10 cm
(13/32 inch) or more
of space at the rear.
10 cm
(13/32 inch)
Insert a memory card into the slot.
4
Insert the memory card containing an image for printing into the appropriate slot with its terminal side facing
toward the slot.
Access indicator
“Memory Stick” media
(“Memory Stick Duo” media)
Turn on the printer.
An image stored on the memory card is
5
displayed.
Select an image
for printing.
6
Press / button
repeatedly until the image
that you want to print
appears.
To
DC IN 24 V
connector
AC power cord
AC adaptor
To the wall
outlet
xD-Picture
Card
Notes
• A memory card has two sides and an insertion direction. Be sure to check the correct insertion direction of the card and
the correct insertion slot width, and then insert the memory card with its label side facing up.
• When carrying your printer, make sure to remove the memory card, AC adaptor, cables or cords, and paper
tray. Otherwise, the printer may be damaged.
SD Memory
Card
CompactFlash
Card
“Memory Stick”
media
(“Memory Stick
Duo” media)
What you can do with the digital photo printer (Refer to the Operating Instructions for the operations below.)
Making a variety of prints
You can process and print selected images from a memory card or internal memory (direct printing).
Calendar printing
Page 29 in the Operating Instructions
Borders/Borderless print
Page 41 in the Operating Instructions
xD-Picture Card or
SD Memory Card
Printing from a device other than a memory card or internal memory
Printing from a PictBridge or other camera Page 49
CompactFlash Card
Printing from a variety of devices
Press the PRINT button.
7
The printing process
e printer employs a dye sublimation printing system.
In this printing system, the thermal print head heats up as it passes over the
yellow, magenta, and then cyan layer of the ink ribbon, causing the dyes to
vaporize and permeate the surface of the print paper. en the nal cycle
lays a laminate layer as an overcoating to protect the printed surface:
Layout print
Page 33 in the Operating Instructions
Adding a frame
Page 33 in the Operating Instructions
ID Photo print
Page 34 in the Operating Instructions
Superimposed printing
Page 31 in the Operating Instructions
Operating your printer from a TV remote control unit
By connecting your printer to a “BRAVIA” Sync-compatible television with an HDMI cable
(sold separately), you can operate your printer from a TV remote control unit. You can print
an image while conrming the printed image on a large TV screen.
Page 45 in the Operating Instructions
Date print
Page 40 in the Operating Instructions
Scrapbook print
Page 26 in the Operating Instructions
Batch printing
Index, DPOF, ALL
Page 35 in the Operating Instructions
Special lter printing
Cross Filter, Painting, Partial Color, Sepia, Monochrome,
Single Color, Fish Eye
Page 22 in the Operating Instructions
Printing via Bluetooth communication Page 50
Printing from a PC Page 52
Printing from a digital photo frame Page 48
The direction the ink lm moves
inside the ink ribbon
Laminate lm
Cyan
Magenta
Yellow
Print Paper
Notes
• e ink ribbon cannot be reused. You cannot reuse it by rewinding.
• e number on the ink ribbon cartridge is the maximum number of sheets that
can be printed with that cartridge. (e.g.: In case of SVM-F40P, you can print up
to 40 sheets.)
• Print paper emerges from the back and front paper outlets each time a color
is printed. Please wait until printing is completed and the print paper is
automatically ejected onto the paper tray.
 Loading...