

Page 1

Digital A udio Mixer
Automation Operation
DMX-R100
1999 – 2002 Sony Corporation
Page 2

Table of Contents
Automation Operation
System Set-up ...................................................................4
Titles...................................................................................5
To Name a Title ............................................................... 5
To Keep a Title................................................................. 6
To Save a New Title......................................................... 6
To Save a Title ................................................................. 6
Cues ...................................................................................7
To Enter a New Cue at the Current Timecode Point ....... 8
To Revise the Time of a Cue ‘On the Fly’....................... 8
To Revise the Time of a Cue Manually ........................... 8
To Locate to a Cue ........................................................... 8
Cycle All .......................................................................... 8
Cycle Between Two Cues ................................................ 8
Overview of Automation Controls ...................................9
GUI Options for Automation ..........................................12
Automating Faders .........................................................14
To Clear Automation Data ............................................. 14
To Automate Moves on One or More Faders ................ 15
Operation of A and B Buffers ........................................ 16
Automation Drop-out Modes ......................................... 16
To Save a Mix ................................................................ 16
To Trim Moves on One or More Faders ........................ 17
Automating Fader Cut Switches....................................18
To Automate One or More Cut Switches....................... 18
To Automate Cuts Simultaneously ................................ 19
Trimming Cut Switches ................................................. 20
Automating Other Switches ...........................................20
Automating Knobs ..........................................................21
To Automate a Pan Knob ............................................... 21
To Automate a Number of Knobs .................................. 22
Trimming Knob Moves.................................................. 22
Automating Sections of Controls ..................................24
To Automate a Complete EQ Section ............................ 24
Trimming Sections of Knob Moves ............................... 25
To Automate All EQ Sections........................................ 26
(Continued)
Table of Contents 2
Page 3

Table of Contents
Footswitch, Audition & Auto..........................................27
Automation Drop-in Using FOOT SW .......................... 28
Automation Drop-in Using AUDITION ........................ 28
Automation Record Using AUTO ................................. 29
Automation Isolate..........................................................30
Isolating Channels or Sections of All Channels............. 30
Snapshots........................................................................31
To Save a New Snapshot................................................ 31
To Revise a Snapshot ..................................................... 32
To Delete a Snapshot ..................................................... 32
To Recall a Complete Snapshot ..................................... 32
To Recall a Partial Snapshot .......................................... 32
Automating Snapshot & Library Entry Recall ..............33
Automating the Recall of a Snapshot............................. 33
Automating the Recall of a Library Entry...................... 33
Fader Gang Grouping Offsets........................................34
Setting Up a Fader Gang Group..................................... 34
Table of Contents 3
Page 4

Automation Operation
Automation Operation
System Set-up
The descriptions and operational procedures that
follow assume that:
•A multitrack machine, either tape or hard drive, is
connected to the DMX-R100.
•The multitrack has suitable material recorded on it,
and its audio outputs are assigned to input channels
on the mixer.
•The multitrack transport is under the control of the
mixer transport keys.
•A timecode link, either SMPTE or MIDI, exists
between the multitrack and the mixer for location and
synchronisation purposes.
Automation Operation
4
Page 5

Titles
The Title for any project is the heading under which all
related data, such as mixes, snapshots and cue points, is
held. So, although not vital, it is a good idea to have a
Title name for any project right from the start.
To Name a Title
1 Touch {SYSTEM} for its pop-up and then touch
{TITLEMANAGER} to access the TITLE
MANAGER GUI.
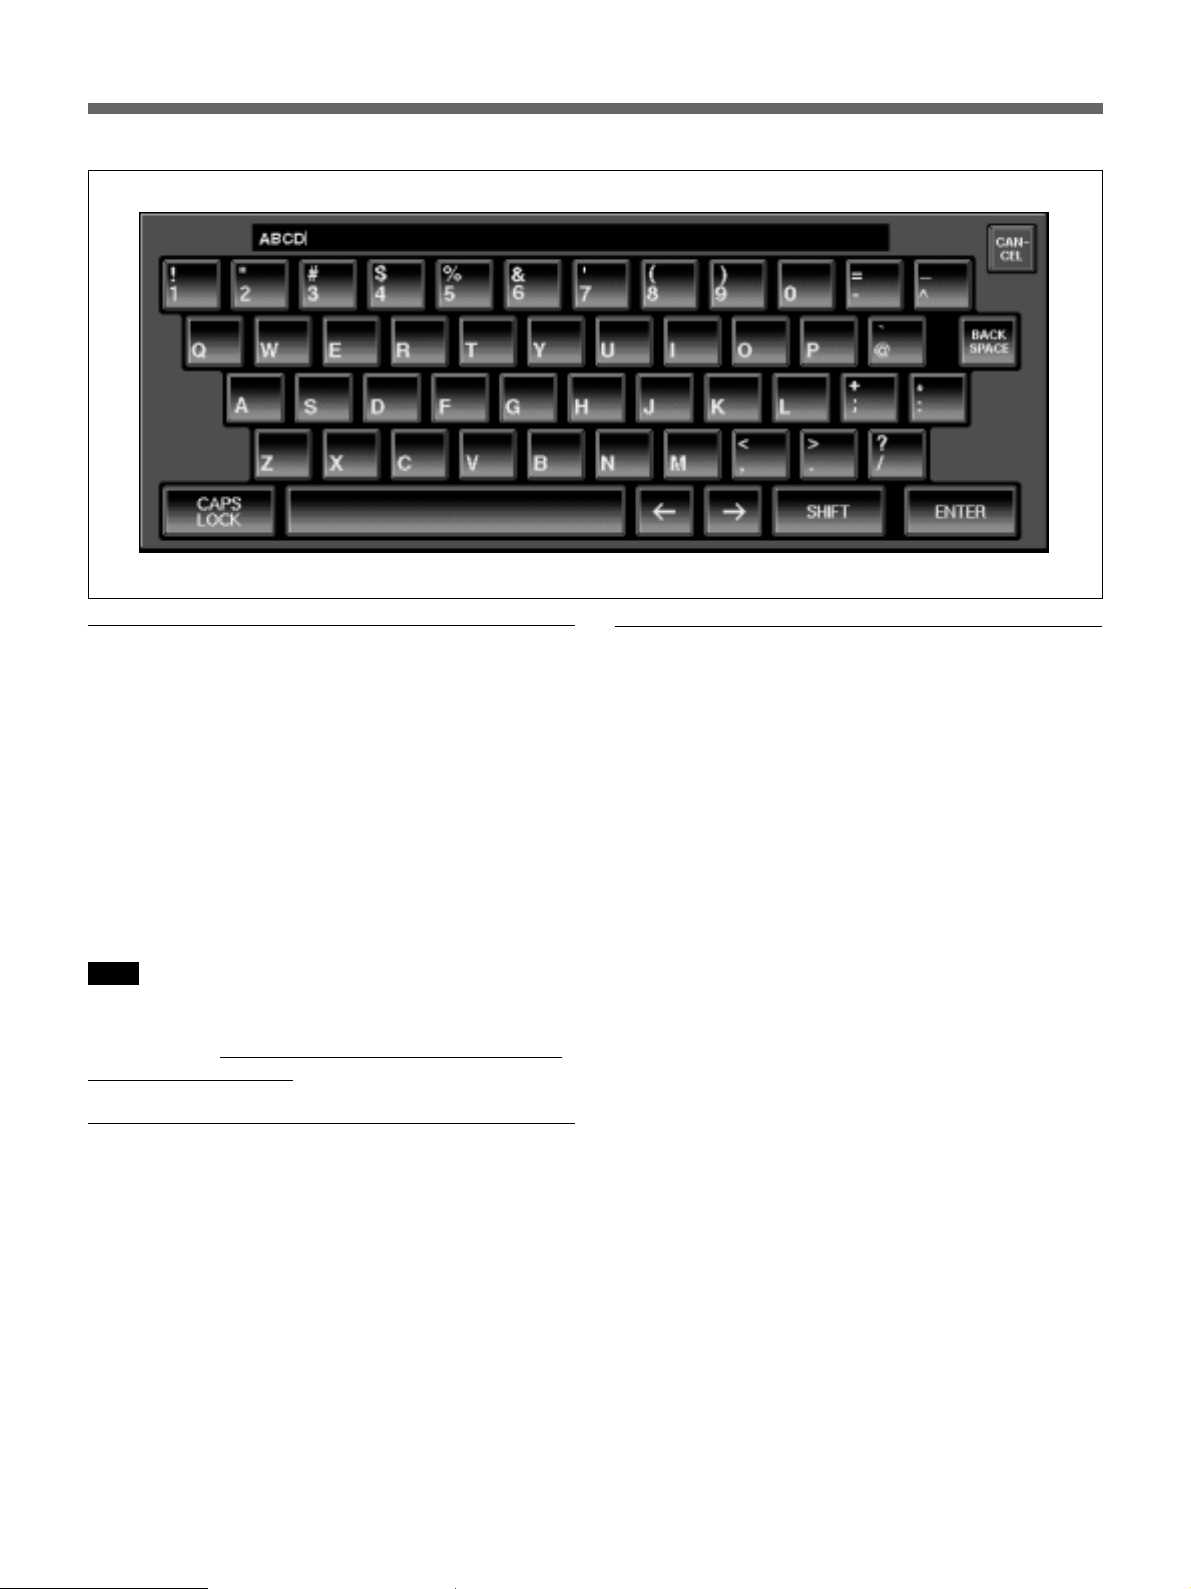
2 Touch the NAME line in the INFORMATION
block in the centre of the GUI, and the QWERTY
Keyboard pop-up appears.
3 ‘UNTITLED’ will be displayed by default in the
upper entry dialogue line for a new system. Either
touch {BACKSPACE} several times to delete it, or
touch and move a finger across it to highlight it.
Then type in a Title name using the touch
QWERTY keyboard. Touch {ENTER} when
finished.
From now on, any changes in settings will relate to
the Current Title which has just been named. The
data for this Title resides in the system Dynamic
RAM.
Note
Data left in RAM will be lost if the system is powered down.
Use KEEP or SAVE to retain it.
Automation Operation
5
Page 6
Automation Operation
To Keep a Title
1 Touch {TITLE} at the very top left of the GUI for its
pop-down.
2 Touch {KEEP} in order to save the current settings
and data into the Flash Memory, where they will
be safely stored.
If the system is turned off and turned on again, the
settings stored using KEEP will be restored.
Note
That having used KEEP for the current Title, recalling a
further Title will overwrite the previously ‘kept’ Title in the
Flash Memory. SAVE or SAVE AS NEW must be used to
permanenty store a Title.
To Save a New Title
1 Touch {SAVEASNEW} and the Current Title will
be saved in the first available slot in the column to
the left of the GUI. The slot number will be
highlighted white and the Title name will appear in
the NAME column.
To Save a Title
1 Touch {SAVE} to overwrite the data in the Title that
has its number highlighted white. A pop-up will
appear, requiring confirmation. Touch {YES} to
complete the save.
2 To save in a different slot, touch its number to
highlight it, and then touch {SAVE}. A pop-up will
appear, requiring confirmation. Touch {YES} to
complete the save.
Automation Operation
6
Page 7
Cues
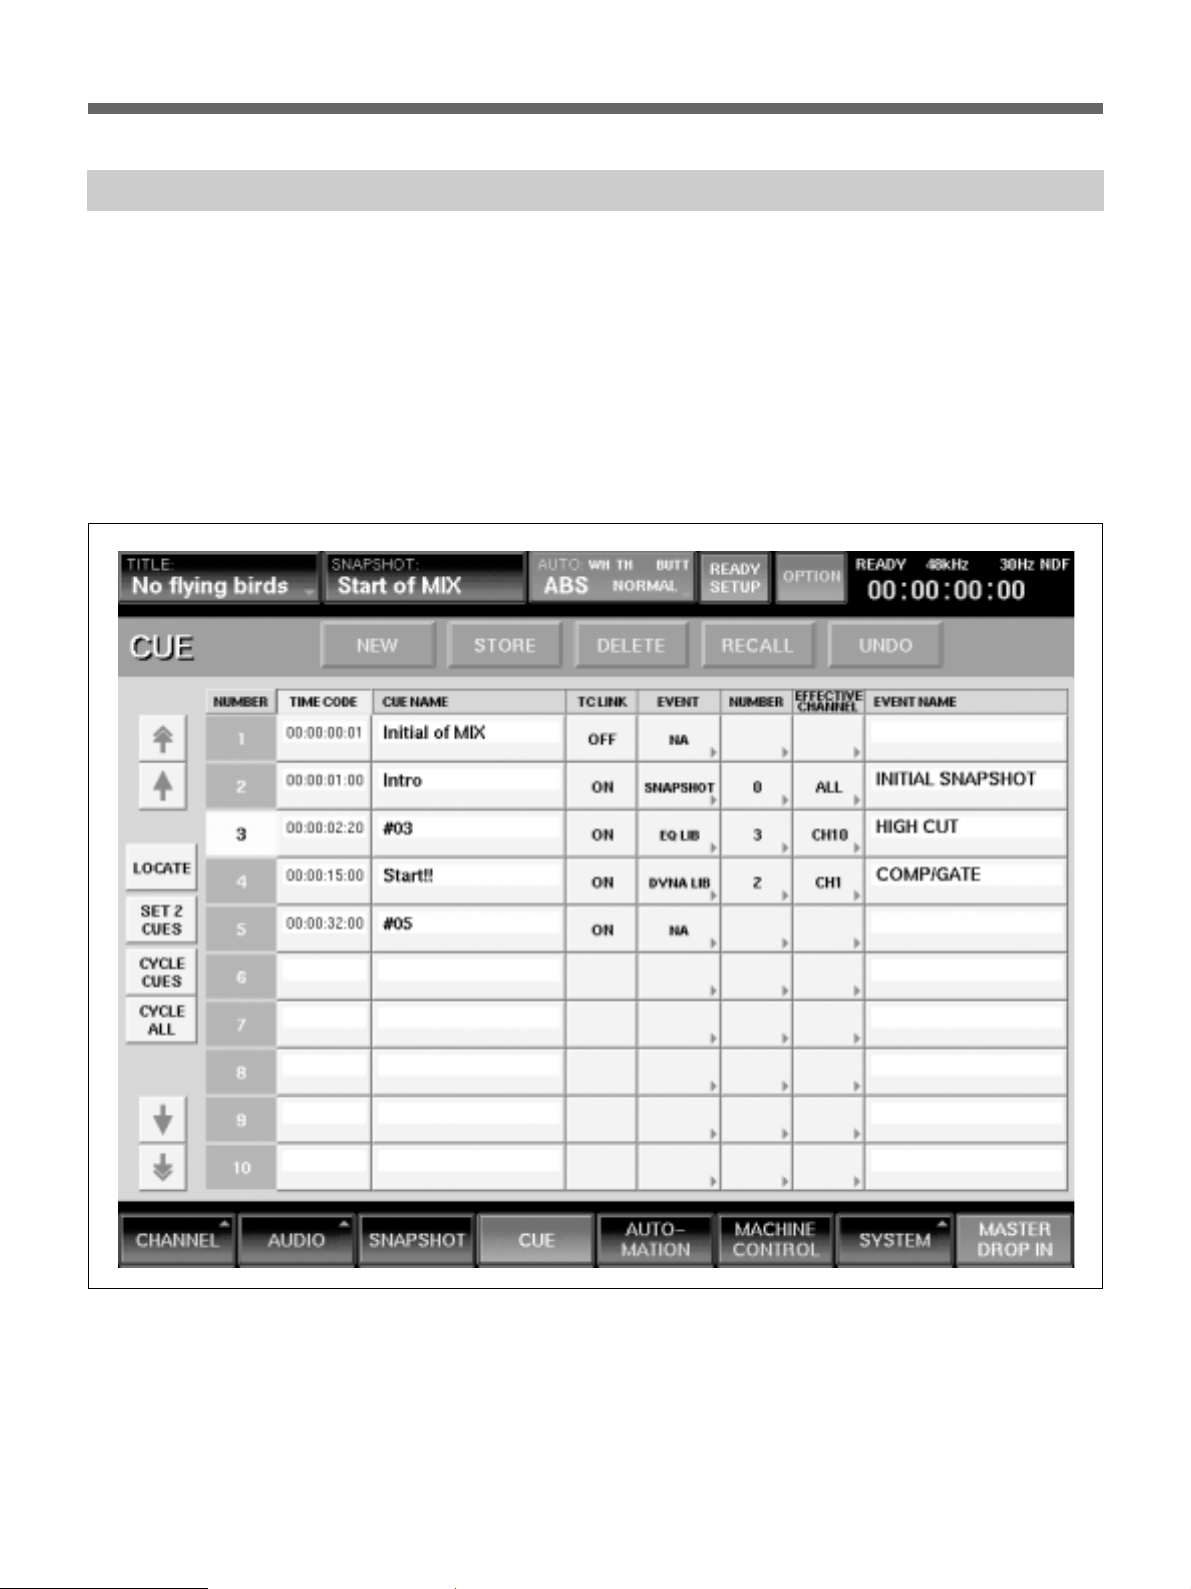
The Cues GUI allows Cue Points, in the form of
timecode markers, to be set along with a name entry.
It is often extremely useful to set Cues for the crucial
points in any piece of material to be worked on. These
include the start and end, verses and choruses for
music, and scene changes in post production projects.
Once set, Cues can be used for a number of purposes,
including locate and cycling between specified Cues.
General
Cue timecode points can be set in a number of ways:
•From the current time point whilst the material is
rolling (‘on the fly’).
•From the current time point whilst the material is
stationary.
• Manual entry using the jog wheel.
• Manual entry using the ten-number key pad.
Cues can be linked to fire events at their timecode
points. Events include Snapshots, EQ and Dynamics
library settings.
Automation Operation
7
Page 8

Automation Operation
To Enter a New Cue at the Current Timecode
Point
To enter a Cue for the start of the material, for
example:
1 Whilst the material is either stationary or moving,
touch {NEW} in the CUE GUI, and a new entry will
appear in the TIMECODE column. A default
number will be entered automatically in the CUE
NAME column.
2 To change the default number to an appropriate
name, touch the default in the CUE NAME
column, and the QWERTY Keyboard pop-up
appears.
3 The default will be displayed in the upper entry
dialogue line. Either touch {BACKSPACE} several
times to delete it, or touch and move a finger
across it to highlight it. Then type in a suitable
name, such as ‘START OF TITLE’ in this case,
using the touch QWERTY keyboard. Touch
{ENTER} when finished.
To Locate to a Cue
1 Under the NUMBER column, touch the Cue
number that is to be the locate point, to highlight it
white.
2 Touch {LOCATE} in the CUE GUI and the system
will locate to the timecode point for the highlighted
Cue.
3 To locate to the same Cue, either touch {LOCATE}
or press the LOCATE button above the transport
keys on the panel.
Note
The front panel LOCATE button will always cause a locate
operation to the point set by touching {LOCATE} in the GUI,
even if another Cue number is touched and highlighted
white in the GUI. However, touching {LOCATE} in the GUI
will always locate to the Cue which is highlighted. In other
words, touching {LOCATE} in the GUI sets the Cue to which
the front panel LOCATE button will operate.
Cycle All
To Revise the Time of a Cue ‘On the Fly’
1 Under the NUMBER column, touch the Cue
number to be revised. It highlights white.
2 Whilst the material is either stationary or moving,
touch {STORE} in the CUE GUI, and the current
timecode point will appear in the TIMECODE
column.
To Revise the Time of a Cue Manually
1 Under the TIMECODE column, touch the
timecode number to be revised. It highlights
white.
2 Then adjust the timecode number using the jog
wheel or the ten-number key pad. Press {ENTER}
at the bottom right of the number key pad when
finished.
To play the source material from beginning to end and
have it repeat until the stop transport key p is pressed:
1 Touch {CYCLEALL} in the CUE GUI and it turns
green. The LOCATE button above the transport
keys on the panel also lights green.
2 Press the LOCATE button and the system will play
from the first Cue to the last Cue and repeat until
the p transport key is pressed.
3 After pressing p, press {LOCATE} again to
continue Cycle All.
4 De-select {CYCLEALL} when finished.
Note
When {LOCATE} in GUI is pressed for the first time or Cycle
All is continued, the system will always play from CUE 1.
Press the z transport key to continue from the current point.
Cycle Between Two Cues
To play the source material from one Cue to another
and have it repeat until the stop transport key p is
pressed:
Automation Operation
8
Page 9

1 Touch {SET2CUES} in the CUE GUI and it turns
green.
2 Under the NUMBER column, touch the first Cue
number and it highlights white.
3 Touch the Cue number for a second Cue, later than
the first. {SET2CUES} will return to grey,
indicating that the two Cues have been accepted.
4 Touch {CYCLECUES} in the CUE GUI and it turns
green. The LOCATE button above the transport
keys on the panel also lights green.
Overview of Automation of Controls
5 Press the front panel LOCATE button and the
system will play between Cues set up in step 3, and
repeat until the p transport key is pressed.
6 After pressing p, press LOCATE again to
continue Cycle Cues.
7 De-select {CYCLECUES} when finished.
Note
When LOCATE is pressed for the first time or to continue
Cycle Cues, the system will always play from the beginning.
Press the z transport key to continue from the current point.
General
The DMX-R100 allows virtually all controls and
switches to be automated. That is to say, movements
of faders, knobs and switch operations can be recorded
and replayed with reference to timecode. Snapshots of
the controls can also be restored with reference to
timecode.
Controls first have to be set or armed into an
automation ‘ready’ mode, much like arming the tracks
of a recorder in readiness for recording audio material.
Once armed, they can be ‘dropped in’ to record
automation data, control by control individually, on a
channel basis, or all ‘ready’ controls simultaneously.
This process will be described in more detail later in
this supplement.
Automatable Controls
Dynamic automation is possible on the following
controls and groups of controls that can be automated:
•Channel Faders, Cuts & Pans
• M/T Faders, Cuts & Pans
• Aux Send Levels & Cuts
• Routing Assignment Buttons
•Equaliser Knobs & Switches
• Dynamics Knobs & Switches
• Master Faders
Static settings and I/O assignments will be stored when
a Title is saved, independent of automation operations.
Saved static settings do not include the CR MONITOR
level knob and SELECT MACHINE buttons.
Automation set-up
The following section describes how to turn the
automation functions on, and the options included.
The actual operation varies according to control type
and therefore the detail will be described in separate
sections later.
Automation data is recorded in two basic modes: ABS
(absolute) where the exact settings are recorded for the
first time or overwrite previous data, and TRIM, which
allows previous data to be trimmed and modified.
The way controls are dropped into automation record
varies according to control type. The following brief
summary assumes controls are already set to
automation ready:
•FADERS
Individual faders drop into automation record when
they are touched and drop out when released. (This
applies so long as ‘Touch Hold’ and ‘Write Hold’ are
not enabled.)
•SWITCHES
An individual switch drops into automation record
when it is pressed and remains so until automation
timecode ceases.
•KNOBS
An individual rotary knob drops into automation
record when its numeric indicator in the CHANNEL
Automation Operation
9
Page 10

Automation Operation
4165
TC AUTOMA TION SNAPSHOT
2
3
A B SAFE
ABS
HOURS
TRIM OFF
MINUTES SECONDS
BARS SETLTC
789
456
TO LINK DELETE SETUP
STORE RECALL UNDO
FRAMES SNAPSHOT
LOCATE
– +
SET
SHUTTLE
TC AUTOMATION buttons
GUI is touched (changing its colour from yellow to
red). Touching it once more will drop it out.
•INDIVIDUAL CHANNELS
Any controls set to ready on an individual channel
will drop into automation record when the {WRITE}
button for that channel is pressed, and drop out when
it is pressed once more.
•ALL CHANNELS
Any controls set to ready on all channels will drop
into automation record when {MASTERDROPIN}, at
123
CLEAR
0
ENTER
the bottom right of the LCD, is touched. Touching it
once more will drop all channels out.
Refer to the illustration ‘TC AUTOMATION buttons’
above for the following sections describing the
functionality of buttons related to automation.
11
1 OFF button
11
{OFF} is set as the system fire-up default. When this
button is lit, the recording and replaying of automation
data is prevented. All functions remain as manual
operations.
Automation Operation
10
Page 11

The upper central indicator block in the GUI will be
black, displaying OFF, when this button is lit. {OFF},
{ABS} and {TRIM} inter-cancel.
Note
Although automation cannot be recorded or replayed when
OFF is lit, controls can still be set into automation ‘ready’.
22
2 ABS button
22
Pressing {ABS} allows ‘absolute’ settings and
movements to be recorded as automation data for any
controls set to automation ‘ready’, i.e. the exact
settings or movements of faders and knobs will be
recorded once dropped in.
A ‘ready’ status is indicated with a yellow marker or
display for each individual control. Red markers or
displays indicate automation record status.
The upper central indicator block in the GUI will be
red, displaying ABS, when this button is lit. {ABS},
{TRIM} and {OFF} inter-cancel.
Automation data can be copied from one buffer to the
other. Press and hold the button, {A} or {B}, for the
source data until its button flashes. Then press the
button for the other buffer. A pop-up will appear,
requiring confirmation before the copy operation can
be completed.
66
6 SAFE button
66
When {SAFE} is set to on, automation data will not be
updated. In other words, automation operations can be
performed whilst {SAFE} is on but previous data is safe.
{SAFE} functions in other ways too:
•Whilst {SAFE} is off, if a mistake is made during an
automation operation, press {SAFE} before stopping
the tape or material rolling, to prevent updating the
automation data.
•Whilst {SAFE} is on, if an automation operation is
performed that should be stored, press SAFE before
stopping the tape or material rolling, to update the
automation data.
33
3 TRIM button
33
Pressing {TRIM} allows previously recorded
automation data to be trimmed for any controls set to
automation ‘ready’. So, as an example, a fader may
have certain movements recorded using the ‘ABS’
function and TRIM allows those movements to be
globally adjusted. In other words, the original moves
are retained but are at a higher or lower level overall.
TRIM can also be dynamic in operation.
To make this operation easy for faders, they will all
jump to their 0dB scale points. This is the reference
point from which any trimming moves are made.
The upper central automation status indicator block in
the GUI will be green, displaying ‘TRIM’, when this
button is lit. {TRIM}, {ABS} and {OFF} inter-cancel.
44
4 A button
44
The {A} button will be lit as the system fire-up default
and indicates that automation data will be stored and
recalled to and from the ‘A’ buffer. The {A} and {B}
buttons inter-cancel.
Note
The {SAFE} button is also used for the AUDITION function
described later in this document.
55
5 B button
55
Pressing the {B} button will cause automation data to
be stored and recalled to and from the ‘B’ buffer. The
{B} and {A} buttons inter-cancel.
Automation Operation
11
Page 12

Automation Operation
GUI Options for Automation
AUTO button
The button in the centre at the top of the GUI (with
AUTO legend at top left) displays the current
automation status. It is crucial to keep an eye on this
area during automation operations.
To the lower left of this button is a larger legend which
reflects the settings of the {ABS}, {TRIM} and {OFF}
buttons.
Touch AUTO legend for a pop-down of automation
options; what follows is a brief explanation of each.
They will be described with practical examples later in
this supplement.
Operational modes
The upper four operational modes inter-cancel with
each other and are displayed in the lower right corner
of the AUTO button:
NORMAL
This option is the fire-up default and is the setting for
the majority of automation operations.
FOOT
This option allows the automation record drop-in and
drop-out to be operated via a foot switch plugged into
the rear of the mixer. This mode can also be activated
in the AUTOMATION GUI by touching {FOOTSW}.
AUTO
This option allows controls that are set ready to write
automation data, to have their settings recorded
between specified timecode points. This mode can
also be activated in the AUTOMATION GUI by
touching {AUTO}.
Automation Operation
12
Page 13

AUDITION
This option allows a preset level to be found which
does not overwrite previous automation data. This
new setting can then be dropped in and out of
automation record at the appropriate times. New
moves can also be made during the drop-in period.
This mode can also be activated in the
AUTOMATION GUI by touching {AUDITION}.
Note
FOOT, AUTO and AUDITION require that automation data
is already present for the time period they are to operate
over.
Automation drop-out modes
The four modes in the middle section of the pop-down
inter-cancel with each other and are displayed in the
upper right corner of the AUTO button, but only whilst
{ABS} or {TRIM} is selected.
Automation drop-in and drop-out can be achieved in a
number of ways depending on the options set. The
options also vary according to control types. They
include:
GUI Operations
•Touch {MASTERDROP-IN} to drop all ready controls
into automation record.
•Touch individual controls, in the GUI, that are set
ready for automation record.
BUTT
This option is the fire-up default. Where a new section
of automation moves is recorded over previous moves,
having BUTT selected causes a jump between the old
and new data, if they are different at the drop-out
point. BUTT can also be found under ‘AUTO
RETURN TIME’ in the AUTOMATION GUI.
RAMP (# FRAMES)
This option allows the mix data to return to the
previous data over a specified time as a ramp between
the new and old values at the drop-out point. The
ramp time, in frames, can be set under ‘AUTO
RETURN TIME’ in the AUTOMATION GUI.
HOLD TO END
This option causes the setting at the automation ‘dropout to’ point to be recorded to the end of the title.
HOLD TO END can also be found under ‘AUTO
RETURN TIME’ in the AUTOMATION GUI.
HOLD TO NEXT
The system stores automation data only when changes
to settings occur, in order to save storage space. These
changes are known as events. Using HOLD TO
NEXT causes the setting at the automation drop-out
point to be recorded until the next event. HOLD TO
NEXT can also be found under ‘AUTO RETURN
TIME’ in the AUTOMATION GUI.
WRITE Buttons
•Press {WRITE} directly above the knob in each fader
strip to drop all the ready controls into automation
record for that channel.
Fader Knobs
•Touch a fader knob for a fader that is set ready for
automation record.
Buttons
•Press an individual button that is set ready for
automation record. It will simultaneously change
state and drop into automation record.
Knobs
•In the CHANNEL GUI touch the numeric indicator
above any knob that is set ready for automation
record. Its numeric indicator will change colour from
yellow red.
TOP TO END
This option causes the setting at the automation ‘dropout point’ to be recorded from the beginning to the end
of the title. TOP TO END can also be found under
‘AUTO RETURN TIME’ in the AUTOMATION
GUI.
WRITE HOLD
Any controls set into automation record during normal
operations will drop out, returning to ready status, if
the source material is stopped or rewound. The system
monitors timecode in order to operate this way.
WRITE HOLD retains the record status without
reference to timecode.
TOUCH HOLD
This option applies to faders. Normally, any faders set
to automation record will have data written only when
contact is made with their touch sensitive fader knobs.
Using TOUCH HOLD, touching any fader will cause
it to latch into automation record.
Automation Operation
13
Page 14

Automation Operation
Automating Faders
AUTOMATION GUI displaying MAKE STATIC option
General
Before using the automation on any control for the first
time, it is wise to clear automation data which may be
resident in memory if the system has been in use by
others. The following assumes that all important
project data has been saved in an open slot in the Title
Manager.
To Clear Automation Data
1 Touch the {AUTOMATION} label in the middle at
the bottom of the GUI to display the
AUTOMATION GUI.
2 Touch the {MAKESTATIC} tab in the upper part of
the GUI.
3 Touch the {ALLON} button to highlight all channel
and signal paths green. Or touch individual
buttons relating to channels and outputs, if more
appropriate, to highlight them green.
4 Touch {EXECUTE} under the MAKE STATIC
label. A confirmation pop-up will appear. Touch
{YES} to complete the operation
Dynamic and Snapshot automation
It is important to note that it is possible to dynamically
automate individual controls as well as to restore
snapshots, both to timecode. This could cause conflict
when, for example, the same control is restored from a
snapshot whilst also being controlled dynamically.
Therefore it is advisable to isolate controls from
dynamic automation when they are included in
Automation Operation
14
Page 15

snapshots using AUTOMATION ISOLATE, which is
described later. For now, make sure {TCLINK} under
the SNAPSHOT heading, is turned off.
To Automate Moves on One or More
Faders
1 Press {ABS} (short for absolute) on the panel under
the TC AUTOMATION heading above the
timecode display. The AUTO button in the middle
at the top of the GUI turns red and indicates ‘ABS’
at the lower left. In this mode the exact fader
positions and moves will be recorded.
2 Make sure the defaults, ‘BUTT’ and ‘NORMAL’
are displayed in the AUTO button. If not, touch it
for a pop-down, that requires an individual
operation for each selection.
3 Touch {READYSETUP} to the right of the AUTO
button and it highlights.
4 Touch the knobs of the faders to be automated.
Their {WRITE} buttons flash on and off red with a
fast double flash in the red part of the cycle. This
indicates that the faders are ready to have any
moves recorded by the automation system. The
fast double flash serves as a reminder that
{READYSETUP} is selected. If a fader is moved
when it is touched, it will not matter as, during the
ready set-up mode, faders spring back and the level
setting will remain.
Note
Please note that it takes just one touch to set a fader ready
for automation record, and that a second touch will take it
out of ready mode!
The ready status of any fader is displayed in the
CHANNEL GUI. Either touch {CHANNEL} at the
bottom left of the LCD or press the {ACCESS}
button for the channel to be viewed. The dB level
display above the fader icon, to the right of the
GUI, will change colour from green to yellow to
indicate its automation ready status.
The {FADER} button in the READY SETUP
column will also highlight orange when the fader is
ready. In fact, touching the {FADER} button or the
dB legend is another way of setting a fader in and
out of automation ready.
But please note that touching {FADER} in the GUI
sets both the channel and multrack faders into
automation ready mode simultaneously.
5 Then touch {READYSETUP} to de-select it, or roll
the material, when it will be de-selected
automatically. When {READYSETUP} is off, the
{WRITE} buttons will flash regularly without the
double flash. The regular flashing indicates the
normal automation ready mode.
6 Then, whilst the material is playing, touch any
fader knob and its {WRITE} button will light
solidly, indicating that automation data is being
recorded. The dB level display above the fader
icon in the CHANNEL GUI will also turn red.
Make some fader moves and the exact fader
positions and moves will be recorded. The dB
level display will indicate changes and moves.
7 If a mistake is made or changes are required to
what has just been recorded, simply wind back the
material and overwrite by touching and moving
faders. When overwriting a previous pass, the two
small cyan arrows either side of the fader knob
icon will indicate the last mix settings.
Automation Operation
15
Page 16

Automation Operation
How to wind back
There are various ways to locate to points within the
material; these depend on the source storage media:
Quick Rollback
•Press and hold the p transport key. Then press the
0 for every 5 seconds to be rolled back. Then
release p and the system will rewind and play again
from the specified point.
Locate
•Press the LOCATE button
above the transport keys to locate the last locate point
set via the CUE GUI.
•In the CUE GUI, touch one of the Cues in the
NUMBERS column to highlight it, and touch
{LOCATE} in the same GUI. Then press the ”
transport key.
Rewind
•Applies to tape recorders or hard disk systems that
simulate a tape recorder. Press the 0 transport key
and then the ” key when the system has rewound to
an appropriate location.
Note
For secondary automation functions, such as TRIM, to
operate correctly, automation data must already be present
ahead of any points where these are carried out.
Operation of A and B Buffers
If the source material is stopped or rewound, {B} will
light as the next destination. This alternating process
will continue while {AUTO} is selected.
Copying buffers
To copy the data from one buffer to the other, press
and hold {A} or {B} for the source data until its
button flashes. Then press the button for the other
buffer. A pop-up will appear requiring confirmation
before the copy operation can be completed.
Automation Drop-out Modes
When changes are made to just a section over previous
moves, the new fader settings may not match the old at
the end of the new section where the previous and new
join. The default return mode is butt, where a jump
will occur. As described earlier there are other
options, summarised below:
•BUTT
•RAMP (# FRAMES)
(Set time in frames in AUTOMATION GUI)
• HOLD TO END
•HOLD TO NEXT
• TOP TO END
Touch {AUTO} in the top centre of the GUI in order to
select the automation drop-out return modes listed
above.
Automation data is first stored in the A and B buffers.
If the system is powered down, the data in these
buffers will be lost. So automation data must be stored
more permanently using the SAVE or KEEP functions.
However, the A and B buffers do serve a useful
purpose as holding places for data before it is saved
permanently.
The A and B buffers have two modes of operation,
Manual and Auto. These touch button options are
found in the upper left of the AUTOMATION GUI:
Manual
Select the front panel {A} or {B} button under the TC
AUTOMATION heading and all automation data is
stored and replayed from that buffer.
Auto
The default fire-up is the A buffer, indicated by {A}
being lit. So automation data will be stored there first.
To Save a Mix
1 Press {TITLE} at the very top left of the GUI for its
pop-down.
2 Then touch {SAVE} to save the data in the current
Title. Touching {SAVEASNEW} will save the data
in the next available Titles slot.
3 If the work is complete, touch {READYSETUP} to
highlight it, and then {OPTIONS} next to it for a
pop-down. Touch {CANCELALL} in the pop-down
and {CLOSE} to finish with the pop-down menu.
All ready indications will cease. Finally touch
{READYSETUP} once more to turn it off. The
system is now completely ‘safe’ and automation
data cannot be overwritten.
Automation Operation
16
Page 17

To Trim Moves on One or More Faders
A/B buffer rotation
When it comes to using the trim function, it is often a
good idea to set the automation ‘A’ and ‘B’ buffer
rotation to manual. This allows a source mix which is
‘safe’ to be kept close at hand. Otherwise, if a
correction is required, confusion may result from
further trimming of an already trimmed mix.
To set the rotation to manual, touch {AUTOMATION} at
the base of the LCD to display the AUTOMATION
GUI. Then touch {MANUAL} beneath the A/B
BUFFER ROTATION heading.
To save a copy of a mix in the ‘A’ buffer for safety,
press and hold {A} under the TC AUTOMATION
heading until it flashes, then press {B}. A pop-up will
appear requiring confirmation before the copy
operation can be completed. Then continue to work on
the mix in the ‘A’ buffer, which stays lit.
Note
Automation data must already be present ahead of any
points where TRIM operations might be carried out.
4 Then touch {READYSETUP} to de-select it, or roll
the material, in which case it will be de-selected
automatically. When {READYSETUP} is off, the
{WRITE} buttons will flash regularly without the
double flash. The regular flashing indicates the
normal automation ready mode.
5 Then, whilst the material is playing, although the
physical fader knobs will not move unless touched,
the knob in the fader icon and the dB display will
reflect the previous mix. The previous mix will be
heard, including the fader moves.
Touch any fader knob and its {WRITE} button will
light solidly, indicating that automation data is
being recorded. The dB level display above the
fader icon will also turn red and continue to
display the levels from the underlying mix, along
with the knob in the fader icon.
1 Press {TRIM} on the panel under the TC
AUTOMATION heading above the timecode
display. The AUTO button in the middle at the top
of the GUI turns green and indicates ‘TRIM’ at the
lower left. All faders move to their 0dB setting
which is the reference point about which any
trimming moves can be made.
2 Touch {READYSETUP} to the right of the AUTO
button and it highlights.
3 Touch the knobs of the fader to be automated.
Their {WRITE} buttons flash on and off red with a
fast double flash in the red part of the cycle. This
indicates that the faders are ready to have any
moves recorded by the automation system. The
fast double flash serves as a reminder that
{READYSETUP} is selected.
As with automation using ABS mode, the
CHANNEL GUI reflects the ready status in the dB
level display above the fader icon as well as the
{FADER} button at the bottom of the READY
SETUP column, in the CHANNEL GUI.
Moving any fader above the 0dB point will trim
the mix, increasing the level. Adjusting the fader
below 0dB will trim to a lower level. Meanwhile
as the physical fader is moved, the two small cyan
arrows either side of the fader knob icon will
reflect the underlying mix. The dB display will
indicate the combined result of trimming the
underlying mix.
This function allows relative adjustment on
previous automated moves whilst those moves are
retained exactly as they were, but at a higher or
lower level.
All trimming adjustments will be heard and if a
fader knob is released it will behave according to
the current automation drop-out mode. If the
return mode is RAMP for example, then a fader
Automation Operation
17
Page 18

Automation Operation
will glide back to the 0dB marker according to the
Ramp Time setting.
6 If a mistake is made or changes are required to
what has just been recorded, the situation may be
tackled in one of several ways:
• Press {SAFE} before pressing the p transport key
to stop the material rolling. Release {SAFE}
afterwards. In this case, the new automation data
is not stored, so rewind and start again.
• Simply wind back the material and re-trim by
touching and moving faders. But remember that
this method causes trim data to be further modified
in trim mode.
• Copy the ‘safe’ mix from the ‘B’ buffer into ‘A’
in order to redo the trim operation completely. In
this case, press and hold {B}, under the TC
Automating Fader Cut Switches
AUTOMATION heading, until it flashes, then
press {A}. A pop-up will appear requiring
confirmation before the copy operation can be
completed. Then continue to work on the restored
‘safe’ mix in the ‘A’ buffer, which stays lit.
7 If the work is complete, touch {READYSETUP} to
highlight it, and then {OPTIONS} next to it for a
pop-down. Touch {CANCELALL} in the pop-down
and {CLOSE} to finish with the pop-down menu.
All ready indications will cease. Finally touch
{READYSETUP} once more to turn it off. The
system is now completely ‘safe’ and automation
data cannot be overwritten.
Note
Fader moves can be viewed on the AUDIO FADER GUI,
including trim offsets. Touch {AUDIO} at the lower left of
the LCD screen for its pop-up, and then touch {FADER} to
view all faders.
General
Before using the automation for cuts or other switches
for the first time, clear automation data which may be
resident in memory if the system has been in use by
others. Clearing automation data is described at the
beginning of the section ‘Automating Faders’.
To Automate One or More Cut Switches
The setting up for automating cut switches works on
exactly the same principles as for faders. There are
differences in actual operation which relate to the
physical differences between faders and switches.
1 Press {ABS} (short for absolute) on the panel under
the TC AUTOMATION heading above the
timecode display. The AUTO button in the middle
at the top of the GUI turns red and indicates ‘ABS’
at the lower left.
2 Make sure the defaults ‘BUTT’ and ‘NORMAL’
are displayed in the AUTO button. If not touch it
for a pop-down, which requires an individual
operation for each selection.
3 Touch {READYSETUP} to the right of the AUTO
button and it highlights.
4 Press each {CUT} button to be automated and note
that they do not change state. Their channel
{WRITE} buttons flash on and off red with a fast
double flash in the red part of the cycle. This
indicates that the cuts are ready to have any switch
operations recorded by the automation system.
The fast double flash serves as a reminder that
{READYSETUP} is selected.
The ready status of any switch is also displayed in
the CHANNEL GUI. Either touch {CHANNEL} at
the bottom left of the LCD or press the {ACCESS}
button for the channel to be viewed. A yellow bar,
indicating automation ready status, will appear
beneath the fader cut switch situated above the
fader icon to the right in the GUI.
The {CUT} button in the READY SETUP column
will also highlight orange when the cut is ready.
Touching this {CUT} button is another way of
setting a fader cuts in and out of automation ready.
But please note that touching {CUT} in the GUI sets
both the channel and multrack cut buttons into
automation ready mode simultaneously.
Automation Operation
18
Page 19

8 If the work is complete, touch {READYSETUP} to
highlight it, and then {OPTIONS} next to it for a
pop-down. Touch {CANCELALL} in the pop-down
and {CLOSE} to finish with the pop-down menu.
All ready indications will cease. Finally touch
{READYSETUP} once more to turn it off. The
system is now completely ‘safe’ and automation
data cannot be overwritten.
To Automate Cuts Simultaneously
A method for dropping a number of cuts into
automation record simultaneously is to set them into a
‘CUT GROUP’:
1 Touch {AUDIO} at the bottom left of the LCD for
its pop-up and touch {FADERGROUP} to display
the AUDIO FADER/CUT GROUPING GUI.
2 Touch one of the GROUP panels to the left of the
GUI in order to set up the CUT GROUP.
5 Then touch {READYSETUP} to de-select it, or roll
the material in which case it will be de-selected
automatically. When {READYSETUP} is off, the
{WRITE} buttons will flash regularly without the
double flash. The regular flashing indicates the
normal automation ready mode.
6 Then, whilst the material is playing, pressing any
cut button will drop it into automation record and
its {WRITE} button will light solidly. The cut will
simultaneously change state and drop into
automation record . The yellow bar beneath the
fader cut in the CHANNEL GUI will also turn red.
Pressing cuts individually drops them into
automation record one at a time.
7 If a mistake is made or some changes are required
to what has just been recorded, simply wind back
the material and overwrite by pressing the cuts
again. As soon as the material is stopped, the cuts
will drop back to their ready state. Pressing any
cut will drop it into automation record again whilst
the material is rolling forward once more.
3 Touch the button immediately to the right of the
GROUP # legend, to cycle through the options
until {CUT} is displayed.
4 Select the channels that are to have their cuts in the
group by touching each individual button in the
channels field occupying most of the GUI.
5 Make sure that {ON} is displayed for the group, set
by the on/off button in the GROUP # panel.
6 Use the procedure described for automating a
single cut. All automation functions carried out on
any individual cut in the group will apply to all
cuts in that group. Automation data is stored for
individual channels, which allows the CUT
GROUP to be disbanded at any time.
Automation Operation
19
Page 20

Automation Operation
Trimming Cut Switches
The trim functions for cut switches allow individual
cut transactions to be time-shifted earlier or later, or
erased.
Note
Automation data must already be present ahead of any
points where TRIM operations might be carried out.
1 Press {TRIM} on the panel under the TC
AUTOMATION heading above the timecode
display. The AUTO button in the middle at the top
of the GUI turns green and indicates ‘TRIM’ at the
lower left.
2 Touch {READYSETUP} to the right of the AUTO
button and it highlights.
3 Press each {CUT} button to be trimmed and note
that they do not change state. Their channel
{WRITE} buttons flash on and off red with a fast
double flash in the red part of the cycle. This
indicates that the cuts are ready to have any switch
operations recorded by the automation system.
The fast double flash serves as a reminder that
{READYSETUP} is selected.
CUT button ON/OFF:
release
ORIGINAL CUT ACTIONS
CUT ON
LATER
A
CUT
B
push
ON OFF
ON
Signal
CUT ON
EARLIER
C
press, hold
& release
Previous cut data
New cut operations
CUT OFF
EARLIER
CUT OFF
LATER
press, hold
& release
The ready status of any switch is also displayed in
the CHANNEL GUI in the same way as when
using the ‘ABS’ mode for automating cuts.
4 Then touch {READYSETUP} to de-select it, or roll
the material in which case it will be de-selected
automatically. When {READYSETUP} is off, the
{WRITE} buttons will flash regularly without the
double flash. The regular flashing indicates the
normal automation ready mode.
5 Once the material is rolling, cuts can be adjusted in
a number ways according to the illustrations that
follow:
A - Shows the original cut actions.
B - Press and release {CUT} before original cut
point to advance the cut on-point. Press and
release {CUT} before the original off-point to
advance the cut off-point. These operations can be
performed independently in one or two passes.
C - Press and hold {CUT} from before the original
cut point, and release after to delay the cut
ERASE CUT TRANSACTION COMPLETELY
D
press & hold release
on-point. Press and hold {CUT} from before the
original off-point, and release after to delay the cut
off-point. These operations can be performed
independently in one or two passes.
D - Press and hold {CUT} from before the original
cut point, and release after the original cut
off-point to erase a cut transaction completely.
Automating Other Switches
The principles of operation for cut switches apply
equally to all other types of switches. They can be set
into automation ready by pressing switches on the
panel, or by touching buttons on the zoomed GUIs.
Automation Operation
20
Page 21

Automating Knobs
General
The principles for automating knobs are very similar to
those for faders. Note that most level control can be
assigned to the row of knobs above the faders. They
can be automated using knobs or faders, provided that
they are assigned to the chosen control type.
Before using the automation for knobs for the first
time, clear all automation data which may be resident
in memory if the system has been in use by others.
Confusion may result if previous automation moves
are replayed whilst learing the system. Clearing
automation data is described at the beginning of the
section ‘Automating Faders’.
To Automate a Pan Knob
1 Make sure no panel buttons are selected under the
‘PANS’ heading to the right of the row of knobs
above the faders. Their default function is pan
unless a button is selected for any other function.
The ready status of any knob is also displayed in
the CHANNEL GUI. Either touch {CHANNEL} at
the bottom left of the LCD or press the {ACCESS}
button for the channel to be viewed. The
positional readout, below the CH PAN legend to
the right of the GUI, will change colour from green
to yellow, indicating automation ready status.
2 Press {ABS} (short for absolute) on the panel under
the TC AUTOMATION heading above the
timecode display. The AUTO button in the middle
at the top of the GUI turns red and indicates ‘ABS’
at the lower left.
3 Make sure the defaults ‘BUTT’ and ‘NORMAL’
are displayed in the AUTO button. If not, touch it
for a pop-down, which requires an individual
operation for each selection.
4 Touch {READYSETUP} to the right of the AUTO
button and it highlights.
5 Turn a pan knob to the right (clockwise) and note
that its surrounding LED position indicator does
not follow when {READYSETUP} is selected. This
sets it into automation ready, indicated by the
channel {WRITE} button above it flashing on and
off red, with a fast double flash in the red part of
the cycle. The fast double flash serves as a
reminder that {READYSETUP} is selected. Turning
the knob to the left (anti clockwise) will take the
pan out of automation ready, at which time the
{WRITE} button will cease flashing. In ‘ABS’
mode, the exact moves and settings will be
recorded by the automation system.
The {PAN} button in the READY SETUP column
will also highlight orange when the fader is ready.
Touching this {PAN} button is another way of
setting a channel pan in and out of automation
ready. But please note that touching {PAN} in the
GUI sets both the channel and multrack pans into
automation ready mode simultaneously.
6 Then touch {READYSETUP} to de-select it, or roll
the material in which case it will be de-selected
automatically. When {READYSETUP} is off, the
{WRITE} buttons will flash regularly without the
double flash. The regular flashing indicates the
normal automation ready mode.
7 Then, either before or whilst the material is
playing, touch the CH PAN positional readout,
touch {MASTERDROPIN} or press the {WRITE}
Automation Operation
21
Page 22

Automation Operation
button to drop into automation record. The readout
will change colour from yellow to red and its
{WRITE} button will light solidly indicating
automation record in progress.
8 Make sure {PANON} is highlighted in green and
then make panning moves and adjustments as
required. They will be reflected in the LED
position indicator and the GUI readout and bar.
For a larger display of the pan readout, either touch
the pan area in the GUI or touch {CHANNEL} at the
bottom left of the LCD for its pop-up, then touch
{INPUT/PAN/ASSIGN}. The INPUT/PAN/ASSIGN
GUI, which has a larger area devoted to the
channel pan at the lower right, will be displayed.
The pan readout in this GUI can also be used for
the ready set-up and automation drop-in.
9 If a mistake is made or changes are required to
what has just been recorded, simply wind back the
material and overwrite. After locating back, either
before or after rolling the material again, drop into
automation record, by touching the CH PAN
positional readout, {MASTERDROPIN} or pressing
{WRITE}.
To set the rotation to manual, touch {AUTOMATION} at
the bottom of the LCD to display the AUTOMATION
GUI. Then touch {MANUAL} beneath the A/B
BUFFER ROTATION heading.
To save a copy of a mix in the ‘A’ buffer for safety,
press and hold {A} under the TC AUTOMATION
heading until it flashes, then press {B}. A pop-up will
appear requiring confirmation before the copy
operation can be completed. Then continue to work on
the mix in the ‘A’ buffer, which stays lit. Using the
trim function for knobs allows previous settings and
moves to be offset or dynamically trimmed.
Note
Automation data must already be present ahead of any
points where TRIM operations might be carried out.
1 Press {TRIM} on the panel under the TC
AUTOMATION heading above the timecode
display. The AUTO button in the middle at the top
of the GUI turns green and indicates ‘TRIM’ at the
lower left.
2 Touch {READYSETUP} to the right of the AUTO
button and it highlights.
When overwriting a previous pass, the two small
cyan dots above and below the pan bar indicator,
will reflect the settings for the previous mix as a
reference.
To Automate a Number of Knobs
1 Use the set-up procedure described in the previous
section.
2 Drop into automation record using
{MASTERDROPIN} to set all knobs to write
simultaneously, or press individual {WRITE}
buttons.
Trimming Knob Moves
A/B buffer rotation
When it comes to using the trim function, it is often a
good idea to set the automation ‘A’ and ‘B’ buffer
rotation to manual. This allows a source mix which is
‘safe’ to be kept close at hand. Otherwise, if a
correction is required, confusion may result from
further trimming of an already trimmed mix.
3 Turn each knob to be trimmed to the right
(clockwise). This sets them into automation ready,
indicated by the channel {WRITE} buttons flashing
on and off red, with a fast double flash in the red
part of the cycle. The fast double flash serves as a
reminder that {READYSETUP} is selected. Turning
knobs to the left (anti clockwise) will take them
out of automation ready, at which time their
{WRITE} buttons will cease flashing.
In ‘TRIM’ mode the system records any knob
changes and moves as differences or offsets from
the underlying mix with reference to the knob
position at the automation drop-in point.
The ready status of any knob is also displayed in
the CHANNEL GUI in the same manner when
using ‘ABS’ mode.
4 Touch {READYSETUP} to de-select it, or roll the
material when it will be de-selected automatically.
When {READYSETUP} is off, the {WRITE} buttons
will flash regularly without the double flash. The
regular flashing indicates the normal automation
ready mode.
Automation Operation
22
Page 23

5 Roll the material and make any adjustments as
required. Although changes will be heard from the
underlying mix, the LED knob position indicators
will only display changes being made for the
current pass. Any knobs being automated, which
are displayed on the LCD, will indicate a
combination of the previous mix and the actions in
the current pass. The two cyan dots, above and
below the pan bar, indicate the settings for the
previous underlying mix. The bar and the position
readout indicate the result of combining the
underlying mix and the new trim operations.
This function allows relative adjustment on
previous automated moves whilst those moves are
retained exactly as they were, but at a higher or
lower level.
6 If a mistake is made or changes are required to
what has just been recorded, the situation may be
tackled in one of several ways:
• Press {SAFE} before pressing the p transport key
to stop the material rolling. Release {SAFE}
afterwards. In this case, the new automation data
is not stored, so rewind and start again.
• Simply wind back the material and re-trim by
touching and moving faders. But remember this
method means that trim data is being further
modified in trim mode.
• Copy the ‘safe’ mix from the ‘B’ buffer into ‘A’
in order to redo the trim operation completely. In
this case, press and hold {B} under the TC
AUTOMATION heading until it flashes, then
press {A}. A pop-up will appear requiring
confirmation before the copy operation can be
completed. Then continue to work on the restored
‘safe’ mix in the ‘A’ buffer, which stays lit.
7 If the work is complete, touch {READYSETUP} to
highlight it, and then {OPTIONS} next to it for a
pop-down. Touch {CANCELALL} in the pop-down
and {CLOSE} to finish with the pop-down menu.
All ready indications will cease. Finally touch
{READYSETUP} once more to turn it off. The
system is now completely ‘safe’ and automation
data cannot be overwritten.
Automation Operation
23
Page 24

Automation Operation
Automating Sections of Controls
To Automate a Complete EQ Section
To set up automating of complete sections of channels
on a channel by channel basis, using the EQ section as
an example, first display the CHANNEL GUI, then:
1 Press {ABS} (short for absolute) on the panel under
the TC AUTOMATION heading above the
timecode display. The AUTO button in the middle
at the top of the GUI turns red and indicates ‘ABS’
at the lower left. In this mode the exact fader
positions and moves will be recorded.
2 Make sure the defaults ‘BUTT’ and ‘NORMAL’
are displayed in the AUTO button. If not, touch it
for a pop-down, which requires an individual
operation for each selection.
3 Touch {READYSETUP} to the right of the AUTO
button and it highlights.
4 Touch {EQ/FILT} under the ‘READY SETUP’
heading to the lower right of the GUI. All EQ
knob readouts will turn from green to yellow and
yellow bars will appear beneath all EQ related
switches, indicating that the complete EQ section
is ready for automation data to be recorded. The
channel {WRITE} button will also flash.
Other sections set for automation in the same way:
• {DYNAMICS} button for the full Dynamics
section.
• {ASSIGN} button for all MTR and Program Bus
Assign buttons.
• {AUXSEND} button for all Aux Sends.
Automation Operation
24
Page 25

5 With all controls selected, individual controls can
be de-selected from ready by touching them one at
a time in the CHANNEL GUI. For a larger view
of the EQ section, touch the EQ section avoiding
areas where controls are placed, or touch
{CHANNEL} at the bottom left of the LCD, and then
touch {EQ/FILT}.
2 Make sure the defaults ‘BUTT’ and ‘NORMAL’
are displayed in the AUTO button. If not touch it
for a pop-down, which requires an individual
operation for each selection.
3 Touch {READYSETUP} to the right of the AUTO
button and it highlights.
6 Touch {READYSETUP} to de-select it, or roll the
material when it will be de-selected automatically.
7 Press the {WRITE} buttons for individual channels
or touch {MASTERDROPIN}. All automation
ready controls, knob readouts and bars beneath
switches, in the GUI, will turn from yellow to red,
indicating automation record.
8 If a mistake is made or some changes are required
to what has just been recorded, simply wind back
the material and overwrite. After locating back,
either before or after rolling the material again,
drop into automation record by pressing individual
channel {WRITE} buttons, or touch
{MASTERDROPIN} to have all channels drop into
automation record simultaneously.
9 When the work is complete, touch {READYSETUP}
to highlight it, and then {OPTIONS} next to it for a
pop-down. Touch {CANCELALL} in the pop-down
and {CLOSE} to finish with the pop-down menu.
All ready indications will cease. Finally touch
{READYSETUP} once more to turn it off. The
system is now completely ‘safe’ and automation
data cannot be overwritten.
4 Touch {EQ/FILT} under the ‘READY SETUP’
heading to the lower right of the GUI if not already
highlighted.
5 Touch {READYSETUP} to de-select it, or roll the
material when it will be de-selected automatically.
6 Press the {WRITE} buttons for individual channels
or touch {MASTERDROPIN} in order for any
trimming moves to be recorded by the automation
system.
7 If a mistake is made or some changes are required
to what has just been recorded, the situation may
be tackled in one of several ways:
• Press {SAFE} before pressing the p transport key
to stop the material rolling. Release {SAFE}
afterwards. In this case, the new automation data
is not stored, so rewind and start again.
• Simply wind back the material and re-trim by
touching and moving faders. But remember that
this method means that trim data is being further
modified in trim mode.
• Perform trimming operations on a ‘safe’ mix in
order to redo the trim operation completely.
Trimming Sections of Knob Moves
The trimming of sections of knobs uses the same
procedure described under ‘Trimming knob moves’. It
is described briefly as follows:
Note
Automation data must already be present ahead of any
points where TRIM operations might be performed.
1 Press {TRIM} on the panel under the TC
AUTOMATION heading above the timecode
display. The AUTO button in the middle at the top
of the GUI turns green and indicates ‘TRIM’ at the
lower left.
8 When the work is complete, touch {READYSETUP}
to highlight it, and then {OPTIONS} next to it for a
pop-down. Touch {CANCELALL} in the pop-down
and {CLOSE} to finish with the pop-down menu.
All ready indications will cease. Finally touch
{READYSETUP} once more to turn it off. The
system is now completely ‘safe’ and automation
data cannot be overwritten.
Automation Operation
25
Page 26

Automation Operation
To Automate All EQ Sections
The R100 allows the automation to be set up in order
to record data from sections of all channels and signal
paths on a global basis. Using the EQ section as an
example, first display the CHANNEL GUI, then:
1 Press {ABS} (short for absolute) on the panel under
the TC AUTOMATION heading above the
timecode display. The AUTO button in the middle
at the top of the GUI turns red and indicates ‘ABS’
at the lower left. In this mode the exact fader
positions and moves will be recorded.
2 Make sure the defaults ‘BUTT’ and ‘NORMAL’
are displayed in the AUTO button. If not, touch it
for a pop-down, which requires an individual
operation for each selection.
3 Touch {READYSETUP} to highlight it, and then
{OPTIONS} next to it for a pop-down. Touch
{ALLEQs} in the pop-down and then {CLOSE} to
finish with the pop-down menu. The {WRITE}
buttons for all channels and signal paths which
include EQ processing will flash, indicating
automation ready mode.
Global automation ready set-up exists for other
controls and sections as below. They are selected
using the {OPTIONS} pop-down:
• {ALLDYNAMICSs} for all channels and signal
paths which include Dynamics processing.
• {ALLAUXKNOBS} for the Aux Send Levels for
all channels.
• {ALLAUXBUTTONS} for the Aux Send Cuts for
all Channels and the Aux Returns.
Automation Operation
26
Page 27

• {ALLCUTS} for the Channel Fader and MTR
Fader Cuts for all Channels and the Aux Returns.
• {ALLBUSASSIGNS} for Program and MTR Bus
Assign buttons for all Channels and the Aux
Returns.
• {ALLPANS} for the Channel and MTR Pans for
all Channels.
• {ALLFADERS} for the Channels, MTRs, Aux
Returns, Bus Masters and Program Faders.
Footswitch, Audition & Auto
4 The rest of this procedure follows that described
earlier in this section so please refer to the
beginning of ‘Automating Sections of Controls’.
General
The FOOT SW, AUDITION and AUTO functions
allow the settings for controls in automation record to
be written as automation data over specified periods.
• FOOT SW allows the drop-in time period to be set
using a footswitch.
• AUDITION allows the drop-in time period to be set
manually using the {SAFE} button.
• AUTO allows the drop-in time period to be set by
specifying timecode points.
Automation Operation
27
Page 28

Automation Operation
Note
Automation data must already be present ahead of any
points where the following operation might be performed.
Automation Drop-in Using FOOT SW
Plug a momentary action footswitch into the jack on
the rear panel behind the PGM L and R bar meters.
1 Touch {FOOTSW} to the left of the
AUTOMATION GUI so that it highlights green.
‘FOOT’ will appear in the AUTO button at the top
centre of the LCD.
2 Select the {ABS} or {TRIM} button according to
whether the underlying data is to be overwritten or
trimmed, and make sure {SAFE} is turned off, i.e.
its LED is off.
3 Set the faders to have automation data recorded
into ready and then drop them into automation
record. This will be confirmed by the {WRITE}
buttons being lit solidly for the channels
concerned.
Automation Drop-in Using AUDITION
1 Touch {AUDITION} to the left of the
AUTOMATION GUI so that it highlights green.
The {SAFE} button will light and the AUTO button
at the top centre of the LCD will then display the
following:
• AUDITION
• WH - Write Hold, which means any faders which
are touched will remain armed to write automation
data at all times, including when the material is
rewound.
• TH - Touch Hold, which means that automation
data is being written continuously and not just
when faders are being touched.
• BUTT - Audition can operate only with butt or a
jump at the join between previous and new
auditioned settings.
2 Select the {ABS} or {TRIM} button according to
whether the underlying data is to be overwritten or
trimmed.
4 Play the material over the section where the
settings are to be recorded and adjust the faders to
suitable settings. The underlying mix will not be
overwritten. It is advisable to use a ‘safe’ mix
when performing this kind of operation in case a
complete re-write is necessary.
5 When the fader settings are finally satisfactory, roll
the material again. At the drop-in point, push and
hold the footswitch for the period required for the
drop-in. Pressing the p transport key will also
drop the system out of automation data record.
6 Make sure the channels involved have returned to
ready mode, indicated by their {WRITE} buttons
flashing, then replay the material to check it.
7 When the work is complete, release {FOOTSW}.
Touch {READYSETUP} to highlight it, and then
{OPTIONS} next to it for a pop-down. Touch
{CANCELALL} in the pop-down and {CLOSE} to
finish with the pop-down menu. All ready
indications will cease. Finally touch
{READYSETUP} once more to turn it off. The
system is now completely ‘safe’ and automation
data cannot be overwritten.
3 Set the faders to have automation data recorded
into ready and then drop them into automation
record. This will be confirmed by the {WRITE}
buttons being lit solidly for the channels
concerned.
4 Play the material over the section where the
settings are to be recorded and adjust the faders to
suitable settings. The underlying mix will not be
overwritten. It is advisable to use a ‘safe’ mix
when performing this kind of operation in case a
complete re-write is necessary.
5 When the fader settings are finally satisfactory, roll
the material again. At the drop-in point, release
{SAFE} so that its LED is no longer lit, when
automation data will be recorded. At the drop-out
point press {SAFE} again.
6 When the work is complete, release {AUDITION}
and the automation will resume ‘NORMAL’ mode.
Check that the automation is in ready mode,
indicated by the {WRITE} buttons flashing. Then
replay the material to check that the revised
automation data is satisfactory.
Automation Operation
28
Page 29

7 When finally complete, touch {READYSETUP} to
highlight it, and then {OPTIONS} next to it for a
pop-down. Touch {CANCELALL} in the pop-down
and {CLOSE} to finish with the pop-down menu.
All ready indications will cease. Finally touch
{READYSETUP} once more to turn it off. The
system is now completely ‘safe’ and automation
data cannot be overwritten.
Note
If a return mode other than BUTT was selected before
touching {AUDITION}, it must re-selected manually. The
mode being used previously will not be returned
automatically when AUDITION is turned off.
Automation Record Using AUTO
Static settings using AUTO
This procedure allows static settings to be recorded as
automation data between fixed time points.
1 Touch {AUTO} towards the left of the
AUTOMATION GUI so that it highlights green.
‘AUTO’ will appear in the AUTO button at the top
centre of the LCD.
2 Set the time when automation data will start to be
recorded. This can be done in two ways:
• Touch {PUNCHINTIME} and the current timecode
point will be set.
• Touch the timecode display to highlight its
background. Then adjust the timecode number
using the jog wheel or the ten-number key pad.
Press {ENTER} at the bottom right of the number
key pad when finished.
5 Set the faders to have automation data recorded
into ready and then drop them into automation
record. This will be confirmed by the {WRITE}
buttons being lit solidly for the channels
concerned.
6 Play the material over the section where the
settings are to be recorded and adjust the faders to
suitable settings. The underlying mix will not be
overwritten. It is advisable to use a ‘safe’ mix
when performing this kind of operation in case a
complete re-write is necessary.
7 When the fader settings are finally satisfactory
press the p transport key. Then press
{WRITENOW}. A pop-up will appear requesting
confirmation in order to finalise the operation.
8 Rewind and check that the automation is in ready
mode, indicated by the {WRITE} buttons flashing.
Then replay the material to check that the revised
automation data is satisfactory.
9 When the work is complete, release {AUTO}.
Touch {READYSETUP} to highlight it, and then
{OPTIONS} next to it for a pop-down. Touch
{CANCELALL} in the pop-down and {CLOSE} to
finish with the pop-down menu. All ready
indications will cease. Finally touch
{READYSETUP} once more to turn it off. The
system is now completely ‘safe’ and automation
data cannot be overwritten.
Dynamic settings using AUTO
This procedure allows dynamic settings to be recorded
as automation data between fixed time points.
3 Set the time when automation data will finish
being recorded. This can be done in two ways:
• Touch {PUNCHOUTTIME} and the current
timecode point will be set.
• Touch the timecode display to highlight its
background. Then adjust the timecode number
using the jog wheel or the ten-number key pad.
Press {ENTER} at the bottom right of the number
key pad when finished.
4 Select the {ABS} or {TRIM} button according to
whether the underlying data is to be overwritten or
trimmed.
1 Repeat steps 1-5 as described in the ‘Static settings
using AUTO’ to set the start and finish times.
2 Play the material from before the ‘punch in time’
set in step 2, to the ‘punch out time’ set in step 3.
3 Make adjustments to any of the controls set in
automation record whilst the material is rolling.
Automation data will only be recorded between the
in and out time points set.
4 Rewind and check that the automation is in ready
mode, indicated by the {WRITE} buttons flashing.
Then replay the material to check that the revised
automation data is satisfactory.
Automation Operation
29
Page 30

Automation Operation
Automation Isolate
General
Complete channels or sections of channels can be set
into an isolate mode in order that automation data will
not affect control settings.
Isolating Channels or Sections of All
Channels
1 Touch the {AUTOMATION} label in the middle at
the bottom of the GUI to display the
AUTOMATION GUI.
2 The {AUTOMATIONISOLATE} tab in the upper part
of the GUI is the default and should already be
selected.
3 Touch the {ALLON} button to highlight all channel
and signal paths green. Or touch individual
buttons relating to channels and outputs, if more
appropriate, to highlight them green. The
automation data will be isolated from all
highlighted channels, leaving their controls free for
adjustment.
4 Alternatively, under the FUNCTION heading,
touch ‘section’ buttons according to what is to be
isolated on a mixer-wide basis:
• {EQ/FILT} for all Equaliser and Filter sections.
• {DYN} for all Dynamics sections.
• {AUXSND} for all Aux Send controls.
• {CUT} for all Channel, MTR and Aux Return
Fader Cuts.
Automation Operation
30
Page 31

• {ASSIGN} for all MTR and Program Bus Assign
buttons.
• {PAN} for all Channel and MTR Pans.
• {FADER} for all Channel, MTR and Aux Return
Faders.
Snapshots
General
The Snapshots GUI allows static control settings to be
stored and recalled. The settings for the whole mixer
are saved for every Store operation whereas an Isolate
function allows snapshots to be recalled on a selective
basis.
To Save a New Snapshot
1 Touch {SNAPSHOT} at the bottom towards the left
of the LCD for the SNAPSHOT GUI.
2 Whilst the material is either stationary or moving,
touch {NEW} and a new entry will appear in the
SNAPSHOT NAME column. A default number
will be entered automatically.
Automation Operation
31
Page 32

Automation Operation
3 To change the default number to an appropriate
name, touch the default in the CUE NAME
column, and the QWERTY Keyboard pop-up
appears.
4 The default will be displayed in the upper entry
dialogue line. Either touch {BACKSPACE} several
times to delete it, or touch and move a finger
across it to highlight it. Then type in a suitable
name, such as ‘START OF TITLE’ in this case,
using the touch QWERTY keyboard. Touch
{ENTER} when finished.
To Revise a Snapshot
1 Under the NUMBER column, touch the Snapshot
number to be revised. It highlights white.
2 Whilst the material is either stationary or moving,
touch {STORE} in the SNAPSHOT GUI, and the
Snapshot location will be overwritten with the
current settings.
To Recall a Partial Snapshot
1 Under the NUMBER column, touch the Snapshot
number to be recalled. It highlights white.
2 Under the ISOLATE heading, touch individual
buttons relating to channels and outputs to
highlight them green. The data for these channels
will not be restored. Or, if more convenient, touch
the {ALLON} button to highlight all and then deselect individual channels.
3 Alternatively, under the FUNCTION heading,
touch ‘section’ buttons according to what is to be
isolated on a mixer-wide basis:
• {INROUT} for all Input Routing assignments.
• {EQ/FILT} for all Equaliser and Filter sections.
• {DYN} for all Dynamics sections.
• {AUXSND} for all Aux Send controls.
• {CUT} for all Channel, MTR and Aux Return
Fader Cuts.
To Delete a Snapshot
1 Under the NUMBER column, touch the Snapshot
number to be deleted. It highlights white.
2 Whilst the material is either stationary or moving,
touch {DELETE} in the SNAPSHOT GUI. A popup requesting confirmation will appear. Touch
{YES} to complete the operation.
This Snapshot location is now available for storing
a New Snapshot by touching {NEW} in the GUI.
To Recall a Complete Snapshot
1 Under the NUMBER column, touch the Snapshot
number to be recalled. It highlights white.
2 Whilst the material is either stationary or moving,
touch {RECALL} in the SNAPSHOT GUI and the
settings will be restored. Touch {UNDO} to reverse
the operation.
• {ASSIGN} for all MTR and Program Bus Assign
buttons.
• {PAN} for all Channel and MTR Pans.
• {FADER} for all Channel, MTR and Aux Return
Faders.
• {INPUT} for all Input Trim and Delay settings.
4 Whilst the material is either stationary or moving,
touch {RECALL} in the SNAPSHOT GUI and the
settings will be restored. Touch {UNDO} to reverse
the operation.
Automation Operation
32
Page 33

Automating Snapshot & Library Entry Recall
Automating the Recall of a Snapshot
1 Touch {CUE} at the bottom of the LCD, just left of
centre for the CUE GUI.
2 In the column headed TC LINK, make sure {ON} is
displayed for the Cue point to which a Snapshot is
to be linked and automated to timecode. If {OFF}
is displayed, touch it to change it to {ON}.
3 In the column headed EVENT, touch the entry
immediately to the right of the {ON} for a pop-up
and select {SNAPSHOT} if not already displayed.
4 In the column headed NUMBER, touch the entry
immediately to the right of the {SNAPSHOT} for a
pop-up displaying the list of Snapshots.
5 Select the Snapshot required by touching it.
6 Make sure {TCLINK} is selected beneath the
SNAPSHOT heading on the panel.
Every time the material is played past the Cue point,
the Snapshot selected will be restored.
Automating the Recall of a Library Entry
EQ and Dynamics settings stored using the Library
function, accessible via the EQUALIZER/FILTER and
DYNAMICS GUIs, can be restored with reference to
timecode as follows:
1 In the column headed TC LINK, make sure {ON} is
displayed for the Cue point to which an EQ or
Automation Operation
33
Page 34

Automation Operation
Dynamics Library entry is to be linked and
automated to timecode. If {OFF} is displayed,
touch it to change it to {ON}.
2 In the column headed EVENT, touch the entry
immediately to the right of the {ON} for a pop-up
and select {EQLIB} or {DYNLIB} according to what
is required.
3 In the column headed NUMBER, touch the entry
immediately to the right of {EQLIB} or {DYNLIB}
for a pop-up displaying the list of appropriate
library entries.
4 Select the Library entry required by touching it.
Fader Gang Grouping Offsets
General
Care should be taken when using Fader Gang Groups
since offsets between faders
can be lost.
5 In the column headed EFFECTIVE CHANNEL,
touch the entry immediately to the right of the
Library entry number for a pop-up allowing the
selection of channels. They are set out in groups
of eight. Touching any group of eight will open a
further pop-up to select an individual channel.
Select a channel.
6 Make sure {TCLINK} is selected beneath the
SNAPSHOT heading on the panel.
Every time the material is played past the Cue point,
the Library entry selected will be restored to the
specified Channel.
Using a Fader Gang Group
Here are a few points to remember when using Fader
Gang Group:
Setting Up a Fader Gang Group
1 Touch {AUDIO} at the bottom left of the LCD for
its pop-up, and then touch {FADERGROUP} for the
AUDIO FADER/CUT GROUPING GUI.
2 Touch one of the {GROUP‹} tabs at the left of the
GUI which is not being used.
3 If the first button to the right of the {GROUP‹} tab
is not displaying {GANG}, touch once or twice until
{GANG} is displayed.
4 The main area of the GUI displays a button for
each fader in the system. Touch three or more
buttons to group them, indicated by ‘GP#’
displayed.
5 Make sure {ON} is displayed on the button next to
the {GANG} button and the Fader Gang Group is
complete.
•Moving any one fader will cause all the other faders
to move according to their relationship when they
were set up.
•Touching and holding any single fader and then
moving another will change the relationship.
• The relationship between faders is based on dBs.
This will be reflected according to the fader scale
markings which are not linear. The amount of fader
travel is less per dB at the lower level settings, for
example.
•
IMPORTANT: Moving a fader with a higher level
setting than others in the group all the way down to
the end stop, then releasing touch will reset the
grouping relationship.
•
IMPORTANT: Moving a fader with a lower level
setting than others in the group all the way up to the
end stop, then releasing touch will reset the grouping
relationship.
Note
VCA Fader Gang Grouping allows offsets to be retained at
all times but please note, one fader must become the master
for other faders within the group.
Automation Operation
34
 Loading...