

Sony DCR-DVD908, DCR-DVD808 Owner’s Manual

,SON'Y
2-319-640-11 (1)
0
Digital Video Camera Recorder
Getting Started
Operating Guide
Addiliona] information on lhis product and answers
Io freguenlly asked guestions can be found at our
Customer Support Websile.
http://www.sony.net/
Printed on 70% or more recycled paper
using VOC (Volatile Organic Compound)
-free vegetable oil based ink.
Printed in Japan
2319640110
DC R-D VD408/D VD508/
Editing
DVD808/D VD908
€
Utilizing recording media U
!
m
C
_ _L_ InfoL/THIUM Q
R/RW DVD *ReWH_a_ie
© 2007 Sony Corporation
DVD+R DL
M_IORYSTIEK,_,
Customizing your U
camcorder
Using a Computer
Troubleshooting
Additional
Information
Quick
Reference
Spanish Quick Guide/
Guia rapida en espanol
To reduce fire or shock hazard, do
not expose the unit to rain or
moisture.
CAUTIONTOa_UC_ THFRISKOF_ _CTalCS_IOCK
DO _OTR_MOVECOVER(OR_AC_.
_OUSER-SERVICEaBLEPAaTSI_SlDE.
R_FERSERWCIN_TOaUA_IFIEDSERVICEPERSOnnEL
the user to the presence of
uninsuhlted "dangerous
/_ This symbol is intended to alert
v(_l_age _' within the produces
ellclosure [hal lllay be of
sufficient magnitude to
constitute a risk of electric
shock to persons.
This symbol is inlended to alert
the user 1_)tile presence: of
important operating and
maintenance (servicing)
insn uctions in the lileramre
accompanying the appliance,

IMPORTANTSAFEGUARDS
For your protection, please read these safety
instructions completely before operating
the appliance, attd keep this manual for
future reference.
Carelidly observe all warnings, precautions
and instructions oil the appliance, or the one
described in the operating instructions :utd
adhere to them.
PowerSources
This set should be operated only fl'om tile type of
power source indicated on the marking label. If
you are not sure of tile type of electrical power
supplied to your home. consuh your dealer or
local power company. For those sets designed to
operate llonl battely power, or other sources, relcr
to the operating instructions.
Polarization
This set may be equipped with a polarized ac
power cord plug (a plug having one blade wider
than tim other).
This plug will fit into the power outlet only one
way. This is a sat_sty Ii:amre. If you are unable to
insert tile plug Ihlly into the outlet, IiT reversing
the plug. If the plug should still tail to fit, contact
your electrician to have a suitable out]et installed.
Do not delt_at the sat_sty purpose of the polarized
plug by b)rcing it in.
Overloading
Do not o_, erload wall onllets, extensioll cords or
corn enience rccept_lcles beyond their Cal)_city_
since this can result in fire or electric shock.
ObjectandLiquidEntry
Ne_er push objects oI any kind into the set
through ol?enings as they may touch dangerous
voltage points or sllort out parts that could rcsull
m a fire or electric shock. Norm- spill liquid of any
kind on the set.
Attachments
Do not use _lttilchlllenls llOt rccolnnlcllded by the
n/_mul_lcturcr. _Ls they Inay cause h_Lzal'dS.
Cleaning
Unplug tile set Irom tile wall outlet betbre
cleaning or polisbmg it. Do not useliquid cleaners
or aerosol cleaners. Use _Lcloth lightly dampened
with water lot cleaning the exterior of tile set.
Water andMoisture
Do not use power-line operated _ts near water
Ibr example, near a bathtub, washbowl, kitchen
sink, or laundry tub, in a wet basemenL or near a
swimming pool, etc.
Power-CordProtection
Route tile power cord so thai it is not likely to be
walked on or pinched by items placed upon or
against thmn, paying particular atrcmion to tile
plugs, receptacles, and the point where the cord
exits I?om tile appliance.
Accessories
Do not placc tile set on an unstable cart, stand,
tripod, bracket, or table. The set may lidl. causing
serious in.iul3' to a child or an aduh, and serious
damage to tile set. Use only a carl, stand, tril?od,
bracket, or table recommended by the
ii/anul_lc[urcr,
Ventilation
Tile slots and openings in the cabinet arc provided
Ibr necessau ventilatkm. To ensure reliable
operation of tile set, and to protect it liom
overheating, these slots and openings must never
be blocked or covered.
Never cover tile slots and openings with a cloth
or other nlalcrials.
Never block the slots and openings by placing
tile set on a bed. sola, rug, or ()tiler similar
sur|ace.
Never place the set in a confined space, such as
a bookcase, or built-in cabinet, unless proper
ventilation is provided.
Do not place tile set near or over a radiator or
heat register, or where it is exposed to direct
sunlight.
Continued._ 3
INPORTANT SAFEGUARDS(go_i_sdl
Lightning
For added protectfim lor this _el during a fighlning
storm, or when it is lelt un_tlended and unused lor
long periods of time. unplug it l_x)m tile wall
outlcl and disconnect lhe antenna or cable system.
This will prevenl damage to the set due to
lighming and power-line surges.
DamageRequiringService
Unplug tim sel hx)m lhe wall oullel and rclcr
selvicing to qualified _rvice personnel under tile
lbllowing condilions:
When the power cord or plug is damaged or
frayed.
If liquid has be_n spilled or objects have hdlen
into the sel.
If the _t has been exposed to rain or water.
If the set has been subjecl to excessive shock by
being dropped, or lhe cabinet has b_n
damaged.
If lhe set does not opert_te normally when
Iollowing lhe operaling instructions. Adjust
only lhose controls thai are specified in the
operating instructions, hnproper adjuslmenl of
other controls may resuh in damage and will
often require extensive work by a qualified
technician 1_>rt2storc tile set to normal operalion.
Wllen file set exhibits a distincl change in
performance this indicales aneed lor service.
Servicing
Do not altelnpl to ser_,ice lhe sel yourself as
opening or rclnoving covers may expose you to
dangerous voltage or olher hazards.
Relcr all servicing to qualified service personnel.
Replacementparts
Whcn replacement paris m'e required, be sure lhe
ser_ ice leclmician has used replacement paris
specilied by tile u/anul_cturer tllat llave tile same
charactcristics as tile original palls.
Unauthorized substitmions may rcsu]l ill fire.
electric sllock, or olher hazards.
SafetyCheck
Upon completion ol any scP4ce or repairs to tile
sel. ask tile service lechnician 1o perfimn routine
salcty checks (as specified by tile manul_,cturcr)
to determine tllal the set is in safi: operating
condilion.

Readthis beforeoperatingyourcamcorder
Before operating the unit, please read this
manual thoroughly, and retain it for futttre
reference.
CAUTION
Tile use of optical instrumenls with this producl
will increase eye ha/urd. Use of controls or
adjtlstlncnls or perfimnance of proccdures olher
than those specified herein may 1_3suh in
hazard(illS radiation exposure.
Replace tile baltcry with tile specified type only.
Otherwi_, filv or inju U may result.
RECYCLINGLITHIUM-IONBATTERIES
LithiunMon balteries are
recyclable. You can help preserve
our ellVirOlll/lelll by relllrllillg
your used rechargeable batleries
tit the colleclion and recycling
location nearest you.
For more inlormation regarding recycling of
rechargeable batteries, call toll h-ee 1-800-822-
8837_ or visil hllp://www.rbrc.org/
Caution: Do nol handle damaged or leaking
Lithium-Ion batteries.
o
Owner'sRecord
Tile model and serial numbers are located on the
bollom. Record tile serial number in the space
provided below. Relcr to lhe_ numbers whenever
you call upon your Sony dealer regarding this
product.
Model No. DCR-DVD
Serial No.
Model Nit. AC-
No,
If you have any questions aboul lhis producl, you
may call:
Sony CtlstVllllel"lnlorlnation Center
1-800-222-SONY (7669).
The number bdow is lor the FCC rclated malters
only.
RegulatoryInformation
Declaration of Conformity
Trade Name: SONY
Model Nit.: DCR-DVD408
Responsible Party:Sony Electronics Inc.
Addrcss: 16530 VizJEsprillo, San Diego, CA
92127 U.S.A.
Telephone Nit.: 858-942-2230
This device complies with Part 15 of ll/e PCC
Rules. Operation is subject 1o tile 6_llowing lwo
condilions: / 1)This device may not cau_
harmflfl interfi:rence, and (2) this device must
accept any intedi:rence received, including
interfi:rence lhat may cause undesired operalion,
Continued._ 5

Rsad this b÷fo_÷0p÷rati_N y0_[rcamcord÷r (Sostissed}
digital device pursuant to Subpall B of Part 15 of
Declaration of Conformity
Trade Name: SONY
Model No.: DCR-DVD508
Responsible Party:Sony Electronics hlc.
Address: 16530 Via Esprillo. San Diego. CA
92127 U.S.A.
Telephone No.: 858-942-2230
This device complies with Part 15 of tile FCC
Rules. Operatkm is sul_iect to tile lollowing two
conditions: ( 1 ) This device nlay not cause
harmlhl interlcrcncc, and 12) this device nmst
accept any interli:rcnce rcceived, including
intm'lErcncc that may cause undesircd operation.
CAUTION
You arc cautioned that any changes or
modifications not exprc_,sly approved in this
inanu_d could void your authority to operate this
equipment.
Note
This equipment has becn tested and lound to
conlply with the linfits lot a Class B digital
device, pursuant to Part 15 of the FCC Rules.
These limits are designed to pro_ ide reasonable
protection against harmfifl interlcrcnce ill a
residential installation. This equipment generates.
uses, and call radiate radii) l?equency energy and,
if not installed and used in accordance with the
instructions, may cause harmlhl interlcrcnce to
radio conltllllnications.
However. tllel_ is no guarantee that interl_:rcnce
will not occur ill a particular installation. If this
equipmcm does cause tlarmlhl interlcrcnce to
radio or television reception, which can be
deternlined by turning the equipnlent off and on,
tile user is encouraged to tl3' to correct tile
interlcrencc by one or nlorc of the lk)llowing
measures:
Reorient or relocatc tile receiving antenna.
Increase the separation betw_n tile equipment
and receiver.
Connect the equipment into an outlet on a
circuit dil]crem from lhat to which dm receiver
is connected.
Consuh the dealer or an experienced mdio/TV
technician lbr help.
Tile supplied interlace cable must be used with tile
equipment ill order to conlply with tile limits lor a
PCC Rules.
Forthe State of California, USAonly
Prechlorale Material - special handling may
apply. See
www.dtsc.ca.gov/h azardouswastc/per chlorate
Perchlorate Material: Lithiunl battcry contains
perchlorate.
Your camcorder is supplied with two
kinds of operations guides.
"Operating (-hlide" (This tnmmal)
"First Step Guide" for using your
camcorder with the computer connected
(stored un the supplied CD-ROM)
Types of the disc you can use in your
camcorder
You can use the fullowing discs un b .
8cm DVD-RW
8cm DVD+RW
8cm DVD-R
8cm DVD+R DL
Use the discs with marks listed below. See
page 14 for details.
For reliability durahility of recording /
playback, we recommend that you use Sony
discs or discs with an _'_I_, *(lk)r
VIDEO CAMERA) mark lk_r yuur
camcorder.
0 Note
• Using a disc other than abo_e may cause tile
unsatishLctory recording/playback or you nl_,y
not be able to remove the disc lionl your
camcorder.
* Depending on the place you boughl, file disc has

Types of "Memory Stick" you can use
in your camcorder
You can use "Memory Stick Duo' marked
with MEMORY5IIEKDUOor
ME_O_VSIiEKPRBDuo (p. I(g).
"Memory Stick Duo"
(This size can be used with your
camcorder.)
"Memory Stick"
(You cannot use it in your camcorder.)
• You cannot use any type of memory card
except "Memory Stick Duo."
• "Memory Stick PRO" and "Memory Stick
PRO Duo" can be used only with
"Memory Stick PRO" cempatible
equipment.
• Do not attach a label or the like on a
"Memory Stick Duo" or a Memory Stick
Due Adapter.
Whenusinga "MemoryStickDuo"
with"MemoryStick" compatible
equipment
Be sure to insert tile "Menlory Stick Duo"
into tile Memory Stick Duo Adaptor.
Memory Stick Duo Adaptor
Usingthecamcorder
• Do net hohl tile camcerder by tile
following parts.
Viewfinder LCD screen
Battery
• The camcorder is not dustproofed.
dripproofcd or waterproofed. See "About
handling of your camcordef' (p. 107).
• To prevent discs l'ronl being broken or
recorded images from being lost. do not
do the following when either of the
respective lamps of the POWER switch
(p. 25) or tile access lamps/p. 28, 30) is
OI11
to remove the battery pack or AC
Adaptor from the camcorder.
to apply mechanical shock or vibratkm to
the camcorder.
• When connecting your camcorder to
another device with a USB cable, be sure
to insert the connector plug in the correct
way. Pushing the plug forcibly into the
terminal will damage the terminal and
may result in a malfunction of your
caulcorder.
About menu items, LCD panel,
viewfinder,and lens
• A meu/i item that is gra}ed eut is not
available under the current recording or
playback conditions.
• The LCD screen and the viewfinder are
manufactured using extremely high-
precision technology, so over 99.9991 of
the pixels are operational for effective
use. However. there may be some tiny
black points anWor bright points (white.
red. blue. or green ill color) that appear
constantly on the LCD screen and the
Continued._ 7

Rsad this bs[o_s oDs_ati_Nyo_[_camcoNs_ {Sostisse_}
viewfiuder. These points are nurmal
results of tile manufacturing process and
do not affect the recording in any way.
green point
• Exposing the LCD screen, the viewfinder,
or the lens to direct sunlight for long
periods uf time may cause malfimctiuus.
• Do not aim at the sun. Doing so might
cause yuur camcorder to malfunction.
Take images of the sun only in low light
conditions, such as at dusk.
Onrecording
• Before starting to recoM, test the
recording limction to make sure the image
and sound are recorded without any
problems. You cannot delete images once
you recurd them on a DVD-R/DVD+R
DL. Use a DVD-RW/DVD+RW fur trial
recording/p. 14).
• Compensation for the contents of
recordings cam/ot be provided, even if
recurding or playback is not possible due
to a mallimction of the camcorder, storage
media, etc.
• TV color systems differ depending un the
countries/regiuns. To view your
recordings on a TV, you need an NTSC
system-based TV.
• Television programs, fihns, video tapes,
and other materials may be copyrighted.
Unauthorized recording of such materials
may be contrary to the copyright laws.
About language setting
The on-screen displays in e:,ch local
language are used fur illustrating the
operating procedures. Change the screen
language befure using your camcorder if
necessary (p. 26).
Aboutthis manual
• The LCD screens and the viewfiuder
images and indicators shown in this
manual were taken with a digital still
camera, and may louk different from what
you actually see.
• Design and specifications uf recording
media and other accessories are subject to
change without nutice.
• The illustration used in this manual are
based uu the mudel DCR-DVD508/
DVD908.
• Disc in this Operating Guide refers to 8cm
DVD discs.
About the Carl Zeiss lens
Your cmncuMer is equipped with :, Carl
Zeiss lens, which was developed jointly by
Carl Zeiss, in Germany, and Sony
Curporatiun, and produces superior images.
It adopts the MTF measurement system for
video cameras and offers a quality typical
of a Carl Zeiss Lens. Also, the lens for your
camcorder is T*-coated to suppress
unwanted reflectiuns and faithfully
reproduce culors.
MTF= Modulation Transfer Function. The
number value indicates the amount of light
from a subject coming into the lens.
Aboutthemarksusedinthismanual
• The operations available depend uu the
disc used. The fullowing marks are used
to indicate the type of disc yuu can use
for a particular operation.

Tableof Contents
Read this before operating your
camcorder .................................... 5
Subject examples and solutions
What you can do with your
camcorder .................................. 12
Choosing a disc .......................... 14
Using your camcorder ................ 16
"1_ HOME" and "0_._=OPTION"
- Taking advantage of two types of
menus ........................................ 18
Step 1: Checking supplied items
.................................................... 21
Step 2: Charging the battery pack
.................................................... 22
Step 3: Turning the power on, and
setting the date and time ............ 25
Changing the language setting
....................................................... 26
Step 4: Preparing for recording
.................................................... 27
Step 5: Inserting a disc or a
"Memory Stick Duo" ................... 28
Recording and playing back with
ease (Easy Handycam) .............. 31
Recording ................................... 34
Zooming ........................................ 36
Recording sound with more presence
(5.1ch surround recording) ........... 36
Using the flash .............................. 36
Recording high quality still images
during movie recording (Dual Rec)
....................................................... 37
Recording in dark places (NightShot)
....................................................... 38
Adjusting the exposure for backlit
subjects ......................................... 38
Recording in mirror mode ............. 38
11
Selecting the aspect ratio (16:9 or 4:3)
Recording the fast action in slow-
motion (SMTH SLW REC) .............. 39
Playback ..................................... 41
Using PB zoom ............................. 43
Playing back a series of still images
(Slide show) .................................. 43
Playing the picture on a TV
38
....................................................44
Making the disc compatible with
playback on other devices or DVD
drives (Finalizing) ....................... 46
NN
I_!(OTHERS) category ............. 50
Deleting images .......................... 50
Dividing the image ...................... 52
Creating the Playlist ................... 53
Dubbing to VCR or DVD/HDD
recorders .................................... 56
Printing recorded images
(PictBridge compliant printer)
.................................................... 57
(MANAGE DISC/MEMORY)
category ...................................... 59
Playing a disc on other devices
.................................................... 59
Finding the right disc (DISC
SELECT GUIDE) ........................ 60
Deleting all scenes on the disc
(Formatting) ................................ 61
Recording additional scenes after
finalizing .................................... 62
Continued._ 9
Tab_÷ofCo_te_ts(Co_ti_ed)
What you can do with the
(SETTINGS) category of the
HOME MENU ............................ 64
Using the HOME MENU ................ 64
List of the _ (SETTINGS) category
items .............................................. 65
MOVIE SETTINGS .................... 66
(Items for recording movies)
PHOTO SETTINGS ................... 68
(Items for recording still images)
VIEW IMAGES SET ................... 71
(Items to customize the display)
SOUND/DISP SET .................... 72
(Items to adjust beep and the
screen)
OUTPUT SETTINGS ................. 74
(Items for when connecting other
devices)
CLOCK/_LANG ........................ 74
(Items to set clock and language)
GENERAL SET .......................... 75
(Other setup items)
Activating functions using the
°.-=OPTION MENU ..................... 76
Using the OPTION MENU ............. 76
Recording items on the OPTION
MENU ............................................ 77
Viewing items on the OPTION MENU
..................................................... 77
Functions set in the OPTION MENU
.................................................... 78
What you can do with Windows
computer .................................... 83
Installing the "First Step Guide" and
software ..................................... 85
Viewing "First Step Guide"
.................................................... 87
Using a Macintosh computer
.................................................... 87
Troubleshooting ......................... 88
Warning indicators and messages
.................................................... 97
Using your camcorder abroad
.................................................. 101
Maintenance and precautions
.................................................. 103
Specifications ........................... 110
Identifying parts and controls
.................................................. 114
Indicators displayed during
recording/playback ................... 118
Glossary ................................... 121
Index ........................................ 122
10
Subjectexamplesandsolutions
af a ski sbpe ar
[
beach
[ etti_g a gead shat
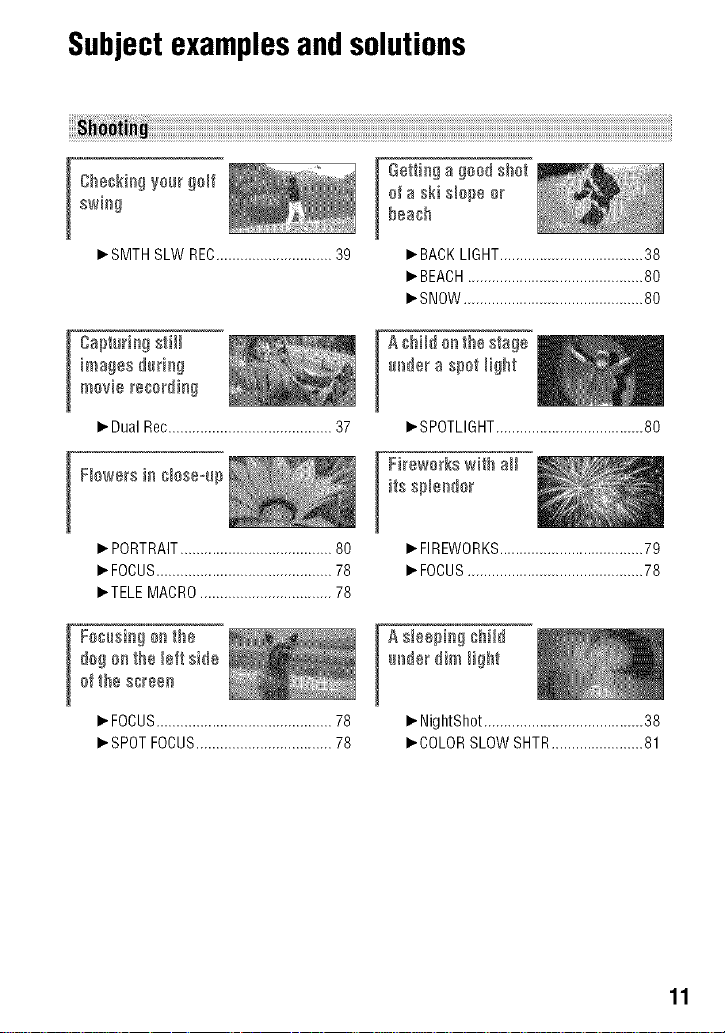
_'SMTH SLW REC............................. 39
images @d_g
movie recording
I_Dual Rec......................................... 37
I Fbwers in _laseqp
_. PORTRAIT...................................... 80
_.FOCUS............................................ 78
_.TELE MACRO................................. 78
afthe s_een
dagan the bft side
_.FOCUS............................................78
_.SPOTFOCUS..................................78
_.BACKLIGHT....................................38
_.BEACH............................................80
_.SNOW.............................................80
m_dera spat _ight
A@ild ar_the stage
_.SPOTLIGHT.....................................80
its spbedar
[ Fi_ewa_kswith aH
I_FIREWORKS....................................79
_'FOCUS............................................78
A sleepi_g @Hd
I_NightShot........................................ 38
I_COLORSLOW SHTR....................... 81
11
E_Tj_ty[#g_,F;hVo_r c_mcon}er
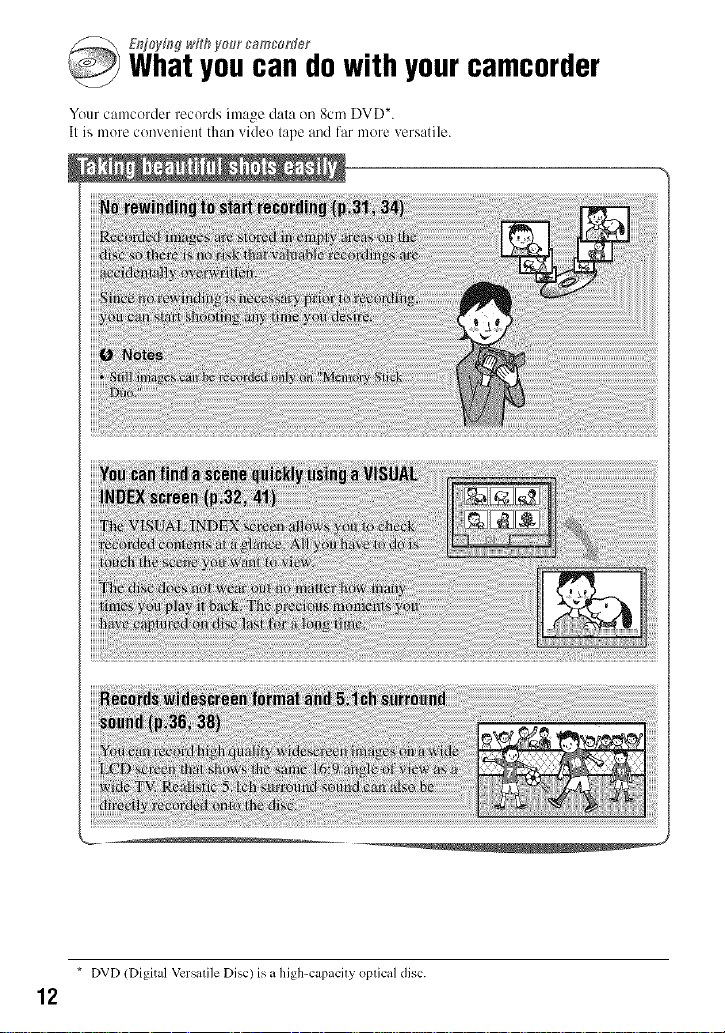
Whatyoucan dowith yourcamcorder
Your camcorder records ima_ge dala on 8cm DVD*.
II is more convenient than video tape and far more versatile.
* DVD (Digital Vcrsalile Disc) is a high-capacily oplical disc.
12

Playback on a DVD device or DVD drive [p.46)
You can play back recorded and finalized *_ discs o11a home
DVD device. DVD recorder or DVD drive of acomputer lhal
supports 8cm disc.
When finNizing tile disc, you can create DVD menus m
enable quick access to scenes you wanl 1o view.
PlaybackonwidescreenTVandhometheater(p.36.
44)
Images recorded in widescrecn li,rmat carl be played back
on a wide TV with completc panoramic efl_ct. Discs are also
recoMed with 5.I ch surround sound to provide lull sound on
a home theater.
** Finalizing: a process 1o make il possible to play back recorded DVD on olher DVD devices (p.46).
13
Choosinga disc
Your camcorder is compatible with 8cm DVD-RW. DVD+RW. DVD-R and DVD+R DL.
It does not support 12cm discs.
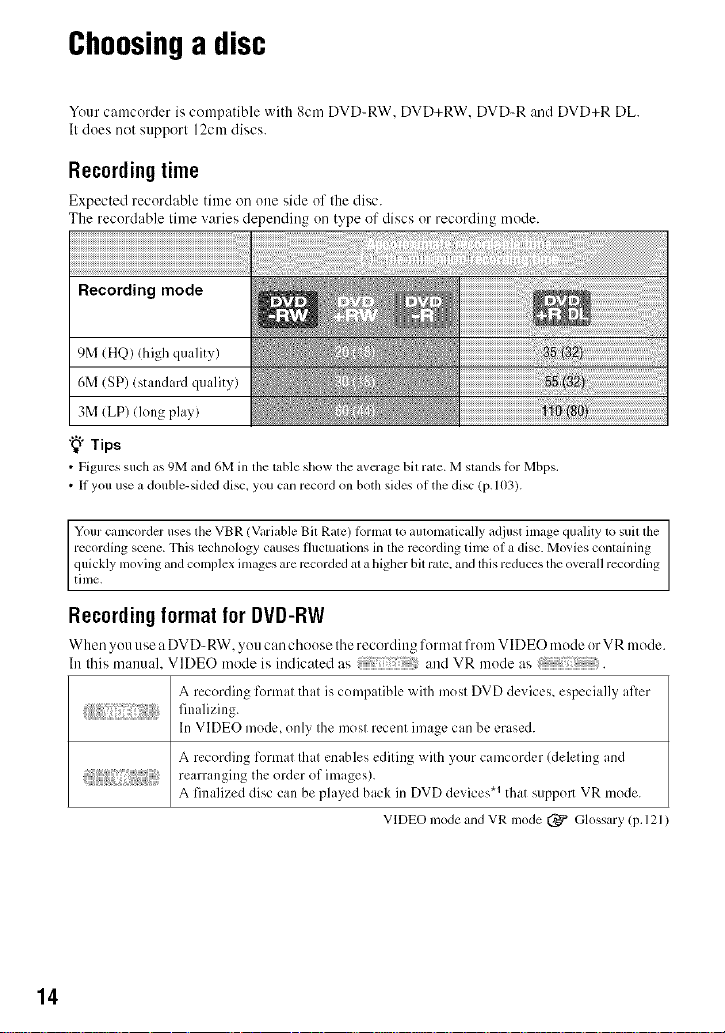
Recordingtime
Expected recordable time on one side of the disc.
The recordable time varies depending on type of discs or recording mode.
Recording mode
9M (HQ) (high quality)
6M (SP) (standard quality)
3M (LP) (long play)
"_° Tips
• Figuressuch as 9Mm_d6Min the tableshow theavcrage bit rate. Mstands lbr Mbps.
• II you use a double-sidcd disc, you can recordon bothsides ofthe disc (p. 103).
Your camcorder uses the VBR (Variable Bit Rate) lbrnmt to automatically adjust image quality to suil the
recording scene. This technology causes fluctuations in the recording time of a disc. Movies conlaining
quickly moving and complex inmges are recorded al a higher bit rale. and lhis reduces the overall recording
time.
Recordingformat for DVD-RW
When you use a DVD-RW. _ou can choose the recording format from VIDE(-) mode or VR mode.
In this manual. VIDEO mode is indicated as and VR mode as .
A recording format that is compatible with most DVD devices, especially afler
14
In VIDEO mode, only the most recent image can be erased.
A recording format that enables editing with your camcorder (deleting and
rearranging the order of images).
A finalized disc can be played back in DVD devices .1 that supp(m VR mode.
VIDEO mode and VR mode (_ Glossary (p. 121 )
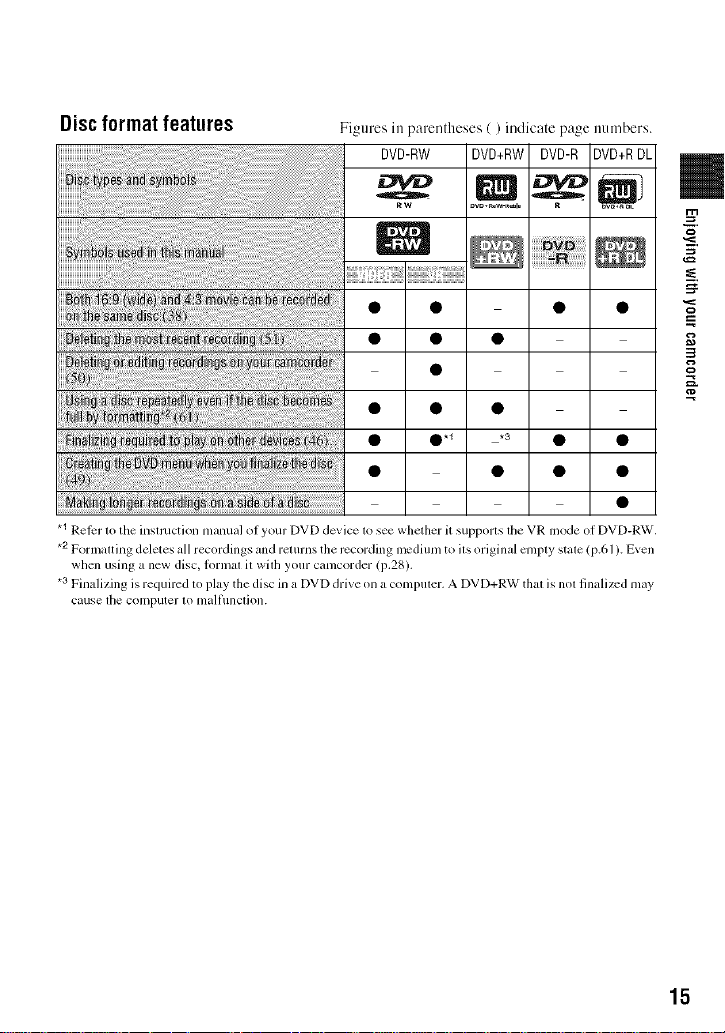
Discformat features
Figures in parentheses ( ) indicate page numbers.
DVD-RW DVD+RW DVD-R DVD+RDL
o
0.1 *3 • •
.1 Reicr lo the inslmction manual of your DVD device 1osee whether it supporls file VR mode of DVD-RW.
*2Formalting deletes all recordings and relurns the recording lncdium to ils original cnlply stale (p.61 ). Even
when using a new disc, lormal it wilh your camcorder (i).28).
.3 Finalizing is required to play the disc in a DVD drive on a compuler. A DVD+RW thai is nol finalized may
cause lhe computer IOmall/lnclion.
g,
15

Usingyourcamcorder
OPreparing
(See page 21 to 30.)
* Select the rccording tbrmal and formal tile disc on your camcorder (p.28).
"_° Tips
• You can select the disc h'om [DISC SELECT GUIDE] (p.60).
Select tile disc that best suits your needs.
corder?
_mYOU want to delete or edit images on
your
@Recording, playback, editing _1
/See pages 3 l, 32, 4 l, :rod 52.)
What you can do with yotlr camcorder depends on the type of disc (p. 15).
,gon your camc0rder
Continued on the next page
16
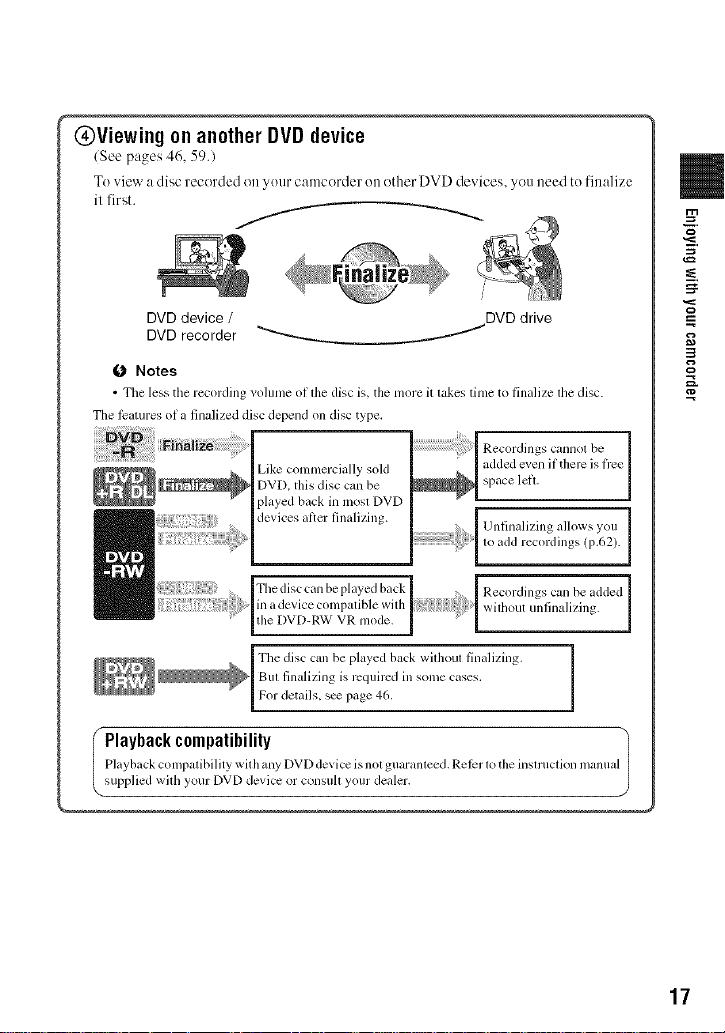
@Viewing onanother DVD device
(See pages 46, 59.)
To ,Jew a disc recorded on your camcerder ()it ether DVD devices, you need to finalize
il first.
/
DVD device / DVD drive
DVD recorder "_'----_ /
0 Notes
• The less the recording volume ol the disc is. the more it takes time to finalize the disc.
The l_tures ol a finalized disc depend on disc type,
Recordings cannot be
Like commercially sold
DVD, this disc can be
played back in mosl DVD
devices al_er finalizing.
added even if there is fi'ee
space left.
Unfinalizing allows you
to add recordings (p.62).
Fhe disc can be played back
in a device colnl)atible with
the DVD-RW VR mode.
The disc can be played back widmul finalizing.
But finalizing is required in some cases,
For details, s_ page 46.
Playback con/patibility wit h any DVD device isnot guaranteed. Rel_r to the instruction manua
I Playbackcompatibility
supplied wid/your DVD device or consuh your dealer.
Recordings can be added
wilhout unlinalizing.
17

"_HOME" and"°_:=OPTION"
- Taking advantage of two types of menus
[_(HELP)
Displays a description of the item (p. 19)
eE TOII
,LA,_Eo,,II "R'_'
I;_21
I
Category
Categoriesand itemsof the HONEMENU
=I_r(CANERA) category
_m
MOVIE* 35
PHOTO_ 35
SMTHSLW REC 39
[_ (VIEW IMAGES)category
!
VISUAL INDEX_ 41
PLAYLIST 53
re(OTHERS) category
_m
DELETE* 50
EDIT 52
PLAYLISTEDIT 53
PRINT 57
COMPUTER 83
18
(MANAGEDISC/MEMORY)
category
FINALIZE_ 46
DISCSELECT GUIDE 60
(_ FORMAT_ 61
FORMAT* 62
UNFINALIZE 62
DISC INFO 59
(SETTINGS}category
To customize your camcerder (p. 64).
* You can also set the_ items during Easy
Handycam operation (p. 3 ] ). For items
a 'ailable in the _(SETTINGS) categ( J3_ s_
page 64.

1Turn the POWER switch to turn
on your camcorder.
4 Touch the item you want to use.
Example: [EDITI
5 Continue operation by following
the guidance on the screen.
2 Press "J_ (HOME) [] (or [_).
(HOME) []
(ItOME) []
3 Touch the category you want to
use.
Example: _ (OTHERS) category
To hide the HONE MENU screen
Touch [_.
When you want to know something
about the function of each item on the
HONE MENU- HELP
0 Press _ (HOME).
The HOME MENU appe:]rs.
@ Touch ITI(HELP).
The bottom of tile [] (HELP) button
turns orange.
Continued._ 19

°°@HOME _a_d _QsO?T_ON"(8o_ti_ed)
(_) Touch the item you want to know the
content.
When you touch an item, its explanation
appears on the screen.
To apply the option, touch [YES],
utherwise, touch [NO].
To deactivate the HELP
Tuuch [] (HELP) again in step 2.
Just a touch uu the screen during recording
ur playback displays the fimctious available
at that mumeut. You will find it easy to
make various settings. See page 76 fur
further details.
2O
?._ (OPTION )

Step1: Checkingsupplieditems
Make sure that you have tile folk)wing
items supplied with yuur camcorder.
The number in the parentheses indicates the
number of that item supplied.
AC Adaptor (1) (p. 22)
Power cord (1) (p. 22)
AN connecting cable (1) (p. 44, 56)
USB cable (1) (p. 57)
Wireless Remote Commander (1)
(p. 117)
CD-ROM "Handycam Application
Software" (1) (p. 83)
Operating Guide (This manual) (1)
m
A buu(m-type lithium battery is aheady installed,
Rechargeable battery pack NP-FH60 (1)
(p. 22)
21

Step2: Chargingthe battery pack
You can charge the "InfoLITHIUM"
battery pack (H series) (p. 106) after
attaching it to your camcorder.
O Notes
• You can use only "[ntbLITHIUM" battery pack
H series.
4
/ Turn the POWER switch in the
direction of the arrow to OFF
(CHG) (The default setting).
Attach the battery pack by sliding
it in the direction of the arrow
until it clicks.
Lift up the viewfinder and attach
the battery pack by sliding it in
the direction of the arrow until it
clicks.
4Connect the power cord to the AC
Adaptor and the wall outlet.
Tile CHG (ch:wge) lamp lights up and
charging starts. The CHG (charge) lamp
turns off when the battery is fully
charged.
5 Disconnect the AC Adaptor from
the DC IN jack on your
camcorder.
O Notes
• DiscolmeCt tile AC Adaptor trom lhe DC IN
jack holding both the camcoMer mM the DC
plug.
3
Connect the AC Adaptor to the
DC IN jack of your camcorder.
Open the jack cover, and connect the
DC plug of the AC Adaptor.
Match the • mark on the DC plug with
the • mark on your camcorder.
22
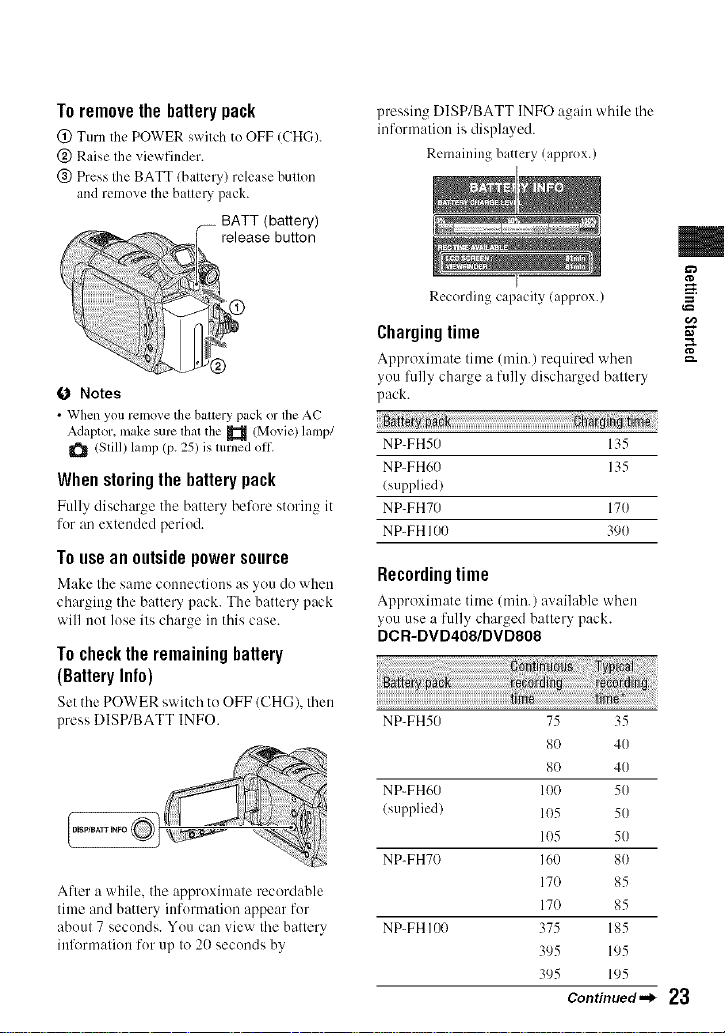
To remove the battery pack
(!) Turn the POWER s_xitch to OFF (CHG).
@ Raise the viewfinder.
@ Press the BATT (battery) release button
and remove the batte U pack.
BATT (battery)
release button
D
0 Notes
• When you remo_ethe battery pack or the AC
Adaptor, makesure that the _ (Movie) lamp/
(Still7lamp (p. 25) isturned oil
When storing the battery pack
Fully discharge the battery before storing it
for an extended period.
To use an outside power source
Make the same couuectious :is }ou do wheu
chargittg the battery pack. The battery pack
will not lose its charge ilt this case.
To checkthe remaining battery
(BatteryInfo)
Set thePOWER switchto OFF/CHG), then
)ress DISP/BATT INFO.
After a while, the approximate recordable
time and battery ittformation appear for
about 7 seconds. You can view the battery
iufi_rmatiou for up to 20 seconds by
pressing DISP/BATT INFO again while the
informalion is displayed.
Remaining battery (approx.)
Recording capacity (approx.)
Charging time
Approximate time (rain.) required when
you fully charge a fully discharged baltery
pack.
NP-FH5(7 135
NP-FH60 135
(st+pplied)
NP-FH70 170
NP-FH 100 390
Recording time
Approximate time (rain.) a_:dl:+ble when
you use a fully charged battery pack.
DCR-DVD408/DVD808
NP-FH50 75 35
80 40
80 40
NP-FH60 100 50
(supplied) 105 50
105 5(7
NP-FH70 16(7 80
170 85
170 85
NP-FH 1170 375 185
395 195
395 195
Continued._ 23
m
g

Step2:gha(g)_)thebatte(ypack(go_ti_ed}
DCR-DVD508/DVD908
NP-FH50 65 30
70 35
70 35
NP-FH60 90 45
(supplied) 90 45
90 45
NP-FH70 140 70
150 75
150 75
NP-FH 100 335 165
345 170
345 170
* Typical rccording time shows the time when
you repeal recording start/stop, turning tile
power on/ol] and zoonlillg,
O Notes
• All tinlcs measured with recording mode [SP]
under the lollowing condilions:
Top: When the LCD backlighl turns on.
Middle: When the LCD backlighl turns oil
Bouoln: Recording tinle when recording with
lhe viewfinder while the LCD panel is dosed.
Playingtime
Approximate time (mitt.) av:dlable when
you use a fully charged battery pack.
DCR-DVD408/DVD808
NP-FH50 110 120
NP-FH60 145 160
(supplied)
NP-FH70 235 255
NP-FH 100 545 590
DCR-DVD508/DVD908
NP-FH50 110 120
NP-FH60 145 160
(supplied)
NP-FH70 235 255
NP-FH 100 545 590
* When the LCD backlight is on.
On the battery pack
• Belore changing tile baltcry pack, Turn the
POWER swilch to OFF (CHG) mid turn oil the
(Movie) lamp/_ /Still) hmlp (p. 25).
• The CT[G (charge) lamp flashes during
charging, or Bauery lnlo (p. 23) will not be
corlvctly displayed under lhe lbllowing
condilkms:
The balicl3, pack is nol altached corrcctly.
Tile baltel 3, pack is damaged.
The battel3' pack is worn-out (For Baltery
Inlo only).
• Tile power will not be supplied Kom the batter
as long as the AC Adaptor is connected to the
DC IN jack of your camcorder, even when the
power cord is disconnected flom the wall oullel.
• When attaching all optional video light, it is
reconmlended that you use all NP-FH70/NP-
FH IO0 bal/el3' pack.
• We do not reconmlend using an NP-FH30,
which only allows sholl lvcording and playback
limes, wilh your calllcorder,
On the charging/recording/playback time
• Times Illeilsurcd whell using lhe Cilll/Col'der _11
25 °C 177 °F) (10 °C to 30 °C 150 °F to 86 °F) is
reconmlended).
• The recording and playback time will be shorter
when you use your camcol_Jer ill low
lemperatures.
• The recording and playback lime will be shorter
depending on the conditions under which you
use your canlcorder.
On the AC Adaptor
• Use the nearby wall oullet when using tile AC
Adaplor. Disconnect tile AC Adaplor lionl the
24
wall outlet imnmdiately if any malflmction
occurs while using your catllcorder,
• Do nol use the AC Adaptor placed in a narrow
space, such as between a wall and lhrnimre.
• Do not shorl-circuit tile DC I?lug of tile AC
Adaptor or baltery lerminal wilh any mclallic
ot_iects. This may cause a malfunction.
• Even if your camcorder is lurned oil AC power
(house current) is still supplied to it wlfile
connected to the wall outlet via the AC Adaptor.
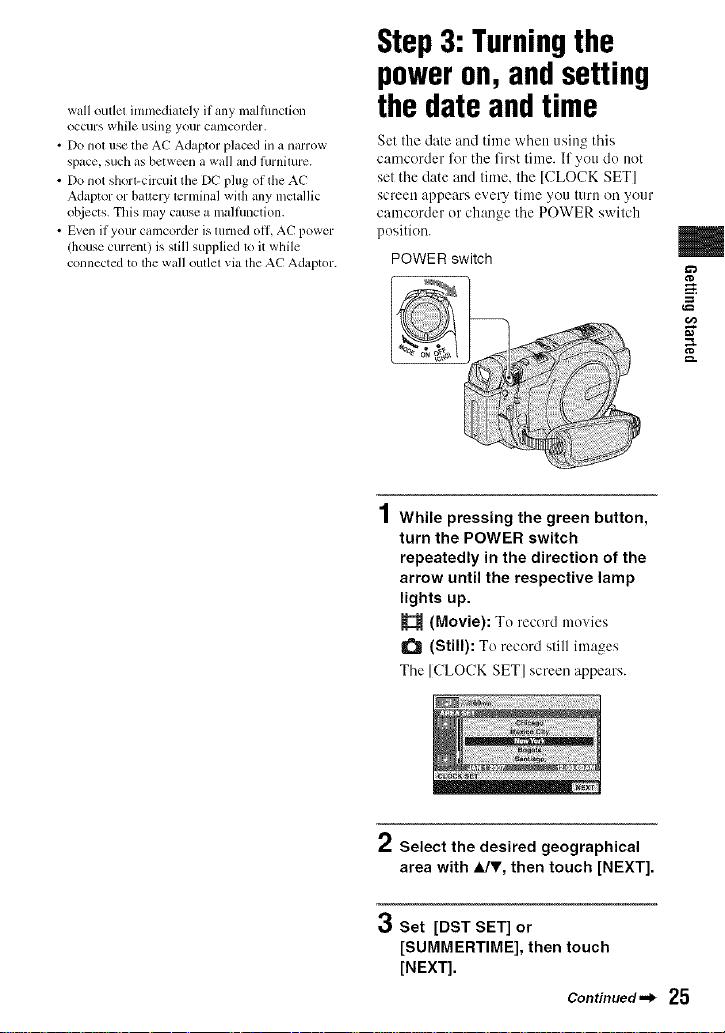
Step3: Turningthe
poweron,andsetting
the dateandtime
Set the date and time when using this
camcorder %r the first time. If you do not
set the date attd time, the [CLOCK SET]
screen appears every tittle you tllrll on your
camcorder or change the POWER switch
position.
POWER switch
I While pressing the green button,
turn the POWER switch
repeatedly in the direction of the
arrow until the respective lamp
lights up.
(Movie): To record movies
(Still): To record still images
Tile [CLOCK SET] screen appears.
m
a_
g
2 Select the desired geographical
area with 4Jr, then touch [NEXT].
3 Set [DST SET] or
[SUMMERTIME], then touch
[NEXT].
Continued,,_ 25

S_÷p3: TurN_gthepowero_,a_ se_i_gthe_atea_ time(go_i_ed)
• The lens cover opens automatically when tile
4Set [Y] (year) with A/V.
5 Select [M] with </b, then set the
month with JJr.
6 Set [D] (day), hour and minute in
the same way, then touch [NEXT].
power is turned on. It doses when file playback
scr_n is selecled, or the power is turned oil
• In the setting al file lime of purchase, the power
turns off automatically if you leave your
camcorder wifl/oul any operation altemptcd lbr
approxinlately 5 minutes, to save battcl T power
([A.SHUT OFFI, p. 75).
"_° Tips
• Tile dale and lime does not appear during
recording bul file,i are auhmlaticallv recorded
on the disc, and can be dispktyed during
playback/see page 71 lor [DATA CODE]).
• Reler lo page 102 lbr inlormalion concerning
"World lime dillerence. '
• It the buttons on lhe louch panel do not work
correctly, adjust tile LCD screen
([CALIBRATION], p. 108).
7 Make sure that the clock is
correctly set, then touch I_.
The clock stm'ls.
You can set any year up to the year
2037.
For midni_hk set it to 12:00 AM.
For midday, sel it to 12:00 PM.
Toturn offthe power
Turnthe POWER switch to OFF (CH(-;).
Toresetthe date andtime
Select _ (HOME) -_- _(SETTINGS)
--, [CLOCK/_LANG]-+ [CLOCK SET],
and sel the dale and time.
0 Notes
• It you do nol use your camcorder lot about 3
months,the built-in rechargeable battcly gels
discharged and lhe dale and lime sellings [nay
be clearcd |tom the tlletlloly. In that case.
charge the rechargeable ballely and lhen set the
date and lime again (p. 109).
• It takes a li:w seconds lot your camcorder 1o be
rcady to shoot al}er lhe power is turned on. You
cannot operate your camcorder during this time.
26
i
You can chan_e the on-screen displays to
show messages in a specified language.
Touch "_" (HOME) _-
_ (SETTINGS)-+[CLOCK/
LANG]_-[ _LANGUAGE SET], dlen
selecl the desired lanouaoe
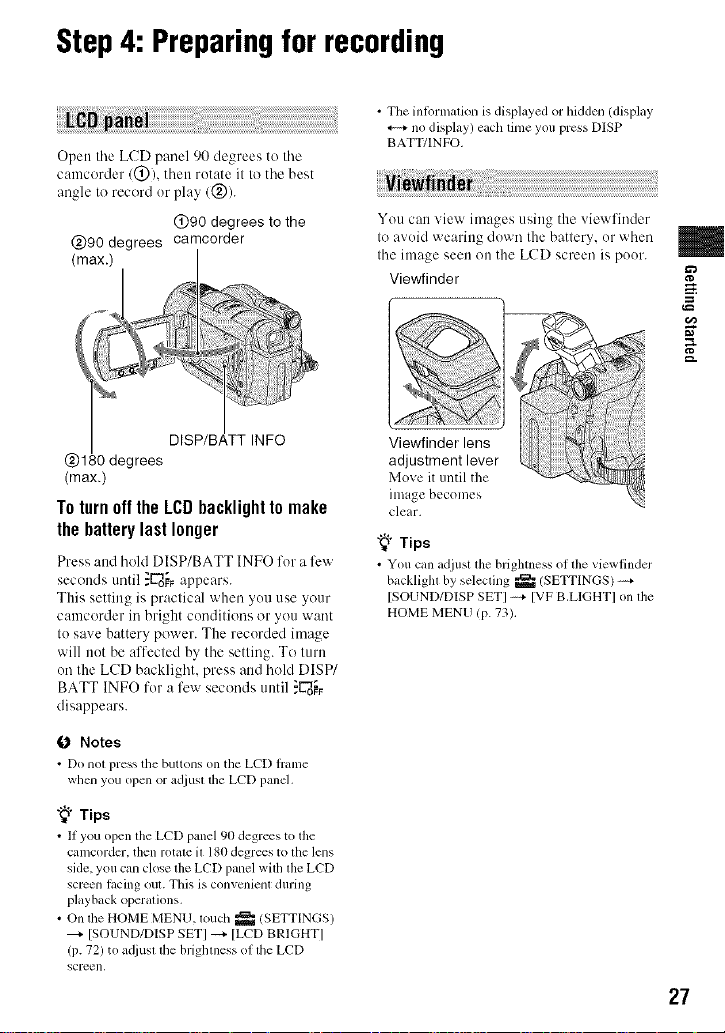
Step4: Preparingfor recording
• The intormalion is displayed or hidden (display
no display) each time you press DISP
Open tile LCD panel 90 degrees to tile
oamcerder/@), then rotate it to tile best
angle to record or play (@).
@90 degrees to the
(max.)
Toturn offthe LCDbacklight to make
the batterylast longer
Press and hold DISP/BATT INFO for a few
seconds until }_oo.;_appears.
This setting is practical when you use your
camcorder in bright conditioos or you want
to save battery power. The recorded image
will not be affected by the setting. To turn
on the LCD backlight, press and hold DISP/
BATT INFO for a few seconds until ._oo_
disappears.
BATT/INFO.
You can view images using the viewfinder
to avoid wearing down the battery, or when
the image seen on the LCD screen is poor.
Viewfinder
Viewfinder lens
adjustment lever
Move it until the
image becomes
clear.
"_° Tips
• You can adjust the brighmess of the viewtindcr
backligla by selecling _/SETTINGS) -_+
[SOUND/DISP SETI -_+ [VF B.LIGHTI on lhe
HOME MENU (p. 73).
m
g
O Notes
• Do nol press the buttons on the LCD hanle
when you open or ad.iustthe LCD panel,
"_° Tips
• If you open the LCD panel 90 degrees to the
camcoMer, then rotate it 180 degrees to the lens
side, you can close tile LCD panel wifll the LCD
screen racing out. This is convcnicm during
playback operations.
• On the HOME MENU, touch _ (SETTINGS)
[SOUND/DISP SET] _ [LCD BRIGHT]
(p. 72) to adjusl die brighmess of die LCD
SCl-t2en,
27

Step5: Insertinga discora "Memory Stick
DUO"
O Notes
• Remove dust or tingerprints trom tile disc
beforehand, using a soil cloth (p. 1{}4),
4
/ Check that the power of your
camcorder is on.
2 Turn the disc cover OPEN switch
in the direction of the arrow
(OPEN _.).
[PREPARING TO ()PEN] appears on
tile LCD screen.
The disc cover slighlly opens
aulenaatically.
Disc cover
OPEN switch
Pickup lens
Set lhe disc wilh the label side lacing
ilut when using a single-skied disc,
4
Close the disc cover.
[DISC ACCESS] appears on tile LCD
scFeeo.
It may take some time for the camcorder
to recognize the disc.
• DVD-RW/DVD+RW
A window appears to ask whether you
will use [DISC SELECT GUIDE].
Using [DISC SELECT GUIDE] lets you
format the disc by following the
guidance on the screen. If you do net
want to use it, proceed to step 5.
• DVD-R/DVD+R DL
You c:m start recording immediately
afler [DIS(! ACCESS] disappears from
the LCD screen. You do not need to
proceed to steps after step 5.
When Ihe disc cover ACCESS lamp
opens slightly, open (Disc)
it further.
Pj
Set the disc with the recording
side facing your camcorder, then
press the center of the disc until it
clicks.
28
5
Touch the option that is right for
you on the screen.
• DVD-RW
Select tile recording l_era'mt, [VIDEO]
or [VR] (p. 14), tlien touch [6g].
• DVD+RW
Select tile aspect ratio of tile movie,
[16:9 WlDEI or [4:31, then louch [_g].
6 Touch [YES].
7 Touch _ when [Completed.] is
displayed.
When tile form:lltin_ is completed, you
can start recording on the disc.
"_° Tips
• When you use a DVD-RW while the Easy
Handycam operation (p. 31) is set, the
recording format is fixed to VIDEO
mode.
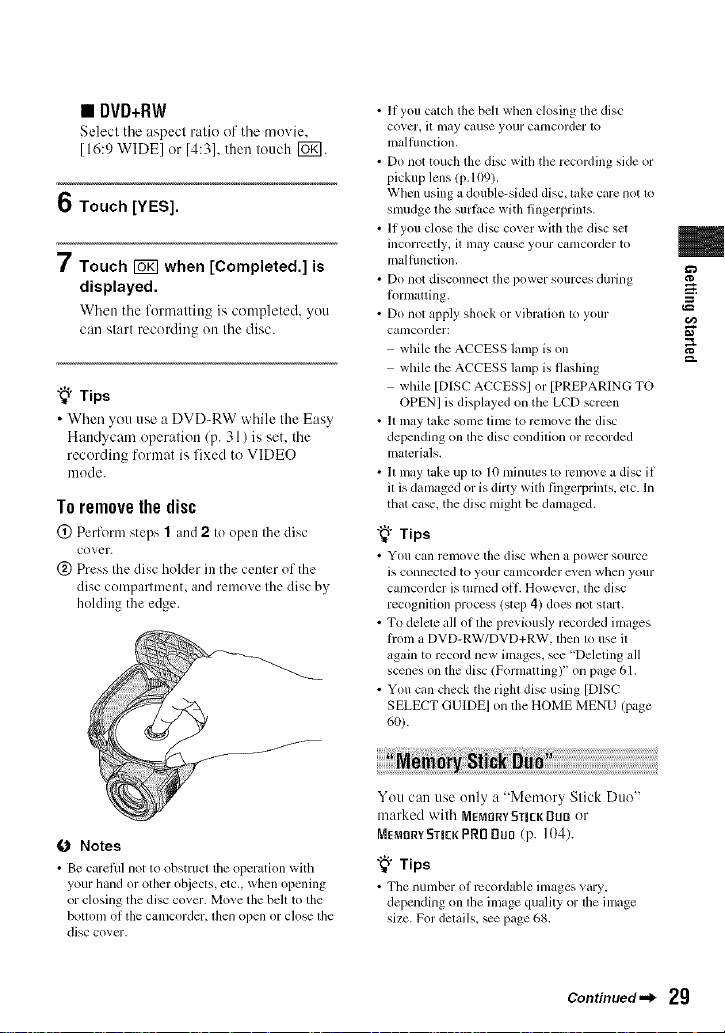
Toremovethedisc
@ Perform steps 1 and 2 to open the disc
cover.
(_) Press the disc holder in the center of the
disc compartment, and remove the disc by
holding the edge.
• If you catch the belt when closing tile disc
cover, it lnay cause your Calllcorder 1o
malflmclion,
• Do not touch the disc with the recording side or
pickup lens (p. 109).
When using a double-sided disc, take care not to
smudge the surlitce with fingerprints.
• If you close the disc cover with the disc sel
incorreclly, it may cause your C_lt/lcorder to
malflmction,
• Do not disconnect the power sources during
l_)rmatting.
• Do not apply shock or vibration to your
camcorder:
while the ACCESS lamp is on
while the ACCESS lamp is flashing
while [DISC ACCESSI or [PREPARING TO
OPENI is displayed on tile LCD screen
• It Inay take some time to remove tile disc
depending on lhe disc condilion or recorded
inaterials.
• It may take up to 10 minutes to remove a disc if
it is damaged or is dirty with fingerprinls, etc. In
that case, the disc mighl be dalnaged.
"_° Tips
• You can relllOVe the disc whell _1 power SOUlCe
is COllll_=cled to your Calllcorder ex,,el/whell youl-
camcorder is turned oil. However, tile disc
recognition process (slep 4) does not slart.
• To delete all ol tile previously recorded ilnages
fronl a DVD-RW/DVD+RW, lhen 1o use il
again to record new ilnages, _e "Deleting all
scenes on the disc/Formatting)" on page 61.
• You can check the righl disc using [DISC
SELECT GUIDEI on the HOME MENU (page
60).
m
g
g.
(J Notes
• Be clu'efill not to obstluct tile operation with
your hand or other ohjects, etc., when opening
or closing tile disc covcr. [Vloxe tile heh to tile
bollonl of tile canlcorder, lhell open or close lhe
disc covcr.
You can use only a "Memory Slick Duo"
marked wilh MEMORYSTICKDUll or
MEMORY5TICK PRO Du0 (p. 104).
"_i° Tips
• Tile numher of rccordahle images xary,
depending on the image quMity or lhe image
size. For delails, _e page 68.
Continued.._ 2g
Step 5: _sertic_ a disc mra °°MemoryStick g_c"/Co,titter}
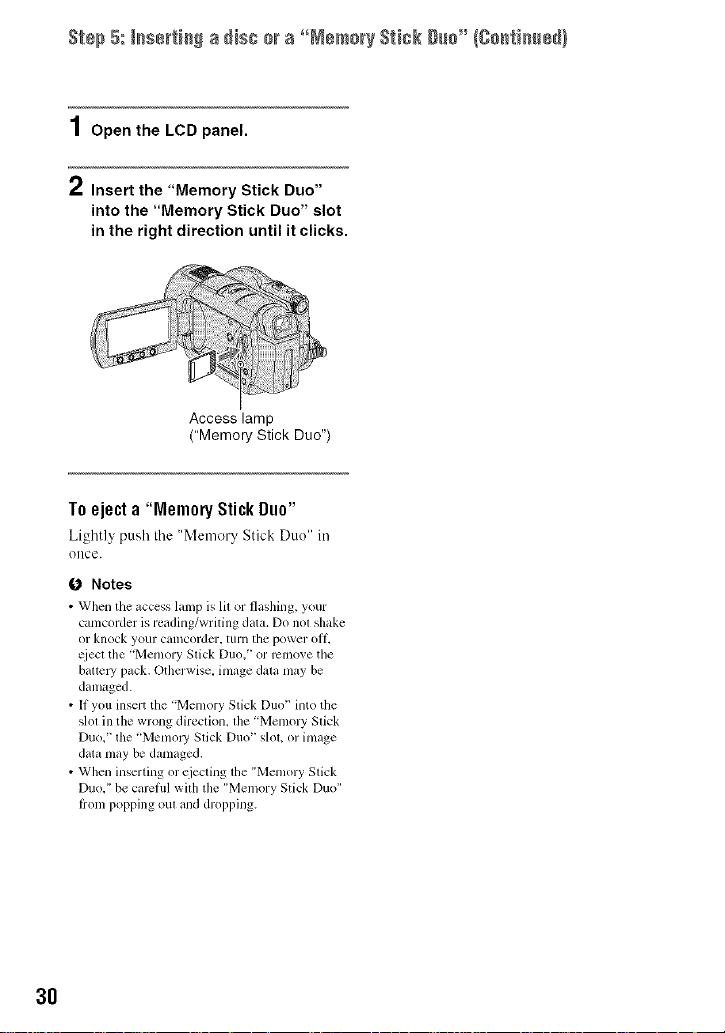
1Open the LCD panel.
2 Insert the "Memory Stick Duo"
into the "Memory Stick Duo" slot
in the right direction until it clicks.
Access lamp
("Memory Stick Duo")
Toe e "
j cta MemoryStickDuo"
Lightly ;:)ush Ihe "Memery Stick Duo" in
()liCe.
Notes
• When the _cccss lamp is lit or flashing, your
camcorder is reading/writing data. Do not shake
or knock yo/ir Call]corder, lurn tile power ott_
qiecl tile "Memory Stick Duo,' or remove the
battcl T pack, Otherwise, image data may be
danlaged.
• If you insert the "Memory Stick Duo' into/tie
slol in (lie wrong direction, lhe "Memory Stick
Duo," the "Memol_ Stick Duo" slot, or image
data may be damaged.
• When inserting or ejecting the "Memory Stick
Duo," be carcfifl with the "Melnory Stick Duo"
trom popping out and dropping.
3O
 Loading...