

Page 1

SONY,
Trinitron® Color Computer Display
Multiscan lOOsx
Operating Instructions
Mode d’emploi
Bedienungsanleitung
Manual de instrucciones
Istruzioni per l’uso
© ¡
V
I:
Sony Corporation
Printed in Thailand
MODEL:
) 1996 by Sony Corporation
CPD-100SX
Page 2
Plug and Play
This monitor complies with the DDC1™ and DDC2B^“ which are the Display Data Channel (DDC) standards of
VESA.
When a DDC1 host system is connected, the monitor synchronizes with the V.CLK in accordance with the VESA
standards and outputs the EDID (Extended Display Identifications) to the data line.
When a DDC2B host system is connected, the monitor automatically switches to the DDC2B communication.
■ DDC™ is a trademark of the non-profit organization. Video Electronics Standard Association.
Plug and Play
Ce moniteur satisfait aux normes DDC1™ et DDC2B™ qui sont les normes DDC (Display Data Channel : Canal
Données d'Affichage) définies par la VESA. ,
Lorsque le moniteur est branché sur un système hôte DDCl, il se synchronise avec le V.CLK conformément aux
normes de la VESA, et émet les EDID (Extended Display Identifications : Identifications d’Affichage Etend,u) à
destination de la ligne données.
Lorsqu'il est branché à un système hôte DDC2B, le moniteur passe automatiquement au mode de communica
tion DDC2B.
■ DDC™ est une marqua déposée de la VESA (Video Electronics Standard Association : Association de Normali
sation de l’Electronique Vidéo), organisation à but non lucratif.
Plug and Play
Diesar Bildschirm entspricht den VESA-Standards DDCl™ und DDC2B™ fur Bildschirmdatenkanâle .
Wenn ein DDCI-System angeschlossen wurde, synchronislert der Monitor entsprechend den VESA-Standards
mit der V.CLK und sendet einen EDID (Identifikationssignal fur erweiterte Anzeigefâhigkeiten, Extended Display
Identifications) über die Datensignalleitung an das System.
Wenn ein DDC2B-System angeschlossen wurde, wechselt der Monitor automatised auf DDC2B-Kommuniation.
* DDC™ ist ein Warenzeichen der gemeinnützigen Video Electronics Standard Association.
Plug and Play
Este monitor cumple con los estándares de VESA DCC1™ y DDC2B™ para canales de transmisión de video.
Si se conecta un sistema DDCl, el monitor sincronizará con la señal V.CLK según los estándares VESA y emi
tirá la señal EDID (Extended Display Indentifications) en la linea de dalos
Si se conecta un sistema DDC2B, el monitor cambiará automáticamente al modo de communicación DDC2B.
• DDC™ está una marca registrada de la asociación no comercial Video Electronics Standard Association.
Plug and Play
Questo monitor é conforme a DDCl™ e DDC2B™ che sono ÿli standards di DDC (Display Data Channel) di
VESA.
Quando un sistema centrale DDCl é collegato, il monitor si sincronizza con V.CLK in accordo con gli standards
VESA e invia l'EDID (Extended Display Identification) alla linea dati.
Quando un sistema centrale DDC2B é collegato, il monitor si inserisce automaticamente in comunicazione
DDC2B.
■ DDC™ é marchio di fabbrica dell'organizzazione senza scopo di profitto Video Electronics Standard Association
FEATURES CARACTERISTIQUES
CARACTERÍSTICAS
ENGLISH
This high-resolution color display has been designed to be compatible with many standard graphics formats, in
cluding Video Graphics Array (VGA), Super VGA (SVGA) and Extended VGA (XGA). The key featurepare:
• 15" CRT color display with resolutions up to 1024 x 768 pixels ,,
• Support for graphics cards with VESA® compatible DDCl (Display Data Channel) interface for disp|ay- to-PC
communications
• Soft power on/otf switch and support for VESA-compatible 4-stage power management systems
• Meets MPRII reduced emissions guidelines
/ FEATURES
CARAHERISTICHE
IVIERKMALEÍ
FRANÇAIS CARACTERISTIQUES
Ce moniteur haute-résolution à multi-balayage est conçu pour être compatible avec de nombreux formats
graphiques standards tels que VGA. SVGA et XGA. Il dispose également des caractéristiques suivantes:
• Moniteur 15 pouces; résolutions jusqu'à 1024 x 768 pixels
• Conçus pour être utilisé avec des cartes vidéo compatible VESA avec une interface DDC1 (Display Data
Channel) pour affichage sur PC communication
• Interrupteur d'alimentation ON/OFF "soft" et support pour VESA compatible avec systèmes de gestion d'ali
mentation en 4-phases
• Conforme aux directives suédoises SWEDAC MPRII relatives à la réduction des émissions
DEUTSCH
Dieser hochauflösende Multiscan-Monitor ist zu vielen Standardgrafikformaten wie VGA, SVGA und XGA kom
patibel und eignet sich daher ideal für eine Vielzahl von Anwendungen. Der Monitor zeichnet sich zusätzlich durch
die folgenden Merkmale aus:
• Hochauflösender 15-Zoll Farbmonitor; Auflösung bis zu 1024 x 768 Bildpunkten
• Unterstützt Grafikkarten mit VESA-kompatiblem DDC1 (Display Data Channel) Interface für Display-zu-PCKommunikation.
• Ausschalter und Unterstützung von VESA-kompatibler 4-stufiger Stromsparfunktion
• Erfüllt die schwedischen Richtlinien SWEDAC MPRII für reduzierte Emissionen
SPAÑOL
Este monitor color de alta resolución ha sido diseñado para ser compatible con la immensa mayoría de los formatos
gráficos estándares, tales como VGA, SVGA y XGA. Sus principales características son:
• Pantalla color de 15 pulgadas con una resolución máxima de 1024 x 768 “pixels”
• Soporte completo para tarjetas de vídeo que ofrecen el interlace de pantalla VESA comptible con DDC1
para comunicación PC
• Soporte para cuatro modos de gestión de ahorro de energía VESA compatibile
• Cumple con los niveles de emisiones reducidas establecidas por la norma SWEDAC MPRII de Suecia
ITALIANO
Questo monitor a colori ad alta risoluzione è stato progettato per essere compatibile con molti formati grafici
standard, inclusi VGA, SVGA e XGA. Sono Inoltre disponibili le caratteristiche che seguono:
• Monitor a colori da 15 pollici ad alta definizione; risoluzioni lino a 1024 x 768 pixel
• Studiato per essere usato con schede video con interfaccia DDCl (Display Data Channel) compatibile
VESA, per comunicazione display-PC
• Interruttore "soff on/off e supporto al sistema di controll dell'energia a quattro fasi, VESA compatibile
• Rispetto delle direttive di emissione ridotte SWEDAC MPRII svedesi
MERKMALE
CARACTERÍSTICAS
CARATTERISTICHE
Page 3
INSTALLATION INSTALLATION
INSTALLAZIONE
■CZ3 -C3 -C3
■xr
ZT-
INSTALLATION
INSTALCION
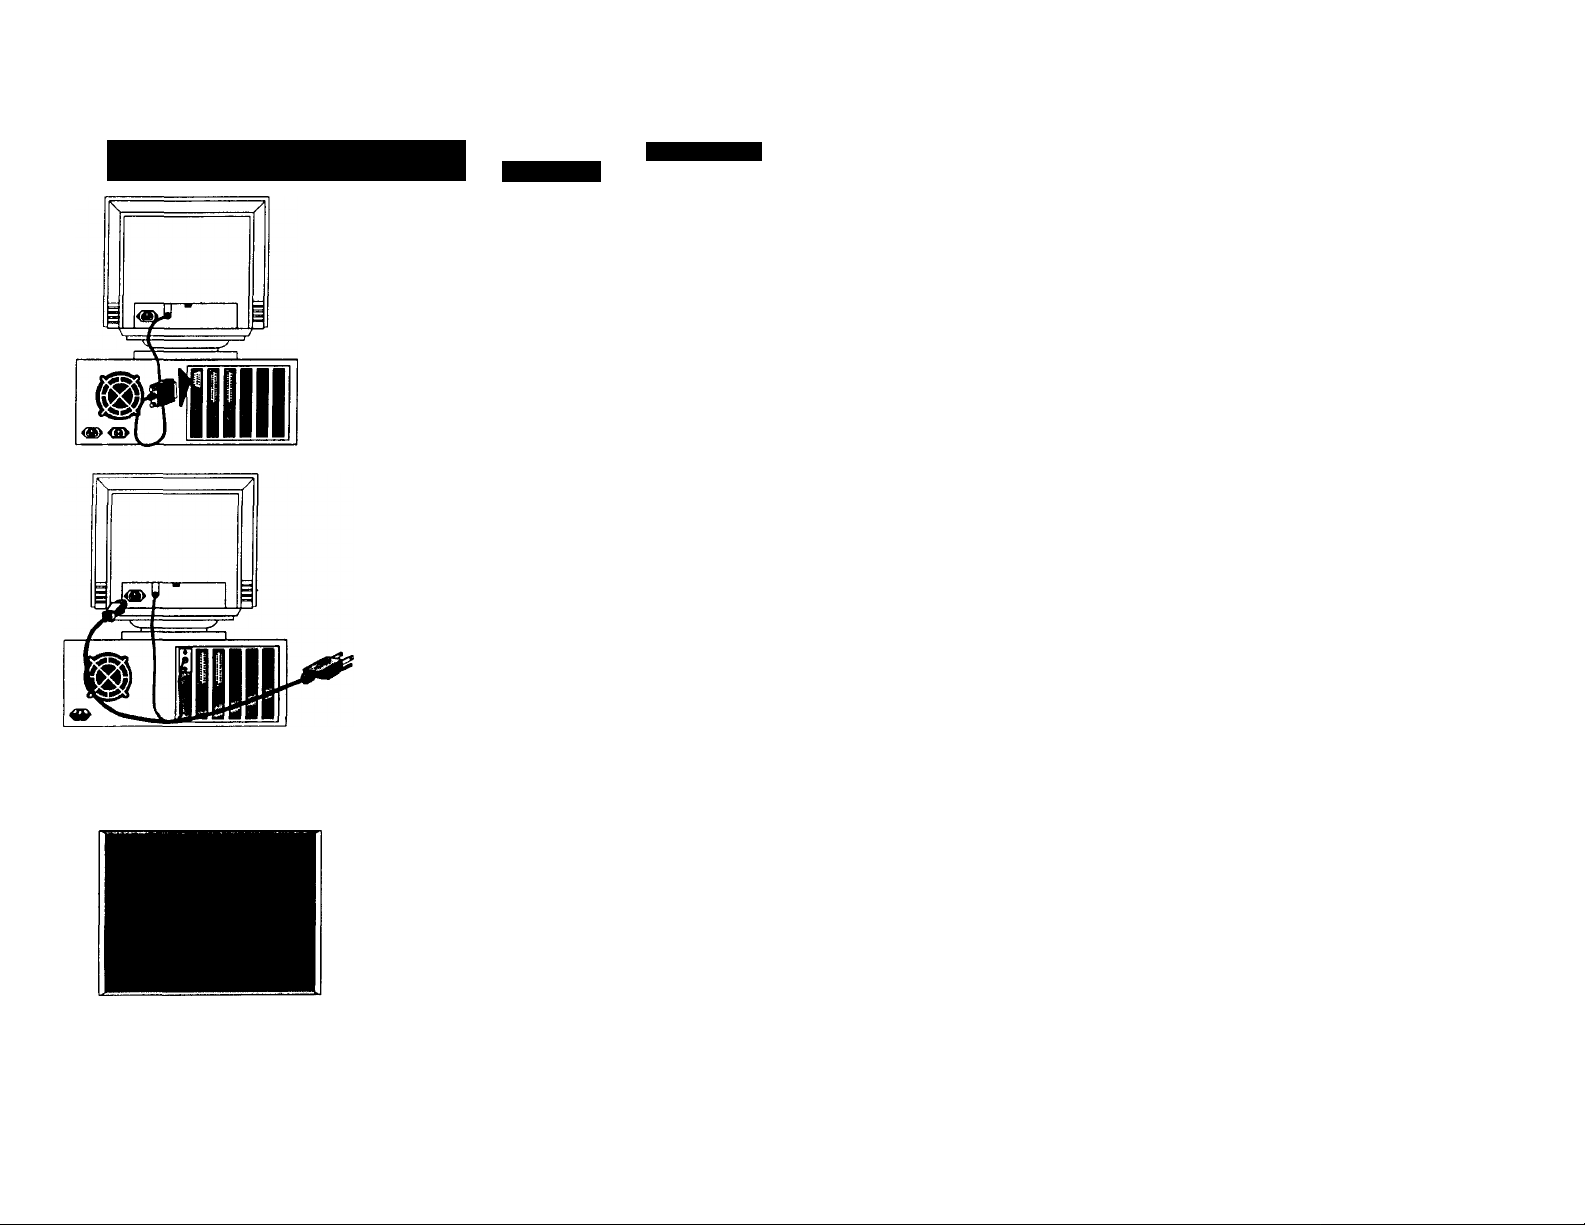
i Connecting the signal cable
' Connecter le câble de signaux
Anschluß des Signalkabels
Conexión del cable de seña
Collegare il cavo di segnalazionel
Connecting the power cable
Branchement de câble d'alimentation
Anschluß des Stromkabels
Conexión del cable de alimentación
Collegamento del cavo di alimentazione
Turning the power on
Allumage
Einschalten
Encedido del monitor
Accensione
Table of Contents
Features..........................................................................................................................,,1
Installation....................................................................................................................... 2
Basic Controls................................................................................................................ 3
Image Adjustment........................................................................................................... 3
Power Management........................................................................................................ 6
Specifications.................................................................................................................. 7
Table des Matières
Caractéristiques.............................................................................................................. 1
Installation....................................................................................................................... 2
Commandes de Base..................................................................................................... 3
Réglage de Limage.......................................................................................................... 3
Contrôle D'alimentation.................................................................................................. 6
Spécifications.................................................................................................................. 7
Inhalt
Merkmale.......................................................................................................................... 1
Installation........................................................................................................................ 2
Einstelltasten................................................................................................................... 3
Bildeinstellung................................................................................................................ 3
Stromsparfunktion.......................................................................................................... 6
Spezifikationen................................................................................................................ 7
Contenido
Características.................................................................................................................. 1
Instalcíon.......................................................................................................................... 2
Controles Básicos........................................................................................................... 3
Ajuste de la Imagen........................................................................................................ 3
Gestion de Potencia........................................................................................................ 6
Especificaciones. ■........................................................................................................ 7
indice
Caratteristiche................................................................................................................... 1
Installazione...................................................................................................................... 2
Controlli di Base............................................................................................................. 3
Regolazione Dell'immagine........................................................................................... 3
Gestione Dell’energia..................................................................................................... 6
Specifiche........................................................................................................................ 7
Page 4

BASIC CONTROLS COMMANDES DE BASE
CONTROLLI Di BASE
EINSTELLTASTEN
CONTROLES BASICOS
1
Damper Wire
When using a white background, a very thin horizontal stripe is visible on the screen
as shown in the illustration. This stripe is a damper wire. This wire is attached to the
aperture grill inside the Trinitron tube and is there to damp vibrations of the aperture
grill in order to prevent them from influencing the picture quality.
Fil Amortisseur (Damper Wire)
Lorsque vous utilisez un arrière-plan blanc, une ligne horizontale très fine est visible
sur l’écran, ainsi que vous pouvez le voir dans l’illustration ci-dessous. Ce ligne est le
Fil Amortisseur. Ce fil est attaché à la grille d’ouverture se trouvant dans le tube Trini
tron et serve à amortir les vibrations de la grille d'ouverture de façon à éviter que ces
vibrations n’affectent la qualité de l’image.
Stabilisierungsdraht (Damper Wire)
Auf einem weißen Hintergrund ist, wie in der Abbildung oben gezeigt, ein dünner hori
zontaler Streifen auf dem Bildschirm zu sehen. Dabei handelt es sich um einen Stabi
lisierungsdraht. Dieser Draht ist auf der Streifenmaske im Inneren der Trinitron-Röhre
befestigt und soll bei Vibrationen das Schwingen der Maske dämpfen, damit dies“
die Bildqualität nicht beeinflussen können.
Alambrado Regulador (Damper Wire)
Cuando se usa un fondo bianco se una linea fina horizontal en la pantalla, como se
muestra en la ilustración. Esta cinta es un alambre regulador. Este alambre está mon
tado sobre la parrilla de abertura dentro del tubo Trinitron y tiene la función de ab
sorber las vibraciones de la parrilla que podrían influir en la calidad del imagen.
Filo smorzatore (Damper Wire)
Durante l’uso di uno sfondo bianco, sottili striscia orizzontali appaiono sullo schermo
come nell’illustrazione. Questa striscia éun filo smorzatore. E’attaccati alla griglia di
apertura all’interno del tubo Trinitron e serve per smorzare le vibrazioni della griglia di
apertura per evitare influenze sulla qualità’ dell’immagine.
RESET
O
' When the maximum or minimum level is
reached, the power indicator will turn orange
and start to flash.
' Lorsque le niveau minimum ou maximum est
atteint, le voyant d'alimentation prend une coul
eur orange et clignote
Wenn der höchste oder niedrigste Einstellwert
erreicht ist, wechselt die Netzleuchte auf or-
SHAPE
•CZZ).
#ŒD CED •
ange und beginnt zu blinken.
• Cuando se alcanzar el valor máximo o mínimo,
el indicador de energía cambiará al color
naranja y empezará a parpadear
Cunado viene raggiunto il livello massimo o
minimoii, l’indicatore di corrente diventa aran
cione ed inizia a lampeggiare
’ Adjusting the brightness
' Réglage de la luminosifé
' Einstelien der Helligkeit
Ajuste de brillo
Regolazione della luminosità
• Adjusting the contrast
• Réglage du contraste
• Einstellen des Kontrastes
• Ajuste de contraste
• Regolazione dei contrasto
( ♦ ) POWER
9C3D
IMAGE ADJUSTMENT REGLAGE DE LIMAGE BILDEINSTELLUNGEN
REGOLAZIONE DELLIMMAGINE AJUSTE DE LA IMAGEN
Picture Rotation- Rotation de L'Imaqe- Blldrotatlon- Rotacton del Area del formato- Rotazione dell'area raster
' Press the "CENT” key for more than 3 seconds.
The LED will blink to indicate secondary function
(Picture Rotation) activation. Press the "CENT”,
"SIZE” or "SHAPE” keys to exit.
' Appuyez sur le bouton "CENT” pendant plus de 3
secondes. L’indicateur lumineux clignote pour in
diquer que c’est la function secondaire (Rotation
de l’image) qui est active. Appuyez sur les boutons
“CENT”, “SIZE”, ou "SHAPE” fois pour sortir.
Drüken Sie »CENT« fOr mehr als 3 Sekunden ge
drückt halten. Die LED blinkt dann, um an
ist. Drüken Sie CENT, SIZE oder SHAPE-Taste, um das zu beenden.
’ Presionando el botón CENT por mas de 3 segundos. La lampara LED lampeggiare indicando la fun-
ción secundaria (Rotacion del Area del formato) adiva. Presione I tasti CENT, SIZE, o SHAPE para salir.
Premete il pulsante CENT per più di 3 secondi. Il LED lampeggerà per indicare l’attivazione dell
funzione secondaria (Rotazione dell’area raster). Premerelos botones CENT, SIZE o SHAPE per uscire.
zuzeigen, daB del Zweitfunktion (Bildrotation) aktiv
Page 5

IMAGE ADJUSTMENT REGLAGE DE LIMAGE BILDEINSTELLUNGEN
REGOLAZIONE DELLIMMAGINE AJUSTE DE UIMAGEN
Hinweise zum Netzanschluß
• Verwenden Sie das mitgelieferte Netzkabel
¥
»t
t
CÏZ)-
Ф ♦
3ŒD
______
I
\fertical position Posición vertical
RæiliorTiemenI verticalet Posizione Verticale
VfertiValeAusncíitijng
ri r^J
Vertical size Dimensión vertical Horizontal size Dimension horizontal
Hauteur de l’image Dimensione Vferticale Hauteur de l'image Dimesione orizzontale
Vertikale Gròsse
ŒD-
ЭСЮ
____
I
_____________ _____________
Horizontal position
Positionnement hori
zontal
Horizontale Ausrichtung
Horizontale Gròfle__________________
*C3Z)
Î . Î
CJEJ
» ♦
Posición horizontal
Posizione Orizzontale
Für 100 bis 120 V Wechselstrom
Warten Sie mindestens 30 Sekunden nach Abschalten des Hauptschalters, bevor Sie das Netzkabel ab
stecken, damit alle statische Elektrizität von der Oberfläche der Kathodenstrahlröhre abfließen kann.
Nachdem Sie die Stromzufuhr eingeschaltet haben, wird die Kathodenstrahlröhre för ungefähr 7 Sekunden
entmagnetisiert. Dadurch entsteht ein starkes magnetisches Feld Im Randbereich, welches die Daten auf
magnefischen Bändern oder Disketten beeinflussen könnte. Bewahren Sie derartige magnetische Aufzeich
nungsgeräte und -medien in einem sicheren Abstand auf.
Die venwendete Steckdose sollte sich in unmittelbarer Nähe des Gerätes befinden und leicht
Aviso de conexión de electricidad
• Use el cable suministrado
para 100 hasta 120 V CA
Después de apagar el sistema con el interruptor, espere por lo menos 30 segundos antes de
desenchufar el cable de conexión de la toma de corriente. Para que asi, se descargue toda la
electricidad estática de la superficie del tubo de rayos catódicos.
Después de encender, el tubo de rayos catódicos será demagnetizado por aproximadamente 7
segundos. Este proceso crea un fuerte campo magnético, lo que podría dañar datos en medios
magnéticos tales como cintas o disquetes. Almacene dispositivos y disquetes o cintas de gra
bación magnética a una distancia segura del monitor.
El enchufe debe estar cerca del dispositivo y fácilmente accesible.
Avvertimento sui collegamenti di corrente
• Usare il cavo di corrente fornito
zugänglich sein.
Für220 bis 240 V Wechselstrom
para 220 hasta 240 V CA
J
I
CAD
_r
3C3D
___
I
Trapezoid
Trapézoide
Trapezoid
Note; IMAGE ADJUSTMENT de-activates If no changes are made
after IS seconds.
Remartiue: RÉGLAGE DE LIMAGE ser désactivé si aucune modilì- trade de datos рог mas que 1 Ss.
cation n’est apportée après 15 secondes. Nota; AJUSTE DE U IMAGEN disaltiveràse non verranno fatti
Merke: BILDEINSTELLUNGEN schaltet automatisch ab, wenn für cambiamenti entro 15s.
Trapecio
Trapezio
Pincushion Wssenentzerrung
Rectitude des bords de Punteamiento
Cuscinetto
15s keine Bngaben erfolgt sind.
Nota; REGOLAZIONE DELQMMAGINE se apagará si no hay en-
da 100 a 120 V CA da 220 a 240 V CA
■ -EJ-Sj
Prima di staccare il cavo, attendere circa 30 secondi dopo avere spento l'interruttore per per
mettere lo scaricamento dell’elettricità' statica sulla superfice del display CRT.
Una volta accesa la corrente, CRT e’ demagnetizzato per circa 7 secondi. Questo crea un po
tente campo magnetico intorno alla cornice dello schermo che può’ influenzare i dati su un nas
tro magnetico o su disco vicino alla cornice. Tenere questi dispositivi magnetici di registrazione,
cosi’ come nastri e dischetti lontani da quest’unità’.
La presa dovrà’ essere installata vicino all’apparecchiatura e facilmente accessibile.
Page 6

NOTICE
This notice is applicable for USA/Canada only.
If shipped to USA/Canada, install only a U1 LISTED/CSA
LABELLED power supply cord meeting the following speci
fications.
SPECIFICATIONS
• Plug Type................. Ncma-Plug 5-15p
• Cord Type
• Length
• Rating....................... Minimum 7A. 125V
................
......................
SVT or SJT, minimum 3x18 AWG
Maximum 15 feet
min in
I ,
NOTICE
Cette notice s’applique aux Etats-unis et au Canada unique
ment.
Si cet appareil est exporté aux Etats-Unis ou au Canada, utilliser
le cordon d’alimentation portant la mention UL USTED/CSA
LABELLED et remplissent les conditions suivantes:
SPECIFICATIONS
• ТУре de fiche
• Cordon туре
• Longueur
• Tension.........................Minimum 7A. !25V.
y
...........
.............
......................
■ «
Fich Nema 5-15 broches
SVT ou SJT, minimum 3x18 AWG
Maximum 15 pieds
Warning on Power Connection
- Use the supplied power cord
For the customers in the USA - if you do not do this, this monitor wili Wot conform to the mandatory FCC
standards.
Before disconnecting the power cord, wait for at least 30 seconds after turning off the power switch to allow
for the discharging of static electricity on the CRT display surface.
After the power has been turned on, the CRT is demagnetized for approximately 7 seconds. This generates
a strong magentic field around the bezel which may affect the data stored on magnetic tape or disks near
the bezel. Place such magnetic recording equipment and tapes/disks at a distance from this unt.
For too to 120 VAC For 220 to 240 VAC
The socket-outlet shall be installed near the equipment and shall be easily assessible.
Avertissement concernant les connexions électriques
• utilisez le cordon d'alimentation fourni
Pour 100 à 120 V Courant Alternant Pour 220 à 240 V Courant Alternatif
Avant de débrancher le cordon d ■ lentation, attendez au moins trente secondes après avoir actionné l’in
terrupteur d'alimentation de façon a permettre le déchargement de l’électricité statique se trouvant sur la
surface du tube cathodique.
Une fois que l’alimentation électrique a été allumée, le tube cathodique est démagnétisé pendant environ 7
secondes. Cela génère un fort champ magnétique autour du cadre de l'écran, ce qui risque d’endommager
les données enregistrées sur les disques ou bandes magnétiques se trouvant à proximité. C'est pourquoi
vous devez placer les bandes/disques et équipements d'enregistrement magnétiques assez loin de l'unité.
La prise électrique doit être située à proximité de l'équipement et doit être facilement accessible.
IMAGE ADJUSTMENT REGLAGE DE LIMAGE
REGOLAZIONE DELLIMMAGINE
• When using ohe of the preset modes as shown on page 8, use tffts button
to discard changes and recall factory preset default. Press and hold the
reset button for more than 3 seconds to recall the factory settings for all
adjustments in all modes. If no factory preset values exist for the mode,
then the RESET function just resets the Brightness and Contrast to factory
default values (Brightness to cut-off, Contrast to maximum).
• Lorsque vous untilisez l'un des modes prédéfinis indiqués à la page 8, appuyez
sur ce boulon pour rappelerles valeurs par défaut du mode pré-défini. Appuyez
pendant au moins 3 secondes sur le bouton remise à zéro (reset) pour
charger à nouveau les paramètres usine par défaut pour tous les réglages
effectués dans tous les modes. Si des valeurs prédéfinies en usine existent
pour ce mode, la fonction RESET (Remise à Zéro) ne fait que restaurer les
valeurs usine par défaut pour la Luminosité et le Contraste (Luminosité
nulle, Contraste réglé au maximum).
• Wenn Sie eine der auf Seite 8 aufgeführten, voreigestellten Grafikmodi
benutzen drücken Sie diese Taste, wenn Sie Änderungen rückgängig
machen und zu den werkseitigen Voreinstellungen dieses Grafikmodes
zurückzukehren wollen. Halten Sie die Reset-Taste mindestens 3 Sekunden
gedrückt, um den Monitor auf die ab Werk voreingesfellten Werte für siile Be
triebsmodi zurückzusetzen. Falls für den benutzten Grafikmode keine vore
ingestellten Werte existieren, setzt die RESET Taste die Helligkeit und den
Kontrast auf die werkseitig voreingestellten Werte zurück (Helligkeit auf cut-off,
Kontrast auf Maximum).
• Si selecciona uno de los modos preinstalados mostrados en la pagina 8,
presione este botón para abandonar los cambios y funcionar con las definicio
nes predeterminadas. Apriete y sujete la tecla de reajuste por tres segundos
o más, para asi, cargar los valores por defecto en todos los modos de oper
ación. Si no hay valores preinstalados de fabrica para este modo, la función
RESET solamente regresa el contaste y el brillo a los valores por defecto de
fabrica (brillo = cancelado, contraste = máximo)
> Quando si usa una delle modalità presetfate come mostrato a pagina 8,
premere questo pulsante per richiamare i setting di default delle modalità
presettate. Tenere premuto il tasto di reset per piu’ di tre secondi per
richiamare le impostazioni predisposte dal produttore per tutte le regolaz
ioni fatte su tutti I modelli. Se non ci sono valori presettati in fabbrica per
questa modalità, la funzione di RESET resetta la luminosità ed il contrasto
su valori di default presetfafi in fabbrica (luminosità al puntodi cut-off, con
trasto ai massimo)
AJUSTE DE LA IMAGEN
BILDEINSTELLUNGEN
Page 7

POWER MANAGEMENT CONTROLE D’ALIMENTATION STROMSPARFUNKTION
GESTIONE DELLENERGIA GESTION DE POTENCIA
When connected to a system with VESA compatible power management, this display is capable of 4 different levels
of power consumption: On, Standby, Suspend, and Off. Please refer to your host system's user manual for details
of how your particular power management system functions.
On Green
standby
Suspend
Off
Lorsque ce moniteur est connecté à un système de gestion de l’alimentation électrique compatible VESA, il peut
avoir quatre niveaux de consommation électrique: Marche, Attente, Mise en Veille et Arrêt. Pour de plus amples
informations sur les fonctions précises de votre s^ème de gestion d'alimentation en particulier, veuillez vous reporter
au manuel de l’utlllsatfon de votre système central.
Marche
Attente
Mise en Veille
Arrêt
.. - -J
Orange
Orange
Orange
Vert
Orange
Orange
Orange
Le moniteur occulte l'écran
Le moniteur occulte l’écran
Le moniteur occulte l’écran
Normal
Blank Screen
Blank Screen Reduced to < 8W
Blank Screen
Normale
120W
Reduced to < 30W
Reduced to < 8W ,
120 W
Réduite à <3CMf
Réduite à < 8W
Réduite à < 8W
FEDERAL COMIVIUNICATIONS COIVIMISSION (FCC)
WARNING:
This equipment has been tested and found to comply with the limits for a Class B digital device, pursuant to part ((5 of the FCC
rules These limits are designed to provide reasonable protection against harmful interference in a rcsidenti^ installation
This equipment generates, u,ses and can radiate radio frequency energy and if not installed and used in accordance with the
instructions, may cause interference to radio communications. However, there is no guarantee that interference will not occur
in a particular installation. If this equipment does cause interference to radio or television reception, which can be determined
by turning the equipment off and on, the user is encouraged to try to correct the interference by one or more of the following
measures:
• Reorient or relocate the receiving antenna.
• Increase the separation between the equipment and the receiver.
• Connect the equipment into an outlet on a circuit different from that to which the receiver is connected.
• Consult the dealer or an experienced radio/TV technician for help.
To assure continued FCC emission limit compliance, the user must use only the power supply cord and shielded interface cable
provided when connecting to a host computer. Also, any unauthorized changes or modifications to this equipment may void the
users authority to operate this monitor.
WARNING
To prevent fire or shock hazard, do not expose the unit to raip or moisture.
Dangerously high voltages are present inside the set. Do not open the cabinet.
Refer servicing to qualified personnel only.
Wenn der Monitor an ein VESA-kompatibles System mit Stromsparfunktion angeschlossen ist, kann er durch das
System in verschiedene Stromsparstufen geschaltet werden; EIN, VIfartestatus, Schlafzustand und Aus. Weitere
Hinweise zur Stromsparfunktion entnehmen Sie bitte den Begleitmaterialien des angeschlossenen Hostsystems.
UílíLíMí
EIN
Wartestatus
Schlafzustand
Aus
SI su sistema cuenta con modos ahorro de energiá compatibile VESA, su monitor será capaz de utilizar cuatro
niveles de consumo de potencia: Encendido, Espera, suspendido y apagado. Si desea Información sobre el
funcionamiento de su sustema concreto de gestión para ahorro de energía, deberá dirigirse al guía de usuario de
su equipo.
Encendido
Espera
Suspendido
Apagado
Collegato ad un sistema di gestione dell’energia VESA compatibile, questo monitor ha 4 livelli diversi di consumo:
Acceso, Attesa, Sospeso e Spento. Fare riferimento al manuale dell’utente del sistema host per i dettagli sui funziona
mento di questo particolare sistema di gestione dell’energia.
Acceso
Attesa
Sospeso
Spento
Grün
Orange
Orange
Orange
Verde
Naranja
Naranja
Naranja
Verde
Arancione
Arancione
Arancione
Normal
Bildschirm Ist dunkel
Bildschirm ist dunkel
Bildschirm Ist dunkel
Normal
Pantalla en blanco
Pantalla en blanco
Pantalla en blanco
IHIHiunSOTffiHMnl
Normale
Schermo vuoto
Schermo vuoto
Schermo vuoto
120W
Auf < 30W reduziert
Auf < 8W reduziert
Auf < 8W reduziert
120 W
Reducida a < 30W
Reducida a < 8W
Reducida a < 8W
120 W
Ridotto a < 30W
Ridotto a < 8W
Ridotto a < 8W
Hinweise
• Aus ergonomischen Gründen wird empfohlen, die Grundfarbe Blau nicht auf dunklem
Untergrund zu verwenden (schlechte Erkennbarkeit, Augenbelastung bei zu geringem
Zeichenkontrast).
• Aus ergonomischen Gründen (flimmern) sollten nur Darstellungen bei Vertikalfrequen
zen ab 70 Hz (ohne Zeilensprung) verwendet werden.
Dieses Gerät entspricht den folgenden Europäischen EMV-Vorschriften für den Betrieb in
Wohngebieten, gewerblichen Gebieten und Leichtindustriegebieten.
EN55022/ 1987 Klasse B
EN50082-1 / 1992
EN60555-2/ 1987
Page 8

Resolution
Modes
CRT Size*
Aperture grille pitch
Phosphor
Transmission Transmission
Bandwidth
Active image;
1) ln Preset Modes
2) Maximum
3) Maximum visible
diagonal
Horizontal Sync.
Vertical Sync. Sync. Verticale
Input Ratings
Environment
(Operating)
Environment
(Non-operating)
Dimensions Dimensions
Weight Poids
Modes de
Resolution
Auflösungen
Dimension de CRT CRT Größe*
D'ouverture de grille
öffnungsgitterdichte
Luminophore Phosphor P22
Transmission 43.5%
Banda Passante Bandbreite 86MHz
Image Active:
1 )Modes prédéfinis
2) Maximum
3) Dlagonale visibi
maximale
Sync. Horizontale
Aktive Bildgröße;
1) Eingestellte
Anzeigmodi
2) Maximum
3) Dlagonal Maximum
Sichtbar
Horizontal Sync.
Vertikal Sync.
Alimentation
Environment
(Allumé)
Environment
(Éteint)
Netzteildaten
Aufstellbedingungen
(In Betrieb)
Aufstellbedingungen
(Außer Betrieb)
Maße
Gewicht
Españo ' “ ..........................................” ' ’
Modeo de Resolución Modalità di risoluzione
Pantalla Tamaño
Dimensione CRT
Rejilla de apertura Griglia di apertura
Fósforo Fosforo
Transmisión Trasmissione
Ancho de la banda
Activa;
1) Modo predefinido
2) Máximo
3) Máxima visibilidad diagonali
Sine. Horizontal
Sine. Vertical
Voltajes de Entrada
Ambientales (En Funcionamiento)
Ambeintales (Apagado
Dimensiones
Larghezza di banda
Immagine attiva;
1) Modi presettate
2) Max.
3) Max. diagonale visibile
Sinc. orizzontale 30 - 65KHz
Sinc. verticale
Potenza nominale
Ambiente (Operatici)
Ambiente (Non operativo))
Dimensioni
Peso Peso
•NOTE: 15 inches measured diagonally (13.9" maximum viewing image) 90 degree deflection
•HINWEIS: 39 ern diagonal gemessen (max.35.6 cm sichtbar) 90-Grad Deflektion
640 X 480, 720 X 400, 800X
600,1024 x 768
15*
0.25mm ''
1) 270mm X 202mm
2) 283mm x 212mm
3) 353mm
30 -65KHZ
50-120Hz
100-240VAC,
50 - 60Hz
10°C (50”F) to 35”C (95°F) / 0-
90%Rh
-40°C (-40°F) to 65°C (149”F) A>
95%Rh
376(T)x368(<^)x414(/)mm
14.2Kg (31.3lbs)
640 X 480, 720 X 400, 800 x
600, 1024x768
15*
0.25mm
P22
43.5%
86MHz
1 )270mm x202mm
2) 283mmx212mm
3) 353mm
50- 120Hz
100-240VAC
50 - 60Hz
10°C (50“F) to 35°C (95°F) / 0-
90%Rh
(-40“F) to 65°C (149°F) /0-
95%Rh
376(T)x368(o)x414(Z)mm
14.2Kg (31.3lbs)
Page 9

SPECIFICATIONS SPECIFICATIONS SPEZIFIKATIONEN
© ® ® © ®
/-V\ ® ® ® ® ®/-y
® 0 9 (fïi
SPECIFICHE ESPECIFICACIONES
1
2 Green video 7
3
4
5
Red video 6 Red GND
Blue video 8
Monitor around
N/C 10
Green GND
Blue GND 13
9 No din 14
Logic GND 15
11 Monitor GND
12 SDA
Horizontal svnc.
VCLK
set
ENGLISH
FRANÇAIS
DEUTSCH
ESPAÑOL
High Resolution 15" Color Display
User’s Guide
Moniteur couleur 15 pouces à haute-résolution
Guide d’utilisation
Hochauflösender 15-Zoll Farbmonitor
Benutzerhandbuch
Monitor a colores de alta resolucion de 15 pulgados
Manual del usarlo
it
Industry
Industry 720 X 400 31.469 70.000
VESA 640 X 480
VESA 800 x 600
VESA 1024 x 768
VESA
VESA 800x600 53.674 85.061
640 X 480
1024 x 768 56.476 70.069 Non-interlaced
31.469 59.940
43.269 85.008
46.875 75.000 Non-interlaced
60.023
75.029
Non-interlaced
Non-interlaced
Non-interlaced
Non-interlaced
Non-interlaced
Out-of-Frequency Indication
If the input signal frequency is out of the range specified above, the monitor goes to stand-by
mode and the power indicator will turn to orange and start to flash.
Indication Hors Plage de Fréquence
Lorsque la fréquence du signal d’entrée se trouve hors de la plage de fréquence spécifiée ci-dessus,
le moniteur se place en mode attente. Le voyant d’alimentation prend une couleur orange et se met à
clignoter.
Überschreitung des Freguenzbereichs
Wenn das Eingangssignal außerhalb des für den Monitor zulässigen Frequenzbereichs liegt, wechseit
der Bildschirm in den Bereitschaftsmodus — die Netzleuchte wechselt auf orange und beginnt zu
blinken.
Indicación de Exceso del Limite de Frecuencia
Si la frecuencia está fuera de los limites permisibles, el monitor cambiará al modo de alerta. El inter
mitente cambiará al color naranja y empezará a parpadear.
Indicazione di Fuori - Frequenza
Se la frequenza del segnale di input e’ al di fuori della gamma specificata qui sopra, il monitor entra in
modo stand-by: l’indicatore di corrente diventa arancione ed inizia a lampeggiare.
ITALIANO
Monitor a colori da 15 pollici ad alta definizione
Manuale per l’utente
 Loading...