


4-241-222-12 (1)
Micro Hi-Fi
Component
System
Operating Instructions
Owner’s Record
The model and serial numbers are located on the rear of the unit. Record the serial
number in the space provided below. Refer to them whenever you call upon your Sony
dealer regarding this product.
Model No. Serial No.
CMT-L7HD
© 2002 Sony Corporation
WARNING
To prevent fire or shock hazard, do not
expose the unit to rain or moisture.
To avoid electrical shock, do not open the cabinet.
Refer servicing to qualified personnel only.
Do not install the appliance in a confined space,
such as a bookcase or built-in cabinet.
This appliance is classified as
a CLASS 1 LASER product.
This label is located on the
rear exterior.
To prevent fire, do not cover the ventilation of the
apparatus with news papers, table-cloths, curtains,
etc. And don’t place lighted candles on the apparatus.
To prevent fire or shock hazard, do not place objects
filled with liquids, such as vases, on the apparatus.
Don’t throw away the battery with
general house waste, dispose of it
correctly as chemical waste.
IN NO EVENT SHALL SELLER BE LIABLE
FOR ANY DIRECT, INCIDENTAL OR
CONSEQUENTIAL DAMAGES OF ANY
NATURE, OR LOSSES OR EXPENSES
RESULTING FROM ANY DEFECTIVE
PRODUCT OR THE USE OF ANY PRODUCT.
US and foreign patents licensed from Dolby
Laboratories.
NOTICE FOR THE CUSTOMERS IN EUROPE
The following caution label is located inside the
apparatus.
NOTICE FOR THE CUSTOMERS IN THE
U.S.A.
This symbol is intended to alert the
user to the presence of uninsulated
“dangerous voltage” within the
product’s enclosure that may be of
sufficient magnitude to constitute a
risk of electric shock to persons.
GB
2
This symbol is intended to alert the
user to the presence of important
operating and maintenance (servicing)
instructions in the literature
accompanying the appliance.
CAUTION
The use of optical instruments with this product will
increase eye hazard.
Note to CATV system installer:
This reminder is provided to call the CATV system
installer’s attention to Article 820-40 of the NEC that
provides guidelines for proper grounding and, in
particular, specifies that the cable ground shall be
connected to the grounding system of the building, as
close to the point of cable entry as practical.
WARNING
This equipment has been tested and found to comply
with the limits for a Class B digital device, pursuant
to Part 15 of the FCC Rules. These limits are
designed to provide reasonable protection against
harmful interference in a residential installation. This
equipment generates, uses, and can radiate radio
frequency energy and, if not installed and used in
accordance with the instructions, may cause harmful
interference to radio communications. However,
there is no guarantee that interference will not occur
in a particular installation. If this equipment does
cause harmful interference to radio or television
reception, which can be determined by turning the
equipment off and on, the user is encouraged to try to
correct the interference by one or more of the
following measures:
– Reorient or relocate the receiving antenna.
– Increase the separation between the equipment and
receiver.
– Connect the equipment into an outlet on a circuit
different from that to which the receiver is
connected.
– Consult the dealer or an experienced radio/TV
technician for help.
If you have any questions about this product, you may
call; Sony customer Information Center 1-800-488-
7669. The Number below is for the FCC related
matters only.
Regulatory Information
Declaration of Conformity
Trade name: SONY
Model No.: HCD-L7HD
Responsible Party: Sony Electronics Inc.
Address: 680 Kinderkamack Road, Oradell, NJ.
07649 USA
Telephone No.: 201-930-6972
This device complies with Part 15 of the FCC
Rules. Operation is subject to the following two
conditions:
(1)This device may not cause harmful interference,
and (2)this device must accept any interference
received, including interference that may cause
undesired operation.
CAUTION
You are cautioned that any changes or modifications
not expressly approved in this manual could void
your authority to operate this equipment.
NOTICE FOR THE CUSTOMERS IN
CANADA
CAUTION
TO PREVENT ELECTRIC SHOCK, DO NOT USE
THIS POLARIZED AC PLUG WITH AN
EXTENSION CORD, RECEPTACLE OR OTHER
OUTLET UNLESS THE BLADES CAN BE FULLY
INSERTED TO PREVENT BLADE EXPOSURE.
Except for European model:
ENERGY STAR
®
is a U.S.
registered mark.
As an ENERGY STAR® partner,
Sony Corporation has determined
that this product meets the
ENERGY STAR
®
guidelines for
energy efficiency.
On moisture condensation
If the system is brought directly from a cold place to a
warm place, or is placed in a room where heat has just
been turned on, moisture may condense on or inside
the system. Since condensation may damage the
system. Leave the system turned off for about an
hour until the moisture evaporates.
Notes on the hard disc
This system records a music to an internal hard disc.
Although the hard disc has safety devices to prevent
losing data due to mechanical vibration, shock or
dust, you should be careful when handling the system.
Avoid damaging your data:
• Do not cause a shock or strong vibration to the
system.
• Do not place the system in a location subject to
mechanical vibration or in unstable location.
• Do not move the system while the power is on.
• Do not pull out the power cord during playback or
recording.
• The storage mode is factory set to “AUTO”.
Each CD track is automatically recorded after it has
been played back. (for details, see page 24)
• Do not use the system in a place subject to extreme
changes in temperature (temperature gradient less
than 10 °C/ hour).
• Do not change the hard disc or add another hard
disc by yourself. This may damage the system.
If the hard disc is damaged, data cannot be restored or
recovered.
For M-crew
• Duplication of any or all of the contents of this
software and instruction manual or lending of this
software to third parties without the express
permission of the copyright holder is strictly
prohibited by copyright law.
• Sony cannot be held liable in any way for monetary
losses, lost profits or claims from third parties
arising from the use of this software.
• Should any manufacturing defects occur, Sony’s
responsibility shall be limited solely to replacing
said defective merchandise.
• This software is approved for use only with the
specified equipment.
• Sony reserves the right to change software
specifications without prior notice. Other related
software and services provided are also subject to
change without prior notice.
Program 1997-2002 Sony Corporation
Documentation 2002 Sony Corporation
2002 Sony Corporation All rights reserved.
• M-crew and LabelMaker are the registered
trademarks of Sony Corporation.
• Microsoft, MS-DOS and Windows are the
registered trademarks of Microsoft Corporation.
• IBM and PC/AT are the registered trademarks of
International Business Machines Corporation.
• Macintosh is the registrated trademark of Apple
Computer Inc.
• Gracenote CDDB or Gracenote CDDB Music
Recognition Service
• Powered by Gracenote CDDB
• Other companies and product names are the
trademarks or the registered trademarks of each
company.
SM
GB
3

Table of Contents
List of Button Locations and
Reference Pages
Main unit ............................................... 6
Remote control ......................................7
Overview
Getting Started
Hooking up the system .......................... 9
Inserting two size AAA (R03) batteries
into the remote .............................. 12
Using the wall hanging bracket ........... 12
Setting the clock .................................. 13
CD
Loading the CD ...................................14
Playing the CD
— Normal Play/Shuffle Play/
Repeat Play ................................... 14
Programing the CD tracks
— Program Play ............................ 15
Labelling a CD
— Disc Memo ............................... 16
HD - Recording
Notes on recording .............................. 23
Recording a CD to the HD
— Auto Storage/
High-Speed Synchro Storage ........ 24
Recording to the HD manually
— Manual Recording .................... 26
Recording tips
— Making tracks/Smart Space/
Adjusting the recording level ........ 26
HD - Editing
Labelling a track, album or playlist
— Name Function ......................... 30
Erasing recordings
— Erase Function.......................... 32
Moving recorded tracks or albums
— Move Function ......................... 33
Dividing recorded tracks
— Divide Function........................ 34
Combining recorded tracks
— Combine Function .................... 35
Undoing the last edit
— Undo Function.......................... 36
GB
4
HD - Play
Playing the HD
— Normal Play/Shuffle Play/
Repeat Play ................................... 18
Registering a track to a playlist
— Playlist Play..............................19
Locating a desired album or track
— Keyword Search/
Highlight Play ...............................20
Playing a registered album
— Album Favorites....................... 22
Playing an album you listened to recently
— History...................................... 22
Tuner
Presetting radio stations....................... 37
Listening to the radio
—
Preset Tuning/Manual Tuning ...
Labelling the preset stations
— Station Name ............................ 39
Using the Radio Data System (RDS)* ...
38
39

Sound Adjustment
Troubleshooting
Adjusting the sound
— DSG.......................................... 40
Timer
Falling asleep to music
— Sleep Timer .............................. 40
Waking up to music
— Daily Timer .............................. 41
Timer recording radio programs.......... 42
Display
Turning off the display
— Power Saving Mode ................. 44
Changing the illumination level ..........44
Using the display ................................. 44
M-crew
Overview ............................................. 46
System requirements ........................... 47
Installing the software .........................47
Connections ......................................... 50
Setup procedure for your computer
system............................................ 50
Installing LabelMaker 5.1 ...................53
Uninstalling the software..................... 53
Starting up the software....................... 54
Quitting the software ........................... 54
Using the Help..................................... 54
Problems and remedies........................ 59
Self-diagnosis display.......................... 62
Additional Information
Precautions .......................................... 64
Specifications ...................................... 65
* European model only
Optional Components
Hooking up optional components........ 56
Listening to audio from a connected
component ..................................... 57
Recording audio from a connected
component ..................................... 57
Recording on a connected component ...
58
GB
5
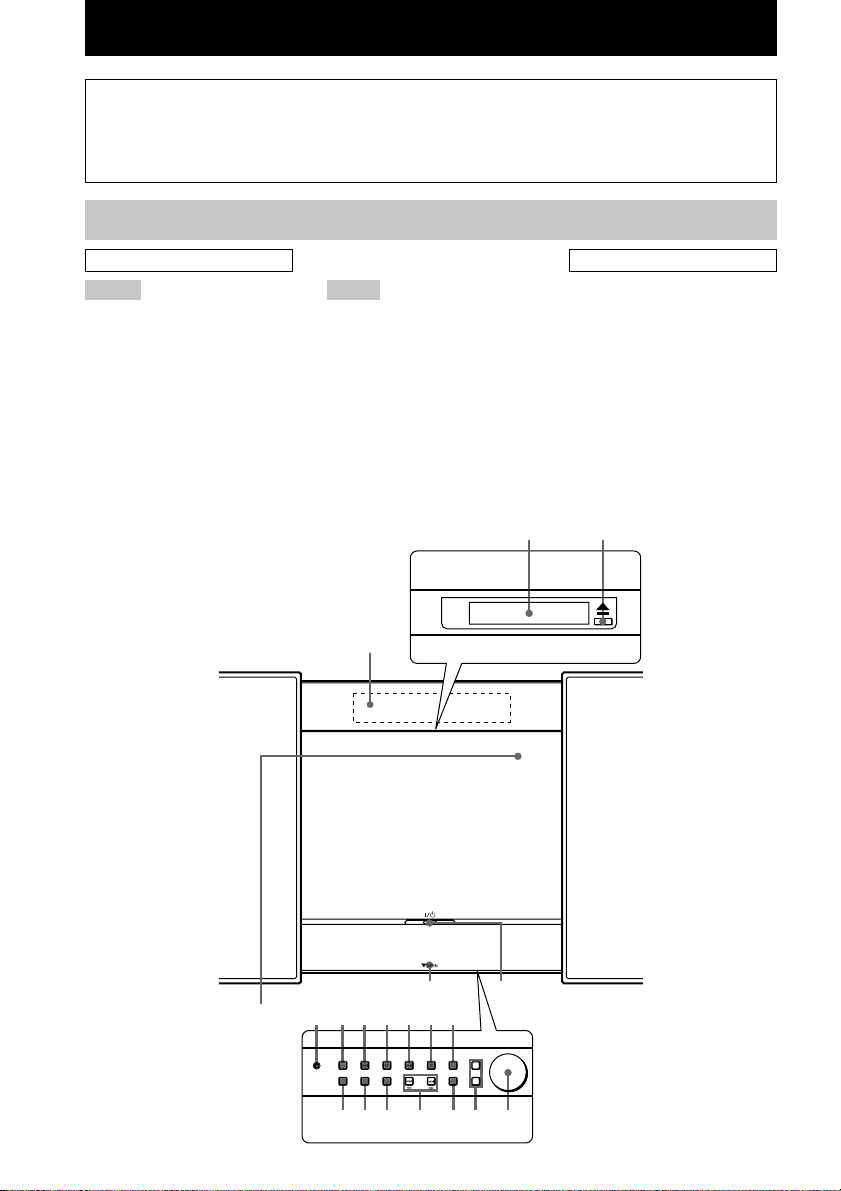
List of Button Locations and Reference Pages
How to use this page
Use this page to find the location of buttons and other
parts of the system that are mentioned in the text.
Main unit
ALPHABETICAL ORDER
A – H
ALBUM dial qf (18, 19, 21, 26)
CD cover 2 (14, 15)
CD u qa (14 - 16, 25)
CD x qs (15, 16, 24, 25)
DISPLAY 8 (39, 44, 45)
Display window 1 (44, 45)
FUNCTION qh (14 - 22, 25 - 28,
30, 32 - 35, 57)
HD u 9 (18, 20 - 22, 25, 26)
HD x q; (18, 25, 26, 30)
HIGH SPEED SYNC ql (25)
P – Z
PHONES jack 7
REC w; (26, 28)
Remote sensor 6
STORAGE MODE qk (14, 25,
26)
TUNER/BAND qd (37, 38)
TUNING +/– qj (37, 38)
VOL +/– qg (41)
1
Illustration number
r
PLAY MODE qh (14 - 18, 21)
Name of button/part Reference page
RR
BUTTON DESCRIPTIONS
@/1 (power) 4 (11, 41, 42)
./> qj (15, 16, 18)
m/M qj (15, 18)
Z 3 (14, 15)
V OPEN 5
To open the front cover, push
down on V OPEN.
2
3
54
6
7 89q;
GB
6
qlqk
qaqsqd
qf
qgqhqjw;
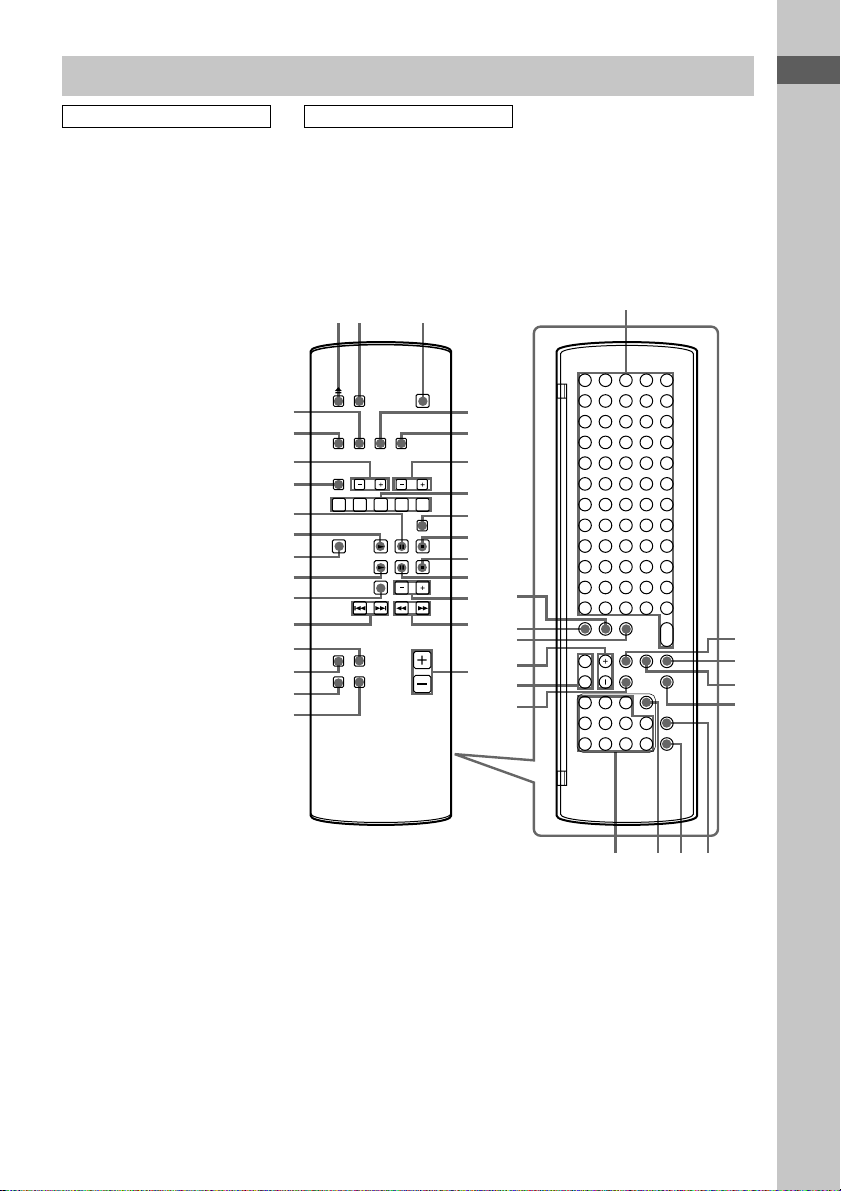
Remote control
ALPHABETICAL ORDER
ALBUM eh (19)
ALBUM FAVORITES 7 (22)
ALBUM MEMORY 8 (22)
ALBUM +/– 6 (18, 19, 21, 26)
CAPS rd (16, 31)
CD N wa (14 - 16, 25)
CD X qa (15)
CD x q; (15, 16, 24, 25)
CLEAR es (15 - 17, 29, 31, 39)
CLOCK/TIMER SELECT eg
(41 - 43)
CLOCK/TIMER SET ef (13, 41,
42)
CURSOR T/t el (13, 17, 20,
21, 31, 35, 42)
DIMMER 5 (44)
DISPLAY wk (39, 44, 45)
DSG qk (40)
ENTER/YES e; (13, 15 - 17,
19 - 21, 27 - 37, 39, 41 - 43, 57)
FM MODE qg (38)
FUNCTION ws (14 - 22, 25 - 28,
30, 32 - 35, 57)
HD N wd (18, 20 - 22, 25, 26)
HD X wf (18, 25, 26)
HD x 9 (18, 25, 26, 30)
HIGHLIGHT wg (21)
HISTORY +/– wh (22)
MENU/NO ek (17, 20, 27 - 39,
57)
MENU +/– r; (13, 17, 20, 21,
27 - 36, 41 - 43)
NAME rs (16, 39)
Numeric buttons for selecting an
album or track ej (15, 19, 38)
PLAYLIST ed (19, 20)
PLAY MODE qh (14 - 18, 21)
PRESET EQ qj (40)
REPEAT qg (15, 18)
SCROLL 4 (17, 45)
SEARCH ea (20)
SLEEP 2 (40)
SML ra (16, 31)
Text input buttons wl (16, 31)
TIME wj (16, 44, 45)
TUNER BAND w; (37, 38)
TUNING MODE qh (37, 38)
TUNING +/– qs (37, 38)
VOL +/– qf (41)
BUTTON DESCRIPTIONS
@/1 (power) 3 (11, 41, 42)
./> ql (15, 16, 18)
m/M qd (15, 18)
Z 1 (14, 15)
12 3
wk
wj
wh
wg
wf
wd
ws
wa
w;
ql
qk
qj
qh
qg
4
5
6
7
8
9
q;
qa
qs
qd
qf
rd
rs
ra
r;
el
ek
List of Button Locations and Reference Pages
wl
e;
ea
es
ed
ej ehegef
GB
7
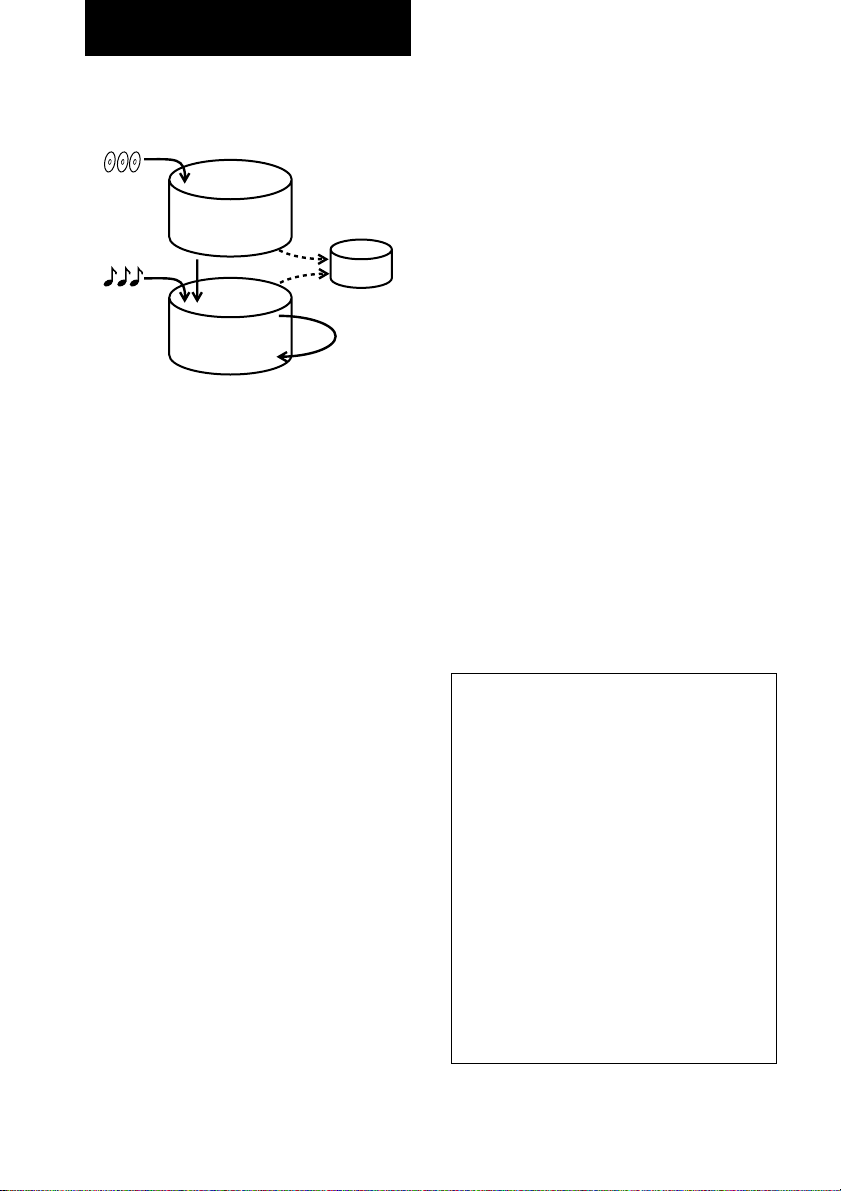
Overview
This system, with its internal hard disc (HD),
supports the following functions:
HD configuration
CDs
Library area
Album/track
Any sound
source
Flexible area
Library area
This area can be used like a 250-CD changer.
CDs (or selected tracks from a CD) are stored
as albums in this area (the “L” indicator lights
up). Up to 250 albums can be stored here.
Flexible area
This area can be used like a 250-MD changer.
As on an MD deck, you can record from any
sound source to the Flexible area and then edit
the recorded material in this area (the “F”
indicator lights up). Up to 250 albums can be
stored here.
Album
Up to 400 tracks can be contained in a single
album and up to 20,000 tracks on the HD (or
more than 300 hours of data on the HD).
Playlist
You can create playlists containing only
desired tracks in the Library or Flexible area
(the “P” indicator lights up during playlist
registration or playback). Up to 10 playlists
can be created.
Library storage
The system automatically records the CD to the
HD during CD playback when Auto Storage is
selected as the storage mode. You can check
the contents of the current CD storage status
through the display window.
Playlist
Editing
Search
Specific tracks on the HD can be easily found.
• Keyword Search (see page 20)
A keyword can be entered to find a desired
album or track. Keywords may be the name
of the album, track or artist.
• Highlight Play (see page 21)
This function allows you to listen to just a
part of a single track in each album in order to
find a specific album on the HD.
Album favorites
By registering up to 5 albums on the HD to
ALBUM FAVORITES (A - E) on the remote,
you can play them easily at the press of a
button.
History
This system memorizes the 20 most recently
played albums, any of which can be selected
for playback.
Labelling
The supplied “M-crew for CMT-L7HD”
software* enables CDDB2** to be accessed
from your computer for automatic labelling of
albums and tracks (refer to the Help).
* For details, see to “Overview” on page 46
**A database containing information on CDs on the
market
Notes
• The recorded music is limited to private use
only. Use of the music beyond this limit requires
permission of the copyright holders.
• Sony is not responsible for any loss that may
arise from lost data.
• Recording to the hard disc should be considered
as a temporary means of storing audio data. Be
sure to retain the original sound source as
backup.
• There is no service for the recovery of lost data.
• You may hear sounds as the system access the
hard disc when you turn on the system, play an
HD track, record to the HD, etc. These sounds
are natural to the HD and are not abnormal.
• The system may make sounds even when no
operation is being performed. These sounds are
produced by the system’s self-maintenance
functions and are not abnormal.
• You may also feel vibrations from the system,
but this is not a malfunction.
GB
8
Getting Started
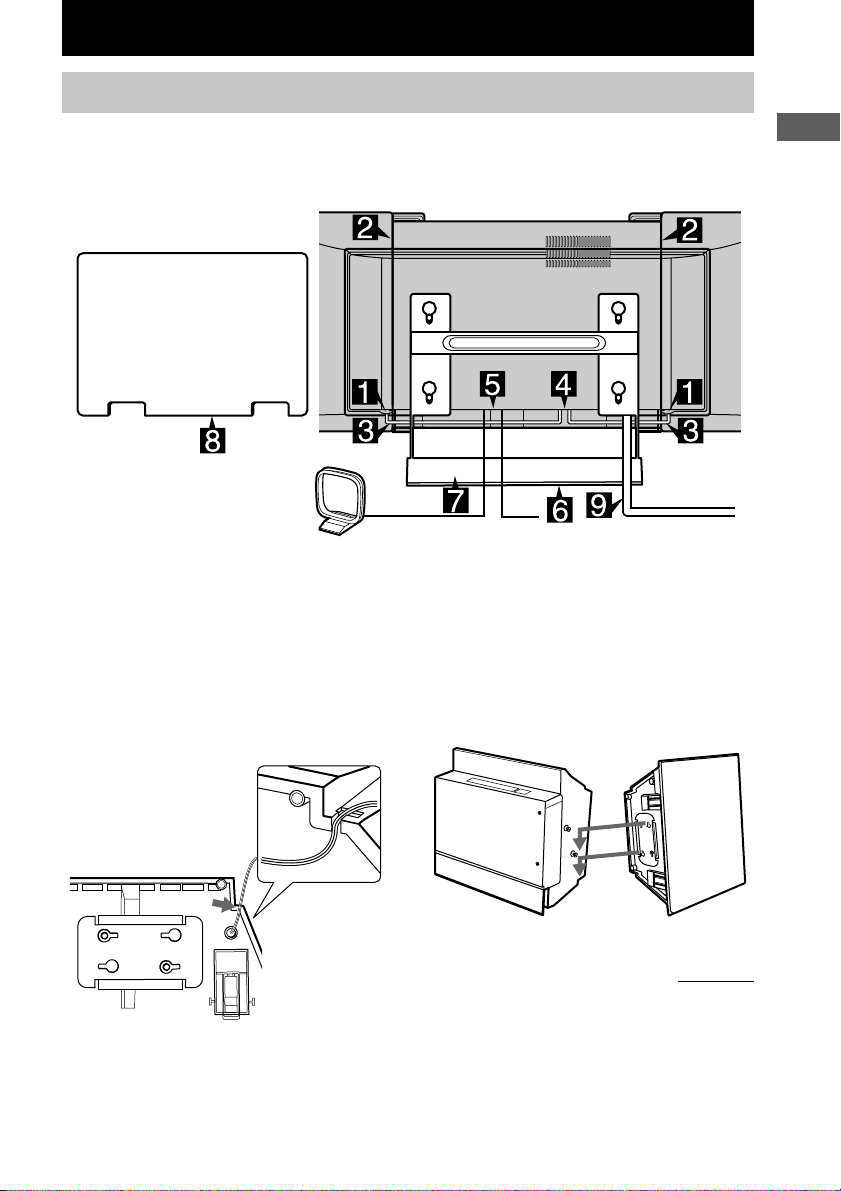
Hooking up the system
Perform the following procedure 1 to 9 to hook up your system using the supplied cords and
accessories.
Right speaker
The rear cover
AM loop antenna
1 Set the speaker cord into the speaker
cord groove at the bottom of the
speaker.
Otherwise, the speaker cord could be
FM antenna
Before attaching the system to the stand, draw the
wires under the horizontal bar of the stand.
Otherwise, the wires could be damaged.
2 Attach the speakers.
Afterwards, push down on the speakers to
make sure they are securely fastened to the
main unit.
Left speaker
Desktop stand
damaged.
Getting Started
Overview/Getting Started
continued
GB
9
Hooking up the system (continued)
3 Secure the speaker cords with the
speaker cord hooks at the bottom of
the main unit.
Otherwise, the speaker cord could be
damaged.
Bend a speaker cord slightly, insert it
into the hole and secure it with the hook.
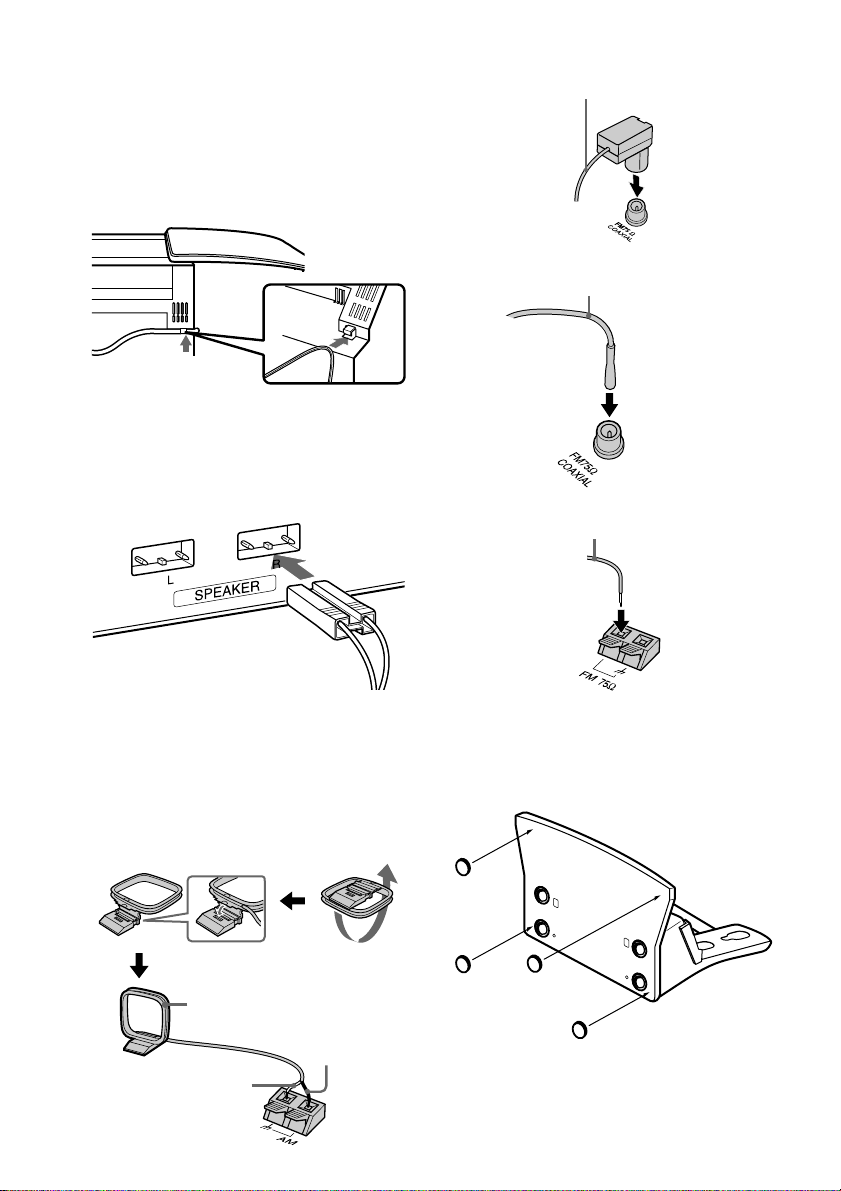
4 Connect the speaker cords.
Connect the speaker cords to the SPEAKER
jacks as shown below.
FM antenna (Jack type A)
Extend the FM wire antenna horizontally
FM antenna (Jack type B)
Extend the FM wire antenna horizontally
FM antenna (Jack type C)
Extend the FM wire antenna horizontally
5 Connect the FM and AM antennas.
Set the AM loop antenna up before
connecting it.
To prevent noise, locate the AM loop
antenna as far away from the system as
possible.
AM antenna
AM loop
antenna
Black
GB
10
White
6 Attach the stand pads.
Attach the supplied stand pads to the bottom
of the stand to stabilize the stand and to
prevent it from slipping.
Note
Use caution when placing the stand on a specially
treated (waxed, oiled, polished, etc.) floor, as
staining or discoloration may result.
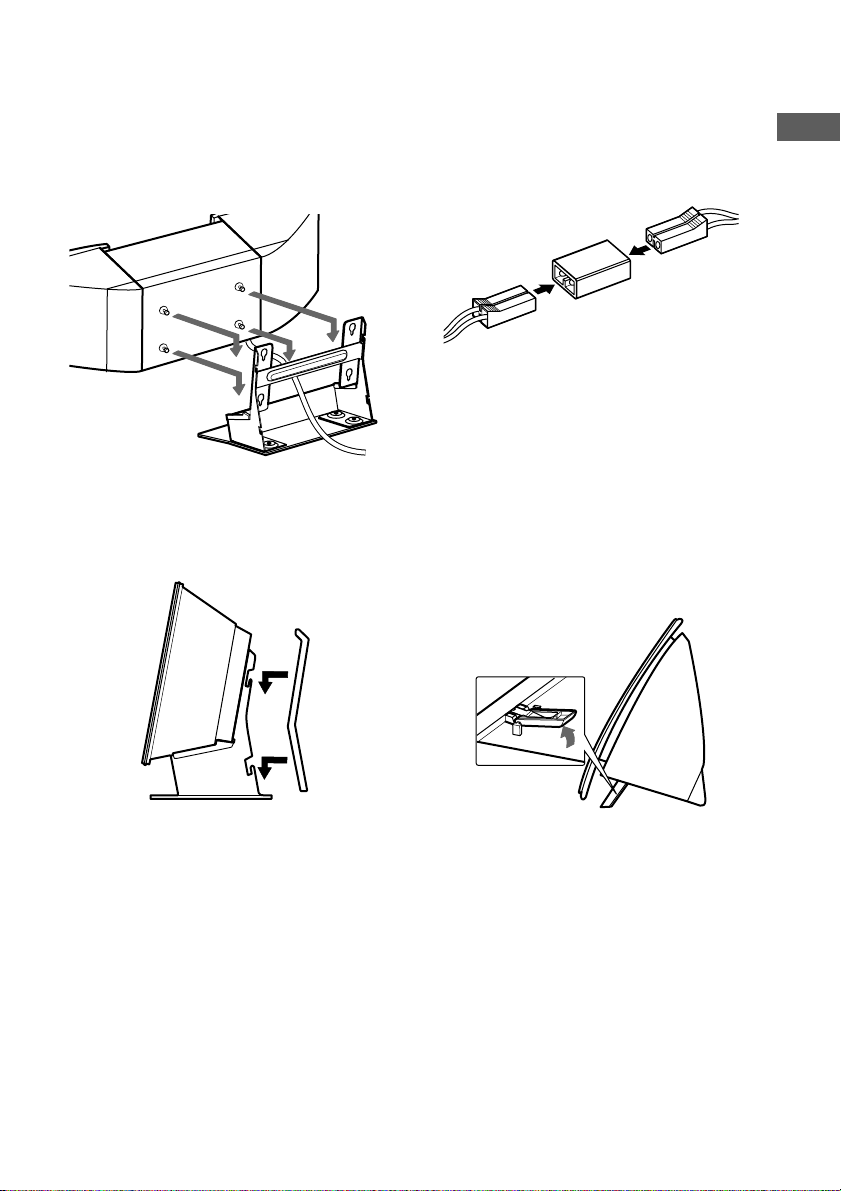
7 Attach the system to the supplied
desktop stand.
Make sure to grasp the main unit, and not
the speakers.
After attaching the system to the stand, push
down on the system to make sure they are
securely fastened to the stand.
8 Attach the supplied rear cover to the
stand.
Put the wires through the holes at the
bottom of the rear cover.
Using the system with the
speakers detached
1Connect one end of the supplied joint
connector to the speaker cord, and then
connect the supplied cord extension to the
other end of the joint connector.
2Connect the cord extensions to the
SPEAKER jacks.
3Secure the cord extensions with the speaker
cord hooks at the bottom of the main unit.
Otherwise, the cord extension could be
damaged.
4Attach the system to the supplied desktop
stand.
5Attach the supplied rear cover to the stand.
6After folding up the speaker legs, set the
speakers at the desired positions.
Getting Started
9 Connect the power cord to a wall outlet.
If the plug does not fit the wall outlet, attach
the supplied plug adaptor (only for models
equipped with an adaptor).
To turn on the system, press @/1.
Notes
• Either mount both speakers or remove both
speakers. Do not use the system with only one
speaker mounted.
• When moving the system, first detach the main unit
from the desktop stand, and then move the system.
If you leave the speakers attached during the move,
make sure to grasp the system by the main unit, and
not by the speakers.
11
GB
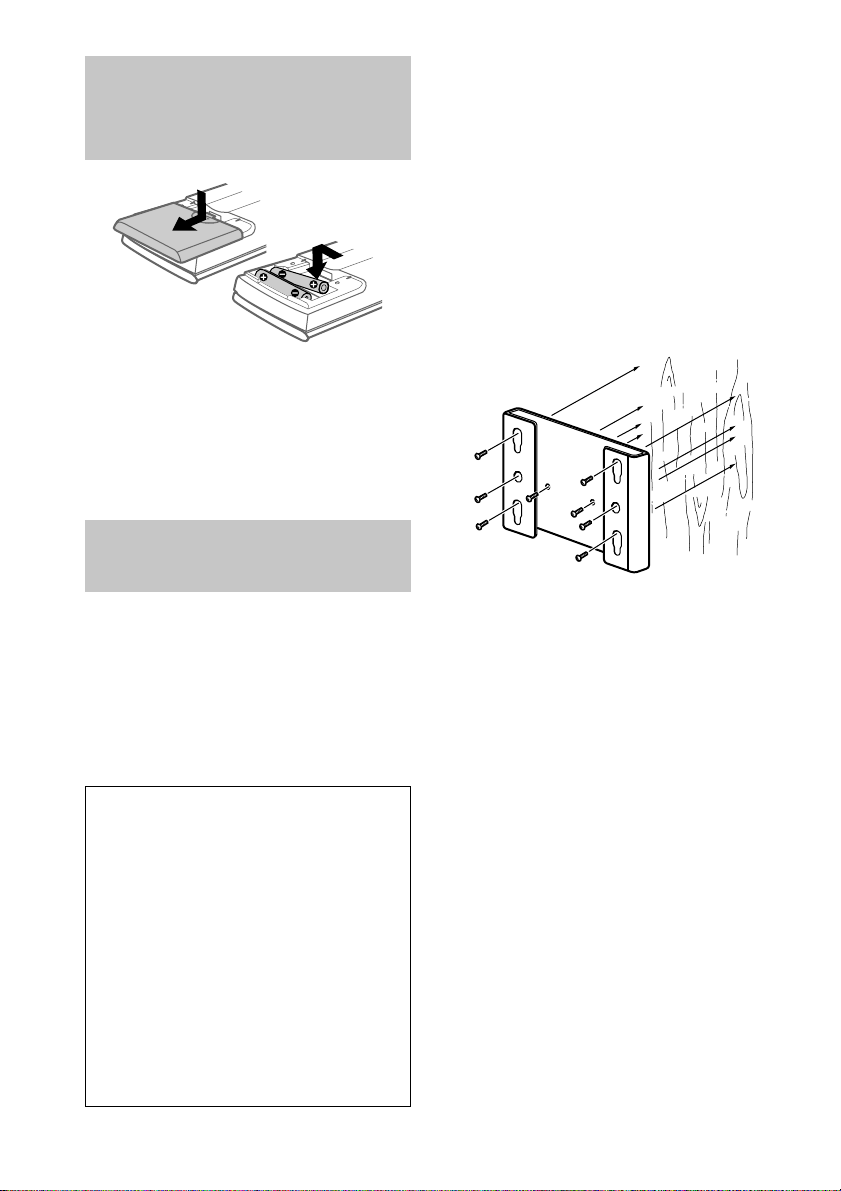
Inserting two size AAA (R03) batteries into the remote
Tip
When the remote no longer operates the system,
replace both batteries with new ones.
Note
If you do not use the remote for a long period of time,
remove the batteries to prevent possible damage from
battery leakage and corrosion.
Using the wall hanging bracket
You can hang the system on the wall using the
supplied wall hanging bracket.
The screws for attaching the wall hanging
bracket to the wall are not supplied. When
installing the bracket by yourself, be sure to use
screws appropriate for the type of wall. Sony
cannot take responsibility for any damages or
injury due to installation.
Safety precautions
• The supplied bracket is for use with the Sony
Interior Hi-Fi Component System CMT-L7HD
only. Using this item for purposes other than to
hang the system on the wall may result in
accidents.
• The component system CMT-L7HD (7.9 kg) and
the wall hanging bracket (0.6 kg) have a
combined weight of 8.5 kg. Therefore, for safety
reasons, the bracket should be attached securely
to a wall made from materials capable of
supporting a load of 50 kg or more.
• When you hang the system on the wall, make
sure the left and right speakers are both attached
or both detached. Attaching one speaker without
the other may cause the system to drop and
injure someone.
Preparation
• The screws for attaching the wall hanging
bracket to the wall are not supplied. Be sure
to purchase screws suited to the wall
materials.
• If the wall materials cannot support a load of
50 kg or more, be sure to reinforce the wall.
Hanging the system on the
wall
1Fix the wall hanging bracket to the wall
using 8 screws (not supplied).
Note
Be sure to secure the bracket in a level position.
2Set the speaker cord into the speaker cord
groove at the bottom of the speaker.
Otherwise, the speaker cord could be
damaged.
3Attach the speakers.
Afterwards, push down on the speakers to
make sure they are securely fastened to the
main unit.
4Connect the speaker cords to the SPEAKER
jacks.
12
GB
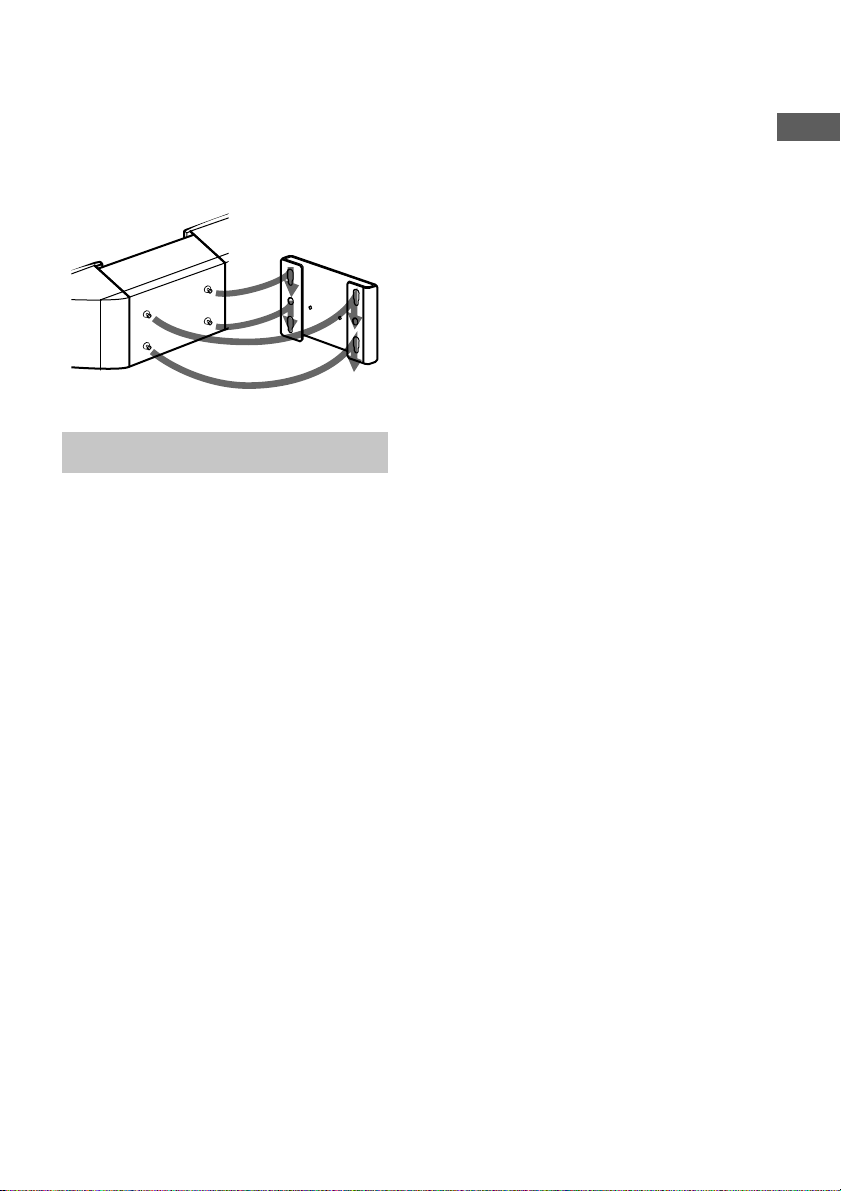
5Attach the system to the wall hanging
bracket which you have fixed to the wall.
Make sure to grasp the main unit, and not the
speakers.
After attaching the system to the bracket,
push down on the system to make sure they
are securely fastened to the bracket.
Setting the clock
1 Turn on the system.
2 Press CLOCK/TIMER SET on the
remote.
3 Press MENU + or – on the remote
repeatedly to set the day, and then
press ENTER/YES or CURSORt on
the remote.
The hour indication flashes.
4 Press MENU + or – on the remote
repeatedly to set the hour, and then
press ENTER/YES or CURSORt on
the remote.
The minute indication flashes.
5 Press MENU + or – on the remote
repeatedly to set the minute, and then
press ENTER/YES on the remote.
If you make a mistake
Press TCURSOR or CURSORt on the
remote repeatedly until the indication you want
to change (day, hour, minute) flashes, and then
change the setting.
To adjust the clock
1Press CLOCK/TIMER SET on the remote.
2Press MENU + or – on the remote repeatedly
until “CLOCK SET?” appears in the display,
and then press ENTER/YES on the remote.
3Do the same procedures as steps 3 to 5
above.
Getting Started
GB
13
CD
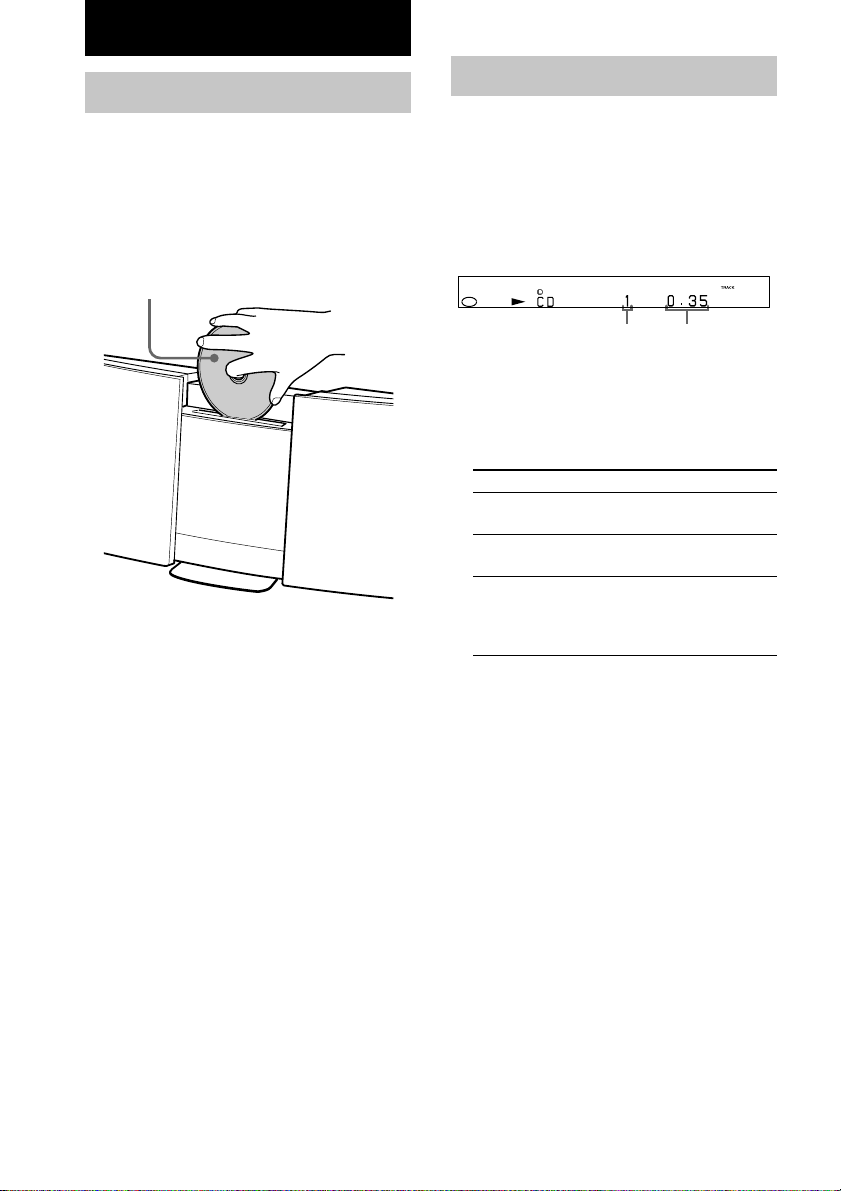
Loading the CD
1 Touch Z (or press Z on the remote).
The CD cover opens and the function
switches to CD.
2 Insert a CD and push down on it gently.
The CD is drawn in and playback starts
automatically.
Load with the label side front.
Tips
• To reload the CD, first remove the CD, and then
load it again.
• You can load a CD single (8-cm CD) without an
adapter.
• Playback starts automatically when you simply load
the CD (CD Auto Play). This function, however,
does not work while Program Play is selected.
Note
If the CD cover does not open when you touch Z (for
example, when you are wearing gloves), touch it with
bare fingers or press the Z button on the remote.
Playing the CD
— Normal Play/Shuffle Play/Repeat
Play
This system lets you play CDs in different play
modes.
The system is set to automatically start CD-toHD recording at the start of CD playback.
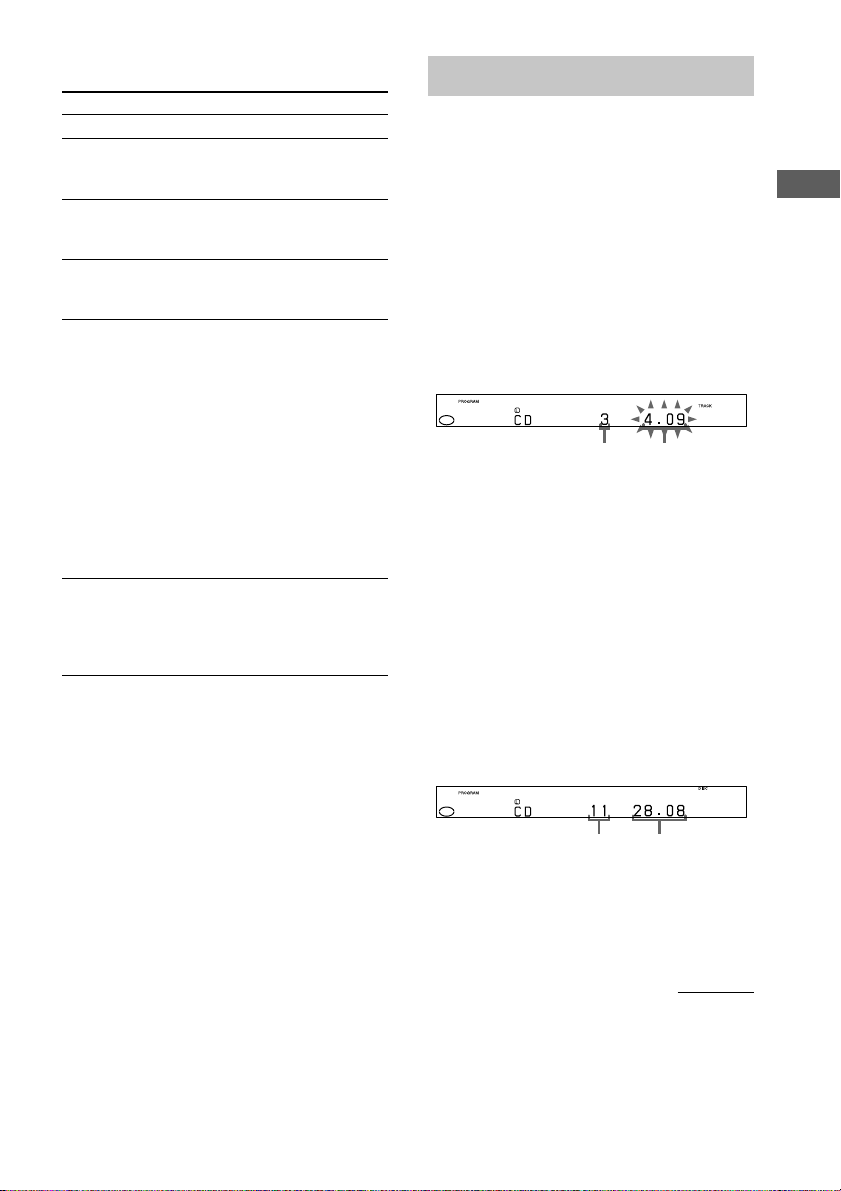
Track number Playing time
1 Press FUNCTION repeatedly until “CD”
appears in the display.
2 Press PLAY MODE on the remote in
stop mode repeatedly until the mode
you want appears in the display.
Select
No display
(Normal Play)
SHUFFLE
(Shuffle Play)
PROGRAM
(Program
Play)
3 Press CD u (or CD N on the remote).
To deactivate automatic CD-to-HD
recording
While the CD is stopped, press STORAGE MODE to
switch the storage mode to off. For details, see page
25.
To play
The CD in original order.
The tracks on the CD in random
order.
The tracks on the CD in any
order that you want (see
“Programing the CD tracks” on
page 15).
14
GB
Other operations
To
Stop playback
Pause
Select a track
Find a point in a
track
Play repeatedly
(Repeat Play)
Remove the CD
To enter track number using the
remote
You can also select the desired track using the
remote during Normal Play (no display).
Press the numeric buttons. The playback
automatically starts.
To enter track number over 10
Do this
Press CD x.
Press CD u (or CD X on the
remote). Press again to resume
playback.
During playback or pause, press
. or > repeatedly until
you find the desired track.
During playback, press and hold
down m or M until you find
the desired point.
Press REPEAT on the remote
repeatedly during playback until
“REP” or “REP1” appears in the
display.
REP: For all the tracks on the
CD up to 5 times.
REP1: For only the currently
playing track.
To cancel playing repeatedly,
press REPEAT on the remote
repeatedly until “REP” and
“REP1” disappear from the
display.
Touch Z (or press Z on the
remote) to remove the CD, then
touch Z (or press Z on the
remote) again to close the CD
cover.
1 Press >10.
2 Enter the corresponding digits.
To enter 0, press 10/0 instead.
Example:
To enter track number 30, press >10, then 3 and 10/0.
Programing the CD tracks
— Program Play
You can make a program of up to 25 tracks on
a CD in any order that you want.
1 Press FUNCTION repeatedly until “CD”
appears in the display.
2 Press PLAY MODE on the remote in
stop mode repeatedly until
“PROGRAM” appears in the display.
3 Press . or > repeatedly until the
desired track number appears in the
display.
Selected track
number
To enter the desired track number using the
remote, press the numeric buttons, then skip
step 4.
4 Press ENTER/YES on the remote.
The track is programmed.
“Step” appears, followed by the order
number of the track just programmed. Then
the last programmed track number appears,
followed by the total playing time of the
program. If you have made a mistake, you
can clear the last programmed track from
the program by pressing CLEAR on the
remote.
Last programmed
track number
5 To program additional tracks, repeat
steps 3 and 4.
6 Press CD u (or CD N on the remote).
Playing time of the
selected track
Total playing
time
continued
CD
15
GB

Programing the CD tracks (continued)
Labelling a CD
Other operations
To
Check the program
order
Check the total
number of
programmed tracks
Cancel Program Play
Add a track to the end
of the program
Erase the last
programmed track
Tips
• The program you made remains after Program Play
finishes. To play the program again, switch the
function to CD, and then press CD u (or CD N
on the remote).
• “--.--” appears when the total program time exceeds
100 minutes, or when you select a CD track whose
number is 21 or over.
Do this
Press . or >
repeatedly during Program
Play.
Press TIME on the remote in
stop mode. The total
number of programmed
tracks appears, and then the
last programmed track
number and the total playing
time of the program.
Press CD x, and then press
PLAY MODE on the remote
repeatedly until
“PROGRAM” and
“SHUFFLE” disappear from
the display.
Do steps 3 and 4 with
Program Play stopped.
Press CLEAR on the remote
in stop mode. Each time you
press the button, the last
programmed track is erased.
— Disc Memo
You can label up to 100 CDs with titles of up
to 20 symbols and characters. Whenever you
load a labelled CD, the title appears in the
display.
Note
When labelling CDs for the first time, be sure to erase
all disc titles using the procedure “Erasing a disc
title” on page 17.
1 Press FUNCTION repeatedly until “CD”
appears in the display.
If “SHUFFLE” or “PROGRAM” appears in
the display, press PLAY MODE on the
remote repeatedly until both disappear.
2 Press NAME on the remote.
The cursor starts flashing.
3 Press CAPS or SML on the remote to
select the desired type of character.
Type of character
Uppercase letters/blank
space/symbols/numbers
Lowercase letters/blank
space/symbols/numbers
Press
CAPS.
SML.
4 Press the corresponding text input
button on the remote to enter a
character.
5 Repeat steps 3 and 4 to enter the rest
of the name.
6 Press ENTER/YES on the remote to
complete the labelling procedure.
16
GB

To erase and change a character
In step 3 or 4, press TCURSOR or
CURSORt on the remote repeatedly until the
character you want to change flashes, press
CLEAR on the remote to erase the character,
and then repeat steps 3 and 4.
To cancel labelling
Press MENU/NO on the remote.
To add a character
After step 2, press TCURSOR or
CURSORt on the remote repeatedly to move
the cursor to the place where you want to add a
character. And then proceed to step 3.
Checking the disc titles
1 Press FUNCTION repeatedly until “CD”
appears in the display.
2 Press MENU/NO on the remote in stop
mode.
3 Press MENU + or – on the remote
repeatedly until “Name Check?”
appears, and then press ENTER/YES on
the remote.
4 Press MENU + or – on the remote
repeatedly to select a disc title stored
in the system memory between 001 and
100.
To check the current disc title
Press SCROLL on the remote in stop mode.
To pause the scrolling, press SCROLL on the
remote again.
4 Press MENU + or – on the remote
repeatedly to select the disc title you
want to erase.
5 Press ENTER/YES on the remote again.
“Complete!” appears.
To erase all disc titles
Press MENU + or – on the remote repeatedly
until “All Erase?” appears in step 3, and then
press ENTER/YES on the remote twice.
To cancel erasing
Press MENU/NO on the remote during steps 1
to 4.
CD
Erasing a disc title
1 Press FUNCTION repeatedly until “CD”
appears in the display.
If “SHUFFLE” or “PROGRAM” appears in
the display, press PLAY MODE on the
remote repeatedly until both disappear.
2 Press MENU/NO on the remote in stop
mode.
3 Press MENU + or – on the remote
repeatedly until “Name Erase?”
appears, then press ENTER/YES on the
remote.
17
GB

HD - Play
Playing the HD
— Normal Play/Shuffle Play/Repeat
Play
This system lets you play the HD in different
play modes.
Track number
Album number Playing time
1 Press FUNCTION repeatedly until “HD”
appears in the display.
2 Press PLAY MODE on the remote in
stop mode repeatedly until the mode
you want appears in the display.
When you
select
ALL ALBUM
only
(Normal Play)
1ALBUM
only
(Normal Play)
ALL ALBUM
and
SHUFFLE
(Shuffle Play)
1ALBUM and
SHUFFLE
(Shuffle Play)
* Except for the playlists
3 Press HD u (or HD N on the remote).
Result
All the albums on the HD are
played back consecutively in the
order of album number.
Only the current album is played
back.
An album* is selected at random
and the tracks in that album are
played back in random order.
After all the tracks have been
played, another album is selected
in the same manner.
All the tracks in the current
album are played back in random
order.
Other operations
To
Stop playback
Pause
Select a track
Select an album
Find a point in a
1
track*
Play repeatedly
(Repeat Play)
Do this
Press HD x.
Press HD u (or HD X on the
remote). Press again to resume
playback.
Press . or > repeatedly
until you find the desired track.
Turn ALBUM dial clockwise (to
go forward) or counterclockwise
(to go backward) (or press
ALBUM + or – on the remote
repeatedly).
During playback, press and hold
down m or M until you find
the desired point.
Press REPEAT on the remote
repeatedly during playback until
“REP” or “REP1” appears in the
display.
REP (All Album Normal Play):
The system repeats all the tracks
on the HD.
REP (1 Album Normal Play):
The system repeats all the tracks
in the current album.
REP (All Album Shuffle Play):
The system repeats all the tracks
(except for the playlists) on the
HD in random order.
REP (1 Album Shuffle Play):
The system repeats all the tracks
in the current album in random
order.
REP1: The system repeats only
the current track*2.
To cancel playing repeatedly,
press REPEAT on the remote
repeatedly until “REP” and
“REP1” disappear from the
display.
18
GB

*1You can locate a point only within the current
album.
*2If a track is not specified, the system repeats the
first track in the current album.
To enter track number using the
remote
You can also select the desired track using the
remote during Normal Play (no display).
Press the numeric buttons. Playback starts
automatically.
To enter track number over 10
1 Press >10.
2 Enter the corresponding digits.
To enter 0, press 10/0 instead.
Example:
• To enter track number 20 for an album containing
less than 100 tracks, press >10, 2 and then 10/0.
• To enter track number 30 for an album containing
100 tracks or more, press >10, 10/0, 3 and then
10/0.
To enter album number using the
remote
You can also select the desired album using the
remote.
Press ALBUM repeatedly until the desired
album area appears.
The display changes cyclically as follows:
L.Album t F.Album t Playlist t No
display
Then press the numeric buttons. Enter three
digits to select an album in the Library or
Flexible area. Enter two digits to select a
playlist. To enter 0, press 10/0 instead.
Playback starts automatically.
Example:
• To enter album number L.Album30 (or F.Album30)
in the Library area (or the Flexible area), press
ALBUM repeatedly, then 10/0, 3 and 10/0.
• To enter album number Playlist4, press ALBUM
repeatedly, then 10/0 and 4.
Registering a track to a
playlist
— Playlist Play
By registering tracks on the HD to a playlist,
you can play back only the tracks you want to
listen to. Up to 10 playlists can be created and
each playlist can contain up to 400 tracks.
1 Press FUNCTION repeatedly until “HD”
appears in the display.
2 During the playback or play pause of
the desired track, press PLAYLIST on
the remote.
When you press the PLAYLIST on the
remote while the system is stopped, all the
tracks in the current album are registered to
a playlist.
3 Turn ALBUM dial (or press ALBUM + or
– on the remote repeatedly) until the
desired playlist appears, then press
ENTER/YES on the remote.
4 Do the procedure of “Playing the HD”
on page 18 to play the playlist.
Notes
• When “ALL ALBUM SHUFFLE” is selected,
playlists cannot be played back.
• If you edit a track in an album that is registered to
one or more playlists, the track is erased from all
the playlists automatically. (except for the Name
function)
HD - Play
19
GB
Locating a desired album
or track
— Keyword Search/Highlight Play
Searching by keywords
(Keyword Search)
You can easily find desired albums or tracks on
the HD if they have been named.
1 Press FUNCTION repeatedly until “HD”
appears in the display.
2 While the system is stopped, press
SEARCH on the remote.
3 Press MENU + or – on the remote to
select the target level, then press
ENTER/YES on the remote.
To
Search for an album
Search for a track
4 Press MENU + or – on the remote to
select the keyword type, then press
ENTER/YES on the remote.
To
Search by an album or
track name
Search by an artist
name
“Keyword In” appears in the display.
5 Enter the keyword (see “Assigning a
title or artist name” on page 30).
Up to 10 characters can be entered.
Select
For Album?.
For Track?.
Select
By Title?.
By Artist?.
6 Press ENTER/YES on the remote.
When the corresponding item is found,
playback of the item starts as follows:
If you selected
For Album?
For Track?
The system plays
the first 10 seconds of
each track in the
album.
the track repeatedly.
If there are multiple matches, press MENU
+ or – on the remote repeatedly to select the
desired album or track.
If there are no matches, “Not Found”
appears in the display.
7 Press HD u (or HD N on the remote).
Playback starts with the current item.
To cancel Keyword Search
Press MENU/NO on the remote.
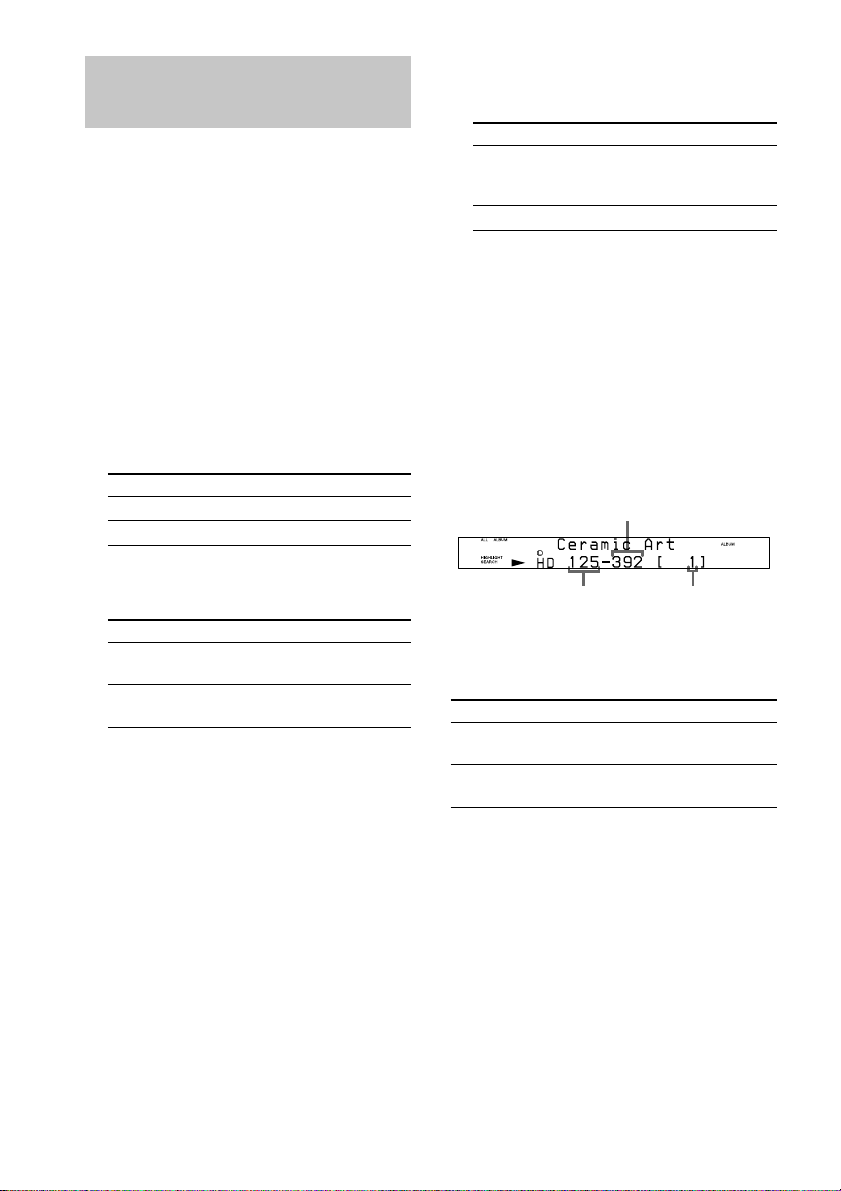
To check information about the
matches
Track number
Item number*Album number
* “– – –” appears when you select an item whose
number is 1,000 or over.
Other operations
To
Select an item
Go back/ahead
(20 items at a time)
Tips
• When you press SEARCH on the remote while the
current item is displayed, the display for entering a
keyword appears again. This allows you to do
another search with another keyword under the
same condition as the previous keyword.
• In step 6, you can register the track to a playlist by
pressing PLAYLIST on the remote. (see
“Registering a track to a playlist” on page 19).
Notes
• You cannot search for a playlist or for a track in a
playlist with Keyword Search.
• If you perform Keyword Search when Shuffle Play
is selected, the HD play mode automatically
switches to Normal Play.
Press
MENU + or – on the
remote.
TCURSOR or
CURSORt on the remote.
20
GB

Searching by playback
(Highlight Play)
This function allows you to easily locate an
album on the HD by playing back a part of a
representative track in each album.
To register a representative track
for Highlight Play
1 Press FUNCTION repeatedly until “HD”
appears in the display.
If “SHUFFLE” appears in the display, press
PLAY MODE on the remote repeatedly
until it disappears.
2 Start playing the track you want to
register in an album.
3 While monitoring the sound, press
HIGHLIGHT on the remote at the
starting point of Highlight Play.
Rehearsal playback starts from the point.
4 Press ENTER/YES on the remote if the
starting point of Highlight Play is
correct.
The Highlight position plays for 10 seconds.
If the point is incorrect, press MENU + or –
on the remote repeatedly to find the correct
point, then press ENTER/YES on the
remote.
You can shift the starting point in 1-frame
(f) intervals (1 frame = 1/43 second).
Tip
To shift the point by minutes or second intervals in
step 4, press TCURSOR or CURSORt on the
remote repeatedly so that the minute or second
indication flashes, then press MENU + or – on the
remote repeatedly.
Second
Notes
• If the registration of the Highlight position has not
been performed, the beginning of the first track in
the album becomes the Highlight position of the
album.
• Only one track can be selected as the representative
track for each album.
• During Highlight Play, you cannot:
– register a Highlight position
– register a track to a playlist
• You cannot register a Highlight position to a
playlist (album numbers Playlist1 to Playlist10).
To play an album found through
Highlight Play
1 Press FUNCTION repeatedly until “HD”
appears in the display.
2 While the system is stopped in Normal
Play, press HIGHLIGHT on the remote.
Highlight Play starts.
3 While monitoring the sound, turn
ALBUM dial (or press ALBUM + or – on
the remote repeatedly) to locate the
desired album.
4 Press HD u (or HD N on the remote).
Playback starts from the first track in the
selected album.
Notes
• Highlight Play starts with the album that was
selected at the time you pressed HIGHLIGHT on
the remote.
• Highlight Play skips blank albums and playlists
(album numbers Playlist1 to Playlist10).
• If you perform Highlight Play when Shuffle Play is
selected, the HD play mode automatically switches
to Normal Play.
HD - Play
Minute Frame
21
GB