

Page 1

4-255-291-13(2)
Micro Hi-Fi
Component
System
Operating Instructions
Owner’s Record
The model and serial num bers are located o n the rear of the u nit. Record the ser ial number
in the space provided below. Refer to them when ev er you c all upon your Sony dealer
regarding this product.
Model No. ______________ Serial No. ______________
CMT-HPX10W
CMT-HPX9
CMT-HPX7
©2004 Sony Corporation
Page 2
WARNING
To prevent fire or shock hazard, do not
expose the unit to rain or moi st u r e.
To prevent fire, do not cover the ventil at ion of the
apparatus with news papers, table-cloths, curtains, etc.
And don’t place lighted candle s on the apparatus.
To prevent fire or shock hazard, do not place obje c ts
filled with liquids, such as vases, on the apparatus.
Do not install the appliance in a confined space,
such as a bookcase or built-in cabi ne t.
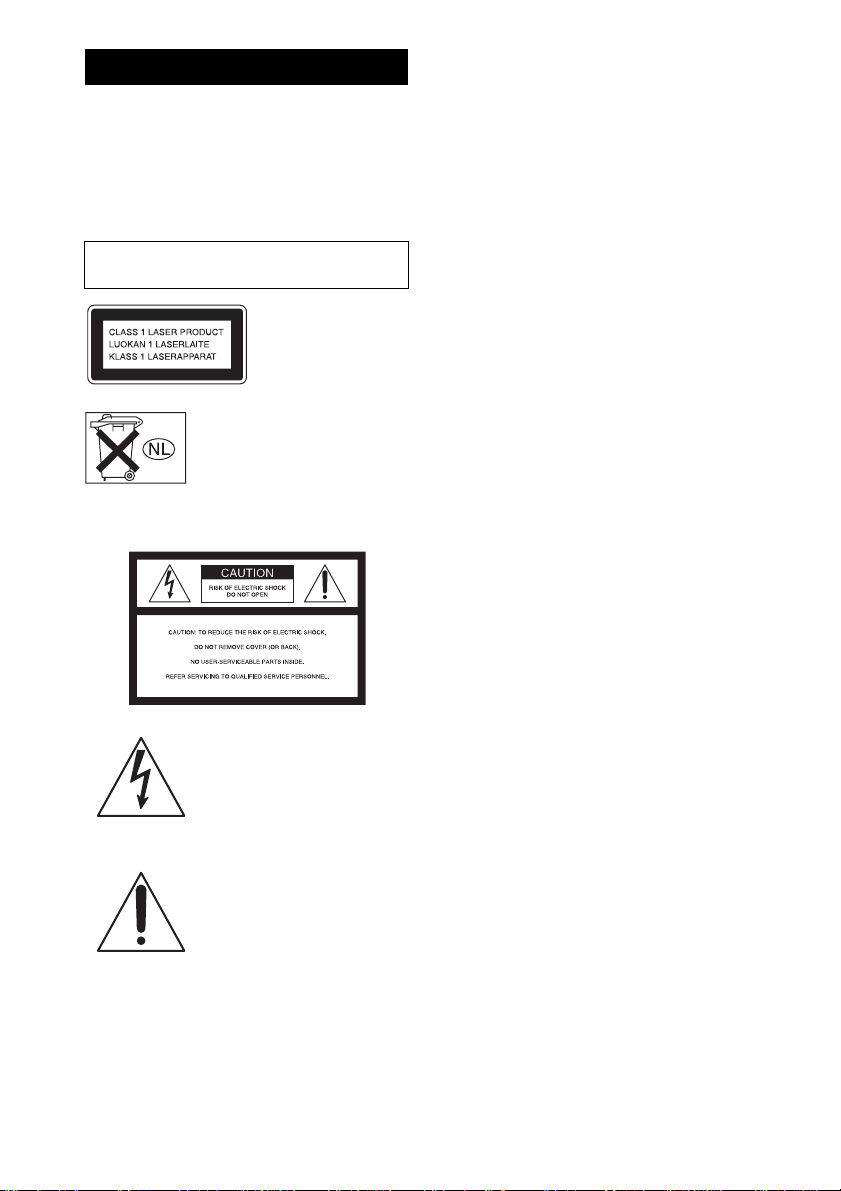
This appliance is
classified as a CLASS 1
LASER product. This
marking is locat ed on the
rear exterior.
Don’t throw away the battery with
general house waste, dispose of it
correctly as chemical was te.
NOTICE FOR THE CUSTOMERS IN THE
U.S.A.
This symbol is intended to alert
the user to the p r esence of
uninsulated “dangerous voltage”
within the product’s enclosure
that may be of sufficient
magnitude to consti tute a risk of
electric shock to persons.
This symbol is intended to alert
the user to the p r esence of
important operating and
maintenance (servicing)
instructions in the literature
accompanying the appliance.
CAUTION
The use of optical instruments wit h this prod uc t will
increase eye hazard.
WARNING
This equipment has been tested and found to comply
with the limits for a Class B digital device, pursuant to
Part 15 of the FCC Rules. These limits are designed to
provide reasonable protectio n aga i nst ha r mf ul
interference in a residential installation. This
equipment generates, uses, and ca n r adia te radio
frequency energy and, if not in sta ll ed and used in
accordance with the instructions, may cause harmful
interference to radio communications. However, there
is no guarantee that interference will not occur in a
particular installa tion. If this equipment doe s cause
harmful interference to radio or television reception,
which can be determined by turning the equipment off
and on, the user is encouraged to try to correct the
interference by one or more of the following measures:
– Reorient or relocate the rece iv i ng an tenna.
– Increase the separation betwe e n the equi pment and
receiver.
– Connect the equipment into an outlet on a circuit
different from that to which the receiver is connected.
– Consult the dealer or an experie nc ed radio/TV
technician for help.
CAUTION
You are cautioned that any changes or modification not
expressly approved in this manual could void your
authority to operate this equipment.
Note to CATV system installer:
This reminder is provided to call the CATV system
installer’s attention to Article 820-40 o f th e N E C that
provides guidelines for proper ground ing a nd, in
particular, specifies that the cable ground shall be
connected to the grounding system of the buil ding, as
close to the point of cable entry as practical.
NOTICE FOR THE CUSTOMERS IN CANADA
CAUTION
TO PREVENT ELECTRIC SHOCK, MATCH WI DE
BLADE OF PLUG TO WIDE SLOT, FULLY INSERT.
CAUTION
The use of optical instruments with this product will
increase eye hazard.
GB
2
Page 3
CMT-HPX10W only
NOTICE FOR THE CUSTOMERS IN THE
U.S.A.
If you have any questions about this product, you may
call; sony customer Information Service Center
1-800-222-7669 or http://www.sony.com/
The Number below is for the FCC related matters only.
Regulatory Information
Declaration of Conformity
Trade Name: SONY
Model No.: HCD-HPX10W
Responsible Party:Sony Electronic s I nc .
Address: 16450 W.Bernardo Dr,
San Diego, CA 92127 U.S.A.
Telephone No.: 858-942-2230
This device compiles with Pa rt 15 of the FC C R ules.
Operation is subject to the following two
conditions: (1) This device ma y not cause harmful
interference, and (2) this device must accept any
interference received, including interference that
may cause undesired operation.
NOTICE FOR THE CUSTOMERS IN CANADA
Operation is subject to the fo llowing two conditions:
(1) this device may not cause interference, and (2) this
device must accept any interference, including
interference that may cause undesired operation of the
device.
NOTICE FOR THE CUSTOMERS IN EUROPE
Except for European model
ENERGY STAR® is a U.S.
registered mark. As an E
®
TAR
partner, Sony Corporation
S
has determined that this product
meets the E
NERGY STAR
guidelines for energy e f ficiency.
NERGY
®
Hereby, Sony Corp., declares that this equipment is in
compliance with the essential requirements and other
relevant provisions of Directive 1999/5/EC.
For details, please a ccess the following URL :
http://www.compliance.sony.de/
This product is intended to be used in the following
countries. United Kingdom, Germany, France , Italy,
Netherlands, Austria, Belgium, Portugal, Switzerland,
Norway, Sweden, Denmark, Finland, Spain
NOTICE FOR THE CUSTOMERS IN THE
U.S.A. AND CANADA
Replace the AC power adaptor with model ACGSX100 only, if replacement is necessary.
GB
3
Page 4

Table of Contents
How to use this manual...........................5
Playable discs..........................................5
Getting Started
Hooking up the system...... ... ...................7
Setting the clock......................................9
CD/MP3 – Play
Loading a disc.......................................10
Playing a disc........................................11
— Normal Play/Shuffle Play
Playing repeatedly.................................12
— Repeat Play
Creating your own program..................13
— Program Play
Tuner
Presetting radio stations........................14
Listening to the radio............................15
— Preset Tuning
— Manual Tuning
Using the Radio Data System (RDS)....16
(European model only)
Tape – Play
Loading a tape.......................................17
Playing a tape........................................17
Tape – Recording
Recording your fav o r ite CD tracks on a
tape..................................................18
— CD-TAPE Synchro Rec ording
Recording on a tape manually...............18
— Manual Recording
Timer
Falling asleep to music.........................19
— Sleep Timer
Waking up to music..............................20
— Play Timer
Timer recording radio programs........... 21
— Rec Timer
Display
Turning off the display.........................22
— Power Saving Mode
Viewing information about the d isc in th e
display............................................22
Optional Components
Hooking up optional components.........23
Transmitter ...........................................24
(CMT-HPX10W only)
Troubleshooting
Problems and remedies.........................26
Messages...............................................29
Additional Info rm at io n
Precautions ...........................................30
Specifications .......................................31
List of button locations and reference
pages...............................................34
Sound Adjus tment
Adjusting the sound..............................19
GB
4
Page 5
How to use this manual
• The instructions in this manual ar e f or mode l
CMT-HPX10W, CMT-HPX9 and CMTHPX7. Check your model number by looking
at the top of the unit. In this manual, CMTHPX7 is used for illu stration purposes unless
stated otherwise. Any difference in operation
is clearly indicated in the text, for example,
“CMT-HPX10W only”.
• This manual mainly explains operation s using
the remote, but the same operations can also
be performed using the buttons on the system
having the same or similar names.
Discs that this system ca nnot
play
•CD-ROMs
• CD-Rs/CD-RWs other than those record ed in
the following formats:
– music CD format
– MP3 format that co nf orms to ISO 9660*
Level 1/Level 2, Joliet, Romeo or Multi
Session**
• A disc that has a non-standard sh ape (e.g.,
card, heart).
• A disc with paper or stickers on it.
• A disc that has the adhesive, cellophane tape,
or a sticker still left on it.
Playable discs
You can play back the following disc s on this
system. Other discs cannot be playe d back.
List of playable discs
Format of discs Disc logo
Audio CDs
CD-R/CD-RW
(audio data/MP3 files)
* ISO 9660 Format
The most common in ternational standar d for the
logical format of files and folders on a CD-ROM.
There are several specificati o n levels. In Level 1,
file names must be in the 8.3 format (no more than
8 characters in the name, no more th an 3 chara cters
in the extension “.MP3”) a nd in c ap ital letters.
Folder names can be no longer than 8 characters.
There can be no more than 8 nested folder levels.
Level 2 specifications allow fil e name s a nd f olde r
names up to 31 characters long. Each folder can
have up to 8 trees.
For Joliet or Romeo in the expansi on f or ma t make
sure of the contents of the writing softwar e , etc.
**Mult i Se ssion
This is a recording method that enables adding of
data using the Track-At-Once me thod.
Conventional CDs begin at a CD control area called
the Lead-in and end at an area called Lead-out. A
Multi Session CD is a CD having multiple sessions,
with each segment from Lead-in to Le ad -o u t
regarded as a single session.
CD-Extra: This format recor ds a udio (audio CD
data) on the tracks in session 1 and data on the tracks
in session 2.
Mixed CD: This format records data on the first
track and audio (audio CD data) on the se con d and
subsequent tracks of a session.
continued
GB
5
Page 6

Notes on CD-R and CD-RW
• Some CD-Rs or CD-RWs cannot be pl ayed
on this system depending upon the reco rd in g
quality or physical condition of the disc, or
the characteristics of the recording device.
Furthermore, the disc will not play if it has not
been correctly finalized. For more
information, see the opera ting instructions f or
the recording device.
• Discs recorded on CD-R/CD-RW drive s may
not be played ba ck be ca us e of sc ra tche s, d irt ,
recording condition or the driver’s
characteristics.
• CD-R and CD-RW discs recorded in multisession that have no t en ded by “closing the
session” are not supported.
• The system ma y be unable to play MP3
format files tha t d o not have the extensio n
“.MP3”.
• Attempting to play non-MP 3 format f iles tha t
have the extension “.MP3” may result in noise
or malfunction.
• With formats other than ISO 9660 Level 1 and
2, folder names or file names may not be
displayed correctly .
• The following discs take a longer time to start
playback.
– a disc recorded with complicated tree
structure.
– a disc recorded in Multi Session.
– a disc to which dat a can be added (non-
finalized disc).
Music discs encoded with
copyright pro tection
technologies
This product is designed to playback discs that
conform to the Compact Disc (CD) standard.
Recently, various music discs encoded with
copyright protect io n t echnologies are marketed
by some record compani es. Plea se be awar e that
among those discs, there are some that do not
conform to the CD standard and may not be
playable by this prod uct.
Cautions when play in g a disc
that is recorded in Multi
Session
• If the disc begins with a CD-DA session, it is
recognized as a CD- D A (audio) disc, and
MP3 sessions are pl ayed back without sou nd.
• If the disc begins with an MP3 session, it is
recognized as an MP3 disc, and CD-DA
sessions are play ed back without soun d.
• The playback ra nge of an MP3 disc is
determined by the tree structure of files
produced by analyzi ng of the disc.
• A disc with a mixed CD format will be
recognized as a CD- D A (audio) disc.
GB
6
Page 7

Getting Started
Hooking up the system
Perform the following procedures 1 to 4 to hook up your system using the sup plied cords and
accessories.
Getting Started
AM loop antenna
Right speaker
1 Connect the speakers.
Connect the right and left speaker cords to
the SPEAKER terminals as shown below.
3
L
#
FM lead antenna
Left speaker
2
3
1
4
2 Connect the FM and AM antennas.
Set up the AM loop antenna, then connect
it.
Gray (3)
Plug type A
Insert this portion
#
R
3
IMPEDANCE
USE 6-16Ω
Black (#)
Extend the FM lead
antenna horizontally
AM loop antenna
continued
GB
7
Page 8
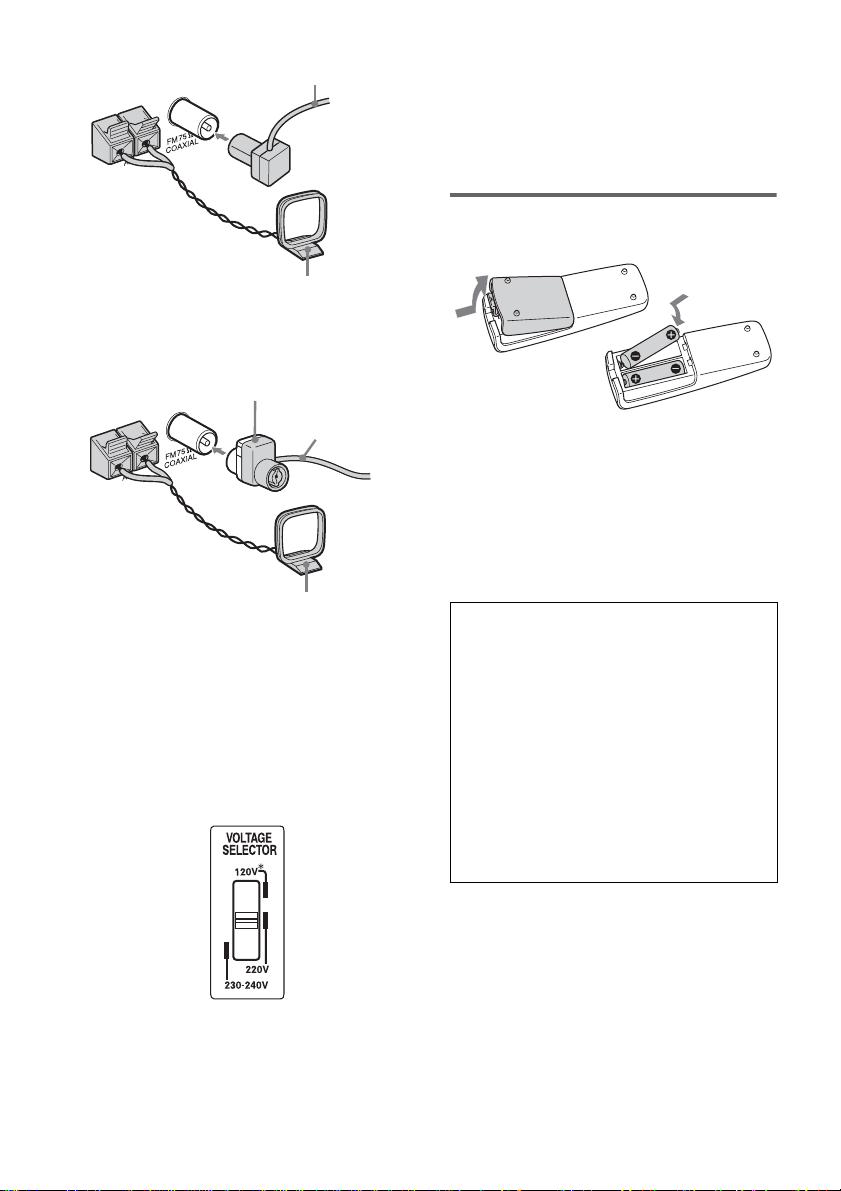
Plug type B
Extend the FM lead antenna horizontally
AM loop antenna
Plug type C
North American models:
Connect using the white side
Other models:
Connect using the brown side
Extend the FM lead
antenna horizontally
AM loop antenna
Note
To prevent noise pickup, keep the antennas away from
the system and other components.
3 For models with a voltage selector, set
VOLTAGE SELEC T OR to the lo cal
power line voltage.
Refer to the print on your system’s
VOLTAGE SELECTOR for available
settings.
4 Connect the power cord to a wall
outlet.
If the plug does not fit the wall socket,
detach the supplied plug adaptor (only for
models equipped w ith an adaptor).
To turn on the system , press ?/1.
Inserting two R6 (size AA)
batteries into the remote
Note
If you do not use the remote for a long period of time,
remove the batteries to avoid possible damage from
battery leakage and corrosion.
Tip
When the remote no longer operates the system,
replace both batteries with new ones.
When carrying this system
Perform the fo llow i ng procedure to prote ct
the CD mechanism.
1 Switch the function to CD.
2 Make sure that all discs are removed
from the system.
3 While holding down EX-CHANGE, press
?/1.
Check that “PLEASE WAIT” then “LOCK” is
displayed.
4 Unplug the power cord.
* Saudi Arabian Model: 120 – 127 V
GB
8
Page 9

Setting the clock
Use buttons on the remote for the operation.
1 Press ?/1 to turn on the system.
2 Press CLOCK/TIMER SET.
3 Press ./> repeatedly to set the
hour.
4 Press ENTER.
5 Press ./> repeatedly to set the
minute.
6 Press ENTER.
The clock starts working.
To adjust the clock
1 Press CLOCK/TIMER SET.
2 Press ./> until “CLOCK SET”
appears, then press ENTER.
3 Do the same procedures as step 3 to 6
above.
Note
The clock is not displayed in Power Saving M ode
(page 22).
Getting Started
GB
9
Page 10
CD/MP3 – Play
Loading a disc
Use buttons on the unit for the operation.
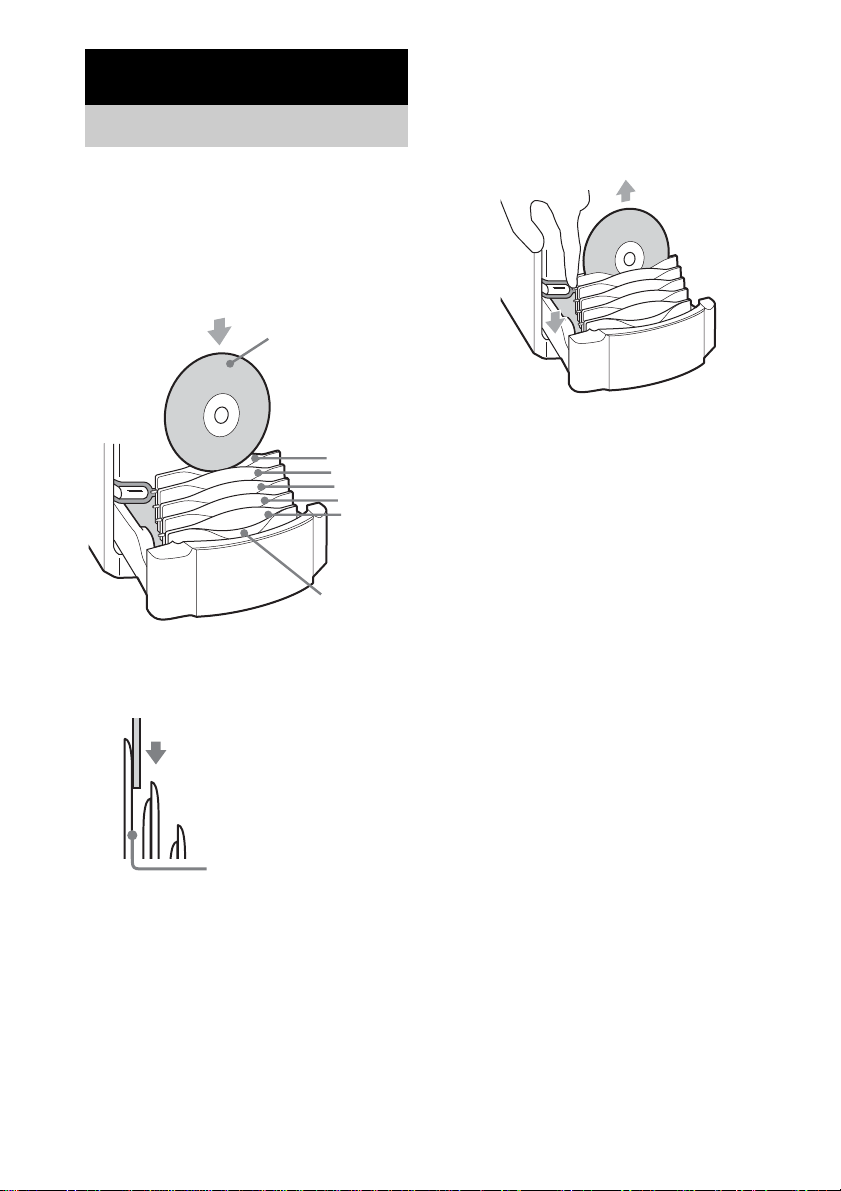
1 Press Z.
2 Insert discs with the label side facing
forward.
Check that the leve r on the left side of the
respective slot raises.
When you play a disc,
insert it with the label
side forward.
To remove discs
1 Press Z.
2 Hold down the lever on the left side of
the respective slot to elevate the disc,
then lift it out with your other hand.
DISC 1 – 5 slot
(for 12 cm d is c onl y )
DISC 1
DISC 2
DISC 3
DISC 4
DISC 5
DISC +1 slot
(for 8 cm di sc only)
To load an 8 cm disc, in sert only DISC +1
slot. You c annot st ore an 8 cm disc in a ny of
DISC 1 – 5 slot.
Place the disc so that it is
flush with the gray side of the
slot, then insert it vertically.
3 Press Z.
To exchange discs during
playback
1 Press EX-CHANGE during playback.
2 Remove and insert discs in any slot
except that of the currently playing
disc.
Notes
• Do not place anything (such as the remote or cords)
in front of the disc tray. When opening the disc tray,
it may catch and cause malfunct ion.
• You cannot store 8 cm discs in the DISC 1 – 5 slots.
For instructions on how to remove these discs, see
page 27.
• Do not use a disc with tape, seals or paste on it as this
may cause malfunction.
• Do not use a non-standard shape disc.
• Do not load an 8 cm disc with an adaptor. Doing so
may cause the system to mal f u nction.
• When you eject a disc, handle the disc by its edge. Do
not touch the surface.
• When using the EX-CHANGE function, be sure that
you do not insert a disc in the slot of the current
playing disc. If you do, “CHECK” and the respective
disc number will be displayed a lte r na te ly. This may
cause malfunction.
10
GB
Page 11

Playing a disc
— Normal Play/Shuffle Play
You can play audio CDs and discs with MP3
audio tracks.
Current disc
Track number
Playing timeLoaded discs
1 Press CD (or FUNCTION repeatedly)
until “CD” appears.
2 Press PLAY MODE in stop mode
repeatedly until the mode you want
appears in the display.
Select To play
ALL DISCS
(Normal Play)
1 DISC
(Normal Play)
ALBM
(Normal Play)
ALL DISCS
SHUF (Shuffle
Play)
1 DISC SHUF
(Shuffle Play)
ALBM SHUF
(Shuffle Play)
PGM
(Program Play)
All discs in the system
continuously.
The tracks on the disc you
have selected in original
order.
All MP3 audio tracks in the
album on the disc you have
selected in original order.
When playing a non-MP3
disc, Album Play becomes 1
DISC Play.
The tracks on all discs in
random order.
The tracks on the disc you
have selected in random
order.
The MP3 audio track s in t he
album on the disc you have
selected in random order.
When playing a non-MP3
disc, Album Shuffle Play
becomes 1 DISC SHUF
Play.
The tracks on all discs in the
order you want them to be
played (see “Creating your
own program” on page 13).
3 Press N on the remote (or CD/NX on
the unit).
Other operations
To Do this
Stop play Press x.
Pause Press X. Press again to resume
Select a track Press ./> repeatedly.
Select an album
1)
of MP3
Find a point in a
2)
track
Select a disc in
stop mode
Switch to CD
function from
another source
Exchange discs Press EX-CHANGE on the unit.
Remove a disc Press Z on the unit.
1) You may not be able to search between multiple
files. Also, the time may not be displayed correctly
for some files.
2) exce pt f or MP3 audi o tr acks
3) DISC 1 – 5 and DISC +1 on the unit a re not
available when “ALL DISCS SHUF” is selecte d.
play.
Press ALBUM +/– repeatedly
after step 2 .
Keep pressing m/M during
playback and release it at the
desired point.
Press DISC SKIP repeatedly (or
any one of the buttons (DISC 1 – 5
and DISC +1
Press any one of the buttons
(DISC 1 – 5 and DISC +1 on the
unit) (Automatic Source
Selection).
3)
on the unit)).
CD/MP3 – Play
continued
11
GB
Page 12

Notes
• You cannot change the play mode during playback.
• Some time may be needed to start playback of discs
recorded in complex configurations such as many
layers.
• When the disc is inserted, the p layer reads all the
audio tracks on that disc. If there are many albums or
non-MP3 audio tracks on the disc, it may take a long
time for play to begin or for the next MP3 audio track
to start play.
• Do not save unnecessary albums or audio tracks
other than MP3 ones in the disc to be use d fo r MP3
listening. We recommend that you do not save other
types of audio tracks or unnecessary albums on a disc
that has MP3 audio tracks.
• An album that does not include an MP3 audio tra c k
is skipped.
• Maximum album number: 150 (including root album
and empty albums)
• The maximum number of MP3 audio tracks and
albums that can be contained on a single dis c is 300.
• Playback is possible up to 8 trees.
• Depending on the encoding/writing software,
recording device or the recordin g media used at the
time an MP3 audio track is recorded, you may
encounter such problems as disabled playback,
sound interruptions a nd noise.
• When playing back an MP3 audio track, the playback
elapsed time indicati o n may differ from the actual
time in the following cases.
– When you play back a VBR (variable bit rate)
MP3 audio track
– When you perform Fast Forward or Rewind
(Manual Search)
Tip
When disc access takes a long time, set “CD POWER”
and “ON” by CD power manage function (page 15).
Playing repeatedly
— Repeat Play
You can pl ay a ll th e tr ac ks o r a si ng le t ra ck o n a
disc repeatedly.
Press REPEAT repeatedly during playback
until “REP” or “REP 1” appears.
REP: For all tracks on th e disc(s) up to five
times.
REP 1: For a single track only.
To cancel Repeat Play
Press REPEAT repeatedly until both “ REP” and
“REP 1” disappear .
Note
• You cannot select “REP” and “ALL DISCS SHUF”
at the same time.
• When you select “REP 1”, that track is repeated
endlessly until “REP 1” is canceled.
12
GB
Page 13

Creating your own program
— Program Play
You can make a program of up to 25 steps from
all the discs in the or der you want to play t hem .
You can synchro record the program ed tracks
onto a cassett e t ape (page 18).
Use buttons on the remote for the operation.
1 Press CD (or FUNCTION repeatedly)
until “CD” appears.
2 Press PLAY MODE in stop mode
repeatedly until “PGM” appears.
3 Press DISC SKIP repeatedly (or press
one of the disc buttons (DISC 1 – 5 and
DISC +1) on the unit) to select a disc.
To program all the tracks on a disc at once,
proceed to step 5 with “A L” displayed.
4 Press ./> repeatedly until the
desired track number appears.
When programing an MP3, press ALBUM
+/– to select an album, then press ./
> repeatedly until the desired track
number appears.
Selected track number
6 Program additional discs or tracks.
To program Repeat steps
Other discs 3 and 5
Other tracks on th e
same disc
Other tracks on
other discs
4 and 5
3 to 5
7 Press N (or CD/NX on the unit).
Program Play star ts .
Other operations
To Do this
Cancel Program
Play
Clear a track from
the end
Tips
• The program you made remains after Program Play
finishes. To play the same program again, pr es s CD
(or FUNCTION on the unit repeatedly) unti l “CD”
appears, then press N (or CD/NX on the unit).
However, the program is cleared when you press Z
on the unit.
• “– –.– –” appears when the total CD program time
exceeds 100 minutes, or when you select a disc with
20 tracks or more, or when you select an MP3 audio
track.
Press PLAY MO DE in stop
mode repeatedly until “PGM”
disappears.
Press CLEAR in stop mode.
CD/MP3 – Play
Current disc
Total playing time
5 Press ENTER (or PLAY MODE on the
unit).
The track is programed.
The program step number appears,
followed by the total playing time.
13
GB
Page 14

Tuner
Presetting radio stations
You can preset up to 20 FM stations and 10 AM
stations. You can th en tune in any of those
stations simply by selecting the corresponding
preset number.
Automatic tuning preset
You can automatically tune in all of t he st ations
that can be receiv ed in your area and then st ore
the radio frequ ency of the desir ed stations.
1 Press TUNER/BAND repeatedly to
select “FM” or “AM”.
2 Press TUNING MODE repeatedly until
“AUTO” appears in the display.
3 Press +/– (or TUNING +/– on the unit).
The frequency changes as the system scans
for a station. Scanning stops automatically
when a station is tuned in. At that time,
“TUNED” and “STEREO” (for stereo
program only) appear.
If “TUNED” does not appear and the
scanning does not stop
Set the freque ncy of the desired r ad i o
station as described in steps 2 and 3 of
“Manual tuning preset” (page 14).
4 Press TUNER MEMORY.
A preset numbe r fl ashes. Perform st eps 5
and 6 while the preset number flashes.
Tip
Press TUNING MODE to stop scanning.
Manual tuning preset
You can manually tune in and store the radio
frequency of the desired stations.
1 Press TUNER/BAND repeatedly to
select “FM” or “AM”.
2 Press TUNING MODE repeatedly until
“AUTO” and “PRESET” disappear from
the display.
3 Press +/– (or TUNING +/– on the unit)
repeatedly to tune in the desired
station.
4 Press TUNER MEMORY.
5 Press +/– (or TUNING +/– on the unit)
repeatedly to select the desired preset
number.
6 Press TUNER MEMORY.
7 Repeat steps 3 through 6 to preset
other stations.
Other operations
To Do this
Tune in a station
with a weak signal
Set another station
to the existing
preset number
Follow the procedure described
in “Manual tuning preset”
(page 14).
After step 4, press +/– (or
TUNING +/– on the unit)
repeatedly to select the preset
number you want to store the
station.
14
Preset number
5 Press +/– (or TUNING +/– on the unit)
repeatedly to select the desired preset
number.
6 Press TUNER MEMORY.
7 Repeat steps 3 through 6 to preset
other stations.
GB
Page 15

To improve tuner reception
When tuner recept ion is poor, set CD player
power off by the CD po w er manage functio n.
CD power is factory set to on.
1 Press FUNCTION repeatedly to switch the
function to CD.
2 Press ?/1 to turn of f th e sy stem.
3 Press ?/1 on the unit while holding x on the
unit.
“CD POWER” and “OFF” appear.
To set the CD power on
Repeat the pr ocedur e above, and “ CD POWER”
and “ON” appear.
Notes
• When “CD POWER” and “OFF” are selected, CD
access time is increased.
• You cannot change the setting in Power Saving
Mode (page 22).
To change the AM tuning interval
(Except for European model)
The AM tuning interval is factory-preset to
9 kHz (or 10 kHz for some area s). To change the
AM tuning interval , tune into any AM station
first, then turn of f the power by pres sing ?/1 on
the unit. While holding TUNING +, press ?/1
on the unit. When you change the interval, all
AM preset stations are erased. To reset the
interval, repeat the above pr ocedure.
Note
You cannot change the AM tuning interval in the
Power Saving Mode (page 22).
Tips
• The preset stations are retained for about half a day
even if you disconnect the power cord or if a power
failure occurs.
• To improve the reception, adjust the supp lie d
antennas or connect an external antenna.
Listening to the radio
You can listen to a radio station either by
selecting a preset station, or by manually tuning
in the station.
Listening to a preset station
— Preset Tuning
Preset radio stations in the tuner’s memory first
(see “Presetting radio stat i ons” on page 14).
1 Press TUNER/BAND repeatedly to
select “FM” or “AM”.
2 Press TUNING MODE repeatedly until
“PRESET” appears in the display.
3 Press +/– (or TUNING +/– on the unit)
repeatedly to select the desired preset
station.
Listening to non-preset radio
station
— Manual Tuning
1 Press TUNER/BAND repeatedly to
select “FM” or “AM”.
2 Press TUNING MODE repeatedly until
“AUTO” and “PRESET” disappea r from
the display.
3 Press +/– (or TUNING +/– on the unit)
repeatedly to tune in the desired
station.
Tuner
continued
15
GB
Page 16

Tips
• To improve broadcast reception, adjust the supplied
antennas, or connect a commercially available
external antenna.
• When an FM stereo program has static noise, press
FM MODE until “MONO” appears. There will be no
stereo effect, but the reception will improve.
• Press TUNING MODE repeatedly until “AUTO”
appears in step 2 above, then press +/– (or TUNING
+/– on the unit). The frequency indication changes
and scanning stops when the system tunes in a station
(Automatic Tuning).
• To record the radio programs, use manual recording
(page 18).
Using the Radio Data System (RDS)
(European model only)
What is the Radio D at a
System?
Radio Data System (RDS) is a broadcasting
service that allows radio stations to send
additional information along wit h the regular
program signal. RDS is available only on FM
stations.*
Note
RDS may not work properly if the station you are tuned
in is not transmitting the RDS signal properly or if the
signal is weak.
* Not all FM stations provide RDS service, nor do they
provide the same types of services. If you are not
familiar with the RDS system, check with your local
radio stations for details on RDS services in your
area.
Receiving RDS broadcasts
Simply select a station from the FM band.
When you tune in a statio n t hat provides RDS
services, the station name appears i n the dis play.
To check the RDS information
Each time you press DISPLAY the display
changes cyclical l y as follows:
Station name* t Frequency t Clock display
t Bass le v el t Treble level
16
* If the RDS broadcast is not prope r ly rece ive d, the
station name may not appear in the display.
GB
Page 17

Tape – Play
Loading a tape
1 Slide the lid open with your hand.
2 Insert a tape.
With the side
you want to
play/record
facing up
To remove the tape, lift up the tape from the
side as shown in the ill ustration.
3 Slide the lid close with your hand.
Playing a tape
You can use TYPE I (normal).
1 Press TAPE (or FUNCTION repeatedly)
until “TAPE” appears.
2 Press N (or TAPE/N on the unit).
Other operations
To Do this
Stop play Press x.
Pause Press X. Press again to resume
Fast-forward or
rewind
Remove a tape Slide the lid open on the unit in
play.
Press m/M.
stop mode.
Tape – Play
17
GB
Page 18

Tape – Recording
Recording your favorite CD tracks on a tape
— CD-TAPE Synchro Recording
You can record a w hole CD on a tape.
You can use TYPE I ( nor mal).
Use buttons on the unit for the operation.
1 Load a recordable tape.
2 Load a CD you want to record.
When you want to record an album from an
MP3 disc, be sure to pre ss PLAY MODE to
select ALBM, then use ALBUM +/– to
select the desired album before proceeding.
3 Press CD SYNC.
“SYNC” and “REC” appear.
The tape deck stands by for recording and
the CD player pauses for playback .
4 Press X TAPE.
Recording star ts.
When the recording is completed, the CD
player and t he tap e de ck st op auto mat icall y.
To stop recording
Press x.
To record a disc by specifying
track order
You can record onl y your favorite CD trac ks
using Program Play. Betwe en steps 2 and 3,
perform steps 1 t o 4 of “Creating you r ow n
program” (page13).
Recording on a tape manually
— Manual Recording
You can record just the portions you like from a
CD on a tape. You can also record a radio
program.
Use buttons on the unit for the operation.
1 Load a recordable tape.
2 Select the desired source to record.
• TUNER: To record from this system’s
tuner.
• CD: To record from thi s system’s CD
player.
• MD/VIDEO: To record from the optio nal
component connected to the MD/VIDEO
jacks.
• WIRELESS (CMT-HPX10W only) : To
record from the op ti onal component
connected to the transmitter.
3 Press z REC.
“REC” appear s and th e tape deck stand s by
for recording.
4 Press X TAPE, then start playing the
desired source to record.
Recording starts.
Other operations
To Do this
Stop recording Press x.
Pause reco rding Press X TAPE.
Tip
For recording from a CD, you can press ./> to
select tracks during recording pause mode (after step 3
and before step 4).
18
GB
Page 19

Sound Adjustment
Timer
Adjusting the sound
You can adjust the bass a nd treble to enjoy more
powerful sound.
Generating a more dynamic
sound (Dynamic Sound
Generator X-tra)
Press DSGX on the unit.
To cancel the DSGX, pr ess DSGX on the unit
again.
Adjusting the bass and treble
You can adjust the bass and treble .
1 Press EQ to select “BASS” or
“TREBLE”.
Each time you press the button, the display
changes cycl i cally as follows:
BASS
y TREBLE
2 Press ./> repeatedly to adjust
the level while “BASS” or “TREBLE”
appears.
Falling asleep to music
—Sleep Timer
You can set the system to turn off after a certain
time, so that you can fall asleep to music.
Use buttons on the remote for the operation.
Press SLEEP repeatedly.
Each time you press the button, the minute
display (the turn-off ti me) change s cy clical ly as
follows:
AUTO* t 90MIN t 80MIN t … t
10MIN t SLEEP OFF
* The system automatically turns off in 100 minutes or
after the current CD or tape finishes playing.
Other operations
To Press
Check the
remaining time**
Change the time
to turn off
Cancel the Sleep
Timer function
**You cannot check the remaining time if you select
“AUTO”.
Tip
You can use Sleep Timer, even if you have not set the
clock.
SLEEP once.
SLEEP repeatedly to select the
time you want.
SLEEP repeatedly until “SLEEP
OFF” appears.
Tape – Recording/Sound Adjustment/Timer
19
GB
Page 20

Waking up to music
— Play Timer
You can wake up to music at a preset time. Make
sure you have set the cl ock (see “Setting the
clock” on page 9).
Use buttons on the r emote for the operati on.
1 Prepare the sound source you want to
play.
• CD: Load a disc. To start from a specific
track, make a program (see “Creating
your own program” on page 13).
• TAPE: Load a tape (see “Playing a tape”
on page 17).
• TUNER: Tune in a radio station (see
“Listening to the radio” on page 15).
2 Adjust the volume.
3 Press CLOCK/TIMER SET.
4 Press ./> repeatedly until “PLAY
SET” appears, then press ENTER.
“ON” appears an d t h e hour indication
flashes.
5 Set the time to start playing.
Press ./> repeatedly to set the hour,
then press ENTER.
The minute indication flashes.
Press
./> repeatedly to set the
minute, then press ENTER.
6 Set the time to stop playing following
the same procedure as step 5.
7 Press ./> repeatedly until the
desired sound source appears.
Each time you press the but to n, th e di sp lay
changes cycli cal l y as follows:
t
TUNER y CD PLAY
t
TAPE PLAY
T
T
Other operations
To Do this
Check the setting 1 Press CLOCK/TIMER
Change the setting Start over from step 1.
Cancel the timer
Notes
• If you use Play Timer and Sleep Timer at the same
time, Sleep Timer has priority.
• Do not operate the system from the time the system
turns on until the play starts (about 15 seconds before
the preset time).
• If the system is on about 15 seconds before the preset
time, Play Timer will not be act iva te d.
• You cannot use the optional component connected to
the MD/VIDEO ja cks or the transmitte r (C MT HPX10W only) as sound sources for Play Timer.
• You cannot activate Play Timer and Rec Timer
simultaneously.
SELECT.
2 Press ./> repeated ly
until “PLAY SEL” appears,
then press ENTER.
1 Press CLOCK/TIMER
SELECT.
2 Press ./> repeated ly
until “TIMER OFF” appears,
then press ENTER.
20
8 Press ENTER.
The start time, the stop time, and the sound
source appear in turn, then the original
display returns.
9 Press ?/1 to turn off the system.
GB
Page 21

Timer recording radio programs
—Rec Timer
To timer record, you must first preset the radio
station (see “Presetting radio stations” on
page 14) a nd s et the clock (see “Setting th e
clock” on page 9).
Use buttons on the remote for the operation.
1 Tune in the preset radio station (see
“Listening to a preset station” on
page 15).
2 Press CLOCK/TIMER SET.
3 Press ./> repeatedly until “REC”
appears, then press ENTER.
“ON” appears with a flashing hour
indication.
4 Set the time to start recording.
Press ./> repeatedly to set the hour,
then press ENTER.
The minute indication flashes.
Press
./> repeated ly to set the
minute, then press ENTER.
5 Set the time to stop recording following
the same procedure as step 4.
Rec Timer settings and the desired station
appear, then the original disp lay return s.
6 Load a recordable tape.
7 Press ?/1 to turn off the system.
Other operations
To Do this
Check the setting 1 Press CLOCK/TIMER
Change the setting Start over from step 1.
Cancel the timer
Notes
• If you use Rec Timer and Sleep Timer at the same
time, Sleep Timer has pri o r ity.
• Do not operate the system from the time the system
turns on until the recording starts (about 15 seconds
before the preset time).
• If the system is on about 15 seconds before the preset
time, Rec Timer will not be activated.
• The volume is reduced to minimum during
recording.
• You cann ot act iva te Pl ay Timer and R ec Tim e r
simultaneously.
SELECT.
2 Press ./> repeatedly
until “REC SEL” appears,
then press ENTER.
1 Press CLOCK/TIMER
SELECT.
2 Press ./> repeatedly
until “TIMER OFF” appears,
then press ENTER.
Timer
21
GB
Page 22

Display
Turning off the display
— Power Saving Mode
The clock display can be turned off to minimize
the amount of power consumed duri ng standby
(Power Saving Mode ).
Press DISPLAY repeatedly while the
system is off until the clock display
disappears.
To cancel Power Saving Mode
Press DISPLAY while the system is off. Each
time you press the button, the display switches
as follows:
Clock display* y No di splay (Power Saving
Mode)
* The clock is displayed only if y ou se t the cl oc k.
Tips
•The ?/1 indicator lights up even in Power Sa ving
Mode.
• The timer continues to operate in Power Saving
Mode.
Note
You cannot perform the following operations in Power
Saving Mode.
– setting the clock
– switching the MD/VIDEO function
– switching the CD power on or off using the CD
power manage function
– changing the AM tuning inte r va l
Viewing information about the disc in the display
You can check th e pl aying time and rema i ning
time of the current track or that of the disc.
When a disc with MP3 audio tracks is loaded,
you can also check the information recorded on
disc, such as the titles.
Checking the remaining t im e
and titles (CD /MP3)
Press DISPLAY repeatedly during
playback.
Each time you press t he button, the display
changes cyclical l y as follows:
Current track number and elapse d playing time
t Current track number and remaining time or
“– –.– –”* t Remaining time of the disc or
“– –.– –”*
tracks** only) t Album name* t Clock
display t Bass level t Treble level
* For discs with MP3 audio tracks
**When you play back a track with an ID3 tag, the ID3
Checking the t otal playing
time and titles (CD/MP3)
Press DISPLAY repeatedly in stop mode.
Each time you press t he button, the display
changes cyclical l y as follows:
TOC display* or total number of albums on the
disc** or total track number of the current
album** t Disc name** t Clock display t
Bass level t Treble level
* TOC = Table of Contents; displays total number of
**For discs with MP3 audio tracks, album titles may
t Track title (disc with MP3 audio
tag appears. The ID3 tag displays only the track title
information.
tracks on the disc and total playing time of the disc.
not be displayed depending on the play mode.
22
GB
Page 23

Optional Components
Hooking up optional components
To enhance your system, you can connect optional components. Refer to the operating in str uc tio n s
provided with each com ponent.
Optional analog component
From the audio output
jacks of an optional
analog component
Display/Optional Components
A MD/VIDEO jacks
Use audio cords (not supplied) to connect an
optional analog component (MD deck, etc.) to
these jacks. You can then listen to the sound
from the compone nt .
Listening to audio from a
connected component
1 Connect audio cords.
See the illustration above.
2 Press FUNCTION repeatedly until “MD” or
“VIDEO” appears.
Start playing the connected component.
Tip
If you cannot select “VIDEO” by pressi ng
FUNCTION repeatedly, turn off the system and then
press ?/1 on the unit while holding down FUNCTION
on the unit. The function will change from “MD” to
“VIDEO”, and “VIDEO” will appear in the display. To
change back to “MD”, repeat the same procedure.
However, you cannot switch the MD/VIDEO function
in Power Saving Mode.
23
GB
Page 24

Transmitter
(CMT-HPX10W only)
2 Connect the transmitter to a wall outlet
using the sup plied AC powe r ad a p t o r .
The transmitter automatically turns on.
Hooking up the transmitter
(North American model only)
1 Set the transmitter by the following
procedures.
Select either AUDIO IN A or AUDIO IN B
hook up depending on the jack type of the
optional component you want to connect
the transmitter to.
Transmitter
DC IN 9V
to AUDIO IN B
jack
Right
channel
(red)
to LINE OUT or
REC OUT jack
OFF ON
FILTERNOISE
Right
channel
(red)
AUDIO IN
Left
channel
(white)
RBAL
123
CHANNEL
to AUDIO IN A
jack
Left
channel
(white)
Connecting
cord (supplied)
Unimatch plug
adaptor (not
supplied)
to headphones
jack (stereo
phone jack) of
optional
components
Transmitter
to DC IN 9V jack
Notes
AC power adaptor
(supplied)
• The NOISE FILTER effects the sound only when
you connect an optional component to the AUDIO
IN A jacks of the transm itt er. Connecting to the
AUDIO IN B jack, the switch has no effect.
• When you connect the transmitter to the analog out
jacks, do not set the NOISE FILTER to ON.
Otherwise, the volume w ill be limited.
• If stereo mini jack is connected to LINE OUT and the
NOISE FILTER is set to ON, audio output will be
reduced and audio signal may be intermittent or auto
muting will activate. In this case, set the N O I SE
FILTER to OFF.
• While WIRELESS is selected as the func tion,
bumping the transmitter or the un it m ay prod uce
noise.
• Use only the supplied AC power adaptor. Do not use
any other AC power adaptor.
Polarity of the plug
• If the connected component has the AVLS
(Automatic Volume Limiter System) function, be
sure to turn off the function when using the
transmitter. Otherwis e, you will have to turn up the
volume of the speaker, and that may cause distortion.
• If the connected component has the BASS BOOST
or MEGA BASS function, be sure to turn off the
function when using the transmitte r . Othe rwi se , th e
sound from the speaker may be distor te d.
24
Optional
Components
(TV, VCR,
Personal
computer, etc.)
GB
Personal
computer, etc.
Page 25

Where to place the transmitter
Placing it up off the flo or, such as on a desk, is
recommended.
Notes
• Do not place the transmitter on or near the following
objects. Doing so may cause noise.
– Main unit, TV, speaker, fluorescent lamp, floor.
– Radio waves generated such as cell phone s and
cordless phone systems or metal instruments are
placed on the unit.
– Inside a building with walls containing steel
beams.
– Area with many steel file cabinets, et c.
– Area with many electrical appliances capable of
generating electromagnetic no is e.
– Area facing roadways.
– Radio transceivers in trucks, et c.
– Wireless communication systems installed along
roadways.
• Even within the signal rece ption area, there ar e some
spots (dead spot) where the RF signal cannot be
received. This is a charact eri stic inherent to RF
signals, and does not indicate a malfunction. By
slightly moving the trans mitter, the location of the
dead spot can be changed.
Hooking up the transmitter
(European model only)
You can use the wireless stere o headphone
system (MDR-RF820RK) as a transmitter by
hooking it up to an optional component.
For details on how t o ho ok up and place this
system, refer to the operating instructions of the
MDR-RF820RK.
To listen to audio using this system, see
“Listening to audio using the wireless system”
on page 25.
Notes
• To use the MDR-RF820RK as a wireless stereo
headphone system, use the connecting c ord to plug
the headphone system into the PHONES jack of the
main unit. For detail s, refer to the operating
instructions of the MDR-RF820RK.
• Turn down the volume on the main unit before
charging the batteries. When placing the wireless
headphones on the transmitter to charge the
headphone batteries, RF signals are not sent from the
transmitter and noise may be out put.
• The optimum distance between the transmitter unit
and the main unit is shorter than the distance between
the transmitter unit and the wirel es s headphones.
Listening to audio using the
wireless system
1 Start playing the connected
component.
2 Press FUNCTION repeatedly to switch
the function to WIRELESS.
(European model only)
Change the color of the CHG indicator on
the transmitter unit from green to red (or
remove the wireless headphones from the
transmitter).
3 Press +/– (or TUNING +/– on the unit).
“AUTO SCAN” appears.
If the system picks up some
noise or “AUTO SCAN” does not
disappear
• Reduce the distance between the transmitter
unit and the main unit.
• Select another channel using CHANNEL 1–3
on the transmitter, then press +/– (or
TUNING +/– on the unit). “AUTO SCAN”
appears.
Notes
• You may not hear the beginning of the sound from
the main unit until the transmitter starts sending th e
RF signals after detecting an au dio si gnal.
• If the transmitter is connected to the headphones jack
of the source component, set the volume of that
component as high as possible without distorting the
audio signal.
• If you hold the ant e nna o f the transmitter with your
hand, noise may occur. However this is not a
malfunction.
• When the transmitter is not to be used for a long
period of time, disconnect the AC power adaptor
from the wall outlet holding the plug. Do not pull on
the cord.
Optional Components
25
GB
Page 26

Troubleshooting
Problems and remedies
Should you encounter a problem with your
system, do the following:
1 Make sure the power cord and speaker
cords are correctly and firmly connected.
2 Find your problem in the troubleshooting
checklist below and take the indicated
corrective action.
If the problem persists after doing all of the
above, consult yo ur nearest Sony dealer.
When the ?/1 indicator flashes
Immediately unplug the power cord and
check the follow i ng i tems.
• If your system has a voltage selector, is the
voltage selector set to the correct voltage?
Check the voltage for your region, then
make sure the voltage selector is set
correctly.
• Are the + and – speaker cords shor tcircuited?
• Are you using th e supplied speaker s ?
• Is anything blockin g th e ventilation holes
on the rear of the system?
Check all the above items and fix any
problems found. A ft er ?/1 indicator stops
flashing, reconnect the power cord and turn
on the system. If the in dicato r stil l fla shes, o r
if the cause of the prob lem cannot be found
even after checki ng all the above items,
consult your neares t So ny dealer.
General
“CANT LOCK” appears.
• Turn the power off and then on again by pressing
?/1 on the system, then perform “When carrying
this system” (page 8). If “CANT LOCK” still
appears, contact your Sony dealer or loca l
authorized Sony servic e faci lity.
“– –:– –” appears in the displa y.
• A power interr uption has occurred. Set the clock
(page 9) and timer settin gs (p ag es 20 and 21 )
again.
There is no sound.
• Press VOLUME + on the remote repeatedly (or
turn VOLUME on the unit clockwise).
• Make sure the headphones are not connected.
• Check the speaker connections (page 7).
Sound comes from one channel, or
unbalanced left and right volume.
• Place the speakers as symmetrically as possible.
• Connect the supplied speakers.
There is severe hum or noise.
• Move the system away from the source of noise.
• Connec t the system to a different wall outlet.
• Install a noise filter (commerci a lly a v a ila ble) to
the power line.
The timer cannot be set.
• Set the clock again (page9).
The timer does not function.
• Press CLOCK/TIMER SELECT on the remote to
set the timer and light up “
in the display (pages 20 and 21).
• Check the timer setting and set the correct time
(pages 20 and 21).
• Cancel the Sleep Timer function (page 19).
• Make sure the clock is correctly set.
The color on the TV screen is irregular.
• Move the speakers farther away from the TV set.
The remote does not function.
• Remove the obstacle.
• Move th e r e mote closer to the syste m.
• Point the remote at the system’s sensor.
• Replace the batteries (R6/size AA).
• Locate the system away from the fluo rescent ligh t.
c PLAY” or “c REC”
Speakers
Sound comes from one channel, or the left
and right volumes are unbalanced.
• Check the speaker connections and placement.
CD/MP3 player
“LOCKED” appears.
• Contact your Sony dealer or local authorized Sony
service facility.
26
GB
Page 27

Play does not start.
• Eject the disc and check whether a disc is loaded.
• Wipe the disc clean (page30).
• Replace the disc.
• Load the disc that this system can play (page 5).
• Load the disc co rre c tly.
• Load the disc with the label side up.
• Remove the disc and wipe away the moisture on
the disc, then leave the system turned on for a few
hours until the moisture evapora te s.
•Press N (or CD/NX on the unit) to start play.
Disc access takes a long time.
• Set “CD POWER” and “ON” by the CD power
manage function (page 15).
The sound skips.
• Wipe the disc clean (page30).
• Replace the disc.
• Try moving the sys te m to a pla ce without
vibration (e.g., on top of a stable stand) .
• Try moving the speakers away fr om the system, or
placing them on separate stands. When you listen
to a track with bass sounds at high volume, the
speaker vibration may cause the sound to skip.
Play does not start from the first track.
• Press PLAY MODE repeatedly until both “PGM”
and “SHUF” disappear to return to Normal Play .
MP3 audio track cannot be played back.
• Recording was not performed according to the
ISO 9660 Level 1 or Level 2 format, or Joliet in
the expansion format.
• The MP3 audio track does not have the extension
“.MP3”.
• The data is not stored in MP3 format.
• Discs contai ning tracks other than MPEG1, 2
Audio Layer-3 files cannot be played.
MP3 audio tracks take longer to pl ay back than
others.
• After the system r eads all trac k s on the discs,
playback may take more time th an usual if:
– the number of albums or tracks on the disc is
very large.
– the album and track organization structure is
very complex.
The album title, track title and ID3 tag do not
appear correctly.
• Use a disc that confor m s with ISO 9660 Level 1,
level 2, or Joliet in the expansion forma t.
You inserted an 8 cm disc in the DISC 1–5
slots.
• Unplug the power cord. Lift the main unit and
remove the disc from underneath the tr ay.
(However, do n ot lif t the tray during this
procedure.) Plug in the power cord once more.
Tuner
Severe hum or noise/stations cannot be
received.
• Set the pr ope r band and freq uen cy (page 14).
• Conn ect the antenna properly (page 7).
• Find a place and an orientation that provide good
reception, then set up the a nte nna a gai n. If you
cannot obtain good reception, we recommend you
connect a commercially av ailable external
antenna.
• The supplied FM lead antenna receives signals
along its entire length, so make sure you extend it
fully.
• Ke e p the antennas away from the system and
other components.
• Cons ult your nearest Sony dealer if the supplie d
AM antenna has come off the plastic stand.
• Try turning off surrounding electrical equipment.
• Set “CD POWER” and “OFF” by the CD power
manage function (page 15).
A stereo FM program cannot be received in
stereo.
• Press FM MODE until “MONO” disappears in the
display.
Tape deck
The tape does not record or play, or there is a
decrease in sound level.
• The heads are dirty. Clean them (page 31).
• The record/playback heads are magne tized.
Demagnetize them (page31).
The tape does not erase completely.
• The record/playback heads are magne tized.
Demagnetize them (page31).
There is excessive wow or flutter, or the sound
drops out.
• The capstans in the tape deck are dirty. Clean
them using a cleaning cassette (page31).
Troubleshooting
continued
27
GB
Page 28

Noise increases or the high frequencies are
erased.
• The record/playback heads are magnetized.
Demagnetize them (page31).
The tape does not record.
• No ca s s e tte is loaded. L o ad a cassette.
• The tab has be en removed from the cassette.
Cover the broken tab with adhesive tape
(page 31).
• The tape has wound to the end.
Optional components
There is no sound.
• Refer to General item “There is no sound.”
(page 26) and check the condit io n of the sy s tem.
• Connect the component properly (page 23) while
checking if:
– the cords are connected properly.
– the cord plugs are firmly inserted all the way.
• Turn on the connected component.
• Refer to the ope r ating instructions supplied with
the connected component and sta r t pla ying.
• Press FUNCTION repeatedly until “MD” or
“VIDEO” appears (page 23).
The sound is distorted.
• Set the volume of the connected component
lower.
Transmitter (CMT-HPX10W only)
There is no sound.
• Check the connection of the optional component.
• Check tha t the optional component is turned on.
• Turn up the volume on the connected optional
component, if the transm itt er is c onne cted to the
headphones jack.
• Change the radio frequency using the CHANNEL
selector on the transm itter, then press +/– (or
TUNING +/– on the unit) again.
• Reduc e the distance between the tr ansmitter unit
and the main unit.
• If you connect the trans mitter to the analog out
jacks of an audio reproducer, make sure that the
NOISE FILTER switch is set to OFF.
• Make sure that the NOISE FILTER switch is set
to either ON or OFF (If the switch gets stuck
between ON and OFF, the sound will be cut off).
• The headphon es of the MDR - RF820RK are
placed on the transmitter. Tilt the headphones and
make sure the CHG indicator lig hts up in red, or
remove the headphones from the transmitter.
(European model only)
There is severe hum or noise.
• If the transmitter is connected to the headphones
jack, turn down the volume of the connected
optional component. If the connected opti ona l
component has the BASS BOOST or MEGA
BASS function, set these function to OFF.
• If the connected optional component has a LINE
OUT jacks, connect its LINE OUT jacks.
• Change the radio frequency using the CHANNEL
selector on the transmitter, then press +/– (or
TUNING +/– on the unit) again.
• Reduce the distance between the transmitter unit
and the main unit.
• If you connect the transmitter to the an alog out
jacks of an audio reproducer, make sure that the
NOISE FILTER switch is set to OFF.
• Make sure that the transmitter is not placed on a
speaker or any place subject to vibration.
• The headphones of the MDR-RF820RK are
placed on the transmitter. Tilt the headphones and
make sure the CHG indicator lights up in red, or
remove the headphones from the transmitter.
(European model only)
If the system still does not
operate properly after performing
the above measures, reset the
system as follows:
Use buttons on the unit for the operation.
1 Disconnect the power cord.
2 Reconnect the power cord.
3 Press ?/1 to turn on the system.
4 Press x, PLAY MODE/TUNING MODE and
?/1 at the same time.
The system is reset to the factory settings. You
should set the settings you made, such as the
preset stations, clock, and timer.
28
GB
Page 29

Messages
One of the follow i n g me ssages may appear or
flash in the display during operation .
CD/MP3
NO DISC
There is no disc in the player.
NO STEP
All of the programed tracks have been erased.
CD OVER
You have reached the end of the disc while pressing
and holding M during playback or pa use .
CHECK DISC
You have inserted a disc in the slot of the currently
playing disc.
STEP FULL
You tried to program 26 or more tracks (steps).
PUSH STOP
You pressed PLAY MODE during playback.
Tuner
COMPLETE
The preset operation ended normally.
SET CLOCK
You tried to select the timer with the cl ock not set.
Wireless (CMT-HPX10W only)
AUTO SCAN
You can adjust the settings so that you hear clear
audio sound.
Other
NOT IN USE
You pressed an invalid button.
Troubleshooting
Tape
NO TAB
You cannot record the tape because the tab has been
removed from the cassette.
NO TAPE
There is no tape in the tape deck .
Timer
SET TIMER
You cannot select the timer function when Play
Timer or Rec Timer are not set.
TIME NG
Play Timer or Rec Ti mer start and end ti mes are set
to the same time.
PUSH SELECT
You tried to set the clock or time r dur ing timer
operation.
29
GB
Page 30

Additional Information
Precautions
On operating voltage
• Before operating the system, check that the operating
voltage of your system is identical with the voltage of
your local power supply.
• The voltage selector is located at the bottom of the
apparatus.
On safety
• The unit is not disconnected from the AC power
source (mains) as long as it is connected to the wall
outlet, even if th e unit itself has been turne d of f.
• Unplug the system from the wall outlet (mains) if it
is not to be used for an extended period of time. To
disconnect the power cord (mains lead), pull it out by
the plug. Never pull the cord itself.
• Should any solid object or liquid fall into the system,
unplug the system and have it checked by qualified
personnel before operating it any further.
• AC power cord must be changed only at the qualified
service shop.
On placement
• Do not place the system in an inclined position.
• Do not place the system in loca tions where it is;
– Extremely hot or cold
– Dusty or dirty
– Very humid
– Subject to vibrations
– Subject to direct sunlight
• Use caution when placing the unit or speakers on
surfaces that have been specially treated (with wax,
oil, polish, etc.) as staining or discoloration of the
surface may result.
On heat buildup
• Although the system heats up during operation, this
is not a malfunction.
• Place the system in a location with adequate
ventilation to prevent hea t build-up in the system.
• If you continuously use this system at a high volume,
the cabinet temperature of the top, side and bottom
rises considerably. To avoid burning yourself, do not
touch the cabinet.
• To prevent a malfunction, do not cover the
ventilation hole.
On operation
• If the system is brought directly from a cold to a
warm location, or is placed in a very damp room,
moisture may condense on the lens inside the CD
player. Should this occur, the system will not operate
properly. Remove the disc and leave the system
turned on for about an hour until the moisture
evaporates.
• When you move the syste m, take out any disc.
If you have any questions or problems concerning your
system, please consult your near es t Son y dea l er.
Notes on discs
• Before playing, clean the disc with a cleaning cloth.
Wipe the disc from the center out.
• Do not use solvents such as benzene, thinner,
commercially available cleaners or anti-static spray
intended for vinyl LPs.
• Do not expose the disc to direct sunlight or heat
sources such as hot air ducts, nor leave it in a car
parked in direct sunlight.
• Do not use discs en circled with a protection ring.
This may cause a malfunction to th e system.
• When using discs that have glue or similar tacky
substance on the label side of the disc or that used a
special ink when th e labe l was printed, there is a
chance that the disc or label may become attached to
parts inside this unit. When this occurs, it may not be
possible to remove th e d is c, and may also cause this
unit to malfunctio n. B e sur e to check that the label
side of the disc is not sticky before u sing.
The following types of disc should not be used:
– Rental or used discs with attach ed seal s where the
glue extends beyond the seal. The perimeter of the
seal on the disc is tacky.
– Discs that have labels printed using a special ink
that feels tacky when touched.
• Discs with non-standard shapes (e.g., heart, square,
star) cannot be played on this unit. Attempting to do
so may damage the unit. Do not use such discs.
Cleaning the cabinet
Clean the cabinet, panel and controls with a soft cloth
slightly moistened with mild detergent solution. Do not
use any type of abrasive pad, scouring powder or
solvent such as thinner, benzene or alcohol.
30
GB
Page 31

To save a tape permanently
To prevent a tape from being accidentally re corde d
over, break off the cassette tab from side A or B as
illustrated.
Break off the
cassette tab
If you later want to reuse the tape for recording, cover
the broken tab with adhesive tape.
Before placing a cassette in the tape
deck
Take up any slack in the tape. Otherwise, the tape may
get entangled in the parts of the tape deck and become
damaged.
When using a tape longer than
90 minutes
The tape is very elastic. Do not change the tape
operations such as play, stop, and fast-wind ing
frequently. The tape may get entangled in the tape
deck.
Cleaning the tape heads
Clean the tape heads after every 10 hour s of use . Be
sure to clean the tape heads before you start an
important recording or after playing an old tape. Use a
separately sold dry-type or wet-type cleaning cassette.
For details, refer to the ins tr u c tions of the cleaning
cassette.
Demagnetizing the tape heads
Demagnetize the tape head s a nd the me ta l parts that
have contact with the tape after every 20 to 30 hours of
use with a separately sold demagnetizing cassette. For
details, refer to the instructions of the demagnetizing
cassette.
Specifications
Main unit (HCD-HPX10W/HCD-HPX9/
HCD-HPX7)
Amplifier section
For the United States model
AUDIO POWER SPECIFICATIONS
HCD-HPX10W
POWER OUTPUT AND TOTAL HARMONIC
DISTORTION:
With 6-ohm loads, both channels driven, from
120 – 10,000 Hz: rated 55 watts per channel
minimum RMS power, with no more than 10%
total harmonic distortion from 250 milliwatts to
rated output.
HCD-HPX9
POWER OUTPUT AND TOTAL HARMONIC
DISTORTION:
With 6-ohm loads, both channels driven, from
120 – 10,000 Hz: rated 75 watts per channel
minimum RMS power, with no more than 10%
total harmonic distortion from 250 milliwatts to
rated output.
HCD-HPX10W for CMT-HPX10W
DIN power output (rated): 50 + 50 W
(6 ohms at 1 kHz, DIN)
Continuous RMS power output (reference) :
60 + 60 W
(6 ohms at 1 kHz, 10%
THD)
Music power output (reference):
100 + 100 W
HCD-HPX9 for CMT-HPX9
North American model:
Continuous RMS power output (reference) :
80 + 80 W
(6 ohms at 1 kHz, 10%
THD)
Other models:
The following measured at AC 240 V, AC 220 V or AC
120 V
DIN power output (rated): 53 + 53 W
(6 ohms at 1 kHz, DIN)
Continuous RMS power output (reference) :
70 + 70 W
(6 ohms at 1 kHz, 10%
THD)
Additional Information
continued
31
GB
Page 32

HCD-HPX7 for CMT-HPX7
European model:
DIN power output (rated): 50 + 50 W
(6 ohms at 1 kHz, DIN)
Continuous RMS power output (refer en ce):
60 + 60 W
(6 ohms at 1 kHz, 10%
THD)
Music power output (reference):
100 + 100 W
Other models:
The following measured at AC 240 V, AC 220 V or AC
120 V
DIN power output (rated): 45 + 45 W
(6 ohms at 1 kHz, DIN)
Continuous RMS power output (refer en ce):
50 + 50 W
(6 ohms at 1 kHz, 10%
THD)
Inputs
MD/VIDEO: Sensitivity 450/250 mV,
impedance 47 kilohms
Outputs
PHONES: Accepts headphones with
an impedance of 8 ohms or
more.
SPEAKER: Accepts impedance of 6 to
16 ohms.
CD player section
Laser Semiconductor laser
(λ=780 nm)
Emission duration:
continuous
Frequency response 20 Hz – 20 kHz
Tape deck section
Recording system 4-track 2-channel, stereo
Frequency response 50 – 13,000 Hz (±3 dB),
using Sony TYPE I
cassettes
Wow and flutter ±0.15% W. Peak (IEC)
0.1% W. RMS (NAB)
±0.2% W. Peak (DIN)
Tuner section
FM stereo, FM/AM superheterodyne tuner
FM tuner section
Tuning range 87.5 – 108.0 MHz
Antenna FM lead antenna
Antenna terminals 75 ohms unbalanced
Intermediate frequency 10.7 MHz
AM tuner section
Tuning range
Pan-American model: 530 – 1,710 kHz
(with the tuning interval
set at 10 kHz)
531 – 1,710 kHz
(with the tuning interval
set at 9 kHz)
European model: 531 – 1,602 kHz
(with the tuning interval
set at 9 kHz)
Other models: 530 – 1,710 kHz
(with the tuning interval
set at 10 kHz)
531 – 1,602 kHz
(with the tuning interval
set at 9 kHz)
Antenna AM loop antenna, external
antenna terminal
Intermediate frequency 450 kHz
Speaker (SS-CHPX10W/SS-CHPX9/SSCHPX7)
SS-CHPX10W for CMT-HPX10W
Speaker system 3-way, bass-reflex type
Speaker units
Super tweeter: 2 cm dia., cone type
Woofer: 12 cm dia., cone type
Tweeter: 4 cm dia., cone type
Nominal impedance 6 ohms
Dimensions (w/h/d) Approx. 170 × 300 × 208
mm
Mass Approx. 2.7 kg net per
speaker
SS-CHPX9 for CMT-HPX9
Speaker system 3-way, bass-reflex type
Speaker units
Super tweeter: 2 cm dia., cone type
Woofer: 12 cm dia., cone type
Tweeter: 4 cm dia., cone type
Nominal impedance 6 ohms
Dimensions (w/h/d) Approx. 170 × 300 × 208
mm
Mass Approx. 2.7 kg net per
speaker
SS-CHPX7 for CMT-HPX7
Speaker system 2-way, bass-reflex type
Speaker units
Woofer: 11 cm dia., cone type
Tweeter: 4 cm dia., cone type
Nominal impedance 6 ohms
Dimensions (w/h/d) Approx. 155 × 270 × 182
mm
32
GB
Page 33

Mass Approx. 2.2 kg net per
speaker
For European model: 0.25 W (in Power Saving
Mode)
Transmitter (for CMT-HPX10W)
North American model
Carrier frequency 913.6 – 914.4 MHz
Channel
CHANNEL 1: 913.6 MHz
CHANNEL 2: 914.0 MHz
CHANNEL 3: 914.4 MHz
Modulation FM stereo
Power source
North American model: DC 9 V: supplied AC
power adaptor
(AC-GSX100)
Audio input phono jacks/stereo mini
jack
Dimensions (w/h/d) Approx. 137 × 106 × 103
mm
Mass Approx. 166 g
European model
See the specifications in the operating instructions for
the MDR-RF820 RK .
General
Power requirements
North American model: 120 V AC, 60 Hz
European model: 230 V AC, 50/60 Hz
Korean model: 220 V AC, 60 Hz
Australian model: 230 – 240 V AC, 50/60 Hz
Taiwanese model: 120 V AC, 50/60 Hz
Argentine model: 220 V AC, 50/60 Hz
Mexican model: 120 V AC, 60 Hz
Saudi Arabian model: 120 – 127/220 or 230 – 240
V AC, 50/60 Hz
Adjustable wit h v oltage
selector
Other models: 120 V, 220 V or 230 – 240
V AC, 50/60 Hz
Adjustable wit h v oltage
selector
Dimensions (w/h/d) Approx. 196 × 270 × 407
mm incl. projecting parts
and controls
Mass
HCD-HPX10W: Approx. 7.8 kg
HCD-HPX9: Approx. 8.1 kg
HCD-HPX7: Approx. 7.8 kg
Supplied accessories
North American model: Remote Commander (1)
R6 (size AA) batter ie s (2)
AM loop antenna (1)
FM lead antenna (1)
Transmitter
(CMT-HPX10W only) (1)
AC adapter
(CMT-HPX10W only) (1)
Connecting cord phono
plug-stereo mini plug
(1 m)
(CMT-HPX10W only) (1)
Other models: Remote Commande r (1 )
R6 (size AA) batter ie s (2)
AM loop antenna (1)
FM lead antenna (1)
Design and specifications are subject to change
without notice.
Additional Information
Power consumption
CMT-HPX10W
North American model: 110 W
Other models: 115 W
CMT-HPX9
North American model: 120 W
Other models: 105 W
CMT-HPX7
European model: 115 W
Other models: 90 W
33
GB
Page 34

List of button locations and reference pages
Illustrati
12 34
q
qhq
q
qgq
How to use this page
Use this page to find the location of butto ns and oth er
parts of the system that are mentioned in the text.
Main unit (CMT-HPX10W/CMT-HPX9)
ALPHABETICAL ORDER
A – O P – Z
ALBUM +/– ws (11, 13)
Cassette comp ar tment 4
CD SYNC qg (18)
DISC 1 – 5, +1 wf (11, 13)
DISC SKIP 5 (11, 13)
Disc tray qs (10)
Display window 3
DSGX 6 (19)
EX-CHANGE w; (10)
FM MODE qh (16, 27)
FUNCTION 9 (11, 13, 15, 17,
23)
PHONES jack qk
PLAY MODE qj (11, 13, 18)
Remote sensor 2
REPEAT qh (12)
TUNER/BAND 0 (14, 15)
TUNING +/– 8 (14, 15)
TUNING MODE qj (14, 15)
VOLUME 7 (20, 26)
on number
r
FM MODE qh (16, 27)
RR
Name of button/part Reference page
BUTTON DESCRIPTIONS
?/1 (power) 1 (8, 15, 20, 21,
28)
.m/M> (skip back/
skip forward, rewind/fast
forward) 8 (11, 13)
x wd (11, 15, 28)
X TAPE (pause) qd (17)
z REC qf (18)
CD/NX (play/pause) ql (11,
13, 27)
TAPE/N (play) wa (17)
Z (CD eject) qa (10, 11)
GB
34
+/1
5
wf
wd
ws
wa
w;
ql
x
lj JL
HS
6
7
8
9
A
0
qa
qs
zX
j
k
d
f
Page 35

Remote control
w
1
ALPHABETICAL ORDER
A – O P – Z
ALBUM +/– qs (11, 13)
CD qj (11, 13, 15)
CLEAR qf (13 )
CLOCK/TIMER SELECT 2
(20, 21, 26)
CLOCK/TIMER SET 3 (9, 20,
21)
DISC SKIP 0 (11, 13)
DISPLAY w; (16, 22)
ENTER 9 (9, 13, 20, 21)
EQ qd (19)
FM MODE 4 (16, 27)
FUNCTION 6 (11, 13, 15, 17,
23)
PLAY MODE ql (11, 13, 18)
REPEAT 4 (12)
SLEEP wa (19)
TAPE qh (17)
TUNER/BAND 5 (14, 15)
TUNER MEMORY qk (14)
TUNING MODE ql (14, 15)
VOLUME +/– qa (20, 26)
w;
ql
qk
qj
qh
qg
BUTTON DESCRIPTIONS
?/1 (powe r) 1 (8, 15, 20, 21,
28)
m/M (rewind/fast forward)
7 (11, 17)
./> (skip back/skip
forward) qg (9, 11, 13, 19, 20,
21)
x (stop) 8 (11, 15, 17, 18, 28)
X (pause) 8 (11, 17)
N (play) 8 (11, 13, 17, 27)
+/– (tuning) qg (14, 15)
Additional Information
a
2
3
4
5
6
7
qf
qd
qs
8
9
0
qa
35
GB
Page 36

Svenska
Härmed intygar Sony Corp. att detta högtalarsystem står i
överensstämmelse med de väsentliga egenskapskrav och övriga
relevanta bestämmelser som framgår av direktiv 1999/5/EG.
Mer information finns på webbadressen:
http://www.compliance.sony.de/
Den här produkten är avsedd att användas i följande länder.
Storbritannien, Tyskland, Sverige, Danmark, Finland, Norge,
Belgien, Schweiz, Österrike, Nederländerna, Frankrike,
Portugal, Italien, Spainien
Produktens version framgår av streckkodsetiketten på lådans
översida.
Dansk
Undertegnede, Sony Corp., erklærer herved, at følgende udstyr
overholder de væsentlige krav og øvrige relevante krav i
direktiv 1999/5/EF.
Yderligere oplysninger findes på http://www.compliance.sony.de/
Dette produkt er beregnet til brug i følgende lande.
Storbritannien, Tyskland, Sverige, Danmark, Finland, Norge,
Belgien, Schweiz, Østrig, Holland, Frankrig, Portugal, Italien og
Spanien.
Øverst på kassen findes en stregkode, hvor du kan se, hvilken
version kassen indeholder.
Suomi
Sony Corp. vakuuttaa täten, että tämä laite on direktiivin 1999/
5/EY oleellisten vaatimusten ja sitä koskevien direktiivin
muiden ehtojen mukainen.
Lisätietoja on seuraavassa Web-sivustossa:
http://www.compliance.sony.de/
Tämä tuote on tarkoitettu käytettäväksi seuraavassa maissa.
Iso-Britannia, Saksa, Ruotsi, Tanska, Suomi, Norja, Belgia, Sveitsi,
Itävalta, Alankomaat, Ranska, Portugali, Italia, Espanja
Näet version pakkauksen yläosassa olevasta viivakooditarrasta.
Norsk
Herved erklærer Sony Corp.at dette utstyret er i
overensstemmelse med vesentlige krav og andre relevante
bestemmelser som fremgår av direktiv 1999/5/EC.
Gå til denne URL-en for mer informasjon:
http://www.compliance.sony.de/
Dette produktet er ment for bruk i følgende land:
Storbritannia, Tyskland, Sverige, Danmark, Finland, Norge,
Belgia, Sveits, Østerrike, Nederland, Frankrike, Portugal, Italia,
Spania
Du kan sjekke versjon ved å se på strekkode-etiketten på
toppen av esken.
Ελληνικά
ΜΕ ΤΗΝ ΠΑΡΟΥΣΑ Η Sony Corp. ∆ΗΛΩΝΕΙ ΟΤΙ H ΣΥΣΚΕΥΗ
ΣΥΜΜΟΡΦΩΝΕΤΑΙ ΠΡΟΣ ΤΙΣ ΟΥΣΙΩ∆ΕΙΣ ΑΠΑΙΤΗΣΕΙΣ ΚΑΙ
ΤΙΣ ΛΟΙΠΕΣ ΣΧΕΤΙΚΕΣ ∆ΙΑΤΑΞΕΙΣ ΤΗΣ Ο∆ΗΓΙΑΣ 1999/5/ΕΚ.
Για περισστερες λεπτοµέρειες, παρακαλούµε να
επισκεφθείτε την παρακάτω ηλεκτρονική διεύθυνση
(URL): http://www.compliance.sony.de/
Αυτ το προϊν προορίζεται για να χρησιµοποιηθεί στις
παρακάτω χώρες.
Ηνωµένο Βασίλειο, Γερµανία, Σουηδία, ∆ανία, Φιλανδία,
Nορβηγία, Bέλγιο, Ελβετία, Aυστρία, Ολλανδία, Γαλλία,
Πορτογαλία, Iταλία, Ισπανία
Για να ελέγξετε την έκδοση, παρακαλούµε ανατρέξτε στην
ετικέτα µε τον κωδικ ραβδώσεων που βρίσκεται στο
επάνω µέρος του κουτιού.
Français
Par la présente, Sony Corp. déclare que cet appareil est
conforme aux exigences essentielles et aux autres dispositions
pertinentes de la directive 1999/5/CE.
Pour de plus amples informations, veuillez vous reporter à
l’URL suivante : http://www.compliance.sony.de/
Ce produit est conçu pour être utilisé dans les pays suivants.
Royaume-Uni, Allemagne, Suède, Danemark, Finlande,
Norvège, Belgique, Suisse, Autriche, Pays-Bas, France, Portugal,
Italie, Espagne
Pour connaître la version que vous utilisez, veuillez vous reportez
au code barre situé sur la partie supérieure de la boîte.
Deutsch
Hiermit erklärt die Sony Corporation, dass sich dieses Gerät in
Übereinstimmung mit den grundlegenden Anforderungen und
den anderen relevanten Vorschriften der Richtlinie 1999/5/EG
befindet.
Erläuterungen dazu finden Sie unter folgendem URL:
http://www.compliance.sony.de/
Dieses Gerät kann in folgenden Ländern verwendet werden.
Großbritannien, Deutschland, Schweden, Dänemark, Finnland,
Norwegen, Belgien, Schweiz, Österreich, Niederlande,
Frankreich, Portugal, Italien, Spanien
Wenn Sie nachsehen wollen, um welche Version es sich bei
Ihrem Modell handelt, schauen Sie bitte nach dem
Strichcodeetikett oben auf dem Karton.
Español
Por medio de la presente, Sony Corp. declara que el equipo
cumple con los requisitos esenciales y cualesquiera otras
disposiciones aplicables o exigibles de la Directiva 1999/5/CE.
Para obtener más información, visite la dirección URL
siguiente: http://www.compliance.sony.de/
Este producto está destinado a utilizarse en los siguientes países:
Reino Unido, Alemania, Suecia, Dinamarca, Finlandia,
Noruega, Bélgica, Suiza, Austria, Holanda, Francia, Portugal,
Italia, España
Para comprobar la versión, consulte la etiqueta del código de
barras situada en la parte superior de la caja.
Nederlands
Hierbij verklaart Sony Corp. dat dit toestel in overeenstemming
is met de essentiële eisen en de andere relevante bepalingen van
richtlijn 1999/5/EG.
Ga naar de volgende URL voor meer informatie:
http://www.compliance.sony.de/
Dit product is bestemd voor gebruik in de volgende landen:
Verenigd Koninkrijk, Duitsland, Zweden, Denemarken,
Finland,Noorwegen, België, Zwitserland, Oostenrijk,
Nederland, Frankrijk, Portugal, Italië, Spanje
De versie vindt u op het barcode label boven op de doos.
Italiano
Con la presente Sony Corp. dichiara che questo apparecchio è
conforme ai requisiti essenziali ed alle altre disposizioni
pertinenti stabilite dalla direttiva 1999/5/CE.
Per ulteriori informazioni, accedere al seguente indirizzo URL:
http://www.compliance.sony.de/
Il presente prodotto è destinato all'utilizzo nei paesi elencati di
seguito.
Regno Unito, Germania, Svezia, Danimarca, Finlandia,
Norvegia, Belgio, Svizzera, Austria, Olanda, Francia,
Portogallo, Italia, Spagna
Per verificare la versione, fare riferimento all'etichetta con il
codice a barre situata sulla parte superiore della scatola.
Português
A Sony Corp., declara que este equipamento está conforme com os
requisitos essenciais e outras provisões da directiva 1999/5/CE.
Para saber mais pormenores, aceda ao seguinte URL :
http://www.compliance.sony.de/
Este produto destina-se a ser utilizado nos seguintes países:
Reino Unido, Alemanha, Suécia, Dinamarca, Finlândia,
Noruega, Bélgica, Suíça, Áustria, Países Baixos, França,
Portugal, Itália, Espanha
Para verificar a versão, consulte a etiqueta do código de barras
localizada na parte de cima da caixa.
Sony Corporation Printed in China
 Loading...