

Page 1

Micro Hi-Fi
Component
System
Operating Instructions
2-023-493-12(1)
CMT-GP8D
©2004 Sony Corporation
Page 2
WARNING
To prevent fire or shock hazard, do not
expose the unit to rain or mo ist u r e.
To prevent fire, do not cover the ventil at ion of the
apparatus with news papers, table-cloths, curtains, etc.
And don’t place lighted candle s on the apparatus.
To prevent fire or shock hazard, do not place obje c ts
filled with liquids, such as vases , on the ap pa ratus.
Do not install the appliance in a confined space,
such as a bookcase or built-in cabi ne t.
This appliance is
classified as a CLASS 1
LASER product. This
marking is locat ed on the
rear exterior.
Don’t throw away the battery with
general house waste, dispose of it
correctly as chemical was te.
Except for Russian model
ENERGY STAR® is a U.S.
registered mark. As an E
®
TAR
partner, Sony Corporation
S
has determined that this produc t
meets the E
NERGY STAR
guidelines for energy efficien cy.
NERGY
®
1)
This system incorporat es Dol by
Digital Surround System.
1)
Manufactured under license from Dolby
Digital and DTS2)
Laboratories.
“Dolby”, “Pro Logic”, and the double-D symbol are
trademarks of Dolby Laborat ories.
2)
Manufactured under license from Digital Theater
Systems, Inc. “DTS” and “DTS 2.0 + Digital Out”
are trademarks of Digital Theater Systems, Inc.
GB
2
Page 3

Table of Contents
How to use this manual...........................5
Playable discs..........................................5
Getting Started
Hooking up the system............................7
Setting the clock....................................10
Selecting a language .............................10
DVD/VIDEO CD/CD/MP3/JPEG
– Play
Loading a disc........................ ... .... ........11
Playing a disc........................................11
— Normal Play/Shuffle Play
Playing DVDs using the menu..............13
Playing VIDEO CDs with PBC functions
(Ver. 2.0).........................................14
— PBC Play
Playing repeatedly.................................14
— Repeat Play
Creating your own program.................. 15
— Program Play
Using the on-screen display
to search..........................................16
DVD – Various functions
Changing the sound/subtitle/angle........18
Changing the language..........................19
— Language
Adjusting the image and audio
settings............................................20
— AV
Restricting disc playback......................21
— Rating (Parental Control)
System setup item list. ... .... ...................23
Tape – Play
Loading a tape......................................27
Playing a tape............. ... ........................27
Tape – Recording
Recording your favorite CD tracks on
a tape ..............................................28
— CD-TAPE Synchro Recording
Recording on a tape manually.............. 29
— Manual Recording
Sound Adjustment
Selecting the sound effect.....................30
Singing along: Karaoke........................ 30
Timer
Falling asleep to music......................... 32
— Sleep Timer
Waking up to music..............................32
— Play Timer
Timer recording radio programs........... 33
— Rec Timer
Display
Turning off the display.........................34
— Power Saving Mode
Adjusting the brightness of
the indicators.................................. 35
Viewing information about the disc in
the display ......................................35
Viewing information about the disc in
the on-screen display......................36
Tuner
Presetting radio stations........................24
Listening to the radio ............................25
— Preset Tuning
— Manual Tuning
continued
GB
3
Page 4

Optional Components
Hooking up optional com po nents.........37
Listening to audio from a connected
component ......................................38
Enjoying the 5.1 channel sound with
the optional amplifier......................39
Recording audio from a connected
component ......................................39
Recording on a connected
component ......................................39
Troubleshooting
Problems and remedies.........................40
Messages...............................................44
Additional Information
Precautions............................................45
Specifications........................................47
Glossary................................................48
List of button locations and refer e nce
pages...............................................51
GB
4
Page 5
How to use this manual
• This manual mainly explains operations u sing
the remote, but the same operations can also
be performed us in g t he buttons on the unit
having the same or similar names.
• The English OSD screen (on-screen display)
is used for illustration purposes only.
• The following symbols are used in this
manual.
Symbol Meaning
Functions that can be used with
DVDs
Functions that can be used with
VIDEO CDs
Functions that can be used with
audio CDs
Functions that can be used with
MP3 audio tracks
Functions available for JPEG
files
Playable discs
You can play back the following discs on this
system. Other discs cannot be playe d back.
List of playable discs
Format of discs Disc logo
DVD VIDEOs
VIDEO CDs
Audio CDs
CD-R/CD-RW
(audio data/
MP3 files/
JPEG files)
Region code of DVDs you can
play on this system
Your system ha s a region code printe d on the
back of the unit and will only play DVDs labeled
with identical region code.
DVDs labeled will also be played on this
ALL
system.
If you try to play any ot her DVD, the message
“Playback prohibited by area limitations.” will
appear on the TV screen. Depending on the
DVD, no region code indication may be labeled
even though playing the DVD is prohibited by
area restrictions.
Discs that this system ca nnot
play
• CD-ROMs (except for ext ension “.MP3” ,
“.JPG” or “.JPEG”)
• CD-Rs/CD-RWs other than those record ed in
the following formats:
– music CD format
– video CD format
– MP3 (MPEG1 Audio Layer-3)/JPEG
format that conforms to ISO9660*
Level 2 or Joliet
• Data part of CD-Extras
• Super Audio CDs
• DVD-RWs in VR mode
• DVD-ROMs
• DVD-RAMs
• DVD Audio discs
• A DVD with a different region code.
• Discs with non-standard shapes (e.g., heart,
square, star) cannot be played on this unit.
Attempting to do so may damage the unit. Do
not use such discs.
• A disc with paper or stickers on it.
• A disc that has the adhesive, cellophane tape,
or a sticker still left on it.
* A logical format of files and folders on a CD-ROMs,
defined by ISO (International Organization for
standardization).
Level 1/
The “DVD VIDEO” logo is a trademark.
continued
GB
5
Page 6

Notes about CD-R/CD-RW/
DVD-R/DVD-RW (Video mode)/
DVD+R/DVD+RW
Cautions when playing a disc
that is recorded in Multi
Session
• In some cases, CD-Rs, CD-RWs, DVD-Rs,
DVD-RWs (Video mode) (DVD-RWs
created in video mode have the same for m at
as a DVD VIDEO), DVD+R or DVD+RW
cannot be played on t hi s s ystem depending
upon the recording quality or physical
condition of the disc, or the characteristics of
the recording device. Further m ore, the disc
will not play if it has n ot been correctly
finalized. For more information, see the
operating instructions for the recording
device.
• A disc recorded i n packet write format cann ot
be played.
Note on playback operations
of DVDs and VIDEO CDs
Some playback operations of DVDs and VIDEO
CDs may be intentionally set by software
producers. Since this system plays DVDs and
VIDEO CDs according to the disc con t ent s the
software producers designed, som e playback
features may not be availa bl e. Also, refer to the
instructions supplied with the DVDs or VIDEO
CDs.
• When playing a disc which contains audio
tracks in music CD format, MP3 audio tracks
and JPEG image files, only the audio tr acks in
music CD format can be played back.
• CD-R and CD-RW discs recorded in multisession that have not ended by “closing the
session” are not supported.
Copyrights
This product i nc orporates copy right protect i on
technology that is protected by U.S. patents and
other intellectu al property rights. Use of this
copyright protect io n technology must be
authorized by Macrovision, and is intended for
home and other limited viewing uses only unles s
otherwise author i zed by Macrovision. Reverse
engineering or disassembly is prohibi t ed.
Music discs encoded with
copyright protection
technologies
This product is desi gned to playback discs that
conform to the Compact Disc (CD) standard.
Recently, various music discs encoded with
copyright protection technologies are marketed
by some record companies. Please be aware that
among those disc s, t here are some that do n ot
conform to the CD standard and may not be
playable by this product.
GB
6
Page 7
Getting Started
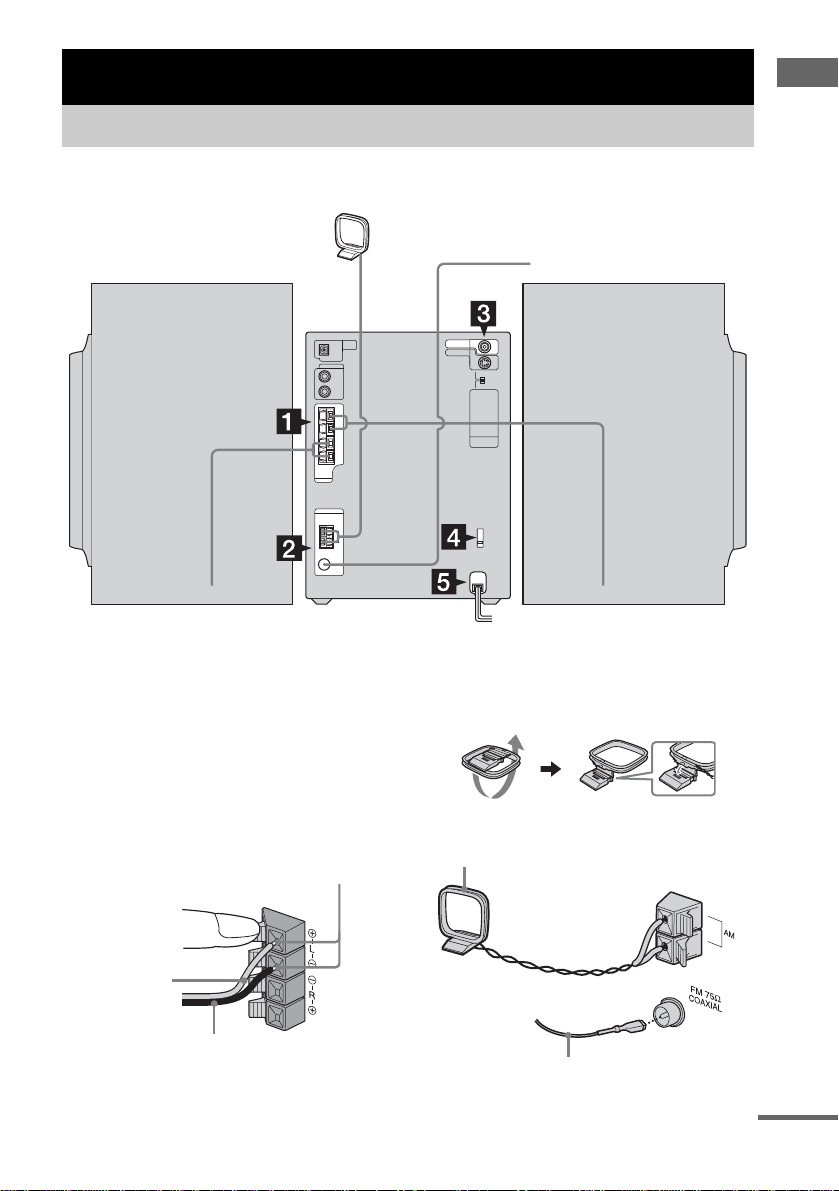
Hooking up the system
Perform the following procedures 1 to 6 to hook up your system using the supplied cords and
accessories.
AM loop antenna
FM antenna
Getting Started
Front speaker (Right)
1 Connect the speakers.
Connect the right and left speaker cords to
the SPEAKER jacks as shown below.
Place the right speaker on the right side and
the left speaker on the left side of the uni t .
Each speaker has a s u bwoofer on the side.
When placing the speakers, be sure to leave
at least 5 cm open subwoofer sides to obtain
a better bass reproduction.
Insert only the stripped portion
Gray/Solid (3)
Black/Stripe (#)
Front speaker (Left)
2 Connect the FM and AM antennas.
Set up the AM loop antenna, then connect
it.
Plug type A
AM loop antenna
Extend the FM lead antenna horizontally
continued
GB
7
Page 8
Plug type B
AM loop antenna
Extend the FM lead antenna horizontally
Plug type C
AM loop antenna
Extend the FM lead
antenna horizontally
Note
North American model:
Connect white side.
Other models:
Connect brown side.
Keep the antennas away from the speaker cords.
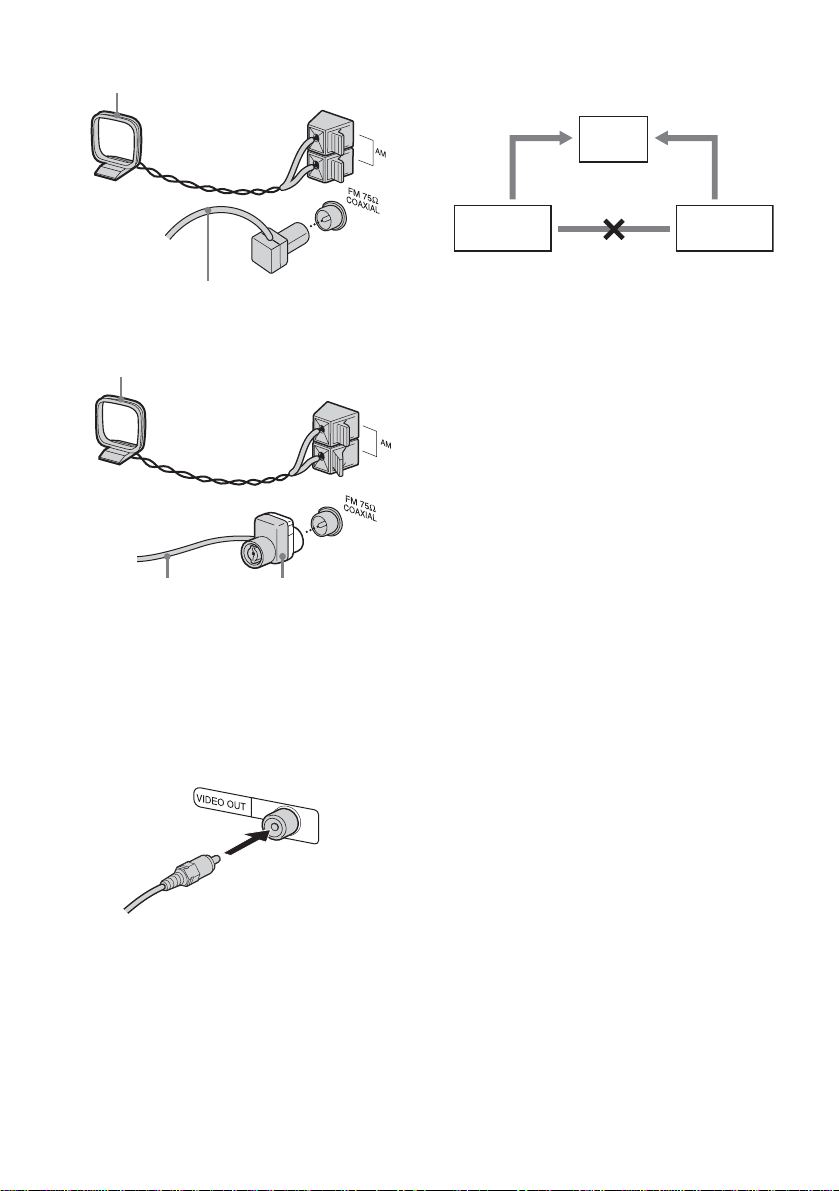
3 Connect the video input jack of your TV
to the VIDEO OUT jack with the
supplied video cable.
When connecting a video deck
Connect the TV and the video deck using video a nd
audio cords (not supplied) as shown below.
TV
Video deck System
Do not connect
directly.
If you connect a video deck between this system and the
TV, you may experience video leakage when watching
the video signal f ro m this system. Do not connect a
video deck between this system and the TV.
Note
Do not place the TV on this system.
Tip
For even higher quality video ima g e s:
For details on connecting your TV through the
T LINE-TV jack (for Russian model) or
COMPONENT VIDEO OUT jacks (for other models)
and setting VIDEO OUT SELECTOR, see page 38.
– For Russian model, use an opti onal SCART cord to
connect a TV. Check that the TV conforms to RGB
signals. If the TV conforms to RGB signals, change
the input mode of the TV to RGB signals, then set
VIDEO OUT SELECTOR on the unit to T LINETV while the system is off. Refer to th e operating
instructions supplied with the TV to be conn ected.
– For other mode ls, use an optional component video
cord to connect the COMPONENT VIDEO input
jacks on your TV to the COMPONENT VIDEO
OUT jacks on this unit, then set VIDEO OUT
SELECTOR to COMPONENT VIDEO OUT while
the system is off.
– You can use an optional S video cord to connect the
S VIDEO input jack on your TV to the S VIDEO
OUT jack, then set VIDEO OUT SELECTOR to S
VIDEO OUT.
When using a TV
Turn on the TV and select the video input so that you
can view the pictures from this syste m.
GB
8
Page 9
4 For models with a voltage selector, set
VOLTAGE SELECTOR to the local
power line voltage.
Depending on the model , the V O LTAGE
SELECTOR may differ.
110–120V
220–240V
5 Connect the power cord to a wall
outlet.
If the supplied adapter on the plug does not
fit your wall outlet, detach it from the plug
(only for models equipped with an adapter).
To turn on the system, press ?/1.
6 (Except for Russian model)
Set the color system to PAL or NTSC
depending on the color system of your
TV.
The color syst em is factor y set to NTSC f or
region code 3 model s, and PAL for other
region code models. Each time you per form
the procedure belo w , t he color system
changes as follows:
NTSC y PAL
1 Press DVD N (or DVD NX on the
unit) to switch the function to DVD.
2 Press x to stop playback.
3 Press ?/1 to turn off the system.
4 Press ?/1 on the unit while holding
down x on the unit.
The system turns on and the color
system is changed.
Notes
• A disturbance in the TV screen may be present for a
moment after changing the color system as described
above.
• When you play back a VIDEO CD recorded in a
different co lo r sy stem from the one yo u set to the
unit, the picture image may be distorted.
• To set the VCD color system, see page 20.
To connect optional components
See page 37.
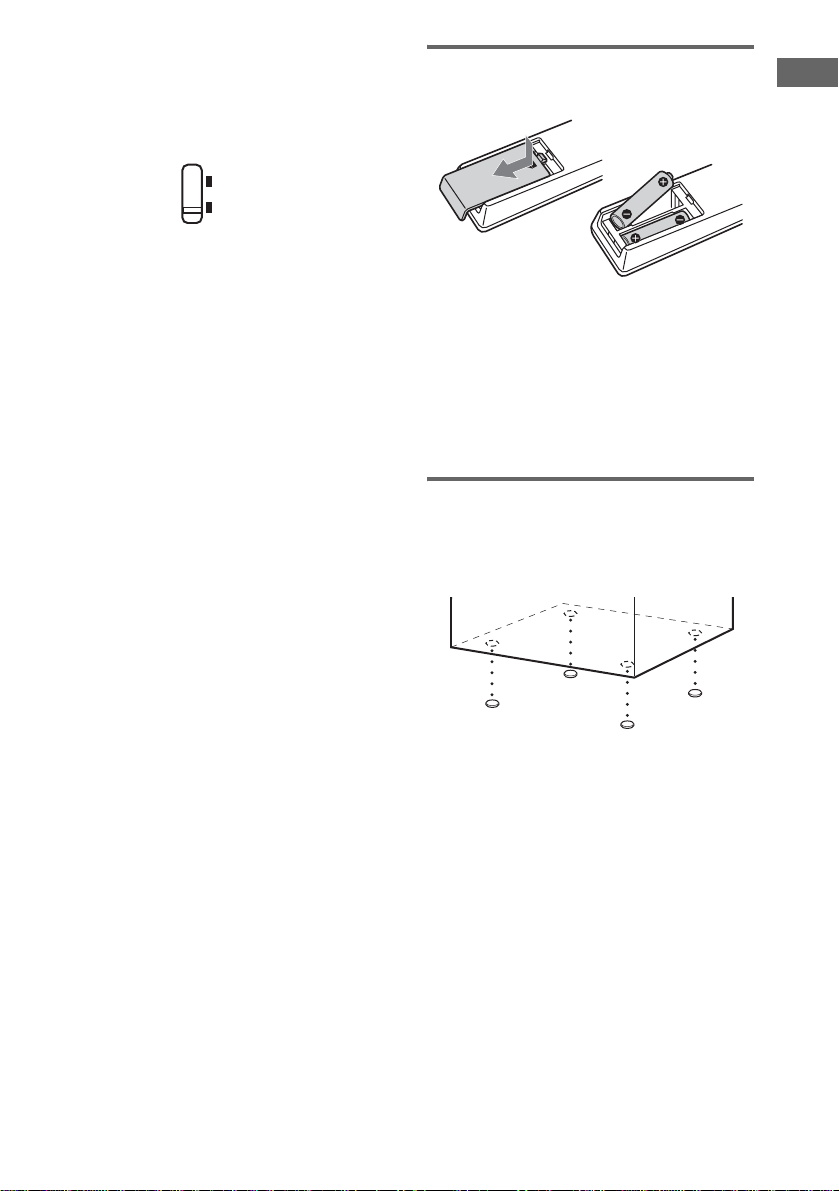
Inserting two R6 (size AA)
batteries into the remote
Note
If you do not use the remote for a long period of time,
remove the batteries to avoid possible damage from
battery leakage and corros io n .
Tip
With normal use, the batteries should last for about six
months. When the remote no longer operates the
system, replace both batterie s with new ones.
Attaching the speaker pads
Attach the supplied speaker pads to the bottom
of the speakers to stabilize the speakers and
prevent them fr om slipping.
Getting Started
GB
9
Page 10

Setting the clock Selecting a language
Use buttons on the r emote for the operati on.
1 Press ?/1 to turn on the system.
2 Press CLOCK/TIMER SET.
3 Press . or > repeatedly to set the
hour.
4 Press ENTER.
5 Press . or > repeatedly to set the
minute.
6 Press ENTER.
The clock starts working.
To adjust the clock
1 Press CLOCK/T IMER SET.
2 Press . or > to select “CLOCK SET”,
then press ENTER.
3 Do the same procedures as step 3 to 6
above.
Notes
• The clock settings are canceled when you disconnect
the power cord or if a power failure occurs.
• You cannot set the clock in Power Saving Mode
(page 34).
You can change the on-screen display language.
1 Turn on your TV and select the video
input.
2 Press ?/1 to turn on the system.
3 Press DVD N (or DVD NX on th e
unit) to switch the function to DVD.
4 Press x to stop playback.
5 Press DVD SETUP in stop mode.
6 Press < or , repeatedly to select
“Language”, then press ENTER.
7 Press M or m repeatedly to select
“OSD”, then press ENTER.
8 Press M or m repeatedly to select a
language from the displayed list, then
press ENTER.
9 Press DVD SETUP to turn off the Setup
Display.
10
GB
Page 11
DVD/VIDEO CD/CD/MP3/JPEG – Play
Loading a disc
Use buttons on the unit for the operation.
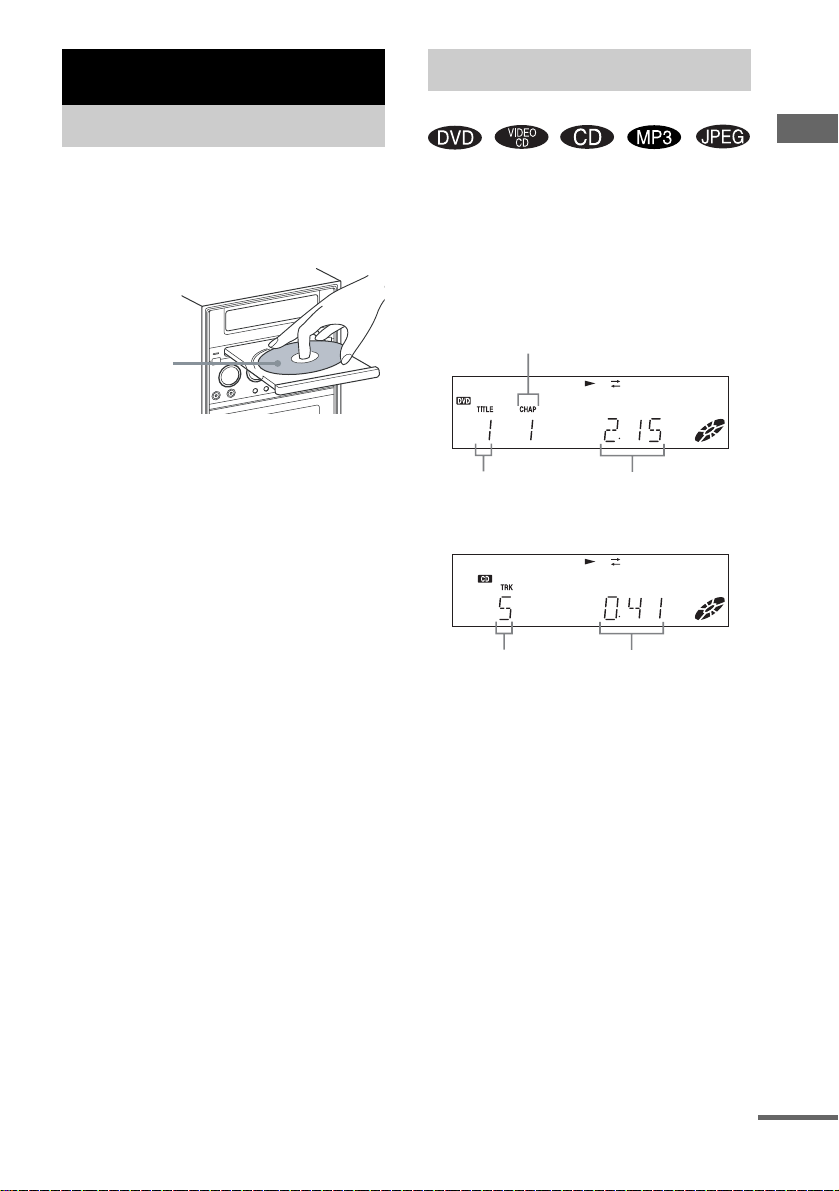
1 Press Z.
2 Place a disc with the label side up on
the disc tray.
When you pl ay
an 8 cm disc,
place it on the
inner circle of
the tray.
3 Press Z again to close the disc tray.
Notes
• Do not use a dis c with tape, s eals or paste on it as this
may cause malfunction.
• Do not forcibly press the disc tray closed with your
finger, as this may cause malfunc tion.
Playing a disc
— Normal Play/Shuffle Play
DVD/VIDEO CD/CD/MP3/JPEG – Play
Before playing a DVD, VIDEO CD or JPEG
turn on your TV and sel ec t the video input.
Depending on the DVD or VIDEO CD, some
operations may be different or restricted. Refer
to the operating instructions supplied with the
disc.
Example: When playing a DVD
Chapter number
Playing timeTitle number
Example: When playing a CD
Playing timeTrack number
Press DVD N (or DVD NX on the unit).
The function switches to DVD and playback
starts automatically.
continued
11
GB
Page 12

Other operations
To Do this
Stop play Press x.
Pause Press X (or DVD NX on the
Select a track,
image or
chapter
Locate a point
quickly in fast
forward or fast
reverse
(Lock Search)
(Except for
MP3/JPEG)
Play all tracks
on the disc in
random order
(Shuffle
3)
Play)
Watch frame
by frame
(Slow-motion
Play)
(DVD/VIDEO
1)2)
CD only)
Rotate the
current image
(JPEG only)
Switch to
DVD function
from another
source
Cut the sound Press MUTING.
Remove a disc Press Z on the unit.
1)
There may be some disturbance in th e vi deo image .
2)
For DVDs and VIDEO CDs, no sound is output.
3)
You cannot perform Shuffle Play on DVDs and
VIDEO CDs with PBC function.
1)
unit).
Press X again to go to the next frame
(DVD/VIDEO CD only).
Press DVD N (or DVD NX on
the unit) to resume play.
Press . or > repeatedly during
play or pause.
Press . once during play or pause
to go back to the beginning of the
current track (except for MP3/JPEG).
Press m or M during play.
For DVD or VIDEO CD, each time
you press the button, searching speed
changes.
For CD, searching speed does not
change.
2)
To return to Normal Play, press
DVD N (or DVD NX on the
.
unit)
Press PLAY MODE repeatedly in
stop mode until “SHUF” appears in
the display, then press DVD N (or
DVD NX on the unit)
During play, press SLOW y. Each
time you press the button, the
playback speed changes.
To return to Normal Play, press
DVD N (or DVD NX on the
unit).
Press < or ,.
Each time you press ,, the image
turns clockwise by 90º.
Each time you press <, the image
turns counterclockwise by 90º .
Press DVD N (or DVD NX on the
unit) (Automatic Source selection).
Playback starts au tomaticall y when a
disc is loaded .
Press MUTING again or VOLUME +
to restore sound.
.
Notes
• Depending on the DVD or VIDEO CD, some
operations may be restricte d.
• Maximum number of albums on a disc: 999 (The
maximum number of MP3 audio trac ks or JP EG
image files that can be contained on a disc is 999.)
However, when a large number of non-MP3/JPEG
files are present, the maximum number of albums,
tracks and files may decrease.
• Playback is possible up to 15 levels.
• The system supports MP3 audio tracks recorded with
a bit rate of 32 to 320 kbps and a sampling frequency
of 32/44.1/48 kHz for MPEG1 Audio Layer-3.
• An album that does not include an MP3 audio track
or JPEG image file is skipped.
• If you put the extension “.MP3” to data not in MP3
format, the system cannot rec ognize the data
properly and will generate a loud noise which could
damage your speaker system.
• The following discs take a longer time to sta r t
playback.
– a disc recorded with complicated tree structure.
– a disc recorded in Multi Session.
– a disc to which data can be added (non-finalized
disc).
• Some CD-Rs or CD-RWs cannot be played on this
system depending on file forma t.
Tip
When playing the data disc contained MP3 audio
tracks and JPEG image files, set “Data CD Pri or it y ”
(page 20).
Resuming playback from the
point you stopped the disc
— Resume Play
This system memor iz es the point where you
stopped the disc so you can resume from that
point.
1 While playing a disc, press x to stop
playback.
“RESUME” appears in the display. If
“RESUME” does not appear, Resume Play
is not available.
2 Press DVD N (or DVD NX on the unit).
The player starts playback from the point
you stopped the disc in step 1.
12
GB
Page 13

Notes
• You cannot perform Resume Play during Shuf fle
Play or Program Play.
• Depending on where you stopped the disc, the
system may resume playback f r om a dif fer e nt point.
• Resume play is canceled when:
– you press x in stop mod e.
– you turn off the system.
– you disconnect the power cord.
– you open the disc tray.
– you change the play mode.
Playing a track by entering the
track number in Normal Play
mode (on the remote only)
Press the number button(s) to enter the track
number of the track yo u w ant to play.
To enter a track number over 10
1 Enter the corresponding digits.
2 Press ENTER.
Example:
To play track number 30, press 3 and 0, then press
ENTER.
Selecting an album/track/file
using the on-screen display (MP3/
JPEG only)
1 Press DVD TOP MENU in stop mode.
The list of albums contained in the disc
appears in the TV screen.
2 Press M/m/</, repeatedly to select an
album you want to play, then press ENTER.
The list of tracks or files contained in the
current album appears.
3 Press M/m/</, repeatedly to select a
track or file, then press ENTER.
The selected track or file starts playing.
Notes
• On the TV screen, up to 8characters can be
displayed for album names, 12 characte rs for tr a ck /
file names. When multiple album names use the
same first 8 characters, th e tracks and files in those
albums are displayed togeth er in a singl e folder.
• Only the letters in the alphabet and numbers can be
used for album or file names. Anything el se is
displayed as “_”.
• If an MP3 fi le is played, indi cat ed elapsed time may
be different from the actual time.
Playing DVDs using the menu
DVD/VIDEO CD/CD/MP3/JPEG – Play
Some DVDs have m enus to help you enjoy th e
DVDs. You can play DVDs using these menus
on the TV screen.
• Using the DVD top menu
A DVD is divided into long sections of a picture
or a music feature called “titles”. When you play
a DVD which contains several titles, you can
select the title you want using the men u.
• Using the DVD menu
Some DVDs allow you to select the disc
contents using a menu. When you play these
DVDs, you can select items such as the language
for the subtitles and the language for the sound
using the DVD menu.
1 Press DVD TOP MENU or DVD MENU.
The menu appears o n th e TV screen. The
contents of the menu vary from disc to disc.
2 Press M/m/</, or the number
buttons to select the title or item you
want to play.
3 Press ENTER.
13
GB
Page 14

Playing VIDEO CDs with
Playing repeatedly
PBC functions (Ver. 2.0)
— PBC Play
You can use PBC* menus on your TV screen to
enjoy the disc’s interactive software. The menu
format and struct ure may differ dependi ng on
each disc.
* PBC: Playback Control
1 Press DVD N (or DVD NX on the
unit) to start playing a VIDEO CD with
PBC functions (Ver. 2.0).
The PBC menu appea rs on t he TV screen.
2 Press the number buttons to select the
item number you want.
3 Press ENTER.
4 Continue playback according to the
instructions on the menus to enjoy
interactive playback.
Refer to the operating instructio ns supplied
with the disc, as the operating procedure
may differ according to the VIDEO CD .
To go back to a previous menu
Press O RETURN.
Note
Depending on the VIDEO CD, “Press ENTER” in step
3 may appear as “Press DVD N” in the operating
instructions supplied with the disc. In this case, press
DVD N (or DVD NX on the unit).
Tip
To cancel playback with PBC functions, press DVD
MENU repeatedly in stop mode until “PB C Off”
appears on the TV screen. Playback starts from the
selected track. Still im ag es , s uch as the menu screens,
will not be shown.
To return to PBC playback, press DVD MENU
repeatedly in stop mode until “PBC On” appears on the
TV screen.
— Repeat Play
You can play all t he tracks/fi l es or a single titl e/
chapter/track /f il e on a disc repeatedly.
Using the front panel display
Press REPEAT during play until “REP” or
“REP1” appears.
REP: For all the tracks/files on the disc up to five
times.
REP1: For a single title*/chapter*/track/file
only.
* You can check whether a title or chapter is being
repeatedly played on the TV screen.
To cancel Repeat Play
Press REPEAT repeatedly until both “REP” and
“REP1” disappear.
Notes
• Depending on the DVD, you cannot perform Repeat
Play.
• You cannot perform Repeat Play during PBC
playback of VIDEO CDs (page 1 4) .
• When you select “REP1”, that title/chapter/track/file
is repeated endlessly until “RE P1 ” is can celed.
14
GB
Page 15
Using the on-screen displ ay
Press REPEAT repeatedly during play.
Each time you press the button, the setting
changes cyclically as follows:
x When playing a DVD
• Off: does no t play repeatedly.
• Title: repeats the current title on a disc.
• Chapter: rep eats the current chapter.
x When playing a VIDEO CD/CD/MP3/JPEG
• Off: does no t play repeatedly.
• All: repeats all the tracks/files on a disc.
• Track (ex cept for JPEG): repeats the current
track.
• File (JPEG only): repeats the current file.
To cancel Repeat Play
Select “Off”.
Notes
• Depending on the DVD, you cannot perform Repeat
Play.
• You cannot perform Repeat Play during PBC
playback of VIDEO CDs (page 14).
• If you select “All”, the program repeats up to five
times.
Tip
You can set Repeat Play when the playback is stopped.
Press REPEAT repe atedly to select the setting, then
press DVD N (or DVD NX on the unit) to start
Repeat Play.
Creating your own program
—Program Play
You can make a pro gram of up to 12 steps.
You can sync hro record t he programmed t racks
onto a cassette tape (page 28).
The program operation can only be set using the
TV screen.
1 Press DVD N (or DVD NX on the
unit) to switch the function to DVD.
Playback star t s.
2 Press x twice to stop playback.
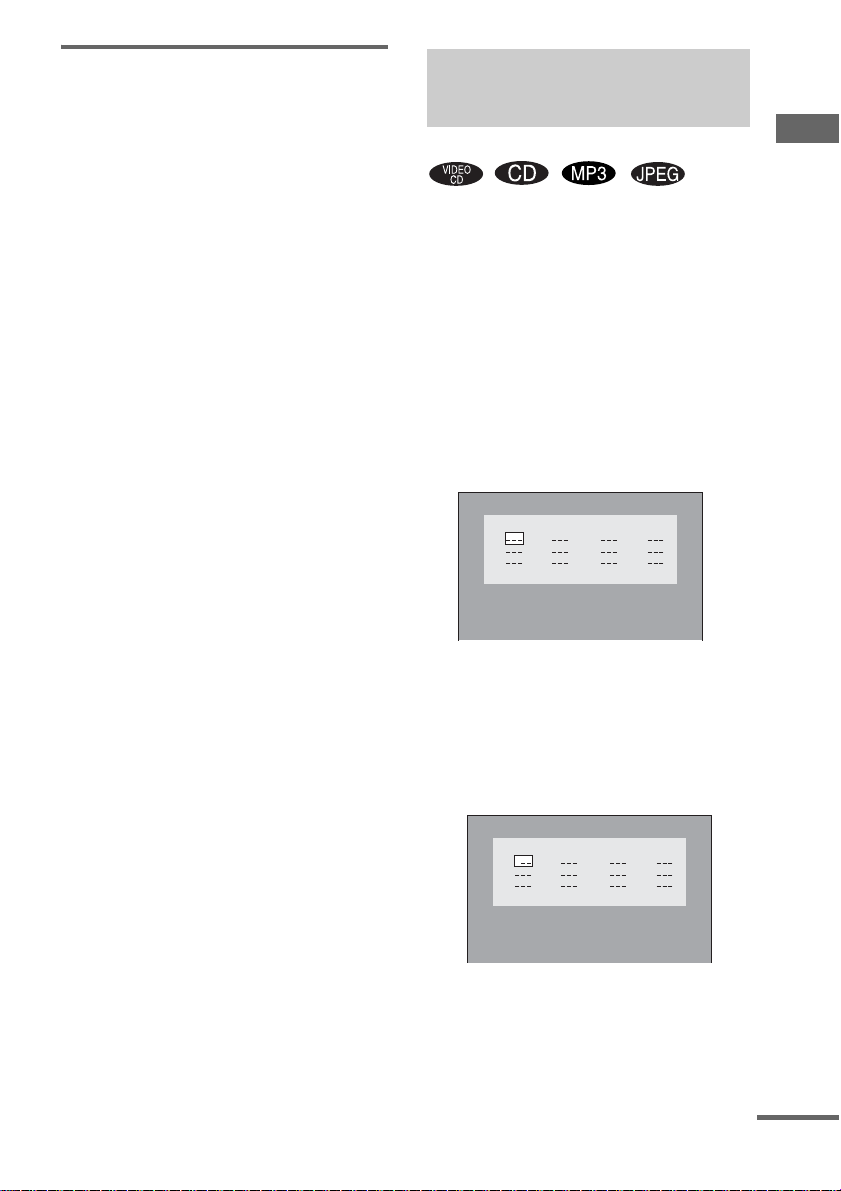
3 Press PLAY MODE repeatedly in stop
mode until the Program Displa y
appears on the TV screen.
Track
Program
4
7
1
2
5
3
6
All Clear Play Program
10
8
11
9
12
4 Press M/m/</, repeatedly to select
the desired step number.
5 Press the number buttons to select the
track you want to program.
If you make a mistake, pre ss C LEA R to
cancel the number, then select anot her
number.
DVD/VIDEO CD/CD/MP3/JPEG – Play
Track
Program
4
7
1 3
2
5
3
6
All Clear Play Program
10
8
11
9
12
6 To program other tracks, repeat steps 4
and 5.
7 Press M/m/</, repeatedly to select
“Play Program”, then press DVD N (or
DVD NX on the unit).
Program Play star ts .
continued
15
GB
Page 16

Other operations
To Do this
Cancel Program Play Press PLAY MODE
Clear a programmed
step
Clear all the
programmed steps
Note
When you switch the play mode to “Pro gr am ” while
“REP” is selected, “REP” is automatically canceled.
Tip
The program you made remains after Progr a m P la y
finishes. To play the same program ag ai n, pre ss
DVD N (or DVD NX on the unit). However, the
program is cleared when you open the disc tray.
repeatedly in stop mode
until “Continue” appears.
Press M/m/</,
repeatedly to select a step
number, then press CLEAR
in stop mode.
Press M/m/</,
repeatedly to select “All
Clear”, then press ENTER.
Using the on-screen display to search
You can search for a chapter (DVD) and track
(VIDEO CD, CD). As chapters and tracks are
assigned unique numbers on the disc, so you can
select the desired one by entering its number. Or,
you can search for a particular point usin g the
time code (Time Search).
Searching for a chapter
1 Press TIME SEARCH.
The Search Display appears.
2 Press M or m repeatedly to select
“Chapter”.
3 Press the number buttons to select the
desired chapter number .
If you make a mistake, press CLEAR to
cancel the number , the n select another
number.
4 Press ENTER.
Playback starts.
16
Searching for a track
1 Press TIME SEARCH repeatedly until
the Disc Search Display appears.
2 Press M or m repeatedly to select
“Track”.
3 Press the number buttons to select the
desired track number.
If you make a mistake, press CLEAR to
cancel the number , the n select another
number.
4 Press ENTER.
The playback starts from the selected
number.
GB
Page 17

Searching for a particular
point using the time code
— Time Search
1 Press TIME SEARCH.
x When playing a DVD
The Search Display appears.
Press M or m repeatedly to select “Time”.
x When playing a VIDEO CD/CD
The Track Search Display app ears.
2 Press the number buttons to input the
time code, then press ENTER.
When playing a DVD, input the playing
time of the current title.
When playing a VIDEO CD/CD, inpu t the
playing time of the current track.
For example, to fin d th e scene at 2 hours,
10 minutes, and 20 sec onds after the
beginning, enter “2:10:20”.
To search for a particular point of
a VIDEO CD/CD
1 Press TIME SEARCH once in stop mode or
twice during play.
The Disc Search Display appears.
2 Press M or m repeatedly to select “Time”.
3 Press the number buttons to input the time
code, then press ENTER.
Input the time from the beginning of a disc.
To cancel searching
Press TIME SEARCH repeatedly until the
display disappea rs.
Notes
• You cannot search for a scene and index of a VIDEO
CD.
• The time search function does not work on a VIDEO
CD (when the PBC function is on).
• You cannot input the time code or the chapte r
number at the same time in the Search Display.
• You cannot activate the time search or the tra ck
search at the same time in the Disc Search Display.
Select the desired search method, then press ENTER.
Tip
You can change the display to show pla ying time or
remaining time. For details, see “Viewing information
about the disc in the on-screen displ ay ” on pa ge 36.
DVD/VIDEO CD/CD/MP3/JPEG – Play
17
GB
Page 18

DVD – Various functions
Changing the sound/ subtitle/angle
Changing the sound (Except
for JPEG)
If a DVD is recorded wit h multilingua l tracks or
audio formats, you can select the language or
audio format you want while playing the DVD.
You can also outp ut either the left or righ t
channel sound from both speakers while playing
a VIDEO CD or CD. Note that this results in
monaural sound. For example, when playing a
Karaoke VID EO CD (disc with the vocals on
one channel and the instruments on the other
channel), you can switch the sound to cancel the
vocal track and listen only to the instruments.
Press AUDIO repeatedly during play.
Each time you press the button, the setting
changes cycli cally as follows:
x When playing a DVD
Depending on the D V D , the choice of the
language and audio format vari es.
When the same language is displayed twice or
more times, the DVD is recorded in multiple
audio formats.
x When playing a VIDEO CD/CD
• Stereo: The standard stereo sound.
• Left: The sound of the left channel
(monaural).
• Right: The sound of the right channel
(monaural).
To preset the desired audio track
You can preset th e system to the desired audio
track with the operations described under
“Changing the language” (page 19).
Notes
• When you play a DVD with the audio other than
2 channels, the sound is composed into 2 channels
and output from the system speake rs. However,
sound is not output in “Multi Channel PCM” format.
• For discs not recorded in multiple audio format, you
cannot change the sound.
• Depending on the DVD, you may not be able to
change the sound even if the DVD is recorded in
multiple audio format.
• For VIDEO CDs and CDs, the setting returns to
“Stereo” when you turn off the system or open the
disc tray.
• During DVD playback, the sound may change
automatically.
Displaying the audio
information of the disc (DVD
only)
When you press AUDIO, the channels being
played are displayed on the TV screen.
For example, in Dolby Digital format, multiple
signals ranging from monaural to 5.1 channel
signals can be recorded on a DVD. Depending
on the DVD, the number of recorded channels
may differ.
Current audio format
2/2 LPCM 2 Ch
The display examples are as
follows:
Format Display
PCM (stereo)
Dolby Digital 2 ch
Dolby Digital 5.1 ch
DTS
18
MPEG AUDIO
GB
Page 19

Displaying the subtitles (DVD
only)
With DVDs on which multilingual subtitles are
recorded, you can change the subtitle la nguage
while playing a DVD, or turn the subtit les o n or
off whenever you w ant.
For example, you can select the language yo u
want to master and turn the subtitles on for better
understanding.
Press SUBTITLE repeatedly during play.
Each time you press the button, the language
changes.
To cancel the SUBTITLE setting
Press SUBTITLE r epeatedly to select “Off”.
Note
Depending on the DVD, you may not be able to change
the subtitles even if multilingual subtitles are recorded
on the DVD.
Changing the angles (DVD
only)
When playing a DVD on which various angles
(multi-angl es ) fo r a sc ene a re reco rd ed, y ou ca n
change the viewing angle.
For example, while playing a scene of a train in
motion, you can display the view from either the
front of the train, the left window of the train or
from the right window without having the train’s
movement interrupted.
Press ANGLE repeatedly during play.
Each time you press the button, the angle
changes.
Note
Depending on the DVD, you may not be able to change
the angles even if multi-angles are reco r d e d on the
DVD.
Changing the language
— Language
1 Press DVD SETUP in stop mode.
The Setup Display appears.
2 Press < or , repeatedly to select
“Language”, then press ENTER.
3 Press M or m repeatedly to select an
item, then press ENTER.
x OSD (on-screen display)
Switches the display language on the TV
screen. Select the language from the
displayed list.
x DVD Menu (DVD only)
Select the language for the DVD menu.
x Audio (DVD only)
Switches the lang uage of the sound track .
Select the language from the displayed list.
x Subtitle (DVD only)
Switches the language of the subtitle. Sele ct
the language from the displayed list.
4 Press M or m repeatedly to select a
language, then press ENTER.
5 Press DVD SETUP to turn off the Setup
Display.
Note
When the selected language is not recorded on the
DVD, one of the recorded languages is automatically
selected (except for “OSD”).
Tip
You can reset all the DVD settings except for Parental
Control by performing the operations described under
“To return the DVD setup to the default settings*,
perform reset as follows:” (page 44).
* Exc ep t for Parental Control settings
DVD – Various functions
19
GB
Page 20

Adjusting the image and audio settings
—AV
1 Press DVD SETUP in stop mode.
The Setup Display appears.
Note
When a JPEG disc is in the system, the Setup
Display does not appear.
2 Press < or , repeatedly to select
“AV”, then press ENTER.
3 Press M or m repeatedly to select an
item, then press ENTER.
4 Press M or m repeatedly to select a
setting, then press ENTER.
5 Press DVD SETUP to turn off the Setup
Display.
x TV Type
Select the aspect ratio of the connected TV.
The default setting is underlined.
4:3 Pan Scan Select this when you connect a 4:3
4:3 Letter
Box
16:9
• 4:3 Pan Scan
• 4:3 Letter Box
•16:9
screen TV. This setting displa ys the
wide picture on the entire screen and
cuts off the portions that do not fit.
Select this when you connect a 4:3
screen TV. This setting displays a wide
picture with bands displayed on the
upper and lower portions of the screen.
Select this when you connect a widescreen TV or a TV with a wide mode
function.
Note
Depending on the DVD, “4:3 Letter Box” may be
selected automati cally instead of “4:3 Pan Scan” o r
vice versa.
x VCD Color Sys (except for Russian
model)
Select the color system when you play a VIDEO
CD.
The default setting is underlined.
NTSC Changes the video signal of a PAL
PAL Changes the video signal of an
Auto
x Dolby Digital
disc and outputs it in the NTSC
system.
NTSC disc and outputs it in the
PAL system.
Outputs the video signal in the
system of the disc, either PAL or
NTSC. If your TV uses a DUAL
system, select “Auto”.
Set the Dolby Digital settings to enjoy 5.1
channel sound when an optional amplifier is
connected (see “Enjoying the 5.1 channel sound
with the optional amplifier” on page 3 9).
x DTS
Set the DTS settings to enjoy 5.1 channe l sound
when an optional amplifier is connected (see
“Enjoying the 5.1 channel sound with the
optional amplif ie r” on page 39).
x Data CD Priority (MP3, JPEG only)
Set priority data you want to play, when you
play the data disc (CD-ROM/CD-R/CD-RW)
contained MP3 audio tracks and JPEG image
files.
The default setting is underlined.
MP3
JPEG If a JPEG file exists on the disc,
If an MP3 file exists on the disc,
the system recognizes the disc as
an “MP3 Disc”. If only JPEG files
exist on the disc, the syst em
recognizes the disc as a “JPEG
Disc”.
the system recognizes the disc as a
“JPEG Disc”. If only MP3 files
exist on the disc, the syst em
recognizes the disc as an “MP3
Disc”.
20
GB
Page 21

Notes
• Except for R uss ian model, you can change t h e c ol o r
system of this unit according to the connected TV
(page 9).
• If “Dolby Digital” or “DTS ” is set to “Bit Stream” ,
sound is not output from the supplied speakers and
optional headphone does not function, and no sound
is being recorded when recordin g to tape.
Tip
You can reset all the DVD settings except for Parental
Control by performing the operations described under
“To return the DVD setup to the default settings*,
perform reset as follows:” (page 44).
* Except for Rating (Parental Control) settings
Restricting disc playback
— Rating (Parental Control)
Limiting playback by children
You can limit the playback of some DVDs
according to a predetermined level such as the
age of the users.
When a limited scen e is played back, that scene
is cut or replaced with a preset othe r s cene.
1 Press DVD SETUP in stop mode.
The Setup Display a ppears.
2 Press < or , repeatedly to select
“Rating”, then press ENTER.
3 Press m to select “Rating”.
When a 4-digit password has already been
registered, enter the 4-digit password using
the number buttons, then press ENTER.
You can then sele ct “R ating”.
DVD – Various functions
Language
Password
Rating
AV ResetRating
8
4 Press ENTER repeatedly to select the
level you want.
Each time you press the button, the level
changes.
The lower the value, the more strict the
limitation.
5 Press M to select “Password”.
continued
21
GB
Page 22

6 Enter or re-ent er your 4- digit pa ssword
using the number buttons, then press
ENTER.
The lock icon is closed and the Parental
Control setting is completed.
If you make a mistake entering your
password, press CL EA R before you press
ENTER and input the cor r ect number.
Language
Password
Rating
To turn off the Parental Control
function and play the DVD after
entering your password
Enter your 4-digit pas sw ord using the number
buttons, then press ENTER.
The lock icon is opened and the Parental Control
function is turned off.
To change the password
1 In step 6, enter your 4-digit password using
the number buttons, then press ENTER.
2 Enter a new 4-digit password using the
number buttons, then press ENTER.
AV ResetRating
1 G
Playing the disc for which
Parental Control is set
1 Insert the disc and press DVD N (or
DVD NX on the unit).
The Rating Display appe ar s.
2 Enter your 4-digit password using the
number buttons, then press ENTER.
Playback starts.
Notes
• When you play DVDs which do not have the Parental
Control function, playback cannot be limited on this
system.
• Depending on the DVD, you may be asked to change
the parental control level while playing the disc. In
this case, enter your password, then change the level.
If the Resume Play mode is canceled, the level
returns to the original level.
Tip
If you forgot your password, select “Password” and
enter “199703” using the number buttons in the Rating
Display, then press ENTER. You can then enter a new
4-digit password.
22
GB
Page 23

System setup item list
When you press DVD SETUP, the following
settings are displayed.
The default settings are underlined.
Language (page 19)
OSD Select the language you want to
use from the displayed language
list.
DVD Menu Select the language you want to
use from the displayed language
list.
Audio Select the language you want to
use from the displayed language
list.
Subtitle Select the language you want to
use from the displayed language
list.
AV (pages 20, 39)
TV Type 4:3 Pan Scan
4:3 Letter Box
16:9
VCD Color Sys* NTSC
PAL
Auto
Dolby Digital PCM
Bit Stream
DTS PCM
Bit Stream
Data CD Priority MP3
JPEG
Reset (page 44)
Reset YES
NO
* Exc ep t fo r Russian model
DVD – Various functions
Rating (page 21)
Password
Rating 1 G
2
3 PG
4 PG 13
5
6 R
7 NC 17
8
23
GB
Page 24

Tuner
Presetting radio stations
You can preset up to 20 FM stations and 10 AM
stations. You can th en tune in any of those
stations simply by sel e ct ing the corresponding
preset number.
Automatic tuning preset
You can automatically tune in all of t he st ations
that can be receiv ed in your area and the n st ore
the radio frequency of the desired stations.
1 Press TUNER BAND repeatedly to
select “FM” or “AM”.
2 Press and hold TUNING + or – until the
frequency indication starts to change,
then release it.
The frequency changes as the system scans
for a station. Scanning stops automatically
when a station is tuned in. At that time,
“TUNED” and “STEREO” (for an FM
stereo program ) a ppear.
If “TUNED” does not appear and the
scanning does not stop
Set the freque ncy of the desired radio
station as describ ed in steps 2 through 6 of
“Manual tuning preset”.
3 Press TUNER MEMORY.
A preset numbe r fl ashes.
Perform steps 4 and 5 while the preset
number flashes.
4 Press PRESET + or – repeatedly to
select the desired preset number.
5 Press ENTER.
“COMPLETE” appears.
6 Repeat steps 1 through 5 to store other
stations.
Manual tuning preset
You can manually tune in and store the radio
frequency of the desired stations.
1 Press TUNER BAND repeatedly to
select “FM” or “AM”.
2 Press TUNING + or – repeatedly to tune
in the desired station.
3 Press TUNER MEMORY.
A preset number flashes.
Perform steps 4 an d 5 w hile the preset
number flashes.
4 Press PRESET + or – repeatedly to
select the desired preset number.
5 Press ENTER.
“COMPLETE” appears.
6 Repeat steps 1 through 5 to store other
stations.
Other operations
To Do this
Tune in a station
with a weak signal
Set another station
to the existing
preset number
Follow the procedure described
in “Manual tuning preset”.
Start over from step 1. After
step 3, press PRESET + or –
repeatedly to select the preset
number you want to store the
other station.
24
Preset number
GB
Page 25

To change the AM tuning interval
(except for Russian model)
The AM tuning interval is factory-preset to
9 kHz (or 10 kHz for some areas). To change the
AM tuning interval, tune in any AM station fir st,
then turn off the system. While holding x on the
unit, press TUNER/BAND on the unit. When
you change the interval, all the AM preset
stations are eras ed. To reset the interval, repeat
the same procedure.
Note
You cannot change the AM tuning interval in Powe r
Saving Mode (page 34).
Tip
To improve broadcast reception, adjust the supplied
antennas, or connect a comme rcially availab le external
antenna.
Listening to the radio
You can listen to a radio station either by
selecting a preset station, or by manually tuning
in the station.
Listening to a preset station
— Preset Tuning
Tuner
Preset radio stations in th e tuner’s memory first
(see “Presetting radio stati o ns” on page 24).
1 Press TUNER BAND repeatedly to
select “FM” or “AM”.
2 Press PRESET + or – repeatedly to
select the desired preset station.
FrequencyPreset number
continued
25
GB
Page 26

Listening to non-preset radio
station
— Manual Tuning
1 Press TUNER BAND repeatedly to
select “FM” or “AM”.
2 Press TUNING + or – repeatedly to tune
in the desired station.
To cut the sound
Press MUTING.
Press MUTING again or VOLU ME + to restore
sound.
To listen to an FM stereo program
without stereo effect
When an FM stereo program has static noise,
press FM MODE repeatedly until “MONO”
appears. There w i ll be no stereo effect, b ut the
reception will improve.
Tips
• To improve broadcast reception, adjust the supplied
antennas, or connect a commercially available
external antenna.
• Press and hold TUNING + or –. The frequency
indication changes and scanni ng stops when the
system tunes in a station (Automatic Tuning).
• To record the radio programs, use manual recording
(pages 29 and 33).
26
GB
Page 27

Tape – Play
Loading a tape
1 Press Z PUSH on the unit.
2 Load a recorded/recordable tape into
the cassette holder.
With the side
you want to
play/record
facing forward.
Playing a tape
You can use TYPE I (normal) tape.
1 Load a tape.
2 Press DIRECTION on the unit
repeatedly to select “g” to play one
side. Select “h” to play both sides, or
to play both sides repeatedly.
“j”*
* The tape deck stops automatically after
repeating the se qu ence five times.
3 Press TAPE nN.
Press TAPE nN again to play the
reverse side. The tape st ar ts pl aying.
Other operations
To Do this
Stop play Press x.
Fast-forward or
rewind
Switch to TAPE
function from
another source
Cut the sound Press MUTING.
Remove a tape Press Z PUSH on the unit in stop
Press m or M.
Press TAPE nN.
Playback star ts automatically
when a tape is loaded.
Press MUTING again or
VOLUME + to restore sound.
mode.
Tape – Play
Tip
When a tape is inserted, corres ponding forward/
reverse indicators light.
27
GB
Page 28

Tape – Recording
Recording your favorite CD tracks on a tape
— CD-TAPE Synchro Recording
You can record a w hole CD on a tape.
You can use TYPE I ( nor mal) tape.
Use buttons on the unit for the operation.
1 Load a recordable tape.
2 Press DIRECTION repeatedly to select
“g” to record on one side. Select
“h” or “j” to record on both sides.
3 Press TAPE nN repeatedly to select
recording side, then press x.
If you select both si des recording or fr ont
side recording, press TAPE nN to light
up the N indicator, then press x. If you
record on the reverse side, press TAPE
nN again to light up the n indicator,
then press x.
4 Press DVD NX and load a disc you
want to record.
Press x twice to stop playback when
playback starts.
5 Press CD SYNC.
The tape deck stands by for recording.
“REC” flashes.
6 Press z START.
Recording starts.
To stop recording
Press x.
To record a CD by specifying
track order
You can record onl y your favorite CD trac ks
using Progra m Pl ay. Between st eps 4 and 5,
perform steps 3 t o 6 of “Creating you r ow n
program” (page15).
Notes
• CD Synchro Recording is not available with DVD,
VIDEO CD, MP3 audio tracks and JPEG im age files.
• You cannot listen to other sources while recording.
• If the play mode is set to Rep eat Play or Shuffle Play,
it automatically switches to Normal Play in step 5.
• The sound effect automatically switches to “FLAT”
in step 5.
Tips
• When you record on both sides, be sure to start from
the front side. If you start from the reve rse si de ,
recording stops at the end of the reverse side.
• If you select both sides recording and the tape
reaches the end of the front side part-way through a
track, the entire track is record ed ag ain from the
beginning of the reverse side.
28
GB
Page 29

Recording on a tape manually
— Manual Recording
You can record just the p ortions you like from a
disc (DVD, VIDEO CD, CD and MP3) or radio
program on a tape.
You can also record from connected
components (see “Hooking up optional
components” on page 37).
Use buttons on the unit for the operation.
1 Load a recordable tape.
2 Press DIRECTION repeatedly to select
“g” to record on one side. Select
“h” or “j” to record on both sides.
3 Press TAPE nN repeatedly to select
recording side, then press x.
If you select bo t h si des recording or front
side recording, press TAPE nN to light
up the N indicator, then p ress x. If you
record on the reve rs e side, press TAPE
nN again to light up the n indicator,
then press x.
4 Press one of the following buttons to
select the desired source to record.
• DVD NX: To record from this
system’s CD/DVD player. Press x twice
to stop playback.
• TUNER/BAND: To record from this
system’s tuner.
• MD: To record from the connected
optional component to MD IN L/R jacks.
5 Press z START.
The tape deck stan ds b y for recording.
“REC” flashes.
6 Press z START, then start playing the
desired source to reco r d.
Recording starts.
To stop recording
Press x.
Notes
• You cannot listen to other sources while recor ding.
• If no sound is being recorded when recording from a
DVD, set “Dolby Digital” or “DTS” to “PCM” under
“AV” in the Setup Disp la y.
• The sound effect automatically switches to “FLAT”
in step 5.
Tips
• When you record on both sides, be sure to start from
the front side. If you start from the reverse side ,
recording stops at the end of the reverse side.
• For recording from the tuner:
If noise is heard while recording from the tuner,
move the respective antenna to reduce the noise.
Tape – Recording
29
GB
Page 30

Sound Adjustment
Selecting the sound effect
Press PRESET EQ repeatedly to select the
preset you desire.
The preset name ap pears in the display.
To cancel the sound effect
Press PRESET EQ repeatedly until “FLAT”
appears in the display.
Sound effect options
EQ Effect
ROCK Bass and treble are greatly boosted.
This gives rock and dance music tracks
even more powerful sound.
JAZZ Bass and treble are somewhat boosted.
This makes liv e instrumenta l
performances such as jazz or other
small ensembles sparkle without losing
the natural ton e s of th e instruments.
CLASSIC Unwanted treble is at te nuated, letting
you enjoy music with a relaxed feeling.
This mode is suitable for orchestra,
piano solos and other classica l music.
HALL Expansive, reverberating sounds are
artificially reproduced. This lets you
enjoy natural expansive sound a nd
reverberations such as inside a large
theater or a chapel.
LIVE Bass and treble are boosted, and
reverberating sounds are artificially
reproduced. This lets you enjoy
expansive, dazzling and powerful
sounds such as in a concert hall.
MOVIE Expansive, reverberating sounds are
artificially reprodu ced and th e b ass is
also boosted. This lets you enjoy
movies with a full sound-space feeling
like being in a movie theater.
Singing along: Karaoke
You can sing along by turning down the singer’s
voice. You need to connect an optional
microphone.
Enjoying Karaoke
1 Press MIC LEVEL – repeatedly until
“MIC OFF” appears.
2
Connect an optional microphone to
jack.
MIC
3 Press KARAOKE PON repeatedly until
“KARA PON” appears.
To sing karaoke of m ul tipl ex CD, press
AUDIO repeatedly during play to select
“Left” or “Right” (see “Changing the sound
(Except for JPEG )” on page 18).
4 Start playing the music.
5 Press MIC LEVEL + or – repeatedly to
adjust the microphone volume.
Each time you press the button, the display
changes cyclical l y as follows:
MIC OFF y MIC 1 y MIC 2
y … y MIC 7
Other operations
To Do this
Use VIDEO
CDs or DVDs
Cancel karaoke
mode
Adjust the
microphone echo
Turn on your TV and switch it to
the appropriate video input.
Press MIC LEVEL – repeatedly
until “MIC OFF” appears and
disconnect the microphone from
MIC jack, then press KARAOKE
PON repeatedly until “m”
disappears.
Press ECHO repeatedly to ad just
the echo effect. To cancel the
echoing, press ECHO repeatedly
until “ECHO OFF” appears.
30
GB
Page 31

Notes
• The instrumental sound may be reduced as well as
the singer’s voice when the sound is recorded in
monaural.
• The singer’s voice may not be reduced when:
– only a few instruments are playing.
– a duet is being played.
– the source has strong echoes or chorus.
– the singer’s voice deviat es from the center.
– the voice on the source is singing in high soprano
or tenor.
• Karaoke mode is canceled when:
– you change the disc.
– you change the function.
However, the microphone volume will not be
changed.
• With some songs, vocals may not be canceled when
you select “KARA PON”.
• KARAOKE PON is not available during recording.
Tip
To adjust the microphone volume or echo on the unit,
press MIC/ECHO on the unit repeatedly until
“MIC X” (for microphone volume) or “ECHO X” (for
microphone echo) appears, then pre ss . or >
repeatedly.
Mixing and recording sounds
You can “mix” sounds by playing on e of the
components and si nging or speaking int o a
microphone (not supplied).
The mixed sound can be recorded on a tape.
Use buttons on the unit for the operation.
1 Prepare the source you want to mix.
2 Load a recordable tape.
3 Press DIRECTION repeatedly to select
“g”
to record on one side. Select
“h” or “j” to record on both sides.
4 Press TAPE nN repeatedly to select
recording side, then press x.
If you select bo t h si des recording or front
side recording, press TAPE nN to light
up the N indicator, then p ress x. If you
record on the reve rs e side, press TAPE
nN again to light up the n indicator,
then press x.
5 Press the function button of the source
you want to record (e.g., DVD N).
When you want t o re cord fr om a d isc, pres s
x twice to stop playback.
6 Press z START.
The tape deck s ta n ds by for record ing.
“REC” flashes.
7 Press z START, and then start si nging,
speaking or playing the desired
source.
Recording starts .
To stop recording
Press x.
Tips
• If acoustic feedback (howling) occurs, move the
microphone away from the speakers or change the
direction of the microphone.
• If you want to record your voice through the
microphone only, you can do so by selecting the
DVD function when a disc is load and not playing a
disc.
Sound Adjustment
31
GB
Page 32

Timer
Falling asleep to music
— Sleep Timer
You can set the system to turn off after a certain
time, so that you can fall asleep to music.
Press SLEEP.
Each time you press the button, the minute
display (the turn-off time) changes cyclically as
follows:
AUTO* t 90 t 80 t 70 t … t 10 t
OFF
* The system automatically turns off in 100 minutes or
after the current disc or tape finishes playing.
Other operations
To Press
Check the
remaining time*
Change the time
to turn off
Cancel the Sleep
Timer Function
* You ca nnot check the remaining time if you sele c t
“AUTO”.
Note
Do not set to “AUTO” during Synchro Recording on a
tape.
Tip
You can use the Sleep Timer, even if you have not set
the clock.
SLEEP once.
SLEEP repeat edly to select the
time you want.
SLEEP repeatedly until “SLE EP
OFF” appears.
Waking up to music
—Play Timer
You can wake up to music at a preset time . Make
sure you have set t he clock (see “Setting the
clock” on page 10).
Use buttons on the remote for the operation.
1 Prepare the sound source you want to
play.
• DVD: Load a disc.
• Tape: Load a tape.
• Tuner: Tune in the preset radio station
(see “Liste nin g to the radi o” on pa ge 25).
2 Press CLOCK/TIMER SET.
3 Press . or > repeatedly to select
“PLAY SET”, then press ENTER.
“ON” appears and the hour indication
flashes.
4 Set the time to start playing.
Press . or > repeatedly to set the
hour, then press ENTER.
The minute indication flashes.
Press
. or > repeatedly to set the
minute, then press ENTER.
5 Set the time to stop playing following
the same procedure as step 5.
6 Press . or > repeatedly until the
desired sound source appears.
Each time you press the button, the display
changes cyclical l y as follows:
t
TUNERy DVD PLAY
t
TAPE PLAY
T
T
32
7 Press ENTER.
The type of timer (“PLAY TIMER”), the
start time, the stop time, and the sound
source appear in tu rn, before the original
display returns.
8 Press VOLUME + or – to adjust the
volume.
9 Press ?/1 to turn off the system.
GB
Page 33

Other operations
To Do this
Check the setting 1 Press CLOCK/TIMER
Change the setting Start over from step 1.
Cancel the timer
Notes
• You cannot activate the Play Timer and Rec Timer at
the same time.
• If you use the Play Timer and the Sleep Timer at the
same time, the sett ing with the earlier end tim e ha s
priority.
• The system turns on 15 seconds before the preset
time. Do not operate the system from the time the
system turns on until the play starts.
• If the system is on 15 seconds before the preset time,
the Play Timer will not be activated.
• You cannot use the optional component connected to
MD IN L/R jacks as the sound source for Play Timer.
SELECT.
2 Press . or >
repeatedly until “PLAY
SELECT” appears, then
press ENTER.
1 Press CLOCK/TIMER
SELECT.
2 Press . or >
repeatedly until “TIMER
OFF” appears, then press
ENTER.
Timer recording radio programs
—Rec Timer
You can record a pr eset radio station fr om a
specified time.
To timer record, you must fi rst preset the radio
station (see “Presetting radio stations” on
page 24) and set the clock (see “Setting the
clock” on page 10).
Use buttons on the remote for the operation.
1 Press CLOCK/TIMER SET.
2 Press . or > repeatedly to select
“REC SET”, then press ENTER.
“ON” appears a nd t he hour indication
flashes.
3 Set the time to start recording.
Press . or > repeatedly to set th e
hour, then press ENTER.
The minute indication flashes.
Press
. or > repeated ly to set the
minute, then press ENTER.
4 Set the time to stop recording following
the same procedure as step 4.
The type of timer (“REC TIMER”), the start
time, the stop time, and “TUNER REC”
appear in turn, before the ori g i nal display
returns.
5 Load a recordable tape.
6 Press DIRECTION on the unit
repeatedly to select “g” to record on
one side. Select “h” or “j” to
record on both sides.
7 Press TAPE nN repeatedly to select
recording side, then press x.
If you select both sides recording or fr ont
side recording, press TAPE nN to light
up the N indicator, then press x. If you
record on the reverse side, press TAPE
nN again to light up the n indicator,
then press x.
8 Tune in the preset radio station (see
“Listening to a preset station” on
page 25).
continued
33
Timer
GB
Page 34

9 Press ?/1 to turn off the system.
Other operations
To Do this
Check the setting 1 Press CLOCK/TIMER
Change the setting S tart over from step 1.
Cancel the time r
Notes
• You cannot activate the Play Timer and Rec Timer at
the same time.
• If you use the Rec Timer and the Sleep Timer at the
same time, the setting with the earlier end time has
priority.
• The system turns on 15 seconds before the preset
time. Do not operat e the system from the time the
system turns on until the play starts.
• If the system is on 15 seconds before the preset time,
the Rec Timer will not be activated.
• The volume is reduced to minimum during
recording.
• Note that if th e Rec Timer is set at the same tim e as
the Play Timer sound source is se t to ta pe , the Rec
Timer sound may be recorded onto the ta pe .
SELECT.
2 Press . or >
repeatedly until “REC
SELECT” ap p ears, then
press ENTER.
1 Press CLOCK/TIMER
SELECT.
2 Press . or >
repeatedly until “TIMER
OFF” appears, then press
ENTER.
Display
Turning off the display
— Power Saving Mode
The clock display can be turned off to minimize
the amount of power consumed during sta ndby
(Power Saving Mode).
Press DISPLAY repeatedly while the
system is off until the clock display
disappears.
To cancel Power Saving Mode
Press DISPLAY while the system is off. Each
time you press the button, the display switches
as follows:
Clock display* y No display (Power Sa vi ng
Mode)
* The clock is displayed only if you set the clock.
Tips
• The timer continues to operate in Power Saving
Mode.
•
?/1 indicator lights up even in Power Saving Mode.
34
GB
Page 35

Adjusting the brightness
Viewing information
of the indicators
Press DIMMER repeatedly.
Each time you press the button, the setting
changes cycl i cally as follows:
DIMMER OFF t DIMMER 1 t
DIMMER 2*
* DIMMER 2 is the darkest.
about the disc in the
display
You can check the playing time and remaining
time of the current track or that of the disc.
Checking the disc in formation
(DVD/VIDEO CD/CD/MP3/
JPEG)
Press DISPLAY.
Each time you press the button, the display
changes cyclically as follows:
x When playing a DVD
Elapsed playing time of the current title t
Remaining time of the current chapter t
Remaining time of the current title t Clock
display (for a few sec onds) t Effect st atus (f or
a few seconds)
x When playing a CD/VIDEO CD without
PBC function
Elapsed playing time of the current track t
Remaining time of the current track t
Remaining time of the disc1) t Clock display
(for a few seconds) t Effect status (for a few
seconds)
x When playing a VIDEO CD with PBC
functions (Ver. 2.0)
Elapsed playing time on the current track2) t
Clock display (for a few seconds) t Effect
status (for a few seconds)
x When playing an MP3
Elapsed playing time of the current track t
Clock display (for a few seconds) t Effect
status (for a few seconds)
x When playing a JPEG
Current file number t Clock di splay ( for a few
seconds) t Effect status (for a few seconds)
Display
continued
35
GB
Page 36

x When you press DISPLAY in stop mode
Total title/track number of the disc and total
playing time of the current disc
3)
t Clock
display (for a few se conds) t Effect sta tus (f or
a few seconds)
1)
These are not displayed during Shuffle Play or
Program Play.
2)
May not appear with still images.
3)
VIDEO CDs and CDs only
Checking the tuner
information (TUNER)
Press DISPLAY while listening to the radio.
Each time you press the button, the display
changes cycli cally as follows:
Preset numb er* and f requenc y t Clock display
(for a few second s) t Effect status (f or a few
seconds)
* Prese t number is displayed only if you preset radio
stations (page 24).
Viewing information about the disc in the on-screen display
You can check th e pl aying time and rema i ning
time of the current title, chapter or track.
Press DISPLAY.
Each time you press t he button, the display
changes cyclical l y as follows:
x When playing a DVD
Elapsed playing time of the current title t
Remaining time of the current chapter t
Remaining time of the current title
x When playing a VIDEO CD
Elapsed playing time of the current track t
Remaining time of the current track*
x When playing a CD
Elapsed playing time of the current track t
Remaining time of the current track t
Remaining time of the current disc
x When playing an MP3
Elapsed playing time of the current track
x When playing a JPEG
Current file number and total number of files
* When playi ng a VIDEO CD wi thout PBC function
To turn off the display
Press DISPLAY repeatedly until the display
disappears.
36
GB
Page 37

Optional Components
Hooking up optional components
To enhance your system, you can connect optional components. Refer to the operating instruc tio n s
provided with each com ponent.
Amplifier or MD deck
To the digital input jack of
the digital component
To the component video input
jack of the TV or projector
TV or projector
A DIGITAL OUT (OPTICAL) jack
Use a digital optical cord (square, not supplied)
to connect an amplifier, MD deck or DAT deck
with a digital optical input jack. Sound is then
output when the system fun cti on is set to DVD.
By connecting this system to the optical input
jack of the optional amplifier equipped with
Dolby Digital or DTS decoder, you can enjoy
the 5.1 channel sound.
In addition, when the CD or DVD audio is linear
PCM, you can make a digital recordin g from this
system to an MD deck or DAT deck.
MD deck or VCR, etc.
From the audio output jack
of the connected component
To the S video input jack
of the TV
TV
Notes
• When playing a VIDEO CD or MP3 audio tracks,
you cannot output digital audio.
• You can record digital audio from this system only
when DVD function is selected.
• You cannot make a digital recording of a copy
guarded disc using a digital component connected to
this system. Also, playback may not be possible
depending on the connected component.
• DVD linear PCM output is output at a sampling
frequency of 48 kHz regardless of the disc being
played back.
• When you connect a component that does not support
Dolby Digital or DTS to the DIGITAL OUT
(OPTICAL) jack and output a Dolby Digital or DTS
bit stream, noise may be heard from the connected
component.
Optional Components
continued
37
GB
Page 38

B MD IN L/R jacks
Use audio cords ( n ot supplied) to connect an
optional analog component (MD dec k or V C R ,
etc.) to these j acks. You ca n then record or listen
to from the component through this system.
C S VIDEO OUT jack
Use an S video cord (not supplied) to connect an
optional TV to this jack. Set VIDEO OUT
SELECTOR to S VIDEO OUT while the system
is off. You can enjoy hi gher quality video
images.
D VIDEO OUT SELECTOR
Set VIDEO OUT SELECTOR depending on
which jack is connected to the TV only while the
system is off.
E T LINE-TV jack (for Russian
model)
Use an optional SCA R T cord to connect a TV.
Check that the TV conforms to RGB signals. If
the TV conforms to RGB signals, change the
input mode of the TV to RGB signals, then set
VIDEO OUT SELECTOR on the unit to
T LINE-TV while the sy stem is off. Refer to
the operating instructions supplied with the TV
to be connected.
E COMPONENT VIDEO OUT
jacks (for other models)
Use an optional com ponent video cord to
connect a TV. Set VIDEO OUT SELECTOR to
COMPONENT VIDEO OUT while the system
is off.
Listening to audio from a connected component
Use buttons on the unit for the operation.
1 Connect audio cords.
See “Hooking up optional components” on
page 37.
2 Press MD to switch the function to MD.
Start playing the connected component.
38
GB
Page 39

Enjoying the 5.1 channel
Recording audio from a
sound with the optional
amplifier
1 Connect a digital optical cord.
See “Hooking up optional components” on
page 37.
2 Connect 6 speakers to an AV amplifier
equipped with a decoder.
For the speaker placement, refer to th e
operating instructions supplied with the
connected amplifier.
3 Press DVD SETUP in stop mode.
The Setup Disp l ay appears.
4 Press < or , repeatedly to select
“AV”, then press ENTER.
5 Press M or m repeatedly to select
“Dolby Digital” or “DTS”, then press
ENTER.
6 Press M or m repeatedly to select “Bit
Stream”, then press ENTER.
7 Press DVD SETUP to turn off the Setup
Display.
8 Switch the output to 5.1 channel Dolby
Digital sound or 5.1 channel DTS
sound.
See “Changi ng the sound /subtitl e/angle” on
page 18.
Note
If “Dolby Digital” or “DTS” is set to “Bi t Str eam”,
sound is not output from the supplied speakers and
optional headphone does not function .
connected component
1 Connect audio cords.
See “Hooking up optional components” on
page 37.
2 Start recording manually.
See “Recording on a t ape manually” on
page 29.
Recording on a connected component
Making a digital recording on
an MD
1 Connect a digital optical cord.
See “Hooking up optional components” on
page 37.
2 Press DVD N (or DVD NX on the
unit) to switch the function to DVD.
3 Press x twice to stop playback.
4 Start recording with the connected
digital component (MD deck, etc.)
Refer to the operating instructions provided
with the connected component.
5 Press DVD N (or DVD NX on the
unit) to start playing.
Notes
• You cannot make a digital recording in the following
cases.
– Copy guarded DVDs
– DVD Dolby Digital or DTS bit stream output
– CD-Rs/CD-RWs* recorded in music CD format
• You cannot make a recording when “Dolby Digital”
or “DTS” under “AV” is set to “Bit Stream”. Set
“Dolby Digital” and “DTS” to “PCM”.
* Playback is possible on a connected digita l
component.
Optional Components
39
GB
Page 40

Troubleshooting
Problems and remedies
Should you encounter a problem with your
system, do the following:
1 Make sure the power cord and speaker
cords are correctly and firmly connected.
2 Find your problem in the troubleshooting
checklist below and take the indicated
corrective action.
If the problem persists after doing all of the
above, consult yo ur nearest Sony dealer.
When the ?/1 indicator flashes
Immediately unplug the power co rd and
check the follow i ng i tems.
• If your system has a voltage selector, is the
voltage selector set to the correct voltage?
Check the voltage for your region, the n
make sure the voltage selector is set
correctly.
• Are the + and – speaker cords shor tcircuited?
• Are you using th e supplied speakers?
• Is anything blocking the ventilation holes
on the rear of the system?
Check all the above items and fix any
problems found. A ft er ?/1 indicator stops
flashing, reconnect the power cord and turn
on the system. If the indi cator s til l fla shes, o r
if the cause of the prob l em cannot be found
even after checki ng all the above items,
consult your neares t Sony dealer.
General
“– –:– –” appears in the displa y .
• A power interruption has occurred. Set the clock
(page 10 ) and tim er settings (pages 32 and 33)
again.
The clock setting/radio presetting/timer is
canceled.
• Redo th e f ollowing:
– “Setting the clock” (page 10)
– “Presetting radio stations” (page 24)
– “Fal ling asleep to music” and “Waking up to
music” (page 32)
– “Time r reco rd ing r ad io progr a ms ” (pa ge 33)
There is no sound.
• Press VOLUME +.
• Make sure the headp hon es are not connected.
• Check the speaker connections (page 7).
• There is no audio output during Rec Timer.
• The system is in pause mode or in slow-motion
play mode. Press DVD N or DVD NX on the
unit to return to Normal Play.
• Set “Dolby Digital” or “DTS” under “AV” to
“PCM”.
There is severe hum or noise.
• Move the syst em away fro m th e so u rce of noise.
• Connect the system to a differen t w all outlet.
• Install a noise filter (commer ci a lly available) to
the power cord.
The timer cannot be set.
• Set the clock again (page10).
The timer does not function.
• Check the timer setting and set the correct time
(pages 32 and 33).
• Cancel the Sleep Timer Function (page 32).
The remote does not function.
• Remove the obstacle.
• Move the remote closer to the system.
• Point the remote at the system’s sensor.
• Replace the batteries (R6/size AA).
• Locate the s ystem away from the fluoresce nt light.
There is acoustic feedback.
• Reduce the volume.
• Move the microphone away from the speakers or
change the direction of the microphone.
40
GB
Page 41

The color irregularity on a TV screen persists.
• Turn off the TV set once, then turn it on after 15
to 30 minutes. If the color irregularity still
persists, place t he s pe ak ers farther away from the
TV set.
Speakers
Sound comes from one channel or
unbalanced left and right volume.
• Check the speaker connection and speaker
placement.
• The source being played back is monaural.
Sound lacks bass.
• Check that the speaker’s + and – jacks are
connected correctly.
DVD/VIDEO CD/CD/MP3/JPEG
player
The disc tray does not open and “LOCKED”
appears.
• Contact your Sony dealer or local authorized Sony
service facility.
The disc tray does not close.
• Place the disc correctly.
• Always close the tray by pressing Z on the unit.
Trying to press the tray closed with your fingers
may cause problems with the pla ye r .
The disc does not eject.
• You cannot ejec t the disc duri ng CD Synchr o
Recording. Press x to cance l th e CD Syn ch ro
Recording, then press Z on the unit to eject the
disc.
• Consult your nearest Sony dealer.
Play does not start.
• Open the disc tray and check wheth er a disc is
loaded.
• Wipe the disc clean (page 4 6).
• Replace th e di sc.
• Place the disc that this system can play (page5).
• Place the disc correctly.
• Place the disc in the tray with the la be l side up.
• Remove the di s c a n d wipe away th e moisture on
the disc, then leave the system turned on for a few
hours until the moisture evapora tes.
• Press DVD N or DVD NX on the unit to start
play.
• The region code on the DVD does not match the
system.
The sound skips.
• Wipe the disc clean ( pa ge46).
• Replace the disc.
• Try moving the system to a place without
vibration (e.g., on top of a stable stand) .
• Try moving the speakers away from the system, or
placing them on separate stands. When you listen
to a track with bass sounds at high volum e , the
speaker vibration may cause the so und to skip.
Play does not start from the first track.
• Press PLAY MODE repeatedly until both “PGM”
and “SHUF” disappear to return to Normal Play.
• Resume Play has been select ed . Pres s x in stop
mode, then start playback (page 12).
• The title, DVD or PBC me nu automatically
appears on the TV screen.
Playback starts automatically.
• The DVD features an auto playback function.
Playback stops automatically.
• Some discs may contain an auto pause signal.
While playing such a disc, the playback stops at
the auto pause signal.
You cannot perform some functions such as
Stop, Search, Slow-motion Play, Repeat Play,
Shuffle Play or Program Play.
• Depending on the disc, you may not be able to do
some of the operations above. Re fer to the
operating instructio ns supplied with the disc.
MP3 audio track cannot be played back.
• Recording was not performed according to the
ISO9660 level 1 or level 2 format, or Joliet in the
expansion format.
• The MP3 audio track does not have the extension
“.MP3”.
• The data is not stored in MP3 format.
• Discs containing files other than MPEG 1 Audio
Layer-3 files cannot be playe d.
• Set “Data CD Priority” under “AV” to “MP3”
(page 20).
• Playback is possible up to 15 levels.
• The album contains more than 999 MP3 audio
tracks.
MP3 audio tracks take longer to play back than
others.
• After the system reads all tracks on the discs,
playback may take more time tha n usual if:
– the numbe r of albums or tracks on the disc is
very large.
– the album and track organization structure is
very complex.
continued
Troubleshooting
41
GB
Page 42

The JPEG image file cannot be played.
• The DATA CD is not recorded in JPEG format
that conforms to ISO9660 Level 1/Level 2 or
Joliet.
• The JPEG image file does not have the extension
“.JPG” or “.JPEG”.
• The data is not formatted in JPEG even though it
has the extension “.JPG” or “.JPEG” .
• Set “Data CD Priority ” und er “AV” to “JPEG”
(page 20).
• Playback is possible up to 15 levels.
• The album contains more than 999 JPEG image
files.
The sound loses stereo effect when you play a
DVD, VIDEO CD, CD or MP3.
• Select “KARA OFF” in step 3 of “Singing along:
Karaoke” (page 3 0).
• Make sure the system is connected appr opr ia te ly.
The recording was not done properly when
making a digital recording from the CD/DVD
player of this system to an optional
component connected to the DIGITAL OUT
(OPTICAL) jack.
• Audio data is output from the DIGI T A L O U T
(OPTICAL) jack without a ny sound processing,
so that the audio data is output slight ly a he ad of
the sound from the speakers. Therefo re, start the
optional component reco rd ing in advance when
making a digital recording to a connected optional
component (MD deck, etc.).
Picture
There is no picture.
• Press DVD.
• Check that th e system is connected secu rel y .
• If video from this system has to go through your
VCR to get to your TV, the cop y - pr o te c tion
applied to some DVD programs could affect
picture quality. If you still exper ie nc e p ro ble ms
after checking your connections, ple as e try
connecting this system dir ectly to your TV’s Svideo-input, if your TV is equipped with this
input, then set VIDEO OUT SELECTOR to S
VIDEO OUT while the system is off (page 8).
• The video cable is damaged. Replace it with a new
one.
• Make sure you conn e ct the system to the video
input jack of your TV (page 8).
• Make sure you turn on the TV and oper ate the T V
correctly.
• Make sure you select the video input on the TV so
that you can view the pictures from the system.
• When you play a VIDEO CD, make sure you set
the color system correctly, according to your TV
(color) system (except for Russian model) .
• Make sure you connect the system and your TV
using only the supplied video cable so that you can
view game images.
Picture noise appears.
• Clean the disc.
• When you play a VIDEO CD, the color system is
different. Set the color system to match your TV
(page 20) (except for Russian model).
The aspect ratio of the screen cannot b e
changed even though you set “TV Type”
under “AV” in the Setup Display when you
play a wide picture.
• The aspect ratio is fixed on your DVD.
• If you connect the system with the S video cable,
connect directly to the TV. Otherwise, you may
not change the aspect ratio.
• Depending on the TV, you may not change the
aspect ratio.
Messages do not appear on the screen in the
language you want.
• Select the language you want for the on-screen
display in “OSD” under “Language” in the Setup
Display (page 19).
42
GB
Page 43

The language for the sound track cannot be
changed.
• Multilingual tracks are not recorded on the DVD
being played.
• The DVD prohibits changing the language for the
sound track.
The subtitle language cannot be changed.
• Multilingual subtitles are not recorded on the
DVD being played.
• The DVD prohibits changing the subtitles.
The subtitle cannot be turned off.
• The DVD prohibits turning off subtitles.
The angles cannot be changed.
• Multi-angles are not recorded on the DVD being
played.
• The DVD prohibits changing the angles.
Tuner
Severe hum or noise/stations cannot be
received. (“TUNED” or “STEREO” flashes in
the display)
• Set the proper band and frequency (page 24).
• Connect th e an tenna properly (page 7).
• Find a place and an orientation that provide good
reception, then set up the antenna again. If you
cannot obtain good reception, we recommend you
connect a commercially available external
antenna.
• The supplied FM lead antenna receives signals
along its entire length, so make sure you extend it
fully.
• Locate the antennas as far away from the speaker
cords as possible.
• Consult your nearest Sony dealer if the supplied
AM antenna has come off the plastic stand.
• Try turning off surrounding electrical equipment.
A stereo FM program cannot be received in
stereo.
• Press FM MODE until “MONO” disappears.
Tape deck
The tape does not record or play, or there is a
decrease in sound level.
• The heads are dirty. Clean them (page 46).
• The record/playback heads are ma gne tized.
Demagnetize them (page46).
The tape does not erase completely.
• The record/playback heads are ma gne tized.
Demagnetize them (page46).
There is excessive wow or flutter, or the sound
drops out.
• The capstans or pinch rollers are dirty. Clean them
(page 46).
Noise increases or the high frequencies are
erased.
• The record/playback heads are ma gne tized.
Demagnetize them (page46).
The tape does not record.
• No cassette is loaded. Load a cassette.
• The tab has been removed from the cassette.
Cover the broken tab with adhesive tape
(page 46).
• The tape has wound to the end.
• Set “Dolby Digital” or “DTS” under “AV” to
“PCM”.
“TAPE ERR” appears in the display.
• Press ?/1 to turn off the system and remove any
tapes from the cassette holder. Then disconnect
the power cord and reconnect it. Then press ?/1
to turn on the system.
If “TAPE ERR” still appears, consult your nearest
Sony deal e r .
Optional components
There is no sound.
• Refer to General item “There is no sound.”
(page 40) and check the condition of the system.
• Connect the component properly (page 37) while
checking:
– if the cords are connected properly.
– if the cord plugs are firmly inserted all the way.
• Turn on the connected component.
• Refer to the operating instructions suppl ie d with
the connected component and st art pl ay ing.
Troubleshooting
continued
43
GB
Page 44

If the system still does not
operate properly after performing
the above measures, reset the
system as follows:
Use buttons on the unit for the operation.
1 Disconnect the power cord.
2 Reconnect the power cord.
3 Press x, DIRECTION and DVD NX at the
same time.
4 Press ?/1 to tu r n on the system.
The system is reset to the factor y settings except
for DVD settings . Y ou should set the settin gs
you made, such as the pr eset stat ions , clock, and
timer.
To return the DVD setup to the
default settings*, perform reset
as follows:
The operation can o nl y be set us in g t he TV
screen.
1 Press DVD SETUP in stop mode.
2 Press < or , repeatedly to select “Reset”,
then press ENTER.
3 Press < or , repeatedly to select “YES”,
then press ENTER.
It takes a few seconds to complete. Do not
press ?/1 when resetting the system.
* Exce pt for Rating (Parental C ontr ol) settings
Messages
One of the following messages may appear or
flash in the display during operation.
DVD/VIDEO CD/CD/MP3/JPEG
CAN’T PLAY
• A disc that cannot be played was inserted.
• A disc with an unsupported Region code was
inserted.
NO DISC
There is no disc in the unit.
NOT IN USE
You pressed an invalid button.
Tape
NO TAB
You cannot record the tape because the tab has been
removed from the cassette.
NO TAPE
There is no tape in the tape deck.
TAPE ERR
A malfunction of the tape deck has occurred.
44
GB
Page 45

Additional Information
Precautions
On operating voltage
Before operating the system, check that the operating
voltage of your system is identical with the voltage of
your local power supply.
On safety
• The unit is not disconnected from the AC power
source (mains) as long as it is connec te d to the wall
outlet, even if the unit itse lf has been turned off.
• Unplug the system from the wall outlet (mains) if it
is not to be used for an extended period of time. To
disconnect the power cord (mains le ad), pull it out by
the plug. Never pull the c or d itse lf .
• Should any solid object or liquid fall into the system,
unplug the system and have it checked by qua lified
personnel before operating it any furthe r .
• AC power cord must be changed only at the qualified
service shop.
On placement
• Do not place the system in an inclined position.
• Do not place the system in locations where it is;
– Extremely hot or cold
– Dusty or dirty
– Very hum id
– Subject to vibrations
– Subject to direct sunlight.
• Use caution when placing the unit or speakers on
surfaces that have been specially treat ed (wi th wa x,
oil, polish, etc.) as staining or discolo ration of the
surface may result.
On heat buildup
• Although the system heats up during operation, this
is not a malfunction.
• Place the system in a location wit h adequate
ventilation to prevent heat buildup in the system.
• If you continuously use this system at a high volume,
the cabinet temperature of th e to p, si de and bot tom
rises considerably. To avoid burning yourself, do not
touch the cabinet.
• To prevent a malfunction, do not cover the
ventilation hole for the cooling fan .
In case color irregularity is observed
on nearby a TV screen
With the magneti cally shield ed type of spe aker system,
the speakers can be installed near a TV set. Howe ve r,
color irregularity may still be observe d on the TV
screen depending on the type of your TV se t.
If color irregularity is observed…
Turn off the TV set once, then turn it on after 15 to 30
minutes.
If color irregularity is observed
again…
Place the speakers farther away from the TV set.
IMPORTANT NOTICE
Caution: This syste m is capable of holding a still
video image or on-screen display image on your
television screen indefinitely. If you leave the still
video image or on-screen display image displayed
on your TV for an extended period of time you risk
permanent damage to your tel ev isi on sc ree n .
Projection televisions are especially susceptible to
this.
On operation
• If the system is brought directly from a cold to a
warm location, or is placed in a very damp room,
moisture may condense on the lens inside the CD/
DVD player. Should this occur, the system will not
operate properly. Remove the disc and leave the
system turned on for about an hour until the moisture
evaporates.
• When you move the system, take out any disc.
If you have any questions or problems concerning your
system, please consult your ne are st S ony de a le r .
Additional Information
continued
45
GB
Page 46

Notes on discs
• Before playing, clean the disc with a cleaning cloth.
Wipe the disc from the center out .
• Do not use solvents such as benzine, thinner,
commercially available cl ean ers or anti-static spray
intended for vinyl LPs.
• Do not expose the disc to direct sunlight or heat
sources such as hot air ducts, nor leav e it in a car
parked in direct sunlight.
• Do not use discs encircl ed wit h a protection ring.
This may cause a malfunction to the system.
• When using discs that have glue or similar tacky
substance on the label side of the disc or that use d a
special ink when the label wa s p rin ted, there is a
chance that the disc or label may become attach ed to
parts inside this unit. When this occurs, it may not be
possible to remove the disc, and may also cause this
unit to malfunction. Be sure to check that the label
side of the disc is not sticky before using.
The following types of disc should not be used:
– Rental or used discs with attach ed seal s where th e
glue extends beyond the seal. The perimeter of the
seal on the disc is tacky.
– Discs that have labels printed using a special ink
that feels tacky when touched.
Cleaning the cabinet
Clean the cabinet, panel and co ntro ls with a soft cloth
slightly moistened wi th mild dete rgent soluti on. Do not
use any type of abrasive pad, scouring powder or
solvent such as thinner, benzine or alcohol.
To save a tape permanently
To prevent a tape from being accidentally recorded
over, break off the cassette tab from side A or B as
illustrated.
When using a tape longer than
90 minutes
The tape is very elastic. Do not change the tape
operations such as play, stop, and fast-winding
frequently. The tape may get entangled in the tape
deck.
Cleaning the tape heads
Clean the tape heads after every 10 hours of use . Be
sure to clean the tape heads before you sta r t an
important recording or after playing an old tape. Use a
separately sold dry-type or wet-type cleaning cassette.
For details, refer to th e instructions of the cleaning
cassette.
Demagnetizing the tape heads
Demagnetize the tape h ead s and the metal parts that
have contact with the tape after every 20 to 30 hours of
use with a separately sold demagnetizing cassette. For
details, refer to the instructions of the dem agnetizing
cassette.
46
Break off the
cassette tab
If you later want to reuse the tape for recording, cover
the broken tab with adhesive tape .
Before placing a cassette in the tape
deck
Take up any slack in the tape. Otherwise, the tape may
get entangled in the parts of the tape deck and become
damaged.
GB
Page 47

Specifications
Main unit (HCD-GP8D)
Amplifier section
Russian model
The following measured at AC 230 V, 50/60 Hz
DIN power output (rated) 30 + 30 watts
Continuous RMS power output (reference)
Other models
The following measured at AC 240 V, 50/60 Hz
DIN power output (rated) 30 + 30 watts
Continuous RMS power output (reference)
Inputs
MD IN (phono jacks): voltage 1 V, impedance
MIC (phone jack): sensitivity 1 mV,
Outputs
VIDEO OUT (phono jack):
S VIDEO OUT (4-pin/mini-DIN jack):
LINE-TV (for Russian model):
COMPONENT VIDEO OUT (for other models):
DIGITAL OUT (OPTICAL) (Square optical connector
jack, rear panel)
Wavelength 660 nm
PHONES (stereo mini jack):
SPEAKER: accepts impedance of
(6 ohms at 1 kHz, DIN)
40 + 40 watts
(6 ohms at 1 kHz, 10%
THD)
(6 ohms at 1 kHz, DIN)
40 + 40 watts
(6 ohms at 1 kHz, 10%
THD)
47 kilohms
impedance 10 kilohms
max. output level
1 Vp-p, unbalanced, Sync
negative, load impedance
75 ohms
Y: 1 Vp-p, unbalanced,
Sync negative,
C: 0.286 Vp-p for NTSC,
load impedance 75 ohms
0.3 Vp-p for PAL, load
impedance 75 ohms
max. output level 1 Vp-p,
unbalanced, Sync
negative, load impedance
75 ohms
Y: 1 Vp-p, 75 ohms
B, CR: 0.7 Vp-p, 75 ohms
C
accepts headphones of
8ohms or more
6 ohms
Disc player section
System Compact disc and digit al
audio and video system
Laser Semiconductor laser
(DVD: λ=650 nm,
CD: λ=780 nm)
Emission duration:
continuous
Frequency response DVD (PCM 48 kHz):
2 Hz – 22 kHz (±1 dB)
CD: 2 Hz – 20 kHz (±1 dB)
Video color system format
Russian model: PAL
Other models: NTSC, PAL
Tape deck section
Recording system 4-track 2-channel stereo
Frequency response 40 – 13,000 Hz,
using Son y TYPE I
cassette
Wow and flutter ±0.15% W.Peak (IEC)
0.1% W.RMS (NAB)
±0.2% W.Peak (DIN)
Tuner section
FM stereo, FM/AM superheterodyne tuner
FM tuner section
Tuning range 87.5 – 108.0 MHz
(50-kHz step)
Antenna FM lead antenna
Antenna terminals 75 ohms unbalanced
Intermediate frequency 10.7 MHz
AM tuner section
Tuning range
Russian model: 531 – 1,602 kHz
(with the interval set at
9kHz)
Other models: 530 – 1,710 kHz
(with the interval set at
10 kHz)
531 – 1,602 kHz
(with the interval set at
9kHz)
Antenna AM loop antenna
Antenna terminals External antenna terminal
Intermediate frequency 450 kHz
continued
Additional Information
47
GB
Page 48

Speaker (SS-CGP8D)
Speaker system 2-way, bass-reflex type,
Built in sub woofer,
magnetically shielded type
Speaker units
Woofer: 12 cm, cone type
Sub woofer: 15 cm, cone type
Tweeter: 2.5 cm, Balance Dome
type
Nominal impedance 6 ohms
Dimensions (w/h/d) Approx. 183 × 295 ×
295 mm
Mass Approx. 4.7 kg net per
speaker
General
Power requirements
Russian model: 230 V AC, 50/60 Hz
Australian model: 230 – 240 V AC, 50/60 Hz
Hong Kong model: 220 – 240 V AC, 50/60 Hz
Other models: 110 – 120 V, 220 – 240 V
AC, 50/60 Hz
Adjustable with voltage
selector
Power consumption
Russian model: 90 watts
0.3 watts (in Power Saving
mode)
Other models: 90 watts
Dimensions (w/h/d) Approx. 191 × 250 ×
312 mm
Mass Approx. 6.2 kg
Supplied accessories: Remote Commander (1)
R6 (size AA) batteries (2)
AM loop antenna (1)
FM lead antenna (1)
Video cable (1)
Speaker pads (8)
Design and specifications are subject to change
without notice.
Glossary
Album
Section of a music piece on a data CD
containing MP3 au di o tracks or JPEG image
files.
Auto Pause
An automatical pauses accordin g to the signal
encoded on the disc while playing a VIDEO CD.
If the CD/DVD player does not resume play for
a long time, press DV D N or DVD NX on
the unit to resume play manually.
Chapter
Sections of a picture or a music piece on a DVD
that are smaller than titles. A t itle is composed o f
several chapte rs. Each chapter i s assigned a
chapter numbe r en abling you to locate the
chapter you wan t .
Dolby Digital
This sound format for movie theaters is more
advanced than Dolby Surround Pro Logic. In
this format, the surround speakers output stereo
sound with an expa nded frequency range an d a
subwoofer channel for deep bass is
independently provided. This forma t is also
called “5.1” beca use the subwoofer channel is
counted as 0.1 channel (since it functi o ns only
when a deep bass e ff ect is needed). All si x
channels in this f ormat are recorded separately
to realize superi or channel separation.
Furthermore, since all the signals are proce ssed
digitally, less signal degrada tio n occu rs .
DTS
Digital audio compression technology that the
Digital Theater Systems, Inc. developed. This
technology conforms to 5.1-channel surrou nd.
The surround chan nel is stereo and there i s
discrete sub woofer channel in this format. DTS
provides the same 5. 1 di screte channels of hi gh
quality digital audio. The good channel
separatio n is realize d because the all chann el
data is recorded dis cr et e and processed in
digital.
48
GB
Page 49

DVD
A disc that contains up to 8 hours of moving
pictures even though its diameter is the same as
a CD.
The data capacity of a si ngle-layer and sing l esided DVD, at 4.7 GB (Giga Byte), is 7 times
that of a CD. Fu rthermor e, the data cap acity o f a
dual-layer and single-sided DVD is 8. 5 G B , a
single-layer and double-sided DVD 9.4 GB, and
a dual-layer and double-sided DVD 17 GB.
The pictur e data uses the MPE G 2 format, on e of
the worldwide standards of digital compression
technology. The pict ur e data is compressed to
about 1/40 of its orig in al size. The DVD also
uses the variable rate coding technology that
changes the data to be allocate d according to the
status of the picture.
The audio data is recorded in Dolby Digital as
well as in PCM, allowing you to enjoy more
realistic audio pr esence.
Furthermor e, various advanced functions suc h
as the multi-angle, multilingual, and Parental
Control functions are provided with the DVD.
File
Section of a picture on a data CD containing
JPEG image files.
Film based software, Video based
software
DVDs can be classified as Film based or Video
based software. Film based DVDs contain the
same images (24 frames per second) that are
shown at movie theaters. Video based DVDs,
such as television dramas or sit-coms, displays
images at 30 frames (or 60 fields) per second.
Index (CD) / Video Index (VIDEO CD)
A number that divides a track into sections to
easily locate the point yo u want on a VIDEO CD
or a CD. Depending on the disc, no indexes may
be recorded.
Menu Playback
Playback using the menu screens recorded on
VIDEO CDs with PBC functions. You can enjoy
simple interactive software using the menu
playback function.
Multi-angle function
Various angle s, or viewpoints of the video
camera, for a scene are recorded on some DVDs.
Multilingual function
Several languages for the sound or subt itles in a
picture are recorded on some DV Ds.
Multi Session
This is a recording method that enables adding
of data using the Trac k-At-Once method.
Conventional CDs begin at a CD control area
called the Lead-in and end at an are a called
Lead-out. A Multi Session CD is a CD having
multiple sessions, with each segment from
Lead-in to Le ad-out regarde d as a si ngle sess ion.
CD-Extra: This format records audio (audio CD
data) on the tracks in session 1 and data on the
tracks in sess i o n 2.
Parental Control
A function of the DVD to limit playback of the
disc by the age of th e users according to t h e
limitation level in each country/region. The
limitation varies from disc to disc; when it is
activated, playback is completely prohibited,
violent scenes are skipped or replaced with other
scenes and so on.
Additional Information
continued
49
GB
Page 50

Playback Contro l (PB C )
Signals encoded on VIDEO CDs (Version 2.0)
to control playback. By using men u screens
recorded on VIDEO CDs with PBC functions,
you can enjoy playing simple interactive
programs, programs with search functions, and
so on.
This system conforms to Ver. 1.1 and Ver. 2.0 of
VIDEO CD standards. You can en joy two ki nds
of playback depending on the disc type.
VIDEO CDs without PBC functions
(Ver. 1.1 discs)
Enjoy video playback (moving pictures) as well
as music.
VIDEO CDs with PBC functions
(Ver. 2.0 discs)
Play interactive software using menu screens
displayed on the TV screen (PBC Playback), in
addition to the video playback functions of Ver.
1.1 discs. Moreover, you can play highresolution still pictures, if they are included on
the disc.
Region Code
This system is used to protect copyrights. A
region number is allocated on each DVD syst em
or DVD disc according to the sales regio n. Each
region code is shown on the sy stem as well as on
the disc packaging. The system can play the
discs that match its region code. The system can
also play disc s with the “ ” mark. Even when
ALL
the region code is not shown on the DVD, the
region limit may still be activated.
Scene
On a VIDEO CD with PBC functions (page 14),
the menu screens, moving pictures, and still
pictures are divided into se ctions called
“scenes”. Ea ch scene is ass igned a scene n umber
enabling you to lo cate the scene you wan t.
Title
The longest sections of a picture or a music
piece on a DVD; a movie, etc., for a picture
piece on video so ft war e; o r an al bum, et c. , for a
music piece on audio software. Ea ch title is
assigned a title number enabling you to locate
the title you want.
Track
Sections of a picture or a m u s ic pi ece on a CD,
VIDEO CD, MP3 or JPEG . Eac h track is
assigned a track nu m ber enabling you to loc at e
the track you w ant.
Disc
DVD
structure
VIDEO CD
or CD
structure
MP3
structure
JPEG
structure
VIDEO CD
Title
Chapter
Track
Index
Album
Track
Album
File
Disc
Disc
Disc
A compact disc that contains moving pictures.
The picture data uses the MPEG 1 format, one of
the worldwide standards for digit al compression
technology. The pict ur e data is compressed to
about 1/140 of its original size. Consequently, a
12 cm VIDEO CD can contain up to 74 minutes
of moving pictures.
VIDEO CDs also con t ain compact audio data.
Sounds outside th e range of human hearin g are
compressed whil e t he sounds we can hear ar e
not compressed. VIDEO CDs can hold 6 times
the audio information of conventional audio
CDs.
There are 2 versions of V ID EO CDs.
• Version 1.1: You can play only moving
pictures and sounds.
• Version 2.0: You can play high-resol ution
still pictures and enjoy PBC functions.
This system conform s t o both versions.
50
GB
Page 51

List of button locations and reference pages
0qaqsqdqfq
How to use this page
Use this page to find the location of buttons and other
parts of the system that are mentioned in the text.
Main unit
ALPHABETICAL ORDER
A – L
Cassette compartment qg (27, 28,
31, 33)
CD SYNC qd (28)
DIRECTION 9 (27, 28, 29, 31,
33, 44)
Disc tray 4 (11)
Display window 3
12 345
M – Z
MD qk (29, 38)
MIC jack qh (30)
MIC/ECHO qa (31)
PHONES jack qj
PRESET EQ 8 (30)
Remote sensor 2
TUNER/BAND qk (24, 25, 29)
TUNING +/– 6 (24, 26)
VOLUME +/– 7 (12, 26, 27)
Illustration number
r
TUNER/BAND qk (24, 25, 29)
RR
Name of button/part Reference page
BUTTON DESCRIPTIONS
?/1 (powe r) 1 (9, 44)
Z (open/close) 5 (11)
m/M (rewind/fast forward)
6 (12, 27)
./> (go back/forward) 6
(12, 31)
Z PUSH (eject) 0 (27)
x (stop) qs (9, 12, 25, 27, 28, 31,
39, 44)
z START (record) qf (28, 31)
DVD NX (play/pause) ql (9,
11, 22, 28, 39, 44)
TAPE nN (play) ql (27, 28,
31)
ql
qk
qj
qh
Additional Information
6
7
8
9
g
continued
51
GB
Page 52

Remote control
q
ALPHABETICAL ORDER
A – J
ANGLE qd (19)
AUDIO qd (18, 30)
CLEAR wa (15, 16, 22)
CLOCK/TIMER SELECT qs
(33, 34)
CLOCK/TIMER SET qs (10, 32,
33)
DIMMER 8 (35)
DISPLAY 0 (34, 35, 36)
DVD MENU 0 (13, 14)
DVD SETUP 0 (10, 19, 20, 21,
23, 39, 44)
DVD TOP MENU 0 (13)
ECHO 6 (30)
ENTER 0qf (10, 13, 14, 16, 19,
20, 21, 24, 32, 33, 39, 44)
FM MODE qk (26)
wd
ws
wa
K – Z
KARAOKE PON qj (30)
MD qg
MIC LEVEL +/– 5 (30)
MUTING qa (12, 26, 27)
Number buttons ws (13, 14, 15,
16, 21)
PLAY MODE 9 (12, 15)
PRESET +/– w; (24, 25)
PRESET EQ qh (30)
REPEAT ql (14)
SLEEP wd (32)
SUBTITLE qd (19)
TIME SEARCH 2 (16)
TUNER BAND w; (24, 25)
TUNER MEMORY 7 (24)
TUNING +/– w; (24, 26)
VOLUME +/– 4 (12, 26, 27, 32)
s
qa
qd
qf
BUTTON DESCRIPTIONS
?/1 (power) 1 (9, 32, 44)
O RETURN 3 (14)
M/m/</, 0 (10, 12, 19, 39,
44)
TAPE nN (play) w; (27, 33)
DVD N (play) w; (10, 11, 22,
39)
./> (go back/forward) w;
(10, 12, 32)
x (stop) w; (9, 12, 27, 33, 39)
m/M (rewind/fast forward)
w; (12, 27)
X (pause) w; (12)
SLOW y w; (12)
1
2
3
w;
ql
Sony Corporation Printed in China
qg
qh
qjqk
0
9
8
7
4
5
6
 Loading...