

Page 1

4-246-166-12(1)
Micro Hi-Fi
Component
System
Operating Instructions
Owner’s Record
The mod el an d serial n u mbers are located at the rear. R e co rd th e serial nu mber in the space
provided below. Refer to them whenever you call upon your Sony dealer regarding this
product.
Model N o . Serial No.
CMT-EP315
CMT-EP313
©2003 Sony Corporation
Page 2
WARNING
To prevent fire or shock hazard, do not
expose the unit to rain or moisture.
To prevent fire, do not cover the ventilation of the
apparatus with news papers, table-cloths, curtains, etc.
And don’t place lighted candles on the apparatus.
To prevent fire or shock hazard, do not place objects
filled with liquids, such as vases, on the apparatus.
Do not install the app lianc e in a confined space,
such as a bookcase or built-in cabinet.
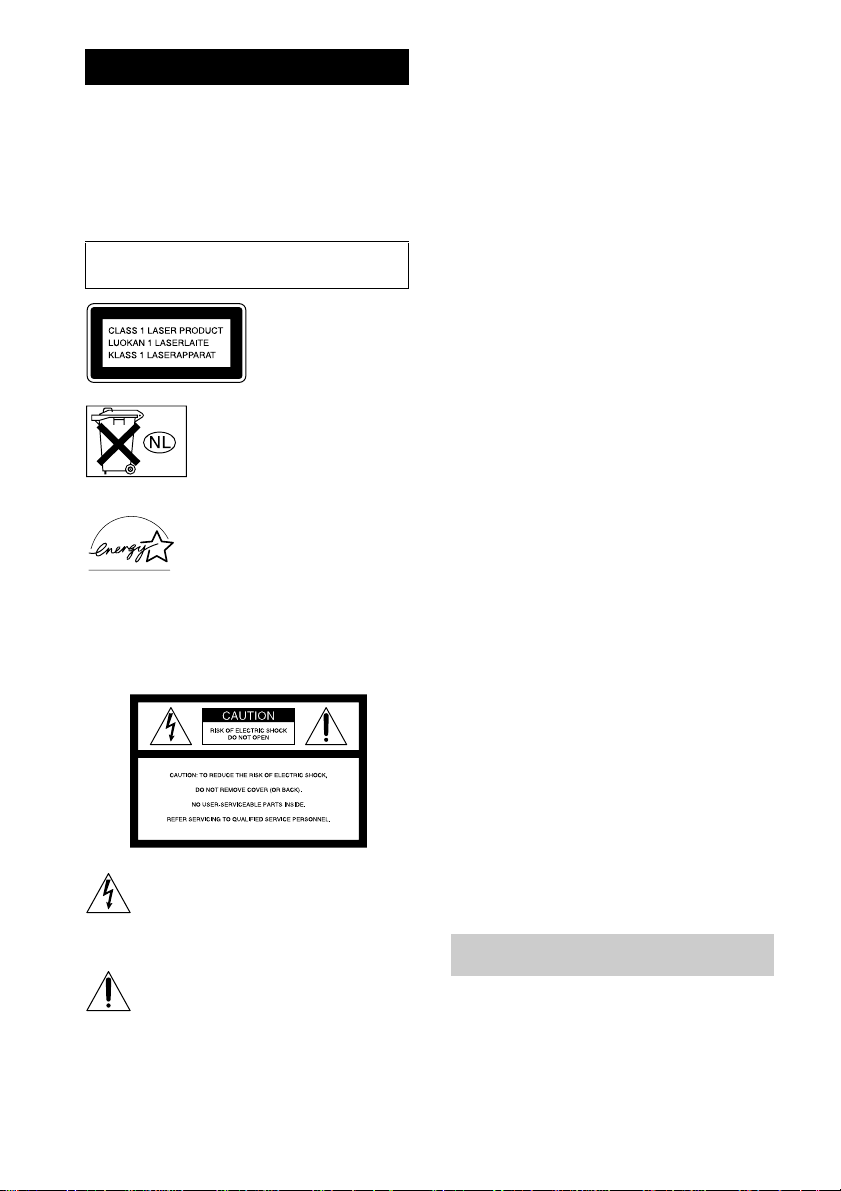
This appliance is
classified as a CLASS 1
LASER product. This
label is located on the
rear exterior.
Don’t throw aw ay the ba ttery w ith
general house waste, dispose of it
correctly as chemical waste.
Except for European model
E
NERGY STAR
registered mark. As an E
®
S
TAR
has determined that this product
meets the E
guidelines for energy efficiency.
NOTICE FOR THE CUSTOMERS IN
THE U.S.A.
This symbol is inten de d to alert th e u ser to
the presence of uninsulated “dangerous
voltage” within the product’s enclosure that
may be of sufficient magnitude to constitute
a risk of electric shock to persons.
This symbol is inten de d to alert th e u ser to
the presence of important operating and
maintenance (servicing) instructions in the
literature accompanying the appliance.
CAUTION
The use of optical instruments with this product will
increase eye hazard.
®
is a U.S.
partner, Sony Corporation
NERGY STAR
NERGY
®
WARNING
This equipment has been tested and found to comply
with the limits for a Class B digital device, pursuant to
Part 15 of the FCC Rules. These limits are designed to
provide reasonable protection against harmful
interference in a residential installation. This
equipment generates, uses, and can radiate radio
frequency energy and, if not installed and used in
accordance with the instructions, may cause har mfu l
interference to radio communications. However, there
is no guarantee that interferen ce will not occur in a
particular installation. If this equip ment does cau se
harmful interference to radio or television reception,
which can be determined by turning the equipment off
and on, the user is en co u raged to try to correct the
interference by one or more of the following measures:
– Reorient or relocate the receiving antenna.
– Increase the separation between the equipment and
receiver.
– Connect the equipment into an outlet on a circuit
different from that to which the receive r is
connected.
– Consult the dealer o r a n experienced radio/TV
technician for help.
CAUTION
You are cautioned that any changes or modifications
not expressly approved in this manual could void your
authority to operate this equipment.
Note to CATV system installer:
This re minde r is pr o v id e d to ca l l th e CATV system
installer’s attention to A rticle 8 20-40 of the N EC that
provides guidelines for proper grounding and, in
particular, specifies that the cable ground shall be
connected to the grounding system of the building, as
close to the point of cab le entry as practical.
NOTICE FOR THE CUSTOMERS IN
CANADA
CAUTION
TO PREVENT ELECTRIC SHOCK, DO NOT USE
THIS POLARIZED AC PLUG WITH AN
EXTENSION CORD, RECEPTACLE OR OTHER
OUTLET UNLESS THE BLADES CAN BE FULLY
INSERTED TO PREVENT BLADE EXPOSURE.
How to use this manual
This manual mainly explains operations using
the remote, but the same operations can also be
performed using the buttons on the system
having the same or similar names.
GB
2
Page 3

Table of Contents
How to use this manual...........................2
Getting Started
Hooking up the system............................4
Setting the clock......................................5
CD – Play
Loading a disc........................ ... .... ..........6
Playing a disc..........................................6
— Normal Play/Shuffle Play
Playing repeatedly...................................7
— Repeat Play
Creating your own program.................... 7
— Program Play
Tuner
Presetting radio stations..........................8
Listening to the radio ..............................9
— Preset Tuning
— Manual Tuning
Tape – Play
Loading a tape................................... ... .10
Playing a tape........................................10
Tape – Recording
Recording your favorite CD tracks on a
tape..................................................11
— CD Synchro Recording
Recording on a tape manually.............. .11
— Manual Recording
Display
Turning off the display .........................14
— Power Saving Mode
Viewing information a b ou t th e di sc in the
display............................................ 14
Optional Components
Hooking up optional components.........15
Troubleshooting
Problems and remedies.........................16
Messages............................................... 18
Additional Information
Precautions............................................18
Specifications........................................ 20
List of button locations and reference
pages...............................................22
Sound Adjustment
Adjusting the sound........... ...................12
Timer
Falling asleep to music..........................12
— Sleep Timer
Waking up to music ..............................13
— Daily Timer
GB
3
Page 4
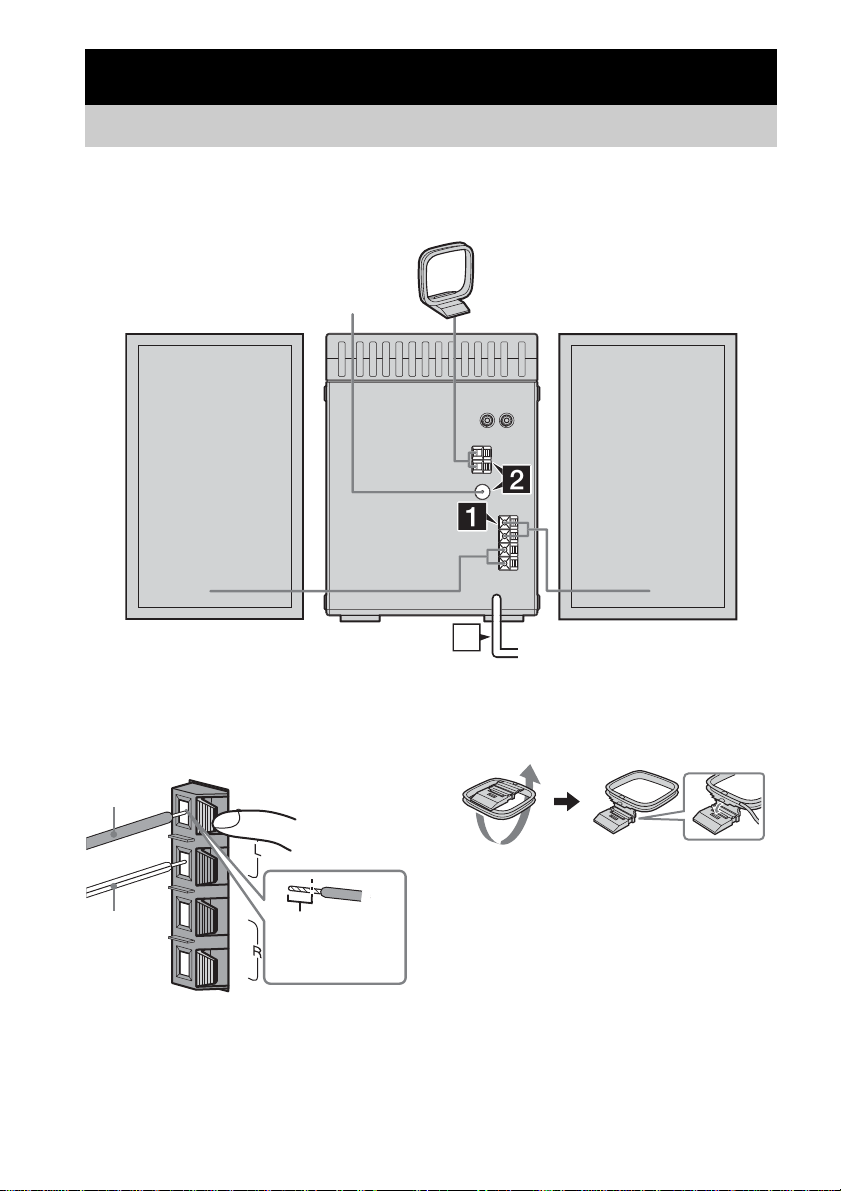
Getting Started
Hooking up the system
Perform the following procedu res 1 to 3 to hook up your system using the supplied cords and
accessories.
AM loop antenna
Right speaker Left speaker
FM lead antenna
1 Connect the speakers.
Connect the right and left speaker cords to
the SP EAKE R termi n als as shown below.
Gray (3)
3
#
3
2 Connect the FM and AM antennas.
Set up the AM loop antenna, then connect
it.
#
PED
3
A
KER
ANCE
Insert this portion
Stripe (#)
SPE
I
M
USE 6-16Ω
GB
4
Page 5
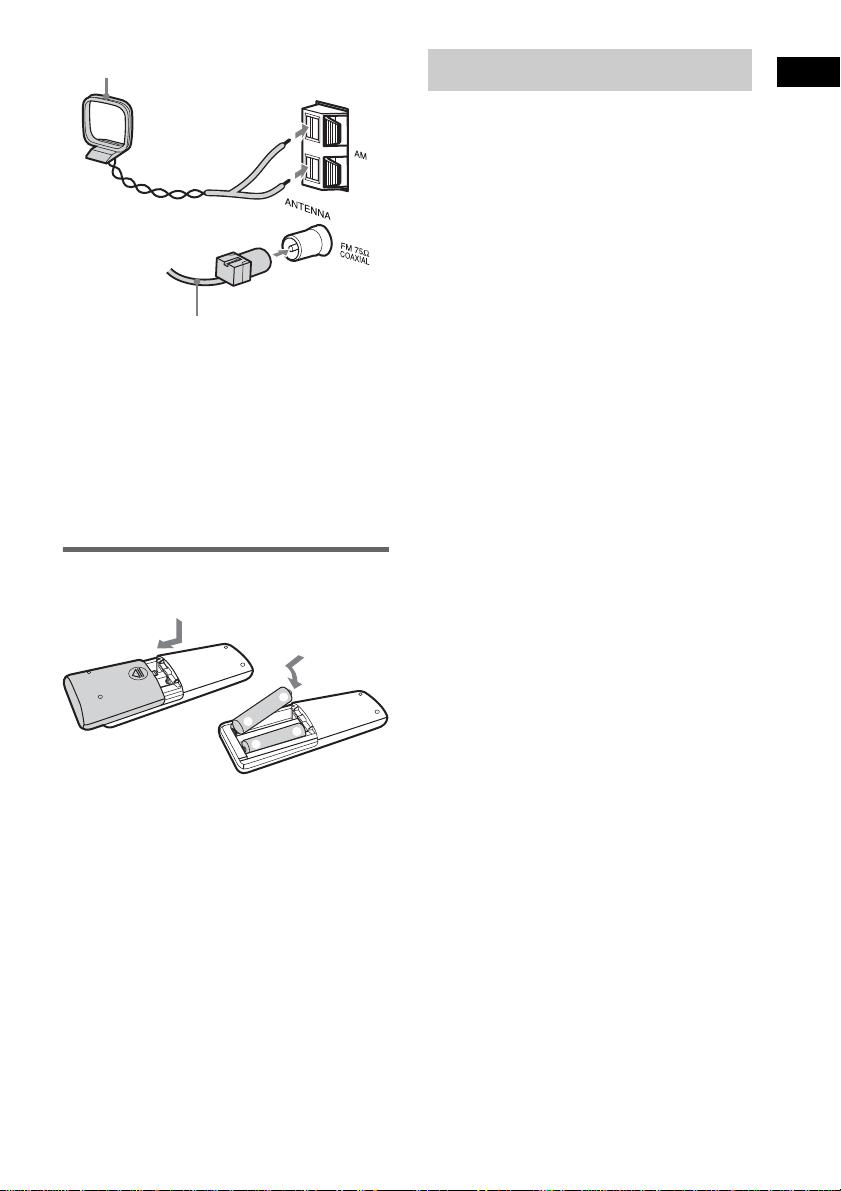
AM loop antenna
Extend the FM lead antenna horizontally
Note
Keep the antennas awa y from the spe aker cords.
3 Connect the power cord to a wall
outlet.
If the plug does not fit the wall socket,
detach the supplied plug adapto r (only fo r
models equipped with an adaptor).
To turn on the system, press ?/1.
Inserting two R6 (size AA)
batteries into the remote
Setting the clock
Press ?/1 to turn on the system.
1
Press CLOCK/TIMER SET.
2
Press ./> repeatedly to set the
3
hour.
Press CLOCK/TIMER SET.
4
Press ./> repeatedly to set the
5
minute.
Press CLOCK/TIMER SET.
6
The clock starts working.
To adjust the clock
Press CLOCK/TIMER SET.
1
Press ./> to select the clock display,
2
then press CLOCK/TIMER SET.
Do the same procedures as step 3 to 6
3
above.
Getting Started
e
E
E
e
Note
If you do not use the remote for a long period of time,
remove the batteries to avoid possible damage from
battery leakage and corrosion.
Tip
When the remote no longer operates the system,
replace both batteries with new ones .
GB
5
Page 6
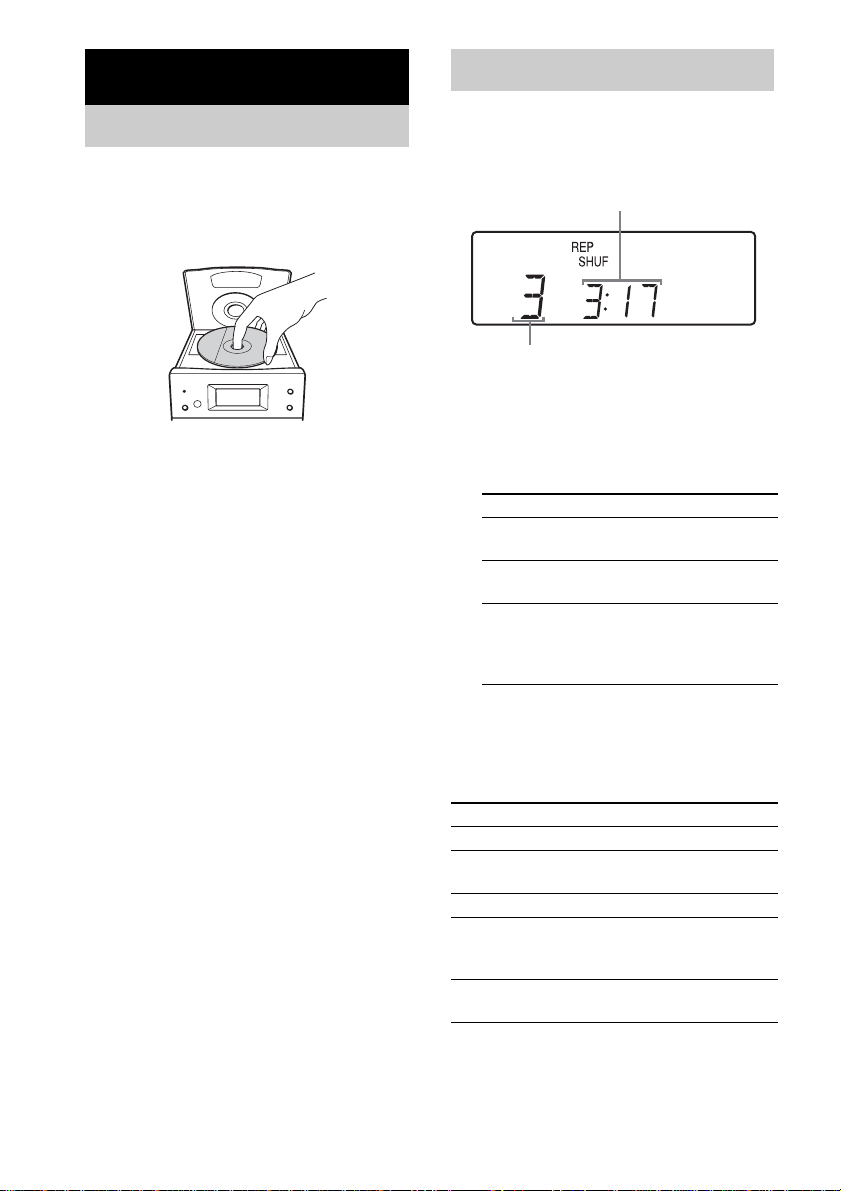
CD – Play
Loading a disc
Press Z PUSH OPEN/CLOSE on the
1
unit.
Place a disc with the label side up on
2
the CD compartment.
Press Z PUSH OPEN/CLOSE on the
3
unit again to close the lid of the CD
compartment.
Note
Do not use a disc with tape, seals or paste on it as this
may cause malfunction.
Playing a disc
— Normal Play/Shuffle Play
This system lets you play the disc in different
play modes.
Playing time
Track number
Press CD N to switch the function to
1
CD.
Press PLAY MODE/DIRECTION in stop
2
mode repeatedly until the mode you
want appears in the display.
Select To play
No display
(Normal Play)
SHUF
(Shuffle Play)
PROGRAM
(Program Play)
Press CD N.
3
Note
You cannot change the play mode during playback.
Other operations
To Do this
Stop play Press x.
Pause Press X. Press again to resume
Select a track Press ./> repeatedly.
Find a point in a
track (Search )
Remove a disc Press Z PUSH OPEN/CLOSE on
The tracks on the disc in
original order.
All tracks on the disc in
random or der.
The tracks on the disc in the
order you want them to be
played (see “Creating your
own program” on page 7).
play.
Keep pressing m/M during
playback and release it at the
desired point.
the unit.
GB
6
Page 7
Playing repeatedly
Creating your own
— Repeat Play
You can play all the tracks or a single track on a
disc.
Press REPEAT/FM MODE during playback
until “REP” or “REP 1” appears.
REP: For all the tracks on the disc up to five
times.
REP 1: For a sin g le trac k only.
To cancel Repeat Play
Press REPE AT/FM MO DE repeatedly u ntil
both “REP” and “REP 1” disappear.
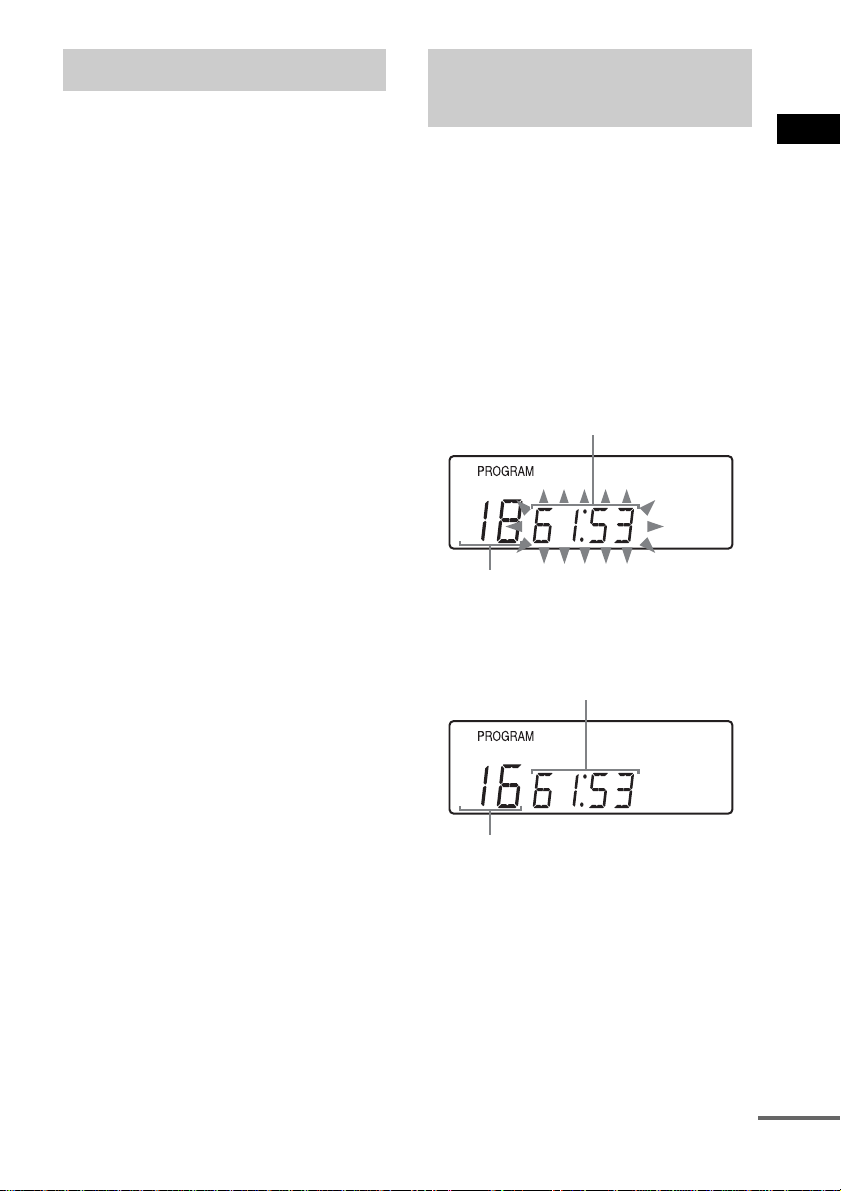
program
—Program Play
You can make a program of up to 30 steps.
You can synchro record the programed tracks
onto a c assette ta pe (page 11).
Press CD N to switch the function to
1
CD, then press x.
Press PLAY MODE/DIRECTION in stop
2
mode repeatedly until “PROGRAM”
appears.
Press ./> repeatedly until the
3
desired track number appears.
Total playing time of the program
Selected track number
Press PLAY MODE/DIRECTION.
4
The track is programed .
The total num ber of prog ram step s a ppe ars.
Total playing time of the program
CD – Play
Total number of program steps
To program additional tracks, repeat
5
steps 3 and 4.
Press CD N.
6
Program Play starts.
continued
GB
7
Page 8
Other operations
To Do this
Cancel Program
Play
Add a track to the
end of the program
Erase the program Press CLEAR in stop m ode.
Tip
The program you made remains after Program Play
finishes. To play the same program again, press CD
N. However, the program is cleared when you ope n
the lid of the CD compartm e nt.
Press PLAY MODE/
DIRECTION in stop mode
repeatedly until both
“PROG R AM” and “SHU F ”
disappear.
Perform steps 1 – 4 in stop mode.
Each time you press the button, a
track is cleared from the end of
the program.
Tuner
Presetting radio stations
You can preset up to 32 stations for FM and AM.
You can the n tu ne in a n y o f th os e s tation s
simply by selecting the corresponding preset
number.
Automatic tuning preset
You c an a ut om atic ally tun e in all o f th e s tatio ns
that can be received in your area and then store
the radio frequency of th e de sired stations.
Press TUNER BAND repeatedly to
1
select FM or AM.
Press and hold TUNING +/– until the
2
frequency indication starts to change,
then release it.
Scann ing stops automati cally wh en a
station is tun e d in . A t tha t ti m e, “ TUNED”
and “STEREO” (for stereo program only)
appear.
If “TUNED” does not appear and the
scanning does not stop
Set the frequency o f the d esired radio
station as described in steps 2 through 4 of
“Manual tuning preset” (page 9).
Press TUNER MEMORY.
3
The preset num ber ap pears. Station storage
starts with preset number 1. If preset
stations have been eras ed, then station s are
stored to the lo west preset number
containing no station.
Preset number
Repeat steps 1 through 3 to preset
4
other stat ions.
GB
8
Page 9

Manual tuning preset
You can manually tune in and store the radio
frequency of the desired stations .
Press TUNER BAND repeatedly to
1
select FM or AM.
Press TUNING +/– repeatedly to tune in
2
the desired station.
Press TUNER MEMORY.
3
The preset number appears. Station storage
starts with preset number 1. If preset
stations have been eras ed, then station s are
stored to the lowest preset n umber
containing no station.
Repeat steps 1 through 3 to preset
4
other stations.
Other Operations
To Do this
Tune in a station
with a weak signal
Erase a preset
station
To change the AM tuning interval
(except for European and Middle
Eastern models)
The AM tuning interval is factory-preset to 9
kHz (or 10 kHz fo r so me areas). T o change the
AM tuning interva l, tune in any A M sta tion first .
While holding TUNER BAND, press ?/1.
Whe n y ou change the interval, all the AM/FM
preset stations are erased. To reset the interval,
tune in any A M station first. W hile hold ing
TUNER BAND, press ?/1.
Tips
• The preset stations are retained for ha lf a day even if
you disconnect the pow er cord or if a power failure
occurs.
• To improv e th e reception, adjust the supplied
antennas or connect an external antenna.
Follow the procedure described
in “Manual tuning preset”
(page9).
Select the preset number of the
station to be erased, and then
press CLEAR twice.
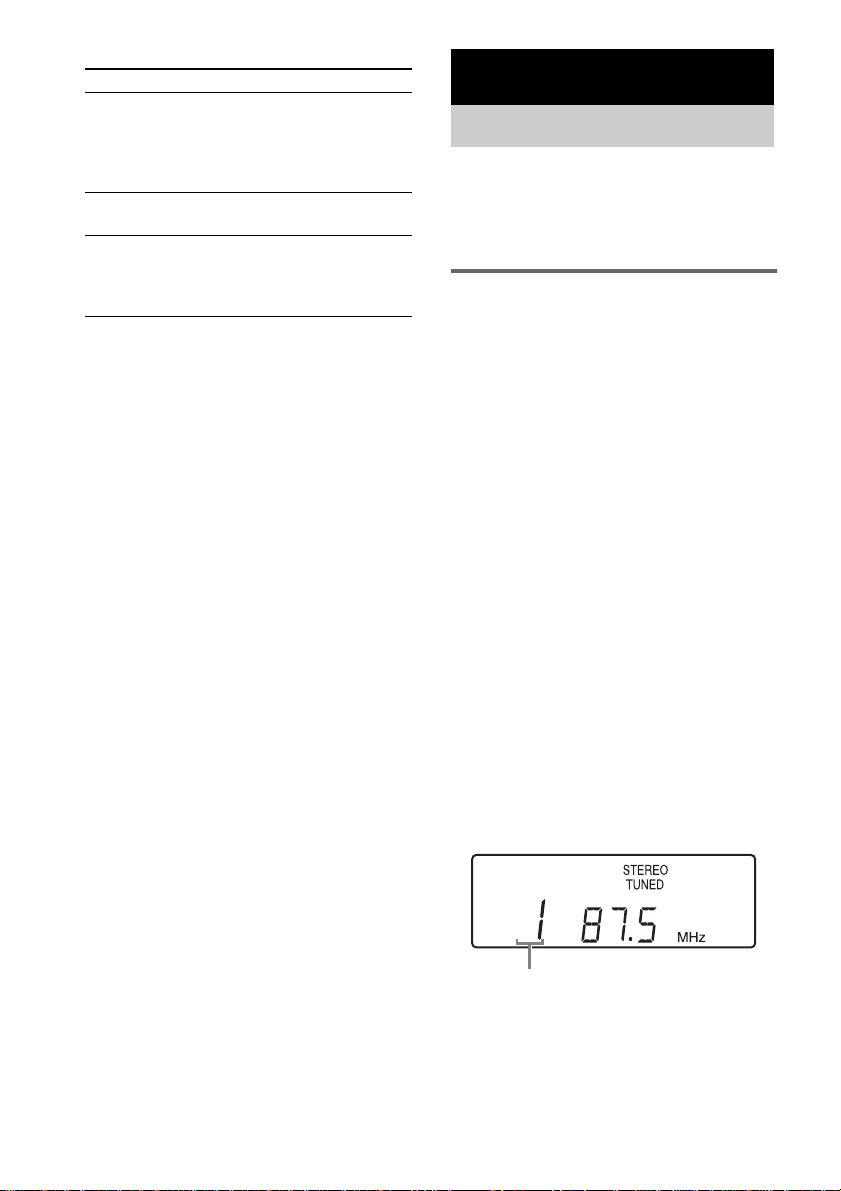
Listening to the radio
You can listen to a radio station either by
selecting a preset station, or by manually tuning
in the sta tion.
Listening to a preset station
— Preset Tuning
Preset ra di o s tatio n s in th e tu ne r’ s m e m or y f irs t
(see “Presetting radio stations” on page 8).
Press TUNER BAND.
1
Press PRESET +/– repeatedly to select
2
the desired preset station.
Listening to non-preset radio
station
— Manual Tuning
Press TUNER BAND repeatedly to
1
select FM or AM.
Press TUNING +/– repeatedly to tune in
2
the desired station.
Tips
• To improve broadcast reception, adjust the supplied
antennas, or connect a co mmercially available
external antenna.
• When an FM stereo program has static noise, pre ss
REPEAT/FM MODE until “STEREO” disappears
from the display. T here will be no stereo effect, bu t
the reception will improve .
• In step 2, press and hold TUN IN G +/– un til the
frequency indication starts to change. Scanning stops
when the system tunes in a station (Autom atic
Tuning).
• To record the radio programs, use manual recording
(page 11).
• You can change the display into the clock display
(for the six seconds) by pressing DISPLAY.
Tuner
GB
9
Page 10

Tape – Play
Loading a tape
Press xZ on the unit.
1
Load a recorded/recordable tape into
2
the cassette holder.
With the side
you want to
play/record
facing
forward.
Playing a tape
You can use TY P E I (norm al) tape.
Load a recorded tape.
1
Press N on the unit.
2
Other operations
To Do this
Stop play Press xZ on the unit.
Pause Press X (tape) on the unit. Press
Fast-forward or
rewind
Remove a tape Press xZ on the unit.
Tip
You can select the tape function by pressing TAPE
nN on the remote, but you cannot start tape
playback with this button.
again to resume play.
Press m/M (tape) on the unit.
10
GB
Page 11

Tape – Recording
Recording your favorite CD tracks on a tape
— CD Synchro Recording
You can record a wh o le CD on a t ape.
You can use TY PE I (norma l) tape.
Load a recordable tape.
1
Load a CD you want to record.
2
Press CD N to switch the function to
3
CD, then press x.
Press z on the unit.
4
After the system has created a blank space
of about 10 seconds on the tape, the CD
starts p laying b a ck automatically.
To stop recording
Press xZ on the unit to stop the tape deck, or
press x to stop t h e CD player.
To record only your favorite CD
tracks
You can record only your favorite CD track s
using Program Play. Between steps 3 and 4,
perform steps 1 to 5 of “Creating your own
program” (page 7).
Tip
You can press ./ > to select tracks (after step 3
and before step 4).
Recording on a tape manually
— Manual Recording
You can record just the portions you like from a
CD on a tape. You can also record a radio
program.
You can use TYPE I (normal) tape.
Load a recordable tape.
1
Select the desired source to record.
2
• CD : T o re co rd fro m th is sy stem’s CD
player.
• TUNER : To record from this system’s
tuner.
• MD: To record from the optional
comp on en t c o nn ec te d to th e M D IN
jacks.
Press z on the unit, then start playing
3
the desired source to record.
Recording starts.
Other operations
To Do this
Stop recordin g Press xZ on the unit.
Pause
recording
Tip
For recording from a CD , you can pr ess ./> to
select tracks (after step 2 and before step 3 ).
Press X (tape) on the u n it.
Tape – Recording
11
GB
Page 12

Sound Adjustment
Timer
Adjusting the sound
You can adjust the bass and treble to enjoy more
powerful sound.
Generating a more dynamic
sound (Dynamic Sound
Generator)
Press DSG.
To cancel the D SG , press D S G again .
Adjusting t he bass and tre ble
Using buttons on the remote
Press BASS +/– repeatedly to adjust the
bass, or TREBLE +/– repeatedly to adjust
the treble.
Using buttons on the unit
Press BASS/TREBL E repeatedly to
1
select “BASS” or “TREBLE”.
Each time you press the button, the display
changes cyclically as follows:
BASS t TREBLE t Original display
Press ./> repeatedly to adjust
2
the level while “BASS” or “TREBLE”
appears.
Falling asleep to music
— Sleep Timer
You ca n set the system to turn off aft er a certa in
time, so that you can fall asleep to music.
Press SLEEP repeatedly.
Each time you press the button, the minute
display (the turn -o ff tim e) c han ge s cyc lica lly a s
follows:
Auto* t 90 t 80 t … t 10 t OFF
* The system automatically turns off in 100 minutes or
after the current CD o r tape finishes p laying .
Other operations
To Press
Check the
remaining time**
Change the time
to turn off
Cancel the Sleep
Timer function
**You cannot check the remaining time if you select
“Auto”.
Note
Do not set to “Auto” during Synchro Recording on a
tape.
Tip
You can use the Slee p T ime r, even if you hav e no t set
the clock.
SLEEP once.
SLEEP repeatedly to select the
time you want.
SLEEP repeatedly until “OFF”
appears.
12
GB
Page 13

Waking up to music
—Daily Timer
You can wake up to music at a preset time. Make
sure you have set the clock (see “Setting the
clock” on page 5).
Prepare the sound source you want to
1
play.
• CD: Loa d a disc. T o st art fro m a spe cific
track, make a program (see “Creating
your own program” on page 7).
• TUN ER: Tune in a radio sta tion (s ee
“Listening to the radio” on page 9).
Press VOL +/– repeatedly (or turn
2
VOLUME on the unit) to adjust the
volume.
Press CLOCK/TIMER SET repeatedly
3
until “ON” and “0:00” appear.
Set the time to start playback.
4
Press ./> repeatedly to set the h our,
then press CLOCK/TIMER SE T.
The m inute in d ica tion f las he s.
Press ./> repeatedly to set the
minute, then press C LOCK/TIMER SET.
Press CLOCK/TIMER SET repeatedly
5
until “OFF” and “0:00” appear.
Set the time to stop playback following
6
the same procedure as step 4.
Press ./> depending on the
7
sound source you want to play.
Each time you press the button, the display
changes as fo llow s:
Tu y Cd
Press ?/1 to turn off the system.
8
Other operations
To Do this
Check the setting Press CLOC K/TIMER
Change the setting Start over from step 1.
Cancel the timer Press CLOCK/TIME R
SELECT repeatedly.
SELECT repeatedly until
“OFF” appears, then p ress
CLOCK/TIMER SET.
Notes
• If you use the Daily Tim er and the Sleep Timer at the
same time, the Sleep Timer has priority.
• Do not ope rate the s ystem from the time the system
turns on until the play starts (about 15 seconds before
the preset time).
• If the system is on about 15 seconds before the preset
time, the Daily Timer will not be activated.
• You cannot use the system’s tape deck and the
optional component connected to MD IN jacks as
sound sources for the Daily Timer.
Timer
13
GB
Page 14

Display
Turning off the display
— Power Saving Mode
The clock display can be turned off to minimize
the amount of power consumed during standby
(Power Saving Mo de).
Press DISPLA Y.
To cancel Power Saving Mode
Press DISPLAY.
Tips
• The STANDBY indicator lights up even in the Power
Saving Mode.
• The timer continues to operate in Power Saving
Mode.
Viewing information about the disc in the display
You can chec k the play ing time an d rem ain ing
time of the cu rr ent track or that o f th e d is c.
Checking the remaining t im e
(CD)
Press DISPLAY repeatedly during CD
playback.
Each time you press the button, the display
changes cyclically as follows:
Elapsed playing time on the current track t
Remaining time on t h e curren t track* t
Remaining time on the current disc**
* “– –:– –” appears when a track is played whose
number is 31 or over.
**“– –:– –” appears when the total playing time of the
program exceeds 100 minutes, when the program
contains 31 tracks or more, or when a disc with 31
tracks or more is played in Shuffle Play m o de.
14
GB
Page 15

Optional Components
Hooking up optional components
To enh an ce yo u r sy stem, you ca n co nn e ct o p tio na l co m p on e nts. R efe r to the ope ra tin g in str uc tio n s
provided with each component.
Optional analog component
From the audio output
jacks of an optional
analog component
Optional Components
A MD IN jacks
Use audio cords (not supplied) to c o nnect an
optional anal og compon ent (MD d ec k , etc.) to
these jacks. You can then listen to the sound
from the component.
Listening to audio from a
connected comp onent
Connect audio cords.
1
See “Hooking up optional components” on
page 15.
Press MD.
2
Start playing the connected component.
Recording au dio from a
connected compone nt
Connect audio cords.
1
Start recording manually.
2
See “Recording on a tape manually” on
page 11.
15
GB
Page 16

Troubleshooting
Problems and remedies
Should you encounter a problem with your
system, do the fo llowing:
Make sure the power cord and speaker
1
cords are correctly and firmly connected.
Find your problem in the troubleshooting
2
checklist below and take the indicated
corrective action.
If the pr o blem p ersists afte r doing all of the
above, consult your nearest Sony dealer.
General
The display or button remains lighted or
flashes even after the system was turned off.
• Press DISPLAY repeatedly until the clock display
appears.
The clock indication does not show the
correct time.
• A power interruption has occurred. Set the clock
(page 5) and timer setting (page 13) again.
The clock setting/radio presetting/timer is
canceled.
• The power cord is disconnected or a power failure
occurs longer than h alf a d ay .
Redo the following:
– “Setting the clock” (page 5)
– “Presetting radio stations” (page 8)
If you have set the timer, also redo “Waking up to
music” (page 13).
There is no sound.
• Press VOL + repeatedly (or tur n VOLU ME on the
unit clockwise).
• Make sure the headphones are not connected.
• Insert only the stripped portion of the speaker cord
into the SPE A KER terminal. Inserting the viny l
portion of the speaker co rd will obstruct the
speaker connections (page4).
Sound comes from one channel, or
unbalanced left and right volume.
• Check the speaker connec tion and speaker
placement.
Sound lacks bass.
• Check that the spea ker’s + and – termin als are
connected correctly.
There is severe hum or noise.
• A TV or VC R is placed too close to the stereo
system. Move th e stereo system aw ay from the TV
or VCR.
• Connect the sy stem to a different wall outlet.
• Install a noise filter (commercially available) to
the power line.
The timer cannot be set.
• Set the clock correctly (page 5).
The timer does not function.
• Check the timer setting and se t the correct time
(page 13).
• Cancel the Slee p Timer function (pag e12).
The remote does not function.
• Remove the obstacle.
• Move the remote closer to the system.
• Point the remote at the system’s sensor.
• Replace the batteries (R6/size AA).
The color irregularity on a TV screen persists.
• Turn off the TV set once, then turn it on after 1 5
to 30 minutes. If the color irregularity still
persists, place the speakers farther aw ay from the
TV set.
CD player
The CD com partm en t does no t close.
• Place the disc correctly.
The sound drops out.
• The lens is dirty. Clean it w ith a commercially
available blower.
Play does not start.
• Open the lid o f th e CD compar tment and check
whether a disc is loaded .
• Wipe the disc clean (page 19).
• Replace the disc.
• Place the disc that this sy stem can play.
• Place the disc correctly.
• Place the disc in the tray with the label side up .
• Remove the disc and wipe away the moisture on
the disc, then leave the system turned on for about
an hour until the moisture evapora tes.
•Press CD N to start play.
16
GB
Page 17

The sound skips.
• Wipe the disc c lean (page 19).
• Replace the disc.
• Try moving the system to a place without
vibration (e.g., on top of a stable stand).
• Try moving the speakers away from the system, o r
placing them on separate stands. W hen you listen
to a track with bass sounds at high volume, the
speaker vibration may cause the sound to skip.
Play do e s no t s ta rt fro m the first tra c k.
• Press PLAY MODE/DIRECTION repeatedly
until both “PROGRAM” and “SHUF” disappear
to return to Normal Pl ay .
Tuner
Severe hum or noise/stations cannot be
received.
• Set the proper band and frequency (page 9).
• Connect the antenna p roperly (p age4).
• Find a place and an orientation that provide good
reception, then set up the antenna again. If you
cannot obtain good reception, we recommend you
connect a commercially available external
antenna.
• The supplied FM lead antenna receives signals
along its entire length, so make sure you extend it
fully.
• Locate the antennas as far aw ay from the spea ker
cords as possible.
• Consult your nearest Sony dealer if the supplied
AM anten n a h as c o me off the plastic stand.
• Try turning off surrounding electrical equipment.
A stereo FM program ca nnot be receive d in
stereo.
• Press REPEAT/FM MODE until “STEREO”
appears in the display.
Tape deck
The tape does not record or play, or there is a
decrease in soun d level.
• The heads are dirty. Clean them (page19).
• The record/playback head s are magne tised.
Demagn etise them (page20).
The tape does not erase completely.
• The record/playback head s are magne tised.
Demagn etise them (page20).
There is excessive wow or flutter, or the sound
drops out.
• The capstans in the tape deck are dirty. Clean
them using a clean in g cassette (page 19).
Noise increases or the high frequencies are
erased.
• The record/playback heads are magnetised.
Demagn etise them (page20).
The tape does not record.
• No cassette is loaded. Load a cassette.
• The tab has been removed from the cassette.
Cover the broken tab with adhesive tape
(page 19).
• The tape has wound to the end.
Optional components
There is no sound.
• Refer to General item “There is no sound.”
(page 16) and check the condition of the system.
• Connect the component properly (page 15) while
checking:
– if the cords are connected properly.
– if the cord plugs are firm ly inserted all the way.
• Turn on the connected component.
• Refer to the operating instructions supplied with
the connected component and start playing.
• Press M D (page15).
The sound is distorted.
• Set the volume of the connected component
lowe r .
If the system still does not
operate properly after performing
the above measures, reset the
system as follows:
Turn off the system.
1
While pressing and holding x, turn on the
2
system.
The system is reset to t he factory settings. You
should set the se t tings you made, such as th e
preset stations, clock, and timer.
Troubleshooting
17
GB
Page 18

Messages
One of the following messages may appear or
flash in the display during operation.
CD
no Cd
There is no disc in th e CD comp ar tm ent.
Additional Information
Precautions
On operating voltage
Before operating the sy stem , ch eck that th e o p era ting
voltage of your system is identical with the voltage of
your local power supply.
On safety
• The unit is not disconnected from the AC power
source (mains) as lon g as it is co nnected to the wall
outlet, even if the unit itself has been turned off.
• Unplug the s y stem from the wall outlet (mains) if it
is not to be used for an extended period of time. To
disconnect the power cord (mains lead), pull it out by
the plug. Nev e r pu ll the cord itself.
• Should any solid object or liquid fall into the system,
unplug the system and have it checked by qualified
personnel before operating it any further.
• AC power cord must be changed only at the qualified
service shop.
• The nameplate is located on the bottom exteror.
On placement
• Do not place the sy stem in an inclined position.
• Do not place the sy stem in locations where it is;
– Extremely hot or cold
– Dusty or dirty
– Very humid
– Subject to vibrations
– Subject to direct sunligh t.
• Use caution when placing the unit or speakers on
surfaces that have been specially treated (with wax ,
oil, polish, etc.) as staining or discoloration of the
surface may result.
On heat buildup
• Although the system heats up during operation, this
is not a malfun ction .
• Place the system in a location with adequate
ventilation to prevent heat build-up in the system.
• If you continuously use this system at a high volume,
the cabinet temperature of the top, side and bottom
rises considerably. To avoid burning yourself, do not
touch the cabinet.
• To prevent a malfunction, do not cover the
ventilation hole.
18
GB
Page 19

In case color irregularity is observed
on nearby a TV screen
With the m agnetically shielded type of speaker system ,
the speakers can be in stalled near a TV set. H o wever,
color irregularity m ay still be observe d o n the TV
screen depending on the type of your TV set.
If color irregularity is observed…
Turn off the T V set o nc e, then tur n it on after 15 to 30
minutes.
If color irregularity is observed
again…
Place the speakers farther away from the TV set.
On operation
• If the system is broug h t d irectly from a cold to a
warm location, o r is p laced in a v ery d a mp room,
moisture may condense on the lens inside the CD
player. Should this occu r, the system will not ope rate
properly. Remove the disc and leave the system
turned on fo r ab ou t an hour until the moisture
evaporates.
• When you move the system, take out any disc.
If you have any questions or problems concerning your
system, please consult yo ur n ear est So ny dealer.
Notes on discs
• Before playing, clean the disc with a cleanin g cloth.
Wipe the disc from the center out.
• Do not use solvents such as benzene, thinner,
commercially av a ilable clea ners or anti-static spray
intended for vinyl LPs.
• Do not expose the disc to direct sunlight or heat
sources such as hot air ducts, nor leave it in a car
parked in direct sunlight.
• Do not use discs encircled with a protection ring.
This may cause a malfunction to the system.
• When using discs that have glue or similar tacky
substance on the label side of the disc or that used a
special ink whe n the label was printed, there is a
chance that the disc or label m ay becom e attach ed to
parts inside this unit. W hen th is occurs , it may no t be
possible to remove the disc, and m ay also cause th is
unit to malfunc tion. Be sure to check th at the label
side of the disc is not sticky before using.
The following types of disc should not be used:
– Rental or used discs with attached seals where the
glue extends beyond the seal. The perimeter of the
seal on the disc is tacky.
– Discs that have labels printed using a special ink
that feels tacky when touched.
• Discs with non-standard shapes (e.g., heart, square,
star) cannot be played on this unit. Attempting to do
so may damage the unit. Do not use such discs.
Note on CD-R/CD-RW playback
Discs recorded on CD-R/CD-RW drives may not be
played back because of scratches, dirt, recording
condition or the drive’s characteristics. Besides, the
discs, which are not yet finalized at the end of
recording, cannot be play ed back.
Music discs encoded with copyright
protection te chnologies
This product is designed to playback discs that
conform to the Compact Disc (CD) standard. Recently,
various music discs encoded with copyright protection
technologies are marketed by som e record co mpa nies.
Please be aware that among those discs, there are some
that do not conform to the CD standard and may not be
playable by this product.
Cleaning the cabinet
Clean the cabinet, pan el an d controls with a soft cloth
slightly moistened w ith mild detergent solution. Do not
use any type of abrasive pad, scouring powder or
solvent such as thinner, benzene or alcohol.
To save a tape permanently
To prevent a tape from being accid entally recorded
over, break off the ca ssette tab from side A or B as
illustrated.
Break off the
cassette tab
If you later want to reuse the tape for recording, cover
the broken tab with adhesive tape.
Before placing a cass ette in the t ape
deck
Take up any slack in the tape. Otherwise, the tape may
get entangled in the parts of the tape deck and b ecom e
damaged.
When using a tape longer than 90
minutes
The tape is very elastic. Do not chan ge th e tape
operations such as play, stop, and fast-winding
frequently. The tape may get entangled in the tape
deck.
Cleaning the tape heads
Clean the tape heads af ter ever y 1 0 h ou rs of u se.
Be sure to clean the tape heads before you start an
important recording or after playing an old tape.
Use a separately sold dry-type or wet-type cleaning
cassette. For details, refer to th e in stru ction s o f the
cleaning cassette.
continued
Additional Information
19
GB
Page 20

Demagnetisi ng the tape heads
Demagne tise the tap e h ead s an d th e metal parts that
have contact with the tape after every 20 to 30 hours of
use with a sepa rately sold de ma gn etising cas sette. For
details, refer to the instru ction s o f the demagnetising
cassette.
Specifications
Main unit
Amplifier section
AUDIO POWER SPECIFICATIONS:
(U.S.A. model only)
POWER OUTPUT AND TOTAL HARMONIC
DISTORTION:
With 6-ohm loads, both channels driven, from 120 10,000 Hz; rated 10 watts per channel minimum RMS
power, with no more than 10% total harmonic
distortion from 250 milliwatts to rated output.
North American model:
Continuous RMS power output (reference):
10 + 10 W
(6 ohms at 1 kHz, 10%
THD)
European model:
DIN power output (rated): 7 + 7 W
(6 ohms at 1 kHz, DIN )
Continuous RMS power output (reference):
10 + 10 W
(6 ohms at 1 kHz, 10%
THD)
Music po w er o utpu t (refe ren ce ):
20 + 20 W
Other models:
The following measured at AC 230 V or AC 120 V, 50/
60 Hz
DIN power output (rated): 7 + 7 W
(6 ohms at 1 kHz, DIN )
Continuous RMS power output (reference):
10 + 10 W
(6 ohms at 1 kHz, 10%
THD)
Inputs
MD IN (phono jacks):
Sensitivity 500 mV,
impedance 47 kilohms
Outputs
PHON E S (ste reo m inija ck ):
Accepts headphones with
an impedance of 8 ohms or
more
SPEAKER: Accepts impedance of 6 to
16 ohms.
20
GB
Page 21

CD player section
System Compact disc and digital
Laser Semiconductor laser
Frequency response 2 Hz – 20 kHz (±0.5 dB)
Tape deck section
Recording system 4-track 2-channel stereo
Frequency response 50 – 13,000 Hz (±3 dB),
Wow and flutter ±0.15% W. Peak (I E C)
Tuner section
FM stereo, FM/AM superheterodyne tuner
FM tuner section
Tuning range 87.5 – 108.0 MHz (50-kHz
Antenna FM lead antenna
Antenna terminals 75 ohms balanced
Intermediate frequency 10.7 MHz
AM tuner section
Tuning range
Pan-American model: 530 – 1,710 kHz
European model: 531 – 1,602 kHz
Other models: 530 – 1,710 kHz
Antenna AM loop antenna, external
Intermediate frequency 450 kHz
audio system
λ
(
=780 nm)
Emission duration:
continuous
using Sony TYPE I
cassettes
0.15% W. RMS (NAB)
±0.2% W. Peak (DIN )
step)
(with the tunin g interv al
set at 10 kHz)
531 – 1,710 kHz
(with the tunin g interv al
set at 9 kHz)
(with the tunin g interv al
set at 9 kHz)
(with the tunin g interv al
set at 10 kHz)
531 – 1,602 kHz
(with the tunin g interv al
set at 9 kHz)
antenna terminal
Speaker
Speaker system Bass-reflex type
Speaker units Full range 10 cm dia., cone
type
Nominal impedance 6 ohms
Dimensions (w/h/d) Approx. 145 × 230 × 140
mm
Mass Approx. 1.3 kg net per
speake r
General
Power req u irem en ts
North American model: 120 V AC, 60 Hz
European model: 230 V AC, 50/60 Hz
Australian model: 230 V AC, 50/60 Hz
Mexican model: 120 V AC, 60 Hz
Argentine model: 220 – 230 V AC, 50/60 Hz
Taiwan model: 110 – 120 V AC, 60 Hz
Other models: 230 V AC, 50/60 Hz
Power consumption
North American m o del: 35 watts
European model: 32 watts
0.3 watts (in the standby
mode)
Other models: 32 watts
Dimensions (w/h/d) Approx. 148 × 233 × 208
mm
Mass Approx. 2.9 kg
Supplied accessories Remote (1)
R6 (size AA) batteries (2)
AM loop antenna (1)
FM lead anten n a ( 1)
Design and specifications are sub ject to ch an g e
without notice.
Additional Information
21
GB
Page 22

List of button locations and reference pages
Illustrati
12 3
qsq
q
qgq
How to use this page
Use th is p a ge to fin d the lo ca tio n of bu tto ns an d o th er
parts of the system that are mentioned in the text.
Main unit
ALPHABETICAL ORDER
A – M
BASS/TREBLE 5 (12)
Cassette compa rtm ent qa
DISPLAY wd (9, 14)
Display window 2
DSG 4 (12)
MD 6 (15)
P – Z
PHONES jack qk
PLAY MODE qj (6, 7)
PRESET +/– 8 (9)
Remote sensor 1
TUNER BAND 7 (8, 9 )
TUNING +/– 0 (8, 9)
VOLUME 9 (13)
on number
r
DISPLAY wd (9, 14)
Name of button/part Reference page
RR
BUTTON DESCRIPTIONS
?/1 (power) wa (5, 9, 13)
m/M (fast forward/rewind)
0 (6)
./> (go back/go forward)
8 (5, 6, 7, 12, 13)
x (stop) ql (6, 7, 11, 17)
X (p au se) w; (6)
CD N (play) ws (6, 7, 11 )
Z PUSH OPEN/CLOSE (open/
close) 3 (6)
TAPE
m/M (fast forward/rewind)
qf (10)
xZ (stop/eject) qd (10, 11)
X (p au se) qs (10, 11)
N (play) qg (10)
z (reco rd ) qh (11)
22
GB
wd
ws
wa
w;
ql
qk
qj
4
5
6
7
8
9
q;
qa
d
h
f
Page 23

Remote control
ALPHABETICAL ORDER
A – M
BASS +/– 0 (12)
CLEAR 8 (8, 9)
CLOCK/TIMER SELECT w;
(13)
CLOCK/TIMER SET wa (5, 13)
DISPLAY 2 (9, 14)
DSG qa (12)
MD qk (15)
wa
w;
ql
qk
qj
qh
qg
P – Z
PLAY MODE/DIRECTION qd
(6, 7)
PRESET +/– 5 (9)
REPEAT/FM MODE qf (7, 9)
SLEEP ql (12)
TREBLE +/– 9 (12)
TUNER BAND qh (8, 9)
TUNER MEMORY qs (8)
TUNING +/– 6 (8 , 9)
VOL +/– 7 (13)
BUTTON DESCRIPTIONS
?/1 (power) 1 (5, 9, 13)
m/M (fast forwa rd/re w ind )
6 (6)
./> (go back/go forward)
5 (5, 6, 7, 13)
x (stop ) 4 (6, 7, 11, 17)
X (pau s e ) 3 (6 )
CD N (play) qj (6 , 7, 11 )
TAPE nN qg (10)
Additional Information
1
2
3
4
5
6
qf
qd
qs
qa
7
8
9
0
23
GB
Page 24

Sony Corporation
Printed in China
 Loading...