

Sony CFM-A50 Operating Manual
3-858-994-13(1)
Radio
Cassette-Corder
Operating Instructions page 2
Bedienungsanleitung Seite 2
D
EN
EN
D
CFM-A50
1997 by Sony Corporation

WARNING
To prevent fire or shock hazard, do not
expose the player to rain or moisture.
To avoid electrical shock, do not open
the cabinet. Refer servicing to qualified
personnel only.
Do not install the appliance in a
confined space , such as a bookcase or
built-in cabinet.
Notice for customers in the
United Kingdom
A moulded plug complying with BS
1363 is fitted to this equipment for your
safety and convenience.
Should the fuse in the plug supplied
need to be replaced, same rating fuse
approved by ASTA or BSI to BS 1362,
(i.e. marked with 2 or @ mark) must be
used.
To prevent fire or shock hazard, do not
place objects filled with liquids, such as
vases, on the appliance.
The FUNCTION selector is located at
the top panel.
When you turn on the player,
the OPR/BATT indicator lights up.
If the plug supplied with this equipment
has a detachable fuse cover, be sure to
attach the fuse cover after you change
the fuse. Never use the plug without the
fuse cover. If you should lose the fuse
cover, please contact your nearest Sony
service station.
EN
Introduction2

Table of contents
Basic Operations
4 Listening to the radio
6 Playing a tape
8 Recording on a tape
Useful Functions
10 Easy listening adjustment
10 Slow playback
Setting Up
11 Choosing the power sources
Additional Information
12 Precautions
13 Troubleshooting
14 Maintenance
14 Specifications
15 Location and function of controls
16 Index
EN
Introduction
EN
3
Basic Operations
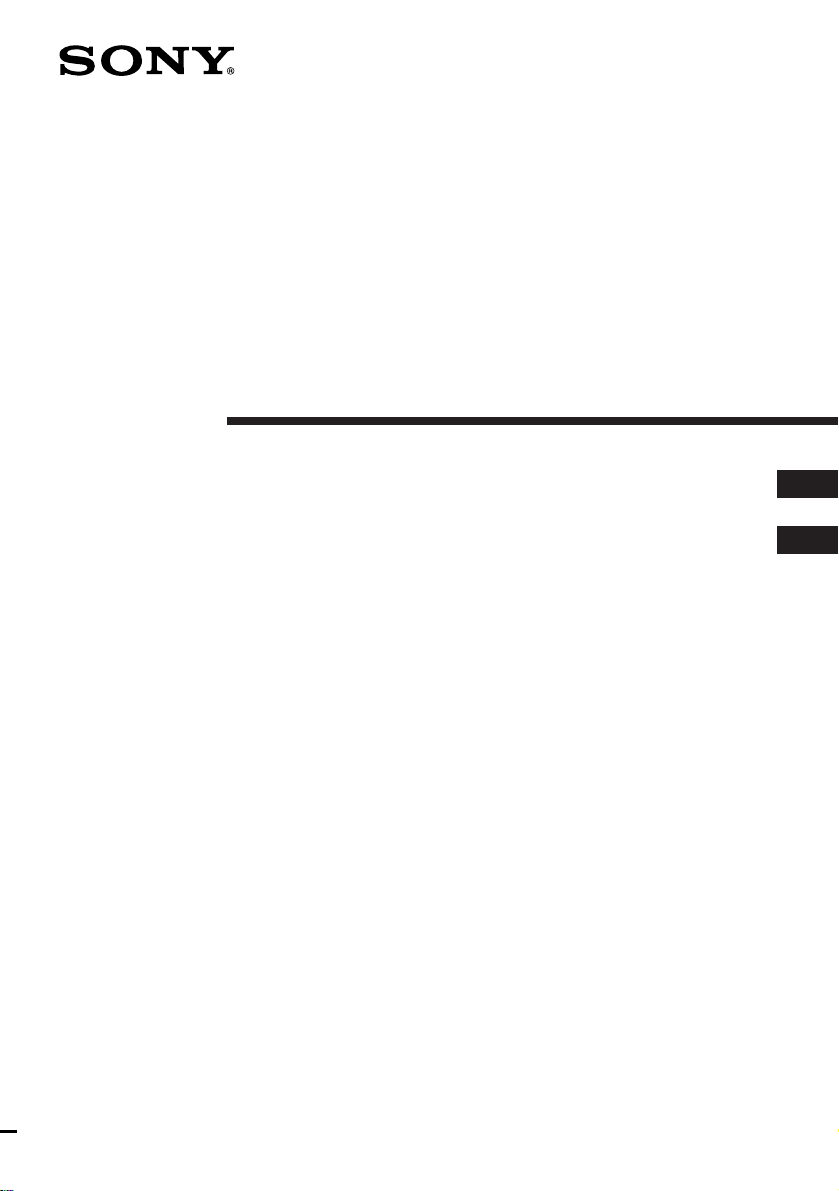
Listening to the radio
Dial scale
12
Connect the supplied AC power cord (see page 11).
1 Set FUNCTION to RADIO.
FUNCTION
RADIO
3
2 Set BAND to FM, MW or LW.
BAND
FM
MW
LW
3 Turn TUNING to tune in a radio
EN
Basic Operations4
TUNING
The dial scale switches to the
band you have chosen.
station.
88 91 94 97 100 103 106
FM
54 60 70 80 100 120 140 160
MW
160 170 190 210 230 250 270
LW
LW STATION
DLF FI EI BBC RMC RTL RTA
MHz
x10kHz
xkHz
23456
70 80 100 120 140
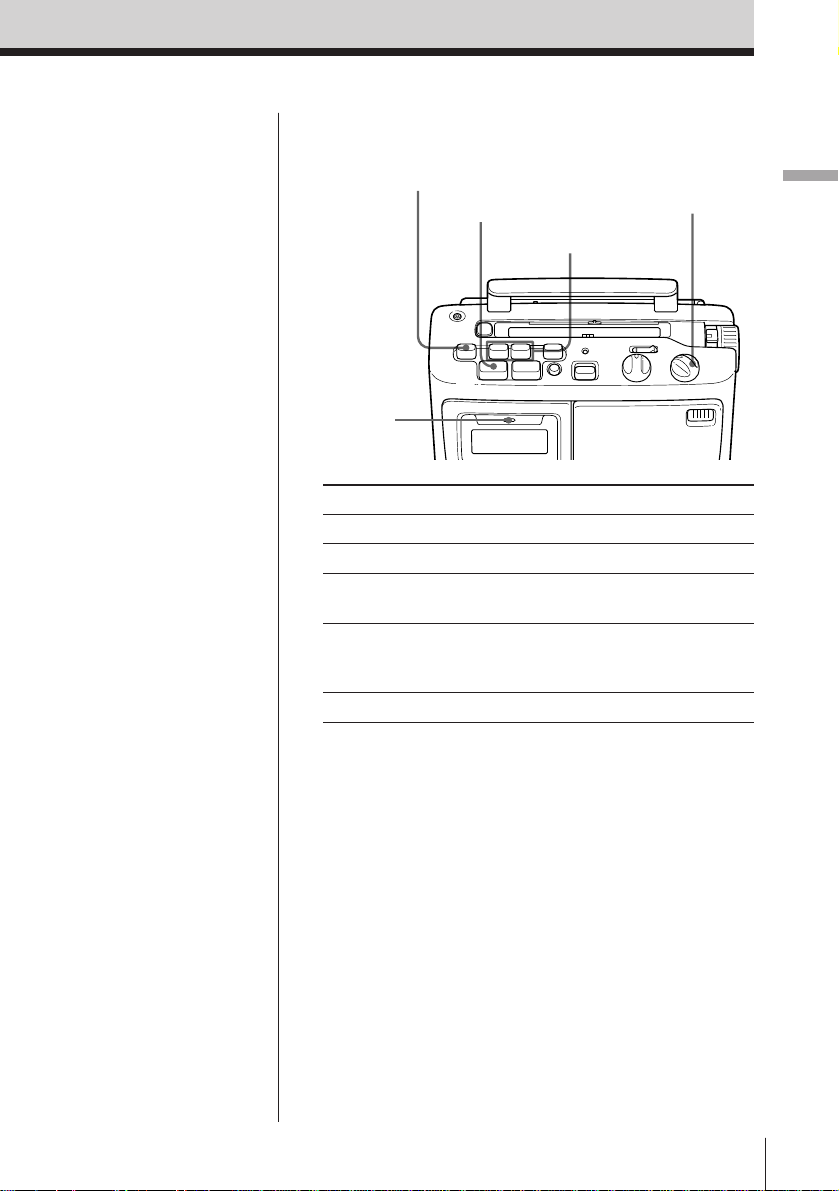
Use these buttons for additional operations
Tips
• To listen by the
earphone, connect the
earphone to the @
(earphone) jack.
• There is a earphone box
on the left side of this
equipment. You may
keep the supplied
earphone in this box.
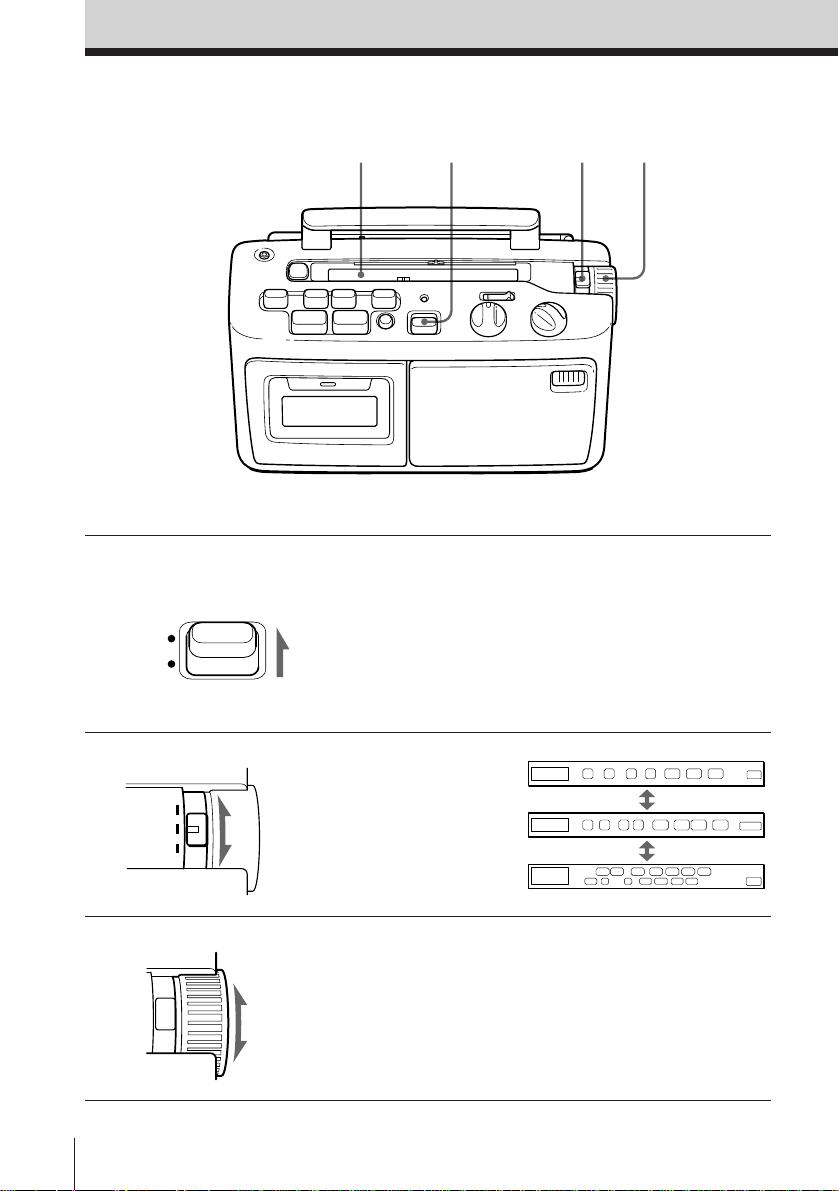
LIGHT
To Do this
Adjust the volume Turn VOLUME.
Turn off the radio Set FUNCTION to
Marker
Dial scale
FUNCTION
TAPE (RADIO OFF).
VOLUME
To improve broadcast reception
Reorient the antenna for FM. Reorient the player itself
for MW or LW.
Basic Operations
For FM For MW or LW
To mark the broadcast station you often listen to
If you set the marker to the frequency you often listen
to, you can easily tune in to this frequency after
listening to other stations.
Using the light
If the dial scale is hard to see, press LIGHT. The light
will be lit for 7 seconds.
Basic Operations
EN
5
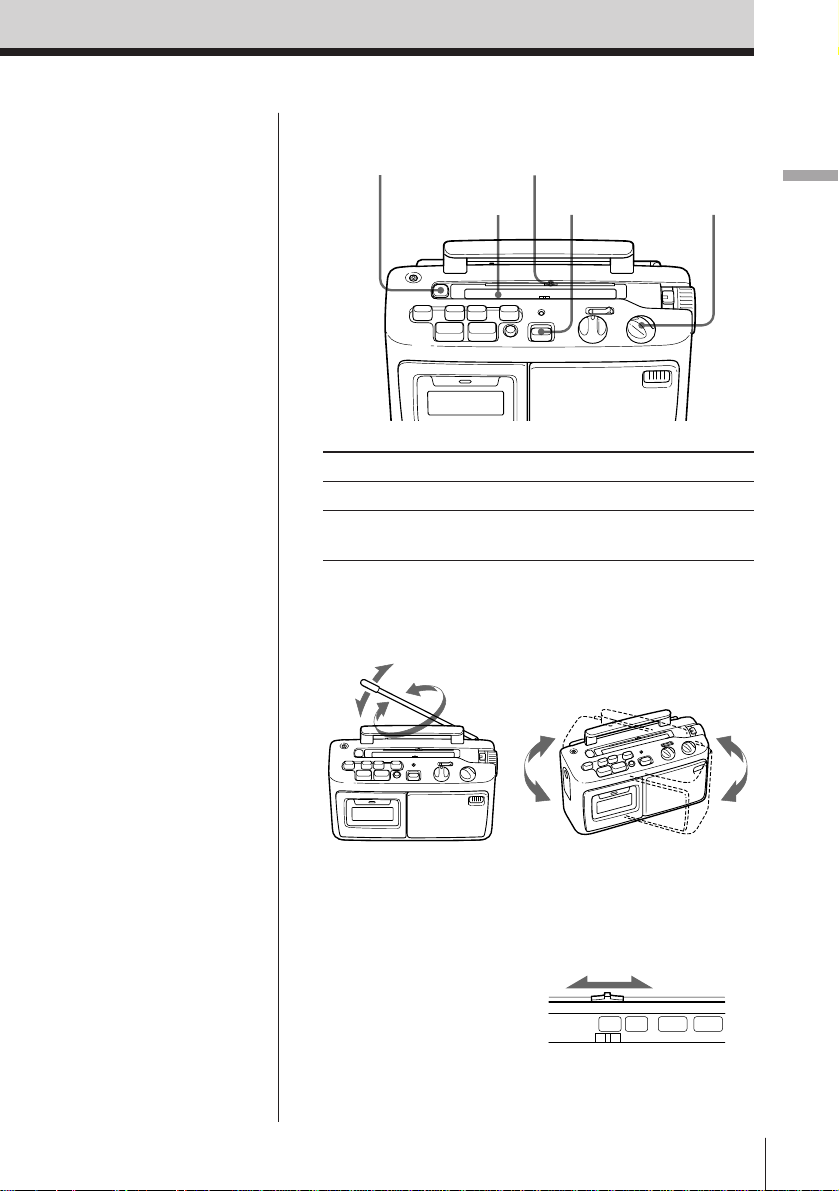
Playing a tape
132
Connect the supplied AC power cord (see page 11).
1 Set FUNCTION to TAPE (RADIO
OFF).
FUNCTION
TAPE
(RADIO OFF)
2 Press p6 STOP/EJECT to open
STOP/EJECT
the tape compartment and insert
a recorded tape. Use TYPE I
(normal) tape only. Close the
compartment.
3 Press 9 PLAY.
PLAY
EN
Basic Operations6
With the side you want
to play facing forward
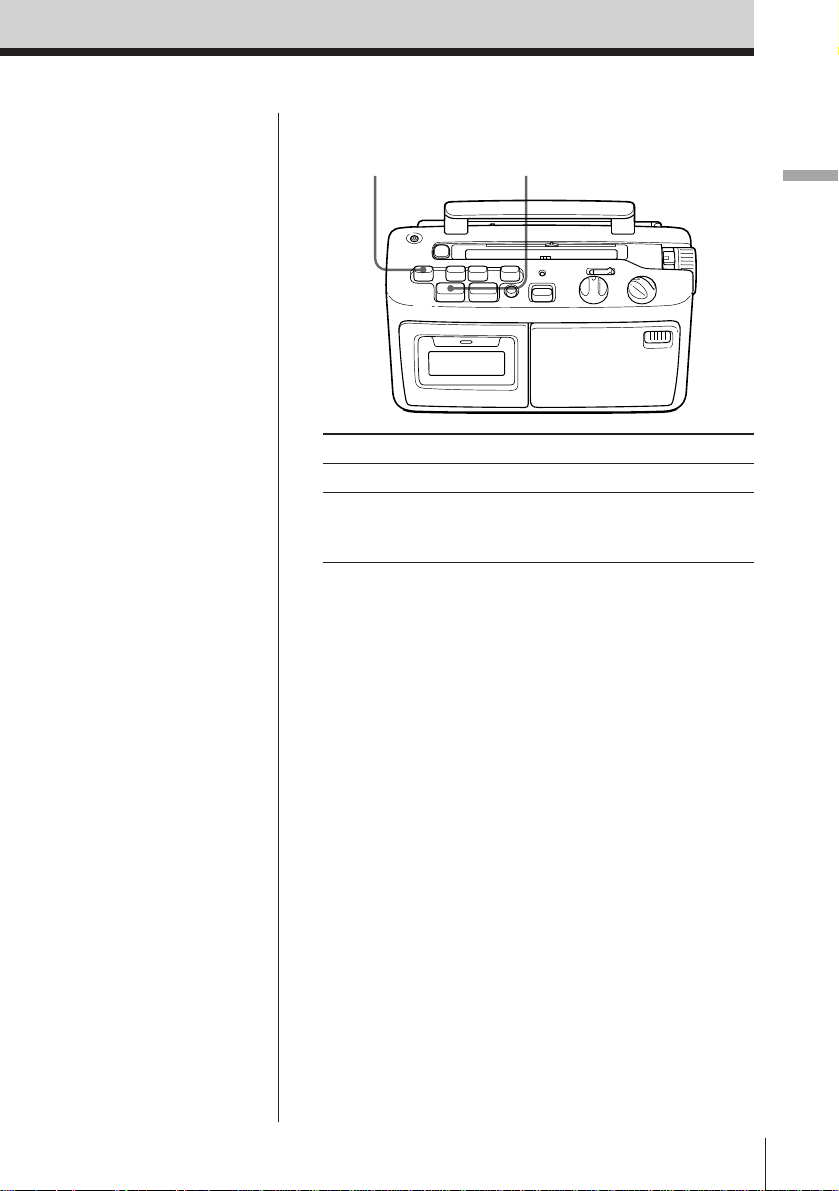
Use these buttons for additional operations
Tip
When a cassette is
inserted, the cassette
sensor button (Ø/TAPE
IN) comes out. You can
touch the cassette
compartment lid to find
out if the cassette is
inserted or not.
P PAUSE
p6 STOP/EJECT
0 FF/) REW
Cassette
sensor
button
To Do this
Adjust the volume Turn VOLUME.
Stop playback Press p6 STOP/EJECT
Fast-forward or Press 0 FF or ) REW
rewind the tape*
Pause playback Press P PAUSE
Press the button again to
resume play after pause.
Eject the cassette Press p6 STOP/EJECT
*For the side facing forward
VOLUME
Basic Operations
Basic Operations
EN
7

Recording on a tape
Connect the supplied AC power cord (see page 11).
Built-in
231
microphone
1 Press p6 STOP/EJECT to open
STOP/EJECT
the tape compartment and insert
a blank tape. Use TYPE I
(normal) tape only.
2 Select the program source you
want to record.
FUNCTION
RADIO
FUNCTION
TAPE
(RADIO OFF)
3 Press REC to start recording.
EN
Basic Operations8
REC
To record from the radio, set
FUNCTION to RADIO, set
BAND to FM, MW or LW and
tune in the station you want (see
page 4).
To record from the built-in
microphone, set FUNCTION to
TAPE (RADIO OFF).
(9 PLAY is depressed
automatically).
With the side you want to
record on facing forward
Tips
• Adjusting the volume or
the tone will not affect
the recording level.
• If the MW/LW program
makes a whistling
sound after you have
pressed the REC button
in step 3, set the ISS
(Interference Suppress
Switch) at the rear to the
position that most
decreases the noise.
• For the best results, use
the AC power as a
power source for
recording.
Notes
• If the SLOW
PLAYBACK button is
pressed during
recording the tape speed
will not change and
recording will stay at
normal speed.
• You cannot listen
through the earphone
when recording from
the built-in microphone.
Use these buttons for additional operations
P PAUSE p6 STOP/EJECT
Basic Operations
To Press
Stop recording p6 STOP/EJECT
Pause recording P PAUSE
Press the button again to
resume recording.
Basic Operations
EN
9
Useful Functions
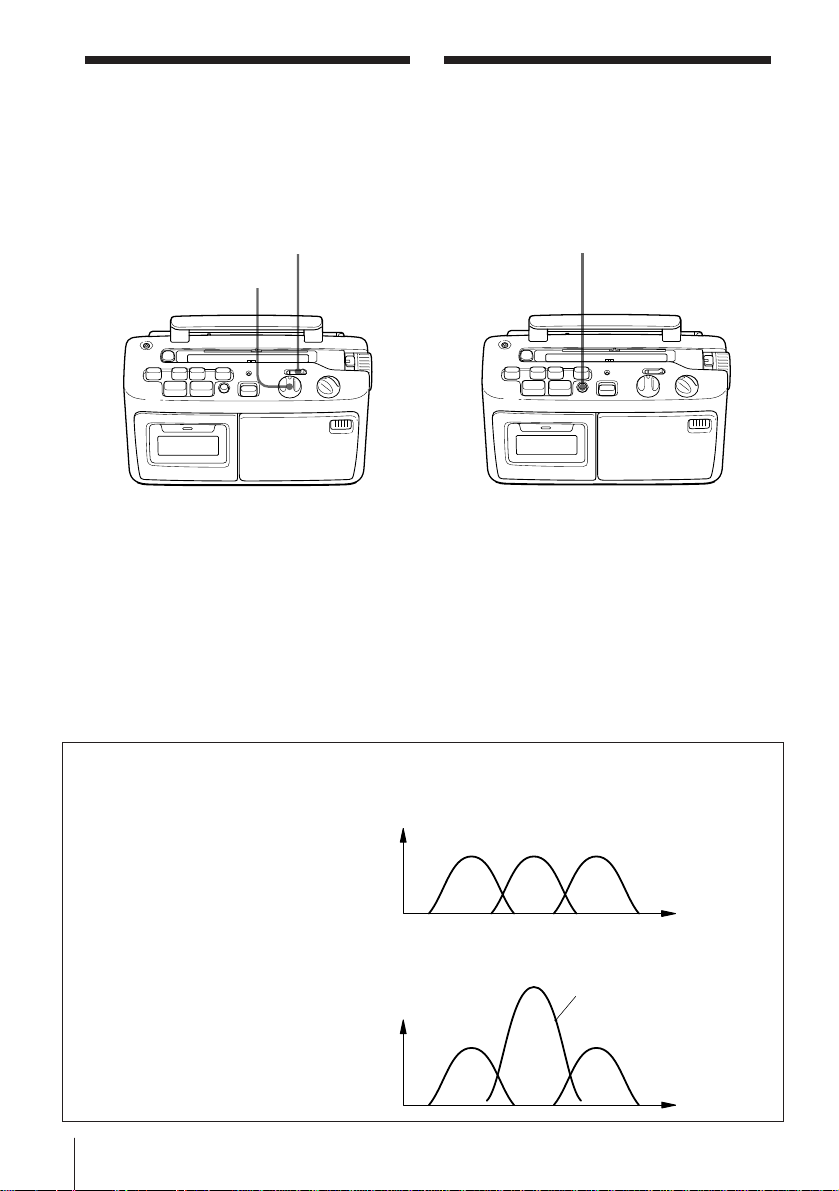
Easy listening
adjustment
This function lets you adjust the sound
to hear the main subject easier.
EASY LISTENING ADJUSTMENT switch
EASY LISTENING
ADJUSTMENT control
1 Playback a tape or turn on the radio.
2 Set the EASY LISTENING
ADJUSTMENT switch to ON.
3 Turn the EASY LISTENING
ADJUSTMENT control to adjust to
the tone of your choice.
Set the EASY LISTENING
ADJUSTMENT switch to OFF to cancel
Easy Listening.
Slow playback
You can slow down the tape speed by
about 15% to the normal tape speed.
SLOW PLAYBACK
To slow down the tape speed
Press SLOW PLAYBACK to “ØON” during
playback.
To cancel the slow tape speed
Press SLOW PLAYBACK again to “øOFF”.
Note
You cannot use SLOW PLAYBACK on other
modes.
How the easy listening
adjustment works
Sounds could be distinguished
by their frequencies. When you
have recorded voices of three
people mixed together, for
example, you will be able to
hear the voice of a certain
person better by emphasizing
the frequency range matching
to the tone of his/her voice.
EN
Setting Up10
Useful Functions
EASY LISTENING ADJUSTMENT switch is set to OFF:
Normal
Sound
Intensity
PERSONAPERSONBPERSON
EASY LISTENING ADJUSTMENT switch is set to ON:
Adjusted to match person B.
Sound
Intensity
PERSON
PERSON
A
B
C
The voice of person B
becomes larger for easy
listening
PERSON
C
Sound
Frequency
Sound
Frequency
 Loading...