

Page 1

Remote
Commander
System
Operating Instructions.
Owner's Record
The model and serial numbers are located on the bottom of the hideaway unit.
Record the serial number in the space provided below.
Refer to these numbers whenever you call upon your Sony dealer regarding this
product.
Model No. RM-X69RF Serial No.
For installation and connections, see the supplied installation / connections
manual.
_______________________________________
RM-X69RF
1998 by Sony Corporation
Page 2

Warning
This equipment has been tested and found to
comply with the limits for a Class B digital
device, pursuant to Part 15 of the FCC Rules.
These limits are designed to provide
reasonable protection against harmful
interference in a residential installation. This
equipment generates, uses, and can radiate
radio frequency energy and, if not installed
and used in accordance with the instructions,
may cause harmful interference to radio
communicatioris. However, there is no
guarantee that interference will not occur in a
particular installation. If this equipment does
cause harmful interference to radio or
television reception, which can be determined
by turning the equipment off and on, the user
is encouraged to try to correct the interference
by one or more of the following measures:
— Reorient or relocate the receiving antenna.
— Increase the separation between the
equipment and receiver.
— Connect the equipment into an outlet on a
circuit different from that to which the
receiver is connected.
— Consult the dealer or an experienced radio/
TV technician for help.
You are cautioned that any changes or
modifications not expressly approved in this
manual could void your authority to operate
this equipment.
Welcome!
Thank you for purchasing the SONY Remote
Commander System. This unit lets you enjoy
CD and MD sound with an optional changer.
You can use this unit with the FM receiver of
your car audio.
Page 3

Table of contents
Getting Started
Resetting the display.......................................4
Preparing the wireless remote.........................4
Setting the clock..............................................5
Changing the transmitting frequency
Changing the output level
...............................
CD/MD Changer
Playing a CD or MD
Playing tracks in random order
— Shuffle play............................................7
Playing tracks repeatedly
— Repeat play
Creating a program
Labelling a CD
— Disc Memo
Locating a disc by name
— List-up..................................................10
.......................................
............................................
.........................................
............................................
Additional Information
Precautions....................................................10
Maintenance..................................................10
Reversing the operative direction of the
rotary commander
Location of controls
Specifications
Troubleshooting guide
Index
................................................
....................................
......................................
................................................
..................................
.............
Back cover
5
5
6
7
7
9
IS
11
12
14
15
Page 4
Resetting the display
Before operating the unit for the first time or
after replacing the car battery, you must reset
the display.
Press the reset button with a pointed object,
such as a ball-point pen.
¥
Reset button
Note
Pressing the reset button will erase all the memorized
^
programs.
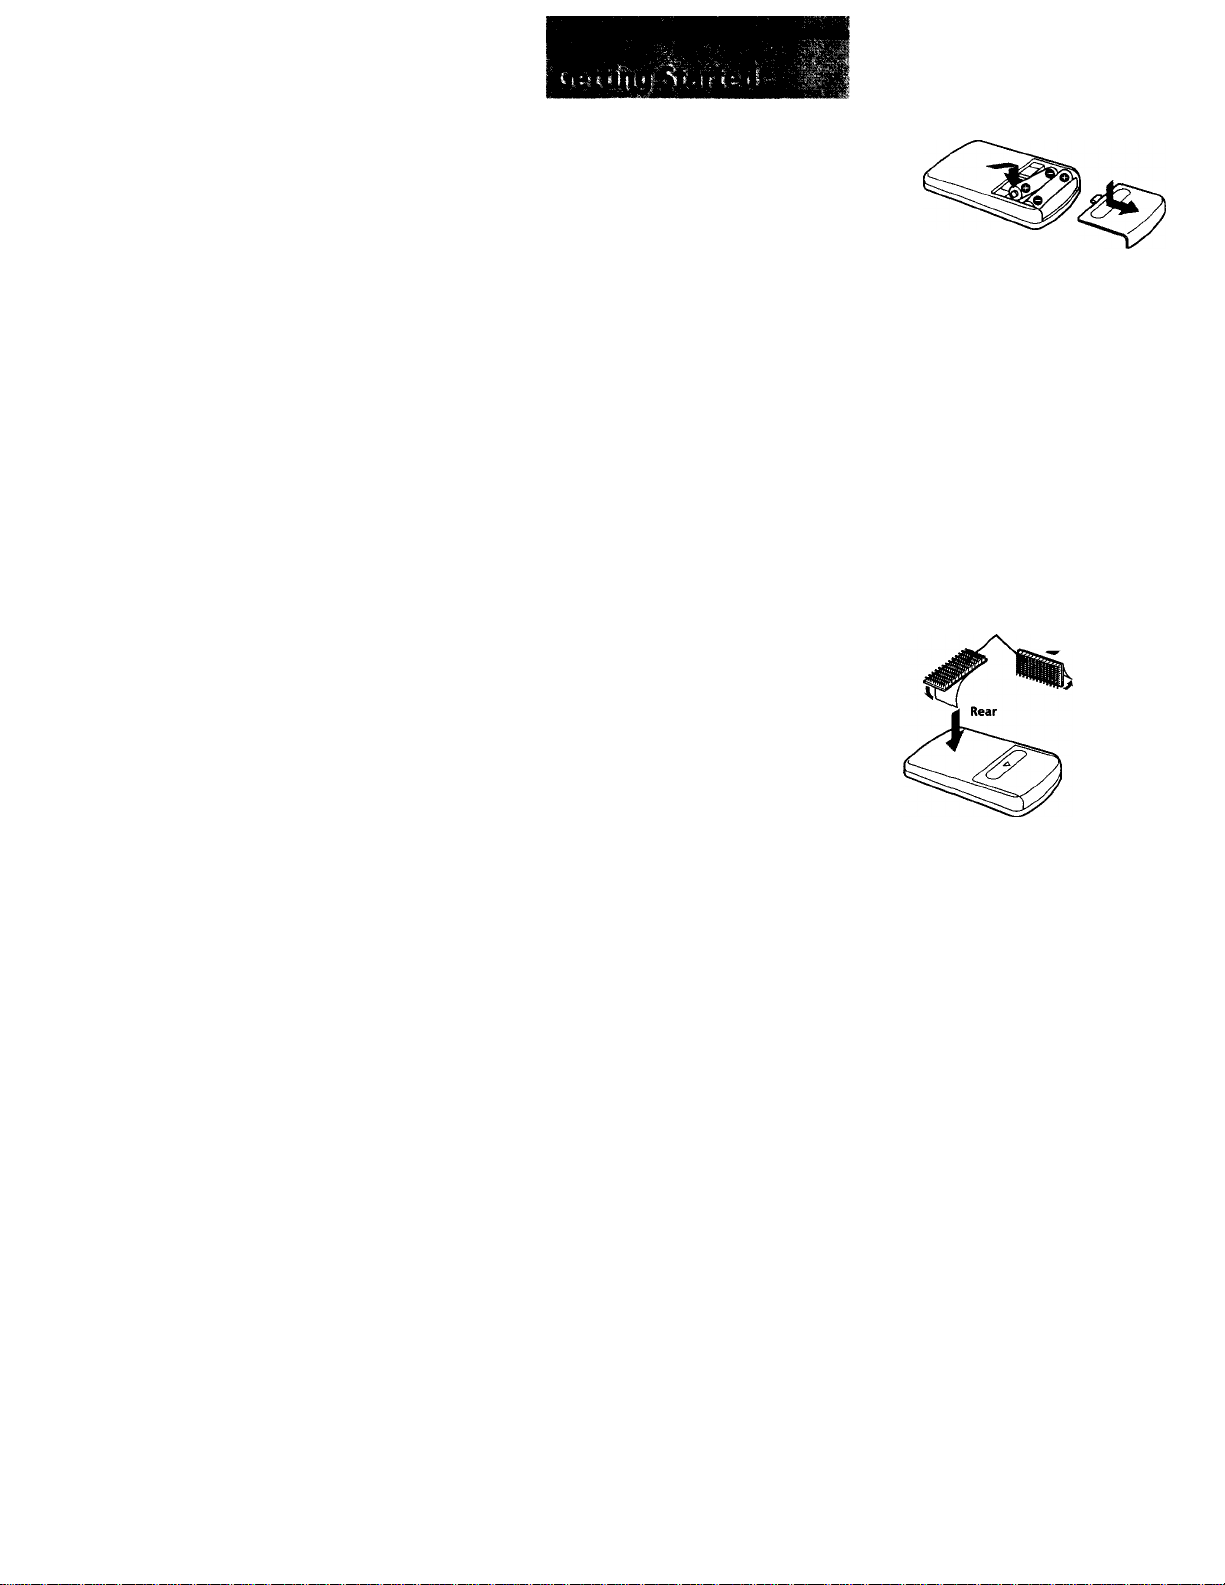
Preparing the wireless
remote
Installing the batteries
Two size AA (R6) batteries
Battery life is approx, six months although it
depending on use.
Notes on batteries
To avoid damage from battery leakage and
subsequent corrosion:
— insert the batteries by matching the and
on the batteries to the "+" and in
the battery compartment.
— do not use an old battery with a new one,
or different types of batteries together.
— remove the batteries when you do not use
the unit for a long period of time.
— do not charge the batteries.
If any battery leakage occurs, replace the
batteries with new ones after cleaning the
battery compartment.
Mounting the wireless remote
Velcro tapes to the place you
wish to install to
Install the wireless remote with velcro tape in the
desired place.
Notes
• Do not install or leave the wireless remote in a location
near any heat sources, or in a place subject to direct
sunlight (especially on the dashboard in summer etc.).
• When you park your car in direct sunlight, detach the
wireless remote and place it in a location such as the
glove-box, where it mil not be subjected to direct sunlight.
• Before installing the wireless remote, be sure to check
whether you can remote-control the system from the
place where you intend to install the loireless remote.
• Clean the surface before attaching the velcro tape.
4
Page 5

Setting the clock
The clock has a 12-hour digital indication.
Example: To set the clock to 10:08
1 Turn the ignition key to the ON position.
2 Press (DSPUCLOCK SET) for more than
two seconds.
Changing the transmitting
frequency
Because this unit processes CD/MD playback
sound through an FM tuner, there may be
interference noise during CD/MD playback. In
this case change the frequency of the
modulated RF signal transmitted from the
hideaway unit. The initial setting is 88.3 MHz.
-:/.DD
The digit flashes.
O Press GD or CD to set the hour.
0 0
to go back to go forward
0 Press ( ENTEFVDELETE ) .
0 Press O or © to set the minute.
0 0
to go back
3 Press (DSPL/CLOCK SET).
ID:0B
The clock starts.
When the POWER SELECT switch on the hideatvay unit
is set to the "OFF" position, the clock display will not
appear on the display unit even if the ignition of your car is
turned on. In such a case, press the POWER switch of the
display unit and play a disc. Then follow steps 2 to 3.
to go forward
Notes
* Be sure to set the frecjuency of your FM tuner to that of
• You can set the frequency, during CDIMD playback.
Changing the output level
2 Press (ENTER/DELETE) again.
3 Press CD# CD to select the output level.
1 Press (ENTER/DELETE) for more than two
seconds.
2 Press either © or © to select the
frequency.
Each time you press ©, the frequencies
change as follows:
88.3 MHz -► 88.5 MHz -► 88.7 MHz -►
88.9 MHz -► 89.1 MHz -► 89.3 MHz -►
89.5 MHz -► 89.7 MHz 89.9 MHz
If you press ©), the frequencies will be
displayed in reverse order.
3 Press (ENTEFVDELETE) for more than two
seconds.
the newly selected frequency.
1 Press (ENTER/DELETE) for more than two
seconds.
LEF
Initial setting
LOW 4-p MID HIGH
n m
E
3-
fb
Q.
4 Press (ENTER/DELETE) for more than two
seconds.
Note
You can change the output level, during CD/MD playback.
Page 6

Playing a CD or MD
1 Turn on the FM tuner of the car audio.
You can label CD and CD TEXT discs with a
personalized name using the disc memo
function, refer to "Labeling a CD" (page 9).
However, if you use personalized labels, ¿\ey
will always take priority over the original CD
TEXT information when such information is
displayed.
Note
1/the name of the MD or CD TEXT disc is too long, you
can scroll it across the display by pressing (SCROLL~).
2 Adjust the selected frequency by the
wireless remote.
(88.3 MHz, 88.5 MHz, 88.7 MHz, 88.9 MHz,
89.1 MHz, 89.3 MHz, 89.5 MHz, 89.7 MHz
or 89.9 MHz)
3 Press the ( power ) on the display.
CD/MD playback start.
СЛ
I 3 1.3 E
If the power is already turned on, CD / MD
playback starts automatically when you press
CMD/CD).
Notes
• When you use a CD changer, “CD" appears in the
display. If you use an MD changer, "MD" appears in
the display.
• If the POWER SELECT switch on the hideaway unit is
set to the OFF position and the display on the display
unit is turned off, you will not be able to start CD/MD
playback with the wireless remote. In this case, press
(POWER) on the display unit.
4 Adjust the volume with the volume
control on the car audio.
All the tracks play from the beginning.
Changing the display item
Each time you press ( dspdclock set ) during
CD/MD playback, the item changes as
follows;
▼
Elapsed playback time
I
Disc name*
I
Track name*
Stopping CD/MD playback
Press either ( power ) on the display or CofD on the wireless remote.
Notes
• When CD/MD playback is stopped, you may hear some
noise from the speakers. To prevent this from happening,
turn the wlume down before stopping CD/MD playback.
• If you turn off the ignition switch of your car without
stopping CD/MD playback, it will automatically resume
CD/MD playback from where it was stopped the next
time you turn on the ignition switch.
Listening to the radio or a tape
Be sure to stop CD/MD playback before you
start listening to the radio or a tape.
Note
Be sure to stop CD/MD playback, otherwise there may be
some interference with radio reception.
Clock
* If you have not labeled the disc, "******" or “NO
NAME" appears in the display.
If you play an MD or CD TEXT disc, the track
name appears in the display.
Page 7

Playing tracks in random
order — Shuffle play
To play the current disc in random order
Press (SHUF) during CD/MD playback to
get the 'SHUF 1' indication.
To play all the discs in the changer
in random order
Press (SHUF) during CD/MD playback to
get the 'SHUF 2' indication.
The function of (SHUF) changes cyclically as
follows:
SHUF 1 (Disc shuffle)
SHUF 2 (CD/MD changer shuffle)
Cancel (Normal CD/MD playback mode)
i
Playing tracks repeatedly
— Repeat play
To repeat a track
Press (REPEAT) during CD/MD playback
to get the 'REP 1' indication.
To repeat a disc
Press i REPEAT) during CD/MD playback
to get the 'REP 2' indication.
The function of (repeat) changes cyclically as
follows:
REP 1 (Track repeat)
REP 2 (Disc repeat)
Cancel (Normal CD/MD playback mode)
I
I
Creating a program
(CD changer or MD changer with program memory function)
You can preselect the tracks you want to hear
and the order in which you want them to be
played back. This function is divided into
Program 1 and Program 2, each allowing you
to preselect up to 12 tracks. Furthermore, once
a program is registered, the track order is
preserved. Changing the disc order in an
opHonally connected changer will not affect
the order in which the tracks have been set for
playback.
1 Press (PGM/EDIT) for more than two
seconds.
CH
5 B IP I.D li
Program 1 Configuration Indicator
To configure Program 2, press ( PGM/EDtT)
repeatedly until Program 2 configuration
indication appears.
2 Play the track you want to enter into
memory.
3 Press ( ENTER/DELETE ) momentarily.
P /
iEtJTERi
cn
3 E IP I.DEI
4 To continue entering tracks, repeat steps
2 and 3.
5 When you are finished entering tracks,
press f PGM/EDrr) for more than two
seconds.
Notes
• When a CD changer ivithout program memory function
is connected, pressing C PGM/EDIT) for more than two
seconds loill not cause the system to enter the program
edit mode.
• “**WArr**" appears on the display when the input
tracks data has not yet been read into the memory, or
when a disc has not been put into the unit.
• “**FULL**" appears on the display when you try to
input more than 12 tracks into a program at one time.
HH\ ItMW
E
n
D
è
o
3
in
Page 8

Playing the stored program
Press CPGM/EDiT) to designate the
program(s) you wish to play.
The function of ( pgm/edit ) changes cyclically
as follows:
Programi Playback
PBn I
3 Press (ENTER/DELETE) for more than two
seconds.
P I
NO URTR
All programed tracks will be erased
completely.
4 when you are finished erasing programs,
press (PGM/EDIT) for more than two
seconds.
Program2 Playback
PBn P
Programi and 2 Playback
PBn HP
PBn OFF
Notes
• If neither Program 1 or Program 2 haw been input in
memory, “NO DATA" will appear on the display.
• If a track stored into program memory is not contained
in the disc magazine, this track will be skipped and the
next track will be played.
• When the disc magazine in the CD changer contains no
tracks stored into program memory, or when information
about program memory-stored tracks has not been loaded
yet, "NO READY" will be displayed.
Erasing the entire program
1 Press (PGM/EDIT) for more than two
seconds.
CH
5 5 IP I.DBI
Programi Configuration Indicator
2 Press O to get following indication.
HEL
--PBn I
If no track is stored into PGMl, this
indication will not appear.
To delete Program 2, press C pgm/edit )
repeatedly until Program 2 is displayed.
///1 I I M\\s
Adding tracks to the program
1 Press (PGM/EDIT) for more than two
seconds.
If you wish to insert tracks into Program 2,
press f PGM/EDIT) repeatedly until Program
2 configuration indication appears,
2 Press GD, (±) to designate the track slot
number in which you wish to insert a
track.
Cl
5 3 IP 1.0 Bl
Programi Configuration Indicator
3 Play the track you wish to insert.
4 Press (ENTER/DELETE) momentarily to
enter the track.
The current track in that slot number and
the succeeding tracks will shift down.
5 To continue inserting tracks, repeat steps
2 through 4.
6 When you are finished inserting tracks,
press (PGM/EDIT) for more than two
seconds.
Notes
• "**WA1T** " appears in the display while the unit is
reading the data.
• Once all 12 slots have been filled, "**FULL**" will
appear on the display and if will not be possible to insert
more tracks.
Erasing tracks
1 Press (PGM/EDIT) for more than two
seconds.
Cl
5 3 IP I.DB:
Programi Configuration Indicator
/n I tt\\\
8
Page 9

2 Press O. CD to designate which track
you wish to erase (shown on the
dispiay).
6 P
The track curiently registered
in slot 6 of Programl.
ilM II
The track slot
number.
3 Once designated, press ( enter/delete )
for more than two seconds.
The track will be erased.
New track in slot 6
Jfi.
- - - P /.05
cn
HIP /.05
When you erase a registered track from a
slot number, the succeeding registered
tracks will shift up to fill the gap.
4 To continue erasing tracks, repeat steps
2 and 3.
5 When you are finished erasing tracks,
press C PGM/EDiT) for more than two
seconds.
Labelling a CD — Disc Memo
(CD changer with custom file function)
You can label each disc with a personalized
label.
1 Press (NAME LiST/NAME EDIT) for more
than two seconds.
CH
Press CD to display the available
characters. If you press CD, the characters
will be displayed in reverse order.
If you wish to put a blank space after a
character, select(under-bar).
An alternative method to erase a title
You can erase a title by selecting eight "_"s (under-bar).
I Press rENTER/DELETE) after locating
the desired character.
The flashing cursor moves to the next
space.
CJ
5.U
O Repeat steps O and O to enter the
entire title. Up to eight characters can
be entered per disc.
3 To return to the normal CD playback
mode, press ( name list/name edit) for
more than two seconds.
Displaying the disc memo
Press f DSPtycLOCKSET) during CD
playback.
Cl
5CHU1ERT
Each time you press ( dspl/clock set^ during CD
playback, the display changes as follows:
Elapsed playback time ► Disc name
- Clock -d- - Track name
Notes
• If you use personalized labels, they will always take
priority over the original CD TEXT information when
such information is displayed.
• "**WA1T**'' appears in the display while the unit is
reading the data.
: name
◄
----
-----
j
1
Erasing the disc memo
1 Play the CD and press
(NAME LIST/NAME EDIT) for more than
two seconds.
E
n
D
'—
Q
n
2 Input the characters.
O Press CD or O to select the desired
characters.
(A-rB->C-r"Z->0-*1->2->
... 9_n._>__»/_>\_K_*>
:'5'
2 Press (DSPUCLOCK set ) for more than
two seconds.
3 Press CD or CD to select the title that
you wish to erase.
4 Press i enter/delete ) for more than two
seconds.
The title is erased.
Repeat steps 3 and 4 if necessary.
continue to next page -
Page 10

Press (NAME LiST/NAME EDiT~) for more
than two seconds.
The unit returns to the normal CD playback
mode.
Locating a disc by name
— List-up
(CD changer with custom file function)
This function can be performed after discs
have been assigned a personalized label. For
more information on disc labels, refer to page
9.
1 Press ( NAME LIST/NAME EDiO
momentarily.
The name assigned to the disc currently
playing will appear on the display.
Note
This function may not work when a changer without list
up feature is connected.
2 Pressing ( name list/name edi~T)
continuously will display In order the
titles.
Notes
• If there are no discs in the magazine, "NO DISC " will
appear on the display.
• If a disc has not been assigned a personalized label,
"****** " will appear on the display.
• If the disc information has not been read in by the unit,
"NOT READ" will appear on the display. If the disc
information has not i>een loaded into the unit, "NOT
READ" will appear on the display. To execute loading,
first push (Dl^). then choose the disc that has not been
loaded.
3 When you have found the desired disc,
press (Disc~) to playback the disc (Direct
search function).
Note
You can still execute the direct search function even if the
"**♦***" message appears on the display (unnamed disc).
Precautions
• If your car was parked in direct sunlight
resulting in a considerable rise in
temperature inside the car, allow the system
to cool down before operating it.
• If no power is being supplied to the system,
check the connections first. If everything is in
order, check the fuse.
• Avoid installing the system in places:
— subject to temperatures exceeding 55 “C
(131 °F).
— subject to direct sunlight.
— near heat sources (such as heaters).
— exposed to rain or moisture.
— exposed to excessive dust or dirt.
— subject to excessive vibration.
If you have any questions or problems
concerning your unit that are not covered in
this manual, please consult your nearest Sony
dealer.
Maintenance
Fuse replacement
If the fuse blows, check the power connection
and replace the fuse. If the fuse blows again
after replacement, there may be an internal
malfunction. In this case, consult your nearest
Sony dealer.
Warning
Use the specified amperage fuse.
Use of a iiigher amperage fuse may cause
serious damage.
10
Page 11

Reversing the operative
direction of the rotary
commander
You can control this unit with the optional
rotary commander (RM-X3S). If the installation
position should require it, the operative
direction of the AMS, DISC and + /- controls
can be reversed. To reverse, press the PGM
button for at least two seconds while pressing
on the AMS control.
The operative direction of controls is factory
preset as in the illustration.
n
O
O
n
3“
<u
3
iD
0>
§
Q.
CL
11
Page 12

Location of controls
Refer to the pages for details.
[T] CD/MD (CD/MD Changer) indication
[2] SHUF (shuffle play) indication
[3] REP (repeat play) indication
[4] PGM (program memory function)
indication 7, 8, 9
¡5] Elapsed playing time indication
[U POWER switch 6
Press to turn the system on and off.
[7] DISC (disc number) indication
[8] TRACK (track number) indication
[9] Reset button 4
Press this button with a ball-point pen etc.
when the operation buttons fail to
function.
m Infrared receptor for the remote
commander
12
Page 13

IV/re/ess remote (RM-X46)
[T] [2] mmm
^ B ■ ^
If you press the function buttons on the remote
quickly, the function described above the
button will be executed.
If you press the function buttons for at least
two seconds, the functions described below the
button will be executed.
DSPL PGM NAME LIST
□ □□ □
aOCKSET EDIT NAME EDIT
Refer to the pages for details.
Q] DSPL (display mode change)/CLOCK SET
(time set) button 5, 6, 9
[D OFF button 6
[3] PGM (program memory play)/EDIT
(program edit mode) button 7, 8, 9
S] NAME LIST (list up function/list-up
select)/NAME EDIT (name edit mode)
button 9, 10
[H ENTER/DELETE button 5, 7, 8, 9
[D MD/CD (CD/MD play/CD/MD changer
select) button 6
When two CD/MD changers are
cormected, press this button to select a
desired CD/MD changer.
[Z] O (±) (character select/program
select) button 5, 8, 9
d] DISC (disc select) button 10
ENTER
DELETE
[6] m
MM 01
d] REPEAT (repeat play) button 7
S3 AMS (automatic music sensor) buttons
Press either side of the button once during
CD/MD playback to search the begrrming
of a track (AMS function).
►M side: To locate the beginning of the
next track
side: To locate the beginning of the
currently playing track
If you keep the button pressed, the
beginnings of either the succeeding or the
previous tracks will be located. However,
if the beginning or the end of the disc is
reached, you ivill not be able to go any
further.
If you press the AMS button during
program memory play, the tracks stored
into program memory will be scanned in
their order.
in! (reverse»forward) button
Press and hold either side of the button
during CD/MD playback to search a
desired point of a track.
►► side: To fast forward
◄◄ side: To fast reverse
The elapsed playing time of the track will
be displayed on the display unit during
the manual search.
m SHUF (shuffle play) button 7
SCROLL button 6
E
>
Q.
g.
r+
o'
3
at
13
Page 14

Specifications
Hideaway unit
Frequency
Dimensions
Mass
Wireless remote
Dimensions
Mass
Display unit
Dimensions
Mass
88.3 MHz/88.5 MHz/
88.7 MHz/88.9 MHz/
89.1MHZ/89.3 MHz/
89.5 MHz/89.7 MHz/
89.9 MHz (switchable)
Approx.
124.8 X 30.0 X 99.8 mm
(5 X 1 ^/i6 X 4 in.)
(w/h/d)
Approx. 330 g (11.64 02.)
Approx. 625 X106 X185 mm
(2V2x4V4xV4in.)
(w/h/d)
Approx. 55 g (2 oz.) not
incl. batteries
Approx. 120 X 37 X 18.5 mm
(4^/4Xl V2X^/4in.)
(w/h/d)
Approx. 115 g (4 oz.)
Generai
Supplied accessories
Optional accessories
Optional equipment
Design and specifications are subject to change without
notice.
Parts for installation and
connections (1 set)
CD single adaptor CSA-8
Source selector
XA-C30
BUS cable (supplied with
an RCA pin cord)
RC-61 (1 m), RC-62 (2 m)
CD changer
CDX-715, CDX-805,
CDX-T62,CDX-T65, etc.
MD changer
MDX-62
Rotary commander
RM-X3S
14
Page 15

Troubleshooting guide
The following check list will assist in the correction of most problems which you may encounter
with your unit.
Before going through the check list below, refer back to the connection and operating procedures.
General
Problem
The operation buttons do not
function.
The sound skips due to • The CD/MD changer unit is installed in an unstable location,
vibration. —► Re-instail it in a stable location.
Error displays
The following indication will flash for about five seconds.
Display
NO tm
N0 JJI5C
ERROR
RESET
ILRNK
NO JJI5E5
Cause
The disc magazine is not inserted in
the CD (hanger.
No disc is inserted in the CD/MD
changer.
The CD is dirty. Qean the CD.
The CD is inserted upside down.
The CD/MD changer caimot be
operated because of some problem.
No tracks have been recorded on an
MD.
One or more CD or MD from the
changer will not play because of some
problem.
Cause/Solution
»The built-in micro computer has malfunctioned.
—» Press the reset button on the display unit
»The coimecting cords are not connected properly.
> The batteries in the wireless remote are weak.
• The distance between the wireless remote and the display unit
is too far.
• Dirty or defective disc(s).
—» Clean or replace it/them.
Solution
Insert the disc magazine with discs
into the CD changer.
Insert the disc in the CD/ MD changer.
Insert the CD correctly.
Press the reset button of the display
unit.
Playback an MD with tracks recorded
on it.
Insert another CD/MD.
E
>
Q.
a
If the above mentioned solutions do not help to improve the situation, consult your nearest Sony
dealer.
15
Page 16

Index
A,B. C
CD playback 6
Change
Frequency 5
Out put level 5
Clock 5
Custom file 9,10
D. E
Disc memo 9
Display 4,12
F, G, H, I, J, K
Function
Disc memo 9
List up 10
Program memory 7, 8
Repeat 7
Shuffle 7
Fuse 10
List up 10
M, N
MD playback 6
o
Output level 5
P,Q
Program memory 7, 8
R
Radio 6
Repeat play 7
Reset 4
s
Shuffle play 7
T, u,v
Tape play 6
w, X, Y, Z
Wireless remote 4,13
Sony Corporation Printed in Japan
iiii
8 6 2 5 9 4
1 1 * (1)
 Loading...