

2-659-707-11 (1)
FM/MW/LW
Compact Disc Player
Operating Instructions
Bedienungsanleitung
Mode d’emploi
Istruzioni per l’uso
Gebruiksaanwijzing
To cancel the demonstration (DEMO) display, see page 12.
Zum Deaktivieren der Demo-Anzeige (DEMO) schlagen Sie bitte auf Seite 12 nach.
Pour annuler la démonstration (DEMO), reportez-vous à la page 12.
Per annullare la dimostrazione (DEMO), vedere pagina 13.
Om de demonstratie (DEMO) te annuleren, zie pagina 12.
GB
DE
FR
IT
NL
CDX-RA550
© 2006 Sony Corporation
Welcome !
Thank you for purchasing this Sony Compact
Disc Player. You can enjoy your drive with the
following functions.
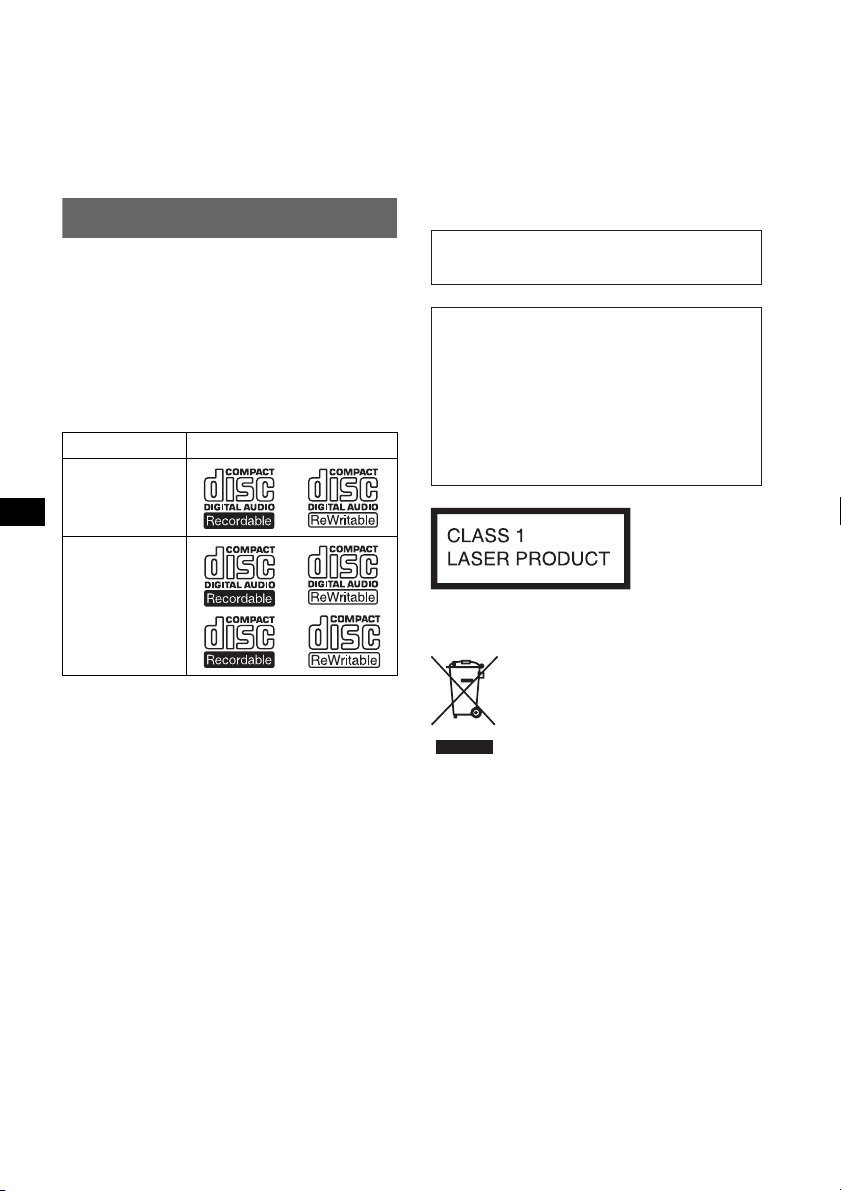
• CD playback
You can play CD-DA (also containing CD
TEXT*), CD-R/CD-RW (MP3/WMA files also
containing Multi Session (page 14)) and
ATRAC CD (ATRAC3 and ATRAC3plus
format (page 15)).
Type of discs Label on the disc
Warning if your car’s ignition has no
ACC position
After turning the ignition off, be sure to press
and hold (OFF) on the unit until the display
disappears.
Otherwise, the display does not turn off and
this causes battery drain.
CD-DA
MP3
WMA
ATRAC CD
• Radio reception
– You can store up to 6 stations per band (FM1,
FM2, FM3, MW and LW).
– BTM (Best Tuning Memory): the unit selects
strong signal stations and stores them.
• RDS services
You can use FM station with Radio Data
System (RDS).
• Sound adjustment
– EQ3 stage2: You can choose any one of 7
preset equalizer curves.
– DSO (Dynamic Soundstage Organizer):
creates a more ambient sound field, using
virtual speaker synthesis, to enhance the
sound of speakers, even if they are installed
low in the door.
– BBE MP: improves digitally compressed
sound such as MP3.
• Optional unit operation
You can also control optional CD/MD changers
and optional Sony portable devices in addition
to playing with this unit.
* A CD TEXT disc is a CD-DA that includes
information such as disc, artist and track name.
This label is located on the bottom of the
chassis.
Disposal of Old Electrical &
Electronic Equipment (Applicable in
the European Union and other
European countries with separate
collection systems)
This symbol on the product or on its
packaging indicates that this product shall not be treated
as household waste. Instead it shall be handed over to the
applicable collection point for the recycling of electrical
and electronic equipment. By ensuring this product is
disposed of correctly, you will help prevent potential
negative consequences for the environment and human
health, which could otherwise be caused by inappropriate
waste handling of this product. The recycling of materials
will help to conserve natural resources. For more detailed
information about recycling of this product, please contact
your local Civic Office, your household waste disposal
service or the shop where you purchased the product.
Applicable accessory: Remote commander
For installation and connections, see the
supplied installation/connections manual.
2

Table of Contents
Getting Started
Resetting the unit . . . . . . . . . . . . . . . . . . . . . . . . 4
Setting the clock . . . . . . . . . . . . . . . . . . . . . . . . 4
Detaching the front panel . . . . . . . . . . . . . . . . . 4
Attaching the front panel . . . . . . . . . . . . . . . 4
Inserting the disc in the unit . . . . . . . . . . . . . . . 5
Ejecting the disc . . . . . . . . . . . . . . . . . . . . . . 5
Location of controls and basic
operations
Main unit. . . . . . . . . . . . . . . . . . . . . . . . . . . . 6
Card remote commander RM-X151 . . . . . . . 6
CD
Display items . . . . . . . . . . . . . . . . . . . . . . . . 8
Repeat and shuffle play. . . . . . . . . . . . . . . . . 8
Radio
Storing and receiving stations . . . . . . . . . . . . . . 8
Storing automatically — BTM . . . . . . . . . . . 8
Storing manually. . . . . . . . . . . . . . . . . . . . . . 8
Receiving the stored stations . . . . . . . . . . . . 8
Tuning automatically . . . . . . . . . . . . . . . . . . 8
RDS . . . . . . . . . . . . . . . . . . . . . . . . . . . . . . . . . . 9
Overview. . . . . . . . . . . . . . . . . . . . . . . . . . . . 9
Setting AF and TA/TP . . . . . . . . . . . . . . . . . 9
Selecting PTY . . . . . . . . . . . . . . . . . . . . . . . 10
Setting CT . . . . . . . . . . . . . . . . . . . . . . . . . . 10
Other functions
Changing the sound settings . . . . . . . . . . . . . . 11
Adjusting the sound characteristics
— BAL/FAD/SUB. . . . . . . . . . . . . . . . . . . 11
Customizing the equalizer curve
— EQ3 . . . . . . . . . . . . . . . . . . . . . . . . . . . . 11
Adjusting setup items — SET . . . . . . . . . . . . 11
Using optional equipment . . . . . . . . . . . . . . . . 12
CD/MD changer . . . . . . . . . . . . . . . . . . . . . 12
Rotary commander RM-X4S . . . . . . . . . . . 12
Auxiliary audio equipment. . . . . . . . . . . . . 13
Additional Information
Precautions . . . . . . . . . . . . . . . . . . . . . . . . . . . 14
Notes on discs . . . . . . . . . . . . . . . . . . . . . . 14
About MP3/WMA files . . . . . . . . . . . . . . . 14
About ATRAC CD. . . . . . . . . . . . . . . . . . . 15
Maintenance . . . . . . . . . . . . . . . . . . . . . . . . . . 15
Removing the unit. . . . . . . . . . . . . . . . . . . . . . 16
Specifications . . . . . . . . . . . . . . . . . . . . . . . . . 16
Troubleshooting . . . . . . . . . . . . . . . . . . . . . . . 17
Error displays/Messages. . . . . . . . . . . . . . . 19
Manufactured under license
R
from BBE Sound, Inc.
improves digitally compressed sound, such as
MP3, by restoring and enhancing the higher
harmonics lost through compression. BBE MP
works by generating even-order harmonics from
the source material, effectively recovering
warmth, detail and nuance.
SonicStage and its logo are trademarks of Sony
Corporation.
ATRAC, ATRAC3, ATRAC3plus and their logos
are trademarks of Sony Corporation.
The BBE MP process
Microsoft, Windows Media,
and the Windows logo are
trademarks or registered
trademarks of Microsoft
Corporation in the United States and/or other
countries.
3
Getting Started
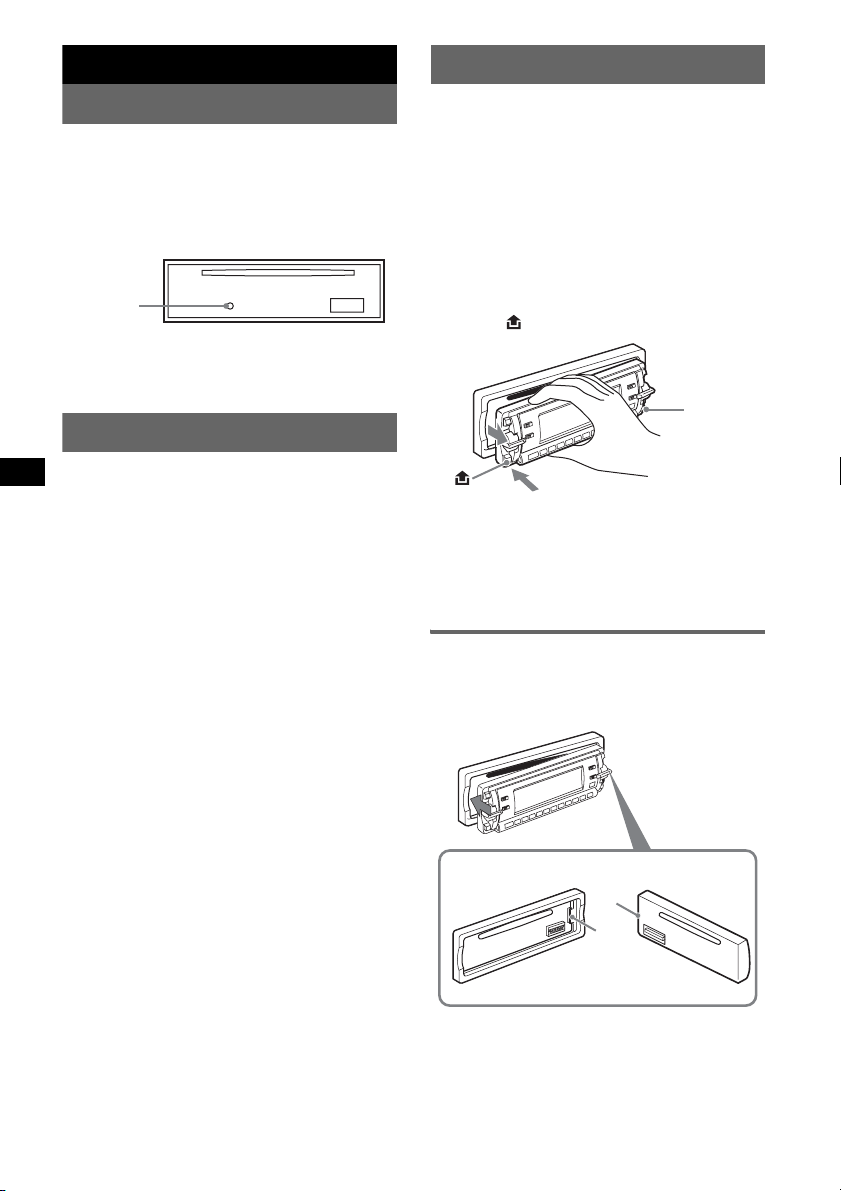
Detaching the front panel
Resetting the unit
Before operating the unit for the first time, or
after replacing the car battery or changing the
connections, you must reset the unit.
Detach the front panel and press the RESET
button with a pointed object, such as a ballpoint
pen.
RESET
button
Note
Pressing the RESET button will erase the clock setting
and some stored contents.
Setting the clock
The clock uses a 24-hour digital indication.
1 Press and hold (SEL).
The setup display appears.
2 Press (SEL) repeatedly until “CLOCK-
ADJ” appears.
3 Press (DSPL).
The hour indication flashes.
4 Press the volume control up or down
to set the hour and minute.
To move the digital indication, press (DSPL).
5 Press (SEL).
The setup is complete and the clock starts.
To display the clock, press (DSPL). Press
(DSPL) again to return to the previous display.
With the card remote commander
In step 4, to set the hour and minute, press M or m.
Tip
You can set the clock automatically with the RDS
feature (page 10).
You can detach the front panel of this unit to
prevent theft.
Caution alarm
If you turn the ignition switch to the OFF
position without detaching the front panel, the
caution alarm will sound for a few seconds.
The alarm will only sound if the built-in
amplifier is used.
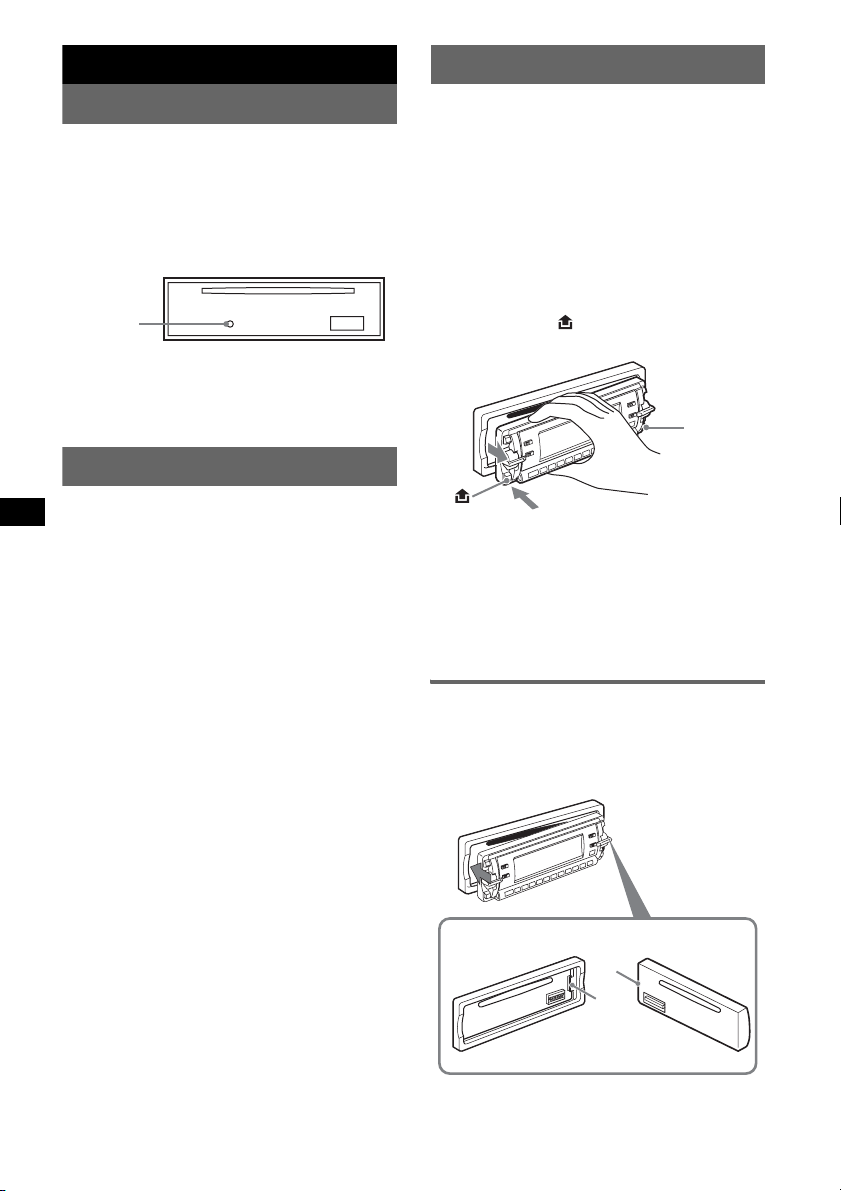
1 Press (OFF).
The unit is turned off.
2 Press , then pull it off towards you.
(OFF)
Notes
• Do not drop or put excessive pressure on the front
panel and display window.
• Do not subject the front panel to heat/high
temperature or moisture. Avoid leaving it in a parked
car or on a dashboard/rear tray.
Attaching the front panel
Engage part A of the front panel with part B of
the unit, as illustrated, and push the left side into
position until it clicks.
A
B
Note
Do not put anything on the inner surface of the front
panel.
4
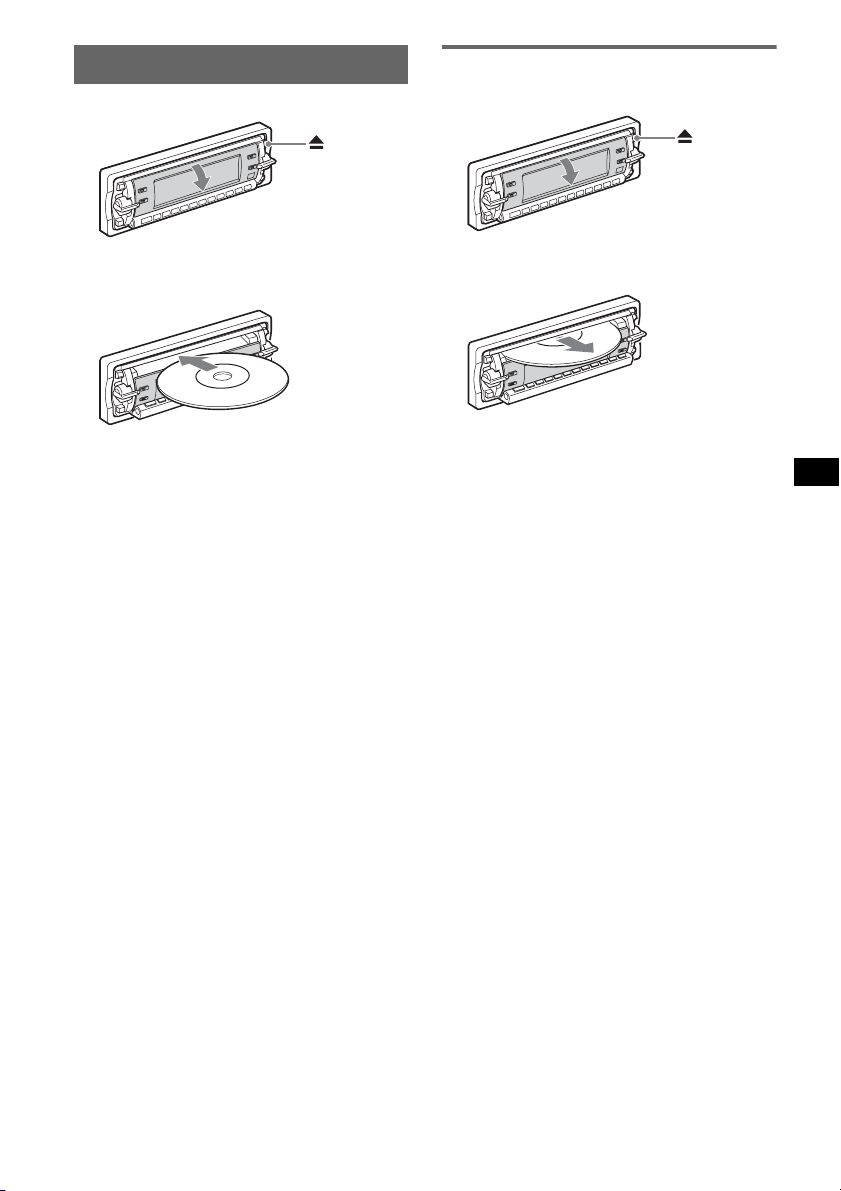
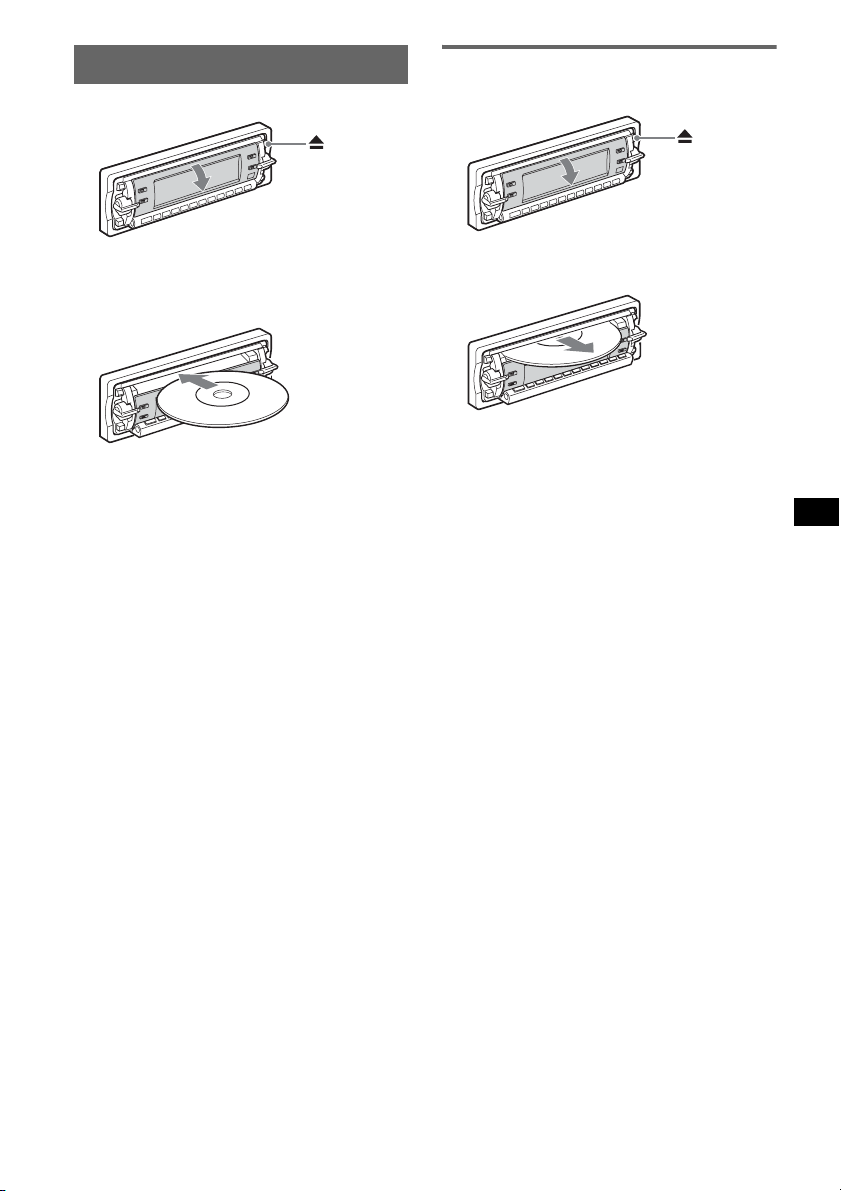
Inserting the disc in the unit
1 Press Z.
Ejecting the disc
1 Press Z.
The shutter opens automatically.
2 Insert the disc label side up.
The shutter closes automatically and
playback starts.
The shutter opens automatically.
x
The disc is ejected.
Note
The shutter will close automatically if no operation is
performed for 15 seconds.
5
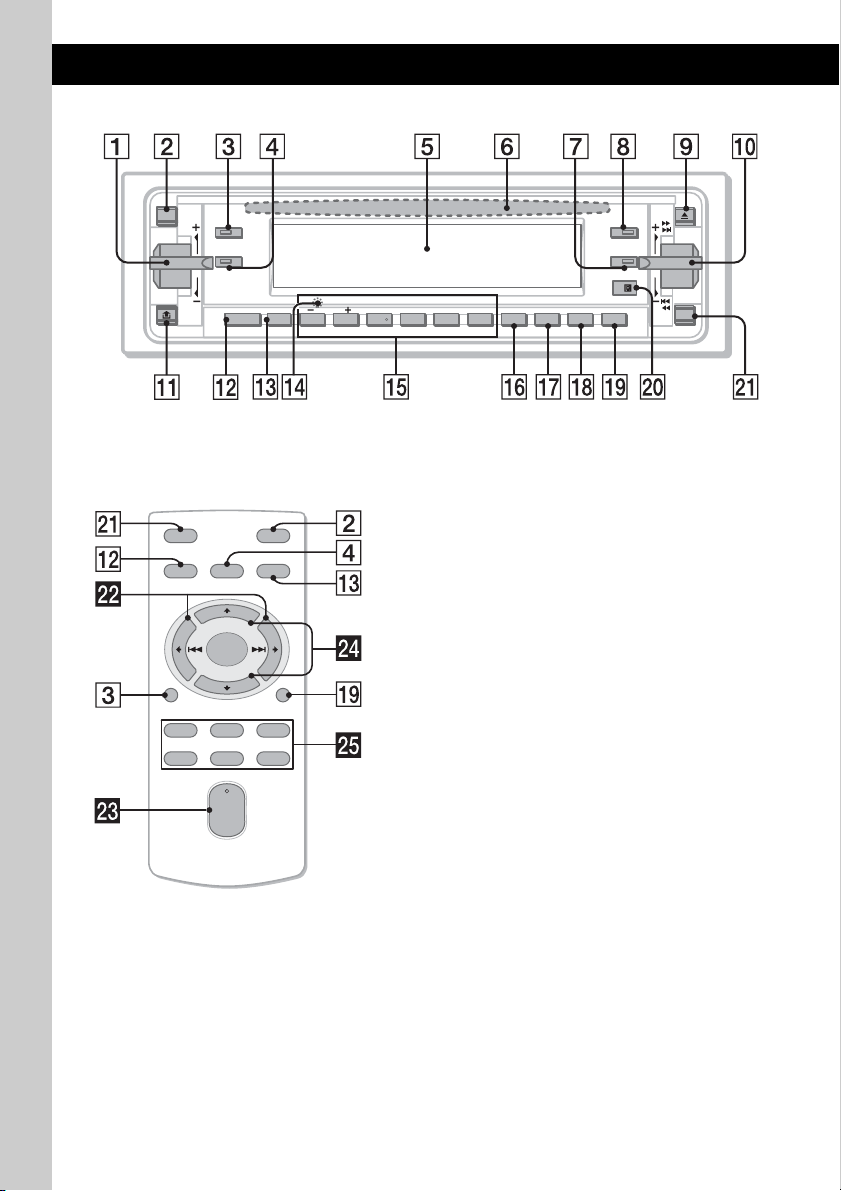
Location of controls and basic operations
Main unit
ATT
DSPL
SOURCE MODE
1 2 3 4 5 6
Card remote commander
RM-X151
OFF
SOURCE
DSPL
132
465
SEL
VOL
ATT
MODE
+
–
SCRL
+
–
GP/ALBM
DSO
EQ3SEL
BBE MP PAUSEREP BTMSHUF
AF/TA SENS PTY SCRL
OFF
CDX-RA550
Refer to the pages listed for details. The
corresponding buttons on the card remote
commander control the same functions as those
on the unit.
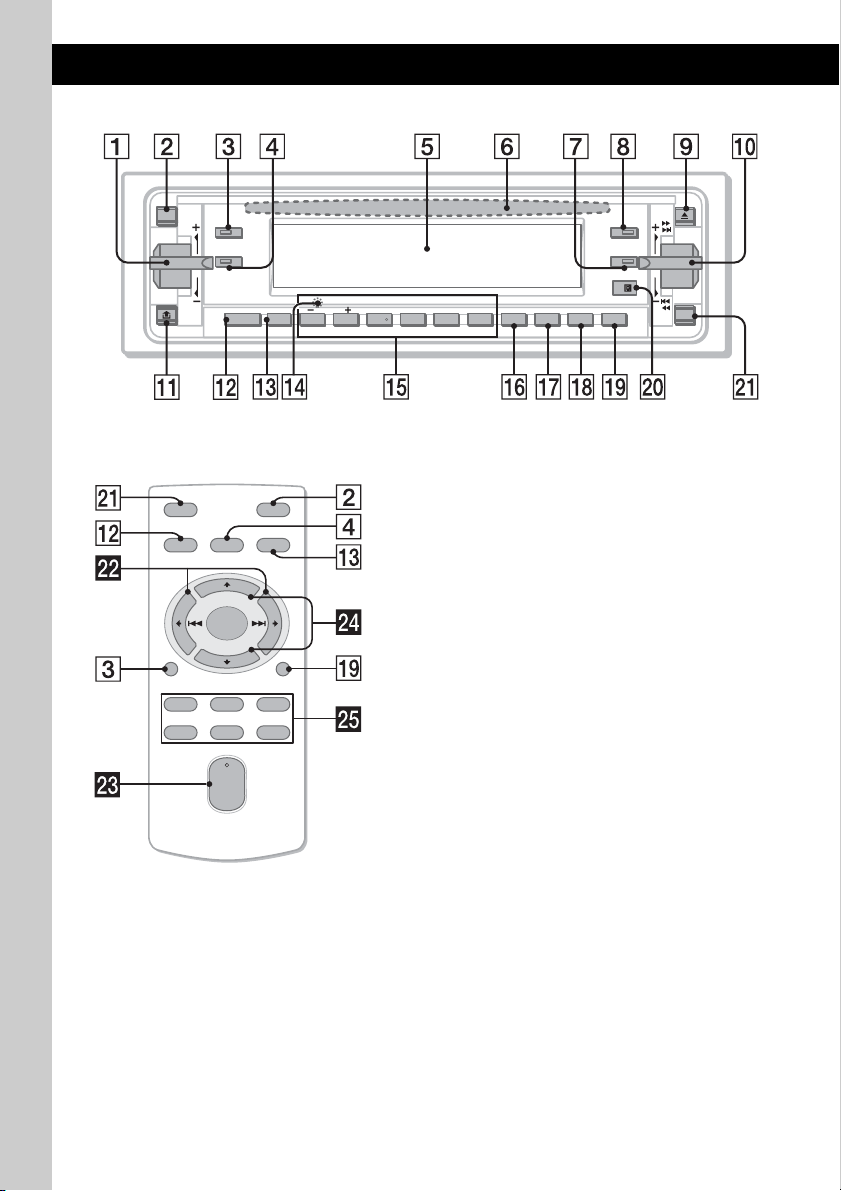
A Volume (+/–) control 11
To adjust volume.
B ATT (attenuate) button
To attenuate the sound. To cancel, press
again.
C DSPL (display) button 8
To change display items.
D SEL (select) button
To select setup items.
E Display window
F Disc slot 5
To insert the disc.
G EQ3 (equalizer) button 11
To select an equalizer type (XPLOD,
VOCAL, EDGE, CRUISE, SPACE,
GRAVITY, CUSTOM or OFF).
6

H DSO button 2
To select the DSO mode (1, 2, 3 or OFF).
The larger the number, the more enhanced
the effect.
I Z (eject) button 5
To eject the disc/open the shutter.
J M>/.m(+/–) control
CD:
To skip tracks (press); skip tracks
continuously (press, then press again within
about 1 second and hold); reverse/fastforward a track (press and hold).
Radio:
To tune in stations automatically (press); find
a station manually (press and hold).
K (front panel release) button 4
L SOURCE button
To power on; change the source (Radio/CD/
1
MD*
/AUX).
M MODE button 8, 12
To select the radio band (FM/MW/LW)/
select the unit*
2
.
N RESET button (located behind the front
panel) 4
O Number buttons
CD/MD*
(1)/(2): GP*
1
:
3
/ALBM*4 –/+*
5
To skip groups/albums (press); skip
groups/albums continuously (press and
hold).
(3): REP 8
(4): SHUF 8
(5): BBE MP*
6
3
To activate the BBE MP function, set
“BBEMP-ON.” To cancel, set
“BBEMP-OFF.”
(6): PAU SE *
6
To pause playback. To cancel, press
again.
Radio:
To receive stored stations (press); store
stations (press and hold).
P AF (Alternative Frequencies)/TA
(Traffic Announcement) button 9
To set AF and TA/TP in RDS.
Q SENS/BTM button 8
To improve weak reception: LOCAL/MONO
(press); start the BTM function (press and
hold).
R PTY (Programme Type) button 10
To select PTY in RDS.
S SCRL (scroll) button 8
To scroll the display item.
T Receptor for the card remote
commander
U OFF button
To power off; stop the source.
The following buttons on the card remote
commander have also different buttons/functions
from the unit.
ws < (.)/, (>) buttons
To control CD/radio, the same as the
M>/.m control on the unit.
wd VOL (volume) +/– button
To adjust volume.
wf M (+)/m (–) buttons
To control CD, the same as (2)/(1) on the
unit.
wg Number buttons
To receive stored stations (press); store
stations (press and hold).
*1 When an MD changer is connected.
*2 When a CD/MD changer is connected.
*3 When an ATRAC CD is played.
*4 When an MP3/WMA is played.
*5 If the changer is connected, the operation is
different, see page 12.
*6 When playing back on this unit.
Note
If the unit is turned off and the display disappears, it
cannot be operated with the card remote commander
unless (SOURCE) on the unit is pressed, or a disc is
inserted to activate the unit first.
Tip
For details on how to replace the battery, see
“Replacing the lithium battery of the card remote
commander” on page 15.
7
CD
For details on selecting a CD/MD changer, see
page 12.
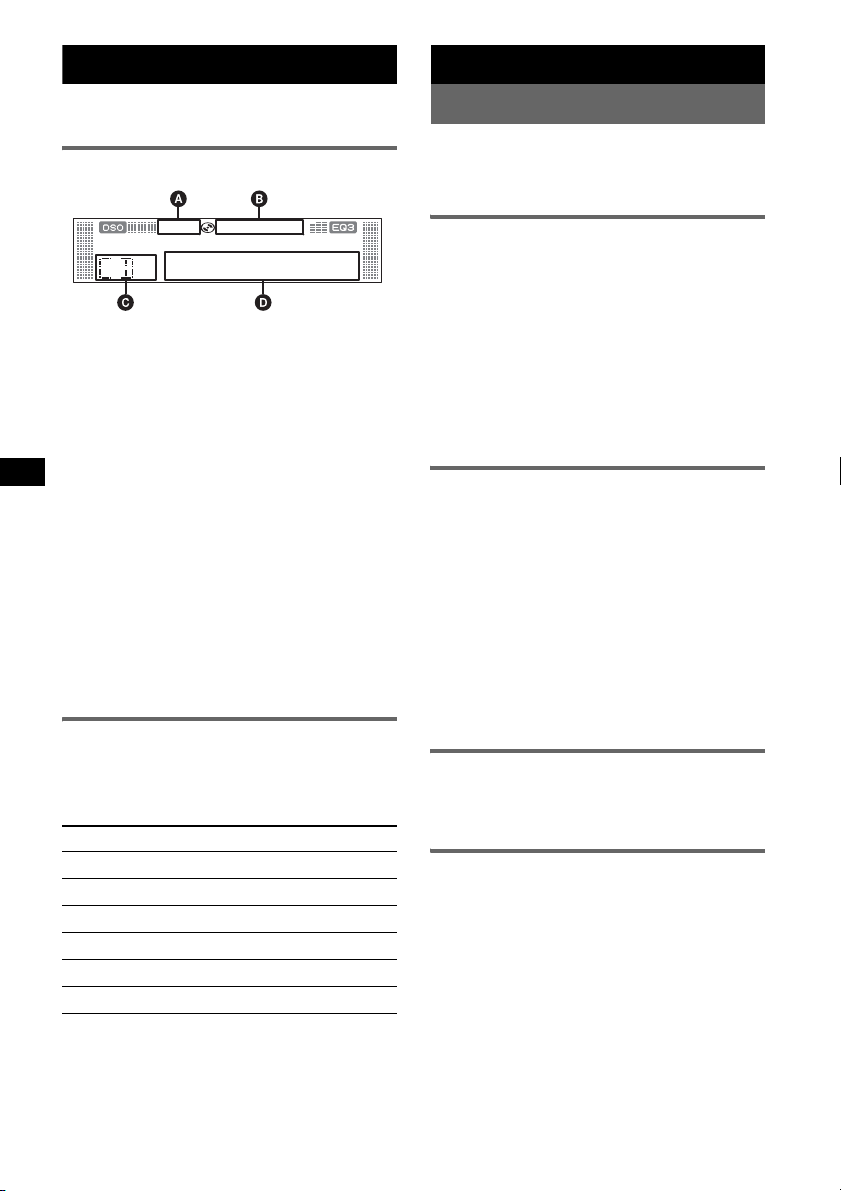
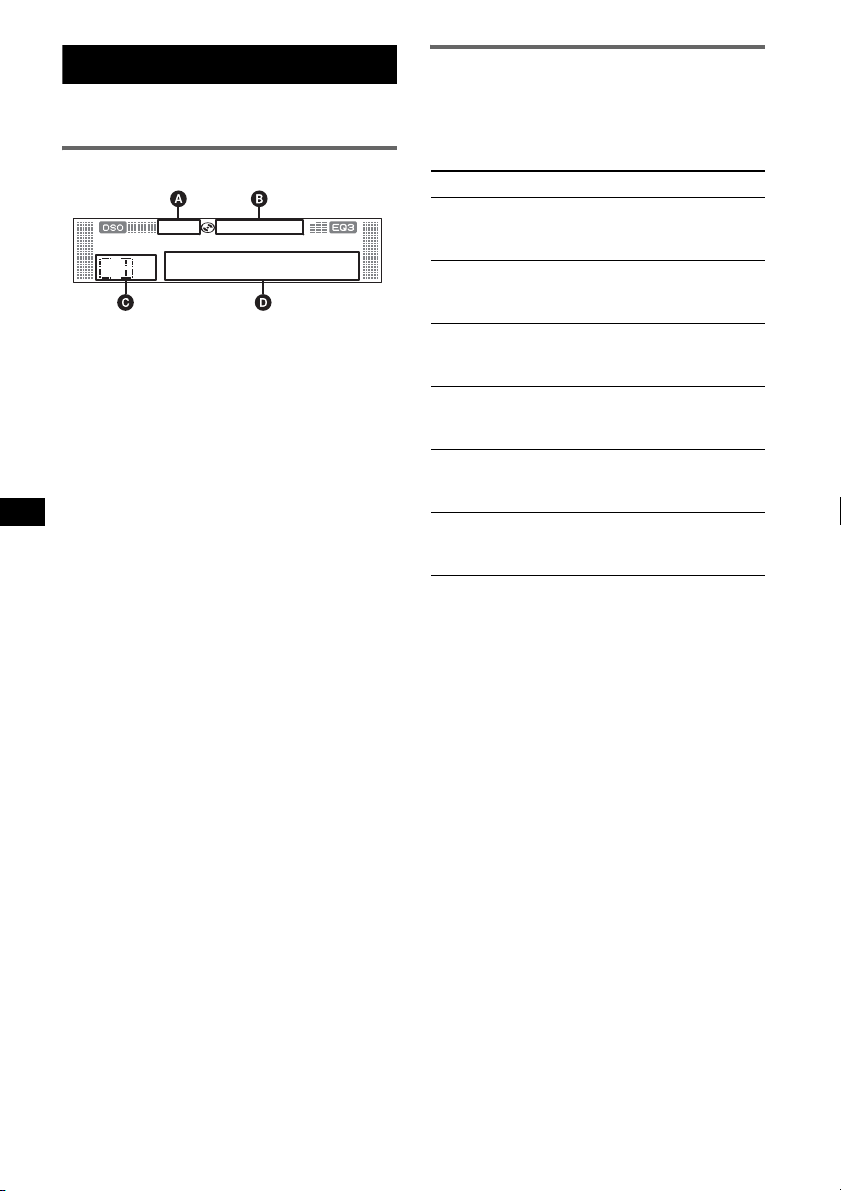
Display items
A WMA/MP3 indication
B ATRAC CD/BBE MP indication
C Source
D Track number/Elapsed playing time, Disc/
artist name, Album/group number*
group name, Track name, Text information*
Clock
*1 Album/group number is displayed only when the
album/group is changed.
*2 When playing an MP3, ID3 tag is displayed, when
playing ATRAC CD, text information written by
SonicStage, etc., is displayed, and when playing
WMA, WMA tag is displayed.
To change display items D, press (DSPL);
scroll display items D, press (SCRL) or set
“A.SCRL-ON” (page 12).
Tip
Displayed items will differ, depending on the disc type,
recorded format and settings. For details on MP3/
WMA, see page 14; ATRAC CD, see page 15.
Repeat and shuffle play
1 During playback, press (3) (REP) or
(4) (SHUF) repeatedly until the
desired setting appears.
Select To play
REP-TRACK track repeatedly.
REP-ALBM*
REP-GP*
SHUF-ALBM*
SHUF-GP*
SHUF-DISC disc in random order.
*1 When an MP3/WMA is played.
*2 When an ATRAC CD is played.
To return to normal play mode, select “REPOFF” or “SHUF-OFF.”
1
2
2
album repeatedly.
group repeatedly.
1
album in random order.
group in random order.
8
1
, Album/
Radio
Storing and receiving stations
Caution
When tuning in stations while driving, use Best
Tuning Memory (BTM) to prevent an accident.
Storing automatically — BTM
1 Press (SOURCE) repeatedly until
“TUNER” appears.
To change the band, press (MODE)
repeatedly. You can select from FM1, FM2,
FM3, MW or LW.
2 Press and hold (BTM) until “BTM”
flashes.
The unit stores stations in order of frequency
2
,
on the number buttons.
A beep sounds when the setting is stored.
Storing manually
1 While receiving the station that you
want to store, press and hold a
number button ((1) to (6)) until
“MEM” appears.
The number button indication appears in the
display.
Note
If you try to store another station on the same number
button, the previously stored station will be replaced.
Tip
When a RDS station is stored, the AF/TA setting is
also stored (page 9).
Receiving the stored stations
1 Select the band, then press a number
button ((1) to (6)).
Tuning automatically
1 Select the band, then press the
M>/.m control up or down to
search for the station.
Scanning stops when the unit receives a
station. Repeat this procedure until the
desired station is received.
Tip
If you know the frequency of the station you want to
listen to, press and hold the M>/.m control
to quickly locate the approximate frequency, then
press the M>/.m control up or down
repeatedly to fine adjust to the desired frequency
(manual tuning).

RDS
Overview
FM stations with Radio Data System (RDS)
service send inaudible digital information along
with the regular radio programme signal.
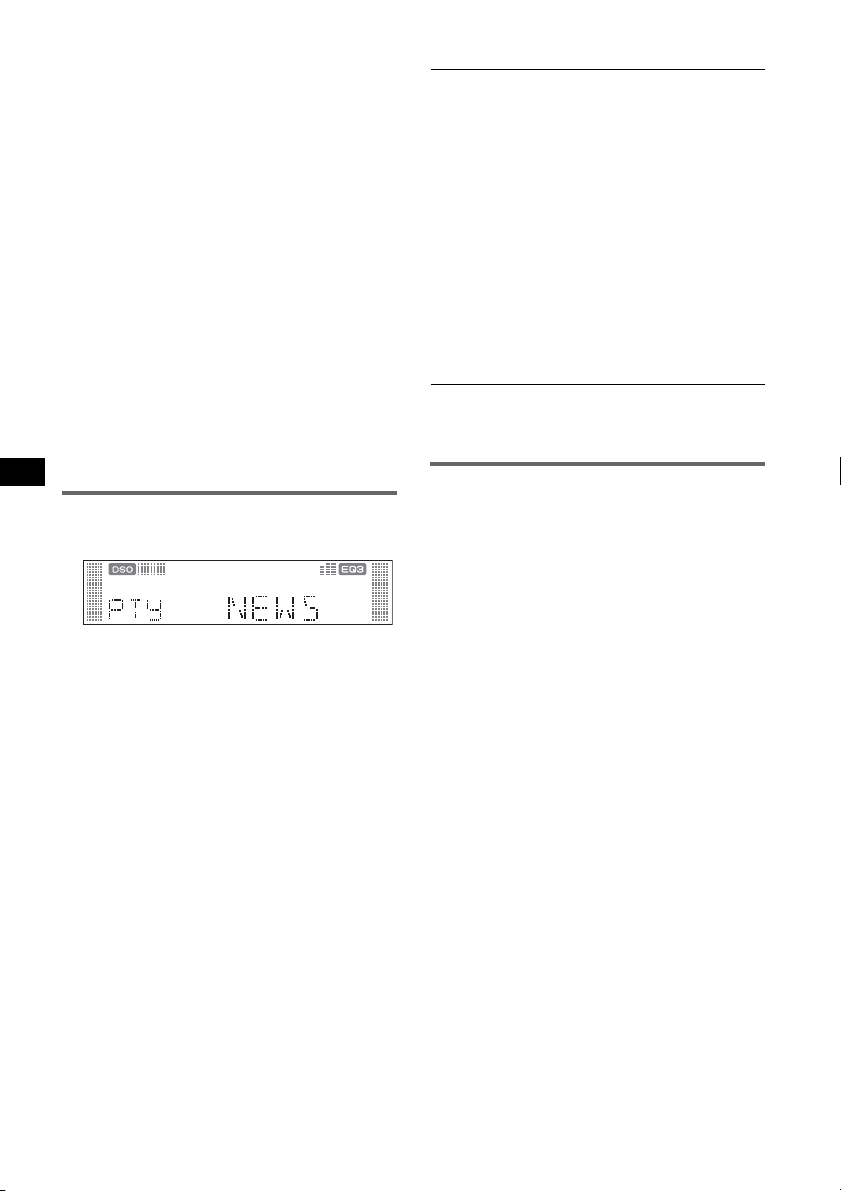
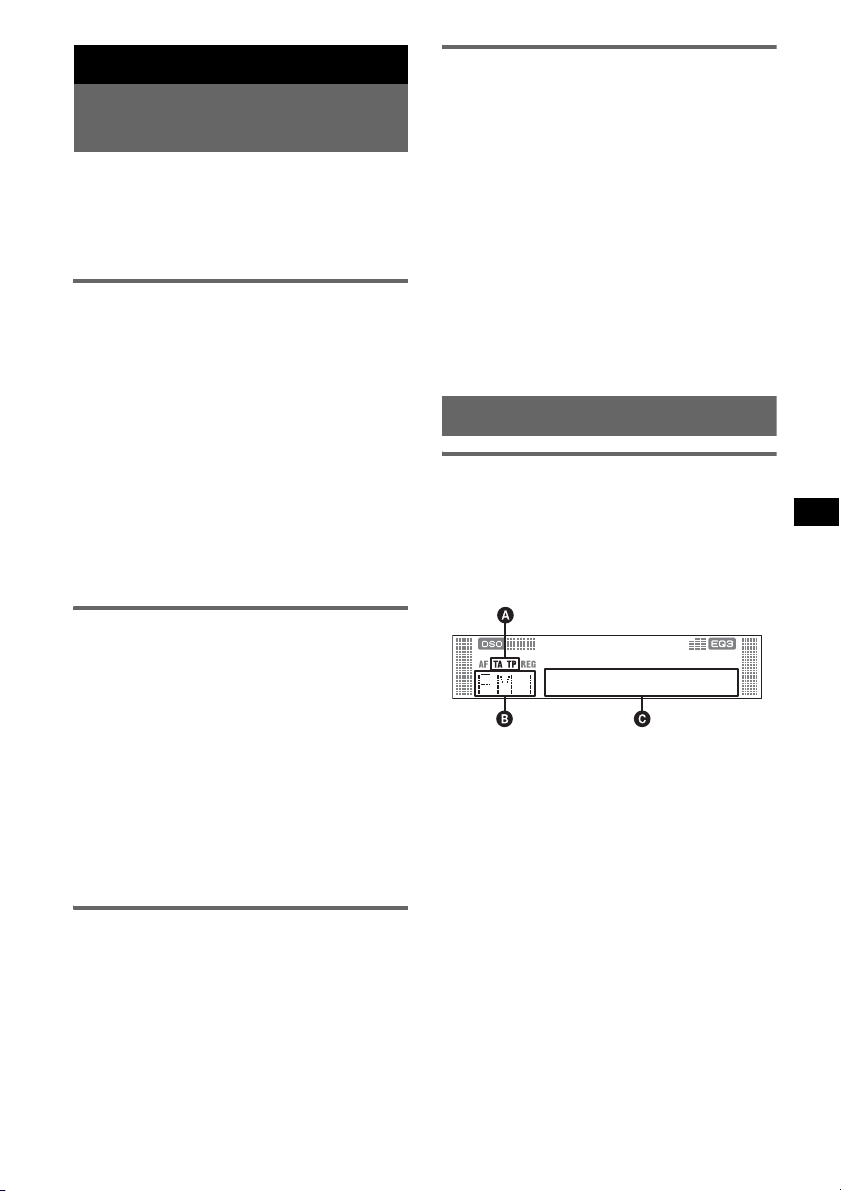
Display items
A TA /T P*
B Radio band, Function
C Frequency*
*1 “TA” flashes during traffic information. “TP” lights
*2 While receiving the RDS station, “ *” is displayed
To change display items C, press (DSPL).
RDS services
This unit automatically provides RDS services as
follows:
AF (Alternative Frequencies)
Selects and retunes the station with the
strongest signal in a network. By using this
function, you can continuously listen to the
same programme during a long-distance drive
without having to retune the same station
manually.
TA (Traffic Announcement)/
TP (Traffic Programme)
Provides current traffic information/
programmes. Any information/programme
received, will interrupt the currently selected
source.
PTY (Programme Types)
Displays the currently received programme
type. Also searches your selected programme
type.
CT (Clock Time)
The CT data from the RDS transmission sets
the clock.
1
2
(Programme service name),
Preset number, Clock, RDS data
up while such a station is received.
on the left of the frequency indication.
Notes
• Depending on the country/region, not all RDS
functions may be available.
• RDS will not work if the signal strength is too weak,
or if the station you are tuned to is not transmitting
RDS data.
Setting AF and TA/TP
1 Press (AF/TA) repeatedly until the
desired setting appears.
Select To
AF-ON activate AF and deactivate TA.
TA-ON activate TA and deactivate AF.
AF, TA-ON activate both AF and TA.
AF, TA-OFF deactivate both AF and TA.
Storing RDS stations with the AF and
TA setting
You can preset RDS stations along with the AF/
TA setting. If you use the BTM function, only
RDS stations are stored with the same AF/TA
setting.
If you preset manually, you can preset both RDS
and non-RDS stations with the AF/TA setting for
each.
1 Set AF/TA, then store the station with BTM or
manually.
Presetting the volume of traffic
announcements
You can preset the volume level of the traffic
announcements so as to not miss hearing them.
1 Press the volume control up or down
repeatedly to adjust the volume level.
2 Press and hold (AF/TA) until “TA” appears.
Receiving emergency
announcements
With AF or TA on, the emergency
announcements will automatically interrupt the
currently selected source.
continue to next page t
9
Staying with one regional
programme — REG
When the AF function is on: this unit’s factory
setting restricts reception to a specific region, so
you will not be switched to another regional
station with a stronger frequency.
If you leave this regional programme’s reception
area, set “REG-OFF” in setup (page 12).
Note
This function does not work in the UK and in some
other areas.
Local Link function (UK only)
This function enables you to select other local
stations in the area, even if they are not stored on
your number buttons.
1 During FM reception, press a number button
((1) to (6)) on which a local station is stored.
2 Within 5 seconds, press again a number button
of the local station.
Repeat this procedure until the local station is
received.
Selecting PTY
1 Press (PTY) during FM reception.
Type of programmes
NEWS (News), AFFAIRS (Current Affairs),
INFO (Information), SPORT (Sports),
EDUCATE (Education), DRAMA (Drama),
CULTURE (Culture), SCIENCE (Science),
VARIED (Varied), POP M (Popular Music),
ROCK M (Rock Music), EASY M (Easy
Listening), LIGHT M (Light Classical),
CLASSICS (Classical), OTHER M (Other
Music Type), WEATHER (Weather),
FINANCE (Finance), CHILDREN (Children’s
Programmes), SOCIAL A (Social Affairs),
RELIGION (Religion), PHONE IN (Phone In),
TRAVEL (Travel), LEISURE (Leisure), JAZZ
(Jazz Music), COUNTRY (Country Music),
NATION M (National Music), OLDIES (Oldies
Music), FOLK M (Folk Music), DOCUMENT
(Documentary)
Note
You cannot use this function in countries/regions
where no PTY data is available.
Setting CT
1 Set “CT-ON” in setup (page 11).
Notes
• The CT function may not work even though an RDS
station is being received.
• There might be a difference between the time set by
the CT function and the actual time.
The current programme type name appears if
the station is transmitting PTY data.
2 Press (PTY) repeatedly until the
desired programme type appears.
3 Press the M>/.m control up
or down.
The unit starts to search for a station
broadcasting the selected programme type.
10

Other functions
Changing the sound settings
Tip
Other equalizer types are also adjustable.
With the card remote commander
In step 3, to adjust the selected item, press <, M, ,
or m.
Adjusting the sound
characteristics — BAL/FAD/SUB
You can adjust the balance, fader, and subwoofer
volume.
1 Press (SEL) repeatedly until “BAL,”
“FAD” or “SUB” appears.
The item changes as follows:
1
LOW*
t MID*1 t HI*1 t
BAL (left-right) t FAD (front-rear) t
SUB (subwoofer volume)*
*1 When EQ3 is activated (page 11).
*2 When the audio output is set to “SUB”
(page 11).
“ATT” is displayed at the lowest setting, and can
be adjusted up to 20 steps.
*3 When AUX source is activated (page 13).
2
t AUX*
3
2 Press the volume control up or down
repeatedly to adjust the selected item.
After 3 seconds, the setting is complete and
the display returns to normal play/reception
mode.
With the card remote commander
In step 2, to adjust the selected item, press <, M, ,
or m.
Customizing the equalizer curve
— EQ3
“CUSTOM” of EQ3 allows you to make your
own equalizer settings.
1 Select a source, then press (EQ3)
repeatedly to select “CUSTOM.”
2 Press (SEL) repeatedly until “LOW,”
“MID” or “HI” appears.
3 Press the volume control up or down
repeatedly to adjust the selected item.
The volume level is adjustable in 1 dB steps,
from –10 dB to +10 dB.
Adjusting setup items — SET
1 Press and hold (SEL).
The setup display appears.
2 Press (SEL) repeatedly until the
desired item appears.
3 Press the volume control up or down
to select the setting (example “ON” or
“OFF”).
4 Press and hold (SEL).
The setup is complete and the display returns
to normal play/reception mode.
Note
Displayed items will differ, depending on the source
and setting.
With the card remote commander
In step 3, to select the setting, press < or ,.
The following items can be set (follow the page
reference for details):
“
z” indicates the default settings.
CLOCK-ADJ (Clock Adjust) (page 4)
CT (Clock Time)
To set “CT-ON” or “CT-OFF” (
BEEP
To set “BEEP-ON” (
AUX-A*
1
(AUX Audio)
z) or “BEEP-OFF.”
To turn the AUX source display “AUX-A-ON”
(
z) or “AUX-A-OFF” (page 13).
SUB/REAR*
1
To switch the audio output.
–“SUB-OUT” (
z): to output to a subwoofer.
– “REAR-OUT”: to output to a power amplifier.
DIM (Dimmer)
To change the brightness of the display.
–“DIM-AT” (
z): to dim the display
automatically when you turn lights on.
– “DIM-ON”: to dim the display.
– “DIM-OFF”: to deactivate the dimmer.
z) (page 9, 10).
Repeat steps 2 and 3 to adjust the equalizer
curve.
To restore the factory-set equalizer curve,
press and hold (SEL) before the setting is
complete.
After 3 seconds, the setting is complete and
the display returns to normal play/reception
mode.
continue to next page t
11

M.DSPL (Motion Display)
To select the Motion Display mode.
–“M.DSPL-SA” (
z): to show moving patterns
and spectrum analyser.
– “M.DSPL-ON”: to show moving patterns.
– “M.DSPL-OFF”: to deactivate the Motion
Display.
1
DEMO*
(Demonstration)
To set “DEMO-ON” (z) or “DEMO-OFF.”
A.SCRL (Auto Scroll)
To scroll long displayed item automatically
when the disc/album/group/track is changed.
– “A.SCRL-ON”: to scroll.
– “A.SCRL-OFF” (
2
REG*
(Regional)
To set “REG-ON” (
3
LPF*
(Low Pass Filter)
z): to not scroll.
z) or “REG-OFF” (page 10).
To select the subwoofer cut-off frequency: “LPF
OFF” (
z), “LPF125Hz” or “LPF 78Hz.”
*1 When the unit is turned off.
*2 When FM is received.
*3 When the audio output is set to “SUB.”
Using optional equipment
CD/MD changer
Selecting the changer
1 Press (SOURCE) repeatedly until “CD” or
“MD” appears.
2 Press (MODE) repeatedly until the desired
changer appears.
Repeat and shuffle play
1 During playback, press (3) (REP) or (4)
(SHUF) repeatedly until the desired setting
appears.
Select To play
REP-DISC*1disc repeatedly.
SHUF-
CHGR*
SHUF-ALL*
tracks in the changer in random
1
order.
2
tracks in all units in random
order.
*1 When one or more CD/MD changers are
connected.
*2 When one or more CD changers, or two or more
MD changers are connected.
To return to normal play mode, select “REPOFF” or “SHUF-OFF.”
Tip
“SHUF-ALL” will not shuffle tracks between CD units
and MD changers.
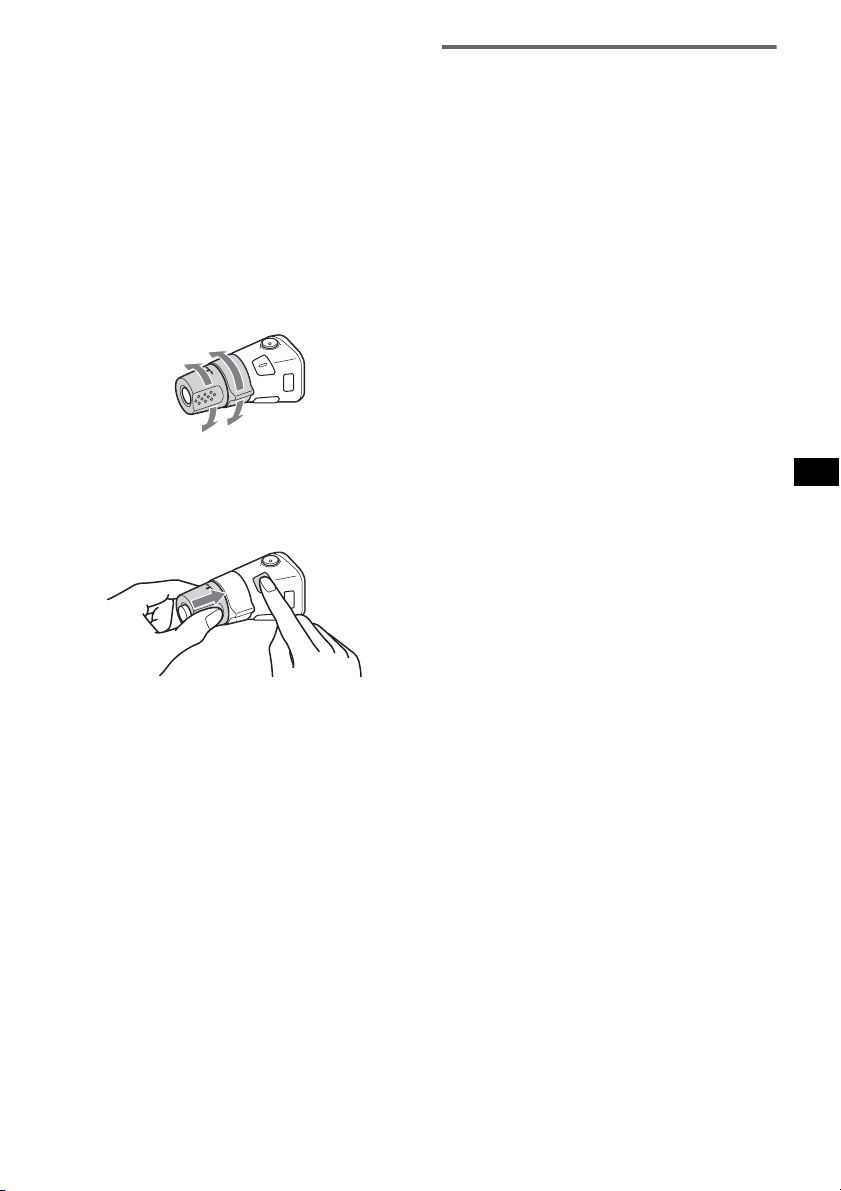
Rotary commander RM-X4S
Attaching the label
Attach the indication label depending on how
you mount the rotary commander.
SEL
DSPL
MODE
MODE
DSPL
SEL
Unit number
Disc number
Playback starts.
Skipping albums and discs
1 During playback, press (GP/ALBM) –/+.
To skip Press (GP/ALBM)
album and release (hold for a
moment).
album
continuously
within 2 seconds of first
releasing.
discs repeatedly.
discs
continuously
then, press again within 2
seconds and hold.
12
Location of controls
The corresponding buttons on the rotary
commander control the same functions as those
on this unit.
SEL
PRESET/
DISC
SOURCE
VOL
ATT
DSPL
SEEK/AMS
MODE
OFF
OFF
The following controls on the rotary commander
require a different operation from the unit.
• PRESET/DISC control
The same as (GP/ALBM) –/+ on the unit (push
in and rotate).
• VOL (volume) control
The same as the volume control on the unit
(rotate).
• SEEK/AMS control
The same as the M>/.m control on
the unit (rotate, or rotate and hold).
Changing the operative direction
The operative direction of the controls is factoryset as shown below.
To increase
To decrease
If you need to mount the rotary commander on
the right hand side of the steering column, you
can reverse the operative direction.
1 While pushing the VOL control, press and
hold (SEL).
Auxiliary audio equipment
You can connect optional Sony portable devices
to the BUS AUDIO IN/AUX IN terminal on the
unit. If the changer or other device is not
connected to the terminal, the unit allows you to
listen to the portable device on your car speakers.
Note
When connecting a portable device, be sure BUS
CONTROL IN is not connected. If a device is
connected to BUS CONTROL IN, “AUX” cannot be
selected by (SOURCE).
Tip
When connecting both a portable device and a
changer, use the optional AUX-IN selector.
Selecting auxiliary equipment
1 Press (SOURCE) repeatedly until “AUX
REAR IN” appears.
Operate by the portable device itself.
Adjust the volume level
Be sure to adjust the volume for each connected
audio device before playback.
1 Turn down the volume on the unit.
2 Press (SOURCE) repeatedly until “AUX
REAR IN” appears.
3 Start playback of the portable audio device at a
moderate volume.
4 Set your usual listening volume on the unit.
5 Press (SEL) repeatedly until “AUX” appears,
and press the volume control up or down to
adjust the input level (±6 dB).
13
Additional Information
Precautions
• If your car has been parked in direct sunlight,
allow the unit to cool off before operating it.
• Power aerial will extend automatically while the
unit is operating.
Moisture condensation
On a rainy day or in a very damp area, moisture
condensation may occur inside the lenses and
display of the unit. Should this occur, the unit will
not operate properly. In such a case, remove the disc
and wait for about an hour until the moisture has
evaporated.
To maintain high sound quality
Be careful not to splash juice or other soft drinks
onto the unit or discs.
Notes on discs
• To keep a disc clean, do not touch its surface.
Handle the disc by its edge.
• Keep your discs in their cases or disc magazines
when not in use.
• Do not subject discs to heat/high temperature.
Avoid leaving them in a parked car or on a
dashboard/rear tray.
• Do not attach labels, or use discs with sticky ink/
residue. Such discs may stop spinning when used,
causing a malfunction, or may ruin the disc.
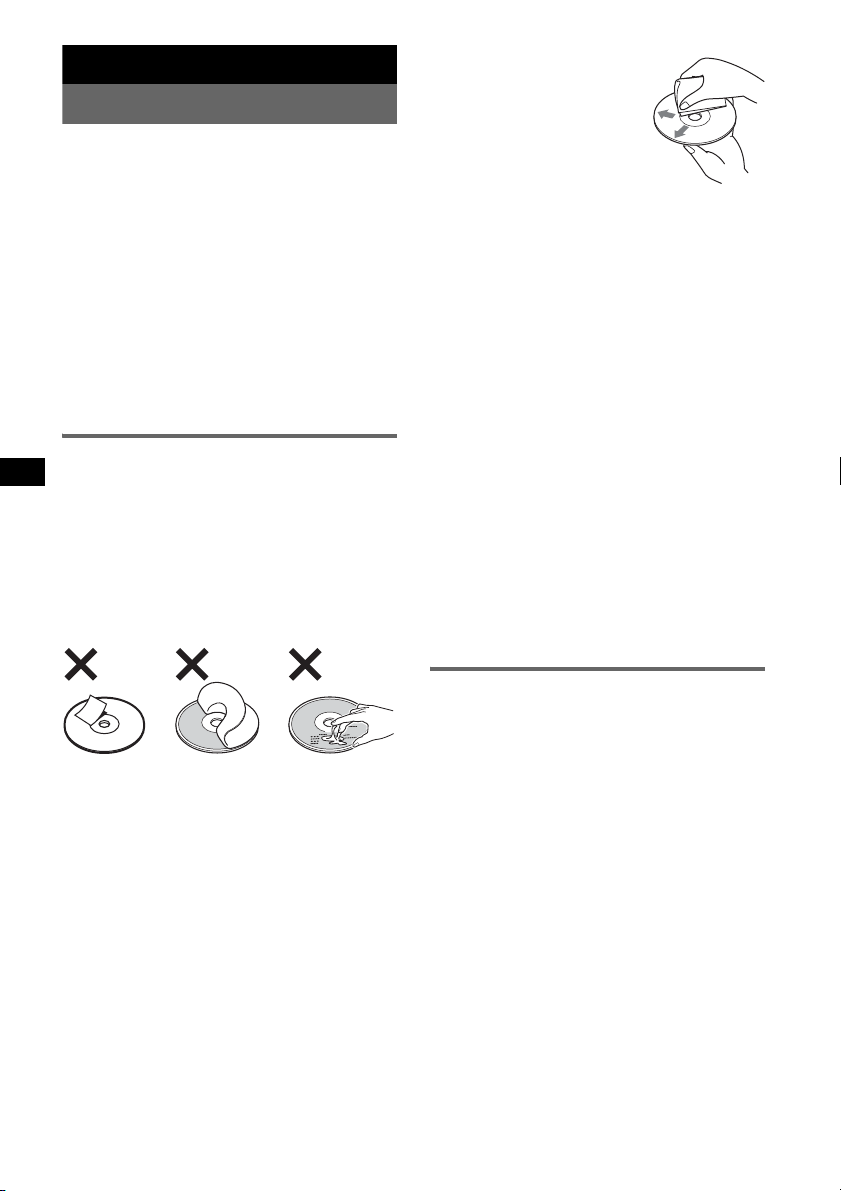
• Before playing, clean the discs
with a commercially available
cleaning cloth. Wipe each disc
from the centre out. Do not use
solvents such as benzine,
thinner, commercially available
cleaners, or antistatic spray
intended for analogue discs.
Notes on CD-R/CD-RW discs
• Some CD-Rs/CD-RWs (depending on the
equipment used for its recording or the condition
of the disc) may not play on this unit.
• You cannot play a CD-R/a CD-RW that is not
finalized.
Music discs encoded with copyright
protection technologies
This product is designed to play back discs that
conform to the Compact Disc (CD) standard.
Recently, various music discs encoded with
copyright protection technologies are marketed by
some record companies. Please be aware that among
those discs, there are some that do not conform to
the CD standard and may not be playable by this
product.
Note on DualDiscs
A DualDisc is a two sided disc product which
mates DVD recorded material on one side with
digital audio material on the other side. However,
since the audio material side does not conform to
the Compact Disc (CD) standard, playback on this
product is not guaranteed.
• Do not use any discs with labels or stickers
attached.
The following malfunctions may result from using
such discs:
– Inability to eject a disc (due to a label or sticker
peeling off and jamming the eject mechanism).
– Inability to read audio data correctly (e.g.,
playback skipping, or no playback) due to heat
shrinking of a sticker or label causing a disc to
warp.
• Discs with non-standard shapes (e.g., heart,
square, star) cannot be played on this unit.
Attempting to do so may damage the unit. Do not
use such discs.
• You cannot play 8 cm CDs.
14
About MP3/WMA files
MP3, which stands for MPEG-1 Audio Layer-3, is a
music file compression format standard. It
compresses audio CD data to approximately 1/10 of
its original size.
WMA, which stands for Windows Media Audio, is
another music file compression format standard. It
compresses audio CD data to approximately 1/22*
of its original size.
* only for 64 kbps
• The unit is compatible with the ISO 9660 level 1/
level 2 format, Joliet/Romeo in the expansion
format, and Multi Session.
• The maximum number of:
– folders (albums): 150 (including root and empty
folders).
– MP3/WMA files (tracks) and folders contained
in a disc: 300 (if a folder/file names contain
many characters, this number may become less
than 300).
– displayable characters for a folder/file name is
32 (Joliet), or 64 (Romeo).
• ID3 tag versions 1.0, 1.1, 2.2, 2.3 and 2.4 apply to
MP3 only. ID3 tag is 15/30 characters (1.0 and
1.1), or 63/126 characters (2.2, 2.3 and 2.4).
WMA tag is 63 characters.
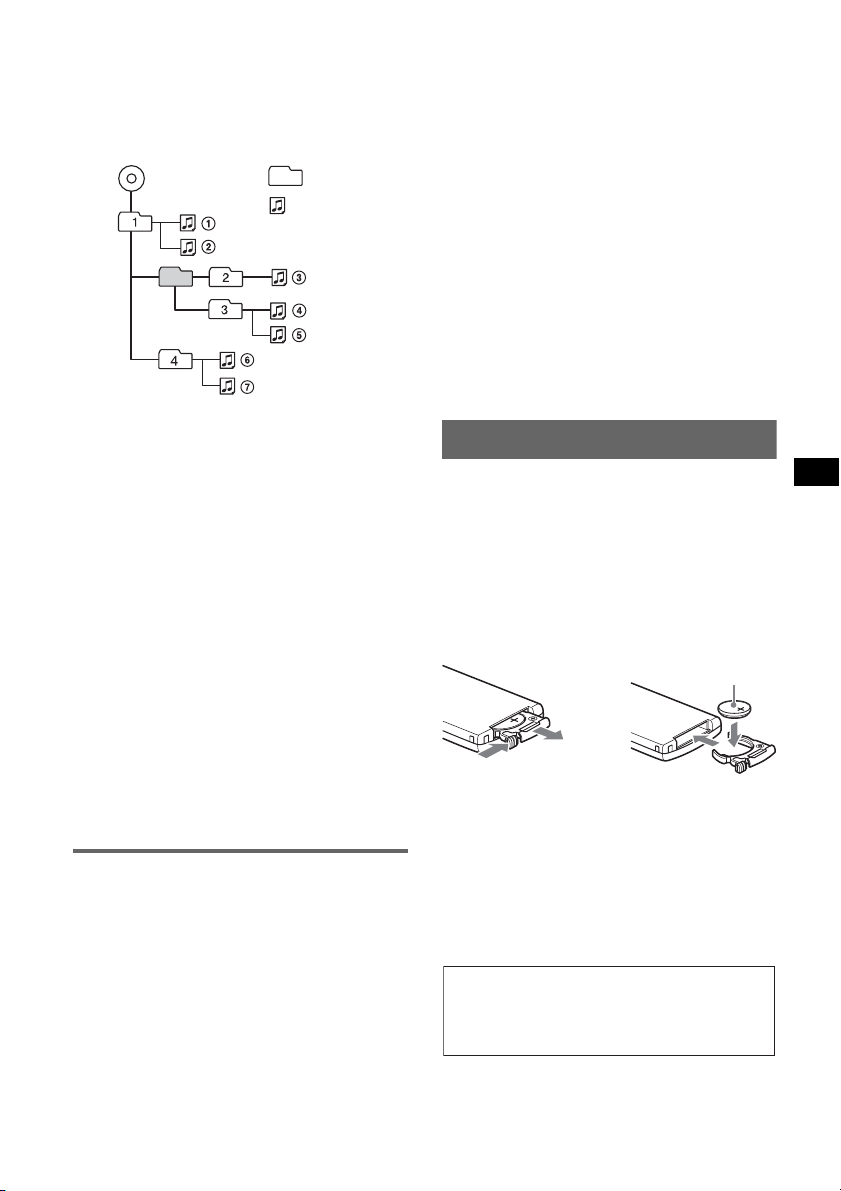
Playback order of MP3/WMA files
MP3/WMA
Notes
• When naming an MP3 file/WMA file, be sure to add
the file extension “.mp3”/“.wma” to the file name.
• During playback of a VBR (variable bit rate) MP3/
WMA file or fast-forward/reverse, elapsed playing
time may not display accurately.
• When the disc is recorded in Multi Session, only the
first track of the first session format is recognized
and played (any other format is skipped). The
priority of the format is CD-DA, ATRAC CD and
MP3/WMA.
– When the first track is a CD-DA, only CD-DA of the
first session is played.
– When the first track is not a CD-DA, an ATRAC CD
or MP3/WMA session is played. If the disc has no
data in any of these formats, “NO MUSIC” is
displayed.
Notes on MP3
• Be sure to finalize the disc before using on the unit.
• If you play a high-bit-rate MP3, such as 320 kbps,
sound may be intermittent.
Notes on WMA
• Files made with lossless compression are not
playable.
• Files protected by copyright are not playable.
Folder
(album)
MP3/WMA file
(track)
About ATRAC CD
ATRAC3plus format
ATRAC3, which stands for Adaptive Transform
Acoustic Coding3, is audio compression
technology. It compresses audio CD data to
approximately 1/10 of its original size.
ATRAC3plus, which is an extended format of
ATRAC3, compresses the audio CD data to
approximately 1/20 of its original size. The unit
accepts both ATRAC3 and ATRAC3plus format.
ATRAC CD
ATRAC CD is recorded audio CD data which is
compressed to ATRAC3 or ATRAC3plus format
using authorized software, such as SonicStage 2.0 or
later, or SonicStage Simple Burner.
• The maximum number of:
– folders (groups): 255
– files (tracks): 999
• The characters for a folder/file name and text
information written by SonicStage is displayed.
For details on ATRAC CD, see the SonicStage or
SonicStage Simple Burner manual.
Note
Be sure to create the ATRAC CD using authorized
software, such as SonicStage 2.0 or later, or
SonicStage Simple Burner 1.0 or 1.1.
If you have any questions or problems concerning
your unit that are not covered in this manual, consult
your nearest Sony dealer.
Maintenance
Replacing the lithium battery of the
card remote commander
Under normal conditions, the battery will last
approximately 1 year. (The service life may be
shorter, depending on the conditions of use.)
When the battery becomes weak, the range of the
card remote commander becomes shorter. Replace
the battery with a new CR2025 lithium battery. Use
of any other battery may present a risk of fire or
explosion.
+ side up
2
c
1
Notes on the lithium battery
• Keep the lithium battery out of the reach of children.
Should the battery be swallowed, immediately
consult a doctor.
• Wipe the battery with a dry cloth to assure a good
contact.
• Be sure to observe the correct polarity when
installing the battery.
• Do not hold the battery with metallic tweezers,
otherwise a short-circuit may occur.
WARNING
Battery may explode if mistreated.
Do not recharge, disassemble, or dispose of
in fire.
continue to next page t
15
Fuse replacement
When replacing the fuse, be
sure to use one matching the
amperage rating stated on the
original fuse. If the fuse blows,
check the power connection and
replace the fuse. If the fuse
blows again after replacement,
there may be an internal
malfunction. In such a case,
consult your nearest Sony
dealer.
Fuse (10A)
Cleaning the connectors
The unit may not function properly if the connectors
between the unit and the front panel are not clean. In
order to prevent this, detach the front panel (page 4)
and clean the connectors with a cotton swab dipped
in alcohol. Do not apply too much force. Otherwise,
the connectors may be damaged.
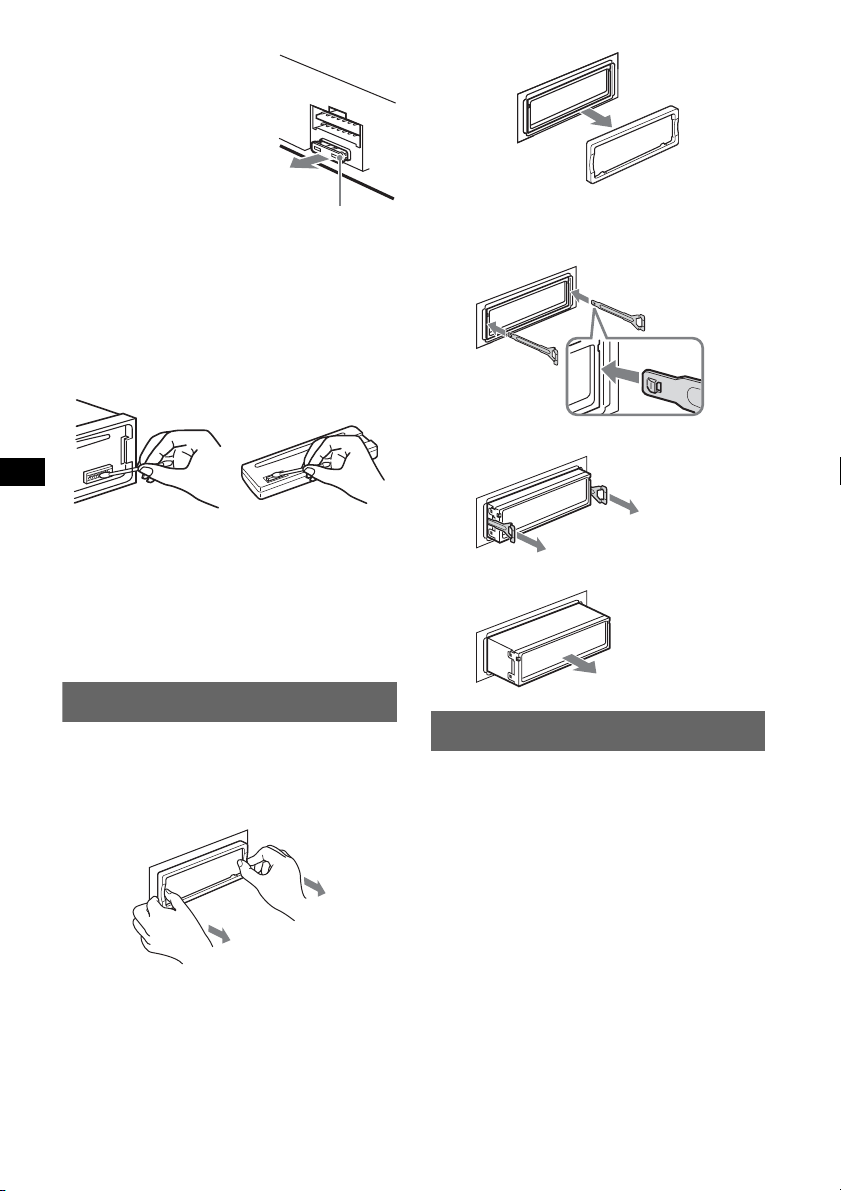
2 Remove the unit.
1Insert both release keys simultaneously
until they click.
Hook facing
inwards.
2Pull the release keys to unseat the unit.
Main unit
Notes
• For safety, turn off the ignition before cleaning the
connectors, and remove the key from the ignition
switch.
• Never touch the connectors directly with your fingers
or with any metal device.
Back of the front
panel
Removing the unit
1 Remove the protection collar.
1Detach the front panel (page 4).
2Pinch both edges of the protection collar,
then pull it out.
x
3Slide the unit out of the mounting.
Specifications
CD Player section
Signal-to-noise ratio: 120 dB
Frequency response: 10 – 20,000 Hz
Wow and flutter: Below measurable limit
Tuner section
FM
Tuning range: 87.5 – 108.0 MHz
Aerial terminal: External aerial connector
Intermediate frequency: 10.7 MHz/450 kHz
Usable sensitivity: 9 dBf
Selectivity: 75 dB at 400 kHz
Signal-to-noise ratio: 67 dB (stereo), 69 dB (mono)
Harmonic distortion at 1 kHz: 0.5 % (stereo),
0.3 % (mono)
Separation: 35 dB at 1 kHz
Frequency response: 30 – 15,000 Hz
16

MW/LW
Tuning range:
MW: 531 – 1,602 kHz
LW: 153 – 279 kHz
Aerial terminal: External aerial connector
Intermediate frequency: 10.7 MHz/450 kHz
Sensitivity: MW: 30 µV, LW: 40 µV
Power amplifier section
Outputs: Speaker outputs (sure seal connectors)
Speaker impedance: 4 – 8 ohms
Maximum power output: 50 W × 4 (at 4 ohms)
General
Outputs:
Audio outputs terminal (front, sub/rear switchable)
Power aerial relay control terminal
Power amplifier control terminal
Inputs:
Telephone ATT control terminal
Illumination control terminal
BUS control input terminal
BUS audio input/AUX IN terminal
Remote controller input terminal
Aerial input terminal
Tone controls:
Low: ±10 dB at 60 Hz (XPLOD)
Mid: ±10 dB at 1 kHz (XPLOD)
High: ±10 dB at 10 kHz (XPLOD)
Power requirements: 12 V DC car battery
(negative earth)
Dimensions: Approx. 178 × 50 × 182 mm (w/h/d)
Mounting dimensions:
Approx. 182 × 53 × 161 mm (w/h/d)
Mass: Approx. 1.2 kg
Supplied accessories:
Card remote commander: RM-X151
Parts for installation and connections (1 set)
Optional accessories/equipment:
Rotary commander: RM-X4S
BUS cable (supplied with an RCA pin cord):
RC-61 (1 m), RC-62 (2 m)
CD changer (10 discs): CDX-757MX
CD changer (6 discs): CDX-T70MX, CDX-T69
MD changer (6 discs): MDX-66XLP
Source selector: XA-C30
AUX-IN selector: XA-300
Your dealer may not handle some of the above listed
accessories. Please ask the dealer for detailed
information.
US and foreign patents licensed from Dolby
Laboratories.
MPEG Layer-3 audio coding technology and
patents licensed from Fraunhofer IIS and Thomson.
Note
This unit cannot be connected to a digital preamplifier
or an equalizer which is Sony BUS system compatible.
Design and specifications are subject to change
without notice.
• Lead-free solder is used for soldering certain parts.
(more than 80 %)
• Halogenated flame retardants are not used in the
certain printed wiring boards.
• Halogenated flame retardants are not used in
cabinets.
• VOC (Volatile Organic Compound)-free vegetable
oil based ink is used for printing the carton.
• Packaging cushions do not use polystyrene foam.
Troubleshooting
The following checklist will help you remedy
problems you may encounter with your unit.
Before going through the checklist below, check the
connection and operating procedures.
General
No power is being supplied to the unit.
• Check the connection. If everything is in order, check
the fuse.
• If the unit is turned off and the display disappears, it
cannot be operated with the remote commander.
tTurn on the unit.
The power aerial does not extend.
The power aerial does not have a relay box.
No sound.
• The volume is too low.
• The ATT function is activated, or the Telephone ATT
function (when the interface cable of a car telephone
is connected to the ATT lead) is activated.
• The position of the fader control “FAD” is not set for
a 2-speaker system.
• The CD changer is incompatible with the disc format
(MP3/WMA/ATRAC CD).
tPlay back with a Sony MP3 compatible CD
changer, or this unit.
No beep sound.
• The beep sound is cancelled (page 11).
• An optional power amplifier is connected and you are
not using the built-in amplifier.
The contents of the memory have been erased.
• The RESET button has been pressed.
tStore again into the memory.
• The power connecting lead or battery has been
disconnected.
• The power connecting lead is not connected properly.
Stored stations and correct time are erased.
The fuse has blown.
Makes noise when the position of the ignition
key is switched.
The leads are not matched correctly with the car’s
accessory power connector.
continue to next page t
17

The display disappears from/does not appear
in the display window.
• The dimmer is set “DIM-ON” (page 11).
• The display disappears if you press and hold (OFF).
tPress and hold (OFF) on the unit until the
display appears.
• The connectors are dirty (page 16).
Shutter does not close.
Press and hold Z for more than 2 seconds. If the
problem persists, consult your nearest Sony dealer.
DSO does not function.
Depending on the type of car interior or type of music,
DSO may not have a desirable effect.
CD/MD playback
The disc cannot be loaded.
• Another disc is already loaded.
• The disc has been forcibly inserted upside down or in
the wrong way.
The disc does not playback.
• Defective or dirty disc.
• The CD-Rs/CD-RWs are not for audio use (page 14).
MP3/WMA files cannot be played back.
The disc is incompatible with the MP3/WMA format
and version (page 14).
MP3/WMA files take longer to play back than
others.
The following discs take a longer time to start
playback.
– a disc recorded with a complicated tree structure.
– a disc recorded in Multi Session.
– a disc to which data can be added.
The ATRAC CD cannot play.
• The disc is not created by authorized software, such
as SonicStage or SonicStage Simple Burner.
• Tracks that are not included in the group cannot be
played.
The display items do not scroll.
• For discs with very many characters, those may not
scroll.
• “A.SCRL” is set to “OFF”.
tSet “A.SCRL-ON” (page 12) or press (SCRL).
The sound skips.
• Installation is not correct.
tInstall the unit at an angle of less than 45° in a
sturdy part of the car.
• Defective or dirty disc.
The operation buttons do not function.
The disc will not eject.
Press the RESET button (page 4).
Card remote commander does not work.
Close the shutter.
“MS” or “MD” does not appear on the source
display when both the optional MGS-X1 and
MD changer are connected.
This unit recognizes MGS-X1 as an MD unit.
tPress (SOURCE) until “MS” or “MD” appears,
then press (MODE) repeatedly.
Radio reception
The stations cannot be received.
The sound is hampered by noises.
• Connect a power aerial control lead (blue) or
accessory power supply lead (red) to the power
supply lead of a car’s aerial booster (only when your
car has built-in FM/MW/LW aerial in the rear/side
glass).
• Check the connection of the car aerial.
• The auto aerial will not go up.
tCheck the connection of the power aerial control
lead.
• Check the frequency.
• When the DSO mode is on, the sound is sometimes
hampered by noises.
tSet the DSO mode to “OFF” (page 7).
Preset tuning is not possible.
• Store the correct frequency in the memory.
• The broadcast signal is too weak.
Automatic tuning is not possible.
• Setting of the local seek mode is not correct.
tTuning stops too frequently:
Press (SENS) until “LOCAL-ON” appears.
tTuning does not stop at a station:
Press (SENS) repeatedly until “MONO-ON” or
“MONO-OFF” (FM), or “LOCAL-OFF” (MW/
LW) appears.
• The broadcast signal is too weak.
tPerform manual tuning.
During FM reception, the “ST” indication
flashes.
• Tune in the frequency accurately.
• The broadcast signal is too weak.
tPress (SENS) to set the monaural reception
mode to “MONO-ON.”
An FM programme broadcast in stereo is heard
in monaural.
The unit is in monaural reception mode.
tPress (SENS) until “MONO-OFF” appears.
RDS
The SEEK starts after a few seconds of
listening.
The station is non-TP or has weak signal.
tDeactivate TA (page 9).
No traffic announcements.
• Activate TA (page 9).
• The station does not broadcast any traffic
announcements despite being TP.
tTune in another station.
PTY displays “- - - - - - - -.”
• The current station is not an RDS station.
• RDS data has not been received.
• The station does not specify the programme type.
18
Error displays/Messages
1
BLANK*
Tracks have not been recorded on the MD.*
tPlay an MD with recorded tracks.
ERROR*
1
• The disc is dirty or inserted upside down.*
tClean or insert the disc correctly.
• A blank disc has been inserted.
• The disc cannot play because of some problem.
tInsert another disc.
FAI LU RE
The connection of speakers/amplifiers is incorrect.
tSee the installation guide manual of this model to
check the connection.
LOAD
The changer is loading the disc.
tWait until loading is complete.
L. SEEK +/–
The local seek mode is on during automatic tuning.
NO AF
There is no alternative frequency for the current
station.
tPress the M>/.m control up or down
while the programme service name is flashing. The
unit starts searching for another frequency with the
same PI (Programme Identification) data (“PI
SEEK” appears).
NO DISC
The disc is not inserted in the CD/MD changer.
tInsert discs in the changer.
NO ID3
ID3 tag information is not written in the MP3 file.
NO INFO
Text information is not written in the ATRAC3/
ATRAC3plus or WMA file.
NO MAG
The disc magazine is not inserted in the CD changer.
tInsert the magazine in the changer.
NO MUSIC
The disc is not a music file.
tInsert a music CD in this unit or MP3 playable
changer.
NO NAME
A track/album/group/disc name is not written in the
track.
NO TP
The unit will continue searching for available TP
stations.
NOT READ
The disc information has not been read by the unit.
tLoad the disc, then select it on the list.
NOTREADY
The lid of the MD changer is open or the MDs are not
inserted properly.
tClose the lid or insert the MDs properly.
2
2
OFFSET
There may be an internal malfunction.
tCheck the connection. If the error indication
remains on in the display, consult your nearest
Sony dealer.
READ
The unit is reading all track and album/group
information on the disc.
tWait until reading is complete and playback starts
automatically. Depending on the disc structure, it
may take more than a minute.
RESET
The CD unit and CD/MD changer cannot be operated
because of some problem.
tPress the RESET button (page 4).
“” or “”
During reverse or fast-forward, you have reached the
beginning or the end of the disc and you cannot go any
further.
“”
The character cannot be displayed with the unit.
*1 If an error occurs during playback of a CD or MD,
the disc number of the CD or MD does not appear
in the display.
*2 The disc number of the disc causing the error
appears in the display.
If these solutions do not help improve the situation,
consult your nearest Sony dealer.
If you take the unit to be repaired because of CD
playback trouble, bring the disc that was used at the
time the problem began.
19
Wichtig!
Bitte nehmen Sie sich etwas Zeit, um
den Geräte-Pass vollständig
auszufüllen. Dieser befindet sich auf
der hinteren Umschlagseite dieser
Bedienungsanleitung.
Willkommen!
Danke, dass Sie sich für diesen CD-Player von
Sony entschieden haben. Mit diesem Gerät
stehen Ihnen im Auto die folgenden Funktionen
zur Verfügung.
• CD-Wiedergabe
Wiedergabe von CD-DAs (auch solche mit CD
TEXT*), CD-Rs/CD-RWs (MP3-/WMADateien, auch auf Multisession-CDs (Seite 16))
sowie ATRAC-CDs (ATRAC3- und
ATRAC3plus-Format (Seite 16)).
CD-Typ Beschriftung auf der CD
CD-DA
MP3
WMA
ATRAC-CD
• Bedienung eines gesondert erhältlichen
Geräts
Sie können nicht nur die Wiedergabe mit
diesem Gerät, sondern auch gesondert
erhältliche CD/MD-Wechsler sowie tragbare
Geräte von Sony steuern.
* Eine CD mit CD TEXT ist eine CD-DA, die
Informationen wie den Namen der CD, den Namen
des Interpreten und die Namen der Titel enthält.
Zur Installation und zum Anschluss siehe die
mitgelieferte Installations-/Anschlussanleitung.
Warnhinweis, wenn die Zündung Ihres
Fahrzeugs nicht über eine
Zubehörposition (ACC oder I) verfügt
Nachdem Sie die Zündung ausgeschaltet
haben, halten Sie am Gerät unbedingt (OFF)
gedrückt, bis die Anzeige ausgeblendet wird.
Andernfalls wird die Anzeige nicht
ausgeschaltet und der Autobatterie wird
Strom entzogen.
Dieses Etikett befindet sich an der Unterseite
des Gehäuses.
• Radioempfang
– Für jeden Frequenzbereich (FM1 (UKW1),
FM2 (UKW2), FM3 (UKW3), MW und LW)
können Sie bis zu 6 Sender speichern.
– BTM (Best Tuning Memory -
Speicherbelegungsautomatik): Das Gerät
wählt die Sender mit den stärksten Signalen
aus und speichert diese.
• RDS-Funktionen
Sie können die RDS-Dienste von UKWSendern nutzen, die RDS-Signale (Radio Data
System) ausstrahlen.
• Klangeinstellungen
– EQ3 stage2: Sie können eine der 7
voreingestellten Equalizer-Kurven
auswählen.
– DSO (Dynamic Soundstage Organizer):
Mithilfe virtueller Lautsprecher wird auch bei
niedrig in der Tür montierten Lautsprechern
eine bessere Raumklangwirkung erzeugt.
– BBE MP: Dient zum Verbessern digital
komprimierten Klangs, wie z. B. bei MP3Dateien.
2
Entsorgung von gebrauchten
elektrischen und elektronischen
Geräten (anzuwenden in den
Ländern der Europäischen Union
und anderen europäischen Ländern
mit einem separaten Sammelsystem
für diese Geräte)
Das Symbol auf dem Produkt oder seiner Verpackung
weist darauf hin, dass dieses Produkt nicht als normaler
Haushaltsabfall zu behandeln ist, sondern an einer
Annahmestelle für das Recycling von elektrischen und
elektronischen Geräten abgegeben werden muss. Durch
Ihren Beitrag zum korrekten Entsorgen dieses Produkts
schützen Sie die Umwelt und die Gesundheit Ihrer
Mitmenschen. Umwelt und Gesundheit werden durch
falsches Entsorgen gefährdet. Materialrecycling hilft, den
Verbrauch von Rohstoffen zu verringern. Weitere
Informationen über das Recycling dieses Produkts
erhalten Sie von Ihrer Gemeinde, den kommunalen
Entsorgungsbetrieben oder dem Geschäft, in dem Sie das
Produkt gekauft haben.
Geeignetes Zubehör: Fernbedienung

Inhalt
Vorbereitungen
Zurücksetzen des Geräts . . . . . . . . . . . . . . . . . . 4
Einstellen der Uhr . . . . . . . . . . . . . . . . . . . . . . . 4
Abnehmen der Frontplatte . . . . . . . . . . . . . . . . . 4
Anbringen der Frontplatte. . . . . . . . . . . . . . . 4
Einlegen einer CD in das Gerät . . . . . . . . . . . . . 5
Auswerfen der CD . . . . . . . . . . . . . . . . . . . . 5
Lage und Grundfunktionen der
Teile und Bedienelemente
Hauptgerät. . . . . . . . . . . . . . . . . . . . . . . . . . . 6
Kartenfernbedienung RM-X151. . . . . . . . . . 6
CD
Informationen im Display . . . . . . . . . . . . . . . 8
Repeat und Shuffle Play . . . . . . . . . . . . . . . . 8
Radio
Speichern und Empfangen von Sendern . . . . . . 9
Automatisches Speichern von Sendern
— BTM. . . . . . . . . . . . . . . . . . . . . . . . . . . . . 9
Manuelles Speichern von Sendern . . . . . . . . 9
Einstellen gespeicherter Sender . . . . . . . . . . 9
Automatisches Einstellen von Sendern. . . . . 9
RDS . . . . . . . . . . . . . . . . . . . . . . . . . . . . . . . . . . 9
Übersicht. . . . . . . . . . . . . . . . . . . . . . . . . . . . 9
Einstellen von AF und TA/TP . . . . . . . . . . 10
Auswählen des Programmtyps (PTY) . . . . 11
Einstellen der Uhrzeit (CT). . . . . . . . . . . . . 11
Weitere Funktionen
Ändern der Klangeinstellungen . . . . . . . . . . . 11
Einstellen der Klangeigenschaften
— BAL/FAD/SUB. . . . . . . . . . . . . . . . . . . 11
Individuelles Einstellen der Equalizer-Kurve
— EQ3 . . . . . . . . . . . . . . . . . . . . . . . . . . . . 11
Einstellen von Konfigurationsoptionen
— SET . . . . . . . . . . . . . . . . . . . . . . . . . . . . . . 12
Verwenden gesondert erhältlicher Geräte. . . . 13
CD/MD-Wechsler . . . . . . . . . . . . . . . . . . . 13
Joystick RM-X4S . . . . . . . . . . . . . . . . . . . . 13
Zusätzliche Audiogeräte. . . . . . . . . . . . . . . 14
Weitere Informationen
Sicherheitsmaßnahmen . . . . . . . . . . . . . . . . . . 15
Hinweise zu CDs . . . . . . . . . . . . . . . . . . . . 15
MP3-/WMA-Dateien . . . . . . . . . . . . . . . . . 16
ATRAC-CDs . . . . . . . . . . . . . . . . . . . . . . . 16
Wartung . . . . . . . . . . . . . . . . . . . . . . . . . . . . . 17
Ausbauen des Geräts. . . . . . . . . . . . . . . . . . . . 18
Technische Daten . . . . . . . . . . . . . . . . . . . . . . 18
Störungsbehebung. . . . . . . . . . . . . . . . . . . . . . 19
Fehleranzeigen/Meldungen . . . . . . . . . . . . 21
Hergestellt unter der Lizenz
R
von BBE Sound, Inc.
sich die Klangqualität bei digital komprimiertem
Ton wie z. B. MP3 verbessern, indem die bei der
Komprimierung verloren gegangenen
harmonischen Obertöne wiederhergestellt und
verstärkt werden. Mit BBE MP werden aus dem
vorhandenen Tonmaterial geradzahlige Obertöne
erzeugt, so dass der Klang wärmer, detailgetreuer
und nuancierter wiedergegeben wird.
Mithilfe von BBE MP lässt
SonicStage und das entsprechende Logo sind
Markenzeichen der Sony Corporation.
ATRAC, ATRAC3, ATRAC3plus und die
entsprechenden Logos sind Markenzeichen der
Sony Corporation.
Microsoft, Windows Media
und das Windows-Logo sind
Markenzeichen oder
eingetragene Markenzeichen
der Microsoft Corporation in den USA und/oder
anderen Ländern.
3
Vorbereitungen
Abnehmen der Frontplatte
Zurücksetzen des Geräts
Bevor Sie das Gerät zum ersten Mal benutzen
oder wenn Sie die Autobatterie ausgetauscht
oder die Verbindungen gewechselt haben,
müssen Sie das Gerät zurücksetzen.
Nehmen Sie die Frontplatte ab und drücken Sie
die Taste RESET mit einem spitzen Gegenstand,
wie z. B. einem Kugelschreiber.
Tas te
RESET
Hinweis
Wenn Sie die Taste RESET drücken, werden die
eingestellte Uhrzeit und einige weitere gespeicherte
Einstellungen gelöscht.
Einstellen der Uhr
Die Uhr zeigt die Uhrzeit im 24-Stunden-Format
digital an.
1 Halten Sie (SEL) gedrückt.
Die Einstellanzeige erscheint.
2 Drücken Sie (SEL) so oft, bis „CLOCK-
ADJ“ angezeigt wird.
3 Drücken Sie (DSPL).
Die Stundenanzeige blinkt.
4 Stellen Sie durch Drücken des
Lautstärkereglers nach oben oder
unten die Stunden und Minuten ein.
Drücken Sie (DSPL), um zur jeweils
nächsten Ziffer in der Digitalanzeige zu
wechseln.
5 Drücken Sie (SEL).
Der Einstellvorgang ist damit abgeschlossen
und die Uhr beginnt zu laufen.
Zum Einblenden der Uhrzeit drücken Sie
(DSPL). Drücken Sie (DSPL) erneut, um zur
vorherigen Anzeige zurückzuschalten.
Mit der Kartenfernbedienung
Stellen Sie in Schritt 4 die Stunden und Minuten mit M
oder m ein.
Tipp
Mithilfe der RDS-Funktion können Sie die Uhr auch
automatisch einstellen lassen (Seite 11).
Um zu verhindern, dass das Gerät gestohlen
wird, können Sie die Frontplatte abnehmen.
Warnton
Wenn Sie den Zündschlüssel in die Position OFF
stellen, ohne die Frontplatte abzunehmen, ertönt
einige Sekunden lang ein Warnton.
Der Warnton wird nur ausgegeben, wenn der
integrierte Verstärker verwendet wird.
1 Drücken Sie (OFF).
Das Gerät schaltet sich aus.
2 Drücken Sie und ziehen Sie die
Frontplatte auf sich zu und heraus.
(OFF)
Hinweise
• Lassen Sie die Frontplatte nicht fallen und drücken
Sie nicht zu stark auf die Frontplatte und das
Display.
• Schützen Sie die Frontplatte vor Hitze bzw. hohen
Temperaturen und vor Feuchtigkeit. Lassen Sie sie
nicht in geparkten Autos, auf dem Armaturenbrett
oder auf der Hutablage liegen.
Anbringen der Frontplatte
Setzen Sie Teil A der Frontplatte wie abgebildet
an Teil B am Gerät an und drücken Sie dann die
linke Seite hinein, bis sie mit einem Klicken
einrastet.
A
B
Hinweis
Legen Sie auf der Innenseite der Frontplatte nichts ab.
4
Einlegen einer CD in das Gerät
1 Drücken Sie Z.
Auswerfen der CD
1 Drücken Sie Z.
Die Klappe öffnet sich automatisch.
2 Legen Sie eine CD mit der
beschrifteten Seite nach oben ein.
Die Klappe schließt sich automatisch und die
Wiedergabe beginnt.
Die Klappe öffnet sich automatisch.
x
Die CD wird ausgeworfen.
Hinweis
Die Klappe schließt sich automatisch, wenn das Gerät
15 Sekunden lang nicht bedient wird.
5
Lage und Grundfunktionen der Teile und Bedienelemente
Hauptgerät
ATT
DSPL
SOURCE MODE
GP/ALBM
1 2 3 4 5 6
Kartenfernbedienung RM-X151
OFF
SOURCE
DSPL
132
465
VOL
SEL
ATT
MODE
+
–
SCRL
+
–
DSO
EQ3SEL
BBE MP PAUSEREP BTMSHUF
AF/TA SENS PTY SCRL
OFF
CDX-RA550
Näheres finden Sie auf den angegebenen Seiten.
Die entsprechenden Tasten auf der
Kartenfernbedienung haben dieselbe Funktion
wie die Tasten am Gerät.
A Lautstärkeregler (+/–) 11
Einstellen der Lautstärke.
B Taste ATT (Dämpfen des Tons)
Dämpfen des Tons. Zum Beenden der
Funktion drücken Sie die Taste erneut.
C Taste DSPL (Anzeige) 8
Wechseln der Informationen im Display.
D Taste SEL (Auswählen)
Auswählen von Einstelloptionen.
E Display
F CD-Einschub 5
Einlegen der CD.
G Taste EQ3 (Equalizer) 11
Auswählen eines Equalizer-Typs (XPLOD,
VOCAL, EDGE, CRUISE, SPACE,
GRAVITY, CUSTOM oder OFF).
6

H Taste DSO 2
Auswählen des DSO-Modus (1, 2, 3 oder
OFF). Je höher die Zahl, desto stärker ist die
Wirkung.
I Taste Z (Auswerfen) 5
Auswerfen der CD/Öffnen der Klappe.
J Regler M>/.m (+/–)
CD:
Überspringen von Titeln (drücken),
Überspringen mehrerer Titel hintereinander
(drücken, dann innerhalb von 1 Sekunde
erneut drücken und gedrückt halten) bzw.
Rückwärts-/Vorwärtssuchen in einem Titel
(gedrückt halten).
Radio:
Automatisches Einstellen von Sendern
(drücken) bzw. manuelle Sendersuche
(gedrückt halten).
K Taste (Lösen der Frontplatte) 4
L Taste SOURCE
Einschalten bzw. Wechseln der Tonquelle
(Radio/CD/MD*
1
/AUX).
M Taste MODE 9, 13
Auswählen des Radiofrequenzbereichs (FM
(UKW)/MW/LW)/Auswählen des Geräts*
N Taste RESET (hinter der Frontplatte) 4
O Zahlentasten (Stationstasten)
CD/MD*
(1)/(2): GP*
1
:
3
/ALBM*4 –/+*
5
Überspringen von Gruppen/Alben
(drücken) bzw. Überspringen mehrerer
Gruppen/Alben hintereinander
(gedrückt halten).
(3): REP 8
(4): SHUF 8
(5): BBE MP*
6
3
Zum Aktivieren der BBE MP-Funktion
wählen Sie „BBEMP-ON“. Zum
Deaktivieren der Funktion stellen Sie
„BBEMP-OFF“ ein.
(6): PAU SE *
6
Anhalten der Wiedergabe. Zum
Beenden der Funktion drücken Sie die
Taste erneut.
Radio:
Einstellen gespeicherter Sender (drücken)
bzw. Speichern von Sendern (gedrückt
halten).
P Taste AF (Alternativfrequenzen)/TA
(Verkehrsdurchsagen) 10
Einstellen von AF und TA/TP bei einem
RDS-Sender.
Q Taste SENS/BTM 9
Verbessern des Empfangs: LOCAL/MONO
(drücken) bzw. Starten der BTM-Funktion
(gedrückt halten).
R Taste PTY (Programmtypauswahl) 11
Auswählen von PTY bei einem RDS-Sender.
S Taste SCRL (Bildlauf) 8
Hiermit lassen Sie die Informationen im
Display durchlaufen.
T Empfänger für die
Kartenfernbedienung
U Taste OFF
Ausschalten bzw. Stoppen der Tonquelle.
Die folgenden Tasten auf der
Kartenfernbedienung unterscheiden sich
außerdem hinsichtlich ihres Namens bzw. ihrer
Funktion von denen am Gerät.
ws Tasten < (.)/, (>)
Beim Steuern von CD- und RadioFunktionen entsprechen diese Tasten dem
Regler M>/.m am Gerät.
wd Taste VOL (Lautstärke) +/–
2
.
Einstellen der Lautstärke.
wf Tasten M (+)/m (–)
Beim Steuern von CD-Funktionen
entsprechen diese Tasten den Tasten
(2)/(1) am Gerät.
wg Zahlentasten (Stationstasten)
Einstellen gespeicherter Sender (drücken)
bzw. Speichern von Sendern (gedrückt
halten).
*1 Wenn ein MD-Wechsler angeschlossen ist.
*2 Wenn ein CD/MD-Wechsler angeschlossen ist.
*3 Bei Wiedergabe einer ATRAC-CD.
*4 Bei Wiedergabe einer MP3-/WMA-Datei.
*5 Wenn ein Wechsler angeschlossen ist, sind andere
Schritte auszuführen (siehe Seite 13).
*6 Bei der Wiedergabe mit diesem Gerät.
Hinweis
Wenn Sie das Gerät ausschalten und die Anzeige
ausgeblendet ist, können Sie es nicht mit der
Kartenfernbedienung bedienen. Drücken Sie zunächst
(SOURCE) am Gerät oder legen Sie eine CD ein, um
das Gerät zu aktivieren.
Tipp
Einzelheiten zum Austauschen der Batterie finden Sie
unter „Austauschen der Lithiumbatterie der
Kartenfernbedienung“ auf Seite 17.
7
CD
Einzelheiten zum Auswählen eines CD/MDWechslers finden Sie auf Seite 13.
Informationen im Display
A WMA/MP3-Anzeige
B ATRAC-CD-/BBE-MP-Anzeige
C Tonquelle
D Titelnummer/Verstrichene Spieldauer, CD-/
Interpretenname, Album-/Gruppennummer*
Album-/Gruppenname, Titelname,
Textinformationen*
*1 Die Album-/Gruppennummer wird nur beim
Wechseln des Albums bzw. der Gruppe angezeigt.
*2 Bei der Wiedergabe einer MP3-Datei wird das ID3-
Tag angezeigt, bei der Wiedergabe einer ATRACCD werden mit SonicStage usw. eingegebene
Textinformationen angezeigt und bei der
Wiedergabe einer WMA-Datei wird das WMA-Tag
angezeigt.
Zum Wechseln der Informationen im Display D
drücken Sie (DSPL). Damit die Informationen
im Display D durchlaufen, drücken Sie (SCRL)
oder stellen „A.SCRL-ON“ ein (Seite 12).
Tipp
Je nach CD-Typ, Aufnahmeformat und Einstellungen
werden unterschiedliche Informationen angezeigt.
Erläuterungen zu MP3/WMA finden Sie auf Seite 16,
Erläuterungen zu ATRAC-CDs auf Seite 16.
2
, Uhrzeit
Repeat und Shuffle Play
1 Drücken Sie während der Wiedergabe
(3) (REP) oder (4) (SHUF) so oft, bis
die gewünschte Einstellung im Display
erscheint.
Einstellung Funktion
REP-TRACK Wiederholtes
REP-ALBM*
REP-GP*
SHUF-ALBM*
1
,
SHUF-GP*
1
2
2
SHUF-DISC Wiedergeben einer CD
*1 Bei Wiedergabe einer MP3-/WMA-Datei.
*2 Bei Wiedergabe einer ATRAC-CD.
Wenn Sie wieder in den normalen
Wiedergabemodus schalten möchten, wählen Sie
„REP-OFF“ oder „SHUF-OFF“.
Wiedergeben eines
Titels.
Wiederholtes
Wiedergeben eines
Albums.
Wiederholtes
Wiedergeben einer
Gruppe.
1
Wiedergeben eines
Albums in willkürlicher
Reihenfolge.
Wiedergeben einer
Gruppe in willkürlicher
Reihenfolge.
in willkürlicher
Reihenfolge.
8
Radio
Speichern und Empfangen von
Sendern
Achtung
Wenn Sie während der Fahrt Sender einstellen,
sollten Sie die BTM-Funktion (Best Tuning
Memory - Speicherbelegungsautomatik)
verwenden. Andernfalls besteht Unfallgefahr.
Automatisches Speichern von
Sendern — BTM
1 Drücken Sie (SOURCE) so oft, bis
„TUNER“ erscheint.
Zum Wechseln des Frequenzbereichs drücken
Sie mehrmals (MODE). Sie können zwischen
FM1 (UKW1), FM2 (UKW2), FM3
(UKW3), MW und LW wählen.
2 Halten Sie (BTM) gedrückt, bis „BTM“
blinkt.
Das Gerät speichert die Sender in der
Reihenfolge der Frequenzen auf den
Zahlentasten (Stationstasten).
Ein Signalton ist zu hören und die Einstellung
wird gespeichert.
Manuelles Speichern von Sendern
1 Während der zu speichernde Sender
empfangen wird, halten Sie eine
Stationstaste ((1) bis (6)) gedrückt,
bis „MEM“ erscheint.
Die Stationstastenanzeige erscheint im
Display.
Hinweis
Wenn Sie auf der gleichen Stationstaste einen
anderen Sender speichern, wird der zuvor
gespeicherte Sender ersetzt.
Tipp
Wenn ein RDS-Sender gespeichert wird, wird auch
die AF/TA-Einstellung gespeichert (Seite 10).
Einstellen gespeicherter Sender
1 Wählen Sie den Frequenzbereich aus
und drücken Sie eine Stationstaste
((1) bis (6)).
Automatisches Einstellen von
Sendern
1 Wählen Sie den Frequenzbereich aus
und drücken Sie den Regler M>/
.m zur Sendersuche nach oben
oder unten.
Der Suchlauf stoppt, wenn ein Sender
empfangen wird. Wiederholen Sie diesen
Vorgang, bis das Gerät den gewünschten
Sender empfängt.
Tipp
Wenn Sie die Frequenz des gewünschten Senders
kennen, halten Sie den Regler M>/.m
gedrückt, bis die Frequenz in etwa erreicht ist, und
drücken Sie den Regler M>/.m dann so oft
nach oben oder unten, bis die gewünschte Frequenz
genau eingestellt ist (manuelle Sendersuche).
RDS
Übersicht
UKW-Sender, die RDS (Radio Data System)
unterstützen, strahlen zusammen mit den
normalen Radioprogrammsignalen nicht hörbare,
digitale Informationen aus.
Informationen im Display
A TA /T P*
B Radiofrequenzbereich, Funktion
C Frequenz*
*1 „TA“ blinkt während einer Verkehrsdurchsage. „TP“
*2 Beim Empfang eines RDS-Senders wird „ *“ links
Zum Wechseln der angezeigten Informationen
C drücken Sie (DSPL).
1
2
Speichernummer, Uhrzeit, RDS-Daten
leuchtet, wenn ein Sender mit Verkehrsdurchsagen
empfangen wird.
neben der Frequenz angezeigt.
Fortsetzung auf der nächsten Seite t
(Programmdienstname),
9

RDS-Funktionen
Mit diesem Gerät stehen folgende RDSFunktionen automatisch zur Verfügung:
AF (Alternativfrequenzen)
In einem Netzwerk wird der Sender mit den
stärksten Signalen ausgewählt und neu
eingestellt. So können Sie auch bei einer langen
Fahrt über eine große Entfernung hinweg
ununterbrochen denselben Sender empfangen,
ohne ihn manuell neu einstellen zu müssen.
TA (Verkehrsdurchsagen)/
TP (Verkehrsfunksender)
Aktuelle Verkehrsinformationen bzw.
Verkehrsfunksender werden empfangen. Wenn
solche Informationen bzw. Sendungen
empfangen werden, wird die gerade
ausgewählte Tonquelle unterbrochen.
PTY (Programmtypen)
Der gerade empfangene Programmtyp wird
angezeigt. Außerdem kann nach dem
ausgewählten Programmtyp gesucht werden.
CT (Uhrzeit)
Mit den CT-Daten (Uhrzeitdaten), die von
RDS-Sendern ausgestrahlt werden, lässt sich
die Uhr einstellen.
Hinweise
• Je nach Land bzw. Region stehen möglicherweise
nicht alle RDS-Funktionen zur Verfügung.
• Die RDS-Funktion arbeitet möglicherweise nicht,
wenn die Sendesignale zu schwach sind oder wenn
der eingestellte Sender keine RDS-Daten ausstrahlt.
Einstellen von AF und TA/TP
1 Drücken Sie (AF/TA) so oft, bis die
gewünschte Einstellung angezeigt
wird.
Einstellung Funktion
AF-ON AF wird aktiviert und TA wird
TA-ON TA wird aktiviert und AF wird
AF, TA-ON AF und TA werden aktiviert.
AF, TA-OFF AF und TA werden deaktiviert.
deaktiviert.
deaktiviert.
10
Speichern von RDS-Sendern
zusammen mit der AF- und TAEinstellung
Sie können zusammen mit den RDS-Sendern die
AF/TA-Einstellung speichern. Mit der BTMFunktion werden nur RDS-Sender mit derselben
AF/TA-Einstellung gespeichert.
Beim manuellen Speichern von Sendern können
Sie RDS- und Nicht-RDS-Sender mit
unterschiedlicher AF/TA-Einstellung speichern.
1 Stellen Sie AF/TA ein und speichern Sie die
Sender dann mit BTM oder manuell ab.
Speichern der Lautstärke von
Verkehrsdurchsagen
Sie können die Lautstärke für die
Verkehrsdurchsagen voreinstellen, so dass Sie sie
nicht überhören.
1 Drücken Sie mehrmals den Lautstärkeregler
nach oben oder unten, um den Lautstärkepegel
einzustellen.
2 Halten Sie (AF/TA) gedrückt, bis „TA“
erscheint.
Empfangen von
Katastrophenwarnungen
Wenn AF oder TA aktiviert ist, unterbrechen
Katastrophenwarnungen automatisch die
ausgewählte Tonquelle.
Unveränderter Empfang eines
Regionalsenders — REG
Wenn die AF-Funktion aktiviert ist, wird der
Empfang dieses Geräts werkseitig auf eine
bestimmte Region beschränkt, so dass nicht zu
einem anderen Regionalsender mit einer
stärkeren Frequenz gewechselt wird.
Wenn Sie den Empfangsbereich des betreffenden
Regionalsenders verlassen, stellen Sie bei der
Konfiguration „REG-OFF“ ein (Seite 12).
Hinweis
Diese Funktion steht in Großbritannien und in einigen
anderen Regionen nicht zur Verfügung.
Lokalsenderfunktion (nur
Großbritannien)
Mithilfe dieser Funktion können Sie andere
Lokalsender auswählen, auch wenn diese zuvor
nicht unter einer Stationstaste gespeichert
wurden.
1 Drücken Sie während des UKW-Empfangs
eine Stationstaste ((1) bis (6)), unter der ein
Lokalsender gespeichert ist.
2 Drücken Sie innerhalb von 5 Sekunden erneut
die Stationstaste des Lokalsenders.
Wiederholen Sie diesen Vorgang, bis das Gerät
den Lokalsender empfängt.

Auswählen des Programmtyps
(PTY)
1 Drücken Sie während des UKW-
Empfangs (PTY).
Der Name des aktuellen Programmtyps
erscheint, wenn der Sender PTY-Daten
ausstrahlt.
2 Drücken Sie (PTY) so oft, bis der
gewünschte Programmtyp angezeigt
wird.
3 Drücken Sie den Regler M>/
.m nach oben oder unten.
Das Gerät beginnt, nach einem Sender zu
suchen, der den ausgewählten Programmtyp
ausstrahlt.
Programmtypen
NEWS (Nachrichten), AFFAIRS (Aktuelles
Zeitgeschehen), INFO (Informationen),
SPORT (Sport), EDUCATE (Erziehung und
Bildung), DRAMA (Hörspiele), CULTURE
(Kultur), SCIENCE (Wissenschaft), VARIED
(Verschiedenes), POP M (Pop-Musik),
ROCK M (Rock-Musik), EASY M
(Unterhaltungsmusik), LIGHT M (Leichte
Klassik), CLASSICS (Klassik), OTHER M
(Sonstige Musik), WEATHER (Wetter),
FINANCE (Finanzberichte), CHILDREN
(Kinderprogramme), SOCIAL A
(Magazinsendungen), RELIGION (Religion),
PHONE IN (Hörertelefon), TRAVEL
(Reiseinformationen), LEISURE
(Freizeitprogramm), JAZZ (Jazz), COUNTRY
(Country-Musik), NATION M (Volksmusik),
OLDIES (Oldies), FOLK M (Folk-Musik),
DOCUMENT (Dokumentarbeiträge)
Hinweis
Sie können diese Funktion in Ländern/Regionen, in
denen keine PTY-Daten zur Verfügung stehen, nicht
verwenden.
Einstellen der Uhrzeit (CT)
1 Stellen Sie bei der Konfiguration „CT-
ON“ ein (Seite 12).
Hinweise
• Die CT-Funktion steht möglicherweise nicht zur
Verfügung, auch wenn ein RDS-Sender empfangen
wird.
• Die mit der CT-Funktion eingestellte Uhrzeit ist nicht
immer korrekt.
Weitere Funktionen
Ändern der Klangeinstellungen
Einstellen der Klangeigenschaften
— BAL/FAD/SUB
Sie können die Balance, den Fader und die
Lautstärke des Tiefsttonlautsprechers einstellen.
1 Drücken Sie (SEL) so oft, bis „BAL“,
„FAD“ oder „SUB“ angezeigt wird.
Die Anzeige wechselt folgendermaßen:
1
LOW*
t MID*1 t HI*1 t
BAL (links-rechts) t
FAD (vorne-hinten) t
SUB (Lautstärke des
Tiefsttonlautsprechers)*
*1 Wenn EQ3 eingeschaltet ist (Seite 11).
*2 Wenn als Audioausgang „SUB“ eingestellt ist
(Seite 12).
„ATT“ wird bei der niedrigsten Einstellung
angezeigt. Die Lautstärke lässt sich in 20
Stufen einstellen.
*3 Wenn die AUX-Tonquelle aktiviert ist (Seite 14).
2 Drücken Sie mehrmals den
Lautstärkeregler nach oben oder
unten, um die ausgewählte Option
einzustellen.
Nach 3 Sekunden ist die Einstellung
abgeschlossen und im Display erscheint
wieder die Anzeige für den normalen
Wiedergabemodus bzw. Empfangsmodus.
Mit der Kartenfernbedienung
Drücken Sie in Schritt 2 die Taste <, M, , oder m,
um die ausgewählte Option einzustellen.
Individuelles Einstellen der
Equalizer-Kurve — EQ3
Mit „CUSTOM“ unter EQ3 können Sie Ihre
individuellen Equalizer-Einstellungen
vornehmen.
1 Wählen Sie eine Tonquelle aus und
drücken Sie mehrmals (EQ3), um
„CUSTOM“ auszuwählen.
2 Drücken Sie (SEL) so oft, bis „LOW“,
„MID“ oder „HI“ angezeigt wird.
3 Drücken Sie mehrmals den
Lautstärkeregler nach oben oder
unten, um die ausgewählte Option
einzustellen.
Fortsetzung auf der nächsten Seite t
2
t AUX*
3
11
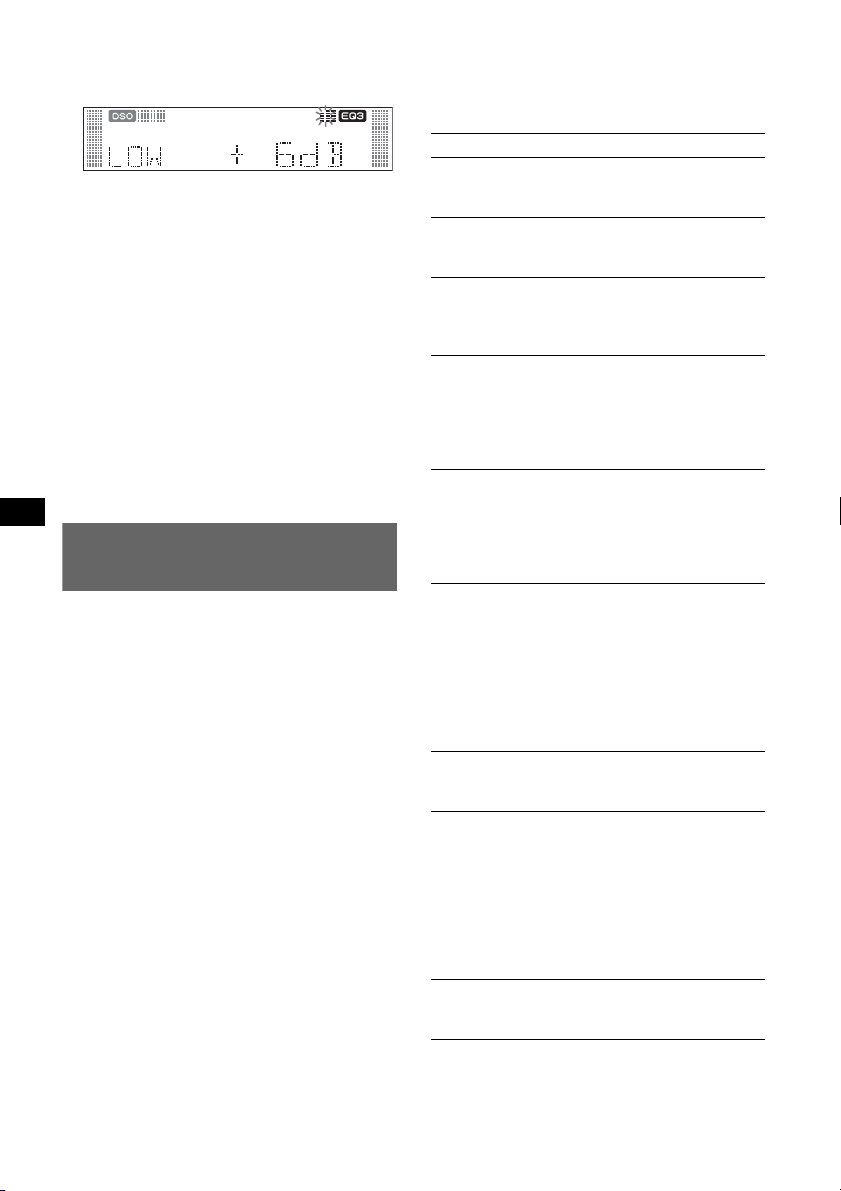
Die Lautstärke lässt sich in Schritten von
1 dB auf einen Wert zwischen –10 dB und
+10 dB einstellen.
Gehen Sie wie in Schritt 2 und 3 vor, wenn
Sie weitere Frequenzbereiche der EqualizerKurve einstellen wollen.
Wenn Sie die werkseitig eingestellte
Equalizer-Kurve wiederherstellen wollen,
halten Sie (SEL) gedrückt, bevor die
Einstellung abgeschlossen ist.
Nach 3 Sekunden ist die Einstellung
abgeschlossen und im Display erscheint
wieder die Anzeige für den normalen
Wiedergabemodus bzw. Empfangsmodus.
Tipp
Andere Equalizer-Typen lassen sich ebenfalls
einstellen.
Mit der Kartenfernbedienung
Drücken Sie in Schritt 3 die Taste <, M, , oder m,
um die ausgewählte Option einzustellen.
Einstellen von
Konfigurationsoptionen — SET
1 Halten Sie (SEL) gedrückt.
Die Einstellanzeige erscheint.
2 Drücken Sie (SEL) so oft, bis die
gewünschte Option angezeigt wird.
3 Drücken Sie den Lautstärkeregler
nach oben oder unten und wählen Sie
die Einstellung aus (beispielsweise
„ON“ oder „OFF“).
4 Halten Sie (SEL) gedrückt.
Die Einstellung ist damit abgeschlossen und
im Display erscheint wieder die Anzeige für
den normalen Wiedergabemodus bzw.
Empfangsmodus.
Hinweis
Die angezeigten Optionen unterscheiden sich je nach
Tonquelle und Einstellung.
Mit der Kartenfernbedienung
Drücken Sie in Schritt 3 die Taste < oder ,, um die
Einstellung auszuwählen.
Folgende Optionen können eingestellt werden
(Einzelheiten finden Sie jeweils auf den
angegebenen Seiten):
„
z“ gibt die Standardeinstellung an.
CLOCK-ADJ (Uhr einstellen) (Seite 4)
CT (Uhrzeit)
Zum Einstellen von „CT-ON“ oder „CT-OFF“
(
z) (Seite 10, 11).
BEEP (Signalton)
Zum Einstellen von „BEEP-ON“ (
z) oder
„BEEP-OFF“.
AUX-A*
1
(AUX-Audio)
Zum Einstellen der AUX-Tonquellenanzeige auf
„AUX-A-ON“ (
z) oder „AUX-A-OFF“
(Seite 14).
SUB/REAR*
1
Zum Wechseln des Audioausgangs.
– „SUB-OUT“ (
z): Ausgabe an einen
Tiefsttonlautsprecher.
– „REAR-OUT“: Ausgabe an einen
Endverstärker.
DIM (Dimmer)
Zum Wechseln der Helligkeit im Display.
–„DIM-AT“ (
z): Das Display wird dunkler,
wenn Sie die Beleuchtung einschalten.
– „DIM-ON“: Das Display wird dunkler.
– „DIM-OFF“: Der Dimmer wird deaktiviert.
M.DSPL (Bewegte Anzeige)
Zum Auswählen des Modus der bewegten
Anzeige.
–„M.DSPL-SA“ (
z): Bewegte Muster und der
Spektrumanalysator werden angezeigt.
– „M.DSPL-ON“: Bewegte Muster werden
angezeigt.
– „M.DSPL-OFF“: Die bewegte Anzeige wird
deaktiviert.
1
DEMO*
(Demo-Modus)
Zum Einstellen von „DEMO-ON“ (z) oder
„DEMO-OFF“.
A.SCRL (Automatischer Bildlauf)
Zum Einstellen des automatischen Bildlaufs für
Informationen mit vielen Zeichen beim
Wechseln der CD, des Albums, der Gruppe bzw.
des Titels.
– „A.SCRL-ON“: Die Informationen laufen im
Display durch.
–„A.SCRL-OFF“ (
z): Die Informationen laufen
im Display nicht durch.
2
REG*
(Regional)
Zum Einstellen von „REG-ON“ (
z) oder „REG-
OFF“ (Seite 10).
12

3
LPF*
(Niedrigpassfilter)
Zum Auswählen der Grenzfrequenz des
Tiefsttonlautsprechers: „LPF OFF“ (
z),
„LPF125Hz“ oder „LPF 78Hz“.
*1 Bei ausgeschaltetem Gerät.
*2 Wenn ein UKW-Sender empfangen wird.
*3 Wenn als Audioausgang „SUB“ eingestellt ist.
Verwenden gesondert
erhältlicher Geräte
CD/MD-Wechsler
Auswählen des Wechslers
1 Drücken Sie (SOURCE) so oft, bis „CD“ oder
„MD“ erscheint.
2 Drücken Sie (MODE) so oft, bis der
gewünschte Wechsler angezeigt wird.
Gerätenummer
Die Wiedergabe beginnt.
Überspringen von Alben und CDs/
MDs
1 Drücken Sie während der Wiedergabe
(GP/ALBM) –/+.
Zum
Überspringen
eines Albums und lassen Sie die Taste nach
weiterer Alben innerhalb von 2 Sekunden nach
von CDs/MDs wiederholt.
mehrerer CDs/
MDs
hintereinander
CD/MD-Nummer
Drücken Sie (GP/ALBM)
einem Moment los.
dem Loslassen erneut.
und drücken Sie die Taste
innerhalb von 2 Sekunden
erneut und halten Sie sie dann
gedrückt.
Repeat und Shuffle Play
1 Drücken Sie während der Wiedergabe (3)
(REP) oder (4) (SHUF) so oft, bis die
gewünschte Einstellung im Display erscheint.
Einstellung Funktion
REP-DISC*1Wiederholte Wiedergabe einer
CD/MD.
SHUFCHGR*
1
Wiedergabe der Titel im
Wechsler in willkürlicher
Reihenfolge.
SHUF-ALL*
2
Wiedergabe der Titel in allen
Geräten in willkürlicher
Reihenfolge.
*1 Wenn mindestens ein CD/MD-Wechsler
angeschlossen ist.
*2 Wenn mindestens ein CD-Wechsler bzw.
mindestens zwei MD-Wechsler angeschlossen
sind.
Wenn Sie wieder in den normalen
Wiedergabemodus schalten möchten, wählen Sie
„REP-OFF“ oder „SHUF-OFF“.
Tipp
Mit „SHUF-ALL“ werden nicht Titel von CD-Geräten
und MD-Wechslern gemischt wiedergegeben.
Joystick RM-X4S
Anbringen des Aufklebers
Bringen Sie den Aufkleber je nach Montage des
Joysticks an.
SEL
DSPL
MODE
MODE
DSPL
SEL
Lage und Funktion der
Bedienelemente
Die entsprechenden Tasten auf dem Joystick
haben dieselbe Funktion wie die Tasten an
diesem Gerät.
SEL
PRESET/
DISC
ATT
MODE
SOURCE
DSPL
VOL
SEEK/AMS
Fortsetzung auf der nächsten Seite t
OFF
OFF
13

Bei folgenden Reglern auf dem Joystick müssen
Sie anders als mit dem Gerät vorgehen.
• Regler PRESET/DISC
Entspricht der Taste (GP/ALBM) –/+ am Gerät
(drücken und drehen).
• Lautstärkeregler VOL
Entspricht dem Lautstärkeregler am Gerät
(drehen).
• Regler SEEK/AMS
Entspricht dem Regler M>/.m am
Gerät (drehen oder drehen und gedreht halten).
Wechseln der Drehrichtung
Die Drehrichtung der Regler ist werkseitig wie in
der folgenden Abbildung zu sehen eingestellt.
Erhöhen
Verrin gern
Wenn Sie den Joystick rechts von der Lenksäule
anbringen, können Sie die Drehrichtung der
Regler ändern.
1 Drücken Sie den Regler VOL nach innen und
halten Sie (SEL) gedrückt.
Zusätzliche Audiogeräte
Sie können gesondert erhältliche tragbare Geräte
von Sony an den Anschluss BUS AUDIO IN/
AUX IN am Gerät anschließen. So können Sie
den Ton von einem tragbaren Gerät über die
Autolautsprecher wiedergeben, sofern kein
Wechsler oder ein anderes Gerät an den
Anschluss angeschlossen ist.
Hinweis
An BUS CONTROL IN darf nichts angeschlossen
sein, wenn Sie ein tragbares Gerät anschließen.
Wenn ein Gerät an BUS CONTROL IN angeschlossen
ist, können Sie „AUX“ nicht mit (SOURCE) auswählen.
Tipp
Wenn Sie ein tragbares Gerät und einen Wechsler
anschließen wollen, müssen Sie einen gesondert
erhältlichen AUX-IN-Signalquellenwähler verwenden.
Auswählen des zusätzlichen Geräts
1 Drücken Sie (SOURCE) so oft, bis „AUX
REAR IN“ erscheint.
Bedienen Sie das tragbare Gerät.
Einstellen des Lautstärkepegels
Stellen Sie unbedingt vor der Wiedergabe die
Lautstärke der einzelnen angeschlossenen
Audiogeräte ein.
1 Drehen Sie die Lautstärke an diesem Gerät
herunter.
2 Drücken Sie (SOURCE) so oft, bis „AUX
REAR IN“ erscheint.
3 Starten Sie die Wiedergabe am tragbaren
Audiogerät mit gemäßigter Lautstärke.
4 Stellen Sie die gewohnte Hörlautstärke an
diesem Gerät ein.
5 Drücken Sie (SEL) so oft, bis „AUX“
erscheint, und stellen Sie durch Drücken des
Lautstärkereglers nach oben oder unten den
Eingangspegel ein (±6 dB).
14

Weitere Informationen
Sicherheitsmaßnahmen
• Wenn das Fahrzeug längere Zeit in direktem
Sonnenlicht geparkt war, lassen Sie das Gerät
etwas abkühlen, bevor Sie es einschalten.
• Motorantennen werden automatisch ausgefahren,
wenn das Gerät eingeschaltet wird.
Feuchtigkeitskondensation
Bei Regen oder bei sehr hoher Luftfeuchtigkeit kann
sich auf den Linsen im Inneren des Geräts und im
Display Feuchtigkeit niederschlagen. In diesem Fall
funktioniert das Gerät nicht mehr richtig. Nehmen
Sie die CD heraus und warten Sie etwa eine Stunde,
bis die Feuchtigkeit verdunstet ist.
So bewahren Sie die hohe
Tonqualität
Achten Sie darauf, keine Säfte oder andere
zuckerhaltige Getränke auf das Gerät oder die CDs
zu verschütten.
Hinweise zu CDs
• Berühren Sie nicht die Oberfläche von CDs, damit
diese nicht verschmutzt werden. Fassen Sie CDs
nur am Rand an.
• Bewahren Sie CDs in ihrer Hülle oder in den CDMagazinen auf, wenn sie nicht abgespielt werden.
• Schützen Sie CDs vor Hitze bzw. hohen
Temperaturen. Lassen Sie sie nicht in geparkten
Autos, auf dem Armaturenbrett oder auf der
Hutablage liegen.
• Bringen Sie keine Aufkleber auf CDs an und
verwenden Sie keine CDs mit Rückständen von
Tinte oder Klebstoffen. Solche CDs drehen sich
beim Betrieb möglicherweise nicht mehr und
führen zu einer Fehlfunktion oder können
beschädigt werden.
• Verwenden Sie keine CDs, an denen Etiketten
oder Aufkleber angebracht sind.
Bei Verwendung solcher CDs kann es zu
folgenden Fehlfunktionen kommen:
– Die CD lässt sich nicht auswerfen, weil sich ein
Etikett oder Aufkleber gelöst hat und den
Auswurfmechanismus blockiert.
– Die Audiodaten werden nicht korrekt gelesen
(z. B. Tonsprünge bei der Wiedergabe, keine
Wiedergabe), weil ein Etikett oder Aufkleber
durch Wärmeeinwirkung geschrumpft ist und
die CD sich verzogen hat.
• CDs mit außergewöhnlichen Formen (z. B.
herzförmige, quadratische oder sternförmige CDs)
können mit diesem Gerät nicht wiedergegeben
werden. Falls Sie es doch versuchen, kann das
Gerät beschädigt werden. Verwenden Sie solche
CDs nicht.
• Single-CDs (8-cm-CDs) können ebenfalls nicht
verwendet werden.
• Reinigen Sie CDs vor dem
Abspielen mit einem
handelsüblichen
Reinigungstuch. Wischen Sie
dabei von der Mitte nach außen.
Verwenden Sie keine
Lösungsmittel wie Benzin oder
Verdünner und keine
handelsüblichen
Reinigungsmittel oder Antistatik-Sprays für
Schallplatten.
Hinweise zu CD-Rs/CD-RWs
• Je nach dem Gerät, mit dem die CD-R/CD-RW
bespielt wurde, oder dem Zustand der CD-R/CDRW selbst ist eine Wiedergabe mit diesem Gerät
nicht in jedem Fall möglich.
• Eine noch nicht abgeschlossene CD-R/CD-RW
kann nicht wiedergegeben werden.
Musik-CDs mit
Urheberrechtsschutzcodierung
Dieses Gerät ist auf die Wiedergabe von CDs
ausgelegt, die dem Compact Disc (CD)-Standard
entsprechen.
Seit neuestem bringen einige Anbieter Musik-CDs
mit Urheberrechtsschutzcodierung auf den Markt.
Beachten Sie bitte, dass einige dieser CDs nicht dem
CD-Standard entsprechen und mit diesem Produkt
möglicherweise nicht wiedergegeben werden
können.
Hinweis zu DualDiscs
Eine DualDisc ist eine zweiseitig bespielte Disc,
auf der DVD-Aufnahmen auf der einen und
digitale Audiodaten auf der anderen Seite
aufgezeichnet sind. Da jedoch die
Audiomaterialseite nicht dem Compact Disc (CD)Standard entspricht, kann die einwandfreie
Wiedergabe auf diesem Produkt nicht garantiert
werden.
Fortsetzung auf der nächsten Seite t
15

MP3-/WMA-Dateien
MP3 steht für MPEG-1 Audio Layer-3. Dabei
handelt es sich um einen Formatstandard zum
Komprimieren von Musikdateien. Hierbei werden
Audio-CD-Daten auf etwa 1/10 ihrer ursprünglichen
Größe komprimiert.
WMA steht für Windows Media Audio. Dabei
handelt es sich um einen weiteren Formatstandard
zum Komprimieren von Musikdateien. Hierbei
werden Audio-CD-Daten auf etwa 1/22* ihrer
ursprünglichen Größe komprimiert.
* nur für 64 Kbps
• Das Gerät ist mit dem Format ISO 9660, Stufe 1/
Stufe 2, dem erweiterten Joliet- bzw. RomeoFormat sowie dem Multisession-Format
kompatibel.
• Höchstzahl an:
– Ordnern (Alben): 150 (einschließlich
Stammordner und leerer Ordner).
– MP3-/WMA-Dateien (Titeln) und Ordnern auf
einer CD: 300. Wenn ein Ordner- bzw. die
Dateinamen viele Zeichen enthalten, ist die
maximale Anzahl möglicherweise geringer als
300.
– anzeigbaren Zeichen für einen Ordner-/
Dateinamen: 32 (Joliet) bzw. 64 (Romeo).
• ID3-Tags der Versionen 1.0, 1.1, 2.2, 2.3 und 2.4
stehen nur bei MP3 zur Verfügung. Ein ID3-Tags
besteht aus 15/30 Zeichen (1.0 und 1.1) bzw.
63/126 Zeichen (2.2, 2.3 und 2.4). WMA-Tags
bestehen aus 63 Zeichen.
Wiedergabereihenfolge von MP3-/
WMA-Dateien
MP3/WMA
Hinweise
• Fügen Sie beim Benennen einer MP3-/WMA-Datei
unbedingt die Dateierweiterung „.mp3“ bzw. „.wma“
zum Dateinamen hinzu.
• Bei der Wiedergabe einer VBR-MP3-/-WMA-Datei
(VBR = Variable Bit Rate) bzw. beim Vorwärts-/
Rückwärtssuchen wird die verstrichene Spieldauer
möglicherweise nicht richtig angezeigt.
Ordner
(Album)
MP3-/WMADatei (Titel)
16
• Bei einer Multisession-CD wird nur das Format des
ersten Titels der ersten Session erkannt und
wiedergegeben (alle anderen Formate werden
übersprungen). Das CD-DA-Format hat Vorrang vor
dem ATRAC-CD-Format und dieses hat Vorrang vor
dem MP3-/WMA-Format.
– Wenn der erste Titel das CD-DA-Format aufweist,
werden nur die CD-DA-Titel der ersten Session
wiedergegeben.
– Wenn der erste Titel nicht das CD-DA-Format
aufweist, wird eine ATRAC-CD- oder MP3-/WMASession wiedergegeben. Wenn auf der CD keine
Daten in einem dieser Formate enthalten sind,
wird „NO MUSIC“ angezeigt.
Hinweise zu MP3
• Schließen Sie die CD unbedingt ab, bevor Sie sie
mit diesem Gerät verwenden.
• Wenn Sie eine MP3-Datei mit einer hohen Bitrate,
wie z. B. 320 Kbps, wiedergeben, kommt es
möglicherweise zu Tonaussetzern.
Hinweise zu WMA
• Mit verlustfreier Komprimierung erstellte Dateien
können nicht wiedergegeben werden.
• Urheberrechtlich geschützte Dateien können nicht
wiedergegeben werden.
ATRAC-CDs
ATRAC3plus-Format
ATRAC3 steht für „Adaptive Transform Acoustic
Coding3“ und ist eine Komprimierungstechnologie
für Tonsignale. Hierbei werden Audio-CD-Daten
auf etwa 1/10 ihrer ursprünglichen Größe
komprimiert. Bei ATRAC3plus, einem erweiterten
ATRAC3-Format, werden Audio-CD-Daten auf
etwa 1/20 ihrer ursprünglichen Größe komprimiert.
Dieses Gerät unterstützt das ATRAC3- und das
ATRAC3plus-Format.
ATRAC-CD
Eine ATRAC-CD ist eine mit Audio-CD-Daten
bespielte CD, bei der die Daten mithilfe autorisierter
Software, wie z. B. SonicStage 2.0 oder höher bzw.
SonicStage Simple Burner, im ATRAC3- oder
ATRAC3plus-Format komprimiert wurden.
• Höchstzahl an:
– Ordnern (Gruppen): 255
– Dateien (Titeln): 999
• Die mit SonicStage eingegebenen Ordner- bzw.
Dateinamen und Textinformationen werden
angezeigt.
Weitere Informationen zu ATRAC-CDs finden Sie
im Handbuch zu SonicStage bzw. SonicStage
Simple Burner.
Hinweis
Verwenden Sie zum Erstellen einer ATRAC-CD
unbedingt ein autorisiertes Softwareprodukt wie
SonicStage 2.0 oder höher bzw. SonicStage Simple
Burner 1.0 oder 1.1.
Sollten an Ihrem Gerät Probleme auftreten oder
sollten Sie Fragen haben, auf die in dieser Anleitung
nicht eingegangen wird, wenden Sie sich bitte an
Ihren Sony-Händler.

Wartung
Austauschen der Lithiumbatterie der
Kartenfernbedienung
Unter normalen Bedingungen hält die Batterie etwa
1 Jahr. Die Lebensdauer der Batterie kann je nach
Gebrauch des Geräts jedoch auch kürzer sein.
Wenn die Batterie schwächer wird, verkürzt sich die
Reichweite der Kartenfernbedienung. Tauschen Sie
die Batterie gegen eine neue CR2025Lithiumbatterie aus. Bei Verwendung einer anderen
Batterie besteht Feuer- oder Explosionsgefahr.
Mit der Seite + nach oben
Austauschen der
Sicherung
Wenn Sie eine Sicherung
austauschen, achten Sie darauf,
eine Ersatzsicherung mit dem
gleichen Ampere-Wert wie die
Originalsicherung zu
verwenden. Dieser ist auf der
Originalsicherung angegeben.
Wenn die Sicherung
durchbrennt, überprüfen Sie
den Stromanschluss und
tauschen die Sicherung aus. Brennt die neue
Sicherung ebenfalls durch, kann eine interne
Fehlfunktion vorliegen. Wenden Sie sich in einem
solchen Fall an Ihren Sony-Händler.
Sicherung (10 A)
2
c
1
Hinweise zur Lithiumbatterie
• Bewahren Sie die Lithiumbatterie außerhalb der
Reichweite von Kindern auf. Sollte eine
Lithiumbatterie verschluckt werden, ist umgehend
ein Arzt aufzusuchen.
• Wischen Sie die Batterie mit einem trockenen Tuch
ab, um einen guten Kontakt zwischen den
Batteriepolen und -anschlüssen sicherzustellen.
• Achten Sie beim Einlegen der Batterie auf die
richtige Polarität.
• Halten Sie die Batterie nicht mit einer Metallpinzette.
Dies könnte zu einem Kurzschluss führen.
VORSICHT
Die Batterie kann bei falscher Handhabung
explodieren!
Auf keinen Fall darf sie aufgeladen,
auseinandergenommen oder ins Feuer
geworfen werden.
Entsorgungshinweis: Bitte werfen Sie nur
entladene Batterien in die Sammelboxen beim
Handel oder den Kommunen. Entladen sind
Batterien in der Regel dann, wenn das Gerät
abschaltet und „Batterie leer“ signalisiert oder
nach längerer Gebrauchsdauer der Batterien
nicht mehr einwandfrei funktioniert.
Um sicherzugehen, kleben Sie die Batteriepole
z. B. mit einem Klebestreifen ab oder geben Sie
die Batterien einzeln in einen Plastikbeutel.
Reinigen der Anschlüsse
Das Gerät funktioniert möglicherweise nicht
ordnungsgemäß, wenn die Anschlüsse zwischen
dem Gerät und der Frontplatte verschmutzt sind.
Um dies zu vermeiden, nehmen Sie die Frontplatte
ab (Seite 4) und reinigen Sie die Anschlüsse mit
einem mit Alkohol angefeuchteten Wattestäbchen.
Drücken Sie dabei nicht zu fest auf die Anschlüsse.
Andernfalls können sie beschädigt werden.
Hauptgerät
Hinweise
• Schalten Sie aus Sicherheitsgründen vor dem
Reinigen der Anschlüsse die Zündung aus und
ziehen Sie den Schlüssel aus dem Zündschloss.
• Berühren Sie die Anschlüsse unter keinen
Umständen direkt mit den Händen oder einem
Metallgegenstand.
Rückseite der
Frontplatte
17

Ausbauen des Geräts
Technische Daten
1 Entfernen Sie die Schutzumrandung.
1Nehmen Sie die Frontplatte ab (Seite 4).
2Fassen Sie die Schutzumrandung mit den
Fingern an den Seitenkanten und ziehen
Sie sie heraus.
x
2 Nehmen Sie das Gerät heraus.
1Setzen Sie beide Löseschlüssel
gleichzeitig so ein, dass sie mit einem
Klicken einrasten.
Der Haken
muss nach
innen weisen.
2Ziehen Sie an den Löseschlüsseln, um das
Gerät zu lösen.
3Ziehen Sie das Gerät aus der Halterung.
CD-Player
Signal-Rauschabstand: 120 dB
Frequenzgang: 10 – 20.000 Hz
Gleichlaufschwankungen: Unterhalb der Messgrenze
Tuner
UKW
Empfangsbereich: 87,5 – 108,0 MHz
Antennenanschluss: Anschluss für Außenantenne
Zwischenfrequenz: 10,7 MHz/450 kHz
Nutzbare Empfindlichkeit: 9 dBf
Trennschärfe: 75 dB bei 400 kHz
Signal-Rauschabstand: 67 dB (stereo), 69 dB (mono)
Harmonische Verzerrung bei 1 kHz: 0,5 % (stereo),
0,3 % (mono)
Kanaltrennung: 35 dB bei 1 kHz
Frequenzgang: 30 – 15.000 Hz
MW/LW
Empfangsbereich:
MW: 531 – 1.602 kHz
LW: 153 – 279 kHz
Antennenanschluss: Anschluss für Außenantenne
Zwischenfrequenz: 10,7 MHz/450 kHz
Empfindlichkeit: MW: 30 µV, LW: 40 µV
Endverstärker
Ausgänge: Lautsprecherausgänge (versiegelte
Anschlüsse)
Lautsprecherimpedanz: 4 – 8 Ohm
Maximale Ausgangsleistung: 50 W × 4 (an 4 Ohm)
Allgemeines
Ausgänge:
Audioausgangsanschluss (vorne, hinten/
Tiefsttonlautsprecher umschaltbar)
Motorantennen-Steueranschluss
Steueranschluss für Endverstärker
Eingänge:
Steueranschluss für Stummschaltung beim
Telefonieren (ATT)
Steueranschluss für Beleuchtung
BUS-Steuereingang
BUS-Audioeingang/AUX IN-Eingang
Fernbedienungseingang
Antenneneingang
Klangregler:
Bässe: ±10 dB bei 60 Hz (XPLOD)
Mitten: ±10 dB bei 1 kHz (XPLOD)
Höhen: ±10 dB bei 10 kHz (XPLOD)
Betriebsspannung: 12 V Gleichstrom, Autobatterie
(negative Erdung)
Abmessungen: ca. 178 × 50 × 182 mm (B/H/T)
Einbaumaße:
ca. 182 × 53 × 161 mm (B/H/T)
Gewicht: ca. 1,2 kg
Mitgeliefertes Zubehör:
Kartenfernbedienung: RM-X151
Montageteile und Anschlusszubehör (1 Satz)
18

Sonderzubehör/gesondert erhältliche Geräte:
Joystick: RM-X4S
BUS-Kabel (mit einem Cinchkabel geliefert):
RC-61 (1 m), RC-62 (2 m)
CD-Wechsler (10 CDs): CDX-757MX
CD-Wechsler (6 CDs): CDX-T70MX, CDX-T69
MD-Wechsler (6 MDs): MDX-66XLP
Signalquellenwähler: XA-C30
AUX IN-Signalquellenwähler: XA-300
Ihr Händler führt unter Umständen nicht alle der
oben genannten Zubehörteile. Fragen Sie Ihren
Händler nach ausführlichen Informationen.
US-amerikanische Patente und Patente anderer
Länder lizenziert von Dolby Laboratories.
MPEG Layer-3 Audiocodiertechnologie und
Patente lizenziert von Fraunhofer IIS und Thomson.
Hinweis
Dieses Gerät kann nicht an einen digitalen
Vorverstärker oder an einen Equalizer, der mit dem
Sony-BUS-System kompatibel ist, angeschlossen
werden.
Änderungen, die dem technischen Fortschritt dienen,
bleiben vorbehalten.
• Bleifreies Lötmetall wird zum Löten bestimmter
Teile verwendet. (mehr als 80 %)
• In bestimmten Leiterplatten werden keine
halogenierten Flammschutzmittel verwendet.
• Im Gehäuse werden keine halogenierten
Flammschutzmittel verwendet.
• Die Druckfarbe basiert auf Pflanzenölen, frei von
leicht flüchtigen organischen Substanzen.
• Es wird kein Polystyrolschaum als Füllmaterial in
der Verpackung verwendet.
Störungsbehebung
Anhand der folgenden Checkliste können Sie die
meisten Probleme, die möglicherweise an Ihrem
Gerät auftreten, selbst beheben.
Bevor Sie die folgende Checkliste durchgehen,
überprüfen Sie bitte zunächst, ob Sie das Gerät
richtig angeschlossen und bedient haben.
Allgemeines
Das Gerät wird nicht mit Strom versorgt.
• Überprüfen Sie die Kabelverbindungen. Wenn die
Anschlüsse in Ordnung sind, überprüfen Sie die
Sicherung.
• Wenn Sie das Gerät ausschalten und die Anzeige
ausgeblendet ist, können Sie es nicht mit der
Kartenfernbedienung bedienen.
tSchalten Sie das Gerät ein.
Die Motorantenne wird nicht ausgefahren.
Die Motorantenne hat kein Relaiskästchen.
Es ist kein Ton zu hören.
• Die Lautstärke ist zu niedrig.
• Die Funktion zum Dämpfen des Tons oder die
Stummschaltfunktion zum Telefonieren (wenn das
Schnittstellenkabel eines Autotelefons mit der ATTLeitung verbunden ist) ist aktiviert.
• Der Fader-Regler „FAD“ ist nicht für ein 2Lautsprecher-System eingestellt.
• Der CD-Wechsler unterstützt das CD-Format (MP3-/
WMA-/ATRAC-CD) nicht.
tLassen Sie die CD mit einem MP3-kompatiblen
CD-Wechsler von Sony oder mit diesem Gerät
wiedergeben.
Kein Signalton ertönt.
• Der Signalton ist deaktiviert (Seite 12).
• Ein gesondert erhältlicher Endverstärker ist
angeschlossen und Sie verwenden nicht den
integrierten Verstärker.
Der Speicherinhalt wurde gelöscht.
• Die Taste RESET wurde gedrückt.
tSpeichern Sie die Einstellungen erneut.
• Das Stromversorgungskabel wurde gelöst oder die
Verbindung zur Batterie besteht nicht mehr.
• Das Stromversorgungskabel ist nicht richtig
angeschlossen.
Gespeicherte Sender und die korrekte Uhrzeit
werden gelöscht.
Die Sicherung ist durchgebrannt.
Störgeräusche sind zu hören, wenn der
Zündschlüssel gedreht wird.
Die Leitungen sind nicht korrekt an den
Stromanschluss für Zubehörgeräte angeschlossen.
Die Anzeige wird ausgeblendet bzw. erscheint
nicht im Display.
• Der Dimmer ist auf „DIM-ON“ eingestellt (Seite 12).
• Die Anzeige wird ausgeblendet, wenn Sie (OFF)
gedrückt halten.
tHalten Sie (OFF) am Gerät erneut gedrückt, bis
die Anzeige eingeblendet wird.
• Die Anschlüsse sind verschmutzt (Seite 17).
Die Klappe schließt sich nicht.
Halten Sie Z länger als 2 Sekunden gedrückt. Wenn
das Problem bestehen bleibt, wenden Sie sich an Ihren
Sony-Händler.
Die DSO-Funktion hat keine Wirkung.
Je nach dem Innenraum des jeweiligen Fahrzeugs bzw.
dem Musiktyp hat die DSO-Funktion möglicherweise
nicht die gewünschte Wirkung.
Fortsetzung auf der nächsten Seite t
19

CD/MD-Wiedergabe
Es lässt sich keine CD/MD einlegen.
• Es ist bereits eine andere CD/MD eingelegt.
• Die CD/MD wurde mit Gewalt falsch herum oder
falsch eingelegt.
Die CD/MD lässt sich nicht abspielen.
• Die CD/MD ist beschädigt oder verschmutzt.
• Die CD-R/CD-RW ist nicht als Audio-CD konzipiert
(Seite 15).
MP3-/WMA-Dateien können nicht
wiedergegeben werden.
Die CD ist nicht mit dem MP3-/WMA-Format bzw.
der Version kompatibel (Seite 16).
Es dauert länger, bis die Wiedergabe von MP3-/
WMA-Dateien beginnt.
Bei folgenden CDs dauert es länger, bis die
Wiedergabe beginnt:
– CDs mit einer komplizierten Datei-/Ordnerstruktur.
– Multisession-CDs.
– CDs, zu denen noch Daten hinzugefügt werden
können.
Eine ATRAC-CD kann nicht abgespielt werden.
• Die CD wurde nicht mit autorisierter Software wie
SonicStage oder SonicStage Simple Burner erstellt.
• Titel, die nicht in einer Gruppe enthalten sind,
können nicht abgespielt werden.
Im Display angezeigte Informationen laufen
nicht automatisch durch.
• Bei CDs/MDs mit sehr viel Textinformationen laufen
diese im Display möglicherweise nicht durch.
• „A.SCRL“ ist auf „OFF“ gesetzt.
tStellen Sie „A.SCRL-ON“ ein (Seite 12) oder
drücken Sie (SCRL).
Tonsprünge treten auf.
• Das Gerät ist nicht richtig installiert.
tInstallieren Sie das Gerät in einem Winkel von
unter 45° an einem stabilen Teil des Fahrzeugs.
• Die CD/MD ist beschädigt oder verschmutzt.
Die Funktionstasten funktionieren nicht.
Die CD/MD lässt sich nicht auswerfen.
Drücken Sie die Taste RESET (Seite 4).
Die Kartenfernbedienung funktioniert nicht.
Schließen Sie die Klappe.
Ein gesondert erhältlicher MGS-X1 und ein MDWechsler sind angeschlossen, aber „MS“ bzw.
„MD“ wird nicht als Tonquelle angezeigt.
Dieses Gerät erkennt den MGS-X1 als ein MD-Gerät.
tDrücken Sie (SOURCE) so oft, bis „MS“ oder
„MD“ erscheint, und drücken Sie dann mehrmals
(MODE).
Radioempfang
Sender lassen sich nicht empfangen.
Der Ton ist stark gestört.
• Schließen Sie eine Motorantennen-Steuerleitung
(blau) oder eine Stromversorgungsleitung für
Zubehörgeräte (rot) an die Stromversorgungsleitung
für den Antennenverstärker des Fahrzeugs an (nur,
wenn das Fahrzeug mit einer in der Heck-/
Seitenfensterscheibe integrierten FM (UKW)/MW/
LW-Antenne ausgestattet ist).
• Prüfen Sie die Verbindung der Autoantenne.
• Die Autoantenne wird nicht ausgefahren.
tPrüfen Sie die Verbindung der Motorantennen-
Steuerleitung.
• Überprüfen Sie die Frequenz.
• Wenn der DSO-Modus aktiviert ist, ist der Ton
manchmal gestört.
tSetzen Sie DSO auf „OFF“ (Seite 7).
Gespeicherte Sender lassen sich nicht
einstellen.
• Speichern Sie den/die Sender unter der korrekten
Frequenz ab.
• Das Sendesignal ist zu schwach.
Der automatische Sendersuchlauf funktioniert
nicht.
• Die Einstellung für den lokalen Suchmodus ist nicht
korrekt.
tDer automatische Sendersuchlauf stoppt zu oft:
Drücken Sie (SENS) so oft, bis „LOCAL-ON“
angezeigt wird.
tDer automatische Sendersuchlauf hält bei keinem
Sender an:
Drücken Sie (SENS) so oft, bis „MONO-ON“
oder „MONO-OFF“ (UKW) bzw. „LOCALOFF“ (MW/LW) erscheint.
• Das Sendesignal ist zu schwach.
tStellen Sie die Sender manuell ein.
Während des UKW-Empfangs blinkt die
Anzeige „ST“.
• Stellen Sie die Frequenz genau ein.
• Das Sendesignal ist zu schwach.
tDrücken Sie (SENS), um den monauralen
Empfangsmodus auf „MONO-ON“ einzustellen.
Eine UKW-Stereosendung ist nur monaural zu
hören.
Das Gerät ist in den monauralen Empfangsmodus
geschaltet.
tDrücken Sie (SENS) so oft, bis „MONO-OFF“
angezeigt wird.
RDS
Der Sendersuchlauf (SEEK) startet nach ein
paar Sekunden Radioempfang.
Der Sender ist kein Verkehrsfunksender (TP) oder die
Sendesignale sind zu schwach.
tDeaktivieren Sie TA (Seite 10).
20

Es sind keine Verkehrsdurchsagen zu hören.
• Aktivieren Sie TA (Seite 10).
• Der Sender sendet keine Verkehrsdurchsagen,
obwohl es sich um einen Verkehrsfunksender (TP)
handelt.
tStellen Sie einen anderen Sender ein.
Bei der PTY-Funktion wird „- - - - - - - -“
angezeigt.
• Der aktuelle Sender ist kein RDS-Sender.
• Es wurden keine RDS-Daten empfangen.
• Der Sender gibt den Programmtyp nicht an.
Fehleranzeigen/Meldungen
1
BLANK*
Die MD enthält keine Titel.*
tLegen Sie eine MD ein, auf der Titel aufgezeichnet
sind.
ERROR*
1
• Die CD/MD ist verschmutzt oder falsch herum
eingelegt.*
2
tReinigen Sie die CD/MD bzw. legen Sie sie
korrekt ein.
• Eine leere CD/MD wurde eingelegt.
• Die CD/MD kann aufgrund einer Störung nicht
wiedergegeben werden.
tLegen Sie eine andere CD/MD ein.
FAI LU RE
Die Lautsprecher-/Verstärkeranschlüsse sind nicht
korrekt.
tSchlagen Sie in der Installationsanleitung nach, wie
die Anschlüsse korrekt vorgenommen werden
müssen.
LOAD
Der Wechsler lädt die CD/MD.
tWarten Sie, bis der Ladevorgang abgeschlossen ist.
L. SEEK +/–
Beim automatischen Sendersuchlauf ist der lokale
Suchmodus aktiviert.
NO AF
Für den aktuellen Sender gibt es keine
Alternativfrequenz.
tDrücken Sie den Regler M>/.m nach
oben oder unten, solange der Programmdienstname
blinkt. Das Gerät beginnt dann mit der Suche nach
einer Frequenz mit denselben PI-Daten
(Programme Identification - Programmkennung).
„PI SEEK“ wird angezeigt.
NO DISC
Im CD/MD-Wechsler befindet sich keine CD/MD.
tLegen Sie CDs/MDs in den Wechsler ein.
NO ID3
Die MP3-Datei enthält keine ID3-Tag-Informationen.
NO INFO
Die ATRAC3-/ATRAC3plus- oder WMA-Datei
enthält keine Textinformationen.
NO MAG
Das CD-Magazin ist nicht in den CD-Wechsler
eingesetzt.
tSetzen Sie das Magazin in den Wechsler ein.
2
NO MUSIC
Die CD enthält keine Musikdateien.
tLegen Sie eine Musik-CD in dieses Gerät oder
einen MP3-kompatiblen Wechsler ein.
NO NAME
Für den Titel gibt es keinen Titel-, Album-, Gruppenbzw. CD-Namen.
NO TP
Das Gerät sucht weiter nach verfügbaren
Verkehrsfunksendern.
NOT READ
Die CD/MD-Informationen wurden vom Gerät nicht
eingelesen.
tLegen Sie die CD/MD ein und wählen Sie sie aus
der Liste aus.
NOTREADY
Der Deckel des MD-Wechslers ist offen oder die MDs
wurden nicht korrekt eingelegt.
tSchließen Sie den Deckel bzw. legen Sie die MDs
korrekt ein.
OFFSET
Es liegt möglicherweise eine interne Fehlfunktion vor.
tÜberprüfen Sie die Kabelverbindungen. Wenn die
Fehleranzeige weiterhin im Display angezeigt wird,
wenden Sie sich an einen Sony-Händler.
READ
Das Gerät liest gerade alle Titel- und Album-/
Gruppeninformationen von der CD/MD ein.
tBitte warten Sie, bis das Einlesen abgeschlossen ist.
Die Wiedergabe beginnt danach automatisch. Je
nach CD/MD-Struktur kann das Einlesen länger als
eine Minute dauern.
RESET
Das CD-Gerät bzw. der CD/MD-Wechsler kann wegen
einer Störung nicht bedient werden.
tDrücken Sie die Taste RESET (Seite 4).
„“ oder „“
Sie sind beim Rückwärts- oder Vorwärtssuchen am
Anfang bzw. Ende der CD/MD angelangt und können
nicht weitersuchen.
„“
Das Zeichen kann mit diesem Gerät nicht angezeigt
werden.
*1 Wenn während der Wiedergabe einer CD oder MD
ein Fehler auftritt, wird die Nummer der CD bzw.
MD nicht im Display angezeigt.
*2 Die Nummer der CD/MD, die den Fehler
verursacht, erscheint im Display.
Wenn sich das Problem mit diesen
Abhilfemaßnahmen nicht beheben lässt, wenden Sie
sich an einen Sony-Händler.
Wenn Sie das Gerät aufgrund einer Störung bei der
CD-Wiedergabe zur Reparatur bringen, bringen Sie
bitte auch die CD mit, die eingelegt war, als das
Problem zum ersten Mal auftrat.
21

Félicitations !
Nous vous remercions d’avoir fait l’acquisition
de ce lecteur de disques compacts Sony. Vous
pouvez profiter de cet appareil grâce aux
fonctions ci-dessous.
• Lecture de CD
Possibilité de lecture de CD-DA (contenant
également des informations CD TEXT*), de
CD-R/CD-RW (fichiers MP3/WMA contenant
également des multisessions (page 16)) et des
CD ATRAC (formats ATRAC3 et ATRAC3plus
(page 16)).
Type de disque
CD-DA
MP3
WMA
CD ATRAC
Symbole indiqué sur le
disque
* Un disque CD TEXT est un CD-DA contenant des
informations, telles que le nom du disque, le nom de
l’artiste et le nom des plages.
En ce qui concerne l’installation et les
connexions, consulter le manuel
d’installation/raccordement fourni.
Avertissement au cas où le contact de
votre voiture ne dispose pas d’une
position ACC
Après avoir coupé le moteur, n’oubliez pas de
maintenir la touche (OFF) de l’appareil
enfoncée jusqu’à ce que l’affichage
disparaisse.
Sinon, l’affichage n’est pas désactivé et la
batterie se décharge.
Cette étiquette est située sur la partie inférieure
du châssis.
• Réception radio
– Vous pouvez mémoriser jusqu’à 6 stations
pour chaque bande de fréquences (FM1,
FM2, FM3, MW (PO) et LW (GO)).
– BTM (Mémorisation des meilleurs accords) :
l’appareil sélectionne les stations émettant
des signaux forts et les mémorise.
• Services RDS
Vous pouvez utiliser une station FM disposant
du système RDS (Radio Data System).
• Réglage du son
– EQ3 stage2 : Vous pouvez choisir une des 7
courbes d’égaliseur prédéfinies.
– DSO (Répartiteur dynamique du son) : crée
un champ sonore mieux réparti grâce à une
synthèse de haut-parleurs virtuels, afin
d’améliorer le son des haut-parleurs même si
ceux-ci sont installés dans la partie inférieure
des portières.
– BBE MP : améliore le son compressé
numériquement, notamment les fichiers MP3.
• Fonctionnement de l’appareil en option
En plus de la lecture avec cet appareil, vous
pouvez aussi commander des changeurs CD/
MD en option ainsi que des appareils Sony
portatifs en option.
2
Traitement des appareils électriques
et électroniques en fin de vie
(Applicable dans les pays de l’Union
Européenne et aux autres pays
européens disposant de systèmes
de collecte sélective)
Ce symbole, apposé sur le produit ou sur son emballage,
indique que ce produit ne doit pas être traité avec les
déchets ménagers. Il doit être remis à un point de collecte
approprié pour le recyclage des équipements électriques et
électroniques. En s’assurant que ce produit est bien mis au
rebut de manière appropriée, vous aiderez à prévenir les
conséquences négatives potentielles pour l’environnement
et la santé humaine. Le recyclage des matériaux aidera à
préserver les ressources naturelles. Pour toute information
supplémentaire au sujet du recyclage de ce produit, vous
pouvez contacter votre municipalité, votre déchetterie ou
le magasin où vous avez acheté le produit.
Accessoire compatible : Télécommande

Table des matières
Préparation
Réinitialisation de l’appareil . . . . . . . . . . . . . . . 4
Réglage de l’horloge . . . . . . . . . . . . . . . . . . . . . 4
Retrait de la façade . . . . . . . . . . . . . . . . . . . . . . 4
Installation de la façade . . . . . . . . . . . . . . . . 4
Insertion du disque dans l’appareil . . . . . . . . . . 5
Ejection du disque. . . . . . . . . . . . . . . . . . . . . 5
Emplacement des commandes et
opérations de base
Appareil principal . . . . . . . . . . . . . . . . . . . . . 6
Mini-télécommande RM-X151. . . . . . . . . . . 6
CD
Rubriques d’affichage . . . . . . . . . . . . . . . . . . 8
Lecture répétée et aléatoire . . . . . . . . . . . . . . 8
Radio
Mémorisation et réception des stations . . . . . . . 9
Mémorisation automatique — BTM. . . . . . . 9
Mémorisation manuelle . . . . . . . . . . . . . . . . 9
Réception des stations mémorisées. . . . . . . . 9
Recherche automatique des fréquences . . . . 9
Fonction RDS . . . . . . . . . . . . . . . . . . . . . . . . . . 9
Aperçu. . . . . . . . . . . . . . . . . . . . . . . . . . . . . . 9
Réglages AF et TA/TP . . . . . . . . . . . . . . . . 10
Sélection de PTY . . . . . . . . . . . . . . . . . . . . 11
Réglage de CT . . . . . . . . . . . . . . . . . . . . . . 11
Autres fonctions
Modification des caractéristiques du son . . . . 11
Réglage des caractéristiques du son
— BAL/FAD/SUB. . . . . . . . . . . . . . . . . . . 11
Personnalisation de la courbe de l’égaliseur
— EQ3 . . . . . . . . . . . . . . . . . . . . . . . . . . . . 11
Réglage des paramètres de configuration
— SET . . . . . . . . . . . . . . . . . . . . . . . . . . . . . . 12
Utilisation d’un appareil en option . . . . . . . . . 13
Changeur CD/MD . . . . . . . . . . . . . . . . . . . 13
Satellite de commande RM-X4S . . . . . . . . 13
Appareil audio auxiliaire . . . . . . . . . . . . . . 14
Informations complémentaires
Précautions . . . . . . . . . . . . . . . . . . . . . . . . . . . 15
Remarques sur les disques . . . . . . . . . . . . . 15
A propos des fichiers MP3/WMA . . . . . . . 16
A propos de CD ATRAC . . . . . . . . . . . . . . 16
Entretien . . . . . . . . . . . . . . . . . . . . . . . . . . . . . 17
Retrait de l’appareil . . . . . . . . . . . . . . . . . . . . 17
Spécifications . . . . . . . . . . . . . . . . . . . . . . . . . 18
Dépannage . . . . . . . . . . . . . . . . . . . . . . . . . . . 19
Affichage des erreurs/messages . . . . . . . . . 21
Fabriqué sous licence de
R
BBE Sound, Inc.
améliore le son compressé numériquement,
comme le MP3, en restaurant et en optimisant
les harmoniques les plus élevées perdues au
cours de la compression. Le processus BBE MP
est fondé sur la génération d’harmoniques
d’ordre paire à partir du matériel source en leur
restituant leur richesse, leurs détails et leurs
nuances.
Le procédé BBE MP
SonicStage et son logo sont des marques
commerciales de Sony Corporation.
ATRAC, ATRAC3, ATRAC3plus et leurs logos
sont des marques commerciales de Sony
Corporation.
Microsoft, Windows Media et
le logo Windows sont des
marques de commerce ou des
marques déposées de
Microsoft Corporation aux Etats-Unis et/ou
dans d’autres pays.
3

Préparation
Retrait de la façade
Réinitialisation de l’appareil
Avant la première mise en service de l’appareil,
après avoir remplacé la batterie du véhicule ou
modifié les raccordements, vous devez
réinitialiser l’appareil.
Retirez la façade et appuyez sur la touche
RESET avec un objet pointu, comme un stylo à
bille.
Touche
RESET
Remarque
Une pression sur la touche RESET remet l’heure à
zéro et efface certaines informations mémorisées.
Réglage de l’horloge
L’horloge numérique fonctionne suivant un cycle
de 24 heures.
1 Appuyez sur la touche (SEL) et
maintenez-la enfoncée.
L’écran de configuration apparaît.
2 Appuyez plusieurs fois sur (SEL)
jusqu’à ce que « CLOCK-ADJ »
apparaisse.
3 Appuyez sur (DSPL).
L’indication des heures clignote.
4 Appuyez sur la commande de volume
vers le haut ou vers le bas pour régler
les heures et les minutes.
Appuyez sur (DSPL) pour déplacer
l’indication numérique.
5 Appuyez sur (SEL).
La configuration est terminée et l’horloge
démarre.
Pour afficher l’horloge, appuyez sur (DSPL).
Appuyez de nouveau sur (DSPL) pour revenir à
l’écran précédent.
Avec la mini-télécommande
Appuyez sur M ou m à l’étape 4 pour régler les heures
et les minutes.
Conseil
Vous pouvez régler l’horloge automatiquement au
moyen de la fonction RDS (page 11).
Vous pouvez retirer la façade de cet appareil pour
le protéger du vol.
Alarme d’avertissement
Si vous mettez la clé de contact en position OFF
sans ôter la façade, l’alarme d’avertissement
retentit pendant quelques secondes.
L’alarme est émise uniquement lorsque
l’amplificateur intégré est utilisé.
1 Appuyez sur (OFF).
L’appareil est mis hors tension.
2 Appuyez sur , puis tirez la façade
vers vous.
(OFF)
Remarques
• N’exercez pas de pression excessive sur la façade
ni sur la fenêtre d’affichage et ne la laissez pas
tomber.
• N’exposez pas la façade à des températures
élevées/à l’humidité. Evitez de la laisser dans un
véhicule en stationnement, sur le tableau de bord/la
plage arrière.
Installation de la façade
Insérez la partie A de la façade dans la partie B
de l’appareil, comme illustré, puis poussez sur le
côté gauche jusqu’au déclic indiquant qu’elle est
en place.
A
B
Remarque
Ne posez rien sur la face interne de la façade.
4

Insertion du disque dans
l’appareil
1 Appuyez sur Z.
Ejection du disque
1 Appuyez sur Z.
Le volet s’ouvre automatiquement.
Le volet s’ouvre automatiquement.
2 Insérez le disque avec le côté imprimé
vers le haut.
Le volet se referme automatiquement et la
lecture commence.
x
Le disque est éjecté.
Remarque
Si aucune opération n’est effectuée dans les 15
secondes, le volet se referme automatiquement.
5

Emplacement des commandes et opérations de base
Appareil principal
ATT
DSPL
SOURCE MODE
GP/ALBM
1 2 3 4 5 6
Mini-télécommande RM-X151
OFF
SOURCE
DSPL
132
465
VOL
SEL
ATT
MODE
+
–
SCRL
+
–
DSO
EQ3SEL
BBE MP PAUSEREP BTMSHUF
AF/TA SENS PTY SCRL
OFF
CDX-RA550
Pour plus de détails, reportez-vous aux numéros
de pages indiqués entre parenthèses. Les touches
correspondantes de la mini-télécommande
commandent les mêmes fonctions que celles de
l’appareil.
A Commande de volume (+/–) 11
Permet de régler le niveau du volume.
B Touche ATT (atténuation du son)
Permet d’atténuer le son. Appuyez de
nouveau sur cette touche pour annuler.
C Touche DSPL (affichage) 8
Permet de modifier les paramètres
d’affichage.
D Touche SEL (sélection)
Permet de régler des paramètres de
configuration.
E Fenêtre d’affichage
F Fente d’insertion des disques 5
Permet d’insérer le disque.
G Touche EQ3 (égaliseur) 11
Permet de sélectionner un type d’égalisation
(XPLOD, VOCAL, EDGE, CRUISE,
SPACE, GRAVITY, CUSTOM ou OFF).
H Touche DSO 2
Permet de sélectionner le mode DSO (1, 2, 3
ou OFF). Plus la valeur est élevée, plus
l’effet est prononcé.
6

I Touche Z (éjection) 5
Permet d’éjecter le disque/ouvrir le volet.
J Commande M>/.m(+/–)
CD :
Permet de sauter des plages (appuyez) ; de
sauter des plages successives (appuyez une
première fois, puis une seconde fois dans un
délai d’environ 1 seconde et en maintenant
enfoncée) ; d’avancer/reculer rapidement
dans une plage (appuyez sur la touche et
maintenez-la enfoncée).
Radio :
Permet de régler des stations
automatiquement (appuyez) ; de rechercher
une station manuellement (appuyez sur la
touche et maintenez-la enfoncée).
K Touche (déverrouillage de la
façade) 4
L Touche SOURCE
Permet de mettre l’appareil sous tension ; de
changer de source (Radio/CD/MD*
1
/AUX).
M Touche MODE 9, 13
Permet de sélectionner la bande radio (FM/
MW/LW)/ou l’appareil*
2
.
N Touche RESET (située derrière la façade)
4
O Touches numériques
CD/MD*
(1)/(2): GP*
1
:
3
/ALBM*4 –/+*
5
Permet de sauter des groupes/albums
(appuyez) ; de sauter des groupes/
albums successifs (appuyez sur la
touche et maintenez-la enfoncée).
(3): REP 8
(4): SHUF 8
(5): BBE MP*
6
3
Pour activer la fonction BBE MP,
choisissez « BBEMP-ON ». Pour
l’annuler, choisissez « BBEMP-OFF ».
(6): PAU SE *
6
Pour interrompre la lecture. Appuyez
de nouveau sur cette touche pour
annuler.
Radio :
Permettent de capter les stations enregistrées
(appuyez) ; de mémoriser des stations
(appuyez sur la touche et maintenez-la
enfoncée).
P Touche AF (fréquences alternatives)/
TA (messages de radioguidage) 10
Permet de régler AF et TA/TP en RDS.
Q Touche SENS/BTM 9
Permet d’améliorer la réception d’un signal
faible LOCAL/MONO (appuyez) ; de
démarrer la fonction BTM (appuyez sur la
touche et maintenez-la enfoncée).
R Touche PTY (Type d’émission) 11
Permet de sélectionner PTY en RDS.
S Touche SCRL (défilement) 8
Permet de faire défiler le paramètre
d’affichage.
T Récepteur de la mini-télécommande
U Touche OFF
Permet de mettre l’appareil hors tension ;
d’arrêter la source.
Les touches suivantes de la mini-télécommande
ont également des touches/fonctions différentes
de celles de l’appareil.
ws Touches < (.)/, (>)
Permettent de commander le lecteur CD/la
radio (identiques à la commande
M>/.m de l’appareil).
wd Touche VOL (volume) +/–
Permet de régler le niveau du volume.
wf Touches M (+)/m (–)
Permettent de commander le lecteur CD
(identiques à la touche (2)/(1) de
l’appareil).
wg Touches numériques
Permettent de capter les stations enregistrées
(appuyez) ; de mémoriser des stations
(appuyez sur la touche et maintenez-la
enfoncée).
*1 Lorsqu’un changeur MD est raccordé.
*2 Lorsqu’un changeur CD/MD est raccordé.
*3 Lors de la lecture d’un CD ATRAC.
*4 Lors de la lecture d’un fichier MP3/WMA.
*5 Si le changeur est raccordé, le fonctionnement est
différent. Reportez-vous à la page 13.
*6 Lors de la lecture sur cet appareil.
Remarque
Si vous mettez l’appareil hors tension et que
l’affichage est désactivé, il ne peut plus être utilisé
avec la mini-télécommande sauf si la touche
(SOURCE) de l’appareil est enfoncée ou si un disque
est inséré dans le lecteur pour l’activer.
Conseil
Pour obtenir des informations détaillées sur la façon
de remplacer la pile, reportez-vous à la section
« Remplacement de la pile au lithium de la minitélécommande » à la page 17.
7

CD
Pour obtenir des informations détaillées sur le
raccordement à un changeur CD/MD, reportezvous à la page 13.
Rubriques d’affichage
A Indication WMA/MP3
B Indication ATRAC CD/BBE MP
C Source
D Numéro de plage/Temps de lecture écoulée,
Nom du disque/artiste, Numéro de l’album/
1
groupe*
plage, Informations textuelles*
*1 Le numéro de l’album/groupe s’affiche uniquement
lorsque l’album/groupe est modifié.
*2 Lorsque vous lisez un fichier MP3, l’étiquette ID3
s’affiche. S’il s’agit d’un CD ATRAC, ce sont des
informations textuelles rédigées par SonicStage,
etc. qui s’affichent tandis que la lecture d’un fichier
WMA s’accompagne de l’affichage de l’étiquette
WMA.
Pour modifier les paramètres d’affichage D,
appuyez sur (DSPL) ; pour faire défiler les
paramètres D, appuyez sur (SCRL) ou
choisissez « A.SCRL-ON » (page 12).
Conseil
Les paramètres affichés diffèrent selon le type de
disque, le format d’enregistrement et les réglages.
Pour plus de détails sur le format MP3/WMA,
reportez-vous à la page 16 ; pour les CD ATRAC,
reportez-vous à la page 16.
, Nom de l’album/groupe, Nom de la
2
, Horloge
Lecture répétée et aléatoire
1 En cours de lecture, appuyez
plusieurs fois sur (3) (REP) ou sur (4)
(SHUF) jusqu’à ce que le réglage
souhaité apparaisse.
Sélectionnez Pour lire
REP-TRACK une plage en boucle.
REP-ALBM*
REP-GP*
SHUF-ALBM*
SHUF-GP*
SHUF-DISC un disque dans un ordre
*1 Lors de la lecture d’un fichier MP3/WMA.
*2 Lors de la lecture d’un CD ATRAC.
Pour rétablir le mode de lecture normale,
sélectionnez « REP-OFF » ou « SHUF-OFF ».
1
2
un album en boucle.
un groupe en boucle.
1
un album dans un ordre
aléatoire.
2
un groupe dans un ordre
aléatoire.
aléatoire.
8

Radio
Mémorisation et réception des
stations
Attention
Pour syntoniser des stations pendant que vous
conduisez, utilisez la fonction de mémorisation
des meilleurs accords (BTM) afin d’éviter les
accidents.
Mémorisation automatique — BTM
1 Appuyez plusieurs fois sur (SOURCE)
jusqu’à ce que l’indication « TUNER »
apparaisse.
Pour changer de bande, appuyez plusieurs
fois sur (MODE). Vous pouvez sélectionner
FM1, FM2, FM3, MW (PO) ou LW (GO).
2 Appuyez sur la touche (BTM) et
maintenez-la enfoncée jusqu’à ce que
l’indication « BTM » clignote.
L’appareil enregistre les stations sur les
touches numériques dans l’ordre des
fréquences.
Un bip retentit lorsque le réglage est
mémorisé.
Mémorisation manuelle
1 Lorsque vous recevez la station que
vous souhaitez mémoriser, appuyez
sur une touche numérique ((1) à (6))
et maintenez-la enfoncée jusqu’à ce
que l’indication « MEM » apparaisse.
Le numéro de la touche apparaît dans la
fenêtre d’affichage.
Remarque
Si vous essayez de mémoriser une autre station sur la
même touche numérique, la station mémorisée
précédemment est effacée.
Conseil
Lorsqu’une station RDS est mémorisée, le réglage
AF/TA est également mémorisé (page 10).
Réception des stations
mémorisées
1 Sélectionnez la bande, puis appuyez
sur une touche numérique ((1) à (6)).
Recherche automatique des
fréquences
1 Sélectionnez la bande, puis appuyez
sur la commande M>/.m vers
le haut ou vers le bas pour rechercher
la station.
Le balayage s’interrompt lorsque l’appareil
capte une station. Répétez cette procédure
jusqu’à ce que vous captiez la station
souhaitée.
Conseil
Si vous connaissez la fréquence de la station que
vous souhaitez écouter, appuyez sur la commande
M>/.met maintenez-la enfoncée pour
localiser la fréquence approximativement, puis
appuyez plusieurs fois vers le haut ou vers le bas sur
la commande M>/.m pour régler la
fréquence souhaitée avec précision (syntonisation
manuelle).
Fonction RDS
Aperçu
Les stations FM disposant du système RDS
(Radio Data System) transmettent des
informations numériques inaudibles en même
temps que le signal normal de leurs émissions
radio.
Rubriques d’affichage
A TA /T P*
B Bande radio, fonctionnement
C Fréquence*
*1 L’indication « TA » clignote pendant les messages
*2 Lorsque vous captez la station RDS, « * » est
Pour modifier les rubriques d’affichage C,
appuyez sur (DSPL).
1
2
Numéro de présélection, Horloge, Données
RDS
de radioguidage. L’indication « TP » s’allume
lorsqu’une de ces stations est captée.
affiché à gauche de la fréquence.
(Nom du service de l’émission),
Suite à la page suivante t
9

Services RDS
Cet appareil propose automatiquement les
services RDS, comme suit :
AF (Fréquences alternatives)
Permet de sélectionner et de régler de nouveau
la station ayant le signal le plus fort sur un
réseau. Cette fonction vous permet d’écouter la
même émission en continu pendant un voyage
de longue distance sans avoir à régler de
nouveau cette station manuellement.
TA (Messages de radioguidage)/
TP (Programmes de radioguidage)
Propose les messages/programmes de
radioguidage disponibles à cet instant. Tout
message/programme reçu interrompt la source
sélectionnée en cours de diffusion.
PTY (Types d’émission)
Permet d’afficher le type de l’émission en cours
et de rechercher votre type d’émission
sélectionné.
CT (Heure)
Les données CT (heure) accompagnant la
transmission RDS assurent un réglage de
l’horloge.
Remarques
• Selon le pays/la région où vous vous trouvez, il est
possible que les services RDS ne soient pas tous
disponibles.
• La fonction RDS ne fonctionne pas correctement si
le signal de retransmission est faible ou si la station
syntonisée ne transmet pas de données RDS.
Réglages AF et TA/TP
1 Appuyez plusieurs fois sur (AF/TA)
jusqu’à ce que le réglage souhaité
apparaisse.
Sélectionnez Pour
AF-ON activer AF et désactiver TA.
TA-ON activer TA et désactiver AF.
AF, TA-ON activer AF et TA.
AF, TA-OFF désactiver AF et TA.
10
Mémorisation des stations RDS avec
les réglages AF et TA
Vous pouvez prérégler les stations RDS avec les
réglages AF/TA. Si vous utilisez la fonction
BTM, seules les stations RDS sont mémorisées
avec les mêmes réglages AF/TA.
Si vous effectuez un préréglage manuel, vous
pouvez prérégler à la fois des stations RDS et
non-RDS, avec leurs réglages AF/TA respectifs.
1 Réglez AF/TA, puis mémorisez la station à
l’aide de la fonction BTM ou manuellement.
Préréglage du volume sonore des
messages de radioguidage
Vous pouvez prérégler le niveau de volume des
messages de radioguidage de façon à ne manquer
aucune information.
1 Appuyez plusieurs fois sur la touche de
volume vers le haut ou vers le bas pour régler
le niveau de volume.
2 Appuyez sur la touche (AF/ TA) et maintenez-
la enfoncée jusqu’à ce que l’indication « TA »
apparaisse.
Réception de messages d’urgence
Lorsque la fonction AF ou TA est activée, les
messages d’urgence interrompent
automatiquement la source sélectionnée en cours
de diffusion.
Ecoute continue d’une émission
régionale — REG
Lorsque la fonction AF est activée : ce réglage
par défaut restreint la réception à une région
spécifique, afin qu’une station régionale ayant
une fréquence plus puissante ne soit pas captée.
Si vous quittez la zone de réception de cette
émission régionale, choisissez « REG-OFF » lors
de la configuration (page 12).
Remarque
Cette fonction est inopérante au Royaume-Uni et dans
certaines autres régions.
Fonction de liaison locale (RoyaumeUni uniquement)
Cette fonction vous permet de sélectionner
d’autres stations locales de la région, même si
elles ne sont pas associées à vos touches
numériques.
1 En réception FM, appuyez sur une touche
numérique ((1) à (6)) sur laquelle une
station locale est mémorisée.
2 Dans les 5 secondes qui suivent, appuyez de
nouveau sur la touche numérique de la station
locale.
Répétez cette procédure jusqu’à ce que vous
captiez la station locale souhaitée.

Sélection de PTY
1 Appuyez sur (PTY) en cours de
réception FM.
Le nom du type d’émission diffusé apparaît si
la station transmet des données PTY.
2 Appuyez plusieurs fois sur (PTY)
jusqu’à ce que le type d’émission
souhaité apparaisse.
3 Appuyez sur la commande M>/
.m vers le haut ou vers le bas.
L’appareil commence à rechercher une station
diffusant le type d’émission sélectionné.
Types d’émissions
NEWS (nouvelles), AFFAIRS (dossiers
d’actualité), INFO (informations), SPORT
(sport), EDUCATE (programmes éducatifs),
DRAMA (théâtre), CULTURE (culture),
SCIENCE (science), VARIED (divers),
POP M (musique pop), ROCK M (rock),
EASY M (musique légère), LIGHT M (musique
classique légère), CLASSICS (musique
classique), OTHER M (autre styles de
musique), WEATHER (météo), FINANCE
(finance), CHILDREN (émissions pour les
enfants), SOCIAL A (affaires sociales),
RELIGION (religion), PHONE IN (émissions
ligne ouverte), TRAVEL (voyage), LEISURE
(loisirs), JAZZ (jazz), COUNTRY (musique
country), NATION M (musique nationale),
OLDIES (musique d’autrefois), FOLK M
(musique folk), DOCUMENT (documentaires)
Remarque
Cette fonction est inopérante dans certains pays ou
régions où les données PTY ne sont pas disponibles.
Réglage de CT
1 Réglez « CT-ON » lors de la
configuration (page 12).
Remarques
• Il est possible que la fonction CT ne fonctionne pas,
même si une station RDS est captée.
• Il peut y avoir une différence entre l’heure réglée par
la fonction CT et l’heure réelle.
Autres fonctions
Modification des
caractéristiques du son
Réglage des caractéristiques du
son — BAL/FAD/SUB
Vous pouvez régler la balance gauche-droite,
l’équilibre avant-arrière, ainsi que le volume du
caisson de graves.
1 Appuyez plusieurs fois sur (SEL)
jusqu’à ce que « BAL », « FAD » ou
« SUB » apparaisse.
Le paramètre change comme suit :
1
LOW*
t MID*1 t HI*1 t
BAL (gauche-droite) t
FAD (avant-arrière) t
SUB (volume du caisson de graves)*
3
AUX*
*1 Lorsque EQ3 est activé (page 11).
*2 Lorsque la sortie audio est réglée sur « SUB »
(page 12).
« ATT » est affiché sur le réglage inférieur et
peut être réglé jusqu’à 20 incréments.
*3 Lorsque la source AUX est activée (page 14).
2 Appuyez plusieurs fois sur la
commande de volume vers le haut ou
vers le bas pour régler le paramètre
sélectionné.
Le réglage est terminé après 3 secondes et la
fenêtre d’affichage revient au mode de
lecture/réception normal.
Avec la mini-télécommande
A l’étape 2, appuyez sur <, M, , ou m pour régler le
paramètre sélectionné.
Personnalisation de la courbe de
l’égaliseur
— EQ3
« CUSTOM » de EQ3 vous permet de définir vos
propres réglages d’égalisation.
1 Sélectionnez une source, puis
appuyez plusieurs fois sur (EQ3) pour
sélectionner « CUSTOM ».
2 Appuyez plusieurs fois sur (SEL)
jusqu’à ce que « LOW », « MID » ou
« HI » apparaisse.
3 Appuyez plusieurs fois sur la
commande de volume vers le haut ou
vers le bas pour régler le paramètre
sélectionné.
2
t
Suite à la page suivante t
11

Le niveau de volume peut être réglé par
incréments de 1 dB, de – 10 dB à + 10 dB.
Répétez les étapes 2 et 3 pour régler la courbe
de l’égaliseur.
Pour restaurer la courbe par défaut de
l’égaliseur, appuyez sur la touche (SEL) et
maintenez-la enfoncée avant la fin du réglage.
Le réglage est terminé après 3 secondes et la
fenêtre d’affichage revient au mode de
lecture/réception normal.
Conseil
D’autres types d’égalisation peuvent aussi être réglés.
Avec la mini-télécommande
A l’étape 3, appuyez sur <, M, , ou m pour régler le
paramètre sélectionné.
Réglage des paramètres de
configuration — SET
1 Appuyez sur la touche (SEL) et
maintenez-la enfoncée.
L’écran de configuration apparaît.
2 Appuyez plusieurs fois sur (SEL)
jusqu’à ce que le paramètre souhaité
s’affiche.
3 Appuyez sur la commande de volume
vers le haut ou vers le bas pour
sélectionner le réglage (par exemple,
«ON» ou «OFF»).
4 Appuyez sur la commande (SEL) et
maintenez-la enfoncée.
Une fois le réglage terminé, la fenêtre
d’affichage revient au mode de lecture/
réception normal.
Remarque
Les rubriques affichées diffèrent selon la source et le
réglage.
Avec la mini-télécommande
A l’étape 3, appuyez sur < ou , pour sélectionner
le réglage.
Les paramètres suivants peuvent être réglés
(reportez-vous à la page indiquée pour plus de
détails) :
«
z » indique les réglages par défaut.
CLOCK-ADJ (Réglage de l’horloge) (page 4)
CT (Heure)
Pour régler « CT-ON » ou « CT-OFF » (
z)
(page 10, 11).
BEEP
Pour régler « BEEP-ON » (
z) ou « BEEP-
OFF ».
AUX-A*
1
(Audio AUX)
Pour régler l’affichage de la source AUX sur
«AUX-A-ON» (
z) ou « AUX-A-OFF »
(page 14).
SUB/REAR*
1
Pour changer la sortie audio.
–«SUB-OUT » (
z) : pour reproduire le son via
un caisson de graves.
– « REAR-OUT » : pour reproduire le son via
un amplificateur de puissance.
DIM (Régulateur de luminosité)
Pour modifier la luminosité de l’affichage.
–«DIM-AT» (
z) : pour réduire
automatiquement la luminosité de l’affichage
lorsque vous allumez les phares.
– « DIM-ON » : pour réduire la luminosité de
l’affichage.
– « DIM-OFF » : pour désactiver le gradateur.
M.DSPL (Affichage animé)
Pour sélectionner le mode Affichage animé.
– « M.DSPL-SA » (
z) : pour afficher les motifs
animés et l’analyseur de spectre.
– « M.DSPL-ON » : pour afficher les motifs
animés.
– « M.DSPL-OFF » : pour désactiver la fonction
d’affichage animé.
1
DEMO*
(Démonstration)
Pour régler « DEMO-ON » (z) ou « DEMOOFF ».
A.SCRL (Défilement automatique)
Pour faire défiler automatiquement les longs
paramètres d’affichage lorsque le disque/album/
groupe/plage est modifié.
– « A.SCRL-ON » : pour faire défiler.
– « A.SCRL-OFF » (
z) : pour ne pas faire
défiler.
2
REG*
(Régional)
Pour régler « REG-ON » (
z) ou « REG-OFF »
(page 10).
3
LPF*
(Filtre passe-bas)
Pour sélectionner la fréquence de coupure du
caisson de graves : « LPF OFF » (
z),
« LPF125Hz » ou « LPF 78Hz ».
*1 Lorsque l’appareil est hors tension.
*2 Lorsqu’une station FM est captée.
*3 Lorsque la sortie audio est réglée sur « SUB ».
12

Utilisation d’un appareil en
option
Changeur CD/MD
Sélection du changeur
1 Appuyez plusieurs fois sur (SOURCE)
jusqu’à ce que l’indication « CD » ou « MD »
apparaisse.
2 Appuyez plusieurs fois sur (MODE) jusqu’à
ce que le changeur souhaité s’affiche.
Numéro de
l’appareil
La lecture commence.
Saut d’albums et de disques
1 En cours de lecture, appuyez sur (GP/ALBM)
–/+.
Pour sauter Appuyez sur (GP/ALBM)
l’album puis relâchez (maintenez la
l’album en
continu
des disques de façon répétée.
des disques en
continu
Numéro du disque
touche enfoncée brièvement).
dans les 2 secondes après avoir
relâché la touche pour la
première fois.
et appuyez de nouveau sur la
touche dans les 2 secondes, puis
maintenez-la enfoncée.
Lecture répétée et aléatoire
1 En cours de lecture, appuyez plusieurs fois sur
(3) (REP) ou sur (4) (SHUF) jusqu’à ce que
le réglage souhaité apparaisse.
Sélectionnez Pour lire
REP-DISC*1un disque en boucle.
SHUF-
1
CHGR*
SHUF-ALL*
des plages du changeur dans un
ordre aléatoire.
2
des plages de tous les appareils
dans un ordre aléatoire.
*1 Lorsqu’un ou plusieurs changeurs CD/MD sont
raccordés.
*2 Lorsqu’un ou plusieurs changeurs CD ou au moins
deux changeurs MD sont raccordés.
Pour rétablir le mode de lecture normale,
sélectionnez « REP-OFF » ou « SHUF-OFF ».
Conseil
La fonction « SHUF-ALL » ne passe pas de façon
aléatoire de la lecture de plages de lecteurs de CD à
la lecture de plages de lecteurs de MD.
Satellite de commande RM-X4S
Fixation de l’étiquette
Fixez l’étiquette comportant les indications en
fonction de la position de montage du satellite de
commande.
SEL
DSPL
MODE
MODE
DSPL
SEL
Emplacement des commandes
Les touches du satellite de commande
commandent les mêmes fonctions que les
touches correspondantes de l’appareil.
SEL
PRESET/
DISC
ATT
MODE
SOURCE
DSPL
VOL
SEEK/AMS
Suite à la page suivante t
OFF
OFF
13

Les commandes suivantes du satellite de
commande ne s’utilisent pas de la même manière
que celles de l’appareil.
• Commande PRESET/DISC
Identique à la touche (GP/ALBM) –/+ de
l’appareil (enfoncez et tournez).
• Commande VOL
Identique à la commande du volume de
l’appareil (tournez).
• Commande SEEK/AMS
Identique à la commande M>/.m de
l’appareil (tournez ou tournez et maintenez
enfoncée).
Modification du sens de
fonctionnement
Le sens de fonctionnement des commandes est
réglé par défaut comme indiqué sur l’illustration
ci-dessous.
Pour augmenter
Appareil audio auxiliaire
Vous pouvez raccorder des appareils Sony
portatifs à la borne BUS AUDIO IN/AUX IN de
l’appareil. Si le changeur ou un autre appareil
n’est pas raccordé à la borne, cet appareil vous
permet d’écouter l’appareil portatif sur les hautparleurs de votre voiture.
Remarque
Lorsque vous raccordez un appareil portatif, assurezvous que BUS CONTROL IN n’est pas raccordé. Si un
appareil est raccordé à BUS CONTROL IN, il est
impossible de sélectionner « AUX » avec (SOURCE).
Conseil
Lors du raccordement d’un appareil portatif et d’un
changeur simultanément, utilisez le sélecteur AUX-IN
en option.
Sélection d’un appareil auxiliaire
1 Appuyez plusieurs fois sur (SOURCE)
jusqu’à ce que « AUX REAR IN » apparaisse.
Effectuez les commandes à partir de l’appareil
audio portatif lui-même.
Pour diminuer
Si vous devez monter le satellite de commande
du côté droit de la colonne de direction, vous
pouvez inverser le sens de fonctionnement.
1 Appuyez sur la touche (SEL) et maintenez-la
enfoncée tout en appuyant sur la commande
VOL.
Réglage du niveau de volume
Avant de commencer la lecture, n’oubliez pas de
régler le volume de chaque appareil audio
raccordé.
1 Diminuez le volume de l’appareil.
2 Appuyez plusieurs fois sur (SOURCE)
jusqu’à ce que « AUX REAR IN » apparaisse.
3 Démarrez la lecture sur l’appareil audio
portatif, à un niveau de volume moyen.
4 Réglez votre appareil sur le volume d’écoute
habituel.
5 Appuyez plusieurs fois sur (SEL) jusqu’à ce
que « AUX » apparaisse, puis tournez la
commande de volume vers le haut ou vers le
bas pour régler le niveau d’entrée (±6 dB).
14

Informations complémentaires
Précautions
• Si votre véhicule a stationné en plein soleil, laissez
l’appareil refroidir avant de l’utiliser.
• L’antenne électrique se déploie automatiquement
lorsque l’appareil est en fonctionnement.
Condensation
Par temps de pluie ou dans des régions très humides,
de l’humidité peut se condenser à l’intérieur des
lentilles et dans la fenêtre d’affichage de l’appareil.
Si cela se produit, l’appareil ne fonctionne pas
correctement. Dans ce cas, retirez le disque et
attendez environ une heure que l’humidité se soit
évaporée.
Pour conserver un son de haute
qualité
Veillez à ne pas renverser de jus de fruit ou d’autres
boissons sucrées sur l’appareil ou sur les disques.
Remarques sur les disques
• Pour que le disque reste propre, ne touchez pas sa
surface. Manipulez le disque en le tenant par les
bords.
• Rangez vos disques dans leurs boîtiers ou dans des
chargeurs lorsque vous ne vous en servez pas.
• Ne soumettez pas les disques à des températures
élevées. Evitez de les laisser dans un véhicule en
stationnement, sur le tableau de bord/la plage
arrière.
• Ne collez pas d’étiquettes sur les disques et
n’utilisez pas de disques rendus collants par de
l’encre ou des résidus. De tels disques peuvent
s’arrêter de tourner en cours de lecture et
provoquer des problèmes de fonctionnement ou
être endommagés.
• N’utilisez pas de disques sur lesquels sont collés
des étiquettes ou des autocollants.
L’utilisation de tels disques peut entraîner les
problèmes de fonctionnement suivants :
– impossibilité d’éjecter un disque parce que
l’étiquette ou l’autocollant s’est décollé et
bloque le mécanisme d’éjection ;
– erreurs de lecture des données audio (notamment
sauts de lecture ou absence de lecture)
provoquées par une déformation du disque suite
au rétrécissement de l’étiquette ou de
l’autocollant sous l’effet de la chaleur.
• Les disques de forme non standard (notamment en
forme de cœur, de carré ou d’étoile) ne peuvent
pas être lus avec cet appareil. Vous risquez
d’endommager votre appareil si vous essayez de le
faire. N’utilisez pas de tels disques.
• Cet appareil ne permet pas la lecture des CD de
8 cm.
• Avant la lecture, nettoyez les
disques avec un chiffon de
nettoyage disponible dans le
commerce. Essuyez chaque
disque en partant du centre vers
l’extérieur. N’utilisez pas de
solvants tels que de l’essence,
du diluant, des nettoyants
disponibles dans le commerce
ou des vaporisateurs antistatiques destinés aux
disques vinyle.
Remarques sur les disques CD-R/
CD-RW
• Il est possible que cet appareil ne puisse pas lire
certains CD-R/CD-RW (en fonction de l’appareil
utilisé pour l’enregistrement ou de l’état du
disque).
• Cet appareil ne permet pas la lecture des CD-R/
CD-RW non finalisés.
Disques de musique encodés à l’aide
d’une technologie de protection des
droits d’auteur
Cet appareil est conçu pour la lecture des disques
conformes à la norme Compact Disc (CD).
Dernièrement, certaines maisons de disques ont
lancé sur le marché divers types de disques de
musique encodés selon des technologies de
protection des droits d’auteur. Notez que, parmi ces
types de disques, certains ne sont pas conformes à la
norme CD. La lecture de ces disques avec cet
appareil peut être impossible.
Remarque sur les DualDiscs
Un DualDisc est un disque double face qui
comporte les données d’un DVD sur une face et
des données audio numériques sur l’autre face.
La face du contenu audio des DualDiscs n’étant
pas conforme à la norme Compact Disc (CD), la
lecture de ces disques sur cet appareil n’est pas
garantie.
Suite à la page suivante t
15

A propos des fichiers MP3/WMA
MP3, qui est l’abréviation de MPEG-1 Audio
Layer-3, est un format standard de compression de
fichiers musicaux. Elle comprime les données de
CD audio à environ 1/10 de leur taille initiale.
WMA, qui est l’abréviation de Windows Media
Audio, est un autre format standard de compression
des fichiers musicaux. Il comprime les données de
CD audio à environ un 1/22* de leur taille initiale.
* uniquement pour 64 kbit/s
• L’appareil est compatible avec le format ISO 9660
niveau 1/niveau 2, avec les extensions Joliet/
Romeo et les multisessions.
• Nombre maximal de :
– dossiers (albums) : 150 (y compris le répertoire
racine et les dossiers vides).
– fichiers (plages) MP3/WMA et de dossiers
contenus sur un disque : 300 (voire moins si des
noms de fichier/dossier contiennent de
nombreux caractères).
– caractères affichables pour un nom de dossier/
fichier : 32 (Joliet) ou 64 (Romeo).
• Versions 1.0, 1.1, 2.2, 2.3 et 2.4 des étiquettes ID3
applicables aux fichiers MP3 uniquement.
L’étiquette ID3 compte 15/30 caractères (1.0 et
1.1) ou 63/126 caractères (2.2, 2.3 et 2.4).
L’étiquette WMA compte 63 caractères.
Ordre de lecture des fichiers MP3/
WMA
MP3/WMA
Remarques
• Lors de l’identification d’un fichier MP3/WMA, veillez
à ajouter l’extension « .mp3 »/« .wma » au nom de
fichier.
• Lors de la lecture d’un fichier MP3/WMA VBR (à
débit variable) ou pendant l’avance/retour rapide, le
temps de lecture écoulé qui s’affiche peut être
inexact.
• Lors de l’enregistrement d’un disque en
multisession, seule la première plage du premier
format de session est reconnue et lue (tout autre
format est ignoré). La priorité du format est CD-DA,
CD ATRAC et MP3/WMA.
– Lorsque la première plage est un CD-DA, seul le
CD-DA de la première session est lu.
Dossier
(album)
Fichier MP3/
WMA (plage)
– Lorsque la première plage n’est pas un CD-DA,
seul un CD ATRAC ou une session MP3/WMA est
lu. Si le disque ne contient aucune information
dans ces formats, l’indication « NO MUSIC »
apparaît.
Remarques sur les fichiers MP3
• Assurez-vous de finaliser le disque avant de l’utiliser
sur l’appareil.
• Il est possible que le son soit intermittent lors de la
lecture d’un fichier MP3 à haut débit binaire (par
exemple 320 kbit/s).
Remarques sur les fichiers WMA
• Il n’est pas possible de lire des fichiers compressés
sans perte.
• Il n’est pas possible de lire des fichiers protégés par
copyright.
A propos de CD ATRAC
Format ATRAC3plus
La norme ATRAC3 (Adaptive Transform Acoustic
Coding3) est une technologie de compression des
données audio. Elle comprime les données de CD
audio à environ 1/10 de leur taille initiale.
ATRAC3plus, qui est un format étendu de ATRAC3,
comprime les données de CD audio à environ 1/20
de leur taille initiale. L’appareil accepte le format
ATRAC3 et ATRAC3plus.
CD ATRAC
Le CD ATRAC est constitué de données CD audio
comprimées au format ATRAC3 ou ATRAC3plus
en utilisant un logiciel autorisé, tel que SonicStage
2.0 ou ultérieur, ou encore SonicStage Simple
Burner.
• Nombre maximal de :
– dossiers (groupes) : 255
– fichiers (plages) : 999
• Les caractères d’un nom de dossier ou de fichier et
les informations textuelles écrites par SonicStage
sont affichés.
Pour plus de détails sur le format CD ATRAC,
reportez-vous au manuel SonicStage ou SonicStage
Simple Burner.
Remarque
Assurez-vous de créer le CD ATRAC à l’aide d’un
logiciel autorisé, tel que SonicStage 2.0 ou ultérieur,
ou encore SonicStage Simple Burner 1.0 ou 1.1.
Si vous avez des questions ou des problèmes
concernant cet appareil qui ne sont pas abordés dans
ce mode d’emploi, contactez votre revendeur Sony.
16
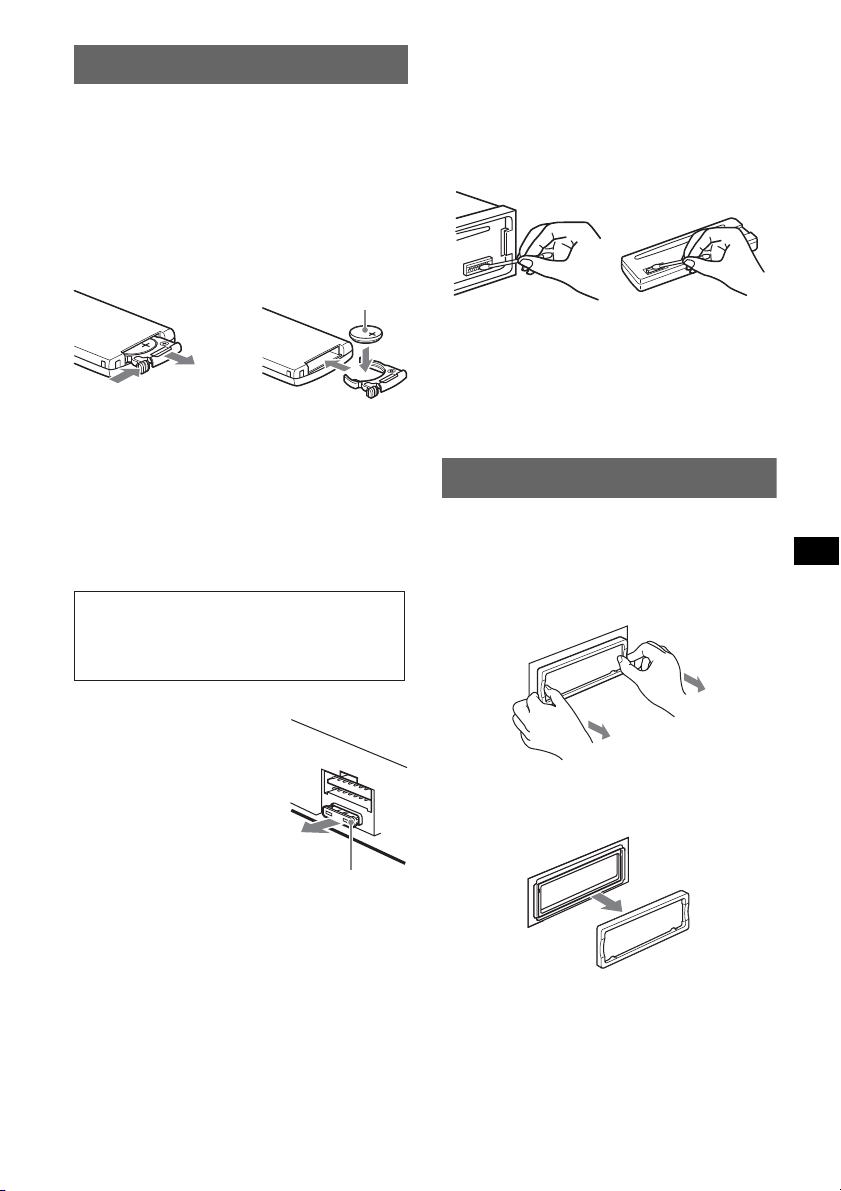
Entretien
Remplacement de la pile au lithium
de la mini-télécommande
Dans des conditions d’utilisation normales, la pile
dure environ 1 an. (En fonction des conditions
d’utilisation, sa durée de vie peut être plus courte.)
Lorsque la pile est faible, la portée de la minitélécommande diminue. Remplacez la pile par une
pile au lithium CR2025 neuve. L’utilisation de tout
autre type de pile présente un risque d’incendie ou
d’explosion.
Pôle + vers le haut
2
c
1
Remarques sur la pile au lithium
• Tenez la pile au lithium hors de la portée des
enfants. En cas d’ingestion de la pile, consultez
immédiatement un médecin.
• Essuyez la pile avec un chiffon sec pour assurer un
bon contact.
• Veillez à respecter la polarité lors de l’installation de
la pile.
• Ne tenez pas la pile avec des pinces métalliques,
car cela pourrait entraîner un court-circuit.
ATTENTION
Utilisée de façon incorrecte, la pile peut
exploser. Ne pas la recharger, la démonter ni
la jeter au feu.
Nettoyage des connecteurs
L’appareil risque de ne pas fonctionner
correctement si les connecteurs entre l’appareil et la
façade sont souillés. Pour éviter cette situation,
enlevez la façade (page 4) et nettoyez les
connecteurs à l’aide d’un coton-tige imbibé
d’alcool. N’exercez pas une pression excessive,
sinon les connecteurs risquent d’être endommagés.
Appareil principal
Remarques
• Pour plus de sécurité, coupez le moteur avant de
nettoyer les connecteurs et retirez la clé du contact.
• Ne touchez jamais les connecteurs directement
avec les doigts ou avec un objet métallique.
Arrière de la
façade
Retrait de l’appareil
1 Retirez le tour de protection.
1Retirez la façade (page 4).
2Saisissez les deux bords du tour de
protection, puis tirez pour extraire
l’appareil.
Remplacement du
fusible
Lorsque vous remplacez le
fusible, veillez à utiliser un
fusible dont l’intensité, en
ampères, correspond à la valeur
indiquée sur le fusible usagé. Si
le fusible saute, vérifiez le
branchement de l’alimentation
et remplacez-le. Si le nouveau
fusible saute également, il est
possible que l’appareil soit
défectueux. Dans ce cas, consultez votre revendeur
Sony le plus proche.
Fusible (10 A)
x
Suite à la page suivante t
17

2 Retirez l’appareil.
1Insérez simultanément deux clés de
déblocage jusqu’à ce qu’elles émettent un
déclic.
Tournez le
crochet vers
l’intérieur.
2Tirez sur les clés de déblocage pour
extraire l’appareil.
3Faites glisser l’appareil en dehors de son
support.
Spécifications
Lecteur CD
Rapport signal/bruit : 120 dB
Réponse en fréquence : 10 à 20 000 Hz
Pleurage et scintillement : en dessous du seuil
mesurable
Radio
FM
Plage de syntonisation : 87,5 à 108,0 MHz
Borne d’antenne : connecteur d’antenne externe
Moyenne fréquence : 10,7 MHz/450 kHz
Sensibilité utile : 9 dBf
Sélectivité : 75 dB à 400 kHz
Rapport signal/bruit : 67 dB (stéréo), 69 dB (mono)
Distorsion harmonique à 1 kHz : 0,5 % (stéréo),
0,3 % (mono)
Séparation : 35 dB à 1 kHz
Réponse en fréquence : 30 à 15 000 Hz
MW (PO)/LW (GO)
Plage de syntonisation :
MW (PO) : 531 à 1 602 kHz
LW (GO) : 153 à 279 kHz
Borne d’antenne : connecteur d’antenne externe
Moyenne fréquence : 10,7 MHz/450 kHz
Sensibilité : MW : 30 µV, LW : 40 µV
Amplificateur de puissance
Sorties : sorties haut-parleurs (connecteurs de sécurité)
Impédance des haut-parleurs : 4 à 8 ohms
Puissance de sortie maximale : 50 W × 4 (à 4 ohms)
Généralités
Sorties :
Borne de sorties audio (commutable avant, caisson
de graves/arrière)
Borne de commande de relais d’antenne électrique
Borne de commande d’amplificateur de puissance
Entrées :
Borne de commande ATT téléphone
Borne de commande de l’éclairage
Borne d’entrée de commande BUS
Borne d’entrée audio BUS/AUX IN
Borne d’entrée de commande à distance
Borne d’entrée de l’antenne
Commandes de tonalité :
Basse : ±10 dB à 60 Hz (XPLOD)
Moyenne : ±10 dB à 1 kHz (XPLOD)
Haute : ±10 dB à 10 kHz (XPLOD)
Alimentation : batterie de véhicule 12 V CC
(masse négative)
Dimensions : environ 178 × 50 × 182 mm (l/h/p)
Dimensions du support :
environ 182 × 53 × 161 mm (l/h/p)
Poids : environ 1,2 kg
Accessoires fournis :
Mini-télécommande : RM-X151
Composants destinés à l’installation et au
raccordement (1 jeu)
Appareils/accessoires en option :
Satellite de commande : RM-X4S
Câble BUS (fourni avec un cordon à broches RCA) :
RC-61 (1 m), RC-62 (2 m)
Changeur CD (10 disques) : CDX-757MX
Changeur CD (6 disques) : CDX-T70MX,
CDX-T69
Changeur MD (6 disques) : MDX-66XLP
Sélecteur de source : XA-C30
Sélecteur AUX-IN : XA-300
Il est possible que votre revendeur ne propose pas
certains des accessoires repris ci-dessus. Demandezlui des informations détaillées.
Brevets américains et internationaux sous licence
de Dolby Laboratories.
Licence de la technologie de codage audio MPEG
Layer-3 et des brevets obtenue de Fraunhofer IIS et
Thomson.
Remarque
Cet appareil ne peut pas être raccordé à un
préamplificateur numérique ou à un égaliseur
compatible avec le système BUS de Sony.
La conception et les spécifications sont sujettes à
modification sans préavis.
18

• De la soudure sans plomb est utilisée pour le
soudage de certaines pièces. (plus de 80 %)
• Aucun retardateur de flamme halogéné n’est utilisé
dans certaines cartes à circuits imprimés.
• Aucun retardateur de flamme halogéné n’est utilisé
dans la composition des coques.
• Imprimée avec de l’encre à base d’huile végétale
sans COV (composés organiques volatils).
• Du polystyrène expansé pour cales d’emballage
n’est pas utilisé dans l’emballage.
Dépannage
La liste de contrôles suivante vous aidera à remédier
aux problèmes que vous pourriez rencontrer avec cet
appareil.
Avant de passer en revue la liste de contrôles cidessous, vérifiez les procédures de raccordement et
d’utilisation.
Généralités
L’appareil n’est pas alimenté.
• Vérifiez le raccordement. Si tout est en ordre, vérifiez
le fusible.
• Si vous mettez l’appareil hors tension et que
l’affichage disparaît, vous ne pouvez pas le
commander avec la mini-télécommande.
tMettez l’appareil sous tension.
L’antenne électrique ne se déploie pas.
L’antenne électrique ne dispose pas d’un boîtier de
relais.
Aucun son.
• Le volume est trop faible.
• La fonction ATT est activée ou la fonction ATT
téléphone (lorsque le câble d’interface d’un
téléphone embarqué est raccordé au fil ATT) est
activée.
• La position de la commande d’équilibre avant-arrière
« FAD » n’est pas réglée sur un système à 2 hautparleurs.
• Le changeur CD est incompatible avec le format du
disque (MP3/WMA/CD ATRAC).
tLecture avec un changeur CD compatible MP3 de
Sony, ou cet appareil.
Aucun bip n’est émis.
• Le bip est désactivé (page 12).
• Un amplificateur de puissance en option est raccordé
et vous n’utilisez pas l’amplificateur intégré.
Le contenu de la mémoire a été effacé.
• La touche RESET a été enfoncée.
tRecommencez la procédure d’enregistrement
dans la mémoire.
• Le cordon d’alimentation ou la batterie a été
déconnecté.
• Le cordon d’alimentation n’est pas raccordé
correctement.
Les stations mémorisées et l’heure sont
effacées.
Le fusible a sauté.
Emission de bruit lorsque la position de la clé
de contact est modifiée.
Les fils ne sont pas raccordés correctement au
connecteur d’alimentation du véhicule destiné aux
accessoires.
L’affichage disparaît de la fenêtre d’affichage
ou il ne s’affiche pas.
• Le gradateur est réglé sur « DIM-ON » (page 12).
• L’affichage est désactivé si vous maintenez la touche
(OFF) enfoncée.
tMaintenez de nouveau la touche (OFF) de
l’appareil enfoncée jusqu’à ce que l’affichage
apparaisse.
• Les connecteurs sont sales (page 17).
Le volet ne se ferme pas.
Appuyez sur la touche Z et maintenez-la enfoncée
pendant plus de 2 secondes. Si le problème persiste,
consultez votre revendeur Sony le plus proche.
Le mode DSO ne fonctionne pas.
Selon l’intérieur de la voiture ou le type de musique, le
mode DSO peut avoir un effet indésirable.
Lecture de CD/de MD
Impossible d’introduire le disque.
• Un autre disque est déjà en place.
• Le disque a été introduit de force à l’envers ou dans le
mauvais sens.
La lecture du disque ne commence pas.
• Le disque est défectueux ou sale.
• Les CD-R/CD-RW ne sont pas destinés à un usage
audio (page 15).
Impossible de lire des fichiers MP3/WMA.
Le disque n’est compatible ni avec le format MP3/
WMA, ni avec la version (page 16).
Certains fichiers MP3/WMA exigent un délai
plus long que d’autres avant le début de la
lecture.
La lecture des types de disques suivants exige un délai
de démarrage plus long :
– disques comportant une hiérarchie de dossiers
complexe ;
– disques enregistrés en multisession ;
– disques auxquels il est possible d’ajouter des
données.
La lecture du CD ATRAC ne commence pas.
• Le disque n’a pas été créé par un logiciel autorisé, tel
que le logiciel SonicStage ou SonicStage Simple
Burner.
• Les plages qui ne sont pas incluses dans le groupe ne
peuvent pas être lues.
Suite à la page suivante t
19

Les rubriques d’affichage ne défilent pas.
• Pour les disques contenant un grand nombre de
caractères, le défilement peut être inopérant.
• « A.SCRL » est réglé sur « OFF ».
tRéglez « A.SCRL-ON » (page 12) ou appuyez
sur (SCRL).
Le son saute.
• L’installation est incorrecte.
tInstallez l’appareil suivant un angle de moins de
45° dans un endroit stable de la voiture.
• Le disque est défectueux ou sale.
Les touches de commande sont inopérantes.
Le disque ne s’éjecte pas.
Appuyez sur la touche RESET (page 4).
La télécommande ne fonctionne pas.
Refermez le volet.
« MS » ou « MD » n’apparaît pas sur l’affichage
de la source lorsque le changeur MD et le
MGS-X1 en option sont tous les deux
raccordés.
Cet appareil reconnaît le MGS-X1 comme étant un
appareil MD.
tAppuyez sur (SOURCE) jusqu’à ce que « MS » ou
« MD » apparaisse, puis appuyez plusieurs fois sur
(MODE).
Réception radio
Impossible de capter des stations.
Le son comporte des parasites.
• Raccordez un câble de commande d’antenne
électrique (bleu) ou un câble d’alimentation
d’accessoire (rouge) au câble d’alimentation de
l’amplificateur d’antenne de la voiture (uniquement
si votre voiture est équipée d’une antenne FM/MW
(PO)/LW (GO) intégrée dans la vitre arrière/latérale.)
• Vérifiez le raccordement de l’antenne du véhicule.
• L’antenne automatique ne se déploie pas.
tVérifiez le raccordement du câble de commande
de l’antenne électrique.
• Vérifiez la fréquence.
• Lorsque le mode DSO est activé, le son peut parfois
comporter des parasites.
tRéglez le mode DSO sur « OFF » (page 6).
Impossible de capter une présélection.
• Enregistrez la fréquence correcte dans la mémoire.
• Le signal capté est trop faible.
Le réglage automatique des stations est
impossible.
• Le réglage du mode de recherche locale est incorrect.
tLa recherche de fréquences s’arrête trop souvent :
Appuyez sur (SENS) jusqu’à ce que l’indication
« LOCAL-ON » apparaisse.
tLa recherche de fréquences ne s’arrête sur aucune
station :
Appuyez plusieurs fois sur (SENS) jusqu’à ce
que l’indication « MONO-ON », « MONOOFF » (FM) ou « LOCAL-OFF » (MW (PO)/LW
(GO)) apparaisse.
• Le signal capté est trop faible.
tRéglez manuellement la fréquence.
20
En cours de réception FM, l’indication « ST »
clignote.
• Réglez la fréquence correctement.
• Le signal capté est trop faible.
tAppuyez sur (SENS) pour régler le mode de
réception mono sur « MONO-ON ».
Un programme FM émis en stéréo est entendu
en mono.
L’appareil est en mode de réception mono.
tAppuyez sur (SENS) jusqu’à ce que l’indication
« MONO-OFF » apparaisse.
Fonction RDS
Une recherche (SEEK) commence après
quelques secondes d’écoute.
La station ne diffuse pas de programmes de
radioguidage (fonction TP désactivée) ou le signal
capté est faible.
tDésactivez TA (page 10).
Aucun message de radioguidage.
• Activez TA (page 10).
• La station n’émet pas de messages de radioguidage,
malgré l’indication TP.
tRéglez la fréquence pour capter une autre station.
PTY affiche « - - - - - - - - ».
• La station actuellement captée n’est pas une station
RDS.
• Les données RDS n’ont pas été reçues.
• La station ne spécifie pas le type d’émission.

Affichage des erreurs/messages
1
BLANK*
Le MD ne contient aucune plage enregistrée.*
tInsérez un MD contenant des plages enregistrées.
ERROR*
1
• Un disque est sale ou inséré à l’envers.*
tNettoyez le disque ou insérez-le correctement.
• Un disque vierge a été inséré.
• Le disque ne peut pas être lu en raison de certains
problèmes.
tInsérez-en un autre.
FAI LU RE
Les haut-parleurs ou les amplificateurs ne sont pas
raccordés correctement.
tReportez-vous au manuel d’installation de ce
modèle pour vérifier les raccordements.
LOAD
Le changeur est en train de charger le disque.
tAttendez que cette opération soit terminée.
L. SEEK +/–
Le mode de recherche locale est activé en cours de
recherche automatique des fréquences.
NO AF
Il n’existe aucune fréquence alternative pour la station
actuelle.
tAppuyez sur la commande M>/.m vers
le haut ou vers le bas pendant que le nom du service
de l’émission clignote. L’appareil commence à
rechercher une autre fréquence avec les mêmes
données d’identification de programme (PI)
(l’indication « PI SEEK » apparaît).
NO DISC
Le disque n’est pas inséré dans le changeur CD/MD.
tInsérez un disque dans le changeur.
NO ID3
Les informations de l’étiquette ID3 ne sont pas écrites
dans le fichier MP3.
NO INFO
Les informations textuelles ne sont pas écrites dans le
fichier ATRAC3/ATRAC3plus ou WMA.
NO MAG
Le chargeur n’a pas été inséré dans le changeur CD.
tInsérez le chargeur dans le changeur.
NO MUSIC
Le disque n’est pas un fichier audio.
tInsérez un CD audio dans cet appareil ou un
changeur compatible MP3.
NO NAME
Aucun nom de plage/album/groupe/disque n’est écrit
dans la plage.
NO TP
L’appareil continue à rechercher les stations diffusant
des messages de radioguidage.
NOT READ
Les informations du disque n’ont pas encore été lues
par l’appareil.
tChargez le disque, puis sélectionnez-le dans la liste.
2
2
NOTREADY
Le couvercle du changeur MD est ouvert ou les MD ne
sont pas insérés correctement.
tFermez le couvercle ou insérez correctement les
MD.
OFFSET
Il est possible qu’il y ait un problème de
fonctionnement.
tVérifiez le raccordement. Si le message d’erreur
reste affiché, contactez votre revendeur Sony le
plus proche.
READ
L’appareil lit toutes les informations de plage et de
groupe ou d’album sur le disque.
tAttendez que la lecture soit terminée et la lecture
commence automatiquement. Selon la structure du
disque, cette opération peut prendre plus d’une
minute.
RESET
Le lecteur CD et le changeur CD/MD ne peuvent pas
être utilisés en raison de certains problèmes.
tAppuyez sur la touche RESET (page 4).
«» ou «»
Pendant le retour ou l’avance rapide, vous avez atteint
le début ou la fin du disque et vous ne pouvez pas aller
plus loin.
«»
Le caractère ne peut pas être affiché.
*1 Si une erreur se produit lors de la lecture d’un CD
ou d’un MD, le numéro de disque du CD ou du MD
ne s’affiche pas.
*2 Le numéro du disque qui a provoqué l’erreur
apparaît dans la fenêtre d’affichage.
Si ces solutions ne permettent pas d’améliorer la
situation, contactez votre revendeur Sony le plus
proche.
Si vous portez l’appareil à réparer en raison d’un
problème de lecture de CD, apportez le disque
utilisé au moment où le problème s’est produit.
21

Si dichiara che l’apparecchio è stato fabbricato in
conformità all’art.2, Comma l del D.M.28.08.1995
n.548.
* Un disco CD TEXT è un CD-DA che include
informazioni quali nome del disco, dell’artista e del
brano.
Congratulazioni!
Complimenti per l’acquisto del presente lettore
CD Sony. Durante la guida, è possibile utilizzare
le funzioni riportate di seguito.
• Riproduzione di CD
È possibile riprodurre CD-DA (contenenti
anche CD TEXT*), CD-R/CD-RW (file MP3/
WMA contenenti anche registrazioni in
multisessione (pagina 16)) e CD ATRAC (in
formato ATRAC3 e ATRAC3plus (pagina 17)).
Tipo di disco Etichetta sul disco
CD-DA
MP3
WMA
CD ATRAC
• Ricezione radiofonica
– È possibile memorizzare fino a 6 stazioni per
banda (FM1, FM2, FM3, MW e LW).
– BTM (Best Tuning Memory, memorizzazione
automatica delle emittenti con sintonia
migliore): l’apparecchio seleziona le stazioni
con il segnale più potente e le memorizza.
• Servizi RDS
È possibile utilizzare la stazione FM con RDS
(Radio Data System, sistema dati radio).
• Regolazione audio
– EQ3 stage2: è possibile scegliere una delle
7 curve dell’equalizzatore preimpostate.
– DSO (Dynamic Soundstage Organizer): crea
un effetto audio più realistico, mediante
sintesi di diffusori virtuali, per enfatizzare
l’audio dei diffusori, anche se questi sono
installati nella parte inferiore della portiera.
– BBE MP: consente di migliorare la qualità
dell’audio compresso digitalmente, ad
esempio dei file MP3.
• Funzionamento di apparecchi opzionali
Oltre alla riproduzione, con il presente
apparecchio è possibile controllare cambia CD/
MD opzionali e dispositivi portatili Sony
opzionali.
Per l’installazione e i collegamenti, fare
riferimento al manuale di istruzioni per
l’installazione e i collegamenti in dotazione.
Avvertenza relativa all’installazione su
un’auto sprovvista della posizione
ACC (accessoria) sul blocchetto di
accensione
Dopo avere spento il motore, assicurarsi di
tenere premuto (OFF) sull’apparecchio
finché il display non scompare.
Diversamente, il display non viene disattivato
causando lo scaricamento della batteria.
Questa etichetta è posta nella parte inferiore
esterna.
Trattamento del dispositivo elettrico
od elettronico a fine vita
(applicabile in tutti i paesi
dell’Unione Europea e in altri paesi
europei con sistema di raccolta
differenziata)
Questo simbolo sul prodotto o sulla confezione indica che
il prodotto non deve essere considerato come un normale
rifiuto domestico, ma deve invece essere consegnato ad un
punto di raccolta appropriato per il riciclo di apparecchi
elettrici ed elettronici. Assicurandovi che questo prodotto
sia smaltito correttamente, voi contribuirete a prevenire
potenziali conseguenze negative per l’ambiente e per la
salute che potrebbero altrimenti essere causate dal suo
smaltimento inadeguato. Il riciclaggio dei materiali aiuta a
conservare le risorse naturali. Per informazioni più
dettagliate circa il riciclaggio di questo prodotto, potete
contattare l’ufficio comunale, il servizio locale di
smaltimento rifiuti oppure il negozio dove l’avete
acquistato.
Accessorio utilizzabile: Telecomando
2

Indice
Operazioni preliminari
Azzeramento dell’apparecchio . . . . . . . . . . . . . 4
Impostazione dell’orologio . . . . . . . . . . . . . . . . 4
Rimozione del pannello anteriore . . . . . . . . . . . 4
Installazione del pannello anteriore . . . . . . . 4
Inserimento del disco nell’apparecchio . . . . . . . 5
Estrazione del disco . . . . . . . . . . . . . . . . . . . 5
Posizione dei comandi e operazioni
di base
Unità principale. . . . . . . . . . . . . . . . . . . . . . . 6
Telecomando a scheda RM-X151. . . . . . . . . 6
CD
Voci del display . . . . . . . . . . . . . . . . . . . . . . 8
Riproduzione ripetuta e in ordine casuale. . . 8
Radio
Memorizzazione e ricezione delle stazioni . . . . 9
Memorizzazione automatica
— BTM. . . . . . . . . . . . . . . . . . . . . . . . . . . . . 9
Memorizzazione manuale . . . . . . . . . . . . . . . 9
Ricezione delle stazioni memorizzate. . . . . . 9
Sintonizzazione automatica . . . . . . . . . . . . . 9
RDS . . . . . . . . . . . . . . . . . . . . . . . . . . . . . . . . . . 9
Cenni preliminari . . . . . . . . . . . . . . . . . . . . . 9
Impostazione dei modi AF e TA/TP. . . . . . 10
Selezione del modo PTY . . . . . . . . . . . . . . 11
Impostazione del modo CT . . . . . . . . . . . . . 11
Altre funzioni
Modifica delle impostazioni audio . . . . . . . . . 12
Regolazione delle caratteristiche dell’audio
— BAL/FAD/SUB. . . . . . . . . . . . . . . . . . . 12
Personalizzazione della curva
dell’equalizzatore
— EQ3 . . . . . . . . . . . . . . . . . . . . . . . . . . . 12
Regolazione delle voci di impostazione
— SET . . . . . . . . . . . . . . . . . . . . . . . . . . . . . . 12
Uso di apparecchi opzionali . . . . . . . . . . . . . . 13
Cambia CD/MD . . . . . . . . . . . . . . . . . . . . . 13
Telecomando a rotazione RM-X4S . . . . . . 14
Apparecchio audio ausiliare. . . . . . . . . . . . 15
Informazioni aggiuntive
Precauzioni . . . . . . . . . . . . . . . . . . . . . . . . . . . 15
Note sui dischi . . . . . . . . . . . . . . . . . . . . . . 15
Informazioni sui file MP3/WMA . . . . . . . . 16
Informazioni sui CD ATRAC . . . . . . . . . . 17
Manutenzione . . . . . . . . . . . . . . . . . . . . . . . . . 17
Rimozione dell’apparecchio . . . . . . . . . . . . . . 18
Caratteristiche tecniche. . . . . . . . . . . . . . . . . . 18
Guida alla soluzione dei problemi . . . . . . . . . 19
Messaggi/indicazioni di errore. . . . . . . . . . 21
Prodotto con Licenza della
R
BBE Sound, Inc.
consente di migliorare la qualità dell
compresso digitalmente, ad esempio in formato
MP3, ripristinando e potenziando i suoni più
acuti persi a seguito della compressione. Grazie
al processo BBE MP, vengono generati suoni di
pari altezza a partire dal materiale sorgente,
recuperando in mode efficace una qualità più
naturale, realistica e sfumata.
Il processo BBE MP
’
audio
SonicStage e il relativo logo sono marchi di
fabbrica di Sony Corporation.
ATRAC, ATRAC3, ATRAC3plus e i rispettivi
loghi sono marchi di fabbrica di Sony
Corporation.
Microsoft, Windows Media e
il loro Windows sono marchi
di fabbrica o marchi registrati
di Microsoft Corporation
negli Stati Uniti e/o in altri paesi.
3

Operazioni preliminari
Azzeramento dell’apparecchio
Prima di utilizzare l’apparecchio per la prima
volta, dopo la sostituzione della batteria dell’auto
o dopo avere effettuato modifiche ai
collegamenti, è necessario azzerare l’apparecchio
stesso.
Rimuovere il pannello anteriore, quindi premere
il tasto RESET utilizzando un oggetto appuntito,
ad esempio una penna a sfera.
Tas to
RESET
Nota
Premendo il tasto RESET verranno cancellate le
impostazioni dell’orologio e alcune funzioni
memorizzate.
Impostazione dell’orologio
L’orologio mostra l’indicazione digitale dell’ora
in base al sistema delle 24 ore.
1 Tenere premuto (SEL).
Viene visualizzato il display di impostazione.
2 Premere più volte (SEL) fino a
visualizzare “CLOCK-ADJ”.
3 Premere (DSPL).
L’indicazione dell’ora lampeggia.
4 Premere il comando del volume verso
l’alto o verso il basso per impostare
l’ora e i minuti.
Per passare da una cifra all’altra
dell’indicazione digitale, premere (DSPL).
5 Premere (SEL).
L’impostazione è completata e l’orologio
viene attivato.
Per visualizzare l’orologio, premere (DSPL).
Premere di nuovo (DSPL) per tornare al display
precedente.
Con il telecomando a scheda
Al punto 4, per regolare l’ora e i minuti, premere M o
m.
Suggerimento
È possibile regolare l’orologio automaticamente
tramite la funzione RDS (pagina 11).
Rimozione del pannello
anteriore
Per evitare il furto dell’apparecchio, è possibile
estrarne il pannello anteriore.
Segnale di avvertimento
Se la chiave di accensione viene impostata sulla
posizione OFF senza che il pannello anteriore sia
stato rimosso, viene emesso per alcuni secondi
un segnale acustico di avvertimento.
Tale segnale viene emesso solo se è in uso
l’amplificatore incorporato.
1 Premere (OFF).
L’apparecchio si spegne.
2 Premere , quindi estrarre.
(OFF)
Note
• Non fare cadere il pannello anteriore né esercitare
eccessiva pressione su quest’ultimo e sulla finestra
del display.
• Non esporre il pannello anteriore a calore,
temperature elevate o umidità. Evitare di lasciarlo
all’interno di auto parcheggiate oppure su cruscotti e
ripiani posteriori.
Installazione del pannello anteriore
Inserire la parte A del pannello anteriore nella
parte B dell’apparecchio, come illustrato, quindi
premere la parte sinistra finché non scatta in
posizione.
A
B
4

Nota
Non collocare alcun oggetto sulla superficie interna
del pannello anteriore.
Inserimento del disco
nell’apparecchio
1 Premere Z.
La chiusura si apre automaticamente.
2 Inserire il disco con il lato
dell’etichetta verso l’alto.
La chiusura si chiude automaticamente e la
riproduzione viene avviata.
Estrazione del disco
1 Premere Z.
La chiusura si apre automaticamente.
x
Il disco viene espulso.
Nota
Se non viene eseguita alcuna operazione per 15
secondi, la chiusura si chiude automaticamente.
5

Posizione dei comandi e operazioni di base
Unità principale
ATT
DSPL
SOURCE MODE
Telecomando a scheda
RM-X151
OFF
SOURCE
DSPL
132
465
VOL
SEL
ATT
MODE
+
–
SCRL
+
–
GP/ALBM
1 2 3 4 5 6
BBE MP PAUSEREP BTMSHUF
Per ulteriori informazioni, fare riferimento alle
pagine indicate. I tasti del telecomando a scheda
corrispondenti a quelli dell’apparecchio
controllano le stesse funzioni.
A Comando del volume (+/–) 12
Per regolare il volume.
B Tasto ATT (attenuazione audio)
Per attenuare l’audio. Per annullare
l’impostazione, premere di nuovo il tasto.
C Tasto DSPL (display) 8
Per cambiare le voci del display.
D Tasto SEL (selezione)
Per selezionare le voci di impostazione.
E Finestra del display
F Alloggiamento del disco 5
Per inserire il disco.
G Tasto EQ3 (equalizzatore) 12
Per selezionare un tipo di equalizzatore
(XPLOD, VOCAL, EDGE, CRUISE,
SPACE, GRAVITY, CUSTOM o OFF).
DSO
EQ3SEL
AF/TA SENS PTY SCRL
OFF
CDX-RA550
6

H Tasto DSO 2
Per selezionare il modo DSO (1, 2, 3 o OFF).
Maggiore è il numero, più enfatizzato sarà
l’effetto.
I Tasto Z (espulsione) 5
Per estrarre il disco/aprire la chiusura.
J Comando M>/.m(+/–)
CD:
Per saltare i brani (premere); per saltare i
brani in modo continuo (premere, quindi
premere di nuovo entro 1 secondo e tenere
premuto); per fare retrocedere/fare avanzare
rapidamente un brano (tenere premuto).
Radio:
Per sintonizzare le stazioni in modo
automatico (premere); per ricercare una
stazione manualmente (tenere premuto).
K
Tasto (rilascio pannello anteriore)
L Tasto SOURCE
Per attivare l’alimentazione; per cambiare la
sorgente (radio/CD/MD*
1
/AUX).
M Tasto MODE 9, 13
Per selezionare la banda radio (FM/MW/
LW)/per selezionare l’unità*
2
.
N Tasto RESET (situato nella parte
posteriore del pannello anteriore) 4
O Tasti numerici
CD/MD*
(1)/(2): GP*
1
:
3
/ALBM*4 –/+*
5
Per saltare gruppi/album (premere); per
saltare gruppi/album in modo continuo
(tenere premuto).
(3): REP 8
(4): SHUF 8
(5): BBE MP*
6
3
Per attivare la funzione BBE MP,
impostare “BBEMP-ON”. Per
annullare l’impostazione, impostare
“BBEMP-OFF”.
(6): PAU SE *
6
Per effettuare una pausa durante la
riproduzione. Per annullare
l’impostazione, premere di nuovo il
tasto.
Radio:
Per ricevere le stazioni memorizzate
(premere); per memorizzare le stazioni
(tenere premuto).
P Tasto AF (frequenze alternative)/TA
(notiziari sul traffico) 10
Per impostare AF e TA/TP nel modo RDS.
Q Tasto SENS/BTM 9
Per migliorare la ricezione: LOCAL/MONO
(premere); per attivare la funzione BTM
(tenere premuto).
R Tasto PTY (tipo di programma) 11
Per selezionare il tipo di programma (PTY)
nel modo RDS.
S Tasto SCRL (scorrimento) 8
Per scorrere le voci del display.
T Ricettore del telecomando a scheda
U Tasto OFF
Per disattivare l’alimentazione; per arrestare
4
la riproduzione della sorgente.
I tasti del telecomando a scheda riportati di
seguito corrispondono a tasti/funzioni differenti
dell’apparecchio.
ws Tasti < (.)/, (>)
Per controllare il CD/la radio.
Corrispondente al comando
M>/.m sull’apparecchio.
wd Tasto VOL (volume) +/–
Per regolare il volume.
wf Tasti M (+)/m (–)
Per controllare il CD. Corrispondente a
(2)/(1) sull’apparecchio.
wg Tasti numerici
Per ricevere le stazioni memorizzate
(premere); per memorizzare le stazioni
(tenere premuto).
*1 Se è collegato un cambia MD.
*2 Se è collegato un cambia CD/MD.
*3 Se viene riprodotto un CD ATRAC.
*4 Se viene riprodotto un file MP3/WMA.
*5 Se è collegato un cambia dischi, l’operazione è
diversa; vedere pagina 13.
*6 Durante la riproduzione con il presente
apparecchio.
Nota
Se l’apparecchio viene spento e il display disattivato,
non è possibile controllarlo mediante il telecomando a
scheda a meno che non venga premuto (SOURCE)
sull’apparecchio o che non venga inserito un disco per
accendere l’apparecchio stesso.
Suggerimento
Per ulteriori informazioni su come sostituire la batteria,
vedere “Sostituzione della batteria al litio del
telecomando a scheda” a pagina 17.
7

CD
Per ulteriori informazioni sulla selezione di un
cambia CD/MD, vedere pagina 13.
Voci del display
A Indicazione WMA/MP3
B Indicazione CD ATRAC/BBE MP
C Sorgente
D Numero del brano/Tempo di riproduzione
trascorso, Nome del disco/Nome dell’artista,
Numero dell’album/Numero del gruppo*
Nome dell’album/Nome del gruppo, Titolo
del brano, Informazioni di testo*
*1 Il numero dell’album/gruppo viene visualizzato solo
quando si cambia album/gruppo.
*2 Durante la riproduzione di un file MP3, vengono
visualizzati i tag ID3; durante la riproduzione di un
CD ATRAC, vengono visualizzate le informazioni di
testo scritte da SonicStage, ecc.; durante la
riproduzione di un file WMA, vengono visualizzati i
tag WMA.
Per cambiare le voci del display D, premere
(DSPL); per scorrere le voci del display D,
premere (SCRL) o impostare “A.SCRL-ON”
(pagina 13).
Suggerimento
Le voci visualizzate potrebbero non corrispondere, a
seconda del tipo di disco, del formato di registrazione
e delle impostazioni effettuate. Per ulteriori
informazioni sui file MP3/WMA, vedere pagina 16; per
ulteriori informazioni sui CD ATRAC, vedere
pagina 17.
2
, Orologio
1
,
Riproduzione ripetuta e in ordine
casuale
1 Durante la riproduzione, premere più
volte (3) (REP) o (4) (SHUF) fino a
visualizzare l’impostazione desiderata.
Selezionare Per riprodurre
REP-TRACK un brano in modo
REP-ALBM*
REP-GP*
1
2
SHUF-ALBM*
SHUF-GP*
2
SHUF-DISC un disco in modo
*1 Se viene riprodotto un file MP3/WMA.
*2 Se viene riprodotto un CD ATRAC.
Per ritornare al modo di riproduzione normale,
selezionare “REP-OFF” o “SHUF-OFF”.
ripetuto.
un album in modo
ripetuto.
un gruppo in modo
ripetuto.
1
un album in modo
casuale.
un gruppo in modo
casuale.
casuale.
8

Radio
Memorizzazione e ricezione
delle stazioni
Attenzione
Per la sintonizzazione delle stazioni durante la
guida, utilizzare la funzione BTM (Best Tuning
Memory, memorizzazione automatica delle
emittenti con sintonia migliore) per evitare
incidenti.
Memorizzazione automatica
— BTM
1 Premere più volte (SOURCE) fino a
visualizzare “TUNER”.
Per cambiare banda, premere più volte
(MODE). È possibile selezionare FM1, FM2,
FM3, MW o LW.
2 Tenere premuto (BTM) fino a quando
l’indicazione “BTM” non lampeggia.
L’apparecchio memorizza le stazioni in
corrispondenza dei tasti numerici in base
all’ordine delle frequenze.
Quando l’impostazione è stata memorizzata,
viene emesso un segnale acustico.
Memorizzazione manuale
1 Durante la ricezione della stazione che
si desidera memorizzare, tenere
premuto un tasto numerico (da (1) a
(6)) fino a visualizzare “MEM”.
L’indicazione del tasto numerico viene
visualizzata nel display.
Nota
Se un’altra stazione viene memorizzata in
corrispondenza dello stesso tasto numerico, la
stazione memorizzata precedentemente viene
sostituita.
Suggerimento
Se viene memorizzata una stazione RDS, viene
memorizzata anche l’impostazione AF/TA (pagina 10).
Ricezione delle stazioni
memorizzate
1 Selezionare la banda, quindi premere
un tasto numerico (da (1) a (6)).
Sintonizzazione automatica
1 Selezionare la banda, quindi premere
il comando M>/.m verso
l’alto o verso il basso per ricercare la
stazione desiderata.
La ricerca si arresta non appena l’apparecchio
riceve una stazione. Ripetere questa
procedura fino alla ricezione della stazione
desiderata.
Suggerimento
Se si conosce la frequenza della stazione che si
desidera ascoltare, tenere premuto il comando
M>/.m per individuare la frequenza
approssimativa, quindi premere il comando M>/
.m più volte verso l’alto o verso il basso per
sintonizzarsi esattamente sulla frequenza desiderata
(sintonizzazione manuale).
RDS
Cenni preliminari
RDS (Radio Data System, sistema dati radio) è
un servizio che consente alle stazioni radio FM
di trasmettere informazioni digitali aggiuntive
oltre al normale segnale in radiofrequenza.
Voci del display
A TA /T P*
B Banda radio, funzione
C Frequenza*
*1 “TA” lampeggia durante la ricezione di notiziari sul
*2 Durante la ricezione della stazione RDS, “ *” è
Per cambiare le voci del display C, premere
(DSPL).
1
2
programma), numero di preselezione,
orologio, dati RDS
traffico. “TP” si illumina durante la ricezione di una
stazione che fornisce programmi sul traffico.
visualizzato a sinistra dell’indicazione della
frequenza.
(nome del servizio del
continua alla pagina successiva t
9

Servizi RDS
Il presente apparecchio fornisce i servizi RDS in
modo automatico come segue:
AF (frequenze alternative)
Consente di selezionare e sintonizzare di nuovo
la stazione con il segnale più potente.
Utilizzando questa funzione, è possibile
riprodurre in modo continuo lo stesso
programma durante un viaggio di lunga durata,
senza la necessità di sintonizzare di nuovo la
stessa stazione manualmente.
TA (notiziari sul traffico)/TP (programma sul
traffico)
Fornisce le informazioni/i programmi correnti
relativi al traffico. Qualsiasi informazione/
programma ricevuto interrompe la riproduzione
della sorgente selezionata.
PTY (tipi di programma)
Consente di visualizzare il tipo di programma
in fase di ricezione, nonché di ricercare il tipo
di programma selezionato.
CT (segnale orario)
L’orologio viene regolato mediante i dati CT
della trasmissione RDS.
Note
• È possibile che non tutte le funzioni RDS siano
disponibili, a seconda del paese o della regione.
• La funzione RDS non è disponibile quando il
segnale è troppo debole o se la stazione
sintonizzata non trasmette dati RDS.
Impostazione dei modi AF e TA/TP
1 Premere più volte (AF/TA) fino a
visualizzare l’impostazione desiderata.
Selezionare Per
AF-ON attivare AF e disattivare TA.
TA-ON attivare TA e disattivare AF.
AF, TA-ON attivare entrambi i modi AF e
AF, TA-OFF disattivare entrambi i modi AF
TA .
e TA.
Memorizzazione di stazioni RDS con
impostazione AF e TA
È possibile preselezionare le stazioni RDS
insieme all’impostazione AF/TA. Se viene
utilizzata la funzione BTM, vengono
memorizzate solo le stazioni RDS con la stessa
impostazione AF/TA.
Se si utilizza il modo di preselezione manuale, è
possibile preselezionare le stazioni RDS e non
RDS con impostazioni AF/TA distinte.
1 Impostare AF/TA, quindi memorizzare la
stazione mediante la funzione BTM o
manualmente.
Preimpostazione del volume dei
notiziari sul traffico
È possibile preimpostare il livello del volume dei
notiziari sul traffico in modo da poterli udire
chiaramente.
1 Premere più volte il comando del volume
verso l’alto o verso il basso per regolare il
livello del volume.
2 Tenere premuto (AF/TA) fino a visualizzare
“TA”.
Ricezione dei notiziari di emergenza
Se è attivato il modo AF o TA, gli annunci di
emergenza interrompono automaticamente la
riproduzione della sorgente selezionata.
Mantenimento di un programma
regionale — REG
Quando la funzione AF è attivata: le
impostazioni predefinite dell’apparecchio
limitano la ricezione a una regione specifica, in
modo che la stazione sintonizzata non venga
sostituita da una stazione regionale dal segnale
più potente.
Se si intende lasciare tale area di ricezione
regionale, impostare “REG-OFF” nelle
impostazioni (pagina 13).
Nota
Questa funzione non è disponibile nel Regno Unito e
in altre aree.
10

Funzione Local Link (solo per il
Regno Unito)
Questa funzione consente di selezionare altre
stazioni locali della stessa area, anche se non
sono memorizzate in corrispondenza dei tasti
numerici.
1 Durante la ricezione FM, premere un tasto
numerico (da (1) a (6)) in corrispondenza
del quale è memorizzata una stazione locale.
2 Entro 5 secondi, premere nuovamente il tasto
numerico della stazione locale.
Ripetere questa procedura fino alla ricezione
della stazione locale.
Selezione del modo PTY
1 Premere (PTY) durante la ricezione
FM.
Tipi di programma
NEWS (Notiziario), AFFAIRS (Attualità),
INFO (Informazioni), SPORT (Sport),
EDUCATE (Istruzione), DRAMA (Teatro),
CULTURE (Cultura), SCIENCE (Scienza),
VARIE D (Vari), POP M (Musica pop),
ROCK M (Musica rock), EASY M (Musica
leggera), LIGHT M (Classica leggera),
CLASSICS (Classica), OTHER M (Altri tipi di
musica), WEATHER (Bollettino
meteorologico), FINANCE (Finanza),
CHILDREN (Programmi per bambini),
SOCIAL A (Sociale), RELIGION (Religione),
PHONE IN (Chat show), TRAVEL (Viaggi),
LEISURE (Divertimento), JAZZ (Musica jazz),
COUNTRY (Musica country), NATION M
(Musica nazionale), OLDIES (Musica degli
anni ‘50/’60), FOLK M (Musica folk),
DOCUMENT (Documentari)
Nota
Non è possibile utilizzare questa funzione in paesi/
regioni in cui non sono disponibili i dati PTY.
Se la stazione sta trasmettendo dati PTY,
viene visualizzato il nome del tipo di
programma corrente.
2 Premere più volte (PTY) fino a quando
non viene visualizzato il tipo di
programma desiderato.
3 Premere il comando M>/.m
verso l’alto o verso il basso.
L’apparecchio avvia la ricerca di una stazione
che trasmette il tipo di programma
selezionato.
Impostazione del modo CT
1 Impostare “CT-ON” nelle impostazioni
(pagina 12).
Note
• La funzione CT potrebbe non essere disponibile
anche durante la ricezione di una stazione RDS.
• L’ora impostata mediante la funzione CT e l’ora
corrente potrebbero non corrispondere.
11

Altre funzioni
Modifica delle impostazioni
audio
Regolazione delle caratteristiche
dell’audio — BAL/FAD/SUB
È possibile regolare il bilanciamento,
l’attenuatore dell’audio e il volume del
subwoofer.
1 Premere più volte (SEL) fino a
visualizzare “BAL”, “FAD” o “SUB”.
La voce cambia come riportato di seguito:
1
LOW*
t MID*1 t HI*1 t
BAL (sinistra-destra) t
FAD (anteriore-posteriore) t
SUB (volume subwoofer)*
*1 Se la funzione EQ3 è attivata (pagina 12).
*2 Se l’uscita audio è impostata su “SUB”
(pagina 13).
“ATT” viene visualizzato con il valore minimo e
può essere regolato fino a un massimo di 20
incrementi.
*3 Se la sorgente AUX è attivata (pagina 15).
2 Premere più volte il comando del
volume verso l’alto o verso il basso
per regolare la voce selezionata.
Dopo 3 secondi, l’impostazione è completata
e il display torna al modo di riproduzione/
ricezione normale.
Con il telecomando a scheda
Al punto 2, per regolare la voce selezionata, premere
<, M, , o m.
Personalizzazione della curva
dell’equalizzatore — EQ3
L’impostazione “CUSTOM” di EQ3 consente di
personalizzare le impostazioni
dell’equalizzatore.
1 Selezionare una sorgente, quindi
premere più volte (EQ3) per
selezionare “CUSTOM”.
2 Premere più volte (SEL) fino a
visualizzare “LOW”, “MID” o “HI”.
3 Premere più volte il comando del
volume verso l’alto o verso il basso
per regolare la voce selezionata.
Il livello del volume può essere regolato per
unità di 1 dB da –10 dB a +10 dB.
2
t AUX*
3
Ripetere i punti 2 e 3 per regolare la curva
dell’equalizzatore.
Per ripristinare la curva dell’equalizzatore
impostata in fabbrica, tenere premuto (SEL)
prima del completamento dell’impostazione.
Dopo 3 secondi, l’impostazione è completata
e il display torna al modo di riproduzione/
ricezione normale.
Suggerimento
È possibile regolare anche altri tipi di equalizzatore.
Con il telecomando a scheda
Al punto 3, per regolare la voce selezionata, premere
<, M, , o m.
Regolazione delle voci di
impostazione — SET
1 Tenere premuto (SEL).
Viene visualizzato il display di impostazione.
2 Premere più volte (SEL) fino a
visualizzare la voce desiderata.
3 Premere il comando del volume verso
l’alto o verso il basso per selezionare
l’impostazione (ad esempio, “ON” o
“OFF”).
4 Tenere premuto (SEL).
L’impostazione è completata e il display torna
al modo di riproduzione/ricezione normale.
Nota
Le voci visualizzate sono diverse, a seconda della
sorgente e dell’impostazione.
Con il telecomando a scheda
Al punto 3, per selezionare l’impostazione, premere
< o ,.
È possibile impostare le seguenti voci (per
ulteriori informazioni, consultare la pagina di
riferimento):
“
z” indica le impostazioni predefinite.
CLOCK-ADJ (regolazione dell’orologio)
(pagina 4)
CT (segnale orario)
Per impostare “CT-ON” o “CT-OFF” (
(pagina 10, 11).
BEEP
Per impostare “BEEP-ON” (
AUX-A*
1
(audio AUX)
z) o “BEEP-OFF”.
Per attivare la visualizzazione della sorgente
AUX, “AUX-A-ON” (
z) o “AUX-A-OFF”
(pagina 15).
z)
12

SUB/REAR*
1
Per cambiare l’uscita audio.
–“SUB-OUT” (
z): per trasmettere a un
subwoofer.
– “REAR-OUT”: per trasmettere a un
amplificatore di potenza.
DIM (attenuatore di luminosità)
Per modificare la luminosità del display.
–“DIM-AT” (
z): per ridurre automaticamente la
luminosità del display quando vengono accesi
i fari.
– “DIM-ON”: per attenuare la luminosità del
display.
– “DIM-OFF”: per disattivare l’attenuatore di
luminosità.
M.DSPL (display in movimento)
Per selezionare il modo Motion Display (display
in movimento).
– “M.DSPL-SA” (
z): per visualizzare modelli in
movimento e l’analizzatore spettrale.
– “M.DSPL-ON”: per visualizzare modelli in
movimento.
– “M.DSPL-OFF”: per disattivare il display in
movimento.
1
DEMO*
(dimostrazione)
Per impostare “DEMO-ON” (z) o “DEMOOFF”.
A.SCRL (scorrimento automatico)
Per fare scorrere automaticamente le voci
visualizzate composte da molti caratteri quando
si cambia disco/album/gruppo/brano.
– “A.SCRL-ON”: per attivare lo scorrimento.
–“A.SCRL-OFF” (
z): per disattivare lo
scorrimento.
2
REG*
(regionale)
Per impostare “REG-ON” (
z) o “REG-OFF”
(pagina 10).
3
LPF*
(filtro passa basso)
Per selezionare la frequenza di taglio del
subwoofer: “LPF OFF” (
z), “LPF125Hz” o
“LPF 78Hz”.
*1 Se l’apparecchio è spento.
*2 Durante la ricezione FM.
*3 Se l’uscita audio è impostata su “SUB”.
Uso di apparecchi opzionali
Cambia CD/MD
Selezione del cambia dischi
1 Premere più volte (SOURCE) fino a
visualizzare “CD” o “MD”.
2 Premere più volte (MODE) fino a visualizzare
il cambia dischi desiderato.
Numero
dell’apparecchio
Viene avviata la riproduzione.
Come saltare album e dischi
1 Durante la riproduzione, premere (GP/ALBM)
–/+.
Per saltare Premere (GP/ALBM)
album e rilasciare (tenere premuto un
album in modo
continuo
dischi più volte.
dischi in modo
continuo
Riproduzione ripetuta e in ordine
casuale
1 Durante la riproduzione, premere più volte
(3) (REP) o (4) (SHUF) fino a visualizzare
l’impostazione desiderata.
Selezionare Per riprodurre
REP-DISC*1un disco in modo ripetuto.
SHUF-
1
CHGR*
SHUF-ALL*
*1 Se sono collegati uno o più cambia CD/MD.
*2 Se sono collegati uno o più cambia CD oppure due
o più cambia MD.
Per ritornare al modo di riproduzione normale,
selezionare “REP-OFF” o “SHUF-OFF”.
Numero del disco
istante).
entro 2 secondi dal momento in
cui viene rilasciato la prima
volta.
quindi premere di nuovo entro 2
secondi e tenere premuto.
i brani nel cambia dischi in
ordine casuale.
2
i brani in tutti gli apparecchi in
ordine casuale.
continua alla pagina successiva t
13

Suggerimento
Mediante la funzione “SHUF-ALL”, non è possibile
riprodurre in ordine casuale i brani nei cambia CD
insieme a quelli nei cambia MD.
Telecomando a rotazione RM-X4S
Applicazione dell’etichetta
Applicare l’etichetta delle indicazioni in base al
modo in cui si desidera montare il telecomando a
rotazione.
SEL
DSPL
MODE
MODE
DSPL
SEL
Individuazione dei comandi
I tasti del telecomando a rotazione corrispondenti
a quelli dell’apparecchio controllano le stesse
funzioni.
SEL
PRESET/
DISC
SOURCE
VOL
ATT
DSPL
SEEK/AMS
MODE
OFF
OFF
I comandi del telecomando a rotazione riportati
di seguito controllano operazioni diverse da
quelle dell’apparecchio.
• Comando PRESET/DISC
Stessa funzione dei tasti (GP/ALBM) –/+
sull’apparecchio (premere e ruotare).
• Comando VOL (volume)
Stessa funzione del comando del volume
dell’apparecchio (ruotare).
• Comando SEEK/AMS
Stessa funzione del comando M>/
.m sull’apparecchio (ruotare oppure
ruotare e mantenere in posizione).
Modifica della direzione operativa
La direzione operativa dei comandi è impostata
in fabbrica come illustrato di seguito.
Per aumentare
Per diminuire
Se si desidera montare il telecomando a
rotazione sul lato destro del piantone di guida, è
possibile invertire la direzione operativa dei
comandi.
1 Tenendo premuto il comando VOL, tenere
premuto (SEL).
14

Apparecchio audio ausiliare
È possibile collegare dispositivi portatili Sony
opzionali al terminale BUS AUDIO IN/AUX IN
dell’apparecchio. Se il cambia dischi o un altro
dispositivo non sono collegati al terminale,
l’apparecchio consente di ascoltare quanto
riprodotto dal dispositivo portatile tramite i
diffusori dell’auto.
Nota
Se viene collegato un dispositivo portatile, accertarsi
che a BUS CONTROL IN non sia collegato alcunché.
Se un dispositivo è collegato a BUS CONTROL IN,
“AUX” non può essere selezionato tramite (SOURCE).
Suggerimento
Se vengono collegati sia un dispositivo portatile che
un cambia dischi, utilizzare il selettore AUX-IN
opzionale.
Selezione di apparecchi ausiliari
1 Premere più volte (SOURCE) fino a
visualizzare “AUX REAR IN”.
Controllare mediante il dispositivo portatile
stesso.
Informazioni aggiuntive
Precauzioni
• Se l’auto è stata parcheggiata in un luogo esposto
a luce solare diretta, attendere che l’apparecchio si
raffreddi prima di utilizzarlo.
• L’antenna elettrica si estende automaticamente
durante il funzionamento dell’apparecchio.
Formazione di condensa
Nei giorni di pioggia o in zone estremamente umide,
è possibile che all’interno delle lenti e del display
dell’apparecchio si formi della condensa. Di
conseguenza, l’apparecchio potrebbe non
funzionare correttamente. In tal caso, rimuovere il
disco e attendere per circa un’ora fino a quando
l’umidità non sia evaporata completamente.
Per mantenere una qualità audio
elevata
Prestare attenzione a non versare bibite o altri
liquidi sull’apparecchio o sui dischi.
Regolazione del livello del volume
Regolare il volume di ogni apparecchio audio
collegato prima della riproduzione.
1 Abbassare il volume sull’apparecchio.
2 Premere più volte (SOURCE) fino a
visualizzare “AUX REAR IN”.
3 Avviare la riproduzione del dispositivo audio
portatile ad un volume moderato.
4 Impostare sull’apparecchio il consueto volume
di ascolto.
5 Premere più volte (SEL) fino a visualizzare
“AUX”, quindi premere il comando del
volume verso l’alto o verso il basso per
regolare il livello di ingresso (±6 dB).
Note sui dischi
• Per mantenere puliti i dischi, non toccarne la
superficie. Afferrare i dischi dal bordo.
• Riporre i dischi nell’apposita custodia o
nell’apposito contenitore quando non vengono
utilizzati.
• Non esporre i dischi a calore/a temperature
elevate. Evitare di lasciarli all’interno di auto
parcheggiate oppure su cruscotti e ripiani
posteriori.
• Non incollare etichette né utilizzare dischi con
residui di colla o inchiostro. Se vengono utilizzati
questi tipi di disco, i residui possono causare
l’arresto del disco, provocando problemi di
funzionamento o rovinando il disco stesso.
• Non utilizzare dischi su cui sono applicati
etichette o adesivi.
Utilizzando tali dischi, è possibile che si
verifichino i seguenti problemi di funzionamento:
– Impossibilità di estrarre il disco (staccandosi dal
disco, l’etichetta o l’adesivo causano
l’inceppamento del meccanismo di espulsione).
– Impossibilità di leggere correttamente i dati
audio (ad esempio, la riproduzione salta oppure
è impossibile riprodurre) poiché il
restringimento dovuto al calore dell’etichetta o
dell’adesivo ha provocato la deformazione del
disco.
continua alla pagina successiva t
15

• Non riprodurre dischi dalla forma irregolare (ad
esempio a forma di cuore, quadrato o stella) con
questo apparecchio, onde evitare problemi di
funzionamento all’apparecchio stesso. Non
utilizzare questo genere di dischi.
• Non è consentita la riproduzione di CD da 8 cm.
• Prima della riproduzione, pulire
i dischi con un panno apposito
disponibile in commercio.
Pulire il disco procedendo dal
centro verso l’esterno. Non
utilizzare solventi quali
benzene, acquaragia, detergenti
disponibili in commercio o
spray antistatici per dischi
analogici.
Note sui dischi CD-R/CD-RW
• È possibile che alcuni CD-R/CD-RW (a seconda
dell’apparecchio utilizzato per la registrazione o
delle condizioni del disco) non possano essere
riprodotti mediante il presente apparecchio.
• Non è possibile riprodurre dischi CD-R/CD-RW
non finalizzati.
Dischi audio codificati mediante
tecnologie di protezione dei diritti
d’autore
Questo prodotto è stato progettato per la
riproduzione di dischi conformi allo standard
Compact Disc (CD).
Recentemente, alcune case discografiche hanno
lanciato sul mercato vari dischi audio codificati
mediante tecnologie di protezione dei diritti
d’autore. Si noti che alcuni di questi dischi non sono
conformi allo standard CD e pertanto non è
possibile riprodurli utilizzando il presente prodotto.
Nota sui DualDisc
Un DualDisc è un disco a due lati che abbina
materiale registrato su DVD su un lato e materiale
audio digitale sull’altro. Tuttavia, poiché il lato del
materiale audio non è conforme allo standard del
Compact Disc (CD), la riproduzione su questo
prodotto non è garantita.
Informazioni sui file MP3/WMA
MP3, acronimo di MPEG-1 Audio Layer-3, è un
formato standard di compressione dei file musicali
che consente di comprimere i dati audio di un CD
fino a circa 1/10 delle dimensioni originali.
WMA, acronimo di Windows Media Audio, è un
altro formato standard di compressione dei file
musicali che consente di comprimere i dati audio di
un CD fino a circa 1/22* delle dimensioni originali.
* solo per 64 kbps
• L’apparecchio è compatibile con il formato ISO
9660 livelli 1/2, Joliet/Romeo nel formato di
espansione e multisessione.
• Numero massimo di:
– cartelle (album): 150, incluse la cartella
principale e le cartelle vuote.
– file MP3/WMA (brani) e cartelle contenuti in un
disco: 300 (se il nome di una cartella/di un file
contiene molti caratteri, è possibile che tale
numero sia inferiore a 300).
– caratteri visualizzabili per un nome di cartella/
file: 32 (Joliet) o 64 (Romeo).
• I tag ID3 versioni 1.0, 1.1, 2.2, 2.3 e 2.4 sono
relativi solo ai file MP3. I tag ID3 possono
contenere 15/30 caratteri (1.0 e 1.1) o 63/126
caratteri (2.2, 2.3 e 2.4). I tag WMA contengono
63 caratteri.
Ordine di riproduzione dei file MP3/
WMA
MP3/WMA
Note
• Durante l’assegnazione di un nome a un file MP3/
WMA, accertarsi di aggiungere l’estensione “.mp3”/
“.wma” al nome del file.
• Durante la riproduzione di un file MP3/WMA VBR
(velocità di trasmissione variabile) o mentre si
procede rapidamente in avanti/all’indietro, è
possibile che il tempo di riproduzione trascorso non
venga visualizzato correttamente.
• Se il disco è registrato in multisessione, viene
riconosciuto e riprodotto solo il primo brano nel
formato della prima sessione (tutti gli altri formati
vengono ignorati). La priorità del formato è CD-DA,
CD ATRAC e MP3/WMA.
– Se il primo brano è un CD-DA, solo il CD-DA della
prima sessione viene riprodotto.
– Diversamente, viene riprodotta una sessione CD
ATRAC o MP3/WMA. Se il disco non contiene dati
in questi formati, viene visualizzato “NO MUSIC”.
Note relative a MP3
• Assicurarsi di finalizzare il disco prima di utilizzarlo
con l’apparecchio.
• Se viene riprodotto un file MP3 ad alta velocità di
trasmissione, ad esempio 320 kbps, è possibile che
l’audio sia soggetto a interruzioni.
Note relative a WMA
• I file realizzati con la compressione senza perdite
non possono essere riprodotti.
• Non è consentita la riproduzione di file protetti da
copyright.
Cartella
(album)
File MP3/
WMA (brano)
16

Informazioni sui CD ATRAC
Formato ATRAC3plus
ATRAC3, l’acronimo di Adaptive Transform
Acoustic Coding3, è una tecnologia di
compressione audio che consente di comprimere i
dati audio di un CD fino a circa 1/10 delle
dimensioni originali. ATRAC3plus, un formato
esteso di ATRAC3, comprime i dati di un CD audio
fino a circa 1/20 delle dimensioni originali. Il
presente apparecchio accetta entrambi i formati
ATR AC 3 e AT RAC3 p lu s .
CD ATRAC
I CD ATRAC sono dati di CD audio registrati che
vengono compressi nel formato ATRAC3 o
ATRAC3plus utilizzando un software autorizzato,
ad esempio SonicStage 2.0 o successivo oppure
SonicStage Simple Burner.
• Numero massimo di:
– cartelle (gruppi): 255
– file (brani): 999
• Vengono visualizzati i caratteri relativi al nome di
una cartella/di un file e le informazioni di testo
create mediante SonicStage.
Per ulteriori informazioni sui CD ATRAC,
consultare il manuale di SonicStage o di SonicStage
Simple Burner.
Nota
Creare il CD ATRAC utilizzando software autorizzato,
ad esempio SonicStage 2.0 o successivi, oppure
SonicStage Simple Burner 1.0 o 1.1.
Per eventuali domande o problemi riguardanti
l’apparecchio non trattati nel presente manuale,
rivolgersi al più vicino rivenditore Sony.
Manutenzione
• Pulire la batteria con un panno asciutto per
assicurare un perfetto contatto.
• Assicurarsi di rispettare la corretta polarità durante
l’inserimento della batteria.
• Non afferrare la batteria con pinze di metallo, in
quanto potrebbe verificarsi un corto circuito.
AVVERTENZA
La batteria può esplodere se usata
scorrettamente. Pertanto, non deve essere
ricaricata, smontata o gettata nel fuoco.
Sostituzione del
fusibile
Per la sostituzione del fusibile,
assicurarsi di utilizzare un
fusibile dello stesso
amperaggio di quello indicato
sull’originale. Se il fusibile si
brucia, controllare i
collegamenti
dell’alimentazione e sostituire
il fusibile. Se dopo la
sostituzione il fusibile si brucia
di nuovo, è possibile che si tratti di un problema
interno. In tal caso, rivolgersi al più vicino
rivenditore Sony.
Fusibile (10 A)
Pulizia dei connettori
Se i connettori tra l’apparecchio e il pannello
anteriore sono sporchi, l’apparecchio potrebbe non
funzionare correttamente. Per evitare questo
problema, aprire il pannello anteriore, rimuoverlo
(pagina 4), quindi pulire i connettori con un
bastoncino di cotone imbevuto di alcol. Non
esercitare forza eccessiva. Diversamente, i
connettori potrebbero venire danneggiati.
Sostituzione della batteria al litio del
telecomando a scheda
In condizioni normali, la batteria dura circa 1 anno
(il ciclo di vita può risultare più breve in funzione
delle condizioni di utilizzo).
Quando la batteria si scarica, il raggio d’azione del
telecomando a scheda risulta ridotto. Sostituire la
batteria con una batteria al litio CR2025 nuova.
L’uso di batterie diverse potrebbe comportare il
rischio di incendi o esplosioni.
Lato + verso l’alto
2
c
1
Note sulla batteria al litio
• Tenere la batteria al litio fuori dalla portata dei
bambini. Se la batteria viene ingerita, consultare
immediatamente un medico.
Unità principale
Note
• Per motivi di sicurezza, spegnere il motore prima di
pulire i connettori e rimuovere la chiave dal
blocchetto di accensione.
• Non toccare mai direttamente i connettori con le dita
o con oggetti di metallo.
Lato posteriore del
pannello anteriore
17

Rimozione dell’apparecchio
Caratteristiche tecniche
1 Rimuovere la cornice di protezione.
1Rimuovere il pannello anteriore
(pagina 4).
2Afferrare la cornice di protezione dai bordi
laterali, quindi estrarla.
x
2 Rimuovere l’apparecchio.
1Inserire contemporaneamente entrambe le
chiavi di rilascio fino a farle scattare in
posizione.
Gancio rivolto
verso l’interno.
2Estrarre le chiavi di rilascio per sbloccare
l’apparecchio.
3Rimuovere l’apparecchio dalla struttura
facendolo scorrere.
Lettore CD
Rapporto segnale rumore: 120 dB
Risposta in frequenza: 10 – 20.000 Hz
Wow e flutter: al di sotto del limite misurabile
Sintonizzatore*
FM
Gamma di frequenze: 87,5 – 108,0 MHz
Terminale dell’antenna: connettore antenna esterna
Frequenza intermedia: 10,7 MHz/450 kHz
Sensibilità utilizzabile: 9 dBf
Selettività: 75 dB a 400 kHz
Rapporto segnale rumore: 67 dB (stereo), 69 dB
(mono)
Distorsione armonica a 1 kHz: 0,5 % (stereo),
0,3 % (mono)
Separazione: 35 dB a 1 kHz
Risposta in frequenza: 30 – 15.000 Hz
MW/LWGamma di frequenze:
MW: 531 – 1.602 kHz
LW: 153 – 279 kHz
Terminale dell’antenna: connettore antenna esterna
Frequenza intermedia: 10,7 MHz/450 kHz
Sensibilità: MW: 30 µV, LW: 40 µV
*
di cui al par. 3 dell’Allegato A al D.M. 25/06/85 e al
par. 3 dell’Allegato 1 al D.M. 27/08/87
Amplificatore di potenza
Uscite: uscite diffusori (connettori a tenuta)
Impedenza diffusori: 4 – 8 ohm
Uscita di potenza massima: 50 W × 4 (a 4 ohm)
Generali
Uscite:
Terminale delle uscite audio (possibilità di
selezione tra anteriore, subwoofer/posteriore)
Terminale di controllo del relè dell’antenna
elettrica
Terminale di controllo dell’amplificatore di
potenza
Ingressi:
Terminale di controllo ATT del telefono
Terminale di controllo dell’illuminazione
Terminale di ingresso controllo BUS
Terminale di ingresso audio BUS/AUX IN
Terminale di ingresso del telecomando
Terminale di ingresso dell’antenna
Comandi relativi al tono:
Bassi: ±10 dB a 60 Hz (XPLOD)
Medi: ±10 dB a 1 kHz (XPLOD)
Alti: ±10 dB a 10 kHz (XPLOD)
Requisiti di alimentazione: batteria auto da 12 V CC
(massa negativa)
Dimensioni: circa 178 × 50 × 182 mm (l/a/p)
Dimensioni di montaggio: circa 182 × 53 × 161 mm
(l/a/p)
Peso: circa 1,2 kg
Accessori in dotazione:
Telecomando a scheda: RM-X151
Elementi per l’installazione e i collegamenti (1 set)
18

Accessori/apparecchi opzionali:
Telecomando a rotazione: RM-X4S
Cavo BUS (in dotazione con un cavo a piedini
RCA):
RC-61 (1 m), RC-62 (2 m)
Cambia CD (10 dischi): CDX-757MX
Cambia CD (6 dischi): CDX-T70MX, CDX-T69
Cambia MD (6 dischi): MDX-66XLP
Selettore di sorgente: XA-C30
Selettore AUX-IN: XA-300
Il rivenditore potrebbe non disporre di alcuni degli
accessori elencati. Richiedere ulteriori informazioni
al rivenditore.
Brevetti degli Stati Uniti d America e di altri Paesi
concessi su licenza dai Dolby Laboratories.
Tecnologia di codifica audio MPEG Layer-3 e
brevetti su licenza del Fraunhofer IIS e della
Thomson.
Nota
Il presente apparecchio non può essere collegato a un
preamplificatore digitale o a un equalizzatore
compatibili con il sistema BUS Sony.
Il design e le caratteristiche tecniche sono soggetti a
modifiche senza preavviso.
• Leghe saldanti prive di piombo sono utilizzate per
la saldatura di determinati componenti. (oltre
l’80%)
• Determinati circuiti stampati non contengono
ritardanti alla fiamma alogenati.
• Le parti estetiche non contengono ritardanti alla
fiamma alogenati.
• La stampa del cartone è realizzata con inchiostro a
base di olio vegetale privo di Composti organici
volatili (VOC).
• Come materiale di riempimento per l’imballaggio
non viene utilizzato polistirolo espanso.
Guida alla soluzione dei
problemi
Fare riferimento alla seguente lista di verifica per
risolvere la maggior parte dei problemi che si
potrebbero verificare durante l’uso di questo
apparecchio.
Prima di esaminare l’elenco che segue, verificare le
procedure di collegamento e d’uso dell’apparecchio.
Generali
L’apparecchio non riceve alimentazione.
• Verificare i collegamenti. Se questi sono corretti,
controllare il fusibile.
• Se l’apparecchio viene spento e il display disattivato,
non è possibile utilizzarlo mediante il telecomando.
tAccendere l’apparecchio.
L’antenna elettrica non si estende.
L’antenna elettrica non dispone di scatola a relè.
L’audio non viene emesso.
• Il volume è troppo basso.
• È attivata la funzione ATT o la funzione ATT del
telefono (se il cavo di interfaccia di un telefono per
auto è collegato al cavo ATT).
• La posizione del comando di attenuazione “FAD”
non è appropriata per un sistema a 2 diffusori.
• Il cambia CD non è compatibile con il formato del
disco (MP3/WMA/CD ATRAC).
tEffettuare la riproduzione mediante un cambia
CD Sony compatibile con il formato MP3 o
mediante il presente apparecchio.
Non viene emesso alcun segnale acustico.
• Il segnale acustico è disattivato (pagina 12).
• Un amplificatore di potenza opzionale è collegato e
l’amplificatore incorporato non viene utilizzato.
Il contenuto della memoria è stato cancellato.
• È stato premuto il tasto RESET.
tReinserire i dati in memoria.
• Il cavo di alimentazione o la batteria sono stati
scollegati.
• Il cavo di alimentazione non è collegato
correttamente.
Le stazioni memorizzate e l’ora esatta sono
cancellate.
Si è bruciato il fusibile.
Quando si cambia la posizione della chiave di
accensione, viene emesso un disturbo.
I cavi non sono collegati correttamente al connettore di
alimentazione accessoria dell’auto.
Il display viene disattivato/non viene
visualizzato nella relativa finestra.
• L’attenuatore di luminosità è impostato su “DIMON” (pagina 13).
• Il display scompare tenendo premuto (OFF).
tTenere premuto (OFF) sull’apparecchio fino a
visualizzare il display.
• I connettori sono sporchi (pagina 17).
La chiusura non si chiude.
Tenere premuto Z per oltre 2 secondi. Se il problema
persiste, rivolgersi al più vicino rivenditore Sony.
La funzione DSO non è disponibile.
A seconda del tipo di interni dell’auto o del tipo di
musica, è possibile che la funzione DSO non produca
l’effetto desiderato.
Riproduzione di CD/MD
Non è possibile inserire un disco.
• Nell’alloggiamento è presente un altro disco.
• Il disco è stato inserito forzatamente in senso
contrario o nel modo sbagliato.
Il disco non viene riprodotto.
• Il disco è difettoso o sporco.
• I CD-R/CD-RW non sono per l’uso audio
(pagina 16).
continua alla pagina successiva t
19

Non è possibile riprodurre file in formato MP3/
WMA.
Il disco non è compatibile con il formato e la versione
MP3/WMA (pagina 16).
I file MP3/WMA necessitano di un tempo
maggiore prima di poter essere riprodotti.
Per i dischi indicati di seguito, l’avvio della
riproduzione necessita di un tempo maggiore:
– dischi registrati con una struttura ad albero
complessa.
– dischi registrati in multisessione.
– dischi ai quali è possibile aggiungere dati.
Non è possibile riprodurre il CD ATRAC.
• Il disco non è stato creato mediante un software
autorizzato, quale SonicStage o SonicStage Simple
Burner.
• I brani che non sono inclusi nel gruppo non possono
essere riprodotti.
Le voci del display non scorrono.
• Per i dischi che presentano molti caratteri, tali voci
potrebbero non scorrere.
• “A.SCRL” è impostato su “OFF”.
tImpostare “A.SCRL-ON” (pagina 13) o premere
(SCRL).
L’audio salta.
• L’installazione non è corretta.
tInstallare l’apparecchio con un’angolazione
inferiore a 45° in una parte stabile dell’auto.
• Il disco è difettoso o sporco.
I tasti per le operazioni non funzionano.
Il disco non viene espulso.
Premere il tasto RESET (pagina 4).
Il telecomando a scheda non funziona.
Chiudere la chiusura.
Non viene visualizzato “MS” o “MD” sul
display della sorgente quando sono collegati
sia il componente opzionale MGS-X1 che il
cambia MD.
Questo apparecchio riconosce l’MGS-X1 come unità
MD.
tPremere più volte (SOURCE) fino a visualizzare
“MS” o “MD”, quindi premere più volte (MODE).
Ricezione radiofonica
Non è possibile ricevere le stazioni.
L’audio è disturbato.
• Collegare il cavo di controllo (blu) dell’antenna
elettrica o il cavo di alimentazione accessoria (rosso)
al cavo di alimentazione di un preamplificatore di
antenne per auto (solo se l’auto dispone di antenna
FM/MW/LW incorporata sul vetro posteriore/
laterale).
• Verificare il collegamento dell’antenna dell’auto.
• L’antenna dell’auto non si estende.
tVerificare il collegamento del cavo di controllo
dell’antenna elettrica.
• Verificare la frequenza.
• Quando il modo DSO è attivato, talvolta l’audio
risulta disturbato.
tImpostare il modo DSO su “OFF” (pagina 7).
20
Non è possibile effettuare la sintonizzazione
preselezionata.
• Memorizzare la frequenza corretta.
• Il segnale di trasmissione è eccessivamente debole.
Non è possibile effettuare la sintonizzazione
automatica.
• L’impostazione del modo di ricerca locale non è stata
effettuata correttamente.
tLa sintonizzazione si arresta di frequente:
Premere (SENS) fino a visualizzare “LOCALON”.
tLa sintonizzazione non si arresta in
corrispondenza di una stazione:
Premere più volte (SENS) fino a visualizzare
“MONO-ON” o “MONO-OFF” (FM) oppure
“LOCAL-OFF” (MW/LW).
• Il segnale di trasmissione è eccessivamente debole.
tEseguire la sintonizzazione manuale.
Durante la ricezione FM, l’indicazione “ST”
lampeggia.
• Sintonizzare la frequenza in modo corretto.
• Il segnale di trasmissione è eccessivamente debole.
tPremere (SENS) per impostare il modo di
ricezione monofonico su “MONO-ON”.
Un programma FM trasmesso in stereofonia
viene ricevuto in monofonia.
L’apparecchio è impostato sul modo di ricezione
monofonico.
tPremere (SENS) fino a visualizzare “MONO-
OFF”.
RDS
Dopo alcuni secondi di ascolto, si avvia la
ricerca.
La stazione non è TP oppure il segnale è debole.
tDisattivare il modo TA (pagina 10).
Non viene trasmesso alcun notiziario sul
traffico.
• Attivare il modo TA (pagina 10).
• La stazione non trasmette notiziari sul traffico pur
essendo una stazione TP.
tSintonizzarsi su un’altra stazione.
Il modo PTY visualizza “- - - - - - - -”.
• La stazione corrente non è una stazione RDS.
• I dati RDS non vengono ricevuti.
• La stazione non specifica il tipo di programma.

Messaggi/indicazioni di errore
1
BLANK*
Sull’MD non sono stati registrati brani.*
tRiprodurre un MD contenente brani registrati.
ERROR*
1
• Il disco è sporco o è stato inserito in senso
contrario.*
2
tPulire il disco o inserirlo correttamente.
• È stato inserito un disco vuoto.
• Il disco non viene riprodotto per un problema non
specificato.
tInserire un altro disco.
FAI LU RE
I collegamenti di diffusori/amplificatori non sono
corretti.
tConsultare la guida all’installazione del presente
modello per verificare i collegamenti.
LOAD
Il cambia dischi sta caricando il disco.
tAttendere che il disco venga caricato.
L. SEEK +/–
Il modo di ricerca locale è attivato durante la
sintonizzazione automatica.
NO AF
Non esiste alcuna frequenza alternativa per la stazione
corrente.
tPremere il comando M>/.m mentre
verso l’alto o verso il basso mentre il nome del
servizio di programma lampeggia. L’apparecchio
avvia la ricerca di un’altra frequenza con gli stessi
dati PI (Programme Identification) (viene
visualizzata l’indicazione “PI SEEK”).
NO DISC
Nel cambia CD/MD non sono inseriti dischi.
tInserire i dischi nel cambia dischi.
NO ID3
Il file MP3 non include informazioni sui tag ID3.
NO INFO
Nel file ATRAC3/ATRAC3plus o WMA non sono
presenti informazioni di testo.
NO MAG
Il contenitore di dischi non è inserito nel cambia CD.
tInserire il contenitore di dischi nel cambia dischi.
NO MUSIC
Il disco inserito non contiene file musicali.
tInserire un CD musicale nel presente apparecchio o
in un cambia dischi compatibile con il formato
MP3.
NO NAME
Il brano non contiene il nome del brano/album/gruppo/
disco.
NO TP
L’apparecchio continua la ricerca di stazioni TP
disponibili.
NOT READ
Le informazioni sul disco non sono state lette
dall’apparecchio.
tCaricare il disco, quindi selezionarlo dall’elenco.
2
NOTREADY
Il coperchio del cambia MD è aperto o gli MD non
sono inseriti correttamente.
tChiudere il coperchio o inserire gli MD
correttamente.
OFFSET
Potrebbe essersi verificato un problema interno.
tVerificare i collegamenti. Se l’indicazione di errore
rimane visualizzata, rivolgersi al più vicino
rivenditore Sony.
READ
È in corso la lettura di tutte le informazioni relative
agli album/ai gruppi del disco.
tUna volta terminata l’operazione, la riproduzione
viene avviata automaticamente. Potrebbe essere
necessario attendere alcuni minuti, a seconda della
struttura del disco.
RESET
L’unità CD e il cambia CD/MD non funzionano a
causa di un problema non specificato.
tPremere il tasto RESET (pagina 4).
“” o “”
Mentre si procede rapidamente in avanti/all’indietro,
sono stati raggiunti l’inizio o la fine del disco e non è
possibile andare oltre.
“”
L’apparecchio non supporta la visualizzazione di un
determinato carattere.
*1 In caso di errori durante la riproduzione di un CD o
di un MD, nel display non viene visualizzato il
numero di disco del CD o dell’MD.
*2 Il numero del disco che causa l’errore viene
visualizzato nel display.
Se le soluzioni riportate non risolvono il problema,
rivolgersi al più vicino rivenditore Sony.
Se l’apparecchio viene portato in un centro di
assistenza a causa di un problema relativo alla
riproduzione di un CD, assicurarsi di portare il disco
utilizzato al momento in cui si è verificato il
problema.
21

Welkom!
Dank u voor de aankoop van deze Sony Compact
Disc Player. U kunt tijdens het rijden genieten
van de volgende functies.
• CD's afspelen
U kunt CD-DA's (met CD TEXT*), CD-R's/
CD-RW's (ook MP3-/WMA-bestanden die in
meerdere sessies zijn opgenomen (pagina 15))
en ATRAC CD's (ATRAC3- en ATRAC3plusindeling (pagina 16)) afspelen.
Soorten discs Label op de disc
Waarschuwing als het contactslot van
de auto geen ACC-positie heeft
Als de motor is uitgeschakeld, moet u op
(OFF) drukken en deze toets ingedrukt
houden tot het display verdwijnt.
Als u dit niet doet, wordt het display niet
uitgeschakeld en raakt de accu uitgeput.
CD-DA
MP3
WMA
ATRAC CD
• Radio-ontvangst
– U kunt maximaal 6 zenders per band opslaan
(FM1, FM2, FM3, MW en LW).
– BTM (Best Tuning Memory): het apparaat
selecteert zenders met sterke signalen en slaat
ze op.
• RDS-diensten
U kunt FM-zenders met RDS (Radio Data
System) gebruiken.
• Geluid regelen
– EQ3 stage2: u kunt kiezen uit 7 ingestelde
equalizercurves.
– DSO (Dynamic Soundstage Organizer):
verbreedt het geluidsveld, waarbij virtuele
luidsprekersynthese zorgt voor een
verbetering van het geluid, zelfs als de
luidsprekers onder in de deur zijn
geïnstalleerd.
– BBE MP: verbetert digitaal gecomprimeerd
geluid, zoals MP3.
• Optionele apparaten bedienen
Naast afspelen op dit apparaat kunt u ook
optionele CD/MD-wisselaars en optionele
draagbare apparaten van Sony bedienen.
* Een CD TEXT-disc is een CD-DA die informatie
bevat, zoals discnamen, artiestennamen en
tracknamen.
Dit label bevindt zich aan de onderkant van het
apparaat.
Verwijdering van oude elektrische
en elektronische apparaten
(Toepasbaar in de Europese Unie en
andere Europese landen met
gescheiden ophaalsystemen)
Het symbool op het product of op de
verpakking wijst erop dat dit product niet als
huishoudelijk afval mag worden behandeld. Het moet
echter naar een plaats worden gebracht waar elektrische
en elektronische apparatuur wordt gerecycled. Als u
ervoor zorgt dat dit product op de correcte manier wordt
verwijderd, voorkomt u voor mens en milieu negatieve
gevolgen die zich zouden kunnen voordoen in geval van
verkeerde afvalbehandeling. De recycling van materialen
draagt bij tot het vrijwaren van natuurlijke bronnen. Voor
meer details in verband met het recyclen van dit product,
neemt u contact op met de gemeentelijke instanties, het
bedrijf of de dienst belast met de verwijdering van
huishoudafval of de winkel waar u het product hebt
gekocht.
Accessoire waarop dit van toepassing is:
Afstandsbediening
Zie voor het monteren en aansluiten van het
apparaat de bijgeleverde handleiding
"Installatie en aansluitingen".
2

Inhoudsopgave
Aan de slag
Het apparaat opnieuw instellen . . . . . . . . . . . . . 4
De klok instellen . . . . . . . . . . . . . . . . . . . . . . . . 4
Het voorpaneel verwijderen. . . . . . . . . . . . . . . . 4
Het voorpaneel bevestigen . . . . . . . . . . . . . . 4
De disc in het apparaat plaatsen . . . . . . . . . . . . 5
De disc uitwerpen . . . . . . . . . . . . . . . . . . . . . 5
Bedieningselementen en algemene
handelingen
Hoofdeenheid . . . . . . . . . . . . . . . . . . . . . . . . 6
Kaartafstandsbediening RM-X151 . . . . . . . . 6
CD
Displayitems . . . . . . . . . . . . . . . . . . . . . . . . . 8
Herhaaldelijk en willekeurig afspelen . . . . . 8
Radio
Zenders opslaan en ontvangen. . . . . . . . . . . . . . 9
Automatisch opslaan — BTM . . . . . . . . . . . 9
Handmatig opslaan . . . . . . . . . . . . . . . . . . . . 9
De opgeslagen zenders ontvangen . . . . . . . . 9
Automatisch afstemmen . . . . . . . . . . . . . . . . 9
RDS . . . . . . . . . . . . . . . . . . . . . . . . . . . . . . . . . . 9
Overzicht. . . . . . . . . . . . . . . . . . . . . . . . . . . . 9
AF en TA/TP instellen . . . . . . . . . . . . . . . . 10
PTY selecteren . . . . . . . . . . . . . . . . . . . . . . 10
CT instellen. . . . . . . . . . . . . . . . . . . . . . . . . 11
Andere functies
De geluidsinstellingen wijzigen . . . . . . . . . . . 11
De geluidskenmerken aanpassen
— BAL/FAD/SUB. . . . . . . . . . . . . . . . . . . 11
De equalizercurve aanpassen
— EQ3 . . . . . . . . . . . . . . . . . . . . . . . . . . . . 11
Instelitems aanpassen — SET. . . . . . . . . . . . . 12
Optionele apparaten gebruiken . . . . . . . . . . . . 12
CD/MD-wisselaar . . . . . . . . . . . . . . . . . . . 12
Bedieningssatelliet RM-X4S . . . . . . . . . . . 13
Extra audioapparatuur . . . . . . . . . . . . . . . . 14
Aanvullende informatie
Voorzorgsmaatregelen . . . . . . . . . . . . . . . . . . 14
Opmerkingen over discs. . . . . . . . . . . . . . . 14
Informatie over MP3-/WMA-bestanden . . 15
Informatie over ATRAC CD's . . . . . . . . . . 16
Onderhoud . . . . . . . . . . . . . . . . . . . . . . . . . . . 16
Het apparaat verwijderen . . . . . . . . . . . . . . . . 17
Technische gegevens . . . . . . . . . . . . . . . . . . . 17
Problemen oplossen . . . . . . . . . . . . . . . . . . . . 18
Foutmeldingen/berichten . . . . . . . . . . . . . . 20
Vervaardigd onder licentie
R
van BBE Sound, Inc.
wordt digitaal gecomprimeerd geluid, zoals
MP3, verbeterd. Tijdens dit proces worden
namelijk de hogere boventonen die zijn
verloren door de compressie, hersteld en
versterkt. Met het BBE MP-proces worden
gelijkmatige boventonen gegenereerd uit hat
bronmateriaal, waardoor warmte, detail en
nuance worden hersteld.
Met het BBE MP-proces
SonicStage en het bijbehorende logo zijn
handelsmerken van Sony Corporation.
ATRAC, ATRAC3, ATRAC3plus en de
bijbehorende logo's zijn handelsmerken van
Sony Corporation.
Microsoft, Windows Media
en het Windows-logo zijn
geregistreerde handelsmerken
van Microsoft Corporation in
de VS en/of andere landen.
3

Aan de slag
Het voorpaneel verwijderen
Het apparaat opnieuw instellen
Voordat u het apparaat voor het eerst gebruikt of
na het vervangen van de accu of het wijzigen van
de aansluitingen, moet u het apparaat opnieuw
instellen.
Maak het voorpaneel los en druk met een puntig
voorwerp, zoals een balpen, op de RESET toets.
RESET
toets
Opmerking
Als u op de RESET toets drukt, worden de
klokinstelling en bepaalde opgeslagen gegevens
gewist.
De klok instellen
De digitale klok werkt met het 24-uurs systeem.
1 Houd (SEL) ingedrukt.
Het installatievenster wordt weergegeven.
2 Druk herhaaldelijk op (SEL) tot
"CLOCK-ADJ" wordt weergegeven.
3 Druk op (DSPL).
De aanduiding voor het uur begint te
knipperen.
4 Druk de volumetoets omhoog of
omlaag om het uur en de minuten in te
stellen.
Als u de digitale aanduiding wilt verplaatsen,
drukt u op (DSPL).
5 Druk op (SEL).
Het instellen is voltooid en de klok begint te
lopen.
Als u de klok wilt weergeven, drukt u op
(DSPL). Druk nogmaals op (DSPL) om terug te
keren naar het vorige display.
Met de kaartafstandsbediening
Als u in stap 4 het uur en de minuten wilt instellen,
drukt u op M of m.
Tip
U kunt de klok automatisch instellen met de RDSfunctie (pagina 11).
U kunt het voorpaneel van het apparaat
verwijderen om diefstal te voorkomen.
Waarschuwingstoon
Wanneer u het contact in de stand OFF zet
zonder het voorpaneel te verwijderen, hoort u
gedurende enkele seconden de
waarschuwingstoon.
U hoort de waarschuwingstoon alleen als de
ingebouwde versterker wordt gebruikt.
1 Druk op (OFF).
Het apparaat wordt uitgeschakeld.
2 Druk op en trek het voorpaneel
naar u toe.
(OFF)
Opmerkingen
• Laat het voorpaneel niet vallen en druk niet te hard
op het voorpaneel en het display.
• Stel het voorpaneel niet bloot aan hitte/hoge
temperaturen of vocht. Laat het voorpaneel niet
achter in een geparkeerde auto of op het
dashboard/de hoedenplank.
Het voorpaneel bevestigen
Bevestig deel A van het voorpaneel op deel B
van het apparaat, zoals in de afbeelding wordt
weergegeven, en druk op de linkerkant van het
voorpaneel tot dit vastklikt.
A
B
Opmerking
4
Plaats niets op de binnenkant van het voorpaneel.

De disc in het apparaat
plaatsen
1 Druk op Z.
De disc uitwerpen
1 Druk op Z.
Het klepje wordt automatisch geopend.
Het klepje wordt automatisch geopend.
2 Plaats de disc met het label naar
boven in het apparaat.
Het klepje wordt automatisch gesloten en het
afspelen begint.
x
De disc wordt uitgeworpen.
Opmerking
Het klepje wordt automatisch gesloten als er 15
seconden geen handelingen zijn uitgevoerd.
5

Bedieningselementen en algemene handelingen
Hoofdeenheid
ATT
DSPL
SOURCE MODE
Kaartafstandsbediening
RM-X151
OFF
SOURCE
DSPL
132
465
VOL
SEL
ATT
MODE
+
–
SCRL
+
–
GP/ALBM
1 2 3 4 5 6
BBE MP PAUSEREP BTMSHUF
Zie de volgende pagina's voor meer informatie.
De overeenkomstige toetsen op de
kaartafstandsbediening bedienen dezelfde
functies als die op het apparaat.
A Volumetoets (+/–) 11
Het volume aanpassen.
B ATT (dempen) toets
Het geluid dempen. Druk nogmaals op de
toets om te annuleren.
C DSPL (display) toets 8
De displayitems wijzigen.
D SEL (selecteren) toets
Instelitems selecteren.
E Display
F Discsleuf 5
De disc plaatsen.
G EQ3 (equalizer) toets 11
Een equalizertype selecteren (XPLOD,
VOCAL, EDGE, CRUISE, SPACE,
GRAVITY, CUSTOM of OFF).
DSO
EQ3SEL
AF/TA SENS PTY SCRL
OFF
CDX-RA550
6

H DSO toets 2
De DSO-stand selecteren (1, 2, 3 of OFF).
Hoe groter het getal, des te duidelijker het
effect.
I Z (uitwerpen) toets 5
De disc uitwerpen/het klepje openen.
J M>/.m(+/–) toets
CD:
Tracks overslaan (indrukken); tracks blijven
overslaan (indrukken, vervolgens binnen 1
seconde nogmaals indrukken en
vasthouden); een track snel terug-/
vooruitspoelen (ingedrukt houden).
Radio:
Automatisch afstemmen op zenders
(indrukken); handmatig zoeken naar zenders
(ingedrukt houden).
K (voorpaneel ontgrendelen) toets 4
L SOURCE toets
Inschakelen; de bron wijzigen (Radio/CD/
1
MD*
/AUX).
M MODE toets 9, 12
De radioband (FM/MW/LW) selecteren/het
apparaat selecteren*
2
.
N RESET toets (bevindt zich achter het
voorpaneel) 4
O Cijfertoetsen
CD/MD*
(1)/(2): GP*
1
:
3
/ALBM*4 –/+*
5
Groepen/albums overslaan (indrukken);
groepen/albums blijven overslaan
(ingedrukt houden).
(3): REP 8
(4): SHUF 8
(5): BBE MP*
6
3
Als u de functie BBE MP wilt
activeren, stelt u "BBEMP-ON" in. Stel
"BBEMP-OFF" in om de functie te
annuleren.
(6): PAU SE *
6
Afspelen onderbreken. Druk nogmaals
op de toets om te annuleren.
Radio:
De opgeslagen zenders ontvangen
(indrukken); zenders opslaan (ingedrukt
houden).
P AF (alternatieve frequenties)/TA
(verkeersinformatie) toets 10
AF en TA/TP in RDS instellen.
Q SENS/BTM toets 9
Slechte ontvangst verbeteren: LOCAL/
MONO (indrukken); de BTM-functie starten
(ingedrukt houden).
R PTY (programmatype) toets 10
PTY in RDS selecteren.
S SCRL (scroll) toets 8
Het displayitem rollen.
T Ontvanger voor de
kaartafstandsbediening
U OFF toets
Het apparaat uitschakelen; de bron stoppen.
De volgende toetsen op de
kaartafstandsbediening verschillen van de
toetsen op het apparaat of hebben andere functies
dan de toetsen op het apparaat.
ws < (.)/, (>) toetsen
CD/radio bedienen, heeft dezelfde functie als
de M>/.m toets op het apparaat.
wd VOL (volume) +/– toets
Het volume aanpassen.
wf M (+)/m (–) toetsen
CD bedienen, heeft dezelfde functie als (2)/
(1) op het apparaat.
wg Cijfertoetsen
De opgeslagen zenders ontvangen
(indrukken); zenders opslaan (ingedrukt
houden).
*1 Als een MD-wisselaar is aangesloten.
*2 Als een CD/MD-wisselaar is aangesloten.
*3 Bij het afspelen van een ATRAC CD.
*4 Bij het afspelen van een MP3-/WMA-bestand.
*5 Als de wisselaar is aangesloten, is de werking
anders. Zie pagina 13 voor meer informatie.
*6 Wanneer met dit apparaat wordt afgespeeld.
Opmerking
Als het apparaat wordt uitgeschakeld en het display
verdwijnt, kan het apparaat niet worden bediend met
de kaartafstandsbediening, tenzij op (SOURCE) op
het apparaat wordt gedrukt of er een disc wordt
geplaatst om het apparaat eerst te activeren.
Tip
Zie "De lithiumbatterij van de kaartafstandsbediening
vervangen" op pagina 16 voor meer informatie over
het vervangen van de batterij.
7

CD
Voor meer informatie over het selecteren van een
CD/MD-wisselaar, zie pagina 12.
Displayitems
A WMA-/MP3-aanduiding
B ATRAC CD-/BBE MP-aanduiding
C Bron
D Tracknummer/verstreken speelduur, naam
van disc/artiest, album-/groepsnummer*
album-/groepsnaam, tracknaam,
tekstinformatie*
*1 Het album-/groepsnummer wordt alleen
weergegeven als het album/de groep wordt
gewijzigd.
*2 Als u MP3-bestanden afspeelt, wordt de ID3-tag
weergegeven. Speelt u een ATRAC CD af, dan
wordt tekstinformatie van SonicStage, enzovoort,
weergegeven. Als u WMA-bestanden afspeelt,
wordt de WMA-tag weergegeven.
2
, klok
Als u de displayitems D wilt wijzigen, drukt u
op (DSPL). Wilt u de displayitems D rollen,
dan drukt u op (SCRL) of stelt u "A.SCRL-ON"
in (pagina 12).
Tip
De weergegeven items zijn afhankelijk van het
disctype, de opname-indeling en de instellingen. Zie
pagina 15 voor meer informatie over MP3/WMA en
pagina 16 voor meer informatie over ATRAC CD's.
1
,
Herhaaldelijk en willekeurig
afspelen
1 Druk tijdens het afspelen herhaaldelijk
op (3) (REP) of (4) (SHUF) tot de
gewenste instelling wordt
weergegeven.
Selecteer Actie
REP-TRACK Track herhaaldelijk
REP-ALBM*
REP-GP*
1
2
SHUF-ALBM*
SHUF-GP*
2
SHUF-DISC Disc in willekeurige
*1 Bij het afspelen van een MP3-/WMA-bestand.
*2 Bij het afspelen van een ATRAC CD.
Als u wilt terugkeren naar de normale
weergavestand, selecteert u "REP-OFF" of
"SHUF-OFF".
afspelen.
Album herhaaldelijk
afspelen.
Groep herhaaldelijk
afspelen.
1
Album in willekeurige
volgorde afspelen.
Groep in willekeurige
volgorde afspelen.
volgorde afspelen.
8

Radio
Zenders opslaan en ontvangen
Let op
Als u afstemt op zenders tijdens het rijden, moet
u de BTM-functie (Best Tuning Memory)
gebruiken om ongelukken te vermijden.
Tip
Als u de frequentie kent van de zender die u wilt
beluisteren, houdt u de M>/.m toets
ingedrukt tot de frequentie ongeveer is bereikt en
drukt u vervolgens herhaaldelijk op M>/.m
om nauwkeurig af te stemmen op de gewenste
frequentie (handmatig afstemmen).
RDS
Automatisch opslaan — BTM
1 Druk herhaaldelijk op (SOURCE) tot
"TUNER" wordt weergegeven.
Druk herhaaldelijk op (MODE) om de band
te wijzigen. U kunt FM1, FM2, FM3, MW of
LW selecteren.
2 Houd (BTM) ingedrukt tot "BTM"
knippert.
Het apparaat slaat de zenders in de volgorde
van frequentie op onder de cijfertoetsen.
Er klinkt een pieptoon wanneer de instelling
is opgeslagen.
Handmatig opslaan
1 Als u de zender ontvangt die u wilt
opslaan, houdt u een cijfertoets ((1)
tot en met (6)) ingedrukt tot "MEM"
wordt weergegeven.
De aanduiding voor de cijfertoets verschijnt
in het display.
Opmerking
Als u een andere zender opslaat onder dezelfde
cijfertoets, wordt de eerder opgeslagen zender
vervangen.
Tip
Als een RDS-zender wordt opgeslagen, wordt de AF-/
TA-instelling ook opgeslagen (pagina 10).
De opgeslagen zenders ontvangen
1 Selecteer de band en druk vervolgens
op een cijfertoets ((1) tot en met (6)).
Automatisch afstemmen
1 Selecteer de band en druk de M>/
.m toets omhoog of omlaag om
de zender te zoeken.
Het zoeken stopt zodra een zender wordt
ontvangen. Herhaal deze procedure tot de
gewenste zender wordt ontvangen.
Overzicht
FM-zenders met de RDS-dienst (Radio Data
System) sturen onhoorbare digitale informatie
mee met het gewone radioprogrammasignaal.
Displayitems
A TA /T P*
B Radioband, functie
C Frequentie*
*1 "TA" knippert tijdens de verkeersinformatie. "TP"
*2 Als u de RDS-zender ontvangt, wordt " *" links van
Als u de displayitems C wilt wijzigen, drukt u
op (DSPL).
1
2
voorinstelnummer, klok, RDS-gegevens
gaat branden als een dergelijke zender wordt
ontvangen.
de frequentieaanduiding weergegeven.
(programmaservicenaam),
RDS-diensten
Dit apparaat biedt automatisch RDS-diensten op
de volgende manier:
AF (alternatieve frequenties)
Hiermee wordt de zender met het sterkste
signaal in een netwerk geselecteerd of wordt
opnieuw op deze zender afgestemd. Als u deze
functie gebruikt, kunt u onafgebroken naar
hetzelfde programma luisteren tijdens een lange
rit zonder dat u steeds handmatig op dezelfde
zender hoeft af te stemmen.
TA (verkeersinformatie)/
TP (verkeersprogramma)
Hiermee ontvangt u de huidige
verkeersinformatie/-programma's. De huidige
bron wordt onderbroken door eventuele
verkeersinformatie/-programma's.
vervolg op volgende pagina t
9

PTY (programmatypen)
Hiermee geeft u het ontvangen programmatype
weer. Hiermee zoekt u ook naar het
geselecteerde programmatype.
CT (kloktijd)
Met de CT-gegevens van de RDS-uitzending
wordt de klok ingesteld.
Opmerkingen
• In bepaalde landen/regio's zijn wellicht niet alle
RDS-functies beschikbaar.
• RDS functioneert wellicht niet als het
ontvangstsignaal zwak is of als de zender waarop u
heeft afgestemd, geen RDS-gegevens verzendt.
Een regionaal programma
beluisteren — REG
Als de AF-functie is ingeschakeld: de
fabrieksinstelling van het apparaat beperkt de
ontvangst tot een bepaalde regio, zodat er niet
wordt overgeschakeld naar een andere regionale
zender met een sterkere frequentie.
Wanneer u het ontvangstgebied van het regionale
programma verlaat, stelt u "REG-OFF" in bij de
instellingen (pagina 12).
Opmerking
Deze functie werkt niet in het Verenigd Koninkrijk en
bepaalde andere gebieden.
AF en TA/TP instellen
1 Druk herhaaldelijk op (AF/TA) tot de
gewenste instelling wordt
weergegeven.
Selecteer Actie
AF-ON AF inschakelen en TA
uitschakelen.
TA-ON TA inschakelen en AF
uitschakelen.
AF, TA-ON AF en TA inschakelen.
AF, TA-OFF AF en TA uitschakelen.
RDS-zenders met de AF- en TAinstelling opslaan
U kunt RDS-zenders vooraf instellen met de
AF-/TA-instelling. Als u de BTM-functie
gebruikt, worden alleen RDS-zenders met
dezelfde AF-/TA-instelling opgeslagen.
Als u handmatig vooraf instelt, kunt u zowel
RDS- als niet-RDS-zenders instellen met elk hun
AF-/TA-instelling.
1 Stel AF/TA in en sla de zender vervolgens met
BTM of handmatig op.
Het volume van de
verkeersinformatie instellen
U kunt het volume van de verkeersinformatie
vooraf instellen, zodat u geen enkel bericht mist.
1 Druk de volumetoets herhaaldelijk omhoog of
omlaag om het volume aan te passen.
2 Houd (AF/TA) ingedrukt tot "TA" wordt
weergegeven.
Local Link-functie (alleen voor het
Verenigd Koninkrijk)
Met deze functie kunt u andere lokale zenders in
het gebied selecteren, ook als deze niet zijn
opgeslagen onder de cijfertoetsen.
1 Druk tijdens FM-ontvangst op een cijfertoets
((1) tot en met (6)) waaronder een lokale
zender is opgeslagen.
2 Druk binnen 5 seconden nogmaals op de
cijfertoets van de lokale zender.
Herhaal dit tot de lokale zender wordt
ontvangen.
PTY selecteren
1 Druk op (PTY) tijdens FM-ontvangst.
De naam van het huidige programmatype
verschijnt als de zender PTY-gegevens
uitzendt.
2 Druk herhaaldelijk op (PTY) tot het
gewenste programmatype verschijnt.
3 Druk de M>/.m toets
omhoog of omlaag.
Het apparaat begint te zoeken naar een zender
die het geselecteerde programmatype
uitzendt.
Noodberichten ontvangen
Als AF of TA is ingeschakeld, wordt de
geselecteerde bron automatisch onderbroken
door de noodberichten.
10

Programmatypen
NEWS (Nieuws), AFFAIRS (Actualiteiten),
INFO (Informatie), SPORT (Sport),
EDUCATE (Educatieve programma's),
DRAMA (Toneel), CULTURE (Cultuur),
SCIENCE (Wetenschap), VAR IED (Diversen),
POP M (Populaire muziek), ROCK M
(Rockmuziek), EASY M (Easy Listening),
LIGHT M (Licht klassiek), CLASSICS
(Klassiek), OTHER M (Ander type muziek),
WEATHER (Weerberichten), FINANCE
(Financiën), CHILDREN (Kinderprogramma's),
SOCIAL A (Sociale zaken), RELIGION
(Religie), PHONE IN (Phone In), TRAVEL
(Reizen), LEISURE (Ontspanning), JAZZ
(Jazzmuziek), COUNTRY (Countrymuziek),
NATION M (Nationale muziek), OLDIES
(Oldies), FOLK M (Folkmuziek),
DOCUMENT (Documentaires)
Opmerking
U kunt deze functie niet gebruiken in bepaalde landen/
regio's waar geen PTY-gegevens beschikbaar zijn.
CT instellen
1 Stel "CT-ON" in bij de instellingen
(pagina 12).
Opmerkingen
• Het is mogelijk dat de CT-functie niet werkt, ook al
wordt er wel een RDS-zender ontvangen.
• Er kan een verschil zijn tussen de tijd van de CT-
functie en de werkelijke tijd.
Andere functies
De geluidsinstellingen wijzigen
De geluidskenmerken aanpassen
— BAL/FAD/SUB
U kunt de balans, de fader en het
subwoofervolume regelen.
1 Druk herhaaldelijk op (SEL) tot "BAL",
"FAD" of "SUB" wordt weergegeven.
Het item wordt als volgt gewijzigd:
1
LOW*
t MID*1 t HI*1 t
BAL (links-rechts) t FA D (voor-achter) t
SUB (subwoofervolume)*
*1 Als EQ3 is ingeschakeld (pagina 11).
*2 Als de audio-uitvoer is ingesteld op "SUB"
(pagina 12).
"ATT" wordt weergegeven bij de laagste
instelling en u kunt deze instelling maximaal 20
stappen aanpassen.
*3 Als AUX-bron is ingeschakeld (pagina 14).
2 Druk de volumetoets herhaaldelijk
omhoog of omlaag om het
geselecteerde item aan te passen.
Na 3 seconden is het instellen voltooid en
keert het display terug naar de normale
weergave-/ontvangststand.
Met de kaartafstandsbediening
Als u in stap 2 het geselecteerde item wilt aanpassen,
drukt u op <, M, , of m.
2
t AUX*
3
De equalizercurve aanpassen
— EQ3
Met "CUSTOM" van EQ3 kunt u uw eigen
equalizerinstellingen bepalen.
1 Selecteer een bron en druk
herhaaldelijk op (EQ3) om "CUSTOM"
te selecteren.
2 Druk herhaaldelijk op (SEL) tot
"LOW", "MID" of "HI" wordt
weergegeven.
3 Druk de volumetoets herhaaldelijk
omhoog of omlaag om het
geselecteerde item aan te passen.
Het volume kan worden aangepast in stappen
van 1 dB, van –10 dB tot +10 dB.
Herhaal stap 2 en 3 om de equalizercurve aan
te passen.
vervolg op volgende pagina t
11

Als u de fabrieksinstelling voor de
equalizercurve wilt herstellen, houdt u (SEL)
ingedrukt voordat het instellen is voltooid.
Na 3 seconden is het instellen voltooid en
keert het display terug naar de normale
weergave-/ontvangststand.
Tip
Andere equalizertypen kunnen ook worden
aangepast.
Met de kaartafstandsbediening
Als u in stap 3 het geselecteerde item wilt aanpassen,
drukt u op <, M, , of m.
Instelitems aanpassen — SET
1 Houd (SEL) ingedrukt.
Het installatievenster wordt weergegeven.
2 Druk herhaaldelijk op (SEL) tot het
gewenste item wordt weergegeven.
3 Druk de volumetoets omhoog of
omlaag om de instelling te selecteren
(bijvoorbeeld "ON" of "OFF").
4 Houd (SEL) ingedrukt.
Het instellen is voltooid en het display keert
terug naar de normale weergave-/
ontvangststand.
Opmerking
De weergegeven items zijn afhankelijk van de bron en
de instelling.
Met de kaartafstandsbediening
Druk in stap 3 op < of , om de instelling te
selecteren.
De volgende instellingen zijn mogelijk (volg de
paginaverwijzing voor meer informatie):
"
z" geeft de standaardinstellingen aan.
DIM (dimmer)
De helderheid van het display regelen.
–"DIM-AT" (
z): het display automatisch
dimmen wanneer u de lichten inschakelt.
– "DIM-ON": het display dimmen.
– "DIM-OFF": de dimmer uitschakelen.
M.DSPL (beweging display)
De stand voor de beweging van het display
selecteren.
–"M.DSPL-SA" (
z): bewegende patronen en
spectrum analyser weergeven.
– "M.DSPL-ON": bewegende patronen
weergeven.
– "M.DSPL-OFF": de beweging van het display
uitschakelen.
1
DEMO*
(demonstratie)
"DEMO-ON" (z) of "DEMO-OFF" instellen.
A.SCRL (automatisch rollen)
Lange displayitems automatisch laten rollen als
de disc/groep/track of het album wordt
gewijzigd.
– "A.SCRL-ON": items rollen.
– "A.SCRL-OFF" (
2
REG*
(regionaal)
"REG-ON" (
z): items niet rollen.
z) of "REG-OFF" instellen
(pagina 10).
3
LPF*
(laagdoorlaatfilter)
Kantelfrequentie van de subwoofer selecteren:
"LPF OFF" (
*1 Als het apparaat is uitgeschakeld.
*2 Als FM wordt ontvangen.
*3 Als de audio-uitvoer is ingesteld op "SUB".
z), "LPF 125Hz" of "LPF 78Hz".
Optionele apparaten gebruiken
CLOCK-ADJ (klok aanpassen) (pagina 4)
CT (kloktijd)
"CT-ON" of "CT-OFF" (
z) instellen (pagina 10,
11).
BEEP
"BEEP-ON" (
AUX-A*
"AUX-A-ON" (
z) of "BEEP-OFF" instellen.
1
(AUX-audio)
z) of "AUX-A-OFF"
(pagina 14) selecteren om het AUX-brondisplay
in of uit te schakelen.
SUB/REAR*
1
De audio-uitvoer wijzigen.
– "SUB-OUT" (
z): uitvoer via een subwoofer.
– "REAR-OUT": uitvoer via een versterker.
12
CD/MD-wisselaar
De wisselaar selecteren
1 Druk herhaaldelijk op (SOURCE) tot "CD" of
"MD" wordt weergegeven.
2 Druk herhaaldelijk op (MODE) tot de
gewenste wisselaar wordt weergegeven.
Apparaatnummer
Het afspelen wordt gestart.
Discnummer

Albums en discs overslaan
1 Druk tijdens het afspelen op (GP/ALBM) –/+.
Actie Druk op (GP/ALBM)
Album
overslaan
Albums blijven
overslaan
en laat los (kort ingedrukt
houden).
binnen 2 seconden nadat u deze
hebt losgelaten.
Discs overslaan herhaaldelijk.
Discs blijven
overslaan
en druk binnen 2 seconden
weer op de toets en houd deze
ingedrukt.
Herhaaldelijk en willekeurig afspelen
1 Druk tijdens het afspelen herhaaldelijk op (3)
(REP) of (4) (SHUF) tot de gewenste
instelling wordt weergegeven.
Selecteer Actie
REP-DISC*1Een disc herhaaldelijk
afspelen.
SHUFCHGR*
1
Tracks in de wisselaar in
willekeurige volgorde
afspelen.
SHUF-ALL*
2
Tracks in alle apparaten in
willekeurige volgorde
afspelen.
*1 Als een of meer CD/MD-wisselaars zijn
aangesloten.
*2 Als een of meer CD-wisselaars of twee of meer
MD-wisselaars zijn aangesloten.
Als u wilt terugkeren naar de normale
weergavestand, selecteert u "REP-OFF" of
"SHUF-OFF".
Tip
Met "SHUF-ALL" kunt u tracks niet in willekeurige
volgorde afspelen tussen CD-apparaten en MDwisselaars.
Bedieningssatelliet RM-X4S
Bedieningselementen
De overeenkomstige toetsen op de
bedieningssatelliet bedienen dezelfde functies als
die op dit apparaat.
ATT
DSPL
SEEK/AMS
MODE
OFF
OFF
PRESET/
SOURCE
SEL
DISC
VOL
De volgende bedieningselementen op de
bedieningssatelliet moeten op een andere manier
worden bediend dan op het apparaat.
• PRESET/DISC regelaar
Heeft dezelfde functie als (GP/ALBM) –/+ op
het apparaat (indrukken en draaien).
• VOL (volume) regelaar
Heeft dezelfde functie als de volumeknop op
het apparaat (draaien).
• SEEK/AMS regelaar
Heeft dezelfde functie als de M>/
.m toets op het apparaat (draaien, of
draaien en vasthouden).
De werkingsrichting wijzigen
De werkingsrichting van de bedieningselementen
is in de fabriek ingesteld, zoals hieronder wordt
aangegeven.
Verhogen
Verlag en
Als u de bedieningssatelliet rechts op de
stuurkolom moet monteren, kan de
werkingsrichting worden omgekeerd.
1 Terwijl u de VOL regelaar indrukt, houdt u
(SEL) ingedrukt.
Het label bevestigen
Houd bij het bevestigen van het label rekening
met de positie waarin de bedieningssatelliet
wordt gemonteerd.
SEL
DSPL
MODE
MODE
DSPL
SEL
vervolg op volgende pagina t
13

Extra audioapparatuur
U kunt optionele draagbare apparaten van Sony
aansluiten op de BUS AUDIO IN/AUX INaansluiting op het apparaat. Als de wisselaar of
het andere apparaat niet op de aansluiting is
aangesloten, maakt dit apparaat het mogelijk dat
u het draagbare apparaat beluistert via de
luidsprekers in de auto.
Opmerking
Wanneer u een draagbaar apparaat aansluit, moet u
zorgen dat er niets op BUS CONTROL IN is
aangesloten. Als een apparaat is aangesloten op BUS
CONTROL IN, kan "AUX" niet worden geselecteerd
met (SOURCE).
Tip
Wanneer u zowel een draagbaar apparaat als een
wisselaar aansluit, gebruikt u de optionele AUX-INkeuzeschakelaar.
Aanvullende informatie
Voorzorgsmaatregelen
• Wanneer uw auto in de volle zon heeft gestaan,
moet u eerst het apparaat laten afkoelen voordat u
het gebruikt.
• Een elektrisch bediende antenne schuift
automatisch uit wanneer het apparaat wordt
ingeschakeld.
Condensvorming
Op een regenachtige dag of in een zeer vochtige
omgeving kan vocht condenseren op de lenzen en
het display van het apparaat. In dit geval kan de
werking van het apparaat worden verstoord.
Verwijder de disc en wacht ongeveer een uur tot alle
vocht is verdampt.
Extra apparaten selecteren
1 Druk herhaaldelijk op (SOURCE) tot "AUX
REAR IN" wordt weergegeven.
Bedien het draagbare apparaat met de toetsen
op het apparaat zelf.
Het volume aanpassen
Pas vóór het afspelen voor elk aangesloten
audioapparaat het volume aan.
1 Verlaag het volume op het apparaat.
2 Druk herhaaldelijk op (SOURCE) tot "AUX
REAR IN" wordt weergegeven.
3 Start met het afspelen van het draagbare
audioapparaat op een normaal volume.
4 Stel uw gebruikelijke luistervolume in op het
apparaat.
5 Druk herhaaldelijk op (SEL) tot "AUX"
wordt weergegeven en druk de volumetoets
omhoog of omlaag om het ingangsniveau aan
te passen (±6 dB).
Optimale geluidskwaliteit behouden
Let op dat u geen drankjes op het apparaat of de
discs morst.
Opmerkingen over discs
• Raak het oppervlak van de disc niet aan zodat dit
schoon blijft. Pak de disc bij de randen vast.
• Bewaar de discs in het doosje of het discmagazijn
wanneer u deze niet gebruikt.
• Stel discs niet bloot aan hitte/hoge temperaturen.
Laat de discs niet achter in een geparkeerde auto
of op het dashboard/de hoedenplank.
• Plak geen etiketten op de discs en gebruik geen
discs met kleverige inkt/resten. Dergelijke discs
kunnen stoppen met draaien, waardoor de werking
wordt verstoord of de disc kan worden
beschadigd.
• Gebruik geen discs waarop stickers zijn geplakt.
Als u dergelijke discs toch gebruikt, kan dat leiden
tot:
– het niet uitwerpen van een disc (doordat een
sticker losraakt en het uitwerpmechanisme wordt
geblokkeerd);
– het niet correct lezen van audiogegevens
(bijvoorbeeld geluid verspringt of wordt niet
weergegeven) doordat de sticker onder invloed
van de warmte krimpt en de disc krom trekt.
• Discs met afwijkende vormen (bijvoorbeeld hart,
vierkant, ster) kunnen niet met dit apparaat
worden afgespeeld. Als u dit toch probeert, kan
het apparaat worden beschadigd. Gebruik
dergelijke discs niet.
• U kunt geen CD's van 8 cm afspelen.
14

• Maak een disc voor het
afspelen altijd schoon met een
in de handel verkrijgbare
reinigingsdoek. Veeg de disc
van binnen naar buiten schoon.
Gebruik geen oplosmiddelen
zoals benzine, thinner en in de
handel verkrijgbare
reinigingsmiddelen of
antistatische sprays voor grammofoonplaten.
Opmerkingen over CD-R/CD-RW
discs
• Sommige CD-R's/CD-RW's (afhankelijk van de
opnameapparatuur of de staat van de disc) kunnen
niet met dit apparaat worden afgespeeld.
• U kunt geen CD-R/CD-RW afspelen die niet is
gefinaliseerd.
Muziekdiscs die zijn gecodeerd met
copyrightbeveiligingstechnologieën
Dit product is ontworpen om discs af te spelen die
voldoen aan de Compact Disc (CD)-norm .
Recentelijk hebben bepaalde platenmaatschappijen
discs op de markt gebracht die zijn gecodeerd met
copyrightbeveiligingstechnologieën. Sommige van
deze discs voldoen niet aan de CD-norm en kunnen
wellicht niet worden afgespeeld met dit apparaat.
Bericht over DualDiscs
Een DualDisc is een tweezijdige disc, waarop aan
de ene kant DVD-materiaal is opgenomen en aan
de andere kant digitaal audiomateriaal. Echter,
aangezien de kant met het audiomateriaal niet
voldoet aan de Compact Disc (CD)-norm, wordt
een juiste weergave op dit apparaat niet
gegarandeerd.
Informatie over MP3-/WMAbestanden
MP3 (MPEG-1 Audio Layer-3) is een compressieindeling voor muziekbestanden. Audio-CDgegevens worden gecomprimeerd tot ongeveer 1/10
van de oorspronkelijke grootte.
WMA (Windows Media Audio) is een alternatieve
compressie-indeling voor muziekbestanden. AudioCD-gegevens worden gecomprimeerd tot ongeveer
1/22* van de oorspronkelijke grootte.
* Alleen voor 64 kbps
• Het apparaat is compatibel met het ISO 9660 level
1/level 2-formaat, Joliet/Romeo in
expansieformaat en Multi Session (meerdere
sessies).
• Maximumaantal:
– mappen (albums): 150 (inclusief hoofdmap en
lege mappen).
– MP3-/WMA-bestanden (tracks) en mappen die
op een disc passen: 300 (als de naam van een
map/bestand veel tekens bevat, kan dit aantal
minder dan 300 zijn).
– tekens dat kan worden weergegeven voor de
naam van een map/bestand is 32 (Joliet) of 64
(Romeo).
• ID3-tag versies 1.0, 1.1, 2.2, 2.3 en 2.4 gelden
alleen voor MP3. ID3-tag is 15/30 tekens (1.0 en
1.1) of 63/126 tekens (2.2, 2.3 en 2.4). WMA-tag
is 63 tekens.
Afspeelvolgorde van MP3-/WMAbestanden
MP3/WMA
Opmerkingen
• Wanneer u een MP3-/WMA-bestand een naam
geeft, moet u altijd de extensie ".mp3"/".wma" aan
de bestandsnaam toevoegen.
• Als u een MP3-/WMA-bestand met VBR (variabele
bitsnelheid) afspeelt of snel vooruit-/terugspoelt,
wordt de verstreken speelduur waarschijnlijk niet
nauwkeurig weergegeven.
• Als de disc in meerdere sessies is opgenomen,
wordt alleen de indeling van de eerste track van de
eerste sessie herkend en afgespeeld (alle andere
indelingen worden overgeslagen). De
prioriteitsvolgorde van de indeling is CD-DA, ATRAC
CD en MP3/WMA.
– Als de eerste track CD-DA is, wordt alleen CD-DA
van de eerste sessie afgespeeld.
– Als de eerste track geen CD-DA is, wordt alleen de
ATRAC CD of MP3/WMA afgespeeld. Als de disc
geen gegevens met deze indelingen bevat, wordt
"NO MUSIC" weergegeven.
Opmerkingen over MP3
• Finaliseer de disc voordat u het apparaat gebruikt.
• Als u een MP3-bestand met een hoge bitsnelheid
afspeelt, zoals 320 kbps, wordt het geluid
waarschijnlijk onderbroken.
Opmerkingen over WMA
• Bestanden gemaakt met lossless compressie
kunnen niet worden afgespeeld.
• Met copyright beveiligde bestanden kunnen niet
worden afgespeeld.
vervolg op volgende pagina t
Map
(album)
MP3-/WMAbestand
(track)
15

Informatie over ATRAC CD's
1
ATRAC3plus-indeling
ATRAC3 (Adaptive Transform Acoustic Coding3)
is een compressietechnologie voor audio. AudioCD-gegevens worden gecomprimeerd tot ongeveer
1/10 van de oorspronkelijke grootte. Met
ATRAC3plus, een uitgebreide indeling van
ATRAC3, worden audio-CD-gegevens tot ongeveer
1/20 van de oorspronkelijke grootte gecomprimeerd.
Zowel de indeling ATRAC3 als ATRAC3plus is
geschikt voor het apparaat.
ATRAC CD
Op een ATRAC CD zijn audio-CD-gegevens
opgenomen die zijn gecomprimeerd tot ATRAC3of ATRAC3plus-indeling met geautoriseerde
software, zoals SonicStage 2.0 of hoger of
SonicStage Simple Burner.
• Maximumaantal:
– mappen (groepen): 255
– bestanden (tracks): 999
• De tekens voor een map-/bestandsnaam en de
tekstinformatie van SonicStage worden
weergegeven.
Raadpleeg de handleiding van SonicStage of
SonicStage Simple Burner voor meer informatie
over de ATRAC CD.
Opmerking
Maak de ATRAC CD met geautoriseerde software,
zoals SonicStage 2.0 of hoger of SonicStage Simple
Burner 1.0 of 1.1.
Met alle vragen of problemen met betrekking tot dit
apparaat die niet aan bod komen in deze
gebruiksaanwijzing, kunt u terecht bij uw Sonyhandelaar.
Opmerkingen over de lithiumbatterij
• Houd de lithiumbatterij buiten het bereik van
kinderen. Raadpleeg meteen een arts wanneer een
batterij wordt ingeslikt.
• Veeg de batterij schoon met een droge doek voor
een goed contact.
• Houd bij het plaatsen van de batterij rekening met
de juiste polariteit.
• Houd de batterij niet vast met een metalen tang, om
kortsluiting te voorkomen.
WAARSCHUWING
Bij oneigenlijk gebruik kan de batterij
ontploffen.
Probeer niet de batterij op te laden of te
openen; werp ook een lege batterij nooit in
het vuur.
Voor de Klanten in
Nederland
Gooi de batterij niet weg
maar lever deze in als klein
chemisch afval (KCA).
Zekeringen vervangen
Vervang een zekering altijd
door een identiek exemplaar.
Als de zekering doorbrandt,
moet u de voedingsaansluiting
controleren en de zekering
vervangen. Brandt de zekering
vervolgens nogmaals door, dan
kan er sprake zijn van een
defect in het apparaat.
Raadpleeg in dat geval de
dichtstbijzijnde Sonyhandelaar.
Zekering (10A)
Onderhoud
De lithiumbatterij van de
kaartafstandsbediening vervangen
In normale omstandigheden gaat de batterij
ongeveer 1 jaar mee. (Afhankelijk van de
gebruiksomstandigheden kan de levensduur korter
zijn.)
Wanneer de batterij verzwakt, wordt het bereik van
de kaartafstandsbediening kleiner. Vervang de
batterij door een nieuwe CR2025-lithiumbatterij.
Bij een andere batterij bestaat er brand- of
explosiegevaar.
2
c
16
+ zijde omhoog
Aansluitingen schoonmaken
De werking van het apparaat kan worden verstoord
als de aansluitingen tussen het apparaat en het
voorpaneel niet schoon zijn. U kunt dit voorkomen
door het voorpaneel (pagina 4) los te maken en de
aansluitingen te reinigen met een in alcohol
gedrenkt wattenstaafje. Gebruik hierbij niet teveel
kracht. Anders kunnen de aansluitingen worden
beschadigd.
Hoofdeenheid
Opmerkingen
• Uit veiligheidsoverwegingen moet u de motor
uitschakelen en de sleutel uit het contactslot halen
voordat u de aansluitingen reinigt.
• Raak de aansluitingen nooit rechtstreeks aan met
uw vingers of een metalen voorwerp.
Achterkant van
het voorpaneel

Het apparaat verwijderen
Technische gegevens
1 Verwijder de beschermende rand.
1Maak het voorpaneel los (pagina 4).
2Druk beide zijden van de beschermende
rand in en trek de rand naar u toe.
x
2 Verwijder het apparaat.
1Plaats beide ontgrendelingssleutels
tegelijkertijd en duw hierop tot deze
vastklikken.
Haakje wijst
naar binnen.
2Trek de ontgrendelingssleutels naar u toe
om het apparaat los te maken.
3Schuif het apparaat uit de houder.
CD-speler
Signaal/ruis-verhouding: 120 dB
Frequentiebereik: 10 – 20.000 Hz
Snelheidsfluctuaties: Minder dan meetbare waarden
Tuner
FM
Afstembereik: 87,5 – 108,0 MHz
Antenne-aansluiting: Aansluiting voor externe
antenne
Tussenfrequentie: 10,7 MHz/450 kHz
Bruikbare gevoeligheid: 9 dBf
Selectiviteit: 75 dB bij 400 kHz
Signaal/ruis-verhouding: 67 dB (stereo), 69 dB
(mono)
Harmonische vervorming bij 1 kHz: 0,5 % (stereo),
0,3 % (mono)
Scheiding: 35 dB bij 1 kHz
Frequentiebereik: 30 – 15.000 Hz
MW/LW
Afstembereik:
MW: 531 – 1.602 kHz
LW: 153 – 279 kHz
Antenne-aansluiting: Aansluiting voor externe
antenne
Tussenfrequentie: 10,7 MHz/450 kHz
Gevoeligheid: MW: 30 µV, LW: 40 µV
Versterker
Uitgangen: Luidsprekeruitgangen (sure seal)
Luidsprekerimpedantie: 4 – 8 ohm
Maximaal uitgangsvermogen: 50 W × 4 (bij 4 ohm)
Algemeen
Uitgangen:
Audio-uitgang (voor, schakelen tussen subwoofer/
achter)
Relaisaansluiting elektrische antenne
Aansluiting versterker
Ingangen:
Telephone ATT-bedieningsaansluiting
Aansluiting verlichtingsregelaar
BUS-bedieningsingang
BUS-audio-ingang/AUX IN-aansluiting
Afstandsbedieningsingang
Antenne-ingang
Toonregelingen:
Laag: ±10 dB bij 60 Hz (XPLOD)
Gemiddeld: ± 10 dB bij 1 kHz (XPLOD)
Hoog: ± 10 dB bij 10 kHz (XPLOD)
Voeding: 12 V gelijkstroom accu
(negatieve aarde)
Afmetingen: Ongeveer 178 × 50 × 182 mm (b/h/d)
Montageafmetingen: Ongeveer 182 × 53 × 161 mm
(b/h/d)
Gewicht: Ongeveer 1,2 kg
Bijgeleverde accessoires:
Kaartafstandsbediening: RM-X151
Onderdelen voor installatie en aansluitingen (1 set)
vervolg op volgende pagina t
17

Optionele accessoires/apparaten:
Bedieningssatelliet: RM-X4S
BUS-kabel (geleverd met RCA-kabel):
RC-61 (1 m), RC-62 (2 m)
CD-wisselaar (10 discs): CDX-757MX
CD-wisselaar (6 discs): CDX-T70MX, CDX-T69
MD-wisselaar (6 discs): MDX-66XLP
Bronkeuzeschakelaar: XA-C30
AUX-IN-keuzeschakelaar: XA-300
Het is mogelijk dat uw handelaar niet beschikt over
sommige van de hierboven vermelde accessoires.
Vraag uw handelaar om meer informatie.
Octrooien in de Verenigde Staten en in andere
landen vallen onder de licentie van Dolby
Laboratories.
MPEG Layer-3 audio-codeertechnologie en
-patenten gebruikt onder licentie van Fraunhofer
IIS en Thomson.
Opmerking
Dit apparaat kan niet worden aangesloten op een
digitale voorversterker of een equalizer die compatibel
is met het Sony BUS-systeem.
Wijzigingen in ontwerp en technische gegevens
voorbehouden zonder voorafgaande kennisgeving.
• Bepaalde onderdelen werden loodvrij gesoldeerd.
(meer dan 80 %)
• Er werden geen halogene brandvertragende
producten gebruikt in de betreffende
printplaat/printplaten.
• In het omhulsel werden geen halogeen bevattende
brandvertragende producten gebruikt.
• Het karton werd bedrukt met inkt op basis van
plantaardige olie vrij van vluchtige organische
stoffen.
• Voor deze verpakking werd geen polystyreen
schuim gebruikt.
Problemen oplossen
De elektrisch bediende antenne schuift niet uit.
De elektrisch bediende antenne heeft geen relaisdoos.
Geen geluid.
• Het volume is te laag.
• De ATT-functie is ingeschakeld of de Telephone
ATT-functie (als de interfacekabel of een
autotelefoon is aangesloten op de ATT-kabel) is
ingeschakeld.
• De positie van de faderregelaar "FAD" is niet
ingesteld op een systeem met 2 luidsprekers.
• De CD-wisselaar is niet compatibel met de
discindeling (MP3/WMA/ATRAC CD).
tSpeel het bestand af met een CD-wisselaar van
Sony die compatibel is met MP3 of speel het af
met dit apparaat.
Geen pieptoon.
• De pieptoon is uitgeschakeld (pagina 12).
• Er is een optionele versterker aangesloten en u
gebruikt de ingebouwde versterker niet.
De geheugeninhoud is gewist.
• De RESET toets is ingedrukt.
tSla opnieuw op in het geheugen.
• De voedingskabel of de accu is losgekoppeld.
• De voedingskabel is niet goed aangesloten.
Opgeslagen zenders en tijd zijn gewist.
De zekering is doorgebrand.
Maakt geluid wanneer de positie van de
contactsleutel wordt gewijzigd.
De kabels zijn niet goed verbonden met de
voedingsaansluiting voor accessoires in de auto.
Het display verdwijnt van/verschijnt niet in het
weergavevenster.
• De dimmer is ingesteld op "DIM-ON" (pagina 12).
• Het display verdwijnt als u op (OFF) drukt en deze
toets ingedrukt houdt.
tDruk op (OFF) op het apparaat en houd deze
toets ingedrukt tot het display verschijnt.
• De aansluitingen zijn vuil (pagina 16).
Het klepje sluit niet.
Houd Z minstens 2 seconden ingedrukt. Als dit
probleem zich blijft voordoen, raadpleegt u de
dichtstbijzijnde Sony-handelaar.
DSO werkt niet.
DSO heeft wellicht niet het gewenste effect,
afhankelijk van het auto-interieur of het muziekgenre.
De onderstaande controlelijst kan u helpen bij het
oplossen van problemen die zich met het apparaat
kunnen voordoen.
Voordat u de onderstaande controlelijst doorneemt,
moet u eerst de aanwijzingen voor aansluiting en
gebruik controleren.
Algemeen
Het apparaat wordt niet van stroom voorzien.
• Controleer de aansluiting. Controleer de zekering
wanneer alles in orde is.
• Als het apparaat wordt uitgeschakeld en het display
verdwijnt, kan het apparaat niet worden bediend met
de afstandsbediening.
tSchakel het apparaat in.
18
CD's/MD's afspelen
De disc kan niet worden geplaatst.
• Er zit al een disc in het apparaat.
• De disc is met kracht omgekeerd of in de verkeerde
richting geplaatst.
De disc wordt niet afgespeeld.
• Disc defect of vuil.
• De CD-R's/CD-RW's zijn niet geschikt voor
audiogebruik (pagina 15).
MP3-/WMA-bestanden kunnen niet worden
afgespeeld.
De disc is niet compatibel met de MP3-/WMAindeling en -versie (pagina 15).

MP3-/WMA-bestanden worden minder snel
afgespeeld dan andere bestanden.
Bij de volgende discs duurt het langer voordat het
afspelen wordt gestart:
– discs opgenomen met een ingewikkelde structuur;
– discs die in meerdere sessies zijn opgenomen;
– discs waaraan gegevens kunnen worden toegevoegd.
De ATRAC CD kan niet worden afgespeeld.
• De disc is niet gemaakt met geautoriseerde software,
zoals SonicStage of SonicStage Simple Burner.
• Tracks die niet in de groep staan, kunnen niet worden
afgespeeld.
De displayitems rollen niet.
• Bij sommige discs met heel veel tekens kunnen de
tekens niet rollen.
• "A.SCRL" is ingesteld op "OFF".
tStel "A.SCRL-ON" in (pagina 12) of druk op
(SCRL).
Het geluid verspringt.
• Het apparaat is niet goed geïnstalleerd.
tInstalleer het apparaat in een hoek van minder
dan 45° op een stabiele plaats in de auto.
• Disc defect of vuil.
De bedieningstoetsen werken niet.
De disc wordt niet uitgeworpen.
Druk op de RESET toets (pagina 4).
Kaartafstandsbediening werkt niet.
Sluit het klepje.
"MS" of "MD" wordt niet in het brondisplay
weergegeven wanneer zowel de optionele
MGS-X1 als de optionele MD-wisselaar zijn
aangesloten.
Dit apparaat herkent de MGS-X1 als MD-apparaat.
tDruk op (SOURCE) tot "MS" of "MD" wordt
weergegeven en druk herhaaldelijk op (MODE).
Radio-ontvangst
Radiozenders kunnen niet worden ontvangen.
Het geluid is gestoord.
• Sluit een antennebedieningskabel (blauw) of
hulpvoedingskabel (rood) aan op de voedingskabel
van de auto-antenneversterker (alleen als uw auto is
uitgerust met een FM/MW/LW-antenne in de achterof zijruit).
• Controleer de aansluiting van de auto-antenne.
• De auto-antenne schuift niet uit.
tControleer de aansluiting van de
antennebedieningskabel.
• Controleer de frequentie.
• Als de DSO-functie is ingeschakeld, is het geluid
soms gestoord.
tStel DSO in op "OFF" (pagina 7).
Er kan niet worden afgestemd op
voorkeurzenders.
• Sla de juiste frequentie op in het geheugen.
• Het ontvangstsignaal is te zwak.
Er kan niet automatisch worden afgestemd op
zenders.
• De lokale zoekfunctie is niet correct ingesteld.
tHet afstemmen wordt te vaak onderbroken:
Druk op (SENS) tot "LOCAL-ON" wordt
weergegeven.
tHet afstemmen stopt niet bij een zender:
Druk herhaaldelijk op (SENS) tot "MONO-ON"
of "MONO-OFF" (FM) of "LOCAL-OFF" (MW/
LW) wordt weergegeven.
• Het ontvangstsignaal is te zwak.
tStem handmatig af.
Tijdens FM-ontvangst knippert de aanduiding
"ST".
• Stem nauwkeurig af op de frequentie.
• Het ontvangstsignaal is te zwak.
tDruk op (SENS) om de mono-ontvangststand in
te stellen op "MONO-ON".
Een stereo-uitzending van een FM-programma
wordt mono weergegeven.
Het apparaat staat in de mono-ontvangststand.
tDruk op (SENS) tot "MONO-OFF" wordt
weergegeven.
RDS
SEEK begint na enkele seconden weergave.
De zender is geen TP-zender of heeft een zwak
signaal.
tSchakel TA uit (pagina 10).
Geen verkeersinformatie.
• Schakel TA in (pagina 10).
• De zender is een TP-zender, maar zendt toch geen
verkeersinformatie uit.
tStem af op een andere zender.
PTY geeft "- - - - - - - -" weer.
• De huidige zender is geen RDS-zender.
• Geen RDS-gegevens ontvangen.
• De zender geeft het programmatype niet door.
vervolg op volgende pagina t
19

Foutmeldingen/berichten
1
BLANK*
Er zijn geen tracks opgenomen op de MD.*
tSpeel een MD af waarop tracks zijn opgenomen.
ERROR*
1
• De CD is vuil of is omgekeerd geplaatst.*
tReinig de disc of plaats deze op de juiste manier.
• Er is een lege disc in het apparaat geplaatst.
• De disc kan niet worden afgespeeld wegens een of
ander probleem.
tPlaats een andere disc.
FAILURE
De luidsprekers of versterkers zijn niet correct
aangesloten.
tRaadpleeg de installatiehandleiding van dit model
om de aansluitingen te controleren.
LOAD
De disc wordt geladen door de wisselaar.
tWacht tot het laden is voltooid.
L. SEEK +/–
De lokale zoekfunctie is ingeschakeld tijdens
automatisch afstemmen.
NO AF
Er is geen alternatieve frequentie voor de huidige
zender.
tDruk M>/.m omhoog of omlaag terwijl
de programmaservicenaam knippert. Het apparaat
zoekt naar een andere frequentie met dezelfde PIgegevens (programma-identificatie). "PI SEEK"
wordt weergegeven.
NO DISC
De disc is niet in de CD/MD-wisselaar geplaatst.
tPlaats discs in de wisselaar.
NO ID3
Er is geen ID3-tag-informatie aan het MP3-bestand
toegevoegd.
NO INFO
Er is geen tekstinformatie aan het ATRAC3-/
ATRAC3plus/WMA-bestand toegevoegd.
NO MAG
Er is geen discmagazijn in de CD-wisselaar geplaatst.
tPlaats het magazijn in de wisselaar.
NO MUSIC
De disc is geen muziekbestand.
tPlaats een muziek-CD in dit apparaat of de MP3-
compatibele wisselaar.
NO NAME
Er is geen naam voor de track/groep/disc of het album
aan de track toegevoegd.
NO TP
Het apparaat blijft zoeken naar beschikbare TPzenders.
NOT READ
De discgegevens zijn niet gelezen door het apparaat.
tPlaats de disc en selecteer de disc in de lijst.
2
2
NOTREADY
De klep van de MD-wisselaar is open of de MD's zijn
niet juist geplaatst.
tSluit de klep of plaats de MD's op de juiste manier.
OFFSET
Er is wellicht een interne storing.
tControleer de aansluiting. Als de foutmelding in
het display blijft staan, moet u de dichtstbijzijnde
Sony-handelaar raadplegen.
READ
Alle informatie over de track en het album/de groep op
de disc wordt gelezen.
tWacht totdat het lezen is voltooid en het afspelen
wordt automatisch gestart. Afhankelijk van de
trackstructuur kan dit meer dan een minuut in
beslag nemen.
RESET
De CD-speler en CD/MD-wisselaar kunnen niet
worden bediend vanwege een probleem.
tDruk op de RESET toets (pagina 4).
"" of ""
Tijdens het snel terug- of vooruitspoelen heeft u het
begin of het einde van de disc bereikt en kunt u niet
verder.
“”
Het teken kan niet worden weergegeven met het
apparaat.
*1 Als er een fout optreedt tijdens het afspelen van
een CD of MD, wordt het discnummer van de CD of
MD niet in het display weergegeven.
*2 Het discnummer van de disc met de fout verschijnt
in het display.
Als deze oplossingen niet helpen, moet u de
dichtstbijzijnde Sony-handelaar raadplegen.
Als u het apparaat ter reparatie wegbrengt omdat
CD's niet goed worden afgespeeld, neemt u best de
disc mee waarmee het probleem is begonnen.
20


Tragen Sie die Seriennummer (SERIAL NO.) in dem
reservierten Feld ein. Sie finden diese auf einem
Aufkleber, der auf dem Gerätegehäuse angebracht ist.
Nehmen Sie den ausgefüllten Geräte-Pass
anschließend unbedingt aus der Bedienungsanleitung
heraus, falls Sie diese im Fahrzeug aufbewahren
möchten. Bitte bewahren Sie den Geräte-Pass an
einem sicheren Ort auf. Er kann im Falle eines
Diebstahls zur ldentifikation lhres Eigentums dienen.
caraudio
Geräte-Pass
Dieser Geräte-Pass dient als Eigentumsnachweis
für Ihr caraudio-Gerät im Falle eines Diebstahls.
Wir empfehlen, den Geräte-Pass nicht im
Fahrzeug aufzubewahren, um Missbrauch zu
verhindern.
Modellbezeichnung
CDX-RA550
Seriennummer (SERIAL NO.)
Sony Corporation Printed in China
 Loading...