

Page 1
3-218-533-11 (1)
©
FM/AM
Compact Disc Player
CDX-M10
FM/MW/LW
Compact Disc Player
CDX-MR10
Operating Instructi on s
Mode d’emploi
Manual de instrucciones
Bedienungsanleitung
Gebruiksaanwijzing
Istruzioni per l’uso
US
FR
ES
DE
NL
IT
Owner’s Record
The model and serial numbers are located on the bot tom of the unit.
Record these numbers in the spaces provided below .
Refer to these numbers whenever you call upon your Sony dealer regarding this produc t.
Model No.
To cancel the demonstration (DEMO) display, see page 11.
Pour annuler la démonstration (DEMO), reportez-vous à la page 12.
Para cancelar la pantalla de dem ost ración (DEMO), consulte la página 12.
Zum Deakti vier e n der D emo- Anz ei ge (DEM O) sch la gen Sie bit te au f Sei te12 nach.
Om de demonstratie (DEMO) te annuleren, zi e pagina 11.
Per annullare la dimostrazione (DEMO), vedere pagi na 12.
Serial No.
2007 Sony Corporation
Page 2
For installation and connections, see the
–
–
–
–
t
supplied installation/connections manual.
Warning
CDX-M10 only
This equipment has been tested and found to
comply with the limits for a Class B digital
device, pursuant to Part 15 of the FCC Rules.
These limits are designed to provide reasonable
protection against harmful interference in a
residential installation. This equipment
generates, uses, and can radiate radio frequency
energy and, if not installed and used in
accordance with the instructions, may cause
harmful interference to radio communications.
However, there is no guarantee that interference
will not occur in a particular installation. If this
equipment does cause harmful interference to
radio or television reception, which can be
determined by turning the equipment off and on,
the user is encouraged to try to correct the
interference by one or more of the following
measures:
Reorient or relocate the receiving antenna.
Increase the separation between the equipment
and receiver.
Connect the equipment into an outlet on a
circuit different from that to which the receiver
is connected.
Consult the dealer or an experienced radio/TV
technician for help.
You are cautioned that any changes or
modifications not expressly approved in this
manual could void your authority to operate this
equipment.
CAUTION
The use of optical instruments with this produc
will increase eye hazard.
This label is located on the bottom of the
chassis.
The manufacturer of this product is Sony
Corporation, 1-7-1 Konan Minato-ku Tokyo,
108-0075 Japan.
The Authorized Representative for EMC and
product safety is Sony Deutschland GmbH,
Hedelfinger Strasse 61, 70327 Stuttgart,
Germany. For any service or guarantee matters
please refer to the addresses given in separate
service or guarantee documents.
Disposal of Old Electrical &
Electronic Equipment (Applicable in
the European Union and other
European countries with separate
collection systems)
This symbol on the product or on its
packaging indicates that this product shall not be treated
as household waste. Instead it shall be handed over to the
applicable collection point for the recycling of electrical
and electronic equipment. By ensuring this product is
disposed of correctly, you will help prevent potential
negative consequences for the environment and human
health, which could otherwise be caused by inappropriate
waste handling of this product. The recycling of materials
will help to conserve natural resources. For more detailed
information about recycling of this product, please contact
your local Civic Office, your household waste disposal
service or the shop where you purchased the product.
Microsoft, Windows Media,
and the Windows logo are
trademarks or registered
trademarks of Microsoft
Corporation in the United States and/or other
countries.
For the state of california, USA only
Perchlorate Material – special handling may apply,
See www.dtsc.ca.gov/hazardouswaste/perchlorate
Perchlorate Material: Lithium battery contains
perchlorate
Warning if your boat’s ignition has no
ACC position
Be sure to set the Auto Off function (page11).
The unit will shut off completely and
automatically in the set time after the unit is
turned off, which prevents battery dra in.
If you do not set the Auto Off function, press
and hold (OFF) until the displa y disap pe a rs
each time you turn the ignition off.
2
Page 3

Table of Contents
Welcome ! . . . . . . . . . . . . . . . . . . . . . . . . . . . . . 4
Getting Started
Setting the clock . . . . . . . . . . . . . . . . . . . . . . . . 4
Detaching the front panel . . . . . . . . . . . . . . . . . 4
Attaching the front panel . . . . . . . . . . . . . . . 5
Location of controls and basic
operations
Main unit. . . . . . . . . . . . . . . . . . . . . . . . . . . . 6
CD
Display items . . . . . . . . . . . . . . . . . . . . . . . . 8
Repeat and shuffle play. . . . . . . . . . . . . . . . . 8
Radio
Storing and receiving stations . . . . . . . . . . . . . . 8
Storing automatically — BTM. . . . . . . . . . . 8
Storing manually. . . . . . . . . . . . . . . . . . . . . . 8
Receiving the stored stations . . . . . . . . . . . . 8
Tuning automatically . . . . . . . . . . . . . . . . . . 8
RDS (CDX-MR10) . . . . . . . . . . . . . . . . . . . . . . 9
Overview. . . . . . . . . . . . . . . . . . . . . . . . . . . . 9
Setting AF and TA . . . . . . . . . . . . . . . . . . . 10
Selecting PTY. . . . . . . . . . . . . . . . . . . . . . . 10
Setting CT. . . . . . . . . . . . . . . . . . . . . . . . . . 10
Other functions
Changing the sound settings. . . . . . . . . . . . . . 11
Adjusting the sound characte ri stics
— BAL/FAD/SUB. . . . . . . . . . . . . . . . . . . 11
Customizing the equalizer curve
— EQ3 . . . . . . . . . . . . . . . . . . . . . . . . . . . . 11
Adjusting setup items — SET . . . . . . . . . . . . 11
Using optional equipment. . . . . . . . . . . . . . . . 12
Auxiliary audio equipment. . . . . . . . . . . . . 12
Card remote commander RM-X114. . . . . . 12
Marine remote commander RM-X11M. . . 13
Additional Information
Precautions . . . . . . . . . . . . . . . . . . . . . . . . . . . 14
Notes on discs . . . . . . . . . . . . . . . . . . . . . . 14
Playback order of MP3/WMA files . . . . . . 15
About MP3 files. . . . . . . . . . . . . . . . . . . . . 15
About WMA files. . . . . . . . . . . . . . . . . . . . 15
Maintenance . . . . . . . . . . . . . . . . . . . . . . . . . . 15
Removing the unit. . . . . . . . . . . . . . . . . . . . . . 15
Specifications . . . . . . . . . . . . . . . . . . . . . . . . . 16
Troubleshooting . . . . . . . . . . . . . . . . . . . . . . . 17
Error displays/Messages. . . . . . . . . . . . . . . 18
3
Page 4
Welcome !
Getting Started
Thank you for purchas in g t hi s Sony Compact
Disc Player. You can enjoy your boating with the
following functions .
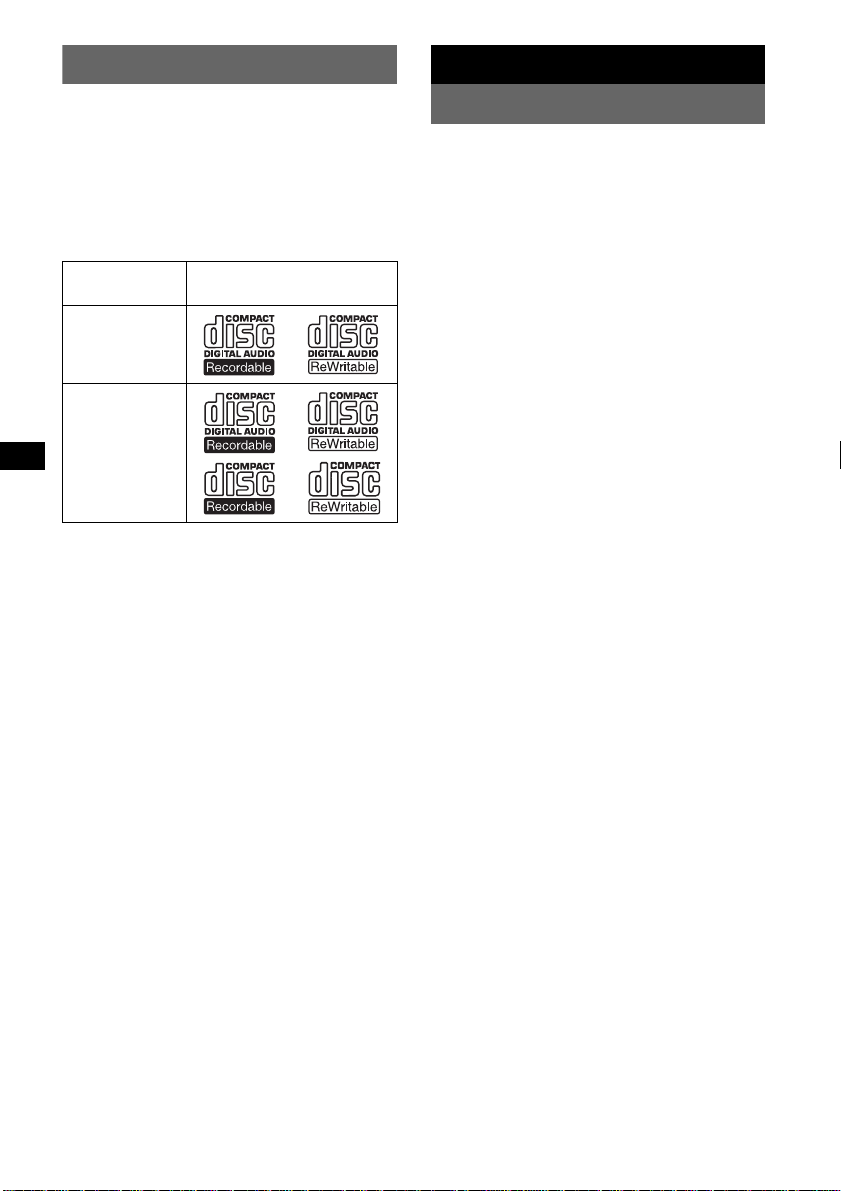
• CD playback
You can play CD-DA (also containi ng CD
TEXT) and CD-R/CD-RW (MP3/WMA files
(page 15)).
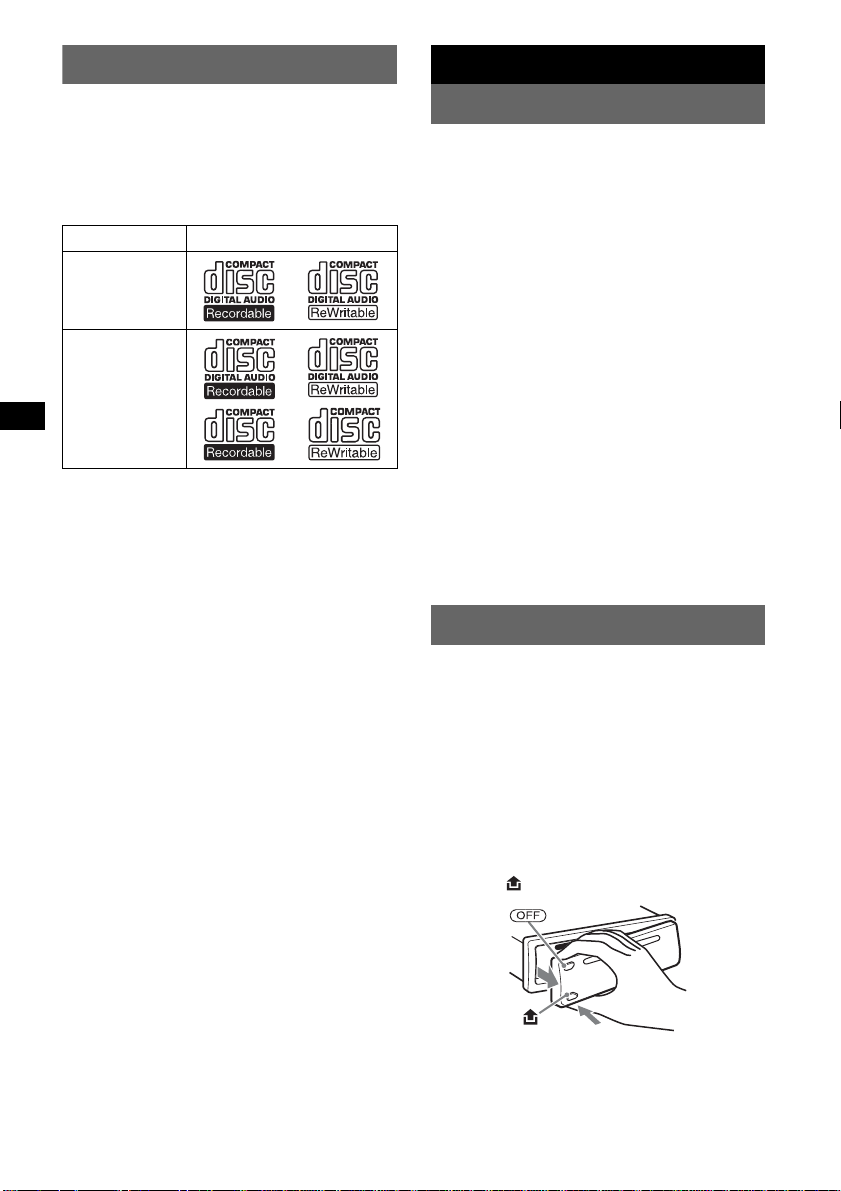
Type of dis c s Label on the disc
CD-DA
MP3
WMA
• Radio reception
–You can store up to 6 stations per band.
CDX-M10:
FM1, FM2, FM3, AM1 and AM2
CDX-MR10:
FM1, FM2, FM3, M W a nd LW
–BTM (Best T unin g Memory): The unit selec ts
strong signal stations and stores them.
• RDS services
–You can listen to FM stations with the Radio
Data System (RDS) in Europe.
(CDX-MR10)
• Sound adjustment
–EQ3 stage2: You can choose any one of 7
preset equalizer curves.
• Auxiliary equipment connection
An AUX input jack on the front of the unit
allows connection of a portable audio device.
Setting the clock
CDX-M10:
12-hour indication
CDX-MR10:
24-hour indication
1 Press and hold the select button.
The setup display ap pears.
2 Press the select button repeatedly
until “CLOCK-ADJ” appears.
3 Press (SEEK) +.
The hour indication flashes.
4 Rotate the volume control dial to set
the hour and minute.
To move the digital indication, press (SEEK)
–/+.
5 Press the select button.
The setup is complete and the clock starts.
To display the clock, press (DSPL). Press
(DSPL) again to return to the previous display.
Tip
You ca n set the clock automatically with the RDS
feature (page 10). (CDX-MR10)
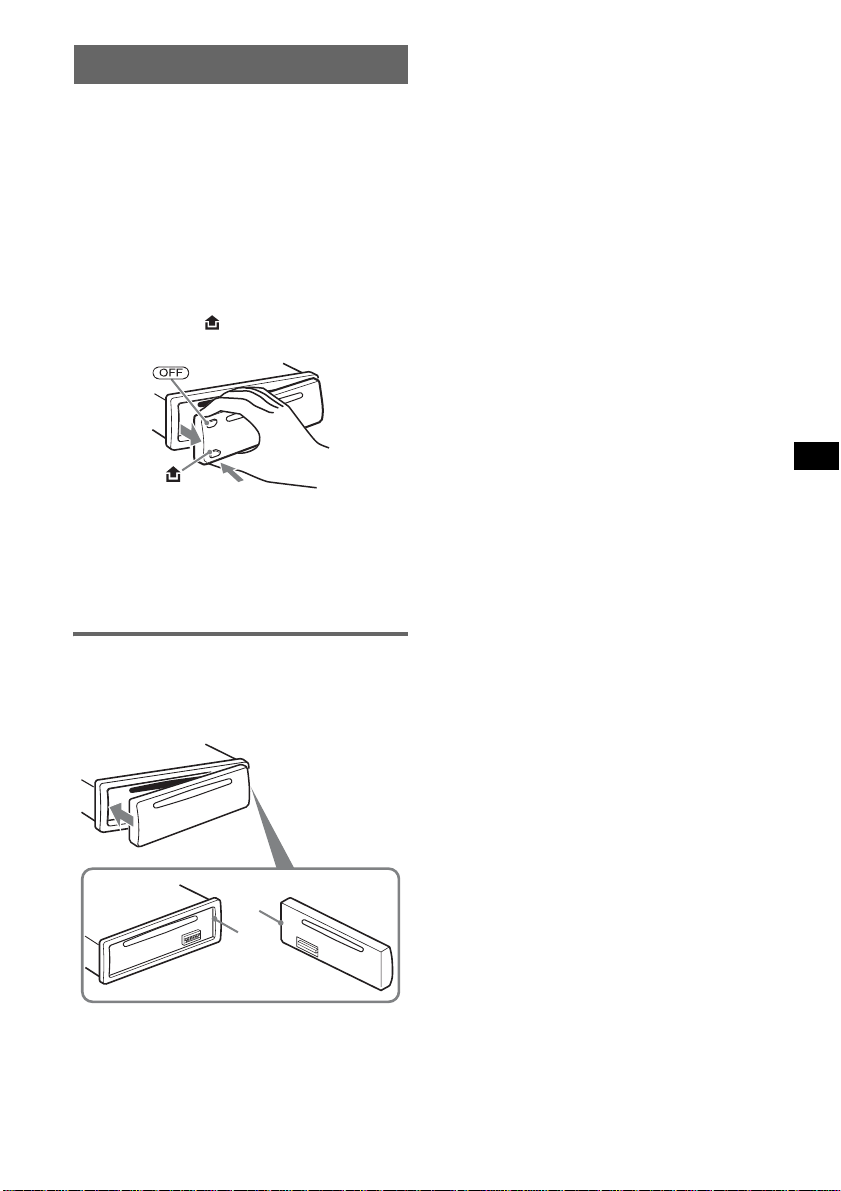
Detaching the front panel
You can detach the front panel of this unit to
prevent theft.
Caution alarm
If you turn the ignition switch to the OFF
position without detaching the front panel, the
caution alarm will sound for a few seconds.
The alarm will only sound if the built-in
amplifier is used.
1 Press (OFF).
The unit is turned off.
2 Press , then pull it off towards you.
Notes
• Do not drop or put excessive pressure on the front
panel and display window.
• Do not subject the front panel to heat/high
temperature or moisture. Avoid leaving it in a
4
moored boat.
Page 5
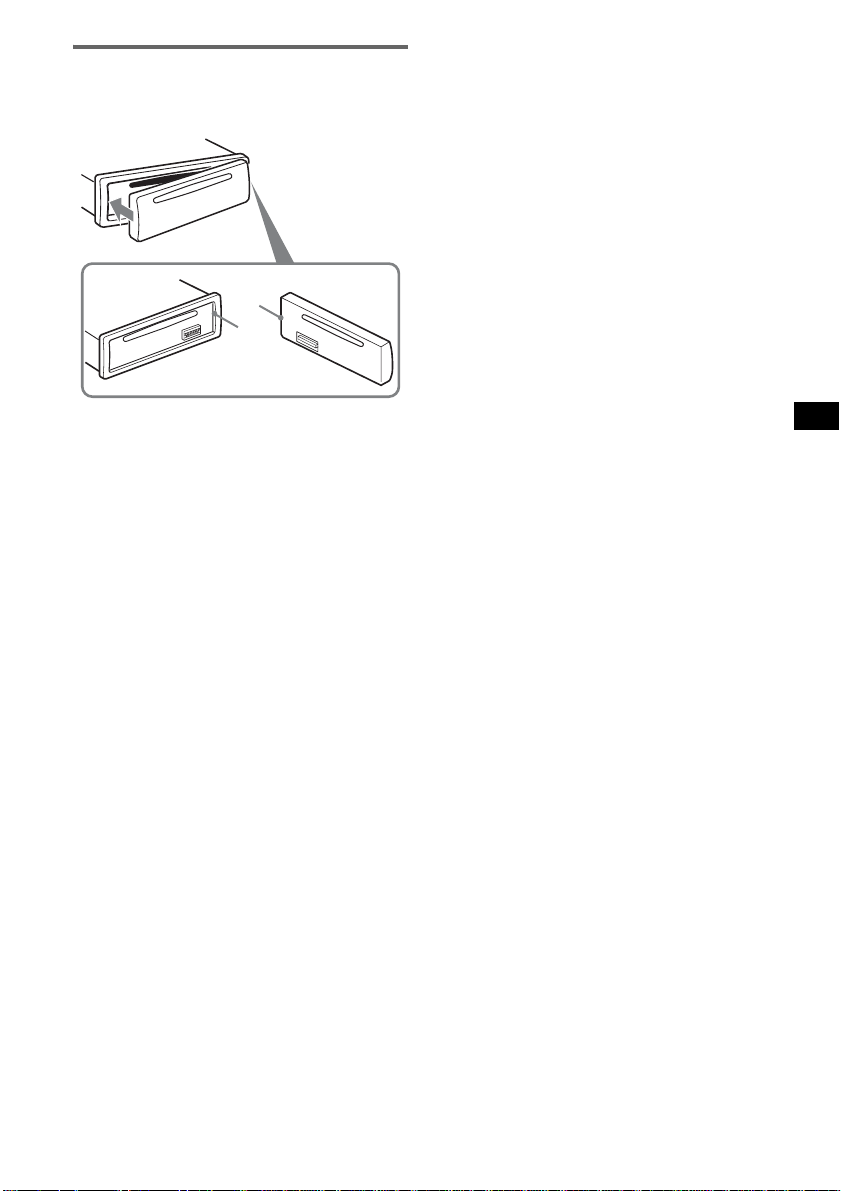
Attaching the front panel
Engage part A of the front panel with part B of
the unit, as illustrated, and push the left side into
position until it clicks.
A
B
Note
Do not put anything on the inner surface of the front
panel.
5
Page 6
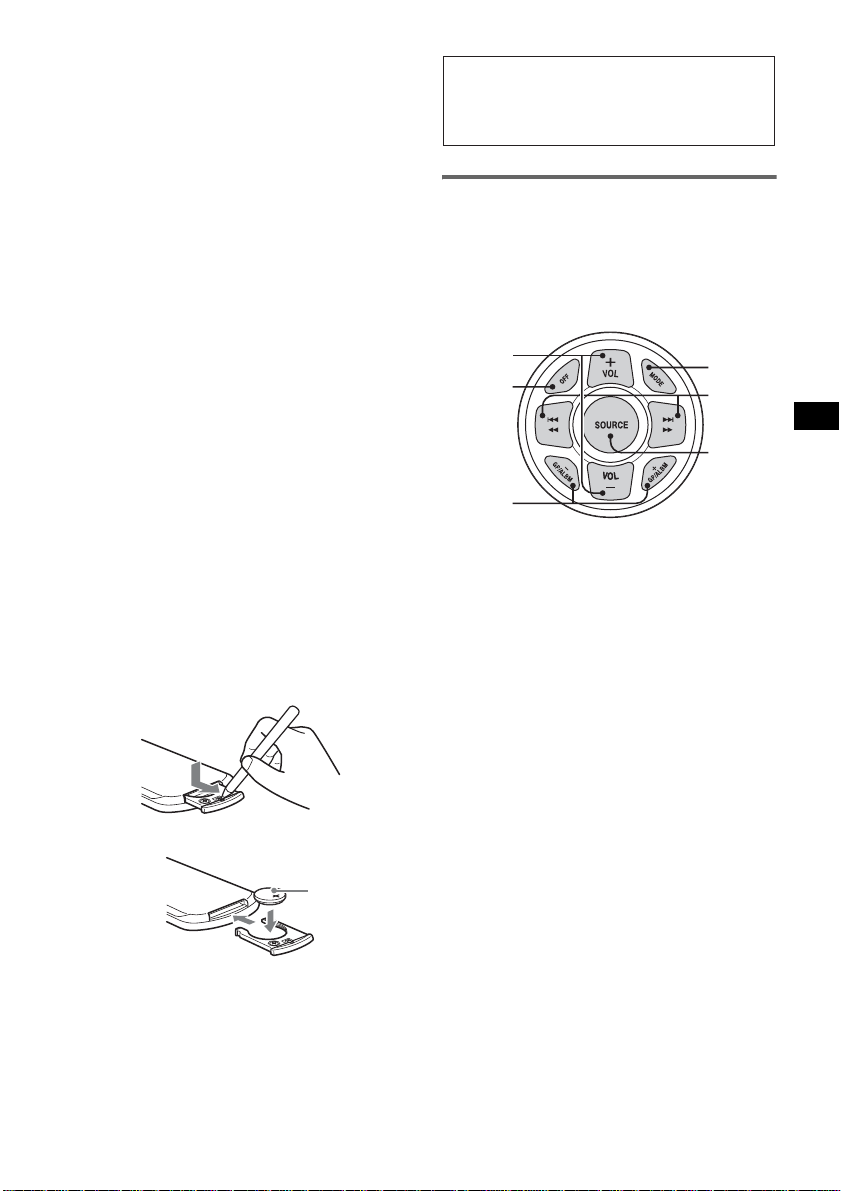
Location of controls and basic operations
qaq
q
9
q
q
q
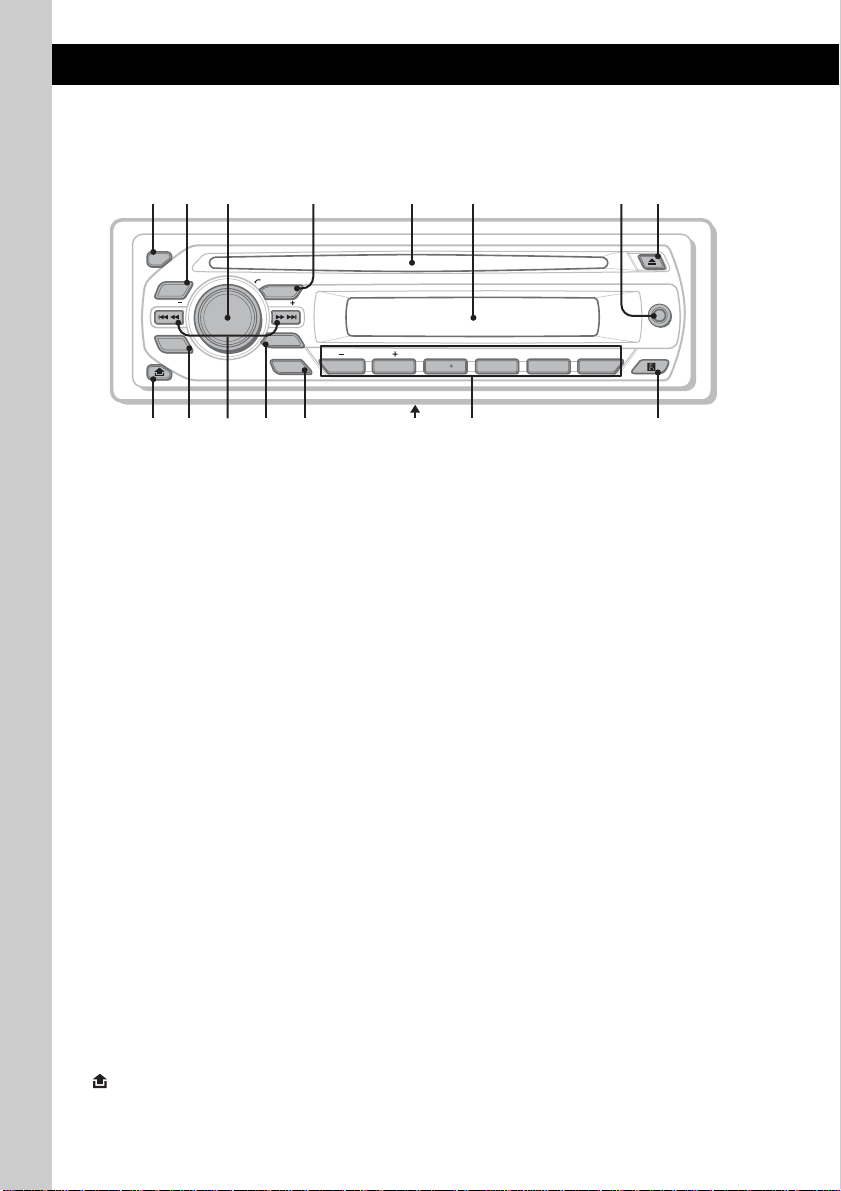
Main unit
1
2
OFF
EQ3
SEEK
SCRL
DSPL
4 5 8673
PUSH SELECT
SOURCE
SEEK
MODE
ALBUM
1623 54
AUX
PAUSEREP SHUF
;
This section contains instructions on the location
of controls an d basic operati ons.
For details, see the respective pages.
A OFF button
T o power off; stop the source.
B EQ3 (equalizer) button page 11
T o select an equalizer type (XPLOD,
VOCAL, EDGE, CRUISE, SPACE,
GRAV I T Y, CUSTOM or OFF) .
C Volume control dial/select button
page 11
To adjust volume (rotate); select setup items
(press and rotate).
D SOURCE button
To power on; change the source (Radio/CD/
AUX).
E Disc slot
Insert the disc (l abel side up), playback
starts.
F Display window
G AUX input jack page 12
To connect a port able audio device.
H Z (eject) butto n
To eject the disc.
I (front panel release) button page 4
s
d
qf
g
J DSPL (display)/SCRL (scroll) button
page 8
To change display items (press); scro l l t h e
display item (press and hold).
K SEEK –/+ buttons
CD:
To skip tracks (press); skip tracks
continuously (press, then press again within
about 1 secon d and hold); reverse/fast forward a track (p ress and hold).
Radio:
To tune in stations a utomatically (pres s); find
a station manually (pr ess and hold).
L MODE button page 8
To select the radio band.
M BTM button (CDX-M10) page 8
To start the BTM function (press and hold).
AF (Alternative Frequencies)/
TA (Traffic Announcement)/
PTY (Progra m Type) button (CDXMR10) page 10
To set AF and TA (press); select PTY (press
and hold) in RDS.
N Frequency select sw itch (CDX- M10
only)
(located on the bottom of the unit)
See “Frequency select switch ” i n th e
supplied installa ti on/connections man ual .
h
6
Page 7

O Number buttons
CD:
(1)/(2): ALBUM –/+ (during M P3/WMA
playback)
To skip albums (press); skip albums
continuously (press and hold).
(3): REP page 8
(4): SHUF page 8
(6): PAUSE
T o pa use pla y back o f a CD on t his u ni t.
To cancel, press aga in.
Radio:
To receive stored stations (press); store
stations (press and hold).
P Receptor f or the card remo t e
commander
About AUX cap
When not using the AUX input jack (7), use the
supplied AUX cap to prevent water entering. Keep the
AUX cap out of the reach of children to prevent
accidental swallowing.
7
Page 8
CD
Radio
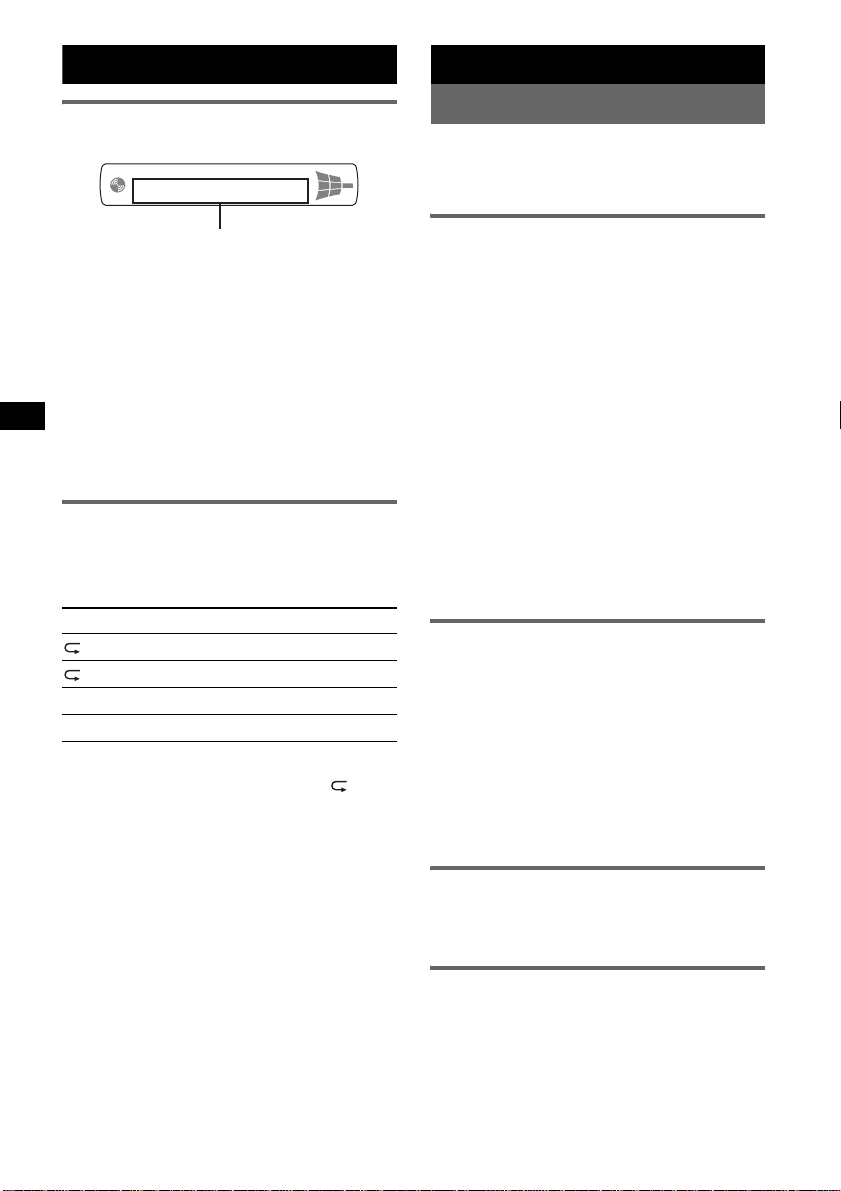
Display items
Track number/Elapsed playing time,
Disc/artist name, Album number*
Album name, Track name, Text
information*
*1 Album number is displayed only when the album is
changed.
*2 When playing an MP3, ID3 tag is displayed, and
when playing a WMA, WMA tag is displayed.
To change displa y i te m s, press (DSPL).
Tip
Displayed items will differ , de pending on the disc type,
recording format and settings. For details on MP3/
WMA, see pa ge15.
2
, Clock
1
,
Repeat and shuffle play
1 During playback, press (3) (REP) or
(4) (SHUF) repeatedly until the
desired setting app ears.
Select To play
TRACK track repeat edly .
ALBUM* album repeatedly.
SHUF ALBUM* album in random order.
SHUF DISC disc in random order.
* When an MP3/WMA is played.
To return to normal play mode, select “ OFF”
or “SHUF OFF.”
Storing and receiving stations
Caution
When tuning in stat i ons while boating, use Bes t
Tuning Memory (BTM) to prevent an accident.
Storing automatically — BTM
1 Press (SOURCE) repeatedly until
“TUNER” appears.
To change the band, pr es s (MODE)
repeatedly.
2 Press and hold the select button.
The setup display ap pears.
3 Press the select button repeatedly
until “BTM” appears.
4 Press (SEEK) +.
The unit stores stations in orde r of frequency
on the number buttons.
A beep sounds when the setting is stored.
Storing by the BTM button
(CDX-M10 only)
Press and hold (BTM) until “BTM” flas hes,
instead of steps 2 to 4.
Storing manually
1 While receiving the statio n th at you
want to store, press and hold a
number button ((1) to (6)) until
“MEMORY” appears.
Note
If you try to st or e a no t her s t at io n o n t he same n um be r
button, the previously stored station will be replaced.
Tip
When a RDS station is stored, the A F/TA setting is
also stored (page 10). (CDX-MR10 only)
Receiving the stored stations
1 Select the band, then press a number
button ((1) to (6)).
Tuning automatically
1 Select the band, then press (SEEK) –/+
to search for the station.
Scanning stops when the unit receives a
station. Repeat this procedure until the
desired station is received.
8
Page 9
Tip
If you know the frequency of the station you want to
listen to, press and hold (SEEK) –/+ to locate the
approximate frequency, then press (SEEK) –/+
repeatedly to fine adjust to the desired frequency
(manual tuning).
RDS (CDX-MR10)
Overview
FM stations with Ra di o D ata System (RDS)
service send ina udible digital information along
with the regular radio program signal.
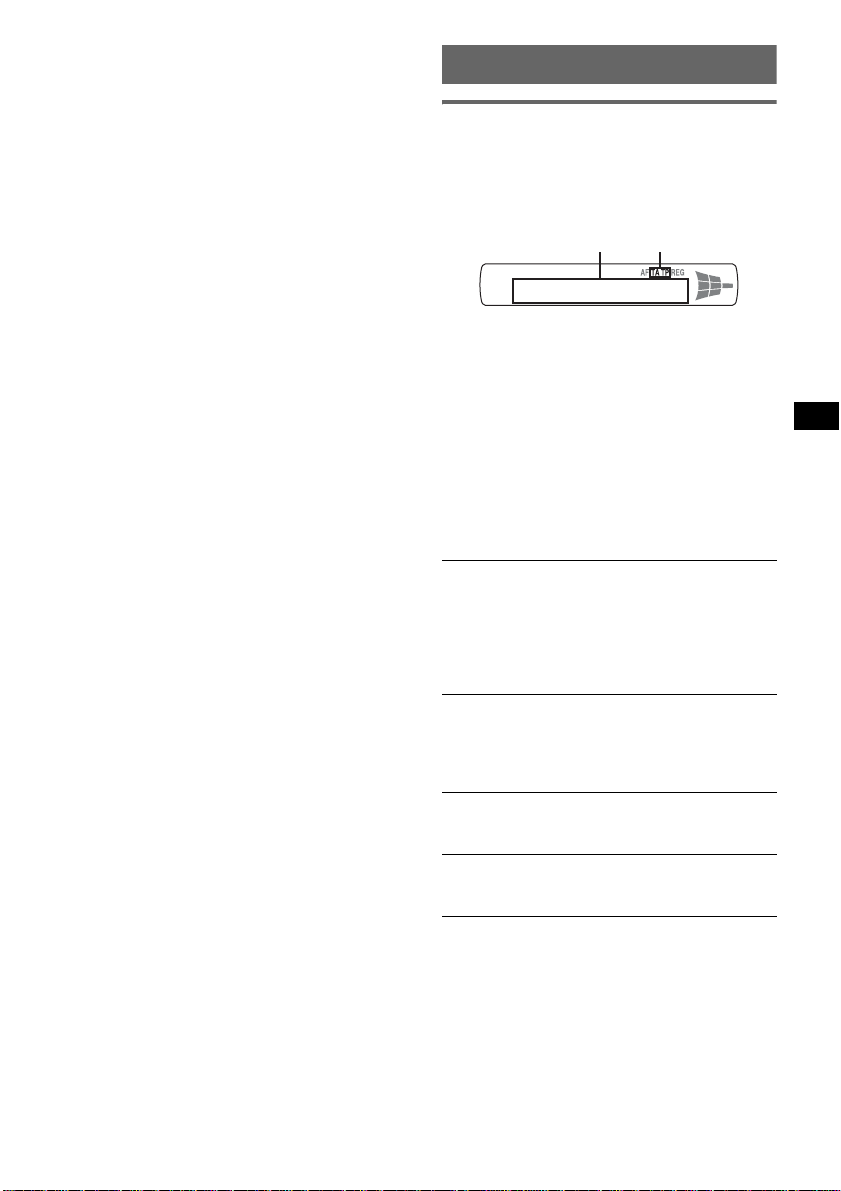
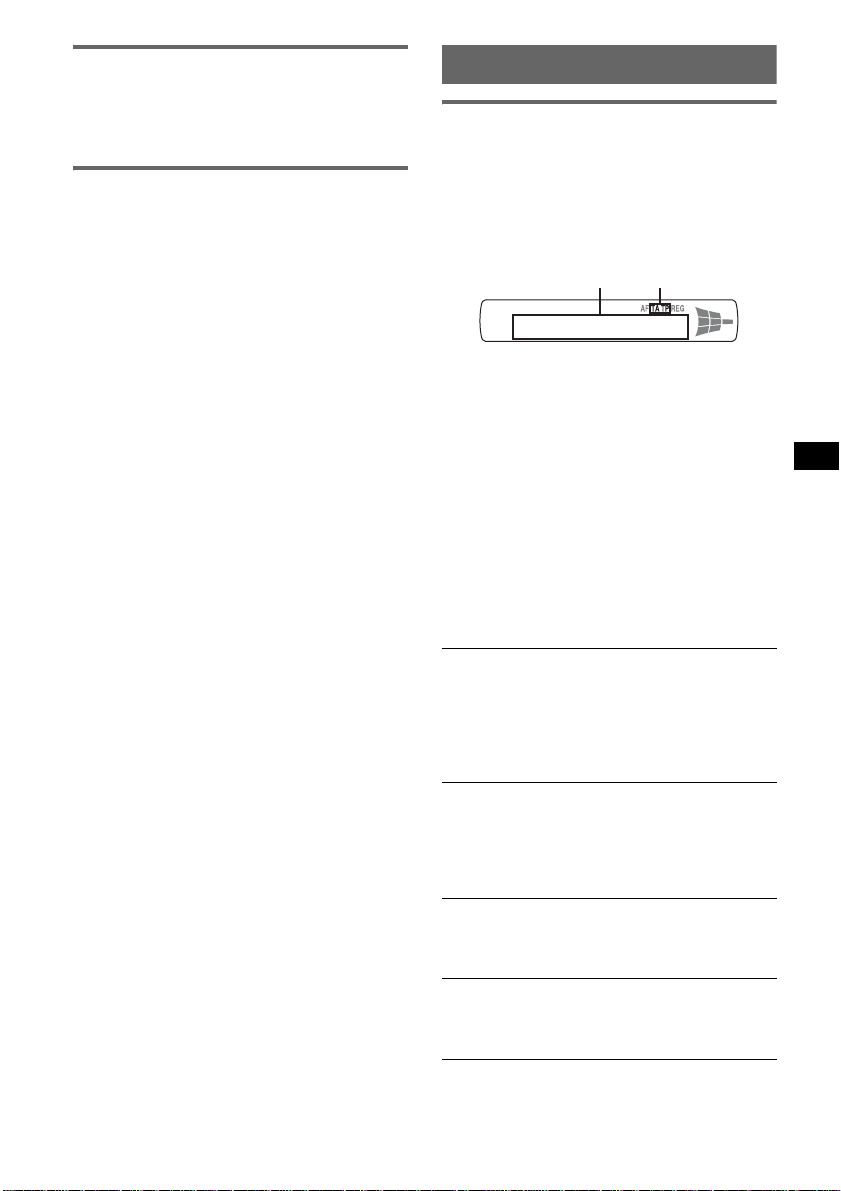
Display items
BA
A Frequency*1 (Program service name), Preset
number, Clock, RDS data
B TA/TP*
*1 While receiving the RDS station, “ *” is displayed
*2 “TA” flashes during traffic information. “TP” lights
To change display items A, press (DSPL).
RDS services
This unit automatically pro vides RDS serv ices as
follows:
AF (Alternative Freque nc ie s)
Selects and retunes the station with the
strongest signal in a network. By using this
function, you can continuo usly listen to th e
same program du ri ng a long-distance voyage
without having to retune the s a me station
manually.
TA (Traffic Announcement)/TP (Tra ffic
Program)
Provides current tra ffic information/programs.
Any information/program received, wi ll
interrupt the currently selected source.
PTY (Program Types)
Displays the currently received pr o gram type .
Also searches yo ur selected program t y pe.
CT (Clock Time)
The CT data from the RDS transmission sets
the clock.
Notes
• Depending on the country/region, not all RDS
functions may be available.
• RDS will not work if the signal strength is too weak,
or if the station you are tuned to is not transmitting
RDS data.
2
on the left of the frequency indication.
up while such a station is received.
9
Page 10

Setting AF and TA
1 Press (AF/TA) repeatedly until the
desired setting app ears.
Select To
AF-ON activate AF and deactivate TA.
TA-ON activate TA and deactivate AF.
AF, TA-ON activate both AF and TA.
AF, TA-OFF deactivate both AF and TA.
2 Withi n 5 s econ d s, pres s a g ain a num ber button
of the local station.
Repeat this procedure until the local station is
received.
Selecting PTY
1 Press and hold (AF/TA) (PTY) during
FM reception.
Storing RDS stations with the AF and
TA setting
You can preset RDS stations along with the AF/
TA setting. If you use the BTM functi on, only
RDS stations are stored with the same AF/TA
setting.
If you preset manually, you can preset both RD S
and non-RDS stations with t he AF/TA s ettin g fo r
each.
1 Set AF/TA, then store the station with BTM or
manually.
Receiving emergency
announcements
With AF or TA on, the emergency
announcements will automatically interrupt the
currently selected source.
Tip
If you adjust the volume level during a traffic
announcement, that level will be stored into memory
for subsequent traffic announcements, independently
from the regular volume level.
Staying with one regional program
— REG
When the AF function is on: this unit’s factory
setting restricts reception to a specific regio n, so
you will not be switched to another regional
station with a stronger frequency.
If you leave this regional program’s reception
area, set “REG-OFF ” i n setup during FM
reception (pag e 12).
Note
This function does not work in the UK and in some
other areas.
Local Link function (UK only)
This function enables you to select other local
stations in the area, even if they are not stored on
your number button s.
1 During FM reception, press a numb er butto n
((1) to (6)) on which a local station is stored.
The current program type name appears if the
station is transmitting PTY data.
2 Press (AF/TA) (PTY) repeatedly until
the desired program type appears.
3 Press (SEEK) –/+.
The unit start s to search for a station
broadcasting the selected program type.
Type of programs
NEWS (News), AFFAIRS (Current Affairs),
INFO (Information), SPORT (Sports),
EDUCATE (Education), DRAMA (Drama),
CULTURE (Culture), SCIENCE (Science),
VARIED (Varied), POP M (Popular Music),
ROCK M (Rock Music), EASY M (Easy
Listening), LIGHT M (Light Cla ss ical),
CLASSICS (Classical), OTHER M (Other
Music Type), WEATHER (Weather),
FINANCE (Finance), CHILDREN (Children’s
Programs), SOCIAL A (Social Affairs),
RELIGION (Religion), PHONE IN (P hon e In),
TRAVEL (Travel), LEISURE (Leisure), JAZZ
(Jazz Music), COUNTRY (Country Music),
NATION M (National Music), OLDIES (Oldies
Music), FOLK M (Folk Music), DOCUMENT
(Documentary)
Note
You cannot use this function in countries/regions
where no PTY data is available.
Setting CT
1 Set “CT-ON” in setup (page 11).
Notes
• The CT function may not work even though an RDS
station is being received.
• There might be a difference between the time set by
the CT function and the actual time.
10
Page 11

Other functions
Adjusting setup items — SET
Changing the sound settings
Adjusting the sound
characteristics — BAL/FAD/SUB
You can adjust the balance, fader, and subwoofer
volume.
1 Press the select button repeat edly
until “BAL,” “FAD” or “SUB” appears.
The item changes as follows:
1
LOW*
t MID*1 t HI*1 t
BAL (left-right) t FAD (front-rear) t
SUB (subwoofer volume )*
*1 When EQ3 is activated (page 11).
*2 When the audio output is set to “SUB”
(page 11).
“A TT ” is d ispla y ed at th e lo west setti ng, and c an
be adjusted up to 21 steps.
*3 When AUX source is activated (page 12).
2 Rotate the volume control d i al to
adjust the selected item .
After 3 seconds, the setting is complete and
the display retur ns to normal play/rec eption
mode.
Customizing the equalizer curve
— EQ3
“CUSTOM” of EQ3 allows you to make your
own equalizer settings.
1 Select a source, then press (EQ3)
repeatedly to select “CUSTOM.”
2 Press the select button repeat edly
until “LOW,” “MID” or “HI” appears.
3 Rotate the volume control d i al to
adjust the selected item .
The volume level is adjusta bl e in 1 dB steps,
from –10 dB to +10 dB.
Repeat steps 2 and 3 to adjust the equalizer
curve.
To restore the factory-set equalizer curve,
press and hold th e select button before the
setting is complete.
After 3 seconds, the setting is complete and
the display retur ns to normal play/rec eption
mode.
Tip
Other equalizer types are also adjustable.
2
t AUX*
3
1 Press and hold the select button.
The setup display appears.
2 Press the select button repeatedly
until the desired item appears.
3 Rotate the volume control dial to
select the setting (example “ON” or
“OFF”).
4 Press and hold the select button.
The setup is complete and the display returns
to normal play/reception mode.
Note
Displayed items will differ, depending on the source
and setting.
The following items can be set (follow the page
reference for details):
“
z” indicates the default setti ngs.
CLOCK-ADJ (Clock Adjust) (page 4)
1
(Clock Time)
CT*
To set “CT-ON” or “CT-OFF” (
BEEP
To set “BEEP-ON” (z) or “BEEP-OFF.”
2
AUX-A*
(AUX Audio)
To turn the AUX source display “AUX-A-ON”
(
z) or “AUX-A-OFF” (page 12).
A.OFF (Auto Off)
To shut off automatically after a desired time
when the unit is turned off,
–“A.OFF-NO” (
z), “A.OFF-30S (Seconds),”
“A.OFF-30M (Minutes )” or “A.OFF-60M
(Minutes).”
REAR/SUB*
2
To switch the audio output.
–“ REAR-OUT” (
z): to output to a power
amplifier.
–“ SUB-OUT”: to output to a subwoofer.
DEMO
(Demonstration)
To set “DEMO-ON” (z) or “DEMO-OFF.”
DIM (Dimmer)
To change the brightness of the display.
–“ DIM-ON”: to dim the display.
–“ DIM-OFF” (
z): to deactivate the dimmer.
M.DSPL (Motion Display)
–“ M.DSPL-ON” (z): to show moving patterns.
–“M.DSPL-OFF”: to deactivate Motion
Display.
continue to next page t
z) (page 9, 10).
11
Page 12
A.SCRL (Auto Scroll)
To scroll long displayed item automatically
when the album/track is changed.
–“A.SCRL-ON” (
z): to scroll.
– “A.SCRL-OFF”: to not scroll.
LOCAL (Local Seek Mode)
–“LOCAL-ON” : to only tune into stati ons with
stronger signals.
–“LOCAL-OFF” (
3
MONO*
(Monaural Mode)
z): to tune normal reception.
To improve poor FM reception, select monaural
reception mod e.
–“MONO-ON” : to hear stereo broadcast in
monaural.
–“MONO-OFF” (
z): to hear stereo broadcast in
stereo.
REG*1*3 (Regional)
To set “REG-ON” (
4
(Low Pass Filter)
LPF*
z) or “REG-OFF” (page 10).
To select the subwoofer cut-off frequency: “LPF
OFF” (
z), “LPF125Hz” o r “LPF 78Hz.”
LOUD (Loudness)
To allow you to listen clearly at low volume
levels.
–“LOUD-ON” : to reinforce bass and treble.
–“LOUD-OFF” (
z): to not reinforce bass and
treble.
BTM (page 8)
*1 CDX-MR10 only
*2 When the unit is turned off.
*3 When FM is received.
*4 When the audio output is set to “SUB.”
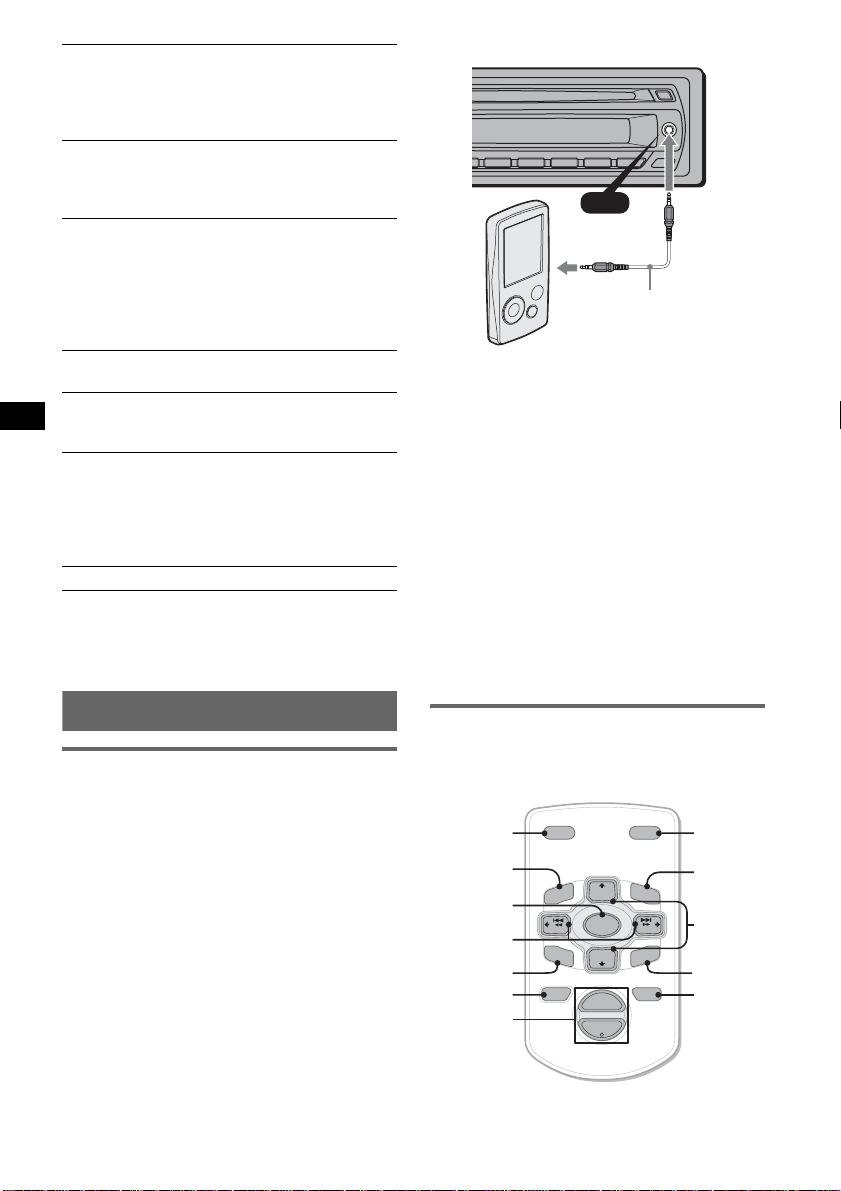
AUX
AUX
Connecting cord*
(not supplied)
* Be sure to use a straight type plug.
Adjust the volume level
Be sure to adjust the volume for each connect ed
audio device before playback.
1 Turn down the volume on the unit.
2 Press (SOURCE) repeatedly until “AUX”
appears.
“FRONT IN” ap pears.
3 Start playback of the portable audio device at a
moderate volume.
4 Set your usual listening volume on the unit.
5 Press the select button repeatedly u n til “ AUX”
appears, and ro ta te the volume control dial to
adjust the input level (–8 dB to +18 dB).
Using optional equipment
Auxiliary audio equipment
By connecting an opt io nal portable audio device
to the AUX input jack (stereo mini jack) on the
unit and then simply selecting the source, you
can listen on your boat’s speakers. The volume
level is adjus t able for any difference be t w een the
unit and the portab le audio device. Follow the
procedure below:
Connecting the portable audio
device
1 Turn off the portable audio device.
2 Turn down the volume on the unit.
3 Connect to the unit.
12
Card remote commander RM-X114
The correspond in g buttons on the card remote
commander control the same functions as those
on this unit.
*
DSPL MODE
+
PRESET
+
DISC
MENU
SOURCE
–
SEEK
SOUND
DISC
PRESET –
+
VOL
–
–
E
LIST
SEEK
N
ATTOFF
MODE
LIST
m/M
*
(DISC
+
PRESET
+/ –)
R
E
T
ENTER
ATT
DSPL
MENU
SOURCE
</,
(SEEK –/+ )
SOUND
OFF
VOL (+/ –)
/
*
Page 13
The following buttons on th e card remote
commander have also different button s/funct ions
from the unit.
• DSPL (display) button
To change display items.
• </, (SEEK –/+) buttons
To control CD/radio, the same as (SEEK)
–/+ on the unit.
• SOUND button
The same as the select button on the unit.
• VOL (volume) +/– buttons
To adjust volume.
• LIST button
To select PTY in RDS. (CDX-MR10 only)
• M/m (DISC */PRESET +/–) buttons
To control CD, the same as (1)/(2)
(ALBUM –/+) on the unit.
• ATT (attenuate) button
To attenuate the sound. To cancel, press again.
* Not available for this unit.
Note
If the unit is turned off and the display disappears, it
cannot be operated with the card remote commander
unless (SOURCE) on the unit is pressed, or a disc is
inserted to activate the unit first.
WARNING
Battery may explode if mistreated.
Do not recharge, disassemble, or dispose of
in fire.
Marine remote commander
RM-X11M
Location of controls
The corresponding buttons on the marine remote
commander control the same functions as those
on this unit.
VOL +/–
OFF
GP/ALBM
–/+
MODE
SEEK –/+
SOURCE
Replacing the lithium battery
Under normal conditions, the battery will last
approximately 1 year. (The service life may be
shorter, depending on the co ndi tions of use.)
When the batt ery bec omes wea k, th e rang e of the
card remote commander becomes shorter.
Replace the battery with a new CR2025 lithium
battery. Use of any other battery may p resent a
risk of fire or explosion.
x
+ side up
Notes on the lithium battery
• Keep the lithium battery out of the reach of children.
Should the battery be swallowed, immediately
consult a doctor.
• Wipe the battery with a dry cloth to assure a good
contact.
• Be sure to observe the correct polarity when
installing the battery.
• Do not hold the battery with metallic tweezers,
otherwise a short-circuit may occur.
The following controls on the marine remote
commander req ui r e a different operation from
the unit.
• VOL (volume) +/– buttons
The same as the volume control dial on the
unit.
• GP/ALBM –/+ buttons
The same as (1)/(2)(ALBUM –/+) on the
unit.
13
Page 14
Additional Information
Precautions
• If your boat has been moor ed in direct sunlight,
allow the unit to cool off before operati ng i t.
• Power antenna (a erial) will extend automatically
while the unit is operating.
Moisture condensation
On a rainy day or in a very damp area , moi s ture
condensation may occur insid e the le nse s and
display of the unit. Should this occur, the unit will
not operate properly. In such a case, remove the disc
and wait for about an hour until the moisture has
evaporated.
To maintain high sound quality
Be careful not to splash juice or other soft drinks
onto the unit or discs.
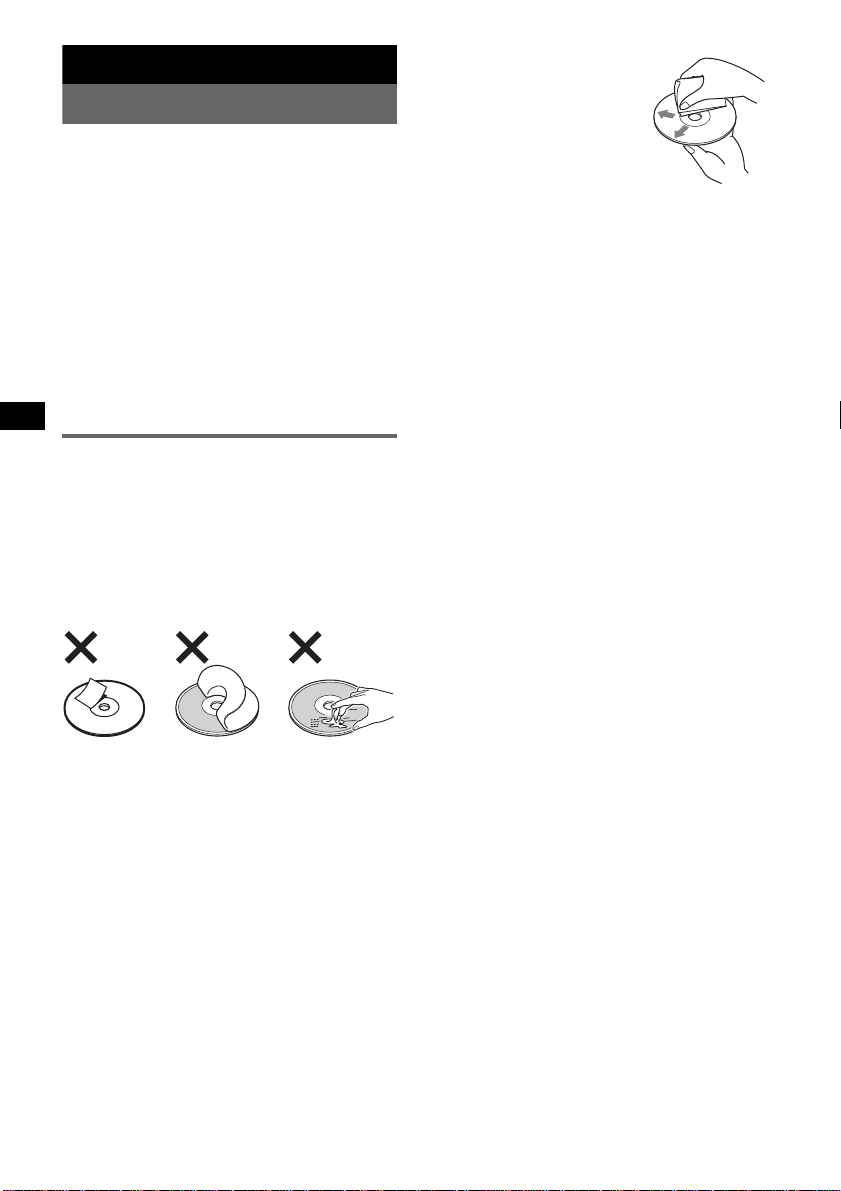
Notes on discs
• To keep a disc clean, do not touch its surface.
Handle the disc by its edge.
• Keep your discs in their cases or disc magazi ne s
when not in use.
• Do not subject discs to hea t /hi gh temperature.
Avoid leaving them in a moored boat.
• Do not attach labels, or us e di scs w it h sticky ink/
residue. Such discs may stop spinning when used,
causing a malfunction, or may ruin the disc.
• Before playi ng, clean the discs
with a commercially available
cleaning cloth. Wipe each disc
from the center out. D o not us e
solvents suc h as benzine,
thinner , com merci al ly a v a il able
cleaners, or antistatic spray
intended for analog discs.
Notes on CD-R/CD-RW discs
• Some CD-Rs/C D-RWs (depending on the
equipment used for its recording or the condition
of the disc) may not play on this unit.
• You cannot play a CD-R/a CD-RW that is not
finalized.
• The unit is compati ble with the ISO 9660 level 1/
level 2 format, Joliet/Romeo in the expansion
format, and Multi Session.
• The maximum num be r of:
– folders (albums): 150 (including root and empty
folders).
– fil es ( tra ck s) an d fo lder s c ont aine d i n a d isc : 300
(if a folder/file names contain many characters,
this number may become less than 300).
– displayable characters for a folder/file name is
32 (Joliet), or 64 (Romeo).
• When the disc is recorded in Multi Session, only
the first track of the first session format is
recognized and played (any other format is
skipped). The priority of the format is CD-DA and
MP3/WMA.
– When the first track is a CD-DA, only CD-DA of
the first session is played.
– When the first track is not a CD-DA, the MP3/
WMA session is played. If the disc has no data
in any of these formats, “NO MUSIC” is
displayed.
• Do not use any discs with labels or stickers
attached.
The followin g ma lfu ncti ons ma y r esult fro m usi ng
such discs:
– Inability to eject a disc (due to a label or sticke r
peeling off and jamming the eject mechanism).
– Inability to read audio data correctly (e.g.,
playback skipping, or no playback) due to heat
shrinking of a sticker or label causing a disc to
warp.
• Discs with non-standard shapes (e.g., heart,
square, star) cannot be played on this unit.
Attempting to do so may damage the unit. Do not
use such discs.
• You cannot play 8 cm (3
1
/4 in) CDs.
14
Music discs encoded with copyright
protection technologies
This product is designed to pla y ba ck discs that
conform to the Compact Disc (CD) standard.
Recently, various music discs encoded with
copyright protection tec hnologies are marketed by
some record co mpanie s. Plea se be aw are th at a mong
those discs, there are some that do not conform to
the CD standard and may no t be pla ya ble by this
product.
Note on DualDiscs
A DualDisc is a two sided disc product which
mates DVD recorded material on one side with
digital audio material on the other side. However,
since the audio material side does not conform to
the Compact Disc (CD) standard, playback on this
product is not guaranteed.
Page 15
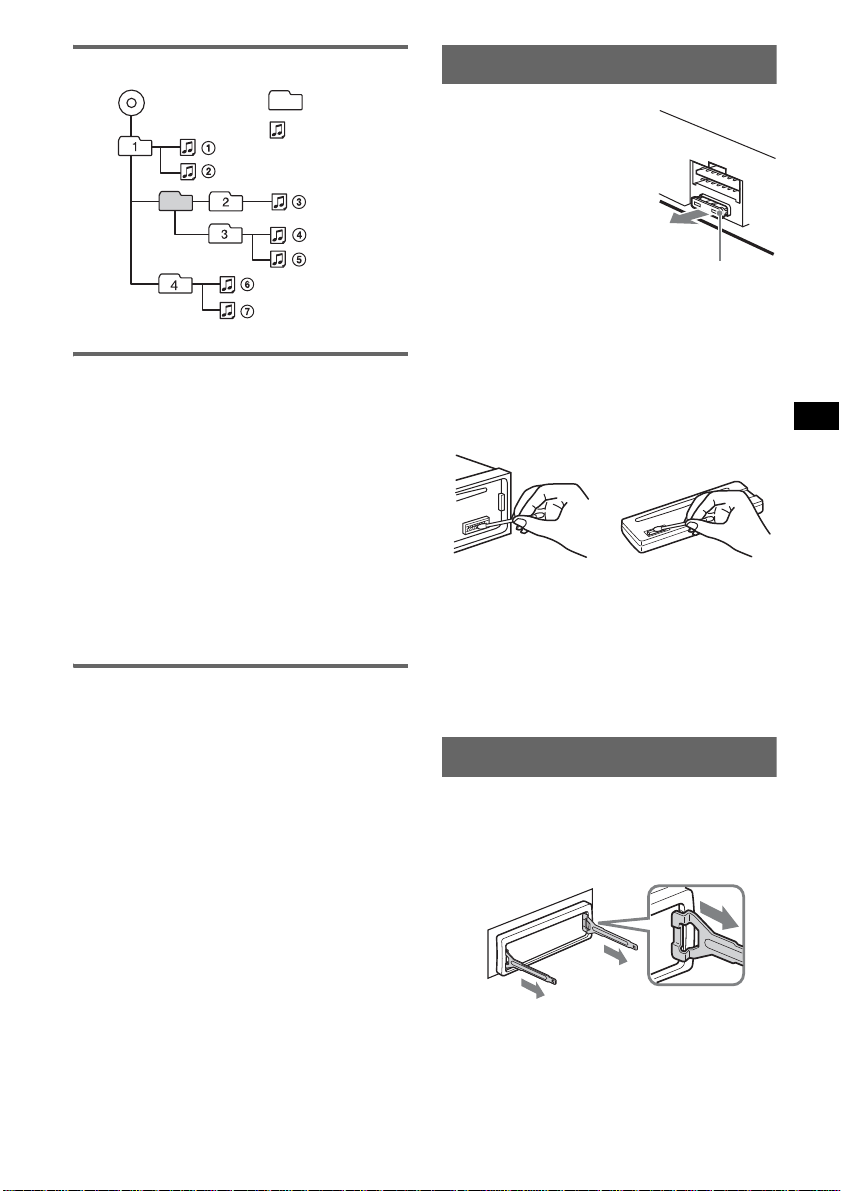
Playback order of MP3/WMA files
MP3/WMA
Folder
(album)
MP3/WMA fi le
(track)
About MP3 files
• MP3, which stan ds for MPEG- 1 Audi o Laye r- 3, is
a music file comp ression format standard. It
compresses audio CD data to appro xi ma t ely 1/10
of its original size.
• ID3 tag versions 1.0, 1.1, 2.2, 2.3 and 2.4 apply to
MP3 only. ID3 tag is 15/30 charact ers (1.0 and
1.1), or 63/126 characters (2. 2, 2.3 and 2.4).
• When naming an MP3 file, be sure to ad d the file
extension “.mp3” to the file name.
• During playback or fast-forward/reverse of a VBR
(variable bit rate) MP3 file, elapsed playing time
may not displ ay accuratel y.
Note
If you play a high-bit-rate MP3, such a s 320 kbps,
sound may be intermittent.
About WMA files
• WMA, which stands for Windows Media Audio,
is a music file co mpression form at s tandard. It
compresses audio CD data to approximately 1/22*
of its original size.
• WMA tag is 63 characters.
• When naming a WM A file, be sure to a dd t h e file
extension “.wma” to the file name.
• During playback or fast-forward/reverse of a VBR
(variable bit rate) WMA file, elapsed playing time
may not displ ay accuratel y.
* only for 64 kbps
Note
Playback of the following WMA files is not supported.
– lossless compression
– copyright-protected
If you have any questions or problems concerning
your unit that are not covered in this manual, consult
your nearest Sony dealer.
Maintenance
Fuse replacement
When replacing the fuse, be
sure to use one matching the
amperage rating stat ed on the
original fuse. If the fuse blows,
check the power connection and
replace the fuse. If the fuse
blows again after replacement,
there may be an internal
malfunction. In such a case,
consult your nearest Sony
dealer.
Fuse (10 A)
Cleaning the connectors
The unit may not function properly if the connectors
between the unit and the front panel are not clean. In
order to prevent this, detach the front panel (page 4)
and clean the conne ct ors with a cott on swab. Do not
apply too much force. O th erwise, the connectors
may be damaged.
Main unit
Notes
• For safety, turn off the ignition before cleaning the
connectors, and remove the key from the ignition
switch.
• Never touch the connectors directly with your fingers
or with any metal device.
Back of the front
panel
Removing the unit
1 Remove the protection collar.
1 Detach the front panel (page 4).
2 Engage the release keys together with the
protection collar.
Orient the re lease
keys as shown.
continue to next page t
15
Page 16
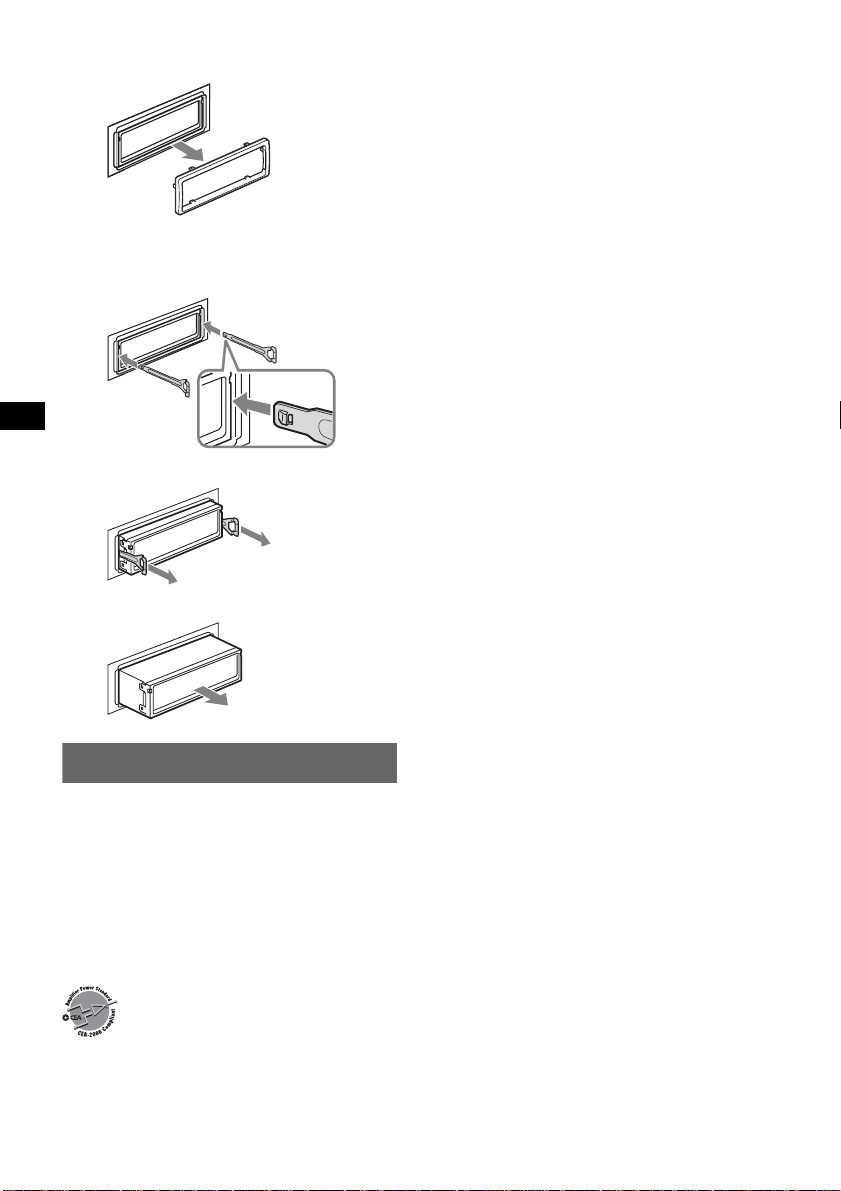
3 Pull out the release keys to remove the
protection collar.
2 Remove the unit.
1 Insert both release keys simultaneously
until they click.
Hook facing
inwards.
2 Pull the release keys to unsea t the unit.
3 Slide the unit out of the mounting.
Specifications
CDX-M10 only
AUDIO POWER SPECIFICATIONS
POWER OUTPUT AND TOTAL HARMONIC
DISTORTION
23.2 watts per channel minimum continuous
average power into 4 ohms, 4 channels driven
from 20 Hz to 20 kHz with no more than 5% total
harmonic distortion.
CDX-M10 only
CEA2006 Standard
Power Output: 17 Watts RMS × 4 at
4 Ohms < 1% THD+N
SN Ratio: 82 dBA
(reference: 1 Watt into 4 Ohms)
CD Player section
Signal-to-noise ratio: 120 dB
Frequency response: 10 – 20,000 Hz
Wo w and flu tter : Below measurable limit
Tuner section
CDX-M10:
FM
T uning range:
87.5 – 108.0 MHz (at 50 kHz step)
87.5 – 107.9 MHz (at 200 kHz step)
FM tuning interval: 50 kHz/200 kHz switchable
Antenna (aerial) terminal:
External antenna (aer ial) connector
Intermediate frequency : 10.7 MHz/450 kHz
Usable sensitivity: 9 dB f
Selectivity: 75 dB at 400 kHz
Signal-to-noise ratio: 67 dB (stereo), 69 dB (mono)
Harmonic distortion at 1 kHz: 0.5 % (stere o),
0.3 % (mono)
Separation: 35 dB at 1 kHz
Frequency response: 30 – 15,000 Hz
AM
T uning range:
531 – 1,602 kHz (at 9 kHz step)
530 – 1,710 kHz (at 10 kHz step)
AM tuning interval: 9 kHz/10 kHz switchable
Antenna (aerial) terminal:
External antenna (aer ial) connector
Intermediate frequency : 10.7 MHz/450 kHz
Sensitivity: 30 µV
CDX-MR10:
FM
T uning range: 87.5 – 108.0 MHz
Antenna (aerial) terminal:
External antenna (aer ial) connector
Intermediate frequency : 10.7 MHz/450 kHz
Usable sensitivity: 9 dB f
Selectivity: 75 dB at 400 kHz
Signal-to-noise ratio: 67 dB (stereo), 69 dB (mono)
Harmonic distortion at 1 kHz: 0.5 % (stere o),
0.3 % (mono)
Separation: 35 dB at 1 kHz
Frequency response: 30 – 15,000 Hz
MW/LW
T uning range:
MW: 531 – 1,602 kHz
LW: 153 – 279 kHz
Antenna (aerial) terminal:
External antenna (aer ial) connector
Intermediate frequency : 10.7 MHz/450 kHz
Sensitivity: MW: 30 µV, LW: 40 µV
Power amplifier section
Outputs: Speaker outputs (sure seal connectors)
Speaker impedance: 4 – 8 ohms
Maximum power output: 52 W × 4 (at 4 ohms)
16
Page 17
General
Output:
Audio outputs terminal (rear/sub switchable)
Power antenna (aerial) relay control terminal
Power amplifier control terminal
Inputs:
Telephone ATT control terminal (CDX-MR10
only)
Remote controller input terminal
Antenna (aeria l) input terminal
AUX input jack (stereo mini jack)
Tone controls:
Low: ±10 dB at 60 Hz (XPLOD)
Mid: ±10 dB at 1 kHz (XPLOD)
High: ±10 dB at 10 kHz (XPLOD)
Power requirements: 12 V DC boat battery
(negative ground (earth))
Dimensions: Approx . 178 × 50 × 179 mm
1
(7
/8 × 2 × 71/8 in) (w/h/d)
Mounting dimensions: Approx. 182 × 53 × 162 mm
1
(7
/4 × 21/8 × 61/2 in) (w/h/d)
Mass: Approx. 1.2 kg (2 lb 11 oz)
Supplied accessories:
AUX cap
Parts for installation and connectio ns (1 set )
Optional accessories/equipment:
Marine remote commander: RM-X11M
Card remote commander: RM-X114
Y our dealer may not handle some of the above listed
accessories. Please ask the dealer for detailed
information.
MPEG Layer-3 audio coding technology and
patents licensed from Fraunhofer IIS and Thomson.
This product is protected by certain intellectual
property rights of Microsoft Corporation. Use or
distribution of such technology outside of this
product is prohibited without a license from
Microsoft or an authorized Microsoft subsidiary.
Design and specifications are subject to change
without notice.
• Halogenated flame retardants are not used in the
certain printed wiring boards.
• Halogenated flame retardants are not used in
cabinets.
• Packaging cushions are made from paper.
Troubleshooting
The following checklist will help you remedy
problems you may encounte r wit h your unit.
Before going through the checklist below, check the
connection and operating procedures.
General
No power is being supplied to the unit.
• Check the connec ti on. I f everything is in order, check
the fuse.
• If the unit is turned off and the display disapp ears, it
cannot be operated with the remote commander.
t Turn on the unit.
The power antenna (aerial) does not extend.
The power antenna (aerial) does not have a relay box.
No sound.
• The volume is too low.
• The ATT function is activated, or the Telephone ATT
function (when the interface cable o f a tele phone is
connected to the ATT lead) is activated.
• The position of the fader control “FAD” is not set for
a 2-speaker system.
No beep sound.
• The beep sound is canceled (page 11).
• An optional power amplifier is connected and you are
not using the built-in amplifier.
The contents of the memory have be en erased.
• The power supply lead or battery has been
disconnected.
• The power supply lead is not connected properly.
Stored stations and correct time are erased.
The fuse has blown.
Makes noise when the position of the ignition
is switched.
The leads are not ma tc he d correctly with the boat’s
accessory power conne cto r.
During playback or reception, demonstration
mode starts.
If no operation is performed for 5 minutes with
“DEMO-ON” set, demonstration mode starts.
t Set “DEMO-OFF” (page 11).
The display disappears from/does not app ear
in the display window.
• The dimmer is set “DIM-ON” (page 11).
• The display disappears if you press and hold (OFF).
t Press and hold (OFF) on the unit until the
display appears.
• The connectors are dirty (page 15).
The Auto Off function does not operate.
The unit is turned on. The Auto Off function activates
after turning off the unit.
t Turn off the unit.
continue to next page t
17
Page 18

CD playback
The disc cannot be loaded.
• Another disc is already loaded.
• The disc has been forcibly inserted upside down or in
the wrong way.
The disc does not playback.
• Defective or dirty disc.
• The CD-Rs/CD-RWs are not for audio use (page 14).
MP3/WMA files cannot be played back.
The disc is incompatible with the MP3/W MA format
and version (page 15).
MP3/WMA files take longer to play back than
others.
The following discs take a longer time to star t
playback.
– a disc recorded with a complicated tree structure.
– a disc recorded in M ulti Session.
– a disc to which data can be added.
The display items do not scroll.
• For discs with very many characters, those may not
scroll.
• “A.SCRL” is set to “OFF”.
tSet “A.SCRL-ON” (page 12).
tPress and hold (DSPL) (SCRL).
The sound skips.
• Installation is not correct.
tInstall the unit at an angle of less than 45° in a
sturdy part of the boat.
• Defective or dirty disc.
The disc will not eject.
Press Z (eject) (page6).
Radio reception
The stations cannot be received.
The sound is hampered by noises.
• Connect a power antenna (aerial) control lead (blue)
or accessory power supply lead (red) to the power
supply lead of a boat’s antenna (aerial) booster (onl y
when your boat has built-in antenna (aeria l) in the
rear/side glass).
• Check the connection of the boat antenna ( aer ia l) .
• The auto antenna (aerial) will not go up.
tCheck the connection of the po wer an tenna
(aerial) control lead.
• Check the frequency.
Preset tuning is not possible.
• Store the correct frequency in the memory.
• The broadcast signal is too weak.
Automatic tuning is not possible.
• Setting of the local seek mode is not correct.
tTuning stops too frequently:
Set “LOCAL-ON” (page 12).
tTuning does not stop at a statio n:
Set “MONO-ON” (page 12).
• The broadcast signal is too weak.
tPerform manual tuning.
During FM reception, the “ST” indication
flashes.
• Tune in the frequency accurately.
• The broadcast signal is too weak.
t Set “MONO-ON” (page 12).
An FM program broadcast in stereo is heard in
monaural.
The unit is in monaural reception mode.
t Set “MONO-OFF” (page 12).
RDS (CDX-MR10)
The SEEK starts after a few seco nds of
listening.
The station is non-TP or has weak signal.
t Deactivate TA (page10).
No traffic announcements.
• Activate TA (page 10).
• The station does not broadcast any traffic
announcements despite be ing TP.
t Tune in another station.
PTY displays “- - - - - - - -.”
• The current station is not an RDS station.
• RDS data has not been received.
• The station does not specify the program type.
Error displays/Messages
ERROR
• The disc is dirty or inserted upside down.
t Clean or insert the disc correctly.
• A blank disc has been inserted.
• The disc cannot play due to a problem.
t Insert another disc.
FAILURE
The connection of speakers/amplifiers is incorrect.
t See the insta ll at ion/connections manual of thi s
model to check the connecti o n .
L. SEEK +/–
The local seek mode is on during automatic tuning.
NO AF (CDX-MR10 only)
There is no alternativ e frequency for the current
station.
t Press (SEEK) –/+ while the program s erv ice name
is flashing. The unit starts searching for another
frequency with the same PI (Program
Identification) data (“PI SEEK” appears).
NO INFO
Text information is not written in the MP3/WMA file.
NO MUSIC
The disc does not contain a music file.
t Insert a mus ic CD in thi s unit
NO NAME
A disc/track name is not written in the track.
NO TP (CDX-MR10 only)
The unit will continue searching for available TP
stations.
18
Page 19

OFFSET
There may be an internal malf unc tion.
tCheck the connection. If the error indication
remains on in the display, consult your nearest
Sony dealer.
PUSH EJT
The disc cannot be ejected.
tPress Z (eject) (page 6).
READ
The unit is reading a ll tr a ck and album information on
the disc.
tWait until reading is complete and playback starts
automatically. Depending on the disc structure, it
may take more than a minute.
“” or “”
During reverse or fast-forward, you have reached the
beginning or the end of the disc and you cannot go any
further.
“”
The character cannot be displayed with the unit.
If these solutions do not help improve the si tu ation,
consult your nearest Sony deal er.
If you take the unit to be repaired because of CD
playback trouble, bring the disc tha t was used at the
time the problem began .
19
Page 20
En ce qui concerne l’installation et les
connexions, consulter le manuel
d’installation/raccordement fourni.
CDX-M10 uniquement
ATTENTION
L’utilisation d’instruments optiques avec ce
produit augmente les risques pour les yeux.
Cette étiquette est située sur la partie inférieure
du châssis.
Le fabricant de ce produit est Sony Corporation,
1-7-1 Konan, Minato-ku, Tokyo, 108-0075 Japon.
Son représentant autorisé concernant la CEM et
la sécurité du produit est Sony Deutschland
GmbH Hedelfinger Strasse 61, 70327 Stuttgart,
Allemagne. Veuillez vous référer aux adresses
indiquées dans les documents d’entretien ou de
garantie séparés concernant toute question
relative à l’entretien et à la garantie.
Traitement des appareils électriques
et électroniques en fin de vie
(Applicable dans les pays de l’Union
Européenne et aux autres pays
européens disposant de systèmes
de collecte sélective)
Ce symbole, apposé sur le produit ou sur son emballage,
indique que ce produit ne doit pas être traité avec les
déchets ménagers. Il doit être remis à un point de collecte
approprié pour le recyclage des équipements électriques et
électroniques. En s’assurant que ce produit est bien mis au
rebut de manière appropriée, vous aiderez à prévenir les
conséquences négatives potentielles pour l’environnement
et la santé humaine. Le recyclage des matériaux aidera à
préserver les ressources naturelles. Pour toute information
supplémentaire au sujet du recyclage de ce produit, vous
pouvez contacter votre municipalité, votre déchetterie ou
le magasin où vous avez acheté le produit.
Avertissement au cas où le conta ct de
votre bateau ne dispose pas d’une
position ACC
Veillez à activer la fonction arrêt automatique
(page 12).
L’appareil s’étei nt alors complètement et
automatiquement à l’issue d’un délai réglé,
une fois l’appareil mis hors ten si on. Ce la év ite
que la batterie ne se décharge.
Si vous n’activez pas la fonc ti on arrêt
automatique , appuyez sur la touche (OFF) et
maintenez-la enfoncée jusqu’à ce que
l’affichage disparaisse chaque fois que vous
coupez le contact.
Microsoft, Windows Media et
le logo Windows sont des
marques de commerce ou des
marques déposées de
Microsoft Corporation aux Etats-Unis et/ou
dans d’autres pays.
2
Page 21

Table des matières
Félicitations !. . . . . . . . . . . . . . . . . . . . . . . . . . . 4
Préparation
Réglage de l’horloge . . . . . . . . . . . . . . . . . . . . . 4
Retrait de la façade . . . . . . . . . . . . . . . . . . . . . . 5
Installation de la façade . . . . . . . . . . . . . . . . 5
Emplacement des commandes et
opérations de base
Appareil principal. . . . . . . . . . . . . . . . . . . . . 6
CD
Rubriques d’affichage. . . . . . . . . . . . . . . . . . 8
Lecture répétée et aléatoire . . . . . . . . . . . . . . 8
Radio
Mémorisation et réception des stations. . . . . . . 8
Mémorisation automatique — BTM. . . . . . . 8
Mémorisation manuelle . . . . . . . . . . . . . . . . 8
Réception des stations mémorisées. . . . . . . . 9
Recherche automatique des fréquences . . . . 9
RDS (CDX-MR10) . . . . . . . . . . . . . . . . . . . . . . 9
Aperçu. . . . . . . . . . . . . . . . . . . . . . . . . . . . . . 9
Réglages AF et TA . . . . . . . . . . . . . . . . . . . 10
Sélection de PTY . . . . . . . . . . . . . . . . . . . . 10
Réglage de CT . . . . . . . . . . . . . . . . . . . . . . 11
Autres fonctions
Modification des caractéristiques du son . . . . 11
Réglage des caractéristiques du son
— BAL/FAD/SUB. . . . . . . . . . . . . . . . . . . 11
Personnalisat io n de la courbe de l’égal is eur
— EQ3 . . . . . . . . . . . . . . . . . . . . . . . . . . . . 11
Réglage des paramètres de configuration
— SET . . . . . . . . . . . . . . . . . . . . . . . . . . . . . . 12
Utilisation d’un appareil en option . . . . . . . . . 13
Appareil audio auxiliaire . . . . . . . . . . . . . . 13
Mini-télécommande RM-X114 . . . . . . . . . 1 3
Télécommande marine RM-X11M . . . . . . 14
Informations complémentaires
Précautions . . . . . . . . . . . . . . . . . . . . . . . . . . . 15
Remarques sur les disques. . . . . . . . . . . . . 15
Ordre de lecture de s fichiers
MP3/WMA. . . . . . . . . . . . . . . . . . . . . . . . . 16
A propos des fichiers MP3. . . . . . . . . . . . . 16
A propos des fichiers WMA . . . . . . . . . . . 16
Entretien . . . . . . . . . . . . . . . . . . . . . . . . . . . . . 16
Retrait de l’appareil . . . . . . . . . . . . . . . . . . . . 17
Spécifications . . . . . . . . . . . . . . . . . . . . . . . . . 17
Dépannage . . . . . . . . . . . . . . . . . . . . . . . . . . . 18
Affichage des erreurs et messages . . . . . . . 20
3
Page 22
Félicitations !
Préparation
Nous vous remercions d’avoir fait l’acquisition
de ce lecteur de disq ues compacts Sony. Vous
pouvez profiter de votre navigation grâce aux
fonctions ci-de ssous.
• Lecture de CD
Vous pouvez lire des CD-DA (contenant
également de s i nformations CD TEXT) et des
CD-R/CD-RW (fichiers MP3/WMA
(page 16)).
Type de disque
CD-DA
MP3
WMA
• Réception radio
–Vous pouvez mémoriser jusqu’à 6 stations
pour chaque band e de fréquences.
CDX-M10 :
FM1, FM2, FM3, AM1 et AM2
CDX-MR10 :
FM1, FM2, FM3, MW (PO) et LW (GO)
–BTM (mémorisation des meilleurs accords) :
L’appareil sélectionne les stations émettant
des signaux puissants et les mémorise.
• Services RDS
–Vous pouvez écouter des stations FM
disposant du système RDS (Système de
radiocommun ic at i on de données) en Europ e.
(CDX-MR10)
• Réglage du son
–EQ3 stage2 : Vous pouvez choisir un e des
7 courbes d’égaliseur prédéfinies.
• Raccordement des appareils auxiliaires
Une prise d’ent ré e AUX, située sur la face
avant de l’appareil, permet de raccorder un
appareil audio portatif.
Symbole indiqué sur le
disque
Réglage de l’horloge
CDX-M10 :
Cycle de 12 heures
CDX-MR10 :
Cycle de 24 heures
1 Appuyez sur la touche de sélection et
maintenez-la enfoncée.
L’écran de configuration apparaît.
2 Appuyez plusieurs fois sur la touche
de sélection jusqu’à ce que « CLOCKADJ » apparaisse .
3 Appuyez sur (SEEK) +.
L’indication des heur es clignote.
4 Tournez la molette de réglage du
volume pour régler les heures et les
minutes.
Appuyez sur (SEEK) –/+ pou r déplacer
l’indication numéri que.
5 Appuyez sur la touche de sélection.
La configuration est term i née et l’horloge
démarre.
Pour afficher l’horloge, appuyez sur (DSPL).
Appuyez de nouvea u sur (DSPL) pour reven i r à
l’écran préc édent.
Conseil
Vous pouvez régler l’horloge automatiquement au
moyen de la fonction RDS (page 11). (CDX-MR10)
4
Page 23
Retrait de la façade
Vous pouvez retirer la façade de cet appareil pour
le protéger du vol.
Alarme d’avertissement
Si vous mettez la clé de contact en position OFF
sans ôter la façade, l’alarme d’avertissement
retentit pendant quelques secondes.
L’alarme est émise un iquement lorsque
l’amplificateur intégré est utilisé.
1 Appuyez sur (OFF).
L’appareil est mis hors tension.
2 Appuyez sur , puis sortez la façade
en tirant vers vous.
Remarques
• N’exercez pas de pression excessive sur la façade
ni sur la fenêtre d’affichage et ne la laissez pas
tomber.
• N’exposez pas l a façade à des températures
élevées ou à l’humidité. Evitez de la laisser sur un
bateau amarré.
Installation de la façade
Insérez la partie A de la façade dans la partie B
de l’appareil, tel qu’illustré, puis poussez sur le
côté gauche jusqu’au dé clic indiqu ant qu’elle e st
en position.
A
B
Remarque
Ne posez rien sur la face interne de la façade.
5
Page 24

Emplacement des commandes et opérations de base
qaq
q
9
q
q
q
Appareil principal
1
2
OFF
EQ3
SEEK
SCRL
DSPL
4 5 8673
PUSH SELECT
SOURCE
SEEK
MODE
ALBUM
1623 54
AUX
PAUSEREP SHUF
;
Cette section contient les instructions relatives à
l’emplacement des commandes et aux opérations
de base.
Pour plus de détails, reportez-vous aux numéros
de pages correspondants.
A Touche OFF
Permet de mettre l’appareil hors tension ;
d’arrêter la source.
B Touche EQ3 (égaliseur) page 11
Permet de sélecti onner un type d’égalis eur
(XPLOD, VOCAL, EDGE, CRUISE,
SPACE, GRAVITY, CUSTOM ou OFF).
C Molette de réglage du volume/touche
de sélection page 11
Permet de régler le volum e (tournez) ; de
sélectionner des paramètres de réglage
(appuyez et tourne z).
D Touche SOURCE
Permet de mettre l’appareil sous tension et
de changer de source (Radio/CD/AUX).
E Fente d’i nsertion des disques
Insérez le disque (côté imprimé vers le
haut) ; la lecture démarre.
F Fenêtre d’affichage
G Prise d’entrée AUX page 13
Permet de raccor der un appareil audio
portatif.
s
d
qf
g
H Touche Z (éjecter)
Permet d’éjecter le disque.
I T ouche (déverrouillage de la
façade) page 5
J Touche DSPL (affichage)/SCRL
(défilement) page 8
Permet de changer les rubriques d’ affichage
(appuyez) ; de faire défiler les rubriques
d’affichage (appuyez sur la touche et
maintenez-la enfoncée).
K Touches SEEK –/+
CD :
Permet de saute r de s plages (appuyez) ; de
sauter des plages successives (appuyez une
première fois , puis une seconde fois dans un
délai d’environ 1 seconde tout en maintenant
la touche enfoncée) ; d’avancer/reculer
rapidement dans une plage (appuyez sur la
touche et maintenez-la enfoncée).
Radio :
Permet de régler des stations
automatiquement (appuyez) ; de rechercher
une station manu ellement (appuyez sur la
touche et maintenez-la enfoncée).
L Touche MODE page 8
Permet de sélec tionner la bande radio.
h
6
Page 25

M Touche BTM (CDX-M10) page 8
Permet de lancer la fonction BT M (appuyez
sur la touche et maintenez-la enfoncée).
Touche AF (Fréquences alternatives)/
TA (Messages de radiogu id ag e )/
PTY (Type d’émission) (CDX-MR10)
page 10
Permet de régler AF et TA (appuyez) ; de
sélectionner PTY (appuyez sur la touche et
mainten ez-la enfo ncée) en RDS.
N Sélecteur de fréquence (C DX - M 10
uniquement)
(situé sur la face inférieure de l’appareil)
Pour de plus amples informations, reportezvous à la section « Séle ct eur de fréquence »
du manuel d’installation/connexions fourni.
O Touches numériques
CD :
(1)/(2) : ALBUM –/+ (en cours de
lecture MP3/WMA )
Permettent de sauter des albums
(appuyez) ; de sauter des albums en
continu (appu yez sur la touche et
maintenez-la enfoncée).
(3) : REP page 8
(4) : SHUF page 8
(6) : PAUSE
Permet d’ef fectu er un e paus e lors de la
lecture d’un CD sur cet appareil.
Appuyez de nou veau sur cette touche
pour annuler.
Radio :
Permettent de capter les stations enregistrées
(appuyez) ; de mémoriser des stations
(appuyez sur la touche et maintenez-la
enfoncée).
P Récepteur de la mini-tél écommande
A propos du capuchon AUX
Si vous n’utilisez pas la prise d’entrée AUX (7),
utilisez le capuchon AUX fourni pour éviter la
pénétration d’eau. Tenez le capuchon AUX hors de la
portée des enfants pour éviter toute ingestion
accidentelle.
7
Page 26
CD
Radio
Rubriques d’affichage
Numéro de plage/ temps de lecture écoulé,
nom du disque/a rtiste, numéro de
l’album*
informations textuelles*
*1 Le numéro de l’album s’affiche uniquement lorsque
l’album est modifié.
*2 Lorsque vous lisez un fichier MP3, l’étiquette ID3
s’affiche. La lecture d’un fichier WMA
s’accompagne de l’affichage de l’étiquette WMA.
Pour modifier les rubriques d’affichage, appuyez
sur (DSPL).
Conseil
Les paramètres affichés diffèrent selon le type de
disque, le format d’enregistrement et les réglages.
Pour plus de détails sur le format MP3/WMA,
reportez-vous à la page 16.
1
, nom d’album, nom de la plage,
2
, horloge
Lecture répétée et aléatoire
1 En cours de lecture, appuyez
plusieurs fois sur (3) (REP) ou
(4) (SHUF) jusqu’à ce que le réglage
souhaité apparaisse.
Sélectionnez Pour lire
TRACK une plage en boucle.
ALBUM* un album en bo ucle.
SHUF ALBUM* un album dans un ordre
SHUF DISC un disque dans un ordre
* Lors de la lecture d’un fichier MP3/WMA.
Pour revenir au mode de lecture normal,
sélectionnez « OFF » ou « SHUF OFF ».
aléatoire.
aléatoire.
Mémorisation et réception des
stations
Attention
Pour syntoniser des st ations pendant que vous
naviguez, utilisez la fonction de mémorisa ti on
des meilleurs accords (BTM) afin d’éviter les
accidents.
Mémorisation automatique — BTM
1 Appuyez plusieurs fois sur (SOURCE)
jusqu’à ce que l’indication « TUNER »
apparaisse.
Appuyez plusieurs fois sur (MODE) pour
changer de bande.
2 Appuyez sur la touche de sélection et
maintenez-la enfoncée.
L’écran de configuration apparaît.
3 Appuyez plusieurs fois sur la touche
de sélection jusqu’à ce que « BTM »
s’affiche.
4 Appuyez sur (SEEK) +.
L’appareil enregist re les stations sur le s
touches numériques dans l’ordre des
fréquences.
Un bip retentit lorsque le réglage est
mémorisé.
Mémorisation via la touche BTM
(CDX-M10 unique ment)
Appuyez sur la touche (BTM) et maintenez-la
enfoncée touche jusqu’à ce que « BTM »
clignote, au lieu d’exécuter les étapes 2 à 4 .
Mémorisation manuelle
1 Lorsque vous recevez la station que
vous souhaitez mémoriser, appuyez
sur une touche numérique ((1) à (6))
et maintenez-la enfoncée jusqu’à ce
que « MEMORY » apparaisse.
Remarque
Si vous mémorisez une autre station sur la même
touche numérique, la station mémorisée
précédemment est effacée.
Conseil
Lorsqu’une station RDS est mémorisée, le réglage
AF/TA est également mémorisé (page 10).
(CDX-MR10 uniquement)
8
Page 27
Réception des stations
mémorisées
1 Sélectionnez la bande, pui s appuyez
sur une touche numérique ((1) à (6)).
Recherche automatique des
fréquences
1 Sélectionnez la bande, pui s appuyez
sur (SEEK) –/+ pour rechercher la
station.
Le balayage s’interrompt lorsque l’appareil
capte une station. Répétez cette procédur e
jusqu’à ce que vous captiez la station
souhaitée.
Conseil
Si vous connaissez la fréquence de la station que
vous souhaitez écouter, appuyez sur la touche
(SEEK) –/+ et maintenez-la enfoncée pour localiser la
fréquence approximativement, puis appuyez plusieurs
fois sur (SEEK) –/+ pour régler la fréquence souhaitée
avec précision (syntonisation manuelle).
RDS (CDX-MR10)
Aperçu
Les stations FM disposant du système RDS
(Système de radiocommunication de données)
transmettent des informations numériq ue s
inaudibles en même temps que le signal normal
de leurs émissions radio .
Rubriques d’affichage
BA
A Fréquence*1 (nom du service de l’émission),
numéro de présélection, horloge, données
RDS
B TA/TP*
*1 Lorsque vous captez la station RDS, « * » est
*2 L’indication « TA » clignote pendant les message s
Pour modifier les rubriques d’affichage A,
appuyez sur (DSPL).
Services RDS
Cet appareil propose automatiquement les
services RDS, comme suit :
2
affiché à gauche de l’indication de la fréqu en ce.
de radioguidage. L’indication « TP » s’allume
lorsqu’une de ces stations est captée.
AF (Fréquences alternativ es)
Permet de sélectionner et de régler de nouveau
la station ayant le signal le plus fort sur un
réseau. Cette fonction vous permet d’écouter la
même émission en continu pendant une l ongue
navigation sans avoir à régler de nouveau cette
station manuellement.
TA (Messages de radioguidage)/
TP (Programme de radi oguidage)
Propose les mess ages et les programm es de
radioguidage disponibles à cet instan t. Tout
message/programme reçu interrompt la source
sélectionn ée en cours de diffusion.
PTY (Type d’émission)
Permet d’afficher le type de l’émission en cours
et de rechercher votre type d’émission
sélectionné.
CT (Heure)
Les données CT (heure) accompagnant la
transmission RDS assurent un réglage de
l’horloge.
suite à la page suivante t
9
Page 28

Remarques
• Selon le pays ou la région où vous vous trouvez, il
est possible que les services RDS ne soient pas
tous disponibles.
• La fonction RDS ne fonctionne pas correctement si
le signal de retransmission est faible ou si la station
syntonisée ne transmet pas de données RDS.
Réglages AF et TA
1 Appuyez plusieurs fois sur (AF/TA)
jusqu’à ce que le réglage souhaité
apparaisse.
Sélectionnez Pour
AF-ON activer AF et désactiver TA.
TA-ON activer TA et désactiver AF.
AF, TA-ON activer AF et TA.
AF, TA-OFF désactiver AF et TA.
Mémorisation des stations RDS avec
les réglages AF et TA
Vous pouvez présélectionner les st at i ons RDS
avec les réglages AF/TA. Si vous utilisez la
fonction BTM, seules les stations RDS sont
mémorisées avec les mêmes réglages AF/TA.
Si vous effectuez une présélec tion manuelle,
vous pouvez présélectionner à la fois des stations
RDS et non-RDS, avec leurs réglages AF/TA
respectifs.
1 Réglez AF/TA, puis mémorisez la station à
l’aide de la fonction BTM ou manuellement.
Fonction de liaison locale
(Royaume-Uni uniquement)
Cette fonction vous per m et de sélectionner
d’autres stations locales de la région, même si
elles ne sont pas associées à vos touches
numériques.
1 En cours de réception FM, appuyez sur une
touche numérique ( (1) à (6)) sur laquelle
une station locale est mémorisée.
2 Dans les 5 secondes qui suivent, appuyez de
nouveau sur la touc he numérique de la station
locale.
Répétez cette pro cédure jusqu’à ce que vous
captiez la station locale souhaitée.
Sélecti on de PTY
1 Appuyez sur la touche (AF/TA) (PTY)
en cours de réception FM et
maintenez-la enfoncée.
Le nom du ty pe d’ émis si on di f f us é ap pa raît si
la station transmet des données PTY.
2 Appuyez plusieurs fois sur (AF/TA)
(PTY) jusqu’à ce que le type
d’émission souhaité apparaisse.
3 Appuyez sur (SEEK) –/+.
L ’appareil commence à rechercher une station
diffusant le type d’émission sélectionné.
Réception de messages d’urgence
Lorsque la fonc t ion AF ou TA est activée, les
messages d’urgence interrompent
automatiquement la source séle ctionnée en cours
de diffusion.
Conseil
Si vous réglez le niveau de volume pendant la
diffusion d’un message de radioguidage, ce niveau
sera enregistré dans la mémoire pour les messages
de radioguidage suivants, indépendamment du niveau
de volume normal.
Ecoute continue d’une émission
régionale — REG
Lorsque la fonction AF est activée : ce réglage
par défaut restreint la réception à une région
spécifique, afin qu’une st at i on régionale ayant
une fréquence plus puissante ne soit pas captée.
Si vous quittez la zone de ré ception de cette
émission régionale, rég le z « REG-OFF » lors de
la configuration en cour s de réception FM
(page 12).
Remarque
Cette fonction est inopérante au Royaume-Uni et dans
certaines autres régions.
10
Types d’émissions
NEWS (Nouvelles), AFFAIRS (Dossiers
d’actualité), INFO (Informations), SPORT
(Sports), EDUCATE (Education), DRAMA
(Théâtre), CULTURE (Culture), SCIENCE
(Science), VARIED (Divers) , POP M (Musiq ue
pop), ROCK M (Roc k), EASY M (Musique
légère), LIGHT M (Musique classique légère),
CLASSICS (Musique classique), OTHER M
(Autres styles de musique), WEATHER
(Météo), FINANCE (Finance), CHILDREN
(Emissions pou r l es enfants), SOCIAL A
(Affaires sociale s), RELIGION (Religion),
PHONE IN (Emissions ligne ouverte),
TRAVEL (Voyage), LEISURE (Loisirs), JAZZ
(Jazz), COUNTRY (Musique country),
NATION M (Musique nationale), OLDIES
(Musique d’autrefois), FOLK M (Musique
folk), DOCUMENT (Documentaires)
Remarque
Cette fonction est inopérante dans certains pays ou
régions où les données PTY ne sont pas disponibles.
Page 29

Réglage de CT
1 Sélectionnez « CT-ON » lors de la
configuration (page 12).
Remarques
• Il est possible que la fonction CT ne fonctionne pas,
même si une station RDS est captée.
• Il peut y avoir une différence entre l’heure réglée par
la fonction CT et l’heure réelle.
Autres fonctions
Modification des
caractéristiques du son
Réglage des caractéristiques du
son — BAL/FAD/SUB
Vous pouvez régler la balance gauche/droite,
l’équilibre avant/arrière , ain si que le volume du
caisson de graves.
1 Appuyez plusieurs fois sur la touche
de sélection jusqu’à ce que « BAL »,
« FAD » ou « SUB » apparaisse.
Le paramètre chan ge comme suit :
1
LOW*
t MID*1 t HI*1 t
BAL (gauche-droite) t
FAD (avant-arrière) t
SUB (volume du caisson d e graves)*
3
AUX*
*1 Lorsque EQ3 est activé (page 11).
*2 Lorsque la sortie audio est réglée sur « SUB »
(page 12).
« ATT » est affiché au réglage le plus bas et
peut être réglé par incréments jusqu’à 21.
*3 Lorsque la source AUX est activée (page 13).
2 Tournez la molette de réglage du
volume pour régl er le paramètre
sélectionné.
Le réglage est term in é après 3 secondes et la
fenêtre d’affichage revient au mode de
lecture/réception normal.
2
t
Personnalisation de la courbe de
l’égaliseur — EQ3
Le paramètre « CUS T OM » d e EQ 3 v o us pe rme t
d’effectuer vos propres réglages de l’égali seur.
1 Sélectionnez une source, puis
appuyez plusieurs fois sur (EQ3) pour
sélectionner « CUSTOM ».
2 Appuyez plusieurs fois sur la touche
de sélection jusqu’à ce que « LOW »,
« MID » ou « HI » apparais se.
suite à la page suivante t
11
Page 30

3 Tournez la molette de réglage du
volume pour régler le paramètre
sélectionné.
Le niveau de volume peut être réglé par
incréments de 1 dB, de – 10 dB à + 10 dB.
Répétez les étapes 2 et 3 pour régler la courbe
de l’égaliseur.
Pour restaure r l a courbe par défaut de
l’égaliseur , appuyez sur la touch e de sélectio n
et maintenez-la enfoncée avant la fin du
réglage.
Le réglage est term i n é après 3 secondes et la
fenêtre d’affichage revient au mode de
lecture/réception normal.
Conseil
D’autres types d’égaliseur peuvent aussi être réglés.
Réglage des paramètres de
configuration — SET
1 Appuyez sur la touche de sélection et
maintenez-la enfoncée.
L’écran de configurat ion apparaît.
2 Appuyez plusieurs fois sur la touche
de sélection jusqu’à ce que le
paramètre souhaité s’affiche.
3 Tournez la molette de réglage du
volume pour sélectionner le réglage
(exemple « ON » ou « OFF »).
4 Appuyez sur la touche de sélection et
maintenez-la enfoncée.
Une fois le réglage terminé, la fenêtre
d’affichage revient au mode de lecture/
réception normal.
Remarque
Les rubriques affichées diffèrent selon la source et le
réglage.
Les paramètres suivants peuvent être réglés
(reportez-vous à la page indiquée pour plus d e
détails) :
«
z » indique les ré glages par défaut.
CLOCK-ADJ (Réglage de l’horloge) (page 4)
1
(Heure)
CT*
Pour régler « CT-ON » ou « CT-OFF » (
(page 9, 11).
BEEP
Pour régler « BEEP -ON » (
z) ou « BEEP-
OFF ».
z)
AUX-A*2 (Audio AUX)
Pour régler l’affichage de la source AUX sur
« AUX-A-ON » (
z) ou « AUX-A-OFF »
(page 13).
A.OFF (Arrêt automatique)
Pour éteindre automatiquement après un laps de
temps choisi lorsque l’appareil est mis hors
tension,
–« A.OFF-NO » (
z), « A.OFF-30S
(secondes) », « A.OFF-30M (minutes) » ou
« A.OFF-60M (minutes) ».
REAR/SUB*
2
Pour commuter la sor tie audio.
–« RE AR-OUT » (
z) : pour émettre vers un
amplificateur de pui ssance.
–« SUB-OUT » : pour émettre vers un caisson
de graves.
DEMO
(Démonstration)
Pour régler « DEMO-ON » (z) ou « DEMOOFF ».
DIM (Régulateur de luminosité)
Pour modifier la luminosité de l’affichage.
–« DIM-ON » : pour réduire la luminosité de
l’affichage.
–« DIM-OFF » (
z) : pour désactiver le
régulateur de luminosité.
M.DSPL (Affichage animé)
–« M.DSPL-ON » (
z) : pour afficher les motifs
animés.
–« M.DSPL-OFF » : pour désactiver le mode
d’affichage animé.
A.SCRL (Défilement automatique)
Pour faire défiler autom atiqueme n t les longs
paramètres d’affichage lorsque l’album/la plage
est modifié(e).
–« A.SCRL-ON » (
z) : pour faire défiler les
rubriques.
–« A.SCRL-OFF » : pour ne pas faire défiler les
rubriques.
LOCAL (Mode de recherche locale)
–« LOCAL-ON » : pour régler uniquement l es
stations dont les signaux sont plus puissants.
–« LOCAL-OFF » (
z) : pour syntoni ser en
réception normale.
MONO*3 (Mode monaur al )
Pour améliorer la réception FM faible,
sélectionnez le mode de réception monaurale.
–« MONO-ON » : pour écouter des émissions
stéréo en mode mono.
–« MONO-OFF » (
z) : pour écouter les
émissions sté ré o en stéréo.
REG*1*3 (Régional)
Pour régler « REG-ON » (
z) ou « REG-OFF »
(page 10).
12
Page 31

4
LPF*
(Filtre passe-bas)
Pour sélection ner la fréquence de coupure du
caisson de graves : « LPF OFF » (
z),
« LPF125Hz » ou « LPF 78Hz ».
LOUD (Intensité sonore )
Pour vous permettre d’entendre des sons clairs à
des volumes faibles.
–« LOUD -ON » : pour amplifier les graves et
les aigus.
–« LOUD-OFF » (
z) : pour ne pa s a m plifier les
graves et les aigus.
BTM (page 8)
*1 CDX-MR10 uniquement
*2 Lorsque l’app areil est hors tension.
*3 Lorsqu’une station FM est captée.
*4 Lorsque la sortie audio est réglée sur « SUB ».
Utilisation d’un appareil en
option
Appareil audio auxiliaire
En raccordan t un appareil audio portatif en
option à la prise d’e ntrée AUX (min i-prise
stéréo) de l’appareil, puis en sélectionnant
simplement la s ource, vous pouvez l’écou te r par
l’intermédiaire des haut-parleurs du bateau. Le
niveau de volume peut être réglé pour corriger
toutes les diff érences entre l’ appareil et l’appareil
audio portatif. Suivez la procédure ci-dessous :
Raccordement de l’appareil audio
portatif
1 Mettez l’ap pareil audio portatif hors tension.
2 Baissez le volume de l’appareil.
3 Effectuez le raccordement à l’appareil.
Réglage du niveau de volume
Avant de commencer la lecture, n’oubliez pa s de
régler le volume de chaque appareil audio
connecté.
1 Baissez le volume de l’appareil.
2 Appuyez plusieur s f ois sur (SOURCE)
jusqu’à ce que « AUX » s’affiche.
« FRONT IN » apparaît.
3 Démarrez la lecture sur l’appareil audio
portatif, à un niveau de volume moye n.
4 Réglez votre appareil sur le v olume d’écoute
habituel.
5 Appuyez plusieur s f ois sur la touche de
sélection jusqu’à ce que « AUX » apparaisse,
puis tournez la molette de réglage du volume
pour ajuster le niveau d’en tr ée (– 8 dB à
+ 18 dB).
Mini-télécommande RM-X114
Les touches correspondantes de la minitélécommande commandent les mêmes foncti ons
que celles de cet appareil.
*
DSPL MODE
+
PRESET
LIST
+
DISC
MENU
SOURCE
–
SEEK
SOUND
DISC
PRESET –
+
VOL
–
–
E
SEEK
N
ATTOFF
MODE
LIST
m/M
*
/
(DISC
+
PRESET
+/ –)
R
E
T
ENTER
ATT
*
DSPL
MENU
SOURCE
</,
(SEEK –/+ )
SOUND
OFF
VOL (+/ –)
AUX
AUX
Cordon de
raccordement*
(non fourni)
* Veillez à utiliser une fiche de type droit.
Les touches suiv a nte s de la mini- té l é co mmande
ont également des touches ou des fonctions
différentes de celles de l’appareil.
• Touche DSPL (affichage)
Permet de changer les rubriques d’affichage.
• Touches </, (SEEK –/+)
Permettent de co m mander le lecteur CD/la
radio, identiques à la commande
(SEEK) –/+ de l’appareil.
• Touche SOUND
Identique à la touche de sélection de l’appareil.
• Touche VOL (volume) +/–
Permet de régler le niveau du volum e.
suite à la page suivante t
13
Page 32

• Touche LIST
Permet de sélectionner PTY en RDS.
(CDX-MR10 uniquement)
• Touches M/m (DISC*/PRESET +/–)
Permettent de commander le lecteur CD,
identiques aux touches (1)/(2) (ALBUM –/+)
de l’appareil.
• Touche ATT (atténuer)
Permet d’atténuer le son. Appuyez de nouveau
sur cette touche pour annuler.
* Non disponible sur cet appareil.
Remarque
Si vous mettez l’appareil hors tension et que
l’affichage est désactivé, il ne peut plus être utilisé
avec la mini-télécommande sauf si vous appuyez sur
la touche (SOURCE) de l’appareil ou si vous insérez
un disque dans le lecteur pour l’activer.
Remplacement de la pile au lithium
Dans des conditions d’utilisation no rm ales, la
pile dure environ 1 an. (En fo nction des
conditions d’utilisation, sa durée de vie peut être
plus courte.)
Lorsque la pile est faible, la portée de la minitélécommande diminue. Remplacez la pile par
une pile au lithium CR2025 neuve. L’utilisation
de tout autre type de pi le présente un risque
d’incendie ou d’explosion.
Télécommande marine RM-X11M
Emplacement des commandes
Les touches correspondantes de la télécommande
marine commandent les mêmes fonctions que
celles de l’appa reil.
VOL +/–
OFF
GP/ALBM
–/+
Les commandes s u ivantes de la tél écommande
marine requièrent un fonctionnement différent de
l’appareil.
• Touches VOL (volume) +/–
Identiques à la molette de réglage d u volu me de
l’appareil.
• Touches GP/ALBM –/+
Identiques aux touches (1)/(2) (ALBUM –/+)
de l’appareil.
MODE
SEEK –/+
SOURCE
x
Pôle + vers
le haut
Remarques sur la pile au lithium
• Tenez la pile au lithium hors de la portée des
enfants. En cas d’ingestion de la pile, consultez
immédiatement un médecin.
• Essuyez la pile avec un chiffon sec pour assurer un
bon contact.
• Veillez à respecter la polarité lors de l’installation de
la pile.
• Ne tenez pas la pile avec des pinces métalliques,
car cela pourrait entraîner un court-circuit.
ATTENTION
Utilisée de façon incorrecte, la pile peut
exploser. Ne pas la recharger, la démonter ni
la jeter au feu.
14
Page 33

Informations complémentaires
Précautions
• Si votre bateau est resté amarré en plein soleil,
laissez l’appareil refroidir avant de l’utiliser.
• L’antenne électrique se déploie automatiquement
lorsque l’appareil est en fonctionnement.
Condensation
Par temps de pluie ou dans des régions très humides,
de l’humidité peut se condenser à l’intérieur des
lentilles et dans la fenêtre d’affichage de l’appareil.
Si cela se produit, l’appareil ne fonctionne pas
correctement. Dans ce cas, retirez le disque et
attendez environ une heure que l’humidité se soit
évaporée.
Pour conserver un son de haute
qualité
Veillez à ne pas renverser de jus de fruit ou d’autres
boissons sucrées sur l’appareil ou sur les disques.
Remarques sur les disques
• Pour que le disque reste propre, ne touchez pas sa
surface. Manipulez le disque en le tenant par les
bords.
• Rangez vos disques dans leurs boîtiers ou dans des
chargeurs lorsque vous ne vous en servez pas.
• Ne soumettez pas les disques à des températures
élevées. Evitez de les laisser sur un bateau amarré.
• Ne collez pas d’étiqu ettes sur les disques et
n’utilisez pas de disques rendus coll ants par de
l’encre ou des résidus. De tels disques peuvent
s’arrêter de tourner en cours de lecture et
provoquer des problèmes de fonctionnement ou
être endommagés.
• Cet appareil ne pe rmet pas la lecture des CD de
8cm.
• Avant la lecture, nettoyez les
disques avec un chiffon de
nettoyage disponible dans le
commerce. Essu yez chaque
disque en partant du centre vers
l’extérieur. N’utilis ez pas de
solvants tels q ue d e l’essence,
du diluant, des nettoyants
disponibles dans le commerce
ou des vaporisateurs antistatiques destinés aux
disques analogiques.
Remarques sur les disques CD-R/
CD-RW
• Il est possible que cet appa re il ne pui sse pa s li re
certains CD-R/CD-RW (en fonction de l’appareil
utilisé pour l’enregistrement ou de l’état du
disque).
• Cet appareil ne pe rmet pas la lecture des CD-R/
CD-RW non finalisés.
• L’appareil est compatible avec le format ISO 9660
niveau 1/niveau 2, avec les extensions Joliet/
Romeo et les multisessions.
• Nombre maxim al de :
– dossiers (albums) : 150 (y compris le répertoire
de base et les dossiers vides).
– fichiers (plages) et dossiers contenus dans un
disque : 300 (lorsqu’un nom de fichier ou de
dossier contient un grand nombre de caractères,
ce nombre peut être inférieur à 300).
– caractères affichables pour un nom de dossier/
fichier : 32 (Joliet) ou 64 (Romeo).
• Lors de l’enregistreme nt d’un di sque en
multisessi on, seule la pr emière plage d u premier
format de session est reconnue et lue (tout autre
format est ignoré). La priorité du form at est
CD-DA et MP3/WMA.
– Lorsque la première plage est un CD-DA, seul le
CD-DA de la première session est lu.
– Lorsque la première plage n’est pas un CD-DA,
la session MP3/WMA est lue. Si le disque ne
contient aucune informati on da ns ces formats,
l’indication « NO MUSIC » apparaît.
• N’utilisez pas de disques sur lesquel s sont collé s
des étiquettes ou des autocolla nt s.
L’utilisation de tels disques peut entraîner les
problèmes de fonctionnement suivants :
– impossibilité d’éjecter un disque parce qu e
l’étiquette ou l’autocollant s’est décollé et
bloque le mécanisme d’éjection ;
– erreurs de lecture des données audio (notamment
sauts de lecture ou absence de lecture)
provoquées par une déformation du disque suite
au rétrécissement de l’étiq ue tt e ou de
l’autocollant sous l’effe t d e la chaleur.
• Les disques de forme non standard (notamment en
forme de cœur, de carré ou d’étoile) ne peuvent
pas être lus avec cet appareil. Vous risquez
d’endommager vo tre ap pareil si v ou s ess ayez de le
faire. N’utilisez pas de tels disques.
Disques de musique encodés à l’aide
d’une technologie de protection des
droits d’auteur
Cet appareil est conçu pour la lecture des disques
conformes à la norme Compact Disc (CD).
Dernièrement, certaine s maisons de disques ont
lancé sur le marché divers types de disques de
musique encodés selon des technologies de
protection des droits d’au te ur. Notez que, parmi ces
types de disques, certains ne sont pas conformes à la
norme CD. La lecture de ces disques avec cet
appareil peut être impossibl e.
suite à la page suivante t
15
Page 34

Remarque sur les DualDiscs
Un DualDisc est un disque double face qui
comporte les données d’un DVD sur une face et
des données audio numériques sur l’autre face.
La face du contenu audio des DualDiscs n’étant
pas conforme à la norme Compact Disc (CD), la
lecture de ces disques sur cet appareil n’est pas
garantie.
Ordre de lecture des fichiers MP3/
WMA
MP3/WMA
Dossier
(album)
Fichier MP3/
WMA (plage)
A propos des fichiers MP3
• MP3, qui est l’abréviation de MPE G-1 Audio
Layer-3, est un format standard de compression de
fichiers musicaux. Elle comprime le s données de
CD audio à environ 1/10e de leur taille initia l e.
• Versions 1.0, 1.1, 2.2, 2.3 et 2.4 des étiquettes ID3
applicables aux fichiers MP3 uniquement.
L’étiquette ID3 compte 15/30 caractères (1.0 et
1.1) ou 63/126 caractères (2 .2 , 2.3 et 2. 4).
• Lors de l’identification d’un fichier MP3, veillez à
ajouter l’extension « .mp3 » au nom de cha que
fichier.
• Lors de la lecture ou pendant l’avance ou le retour
rapide d’un fichier MP3 VBR (Débit variable), le
temps de lecture écoulé qui s’affiche peut être
inexact.
Remarque
Il est possible que le son soit intermittent lors de la
lecture d’un fichier MP3 à haut débit binaire, par
exemple 320 kbit/s.
• Lors de la lecture ou pendant l’avance ou le retour
rapide d’un fichier WMA VBR (Débit variable), le
temps de lecture écou lé qu i s’a ffiche peut être
inexact.
* uniquement pour 64 kbit/s
Remarque
La lecture des fichiers WMA suivants n’est pas prise
en charge.
– fichiers comprimés sans perte
– fichiers contenant une protection des droits d’auteur
Si vous avez des questions ou des problèmes
concernant cet appareil qui ne sont pas abordés dans
ce mode d’emploi, con ta ctez votre revendeur Sony.
Entretien
Remplacement du
fusible
Lorsque vous remplacez le
fusible, veillez à uti liser un
fusible dont l’intensité, en
ampères, correspond à la valeur
indiquée sur le fusible usagé. Si
le fusible saute, vérifiez le
branchement de l’alimentation
et remplacez-le. Si le nouveau
fusible saute également, il est
possible que l’appareil soit
défectueux. Dans ce cas, consultez votre revendeur
Sony le plus proche.
Nettoyage des connecteurs
L’appareil peut ne pas fonctionner correctement si
les connecteurs entre l’a ppareil et la façade sont
souillés. Pour éviter cette situation, enlevez la
façade (page 5) et nettoyez les connecteurs à l’aide
d’un coton-tige. N’exercez pas une pression trop
forte, sinon les connecteurs peuvent êtr e
endommagés.
Appareil principal
Fusible (10 A)
Arrière de la façade
A propos des fichiers WMA
• WMA, qui signifie Windows Media Audio, est
une norme de format de compressio n des fichier s
audio. Il comprime les do nnées de CD audio à
environ un 1/22e* de leur taille initiale .
• L’étiquette WMA compte 63 caractèr es .
• Lors de l’identification d’un fichier WMA, veillez
à ajouter l’extension « .wma » au nom de chaque
fichier.
16
Remarques
• Pour plus de sécurité, coupez le mote ur avant de
nettoyer les connecteurs et retirez la clé du contact.
• Ne touchez jamais les connecteurs directement
avec les doigts ou avec un objet métallique.
Page 35

Retrait de l’appareil
Spécifications
1 Retirez le tour de protection.
1 Retirez la façade (page 5).
2 Insérez les clés de déblocage dans le tour
de protection.
Orientez correctement la clé
de déblocage comme illustré.
3 Tirez sur les clés de déblocage pour retirer
le tour de protection.
2 Retirez l’appareil.
1 Insérez simultanément les deux clés de
déblocage jusqu’ à ce qu’elles émettent un
déclic.
Tournez le
crochet vers
l’intérieur.
2 Tirez sur les clés de déblocage pou r
extraire l’appareil.
3 Faites gliss e r l’ appareil en dehors de son
support.
Lecteur CD
Rapport signal/bruit : 120 dB
Réponse en fréquence : 10 – 20 000 Hz
Pleurage et scintillement : en dessous du seuil
mesurable
Radio
CDX-M10 :
FM
Plage de syntonisation :
87,5 – 108, 0 MH z ( par incréments de 50 kHz)
87,5 – 107,9 MHz (par incréments de 200 kHz)
Intervalle de syntonisation FM :
Commutable 50 kHz/200 kHz
Borne d’antenne : connecteur d’antenne externe
Moyenne fréquence: 10,7 MHz/450 kHz
Sensibilité utile : 9 dBf
Sélectivité: 75 dB à 400 kHz
Rapport signal/bruit : 67 dB (stér éo ), 69 dB (mono)
Distorsion harmonique à 1 kHz : 0,5 % (stéréo),
0,3 % (mono)
Séparation : 35 dB à 1 kHz
Réponse en fréquence : 30 – 15 000 Hz
AM
Plage de syntonisation :
531 – 1 602 kHz (par incréments de 9 kHz)
530 – 1 710 kHz (par incréments de 10 kHz)
Intervalle de syntonisation AM :
Commutable 9 kHz/10 kHz
Borne d’antenne : connecteur d’antenne externe
Moyenne fréquence: 10,7 MHz/450 kHz
Sensibilité : 30 µV
CDX-MR10 :
FM
Plage de syntonisation : 87,5 – 108,0 MHz
Borne d’antenne : connecteur d’antenne externe
Moyenne fréquence: 10,7 MHz/450 kHz
Sensibilité utile : 9 dBf
Sélectivité: 75 dB à 400 kHz
Rapport signal/bruit : 67 dB (stér éo ), 69 dB (mono)
Distorsion harmonique à 1 kHz : 0,5 % (stéréo),
0,3 % (mono)
Séparation : 35 dB à 1 kHz
Réponse en fréquence : 30 – 15 000 Hz
MW (PO)/LW (GO)
Plage de syntonisation :
MW (PO) : 531 – 1 602 kHz
LW (GO) : 153 – 279 kHz
Borne d’antenne : connecteur d’antenne externe
Moyenne fréquence: 10,7 MHz/450 kHz
Sensibilité : MW (PO) : 30 µV, LW (GO) : 40 µV
Amplificateur de puissance
Sorties : sorties de haut-parleurs (connecteurs de
sécurité)
Impédance des haut-parleurs : 4 à 8 ohms
Puissance de sortie maximale : 52 W × 4 (à 4 ohms)
suite à la page suivante t
17
Page 36

Généralités
Sorties :
Borne de sorties audio (commutable arrière/
caisson de graves)
Borne de commande de relais d’antenne électrique
Borne de commande d’amplificate ur de pui ssa nc e
Entrées :
Borne de commande ATT téléphone (CDX-MR10
uniquement)
Borne d’en tr ée de comman de à distance
Borne d’entrée de l’antenne
Prise d’entrée AUX (mini-prise stéréo)
Commandes de tonalité :
Graves : ± 10 dB à 60 Hz (XPLOD)
Médiums : ± 10 dB à 1 kHz (XPLOD)
Aigus : ± 10 dB à 10 kHz (XPLOD)
Alimentation requise : batterie de bateau 12 V CC
(masse négative)
Dimensions : environ 178 × 50 × 179 mm (l/h/p)
Dimensions du support : environ 182 × 53 × 162 mm
(l/h/p)
Poids : environ 1,2 kg
Accessoires fournis :
Capuchon AUX
Composants destinés à l’installation et au
raccordement (1 jeu)
Appareils/accessoires en option :
Télécommande marine : RM-X11M
Mini-télécommande : RM- X114
Il est possible que votre revendeur ne dispose pas de
certains accessoires décrits ci-dessus. Veuillez vous
adresser à lui pour tout renseign em ent
complémentaire.
Licence de la technologie de codage audio MPEG
Layer-3 et des brevets obtenue de Fraunhofer IIS et
Thomson.
Ce produit est protégé par des droits de propriété
intellectuelle de Microsoft Corporation. Toute
utilisation ou diffusion de la technologie décrite
sortant du cadre de l’utilisation de ce produit est
interdite sans licence accordée par Microsoft ou
une filiale autorisée de Microsoft.
La conception et les spécifications sont sujettes à
modification sans préavis.
• Aucun retardateur de flamme halogéné n’est utilisé
dans certaines cartes à circuits imprimés.
• Aucun retardateur de flamme halogéné n’est utilisé
dans la composition des coques.
• Du papier est utilisé pour les cales d’emballage.
Dépannage
La liste de contrôles suivante vous aidera à remédier
aux problèmes que vous pourriez rencontrer avec cet
appareil.
Avant de passer en revue la liste de contrôles cidessous, vérifiez les procédures de raccordement et
d’utilisation.
Généralités
L’appareil n’est pas alimenté.
• Vérif iez le raccor dement. Si tout es t en ord re, vérif iez
le fusible.
• Si vous mettez l’appareil hors tension et que
l’affich ag e di s p araî t, vous ne pouvez pas le
commander avec la mini-télécommande.
t Mettez l’appa reil sous tension.
L’antenne électrique ne se déploie pas.
L’antenne électrique ne dispose pas d’ un boî tie r de
relais.
Aucun son.
• Le volume est trop faible.
• La fonction ATT est activée ou la fonction A TT du
téléphone (lorsque le câble d’interface d’un
téléphone embarqué est raccordé au fil ATT) est
activée.
• La position de la commande d’équilibre avant/arrière
« FAD » n’est pas réglée pour un système à
2 enceintes.
Aucun bip n’est émis.
• Le bip est désactivé (page 12).
• Un amplificateur de puissance en o pt i on es t racco rd é
et vous n’utilisez pas l’amplificateur int ég ré.
Le contenu de la mémoire a été effacé.
• Le cordon d’alimentation ou la batterie a été
déconnecté.
• Le cordon d’alimentation n’est pas raccordé
correctement.
Les stations mémorisée s et l’heure sont
effacées.
Le fusible a sauté.
Emission de bruit lorsque la position de la clé
de contact est modifiée.
Les câbles ne sont pas raccordés correctement au
connecteur d’alimentation du bateau de stiné aux
accessoires.
En cours de lecture ou de réception, le mode
de démonstration démarre.
Si aucune opération n’est effectuée pendant 5 minutes
avec « DEMO-ON » activé, le mode de démonstration
démarre.
t Réglez « DEMO-OFF » (page 12).
18
Page 37

L’affichage disparaît de la fenê tre d’affichage
ou il ne s’affiche pas.
• Le régulateur de luminosité est réglé sur « DIM-ON »
(page 12).
• L’affichage est désactivé si vous maintenez la touche
(OFF) enfoncée.
t Maintenez de no uveau la to uc he (OFF) de
l’appareil enfoncée jusq u’ à ce que l’affichag e
apparaisse.
• Les connecteurs sont sales (page 16).
La fonction arrêt automatique est inopérante.
L’appareil est mis sous tension. La fonction arrêt
automatique s’active après la mise hors tension de
l’appareil.
tMettez l’appareil hors tension.
Lecture de CD
Impossible d’introduire le disque.
• Un autre disque est déjà en place.
• Le disque a été introduit de force à l’envers ou dans le
mauvais sens.
La lecture du disque ne commen ce pas.
• Le disque est défectueux ou sale.
• Les CD-R/CD-RW ne sont pas destinés à un usage
audio (page 15).
Impossible de lire des fichiers MP3/WMA.
Le disque n’est compati ble ni av ec le for mat, ni av ec la
version MP3/WMA (page 16).
Certains fichiers MP3/WMA exigent un délai
plus long que d’autres avant le début de la
lecture.
La lecture des types de disques suivants exige un délai
de démarrage plus long :
– disques comportant une hiérarchie de dossiers
complexe ;
– disques enregistrés en multisess ion ;
– disques auxquels il est possible d’ajout er des
données.
Les rubriques d’affichage ne défilent pas.
• Pour les disques contenant un grand nombre de
caractères, le défilement peut être inopérant.
• « A.SCRL » est réglé sur « OFF ».
t Réglez « A.SCRL-ON » (page 12).
t Appuyez sur la touche (DSPL) (SCRL) et
maintenez-la enfoncée.
Le son saute.
• L’ins t allation est incorrecte.
t Installez l’appareil suivant un angle de moins de
45° dans un e ndroit stable du bateau.
• Le disque est défectueux ou sale.
Le disque ne s’éjecte pas.
Appuyez sur Z (éjecter) (page 6).
Réception radio
Impossible de capter des stations.
Le son comporte des parasites.
• Raccordez un câble de commande d’antenne
électrique (bleu) ou un câble d’alimentation
d’accessoires (rouge) au câble d’alimentation de
l’amplificateur d’antenne du bateau (uni que ment si
votre bateau est équipé d’une anten ne inté gr é e dans
la vitre arrière/latérale).
• Vérifiez le raccordement de l’antenne du bate a u.
• L’antenne automatique ne se déploie pas.
t Vérifiez le raccordement du c âb le de commande
d’antenne électrique.
• Vérifi ez la fréquence.
Impossible de capter une présélection.
• Enregistrez la fréquence correcte dans la mémoire.
• Le signal capté est trop faib le .
Le réglage automatique des stations est
impossible.
• Le réglage du mode de rec he rch e lo cale est incorrect.
t La syntonisat ion s’ a r rête tr op souvent :
Réglez « LOCAL-ON » (page 12).
t La syntonisat ion ne s’arr ê te sur auc une sta ti on :
Réglez « MONO-ON » (page 12).
• Le signal capté est trop faib le .
t Réglez manu el le me nt la fréquence.
En cours de réception FM, l’indication « ST »
clignote.
• Réglez la fréquence correctement.
• Le signal capté est trop faib le .
t Réglez « MONO-ON » (page 12).
Un programme FM émis en stéréo est entendu
en mono.
L’appareil est en mode de réception mono.
t Réglez « MONO-OFF » (page 12).
RDS (CDX-MR10)
Une recherche (SEEK) commence après
quelques secondes d’écoute.
La station ne diffuse pas de programmes de
radioguidage (fonction TP désact ivée) ou le signal
capté est faible.
t Désac tivez TA (page 10).
Aucun message de radioguidage.
• Activez TA (page 10).
• La station n’émet pas de messages de radioguid ag e,
malgré l’indication TP.
t Réglez la fréquence pour capter une autre station.
PTY affiche « - - - - - - - - ».
• La station actuellement captée n’est pa s une sta tion
RDS.
• Les données RDS n’ont pas été reçues.
• La station ne spécifie pas le type d’émission.
suite à la page suivante t
19
Page 38

Affichage des erreurs et messages
ERROR
• Le disque est sale ou inséré à l’envers.
tNettoyez le disque ou insérez-le correctement.
• Un disque vierge a été inséré.
• Le d isque ne peu t pas être lu en r a ison d’un
problème.
tInsérez-en un autre.
FAILURE
Les haut-parleurs ou les amplificateurs ne sont pas
raccordés correctement.
t Reportez-vous au manuel d’installation/connexions
de ce modèle pour vérifier les connexions.
L. SEEK +/–
Le mode de recherche locale est activé en cours de
syntonisation automa tique.
NO AF (CDX-MR10 uniquement)
Il n’existe aucune fréquence alternative pour la station
actuelle.
t Appuyez sur (SEEK) –/+ pendant que le nom du
service de programme clignote. L’appareil
commence à rechercher une autre fréqu en ce avec
les mêmes données d’identi fication de pro g ram me
(PI) (l’indication « PI SEEK » apparaît).
NO INFO
Les informations textuelle s ne sont pa s é crites dans le
fichier MP3/WMA.
NO MUSIC
Le disque ne contient pas de fichiers de musique .
t Insérez un CD de mus ique dans le lecteur.
NO NAME
Aucun nom de disque/plage n’est écrit dans la plage.
NO TP (CDX-MR10 uniquement)
L’appareil continue à rechercher les stations diffusant
des programmes de radioguidage.
OFFSET
Il est possible qu’il y ait un problème de
fonctionnement.
t Vérifiez le raccordement. Si le message d’erreur
reste affiché, co n tactez votre revendeur Sony le
plus proche.
PUSH EJT
Impossible d’éjecter le disq ue .
t Appuyez sur Z (éjecter) (page 6).
READ
L’appareil lit toutes les informations de plage et
d’album sur le disque.
t Attendez que la lecture soit terminée et la lecture
commence automa tiquement. Selon la structure du
disque, cette opération peut prendre plus d’une
minute.
« » ou « »
Pendant le retour ou l’avance rapide, vous avez atteint
le début ou la fin du disque et vous ne pouvez pas aller
plus loin.
« »
Le caractère ne peut pas être affiché.
Si ces solutions ne permettent pas d’améliorer la
situation, contactez votre revendeur Sony le plus
proche.
Si vous portez l’appareil à réparer en raison d’un
problème de le cture de CD, apportez le disque
utilisé au moment où le problèm e s’es t produit.
20
Page 39

Page 40

Para obtener información sobre la instalación
y las conexiones, consulte el manual de
instalación/conexiones suministrado.
Esta etiqueta está situada en la parte inferior
del chasis.
El fabricante de este producto es Sony
Corporation, 1-7-1 Konan, Minato-ku, Tokio,
108-0075 Japón.
El representante autorizado para la aplicación
de la directiva EMC y la seguridad de los
productos es Sony Deutschland GmbH,
Hedelfinger Strasse 61, 70327 Stuttgart,
Alemania. Para cualquier cuestión relacionada
con el servicio técnico o la garantía, consulte
las direcciones facilitadas en los documentos de
garantía o servicio técnico.
Tratamiento de los equipos
eléctricos y electrónicos al final de
su vida útil (aplicable en la Unión
Europea y en países europeos con
sistemas de recogida selectiva de
residuos)
Este símbolo en el equipo o el embalaje indica que el
presente producto no puede ser tratado como residuos
domésticos normales, sino que debe entregarse en el
correspondiente punto de recogida de equipos eléctricos y
electrónicos. Al asegurarse de que este producto se
desecha correctamente, Ud. ayuda a prevenir las
consecuencias negativas para el medio ambiente y la salud
humana que podrían derivarse de la incorrecta
manipulación en el momento de deshacerse de este
producto. El reciclaje de materiales ayuda a conservar los
recursos naturales. Para recibir información detallada
sobre el reciclaje de este producto, póngase en contacto
con el ayuntamiento, el punto de recogida más cercano o
el establecimiento donde ha adquirido el producto.
Advertencia si el encendido del barco
no dispone de una posición ACC
Asegúrese de ajusta r l a función de
desconexión automática (página 11).
La unidad se desconectará compl eta y
automáticamente en el tiempo establecido
después de apaga r l a unidad lo cual evita que
se agote la batería.
Si no ajusta la función de desconexión
automática, mantenga pulsado (OFF) hasta
que se apague la pantalla cada vez que apague
el motor.
Microsoft, Windows Media
y el logotipo de Windows
son marcas comerciales o
marcas comerciales
registradas de Microsoft Corporation en
Estados Unidos o en otros países.
2
Page 41

Tabla de contenido
Bienvenido. . . . . . . . . . . . . . . . . . . . . . . . . . . . . 4
Procedimientos iniciales
Ajuste del reloj . . . . . . . . . . . . . . . . . . . . . . . . . 4
Extracción del panel frontal. . . . . . . . . . . . . . . . 4
Colocación del panel frontal. . . . . . . . . . . . . 5
Ubicación de los controles y
operaciones básicas
Unidad principal . . . . . . . . . . . . . . . . . . . . . . 6
CD
Elementos de la pantalla. . . . . . . . . . . . . . . . 8
Reproducción repetida y aleatoria . . . . . . . . 8
Radio
Almacenamiento y recepción de emisoras . . . . 8
Almacenamiento automático — BTM . . . . . 8
Almacenamiento manual . . . . . . . . . . . . . . . 8
Recepción de las emisoras almacenadas. . . . 8
Sintonización automática . . . . . . . . . . . . . . . 9
RDS (CDX-MR10) . . . . . . . . . . . . . . . . . . . . . . 9
Descripción general . . . . . . . . . . . . . . . . . . . 9
Ajuste de AF y TA . . . . . . . . . . . . . . . . . . . 10
Selección de PTY . . . . . . . . . . . . . . . . . . . . 10
Ajuste CT . . . . . . . . . . . . . . . . . . . . . . . . . . 10
Otras funciones
Cambio de los ajustes de sonido. . . . . . . . . . . 11
Ajuste de las características del so ni do
— BAL/FAD/SUB. . . . . . . . . . . . . . . . . . . 11
Personalización de la curva de ecualizador
— EQ3 . . . . . . . . . . . . . . . . . . . . . . . . . . . . 11
Definición de los elementos de configuración
— SET . . . . . . . . . . . . . . . . . . . . . . . . . . . . . . 11
Uso de un equipo opcional . . . . . . . . . . . . . . . 12
Equipo de audio auxiliar . . . . . . . . . . . . . . 12
Mando a distan ci a de tarjeta RM-X114 . . . 13
Mando a distanci a subacuático
RM-X11M . . . . . . . . . . . . . . . . . . . . . . . . . 14
Información adicional
Precauciones . . . . . . . . . . . . . . . . . . . . . . . . . . 14
Notas sobre los discos . . . . . . . . . . . . . . . . 14
Orden de reprodu cci ón de los archivos
MP3/WMA. . . . . . . . . . . . . . . . . . . . . . . . . 15
Acerca de los archivos MP3. . . . . . . . . . . . 15
Acerca de los archivos WMA . . . . . . . . . . 16
Mantenimiento . . . . . . . . . . . . . . . . . . . . . . . . 1 6
Extracción de la unidad. . . . . . . . . . . . . . . . . . 16
Especificaciones . . . . . . . . . . . . . . . . . . . . . . . 17
Solución de problemas . . . . . . . . . . . . . . . . . . 18
Mensajes/indicaciones de error . . . . . . . . . 19
3
Page 42

Bienvenido
Procedimientos iniciales
Le agradecemos qu e h aya adquirido este
reproductor de discos compactos Sony. Mientras
navega puede disfrutar de las funci ones
siguientes.
• Reproducción de CD
Puede reprod uci r di sco s CD- DA (inclui dos CD
TEXT) y CD-R/CD-RW (archivos MP3/WMA
(página 15)).
Tipo de discos Etiqueta del disco
CD-DA
MP3
WMA
• Recepción de radio
–Puede almacenar hasta 6 emisor as de radio
por banda.
CDX-M10:
FM1, FM2, FM3, AM 1 y A M2
CDX-MR10:
FM1, FM2, FM3, MW y LW
–BTM (Memoria de la mejor sintonía): la
unidad selecciona las emisoras que emiten la
señal más intensa y las almacena.
• Servicios RDS
–Puede escuchar emisoras FM co n el sistema
de datos de radio (RDS) en Europa.
(CDX-MR10)
• Ajuste del sonido
–EQ3 stage2: es posible seleccionar entre 7
curvas de ecualizador predefinidas.
• Conexión de un equipo auxiliar
Es posible conectar un dispositivo de audio
portátil mediante la toma de entrada AUX
situada en la parte frontal de la unidad.
Ajuste del reloj
CDX-M10:
Indicación de 12 horas
CDX-MR10:
Indicación de 24 horas
1 Mantenga pulsado el botón de
selección.
Aparece la pantall a de ajustes.
2 Pulse el botón de selección varias
veces hasta que aparezca “CLO C KADJ”.
3 Pulse (SEEK) +.
La indicación de la hora parpadea.
4 Gire el selector de control de volumen
para ajustar la hora y los minutos.
Para mover la indicación digital, pulse
(SEEK) –/+.
5 Pulse el botón de selección.
La configuración finaliza y el reloj se inicia.
Para mostr ar el reloj, p ulse (DSPL). Vuelva a
pulsar (DSPL) para volver a la pantalla anterior.
Sugerencia
Es posible ajustar el reloj automáticamente con la
función RDS (página 10). (CDX-MR10)
Extracción del panel frontal
Es posible extraer el panel frontal de la unidad
para evitar el robo.
Alarma de precaución
Si ajusta el interrupt or de la llave de encendido
en la posición OFF sin extraer el panel fr ontal, la
alarma de precau ci ón sonará durante unos
segundos.
La alarma solamente sonará si se utiliza el
amplificador integrado.
1 Pulse (OFF).
La unidad se apaga.
2 Pulse y, a continuación, tire del
panel hacia usted.
4
Page 43

Notas
• No deje caer ni ejerza excesiva presión sobre el
panel frontal o el visualizador.
• No someta el panel frontal al calor, a altas
temperaturas ni a la humedad. Evite dejarlo en un
barco amarrado.
Colocación del panel frontal
Acople la parte A del panel frontal con la part e
B de la unidad, tal como se indica en la
ilustración, y ponga el lado izquierdo en su sitio
hasta que haga clic.
A
B
Nota
No coloque nada en la superficie interior del panel
frontal.
5
Page 44

Ubicación de los controles y operaciones básicas
qaq
q
9
q
q
q
Unidad principal
1
2
OFF
EQ3
SEEK
SCRL
DSPL
4 5 8673
PUSH SELECT
SOURCE
SEEK
MODE
ALBUM
1623 54
AUX
PAUSEREP SHUF
;
Esta sección contiene instrucciones sobre la
ubicación de los controles y las opera ci ones
básicas.
Para obtener información detallada, consulte las
páginas correspondientes.
A Botón OFF
Para apagar la unida d o detener la fuente .
B Botón EQ3 (ecualizador) página 11
Para seleccionar el tipo de ecual iz ad or
(XPLOD, VOCAL, EDGE, CRUISE,
SPACE, GRAVITY, CUSTOM u OFF).
C Selector de control de volumen/botón
de selección página 11
Para ajustar el volumen (girar); para
seleccionar los elementos de configuración
(pulsar y girar).
D Botón SOURCE
Para encender la unidad o cambiar la fuente
(Radio/CD/AUX).
E Ranura del disco
Introduzca el disco (con la etiqueta ha ci a
arriba) y se iniciará la reproducción .
F Pantalla
G Toma de entrada AUX página 12
Para conec t ar un dispositivo de audio
portátil.
H Botón Z (expulsar)
6
Para expulsar un disco.
s
d
qf
g
I Botón (liberación del panel frontal)
página 4
J Botón DSPL (pantalla)/SCRL
(desplazamiento) página 8
Para cambiar los elementos en panta l la
(pulsar); para desplazar el elemento en
pantalla (mante ner pulsado).
K Botones SEEK –/+
CD:
Para omitir pistas (pulsar); para omitir pistas
en forma continuada (pulsar y volver a pulsar
antes de que transcurra 1 segundo y
mantener puls ado); pa ra av anzar o re troced er
una pista rápidamente (mantener pulsado).
Radio:
Para sintonizar emisoras automáticamente
(pulsar); para localizar una emisor a
manualmente (mantener pulsado).
L Botón MODE página 8
Para seleccionar l a banda de radio.
h
Page 45

M Botón BTM (CDX-M10) página 8
Para iniciar la función BTM (mantener
pulsado).
AF (frecuencias alter nat i vas)/
TA (anuncio de tráfico)/
PTY (tipo de programa) (CDX-MR10)
página 10
Para ajustar AF y TA (pulsar), para
seleccionar PTY (m antener presionado) en
RDS.
N Selector de frecuencias (s ol am e n te
CDX-M10)
(ubicado en la parte inferior de la unidad )
Consulte “Select or de frecuencias” en el
manual de instalación/conexiones
suministrado.
O Botones numéricos
CD:
(1)/(2): ALBUM –/+ (dura nte la
reproducción de MP3/WMA)
Para omitir álbumes (pulsar); para
omitir álbumes continuamente
(mantener pu l sado).
(3): REP página 8
(4): SHUF página 8
(6): PAUSE
Para insertar una pausa en la
reproducción de un CD e n esta unidad.
Para cancelar esta fu nción, vuelva a
pulsar el botón.
Radio:
Para recibir emis or as almacenadas ( pulsar);
para almacenar emisoras (mantener
pulsado).
P Receptor del mando a distancia de
tarjeta
Acerca de la tapa de la toma AUX
Cuando no utilice la toma de entrada AUX (7), utilice
la tapa de la toma A UX suministrada para evitar que
entre agua. Mantenga la tapa de la toma AUX fuera
del alcance de los niños para evitar una ingestión
accidental.
7
Page 46

CD
Radio
Elementos de la pantalla
Número de pista/tiempo de reproducción
transcurrido; nombre del disco/artista, número
de álbum*
pista, información de texto*
*1 El número de álbum se muestra solamente cuando
se cambia de álbum.
*2 Durante la reproducción de un archivo MP3
aparece un indicador ID3, mientras que al
reproducir un archivo WMA, aparece un indicador
WMA.
Para cambiar los elementos de la pantalla, pulse
(DSPL).
Sugerencia
Los elementos que se muestran variarán en función
del tipo de disco, el formato de grabación y los
ajustes. Para obtener más información acerca de los
archivos MP3/WMA, consulte página 15.
1
, nombre del álbum, nom br e de la
2
, reloj
Reproducción repetida y aleatoria
1 Durante la reproducción, pulse
(3) (REP) o (4) (SHUF) varias veces
hasta que aparezca el ajuste deseado.
Seleccione Para reproducir
TRACK pistas en forma repetida.
ALBUM* álbumes en forma
SHUF ALBUM* álbumes en orden
SHUF DISC discos en orden
* Cuando se reproduce un archivo MP3/WMA.
Para volver al modo de reproducción normal,
seleccione “ OFF” o “SHUF OFF”.
repetida.
aleatorio.
aleatorio.
Almacenamiento y recepción
de emisoras
Atención
Para sintonizar emisoras mie ntr as navega, util ic e
la función Memoria de la mejor sintonía (BTM)
para evitar accidentes .
Almacenamiento automático
— BTM
1 Pulse (SOURCE) varias veces hasta
que aparezca “TUNER”.
Para cambiar la banda, pulse (MODE) varias
veces.
2 Mantenga pulsado el botón de
selección.
Aparece la pantall a de ajustes.
3 Pulse el botón de selección varias
veces hasta que aparezca “BTM ”.
4 Pulse (SEEK) +.
La unidad almacen a la s emisoras en el orden
de frecuencia en los botones numéricos.
La unidad emite un piti do al almacenar el
ajuste.
Almacenamiento mediante el botón
BTM
(solamente CDX-M10)
Mantenga pulsad o (BTM) hasta que “ B TM ”
parpadee, en lugar de realizar los pasos del 2 al 4.
Almacenamiento manual
1 Mientras recibe la emisor a que desee
almacenar, mantenga pulsado un
botón numérico (de (1) a (6)) hasta
que aparezca “MEMORY”.
Nota
Si intenta almacenar otra emisora en el mismo botón
numérico, se reemplazará la que estaba almacenada
previamente.
Sugerencia
Si almacena una emisora RDS, el ajuste de AF/TA
también se almacenará (página 10). (solamente CDXMR10)
Recepción de las emisoras
almacenadas
1 Seleccione la banda y, a continuación,
pulse un botón numérico (de (1) a
8
(6)).
Page 47

Sintonización automática
1 Seleccione la banda y, a continuación,
pulse (SEEK) –/+ para buscar la
emisora.
La búsqueda se detiene cuando la uni dad
recibe una emisor a. Repita este
procedimiento hasta recibir la emisora
deseada.
Sugerencia
Si conoce la frecuencia de la emisora que desea
escuchar, mantenga pulsado (SEEK) –/+ para
localizar la frecuencia aproximada y, a continuación,
pulse (SEEK) –/+ varias veces para ajustar la
frecuencia deseada con mayor precisión
(sintonización manual).
RDS (CDX-MR10)
Descripción general
Las emisoras FM con servicio de sistema de
datos de radio (RDS) envían información digital
inaudible j unto c on la señ al de prog rama d e rad io
normal.
Elementos de la pantalla
BA
A Frecuencia*1 (nombre del servicio del
programa), número de presintonía, reloj,
datos RDS
B TA/TP*
*1 Durante la recepción de una emisora RDS,
*2 “TA” parpadea mientras se recibe información de
Para cambiar los elementos de la pantalla A,
pulse (DSPL).
Servicios RDS
Esta unidad propo rciona servicios RDS
automáticame nt e como se indica a continuación:
AF (frecuencias al ternativas)
Selecciona y vuelve a sintonizar la emisora que
tenga la señal más in tensa de la re d. Median te
esta función, podrá escuchar de forma continua
el mismo program a durante trayectos de larga
distancia sin tene r que volver a sintonizar la
misma emisora manualmente.
TA (anuncio de tráfico)/TP (programa de
tráfico)
Proporciona la in formación/los pr ogramas
actuales de tráfico. Cualquier info rmac ió n/
programa rec ib ido, interrumpi rá la fuente
seleccionada actual.
PTY (tipos de programa)
Muestra el tipo de programa que se recibe
actualmente. Asimismo, busca el tipo de
programa seleccionado.
CT (hora del reloj)
Los datos CT de la transmisión RDS ajustan el
reloj.
Notas
• En función del país/región, no todas las funciones
del servicio RDS estarán disponibles.
• El servicio RDS no funcionará si la señal es
demasiado débil o si la emisora que sintoniza no
transmite datos RDS.
2
aparece en la pantalla “ *” a la izquierda de la
indicación de frecuencia.
tráfico. “TP” se ilumina mientras se recibe una
emisora de este tipo.
9
Page 48

Ajuste de AF y TA
1 Pulse (AF/TA) varias veces hasta que
aparezca el ajuste dese ado.
Seleccione Para
AF-ON activar AF y desactivar TA.
TA-ON activar TA y desactivar AF.
AF, TA-ON activar AF y TA.
AF, TA-OFF desactivar AF y TA.
Almacenamiento de emisoras RDS
con el ajuste de las funciones AF y
TA
Es posible preestabl ecer emisoras RD S con el
ajuste AF/TA. Si utiliza la función BTM, sólo se
almacenan las emisoras RDS con el mismo
ajuste AF/TA.
Es posible preestablecer emisoras manualmente
tanto si son RDS como si no, con el ajuste AF/
TA que corresponda.
1 Ajuste AF/TA y, a continuación, almacene la
emisora con BTM o manu almente.
Recepción de anuncios de
emergencia
Con las funciones AF o TA activadas, los
anuncios de emergencia interrumpirán
automáticamente la fuente seleccionada actual.
Sugerencia
Si ajusta el nivel de volumen durante un anuncio de
tráfico, ese nivel se almacenará en la memoria para
los siguientes anuncios de tráfico,
independientemente del nivel de volumen normal.
Permanencia en un programa
regional — REG
Si la función AF está activada: la conf iguración
de fábrica de la unid ad restringe la rece pción a
una región específica, por este motivo, no
cambiará a otra emisora regional con una
frecuencia más intensa.
Si abandona la zona de recepció n de dicho
programa regional, a ju ste “REG-OFF” en la
configuración durante la recepció n FM
(página 12).
Nota
Esta función no está disponible en el Reino Unido ni
en algunas otras zonas.
Función Local Link (sólo en el Reino
Unido)
Esta función permite seleccionar otras emisora s
locales de la zona, aunque no estén almacenadas
en los botones numér ic os.
10
1 Durante la recepci ón FM, pulse un botón
numérico (de (1) a (6)) en el cuál esté
almacenada una emisora local.
2 Transcurridos 5 segundos, vu elva a pulsar el
botón numérico de la emisora local.
Repita este procedimiento hasta recibir la
emisora local.
Selección de PTY
1 Mantenga pulsado (AF/TA) (PTY)
durante la recepción de FM.
El nombre del tipo de programa actual
aparece si la emisora transmite datos PTY.
2 Pulse (AF/TA) (PTY) varias veces
hasta que aparezca el tipo de
programa deseado.
3 Pulse (SEEK) –/+.
La unidad comienza la bú squeda de emisoras
que ofrezcan el tipo de programa
seleccionado.
Tipos de programas
NEWS (noticias), AFFAIRS (temas de
actualidad), INFO (información), SPORT
(deportes), EDUCATE (educación ), DRAMA
(drama), CULTURE (cultura), SCIENCE
(ciencia), VARIED (variado), POP M (música
popular), ROCK M (música rock), EASY M
(música ligera), LIGHT M (clásica ligera),
CLASSICS (clásica), OTHER M (otr os tipos
de música), WEATHER (el tiempo), FINANCE
(finanzas), CHILDREN (p rogramas infant iles),
SOCIAL A (temas sociales), RELIGION
(religión), PHONE IN (entrada de teléfo no),
TRAVEL (viajes ), LEISURE (ocio), JAZZ
(música jazz), COUNTRY (música country),
NATION M (música nacional), OLDIES
(música de década s pas adas), FOLK M (m úsica
folk), DOCUMENT (documental)
Nota
No es posible utilizar esta función en países/regiones
en los que no estén disponibles los datos PTY.
Ajuste CT
1 Ajuste “CT-ON” en la configuración
(página 11).
Notas
• Es posible que la función CT no funcione aunque se
reciba una emisora RDS.
• Puede haber una diferencia entre la hora de la
función CT y la hora real.
Page 49

Otras funciones
Cambio de los ajustes de
sonido
Después de 3 segundos , se completa el ajuste
y la pantalla vuelve al mo do de reproducción/
recepción norm al.
Sugerencia
También es posible ajustar otros tipos de ecualizador.
Ajuste de las características del
sonido — BAL/FAD/SUB
Puede ajustar el ba l ance, el equilibrio y el
volumen del altavoz potenciador de graves.
1 Pulse el botón de selección varias
veces hasta que aparezca “BAL”,
“FAD” o “SUB”.
El elemento cambia de la manera siguiente:
1
LOW*
t MID*1 t HI*1 t
BAL (izquierdo-derecho) t
FAD (frontal-posterior) t
SUB (volumen del altavoz potenciador de
2
graves)*
*1 Si está activado EQ3 (página 11).
*2 Cuando la salida de audio se ajusta en “SUB”
*3 Si está activada la fuente AUX (página 12).
t AUX*
(página 12).
“ATT” aparece con el ajuste más bajo y puede
ajustarse hasta con 21 intervalos.
3
2 Gire el selector de control de volumen
para ajustar el elemento seleccionado.
Después de 3 segun dos, se completa el ajuste
y la pantalla vu elve al modo de re producción/
recepción normal.
Personalización de la curva de
ecualizador — EQ3
“CUSTOM” de EQ3 le pe rm i te realizar sus
propios ajustes en el ecualizador.
1 Seleccione una fuente y puls e (EQ3)
varias veces para seleccionar
“CUSTOM”.
2 Pulse el botón de selección varias
veces hasta que aparez ca “LOW”,
“MID” o “HI”.
3 Gire el selector de control de volumen
para ajustar el elemento seleccionado.
El nivel de volumen puede ajustarse en
intervalos de 1 dB entr e –10 dB y +10 dB.
Repita los pasos 2 y 3 para ajustar la curva de
ecualizador.
Para restablecer la curva de ecualizador
ajustada en fábrica, mantenga pulsado el
botón de selección antes de que finalice el
ajuste.
Definición de los elementos de
configuración — SET
1 Mantenga pulsado el botón de
selección.
Aparece la pantalla de ajustes.
2 Pulse el botón de selección varias
veces hasta que aparezca el elemento
deseado.
3 Gire el selector de control de volumen
para seleccionar el ajust e (por
ejemplo, “ON” u “OFF”) .
4 Mantenga pulsado el botón de
selección.
La configuración finaliza y la pantalla vuelve
al modo de reproducción/recepción normal.
Nota
Los elementos que se muestran en pantalla variarán
en función de la fuente y del ajuste.
Se pueden ajust ar los elementos sig uientes
(consulte la referencia de la pá gi na para obtener
más información):
“
z” indica el ajuste predeterminado.
CLOCK-ADJ (ajuste del reloj) (página 4)
1
(hora del reloj)
CT*
Permite ajustar “CT-ON” o “CT-OFF” (
(página 9, 10).
BEEP
Permite ajustar “BEEP-ON” (
OFF”.
AUX-A*2 (audio AU X)
Permite ajustar la pantalla de la fuente auxiliar
en “AUX-A-ON” (
(página 12).
A.OFF (desconexión automática)
Para desconectar la alimenta ci ón
automáticamente una vez transcurri do un
período de tiempo deseado cuando la un i dad
está apagada,
–“A.OFF-NO” (
“A.OFF-30M (minutos)” o “A.OFF-60M
(minutos)”.
continúa en la página siguiente t
z) o “AUX-A-OFF”
z), “A.OFF-30S (segundos)”,
z) o “BEEP-
z)
11
Page 50

REAR/SUB*
2
Para cambiar la salida de audio.
–“REAR-OUT” (
z): para que la salida se
realice a través de un amplificador de potencia.
–“SUB-OUT”: para que la salida se realice a
través de un altavoz potenciador de graves.
DEMO
(demostración)
Para ajustar “DEMO-ON” (z) o “DEMO-OFF”.
DIM (atenuador)
Para cambiar el brillo de la pantalla.
– “DIM-ON”: para atenuar l a pantalla.
–“DIM-OFF” (
z): para desactivar el atenuador.
M.DSPL (desplazamiento de indicaciones)
– “M.DSPL-ON” (z): para mostrar los patrones
de movimiento.
–“M.DSPL-OFF”: para desactivar el
desplazamiento de indicaciones.
A.SCRL (desplazamiento automático)
Para desplazar au tomáticamente los elementos
de la pantalla cuando se cambia de álbum o
pista.
–“A.SCRL-ON” (
z): para que se desplacen.
–“A.SCRL-OFF”: para que no se desplacen.
LOCAL (modo de búsqueda local)
–“L O CA L - O N ”: para que se sint onicen
solamente las emisoras de señal más intensa.
–“LOCAL-OFF” (
z): para ajustar l a recepción
normal.
MONO*3 (modo monoaural)
Para mejorar una recepción de FM defec tu osa,
seleccione el modo de recepción monoaural.
–“MONO-ON”: para escuchar las emisiones
estéreo en monoaural.
–“MONO-OFF” (
z): para escuchar las
emisiones estéreo en estéreo.
REG*1*3 (regional)
Permite ajustar “REG-ON” (
z) o “REG-OFF”
(página 10).
LPF*4 (filtro de paso bajo)
Para seleccionar l a frecuencia de cor te de l
altavoz potenciador de graves: “LPF OFF” (
z),
“LPF125Hz” o “L PF 78Hz”.
LOUD (sonoridad)
Permite escuchar el sonido con claridad a
niveles de volumen bajo.
–“LOUD-ON”: para reforzar los agudos y
graves.
–“LOUD-OFF” (
z): para no reforza r los agudos
y graves.
BTM (página 8 )
*1 Solamente CDX-MR10
*2 Cuando la unidad está apagada.
*3 Cuando se recibe FM.
*4 Cuando la salida de audio se ajusta en “SUB”.
Uso de un equipo opcional
Equipo de audio auxiliar
Si conecta un disp osi tivo de audio portátil
opcional a la toma de entrada AUX (minitoma
estéreo) de la unidad y simplemente seleccio na la
fuente, podrá escuc har el son ido por los alta v oces
del barco. Puede ajustar cualquier diferencia en
el nivel de volumen entre la unidad y el
dispositivo de audio portátil. Siga este
procedimiento:
Conexión del dispositivo de audio
portátil
1 Apague el dispositivo de audio portátil.
2 Baje el volu men de la unidad.
3 Conéctelo a la unidad.
AUX
AUX
Cable de conexión*
(no suministrado)
* Asegúrese de utilizar una clavija recta.
Ajuste del nivel de volumen
Asegúrese de ajustar el volumen de cada
dispositivo de audio conecta do antes de la
reproducción.
1 Baje el volu men de la unidad.
2 Pulse (SOURCE) varias veces hasta que
aparezca “AUX”.
Aparece “FRONT IN”.
3 Inicie la reproducción del dispositivo de audio
portátil a un volumen moderado.
4 Ajuste el volumen acostumbrado en la unidad.
5 Pulse el botón de sele cción varias veces hasta
que aparezca “AUX” y, a continuación, gire el
selector de control de volumen para ajustar el
nivel de entrada (de –8 dB a +18 dB) .
12
Page 51

Mando a distancia de tarjeta
RM-X114
Los botones corr es pondientes del man do a
distancia de tarjeta controlan las mismas
funciones que lo s de la unidad.
*
DSPL MODE
+
PRESET
+
DISC
MENU
SOURCE
–
SEEK
SOUND
DISC
PRESET –
+
VOL
–
–
MODE
LIST
LIST
m/M
*
/
(DISC
+
SEEK
PRESET
+/ –)
R
E
T
N
E
ATTOFF
ENTER
ATT
*
DSPL
MENU
SOURCE
</,
(SEEK –/+ )
SOUND
OFF
VOL (+/ –)
Los botones siguientes del mando a dist ancia de
tarjeta también presentan botones y funciones
distintos de los de la unidad.
• Botón DSPL (pantalla)
Para cambiar los el ementos de la pantall a.
• Botones </, (S EEK –/+)
Permiten controlar el CD o la radio, de la
misma manera que con (SEEK) –/+ en la
unidad.
• Botón SOUND
Funciona de la mism a manera que el botón de
selección de la unidad.
• Botones VOL (volumen) +/–
Para ajustar el volumen.
• Botón LIST
Para seleccionar PTY e n R DS. (Solamente
CDX-MR10)
• Botones M/m (DISC*/PRESET +/–)
Para controlar el CD, de la misma manera que
con (1)/(2) (ALBUM –/+) en la uni dad.
• Botón ATT (atenuación)
Para atenuar el sonido. Para cancelar esta
función, vuelva a pulsar el bot ón.
* La función no está disponible en esta unidad.
Nota
Si la unidad está apagada y desaparece la indicación
de pantalla, no se podrá utilizar con el mando a
distancia salvo que se pulse (SOURCE) en la unidad o
se inserte un disco para activarla en primer lugar.
Sustitución de la pila de litio
En condiciones normales, la pila durará
aproximadamente 1 año. (La vida útil puede ser
menor, dependiendo de las condiciones de uso.)
Cuando la pila está próxima a agotarse, el campo
de acción del control remoto de tarjeta es menor.
Cámbiela por una pila de l i tio CR2025 nueva. Si
se utiliza una pila distinta, podría producirse un
incendio o una explosi ón.
x
Lado +
hacia arriba
Notas sobre la pila de litio
• Mantenga la pila de litio fuera del alcance de los
niños. En caso de tragarse la pila, póngase en
contacto inmediatamente con el médico.
• Limpie la pila con un paño seco para garantizar un
buen contacto .
• Asegúrese de colocar la pila con la polaridad
correcta.
• No coja la pila con pinzas metálicas, ya que podría
producirse un cortoc ir cuito.
ADVERTENCIA
La pila puede explotar si no se emplea
adecuadamente.
No recargue la pila; tampoco la desmonte ni
la arroje al fuego.
13
Page 52

Mando a distancia subacuático
RM-X11M
Ubicación de los controles
Los botones correspondientes del mando a
distancia subacuático controlan las mismas
funciones que los de la unidad.
VOL +/–
OFF
GP/ALBM
–/+
Los siguientes con t roles del mando a dista ncia
subacuático requieren una operac ió n diferente a
los de la unidad.
• Botones VOL (volumen) +/–
Igual que el selector de control de volumen de
la unidad.
• Botones GP/ALBM –/+
Funciona como (1)/(2) (ALBUM –/+) de la
unidad.
MODE
SEEK –/+
SOURCE
Información adicional
Precauciones
• Si el barco se ha amarrado bajo la luz directa del
sol, deje que la unidad se enfríe a nte s de utilizarla.
• La antena motorizada se extenderá
automáticamente mientras la unidad se encuentre
en funcionamiento.
Condensación de humedad
En días lluviosos o en zonas muy húmedas, es
posible que se condense hu medad en el interior de
las lentes y la pantalla de la unidad. Si esto ocurre, la
unidad no funcionará correctamente. En este caso,
retire el disc o y es pere aproximad amente una hora
hasta que se evapore la humedad.
Para mantener una alta calidad de
sonido
Asegúrese de no derramar zumos ni refr esc os sobre
la unidad o los discos.
Notas sobre los discos
• Para mantener los discos limpio s, no toqu e su
superficie. Tómelos por los bordes.
• Guarde los discos en sus cajas o en los cargadores
de discos cuando no los use.
• No someta los discos al calor ni a altas
temperaturas. Evite dejarlos en un barco
amarrado.
• No adhiera etiquetas ni utilice discos con residuos
de pegamento o tinta. Tales discos pueden dejar de
girar durante el uso, lo que provocaría un fallo de
funcionamiento o daños en el disco.
14
• No utilice discos con etiq ue ta s u adhesivos.
Su uso puede producir los siguientes fallos de
funcionamiento:
– Imposibil id ad de e xpu lsar el disco (de bido a una
etiqueta o adhesivo que se despega y obstruye el
mecanismo de expulsión).
– Imposibilidad de leer los datos de audio
correctamente (por ejemplo, se interrumpe la
reproducción o simplemente no se produce)
debido a que el calor contrae el adhesivo o la
etiqueta y hace que el disco se deforme.
• No se pueden reproducir en esta unidad discos con
formas no estándar (p or ej em plo, formas de
corazón, cuadra d o o es trella). Si intenta la
reproducción de este tipo de discos, puede dañar la
unidad. No utilice este tipo de disc os.
• No es posible reproducir di scos compactos de
8cm.
Page 53

• Antes de reproducir los discos,
límpielos con un paño de
limpieza disponible en el
mercado. Hágalo desde el
centro hacia los bordes. No
utilice disolven te s como
bencina, diluyentes, pro duc to s
de limpieza disponibles en el
mercado ni aerosoles
antiestáticos para discos anal ógi c os.
Notas sobre los discos CD-R/CD-RW
• Según el estado del disco o el equi po utilizado
para su grabación, es posible que al gunos discos
CD-R/CD-RW no puedan reproduci rse en esta
unidad.
• No es posible reproducir un disco CD-R/CD-RW
que no esté finalizado.
• La unidad es compatible con la norma ISO 9660
de formato de nivel 1/nivel 2, con la norma Joliet/
Romeo en cuanto al formato de expansión y con
Multi Sess ion.
• Cantidad máxima de:
– carpetas (álbumes): 150 (incluidas la carpeta raíz
y las carpetas vacías).
– archivos (pistas) y carpetas contenidas en un
disco: 300 (si un nombre de archivo o carpeta
contiene muchos ca ra cteres, este número puede
ser inferior a 300).
– caracteres que se pueden visualizar en el nombre
de un archivo o carpeta: 32 (Joliet) o 64
(Romeo).
• Cuando el disco se graba en Multi Session, sólo se
reconoce y reproduce la pri mera pista del formato
de la primera sesión (el resto de formatos se
omite). La pri oridad de formatos es CD-DA y
MP3/WMA.
– Cuando la primera pista es un CD-DA,
solamente se reproduce el CD-DA de la primera
sesión.
– Cuando la primera pista no es un CD-DA, se
reproduce una sesión de MP3/WMA. Si el disco
no contiene datos en ninguno de estos formatos,
aparece “NO MUSIC”.
Discos de música codificados con
tecnologías de protección de los
derechos de autor
Este producto ha sido diseñad o pa ra reproducir
discos que cumplen con el estándar Compact Disc
(CD).
Recientement e, algunas compañía s dis cográfica s
comercializan discos de música codificados con
tecnologías de protecció n de de re chos de autor.
Tenga en cuenta que, entre estos d iscos, algunos no
cumplen con el están dar CD, por lo que no podrán
reproducirse con este producto.
Nota sobre discos DualDisc
Un DualDisc es un disco de dos caras que combina
material grabado en DVD en una cara con material
de audio digital en la otra cara. Sin embargo, como
el lado del material de audio no cumple con la
norma Compact Disc (CD), no es seguro que la
reproducción pueda hacerse en este producto.
Orden de reproducción de los
archivos MP3/WMA
MP3/WMA
Carpeta
(álbum)
Archivo MP3/
WMA (pista)
Acerca de los archivos MP3
• MP3, que significa MPEG-1 Audio Layer-3, es un
formato estandarizado que per mite comprimir
archivos de música. Comprime datos de CD de
audio a aproximadamente 1/1 0 de su tamaño
original.
• Las versiones 1.0, 1.1, 2.2, 2. 3 y 2. 4 del ind ic ad or
ID3 se aplican solamente al forma to M P 3. El
indicador ID3 puede tener de 15/30 caracteres
(versiones 1.0 y 1.1) o de 63/126 caracteres
(versiones 2.2, 2.3 y 2.4).
• Cuando nombr e un archivo MP3, asegúrese de
añadir la extensión “.mp3” al n om bre de archivo.
• Durante la rep roducción o el avance o retroceso
rápido de un archivo MP3 grabado en VBR
(velocidad de bits variable), es posible que el
tiempo de reproducción transcurrido no coinci da
con la realidad.
Nota
Si reproduce un archivo MP3 con una velocidad de
bits alta como, por ejemplo, 320 kbps, es posible que
el sonido sea intermiten te.
15
Page 54

Acerca de los archivos WMA
• WMA, que significa Windows Media Audio, es un
formato estandarizado que permite comprimir
archivos de música. Comprime datos de CD de
audio a aproximadam ente 1/22* de su tamaño
original.
• El indicador WMA tiene 63 caracteres.
• Cuando nombre un archivo WMA, asegúrese de
añadir la extensión “.wm a” al nombre de archivo.
• Durante la reproducción o el avance o retroceso
rápido de un archivo WMA grabado en VBR
(velocidad de bits variable), es posibl e que el
tiempo de reproducción transcurrido no coincida
con la realidad.
* solamente de los 64 kbps
Nota
La reproducción de los siguientes archivos WMA no
es compatible.
– compresión sin pérdidas
– protegidos por derechos de autor
Si desea realizar alguna consulta o solucionar algún
problema relativo a la unidad que no se trate en este
manual, póngase en con ta ct o con el distribuidor
Sony más cercano.
Mantenimiento
Cambio del fusible
Al cambiar e l fusible , aseg úrese
de utilizar uno con el mismo
amperaje indicado en el fusible
original. Si se funde el fusible,
compruebe la conexión de la
alimentaci ón y cambie el
fusible. Si el fusib le se v uel ve a
fundir de spué s de cam bi ar lo, es
posible que haya un problema
interno. En este caso, póngase
en contacto con su distribuidor
de Sony.
Fusible (10 A)
Notas
• Por motivos de seguridad, apa gue el ence nd ido
antes de limpiar los conectores y extraiga la llave del
interruptor de la llave de encendido.
• Nunca toque los conectores directamente con los
dedos ni con dispositivos de metal.
Extracción de la unidad
1 Extraiga el marco de protección.
1Extraiga el panel frontal (página 4).
2Enganche las llaves de liberaci ón al marco
de protección.
Oriente las llaves de liberación
en la dirección indicada.
3Tire de las llaves de liberación para retirar
el marco de prot ección.
2 Extraiga la unidad.
1Inserte ambas llaves de liberació n al
mismo tiempo hasta que encajen con un
clic.
El gancho
debe mirar
hacia adentro.
Limpieza de los conectores
Es posible que la unidad no funcione correctamente
si los conectores entre la unidad y el panel frontal no
están limpios. P ar a e vit arl o, e xtr ai ga el panel fro ntal
(página 4) y limpie los conectores con un
bastoncillo de algodón. No aplique demasiada
fuerza. Si lo hace, podría dañar los co nectores.
Unidad principal
Parte posterior
del panel frontal
16
2Tire de las lla v es d e lib eració n para e xtra er
la unidad.
Page 55

3 Deslice la unidad para extraerla del soporte
de montaje.
Especificaciones
Sección del reproductor de CD
Relación señal-rui do : 120 dB
Respuesta de frecuencia: de 10 a 20.000 Hz
Fluctuación y trémolo: inferior al límite medible
Sección del sintonizador
CDX-M10:
FM
Rango de sintonización:
de 87,5 a 108,0 MHz (a intervalos de 50 kHz)
de 87,5 a 107,9 MHz (a intervalos de 200 kHz)
Intervalo de sintonización de FM:
50 kHz/200 kHz intercambiable
Te rminal de antena: conector de antena externa
Frecuencia inte rm edia: 10,7 MHz/450 kHz
Sensibilidad útil: 9 dBf
Selectividad: 75 dB a 400 kHz
Relación señal-rui do : 67 dB (estéreo), 69 dB (mono)
Distorsión armónica a 1 kHz: 0,5 % (estéreo),
0,3 % (mono)
Separación: 35 dB a 1 kHz
Respuesta de frecuencia: de 30 a 15.000 Hz
AM
Rango de sintonización:
de 531 a 1.602 kHz (a intervalos de 9 kHz)
de 530 a 1.710 kHz (a intervalos de 10 kHz)
Intervalo de sintonización de AM:
9 kHz/10 kHz intercambiable
Te rminal de antena: conector de antena externa
Frecuencia inte rm edia: 10,7 MHz/450 kHz
Sensibilidad: 30 µV
CDX-MR10:
FM
Rango de sintonización: de 87,5 a 108,0 MHz
Te rminal de antena: conector de antena externa
Frecuencia inte rm edia: 10,7 MHz/450 kHz
Sensibilidad útil: 9 dBf
Selectividad: 75 dB a 400 kHz
Relación señal-rui do : 67 dB (estéreo), 69 dB (mono)
Distorsión armónica a 1 kHz: 0,5 % (estéreo),
0,3 % (mono)
Separación: 35 dB a 1 kHz
Respuesta de frecuencia: de 30 a 15.000 Hz
MW/LW
Rango de sintonización:
MW: 531 – 1.602 kHz
LW: 153 – 279 kHz
Te rminal de antena: conector de antena externa
Frecuencia inte rm edia: 10,7 MHz/450 kHz
Sensibilidad: MW: 30 µV, LW: 40 µV
Sección del amplificador de potencia
Salidas: salidas de altavoz (conectores de sellado
seguro)
Impedancia de altavoz: de 4 a 8 Ω
Máxima potencia de salida: 52 W × 4 (a 4 Ω)
General
Salidas:
Termin al de sal idas de audio (intercambi ab le entre
altavoz potenciador de graves y posterior)
Terminal de control de relé de la antena motorizada
Terminal de control del amplificador de potencia
Entradas:
Terminal de control ATT de teléfono (solamente
CDX-MR10)
Terminal de entrada del mando a distancia
Terminal de entrada de la antena
Toma de entrada AUX (minitoma estéreo)
Controles de tono:
Graves: ±10 dB a 60 Hz (XPLOD)
Medios: ±10 dB a 1 kHz (XPLOD)
Agudos: ±10 dB a 10 kHz (XPLOD)
Alimentación: batería de barc o cc de 12 V
(masa negativa)
Dimensiones: aprox. 178 × 50 × 179 mm (an/al/prf)
Dimensiones de montaje: aprox. 182 × 53 × 162 mm
(an/al/prf)
Peso: aprox. 1,2 kg
Accesorios suministrados:
Tapa de la toma AUX
Componentes de instalación y conexiones
(1 juego)
Equipo y accesorios opcionales:
Mando a distancia subacuático: RM - X11M
Mando a distancia de tarjeta: RM-X114
Es posible que su distribuidor no comercialice
algunos de los acceso rios que figu ra n en la lista
anterior. Para obtener más información, consulte al
distribuidor.
Tecnología de codificación de audio MPEG
Layer-3 y patentes bajo licencia de Fraunhofer IIS
y Thomson.
Este producto está protegido por los derechos de
propiedad intelectual de Microsoft Corporation.
Queda prohibido el uso o la distribución de esta
tecnología fuera de este producto si no se dispone
de una licencia de Microsoft o una división
autorizada de Microsoft.
El diseño y las especificaciones pueden variar sin
previo aviso.
continúa en la página siguiente t
17
Page 56

• Ciertas placas del circuito impreso no contienen
retardantes de llama halogenados.
• Los chasis impresos no contienen retardantes de
llama halogenados.
• Para el material de relleno y protección se ha
utilizado papel.
Solución de problemas
La siguient e list a de comp roba ción pre tende f acil itar
la solución de los problemas que surjan con la
unidad.
Antes de consultar la siguiente li sta de
comprobación, verifique los procedimientos de
conexión y de funcionami ent o.
General
La unidad no recibe alimentación.
• Re vise l a c one xió n. Si t od o está en o rden , co mprueb e
el fusible.
• Si la unidad está apagada y la pantalla desaparece, no
se puede operar con el mando a distancia.
tEncienda la unidad.
La antena motorizada no se extiende.
La antena motorizada no dispone de una caja de rel é.
No se emite el sonido.
• El volumen está demasiado bajo.
• Está activada la función A TT o la función ATT de
teléfono (cuando se conecta el cable de interfaz de un
teléfono para automóvil al cable ATT).
• La posición del control de equilibrio “FAD” no está
ajustada para un sistema de 2 altavoces.
No se escuchan pitidos.
• El sonido de los pitidos está cancelado (página 11).
• Se encuentra conectado un amplificador de potencia
opcional y no está usando el amplificador integrado.
El contenido de la memoria se borró.
• Se descon ectó el cable de fuen te de alimentación o la
batería.
• El cable de fuente de alimentación no está conectado
correctamente.
Las emisoras almacenadas y la hora correcta
se borraron.
El fusible se fundió.
Se escucha ruido cuando se cambia la
posición del interruptor de la llave de
encendido.
Los cables no coinciden corr ectam ente con el cone ctor
de alimentación auxiliar del barc o.
Durante la reproducción o recepción, se inicia
el modo de demostración.
Si no se realiza ninguna operación durant e 5 mi nutos
con el ajuste “DEMO-ON”, se inicia el modo de
demostración.
t Ajuste “DEMO-OFF” (página 12).
18
Las indicaciones desa parecen del visual izador
o no aparecen en él.
• El atenuador está ajustado en “DIM-ON” (página 12).
• La pantalla se apaga si mantiene pulsado (OFF).
t Mantenga pulsad o (OFF) en la unidad hasta que
se ilumine la pantalla.
• Los conectores están sucios (página16).
No funciona la desconexión automática.
La unidad está encendida. La función de desconexión
automática se activa después de apagar la unidad.
t Apague la unidad.
Reproducción de CD
No es posible in t roducir el disco.
• Ya hay un disco insertado.
• El disco se insertó a la fuerza al revés o en forma
incorrecta.
No se inicia la reproducción.
• El disco es defectuoso o está sucio.
• Los discos CD - R/CD-RW no son pa ra audio
(página 15).
No es posible reproducir archivos MP3/WMA.
El disco no es compatible con el forma to y la versión
del archivo MP3/WMA (página 15).
Los archivos MP3/WMA tardan más tiempo en
reproducirse que los demás.
El inicio de la reproducción de los siguientes discos
tarda algo más de tiempo.
– disco grabado con una estructura de árbol
complicada.
– disco grabado en Multi Session.
– disco al que es posible añadir datos.
Los elementos de la pantalla no se desplazan.
• En el caso de disco s con mu ch o s car acteres, es
posible que éstos no se desplacen.
• “A.SCRL” está ajustado en “OFF”.
t Ajuste “A.SCRL-ON” (página 12).
t Mantenga pulsad o (DSPL) (SCRL).
Se producen saltos de sonido.
• La instalación no es correcta.
t Instale la unidad en un ángulo inferior a 45° en
una parte firme de l barco.
• El disco es defectuoso o está sucio.
El disco no se expulsa.
Pulse Z (expulsar) (página 6).
Recepción de radio
No es posible recibir la emisoras.
Hay ruidos que obstaculizan el sonido.
• Conecte un cab le de control de antena motorizada
(azul) o un cable de fuente de alimentación auxiliar
(rojo) al ca ble de fuente de alimentació n del
amplificador de antena del barco (sól o si el barc o
dispone de antena integrada en el cris ta l posterior o
lateral).
• Compruebe la conexión de la antena del barco.
• La antena automática no se extiende.
t Compruebe la conexión del cable de control de la
antena del barco.
• Re vise la frecuencia.
Page 57

No es posible utilizar la sintonización
programada.
• Almacene la frecuencia correcta en la memoria.
• La señal de emisión es demasiado débi l.
No es posible utilizar la sintonización
automática.
• El ajuste del modo de búsqueda local no es correcto.
t La sintoniz ac ión se detiene con demasiada
frecuencia:
Ajuste “LOCAL-ON” (página 12).
t La sintoniz ac ión no se detiene en una emisora:
Ajuste “MONO-ON” (página 12).
• La señal de emisión es demasiado débi l.
t Utilice la sintonización manual.
Durante la recepción de FM, la indicación “ST”
parpadea.
• Sintonice la frecuencia con precisión.
• La señal de emisión es demasiado débi l.
t Ajuste “MONO-ON” (página 12).
Un programa de FM emitido en estéreo se
escucha en monoaural.
La unidad se encuentra en el modo de re ce pc ión
monoaural.
tAjuste “MONO-OFF” (página 12).
RDS (CDX-MR10)
La búsqueda (SEEK) comienza después de
unos segundos de escucha.
La emisora no es TP o tiene una señal débil.
tDesactive TA (página10).
No hay información de tráfico.
• Active TA (página10).
• La emisora no emite información de tráfico a pesar
de ser TP.
t Sintonice otra em isora.
PTY muestra “- - - - - - - -”.
• La emis or a actual no es RDS.
• No se reciben datos RDS.
• La emisora no especifica el tipo de programa.
Mensajes/indicaciones de error
ERROR
• El disco está sucio o se insertó al revés.
t Límpie lo o insértelo correct amente.
• Se insertó un disco vacío.
• El disco no se puede reproducir debido a un
problema.
t Inserte otro disco.
FAILURE
La conexión de los altavoces o de los amplificadores es
incorrecta.
tConsulte el manual de inst al ación/conexiones de
este modelo para revisar la conexión.
L. SEEK +/–
El modo de búsqueda local está activado durante la
sintonización automática.
NO AF (solamente CDX-MR10)
No hay frecuencia alternativa para la emisora actual.
t Pulse (SEEK) –/+ mientras el nomb r e del servicio
del programa parpadea. La unidad empieza a
buscar otra frecuencia con los mismos datos PI
(identific ación de programa) (y aparece “PI
SEEK”).
NO INFO
No se ha grabado información de texto en el archivo
MP3/WMA.
NO MUSIC
El disco no contiene ningún archivo de música.
t Inserte un CD de músi ca en esta unidad
NO NAME
No se ha grabado ningún nombre de disco/pis ta en la
pista.
NO TP (solamente CDX-MR10)
La unidad continúa buscando emisoras TP disponibles.
OFFSET
Es posible que se haya producido un error interno.
t Revise la conexión. Si el indicador de error
permanece en pantalla, póngase en contacto co n el
distribuidor Sony más cercano.
PUSH EJT
No es posible expulsar el disco.
t Pulse Z (expulsar) (página6).
READ
La unidad está leyendo toda la información de pistas y
de álbumes del disco.
t Espere hasta que finalice la lectura y se inicie la
reproducción automáticament e. Es posi ble q ue
tarde más de un minuto en función de la es tr uc tur a
del disco.
“” o “”
Durante la operación de retraso o avance rápido, lle gó
al principio o al final del disco, por lo que no es posible
continuar.
“”
No se puede mostrar el carácter con la unidad .
Si estas soluciones no ayudan a mejorar la situación,
póngase en contacto con el distri buidor Sony más
cercano.
Si entrega la unidad para su repa rac ión a causa de
problemas en la repro duc ción de CD, lleve el disco
que se utilizó cuando se produjo el problema.
19
Page 58

Wichtig!
Bitte nehmen Sie sich etwas Zeit, um
den Geräte-Pass vollständig
auszufüllen. Dieser befindet sich auf
der hinteren Umschlagseite dieser
Bedienungsanleitung.
Zur Installation und zum Anschluss siehe die
mitgelieferte Installations-/Anschlussanleitung.
Dieses Etikett befindet sich an der Unterseite
des Gehäuses.
Der Hersteller dieses Produkts ist Sony
Corporation, 1-7-1 Konan, Minato-ku, Tokio,
108-0075, Japan.
Autorisierter Vertreter für EMV und
Produktsicherheit ist die Sony Deutschland
GmbH, Hedelfinger Strasse 61, 70327 Stuttgart,
Deutschland. Für Fragen im Zusammenhang mit
Kundendienst oder Garantie wenden Sie sich
bitte an die in den separaten Kundendienst- oder
Garantieunterlagen genannten Adressen.
Microsoft, Windows Media
und das Windows-Logo sind
Markenzeichen oder
eingetragene Markenzeichen
der Microsoft Corporation in den USA und/oder
anderen Ländern.
Warnhinweis, wenn die Zündung Ihres
Boots nicht über eine Zubehörposition
(ACC oder I) verfügt
Aktivie r en Sie unbedi ngt die
Abschaltautomatik (Seite12).
Nach dem Ausschalten wird das Ger ät dann
nach der voreingestellten Zeit automatisch
vollstän dig abgeschaltet, so dass der Ba t terie
kein Strom mehr entzogen wird.
Wenn Sie die Abschaltautomatik ni cht
aktivieren, müssen Sie jedes Ma l, wenn Sie die
Zündung ausschalten, die Taste (OFF)
gedrückt halten, bis die Anzeige ausgeblendet
wird.
Entsorgung von gebrauchten
elektrischen und elektronischen
Geräten (anzuwenden in den
Ländern der Europäischen Union
und anderen europäischen Ländern
mit einem separaten Sammelsystem
für diese Geräte)
Das Symbol auf dem Produkt oder seiner Verpackung
weist darauf hin, dass dieses Produkt nicht als normaler
Haushaltsabfall zu behandeln ist, sondern an einer
Annahmestelle für das Recycling von elektrischen und
elektronischen Geräten abgegeben werden muss. Durch
Ihren Beitrag zum korrekten Entsorgen dieses Produkts
schützen Sie die Umwelt und die Gesundheit Ihrer
Mitmenschen. Umwelt und Gesundheit werden durch
falsches Entsorgen gefährdet. Materialrecycling hilft, den
Verbrauch von Rohstoffen zu verringern. Weitere
Informationen über das Recycling dieses Produkts
erhalten Sie von Ihrer Gemeinde, den kommunalen
Entsorgungsbetrieben oder dem Geschäft, in dem Sie das
Produkt gekauft haben.
2
Page 59

Inhalt
Willkommen!. . . . . . . . . . . . . . . . . . . . . . . . . . . 4
Vorbereitungen
Einstellen der Uhr . . . . . . . . . . . . . . . . . . . . . . . 4
Abnehmen der Frontplatte. . . . . . . . . . . . . . . . . 4
Anbringen der Frontplatte. . . . . . . . . . . . . . . 5
Lage und Grundfunktionen der
Teile und Bedienelemente
Hauptgerät. . . . . . . . . . . . . . . . . . . . . . . . . . . 6
CD
Informationen im Display. . . . . . . . . . . . . . . 8
Repeat und Shuffle Play . . . . . . . . . . . . . . . . 8
Radio
Speichern und Emp fa ngen von Sendern . . . . . . 8
Automatisches Spei chern von Sendern
— BTM. . . . . . . . . . . . . . . . . . . . . . . . . . . . . 8
Manuelles Speichern von Sendern . . . . . . . . 8
Einstellen gespeicherter Sender . . . . . . . . . . 8
Automatisches Einste l l en von Sendern. . . . . 9
RDS (CDX-MR10) . . . . . . . . . . . . . . . . . . . . . . 9
Übersicht . . . . . . . . . . . . . . . . . . . . . . . . . . . . 9
Einstellen von AF und TA . . . . . . . . . . . . . 10
Auswählen des Programmtyps (PTY) . . . . 10
Einstellen der Uhrzeit (CT). . . . . . . . . . . . . 11
Weitere Funktionen
Ändern der Klangeinstellungen . . . . . . . . . . . 11
Einstellen der Klangeigenschaft en
— BAL/FAD/SUB. . . . . . . . . . . . . . . . . . . 11
Individuelles Einste lle n der Equalizer-Kurve
— EQ3 . . . . . . . . . . . . . . . . . . . . . . . . . . . . 11
Einstellen von Konfigurationsop t ionen
— SET . . . . . . . . . . . . . . . . . . . . . . . . . . . . . . 12
Verwenden gesondert erhältlicher Geräte. . . . 13
Zusätzliche Audiogeräte. . . . . . . . . . . . . . . 13
Kartenfernbedienung RM-X114 . . . . . . . . 13
Bootstaugliche Fernbedienung
RM-X11M . . . . . . . . . . . . . . . . . . . . . . . . . 14
Weitere Informationen
Sicherheitsmaßnahmen. . . . . . . . . . . . . . . . . . 15
Hinweise zu CDs . . . . . . . . . . . . . . . . . . . . 15
Wiedergabereihenfolge vo n
MP3-/WMA-Dateien . . . . . . . . . . . . . . . . . 16
MP3-Dateien . . . . . . . . . . . . . . . . . . . . . . . 16
WMA-Dateien . . . . . . . . . . . . . . . . . . . . . . 16
Wartung . . . . . . . . . . . . . . . . . . . . . . . . . . . . . 16
Ausbauen des Geräts. . . . . . . . . . . . . . . . . . . . 17
Technische Daten . . . . . . . . . . . . . . . . . . . . . . 17
Störungsbehebung. . . . . . . . . . . . . . . . . . . . . . 18
Fehleranzeigen/Meldungen . . . . . . . . . . . . 2 0
3
Page 60

Willkommen!
Vorbereitungen
Danke, dass Sie sich für diesen CD-Player von
Sony entschieden habe n. Mit diesem Gerät
stehen Ihnen i m Bo ot die folgenden Funktionen
zur Verfügung.
• CD-Wiedergabe
Wiedergabe von CD-DAs (auch solch e mit CD
TEXT) und CD-Rs/CD-RWs (MP3-/WMADateien (Seite 16)).
CD-Typ Beschriftung auf der CD
CD-DA
MP3
WMA
• Radioempfang
–Für jeden Frequenzbereich können Sie bis zu
6 Sender speichern.
CDX-M10:
FM1 (UKW1), FM2 (UKW2), FM3
(UKW3), AM1 und AM2
CDX-MR10:
FM1 (UKW1), FM2 (UKW2), FM3
(UKW3), MW und LW
–BTM (Speiche rb e le gungsautomatik): Das
Gerät wählt die Sender mit den stärksten
Signalen aus un d speichert diese.
• RDS-Funktionen
–In Europa können Sie UKW-Sender mit RDS
(Radiodatensystem) hören. (CDX-MR10)
• Klangeinstellungen
–EQ3 stage2: Sie können eine der 7
voreingestellten Equalizer-Kurven
auswählen.
• Anschließen eines zusätzlichen Geräts
An die AUX-Eingangsbuchse an der
Vorderseite des Geräts können Sie ein tragbares
Audiogerät anschließen.
Einstellen der Uhr
CDX-M10:
12-Stunden-Format
CDX-MR10:
24-Stunden-Format
1 Halten Sie die Auswahltaste gedrückt.
Die Einstellanzeige erscheint.
2 Drücken Sie die Auswahltaste so oft,
bis „CLOCK-ADJ“ angezeigt wird.
3 Drücken Sie (SEEK) +.
Die Stundenanze ig e bl i nkt .
4 Drehen Sie den Lautstärkeregler, um
die Stunden und Minuten einzustellen.
Drücken Si e (SEEK) –/+, um zur jeweils
nächsten Ziffer in der Digitalanzeige zu
wechseln.
5 Drücken Sie die Auswahltaste.
Der Einstellvorgang ist damit abgeschlossen
und die Uhr beginnt zu laufen.
Zum Einblenden der U hrzeit drücken Sie
(DSPL). Drücken Sie (DSPL) erneut , u m zur
vorherigen Anzeige zurückzuschalten.
Tipp
Mithilfe der RDS-Funktion können Sie die Uhr auch
automatisch einstellen lassen (Seite 11). (CDX-MR10)
Abnehmen der Frontplatte
Um zu verhindern, da ss das Gerät gestohle n
wird, können Sie die Frontplatte abnehm en.
Warnton
Wenn Sie den Zündschlüssel in die Position OFF
stellen, ohne die Frontplatte abzunehmen, ertönt
einige Sekunden l ang ein Warnton.
Der Warnton wird nur ausgegeben, wenn der
integrierte Verstärker verwendet wird.
1 Drücken Sie (OFF).
Das Gerät schaltet sich aus.
2 Drücken Sie und ziehen Sie di e
Frontplatte auf sich zu und heraus.
4
Page 61

Hinweise
• Lassen Sie die Frontplatte nicht fallen und drücken
Sie nicht zu stark auf die Frontplatte und das
Display.
• Schützen Sie die Frontplatte vor Hitze bzw. hohen
Temperaturen und vor Feuchtigkeit. Lassen Sie sie
nicht im festgemachten Boot liegen.
Anbringen der Frontplatte
Setzen Sie Teil A der Frontplatte wie abgebildet
an Teil B am Gerät an und drücken Sie dann die
linke Seite hinein, bis sie mit einem Klicken
einrastet.
A
B
Hinweis
Legen Sie auf der Innenseite der Frontplatte nichts ab.
5
Page 62

Lage und Grundfunktionen der Teile und Bedienelemente
qaq
q
9
q
q
q
Hauptgerät
1
2
OFF
EQ3
SEEK
SCRL
DSPL
4 5 8673
PUSH SELECT
SOURCE
SEEK
MODE
ALBUM
1623 54
PAUSEREP SHUF
AUX
;
In diesem Abschnitt werden Lage und
Grundfunktionen der Teile und Bedienelemente
beschrieben.
Nähere Erläuterunge n finden Sie auf den
jeweiligen Seiten.
A Taste OFF
Ausschalten bzw. Stoppen der Tonquelle.
B Taste EQ3 (Equalizer) Seite 11
Auswählen eines Equalizer-Typs (XPLOD,
VOCAL, EDGE, CRUISE, SPACE,
GRAVITY, CUSTOM oder OFF).
C Lautstärkeregler/Auswahltaste
Seite 11
Einstellen der Laut st ärke (drehen) bzw.
Auswählen von Einste lloptionen (drücken
und drehen).
D Taste SOURCE
Einschalten bzw. Wechseln der Tonquelle
(Radio/CD/AUX).
E CD-Einschub
Legen Sie eine CD mit der beschrifteten
Seite nach oben ein. Die Wiedergabe
beginnt.
F Display
G AUX-Eingangsbuchse Seite 13
Anschließen ei nes tragbaren Audi ogeräts.
H Taste Z (Auswerfen)
6
Auswerfen der CD.
s
d
qf
g
I Taste (Lösen der Frontplatte)
Seite 4
J Taste DSPL (Anzeige)/SCRL (Bildlauf)
Seite 8
Wechseln der Informationen im Disp lay
(drücken) bzw. Durchlaufenlassen der
Informationen im Display (gedrückt halten).
K Tasten SEEK –/+
CD:
Überspringen von Titeln (drücken),
Überspringen mehrerer Titel hinterein ander
(drücken, dann inner hal b von 1 Sekunde
erneut drücken und ge dr ückt halten) bzw.
Rückwärts-/Vorwärtssuchen in einem Titel
(gedrückt halten).
Radio:
Automatisches Einstellen von Sendern
(drücken) bzw. manuelle Senders uche
(gedrückt halten).
L T aste MODE Seite 8
Auswählen des Radiofrequenzbere ic hs.
h
Page 63

M Taste BTM (CDX-M10) Seite 8
Starten der BTM-Funkt io n (ged rück t halt en ).
Taste AF (Alternativfrequenzen)/
TA (Verkehrsdurchsagen)/
PTY (Programmtypaus w ahl)
(CDX-MR10) Seite 10
Einstellen von AF und TA (drücken) bzw.
Auswählen des Programmtyps bei einem
RDS-Sender (gedrückt halte n).
N Frequenzwählschalter (nur CDX-M10)
(an der Geräteunterseite)
Näheres dazu finden Sie unt er
„Frequenzwählschalter“ in der mitgelieferten
Installations-/Anschlussanleitung.
O Zahlentasten (Stationstasten)
CD:
(1)/(2): ALBUM –/+ (während der MP3-/
WMA-Wiedergabe)
Überspringen von Alben (drücken)
bzw. Überspringen mehrerer Alben
hintereinander (gedrückt halten).
(3): REP Seite 8
(4): SHUF Seite 8
(6): PAUSE
Anhalten der CD-Wiedergabe an
diesem Gerät. Zum Beenden der
Funktion drücken Sie d i e Taste erneut.
Radio:
Einstellen gesp ei cherter Sender (d rücken)
bzw. Speichern von Sendern (gedrück t
halten).
P Empfänger f ür die
Kartenfernbedienung
Hinweis zur AUX-Kappe
Wenn die AUX-Eingangsbuchse (7) nicht verwendet
wird, bringen Sie die mitgelieferte AUX- Kappe an,
damit kei n W as ser e ind ringe n ka nn. B ew ahr en Si e die
AUX-Kappe außerhalb der Reichweite von kleinen
Kindern auf, damit diese sie nicht aus Versehen
verschlucken.
7
Page 64

CD
Radio
Informationen im Display
Titelnummer/Verstrichene Spieldauer, CD-/
Interpretenname, Albumnummer*
Albumname, Titelname,
Textinformationen*
*1 Die Albumnummer wird nur beim Wechseln des
Albums angezeigt.
*2 Bei der Wiedergabe einer MP3-Datei wird das ID3-
Tag angezeigt, bei der Wiedergabe einer WMADatei wird das WMA-Tag angezeigt.
Zum Wechseln der angezeigten Informationen
drücken Sie (DSPL).
Tipp
Je nach CD-Typ, Aufnahmeformat und Einstellungen
werden unterschiedliche Informationen angezeigt.
Erläuterungen zu MP3/WMA finden Sie auf Seite 16.
2
, Uhrzeit
Repeat und Shuffle Play
1 Drücken Sie während der Wiedergabe
(3) (REP) oder (4) (SHUF) so oft, bis
die gewünschte Einstellung im Display
erscheint.
Einstellung Funktion
TRACK Wiederholtes
ALBUM* Wiederholtes
SHUF ALBUM* Wiedergeben eines
SHUF DISC Wiedergeben einer CD
* Bei Wiedergabe einer MP3-/WMA-Datei.
Wenn Sie wieder in den normalen
Wiedergabemodus wechseln m öchten, wählen
Sie „ OFF“ bzw. „SHUF OFF“.
Wiedergeben eines
Titels.
Wiedergeben eines
Albums.
Albums in willkürlicher
Reihenfolge.
in willkürlicher
Reihenfolge.
8
Speichern und Empfangen von
Sendern
Achtung
Wenn Sie während der Bootsfahrt Sender
einstellen, sollten Sie die BTM-Funktion
(Speicherbelegungsautomatik) verwenden.
1
,
Andernfalls besteht Unfallgefahr.
Automatisches Speichern von
Sendern — BTM
1 Drücken Sie (SOURCE) so oft, bis
„TUNER“ erscheint.
Zum W echse ln des F reque nzberei chs drüc ken
Sie mehrmals (MODE).
2 Halten Sie die Auswahltaste gedrückt.
Die Einstellanzeige erscheint.
3 Drücken Sie die Auswahltaste so oft,
bis „BTM“ angezeigt wird.
4 Drücken Sie (SEEK) +.
Das Gerät speichert di e Sender in der
Reihenfolge der Frequenzen auf den
Zahlentasten (Stationstasten).
Ein Signalton ist zu hören und die Einstellung
wird gespeichert.
Speichern mit der Taste BTM
(nur CDX-M10)
Halten Sie (BTM) gedrückt, bis „BTM“ blinkt,
anstatt Schritt 2 bis 4 auszuführen.
Manuelles Speichern von Sendern
1 Während der zu speichernde Sender
empfangen wird, halten Sie eine
Stationstaste ((1) bis (6)) gedrückt,
bis „MEMORY“ erscheint.
Hinweis
Wenn Sie auf der gleichen Stationstaste eine n
anderen Sender speichern, wird der zuvor
gespeicherte Sender ersetzt.
Tipp
Wenn ein RDS-Sender gespeichert wird, wird auch
die AF/TA-Einstellung ges peichert (Seite10).
(nur CDX-MR10)
Einstellen gespeicherter Sender
1 Wählen Sie den Frequenzbereich aus
und drücken Sie eine Stationstaste
((1) bis (6)).
Page 65

Automatisches Einstellen von
Sendern
1 Wählen Sie den Frequenzbereich aus
und starten Sie mit (SEEK) –/+ die
Suche nach dem Sender.
Der Suchlauf stoppt, wenn ein Sender
empfangen wird . Wiederho le n Si e diesen
Vorgang, bis das Gerät den gewünschten
Sender empfängt.
Tipp
Wenn Sie die Frequenz des gewünschten Senders
kennen, halten Sie (SEEK) –/+ gedrückt, bis die
Frequenz in etwa erreicht ist, und drücken Sie
(SEEK) –/+ dann so oft, bis die gewünschte Frequenz
genau eingestellt ist (manuelle Sendersuche).
RDS (CDX-MR10)
Übersicht
UKW-Sender, die RDS (Radiodatensystem)
unterstützen, strahlen zusammen mit den
normalen Radi oprogramms ignalen ni cht hörbare ,
digitale Informationen aus.
Informationen im Display
BA
A Frequenz*1 (Programmdienstname),
Speichernummer, Uhrzeit, RDS-Daten
B TA/TP*
*1 Beim Empfang eines RDS-Senders wird „ *“ links
*2 „TA“ blinkt während einer Verkehrsdurchsage. „TP“
Zum Wechseln der angezeigten Informationen
A drücken Sie (DSPL).
RDS-Funktionen
Mit diesem Ger ät stehen folgende RD SFunktionen automatisch zur Verfügung:
AF (Alternativfrequ enzen)
In einem Netzwe rk wird der Sender m it den
stärksten Signal en ausgewählt und neu
eingestellt. So können Sie auch bei einer langen
Reise über eine große E nt fe rn ung hinweg
ununterbroch en denselben Sender empfangen,
ohne ihn manuell neu einstellen zu müssen.
TA (Verkehrsdurchsage n) /
TP (Verkehrsfunksender)
Aktuelle Verkehrsinformationen bzw.
Verkehrsfunksender w erden empfangen. Wenn
solche Informationen bzw. Sendungen
empfangen werde n, w ir d di e gerade
ausgewählte Tonquelle unterbrochen.
PTY (Programmtypauswahl)
Der gerade empfangene Programmtyp wird
angezeigt. Außerdem kann nach dem
ausgewählten Programmtyp gesucht werden.
CT (Uhrzeit)
Mit den CT-Daten (Uhrzeitdaten), die von
RDS-Sendern ausgestrahlt werden, lässt sich
die Uhr einstellen.
Hinweise
• Je nach Land bzw. Region stehen möglicherweise
nicht alle RDS-Funktionen zur Verfügung.
2
neben der Frequenz angezeigt.
leuchtet, wenn ein Sender mit Verkehrsdurchsagen
empfangen wird.
Fortsetzung auf der nächsten Seite t
9
Page 66

• Die RDS-Funktion arbeitet möglicherweise nicht,
wenn die Sendesignale zu schwach sind oder wenn
der eingestellte Sender keine RDS-Daten ausstrahlt.
Einstellen von AF und TA
1 Drücken Sie (AF/TA) so oft, bis die
gewünschte Einstellung angezeigt
wird.
Einstellung Funktion
AF-ON AF wird aktiviert und TA wird
TA-ON TA wird aktiviert und AF wird
AF, TA-ON AF und TA werden aktiviert .
AF, TA-OFF AF und TA werden deaktiviert.
Speichern von RDS-Sendern
zusammen mit der AF- und TAEinstellung
Sie können zusammen mit den RDS-Sendern die
AF/TA-Einstellung speichern. Mit der BTMFunktion werden nur RDS-Sender mit derselben
AF/TA-Einstellung gespeichert.
Beim manuellen Spei chern von Sendern können
Sie RDS- und Nicht-RDS-Sender mit
unterschiedlicher A F/TA-Einstellung spe ic hern.
1 Stellen Sie AF/TA ein und speichern Sie die
Sender dann mit BTM oder manuell ab.
Empfangen von
Katastrophenwarnungen
Wenn AF oder TA aktiviert ist, unterbrechen
Katastrophenwar nungen automatisch di e
ausgewählte Tonquelle.
Tipp
Wenn Sie die Lautstärke während einer
Verkehrsdurchsage einstellen, wird der eingestellte
Pegel für spätere Verkehrsdurchsagen gespeichert,
und zwar unabhängig von der sonst eingestellten
Lautstärke.
deaktiviert.
deaktiviert.
Lokalsenderfunktion
(nur Großbritannien)
Mithilfe dieser Fu nkt ion können Sie ande re
Lokalsender au sw ählen, auch wenn diese zuvor
nicht unter eine r St ationstaste gespeichert
wurden.
1 Drücken Sie währen d des U K W-Empfangs
eine Stationstaste ((1) bis (6)), unter der ein
Lokalsender gespeichert ist.
2 Drücken Sie innerhalb von 5 Sekunden erneut
die Stationstast e des Lokalsenders.
Wiederholen Sie diesen V organg, bis das Gerät
den Lokalsender empfängt.
Auswählen des Pr ogrammtyps
(PTY)
1 Halten Sie während des UKW-
Empfangs (AF/TA) (PTY) gedrückt.
Der Name des aktuellen Programmtyps
erscheint, wenn der Sender PTY-Daten
ausstrahlt.
2 Drücken Sie (AF/TA) (PTY) so oft, bis
der gewünschte Programmtyp
angezeigt wird.
3 Drücken Sie (SEEK) –/+.
Das Gerät beginnt, nach ein em Sender zu
suchen, der den ausgewählten Programmtyp
ausstrahlt.
Unveränderter Empfang eines
Regionalsenders — REG
Wenn die AF-Funktion aktiviert ist, wi rd der
Empfang dieses Geräts werkseitig auf eine
bestimmte Region be schränkt, so dass nic ht zu
einem anderen Regionalsender mit einer
stärkeren Frequenz gewechselt wird.
W enn Si e den E mpfa ngs berei ch des b etre f fend en
Regionalsenders verlassen, stellen Sie während
des Empfangs eines UK W-Senders bei der
Konfiguration „REG-OFF“ ein (Seite 12).
Hinweis
Diese Funktion steht in Großbritannien und in einigen
anderen Regionen nicht zur Verfügung.
10
Page 67

Programmtypen
NEWS (Nachrichten ), AFFAIRS (Aktuelles
Zeitgeschehen), INFO (Informationen ),
SPORT (Sport), EDUCATE (Erziehung und
Bildung), DRAMA (Hörspiele), CULTURE
(Kultur), SCIENCE (Wisse nschaft), VARIED
(Verschiedenes), POP M (Pop-Musik),
ROCK M (Rock-Musik), EASY M
(Unterhaltungsmusik), LIGHT M (Leichte
Klassik), CLASSICS (Klassik), OTHER M
(Sonstige Mu si k), WEATHER (Wetter),
FINANCE (Finanzberic hte), CHILDREN
(Kinderprogramme), SOCIAL A
(Magazinsendungen), RELIGION (Religion),
PHONE IN (Hörer te l ef on), TRAVEL
(Reiseinformationen), LEISURE
(Freizeitprogramm), JAZZ (Jazz), COUNTRY
(Country-Musik), NATION M (Volksmusik),
OLDIES (Oldies), FOLK M (Folk-Musik),
DOCUMENT (Dokumentarbeiträge)
Hinweis
Sie können diese Funktion in Ländern/Regionen, in
denen keine PTY-Daten zur Verfügung stehen, nicht
verwenden.
Einstellen der Uhrzeit (CT)
1 Stellen Sie bei der Konfiguration „CT-
ON“ ein (Seite 12).
Hinweise
• Die CT-Funktion steht möglicherweise nicht zur
Verfügung, auch wenn ein RDS-Sender empfangen
wird.
• Die mit der CT-Funktion eingestellte Uhrzeit ist nicht
immer korrekt.
Weitere Funktionen
Ändern der Klangeinstellungen
Einstellen der Klangeigenschaften
— BAL/FAD/SUB
Sie können die Balance, den Fader und die
Lautstärke des T iefsttonlautspreche rs eins tellen.
1 Drücken Sie die Auswahltaste so oft,
bis „BAL“, „FAD“ oder „SUB“
angezeigt wird.
Die Anzeige wechselt folgendermaßen:
1
LOW*
t MID*1 t HI*1 t
BAL (links-rechts) t
FAD (vorne-hinten) t
SUB (Lautstärke des
Tiefsttonlautsprechers)*
*1 Wenn EQ3 eingeschaltet ist (Seite 11).
*2 Wenn als Audioausgang „SUB“ eingestellt ist
(Seite 12).
„ATT“ wird bei der niedrigsten Einstellung
angezeigt. Die Lautstärke lässt sich in 21
Stufen einstellen.
*3 Wenn die AUX-T onquelle aktiviert ist (Seite 13).
2 Stellen Sie durch Drehen des
Lautstärkereglers die ausgewählte
Option ein.
Nach 3 Sekunden ist die Ei nstellung
abgeschlossen und im Display ersch ei nt
wieder die Anzeige für den normalen
Wiedergabemodus bzw. Empfangsmodus.
Individuelles Einstellen der
Equalizer-Kurve — EQ3
Mit „CUSTOM“ unte r EQ3 können Sie Ihre
individuellen Equalizer-Eins tellungen
vornehmen.
1 Wählen Sie eine Tonquelle aus und
drücken Sie mehrfach (EQ3), um
„CUST O M “ auszuwählen.
2 Drücken Sie die Auswahltaste so oft,
bis „LOW“, „MID“ oder „HI“ erscheint.
3 Stellen Sie durch Drehen des
Lautstärkereglers die ausgewählte
Option ein.
Die Lautstärke lässt si ch in Schritten von
1 dB auf einen Wert zwis chen –10 dB und
+10 dB einstel len.
2
t AUX*
3
Fortsetzung auf der nächsten Seite t
11
Page 68

Gehen Sie wie in Schr it t 2 und 3 vor, wenn
Sie weitere Frequenzber ei che der Equali zerKurve einstellen wolle n.
Wenn Sie die werkseitig eingestellt e
Equalizer-Kurve wiede rher ste lle n woll en,
halten Sie die Aus wah ltaste gedrückt, bevor
die Einstellung abgeschlossen ist.
Nach 3 Sekunden ist die Einstellung
abgeschlossen und im Display ersc heint
wieder die Anzei ge für den normalen
Wiedergabemodus bzw. Empfangsmodus.
Tipp
Andere Equalizer-Typen lassen sich ebenfalls
einstellen.
Einstellen von
Konfigurationsoptionen — SET
1 Halten Sie die Auswahltaste gedrückt.
Die Einstellanzeige erscheint.
2 Drücken Sie die Auswahltaste so oft,
bis die gewünschte Option angezeigt
wird.
3 Wählen Sie durch Drehen des
Lautstärkereglers die Einstellun g aus
(beispielsweise „ON“ oder „OFF“).
4 Halten Sie die Auswahltaste gedrückt.
Die Einstellung ist d am i t a bgeschlossen und
im Display ersc heint wieder die Anz ei ge für
den normalen Wiedergabem odus bzw.
Empfangsmodus.
Hinweis
Die angezeigten Optionen unterscheiden sich je nach
Tonquelle und Einstellung.
Folgende Optionen können eingestell t we rden
(Einzelheiten finden Sie jeweils auf den
angegebenen Seiten):
„
z“ gibt die Standar dei nstellung an.
CLOCK-ADJ (Uhr einstellen) (Seite 4)
1
(Uhrzeit)
CT*
Zum Einstellen von „CT-ON“ oder „CT-OFF“
(
z) (Seite 9, 11) .
BEEP (Signalton)
Zum Einstellen von „ BEEP-ON “ (z) oder
„BEEP-OFF“.
AUX-A*2 (AUX-Audio)
Zum Einstellen der A UX-T onquellenanzeige auf
„AUX-A-ON“ (
(Seite 13).
z) oder „AUX-A-OFF“
A.OFF (Abschaltautomatik)
Das Gerät kann nach dem Ausschalten nach
einer voreingestellten Zeit automatisch
vollständig abgeschaltet werden:
–„A .OFF-NO“ (
z), „A.OFF-30S (Seconds)“ ,
„A.OFF-30M (Minutes)“ oder „A.OFF-60M
(Minutes)“.
REAR/SUB*
2
Zum Wechseln des Audioausgangs.
–„R EAR-OUT“ (
z): Ausgabe an einen
Endverstärker.
–„SUB-OUT“: Ausgabe an einen
Tiefsttonlautsprecher.
DEMO
(Demo-Modus)
Zum Einstellen von „DEMO-ON“ (z) oder
„DEMO-OFF“.
DIM (Dimmer)
Zum Wechseln der Helligkeit im Display.
–„DIM-ON“: Das Display wird dunkler.
–„DIM-OFF“ (
z): Der Dimmer wird
deaktiviert.
M.DSPL (Bewegte Anzeige)
–„M.DSPL-ON“ (
z): Bewegte Muster werden
angezeigt.
–„M.DSPL-OFF“: Die bewegte Anzeige wird
deaktiviert.
A.SCRL (Automatischer Bildlauf)
Zum Einstellen des automatischen Bildlaufs für
Informationen mit vielen Zeichen beim
Wechseln des Albums bzw. des Titels.
–„A.SCRL-ON“ (
z): Die Informationen laufen
im Display durch.
–„A.SCRL-OFF“: Die Informationen laufen im
Display nicht durch.
LOCAL (Lokaler Suchmodus)
–„LOCAL-ON“: Nur Sender mit starken
Signalen werden ei ngestellt.
–„LOCAL-OFF“ (
z): Normaler Empfang beim
Einstellen von Sendern.
MONO*3 (Monauraler Modus)
Zum Verbessern des UKW-Empfangs w ählen
Sie den monauralen Em pfangsmodus.
–„MONO-ON“: Stereosendungen werden
monaural ausgegeben.
–„MONO-OFF“ (
z): Stereosend ungen werden
stereo ausgegeben.
REG*1*3 (Regional)
Zum Einstellen von „REG-ON“ (
z) oder „REG-
OFF“ (Seite 10).
LPF*4 (Niedrigpassfilt er )
Zum Auswählen der Grenzfrequenz des
Tiefsttonlautsprechers: „LPF OFF“ (
z),
„LPF125Hz“ oder „LPF 78Hz“.
12
Page 69

LOUD (Loudness)
Ermöglicht au ch bei niedriger Laut st ärke einen
klaren Klang.
–„LOUD-ON“: Bässe und Höhen werd en
angehoben.
–„LO UD-O FF“ (
z): Bässe und Höh en werden
nicht angehoben.
BTM (Speicherbelegungsautomatik) (Seite 8)
*1 Nur CDX-MR10
*2 Bei ausgeschaltetem Gerät.
*3 Wenn ein UKW-Sender empfangen wird.
*4 Wenn als Audioausgang „SUB“ eingestellt ist.
Verwenden gesondert
erhältlicher Geräte
Zusätzliche Audiogeräte
Wenn Sie ein gesondert erhältliches tragbares
Audiogerät an die AUX-Eingangsbuchse
(Stereominibuchse) am Gerät anschließen und
dann einfach die Tonquelle auswählen, können
Sie den Ton über die Lautsprecher des Boots
wiedergeben lassen. Unterschiede im
Lautstärkepegel zwischen diesem Gerät und dem
tragbaren Audi ogerät können korri giert werden.
Gehen Sie wie im Folgen den erläutert vor:
Anschließen eines tragbaren
Audiogeräts
1 Schalten Sie das trag bare Audiogerät au s.
2 Drehen Sie die Lautstärke an diesem Gerät
herunter.
3 Schließen Sie das Audi ogerät an dieses Gerät
an.
Einstellen des Lautstärkepegels
Stellen Sie unbedi ngt vor der Wiedergabe die
Lautstärk e der einzelnen angeschlossenen
Audiogeräte ein.
1 Drehen Sie die Laut st är ke an diesem Gerät
herunter.
2 Drücken Sie (SOURCE) so oft, bis „AUX“
erscheint.
„FRONT IN“ erscheint.
3 Starten Sie die Wiedergabe am trag baren
Audiogerät mit ge m äßigter Lautstärke.
4 Stellen Sie die gewohnte Hör l autstärke an
diesem Gerät ein.
5 Drücken Sie die Auswahlta st e s o oft, bis
„AUX“ erscheint, un d st ellen Sie durch
Drehen des Lautstärkereglers den
Eingangspegel (–8 dB bi s +18 dB) ein.
Kartenfernbedienung RM-X114
Die entsprechenden Tasten au f de r
Kartenfernbedienung haben dieselbe Funktion
wie die Tasten an di esem Gerät.
*
DSPL MODE
+
PRESET
LIST
+
DISC
MENU
SOURCE
–
SEEK
SOUND
DISC
PRESET –
+
VOL
–
–
E
SEEK
N
ATTOFF
MODE
LIST
m/M
(DISC
+
PRESET
+/ –)
R
E
T
ENTER
ATT
DSPL
MENU
SOURCE
</,
(SEEK –/+ )
SOUND
OFF
VOL (+/ –)
*
/
*
AUX
AUX
Verbindungskabel*
(nicht mitgeliefert)
* Verwenden Sie unbedingt einen Stecker ohne
Überkreuzung.
Fortsetzung auf der nächsten Seite t
13
Page 70

Die folgenden Tasten auf der
Kartenfernbedienung unterscheiden sich
außerdem hinsichtlich ihres Namens bzw. ihrer
Funktion von denen am Ger ät .
• Taste DSPL (Anzeige)
W echseln der Informationen im Display.
• Tasten </, (SEEK –/+)
Beim Steuern von CD- und Radio -Fu nktionen
entsprechen diese Tasten den Tasten
(SEEK) –/+ am Gerät.
• Taste SOUND
Diese Taste entspricht der Auswahltaste am
Gerät.
• Lautstär ketasten VOL +/–
Einstellen der Lautst ärke.
• Taste LIST
Auswählen von PTY bei einem RDS-Sender.
(nur CDX-MR10 )
• Tasten M/m (DISC*/PRESET +/–)
Beim Steuern von CD-Funkti onen entsprechen
diese Tasten den Tasten (1)/(2)
(ALBUM –/+) am Gerät.
• Taste ATT (Dämpfen des Tons)
Dämpfen des Tons. Zum Beenden der Funktion
drücken Sie die Taste erneut.
* Bei diesem Gerät nicht verfügbar.
Hinweis
Wenn Sie das Gerät ausschalten und die Anzeige
ausgeblendet ist, können Sie es nicht mit der
Kartenfernbedienung bedienen. Drücken Sie zunächst
(SOURCE) am Gerät oder legen Sie eine CD ein, um
das Gerät zu aktivieren.
Austauschen der Lithiumbatterie
Unter normalen Bedingungen hält die Batterie
etwa 1 Jahr. Die Lebensdauer der Batterie kann
je nach Gebrauch des Geräts jedoch auch kürzer
sein.
Wenn die Batterie schwächer wird, verkürzt sich
die Reichweite der Kartenfernbedienung.
Tauschen Sie die Batterie gegen eine neue
CR2025-Lithiumbatterie aus. Bei Verwendung
einer anderen Batt erie besteht Feuer- oder
Explosionsgefahr.
Hinweise zur Lithiumbatterie
• Bewahren Sie die Lithiumbatterie außerhalb der
Reichweite von Kindern auf. Sollte eine
Lithiumbatterie verschluckt werden, ist umgehend
ein Arzt aufzusuchen.
• Wischen Sie die Batterie mit einem trockenen Tuch
ab, um einen guten Kontakt zwischen den
Batteriepolen und -anschlüssen sicherzustellen.
• Achten Sie beim Einlegen der Batterie auf die
richtige Polarität.
• Halten Sie die Batterie nicht mit einer Metallpinzette.
Dies könnte zu einem Kurzschluss führen.
VORSICHT
Die Batterie kann bei falscher Handhabung
explodieren!
Auf keinen Fall darf sie aufgeladen,
auseinander g enommen od er ins Feuer
geworfen werden.
Entsorgungshinweis: Bitte werfen Sie nur
entladene Batter ien in die Sammelboxen beim
Handel oder den Kommunen. Entladen sind
Batterien in der Regel dann, wenn das Gerät
abschaltet und „Batterie leer“ signalisiert oder
nach längerer Gebrauchsdauer der Batterien
nicht mehr einwandfrei funktioniert.
Um sicherzugehen, kleben Sie die Batteriepole
z. B. m i t ein em Klebestreifen ab oder geben Sie
die Batterien einzeln in einen Plastikbeutel.
Bootstaugliche Fernbedienung
RM-X11M
Lage und Funktion der
Bedienelemente
Die entsprechenden Tasten auf der
bootstauglichen Fernbedienung haben di eselbe
Funktion wie die Tasten an diesem Gerät.
VOL +/–
OFF
MODE
SEEK –/+
14
x
Mit der Seite
+ nach oben
SOURCE
GP/ALBM
–/+
Bei folgenden Reglern auf der bootstauglichen
Fernbedienung müssen Sie anders als mit dem
Gerät vorgehen.
• Lautstärketasten VOL +/–
Entsprechen d em Lautstärkeregler am Gerä t.
• Tasten GP/ALBM –/+
Diese Tasten entsprechen den Tasten (1)/(2)
(ALBUM –/+) am Gerät.
Page 71

Weitere Informationen
Sicherheitsmaßnahmen
• Wenn das Boot längere Zeit in direktem
Sonnenlicht festgemach t war, lassen Sie das Gerät
etwas abkühlen, bevor Sie es einschalten.
• Motorantenne n w erden automatisch ausgefahren,
wenn das Gerät eingeschaltet wird.
Feuchtigkeitskondensation
Bei Regen oder bei sehr hoher Luftfeuchtigkeit kann
sich auf den Linsen im Inneren des Geräts und im
Display Feuchtigkeit niederschlagen. In diesem Fall
funktioniert das Gerät nicht mehr richtig. Nehmen
Sie die CD heraus und warten Sie etwa eine Stunde,
bis die Feuchtigkeit verdunstet ist.
So bewahren Sie die hohe
Tonqualität
Achten Sie darauf, keine Säft e oder andere
zuckerhaltige Geträ nke a u f da s Gerät oder die CDs
zu verschütten.
Hinweise zu CDs
• Berühren Sie nich t die Obe rfläch e v on CDs, d amit
diese nicht verschmutzt werden. Fassen Sie CDs
nur am Rand an.
• Bewahren Sie CDs in ihrer Hülle oder in den CDMagazinen auf, wenn sie nicht abgespielt werden.
• Schützen Sie CDs vor Hitze bzw. hohen
Temperaturen. Lassen Sie sie nicht im
festgemachte n Boot liegen.
• Bringen Sie keine Aufkleber auf CDs an und
verwenden Sie keine CDs mit Rück ständen von
Tinte oder Klebstoffen. Solche CDs drehen sich
beim Betrieb möglicherwe ise nic ht mehr und
führen zu einer Fehlfunktion oder können
beschädigt werden.
• Verwenden Sie keine CDs, an denen Etiketten
oder Aufkleber angebracht sind.
Bei Verwendung solcher CDs kann es zu
folgenden F e hlfunktio nen kommen:
– Die CD lässt sich nicht auswerfen, weil sich ein
Etikett oder Aufkleber gelöst hat und den
Auswurfmechanismus blockiert.
– Die Audiodaten werden nicht korrekt gele sen
(z. B. Tonsprünge bei der Wiedergabe, keine
Wiedergabe), weil ein Etikett oder Aufkleber
durch Wärmeeinwirku ng ge schrumpft ist und
die CD sich verzogen hat.
• CDs mit außergewöhnlichen Forme n (z . B.
herzförmige, quadratische oder sternförmige CDs)
können mit diesem Gerät ni cht wiedergegeben
werden. Falls Sie es doch versuchen, ka nn da s
Gerät beschädigt werden. Verwenden Sie solche
CDs nicht.
• Single - CDs (8-cm-CDs ) kö nnen ebenfall s n icht
verwendet werden.
• Reinigen Sie CDs vor dem
Abspielen mit einem
handelsüblichen
Reinigungstuch. Wischen Sie
dabei von der Mitte nach außen.
Verwenden Sie keine
Lösungsmittel wie Benzin oder
Verdünner und keine
handelsüblichen
Reinigungsmitte l oder Antistatik-Sprays für
Schallplatten.
Hinweise zu CD-Rs/CD-RWs
• Je nach dem Gerät, mit dem die CD-R/CD-RW
bespielt wurde, oder dem Zustand der
CD-R/CD-RW selbst ist eine Wiedergabe mit
diesem Gerät nicht in jedem Fall möglich.
• Eine noch nicht abgeschlossene CD-R/CD-RW
kann nicht wiedergegeben w erden.
• Das Gerät ist mit de m Format ISO 9660, Stufe 1/
Stufe 2, dem erweiterten Joli et - bzw. RomeoFormat sowie dem Multisession-Format
kompatibel.
• Höchstzahl an:
– Ordnern (Alben): 150 (einschließlich
Stammordner und leerer Ordner).
– Dateien (Titeln) und Ordnern auf einer CD: 300
(Wenn die Ordner- bzw. Dateinamen viele
Zeichen enthalten, ist die maximale Anzahl
möglicherweise geringer als 300).
– anzeigbaren Zeichen für einen Ordne r-/
Dateinamen: 32 (Joliet) bzw. 64 (Romeo).
• Bei einer Multisessi on-CD wird nur das Format
des ersten Titels der ersten Session erkannt und
wiedergegeben (all e an deren Formate werden
übersprungen). Das CD-DA-Format hat Vorrang
vor dem MP3-/WMA-Format.
– Wenn de r erste Titel das CD-D A -Format
aufweist, werden nur die CD-DA-Titel der ersten
Session wiedergegeben.
– Wenn der erste Titel nicht das CD-DA-Format
aufweist, wird eine MP3-/WMA-Session
wiedergegeben. Wenn auf der CD keine Daten in
einem dieser Form ate enthalten sin d , wi rd „NO
MUSIC“ angezeigt.
Fortsetzung auf der nächsten Seite t
15
Page 72

Musik-CDs mit
Urheberrechtsschutzcodierung
Dieses Gerät ist auf di e Wiedergabe von CDs
ausgelegt, die dem Compa ct Di sc-Standard (CD)
entsprechen.
Seit neuestem bringen einige Anbieter Musik-C Ds
mit Urheberrechtsschutzco dierung auf den Markt.
Beachten Sie bitte, dass einige dieser CDs nicht dem
CD-Standard entspreche n und mit diesem Produkt
möglicherweise nicht wi edergegeben werden
können.
Hinweis zu DualDiscs
Eine DualDisc ist eine zweiseitig bespielte Disc,
auf der DVD-Aufnahmen auf der einen und
digitale Audiodaten auf der anderen Seite
aufgezeichnet sind. Da jedoch die
Audiomaterialseite nicht dem Compact Disc (CD)Standard entspricht, kann einwandfreie
Wiedergabe auf diesem Produkt nicht garantiert
werden.
Wiedergabereihenfolge von MP3-/
WMA-Dateien
MP3/WMA
Ordner
(Album)
MP3-/WMADatei (Titel)
MP3-Dateien
• MP3 steht für MPEG-1 Audio La ye r-3. Dabei
handelt es sich um einen Formatstand ard zum
Komprimi er en von Musikdateien. Hierbei werden
Audio-CD-Daten auf etwa 1/10 ihrer
ursprünglichen Größe komprimiert.
• ID3-Tags der Versionen 1.0, 1.1, 2.2, 2.3 und 2.4
stehen nur bei MP3 zur Verfügung. Ein ID3-Tag
besteht aus 15/30 Zeichen (1.0 und 1.1) bzw.
63/126 Zeichen (2.2, 2.3 und 2.4).
• Fügen Sie beim Bene nne n e ine r MP3-Datei
unbedingt die Dateierw eiterung „.mp3“ zum
Dateinamen hinzu.
• Bei der Wiedergabe bzw. beim Vorwärts-/
Rückwärtssuchen in einer VBR-MP3-Datei
(variable Bitrate) wird die verstrichene Spieldauer
möglicherweise nicht richtig angezeigt.
Hinweis
Wenn Sie eine MP3-Datei mit einer hohen Bitrate, wie
z. B. 320 Kbps, wiedergeben, kommt es
möglicherweise zu Tonaussetzern.
16
WMA-Dateien
• WMA steht für Windows Media Audio. Dabei
handelt es sic h um einen Forma ts tandard zum
Komprimieren von Musikdat eien. Hierbei werden
Audio-CD-Daten auf etwa 1/22* ihrer
ursprünglichen Größe kom pri miert.
• WMA-Tags bestehen aus 63 Zeichen.
• Fügen Sie beim Benennen einer WM A- D atei
unbedingt die Dateie rw eiterung „.wma“ zum
Dateinamen hinzu.
• Bei der Wiedergabe bzw. beim Vorwärts-/
Rückwärtssuchen in einer VBR-WMA-Datei
(variabl e Bitrate) wi rd die verstrichene Sp ieldauer
möglicherweise nicht richtig angezeigt.
* nur bei 64 Kbps
Hinweis
Die Wiedergabe folgender WMA- Date ien w ird ni cht
unterstützt:
– Dateien mit verlustfreier Komprimierung
– kopiergeschützte Dateien
Sollten an Ihrem Gerät Probleme auftreten oder
sollten Sie Fragen haben, auf die in dieser Anleitung
nicht eingegangen wird, wenden Sie sich bitte an
Ihren Sony-Händler.
Wartung
Austauschen der
Sicherung
Wenn Sie eine Sicherung
austauschen, achten Sie darauf ,
eine Ersatzsicherung mit dem
gleichen Ampere-Wert wie die
Originalsich erung zu
verwenden. Dieser ist auf der
Originalsicherung angegeben.
Wenn die Sicherung
durchbrennt, überprüfen Sie
den Stromanschluss und
tauschen die Sicheru ng aus. Brennt die neue
Sicherung eben falls durch, kann eine interne
Fehlfunktion vorliegen. Wenden Sie sich in einem
solchen Fall an Ihren Sony-Händler.
Sicherung (10 A)
Page 73

Reinigen der Anschlüsse
Das Gerät funktioniert möglicherweise nicht
ordnungsgemäß, wenn die Ansc hlüsse zwischen
dem Gerät und der Frontplatte verschmutzt sind.
Um dies zu vermeiden, nehm en Sie die Frontplatte
ab (Seite 4) und reinigen Sie die Anschlüsse mit
einem Wattestäbchen. Drücken Sie dabei nicht zu
fest auf die Anschlüsse. Andernfalls kö nnen sie
beschädigt werden.
Hauptgerät
Hinweise
• Schalten Sie aus Sicherheitsgründen vor dem
Reinigen d er Anschlüsse die Zündung aus und
ziehen Sie den Schlüssel aus dem Zündschloss.
• Berühren Sie die Anschlüsse unter keinen
Umständen direkt mit den Händen oder einem
Metallgegenstand.
Rückseite der
Frontplatte
Ausbauen des Geräts
1 Entfernen Sie die Schutzumrandung.
1 Nehmen Sie die Frontplatte ab (Seite 4).
2 Setzen Si e beide Löseschlüssel an der
Schutzumrandung an.
2 Nehmen Sie das Gerät heraus .
1 Setzen Sie beide Löseschlüssel
gleichzeitig so ein, dass sie mit einem
Klicken einrasten.
Der Haken
muss nach
innen weisen.
2 Ziehen Sie an den Löseschlüsseln, um das
Gerät zu lösen.
3 Ziehen Sie das Gerät aus de r Hal t erung.
Technische Daten
CD-Player
Signal-Rauschabstand: 120 dB
Frequenzgang: 10 – 20.000 Hz
Gleichlaufschwankungen: Unterhalb der Messgrenze
Richten Sie die Löseschlüssel wie
in der Abbildun g dargestellt aus.
3 Ziehen Sie die Schutzumrandung mithilfe
der Löseschlüs sel heraus.
Tuner
CDX-M10:
FM (UKW)
Empfangsbereich:
87,5 – 108, 0 MHz (in Schritten v on 50 kHz)
87,5 – 107, 9 MHz (in Schritten v on 200 kHz)
UKW-Empfangsintervall: 50 kHz/200 kHz
umschaltbar
Antennenanschluss: Anschluss für Außenantenne
Zwischenfrequenz: 10,7 MHz/450 kHz
Nutzbare Empfindlichkeit: 9 dBf
Trennschärfe: 75 dB bei 400 kHz
Signal-Rauschabstand: 67 dB (stereo), 69 dB (mono)
Harmonische Verzerrung bei 1 kHz: 0,5 % (stereo),
0,3 % (mono)
Kanaltrennung: 35 dB bei 1 kHz
Frequenzgang: 30 – 15.000 Hz
Fortsetzung auf der nächsten Seite t
17
Page 74

AM
Empfangsbereich:
531 – 1.602 kHz (in Schritten von 9 kHz)
530 – 1.710 kHz (in Schritten von 10 kHz)
AM-Empfangsintervall: 9 kHz/10 kHz umschaltbar
Antennenanschluss: Anschluss für Au ßenanten ne
Zwischenfrequenz: 10,7 MHz/450 kHz
Empfindlichkeit: 30 µV
CDX-MR10:
FM (UKW)
Empfangsbereich: 87,5 – 108,0 MHz
Antennenanschluss: Anschluss für Au ßenanten ne
Zwischenfrequenz: 10,7 MHz/450 kHz
Nutzbare Empfindlichkeit: 9 dBf
Trennschärfe: 75 dB bei 400 kHz
Signal-Rauschabstand: 67 dB (stereo), 69 dB (mono)
Harmonische Verzerru ng bei 1 kHz: 0,5 % (stereo),
0,3 % (mono)
Kanaltrennung: 35 dB bei 1 kHz
Frequenzgang: 30 – 15.000 Hz
MW/LW
Empfangsbereich:
MW: 531 – 1.602 kHz
LW: 153 – 279 kHz
Antennenanschluss: Anschluss für Au ßenanten ne
Zwischenfrequenz: 10,7 MHz/450 kHz
Empfindlichkeit: MW: 30 µV, LW: 40 µV
Endverstärker
Ausgänge: Lautsprecherausgänge (versiegelte
Anschlüsse)
Lautsprecherimpedanz: 4 – 8 Ohm
Maximale Ausgangsleistung: 52 W × 4 (an 4 Ohm)
Allgemeines
Ausgänge:
Audioausgangsanschluss (hinten/
Tiefsttonlautsprecher umschaltbar)
Motorantennen-Steueranschluss
Steueranschluss für Endverstärker
Eingänge:
Steueranschluss für Stummsc ha lt ung be im
Telefonieren (nur CDX-MR10)
Fernbedienungseingang
Antenneneingang
AUX-Eingangsbuchse (Stereominibuchse)
Klangregler:
Bässe: ±10 dB bei 60 Hz (XPLOD)
Mitten: ±10 dB bei 1 kHz (XPLOD)
Höhen: ±10 dB bei 10 kHz (XPLOD)
Betriebsspannung: 12 V Gleichstrom, Bootsbatterie
(negative Erdung)
Abmessungen: ca. 178 × 50 × 179 mm ( B/H /T)
Einbaumaße: ca. 182 × 53 × 162 mm (B/H/T)
Gewicht: ca. 1,2 kg
Mitgeliefertes Zubehör:
AUX-Kappe
Montageteile und Anschlusszu be hör (1 Sa tz)
Sonderzubehör/gesondert erhältliche Geräte:
Bootstaugliche Fernbed ie nung: RM-X11M
Kartenfernbedienung: RM-X114
Ihr Händler führt unter Umstän de n nicht alle der
oben genannten Zube hörteile. Fragen Sie Ihren
Händler nach ausführlichen Informationen.
MPEG Layer-3 Audiocodiertechnologie und
Patente lizenziert von Fraunhofer IIS und Thomson.
Dieses Produkt ist durch bestimmte gewerbliche
Schutz- und Urheberrechte der Microsoft
Corporation geschützt. Die Verwendung oder der
Vertrieb derartiger Technologie außerhalb dieses
Produkts ohne eine Lizenz von Microsoft oder
einer autorisierten Microsoft-Niederlassung ist
untersagt.
Änderungen, die dem technischen Fortschritt dienen,
bleiben vorbehalten.
• In bestimmten Leiterplatten werden keine
halogenierten Flammschutzmittel verwendet.
• Im Gehäuse werden keine halogenierten
Flammschutzmittel verwendet.
• Papier wird als Verpackungsfüllmaterial verwendet.
Störungsbehebung
Anhand der folgenden Checkliste können Sie die
meisten Probleme, die möglic he rw e ise an Ihr em
Gerät auftreten, selbst beheben.
Bevor Sie die folgende Checkliste durchgehen,
überprüfen Sie bitte zunächst, ob Sie das Gerät
richtig angeschlossen und bedient haben.
Allgemeines
Das Gerät wird nic ht mit Strom versorgt.
• Überprüfen Sie die Verbindungen. Wenn die
Anschlüsse in Ordnung sind, überprüfen Sie die
Sicherung.
• Wenn Sie das Gerät ausschalten und die Anzeige
ausgeblendet ist, können Sie es nicht mit der
Fernbedienung bedienen.
t Schalten Sie das Gerät e in.
Die Motorantenne wird nicht ausgefahren.
Die Motorantenne hat kein Relaiskästchen.
Es ist kein Ton zu hören.
• Die Lautstärke ist zu niedrig.
• Die Funktion zum Dämpfen des Tons oder die
Stummschaltfunktion zum Telefonieren (wenn das
Schnittstellenkabel e ine s Telefons mit der ATTLeitung verbunden ist) ist aktiviert.
• Der Fader-Regler „FAD“ ist nicht für ein 2Lautsprecher-Sy s te m e ingestellt.
18
Page 75

Kein Signalton ertönt.
• Der Signalton ist deaktiviert (Seite 12).
• Ein gesondert erhältlicher Endverstärker ist
angeschlossen und Sie verwenden nicht den
integrierten Vers tä rk er.
Der Speicherinhalt wurde gelöscht.
• Das Stromversorgungskabel wurde gelöst oder die
Verbindung zur Batterie besteht nicht mehr.
• Das Stromversorgungskabel ist nicht richtig
angeschlossen.
Gespeicherte Sender und die korrekte Uhrzeit
werden gelöscht .
Die Sicherung ist durchgebrannt.
Störgeräusche sind zu hören, wenn der
Zündschlüssel gedreht wird.
Die Leitungen sind nicht korrekt an den
Stromanschluss für Zube hörgerät e ange sc hlossen.
Das Gerät wechselt während der Wiedergabe
bzw. des Radioempfangs in den Demo-Modus.
Wenn „DEMO-ON“ eingestellt ist und 5 Minuten lang
keine Funktion ausgeführt wird, wechselt das Gerät in
den Demo-Modus.
tStellen Sie „DEMO-OFF“ ein (Seite 12).
Die Anzeige wird ausgeblendet bzw. erscheint
nicht im Display.
• Der Dim mer i s t auf „DIM-ON“ eingestellt (Sei t e12).
• Die Anzeig e wird au sgeb l en d et , wenn Sie (OFF)
gedrückt halten.
t Halten Sie (OFF) am Gerät erneut gedrückt, bis
die Anzeige eingeblendet wird.
• Die Anschlüsse sind verschmutzt (Seite 17).
Die Abschaltautomatik funktioniert nicht.
Das Gerät ist eingeschaltet. Die Abschaltautomatik
wird nach dem Ausschalten des Geräts aktiviert.
tSchalten Sie das Gerät aus .
CD-Wiedergabe
Es lässt sich keine CD einlegen .
• Es ist bereits eine andere CD eingelegt.
• Die CD wurde mit Gewalt falsch herum ode r falsch
eingelegt.
Die CD lässt sich nicht abspielen.
• Die CD ist beschädigt oder verschmutzt.
• Die CD-R/CD-RW ist nicht als Audio-CD konzipiert
(Seite 15).
MP3-/WMA-Dateien können nicht
wiedergegeben werden.
Die CD ist nicht mit de m MP 3- /WMA-Format bzw.
der Version kompatibel (Seite 16).
Es dauert länger, bis die Wiedergabe von MP3-/
WMA-Dateien beginnt.
Bei folgenden CDs dauert es länger, bis die
Wiedergabe beginnt:
– CDs mit eine r k omplizierten Da tei-/Ordners truktur.
– Multisession-CDs.
– CDs, zu denen noch D a ten hinzugefügt werden
können.
Im Display ange zeigte Informat io ne n laufen
nicht automatisch durch.
• Bei CDs mit sehr viel Textinformationen laufen diese
im Display möglicherwe ise nic h t durch.
• „A.SCRL“ ist auf „OFF “ eing es tellt.
t Stellen Sie „A.SCRL-ON“ ein (Seite 12).
t Halten Sie (DSPL) (SCRL) gedrückt.
Tonsprünge treten auf.
• Das Gerät ist nicht rich tig installiert.
t Installiere n Sie da s Gerä t in e ine m Winkel von
unter 45° an einem stabilen Teil des Boots.
• Die CD ist beschädigt oder verschmutzt.
Die CD läss t sich n ich t au sw e r fe n .
Drücken Sie Z (Auswerfen) (Seite 6).
Radioempfang
Sender lassen sich ni cht empfangen.
Der Ton ist stark gestört.
• Schließen Sie eine Motorantennen-Steuerleitung
(blau) oder eine Stromversorgungsleitung für
Zubehörgeräte (rot) an die Stromversorgungsle it ung
für den Antennenverstärker des Boots an (nur, wenn
das Boot mit einer in der Heck-/Seit en fensterscheibe
integrierten Ant enne ausgestattet ist).
• Prüfen Sie die Verbindung der Bootsantenne.
• Die Autoantenne wird nicht ausgefahren.
t Prüfen Sie die Verbindung der Motorantennen-
Steuerleitung.
• Überprüfen Sie die Frequenz.
Gespeicherte Sender lassen sich nicht
einstellen.
• Speichern Sie den/die Sender unter der korrekten
Frequenz ab.
• Das Sendesignal ist zu schwach.
Der automatische Sendersuchlauf funktioniert
nicht.
• Die Einstellung für den lokalen Suchmodus ist nicht
korrekt.
t Der automati sc he Se nde r suc hla uf stoppt zu oft:
Stellen Sie „LOCAL-ON“ ein (Seite 12).
t Der automatische Sendersuchlauf hält bei keinem
Sender an:
Stellen Sie „MONO-ON“ ein (Seite12).
• Das Sendesignal ist zu schwach.
t Stellen Sie die Sender manuell ein.
Während des UKW-Empfangs blinkt die
Anzeige „ST“.
• Stellen Sie die Frequenz genau ein.
• Das Sendesignal ist zu schwach.
t Stellen Sie „MONO-ON“ ein (Seite 12).
Eine UKW-Stereosendung ist nur monaural zu
hören.
Das Gerät ist in den monauralen Empfangsm odus
geschaltet.
t Stelle n Sie „MONO-O F F“ ein (Seite 12 ).
Fortsetzung auf der nächst en Seite t
19
Page 76

RDS (CDX-MR10)
Der Sendersuchlauf (SEEK) startet nach ein
paar Sekunden Radioempfang.
Der Sender ist kein Verkehrsfunksender (TP) oder die
Sendesignale sind zu schwach.
t Deaktivieren Sie TA (Seite 10).
Es sind keine Verkehrsdurchsagen zu hören.
• Akti v ie ren Sie TA (Seite 10).
• Der Sender sendet keine Verkehrsdurchsagen,
obwohl es sich um einen Verkehrsfunksender (TP)
handelt.
tStellen Sie einen anderen Send er ein.
Bei der PTY-Funktion wird „- - - - - - - -“
angezeigt.
• Der aktuelle Sender ist kein RDS-Sender.
• Es wurden keine RDS-Daten empfangen.
• Der Sender gibt den Programmtyp nicht an.
Fehleranzeigen/Meldungen
ERROR
• Die CD ist verschmutzt oder falsch he r u m e ingelegt.
tReinigen Sie die CD bz w. legen Sie sie korrekt
ein.
• Eine leere CD wurde eingelegt.
• Die CD kann aufgrund eines Problems nicht
wiedergegeben werden.
tLegen Sie eine andere CD ein.
FAILURE
Die Lautsprecher-/Verstärkeranschlüsse sind nicht
korrekt.
t Schlagen Sie in der Installations-/
Anschlussanleitu ng zum jeweiligen Modell nach,
wie die Anschlüsse korrekt vorgenommen werden
müssen.
L. SEEK +/–
Beim automatische n Se nde r suchlauf ist der lokale
Suchmodus aktiviert.
NO AF (nur CDX-MR10)
Für den aktuellen Sender gib t es keine
Alternativfrequenz.
t Drücken Sie (SEEK) –/ +, so la nge der
Programmdienstname blinkt. Das Gerät beginnt
dann mit der Suche nach einer Frequenz mit
denselben PI-Daten (Programmkennung). „PI
SEEK“ wird angezeigt.
NO INFO
Die MP3-/WMA-Datei enthält keine
Textinformationen.
NO MUSIC
Die CD enthält keine Musikdateien.
t Legen Sie eine Musik-CD in diese s Gerät e in.
NO NAME
Für die CD/den Titel gibt es keinen Titelnamen.
NO TP (nur CDX-MR10)
Das Gerät sucht weiter nach verfügbaren
Verkehrsfunksendern.
OFFSET
Es liegt möglicherweise eine inte rn e F eh lf unkt ion vor.
t Überprüfen Sie die Verbindungen. Wenn die
Fehleranzeige weiterhi n im Displa y angezeigt wi rd,
wenden Sie sich an einen Sony-Händler.
PUSH EJT
Die CD kann nicht ausgeworfen werden.
t Drücken Sie Z (Auswerfen) (Seite 6).
READ
Das Gerät liest gerade alle Titel- und
Albumi nformationen von der CD ein.
t Bitte warten Sie, bis das Einlesen abge schlossen ist.
Die Wiederg ab e beginnt danach automati sc h. Je
nach CD-Struktur kann das Einlesen länger al s eine
Minute dauern.
„ “ oder „ “
Sie sind beim Rückwärts- oder Vorwärtssuchen am
Anfang bzw. Ende der CD angelangt und können nicht
weitersuchen.
„“
Das Zeichen kann mit diesem Gerät nich t an g ezeigt
werden.
Wenn sich das Proble m mit diesen
Abhilfemaßnahmen nicht beheben lässt, wenden Sie
sich an einen Sony-Händler.
Wenn Sie das Gerät aufgrund einer Störung bei der
CD-Wiedergabe zur Reparatur bringen, bringen Sie
bitte auch die CD mit, die eingelegt war, als das
Problem zum ersten Mal auftrat.
20
Page 77

Page 78

Zie voor het monteren en aansluiten van het
pp
b
apparaat de bijgeleverde handleiding
"Installatie en aansluitingen".
Dit label bevindt zich aan de onderkant van het
a
araat.
De fabrikant van dit product is Sony Corporation,
1-7-1 Konan Minato-ku Tokio, 108-0075 Japan.
De geautoriseerde vertegenwoordiger voor EMC
en productveiligheid is Sony Deutschland GmbH,
Hedelfinger Strasse 61, 70327 Stuttgart,
Duitsland. Voor zaken met betrekking tot
onderhoud of garantie kunt u contact opnemen
met de adressen die worden vermeld in de
afzonderlijke onderhouds-of garantiedocumenten.
Verwijdering van oude elektrische
en elektronische apparaten
(Toepasbaar in de Europese Unie en
andere Europese landen met
gescheiden ophaalsystemen)
verpakking wijst erop dat dit product niet als
huishoudelijk afval mag worden behandeld. Het moet
echter naar een plaats worden gebracht waar elektrische
en elektronische apparatuur wordt gerecycled. Als u
ervoor zorgt dat dit product op de correcte manier wordt
verwijderd, voorkomt u voor mens en milieu negatieve
gevolgen die zich zouden kunnen voordoen in geval van
verkeerde afvalbehandeling. De recycling van materialen
draagt bij tot het vrijwaren van natuurlijke bronnen. Voor
meer details in verband met het recyclen van dit product,
neemt u contact op met de gemeentelijke instanties, het
edrijf of de dienst belast met de verwijdering van
huishoudafval of de winkel waar u het product hebt
gekocht.
Het symbool op het product of op de
Waarschuwing als het contactslot van
de boot geen ACC-positie heeft
Zorg ervoor dat u de functie voor automatisch
uitschakelen instelt (pagina 11).
Hiermee wordt het apparaat na de ingestelde
tijdsduur automatisch volledig uitgeschakeld
nadat u het apparaat hebt uitgeschakeld. Zo
voorkomt u dat de accu le egraakt.
Als u de functie v oo r automa tisc h uitsc hak elen
niet instelt, houdt u (OFF) ingedrukt totdat het
scherm verdwijnt wanneer u het contac tslot op
uit zet.
Microsoft, Windows Media
en het Windows-logo zijn
geregistreerde handelsmerken
van Microsoft Corporation in
de VS en/of andere landen.
2
Page 79

Inhoudsopgave
Welkom! . . . . . . . . . . . . . . . . . . . . . . . . . . . . . . 4
Aan de slag
De klok instellen . . . . . . . . . . . . . . . . . . . . . . . . 4
Het voorpaneel verwijderen. . . . . . . . . . . . . . . . 4
Het voorpaneel bevestigen . . . . . . . . . . . . . . 5
Bedieningselementen en algemene
handelingen
Hoofdeenheid . . . . . . . . . . . . . . . . . . . . . . . . 6
CD
Schermitems . . . . . . . . . . . . . . . . . . . . . . . . . 8
Herhaaldelijk en willekeurig afspelen . . . . . 8
Radio
Zenders opslaan en ontvangen. . . . . . . . . . . . . . 8
Automatisch opslaan — BTM . . . . . . . . . . . 8
Handmatig opslaan . . . . . . . . . . . . . . . . . . . . 8
De opgeslagen zenders ontvangen . . . . . . . . 8
Automatisch afstemmen . . . . . . . . . . . . . . . . 9
RDS (CDX-MR10) . . . . . . . . . . . . . . . . . . . . . . 9
Overzicht. . . . . . . . . . . . . . . . . . . . . . . . . . . . 9
AF en TA instellen . . . . . . . . . . . . . . . . . . . . 9
PTY selecteren . . . . . . . . . . . . . . . . . . . . . . 10
CT instellen. . . . . . . . . . . . . . . . . . . . . . . . . 10
Andere functies
De geluidsinstellingen wijzigen . . . . . . . . . . . 11
De geluidskenmerken aanpassen
— BAL/FAD/SUB. . . . . . . . . . . . . . . . . . . 11
De equalizercurve aanpassen — EQ3 . . . . 11
Instelitems aanpassen — SET. . . . . . . . . . . . . 11
Optionele apparaten gebruiken. . . . . . . . . . . . 12
Randapparatuur voor audio . . . . . . . . . . . . 1 2
Kaartafstandsbediening RM-X114. . . . . . . 13
Maritieme kaar ta fstandsbediening
RM-X11M . . . . . . . . . . . . . . . . . . . . . . . . . 14
Aanvullende informatie
Voorzorgsmaatregelen . . . . . . . . . . . . . . . . . . 14
Opmerkingen over discs. . . . . . . . . . . . . . . 14
Afspeelvolgo rde van
MP3-/WMA-bestanden . . . . . . . . . . . . . . . 15
Informatie over MP3-bestanden. . . . . . . . . 15
Informatie over WMA-bestanden . . . . . . . 15
Onderhoud . . . . . . . . . . . . . . . . . . . . . . . . . . . 16
Het apparaat verwijderen . . . . . . . . . . . . . . . . 16
Technische gegevens . . . . . . . . . . . . . . . . . . . 17
Problemen oplossen . . . . . . . . . . . . . . . . . . . . 18
Foutmeldingen/berichten . . . . . . . . . . . . . . 19
3
Page 80

Welkom!
Aan de slag
Dank u voor de aankoop van deze Sony Compact
Disc Player. U kunt tijdens het varen genieten
van de volgende functies.
• CD's afspelen
U kunt CD-DA's (ook met CD TEXT) en
CD-R's/CD-RW's (MP3- /WMA -bestanden
(pagina 15 )) afspelen.
Soorten discs Label op de disc
CD-DA
MP3
WMA
• Radio-ontvangst
–U kunt maximaal 6 zenders per band o ps la an.
CDX-M10:
FM1, FM2, FM3, AM1 en AM2
CDX-MR10:
FM1, FM2, FM3, MW en LW
–BTM (geheu gen voor be ste afstemming): Me t
het apparaat w orden zenders met st erke
signalen gese le ct eerd en opgeslagen.
• RDS-diensten
–U kunt naar FM-zenders met de RDS-dienst
(radiogegevenssysteem ) luisteren in Euro pa.
(CDX-MR10)
• Geluidsaanpassing
–EQ3 stage2: U kunt kiezen uit 7 ingesteld e
equalizercurves.
• Randapparatuur aansl ui te n
Op de AUX-ingang aan de voorkant van het
apparaat ku nt u draagbare audioappara t uur
aansluiten.
De klok instellen
CDX-M10:
12-uurs systeem
CDX-MR10:
24-uurs systeem
1 Houd de selectietoets ingedrukt.
Het installatievenster wordt weergegeven.
2 Druk herhaaldelijk op de se le ct ie to ets
tot "CLOCK-ADJ" wordt weergegeven.
3 Druk op (SEEK) +.
De aanduiding voor het uur begint te
knipperen.
4 Draai de volumeknop om het uur en de
minuten in te stellen.
Als u de digit al e aanduiding wilt verplaatsen,
drukt u op (SEEK) –/+.
5 Druk op de selectietoets.
Het instellen is voltooid en de klok begint te
lopen.
Als u de klok wilt weergeven, dr ukt u op
(DSPL). Druk nogmaals op (DSPL) om terug te
keren naar het vorige scherm.
Tip
U kunt de klok automatisch instellen met de RDSfunctie (pagina 10). (CDX-MR10)
Het voorpaneel verwijderen
U kunt het voorpaneel van het apparaat
verwijderen om diefstal te voorkomen.
Waarschuwingstoon
Wanneer u het contact in de stand OFF zet
zonder het voorpaneel te verwijderen, hoort u
gedurende enkel e seconden de
waarschuwingstoon.
U hoort de waarschuwingstoon alleen als de
ingebouwde versterker wordt gebruikt.
1 Druk op (OFF).
Het apparaat wordt ui tgeschakeld.
2 Druk op en trek het voorpaneel
naar u toe.
4
Page 81

Opmerkingen
• Laat het voorpaneel niet vallen en druk niet te hard
op het voorpaneel en het scherm.
• Stel het voorpaneel niet bloot aan hitte/hoge
temperaturen of vocht. Laat het niet achter in een
aangemeerde boot.
Het voorpaneel bevestigen
Plaats deel A van het voorpaneel op deel B van
het apparaat, zoa ls wo rdt weergegeven, en druk
de linkerzijde vast tot deze klikt.
A
B
Opmerking
Plaats niets op de binnenkant van het voorpaneel.
5
Page 82

Bedieningselementen en algemene handelingen
qaq
q
9
q
q
q
Hoofdeenheid
1
2
OFF
EQ3
SEEK
SCRL
DSPL
4 5 8673
PUSH SELECT
SOURCE
SEEK
MODE
ALBUM
1623 54
AUX
PAUSEREP SHUF
;
In dit gedeelte vindt u i n f ormatie over de locatie
van bedieningselement en en instructies voor
algemene handelin gen.
Bekijk de betreffende pagina's voor meer
informatie.
A OFF toets
Uitschakelen; de bron stoppen.
B EQ3 (equalizer) toet s pagina 11
Een equalizertype selecteren (XPLOD,
VOCAL, EDGE, CRUISE, SPACE,
GRAV I T Y, CUSTOM of OFF) .
C Volumeknop/selectietoets pagina 11
Volume aanpas se n (draaien); instelitems
selecteren (ind rukken en draaien).
D SOURCE toets
Inschakelen; de bron wijzigen (Radi o/ C D /
AUX).
E Discsleuf
Plaats de disc (met het l abe l omhoog) en het
afspelen begint.
F Scherm
G AUX-ingang pagina 12
Een draagbaar audioapparaat aanslu i t en.
H Z (uitwerpen) toets
De disc uitwerpen.
I (voorpaneel loslaten) toets
pagina 4
s
d
6
qf
g
J DSPL (scherm)/SCRL (rollen) toets
pagina 8
Schermitem s w ijzigen (indrukken); het
schermitem rollen (ingedrukt houden).
K SEEK –/+ toetsen
CD:
Tracks overslaan (indrukke n) ; tracks blijven
overslaan (indrukken, vervolgens binnen 1
seconde nogmaals indrukken en
vasthouden); een track sne l t er ug-/
vooruitspoelen (ingedrukt houden).
Radio:
Automatisch afstemmen op zenders
(indrukken); handmatig zoeken naar zenders
(ingedrukt houden).
L MODE toets pagina 8
De radioband sel ecteren.
M BTM toets (CDX-M10) pagina 8
De BTM-functie inschakelen (ingedrukt
houden).
AF (alternatieve frequenties)/
TA (verkeersinformatie)/
PTY (programmatype) toets
(CDX-MR10) pagina 9
AF en TA instellen (indrukken); PTY
selecteren (ingedrukt houden) in RDS.
h
Page 83

N Frequentiekeuze schak el aar (alleen
CDX-M10)
(bevindt zich aan de onderkant van het
apparaat)
Zie "Frequentiekeuzeschakelaar" in de
bijgeleverde handleiding voor ins t al la t ie /
aansluitingen.
O Cijfertoetsen
CD:
(1)/(2): ALBUM –/+ (tijdens het afspelen
van MP3/WMA)
Albums overslaan (indrukken); albums
blijven overslaan (ingedru kt houden).
(3): REP pagina 8
(4): SHUF pagina 8
(6): PAUSE
Het afspelen van een CD met dit
apparaat onderbreken. Druk nogmaals
op de toets om te annul eren.
Radio:
De opgeslagen zenders ontvangen
(indrukken); zend er s opslaan (ingedrukt
houden).
P Ontvanger voor de
kaartafstandsbediening
Informatie over de AUX-afdekplug
Wanneer u de AUX-ingang (7) niet gebruikt, kunt u
met de bijgeleverde AUX-afdekplug voorkomen dat er
water in het apparaat komt. Houd de AUX-afdekplug
buiten het bereik van kinderen om te voorkomen dat
deze per ongeluk wordt ingeslikt.
7
Page 84

CD
Radio
Schermitems
Tracknummer/verstreken s peelduur,
naam van disc/artiest,
albumnummer*
tracknaam, tekstinformatie*
*1 Het albumnummer wordt alleen weergegeven als
het album wordt gewijzigd.
*2 Als u MP3-bestanden afspeelt, wordt de ID3-tag
weergegeven en wanneer u WMA-bestanden
afspeelt, wordt de WMA-tag weergegeven.
Als u de schermitems wilt wijzigen, drukt u op
(DSPL).
Tip
De weergegeven items zijn afhankelijk van het
disctype, de opname-indeling en de instellingen. Zie
pagina 15 voor meer informatie over MP3/WMA.
1
, albumnaam,
2
, klok
Herhaaldelijk en willekeurig
afspelen
1 Druk tij dens het afsp elen herh aald elij k
op (3) (REP) of (4) (SHUF) tot de
gewenste instelling wordt
weergegeven.
Selecteer Actie
TRACK Track he rhaaldelijk
ALBUM* Album herhaaldelijk
SHUF ALBUM* Album in willekeurige
SHUF DISC Disc in willekeurig e
* Bij het afspelen van een MP3-/WMA-bestand.
Als u wilt terugkeren naar de normale
weergavestand, selecteert u " OFF" of "SHUF
OFF".
afspelen.
afspelen.
volgorde afspelen.
volgorde afspelen.
Zenders opslaan en ontvangen
Let op
Als u afstemt op zenders tijdens het varen, moet
u de BTM-functie (geheugen voor beste
afstemming) gebruiken om ongelukken te
vermijden.
Automatisch opslaan — BTM
1 Druk herhaaldelijk op (SOURCE) tot
"TUNER" wordt weergegeven.
Druk herhaaldelijk op (MODE) om de band
te wijzigen.
2 Houd de selectietoets ingedrukt.
Het installatievenster wordt weergegeven.
3 Druk herhaaldelijk op de se le ct ie to ets
tot "BTM" wordt weergegeven.
4 Druk op (SEEK) +.
Het apparaat slaat de zenders in de volgorde
van frequentie op onder de cijfertoetsen.
Er klinkt een pieptoon wanneer de instelling
is opgeslagen.
Opslaan met de BTM toets
(Alleen CDX-M10)
Houd (BTM) ingedrukt tot "BTM" knippert in
plaats van stap 2 tot en met 4 uit te voeren.
Handma ti g o pslaan
1 Als u de zender ontvangt die u wilt
opslaan, houdt u een cijfertoets ((1)
tot en met (6)) ingedrukt tot
"MEMORY" wordt weergegeven.
Opmerking
Als u een andere zender opslaat onder dezelfde
cijfertoets, wordt de eerder opgeslagen zender
vervangen.
Tip
Als een RDS-zender wordt opgeslagen, wordt de AF-/
TA-instelling ook opgeslagen (pagina 9). (Alleen CDXMR10)
De opgeslagen zenders ontvangen
1 Selecteer de band en druk vervolgens
op een cijfertoets ((1) tot en met (6)).
8
Page 85

Automatisch afstemmen
1 Selecteer de band en druk op
(SEEK) –/+ om de ze nder te zoeken.
Het zoeken stopt zodra een zender wordt
ontvangen. Herhaal deze procedure tot de
gewenste zender wordt ont vangen.
Tip
Als u de frequentie kent van de zender die u wilt
beluisteren, houdt u (SEEK) –/+ ingedrukt tot de
frequentie ongeveer is bereikt en drukt u vervolgens
herhaaldelijk op (SEEK) –/+ om nauwkeurig af te
stemmen op de gewenste frequentie (handmatig
afstemmen).
RDS (CDX-MR10)
Overzicht
FM-zenders met de R D S- dienst
(radiogegevenssysteem ) s tu ren onhoorbare
digitale informatie mee met het gewone
radioprogrammasignaal.
Schermitems
BA
A Frequentie*1 (programma servicenaam ),
voorinstelnummer, klok, RDS-gegevens
B TA/TP*
*1 Als u de RDS-zender ontvangt, wordt " *" links van
*2 "TA" knippert tijdens de verkeersinformatie. "TP"
Als u de schermitems A wilt wijzigen, drukt u
op (DSPL).
RDS-diensten
Dit apparaat bied t automatisch RDS-d iensten op
de volgende manier:
AF (alternatieve frequenties)
Hiermee wordt de zender met het sterkste
signaal in een ne tw erk geselecteerd en wordt
opnieuw op deze zender afgestemd. Als u deze
functie gebruikt, kunt u onafgebroken naar
hetzelfde programma luisteren t ijdens een lange
vaartocht zonder dat u st eeds handmatig op
dezelfde zender hoeft af te stemme n.
2
de frequentieaanduiding weergegeven.
gaat branden als dergelijke zenders worden
ontvangen.
TA (verkeersinformatie)/
TP (verkeersprogramma)
Hiermee ontvangt u de huidige
verkeersinformatie/-programma's. De huidige
bron wordt onderbroke n door eventuele
verkeersinformatie/-programma's.
PTY (programmatypen)
Hiermee geeft u he t on tvange n programmatype
weer. Hiermee zoekt u ook naar het
geselecteerde programmatype .
CT (kloktijd)
Met de CT-gegevens van de RDS-uitzending
wordt de klok ingesteld.
Opmerkingen
• In bepaalde landen/regio's zijn wellicht niet alle
RDS-functies beschikbaar.
• RDS functioneert wellicht niet als het
ontvangstsignaal zwak is of als de zender waarop u
hebt afgestemd, geen RDS-gegevens verzendt.
AF en TA instellen
1 Druk herhaaldelijk op (AF/TA) tot de
gewenste instelling wordt
weergegeven.
Selecteer Actie
AF-ON AF inschakelen en TA
TA-ON TA inschakelen en AF
AF, TA-ON AF en TA inschakelen.
AF, TA-OFF AF en TA uitschakelen.
RDS-zenders met de AF- en TAinstelling opslaan
U kunt RDS-zender s vooraf instellen met de
AF-/TA-instelling. Als u de BTM-functie
gebruikt, worden alleen RDS-zenders met
dezelfde AF-/TA-instelling opges la gen.
Als u handmatig vooraf instelt, kunt u zowel
RDS- als niet-RDS-zenders instellen met elk hun
AF-/TA-instelling.
1 Stel AF/TA in en sla de zender vervolgens met
BTM of handmatig op.
Noodberichten ontvangen
Als AF of TA is ingeschakeld, wordt de
geselecteerde bron automatisch o nderbroken
door de noodberichten.
uitschakelen.
uitschakelen.
vervolg op volgende pagina t
9
Page 86

Tip
Als u het volume aanpast tijdens een verkeersbericht,
wordt dat volume opgeslagen in het geheugen voor
volgende verkeersberichten, onafhankelijk van het
normale volume.
Een regionaal programma
beluisteren — REG
Als de AF-functie is ingeschake ld: met de
fabrieksinstelling van het ap paraat wordt
ontvang st tot ee n bepa alde re gio bep erkt, zodat er
niet automatisch wor dt overgesch akeld naar een
andere regionale zen der met een sterkere
frequentie.
W ann ee r u he t o nt v ang st ge bi ed van het re gi onal e
programma verlaa t, stelt u tijdens FM-ontvangst
"REG-OFF" in bij de instellingen (pagina 12).
Opmerking
Deze functie werkt niet in het Verenigd Koninkrijk en
bepaalde andere gebieden.
Local Link-functie (alleen voor het
Verenigd Koninkrijk)
Met deze functie ku nt u andere lokale zenders in
het gebied selecter en, ook als deze niet zijn
opgeslagen onder de cijfertoetsen.
1 Druk tijdens FM-ontvangst op een cijf ertoets
((1) tot en met (6)) waaronder een lokale
zender is opgeslagen.
2 Druk binnen 5 seconden nogmaals op de
cijfertoets van de lokale zender.
Herhaal dit tot de lokale zender wordt
ontvangen.
Programmatypen
NEWS (Nieuws), AFFAIRS (Actualiteiten),
INFO (Informatie), SPORT (Sport),
EDUCATE (Educatieve programma's),
DRAMA (Toneel), CULTURE (Cultuur),
SCIENCE (Wetenschap), VARIED (Diversen),
POP M (Populaire muziek), ROCK M (Rock-
muziek), EASY M (Easy Listening), LIGHT M
(Licht klassiek), CLASSICS (Klassiek),
OTHER M (Ander type muziek), WEATHER
(Weerberichten), FINANCE (Financiën),
CHILDREN (Kinderprogramma' s), SOCIAL A
(Sociale zaken), R ELIGION (Religie),
PHONE IN (P hone In), TRAVEL (Reizen),
LEISURE (Ontspanning), JAZZ (Jazz-muzie k),
COUNTRY (Country-mu ziek), NATION M
(Nationale muziek), OLDIES (Oldies),
FOLK M (Folk-muziek), DOCUMENT
(Documentaires)
Opmerking
U kunt deze functie niet gebruiken in bepaalde landen/
regio's waar geen PTY-gegevens beschikbaar zijn.
CT instellen
1 Stel "CT-ON" in bij de instellingen
(pagina 11).
Opmerkingen
• Het is mogelijk dat de CT-functie niet werkt, ook al
wordt er wel een RDS-zender ontvangen.
• Er kan een verschil zijn tussen de tijd van de CTfunctie en de werkelijke tijd.
PTY selecteren
1 Houd (AF/TA) (PTY) ingedrukt tijdens
FM-ontvangst.
De naam van het huidige programmatype
verschijnt als de zend er PTY-gegevens
uitzendt.
2 Druk herhaaldelijk op (AF/TA) (PTY) tot
het gewenste programmatype
verschijnt.
3 Druk op (SEEK) –/+.
Het apparaat begint te zoeken naar een zender
die het geselecteerde programmatype
uitzendt.
10
Page 87

Andere functies
De geluidsinstellingen wijzigen
De geluidskenmerken aanpassen
— BAL/FAD/SUB
U kunt de balans, de fad er en het
subwoofervolume regele n.
1 Druk herhaaldelijk op de selectietoets
tot "BAL", "FAD" of "SUB" wordt
weergegeven.
Het item wordt als volgt gewijzigd:
1
LOW*
t MID*1 t HI*1 t
BAL (links-rechts) t
FAD (voor-achter) t
SUB (subwoofervolume)*
*1 Als EQ3 is ingeschakeld (pagina 11).
*2 Als de audio-uitvoer is ingesteld op "SUB"
(pagina 11).
"ATT" wordt weergegeven bij de laagste
instelling en u kunt deze instelling maximaal 21
stappen aanpassen.
*3 Als AUX-bron is ingeschakeld (pagina 12).
2 Draai de volumeknop om het
geselecteerde item aa n te passen.
Na 3 seconden is he t ins t el le n volt ooid en
keert het scherm terug naar de norma l e
weergave-/ontvangststand.
De equalizercurve aanpassen
— EQ3
Met "CUSTOM" bij EQ3 ku nt u zelf
equalizerinstellingen opgeven.
1 Selecteer een bron en druk
herhaaldelijk op (EQ3) om "CUSTOM"
te selecteren.
2 Druk herhaaldelijk op de selectietoets
tot "LOW", "MID" of "HI" wordt
weergegeven.
3 Draai de volumeknop om het
geselecteerde item aa n te passen.
Het volume kan worden aangepast in stappen
van 1 dB, van –10 dB tot +10 dB.
Herhaal stap 2 en 3 om de equalizercurve aan
te passen.
Als u de fabrieksinstelling voor de
equalizercurve wi lt herstellen, houdt u de
selectietoets ingedrukt v oordat het inste llen is
voltooid.
2
t AUX*
3
Na 3 seconden is het instellen voltooid en
keert het scherm terug naar de normale
weergave-/ontvangststand.
Tip
Andere equalizertypen kunnen ook worden
aangepast.
Instelitems aanpassen — SET
1 Houd de selectietoets in gedrukt.
Het installatievenster wordt weergegeven.
2 Druk herhaaldelijk op de selectietoets
tot het gewenste ite m wordt
weergegeven.
3 Draai de volumeknop om de instelling
(bijvoorbeeld "ON" of "OFF") te
selecteren.
4 Houd de selectietoets in gedrukt.
Het instellen is voltooid en het scherm keert
terug naar de normale weergave-/
ontvangststand.
Opmerking
De weergegeven items zijn afhankelijk v an de bron en
de instelling.
De volgende items kunnen worden ingest el d
(volg de paginaverwijzing voor meer informatie):
"
z" geeft de standaa rd i nstellingen aan.
CLOCK-ADJ (klok aanpassen) (pagina 4)
1
(kloktijd)
CT*
"CT-ON" of "CT-OFF" (
10).
BEEP
"BEEP-ON" (
AUX-A*
z) of "BEEP-OFF" instel len.
2
(AUX-audio)
Het AUX-bronscherm instellen op "AUX-AON" (
z) of "AUX-A-OFF" (pag ina 12).
A.OFF (automatisch uitschakelen)
Automatisch volledig uitschakelen na de
gewenste tijd wanneer het apparaat is
uitgeschakeld:
–"A.OFF-NO" (
"A.OFF-30M (minuten)" of "A.O FF-60M
(minuten)".
REAR/SUB*
2
De audio-uitvoer wijzigen.
–"REAR-OUT" (
versterker weergeven.
–"SU B-OUT": het geluid via een subwoofer
weergeven.
DEMO
(demonstratie)
"DEMO-ON" (z) of "DEMO-OFF" instellen.
vervolg op volgende pagina t
z) instellen (pagina 9,
z), "A.OFF-30S (s econden)",
z): het geluid via een
11
Page 88

DIM (dimmer)
De helderheid van het scherm regelen.
–"DIM-ON": om het scherm te dimmen.
–"DIM-OFF" (
z): om de dimmer uit te
schakelen.
M.DSPL (beweging scherm)
–"M.DSPL-ON" (
z): bewegende patronen
weergeven.
– "M.DSPL-OFF": de beweging van het scherm
uitschakelen.
A.SCRL (automatisch ro ll en)
Lange schermitems automatisch laten rollen als
het album of de track wordt gewijzigd.
–"A.SCRL-ON" (
z): om items te rollen.
–"A.SCRL-OFF": om items niet te rollen.
LOCAL (lokale zoekfunctie)
–"LOCAL-ON": om alleen af te stemmen op
krachtige zenders.
–"LOCAL-OFF" (
z): om af te stemmen met
normale ontvangst.
MONO*3 (monostand)
Selecteer de mono- ontvangststand als u slecht e
FM-ontvangst wil t verbeteren.
– "MONO-ON": om stereo- uitzendingen in
mono te horen.
–"MONO-OFF" (
z): om stereo-ui tzendingen in
stereo te horen.
REG*1*3 (regionaal)
"REG-ON" (
z) of "REG-OFF" ins t el le n
(pagina 10).
LPF*4 (laagdoorlaa tfilt er )
Hiermee select eert u de kantelfrequentie van de
subwoofer: "LPF OFF" (
z), "LPF125Hz" of
"LPF 78Hz".
LOUD (Loudness)
Hiermee kunt u het ge luid goed horen met ee n
laag volume.
–"LOUD-ON": om hoge en lage tonen te
versterken.
–"LOUD-OFF" (
z) : om hoge en lage tonen niet
te versterken.
BTM (pagina 8 )
*1 Alleen CDX-MR10
*2 Als het apparaat is uitgeschakel d.
*3 Als FM wordt ontvangen.
*4 Als de audio-uitvoer is ingestel d op "SUB".
Optionele apparaten gebruiken
Randapparatuur voor audio
Door een optioneel draagbaar audioapparaat aan
te sluiten op de AUX-ingang (stereo miniaansluiting) op he t a pparaat en vervolgens de
bron te selecteren , ku nt u het audioapparaat
beluisteren via de luidsprekers van de boot. Het
volume kan worden aangepast voor elk verschil
tussen het apparaat en het draagbare
audioapparaat. Volg de onderstaande procedure:
Een draagbaar audioapparaat
aansluiten
1 Schakel he t draagbare audioapparaat uit.
2 Verlaag het volume op het apparaat.
3 Sluit het draagbare audioapparaat aan.
AUX
AUX
Verbindingskabel*
(niet bijgeleverd)
* Gebruik een rechte stekker.
Het volume aanpassen
Pas het volume voor elk aangesloten
audioapparaat a an voor dat u het afspelen start.
1 Verlaag het volume op het apparaat.
2 Druk herhaaldelijk op (SOURCE) tot "AUX"
wordt weergegeven.
"FRONT IN" wordt weergegeven.
3 Start het afspelen op het draagbare
audioapparaat m et een normaal volume.
4 Stel uw gebruikelijke luistervolume in op het
apparaat.
5 Druk herhaaldelijk op de selectietoets tot
"AUX" wordt weergegeven en draai de
volumeknop om het inga ngsniveau aan te
passen (–8 dB tot +1 8 dB).
12
Page 89

Kaartafstandsbediening RM-X114
De overeenkomstige toets en op de
kaartafstands bediening bedienen de zelfde
functies als die op het apparaat.
*
DSPL MODE
+
PRESET
+
DISC
MENU
SOURCE
–
SEEK
SOUND
DISC
PRESET –
+
VOL
–
–
MODE
LIST
LIST
m/M
*
/
(DISC
+
SEEK
PRESET
+/ –)
R
E
T
N
E
ATTOFF
ENTER
ATT
*
DSPL
MENU
SOURCE
</,
(SEEK –/+ )
SOUND
OFF
VOL (+/ –)
De volgende toetsen op de
kaartafstandsbediening verschillen van de
toetsen op he t ap para at of hebbe n ander e fu nctie s
dan de toetsen op het apparaat.
• DSPL (sch e rm) toets
De schermitems wijzigen.
• </, (SEEK –/+) toetsen
CD/radio bedienen, dezelfde functie als
(SEEK) –/+ op het appara at .
• SOUND toets
Dezelfde functie als de selectietoets op het
apparaat.
• VOL (volume) +/– toetsen
Het volume aanpassen.
• LIST toets
PTY in RDS selecteren. (Alleen CDX- MR10)
• M/m (DISC */PRESET +/–) toetsen
CD bedienen, dezelfde functie als (1)/(2)
(ALBUM –/+) op het ap paraat.
• ATT (dempen) toets
Het geluid d empen. Druk no gm aals op de t oets
om te annuleren.
* Niet beschikbaar op dit apparaat.
Opmerking
Als het apparaat wordt uitgeschakeld en het scher m
verdwijnt, kan het apparaat niet worden bediend met
de kaartafstandsbediening, tenzij op (SOURCE) op
het apparaat wordt gedrukt of er een disc wordt
geplaatst om het apparaat eerst te activeren.
De lithiumbatterij vervangen
Onder normal e om standigheden gaat de batterij
ongeveer 1 jaar mee. (Afhankelijk van de
gebruiksomstandigheden kan de levensduu r
korter zijn.)
Wanneer de batterij verzwakt, wordt het bereik
van de kaartafstandsbediening kleiner. Vervang
de batterij door een nieuwe CR2025lithiumbatterij. Bij een andere batterij best aa t er
brand- of explosiegevaar.
x
+ zijde
omhoog
Opmerkingen over de lithiumbatterij
• Houd de lithiumbatterij buiten het bereik van
kinderen. Raadpleeg meteen een arts wanneer een
batterij wordt ingeslikt.
• Veeg de batterij schoon met een droge doek voor
een goed contact.
• Houd bij het plaatsen van de batterij rekening met
de juiste polariteit.
• Houd de batterij niet vast met een metalen tang om
kortsluiting te voorkomen.
WAARSCHUWING
Bij oneigenlijk gebruik kan de batterij
ontploffen.
Probeer niet de batterij op te laden of te
openen; werp ook een lege batterij nooit in
het vuur.
Voor de Klanten in
Nederland
Gooi de batterij niet weg
maar lever deze in als klein
chemisch afval (KCA).
13
Page 90

Maritieme kaartafsta ndsb edien ing
RM-X11M
Bedieningselementen
De overeenkomstige toetsen op de maritieme
kaartafstandsbediening bedienen dezelfde
functies als die op het apparaat.
VOL +/–
OFF
GP/ALBM
–/+
De volgende bedienings el ementen op de
maritieme kaartafstandsb ediening moete n op een
andere manier worde n be diend dan op het
apparaat.
• VOL ( volume) +/– toetsen
Dezelfde functie al s de volumeknop op het
apparaat.
• GP/ALBM –/+ toetsen
Dezelfde functie als (1)/(2) (ALBUM –/+) op
het apparaat.
MODE
SEEK –/+
SOURCE
Aanvullende informatie
Voorzorgsmaatregelen
• Wanneer uw boot in de volle zon heeft gelegen,
moet u eerst het appa raa t l at en afkoelen voordat u
het gebruikt.
• Een elektrisch bediende antenne schuift
automatisch uit wanneer het apparaat wordt
ingeschakeld.
Condensvorming
Op een regenachtige dag of in een zeer vochtige
omgeving kan vocht condenseren op de lenzen en
het scherm van het apparaat. In dit geval kan de
werking van het apparaat worden verstoord.
V erwijder de disc en wacht ongeveer een uur tot alle
vocht is verdam pt .
Optimale geluidskwaliteit behouden
Let op dat u geen drankjes op het apparaat of de
discs morst.
Opmerkingen over discs
• Raak het oppe rvl ak van de di sc ni et aan zodat dit
schoon blijft. Pak de disc bij de randen vast.
• Bewaar de discs in het doosje of het discmagaz i jn
wanneer u deze niet geb ruikt.
• Stel discs niet bloo t aa n hi tt e/ hoge temperaturen.
Laat geen discs achter in een aangem eerde boot.
• Plak geen etiketten op de discs en gebruik geen
discs met kleverige inkt/resten. Dergelijke discs
kunnen stoppen met draaien, waardoor de werking
wordt verstoord of de disc kan worden
beschadigd.
14
• Gebruik geen discs waar op sti ckers zijn geplakt.
Als u dergelijke discs toch gebruikt, kan dat leiden
tot:
– het niet uitwerpen van een disc (do orda t een
sticker losraakt en het uitwe rpmechanisme wordt
geblokkeerd);
– het niet correct lezen van audiogegevens
(bijvoorbeeld geluid verspringt of wordt niet
afgespeeld) doordat de sticker onder invloed van
de warmte krimpt en de disc krom trekt.
• Discs met afwijkende vormen (bijvoorbeeld hart,
vierkant, ster) kunnen niet me t dit a ppa raat
worden afgespeeld. Als u dit toch probeert, kan
het apparaat worden beschadigd. G eb ruik
dergelijke discs niet.
• U kunt 8-cm CD ' s ni et afspelen.
Page 91

• Reinig een disc voor het
afspelen altijd met een in de
handel verkrijgbare
reinigingsdoek. Veeg de disc
van binnen naar buiten schoon.
Gebruik geen oplosmiddele n
zoals benzine, thinner en in de
handel verkrijgbare
reinigingsmiddelen of
antistatische sprays voor grammofoonplaten.
Opmerkingen over CD-R's/CD-RW's
• Sommige CD-R's/CD-RW's (afhankelijk van de
opnameapparatuur of de staat van de disc) kunnen
niet met dit appar aat worden afges p eeld.
• U kunt geen CD-R/CD-RW afspelen die niet is
gefinaliseerd.
• Het apparaat is compa tibel met het ISO 9660
level 1/level 2-formaat, Joliet/Romeo in
expansieformaat en Multi Session (m ee rdere
sessies).
• Maximum aantal:
– mappen (albums): 150 (inclusief hoofdmap en
lege mappen).
– bestanden (tracks) en mappen op een disc: 300
(als de naam van een bestand/map veel teke ns
bevat, kan dit aantal minder dan 300 word en).
– tekens dat kan worden weergegeven voor de
naam van een map/bestand is 32 (Joliet) of 64
(Romeo).
• Als de disc in Multi Session (meerdere sessies) is
opgenomen, wordt alleen de indeling van de eerste
track van de eerste sessie herkend en afge spe el d
(alle andere indelingen worden overgeslagen). De
prioriteitsvolgorde van de indeling is CD-DA en
MP3/WMA.
– Als de eerste track CD-DA is, wordt alleen
CD-DA van de eerste sessie afgespeeld.
– Als de eerste track ge en CD-DA is , w o rdt alleen
de MP3-/WMA-sessie afgespeeld. Als de disc
geen gegevens met deze indelingen bevat, wordt
"NO MUSIC" weergegeven.
Muziekdiscs die zijn gecodeerd met
copyrightbeveiligingstechnologieën
Dit product is ontworpen om discs af te spe le n di e
voldoen aan de CD-norm (Comp ac t Di sc).
Recentelijk hebben bepaalde platenmaatschappijen
discs op de markt gebracht die zi j n gec o deerd met
copyrightbeveiligingstechnologieën. Som m ig e van
deze discs voldoen niet aan de CD-norm en kunnen
wellicht n iet worden afg es peeld met di t apparaat.
Bericht over DualDiscs
Een DualDisc is een tweezijdige disc, waarop aan
de ene kant DVD-materiaal is opgenomen en aan
de andere kant digitaal audiomateriaal. Echter,
aangezien de kant met het audiomateriaal niet
voldoet aan de Compact Disc (CD)-norm, wordt
een juiste weergave op dit apparaat niet
gegarandeerd.
Afspeelvolgorde van MP3-/WMAbestanden
MP3/WMA
Map
(album)
MP3-/WMAbestand
(track)
Informatie over MP3-bestanden
• MP3 (MPEG-1 Audio Layer-3) is een compressieindeling voor muziekbestanden. Audio-CDgegev en s w o r den gecomprimeerd tot ongeveer
1/10 van de oorspronkelijke grootte.
• ID3-tag versies 1.0, 1.1, 2.2 , 2.3 en 2.4 gelden
alleen voor MP3. ID3-tag is 15/30 tekens (1. 0 en
1.1) of 63/126 tekens (2.2, 2.3 en 2.4).
• Wanneer u een MP3-bestand een naam geeft, moet
u altijd de extensie ".mp3" aan de bestandsna a m
toevoegen.
• Als u een MP3-bestand m et V BR (variabele
bitsnelheid) afspeelt of sne l voorui t-/ te rugspoelt,
wordt de verstreken speelduur wellicht nie t
nauwkeurig weergegeven.
Opmerking
Als u een MP3-bestand met een hoge bitsnelheid
afspeelt, zoals 320 kbps, wordt het geluid
waarschijnlijk onderbro ken.
Informatie over WMA-bestanden
• WMA (Windows Media Audio) is een
compressie-indeling voor muziekbestanden.
Audio-CD-gegevens worden gecomprime e rd tot
ongeveer 1/22* van de oorspronkelijke grootte.
• WMA-tag is 63 te kens.
• Wanneer u een WMA-bestand een naam geeft ,
moet u altijd de extensie ".wma" aan de
bestandsnaam toevoegen.
• Als u een WMA-bestand met VBR (variabele
bitsnelheid) afspeelt of sne l voorui t-/ te rugspoelt,
wordt de verstreken speelduur wellicht nie t
nauwkeurig weergegeven.
* Alleen voor 64 kbps
Opmerking
Het afspelen van de volgende WMA-bestanden wordt
niet ondersteund.
– compressie zonder gegevensverlies (lossless)
– auteursrechtelijk beveiligd
vervolg op volgende pagina t
15
Page 92

Met alle vragen of problemen met betrekking tot dit
apparaat die niet aa n bod komen in deze
gebruiksaanwijzing, kun t u tere cht bij uw Sonyhandelaar.
Onderhoud
Zekeringen vervangen
Vervang een zekering altijd
door een identiek exemplaar.
Als de zekering doorbrandt,
moet u de voedingsaansluiting
controleren en de zekering
vervangen. Brandt de zekering
vervolgens nogmaals door, dan
kan er sprake zijn van een
defect in het appar aa t.
Raadpleeg in dat geval de
dichtstbijzijnde Sonyhandelaar.
Aansluitingen schoonmaken
De werking van het apparaat kan worden verstoord
als de aansluitingen tussen het appa ra at en het
voorpaneel niet schoon zijn. U ku nt dit voorkomen
door het voorpaneel (pagina 4) los te maken en de
aansluitingen te reinigen met een wattenstaafje.
Gebruik hierbij niet teveel kracht. Anders kunnen de
aansluitingen worden bescha di gd.
Zekering (10 A)
Het apparaat verwijderen
1 Verwijder de beschermende rand.
1Maak het voorpaneel los (pagina 4).
2Bevestig de ontgrendelingssleutels op de
beschermende rand.
Plaats de ontgrendelingssleutels
zoals aangegeven.
3Trek de ontgrend el in gssleutels naar u toe
om de beschermen de rand te verwijde ren.
2 Verwijder het apparaat.
1Plaats beide ontgrendelingssleutels
tegelijkertijd en duw hierop tot deze
vastklikken.
Hoofdeenheid Achterkant van
Opmerkingen
• Uit veiligheidsoverwegingen moet u de motor
uitschakelen en de sleutel uit het contactslot halen
voordat u de aansluitingen reinigt.
• Raak de aansluitingen nooit rechtstreeks aan met
uw vingers of een metalen voorwerp.
het voorpaneel
16
Haakje wijst
naar binnen.
2Trek de ontgrend el in gssleutels naar u toe
om het apparaat los te maken.
3Schuif het a pparaat uit de houder.
Page 93

Technische gegevens
CD-speler
Signaal/ruis-afstand: 120 dB
Frequentiebereik: 10 – 20.000 Hz
Snelheidsfluctuaties: Minder dan meetbare wa a rden
Tuner
CDX-M10:
FM
Afstembereik:
87,5 – 108,0 MHz (bij stappen van 50 kHz)
87,5 – 107,9 MHz (bij stappen van 200 kHz)
FM-afsteminterval: Schakelen tussen 50 kHz/200 kHz
Antenne-aansluiting:
Aansluiting voor externe antenne
Tussenfrequentie: 10,7 MHz/450 kHz
Bruikbare gevoeligheid: 9 dBf
Selectiviteit: 75 dB bij 400 kHz
Signaal/ruis-afstand: 67 dB (stereo), 69 dB (mono)
Harmonische vervorming bij 1 kHz: 0,5 % (stereo),
0,3 % (mono)
Scheiding: 35 dB bij 1 kHz
Frequentiebereik: 30 – 15.000 Hz
AM
Afstembereik:
531 – 1.602 kHz (bij stappen van 9 kHz)
530 – 1.710 kHz (bij stappen van 10 kHz)
AM-afsteminterval: Schakelen tussen 9 kHz/10 kHz
Antenne-aansluiting:
Aansluiting voor externe antenne
Tussenfrequentie: 10,7 MHz/450 kHz
Gevoeligheid: 30 µV
CDX-MR10:
FM
Afstembereik: 87,5 – 108,0 MHz
Antenne-aansluiting:
Aansluiting voor externe antenne
Tussenfrequentie: 10,7 MHz/450 kHz
Bruikbare gevoeligheid: 9 dBf
Selectiviteit: 75 dB bij 400 kHz
Signaal/ruis-afstand: 67 dB (stereo), 69 dB (mono)
Harmonische vervorming bij 1 kHz: 0,5 % (stereo),
0,3 % (mono)
Scheiding: 35 dB bij 1 kHz
Frequentiebereik: 30 – 15.000 Hz
MW/LW
Afstembereik:
MW: 531 – 1.602 kHz
LW: 153 – 279 kHz
Antenne-aansluiting:
Aansluiting voor externe antenne
Tussenfrequentie: 10,7 MHz/450 kHz
Gevoeligheid: MW: 30 µV, L W: 40 µV
Versterker
Uitgangen: Luidsprekeruitgangen (sure seal)
Luidsprekerimpedantie: 4 – 8 ohm
Maximaal uitgangsvermogen: 52 W × 4 (bij 4 ohm)
Algemeen
Uitgangen:
Audio-uitgang (schakelen tussen subwoofer/
achter)
Relaisaansluiting elektrische antenne
Aansluiting versterker
Ingangen:
Telephone ATT-bedieningsaansluiting (alleen
CDX-MR10)
Afstandsbedieningsingang
Antenne-ingang
AUX-ingang (stereo mini-aansluiting)
Toonregelingen:
Laag: ±10 dB bij 60 Hz (XPLOD)
Midden: ±10 dB bij 1 kHz (XPLOD)
Hoog: ±10 dB bij 10 kHz (XPLOD)
Voeding: 12 V gelijks tr oom acc u (n egatieve aarde)
Afmetingen: Ongeveer 178 × 50 × 179 mm (b/h/d)
Montageafmetingen: Ongeveer 182 × 53 × 162 mm
(b/h/d)
Gewicht: Ongeveer 1,2 kg
Bijgeleverde acces s o ires:
AUX-afdekplug
Onderdelen voor installatie en aansluitingen (1 set)
Optionele accessoires/apparaten:
Maritieme kaartafstandsbediening: RM-X11M
Kaartafstandsbediening: RM-X114
Het is mogelijk dat niet alle vermelde accessoires
verkrijgbaar zijn bij uw Sony-handelaar. Neem
contact op met uw Sony-han d elaar voor meer
informatie.
MPEG Layer-3 audio-codeertechnologie en
-patenten gebruikt onder licentie van Fraunhofer
IIS en Thomson.
Dit product wordt beschermd door bepaalde
intellectuele eigendomsrechten van Microsoft
Corporation. Het gebruik of de verspreiding van
dergelijke technologie buiten dit product om is
verboden zonder een licentie van Microsoft of een
erkend dochterbedrijf van Microsoft.
Wijzigingen in ontwerp en technische gegevens
voorbehouden zonder voorafgaande kennisgeving.
• Er werden geen halogene brandvertragende
producten gebruikt in de betreffende
printplaat/printplaten.
• In het omhulsel werden geen halogeen bevattende
brandvertragende producten gebruikt.
• Als beschermings- en opvulmateriaal werd er
papier gebruikt.
17
Page 94

Problemen oplossen
De onderstaande controlelijst kan u helpen bij het
oplossen van problemen die zich met het ap paraat
kunnen voordoen.
Voordat u de onderstaande controlel ij s t doo rneemt,
moet u eerst de aanwijzin gen voor aansluiting en
gebruik controleren.
Algemeen
Het apparaat wordt niet van stroom voorzien.
• Controleer de aansluiting. Controleer de zekering
wanneer alles in or de is.
• Als het apparaat wordt uitgeschakeld en het scherm
verdwijnt, kan het apparaat niet worden bediend me t
de afstandsbediening.
tSchakel het apparaat in.
De elektrisch bediende antenne schuift niet uit.
De elektrisch bediende antenne he eft geen relaisdoos.
Geen geluid.
• Het volume is te laag.
• De ATT-functie is ingeschakeld of de Telephone
ATT-functie (als de interfacekabel of een telefoon is
aangesloten op de ATT-kabel) is ingeschakeld.
• De positie van de faderregel aar "FAD" is niet
ingesteld op een systeem met 2 luidsprekers.
Geen pieptoon.
• De pieptoon is uitgeschakeld (pagina 11).
• Er is een optionele versterker aangesloten en u
gebruikt de ingebouwde versterker niet.
De geheugeninhoud is gewist.
• De voedingskabel of de accu is losgekoppeld.
• De voedingskabel is niet goed aangesloten.
Opgeslagen zenders en tijd zijn gewist.
De zekering is doorgebrand.
Maakt geluid wanneer de positie van de
contactsleutel wordt gewijzigd .
De kabels zijn niet goed verbonden met de
voedingsaansluiting voor accessoires van de boot.
Tijdens het afspelen of radio-ontvangst wordt
de demonstratie gestart.
Als er 5 minuten geen handeling wordt uit gevoerd en
"DEMO-ON" is inges te ld, wordt de demonstratie
gestart.
t Stel "DEMO-OFF" in (pagina 11).
Het scherm verdwijnt van/versc hijnt niet in het
weergavevenster.
• De dimmer is ingesteld op "DIM-ON" (pagina 12).
• Het scherm verdwijnt als u op (OFF) drukt en deze
toets ingedrukt houdt.
tDruk op (OFF) op het apparaat en houd deze
toets ingedrukt tot het scherm verschijnt.
• De aansluitingen zijn vuil (pagina 16).
De functie voor automatisch uitschakelen
werkt niet.
Het apparaat is ingeschakeld. De functie voor het
automatisch uitschakelen wordt geactiveerd nadat het
apparaat is uitgeschakeld.
t Schakel het app ara at uit.
18
CD's afspelen
De disc kan n ie t word en geplaatst.
• Er zit al een disc in het apparaat.
• De disc is met kracht omgekeerd of in de verkeerde
richting geplaatst.
De disc wordt niet afgespeeld.
• Disc defect of vuil.
• De CD-R's/CD-RW's zijn niet geschikt voor
audiogebruik (pagina 15).
MP3-/WMA-bestanden kunnen niet worden
afgespeeld.
De disc is niet compatibel met de MP3- /W MAindeling en -versie (pagina 15).
MP3-/WMA-bestanden worden minder snel
afgespeeld dan andere bestanden.
Bij de volgende discs duurt het langer voordat het
afspelen wordt gestart:
– discs opgenomen met een ingewikkelde structuur ;
– discs die in meerde re se ss ies zijn opgenomen;
– discs waaraan gegevens kunnen worden toegevoegd.
De schermitems rollen niet.
• Bij sommige discs met heel veel tekens kunnen de
tekens niet rollen.
• "A.SCRL" is ingesteld op "OFF".
t Stel "A.SCRL-ON" in (pagina12).
t Houd (DSPL) (SCRL) ingedrukt.
Het geluid verspringt.
• Het apparaat is niet goed geïnstalleerd.
t Installeer het apparaat onder een hoek van minder
dan 45° op een stabiele plaats in de boot.
• Disc defect of vuil.
De disc wordt niet uitgeworpen.
Druk op Z (uitwerpen) (pagina 6).
Radio-ontvangst
De zenders kunnen niet worden ontvangen.
Het geluid is gestoord.
• Sluit de bedieningskabel van de elektrische antenne
(blauw) of voedingskabel voor accessoires (rood) aan
op de voedingskabel van de boot-antenneversterker
(alleen als uw boot is uitgerust met een antenne in de
achter- of zijruit).
• Controleer de aansluiting van de boot-antenne.
• De automatische antenne sch uif t niet uit.
t Controleer de aansluiting van de
antennebedieningskabel.
• Controleer de frequentie.
Er kan niet worden afgestemd op
voorkeurzenders.
• Sla de juiste frequentie op in het geheugen.
• Het ontvangstsignaal is te zwak.
Er kan niet automatisch w orden afgestemd op
zenders.
• De lokale zoekfunctie is niet cor r ec t ingesteld.
t Het afstemmen wordt te vaak onderbroken:
Stel "LOCAL-ON" in (pagina 12).
t Het afstemmen st opt ni et bij e en zender:
Stel "MONO-ON" in (pagina 12).
• Het ontvangstsignaal is te zwak.
t Stem handmatig af.
Page 95

Tijdens FM-ontvangst knippert de aanduiding
"ST".
• Stem nauwkeurig af op de frequentie.
• Het ontvangstsignaal is te zwak.
t Stel "MONO-ON" in (pagina 12).
Een stereo-uitzending van een FM-programma
wordt mono weergegeven.
Het apparaat staat in de mono-ontvangststand.
tStel "MONO-OFF" in (pagina 12).
RDS (CDX-MR10)
SEEK begint na enkele seconden weergave.
De zender is geen TP-zender of heeft een zwak
signaal.
tSchakel TA uit (pagina 9).
Geen verkeersinformatie.
• Schakel TA in (pagina 9).
• De zender is een TP-zender, maar zendt toch geen
verkeersinformatie uit.
t Stem af op een andere zend er.
PTY geeft "- - - - - - - -" weer.
• De huid ig e zen d er is ge en RDS- zen d er.
• Geen RDS-gegevens ontvangen.
• De zender geeft het programmatype niet door.
Foutmeldingen/berichten
ERROR
• De disc is vuil of is omgekeerd geplaatst.
t Reinig de disc of plaats deze op de juiste manier.
• Er is een lege disc in het apparaat geplaatst.
• De disc kan niet w o rden af ge speeld wegens een
probleem.
t Plaats een andere disc.
FAILURE
De luidsprekers of versterkers zijn niet correct
aangesloten.
tRaadpleeg de handleiding voor installatie/
aansluitingen van dit model om de aansluitingen te
controleren.
L. SEEK +/–
De lokale zoekfunctie is ingeschakeld tijdens
automatisch afstemmen.
NO AF (alleen CDX-MR10)
Er is geen alterna tieve fr equentie voor de huidige
zender.
tDruk op (SEEK) –/+ terwijl de
programmaservicenaam knippert. Het apparaat gaat
zoeken naar een andere frequent ie met dezelfde PIgegevens (programma-identificatie). ("PI SEEK"
wordt weergegeven.)
NO INFO
Er is geen tekstinformatie aa n he t MP 3- /W MAbestand toegevoegd.
NO MUSIC
De disc bevat geen muziekbestanden.
tPlaats een muziek-CD in het apparaat.
NO NAME
Er is geen disc-/tracknaam aan de track toegevoegd.
NO TP (alleen CDX-MR10)
Het apparaat blijft zoeken naar beschikbare TPzenders.
OFFSET
Er is wellicht een int er ne storing.
t Controlee r de a an sluiting. Als de foutmelding in
het scherm blijft staan, moet u de dichtstbijzijnde
Sony-handelaar raadplegen.
PUSH EJT
De disc kan niet worden uitgeworpen.
t Druk op Z (uitw erpen) (pagina 6).
READ
Alle track- en albumin fo rmatie op de disc wordt
gelezen.
t Wacht totdat het lezen is voltooid en het afspelen
automatisch wordt gestart. Afhanke lij k van de
discstructuur kan dit meer dan een minuut in beslag
nemen.
"" of ""
Tijdens het snel terug- of vooruitspoelen hebt u he t
begin of het einde van de disc bereikt en kunt u niet
verder.
""
Het teken kan niet worden weergegeven met het
apparaat.
Als deze oplossingen niet help en, moet u de
dichtstbijzijnde Sony-ha ndelaar raadplegen.
Als u het apparaat ter repa rat ie w egbre ngt om dat
CD's niet goed worden afgespeeld, kunt u beste de
disc meenemen waarmee het probleem is begonnen.
19
Page 96

Si dichiara che l’apparecchio è stato fabbricato in
conformità all’art.2, Comma l del D.M.28.08.1995
n.548.
Per l’installazione e i collegamenti, fare
riferimento al manuale di istruzioni per
l’installazione e i collegamenti in dotazione.
Questa etichetta è posta nella parte inferiore
esterna.
Il presente apparecchio è un prodotto di Sony
Corporation 1-7-1 Konan Minato-ku Tokyo,
108-0075 Giappone.
Il Rappresentante Autorizzato per EMC e per la
sicurezza del prodotto è Sony Deutschland
GmbH, Hedelfinger Strasse 61, 70327 Stuttgart,
Germania. Per qualsiasi questione riguardante
l’assistenza o la garanzia, rivolgersi agli
indirizzi che si trovano nei documenti di
assistenza o di garanzia.
Trattamento del dispositivo elettrico
od elettronico a fine vita
(applicabile in tutti i paesi
dell’Unione Europea e in altri paesi
europei con sistema di raccolta
differenziata)
Questo simbolo sul prodotto o sulla confezione indica che
il prodotto non deve essere considerato come un normale
rifiuto domestico, ma deve invece essere consegnato ad un
punto di raccolta appropriato per il riciclo di apparecchi
elettrici ed elettronici. Assicurandovi che questo prodotto
sia smaltito correttamente, voi contribuirete a prevenire
potenziali conseguenze negative per l’ambiente e per la
salute che potrebbero altrimenti essere causate dal suo
smaltimento inadeguato. Il riciclaggio dei materiali aiuta a
conservare le risorse naturali. Per informazioni più
dettagliate circa il riciclaggio di questo prodotto, potete
contattare l’ufficio comunale, il servizio locale di
smaltimento rifiuti oppure il negozio dove l’avete
acquistato.
Avvertenza relativa all’installazione su
un’imbarcazione sprovvista della
posizione ACC (accessoria) su l
blocchetto di accensione
Assicurarsi di impostare la funzione di
spegnimento automatico (pagina 11).
In questo modo, l’apparecchio si spegne
completamente e in modo automatico dopo
l’intervallo di tempo impostato dal relativo
spegnimento, per e v itare lo scaricamento della
pila.
Se non viene impo st at a l a f unzione di
spegnimento automatico, tenere premuto
(OFF) fino a quando l’indicazione non
scompare ogni volta che si spegne il motore.
Microsoft, Windows Media e
il loro Windows sono marchi
di fabbrica o marchi registrati
di Microsoft Corporation
negli Stati Uniti e/o in altri paesi.
2
Page 97

Indice
Congratulazioni! . . . . . . . . . . . . . . . . . . . . . . . . 4
Operazioni preliminari
Impostazione dell’orologio . . . . . . . . . . . . . . . . 4
Rimozione del pannello anteriore . . . . . . . . . . . 4
Installazione del pannello anteriore . . . . . . . 5
Posizione dei comandi e operazioni
di base
Unità principale. . . . . . . . . . . . . . . . . . . . . . . 6
CD
Voci del display . . . . . . . . . . . . . . . . . . . . . . 8
Riproduzione ripetuta e in ordine casuale. . . 8
Radio
Memorizzazi one e ricezione delle st azioni . . . . 8
Memorizzazione automatica — BTM . . . . . 8
Memorizzazione manuale. . . . . . . . . . . . . . . 8
Ricezione delle stazioni memorizzate. . . . . . 9
Sintonizzazione automatica . . . . . . . . . . . . . 9
RDS (CDX-MR10) . . . . . . . . . . . . . . . . . . . . . . 9
Panoramica . . . . . . . . . . . . . . . . . . . . . . . . . . 9
Impostazione dei modi AF e TA. . . . . . . . . . 9
Selezione del modo PTY . . . . . . . . . . . . . . 10
Impostazione del modo CT. . . . . . . . . . . . . 10
Altre funzioni
Modifica delle impostazioni audio . . . . . . . . . 11
Regolazione delle caratteristiche dell’audio
— BAL/FAD/SUB. . . . . . . . . . . . . . . . . . . 11
Personalizzazi one della curva
dell’equalizzatore — EQ3 . . . . . . . . . . . . . 11
Regolazione delle voci di impostazione
— SET . . . . . . . . . . . . . . . . . . . . . . . . . . . . . . 11
Uso di apparecchi opzionali . . . . . . . . . . . . . . 12
Apparecchio audio ausiliare. . . . . . . . . . . . 12
Telecomando a scheda RM-X114 . . . . . . . 13
Telecomando RM-X11M per uso i n ambiente
marino . . . . . . . . . . . . . . . . . . . . . . . . . . . . 14
Informazioni aggiuntive
Precauzioni . . . . . . . . . . . . . . . . . . . . . . . . . . . 14
Note sui dischi . . . . . . . . . . . . . . . . . . . . . . 14
Ordine di riproduzione dei file
MP3/WMA. . . . . . . . . . . . . . . . . . . . . . . . . 15
Informazioni sui file MP3 . . . . . . . . . . . . . 15
Informazioni sui file WMA . . . . . . . . . . . . 15
Manutenzione . . . . . . . . . . . . . . . . . . . . . . . . . 16
Rimozione dell’apparecchio. . . . . . . . . . . . . . 16
Caratteristiche tecniche. . . . . . . . . . . . . . . . . . 17
Guida alla soluzione dei problemi . . . . . . . . . 18
Messaggi e indicazioni di errore . . . . . . . . 19
3
Page 98

Congratulazioni!
Operazioni preliminari
Complimenti per l’acquisto del presente letto re
CD Sony. Durante la navigazione, è possibile
utilizzare le funz ioni riportate di seguito.
• Riproduzione di CD
È possibile riprodurre CD-DA (contenenti
inoltre CD TEXT), CD-R/CD-RW (file MP3/
WMA (pagina 15)).
Tipo di disco Etichetta sul disco
CD-DA
MP3
WMA
• Ricezione radiofonica
–È possibile memorizzare fino a 6 st azioni per
banda.
CDX-M10:
FM1, FM2, FM3, AM1 e AM2
CDX-MR10:
FM1, FM2, FM3, MW e LW
–BTM (memorizzazione automatica delle
emittenti con sintonia migliore):
l’apparecchio seleziona l e stazioni con il
segnale più potente e le memorizza.
• Servizi RDS
–In Europa, è possibile ascoltare stazioni FM
mediante il sistema RDS (sistema dati radio).
(CDX-MR10)
• Regolazione audio
–EQ3 stage2: è possibile scegli ere una delle
7 curve dell ’equalizzatore preimpostate.
• Collegamento di apparecchi ausiliari
Una presa di ingresso AUX nella parte
anteriore dell ’a pparecchio consen te il
collegamento di un dispositivo audio portatile.
Impostazione dell’orologio
CDX-M10:
Indicazione dell’ora in base al sistem a delle 12 ore
CDX-MR10:
Indicazione dell’ora in base al sistem a delle 24 ore
1 Tenere premuto il tasto di selezione.
Viene visualizzato il display di impostazio ne.
2 Premere più volte il tasto di selezione
fino a visualizzare “CLOCK-ADJ”.
3 Premere (SEEK) +.
L’indicazione dell’ora lampeggia.
4 Ruotare la manopola di controllo del
volume per impostare l’ora e i minuti.
Per passare da una ci fra all’altra
dell’indicazione di gitale, premere
(SEEK) –/+.
5 Premere il tasto di selezione.
L’impostazione è completata e l’orologio
viene attivato.
Per visualizz are l’orolog i o, premere (DSPL).
Premere di nuovo (DSPL) per tornare al display
precedente.
Suggerimento
È possibile regolare l’orologio automaticamente
tramite la funzione RDS (pagina 10). (CDX-MR10)
Rimozione del pannello
anteriore
Per evitare il furto dell’apparecchio, è possibile
estrarne il pannello anteriore.
Segnale di avvertimento
Se la chiave di accensione viene impostata sulla
posizione OF F senz a che i l pann ello anter iore sia
stato rimosso, viene emesso per alcuni secondi
un segnale acustico di avvertimento.
Tale segnale viene emesso solo se è in uso
l’amplificatore incorp or at o.
1 Premere (OFF).
L’apparecchio si spegne.
2 Premere , quindi estrarlo.
4
Page 99

Note
• Non fare cadere il pannello anteriore né esercitare
eccessiva pressione su quest’ultimo e sulla finestra
del display.
• Non esporre il pannello anteriore a calore,
temperature elevate o umidità. Evitare di lasciarlo
all’interno di un’imbarcazione ormeggiata.
Installazione del pannello anteriore
Inserire la parte A del pannello anteriore nella
parte B dell’apparecchio, come illustrato, quindi
premere il lato sinistro finché non scatta in
posizione.
A
B
Nota
Non collocare alcun oggetto sulla superficie interna
del pannello anteriore.
5
Page 100

Posizione dei comandi e operazioni di base
qaq
q
9
q
q
q
Unità principale
1
2
OFF
EQ3
SEEK
SCRL
DSPL
4 5 8673
PUSH SELECT
SOURCE
SEEK
MODE
ALBUM
1623 54
AUX
PAUSEREP SHUF
;
La presente sezion e contiene le istruzioni
riguardanti la posi zione dei comandi e le
operazioni di base.
Per ulteriori informazioni, vedere le pagine
corrispondenti.
A Tasto OFF
Per disattivare l’alimentazione; per arrestar e
la sorgente.
B Tasto EQ3 (equalizzatore) pagina 11
Per selezionare un tipo di equalizza t or e
(XPLOD, VOCAL, EDGE, CRUISE,
SPACE, GRAVITY, CUSTOM o OFF).
C Manopola di controllo del volume/
tasto di selezione pagina 11
Per regolare il volume (r uot are); per
selezionare le voci di impostazione
(premere, qu in di ruotare).
D Tasto SOURCE
Per accendere l’apparecchio; cambiare la
sorgente (Radio/CD/AUX).
E Alloggiamento del disco
Inserire il disco (lato con l’etichetta rivolto
verso l’alto). La riproduzione viene avviata.
F Finestra del display
G Presa di ingresso AUX pagina 12
Per collegare un dispo si t ivo audio portatile.
H Tasto Z (espulsione)
6
Per estrarre il disco.
s
d
qf
g
I T asto (rilascio pa nnello ante riore)
pagina 4
J Tasto DSPL (display)/SCRL
(scorrimento) pagina 8
Per cambiare le voci del display (premere);
per scorrere le voci del display (tenere
premuto).
K Tasti SEEK –/+
CD:
Per saltare i brani (premere); per saltare i
brani in modo continuo (premere, quindi
premere di nuo vo entro 1 secondo e tenere
premuto); per fare retrocedere o fare
avanzare rapidamente un brano (tenere
premuto).
Radio:
Per sintonizzare le stazioni in modo
automatico (premere ); pe r ricercare una
stazione manualmente (tenere premuto).
L Tasto MODE pagina 8
Per selezionare la banda radi o.
h
 Loading...