

Page 1
4-193-831-11(1)
FM/AM
Compact Disc Player
Operating Instructions
Mode d’emploi
Owner’s Record
The model and serial numbers are located on the bottom of the unit.
Record the serial number in the space provided below.
Refer to these numbers whenever you call upon your Sony dealer regarding this product.
Model No. CDX-GT650UI Serial No.
To cancel the demonstration (DEMO) display, see page 6.
Pour annuler l’affichage de démonstration (DEMO), reportez-vous à la page 6.
CDX-GT650UI
©2010 Sony Corporation
US
FR
Page 2

Be sure to install this unit in the dashboard of
–
–
–
–
the car for safety. For installation and
HD RadioTM is a proprietary trademark of
iBiquity Digital Corp.
connections, see the supplied installation/
connections manual.
The “SAT Radio Ready”
logo indicates that this
product will control a satellite
Warning
radio tuner module (sold
separately). Please see your nearest authorized
FOR UNITED STATES CUSTOMERS. NOT
APPLICABLE IN CANADA, INCLUDING
IN THE PROVINCE OF QUEBEC.
POUR LES CONSOMMATEURS AUX
ÉTATS-UNIS. NON APPLICABLE AU
CANADA, Y COMPRIS LA PROVINCE DE
QUÉBEC.
This equipment has been tested and found to
comply with the limits for a Class B digital
device, pursuant to Part 15 of the FCC Rules.
These limits are designed to provide reasonable
protection against harmful interference in a
residential installation. This equipment
generates, uses, and can radiate radio frequency
energy and, if not installed and used in
accordance with the instructions, may cause
harmful interference to radio communications.
However, there is no guarantee that interference
will not occur in a particular installation. If this
equipment does cause harmful interference to
radio or television reception, which can be
determined by turning the equipment off and on,
the user is encouraged to try to correct the
interference by one or more of the following
measures:
Reorient or relocate the receiving antenna.
Increase the separation between the equipment
and receiver.
Connect the equipment into an outlet on a
circuit different from that to which the receiver
is connected.
Consult the dealer or an experienced radio/TV
technician for help.
You are cautioned that any changes or
modifications not expressly approved in this
manual could void your authority to operate this
equipment.
CAUTION
Sony dealer for details on the satellite radio
tuner module.
“SAT Radio,” “SAT Radio Ready,” the SAT
Radio and SAT Radio Ready logos and all
related marks are trademarks of Sirius XM
Radio Inc. and XM Satellite Radio Inc.
ZAPPIN and Quick-BrowZer are trademarks of
Sony Corporation.
12 TONE ANALYSIS and its
logo are trademarks of Sony
Corporation.
SensMe and the SensMe logo are
trademarks or registered
trademarks of Sony Ericsson
Mobile Communications AB.
Music recognition technology and related data are
provided by Gracenote®. Gracenote is the industry
standard in music recognition technology and
related content delivery. For more information,
please visit www.gracenote.com.
CD and music-related data from Gracenote, Inc.,
copyright © 2000-2010 Gracenote. Gracenote
Software, copyright © 2000-2010 Gracenote. This
product and service may practice one or more of
the following U.S. Patents: #5,987,525;
#6,061,680; #6,154,773, #6,161,132, #6,230,192,
#6,230,207, #6,240,459, #6,330,593, and other
patents issued or pending. Some services supplied
under license from Open Globe, Inc. for U.S.
Patent: #6,304,523.
Gracenote and CDDB are registered trademarks of
Gracenote. The Gracenote logo and logotype, and
the “Powered by Gracenote” logo are trademarks
of Gracenote.
The use of optical instruments with this product
will increase eye hazard.
Microsoft, Windows, Windows Vista and
Windows Media and logos are trademarks or
For the State of California, USA only
Perchlorate Material – special handling may apply,
See www.dtsc.ca.gov/hazardouswaste/perchlorate
Perchlorate Material: Lithium battery contains
perchlorate
registered trademarks of Microsoft Corporation
in the United States and/or other countries.
2
Page 3

This product is protected by certain intellectual
property rights of Microsoft Corporation. Use or
distribution of such technology outside of this
product is prohibited without a license from
Microsoft or an authorized Microsoft subsidiary.
iPhone, iPod, iPod classic, iPod nano, and iPod
touch are trademarks of Apple Inc., registered
in the U.S. and other countries.
Apple, Macintosh and iTunes are trademarks of
Apple Inc., registered in the U.S. and other
countries.
MPEG Layer-3 audio coding technology and
patents licensed from Fraunhofer IIS and Thomson.
Warning if your car’s ignition has no
ACC position
Be sure to set the Auto Off function (page 24).
The unit will shut off completely and
automatically in the set time after the unit is
turned off, which prevents battery drain.
If you do not set the Auto Off function, press
and hold (SOURCE/OFF) until the display
disappears each time you turn the ignition off.
3
Page 4

Table of Contents
Getting Started
Playable discs on this unit . . . . . . . . . . . . . . . . . 6
Resetting the unit. . . . . . . . . . . . . . . . . . . . . . . . 6
Canceling the DEMO mode . . . . . . . . . . . . . . . 6
Preparing the card remote commander . . . . . . . 6
Setting the clock . . . . . . . . . . . . . . . . . . . . . . . . 6
Detaching the front panel . . . . . . . . . . . . . . . . . 7
Attaching the front panel . . . . . . . . . . . . . . . 7
Location of controls and basic
operations
Main unit. . . . . . . . . . . . . . . . . . . . . . . . . . . . 8
RM-X151 Card Remote Commander. . . . . 10
Radio
Storing and receiving stations . . . . . . . . . . . . . 11
Storing automatically — BTM . . . . . . . . . . 11
Storing manually. . . . . . . . . . . . . . . . . . . . . 11
Receiving the stored stations . . . . . . . . . . . 11
Tuning automatically . . . . . . . . . . . . . . . . . 11
RDS . . . . . . . . . . . . . . . . . . . . . . . . . . . . . . . . . 11
Overview. . . . . . . . . . . . . . . . . . . . . . . . . . . 11
Selecting PTY. . . . . . . . . . . . . . . . . . . . . . . 12
Setting CT. . . . . . . . . . . . . . . . . . . . . . . . . . 12
CD
Playing a disc. . . . . . . . . . . . . . . . . . . . . . . . . . 12
Display items . . . . . . . . . . . . . . . . . . . . . . . 12
Repeat and shuffle play. . . . . . . . . . . . . . . . 12
USB devices
Playing back a USB device . . . . . . . . . . . . . . . 13
Display items . . . . . . . . . . . . . . . . . . . . . . . 13
Repeat and shuffle play. . . . . . . . . . . . . . . . 14
Enjoying music according to your mood
— SensMe™ . . . . . . . . . . . . . . . . . . . . . . . . . . 14
Before using the SensMe™ function . . . . . 14
Installing “SensMe™ Setup” and “Content
Transfer” in your computer. . . . . . . . . . . . . 14
Registering a USB device using “SensMe™
Setup” . . . . . . . . . . . . . . . . . . . . . . . . . . . . . 15
Transferring tracks to the USB device using
“Content Transfer” . . . . . . . . . . . . . . . . . . . 15
Playing tracks in the channel
— SensMe™ channels . . . . . . . . . . . . . . . . 15
iPod
Playing back iPod . . . . . . . . . . . . . . . . . . . . . . 16
Display items . . . . . . . . . . . . . . . . . . . . . . . 17
Skipping albums, podcasts, genres, playlists
and artists . . . . . . . . . . . . . . . . . . . . . . . . . . 17
Repeat and shuffle play . . . . . . . . . . . . . . . 17
Operating an iPod directly
— Passenger control. . . . . . . . . . . . . . . . . . . . 18
Searching for a track
Searching a track by name
— Quick-BrowZer™ . . . . . . . . . . . . . . . . . . . 18
Searching by skip items
— Jump mode . . . . . . . . . . . . . . . . . . . . . . 18
Searching by alphabetical order
— Alphabet search. . . . . . . . . . . . . . . . . . . 19
Searching a track by listening to track passages
— ZAPPIN™ . . . . . . . . . . . . . . . . . . . . . . . . . 19
In the case of “SensMe™ channels”
playback . . . . . . . . . . . . . . . . . . . . . . . . . . . 19
Enjoying the illumination color
variation
Changing the color of display and buttons
—Dynamic Color Illuminator. . . . . . . . . . . . . 20
Customizing the display and button color
— Custom Color . . . . . . . . . . . . . . . . . . . . 20
Advanced color setting . . . . . . . . . . . . . . . . . . 21
SensMe™ Channels synchronization
— SensMe™ Channels Color . . . . . . . . . . 21
Changing the color with sound
synchronization
— Sound Synchronization . . . . . . . . . . . . . 21
Displaying clear color — White Menu . . . 21
Start up effect — Start White. . . . . . . . . . . 21
4
Page 5

Sound Settings and Setup Menu
Additional Information
Changing the sound settings . . . . . . . . . . . . . . 22
Adjusting the sound characteristics . . . . . . 22
Enjoying sophisticated sound functions
— Advanced Sound Engine . . . . . . . . . . . . . . 22
Selecting the sound quality
— EQ7 Preset . . . . . . . . . . . . . . . . . . . . . . . 22
Customizing the equalizer curve
— EQ7 Setting . . . . . . . . . . . . . . . . . . . . . . 23
Optimizing sound by Time Alignment
— Listening Position . . . . . . . . . . . . . . . . . 23
Adjusting the listening position . . . . . . . . . 24
DM+ Advanced. . . . . . . . . . . . . . . . . . . . . . 24
Using rear speakers as subwoofer
— Rear Bass Enhancer . . . . . . . . . . . . . . . . 24
Adjusting setup items — SET. . . . . . . . . . . . . 24
Other functions
Using optional equipment . . . . . . . . . . . . . . . . 25
Auxiliary audio equipment . . . . . . . . . . . . . 25
Precautions . . . . . . . . . . . . . . . . . . . . . . . . . . . 26
Notes on discs . . . . . . . . . . . . . . . . . . . . . . 26
Playback order of MP3/WMA/AAC
files. . . . . . . . . . . . . . . . . . . . . . . . . . . . . . . 26
About iPod . . . . . . . . . . . . . . . . . . . . . . . . . 26
Maintenance . . . . . . . . . . . . . . . . . . . . . . . . . . 27
Removing the unit. . . . . . . . . . . . . . . . . . . . . . 28
Specifications . . . . . . . . . . . . . . . . . . . . . . . . . 28
Troubleshooting . . . . . . . . . . . . . . . . . . . . . . . 29
Error displays/Messages. . . . . . . . . . . . . . . 31
Support site
If you have any questions or for the latest support information on this
product, please visit the web site below:
http://esupport.sony.com
http://www.sony.com/mobileAV
Provides information on:
• Models and manufacturers of compatible digital audio players
• Supported MP3/WMA/AAC files
• System requirements for the software in the supplied CD-ROM
5
Page 6
Getting Started
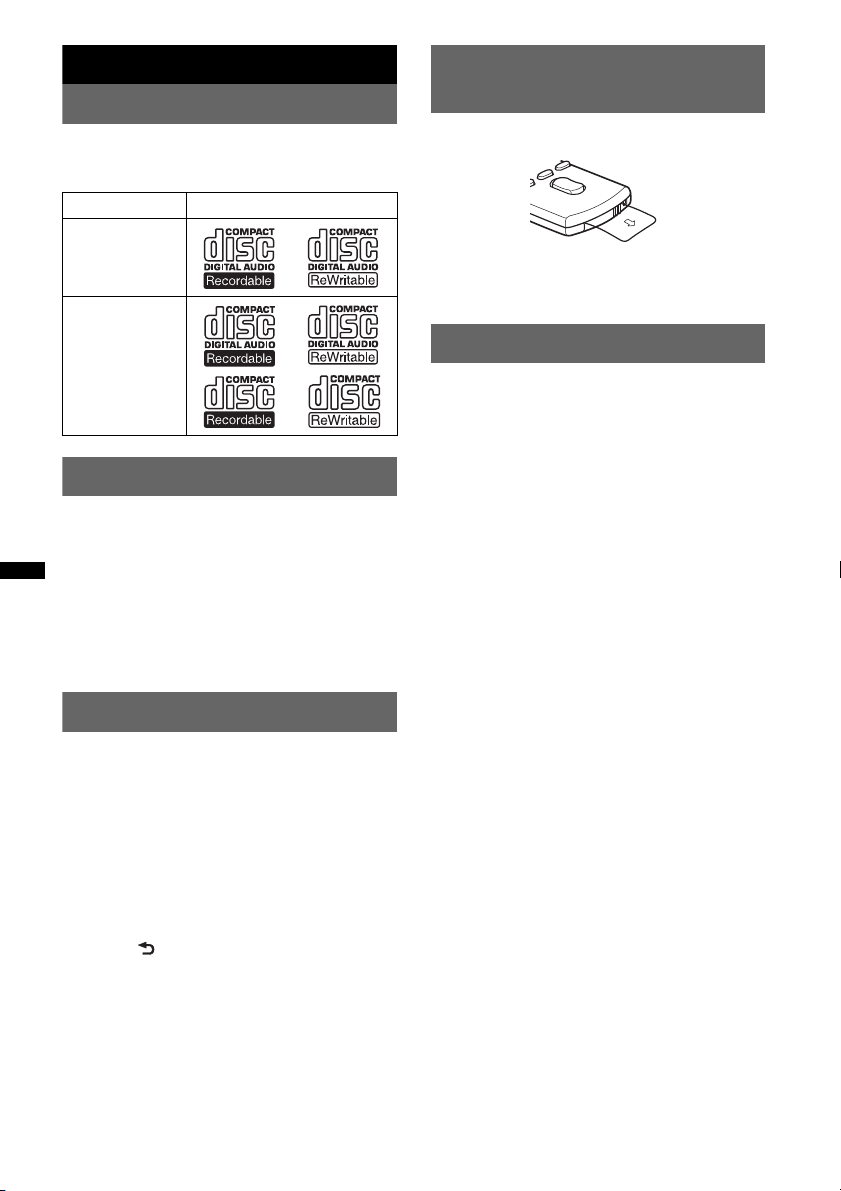
Playable discs on this unit
This unit can play CD-DA (also containing CD
TEXT) and CD-R/CD-RW (MP3/WMA/AAC
files (page 26)).
Type of discs Label on the disc
Preparing the card remote
commander
Remove the insulation film.
CD-DA
MP3
WMA
AAC
Resetting the unit
Before operating the unit for the first time, or
after replacing the car battery or changing the
connections, you must reset the unit.
Detach the front panel (page 7) and press the
RESET button (page 8) with a pointed object,
such as a ball-point pen.
Note
Pressing the RESET button will erase the clock setting
and some stored contents.
Canceling the DEMO mode
You can cancel the demonstration display which
appears during turning off.
1 Press and hold the select button.
The setup display appears.
2 Rotate the control dial until “DEMO”
appears, then press it.
3 Rotate the control dial to select
“DEMO-OFF,” then press it.
The setting is complete.
4 Press (BACK).
The display returns to normal reception/play
mode.
Tip
For how to replace the battery, see page 27.
Setting the clock
The clock uses a 12-hour digital indication.
1 Press and hold the select button.
The setup display appears.
2 Rotate the control dial until “CLOCK
ADJ” appears, then press it.
The hour indication flashes.
3 Rotate the control dial to set the hour
and minute.
To move the digital indication, press (SEEK)
–/+.
4 After setting the minute, press the
select button.
The setup is complete and the clock starts.
To display the clock, press (DSPL). Press
(DSPL) again to return to the previous display.
Tip
You can set the clock automatically with the RDS
feature (page 12).
6
Page 7

Detaching the front panel
You can detach the front panel of this unit to
prevent theft.
Caution alarm
If you turn the ignition switch to the OFF
position without detaching the front panel, the
caution alarm will sound for a few seconds.
The alarm will only sound if the built-in
amplifier is used.
1 Press and hold (SOURCE/OFF).
The unit is turned off.
2 Press (OPEN).
The front panel is flipped down.
3 Slide the front panel to the right, then
gently pull out the left end of the front
panel.
Notes
• Do not drop or put excessive pressure on the front
panel and display window.
• Do not subject the front panel to heat/high
temperature or moisture. Avoid leaving it in a parked
car or on a dashboard/rear tray.
• Do not detach the front panel during playback of the
USB device, otherwise USB data may be damaged.
Attaching the front panel
Place the hole A of the front panel onto the
spindle B on the unit, then lightly push the left
side in.
Press (SOURCE/OFF) on the unit (or insert a
disc) to operate the unit.
Note
Do not put anything on the inner surface of the front
panel.
7
Page 8
Location of controls and basic operations
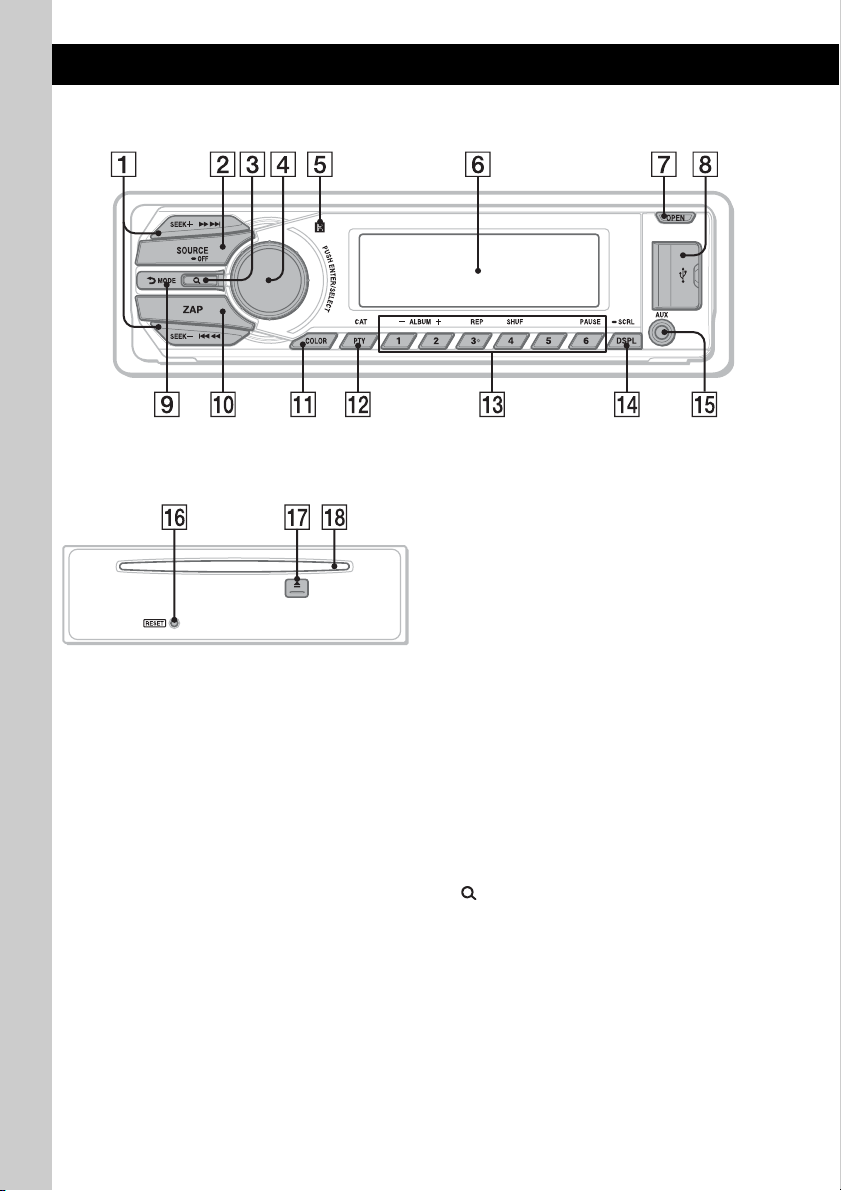
Main unit
Front panel removed This section contains instructions on the location
of controls and basic operations.
For details, see the respective pages.
A SEEK +/– buttons
Radio:
To tune in stations automatically (press); find
a station manually (press and hold).
CD/USB:
To skip tracks (press); skip tracks
continuously (press, then press again within
about 1 second and hold); reverse/fastforward a track (press and hold).
SensMe™:
To skip tracks (press); reverse/fastforward a
track (press and hold).
B SOURCE/OFF button*
Press to turn on the power/change the source
(Radio/CD/USB/SensMe™*
Press for 1 second to turn off the power.
Press for more than 2 seconds to turn off the
power and the display disappears.
C (BROWSE) button page 18
To enter the Quick-BrowZer™ mode.
D Control dial/select button page 22, 24
To adjust volume (rotate); select setup items
(press and rotate).
1
2
/AUX).
8
Page 9

E Receptor for the card remote
commander
F Display window
G OPEN button page 7, 12
H USB connector page 13, 15, 16
To connect to the USB device.
I (BACK)/MODE button*
1
page 11,
18
Press to return to the previous display/select
the radio band (FM/AM).
Press and hold to enter/cancel the passenger
control.
J ZAP button page 19
To enter ZAPPIN™ mode.
K COLOR button page 20
To select the preset colors (press); register
custom color settings (press and hold).
L PTY/CAT*
3
button page 12
To select PTY in RDS.
M Number buttons
Radio:
To receive stored stations (press); store
stations (press and hold).
CD/USB/SensMe™:
(1)/(2): ALBUM –/+ (during MP3/WMA/
AAC playback)
To skip albums/change SensMe™
channels (press); skip albums
continuously (press and hold).
(3): REP*
4
page 12, 14, 17
(4): SHUF page 12, 14, 17
(6): PAUS E
To pause playback. To cancel, press
again.
N DSPL (display)/SCRL (scroll) button
page 11, 12, 13, 17, 18
To change display items (press); scroll the
display item (press and hold).
O AUX input jack page 25
To connect a portable audio device.
P RESET button page 6
Q Z (eject) button
To eject the disc.
R Disc slot
Insert the disc (label side up), playback
starts.
*1 If an HD Radio tuner or SAT tuner is connected:
when (SOURCE/OFF) is pressed, the connected
device (“HD,” “XM” or “SR”) will appear in the
display. Furthermore, if (MODE) is pressed, you
can switch the HD Radio tuner band or SAT tuner
band.
*2 When a USB device set up for the SensMe™
function is connected.
*3 When the SAT tuner is connected.
*4 This button has a tactile dot.
Notes
• When ejecting/inserting a disc, keep any USB
devices disconnected to avoid damage to the disc.
• If the unit is turned off and the display disappears, it
cannot be operated with the card remote
commander unless (SOURCE/OFF) on the unit is
pressed, or a disc is inserted to activate the unit first.
9
Page 10
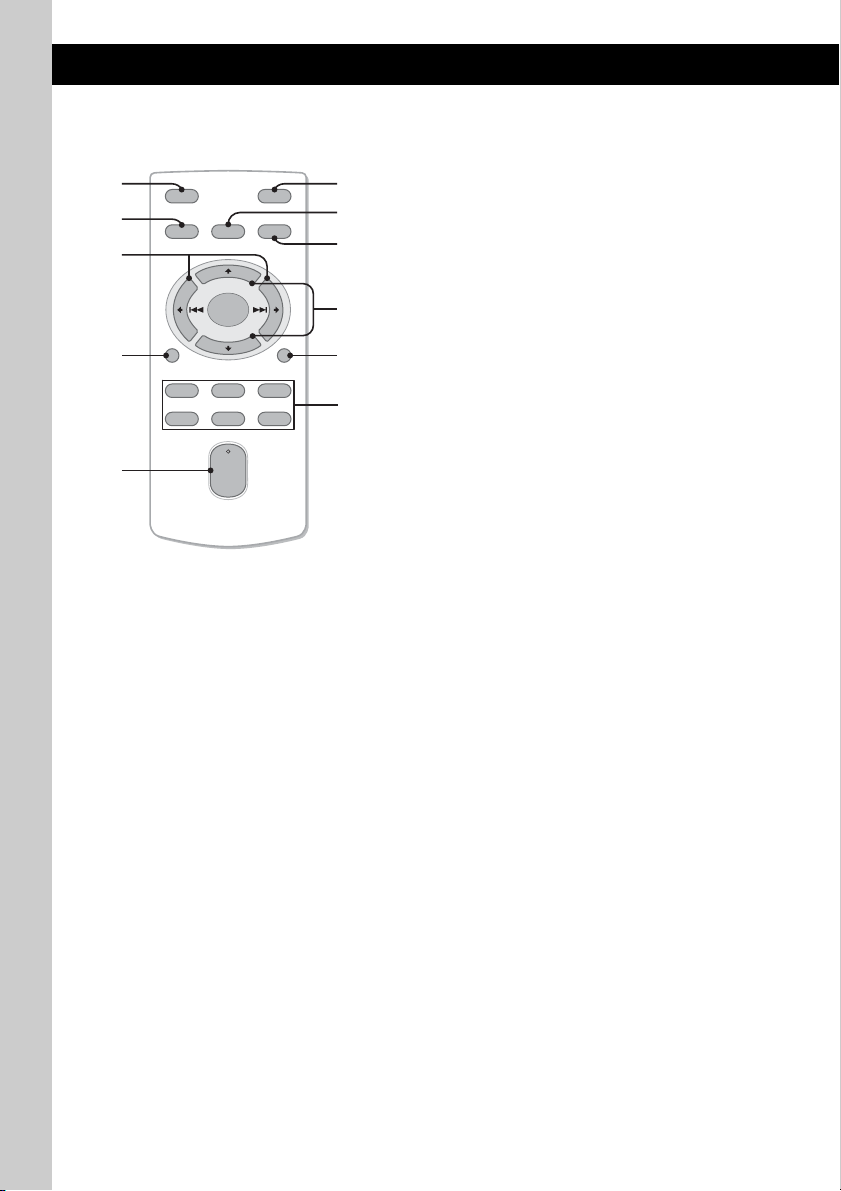
RM-X151 Card Remote
Commander
1
2
OFF
SOURCE
SEL
ATT
MODE
3
+
–
VOL
SCRL
+
–
4
5
DSPL
132
465
6
7
8
9
q;
qa
Remove the insulation film before use (page 6).
A OFF button
To turn off the power; stop the source.
B SOURCE button*
To turn on the power; change the source
(Radio/CD/USB/SensMe™*
1
2
/AUX).
C < (.)/, (>) buttons
To control Radio/CD/USB/SensMe™, the
same as (SEEK) –/+ on the unit.
Setup, sound setting, etc., can be operated by
< ,.
D DSPL (display) button
To change display items.
E VOL (volume) +*
3
/– button
To adjust volume.
F ATT (attenuate) button
To attenuate the sound. To cancel, press
again.
G SEL (select) button
The same as the select button on the unit.
H MODE button*
1
Press to select the radio band (FM/AM).
Press and hold to enter/cancel the passenger
control.
I M (+)/m (–) buttons
To control CD/USB/SensMe™, the same as
(1)/(2) (ALBUM –/+) on the unit.
Setup, sound setting, etc., can be operated by
M m.
J SCRL (scroll) button
To scroll the display item.
K Number buttons
To receive stored stations (press); store
stations (press and hold).
*1 If an HD Radio tuner or SAT tuner is connected:
when (SOURCE) is pressed, the connected device
(“HD,” “XM” or “SR”) will appear in the display.
Furthermore, if (MODE) is pressed, you can switch
the HD Radio tuner band or SAT tuner band.
*2 When a USB device set up for the SensMe™
function is connected.
*3 This button has a tactile dot.
10
Page 11
Radio
RDS
Storing and receiving stations
Caution
When tuning in stations while driving, use Best
Tuning Memory (BTM) to prevent an accident.
Storing automatically — BTM
1 Press (SOURCE/OFF) repeatedly until
“TUNER” appears.
To change the band, press (MODE)
repeatedly. You can select from FM1, FM2,
FM3, AM1 or AM2.
2 Press and hold the select button.
The setup display appears.
3 Rotate the control dial until “BTM”
appears, then press it.
The unit stores stations in order of frequency
on the number buttons.
A beep sounds when the setting is stored.
Storing manually
1 While receiving the station that you
want to store, press and hold a
number button ((1) to (6)) until
“MEMO” appears.
Note
If you try to store another station on the same number
button, the previously stored station will be replaced.
Receiving the stored stations
1 Select the band, then press a number
button ((1) to (6)).
Tuning automatically
1 Select the band, then press (SEEK) +/–
to search for the station.
Scanning stops when the unit receives a
station. Repeat this procedure until the
desired station is received.
Tip
If you know the frequency of the station you want to
listen to, press and hold (SEEK) +/– to locate the
approximate frequency, then press (SEEK) +/–
repeatedly to fine adjust to the desired frequency
(manual tuning).
Overview
FM stations with Radio Data System (RDS)
service send inaudible digital information along
with the regular radio program signal.
Display items
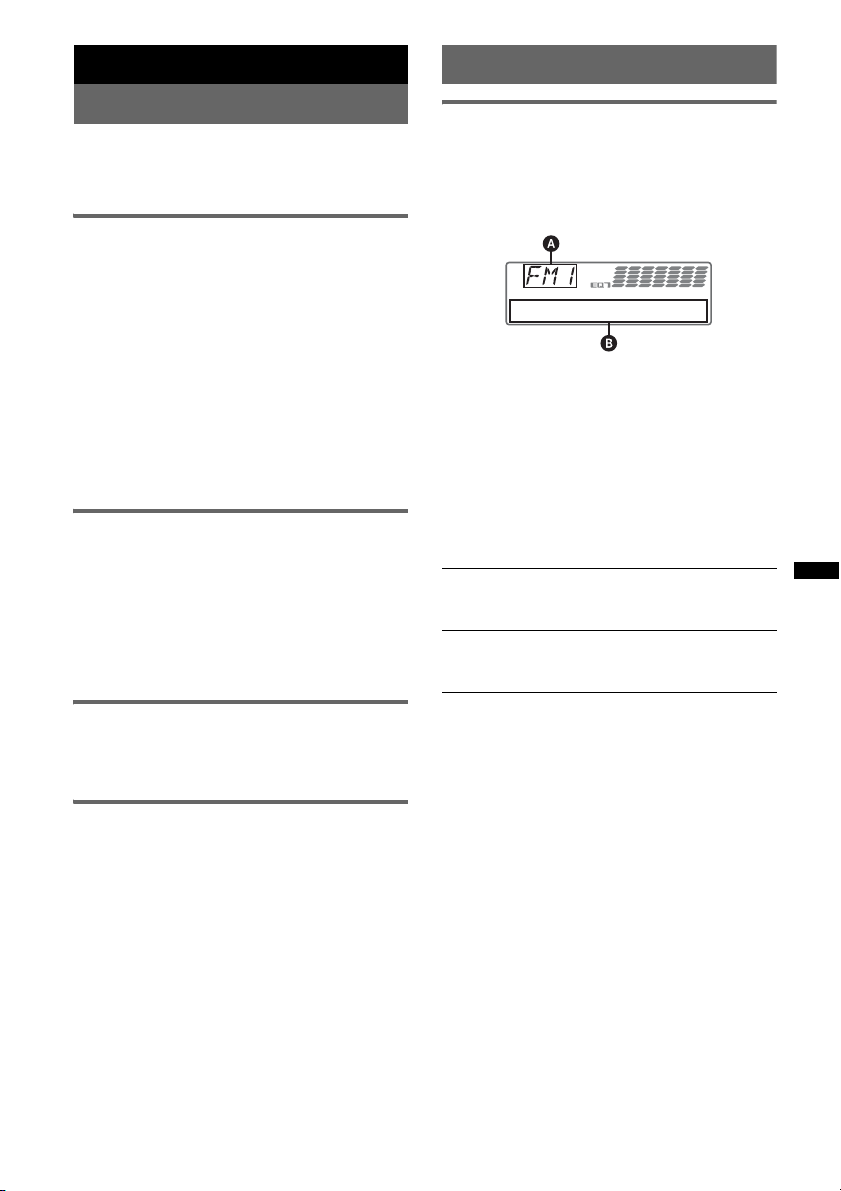
A Radio band, Function
B Program service name, Clock, Frequency*,
Preset number
* While receiving the RDS station, “ *” is displayed on
the left of the frequency indication.
To change display items B, press
(DSPL)
.
RDS services
This unit automatically provides RDS services as
follows:
PTY (Program Types)
Displays the currently received program type.
Also searches your selected program type.
CT (Clock Time)
The CT data from the RDS transmission sets
the clock.
Notes
• Depending on the country/region, not all RDS
functions may be available.
• RDS will not work if the signal strength is too weak,
or if the station you are tuned to is not transmitting
RDS data.
11
Page 12
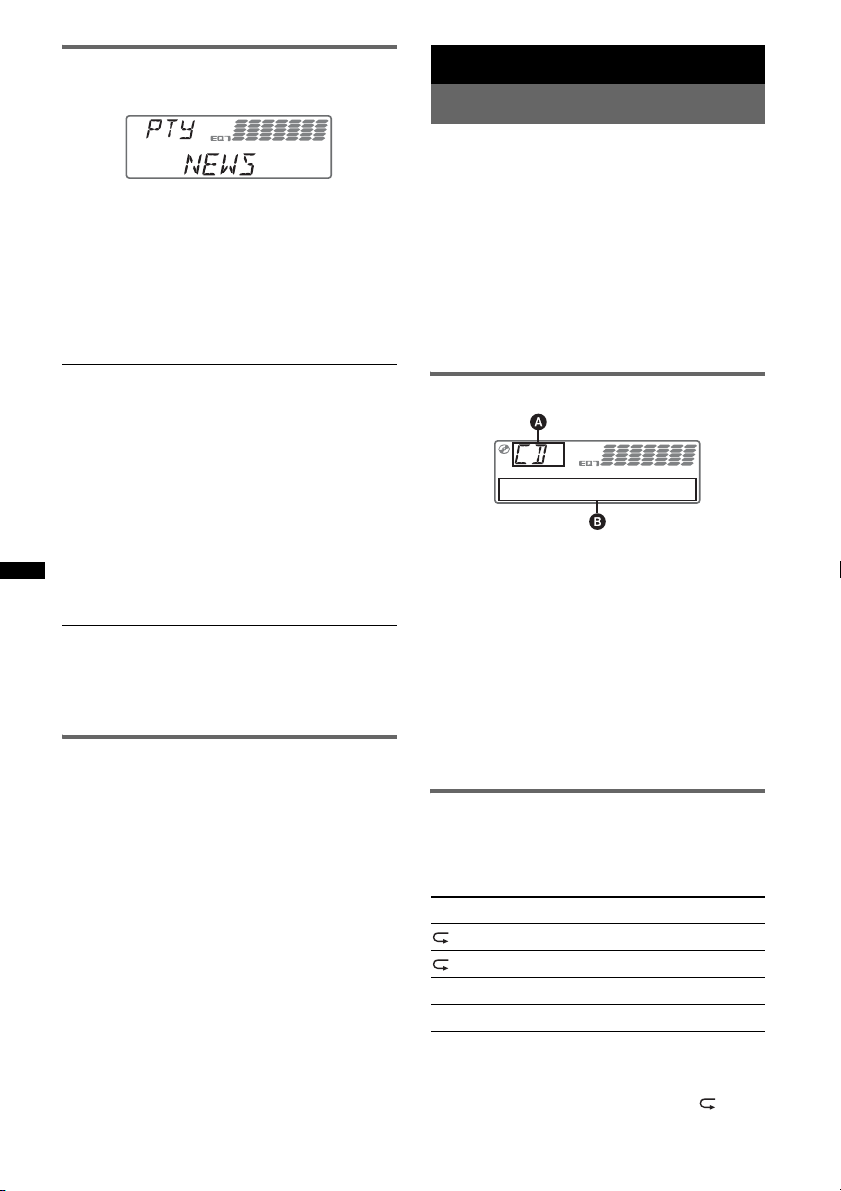
Selecting PTY
1 Press (PTY) during FM reception.
The current program type name appears if the
station is transmitting PTY data.
2 Rotate the control dial until the
desired program type appears, then
press it.
The unit starts to search for a station
broadcasting the selected program type.
Type of programs
NEWS (News), INFORM (Information),
SPORTS (Sports), TALK (Talk), ROCK
(Rock), CLS ROCK (Classic Rock), ADLT
HIT (Adult Hits), SOFT RCK (Soft Rock),
TOP 40 (Top 40), COUNTRY (Country),
OLDIES (Oldies), SOFT (Soft), NOSTALGA
(Nostalgia), JAZZ (Jazz), CLASSICL
(Classical), R AND B (Rhythm and Blues),
SOFT R B (Soft Rhythm and Blues),
LANGUAGE (Foreign Language), REL
MUSC (Religious Music), REL TALK
(Religious Talk), PERSNLTY (Personality),
PUBLIC (Public), COLLEGE (College),
WEATHER (Weather)
Notes
• You cannot use this function in countries/regions
where no PTY data is available.
• You may receive a different radio program from the
one you select.
Setting CT
1 Set “CT-ON” in setup (page 24).
Notes
• The CT function may not work even though an RDS
station is being received.
• There might be a difference between the time set by
the CT function and the actual time.
12
CD
Playing a disc
1 Press (OPEN).
2 Insert the disc (label side up).
3 Close the front panel.
Playback starts automatically.
Ejecting the disc
1 Press (OPEN).
2 Press Z.
The disc is ejected.
3 Close the front panel.
Display items
A Source
B Track name*
name*
Track number/Elapsed playing time, Clock
*1 The information of a CD TEXT, MP3/WMA/AAC is
displayed.
*2 Album number is displayed only when the album is
changed.
To change display items B, press (DSPL).
Tip
Displayed items may differ depending on the disc type,
recording format and settings.
Repeat and shuffle play
1 During playback, press (3) (REP) or
(4) (SHUF) repeatedly until the
desired setting appears.
Select To play
TRACK track repeatedly.
ALBUM* album repeatedly.
SHUF ALBUM* album in random order.
SHUF DISC disc in random order.
* When an MP3/WMA/AAC is played.
After 3 seconds, the setting is complete.
To return to normal play mode, select “ OFF”
or “SHUF OFF.”
1
, Disc/artist name*1, Artist
1
, Album number*2, Album name*1,
Page 13
USB devices
For details on the compatibility of your USB
device, visit the support site.
Support site
http://esupport.sony.com
http://www.sony.com/mobileAV
• MSC (Mass Storage Class) and MTP (Media
Transfer Protocol) type USB devices compliant
with the USB standard can be used.
• Corresponding codec is MP3 (.mp3), WMA
(.wma), AAC (.m4a) and AAC (.mp4).
• Backup of data in a USB device is
recommended.
Note
Connect the USB device after starting the engine.
Depending on the USB device, malfunction or damage
may occur if it is connected before starting the engine.
Removing the USB device
1 Stop the USB device playback.
2 Remove the USB device.
If you remove your USB device during
playback, data in the USB device may be
damaged.
Notes
• Do not use USB devices so large or heavy that they
may fall down due to vibration, or cause a loose
connection.
• Do not detach the front panel during playback of the
USB device, otherwise USB data may be damaged.
• This unit cannot recognize USB devices via a USB
hub.
Display items
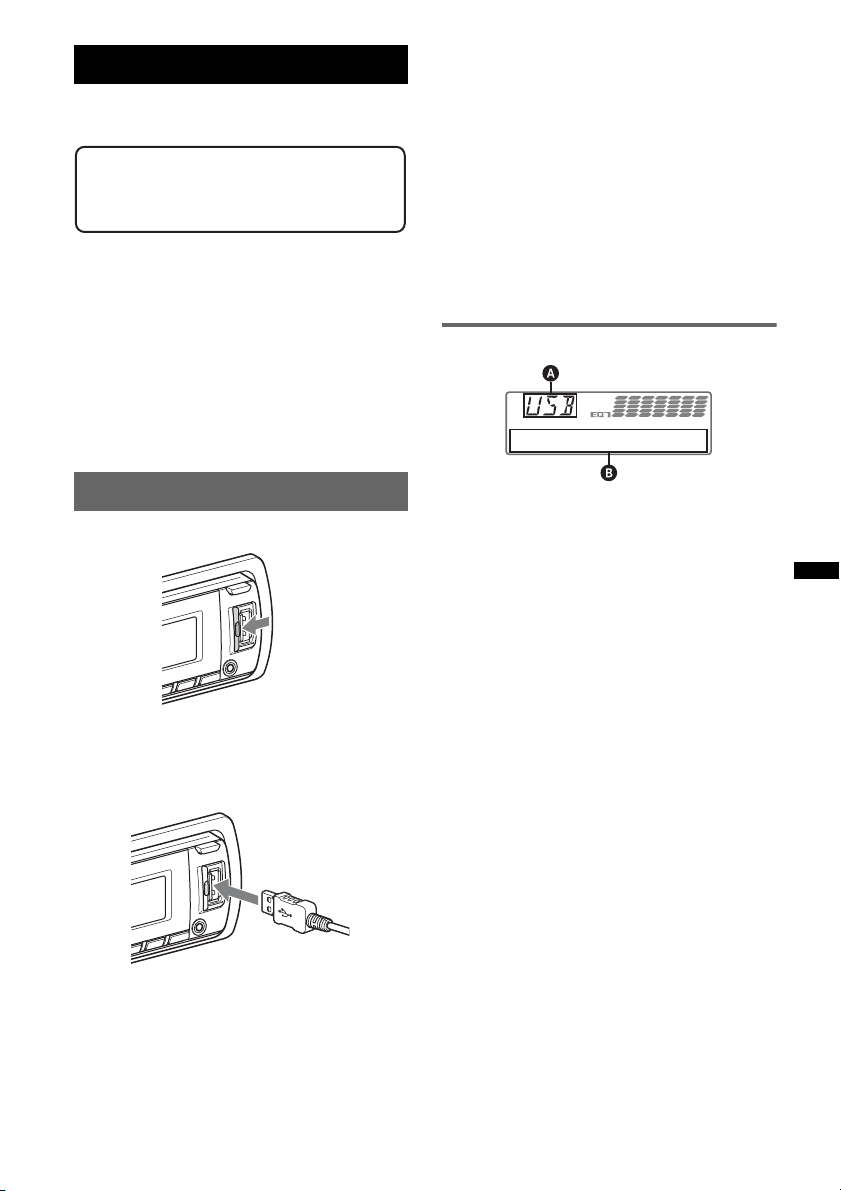
Playing back a USB device
1 Slide the USB cover.
2 Connect the USB device to the USB
connector.
When using a cable, use the one supplied with
the USB device to connect.
Playback starts.
If a USB device is already connected, to start
playback, press (SOU RCE/OFF) repeatedly until
“USB” appears.
Press and hold (SOURCE/OFF) for 1 second to
stop playback.
A Source
B Track name, Artist name, Album number*,
Album name, Track number/Elapsed playing
time, Clock
* Album number is displayed only when the album is
changed.
To change display items B, press (DSPL).
Notes
• Displayed items will differ, depending on the USB
device, recorded format and settings. For details,
visit the support site.
• The maximum number of displayable data is as
follows.
– folders (albums): 128
– files (tracks) per folder: 500
• Do not leave a USB device in a parked car, as
malfunction may result.
• It may take time for playback to begin, depending on
the amount of recorded data.
• DRM (Digital Rights Management) files may not be
played.
• During playback or fast-forward/reverse of a VBR
(Variable Bit Rate) MP3/WMA/AAC file, elapsed
playing time may not display accurately.
• Playback of the following MP3/WMA/AAC files is not
supported.
– lossless compression
– copyright-protected
13
Page 14
Repeat and shuffle play
1 During playback, press (3) (REP) or
(4) (SHUF) repeatedly until the
desired setting appears.
Select To play
TRACK track repeatedly.
ALBUM album repeatedly.
SHUF ALBUM album in random order.
SHUF DEVICE device in random order.
After 3 seconds, the setting is complete.
To return to normal play mode, select “ OFF”
or “SHUF OFF. ”
Enjoying music according to
your mood — SensMe™
Tip
Registration can be performed either along with the
installation procedure or after installation.
3 Transferring tracks to the USB device
using “Content Transfer”
In order to group tracks by channel, track
sound patterns need to be analyzed by 12
TONE ANALYSIS™, which is loaded in
“Content Transfer.”
With the USB device connected to your
computer, drag and drop tracks from Windows
Explorer or iTunes, etc., to “Content
Transfer.”
Both analysis and transfer of tracks will be
performed by “Content Transfer.”
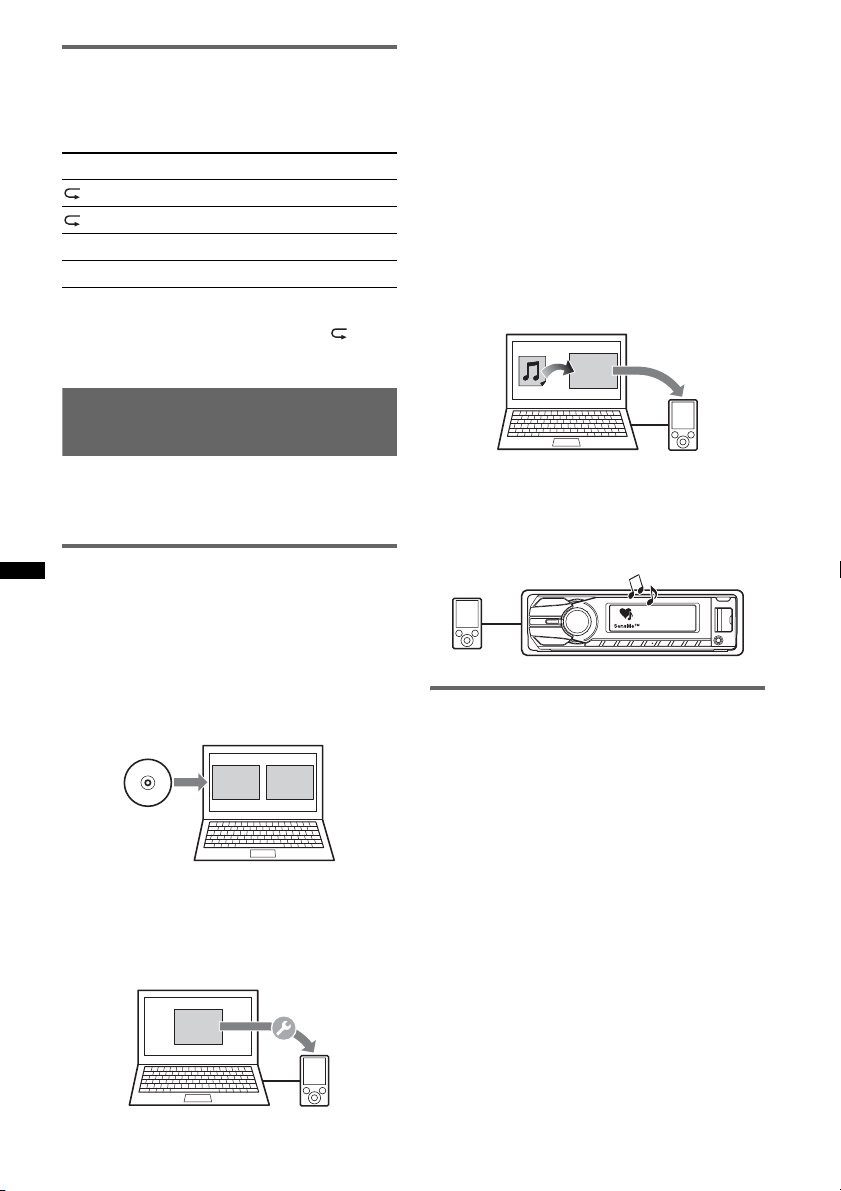
Content
Transfer
Sony’s unique “SensMe™ channels” features
automatically group tracks by channel, and allow
you to enjoy music intuitively.
Before using the SensMe™
function
The following is the basic procedure required to
enjoy the SensMe™ function on the unit.
1Installing “SensMe™ Setup” and
“Content Transfer” in your computer
First install “SensMe™ Setup” and “Content
Transfer” from the supplied CD-ROM.
™
Content
SensMe
Transfer
Setup
2Registering a USB device using
“SensMe™ Setup”
Connect a USB device to your computer, and
perform registration using “SensMe™ Setup”
to enable the SensMe™ function on this unit.
™
SensMe
Setup
4 Connecting the USB device and
enjoying the SensMe™ function on the
unit
Connect the set up USB device. You can then
enjoy “SensMe™ channels” on this unit.
Installing “SensMe™ Setup” and
“Content Transfer” in your
computer
Use of the supplied software (“SensMe™ Setup”
and “Content Transfer”) is required to enable the
SensMe™ function on this unit.
Install the software in your computer from the
supplied CD-ROM.
1 Insert the supplied CD-ROM into your
computer.
The Installation Wizard runs automatically.
2 Follow the on-screen instructions to
complete the installation.
14
Page 15
Registering a USB device using
“SensMe™ Setup”
USB device registration is required to enable the
SensMe™ function on the unit.
If registration is not performed along with the
installation procedure, follow the steps below.
1 Start “SensMe™ Setup” on your
computer.
2 Connect a USB device to your
computer.
3 Complete registration following the
on-screen instructions.
Tip
If you connect a registered USB device containing
analyzed tracks, the USB device can be unregistered
again.
Playing tracks in the channel
— SensMe™ channels
“SensMe™ channels” automatically group tracks
into channels by their tunes. You can select and
play a channel that fits your mood, activity, etc.
1 Connect a USB device set up for the
SensMe™ function.
2 Press (SOURCE/OFF) repeatedly until
“SENSME CH” appears.
The channel list appears, and the most
melodic or rhythmical sections* of tracks are
shuffle played.
* May not be detected correctly.
Transferring tracks to the USB
device using “Content Transfer”
To enable the SensMe™ function on this unit,
tracks need to be analyzed and transferred to the
registered USB device, using “Content Transfer.”
1 Connect the registered USB device to
your computer.
For USB devices, connect with the MSC
mode.
“Content Transfer” starts automatically.
If a message appears, follow the on-screen
instructions to proceed.
2 Drag and drop tracks from Windows
Explorer or iTunes, etc., to “Content
Transfer.”
The analysis and transfer of tracks start.
For details on operations, see the Help of
“Content Transfer.”
Note
The track analysis by 12 TONE ANALYSIS™ may take
time, depending on the computer environment.
3 Selecting a track from the channel list
using the control dial.
• Change the channel
Push (1)/(2) (ALBUM –/+) to select the
desired channel.
• Change the track
Push (SEEK) +/– until the desired track
appears, then press the control dial.
Playback starts from the beginning of the
current track.
If you do not operate anything for 10 seconds,
the display returns to normal play mode.
Notes
• Depending on the track, it may not be detected
correctly or may be grouped in a channel not suited
to the track’s mood.
• If the connected USB device contains many tracks, it
may take time for “SensMe™ channels” to start, due
to data reading.
Tip
Tracks are played in random order. The order will vary
at each channel selection.
continue to next page t
15
Page 16
Channel list
x Recommended, Shuffle All
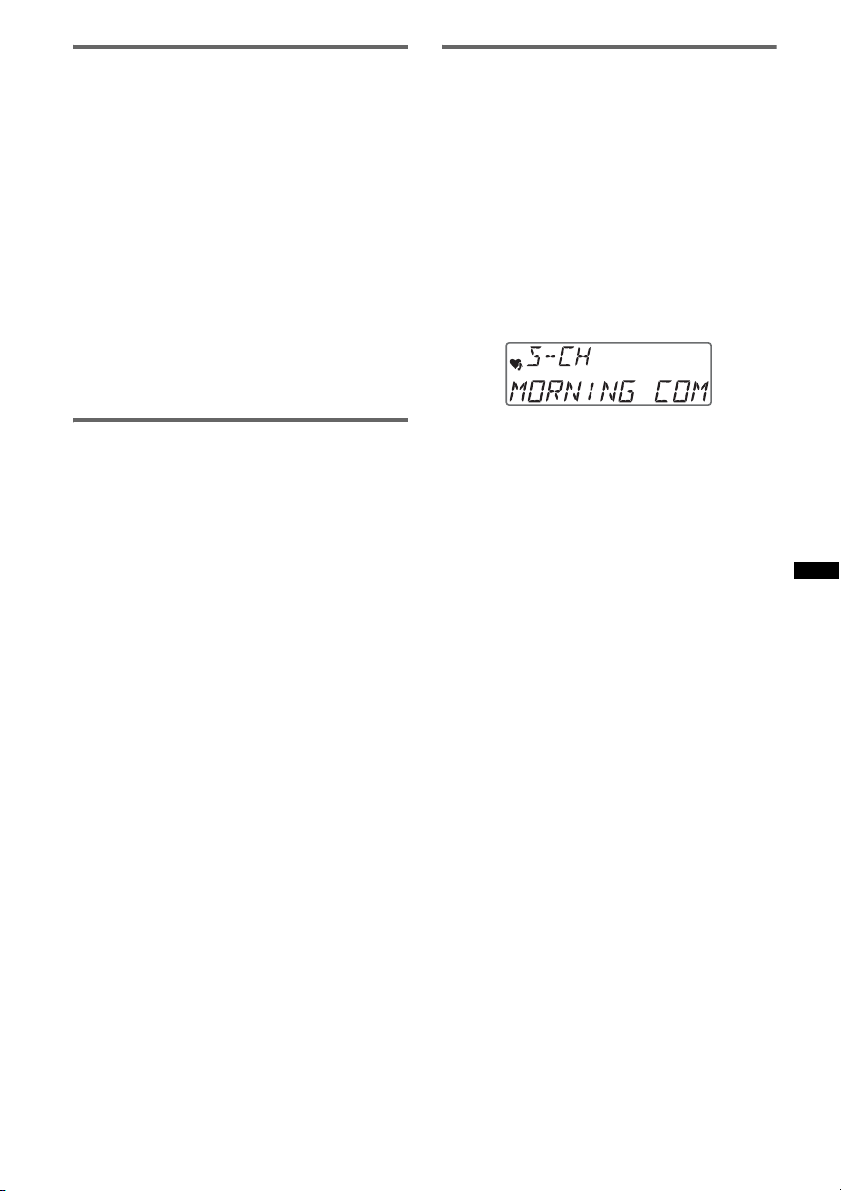
“MORNING” (5:00 AM – 9:59 AM)
“DAYTIME” (10:00 AM – 3:59 PM)
“EVENING” (4:00 PM – 6:59 PM)
“NIGHT” (7:00 PM – 11:59 PM)
“MIDNIGHT” (12:00 AM – 4:59 AM)
Tracks recommended for each time of day.
Set the clock (page 6) for the channel to be
displayed accurately.
“SHUFFLE ALL”: Plays all analyzed tracks in
random order.
iPod
For details on the compatibility of your iPod, see
“About iPod” (page 26) or visit the support site.
In these Operating Instructions, “iPod” is used as
a general reference for the iPod functions on the
iPod and iPhone, unless otherwise specified by
the text or illustrations.
Support site
http://esupport.sony.com
http://www.sony.com/mobileAV
x Basic channels
Plays tracks according to the music type.
“ENERGETIC”: High-spirit tracks.
“RELAX”: Calm tracks.
“MELLOW”: Mellow, melancholy tracks.
“UPBEAT”: Happy tracks to improve your
mood.
“EMOTIONAL”: Ballad tracks.
“LOUNGE”: Lounge music.
“DANCE”: Rhythm and rap, rhythm and blues
tracks.
“EXTREME”: Intense rock tracks.
x In-car channels
Plays tracks that are suitable while driving.
“FREEWAY”: Speedy, high-spirit tracks.
“CHILLOUT DRIVE”: Intoned, healing ballad
tracks.
“WEEKEND TRIP”: Delightful, bright and
happy tracks.
“MIDNIGHT CRUISE”: Jazz or piano-featured
tracks with mature mood.
“PARTY RIDE”: Up-tempo and alive tracks.
“MORNING COMMUTE”: Bright and breezy
tracks.
“GOIN’ HOME”: Warm and relaxing tracks.
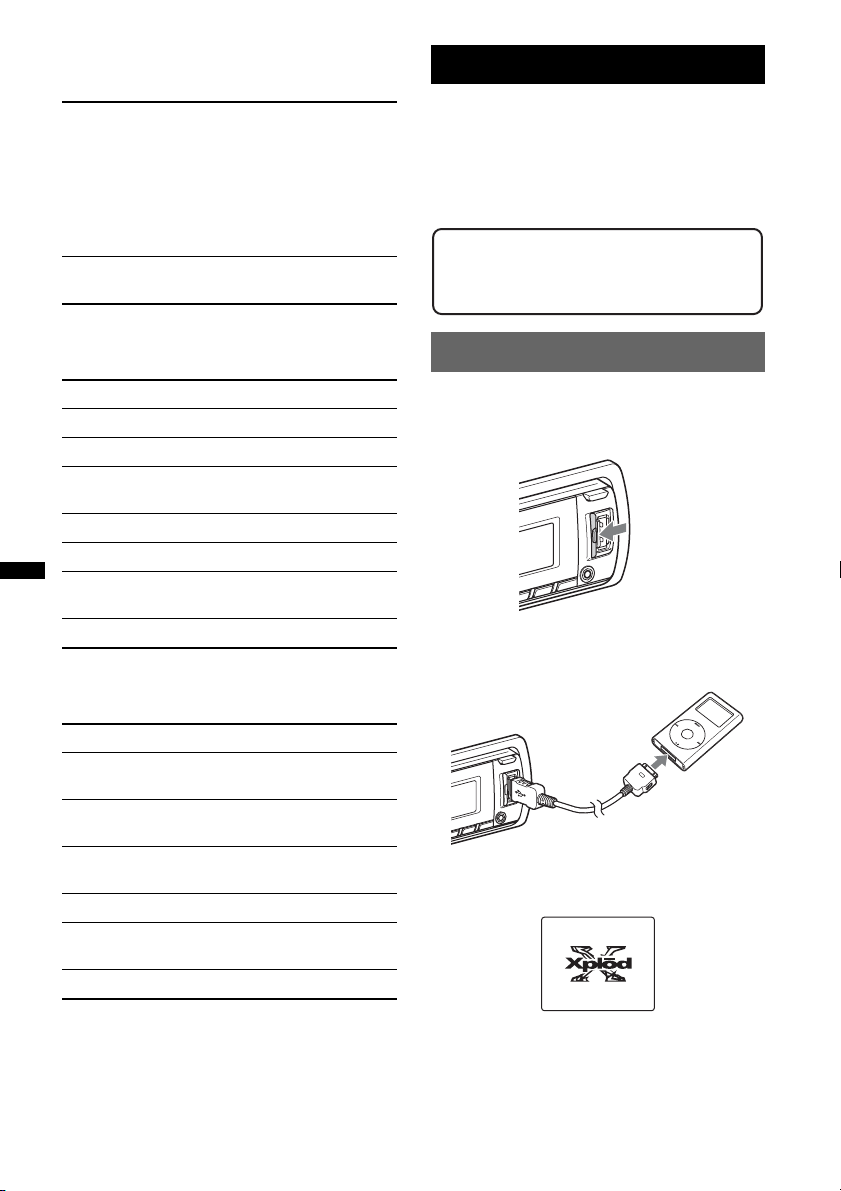
Playing back iPod
Before connecting the iPod, turn down the
volume of the unit.
1 Slide the USB cover.
2 Connect the iPod to the USB
connector via the dock connector to
USB cable.
The iPod will turn on automatically, and the
display will appear on the iPod screen as
below.*
16
Tip
We recommend the RC-100IP USB cable (not
supplied) to connect the dock connector.
The tracks on the iPod start playing
automatically from the point last played.
Page 17
If an iPod is already connected, to start
playback press (SOURCE/OFF) repeatedly
until “USB” appears. (“IPOD” appears in the
display when iPod is recognized.)
* In the case of an iPod touch or iPhone being
connected, or that the iPod was last played back
using passenger control, the logo will not appear on
the screen.
3 Adjust the volume.
Press and hold (SOURCE/OFF) for 1 second to
stop playback.
Removing the iPod
1 Stop the iPod playback.
2 Remove the iPod.
Caution for iPhone
When you connect an iPhone via USB, telephone
volume is controlled by iPhone itself. In order to avoid
sudden loud sound after a call, do not increase the
volume on the unit during a telephone call.
Notes
• Do not detach the front panel during playback of the
iPod, otherwise data may be damaged.
• This unit cannot recognize iPod via a USB hub.
Tips
• When the ignition key is turned to the ACC position,
and the unit is on, the iPod will be recharged.
• If the iPod is disconnected during playback, “NO
DEV” appears in the display of the unit.
Resuming mode
When the iPod is connected to the dock
connector, the mode of this unit changes to
resuming mode and playback starts in the mode
set by the iPod.
In resuming mode, the following buttons do not
function.
– (3) (REP)
– (4) (SHUF)
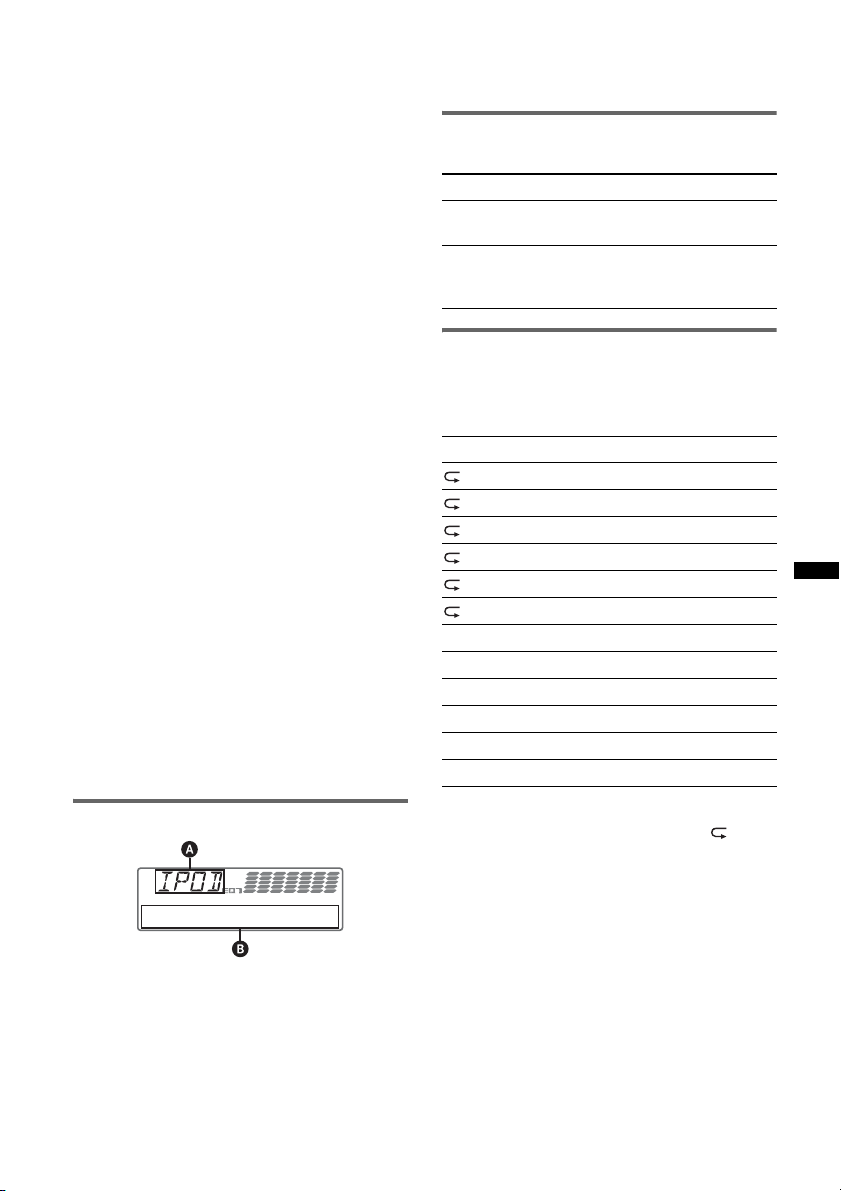
Display items
Note
Some letters stored in iPod may not be displayed
correctly.
Skipping albums, podcasts,
genres, playlists and artists
To Do this
Skip Press (1)/(2) (ALBUM –/+)
[press once for each]
Skip
continuously
Press and hold (1)/(2)
(ALBUM –/+)
[hold to desired point]
Repeat and shuffle play
1 During playback, press (3) (REP) or
(4) (SHUF) repeatedly until the
desired setting appears.
Select To play
TRACK track repeatedly.
ALBUM album repeatedly.
PODCAST podcast repeatedly.
ARTIST artist repeatedly.
PLAYLIST playlist repeatedly.
GENRE genre repeatedly.
SHUF ALBUM album in random order.
SHUF PODCAST podcast in random order.
SHUF ARTIST artist in random order.
SHUF PLAYLIST playlist in random order.
SHUF GENRE genre in random order.
SHUF DEVICE device in random order.
After 3 seconds, the setting is complete.
To return to normal play mode, select “ OFF”
or “SHUF OFF.”
A Source (iPod) indication
B Track name, Artist name, Album name, Track
number/Elapsed playing time, Clock
To change display items B, press (DSPL).
Tip
When album/podcast/genre/artist/playlist is changed,
its item number appears momentarily.
17
Page 18
Operating an iPod directly
— Passenger control
You can operate an iPod connected to the dock
connector directly.
1 During playback, press and hold
(MODE).
“MODE IPOD” appears and you will be able
to operate the iPod directly.
To change the display item
Press (DSPL).
The display items change as follows:
Track name t Artist name t Album name t
MODE IPOD t Clock
To exit the passenger control
Press and hold (MODE).
Then “MODE AUDIO” will appear and the play
mode will change to resuming mode.
Notes
• The volume can be adjusted only by the unit.
• If this mode is canceled, the repeat setting will be
turned off.
Searching for a track
Searching a track by name
— Quick-BrowZer™
You can search for a track in a CD or USB device
easily by category.
1 Press (BROWSE).
The unit enters the Quick-BrowZer mode,
and the list of search categories appears.
2 Rotate the control dial to select the
desired search category, then press it
to confirm.
3 Repeat step 2 until the desired track is
selected.
Playback starts.
To return to the previous display
Press (BACK).
To exit the Quick-BrowZer mode
Press (BROWSE).
Note
When entering the Quick-BrowZer mode, the repeat/
shuffle setting is canceled.
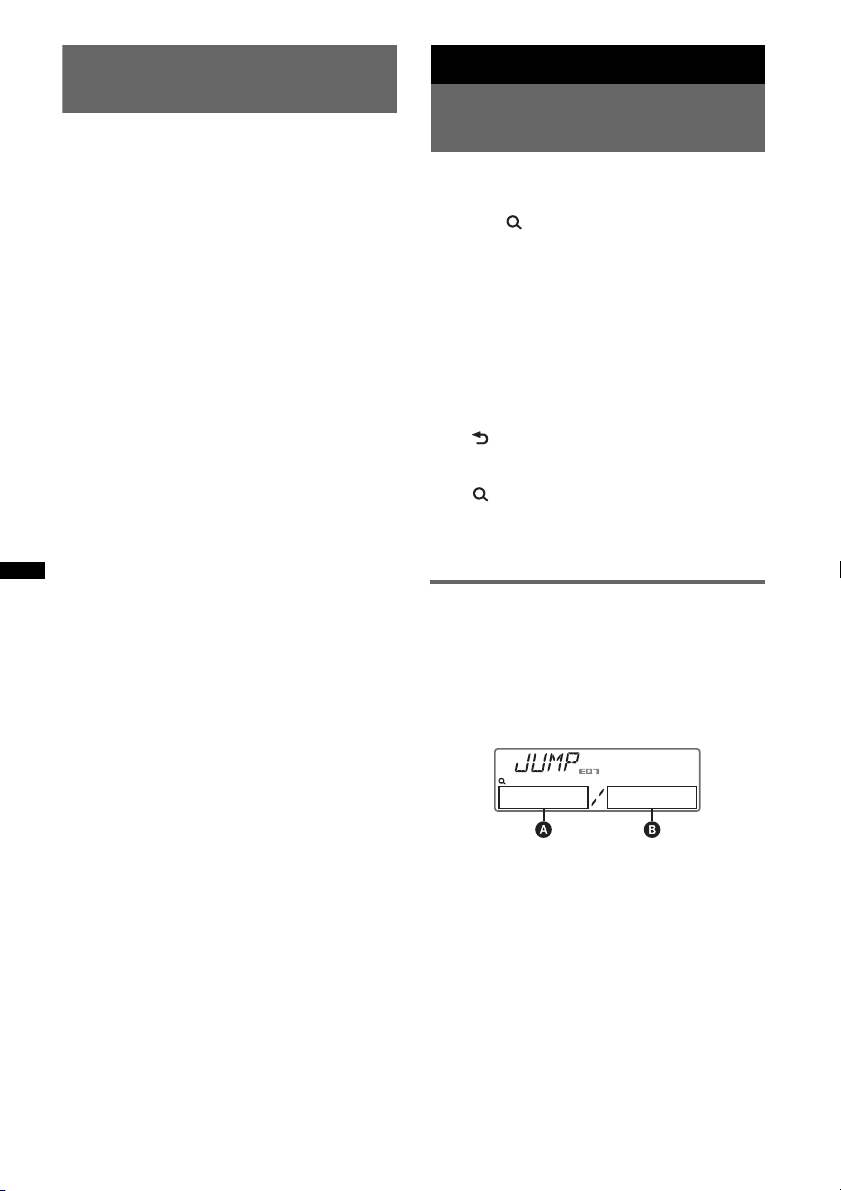
Searching by skip items
— Jump mode
When many items are in a category, you can
search the desired item quickly.
1 Press (SEEK) + in Quick-BrowZer
mode.
The following display appears.
18
A Current item number
B Total item number in the current layer
Then the item name will appear.
2 Rotate the control dial to select the
desired item or one near the desired
item.
It skips in steps of 10% of the total item
number.
3 Press the select button.
The display returns to the Quick-BrowZer
mode and the selected item appears.
4 Rotate the control dial to select the
desired item and press it.
Playback starts if the selected item is a track.
Page 19
To cancel Jump mode
Press (BACK) or (SEEK) –.
Note
If no operation is performed for 7 seconds, the Jump
mode is canceled.
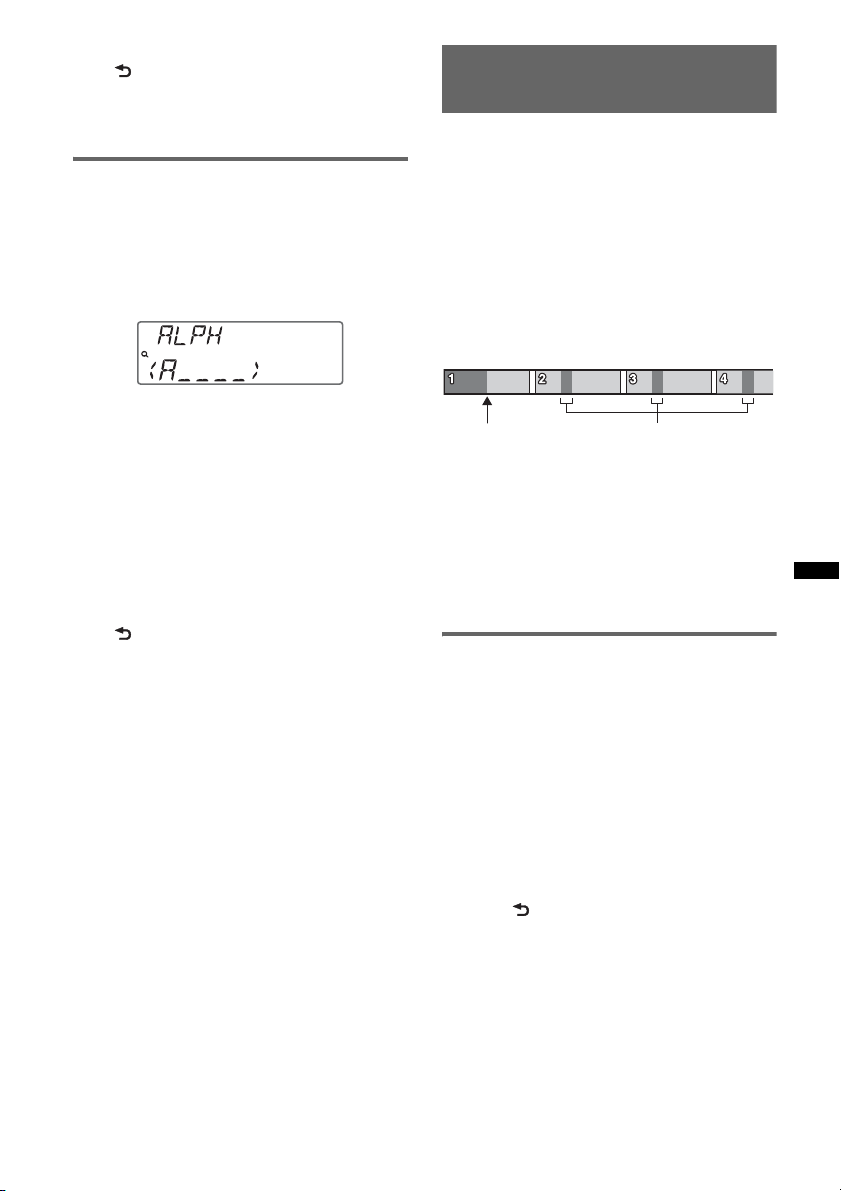
Searching by alphabetical order
— Alphabet search
When an iPod is connected to the unit, you can
search for a desired item alphabetically.
1 Press (SEEK) + in Quick-BrowZer
mode.
An alphabetical list appears.
2 Rotate the control dial to select the
first letter of the desired item, then
press it.
A list of items beginning with the selected
letter appears in alphabetical order.
If there is no song beginning with the selected
letter, “NOT FOUND” appears.
3 Rotate the control dial to select the
desired item, then press it.
Playback starts if the selected item is a track.
To cancel Alphabet search
Press (BACK) or (SEEK) –.
A list of the search categories appears.
Notes
• In Alphabet search, a symbol or article (a/an/the)
before the selected letter of the item is excluded.
• Depending on the search item you select, only Jump
mode may be available.
• If no operation is performed for 5 seconds, Alphabet
search is canceled.
• Alphabet search may take some time, depending on
the amount of tracks.
Searching a track by listening
to track passages — ZAPPIN™
While playing back short track passages in a CD
or USB device in sequence, you can search for a
track you want to listen to.
ZAPPIN mode is suitable for searching for a
track in shuffle or shuffle repeat mode.
1 Press (ZAP) during playback.
After “ZAPPIN” appears in the display,
playback starts from a passage of the next
track.
The passage is played for the set time, then a
click sounds and the next passage starts.
Tra ck
(ZAP) pressed.
2 Press the select button or (ZAP) when
a track you want to listen is played
back.
The track that you select returns to normal
play mode from the beginning.
To search a track by ZAPPIN mode again,
repeat steps 1 and 2.
In the case of “SensMe™
channels” playback
If the track being searched is transfered by
“Content Transfer,” the most melodic or
rhythmical sections* of tracks are played. For
details on the SensMe™ function, see page 14.
* May not be detected correctly.
Tips
• You can select the playback time from about 6
seconds/15 seconds/30 seconds (page 25). You
cannot select the passage of the track to playback.
• Press (SEEK) +/– in ZAPPIN mode to skip a track.
• Press (1)/(2) (ALBUM –/+) in ZAPPIN mode to skip
album.
• Pressing (BACK) also confirms a track to
playback.
The part of each track to
playback in ZAPPIN mode.
19
Page 20

Enjoying the illumination color
variation
Changing the color of display
and buttons
—Dynamic Color Illuminator
Dynamic Color Illuminator allows you to change
the color of the display and buttons on the main
unit to match the car's interior.
You can select from 12 preset colors, customized
color and 5 preset patterns.
x Preset colors
“RED,” “AMBER,” “M_AMBER,” “YELLOW,”
“WHITE,” “LIGHT GREEN,” “GREEN,”
“LIGHT BLUE,” “SKY BLUE,” “BLUE,”
“PURPLE,” “PINK.”
x Preset patterns
“RAINBOW,” “OCEAN,” “SUNSET,”
“FOREST,” “RANDOM.”
1 Press (COLOR).
2 Rotate the control dial to select the
desired preset color, then press it.
The display returns to normal reception/play
mode.
Note
If the control dial is rotated rapidly, the color of the
display and the buttons may change too quickly.
Tip
You can enter the preset color mode from the setup
menu.
1 Press and hold (COLOR).
The DAY/NIGHT custom color display varies
according to the DIMMER setting.
To change the DAY/NIGHT color mode, see
page 20.
2 Rotate the control dial until “BASE
COLOR” appears, then press it.*
You can select a preset color as a basis for
further customizing.
To not customize a preset color, skip to step 5.
* When you select “BASE COLOR,” customized color
is overwritten.
3 Rotate the control dial to select from
“RGB RED,” “RGB GREEN,” or “RGB
BLUE,” then press it.
4 Rotate the control dial to adjust the
color range, then press it.
Adjustable color range: “0” – “32.”
You cannot set “0” for all color ranges at the
same time.
5 Press (BACK).
The display returns to normal reception/play
mode.
Changing DAY/NIGHT color mode
1 Select “DAY/NIGHT” in step 2.
2 Select “DAY” or “NIGHT.”
3 Customize the preset channel from step 2 to 5.
Tip
You can set the DAY/NIGHT color mode from the
setup menu.
Customizing the display and
button color — Custom Color
You can register a customized color for the
display and buttons.
About DAY/NIGHT color mode
You can set a different color for DAY/NIGHT.
The display color changes for DAY/NIGHT
color mode as below.
Color mode DIMMER
DAY OFF or AUTO (turn off
NIGHT ON or AUTO (turn on
* Available only when the illumination control lead is
connected.
For details on the DIMMER, see page 24.
the head light*)
the head light*)
20
Page 21

Advanced color setting
SensMe™ Channels
synchronization
— SensMe™ Channels Color
The color of the display and buttons on the main
unit changes according to the SensMe™ channel.
1 Press and hold the select button.
The setup display appears.
2 Rotate the control dial until “SENSME
COLR” appears, then press it.
3 Rotate the control dial to select
“SENSME-ON,” then press it.
4 Press (BACK).
The setting is complete and the display
returns to normal reception/play mode.
To cancel SensMe™ Channels Color, select
“OFF” on step 3.
Note
When SensMe™ Channels Color is set to “ON” for the
SensMe™ source, SensMe™ Channels Color
overrides the preset color/pattern settings. The color/
pattern setting changes to the preset color/pattern if
you turn off SensMe™ Channels Color or change the
source to other than SensMe™.
Changing the color with sound
synchronization
— Sound Synchronization
The color changes according to synchronization
of playing music. When you select a preset
pattern or play tracks in the SensMe channel,
sound synchronization becomes effective.
1 Press and hold the select button.
The setup display appears.
2 Rotate the control dial until “SOUND
SYNC” appears, then press it.
3 Rotate the control dial to select
“SYNC-ON,” then press it.
4 Press (BACK).
The setting is complete and the display
returns to normal reception/play mode.
Note
May not be synchronized correctly.
Displaying clear color
— White Menu
You can display the menu more clearly (White)
without concern for color setting.
1 Press and hold the select button.
The setup display appears.
2 Rotate the control dial until “WHITE
MENU” appears, then press it.
3 Rotate the control dial to select
“WHITE-ON,” then press it.
4 Press (BACK).
The setting is complete and the display
returns to normal reception/play mode.
To cancel White Menu, select “OFF” on step 3.
Start up effect
— Start White
When you push (SOURCE/OFF) on, the color of
display and the buttons on the main unit turns
white once, and then the color changes to the
customized color. You can enjoy the effect
whenever the source is turned on.
1 Press and hold the select button.
The setup display appears.
2 Rotate the control dial until “START
WHITE” appears, then press it.
3 Rotate the control dial to select
“WHITE-ON,” then press it.
4 Press (BACK).
The setting is complete and the display
returns to normal reception/play mode.
To cancel Start White, select “OFF” on step 3.
21
Page 22

Sound Settings and Setup Menu
Changing the sound settings
Enjoying sophisticated sound
functions — Advanced Sound
Engine
Adjusting the sound
characteristics
1 During reception/playback, press the
select button.
2 Rotate the control dial until the
desired menu item appears, then
press it.
3 Rotate the control dial to select the
setting, then press it.
4 Press (BACK).
The setting is complete and the display
returns to normal reception/play mode.
The following items can be set (follow the page
reference for details):
EQ7 PRESET (page 22)
EQ7 SETTING (page 23)
POSITION
POSITION (Listening Position setting)
(page 23)
ADJUST POS*
adjustment) (page 24)
SW POSITION*
(page 23)
BALANCE
Adjusts the sound balance: “RIGHT-15” –
“CENTER” – “LEFT-15.”
FADER
Adjusts the relative level: “FRONT-15” –
“CENTER” – “REAR-15.”
DM+ (page 24)
REARBAS ENH (Rear Bass Enhancer)
(page 24)
SUBW LEVEL (Subwoofer Level)
Adjusts the subwoofer volume level: “+10 dB”
– “0 dB” – “–10 dB.”
(“ATT” is displayed at the lowest setting.)
AUX VOLUME*
Adjusts the volume level for each connected
auxiliary equipment: “+18 dB” – “0 dB” – “–8
dB.”
This setting negates the need to adjust the
volume level between sources.
1
(Listening Position
1
(Subwoofer Position)
2
(AUX Volume level)
Advanced Sound Engine, Sony’s new sound
engine, creates an ideal in-car sound field with
digital signal processing. Advanced Sound
Engine contains the following features: EQ7,
Listening Position, DM+ Advanced, Rear Bass
Enhancer.
Selecting the sound quality
— EQ7 Preset
You can select an equalizer curve from 7
equalizer curves (“XPLOD,” “VOCAL,”
“EDGE,” “CRUISE,” “SPACE,” “GRAVITY,”
“CUSTOM” or “OFF”).
1 During reception/playback, press the
select button.
2 Rotate the control dial until “EQ7
PRESET” appears, then press it.
3 Rotate the control dial until the
desired equalizer curve appears, then
press it.
4 Press (BACK).
The display returns to normal reception/play
mode.
To cancel the equalizer curve, select “OFF” in
step 3.
Tip
The equalizer curve setting can be memorized for
each source.
*1 Hidden when “POSITION” is set to “OFF.”
*2 When AUX source is activated (page 25).
22
Page 23

Customizing the equalizer curve
— EQ7 Setting
“CUSTOM” of EQ7 allows you to make your
own equalizer settings.
1 Select a source, then press the select
button.
2 Rotate the control dial until “EQ7
SETTING” appears, then press it.
3 Rotate the control dial until “BASE”
appears, then press it.
You can select an equalizer curve as a basis
for further customizing.
To not customize a preset equalizer curve,
skip to step 5.
4 Rotate the control dial to select the
equalizer curve, then press it.
5 Setting the equalizer curve.
1 Rotate the control dial to select the
frequency range, then press it.
BAND1: 63 Hz
BAND2: 160 Hz
BAND3: 400 Hz
BAND4: 1 kHz
BAND5: 2.5 kHz
BAND6: 6.3 kHz
BAND7: 16.0 kHz
2 Rotate the control dial to adjust the
volume level, then press it.
The volume level is adjustable in 1 dB
steps, from -6 dB to +6 dB.
Repeat steps 1 and 2 to adjust other
frequency ranges.
6 Press (BACK) twice.
The equalizer curve is stored in “CUSTOM,”
and the display returns to normal reception/
play mode.
Optimizing sound by Time
Alignment — Listening Position
The unit can change the localization of sound by
delaying the sound output from each speaker to
suit your position, and simulate a natural sound
field with the feeling of being in the center of it
wherever you sit in the car.
The options for “POSITION” are indicated
below.
“FRONT L” (1): Front left
“FRONT R” (2): Front
right
“FRONT” (3): Center front
“ALL” (4): In the center of
your car
“OFF”: No position set
You can also set the approximate subwoofer
position from your listening position if:
– the subwoofer is connected
– the listening position is set to “FRONT L,”
“FRONT R,” “FRONT” or “ALL.”
The options for “SW POSITION” are indicated
below.
“NEAR” (A): Near
“NORMAL” (B): Normal
“FAR” (C): Far
1 During reception/playback, press the
select button.
2 Rotate the control dial until
“POSITION” appears, then press it.
3 Rotate the control dial to select from
“FRONT L,” “FRONT R,” “FRONT” or
“ALL,” then press it.
4 Rotate the control dial until “SW
POSITION” appears, then press it.
If you select “FRONT L,” “FRONT R,”
“FRONT” or “ALL” in step 3 above, you can
set the subwoofer position.
Rotate the control dial to select from
“NEAR,” “NORMAL” or “FAR,” then press
it.
5 Press (BACK).
The display returns to normal reception/play
mode.
To cancel listening position, select “OFF” on
step 3.
23
Page 24

Adjusting the listening position
You can fine-tune the listening position setting.
1 During reception/playback, press the
select button.
2 Rotate the control dial until “ADJUST
POS” appears, then press it.
3 Rotate the control dial to adjust the
listening position, then press it.
Adjustable range: “+3” – “CENTER” – “–3.”
4 Press (BACK).
The display returns to normal reception/play
mode.
DM+ Advanced
DM+ Advanced improves digitally compressed
sound by restoring high frequencies lost in the
compression process.
1 During playback, press the select
button.
2 Rotate the control dial until “DM+”
appears, then press it.
3 Rotate the control dial to select “ON,”
then press it.
4 Press (BACK).
The display returns to normal play mode.
Tip
The DM+ setting can be memorized for each source.
Using rear speakers as subwoofer
— Rear Bass Enhancer
Rear Bass Enhancer enhances the bass sound by
applying the low pass filter setting (page 25) to
the rear speakers. This function allows the rear
speakers to work as a subwoofer if one is not
connected.
1 During reception/playback, press the
select button.
2 Rotate the control dial until
“REARBAS ENH” appears, then press
it.
3 Rotate the control dial to select from
“1,” “2” or “3,” then press it.
4 Press (BACK).
The display returns to normal reception/play
mode.
24
Adjusting setup items — SET
1 Press and hold the select button.
The setup display appears.
2 Rotate the control dial until the
desired item appears, then press it.
3 Rotate the control dial to select the
setting, then press it.*
The setting is complete.
4 Press (BACK).
The display returns to normal reception/play
mode.
* For Custom Color setting, you need to take
additional steps (page 20).
Note
Displayed items will differ, depending on the source
and setting.
The following items can be set (follow the page
reference for details):
CLOCK ADJ (Clock Adjust) (page 6)
CT (Clock Time)
Activates the CT function: “ON,” “OFF”
(page 11, 12).
BEEP
Activates the beep sound: “ON,” “OFF.”
AUX-A*1 (AUX Audio)
Activates the AUX source display: “ON,”
“OFF” (page 25).
AUTO OFF
Shuts off automatically after a desired time
when the unit is turned off: “NO,” “30S
(Seconds),” “30M (Minutes),” “60M (Minutes).”
DEMO
(Demonstration)
Activates the demonstration: “ON,” “OFF.”
DIMMER
Changes the display brightness.
– “AT”: to dim the display automatically when
you turn lights on. (Available only when the
illumination control lead is connected.)
– “ON”: to dim the display.
– “OFF”: deactivate the dimmer.
CONTRAST
Adjusts the contrast of the display. The contrast
level is adjustable in 7 steps.
COLOR (Preset Color)
Selects the preset color of the display and
buttons on the main unit (page 20).
CUSTOM COLR (Custom Color)
Selects a preset color as a basis for further
customizing (page 20).
SENSME COLR (SensMe Color)
Changes the color according to the SensMe
channels: “ON,” “OFF.”
Page 25

SOUND SYNC
Selects the color with sound synchronization:
“ON,” “OFF.”
WHITE MENU
Sets the effect when the source is switched:
“ON,” “OFF.”
START WHITE
Sets the start up color: “ON,” “OFF.”
MOTION DSPL (Motion Display)
– “SA”: to show moving patterns and spectrum
analyzer.
– “ON”: to show moving patterns.
– “OFF”: to deactivate the Motion Display.
AUTO SCROLL
Scrolls long items automatically: “ON,” “OFF.”
LOCAL (Local Seek Mode)
– “ON”: to only tune into stations with stronger
signals.
– “OFF”: to tune normal reception.
MONO*
ZAPPIN TIME
ZAPPIN BEEP
LPF FREQ (Low Pass Filter Frequency)
LPF SLOPE (Low Pass Filter Slope)
SUBW PHASE (Subwoofer Phase)
HPF FREQ (High Pass Filter Frequency)
HPF SLOPE (High Pass Filter Slope)
Selects the HPF slope (effective only when HPF
FREQ is set to other than “OFF”): “1,” “2,” “3.”
LOUDNESS (Dynamic Loudness)
BTM (page 11)
*1 When the unit is turned off.
*2 When FM is received.
2
Selects monaural reception mode to improve
poor FM reception: “ON,” “OFF.”
Selects the playback time for the ZAPPIN
function.
– “ZAP.TIME-1 (about 6 seconds),”
Has the beep sound between track passages:
“ON,” “OFF.”
Selects the subwoofer cut-off frequency:
“50Hz,” “60Hz,” “80Hz,” “100Hz,” “120Hz.”
Selects the LPF slope: ”1,” ”2,” ”3.”
Selects the subwoofer phase: “NORM,” “REV.”
Selects the front/rear speaker cut-off frequency:
“OFF,”“50Hz,” “60Hz,” “80Hz,” “100Hz,”
“120Hz.”
Reinforces bass and treble for clear sound at low
volume levels: “ON,” “OFF.”
(Monaural Mode)
“ZAP.TIME-2 (about 15 seconds),”
“ZAP.TIME-3 (about 30 seconds).”
Other functions
Using optional equipment
Auxiliary audio equipment
By connecting an optional portable audio device
to the AUX input jack (stereo mini jack) on the
unit and then simply selecting the source, you
can listen on your car speakers. The volume level
is adjustable for any difference between the unit
and the portable audio device. Follow the
procedure below:
Connecting the portable audio
device
1 Turn off the portable audio device.
2 Turn down the volume on the unit.
3 Connect to the unit.
Connecting cord*
(not supplied)
* Be sure to use a straight type plug.
Adjusting the volume level
Be sure to adjust the volume for each connected
audio device before playback.
1 Turn down the volume on the unit.
2 Press (SOURCE/OFF) repeatedly until “AUX”
appears.
After that, “AUX FRONT IN” appears.
3 Start playback of the portable audio device at a
moderate volume.
4 Set your usual listening volume on the unit.
5 Adjust the input level (page 22).
25
Page 26

Additional Information
Precautions
– CD-R/CD-RW other than those recorded in
music CD format or MP3 format conforming to
ISO9660 Level 1/Level 2, Joliet/Romeo or
multi-session.
• Cool off the unit beforehand if your car has been
parked in direct sunlight.
• Power antenna (aerial) extends automatically.
Moisture condensation
Should moisture condensation occur inside the unit,
remove the disc and wait for about an hour for it to
dry out; otherwise the unit will not operate properly.
To maintain high sound quality
Do not splash liquid onto the unit or discs.
Notes on discs
• Do not expose discs to direct sunlight or heat
sources such as hot air ducts, nor leave it in a car
parked in direct sunlight.
• Before playing, wipe the discs
with a cleaning cloth from the
center out. Do not use solvents
such as benzine, thinner,
commercially available
cleaners.
• This unit is designed to
playback discs that conform to
the Compact Disc (CD)
standard. DualDiscs and some of the music discs
encoded with copyright protection technologies do
not conform to the Compact Disc (CD) standard,
therefore, these discs may not be playable by this
unit.
• Discs that this unit CANNOT play
– Discs with labels, stickers, or sticky tape or
paper attached. Doing so may cause a
malfunction, or may ruin the disc.
– Discs with non-standard shapes (e.g., heart,
square, star). Attempting to do so may damage
the unit.
1
–8 cm (3
/4 in) discs.
Notes on CD-R/CD-RW discs
• The maximum number of: (CD-R/CD-RW only)
– folders (albums): 150 (including root folder)
– files (tracks) and folders: 300 (may less than 300
if folder/file names contain many characters)
– displayable characters for a folder/file name: 32
(Joliet)/64 (Romeo)
• If the multi-session disc begins with a CD-DA
session, it is recognized as a CD-DA disc, and
other sessions are not played back.
• Discs that this unit CANNOT play
– CD-R/CD-RW of poor recording quality.
– CD-R/CD-RW recorded with an incompatible
recording device.
– CD-R/CD-RW which is finalized incorrectly.
Playback order of MP3/WMA/AAC
files
MP3/WMA/AAC
Folder
(album)
MP3/WMA/
AAC file
(track)
About iPod
• You can connect to the following iPod models.
Update your iPod devices to the latest software
before use.
Made for
– iPod touch (2nd generation)
– iPod touch (1st generation)
– iPod classic
– iPod with video*
– iPod nano (5th generation)
– iPod nano (4th generation)
– iPod nano (3rd generation)
– iPod nano (2nd generation)
– iPod nano (1st generation)*
– iPhone 3GS
– iPhone 3G
– iPhone
* Passenger control is not available for iPod nano
(1st generation) or iPod with video.
• “Made for iPod” and “Made for iPhone” mean
that an electronic accessory has been designed to
connect specifically to iPod or iPhone
respectively, and has been certified by the
developer to meet Apple performance standards.
• Apple is not responsible for the operation of this
device or its compliance with safety and
regulatory standards.
If you have any questions or problems concerning
your unit that are not covered in this manual, consult
your nearest Sony dealer.
26
Page 27

Maintenance
1
Replacing the lithium battery of the
card remote commander
Under normal conditions, the battery will last
approximately 1 year. (The service life may be
shorter, depending on the conditions of use.)
When the battery becomes weak, the range of the
card remote commander becomes shorter.
Replace the battery with a new CR2025 lithium
battery. Use of any other battery may present a
risk of fire or explosion.
+ side up
2
c
Notes on the lithium battery
• Keep the lithium battery out of the reach of children.
Should the battery be swallowed, immediately
consult a doctor.
• Wipe the battery with a dry cloth to assure a good
contact.
• Be sure to observe the correct polarity when
installing the battery.
• Do not hold the battery with metallic tweezers,
otherwise a short-circuit may occur.
Cleaning the connectors
The unit may not function properly if the connectors
between the unit and the front panel are not clean. In
order to prevent this, detach the front panel (page 7)
and clean the connectors with a cotton swab. Do not
apply too much force. Otherwise, the connectors
may be damaged.
Main unit
Notes
• For safety, turn off the ignition before cleaning the
connectors, and remove the key from the ignition
switch.
• Never touch the connectors directly with your fingers
or with any metal device.
Back of the front
panel
WARNING
Battery may explode if mistreated.
Do not recharge, disassemble, or dispose of
in fire.
Fuse replacement
When replacing the fuse, be
sure to use one matching the
amperage rating stated on the
original fuse. If the fuse blows,
check the power connection and
replace the fuse. If the fuse
blows again after replacement,
there may be an internal
malfunction. In such a case,
consult your nearest Sony
dealer.
Fuse (10 A)
27
Page 28

Removing the unit
Specifications
1 Remove the protection collar.
1 Detach the front panel (page 7).
2 Pinch both edges of the protection collar,
then pull it out.
x
2 Remove the unit.
1 Insert both release keys simultaneously
until they click.
Hook facing
inwards.
FOR UNITED STATES CUSTOMERS. NOT
APPLICABLE IN CANADA, INCLUDING
IN THE PROVINCE OF QUEBEC.
POUR LES CONSOMMATEURS AUX
ÉTATS-UNIS. NON APPLICABLE AU
CANADA, Y COMPRIS LA PROVINCE DE
QUÉBEC.
AUDIO POWER SPECIFICATIONS
CEA2006 Standard
Power Output: 17 Watts RMS
4 Ohms < 1% THD+N
SN Ratio: 80 dBA
(reference: 1 Watt into 4 Ohms)
4 at
Tuner section
FM
Tuning range: 87.5 – 107.9 MHz
Antenna (aerial) terminal:
External antenna (aerial) connector
Intermediate frequency: 150 kHz
Usable sensitivity: 10 dBf
Selectivity: 75 dB at 400 kHz
Signal-to-noise ratio: 70 dB (mono)
Separation: 40 dB at 1 kHz
Frequency response: 20 – 15,000 Hz
AM
Tuning range: 530 – 1,710 kHz
Antenna (aerial) terminal:
External antenna (aerial) connector
Intermediate frequency: 25 kHz
Sensitivity: 26 µV
2 Pull the release keys to unseat the unit.
3 Slide the unit out of the mounting.
28
CD Player section
Signal-to-noise ratio: 120 dB
Frequency response: 10 – 20,000 Hz
Wow and flutter: Below measurable limit
USB Player section
Interface: USB (Full-speed)
Maximum current: 500 mA
Power amplifier section
Output: Speaker outputs
Speaker impedance: 4 – 8 ohms
Maximum power output: 52 W × 4 (at 4 ohms)
General
Outputs:
Audio outputs terminal (front/rear)
Subwoofer output terminal (mono)
Power antenna (aerial) relay control terminal
Power amplifier control terminal
Inputs:
BUS control input terminal
BUS audio input terminal
Remote controller input terminal
Antenna (aerial) input terminal
Telephone ATT control terminal
Page 29

AUX input jack (stereo mini jack)
USB signal input connector
Power requirements: 12 V DC car battery
(negative ground (earth))
Dimensions: Approx. 178 × 50 × 180 mm
1
/8 × 2 × 71/8 in) (w/h/d)
(7
Mounting dimensions: Approx. 182 × 53 × 162 mm
1
/4 × 21/8 × 61/2 in) (w/h/d)
(7
Mass: Approx. 1.3 kg (2 lb 14 oz)
Supplied accessories:
Card remote commander: RM-X151
Parts for installation and connections (1 set)
Optional accessories/equipment:
BUS cable (supplied with an RCA pin cord):
RC-61 (1 m), RC-62 (2 m)
USB connection cable for iPod: RC-100IP
HD Radio™ tuner: XT-100HD
Your dealer may not handle some of the above listed
accessories. Please ask the dealer for detailed
information.
Design and specifications are subject to change
without notice.
System requirements for the software
in the supplied CD-ROM
Computer
•CPU/RAM
– IBM PC/AT compatible machine
– CPU: Intel Pentium III Processor 450 MHz or
higher
– RAM: 256 MB or more (For Windows XP), 512
MB or more (For Windows Vista or later)
• CD-ROM drive
•USB port
OS
Windows XP, Windows Vista, Windows 7
For details on compatible editions or Service Pack, visit
the following support site:
http://esupport.sony.com
http://www.sony.com/mobileAV
Monitor
High color (16-bit) or more, 800 × 600 dots or more
Other
Internet connection
Notes
• The following system environments are not
supported.
– Non IBM PC type computers, such as Macintosh,
etc.
– Homemade computers
– OS upgraded computers
– Multi-display environment
– Multi-boot environment
– Virtual machine environment
• Depending on the computer condition, operation
may not be possible even with the recommended
environment.
Troubleshooting
The following checklist will help you remedy
problems you may encounter with your unit.
Before going through the checklist below, check the
connection and operating procedures.
If the problem is not solved, visit the following
support site.
Support site
http://esupport.sony.com
http://www.sony.com/mobileAV
General
No power is being supplied to the unit.
• Check the connection or fuse.
• If the unit is turned off and the display disappears, it
cannot be operated with the remote commander.
t Turn on the unit.
The power antenna (aerial) does not extend.
The power antenna (aerial) does not have a relay box.
No sound.
• The ATT function is activated, or the Telephone ATT
function (when the interface cable of a car telephone
is connected to the ATT lead) is activated.
• The position of the fader control “FADER” is not set
for a 2-speaker system.
No beep sound.
• The beep sound is canceled (page 24).
• An optional power amplifier is connected and you are
not using the built-in amplifier.
The contents of the memory have been erased.
• The RESET button has been pressed.
t Store again into the memory.
• The power supply lead or battery has been
disconnected or it is not connected properly.
Stored stations and correct time are erased.
The fuse has blown.
Makes noise when the position of the ignition
is switched.
The leads are not matched correctly with the car’s
accessory power connector.
During playback or reception, demonstration
mode starts.
If no operation is performed for 5 minutes with
“DEMO-ON” set, demonstration mode starts.
t Set “DEMO-OFF” (page 24).
The display disappears from/does not appear
in the display window.
• The dimmer is set to “DIMMER-ON” (page 24).
• The display disappears if you press and hold
(SOURCE/OFF).
t Press (SOURCE/OFF) on the unit until the
display appears.
• The connectors are dirty (page 27).
continue to next page t
29
Page 30

The Auto Off function does not operate.
The unit is turned on. The Auto Off function activates
after turning off the unit.
t Turn off the unit.
Radio reception
The stations cannot be received.
The sound is hampered by noises.
• The connection is not correct.
tConnect a power antenna (aerial) control lead
(blue) or accessory power supply lead (red) to the
power supply lead of a car’s antenna (aerial)
booster (only when your car has built-in FM/AM
antenna (aerial) in the rear/side glass).
tCheck the connection of the car antenna (aerial).
tIf the auto antenna (aerial) will not go up, check
the connection of the power antenna (aerial)
control lead.
Preset tuning is not possible.
• Store the correct frequency in the memory.
• The broadcast signal is too weak.
Automatic tuning is not possible.
• Setting of the local seek mode is not correct.
tTuning stops too frequently:
Set “LOCAL-ON” (page 25).
tTuning does not stop at a station:
Set “LOCAL-OFF” (page 25).
• The broadcast signal is too weak.
tPerform manual tuning.
During FM reception, the “ST” indication
flashes.
• Tune in the frequency accurately.
• The broadcast signal is too weak.
tSet “MONO-ON” (page 25).
An FM program broadcast in stereo is heard in
monaural.
The unit is in monaural reception mode.
t Set “MONO-OFF” (page 25).
RDS
PTY displays “- - - - - - - -.”
• The current station is not an RDS station.
• RDS data has not been received.
• The station does not specify the program type.
MP3/WMA/AAC files take longer to play back
than others.
The following discs take a longer time to start
playback.
– a disc recorded with a complicated tree structure.
– a disc recorded in Multi Session.
– a disc to which data can be added.
The display items do not scroll.
• For discs with very many characters, those may not
scroll.
• “AUTO SCROLL” is set to “OFF.”
t Set “A.SCRL-ON” (page 25).
t Press and hold (DSPL) (SCRL).
The sound skips.
• Installation is not correct.
t Install the unit at an angle of less than 45° in a
sturdy part of the car.
• Defective or dirty disc.
The operation buttons do not function.
The disc will not eject.
Press the RESET button (page 6).
USB playback
You cannot play back items via a USB hub.
This unit cannot recognize USB devices via a USB
hub.
Cannot play back items.
A USB device does not work.
t Reconnect it.
The USB device takes longer to play back.
The USB device contains files with a complicated tree
structure.
A beep sounds.
During playback, the USB device has been
disconnected.
t Before disconnecting a USB device, make sure to
stop playback first for data protection.
The sound is intermittent.
The sound may be intermittent at a high-bit-rate of
more than 320 kbps.
CD playback
The disc cannot be loaded.
• Another disc is already loaded.
• The disc has been forcibly inserted upside down or in
the wrong way.
The disc does not playback.
• Defective or dirty disc.
• The CD-Rs/CD-RWs are not for audio use (page 26).
MP3/WMA/AAC files cannot be played back.
The disc is incompatible with the MP3/WMA/AAC
format and version. For details on playable discs and
formats, visit the support site.
30
Page 31

Error displays/Messages
CHECKING
The unit is confirming the connection of a USB device.
tWait until confirming the connection is finished.
ERROR
• The disc is dirty or inserted upside down.
t Clean or insert the disc correctly.
• A blank disc has been inserted.
• The disc cannot play due to a problem.
t Insert another disc.
• USB device was not automatically recognized.
t Reconnect it again.
•Press Z to remove the disc.
FAILURE (Illuminates until any button is pressed.)
The connection of speakers/amplifiers is incorrect.
tSee the installation/connections manual of this
model to check the connection.
FAILURE (Illuminates for about 1 second.)
When the SAT tuner is connected, storing an SAT
radio channel into a preset failed.
tBe sure to receive the channel that you want to
store, then try it again.
HUBS NO SUPRT
USB hub is not supported on this unit.
INVALID
The connected USB device does not contain a music
file for the SensMe™ function.
L. SEEK +/–
The local seek mode is on during automatic tuning.
NO CHANNEL
The connected USB device does not contain a channel
list for the SensMe™ function.
NO DEV (No Device)
USB is selected as source without a USB device
connected. A USB device or a USB cable has been
disconnected during playback.
tBe sure to connect a USB device and USB cable.
NO MUSIC
The disc or USB device does not contain a music file.
tInsert a music CD in this unit.
tConnect a USB device with a music file in it.
NO NAME
A disc/album/artist/track name is not written in the
track.
NOT FOUND
There is no item beginning with the selected letter in
Alphabet search.
OFFSET
There may be an internal malfunction.
tCheck the connection. If the error indication
remains on in the display, consult your nearest
Sony dealer.
OVERLOAD
USB device is overloaded.
tDisconnect the USB device, then change the source
by pressing (SOURCE/OFF).
tIndicates that the USB device is out of order, or an
unsupported device is connected.
READ
The unit is reading all track and album information on
the disc.
t Wait until reading is complete and playback starts
automatically. Depending on the disc structure, it
may take more than a minute.
RESET
This unit or USB device cannot be operated due to a
problem.
t Press the RESET button (page 6).
S-CH NO SUPRT (SensMe™ channel Not Support)
The connected USB device is not supported.
t For details on the compatibility of your USB
device, visit the support site.
USB NO SUPRT (USB Not Support)
The connected USB device is not supported.
t For details on the compatibility of your USB
device, visit the support site.
“” or “”
During reverse or fast-forward, you have reached the
beginning or the end of the disc and you cannot go any
further.
“”
The character cannot be displayed with the unit.
If these solutions do not help improve the situation,
consult your nearest Sony dealer.
If you take the unit to be repaired because of CD
playback trouble, bring the disc that was used at the
time the problem began.
31
Page 32

Pour plus de sécurité, installez cet appareil
H
d
dans le tableau de bord de votre véhicule. Pour
de plus amples informations sur l’installation
et les raccordements, reportez-vous au manuel
d’installation et de raccordement fourni.
D RadioTM est une marque propriétaire
’iBiquity Digital Corp.
Le logo « SAT Radio Ready »
indique que ce produit
commande un module
récepteur radio satellite
(vendu séparément). Consultez votre détaillant
agréé Sony le plus proche pour en savoir plus sur
le fonctionnement du module récepteur radio
satellite.
« SAT Radio », « SAT Radio Ready », les logos
SAT Radio et SAT Radio Ready, ainsi que
toutes les marques associées sont des marques de
commerce de Sirius XM Radio Inc. et de XM
Satellite Radio Inc.
ZAPPIN et Quick-BrowZer sont des marques de
commerce de Sony Corporation.
12 TONE ANALYSIS et son
logo sont des marques de
commerce de Sony
Corporation.
SensMe et le logo SensMe sont
des marques de commerce ou des
marques déposées de Sony
Ericsson Mobile
Communications AB.
Technologie de reconnaissance musicale et
données connexes fournies par Gracenote.
Gracenote constitue la norme de l’industrie en
matière de technologie de reconnaissance musicale
et de fourniture de contenus connexes. Pour plus
de détails, visitez www.gracenote.com.
CD et données musicales de Gracenote, Inc. –
Copyright © 2000-2010 Gracenote. Logiciel
Gracenote – Copyright © 2000-2010 Gracenote.
Ce produit et ce service sont protégés par un ou
plusieurs brevets appartenant à Gracenote (pour
plus de détails, visitez le site Web de Gracenote).
Les noms « Gracenote », « CDDB », « MusicID »,
le logo Gracenote, le graphisme Gracenote, la
mention « Powered by Gracenote » sont des
marques de commerce ou des marques déposées de
Gracenote homologuées aux États-Unis et/ou dans
d’autres pays.
Microsoft, Windows, Windows Vista et
Windows Media et leurs logos sont des marques
de commerce ou des marques déposées de
Microsoft Corporation aux États-Unis et dans
d'autres pays.
Ce produit est protégé par des droits de propriété
intellectuelle de Microsoft Corporation. Toute
utilisation ou diffusion de la technologie décrite
sortant du cadre de l’utilisation de ce produit est
interdite sans licence accordée par Microsoft ou
une filiale autorisée de Microsoft.
2
Page 33

iPhone, iPod, iPod classic, iPod nano, et iPod
touch sont des marques d'Apple Inc., déposées
aux Etats-Unis et dans d'autres pays.
Apple, Macintosh et iTunes sont des marques
commerciales de Apple Inc., déposées aux
Etats-Unis et dans d’autres pays.
Licence de la technologie de codage audio MPEG
Layer-3 et des brevets obtenue de Fraunhofer IIS et
Thomson.
Avertissement si le contact de votre
véhicule ne comporte pas de position
ACC
Veillez à régler la fonction arrêt automatique
(page 27).
L’appareil s’éteint complètement et
automatiquement après le laps de temps choisi
une fois l’appareil arrêté afin d’éviter que la
batterie ne se décharge.
Si vous ne réglez pas la fonction arrêt
automatique, appuyez sur la touche
(SOURCE/OFF) et maintenez-la enfoncée
jusqu’à ce que l’affichage disparaisse chaque
fois que vous coupez le contact.
3
Page 34

Table des matières
Préparation
Disques pouvant être lus sur cet appareil . . . . . 6
Réinitialisation de l’appareil . . . . . . . . . . . . . . . 6
Annulation du mode DEMO . . . . . . . . . . . . . . . 6
Préparation de la mini-télécommande . . . . . . . . 6
Réglage de l’horloge . . . . . . . . . . . . . . . . . . . . . 6
Retrait de la façade . . . . . . . . . . . . . . . . . . . . . . 7
Installation de la façade . . . . . . . . . . . . . . . . 7
Emplacement des commandes et
opérations de base
Appareil principal . . . . . . . . . . . . . . . . . . . . . 8
Mini-télécommande RM-X151. . . . . . . . . . 10
Radio
Mémorisation et réception des stations . . . . . . 11
Mémorisation automatique — BTM. . . . . . 11
Mémorisation manuelle . . . . . . . . . . . . . . . 11
Réception des stations mémorisées. . . . . . . 11
Syntonisation automatique . . . . . . . . . . . . . 11
RDS . . . . . . . . . . . . . . . . . . . . . . . . . . . . . . . . . 11
Aperçu. . . . . . . . . . . . . . . . . . . . . . . . . . . . . 11
Sélection de PTY . . . . . . . . . . . . . . . . . . . . 12
Réglage de la fonction CT . . . . . . . . . . . . . 12
CD
Lecture d’un disque. . . . . . . . . . . . . . . . . . . . . 12
Éléments d’affichage . . . . . . . . . . . . . . . . . 12
Lecture répétée et lecture aléatoire . . . . . . . 13
Périphériques USB
Lecture d’un périphérique USB. . . . . . . . . . . . 13
Éléments d’affichage . . . . . . . . . . . . . . . . . 14
Lecture répétée et lecture aléatoire . . . . . . . 14
Pour écouter une musique adaptée à votre humeur
— SensMe™ . . . . . . . . . . . . . . . . . . . . . . . . . . 15
Avant d’utiliser la fonction SensMe™ . . . . 15
Installation de « SensMe™ Setup » et
« Content Transfer » sur votre
ordinateur . . . . . . . . . . . . . . . . . . . . . . . . . . 15
Enregistrement d’un périphérique USB à
l’aide de « SensMe™ Setup ». . . . . . . . . . . 16
Transfert de plages sur le périphérique USB à
l’aide de « Content Transfer » . . . . . . . . . . 16
Lecture des plages d’un canal
— SensMe™ channels . . . . . . . . . . . . . . . . 16
iPod
Lecture d’un iPod . . . . . . . . . . . . . . . . . . . . . . 17
Éléments d’affichage . . . . . . . . . . . . . . . . . 18
Saut d’albums, d’émissions baladodiffusées,
de genres, de listes de lecture et
d’artistes. . . . . . . . . . . . . . . . . . . . . . . . . . . 18
Lecture répétée et lecture aléatoire . . . . . . 19
Commande directe d’un iPod
— Commande passager . . . . . . . . . . . . . . . . . 19
Recherche d’une plage
Recherche d’une plage par nom
— Quick-BrowZer™ . . . . . . . . . . . . . . . . . . . 20
Recherche d’éléments par saut
— Mode Jump . . . . . . . . . . . . . . . . . . . . . . 20
Recherche par ordre alphabétique
— Alphabet search. . . . . . . . . . . . . . . . . . . 20
Recherche d’une plage en écoutant des passages
de plages — ZAPPIN™ . . . . . . . . . . . . . . . . . 21
Pendant la lecture de « SensMe™
channels ». . . . . . . . . . . . . . . . . . . . . . . . . . 21
Pour apprécier la variation de
couleur d’illumination
Changement de couleur de la fenêtre d’affichage
et des touches — Illuminateur de couleur
dynamique. . . . . . . . . . . . . . . . . . . . . . . . . . . . 21
Personnalisation de la couleur de la fenêtre
d’affichage et des touches
— Couleur personnalisée. . . . . . . . . . . . . . 21
Réglage de couleur avancé . . . . . . . . . . . . . . . 22
Synchronisation des canaux SensMe™
— Couleur des canaux SensMe™ . . . . . . . 22
Changement de la couleur avec
synchronisation sonore
— Synchronisation sonore. . . . . . . . . . . . . 23
Affichage de couleur claire
— Clarté du menu . . . . . . . . . . . . . . . . . . . 23
Effet de démarrage
— Blanc au démarrage. . . . . . . . . . . . . . . . 23
4
Page 35

Réglages du son et menu de
configuration
Changement des réglages du son. . . . . . . . . . . 24
Réglage des caractéristiques du son . . . . . . 24
Pour apprécier les fonctions sonores
sophistiquées — Advanced Sound Engine . . . 24
Sélection de la qualité sonore
— Préréglage EQ7 . . . . . . . . . . . . . . . . . . . 24
Personnalisation de la courbe de l’égaliseur
— Réglage EQ7 . . . . . . . . . . . . . . . . . . . . . 25
Optimisation du son par alignement
temporel — Position d’écoute . . . . . . . . . . 25
Réglage de la position d’écoute . . . . . . . . . 26
DM+ avancée . . . . . . . . . . . . . . . . . . . . . . . 26
Utilisation des haut-parleurs arrière comme
caisson de graves — Amplificateur de graves à
l’arrière . . . . . . . . . . . . . . . . . . . . . . . . . . . . 26
Réglage des paramètres de configuration
— SET. . . . . . . . . . . . . . . . . . . . . . . . . . . . . . . 27
Autres fonctions
Utilisation d’un appareil en option . . . . . . . . . 28
Appareil audio auxiliaire . . . . . . . . . . . . . . 28
Informations complémentaires
Précautions . . . . . . . . . . . . . . . . . . . . . . . . . . . 29
Remarques sur les disques . . . . . . . . . . . . . 29
Ordre de lecture des fichiers
MP3/WMA/AAC . . . . . . . . . . . . . . . . . . . . 29
À propos de l’iPod . . . . . . . . . . . . . . . . . . . 30
Entretien . . . . . . . . . . . . . . . . . . . . . . . . . . . . . 30
Démontage de l’appareil. . . . . . . . . . . . . . . . . 31
Caractéristiques techniques. . . . . . . . . . . . . . . 31
Dépannage . . . . . . . . . . . . . . . . . . . . . . . . . . . 32
Affichage des erreurs et messages . . . . . . . 34
Sites d’assistance
Si vous avez des questions ou si vous souhaitez consulter les dernières
informations d’assistance sur ce produit, visitez les sites Web suivants :
http://esupport.sony.com
http://www.sony.com/mobileAV
Fournissent des informations sur :
• Les modèles et les fabricants de lecteurs audio numériques compatibles
• Les fichiers MP3/WMA/AAC pris en charge
• Exigences système pour le logiciel sur le CD-ROM fourni
5
Page 36

Préparation
Disques pouvant être lus sur cet
appareil
Cet appareil peut lire des CD-DA (y compris
ceux qui contiennent des informations CD
TEXT) et des CD-R/CD-RW (fichiers MP3/
WMA/AAC (page 29)).
Type de
disques
CD-DA
MP3
WMA
AAC
Symbole indiqué sur le
disque
Réinitialisation de l’appareil
Avant la première utilisation de l’appareil ou
après avoir remplacé la batterie du véhicule ou
modifié les raccordements, vous devez
réinitialiser l’appareil.
Retirez la façade (page 7), puis appuyez sur la
touche RESET (page 8) avec un objet pointu tel
qu’un stylo à bille.
Remarque
Une pression sur la touche RESET remet l’heure à
zéro et efface certaines informations mémorisées.
Annulation du mode DEMO
Vous pouvez désactiver l’affichage de
démonstration qui apparaît lors de l’arrêt de
l’appareil.
1 Appuyez sur la touche de sélection et
maintenez-la enfoncée.
L’écran de configuration apparaît.
2 Tournez la molette de réglage jusqu’à
ce que « DEMO » s’affiche, puis
appuyez dessus.
3 Tournez la molette de réglage pour
sélectionner « DEMO-OFF », puis
appuyez dessus.
Le réglage est terminé.
4 Appuyez sur (BACK).
La fenêtre d’affichage retourne au mode de
réception/lecture normal.
Préparation de la minitélécommande
Retirez la feuille de protection.
Conseil
Pour obtenir des informations sur la façon de
remplacer la pile, reportez-vous à la page 30.
Réglage de l’horloge
L’horloge numérique fonctionne suivant un cycle
de 12 heures.
1 Appuyez sur la touche de sélection et
maintenez-la enfoncée.
L’écran de configuration apparaît.
2 Tournez la molette de réglage jusqu’à
ce que « CLOCK ADJ » apparaisse,
puis appuyez dessus.
L’indication des heures clignote.
3 Tournez la molette de réglage pour
régler l’heure et les minutes.
Appuyez sur (SEEK) –/+ pour déplacer
l’indication numérique.
4 Appuyez sur la touche de sélection
après avoir réglé les minutes.
Le réglage est terminé et l’horloge démarre.
Pour afficher l’horloge, appuyez sur (DSPL).
Appuyez à nouveau sur (DSPL) pour retourner à
l’écran précédent.
Conseil
Vous pouvez régler l’horloge automatiquement à l’aide
de la fonction RDS (page 12).
6
Page 37

Retrait de la façade
Vous pouvez retirer la façade de cet appareil pour
le protéger du vol.
Alarme d’avertissement
Si vous mettez la clé de contact en position OFF
sans retirer la façade, l’alarme d’avertissement
retentit pendant quelques secondes.
L’alarme retentit uniquement lorsque
l’amplificateur intégré est utilisé.
1 Appuyez sur la touche (SOURCE/OFF)
et maintenez-la enfoncée.
L’appareil s’éteint.
2 Appuyez sur (O PEN ).
La façade bascule automatiquement vers le
bas.
3 Faites coulisser la façade à la droite,
puis tirez doucement vers vous
l’extrémité gauche de la façade.
Installation de la façade
Placez l’orifice A de la façade sur la tige B de
l’appareil, puis poussez doucement sur le côté
gauche pour l’engager en position.
Appuyez sur la touche (SOURCE/OFF) de
l’appareil (ou insérez un disque) pour le faire
fonctionner.
Remarque
Ne posez rien sur la face interne de la façade.
Remarques
• N’exercez pas de pression excessive sur la façade
ou la fenêtre d’affichage et ne la laissez pas tomber.
• N’exposez pas la façade à des températures ou taux
d’humidité élevés. Évitez de la laisser dans un
véhicule stationné ou sur le tableau de bord ou la
plage arrière.
• Ne retirez pas la façade pendant la lecture du
périphérique USB, car cela pourrait endommager
les données USB.
7
Page 38

Emplacement des commandes et opérations de base
Appareil principal
Sans la façade Cette section contient les instructions relatives à
l’emplacement des commandes et aux opérations
de base.
Pour plus de détails, reportez-vous aux pages
correspondantes.
A Touches SEEK +/–
Radio :
Permettent d’effectuer une syntonisation
automatique (appuyez) ; de rechercher une
station manuellement (appuyez sur la touche
et maintenez-la enfoncée).
CD/USB :
Permettent de sauter des plages (appuyez) ;
de sauter des plages en continu (appuyez,
puis appuyez de nouveau dans un délai
d’environ 1 seconde et maintenez la touche
enfoncée) ; d’effectuer un retour/une avance
rapide dans une plage (appuyez sur la touche
et maintenez-la enfoncée).
SensMe™ :
Permettent de sauter des plages (appuyez) ;
d’effectuer un retour/une avance rapide dans
une plage (appuyez sur la touche et
maintenez-la enfoncée).
B Touche SOURCE/OFF*
Appuyez pour mettre l’appareil en marche/
changer la source (Radio/CD/USB/
SensMe™*
Appuyez pendant 1 seconde pour éteindre
l’appareil.
Appuyez pendant plus de 2 secondes pour
éteindre l’appareil et faire disparaître
l’affichage.
2
/AUX).
1
8
Page 39

C Touche (BROWSE) page 20
Permet d’accéder au mode QuickBrowZer™.
D Molette de réglage/touche de
sélection page 24, 27
Permet de régler le niveau de volume
(tournez) ; de sélectionner des paramètres de
configuration (appuyez et tournez).
E Récepteur de la mini-télécommande
F Fenêtre d’affichage
G Touche OPEN page 7, 12
H Connecteur USB page 13, 16, 17
Permet de raccorder un périphérique USB.
I Touche (BACK)/MODE*
1
page 11, 19
Appuyez pour retourner à l’affichage
précédent/sélectionner la bande radio (FM/
AM).
Appuyez et maintenez enfoncée pour activer/
désactiver la commande passager.
J Touche ZAP page 21
Permet d’accéder au mode ZAPPIN™.
K Touche COLOR page 21, 22
Permet de sélectionner les couleurs
présélectionnées (appuyez) ; d’enregistrer les
réglages de couleur personnalisés (appuyez
sur la touche et maintenez-la enfoncée).
L Touche PTY/CAT*
3
page 12
Permet de sélectionner PTY en mode RDS.
M Touches numériques
Radio :
Permettent de capter les stations enregistrées
(appuyez) ; de mémoriser des stations
(appuyez sur la touche et maintenez-la
enfoncée).
CD/USB/SensMe™ :
(1)/(2) : ALBUM –/+ (pendant la lecture
de fichiers MP3/WMA/AAC)
Permettent de sauter des albums/
changer les canaux SensMe™
(appuyez) ; de sauter des albums en
continu (appuyez sur la touche et
maintenez-la enfoncée).
(3) : REP*
4
page 13, 14, 19
(4) : SHUF page 13, 14, 19
(6) : PAU SE
Permet d’interrompre la lecture. Pour
annuler l’opération, appuyez à
nouveau sur cette touche.
N Touche DSPL (affichage)/SCRL
(défilement) page 11, 12, 14, 18, 19
Permet de modifier les éléments d’affichage
(appuyez) ; de faire défiler un élément
d’affichage (appuyez sur la touche et
maintenez-la enfoncée).
O Prise d’entrée AUX page 28
Permet de raccorder un appareil audio
portatif.
P Touche RESET page 6
Q Touche Z (éjecter)
Permet d’éjecter le disque.
R Fente d’insertion des disques
Insérez le disque (côté imprimé vers le
haut) ; la lecture démarre.
*1 Si un récepteur HD Radio ou un récepteur SAT est
raccordé : lorsque vous appuyez sur
(SOURCE/OFF), l’appareil raccordé (« HD »,
« XM » ou « SR ») apparaît dans la fenêtre
d’affichage. De plus, si vous appuyez sur (MODE),
vous pouvez commuter la bande du récepteur HD
Radio ou la bande du récepteur SAT.
*2 Lorsqu’un périphérique USB configuré pour la
fonction SensMe™ est raccordé.
*3 Lorsqu’un récepteur SAT est raccordé.
*4 Cette touche comporte un point tactile.
Remarques
• Lors de l’éjection ou l’insertion d’un disque, laissez
les périphériques USB débranchés pour ne pas
endommager le disque.
• Si vous éteignez l’appareil et que l’affichage
disparaît, vous ne pourrez pas le faire fonctionner
avec la mini-télécommande sans d’abord appuyer
sur la touche (SOURCE/OFF) de l’appareil ou insérer
un disque pour l’activer.
9
Page 40

Mini-télécommande RM-X151
1
2
3
OFF
SOURCE
SEL
ATT
MODE
+
6
7
8
9
–
VOL
SCRL
q;
qa
+
–
1
3
/–
4
DSPL
132
465
5
Retirez la feuille de protection avant l’utilisation
(page 6).
A Touche OFF
Permet d’éteindre l’appareil ; d’arrêter la
source.
B Touche SOURCE*
Permet de mettre l’appareil en marche ; de
changer la source (Radio/CD/USB/
SensMe™*
C Touches < (.)/, (>)
Permettent de commander la source Radio/
CD/USB/SensMe™ de la même façon que
les touches (SEEK) –/+ de l’appareil.
La configuration, le réglage du son, etc.,
peuvent être effectués à l’aide des touches
< ,.
D Touche DSPL (affichage)
Permet de changer les éléments d’affichage.
E Touche VOL (volume) +*
Permet de régler le niveau du volume.
F Touche ATT (atténuation du son)
Permet d’atténuer le son. Pour annuler
l’opération, appuyez à nouveau sur cette
touche.
2
/AUX).
G Touche SEL (sélection)
Identique à la touche de sélection de
l’appareil.
H Touche MODE*
1
Appuyez sur cette touche pour sélectionner
la bande radio (FM/AM).
Appuyez et maintenez enfoncée pour activer/
désactiver la commande passager.
I Touches M (+)/m (–)
Permettent de commander la source CD/
USB/SensMe™ de la même façon que les
touches (1)/(2) (ALBUM –/+) de
l’appareil.
La configuration, le réglage du son, etc.,
peuvent être effectués à l’aide des touches
M m.
J Touche SCRL (défilement)
Permet de faire défiler l’élément affiché.
K Touches numériques
Permettent de capter les stations enregistrées
(appuyez) ; de mémoriser des stations
(appuyez sur la touche et maintenez-la
enfoncée).
*1 Si un récepteur HD Radio ou un récepteur SAT est
raccordé : lorsque vous appuyez sur (SOURCE),
l’appareil raccordé (« HD », « XM » ou « SR »)
apparaît dans la fenêtre d’affichage. De plus, si
vous appuyez sur (MODE), vous pouvez commuter
la bande du récepteur HD Radio ou la bande du
récepteur SAT.
*2 Lorsqu’un périphérique USB configuré pour la
fonction SensMe™ est raccordé.
*3 Cette touche comporte un point tactile.
10
Page 41

Radio
Mémorisation et réception des
stations
Attention
Pour syntoniser des stations pendant que vous
conduisez, utilisez la fonction BTM
(Mémorisation des meilleurs accords) afin
d’éviter tout accident.
Mémorisation automatique — BTM
1 Appuyez plusieurs fois sur
(SOURCE/OFF) jusqu’à ce que
« TUNER » apparaisse.
Pour changer de bande, appuyez plusieurs
fois sur (MODE). Vous pouvez sélectionner
FM1, FM2, FM3, AM1 ou AM2.
2 Appuyez sur la touche de sélection et
maintenez-la enfoncée.
L’écran de configuration apparaît.
3 Tournez la molette de réglage jusqu’à
ce que « BTM » s’affiche, puis
appuyez dessus.
L’appareil mémorise les stations sur les
touches numériques en respectant l’ordre des
fréquences.
Un bip retentit lorsque le réglage est
mémorisé.
Syntonisation automatique
1 Sélectionnez la bande, puis appuyez
sur (SEEK) +/– pour rechercher la
station.
Le balayage s’interrompt lorsque l’appareil
capte une station. Répétez cette procédure
jusqu’à ce que vous captiez la station
souhaitée.
Conseil
Si vous connaissez la fréquence de la station que
vous souhaitez écouter, maintenez la touche
(SEEK) +/– enfoncée pour localiser la fréquence
approximativement, puis appuyez plusieurs fois sur
(SEEK) +/– pour régler la fréquence souhaitée avec
précision (syntonisation manuelle).
RDS
Aperçu
Les stations de radio FM dotées des services
RDS (Système de radiocommunication de
données) transmettent des données numériques
inaudibles en plus du signal d’émission de radio
ordinaire.
Éléments d’affichage
Mémorisation manuelle
1 Lorsque vous captez la station que
vous souhaitez mémoriser, appuyez
sur une touche numérique ((1) à (6))
et maintenez-la enfoncée jusqu’à ce
que « MEMO » s’affiche.
Remarque
Si vous essayez de mémoriser une autre station sur la
même touche numérique, la station mémorisée
précédemment est effacée.
Réception des stations
mémorisées
1 Sélectionnez la bande, puis appuyez
sur une touche numérique ((1) à (6)).
A Bande radio, fonction
B Nom du service de l’émission, horloge,
fréquence*, numéro de présélection
* Lorsque vous captez la station RDS, le symbole
« * » est affiché à gauche de l’indication de
fréquence.
Appuyez sur
d’affichage
(DSPL)
B
.
pour changer les éléments
Services RDS
Cet appareil fournit automatiquement les
services RDS comme suit :
PTY (Type d’émission)
Affiche le type d’émission actuellement
syntonisé. Recherche également votre type
d’émission sélectionné.
CT (Heure)
Les données CT de la transmission RDS règlent
l’horloge.
suite à la page suivante t
11
Page 42

Remarques
• Selon le pays ou la région, certaines fonctions RDS
peuvent ne pas être accessibles.
• Le service RDS ne fonctionnera pas si le signal est
trop faible ou si la station que vous syntonisez ne
transmet pas de données RDS.
Sélection de PTY
1 Appuyez sur (PTY) pendant la
réception FM.
Le nom du type d’émission en cours apparaît
si la station transmet des données PTY.
2 Tournez la molette de réglage jusqu’à
ce que le type d’émission souhaité
apparaisse, puis appuyez dessus.
L’appareil commence à chercher une station
diffusant le type d’émission sélectionné.
Type d’émission
NEWS (nouvelles), INFORM (information),
SPORTS (sports), TA LK (infovariétés), ROCK
(rock), CLS ROCK (rock classique), ADLT
HIT (succès adultes), SOFT RCK (rock
détente), TOP 40 (palmarès), COUNTRY
(country), OLDIES (anciens succès), SOFT
(détente), NOSTALGA (nostalgie), JAZZ
(jazz), CLASSICL (classique), R AND B
(rhythm and blues ), SOFT R B (rhythm and
blues léger), LANGUAGE (langue étrangère),
REL MUSC (musique religieuse), REL TALK
(infovariétés religieuses), PERSNLTY
(personnalités), PUBLIC (publique),
COLLEGE (collège), WEATHER (météo)
Remarques
• Vous ne pouvez pas utiliser cette fonction dans les
pays ou régions où aucun service de données PTY
n’est disponible.
• Il se peut que l’émission de radio captée diffère de
celle que vous avez sélectionnée.
CD
Lecture d’un disque
1 Appuyez sur (OPEN).
2 Insérez le disque (côté imprimé vers le
haut).
3 Fermez la façade.
La lecture démarre automatiquement.
Éjection du disque
1 Appuyez sur (OPEN ) .
2 Appuyez sur Z.
Le disque est éjecté.
3 Fermez la façade.
Éléments d’affichage
A Source
B Nom de plage*
nom de l’artiste*
d’album*
écoulé, horloge
*1 Les informations d’un CD TEXT, MP3/WMA/AAC
sont affichées.
*2 Le numéro d’album s’affiche uniquement lorsque
vous changez d’album.
Appuyez sur (DSPL) pour changer les éléments
d’affichage B.
Conseil
Les éléments d’affichage diffèrent selon le type de
disque, le format d’enregistrement et les réglages.
1
, nom du disque/de l’artiste*1,
1
, numéro d’album*2, nom
1
, numéro de plage/temps de lecture
Réglage de la fonction CT
1 Réglez l’appareil à « CT-ON » dans le
menu de configuration (page 27).
Remarques
• La fonction CT peut ne pas fonctionner même si une
station RDS est captée.
• L’heure réglée par la fonction CT peut différer de
l’heure réelle.
12
Page 43

Lecture répétée et lecture aléatoire
1 En cours de lecture, appuyez
plusieurs fois sur (3) (REP) ou (4)
(SHUF) jusqu’à ce que le réglage
souhaité apparaisse.
Sélectionnez Pour lire
TRACK une plage en boucle.
ALBUM* un album en boucle.
SHUF ALBUM* un album dans un ordre
aléatoire.
SHUF DISC un disque dans un ordre
aléatoire.
* Lors de la lecture d’un fichier MP3/WMA/AAC.
Le réglage est terminé après 3 secondes.
Pour retourner au mode de lecture normal,
sélectionnez « OFF » ou « SHUF OFF ».
Périphériques USB
Pour plus de détails sur la compatibilité de votre
périphérique USB, visitez notre site d’assistance.
Sites d’assistance
http://esupport.sony.com
http://www.sony.com/mobileAV
• Vous pouvez utiliser des périphériques USB de
type MSC (stockage de masse) et MTP
(protocole de transfert des médias) conformes à
la norme USB.
• Le codec correspondant est MP3 (.mp3), WMA
(.wma), AAC (.m4a) et AAC (.mp4).
• Il est recommandé d’effectuer des copies de
sauvegarde des données contenues dans le
périphérique USB.
Remarque
Raccordez le périphérique USB après avoir démarré
le moteur.
Selon le périphérique USB utilisé, le raccordement
avant le démarrage du moteur pourrait causer un
problème de fonctionnement ou des dommages.
Lecture d’un périphérique USB
1 Faites coulisser le capuchon USB.
2 Raccordez le périphérique USB au
connecteur USB.
Si vous utilisez un câble pour les
raccordements, utilisez le câble fourni avec le
périphérique USB.
La lecture commence.
suite à la page suivante t
13
Page 44

Si un périphérique USB est déjà raccordé,
appuyez plusieurs fois sur (SOURCE/OFF)
jusqu’à ce que l’indication « USB » s’affiche
pour lancer la lecture.
Appuyez sur la touche (SOURCE/OFF) et
maintenez-la enfoncée pendant 1 seconde pour
arrêter la lecture.
• Pendant la lecture ou l’avance/le retour rapide dans
un fichier MP3/WMA/AAC VBR (Débit binaire
variable), le temps de lecture écoulé affiché peut
être incorrect.
• La lecture des fichiers MP3/WMA/AAC suivants
n’est pas prise en charge :
– fichiers avec compression sans perte
– fichiers avec protection des droits d’auteur
Retrait du périphérique USB
1 Arrêtez la lecture du périphérique USB.
2 Retirez le périphérique USB.
Si vous retirez votre périphérique USB
pendant la lecture, les données stockées sur
celui-ci pourraient être endommagées.
Remarques
• N’utilisez pas un périphérique USB de grande taille
ou lourd qui pourrait tomber à cause des vibrations
ou entraîner un raccordement peu fiable.
• Ne retirez pas la façade pendant la lecture du
périphérique USB, car cela pourrait endommager
les données USB.
• Cet appareil ne peut pas reconnaître les
périphériques USB raccordés au moyen d’un
concentrateur USB.
Éléments d’affichage
A Source
B Nom de plage, nom de l’artiste, numéro
d’album*, nom d’album, numéro de plage/
temps de lecture écoulé, horloge
* Le numéro d’album s’affiche uniquement lorsque
vous changez d’album.
Appuyez sur (DSPL) pour changer les éléments
d’affichage B.
Remarques
• Les paramètres affichés varient selon le
périphérique USB, le format d’enregistrement et les
réglages. Pour plus de détails, visitez notre site
d’assistance.
• Le nombre maximal de données pouvant être
affichées est le suivant :
– dossiers (albums) : 128
– fichiers (plages) par dossier : 500
• Ne laissez pas un périphérique USB dans un
véhicule stationné car cela pourrait entraîner des
problèmes de fonctionnement.
• Selon la quantité de données enregistrées, la
lecture peut mettre quelques instants à démarrer.
• La lecture de fichiers DRM (Gestion des droits
numériques) peut être impossible.
Lecture répétée et lecture aléatoire
1 En cours de lecture, appuyez
plusieurs fois sur (3) (REP) ou
(4) (SHUF) jusqu’à ce que le réglage
souhaité apparaisse.
Sélectionnez Pour lire
TRACK une plage en boucle.
ALBUM un album en boucle.
SHUF ALBUM un album dans un ordre
aléatoire.
SHUF DEVICE un périphérique dans un
ordre aléatoire.
Le réglage est terminé après 3 secondes.
Pour retourner au mode de lecture normal,
sélectionnez « OFF » ou « SHUF OFF ».
14
Page 45

Pour écouter une musique
adaptée à votre humeur
— SensMe™
Les fonctions « SensMe™ channels » novatrices
de Sony regroupent automatiquement les plages
dans des canaux pour vous permettre d’écouter
votre musique de façon intuitive.
Les opérations d’analyse et de transfert des
plages seront effectuées par « Content
Transfer ».
Content
Transfer
Avant d’utiliser la fonction
SensMe™
Cette procédure de base est requise pour
permettre l’utilisation de la fonction SensMe™
sur l’appareil.
1 Installation de « SensMe™ Setup » et
« Content Transfer » sur votre
ordinateur
Commencez par installer « SensMe™ Setup »
et « Content Transfer » à partir du CD-ROM
fourni.
™
Content
SensMe
Transfer
Setup
2 Enregistrement d’un périphérique USB
à l’aide de « SensMe™ Setup »
Raccordez un périphérique USB à votre
ordinateur, puis enregistrez-le à l’aide de
« SensMe™ Setup » pour activer la fonction
SensMe™ sur cet appareil.
™
SensMe
Setup
4 Raccordement du périphérique USB et
utilisation de la fonction SensMe™ sur
l’appareil
Raccordez le périphérique USB configuré.
Vous pouvez alors utiliser les « SensMe™
channels » sur cet appareil.
Installation de « SensMe™ Setup »
et « Content Transfer » sur votre
ordinateur
L’utilisation du logiciel fourni (« SensMe™
Setup » et « Content Transfer ») est requise pour
activer la fonction SensMe™ sur cet appareil.
Installez le logiciel sur votre ordinateur à partir
du CD-ROM fourni.
1 Insérez le CD-ROM fourni dans votre
ordinateur.
L’Assistant Installation démarre
automatiquement.
2 Suivez les instructions à l’écran pour
terminer l’installation.
Conseil
L’enregistrement peut être effectué pendant la
procédure d’installation, ou après l’installation.
3 Transfert de plages sur le périphérique
USB à l’aide de « Content Transfer »
Pour regrouper les plages par canal, les
caractéristiques sonores doivent être analysées
par 12 TONE ANALYSIS™, une fonction
chargée dans « Content Transfer ».
Pendant que le périphérique USB est raccordé
à votre ordinateur, glissez-déposez les plages
de Windows Explorer ou iTunes, etc., vers
« Content Transfer ».
15
Page 46

Enregistrement d’un périphérique
USB à l’aide de « SensMe™
Setup »
L’enregistrement du périphérique USB est requis
pour activer la fonction SensMe™ sur l’appareil.
Si l’enregistrement n’a pas été effectué pendant
la procédure d’installation, suivez les étapes cidessous.
1 Démarrez « SensMe™ Setup » sur
votre ordinateur.
2 Raccordez un périphérique USB à
votre ordinateur.
3 Terminez l’enregistrement en suivant
les instructions à l’écran.
Conseil
Si vous raccordez un périphérique USB enregistré qui
contient des plages analysées, le périphérique USB
peut redevenir non enregistré.
Transfert de plages sur le
périphérique USB à l’aide de
« Content Transfer »
Pour activer la fonction SensMe™ sur cet
appareil, des plages doivent être analysées et
transférées sur le périphérique USB enregistré à
l’aide de « Content Transfer ».
1 Raccordez le périphérique USB
enregistré à votre ordinateur.
Pour les périphériques USB, effectuez le
raccordement en mode MSC.
« Content Transfer » démarre
automatiquement.
Si un message apparaît, suivez les instructions
à l’écran pour continuer.
2 Glissez-déposez les plages de
Windows Explorer ou iTunes, etc.,
vers « Content Transfer ».
L’analyse et le transfert des plages démarrent.
Pour plus de détails sur le fonctionnement,
consultez la section Help de « Content
Transfer ».
Remarque
L’analyse de plage effectuée par 12 TONE
ANALYSIS™ peut prendre un certain temps, selon
votre configuration informatique.
Lecture des plages d’un canal
— SensMe™ channels
Les « SensMe™ channels » regroupent
automatiquement les plages dans des canaux en
se basant sur leurs mélodies. Vous pouvez
sélectionner et lire un canal adapté à votre
humeur, activité, etc.
1 Raccordez un périphérique USB
configuré pour la fonction SensMe™.
2 Appuyez plusieurs fois sur
(SOURCE/OFF) jusqu’à ce que
« SENSME CH » apparaisse.
La liste de canal apparaît, puis les passages
les plus mélodiques ou rythmés* des plages
sont lus de façon aléatoire.
* Il est possible qu’ils ne soient pas détectés
correctement.
3 Sélectionnez une plage de la liste de
canal à l’aide de la molette de réglage.
• Changez le canal
Appuyez sur (1)/(2) (ALBUM –/+) pour
sélectionner le canal souhaité.
• Changez la plage
Appuyez sur (SEEK) +/– jusqu’à ce que la
plage souhaitée apparaisse, puis appuyez sur la
molette de réglage.
La lecture démarre à partir du début de la plage
en cours.
Si vous n’effectuez aucune opération pendant
10 secondes, la fenêtre d’affichage retourne au
mode de lecture normal.
Remarques
• Certaines plages peuvent être détectées
incorrectement ou regroupées dans un canal
inapproprié pour leur style.
• Si le périphérique USB raccordé contient de
nombreuses plages, le démarrage de la fonction
« SensMe™ channels » peut être retardé par la
lecture des données.
Conseil
Les plages sont lues dans un ordre aléatoire. L’ordre
varie pour chaque sélection de canal.
16
Page 47

Liste de canal
x Recommandée, Shuffle All
« MORNING » (5:00 AM – 9:59 AM)
«DAYTIME» (10:00 AM – 3:59 PM)
« EVENING » (4:00 PM – 6:59 PM)
« NIGHT » (7:00 PM – 11:59 PM)
« MIDNIGHT » (12:00 AM – 4:59 AM)
Plages recommandées pour chaque moment de
la journée.
Réglez l’horloge (page 6) pour permettre au
canal de s’afficher correctement.
« SHUFFLE ALL » : lecture de toutes les
plages analysées dans un ordre aléatoire.
iPod
Pour plus de détails sur la compatibilité de votre
iPod, reportez-vous à la section « À propos de
l’iPod » (page 30) ou visitez le site d’assistance.
Dans ce mode d’emploi, « iPod » est utilisé
comme référence générale pour des fonctions
iPod sur les iPod et iPhone, sauf mention
contraire dans le texte ou les illustrations.
Sites d’assistance
http://esupport.sony.com
http://www.sony.com/mobileAV
x Canaux de base
Lecture des plages en fonction du type de
musique.
« ENERGETIC » : plages entraînantes.
«RELAX»: plages calmes.
«MELLOW»: plages sereines et
mélancoliques.
«UPBEAT»: plages enjouées pour améliorer
votre humeur.
« EMOTIONAL » : plages de ballades.
«LOUNGE»: musique d’ambiance.
« DANCE » : plages rythmées de rap et rhythm
and blues.
« EXTREME » : plages de rock intense.
x Canaux pour le véhicule
Lecture de plages appropriées pour la conduite.
«FREEWAY»: plages rapides et entraînantes.
« CHILLOUT DRIVE » : plages apaisantes de
ballades entonnées.
« WEEKEND TRIP » : plages enjouées, vives
et réjouissantes.
« MIDNIGHT CRUISE » : plages de jazz ou
comportant du piano avec ambiance mature.
« PARTY RIDE » : plages énergiques et
entraînantes.
« MORNING COMMUTE » : plages joyeuses
et légères.
« GOIN’ HOME » : plages chaleureuses et
relaxantes.
Lecture d’un iPod
Réduisez le volume de l’appareil avant de
raccorder le iPod.
1 Faites coulisser le capuchon USB.
2 Raccordez le iPod au connecteur USB
au moyen du connecteur Dock sur le
câble USB.
Le iPod se met en marche automatiquement
et l’indication suivante s’affiche à l’écran du
iPod.*
suite à la page suivante t
17
Page 48

Conseil
Nous vous recommandons d’utiliser le câble USB
RC-100IP (non fourni) pour raccorder le connecteur
Dock.
Les plages du iPod sont lues
automatiquement à partir de l’endroit où la
lecture s’était terminée.
Si un iPod est déjà raccordé, appuyez
plusieurs fois sur (SOURCE/OFF) jusqu’à ce
que l’indication « USB » s’affiche pour lancer
la lecture. (« IPOD » apparaît dans la fenêtre
d’affichage lorsque le iPod est reconnu.)
* Le logo n’apparaît pas à l’écran lorsqu’un iPod touch
ou un iPhone est raccordé, ou lorsque la dernière
lecture du iPod a été effectuée au moyen de la
commande passager.
3 Réglez le volume.
Appuyez sur la touche (SOURCE/OFF) et
maintenez-la enfoncée pendant 1 seconde pour
arrêter la lecture.
Retrait du iPod
1 Arrêtez la lecture du iPod.
2 Retirez le iPod.
Précaution relative au iPhone
Lorsque vous raccordez un iPhone au moyen d’un
câble USB, le volume du téléphone est contrôlé par le
iPhone lui-même. Afin d’éviter une hausse soudaine
du son après un appel, n’augmentez pas le volume de
l’appareil pendant un appel téléphonique.
Remarques
• Ne retirez pas la façade pendant la lecture du iPod,
car cela pourrait endommager les données.
• Cet appareil ne peut pas reconnaître un iPod
raccordé au moyen d’un concentrateur USB.
Conseils
• Lorsque le contact est réglé à la position ACC et que
l’appareil est en marche, le iPod se recharge.
• Si le iPod est déconnecté en cours de lecture, « NO
DEV » apparaît dans la fenêtre d’affichage de
l’appareil.
Éléments d’affichage
A Indication de la source (iPod)
B Nom de plage, nom de l’artiste, nom d’album,
numéro de plage/temps de lecture écoulé,
horloge
Appuyez sur (DSPL) pour changer les éléments
d’affichage B.
Conseil
Lorsque l’album, l’émission baladodiffusée, le genre,
l’artiste ou la liste de lecture est modifié(e), le numéro
de l’élément s’affiche pendant quelques instants.
Remarque
Il se peut que certaines lettres enregistrées dans le
iPod ne s’affichent pas correctement.
Saut d’albums, d’émissions
baladodiffusées, de genres, de
listes de lecture et d’artistes
Opération Action
Saut Appuyez sur (1)/(2)
Saut en continu Maintenez enfoncée la touche
(ALBUM –/+) [appuyez une
fois pour chaque élément]
(1)/(2) (ALBUM –/+)
[maintenez-la enfoncée
jusqu’au point souhaité]
Mode de reprise de la lecture
Lorsque le iPod est raccordé au connecteur
Dock, l’appareil passe en mode de reprise et la
lecture démarre dans le mode sélectionné par le
iPod.
En mode de reprise de la lecture, les touches
suivantes ne fonctionnent pas :
– (3) (REP)
– (4) (SHUF)
18
Page 49

Lecture répétée et lecture aléatoire
1 En cours de lecture, appuyez
plusieurs fois sur (3) (REP) ou
(4) (SHUF) jusqu’à ce que le réglage
souhaité apparaisse.
Sélectionnez Pour lire
TRACK une plage en boucle.
ALBUM un album en boucle.
PODCAST une émission
baladodiffusée en
boucle.
ARTIST un artiste en boucle.
PLAYLIST une liste de lecture en
boucle.
GENRE un genre en boucle.
SHUF ALBUM un album dans un ordre
aléatoire.
SHUF PODCAST des émissions
baladodiffusées dans un
ordre aléatoire.
SHUF ARTIST un artiste dans un ordre
aléatoire.
SHUF PLAYLIST une liste de lecture dans
un ordre aléatoire.
SHUF GENRE un genre dans un ordre
aléatoire.
SHUF DEVICE un périphérique dans un
ordre aléatoire.
Le réglage est terminé après 3 secondes.
Pour retourner au mode de lecture normal,
sélectionnez « OFF » ou « SHUF OFF ».
Commande directe d’un iPod
— Commande passager
Vous pouvez commander directement un iPod
raccordé au connecteur Dock.
1 En cours de lecture, appuyez sur
(MODE) et maintenez la touche
enfoncée.
L’indication « MODE IPOD » apparaît et
vous pouvez commander directement le iPod.
Pour changer l’élément d’affichage
Appuyez sur (DSPL) .
Les éléments d’affichage changent dans l’ordre
suivant :
Nom de plage t nom de l’artiste t nom
d’album t MODE IPOD t horloge
Pour désactiver la commande passager
Appuyez sur la touche (MODE) et maintenez-la
enfoncée.
L’indication « MODE AUDIO » apparaît et le
mode de lecture passe au mode de reprise.
Remarques
• Le volume peut être réglé uniquement par l’appareil.
• Lorsque ce mode est désactivé, la lecture répétée
est annulée.
19
Page 50

Recherche d’une plage
Recherche d’une plage par nom
— Quick-BrowZer™
Vous pouvez facilement rechercher une plage par
catégorie sur un CD ou périphérique USB.
1 Appuyez sur (BROWSE).
L’appareil passe en mode Quick-BrowZer et
la liste des catégories de recherche apparaît.
2 Tournez la molette de réglage pour
sélectionner la catégorie de recherche
de votre choix, puis appuyez pour
valider.
3 Répétez l’étape 2 jusqu’à ce que la
plage de votre choix soit sélectionnée.
La lecture commence.
Pour retourner à l’écran précédent
Appuyez sur (BACK).
Pour quitter le mode Quick-BrowZer
Appuyez sur (BROWSE).
Remarque
Lorsque l’appareil passe en mode Quick-BrowZer, la
lecture répétée ou aléatoire est annulée.
Recherche d’éléments par saut
— Mode Jump
Lorsqu’une catégorie contient de nombreux
éléments, vous pouvez rechercher rapidement
l’élément de votre choix.
1 Appuyez sur (SEEK) + en mode Quick-
BrowZer.
L’écran suivant apparaît.
4 Tournez la molette de réglage pour
sélectionner l’élément de votre choix,
puis appuyez pour valider.
La lecture commence si l’élément sélectionné
est une plage.
Pour annuler le mode Jump
Appuyez sur (BACK) ou (SEEK) –.
Remarque
Si vous n’effectuez aucune opération pendant
7 secondes, le mode Jump est annulé.
Recherche par ordre alphabétique
— Alphabet search
Lorsqu’un iPod est raccordé à l’appareil, vous
pouvez rechercher un élément souhaité par ordre
alphabétique.
1 Appuyez sur (SEEK) + en mode Quick-
BrowZer.
Une liste alphabétique s’affiche.
2 Tournez la molette de réglage pour
sélectionner la première lettre de
l’élément souhaité, puis appuyez
dessus.
Une liste des éléments débutant par la lettre
sélectionnée s’affiche dans l’ordre
alphabétique.
Si aucune chanson ne commence par la lettre
sélectionnée, « NOT FOUND » apparaît.
3 Tournez la molette de réglage pour
sélectionner l’élément de votre choix,
puis appuyez dessus.
La lecture commence si l’élément sélectionné
est une plage.
A Numéro d’élément actuel
B Nombre total d’éléments dans la couche
actuelle
Le nom de l’élément s’affiche ensuite.
2 Tournez la molette de réglage pour
sélectionner l’élément souhaité ou un
élément situé à proximité.
L’appareil effectue des sauts par incrément de
10 % du nombre total d’éléments.
3 Appuyez sur la touche de sélection.
L’affichage retourne au mode Quick-BrowZer
et l’élément sélectionné apparaît.
20
Pour annuler la recherche
alphabétique
Appuyez sur (BACK) ou (SEEK) –.
Une liste des catégories de recherche apparaît.
Remarques
• Le mode de recherche alphabétique exclut les
symboles ou articles (un/une/le/la) placés devant la
lettre sélectionnée de l’élément.
• Selon l’élément de recherche sélectionné, seul le
mode Jump peut être disponible.
• Si vous n’effectuez aucune opération pendant
5 secondes, la recherche alphabétique est annulée.
• La recherche alphabétique peut prendre un certain
temps, selon le nombre de plages.
Page 51

Recherche d’une plage en
écoutant des passages de
plages — ZAPPIN™
Vous pouvez rechercher la plage de votre choix
en écoutant successivement de courts passages
des plages d’un CD ou périphérique USB.
Le mode ZAPPIN est approprié pour rechercher
une plage en mode de lecture aléatoire ou répétée
aléatoire.
1 Appuyez sur (Z AP) pendant la lecture.
Lorsque « ZAPPIN » s’affiche, la lecture
démarre à partir d’un passage de la plage
suivante.
Le passage est lu pendant la durée définie,
puis un déclic est émis et le passage suivant
démarre.
Plage
(ZAP) enfoncée.
2 Appuyez sur la touche de sélection ou
sur (ZAP) pendant la lecture d’une
plage que vous souhaitez écouter.
La plage que vous sélectionnez revient au
mode de lecture normal à partir du début.
Pour rechercher une autre plage en mode
ZAPPIN, répétez les étapes 1 et 2.
Pendant la lecture de « SensMe™
channels »
Si la plage que vous recherchez est transférée par
« Content Transfer », les passages les plus
mélodiques ou rythmés* des plages seront lus.
Pour plus de détails sur la fonction SensMe™,
consultez la page 15.
* Il est possible qu’ils ne soient pas détectés
correctement.
Conseils
• Vous pouvez sélectionner le temps de lecture :
environ 6 secondes/15 secondes/30 secondes
(page 27). Vous ne pouvez pas sélectionner le
passage de la plage en lecture.
• Appuyez sur (SEEK) +/– en mode ZAPPIN pour
sauter une plage.
• Appuyez sur (1)/(2) (ALBUM –/+) en mode
ZAPPIN pour sauter un album.
• Lorsque vous appuyez sur (BACK), la lecture
d’une plage est également confirmée.
Partie de chaque plage à lire
en mode ZAPPIN.
Pour apprécier la variation de
couleur d’illumination
Changement de couleur de la fenêtre
d’affichage et des touches
— Illuminateur de couleur dynamique
L’illuminateur de couleur dynamique vous
permet de changer la couleur de la fenêtre
d’affichage et des touches de l’appareil principal
pour l’adapter à l’intérieur du véhicule.
Vous pouvez sélectionner 12 couleurs préréglées,
une couleur personnalisée et 5 motifs préréglés.
x Couleurs préréglées
«RED», «AMBER», «M_AMBER»,
« Y ELLOW », « WHITE », « LIGHT GREEN »,
« GREEN », « LIGHT BLUE », « SKY
BLUE », « BLUE », « PURPLE », « PINK ».
x Motifs préréglés
« RAINBOW », « OCEAN », « SUNSET »,
« FOREST », « RANDOM ».
1 Appuyez sur (COLOR).
2 Tournez la molette de réglage pour
sélectionner la couleur préréglée de
votre choix, puis appuyez dessus.
La fenêtre d’affichage retourne au mode de
réception/lecture normal.
Remarque
Si vous tournez rapidement la molette de réglage, la
couleur de la fenêtre d’affichage et des touches peut
changer trop rapidement.
Conseil
Vous pouvez accéder au mode de couleur préréglée à
partir du menu de configuration.
Personnalisation de la couleur de
la fenêtre d’affichage et des
touches — Couleur personnalisée
Vous pouvez enregistrer une couleur
personnalisée pour la fenêtre d’affichage et les
touches.
À propos du mode de couleur DAY/
NIGHT
Vous pouvez sélectionner une couleur différente
pour le mode DAY/NIGHT.
La couleur de la fenêtre d’affichage change de la
façon suivante en mode de couleur DAY/NIGHT.
suite à la page suivante t
21
Page 52

Mode de couleur DIMMER
DAY OFF ou AUTO (éteint
NIGHT ON ou AUTO (allume
* Disponible uniquement lorsque le câble de
commande d’éclairage est raccordé.
Pour plus de détails sur le réglage DIMMER,
consultez la page 27.
les phares*)
les phares*)
1 Maintenez la touche (COLOR)
enfoncée.
L’affichage de la couleur personnalisée DAY/
NIGHT varie en fonction du réglage
DIMMER.
Pour changer le mode de couleur DAY/
NIGHT, consultez la page 22.
2 Tournez la molette de réglage jusqu’à
ce que « BASE COLOR » apparaisse,
puis appuyez dessus.*
Vous pouvez sélectionner une couleur
préréglée comme point de départ pour
apporter des modifications.
Si vous ne souhaitez pas personnaliser une
couleur préréglée, passez à l’étape 5.
* Lorsque vous sélectionnez « BASE COLOR », la
couleur personnalisée est écrasée.
3 Tournez la molette de réglage pour
sélectionner « RGB RED », « RGB
GREEN » ou « RGB BLUE », puis
appuyez dessus.
4 Tournez la molette de réglage pour
régler la gamme de couleur, puis
appuyez dessus.
Gamme de couleur réglable : « 0 » – « 32 ».
Vous ne pouvez pas sélectionner « 0 » pour
toutes les gammes de couleur en même
temps.
5 Appuyez sur (BACK).
La fenêtre d’affichage retourne au mode de
réception/lecture normal.
Réglage de couleur avancé
Synchronisation des canaux
SensMe™ — Couleur des canaux
SensMe™
La couleur de la fenêtre d’affichage et des
touches de l’appareil principal change en
fonction du canal SensMe™ sélectionné.
1 Appuyez sur la touche de sélection et
maintenez-la enfoncée.
L’écran de configuration apparaît.
2 Tournez la molette de réglage jusqu’à
ce que « SENSME COLR » apparaisse,
puis appuyez dessus.
3 Tournez la molette de réglage pour
sélectionner « SENSME-ON », puis
appuyez dessus.
4 Appuyez sur (BACK).
Le réglage est terminé et la fenêtre
d’affichage retourne au mode de réception/
lecture normal.
Pour annuler la couleur des canaux SensMe™,
sélectionnez « OFF » à l’étape 3.
Remarque
Lorsque la couleur des canaux SensMe™ est réglée à
« ON » pour la source SensMe™, la couleur des
canaux SensMe™ prend priorité sur les réglages de
couleur/motif préréglé. Le réglage de couleur/motif
passe à la couleur/au motif préréglé si vous
désactivez la couleur des canaux SensMe™ ou
sélectionnez une source autre que SensMe™.
Changement du mode de couleur
DAY/NIGHT
1 Sélectionnez « DAY/NIGHT » à l’étape 2.
2 Sélectionnez « DAY » ou « NIGHT ».
3 Personnalisez la couleur préréglée en suivant
les étapes 2 à 5.
Conseil
Vous pouvez régler le mode de couleur DAY/NIGHT à
partir du menu de configuration.
22
Page 53

Changement de la couleur avec
synchronisation sonore
— Synchronisation sonore
Le changement de couleur est synchronisé sur la
musique en cours de lecture. Lorsque vous
sélectionnez un motif préréglé ou écoutez des
plages du canal SensMe, la synchronisation
sonore est activée.
1 Appuyez sur la touche de sélection et
maintenez-la enfoncée.
L’écran de configuration apparaît.
2 Tournez la molette de réglage jusqu’à
ce que « SOUND SYNC » s’affiche,
puis appuyez dessus.
3 Tournez la molette de réglage pour
sélectionner « SYNC-ON », puis
appuyez dessus.
4 Appuyez sur (BACK).
Le réglage est terminé et la fenêtre
d’affichage retourne au mode de réception/
lecture normal.
Remarque
Il est possible qu’elle ne soit pas synchronisée
correctement.
Affichage de couleur claire
— Clarté du menu
Vous pouvez afficher le menu avec plus de clarté
(blanc) sans affecter le réglage de couleur.
1 Appuyez sur la touche de sélection et
maintenez-la enfoncée.
L’écran de configuration apparaît.
2 Tournez la molette de réglage jusqu’à
ce que « WHITE MENU » s’affiche,
puis appuyez dessus.
3 Tournez la molette de réglage pour
sélectionner « WHITE-ON », puis
appuyez dessus.
4 Appuyez sur (BACK).
Le réglage est terminé et la fenêtre
d’affichage retourne au mode de réception/
lecture normal.
Pour annuler l’option de clarté du menu,
sélectionnez « OFF » à l’étape 3.
Effet de démarrage
— Blanc au démarrage
Lorsque vous appuyez sur (SOURCE/OFF), la
fenêtre d’affichage et les touches de l’appareil
principal deviennent blanches, puis la couleur est
remplacée par la couleur personnalisée. Vous
pouvez apprécier cet effet chaque fois que la
source est activée.
1 Appuyez sur la touche de sélection et
maintenez-la enfoncée.
L’écran de configuration apparaît.
2 Tournez la molette de réglage jusqu’à
ce que « START WHITE » s’affiche,
puis appuyez dessus.
3 Tournez la molette de réglage pour
sélectionner « WHITE-ON », puis
appuyez dessus.
4 Appuyez sur (BACK).
Le réglage est terminé et la fenêtre
d’affichage retourne au mode de réception/
lecture normal.
Pour annuler l’option du blanc au démarrage,
sélectionnez « OFF » à l’étape 3.
23
Page 54

Réglages du son et menu de
configuration
Changement des réglages du
son
*1 Caché lorsque « POSITION » est réglé à « OFF ».
*2 Lorsque la source AUX est activée (page 28).
Pour apprécier les fonctions
sonores sophistiquées
— Advanced Sound Engine
Réglage des caractéristiques du
son
1 Pendant la réception/lecture, appuyez
sur la touche de sélection.
2 Tournez la molette de réglage jusqu’à
ce que le paramètre souhaité s’affiche,
puis appuyez dessus.
3 Tournez la molette de réglage pour
sélectionner le réglage, puis appuyez
dessus.
4 Appuyez sur (BACK).
Le réglage est terminé et la fenêtre
d’affichage retourne au mode de réception/
lecture normal.
Les paramètres suivants peuvent être réglés
(reportez-vous à la page indiquée pour plus de
détails) :
EQ7 PRESET (page 24)
EQ7 SETTING (page 25)
POSITION
POSITION (réglage de position d’écoute)
(page 25)
ADJUST POS*
d’écoute) (page 26)
SW POSITION*
graves) (page 25)
BALANCE
Permet de régler l’équilibre du son :
«RIGHT-15» – «CENTER» – «LEFT-15».
FADER
Permet de régler le niveau relatif :
«FRONT-15» – «CENTER» – «REAR-15».
DM+ (page 26)
REARBAS ENH (Amplificateur de graves à
l’arrière) (page 26)
SUBW LEVEL (niveau du caisson de graves)
Permet de régler le volume du caisson de
graves : « +10 dB » – « 0 dB » – « –10 dB ».
(« ATT » est affiché au réglage le plus bas.)
AUX VOLUME*
Permet de régler le niveau de volume de chaque
appareil auxiliaire raccordé : « +18 dB » –
« 0 dB » – « –8 dB ».
Ce réglage évite de régler le niveau de volume
entre les sources.
24
1
(ajustement de position
1
(position du caisson de
2
(niveau de volume AUX)
Advanced Sound Engine, le nouveau moteur
sonore de Sony, permet de créer un champ
acoustique parfaitement adapté à l’intérieur de
votre véhicule en appliquant un traitement de
signal numérique. Advanced Sound Engine
propose les fonctions suivantes : EQ7, Position
d’écoute, DM+ avancée, Amplificateur de graves
à l’arrière.
Sélection de la qualité sonore
— Préréglage EQ7
Vous pouvez sélectionner une courbe d’égaliseur
parmi 7 courbes d’égaliseur (« XPLOD »,
« VOCAL », « EDGE », « CRUISE »,
«SPACE», «GRAVITY», «CUSTOM» ou
« OFF »).
1 Pendant la réception/lecture, appuyez
sur la touche de sélection.
2 Tournez la molette de réglage jusqu’à
ce que « EQ7 PRESET » s’affiche, puis
appuyez dessus.
3 Tournez la molette de réglage jusqu’à
ce que la courbe d’égaliseur souhaitée
s’affiche, puis appuyez dessus.
4 Appuyez sur (BACK).
La fenêtre d’affichage retourne au mode de
réception/lecture normal.
Pour annuler la courbe de l’égaliseur,
sélectionnez « OFF » à l’étape 3.
Conseil
Le réglage de courbe d’égaliseur peut être mémorisé
pour chaque source.
Page 55

Personnalisation de la courbe de
l’égaliseur — Réglage EQ7
L’option « CUSTOM » de EQ7 vous permet
d’effectuer vos propres réglages d’égaliseur.
1 Sélectionnez une source, puis
appuyez sur la touche de sélection.
2 Tournez la molette de réglage jusqu’à
ce que « EQ7 SETTING » s’affiche,
puis appuyez dessus.
3 Tournez la molette de réglage jusqu’à
ce que « BASE » s’affiche, puis
appuyez dessus.
Vous pouvez sélectionner une courbe
d’égaliseur comme point de départ pour
modifier le réglage.
Si vous ne souhaitez pas personnaliser une
courbe d’égaliseur préréglée, passez à
l’étape 5.
4 Tournez la molette de réglage pour
sélectionner la courbe d’égaliseur,
puis appuyez dessus.
5 Réglez la courbe de l’égaliseur.
1 Tournez la molette de réglage pour
sélectionner la plage de fréquences, puis
appuyez dessus.
BAND1 : 63 Hz
BAND2 : 160 Hz
BAND3 : 400 Hz
BAND4 : 1 kHz
BAND5 : 2,5 kHz
BAND6 : 6,3 kHz
BAND7 : 16,0 kHz
2 Tournez la molette de réglage pour
régler le niveau de volume, puis appuyez
dessus.
Le niveau de volume peut être réglé par
incréments de 1 dB, de –6 dB à +6 dB.
Répétez les étapes 1 et 2 pour régler les
autres plages de fréquences.
6 Appuyez deux fois sur (BACK).
La courbe de l’égaliseur est mémorisée dans
« CUSTOM » et la fenêtre d’affichage
retourne au mode de réception/lecture
normal.
Optimisation du son par
alignement temporel — Position
d’écoute
L’appareil peut modifier la localisation du son en
retardant les sons émis par chaque haut-parleur
en fonction de votre position, et en simulant un
champ acoustique naturel vous donnant
l’impression de vous trouver au centre de celuici, où que vous soyez assis dans le véhicule.
Les options pour « POSITION » sont indiquées
ci-dessous.
«FRONT L» (1): avant
gauche
«FRONT R» (2): avant
droite
«FRONT» (3) : centre
avant
«ALL» (4) : au centre de
votre véhicule
«OFF»: aucune position
réglée
Vous pouvez également régler la position
approximative du caisson de graves à partir de
votre position d’écoute si :
– le caisson de graves est raccordé
– la position d’écoute est réglée sur « FRONT
L », « FRONT R », « FRONT » ou « ALL ».
Les options pour « SW POSITION » sont
indiquées ci-dessous.
«NEAR» (A) : rapprochée
«NORMAL» (B): normale
«FAR» (C) : éloignée
1 Pendant la réception/lecture, appuyez
sur la touche de sélection.
2 Tournez la molette de réglage jusqu’à
ce que « POSITION » s’affiche, puis
appuyez dessus.
3 Tournez la molette de réglage pour
sélectionner « FRONT L », « FRONT
R», «FRONT» ou «ALL», puis
appuyez dessus.
4 Tournez la molette de réglage jusqu’à
ce que « SW POSITION » s’affiche,
puis appuyez dessus.
Lorsque vous sélectionnez « FRONT L »,
« FRONT R », « FRONT » ou « ALL » à
l’étape 3 ci-dessus, vous pouvez régler la
position du caisson de graves.
Tournez la molette de réglage pour
sélectionner « NEAR », « NORMAL » ou
« FAR », puis appuyez dessus.
suite à la page suivante t
25
Page 56

5 Appuyez sur (BACK).
La fenêtre d’affichage retourne au mode de
réception/lecture normal.
Pour annuler la position d’écoute, sélectionnez
« OFF » à l’étape 3.
Réglage de la position d’écoute
Vous pouvez régler la position d’écoute avec
précision.
1 Pendant la réception/lecture, appuyez
sur la touche de sélection.
2 Tournez la molette de réglage jusqu’à
ce que « ADJUST POS » s’affiche, puis
appuyez dessus.
3 Tournez la molette de réglage pour
régler la position d’écoute, puis
appuyez dessus.
Plage de réglage : « +3 » – « CENTER » –
«–3».
4 Appuyez sur (BACK).
La fenêtre d’affichage retourne au mode de
réception/lecture normal.
DM+ avancée
La fonction DM+ avancée améliore la qualité des
sons compressés numériquement en restaurant
les hautes fréquences supprimées lors du
processus de compression.
1 Pendant la lecture, appuyez sur la
touche de sélection.
2 Tournez la molette de réglage jusqu’à
ce que « DM+ » s’affiche, puis appuyez
dessus.
3 Tournez la molette de réglage pour
sélectionner « ON », puis appuyez
dessus.
4 Appuyez sur (BACK).
La fenêtre d’affichage retourne au mode de
lecture normal.
Conseil
Le réglage DM+ peut être mémorisé pour chaque
source.
Utilisation des haut-parleurs
arrière comme caisson de graves
— Amplificateur de graves à
l’arrière
La fonction Amplificateur de graves à l’arrière
accentue les graves en appliquant le réglage de
filtre passe-bas (page 27) aux haut-parleurs
arrière. Cette fonction permet d’utiliser les hautparleurs arrière comme caisson de graves si vous
n’en raccordez aucun.
1 Pendant la réception/lecture, appuyez
sur la touche de sélection.
2 Tournez la molette de réglage jusqu’à
ce que « REARBAS ENH » s’affiche,
puis appuyez dessus.
3 Tournez la molette de réglage pour
sélectionner « 1 », « 2 » ou « 3 », puis
appuyez dessus.
4 Appuyez sur (BACK).
La fenêtre d’affichage retourne au mode de
réception/lecture normal.
26
Page 57

Réglage des paramètres de
configuration — SET
1 Appuyez sur la touche de sélection et
maintenez-la enfoncée.
L’écran de configuration apparaît.
2 Tournez la molette de réglage jusqu’à
ce que le paramètre souhaité s’affiche,
puis appuyez dessus.
3 Tournez la molette de réglage pour
sélectionner le réglage, puis appuyez
dessus.*
Le réglage est terminé.
4 Appuyez sur (BACK).
La fenêtre d’affichage retourne au mode de
réception/lecture normal.
* Des étapes supplémentaires sont nécessaires pour
le réglage Custom Color (page 21).
Remarque
Les paramètres affichés varient selon la source et le
réglage.
Les paramètres suivants peuvent être réglés
(reportez-vous à la page indiquée pour plus de
détails) :
CLOCK ADJ (Réglage de l’horloge) (page 6)
CT (Heure)
Permet d’activer ou de désactiver la fonction
CT : « ON », « OFF » (page 11, 12).
BEEP
Permet d’activer ou de désactiver le bip :
«ON», «OFF».
AUX-A*
AUTO OFF
DEMO
DIMMER
1
Permet d’activer ou de désactiver l’affichage de
la source AUX: «ON», «OFF» (page28).
Permet d’éteindre automatiquement après un
laps de temps souhaité lors de l’arrêt de
l’appareil : « NO », « 30S » (secondes),
« 30M » (minutes), « 60M » (minutes).
Permet d’activer ou de désactiver le mode de
démonstration : « ON », « OFF ».
Permet de modifier la luminosité de la fenêtre
d’affichage.
– « AT » : pour réduire automatiquement la
– « ON » : pour réduire la luminosité de la
– « OFF » : pour désactiver le régulateur de
(AUX Audio)
(Démonstration)
luminosité lorsque vous allumez les phares.
(Disponible uniquement lorsque le câble de
commande d’éclairage est raccordé.)
fenêtre d’affichage.
luminosité.
CONTRAST
Permet de régler le contraste de la fenêtre
d’affichage. Le niveau de contraste peut être
réglé à 7 positions.
COLOR (Couleur préréglée)
Permet de sélectionner la couleur préréglée de la
fenêtre d’affichage et des touches de l’appareil
principal (page 21).
CUSTOM COLR (Couleur personnalisée)
Permet de sélectionner une couleur préréglée
comme point de départ pour apporter des
modifications (page 21).
SENSME COLR (Couleur SensMe)
Permet de changer la couleur en fonction des
canaux SensMe : « ON », « OFF ».
SOUND SYNC
Permet de sélectionner la couleur avec la
synchronisation sonore : « ON », « OFF ».
WHITE MENU
Permet d’activer l’effet lorsque la source est
sélectionnée : « ON », « OFF ».
START WHITE
Permet d’activer la couleur de démarrage :
«ON», «OFF».
MOTION DSPL (Affichage animé)
– « SA » : pour afficher les motifs animés et
l’analyseur de spectre.
– « ON » : pour afficher les motifs animés.
– « OFF » : pour désactiver l’affichage animé.
AUTO SCROLL
Permet de faire défiler automatiquement les
éléments longs : « ON », « OFF ».
LOCAL (Mode de recherche locale)
– « ON » : pour syntoniser uniquement les
stations dont les signaux sont puissants.
– « OFF » : pour syntoniser une réception
normale.
MONO*
ZAPPIN TIME
ZAPPIN BEEP
LPF FREQ (Fréquence de filtre passe-bas)
2
Permet de sélectionner le mode de réception
monaural pour améliorer la réception FM
faible : « ON », « OFF ».
Permet de sélectionner le temps de lecture pour
la fonction ZAPPIN.
– « ZAP.TIME-1 » (environ 6 secondes),
Permet de faire retentir le bip entre les passages
de plage : « ON », « OFF ».
Permet de sélectionner la fréquence de coupure
du caisson de graves : « 50Hz », « 60Hz »,
« 80Hz », « 100Hz », « 120Hz ».
(Mode monaural)
«ZAP.TIME-2» (environ 15secondes),
«ZAP.TIME-3» (environ 30secondes).
suite à la page suivante t
27
Page 58

LPF SLOPE (Pente de filtre passe-bas)
Permet de sélectionner la pente du filtre passebas: «1», «2», «3».
SUBW PHASE (Phase du caisson de graves)
Permet de sélectionner la phase du caisson de
graves : « NORM », « REV ».
HPF FREQ (Fréquence de filtre passe-haut)
Permet de sélectionner la fréquence de coupure
du haut-parleur avant/arrière : « OFF »,
« 50Hz », « 60Hz », « 80Hz », « 100Hz »,
« 120Hz ».
HPF SLOPE (Pente de filtre passe-haut)
Permet de sélectionner la pente de filtre passehaut (applicable uniquement lorsque l’option
HPF FREQ n’est pas réglée à «OFF»): «1»,
«2», «3».
LOUDNESS (Intensité sonore)
Permet de renforcer les graves et les aigus pour
vous permettre d’entendre les sons clairement à
des volumes faibles : « ON », « OFF ».
BTM (page 11)
*1 Lorsque l’appareil est éteint.
*2 Lors d’une réception FM.
Autres fonctions
Utilisation d’un appareil en
option
Appareil audio auxiliaire
En raccordant un appareil audio portatif en
option à la prise d’entrée AUX (mini-prise
stéréo) de l’appareil, puis en sélectionnant
simplement la source, vous pouvez écouter le son
par l’intermédiaire des haut-parleurs de votre
voiture. Le niveau de volume peut être réglé pour
corriger toutes les différences entre l’appareil et
l’appareil audio portatif. Suivez la procédure cidessous :
Raccordement de l’appareil audio
portatif
1 Éteignez l’appareil audio portatif.
2 Réduisez le volume de l’appareil.
3 Procédez au raccordement à l’appareil.
28
Cordon de raccordement*
(non fourni)
* Veillez à utiliser une fiche droite.
Réglage du niveau de volume
Avant de commencer la lecture, n’oubliez pas de
régler le volume de chaque appareil audio
connecté.
1 Réduisez le volume de l’appareil.
2 Appuyez plusieurs fois sur (SOURCE/OFF)
jusqu’à ce que l’indication « AUX »
apparaisse.
L’indication « AUX FRONT IN » apparaît
ensuite.
3 Démarrez la lecture sur l’appareil audio
portatif, avec un niveau de volume modéré.
4 Réglez votre appareil sur le volume d’écoute
habituel.
5 Réglez le niveau d’entrée (page 24).
Page 59

Informations complémentaires
Précautions
• Si votre véhicule est resté stationné en plein soleil,
laissez l’appareil refroidir avant de l’utiliser.
• L’antenne électrique se déploie automatiquement.
Condensation
Si de la condensation s’est formée dans l’appareil,
retirez le disque et attendez environ une heure pour
que l’appareil puisse sécher ; sinon, il ne
fonctionnera pas correctement.
Pour conserver un son de haute
qualité
Ne renversez pas de liquide sur l’appareil ou sur les
disques.
Remarques sur les disques
• N’exposez pas les disques au rayonnement direct
du soleil ou à des sources de chaleur telles que des
conduits d’air chaud, et ne les laissez pas dans un
véhicule stationné en plein soleil.
• Avant la lecture, essuyez les
disques avec un chiffon de
nettoyage en partant du centre
vers l’extérieur. N’utilisez pas
de solvants tels que de
l’essence, du diluant ou des
nettoyants disponibles sur le
marché.
• Cet appareil est conçu pour la
lecture des disques conformes à la norme Compact
Disc (CD). Les DualDiscs et certains disques de
musique encodés avec des technologies de
protection des droits d’auteur ne sont pas
conformes à la norme Compact Disc (CD). Par
conséquent, il est possible que ces disques ne
soient pas lus par cet appareil.
• Disques ne pouvant PAS être lus sur cet
appareil
– Les disques sur lesquels sont collés des
étiquettes, des autocollants, du ruban adhésif ou
du papier. De tels disques peuvent provoquer des
problèmes de fonctionnement ou être
endommagés.
– Les disques de forme non standard (notamment
en forme de cœur, de carré ou d’étoile). Vous
risquez d’endommager votre appareil si vous
essayez de lire ces types de disques.
– Les disques de 8 cm (3
1
/4 po).
Remarques sur les disques CD-R/
CD-RW
• Nombre maximal de : (CD-R/CD-RW
uniquement)
– dossiers (albums) : 150 (y compris le répertoire
racine)
– fichiers (plages) et dossiers : 300 (lorsque les
noms de dossier/fichier contiennent un grand
nombre de caractères, ce nombre peut être
inférieur à 300)
– caractères affichables pour un nom de dossier/
fichier : 32 (Joliet)/64 (Romeo)
• Si le disque multisession commence avec une
session CD-DA, il est reconnu comme un disque
CD-DA et les autres sessions ne sont pas lues.
• Disques ne pouvant PAS être lus sur cet
appareil
– CD-R/CD-RW dont la qualité d’enregistrement
est mauvaise.
– CD-R/CD-RW enregistrés avec un appareil
d’enregistrement non compatible.
– CD-R/CD-RW n’ayant pas été finalisés
correctement.
– CD-R/CD-RW autres que ceux enregistrés au
format CD audio ou MP3 conformément à la
norme ISO9660 niveau 1/niveau 2, Joliet/Romeo
ou multisession.
Ordre de lecture des fichiers MP3/
WMA/AAC
MP3/WMA/AAC
Dossier
(album)
Fichier MP3/
WMA/AAC
(plage)
29
Page 60

À propos de l’iPod
1
• Vous pouvez raccorder cet appareil aux modèles
d’iPod suivants. Mettez vos périphériques iPod à
jour avec le logiciel le plus récent avant toute
utilisation.
Made for
– iPod touch (2ème génération)
– iPod touch (1ère génération)
– iPod classic
– iPod avec vidéo*
– iPod nano (5ème génération)
– iPod nano (4ème génération)
– iPod nano (3ème génération)
– iPod nano (2ème génération)
– iPod nano (1ère génération)*
– iPhone 3GS
– iPhone 3G
– iPhone
* La commande passager n’est pas disponible pour
l’iPod nano (1ère génération) ou l’iPod avec vidéo.
• « Made for iPod » et « Made for iPhone »
signifient qu’un accessoire électronique a été
conçu pour être connecté spécifiquement à un
iPod ou un iPhone et a été certifié par le
développeur afin de répondre aux normes de
performance Apple.
• Apple n’est pas responsable du fonctionnement
de cet appareil ou de sa conformité aux normes
de sécurité et de réglementations.
Remarques sur la pile au lithium
• Tenez la pile au lithium hors de la portée des
enfants. En cas d’ingestion de la pile, consultez
immédiatement un médecin.
• Essuyez la pile avec un chiffon sec pour assurer un
bon contact.
• Veillez à respecter la polarité lors de l’installation de
la pile.
• Ne tenez pas la pile avec des pinces métalliques car
cela pourrait causer un court-circuit.
ATTENTION
Utilisée de façon incorrecte, la pile peut
exploser.
Ne pas la recharger, la démonter ni la jeter
au feu.
Remplacement du
fusible
Lorsque vous remplacez le
fusible, veillez à utiliser un
fusible dont l’intensité, en
ampères, correspond à la valeur
indiquée sur le fusible usagé. Si
le fusible grille, vérifiez le
branchement de l’alimentation
et remplacez le fusible. Si le
nouveau fusible grille
également, il est possible que
l’appareil soit défectueux. Dans ce cas, consultez
votre détaillant Sony le plus proche.
Fusible (10 A)
Si vous avez des questions ou des problèmes
concernant cet appareil qui ne sont pas abordés dans
ce mode d’emploi, contactez votre détaillant Sony.
Entretien
Remplacement de la pile au lithium
de la mini-télécommande
Dans des conditions d’utilisation normales, la
pile dure environ 1 an. (Selon les conditions
d’utilisation, sa durée de vie peut être plus
courte.)
Lorsque la pile est faible, la portée de la minitélécommande diminue. Remplacez la pile par
une pile au lithium CR2025 neuve. L’utilisation
de tout autre type de pile présente un risque
d’incendie ou d’explosion.
Pôle + vers le haut
2
c
30
Nettoyage des connecteurs
L’appareil peut ne pas fonctionner correctement si
les connecteurs entre l’appareil et la façade sont
sales. Pour éviter cette situation, retirez la façade
(page 7) et nettoyez les connecteurs avec un cotontige. N’exercez pas une pression trop forte car vous
pourriez endommager les connecteurs.
Appareil principal
Remarques
• Pour plus de sécurité, coupez le contact avant de
nettoyer les connecteurs et retirez la clé de contact.
• Ne touchez jamais les connecteurs directement
avec les doigts ou avec un objet métallique.
Arrière de la façade
Page 61

Démontage de l’appareil
Caractéristiques techniques
1 Retirez le tour de protection.
1 Retirez la façade (page 7).
2 Pincez les deux bords du tour de
protection, puis sortez-le.
x
2 Retirez l’appareil.
1 Insérez simultanément les deux clés de
déblocage jusqu’au déclic.
Crochet vers
l’intérieur.
2 Tirez sur les clés de déblocage pour
extraire l’appareil.
3 Faites glisser l’appareil en dehors de son
support.
Radio
FM
Plage de syntonisation : 87,5 à 107,9 MHz
Borne d’antenne :
connecteur d’antenne externe
Fréquence intermédiaire : 150 kHz
Sensibilité utile : 10 dBf
Sélectivité : 75 dB à 400 kHz
Rapport signal/bruit : 70 dB (mono)
Séparation : 40 dB à 1 kHz
Réponse en fréquence : 20 à 15 000 Hz
AM
Plage de syntonisation : 530 à 1 710 kHz
Borne d’antenne :
connecteur d’antenne externe
Fréquence intermédiaire : 25 kHz
Sensibilité : 26 µV
Lecteur CD
Rapport signal/bruit : 120 dB
Réponse en fréquence : 10 à 20 000 Hz
Pleurage et scintillement : en dessous du seuil
mesurable
Lecteur USB
Interface : USB (haute vitesse)
Courant maximal : 500 mA
Amplificateur de puissance
Sorties : sorties de haut-parleurs
Impédance des haut-parleurs : 4 à 8 ohms
Puissance de sortie maximale : 52 W × 4 (à 4 ohms)
Généralités
Sorties :
Borne de sorties audio (avant/arrière)
Borne de sortie du caisson de graves (mono)
Borne de commande de relais d’antenne électrique
Borne de commande d’amplificateur de puissance
Entrées :
Borne d’entrée de commande BUS
Borne d’entrée audio BUS
Borne d’entrée de télécommande
Borne d’entrée de l’antenne
Borne de commande ATT téléphone
Prise d’entrée AUX (mini-prise stéréo)
Connecteur d’entrée du signal USB
Alimentation requise : batterie de véhicule 12 V CC
(masse négative)
Dimensions : environ 178 × 50 × 180 mm
1
(7
/8 × 2 × 71/8 po) (l/h/p)
Dimensions de montage : environ 182 × 53 × 162 mm
1
(7
/4 × 21/8 × 61/2 po) (l/h/p)
Poids : environ 1,3 kg (2 lb 14 oz)
Accessoires fournis :
Mini-télécommande : RM-X151
Composants destinés à l’installation et aux
raccordements (1 jeu)
suite à la page suivante t
31
Page 62

Accessoires/appareils en option :
Câble BUS (fourni avec un câble à broche RCA) :
RC-61 (1 m), RC-62 (2 m)
Câble de raccordement USB pour iPod : RC-100IP
Récepteur HD Radio™ : XT-100HD
Il est possible que votre détaillant ne dispose pas de
certains accessoires énoncés ci-dessus. Veuillez
vous adresser à lui pour tout renseignement
complémentaire.
La conception et les caractéristiques techniques sont
sujettes à modification sans préavis.
Configurations requises pour le
logiciel sur le CD-ROM fourni
Ordinateur
•CPU/RAM
– Ordinateur compatible IBM PC/AT
– CPU : Intel Pentium III Processor
450 MHz ou supérieur
– RAM : 256 MB ou plus
(pour Windows XP), 512 MB ou plus
(pour Windows Vista ou version ultérieure)
• Lecteur de CD-ROM
• Port USB
Système d’exploitation
Windows XP, Windows Vista, Windows 7
Pour plus de détails sur les éditions ou Service Pack
compatibles, visitez le site d’assistance suivant :
http://esupport.sony.com
http://www.sony.com/mobileAV
Moniteur
Couleurs (16 bits) ou plus, 800 × 600 points ou plus
Autre
Connexion Internet
Remarques
• Les environnements système suivants ne sont pas
pris en charge.
– Ordinateurs d’un type autre que IBM PC, tels que
les Macintosh, etc.
– Ordinateurs assemblés à la maison
– Ordinateurs avec système d’exploitation mis à
niveau
– Environnement à affichage multiple
– Environnement à démarrage multiple
– Environnement de machine virtuelle
• Selon les caractéristiques de l’ordinateur, le
fonctionnement peut être impossible même dans
l’environnement recommandé.
Dépannage
La liste de vérification suivante vous aidera à
remédier aux problèmes que vous pourriez
rencontrer avec cet appareil.
Avant de passer en revue la liste ci-dessous, vérifiez
les procédures de raccordement et d’utilisation.
Si vous ne parvenez pas à résoudre le problème,
consultez le site d’assistance suivant.
Sites d’assistance
http://esupport.sony.com
http://www.sony.com/mobileAV
Généralités
L’appareil n’est pas alimenté.
• Vérifiez le raccordement ou le fusible.
• Si l’appareil est éteint et que l’affichage disparaît, il
est impossible de commander l’appareil avec la
télécommande.
t Mettez l’appareil en marche.
L’antenne électrique ne se déploie pas.
L’antenne électrique ne dispose pas d’un boîtier de
relais.
Aucun son n’est émis.
• La fonction ATT est activée ou la fonction ATT
téléphone (lorsque le câble d’interface d’un
téléphone de voiture est raccordé au câble ATT) est
activée.
• La position de la commande d’équilibre avant/arrière
« FADER » n’est pas réglée pour un système à
2 haut-parleurs.
Aucun bip n’est émis.
• Le bip est désactivé (page 27).
• Un amplificateur de puissance en option est raccordé
et vous n’utilisez pas l’amplificateur intégré.
Le contenu de la mémoire a été effacé.
• La touche RESET a été enfoncée.
t Recommencez la procédure d’enregistrement
dans la mémoire.
• Le câble d’alimentation ou la batterie a été
déconnecté(e) ou n’est pas raccordé(e) correctement.
Les stations mémorisées sont effacées et
l’heure est remise à zéro.
Le fusible est grillé.
Émission de bruit lorsque la position de la clé
de contact est modifiée.
Les câbles ne sont pas raccordés correctement au
connecteur d’alimentation du véhicule destiné aux
accessoires.
Pendant la lecture ou la réception, l’écran du
mode de démonstration apparaît.
Si aucune opération n’est effectuée pendant 5 minutes
alors que le réglage « DEMO-ON » est sélectionné,
l’écran du mode de démonstration apparaît.
t Sélectionnez le réglage « DEMO-OFF » (page 27).
32
Page 63

L’affichage disparaît de la fenêtre d’affichage
ou il n’apparaît pas.
• Le régulateur de luminosité est réglé à « DIMMERON » (page 27).
• L’affichage est désactivé si vous maintenez la touche
(SOURCE/OFF) enfoncée.
t Maintenez enfoncée la touche (SOURCE/OFF)
de l’appareil jusqu’à ce que l’affichage
apparaisse.
• Les connecteurs sont sales (page 30).
La fonction arrêt automatique est inopérante.
L’appareil est en marche. La fonction arrêt
automatique s’active lorsque l’appareil est éteint.
tÉteignez l’appareil.
Réception radio
Impossible de capter des stations.
Le son est parasité.
• Le raccordement est incorrect.
t Raccordez un câble de commande d’antenne
électrique (bleu) ou un câble d’alimentation
d’accessoires (rouge) au câble d’alimentation de
l’amplificateur d’antenne du véhicule
(uniquement si votre véhicule est équipé d’une
antenne FM/AM intégrée dans la fenêtre arrière
ou latérale).
t Vérifiez le raccordement de l’antenne du
véhicule.
t Si l’antenne automatique ne se déploie pas,
vérifiez le raccordement du câble de commande
d’antenne électrique.
Impossible de capter une station
présélectionnée.
• Enregistrez la fréquence correcte dans la mémoire.
• Le signal capté est trop faible.
La syntonisation automatique est impossible.
• Le réglage du mode de recherche locale est incorrect.
t La syntonisation s’arrête trop souvent :
Sélectionnez le réglage « LOCAL-ON »
(page 27).
t La syntonisation ne s’arrête sur aucune station :
Sélectionnez le réglage « LOCAL-OFF »
(page 27).
• Le signal capté est trop faible.
t Réglez manuellement la fréquence.
Pendant la réception FM, l’indication « ST »
clignote.
• Réglez la fréquence correctement.
• Le signal capté est trop faible.
t Sélectionnez le réglage « MONO-ON »
(page 27).
Une émission FM en stéréo est entendue en
mono.
L’appareil est en mode de réception mono.
tSélectionnez le réglage « MONO-OFF » (page 27).
RDS
PTY affiche « - - - - - - - - ».
• La station captée n’est pas une station RDS.
• Aucune donnée RDS n’a été reçue.
• La station ne spécifie pas le type d’émission.
Lecture de CD
Impossible d’introduire le disque.
• Un autre disque est déjà en place.
• Le disque a été introduit de force à l’envers ou dans le
mauvais sens.
La lecture du disque ne commence pas.
• Le disque est défectueux ou sale.
• Les CD-R/CD-RW ne sont pas destinés à un usage
audio (page 29).
Impossible de lire des fichiers MP3/WMA/AAC.
Le disque n’est pas compatible avec le format et la
version MP3/WMA/AAC. Pour plus de détails sur les
formats et disques pouvant être lus, visitez le site
d’assistance.
Certains fichiers MP3/WMA/AAC exigent un
délai plus long que d’autres avant le début de
la lecture.
La lecture des types de disques suivants exige un délai
de démarrage plus long :
– disques comportant une hiérarchie de dossiers
complexe.
– disques enregistrés en multisession.
– disques auxquels il est possible d’ajouter des
données.
Les éléments d’affichage ne défilent pas.
• Pour certains disques contenant un grand nombre de
caractères, la fonction de défilement peut être
inopérante.
• La fonction « AUTO SCROLL » est réglée à
«OFF».
t Sélectionnez le réglage « A.SCRL-ON »
(page 27).
t Appuyez sur la touche (DSPL) (SCRL) et
maintenez-la enfoncée.
Le son est saccadé.
• L’installation est incorrecte.
t Installez l’appareil suivant un angle de moins de
45° dans un endroit stable du véhicule.
• Le disque est défectueux ou sale.
Les touches de commande ne fonctionnent
pas.
Impossible d’éjecter le disque.
Appuyez sur la touche RESET (page 6).
Lecture USB
Impossible de lire des éléments à l’aide d’un
concentrateur USB.
Cet appareil ne peut pas reconnaître les périphériques
USB raccordés au moyen d’un concentrateur USB.
Impossible de lire certains éléments.
Un périphérique USB ne fonctionne pas.
t Raccordez-le.
La lecture sur le périphérique USB exige un
délai de démarrage plus long.
Le périphérique USB contient des fichiers avec une
hiérarchie de dossiers complexe.
suite à la page suivante t
33
Page 64

Un bip est émis.
Le périphérique USB a été déconnecté en cours de
lecture.
t Avant de déconnecter un périphérique USB, arrêtez
la lecture afin de ne pas endommager les données.
Le son est intermittent.
Il est possible que le son soit intermittent à un débit
binaire supérieur à 320 kbit/s.
Affichage des erreurs et messages
CHECKING
L’appareil confirme le raccordement d’un périphérique
USB.
t Attendez la fin de la confirmation du raccordement.
ERROR
• Le disque est sale ou inséré à l’envers.
tNettoyez le disque ou insérez-le correctement.
• Un disque vierge a été inséré.
• Le disque ne peut pas être lu en raison de certains
problèmes.
tInsérez un autre disque.
• Le périphérique USB n’a pas été reconnu
automatiquement.
tRaccordez-le de nouveau.
• Appuyez sur Z pour retirer le disque.
FAILURE (Reste allumé jusqu’à ce qu’une touche soit
enfoncée.)
Le raccordement des haut-parleurs ou des
amplificateurs est incorrect.
t Reportez-vous au manuel d’installation/
raccordement de ce modèle pour vérifier les
raccordements.
FAILURE (Reste allumé pendant environ 1 seconde.)
La mémorisation d’une station radio SAT sur une
présélection a échoué pendant qu’un récepteur SAT est
raccordé.
t Vérifiez que vous recevez la station radio que vous
souhaitez mémoriser, puis essayez de nouveau.
HUBS NO SUPRT
Cet appareil ne prend pas en charge les concentrateurs
USB.
INVALID
Le périphérique USB raccordé ne contient aucun
fichier de musique pour la fonction SensMe™.
L. SEEK +/–
Le mode de recherche locale est activé en cours de
syntonisation automatique.
NO CHANNEL
Le périphérique USB raccordé ne contient aucune liste
de canal pour la fonction SensMe™.
NO DEV (Pas de périphérique)
USB est sélectionné comme source mais aucun
périphérique USB n’est raccordé. Un périphérique
USB ou un câble USB a été déconnecté en cours de
lecture.
t Raccordez un périphérique USB et un câble USB.
NO MUSIC
Le disque ou le périphérique USB ne contient pas de
fichiers de musique.
t Insérez un CD audio dans cet appareil.
t Raccordez un périphérique USB contenant des
fichiers de musique.
NO NAME
Aucun nom de disque/d’album/d’artiste/de plage n’est
écrit dans la plage.
NOT FOUND
Aucun élément ne débute par la lettre sélectionnée
dans la recherche alphabétique.
OFFSET
Il se peut que l’appareil soit défectueux.
t Vérifiez le raccordement. Si le message d’erreur ne
disparaît pas de l’affichage, contactez votre
détaillant Sony le plus proche.
OVERLOAD
Le périphérique USB est saturé.
t Débranchez le périphérique USB, puis changez la
source en appuyant sur (SOURCE/OFF).
t Indique que le périphérique USB ne fonctionne
plus ou qu’un périphérique non pris en charge est
raccordé.
READ
L’appareil lit toutes les informations relatives aux
plages et albums du disque.
t Attendez que la lecture soit terminée et la lecture
commence automatiquement. Selon la structure du
disque, cette opération peut prendre plus d’une
minute.
RESET
Impossible de commander cet appareil ou le
périphérique USB en raison d’un problème.
t Appuyez sur la touche RESET (page 6).
S-CH NO SUPRT (Canal SensMe™ non pris en
charge)
Le périphérique USB raccordé n’est pas pris en charge.
t Pour plus de détails sur la compatibilité de votre
périphérique USB, visitez notre site d’assistance.
USB NO SUPRT (USB non pris en charge)
Le périphérique USB raccordé n’est pas pris en charge.
t Pour plus de détails sur la compatibilité de votre
périphérique USB, visitez notre site d’assistance.
« » ou « »
En mode de retour ou d’avance rapide, vous avez
atteint le début ou la fin du disque et vous ne pouvez
pas aller plus loin.
«»
Le caractère ne peut pas être affiché sur l’appareil.
Si ces solutions ne permettent pas d’améliorer la
situation, contactez votre détaillant Sony le plus
proche.
Si vous devez faire réparer l’appareil en raison d’un
problème de lecture de CD, apportez le disque
utilisé au moment où le problème s’est produit.
34
Page 65

Page 66

Page 67

Page 68

If you have any questions/problems
regarding this product, try the following:
1
Read Troubleshooting in these
Operating Instructions.
2
Reset the unit.
Note: Stored data may be erased.
3
Please contact (U.S.A. only);
Call
URL
1-800-222-7669
http://www.SONY.com
http://www.sony.net/
Sony Corporation Printed in Thailand
 Loading...