

Page 1

FM/MW/LW Compact Disc Player
4-193-831-71(1)
FM/MW/LW
Compact Disc Player
Operating Instructions
Bedienungsanleitung
Mode d’emploi
Istruzioni per l’uso
Gebruiksaanwijzing
To cancel the demonstration (DEMO) display, see page 6.
Zum Deaktivieren der Demo-Anzeige (DEMO) schlagen Sie bitte auf Seite 6 nach.
Pour annuler la démonstration (DEMO), reportez-vous à la page 6.
Per annullare la dimostrazione (DEMO), vedere pagina 6.
Om de demonstratie (DEMO) te annuleren, zie pagina 6.
CDX-GT650UI
©2010 Sony Corporation
GB
DE
FR
IT
NL
Page 2
Be sure to install this unit in the dashboard of
the car for safety. For installation and
connections, see the supplied installation/
connections manual.
This label is located on the bottom of the
chassis.
Notice for customers: the following
information is only applicable to
equipment sold in countries applying
EU Directives
The manufacturer of this product is Sony
Corporation, 1-7-1 Konan Minato-ku Tokyo,
108-0075 Japan. The Authorized Representative
for EMC and product safety is Sony
Deutschland GmbH, Hedelfinger Strasse 61,
70327 Stuttgart, Germany. For any service or
guarantee matters please refer to the addresses
given in separate service or guarantee
documents.
Disposal of Old Electrical &
Electronic Equipment (Applicable in
the European Union and other
European countries with separate
collection systems)
This symbol on the product or on its
packaging indicates that this product shall not be treated
as household waste. Instead it shall be handed over to the
applicable collection point for the recycling of electrical
and electronic equipment. By ensuring this product is
disposed of correctly, you will help prevent potential
negative consequences for the environment and human
health, which could otherwise be caused by inappropriate
waste handling of this product. The recycling of materials
will help to conserve natural resources. For more detailed
information about recycling of this product, please contact
your local Civic Office, your household waste disposal
service or the shop where you purchased the product.
Applicable accessory: Remote commander
Disposal of waste batteries
(applicable in the European Union
and other European countries with
separate collection systems)
This symbol on the battery or on the packaging indicates
that the battery provided with this product shall not be
treated as household waste. On certain batteries this
symbol might be used in combination with a chemical
symbol. The chemical symbols for mercury (Hg) or lead
(Pb) are added if the battery contains more than 0.0005%
mercury or 0.004% lead. By ensuring these batteries are
disposed of correctly, you will help prevent potentially
negative consequences for the environment and human
health which could otherwise be caused by inappropriate
waste handling of the battery. The recycling of the
materials will help to conserve natural resources.
In case of products that for safety, performance or data
integrity reasons require a permanent connection with an
incorporated battery, this battery should be replaced by
qualified service staff only. To ensure that the battery will
be treated properly, hand over the product at end-of-life to
the applicable collection point for the recycling of
electrical and electronic equipment.
For all other batteries, please view the section on how to
remove the battery from the product safely. Hand the
battery over to the applicable collection point for the
recycling of waste batteries.
For more detailed information about recycling of this
product or battery, please contact your local Civic Office,
your household waste disposal service or the shop where
you purchased the product.
ZAPPIN and Quick-BrowZer are trademarks of
Sony Corporation.
12 TONE ANALYSIS and its
logo are trademarks of Sony
Corporation.
SensMe and the SensMe logo are
trademarks or registered
trademarks of Sony Ericsson
Mobile Communications AB.
2
Page 3
Music recognition technology and related data are
provided by Gracenote®. Gracenote is the industry
standard in music recognition technology and
related content delivery. For more information,
please visit www.gracenote.com.
CD and music-related data from Gracenote, Inc.,
copyright © 2000-2010 Gracenote. Gracenote
Software, copyright © 2000-2010 Gracenote. This
product and service may practice one or more of
the following U.S. Patents: #5,987,525;
#6,061,680; #6,154,773, #6,161,132, #6,230,192,
#6,230,207, #6,240,459, #6,330,593, and other
patents issued or pending. Some services supplied
under license from Open Globe, Inc. for U.S.
Patent: #6,304,523.
Gracenote and CDDB are registered trademarks of
Gracenote. The Gracenote logo and logotype, and
the “Powered by Gracenote” logo are trademarks
of Gracenote.
Microsoft, Windows, Windows Vista and
Windows Media and logos are trademarks or
registered trademarks of Microsoft Corporation
in the United States and/or other countries.
This product is protected by certain intellectual
property rights of Microsoft Corporation. Use or
distribution of such technology outside of this
product is prohibited without a license from
Microsoft or an authorized Microsoft subsidiary.
iPhone, iPod, iPod classic, iPod nano, and iPod
touch are trademarks of Apple Inc., registered
in the U.S. and other countries.
Apple, Macintosh and iTunes are trademarks of
Apple Inc., registered in the U.S. and other
countries.
MPEG Layer-3 audio coding technology and
patents licensed from Fraunhofer IIS and Thomson.
Note on the lithium battery
Do not expose the battery to excessive heat such as
direct sunlight, fire or the like.
Warning if your car’s ignition has no
ACC position
Be sure to set the Auto Off function (page 25).
The unit will shut off completely and
automatically in the set time after the unit is
turned off, which prevents battery drain.
If you do not set the Auto Off function, press
and hold (SOURCE/OFF) until the display
disappears each time you turn the ignition off.
3
Page 4

Table of Contents
Getting Started
Playable discs on this unit . . . . . . . . . . . . . . . . . 6
Resetting the unit. . . . . . . . . . . . . . . . . . . . . . . . 6
Canceling the DEMO mode . . . . . . . . . . . . . . . 6
Preparing the card remote commander . . . . . . . 6
Setting the clock . . . . . . . . . . . . . . . . . . . . . . . . 6
Detaching the front panel . . . . . . . . . . . . . . . . . 7
Attaching the front panel . . . . . . . . . . . . . . . 7
Location of controls and basic
operations
Main unit. . . . . . . . . . . . . . . . . . . . . . . . . . . . 8
RM-X151 Card Remote Commander. . . . . 10
Radio
Storing and receiving stations . . . . . . . . . . . . . 11
Storing automatically — BTM . . . . . . . . . . 11
Storing manually. . . . . . . . . . . . . . . . . . . . . 11
Receiving the stored stations . . . . . . . . . . . 11
Tuning automatically . . . . . . . . . . . . . . . . . 11
RDS . . . . . . . . . . . . . . . . . . . . . . . . . . . . . . . . . 11
Overview. . . . . . . . . . . . . . . . . . . . . . . . . . . 11
Setting AF and TA . . . . . . . . . . . . . . . . . . . 12
Selecting PTY. . . . . . . . . . . . . . . . . . . . . . . 12
Setting CT. . . . . . . . . . . . . . . . . . . . . . . . . . 12
CD
Playing a disc. . . . . . . . . . . . . . . . . . . . . . . . . . 13
Display items . . . . . . . . . . . . . . . . . . . . . . . 13
Repeat and shuffle play. . . . . . . . . . . . . . . . 13
USB devices
Playing back a USB device . . . . . . . . . . . . . . . 13
Display items . . . . . . . . . . . . . . . . . . . . . . . 14
Repeat and shuffle play. . . . . . . . . . . . . . . . 14
Enjoying music according to your mood
— SensMe™ . . . . . . . . . . . . . . . . . . . . . . . . . . 14
Before using the SensMe™ function . . . . . 14
Installing “SensMe™ Setup” and “Content
Transfer” in your computer. . . . . . . . . . . . . 15
Registering a USB device using “SensMe™
Setup” . . . . . . . . . . . . . . . . . . . . . . . . . . . . . 15
Transferring tracks to the USB device using
“Content Transfer” . . . . . . . . . . . . . . . . . . . 15
Playing tracks in the channel
— SensMe™ channels . . . . . . . . . . . . . . . . 16
iPod
Playing back iPod . . . . . . . . . . . . . . . . . . . . . . 17
Display items . . . . . . . . . . . . . . . . . . . . . . . 17
Skipping albums, podcasts, genres, playlists
and artists . . . . . . . . . . . . . . . . . . . . . . . . . . 18
Repeat and shuffle play . . . . . . . . . . . . . . . 18
Operating an iPod directly
— Passenger control. . . . . . . . . . . . . . . . . . . . 18
Searching for a track
Searching a track by name
— Quick-BrowZer™ . . . . . . . . . . . . . . . . . . . 19
Searching by skip items
— Jump mode . . . . . . . . . . . . . . . . . . . . . . 19
Searching by alphabetical order
— Alphabet search. . . . . . . . . . . . . . . . . . . 19
Searching a track by listening to track passages
— ZAPPIN™ . . . . . . . . . . . . . . . . . . . . . . . . . 20
In the case of “SensMe™ channels”
playback . . . . . . . . . . . . . . . . . . . . . . . . . . . 20
Enjoying the illumination color
variation
Changing the color of display and buttons
—Dynamic Color Illuminator. . . . . . . . . . . . . 20
Customizing the display and button color
— Custom Color . . . . . . . . . . . . . . . . . . . . 21
Advanced color setting . . . . . . . . . . . . . . . . . . 21
SensMe™ Channels synchronization
— SensMe™ Channels Color . . . . . . . . . . 21
Changing the color with sound
synchronization
— Sound Synchronization . . . . . . . . . . . . . 21
Displaying clear color
— White Menu. . . . . . . . . . . . . . . . . . . . . . 22
Start up effect
— Start White . . . . . . . . . . . . . . . . . . . . . . 22
4
Page 5

Sound Settings and Setup Menu
Other functions
Changing the sound settings . . . . . . . . . . . . . . 22
Adjusting the sound characteristics . . . . . . 22
Enjoying sophisticated sound functions
— Advanced Sound Engine . . . . . . . . . . . . . . 23
Selecting the sound quality
— EQ7 Preset . . . . . . . . . . . . . . . . . . . . . . . 23
Customizing the equalizer curve
— EQ7 Setting . . . . . . . . . . . . . . . . . . . . . . 23
Optimizing sound by Time Alignment
— Listening Position . . . . . . . . . . . . . . . . . 23
Adjusting the listening position . . . . . . . . . 24
DM+ Advanced. . . . . . . . . . . . . . . . . . . . . . 24
Using rear speakers as subwoofer
— Rear Bass Enhancer . . . . . . . . . . . . . . . . 24
Adjusting setup items — SET. . . . . . . . . . . . . 24
Using optional equipment. . . . . . . . . . . . . . . . 26
Auxiliary audio equipment. . . . . . . . . . . . . 26
Additional Information
Precautions . . . . . . . . . . . . . . . . . . . . . . . . . . . 26
Notes on discs . . . . . . . . . . . . . . . . . . . . . . 26
Playback order of MP3/WMA/AAC
files. . . . . . . . . . . . . . . . . . . . . . . . . . . . . . . 27
About iPod . . . . . . . . . . . . . . . . . . . . . . . . . 27
Maintenance . . . . . . . . . . . . . . . . . . . . . . . . . . 27
Removing the unit. . . . . . . . . . . . . . . . . . . . . . 28
Specifications . . . . . . . . . . . . . . . . . . . . . . . . . 29
Troubleshooting . . . . . . . . . . . . . . . . . . . . . . . 30
Error displays/Messages. . . . . . . . . . . . . . . 32
Support site
If you have any questions or for the latest support information on this
product, please visit the web site below:
http://support.sony-europe.com/
Provides information on:
• Models and manufacturers of compatible digital audio players
• Supported MP3/WMA/AAC files
• System requirements for the software in the supplied CD-ROM
5
Page 6
Getting Started
Playable discs on this unit
This unit can play CD-DA (also containing CD
TEXT) and CD-R/CD-RW (MP3/WMA/AAC
files (page 26)).
Type of discs Label on the disc
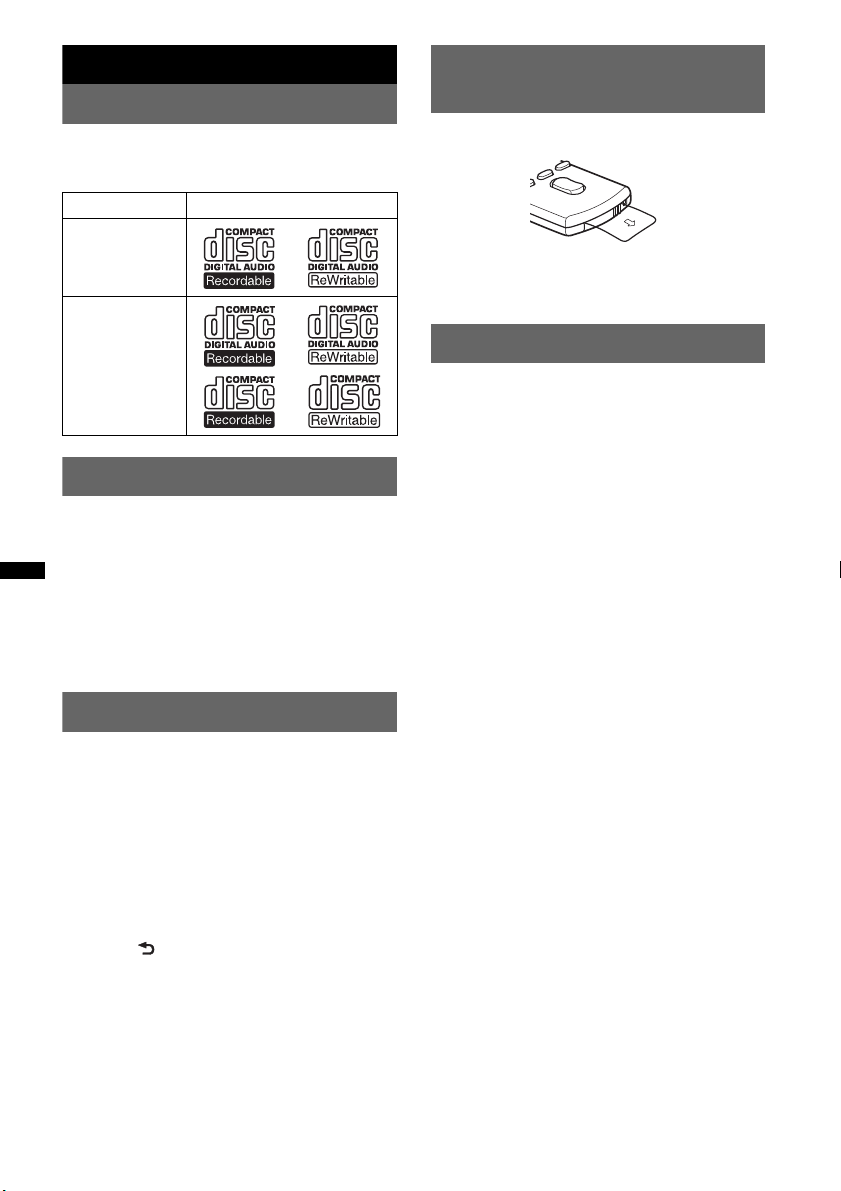
Preparing the card remote
commander
Remove the insulation film.
CD-DA
MP3
WMA
AAC
Resetting the unit
Before operating the unit for the first time, or
after replacing the car battery or changing the
connections, you must reset the unit.
Detach the front panel (page 7) and press the
RESET button (page 8) with a pointed object,
such as a ball-point pen.
Note
Pressing the RESET button will erase the clock setting
and some stored contents.
Canceling the DEMO mode
You can cancel the demonstration display which
appears during turning off.
1 Press and hold the select button.
The setup display appears.
2 Rotate the control dial until “DEMO”
appears, then press it.
3 Rotate the control dial to select
“DEMO-OFF,” then press it.
The setting is complete.
4 Press (BACK).
The display returns to normal reception/play
mode.
Tip
For how to replace the battery, see page 27.
Setting the clock
The clock uses a 24-hour digital indication.
1 Press and hold the select button.
The setup display appears.
2 Rotate the control dial until “CLOCK
ADJ” appears, then press it.
The hour indication flashes.
3 Rotate the control dial to set the hour
and minute.
To move the digital indication, press (SEEK)
–/+.
4 After setting the minute, press the
select button.
The setup is complete and the clock starts.
To display the clock, press (DSPL). Press
(DSPL) again to return to the previous display.
Tip
You can set the clock automatically with the RDS
feature (page 12).
6
Page 7
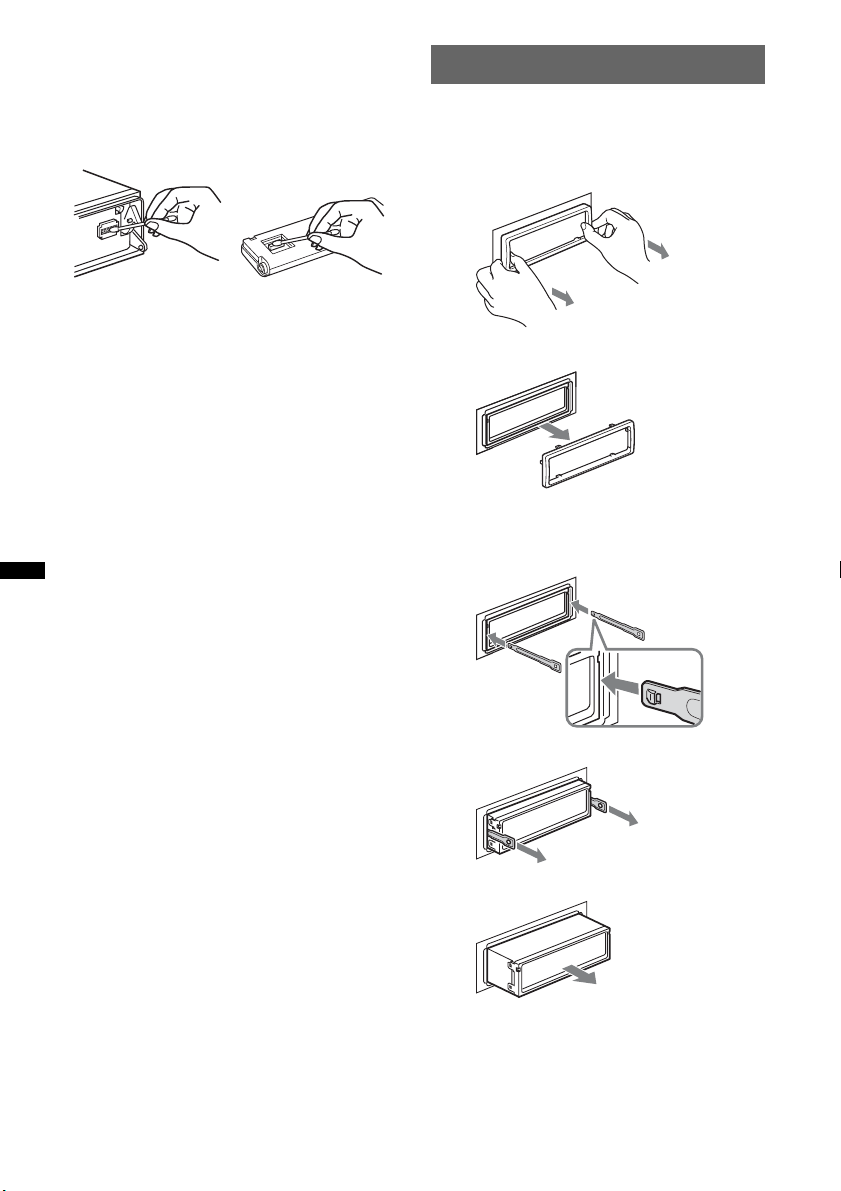
Detaching the front panel
You can detach the front panel of this unit to
prevent theft.
Caution alarm
If you turn the ignition switch to the OFF
position without detaching the front panel, the
caution alarm will sound for a few seconds.
The alarm will only sound if the built-in
amplifier is used.
1 Press and hold (SOURCE/OFF).
The unit is turned off.
2 Press (OPEN).
The front panel is flipped down.
3 Slide the front panel to the right, then
gently pull out the left end of the front
panel.
Notes
• Do not drop or put excessive pressure on the front
panel and display window.
• Do not subject the front panel to heat/high
temperature or moisture. Avoid leaving it in a parked
car or on a dashboard/rear tray.
• Do not detach the front panel during playback of the
USB device, otherwise USB data may be damaged.
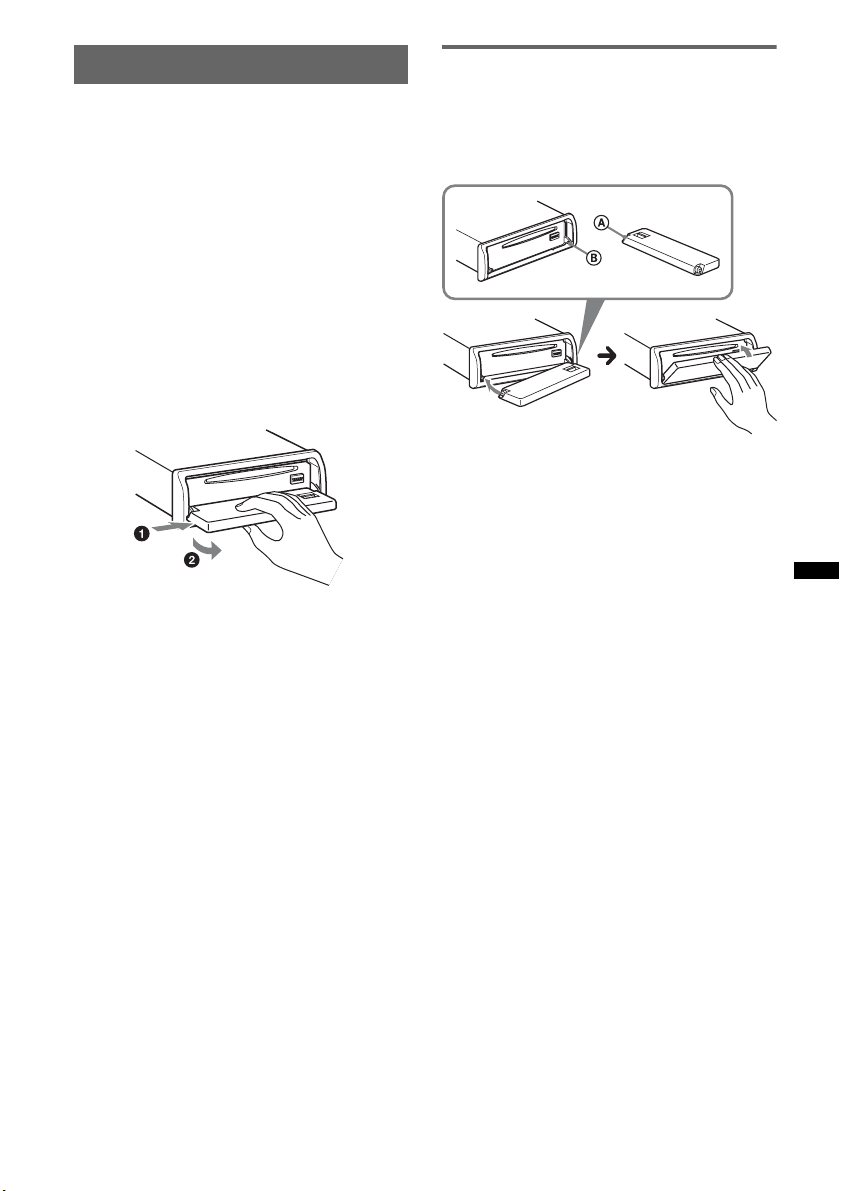
Attaching the front panel
Place the hole A of the front panel onto the
spindle B on the unit, then lightly push the left
side in.
Press (SOURCE/OFF) on the unit (or insert a
disc) to operate the unit.
Note
Do not put anything on the inner surface of the front
panel.
7
Page 8
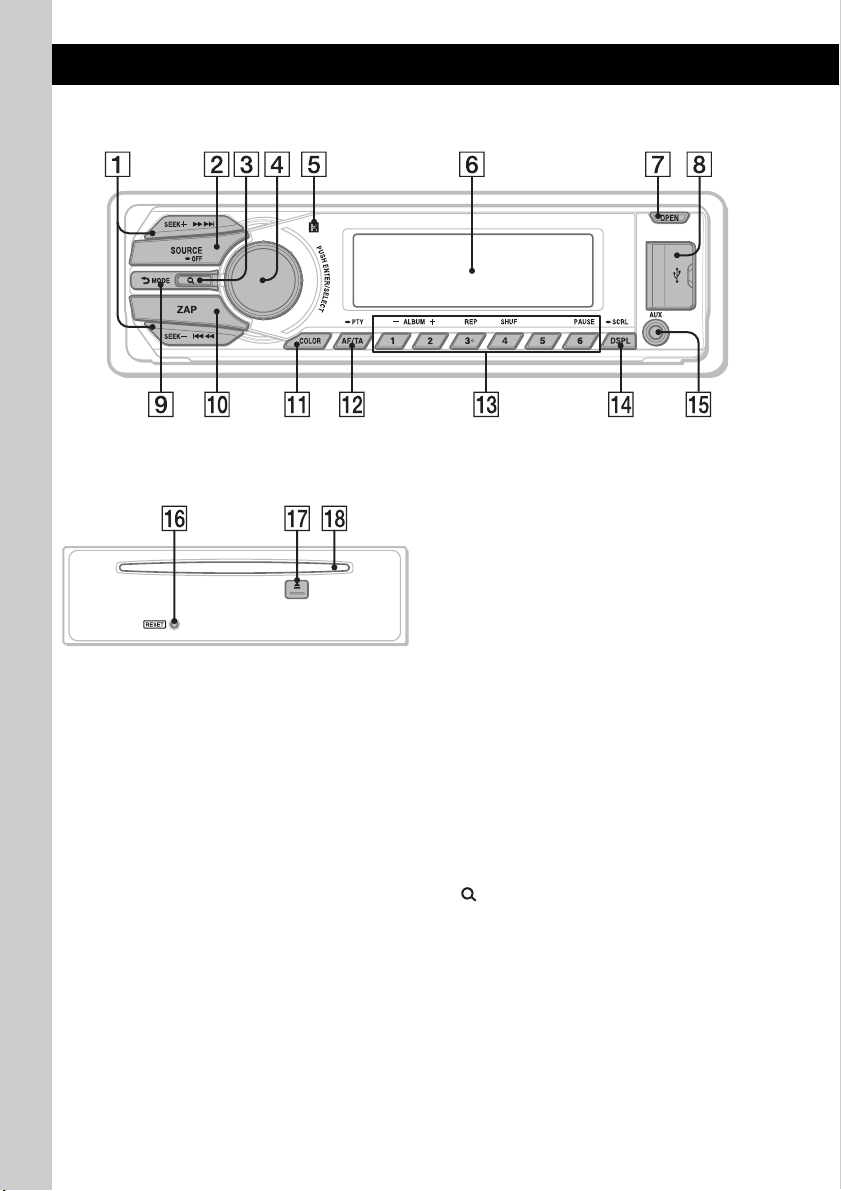
Location of controls and basic operations
Main unit
Front panel removed This section contains instructions on the location
of controls and basic operations.
For details, see the respective pages.
A SEEK +/– buttons
Radio:
To tune in stations automatically (press); find
a station manually (press and hold).
CD/USB:
To skip tracks (press); skip tracks
continuously (press, then press again within
about 1 second and hold); reverse/fastforward a track (press and hold).
SensMe™:
To skip tracks (press); reverse/fastforward a
track (press and hold).
B SOURCE/OFF button
Press to turn on the power/change the source
(Radio/CD/USB/SensMe™*
Press for 1 second to turn off the power.
Press for more than 2 seconds to turn off the
power and the display disappears.
C (BROWSE) button page 19
To enter the Quick-BrowZer™ mode.
D Control dial/select button page 22, 24
To adjust volume (rotate); select setup items
(press and rotate).
1
/AUX).
8
Page 9

E Receptor for the card remote
commander
F Display window
G OPEN button page 7, 13
H USB connector page 13, 16, 17
To connect to the USB device.
I (BACK)/MODE button page 11, 18
Press to return to the previous display/select
the radio band (FM/MW/LW).
Press and hold to enter/cancel the passenger
control.
J ZAP button page 20
To enter ZAPPIN™ mode.
K COLOR button page 20, 21
To select the preset colors (press); register
custom color settings (press and hold).
L AF (Alternative Frequencies)/
TA (Traffic Announcement)/
PTY (Program Type) button page 12
To set AF and TA (press); select PTY (press
and hold) in RDS.
M Number buttons
Radio:
To receive stored stations (press); store
stations (press and hold).
CD/USB/SensMe™:
(1)/(2): ALBUM –/+ (during MP3/WMA/
AAC playback)
To skip albums/change SensMe™
channels (press); skip albums
continuously (press and hold).
(3): REP*
2
page 13, 14, 18
(4): SHUF page 13, 14, 18
(6): PAUSE
To pause playback. To cancel, press
again.
N DSPL (display)/SCRL (scroll) button
page 11, 13, 14, 17, 18
To change display items (press); scroll the
display item (press and hold).
O AUX input jack page 26
To connect a portable audio device.
P RESET button page 6
Q Z (eject) button
To eject the disc.
R Disc slot
Insert the disc (label side up), playback
starts.
*1 When a USB device set up for the SensMe™
function is connected.
*2 This button has a tactile dot.
Notes
• When ejecting/inserting a disc, keep any USB
devices disconnected to avoid damage to the disc.
• If the unit is turned off and the display disappears, it
cannot be operated with the card remote
commander unless (SOURCE/OFF) on the unit is
pressed, or a disc is inserted to activate the unit first.
9
Page 10

RM-X151 Card Remote
Commander
1
2
OFF
SOURCE
SEL
ATT
MODE
3
+
–
VOL
SCRL
+
–
4
5
DSPL
132
465
6
7
8
9
q;
qa
Remove the insulation film before use (page 6).
A OFF button
To turn off the power; stop the source.
B SOURCE button
To turn on the power; change the source
(Radio/CD/USB/SensMe™*
1
/AUX).
C < (.)/, (>) buttons
To control Radio/CD/USB/SensMe™, the
same as (SEEK) –/+ on the unit.
Setup, sound setting, etc., can be operated by
< ,.
D DSPL (display) button
To change display items.
E VOL (volume) +*
2
/– button
To adjust volume.
F ATT (attenuate) button
To attenuate the sound. To cancel, press
again.
G SEL (select) button
The same as the select button on the unit.
H MODE button
Press to select the radio band (FM/MW/LW).
Press and hold to enter/cancel the passenger
control.
I M (+)/m (–) buttons
To control CD/USB/SensMe™, the same as
(1)/(2) (ALBUM –/+) on the unit.
Setup, sound setting, etc., can be operated by
M m.
J SCRL (scroll) button
To scroll the display item.
K Number buttons
To receive stored stations (press); store
stations (press and hold).
*1 When a USB device set up for the SensMe™
function is connected.
*2 This button has a tactile dot.
10
Page 11
Radio
RDS
Storing and receiving stations
Caution
When tuning in stations while driving, use Best
Tuning Memory (BTM) to prevent an accident.
Storing automatically — BTM
1 Press (SOURCE/OFF) repeatedly until
“TUNER” appears.
To change the band, press (MODE)
repeatedly. You can select from FM1, FM2,
FM3, MW or LW.
2 Press and hold the select button.
The setup display appears.
3 Rotate the control dial until “BTM”
appears, then press it.
The unit stores stations in order of frequency
on the number buttons.
A beep sounds when the setting is stored.
Storing manually
1 While receiving the station that you
want to store, press and hold a
number button ((1) to (6)) until
“MEMO” appears.
Note
If you try to store another station on the same number
button, the previously stored station will be replaced.
Tip
When a RDS station is stored, the AF/TA setting is
also stored (page 12).
Receiving the stored stations
1 Select the band, then press a number
button ((1) to (6)).
Tuning automatically
1 Select the band, then press (SEEK) +/–
to search for the station.
Scanning stops when the unit receives a
station. Repeat this procedure until the
desired station is received.
Tip
If you know the frequency of the station you want to
listen to, press and hold (SEEK) +/– to locate the
approximate frequency, then press (SEEK) +/–
repeatedly to fine adjust to the desired frequency
(manual tuning).
Overview
FM stations with Radio Data System (RDS)
service send inaudible digital information along
with the regular radio program signal.
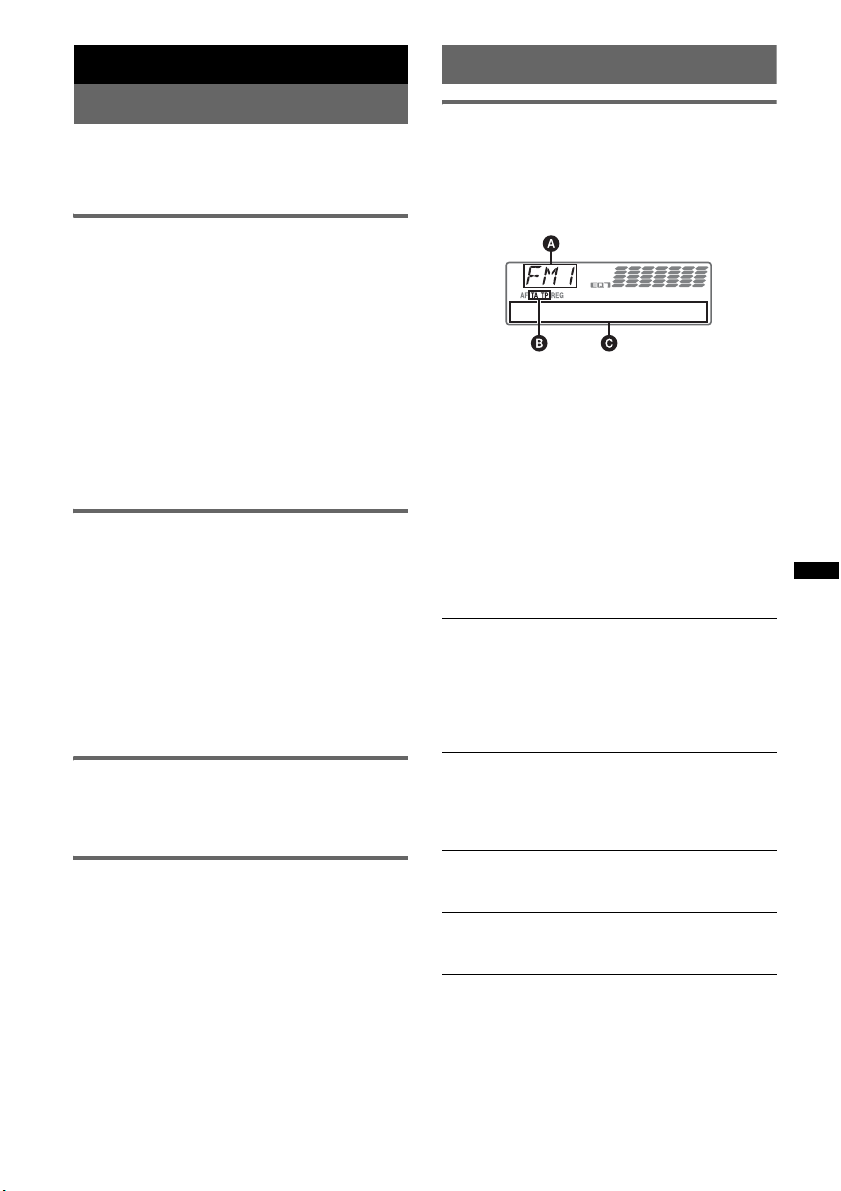
Display items
A Radio band, Function
B TA /T P*
C Frequency*2 (Program service name), Preset
*1 “TA” flashes during traffic information. “TP” lights
*2 While receiving the RDS station, “ *” is displayed
To change display items C, press (DSPL).
1
number, Clock, RDS data
up while such a station is received.
on the left of the frequency indication.
RDS services
This unit automatically provides RDS services as
follows:
AF (Alternative Frequencies)
Selects and retunes the station with the
strongest signal in a network. By using this
function, you can continuously listen to the
same program during a long-distance drive
without having to retune the same station
manually.
TA (Traffic Announcement)/TP (Traffic
Program)
Provides current traffic information/programs.
Any information/program received, will
interrupt the currently selected source.
PTY (Program Types)
Displays the currently received program type.
Also searches your selected program type.
CT (Clock Time)
The CT data from the RDS transmission sets
the clock.
Notes
• Depending on the country/region, not all RDS
functions may be available.
• RDS will not work if the signal strength is too weak,
or if the station you are tuned to is not transmitting
RDS data.
11
Page 12

Setting AF and TA
1 Press (AF/TA) repeatedly until the
desired setting appears.
Select To
AF-ON activate AF and deactivate TA.
TA-O N activate TA and deactivate AF.
AF/TA-ON activate both AF and TA.
AF/TA-OFF deactivate both AF and TA.
Storing RDS stations with the AF and
TA setting
You can preset RDS stations along with the AF/
TA setting. If you use the BTM function, only
RDS stations are stored with the same AF/TA
setting.
If you preset manually, you can preset both RDS
and non-RDS stations with the AF/TA setting for
each.
1 Set AF/TA, then store the station with BTM or
manually.
Receiving emergency
announcements
With AF or TA on, the emergency
announcements will automatically interrupt the
currently selected source.
Tip
If you adjust the volume level during a traffic
announcement, that level will be stored into memory
for subsequent traffic announcements, independently
from the regular volume level.
Staying with one regional program
— REGIONAL
When the AF function is on: this unit’s factory
setting restricts reception to a specific region, so
you will not be switched to another regional
station with a stronger frequency.
If you leave this regional program’s reception
area, set “REG-OFF” in setup during FM
reception (page 25).
Note
This function does not work in the UK and in some
other areas.
Local Link function (UK only)
This function enables you to select other local
stations in the area, even if they are not stored on
your number buttons.
1 During FM reception, press a number button
((1) to (6)) on which a local station is stored.
2 Within 5 seconds, press again a number button
of the local station.
12
Repeat this procedure until the local station is
received.
Selecting PTY
1 Press and hold (AF/TA) (PTY) during
FM reception.
The current program type name appears if the
station is transmitting PTY data.
2 Rotate the control dial until the
desired program type appears, then
press it.
The unit starts to search for a station
broadcasting the selected program type.
Type of programs
NEWS (News), AFFAIRS (Current Affairs),
INFO (Information), SPORT (Sports),
EDUCATE (Education), DRAMA (Drama),
CULTURE (Culture), SCIENCE (Science),
VARIED (Varied), POP M (Pop Music),
ROCK M (Rock Music), EASY M (M.O.R.
Music), LIGHT M (Light classical),
CLASSICS (Serious classical), OTHER M
(Other Music), WEATHER (Weather),
FINANCE (Finance), CHILDREN (Children’s
program), SOCIAL A (Social Affairs),
RELIGION (Religion), PHONE IN (Phone In),
TRAVEL (Travel), LEISURE (Leisure), JAZZ
(Jazz Music), COUNTRY (Country Music),
NATION M (National Music), OLDIES (Oldies
Music), FOLK M (Folk Music), DOCUMENT
(Documentary)
Note
You cannot use this function in countries/regions
where no PTY data is available.
Setting CT
1 Set “CT-ON” in setup (page 25).
Notes
• The CT function may not work even though an RDS
station is being received.
• There might be a difference between the time set by
the CT function and the actual time.
Page 13

CD
Playing a disc
1 Press (OPEN).
2 Insert the disc (label side up).
3 Close the front panel.
Playback starts automatically.
Ejecting the disc
1 Press (OPEN).
2 Press Z.
The disc is ejected.
3 Close the front panel.
Display items
USB devices
For details on the compatibility of your USB
device, visit the support site.
Support site
http://support.sony-europe.com/
• MSC (Mass Storage Class) and MTP (Media
Transfer Protocol) type USB devices compliant
with the USB standard can be used.
• Corresponding codec is MP3 (.mp3), WMA
(.wma), AAC (.m4a) and AAC (.mp4).
• Backup of data in a USB device is
recommended.
Note
Connect the USB device after starting the engine.
Depending on the USB device, malfunction or damage
may occur if it is connected before starting the engine.
Playing back a USB device
1 Slide the USB cover.
A Source
B Track name*
name*
Track number/Elapsed playing time, Clock
*1 The information of a CD TEXT, MP3/WMA/AAC is
displayed.
*2 Album number is displayed only when the album is
changed.
To change display items B, press (DSPL).
Tip
Displayed items may differ depending on the disc type,
recording format and settings.
1
, Disc/artist name*1, Artist
1
, Album number*2, Album name*1,
Repeat and shuffle play
1 During playback, press (3) (REP) or
(4) (SHUF) repeatedly until the
desired setting appears.
Select To play
TRACK track repeatedly.
ALBUM* album repeatedly.
SHUF ALBUM* album in random order.
SHUF DISC disc in random order.
* When an MP3/WMA/AAC is played.
After 3 seconds, the setting is complete.
To return to normal play mode, select “ OFF”
or “SHUF OFF.”
2 Connect the USB device to the USB
connector.
When using a cable, use the one supplied with
the USB device to connect.
Playback starts.
If a USB device is already connected, to start
playback, press (SOURCE/OFF) repeatedly until
“USB” appears.
Press and hold (SOURCE/OFF) for 1 second to
stop playback.
continue to next page t
13
Page 14
Removing the USB device
1 Stop the USB device playback.
2 Remove the USB device.
If you remove your USB device during
playback, data in the USB device may be
damaged.
Notes
• Do not use USB devices so large or heavy that they
may fall down due to vibration, or cause a loose
connection.
• Do not detach the front panel during playback of the
USB device, otherwise USB data may be damaged.
• This unit cannot recognize USB devices via a USB
hub.
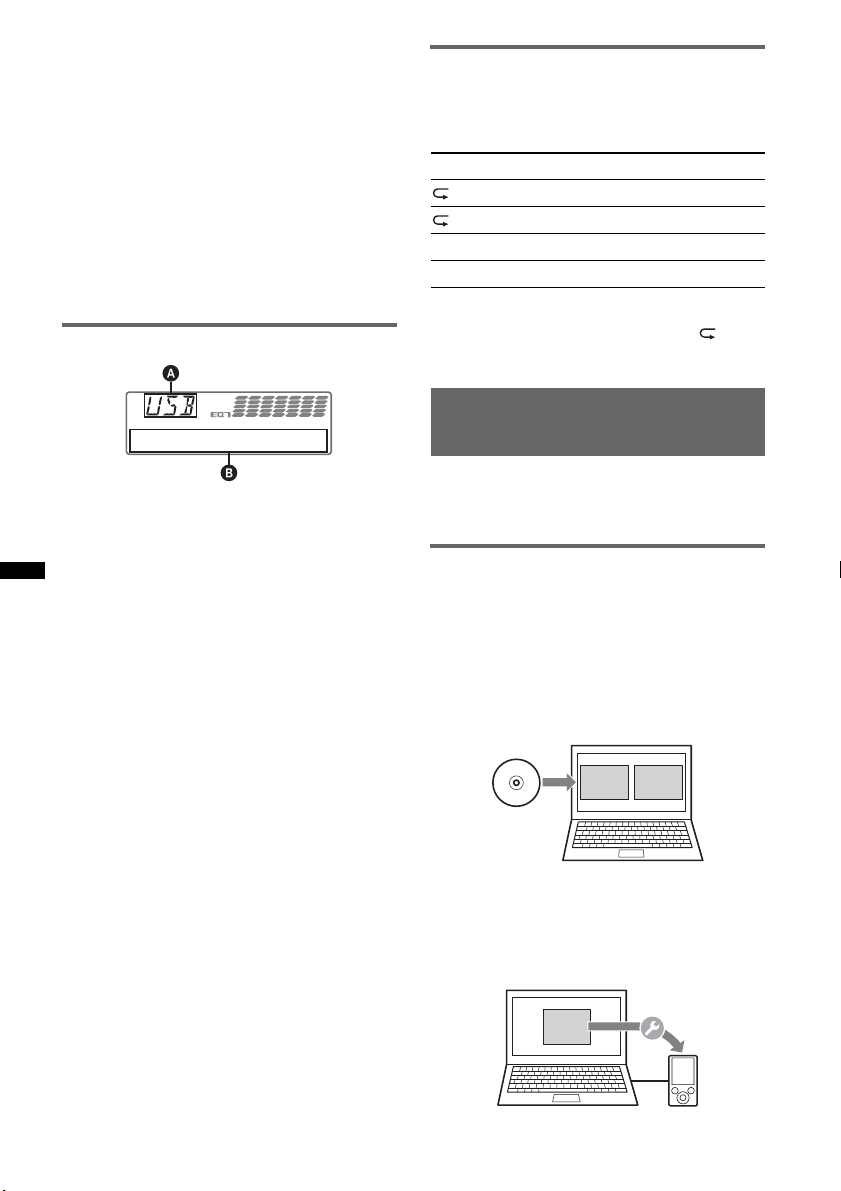
Display items
A Source
B Track name, Artist name, Album number*,
Album name, Track number/Elapsed playing
time, Clock
* Album number is displayed only when the album is
changed.
To change display items B, press (DSPL).
Notes
• Displayed items will differ, depending on the USB
device, recorded format and settings. For details,
visit the support site.
• The maximum number of displayable data is as
follows.
– folders (albums): 128
– files (tracks) per folder: 500
• Do not leave a USB device in a parked car, as
malfunction may result.
• It may take time for playback to begin, depending on
the amount of recorded data.
• DRM (Digital Rights Management) files may not be
played.
• During playback or fast-forward/reverse of a VBR
(Variable Bit Rate) MP3/WMA/AAC file, elapsed
playing time may not display accurately.
• Playback of the following MP3/WMA/AAC files is not
supported.
– lossless compression
– copyright-protected
Repeat and shuffle play
1 During playback, press (3) (REP) or
(4) (SHUF) repeatedly until the
desired setting appears.
Select To play
TRACK track repeatedly.
ALBUM album repeatedly.
SHUF ALBUM album in random order.
SHUF DEVICE device in random order.
After 3 seconds, the setting is complete.
To return to normal play mode, select “ OFF”
or “SHUF OFF. ”
Enjoying music according to
your mood — SensMe™
Sony’s unique “SensMe™ channels” features
automatically group tracks by channel, and allow
you to enjoy music intuitively.
Before using the SensMe™
function
The following is the basic procedure required to
enjoy the SensMe™ function on the unit.
1 Installing “SensMe™ Setup” and
“Content Transfer” in your computer
First install “SensMe™ Setup” and “Content
Transfer” from the supplied CD-ROM.
™
Content
SensMe
Transfer
Setup
2 Registering a USB device using
“SensMe™ Setup”
Connect a USB device to your computer, and
perform registration using “SensMe™ Setup”
to enable the SensMe™ function on this unit.
14
SensMe
Setup
™
Page 15
Tip
Registration can be performed either along with the
installation procedure or after installation.
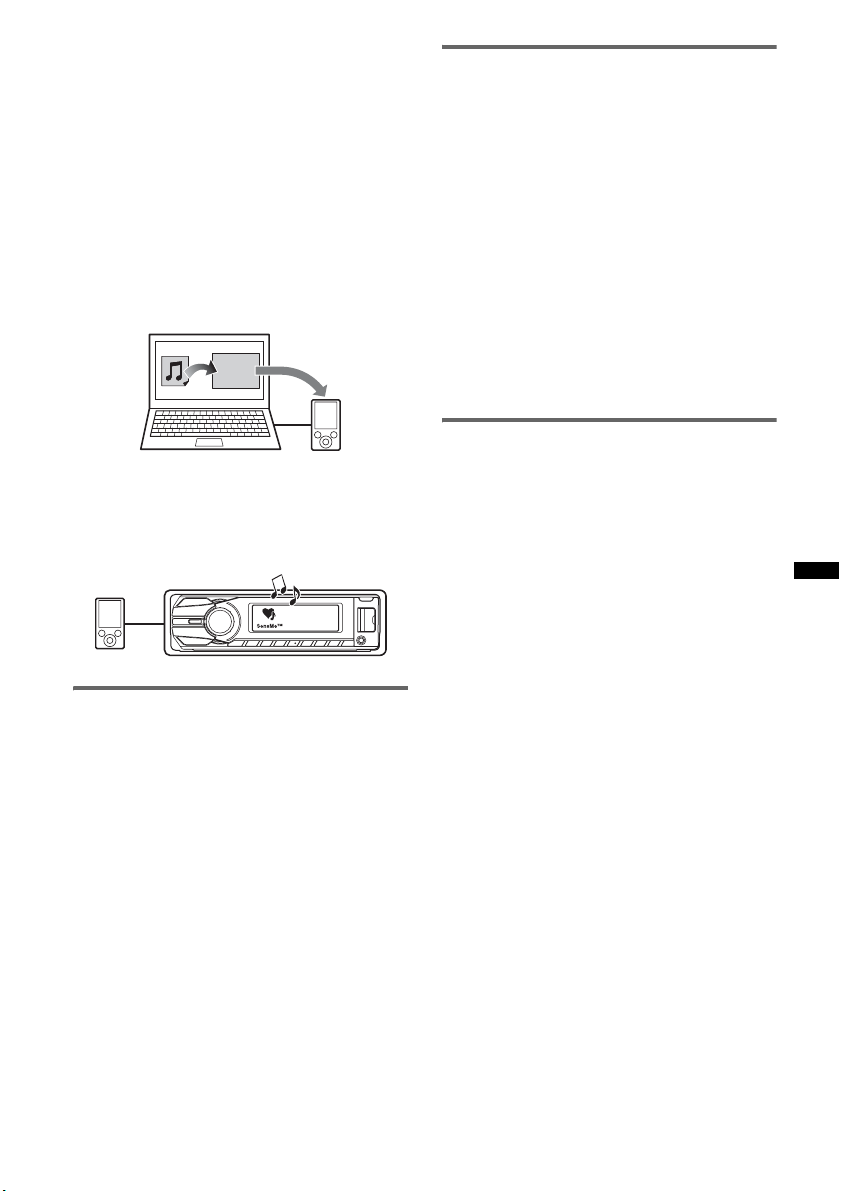
3 Transferring tracks to the USB device
using “Content Transfer”
In order to group tracks by channel, track
sound patterns need to be analyzed by 12
TONE ANALYSIS™, which is loaded in
“Content Transfer.”
With the USB device connected to your
computer, drag and drop tracks from Windows
Explorer or iTunes, etc., to “Content
Transfer.”
Both analysis and transfer of tracks will be
performed by “Content Transfer.”
Content
Transfer
4 Connecting the USB device and
enjoying the SensMe™ function on the
unit
Connect the set up USB device. You can then
enjoy “SensMe™ channels” on this unit.
Installing “SensMe™ Setup” and
“Content Transfer” in your
computer
Use of the supplied software (“SensMe™ Setup”
and “Content Transfer”) is required to enable the
SensMe™ function on this unit.
Install the software in your computer from the
supplied CD-ROM.
1 Insert the supplied CD-ROM into your
computer.
The Installation Wizard runs automatically.
2 Follow the on-screen instructions to
complete the installation.
Registering a USB device using
“SensMe™ Setup”
USB device registration is required to enable the
SensMe™ function on the unit.
If registration is not performed along with the
installation procedure, follow the steps below.
1 Start “SensMe™ Setup” on your
computer.
2 Connect a USB device to your
computer.
3 Complete registration following the
on-screen instructions.
Tip
If you connect a registered USB device containing
analyzed tracks, the USB device can be unregistered
again.
Transferring tracks to the USB
device using “Content Transfer”
To enable the SensMe™ function on this unit,
tracks need to be analyzed and transferred to the
registered USB device, using “Content Transfer.”
1 Connect the registered USB device to
your computer.
For USB devices, connect with the MSC
mode.
“Content Transfer” starts automatically.
If a message appears, follow the on-screen
instructions to proceed.
2 Drag and drop tracks from Windows
Explorer or iTunes, etc., to “Content
Transfer.”
The analysis and transfer of tracks start.
For details on operations, see the Help of
“Content Transfer.”
Note
The track analysis by 12 TONE ANALYSIS™ may take
time, depending on the computer environment.
15
Page 16
Playing tracks in the channel
— SensMe™ channels
“SensMe™ channels” automatically group tracks
into channels by their tunes. You can select and
play a channel that fits your mood, activity, etc.
1 Connect a USB device set up for the
SensMe™ function.
2 Press (SOURCE/OFF) repeatedly until
“SENSME CH” appears.
The channel list appears, and the most
melodic or rhythmical sections* of tracks are
shuffle played.
* May not be detected correctly.
3 Selecting a track from the channel list
using the control dial.
• Change the channel
Push (1)/(2) (ALBUM –/+) to select the
desired channel.
• Change the track
Push (SEEK) +/– until the desired track
appears, then press the control dial.
Playback starts from the beginning of the
current track.
If you do not operate anything for 10 seconds,
the display returns to normal play mode.
Notes
• Depending on the track, it may not be detected
correctly or may be grouped in a channel not suited
to the track’s mood.
• If the connected USB device contains many tracks, it
may take time for “SensMe™ channels” to start, due
to data reading.
Tip
Tracks are played in random order. The order will vary
at each channel selection.
Channel list
x Recommended, Shuffle All
“MORNING” (5:00 – 9:59)
“DAYTIME” (10:00 – 15:59)
“EVENING” (16:00 – 18:59)
“NIGHT” (19:00 – 23:59)
“MIDNIGHT” (0:00 – 4:59)
Tracks recommended for each time of day.
Set the clock (page 6) for the channel to be
displayed accurately.
“SHUFFLE ALL”: Plays all analyzed tracks in
random order.
x Basic channels
Plays tracks according to the music type.
“ENERGETIC”: High-spirit tracks.
“RELAX”: Calm tracks.
“MELLOW”: Mellow, melancholy tracks.
“UPBEAT”: Happy tracks to improve your
mood.
“EMOTIONAL”: Ballad tracks.
“LOUNGE”: Lounge music.
“DANCE”: Rhythm and rap, rhythm and blues
tracks.
“EXTREME”: Intense rock tracks.
x In-car channels
Plays tracks that are suitable while driving.
“FREEWAY”: Speedy, high-spirit tracks.
“CHILLOUT DRIVE”: Intoned, healing ballad
tracks.
“WEEKEND TRIP”: Delightful, bright and
happy tracks.
“MIDNIGHT CRUISE”: Jazz or piano-featured
tracks with mature mood.
“PARTY RIDE”: Up-tempo and alive tracks.
“MORNING COMMUTE”: Bright and breezy
tracks.
“GOIN’ HOME”: Warm and relaxing tracks.
16
Page 17
iPod
For details on the compatibility of your iPod, see
“About iPod” (page 27) or visit the support site.
In these Operating Instructions, “iPod” is used as
a general reference for the iPod functions on the
iPod and iPhone, unless otherwise specified by
the text or illustrations.
Support site
http://support.sony-europe.com/
Playing back iPod
Before connecting the iPod, turn down the
volume of the unit.
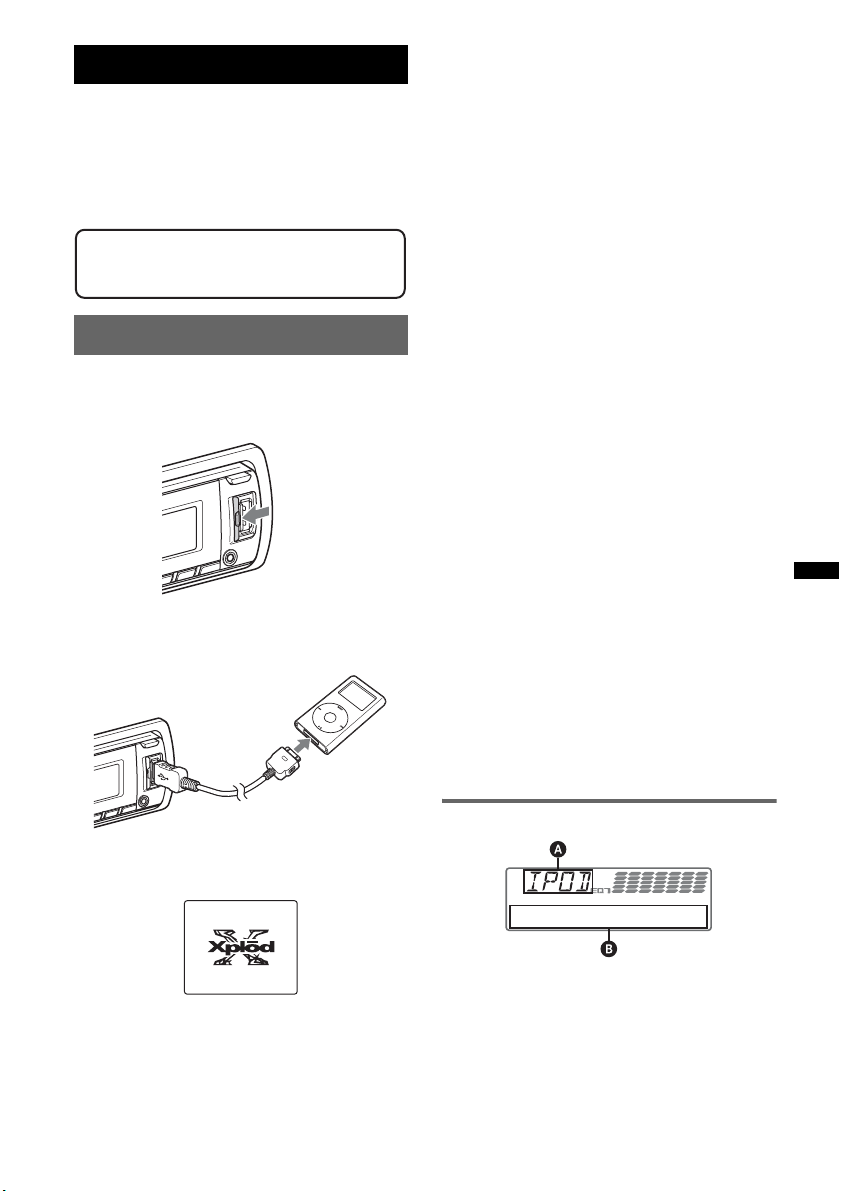
1 Slide the USB cover.
If an iPod is already connected, to start
playback press (SOURCE/OFF) repeatedly
until “USB” appears. (“IPOD” appears in the
display when iPod is recognized.)
* In the case of an iPod touch or iPhone being
connected, or that the iPod was last played back
using passenger control, the logo will not appear on
the screen.
3 Adjust the volume.
Press and hold (SOURCE/OFF) for 1 second to
stop playback.
Removing the iPod
1 Stop the iPod playback.
2 Remove the iPod.
Caution for iPhone
When you connect an iPhone via USB, telephone
volume is controlled by iPhone itself. In order to avoid
sudden loud sound after a call, do not increase the
volume on the unit during a telephone call.
Notes
• Do not detach the front panel during playback of the
iPod, otherwise data may be damaged.
• This unit cannot recognize iPod via a USB hub.
Tips
• When the ignition key is turned to the ACC position,
and the unit is on, the iPod will be recharged.
• If the iPod is disconnected during playback, “NO
DEV” appears in the display of the unit.
2 Connect the iPod to the USB
connector via the dock connector to
USB cable.
The iPod will turn on automatically, and the
display will appear on the iPod screen as
below.*
Tip
We recommend the RC-100IP USB cable (not
supplied) to connect the dock connector.
The tracks on the iPod start playing
automatically from the point last played.
Resuming mode
When the iPod is connected to the dock
connector, the mode of this unit changes to
resuming mode and playback starts in the mode
set by the iPod.
In resuming mode, the following buttons do not
function.
– (3) (REP)
– (4) (SHUF)
Display items
A Source (iPod) indication
B Track name, Artist name, Album name, Track
number/Elapsed playing time, Clock
To change display items B, press (DSPL).
continue to next page t
17
Page 18
Tip
When album/podcast/genre/artist/playlist is changed,
its item number appears momentarily.
Note
Some letters stored in iPod may not be displayed
correctly.
Skipping albums, podcasts,
genres, playlists and artists
To Do t h i s
Skip Press (1)/(2) (ALBUM –/+)
Skip
continuously
[press once for each]
Press and hold (1)/(2)
(ALBUM –/+)
[hold to desired point]
Repeat and shuffle play
1 During playback, press (3) (REP) or
(4) (SHUF) repeatedly until the
desired setting appears.
Select To play
TRACK track repeatedly.
ALBUM album repeatedly.
PODCAST podcast repeatedly.
ARTIST artist repeatedly.
PLAYLIST playlist repeatedly.
GENRE genre repeatedly.
SHUF ALBUM album in random order.
SHUF PODCAST podcast in random order.
SHUF ARTIST artist in random order.
SHUF PLAYLIST playlist in random order.
SHUF GENRE genre in random order.
SHUF DEVICE device in random order.
After 3 seconds, the setting is complete.
To return to normal play mode, select “ OFF”
or “SHUF OFF.”
Operating an iPod directly
— Passenger control
You can operate an iPod connected to the dock
connector directly.
1 During playback, press and hold
(MODE).
“MODE IPOD” appears and you will be able
to operate the iPod directly.
To change the display item
Press (DSPL).
The display items change as follows:
Track name t Artist name t Album name t
MODE IPOD t Clock
To exit the passenger control
Press and hold (MODE).
Then “MODE AUDIO” will appear and the play
mode will change to resuming mode.
Notes
• The volume can be adjusted only by the unit.
• If this mode is canceled, the repeat setting will be
turned off.
18
Page 19
Searching for a track
Searching a track by name
— Quick-BrowZer™
To cancel Jump mode
Press (BACK) or (SEEK) –.
Note
If no operation is performed for 7 seconds, the Jump
mode is canceled.
You can search for a track in a CD or USB device
easily by category.
1 Press (BROWSE).
The unit enters the Quick-BrowZer mode,
and the list of search categories appears.
2 Rotate the control dial to select the
desired search category, then press it
to confirm.
3 Repeat step 2 until the desired track is
selected.
Playback starts.
To return to the previous display
Press (BACK).
To exit the Quick-BrowZer mode
Press (BROWSE).
Note
When entering the Quick-BrowZer mode, the repeat/
shuffle setting is canceled.
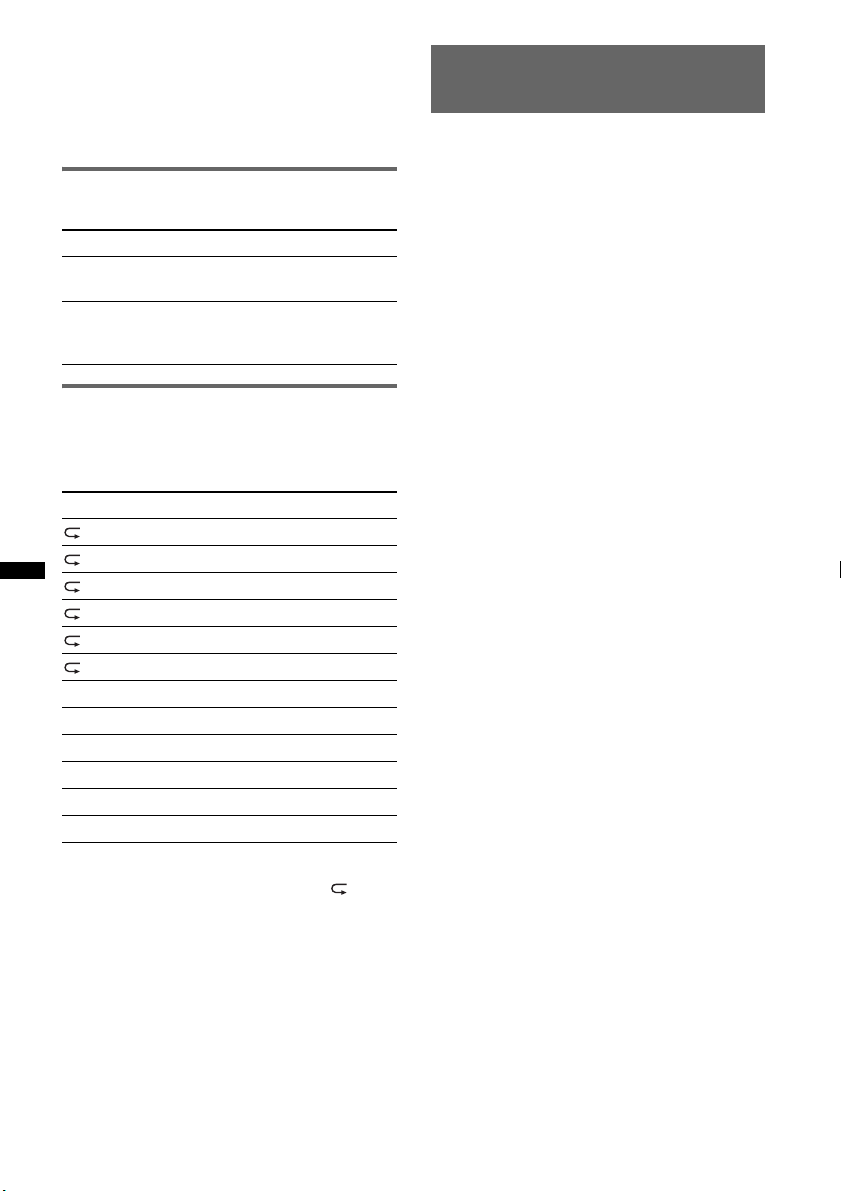
Searching by skip items
— Jump mode
When many items are in a category, you can
search the desired item quickly.
1 Press (SEEK) + in Quick-BrowZer
mode.
The following display appears.
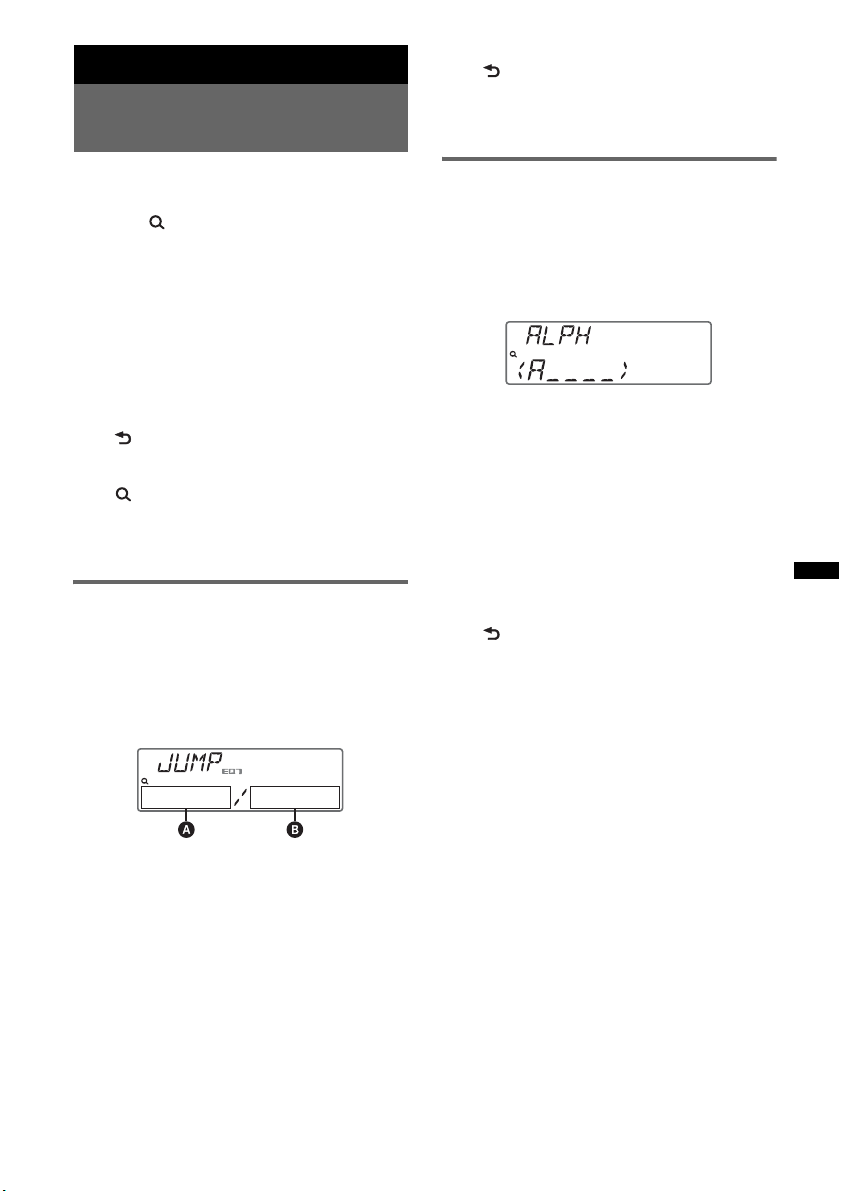
Searching by alphabetical order
— Alphabet search
When an iPod is connected to the unit, you can
search for a desired item alphabetically.
1 Press (SEEK) + in Quick-BrowZer
mode.
An alphabetical list appears.
2 Rotate the control dial to select the
first letter of the desired item, then
press it.
A list of items beginning with the selected
letter appears in alphabetical order.
If there is no song beginning with the selected
letter, “NOT FOUND” appears.
3 Rotate the control dial to select the
desired item, then press it.
Playback starts if the selected item is a track.
To cancel Alphabet search
Press (BACK) or (SEEK) –.
A list of the search categories appears.
Notes
• In Alphabet search, a symbol or article (a/an/the)
before the selected letter of the item is excluded.
• Depending on the search item you select, only Jump
mode may be available.
• If no operation is performed for 5 seconds, Alphabet
search is canceled.
• Alphabet search may take some time, depending on
the amount of tracks.
A Current item number
B Total item number in the current layer
Then the item name will appear.
2 Rotate the control dial to select the
desired item or one near the desired
item.
It skips in steps of 10% of the total item
number.
3 Press the select button.
The display returns to the Quick-BrowZer
mode and the selected item appears.
4 Rotate the control dial to select the
desired item and press it.
Playback starts if the selected item is a track.
19
Page 20
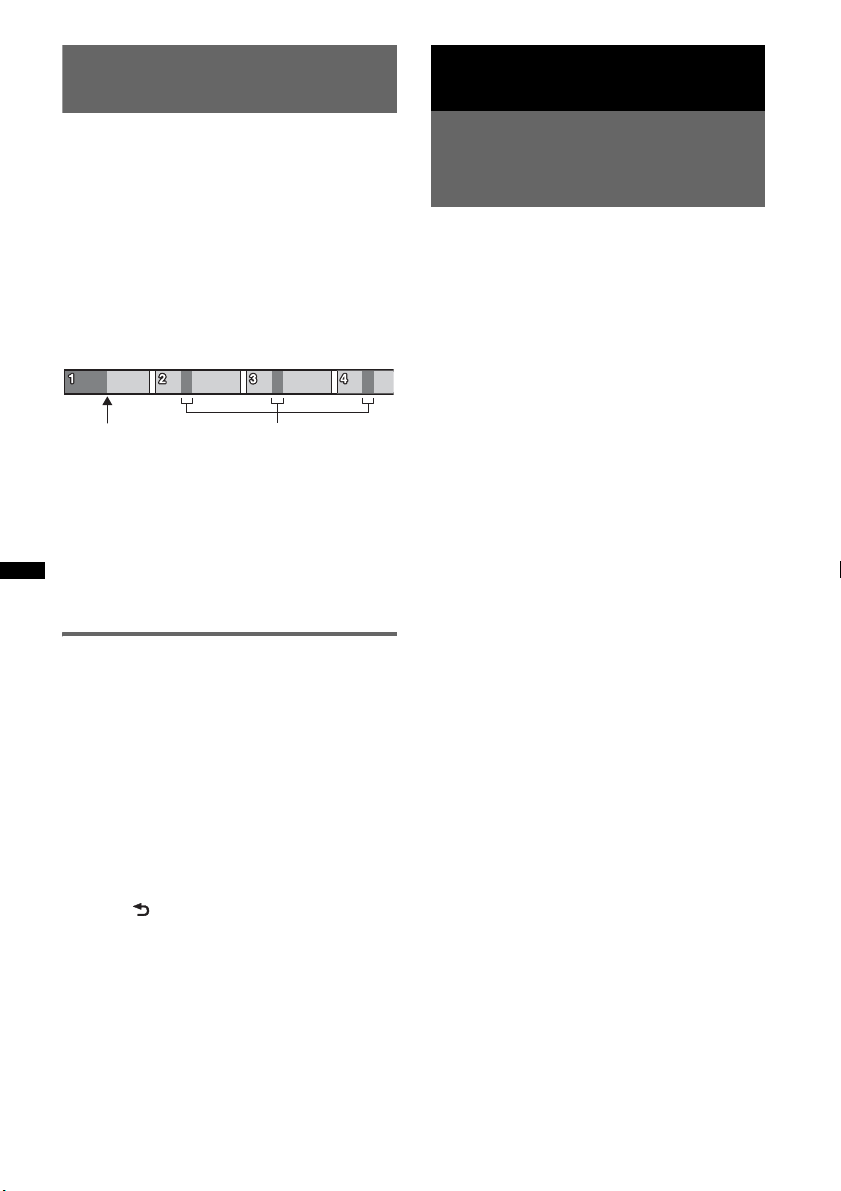
Searching a track by listening
to track passages — ZAPPIN™
Enjoying the illumination color
variation
While playing back short track passages in a CD
or USB device in sequence, you can search for a
track you want to listen to.
ZAPPIN mode is suitable for searching for a
track in shuffle or shuffle repeat mode.
1 Press (ZAP) during playback.
After “ZAPPIN” appears in the display,
playback starts from a passage of the next
track.
The passage is played for the set time, then a
click sounds and the next passage starts.
Tra ck
(ZAP) pressed.
The part of each track to
playback in ZAPPIN mode.
2 Press the select button or (ZAP) when
a track you want to listen is played
back.
The track that you select returns to normal
play mode from the beginning.
To search a track by ZAPPIN mode again,
repeat steps 1 and 2.
In the case of “SensMe™
channels” playback
If the track being searched is transfered by
“Content Transfer,” the most melodic or
rhythmical sections* of tracks are played. For
details on the SensMe™ function, see page 14.
* May not be detected correctly.
Tips
• You can select the playback time from about 6
seconds/15 seconds/30 seconds (page 25). You
cannot select the passage of the track to playback.
• Press (SEEK) +/– in ZAPPIN mode to skip a track.
• Press (1)/(2) (ALBUM –/+) in ZAPPIN mode to skip
album.
• Pressing (BACK) also confirms a track to
playback.
Changing the color of display
and buttons
—Dynamic Color Illuminator
Dynamic Color Illuminator allows you to change
the color of the display and buttons on the main
unit to match the car's interior.
You can select from 12 preset colors, customized
color and 5 preset patterns.
x Preset colors
“RED,” “AMBER,” “M_AMBER,” “YELLOW,”
“WHITE,” “LIGHT GREEN,” “GREEN,”
“LIGHT BLUE,” “SKY BLUE,” “BLUE,”
“PURPLE,” “PINK.”
x Preset patterns
“RAINBOW,” “OCEAN,” “SUNSET,”
“FOREST,” “RANDOM.”
1 Press (COLOR).
2 Rotate the control dial to select the
desired preset color, then press it.
The display returns to normal reception/play
mode.
Note
If the control dial is rotated rapidly, the color of the
display and the buttons may change too quickly.
Tip
You can enter the preset color mode from the setup
menu.
20
Page 21

Customizing the display and
button color — Custom Color
You can register a customized color for the
display and buttons.
About DAY/NIGHT color mode
You can set a different color for DAY/NIGHT.
The display color changes for DAY/NIGHT
color mode as below.
Color mode DIMMER
DAY OFF or AUTO (turn off
NIGHT ON or AUTO (turn on
* Available only when the illumination control lead is
connected.
For details on the DIMMER, see page 25.
the head light*)
the head light*)
1 Press and hold (COLOR).
The DAY/NIGHT custom color display varies
according to the DIMMER setting.
To change the DAY/NIGHT color mode, see
page 21.
2 Rotate the control dial until “BASE
COLOR” appears, then press it.*
You can select a preset color as a basis for
further customizing.
To not customize a preset color, skip to step 5.
* When you select “BASE COLOR,” customized color
is overwritten.
3 Rotate the control dial to select from
“RGB RED,” “RGB GREEN,” or “RGB
BLUE,” then press it.
4 Rotate the control dial to adjust the
color range, then press it.
Adjustable color range: “0” – “32.”
You cannot set “0” for all color ranges at the
same time.
5 Press (BACK).
The display returns to normal reception/play
mode.
Changing DAY/NIGHT color mode
1 Select “DAY/NIGHT” in step 2.
2 Select “DAY” or “NIGHT.”
3 Customize the preset channel from step 2 to 5.
Tip
You can set the DAY/NIGHT color mode from the
setup menu.
Advanced color setting
SensMe™ Channels
synchronization
— SensMe™ Channels Color
The color of the display and buttons on the main
unit changes according to the SensMe™ channel.
1 Press and hold the select button.
The setup display appears.
2 Rotate the control dial until “SENSME
COLR” appears, then press it.
3 Rotate the control dial to select
“SENSME-ON,” then press it.
4 Press (BACK).
The setting is complete and the display
returns to normal reception/play mode.
To cancel SensMe™ Channels Color, select
“OFF” on step 3.
Note
When SensMe™ Channels Color is set to “ON” for the
SensMe™ source, SensMe™ Channels Color
overrides the preset color/pattern settings. The color/
pattern setting changes to the preset color/pattern if
you turn off SensMe™ Channels Color or change the
source to other than SensMe™.
Changing the color with sound
synchronization
— Sound Synchronization
The color changes according to synchronization
of playing music. When you select a preset
pattern or play tracks in the SensMe channel,
sound synchronization becomes effective.
1 Press and hold the select button.
The setup display appears.
2 Rotate the control dial until “SOUND
SYNC” appears, then press it.
3 Rotate the control dial to select
“SYNC-ON,” then press it.
4 Press (BACK).
The setting is complete and the display
returns to normal reception/play mode.
Note
May not be synchronized correctly.
21
Page 22

Displaying clear color
— White Menu
You can display the menu more clearly (White)
without concern for color setting.
1 Press and hold the select button.
The setup display appears.
2 Rotate the control dial until “WHITE
MENU” appears, then press it.
3 Rotate the control dial to select
“WHITE-ON,” then press it.
4 Press (BACK).
The setting is complete and the display
returns to normal reception/play mode.
To cancel White Menu, select “OFF” on step 3.
Start up effect
— Start White
When you push (SOURCE/OFF) on, the color of
display and the buttons on the main unit turns
white once, and then the color changes to the
customized color. You can enjoy the effect
whenever the source is turned on.
1 Press and hold the select button.
The setup display appears.
2 Rotate the control dial until “START
WHITE” appears, then press it.
3 Rotate the control dial to select
“WHITE-ON,” then press it.
4 Press (BACK).
The setting is complete and the display
returns to normal reception/play mode.
To cancel Start White, select “OFF” on step 3.
Sound Settings and Setup Menu
Changing the sound settings
Adjusting the sound
characteristics
1 During reception/playback, press the
select button.
2 Rotate the control dial until the
desired menu item appears, then
press it.
3 Rotate the control dial to select the
setting, then press it.
4 Press (BACK).
The setting is complete and the display
returns to normal reception/play mode.
The following items can be set (follow the page
reference for details):
EQ7 PRESET (page 23)
EQ7 SETTING (page 23)
POSITION
POSITION (Listening Position setting)
(page 23)
ADJUST POS*
adjustment) (page 24)
SW POSITION*
(page 24)
BALANCE
Adjusts the sound balance: “RIGHT-15” –
“CENTER” – “LEFT-15.”
FADER
Adjusts the relative level: “FRONT-15” –
“CENTER” – “REAR-15.”
DM+ (page 24)
REARBAS ENH (Rear Bass Enhancer)
(page 24)
SUBW LEVEL (Subwoofer Level)
Adjusts the subwoofer volume level: “+10 dB”
– “0 dB” – “–10 dB.”
(“ATT” is displayed at the lowest setting.)
AUX VOLUME*
Adjusts the volume level for each connected
auxiliary equipment: “+18 dB” – “0 dB” – “–8
dB.”
This setting negates the need to adjust the
volume level between sources.
1
(Listening Position
1
(Subwoofer Position)
2
(AUX Volume level)
22
*1 Hidden when “POSITION” is set to “OFF.”
*2 When AUX source is activated (page 26).
Page 23
Enjoying sophisticated sound
functions — Advanced Sound
Engine
Advanced Sound Engine, Sony’s new sound
engine, creates an ideal in-car sound field with
digital signal processing. Advanced Sound
Engine contains the following features: EQ7,
Listening Position, DM+ Advanced, Rear Bass
Enhancer.
Selecting the sound quality
— EQ7 Preset
You can select an equalizer curve from 7
equalizer curves (“XPLOD,” “VOCAL,”
“EDGE,” “CRUISE,” “SPACE,” “GRAVITY,”
“CUSTOM” or “OFF”).
1 During reception/playback, press the
select button.
2 Rotate the control dial until “EQ7
PRESET” appears, then press it.
3 Rotate the control dial until the
desired equalizer curve appears, then
press it.
4 Press (BACK).
The display returns to normal reception/play
mode.
To cancel the equalizer curve, select “OFF” in
step 3.
Tip
The equalizer curve setting can be memorized for
each source.
Customizing the equalizer curve
— EQ7 Setting
“CUSTOM” of EQ7 allows you to make your
own equalizer settings.
1 Select a source, then press the select
button.
2 Rotate the control dial until “EQ7
SETTING” appears, then press it.
3 Rotate the control dial until “BASE”
appears, then press it.
You can select an equalizer curve as a basis
for further customizing.
To not customize a preset equalizer curve,
skip to step 5.
4 Rotate the control dial to select the
equalizer curve, then press it.
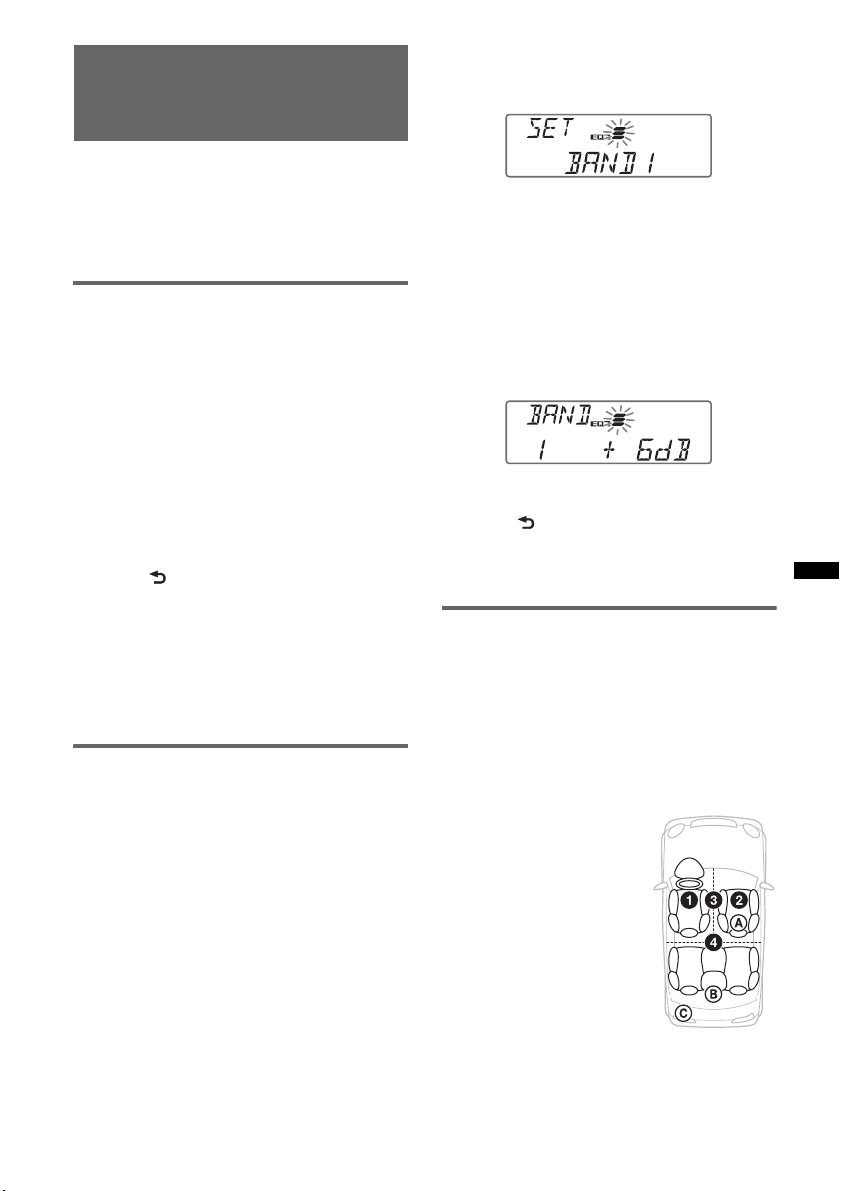
5 Setting the equalizer curve.
1 Rotate the control dial to select the
frequency range, then press it.
BAND1: 63 Hz
BAND2: 160 Hz
BAND3: 400 Hz
BAND4: 1 kHz
BAND5: 2.5 kHz
BAND6: 6.3 kHz
BAND7: 16.0 kHz
2 Rotate the control dial to adjust the
volume level, then press it.
The volume level is adjustable in 1 dB
steps, from -6 dB to +6 dB.
Repeat steps 1 and 2 to adjust other
frequency ranges.
6 Press (BACK) twice.
The equalizer curve is stored in “CUSTOM,”
and the display returns to normal reception/
play mode.
Optimizing sound by Time
Alignment — Listening Position
The unit can change the localization of sound by
delaying the sound output from each speaker to
suit your position, and simulate a natural sound
field with the feeling of being in the center of it
wherever you sit in the car.
The options for “POSITION” are indicated
below.
“FRONT L” (1): Front left
“FRONT R” (2): Front
right
“FRONT” (3): Center front
“ALL” (4): In the center of
your car
“OFF”: No position set
continue to next page t
23
Page 24

You can also set the approximate subwoofer
position from your listening position if:
– the subwoofer is connected
– the listening position is set to “FRONT L,”
“FRONT R,” “FRONT” or “ALL.”
The options for “SW POSITION” are indicated
below.
“NEAR” (A): Near
“NORMAL” (B): Normal
“FAR” (C): Far
1 During reception/playback, press the
select button.
2 Rotate the control dial until
“POSITION” appears, then press it.
3 Rotate the control dial to select from
“FRONT L,” “FRONT R,” “FRONT” or
“ALL,” then press it.
4 Rotate the control dial until “SW
POSITION” appears, then press it.
If you select “FRONT L,” “FRONT R,”
“FRONT” or “ALL” in step 3 above, you can
set the subwoofer position.
Rotate the control dial to select from
“NEAR,” “NORMAL” or “FAR,” then press
it.
5 Press (BACK).
The display returns to normal reception/play
mode.
To cancel listening position, select “OFF” on
step 3.
Adjusting the listening position
You can fine-tune the listening position setting.
1 During reception/playback, press the
select button.
2 Rotate the control dial until “ADJUST
POS” appears, then press it.
3 Rotate the control dial to adjust the
listening position, then press it.
Adjustable range: “+3” – “CENTER” – “–3.”
4 Press (BACK).
The display returns to normal reception/play
mode.
24
DM+ Advanced
DM+ Advanced improves digitally compressed
sound by restoring high frequencies lost in the
compression process.
1 During playback, press the select
button.
2 Rotate the control dial until “DM+”
appears, then press it.
3 Rotate the control dial to select “ON,”
then press it.
4 Press (BACK).
The display returns to normal play mode.
Tip
The DM+ setting can be memorized for each source.
Using rear speakers as subwoofer
— Rear Bass Enhancer
Rear Bass Enhancer enhances the bass sound by
applying the low pass filter setting (page 25) to
the rear speakers. This function allows the rear
speakers to work as a subwoofer if one is not
connected.
1 During reception/playback, press the
select button.
2 Rotate the control dial until
“REARBAS ENH” appears, then press
it.
3 Rotate the control dial to select from
“1,” “2” or “3,” then press it.
4 Press (BACK).
The display returns to normal reception/play
mode.
Adjusting setup items — SET
1 Press and hold the select button.
The setup display appears.
2 Rotate the control dial until the
desired item appears, then press it.
3 Rotate the control dial to select the
setting, then press it.*
The setting is complete.
4 Press (BACK).
The display returns to normal reception/play
mode.
* For Custom Color setting, you need to take
additional steps (page 21).
Note
Displayed items will differ, depending on the source
and setting.
Page 25

The following items can be set (follow the page
reference for details):
CLOCK ADJ (Clock Adjust) (page 6)
CT (Clock Time)
Activates the CT function: “ON,” “OFF”
(page 11, 12).
BEEP
Activates the beep sound: “ON,” “OFF.”
AUX-A*1 (AUX Audio)
Activates the AUX source display: “ON,”
“OFF” (page 26).
AUTO OFF
Shuts off automatically after a desired time
when the unit is turned off: “NO,” “30S
(Seconds),” “30M (Minutes),” “60M (Minutes).”
DEMO
(Demonstration)
Activates the demonstration: “ON,” “OFF.”
DIMMER
Changes the display brightness.
– “AT”: to dim the display automatically when
you turn lights on. (Available only when the
illumination control lead is connected.)
– “ON”: to dim the display.
– “OFF”: deactivate the dimmer.
CONTRAST
Adjusts the contrast of the display. The contrast
level is adjustable in 7 steps.
COLOR (Preset Color)
Selects the preset color of the display and
buttons on the main unit (page 20).
CUSTOM COLR (Custom Color)
Selects a preset color as a basis for further
customizing (page 21).
SENSME COLR (SensMe Color)
Changes the color according to the SensMe
channels: “ON,” “OFF.”
SOUND SYNC
Selects the color with sound synchronization:
“ON,” “OFF.”
WHITE MENU
Sets the effect when the source is switched:
“ON,” “OFF.”
START WHITE
Sets the start up color: “ON,” “OFF.”
MOTION DSPL (Motion Display)
– “SA”: to show moving patterns and spectrum
analyzer.
– “ON”: to show moving patterns.
– “OFF”: to deactivate the Motion Display.
AUTO SCROLL
Scrolls long items automatically: “ON,” “OFF.”
LOCAL (Local Seek Mode)
– “ON”: to only tune into stations with stronger
signals.
– “OFF”: to tune normal reception.
MONO*
2
(Monaural Mode)
Selects monaural reception mode to improve
poor FM reception: “ON,” “OFF.”
REGIONAL*
2
Restricts reception to a specific region: “ON,”
“OFF” (page 12).
ZAPPIN TIME
Selects the playback time for the ZAPPIN
function.
– “ZAP.TIME-1 (about 6 seconds),”
“ZAP.TIME-2 (about 15 seconds),”
“ZAP.TIME-3 (about 30 seconds).”
ZAPPIN BEEP
Has the beep sound between track passages:
“ON,” “OFF.”
LPF FREQ (Low Pass Filter Frequency)
Selects the subwoofer cut-off frequency:
“50Hz,” “60Hz,” “80Hz,” “100Hz,” “120Hz.”
LPF SLOPE (Low Pass Filter Slope)
Selects the LPF slope: ”1,” ”2,” ”3.”
SUBW PHASE (Subwoofer Phase)
Selects the subwoofer phase: “NORM,” “REV.”
HPF FREQ (High Pass Filter Frequency)
Selects the front/rear speaker cut-off frequency:
“OFF,”“50Hz,” “60Hz,” “80Hz,” “100Hz,”
“120Hz.”
HPF SLOPE (High Pass Filter Slope)
Selects the HPF slope (effective only when HPF
FREQ is set to other than “OFF”): “1,” “2,” “3.”
LOUDNESS (Dynamic Loudness)
Reinforces bass and treble for clear sound at low
volume levels: “ON,” “OFF.”
BTM (page 11)
*1 When the unit is turned off.
*2 When FM is received.
25
Page 26
Other functions
Additional Information
Using optional equipment
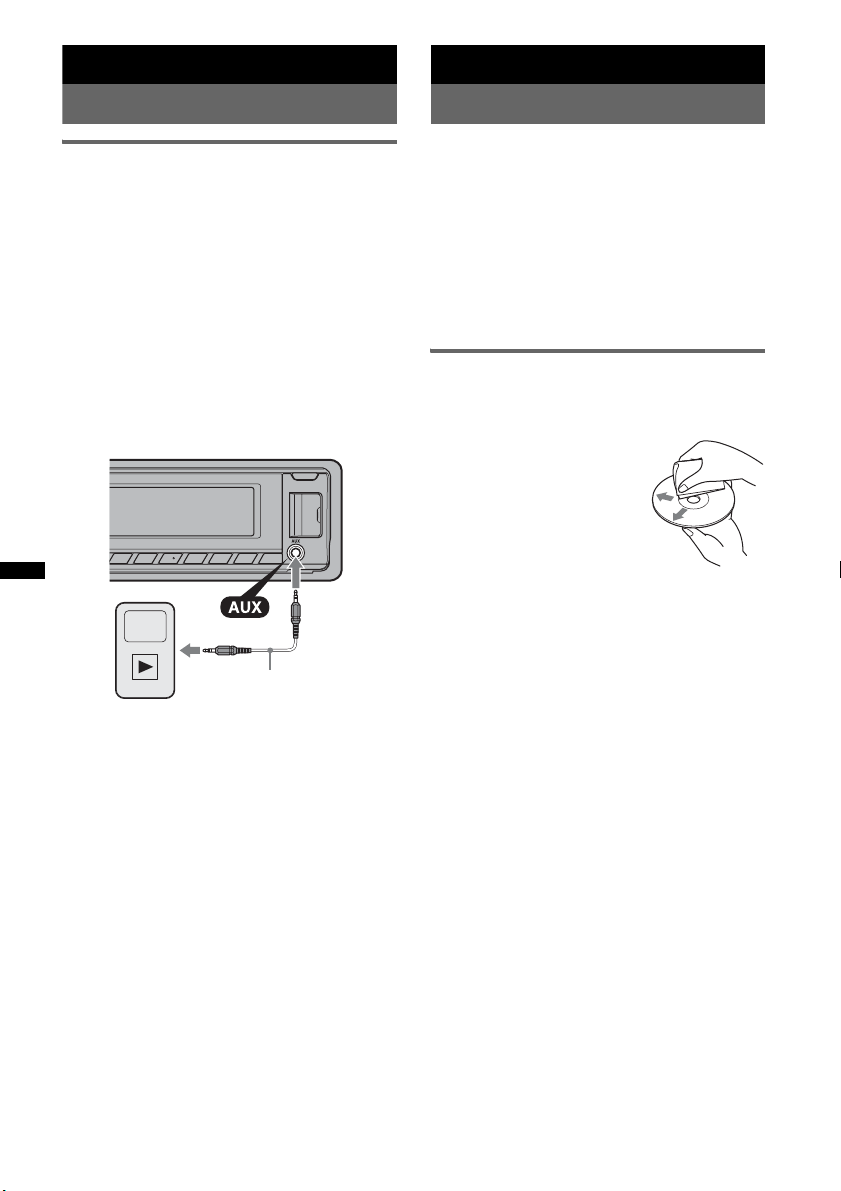
Auxiliary audio equipment
By connecting an optional portable audio device
to the AUX input jack (stereo mini jack) on the
unit and then simply selecting the source, you
can listen on your car speakers. The volume level
is adjustable for any difference between the unit
and the portable audio device. Follow the
procedure below:
Connecting the portable audio
device
1 Turn off the portable audio device.
2 Turn down the volume on the unit.
3 Connect to the unit.
Connecting cord*
(not supplied)
* Be sure to use a straight type plug.
Adjusting the volume level
Be sure to adjust the volume for each connected
audio device before playback.
1 Turn down the volume on the unit.
2 Press (SOURCE/OFF) repeatedly until “AUX”
appears.
After that, “AUX FRONT IN” appears.
3 Start playback of the portable audio device at a
moderate volume.
4 Set your usual listening volume on the unit.
5 Adjust the input level (page 22).
Precautions
• Cool off the unit beforehand if your car has been
parked in direct sunlight.
• Power antenna (aerial) extends automatically.
Moisture condensation
Should moisture condensation occur inside the unit,
remove the disc and wait for about an hour for it to
dry out; otherwise the unit will not operate properly.
To maintain high sound quality
Do not splash liquid onto the unit or discs.
Notes on discs
• Do not expose discs to direct sunlight or heat
sources such as hot air ducts, nor leave it in a car
parked in direct sunlight.
• Before playing, wipe the discs
with a cleaning cloth from the
center out. Do not use solvents
such as benzine, thinner,
commercially available
cleaners.
• This unit is designed to
playback discs that conform to
the Compact Disc (CD)
standard. DualDiscs and some of the music discs
encoded with copyright protection technologies do
not conform to the Compact Disc (CD) standard,
therefore, these discs may not be playable by this
unit.
• Discs that this unit CANNOT play
– Discs with labels, stickers, or sticky tape or
paper attached. Doing so may cause a
malfunction, or may ruin the disc.
– Discs with non-standard shapes (e.g., heart,
square, star). Attempting to do so may damage
the unit.
1
–8 cm (3
Notes on CD-R/CD-RW discs
• The maximum number of: (CD-R/CD-RW only)
– folders (albums): 150 (including root folder)
– files (tracks) and folders: 300 (may less than 300
– displayable characters for a folder/file name: 32
• If the multi-session disc begins with a CD-DA
session, it is recognized as a CD-DA disc, and
other sessions are not played back.
• Discs that this unit CANNOT play
– CD-R/CD-RW of poor recording quality.
– CD-R/CD-RW recorded with an incompatible
– CD-R/CD-RW which is finalized incorrectly.
/4 in) discs.
if folder/file names contain many characters)
(Joliet)/64 (Romeo)
recording device.
26
Page 27
– CD-R/CD-RW other than those recorded in
1
music CD format or MP3 format conforming to
ISO9660 Level 1/Level 2, Joliet/Romeo or
multi-session.
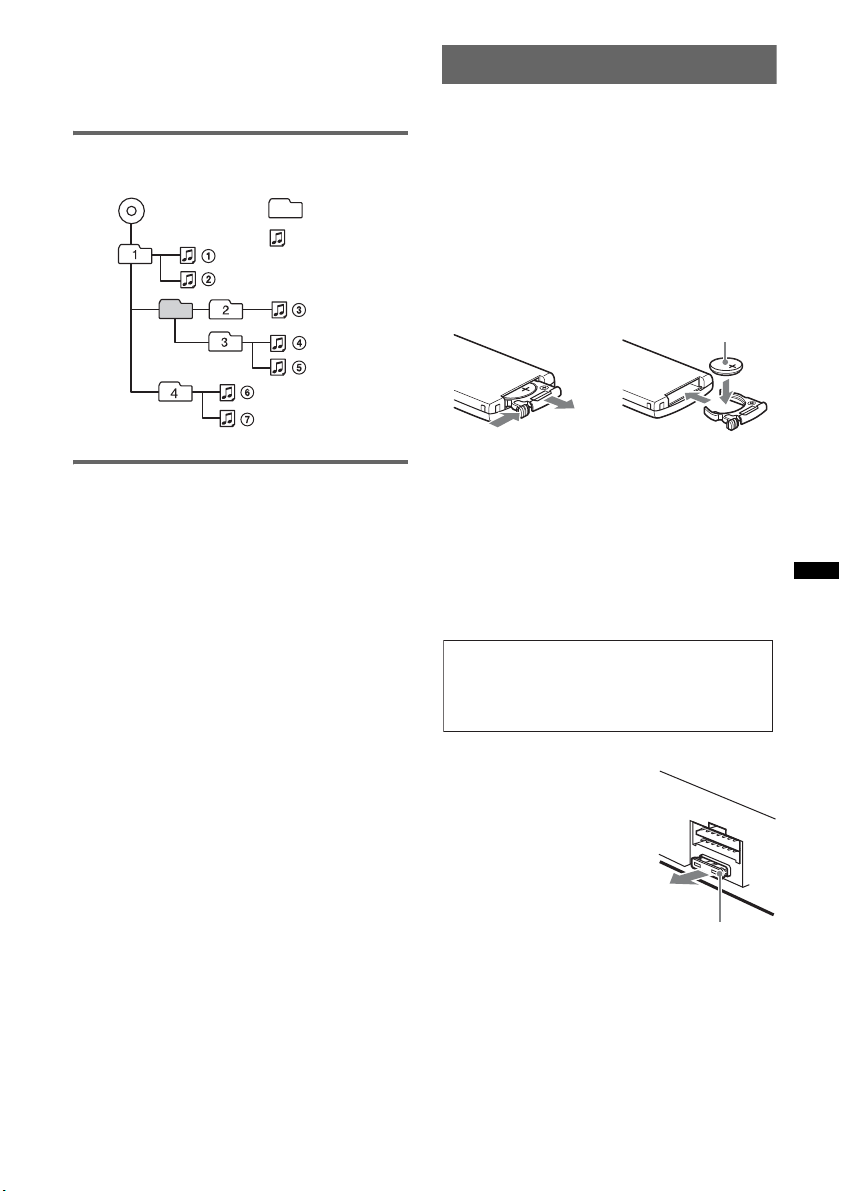
Playback order of MP3/WMA/AAC
files
MP3/WMA/AAC
Folder
(album)
MP3/WMA/
AAC file
(track)
Maintenance
Replacing the lithium battery of the
card remote commander
Under normal conditions, the battery will last
approximately 1 year. (The service life may be
shorter, depending on the conditions of use.)
When the battery becomes weak, the range of the
card remote commander becomes shorter.
Replace the battery with a new CR2025 lithium
battery. Use of any other battery may present a
risk of fire or explosion.
+ side up
2
c
About iPod
• You can connect to the following iPod models.
Update your iPod devices to the latest software
before use.
Made for
– iPod touch (2nd generation)
– iPod touch (1st generation)
– iPod classic
– iPod with video*
– iPod nano (5th generation)
– iPod nano (4th generation)
– iPod nano (3rd generation)
– iPod nano (2nd generation)
– iPod nano (1st generation)*
– iPhone 3GS
– iPhone 3G
– iPhone
* Passenger control is not available for iPod nano
(1st generation) or iPod with video.
• “Made for iPod” and “Made for iPhone” mean
that an electronic accessory has been designed to
connect specifically to iPod or iPhone
respectively, and has been certified by the
developer to meet Apple performance standards.
• Apple is not responsible for the operation of this
device or its compliance with safety and
regulatory standards.
If you have any questions or problems concerning
your unit that are not covered in this manual, consult
your nearest Sony dealer.
Notes on the lithium battery
• Keep the lithium battery out of the reach of children.
Should the battery be swallowed, immediately
consult a doctor.
• Wipe the battery with a dry cloth to assure a good
contact.
• Be sure to observe the correct polarity when
installing the battery.
• Do not hold the battery with metallic tweezers,
otherwise a short-circuit may occur.
WARNING
Battery may explode if mistreated.
Do not recharge, disassemble, or dispose of
in fire.
Fuse replacement
When replacing the fuse, be
sure to use one matching the
amperage rating stated on the
original fuse. If the fuse blows,
check the power connection and
replace the fuse. If the fuse
blows again after replacement,
there may be an internal
malfunction. In such a case,
consult your nearest Sony
dealer.
continue to next page t
Fuse (10 A)
27
Page 28
Cleaning the connectors
The unit may not function properly if the connectors
between the unit and the front panel are not clean. In
order to prevent this, detach the front panel (page 7)
and clean the connectors with a cotton swab. Do not
apply too much force. Otherwise, the connectors
may be damaged.
Removing the unit
1 Remove the protection collar.
1Detach the front panel (page 7).
2Pinch both edges of the protection collar,
then pull it out.
Main unit
Notes
• For safety, turn off the ignition before cleaning the
connectors, and remove the key from the ignition
switch.
• Never touch the connectors directly with your fingers
or with any metal device.
Back of the front
panel
x
2 Remove the unit.
1Insert both release keys simultaneously
until they click.
Hook facing
inwards.
2Pull the release keys to unseat the unit.
28
3Slide the unit out of the mounting.
Page 29

Specifications
Tuner section
FM
Tuning range: 87.5 – 108.0 MHz
Antenna (aerial) terminal:
External antenna (aerial) connector
Intermediate frequency: 150 kHz
Usable sensitivity: 10 dBf
Selectivity: 75 dB at 400 kHz
Signal-to-noise ratio: 70 dB (mono)
Separation: 40 dB at 1 kHz
Frequency response: 20 – 15,000 Hz
MW/LW
Tuning range:
MW: 531 – 1,602 kHz
LW: 153 – 279 kHz
Antenna (aerial) terminal:
External antenna (aerial) connector
Intermediate frequency: 25 kHz
Sensitivity: MW: 26 µV, LW: 45 µV
CD Player section
Signal-to-noise ratio: 120 dB
Frequency response: 10 – 20,000 Hz
Wow and flutter: Below measurable limit
USB Player section
Interface: USB (Full-speed)
Maximum current: 500 mA
Power amplifier section
Output: Speaker outputs
Speaker impedance: 4 – 8 ohms
Maximum power output: 52 W × 4 (at 4 ohms)
General
Outputs:
Audio outputs terminal (front/rear)
Subwoofer output terminal (mono)
Power antenna (aerial) relay control terminal
Power amplifier control terminal
Inputs:
Telephone ATT control terminal
Remote controller input terminal
Antenna (aerial) input terminal
AUX input jack (stereo mini jack)
USB signal input connector
Power requirements: 12 V DC car battery
(negative ground (earth))
Dimensions: Approx. 178 × 50 × 180 mm
1
(7
/8 × 2 × 71/8 in) (w/h/d)
Mounting dimensions: Approx. 182 × 53 × 162 mm
1
(7
/4 × 21/8 × 61/2 in) (w/h/d)
Mass: Approx. 1.3 kg (2 lb 14 oz)
Supplied accessory:
Card remote commander: RM-X151
Parts for installation and connections (1 set)
Optional accessory/equipment:
USB connection cable for iPod: RC-100IP
Your dealer may not handle some of the above listed
accessories. Please ask the dealer for detailed
information.
Design and specifications are subject to change
without notice.
System requirements for the software
in the supplied CD-ROM
Computer
•CPU/RAM
– IBM PC/AT compatible machine
– CPU: Intel Pentium III Processor 450 MHz or
higher
– RAM: 256 MB or more (For Windows XP), 512
MB or more (For Windows Vista or later)
•CD-ROM drive
• USB port
OS
Windows XP, Windows Vista, Windows 7
For details on compatible editions or Service Pack, visit
the following support site:
http://support.sony-europe.com/
Monitor
High color (16-bit) or more, 800 × 600 dots or more
Other
Internet connection
Notes
• The following system environments are not
supported.
– Non IBM PC type computers, such as Macintosh,
etc.
– Homemade computers
– OS upgraded computers
– Multi-display environment
– Multi-boot environment
– Virtual machine environment
• Depending on the computer condition, operation
may not be possible even with the recommended
environment.
29
Page 30
Troubleshooting
The following checklist will help you remedy
problems you may encounter with your unit.
Before going through the checklist below, check the
connection and operating procedures.
If the problem is not solved, visit the following
support site.
Support site
http://support.sony-europe.com/
General
No power is being supplied to the unit.
• Check the connection or fuse.
• If the unit is turned off and the display disappears, it
cannot be operated with the remote commander.
tTurn on the unit.
The power antenna (aerial) does not extend.
The power antenna (aerial) does not have a relay box.
No sound.
• The ATT function is activated, or the Telephone ATT
function (when the interface cable of a car telephone
is connected to the ATT lead) is activated.
• The position of the fader control “FADER” is not set
for a 2-speaker system.
No beep sound.
• The beep sound is canceled (page 25).
• An optional power amplifier is connected and you are
not using the built-in amplifier.
The contents of the memory have been erased.
• The RESET button has been pressed.
tStore again into the memory.
• The power supply lead or battery has been
disconnected or it is not connected properly.
Stored stations and correct time are erased.
The fuse has blown.
Makes noise when the position of the ignition
is switched.
The leads are not matched correctly with the car’s
accessory power connector.
During playback or reception, demonstration
mode starts.
If no operation is performed for 5 minutes with
“DEMO-ON” set, demonstration mode starts.
t Set “DEMO-OFF” (page 25).
The display disappears from/does not appear
in the display window.
• The dimmer is set to “DIMMER-ON” (page 25).
• The display disappears if you press and hold
(SOURCE/OFF).
tPress (SOURCE/OFF) on the unit until the
display appears.
• The connectors are dirty (page 28).
The Auto Off function does not operate.
The unit is turned on. The Auto Off function activates
after turning off the unit.
t Turn off the unit.
Radio reception
The stations cannot be received.
The sound is hampered by noises.
The connection is not correct.
t Connect a power antenna (aerial) control lead
(blue) or accessory power supply lead (red) to the
power supply lead of a car’s antenna (aerial)
booster (only when your car has built-in FM/
MW/LW antenna (aerial) in the rear/side glass).
t Check the connection of the car antenna (aerial).
t If the auto antenna (aerial) will not go up, check
the connection of the power antenna (aerial)
control lead.
Preset tuning is not possible.
• Store the correct frequency in the memory.
• The broadcast signal is too weak.
Automatic tuning is not possible.
• Setting of the local seek mode is not correct.
t Tuning stops too frequently:
Set “LOCAL-ON” (page 25).
t Tuning does not stop at a station:
Set “LOCAL-OFF” (page 25).
• The broadcast signal is too weak.
t Perform manual tuning.
During FM reception, the “ST” indication
flashes.
• Tune in the frequency accurately.
• The broadcast signal is too weak.
t Set “MONO-ON” (page 25).
An FM program broadcast in stereo is heard in
monaural.
The unit is in monaural reception mode.
t Set “MONO-OFF” (page 25).
RDS
The SEEK starts after a few seconds of
listening.
The station is non-TP or has weak signal.
t Deactivate TA (page 12).
No traffic announcements.
• Activate TA (page 12).
• The station does not broadcast any traffic
announcements despite being TP.
t Tune in another station.
PTY displays “- - - - - - - -.”
• The current station is not an RDS station.
• RDS data has not been received.
• The station does not specify the program type.
30
Page 31

Program service name flashes.
There is no alternative frequency for the current
station.
tPress (SEEK) +/– while the program service name
is flashing. “PI SEEK” appears and the unit starts
searching for another frequency with the same PI
(Program Identification) data.
CD playback
The disc cannot be loaded.
• Another disc is already loaded.
• The disc has been forcibly inserted upside down or in
the wrong way.
The disc does not playback.
• Defective or dirty disc.
• The CD-Rs/CD-RWs are not for audio use (page 26).
MP3/WMA/AAC files cannot be played back.
The disc is incompatible with the MP3/WMA/AAC
format and version. For details on playable discs and
formats, visit the support site.
MP3/WMA/AAC files take longer to play back
than others.
The following discs take a longer time to start
playback.
– a disc recorded with a complicated tree structure.
– a disc recorded in Multi Session.
– a disc to which data can be added.
The display items do not scroll.
• For discs with very many characters, those may not
scroll.
• “AUTO SCROLL” is set to “OFF.”
t Set “A.SCRL-ON” (page 25).
t Press and hold (DSPL) (SCRL).
The sound skips.
• Installation is not correct.
t Install the unit at an angle of less than 45° in a
sturdy part of the car.
• Defective or dirty disc.
The operation buttons do not function.
The disc will not eject.
Press the RESET button (page 6).
The sound is intermittent.
The sound may be intermittent at a high-bit-rate of
more than 320 kbps.
USB playback
You cannot play back items via a USB hub.
This unit cannot recognize USB devices via a USB
hub.
Cannot play back items.
A USB device does not work.
tReconnect it.
The USB device takes longer to play back.
The USB device contains files with a complicated tree
structure.
A beep sounds.
During playback, the USB device has been
disconnected.
tBefore disconnecting a USB device, make sure to
stop playback first for data protection.
31
Page 32

Error displays/Messages
CHECKING
The unit is confirming the connection of a USB device.
t Wait until confirming the connection is finished.
ERROR
• The disc is dirty or inserted upside down.
tClean or insert the disc correctly.
• A blank disc has been inserted.
• The disc cannot play due to a problem.
tInsert another disc.
• USB device was not automatically recognized.
tReconnect it again.
• Press Z to remove the disc.
FAILURE
The connection of speakers/amplifiers is incorrect.
t See the installation/connections manual of this
model to check the connection.
HUBS NO SUPRT
USB hub is not supported on this unit.
INVALID
The connected USB device does not contain a music
file for the SensMe™ function.
L. SEEK +/–
The local seek mode is on during automatic tuning.
NO AF
There is no alternative frequency for the current
station.
t Press (SEEK) +/– while the program service name
is flashing. The unit starts searching for another
frequency with the same PI (Program
Identification) data (“PI SEEK” appears).
NO CHANNEL
The connected USB device does not contain a channel
list for the SensMe™ function.
NO DEV (No Device)
USB is selected as source without a USB device
connected. A USB device or a USB cable has been
disconnected during playback.
t Be sure to connect a USB device and USB cable.
NO MUSIC
The disc or USB device does not contain a music file.
t Insert a music CD in this unit.
t Connect a USB device with a music file in it.
NO NAME
A disc/album/artist/track name is not written in the
track.
NOT FOUND
There is no item beginning with the selected letter in
Alphabet search.
NO TP
The unit will continue searching for available TP
stations.
OFFSET
There may be an internal malfunction.
t Check the connection. If the error indication
remains on in the display, consult your nearest
Sony dealer.
32
OVERLOAD
USB device is overloaded.
t Disconnect the USB device, then change the source
by pressing (SOURCE/OFF).
t Indicates that the USB device is out of order, or an
unsupported device is connected.
READ
The unit is reading all track and album information on
the disc.
t Wait until reading is complete and playback starts
automatically. Depending on the disc structure, it
may take more than a minute.
RESET
This unit or USB device cannot be operated due to a
problem.
t Press the RESET button (page 6).
S-CH NO SUPRT (SensMe™ channel Not Support)
The connected USB device is not supported.
t For details on the compatibility of your USB
device, visit the support site.
USB NO SUPRT (USB Not Support)
The connected USB device is not supported.
t For details on the compatibility of your USB
device, visit the support site.
“” or “”
During reverse or fast-forward, you have reached the
beginning or the end of the disc and you cannot go any
further.
“”
The character cannot be displayed with the unit.
If these solutions do not help improve the situation,
consult your nearest Sony dealer.
If you take the unit to be repaired because of CD
playback trouble, bring the disc that was used at the
time the problem began.
Page 33

Page 34

Wichtig!
b
Bitte nehmen Sie sich etwas Zeit, um
den Geräte-Pass vollständig
auszufüllen. Dieser befindet sich auf
der hinteren Umschlagseite dieser
Bedienungsanleitung.
Montieren Sie dieses Gerät aus
Sicherheitsgründen im Armaturenbrett des
Fahrzeugs. Zur Installation und zum
Anschluss siehe die mitgelieferte
Installations-/Anschlussanleitung.
Dieses Etikett befindet sich an der Unterseite
des Gehäuses.
Hinweis für Kunden: Die folgenden
Informationen gelten nur für Geräte, die
in Ländern verkauft werden, in denen
EU-Richtlinien gelten
Der Hersteller dieses Produktes ist Sony
Corporation, 1-7-1 Konan Minato-ku Tokio,
108-0075 Japan. Bevollmächtigter für EMV
und Produktsicherheit ist Sony Deutschland
GmbH, Hedelfinger Strasse 61, 70327 Stuttgart,
Deutschland. Für Kundendienst- oder
Garantieangelegenheiten wenden Sie sich bitte
an die in Kundendienst- oder
Sammelsystem für diese Produkte)
Das Symbol auf der Batterie/dem Akku oder der
Verpackung weist darauf hin, dass diese nicht als normaler
Haushaltsabfall zu behandeln sind. Ein zusätzliches
chemisches Symbol Pb (Blei) oder Hg (Quecksilber) unter
der durchgestrichenen Mülltonne bedeutet, dass die
Batterie/der Akku einen Anteil von mehr als 0,0005%
Quecksilber oder 0,004% Blei enthält. Durch Ihren
Beitrag zum korrekten Entsorgen dieser Batterien/Akkus
schützen Sie die Umwelt und die Gesundheit Ihrer
Mitmenschen. Umwelt und Gesundheit werden durch
falsches Entsorgen gefährdet. Materialrecycling hilft, den
Verbrauch von Rohstoffen zu verringern.
Bei Produkten, die auf Grund ihrer Sicherheit, der
Funktionalität oder als Sicherung vor Datenverlust eine
ständige Verbindung zur eingebauten Batterie benötigen,
sollte die Batterie nur durch qualifiziertes Servicepersonal
ausgetauscht werden.
Um sicherzustellen, dass die Batterie korrekt entsorgt
wird, geben Sie das Produkt zwecks Entsorgung an einer
Annahmestelle für das Recycling von elektrischen und
elektronischen Geräten ab.
Für alle anderen Batterien entnehmen Sie die Batterie
bitte entsprechend dem Kapitel über die sichere
Entfernung der Batterie. Geben Sie die Batterie an einer
Annahmestelle für das Recycling von Batterien/Akkus ab.
Weitere Informationen über das Recycling dieses Produkts
oder der Batterie erhalten Sie von Ihrer Gemeinde, den
kommunalen Entsorgungsbetrieben oder dem Geschäft, in
dem Sie das Produkt gekauft haben.
ZAPPIN und Quick-BrowZer sind
Markenzeichen der Sony Corporation.
Garantiedokumenten genannten Adressen.
Entsorgung von gebrauchten
elektrischen und elektronischen
Geräten (anzuwenden in den
Ländern der Europäischen Union
und anderen europäischen Ländern
mit einem separaten Sammelsystem
für diese Geräte)
Das Symbol auf dem Produkt oder seiner Verpackung
weist darauf hin, dass dieses Produkt nicht als normaler
Haushaltsabfall zu behandeln ist, sondern an einer
Annahmestelle für das Recycling von elektrischen und
elektronischen Geräten abgegeben werden muss. Durch
Ihren Beitrag zum korrekten Entsorgen dieses Produkts
schützen Sie die Umwelt und die Gesundheit Ihrer
Mitmenschen. Umwelt und Gesundheit werden durch
falsches Entsorgen gefährdet. Materialrecycling hilft, den
Verbrauch von Rohstoffen zu verringern. Weitere
Informationen zum Recycling dieses Produkts erhalten Sie
ei Ihrer Gemeindeverwaltung, den kommunalen
Entsorgungsbetrieben oder dem Geschäft, in dem Sie das
Produkt gekauft haben.
Geeignetes Zubehör: Fernbedienung
2
Entsorgung von gebrauchten
Batterien und Akkus (anzuwenden in
den Ländern der Europäischen
Union und anderen europäischen
Ländern mit einem separaten
12 TONE ANALYSIS und das
entsprechende Logo sind
Markenzeichen der Sony
Corporation.
SensMe und das SensMe-Logo
sind Markenzeichen oder
eingetragene Markenzeichen von
Sony Ericsson Mobile
Communications AB.
Page 35

Die Musikerkennungstechnologie und die damit
zusammenhängenden Daten werden von
Gracenote® zur Verfügung gestellt. Gracenote ist
der Branchenstandard im Bereich der
Musikerkennungstechnologie und Bereitstellung
damit zusammenhängender Inhalte. Weitere
Informationen erhalten Sie unter
www.gracenote.com.
CD- und musikbezogene Daten von Gracenote,
Inc. Copyright © 2000-2010 Gracenote. Gracenote
Software Copyright © 2000-2010 Gracenote. Für
dieses Produkt bzw. diese Dienstleistung ist
Gracenote Inhaber mindestens eines Patents. Eine
Liste ausgewählter entsprechender GracenotePatente finden Sie auf der Website von Gracenote.
Gracenote, CDDB, MusicID, MediaVOCS, das
Gracenote-Logo und die Logoschriftart sowie das
Logo „Powered by Gracenote“ sind eingetragene
Marken oder Marken von Gracenote in den
Vereinigten Staaten von Amerika und/oder anderen
Ländern.
Microsoft, Windows, Windows Vista und
Windows Media sowie die entsprechenden
Logos sind Markenzeichen oder eingetragene
Markenzeichen der Microsoft Corporation in
den USA und/oder anderen Ländern.
Dieses Produkt ist durch bestimmte gewerbliche
Schutz- und Urheberrechte der Microsoft
Corporation geschützt. Die Verwendung oder der
Vertrieb derartiger Technologie außerhalb dieses
Produkts ohne eine Lizenz von Microsoft oder
einer autorisierten Microsoft-Niederlassung ist
untersagt.
iPhone, iPod, iPod classic, iPod nano und iPod
touch sind Markenzeichen der Apple Inc., die in
den USA und anderen Ländern eingetragen sind.
Apple, Macintosh und iTunes sind in den USA
und anderen Ländern eingetragene
Markenzeichen der Apple Inc.
MPEG Layer-3 Audiocodiertechnologie und
Patente lizenziert von Fraunhofer IIS und Thomson.
Hinweis zur Lithiumbatterie
Schützen Sie die Batterie vor übermäßiger Hitze, wie
z. B. direktem Sonnenlicht, Feuer o. Ä.
Warnhinweis, wenn die Zündung Ihres
Fahrzeugs nicht über eine
Zubehörposition (ACC oder I) verfügt
Aktivieren Sie unbedingt die
Abschaltautomatik (Seite 28).
Nach dem Ausschalten wird das Gerät dann
nach der voreingestellten Zeit automatisch
vollständig abgeschaltet, so dass der
Autobatterie kein Strom mehr entzogen wird.
Wenn Sie die Abschaltautomatik nicht
aktivieren, müssen Sie jedes Mal, wenn Sie die
Zündung ausschalten, die Taste
(SOURCE/OFF) gedrückt halten, bis die
Anzeige ausgeblendet wird.
3
Page 36

Inhalt
Vorbereitungen
Auf diesem Gerät abspielbare CDs . . . . . . . . . . 6
Zurücksetzen des Geräts . . . . . . . . . . . . . . . . . . 6
Beenden des DEMO-Modus . . . . . . . . . . . . . . . 6
Vorbereiten der Kartenfernbedienung. . . . . . . . 6
Einstellen der Uhr . . . . . . . . . . . . . . . . . . . . . . . 6
Abnehmen der Frontplatte. . . . . . . . . . . . . . . . . 7
Anbringen der Frontplatte. . . . . . . . . . . . . . . 7
Lage und Grundfunktionen der
Teile und Bedienelemente
Hauptgerät. . . . . . . . . . . . . . . . . . . . . . . . . . . 8
Kartenfernbedienung RM-X151. . . . . . . . . 10
Radio
Speichern und Empfangen von Sendern . . . . . 11
Automatisches Speichern von Sendern
— BTM. . . . . . . . . . . . . . . . . . . . . . . . . . . . 11
Manuelles Speichern von Sendern . . . . . . . 11
Einstellen gespeicherter Sender . . . . . . . . . 11
Automatisches Einstellen von Sendern. . . . 11
RDS . . . . . . . . . . . . . . . . . . . . . . . . . . . . . . . . . 11
Übersicht. . . . . . . . . . . . . . . . . . . . . . . . . . . 11
Einstellen von AF und TA . . . . . . . . . . . . . 12
Auswählen des Programmtyps (PTY) . . . . 13
Einstellen der Uhrzeit (CT). . . . . . . . . . . . . 13
CD
Wiedergeben einer CD . . . . . . . . . . . . . . . . . . 13
Informationen im Display. . . . . . . . . . . . . . 13
Repeat und Shuffle Play . . . . . . . . . . . . . . . 14
USB-Geräte
Wiedergabe mit einem USB-Gerät . . . . . . . . . 14
Informationen im Display. . . . . . . . . . . . . . 15
Repeat und Shuffle Play . . . . . . . . . . . . . . . 15
Wiedergeben von Musik je nach Stimmung
— SensMe™ . . . . . . . . . . . . . . . . . . . . . . . . . . 15
Vorbereitungen für die
SensMe™-Funktion . . . . . . . . . . . . . . . . . . 15
Installieren von „SensMe™ Setup“ und
„Content Transfer“ auf dem Computer. . . . 16
Registrieren eines USB-Geräts mit
„SensMe™ Setup“ . . . . . . . . . . . . . . . . . . . 16
Übertragen von Titeln auf das USB-Gerät mit
„Content Transfer“ . . . . . . . . . . . . . . . . . . . 17
Wiedergeben von Titeln in einem Channel
4
— SensMe™ channels . . . . . . . . . . . . . . . . 17
iPod
Wiedergabe mit einem iPod . . . . . . . . . . . . . . 18
Informationen im Display . . . . . . . . . . . . . 19
Überspringen von Alben, Podcasts, Genres,
Playlists und Interpreten. . . . . . . . . . . . . . . 19
Repeat und Shuffle Play. . . . . . . . . . . . . . . 20
Direktes Bedienen eines iPod
— Direkte Steuerung . . . . . . . . . . . . . . . . . . . 20
Suchen nach einem Titel
Suchen nach einem Titel anhand seines Namens
— Quick-BrowZer™ . . . . . . . . . . . . . . . . . . . 21
Suchen mit Überspringen von Elementen
— Jump-Modus . . . . . . . . . . . . . . . . . . . . . 21
Suchen in alphabetischer Reihenfolge
— Alphabetische Suche. . . . . . . . . . . . . . . 21
Suchen nach einem Titel durch Anspielen der
Titel — ZAPPIN™. . . . . . . . . . . . . . . . . . . . . 22
Bei der Wiedergabe mit
„SensMe™ channels“ . . . . . . . . . . . . . . . . 22
Auswählen einer passenden
Beleuchtungsfarbe
Ändern der Display- und Tastenfarbe
— Dynamische farbige Beleuchtung . . . . . . . 23
Individuelles Einstellen der Display- und
Tastenfarbe
— Benutzerdefinierte Farbe. . . . . . . . . . . . 23
Weitere Funktionen zur Farbeinstellung. . . . . 24
Synchronisation mit SensMe™-Channels
— SensMe™-Channels-Farbe . . . . . . . . . . 24
Wechseln der Farbe mit Sound-
Synchronisation
— Sound-Synchronisation. . . . . . . . . . . . . 24
Anzeigen klarer Farben
— Weißes Menü . . . . . . . . . . . . . . . . . . . . 24
Starteffekt
— Weiß beim Start. . . . . . . . . . . . . . . . . . . 24
Page 37

Klangeinstellungen und SetupMenü
Ändern der Klangeinstellungen. . . . . . . . . . . . 25
Einstellen der Klangeigenschaften . . . . . . . 25
Verwenden der erweiterten Klangfunktionen
— Advanced Sound Engine . . . . . . . . . . . . . . 26
Auswählen der Klangqualität
— EQ7 Preset . . . . . . . . . . . . . . . . . . . . . . . 26
Individuelles Einstellen der Equalizer-Kurve
— EQ7 Setting . . . . . . . . . . . . . . . . . . . . . . 26
Optimieren des Klangs mithilfe der
Tonverzögerung — Listening Position . . . . 27
Feineinstellen der Hörposition . . . . . . . . . . 27
DM+ Advanced. . . . . . . . . . . . . . . . . . . . . . 27
Verwenden der Hecklautsprecher als
Tiefsttonlautsprecher
— Rear Bass Enhancer . . . . . . . . . . . . . . . . 28
Einstellen von Konfigurationsoptionen
— SET. . . . . . . . . . . . . . . . . . . . . . . . . . . . . . . 28
Weitere Funktionen
Verwenden gesondert erhältlicher Geräte. . . . 29
Zusätzliche Audiogeräte. . . . . . . . . . . . . . . 29
Weitere Informationen
Sicherheitsmaßnahmen. . . . . . . . . . . . . . . . . . 30
Hinweise zu CDs . . . . . . . . . . . . . . . . . . . . 30
Wiedergabereihenfolge von MP3-/WMA-/
AAC-Dateien . . . . . . . . . . . . . . . . . . . . . . . 30
Der iPod . . . . . . . . . . . . . . . . . . . . . . . . . . . 30
Wartung . . . . . . . . . . . . . . . . . . . . . . . . . . . . . 31
Ausbauen des Geräts. . . . . . . . . . . . . . . . . . . . 32
Technische Daten . . . . . . . . . . . . . . . . . . . . . . 32
Störungsbehebung. . . . . . . . . . . . . . . . . . . . . . 33
Fehleranzeigen/Meldungen . . . . . . . . . . . . 35
Support-Website
Wenn Sie Fragen haben oder die neuesten Support-Informationen zu
diesem Produkt abrufen möchten, rufen Sie bitte folgende Website auf:
http://support.sony-europe.com/
Hier finden Sie folgende Informationen:
• Modelle und Hersteller kompatibler digitaler Audioplayer
• Unterstützte MP3-/WMA-/AAC-Dateien
• Systemvoraussetzungen für die Software auf der mitgelieferten CD-ROM
5
Page 38

Vorbereitungen
Auf diesem Gerät abspielbare
CDs
Mit dem Gerät lassen sich CD-DAs (auch solche
mit CD TEXT) und CD-Rs/CD-RWs (MP3-/
WMA-/AAC-Dateien (Seite 30)) wiedergeben.
CD-Typ Beschriftung auf der CD
CD-DA
4 Drücken Sie (BACK).
Die Anzeige wechselt wieder in den
normalen Empfangsmodus bzw.
Wiedergabemodus.
Vorbereiten der
Kartenfernbedienung
Entfernen Sie die Isolierfolie.
MP3
WMA
AAC
Zurücksetzen des Geräts
Bevor Sie das Gerät zum ersten Mal benutzen
oder wenn Sie die Autobatterie ausgetauscht
oder die Verbindungen gewechselt haben,
müssen Sie das Gerät zurücksetzen.
Nehmen Sie die Frontplatte ab (Seite 7) und
drücken Sie die Taste RESET (Seite 8) mit einem
spitzen Gegenstand, wie z. B. einem
Kugelschreiber.
Hinweis
Wenn Sie die Taste RESET drücken, werden die
eingestellte Uhrzeit und einige weitere gespeicherte
Einstellungen gelöscht.
Beenden des DEMO-Modus
Sie können die Demo, die beim Ausschalten des
Geräts angezeigt wird, abbrechen.
1 Halten Sie die Auswahltaste gedrückt.
Die Einstellanzeige erscheint.
2 Drehen Sie den Steuerregler, bis
„DEMO“ angezeigt wird, und drücken
Sie anschließend den Steuerregler.
3 Wählen Sie durch Drehen des
Steuerreglers „DEMO-OFF“ aus und
drücken Sie anschließend den
Steuerregler.
Die Einstellung ist damit abgeschlossen.
Tipp
Informationen zum Austauschen der Batterie finden
Sie auf Seite 31.
Einstellen der Uhr
Die Uhr zeigt die Uhrzeit im 24-Stunden-Format
digital an.
1 Halten Sie die Auswahltaste gedrückt.
Die Einstellanzeige erscheint.
2 Drehen Sie den Steuerregler, bis
„CLOCK ADJ“ erscheint, und drücken
Sie anschließend den Steuerregler.
Die Stundenanzeige blinkt.
3 Drehen Sie den Steuerregler, um die
Stunden und Minuten einzustellen.
Drücken Sie (SEEK) –/+, um zur jeweils
nächsten Ziffer in der Digitalanzeige zu
wechseln.
4 Drücken Sie die Auswahltaste,
nachdem Sie die Minuten eingestellt
haben.
Der Einstellvorgang ist damit abgeschlossen
und die Uhr beginnt zu laufen.
Zum Einblenden der Uhrzeit drücken Sie
(DSPL). Drücken Sie (DSPL) erneut, um zur
vorherigen Anzeige zurückzuschalten.
Tipp
Mithilfe der RDS-Funktion können Sie die Uhr auch
automatisch einstellen lassen (Seite 13).
6
Page 39

Abnehmen der Frontplatte
Um zu verhindern, dass das Gerät gestohlen
wird, können Sie die Frontplatte abnehmen.
Warnton
Wenn Sie den Zündschlüssel in die Position OFF
stellen, ohne die Frontplatte abzunehmen, ertönt
einige Sekunden lang ein Warnton.
Der Warnton wird nur ausgegeben, wenn der
integrierte Verstärker verwendet wird.
1 Halten Sie (SOURCE/OFF) gedrückt.
Das Gerät schaltet sich aus.
2 Drücken Sie (OPEN).
Die Frontplatte klappt nach unten auf.
3 Schieben Sie die Frontplatte nach
rechts und ziehen Sie sie an der linken
Seite vorsichtig heraus.
Hinweise
• Lassen Sie die Frontplatte nicht fallen und drücken
Sie nicht zu stark auf die Frontplatte und das
Display.
• Schützen Sie die Frontplatte vor Hitze bzw. hohen
Temperaturen und vor Feuchtigkeit. Lassen Sie sie
nicht in geparkten Autos, auf dem Armaturenbrett
oder auf der Hutablage liegen.
• Nehmen Sie die Frontplatte nicht ab, während die
Wiedergabe am USB-Gerät läuft. Andernfalls
können die USB-Daten beschädigt werden.
Anbringen der Frontplatte
Setzen Sie die Aussparung A an der Frontplatte
am Stift B am Gerät an und drücken Sie dann
die linke Seite behutsam hinein.
Drücken Sie (SOURCE/OFF) am Gerät oder
legen Sie eine CD ein, um das Gerät
einzuschalten.
Hinweis
Legen Sie auf der Innenseite der Frontplatte nichts ab.
7
Page 40

Lage und Grundfunktionen der Teile und Bedienelemente
Hauptgerät
Mit abgenommener Frontplatte In diesem Abschnitt werden Lage und
Grundfunktionen der Teile und Bedienelemente
beschrieben.
Nähere Erläuterungen finden Sie auf den
jeweiligen Seiten.
A Tasten SEEK +/–
Radio:
Automatisches Einstellen von Sendern
(drücken) bzw. manuelle Sendersuche
(gedrückt halten).
CD/USB:
Überspringen von Titeln (drücken),
Überspringen mehrerer Titel hintereinander
(drücken, dann innerhalb von 1 Sekunde
erneut drücken und gedrückt halten) bzw.
Rückwärts-/Vorwärtssuchen in einem Titel
(gedrückt halten).
SensMe™:
Überspringen von Titeln (drücken) bzw.
Rückwärts-/Vorwärtssuchen in einem Titel
(gedrückt halten).
B Taste SOURCE/OFF
Drücken Sie diese Taste, um das Gerät
einzuschalten bzw. die Tonquelle (Radio/
CD/USB/SensMe™*
Wenn Sie die Taste 1 Sekunde lang drücken,
schaltet sich das Gerät aus.
Wenn Sie die Taste mehr als 2 Sekunden
lang drücken, schaltet sich das Gerät aus und
die Anzeige wird ausgeblendet.
C Taste (BROWSE) Seite 21
Aktivieren des Quick-BrowZer™-Modus.
1
/AUX) zu wechseln.
8
Page 41

D Steuerregler/Auswahltaste Seite 25,
28
Einstellen der Lautstärke (drehen) bzw.
Auswählen von Einstelloptionen (drücken
und drehen).
E Empfänger für die
Kartenfernbedienung
F Display
G Taste OPEN Seite 7, 13
H USB-Anschluss Seite 14, 17, 18
Anschließen eines USB-Geräts.
I Taste (BACK)/MODE Seite 11, 20
Zurückschalten zur vorherigen Anzeige bzw.
Auswählen des Radiofrequenzbereichs (FM
(UKW)/MW/LW).
Einschalten/Ausschalten der direkten
Steuerung (gedrückt halten).
J Taste ZAP Seite 22
Aufrufen des ZAPPIN™-Modus.
K Taste COLOR Seite 23
Auswählen einer voreingestellten Farbe
(drücken) bzw. Speichern von Einstellungen
für eine benutzerdefinierte Farbe (gedrückt
halten).
L Taste AF (Alternativfrequenzen)/
TA (Verkehrsdurchsagen)/
PTY (Programmtypauswahl) Seite 12,
13
Einstellen von AF und TA (drücken) bzw.
Auswählen des Programmtyps (PTY) bei
einem RDS-Sender (gedrückt halten).
M Zahlentasten (Stationstasten)
Radio:
Einstellen gespeicherter Sender (drücken)
bzw. Speichern von Sendern (gedrückt
halten).
CD/USB/SensMe™:
(1)/(2): ALBUM –/+ (während der MP3-/
WMA-/AAC-Wiedergabe)
Überspringen von Alben, Wechseln
von SensMe™-Channels (drücken)
bzw. Überspringen mehrerer Alben
hintereinander (gedrückt halten).
(3): REP*
2
Seite 14, 15, 20
(4): SHUF Seite 14, 15, 20
(6): PAUSE
Anhalten der Wiedergabe. Zum
Beenden der Funktion drücken Sie die
Taste erneut.
N Taste DSPL (Anzeige)/SCRL (Bildlauf)
Seite 11, 13, 15, 19, 20
Wechseln der Informationen im Display
(drücken) bzw. Durchlaufenlassen der
Informationen im Display (gedrückt halten).
O AUX-Eingangsbuchse Seite 29
Anschließen eines tragbaren Audiogeräts.
P Taste RESET Seite 6
Q Taste Z (Auswerfen)
Auswerfen der CD.
R CD-Einschub
Legen Sie eine CD mit der beschrifteten
Seite nach oben ein. Die Wiedergabe
beginnt.
*1 Wenn ein für die Funktion SensMe™
eingerichtetes USB-Gerät angeschlossen ist.
*2 Diese Taste ist mit einem fühlbaren Punkt
gekennzeichnet.
Hinweise
• Wenn Sie eine CD auswerfen bzw. einlegen wollen,
schließen Sie kein USB-Gerät an. Andernfalls kann
die CD beschädigt werden.
• Wenn Sie das Gerät ausschalten und die Anzeige
ausgeblendet ist, können Sie es nicht mit der
Kartenfernbedienung bedienen. Drücken Sie
zunächst (SOURCE/OFF) am Gerät oder legen Sie
eine CD ein, um das Gerät zu aktivieren.
9
Page 42
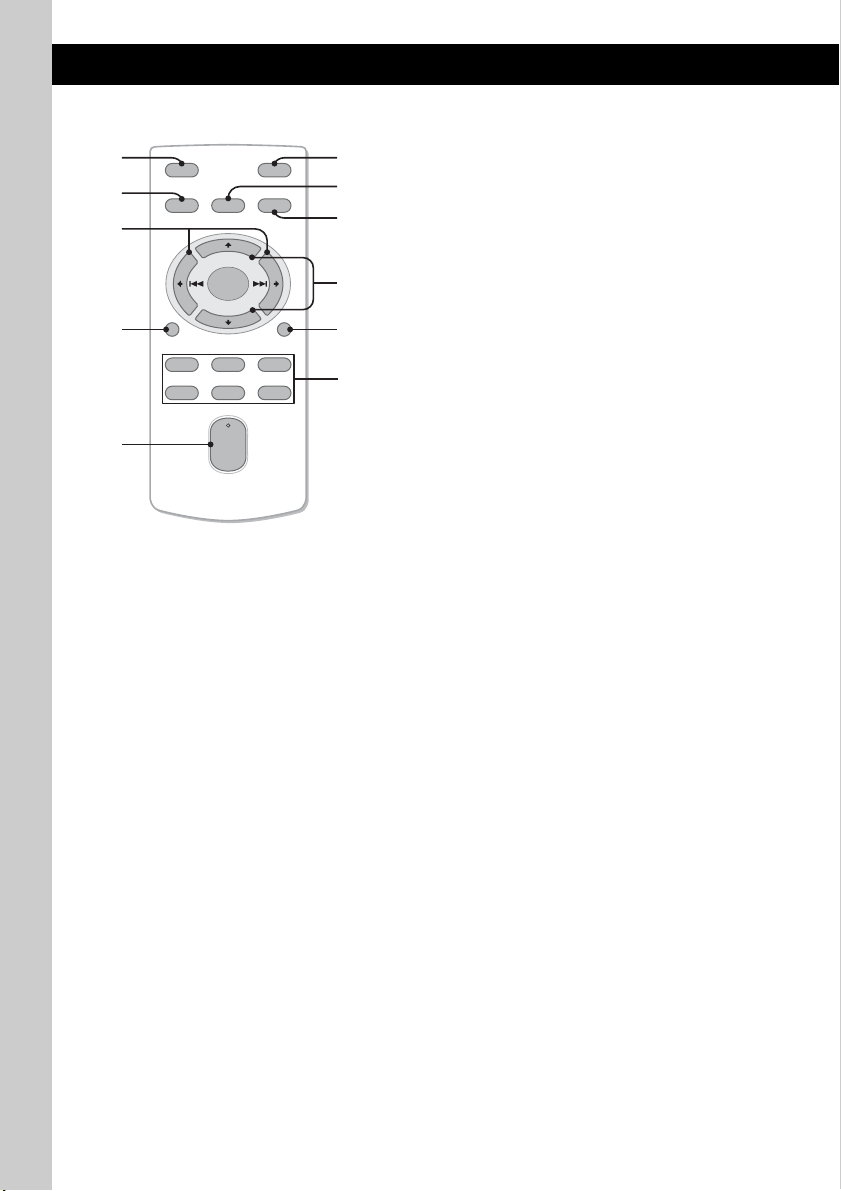
Kartenfernbedienung RM-X151
1
2
3
OFF
SOURCE
SEL
ATT
MODE
+
6
7
8
9
–
VOL
SCRL
q;
qa
+
–
4
5
DSPL
132
465
Ziehen Sie vor dem Gebrauch die Isolierfolie
heraus (Seite 6).
A Taste OFF
Ausschalten des Geräts bzw. Stoppen der
Tonquelle.
B Taste SOURCE
Einschalten des Geräts bzw. Wechseln der
Tonquelle (Radio/CD/USB/SensMe™*
AUX ).
C Tasten < (.)/, (>)
Beim Steuern von Radio-, CD-, USB- und
SensMe™-Funktionen entsprechen diese
Tasten den Tasten (SEEK) –/+ am Gerät.
Konfiguration, Klangeinstellung usw.
können Sie mit < , vornehmen.
D Taste DSPL (Anzeige)
Wechseln der Informationen im Display.
E Taste VOL (Lautstärke) +*
2
/–
Einstellen der Lautstärke.
F Taste ATT (Dämpfen des Tons)
Dämpfen des Tons. Zum Beenden der
Funktion drücken Sie die Taste erneut.
G Taste SEL (Auswählen)
Diese Taste entspricht der Auswahltaste am
Gerät.
H Taste MODE
Auswählen des Radiofrequenzbereichs (FM
(UKW)/MW/LW) (drücken).
Einschalten/Ausschalten der direkten
Steuerung (gedrückt halten).
I Tasten M (+)/m (–)
Beim Steuern von CD-, USB- und
SensMe™-Funktionen entsprechen diese
Tasten den Tasten (1)/(2) (ALBUM –/+)
am Gerät.
Konfiguration, Klangeinstellung usw.
können Sie mit M m vornehmen.
J Taste SCRL (Bildlauf)
Hiermit lassen Sie die Informationen im
Display durchlaufen.
K Zahlentasten (Stationstasten)
Einstellen gespeicherter Sender (drücken)
bzw. Speichern von Sendern (gedrückt
halten).
*1 Wenn ein für die Funktion SensMe™
eingerichtetes USB-Gerät angeschlossen ist.
*2 Diese Taste ist mit einem fühlbaren Punkt
gekennzeichnet.
1
/
10
Page 43

Radio
Speichern und Empfangen von
Sendern
Achtung
Wenn Sie während der Fahrt Sender einstellen,
sollten Sie die BTM-Funktion
(Speicherbelegungsautomatik) verwenden.
Andernfalls besteht Unfallgefahr.
Automatisches Speichern von
Sendern — BTM
1 Drücken Sie (SOURCE/OFF) so oft, bis
„TUNER“ erscheint.
Zum Wechseln des Frequenzbereichs drücken
Sie mehrmals (MODE). Sie können zwischen
FM1 (UKW1), FM2 (UKW2), FM3
(UKW3), MW und LW wählen.
2 Halten Sie die Auswahltaste gedrückt.
Die Einstellanzeige erscheint.
3 Drehen Sie den Steuerregler, bis
„BTM“ angezeigt wird, und drücken
Sie anschließend den Steuerregler.
Das Gerät speichert die Sender in der
Reihenfolge der Frequenzen auf den
Zahlentasten (Stationstasten).
Ein Signalton ist zu hören und die Einstellung
wird gespeichert.
Automatisches Einstellen von
Sendern
1 Wählen Sie den Frequenzbereich aus
und starten Sie mit (SEEK) +/– die
Suche nach dem Sender.
Der Suchlauf stoppt, wenn ein Sender
empfangen wird. Wiederholen Sie diesen
Vorgang, bis das Gerät den gewünschten
Sender empfängt.
Tipp
Wenn Sie die Frequenz des gewünschten Senders
kennen, halten Sie (SEEK) +/– gedrückt, bis die
Frequenz in etwa erreicht ist, und drücken Sie
(SEEK) +/– dann so oft, bis die gewünschte Frequenz
genau eingestellt ist (manuelle Sendersuche).
RDS
Übersicht
UKW-Sender, die RDS (Radiodatensystem)
unterstützen, strahlen zusammen mit den
normalen Radioprogrammsignalen nicht hörbare,
digitale Informationen aus.
Informationen im Display
Manuelles Speichern von Sendern
1 Während des Empfangs des zu
speichernden Senders halten Sie eine
Stationstaste ((1) bis (6)) so lange
gedrückt, bis „MEMO“ angezeigt wird.
Hinweis
Wenn Sie auf der gleichen Stationstaste einen
anderen Sender speichern, wird der zuvor
gespeicherte Sender ersetzt.
Tipp
Wenn ein RDS-Sender gespeichert wird, wird auch
die AF/TA-Einstellung gespeichert (Seite 12).
Einstellen gespeicherter Sender
1 Wählen Sie den Frequenzbereich aus
und drücken Sie eine Stationstaste
((1) bis (6)).
A Radiofrequenzbereich, Funktion
B TA /T P*
C Frequenz*2 (Programmdienstname),
*1 „TA“ blinkt während einer Verkehrsdurchsage. „TP“
*2 Beim Empfang eines RDS-Senders wird „*“ links
Zum Wechseln der angezeigten Informationen
im Display C drücken Sie (DSPL).
1
Speichernummer, Uhrzeit, RDS-Daten
leuchtet, wenn ein Sender mit Verkehrsdurchsagen
empfangen wird.
neben der Frequenz angezeigt.
Fortsetzung auf der nächsten Seite t
11
Page 44

RDS-Funktionen
Mit diesem Gerät stehen folgende RDSFunktionen automatisch zur Verfügung:
AF (Alternativfrequenzen)
In einem Netzwerk wird der Sender mit den
stärksten Signalen ausgewählt und neu
eingestellt. So können Sie auch bei einer langen
Fahrt über eine große Entfernung hinweg
ununterbrochen denselben Sender empfangen,
ohne ihn manuell neu einstellen zu müssen.
TA (Verkehrsdurchsagen)/
TP (Verkehrsfunksender)
Aktuelle Verkehrsinformationen bzw.
Verkehrsfunksender werden empfangen. Wenn
solche Informationen bzw. Sendungen
empfangen werden, wird die gerade
ausgewählte Tonquelle unterbrochen.
PTY (Programmtypauswahl)
Der gerade empfangene Programmtyp wird
angezeigt. Außerdem kann nach dem
ausgewählten Programmtyp gesucht werden.
CT (Uhrzeit)
Mit den CT-Daten (Uhrzeitdaten), die von
RDS-Sendern ausgestrahlt werden, lässt sich
die Uhr einstellen.
Hinweise
• Je nach Land bzw. Region stehen möglicherweise
nicht alle RDS-Funktionen zur Verfügung.
• Die RDS-Funktion arbeitet möglicherweise nicht,
wenn die Sendesignale zu schwach sind oder wenn
der eingestellte Sender keine RDS-Daten ausstrahlt.
Einstellen von AF und TA
1 Drücken Sie (AF/TA) so oft, bis die
gewünschte Einstellung angezeigt
wird.
Einstellung Funktion
AF-ON AF wird aktiviert und TA wird
TA-O N TA wird aktiviert und AF wird
AF/TA-ON AF und TA werden aktiviert.
AF/TA-OFF AF und TA werden deaktiviert.
deaktiviert.
deaktiviert.
Speichern von RDS-Sendern
zusammen mit der AF- und
TA-Einstellung
Sie können zusammen mit den RDS-Sendern die
AF/TA-Einstellung speichern. Mit der BTMFunktion werden nur RDS-Sender mit derselben
AF/TA-Einstellung gespeichert.
Beim manuellen Speichern von Sendern können
Sie RDS- und Nicht-RDS-Sender mit
unterschiedlicher AF/TA-Einstellung speichern.
1 Stellen Sie AF/TA ein und speichern Sie die
Sender dann mit BTM oder manuell ab.
Empfangen von
Katastrophenwarnungen
Wenn AF oder TA aktiviert ist, unterbrechen
Katastrophenwarnungen automatisch die
ausgewählte Tonquelle.
Tipp
Wenn Sie die Lautstärke während einer
Verkehrsdurchsage einstellen, wird der eingestellte
Pegel für spätere Verkehrsdurchsagen gespeichert,
und zwar unabhängig von der sonst eingestellten
Lautstärke.
Unveränderter Empfang eines
Regionalsenders — REGIONAL
Wenn die AF-Funktion aktiviert ist, wird der
Empfang dieses Geräts werkseitig auf eine
bestimmte Region beschränkt, so dass nicht zu
einem anderen Regionalsender mit einer
stärkeren Frequenz gewechselt wird.
Wenn Sie den Empfangsbereich des betreffenden
Regionalsenders verlassen, stellen Sie während
des Empfangs eines UKW-Senders bei der
Konfiguration „REG-OFF“ ein (Seite 29).
Hinweis
Diese Funktion steht in Großbritannien und in einigen
anderen Regionen nicht zur Verfügung.
Lokalsenderfunktion (nur
Großbritannien)
Mithilfe dieser Funktion können Sie andere
Lokalsender auswählen, auch wenn diese zuvor
nicht unter einer Stationstaste gespeichert
wurden.
1 Drücken Sie während des UKW-Empfangs
eine Stationstaste ((1) bis (6)), unter der ein
Lokalsender gespeichert ist.
2 Drücken Sie innerhalb von 5 Sekunden erneut
die Stationstaste des Lokalsenders.
Wiederholen Sie diesen Vorgang, bis das Gerät
den gewünschten Lokalsender empfängt.
12
Page 45

Auswählen des Programmtyps
(PTY)
1 Halten Sie während des UKW-
Empfangs (AF/TA) (PTY) gedrückt.
Der Name des aktuellen Programmtyps
erscheint, wenn der Sender PTY-Daten
ausstrahlt.
2 Drehen Sie den Steuerregler, bis der
gewünschte Programmtyp angezeigt
wird, und drücken Sie anschließend
den Steuerregler.
Das Gerät beginnt, nach einem Sender zu
suchen, der den ausgewählten Programmtyp
ausstrahlt.
Programmtypen
NEWS (Nachrichten), AFFAIRS (Aktuelles
Zeitgeschehen), INFO (Informationen),
SPORT (Sport), EDUCATE (Erziehung und
Bildung), DRAMA (Hörspiele), CULTURE
(Kultur), SCIENCE (Wissenschaft), VARIED
(Verschiedenes), POP M (Pop-Musik),
ROCK M (Rock-Musik), EASY M
(Unterhaltungsmusik), LIGHT M (Leichte
Klassik), CLASSICS (Klassik), OTHER M
(Sonstige Musik), WEATHER (Wetter),
FINANCE (Finanzberichte), CHILDREN
(Kinderprogramme), SOCIAL A
(Magazinsendungen), RELIGION (Religion),
PHONE IN (Hörertelefon), TRAVEL
(Reiseinformationen), LEISURE
(Freizeitprogramm), JAZZ (Jazz), COUNTRY
(Country-Musik), NATION M (Volksmusik),
OLDIES (Oldies), FOLK M (Folk-Musik),
DOCUMENT (Dokumentarbeiträge)
Hinweis
Sie können diese Funktion in Ländern/Regionen, in
denen keine PTY-Daten zur Verfügung stehen, nicht
verwenden.
CD
Wiedergeben einer CD
1 Drücken Sie (OPEN).
2 Legen Sie eine CD mit der
beschrifteten Seite nach oben ein.
3 Schließen Sie die Frontplatte.
Die Wiedergabe beginnt automatisch.
Auswerfen der CD
1 Drücken Sie (OPEN).
2 Drücken Sie Z.
Die CD wird ausgeworfen.
3 Schließen Sie die Frontplatte.
Informationen im Display
A Tonquelle
B Titelname*
Interpretenname*
Albumname*
Spieldauer, Uhrzeit
*1 Die Informationen einer CD TEXT bzw. einer
MP3-/WMA-/AAC-Datei werden angezeigt.
*2 Die Albumnummer wird nur beim Wechseln des
Albums angezeigt.
Zum Wechseln der angezeigten Informationen
im Display B drücken Sie (DSPL).
Tipp
Je nach CD-Typ, Aufnahmeformat und Einstellungen
werden möglicherweise unterschiedliche
Informationen angezeigt.
1
, CD-/Interpretenname*1,
1
, Albumnummer*2,
1
, Titelnummer/Verstrichene
Einstellen der Uhrzeit (CT)
1 Stellen Sie bei der Konfiguration
„CT-ON“ ein (Seite 28).
Hinweise
• Die CT-Funktion steht möglicherweise nicht zur
Verfügung, auch wenn ein RDS-Sender empfangen
wird.
• Die mit der CT-Funktion eingestellte Uhrzeit ist nicht
immer korrekt.
13
Page 46

Repeat und Shuffle Play
1 Drücken Sie während der Wiedergabe
(3) (REP) oder (4) (SHUF) so oft, bis
die gewünschte Einstellung im Display
erscheint.
Einstellung Funktion
TRACK Wiederholtes
Wiedergeben eines
Titels.
ALBUM* Wiederholtes
Wiedergeben eines
Albums.
SHUF ALBUM* Wiedergeben eines
Albums in willkürlicher
Reihenfolge.
SHUF DISC Wiedergeben einer CD
in willkürlicher
Reihenfolge.
* Bei Wiedergabe einer MP3-/WMA-/AAC-Datei.
Nach 3 Sekunden ist die Einstellung
abgeschlossen.
Wenn Sie wieder in den normalen
Wiedergabemodus wechseln möchten, wählen
Sie „ OFF“ bzw. „SHUF OFF“.
USB-Geräte
Einzelheiten zur Kompatibilität Ihres USBGeräts finden Sie auf der Support-Website.
Support-Website
http://support.sony-europe.com/
• Sie können USB-Geräte des Typs MSC
(Massenspeicherklasse) und MTP
(Medientransferprotokoll) verwenden, die dem
USB-Standard entsprechen.
• Der entsprechende Codec ist MP3 (.mp3),
WMA (.wma), AAC (.m4a) und AAC (.mp4).
• Es empfiehlt sich, eine Sicherungskopie der
Daten auf dem USB-Gerät zu erstellen.
Hinweis
Lassen Sie den Motor an, bevor Sie das USB-Gerät
anschließen.
Bei manchen USB-Geräten kann es zu Fehlfunktionen
und Beschädigungen kommen, wenn Sie zuerst das
Gerät anschließen und dann den Motor anlassen.
Wiedergabe mit einem
USB-Gerät
1 Schieben Sie die USB-Abdeckung auf.
14
2 Schließen Sie das USB-Gerät an den
USB-Anschluss an.
Verwenden Sie zum Anschließen, falls Sie ein
Kabel verwenden, das mit dem USB-Gerät
gelieferte Kabel.
Die Wiedergabe beginnt.
Wenn bereits ein USB-Gerät angeschlossen ist,
drücken Sie zum Starten der Wiedergabe
(SOURCE/OFF) so oft, bis „USB“ erscheint.
Page 47

Halten Sie zum Stoppen der Wiedergabe
1 Sekunde lang (SOURCE/OFF) gedrückt.
Lösen des USB-Geräts
1 Stoppen Sie die Wiedergabe am USB-Gerät.
2 Trennen Sie das USB-Gerät von diesem Gerät.
Wenn Sie das USB-Gerät während der
Wiedergabe vom Gerät trennen, können die
Daten auf dem USB-Gerät beschädigt werden.
Hinweise
• Verwenden Sie keine USB-Geräte, die so groß oder
schwer sind, dass sich bei einer Erschütterung die
Verbindung lösen bzw. das Gerät herunterfallen
kann.
• Nehmen Sie die Frontplatte nicht ab, während die
Wiedergabe am USB-Gerät läuft. Andernfalls
können die USB-Daten beschädigt werden.
• Dieses Gerät kann keine USB-Geräte erkennen, die
über einen USB-Hub angeschlossen sind.
Informationen im Display
A Tonquelle
B Titelname, Interpretenname,
Albumnummer*, Albumname, Titelnummer/
Verstrichene Spieldauer, Uhrzeit
* Die Albumnummer wird nur beim Wechseln des
Albums angezeigt.
Zum Wechseln der angezeigten Informationen im
Display B drücken Sie (DSPL).
Hinweise
• Je nach USB-Gerät, Aufnahmeformat und
Einstellungen werden unterschiedliche
Informationen angezeigt. Einzelheiten dazu finden
Sie auf der Support-Website.
• Im Folgenden wird die Höchstzahl an anzeigbaren
Daten angegeben.
– Ordner (Alben): 128
– Dateien (Titel) pro Ordner: 500
• Lassen Sie das USB-Gerät nicht in einem geparkten
Fahrzeug liegen. Andernfalls kann es zu
Fehlfunktionen kommen.
• Je nach Menge der aufgezeichneten Daten kann es
etwas dauern, bis die Wiedergabe beginnt.
• DRM-Dateien (digitale Rechteverwaltung) werden
unter Umständen nicht wiedergegeben.
• Bei der Wiedergabe bzw. beim Vorwärts-/
Rückwärtssuchen in einer VBR-MP3-/WMA-/AACDatei (variable Bitrate) wird die verstrichene
Spieldauer möglicherweise nicht richtig angezeigt.
• Die Wiedergabe folgender MP3-/WMA-/AACDateien wird nicht unterstützt:
– Dateien mit verlustfreier Komprimierung
– Kopiergeschützte Dateien
Repeat und Shuffle Play
1 Drücken Sie während der Wiedergabe
(3) (REP) oder (4) (SHUF) so oft, bis
die gewünschte Einstellung im Display
erscheint.
Einstellung Funktion
TRACK Wiederholtes
Wiedergeben eines
Titels.
ALBUM Wiederholtes
Wiedergeben eines
Albums.
SHUF ALBUM Wiedergeben eines
Albums in willkürlicher
Reihenfolge.
SHUF DEVICE Wiedergeben des Inhalts
auf einem Gerät in
willkürlicher
Reihenfolge.
Nach 3 Sekunden ist die Einstellung
abgeschlossen.
Wenn Sie wieder in den normalen
Wiedergabemodus wechseln möchten, wählen
Sie „ OFF“ bzw. „SHUF OFF“.
Wiedergeben von Musik je nach
Stimmung — SensMe™
Mit Sonys neuartiger Funktion „SensMe™
channels“ werden Titel automatisch je nach
Channel in Gruppen zusammengefasst, so dass
Sie die jeweils passende Musik ganz einfach
wiedergeben lassen können.
Vorbereitungen für die SensMe™Funktion
Die folgenden Schritte sind die
Grundvoraussetzungen für die Wiedergabe mit
der SensMe™-Funktion auf diesem Gerät.
Fortsetzung auf der nächsten Seite t
15
Page 48

1Installieren von „SensMe™ Setup“ und
„Content Transfer“ auf dem Computer
Installieren Sie zunächst „SensMe™ Setup“
und „Content Transfer“ von der mitgelieferten
CD-ROM.
™
Content
SensMe
Transfer
Setup
4 Anschließen des USB-Geräts und
Wiedergabe mit der SensMe™Funktion auf diesem Gerät
Schließen Sie das vorbereitete USB-Gerät an.
Sie können die Wiedergabe mit „SensMe™
channels“ auf diesem Gerät starten.
2Registrieren eines USB-Geräts mit
„SensMe™ Setup“
Schließen Sie ein USB-Gerät an den
Computer an und führen Sie mit „SensMe™
Setup“ eine Registrierung aus, um die
SensMe™-Funktion auf diesem Gerät zu
ermöglichen.
™
SensMe
Setup
Tipp
Die Registrierung kann während oder nach der
Installation ausgeführt werden.
3Übertragen von Titeln auf das USB-
Gerät mit „Content Transfer“
Damit Titel in Channels eingeordnet werden
können, müssen die Klangmuster der Titel mit
12 TONE ANALYSIS™ analysiert werden,
das in „Content Transfer“ geladen wird.
Wenn das USB-Gerät an den Computer
angeschlossen ist, übertragen Sie Titel per
Drag & Drop aus Windows Explorer oder
iTunes usw. in „Content Transfer“.
Die Analyse und die Übertragung der Titel
erfolgt mit „Content Transfer“.
Content
Transfer
Installieren von „SensMe™ Setup“
und „Content Transfer“ auf dem
Computer
Sie müssen die mitgelieferte Software
(„SensMe™ Setup“ und „Content Transfer“)
verwenden, um die SensMe™-Funktion auf
diesem Gerät nutzen zu können.
Installieren Sie die Software von der
mitgelieferten CD-ROM auf dem Computer.
1 Legen Sie die mitgelieferte CD-ROM in
den Computer ein.
Der Installationsassistent wird automatisch
gestartet.
2 Gehen Sie nach den Anweisungen auf
dem Bildschirm vor, um die
Installation vorzunehmen.
Registrieren eines USB-Geräts mit
„SensMe™ Setup“
Die Registrierung des USB-Geräts ist
erforderlich, um die SensMe™-Funktion auf
diesem Gerät zu ermöglichen.
Wenn die Registrierung nicht während der
Installation ausgeführt wurde, gehen Sie wie im
Folgenden erläutert vor.
1 Starten Sie „SensMe™ Setup“ auf dem
Computer.
2 Schließen Sie das USB-Gerät an den
Computer an.
3 Gehen Sie nach den Anweisungen auf
dem Bildschirm vor, um die
Registrierung vorzunehmen.
Tipp
Wenn Sie ein registriertes USB-Gerät mit analysierten
Titeln anschließen, können Sie die Registrierung des
USB-Geräts wieder aufheben.
16
Page 49

Übertragen von Titeln auf das USBGerät mit „Content Transfer“
Damit Sie die SensMe™-Funktion auf diesem
Gerät nutzen können, müssen die Titel mit
„Content Transfer“ analysiert und auf das
registrierte USB-Gerät übertragen werden.
1 Schließen Sie das registrierte USB-
Gerät an den Computer an.
Schließen Sie USB-Geräte im MSC-Modus
an.
„Content Transfer“ wird automatisch
gestartet.
Wenn eine Meldung angezeigt wird, befolgen
Sie zum Fortfahren die Anweisungen auf dem
Bildschirm.
2 Übertragen Sie Titel per Drag & Drop
aus Windows Explorer oder iTunes
usw. in „Content Transfer“.
Die Analyse und die Übertragung der Titel
werden gestartet.
Nähere Informationen zum Vorgehen finden Sie
in der Hilfe zu „Content Transfer“.
Hinweis
Die Analyse der Titel mit 12 TONE ANALYSIS™ kann
je nach Computerumgebung eine Weile dauern.
Wiedergeben von Titeln in einem
Channel — SensMe™ channels
Mit „SensMe™ channels“ werden Titel nach
dem Klang automatisch in Channels eingeordnet.
Sie können einen zu Ihrer Stimmung oder
Beschäftigung usw. passenden Channel
auswählen und wiedergeben lassen.
1 Schließen Sie ein USB-Gerät, das für
die SensMe™-Funktion vorbereitet
wurde, an dieses Gerät an.
2 Drücken Sie (SOURCE/OFF) so oft, bis
„SENSME CH“ erscheint.
Die Channel-Liste wird angezeigt und die
melodisch oder rhythmisch am stärksten
ausgeprägten Passagen* der Titel werden in
willkürlicher Reihenfolge wiedergegeben.
* Wird möglicherweise nicht richtig erkannt.
3 Wählen Sie mit dem Steuerregler
einen Titel aus der Channel-Liste aus.
• Wechseln des Channel
Drücken Sie (1)/(2) (ALBUM –/+), um den
gewünschten Channel auszuwählen.
• Wechseln des Titels
Drücken Sie (SEEK) +/–, bis der gewünschte
Titel angezeigt wird, und drücken Sie dann den
Steuerregler.
Die Wiedergabe startet am Anfang des
aktuellen Titels.
Wenn Sie 10 Sekunden lang keine Funktion
ausführen, erscheint im Display wieder die
Anzeige für den normalen Wiedergabemodus.
Hinweise
• Manche Titel werden möglicherweise nicht richtig
erkannt und in einen Channel eingeordnet, der nicht
der Stimmung des Titels entspricht.
• Wenn das angeschlossene USB-Gerät viele Titel
enthält, kann es länger dauern, bis die Wiedergabe
mit „SensMe™ channels“ beginnt, da zunächst die
Daten eingelesen werden.
Tipp
Die Titel werden in willkürlicher Reihenfolge
wiedergegeben. Die Reihenfolge ändert sich jedes
Mal, wenn ein Channel ausgewählt wird.
Channel-Liste
x Empfohlen, Shuffle All
„MORNING“ (5:00 – 9:59)
„DAYTIME“ (10:00 – 15:59)
„EVENING“ (16:00 – 18:59)
„NIGHT“ (19:00 – 23:59)
„MIDNIGHT“ (0:00 – 4:59)
Für bestimmte Tageszeiten empfohlene Titel.
Stellen Sie die Uhrzeit ein (Seite 6), damit der
Channel präzise angezeigt wird.
„SHUFFLE ALL“: Gibt alle analysierten Titel
in zufälliger Reihenfolge wieder.
x Basis-Channels
Die Titel werden je nach Musikrichtung
abgespielt.
„ENERGETIC“: Dynamische Titel.
„RELAX“: Ruhige Titel.
„MELLOW“: Sanfte, melancholische Titel.
„UPBEAT“: Fröhliche Titel, die Ihre Stimmung
verbessern.
„EMOTIONAL“: Balladen.
„LOUNGE“: Lounge-Musik.
„DANCE“: Titel in Richtung Rhythmus und
Rap bzw. Rhythm ‘n’ Blues.
„EXTREME“: Intensive Rocktitel.
Fortsetzung auf der nächsten Seite t
17
Page 50

x Channels zum Autofahren
Wiedergabe von Titeln, die beim Autofahren
passend sind.
„FREEWAY“: Schnelle, dynamische Titel.
„CHILLOUT DRIVE“: Intonierte, heilende
Balladen.
„WEEKEND TRIP“: Reizvolle, muntere und
fröhliche Titel.
„MIDNIGHT CRUISE“: Titel mit Jazz oder
Klavierpassagen mit einer ruhigen Stimmung.
„PARTY RIDE“: Schnelle und lebendige Titel.
„MORNING COMMUTE“: Muntere und flotte
Titel.
„GOIN’ HOME“: Warme und entspannende
Titel.
iPod
Erläuterungen zur Kompatibilität des iPod finden
Sie unter „Der iPod“ (Seite 30) oder auf der
Support-Website.
In dieser Bedienungsanleitung wird „iPod“ als
allgemeiner Begriff für die iPod-Funktionen bei
einem iPod und iPhone verwendet, sofern nicht
im Text oder in Abbildungen anders angegeben.
Support-Website
http://support.sony-europe.com/
Wiedergabe mit einem iPod
Drehen Sie die Lautstärke an diesem Gerät
herunter, bevor Sie den iPod anschließen.
1 Schieben Sie die USB-Abdeckung auf.
18
2 Schließen Sie den iPod über das USB-
Kabel mit Dock-Anschluss an den
USB-Anschluss an.
Der iPod schaltet sich automatisch ein und im
iPod-Display erscheint die unten abgebildete
Anzeige.*
Tipp
Zum Anschließen des Dock-Anschlusses empfehlen
wir das USB-Kabel RC-100IP (nicht mitgeliefert).
Page 51

Die Titel auf dem iPod werden automatisch
ab der zuletzt wiedergegebenen Stelle
abgespielt.
Wenn bereits ein iPod angeschlossen ist,
drücken Sie zum Starten der Wiedergabe
(SOURCE/OFF) so oft, bis „USB“ erscheint.
(„IPOD“ erscheint im Display, wenn der iPod
erkannt wird.)
* Wenn Sie einen iPod touch oder ein iPhone
anschließen oder wenn die Wiedergabe am iPod
beim letzten Mal mit direkter Steuerung erfolgte,
erscheint das Logo nicht im Display.
3 Stellen Sie die Lautstärke ein.
Halten Sie zum Stoppen der Wiedergabe
1 Sekunde lang (SOURCE/OFF) gedrückt.
Lösen des iPod
1 Stoppen Sie die Wiedergabe am iPod.
2 Trennen Sie den iPod von diesem Gerät.
Vorsicht beim iPhone
Wenn Sie ein iPhone über USB anschließen, wird die
Lautstärke beim Telefonieren vom iPhone selbst
gesteuert. Um nach einem Telefonat plötzliche laute
Geräusche zu vermeiden, erhöhen Sie während des
Telefonats nicht die Lautstärke am Gerät.
Hinweise
• Nehmen Sie die Frontplatte nicht ab, während die
Wiedergabe am iPod läuft. Andernfalls können die
Daten beschädigt werden.
• Dieses Gerät kann keinen iPod erkennen, der über
einen USB-Hub angeschlossen ist.
Tipps
• Sofern der Zündschlüssel in der Position ACC oder I
steht und das Gerät eingeschaltet ist, wird der iPod
geladen.
• Wenn der iPod während der Wiedergabe vom Gerät
getrennt wird, erscheint „NO DEV“ im Display des
Geräts.
Informationen im Display
A Tonquellenanzeige (iPod)
B Titelname, Interpretenname, Albumname,
Titelnummer/Verstrichene Spieldauer,
Uhrzeit
Zum Wechseln der angezeigten Informationen im
Display B drücken Sie (DSPL).
Tipp
Beim Wechseln des Albums, des Podcasts, des
Genres, des Interpreten bzw. der Playlist wird kurz die
entsprechende Nummer angezeigt.
Hinweis
Manche auf dem iPod gespeicherte Zeichen werden
möglicherweise nicht richtig angezeigt.
Überspringen von Alben,
Podcasts, Genres, Playlists und
Interpreten
Funktion Vorgehen
Überspringen Drücken Sie (1)/(2)
Überspringen
mehrerer
Elemente
hintereinander
(ALBUM –/+)
[pro Element einmal drücken]
Halten Sie (1)/(2)
(ALBUM –/+) gedrückt
[bis zur gewünschten Stelle
gedrückt halten]
Wiedergabefortsetzung
Wenn der iPod an den Dock-Anschluss
angeschlossen ist, wird an diesem Gerät als
Modus die Wiedergabefortsetzung eingestellt
und die Wiedergabe startet in dem am iPod
eingestellten Modus.
Bei der Wiedergabefortsetzung stehen folgende
Tasten nicht zur Verfügung.
– (3) (REP)
– (4) (SHUF)
19
Page 52
Repeat und Shuffle Play
1 Drücken Sie während der Wiedergabe
(3) (REP) oder (4) (SHUF) so oft, bis
die gewünschte Einstellung im Display
erscheint.
Einstellung Funktion
TRACK Wiederholtes
Wiedergeben eines
Titels.
ALBUM Wiederholtes
Wiedergeben eines
Albums.
PODCAST Wiederholtes
Wiedergeben eines
Podcasts.
ARTIST Wiederholtes
Wiedergeben der Titel
eines Interpreten.
PLAYLIST Wiederholtes
Wiedergeben einer
Playlist.
GENRE Wiederholtes
Wiedergeben der Titel
eines Genres.
SHUF ALBUM Wiedergeben eines
Albums in willkürlicher
Reihenfolge.
SHUF PODCAST Wiedergeben von
Podcasts in willkürlicher
Reihenfolge.
SHUF ARTIST Wiedergeben der Titel
eines Interpreten in
willkürlicher
Reihenfolge.
SHUF PLAYLIST Wiedergeben einer
Playlist in willkürlicher
Reihenfolge.
SHUF GENRE Wiedergeben der Titel
eines Genres in
willkürlicher
Reihenfolge.
SHUF DEVICE Wiedergeben des Inhalts
auf einem Gerät in
willkürlicher
Reihenfolge.
Nach 3 Sekunden ist die Einstellung
abgeschlossen.
Wenn Sie wieder in den normalen
Wiedergabemodus wechseln möchten, wählen
Sie „ OFF“ bzw. „SHUF OFF“.
20
Direktes Bedienen eines iPod
— Direkte Steuerung
Ein iPod, der an den Dock-Anschluss
angeschlossen ist, lässt sich direkt bedienen.
1 Halten Sie während der Wiedergabe
(MODE) gedrückt.
„MODE IPOD“ erscheint und Sie können den
iPod direkt bedienen.
So wechseln Sie die Informationen im
Display
Drücken Sie (DSPL).
Die Informationen im Display wechseln
folgendermaßen:
Titelname t Interpretenname t Albumname
t MODE IPOD t Uhrzeit
So beenden Sie die direkte Steuerung
Halten Sie (MODE) gedrückt.
„MODE AUDIO“ erscheint und das Gerät
schaltet in die Wiedergabefortsetzung.
Hinweise
• Die Lautstärke lässt sich nur mit diesem Gerät
einstellen.
• Wenn dieser Modus deaktiviert wird, wird auch die
Wiederholeinstellung deaktiviert.
Page 53

Suchen nach einem Titel
Suchen nach einem Titel
anhand seines Namens
— Quick-BrowZer™
Sie können anhand der Kategorie mühelos nach
einem Titel auf einer CD oder auf einem USBGerät suchen.
1 Drücken Sie (BROWSE).
Das Gerät wechselt in den Quick-BrowZerModus und die Liste der Suchkategorien
erscheint.
2 Wählen Sie durch Drehen des
Steuerreglers die gewünschte
Kategorie für die Suche aus und
drücken Sie zum Bestätigen den
Steuerregler.
3 Gehen Sie wie in Schritt 2 erläutert
vor, bis der gewünschte Titel
ausgewählt ist.
Die Wiedergabe beginnt.
So schalten Sie zur vorherigen
Anzeige zurück
Drücken Sie (BACK).
So deaktivieren Sie den QuickBrowZer-Modus
Drücken Sie (BROWSE).
Hinweis
Wenn Sie den Quick-BrowZer-Modus aktivieren, wird
die Einstellung für die Wiedergabewiederholung bzw.
Zufallswiedergabe außer Kraft gesetzt.
2 Drehen Sie den Steuerregler, um das
gewünschte Element oder ein Element
in der Nähe des gewünschten
Elements auszuwählen.
Das Gerät durchsucht die Elemente in
Schritten von 10 % der Gesamtzahl an
Elementen.
3 Drücken Sie die Auswahltaste.
Im Display erscheint wieder die Anzeige für
den Quick-BrowZer-Modus und das
ausgewählte Element wird angezeigt.
4 Drehen Sie den Steuerregler, um das
gewünschte Element auszuwählen,
und drücken Sie den Steuerregler.
Die Wiedergabe beginnt, wenn es sich bei
dem ausgewählten Element um einen Titel
handelt.
So deaktivieren Sie den Jump-Modus
Drücken Sie (BACK) oder (SEEK) –.
Hinweis
Wenn das Gerät 7 Sekunden lang nicht bedient wird,
wird der Jump-Modus deaktiviert.
Suchen in alphabetischer
Reihenfolge — Alphabetische
Suche
Wenn ein iPod an das Gerät angeschlossen wird,
können Sie das gewünschte Element
alphabetisch suchen.
1 Drücken Sie im Quick-BrowZer-Modus
die Taste (SEEK) +.
Eine alphabetische Liste wird angezeigt.
Suchen mit Überspringen von
Elementen — Jump-Modus
Auch wenn eine Kategorie viele Elemente
enthält, können Sie das gewünschte Element
schnell ausfindig machen.
1 Drücken Sie im Quick-BrowZer-Modus
die Taste (SEEK) +.
Die folgende Anzeige erscheint.
A Nummer des aktuellen Elements
B Gesamtzahl der Elemente in der aktuellen
Ordnerebene
Anschließend erscheint der Name des
Elements.
2 Drehen Sie den Steuerregler, um den
ersten Buchstaben des gewünschten
Elements auszuwählen, und drücken
Sie anschließend den Steuerregler.
Eine Liste der Elemente, die mit dem
ausgewählten Buchstaben beginnen, wird in
alphabetischer Reihenfolge angezeigt.
Wenn es keinen Song gibt, der mit dem
ausgewählten Buchstaben beginnt, wird
„NOT FOUND“ angezeigt.
3 Drehen Sie den Steuerregler, um das
gewünschte Element auszuwählen,
und drücken Sie den Steuerregler.
Die Wiedergabe beginnt, wenn es sich bei
dem ausgewählten Element um einen Titel
handelt.
Fortsetzung auf der nächsten Seite t
21
Page 54

So brechen Sie die alphabetische
Suche ab
Drücken Sie (BACK) oder (SEEK) –.
Eine Liste der Suchkategorien erscheint.
Hinweise
• Bei der alphabetischen Suche werden Symbole oder
Artikel („a“/„an“/„the“) vor dem ausgewählten
Buchstaben des Elements nicht berücksichtigt.
• Je nach dem ausgewählten Suchelement steht
möglicherweise nur der Jump-Modus zur Verfügung.
• Wenn das Gerät 5 Sekunden lang nicht bedient
wird, wird die alphabetische Suche deaktiviert.
• Die alphabetische Suche kann je nach Anzahl der
Titel einige Zeit in Anspruch nehmen.
Suchen nach einem Titel durch
Anspielen der Titel — ZAPPIN™
Sie können kurze Passagen der Titel auf einer
CD oder einem USB-Gerät nacheinander
anspielen, um nach dem gewünschten Titel zu
suchen.
Der ZAPPIN-Modus eignet sich besonders für
die Titelsuche, wenn die Wiedergabe in
willkürlicher Reihenfolge oder die wiederholte
Wiedergabe in willkürlicher Reihenfolge läuft.
1 Drücken Sie während der Wiedergabe
die Taste (ZAP).
„ZAPPIN“ erscheint im Display und dann
beginnt die Wiedergabe einer Passage aus
dem nächsten Titel.
Die Passage wird die eingestellte Anzahl an
Sekunden lang wiedergegeben, danach ist ein
Klicken zu hören und die Wiedergabe der
nächsten Passage beginnt.
Titel
22
(ZAP) wird
gedrückt.
Passagen der Titel, die im
ZAPPIN-Modus
wiedergegeben werden.
2 Drücken Sie die Auswahltaste oder
(ZAP), sobald eine Passage aus einem
Titel wiedergegeben wird, den Sie
ganz hören möchten.
Der ausgewählte Titel wird im normalen
Wiedergabemodus ab dem Anfang
wiedergegeben.
Wenn Sie im ZAPPIN-Modus einen weiteren
Titel suchen wollen, gehen Sie wie in
Schritt 1 und 2 erläutert vor.
Bei der Wiedergabe mit „SensMe™
channels“
Wenn der gesuchte Titel durch „Content
Transfer“ übertragen wurde, werden die
melodischsten oder rhythmischsten Abschnitte*
der Titel wiedergegeben. Weitere Informationen
zur Funktion SensMe™ finden Sie auf Seite 15.
* Wird möglicherweise nicht richtig erkannt.
Tipps
• Sie können als Wiedergabedauer etwa 6 Sekunden,
15 Sekunden oder 30 Sekunden auswählen
(Seite 29). Welche Passage des Titels
wiedergegeben wird, lässt sich nicht einstellen.
• Drücken Sie im ZAPPIN-Modus (SEEK) +/–, um
einen Titel zu überspringen.
• Drücken Sie im ZAPPIN-Modus (1)/(2)
(ALBUM –/+), um ein Album zu überspringen.
• Auch mit (BACK) können Sie den
wiederzugebenden Titel bestätigen.
Page 55

Auswählen einer passenden
Beleuchtungsfarbe
Ändern der Display- und
Tastenfarbe — Dynamische
farbige Beleuchtung
Dank der dynamischen farbigen Beleuchtung
können Sie die Display- und Tastenfarbe am
Hauptgerät wechseln, so dass sie zum
Fahrzeuginnenraum passt.
Sie können aus 12 voreingestellten Farben,
benutzerdefinierten Farben und 5
voreingestellten Mustern auswählen.
x Voreingestellte Farben
„RED“, „AMBER“, „M_AMBER“,
„YELLOW“, „WHITE“, „LIGHT GREEN“,
„GREEN“, „LIGHT BLUE“, „SKY BLUE“,
„BLUE“, „PURPLE“, „PINK“.
x Voreingestellte Muster
„RAINBOW“, „OCEAN“, „SUNSET“,
„FOREST“, „RANDOM“.
1 Drücken Sie (COLOR).
2 Drehen Sie den Steuerregler, um die
gewünschte voreingestellte Farbe
auszuwählen, und drücken Sie den
Steuerregler.
Die Anzeige wechselt wieder in den
normalen Empfangsmodus bzw.
Wiedergabemodus.
Hinweis
Wenn Sie den Steuerregler schnell drehen, wechselt
die Display- und Tastenfarbe möglicherweise zu
schnell.
Tipp
Sie können vom Setup-Menü aus in den Modus für
voreingestellte Farben wechseln.
Individuelles Einstellen der
Display- und Tastenfarbe
— Benutzerdefinierte Farbe
Sie können eine benutzerdefinierte Farbe für das
Display und die Tasten speichern.
Hinweis zum DAY/NIGHT-Farbmodus
Sie können für DAY/NIGHT unterschiedliche
Farben einstellen.
Die Displayfarbe wechselt im DAY/NIGHTFarbmodus wie im Folgenden erläutert.
Farbmodus DIMMER
DAY OFF oder AUTO
NIGHT ON oder AUTO
* Steht nur zur Verfügung, wenn die Steuerleitung für
die Beleuchtung angeschlossen ist.
Einzelheiten zu DIMMER finden Sie auf
Seite 28.
(Scheinwerfer
ausgeschaltet*)
(Scheinwerfer
eingeschaltet*)
1 Halten Sie (COLOR) gedrückt.
Die individuelle DAY/NIGHT-Displayfarbe
variiert je nach der Einstellung von
DIMMER.
Informationen zum Ändern des DAY/NIGHTFarbmodus finden Sie auf Seite 23.
2 Drehen Sie den Steuerregler, bis
„BASE COLOR“ angezeigt wird, und
drücken Sie anschließend den
Steuerregler.*
Sie können eine voreingestellte Farbe als
Grundlage für individuelle Einstellungen
auswählen.
Wenn Sie keine voreingestellte Farbe
individuell einstellen wollen, fahren Sie mit
Schritt 5 fort.
* Wenn Sie „BASE COLOR“ auswählen, wird die
benutzerdefinierte Farbe überschrieben.
3 Wählen Sie durch Drehen des
Steuerreglers „RGB RED“, „RGB
GREEN“ oder „RGB BLUE“ aus und
drücken Sie anschließend den
Steuerregler.
4 Drehen Sie den Steuerregler, um den
Farbbereich einzustellen, und drücken
Sie anschließend den Steuerregler.
Einstellbarer Farbbereich: „0“ – „32“.
Sie können nicht alle Farbbereiche
gleichzeitig auf „0“ setzen.
5 Drücken Sie (BACK).
Die Anzeige wechselt wieder in den
normalen Empfangsmodus bzw.
Wiedergabemodus.
Ändern des DAY/NIGHT-Farbmodus
1 Wählen Sie in Schritt 2 die Option „DAY/
NIGHT“.
2 Wählen Sie „DAY“ oder „NIGHT“ aus.
3 Stellen Sie eine voreingestellte Farbe wie in
Schritt 2 bis 5 erläutert individuell ein.
Tipp
Sie können vom Setup-Menü aus den DAY/NIGHTFarbmodus einstellen.
23
Page 56

Weitere Funktionen zur
Farbeinstellung
Synchronisation mit SensMe™Channels — SensMe™-ChannelsFarbe
Die Display- und Tastenfarbe am Hauptgerät
wechselt je nach SensMe™-Channel.
1 Halten Sie die Auswahltaste gedrückt.
Die Einstellanzeige erscheint.
2 Drehen Sie den Steuerregler, bis
„SENSME COLR“ angezeigt wird, und
drücken Sie anschließend den
Steuerregler.
3 Drehen Sie den Steuerregler, um
„SENSME-ON“ auszuwählen, und
drücken Sie anschließend den
Steuerregler.
4 Drücken Sie (BACK).
Die Einstellung ist damit abgeschlossen und
im Display erscheint wieder die Anzeige für
den normalen Empfangsmodus bzw.
Wiedergabemodus.
Wenn Sie die SensMe™-Channels-Farbe
deaktivieren wollen, wählen Sie in Schritt 3 die
Option „OFF“.
Hinweis
Wenn SensMe™-Channels-Farbe für die Quelle
SensMe™ auf „ON“ gesetzt ist, hat die SensMe™Channels-Farbe Vorrang vor den voreingestellten
Farben/Mustern. Schalten Sie SensMe™-ChannelsFarbe aus oder stellen Sie eine andere Quelle als
SensMe™ ein, wenn wieder voreingestellte Farben
bzw. Muster angezeigt werden sollen.
Wechseln der Farbe mit SoundSynchronisation
— Sound-Synchronisation
Die Farbe wechselt synchron zur
wiedergegebenen Musik. Wenn Sie ein
voreingestelltes Muster auswählen oder Titel in
einem SensMe-Channel wiedergeben, zeigt die
Sound-Synchronisation Wirkung.
1 Halten Sie die Auswahltaste gedrückt.
Die Einstellanzeige erscheint.
2 Drehen Sie den Steuerregler, bis
„SOUND SYNC“ angezeigt wird, und
drücken Sie anschließend den
Steuerregler.
3 Drehen Sie den Steuerregler, um
„SYNC-ON“ auszuwählen, und
drücken Sie anschließend den
Steuerregler.
24
4 Drücken Sie (BACK).
Die Einstellung ist damit abgeschlossen und
im Display erscheint wieder die Anzeige für
den normalen Empfangsmodus bzw.
Wiedergabemodus.
Hinweis
Wird möglicherweise nicht richtig synchronisiert.
Anzeigen klarer Farben
— Weißes Menü
Sie können das Menü klarer (weiß) anzeigen
lassen, ohne dass die Farbeinstellung
beeinträchtigt wird.
1 Halten Sie die Auswahltaste gedrückt.
Die Einstellanzeige erscheint.
2 Drehen Sie den Steuerregler, bis
„WHITE MENU“ angezeigt wird, und
drücken Sie anschließend den
Steuerregler.
3 Drehen Sie den Steuerregler, um
„WHITE-ON“ auszuwählen, und
drücken Sie anschließend den
Steuerregler.
4 Drücken Sie (BACK).
Die Einstellung ist damit abgeschlossen und
im Display erscheint wieder die Anzeige für
den normalen Empfangsmodus bzw.
Wiedergabemodus.
Wenn Sie die Funktion „Weißes Menü“
deaktivieren wollen, wählen Sie in Schritt 3 die
Option „OFF“.
Starteffekt
— Weiß beim Start
Wenn S ie (SOURCE/OFF) drücken, wird die
Display- und Tastenfarbe am Hauptgerät kurz
weiß und anschließend wird als Farbe die
benutzerdefinierte Farbe eingestellt. Der Effekt
wird bei jedem Einschalten der Tonquelle
aktiviert.
1 Halten Sie die Auswahltaste gedrückt.
Die Einstellanzeige erscheint.
2 Drehen Sie den Steuerregler, bis
„START WHITE“ angezeigt wird, und
drücken Sie anschließend den
Steuerregler.
3 Drehen Sie den Steuerregler, um
„WHITE-ON“ auszuwählen, und
drücken Sie anschließend den
Steuerregler.
Page 57

4 Drücken Sie (BACK).
Die Einstellung ist damit abgeschlossen und
im Display erscheint wieder die Anzeige für
den normalen Empfangsmodus bzw.
Wiedergabemodus.
Wenn Sie Weiß beim Start deaktivieren wollen,
wählen Sie in Schritt 3 die Option „OFF“.
Klangeinstellungen und SetupMenü
Ändern der Klangeinstellungen
Einstellen der Klangeigenschaften
1 Drücken Sie während des Empfangs
bzw. der Wiedergabe die
Auswahltaste.
2 Drehen Sie den Steuerregler, bis die
gewünschte Menüoption angezeigt
wird, und drücken Sie anschließend
den Steuerregler.
3 Drehen Sie den Steuerregler, um die
Einstellung auszuwählen, und
drücken Sie anschließend den
Steuerregler.
4 Drücken Sie (BACK).
Die Einstellung ist damit abgeschlossen und
im Display erscheint wieder die Anzeige für
den normalen Empfangsmodus bzw.
Wiedergabemodus.
Folgende Optionen können eingestellt werden
(Einzelheiten finden Sie jeweils auf den
angegebenen Seiten):
EQ7 PRESET (Seite 26)
EQ7 SETTING (Seite 26)
POSITION
POSITION (Einstellen der Hörposition)
(Seite 27)
ADJUST POS*
Hörposition) (Seite 27)
SW POSITION*
Tiefsttonlautsprechers) (Seite 27)
BALANCE
Damit stellen Sie die Balance ein: „RIGHT-15“
– „CENTER“ – „LEFT-15“.
FADER
Damit stellen Sie den relativen Pegel ein:
„FRONT-15“ – „CENTER“ – „REAR-15“.
DM+ (Seite 27)
REARBAS ENH (Verstärker für Bässe über
Hecklautsprecher) (Seite 28)
SUBW LEVEL (Pegel des
Tiefsttonlautsprechers)
Stellen Sie hier den Lautstärkepegel des
Tiefsttonlautsprechers ein: „+10 dB“ – „0 dB“ –
„–10 dB“.
(„ATT“ wird bei der niedrigsten Einstellung
angezeigt.)
1
(Feineinstellen der
1
(Position des
Fortsetzung auf der nächsten Seite t
25
Page 58

AUX VOLUME*
Damit stellen Sie die Lautstärke der einzelnen
angeschlossenen Zusatzgeräte ein: „+18 dB“ –
„0 dB“ – „–8 dB“.
Wenn Sie die Einstellung hier vornehmen,
brauchen Sie die Lautstärke der einzelnen
Tonquellen nicht mehr einzustellen.
*1 Wird nicht angezeigt, wenn „POSITION“ auf „OFF“
gesetzt ist.
*2 Wenn die AUX-Tonquelle aktiviert ist (Seite 29).
2
(AUX-Lautstärkepegel)
Verwenden der erweiterten
Klangfunktionen — Advanced
Sound Engine
Advanced Sound Engine, die neue Klangengine
von Sony, erzeugt mit digitaler
Signalverarbeitung ein ideales Klangfeld in
Fahrzeugen. Advanced Sound Engine umfasst
die folgenden Funktionen: EQ7, Listening
Position, DM+ Advanced, Rear Bass Enhancer.
Auswählen der Klangqualität
— EQ7 Preset
Sie können unter 7 Equalizer-Kurven eine
Equalizer-Kurve auswählen oder die Funktion
ausschalten („XPLOD“, „VOCAL“, „EDGE“,
„CRUISE“, „SPACE“, „GRAVITY“,
„CUSTOM“ oder „OFF“).
1 Drücken Sie während des Empfangs
bzw. der Wiedergabe die
Auswahltaste.
2 Drehen Sie den Steuerregler, bis „EQ7
PRESET“ angezeigt wird, und drücken
Sie anschließend den Steuerregler.
3 Drehen Sie den Steuerregler, bis die
gewünschte Equalizer-Kurve
angezeigt wird, und drücken Sie
anschließend den Steuerregler.
4 Drücken Sie (BACK).
Die Anzeige wechselt wieder in den
normalen Empfangsmodus bzw.
Wiedergabemodus.
Wenn Sie die Equalizer-Kurve deaktivieren
wollen, wählen Sie in Schritt 3 die Option
„OFF“.
Tipp
Die Einstellung für die Equalizer-Kurve kann für jede
Tonquelle gespeichert werden.
Individuelles Einstellen der
Equalizer-Kurve — EQ7 Setting
Mit „CUSTOM“ unter EQ7 können Sie Ihre
individuellen Equalizer-Einstellungen
vornehmen.
1 Wählen Sie eine Tonquelle aus und
drücken Sie die Auswahltaste.
2 Drehen Sie den Steuerregler, bis „EQ7
SETTING“ angezeigt wird, und
drücken Sie anschließend den
Steuerregler.
3 Drehen Sie den Steuerregler, bis
„BASE“ angezeigt wird, und drücken
Sie anschließend den Steuerregler.
Sie können eine Equalizer-Kurve als
Grundlage für individuelle Einstellungen
auswählen.
Wenn Sie eine voreingestellte EqualizerKurve nicht individuell einstellen wollen,
fahren Sie mit Schritt 5 fort.
4 Drehen Sie den Steuerregler, um die
Equalizer-Kurve auszuwählen, und
drücken Sie anschließend den
Steuerregler.
5 Stellen Sie die Equalizer-Kurve ein.
1Drehen Sie den Steuerregler, um den
Frequenzbereich auszuwählen, und
drücken Sie anschließend den
Steuerregler.
BAND1: 63 Hz
BAND2: 160 Hz
BAND3: 400 Hz
BAND4: 1 kHz
BAND5: 2,5 kHz
BAND6: 6,3 kHz
BAND7: 16,0 kHz
2Drehen Sie den Steuerregler, um den
Lautstärkepegel einzustellen, und
drücken Sie anschließend den
Steuerregler.
Die Lautstärke lässt sich in Schritten von
1 dB auf einen Wert zwischen -6 dB und
+6 dB einstellen.
Stellen Sie wie in Schritt 1 und 2 erläutert
weitere Frequenzbereiche ein.
26
Page 59

6 Drücken Sie (BACK) zweimal.
Die Equalizer-Kurve wird unter „CUSTOM“
gespeichert und im Display erscheint wieder
die Anzeige für den normalen
Empfangsmodus bzw. Wiedergabemodus.
Optimieren des Klangs mithilfe der
Tonverzögerung — Listening
Position
Das Gerät kann die räumliche Klangwirkung
verändern, indem es die Tonausgabe aus den
einzelnen Lautsprechern je nach Hörposition
verzögert und ein natürliches Klangfeld
simuliert, das Ihnen unabhängig von Ihrer
tatsächlichen Hörposition im Fahrzeug den
Eindruck vermittelt, dass Sie sich in der Mitte
des Klangfeldes befinden.
Die Optionen für „POSITION“ sind im
Folgenden aufgeführt.
„FRONT L“ (1): Vorne
links
„FRONT R“ (2): Vorne
rechts
„FRONT“ (3): Vorne Mitte
„ALL“ (4): In der Mitte des
Fahrzeugs
„OFF“: Keine Position
festgelegt
Sie können in folgenden Fällen auch die
ungefähre Position des Tiefsttonlautsprechers im
Verhältnis zur Hörposition einstellen:
– Ein Tiefsttonlautsprecher ist angeschlossen.
– Die Hörposition ist auf „FRONT L“, „FRONT
R“, „FRONT“ oder „ALL“ gesetzt.
Die Optionen für „SW POSITION“ sind im
Folgenden aufgeführt.
„NEAR“ (A): Nah
„NORMAL“ (B): Normal
„FAR“ (C): Weiter entfernt
1 Drücken Sie während des Empfangs
bzw. der Wiedergabe die
Auswahltaste.
2 Drehen Sie den Steuerregler, bis
„POSITION“ angezeigt wird, und
drücken Sie anschließend den
Steuerregler.
3 Wählen Sie durch Drehen des
Steuerreglers „FRONT L“, „FRONT R“,
„FRONT“ oder „ALL“ aus und drücken
Sie anschließend den Steuerregler.
4 Drehen Sie den Steuerregler, bis „SW
POSITION“ angezeigt wird, und
drücken Sie anschließend den
Steuerregler.
Wenn Sie in Schritt 3 oben „FRONT L“,
„FRONT R“, „FRONT“ oder „ALL“
auswählen, können Sie die Position des
Tiefsttonlautsprechers einstellen.
Wählen Sie durch Drehen des Steuerreglers
„NEAR“, „NORMAL“ oder „FAR“ aus und
drücken Sie anschließend den Steuerregler.
5 Drücken Sie (BACK).
Die Anzeige wechselt wieder in den
normalen Empfangsmodus bzw.
Wiedergabemodus.
Wenn Sie die Hörposition deaktivieren wollen,
wählen Sie in Schritt 3 die Option „OFF“.
Feineinstellen der Hörposition
Sie können eine Feineinstellung für die
Hörposition vornehmen.
1 Drücken Sie während des Empfangs
bzw. der Wiedergabe die
Auswahltaste.
2 Drehen Sie den Steuerregler, bis
„ADJUST POS“ angezeigt wird, und
drücken Sie anschließend den
Steuerregler.
3 Drehen Sie den Steuerregler, um die
Hörposition feineinzustellen, und
drücken Sie anschließend den
Steuerregler.
Einstellbereich: „+3“ – „CENTER“ – „–3“.
4 Drücken Sie (BACK).
Die Anzeige wechselt wieder in den
normalen Empfangsmodus bzw.
Wiedergabemodus.
DM+ Advanced
DM+ Advanced verbessert digital komprimierten
Ton, indem die hohen Frequenzen
wiederhergestellt werden, die beim
Komprimierungsvorgang verloren gehen.
1 Drücken Sie während der Wiedergabe
die Auswahltaste.
2 Drehen Sie den Steuerregler, bis
„DM+“ angezeigt wird, und drücken
Sie anschließend den Steuerregler.
3 Drehen Sie den Steuerregler, um „ON“
auszuwählen, und drücken Sie
anschließend den Steuerregler.
Fortsetzung auf der nächsten Seite t
27
Page 60

4 Drücken Sie (BACK).
Die Anzeige wechselt wieder in den
normalen Wiedergabemodus.
Tipp
Die DM+-Einstellung kann für jede Tonquelle
gespeichert werden.
Verwenden der Hecklautsprecher
als Tiefsttonlautsprecher — Rear
Bass Enhancer
Rear Bass Enhancer verstärkt die Bässe, indem
die Einstellung für den Niedrigpassfilter
(Seite 29) auf die Hecklautsprecher angewendet
wird. Dabei fungieren die Hecklautsprecher als
Tiefsttonlautsprecher, ohne dass tatsächlich einer
angeschlossen ist.
1 Drücken Sie während des Empfangs
bzw. der Wiedergabe die
Auswahltaste.
2 Drehen Sie den Steuerregler, bis
„REARBAS ENH“ angezeigt wird, und
drücken Sie anschließend den
Steuerregler.
3 Wählen Sie durch Drehen des
Steuerreglers „1“, „2“ oder „3“ aus
und drücken Sie anschließend den
Steuerregler.
4 Drücken Sie (BACK).
Die Anzeige wechselt wieder in den
normalen Empfangsmodus bzw.
Wiedergabemodus.
Einstellen von
Konfigurationsoptionen — SET
1 Halten Sie die Auswahltaste gedrückt.
Die Einstellanzeige erscheint.
2 Drehen Sie den Steuerregler, bis die
gewünschte Option angezeigt wird,
und drücken Sie anschließend den
Steuerregler.
3 Drehen Sie den Steuerregler, um die
Einstellung auszuwählen, und
drücken Sie anschließend den
Steuerregler.*
Die Einstellung ist damit abgeschlossen.
4 Drücken Sie (BACK).
Die Anzeige wechselt wieder in den
normalen Empfangsmodus bzw.
Wiedergabemodus.
* Zum Einstellen der benutzerdefinierten Farbe
müssen Sie weitere Schritte ausführen (Seite 23).
28
Hinweis
Die angezeigten Optionen unterscheiden sich je nach
Tonquelle und Einstellung.
Folgende Optionen können eingestellt werden
(Einzelheiten finden Sie jeweils auf den
angegebenen Seiten):
CLOCK ADJ (Uhr einstellen) (Seite 6)
CT (Uhrzeit)
Zum Einstellen der CT-Funktion: „ON“, „OFF“
(Seite 12, 13).
BEEP
Zum Einstellen des Signaltons: „ON“, „OFF“.
AUX-A*1 (AUX-Audio)
Zum Einstellen der AUX-Tonquellenanzeige:
„ON“, „OFF“ (Seite 29).
AUTO OFF (Abschaltautomatik)
Das Gerät kann nach dem Ausschalten nach
einer voreingestellten Zeit automatisch
vollständig abgeschaltet werden: „NO“, „30S“
(Sekunden), „30M“ (Minuten), „60M“
(Minuten).
DEMO
(Demo-Modus)
Zum Einstellen des Demo-Modus: „ON“,
„OFF“.
DIMMER
Zum Wechseln der Helligkeit im Display.
– „AT“: Das Display wird dunkler, wenn Sie die
Beleuchtung einschalten. (Steht nur zur
Verfügung, wenn die Steuerleitung für die
Beleuchtung angeschlossen ist.)
– „ON“: Das Display wird dunkler.
– „OFF“: Der Dimmer wird deaktiviert.
CONTRAST
Zum Einstellen des Kontrasts im Display. Der
Kontrast lässt sich in 7 Stufen einstellen.
COLOR (Voreingestellte Farbe)
Zum Auswählen einer voreingestellten Farbe für
Display und Tasten am Hauptgerät (Seite 23).
CUSTOM COLR (Benutzerdefinierte Farbe)
Zum Auswählen einer voreingestellten Farbe als
Grundlage für individuelle Einstellungen
(Seite 23).
SENSME COLR (SensMe-Farbe)
Zum Wechseln der Farbe je nach SensMeChannel: „ON“, „OFF“.
SOUND SYNC
Zum Wechseln der Farbe mit SoundSynchronisation: „ON“, „OFF“.
WHITE MENU
Zum Einstellen des Effekts beim Wechseln der
Tonquelle: „ON“, „OFF“.
START WHITE
Zum Einstellen der Startfarbe: „ON“, „OFF“.
Page 61

MOTION DSPL (Bewegte Anzeige)
– „SA“: Bewegte Muster und der
Spektrumanalysator werden angezeigt.
– „ON“: Bewegte Muster werden angezeigt.
– „OFF“: Die bewegte Anzeige wird deaktiviert.
AUTO SCROLL
Zum Einstellen des automatischen Bildlaufs für
lange Informationen: „ON“, „OFF“.
LOCAL (Lokaler Suchmodus)
– „ON“: Nur Sender mit starken Signalen
werden eingestellt.
– „OFF“: Normaler Empfang beim Einstellen
von Sendern.
MONO*
REGIONAL*
ZAPPIN TIME
ZAPPIN BEEP
LPF FREQ (Frequenz des Niedrigpassfilters)
LPF SLOPE (Steilheit des Niedrigpassfilters)
SUBW PHASE (Phase des
Tiefsttonlautsprechers)
HPF FREQ (Frequenz des Hochpassfilters)
HPF SLOPE (Steilheit des Hochpassfilters)
Zum Auswählen der Steilheit des Hochpassfilters
(nur wirksam, wenn HPF FREQ nicht auf „OFF“
gesetzt ist): „1“, „2“, „3“.
LOUDNESS (Dynamische Loudness)
BTM (Speicherbelegungsautomatik) (Seite 11)
*1 Bei ausgeschaltetem Gerät.
*2 Wenn ein UKW-Sender empfangen wird.
2
Zum Verbessern des UKW-Empfangs durch
Auswahl des monauralen Empfangsmodus:
„ON“, „OFF“.
Zum Beschränken des Empfangs auf eine
bestimmte Region: „ON“, „OFF“ (Seite 12).
Zum Einstellen der Wiedergabedauer für die
Funktion ZAPPIN.
– „ZAP.TIME-1“ (etwa 6 Sekunden),
Zum Einstellen des Signaltons zwischen den
Passagen der Titel: „ON“, „OFF“.
Zum Auswählen der Grenzfrequenz des
Tiefsttonlautsprechers: „50Hz“, „60Hz“,
„80Hz“, „100Hz“, „120Hz“.
Zum Auswählen der Steilheit des
Niedrigpassfilters: „1“, „2“, „3“.
Zum Auswählen der Phase des
Tiefsttonlautsprechers: „NORM“, „REV“.
Zum Auswählen der Grenzfrequenz der Front-/
Hecklautsprecher: „OFF“, „50Hz“, „60Hz“,
„80Hz“, „100Hz“, „120Hz“.
Zum Verstärken von Bässen und Höhen, so dass
auch bei niedriger Lautstärke ein Klang von
guter Qualität erzielt wird: „ON“, „OFF“.
(Monauraler Modus)
2
„ZAP.TIME-2“ (etwa 15 Sekunden),
„ZAP.TIME-3“ (etwa 30 Sekunden).
Weitere Funktionen
Verwenden gesondert
erhältlicher Geräte
Zusätzliche Audiogeräte
Wenn Sie ein gesondert erhältliches tragbares
Audiogerät an die AUX-Eingangsbuchse
(Stereominibuchse) am Gerät anschließen und
dann einfach die Tonquelle auswählen, können
Sie den Ton über die Lautsprecher des Fahrzeugs
wiedergeben lassen. Unterschiede im
Lautstärkepegel zwischen diesem Gerät und dem
tragbaren Audiogerät können korrigiert werden.
Gehen Sie wie im Folgenden erläutert vor:
Anschließen eines tragbaren
Audiogeräts
1 Schalten Sie das tragbare Audiogerät aus.
2 Drehen Sie die Lautstärke an diesem Gerät
herunter.
3 Schließen Sie das Audiogerät an dieses Gerät
an.
Verbindungskabel*
(nicht mitgeliefert)
* Verwenden Sie unbedingt einen geraden Stecker.
Einstellen des Lautstärkepegels
Stellen Sie unbedingt vor der Wiedergabe die
Lautstärke der einzelnen angeschlossenen
Audiogeräte ein.
1 Drehen Sie die Lautstärke an diesem Gerät
herunter.
2 Drücken Sie (SOURCE/OFF) so oft, bis
„AUX“ erscheint.
Danach wird „AUX FRONT IN“ angezeigt.
3 Starten Sie die Wiedergabe am tragbaren
Audiogerät mit gemäßigter Lautstärke.
4 Stellen Sie die gewohnte Hörlautstärke an
diesem Gerät ein.
5 Stellen Sie den Eingangspegel ein (Seite 26).
29
Page 62

Weitere Informationen
Sicherheitsmaßnahmen
• Lassen Sie das Gerät vor dem Betrieb abkühlen,
wenn das Auto in direkter Sonne geparkt war.
• Die Motorantenne wird automatisch ausgefahren.
Feuchtigkeitskondensation
Sollte sich im Inneren des Geräts Feuchtigkeit
niederschlagen, nehmen Sie die CD heraus und
warten Sie etwa eine Stunde, bis die Feuchtigkeit
verdunstet ist. Andernfalls funktioniert das Gerät
nicht einwandfrei.
So bewahren Sie die hohe
Tonqualität
Achten Sie darauf, dass keine Flüssigkeiten auf das
Gerät oder die CDs gelangen.
Hinweise zu CDs
• Setzen Sie CDs weder direktem Sonnenlicht noch
Wärmequellen wie zum Beispiel
Warmluftauslässen aus. Lassen Sie sie auch nicht
in einem in der Sonne geparkten Auto liegen.
• Reinigen Sie CDs vor dem
Abspielen mit einem
Reinigungstuch. Wischen Sie
dabei von der Mitte nach außen.
Verwenden Sie keine
Lösungsmittel wie Benzin oder
Verdünner und keine
handelsüblichen
Reinigungsmittel.
• Dieses Gerät ist auf die Wiedergabe von CDs
ausgelegt, die dem Compact Disc-Standard (CD)
entsprechen. DualDiscs und manche Musik-CDs
mit Urheberrechtsschutzcodierung entsprechen
nicht dem Compact Disc-Standard (CD) und
können daher mit diesem Gerät nicht
wiedergegeben werden.
• Auf diesem Gerät NICHT abspielbare CDs
– CDs mit Etiketten, Aufklebern, Klebeband oder
aufgeklebtem Papier. Wenn Sie solche CDs
verwenden, kann es zu einer Fehlfunktion
kommen oder die CD kann beschädigt werden.
– CDs mit außergewöhnlichen Formen (z. B.
herzförmige, quadratische oder sternförmige
CDs). Falls Sie es doch versuchen, kann das
Gerät beschädigt werden.
–8-cm-CDs.
Hinweise zu CD-Rs/CD-RWs
• Höchstzahl an: (nur CD-Rs/CD-RWs)
– Ordnern (Alben): 150 (einschließlich
Stammordner)
– Dateien (Titeln) und Ordnern: 300
(gegebenenfalls weniger als 300, wenn die
Ordner-/Dateinamen viele Zeichen enthalten)
– anzeigbaren Zeichen für einen Ordner-/
Dateinamen: 32 (Joliet)/64 (Romeo)
30
• Wenn eine Multisession-CD mit einer CD-DASession beginnt, wird sie als CD-DA erkannt und
andere Sessions werden nicht wiedergegeben.
• Auf diesem Gerät NICHT abspielbare CDs
– CD-Rs/CD-RWs mit schlechter
Aufnahmequalität.
– CD-Rs/CD-RWs, die mit einem inkompatiblen
Aufnahmegerät bespielt wurden.
– CD-Rs/CD-RWs, die nicht richtig abgeschlossen
wurden.
– CD-Rs/CD-RWs, die nicht im Musik-CD-
Format oder im MP3-Format (ISO9660 Stufe 1/
Stufe 2, Joliet/Romeo oder Multisession)
bespielt wurden.
Wiedergabereihenfolge von MP3-/
WMA-/AAC-Dateien
MP3/WMA/AAC
Ordner
(Album)
MP3-/WMA-/
AAC-Datei
(Titel)
Der iPod
• Folgende iPod-Modelle können angeschlossen
werden. Aktualisieren Sie Ihr iPod-Modell vor
dem Gebrauch anhand der neuesten Software.
Made for
– iPod touch (2. Generation)
– iPod touch (1. Generation)
– iPod classic
– iPod mit Videofunktion*
– iPod nano (5. Generation)
– iPod nano (4. Generation)
– iPod nano (3. Generation)
– iPod nano (2. Generation)
– iPod nano (1. Generation)*
– iPhone 3GS
– iPhone 3G
– iPhone
* Die direkte Steuerung steht bei einem iPod nano
(1. Generation) oder iPod mit Videofunktion nicht
zur Verfügung.
• „Made for iPod“ und „Made for iPhone“
bedeuten, dass elektronisches Zubehör speziell
für den Anschluss an einen iPod bzw. ein iPhone
konzipiert und vom Entwickler entsprechend der
Leistungsstandards von Apple getestet wurde.
• Apple übernimmt keine Garantie für die
Funktionsfähigkeit dieses Geräts bzw. die
Einhaltung von Sicherheitsstandards.
Page 63

Sollten an Ihrem Gerät Probleme auftreten oder
1
sollten Sie Fragen haben, auf die in dieser Anleitung
nicht eingegangen wird, wenden Sie sich bitte an
Ihren Sony-Händler.
Wartung
Austauschen der Lithiumbatterie der
Kartenfernbedienung
Unter normalen Bedingungen hält die Batterie
etwa 1 Jahr. Die Lebensdauer der Batterie kann
je nach Gebrauch des Geräts jedoch auch kürzer
sein.
Wenn die Batterie schwächer wird, verkürzt sich
die Reichweite der Kartenfernbedienung.
Tauschen Sie die Batterie gegen eine neue
CR2025-Lithiumbatterie aus. Bei Verwendung
einer anderen Batterie besteht Feuer- oder
Explosionsgefahr.
Mit der Seite +
nach oben
2
c
Hinweise zur Lithiumbatterie
• Bewahren Sie die Lithiumbatterie außerhalb der
Reichweite von Kindern auf. Sollte eine
Lithiumbatterie verschluckt werden, ist umgehend
ein Arzt aufzusuchen.
• Wischen Sie die Batterie mit einem trockenen Tuch
ab, um einen guten Kontakt zwischen den
Batteriepolen und -anschlüssen sicherzustellen.
• Achten Sie beim Einlegen der Batterie auf die
richtige Polarität.
• Halten Sie die Batterie nicht mit einer Metallpinzette.
Dies könnte zu einem Kurzschluss führen.
Austauschen der
Sicherung
Wenn Sie eine Sicherung
austauschen, achten Sie darauf,
eine Ersatzsicherung mit dem
gleichen Ampere-Wert wie die
Originalsicherung zu
verwenden. Dieser ist auf der
Originalsicherung angegeben.
Wenn die Sicherung
durchbrennt, überprüfen Sie
den Stromanschluss und
tauschen die Sicherung aus. Brennt die neue
Sicherung ebenfalls durch, kann eine interne
Fehlfunktion vorliegen. Wenden Sie sich in einem
solchen Fall an Ihren Sony-Händler.
Sicherung (10 A)
Reinigen der Anschlüsse
Das Gerät funktioniert möglicherweise nicht
ordnungsgemäß, wenn die Anschlüsse zwischen
dem Gerät und der Frontplatte verschmutzt sind.
Um dies zu vermeiden, nehmen Sie die Frontplatte
ab (Seite 7) und reinigen Sie die Anschlüsse mit
einem Wattestäbchen. Drücken Sie dabei nicht zu
fest auf die Anschlüsse. Andernfalls können sie
beschädigt werden.
Hauptgerät
Hinweise
• Schalten Sie aus Sicherheitsgründen vor dem
Reinigen der Anschlüsse die Zündung aus und
ziehen Sie den Schlüssel aus dem Zündschloss.
• Berühren Sie die Anschlüsse unter keinen
Umständen direkt mit den Händen oder einem
Metallgegenstand.
Rückseite der
Frontplatte
VORSICHT
Die Batterie kann bei falscher Handhabung
explodieren!
Auf keinen Fall darf sie aufgeladen,
auseinandergenommen oder ins Feuer
geworfen werden.
Entsorgungshinweis: Bitte werfen Sie nur
entladene Batterien in die Sammelboxen beim
Handel oder den Kommunen. Entladen sind
Batterien in der Regel dann, wenn das Gerät
abschaltet und
„Batterie leer“ signalisiert oder
nach längerer Gebrauchsdauer der Batterien
nicht mehr einwandfrei funktioniert.
Um sicherzugehen, kleben Sie die Batteriepole
z. B. mit einem Klebestreifen ab oder geben Sie
die Batterien einzeln in einen Plastikbeutel.
31
Page 64

Ausbauen des Geräts
Technische Daten
1 Entfernen Sie die Schutzumrandung.
1 Nehmen Sie die Frontplatte ab (Seite 7).
2 Fassen Sie die Schutzumrandung mit den
Fingern an den Seitenkanten und ziehen
Sie sie heraus.
x
2 Nehmen Sie das Gerät heraus.
1 Setzen Sie beide Löseschlüssel
gleichzeitig so ein, dass sie mit einem
Klicken einrasten.
Der Haken
muss nach
innen weisen.
2 Ziehen Sie an den Löseschlüsseln, um das
Gerät zu lösen.
3 Ziehen Sie das Gerät aus der Halterung.
Tuner
FM (UKW)
Empfangsbereich: 87,5 – 108,0 MHz
Antennenanschluss:
Anschluss für Außenantenne
Zwischenfrequenz: 150 kHz
Nutzbare Empfindlichkeit: 10 dBf
Trennschärfe: 75 dB bei 400 kHz
Signal-Rauschabstand: 70 dB (mono)
Kanaltrennung: 40 dB bei 1 kHz
Frequenzgang: 20 – 15.000 Hz
MW/LW
Empfangsbereich:
MW: 531 – 1.602 kHz
LW: 153 – 279 kHz
Antennenanschluss:
Anschluss für Außenantenne
Zwischenfrequenz: 25 kHz
Empfindlichkeit: MW: 26 µV, LW: 45 µV
CD-Player
Signal-Rauschabstand: 120 dB
Frequenzgang: 10 – 20.000 Hz
Gleichlaufschwankungen: Unterhalb der Messgrenze
USB-Player
Schnittstelle: USB (Full-Speed)
Maximale Stromstärke: 500 mA
Endverstärker
Ausgänge: Lautsprecherausgänge
Lautsprecherimpedanz: 4 – 8 Ohm
Maximale Ausgangsleistung: 52 W × 4 (an 4 Ohm)
Allgemeines
Ausgänge:
Audioausgänge (vorne/hinten)
Ausgang für Tiefsttonlautsprecher (mono)
Motorantennen-Steueranschluss
Steueranschluss für Endverstärker
Eingänge:
Steueranschluss für Stummschaltung beim
Telefonieren
Fernbedienungseingang
Antenneneingang
AUX-Eingangsbuchse (Stereominibuchse)
USB-Signaleingang
Betriebsspannung: 12 V Gleichstrom, Autobatterie
(negative Erdung)
Abmessungen: ca. 178 × 50 × 180 mm (B/H/T)
Einbaumaße: ca. 182 × 53 × 162 mm (B/H/T)
Gewicht: ca. 1,3 kg
Mitgeliefertes Zubehör:
Kartenfernbedienung: RM-X151
Montageteile und Anschlusszubehör (1 Satz)
Sonderzubehör/gesondert erhältliche Geräte:
USB-Verbindungskabel für iPod: RC-100IP
32
Page 65

Ihr Händler führt unter Umständen nicht alle der
oben genannten Zubehörteile. Fragen Sie Ihren
Händler nach ausführlichen Informationen.
Änderungen, die dem technischen Fortschritt dienen,
bleiben vorbehalten.
Systemvoraussetzungen für die
Software auf der mitgelieferten
CD-ROM
Computer
•CPU/RAM
– IBM PC/AT-kompatibel
– CPU: Intel Pentium III-Prozessor mit mindestens
450 MHz
– RAM: mindestens 256 MB (bei Windows XP),
mindestens 512 MB (bei Windows Vista oder
höher)
• CD-ROM-Laufwerk
•USB-Anschluss
Betriebssystem
Windows XP, Windows Vista, Windows 7
Näheres zu kompatiblen Editionen oder zu Service
Packs finden Sie auf der folgenden Support-Website:
http://support.sony-europe.com/
Monitor
Mindestens High Color (16 Bit), mindestens
800 × 600 Punkte
Sonstiges
Internetverbindung
Hinweise
• Die folgenden Systemumgebungen werden nicht
unterstützt.
– Andere als IBM PC-Computer, wie z. B. Macintosh
usw.
– Selbst zusammengestellte Computer
– Computer mit aufgerüstetem Betriebssystem
– Umgebungen mit mehreren Bildschirmen
– Umgebungen mit mehreren boot-fähigen
Betriebssystemen
– Umgebung mit virtuellen Rechnern
• Bei manchen Computern ist der Betrieb unter
Umständen auch mit der empfohlenen Umgebung
nicht möglich.
Störungsbehebung
Anhand der folgenden Checkliste können Sie die
meisten Probleme, die möglicherweise an Ihrem
Gerät auftreten, selbst beheben.
Bevor Sie die folgende Checkliste durchgehen,
überprüfen Sie bitte zunächst, ob Sie das Gerät
richtig angeschlossen und bedient haben.
Wenn das Problem sich nicht beheben lässt,
besuchen Sie folgende Support-Website.
Support-Website
http://support.sony-europe.com/
Allgemeines
Das Gerät wird nicht mit Strom versorgt.
• Prüfen Sie die Verbindung oder Sicherung.
• Wenn Sie das Gerät ausschalten und die Anzeige
ausgeblendet ist, können Sie es nicht mit der
Kartenfernbedienung bedienen.
t Schalten Sie das Gerät ein.
Die Motorantenne wird nicht ausgefahren.
Die Motorantenne hat kein Relaiskästchen.
Es ist kein Ton zu hören.
• Die Funktion zum Dämpfen des Tons oder die
Stummschaltfunktion zum Telefonieren (wenn das
Schnittstellenkabel eines Autotelefons mit der ATTLeitung verbunden ist) ist aktiviert.
• Der Fader-Regler „FADER“ ist nicht für ein
2-Lautsprecher-System eingestellt.
Kein Signalton ertönt.
• Der Signalton ist deaktiviert (Seite 28).
• Ein gesondert erhältlicher Endverstärker ist
angeschlossen und Sie verwenden nicht den
integrierten Verstärker.
Der Speicherinhalt wurde gelöscht.
• Die Taste RESET wurde gedrückt.
t Speichern Sie die Einstellungen erneut.
• Das Stromversorgungskabel wurde gelöst, die
Verbindung zur Batterie besteht nicht mehr oder das
Kabel bzw. die Batterie ist falsch angeschlossen.
Gespeicherte Sender und die korrekte Uhrzeit
werden gelöscht.
Die Sicherung ist durchgebrannt.
Störgeräusche sind zu hören, wenn der
Zündschlüssel gedreht wird.
Die Leitungen sind nicht korrekt an den
Stromanschluss für Zubehörgeräte angeschlossen.
Das Gerät wechselt während der Wiedergabe
bzw. des Radioempfangs in den Demo-Modus.
Wenn „DEMO-ON“ eingestellt ist und 5 Minuten lang
keine Funktion ausgeführt wird, wechselt das Gerät in
den Demo-Modus.
t Stellen Sie „DEMO-OFF“ ein (Seite 28).
Fortsetzung auf der nächsten Seite t
33
Page 66

Die Anzeige wird ausgeblendet bzw. erscheint
nicht im Display.
• Der Dimmer ist auf „DIMMER-ON“ eingestellt
(Seite 28).
• Die Anzeige wird ausgeblendet, wenn Sie
(SOURCE/OFF) gedrückt halten.
tDrücken Sie (SOURCE/OFF) am Gerät erneut,
bis die Anzeige eingeblendet wird.
• Die Anschlüsse sind verschmutzt (Seite 31).
Die Abschaltautomatik funktioniert nicht.
Das Gerät ist eingeschaltet. Die Abschaltautomatik
wird nach dem Ausschalten des Geräts aktiviert.
t Schalten Sie das Gerät aus.
Radioempfang
Sender lassen sich nicht empfangen.
Der Ton ist stark gestört.
Die Verbindung wurde nicht richtig hergestellt.
tSchließen Sie eine Motorantennen-Steuerleitung
(blau) oder eine Stromversorgungsleitung für
Zubehörgeräte (rot) an die
Stromversorgungsleitung für den
Antennenverstärker des Fahrzeugs an (nur, wenn
das Fahrzeug mit einer in der Heck-/
Seitenfensterscheibe integrierten FM (UKW)/
MW/LW-Antenne ausgestattet ist).
tPrüfen Sie die Verbindung der Autoantenne.
tWenn die Motorantenne nicht automatisch
ausgefahren wird, prüfen Sie die Verbindung der
Motorantennen-Steuerleitung.
Gespeicherte Sender lassen sich nicht
einstellen.
• Speichern Sie den/die Sender unter der korrekten
Frequenz ab.
• Das Sendesignal ist zu schwach.
Der automatische Sendersuchlauf funktioniert
nicht.
• Die Einstellung für den lokalen Suchmodus ist nicht
korrekt.
tDer automatische Sendersuchlauf stoppt zu oft:
Stellen Sie „LOCAL-ON“ ein (Seite 29).
tDer automatische Sendersuchlauf hält bei keinem
Sender an:
Stellen Sie „LOCAL-OFF“ ein (Seite 29).
• Das Sendesignal ist zu schwach.
tStellen Sie die Sender manuell ein.
Während des UKW-Empfangs blinkt die
Anzeige „ST“.
• Stellen Sie die Frequenz genau ein.
• Das Sendesignal ist zu schwach.
tStellen Sie „MONO-ON“ ein (Seite 29).
Eine UKW-Stereosendung ist nur monaural zu
hören.
Das Gerät ist in den monauralen Empfangsmodus
geschaltet.
t Stellen Sie „MONO-OFF“ ein (Seite 29).
RDS
Der Sendersuchlauf (SEEK) startet nach ein
paar Sekunden Radioempfang.
Der Sender ist kein Verkehrsfunksender (TP) oder die
Sendesignale sind zu schwach.
t Deaktivieren Sie TA (Seite 12).
Es sind keine Verkehrsdurchsagen zu hören.
• Aktivieren Sie TA (Seite 12).
• Der Sender sendet keine Verkehrsdurchsagen,
obwohl es sich um einen Verkehrsfunksender (TP)
handelt.
t Stellen Sie einen anderen Sender ein.
Bei der PTY-Funktion wird „- - - - - - - -“
angezeigt.
• Der aktuelle Sender ist kein RDS-Sender.
• Es wurden keine RDS-Daten empfangen.
• Der Sender gibt den Programmtyp nicht an.
Der Programmdienstname blinkt.
Für den aktuellen Sender gibt es keine
Alternativfrequenz.
t Drücken Sie (SEEK) +/–, solange der
Programmdienstname blinkt. „PI SEEK“ wird
angezeigt und das Gerät beginnt dann mit der
Suche nach einer Frequenz mit denselben PI-Daten
(Programmkennung).
CD-Wiedergabe
Es lässt sich keine CD einlegen.
• Es ist bereits eine andere CD eingelegt.
• Die CD wurde mit Gewalt falsch herum oder falsch
eingelegt.
Die CD lässt sich nicht abspielen.
• Die CD ist beschädigt oder verschmutzt.
• Die CD-R/CD-RW ist nicht als Audio-CD konzipiert
(Seite 30).
MP3-/WMA-/AAC-Dateien können nicht
wiedergegeben werden.
Die CD ist nicht mit dem MP3-/WMA-/AAC-Format
bzw. der Version kompatibel. Einzelheiten zu
abspielbaren CDs und den Formaten finden Sie auf der
Support-Website.
Es dauert länger, bis die Wiedergabe von MP3-/
WMA-/AAC-Dateien beginnt.
Bei folgenden CDs dauert es länger, bis die
Wiedergabe beginnt:
– CDs mit einer komplizierten Datei-/Ordnerstruktur.
– Multisession-CDs.
– CDs, zu denen noch Daten hinzugefügt werden
können.
Im Display angezeigte Informationen laufen
nicht automatisch durch.
• Bei CDs mit sehr vielen Textinformationen laufen
diese im Display möglicherweise nicht durch.
• „AUTO SCROLL“ ist auf „OFF“ gesetzt.
t Stellen Sie „A.SCRL-ON“ ein (Seite 29).
t Halten Sie (DSPL) (SCRL) gedrückt.
34
Page 67

Tonsprünge treten auf.
• Das Gerät ist nicht richtig installiert.
t Installieren Sie das Gerät in einem Winkel von
unter 45° an einem stabilen Teil des Fahrzeugs.
• Die CD ist beschädigt oder verschmutzt.
Die Funktionstasten funktionieren nicht.
Die CD lässt sich nicht auswerfen.
Drücken Sie die Taste RESET (Seite 6).
USB-Wiedergabe
Sie können über einen USB-Hub nichts
wiedergeben lassen.
Dieses Gerät kann keine USB-Geräte erkennen, die
über einen USB-Hub angeschlossen sind.
Die Wiedergabe ist nicht möglich.
Das USB-Gerät funktioniert nicht.
tSchließen Sie es nochmals an.
Es dauert länger, bis am USB-Gerät die
Wiedergabe beginnt.
Die Dateien auf dem USB-Gerät befinden sich in einer
komplizierten Datei-/Ordnerstruktur.
Ein Signalton ist zu hören.
Das USB-Gerät wurde während der Wiedergabe vom
Gerät getrennt.
tVor dem Trennen eines USB-Geräts müssen Sie
zuerst die Wiedergabe stoppen, um die Daten zu
schützen.
Der Ton setzt aus.
Bei einer hohen Bitrate von über 320 Kbps kommt es
möglicherweise zu Tonaussetzern.
Fehleranzeigen/Meldungen
CHECKING
Das Gerät überprüft die Verbindung mit einem USBGerät.
t Warten Sie, bis das Überprüfen der Verbindung
beendet ist.
ERROR
• Die CD ist verschmutzt oder falsch herum eingelegt.
t Reinigen Sie die CD bzw. legen Sie sie korrekt
ein.
• Eine leere CD wurde eingelegt.
• Die CD kann aufgrund eines Problems nicht
wiedergegeben werden.
t Legen Sie eine andere CD ein.
• Das USB-Gerät wurde nicht automatisch erkannt.
t Schließen Sie es erneut an.
• Drücken Sie Z, um die CD herauszunehmen.
FAILURE
Die Lautsprecher-/Verstärkeranschlüsse sind nicht
korrekt.
t Schlagen Sie in der Installations-/
Anschlussanleitung zum jeweiligen Modell nach,
wie die Anschlüsse korrekt vorgenommen werden
müssen.
HUBS NO SUPRT
Ein USB-Hub wird von diesem Gerät nicht unterstützt.
INVALID
Das angeschlossene USB-Gerät enthält keine
Musikdatei für die SensMe™-Funktion.
L. SEEK +/–
Beim automatischen Sendersuchlauf ist der lokale
Suchmodus aktiviert.
NO AF
Für den aktuellen Sender gibt es keine
Alternativfrequenz.
t Drücken Sie (SEEK) +/–, solange der
Programmdienstname blinkt. Das Gerät beginnt
dann mit der Suche nach einer Frequenz mit
denselben PI-Daten (Programmkennung) („PI
SEEK“ wird angezeigt).
NO CHANNEL
Das angeschlossene USB-Gerät enthält keine ChannelListe für die SensMe™-Funktion.
NO DEV (Kein Gerät)
USB wurde als Tonquelle ausgewählt, aber es ist kein
USB-Gerät angeschlossen. Ein USB-Gerät oder ein
USB-Kabel wurde während der Wiedergabe von
diesem Gerät getrennt.
t Schließen Sie unbedingt USB-Gerät und USB-
Kabel an.
NO MUSIC
Die CD bzw. das USB-Gerät enthält keine
Musikdateien.
t Legen Sie eine Musik-CD in dieses Gerät ein.
t Schließen Sie ein USB-Gerät an, das eine
Musikdatei enthält.
Fortsetzung auf der nächsten Seite t
35
Page 68

NO NAME
Für den Titel gibt es keinen CD-, Album-, Interpretenbzw. Titelnamen.
NOT FOUND
Bei der alphabetischen Suche gibt es kein Element, das
mit dem ausgewählten Buchstaben anfängt.
NO TP
Das Gerät sucht weiter nach verfügbaren
Verkehrsfunksendern (TP).
OFFSET
Es liegt möglicherweise eine interne Fehlfunktion vor.
t Überprüfen Sie die Verbindungen. Wenn die
Fehleranzeige weiterhin im Display angezeigt wird,
wenden Sie sich an einen Sony-Händler.
OVERLOAD
Das USB-Gerät ist überlastet.
t Trennen Sie das USB-Gerät von diesem Gerät und
wechseln Sie mit (SOURCE/OFF) die Tonquelle.
t Zeigt an, dass das USB-Gerät nicht einwandfrei
funktioniert oder dass ein nicht unterstütztes Gerät
angeschlossen ist.
READ
Das Gerät liest gerade alle Titel- und
Albuminformationen von der CD ein.
t Bitte warten Sie, bis das Einlesen abgeschlossen ist.
Die Wiedergabe beginnt danach automatisch. Je
nach CD-Struktur kann das Einlesen länger als eine
Minute dauern.
RESET
Dieses Gerät oder das USB-Gerät funktioniert
aufgrund einer Störung nicht.
t Drücken Sie die Taste RESET (Seite 6).
S-CH NO SUPRT (SensMe™-Channel nicht
unterstützt)
Das angeschlossene USB-Gerät wird nicht unterstützt.
t Einzelheiten zur Kompatibilität Ihres USB-Geräts
finden Sie auf der Support-Website.
USB NO SUPRT (USB nicht unterstützt)
Das angeschlossene USB-Gerät wird nicht unterstützt.
t Einzelheiten zur Kompatibilität Ihres USB-Geräts
finden Sie auf der Support-Website.
„“ oder „“
Sie sind beim Rückwärts- oder Vorwärtssuchen am
Anfang bzw. Ende der CD angelangt und können nicht
weitersuchen.
„“
Das Zeichen kann mit diesem Gerät nicht angezeigt
werden.
Wenn sich das Problem mit diesen
Abhilfemaßnahmen nicht beheben lässt, wenden Sie
sich an einen Sony-Händler.
Wenn Sie das Gerät aufgrund einer Störung bei der
CD-Wiedergabe zur Reparatur bringen, bringen Sie
bitte auch die CD mit, die eingelegt war, als das
Problem zum ersten Mal auftrat.
36
Page 69

Page 70

Pour plus de sécurité, installez cet appareil
dans le tableau de bord de votre véhicule. Pour
de plus amples informations sur l’installation
et les raccordements, reportez-vous au manuel
d’installation et de raccordement fourni.
Cette étiquette est située sur la partie inférieure
du châssis.
Avis à l’attention des clients : les
informations suivantes s’appliquent
uniquement aux appareils vendus dans
des pays qui appliquent les directives
de l’Union Européenne
Le fabricant de ce produit est Sony Corporation,
1-7-1 Konan Minato-ku Tokyo, 108-0075 Japon.
Le représentant autorisé pour les questions de
compatibilité électromagnétique (EMC) et la
sécurité des produits est Sony Deutschland
GmbH, Hedelfinger Strasse 61, 70327 Stuttgart,
Allemagne. Pour toute question relative au SAV
ou à la garantie, merci de bien vouloir vous
référer aux coordonnées contenues dans les
documents relatifs au SAV ou la garantie.
Traitement des appareils électriques
et électroniques en fin de vie
(Applicable dans les pays de l’Union
Européenne et aux autres pays
européens disposant de systèmes
de collecte sélective)
Ce symbole, apposé sur le produit ou sur son emballage,
indique que ce produit ne doit pas être traité avec les
déchets ménagers. Il doit être remis à un point de collecte
approprié pour le recyclage des équipements électriques et
électroniques. En s’assurant que ce produit est bien mis au
rebut de manière appropriée, vous aiderez à prévenir les
conséquences négatives potentielles pour l’environnement
et la santé humaine. Le recyclage des matériaux aidera à
préserver les ressources naturelles. Pour toute information
supplémentaire au sujet du recyclage de ce produit, vous
pouvez contacter votre municipalité, votre déchetterie ou
le magasin où vous avez acheté le produit.
Accessoire compatible : télécommande
Elimination des piles et accumulateurs
usagés (Applicable dans les pays de
l’Union Européenne et aux autres pays
européens disposant de systèmes de
collecte sélective)
Ce symbole, apposé sur les piles et accumulateurs ou sur
les emballages, indique que les piles et accumulateurs
fournis avec ce produit ne doivent pas être traités comme
de simples déchets ménagers. Sur certains types de piles,
ce symbole apparaît parfois combiné avec un symbole
chimique. Les symboles pour le mercure (Hg) ou le plomb
(Pb) sont rajoutés lorsque ces piles contiennent plus de
0,0005% de mercure ou 0,004% de plomb. En vous
assurant que ces piles et accumulateurs sont mis au rebut
de façon appropriée, vous participez activement à la
prévention des conséquences négatives que leur mauvais
traitement pourrait provoquer sur l’environnement et sur la
santé humaine. Le recyclage des matériaux contribue par
ailleurs à la préservation des ressources naturelles.
Pour les produits qui pour des raisons de sécurité, de
performance ou d’intégrité de données nécessitent une
connexion permanente à une pile ou à un accumulateur, il
conviendra de vous rapprocher d’un service technique
qualifié pour effectuer son remplacement. En rapportant
votre appareil électrique en fin de vie à un point de collecte
approprié vous vous assurez que la pile ou l’accumulateur
incorporée sera traitée correctement.
Pour tous les autres cas de figure et afin d’enlever les piles
ou accumulateurs en toute sécurité de votre appareil,
reportez-vous au manuel d’utilisation. Rapportez les piles
ou accumulateurs usagés au point de collecte approprié
pour le recyclage.
Pour toute information complémentaire au sujet du
recyclage de ce produit ou des piles et accumulateurs, vous
pouvez contacter votre municipalité, votre déchetterie
locale ou le point de vente où vous avez acheté ce produit.
ZAPPIN et Quick-BrowZer sont des marques
commerciales de Sony Corporation.
12 TONE ANALYSIS et son
logo sont des marques
commerciales de Sony
Corporation.
SensMe et le logo SensMe sont
des marques commerciales ou
des marques déposées de Sony
Ericsson Mobile
Communications AB.
2
Page 71

La technologie de reconnaissance des données
audio/vidéo et les données associées sont fournies
par Gracenote®. Gracenote constitue la norme de
l’industrie en matière de technologie de
reconnaissance musicale et de fourniture de
contenus connexes. Pour plus de détails, visitez
www.gracenote.com.
Les données sur CD, DVD ou/et Blu-Ray et les
données associées aux morceaux de musique et
aux clips vidéo sont fournies par Gracenote, Inc. –
Copyright © 2000-Date actuelle Gracenote.
Logiciels Gracenote Copyright © 2000-Date
actuelle Gracenote. Ce produit et ce service sont
protégés par un ou plusieurs brevets appartenant à
Gracenote (pour plus de détails, visitez le site Web
de Gracenote).
Les noms « Gracenote », « CDDB », « MusicID »,
« MediaVOCS », le logo Gracenote, le graphisme
Gracenote, la mention « Powered by Gracenote »
sont des marques ou des marques déposées de
Gracenote aux États-Unis et/ou dans d’autres pays.
Microsoft, Windows, Windows Vista et
Windows Media et leurs logos sont des marques
commerciales ou déposées de Microsoft
Corporation aux Etats-Unis et/ou dans d'autres
pays/régions.
Ce produit est protégé par des droits de propriété
intellectuelle de Microsoft Corporation. Toute
utilisation ou diffusion de la technologie décrite
sortant du cadre de l’utilisation de ce produit est
interdite sans licence accordée par Microsoft ou
une filiale autorisée de Microsoft.
iPhone, iPod, iPod classic, iPod nano, et iPod
touch sont des marques d'Apple Inc., déposées
aux Etats-Unis et dans d'autres pays.
Apple, Macintosh et iTunes sont des marques
commerciales de Apple Inc., déposées aux
Etats-Unis et dans d’autres pays.
Licence de la technologie de codage audio MPEG
Layer-3 et des brevets obtenue de Fraunhofer IIS et
Thomson.
Remarque sur la pile au lithium
N’exposez pas la pile à une chaleur excessive,
comme en plein soleil, près d’un feu ou autre.
Avertissement au cas où le contact de
votre voiture ne dispose pas d’une
position ACC
Veillez à activer la fonction Auto Off
(page 26).
L’appareil s’éteint alors complètement et
automatiquement à l’issue d’un délai défini
une fois l’appareil mis hors tension, afin
d’éviter que la batterie ne se décharge.
Si vous n’activez pas la fonction Auto Off,
appuyez sur la touche (SOURCE/OFF) et
maintenez-la enfoncée jusqu’à ce que
l’affichage disparaisse, chaque fois que vous
coupez le contact.
3
Page 72

Table des matières
Préparation
Disques pouvant être lus sur cet appareil . . . . . 6
Réinitialisation de l’appareil . . . . . . . . . . . . . . . 6
Désactivation du mode DEMO . . . . . . . . . . . . . 6
Préparation de la mini-télécommande . . . . . . . . 6
Réglage de l’horloge . . . . . . . . . . . . . . . . . . . . . 6
Retrait de la façade . . . . . . . . . . . . . . . . . . . . . . 7
Installation de la façade . . . . . . . . . . . . . . . . 7
Emplacement des commandes et
opérations de base
Appareil principal . . . . . . . . . . . . . . . . . . . . . 8
Mini-télécommande RM-X151. . . . . . . . . . 10
Radio
Mémorisation et réception des stations . . . . . . 11
Mémorisation automatique — BTM. . . . . . 11
Mémorisation manuelle . . . . . . . . . . . . . . . 11
Réception des stations mémorisées. . . . . . . 11
Recherche automatique des fréquences . . . 11
RDS . . . . . . . . . . . . . . . . . . . . . . . . . . . . . . . . . 11
Aperçu. . . . . . . . . . . . . . . . . . . . . . . . . . . . . 11
Réglage de AF et TA . . . . . . . . . . . . . . . . . 12
Sélection de PTY . . . . . . . . . . . . . . . . . . . . 12
Réglage de CT . . . . . . . . . . . . . . . . . . . . . . 13
CD
Lecture d’un disque. . . . . . . . . . . . . . . . . . . . . 13
Rubriques d’affichage. . . . . . . . . . . . . . . . . 13
Lecture répétée et aléatoire. . . . . . . . . . . . . 14
Périphériques USB
Lecture d’un périphérique USB. . . . . . . . . . . . 14
Rubriques d’affichage. . . . . . . . . . . . . . . . . 15
Lecture répétée et aléatoire. . . . . . . . . . . . . 15
Ecoutez de la musique selon votre humeur
— SensMe™ . . . . . . . . . . . . . . . . . . . . . . . . . . 15
Avant d’utiliser la fonction SensMe™ . . . . 15
Installation de « SensMe™ Setup » et de
« Content Transfer » sur l’ordinateur . . . . . 16
Inscription d’un périphérique USB à l’aide de
« SensMe™ Setup » . . . . . . . . . . . . . . . . . . 16
Transfert de plages vers le périphérique USB à
l’aide de « Content Transfer » . . . . . . . . . . 16
Lecture de plages par canal
— SensMe™ channels . . . . . . . . . . . . . . . . 17
iPod
Lecture sur un iPod. . . . . . . . . . . . . . . . . . . . . 18
Rubriques d’affichage . . . . . . . . . . . . . . . . 18
Saut d’albums, de podc asts, de genres, de listes
de lecture et d’artistes. . . . . . . . . . . . . . . . . 19
Lecture répétée et aléatoire . . . . . . . . . . . . 19
Utilisation directe d’un iPod
— Commande passager . . . . . . . . . . . . . . . . . 19
Recherche d’une plage
Recherche d’une plage par son nom
— Quick-BrowZer™ . . . . . . . . . . . . . . . . . . . 20
Recherche d’éléments par saut
— Mode de saut . . . . . . . . . . . . . . . . . . . . . 20
Recherche par ordre alphabétique
— Recherche alphabétique . . . . . . . . . . . . 20
Recherche d’une plage en écoutant des passages
de plages — ZAPPIN™ . . . . . . . . . . . . . . . . . 21
En cas de lecture en mode « SensMe™
channels ». . . . . . . . . . . . . . . . . . . . . . . . . . 21
Changement de couleur de
l’éclairage
Changement de couleur de l’affichage et des
touches
—Eclairage en couleur dynamique. . . . . . . . . 21
Personnalisation des couleurs de l’affichage et
des touches
— Couleur personnalisée. . . . . . . . . . . . . . 22
Réglage avancé de la couleur . . . . . . . . . . . . . 22
Synchronisation des canaux SensMe™
— Couleur des canaux SensMe™ . . . . . . . 22
Modification de la synchronisation de la
couleur et du son
— Synchronisation du son. . . . . . . . . . . . . 22
Affichage d’une couleur plus nette
— Menu blanc . . . . . . . . . . . . . . . . . . . . . . 23
Effet au démarrage
— Démarrage en blanc. . . . . . . . . . . . . . . . 23
4
Page 73

Réglages du son et menu de
configuration
Modification des caractéristiques du son. . . . . 24
Réglage des caractéristiques du son . . . . . . 24
Utilisation de fonctions audio évoluées
— Advanced Sound Engine . . . . . . . . . . . . . . 24
Sélection de la qualité du son
— EQ7 Preset . . . . . . . . . . . . . . . . . . . . . . . 24
Personnalisation de la courbe de l’égaliseur
— EQ7 Setting . . . . . . . . . . . . . . . . . . . . . . 24
Optimisation du son grâce à la synchronisation
— Position d’écoute . . . . . . . . . . . . . . . . . . 25
Ajustement de la position d’écoute. . . . . . . 26
DM+ Advanced. . . . . . . . . . . . . . . . . . . . . . 26
Utilisation des haut-parleurs arrière comme
caisson de graves
— Rear Bass Enhancer . . . . . . . . . . . . . . . . 26
Réglage des paramètres de configuration
— SET. . . . . . . . . . . . . . . . . . . . . . . . . . . . . . . 26
Autres fonctions
Utilisation d’un appareil en option . . . . . . . . . 28
Appareil audio auxiliaire . . . . . . . . . . . . . . 28
Informations complémentaires
Précautions . . . . . . . . . . . . . . . . . . . . . . . . . . . 28
Remarques sur les disques . . . . . . . . . . . . . 28
Ordre de lecture des fichiers MP3/WMA/
AAC . . . . . . . . . . . . . . . . . . . . . . . . . . . . . . 29
A propos de l’iPod . . . . . . . . . . . . . . . . . . . 29
Entretien . . . . . . . . . . . . . . . . . . . . . . . . . . . . . 29
Retrait de l’appareil . . . . . . . . . . . . . . . . . . . . 30
Spécifications . . . . . . . . . . . . . . . . . . . . . . . . . 31
Dépannage . . . . . . . . . . . . . . . . . . . . . . . . . . . 32
Affichage des erreurs et messages . . . . . . . 34
Site d’assistance
Si vous avez des questions ou si vous souhaitez consulter les toutes dernières
informations techniques sur ce produit, rendez-vous sur le site Web suivant :
http://support.sony-europe.com/
Fournit des informations relatives aux :
• modèles et fabricants de lecteurs audio numériques compatibles ;
• fichiers MP3/WMA/AAC pris en charge ;
• Configuration système requise pour le logiciel du CD-ROM fourni.
5
Page 74

Préparation
Disques pouvant être lus sur cet
appareil
Cet appareil peut lire des CD-DA (y compris
ceux qui contiennent des informations CD
TEXT) et des CD-R/CD-RW (fichiers MP3/
WMA/AAC (page 29)).
Type de
disques
CD-DA
MP3
WMA
AAC
Symbole indiqué sur le
disque
Réinitialisation de l’appareil
Avant la première mise en service de l’appareil
ou après avoir remplacé la batterie du véhicule
ou modifié les raccordements, vous devez
réinitialiser l’appareil.
Retirez la façade (page 7) et appuyez sur la
touche RESET (page 8) avec un objet pointu,
comme un stylo à bille.
Remarque
Une pression sur la touche RESET remet l’heure à
zéro et efface certaines informations mémorisées.
Désactivation du mode DEMO
Vous pouvez désactiver l’écran de démonstration
qui apparaît lors de la mise hors tension.
1 Appuyez sur la touche de sélection et
maintenez-la enfoncée.
L’écran de configuration apparaît.
2 Tournez la molette de réglage jusqu’à
ce que « DEMO » s’affiche, puis
appuyez dessus.
3 Tournez la molette de réglage pour
sélectionner « DEMO-OFF », puis
appuyez dessus.
Le réglage est terminé.
4 Appuyez sur (BACK).
L’affichage revient au mode de réception/
lecture normal.
6
Préparation de la minitélécommande
Retirez la feuille isolante.
Conseil
Pour obtenir des informations sur la façon de
remplacer la pile, reportez-vous à la page 29.
Réglage de l’horloge
L’horloge numérique fonctionne suivant un cycle
de 24 heures.
1 Appuyez sur la touche de sélection et
maintenez-la enfoncée.
L’écran de configuration apparaît.
2 Tournez la molette de réglage jusqu’à
ce que « CLOCK ADJ » s’affiche, puis
appuyez dessus.
L’indication des heures clignote.
3 Tournez la molette de réglage pour
régler l’heure et les minutes.
Appuyez sur (SEEK) –/+ pour déplacer
l’indication numérique.
4 Une fois les minutes réglées, appuyez
sur la touche de sélection.
La configuration est terminée et l’horloge
démarre.
Pour afficher l’horloge, appuyez sur (DSPL).
Appuyez de nouveau sur (DSPL) pour revenir à
l’écran précédent.
Conseil
Vous pouvez régler l’horloge automatiquement au
moyen de la fonction RDS (page 13).
Page 75

Retrait de la façade
Vous pouvez retirer la façade de cet appareil pour
le protéger du vol.
Alarme d’avertissement
Si vous mettez la clé de contact en position OFF
sans retirer la façade, l’alarme d’avertissement
retentit pendant quelques secondes.
L’alarme retentit uniquement lorsque
l’amplificateur intégré est utilisé.
1 Appuyez sur la touche (SOURCE/OFF)
et maintenez-la enfoncée.
L’appareil est mis hors tension.
2 Appuyez sur (O PEN ).
La façade bascule vers le bas.
3 Faites glisser la façade vers la droite,
puis tirez doucement son extrémité
gauche vers l’extérieur.
Remarques
• N’exercez pas de pression excessive sur la façade
ou sur la fenêtre d’affichage et ne la laissez pas
tomber.
• N’exposez pas la façade à des températures
élevées ou à l’humidité. Evitez de la laisser dans un
véhicule en stationnement, sur le tableau de bord ou
la plage arrière.
• Ne retirez pas la façade pendant la lecture d’un
périphérique USB, sinon les données de ce
périphérique USB risquent d’être endommagées.
Installation de la façade
Placez l’orifice A de la façade sur la tige B de
l’appareil, puis poussez légèrement sur le côté
gauche pour l’enclencher.
Appuyez sur la touche (SOURCE/OFF) de
l’appareil (ou insérez un disque) pour le faire
fonctionner.
Remarque
Ne posez rien sur la face interne de la façade.
7
Page 76

Emplacement des commandes et opérations de base
Appareil principal
Sans la façade Cette section contient les instructions relatives à
l’emplacement des commandes et aux opérations
de base.
Pour plus de détails, reportez-vous aux numéros
de pages correspondants.
A Touches SEEK +/–
Radio :
Permettent de régler des stations
automatiquement (appuyez) ; de rechercher
une station manuellement (appuyez sur la
touche et maintenez-la enfoncée).
CD/USB :
Permettent de sauter des plages (appuyez) ;
de sauter des plages en continu (appuyez une
première fois, puis une seconde fois dans un
délai d’environ 1 seconde et maintenez la
touche enfoncée) ; d’avancer/de reculer
rapidement dans une plage (appuyez sur la
touche et maintenez-la enfoncée).
SensMe™ :
Permettent de sauter des plages (appuyez) ;
d’avancer/de reculer rapidement dans une
plage (appuyez sur la touche et maintenez-la
enfoncée).
B Touche SOURCE/OFF
Appuyez sur cette touche pour mettre
l’appareil sous tension/changer de source
(Radio/CD/USB/SensMe™*
Appuyez pendant 1 seconde sur la touche
pour mettre l’appareil hors tension.
Appuyez plus de 2 secondes pour mettre
l’appareil hors tension et pour faire
disparaître l’affichage.
1
/AUX).
8
Page 77

C Touche (BROWSE) page 20
Permet de passer en mode QuickBrowZer™.
D Molette de réglage/touche de
sélection page 24, 26
Permet de régler le volume (tournez) ; de
sélectionner des paramètres de configuration
(appuyez et tournez).
E Récepteur de la mini-télécommande
F Fenêtre d’affichage
G Touche OPEN page 7, 13
H Connecteur USB page 14, 17, 18
Permet de raccorder un périphérique USB.
I Touche (BACK)/MODE page 11, 19
Permet de revenir à l’affichage précédent/
sélectionner la bande radio (FM/MW(PO)/
LW(G O)).
Appuyez sur la touche et maintenez-la
enfoncée pour activer/désactiver la
commande passager.
J Touche ZAP page 21
Permet de passer en mode ZAPPIN™.
K Touche COLOR page 21, 22
Permet de sélectionner des couleurs
prédéfinies (appuyez) ; de mémoriser les
réglages de couleur personnalisée (appuyez
sur la touche et maintenez-la enfoncée).
L Touche AF (Fréquences alternatives)/
TA (Messages de radioguidage)/
PTY (Type d’émission) page 12
Permet de régler AF et TA (appuyez) ; de
sélectionner PTY (appuyez sur la touche et
maintenez-la enfoncée) en RDS.
M Touches numériques
Radio :
Permettent de capter les stations enregistrées
(appuyez) ; de mémoriser des stations
(appuyez sur la touche et maintenez-la
enfoncée).
CD/USB/SensMe™ :
(1)/(2) : ALBUM –/+ (pendant une lecture
MP3/WMA/AAC)
Permettent de changer de canaux
SensMe™ (appuyez) ; de sauter des
albums en continu (appuyez sur la
touche et maintenez-la enfoncée).
(3) : REP*
2
page 14, 15, 19
(4) : SHUF page 14, 15, 19
(6) : PAU SE
Permet d’interrompre la lecture.
Appuyez de nouveau sur cette touche
pour annuler.
N Touche DSPL (affichage)/SCRL
(défilement) page 11, 13, 15, 19
Permet de changer les rubriques d’affichage
(appuyez) ; de faire défiler les rubriques
d’affichage (appuyez sur la touche et
maintenez-la enfoncée).
O Prise d’entrée AUX page 28
Permet de raccorder un appareil audio
portatif.
P Touche RESET page 6
Q Touche Z (éjection)
Permet d’éjecter le disque.
R Fente d’insertion des disques
Insérez le disque (côté imprimé vers le haut),
la lecture démarre.
*1 Lors du raccordement d’un périphérique USB
configuré pour la fonction SensMe™.
*2 Cette touche possède un point tactile.
Remarques
• Lors de l’éjection/insertion d’un disque, laissez les
périphériques USB débranchés pour ne pas
endommager le disque.
• Si vous mettez l’appareil hors tension et que
l’affichage est désactivé, il ne peut plus être utilisé
avec la mini-télécommande sauf si vous appuyez
sur la touche (SOURCE/OFF) de l’appareil ou si vous
insérez un disque dans le lecteur pour l’activer.
9
Page 78

Mini-télécommande RM-X151
1
2
OFF
SOURCE
SEL
ATT
MODE
3
+
–
VOL
SCRL
+
–
4
5
DSPL
132
465
10
6
7
8
9
q;
qa
Retirez la feuille isolante avant l’utilisation
(page 6).
A Touche OFF
Permet de mettre l’appareil hors tension ;
d’arrêter la source.
B Touche SOURCE
Permet de mettre l’appareil sous tension ; de
changer de source (Radio/CD/USB/
SensMe™*
1
/AUX).
C Touches < (.)/, (>)
Permettent de commander la radio/le lecteur
CD/le périphérique USB/SensMe™,
identiques aux touches (SEEK) –/+ de
l’appareil.
La configuration, le réglage du son, etc.,
peuvent être effectués au moyen de < ,.
D Touche DSPL (affichage)
Permet de changer les rubriques d’affichage.
E Touche VOL (volume) +*
2
/–
Permet de régler le niveau du volume.
F Touche ATT (atténuer)
Permet d’atténuer le son. Appuyez de
nouveau sur cette touche pour annuler.
G Touche SEL (sélection)
Identique à la touche de sélection de
l’appareil.
H Touche MODE
Appuyez sur cette touche pour sélectionner
la bande radio (FM/MW (PO)/LW (GO)).
Appuyez sur la touche et maintenez-la
enfoncée pour activer/désactiver la
commande passager.
I Touches M (+)/m (–)
Permettent de commander le lecteur CD/le
périphérique USB/SensMe™, identiques aux
touches (1)/(2) (ALBUM –/+) de
l’appareil.
La configuration, le réglage du son, etc.,
peuvent être effectués au moyen de M m.
J Touche SCRL (défilement)
Permet de faire défiler la rubrique
d’affichage.
K Touches numériques
Permettent de capter les stations enregistrées
(appuyez) ; de mémoriser des stations
(appuyez sur la touche et maintenez-la
enfoncée).
*1 Lors du raccordement d’un périphérique USB
configuré pour la fonction SensMe™.
*2 Cette touche possède un point tactile.
Page 79

Radio
Mémorisation et réception des
stations
Avertissement
Pour syntoniser des stations pendant que vous
conduisez, utilisez la fonction BTM
(Mémorisation des meilleurs accords) afin
d’éviter les accidents.
Mémorisation automatique — BTM
1 Appuyez plusieurs fois sur
(SOURCE/OFF) jusqu’à ce que
l’indication « TUNER » apparaisse.
Pour changer de bande, appuyez plusieurs
fois sur (MODE). Vous pouvez sélectionner
FM1, FM2, FM3, MW (PO) ou LW (GO).
2 Appuyez sur la touche de sélection et
maintenez-la enfoncée.
L’écran de configuration apparaît.
3 Tournez la molette de réglage jusqu’à
ce que « BTM » s’affiche, puis
appuyez dessus.
L’appareil enregistre les stations sur les
touches numériques dans l’ordre des
fréquences.
Un bip retentit lorsque le réglage est
mémorisé.
Recherche automatique des
fréquences
1 Sélectionnez la bande, puis appuyez
sur (SEEK) +/– pour rechercher la
station.
Le balayage s’interrompt lorsque l’appareil
capte une station. Répétez cette procédure
jusqu’à ce que vous captiez la station
souhaitée.
Conseil
Si vous connaissez la fréquence de la station que
vous souhaitez écouter, appuyez sur la touche
(SEEK) +/– et maintenez-la enfoncée pour localiser la
fréquence approximativement, puis appuyez plusieurs
fois sur (SEEK) +/– pour régler la fréquence souhaitée
avec précision (syntonisation manuelle).
RDS
Aperçu
Les stations FM disposant du système RDS
(système de radiocommunication de données)
transmettent des informations numériques
inaudibles en même temps que le signal normal
de leurs émissions radio.
Rubriques d’affichage
Mémorisation manuelle
1 Lorsque vous captez la station que
vous souhaitez mémoriser, appuyez
sur une touche numérique ((1) à (6))
et maintenez-la enfoncée jusqu’à ce
que « MEMO » apparaisse.
Remarque
Si vous mémorisez une autre station sur la même
touche numérique, la station mémorisée
précédemment est effacée.
Conseil
Lorsqu’une station RDS est mémorisée, le réglage
AF/TA l’est également (page 12).
Réception des stations
mémorisées
1 Sélectionnez la bande, puis appuyez
sur une touche numérique ((1) à (6)).
A Bande radio, Fonction
B TA /T P*
C Fréquence*2 (Nom du service de l’émission),
*1 L’indication « TA » clignote pendant les messages
*2 Lorsque vous captez la station RDS, « * » est
Pour changer de rubrique d’affichage C,
appuyez sur (DSPL).
1
numéro de présélection, horloge, données
RDS
de radioguidage. L’indication « TP » s’allume
lorsqu’une de ces stations est captée.
affiché à gauche de l’indication de la fréquence.
suite à la page suivante t
11
Page 80

Services RDS
Cet appareil propose automatiquement les
services RDS, comme suit :
AF (Fréquences alternatives)
Permet de sélectionner et de régler de nouveau
la station ayant le signal le plus fort sur un
réseau. Cette fonction vous permet d’écouter la
même émission en continu pendant un voyage
longue distance sans avoir à régler de nouveau
cette station manuellement.
TA (Messages de radioguidage)/
TP (Programmes de radioguidage)
Propose les messages et les programmes de
radioguidage disponibles à cet instant. Tout
message/programme reçu interrompt la source
sélectionnée en cours de diffusion.
PTY (Types d’émission)
Affiche le type de l’émission en cours. Permet
également de rechercher le type d’émission
sélectionné.
CT (Heure)
Les données CT accompagnant la transmission
RDS assurent un réglage de l’horloge.
Remarques
• Selon le pays ou la région où vous vous trouvez, il
est possible que les services RDS ne soient pas
tous disponibles.
• La fonction RDS ne fonctionne pas correctement si
le signal de retransmission est faible ou si la station
syntonisée ne transmet pas de données RDS.
Réglage de AF et TA
1 Appuyez plusieurs fois sur (AF/TA)
jusqu’à ce que le réglage souhaité
apparaisse.
Sélectionnez Pour
AF-ON activer AF et désactiver TA.
TA-O N activer TA et désactiver AF.
AF/TA-ON activer AF et TA.
AF/TA-OFF désactiver AF et TA.
Mémorisation des stations RDS avec
les réglages AF et TA
Vous pouvez présélectionner les stations RDS
avec les réglages AF/TA. Si vous utilisez la
fonction BTM, seules les stations RDS sont
mémorisées avec les mêmes réglages AF/TA.
Si vous effectuez une présélection manuelle,
vous pouvez présélectionner à la fois des stations
RDS et non-RDS, avec leurs réglages AF/TA
respectifs.
1 Réglez AF/TA, puis mémorisez la station à
l’aide de la fonction BTM ou manuellement.
12
Réception de messages d’urgence
Lorsque la fonction AF ou TA est activée, les
messages d’urgence interrompent
automatiquement la source sélectionnée en cours
de diffusion.
Conseil
Si vous réglez le niveau de volume pendant la
diffusion d’un message de radioguidage, ce niveau
sera enregistré dans la mémoire pour les messages
de radioguidage suivants, indépendamment du niveau
de volume normal.
Ecoute continue d’une émission
régionale — REGIONAL
Lorsque la fonction AF est activée : ce réglage
par défaut restreint la réception à une région
spécifique, afin qu’une station régionale ayant
une fréquence plus puissante ne soit pas captée.
Si vous quittez la zone de réception de cette
émission régionale, réglez « REG-OFF » lors de
la configuration en cours de réception FM
(page 27).
Remarque
Cette fonction est inopérante au Royaume-Uni et dans
certaines autres régions.
Fonction de liaison locale (RoyaumeUni uniquement)
Cette fonction vous permet de sélectionner
d’autres stations locales de la région, même si
elles ne sont pas associées à vos touches
numériques.
1 En cours de réception FM, appuyez sur une
touche numérique ((1) à (6)) sur laquelle
une station locale est mémorisée.
2 Dans les 5 secondes qui suivent, appuyez de
nouveau sur la touche numérique de la station
locale.
Répétez cette procédure jusqu’à ce que vous
captiez la station locale souhaitée.
Sélection de PTY
1 Appuyez sur la touche (AF/TA) (PTY)
et maintenez-la enfoncée en cours de
réception FM.
Le nom du type d’émission diffusé apparaît si
la station transmet des données PTY.
2 Tournez la molette de réglage jusqu’à
ce que le type d’émission souhaité
s’affiche, puis appuyez dessus.
L’appareil commence à rechercher une station
diffusant le type d’émission sélectionné.
Page 81

Types d’émissions
NEWS (Nouvelles), AFFAIRS (Dossiers
d’actualité), INFO (Informations), SPORT
(Sports), EDUCATE (Education), DRAMA
(Théâtre), CULTURE (Culture), SCIENCE
(Sciences), VARIED (Divers), POP M
(Musique pop), ROCK M (Rock), EASY M
(Musique légère), LIGHT M (Musique classique
légère), CLASSICS (Musique classique),
OTHER M (Autres styles de musique),
WEATHER (Météo), FINANCE (Finances),
CHILDREN (Emissions pour les enfants),
SOCIAL A (Affaires sociales), RELIGION
(Religion), PHONE IN (Emissions ligne
ouverte), TRAVEL (Voyages), LEISURE
(Loisirs), JAZZ (Jazz), COUNTRY (Musique
country), NATION M (Musique nationale),
OLDIES (Musique d’autrefois), FOLK M
(Musique folk), DOCUMENT (Documentaires)
Remarque
Cette fonction est inopérante dans certains pays ou
régions où les données PTY ne sont pas disponibles.
Réglage de CT
1 Réglez « CT-ON » lors de la
configuration (page 26).
Remarques
• Il est possible que la fonction CT ne fonctionne pas,
même si une station RDS est captée.
• Il peut y avoir une différence entre l’heure réglée par
la fonction CT et l’heure réelle.
CD
Lecture d’un disque
1 Appuyez sur (OPEN).
2 Insérez le disque (étiquette vers le
haut).
3 Fermez la façade.
La lecture commence automatiquement.
Ejection du disque
1 Appuyez sur (OPEN).
2 Appuyez sur Z.
Le disque est éjecté.
3 Fermez la façade.
Rubriques d’affichage
A Source
B Nom de la plage*
nom de l’artiste*
de l’album*
lecture écoulé, horloge
*1 Les informations d’un CD TEXT, MP3/WMA/AAC
sont affichées.
*2 Le numéro de l’album s’affiche uniquement lorsque
l’album est modifié.
Pour changer de rubrique d’affichage B,
appuyez sur (DSPL).
Conseil
Les paramètres affichés peuvent différer selon le type
de disque, le format d’enregistrement et les réglages.
1
, nom du disque/artiste*1,
1
, numéro de l’album*2, nom
1
, numéro de plage/temps de
13
Page 82

Lecture répétée et aléatoire
1 En cours de lecture, appuyez
plusieurs fois sur (3) (REP) ou (4)
(SHUF) jusqu’à ce que le réglage
souhaité apparaisse.
Sélectionnez Pour lire
TRACK une plage en boucle.
ALBUM* un album en boucle.
SHUF ALBUM* un album dans un ordre
aléatoire.
SHUF DISC un disque dans un ordre
aléatoire.
* Lors de la lecture d’un fichier MP3/WMA/AAC.
Après 3 secondes, le réglage est terminé.
Pour revenir au mode de lecture normal,
sélectionnez « OFF » ou « SHUF OFF ».
Périphériques USB
Pour plus de détails sur la compatibilité de votre
périphérique USB, visitez le site d’assistance.
Site d’assistance
http://support.sony-europe.com/
• Des périphériques USB de stockage de masse
(MSC) et de type MTP compatibles avec la
norme USB peuvent être utilisés avec cet
appareil.
• Le codec correspondant est MP3 (.mp3), WMA
(.wma), AAC (.m4a) et AAC (.mp4).
• Il est recommandé d’effectuer des copies de
sauvegarde des données contenues dans le
périphérique USB.
Remarque
Raccordez le périphérique USB après avoir démarré
le moteur.
Selon le périphérique USB, son raccordement avant le
démarrage du moteur peut entraîner un
dysfonctionnement ou des dégâts.
Lecture d’un périphérique USB
1 Faites glisser le cache USB.
14
2 Raccordez le périphérique USB au
connecteur USB.
Si vous utilisez un câble pour les
raccordements, utilisez le câble fourni avec le
périphérique USB.
La lecture commence.
Si un périphérique USB est déjà raccordé,
appuyez plusieurs fois sur (SOU RCE/OFF)
jusqu’à ce que l’indication « USB » s’affiche
pour lancer la lecture.
Page 83
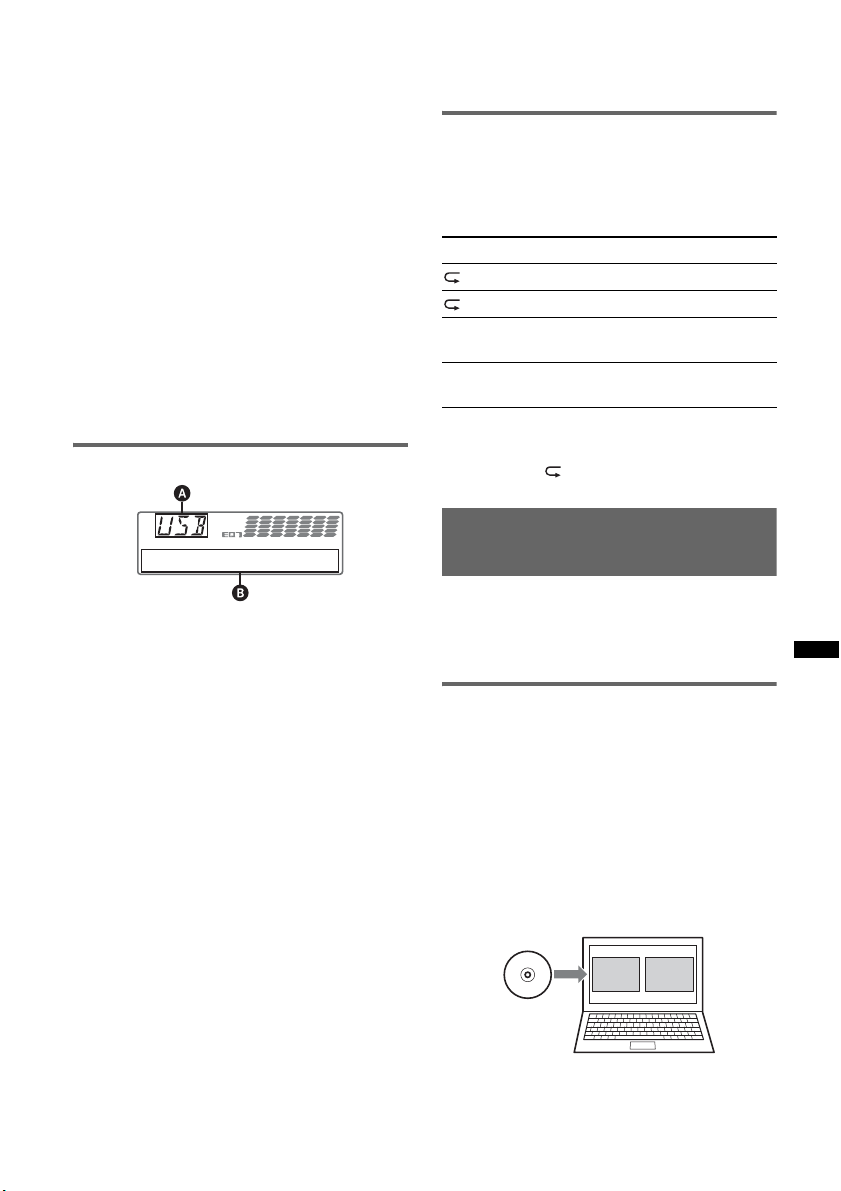
Appuyez sur la touche (SOURCE/OFF) et
maintenez-la enfoncée pendant 1 seconde pour
arrêter la lecture.
– fichiers comprimés sans perte
– fichiers contenant une protection des droits
d’auteur
Retrait du périphérique USB
1 Arrêtez la lecture du périphérique USB.
2 Retirez le périphérique USB.
Si vous retirez le périphérique USB en cours
de lecture, les données stockées sur celui-ci
peuvent être endommagées.
Remarques
• N’utilisez pas de périphériques USB de grande taille
ou lourds, qui risqueraient de tomber à cause des
vibrations ou d’entraîner un raccordement peu
fiable.
• Ne retirez pas la façade pendant la lecture d’un
périphérique USB, sinon les données de ce
périphérique USB risquent d’être endommagées.
• Cet appareil ne peut pas reconnaître les
périphériques USB raccordés via un concentrateur
USB.
Rubriques d’affichage
A Source
B Nom de plage, nom de l’artiste, numéro
d’album*, nom d’album, numéro de plage/
temps de lecture écoulé, horloge
* Le numéro de l’album s’affiche uniquement lorsque
l’album est modifié.
Pour changer de rubrique d’affichage B, appuyez
sur (DSPL).
Remarques
• Les paramètres affichés diffèrent selon le
périphérique USB, le format d’enregistrement et les
réglages. Pour plus de détails, visitez le site
d’assistance.
• Le nombre maximal de données pouvant être
affichées est le suivant.
– dossiers (albums) : 128
– fichiers (plages) par dossier : 500
• Ne laissez pas de périphérique USB dans un
véhicule stationné, car cela pourrait entraîner des
problèmes de fonctionnement.
• Selon la quantité de données enregistrées, la
lecture peut mettre quelques instants à démarrer.
• Il est possible que des fichiers DRM (Gestion des
droits numériques) ne puissent être lus.
• Lors de la lecture ou pendant l’avance ou le retour
rapide d’un fichier MP3/WMA/AAC VBR (Débit
variable), le temps de lecture écoulée qui s’affiche
peut être inexact.
• La lecture des fichiers MP3/WMA/AAC suivants
n’est pas prise en charge.
Lecture répétée et aléatoire
1 En cours de lecture, appuyez
plusieurs fois sur (3) (REP) ou (4)
(SHUF) jusqu’à ce que le réglage
souhaité apparaisse.
Sélectionnez Pour lire
TRACK une plage en boucle.
ALBUM un album en boucle.
SHUF ALBUM un album dans un ordre
aléatoire.
SHUF DEVICE un périphérique dans un
ordre aléatoire.
Après 3 secondes, le réglage est terminé.
Pour revenir au mode de lecture normal,
sélectionnez « OFF » ou « SHUF OFF ».
Ecoutez de la musique selon
votre humeur — SensMe™
Les fonctions « SensMe™ channels » uniques de
Sony regroupent automatiquement les plages par
canal et permettent d’écouter de la musique de
manière intuitive.
Avant d’utiliser la fonction
SensMe™
Vous trouverez ci-dessous la procédure
d’utilisation de base de la fonction SensMe™ sur
cet appareil.
1 Installation de « SensMe™ Setup » et
de « Content Transfer » sur
l’ordinateur
Installez d’abord « SensMe™ Setup » et
« Content Transfer » à partir du CD-ROM
fourni.
™
Content
SensMe
Transfer
Setup
suite à la page suivante t
15
Page 84

2Inscription d’un périphérique USB à
l’aide de « SensMe™ Setup »
Raccordez un périphérique USB à l’ordinateur
et inscrivez-le à l’aide de « SensMe™ Setup »
pour permettre l’activation de la fonction
SensMe™ sur cet appareil.
™
SensMe
Setup
Conseil
L’inscription peut s’effectuer lors de la procédure
d’installation ou ultérieurement.
3Transfert de plages vers le
périphérique USB à l’aide de « Content
Transfer »
Afin de regrouper des plages par canal, 12
TONE ANALYSIS™ (chargé dans « Content
Transfer ») doit analyser les modèles sonores
des plages.
Lorsque le périphérique USB est raccordé à
l’ordinateur, faites glisser des plages depuis
Windows Explorer, iTunes, etc. jusqu’à
« Content Transfer ».
L’analyse et le transfert de plages seront
effectués par « Content Transfer ».
Content
Transfer
4Raccordement du périphérique USB et
utilisation de la fonction SensMe™ de
l’appareil
Raccordez le périphérique USB configuré.
Vous pouvez utiliser « SensMe™ channels »
sur cet appareil.
Installation de « SensMe™ Setup »
et de « Content Transfer » sur
l’ordinateur
Il est nécessaire d’utiliser les logiciels fournis
(« SensMe™ Setup » et « Content Transfer »)
pour activer la fonction SensMe™ sur cet
appareil.
16
Installez les logiciels sur votre ordinateur à partir
du CD-ROM fourni.
1 Insérez le CD-ROM fourni dans
l’ordinateur.
L’assistant d’installation s’exécute
automatiquement.
2 Procédez comme indiqué à l’écran
pour terminer l’installation.
Inscription d’un périphérique USB
à l’aide de « SensMe™ Setup »
Pour activer la fonction SensMe™ sur l’appareil,
il est nécessaire d’inscrire le périphérique USB.
Si vous n’avez pas effectué l’inscription lors de
la procédure d’installation, procédez comme suit.
1 Démarrez « SensMe™ Setup » sur
votre ordinateur.
2 Raccordez un périphérique USB à
l’ordinateur.
3 Procédez comme indiqué à l’écran
pour inscrire le périphérique.
Conseil
Si vous raccordez un périphérique USB inscrit
contenant des plages analysées, il est possible de le
désinscrire.
Transfert de plages vers le
périphérique USB à l’aide de
« Content Transfer »
Pour activer la fonction SensMe™ sur cet
appareil, vous devez utiliser « Content Transfer »
pour analyser et transférer des plages vers le
périphérique USB inscrit.
1 Raccordez le périphérique USB inscrit
à l’ordinateur.
Pour les périphériques USB, raccordez-les en
mode MSC.
« Content Transfer » démarre
automatiquement.
Si un message s’affiche, procédez comme
indiqué à l’écran.
2 Faites glisser des plages depuis
Windows Explorer, iTunes, etc. jusqu’à
« Content Transfer ».
L’analyse et le transfert des plages
commencent.
Pour plus de détails sur les différentes
opérations, consultez l’aide de « Content
Transfer ».
Page 85

Remarque
L’analyse des plages par 12 TONE ANALYSIS™ peut
durer un certain temps, selon l’environnement de
l’ordinateur.
Lecture de plages par canal
— SensMe™ channels
« SensMe™ channels » regroupe
automatiquement les plages dans des canaux
selon leur mélodie. Vous pouvez sélectionner un
canal à lire en fonction de votre humeur, de votre
activité, etc.
1 Raccordez un périphérique USB
configuré pour la fonction SensMe™.
2 Appuyez plusieurs fois sur
(SOURCE/OFF) jusqu’à ce que
l’indication « SENSME CH »
apparaisse.
La liste des canaux s’affiche et les sections les
plus mélodiques ou rythmiques* des plages
sont lues de manière aléatoire.
* Il se peut qu’elles ne soient pas correctement
détectées.
3 Sélectionnez une plage dans la liste
des canaux à l’aide de la molette de
réglage.
• Pour changer de canal
Appuyez sur la touche (1)/(2) (ALBUM –/+)
pour sélectionner le canal souhaité.
• Pour changer de plage
Appuyez sur (SEEK) +/– jusqu’à ce que la
plage souhaitée s’affiche, puis appuyez sur la
molette de réglage.
La lecture commence depuis de début de la
plage en cours.
Si vous n’utilisez aucune touche pendant
10 secondes, la fenêtre d’affichage revient au
mode de lecture normal.
Remarques
• Selon la plage, il se peut qu’elle ne soit pas
correctement détectée ou qu’elle soit classée dans
un canal qui ne correspond pas à son humeur.
• Si le périphérique USB raccordé contient de
nombreuses plages, le démarrage de « SensMe™
channels » peut être fastidieux en raison de la
lecture des données.
Conseil
Les plages sont lues dans un ordre aléatoire. L’ordre
varie à chaque sélection d’un canal.
Liste des canaux
x Recommandé, Shuffle All
« MORNING » (5:00 – 9:59)
«DAYTIME» (10:00 – 15:59)
« EVENING » (16:00 – 18:59)
«NIGHT» (19:00 – 23:59)
« MIDNIGHT » (0:00 – 4:59)
Plages recommandées aux différentes heures de
la journée.
Réglez l’horloge (page 6) afin que le canal
s’affiche avec précision.
« SHUFFLE ALL » : pour lire toutes les plages
analysées dans un ordre aléatoire.
x Canaux de base
Pour lire les plages correspondant au type de
musique.
« ENERGETIC » : plages pleines d’entrain.
«RELAX»: plages calmes.
« MELLOW » : plages douces, mélancoliques.
« UPBEAT » : plages joyeuses qui améliorent
votre humeur.
« EMOTIONAL » : plages romantiques.
« LOUNGE » : musique lounge.
« DANCE » : plages de rhythm and rap ou de
rhythm and blues.
«EXTREME»: plages de rock intense.
x Canaux à écouter dans la voiture
Pour lire les plages adaptées à la conduite.
« FREEWAY » : plages rapides et pleines
d’entrain.
« CHILLOUT DRIVE » : chants et musiques
apaisantes.
« WEEKEND TRIP » : plages joyeuses, vives,
exprimant un sentiment de bonheur.
« MIDNIGHT CRUISE » : plages de jazz ou au
piano empreintes de maturité.
« PARTY RIDE » : plages excitantes au rythme
enlevé.
« MORNING COMMUTE » : plages vives et
enjouées.
« GOIN’ HOME » : plages chaleureuses et
relaxantes.
17
Page 86

iPod
Pour plus de détails sur la compatibilité de votre
iPod, consultez la section « A propos de l’iPod »
(page 29) ou visitez le site d’assistance.
Dans ce mode d’emploi, « iPod » est utilisé
comme terme générique pour désigner les
fonctions iPod de l’iPod et l’iPhone, sauf
mention contraire dans le texte ou les
illustrations.
Site d’assistance
http://support.sony-europe.com/
Lecture sur un iPod
Avant de raccorder l’iPod, baissez le volume de
l’appareil.
1 Faites glisser le cache USB.
2 Raccordez l’iPod au connecteur USB
via le connecteur dock du câble USB.
L’iPod se met automatiquement sous tension
et l’écran ci-dessous s’affiche sur l’iPod.*
Si un iPod est déjà raccordé, appuyez
plusieurs fois sur (SOURCE/OFF) jusqu’à ce
que l’indication « USB » s’affiche. (« IPOD »
apparaît dans la fenêtre d’affichage lorsque
l’iPod est identifié.)
* Si un iPod touch ou un iPhone est raccordé, ou si
l’iPod a été lu la dernière fois à l’aide de la
commande passager, le logo n’apparaît pas sur
l’écran.
3 Réglez le volume.
Appuyez sur la touche (SOURCE/OFF) et
maintenez-la enfoncée pendant 1 seconde pour
arrêter la lecture.
Retrait de l’iPod
1 Arrêtez la lecture de l’iPod.
2 Retirez l’iPod.
Avertissement concernant l’iPhone
Lorsque vous connectez un iPhone via un
raccordement USB, le volume du téléphone est
contrôlé par l’iPhone lui-même. Afin d’éviter un son
fort soudain après un appel, n’augmentez pas le
volume de l’appareil pendant un appel téléphonique.
Remarques
• Ne retirez pas la façade pendant la lecture de l’iPod,
sinon ses données risquent d’être endommagées.
• Cet appareil ne peut pas reconnaître les iPod
raccordés via un concentrateur USB.
Conseils
• Lorsque la clé de contact est en position ACC ou
lorsque l’appareil est sous tension, l’iPod est
rechargé.
• Si l’iPod est débranché en cours de lecture, « NO
DEV » apparaît sur l’affichage de l’appareil.
Mode de reprise de la lecture
Lorsque l’iPod est raccordé au connecteur dock,
le mode de cet appareil passe en mode de reprise
de la lecture et la lecture démarre dans le mode
réglé sur l’iPod.
En mode de reprise de la lecture, les touches
suivantes ne fonctionnent pas.
– (3) (REP)
– (4) (SHUF)
Rubriques d’affichage
Conseil
Il est recommandé d’utiliser le câble USB RC-100IP
(non fourni) pour raccorder le connecteur dock.
La lecture des plages de l’iPod commence
automatiquement à l’endroit où vous aviez
arrêté la lecture.
18
A Indication de la source (iPod)
B Nom de plage, nom de l’artiste, nom d’album,
numéro de plage/temps de lecture écoulé,
horloge
Page 87

Pour changer de rubrique d’affichage B, appuyez
sur (DSPL).
Conseil
Lorsque l’album/le podcast/le genre/l’artiste/la liste de
lecture est modifié(e), son numéro apparaît
momentanément.
Remarque
Certaines lettres mémorisées dans l’iPod peuvent ne
pas s’afficher correctement.
Saut d’albums, de podcasts, de
genres, de listes de lecture et
d’artistes
Pour
Ignorer Appuyez sur (1)/(2)
Ignorer en
continu
Effectuez l’opération
suivante
(ALBUM –/+)
[une fois pour chaque]
Appuyez sur la touche (1)/(2)
(ALBUM –/+) et maintenez-la
enfoncée
[maintenez la touche enfoncée
jusqu’au point souhaité]
Lecture répétée et aléatoire
1 En cours de lecture, appuyez
plusieurs fois sur (3) (REP) ou (4)
(SHUF) jusqu’à ce que le réglage
souhaité apparaisse.
Sélectionnez Pour lire
TRACK une plage en boucle.
ALBUM un album en boucle.
PODCAST un podcast en boucle.
ARTIST un artiste en boucle.
PLAYLIST une liste de lecture en
GENRE un genre en boucle.
SHUF ALBUM un album dans un ordre
SHUF PODCAST un podcast dans un ordre
SHUF ARTIST un artiste dans un ordre
SHUF PLAYLIST une liste de lecture dans
SHUF GENRE un genre dans un ordre
SHUF DEVICE un périphérique dans un
boucle.
aléatoire.
aléatoire.
aléatoire.
un ordre aléatoire.
aléatoire.
ordre aléatoire.
Après 3 secondes, le réglage est terminé.
Pour revenir au mode de lecture normal,
sélectionnez « OFF » ou « SHUF OFF ».
Utilisation directe d’un iPod
— Commande passager
Vous pouvez utiliser directement un iPod
raccordé au connecteur dock.
1 En cours de lecture, appuyez sur la
touche (MODE) et maintenez-la
enfoncée.
« MODE IPOD » apparaît et vous pouvez
utiliser directement votre iPod.
Pour changer de rubrique d’affichage
Appuyez sur (DSPL) .
Les rubriques d’affichage changent de la façon
suivante :
Nom de plage t Nom de l’artiste t
Nom d’album t MODE IPOD t Horloge
Pour quitter la commande passager
Appuyez sur la touche (MODE) et maintenez-la
enfoncée.
« MODE AUDIO » apparaît alors et le mode de
lecture est remplacé par le mode de reprise de la
lecture.
Remarques
• Le volume peut être réglé uniquement avec
l’appareil.
• Si ce mode est annulé, le réglage de lecture répétée
sera désactivé.
19
Page 88

Recherche d’une plage
Recherche d’une plage par son
nom — Quick-BrowZer™
Vous pouvez facilement rechercher une plage sur
un CD ou un périphérique USB, par catégorie.
1 Appuyez sur (BROWSE).
L’appareil passe en mode Quick-BrowZer et
la liste des catégories de recherche apparaît.
2 Tournez la molette de réglage pour
sélectionner la catégorie de recherche
de votre choix, puis appuyez pour
valider.
3 Répétez l’étape 2 jusqu’à ce que la
plage de votre choix soit sélectionnée.
La lecture commence.
Pour revenir à l’écran précédent
Appuyez sur (BACK).
Pour quitter le mode Quick-BrowZer
Appuyez sur (BROWSE).
Remarque
Lorsque l’appareil passe en mode Quick-BrowZer, la
lecture répétée ou aléatoire est annulée.
Recherche d’éléments par saut
— Mode de saut
Lorsqu’une catégorie contient de nombreux
éléments, vous pouvez rechercher rapidement
l’élément de votre choix.
1 Appuyez sur (SEEK) + en mode Quick-
BrowZer.
L’affichage suivant apparaît.
4 Tournez la molette de réglage pour
sélectionner l’élément souhaité, puis
appuyez dessus.
La lecture commence si l’élément sélectionné
est une plage.
Pour annuler le mode de saut
Appuyez sur (BACK) ou (SEEK) –.
Remarque
Si vous n’exécutez aucune opération pendant
7 secondes, le mode de saut est annulé.
Recherche par ordre alphabétique
— Recherche alphabétique
Lorsqu’un iPod est raccordé à l’appareil, vous
pouvez rechercher l’élément souhaité par ordre
alphabétique.
1 Appuyez sur (SEEK) + en mode Quick-
BrowZer.
Une liste alphabétique s’affiche.
2 Tournez la molette de réglage pour
sélectionner la première lettre de
l’élément souhaité, puis appuyez
dessus.
La liste des éléments commençant par la
lettre sélectionnée s’affiche dans l’ordre
alphabétique.
Si aucun morceau ne commence par la lettre
sélectionnée, l’indication « NOT FOUND »
apparaît.
3 Tournez la molette de réglage pour
sélectionner l’élément souhaité, puis
appuyez dessus.
La lecture commence si l’élément sélectionné
est une plage.
A Numéro de l’élément actuel
B Nombre total d’éléments dans la couche
actuelle
Le nom de l’élément apparaît ensuite.
2 Tournez la molette de réglage pour
sélectionner l’élément souhaité ou un
élément proche de celui-ci.
L’appareil effectue des sauts par incrément de
10% du nombre total d’éléments.
3 Appuyez sur la touche de sélection.
L’affichage revient au mode Quick-BrowZer
et l’élément sélectionné apparaît.
20
Pour annuler la recherche
alphabétique
Appuyez sur (BACK) ou (SEEK) –.
La liste des catégories de recherche apparaît.
Remarques
• Dans la recherche alphabétique, le symbole ou
l’article (un/une/le/la) qui précède la lettre
sélectionnée de l’élément est exclu.
• Selon l’élément recherché que vous sélectionnez, il
est possible que seul le mode Saut soit disponible.
• Si vous n’exécutez aucune opération pendant
5 secondes, la recherche alphabétique est annulée.
• Selon le nombre de plages, la recherche
alphabétique peut prendre un certain temps.
Page 89

Recherche d’une plage en
écoutant des passages de
plages — ZAPPIN™
Vous pouvez rechercher la plage que vous
souhaitez écouter en écoutant de courts passages
consécutifs des plages d’un CD ou d’un
périphérique USB.
Le mode ZAPPIN peut être utilisé pour la
recherche d’une plage en mode de lecture
aléatoire ou de lecture répétée aléatoire.
1 Appuyez sur (Z AP) en cours de
lecture.
La lecture commence à partir d’un passage de
la plage suivante après l’apparition de
l’indication « ZAPPIN » sur l’affichage.
Le passage est lu pendant la durée définie,
puis un déclic retentit et la lecture du passage
suivant commence.
Plage
Appui de la
touche (ZAP).
2 Appuyez sur la touche de sélection ou
sur (ZAP) lorsque la plage que vous
souhaitez écouter est en cours de
lecture.
La plage sélectionnée reprend depuis le début
en mode de lecture normal.
Pour rechercher à nouveau une plage en mode
ZAPPIN, répétez les étapes 1 et 2.
En cas de lecture en mode
« SensMe™ channels »
Si la plage recherchée est transférée par
« Content Transfer », les sections les plus
mélodiques ou rythmiques* de la plage sont lues.
Pour plus de détails sur la fonction SensMe™,
reportez-vous à la page 15.
* Il se peut qu’elles ne soient pas correctement
détectées.
Conseils
• Vous pouvez sélectionner une durée de lecture
d’environ 6 secondes/15 secondes/30 secondes
(page 27). Vous ne pouvez pas sélectionner le
passage de la plage à lire.
• Appuyez sur (SEEK) +/– en mode ZAPPIN pour
sauter une plage.
• Appuyez sur (1)/(2) (ALBUM –/+) en mode
ZAPPIN pour sauter un album.
• Une pression sur la touche (BACK) confirme
également une plage à lire.
Partie de chaque plage à lire
en mode ZAPPIN.
Changement de couleur de
l’éclairage
Changement de couleur de
l’affichage et des touches
—Eclairage en couleur
dynamique
L’Eclairage en couleur dynamique vous permet
de changer la couleur de l’affichage et des
touches de l’unité principale en fonction de
l’habitacle du véhicule.
Vous avez le choix entre 12 couleurs prédéfinies,
une couleur personnalisée et 5 ambiances
prédéfinies.
x Couleurs prédéfinies
«RED», «AMBER», «M_AMBER»,
« YELLOW », « WHITE », « LIGHT GREEN »,
« GREEN », « LIGHT BLUE », « SKY
BLUE », « BLUE », « PURPLE », « PINK ».
x Ambiances prédéfinies
« RAINBOW », « OCEAN », « SUNSET »,
« FOREST », « RANDOM ».
1 Appuyez sur (COLOR).
2 Tournez la molette de réglage pour
sélectionner la couleur prédéfinie
souhaitée, puis appuyez dessus.
L’affichage revient au mode de réception/
lecture normal.
Remarque
Si vous tournez rapidement la molette de réglage, la
couleur de l’affichage et des touches risque de
changer trop rapidement.
Conseil
Vous pouvez accéder au mode de couleur prédéfinie à
partir du menu de configuration.
21
Page 90

Personnalisation des couleurs de
l’affichage et des touches
— Couleur personnalisée
Vous pouvez mémoriser une couleur
personnalisée pour l’affichage et les touches.
A propos du mode de couleur DAY/
NIGHT
Vous pouvez définir une couleur différente pour
DAY/NIGHT.
La couleur de l’affichage change comme suit en
mode de couleur DAY/NIGHT.
Mode de couleur DIMMER
DAY OFF ou AUTO (éteignez
NIGHT ON ou AUTO (allumez
* Disponible uniquement lorsque le câble de
commande de l’éclairage est raccordé.
Pour plus de détails sur la fonction DIMMER,
reportez-vous à la page 27.
les phares*)
les phares*)
1 Appuyez sur la touche (COLOR) et
maintenez-la enfoncée.
L’affichage de la couleur personnalisée DAY/
NIGHT varie en fonction du réglage de la
fonction DIMMER.
Pour modifier le mode de couleur DAY/
NIGHT, reportez-vous à la page 22.
2 Tournez la molette de réglage jusqu’à
ce que « BASE COLOR » s’affiche,
puis appuyez dessus.*
Vous pouvez sélectionner une couleur
prédéfinie et la personnaliser.
Si vous ne souhaitez pas personnaliser une
couleur prédéfinie, passez à l’étape 5.
* Lorsque vous sélectionnez « BASE COLOR », la
couleur personnalisée est remplacée.
3 Tournez la molette de réglage pour
sélectionner « RGB RED », « RGB
GREEN » ou « RGB BLUE », puis
appuyez dessus.
4 Tournez la molette de réglage pour
ajuster la gamme de couleur, puis
appuyez dessus.
Gamme de réglage de la couleur : « 0 » –
«32».
Vous ne pouvez pas choisir « 0 » pour toutes
les gammes de couleur à la fois.
5 Appuyez sur (BACK).
L’affichage revient au mode de réception/
lecture normal.
Modification du mode de couleur
DAY/NIGHT
1 Sélectionnez « DAY/NIGHT » à l’étape 2.
2 Sélectionnez « DAY » ou « NIGHT ».
3 Personnalisez le canal prédéfini de l’étape 2 à
l’étape 5.
Conseil
Vous pouvez accéder au mode de couleur DAY/
NIGHT à partir du menu de configuration.
Réglage avancé de la couleur
Synchronisation des canaux
SensMe™ — Couleur des canaux
SensMe™
La couleur de l’affichage et des touches de
l’unité principale change en fonction du canal
SensMe™.
1 Appuyez sur la touche de sélection et
maintenez-la enfoncée.
L’écran de configuration apparaît.
2 Tournez la molette de réglage jusqu’à
ce que « SENSME COLR » s’affiche,
puis appuyez dessus.
3 Tournez la molette de réglage pour
sélectionner « SENSME-ON », puis
appuyez dessus.
4 Appuyez sur (BACK).
Une fois le réglage terminé, la fenêtre
d’affichage revient au mode de réception/
lecture normal.
Pour annuler la couleur des canaux SensMe™,
sélectionnez « OFF » à l’étape 3.
Remarque
Lorsque SensMe™ Channels Color est réglé sur
« ON » pour la source SensMe™, SensMe™
Channels Color a priorité sur les réglages de la
couleur/du motif prédéfinis. Le réglage de la couleur/
du motif est remplacé par celui de la couleur/du motif
prédéfini si vous désactivez SensMe™ Channels
Color ou si vous choisissez une source différente de
SensMe™.
Modification de la synchronisation
de la couleur et du son
— Synchronisation du son
La couleur change en fonction de la
synchronisation de la musique écoutée. Quand
vous sélectionnez une ambiance prédéfinie ou
lorsque vous écoutez des plages du canal
SensMe, la synchronisation du son est appliquée.
22
Page 91

1 Appuyez sur la touche de sélection et
maintenez-la enfoncée.
L’écran de configuration apparaît.
2 Tournez la molette de réglage jusqu’à
ce que « SOUND SYNC » s’affiche,
puis appuyez dessus.
3 Tournez la molette de réglage pour
sélectionner « SYNC-ON », puis
appuyez dessus.
4 Appuyez sur (BACK).
Une fois le réglage terminé, la fenêtre
d’affichage revient au mode de réception/
lecture normal.
Remarque
Il se peut qu’ils ne soient pas correctement
synchronisés.
Affichage d’une couleur plus nette
— Menu blanc
Vous pouvez afficher le menu avec davantage de
netteté (Blanc) sans vous préoccuper du réglage
de la couleur.
1 Appuyez sur la touche de sélection et
maintenez-la enfoncée.
L’écran de configuration apparaît.
2 Tournez la molette de réglage jusqu’à
ce que « WHITE MENU » s’affiche,
puis appuyez dessus.
3 Tournez la molette de réglage pour
sélectionner « WHITE-ON », puis
appuyez dessus.
4 Appuyez sur (BACK).
Une fois le réglage terminé, la fenêtre
d’affichage revient au mode de réception/
lecture normal.
Pour annuler le menu blanc, sélectionnez
« OFF » à l’étape 3.
3 Tournez la molette de réglage pour
sélectionner « WHITE-ON », puis
appuyez dessus.
4 Appuyez sur (BACK).
Une fois le réglage terminé, la fenêtre
d’affichage revient au mode de réception/
lecture normal.
Pour annuler le démarrage en blanc, sélectionnez
« OFF » à l’étape 3.
Effet au démarrage
— Démarrage en blanc
Quand vous appuyez sur (SOURCE/OFF), la
couleur de l’affichage et des touches de l’unité
principale vire au blanc avant de revenir à la
couleur personnalisée. Vous pouvez obtenir cet
effet aussi longtemps que la source est activée.
1 Appuyez sur la touche de sélection et
maintenez-la enfoncée.
L’écran de configuration apparaît.
2 Tournez la molette de réglage jusqu’à
ce que « START WHITE » s’affiche,
puis appuyez dessus.
23
Page 92

Réglages du son et menu de
configuration
*1 Masqué lorsque « POSITION » est réglé sur
«OFF».
*2 Lorsque la source AUX est activée (page 28).
Modification des
caractéristiques du son
Réglage des caractéristiques du son
1 En cours de réception/lecture,
appuyez sur la touche de sélection.
2 Tournez la molette de réglage jusqu’à
ce que l’élément de menu souhaité
s’affiche, puis appuyez dessus.
3 Tournez la molette de réglage pour
sélectionner le réglage, puis appuyez
dessus.
4 Appuyez sur (BACK).
Une fois le réglage terminé, la fenêtre
d’affichage revient au mode de réception/
lecture normal.
Les paramètres suivants peuvent être réglés (reportezvous à la page indiquée pour plus de détails) :
EQ7 PRESET (page 24)
EQ7 SETTING (page 24)
POSITION
POSITION (Réglage de la position d’écoute)
(page 25)
ADJUST POS*
d’écoute) (page 26)
SW POSITION*
graves) (page 25)
BALANCE
Permet de régler la balance du son :
«RIGHT-15» – «CENTER» – «LEFT-15».
FADER
Permet de régler le niveau relatif :
«FRONT-15» – «CENTER» – «REAR-15».
DM+ (page 26)
REARBAS ENH (Rear Bass Enhancer)
(page 26)
SUBW LEVEL (Niveau du caisson de graves)
Permet de régler le volume du caisson de
graves : « +10 dB » – « 0 dB » – « –10 dB ».
(« ATT » est affiché au réglage le plus bas.)
AUX VOLUME*
Permet de régler le niveau de volume de chaque
appareil auxiliaire raccordé : « +18 dB » –
« 0 dB » – « –8 dB ».
Ce réglage évite d’ajuster le niveau de volume
entre les sources.
1
(Ajustement de la position
1
(Position du caisson de
2
(Niveau de volume AUX)
Utilisation de fonctions audio
évoluées — Advanced Sound
Engine
Le nouveau moteur audio Advanced Sound
Engine de Sony crée un champ acoustique idéal
pour les trajets en voiture, avec traitement des
signaux numériques. Advanced Sound Engine
propose les fonctions suivantes : EQ7, Position
d’écoute, DM+ Advanced, Rear Bass Enhancer.
Sélection de la qualité du son
— EQ7 Preset
Vous avez le choix entre 7 courbes de l’égaliseur
(« XPLOD », « VOCAL », « EDGE »,
«CRUISE», «SPACE», «GRAVITY»,
« CUSTOM » ou « OFF »).
1 En cours de réception/lecture,
appuyez sur la touche de sélection.
2 Tournez la molette de réglage jusqu’à
ce que « EQ7 PRESET » s’affiche, puis
appuyez dessus.
3 Tournez la molette de réglage jusqu’à
ce que la courbe de l’égaliseur
souhaitée s’affiche, puis appuyez
dessus.
4 Appuyez sur (BACK).
L’affichage revient au mode de réception/
lecture normal.
Pour annuler la courbe de l’égaliseur,
sélectionnez « OFF » à l’étape 3.
Conseil
Il est possible de mémoriser le réglage de la courbe
de l’égaliseur pour chaque source.
Personnalisation de la courbe de
l’égaliseur — EQ7 Setting
Le paramètre « CUSTOM » de EQ7 vous permet
d’effectuer vos propres réglages de l’égaliseur.
1 Sélectionnez une source, puis
appuyez sur la touche de sélection.
2 Tournez la molette de réglage jusqu’à
ce que « EQ7 SETTING » s’affiche,
puis appuyez dessus.
24
Page 93

3 Tournez la molette de réglage jusqu’à
ce que « BASE » s’affiche, puis
appuyez dessus.
Vous pouvez sélectionner une courbe de
l’égaliseur en vue de la personnaliser ensuite.
Si vous ne souhaitez pas personnaliser une
courbe prédéfinie de l’égaliseur, passez à
l’étape 5.
4 Tournez la molette de réglage pour
sélectionner la courbe de l’égaliseur,
puis appuyez dessus.
5 Définition de la courbe de l’égaliseur.
1 Tournez la molette de réglage pour
sélectionner la plage de fréquences, puis
appuyez dessus.
BAND1 : 63 Hz
BAND2 : 160 Hz
BAND3 : 400 Hz
BAND4 : 1 kHz
BAND5 : 2,5 kHz
BAND6 : 6,3 kHz
BAND7 : 16,0 kHz
2 Tournez la molette de réglage pour
ajuster le niveau du volume, puis
appuyez dessus.
Le niveau de volume peut être réglé par
incréments de 1 dB, de -6 dB à + 6 dB.
Répétez les étapes 1 et 2 pour régler
d’autres plages de fréquences.
6 Appuyez deux fois sur (BACK).
La courbe de l’égaliseur « CUSTOM » est
rétablie et l’affichage revient au mode de
réception/lecture normal.
Optimisation du son grâce à la
synchronisation — Position
d’écoute
L’appareil peut modifier la localisation du son en
retardant la sortie audio provenant de chaque
haut-parleur en fonction de votre position et
simuler un champ acoustique naturel donnant
l’impression d’être au centre de l’action, quelle
que soit votre place dans la voiture.
Les options de « POSITION » sont indiquées cidessous.
«FRONT L» (1): avant
gauche
«FRONT R» (2): avant
droite
«FRONT» (3): avant
centrale
«ALL» ( 4) : au centre de la
voiture
«OFF»: aucune position
définie
Vous pouvez également définir la position
approximative du caisson de graves par rapport à
votre position d’écoute si :
– le caisson de graves est raccordé ;
– la position d’écoute est réglée sur « FRONT
L », « FRONT R », « FRONT » ou « ALL ».
Les options de « SW POSITION » sont
indiquées ci-dessous.
«NEAR» (A) : proche
«NORMAL» (B): normale
«FAR» (C) : éloignée
1 En cours de réception/lecture,
appuyez sur la touche de sélection.
2 Tournez la molette de réglage jusqu’à
ce que « POSITION » s’affiche, puis
appuyez dessus.
3 Tournez la molette de réglage pour
sélectionner « FRONT L », « FRONT
R», «FRONT» ou «ALL», puis
appuyez dessus.
4 Tournez la molette de réglage jusqu’à
ce que « SW POSITION » s’affiche,
puis appuyez dessus.
Si vous sélectionnez « FRONT L »,
« FRONT R », « FRONT » ou « ALL » à
l’étape 3 ci-dessus, vous pouvez définir la
position du caisson de graves.
Tournez la molette de réglage pour
sélectionner « NEAR », « NORMAL » ou
« FAR », puis appuyez dessus.
5 Appuyez sur (BACK).
L’affichage revient au mode de réception/
lecture normal.
Pour annuler la position d’écoute, sélectionnez
« OFF » à l’étape 3.
25
Page 94

Ajustement de la position d’écoute
Vous pouvez ajuster le réglage de la position
d’écoute.
1 En cours de réception/lecture,
appuyez sur la touche de sélection.
2 Tournez la molette de réglage jusqu’à
ce que « ADJUST POS » s’affiche, puis
appuyez dessus.
3 Tournez la molette de réglage pour
ajuster la position d’écoute, puis
appuyez dessus.
Plage de réglage : « +3 » – « CENTER » –
«–3».
4 Appuyez sur (BACK).
L’affichage revient au mode de réception/
lecture normal.
DM+ Advanced
DM+ Advanced améliore le son compressé
numériquement en restaurant les hautes
fréquences perdues lors du processus de
compression.
1 En cours de lecture, appuyez sur la
touche de sélection.
2 Tournez la molette de réglage jusqu’à
ce que « DM+ » s’affiche, puis appuyez
dessus.
3 Tournez la molette de réglage pour
sélectionner « ON », puis appuyez
dessus.
4 Appuyez sur (BACK).
L’affichage revient au mode de lecture
normal.
Conseil
Il est possible de mémoriser le réglage DM+ pour
chaque source.
Utilisation des haut-parleurs
arrière comme caisson de graves
— Rear Bass Enhancer
Rear Bass Enhancer améliore les sons graves en
appliquant le réglage du filtre passe-bas
(page 27) aux haut-parleurs arrière. Cette
fonction permet d’utiliser les haut-parleurs
arrière comme caisson de graves si vous n’en
avez raccordé aucun.
1 En cours de réception/lecture,
appuyez sur la touche de sélection.
2 Tournez la molette de réglage jusqu’à
ce que « REARBAS ENH » s’affiche,
puis appuyez dessus.
26
3 Tournez la molette de réglage pour
sélectionner « 1 », « 2 » ou « 3 », puis
appuyez dessus.
4 Appuyez sur (BACK).
L’affichage revient au mode de réception/
lecture normal.
Réglage des paramètres de
configuration — SET
1 Appuyez sur la touche de sélection et
maintenez-la enfoncée.
L’écran de configuration apparaît.
2 Tournez la molette de réglage jusqu’à
ce que le réglage souhaité s’affiche,
puis appuyez dessus.
3 Tournez la molette de réglage pour
sélectionner le réglage, puis appuyez
dessus.*
Le réglage est terminé.
4 Appuyez sur (BACK).
L’affichage revient au mode de réception/
lecture normal.
* Pour régler la couleur personnalisée, des étapes
supplémentaires sont requises (page 22).
Remarque
Les rubriques affichées diffèrent selon la source et le
réglage.
Les paramètres suivants peuvent être réglés
(reportez-vous à la page indiquée pour plus de
détails) :
CLOCK ADJ (Réglage de l’horloge) (page 6)
CT (Heure)
Permet d’activer la fonction CT : « ON »,
« OFF » (page 12, 13).
BEEP
Permet d’activer le bip sonore : « ON »,
«OFF».
1
AUX-A*
Permet d’activer l’affichage de la source AUX :
«ON», «OFF» (page28).
AUTO OFF
Permet d’éteindre l’appareil automatiquement
après un laps de temps choisi lorsque l’appareil
est mis hors tension : « NO », « 30S »
(Secondes), « 30M » (Minutes), « 60M »
(Minutes).
DEMO
Permet d’activer la démonstration : « ON »,
«OFF».
(Audio AUX)
(Démonstration)
Page 95

DIMMER
Permet de modifier la luminosité de la fenêtre
d’affichage.
– « AT » : pour réduire automatiquement la
luminosité de l’affichage lorsque vous allumez
les phares. (Disponible uniquement lorsque le
câble de commande de l’éclairage est
raccordé.)
– « ON » : pour réduire la luminosité de
l’affichage.
– « OFF » : pour désactiver le régulateur de
luminosité.
CONTRAST
Permet de régler le contraste de l’affichage. Le
niveau du contraste peut être réglé en 7 pas.
COLOR (Couleur prédéfinie)
Permet de sélectionner la couleur prédéfinie de
l’affichage et des touches de l’unité principale
(page 21).
CUSTOM COLR (Couleur personnalisée)
Permet de sélectionner une couleur prédéfinie et
la personnaliser (page 22).
SENSME COLR (Couleur SensMe)
Permet de changer de couleur en fonction des
canaux SensMe : « ON », « OFF ».
SOUND SYNC
Permet de sélectionner la synchronisation de la
couleur et du son : « ON », « OFF ».
WHITE MENU
Permet de définir l’effet appliqué lorsque la
source est commutée : « ON », « OFF ».
START WHITE
Permet de définir la couleur de démarrage :
«ON», «OFF».
MOTION DSPL (Affichage animé)
– « SA » : pour afficher les motifs animés et
l’analyseur de spectre.
– « ON » : pour afficher les motifs animés.
– « OFF » : pour désactiver l’affichage animé.
AUTO SCROLL
Permet de faire défiler automatiquement les
rubriques longues : « ON », « OFF ».
LOCAL (Mode de recherche locale)
– « ON » : pour syntoniser uniquement les
stations dont les signaux sont plus puissants.
– « OFF » : pour syntoniser en réception
normale.
MONO*
2
(Mode mono)
Permet de sélectionner le mode de réception
mono pour améliorer une réception FM
médiocre: «ON», «OFF».
REGIONAL*
2
Permet de restreindre la réception à une région
spécifique : « ON », « OFF » (page 12).
ZAPPIN TIME
Permet de sélectionner la durée de lecture de la
fonction ZAPPIN.
– « ZAP.TIME-1 (environ 6 secondes) »,
« ZAP.TIME-2 (environ 15 secondes) »,
« ZAP.TIME-3 (environ 30 secondes) ».
ZAPPIN BEEP
Pour émettre un bip entre les différents passages
de plages : « ON », « OFF ».
LPF FREQ (Fréquence du filtre passe-bas)
Permet de sélectionner la fréquence de coupure
du caisson de graves : « 50Hz », « 60Hz »,
« 80Hz », « 100Hz », « 120Hz ».
LPF SLOPE (Pente du filtre passe-bas)
Permet de sélectionner la pente LPF : « 1 »,
«2», «3».
SUBW PHASE (Phase du caisson de graves)
Permet de sélectionner la phase du caisson de
graves : « NORM », « REV ».
HPF FREQ (Fréquence du filtre passe-haut)
Permet de sélectionner la fréquence de coupure
des haut-parleurs avant/arrière : « OFF »,
« 50Hz », « 60Hz », « 80Hz », « 100Hz »,
« 120Hz ».
HPF SLOPE (Pente du filtre passe-haut)
Permet de sélectionner la pente HPF (ne
s’applique que si le réglage de HPF FREQ est
différent de «OFF»): «1», «2», «3».
LOUDNESS (Intensité sonore dynamique)
Permet de renforcer les graves et les aigus et
d’entendre des sons clairs à des volumes
faibles : « ON », « OFF ».
BTM (page 11)
*1 Lorsque l’appareil est hors tension.
*2 Lorsqu’une station FM est captée.
27
Page 96

Autres fonctions
Informations complémentaires
Utilisation d’un appareil en
option
Appareil audio auxiliaire
En raccordant un appareil audio portatif en
option à la prise d’entrée AUX (mini-prise
stéréo) de l’appareil, puis en sélectionnant
simplement la source, vous pouvez l’écouter par
l’intermédiaire des haut-parleurs du véhicule. Le
niveau de volume peut être réglé pour corriger
toutes les différences entre l’appareil et l’appareil
audio portatif. Suivez la procédure ci-dessous :
Raccordement de l’appareil audio
portatif
1 Mettez l’appareil audio portatif hors tension.
2 Baissez le volume sur l’appareil.
3 Effectuez le raccordement à l’appareil.
Cordon de
raccordement*
(non fourni)
* Veillez à utiliser une fiche de type droit.
Réglage du niveau de volume
Avant de commencer la lecture, n’oubliez pas de
régler le volume de chaque appareil audio
raccordé.
1 Baissez le volume sur l’appareil.
2 Appuyez plusieurs fois sur (SOURCE/OFF)
jusqu’à ce que l’indication « AUX »
apparaisse.
« AUX FRONT IN » apparaît ensuite.
3 Démarrez la lecture sur l’appareil audio
portatif, à un niveau de volume moyen.
4 Réglez votre appareil sur le volume d’écoute
habituel.
5 Réglez le niveau d’entrée (page 24).
28
Précautions
• Si votre véhicule est resté garé en plein soleil,
laissez l’appareil refroidir avant de l’utiliser.
• L’antenne électrique se déploie automatiquement.
Condensation
Si de la condensation se produisait dans l’appareil,
retirez le disque et attendez environ une heure que
l’humidité se soit évaporée. Si cela se produit,
l’appareil ne fonctionne pas correctement.
Pour conserver un son de haute
qualité
Ne renversez pas de liquide sur l’appareil ou sur les
disques.
Remarques sur les disques
• N’exposez pas les disques à la lumière directe du
soleil ou à des sources de chaleur comme des
conduits d’air chaud et ne les laissez pas dans une
voiture garée en plein soleil.
• Avant la lecture, nettoyez les
disques avec un chiffon de
nettoyage en partant du centre
vers l’extérieur. N’utilisez pas
de solvants tels que de
l’essence, du diluant, des
nettoyants disponibles dans le
commerce.
• Cet appareil est conçu pour la
lecture des disques conformes à la norme Compact
Disc (CD). Les DualDiscs et certains disques de
musique encodés avec des technologies de
protection des droits d’auteur ne sont pas
conformes à la norme Compact Disc (CD), par
conséquent, ces disques ne peuvent pas être lus
avec cet appareil.
• Disques NE POUVANT PAS être lus sur cet
appareil
– Disques sur lesquels sont collés des étiquettes,
des autocollants, de l’adhésif ou du papier. La
lecture de tels disques pourrait entraîner un
problème de fonctionnement ou endommager le
disque.
– Disques de forme non standard (notamment en
forme de cœur, de carré ou d’étoile). Vous
risquez d’endommager votre appareil si vous
essayez de le faire.
– Disques de 8 cm.
Page 97

Remarques sur les disques CD-R/
CD-RW
• Nombre maximal de : (CD-R/CD-RW uniquement)
– dossiers (albums) : 150 (y compris le répertoire
racine)
– fichiers (plages) et dossiers : 300 (ce nombre peut
être inférieur à 300 si les noms de dossiers/fichiers
contiennent un grand nombre de caractères)
– caractères affichables pour un nom de dossier/
fichier : 32 (Joliet)/64 (Romeo)
• Si le disque en multisession commence par une
session CD-DA, il est identifié comme un disque
CD-DA et les autres sessions ne sont pas lues.
• Disques NE POUVANT PAS être lus sur cet
appareil
– Les CD-R/CD-RW avec une qualité
d’enregistrement médiocre.
– Les CD-R/CD-RW enregistrés avec un appareil
d’enregistrement incompatible.
– Les CD-R/CD-RW finalisés de façon incorrecte.
– Les CD-R/CD-RW autres que ceux enregistrés
au format de CD de musique ou au format MP3
conforme à la norme ISO9660 niveau 1/
niveau 2, Joliet/Romeo ou multi-session.
Ordre de lecture des fichiers MP3/
WMA/AAC
MP3/WMA/AAC
Dossier
(album)
Fichier MP3/
WMA/AAC
(plage)
• « Made for iPod » et « Made for iPhone »
signifient qu’un accessoire électronique a été
conçu pour être connecté spécifiquement à un
iPod ou un iPhone et a été certifié par le
développeur afin de répondre aux normes de
performance Apple.
• Apple n’est pas responsable du fonctionnement
de cet appareil ou de sa conformité aux normes
de sécurité et de réglementations.
Si vous avez des questions ou des problèmes
concernant cet appareil qui ne sont pas abordés dans
ce mode d’emploi, contactez votre revendeur Sony.
Entretien
Remplacement de la pile au lithium
de la mini-télécommande
Dans des conditions d’utilisation normales, la
batterie dure environ 1 an. (En fonction des
conditions d’utilisation, sa durée de vie peut être
plus courte.)
Lorsque la pile est faible, la portée de la minitélécommande diminue. Remplacez la pile par
une pile au lithium CR2025 neuve. L’utilisation
de tout autre type de pile présente un risque
d’incendie ou d’explosion.
Pôle + vers le haut
A propos de l’iPod
• Vous pouvez raccorder cet appareil aux modèles
d’iPod suivants. Mettez vos périphériques iPod à
jour avec le logiciel le plus récent avant toute
utilisation.
Made for
– iPod touch (2ème génération)
– iPod touch (1ère génération)
– iPod classic
– iPod avec vidéo*
– iPod nano (5ème génération)
– iPod nano (4ème génération)
– iPod nano (3ème génération)
– iPod nano (2ème génération)
– iPod nano (1ère génération)*
– iPhone 3GS
– iPhone 3G
– iPhone
* La commande passager n’est pas disponible pour
l’iPod nano (1ère génération) ou l’iPod avec vidéo.
2
c
1
Remarques sur la pile au lithium
• Tenez la pile au lithium hors de la portée des
enfants. En cas d’ingestion de la pile, consultez
immédiatement un médecin.
• Essuyez la pile avec un chiffon sec pour assurer un
bon contact.
• Veillez à respecter la polarité lors de l’installation de
la pile.
• Ne tenez pas la pile avec des pinces métalliques,
car cela pourrait entraîner un court-circuit.
ATTENTION
Utilisée de façon incorrecte, la pile peut
exploser.
Ne pas la recharger, la démonter ni la jeter
au feu.
suite à la page suivante t
29
Page 98
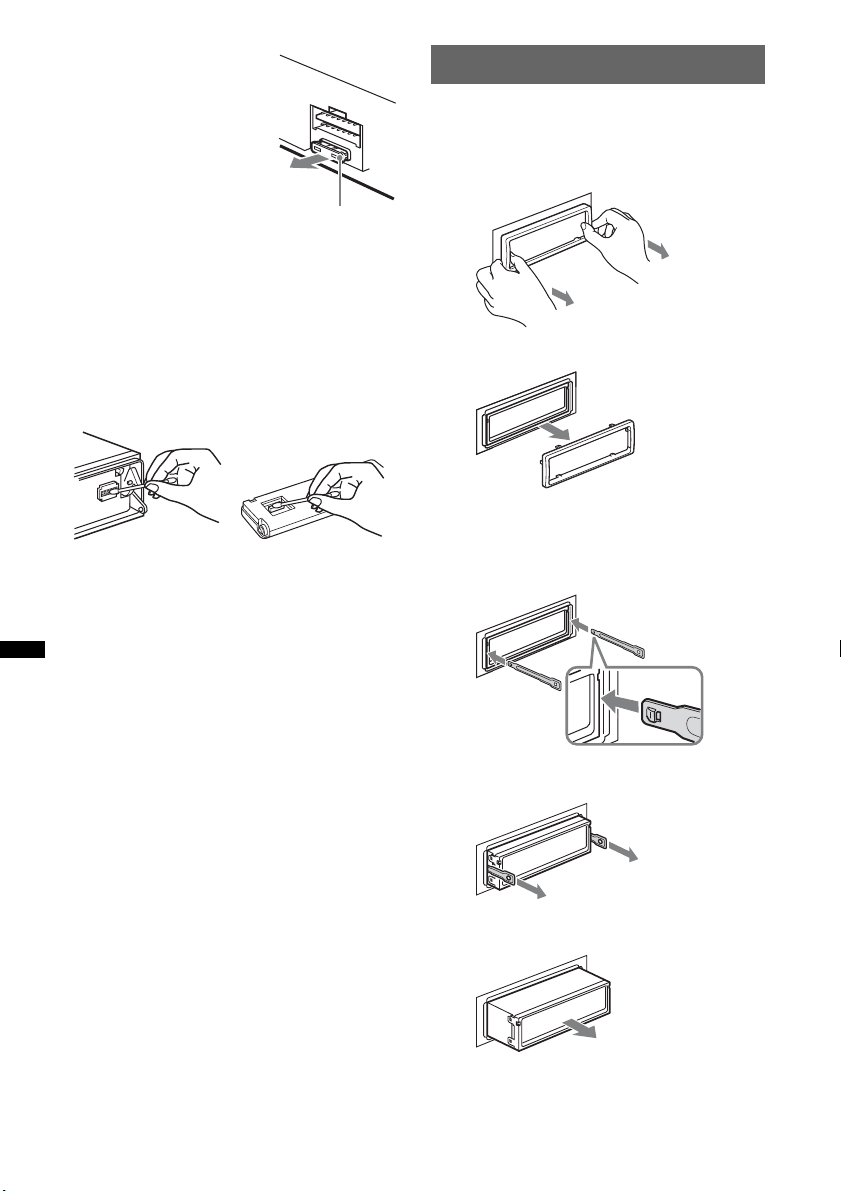
Remplacement du
fusible
Lorsque vous remplacez le
fusible, veillez à utiliser un
fusible dont l’intensité, en
ampères, correspond à la valeur
indiquée sur le fusible usagé. Si
le fusible saute, vérifiez le
branchement de l’alimentation
et remplacez-le. Si le nouveau
fusible saute également, il est
possible que l’appareil soit
défectueux. Dans ce cas, consultez votre revendeur
Sony le plus proche.
Fusible (10 A)
Nettoyage des connecteurs
L’appareil peut ne pas fonctionner correctement si
les connecteurs entre l’appareil et la façade sont
souillés. Pour éviter cette situation, retirez la façade
(page 7) et nettoyez les connecteurs à l’aide d’un
coton-tige. N’exercez pas une pression trop forte,
sinon les connecteurs peuvent être endommagés.
Appareil principal
Remarques
• Pour plus de sécurité, coupez le moteur avant de
nettoyer les connecteurs et retirez la clé de contact.
• Ne touchez jamais les connecteurs directement
avec les doigts ou avec un objet métallique.
Arrière de la façade
Retrait de l’appareil
1 Retirez le tour de protection.
1Retirez la façade (page 7).
2Pincez les deux bords du tour de
protection, puis retirez-le.
x
2 Retirez l’appareil.
1Insérez simultanément les deux clés de
déblocage jusqu’à ce qu’elles émettent un
déclic.
Tournez le
crochet vers
l’intérieur.
30
2Tirez sur les clés de déblocage pour
extraire l’appareil.
3Faites glisser l’appareil en dehors de son
support.
Page 99

Spécifications
Radio
FM
Plage de syntonisation : 87,5 – 108,0 MHz
Borne d’antenne :
Connecteur d’antenne externe
Moyenne fréquence : 150 kHz
Sensibilité utile : 10 dBf
Sélectivité : 75 dB à 400 kHz
Rapport signal/bruit : 70 dB (mono)
Séparation : 40 dB à 1 kHz
Réponse en fréquence : 20 – 15 000 Hz
MW (PO)/LW (GO)
Plage de syntonisation :
MW (PO) : 531 – 1 602 kHz
LW (GO) : 153 – 279 kHz
Borne d’antenne :
Connecteur d’antenne externe
Moyenne fréquence : 25 kHz
Sensibilité : MW (PO) : 26 µV, LW (GO) : 45 µV
Lecteur CD
Rapport signal/bruit : 120 dB
Réponse en fréquence : 10 à 20 000 Hz
Pleurage et scintillement :
En dessous du seuil mesurable
Lecteur USB
Interface : USB (haute vitesse)
Courant maximal : 500 mA
Amplificateur de puissance
Sortie : sorties haut-parleurs
Impédance des haut-parleurs : 4 – 8 ohms
Puissance de sortie maximale : 52 W × 4 (sous
4 ohms)
Généralités
Sorties :
Borne de sorties audio (avant/arrière)
Borne de sortie du caisson de graves (mono)
Borne de commande de relais d’antenne électrique
Borne de commande d’amplificateur de puissance
Entrées :
Borne de commande ATT téléphone
Borne d’entrée de commande à distance
Borne d’entrée de l’antenne
Prise d’entrée AUX (mini-prise stéréo)
Connecteur d’entrée du signal USB
Alimentation requise : Batterie de véhicule 12 V CC
(masse négative (terre))
Dimensions : environ 178 × 50 × 180 mm (l/h/p)
dimensions du support : environ 182 × 53 × 162 mm
(l/h/p)
Poids : environ 1,3 kg
Accessoires fournis :
Mini-télécommande : RM-X151
Composants destinés à l’installation et au
raccordement (1 jeu)
Appareils/accessoires en option :
Câble de connexion USB pour iPod : RC-100IP
Il est possible que votre revendeur ne dispose pas de
certains accessoires décrits ci-dessus. Veuillez vous
adresser à lui pour tout renseignement
complémentaire.
La conception et les spécifications sont sujettes à
modification sans préavis.
Configurations requises pour les
logiciels disponibles sur le CD-ROM
fourni
Ordinateur
• UC/mémoire RAM
– Ordinateur compatible IBM PC/AT
– UC : processeur Intel Pentium III 450 MHz ou
supérieur
– Mémoire RAM : 256 Mo ou davantage (pour
Windows XP), 512 Mo ou davantage (pour
Windows Vista ou ultérieur)
• Lecteur de CD-ROM
•Port USB
Systèmes d’exploitation
Windows XP, Windows Vista, Windows 7
Pour plus de détails sur les éditions ou Service Pack
compatibles, visitez le site d’assistance suivant :
http://support.sony-europe.com/
Moniteur
Couleurs (16 bits) ou davantage, 800 × 600 points ou
davantage
Autre
Connexion Internet
Remarques
• Les environnements système suivants ne sont pas
pris en charge.
– Ordinateurs de type PC non-IBM, tels que
Macintosh, etc.
– Ordinateurs assemblés par l’utilisateur
– Ordinateurs dont le système d’exploitation a été
mis à niveau
– Environnement à plusieurs écrans
– Environnement à amorçage multiple
– Environnement à machine virtuelle
• Selon l’état de l’ordinateur, le fonctionnement peut
être impossible, même dans l’environnement
recommandé.
31
Page 100

Dépannage
La liste de contrôles suivante vous aidera à remédier
aux problèmes que vous pourriez rencontrer avec cet
appareil.
Avant de passer en revue la liste de contrôles cidessous, vérifiez les procédures de raccordement et
d’utilisation.
Si le problème n’est pas résolu, visitez le site
d’assistance suivant.
Site d’assistance
http://support.sony-europe.com/
Généralités
L’appareil n’est pas alimenté.
• Vérifiez le raccordement ou le fusible.
• Si vous mettez l’appareil hors tension et que
l’affichage disparaît, vous ne pouvez pas le
commander avec la mini-télécommande.
tMettez l’appareil sous tension.
L’antenne électrique ne se déploie pas.
L’antenne électrique ne dispose pas d’un boîtier de
relais.
Aucun son.
• La fonction ATT est activée ou la fonction ATT du
téléphone (lorsque le câble d’interface d’un
téléphone embarqué est raccordé au câble ATT) est
activée.
• La position de la commande d’équilibre avant-arrière
« FADER » n’est pas réglée pour un système à 2
haut-parleurs.
Aucun bip n’est émis.
• Le bip est désactivé (page 26).
• Un amplificateur de puissance en option est raccordé
et vous n’utilisez pas l’amplificateur intégré.
Le contenu de la mémoire a été effacé.
• La touche RESET a été enfoncée.
tRecommencez la procédure d’enregistrement
dans la mémoire.
• Le câble d’alimentation ou la batterie a été
débranché(e) ou n’est pas correctement raccordé(e).
Les stations mémorisées et l’heure sont
effacées.
Le fusible a sauté.
Emission de bruit lorsque la position de la clé
de contact est modifiée.
Les câbles ne sont pas raccordés correctement au
connecteur d’alimentation destiné aux accessoires.
En cours de lecture ou de réception, le mode
de démonstration démarre.
Si aucune opération n’est effectuée pendant 5 minutes
avec « DEMO-ON » activé, le mode de démonstration
démarre.
t Réglez « DEMO-OFF » (page 26).
L’affichage disparaît de la fenêtre d’affichage
ou il ne s’affiche pas.
• Le régulateur de luminosité est réglé sur
« DIMMER-ON » (page 27).
• L’affichage est désactivé si vous maintenez la touche
(SOURCE/OFF) enfoncée.
t Maintenez de nouveau la touche (SOURCE/OFF)
de l’appareil enfoncée jusqu’à ce que l’affichage
apparaisse.
• Les connecteurs sont sales (page 30).
La fonction Auto Off est inopérante.
L’appareil est mis sous tension. La fonction Auto Off
s’active après la mise hors tension de l’appareil.
t Mettez l’appareil hors tension.
Réception radio
Impossible de capter des stations.
Le son comporte des parasites.
Le raccordement n’est pas correct.
t Raccordez un câble de commande d’antenne
électrique (bleu) ou un câble d’alimentation
d’accessoires (rouge) au câble d’alimentation de
l’amplificateur d’antenne de la voiture
(uniquement si votre voiture est équipée d’une
antenne FM/MW (PO)/LW (GO) intégrée dans la
vitre arrière/latérale).
t Vérifiez le raccordement de l’antenne de voiture.
t Si l’antenne automatique ne se déploie pas,
vérifiez le raccordement du câble de commande
d’antenne électrique.
Impossible de capter une présélection.
• Enregistrez la fréquence correcte dans la mémoire.
• Le signal capté est trop faible.
Le réglage automatique des stations est
impossible.
• Le réglage du mode de recherche locale est incorrect.
t La syntonisation s’arrête trop souvent :
Réglez « LOCAL-ON » (page 27).
t La syntonisation ne s’arrête pas sur une station :
Réglez « LOCAL-OFF » (page 27).
• Le signal capté est trop faible.
t Réglez manuellement la fréquence.
En cours de réception FM, l’indication « ST »
clignote.
• Réglez la fréquence correctement.
• Le signal capté est trop faible.
t Réglez « MONO-ON » (page 27).
Un programme FM émis en stéréo est entendu
en mono.
L’appareil est en mode de réception mono.
t Réglez « MONO-OFF » (page 27).
RDS
Une recherche (SEEK) commence après
quelques secondes d’écoute.
La station ne diffuse pas de programmes de
radioguidage (fonction TP désactivée) ou le signal
capté est faible.
t Désactivez TA (page 12).
32
 Loading...