

Sony CDX-GT55IP User Manual
3-285-539-21 (1)
©
FM/MW/LW
Compact Disc Player
Operating Instructions
Bedienungsanleitung
Mode d’emploi
Istruzioni per l’uso
Gebruiksaanwijzing
To cancel the demonstration (DEMO) display, see page 14.
Zum Deaktivieren der Demo-Anzeige (DEMO) schlagen Sie bitte auf Seite 15 nach.
Pour annuler la démonstration (DEMO), reportez-vous à la page 14.
Per annullare la dimostrazione (DEMO), vedere pagina 15.
Om de demonstratie (DEMO) te annuleren, zie pagina 15.
GB
DE
FR
IT
NL
CDX-GT55IP
2008 Sony Corporation
For installation and connections, see the
supplied installation/connections manual.
This label is located on the bottom of the
chassis.
Notice for the customer in the countries
applying EU Directives
The manufacturer of this product is Sony
Corporation, 1-7-1 Konan, Minato-ku, Tokyo,
Japan.
The Authorized Representative for EMC and
product safety is Sony Deutschland GmbH,
Hedelfinger Strasse 61, 70327 Stuttgart,
Germany. For any service or guarantee matters
please refer to the addresses given in separate
service or guarantee documents.
Disposal of Old Electrical &
Electronic Equipment (Applicable in
the European Union and other
European countries with separate
collection systems)
This symbol on the product or on its
packaging indicates that this product shall not be treated
as household waste. Instead it shall be handed over to the
applicable collection point for the recycling of electrical
and electronic equipment. By ensuring this product is
disposed of correctly, you will help prevent potential
negative consequences for the environment and human
health, which could otherwise be caused by inappropriate
waste handling of this product. The recycling of materials
will help to conserve natural resources. For more detailed
information about recycling of this product, please contact
your local Civic Office, your household waste disposal
service or the shop where you purchased the product.
Applicable accessory: Remote commander
Disposal of waste batteries
(applicable in the European Union
and other European countries with
separate collection systems)
This symbol on the battery or on the packaging indicates
that the battery provided with this product shall not be
treated as household waste. By ensuring these batteries are
disposed of correctly, you will help prevent potentially
negative consequences for the environment and human
health which could otherwise be caused by inappropriate
waste handling of the battery. The recycling of the
materials will help to conserve natural resources.
In case of products that for safety, performance or data
integrity reasons require a permanent connection with an
incorporated battery, this battery should be replaced by
qualified service staff only. To ensure that the battery will
be treated properly, hand over the product at end-of-life to
the applicable collection point for the recycling of
electrical and electronic equipment.
For all other batteries, please view the section on how to
remove the battery from the product safely. Hand the
battery over to the applicable collection point for the
recycling of waste batteries.
For more detailed information about recycling of this
product or battery, please contact your local Civic Office,
your household waste disposal service or the shop where
you purchased the product.
Microsoft, Windows Media,
and the Windows logo are
trademarks or registered
trademarks of Microsoft
Corporation in the United States and/or other
countries.
iPod is a trademark of Apple Inc., registered in
the U.S. and other countries.
Warning if your car’s ignition has no
ACC position
Be sure to set the Auto Off function (page 14).
The unit will shut off completely and
automatically in the set time after the unit is
turned off, which prevents battery drain.
If you do not set the Auto Off function, press
and hold (OFF) until the display disappears
each time you turn the ignition off.
2

Table of Contents
Welcome ! . . . . . . . . . . . . . . . . . . . . . . . . . . . . . 4
Getting Started
Resetting the unit. . . . . . . . . . . . . . . . . . . . . . . . 4
Preparing the card remote commander . . . . . . . 4
Setting the clock . . . . . . . . . . . . . . . . . . . . . . . . 4
Detaching the front panel . . . . . . . . . . . . . . . . . 5
Attaching the front panel . . . . . . . . . . . . . . . 5
Inserting the disc in the unit . . . . . . . . . . . . . . . 5
Ejecting the disc . . . . . . . . . . . . . . . . . . . . . . 5
Location of controls and basic
operations
Main unit. . . . . . . . . . . . . . . . . . . . . . . . . . . . 6
Card remote commander RM-X151. . . . . . . 6
Searching for a track
— Quick-BrowZer . . . . . . . . . . . . . . . . . . . . 8
CD
Display items . . . . . . . . . . . . . . . . . . . . . . . . 9
Repeat and shuffle play. . . . . . . . . . . . . . . . . 9
Radio
Storing and receiving stations . . . . . . . . . . . . . . 9
Storing automatically — BTM . . . . . . . . . . . 9
Storing manually. . . . . . . . . . . . . . . . . . . . . . 9
Receiving the stored stations . . . . . . . . . . . . 9
Tuning automatically . . . . . . . . . . . . . . . . . . 9
RDS . . . . . . . . . . . . . . . . . . . . . . . . . . . . . . . . . 10
Overview. . . . . . . . . . . . . . . . . . . . . . . . . . . 10
Setting AF and TA . . . . . . . . . . . . . . . . . . . 10
Selecting PTY. . . . . . . . . . . . . . . . . . . . . . . 11
Setting CT. . . . . . . . . . . . . . . . . . . . . . . . . . 11
Other functions
Changing the sound settings. . . . . . . . . . . . . . 13
Adjusting the sound characteristics . . . . . . 13
Customizing the equalizer curve
— EQ3 . . . . . . . . . . . . . . . . . . . . . . . . . . . . 13
Adjusting setup items — SET . . . . . . . . . . . . 14
Using optional equipment. . . . . . . . . . . . . . . . 15
Auxiliary audio equipment. . . . . . . . . . . . . 15
Rotary commander RM-X4S . . . . . . . . . . . 15
Additional Information
Precautions . . . . . . . . . . . . . . . . . . . . . . . . . . . 16
Notes on discs . . . . . . . . . . . . . . . . . . . . . . 16
Playback order of MP3/WMA/AAC files
(CD-R/RW) . . . . . . . . . . . . . . . . . . . . . . . . 17
About MP3 files. . . . . . . . . . . . . . . . . . . . . 17
About WMA files. . . . . . . . . . . . . . . . . . . . 17
About AAC files . . . . . . . . . . . . . . . . . . . . 18
About iPod . . . . . . . . . . . . . . . . . . . . . . . . . 18
Maintenance . . . . . . . . . . . . . . . . . . . . . . . . . . 18
Removing the unit. . . . . . . . . . . . . . . . . . . . . . 19
Specifications . . . . . . . . . . . . . . . . . . . . . . . . . 20
Troubleshooting . . . . . . . . . . . . . . . . . . . . . . . 21
Error displays/Messages. . . . . . . . . . . . . . . 22
iPod
Playing back iPod . . . . . . . . . . . . . . . . . . . . . . 11
Playing tracks . . . . . . . . . . . . . . . . . . . . . . . 11
Display items . . . . . . . . . . . . . . . . . . . . . . . 12
Setting the play mode . . . . . . . . . . . . . . . . . . . 12
Repeat and shuffle play. . . . . . . . . . . . . . . . 12
3
Welcome !
Getting Started
Thank you for purchasing this Sony Compact
Disc Player. You can enjoy your drive with the
following functions.
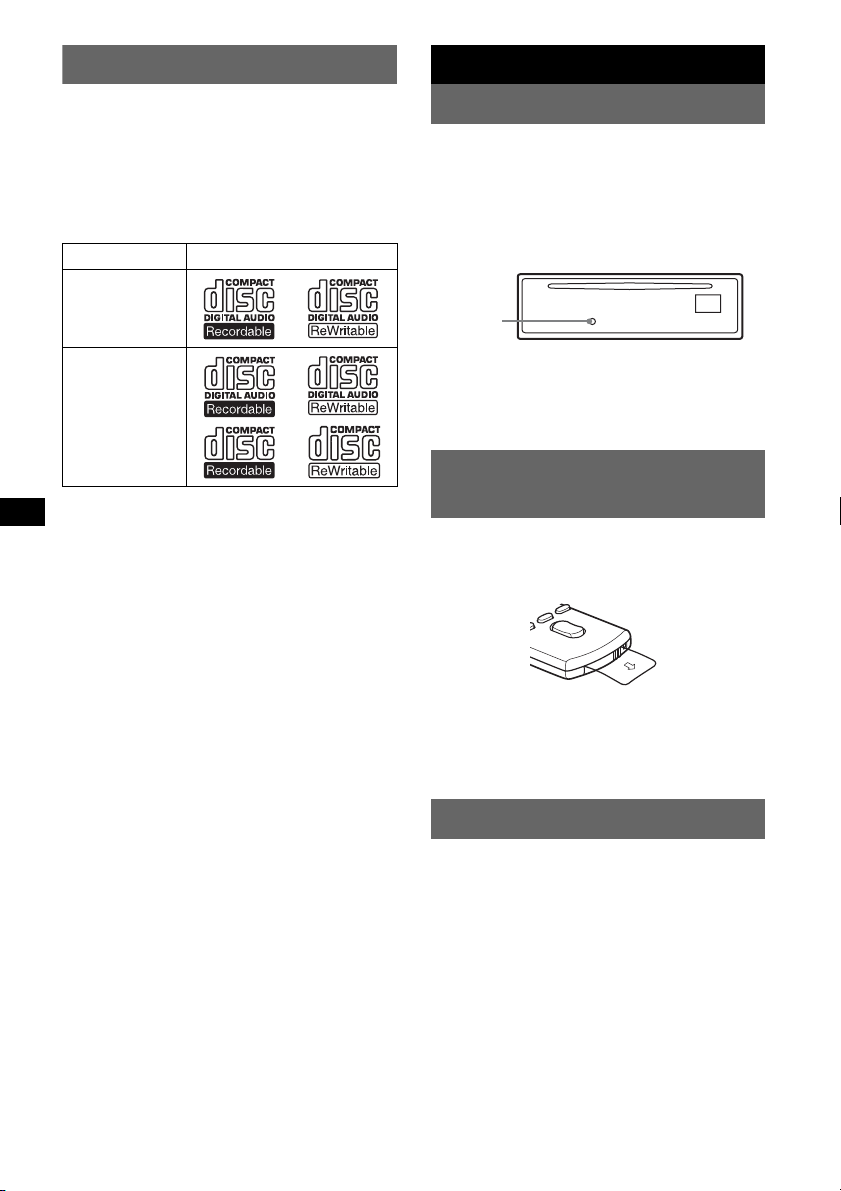
• CD playback
You can play CD-DA (also containing CD
TEXT) and CD-R/CD-RW (MP3/WMA/AAC
files (
page 17)).
Type of discs Label on the disc
CD-DA
MP3
WMA
AAC
• Radio reception
– You can store up to 6 stations per band (FM1,
FM2, FM3, MW and LW).
– BTM (Best Tuning Memory): The unit selects
strong signal stations and stores them.
• RDS services
You can use FM station with Radio Data
System (RDS).
• Search function
Quick-BrowZer: You can quickly and easily
search for a track in a CD, or iPod connected to
this unit (
• Sound adjustment
– EQ3 stage2: You can choose any one of 7
– DSO (Dynamic Soundstage Organizer):
• iPod operation
iPod connection can be made by the dock
connector cable on the rear of the unit.
• Auxiliary equipment connection
An AUX input jack on the front of the unit
allows connection of a portable audio device.
page 8).
preset equalizer curves.
Creates a more ambient sound field, using
virtual speaker synthesis, to enhance the
sound of speakers, even if they are installed
low in the door.
4
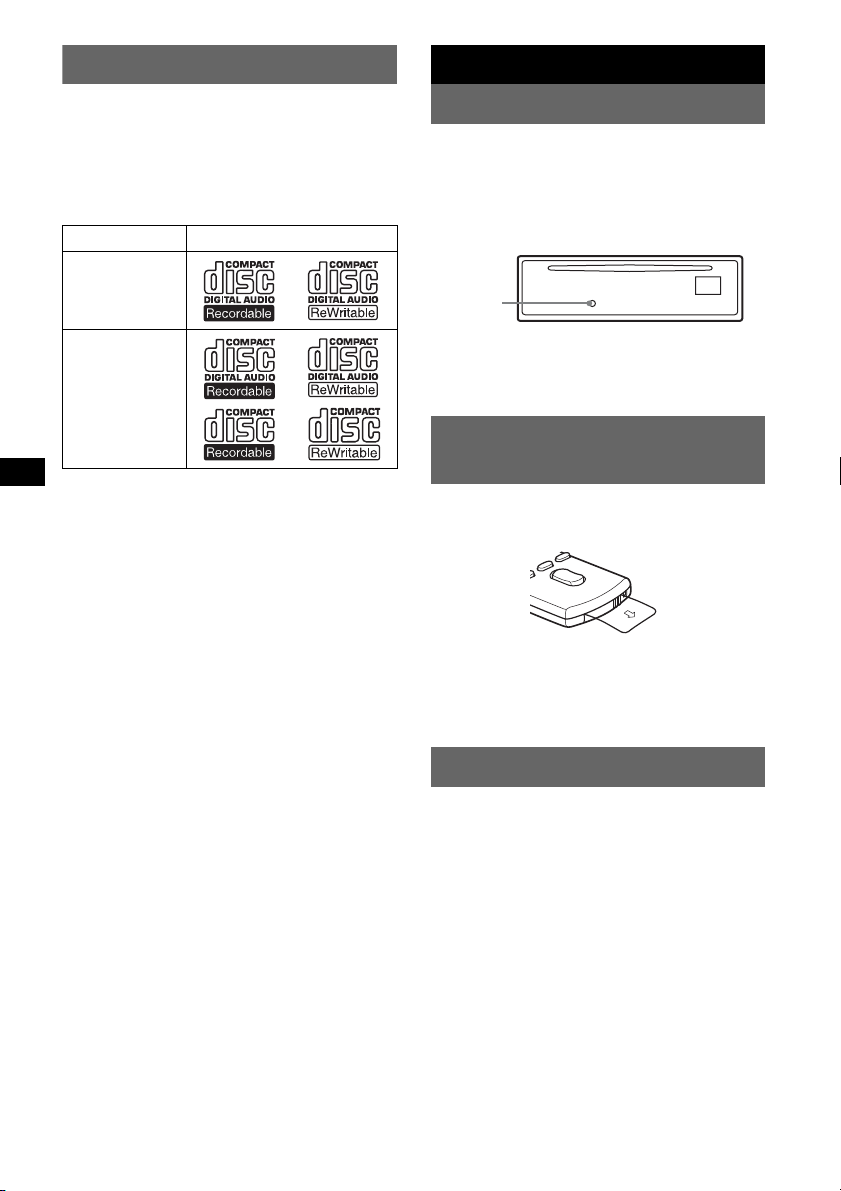
Resetting the unit
Before operating the unit for the first time, or
after replacing the car battery or changing the
connections, you must reset the unit.
Detach the front panel and press the RESET
button with a pointed object, such as a ball-point
pen.
RESET
button
Note
Pressing the RESET button will erase the clock setting
and some stored contents.
Preparing the card remote
commander
Before using the card remote commander for the
first time, remove the insulation film.
Tip
For how to replace the battery, see “Replacing the
lithium battery of the card remote commander” on
page 18.
Setting the clock
The clock uses a 24-hour digital indication.
1 Press and hold the select button.
The setup display appears.
2 Press the select button repeatedly
until “CLOCK-ADJ” appears.
3 Press (SEEK) +.
The hour indication flashes.
4 Rotate the control dial to set the hour
and minute.
To move the digital indication, press (SEEK)
–/+.
5 Press the select button.
The setup is complete and the clock starts.
To display the clock, press (DSPL). Press
(DSPL) again to return to the previous display.
Tip
You can set the clock automatically with the RDS
feature (
page 11).
Press (SOURCE) on the unit (or insert a disc) to
operate the unit.
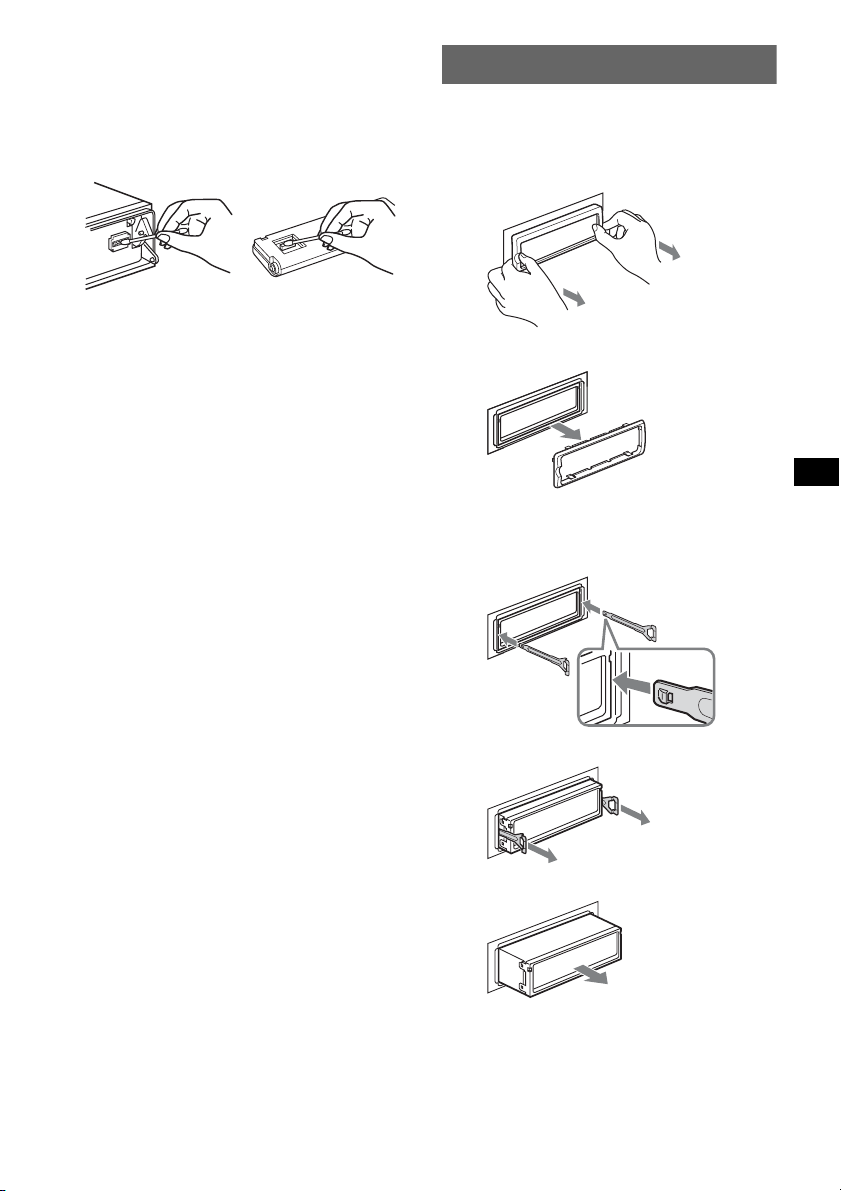
Detaching the front panel
You can detach the front panel of this unit to
prevent theft.
Caution alarm
If you turn the ignition switch to the OFF
position without detaching the front panel, the
caution alarm will sound for a few seconds.
The alarm will only sound if the built-in
amplifier is used.
1 Press (OFF).
The unit is turned off.
2 Press (OPEN).
The front panel is flipped down.
3 Slide the front panel to the right, then
gently pull out the left end of the front
panel.
1
2
Notes
• Do not drop or put excessive pressure on the front
panel and display window.
• Do not subject the front panel to heat/high
temperature or moisture. Avoid leaving it in a parked
car or on a dashboard/rear tray.
Attaching the front panel
Place the hole A of the front panel onto the
spindle B on the unit, then lightly push the left
side in.
A
B
c
Note
Do not put anything on the inner surface of the front
panel.
Inserting the disc in the unit
1 Press (OPEN).
2 Insert the disc (label side up).
3 Close the front panel.
Playback starts automatically.
Ejecting the disc
1 Press (OPEN).
2 Press Z.
The disc is ejected.
3 Close the front panel.
5
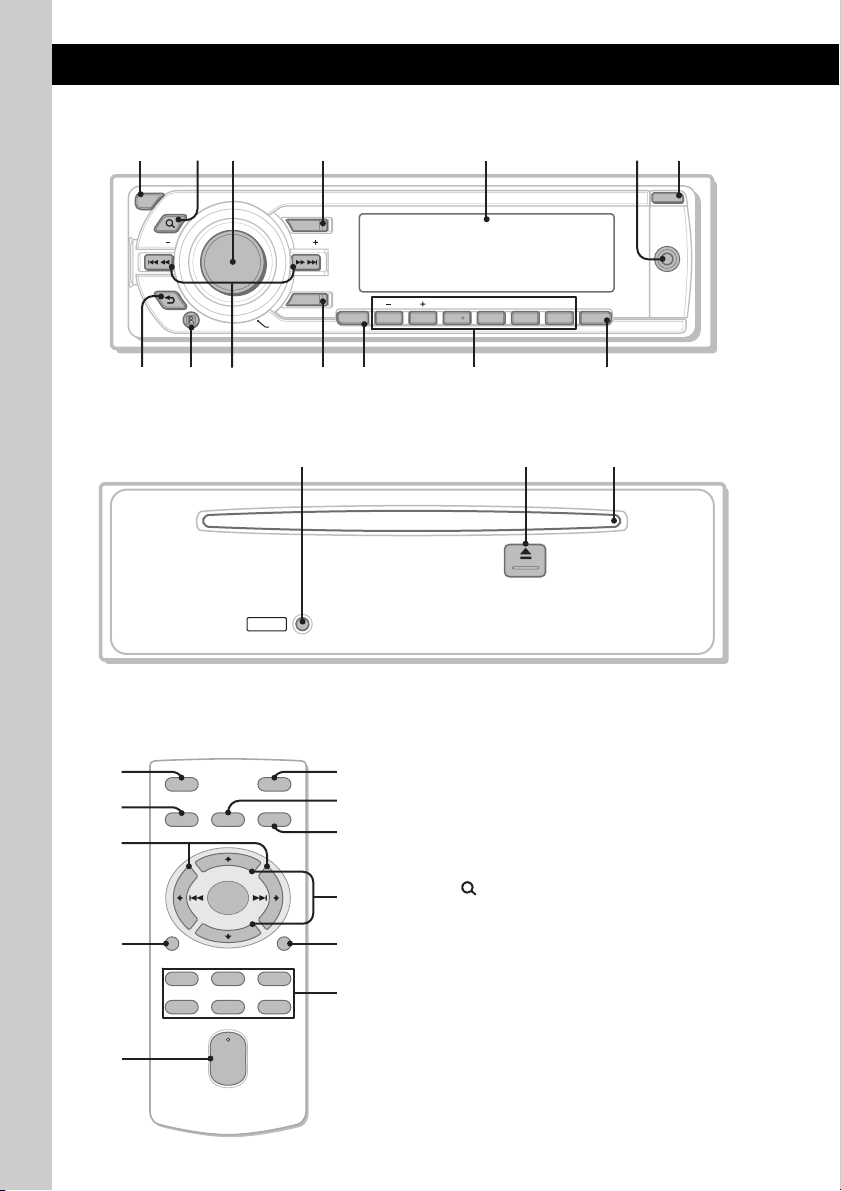
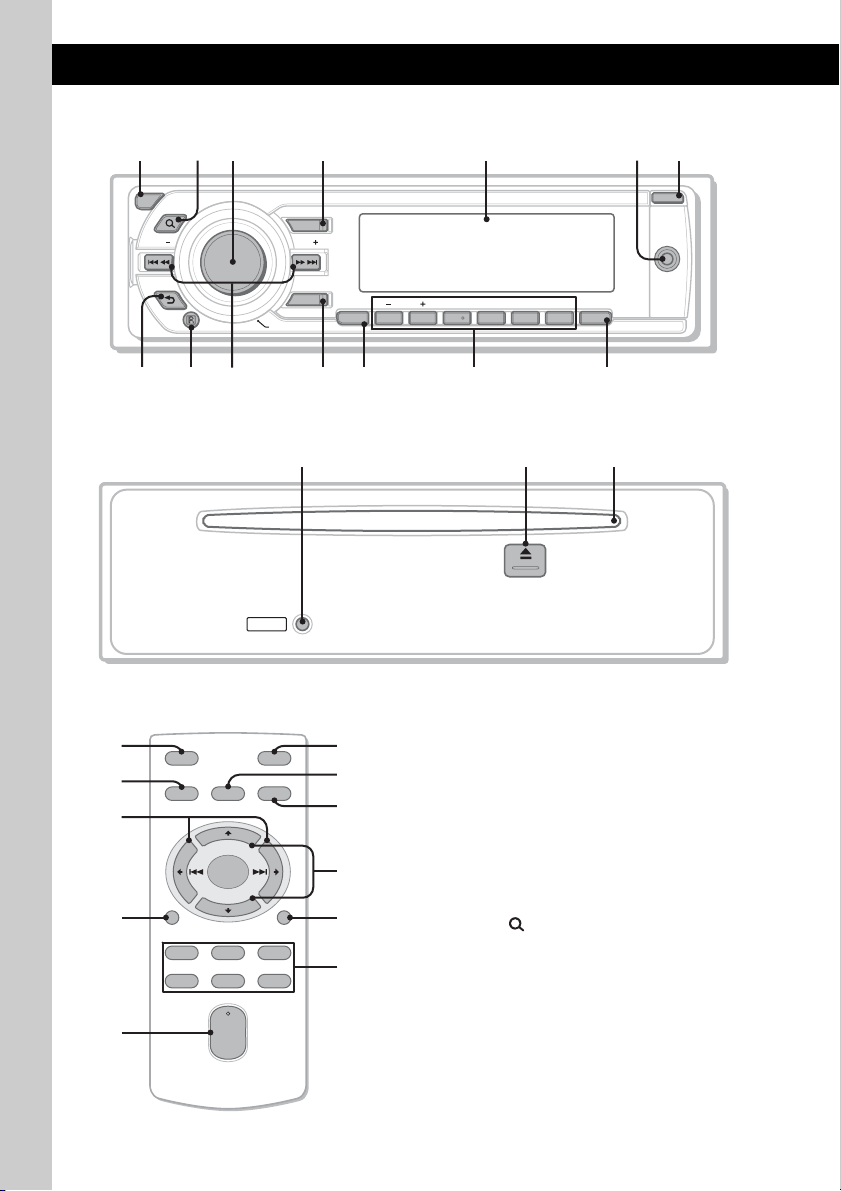
Location of controls and basic operations
q
q
8
q
9 q
q
Main unit
1
OFF
SEEK SEEK
BACK
32
BROWSE
SOURCE
MODE
PUSH ENTER / SELECT
;
Front panel removed
RESET
Card remote commander
RM-X151
1
4
OFF
SOURCE
SEL
ATT
MODE
qk
+
–
VOL
SCRL
+
–
ql
w;
DSPL
132
465
a
5674
ALBUM
REP SHUF
PTY
AF/TA
123456
s
This section contains instructions on the location
of controls and basic operations. For details, see
the respective pages.
wa
ws
qa
wd
wf
wg
For iPod operation, see “iPod” on page 11.
The corresponding buttons on the card remote
commander control the same functions as those
on the unit.
A OFF button
To power off; stop the source.
B (BROWSE) button page 8
To enter the Quick-BrowZer mode.
C Control dial/select button page 8, 13
To adjust volume (rotate); select items (press
and rotate).
D SOURCE button
To power on; change the source (Radio/CD/
iPod/AUX).
E Display window
OPEN
AUX
PAUSE SCRL
DSPL
d
f
qh qjqg
6

F AUX input jack page 15
To connect a portable audio device.
G OPEN button page 5
H (BACK) button page 8
To return to the previous display.
I Receptor for the card remote
commander
J SEEK –/+ buttons
CD/iPod:
To skip tracks (press); skip tracks
continuously (press, then press again within
about 1 second and hold); reverse/fastforward a track (press and hold).
Radio:
To tune in stations automatically (press); find
a station manually (press and hold).
K MODE button page 9, 11
To select the radio band (FM/MW/LW);
select the play mode of iPod.
L AF (Alternative Frequencies)/
TA (Traffic Announcement)/
PTY (Program Type) button page 10,
11
To set AF and TA (press); select PTY (press
and hold) in RDS.
M Number buttons
CD/iPod:
(1)/(2): ALBUM –/+
To skip albums (press); skip albums
continuously (press and hold).
(3): REP page 9, 12
(4): SHUF page 9, 12
(6): PAUS E
To pause playback. To cancel, press
again.
Radio:
To receive stored stations (press); store
stations (press and hold).
N DSPL (display)/SCRL (scroll) button
page 9, 10
To change display items (press); scroll the
display item (press and hold).
O RESET button page 4
P Z (eject) button page 5
To eject the disc.
Q Disc slot page 5
To insert the disc.
The following buttons on the card remote
commander have also different buttons/functions
from the unit. Remove the insulation film before
use (
page 4).
qk < (.)/, (>) buttons
To control CD/radio/iPod, the same as
(SEEK) –/+ on the unit.
Setup, sound setting, etc., can be operated by
< ,.
ql DSPL (display) button
To change display items.
w; VOL (volume) +/– button
To adjust volume.
wa ATT (attenuate) button
To attenuate the sound. To cancel, press
again.
ws SEL (select) button
The same as the select button on the unit.
During the Quick-BrowZer mode, (SEL)
(select) is inactive.
wd M (+)/m (–) buttons
To control CD/iPod, the same as (1)/(2)
(ALBUM –/+) on the unit.
Setup, sound setting, etc., can be operated by
M m.
wf SCRL (scroll) button
To scroll the display item.
wg Number buttons
To receive stored stations (press); store
stations (press and hold).
Note
If the unit is turned off and the display disappears, it
cannot be operated with the card remote commander
unless (SOURCE) on the unit is pressed, or a disc is
inserted to activate the unit first.
7
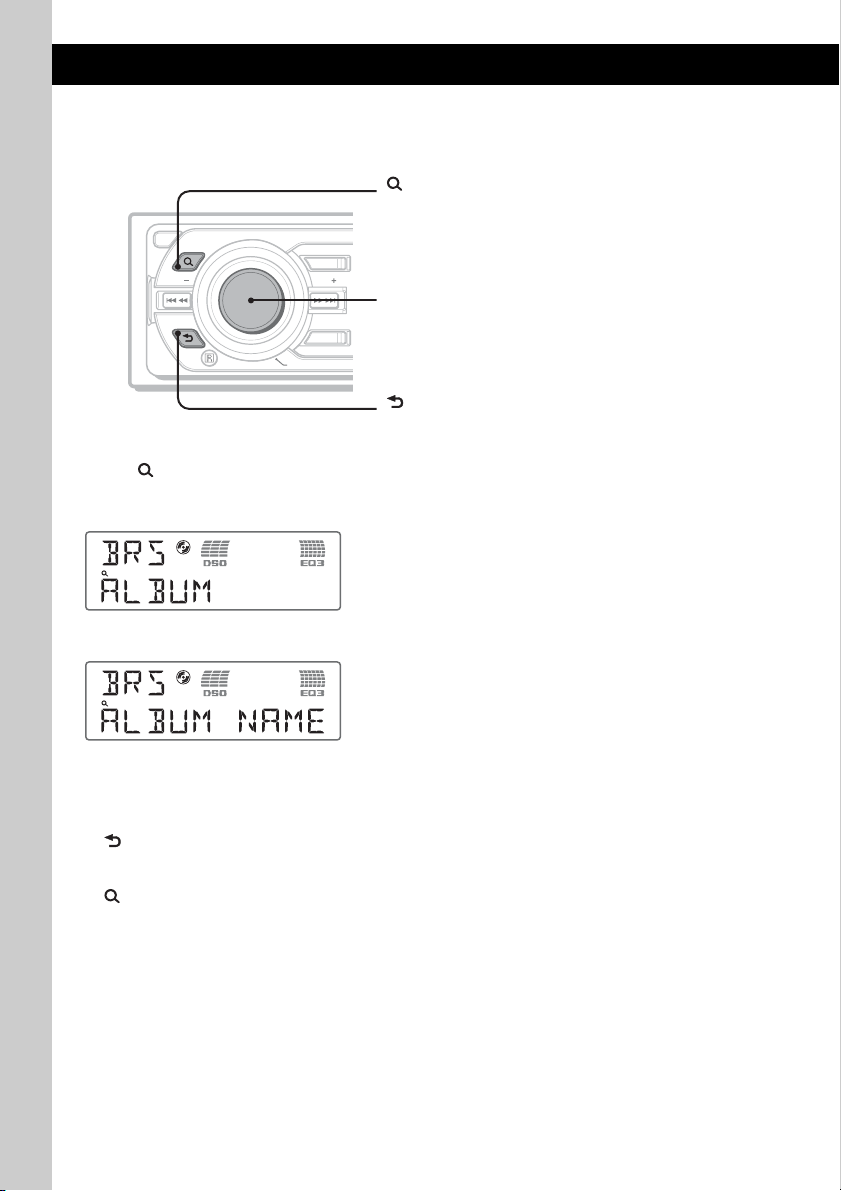
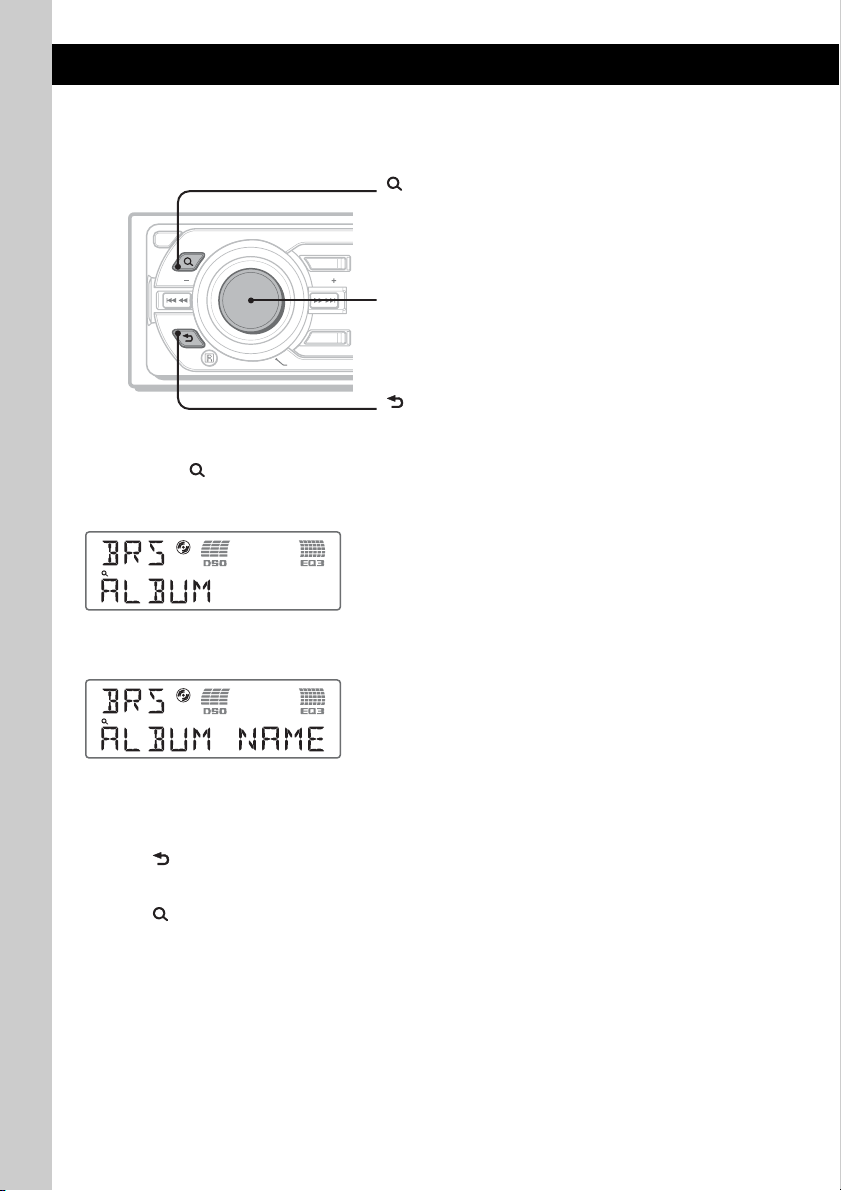
Searching for a track — Quick-BrowZer
You can search for a track in a CD or iPod easily by category.
(BROWSE):
To enter/exit the Quick-BrowZer mode.
OFF
BROWSE
SEEK SEEK
BACK
SOURCE
MODE
PUSH ENTER
/
SELECT
Control dial:
To select the item (rotate); confirm the item (press).
(BACK):
To return to the previous display.
1 Press (BROWSE).
The unit enters the Quick-BrowZer mode, and the list of search categories appears.
Display items differ, depending on the type of iPod or disc.
2 Rotate the control dial to select the desired search category, then press it to confirm.
3 Repeat step 2 until the desired track is selected.
Playback starts.
To return to the previous display
Press (BACK).
To exit the Quick-BrowZer mode
Press (BROWSE).
Note
When entering the Quick-BrowZer mode, the repeat/shuffle setting is canceled.
8
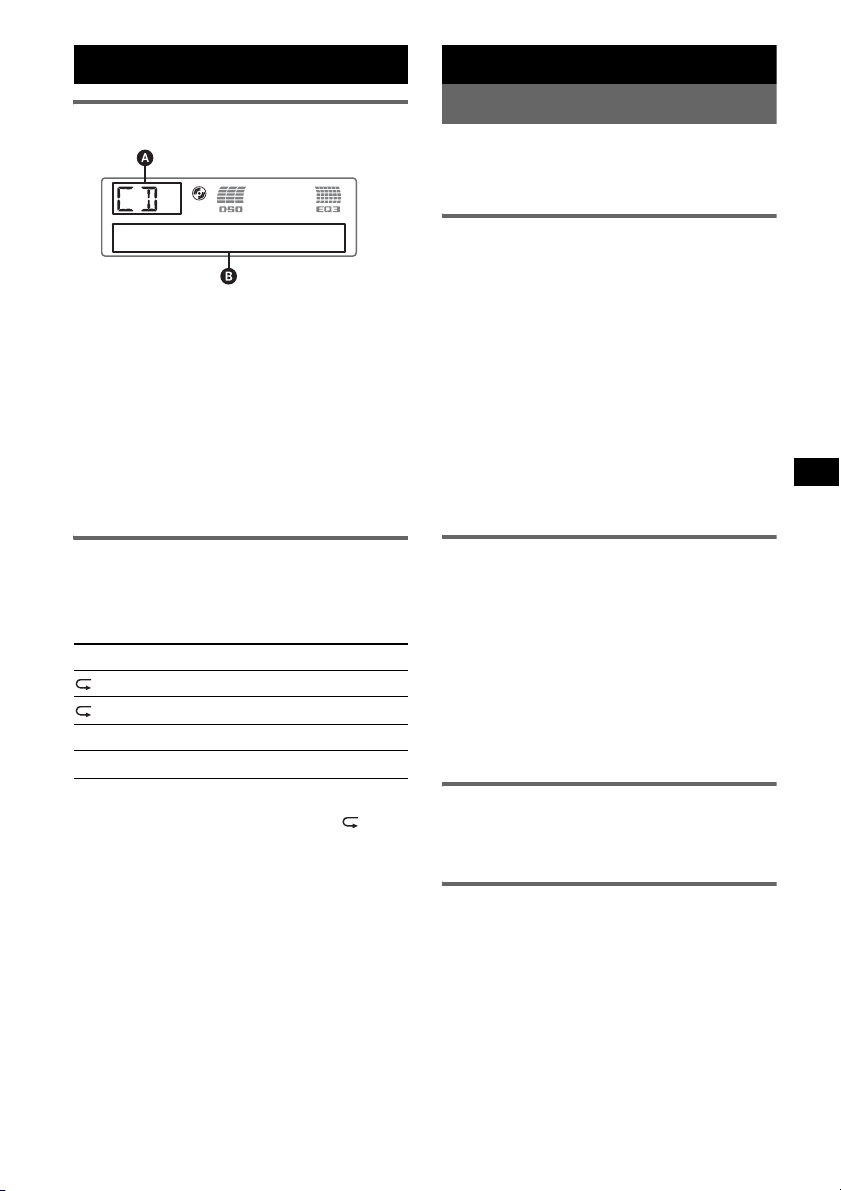
CD
Radio
Display items
A Source
B Track number/Elapsed playing time, Disc/
artist name, Album number*, Album name,
Track name, Text information, Clock
* Album number is displayed only when the album is
changed.
To change display items B, press (DSPL).
Tip
Displayed items will differ, depending on the disc type,
recording format and settings. For details on MP3/
WMA/AAC, see
page 17.
Repeat and shuffle play
1 During playback, press (3) (REP) or
(4) (SHUF) repeatedly until the
desired setting appears.
Select To play
TRACK track repeatedly.
ALBUM* album repeatedly.
SHUF ALBUM* album in random order.
SHUF DISC disc in random order.
* When an MP3/WMA/AAC is played.
To return to normal play mode, select “ OFF”
or “SHUF OFF.”
Storing and receiving stations
Caution
When tuning in stations while driving, use Best
Tuning Memory (BTM) to prevent an accident.
Storing automatically — BTM
1 Press (SOURCE) repeatedly until
“TUNER” appears.
To change the band, press (MODE)
repeatedly. You can select from FM1, FM2,
FM3, MW or LW.
2 Press and hold the select button.
The setup display appears.
3 Press the select button repeatedly
until “BTM” appears.
4 Press (SEEK) +.
The unit stores stations in order of frequency
on the number buttons.
A beep sounds when the setting is stored.
Storing manually
1 While receiving the station that you
want to store, press and hold a
number button ((1) to (6)) until
“MEM” appears.
Note
If you try to store another station on the same number
button, the previously stored station will be replaced.
Tip
When a RDS station is stored, the AF/TA setting is
also stored (
Receiving the stored stations
1 Select the band, then press a number
page 10).
button ((1) to (6)).
Tuning automatically
1 Select the band, then press (SEEK) –/+
to search for the station.
Scanning stops when the unit receives a
station. Repeat this procedure until the
desired station is received.
Tip
If you know the frequency of the station you want to
listen to, press and hold (SEEK)
approximate frequency, then press (SEEK)
repeatedly to fine adjust to the desired frequency
(manual tuning).
–/+ to locate the
–/+
9
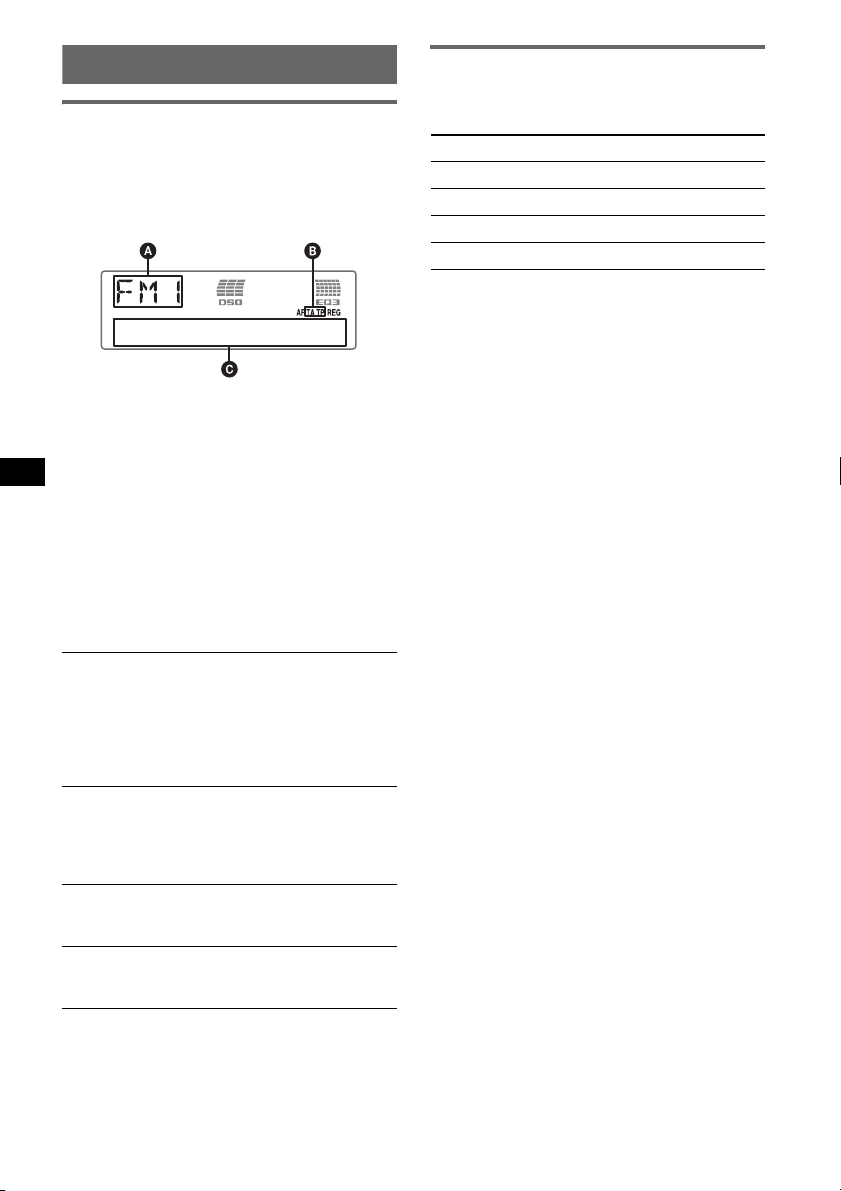
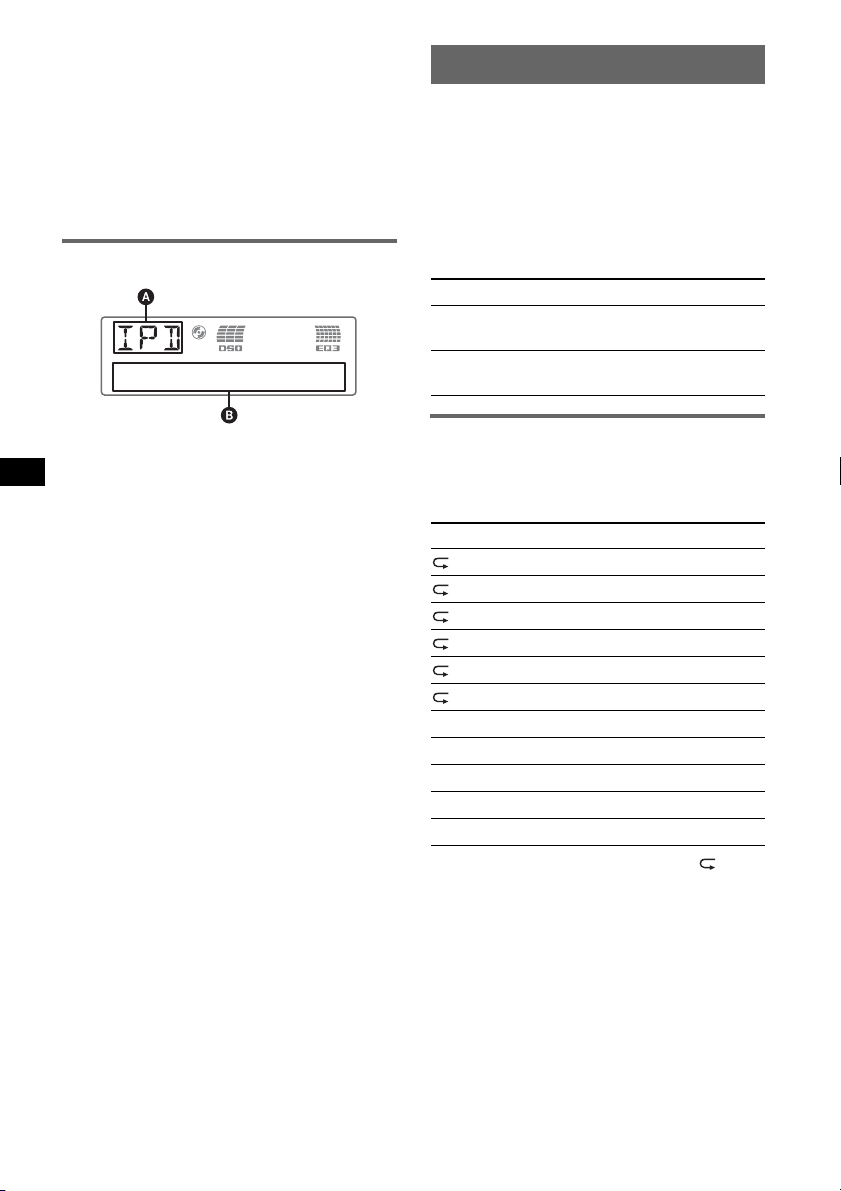
RDS
Overview
FM stations with Radio Data System (RDS)
service send inaudible digital information along
with the regular radio program signal.
Display items
A Radio band, Function
B TA /T P*
C Frequency*2 (Program service name), Preset
*1 “TA” flashes during traffic information. “TP” lights
*2 While receiving the RDS station, “ *” is displayed
To change display items C, press (DSPL).
1
number, Clock, RDS data
up while such a station is received.
on the left of the frequency indication.
RDS services
This unit automatically provides RDS services as
follows:
AF (Alternative Frequencies)
Selects and retunes the station with the
strongest signal in a network. By using this
function, you can continuously listen to the
same program during a long-distance drive
without having to retune the same station
manually.
TA (Traffic Announcement)/TP (Traffic
Program)
Provides current traffic information/programs.
Any information/program received, will
interrupt the currently selected source.
PTY (Program Types)
Displays the currently received program type.
Also searches your selected program type.
CT (Clock Time)
The CT data from the RDS transmission sets
the clock.
Notes
• Depending on the country/region, not all RDS
functions may be available.
• RDS will not work if the signal strength is too weak,
or if the station you are tuned to is not transmitting
RDS data.
10
Setting AF and TA
1 Press (AF/TA) repeatedly until the
desired setting appears.
Select To
AF-ON activate AF and deactivate TA.
TA-ON activate TA and deactivate AF.
AF, TA-ON activate both AF and TA.
AF, TA-OFF deactivate both AF and TA.
Storing RDS stations with the AF and
TA setting
You can preset RDS stations along with the AF/
TA setting. If you use the BTM function, only
RDS stations are stored with the same AF/TA
setting.
If you preset manually, you can preset both RDS
and non-RDS stations with the AF/TA setting for
each.
1 Set AF/TA, then store the station with BTM or
manually.
Receiving emergency
announcements
With AF or TA on, the emergency
announcements will automatically interrupt the
currently selected source.
Tip
If you adjust the volume level during a traffic
announcement, that level will be stored into memory
for subsequent traffic announcements, independently
from the regular volume level.
Staying with one regional program
— REG
When the AF function is on: this unit’s factory
setting restricts reception to a specific region, so
you will not be switched to another regional
station with a stronger frequency.
If you leave this regional program’s reception
area, set “REG-OFF” in setup during FM
reception (
Note
This function does not work in the UK and in some
other areas.
Local Link function (UK only)
This function enables you to select other local
stations in the area, even if they are not stored on
your number buttons.
1 During FM reception, press a number button
page 14).
((1) to (6)) on which a local station is stored.
2 Within 5 seconds, press again a number button
of the local station.
Repeat this procedure until the local station is
received.
iPod
Playing back iPod
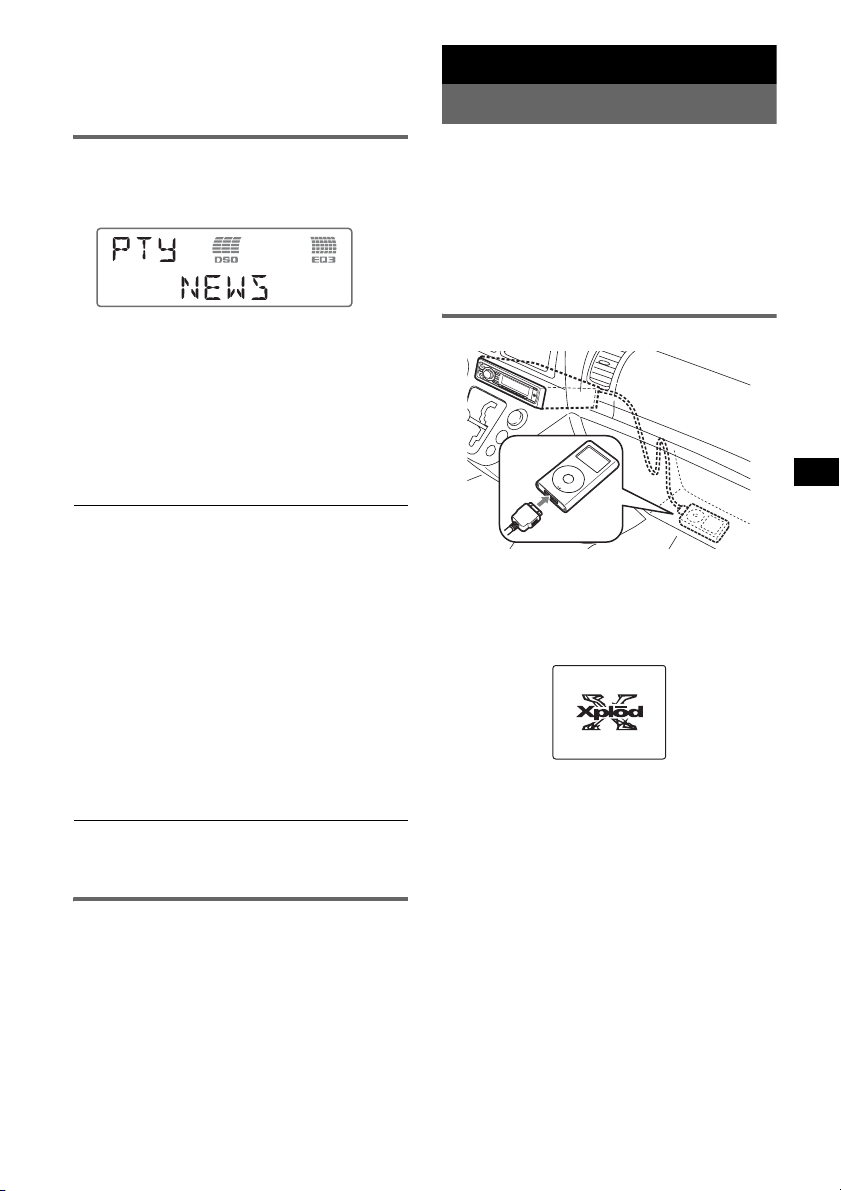
Selecting PTY
1 Press and hold (AF/TA) (PTY) during
FM reception.
The current program type name appears if the
station is transmitting PTY data.
2 Press (AF/TA) (PTY) repeatedly until
the desired program type appears.
3 Press (SEEK) –/+.
The unit starts to search for a station
broadcasting the selected program type.
Type of programs
NEWS (News), AFFAIRS (Current Affairs),
INFO (Information), SPORT (Sports),
EDUCATE (Education), DRAMA (Drama),
CULTURE (Culture), SCIENCE (Science),
VARIED (Varied), POP
ROCK
M (Rock Music), EASY M (Easy
Listening), LIGHT
CLASSICS (Classical), OTHER
M (Popular Music),
M (Light Classical),
M (Other
Music Type), WEATHER (Weather),
FINANCE (Finance), CHILDREN (Children’s
Programs), SOCIAL
RELIGION (Religion), PHONE
A (Social Affairs),
IN (Phone In),
TRAVEL (Travel), LEISURE (Leisure), JAZZ
(Jazz Music), COUNTRY (Country Music),
NATION
Music), FOLK
M (National Music), OLDIES (Oldies
M (Folk Music), DOCUMENT
(Documentary)
Note
You cannot use this function in countries/regions
where no PTY data is available.
Setting CT
1 Set “CT-ON” in setup (page 14).
Notes
• The CT function may not work even though an RDS
station is being received.
• There might be a difference between the time set by
the CT function and the actual time.
By connecting an iPod to the dock connector at
the rear of the unit, you can listen on your car
speakers, while controlling the iPod from the
unit.
Notes
• When an iPod is connected to the dock connector,
operation from the iPod cannot be performed.
• Before connecting the iPod to the dock connector,
turn down the volume of the unit.
Playing tracks
M
E
N
U
>
.
1 Connect the iPod to the dock
connector.
The iPod will turn on automatically, and the
display will appear on the iPod screen as
below.
The tracks on the iPod start playing
automatically from the point last played.
If an iPod is already connected, to start
playback press (SOURCE) repeatedly until
“IPOD” appears.
2 Press (MODE) to select the play mode.
The mode changes as follows:
Resuming Mode t Album Mode t
Track Mo de t Podcast Mode t Genre
Mode t Playlist Mode t Artist Mode
3 Adjust the volume.
Press (OFF) to stop playback.
continue to next page t
11
Tips
• When the iPod is connected to the dock connector,
the mode changes to the Resuming mode. In
Resuming mode, pressing (3)
does not function. If you cancel the resuming mode
by pressing (MODE) or (1)/(2)
function to change the play mode.
• When the ignition key is turned to the ACC position,
or the unit is on, the iPod will be recharged.
• If the iPod is disconnected during playback, “NO
IPOD” appears in the display of the unit.
(REP) or (4) (SHUF)
(ALBUM –/+) now
Display items
Setting the play mode
1 During playback, press (MODE).
The mode changes as follows:
Album Mode t Track Mode t
Podcast Mode* t Genre Mode t
Playlist Mode t Artist Mode
* May not appear depending on iPod setting.
Skipping albums, podcasts, genres,
playlists and artists
To Press
Skip (1)/(2) (ALBUM –/+)
Skip
continuously
[press once for each]
(1)/(2) (ALBUM –/+)
[hold to desired point]
A Source (iPod) indication
B Track/Album/Podcast/Artist/Playlist/Genre
number, Track/Artist/Album name, Elapsed
playing time, Clock
To change display items B, press (DSPL).
Note
Some letters stored in iPod may not be displayed
correctly.
Repeat and shuffle play
1 During playback, press (3) (REP) or
(4) (SHUF) repeatedly until the
desired setting appears.
Select To play
TRACK track repeatedly.
ALBUM album repeatedly.
PODCAST podcast repeatedly.
ARTIST artist repeatedly.
PLAYLIST playlist repeatedly.
GENRE genre repeatedly.
SHUF ALBUM album in random order.
SHUF ARTIST artist in random order.
SHUF PLAYLIST playlist in random order.
SHUF GENRE genre in random order.
SHUF DEVICE device in random order.
To return to normal play mode, select “ OFF”
or “SHUF OFF. ”
Note
If (4)(SHUF) is pressed during podcast playback, only
the first content will playback.
12

Other functions
Changing the sound settings
Adjusting the sound
characteristics
1 Press the select button repeatedly
until the desired item appears.
2 Rotate the control dial to adjust the
selected item.
After 3 seconds, the setting is complete and
the display returns to normal play/reception
mode.
The following items can be set (follow the page
reference for details):
“z” indicates the default settings.
EQ3
To select an equalizer type: “XPLOD” (
“VOCAL,” “EDGE,” “CRUISE,” “SPACE,”
“GRAVITY,” “CUSTOM” or “OFF.”
1
DSO*
To select the DSO mode: “1,” “2” (z), “3” or
“OFF.” The larger the number, the more
enhanced the effect.
2
LOW*
, MID*2, HI*2 (page 13)
To customize the equalizer curve.
BAL (Balance)
To adjust the balance between the right and left
speakers: “RIGHT-10” – “CENTER” (
“LEFT-10”
FAD (Fader)
To adjust the balance between the front and rear
speakers: “FRONT-10” – “CENTER” (
“REAR-10”
SUB*3 (Subwoofer volume)
To adjust the subwoofer volume: “+10 dB” –
“0 dB” (
z) – “–10 dB”
(“ATT” is displayed at the lowest setting.)
AUX*4 (AUX level)
To adjust the volume level for each connected
auxiliary equipment. This setting negates the
need to adjust the volume level between sources
(page 15).
Adjustable level: “+18 dB” – “0 dB” (
“–8 dB”
*1 When tuner is selected as the source, the default
setting is “OFF.”
*2 When EQ3 is activated.
*3 When the audio output is set to “SUB-OUT”
(page 14).
*4 When AUX source is activated.
z),
z) –
z) –
z) –
Customizing the equalizer curve
— EQ3
“CUSTOM” of EQ3 allows you to make your
own equalizer settings.
1 Select a source, then press the select
button repeatedly to select “EQ3.”
2 Rotate the control dial to select
“CUSTOM.”
3 Press the select button repeatedly
until “LOW,” “MID” or “HI” appears.
4 Rotate the control dial to adjust the
selected item.
The volume level is adjustable in 1 dB steps,
from –10 dB to +10 dB.
Repeat steps 3 and 4 to adjust the equalizer
curve.
To restore the factory-set equalizer curve,
press and hold the select button before the
setting is complete.
After 3 seconds, the setting is complete and
the display returns to normal play/reception
mode.
Tip
Other equalizer types are also adjustable.
13

Adjusting setup items — SET
1 Press and hold the select button.
The setup display appears.
2 Press the select button repeatedly
until the desired item appears.
3 Rotate the control dial to select the
setting (example “ON” or “OFF”).
4 Press and hold the select button.
The setup is complete and the display returns
to normal play/reception mode.
Note
Displayed items will differ, depending on the source
and setting.
The following items can be set (follow the page
reference for details):
“z” indicates the default settings.
CLOCK-ADJ (Clock Adjust) (page 4)
CT (Clock Time)
To set “CT-ON” or “CT-OFF” (
BEEP
To set “BEEP-ON” (z) or “BEEP-OFF.”
1
AUX-A*
(AUX Audio)
To turn the AUX source display “AUX-A-ON”
(
z) or “AUX-A-OFF” (page 15).
A.OFF (Auto Off)
To shut off automatically after a desired time
when the unit is turned off.
– “A.OFF-NO” (
z), “A.OFF-30S (Seconds),”
“A.OFF-30M (Minutes)” or “A.OFF-60M
(Minutes).”
SUB/REAR*
1
To switch the audio output.
–“SUB-OUT” (
z): to output to a subwoofer.
– “REAR-OUT”: to output to a power amplifier.
DEMO
(Demonstration)
To set “DEMO-ON” (z) or “DEMO-OFF.”
DIMMER
To change the brightness of the display.
– “DIMMER-AT” (
z): to dim the display
automatically when you turn lights on.
– “DIMMER-OFF”: to deactivate the dimmer.
– “DIMMER-ON”: to dim the display.
CONTRAST
To adjust the contrast of the display. The
contrast level is adjustable in 7 steps.
M.DSPL (Motion Display)
To select the Motion Display mode.
– “M.DSPL-SA” (
z): to show moving patterns
and spectrum analyzer.
– “M.DSPL-ON”: to show moving patterns.
– “M.DSPL-OFF”: to deactivate the Motion
Display.
z) (page 10, 11).
14
A.SCRL (Auto Scroll)
To scroll long displayed item automatically
when the disc/album/track is changed.
– “A.SCRL-ON” (
z): to scroll.
– “A.SCRL-OFF”: to not scroll.
LOCAL (Local Seek Mode)
– “LOCAL-ON” : to only tune into stations with
stronger signals.
–“LOCAL-OFF” (
2
MONO*
(Monaural Mode)
z): to tune normal reception.
To improve poor FM reception, select monaural
reception mode.
– “MONO-ON” : to hear stereo broadcast in
monaural.
– “MONO-OFF” (
z): to hear stereo broadcast in
stereo.
REG*2 (Regional)
To set “REG-ON” (
3
(Low Pass Filter)
LPF*
z) or “REG-OFF” (page 10).
To select the subwoofer cut-off frequency: “LPF
OFF” (
z), “LPF125Hz” or “LPF 78Hz.”
LOUD (Loudness)
To allow you to listen clearly at low volume
levels.
– “LOUD-ON” : to reinforce bass and treble.
– “LOUD-OFF” (
z): to not reinforce bass and
treble.
BTM (page 9)
*1 When the unit is turned off.
*2 When FM is received.
*3 When the audio output is set to “SUB-OUT”
(page 14).

Using optional equipment
Rotary commander RM-X4S
Auxiliary audio equipment
By connecting an optional portable audio device
to the AUX input jack (stereo mini jack) on the
unit and then simply selecting the source, you
can listen on your car speakers. The volume level
is adjustable for any difference between the unit
and the portable audio device. Follow the
procedure below:
Connecting the portable audio
device
1 Turn off the portable audio device.
2 Turn down the volume on the unit.
3 Connect to the unit.
AUX
AUX
Connecting cord*
(not supplied)
* Be sure to use a straight type plug.
Adjust the volume level
Be sure to adjust the volume for each connected
audio device before playback.
1 Turn down the volume on the unit.
2 Press (SOURCE) repeatedly until “AUX”
appears.
“AUX FRONT IN” appears.
3 Start playback of the portable audio device at a
moderate volume.
4 Set your usual listening volume on the unit.
5 Adjust the input level (page 13).
Attaching the label
Attach the indication label depending on how
you mount the rotary commander.
D
S
P
L
SE
E
D
O
M
L
P
S
D
L
M
O
D
E
S
E
L
Location of controls
The corresponding buttons on the rotary
commander control the same functions as those
on this unit.
SEL
PRESET/
DISC
SOURCE
VOL
The following controls on the rotary commander
require a different operation from the unit.
• ATT (attenuate) button
To attenuate the sound. To cancel, press again.
• SEL (select) button
The same as the select button on the unit.
During the Quick-BrowZer mode, (SEL)
(select) is inactive.
• PRESET/DISC control
CD/iPod: The same as (1)/(2) (ALBUM –/+)
on the unit (push in and rotate).
Radio: To receive stored stations (push in and
rotate).
• VOL (volume) control
The same as the control dial on the unit (rotate).
• SEEK/AMS control
The same as (SEEK) –/+ on the unit (rotate, or
rotate and hold).
• DSPL (display) button
To change display items.
ATT
MODE
DSPL
SEEK/AMS
OFF
OFF
continue to next page t
15
Changing the operative direction
The operative direction of the controls is factoryset as shown below.
To increase
To decrease
If you need to mount the rotary commander on
the right hand side of the steering column, you
can reverse the operative direction.
1 While pushing the VOL control, press and
hold (SEL).
Additional Information
Precautions
• If your car has been parked in direct sunlight,
allow the unit to cool off before operating it.
• Power antenna (aerial) will extend automatically
while the unit is operating.
Moisture condensation
On a rainy day or in a very damp area, moisture
condensation may occur inside the lenses and
display of the unit. Should this occur, the unit will
not operate properly. In such a case, remove the disc
and wait for about an hour until the moisture has
evaporated.
To maintain high sound quality
Be careful not to splash juice or other soft drinks
onto the unit or discs.
Notes on discs
• To keep a disc clean, do not touch its surface.
Handle the disc by its edge.
• Keep your discs in their cases or disc magazines
when not in use.
• Do not subject discs to heat/high temperature.
Avoid leaving them in a parked car or on a
dashboard/rear tray.
• Do not attach labels, or use discs with sticky ink/
residue. Such discs may stop spinning when used,
causing a malfunction, or may ruin the disc.
16
• Do not use any discs with labels or stickers
attached.
The following malfunctions may result from using
such discs:
– Inability to eject a disc (due to a label or sticker
peeling off and jamming the eject mechanism).
– Inability to read audio data correctly (e.g.,
playback skipping, or no playback) due to heat
shrinking of a sticker or label causing a disc to
warp.
• Discs with non-standard shapes (e.g., heart,
square, star) cannot be played on this unit.
Attempting to do so may damage the unit. Do not
use such discs.
• You cannot play 8 cm (3
1
/4 in) CDs.

• Before playing, clean the discs
with a commercially available
cleaning cloth. Wipe each disc
from the center out. Do not use
solvents such as benzine,
thinner, commercially available
cleaners, or antistatic spray
intended for analog discs.
Notes on CD-R/CD-RW discs
• Some CD-Rs/CD-RWs (depending on the
equipment used for its recording or the condition
of the disc) may not play on this unit.
• You cannot play a CD-R/a CD-RW that is not
finalized.
• The unit is compatible with the ISO 9660 level 1/
level 2 format, Joliet/Romeo in the expansion
format, and Multi Session.
• The maximum number of:
– folders (albums): 150 (including root and empty
folders).
– files (tracks) and folders contained in a disc: 300
(if a folder/file names contain many characters,
this number may become less than 300).
– displayable characters for a folder/file name is
32 (Joliet), or 64 (Romeo).
• When the disc is recorded in Multi Session, only
the first track of the first session format is
recognized and played (any other format is
skipped). The priority of the format is CD-DA and
MP3/WMA/AAC.
– When the first track is a CD-DA, only CD-DA of
the first session is played.
– When the first track is not a CD-DA, the MP3/
WMA/AAC session is played. If the disc has no
data in any of these formats, “NO MUSIC” is
displayed.
Playback order of MP3/WMA/AAC
files (CD-R/RW)
MP3/WMA/AAC
Folder
(album)
MP3/WMA/
AAC file
(track)
About MP3 files
• MP3, which stands for MPEG-1 Audio Layer-3, is
a music file compression format standard. It
compresses audio CD data to approximately 1/10
of its original size.
• ID3 tag versions 1.0, 1.1, 2.2, 2.3 and 2.4 apply to
MP3 only. ID3 tag is 15/30 characters (1.0 and
1.1), or 63/126 characters (2.2, 2.3 and 2.4).
• When naming an MP3 file, be sure to add the file
extension “.mp3” to the file name.
• During playback or fast-forward/reverse of a VBR
(variable bit rate) MP3 file, elapsed playing time
may not display accurately.
Note
If you play a high-bit-rate MP3, such as 320 kbps,
sound may be intermittent.
Music discs encoded with copyright
protection technologies
This product is designed to play back discs that
conform to the Compact Disc (CD) standard.
Recently, various music discs encoded with
copyright protection technologies are marketed by
some record companies. Please be aware that among
those discs, there are some that do not conform to
the CD standard and may not be playable by this
product.
Note on DualDiscs
A DualDisc is a two sided disc product which
mates DVD recorded material on one side with
digital audio material on the other side. However,
since the audio material side does not conform to
the Compact Disc (CD) standard, playback on this
product is not guaranteed.
About WMA files
• WMA, which stands for Windows Media Audio,
is a music file compression format standard. It
compresses audio CD data to approximately 1/22*
of its original size.
• WMA tag is 63 characters.
• When naming a WMA file, be sure to add the file
extension “.wma” to the file name.
• During playback or fast-forward/reverse of a VBR
(variable bit rate) WMA file, elapsed playing time
may not display accurately.
* only for 64 kbps
Note
Playback of the following WMA files is not supported.
– lossless compression
– copyright-protected
17
About AAC files
1
• AAC, which stands for Advanced Audio Coding,
is a music file compression format standard. It
compresses audio CD data to approximately 1/11*
of its original size.
• AAC tag is 126 characters.
• When naming an AAC file, be sure to add the file
extension “.m4a” to the file name.
• During playback or fast-forward/reverse of a VBR
(variable bit rate) AAC file, elapsed playing time
may not display accurately.
* only for 128 kbps
Note
Playback of the following AAC files is not supported.
– lossless compression
– copyright-protected
About iPod
This unit can be used with the dock connector type
iPod, iPod photo, iPod mini and iPod nano with the
following software versions. All other versions
earlier than listed are not guaranteed.
– Fourth-generation iPod: Ver.3.1.1
– Fifth-generation iPod: Ver.1.2.1
– iPod photo: Ver.1.2.1
– iPod mini: Ver.1.4.1
– First-generation iPod nano: Ver.1.3.1
– Second-generation iPod nano: Ver.1.1.3
– iPod classic: Ver.1.0PC
– Third-generation iPod nano: Ver.1.0PC
– iPod touch: Ver.1.1.1
(Video function of fifth-generation iPod, iPod
classic, third-generation iPod nano, photo
function of iPod photo, and functions other than
for music of iPod touch are not supported.)
For customers in USA, please visit the following
site for further information:
http://www.xplodsony.com
If you have any questions or problems concerning
your unit that are not covered in this manual, consult
your nearest Sony dealer.
Maintenance
Replacing the lithium battery of the
card remote commander
Under normal conditions, the battery will last
approximately 1 year. (The service life may be
shorter, depending on the conditions of use.)
When the battery becomes weak, the range of the
card remote commander becomes shorter.
Replace the battery with a new CR2025 lithium
battery. Use of any other battery may present a
risk of fire or explosion.
+ side up
2
c
Notes on the lithium battery
• Keep the lithium battery out of the reach of children.
Should the battery be swallowed, immediately
consult a doctor.
• Wipe the battery with a dry cloth to assure a good
contact.
• Be sure to observe the correct polarity when
installing the battery.
• Do not hold the battery with metallic tweezers,
otherwise a short-circuit may occur.
WARNING
Battery may explode if mistreated.
Do not recharge, disassemble, or dispose of
in fire.
Fuse replacement
When replacing the fuse, be
sure to use one matching the
amperage rating stated on the
original fuse. If the fuse blows,
check the power connection and
replace the fuse. If the fuse
blows again after replacement,
there may be an internal
malfunction. In such a case,
consult your nearest Sony
dealer.
Fuse (10 A)
18
Cleaning the connectors
The unit may not function properly if the connectors
between the unit and the front panel are not clean. In
order to prevent this, detach the front panel (page 5)
and clean the connectors with a cotton swab. Do not
apply too much force. Otherwise, the connectors
may be damaged.
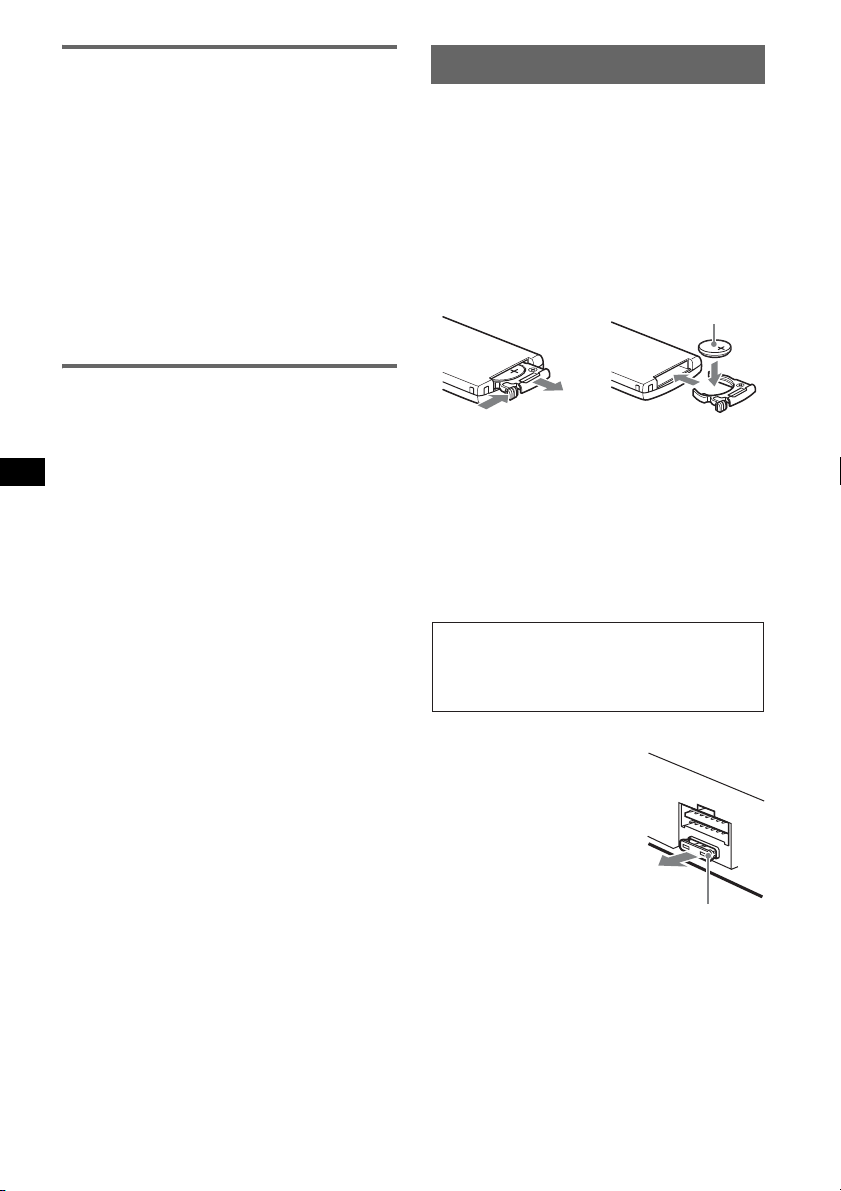
Removing the unit
1 Remove the protection collar.
1 Detach the front panel (page 5).
2 Pinch both edges of the protection collar,
then pull it out.
Main unit
Notes
• For safety, turn off the ignition before cleaning the
connectors, and remove the key from the ignition
switch.
• Never touch the connectors directly with your fingers
or with any metal device.
Back of the front
panel
x
2 Remove the unit.
1 Insert both release keys simultaneously
until they click.
Hook facing
inwards.
2 Pull the release keys to unseat the unit.
3 Slide the unit out of the mounting.
19

Specifications
p
CD Player section
Signal-to-noise ratio: 120 dB
Frequency response: 10 – 20,000 Hz
Wow and flutter: Below measurable limit
Tuner section
FM
Tuning range: 87.5 – 108.0 MHz
Antenna (aerial) terminal:
External antenna (aerial) connector
Intermediate frequency: 10.7 MHz/450 kHz
Usable sensitivity: 9 dBf
Selectivity: 75 dB at 400 kHz
Signal-to-noise ratio: 67 dB (stereo), 69 dB (mono)
Harmonic distortion at 1 kHz: 0.5 % (stereo),
0.3 % (mono)
Separation: 35 dB at 1 kHz
Frequency response: 30 – 15,000 Hz
MW/LW
Tuning range:
MW: 531 – 1,602 kHz
LW: 153 – 279 kHz
Antenna (aerial) terminal:
External antenna (aerial) connector
Intermediate frequency: 10.7 MHz/450 kHz
Sensitivity: MW: 30 µV, LW: 40 µV
Power amplifier section
Outputs: Speaker outputs (sure seal connectors)
Speaker impedance: 4 – 8 ohms
Maximum power output: 52 W × 4 (at 4 ohms)
General
Output:
Audio outputs terminal (front, sub/rear switchable)
Power antenna (aerial) relay control terminal
Power amplifier control terminal
Inputs:
Telephone ATT control terminal
Remote controller input terminal
Antenna (aerial) input terminal
AUX input jack (stereo mini jack)
iPod signal input terminal (dock connector)
Tone controls:
Low: ±10 dB at 60 Hz (XPLOD)
Mid: ±10 dB at 1 kHz (XPLOD)
High: ±10 dB at 10 kHz (XPLOD)
Power requirements: 12 V DC car battery
(negative ground (earth))
Dimensions: Approx. 178 × 50 × 180 mm
(7 1/8 × 2 × 7 1/8 in) (w/h/d)
Mounting dimensions: Approx. 182 × 53 × 162 mm
(7
1/4 × 2 1/8 × 6 1/2 in) (w/h/d)
Mass: Approx. 1.3 kg (2 lb 14 oz)
Supplied accessories:
Card remote commander: RM-X151
Parts for installation and connections (1 set)
Optional accessory:
Rotary commander: RM-X4S
Your dealer may not handle some of the above listed
accessory. Please ask the dealer for detailed
information.
MPEG Layer-3 audio coding technology and
atents licensed from Fraunhofer IIS and Thomson.
This product is protected by certain intellectual
property rights of Microsoft Corporation. Use or
distribution of such technology outside of this
product is prohibited without a license from
Microsoft or an authorized Microsoft subsidiary.
Design and specifications are subject to change
without notice.
• Halogenated flame retardants are not used in the
certain printed wiring boards.
• Halogenated flame retardants are not used in
cabinets.
• Packaging cushions are made from paper.
20

Troubleshooting
The following checklist will help you remedy
problems you may encounter with your unit.
Before going through the checklist below, check the
connection and operating procedures.
General
No power is being supplied to the unit.
• Check the connection. If everything is in order, check
the fuse.
• If the unit is turned off and the display disappears, it
cannot be operated with the remote commander.
t Turn on the unit.
The power antenna (aerial) does not extend.
The power antenna (aerial) does not have a relay box.
No sound.
• The volume is too low.
• The ATT function is activated, or the Telephone ATT
function (when the interface cable of a car telephone
is connected to the ATT lead) is activated.
• The position of the fader control “FAD” is not set for
a 2-speaker system.
No beep sound.
• The beep sound is canceled (page 14).
• An optional power amplifier is connected and you are
not using the built-in amplifier.
The contents of the memory have been erased.
• The RESET button has been pressed.
t Store again into the memory.
• The power supply lead or battery has been
disconnected.
• The power supply lead is not connected properly.
Stored stations and correct time are erased.
The fuse has blown.
Makes noise when the position of the ignition
is switched.
The leads are not matched correctly with the car’s
accessory power connector.
During playback or reception, demonstration
mode starts.
If no operation is performed for 5 minutes with
“DEMO-ON” set, demonstration mode starts.
tSet “DEMO-OFF” (page 14).
The display disappears from/does not appear
in the display window.
• The dimmer is set “DIMMER-ON” (page 14).
• The display disappears if you press and hold (OFF).
t Press and hold (OFF) on the unit until the
display appears.
• The connectors are dirty (page 19).
The Auto Off function does not operate.
The unit is turned on. The Auto Off function activates
after turning off the unit.
tTurn off the unit.
Card remote commander operation is not
possible.
Make sure the insulation film has been removed
(page 4).
DSO does not function.
Depending on the type of car interior or type of music,
DSO may not have a desirable effect.
CD playback
The disc cannot be loaded.
• Another disc is already loaded.
• The disc has been forcibly inserted upside down or in
the wrong way.
The disc does not playback.
• Defective or dirty disc.
• The CD-Rs/CD-RWs are not for audio use (page 17).
MP3/WMA/AAC files cannot be played back.
The disc is incompatible with the MP3/WMA/AAC
format and version (page 17).
MP3/WMA/AAC files take longer to play back
than others.
The following discs take a longer time to start
playback.
– a disc recorded with a complicated tree structure.
– a disc recorded in Multi Session.
– a disc to which data can be added.
The display items do not scroll.
• For discs with very many characters, those may not
scroll.
• “A.SCRL” is set to “OFF”.
t Set “A.SCRL-ON” (page 14).
t Press and hold (DSPL) (SCRL).
The sound skips.
• Installation is not correct.
t Install the unit at an angle of less than 45° in a
sturdy part of the car.
• Defective or dirty disc.
The operation buttons do not function.
The disc will not eject.
Press the RESET button (page 4).
Radio reception
The stations cannot be received.
The sound is hampered by noises.
• Connect a power antenna (aerial) control lead (blue)
or accessory power supply lead (red) to the power
supply lead of a car’s antenna (aerial) booster (only
when your car has built-in FM/MW/LW antenna
(aerial) in the rear/side glass).
• Check the connection of the car antenna (aerial).
• The auto antenna (aerial) will not go up.
t Check the connection of the power antenna
(aerial) control lead.
• Check the frequency.
• When the DSO mode is on, the sound is sometimes
hampered by noises.
t Set the DSO mode to “OFF” (page 13).
Preset tuning is not possible.
• Store the correct frequency in the memory.
• The broadcast signal is too weak.
continue to next page t
21

Automatic tuning is not possible.
• Setting of the local seek mode is not correct.
tTuning stops too frequently:
Set “LOCAL-ON” (page 14).
tTuning does not stop at a station:
Set “MONO-ON” (page 14).
• The broadcast signal is too weak.
tPerform manual tuning.
During FM reception, the “ST” indication
flashes.
• Tune in the frequency accurately.
• The broadcast signal is too weak.
tSet “MONO-ON” (page 14).
An FM program broadcast in stereo is heard in
monaural.
The unit is in monaural reception mode.
t Set “MONO-OFF” (page 14).
RDS
The SEEK starts after a few seconds of
listening.
The station is non-TP or has weak signal.
t Deactivate TA (page 10).
No traffic announcements.
• Activate TA (page 10).
• The station does not broadcast any traffic
announcements despite being TP.
tTune in another station.
PTY displays “- - - - - - - -.”
• The current station is not an RDS station.
• RDS data has not been received.
• The station does not specify the program type.
Error displays/Messages
CHECKING
The unit is confirming the connection of an iPod.
t Wait until confirming the connection is finished.
COM ERR (iPod Communication Error)
Due to incorrect connection, data did not transfer
successfully between the unit and iPod.
t Reconnect the iPod and select iPod.
ERROR
• The disc is dirty or inserted upside down.
t Clean or insert the disc correctly.
• A blank disc has been inserted.
• The disc cannot play due to a problem.
t Insert another disc.
• iPod was not automatically recognized.
t Reconnect it again.
•Press Z to remove the disc.
FAILURE
The connection of speakers/amplifiers is incorrect.
t See the installation/connections manual of this
model to check the connection.
L. SEEK +/–
The local seek mode is on during automatic tuning.
NO AF
There is no alternative frequency for the current
station.
t Press (SEEK) –/+ while the program service name
is flashing. The unit starts searching for another
frequency with the same PI (Program
Identification) data (“PI SEEK” appears).
NO INFO
Text information is not written in the MP3/WMA/
AAC file.
NO IPOD
The iPod is not connected.
t Connect iPod to dock connector.
If “NO IPOD” appears after connecting the iPod to the
dock connector, disconnect the iPod from the dock
connector, then reconnect.
NO MUSIC
The disc/iPod does not contain a music file.
t Insert a music CD in this unit.
t Connect an iPod with a music file in it.
NO NAME
A disc/album/track name is not written in the track.
NO SUPRT (iPod Not Support)
• Third-generation iPod is connected.
• iPod connection was interrupted for over 30 seconds
during data transfer.
NO TP
The unit will continue searching for available TP
stations.
OFFSET
There may be an internal malfunction.
t Check the connection. If the error indication
remains on in the display, consult your nearest
Sony dealer.
22

READ
The unit is reading all track and album information on
the disc/iPod.
tWait until reading is complete and playback starts
automatically. Depending on the disc/iPod
structure, it may take more than a minute.
RESET
The CD unit/iPod cannot be operated due to a problem.
tPress the RESET button (page 4).
“ ” or “ ”
During reverse or fast-forward, you have reached the
beginning or the end of the disc and you cannot go any
further.
“ ”
The character cannot be displayed with the unit.
If these solutions do not help improve the situation,
consult your nearest Sony dealer.
If you take the unit to be repaired because of CD
playback trouble, bring the disc that was used at the
time the problem began.
23
Wichtig!
Bitte nehmen Sie sich etwas Zeit, um
den Geräte-Pass vollständig
auszufüllen. Dieser befindet sich auf
der hinteren Umschlagseite dieser
Bedienungsanleitung.
Zur Installation und zum Anschluss siehe die
mitgelieferte Installations-/Anschlussanleitung.
Dieses Etikett befindet sich an der Unterseite
des Gehäuses.
Hinweis für Kunden in Ländern, in denen
EU-Richtlinien gelten
Der Hersteller dieses Produkts ist Sony
Corporation, 1-7-1 Konan, Minato-ku, Tokio,
Japan.
Autorisierter Vertreter für EMV und
Produktsicherheit ist die Sony Deutschland
GmbH, Hedelfinger Strasse 61, 70327 Stuttgart,
Deutschland. Für Fragen im Zusammenhang
mit Kundendienst oder Garantie wenden Sie
sich bitte an die in den separaten Kundendienstoder Garantieunterlagen genannten Adressen.
Entsorgung von gebrauchten
elektrischen und elektronischen
Geräten (anzuwenden in den
Ländern der Europäischen Union
und anderen europäischen Ländern
mit einem separaten Sammelsystem
für diese Geräte)
Das Symbol auf dem Produkt oder seiner Verpackung
weist darauf hin, dass dieses Produkt nicht als normaler
Haushaltsabfall zu behandeln ist, sondern an einer
Annahmestelle für das Recycling von elektrischen und
elektronischen Geräten abgegeben werden muss. Durch
Ihren Beitrag zum korrekten Entsorgen dieses Produkts
schützen Sie die Umwelt und die Gesundheit Ihrer
Mitmenschen. Umwelt und Gesundheit werden durch
falsches Entsorgen gefährdet. Materialrecycling hilft, den
Verbrauch von Rohstoffen zu verringern. Weitere
Informationen über das Recycling dieses Produkts
erhalten Sie von Ihrer Gemeinde, den kommunalen
Entsorgungsbetrieben oder dem Geschäft, in dem Sie das
Produkt gekauft haben.
Geeignetes Zubehör: Fernbedienung
Entsorgung von gebrauchten
Batterien und Akkus (anzuwenden in
den Ländern der Europäischen
Union und anderen europäischen
Ländern mit einem separaten
Sammelsystem für diese Produkte)
Das Symbol auf der Batterie/dem Akku oder der
Verpackung weist darauf hin, dass diese nicht als normaler
Haushaltsabfall zu behandeln sind. Durch Ihren Beitrag
zum korrekten Entsorgen dieser Batterien/Akkus schützen
Sie die Umwelt und die Gesundheit Ihrer Mitmenschen.
Umwelt und Gesundheit werden durch falsches Entsorgen
gefährdet. Materialrecycling hilft, den Verbrauch von
Rohstoffen zu verringern.
Bei Produkten, die auf Grund ihrer Sicherheit, der
Funktionalität oder als Sicherung vor Datenverlust eine
ständige Verbindung zur eingebauten Batterie benötigen,
sollte die Batterie nur durch qualifiziertes Servicepersonal
ausgetauscht werden.
Um sicherzustellen, dass die Batterie korrekt entsorgt
wird, geben Sie das Produkt zwecks Entsorgung an einer
Annahmestelle für das Recycling von elektrischen und
elektronischen Geräten ab.
Für alle anderen Batterien entnehmen Sie die Batterie
bitte entsprechend dem Kapitel über die sichere
Entfernung der Batterie. Geben Sie die Batterie an einer
Annahmestelle für das Recycling von Batterien/Akkus ab.
Weitere Informationen über das Recycling dieses Produkts
oder der Batterie erhalten Sie von Ihrer Gemeinde, den
kommunalen Entsorgungsbetrieben oder dem Geschäft, in
dem Sie das Produkt gekauft haben.
Microsoft, Windows Media
und das Windows-Logo sind
Markenzeichen oder
eingetragene Markenzeichen
der Microsoft Corporation in den USA und/oder
anderen Ländern.
iPod ist ein in den USA und anderen Ländern
eingetragenes Markenzeichen von Apple Inc.
Warnhinweis, wenn die Zündung Ihres
Fahrzeugs nicht über eine
Zubehörposition (ACC oder I) verfügt
Aktivieren Sie unbedingt die
Abschaltautomatik (Seite 15).
Nach dem Ausschalten wird das Gerät dann
nach der voreingestellten Zeit automatisch
vollständig abgeschaltet, so dass der Batterie
kein Strom mehr entzogen wird.
Wenn Sie die Abschaltautomatik nicht
aktivieren, müssen Sie jedes Mal, wenn Sie die
Zündung ausschalten, die Taste (OFF)
gedrückt halten, bis die Anzeige ausgeblendet
wird.
2

Inhalt
Willkommen!. . . . . . . . . . . . . . . . . . . . . . . . . . . 4
Vorbereitungen
Zurücksetzen des Geräts . . . . . . . . . . . . . . . . . . 4
Vorbereiten der Kartenfernbedienung. . . . . . . . 4
Einstellen der Uhr . . . . . . . . . . . . . . . . . . . . . . . 4
Abnehmen der Frontplatte. . . . . . . . . . . . . . . . . 5
Anbringen der Frontplatte. . . . . . . . . . . . . . . 5
Einlegen einer CD in das Gerät. . . . . . . . . . . . . 5
Auswerfen der CD . . . . . . . . . . . . . . . . . . . . 5
Lage und Grundfunktionen der
Teile und Bedienelemente
Hauptgerät. . . . . . . . . . . . . . . . . . . . . . . . . . . 6
Kartenfernbedienung RM-X151. . . . . . . . . . 6
Suche nach einem Titel
— Quick-BrowZer . . . . . . . . . . . . . . . . . . . . 8
CD
Informationen im Display. . . . . . . . . . . . . . . 9
Repeat und Shuffle Play . . . . . . . . . . . . . . . . 9
Radio
Speichern und Empfangen von Sendern . . . . . . 9
Automatisches Speichern von Sendern
— BTM. . . . . . . . . . . . . . . . . . . . . . . . . . . . . 9
Manuelles Speichern von Sendern . . . . . . . . 9
Einstellen gespeicherter Sender . . . . . . . . . . 9
Automatisches Einstellen von Sendern. . . . 10
RDS . . . . . . . . . . . . . . . . . . . . . . . . . . . . . . . . . 10
Übersicht. . . . . . . . . . . . . . . . . . . . . . . . . . . 10
Einstellen von AF und TA . . . . . . . . . . . . . 10
Auswählen des Programmtyps (PTY) . . . . 11
Einstellen der Uhrzeit (CT). . . . . . . . . . . . . 11
Weitere Funktionen
Ändern der Klangeinstellungen . . . . . . . . . . . 14
Einstellen der Klangeigenschaften. . . . . . . 14
Individuelles Einstellen der Equalizer-Kurve
— EQ3 . . . . . . . . . . . . . . . . . . . . . . . . . . . . 14
Einstellen von Konfigurationsoptionen
— SET . . . . . . . . . . . . . . . . . . . . . . . . . . . . . . 15
Verwenden gesondert erhältlicher Geräte. . . . 16
Zusätzliche Audiogeräte. . . . . . . . . . . . . . . 16
Joystick RM-X4S. . . . . . . . . . . . . . . . . . . . 16
Weitere Informationen
Sicherheitsmaßnahmen. . . . . . . . . . . . . . . . . . 17
Hinweise zu CDs . . . . . . . . . . . . . . . . . . . . 17
Wiedergabereihenfolge von MP3-/WMA-/
AAC-Dateien (CD-R/RW). . . . . . . . . . . . . 18
MP3-Dateien . . . . . . . . . . . . . . . . . . . . . . . 18
WMA-Dateien . . . . . . . . . . . . . . . . . . . . . . 19
AAC-Dateien . . . . . . . . . . . . . . . . . . . . . . . 19
Der iPod . . . . . . . . . . . . . . . . . . . . . . . . . . . 19
Wartung . . . . . . . . . . . . . . . . . . . . . . . . . . . . . 20
Ausbauen des Geräts. . . . . . . . . . . . . . . . . . . . 21
Technische Daten . . . . . . . . . . . . . . . . . . . . . . 21
Störungsbehebung. . . . . . . . . . . . . . . . . . . . . . 22
Fehleranzeigen/Meldungen . . . . . . . . . . . . 24
iPod
Wiedergabe mit einem iPod . . . . . . . . . . . . . . 12
Wiedergeben von Titeln . . . . . . . . . . . . . . . 12
Informationen im Display. . . . . . . . . . . . . . 12
Einstellen des Wiedergabemodus . . . . . . . . . . 13
Repeat und Shuffle Play . . . . . . . . . . . . . . . 13
3
Willkommen!
Vorbereitungen
Danke, dass Sie sich für diesen CD-Player von
Sony entschieden haben. Mit diesem Gerät
stehen Ihnen im Auto die folgenden Funktionen
zur Verfügung.
• CD-Wiedergabe
Wiedergabe von CD-DAs (auch solche mit CD
TEXT) und CD-Rs/CD-RWs (MP3-/WMA-/
AAC-Dateien (
CD-Typ Beschriftung auf der CD
CD-DA
MP3
WMA
AAC
• Radioempfang
– Für jeden Frequenzbereich (FM1 (UKW1),
FM2 (UKW2), FM3 (UKW3), MW und LW)
können Sie bis zu 6 Sender speichern.
– BTM (Speicherbelegungsautomatik): Das
Gerät wählt die Sender mit den stärksten
Signalen aus und speichert diese.
• RDS-Funktionen
Sie können die RDS-Dienste von
UKW-Sendern nutzen, die RDS-Signale
(Radiodatensystem) ausstrahlen.
• Suchfunktion
Quick-BrowZer: Sie können schnell und
mühelos nach einem Titel auf einer CD oder
auf einem an dieses Gerät angeschlossenen
iPod suchen (
• Klangeinstellungen
– EQ3 stage2: Sie können eine der
7 voreingestellten Equalizer-Kurven
auswählen.
– DSO (Dynamische Klangraumverbesserung):
Mithilfe virtueller Lautsprecher wird auch bei
niedrig in der Tür montierten Lautsprechern
eine bessere Raumklangwirkung erzeugt.
• iPod-Funktionen
An das Dock-Anschlusskabel an der Rückseite
des Geräts kann ein iPod angeschlossen
werden.
• Anschließen eines zusätzlichen Geräts
An die AUX-Eingangsbuchse an der
Vorderseite des Geräts können Sie ein tragbares
Audiogerät anschließen.
Seite 18)).
Seite 8).
4
Zurücksetzen des Geräts
Bevor Sie das Gerät zum ersten Mal benutzen
oder wenn Sie die Autobatterie ausgetauscht
oder die Verbindungen gewechselt haben,
müssen Sie das Gerät zurücksetzen.
Nehmen Sie die Frontplatte ab und drücken Sie
die Taste RESET mit einem spitzen Gegenstand,
wie z. B. einem Kugelschreiber.
Taste
RESET
Hinweis
Wenn Sie die Taste RESET drücken, werden die
eingestellte Uhrzeit und einige weitere gespeicherte
Einstellungen gelöscht.
Vorbereiten der
Kartenfernbedienung
Bevor Sie die Kartenfernbedienung zum ersten
Mal verwenden, müssen Sie die Isolierfolie
entfernen.
Tipp
Informationen zum Austauschen der Batterie finden
„Austauschen der Lithiumbatterie der
Sie unter
Kartenfernbedienung“ auf Seite 20.
Einstellen der Uhr
Die Uhr zeigt die Uhrzeit im 24-Stunden-Format
digital an.
1 Halten Sie die Auswahltaste gedrückt.
Die Einstellanzeige erscheint.
2 Drücken Sie die Auswahltaste so oft,
bis „CLOCK-ADJ“ angezeigt wird.
3 Drücken Sie (SEEK) +.
Die Stundenanzeige blinkt.
4 Drehen Sie den Steuerregler, um die
Stunden und Minuten einzustellen.
Drücken Sie (SEEK) –/+, um zur jeweils
nächsten Ziffer in der Digitalanzeige zu
wechseln.

5 Drücken Sie die Auswahltaste.
Der Einstellvorgang ist damit abgeschlossen
und die Uhr beginnt zu laufen.
Zum Einblenden der Uhrzeit drücken Sie
(DSPL). Drücken Sie (DSPL) erneut, um zur
vorherigen Anzeige zurückzuschalten.
Tipp
Mithilfe der RDS-Funktion können Sie die Uhr auch
automatisch einstellen lassen (
Seite 11).
Abnehmen der Frontplatte
Um zu verhindern, dass das Gerät gestohlen
wird, können Sie die Frontplatte abnehmen.
Anbringen der Frontplatte
Setzen Sie die Aussparung A an der Frontplatte
am Stift B am Gerät an und drücken Sie dann
die linke Seite behutsam hinein.
Drücken Sie (SOURCE) am Gerät (oder legen
Sie eine CD ein), um das Gerät einzuschalten.
A
B
Warnton
Wenn Sie den Zündschlüssel in die Position OFF
stellen, ohne die Frontplatte abzunehmen, ertönt
einige Sekunden lang ein Warnton.
Der Warnton wird nur ausgegeben, wenn der
integrierte Verstärker verwendet wird.
1 Drücken Sie (OFF).
Das Gerät schaltet sich aus.
2 Drücken Sie (OPEN).
Die Frontplatte klappt nach unten auf.
3 Schieben Sie die Frontplatte nach
rechts und ziehen Sie sie an der linken
Seite vorsichtig heraus.
1
2
Hinweise
• Lassen Sie die Frontplatte nicht fallen und drücken
Sie nicht zu stark auf die Frontplatte und das
Display.
• Schützen Sie die Frontplatte vor Hitze bzw. hohen
Temperaturen und vor Feuchtigkeit. Lassen Sie sie
nicht in geparkten Autos, auf dem Armaturenbrett
oder auf der Hutablage liegen.
c
Hinweis
Legen Sie auf der Innenseite der Frontplatte nichts ab.
Einlegen einer CD in das Gerät
1 Drücken Sie (OPEN).
2 Legen Sie eine CD ein (mit der
beschrifteten Seite nach oben).
3 Schließen Sie die Frontplatte.
Die Wiedergabe beginnt automatisch.
Auswerfen der CD
1 Drücken Sie (OPEN).
2 Drücken Sie Z.
Die CD wird ausgeworfen.
3 Schließen Sie die Frontplatte.
5
Lage und Grundfunktionen der Teile und Bedienelemente
q
q
8
q
9 q
q
Hauptgerät
1
OFF
SEEK SEEK
BACK
32
BROWSE
SOURCE
MODE
PUSH ENTER / SELECT
;
Mit abgenommener Frontplatte
RESET
Kartenfernbedienung RM-X151
1
4
OFF
SOURCE
SEL
ATT
MODE
qk
+
–
VOL
SCRL
+
–
ql
w;
DSPL
132
465
6
a
5674
ALBUM
REP SHUF
PTY
AF/TA
123456
s
In diesem Abschnitt werden Lage und
Grundfunktionen der Teile und Bedienelemente
wa
ws
qa
wd
wf
wg
beschrieben. Nähere Erläuterungen finden Sie
auf den jeweiligen Seiten.
Informationen zum Bedienen eines iPod finden
Sie unter „iPod“ auf Seite 12.
Die entsprechenden Tasten auf der
Kartenfernbedienung haben dieselbe Funktion
wie die Tasten am Gerät.
A Taste OFF
Ausschalten bzw. Stoppen der Tonquelle.
B Taste (BROWSE) Seite 8
Aktivieren des Quick-BrowZer-Modus.
C Steuerregler/Auswahltaste Seite 8, 14
Einstellen der Lautstärke (drehen) bzw.
Auswählen von Optionen (drücken und
drehen).
D Taste SOURCE
Einschalten bzw. Wechseln der Tonquelle
(Radio/CD/iPod/AUX).
E Display
OPEN
AUX
PAUSE SCRL
DSPL
d
f
qh qjqg

F AUX-Eingangsbuchse Seite 16
Anschließen eines tragbaren Audiogeräts.
G Taste OPEN Seite 5
H Taste (BACK) Seite 8
Zurückschalten zur vorherigen Anzeige.
I Empfänger für die
Kartenfernbedienung
J Tasten SEEK –/+
CD/iPod:
Überspringen von Titeln (drücken),
Überspringen mehrerer Titel hintereinander
(drücken, dann innerhalb von 1 Sekunde
erneut drücken und gedrückt halten) bzw.
Rückwärts-/Vorwärtssuchen in einem Titel
(gedrückt halten).
Radio:
Automatisches Einstellen von Sendern
(drücken) bzw. manuelle Sendersuche
(gedrückt halten).
K Taste MODE Seite 9, 12
Auswählen des Radiofrequenzbereichs
(FM (UKW)/MW/LW) bzw. Auswählen des
Wiedergabemodus am iPod.
L Taste AF (Alternativfrequenzen)/
TA (Verkehrsdurchsagen)/
PTY (Programmtypauswahl)
Seite 10, 11
Einstellen von AF und TA (drücken) bzw.
Auswählen des Programmtyps (PTY) bei
einem RDS-Sender (gedrückt halten).
M Zahlentasten (Stationstasten)
CD/iPod:
(1)/(2): ALBUM –/+
Überspringen von Alben (drücken)
bzw. Überspringen mehrerer Alben
hintereinander (gedrückt halten).
(3): REP Seite 9, 13
(4): SHUF Seite 9, 13
(6): PAUS E
Anhalten der Wiedergabe. Zum
Beenden der Funktion drücken Sie die
Taste erneut.
Radio:
Einstellen gespeicherter Sender (drücken)
bzw. Speichern von Sendern (gedrückt
halten).
N Taste DSPL (Anzeige)/SCRL (Bildlauf)
Seite 9, 10
Wechseln der Informationen im Display
(drücken) bzw. Durchlaufenlassen der
Informationen im Display (gedrückt halten).
O Taste RESET Seite 4
P Taste Z (Auswerfen) Seite 5
Auswerfen der CD.
Q CD-Einschub Seite 5
Einlegen der CD.
Die folgenden Tasten auf der
Kartenfernbedienung unterscheiden sich
außerdem hinsichtlich ihres Namens bzw. ihrer
Funktion von denen am Gerät. Ziehen Sie vor
dem Gebrauch die Isolierfolie heraus (
Seite 4).
qk Tasten < (.)/, (>)
Beim Steuern von CD-, Radio- und iPodFunktionen entsprechen diese Tasten den
Tast en (SEEK) –/+ am Gerät.
Konfiguration, Klangeinstellung usw.
können Sie mit < , vornehmen.
ql Taste DSPL (Anzeige)
Wechseln der Informationen im Display.
w; Taste VOL (Lautstärke) +/–
Einstellen der Lautstärke.
wa Taste ATT (Dämpfen des Tons)
Dämpfen des Tons. Zum Beenden der
Funktion drücken Sie die Taste erneut.
ws Taste SEL (Auswählen)
Diese Taste entspricht der Auswahltaste am
Gerät.
Im Quick-BrowZer-Modus steht
(SEL) (Auswählen) nicht zur Verfügung.
wd Tasten M (+)/m (–)
Beim Steuern von CD-/iPod-Funktionen
entsprechen diese Tasten den Tasten
(1)/(2) (ALBUM –/+) am Gerät.
Konfiguration, Klangeinstellung usw.
können Sie mit M m vornehmen.
wf Taste SCRL (Blättern)
Hiermit lassen Sie die Informationen im
Display durchlaufen.
wg Zahlentasten (Stationstasten)
Einstellen gespeicherter Sender (drücken)
bzw. Speichern von Sendern (gedrückt
halten).
Hinweis
Wenn Sie das Gerät ausschalten und die Anzeige
ausgeblendet ist, können Sie es nicht mit der
Kartenfernbedienung bedienen. Drücken Sie zunächst
(SOURCE) am Gerät oder legen Sie eine CD ein, um
das Gerät zu aktivieren.
7
Suche nach einem Titel — Quick-BrowZer
Sie können anhand der Kategorie mühelos nach einem Titel auf einer CD oder einem iPod suchen.
(BROWSE):
Aktivieren/Deaktivieren des Quick-BrowZer-Modus.
OFF
BROWSE
SEEK SEEK
BACK
SOURCE
MODE
PUSH ENTER
/
SELECT
Steuerregler:
Auswählen einer Option (drehen) bzw. Bestätigen der
Option (drücken).
(BACK):
Zurückschalten zur vorherigen Anzeige.
1 Drücken Sie (BROWSE).
Das Gerät wechselt in den Quick-BrowZer-Modus und die Liste der Suchkategorien erscheint.
Je nach iPod- oder CD-Typ werden unterschiedliche Informationen angezeigt.
2 Wählen Sie durch Drehen des Steuerreglers die gewünschte Kategorie für die Suche
aus und drücken Sie zum Bestätigen den Steuerregler.
3 Gehen Sie wie in Schritt 2 erläutert vor, bis der gewünschte Titel ausgewählt ist.
Die Wiedergabe beginnt.
Zurückschalten zur vorherigen Anzeige
Drücken Sie (BACK).
Deaktivieren des Quick-BrowZer-Modus
Drücken Sie (BROWSE).
Hinweis
Wenn Sie den Quick-BrowZer-Modus aktivieren, wird die Einstellung für die Wiedergabewiederholung bzw.
Zufallswiedergabe außer Kraft gesetzt.
8
 Loading...