

Page 1
FM/AM
Compact Disc
Player
3-261-847-11 (1)
Operating Instructi on s
Mode d’emploi
Owner’s Record
The model and serial numbers are located on the bot tom of the unit.
Record these numbers in the spa ce provided below.
Refer to these numbers whenever you call upon your Sony dealer regarding this produc t.
Model No. CDX-F5000 Serial No.
For installation and connections, see the supplied installation/connections manual.
En ce qui concerne l’installation et les connexions, consulter le manuel
d’installation/raccordement fourni.
US
FR
CDX-F5000
© 2004 Sony Corporation
Page 2

Warning
p
r
r
–
–
–
–
t
Welcome !
This equipment has been tested and found to
comply with the limits for a Class B digital
device, pursuant to Part 15 of the FCC Rules.
These limits are designed to provide reasonable
rotection against harmful interference in a
esidential installation. This equipment
generates, uses, and can radiate radio frequency
energy and, if not installed and used in
accordance with the instructions, may cause
harmful interference to radio communications.
However, there is no guarantee that interference
will not occur in a particular installation. If this
equipment does cause harmful interference to
adio or television reception, which can be
determined by turning the equipment off and on,
the user is encouraged to try to correct the
interference by one or more of the following
measures:
Reorient or relocate the receiving antenna.
Increase the separation between the equipment
and receiver.
Connect the equipment into an outlet on a
circuit different from that to which the receiver
is connected.
Consult the dealer or an experienced radio/TV
technician for help.
You are cautioned that any changes or
modifications not expressly approved in this
manual could void your authority to operate this
equipment.
Thank you for purchasing this Sony Compact
Disc Player. You can enjoy its various features
even mo re with:
• Optional CD/MD units (both changers and
players)*
• CD TEXT information (displayed when a CD
TEXT disc*
• Supplied controller accessory
Card remote commander RM-X115
• Optional controller accessory
Rotary commander RM-X4S
*1 This unit works with Sony products only.
*2 A CD TEXT disc is an audio CD that includes
The “XM Ready” logo indicates that this product
will control a Sony XM tuner module (sold
separately).
Please see your nearest authorized Sony dealer
for details on the XM tuner module.
For instructions on XM tuner operation, please
refer to the XM tuner module’s included
instruction manual.
1
.
2
is played).
information such as the disc name, artist name,
and track names. This information is recorded on
the disc.
CAUTION
The use of optical instruments with this produc
will increase eye hazard.
2
Page 3

Table of Contents
Location of controls . . . . . . . . . . . . . . . . . . . 4
Precautions . . . . . . . . . . . . . . . . . . . . . . . . . . 6
Notes on discs . . . . . . . . . . . . . . . . . . . . . . . . 7
Getting Started
Resetting the unit. . . . . . . . . . . . . . . . . . . . . . 8
Detaching the front panel . . . . . . . . . . . . . . . 8
Setting the clock . . . . . . . . . . . . . . . . . . . . . . 9
CD Player
CD/MD Unit (optional)
Playing a disc. . . . . . . . . . . . . . . . . . . . . . . . 10
Display items. . . . . . . . . . . . . . . . . . . . . . . . 11
Playing tracks repeatedly
— Repeat Play . . . . . . . . . . . . . . . . . . . . 11
Playing tracks in ra ndom order
— Shuffle Play . . . . . . . . . . . . . . . . . . . . 12
Labeling a CD
— Disc Memo
Locating a di sc by name
— List-up
* Functions available with optional CD/MD unit
*. . . . . . . . . . . . . . . . . . . . 12
* . . . . . . . . . . . . . . . . . . . . . . . 13
Radio
Storing stations automatically
— Best Tuning Memory (BTM) . . . . . . 14
Receiving the stored stations . . . . . . . . . . . 14
Storing only the desired stations . . . . . . . . . 15
Tuning in a station thr ough a list
— List-up. . . . . . . . . . . . . . . . . . . . . . . . 15
Other Functions
Using the rotary commander. . . . . . . . . . . . 16
Adjusting the sound characteristics . . . . . . 17
Quickly attenuating the sound . . . . . . . . . . 1 7
Changing the sound and display
settings . . . . . . . . . . . . . . . . . . . . . . . . . . 18
Setting the equalizer (EQ3). . . . . . . . . . . . . 19
Setting the Dynamic Soundstage Organizer
(DSO). . . . . . . . . . . . . . . . . . . . . . . . . . . 20
Additional Information
Maintenance . . . . . . . . . . . . . . . . . . . . . . . . 20
Removing the unit. . . . . . . . . . . . . . . . . . . . 21
Specifications . . . . . . . . . . . . . . . . . . . . . . . 22
Troubleshooting . . . . . . . . . . . . . . . . . . . . . 23
Error displays/Messages. . . . . . . . . . . . . . . 24
3
Page 4
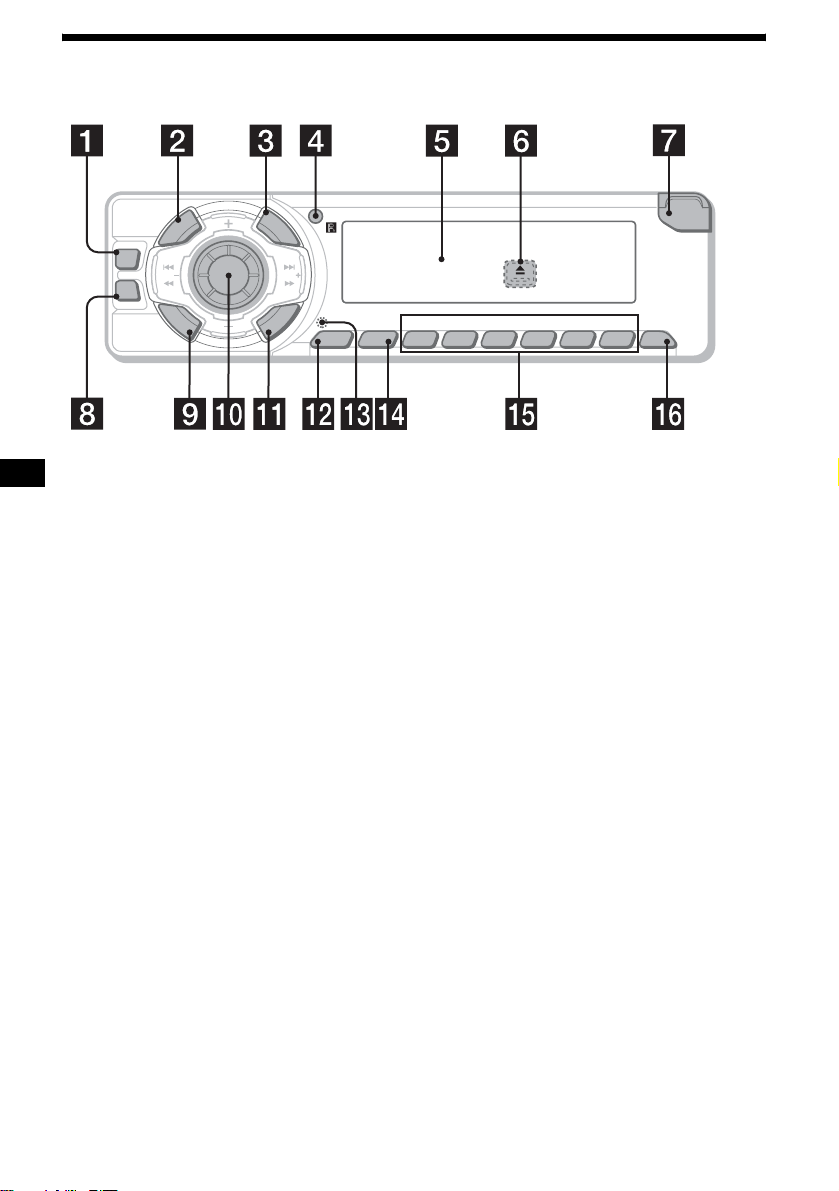
Location of controls
Refer to the pages listed for details.
P
U
R
E
P
/
S
C
S
E
S
T
D
E
C
R
U
O
S
DSO
SEEK SEEK
EQ3
M
O
D
E
I
H
D
I
A
L
I
S
T
C
A
T
L
P
S
D
L
S
E
L
E
C
T
BTMSENS
21
CDX-F5000
BBESHUFREP
OPEN
6543
OFF
a DSO button 20
b SOURCE (Power on/Radio/CD/MD)
button
T o select the source.
c LIST/CAT*
1
button 12, 13, 15
d Receptor for the card remote
commander
e Display window
f Z (eject) button (located on the front sid e
of the unit, behind the front panel) 10
g OPEN button 8, 10
h EQ3 button 19
i MODE button
To change operation.
j Volume control dial/Select button
Rotate to:
– Adjust the volume.
– Adjust settings.
Press to:
– Select it ems.
k DSPL (dis play mode change) button
9, 11, 13, 18
l SENS button 14, 15
m RESET button (located on the front side of
the unit, behind the front panel) 8
n BTM button
o Number buttons 18
Radio:
To store stations/receive store d stations.
CD/MD:
(3): REP 11
(4): SHUF 12
p OFF (Stop/Power off) button*
*1 (CAT) is available only when the XM tuner is
connected.
*2
Warning when installing in a car without
2
8, 10
an ACC (accessory) position on the
ignitio n switch
After turning off the ignition, be sure to press
and hold (OFF) on the unit until the display
disappears.
Otherwise, the display does not turn off and this
causes battery drain.
4
Page 5
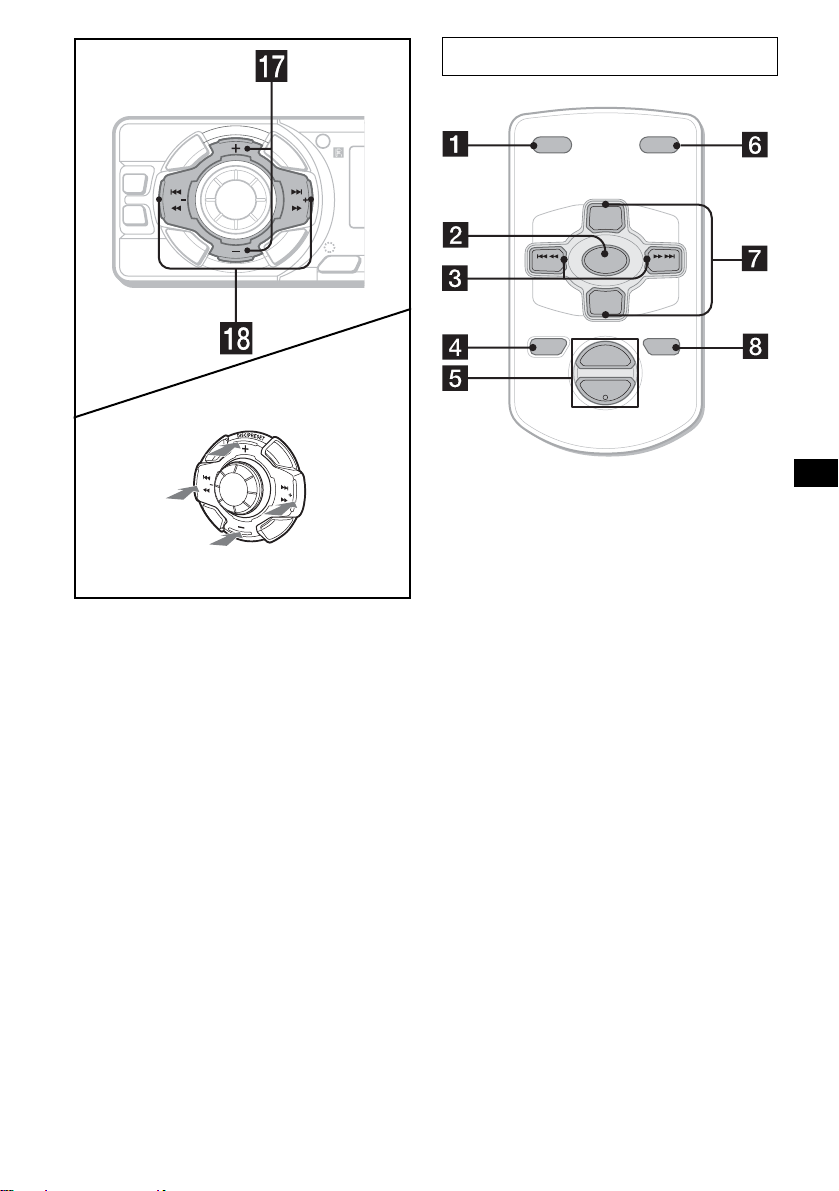
I
D
E
C
R
U
O
S
DSO
SEEK SEEK
EQ3
M
O
D
E
(DISC/PRESET)
(+): to select upwards
Card remote commander RM-X115
P
U
R
E
P
/
S
C
S
E
S
T
H
D
I
A
L
L
I
S
S
E
T
L
C
E
A
C
T
T
L
P
S
D
SENS
DSPL MODE
+
PRESET
SOURCE
–
SEEK
PRESET
–
+
VOL
–
SEEK
ATTOFF
+
(SEEK)
(–): to select
leftwards/
.
S
E
E
K
(DISC/PRESET)
(–): to select downwards
(SEEK)
(+): to select
SEEK
rightwards/
>
q DISC (ALBUM)/PRESET buttons (+/–)
To receive preset stations/change the disc*
skip albums*
*1 When an optional CD/MD unit is connected.
*2 Av ailable only when an optional CD unit with the
MP3 file control function is connected, and MP3
file is played.
2
.
r SEEK buttons (–/+)
To skip tracks/fast-forward, reverse a track/
tune in stations automatically, find a station
manually/select a setting.
The correspondin g buttons of th e ca rd
remote commander control the same
functions as those on this unit.
a DSPL button
b SOURCE button
c SEEK (–/+) buttons
d OFF button
1
,
e VOL (+/–) buttons
f MODE button
g PRESET (DISC/ALBUM) (+/–) buttons
h ATT button
Note
If the display disappears by pressing (OFF), it cannot
be operated with the card remote commander unless
(SOURCE) on the unit is pressed, or a disc is inserted
to activate the unit first.
Tip
For details on how to replace the battery, see
“Replacing the lithium battery” on page 21.
continue to next page t
5
Page 6

Selecting a disc and album with the
card remote co mmander
Disc and album can be skipped using the
PRESET (DISC/ALBUM) (+/–) buttons on the
card remote comm ander.
(With optional unit)
To Press
Skip discs
–Disc selection
Skip albums*
–Album selection
* Available only when an optional CD unit with the
MP3 file control function is connected, and MP3 file
is played.
+ or – [once for each disc]
To continuously skip discs,
press once and press again
within 2 second s (and hold)
either button.
+ or – [hold for a mome nt ]
and release
To continuo usly skip
albums, press (and hold)
within 2 second s of first
releasin g the button.
Skipping tracks continuo usly
Press once (SEEK) (+) or (SEEK) (–) on the
card remote comm ander, then press again within
2 seconds and hold.
Precautions
• If your car has been parked in direct sunlight,
allow the unit to cool off before operating it.
• Power antenna will extend automatically while
the unit is operating.
• While driving, do not use the CUSTOM FILE
feature or any othe r funct ions w hich ma y di ve rt
your attention from the road.
If you have any questions or prob le ms
concerning your unit that are not covered in this
manual, please co ns ult your nearest Sony deale r.
Moisture condensation
On a rainy day or in a very dam p area, moisture
condensation may occur inside the lenses and
display of the unit. Should this occur, the unit
will not operate properly. In such a case, remove
the disc and wait for about an hour until the
moisture has evaporated.
To maintain high sound quality
Be careful not to splash juice or other soft drinks
onto the unit or discs.
6
Page 7
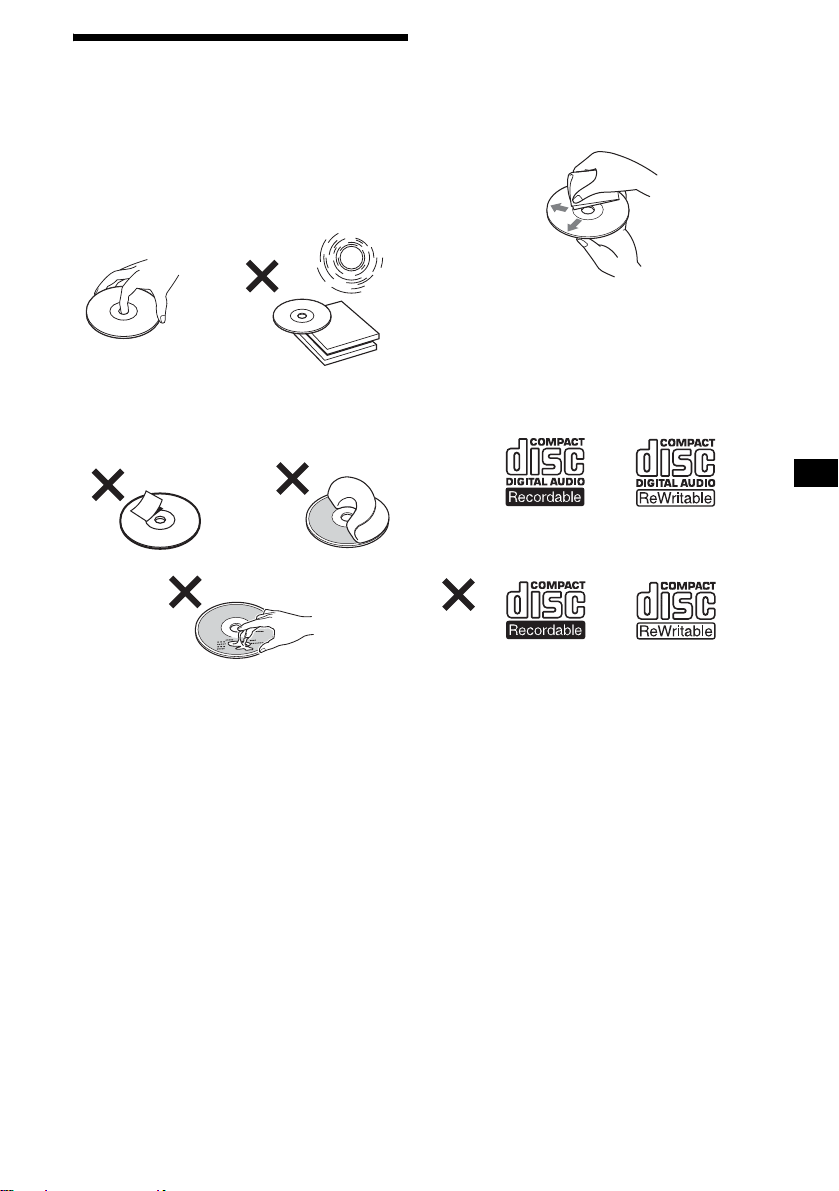
Notes on discs
• To keep a disc clean, do not touch its surface.
Handle the disc by its edge.
• Keep your discs in t heir cases or disc
magazines when not in use.
• Do not subject discs to heat/high temperature.
Avoid leaving them in a parked car or on a
dashboard/rear tray.
• Do not attach labels, or use discs with sticky
ink/residue. Such discs may stop spi nning
when used, causing a malfunction, or may ruin
the disc.
• Before playing, clean the discs with a
commercially available cle ani ng cloth. Wipe
each disc from the center out. Do not use
solvents such as benz ine, thinner , commerc ially
available cleaners, or antis ta t ic spray intended
for analog discs.
Notes on CD-R/CD-RW discs
• You can play CD-Rs (recordable CDs)/CDRWs (rewritable CDs) designed for au dio use
on this unit.
Look for these marks to distinguish CD-Rs/
CD-RWs for audio use.
These marks denote that a disc is not for audio
use.
• Do not use any disc s w ith labels or stickers
attached.
The following malfunctions may result from
using such dis cs:
– Inability to eject a disc (due to a label or
sticker peeling off and jamm i ng t he eject
mechanism).
– Inability to read audio data correctly (e.g.,
playback skippi ng, or no playback) due to
heat shrinking of a st i cker or label causing a
disc to warp.
• Discs with non-standard shapes (e.g., heart,
square, star) cannot be played on this un i t.
Attempting to do so may damage the unit. Do
not use such discs.
• You cannot play 8 cm (3 in) CD s.
• Some CD-Rs/CD-RWs (depending on the
equipment use d for its recording or the
condition of the disc) may not play on this unit.
• You cannot play a CD-R/C D - RW that is not
finalized*.
* A process necessary for a recorded CD-R/CD-RW
disc to be played on the audio CD player.
7
Page 8
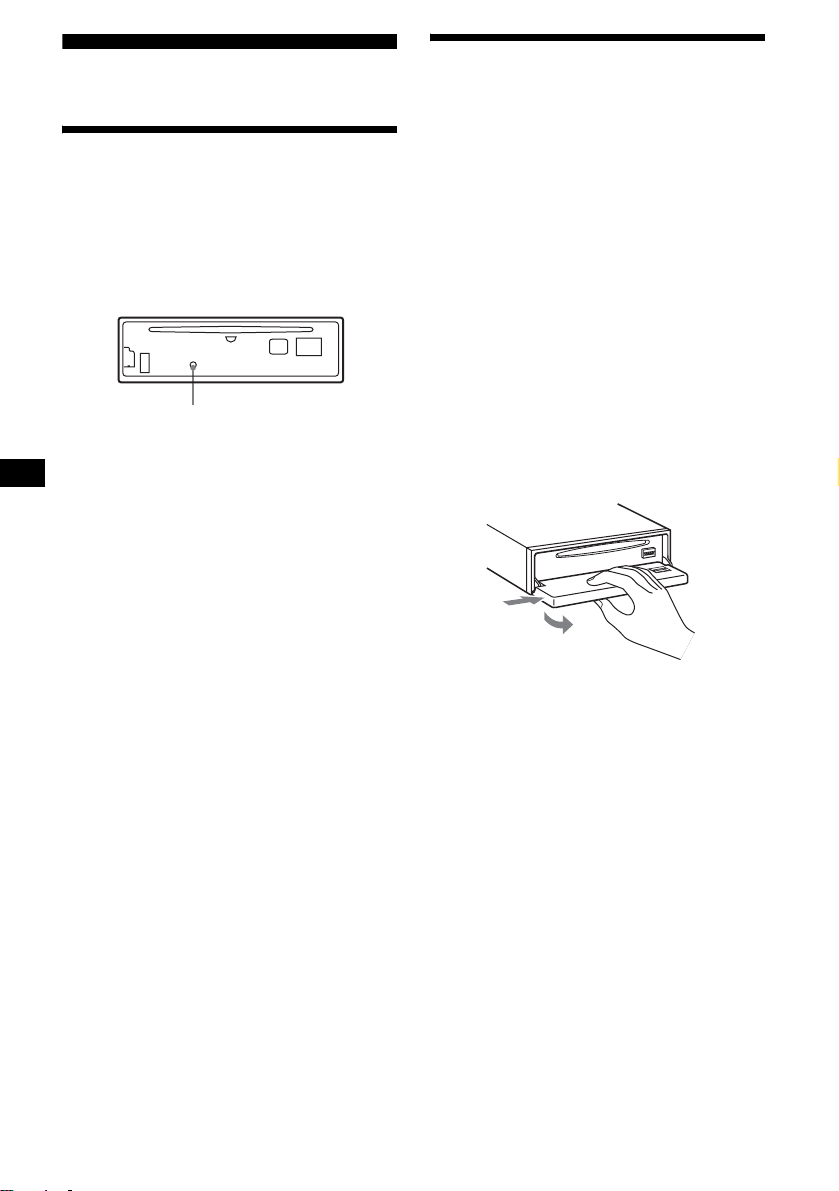
Getting Started
Detaching the front panel
You can detach the front panel of this unit to
protect the unit fr om being stolen.
Resetting the unit
Before operating the unit for the first time, or
after replacing the car battery or chan gi ng the
connections, you must reset the unit.
Remove the front panel and pres s the RESET
button with a pointed object, such as a ball-point
pen.
RESET button
Note
Pressing the RESET button will er ase the clock setting
and some stored contents.
Caution alarm
If you turn the ignition switch to the OFF
position withou t removing the front panel, t he
caution alarm will beep for a few seconds.
If you connect an optional amplifier and do not
use the built-in amplifier, the beep sound will be
deactivated.
1 Press (OFF)*.
CD/MD playback or radio reception stops
(the key illumination an d display remain on).
* If your car has no ACC (accessory) position on
the ignition switch, be sure to turn the unit off by
pressing (OFF) until the display disappears to
avoid car battery drain.
2 Press (OPEN), then slide the front
panel to the right, and gently pull out
the left end o f the front pa n el.
1
2
Notes
• If you detach the panel while the unit is still turned
on, the power will turn off automatically to prevent
the speakers from being damaged.
• Do not drop or put excessive pressure on the front
panel and its display window.
• Do not subject the front panel to heat/high
temperature or moisture. Avoid leaving it in a parked
car or on a dashboard/rear tray.
Tip
When carrying the front panel with you, use the
supplied front panel case.
8
Page 9
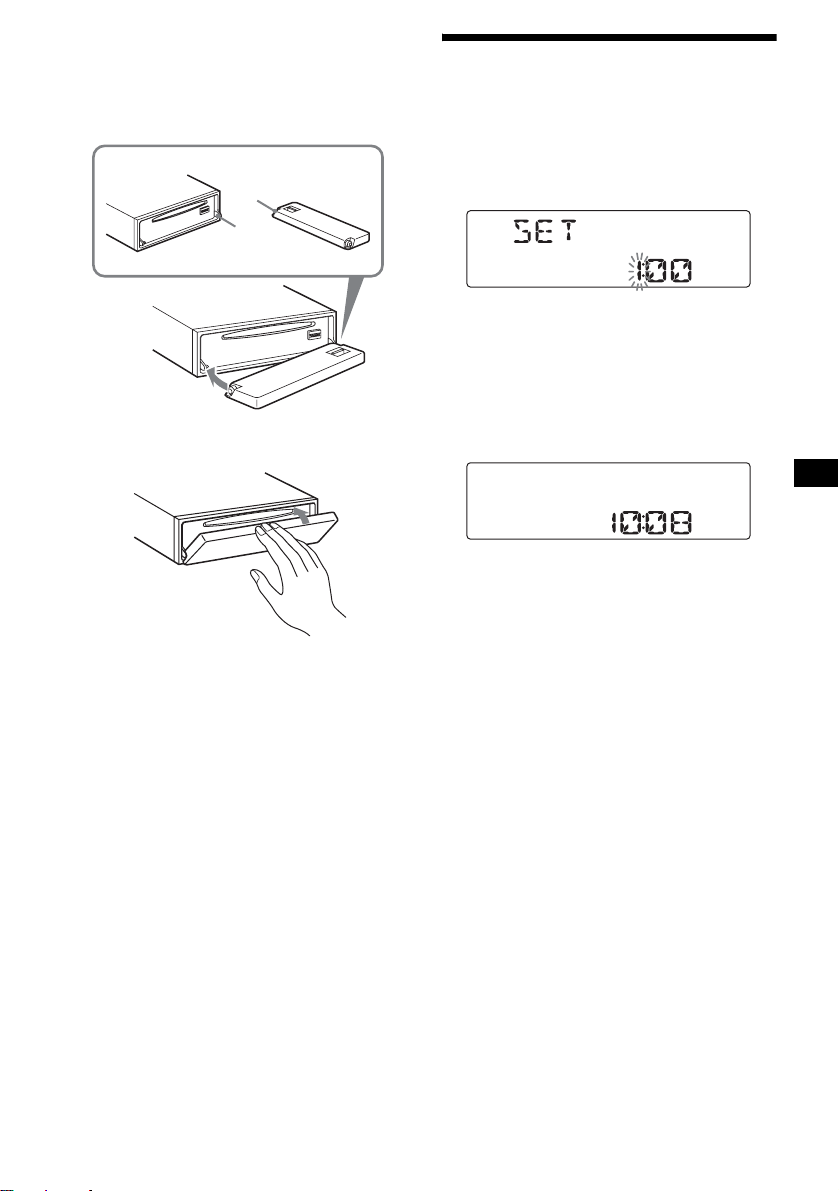
Attaching the front panel
Place hole A of the fr ont panel onto the spindle
B on the unit, then lightly push the left side in.
Press (SOURCE) on the unit (or insert a CD) to
operate the unit.
A
B
x
Setting the clock
The clock uses a 12-hour digital indication.
Example: To set the clock to 10:08
1 Press (DSPL) for 2 seconds.
The hour indication flashes.
1 Rotate the volume control dial to set
the hour.
2 Press the sel ect button.
The minute indication flashes.
3 Rotate the volume control dial to set
the minute.
2 Press (DSPL).
The clock starts. After the clock setting is
complete, the display returns to normal play
mode.
Note
Do not put anything on the inner surface of the front
panel.
9
Page 10
CD Player
CD/MD Unit (optional)
Notes
• While the first/last track on the disc is playing, if
(SEEK) (–) or (SEEK) (+) is pressed, playback skips
to the last/first track of the disc.
• When the last track on the disc is over, playback
restarts from the first track of the disc.
In addition to playing a CD with this unit, you
can also control external CD (MP3 playable CD)/
MD units. If you connect optional MP3 playab le
CD units (eg., MP3 CD changer), you can play
MP3 files; compressed audio files (tracks) with
quality of sound.
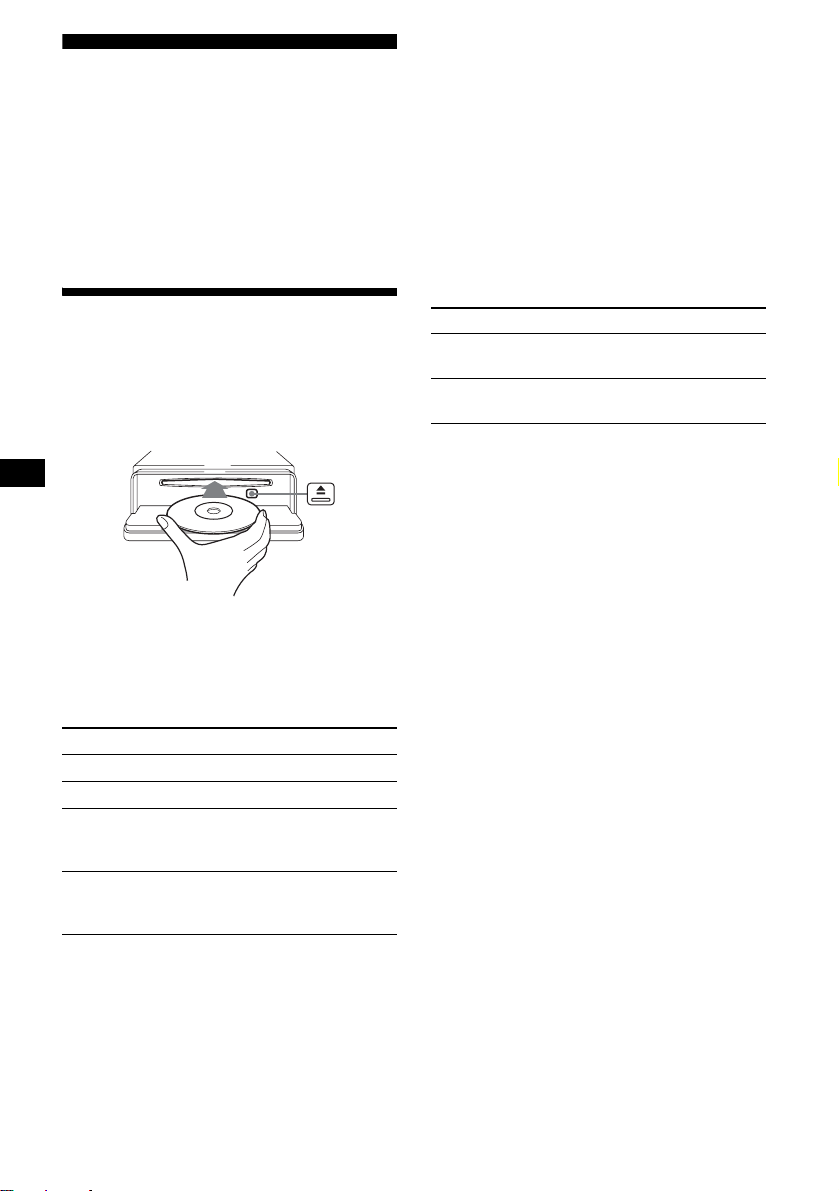
Playing a disc
(With this unit)
1 Press (OPEN) and inse rt the disc
(labeled side up).
2 Close the fron t p anel.
Playback starts automatically.
If a disc is already inserted, press (SOURCE)
repeatedly until “CD” appears to st art playback.
To Press
Stop playba ck (OFF)
Eject the disc (OPEN) then Z
Skip tracks
–Automatic
Music Sensor
Fast-forward/
reverse
–Manual Search
T o ski p tr acks co nti nuous ly, pr ess (SEEK) (+) or
(SEEK) (–), then press again within 2 se conds
and hold.
(SEEK) (–/+)
(./>)
[once for each tr ack]
(SEEK) (–/+)
(m/M)
[hold to desired po int]
(With optional unit)
1 Press (SOURCE) repeatedly to select
“CD” or “MD (MS*
1
).”
2 Press (MODE) repeatedly until the
desired unit appears.
Playback starts.
To Press
Skip discs
–Disc selection
Skip albums*
–Albums selection
*1 MS: MG Memory Stick System-up Player MGS-X1
*2 Available only when an optional CD unit with the
MP3 file control function is connected, and MP3 file
is played.
Cautions when c onn ect in g M GS-X1 a nd MD un it( s )
This unit recognizes MGS-X1 as an MD unit.
• When you want to play MGS-X1, press (SOURCE) to
select “MS ” or “MD.” When “MS” appears in the
source display, MGS-X1 starts to play. When “MD”
appears in the source display, press (MODE) to
select “MS,” to start playback.
• When you want to play an MD unit, press (SOURCE)
to select “MD” or “MS.” If your desired MD unit
appears in the source display, it starts to play. If “MS”
or another MD unit appears in the source display,
press (MODE) to select your desired MD unit, to
start playback.
Notes when connecting MP3 playable CD unit(s)
• If a disc with no MP3 files (tracks) is inserted, “NO
MUSIC” appears in the display and playback of the
next disc starts.
• Before playing a track, this unit reads all track and
album information on the disc. Depending on the
track structure, it may take more than a minute
before playback begins. During this time, “READ” is
displayed. Play will automatically start when reading
is complete.
Note
With an optional unit connected, playback of the same
source will continue on to the optional CD/MD unit.
(DISC/PRESET) (+/–)
[once for each disc ]
2
(DISC/PRESET) (+/–)
[hold to desire d point]
10
Page 11
Display items
When the disc/album/track changes, any
prerecorded title*
automatically displayed. (If the A.SCRL (Auto
Scroll) function is set to “ON,” names e x c ee di ng
8 characters will be scrolled (page 18).)
Source
Displayable items
• Disc
number/Track number/Elapsed
playing time
• Disc name*
• Album (folder) name*
• Tra ck (file) name*1*
• ID3 tag*
• Clock
To Press
Switch display item (DSPL)
*1 When pressing (DSPL), “NO NAME” indicates that
there is no Disc Memo (page 12) or no prerecorded
name to display.
*2 Only for CD TEXT discs with the artist name.
*3 Only for MP3 files.
Only track name/artist name/album name in ID3
tag is displayed.
When pressing (DSPL), “NO ID3” indicates that
there is no ID3 tag to display.
Notes
• Some characters cannot be displayed. Characters
and signs which cannot be displayed appear as “ *.”
• For some CD TEXT discs or ID3 tags with very
many characters, information may not scroll.
• This unit cannot display the artist name for each
track of a CD TEXT disc.
Tips
• When the A.SCRL (Auto Scroll) function is set to
“OFF” and the disc/album/track is changed, the disc/
album/track name or ID3 tag does not scroll.
• When an MP3 file is played and the album is
changed, the new album number is displayed.
1
of the new disc/album/track is
1
/Artist name*
3
2
3
3
Playing tracks repeatedly
— Repeat Play
You can select:
• REP-TRACK — to repeat the current t rack.
• REP-ALBM*
current album.
• REP-DISC*
current disc.
*1 Available only when an optional CD unit with the
MP3 file control function is connected, and MP3 file
is played.
*2 Available only when one or more optional CD/MD
units are connected.
During playback, press (3) (REP)
repeatedly until the desired setting
appears in the display.
Repeat Play s t arts.
To return to normal play mode, select
“REP-OFF.”
1
— to repeat the tracks in the
2
— to repeat the tracks in the
11
Page 12
Playing tracks in random
order
— Shuffle Play
You can select:
•SHUF-ALBM*
current album in random order.
• SHUF-DISC — to play the tracks in the current
disc in random order.
• SHUF-CHGR*
current optional CD (MD) changer i n random
order.
• SHUF-ALL*
connected CD (MD) units (including this unit)
in random order.
*1 Available only when an optional CD unit with the
MP3 file control function is connected, and MP3 file
is played.
*2 Available only when one or more optional CD (MD)
changers are connected.
*3 Available only when one or more optional CD units,
or two or more optional MD units are c onnected.
During playback, press (4) (SHUF)
repeatedly until the desired se ttin g
appears in the display.
Shuffle Play starts.
To return to normal play mode, select
“SHUF-OFF.”
Note
“SHUF-ALL” will not shuffle tracks between CD units
and MD units.
1
— to play the tracks in the
2
— to play the tracks in the
3
— to play all the tracks in all
Labeling a CD
— Disc Memo (When connecting a CD unit
with the CUSTOM FILE function)
You can label each disc with a cus t om name
(Disc Memo). You can enter up to 8 characters
for a disc. If you label a CD, you can locate the
disc by name (page 13).
1 Start playing the disc you want to label
in a CD unit with the CUSTOM FILE
function.
2 Press (LIST/CAT) for 2 seconds.
The unit will repeat the disc during the
labeling procedure .
3 Enter the characters.
1Rotate the volume c o ntrol dial to
select the desired character.
A y B y C ... y 0 y 1 y 2 ...
y + y – y
* (blank space)
2Press the sele ct button af te r
locating the desired charac te r.
The next characte r flashes.
... y * y A
*
12
3Repeat steps 1 and 2 to enter the
entire name.
4 To return to normal play mode, press
(LIST/CAT) for 2 seconds.
Tips
• Simply overwrite or enter “ ” to correct or erase a
character.
• You can label CDs on a unit without the CUSTOM
FILE function if that unit is connected along with a
CD unit that has the function. The Disc Memo will be
stored in the memory of the CD unit with the
CUSTOM FILE function.
Note
REP-TRACK/SHUF play is suspended until the name
edit is complete.
Page 13
Viewing the Disc Memo
As a display item, the Disc Memo always takes
priority over any original CD TEXT information.
To Press
View (DSPL) during CD/CD
Tip
Other items can be displayed (page 11).
TEXT disc playback
Erasing the Disc Memo
1 Press (SOURCE) repeatedly to select
“CD.”
2 Press (MODE) repeatedly to select the
CD unit storing the Disc Memo.
3 Press (LIST/CAT) for 2 seconds.
4 Press (DSPL) for 2 seconds.
The stored names will appear.
5 Rotate th e volume control d ial to
select the disc name you want to
erase.
6 Press the select button for 2 seconds.
The name is eras ed.
Repeat ste ps 5 and 6 if you want to er ase
other names.
7 Press (LIST/CAT) for 2 seconds.
The unit returns to normal play mode.
Notes
• When the Disc Memo for a CD TEXT disc is erased,
the original CD TEXT information is displayed.
• If you cannot find the Disc Memo you want to erase,
try selecting a different CD un it in step 2.
Locating a disc by name
— List-up (When connecting a CD u nit with
the CD TEXT/CUSTOM F ILE functio n, or an MD
unit)
Y ou can use this function for discs that have been
assigned custom names*
2
discs*
.
*1 Locating a disc by its custom name: when you
assign a name for a CD (page 12) or an MD.
*2 Locating discs by the CD TEXT information: when
you play a CD TEXT disc on a CD unit with the CD
TEXT function.
1 During playback, press (LIST/CAT).
The name assi gned to the curr ent disc app ears
in the display.
2 Press (LIST/CAT) repeatedly until you
find the desired disc.
3 Press (SEEK) (+) or (SEEK) (–) to play
the disc.
Notes
• Once a disc name has been displayed for 5
seconds, the display goes back to its normal
playback mode.
• If there are no discs in the magazine, “NO DISC”
appears in the display.
• If a disc has not been assigned a custom file, “NO
NAME” appears in the display.
• The information appears only in upper case. There
are also some letters which cannot be displayed.
1
or for CD TEXT
13
Page 14
Radio
The unit can stor e up to 6 stations pe r band
(FM1, FM2, FM3, A M1 and AM2).
Caution
When tuning in stations while driving, use Best
Tuning Memory to prevent accidents.
Storing stations
automatically
— Best Tuning Memory (BTM)
The unit selects the stations with the strongest
signals within the selected band, and stores them
in the order of their frequency.
1 Press (SOURCE) repeatedly to select
the radio.
2 Press (MODE) repeatedly to select the
band.
3 Press (BTM) for 2 second s.
The unit stores stations in the order o f their
frequencies on th e number buttons.
A beep sounds when the setting is stored.
Notes
• If only a few stations can be received due to weak
signals, some number buttons will retain their former
settings.
• When a number is indicated in the displa y, the unit
starts storing stations from the one currently
displayed.
Receiving the stored stations
1 Press (SOURCE) repeatedly to select
the radio.
2 Press (MODE) repeatedly to select the
band.
3 Press the number button ((1) to (6))
on which the desired station is stored.
If preset tuning does not work
— Automatic tuning/Local Seek Mode
Automatic tuning:
Press (SEEK) (+) or (SEEK) (–) to
search for the station.
Scanning stops when the unit receives a
station. Repeat the operation until the desired
station is received.
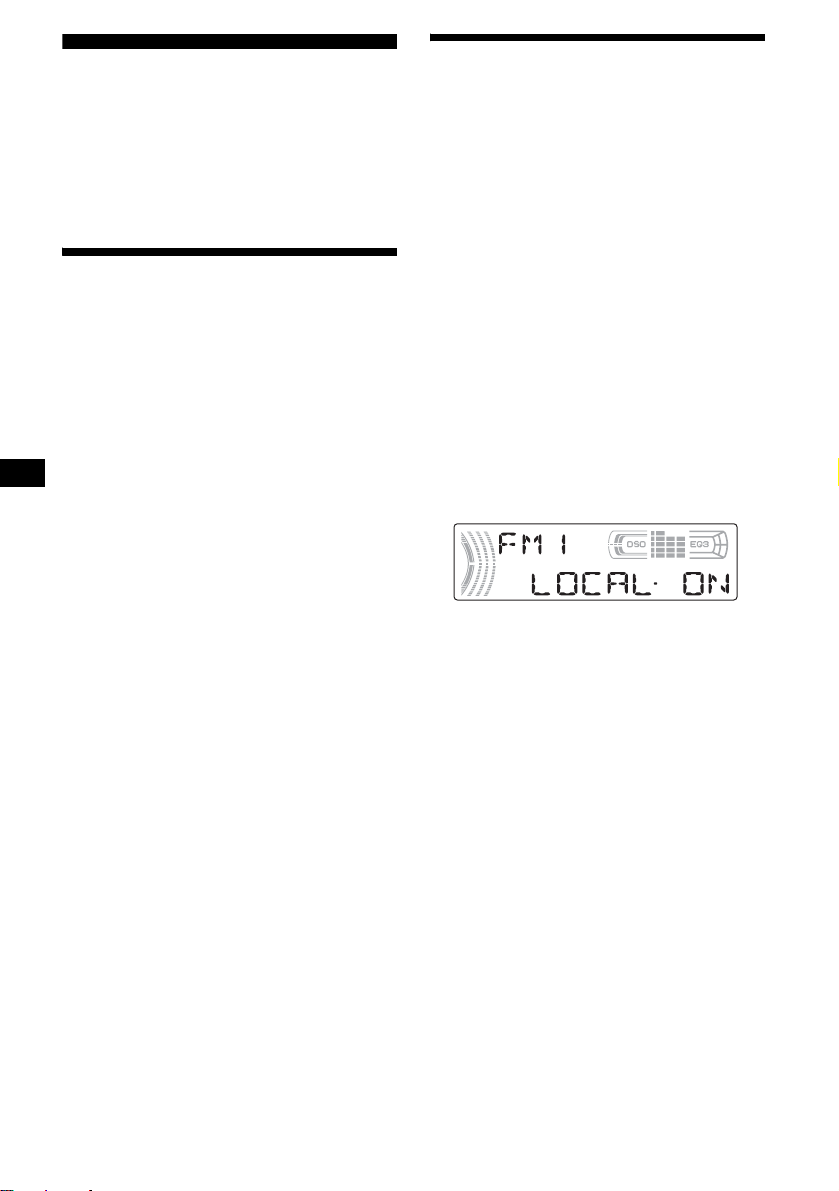
Local Seek Mode:
If the automatic tuning stops too
frequently, press (SENS) repeatedly
until “LOCAL-ON” appears.
Only the stations with relatively strong
signals will be tuned in.
To cancel the local seek mode, press (S ENS)
twice when receiving FM.
Note
When receiving AM, to cancel the local seek mode,
press (SENS) (“LOCAL-OFF” appears).
Tip
If you know the frequency of the station you want to
listen to, press and hold (SEEK) (+) or (SEEK) (–) to
locate the approximate frequency, then press
(SEEK) (+) or (SEEK) (–) repeatedly to fine adjust to
the desired frequency (manual tuning).
14
Page 15

If FM stereo reception is poor
— Monaural Mode
During radio reception, press (SENS)
repeatedly until “MONO-ON” appears.
The sound improves, but becomes monaural
(“ST” disappears).
To return to nor mal radio recepti on m ode, press
(SENS) (“MONO-OFF” appears).
Tip
If FM broadcasts are difficult to hear, set DSO to
“OFF” (page 20).
Storing only the desired
stations
Yo u can manually preset the desired stations on
any chosen number button.
1 Press (SOURCE) repeatedly to select
the radio.
2 Press (MODE) repeatedly to select the
band.
3 Press (SEEK) (+) or (SEEK) (–) to tu ne
in the station that you want to store.
4 Press the desired number button ((1)
to (6)) for 2 seconds until “MEM”
appears.
The number button in di cation appears in the
display.
Note
If you try to store another station on the same number
button, the previously stored station will be erased.
Tuning in a station through
a list
— List-up
1
During radio reception, press
The frequency appea rs in the display.
2 Press (LIST/CAT) repeatedly until you
find the desired station.
3 Press (SEEK) (+) or (SEEK) (–) to tune
in the desired station.
(LIST/CAT)
.
15
Page 16

Other Functions
You can also control the unit (and optional CD/
MD units) with a rotary commander (optional).
Using the rotary commander
By rotating the control
SEEK/AMS
control
First, attach the appropriate label depending on
how you want to mount the rotary commander.
The rotary commander works by pressing
buttons and/or rotatin g con tro ls.
MODE
DSPL
SEL
SEL
DSPL
MODE
By pressing buttons
(SEL)
(SOURCE)
Rotate the VOL control
to adjust the volume.
Press To
(SOURCE) Change the source
(MODE) Change operation
(ATT)
(MODE)
(DSPL)
(Radio/CD/MD*
(Radio band/CD unit *
1
unit*
)
1
)/Power on
(OFF)
1
/MD
(ATT) Attenuate the sound
(OFF)*
2
Stop playback or radio
reception/Power off
(SEL) Adjust and select
(DSPL) Change the display item
Rotate and release to:
– Skip tracks.
To continuously skip tracks, rotate once
and rotate again wi t hi n 2 seconds and hold
the control.
– Tune in stations automatically.
Rotate, hold, and release to:
– Fast-forward/reverse a track.
– Find a statio n manually.
By pushing in and rotating the control
PRESET/DISC
control
OFF
Push in and rotate the control to:
– Receive pres et st ations.
– Change di scs during CD (MD) pl ayback*
– Change albums*
3
.
1
.
16
Page 17

When an MP3 file is played, you can select an
album using the rotary commander.
(With optional unit)
To Do this
Skip discs
–Disc selection
Push in and rotate [once for
each disc] the control.
To continuously skip discs,
push in and rotate on ce and
rotate again within 2
seconds (and hol d ) the
control.
Skip albums*
–Album selection
3
1 To enter Album selection
mode, push in, then rotate
and hold the cont rol.
Within 2 seconds,
proceed to step 2.
2 Push in, then rotate
quickly and repeatedly, to
skip albums one by one.
*1 Only if the corresponding optional equipment is
connected.
*2 If your car has no ACC (accessory) position on the
ignition key switch, after turning off the ignition, be
sure to press and hold (OFF) until the display
disappears.
*3 Available only when an optional CD unit with the
MP3 file control function is connected, and MP3 file
is played.
Changing the operative direction
The operative direction of controls is factory-se t
as shown below.
To increase
Adjusting the sound
characteristics
You can adjust the balance, fader, low pass filter
and subwoofer volume.
1 Press the select button repeatedly
until “BAL,” “FAD,” “LPF” or “SUB”
appears.
Each time you press the select button, the
item changes as follows:
1
LOW*
t MID*1 t HI*1 t
BAL (left-right) t FAD (front-rear) t
LPF (low pass filter)*
SUB (subwoofer volume)*
*1 When EQ3 is activated (page 19).
*2 When “SUB” is selected (page 18).
*3 The cut off frequency is adjustable to 78 Hz,
125 Hz or OFF.
*4 The volume level is adjustable between –10
and +10 steps. (Below –10, “ATT” is displayed.)
2*3
t
2*4
2 Rotate the volume control dial to
adjust the selected item .
Note
Adjust within 3 seconds after selecting the item.
Quickly attenuating the
sound
(With the rota ry commander or the card
remote commander)
Press (ATT).
After “ATT-ON” momentarily appears,
“ATT” appears in the disp la y.
To decrease
If you need to mount the rotary commander on
the right hand side of the steering column, you
can rev erse the operative direction.
Press (SEL) for 2 seconds while
pushing the VOL control.
To restore the previous volume level, press
(ATT) again.
Tip
When the interface cable of a car telephone is
connected to the ATT lead, the unit decreases the
volume automatically when a telephone call comes in
(Telephone ATT function).
17
Page 18

Changing the sound and
display settings
The following items can be set:
• REAR/SUB*
REAR or SUB.
– Select “REAR” to output to a power amplifier .
– Select “SUB ” t o output to a subwoofer.
• A.SCRL (Auto Scroll)*
• M.DSPL (Motion Display) — to turn the
motion display on or off.
– Select “ON” to activate the motion display
(the moving pattern a ppears in the display ).
– Select “OFF” to deactiv ate the moti on disp lay.
•DEMO*
on or off.
– Select “ON” to activate the demonstration
display (The demo nstration starts about 10
seconds after the unit is turned off).
– Select “OFF ” t o deactivate the
demonstration display.
•BEEP*
• DIM — to chang e th e brightness of the disp la y.
– Select “ON” to dim the display.
– Select “OFF” to deactivate the Dimmer.
1
— to switch the audi o output
2
(page 11).
1
— to turn the demonstration display
3
— to turn the beeps on or off.
Switching the REAR/SUB*
1
Press the select button and then r otate
the volume control dial.
After 3 seconds, the display returns to normal
play mode.
Selecting the desired item
Press the select button and the
desired button simultaneously.
select button + (3): A.SCRL*
2
select button + (4): M.DSPL
select button + (4): DEMO*
select button + (6): BEEP*
1
3
select button + (DSPL) : D IM
After the mode setting is complete, the display
returns to normal play mode.
To cancel the item, press the select button and the
desired button simulta neously again .
*1 When the unit is turned off.
*2 When CD or MD is played.
*3 The beep sound is output only when the built-in
amplifier is used.
18
Page 19

Setting the equalizer (EQ3)
You can select an equ al izer curve for 7 music
types (XPLOD, VOCAL, CLUB, JAZZ, NEW
AGE, ROCK, CUSTOM and OFF (equalizer
OFF)).
You can store a different equa l iz er setting for
each source.
Selecting the equalizer curve
1 Press (SOURCE) to select a source
(Radio , CD or MD).
2 Press (EQ3) repeatedly to select the
desired equalizer cur ve.
Each time you pr ess (EQ3), the item
changes.
To cancel the equalizing effect, select “O FF.”
Adjusting the equalizer curve
You can store and adju st the equalizer settings
for different tone ranges.
1 Press (SOURCE) to select a source
(Radio, CD or MD).
2 Press (EQ3) repeatedly to select the
desired equalizer curve.
3 Adjusting the equalizer curve.
1 Press the sel ect button repe atedly
to select the desired tone rang e.
Each time you press the select button, the
tone range changes.
LOW t MID t HI (t BAL t FAD t
LPF t SUB)
2 Rotate the volume control dial to
adjust to the desired volume level.
The volume l evel is adjustable by 1 dB
steps from –10 dB to +10 dB.
3 Repeat step 1 and 2 to adjust the
equalizer curve.
To restore the facto ry-set equalizer c urve,
press the select button for 2 seconds.
Note
When EQ3 is set to “OFF,” you cannot adjust the
equalizer curve settings.
19
Page 20

Setting the Dynamic
Soundstage Organizer (DSO)
If your speakers are i nstalled into the lower part
of the doors, the so und will come from be l ow
and may not be clear.
The DSO (Dynami c Soundstage Organizer)
function creates a more ambient sound as if there
were speakers above th e dashboard (virtu al
speakers).
You can store the DSO setting for each sour ce.
DSO mode and image of virtual speakers
*3
*2
*1
*4
*3
*2
*1
*4
Additional Information
Maintenance
Fuse replacement
When replacing the fuse, be sure to use one
matching the amperage rating stat ed on the
original fuse. If the fuse blows, check the power
connection and replace the fuse. If the fuse blows
again after replacement, there may be an internal
malfunction. In su ch a case, consult your nearest
Sony dealer.
*1 DSO-1
*2 DSO-2
*3 DSO-3
*4 DSO-OFF
1 Press (SOURCE) to select a source
(Radio, CD or MD).
2 Press (DSO) repeatedly until the
desired DSO setting appears.
Each time you press (DSO), the DSO setting
changes.
To cancel the DSO function, select “D SOOFF.” After 3 seconds, the display returns to
normal play mode.
Notes
• Depending on the type of car interior or type of
music, DSO may not have a desirable effect.
• If FM broadcasts are difficult to hear, set DSO to
“OFF.”
20
Fuse (10 A)
Warning
Never use a fuse with an am perage rating
exceeding the one supplied with the unit as this
could damage the uni t.
Cleaning the connectors
The unit may not function properly if the
connectors betw een the unit and the fr ont panel
are not clean. In order to prevent this, detach the
front panel (pa ge 8) and clean the connectors
with a cotton swab dipped in alcohol. Do not
apply too much force. Otherwise, the connectors
may be damaged.
Main unit
Back of the front panel
Notes
• For safety, turn off the ignition before cleaning the
connectors, and remove the key from the ignition
switch.
• Never touch the connectors directly with your fingers
or with any metal device.
Page 21

Replacing the lithium battery
Under normal conditions, battery will last
approximately 1 year. (The service life may be
shorter, depending on the co ndi tions of use.)
When the batt ery bec omes wea k, th e rang e of the
card remote commander becomes shorter.
Replace the battery with a new CR2025 lithium
battery. Use of any other battery may p resent a
risk of fire or explosion.
x
+ side up
Notes on lithium battery
• Keep the lithium battery out of the reach of
children. Should the battery be swallowed,
immediately consult a doctor .
• Wipe the battery with a dry cloth to assure a
good contact .
• Be sure to observe the correct polarity when
installing the battery.
• Do not hold the battery with metallic tweezers,
otherwise a short-circuit may occur.
Removing the unit
1 Remove the protection collar.
1 Detach the front panel (page 8).
2 Engage the release keys together
with the protection collar.
Orient the release
key correctly.
3 Pull out the release keys to remove
the protection collar.
2 Remove the unit.
1 Insert both release keys together
until t hey click.
Face the hook
inwards.
WARNING
Battery may explode if mistreated.
Do not recharge, disassemble, or dispose of
in fire.
2 Pull the release keys t o unseat the
unit.
3 Slide the unit out of the mounting.
21
Page 22

Specifications
AUDIO POWER SPECIFICATIONS
POWER OUTPUT AND TOTAL HARMONIC DISTORTION
23.2 watts per channel minimum continuous average power into 4 ohms,
4 channels driven from 20 Hz to 20 kHz with no more than 5% total
harmonic distortion.
CD Player section
Signal-to-noise ratio 120 dB
Frequency response 10 – 20,000 Hz
Wow and flutter Below measurable limit
Tuner section
FM
Tuning range 87.5 – 107.9 MHz
Antenna terminal External antenna connector
Intermediate frequency 10.7 MHz/450 kHz
Usable sensitivity 9 dBf
Selectivity 75 dB at 400 kHz
Signal-to-noise ratio 67 dB (stereo),
Harmonic distortion at 1 kHz
Separation 35 dB at 1 kHz
Frequency response 30 – 15,000 Hz
69 dB (mono)
0.5 % (stereo),
0.3 % (mono)
AM
Tuning range 530 – 1,710 kHz
Antenna terminal External antenna connector
Intermediate frequency 10.7 MHz/450 kHz
Sensitivity 30 µV
Power amplifier section
Outputs Speaker outputs
Speaker impedance 4 – 8 ohms
Maximum power output 52 W × 4 (at 4 ohms)
(sure seal connectors)
General
Outputs Audio output terminals
Inputs Telephone ATT control
(rear/sub switchable)
Power antenna relay control
terminal
Power amplifier control
terminal
terminal
Remote controller input
terminal
BUS control input terminal
BUS audio input terminal
Antenna input termina l
Tone controls Low:
Power requirements 12 V DC car battery
Dimensions Approx. 178 × 50 × 177 mm
Mounting dimensions Approx. 182 × 53 × 161 mm
Mass Approx. 1.2 kg
Supplied accessories Card remote commander
Optional accessories Rotary commander
Optional equipment CD changer (10 discs)
Note
This unit cannot be connected to a digital preamplifier
or an equalizer which is Sony BUS system compatible.
Design and specifications are subject to chan ge
without notice.
±10 dB at 60 Hz (XPLOD)
Mid:
±10 dB at 1 kHz (XPLOD)
High:
±10 dB at 10 kHz (XPLOD)
(negative ground)
1
(7
/8 × 2 × 7 in)
(w/h/d)
1
(7
/4 × 2 1/8 × 6 3/8 in)
(w/h/d)
(2 lb 10 oz)
RM-X115
Parts for installation and
connections (1 set)
Front panel case (1)
RM-X4S
BUS cable (supplied with
an RCA pin cord)
RC-61 (1 m), RC-62 (2 m)
CDX-757MX
CD changer (6 discs)
CDX-T69
MD changer (6 discs)
MDX-66XLP
XM Satellite Radio
Receiver
XT-XM1
Source selector
XA-C30
AUX-IN Selector
XA-300
22
Page 23

Troubleshooting
The following checklist will help you remedy
problems you may encounter with your unit.
Before going t hrough the checkl ist belo w, check
the connection and operating procedur es.
General
No sound.
• Rotate the volume co n trol dial to a djust the
volume.
• Cancel the ATT function.
• Set the fader control to the ce nter position f or
a 2-speaker system.
• You tried to play back MP3 files with an
optional CD unit which is incompatible with
MP3.
t Play back with a Sony MP3 compatible
CD unit, such as the CD X - 757MX.
The contents of the memory have been
erased.
• The RESET button has been pressed.
t Store again into the memory.
• The power lead or battery has been
disconnected.
• The power connecting lead is not connected
properly.
No beep sound.
• The beep sound i s canceled (page 18).
• An optional power amplifier is connected
and you are not using the built-in amplifier.
The display disappears from/does not
appear in the display window.
• The display disappears if you press and ho l d
(OFF).
t Press and hold (OFF) again until the
display appe ar s.
• Remove the front panel and clean the
connectors. For det ai ls, see “Cleaning th e
connectors” on page 20.
Stored stations and correct time are erased.
The fuse has blown.
Makes noise when the ignition key is in the
ON, ACC, or OFF position.
The leads are not matched correctly with the
car’s accessory power connec to r.
No power is being supplied to the unit.
• Check the connection. If everything is in
order, check the fuse.
• The car does not have an ACC positio n.
t Press (SOURCE) (or insert a disc) to turn
on the unit.
The power is continuous ly supplied to the
unit.
The car does not have an ACC position.
The power antenna does not extend.
The power antenna does not have a relay box.
CD/MD playback
A disc cannot be loaded.
• Another CD is already loaded.
• The CD has been forcibly inserte d upside
down or in th e wr ong way.
Playback does not begin.
• Defective MD or dir t y C D .
• CD-R/CD-RW that is not finalized.
• You tried to play back a CD-R/CD-RW not
designed for audio use.
• Some CD-Rs/CD-RWs may not play due to
its recording equipment or the disc
condition.
A disc is automatically ejected.
The ambient temp erature exceeds 50°C
(122°F).
The operation buttons do not function.
CD will not be ejected.
Press the RESET button.
The sound skips from vibration.
• The unit is installed at an angle of more than
45°.
• The unit is not installed in a sturdy part of
the car.
The sound skips.
Dirty or defective disc.
continue to next page t
23
Page 24

Radio reception
Preset tuning is not possible.
• Store the correct frequency in the memory.
• The broadcast si gnal is too weak.
The stations cannot be received.
The sound is hampered by noises.
• Connect a power antenna control lead (blue)
or accessory power supply lead (red) to the
power supp l y lead of a car’s antenna booster
(only when your car has built-in FM/AM
antenna in the rear/side glass).
• Check the conne ct i on of the car antenna.
• The auto antenna will not go up.
t Chec k t he connection of the power
antenna control lead.
• Check the frequency.
• When the DSO mode is on, the sound is
sometimes hampered by noises.
t Set the DSO mode to “OFF” (page 20).
Automatic tuning is not possible.
• The local seek mod e is set to “ON.”
t Set the local seek mode to “O FF”
(page 14).
• The broadcast si gnal is too weak.
t Perform manual tuning.
The “ST” indication flashes.
• Tune in the frequency accurat ely.
• The broadcast si gnal is too weak.
t Set the monaural reception mode to
“ON” (page 15).
A program broadcast in stereo is heard in
monaural.
The unit is in monaural reception mode.
t Canc el monaural reception m ode
(page 15).
Error displays/Messages
Error displays
(For this unit and optional CD/MD changers)
The following indications will flash for about
5 seconds, and an alarm sound will be heard.
BLANK*
ERROR*
FAILURE (Illuminates until any button is
pressed.)
FAILURE (Illuminates for about 1 second.)
NO DISC
NO MAG
NO MUSIC
NOTREADY
OFFSET
RESET
1
No tracks have been recor ded on an MD.*
2
t Play an MD with recorded tracks on it.
1
• A CD is dirty or inserted upside down.*
2
t Clean or insert the CD correctly.
• A CD/MD cannot play because of so me
problem.
t Insert another CD /MD.
The connection of speakers/amplifiers is
incorrect.
t See the installation guide manual of this
model to check the connection.
When the XM tune r i s connected, storing a n
XM radio channel into a preset failed.
t Be sure to receive the chan nel that you
want to store, then try it again.
No disc is inserted in the CD/MD unit.
t Insert discs in the CD/MD unit.
The disc magazine is not inserted in the CD
unit.
t Insert the magazine in the CD unit.
A CD whic h is not a music file is inserted in
the MP3 playable CD unit.
t Insert a music CD in the MP3 playable CD
unit.
The lid of the MD unit is open or the MDs are
not inserted properly.
t Close the lid or insert the MDs properly.
There may be an internal malfunction.
t Check the connection. If the error
indication remains on in the display,
consult your nearest Sony dealer.
The CD/MD unit ca nnot be operated becaus e
of some problem.
t Press the RESET butto n on the unit.
24
*1 When an error occurs during playback of a CD or
MD, the disc number of the CD or MD does not
appear in the display.
*2 The disc number of the disc causing the error
appears in the display.
Page 25

Messages
L.SEEK +/–
The loca l seek mode is on durin g a utomatic
tuning (page 14).
“” or “”
You have reached the beginning or th e end of
the disc and you cannot go any further.
If these solutions do not help improve the
situation, consult your nearest Sony de al er.
25
Page 26

Félicitations !
r
Nous vous remercions d’avoir fait l’acquisition
de ce lecteur de disq ues compacts Sony. Vous
pouvez profiter encore davantage des mu l t ip le s
fonctions de cet appareil grâce aux fonctions et
accessoires cités ci-dessous :
• Fonctionnement avec des lecteurs CD ou MD
en option (chang eurs et lecteurs)*
• Affichage des informations CD TEXT (pendant
la lecture d'un CD TEXT*
• Accessoire de commande fourni
Mini-télécommande RM-X115
• Accessoire de commande en option
Satellite de commande RM-X4S
*1 Cet appareil fonctionne uniquement avec des
produits Sony.
*2 Un disque CD TEXT est un CD audio contenant
des informations, telles que le nom du disque, le
nom de l'artiste et les noms des plages. Ces
informations sont enregistrées sur le disque.
Le logo « XM Ready » indique que ce produit
commande un tuner XM Sony (vendu
séparément).
Consultez votre revendeur agréé Sony le plus
proche pour obtenir plus d'informations sur le
tuner XM.
Pour en savoir plus sur le fonctionnement du
tuner XM, reportez-vous au manuel utilisateu
1
.
2
).
2
Page 27

Table des matières
Emplacement des commandes . . . . . . . . . . . 4
Précautions . . . . . . . . . . . . . . . . . . . . . . . . . . 6
Remarques sur les disques. . . . . . . . . . . . . . . 7
Préparation
Réinitialisation de l’appareil . . . . . . . . . . . . . 8
Retrait de la façade . . . . . . . . . . . . . . . . . . . . 8
Réglage de l’horloge . . . . . . . . . . . . . . . . . . . 9
Lecteur CD
Lecteur CD ou MD (en option)
Lecture d’un disque. . . . . . . . . . . . . . . . . . . 10
Rubriques d’affichage . . . . . . . . . . . . . . . . . 11
Lecture de plages en boucle
— Lecture répétée. . . . . . . . . . . . . . . . . . 12
Lecture des plages dans un ordre aléatoire
— Lecture aléatoire . . . . . . . . . . . . . . . . 12
Identification d’un CD
— Fonction de mé m o de disque
Recherche d’un dis que par son nom
— Affichage automatique des titres
* Fonctions disponibles avec un lecteur CD ou MD en
option
* . . . . . . 13
* . . . 14
Radio
Mémorisation automatique des stations
— Mémorisation des meilleurs accords
(BTM) . . . . . . . . . . . . . . . . . . . . . . . . . . 14
Réception des stations mémorisées. . . . . . . 15
Mémorisation des statio n s sou h aitées
uniquement. . . . . . . . . . . . . . . . . . . . . . . 15
Syntonisation d’une station à partir d’une liste
— Affichage automatique de la liste . . . 16
Autres fonctions
Fonctionnement du satellite de
commande . . . . . . . . . . . . . . . . . . . . . . . 16
Réglages des ca ractéristiques sonores . . . . 19
Atténuation rapide du son. . . . . . . . . . . . . . 19
Modificatio n des réglages du son et de
l’affichage . . . . . . . . . . . . . . . . . . . . . . . 19
Réglage de l’égaliseur (EQ3) . . . . . . . . . . . 2 0
Réglage du répartiteur dynamique du son émis
(DSO). . . . . . . . . . . . . . . . . . . . . . . . . . . 21
Informations complémentaires
Entretien . . . . . . . . . . . . . . . . . . . . . . . . . . . 22
Démontage de l’appareil. . . . . . . . . . . . . . . 23
Caractéristiques techniques . . . . . . . . . . . . 24
Dépannage . . . . . . . . . . . . . . . . . . . . . . . . . 25
Affichage des erreurs et messages . . . . . . . 26
3
Page 28

Emplacement des commandes
Pour obtenir des in formations plus détaillées, reporte z- vous aux numéros de page s i ndi qués.
P
U
R
D
E
C
R
U
O
S
DSO
SEEK SEEK
EQ3
M
O
D
E
E
P
/
S
C
S
E
S
T
I
H
D
I
A
L
L
I
S
S
E
T
L
C
E
A
C
T
T
L
P
S
D
BTMSENS
21
CDX-F5000
BBESHUFREP
OPEN
6543
OFF
a Touche DSO 21
b Touche SOURCE (Mise sous tension/
Radio/CD/MD)
Sélection de la source.
c Touche LIST/CAT*
1
13, 14, 16
d Récepteur de la mini-télécommande
e Fenêtre d’affichage
f Touche Z (éjecter) (située à l’a vant de
l’appareil, derrière la façade) 10
g Touche OPEN 8, 10
h Touche EQ3 (égaliseur) 20, 21
i Touche MODE
Changement du mo de de fonctionnemen t.
j Molette de réglage du volume /Touche
de sélection
Tournez cette comm ande pour :
– régler le volume.
– régler les param ètres.
Appuyez sur cette commande pour :
– sélectionner les paramètres.
k Touche DSPL (modification du mode
d’affichage) 9, 11, 13, 20
l Touche SENS 15
m Touche RESET (située à l’avant de
l’appareil, derrière la façade) 8
n Touche BTM
o Touches numériques 20
Radio :
Pour mémoriser des stations ou synto niser
des stations mémorisées.
CD/MD :
(3) : REP 12
(4) : SHUF 12
p Touche OFF (Arrêt/Mise hors
tension)*
*1 (CAT) est disponible uniquement lorsque le
récepteur XM est raccordé.
Avertissement en cas d’installation de
*2
2
8, 10
l’appareil da ns un véhicule do nt le
contact ne c omporte pas de positi on A CC
(accessoires)
Après avoir coupé le moteur, n’oubliez pas
de maintenir (OFF) enfoncée sur l’appareil,
jusqu’à ce que l’affichage apparaisse.
Sinon, l’affichage n’est pas désactivé et la
batterie du véhicule se décharge.
4
Page 29

P
U
R
E
P
/
S
C
S
E
S
T
I
D
E
C
R
U
O
S
DSO
SEEK SEEK
EQ3
M
O
D
E
(+) : pour déplacer la sélection vers le haut
(DISC/PRESET)
H
D
I
A
L
L
I
S
S
E
T
L
C
E
A
C
T
T
L
P
S
D
SENS
Mini-télécommande RM-X115
DSPL MODE
+
PRESET
SOURCE
SEEK
–
PRESET
–
+
VOL
–
SEEK
ATTOFF
+
(SEEK)
(–) : pour
déplacer la
sélection
vers la
gauche/
.
(–) : pour déplacer la sélection vers le bas
S
E
E
K
(DISC/PRESET)
SEEK
(SEEK)
(+) : pour
déplacer la
sélection
vers la
droite/>
q Touches DISC (ALBUM)/PRESET (+/–)
Pour syntoniser des stations présélectionnées
ou changer de disque*
*1 Lors qu’un appareil CD ou MD en option est
raccordé.
*2 Disponible uniquement lorsqu’un appareil CD
en option avec fonction MP3 est raccordé et
qu’un fichier MP3 est en cours de lecture.
1
, sauter des albums*2.
r Touches SEEK (–/+)
Pour passer d’une plage à l’aut r e, avan cer
rapidement ou re culer, syntoniser des
stations automatiquement ou manuellement
ou pour sélectionner un réglage.
Les touches de la mini-télécomm ande
permettent de commander les mêmes
fonctions que les touches
correspondantes sur l’appareil.
a Touche DSPL
b Touche SOURCE
c Touches SEEK (–/+)
d Touche OFF
e Touches VOL (+/–)
f Touche MODE
g Touches PRESET (DISC/ALBUM) ( +/–)
h Touche ATT
Remarque
Si vous désactivez l’affichage en appuyant sur (OFF),
il ne peut pas être réactivé avec la minitélécommande, sauf si vous activez d’abord l’appareil
en appuya nt sur (SOURCE) ou si vous insérez un
disque dans le lecteur.
Conseil
Pour obtenir des informations plus détaillées sur le
remplacement de la pile, reportez-vous à la section
« Remplacement de la pile au lithium » page 22.
Suite à la page suivantet
5
Page 30

Sélection d’un disque ou d’un album à
l’aide de la mini-télécommande
Les touches PRESET (DISC/ALBUM) (+/–) de
la mini-télécommande permettent de pass er d’un
album à l’autre ou d’un di sque à l’autre.
(Avec un appareil en option)
Pour Appuyez sur
passer d’un disque
à l’autre
–Sélection d’un
disque
passer d’un album
à l’autre*
–Sélection d’un
album
* Disponible uniquement lorsqu’un appareil CD en
option avec fonction MP3 est raccordé et qu’un
fichier MP3 est en cours de lecture.
+ ou – [une fois pour chaque
disque]
Pour sauter plusieurs
disques de suite, appuyez
une fois sur une des touches,
puis appuyez de nouveau sur
cette touche dans les 2
secondes qui suivent et
maintenez-la enfoncée.
+ ou – [maintenez la touche
enfoncée brièvement], puis
relâchez
Pour saute r plusieurs albums
de suite, appuyez une fois
sur une des touche s, puis
appuyez de nouveau sur la
même touche dans les 2
secondes qui suivent et
maintenez-la enfoncée.
Précautions
• Si votre véhicule es t r esté stationné en plein
soleil, laissez refroidir l’appareil avant de
l’utiliser.
• L’antenne électrique se déploie
automatiquement lorsque l’appareil fonctionne.
• N’utilisez pas la fonction CUSTOM FILE
pendant que vous conduise z, ni aucune autr e
fonction susceptible de diminuer l’attention
portée à la route.
Si vous avez des questions ou de s problèmes
concernant cet ap pareil qui ne sont pas abordés
dans ce mode d’emploi, contactez votre
revendeur Sony.
Condensation
Par temps de pluie ou dans des régions très
humides, de la condensation peu t s e former à
l’intérieur des lentilles et dans la fenêtre
d’affichage de l’appare il . Si cel a se produit,
l’appareil ne fonctionne pas correctement. Dans
ce cas, retirez le di sque et attendez environ une
heure que l’humi di té se soit évaporée.
Pour conserver un son de h aute qual ité
Ve i ll ez à ne pas renverser de jus de fruit ou
d’autres bo issons suc rées su r l’ap par eil ou sur l es
disques.
Saut de plusieurs plages de suite
Appuyez une fois sur (SEEK) (+) ou
(SEEK) (–), puis ap puyez de nouveau sur la
même touche dans le s 2 secondes qui suivent et
maintenez-la enfoncée.
6
Page 31

Remarques sur les disques
• Pour qu’un disque reste propre, ne to uchez pas
sa surface. Saisissez-le par les bords.
• Rangez vos disques dans leur boîtier ou dans un
chargeur lorsque vous ne vous en servez pas.
• N’exposez pas les disques à des températures
élevées. Évitez de les laisser dans un véhicule
en stationnement ou sur le tableau de bord ou la
plage arrière .
• Ne collez pas d’étiquettes sur les disq ue s et
n’utilisez pas de disques rendus collants par de
l’encre ou des rés idus. De tels disques peuvent
s’arrêter de tourner en cours de lecture et
provoquer des dysfonctionnements ou être
endommagés.
• Avant la lecture, nettoyez les disques avec un
chiffon de nettoyage disponi bl e dans le
commerce. Essuyez chaque disque en par tant
du centre vers l’extérieur. N’utilisez pas de
solvants, tels que de l’essence du diluant, des
produits de nettoyage vendus dans le commerce
ou des vaporisateurs an tistatiques destinés aux
disques analogiques.
Remarques sur les disques CD-R et
CD-RW
• Cet appareil permet la lecture des dis ques CDR (CD enregistrables) et CD-RW (CD
réinscriptibles) destinés à un usage audio.
Vérifiez le logo sur le CD pour identifier les
disques CD-R et CD- RW à usage audio.
La présence de l’un des logos ci-dessous indique
que le CD n’est pas destiné à l’usage audio.
• N’utilisez pas de disques sur lesquels sont
collés des étiquettes ou des autocollants.
L’utilisation de tels disques peut entraîner les
dysfonctionnements suivants :
– Impossib il i té d’éjecter un disque parce que
l’étiquette ou l’autocollant se décoll e et
bloque le mécanisme d’éjection.
– Erreurs d e le ct ure des données audio (p. ex.,
sauts de lecture ou aucune lecture)
provoquées par une déformation du disqu e
suite au rétrécissement de l’étiqu et te ou de
l’autocollant sous l’effet de la chaleur.
• Les disques de forme non stan dard (ex. : en
forme de cœur, de carré ou d’étoil e) ne pe uv e nt
pas être lus ave c cet appareil. Vous risquez
d’endommager votre appare i l si vous essayez
de le faire. N’utilisez pas de tels disques.
• Ce lecteur ne permet pas la lecture des CD de
8 cm (3 po).
• En fonction de l’appareil utilisé pour
l’enregistrement ou de l’état du disque, il es t
possible que ce lecteur ne puisse pas lire
certains disques CD - R ou CD-RW.
• Ce lecteur ne permet pas la lecture de disques
CD-R ou CD-RW non finalisés*.
* Processus nécessaire pour qu’un disque CD-R ou
CD-RW enregistré puisse être lu dans un lecteur CD
audio.
7
Page 32

Préparation
Retrait de la façade
Vous pouvez retirer la façade de cet appareil pour
éviter qu’il ne soit volé.
Réinitialisation de l’appareil
Avant la pre m ière mise e n service de l’ a ppareil,
après avoir remplacé la batterie du véhicule ou
modifié les raccordements, vous devez
réinitialiser l’appareil.
Retirez la façade, pui s appuyez sur la touche
RESET avec un objet pointu, comme un stylo à
bille.
Touche RESET
Remarque
Une pression sur la touche RESET remet l’heure à
zéro et efface certaines informations mémorisées.
Alarme d’avertissement
Si vous mettez la clé de contact en position OFF
sans ôter la façade , l’a larme d’avertissement
retentit pe ndant quelques secondes.
Si vous raccordez un ampl i ficate ur en option et
que vous n’utilisez pas l’amplificateur intégré, le
bip est désact ivé.
1 Appuyez sur (OFF)*.
La lecture du disque CD ou MD ou la
réception radio s 'a rr ête (l’éclairage des
touches et l’affichage rest ent allumés).
* Si le contact de votre véhicule n’est pas doté
d’une position ACC (accessoires), veillez à
désactiver l’appareil en appuyant sur (OFF)
jusqu’à ce que l’affichage disparaisse pour éviter
que la batterie du véhicule ne se décharge.
2 Appuyez sur (OPEN), faites glisse r la
façade vers la droite, puis tirez
doucement vers vous l’extrémité
gauche de la façade.
1
2
Remarques
• Si vous retirez la façade alors que l’appareil est sous
tension, l’alimentation est automatiquement coupée,
de manière à éviter d’endommager les hautparleurs.
• N’exercez pas de pression excessive sur la façade
(y compris la fenêtre d’affichage) et ne la faites pas
tomber non plus.
• N’exposez pas la façade à une température ou à un
taux d’humidité élevé. Évitez de la laisser dans un
véhicule en stationnement ou sur le tableau de bord
ou la plage arrière.
Conseil
Lorsque vous transportez la façade, glissez-la dans
l’étui fourni à cet effet.
8
Page 33

Installation de la façade
Enfilez l’orifice A de la façade sur la tige B de
l’appareil, puis poussez doucement sur le côté
gauche pour l’engager en position.
Appuyez sur (SOURCE) sur l’appareil (ou
insérez un CD) pour le faire fonctionner.
A
B
x
Réglage de l’horloge
L ’horloge numérique fonctionne suivant un cycle
de 12 heures.
Exemple : pour régl er l’ horloge à 10:08
1 Appuyez sur (DSPL) pendant 2
secondes.
L’indication des heures clignote.
1 Tournez la molette de réglage du
volume pour régler les heures.
2 Appuyez sur la touche de sélect ion.
L’indication des minutes clignote.
3 Tournez la molette de réglage du
volume pour régler les minutes.
2 Appuyez sur (DSPL).
L’horloge démarre. Une fois l e réglage de
l’horloge terminé, la fenêtre d’affichage
revient au mode de lecture normal.
Remarque
Ne posez rien sur la face interne de la façade.
9
Page 34

Lecteur CD
Lecteur CD ou MD (en
option)
Cet appareil vous permet, en plus de la lecture de
CD, de piloter des le cteurs externes MD ou CD
(y compris les lecteurs CD MP3). Si vous
raccordez un lecteur de CD compatible MP 3 e n
option (p. ex. un changeur CD MP3), vous
pouvez lire des fichiers M P 3, des fichiers audio
(plages) compri més offrant un son de grande
qualité.
Pour Appuyez sur
interrompre la
lecture
éjecter le disque (OPEN), puis sur Z
passer d’une plag e
à l’autre
–Accès
automatique
aux plages
avancer
rapidement ou
reculer dans une
plage
–Recherche
manuelle
(OFF)
(SEEK) (–/+)
(./>)
[une fois par plag e]
(SEEK) (–/+)
(m/M)
[maintenez la touche
enfoncée jusqu’au point
souhaité]
Lecture d’un disque
(Avec cet appareil)
1 Appuyez sur (OPEN) et insérez le
disque (côté imprimé vers le haut).
2 Fermez la façade.
La lecture commen ce automatiquemen t.
Si un disque se trouve déjà dans l’appareil,
appuyez plusieurs fois sur (SOURCE) jusqu’à ce
que l’indication « CD » s’a ffiche pou r l ancer la
lecture.
Pour sauter plusieurs plages de suite, appuyez sur
(SEEK) (+) ou (SEEK) (–), puis appuyez de
nouveau sur la même touche dans les 2 secondes
qui suivent et maintenez-la enfoncée.
Remarques
• Si vous appuyez sur (SEEK) (–) ou (SEEK) (+), la
lecture saute à la dernière ou à la première plage du
disque.
• Lorsque la dernière plage du disque est terminée, la
lecture reprend à partir de la première plage du
disque.
(Avec un appareil en option)
1 Appuyez plusieurs fois sur (SOURCE)
pour sélectionner « CD » ou « MD
1
(MS*
)».
2 Appuyez plusieurs fois sur (MODE)
jusqu’à ce que l’appareil souhaité
s’affiche.
La lecture commence.
Pour Appuyez sur
passer d’un disque
à l’autre
–Sélection d’un
disque
passer d’un album
à l’autre*
–Sélection d’un
2
album
(DISC/PRESET) (+/–)
[une fois pour ch aque
disque]
(DISC/PRESET) (+/–)
[maintenez la touche
enfoncée jusqu’au point
souhaité]
10
*1 MS : Lecteur MG System-up à Memory Stick
MGS-X1
*2 Disponible uniquement lorsqu’un appareil CD en
option avec fonction MP3 est raccordé et qu’un
fichier MP3 est en cours de lecture.
Page 35

Précautions à prendre lors du raccordement
d’appareils MGS-X1 ou MD
Cet appareil reconnaît le MGS-X1 comme étant un
appareil MD.
• Pour lancer la lecture sur un lecteur MGS-X1,
appuyez sur (SOURCE) pour sélect ionne r « MS » ou
« MD ». Lorsque « MS » s’affiche comme source, le
MGS-X1 commence la lecture. Si « MD » est affiché
comme source, appuyez sur (MODE) pour
sélectionner « MS » et lancer la lecture.
• Pour lancer la lecture sur un lecteur MD, appuyez
sur (SOURCE) pour sélectionner « MD » ou « MS ».
Lorsque l’appareil MD souhaité s’affiche comme
source, la lecture commence. Si « MS » ou un autre
appareil MD s’affiche comme source, appuyez sur
(MODE) pour sélectionner l’appareil MD souhaité et
lancer la lecture.
Remarques sur le raccordement de lecteurs CD
compatibles MP3
• Si un disque sans fichiers (plages) MP3 est inséré,
l’indication « NO MUSIC » s’affiche à l’écran et la
lecture passe au disque suivant.
• Avant de lancer la lecture d’une plage, cet appareil
lit toutes les informations relatives aux plages et aux
albums du disque. Selon la structure des plages,
cette recherche d’informations peut durer plus d’une
minute avant que la lecture ne puisse commencer.
Pendant cette période, l’indication « READ »
s’affiche à l’écran. La lecture commence
automatiquement lorsque la lecture des informations
est terminée.
Remarque
Avec un appareil en option raccordé, la lecture de la
même source continue sur le lecteur CD ou MD en
option.
Rubriques d’affichage
Lorsque le disque, l’album ou la plage change,
tout titre préenregistré*
nouvel album ou de la nouvell e pl age et
automatiquement affiché. (Si la fonction de
défilement automatique (A.SCRL) est réglée à
« ON », les noms de plus de 8 caractères défilent
dans l’écran d’ affichage (page 19).)
Source
Rubriques affichables
• Numéro
de disque/Numéro de plage/
Durée de lecture écoulée
• Nom du disque*
• Nom de l’album (du dossier)*
• Nom de la plage (du fichier)*1*
• Étiquette ID3*
• Horloge
Pour Appuyez sur
passer d’une
rubrique
d’afficha ge à
l’autre
1
du nouveau disque, du
1
/Nom de l’artiste*
3
(DSPL)
2
3
3
*1 Lorsque vous appuyez sur (DSPL), l’indication
« NO NAME » indique qu’il n’existe pas de mémo
de disque (page 13) ou de nom préenregistré à
afficher.
*2 Uniquement pour les disques CD TEXT contenant
le nom de l’artiste.
*3 Uniquement pour les fichiers MP3.
Dans une étiquette ID3, seuls le nom de la plage,
de l’artiste et de l’album sont affichés.
Lorsque vous appuyez sur (DSPL), l’indication
« NO ID3 » indique qu’il n’existe pas d’étiquette
ID3 à afficher.
Remarques
• Certains caractères ne peuvent pas être affichés.
Les caractères qui ne peuvent être affichés sont
remplacés par le symbole « * » à l’affichage.
• Pour certains disques CD TEXT ou étiquettes ID3
contenant un grand nombre de caractères, le
défilement automatiqu e peut ne pas fonctionne r.
• Cet appareil ne peut pas afficher le nom de l’artiste
de chaque plage d’un disque CD TEXT.
Conseils
• Lorsque la fonction de défilement automatique
(A.SCRL) est réglée à « OFF » et que le nom du
disque, de l’album ou de la plage est modifié, ce
nom ou celui de l’étiquette ID3 ne défile pas.
• Si un fichier MP3 est lu et que l’album est changé, le
numéro du nouvel album s’affiche.
11
Page 36

Lecture de plages en boucle
— Lecture répété e
Vous po uvez sélectionner :
• REP-TRACK — pour répéter la plage en cours
de lecture.
•REP-ALBM*
l’album en cours de lecture.
•REP-DISC*
disque en cours de le ct ur e.
*1 Disponible uniquement lorsqu’un appareil CD en
option avec fonction MP3 est raccordé et qu’un
fichier MP3 est en cours de lecture.
*2 Disponible uniquement lorsqu’un ou plusieurs
lecteurs CD ou MD en option sont raccordés.
En cours de lecture, appuyez
plusieurs fois sur (3) (REP) jusqu’à ce
que le réglage souhaité ap par ai sse
dans la fenêtre d’affichage.
La lecture répétée c om m ence.
Pour revenir en mode de lecture normal,
sélectionnez « REP-OFF ».
1
— pour répéter les pla ges de
2
— pour répéter les plages du
Lecture des plages dans un
ordre aléatoire
— Lecture aléato ire
Vous pouvez sélectionner :
• SHUF-ALBM*
l’album en cours dans un or dr e aléatoire.
• SHUF-DISC — pour écouter les plag es du
disque en cours de lec t ure dans un ordre
aléatoire.
• SHUF-CHGR*
aléatoire les plages du changeur CD (MD)
utilisé.
• SHUF-ALL*
aléatoire toutes les plages de tous les lecteurs
CD (MD) raccordés, y compris de cet appareil.
*1 Disponible uniquement lorsqu’un appareil CD en
option avec fonction MP3 est raccordé et qu’un
fichier MP3 est en cours de lecture.
*2 Disponi ble uniquement lorsqu’un ou plusieurs
changeurs CD ou MD en option sont raccordés.
*3 Disponi ble uniquement lorsqu’un ou plusieurs
lecteurs CD en option ou plusieurs lecteurs MD en
option sont raccordés.
En cours de lecture, appuyez
plusieurs fois sur (4) (SHUF) jusqu’à
ce que le réglage souhaité ap par ai sse
dans la fenêtre d’affichage.
La lecture aléatoire commence.
Pour revenir en mode de lecture normal,
sélectionnez « SHUF-OFF ».
Remarque
La fonction « SHUF-ALL » ne passe pas de façon
aléatoire des plages de lecteurs CD aux plages de
lecteurs MD.
1
— pour écouter les plages de
2
— pour écouter dans un ordre
3
— pour écouter dans un ordre
12
Page 37

Identification d’un CD
— Fonction de mémo de dis qu e ( lor s du
raccordement d’un lecteur CD disposant de la
fonction CUSTOM FILE)
Vous pouvez identifier chaque dis que avec un
nom personnali sé (mémo de disque). Vous
pouvez saisir jusqu’à 8 caractères pour chaque
disque. Lorsque vous avez identifié un CD , vous
pouvez ensuite le localiser par son nom
(page 14).
1 Commencez à écouter le disque que
vous souhaitez identifier dans un
lecteur CD disposant de la fonction
CUSTOM FILE.
2 Appuyez sur (LIST/CAT) pendant 2
secondes.
L ’appare il répè te la lect ure du di sque au co urs
de la procédure d’ id entification.
3 Saisissez les caractères du nom
souhaité.
1 Tournez la molette de réglage du
volume pour sélectionner le
caractère souhait é.
A y B y C ... y 0 y 1 y 2 ...
y + y – y
* (Inser t ion d’ un espace )
2 Appuyez sur la touche de sélection
lorsque vous avez repéré le
caractère souhait é.
Le caractère suivant clignote.
3 Répétez les étape s 1 et 2 pour
saisir le reste du nom.
4 Pour revenir au mode de lecture
normal, appuyez sur (LIST/CAT)
pendant 2 secondes.
... y * y A
*
Conseils
• Pour corriger ou effacer un caractère, procédez
simplement par réécriture ou saisissez « ».
• Vous pouvez identifier les CD avec un appareil ne
disposant pas de la fonction CUSTOM FILE si cet
appareil est raccordé à un autre lecteur CD
disposant de cette fonction. Le mémo de disque est
alors sauvegardé dans la mémoire du lecteur CD
disposant de la fonction CUSTOM FILE.
Remarque
Les fonctions de lecture répétée et de lecture aléatoire
(REP-TRACK/SHUF) sont interrompues jusqu’à ce
que l’ident ification du disque soit terminée .
Affichage du mémo de disque
En tant que rubriq ue d’affichage, le mémo de
disque est toujours affiché en priorité par rapport
aux informations CD TEXT d’origine.
Pour Appuyez sur
afficher le nom (DSPL) pendant la lecture
Conseil
D’autres informations peuvent également être
affichées (page 11).
d’un disque CD ou CD
TEXT
Suppression du mémo de disque
1 Appuyez plusieurs fois sur (SOURCE)
pour sélectionner « CD ».
2 Appuyez plusieurs fois sur (MODE)
pour sélectionner le le ct eur C D sur
lequel le mémo de disque est
mémorisé.
3 Appuyez sur (LIST/CAT) pendant 2
secondes.
4 Appuyez sur (DSPL) pendant 2
secondes.
Les noms mémorisés apparaissent.
5 Tournez la molette de réglage du
volume pour sélectionner le nom de
disque à supprimer.
6 Appuyez sur la touche de sélection
pendant 2 secondes.
Le nom est supprimé.
Répétez les étape s 5 et 6 si vous souhaitez
effacer d’autres noms.
7 Appuyez sur (LIST/CAT) pendant 2
secondes.
Le lecteur revient en mod e de lecture normal.
Remarques
• Lorsque le mémo d’un disque CD TEXT est effacé,
les informations CD TEXT d’origine s’affichent.
• Si vous ne réussissez pas à trouver le mémo de
disque que vous souhaitez effacer, essayez de
sélectionner un autre lecteur CD à l’étape 2.
13
Page 38

Recherche d’un disque par
son nom
— Affichage automatique des titres (lors du
raccordement d’un lecteur CD disposant de la
fonction CD TEXT ou CUSTOM FILE ou pour un
lecteur MD)
Vous po uvez utiliser cette foncti on pour les
disques auxquels vous avez attribué des noms*
et pour les disques CD TEXT*
*1 Recherche d’un disq ue pa r so n no m : lor squ e v ou s
avez attribué un nom au CD (page 13) ou au MD.
*2 Recherche d’un disque grâce aux informations CD
TEXT : lorsque vous écoutez un disque CD TEXT
sur un lecteur CD disposant de la fonction CD
TEXT.
2
.
1 En cours de lecture, appuyez sur
(LIST/CAT).
Le nom attribué au disque en cours de lecture
s’aff iche à l’écran.
2 Appuyez plusieurs fois sur (LIST/CAT)
pour sélectionner le disque souhaité.
3 Appuyez sur (SEEK) (+) ou (SEEK) (–)
pour lancer la lecture du disque.
Remarques
• Après affichage pendant 5 secondes du nom du
disque, l’affichage revient au mode de lecture
normal.
• S’il n’y a pas de disque dans le chargeur, le
message « NO DISC » apparaît dans la fenêtre
d’affichage.
• Si aucun fichier n’a été attribué à un disque, le
message « NO NAME » apparaît dans la fenêtre
d’affichage.
• Les informations s’affichent uniquement en
majuscules. De même, certaines lettres ne peuvent
pas être affichées.
1
Radio
L’appareil peut mémoriser jusqu’à 6 stations par
bande de fréquences (FM1, FM2, FM3, AM1 et
AM2).
Attention
Pour sélectionner des stations pend ant que vous
conduisez, utilisez la fonction « Mémorisation
des meilleurs acc ords (BTM) », de façon à
réduire les risques d’accident.
Mémorisation automatique
des stations
— Mémorisation des meilleurs accords
(BTM)
L’appareil sélection ne les stations ayant les
signaux les plus pui ss ants dans la bande
sélectionnée et les mémorise dans l’ordre des
fréquences.
1 Appuyez plusieurs fois sur (SOURCE)
pour sélectionner la radio.
2 Appuyez plusieurs fois sur (MODE)
pour sélectionner la bande.
3 Appuyez sur (BTM) pen d ant 2
secondes.
L’appareil enregist re les stations sur le s
touches numériques selon l’ordre des
fréquences.
Un bip retentit lorsque le réglage est
mémorisé.
Remarques
• S’il n’est possible de capter que quelques stations
en raison de la faiblesse des signaux, certaines
touches numériques conservent leur réglage
précédent.
• Si un numéro est affiché à l’écran, l’appareil
commence la mémorisation des stations à partir de
la station affichée.
14
Page 39

Réception des stations
mémorisées
1 Appuyez plusieurs fois sur (SOURCE)
pour sélectionner la radio.
2 Appuyez plusieurs fois sur (MODE)
pour sélectionner la bande.
3 Appuyez sur la touche numérique ((1)
à (6)) sur laquelle la station souhaitée
est mémorisée.
Si la fonction de réglage des
présélections ne fonctionne pas
— Recherche autom atique des fréquen c es /
Mode de recherche locale
Recherche automatique des fréquences :
Appuyez sur (SEEK) (+) ou (SEEK) (–)
pour rechercher la station souhaitée.
Le balayage s’interrompt lorsque l’appareil
capte une station. Répétez cette opération
jusqu’à ce que vous captiez la station
souhaitée.
Mode de recherche locale :
Si la recherche automatique des
fréquences s’arrête trop fréquemment,
appuyez plusieurs fois sur (SENS)
jusqu’à ce que l’indication « LOCALON » s’affiche.
Seules les stations émettant des signaux
relativement puissants sont accordées.
Pour annuler le mode de recherche locale,
appuyez deux fois sur (SENS) lors de la
réception FM.
Remarque
Lors de la réception AM, pour annuler le mode de
recherche locale, appuyez une fois sur (SENS)
(l’indication « LOCAL-ON » disparaît).
Conseil
Si vous connaissez la fréquence de la station que
vous souhaitez écouter, maintenez (SEEK) (+) ou
(SEEK) (–) enfoncée pour rechercher la fréquence
approximative, puis appuyez plusieurs fois sur
(SEEK) (+) ou (SEEK) (–) pour la régler avec
précision (réglage manuel de la fréquence).
Si la réception stéréo FM est mauvaise
— Mode mono
En cours de réception radio, ap puyez
plusieurs fois sur (SENS) jusqu’à ce
que l’indication « MONO-ON »
s’affiche.
La qualité sonore est améliorée, mais le son
est diffusé en mono (l’indication « ST »
disparaît).
Pour revenir au mode de réception radio normal,
appuyez de nouveau sur ( SENS) (l’indication
« MONO-OFF » s’affiche).
Conseil
Si vous avez de la difficulté à entendre les émissions
FM, réglez DSO à « OFF » (page 21).
Mémorisation des stations
souhaitées uniquement
Vous po uvez présélectionner m anuellement les
stations souhaitées sur les touches numériques de
votre choix.
1 Appuyez plusieurs fois sur (SOURCE)
pour sélectionner la radio.
2 Appuyez plusieurs fois sur (MODE)
pour sélectionner la bande .
3 Pour capter la station que vous
souhaitez mémoriser, appuyez sur
(SEEK) (+) ou (SEEK) (–) .
4 Appuyez sur la touche numérique
souhaitée ((1) à (6)) pendant 2
secondes jusqu’à ce que l’indication
« MEM » apparai ss e.
Le numéro de la touche apparaît dans la
fenêtre d’affichage.
Remarque
Si vous essayez de mémoriser une autre station sur la
même touche numérique, la station mémorisée
précédemment est effacée.
15
Page 40

Syntonisation d’une station à
partir d’une liste
— Affichage automatique de la liste
1
En cours de réception radio, appuyez
sur
(LIST/CAT)
La fréquence s’affiche à l’é cran.
2 Appuyez plusieurs fois sur (LIST/CAT)
pour sélectionner la station souhaitée.
3 Appuyez sur (SEEK) (+) ou (SEEK) (–)
pour régler la station souhaitée.
.
Autres fonctions
Vous pouvez également comm ander l’appareil
(et les appareils CD ou MD en option) avec un
satellite de commande (en option).
Fonctionnement du satellite
de commande
Apposez d’abor d l’ ét i quette appropriée, suivant
la position de montage du satelli te de commande.
Le satellite de comm ande fonctionne p ar
pression sur les touches et/ou par r ot ation des
commandes.
MODE
DSPL
SEL
SEL
DSPL
MODE
Fonctionnement par pression sur les
touches
(ATT)
(MODE)
(DSPL)
Suite à la page suivantet
(OFF)
(SOURCE)
(SEL)
Tournez la commande VOL
pour régler le volume.
OFF
16
Page 41

Appuyez sur Pour
(SOURCE) changer de source
(Radio/CD/MD*
1
)/mettre
l’appareil sous tension
(MODE) changer de mode de
fonctionnement
(Bande radio/lecteur CD*
lecteur MD*
1
)
(ATT) atténuer le son
(OFF)*
2
arrêter la lecture d’un disque
ou la réception radio/mettre
l’appareil hors te nsion
(SEL) régler et sé le ct ionner
(DSPL) changer de rubrique
d’affichage
Fonctionnement par rotation de la
commande
Commande
SEEK/AMS
Fonctionnement par pression et
rotation de la commande
1
/
Exercez une pression sur la commande
et tournez-la pour :
– régler les stations mémorisées.
– changer de disque en cours de lecture d’un
CD ou d’un MD*
– passer d’un album à l’autre*
Suite à la page suivantet
Commande
PRESET/DISC
1
.
3
.
Tournez la commande et relâchez-la
pour :
– passer d’une plage à l’autre.
Pour sauter plus ie ur s plages de suite,
tournez une fois la commande rotative , puis
tournez-la de nou veau dans les 2 sec ondes
qui suivent et maintenez-la.
– régler automatiquement des stations de
radio.
Tournez la commande, maintenez-la
enfoncée et relâchez-la pour :
– avancer ou reculer rapidement dans une
plage.
– trouver une station manuellement.
17
Page 42

Pendant la lecture d’un fichier MP3, vous pouvez
sélectionner un album a v e c le sate llite de
commande.
(Avec un appareil en option)
Pour Procédez ainsi
passer d’un disque
à l’autre
–Sélection d’un
disque
Exercez un e pression sur la
commande et tourne z-la
[une fois pour chaque
disque].
Pour sauter plusieurs
disques de suite, appuyez et
tournez, puis tournez de
nouveau la commande dans
les 2 secondes qu i suivent et
maintenez-la en place.
passer d’un album
à l’autre*
3
–Sélection d’un
album
1Pour accéder au mode de
sélection d’un album,
appuyez et tourne z, pui s
tournez de nouveau la
commande et maintenezla en place.
Dans les 2 second es,
passez à l’étape 2.
2Pour sauter un album un
après l’autre, appuyez,
puis tournez rapidement
et à plusieurs reprises.
*1 Uniquement si l’appareil en option correspondant
est raccordé.
*2 Si le contact de votre voiture n’est pas doté d’une
position ACC (accessoires), veillez à appuyer sur
(OFF) une fois le moteur coupé et à maintenir
cette touche enfoncée jusqu’à ce que l’affichage
disparaisse.
*3 Disponible uniquement lorsqu’un appareil CD en
option avec fonction MP3 est raccordé et qu’un
fichier MP3 est en cours de lecture.
Modification du sens de
fonctionnement
Le sens de fonctionnement des comm andes est
réglé par défaut comme indiqué dans
l’illustration ci-dessous.
Pour augmenter
Pour diminuer
Si vous devez monter le satellite de commande
du côté droit de l a colonne de dir ection, vo us
pouvez inverser le sens de fonctionnement.
Appuyez sur (SEL) pend ant 2
secondes tout en poussant la
commande VOL.
18
Page 43

Réglages des
caractéristiques sonores
Modification des réglages du
son et de l’affichage
Vous po uvez régler la balance, l’at t énuateur, le
filtre passe-bas et le volum e du caisson de
graves.
1 Appuyez plusieurs fois sur la touche
de sélection jusqu’à ce que
l’indication « BAL », « FAD », « LPF »
ou « S UB » appar ai sse.
À chaque pression sur la touche de sélection,
le paramètre change de la façon suivante :
1
LOW*
t MID*1 t HI*1 t
BAL (gauche-droite) t
FAD (avant-arrière) t
LPF (filtre passe-bas)*
SUB (volume du caisson de
graves)*
*1 Lorsque EQ3 est activé (page 20).
*2 Lorsque « S UB » est sélectionné (page 19) .
*3 La fréquence de coupure peut être réglée à
*4 Le volume sonore peut être réglé par
2*4
78 Hz, 125 Hz ou OFF.
incréments de –10 à +10 (à moins de –10,
l’indication « ATT» s’affiche).
2*3
t
2 Tournez la molette de réglage du
volume pour régler le paramètre
sélectionné.
Remarque
Effectuez ce réglage dans les 3 secondes après avoir
sélectionné le paramètre.
Atténuation rapide du son
(À l’aide du satellite de commande ou de la
mini-télécommande)
Appuyez sur (ATT).
L’indication « ATT-ON » s’affiche
brièvement à l’écran, pu is « ATT » apparaît.
Les réglages suivants sont disponibles :
• REAR/SUB*
1
— pour commuter la sortie
audio à REAR ou SUB .
– Sélectionnez « REAR » pour émettre vers un
amplificateur de puissance.
– Sélectio nnez « SUB » pour émettre vers un
caisson de graves.
• A.SCRL (Défilement automatique)*
2
(page 11).
• M.DSPL (affichage an im é ) — pour activer ou
désactiver le mode d’affichage animé .
– Sélectionnez « ON » pour activer le mode
d’aff ichage animé (l’ affichage animé
apparaît).
– Sélectionnez « OFF » pour désactiver la
fonction d’affichage animé.
•DEMO*
1
— pour activer ou désactiver
l’affichage de démonstration.
– Sélectionnez « ON » pour activer l’affichage
de démonstration (la démonstration démarre
environ 10 secondes après la mise hors
tension de l’appar ei l ).
– Sélectio nnez « OFF » pour désactiver la
fonction d’affichage de démonstrat ion.
• BEEP*
3
— pour activer ou désactiver le bip.
• DIM — pour modifier la luminosité de la
fenêtre d’affichage.
– Sélectionnez « ON » pour diminuer la
luminosité de la fenêtre d’affichage.
– Sélectio nnez « OFF » pour désactiver le
régulateur de luminosité.
Suite à la page suivantet
Pour rétablir le niveau de volume précédent,
appuyez de nouveau sur (ATT).
Conseil
Lorsque le câble d’interface d’un téléphone de voiture
est raccordé au fil ATT, l’appareil réduit
automatiquement le volume lors d’un appel
téléphonique entrant (fonction A TT téléphone).
19
Page 44

Commutation REAR/SUB*
1
Appuyez sur la touche de sélection,
puis tournez la molette de réglage du
volume.
Après 3 secondes, l’affichage revient en mode de
lecture normal.
Sélection de l’option souhaitée
Appuyez simultanément sur la touch e
de sélection et la touche souhaitée.
touche de sélection + (3) : A.SCRL*
2
touche de sélection + (4) : M.DSPL
touche de sélection + (4) : DEMO*
touche de sélection + (6) : BEEP*
1
3
touche de sélection + (DSPL) : DIM
Une fois le réglage terminé, la fenêtre
d’affichage revient au mode de le ct ure normal.
Pour annuler l’option sélectionnée, appuyez de
nouveau simultanément sur la touche de
sélection et sur la touche souhaitée.
*1 Lorsque l’appareil est hors tension.
*2 Lorsqu’un CD ou un MD est en co urs de lecture.
*3 Le bip retentit uniquement lorsque l’amplificateur
intégré est utilisé.
Réglage de l’égaliseur (EQ3)
Vous pouvez sélectionner l’une des 7 courbes de
réglages de l’égalis eur, dont chacune correspond
à un type de musique (XPLOD, VOCAL, CLUB,
JAZZ, NEW AGE, ROCK, CUSTOM et OFF
(égaliseur éteint) ).
Vous pouvez sauvegarder un réglage d’égaliseur
différent pour chaqu e source.
Sélection de la courbe d’égaliseur
1 Appuyez sur (SOURCE) pour
sélectionner une source (Radio, CD ou
MD).
2 Appuyez plusieurs fois sur (EQ3) pour
sélectionner la courbe d’égaliseur
souhaitée.
Chaque fois que vous appuyez sur (EQ3), le
paramètre ch an ge.
Pour annuler l’effet d e l’égaliseur,
sélectionnez « OFF ».
20
Page 45

Réglage de la courbe de l’égaliseur
Vous pouvez mémoriser et ré gl er différentes
plages de tonalité pour l’égaliseur.
1 Appuyez sur (SOURCE) pour
sélectionner une source (Radio, CD ou
MD).
2 Appuyez plusieurs fois sur (EQ3) pour
sélectionner la courbe d’égaliseur
souhaitée.
3 Réglage de la courbe d’égaliseur.
1 Appuyez plus ie urs fois su r la
touche de sélection pour
sélectionner la plage de tonalités
souhaitée.
Chaque fois que vous appuyez sur la
touche de sélection, la plage de tonalité
change.
LOW t MID t HI (t BAL t FAD t
LPF t SUB)
2 Tournez la molette de réglage du
volume pour le régler au niveau
souhaité.
Le niveau de volume peut être réglé par
incréments de 1 dB, de –10 dB à +10 dB.
3 Répétez les étape s 1 et 2 pour
régler la courbe de l’égaliseur.
Pour rétablir la courbe par défaut de
l’égaliseur, appuyez sur la molette de
sélection pendant 2 secondes.
Remarque
Lorsque EQ3 est réglé à « OFF », vous ne pouvez
pas régler les paramètres de la courbe de l’égaliseur.
Réglage du répartiteur
dynamique du son émis
(DSO)
Si vos haut-parleurs sont installés dans la partie
inférieure des port ières, le son est émis à un
niveau pr oche du sol et i l se pe ut qu’i l ne so it p a s
clair.
La fonction DSO (réglage dynamiq ue du son
émis) crée un son mieux réparti, comme s’il y
avait des haut-parleurs da ns le tableau de bord
(haut-parleurs virtuels).
Vous p ouvez sauvegarder un réglag e D S O pour
chaque source .
Représentation des haut-parleurs virtuels
en mode DSO
*3
*2
*1
*4
*1 DSO-1
*2 DSO-2
*3 DSO-3
*4 DSO-OFF
1 Appuyez sur (SOURCE) pour
sélectionner une source (Radio, CD ou
MD).
2 Appuyez plusieurs fois sur (DSO)
jusqu’à ce que le réglage DSO
souhaité s’affiche.
À chaque pression sur (DSO), le réglage
DSO change.
*3
*2
*1
*4
Pour désactive r la fonction DSO, sélect ionnez
« DSO-OFF ». Après 3 secondes, l’affichage
revient en mode de lecture normal.
Remarques
• S elon l’in térieur de la voiture ou le type de musique,
la fonction DSO peut avoir un effet indésirable.
• Si v ous av ez des difficultés à entendre les émissions
FM, réglez DSO sur « OFF ».
21
Page 46

Informations
complémentaires
Entretien
Remplacement du fusible
Lorsque vous remplacez le fusible, ve illez à
utiliser un fusible dont la capacité, en ampères,
correspond à la valeur indi quée sur l’ancie n
fusible. Si le fusibl e fond, vérifiez le
branchement de l’alimentation et remplacez le
fusible. Si le nouvea u f usible fond égaleme nt, il
est possible que l’appareil soit défectueux. Dans
ce cas, contactez votre r evendeur Sony le plus
proche.
Fusible (10 A)
Avertissement
Ne jamais utiliser de fusible dont la cap acité en
ampères dépasse celle du fusible fourni avec
l’appareil, car cela pourrait endommager
l’appareil.
Nettoyage des connecteurs
L’appareil peut ne pa s f o nctionner correctement
si les connecteurs entre l’apparei l et l a façade
sont encrassés. Pour éviter cette situation, retirez
la façade (page 8) et nettoyez les c onnecteurs
avec un coton-tige imbibé d’alcool. N’exercez
pas une pression tr op forte, car les connecteurs
pourraien t être endommagés .
Remarques
• Pour plus de sécur ité, coupez le moteur avant de
nettoyer les connecteurs et retirez la clé du contact.
• Ne touchez jamais les connecteurs directement
avec les doigts ou avec un objet métallique.
Remplacement de la pile au lithium
En fonctionnement normal, une pile dure environ
1 an. (En fonction des con ditions d’utili sa tion, sa
durée de vie peut êt re plus courte.) Lorsque la
pile est faible, la portée de l a mini-tél écommande
diminue. Remplacez la pile par une nouvelle pile
au lithium CR2025. L’utilisation de tout autre
type de pile entraîne un risque d’incendie ou
d’explosion.
x
pôle + vers le haut
Remarques sur la pile au lithium
• Tenez la pile au lithium hors de portée des
enfants. En cas d’ingestion de la pile, consultez
immédiatement un médecin.
• Essuyez la pil e a vec un chi f fon s ec pour assu rer
un bon contact.
• Veillez à respecter la polarité lors de
l’installation de la pile.
• Ne tenez pas l a pi l e avec des pi nces
métalliques, car cela peut entraîner un courtcircuit.
22
Appareil principal
Arrière de la façade
ATTENTION
Utilisée de façon incorrecte, la pile peut
exploser. Ne pas la recharger, la démonter ni
la jeter au feu.
Page 47

Démontage de l’appareil
1 Retirez le cadre de sûre té .
1 Retirez la façade (page 8).
2 Insérez le s clés de déblo cage
simultanément dans le cadre de
sûreté.
Orientez
correctement la
clé de débl ocage.
3 Tirez sur les clés de déblocage pour
retirer le cadre de sûreté.
2 Retirez l’appareil.
1 Insérez le s de ux clés de déblocage
simultanément jusqu’au dé clic.
3 Faites glisser l’appareil en dehors
de son support.
Tournez les
crochets vers
l’intérieur.
2 Tirez sur les clés de déblocage pour
dégager l’appareil.
23
Page 48

Caractéristiques techniques
Lecteur CD
Rapport signal-bruit 120 dB
Réponse en fréquence 10 à 20 000 Hz
Pleurage et scintillement En dessous du seuil
mesurable
Radio
FM
Plage de syntonisation 87,5 à 107,9 MHz
Borne d’antenne Connecteur d’antenne
Fréquence intermédiaire 10,7 MHz/450 kHz
Sensibilité utile 9 dBf
Sélectivité 75 dB à 400 kHz
Rapport signal/bruit 67 dB (stéréo),
Distorsion harmo nique à 1 kHz
Séparation 35 dB à 1 kHz
Réponse en fréquence 30 à 15 000 Hz
externe
69 dB (mono)
0,5 % (stéréo),
0,3 % (mono)
AM
Plage de syntonisation 530 à 1 710 kHz
Borne d’antenne Connecteur d’antenne
Fréquence intermédiaire 10,7 MHz/450 kHz
Sensibilité 30 µV
externe
Amplificateur de puissance
Sorties Sorties de haut-parleurs
Impédance des haut-parleurs
Puissance de sortie maximale
(connecteurs de sécurité)
4 à 8 ohms
52 W × 4 (à 4 ohms)
Généralités
Sorties Bornes de sortie audio
Entrées Fil de commande ATT
(commutation arrièr e /
caisson de graves)
Borne de commande de
relais d’antenne électrique
Borne de commande
d’amplificateur de
puissance
téléphone
Borne d’entrée de
télécommande
Borne d’entrée de
commande BUS
Borne d’entrée audio BUS
Borne d’entrée de l’antenne
Commandes de tonalité Bas :
Alimentation requise Batterie de véhicule 12 V
Dimensions Environ 17 8 × 50 × 177 mm
Dimensions du support Environ 182 × 53 × 161 mm
Poids Environ 1,2 kg
Accessoires fournis Mini-télécommande
Accessoires en option Satellite de commande
Appareils en option Changeur CD (10 disques)
Remarque
Cet appareil ne doit pas être branché à un
préamplificateur numérique ni à un égaliseur
compatible avec le système Sony BUS.
La conception et les caractéristiques techniques sont
sujettes à modification sans préavis.
±10 dB à 60 Hz (XPLOD)
Moyen :
±10 dB à 1 kHz (XPLOD)
Haut :
±10 dB à 10 kHz (XPLOD)
CC (masse négative)
1
(7
/8 × 2 × 7 po)
(l/h/p)
1
(7
/4 × 2 1/8 × 6 3/8 po)
(l/h/p)
(2 lb 10 oz)
RM-X115
Composants destinés à
l’installation et au
raccordement (1 jeu)
Étui pour la façade (1)
RM-X4S
Câble BUS (fourni avec un
câble à broche RCA)
RC-61 (1 m), RC-62 (2 m)
CDX-757MX
Changeur CD (6 disques)
CDX-T69
Changeur MD (6 disques)
MDX-66XLP
Récepteur radio par satellite
XM
XT-XM1
Sélecteur de source
XA-C30
Sélecteu r AUX-IN
XA-300
24
Page 49

Dépannage
La liste de contrôle suivante vous aidera à
remédier aux problèmes que vous pourriez
rencontrer avec cet appareil.
Avant de passer en revue la liste de contrôle cidessous, vérifiez les procédures de raccordement
et d’utilisation.
Généralités
Aucun son n’est émis.
• Tournez la molette de réglage du volume
dans le sens des aig u i lles d’une montre p our
régler le volume.
• Désactivez la fonction ATT.
• Pour un système à 2 haut-parleurs, réglez la
commande d’équilibre avant-arri ère sur la
position médiane.
• Vous avez essayé d’effectuer la l ecture de
fichiers MP3 avec un lecteu r C D en option
qui n’est pas compatible avec le format MP3.
t Lecture avec un lecteur CD compatible
MP3 de Sony, tel que le CDX-757MX.
Le contenu de la mémoire a été effacé.
• La touche RESET a été enfoncée.
t Recommencez la procédure
d’enregistrement dans la mémoire.
• Le câble d’alimentation ou la batterie a été
déconnecté.
• Le câble d’alimentation n’est pas raccordé
correctement.
Aucun bip n’est émis.
• Le bip est désactivé (page 19).
• Un amplificateu r de puissance en option est
raccordé et vous n’utilisez pas
l’amplificateur intégré.
L’affichage disparaît de la fenêtre
d’affichage ou il ne s’affiche pas.
• L’affichage est désactivé si vous maintenez
(OFF) enfoncée.
t Maintenez de nouveau (OFF) enfoncée
jusqu’à ce que l’affichage apparaisse.
• Retirez la façade et nettoyez les connecteurs.
Pour plus de détails , reportez-vous à la
section « Nettoyage des conne ct eurs »
page 22.
Les stations mémorisées sont effacées et
l’heure est remise à zéro.
Le fusible a fond u.
Émission de bruits lorsque la clé de contact
est en position ON, ACC ou OFF.
Les câbles ne sont pas raccordés correctement
au connecteur d’alimentation du véhicule
destiné aux accessoires.
L’appareil n’est pas alimenté.
• Vérifiez le ra ccordement. Si tout e st en
ordre, vérifiez le fusible.
• Le véhicu le n’ est pas équipé d’une pos i tion
ACC (accessoires).
t Appuyez sur (SOURCE) (ou insérez un
disque) pour mettre l’appareil sous
tension.
L’appareil est alimenté en permanence.
Le véhicule n’est pa s équipé d’une position
ACC (accessoires).
L’antenne électrique ne se déploie pas.
L’antenne électrique ne dispose pas d’un
boîtier de relais.
Lecture de CD et de MD
Impossibl e d’ introduire un di s q ue.
• Un autre CD est déjà en place.
• Le CD a été in tr oduit de force à l’envers ou
dans le mauvais sens.
La lecture ne commence pas.
• Disque M D dé fectueux ou disque CD
souillé.
• CD-R ou CD-RW non finalisé.
• Vous avez essayé de lancer la lec t ure d’un
disque CD-R ou CD-RW qui n’est pas conçu
pour une utilisati on audio.
• En fonction de l’appareil utilisé pour
l’enregistrement ou de l’état du disque,
certains disques CD -R ou CD-RW peuvent
ne pas être lus.
Un disque est automatiquement éjecté.
La température ambiante dépasse 50 °C
(122 °F).
Les touches de commande ne fonctionnent
pas.
Impossible d’éjecter le CD.
Appuyez sur la to uche RESET.
Des sauts de lecture se produisent à cause
de vibrations.
• L’appareil est installé suivant un angle
supérieur à 45°.
• L’appareil n’est pas installé à un endroit
suffisamment stable du vé hi cule.
Le son saute.
Le disque est sale ou défectueux.
Suite à la page suivantet
25
Page 50

Réception radio
Impossible de capter une présélection.
• Enregistrez la fr équence correcte dans la
mémoire.
• Le signal capté est trop faible.
Impossible de capter des stations.
Le son est parasité.
• Raccordez un fil d e commande d’antenne
électrique (bleu) ou un fil d’alimentation
d’accessoire (rouge) au câble d’alime ntation
de l’amplificateur d’ant e nne du véhicule
(uniquement si votre véhicule est équipé
d’une antenne FM/ A M intégrée dans la
fenêtre arrière ou latérale).
• Vérifiez le raccordement de l’antenn e du
véhicule.
• L’antenne autom atique ne se déploie pas.
t Vérifiez le raccordement du fil de
commande de l’ant enne électrique.
• Vérifiez la fréque nce.
• Lorsque le mode DSO est activé, le son peut
parfois être parasité.
t Réglez le mode DSO à « O FF »
(page 21).
Le réglage automatique des stations est
impossible.
• Le mode de recherche locale est réglé à
«ON».
t Régl ez le mode de recherch e l o c ale à
« OFF » (page 15).
• Le signal capté est trop faible.
t Réglez la fréquence manuellement.
L’indication « ST » clig note.
• Réglez la fréquence correcteme nt .
• Le signal capté est trop faible.
t Réglez le mode de réception mo no à
« ON » (page 15).
Une émission en stéréo est entendue en
mode mono.
L’appareil est en mode de réception m ono.
t Dé sactivez le mode de réception mo no
(page 15).
Affichage des erreurs et
messages
Affichage des erreurs
(pour cet appareil et les changeurs CD ou
MD en option)
Les indications suivantes clignotent pendant
environ 5 seconde s et une alarme retentit.
BLANK*
ERROR*
FAILURE (Reste allumé jusqu’à ce que vous
appuyiez sur une to uc he.)
FAILURE (Reste allumé p endant une seconde
environ.)
NO DISC
NO MAG
NO MUSIC
NOTREADY
1
Aucune plage n’a été enre gistrée sur un MD.*
t I nsérez un MD conten ant des plages
enregistrées.
1
• Le CD est sale ou in séré à l’envers.*
2
t Nettoyez le CD ou insérez-le
correctement.
• Un CD ou un MD ne peut pas être lu en
raison de certains pr oblèmes.
t Insérez un autre CD ou MD.
Le raccordement des haut-parleurs ou des
amplificateurs est incorrect.
t Reportez-vous au guide d’ins ta lla tion de
cet appareil et vérifiez le raccordement.
Quand un récept eur XM est racc ordé, échec de
mémorisation d’une station radio XM sur un
numéro présélectionné.
t Vérifiez que vous recevez la stati on radio
que vous souhaitez mémoriser, puis
essayez de nouv eau.
Aucun disque n’a été inséré dans le lecteur CD
ou MD.
t I ns ér ez un disque dans le lecteur CD ou
MD.
Le chargeur n’a pas été inséré dans le lecteur
CD.
t Insérez le chargeur dans le lecteur CD.
Un CD ne comporta nt pas de fichi ers de
musique a été inséré dans un lecteur de CD
avec fonction MP3.
t I nsérez un disque audio dans le lecteur de
CD MP3.
Le couvercle du lecteur MD est ouvert ou les
MD ne sont pas insérés correctement.
t Fermez le couvercle ou insére z
correctement les MD.
2
26
Page 51

OFFSET
Il se peut que l’appareil soit défectueux.
t Vérifiez le raccordement. Si le message
d’erreur ne disparaît pas de l’affichage,
contactez votre revendeur Sony le plus
proche.
RESET
Le lecteur CD ou MD ne peu t pas fon ct i onner
en raison de certains problèmes.
t Ap puyez sur la touche RESET de
l’appareil.
*1 Lorsqu’une erreur se produit lors de la lecture d’un
CD ou d’un MD, le numéro de disque du CD ou du
MD ne s’affiche pas.
*2 Le numéro du disque qui a provoqué l’erreur
s’affiche à l’écran.
Messages
L.SEEK +/–
Le mode de recher che locale est activé en
cours de recher che automatiqu e des
fréquences (pa ge 15).
«» ou «»
Vous avez atteint le début ou la fin du disque et
vous ne pouvez pas aller plus loin.
Si ces solutions ne permettent pas d’am éliorer la
situation, contactez votre revendeur Sony le plus
proche.
27
Page 52

• Lead-free solder is used for soldering certain parts.
• Halogenated flame retardants are not used in the certain printed wiring boards.
• Halogenated flame retardants are not used in cabinets.
• Paper is used for the packaging cushions.
Sony Corporation Printed in Korea
 Loading...