

Page 1
FM/AM
Compact Disc
Player
3-859-005-11 (1)
Operating Instructions
Manual de instrucciones
############
For installation and connections, see the supplied installation/connections
manual.
Con respecto a la instalación y las conexiónes, consulte el manual de Instalación/
conexiones suministrado.
#####
#####
EN
ES
C
CDX-4160
1997 by Sony Corporation
Actual total number: Sony CDX-4160 (E,S,C,A) 3-859-005-11(1)
Page 2

EN
Welcome !
Thank you for purchasing the Sony Compact
Disc Player. This unit lets you enjoy a variety
of features. You can use an optional rotary
remote (RM-X2S).
2
Actual total number: Sony CDX-4160 (E,S,C,A) 3-859-005-11(1)
Page 3

Table of Contents
Getting Started
Resetting the unit ................................................ 4
Detaching the front panel .................................. 4
Setting the clock .................................................. 5
CD Player
Listening to a CD ................................................ 5
Playing a CD in various modes ........................ 6
Radio
Memorizing stations automatically
— Automatic Memory .................................. 6
Memorizing only the desired stations ............. 7
Receiving the memorized stations.................... 7
Other Functions
Adjusting the sound characteristics ................. 8
Muting the sound................................................ 8
Changing the sound and beep tone ................. 8
Turning on the clock display
— Power Select Function .............................. 8
Additional Information
Precautions ........................................................... 9
Maintenance ......................................................... 9
Dismounting the unit ....................................... 10
Attaching the label to the rotary remote ........ 10
Location of controls .......................................... 11
Specifications ..................................................... 12
Troubleshooting guide ..................................... 13
Index ................................................................... 14
EN
Actual total number: Sony CDX-4160 (E,S,C,A) 3-859-005-11(1)
3
Page 4
EN
Getting Started
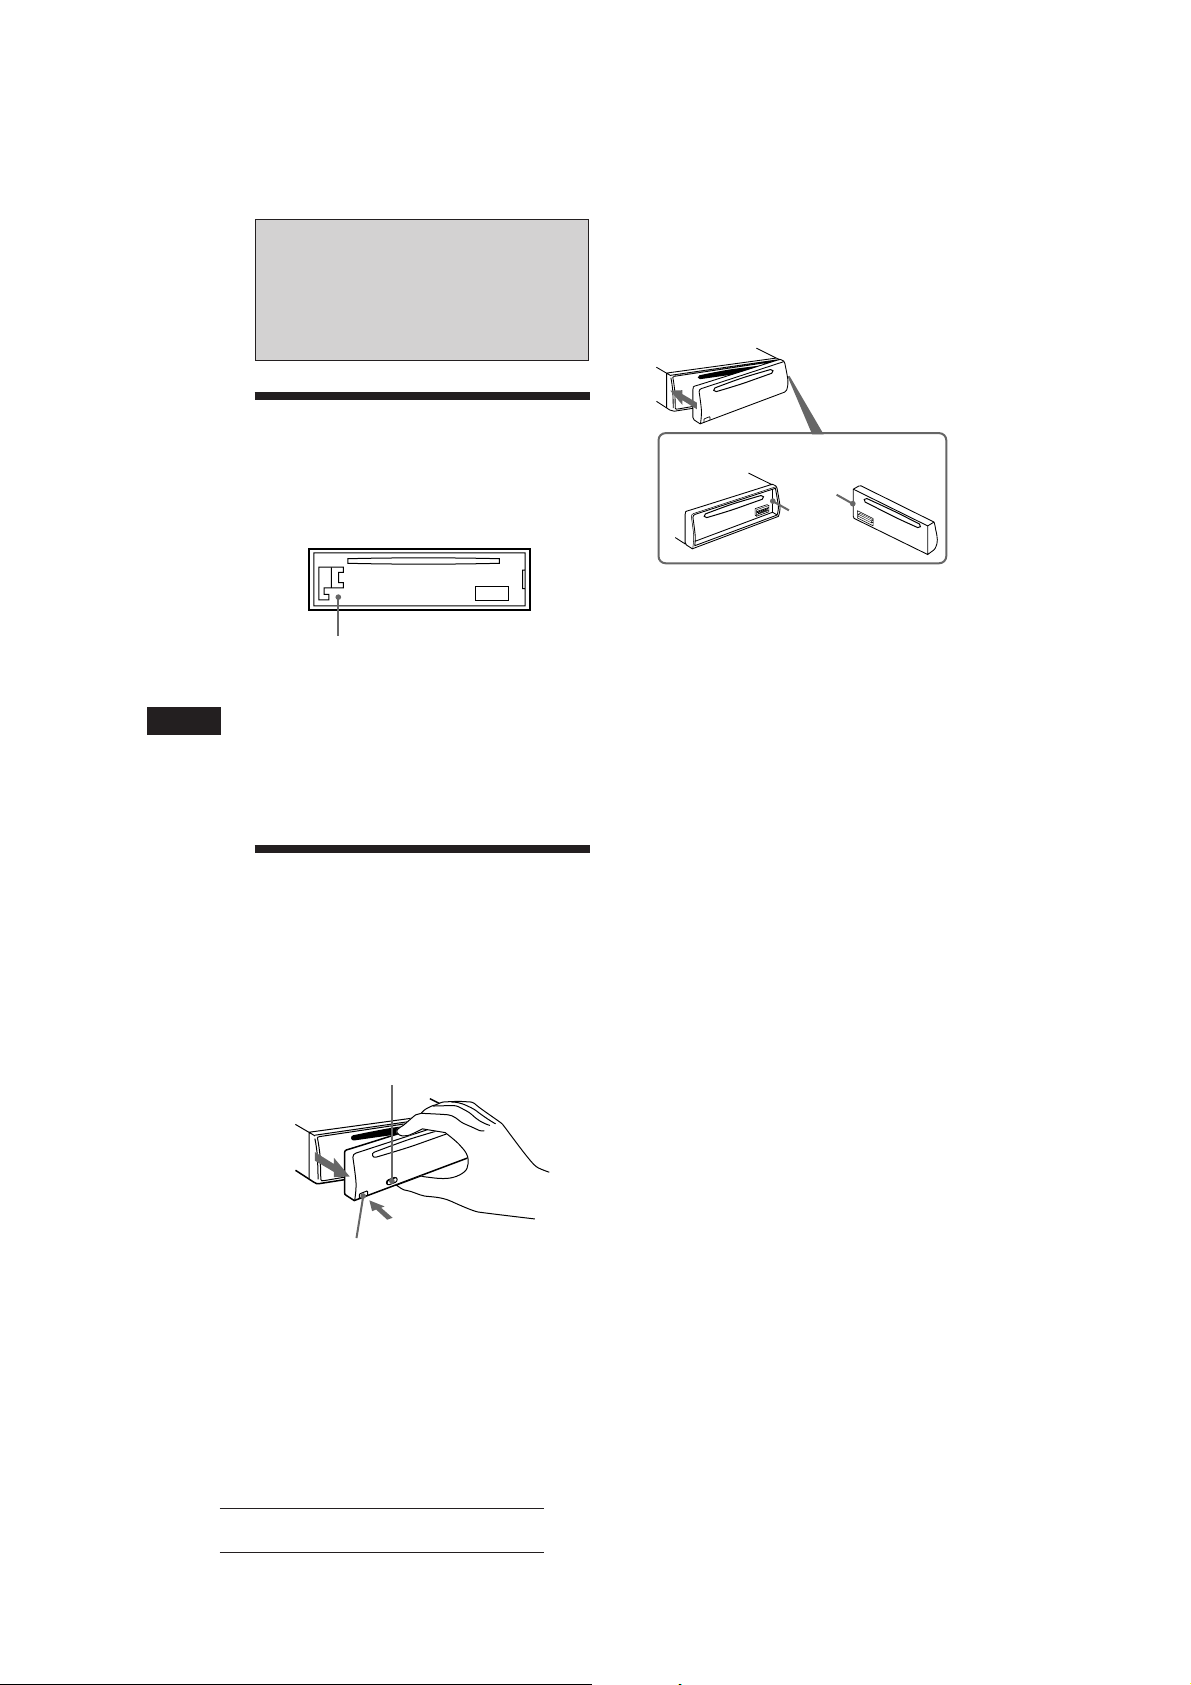
Resetting the unit
Before operating the unit for the first time or
after replacing the car battery, you must reset
the unit.
Press the reset button with a pointed object,
such as a ball-point pen.
Reset button
Notes
• Pressing the reset button will erase all the memorized
program and memory functions.
• When you connect the power supply cord to the unit or
reset the unit, wait for about 10 seconds before you insert
a disc. Do not insert a disc within these 10 seconds,
otherwise, the unit will not be reset, and you will have to
press the reset button again.
Detaching the front panel
You can detach the front panel of this unit to
prevent the unit from being stolen.
Attaching the front panel
Align part A of the front panel to part B of
the unit as illustrated, and push until it clicks.
A
B
Notes
• Be sure not to attach the front panel upside down.
• Do not press the front panel hard against the unit when
attaching it. Press it lightly against the unit.
• Do not press hard or put excessive pressure on the
display window of the front panel.
• Do not expose the front panel to direct sunlight, heat
sources such as hot air ducts, and do not leave it in a
humid place. Never leave it on the dashboard of a car
parked in direct sunlight where there may be a
considerable rise in temperature.
Caution alarm
If you turn the ignition key switch to the OFF
position without removing the front panel, the
caution alarm will be activated and a beep tone
will be heard for a few seconds (only for cars
with an accessory position on the ignition key
switch). If you connect an optional power
amplifier and do not use the built-in amplifier,
the beep tone will be disabled.
1 Press (OFF).
2 Press (RELEASE) to open up the front
panel, and detach the panel by pulling it
towards you.
(OFF)
(RELEASE)
Notes
• Be sure not to drop the panel when detaching it from the
unit.
• If you press (RELEASE) to detach the panel while the
unit is still on, the unit will turn off automatically to
prevent the speakers from being damaged.
• When you carry the front panel with you, put it in the
4
supplied front panel case.
Actual total number: Sony CDX-4160 (E,S,C,A) 3-859-005-11(1)
Page 5
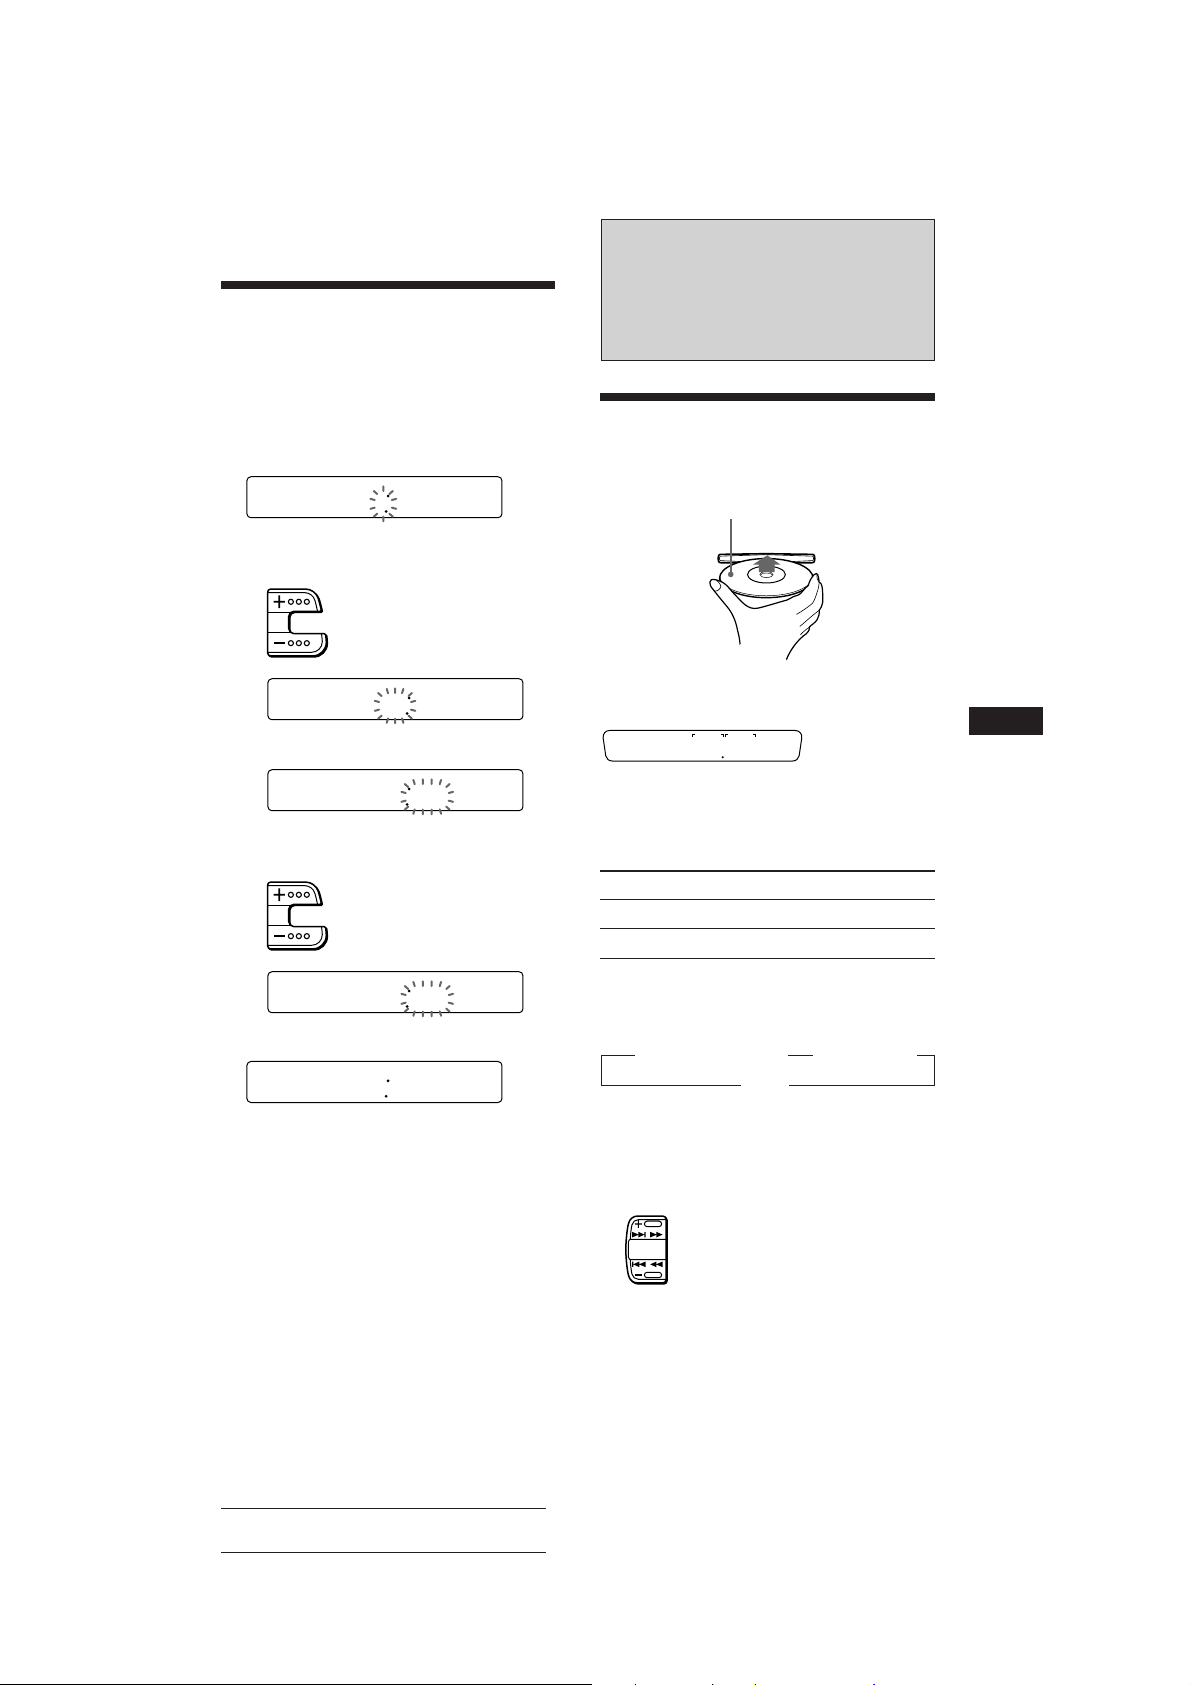
Setting the clock
SEEK
AMS
The clock has a 12-hour digital indication.
Example: Set the clock to 10:08
1 Press (OFF) or (DSPL) during operation.
2 Press (DSPL) for two seconds.
100
The hour digit flashes.
1 Set the hour digits.
To go forward
To go back
1000
2 Press (SEL) momentarily.
1000
The minute digits flash.
3 Set the minute digits.
To go forward
To go back
CD Player
Listening to a CD
Simply insert the CD.
Playback starts automatically.
Labelled side up
If a CD is already inserted, press (SOURCE)
repeatedly until “CD” appears.
MIN SEC
215
Elapsed playing time
Note
To play back an 8 cm CD, use the optional Sony compact
disc single adapter (CSA-8).
To Press
Stop playback 6 or (OFF)
Eject the CD 6
EN
Getting Started/CD Player
1008
3 Press (DSPL) momentarily.
1008
The clock is activated.
Note
If the car has no accessory position on the ignition key
switch, the clock cannot be set unless the power is turn on.
Set the clock after you have turned on the radio, or started
CD playback.
Each time you press (DSPL), the item changes
as follows:
z Elapsed playing time z Track number
Time Z
Locating a specific track
— Automatic Music Sensor (AMS)
During playback, press either side of
(SEEK/AMS) momentarily.
To locate succeeding tracks
To locate preceding tracks
Actual total number: Sony CDX-4160 (E,S,C,A) 3-859-005-11(1)
Changing the displayed items
5
Page 6
Locating a specific point in a track
— Manual Search
During playback, press and hold either
side of (SEEK/AMS) for two seconds.
Release the button when you have
found the desired point.
To search forward
SEEK
AMS
To search backward
Note
If “_ _ ” or “ _ _” appears in the display, you have
reached the beginning or the end of the disc and you cannot
go any further.
Radio
Memorizing stations
automatically
— Automatic Memory
Stations with the clearest reception are
automatically searched and memorized on
each band (FMI, FMII, FMIII and AM). Up to 6
stations on each band can be stored on the
number buttons ((1) to (6)) in the order of
band frequency.
EN
Playing a CD in various
modes
Searching for the desired track
— Intro Scan
Press (1) during playback.
“INTRO” appears in the display.
The first 10 seconds of all the tracks are played.
When you find the desired track, press again.
The unit returns to the normal playback mode.
Playing tracks repeatedly
— Repeat Play
Press (2) during playback.
“REPEAT” appears in the display.
When the currently played track is over, it will
be played again from the beginning.
To cancel this mode, press again.
Playing tracks in random order
— Shuffle Play
Press (3) during playback.
“SHUFFLE” appears in the display.
To cancel this mode, press again.
1 Press (SOURCE) repeatedly to select the
tuner.
Each time you press (MODE), the mode
changes as follows:
CD ˜ TUNER
2 Press (MODE) repeatedly to select the
band.
Each time you press (MODE), the mode
changes as follows:
” FMI ” FMII ” FMIII ” AM
3 Press (A.MEM) for two seconds.
The unit will be starts scanning the selected
band and memories the tuned stations on
the number button (1) through (6)
automatically.
Notes
• The unit does not store stations with weak signals. If
only a few stations are received, some number buttons
remain empty.
• When a number is indicated in the display, the unit
starts storing stations from the one currently displayed.
• If a CD is not in the unit, only the tuner band appears
even if you press (SOURCE).
6
Actual total number: Sony CDX-4160 (E,S,C,A) 3-859-005-11(1)
Page 7

Memorizing only the
desired stations
You can store up to 6 stations on each band (18
for FMI, FMII and FMIII, 6 for AM) in the
order of your choice.
1 Press (SOURCE) repeatedly to select the
tuner.
2 Press (MODE) repeatedly to select the
band.
3 Press either side of (SEEK/AMS) to tune
in the station that you want to store on
the number button.
4 Press the desired number button ((1) to
(6)) for two seconds until “MEM”
appears.
The number button indication appears in
the display.
Note
If you try to store another station on the same number
button, the previously stored station will be erased.
Tip
If you know the frequency of the station you want to listen
to, press and hold either side of (SEEK/AMS) for two
seconds until the desired frequency appears (manual
tuning).
If FM stereo reception is poor
— Monaural Mode
Press (SENS) momentarily until “MONO”
appears.
The sound improves, but becomes
monaural (“ST” disappears).
To go back to the normal mode, press again
until “MONO” disappears.
Changing the displayed items
Each time you press (DSPL), the items
alternate between the frequency and time.
EN
CD Player/Radio
Receiving the memorized
stations
1 Select the desired band (page 6).
2 Press the number button ((1) to (6))
momentarily where the desired station is
stored.
If you cannot tune in a preset
station
Press either side of (SEEK/AMS)
momentarily to search for the station
(automatic tuning).
Scanning stops when the unit receives a
station. Press either side of (SEEK/AMS)
repeatedly until the desired station is
received.
Note
If the automatic tuning stops too frequently, press
(SENS) momentarily until “LCL” appears in the display
(local seek mode). Only the stations with relatively strong
signals will be tuned in.
7
Actual total number: Sony CDX-4160 (E,S,C,A) 3-859-005-11(1)
Page 8

Other Functions
Digital D-BASS
D-BASS 3
Level
D-BASS 2
D-BASS 1
Analog D-BASS
Level
D-BASS 3
D-BASS 2
D-BASS 1
EN
Adjusting the sound
characteristics
You can adjust bass, treble, balance and fader.
Each source can store the bass and treble level
independently.
1 Select the item you want to adjust by
pressing (SEL) repeatedly.
VOL (volume) n BAS (bass) n TRE (treble)
n BALANCE (balance) n FADER (fader)
2 Adjust the selected item by pressing (+)
or (–).
Adjust within three seconds after selecting
the item. (After three seconds, the buttons
work as volume control buttons.)
Muting the sound
Press (MUTE).
“MUTE” flashes.
To restore the previous volume level, press
(MUTE) again.
0dB
Adjusting the bass curve
Turn the D-BASS dial to adjust the bass
level (1, 2 or 3).
“D-BASS” appears in the display.
During CD playback, “DIGITAL D-BASS”
appears in the display.
To cancel, turn the dial to the OFF position.
0dB
Frequency (Hz)Frequency (Hz)
Muting the beep tone
Press (6) while pressing (SEL).
To obtain the beep tone again, press these
buttons again.
Note
If you connect an optional power amplifier and do not use
the built-in amplifier, the beep tone will be disabled.
Turning on the clock
display
Only for cars with an accessory position on the
ignition key switch
— Power Select Function
To turn the Power Select Function ON
Press (OFF) while pressing (SEL).
Changing the sound and
beep tone
Boosting the bass sound — D.bass
You can enjoy clear and powerful bass sound.
The D-bass function boosts the low frequency
signal with a sharper curve than conventional
bass boost.
You can hear the bass line more clearly even if
the vocal sound is the same volume. You can
emphasize and adjust the bass sound easily
with the D-bass control. This effect is similar to
the one you get when you use an optional
subwoofer system.
Moreover, the Digital D-bass* function creates
even sharper and more powerful bass sound
than Analog D-bass.
* Digital D-bass is available during CD playback.
8
The Power Select Function ties the clock
display power to the accessory position on
the ignition key switch.
To avoid battery wear, the clock is not
displayed while the unit is initializing.
Note
You cannot operate this function with the optional rotary
remote (RM-X2S).
Actual total number: Sony CDX-4160 (E,S,C,A) 3-859-005-11(1)
Page 9
Additional
Information
Precautions
• If your car was parked in direct sunlight
resulting in a considerable rise in
temperature inside the car, allow the unit to
cool off before operating it.
• If no power is being supplied to the unit,
check the connections first. If everything is in
order, check the fuse.
• If no sound comes from the speakers of a
two-speaker system, set the fader control to
the center position.
• If your car is equipped with a power
antenna, note that it will extend
automatically while the unit is operating.
If you have any questions or problems
concerning your unit that are not covered in
this manual, please consult your nearest Sony
dealer.
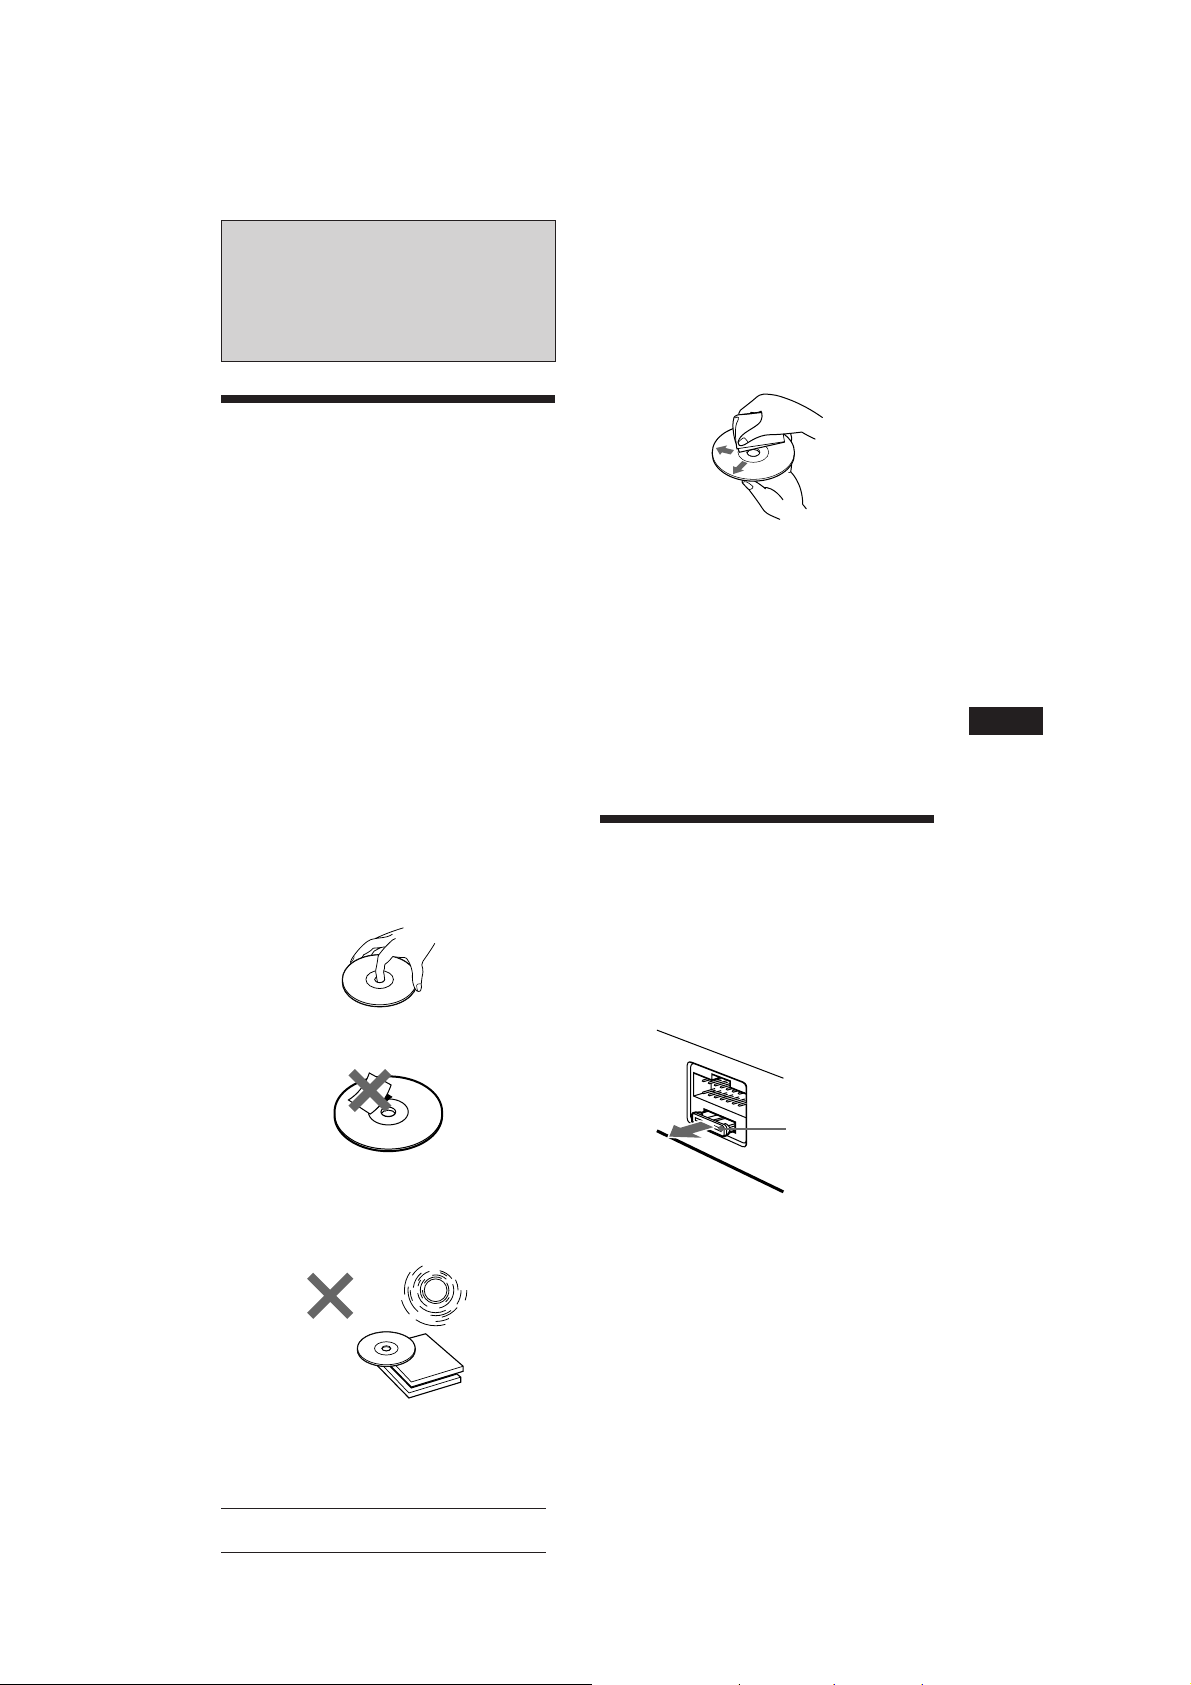
Notes on handling CDs
A dirty or defective disc may cause sound
dropouts while playing. To enjoy optimum
sound, handle the disc as follows.
Handle the disc by its edge. To keep the disc
clean, do not touch the surface.
Do not stick paper or tape on the labeled
surface.
Before playing, clean the discs with an
optional cleaning cloth. Wipe each disc from
the center out.
Do not use solvents such as benzine, thinner,
commercially available cleaners or antistatic
spray intended for analog discs.
Notes on moisture condensation
On a rainy day or in a very damp area,
moisture may condense on the lenses inside
the CD player. Should this occur, the unit will
not operate properly. In this case, remove the
disc and wait for about an hour until the
moisture evaporates.
When you play 8 cm CDs
Use the optional Sony compact disc single
adapter (CSA-8) to protect the CD player from
being damaged.
Maintenance
Fuse replacement
When replacing the fuse, be sure to use one
that matches the amperage described on the
fuse. If the fuse blows, check the power
connection and replace the fuse. If the fuse
blows again after replacement, there may be
an internal malfunction. In such a case, consult
your nearest Sony dealer.
EN
Other Functions/Additional Information
Fuse (10 A)
Do not expose the discs to direct sunlight or
heat sources such as hot air-ducts, or leave
them in a car parked in direct sunlight where
there can be a considerable rise in the
temperature inside the car.
Warning
Never use a fuse with an amperage rating
exceeding the one supplied with the unit as
this could damage the unit.
Actual total number: Sony CDX-4160 (E,S,C,A) 3-859-005-11(1)
9
Page 10
Cleaning the connectors
The unit may not function properly if the
connectors between the unit and the front
panel are not clean. To prevent this, open the
front panel by pressing (RELEASE), then
detach it and clean the connectors with a
cotton swab dipped in alcohol. Do not apply
too much force. Otherwise, the connectors may
be damaged.
Main unit
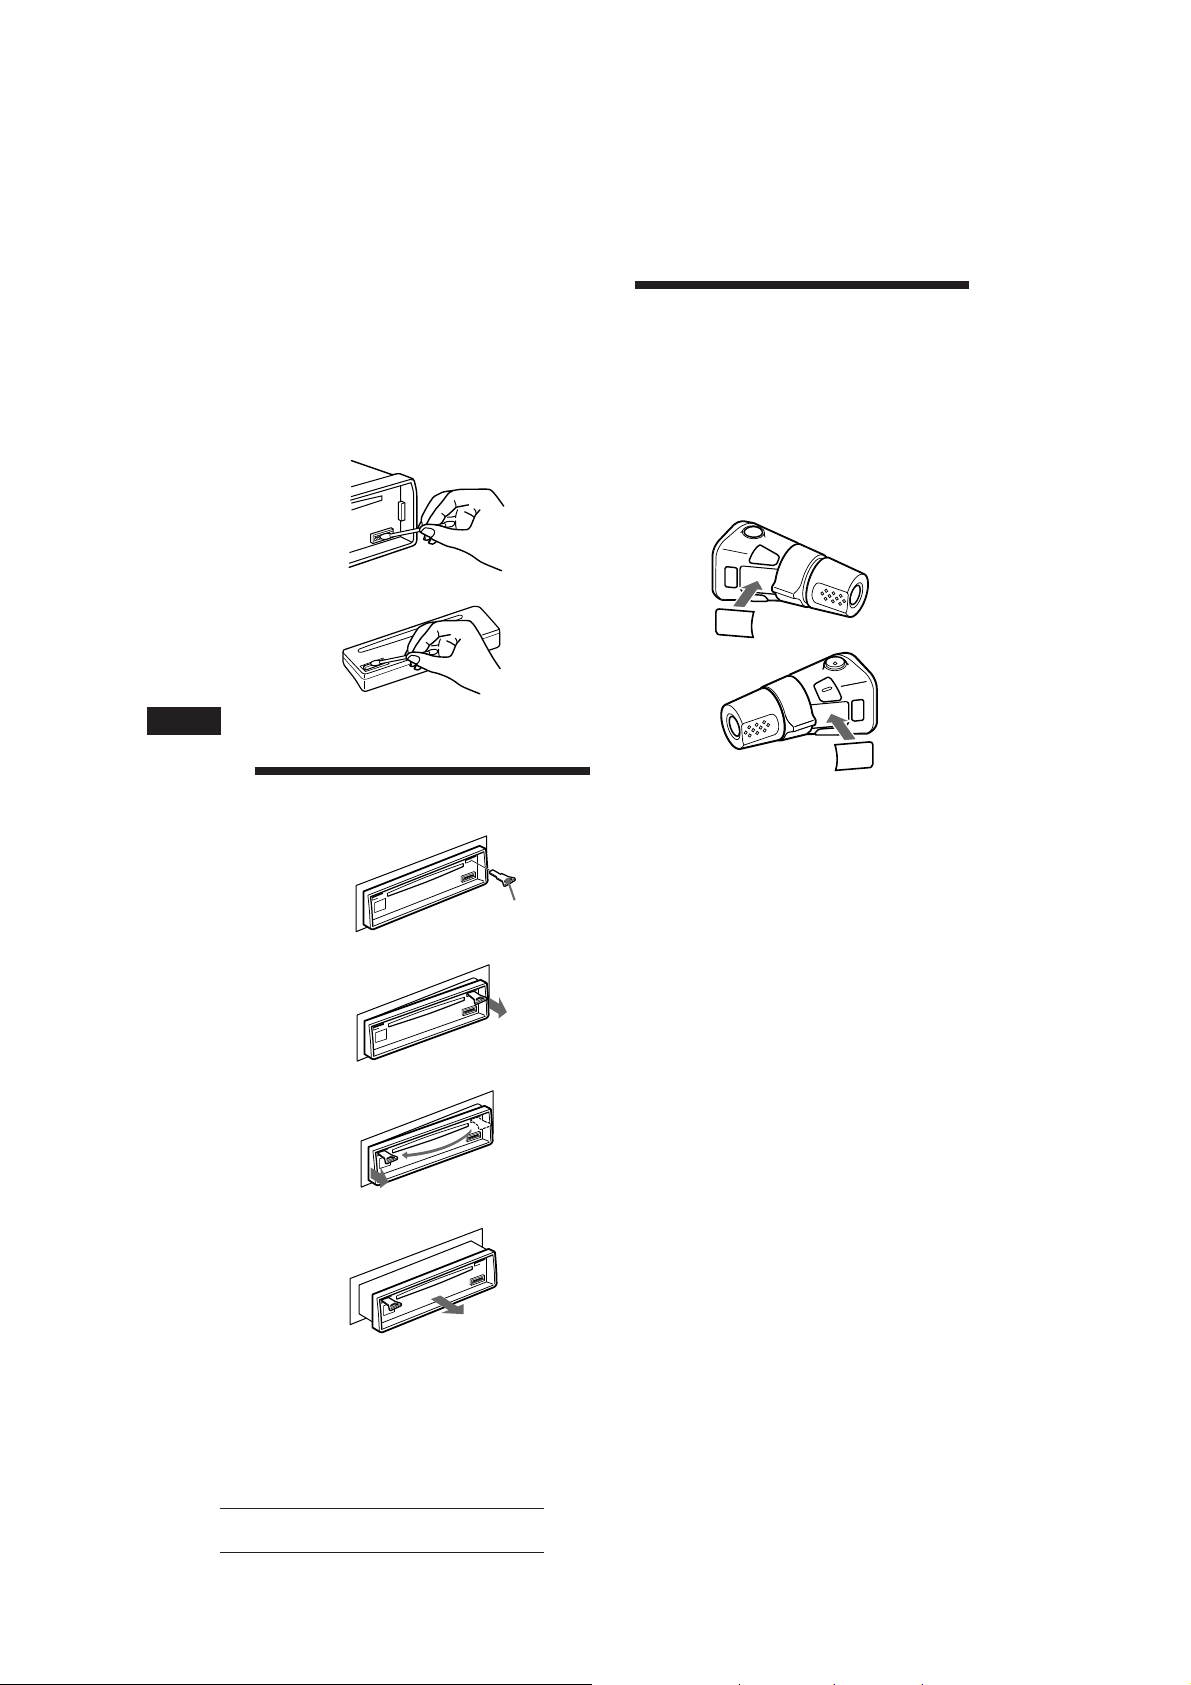
Attaching the label to the
rotary remote
You can control this unit with the optional
rotary remote (RM-X2S).
Several labels are supplied with the rotary
remote. Attach the label that matches the
functions of this unit and the mounting
position of the rotary remote.
After you mount the rotary remote, attach the
label in the illustration below.
DSPL
MODE
SEL
EN
Back of the front panel
Dismounting the unit
Release key
(supplied)
µ
µ
µ
SEL
MODE
DSPL
10
Actual total number: Sony CDX-4160 (E,S,C,A) 3-859-005-11(1)
Page 11

Location of controls
SOURCE
SEEK
AMS
RELEASE
MODE
MUTE
SEL
DSPL
INTRO REPEAT SHUF
OFF
Refer to the pages for details.
1 SEEK/AMS (seek/Automatic Music
Sensor/manual search) button 5, 6, 7
2 SOURCE (source select) button 5, 6, 7
3 MODE (band select) button 6, 7
4 SEL (control mode select) button 5, 8
5 DSPL (display mode change/time set)
button 5, 7
6 Display window
7 SENS (sensitivity adjust) button 7
8 6 (eject) button 5
9 A.MEM (Automatic Memory) button 6
!º RELEASE (front panel release) button 4,
10
!¡ (+) (–) (volume/bass/treble/balance/
fader control) buttons 5, 8
!™ MUTE button 8
!£ Reset button (located on the front side
of the unit hidden by the front panel) 4
SENS A.MEM
1
OFF
2
D-BASS
21 3456
3
!¢ OFF button 4, 5, 8
!∞ Frequency Select switch (located on the
bottom of the unit)
See “Frequency Select Switch” in the
Installation/Connections manual.
!§ During radio reception:
Number buttons 6, 7
During CD playback:
(1) INTRO button 6
(2) REPEAT button 6
(3) SHUF button 6
!¶ D-BASS dial 8
When the positions of switch !∞ have been
changed, be sure to press the reset button after
connecting power.
EN
Additional Information
Actual total number: Sony CDX-4160 (E,S,C,A) 3-859-005-11(1)
11
Page 12

EN
Specifications
CD player section
System Compact disc digital audio
system
Signal-to-noise ratio 90 dB
Frequency response 10 – 20,000 Hz
Wow and flutter Below measurable limit
Tuner section
FM
Tuning range FM tuning interval:
50 kHz/200 kHz
switchable
87.5 – 108.0 MHz (at
50␣ kHz step)
87.5 – 107.9 MHz (at
200␣ kHz step)
Antenna terminal External antenna connector
Intermediate frequency 10.7 MHz
Usable sensitivity 8 dBf
Selectivity 75 dB at 400 kHz
Signal-to-noise ratio 65 dB (stereo),
68 dB (mono)
Harmonic distortion at 1 kHz
0.5 % (stereo),
0.3 % (mono)
Separation 35 dB at 1 kHz
Frequency response 30 – 15,000 Hz
Capture ratio 2 dB
AM
Tuning range AM tuning interval :
9 kHz/10 kHz switchable
531 – 1,602 kHz (at 9 kHz
step)
530 – 1,710 kHz (at 10 kHz
step)
Antenna terminal External antenna connector
Intermediate frequency 10.71 MHz/450 kHz
Sensitivity 30 µV
General
Outputs Line output (2)
Power antenna relay
control/Power amplifier
control lead
Tone controls Bass ±10 dB at 100 Hz
Treble ±10 dB at 10 kHz
Power requirements 12 V DC car battery
(negative ground)
Dimensions Approx. 188 × 58 × 180 mm
(w/h/d)
Mounting dimensions Approx. 183 × 53 × 163 mm
(w/h/d)
Mass Approx. 1.3 kg
Supplied accessories Parts for installation and
connections (1 set)
Front panel case (1)
Optional accessories Rotary remote RM-X2S
RCA pin cord
RC-63 (1 m), RC-64 (2 m),
RC-65 (5 m)
Cleaning cloth XP-CD1
Compact disc single
adapter CSA-8
Design and specifications are subject to change without
notice.
Power amplifier section
Outputs Speaker outputs
Speaker impedance 4 – 8 ohms
Maximum power output 35 W × 4 (at 4 ohms)
(sure seal connectors)
12
Actual total number: Sony CDX-4160 (E,S,C,A) 3-859-005-11(1)
Page 13

Troubleshooting guide
The following checklist will help you remedy the problems that you may encounter with your unit.
Before going through the checklist below, check the connection and operating procedures.
General
Problem
No sound.
The contents of the memory
have been erased.
Indications do not appear in the
display.
No beep tone.
CD playback
Problem
CD cannot be loaded.
Play does not begin.
CD is automatically ejected.
CD will not eject.
The operation buttons do not
function.
The sound skips due to
vibration.
Radio reception
Problem
Preset tuning is not possible.
Automatic tuning is not
possible.
The “ST” indication flashes.
Cause/Solution
•Adjust the volume with (+).
•Set the fader control to the center position for two-speaker
systems.
• The power cord or battery has been disconnected.
• The reset button has been pressed.
n Store the settings again into the memory.
Remove the front panel and clean the connectors. See “Cleaning
the connectors” (page 10) for details.
• An optional power amplifier is connected and you are not
using the built-in amplifier.
• The beep tone is muted (page 8).
Cause/Solution
• Another CD is already loaded.
• The CD was forcibly inserted upside down.
Dusty disc.
The ambient temperature is more than 50°C.
Press the 6 button for two seconds.
Press the reset button.
• The unit is installed at an angle of more than 20°.
• The unit is not installed in a sturdy part of the car.
Cause/Solution
• Store the correct frequency.
• The broadcast signal is too weak.
The broadcast signal is too weak.
n Use manual tuning.
•Tune in the frequency correctly.
•The broadcast signal is too weak.
n Set to the MONO mode (page 7).
EN
Additional Information
Error displays
The following indications will flash for about five seconds.
Display
If the above-mentioned solutions do not help improve the situation, consult your nearest Sony
dealer.
Cause
A CD is dirty or inserted upside
down.
The CD player cannot be operated
because of some problem.
Solution
Clean or insert the CD correctly.
Press the reset button or 6.
Actual total number: Sony CDX-4160 (E,S,C,A) 3-859-005-11(1)
13
Page 14

Index
EN
A
Automatic Memory 6
Automatic Music Sensor (AMS) 5
Automatic tuning 7
B
Balance 8
Bass 8
Beep tone 8
C
Caution alarm 4
CD playback 5
Clock 5
D, E
D-BASS 8
Display 5, 7
F, G, H
Fader 8
Front panel 4
Fuse 9
I, J, K
Intro Scan 6
L
Local seek 7
Locating
a specific point 5
a specific track 6
M, N, O
Manual search 6
Manual tuning 7
Memorizing a station 6
Monaural mode 7
Mute 8
P, Q
Power select 8
R
Radio 6
Repeat Play 6
Reset 4
Rotary remote 10
S
Shuffle Play 6
T, U
Treble 8
V, W, X, Y, Z
Volume 8
14
Actual total number: Sony CDX-4160 (E,S,C,A) 3-859-005-11(1)
Page 15

EN
Actual total number: Sony CDX-4160 (E,S,C,A) 3-859-005-11(1)
15
Page 16

¡Bienvenido!
Enhorabuena por la adquisición del
reproductor de discos compactos Sony. Esta
unidad le permitirá disfrutar de una serie de
funciones. Podrá usar un mando a distancia
rotativo opcional (RM-X2S).
ES
2
Actual total number: Sony CDX-4160 (E,S,C,A) 3-859-005-11(1)
Page 17

Indice
Procedimientos iniciales
Restauración de la unidad ................................. 4
Extracción del panel frontal............................... 4
Ajuste del reloj ..................................................... 5
Reproductor de discos
compactos
Reproducción de un disco compacto ............... 5
Reproducción de un disco compacto en
diversos modos .............................................. 6
Radio
Memorización automática de emisoras
— Función de memoria automática ............ 6
Memorización de las emisoras deseadas......... 7
Recepción de emisoras memorizadas .............. 7
Otras funciones
Ajuste de las características de sonido ............. 8
Cancelación del sonido ...................................... 8
Cambio de los ajustes de sonido y
tono del pitido ................................................ 8
Activación de la indicación de hora
— Función de selección de alimentación .. 9
Información complementaria
Precauciones ........................................................ 9
Mantenimiento .................................................. 10
Desmontaje de la unidad ................................. 11
Adhesión de la etiqueta al mando a distancia
rotativo .......................................................... 11
Ubicación de los controles ............................... 12
Especificaciones ................................................. 13
Guía de solución de problemas ...................... 14
Indice alfabético ................................................ 16
ES
Actual total number: Sony CDX-4160 (E,S,C,A) 3-859-005-11(1)
3
Page 18

Procedimientos
iniciales
Restauración de la unidad
Antes de utilizar la unidad por primera vez o
después de sustituir la batería del automóvil,
es necesario restaurar dicha unidad.
Pulse el botón de restauración con un objeto
puntiagudo, por ejemplo, un bolígrafo.
Fijación del panel frontal
Alinee la parte A del panel con la parte B de
la unidad como muestra la ilustración y, a
continuación, ejerza presión hasta oír un
chasquido.
A
B
Botón de restauración
Notas
• Al pulsar el botón de restauración se borrarán todos los
programas memorizados y las funciones de memoria.
• Cuando conecte el cable de alimentación o restaure la
unidad, espere unos 10 segundos antes de insertar un
ES
disco. No inserte ningún disco antes de que transcurran
10 segundos, ya que de lo contrario la unidad no se
restaurará y deberá volver a pulsar el botón de
restauración.
Extracción del panel
frontal
Es posible extraer el panel frontal de esta
unidad con el fin de evitar su robo.
1 Pulse (OFF).
2 Pulse (RELEASE) para abrir el panel
frontal y retire el panel tirando hacia
fuera del mismo.
(OFF)
Notas
• Asegúrese de no fijar el panel frontal al revés.
• No ejerza excesiva presión sobre el panel frontal al fijarlo
a la unidad. Presiónelo ligeramente.
• No presione con fuerza o en exceso el visor del panel
frontal.
• No exponga el panel frontal a la luz solar directa, a
fuentes térmicas, como conductos de aire caliente, ni lo
deje en un lugar húmedo. No lo deje nunca sobre el
salpicadero de un automóvil aparcado al sol, ya que
podría producirse un considerable aumento de
temperatura.
Alarma de precaución
Si gira el interruptor de la llave de contacto a la
posición OFF sin haber extraído el panel
frontal, la alarma de precaución emitirá pitidos
durante unos segundos (sólo si su automóvil
tiene posición de accesorios en la llave de
encendido). Si conecta un amplificador
opcional de potencia y no utiliza el
incorporado, los pitidos se desactivarán.
(RELEASE)
Notas
• Procure no dejar caer el panel al extraerlo de la unidad.
• Si pulsa (RELEASE) para extraer el panel mientras la
unidad se encuentra encendida, ésta se desactivará
automáticamente para evitar que se dañen los altavoces.
• Para transportar el panel frontal, guárdelo en el estuche
4
suministrado.
Actual total number: Sony CDX-4160 (E,S,C,A) 3-859-005-11(1)
Page 19

Ajuste del reloj
SEEK
AMS
El reloj dispone de una indicación digital de 12
horas.
Ejemplo: Para ajustar el reloj a las 10:08
1 Pulse (OFF) o (DSPL) durante el
funcionamiento.
Reproductor de discos
compactos
Reproducción de un disco
compacto
2 Pulse(DSPL) durante más de dos
segundos.
100
El dígito de la hora parpadea.
1 Ajuste los dígitos de la hora.
Para avanzar
Para retroceder
1000
2 Pulse (SEL) durante un instante.
1000
El dígito de los minutos parpadea.
3 Ajuste los dígitos de los minutos.
Para avanzar
Para retroceder
1008
3 Pulse (DSPL) durante un instante.
1008
Basta con insertar el CD.
La reproducción se iniciará de forma
automática.
Con el lado de la etiqueta hacia arriba
Si ya hay un CD insertado, pulse (SOURCE)
varias veces hasta que aparezca “CD.”
MIN SEC
215
Tiempo de reproducción transcurrido
Nota
Si desea reproducir un CD de 8 cm, utilice el adaptador
sencillo de discos compactos opcional Sony (CSA-8).
Para Pulse
Detener la reproducción 6 u (OFF)
Expulsar el CD 6
Cambio de los elementos
mostrados
Cada vez que pulse (DSPL), el elemento
cambiará de la siguiente forma:
z Tiempo de reproducción transcurrido
Hara Z Número de tema Z
ES
Procedimientos iniciales/Reproductor de discos compactos
El reloj se activa.
Nota
Si su automóvil no tiene posición de accesorios en la llave
de encendido, no es posible poner en hora el reloj a menos
que esté activada la alimentación.
Localización de un tema específico
— Sensor de música automático (AMS)
Durante la reproducción, pulse durante
un instante cualquier lado de
(SEEK/AMS).
Para localizar temas posteriores
Para localizar temas anteriores
Actual total number: Sony CDX-4160 (E,S,C,A) 3-859-005-11(1)
5
Page 20

Localización de una parte
específica de un tema
— Búsqueda manual
Durante la reproducción, mantenga
pulsado cualquier lado de (SEEK/AMS)
durante dos segundos. Suelte el botón
cuando encuentre la parte que desee.
Para buscar hacia delante
SEEK
AMS
Para buscar hacia atrás
Nota
Si “_ _ ” o “ _ _” aparece en el visor, significa que ha
llegado al principio o al final del disco y no es posible
continuar la búsqueda.
Radio
Memorización automática
de emisoras
— Función de memoria automática
Las emisoras de cada banda que se reciben con
mayor claridad se localizan y se almacenan en
la memoria de forma automática (FMI, FMII,
FMIII y AM). Es posible almacenar un máximo
de 6 emisoras de cada banda en los botones
numéricos de memorización de (1) a (6) por
orden de frecuencia.
Reproducción de un disco
compacto en diversos
modos
Búsqueda de un tema determinado
ES
— Exploración de temas
Pulse (1) durante la reproducción.
“INTRO” se muestra en el visor.
Se reproducen los 10 primeros segundos de
todos los temas.
Cuando localice el tema que desee, vuelva a
pulsar el botón. La unidad vuelve al modo de
reproducción normal.
Reproducción repetida de temas
— Reproducción repetida
Pulse (2) durante la reproducción.
“REPEAT” se muestra en el visor.
Cuando finalice la reproducción del tema
actual, éste volverá a reproducirse desde el
principio.
Para cancelar este modo, vuelva a pulsar el
botón.
Reproducción de temas en orden
aleatorio
— Reproduccióno aleatoria
Pulse (3) durante la reproducción.
“SHUFFLE” se muestra en el visor.
Todas los temas del disco se reproducen en
orden aleatorio.
Para cancelar este modo, vuelva a pulsar el
botón.
6
1 Pulse (SOURCE) varias veces para
seleccionar el sintonizador.
Cada vez que pulse (MODE), el modo
cambia de la siguiente forma:
CD ˜ TUNER
2 Pulse (MODE) varias veces para
seleccionar la banda.
Cada vez que pulse (MODE), el modo
cambia de la siguiente forma:
z FMI z FMII z FMIII z AM
3 Pulse (A.MEM) durante dos segundos.
La unidad comienza a buscar en la banda
seleccionada y memoriza las emisoras
sintonizadas automáticamente en los
botones numéricos de memorización de
(1) a (6).
Notas
• La unidad no almacenará emisoras de señales débiles. Si
se reciben pocas emisoras, algunos botones numéricos
permanecerán vacíos.
• Si se muestra algún número en el visor, la unidad
almacenará las emisoras a partir de dicho número.
• Si no hay ningun disco en la unidad, sólo aparece la
banda de del sintonizador aungue pulse (SOURCE).
Actual total number: Sony CDX-4160 (E,S,C,A) 3-859-005-11(1)
Page 21

Memorización de las
emisoras deseadas
Es posible almacenar un máximo de 6 emisoras
de cada banda (18 de FMI, FMII y FMIII, y 6 de
y AM respectivamente) en el orden en que
desee.
1 Pulse (SOURCE) varias veces para
seleccionar el sintonizador.
2 Pulse (MODE) varias veces para
seleccionar la banda.
3 Pulse cualquier lado de (SEEK/AMS) para
sintonizar la emisora que desee
almacenar en el botón numérico.
4 Pulse el botón numérico que desee (de
(1) a (6)) durante dos segundos hasta
que aparezca “MEM”.
En el visor aparecerá la indicación del
botón numérico.
Nota
Si intenta almacenar una emisora en un botón numérico ya
asignado a otra emisora, la emisora previamente
almacenada se borrará.
Recepción de emisoras
memorizadas
1 Seleccione la banda que desee (página 6).
2 Pulse durante un instante el botón
numérico ((1) a (6)) en el que esté
almacenada la emisora que desee recibir.
Si no puede sintonizar una emisora
programada
Pulse momentáneamente cualquier lado
de (SEEK/AMS) para buscar la emisora
(sintonización automática).
La exploración se detiene al recibirse una
emisora. Pulse varias veces cualquier lado
del botón (SEEK/AMS) hasta recibir la
emisora que desee.
Nota
Si la sintonización automática se detiene con demasiada
frecuencia, pulse (SENS) durante un instante hasta que
“LCL” aparezca en el visor (modo de búsqueda local). Sólo
podrán sintonizarse las emisoras con señales relativamente
intensas.
Consejo
Si conoce la frecuencia de la emisora que desea escuchar,
mantenga pulsado cualquier lado de (SEEK/AMS) durante
dos segundos hasta que aparezca la frecuencia que desee
(sintonización manual).
ES
Reproductor de discos compactos/Radio
Si la recepción de FM estéreo es de
baja calidad — Modo monofónico
Pulse (SENS) durante un instante hasta
que aparezca “MONO”.
El sonido mejora, pero se emite en modo
monofónico (“ST” desaparece).
Para recuperar el modo normal, vuelva a
pulsarlo hasta que la indicación “MONO”
desaparezca.
Cambio de los elementos
mostrados
Cada vez que pulse (DSPL), los elementos se
alternarán entre la frecuencia y la hora.
7
Actual total number: Sony CDX-4160 (E,S,C,A) 3-859-005-11(1)
Page 22

Otras funciones
Ajuste de las
características de sonido
Es posible ajustar los graves, los agudos, el
balance y el equilibrio entre altavoces. Cada
fuente puede almacenar el nivel de graves y
agudos por separado.
1 Pulse (SEL) varias veces para seleccionar
el elemento que desee ajustar.
VOL (volumen) n BAS (graves) n TRE
(agudos) n BAL (balance) n FAD
(equilibrio entre los altavoces)
2 Pulse (+) o (–) para ajustar el elemento
seleccionado.
ES
Realice el ajuste en un intervalo de tres
segundos después de seleccionar el
elemento. (Transcurridos tres segundos, los
botones funcionan como botones de control
de volumen).
Cambio de los ajustes de
sonido y tono del pitido
Refuerzo de los graves — D-bass
Es posible disfrutar de graves intensos y
nítidos. La función D-bass refuerza la señal de
frecuencias bajas con una curva más marcada
que la del refuerzo de graves convencional.
Es posible escuchar la línea de graves con
mayor nitidez aunque el sonido vocal se
encuentre al mismo nivel. Igualmente, es
posible enfatizar y ajustar los graves
fácilmente con el dial D-BASS. Este efecto es
similar al obtenido cuando se utiliza un
sistema opcional de altavoces potenciadores de
graves.
Además, la función D-bass digital* crea graves
incluso más intensos y nítidos que la función
D-bass analógica.
* La característica D-bass digital se encuentra disponible
durante la reproducción de discos compactos.
D-BASS digital D-BASS analógico
D-BASS 3
D-BASS 2
D-BASS 1
Frecuencia (Hz)
0dB
Nivel
D-BASS 3
D-BASS 2
D-BASS 1
Frecuencia (Hz)
Nivel
0dB
Cancelación del sonido
Pulse (MUTE).
La indicación “MUTE” parpadea.
Para restaurar el nivel de volumen anterior,
vuelva a pulsar (MUTE).
8
Ajuste de la curva de graves
Gire el dial D-BASS para ajustar el nivel
de graves (1, 2 o 3).
“D-BASS” aparece en el visor.
Durante la reproducción de discos
compactos, la indicación “DIGITAL DBASS” aparece en el visor.
Para cancelar esta acción, sitúe el ajuste en la
posición OFF.
Silenciamiento del pitido
Pulse (6) mientras pulsa (SEL).
Para volver a activar el pitido, pulse de nuevo
estos botones.
Nota
Si conecta un amplificador opcional de potencia y no
utiliza el incorporado, el pitido se desactivará.
Actual total number: Sony CDX-4160 (E,S,C,A) 3-859-005-11(1)
Page 23

Activación de la indicación
de hora
— Función de selección de alimentación
Información
complementaria
Sólo para automóviles con posición de
accesorios en la llave de encendido
Para activar la función de selección
de alimentación
Presione (OFF) mientras mantiene
presionado (SEL).
La función de selección de alimentación
enlaza la alimentación de la indicación de
hora a la posición de accesorios en la llave
de encendido.
Para evitar descargar la batería, la
indicación de hora no se muestra cuando se
está inicializando la unidad.
Nota
No es posible utilizar esta función con el mando a distancia
rotativo opcional (RM-X2S).
Precauciones
•Si aparca el automóvil bajo la luz solar
directa y se produce un considerable
aumento de temperatura en su interior, deje
que la unidad se enfríe antes de utilizarla.
•Si la unidad no recibe alimentación,
compruebe las conexiones en primer lugar. Si
todo está en orden, examine el fusible.
•Si los altavoces no emiten sonido con un
sistema de 2 altavoces, ajuste el control de
equilibrio en la posición central.
•Si el automóvil dispone de antena
motorizada, observe que ésta se extenderá
automáticamente durante el funcionamiento
de la unidad.
Si desea realizar alguna consulta o solucionar
algún problema referentes a la unidad que no
aparezcan en este manual, póngase en contacto
con el proveedor Sony más próximo.
Notas sobre el manejo de discos
compactos
Si el disco está sucio o es defectuoso, puede
producirse pérdida de sonido durante la
reproducción. Para disfrutar de buena calidad
de sonido, maneje el disco como se explica a
continuación.
Agárrelo per por los bordes. Para mantenerlo
limpio, no toque la superficie.
ES
Radio/Otras funciones/Información complementaria
No adhiera papel ni cinta adhesiva en la
superficie de la etiqueta.
Actual total number: Sony CDX-4160 (E,S,C,A) 3-859-005-11(1)
9
Page 24

No exponga los discos a la luz solar directa ni
a fuentes de calor, como conductos de aire
caliente, ni los deje en un automóvil aparcado
al sol, ya que puede producirse un
considerable aumento de temperatura en su
interior.
Antes de iniciar la reproducción, limpie los
discos con un paño de limpieza opcional desde
el centro hacia los bordes.
No utilice disolventes, como bencina,
diluyentes o productos de limpieza
disponibles en las tiendas del ramo, ni
aerosoles antiestáticos destinados a discos
analógicos.
ES
Notas sobre condensación de
humedad
En los días lluviosos o en zonas muy húmedas,
puede condensarse humedad en las lentes del
interior del reproductor de discos compactos.
Si esto ocurre, la unidad no funcionará
correctamente. En este caso, extraiga el disco y
espere una hora aproximadamente hasta que
la humedad se evapore.
Mantenimiento
Sustitución del fusible
Cuando sustituya el fusible, compruebe que
utiliza uno con el amperaje especificado en el
fusible. Si éste se funde, compruebe la
conexión de alimentación y sustitúyalo. Si una
vez sustituido vuelve a fundirse, es posible
que exista alguna anomalía interna. En este
caso, póngase en contacto con el proveedor
Sony más próximo.
Fusible (10 A)
Advertencia
No utilice nunca un fusible de amperaje
superior al del suministrado con la unidad, ya
que ésta podría dañarse.
Limpieza de los conectores
La unidad puede no funcionar correctamente
si los conectores de la misma y del panel
frontal están sucios. Con el fin de evitarlo, abra
el panel frontal pulsando (RELEASE); a
continuación, sepárelo y limpie los conectores
con un bastoncillo humedecido en alcohol. No
aplique demasiada presión, ya que los
conectores podrían dañarse.
Reproducción de discos compactos
de 8 cm
Utilice el adaptador sencillo de discos
compactos opcional de Sony (CSA-8) para
evitar que el reproductor de discos compactos
se dañe.
10
Actual total number: Sony CDX-4160 (E,S,C,A) 3-859-005-11(1)
Unidad principal
Parte posterior del panel frontal
Page 25

Desmontaje de la unidad
Llave de
apertura
(suministrada)
µ
µ
µ
Adhesión de la etiqueta al
mando a distancia
rotativo
Esta unidad puede controlarse con el mando a
distancia rotativo opcional (RM-X2S).
Con el mando rotativo se suministra una serie
de etiquetas. Adhiera la etiqueta que
corresponda a las funciones de esta unidad y a
la posición de montaje del mando a distancia
rotativo. Después de montar el mando a
distancia rotativo, adhiera la etiqueta como se
muestra en la ilustración siguiente.
ES
Información complementaria
DSPL
MODE
SEL
SEL
MODE
DSPL
Actual total number: Sony CDX-4160 (E,S,C,A) 3-859-005-11(1)
11
Page 26

Ubicación de los controles
SOURCE
SEEK
AMS
RELEASE
MODE
MUTE
SEL
DSPL
INTRO REPEAT SHUF
OFF
Consulte las páginas indicadas para obtener más información.
1 Botón SEEK/AMS (búsqueda/sensor de
ES
música automático/búsqueda manual)
5, 6, 7
2 Botón SOURCE (selección de fuente) 5,
6, 7
3 Botón MODE (selección de banda) 6, 7
4 Botón SEL (selección del modo de
control) 5, 8, 9
5 Botón DSPL (cambio de visualización/
ajuste de la hora) 5, 7
6 Visor
7 Botón SENS (ajuste de sensibilidad) 7
8 Botón 6 (expulsión) 5
9 Botón A.MEM (memoria automática) 6
0 Botón RELEASE (extracción del panel
frontal) 4, 10
!¡ Botones (+) (–) (control de volumen/
graves/agudos/balance/equilibrio) 5, 8
!™ Botón MUTE 8
!£ Botón de restauración (situado en la
parte frontal de la unidad, oculto por el
panel frontal) 4
SENS A.MEM
1
OFF
2
D-BASS
21 3456
3
!¢ Botón OFF 4, 5, 9
!∞ Selector de frecuencia (situado en la
base de la unidad)
Consulte ”Selector de frecuencia“ del
manual de Instalación/conexiones.
!§ Durante la recepción de radio:
Botones numéricos 6, 7
Durante la reproducción de un CD:
(1) Botón INTRO 6
(2) Botón REPEAT 6
(3) Botón SHUF 6
!¶ Dial D-BASS 8
Cuando se haya cambiado la posición del
selector !∞ , asegúrese de presionar el botón de
restauración después de conectar la
alimentación.
12
Actual total number: Sony CDX-4160 (E,S,C,A) 3-859-005-11(1)
Page 27

Especificaciones
Sección del reproductor de discos
compactos
Sistema Audiodigital de discos
compactos
Relación señal-ruido 90 dB
Respuesta de frecuencia 10 – 20.000 Hz
Fluctuación y trémolo Inferior al límite medible
Sección del sintonizador
FM
Gama de sintonía Intervalo de sintonía de
FM:
50 kHz/200 kHz,
conmutable
87,5 – 108,0 MHz (intervalo
de 50 kHz)
87,5 – 107,9 MHz (intervalo
de 200 kHz)
Terminal de antena Conector para antena
exterior
Frecuencia intermedia 10,7 MHz
Sensibilidad útil 8 dBf
Selectividad 75 dB a 400 kHz
Relación señal-ruido 65 dB (estéreo)
68 dB (monoaural)
Distorsión armónica a 1kHz
0,5% (estéreo),
0,3% (monoaural)
Separación entre canales 35 dB a 1 kHz
Respuesta de frecuencia 30 – 15.000 Hz
Relación de captura 2 dB
AM
Gama de sintonía Intervalo de sintonía de
AM:
9 kHz/10 kHz, conmutable
531 – 1.602 kHz (intervalo
de 9 kHz)
530 – 1.710 kHz (intervalo
de 10 kHz)
Terminal de antena Conector para antena
exterior
Frecuencia intermedia 10,71 MHz/450 kHz
Sensibilidad 30 µV
Generales
Salidas Salida de línea (2)
Cable de control de relé de
antena motorizada/Cable
de control de amplificador
de potencia
Controles de tono Graves ±10 dB a 100 Hz
Agudos ±10 dB a 10 kHz
Requisitos de alimentación
Batería de automóvil de
12␣ V CC (toma a tierra
negativa)
Dimensiones Aprox. 188 × 58 × 180 mm
(an/al/prf)
Dimensión de montaje Aprox. 183 × 53 × 163 mm
(an/al/prf)
Masa Aprox. 1,3 kg
Accesorios suministrados Componentes para
instalación y conexiones
(1 juego)
Estuche para el panel
frontal (1)
Accesorios opcionales Mando a distancia rotativo
RM-X2S
Cable de pines RCA
RC-63 (1 m), RC-64 (2 m),
RC-65 (5 m)
Paño de limpieza XP-CD1
Adaptador sencillo de
discos compactos CSA-8
Diseño y especificaciones sujetos a cambios sin previo
aviso.
ES
Información complementaria
Sección del amplificador de
potencia
Salidas Salidas de altavoz
(conectores herméticos
seguros)
Impedancia de altavoz 4 – 8 ohmios
Salida máxima de potencia
35 W × 4 (a 4 ohmios)
Actual total number: Sony CDX-4160 (E,S,C,A) 3-859-005-11(1)
13
Page 28

Guía de solución de problemas
La siguiente lista de comprobación proporciona ayuda para solucionar la mayoría de los problemas
que pueden producirse con la unidad.
Antes de consultar la lista que aparece a continuación, compruebe los procedimientos de conexión y
funcionamiento.
Generales
Problema
Ausencia de sonido.
Se ha borrado el contenido de
la memoria.
El visor no muestra
indicaciones.
Ausencia de pitidos.
ES
Reproducción de CD
Problema
No es posible cargar un CD.
No se inicia la reproducción.
El CD se extrae automáticamente.
El CD no se expulsa.
Los botones de funcionamiento
no se activan.
El sonido se omite debido a
vibraciones.
Causa/Solución
•Ajuste el volumen con (+).
•Ajuste el control de equilibrio entre los altavoces en la posición
central para sistemas de 2 altavoces.
•Ha desconectado el cable de alimentación o la batería.
•Ha pulsado el botón de restauración.
n Vuelva a almacenar los ajustes en la memoria.
Retire el panel frontal y limpie los conectores. Para obtener más
información, consulte el apartado “Limpieza de los conectores”
(página 10).
•Ha conectado un amplificador opcional de potencia y no utiliza
el incorporado.
•Los pitidos se desactivan(página 8).
Causa/Solución
• Ya se ha cargado otro CD.
• Se ha forzado el CD al introducirlo al revés.
El disco está sucio.
La temperatura ambiente es superior a 50°C.
Presione la tecla 6 durante más de dos segundos.
Pulse el botón de restauración.
•Ha instalado la unidad en un ángulo superior a los 20°.
•No ha instalado la unidad en una parte segura del automóvil.
Recepción de radio
Problema
No es posible realizar la
sintonización de programación.
No es posible realizar la
sintonización automática.
La indicación “ST” parpadea.
14
Actual total number: Sony CDX-4160 (E,S,C,A) 3-859-005-11(1)
Causa/Solución
•Almacene la frecuencia correcta.
•La señal de emisión es demasiado débil.
La señal de emisión es demasiado débil.
n Utilice la sintonización manual.
•Realice la sintonización con precisión.
•La señal de emisión es demasiado débil.
n Realice el ajuste en el modo MONO (página 7).
Page 29

Indicaciones de error
Las siguientes indicaciones parpadearán durante cinco segundos aproximadamente.
Indicación Causa
El CD está sucio o se ha insertado al
revés.
El reproductor de CD no funciona
debido a algún problema.
Si el problema no se soluciona con las sugerencias anteriormente enumeradas, póngase en contacto
con el proveedor Sony más próximo.
Solución
Limpie el CD o insértelo
correctamente.
Pulse el botón de restauración o 6.
ES
Información complementaria
Actual total number: Sony CDX-4160 (E,S,C,A) 3-859-005-11(1)
15
Page 30

Indice alfabético
ES
A
Agudos 8
Alarma de precaución 4
B
Balance 8
Búsqueda local 7
Búsqueda manual 6
C
Cancelación del sonido 8
D
D-BASS 8
E
Equilibrio entre los altavoces 8
Exploración de temas 6
F
Fusible 10
G, H, I, J, K
Graves 8
L
Localización de
una parte determinada 6
un tema específico 5
P, Q
Panel frontal 4
Pitidos 8
R
Radio 6
Reloj 5
Reproducción aleatoria 6
Reproducción de CD 5
Reproducción repetida 6
Restauración 4
S, T, U
Selección de alimentación 9
Sensor de música automático (AMS) 5
Sintonización automática 7
Sintonización manual 7
V, W, X, Y, Z
Visor 5, 7
Volumen 8
16
M, N, O
Mando a distancia rotativo 11
Memoria automática 6
Memorización de emisoras 6
Modo monofónico 7
Actual total number: Sony CDX-4160 (E,S,C,A) 3-859-005-11(1)
Page 31

ES
Actual total number: Sony CDX-4160 (E,S,C,A) 3-859-005-11(1)
17
Page 32

Sony Corporation Printed in Korea
Actual total number: Sony CDX-4160 (E,S,C,A) 3-859-005-11(1)
 Loading...