

Page 1

3-753-610-22 (3)
Compact Disc
Player
Operating Instructions
n COMPACT
(i1d@(s
DIGITAL AUDIO
CDP-C910
® 1991 by Sony Corporation
Page 2
WARNING
To prevent fire or shock hazard, do not
expose the unit to rain or moisture.
CAUTION
RISK OF ELECTRIC SHOCK
DO MOT OPEN
CAUTION : TO REDUCE THE RISK OF ELECTRIC SHOCK,
DO NOT REMOVE COVER (OR BACK).
NO USER-SERVICEABLE PARTS INSIDE.
REFER SERVICING TO QUALIFIED SERVICE PERSONNEL.
This symbol is intended to alert the user
to the presence of uninsulated
“dangerous voltage” within the product’s
enclosure that may be of sufficient
magnitude to consititute a risk of electric
shock to persons.
This symbol is intended to alert the user
to the presence of important operating
and maintenance (servicing) instructions in
the literature accompanying the appliance.
INFORMATION
This equipment generates and uses radio frequency
energy and if not installed and used properly, that is, in
strict accordance with the manufacturer’s instructions, may
cause interference to radio and television reception. It has
been type tested and found to comply with the limits for a
Class B computing device in accordance with the
specifications in Subpart J of Part 15 of FCC Rules, which
are designed to provide reasonable protection against
such interference in a residential installation. However,
there is no guarantee that interference will not occur in a
particular installation. If this equipment does cause
interference to radio or television reception, which can be
determined by turning the equipment off and on, the user
is encouraged to try to correct the interference by one or
more of the following measures:
Reorient the receiving antenna
Relocate the equipment with respect to the receiver
Move the equipment away from the receiver
Plug the equipment into a different outlet so that
equipment and receiver are on different branch circuits.
If necessary, the user should consult the dealer or an
experienced radio/television technician for additional
suggestions. The user may find the following booklet
prepared by the Federal Communications Commission
helpful:
“How to identify and Resolve Radio-TV interference
Problems”.
This booklet is available from the U.S. Government
Printing Office, Washington, DC 20402, Stock No. 004000-00345-4.
For the customers in Australia
This Compact Disc player
is classified as a CLASS 1
LASER product.
The CLASS 1 LASER
PRODUCT label is located
on the rear exterior.
Owner’s Record
The model and serial numbers are located at the rear.
Record these numbers in the spaces provided below.
Refer to these numbers whenever you call upon your Sony
dealer regarding this product.
Model No. CDP-C910 Serial No.
____
_______________________
Page 3

Warning ............................................................................ 2
Introducing this CD player ............................................. 3
Installation ....................................................................... 4
Precautions...................................................................... 4
Connections .................................................................... 5
Location of controls
Front panel ............................................................................ 6
Remote commander ............................................................. 7
Preparing the remote commander
Installing batteries
Setting up the disc magazine
Playing a disc - Continuous play
Information display
Selecting a desired disc ..................................................... 11
Locating a particular selection .......................................... 11
Locating a particular point in a selection
Playing in a random order - Shuffle play
To play only the desired discs in a random order
- Select shuffle play............................................................ 12
.......................................................
................................
...............................................................
........................................
...................................
............................................................
.........................
......................
10
11
12
Playing repeatedly - Repeat play ................................. 13
Playing in a desired order - Program play
Designating the playing time-Program edit
Checking the programmed selections
Clearing the programmed selections................................ 15
Designating the total playing time-Time edit
...................
....................
.............................
.............
14
14
15
16
Convenient features for tape recording ...................... 18
Fading in/Fading out .......................................................... 18
Fading out after a desired duration - Time fade
Locating the loudest portion of the disc
- Peak search
.....................................................................
..............
18
19
Playing the beginning of each selection
- Music scan
On custom files
Assigning names to a disc - Disc memo
Displaying the memos ....................................................... 23
Clearing the disc memo ..................................................... 23
Keeping the program in memory - Bank
Memorizing a bank.............................................................. 24
Playing the disc using the bank
Ciearing the bank ................................................................24
............................................................
.............................................................
.....................
.....................
.......................................
20
21
22
24
24
Preset the desired output level to a disc
- Level file ................................................................25
Clearing the level file
Timer activated playing
Activating the power with an audio timer
..........................................................
.................................................
.........................
26
26
Maintenance ...................................................................27
Specifications .................................................................27
Troubleshooting guide
..................................
back cover
6
7
8
25
This unit is equipped with an automatic disc changer
which allows you to play up to 10 discs in a row. You can
choose from a large number and wide variety of
selections.
Enjoy listening in various playing modes
You can select the playing modes among the following:
Continuous play
(page 9)
7
9
Shuffle play (page 12)
Program play (page 14)
Repeat play (page 13)
The entire disc(s) is played
once.
- Selections are played in a
random order.
- Selections are played in your
desired order.
- Selections or portions are
played repeatedly.
____________
Editing your own tapes
You can fade the play in or out when making your own
tape recording. - Fading in/Fading out (page 18)
• You can confirm the total playing time while choosing
the selections to be programmed. - Program edit (page
14)
• The player can program selections automatically to fit in
a desired duration. - Time edit (page 16)
• You can stop the play, fading out at the time desired.
- Time fade (page 18)
• The loudest portion of the disc will be determined and
played repeatedly. - Peak search (page 19)
Making your disc custom-made - CUSTOM FILE
function
• You can assign a name to a disc, such as the title of the
• You can store the programmed playing order for a
• You can store the optimum playback level of each disc
____________________________________
disc or the date of purchase. - Disc memo (page 22)
disc. - Bank (page 24)
in the unit's memory. - Level file (page 25)
_
You can play a beginning of each selection
- Music scan
You can check the selections by scanning the beginning
of each selection in the disc. You can use this function in
any play mode, (page 20)
The easy-to-use disc magazine
Allows you to play a particular set of discs at any time
simply by inserting the disc magazine into the CD player.
Additional magazines (optional) allow you to create a wide
variety of sets.
________
________________________
_____________
_
Easy-to-see display
The selection number, the playing time and the remaining
time are displayed by pressing the TIME/MEMO button.
And also playing modes like repeat, shuffle, program and
bank are displayed in the display window.
This indicates a function operated only from the
remote commander.
m This indicates a function operated only on the
main unit.
Page 4

Installation
Notes on Installation
Place the unit in a location with adequate air circulation
to prevent internal heat build-up in the unit.
This way.
Do not install the unit:
- near heat sources such as radiators or air ducts.
- in a place subject to direct sunlight, excessive dust,
mechanical vibration shock.
Do not move the unit while the disc magazine is inside,
otherwise the discs may fall out of the magazine and
you will be unable to remove them.
Do not place the unit on a soft surface, such as a rug
that would block the ventilation holes on the bottom.
On moisture condensation
If the player is brought directly from a cold to a warm
location, or is placed in a very damp room, moisture
may condense on the lens inside the unit.
Should this occur, the player will not operate. In this
case, remove the disc and leave the player turned on
for about an hour until the moisture evaporates.
Precautions
On Safety
• Check the unit’s operating voltage before operation.
It must be identical with that of your local power supply.
• Should any liquid or solid object fall into the cabinet.
Unplug the unit and have it checked by qualified
personnel before operating it any further.
• Unplug the unit from the wall outlet if it will not be used
for a long time. To disconnect the cord, pull it out by
grasping the plug. Never pull the cord itself.
• As the laser beam used in this compact disc player is
harmful to the eyes, do not attempt to disassemble the
cabinet. Refer servicing to qualified personnel only.
On operation
When the unit is not used, turn the power off to conserve
energy and to extend the useful life of your unit.
Important
Since the CD system boasts a wide dynamic range, the
peaks of high level inputs are recorded with high
fidelity, and the noise level is very low.
Do not turn up the volume while listening to a portion
with no audio signals or very low level inputs if you do,
the speakers may be damaged when a peak level
portion is played.
For detailed safety precautions, see the leaflet
“IMPORTANT SAFEGUARDS”.
If you have any questions or problems concerning your
unit, please contact you nearest Sony dealer.
Page 5
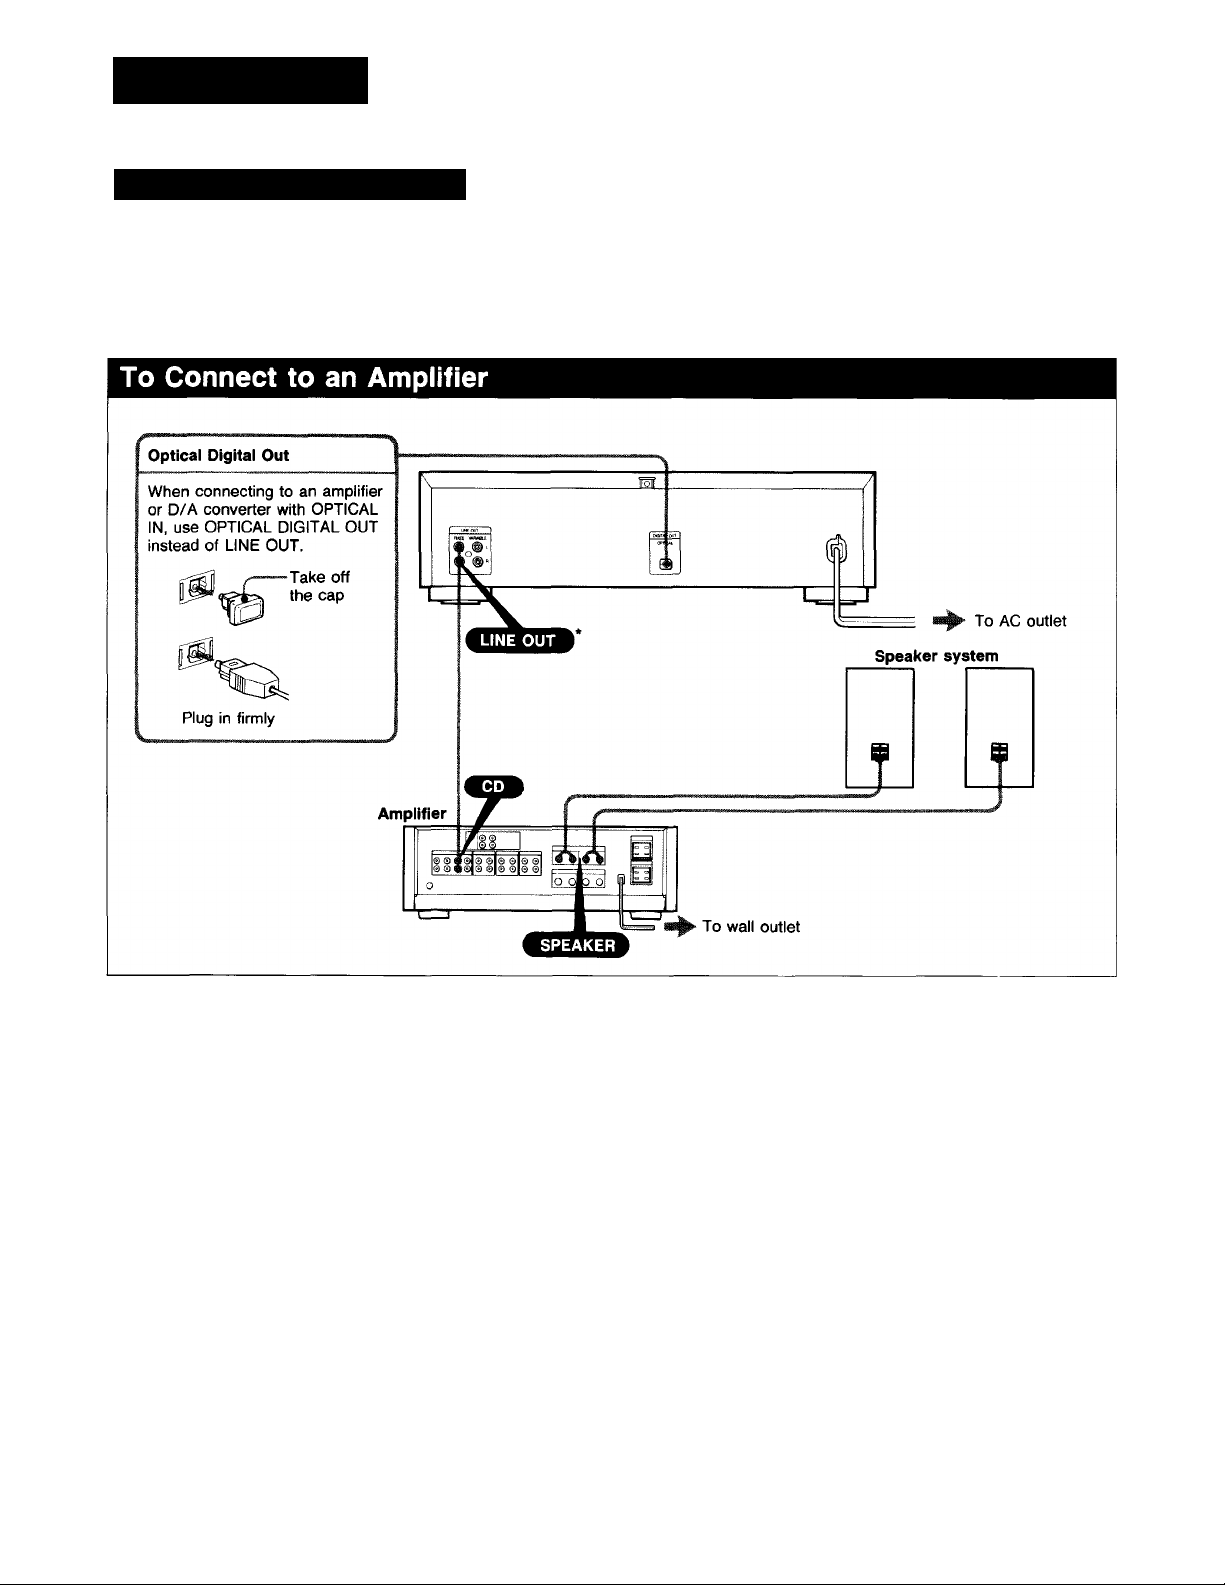
Connections
For Correct Connections
Turn off the power of each unit before making
connections.
Connect the AC power cord last.
Be sure to insert the plugs firmly into the jacks.
Loose connection may cause hum and noise.
Leave a little slack in the connecting cord to allow for
inadvertent shock or vibration.
Cord plugs and jacks are color coded: Red plugs and
jacks are for the right channel (R) and white ones for the
left channel (L).
*Notes on LINE OUT
FIXED; The output level is fixed.
VARIABLE: The output level can be adjusted with PHONE
LEVEL/LINE OUT LEVEL control or LINE
OUT LEVEL buttons on the remote
commander. However, if the PHONE
LEVEL/LINE OUT LEVEL control is turned
while recording, the recording level will change
even when it is preset on the tape deck.
Note on optical digital out
Connect the optical out to the amplifier with the optical
input or D/A converter. When you connect, use the
connecting cable for optical out POC-15 (not supplied).
When the optical out is connected, you cannot use fade
out, fade in and time fade function.
Page 6
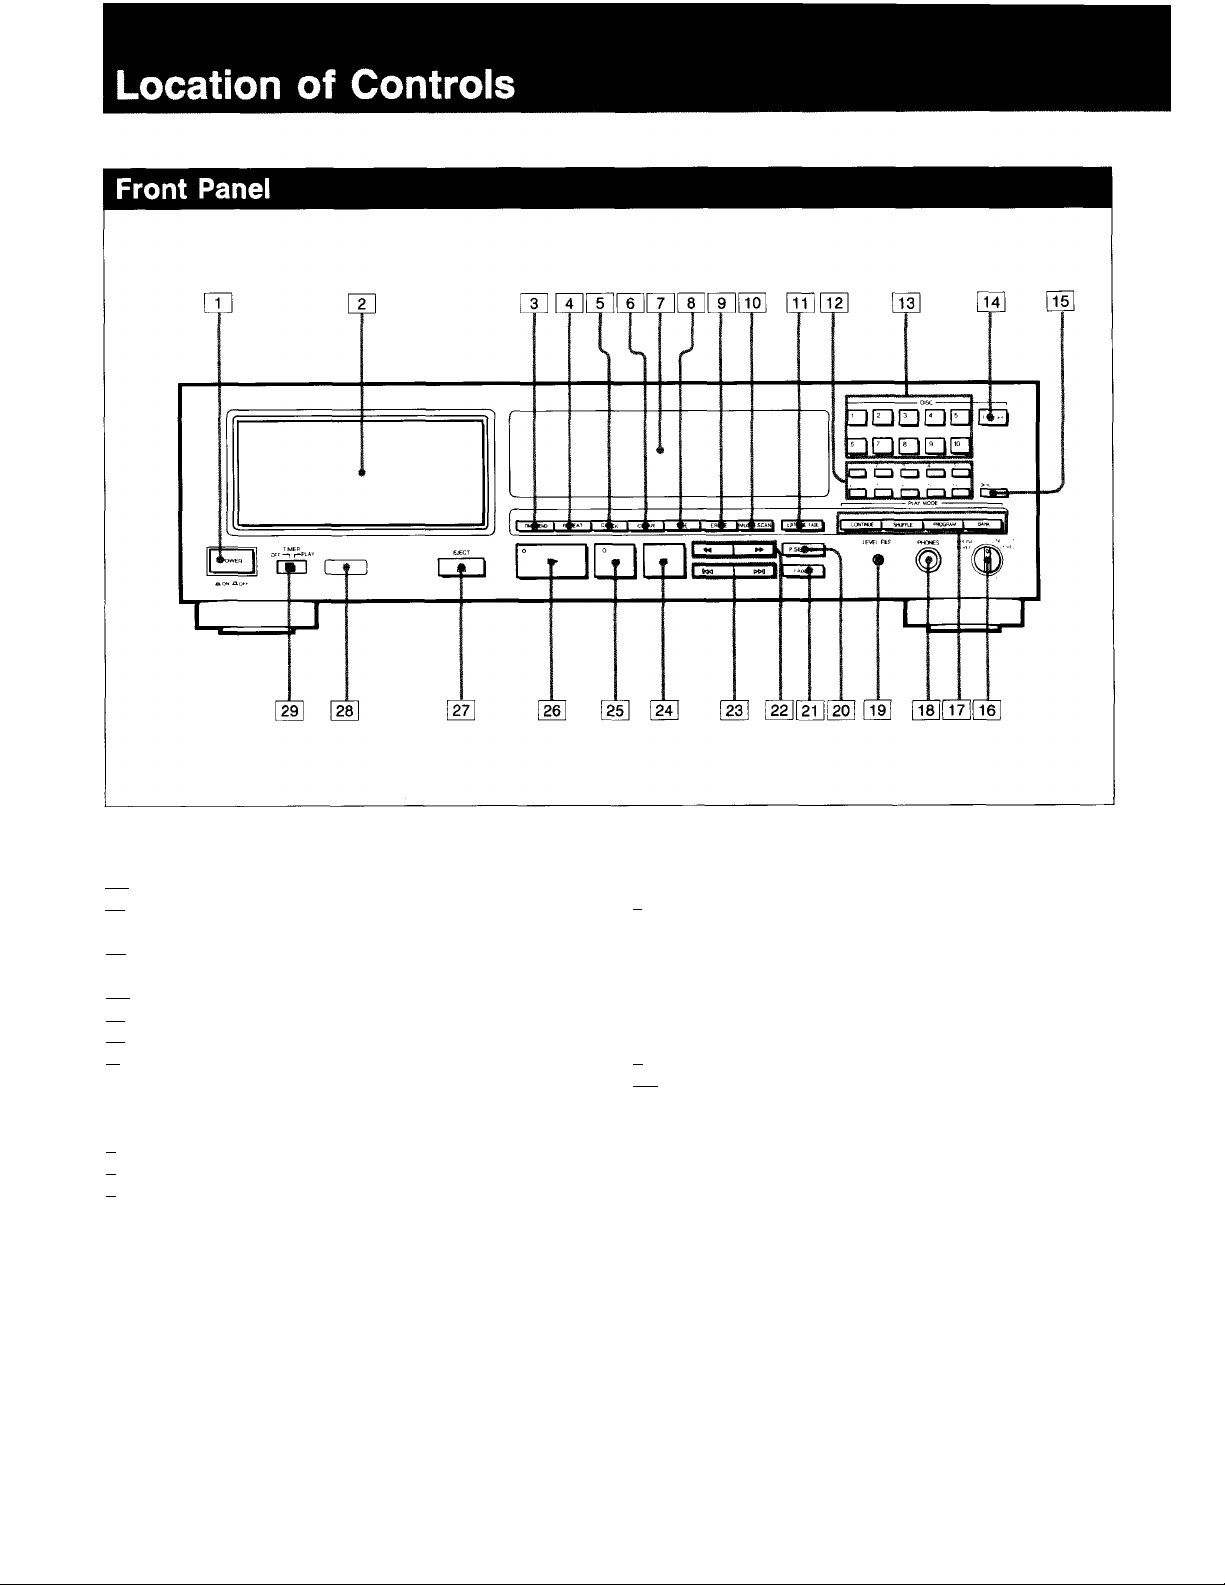
Refer to the pages indicated in • for details.
n~| POWER switch ©
[Yl Magazine slot ©
[l]TIME/MEMO button ®
[T] REPEAT button ®
[J] CHECK (program check) button iE
fen CLEAR (program clear) button ©
[y] Display window ®
[Tl FILE button ©
in ERASE button ©
n MUSIC SCAN button ©
QT] EDIT/TIME FADE button © ©
n Track buttons ©
n DISC selectors ©
n DISC SKIP button ©
n > 10 (over 10) button ©
[Tg PHONE LEVEL/LINE OUT LEVEL control
n PLAY MODE buttons
CONTINUE button ©
SHUFFLE button ©
PROGRAM button ©
BANK button ©
n HEADPHONES jack
n level file button ©
n P(peak).SEARCH button ©
[yri FADER button ®
(manual search) buttons ©
(AMS*) buttons ©
[15 ■ (stop) button ©
mi (pause) button/indicator ©
[25► (play) button/indicator ©
[27] ± EJECT button ©
[28] Remote sensor
[29] TIMER switch ©
AMS is the abbreviation of Automatic Music Sensor.
Page 7
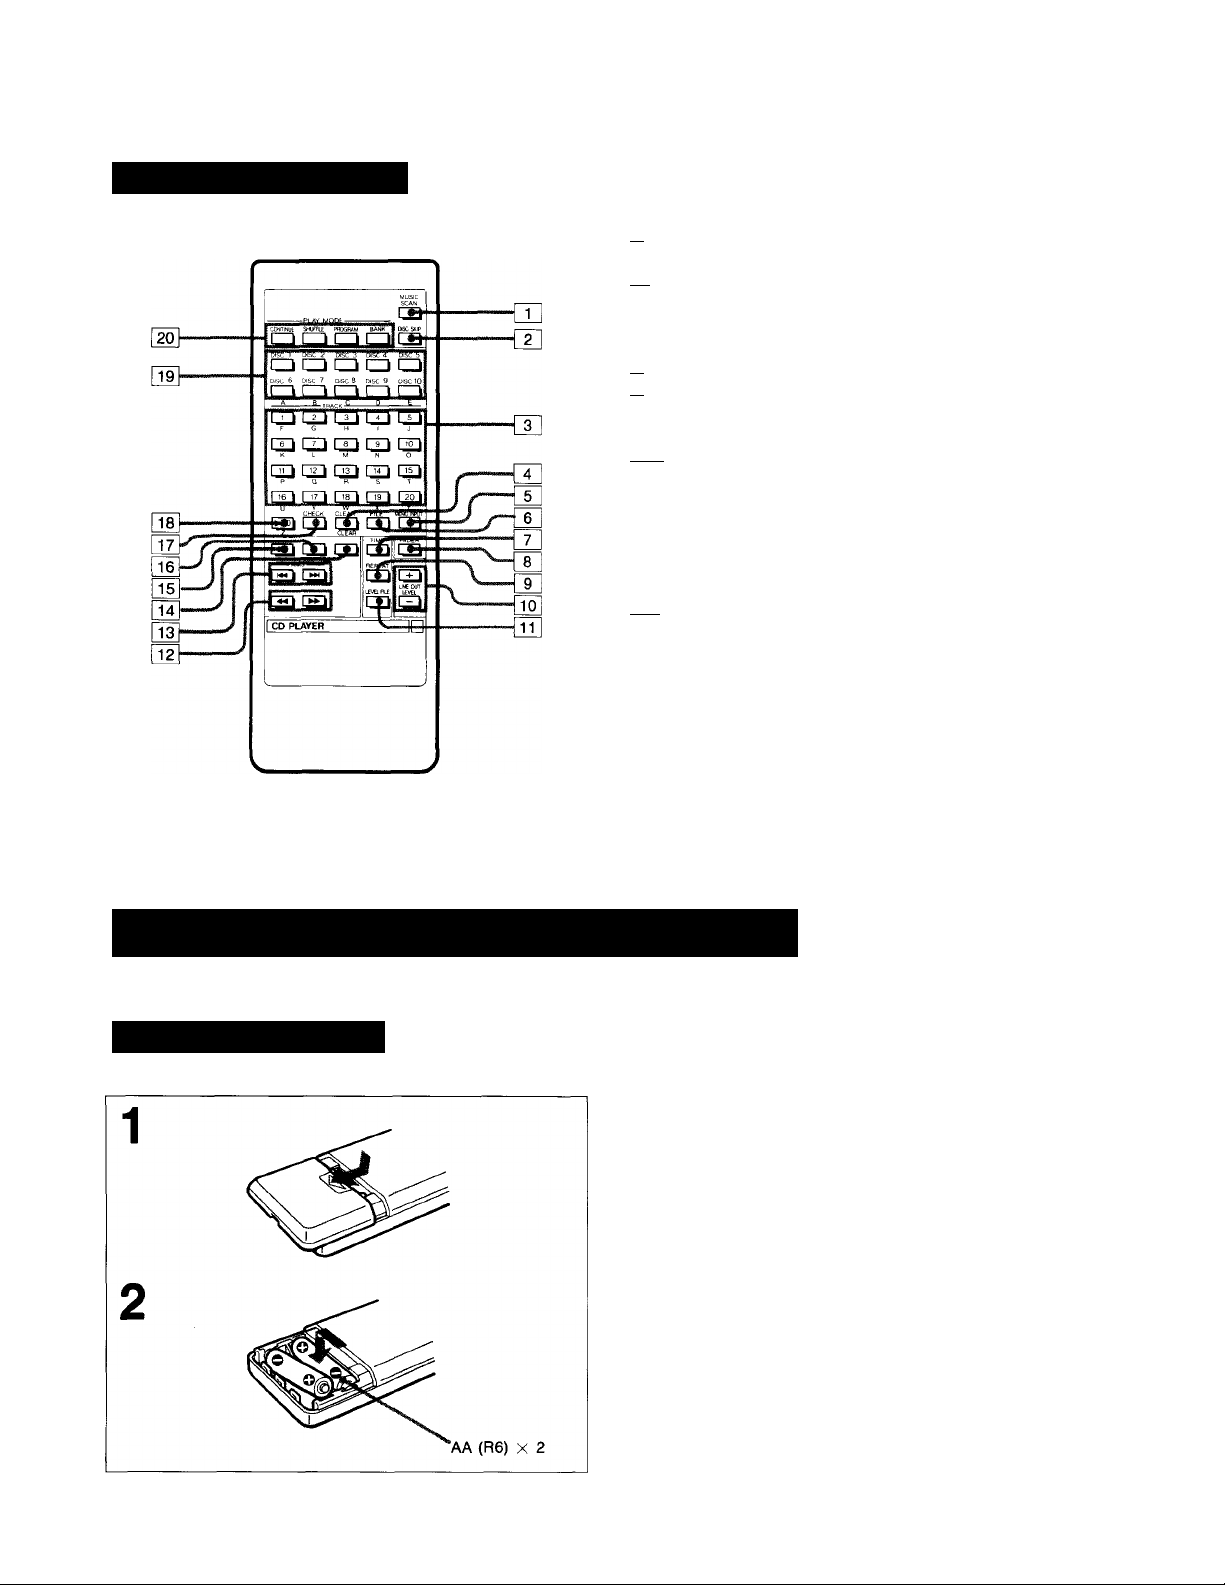
Remote Commander
Refer to the pages indicated in • for details.
[T] MUSIC SCAN button @
m DISC SKIP button 0
Track buttons 0
[Tl CLEAR (program clear) button 0
[yjMEMO INPUT button ©
HFILE button ©
[^TIME button ©
m FADER button ©
m REPEAT button ©
[lo] LINE OUT LEVEL buttons 0 ©
[Til LEVEL FILE button ©
[rz ]« ►► (manual search) buttons
[H]K4 (AMS) buttons 0
[33
■ (stop) button ©
¡31] ► (play) button ©
Tslll (pause) button ©
133 CHECK (program check) button ©
133 >20 (over 20) button
[Ts] DISC selectors ©
r^PLAY MODE buttons
CONTINUE button ©
SHUFFLE button ©
PROGRAM button 0
BANK button ©
0
0
Buttons with yellow letters (A, B, C
disc memo (page 22).
Preparing the Remote Commander
Installing Batteries
On battery life
• About half a year of normal operation can be expected
when using the Sony SUM-3(NS) batteries.
• When the batteries are run down, the remote
commander wiil not operate the unit, in this case,
replace both batteries with new ones.
Notes on the remote commander and remote control
operation
• Keep the commander away from extremely hot or humid
places.
• Avoid dropping any foreign objects into the commander
casing, particulariy when repiacing the batteries.
• Avoid exposing the remote sensor to direct sunlight or
lighting apparatus. Such exposure can cause a
malfunction.
• To avoid damage caused by battery leakage and
corrosion, remove the batteries when the commander
will not be used for a long time.
............
) are for writing a
Page 8

Setting Up the Disc Magazine
Inserting Discs into the Disc Magazine (up to 10 discs, one in each siot)
Labeled surface
Slot numbers
Push in until the disc
is fully inserted.
Notes
• Do not insert more than one disc into a slot.
• Each slot number corresponds to a disc number that is selected
by the DISC selectors. If you select the empty slot using the
DISC selectors, the circle and the selected disc number in the
display will disappear.
Note on 8 cm (3-inch) CDs
8 cm (3-inch) CDs can be played in this unit provided
that either a Sony CSA-8 adaptor, one that complies
with CD standard specifications, or one that has
mark is used. Without an adaptor, or if an adaptor not
recommended above is used, the unit and disc may be
damaged.
NOT THIS WAY
a 8 cm (3 inch)
without an adaptor
Do not insert an empty adaptor as it will become
lodged in the unit and cannot be removed without
special equipment.
NOT THIS WAY
To Remove Discs
Slide the blue lever of the storage
shelf in the direction of the arrow.
Notes on handling disc
• To keep the disc clean, handle the disc by its edge. Do not
touch the surface.
• Do not stick paper or tape on the disc.
• Do not expose the disc to direct sunlight or heat sources such
as hot air ducts, or leave it in a car parked in direct sunlight as
there can be a considerable rise in the temperature.
• After playing, store the disc in its case.
an empty adpator
8
Page 9

Playing a Disc - Continuous Play
Before playing a disc, turn on the amplifier and set the
input selector to the CD player position.
To stop play
To stop for a moment during play, press II.
Press ► or II to resume play.
To stop play, press ■.
To stop play and remove the disc magazine, press A
EJECT.
Caution on adjusting voiume
Do not turn up the volume while listening to a portion
with very low level inputs or no audio signals. If you do,
the speakers may be damaged when a peak level
portion is played.
To listen with the headphones
Connect the headphones and control the volume with
PHONE LEVEL/LINE OUT LEVEL control or LINE OUT
LEVEL buttons on the remote commander.
Notes
• Disc memo (see page 22) appears in the display window during
the stop mode. If the disc memo is not stored, the disc
number-such as "-X-DISC-1-X-", is displayed.
■ When a magazine is loaded, all slot numbers will be displayed
until that slot is recognized as empty. Empty slots are
recognized when ► is pressed. The corresponding numbers will
disappear.
• NO DISC is displayed when the magazine is not loaded in
the unit, or when the magazine is empty.
You can change the NO DISC display. See page 22 for
procedure.
• The play mode in use before turning the power off is retained in
memory.
About the SEE YOU 1- ” display
The SEE YOU ! display only appears after ejecting the
magazine. A few seconds later, the display will change to NO
DISC
Page 10

Playing a Disc - Continuous Play
During stop
slot number where Total number of selections
the disc is in the disc
clamped currently
□
Information Display
Choose a disc to play with the DISC selectors. If you
press ■ while the bar under the disc number is blinking,
the total number of selections and total playing time will
appear after the bar stops flashing. In a few seconds, the
display will change and show the disc number or if there is
one, the disc memo. This display sequence is also
available when using the DISC SKIP. When the DISC SKIP
button is pressed the disc number or, if applicable, the
disc memo will appear until that disc is set.
To activate this display sequence while the disc number or
disc memo is being shown, press the TIME/MEMO button.
If you press TIME/MEMO during play, the display changes
to give you the following information:
□ Elapsed playing time of the selection. It automatically
displayed when play begins.
:mo I in a selection
I TIME^EMO t
n Remaining time in a selection. Selection numbers up
to 20 are also displayed at the bottom of the display
window.
If the track number is iarger than 20, appears
insted of the remaining time display.
□ Remaining time and remaining selections of the disc
(displayed only in the continue mode).
When the time fade function is activated, remaining
time and remaining selections until the fading out will
be displayed.
13 Disc memo or disc number.
Notes
• Total remaining time is only available during continuous mode. It
will not be displayed by pressing the TIME/MEMO button during
program, bank or shuffle mode.
• Total remaining time will be displayed, if time fade is set during
all play mode.
10
Page 11

Locating a Particular Selection
DISC selectors DISC SKIP
■DISC SKIP
•TRACK
buttons
(1-20)
Locating a selection in sequence (Automatic Music
Sensor)
You can locate the beginning of a selection on the disc
being played.
To locate the beginning of
the selection being played
To locate the beginning of
the next selection
Continue to press until the selection you wanted has been
located.
To locate directly
Press one of the TRACK buttons to enter the desired
selection number.
• ¡T] to QS on the main unit.
To enter a number greater than 10, use the r>ïô1
button.
• H] to [20] on the remote commander.
To enter a number greater than 20, use the I >201
button.
e.g. To play from selection No.22
Press [yfOlfHi^ or .
To play from selection No.30
Press rTTÔ][3irfÏÏ1 or [>^Î31FIÔ].
PfÏÏl functions as the figure 0.
_________________________________
Press once.
Press once.
Selecting a Desired Disc
By using the DISC selectors or the DISC SKIP button
during play, you can locate the beginning of any disc.
To select a particular disc
To change to the disc next
to the current one
Press the corresponding
DISC 1 to 10 button.
Press DISC SKIP.
Locating a Particular Point in a
Selection
You can locate a particular point in a selection during play.
To search quickly while monitoring the sound To go ahead at high speed
Keep ►► pressed during play and release at the desired
point.
To go back at high speed
Keep ◄◄ pressed during play and release at the desired
point.
To search quickly by observing the display
Press II then keep ►► or ◄◄ pressed. The search
speed will increase, but there will be no sound. Find the
desired point by observing the display.
Press ► or II again at the desired point.
If you continue to press
If you continue to press ►► once the end of the disc has
been reached, OVER appears in the display window.
Press ◄◄ or to return to the normal display.
I
11
Page 12

Playing in a Random Order - Shuffle Play
You can have the selections played in a random order.
The unit will play all the discs or just disc(s) you desire.
Once a selection is played, it will not be played again until
the random order is completed.
To stop play
Press ■.
To cancel shuffle play
Press CONTINUE and return to the continuous playing
mode.
To select a desired disc during “1 DISC” shuffle play
Press the desired DISC 1-10 buttons. A circle will appear
around the selected disc.
To Play Only the Desired Discs In
a Random Order - Select Shuffle
Play
You can select the desired discs during the stop and play
modes. (ALL DISCS mode)
To select the desired discs
Press the DISC 1-10 buttons. Circles appear around the
selected disc numbers to be played.
To delete a disc which you have selected, press the
applicable DISC 1 -10 buttons. The circle around the
selected disc number will disappear.
You cannot put off a circle around the number of the disc
being played.
If you press SHUFFLE during play (except for shuffle play)
Shuffle play begins from the current selection.
j........I This indication appears while the player is shuffling the
Note
Only the first 48 selections of a disc that contains more than 48
selections will be played in “ALL DISCS” mode. In “1 DISC”
mode up to 99 selections of a given disc can be played.
What Is this indication?
j selections.
12
Page 13

Playing Repeatedly - Repeat Play
Repeat play can be used in any play mode to repeat a
single disc or all discs in the unit.
REPEAT
In the continuous play mode, you can repeat a single
selection.
Press before or during play.
"REPEAT” appears. The unit repeats the current playing
mode. To repeat a single selection, press REPEAT again
during repeat play of the continuous playing mode.
“REPEAT 1” appears.
Playing mode
Continuous play
(ALL DISCS)
Continuous play
(1 DISC)
Shuffle play All selections on the disc (in the 1 DISC
Select shuffle play
Program play Repeats all selections and/or programs
Bank play Repeats all selections stored in the bank
All the selections on all discs, or the
selection currently being played
(REPEAT 1)
All selections on the disc currently being
played, or the selection currently being
played (REPEAT 1)
mode) or all discs (in the ALL DISCS
mode) are reshuffled.
All selections on a selected disc are
reshuffled.
in their programmed order.
in their programmed order (or all
selections if the disc does not have a
bank file).
Selections played
To cancel repeat play
Press REPEAT again.
“REPEAT” disappears.
To cancel repeat play of the continuous play, press
REPEAT twice. “REPEAT 1” disappears.
13
Page 14

Playing in a Desired Order - Program Play
Designating the Piaying Time
- Program Edit
Choose selection and check the time.
Press §◄◄/►►1 repeatedly to choose an appropriate
selection.
h
Current selection.
[¥] A satisfactory selection has been chosen.
The selection is stored, and the flashing numbers in
the window lights up.
To program additional selections from the same
disc, repeat step 4.
To program additional selections from another disc,
repeat steps 3 and 4.
If you program the selections for side B, insert a
pause.
(i) ! 3 4 $ 6 7 6 9 10
Total time
■:: '-j EES
“B” lights up.
•pnOOniM
la
Total time will return to “0.00”
Program the selections for side B.
Repeat steps 3 to 4.
14
The selections for side A will
start playing.
It may take time for the total playing time of the
program to appear. Also, if the total playing time
exceeds one hour, the current selection indication will
be used to display the hour unit.
Page 15

You can make a program by designating up to 32
selections in the order you want them to be played. The
unit will play the disc according to your program.
Checking the Programmed Selections
You can make a program for both sides (side A and side
B) of the tape at one time.
You can program one selection or one disc in a step.
To play the selection for side B
When the selections for side A have been played, the unit
will pause. (“B” will light up.)
Set the tape to the beginning of side B, then press ► or
II. The selections for side B will start playing.
Adding selections to a program during program play
1 Press the desired disc button while the unit is in the
play or pause mode.
2 While the step display appears, press the TRACK
buttons which correspond to the selection number you
want to add.
To stop program play
Press ■. The last selection number programmed is
displayed.
To resume play, press ►. Play begins from the beginning
of the program.
You can play the same program repeatedly as long as you
do not cancel program play or erase the program.
To cancel program play
Press CONTINUE and return to the continuous playing
mode. The program will be erased.
Skipping to the next seiection programmed
Press ►>! during play.
Going back to the beginning of the seiection being piayed
Press during play.
Dispiay on step 3 (procedure step dispiay):
Press CHECK
The disc, track, and program numbers of the first selection
in your program will be displayed.
Each time you press CHECK, the next selection in the
program will be displayed. When CHECK is pressed after
the last selection, “-END-” appears and then the display
returns to the initial display.
Clearing the Programmed Selections
Clearing the whole program
Press ■ once during stop, or twice during play.
All the selections will be cleared.
Clearing the last selection in a program
Press CLEAR during stop.
The last selection will be cleared each time CLEAR is
pressed.
Clearing a specific selection
1 Press CHECK repeatedly until the selection to be
cleared is displayed.
2 Press CLEAR while the selection number is displayed.
The selection will be cleared from the program.
The whoie program wiii aiso be cieared in the foiiowing
situations
■ £ is pressed.
• Power is turned off.
• Select other play modes.
To check the step of programmed seiections
Press TIME/MEMO during stop mode.
The number of programmed selections will be displayed for few
seconds in the window.
To check the remaining time of the seiection being piayed
Press TIME/MEMO once to see the remaining time of the
selection being played; twice to see the disc memo or disc
number; three times to return to the initial display.
The total remaining time cannot be displayed.
If you have programmed a selection number over 20, - -. - - is
displayed instead of the remaining time.
Note
When selections have been programmed for sides A and B, the
total playing time displayed during stop mode will show the
selections programmed for side B and the total playing time for
side B.
15
Page 16

Designating the Totai Piaying Time
-Time Edit
Designate the length of one side of your tape.
Example: a 46 minute tape
(23 minutes per side)
1
Choose the Disc.
Make sure that the total number of selections and
the total playing time are displayed. Then proceed
as follows in the stop mode.
Time
Press [To] for “0”
You need not press keys for seconds, unless
required.
You can designate the tape length easily with the
¡◄◄/►W buttons. Each time you press a button,
the time changes in the following way.
Press K4 : Press -
I—C-90 45.-
^—C-'
C-74 37.----------C-60 30.- —
To set the seconds, press ◄◄/►►. The time
increases or decreases by 10 seconds.
EOn-miEFAOE
The program for side A is completed.
If “LINK” blinks, see “To add selection(s)”.
-C-46 23.-
-C-54 27.
16
“EDIT” light up.
■ CONTINUE
, ©®@®®®®®®i
Jvl/; ■
/i ^ •
Bricking
...
Chosen selections
® " • ‘ ‘ • ’ • " ” iIk'
■
Current selection Total playing time
Press EDIT/TIME FADE once more, to make a
program for the other side of your tape. If “LINK”
blinks, see “To add selection(s)”.
Note
Total playing time can be set from 10 seconds up to 59 minutes
59 seconds.
■J *
_u
al 41 s!
_LU
Page 17

You can designate a time and the unit will make 2
different programs of selections each fitting within that
period. Use this function, by designating the iength of your
tape, for editing both sides of a tape.
To add selection(s) — LINK —
After all selections on the disc have been programmed, if
there is selection(s) within the remaining time, “LINK” and
the selection number(s) wili blink.
-i3£-\ I /
w*e T*«* MM sfc '
To add selection, press the numeric button for the
seiection number or press the EDIT/TIME FADE again.
When pressing the EDiT/TIME FADE, a program will be
made automatically to fit the playing time as close as
possible to the remaining time.
If the remaining time can contain other selection(s),
“LINK” and the selection number keep blinking. When
“LiNK” blinks, if the disc is changed by another disc, the
new selection number(s) on the new disc that fit in the
remaining time will blink.
“EDIT” disappears when the playing time becomes equal
to the designated time. Whether “LINK” is blinking or not,
you can change the disc by another disc and choose
selection(s) to fit the remaining time.
To cancei the “EDIT” display in the window, press the ■
button.
r
^ I
To Include desired selections in the program _________
1 Make you own program of the desired selections.
See page 14 for instructions.
2 Follow the procedure as shown on the preceding page.
Just designate the length of your tape; you need not
subtract the length of your program. The unit wili place
your selections at the beginning of its program and add
other selections to fit the remaining time.
Checking the programmed selection
See page 15.
________________
To designate a different tíme for each side
Execute steps 1 to 4 and press II. Then repeat steps 2 and 4.
Do not execute step 5.
If your disc has more than 20 selections
• Selections over 20 cannot be programmed with the time edit
function.
• If the program already contains a selection over 20, the time
edit function will not work.
Notes
• Up to 32 steps will be programmed. Furthermore, the time edit
function cannot be used if your program has 32 steps.
• Time edit will not work for programs with total playing times
exceeding one hour.
To play the program
Press ►.
The selections for side A will be played and then the unit
wili pause. “B” iights up in the tape side indicator. Set the
tape to the beginning of side B, then press ^ or II.
The selections for side B will be played.
Note
Playback can be performed when “EDIT” is displayed.
To stop playing Press ■.
You can play the same program repeatedly as long as you
do not erase the program.
To cancel time edit
Press CONTINUE and return to the continuous piaying mode.
The program will be erased.
To erase the entire program
Press ■ once during stop; twice during play.
Press ■ twice when “EDiT” appears in the display during
the stop mode.
The program is also erased, when you turn off the unit or
press
17
Page 18

Convenient Features for Tape Recording
The following functions are convenient for editing your own
tapes.
Time Fade and Fade in/Fade out cannot be operated
when the DIGITAL (optical) OUT is used for connections.
Fading in/Fading out
You can have the play fade in and fade out between 2-10
seconds.
When no time is specified, the play will fade in and fade
out for 5 seconds.
To set the fade time_______________________________
1 Press ■.
2 Press FADER. “FADE 5 SEC” will appear in the display
window. The actual fade time “5” will be flashing.
3 Press to select fade time between 2-10
seconds.
4 Press FADER.
To end the play fading out
Press FADER when you want to start fading out.
flashes in the window, and play fades out and unit
enters the pause mode.
To restart the play fading in
Press FADER in the pause mode.
flashes in the window, and play fades in.
Fading out after a desired duration - Time Fade
You can have the play fade out at the end by designating
the play duration. Once time fade is set, it functions twice
for editing both sides of a tape. You can change discs
without canceling this function. The fade time is preset to
5 seconds, but you can change it between 2-10 seconds.
To set time fade__________________________________
1 Press EDIT/TIME FADE twice during stop.
TIME
[i~i,L™~| is displayed in the window.
2 Set the desired play duration, using numeric buttons.
e.g. To set to 27 minutes, press [1][T][10]|T0].
You need not press buttons for seconds, unless
required.
You can designate the tape length easily with the
¡◄◄/►►I buttons. Each time you press a button, the
time changes in the following way.
■ Press
C-90 45.---
(I
C-74 37.- —
To set the seconds, press
or decreases by 10 seconds.
-C-60 30.-
Press -
-C-46 23.—
-C-54 27.—
. The time increases
□
Note
The desired play duration can be set from 10 seconds up to 59
minutes 59 seconds.
3 Press EDIT/TIME FADE.
4 To start play, press ►.
After the designated time, play fades out and pauses.
Tape side B lights up. Press II or ► to resume playing
for the other side of the tape. If you press FADER, fade
in will start. When the play fades out for the second
time, the unit pauses and the time fade function is
canceled.
When playback ends in the duration of time fade
Time fade function will be kept on. Change the disc and
start playback automatically when the total playing time is
within some seconds before the designated time, the
player fades out.
To cancel time fade
Time fade will be canceled when
- EDIT/TIME FADE is pressed once again.
- ◄◄/►► (manual search) is pressed during piay.
To display the time remaining until the time set
Press TIME/MEMO twice.
If the P.SEARCH is pressed after setting time fade,
time fade is released but peak search is kept active.
18
Page 19

Locating the loudest portion of
the disc - Peak Search H
This unit can search a disc from the beginning to the end
and determine the loudest portion (peak level) of the disc,
and then play that portion repeatedly. This function will
make it easier for you to adjust to the optimum level when
recording on tape.
This function operates in all play modes as follows:
Play mode Operation
Continuous and
shuffle modes
Program mode Searches all programmed selections
Bank mode Searches all programmed selections
Unless you are using the program mode, the unit will scan
all discs that are clamped, even in the ALL DISCS mode.
To activate the peak search
Press P.SEARCH during the stop mode.
“PEAK” flashes in the display and the all selection of the
disc or program will be searched automatically. After
finishing the search, “-PEAK-” is displayed and the
loudest portion is played repeatedly for 4 seconds.
Searches all selections on the disc
that is currently clamped.
on the disc that is currently
clamped.
Note
To go to another disc press DISC SKIP button during stop.
To start play immediately
Press ►. The play starts from the beginning of the disc.
To stop the peak search
Press ■.
Press II to pause at the first selection.
Note on peak search function
The unit determines the loudest portion (peak level) of a disc
by searching it at fixed intervals. As a result, the portion
searched may differ from the actual peak level. In addition, this
function may determine different portions as the peak level for
the same disc. However, the difference between the portion
searched and the actual peak level is insignificant and will not
present any problem in adjusting the recording level.
19
Page 20

aying tne Beginning of Each Selection
- Music Scan
You can check the selections by scanning the beginning
of each selection on the disc. When “ALL DISCS” is
selected in continue mode, the first selection of each disc
will be scanned.
You can use this function in any play mode.
When scanning Is finished,
the unit enters the stop mode.
To stop music scan play
Press ■.
Starting play at the selection being played during music scan
Press ►. The indicator on the ► button will light up.
Notes
• Programmed pauses in program mode will be disregarded during
music scan play.
• If you press the button, music scan will be canceled.
• Pressing the MUSIC SCAN button while the beginning of
selection is being scanned will extend the playing time for 10,
20, or 30 more seconds.
20
Page 21

On Custom Files
The CD player is equipped with a memory which allows
you to store three types of information called “custom
files”.
Up to 184 discs of Custom File can be retained in the
unit’s memory.
The three custom files you can store in memory
Disc memo
Bank
Level file
To store a name of up to 10 letters for
an individual disc, (page 22)
To store a program in memory so it
can be played again, (page 24)
To preset an output level of the
headphones/variable line out jacks for
an individual disc, (page 25)
What is this Indication?
[CF|MEM0| BANK I level]
Lights when Level file is memorized.
Lights when Bank is memorized,
when Disc Memo is memorized.
Lights
What Is this Indication?
This indication appears when FILE is
pressed while no custom file can be
memorized for the disc currently put
in the player. To make a custom file
for the disc, clear the custom file of
another disc.
To clear custom files of all discs at once
Without loading the disc magazine, press POWER to turn
on the unit while keeping ERASE and FILE pressed. “ALL
ERASE” will be displayed and all custom files are cleared.
To check the Items of the custom files
Press TIME/MEMO (while “-NO DISC-” is displayed) without the
disc magazine loaded. Each time you press TIME/MEMO, the
items of the custom files and the items of the each column of
|CF|MEM0|BANK|L£VH.| sbout thc dlsc atc displayed. If you press
TIME/MEMO when the last disc’s information is displayed,
“-END-” is displayed and returns to “-NO DISC-” after a few
seconds. To clear all custom files for a single disc, press
TIME/MEMO repeatedly until the undesired custom file is
displayed. Then press ERASE. “FILE ERASE" is displayed and
icFiMEMoiMwiiiYELi go6s off In the display window.
Memory backup for the custom files
Custom files, once memorized, are retained in the compact
disc player’s memory for approximately 1 month without
AC power supply.
Since the memory is stored in the unit and not on the disc,
you cannot perform custom file functions with the same
disc on a different player.
21
Page 22

Assigning Names to a Disc - Disc Memo
[1] Using the buttons
^ I^ I «n
_4n
----------------------
Press ◄◄ or ►► until the desired letter
appears.
Example; if ►► is pressed 7 times, F appears.
2 When the desired letter appears, press
&
&
Move the cursor to select
the next letter.
Repeat steps [§ -1 and [B] -2.
Lights up.
bScs®@®®®®®®®®
After about 1 second, the memo you have written
will be displayed.
Each time the disc is put in the unit, the memo will
be displayed.
Note
Symbols cannot be entered with the letter buttons on the remote
commander. To enter symbols, use buttons.
134
12
bi
sl
«
22
Page 23

Using the disc memo function, you can assign a name
within 10 letters for each disc. The memo appears in the
window every time you put the disc in the player.
One name can be assigned for one disc.
When the magazine is not loaded in the unit, you can also
assign a title for the NO DISC display (see page 9)
using the same procedure as that for the disc memo.
Usable letters and symbols
For the disc memo, 46 letters and symbols and a space
can be used. When the button is pressed for the
first time, the space appears. Each time ►► is pressed,
letters and symbols will appear in the following order.
(space) ABCDEFGHIJKLMNOPQRSTUVWX
YZ’&:.< >*/ + 9876543210-
Use ◄◄ to call up a previous character.
To rewrite letters or symbols
Before pressing FILE
Move the cursor under the letter/symbol to be changed
and then select the desired letter/symbol using ◄◄/!
or letter buttons on the remote commander.
To erase the letter and make space, locate the desired
place with and press CLEAR.
After pressing FILE
Repeat from step 2.
Note
Disc memos can also be changed while playing a disc by pressing
the MEMO INPUT button on the Remote Commander.
Displaying the Memos
To display the memo for the disc being played
Press TIME/MEMO twice during the shuffle, program or
bank mode and three times during the continuous mode.
To return to the normal display, press TIME/MEMO once
more.
Clearing the Disc Memo
Load the magazine with the disc that has the disc
memo you want to clear. Insert the magazine and
choose that disc with the DISC selectors or the DISC
SKIP button.
When the disc memo appears, press ◄◄/►► or
MEMO INPUT on the remote commander.
The blinking cursor will appear.
Press ERASE.
“FILE ERASE” is displayed and “CF MEMO” goes off
from the display window.
23
Page 24

Keeping the Program in Memory - Bank
After programming selections, you can keep the program
memorized, so that the disc is played always in the fixed
order. The memorized program is called “bank.”
Memorizing a Bank
The program is stored into the memory. (One disc can
memorize up to 24 programs.) Only one bank can be
made for a disc.
Notes
• You cannot program a whole disc under a single program
number.
1
Press BANK and the “BANK” indicator will turn on.
Choose the disc.
OOIDQO
OOQQID
Program the selections as your desire. (See page
14) Press BANK instead of PROGRAM for steps 2
and 4.
• To pause during the bank play, press II Instead of step 4.
• If you press a DISC 1-10 buttons during the stop mode, the
bank stored for the disc is displayed.
Playing the Disc Using the Bank
1 Insert discs into the magazine and set the magazine into
the unit.
2 Press BANK to choose whether to play “1 DISC” or
“ALL DISCS”.
3 If you have any disc that you want to play before playing
the bank, or if you want to play in the 1 Disc mode,
choose the applicable disc.
icFi iBANKi I appears in the display.
4 Press ► to start play. When playing in the ALL DISCS
mode, any disc without a bank file will be played in its
entirety.
Clearing the Bank
1 Load the magazine with the disc that has the bank you
want to clear. Insert the magazine and choose that disc
with the DISC selectors or the DISC SKIP button.
2 Press BANK.
3 Press ERASE.
“FILE ERASE” is displayed and “CF BANK” goes off
from the display window. The bank is cleared.
(“- FILE will disappear approximately one
second later.)
24
Lights up
2 4
----
Page 25

9set the desired Output Level to a Disc
.evel File
Using the level file function, you can preset the desired
output level for each disc. When a disc with the level file
is played, the PHONE LEVEL/LINE OUT LEVEL control on
the front panel is automatically adjusted to the preset
level.
When you use the level file function, use headphones or
the amplifier connected to the variable line output jacks.
This function does not work for the output level of the
fixed line output and optical digital output jacks.
To preset a new level on to the current level file
Repeat steps 3 and 4.
Clearing the Level File
Load the magazine with the disc that has the level file
you want to clear. Insert the magazine and choose that
disc with the DISC selectors or the DISC SKIP button.
Press LEVEL FILE. “LEVEL FILE” appears in the
display.
Press ERASE while the “LEVEL FILE” is displayed.
“FILE ERASE” is displayed and “CF LEVEL” goes off
from the display window. The level file setting is cleared.
Adjust the level. You can also use LINE OUT
LEVEL buttons on the remote commander.
ts up
25
Page 26

Troubleshooting Guide
The following checks will help you correct most problems which you may encounter with your unit.
Before going through the check list below, refer to the connections and operating procedures.
Should any problem persist after you have made these checks, consult your nearest Sony service facility.
Sympton Cause Remedy
Play does not start. Dirty disc Clean the disc.
No sound
Display window does not illuminate
even when the power is turned on.
Remote commander does not operate
the unit.
The disc magazine cannot be
removed even if the ^ button is
pressed.
Any operation is not possible.
The disc is inserted with the label
surface downward.
The unit is in the pause mode. Press the ► or 11 button to release
Moisture condensation
Loose connection Connect the cords firmly.
The AC power cord is disconnected. Connect the AC power cord firmly.
The batteries are exhausted.
The remote commander is not
pointed at the remote control sensor.
There is an obstacle between the
remote commander and the unit.
The remote commander is too far
from the unit.
The power of the unit is not turned
on.
The â button is not pressed firmly.
The internal control program may not
run.
Insert the disc with the label surface
up.
pause.
Wait for approx, one hour after
turning on the unit then start play.
Replace both batteries.
Point the remote commander to the
sensor.
Remove the obstacle.
Move closer.
Depress the POWER switch ON).
Press the button again.
Turn off the power and turn it on
again.
Note
This unit uses several micro-computer chips to control a series of operations. Sometimes, an operation may not work properly due to the
condition of the power being supplied. In this case, turn the power off, then turn it back on and retry the operation.
Sony Corporation Printed in Japan
 Loading...