

Page 1

3-753-438-23 (1)
Compact Disc
Player
Operating Instructions
DIGITAL AUDIO
CDP-C77ES
CDP-C87ES
Page 2
WARNING
To prevent fire or shock hazard, do not
expose the unit to rain or moisture.
CAUTION
RISK OF ELECTRIC SHOCK
00 NOT OPEN
CAUTION TO REDUCE THE RISK OF ELECTRIC SHOCK.
00 NOT REMOVE COVER lOR BACK»
NO USER SERVICEABLE PARTS INSIDE
REFER SERVICING TO QUALIFIED SERVICE PERSONNEL
This symbol is intended to alert the user
to the presence of uninsulated
“dangerous voltage” within the product’s
enclosure that may be of sufficient
magnitude to consititute a risk of electric
shock to persons.
This symbol is intended to alert the user
to the presence of important operating
and maintenance (servicing) instructions in
the literature accompanying the appliance.
INFORMATION
This equipment generates and uses radio frequency
energy and if not installed and used properly, that is, in
strict accordance with the manufacturer’s instructions, may
cause interference to radio and television reception. It has
been type tested and found to comply with the limits for a
Class B computing device in accordance with the
specifications in Subpart J of Part 15 of FCC Rules, which
are designed to provide reasonable protection against
such interference in a residential installation. However,
there is no guarantee that interference will not occur in a
particular installation. If this equipment does cause
interference to radio or television reception, which can be
determined by turning the equipment off and on, the user
is encouraged to try to correct the interference by one or
more of the following measures:
Reorient the receiving antenna
Relocate the equipment with respect to the receiver
Move the equipment away from the receiver
Plug the equipment into a different outlet so that
equipment and receiver are on different branch circuits.
If necessary, the user should consult the dealer or an
experienced radio/television technician for additional
suggestions. The user may find the following booklet
prepared by the Federal Communications Commission
helpful:
“How to identify and Resolve Radio-TV interference
Problems”.
This booklet is available from the U.S. Government
Printing Office, Washington, DC 20402, Stock No. 004000-00345-4.
Owner’s Record
The model and serial numbers are located at the rear.
Record these numbers in the spaces provided below.
Refer to these numbers whenever you call upon your Sony
dealer regeirding this product.
Model No
______________
Serial No
_________________________
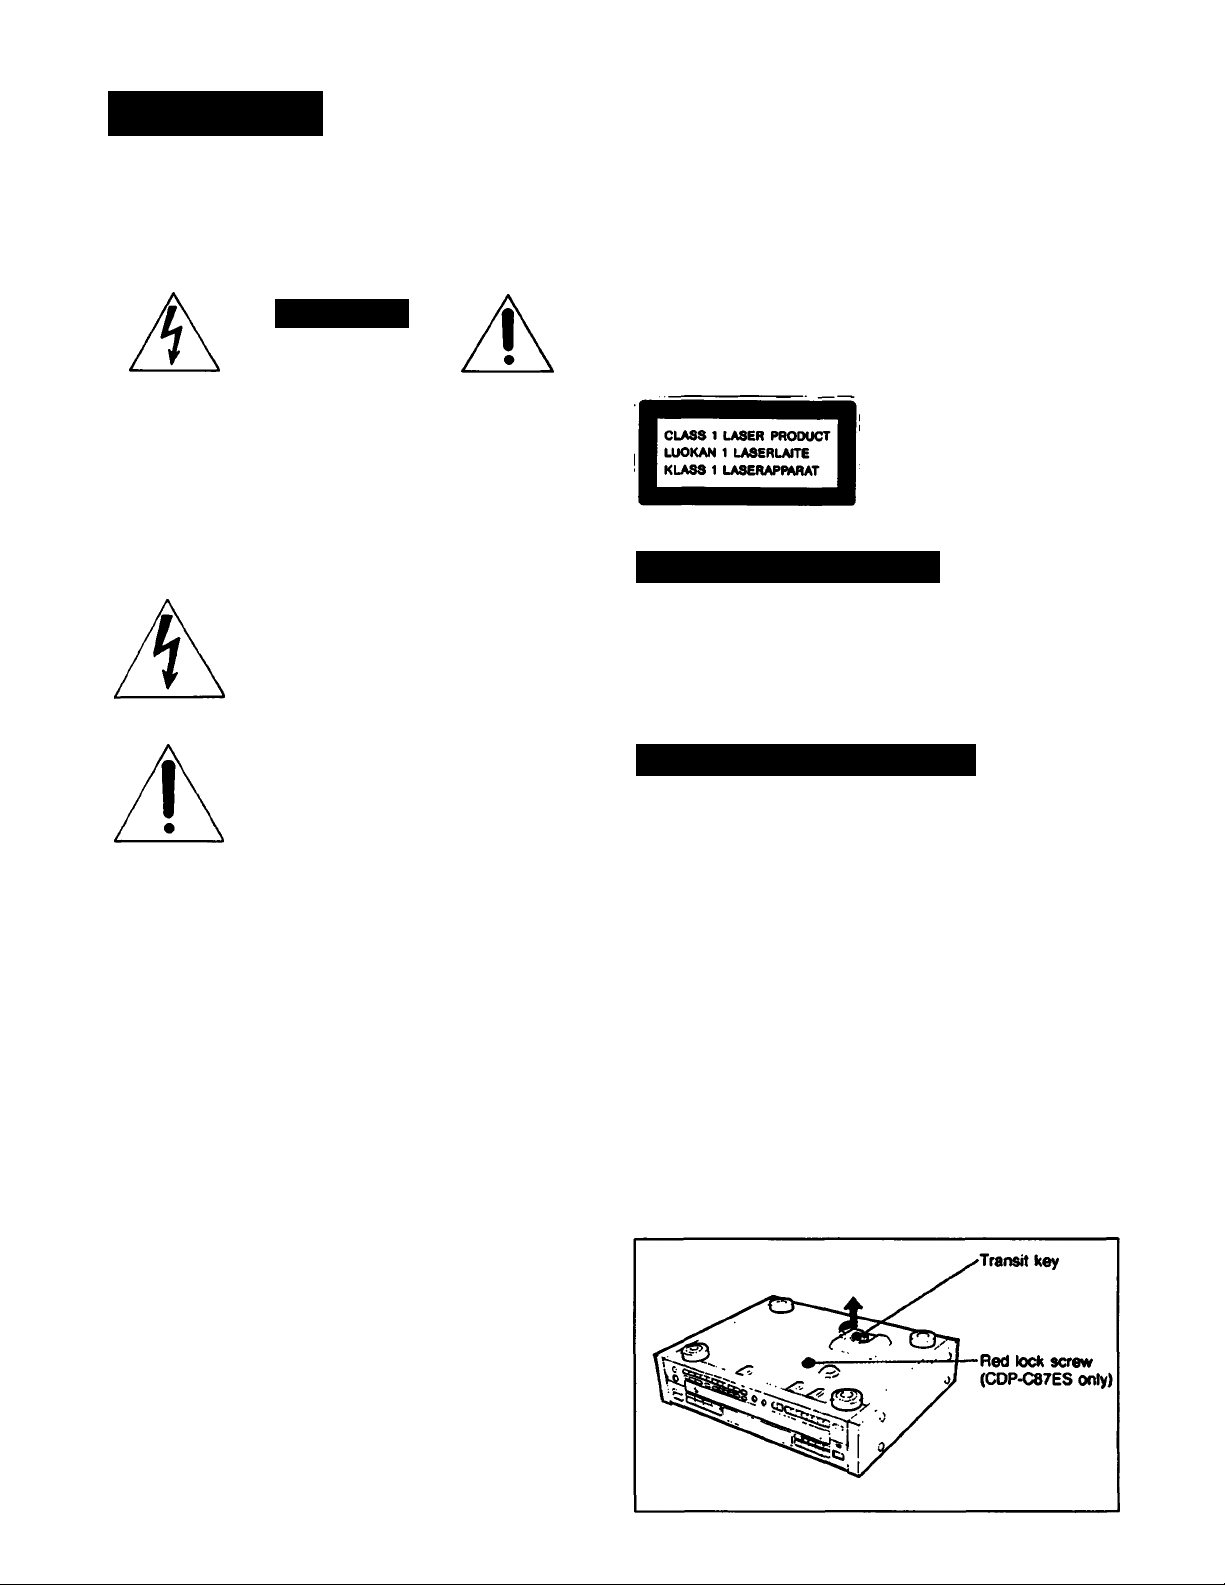
For the customers in Australia
This Compact Disc player is
classified as a CLASS 1
LASER product.
The CLASS 1 LASER
PRODUCT label is located
on the rear exterior.
Differences by Model
This instruction manual covers the CDP-C77ES and the
CDP-C87ES. Their performance and operation is identical
except for the following:
CDP-C87ES comes with a SERIAL CHAIN terminal and
CONTROL SIN/OUT terminals.
Note on the Transit Key
The transit key and the red lock screw (CDP-C87ES only)
on the bottom exterior of the unit protects the optical
system against shock during transportation. Before
operating the CD player, be sure to remove the key and
red lock screw (CDP-C87ES only) by following the
instructions on the label, and store it in a safe place.
When transporting the unit, replace the key and red lock
screw (CDP-C87ES only) in its original hole and lock it in
place.
Re-install the red lock screw
1. Open the disc compertment by pressing the —
OPEN/CLOSE button.
2. Press the DISC SKIP button until disc tray 1 is at the
front.
3. Close the disc compertment by pressing the —
OPEN/CLOSE button.
4. Wait for the 0 (DISC 1) i ndicator to blink before turning
the power off. Re-install the transporting lock screw.
Page 3

Warning............................................................................................2
Introducing this CO player................................................................. 3
Installing the CD player
......................................................................
Maintenance...................................................................................... 4
Precautions....................................................................................... 4
Connections...................................................................................... 5
Location of controls .......................................................................... 6
Front panel................................................................................. 6
Remote commander...................................................................7
Preparing the remote commander
Installing batteries
......................................................................
......................................................
Playing a disc-Continuous play ..........................................................8
Information display.....................................................................9
Selecting a desired disc.............................................................10
Locating a particular selection
Locating a particular point in a selection
..................................................
....................................
Playing in a random order-Shuffle play.............................................11
To play only the desired discs in a random order
-Select shuffle play
...................................................................
11
Playing in a desired order-Program play............................................12
Designating the playing time-Program edit................................12
Checking the programmed selections
Clearing the programmed selections
.......................................
.........................................
Designating the total playing time-Time edit.......................................14
Convenient features for tape recording
Fading in/Fading out
.................................................................
.............................................
Fading out after a desired duration-Time fade............................16
Locating the loudest portion of the disc
-Peak search.............................................................................17
Playing repeatedly - Repeat play
.......................................................
Playing the beginning of each selection
- Music scan..............................................................................19
Enhanced surround effects-Digital signal
processor................................................................................. 20
Memorizing a DSP mode
..........................................................
On custom files................................................................................ 22
Keeping the program in memory-Bank .............................................23
Memorizing a bank....................................................................23
Playing the disc using the bank
.................................................
Clearing the bank...................................................................... 23
Assigning names to a disc-Disc Memo..............................................24
Displaying the memos
..............................................................
Clearing the disc memo.............................................................25
Preset the desired output level to a disc
-Level File..................................................................................26
Clearing the level file..................................................................26
Timer activated playing.....................................................................27
Activating the power with an audio timer....................................27
Connect two players and for more listening
enjoyment-Serial chain control
(CDP-C87ES only)..................................................................... 28
Specifications ..................................................................................30
Troubleshooting guide .................................................................... 31
This unit is equipped with 5 disc trays which allow you to choose
from a large number and wide variety of selections.
4
7
7
Any disc at any time can be played using the DISC 1 to 5 buttons.
Enjoy tisteninfl In various ptaylna modes
You can select the playing modes among the following:
Continuous play
(pages)
Shuffle play (page 11)
Program play (page 12)
Repeat play (page 18)
________________________
- The entire disc(s) is played once.
- Selections are played in a random
order.
- Selections are played in your
desired order.
- Selections or portions are played
repeatedly.
Edtttna your own tw>es
10
10
13
13
18
16
18
You can fade the play in or out when making your own tape
recording. - Fade in/Fade out (page 16)
• You can confirm the total playing time while choosing the
selections to be programmed. - Program edit (page 12)
• The player can program selections automatically to fit in a
desired duration. - Time edit (page 14)
• You can stop the play, fading out at the time desired.
-Time fade (page 16)
• The loudest portion of the disc will be determined and played
repeatedly. - Peak search (page 17)
Making your disc custom-made-CUSTOM RLE function
• You can assign a name to a disc, such as the title of the disc
or the date of purchase. - Disc memo (page 24)
• You can select and store specific acoustic surround effects for
an individual disc. - DSP file (page 21)
• You can store the programmed playing order for a disc.
- Bank (page 23)
• You can store the optimum playback level of each disc in the
unit's memory. - Level file (page 26)
You can play a beginning of each selection - Music scan
21
23
You can check the selections by scanning the beginning of each
selection in the disc. You can use this function in any play mode,
(page 19)
Enjoy listening in various acoustic atmospheres
The DIGITAL SIGNAL PROCESSOR (DSP) lets you listen to
selections according to various acoustic atmospheres, (page 20)
__________________
Eaay-to-see display________________________________________
25
The selection number, the playing time and the remaining time are
displayed by pressing the TIME/MEMO button. And also playing
modes like repeat, shuffle, program and bank are displayed in the
display window.
To operate two CD players serially - Serial chain control
(CPP-C87ES only)_________________________________________
Serial chain gives you control over two players for more listenirrg
enjoyment, (page 28)
This indicates a function operated only from the
remote commander.
This indicates a function operated only on the
main unit
Page 4
Installing the CD Player ■ Maintenance
Notes on Installation
Place the unit in a iocation with adequate air circuiation
to prevent internal heat build up in the unit.
Do not place the unit on a soft surface, such as a rug
that would block the ventilation holes on the bottom.
Do not install the unit.
- near heat sources such as radiators or air ducts.
- in a place subject to direct sunlight, excessive dust,
mechanical vibration or shock.
Use on level surface. Make sure that the unit is placed
in a proper location before switching the power on.
Do not transport the unit with the discs inserted.
If you remove the side panels to install the unit in a
rack, be sure to secure the metal casing with the
supplied screws (M3x8 mm in length). DO NOT use the
longer screws that held the side panels in place.
On moisture condensation
If the player is brought directly from a cold to a warm
location, or is placed in a very damp room, moisture
may condense on the lens inside the unit. Should this
occur, the player will not operate. In this case,
remove the disc and leave the player turned on for
about an hour until the moisture evaporates.
Cleaning the cabinet
Clean the cabinet, panel and controls with a soft cloth
lightly moistened with mild detergent solution. Do not use
any type of abrasive pad scouring powder or solvent such
as alcohol or benzine.
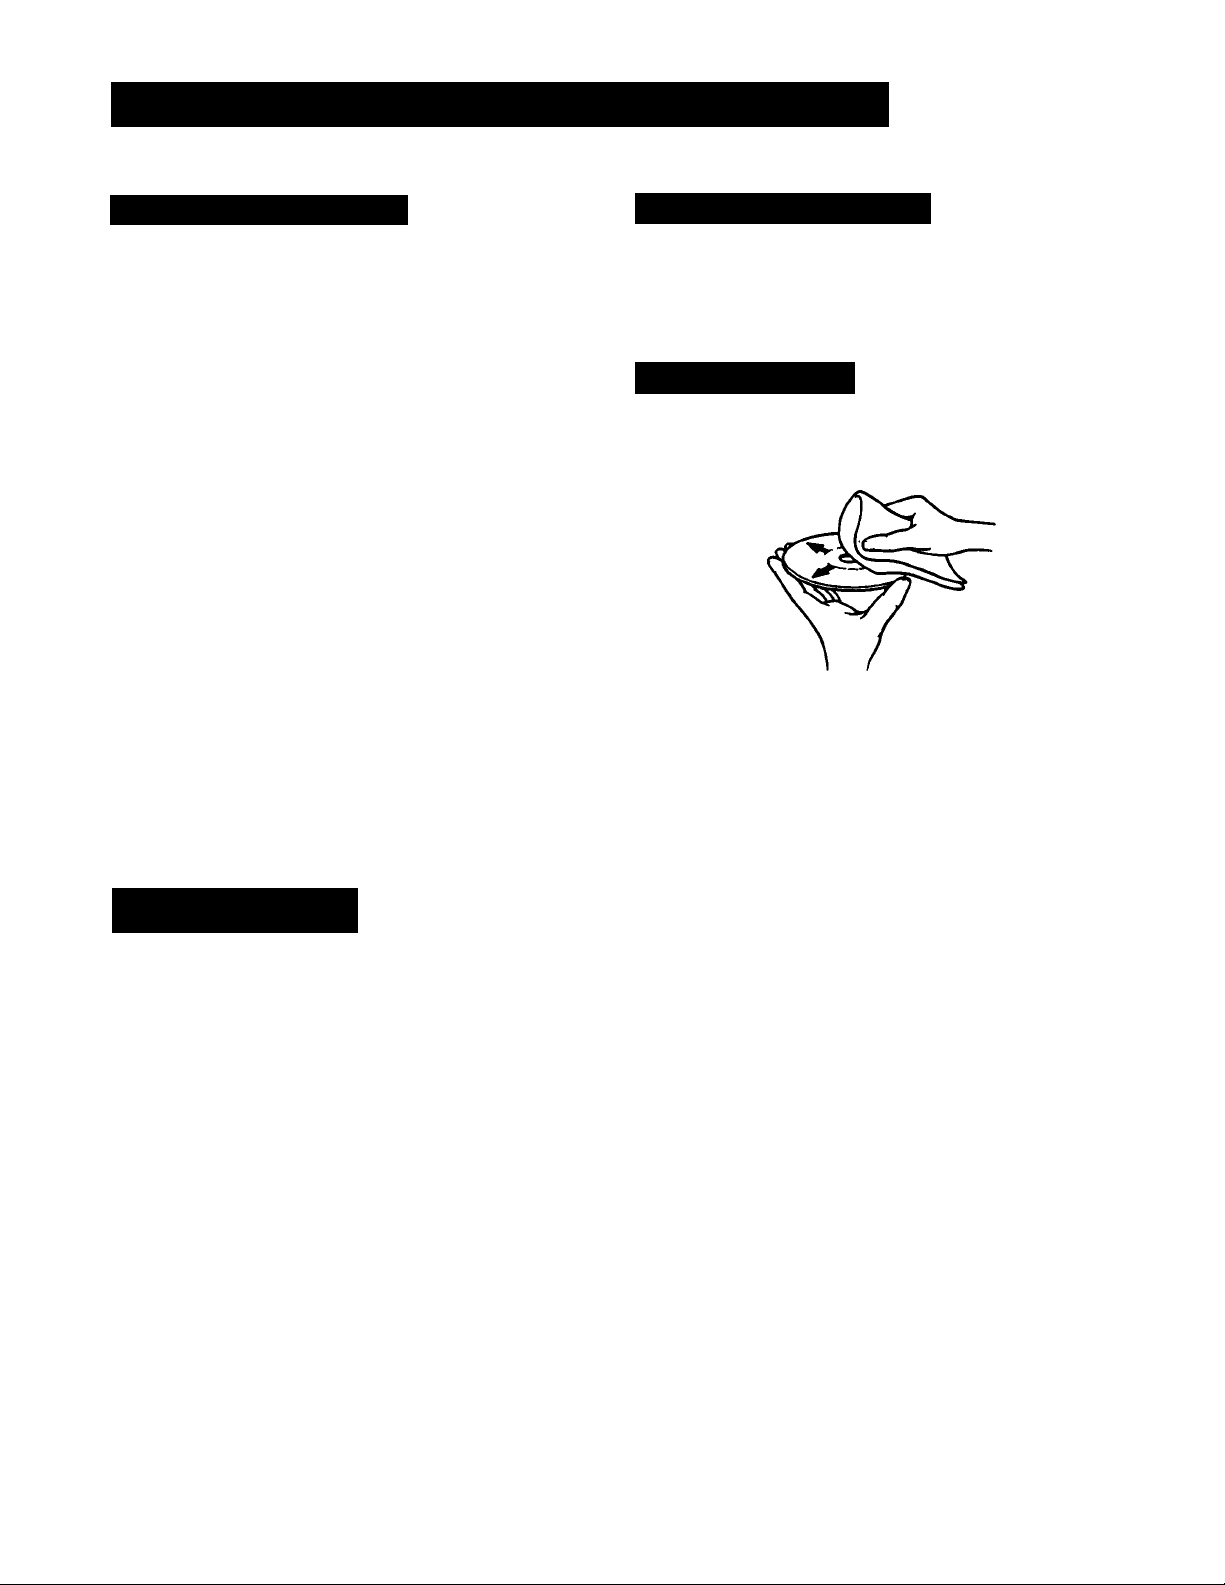
Cleaning discs
Before playing, clean the disc with the cleaning cloth.
Wipe the disc from the center out.
Do not use solvents such as benzine, thinner,
commercially availeible cleaners or anti-static spray
intended for analog discs.
Precautions
On Safety
• Check the unit’s operating voltage before operation. It
must be identical with that of your local power supply.
The operating voltage is indicated on the nameplate at
the rear of the unit.
• Should any liquid or solid object fall into the cabinet.
Unplug the unit and have it checked by qualified
personnel before operating it any further.
• Unplug the unit from the wall outlet if it will not be used
for a long time. To disconnect the cord, pull it out by
grasping the plug. Never pull the cord itself.
• As the laser beam used in this compact disc player is
harmful to the eyes, do not attempt to disassemble the
cabinet. Refer servicing to qualified personnel only.
On operation
When the unit is not used, turn the power off to conserve
energy ¿md to extend the useful life of your unit
After playing, store the disc in its case.
Important
Since the CD system boasts a wide dynamic range, the
peaks of high level inputs are recorded with high
fidelity, and the noise level is very low.
Do not turn up the volume while listening to a portion
with no audio signals or very low level inputs if you do,
the speakers may be damaged when a peak level
portion is played.
For detailed safety precautions, see the leaflet
“IMPORTANT SAFEGUARDS”.
If you have any questions or problems concerning your
unit please contact you nearest Sony dealer.
Page 5
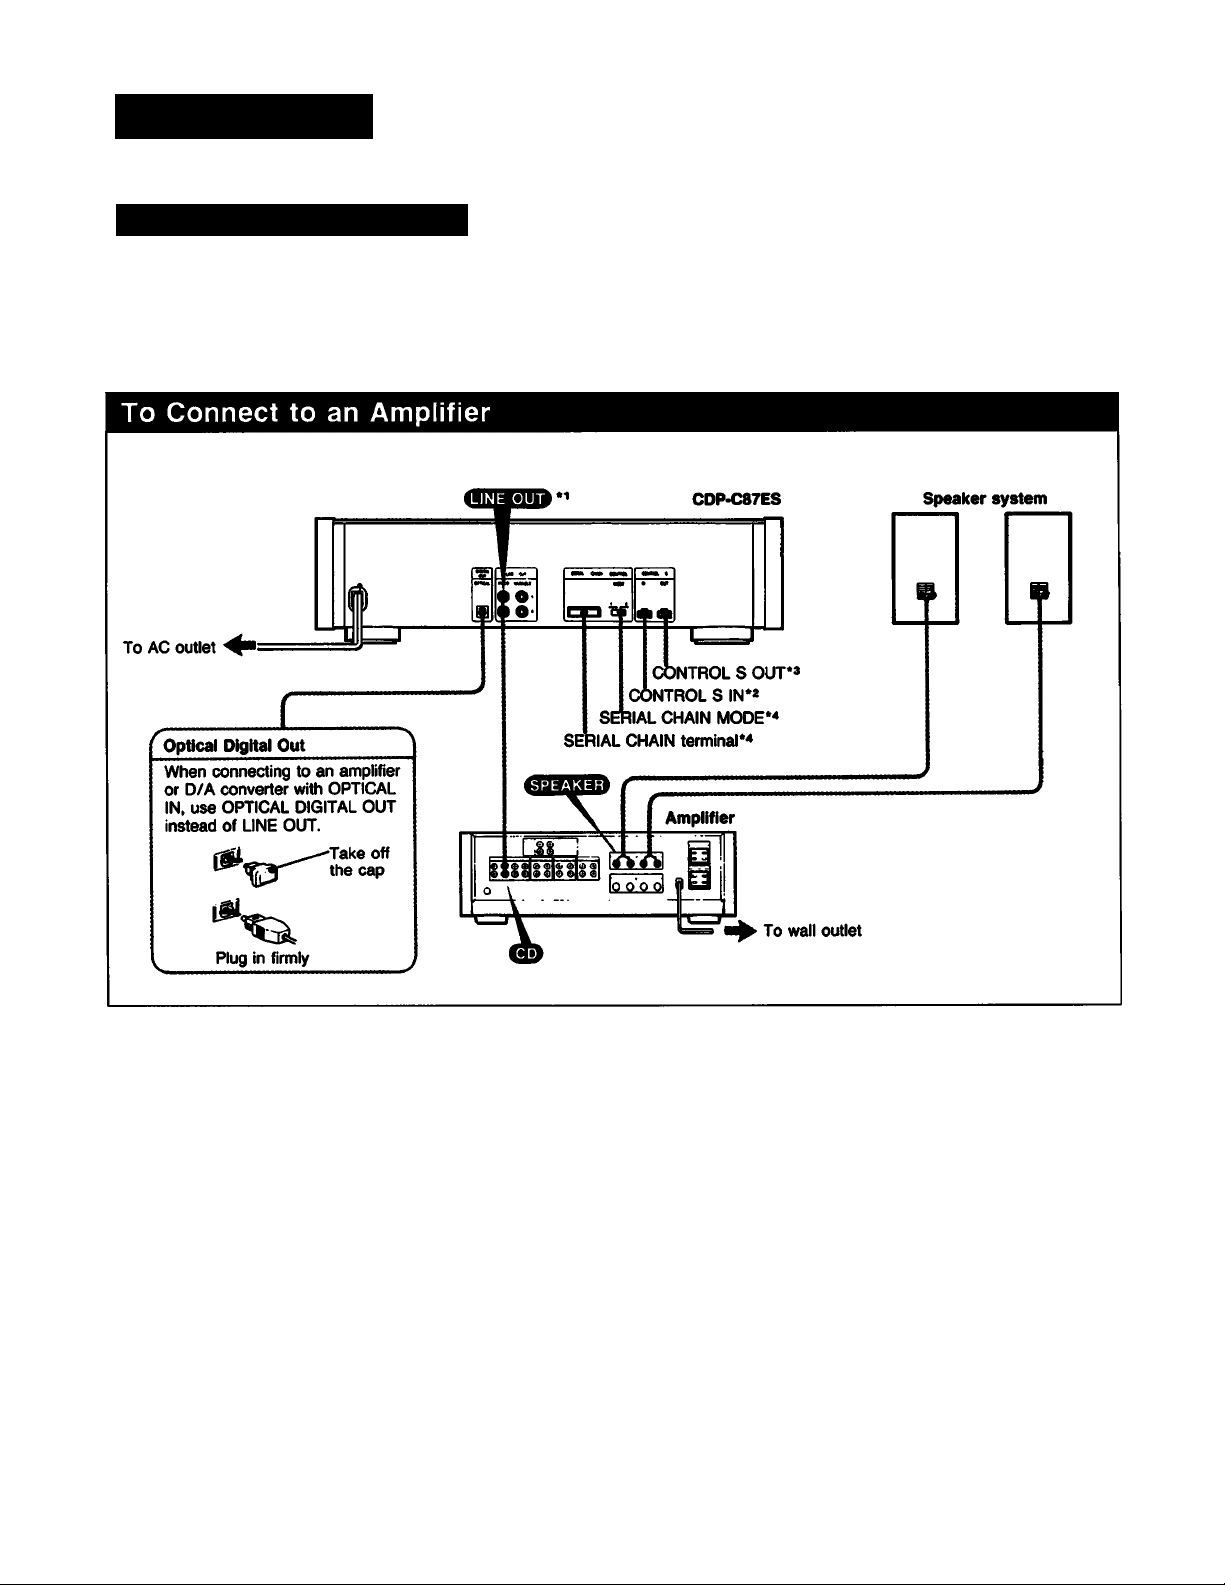
Connections
For Correct Connections
• Turn off the power of each unit before making
connections.
• Connect the AC power cord last.
• Be sure to insert the plugs firmly into the jacks.
Loose connection may cause hum and noise.
Leave a little slack in the connecting cord to allow for
inadvertent shock or vibration.
Cord plugs and jacks are color coded: Red plugs and
jacks are for the right channel (R) and white ones for the
left channel (L).
*iNotes on LINE OUT
FIXED: The output level is fixed.
VARIABLE: The output level can be adjusted with LINE
OUT/PHONE LEVEL control or LINE OUT
LEVEL buttons on the remote commander.
However, if the LINE OUT/PHONE LEVEL
control is turned while recording, the recording
level will change even when it is preset on the
tape deck.
*>Note on the CONTROL S IN 0nput)
To rennote control this unit through a CD player, receiver
or amplifier, connect the input on this unit to the
CONTROL S OUT (output) on a Sony CD player, receiver
or amplifier, with a CONTROL S cable.
*>Note on the CONTROL S OUT (output)
(CDP-C87ES only)
To renrrate control another CD player (supporting the Serial
Chain feature) through this unit, connect the output on this
unit to CONTROL S IN (input) on the other unit with a
(X>NTROLS cable.
Note on optical digital out
Connect the optical out to the amplifier with the optical
input or D/A converter. When you connect, use the
connecting cable for optical out POC-15 (not supplied).
When the optical out is connected, you cannot use fade
oirt, fade in, DSP mode etnd time fade function.
*«Note on the SERIAL CHAIN terminal and MODE
selector (CDP-C87ES only)
Use both serietl chain terminals to control two CD players
serially. See page 28 for details.
Page 6
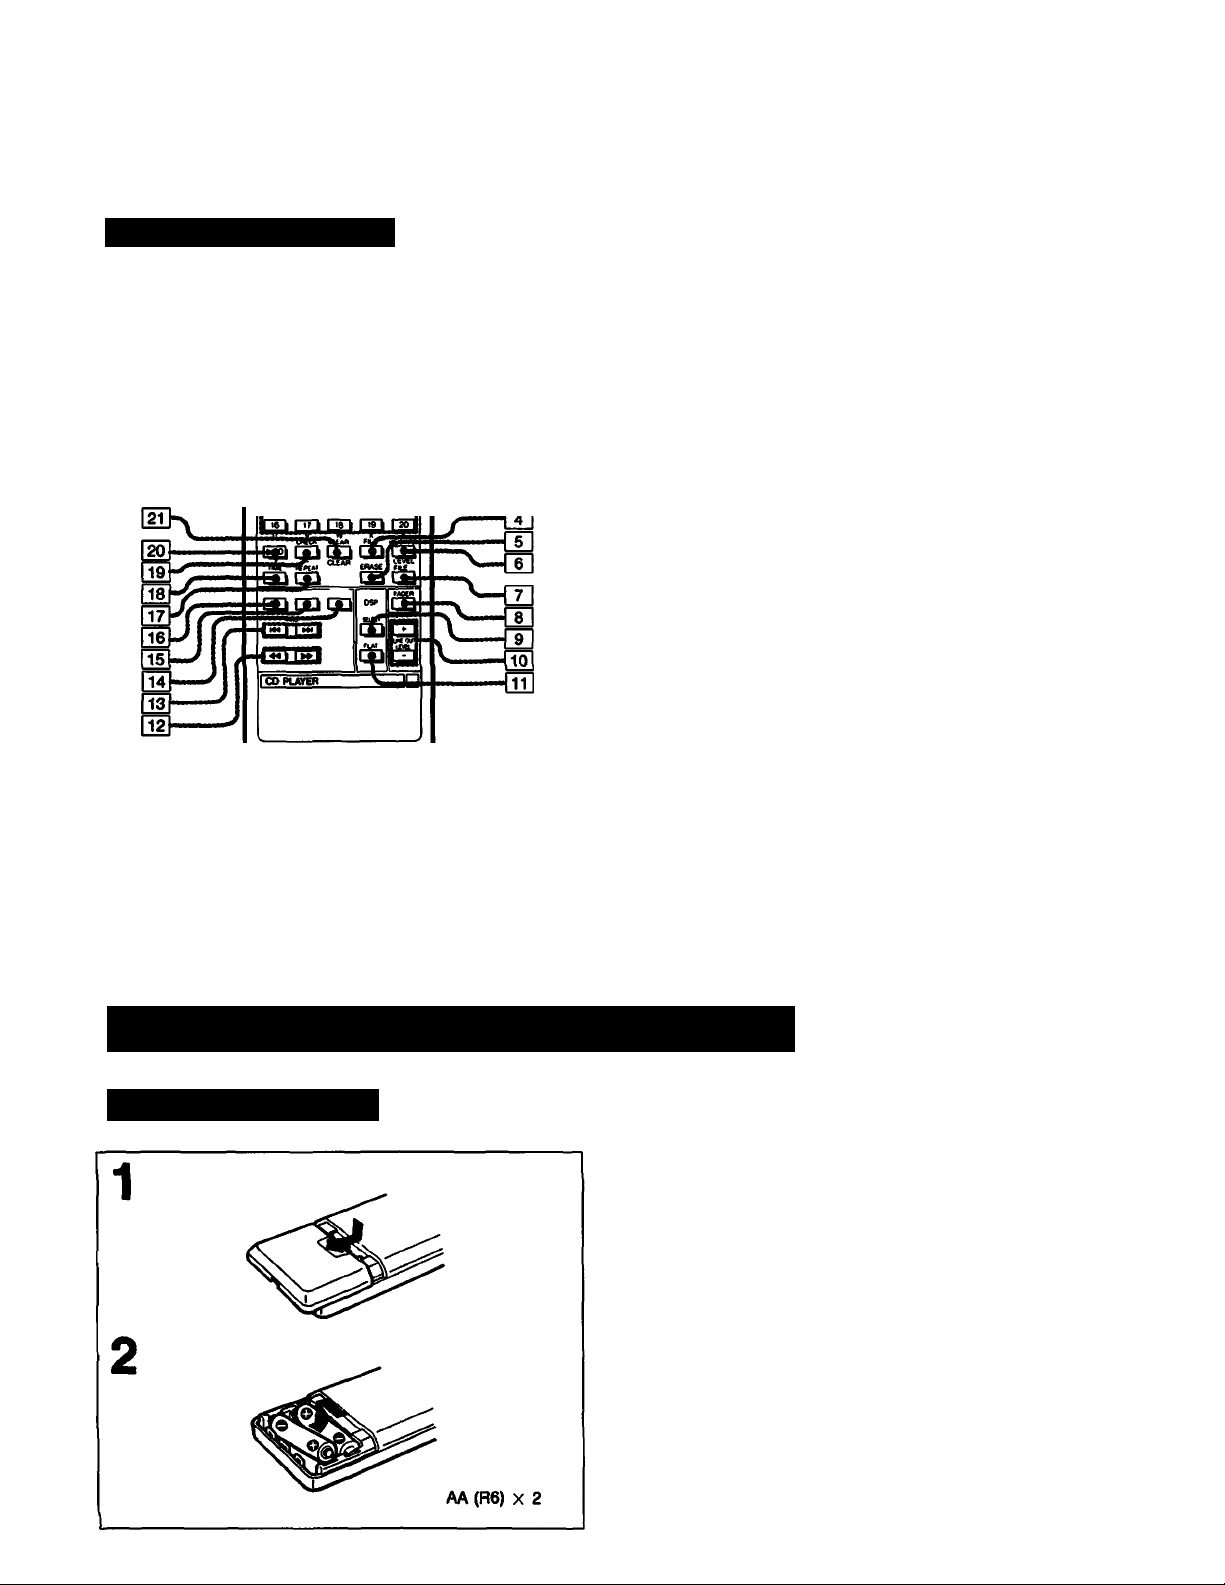
Location of Controls
Front Panel
Refer to the pages indicated in • for details.
POWER switch ®
PLAY MODE buttons
CONTINUE button ®
a
SHUFFLE button #
PROGRAM button O
BANK button 0
TiDISC 1-5 buttons ®
7]TIME/MEM0 button O
Display window ®
Disc tray ®
REPEAT button ®
CHECK button 9
CLEAR button ®
FADER button ®
PEAK SEARCH button ®
EDIT/TIME FADE button ®
FILE button 9
___
►(play) button ®
^11 (pause) button ®
^ ■ (stop) button ®
OPEN/CLOSE button ®
DISC SKIP button ®
« (manual search) buttons ®
K4 ►M (AMS*) buttons ®
PHONE LEVEL/LINE OUT LEVEL control ®
HEADPHONES jack ®
LEVEL FILE button O
ERASE button ®
Track buttons ®
MUSIC SCAN button ®
>10 (over 10) button ®
DSP REVERB level control ®
DSP EQUALIZER level control O
DSP FILE button ®
FLAT button
DSP mode buttons
BGM button ®
LIVE ROOM button ®
DISCO button ®
STADIUM button ®
JAZZ CLUB button •
CHURCH button ®
HALL button ®
Remote sensor
TIMER switch #
* AMS is the abbreviation Automatic Music Sensor.
Page 7
Remote Commander
US---------------
[pcpcpcpq«
Gpl
■ Œ 1
Refer to the pages indicated in • for details.
MUSIC SCAN button ®
DISC SKIP button ®
Track buttons 0
FILE button 0
ERASE button 9
MEMO INPUT button 0
LEVEL FILE button 0
FADER button ®
DSP SELECT button 0
LINE OUT LEVEL buttons 0
DSP FLAT button 0
◄◄ (manual search) buttons ®
►M (AMS) buttons
(stop) button 0
II (pause) button
^ (play) button 0
REPEAT button Q)
TIME button O
18
CHECK (program check) button ®
19
>20 (over 20) button 0
20
0
0
2ii CLEAR (program cjear) button <
^ DISC 1-5 buttons <
M]FLAY MODE buttons
CONTINUE button O
SHUFFLE button
PROGRAM button
BANK button
^ CHAIN MODE button (CDP-C87ES only)
Ml player SELECT button (CDP-C87ES only) i
0
0
0
0
Buttons vifith yellow letters (A, B, C
disc memo (page 24).
Preparing the Remote Commander
Installing Batteries
On battery life
• About half a year of normal operation can be expected
when using the Sony SUM-3(NS) batteries.
• When the batteries are run down, the remote
commander will not operate the unit. In this case,
replace both batteries with new ones.
Notes on the remote commander and remote control
operation
• Keep the commander away from extremely hot or humid
places.
• Avoid dropping any foreign objects into the commander
casing, particularly when replacing the batteries.
• Avoid exposing the remote sensor to direct sunlight or
lighting apparatus. Such exposure can cause a
malfunction.
• To avoid damage caused by battery leakage and
corrosion, remove the batteries when the commander
will not be used for a long time.
...................
.) are for writing a
Page 8

Playing a Disc - Continuous Piay
Before playing a disc, turn on the amplifier and set the
input selector to the CD player position.
To stop play
To stop for a moment during play, press II.
Press ^ or II to resume play.
To stop play, press ■.
To stop play and open the compartment, press A.
Caution on adjusting volume
Do not turn up the volume while listening to a portion
with very low level inputs or no audio signals. If you do,
the speakers may be damaged when a peak level
1
■fe
Label side up
To play more than one disc, place additional discs
on the tray in the desired order.
OK»# I
Choose whether to play one disc (1 DISC) or all
discs (ALL DISCS).
poweA II
Disc number appears
Disc No.
lise tray
portion is played.
To listen with the headphones
Connect the headphones and control the volume with
PHONE LEVEL/LINE OUT LEVEL control or LINE OUT
LEVEL buttons on the remote commander.
Notea
• Disc memo (see page 24) appears in the display window during
the stop mode. If the disc memo is not stored, the disc
number-such as “-K-DISC-I ■)(■”, is displayed.
• The tray number of an empty tray will be displayed untit the
empty tray number is set to play. Once they are recognized
empfy, they will disappear.
• *- NO DISC-’* is displayed when all trays are empty.
You can put another title for “-NO DISC-" display. See page
24 for procedure.
• Place an empty tray in the front loading position, and put the
disc in ft.
If you insert the disc into a tray other than the one in the front
the unit may not be able to find the disc. Be sure to use DISC
SKIP to rotate to the next empty tray.
Notes on hanetUng tUees
• To keep the disc clean, handle the disc by its edge. Do not
touch the surface.
• Do not stick paper or tape on the disc.
'Ò
S®®®® Fit. L DISCS
----------------------ose —
6
oamaam
When all selections of a disc are played, the circle
on the tray number goes off.
or
t
^ 1 ^
Music calender
«S MOS s« W» » «e m
* Do not expose the disc to direct sunlight or heat sources such
as hot air ducts, or leave ft in a car parked in direct sunlight as
there can be a considerable rise in the temperature.
• After playing, store the disc in its case.
To play an (3-lneh) 8 cm CD
Place ft on the inner circle of the tray. If the disc is provided with
an adaptor, first remove ft. Do not put a normal CD (12 cm/
5-inch) on top of an 8 cm CD.
Page 9
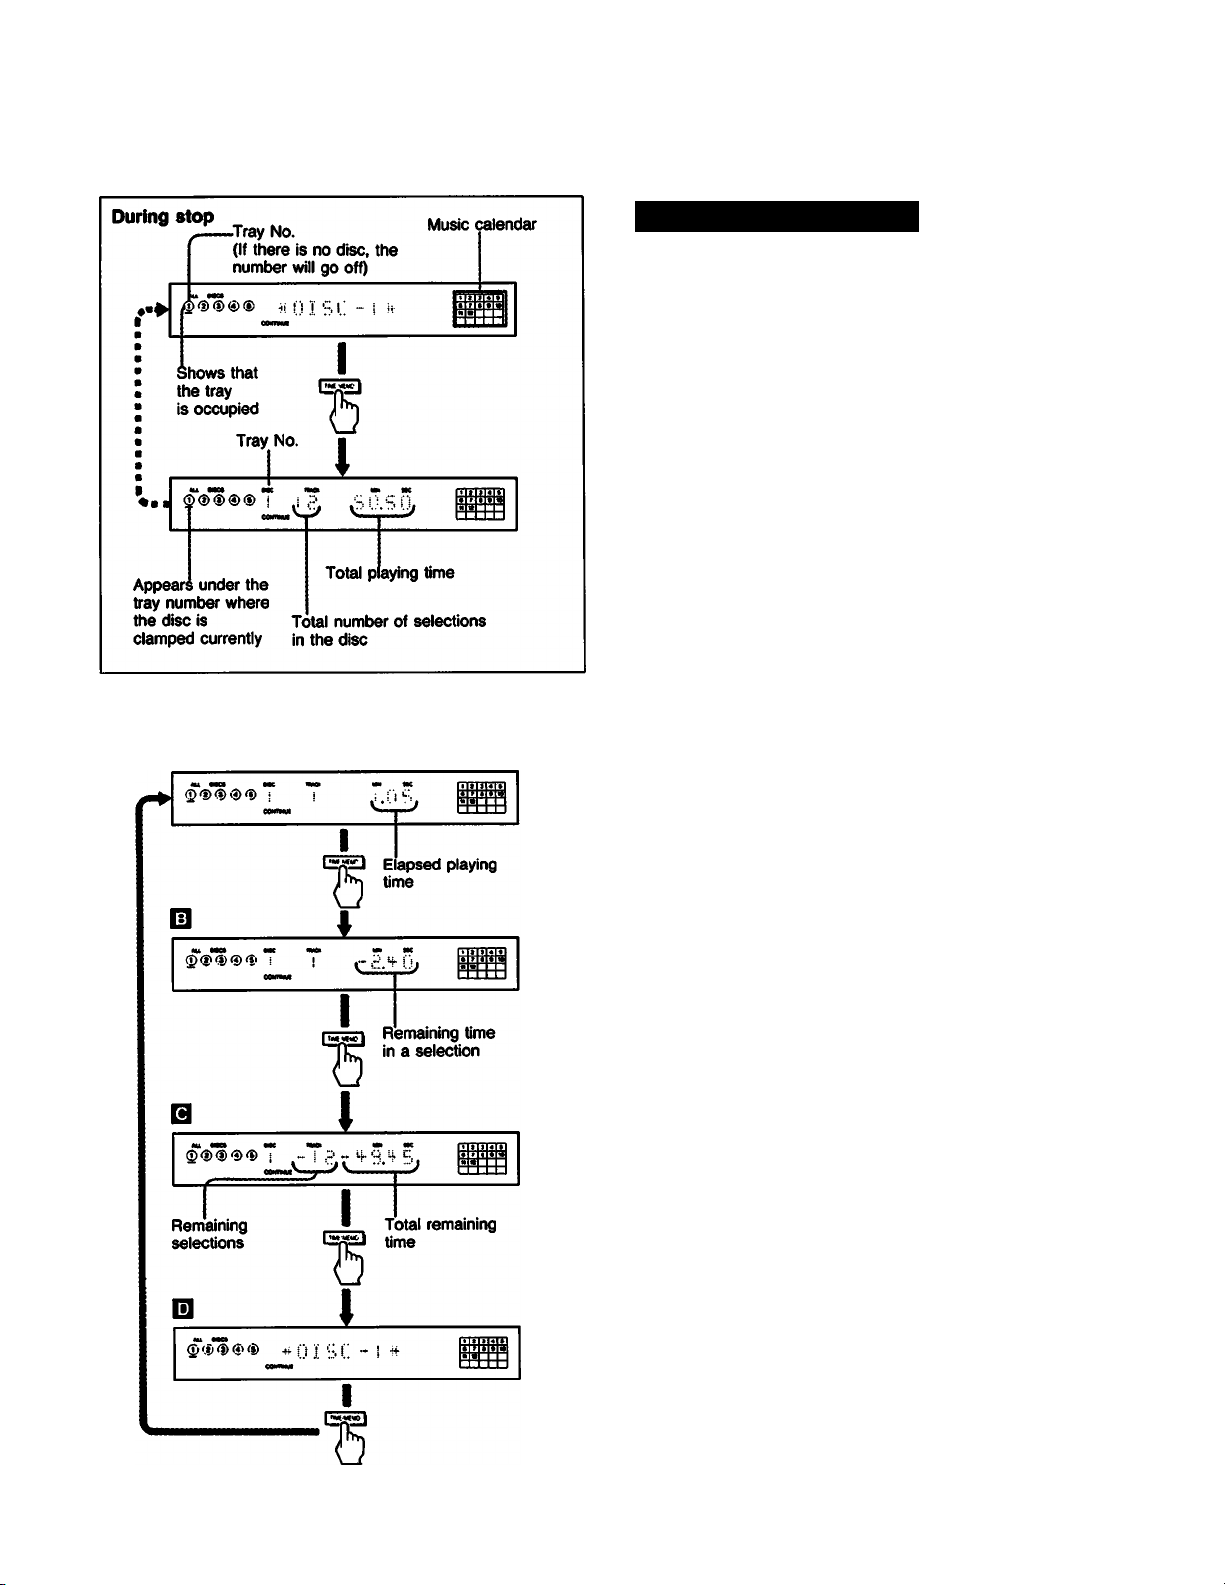
Information Display
When you press £ OPEN/CLOSE or the disc tray itself to
close the tray, the total number of selections and the total
playing time of the disc will be displayed after the disc
memo or disc number is displayed.
If you press TIME/MEMO during play, the display changes
to give you the following information:
Q Elapsed playing time of the selection in the manner
you choose during the stop mode. It automatically
displayed when play begins.
Q Remaining time in a selection. Selection numbers up
to 20 are also displayed at the bottom of the display
window.
If the track number is larger than 20, “—.—appears
insted of the remaining time display.
B Remaining time and remaining selections of the disc
(displayed only in the continue mode).
When the time fade function is activated, remaining
time and remaining selections until the fading out will
be displayed.
B Disc memo or disc number.
Notes
• Total remaining time is only available during continuous mode. It
‘ will not be displayed by pressing the TIME/MEMO button during
program, bank or shuffle mode.
• Total remaining time will be displayed, if time fade is set during
program, bank or shuffle.
Page 10
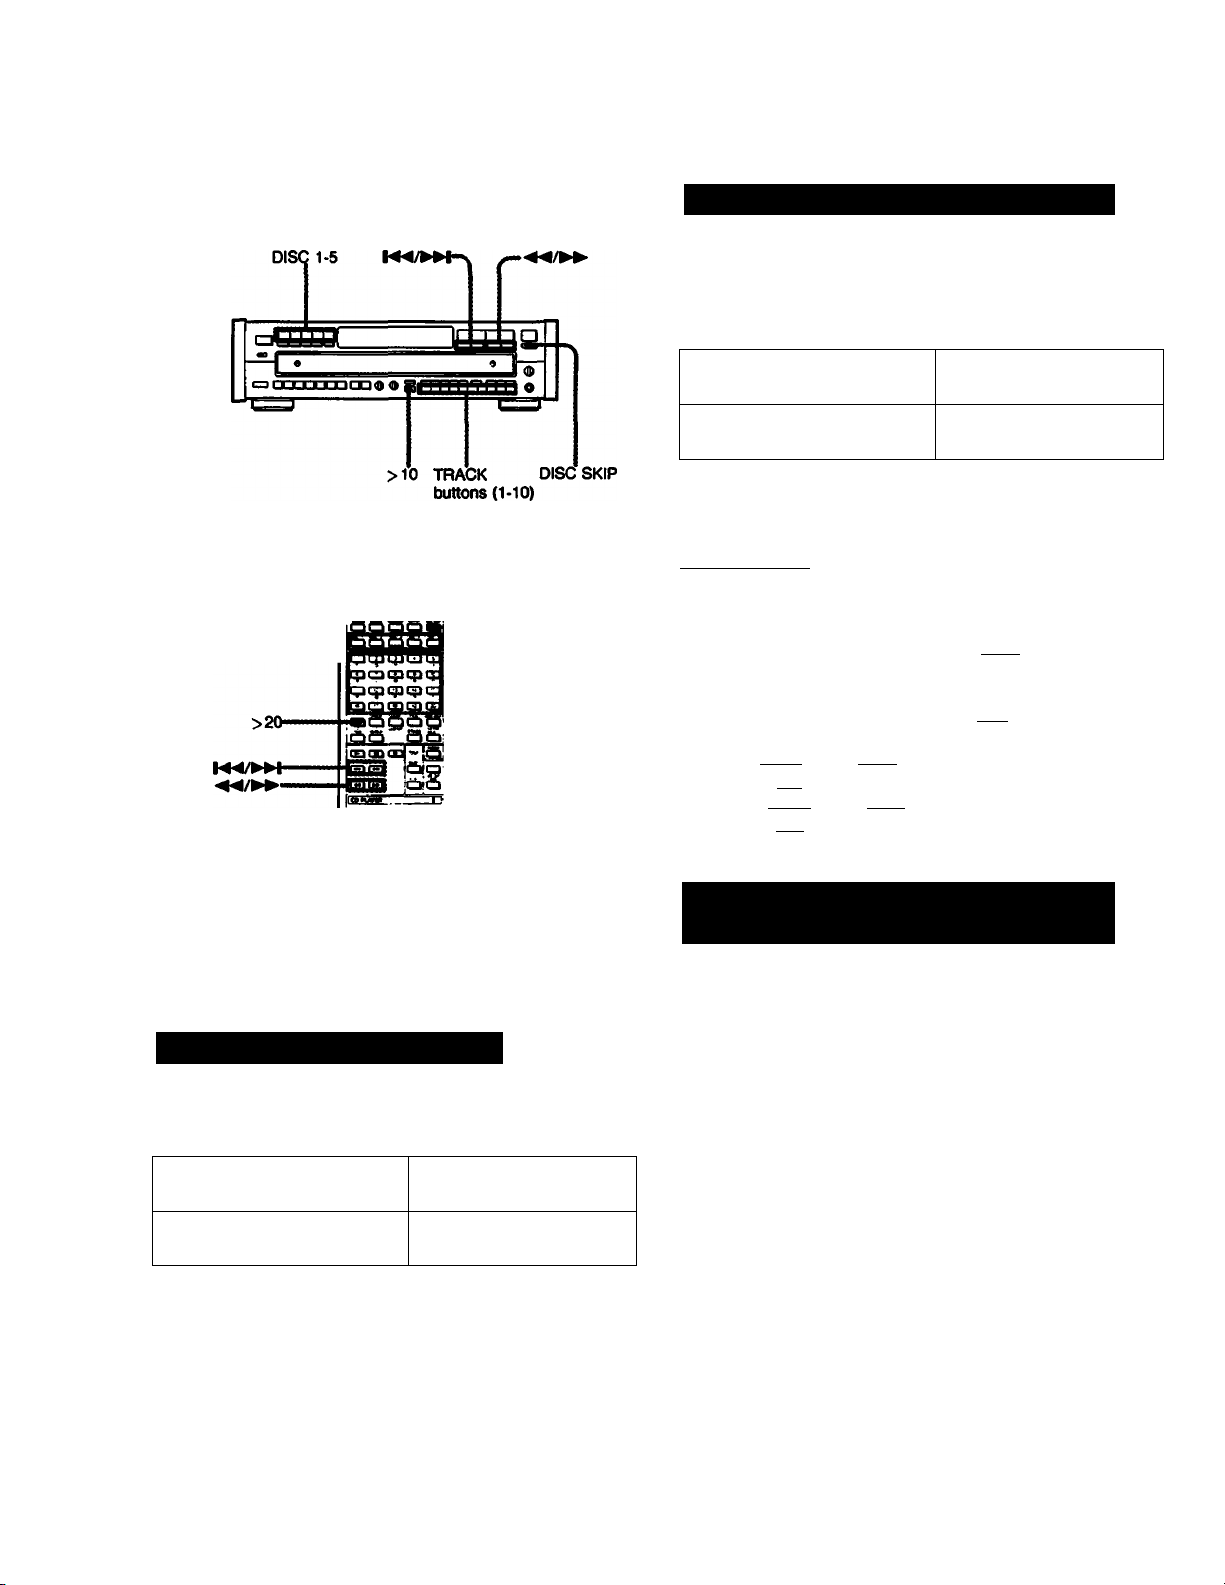
Locating a Particular Selection
Locating a selection in sequence (Automatic Music
Sensor)
You can locate the beginning of a selection on the disc
being played.
DISC 1-5-
Sl
____
sa!
‘DISC SKIP
.TRACK
buttons
(1-20)
To locate the beginning of
the selection being played
To locate the beginning of
the next selection
Continue to press until the selection you wanted has been
located.
Press Kd once.
Press once.
To locate directly___________________________________
Press one of the track buttons to enter the desired
selection number.
• H] to 03 on the main unit
To enter a number greater than 10, use the I >101
button.
• Q] to US) on the remote commander.
To enter a number greater than 20, use thel>20l
button.
e.g. To play from selection No.22
Press r>l3fg|[2] or [¿13I11I11 •
To play from selection No.30
Press i>ioi[51fl3 or [¿i^SlQSl •
03 functions as the figure 0.
__________________
_____
Locating a Particular Point in a
Selection
Selecting a Desired Disc
By using the DISC selectors or the DISC SKIP button
during play, you can locate the beginning of any disc.
To select a particular disc
To move to the disc tray
next to the current one
Press the corresponding
DISC 1 to 5 button.
Press DISC SKIP.
10
You ceui locate a particular point in the disc during play.
To search quickly while monitoring the sound
To go ahead at high speed
Keep pressed during play and release at the desired
point.
To go back at high speed
Keep •« pressed during paly and release at the desired
point.
To search quickly by observing the display
Press II then keep ►► or ◄◄ pressed. The search
speed will increase, but there will be no sound. Find the
desired point by observing the display.
Press ^ or II again at the desired point.
If you continue to press ►► or
If you continue to press once the end of the disc has
been reached, OVER appears in the display window.
Press or Md to return to the normal display.
Page 11

Playing in a Random Order-Shuffle Play
You can have the selections played in a random order (up
to 99). The unit will play all the discs or just disc(s) you
Once a selection is played, it will not be played again until
the random order is completed.
To stop play
Press ■.
To cancel shuffle play
Press CONTINUE and return to the continuous playing
mode.
1
Choose whether to play one disc (1 DISC) or all
discs (ALL DISCS).
2
to
©d)®®® RLl. PISCES
To select a desired disc during “1 DISC” shuffle play
Press the desired DISC 1-5 buttons. A circle will appear
around the selected disc.
To Play Only the Desired Discs in
a Random Order-Select Shuffle
Play
You can select the desired discs during the stop and play
modes. (ALL DISCS mode)
To select the desired discs
Press the DISC 1-5 buttons. Circles appear around the
selected disc numbers to be played.
To delete a disc which you have selected
Press the applicable DISC 1-5 button. The circle around the
selected disc number will disappear.
You cannot put off a circle around the number of the disc
being played.
If you press SHUFFLE during play (except for shuffle pla^
Shuffle play begins from the current selection.
What Is this Indication?
I . This indication appears while the player is shuffling the
selections.
When all selections of a disc are piayed, the circle
on the tray number goes off.
11
Page 12

Playing in a Desired Order - Program Play
Designating the Playing Time
- Program Edit
Choose selection and check the time.
I KW I »n
b
Press repeatedly to choose an appropriate
selection.
“PROGRAM” is displayed.
Choose the Disc.
5
1 n h
t?
To program all selections on a disc in one step,
continue by choosing another disc.
Press track number in the desired order.*
1 » » 4 •
Current selection^ Total time
■ ■■
♦
d] A satisfactory selection has been chosen.
1^55271
The selection is stored, and the flashing numbers in
the window lights up.
To program additional selections from the same
disc, repeat step 4.
To program additional selections from another disc,
repeat steps 3 and 4.
If you program the selections for side B, insert a
pause.
Total time will return to “0.00”.
Program the selections for side B.
t Repeat steps 3 to 4.
“8” lights up.
« S 4 $
Current selection* Total playing time**
* To choose a track number over 10 (or 20), see
page 10.
If you have programmed a selection number over
20, numeric of STEP is displayed instead of the
total time.
12
Chosen selections
r r ^
¥
The selections for side A will
start playing.
** It may take time for the total playing time of the
program to appear. Also, if the total playing time
exceeds one hour, the current selection indication will
be used to display the hour unit.
Page 13

You can make a program by designating up to 32
seiections in the order you want them to be played. The
unit will play the disc according to your program.
Checking the Programmed Selections
You can make a program for both sides (side A and side
B) of the tape at one time.
You can program one selection or one disc in a step.
To play the selection for side B
When the selections for side A have been played, the unit
will pause. (“B” will light up.)
Set the tape to the beginning of side B, then press ^ or
II. The selections for side B will start playing.
Adding selections to a program during program play
1 Press the desired disc button while the unit is in №e
play or pause mode.
2 While the step display appears, press the TRACK
buttons which correspond to the selection number you
want to add.
To stop program play
Press ■. The last selection number programmed is
displayed.
To resume play, press Play begins from the beginning
of the program.
You can play the same program repeatedly as long as you
do not cancel program play or erase the program.
To cancel program play
Press CONTINUE and return to the continuous playing
mode. The program will be erased.
Skipping to the next selection programmed
Press during play.
Gohtg beOi to the beginning of the aelechon being played
Press M4 during play.
DIaplay on atep 3 (procedure atep diaplayf:
(!i!l
qr.
HI
BL
BO.! B
Press CHECK
The disc, track, and program numbers of the first selection
in your program will be displayed.
Each time you press CHECK, the next selection in the
program will be displayed.
When CHECK is pressed after the last selection, END
appears and then the display returns to the initial display.
Clearing the Programmed
Selections
Clearing the whole program
Press ■ once during stop, or twice during play.
All the selections will be cleared.
Clearing the last selection in a program
Press CLEAR during stop.
The last selection will be cleared each time CLEAR is
pressed.
Clearing a specific seiection
1 Press CHECK repeatedly until the selection to be
cleared is displayed.
2 Press CLEAR while the selection number is displayed.
The selection will be cleared from the program.
The whole program wW afso be cleared hi the foHoerlng
situations
•ft is pressed.
• Power is turned off.
• Select other play modes.
To check the atep of prognunmed aelectlona
Press TIME/MEMO during stop mode.
The number of programmed selections will be displayed for few
seconds in the window.
To check the remaining time of the selection being played
Press TIME/MEMO once to see the remaining time of the
selection being played; twice to see the disc memo or disc
number; three times to return to the initial display.
The total remaining time cannot be displayed.
If you have programmed a selection number over 20, —.— is
di^ayed instead of the remaining time.
Note
When selections have been programmed for sides A and B, the
total playing time displayed during stop nrode will show the
selections programmed for side B and the total playing time for
side B.
13
Page 14

Designating the Total Playing
-Time Edit
ime
(yi* f/t »*:»
The program for side A is completed.
If “LINK” blinks, see “To add selection(s)“.
Chosen selections
V } > 4 »
Current selection Total playing time
Press EDIT/TIME FADE once more, to make a
program for the other side of your tape. If “LINK”
blinks, see “To add selection(s)“.
Note
The desired play duration can be set from 10 seconds up to 59
minutes 59 seconds.
14
Page 15

You can designate a time and the unit will make 2
different progreuns of selections each fitting within that
period. Use this function, by designating the length of your
tape, for editing both sides of a tape.
To add selection(s) — LINK —
After all selections on the disc have been programmed, if
there is selection(s) within the remaining time, “LINK” and
the selection numberfs) will blink.
-h
Te
2F1
S » » « • I 1 i
mcs am
To add selection, press the numeric button for the
selection number or press the EDIT/TIME FADE again.
When pressing the EDIT/TIME FADE, a program will be
made automatically to fit the playing time as close as
possible to the remaining time.
If the remaining time can contain other selectionfs),
“LINK” and the selection number keep blinking. When
“LINK” blinks, if the disc is changed by another disc, the
new selection numberfs) on the new disc that fit in the
remaining time will blink.
“EDIP’ disappears when the playing time becomes equal
to the designated time. Whether “LINK” is blinking or not,
you can change the disc by another disc and choose
selection(s) to fit the remaining time.
To disappear “EDIT” in the window, press ■ button.
Ts ^
To Include desired selections in the program
______________
1 Meüte you own program of the desired selections.
See page 12 for instructions.
2 Follow the procedure as shown on the preceding page.
Just designate the length of your tape; you need not
subtract the length of your program. The unit will place
your selections at the beginning of its program and add
other selections to fit the remaining time.
Checking the programmed selection
____________________
See page 13.
To désignât» a tttffwent dm» tor each aU»
Execute steps 1 to 4 and press II Then repeat steps 2 and 4.
Do not execute step 5.
If your disc has more than 20 selections
• Selections over 20 cannot be programmed with the time edit
function.
• If the program already contains a selection over 20, the time
edit function will not work.
Notes
• Up to 32 steps will be programmed. Furthermore the time edit
function cannot be used if your program has 32 steps.
• Time edit will not work for programs with total playing times
exceeding one hour.
To play the program
Press ►.
The selections for side A will be played and then the unit
will pause. “B” lights up in the tape side indicator. Set the
tape to the beginning of side B, then press ^ or II.
The selections for side B will be played.
Not»
Playback can be performed when “EDIT’ is displayed.
To stop playing Press ■.
You can play the same program repeatedly as long as you do
not erase the program.
To cancel time edit
Press CONTINUE and return to the continuous playing mode.
The program will be erased.
To erase the entire program
Press ■ once during stop: twice during play.
Press ■ twice when “EDIT’ appears in the display during
the stop mode.
The program is also erased, when you turn off the unit, or
press*.
15
Page 16

Convenient Features for Tape Recording
The following functions are convenient for editing your own
tapes.
Time Fade and Fade in/Fade out cannot be operated
when the DIGITAL (optical) OUT is used for connections.
Fading in/Fading out
You can have the play fade in and fade out between 2-10
seconds.
When no time is specified, the play will fade in and fade
out for 5 seconds.
To set the fade time_________________________________
1 Press ■.
2 Press FADER. "FADE 5 SEC” will appear in the display
window. The actual fade time “5” will be flashing.
3 Press to select fade time between 2-10
seconds.
4 Press FADER.
To end the play fading out
Press FADER when you want to start fading out.
flashes in the window, and play fades out and unit
enters the pause mode.
To restart the play fading In
Press FADER in the pause mode.
flashes in the window, and play fades in.
Fading out after a desired duration-Time Fade
You can have the play fade out at the end by designating
the play duration. Once time fade is set, it functions twice
for editing both sides of a tape. You can change discs
without canceling this function. The fade time is preset to
5 seconds, but you can change it between 2-10 seconds.
To set time fade
1 Press EDIT/TIME FADE twice during stop.
lii.. lis displayed in the window.
2 Set the desired play duration, using numeric buttons.
e.g. To set to 27 minutes, press |H(7]Qni(3ni«
You need not press buttons for seconds, unless
required.
You can designate the tape length easily with the
time changes in the following way.
C
To set the seconds, press The time increases
or decreases by 10 seconds.
___________________________________
buttons. Each time you press a button, the
• Press : Press •
C-90 45.
-------------------------
C-74 37.
----------------
.-----------------C-46 23.- -
C-60 30.-----------------C-54 27.-- ■
Note
The desired play duration can be set from 10 seconds up to 59
minutes 59 seconds.
3 Press EDIT/TIME FADE.
4 To start play, press >■.
After the designated time, play fades out and pauses.
Tape side B lights up. Press II or ^ to resume playing
for the other side of the tape. If you press FADER, fade
in will start When the play fades out for the second
time, the unit pauses and the time fade function is
canceled.
When playback ends in the duration of time fade
Time fade function will be kept on. Change the disc and
start playback automatically when the total playing time is
within some seconds before the designated time, the
player fades out.
To cancel time fade
Time fade will be canceled when
- EDIT/TIME FADE is pressed once again.
- -«/>^ (manual search) is pressed during play.
To tOeptay the tbne remaining imtK the time eat
Press TIME/MEMO twice.
If the PEAK SEARCH is pressed after setting time
fade, time fade is released but peak search is kept active.
16
Page 17

Locating the loudest portion of the disc - Peak Search U
The CD player can search a disc from the beginning to the
end and determine the loudest portion (peak level) of the
disc, and then play that portion repeatedly. This function
will make it easier for you to adjust to the optimum level
when recording on tape.
This function operates in all play modes as follows:
Play mode
Continuous and
shuffle modes
Program mode
Bank mode
Unless you are using the program mode, the unit will scan
all discs that are clamped, even in the ALL DISCS mode.
Searches all selections of the disc
which is clamped currently
Searches all programmed selections
Searches all selections stored in the
program bank
Operation
To activate the peak search
Press PEAK SEARCH during the stop mode.
“PEAK” flashes in the display and the all selection of the
disc or program will be searched automatically. After
finishing the search, the loudest portion is played
repeatedly for 4 seconds and “-PEAK-” appears.
Note
To go to another disc press DISC SKIP button during stop.
To start play Immediately
Press >■. The play starts from the beginning of the disc.
To stop the peak search
Press ■.
Note on peak aearch funetkm
The unit determines the loudest portion (peak leveO of a disc
by searching it at fixed intervals. As a result, the portion
searched may differ from the actual peak level. In addition, this
function may determine different portions as the peak level for
the same disc. However, the difference between the portion
searched and the actual peak level is insignificant and will not
present any problem In adjusting the recording level.
17
Page 18

Playing Repeatedly - Repeat Play
Repeat play can be used in any play mode to repeat a
single disc or all discs in the unit.
In the continuous play mode, you can repeat a single
selection.
Playing mode
Continuous play
(ALL DISCS)
Continuous play
(1 DISC)
Shuffle play
Select shuffle
play
Program play Repeats all selections and/or programs in
Bank play Repeats all selections stored in the bank in
All the selections on all discs, or the
selection currently being played (REPEAT
1)
All selections on the disc currently being
played, or the selection currently being
played (REPEAT 1)
All selections on the disc Cm the 1 DISC
mode) or all discs (in the ALL DISCS
mode) are reshuffled.
All selections on a selected disc are
reshuffled.
their programmed order.
their programmed order (or all selections if
the disc does not have a bank file).
Selections played
To cancel repeat play
Press REPEAT again.
••REPEAT” disappears.
To cancel repeat play of the continuous play, press
REPEAT twice. ••REPEAT’^ disappears.
18
Page 19

Playing the Beginning of Each Selection
- Music Scan
You can check the selectons by scanning the beginning
of each selection on the disc. When “ALL DISCS” is
selected in continue mode, the first selection of each disc
will be scanned.
You can use this function in any play mode.
DDooii^BaSBBe
MUSIC SCAN
Press during stop.
To change the playing time
Press MUSIC SCAN again.
Each time you press MUSIC SCAN, the display will be
as follows:
When scanning is finished,
the unit enters the stop mode.
To stop music scan play
* •
Press ■.
Starting play at the selection being played during music
scan
Press The indicator on the ^ button will lights up.
Motes
• Programmed pauses in program mode will be disregarded during
music scan play.
• If you press the button, music scan will be canceled.
• Pressing the MUSIC SCAN button while the beginning of
selection is being scanned will extend the playing time for 10,
20, or 30 more seconds.
The indicator on the button blinks and beginning of
each selection is played for 10, 20 or 30 seconds as
designated and fades out.
Page 20

Enhanced Surround Effects
- Digital Signal Processor
The Digital Signal Processor (DSP) lets you listen to
selections according to various acoustic atmospheres.
These atmospheres are produced by a digital processing
technique that involves simulating reflected and
reverberated sound effects and digitally compensated
frequency response. DSP modes can be stored in the
memory of the player as a custom file.
You can choose from the following processing mode.
Choose the desired DSP mode
1
Main unit
о о
HAU СМЦЙСН
Remote commander
Аггаие
Lights up
----
otilWl. SIGNAI Pfiocesso« -
о
STAOWd
DISCO 1 еом 1
b
SELECT
о 1
о 1
lMroomI
о 1
DSP mode
HALL
CHURCH
JAZZ CLUB Reproduces the acoustics of a modern
STADIUM
DISCO
LIVE ROOM
BGM
«Adjusting the EQUAUZER level
The equalizer level adjusts the frequency response.
Turning this knob toward MAX increases the frequency
response, while turning it toward MIN lowers the frequency
response.
Reproduces the acoustics of a 2,000
seat capacity concert hall.
Reproduces the acoustics of a church
with solid walls, stained glass interior,
and high roof.
jazz club.
Reproduces the acoustics of a 30,000
seat capacity out door stadium.
Reproduces the acoustics of a
discotheque and features strong
reverberation with a dynamic bass.
Expands the sound for ideal listening
acoustics in small rooms or when
using headphones.
Softens the sound for a background
music effect similar to the acoustics of
a hotel lobby.
Characteristic
Each press this button will change the DSP mode
as follows;
HALL -» CHURCH — JAZZ CLUB-
c
BGM n- LIVE ROOM - DISCO STADIUM»
The indicator on the DSP mode select button
lights up.
Adjust to the desired equalizer and reverb level*.
(Cannot be controlled from the remote commander.]
20
«Adjusting the REVERB level
The reverb level adjusts the level of the Surround effect.
Turning this knob toward MAX enhances the Surround
effect. While turning it toward MIN reduces the Surround
effect.
To cancel the DSP mode
Press the FLAT button. The DSP mode indicator will turn
off.
Notes
• The DSP mode is back-up while the power is turned off.
• Noise may occur when switching DSP modes and Effect levels.
• When using the DSP mode, large outputs from the player may
cause distortion from your amplifier.
In this case, change the LINE OUT connections from FIXED to
VARIABLE so that you can adjust the output level with the
PHONE LEVEL/LINE OUT LEVEL control.
Page 21

Memorizing a DSP Mode
The DSP modes, as well as the Equalizer and Reverb
settings, can be stored in memory to correspond with a
certain disc. By making a DSP file, you can insert or select
a disc and have it played to a pre-selected acoustic
atmosphere (See “On Custom Files” on page 22).
To make a DSP file__________________________________
1 Play the applicable disc and select a DSP mode.
Adjust the Equalizer and Reverb controls as necessary.
2 Press the DSP FILE button. “DSP FILE” is displayed
and CF DSP appear in the display.
The indicator on DSP FILE button will also lights up as
long as the DSP settings correspond with the DSP file.
© ® S' ‘i> I :
m:\T. .i-UB nriu
To change DSP files
Select a new DSP mode. Press the DSP FILE button,
new DSP mode will be stored in the DSP file.
To change DSP mode without erasing the DSP file
Select the desired DSP mode or adjust the
Equaiizer/Reverb level control as necessary.
The indicator on the DSP FILE button will go out,
indicating you have disabled the DSP mode specified in
your DSP file and are now adjusting manually. The current
mode will stay in effect until you change it again, or press
the DISC SKIP button and changes discs.
You can recall the DSP file by selecting the bank mode, if
the bank is filed. The DSP FILE indicator will lights up
again.
The
About Surround Sound
There are three basic sound effects that produce the
acoustics of concert halls and movie theater. Direct sound,
early reflection, and reverberation. The acoustic quality of
a room depends on how that room reproduces these three
sounds.
Clearing a DSP file
1 Put the disc whose DSP file is to be cleared in the
player. Press FLAT button.
2 Press the DSP FILE. “FILE ERASE” is displayed and
“CF DSP” goes off from the display window.
__________________________________
21
Page 22

On Custom Files
The CD player is equipped with a memory which allows
you to store three ti^es of information called “custom
files*’.
Up to 184 discs of Custom RIe can be retained in the
unit’s memory.
The four custom files you can store in memory
Disc memo
Bank To store a program in memory so it
Level file To preset an output level of the
DSP file To store an acoustic atmosphere for
What is this indication?
^BA
ICFMS
LightsLHwhen
To store a name of up to 10 letters for
an individual disc, (page 24)
can be played again, (page 23)
headphones/variable line out jacks for
an individual disc, (page 26)
an individual disc, (page 20)
«(ILEVEU osp-j—Lights when DSP file is
memorized.
Lights when Level file is memorized,
hts when Program Bank is memorized.
Disc Memo is memorized.
What la this Indication?
This indication appears when FILE is
pressed while no custom file can be
memorized for the disc currently put
in the player. To make a custom file
for the disc, clear the custom file of
another disc.
To clear custom files of all discs at once
Press POWER to turn on the unit (without discs on the
tray) while keeping ERASE and FILE pressed. “ALL
ERASE’’ will be displayed and all custom files are cleared.
To check the Items of the custom hies
Press TIME/MEMO (while “-NO DISC-’’ is displayed) without the
disc(s) inserted. Each time you press TIME/MEMO, the items of
the custom files and the items of the each column of
KffcmMmtpgg] about the disc are displayed. If you press
TIME/MEMO when the last disc’s information id displayed,
“- END -’’ is displayed and returns to “- NO DISC -’’ after a few
seconds. To clear all custom files for a single disc, press
TIME/MEMO repeatedly until the undesired custom file is
displayed. Then press ER/VSE. “FILE ERASE” is displayed and
icrMtiMie«wCgnffi goes off in the display window.
Memory backup for the custom files
Custom flies, once memorized, are retained in the compact
disc player’s memory for approximately 1 month without
AC power supply.
Since the memory is stored in the unit and not on the disc,
you cannot perform custom file functions with the same
disc on a different player.
22
Page 23

Keeping the Program in Memory - Bank
After programming selections, you can keep the program
memorized, so that the disc is played always in the fixed
order. The memorized program is called “bank.”
Memorizing a Bank
The program is stored into the memory (One disc can
memorize up to 24 programs). Only one bank can be made
for a disc.
Notes
• You cannot program a whole disc under a single program
number.
• To pause during the bank play, press II instead of step 3.
• If you press a DISC button during the stop mode, the bank
stored for the disc is displayed.
Playing the Disc Using the Bank
1 Press BANK to choose whether to play “1 DISC” or
“ALL DISCS”.
2 Press M to insert the disc having the bank. “CF BANK”
appears in the display.
3 If you choose the “1 DISC” mode, press the DISC
selector which corresponds to the disc you want.
4 Press ^ to start play. When playing in the ALL DISCS
mode, any disc without a bank file will be played in its
entirety.
1
I
SANK
I
b
ERASE
■ <!b
Press BANK and the “BANK” indicator will turn on.
Program the selections as your desire, (see page
12, Press BANK instead of PROGRAM for steps 2
and 5.
1
“-FILE-” and “CF BANK” will appear in the
display window.
(“- FILE -” will disappear approximately one
second later.)
Clearing the Bank
1 Put the disc whose bank is to be cleared in the player.
Then close the disc tray by pressing
2 Press BANK.
3 Press ERASE.
“FILE ERASE” is displayed and “CF BANK” goes off
from the display window. The bank is cleared.
Page 24

Assigning Names to a Disc-Disc Memo
d] Using the buttons
1
I » >
DOOS
1
Make sure that the total number of selections and
the total playing time are displayed. Then proceed
as follows in the stop mode.
Using the MEMO INPUT button with the letter
buttons on the remote commander
(This function can be entered while playing)
1
*U «9
" T- I
(b
Press or until the desired letter
appears.
Example: if »■ is pressed 7 times, F appears.
2 When the desired letter appears, press
CSZUSD
6
«scs ,
X* 'Ï- !• i Î * /
Move the cursor to select the next letter.
Repeat steps[1]-1 and(Bj-2.
CrP
6
Each time you press MEMO INPUT, the display
changes as shown above. Choose the desired
capital letters, or numbers.
2 Press the applicable letter button.
fTi fî» <îi lî» tîi }U
Move the cursor to select the next letter.
To change to numbers, return to the step [A] -1.
24
OISC I
à &
mnm , X
X -I * ! ¿*’ •* ‘
Lights up.
After 2ibout 1 second, the memo you have written
will be displayed.
Each time the disc is put in the unit the memo will
be displayed.
Note
Symbols cannot be entered with the letter buttons on the remote
commander. To enter symbols, use buttons.
Page 25

Using the disc memo function, you can assign a name
within 10 letters for each disc. The memo appears in the
window every time you put the disc in the player.
One name can be assigned for one disc.
You can also assign a title for the “-NO DISC-” display
(see page 8) using the same procedure as that for the
di.sc memo
Usable letters and symbols
For the disc memo, 46 letters and symbols and a space
can be used. When the button is pressed for the
first time, the space appears. Each time is pressed,
letters and symbols will appear in the following order.
(space) ABC DEFG Hid KLM NO PQRSTUVWX
YZ’&:.<>*/ + 9876543210-
Use « to call up a previous character.
1 Put the disc whose memo you want to clear in the
player, and close the disc tray.
2 Press -«I ►► or MEMO INPUT on the remote
commander.
The blinking cursor will appear.
3 Press ERASE.
"FILE ERASE" is displayed and “CF MEMO" goes off
from the display window.
To rewrite letters or symbols
__________________________
Before pressing FILE
Move the cursor under the letter/symbol to be changed
and then select the desired letter/symbol using -<^/^^
or letter buttons on the remote commander.
To erase the letter and make space, locate the desired
place with and press CLEAR.
After pressing FILE
Repeat from step 2.
If you want to assign names while referring labels
1 Place the disc(s) on the disc tray and keep the tray
opened.
2 Follow step 2 to create a name for the disc.
3 Press DISC SKIP to select another if you want to assign
two or more discs.
4 Repeat step 2 until you assign the all desired discs.
5 Press FILE. The disc tray closes automatically emd
"MEMO FILE" appears in the display window. The
name for each disc h2№ been assigned at once.
Note
Disc memos can also be changed while playing a disc by pressing
the MEMO INPUT button on the Remote Commander.
Displaying the Memos
To display the memo for the disc being played
Press TIME/MEMO twice during the shuffie, program or
bank mode and three times during the continuous mode.
To return to the normai display, press TIME/MEMO once
more.
25
Page 26

Preset the desired Output Level to a Disc
- Level File
Using the level file function, you can preset the desired
output level for each disc. When a disc with the level file
is played, the PHONE LEVEL/LINE OUT LEVEL control on
the front panel is automatically adjusted to the preset
level.
When you use the level file function, use headphones or
the amplifier connected to the variable line output jacks.
This function does not work for the output level of the
fixed line output and optical digital output jacks.
To preset a new level on to the current level file
Repeat steps 3 and 4.
1
"Г
ifvfi uv(i
Adjust the level. You can also use LINE OUT
LEVEL buttons on the remote commander.
t'Nk OU»
Clearing the Level File
Put the disc whose level file is to be cleared in the
player.
Press DISC button which corresponds to the disc whose
level file you want to clear.
Press LEVEL FILE. “LEVEL FILE” appears in the
display.
Press ERASE while the “LEVEL FILE” is displayed.
“FILE ERASE” is displayed and “CF LEVEL” ^s off
from the display window. The level file setting is cleared.
“LEVEL FILE” and "CF LEVEL” appears in the
display window.
26
Page 27

Timer Activated Playing
By connecting a commercially available timer, disc play
can be started at any desired time.
Activating the Power with an Audio Timer
1 Press POWER to turn on the unit.
2 Put disc(s) on the disc tray.
3 Choose the desired play mode.
Note: you cannot choose the program mode for timer
activated playing.
4 Set the TIMER to PLAY.
5 Set the tum-on time of the audio timer.
When the timer play ends
Be sure to set TIMER to OFF.
Note
If two CD players are connected in a serial chain, turn the TIMER
switch on for one player only.
27
Page 28

Connect Two Players and for More Listening Enjoyment - Serial Chain Controi (CDP-C87ES only)
The serial chain control feature allows you to play from
two different piayers. You will need another CD player that
supports the serial chain function.
The following three modes are available.
CHAIN mode - Each player takes turns playing either
RELAY mode-After all discs in the first player have been
played, the discs in the second player are
played.
OFF mode- Disables the serial chain mode to play
either player alone.
[olol To, roTol foTo j [cTo]
^oIoT W
dZT
Il
1
Amplifier
o olo o
O olo O
1=
Connect
Player 1
2—
Mode
Player 1
Playera
CHAIN
Continuous
play
Bank play
Shuffle play
Select shuffle
play
Program play Not available in the
Repeat play is available with serial chain operation.
However, you can repeat a single selection in the
continuous play mode.
Notes
Each player takes
turns playing one
complete at a time.
Each player takes
turns pla^ng discs.
Discs are exchanged
after playing all
shuffled selections on
that disc.
chain mode.
After all discs in player
1 (or 2) are played, the
discs in player 2 (or 1)
are played.
After alt discs in player
1 (or 2) are play^, all
the discs in player 2
(or 1) are played.
After all selections
programmed (or stored
in the bank) (or player
1 are played, all the
selections programmed
(or stored in the bank)
for player 2 are played.
• The 1 DISC mode is not available in the serial chain mode.
• Music scan will only work with one player.
RELAY
Disconnect
28
Player 2
To Connect
Be sure both players are turned off before connecting
them.
1 Turn the power off to both piayers.
2 Connect the players with the serial chain cable supplied
with either player.
3 Set the SERIAL CHAIN CONTROL MODE selector
switch on piayer 1 to 1. Set player 2 to 2.
To use the CONTROL S feature, connect as follows.
Amplifier or receiver This unit dSdn*eature*'
am
CONTROLS oIjT
Notes
CONTROLS llil
¿ONTRaSOUT 1
• The LINE OUT Signal to your amplifier can be connected to the
FIXED or VARIABLE jack on either player 1 or player 2.
• Audio optical connecting cord cannot be used to connect both
players. Set the function mode on your amplifier to ANALOG IN.
±1 9) □
Page 29

1 Player 1
-^rrrm'
Select a chain mode on the remote commander
(Not available on the main unit)
CHAIN
MODE
1
□□oo
Players
1-
Player 1
Player 2
O
Each press of the CHAIN MODE button changes
the display as follows.
C
Select the player you want to play first
Remote
commander
The display window on the selected player will
appear brighter than the other player.
f)
^ 01 S C • I ^
lights up
CHAIN — RELAY-,
—f
-(Off)
PLAYER
SELECT
S
The player turned on first will have a brighter
display window. This player plays first.
■fe
Select a playing mode
Ò
Select the desired mode on the piayer with the
brighter display.
If you select the program mode, continue by
making your program. (See page 12)
Notes
• If BANK is selected, any disc not having a bank file will be
played continuously.
• The PEAK SEARCH and PLAY MODE buttons are disabled on
the player with the darker display window.
• EDIT/TIME FADE is not available.
• You cannot connect a headphone to player that is turned off.
However, the output from LINE OUT is available.
• Adjust the PHONE LEVEL/LINE OUT LEVEL and DSP modes
on the player operating at that time.
• The Remote Commander will only work with the player with the
brighter display. To change players, press the PLAYER SELECT
button on the Remote Commander.
• The DISC SKIP button on the player with the darker display will
not work while shuffle play mode in the Chain or Relay modes.
29
Page 30

Specifications
Compact Disc Player
Frequency response
Signal to noise ratio
Dynamic range
Harmonic distortion
Channel separation
Outputs
LINE OUT (FIXED)
(phono jacks)
LINE OUT (VARIABLE)
(phono jacks)
DIGITAL OUTPUT
(OPTICAL) (optical
output connector)
HEADPHONES
(stereo phone jack)
General
Power requirements
Power consumption
Dimensions (w/h/d)
Weight
2 Hz-20 kHz (±0.3 dB)
More than 110 dB
More than 100 dB
Less than 0.0025%
(CDP-C87ES/C77ES)
More than 105 dB
Output level 2 V (at 50 kiloohms,
non DSP mode)
Load impedance over
10 kiloohms
Output level max 2 V
(at 50 kiloohms, non DSP mode)
Load impedance over
10 kiloohms
Wave length 660 nm
Output level -18 dBm
Output level max. 15 mW
Load impedance 32 ohms
USA model: AC 120 V, 60 Hz
Australia model:
240 V AC. 50/60 Hz
18 W
Approx. 470 X 125 X 385 mm
(16*/8 X 5 X 15V4 inches)
(CDP-C387ES/C77ES)
Including projecting parts emd
controls
Approx. 9.4 kg (20 lbs 12 oz), net
(CDP-C87ES)
Approx. 8 kg (17 lbs 11 oz), net
(CDP-C77ES)
Remote Commander RM'D715 (CDP>C77E8 supplied)
RM-D870 (CDP-C87ES supplied)
Remote control system Infrared control
Power requirements 3 V DC with two size AA batteries
(lEC designation R6)
Dimensions 62 X 20 X 175 mm (w/h/d)
(2Va X ’V,e X 7 inches)
Weight 130 g (4.6 oz) including batteries
Supplied Accessories
CXinnecting cord
(2 phono plugs «-» 2 phono plugs) (1)
Serial chain cable (1) (CDP-C87ES only)
CONTROL S cable (1) (CDP-C87ES only)
Remote commander (1)
Size AA batteries (2)
Screws (1 set)
Optional Accessory
Audio optical connecting cord PO&15
Design £uid specifications subject to change without
notice.
30
Page 31

Troubleshooting Guide
The following checks will assist in the correction of most problems which you may encounter with your unit.
Should any problem persist after you have made these checks, consult your nearest Sony service facility.
Before going through the check list below, first refer back to the connection and operating procedures.
Trouble
No audio from one or both channels
Play does not begin.
Remote commander does not operate
the unit.
Any operation is not possible.
Note
This unit uses several micro.computer chips to control a series of operations. Sometimes, an operation may not work properly due to the
condition of the power being supplied. In this case, turn the power off, then turn it back on and retry the operation.
Incorrect operation of the amplifier Operate correctly.
Loose connection Connect the cords firmly.
No disc in the disc compartment
The player is in the pause mode. Press ^ or II to release pause.
Moisture condensation
The disc is set upside down.
The disc is tilted.
The disc is extremely dirty.
The batteries are exhausted.
The remote commander is not
pointed at the remote control sensor.
There is an obstacle between the
remote commander and the unit.
The remote commander is too far
from the unit.
The internal control program may not
run.
Causes Remedy
Put disc(s) in the compartment.
Leave the player turned on for about
an hour.
Set the disc with the label side up.
Set the disc correctly.
Clean the disc.
Replace both batteries.
Point the remote commander to the
sensor.
Remove the obstacle.
Move closer.
Turn off the power and turn it on
again.
31
Page 32

Sony Corporation Printed in Japan
 Loading...