

Page 1

Video Camera Recorder
CCD-F33
Operating Instructions
Before operating the unit, please read this manual thoroughly
and retain it for future reference.
3-751-369-22 (1)
*
Video 8 Handycam
'?> 1990 by Sony Corporation
Page 2
Owner’s Record
The model and serial numbers are located on the
bottom. Record the serial number in the space
provided below. Refer to these numbers
whenever you call upon your Sony dealer
regarding this product.
Model No. CCD-F33 Serial No.
____________
To prevent fire or shock hazard, do not ex
pose the unit to rain or moisture.
CAUTION
Risk of ELECrfliC SHOCK
DO NOT OPEN
CAUTION TO REDUCE THE RISK OF ELECTRIC SHOCK.
DO NOT REMOVE COVER (OR BACK)
NO USER-SERVICEABLE PARTS INSIDE
REFER SERVICING TO QUALIFIED SERVICE PERSONNEL
This symbol is intended to alert the
user to the presence of uninsulated
"dangerous voltage” within the prod
uct's enclosure that may be of suffi
cient magnitude to constitute a risk of
electric shock to persons.
This symbol is intended to alert the
user to the presence of important
operating and maintenance (servicing)
instructions in the literature accompa
nying the appliance.
information for the customers in the U.S.A.
This equipment generates and uses radio
frequency energy and if not installed and
used properly, that is, in strict accordance
with the manufacturer’s instructions, may
cause interference to radio and television
reception. It has been type tested and found
to comply with the limits for a Class B
computing device in accordance with the
specifications in Subpart J of Part 15 of FCC
Rules, which are designed to provide
reasonable protection against such
interference in a residential installation.
However, there is no guarantee that
interference will not occur in a particular
installation. If this equipment does cause
interference to radio or television reception,
which can be determined by turning the
equipment off and on, the user is encouraged
to try to correct the interference by one or
more of the following measures:
Reorient the receiving antenna
Relocate the equipment with respect to
the receiver
Move the equipment away from the
receiver
Plug the equipment into a different outlet
so that equipment and receiver are on
different branch circuits.
If necessary, the user should consult the
dealer or an experienced radio/television
technician for additional suggestions. The
user may find the following booklet prepared
by the Federal Communications Commission
helpful:
“How to Identify and Resolve Radio-TV
Interference Problems”.
This booklet is available from the U.S.
Government Printing Office, Washington, DC
20402, Stock No. 004-000-00345-4.
Notice for the customers in Canada
This apparatus complies with the Class B
limits for radio noise emissions set out in
Radio Interference Regulations.
Page 3

Getting Started
Introduction
Identifying the parts
Preparing your video camera recorder
Connecting the power sources
Setting the date and time
....................................
...........................
......
................
....................
4
5
9
9
13
Inserting tapes ................................16
Adjusting the viewfinder lens.................17
Operating the Camera Section
Selecting the automatic/manual adjustment.18
Recording a picture using the automatic
adjustments
.........................................
19
Start recording.............................19
Indications nside the viewfinder
Playing back your picture instantly
.........
......
21
22
To re-record on a previously recorded
portion during recording
Recording a picture using manual
adjustments
Manual focusing
...............................
Adjusting the white balance
..............
................
22
23
25
Setting shutter speed.........................27
Shooting a subject in backlight
..............
28
Zooming........................................29
Close-ups (Macro)
.............................
30
To re-record a picture in the middle of a
recorded tape (Insert recording)
........
31
Operating the VTR Section
Preparation for playback
Playing back a tape
Recording a TV program
....
...........
.....
Insert recording from the VCR
Using the tape counter
Tape editing
Others
...................
Hints for better shooting
Using the battery pack
Notes and precautions
......
..
... .
.....
Using your recorder abroad
Specifications
Trouble check
...............
..............
.32
.33
.35
.39
.40
.41
.42
.44
.47
.49
.50
.51
Page 4

Introduction
Overview of the CCD-F33
The CCD-F33 Video 8 Handycam is a cableless,
compact color video camera/recorder. You can
use it to shoot the pictures you want and play
them back on your television set.
The video camera recorder works with 8 mm
video format cassettes.
Who this Manual is for
This manuai is designed for you. You can use this
manual to find exactly the information you need,
whether you are familiar with video equipment or
not. You do not need to have any previous video
experience to use the video camera recorder.
How the Manual is Organized
The first section of the manual explains the
preliminary steps necessary to prepare for
shooting.
Other sections include shooting procedures that
show you how to use the features and functions
of your video camera recorder to get the effects
you want. If you are a beginner, start with
“Recording with automatic adjustments". If you
are very familiar with the video camera recorder,
try to shoot your picture with manual adjustments
as well as automatic adjustments.
If you want to record right away, see p.10,13 to
19.
How this Manual Works
Use the information below to help you follow the
instructions in this manual.
• The letter on an illustration corresponds to the
letter in the text:
ex. Focusing Manually IG-31
• The step numbers in an illustration correspond
to the step numbers in the text.
• Subsidiary information enclosed in boxes.
• Headings are identified by blue bars. Sub
headings are identified by gray bars.
Supplied accessories
The video camera recorder is packed with the
following units. Check your package to see
that everything is packed.
(*Attached to the video camera recorder.)
• Battery pack NP-55 (1)
• AC Power adaptor AC-V35 (1) or
AC-V35A(1)
• RFU adaptor RFU-90UC(1)
• Lithium battery CR2025 (1)
• Lens cap (1)*
The manual also includes how to play back a
picture on a TV and how to edit your original
8 mm tape onto another video tape.
Finally, this manual includes “Using a battery
pack” section that gives you some hints on how
to get longer recording time with the battery pack.
If you have any problems during operation, see
the Trouble Check section.
Page 5
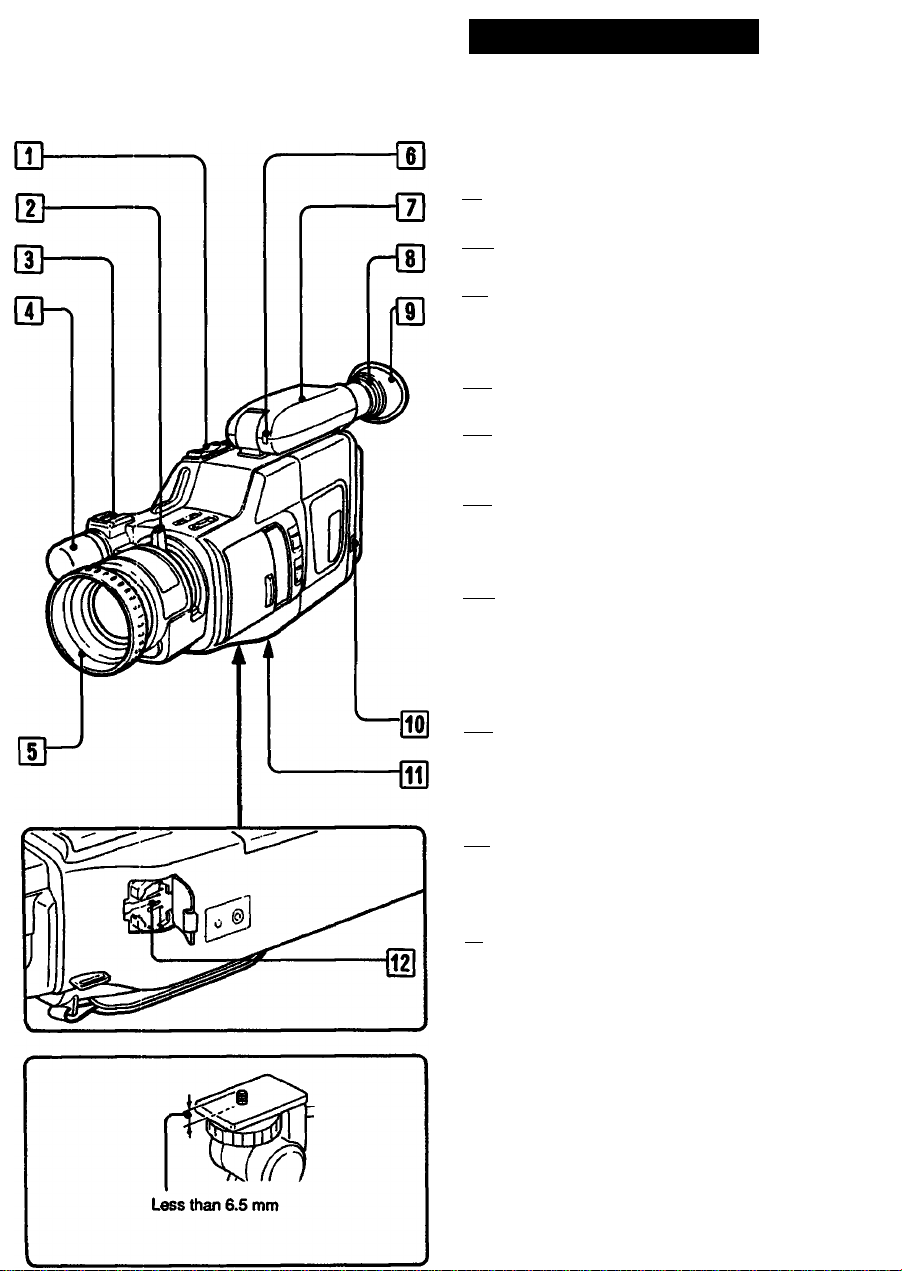
Identifying the Parts
A-1
For details on the use of each control, refer to the
pages indicated in the circle.
[Ш
ГП Power zoom button ф
|T| Zoom lever and Macro button ф ф
[T| Accessory shoe
Attach an external microphone video light.
Ate.
|T| Built-in microphone (monaural)
|T1 Lens hood
Also functions as focus ring.
|T| Camera recording/battery lamp
Lights during camera recording. It blinks
when the battery is exhausted.
|T1 Viewfinder Ф
The picture being recorded or played back
can be monitored in monochrome here. Also,
data such as caution indications and function
mode are displayed on the viewfinder screen.
|T| Viewfinder lens adjustment ring ф
Adjust to your eyesight to assure good focus.
Be sure to adjust this ring when shooting for
the first time.
[T| Eyecup
05 ВАТТ (battery eject) knob ф
fill Tripod receptacle (bottom)
05 Lithium battery compartment ф
Note when attaching a tripod not manufactured
by Sony
When attaching a tripod not manufactured by Sony,
the length of the camera mounting screw must be
less than 6.5 mm.
Othenvise the screw may damage the inner parts of
the camera.
Page 6
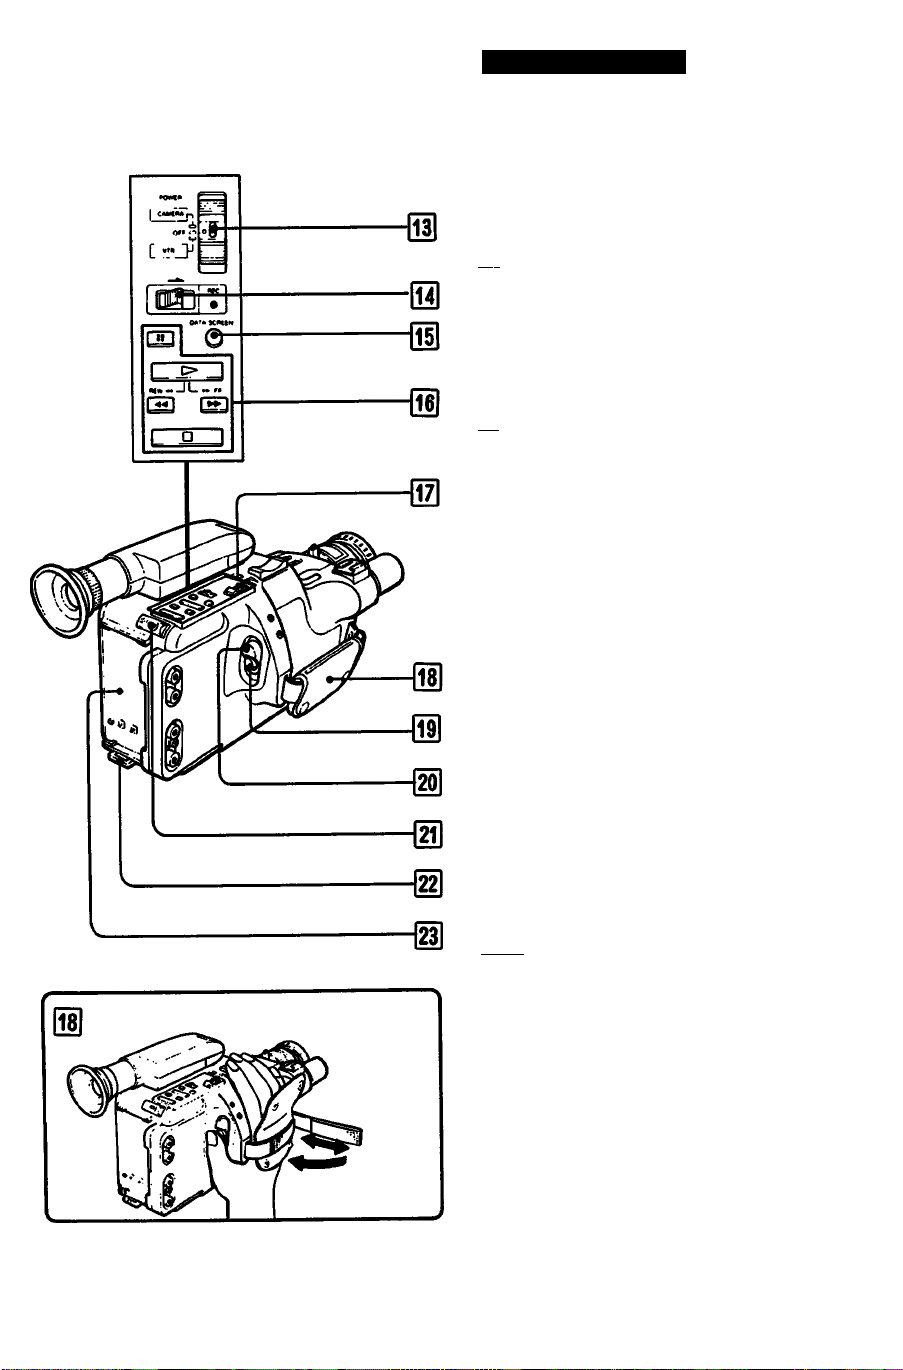
Identifying the Parts
A-2
[M]
POWER switch
CAMERA: For camera recording
VTR: For playing back or editing tapes
OFF: Power off
[m] • REC (recording) switch 0 ® ® ®
Slide in the direction of the arrow.
[jS] DATA SCREEN button 0
Press to display the indication on the
viewfinder screen on the TV.
Ri] Tape transport buttons
t> (playback)
FF (fast fonivard)
REW (rewind)
□ (stop)
II (pause)
[1] EDIT switch 0
Normally set it to the OFF position. When
editing tapes, set in the direction of the arrow
(ON).
QD Grip belt
Adjust the length so that your thumb can
easily manipulate the START/STOP button.
[j9] START/STOP button
Press to start and stop camera recording.
STANDBY switch
Slide up to STANDBY to set the unit to
recording pause mode.
[2?1 EJECT (cassette eject) button 0
Hook for shoulder strap
Attach a shoulder strap.
^ Battery mounting surface
Page 7
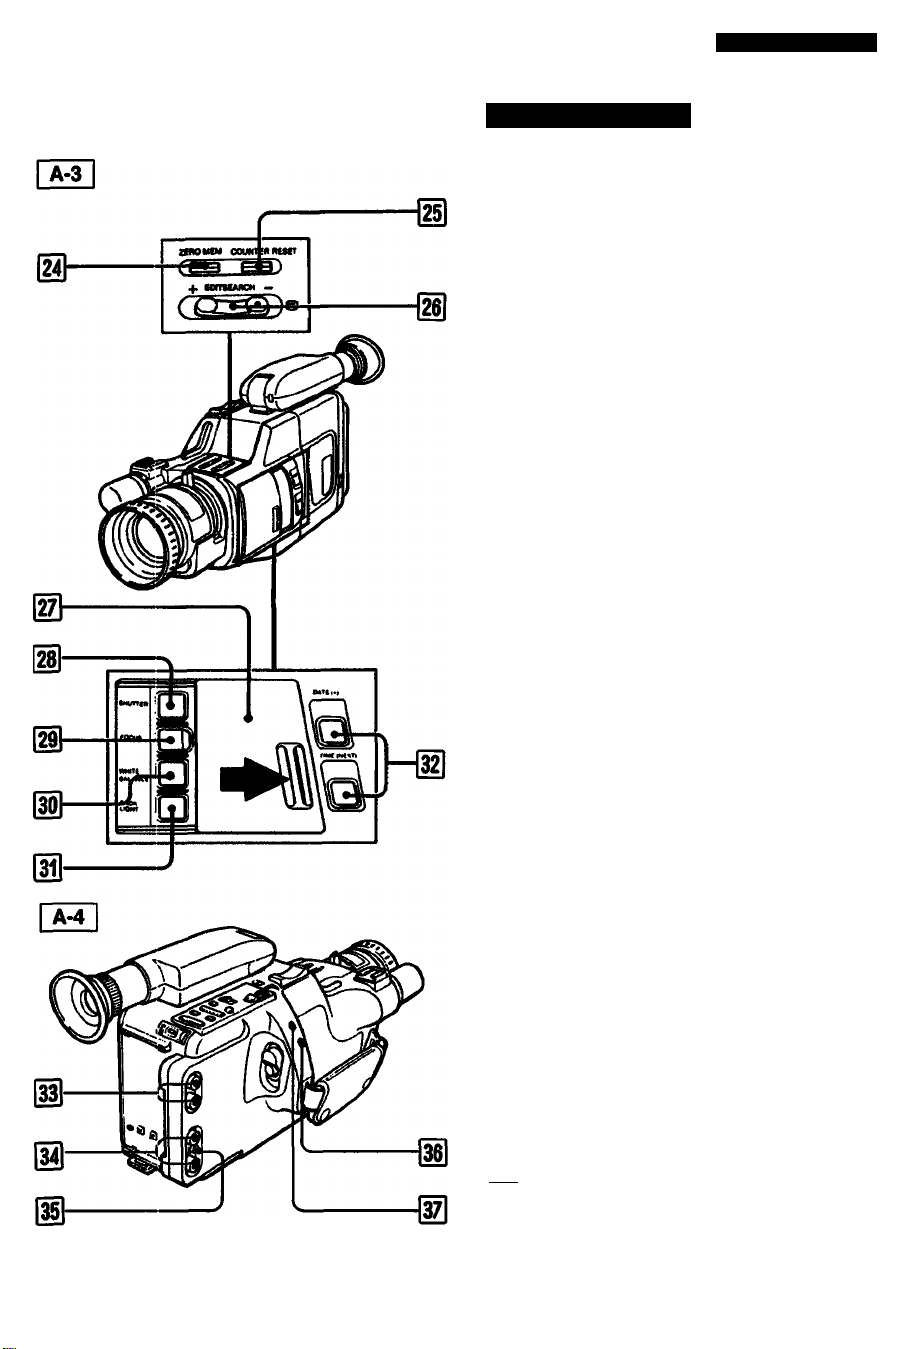
Identifying the Parts
[M]
ZERO MEM (zero memory) button O ® ®
Used to memorize the counter zero point.
COUNTER RESET button C) ® ®
Press to reset the counter to zero.
EDiTSEARCH (and recording review)
button®®
AUTO LOCK cover®
Keep this cover closed when adjusting the
focus, white balance, or shutter speed
automatically. To adjust them manually, slide
open this cover so that the buttons inside can
be seen.
^ SHUTTER SPEED button ®
Used to select the shutter speed.
^ FOCUS button ®
Used for manual focusing.
^ WHITE BAL (balance) button ®
Used for manual white balance adjustment.
di] BACK LIGHT button ®
DATE {* ) and TIME (NEXT) buttons ®
Press to display or turn off the date or time.
IMI
VIDEO/AUDIO IN (input) jacks (phono Jacks)
ViDEO/AUDIO OUT (output) jacks (phono jacks)
RFU DC OUT (RFU adaptor DC output)
jack (special minijack)
Supplies power to the RFU adaptor.
36| ® (earphone) jack (minijack)
REMOTE connector (stereo minFminijack)
Connect an optional GP-80 Remote
Commander or wired Remote Commander
RM-95.
Do not connect other eauioment.
Page 8
Identifying the Parts
A-5
[M]
MIC jack and DC OUT (microphone power
output) jack
Connect an external microphone.
The MIC jack accepts Sony "plug-in-power”
microphones and supplies power to them.
^ REC START/STOP button for low position
40
Hook for shoulder strap
Attach a shoulder strap.
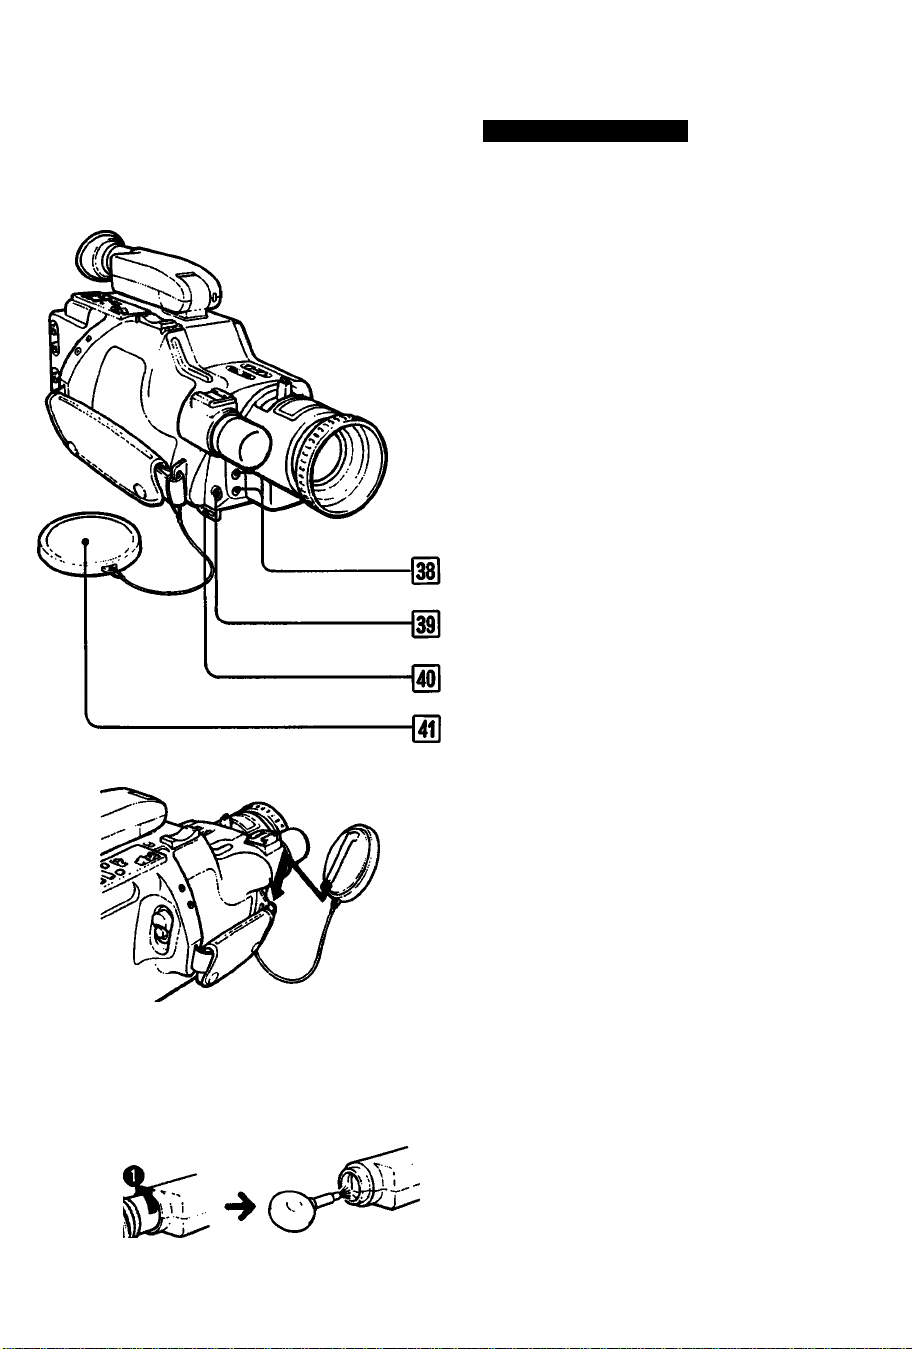
Lens cap
0
Squeeze both sides of the lens cap to
remove it. Hook it to the grip strap so it won't
be lost or hanging loose while recording.
A-6
[Ml
To remove dust from inside the viewfinder
Detach the eyecup as illustrated and clean the
surface of the screen with a blower.
Page 9

Before recording, prepare your recorder following
the steps belovir:
1. Connect a power source. -»see page 9.
2. Set the date and time. see page 14.
3. Insert a tape. see page 16.
4. Adjust the viewfinder lens. -»see page 17.
5. Adjust the length of the grip belt. -> see page 6.
6. Set the auto function on. -»see page 19.
The focus, white balance, iris (back light), and
shutter speed will be adjusted automatically. If
you want to adjust them manually, see page 23.
When you have completed these preparations, go
to page 18.
First, choose the power source.
Power source Accessory to be used
House current
S2
o
o
"D
C
Battery pack
S2
o
o
2
3
o
Alkaline battery Battery case EBP-55
12V or2 4V
S
car battery
0>
2
c
Notes on power source
« Disconnecting the power source or removing the
battery pack during recording or playback may
damage the inserted cassette tape. If this is done
by accident, supply the power again immediately
and turn on the power switch.
• Be careful not to let any metal object touch the
metal part on the battery pack or AC power
adaptor. When the battery pack is not to be used,
keep it in its case.
AC power adaptor
AC-V35, AC-V35A,
AC-V55orAC-V30
(page 12)
Battery pack NP-55 or
large capacity battery
pack NP-77, NP-77H or
NP-66H (page 10)
(page 11)
DC pack DCP-55
(page 12)
(DCC-16B car battery
cord supplied)
9
Page 10
Connecting the Power Sources
B-1
B-2
Using the Battery Pack
Step 1
Charge the battery pack. I B-11
1 Connect the AC power adaptor to a wall outlet.
2 Align the grooves on the battery pack with
those on the AC power adaptor.
3 Slide in the battery pack to the right, as
illustrated.
4 Set the VTR CHARGE selector to CHARGE.
NP-55
Required
charging time
NP-66H
NP-77 NP-77H
60 100 120
140
approx, minutes
See the instruction manual of the AC power
adaptor for details.
Step 2
I
Mount the battery pack on the
recorder. 1b-2|
1 Align the right side of the battery pack with the
white line on the recorder.
2 Slide in the battery pack to the right.
Note
Make sure the battery fits completely on the mounting
surface of the recorder. Imperfect fit may damage the
projections on the recorder.
B>3
B-4
To remove the battery pack |B-3|
1 While pressing the ВАТТ knob in the arrow
direction,
2 slide and pull out the battery pack.
Battery life
A fully charged battery pack lasts for;
NP-55
40
When the battery becomes weak | B-41
NP-66H NP-77
75
80
NP-77H
115
(approx, minutes)
The 4X1 indication and red lamp blink in the
viewfinder. Replace the battery pack with the fully
charged one.
Optional Accessories for Charging
• AC-V5S AC power adaptor
Two battery packs can be charged simultaneously.
• DC-V30 car battery charger
Connect to the cigarette lighter socket of a car to
charge an NP-55 or NP-77 battery pack, or to
supply power to Sony 6 mm video equipment that
operates only on NP-55 or NP-77.
• BC-5S, BC-77 battery charger
A battery pack can be charged.
10
Page 11
Connecting the Power Sources
Notes
• When the video camera recorder is not in use,
remove the battery pack.
If the battery is installed, even if the POWER
switch is set to OFF, a very small amount of
electric current flows.
• The video camera recorder consumes power even
in the recording pause mode. When recording
short scenes using the recording pause mode, the
battery life is less than half that of continuous
recording.
When recording is not to be started soon, turn off
the power with the STANDBY switch.
• If the battery pack is not fully charged or if it is used
in a cold place, its operating time is also shortened.
B-5
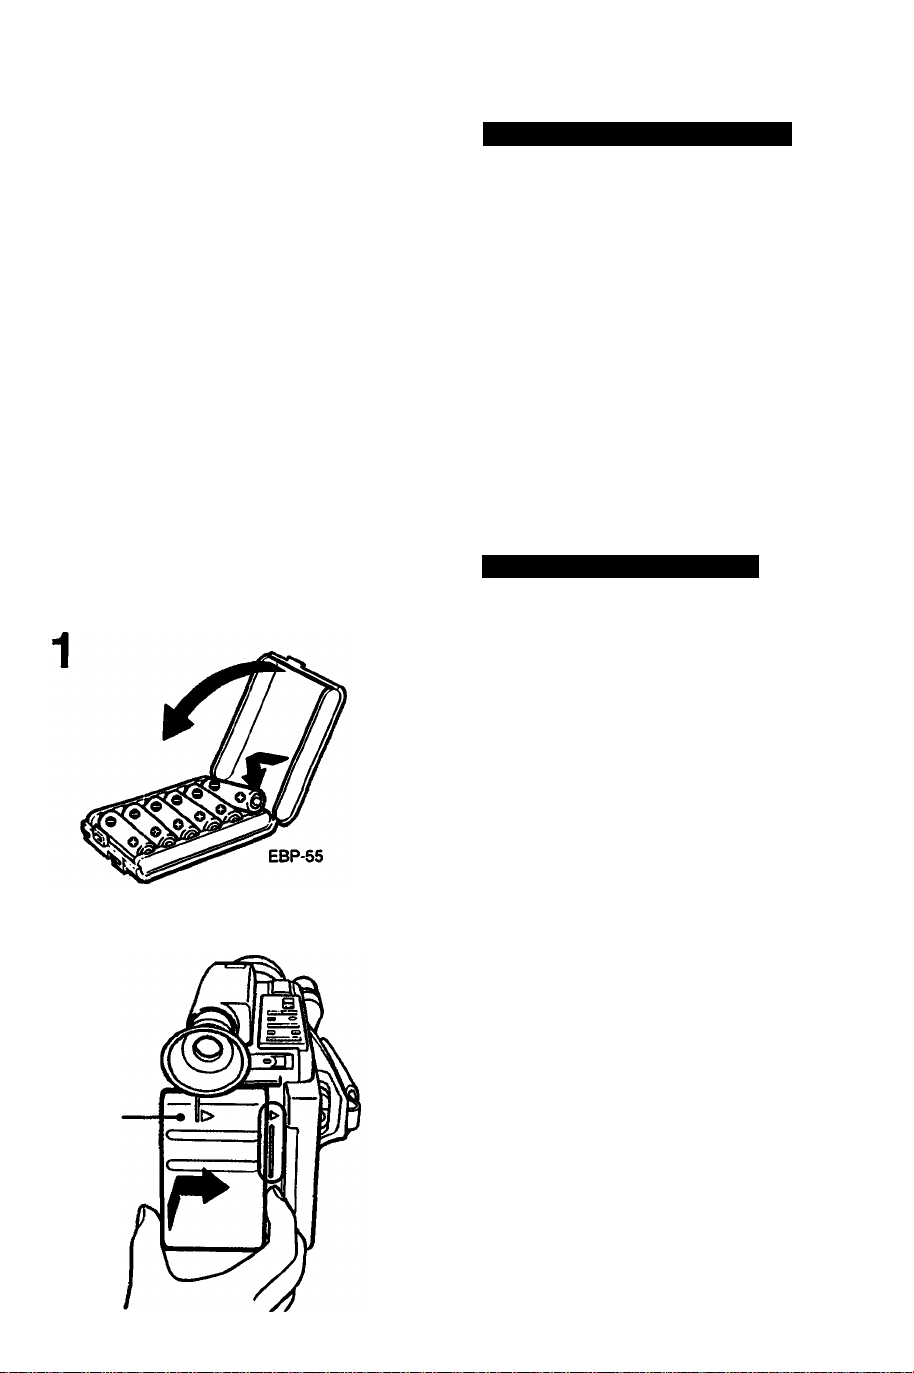
EBP-55
Using the Alkaline Batteries
The EBP-55 battery case (optional) is required.
1 Insert the six R6 (size AA) alkaline batteries
into the battery case.
2 Align the right side of the battery case with the
line on the recorder, and while pressing the
battery case, slide it to the right.
To remove the battery case
While pressing the ВАТТ knob on the recorder,
slide and pull out the battery case.
Battery life
With new alkaline batteries, the battery case
provides approximately 40 minutes of continuous
camera recording when used indoors.
Notes on the battery case
• Be sure to use the alkaline batteries.
• The battery case cannot be used in a cold place.
• The OQ indication may not blink when the batteries
in the battery case become weak, as the voltage of
the battery lowers suddenly. If the cassette
compartment does not open, replace the batteries.
Page 12
Connecting the Power Sources
B-6
B-7
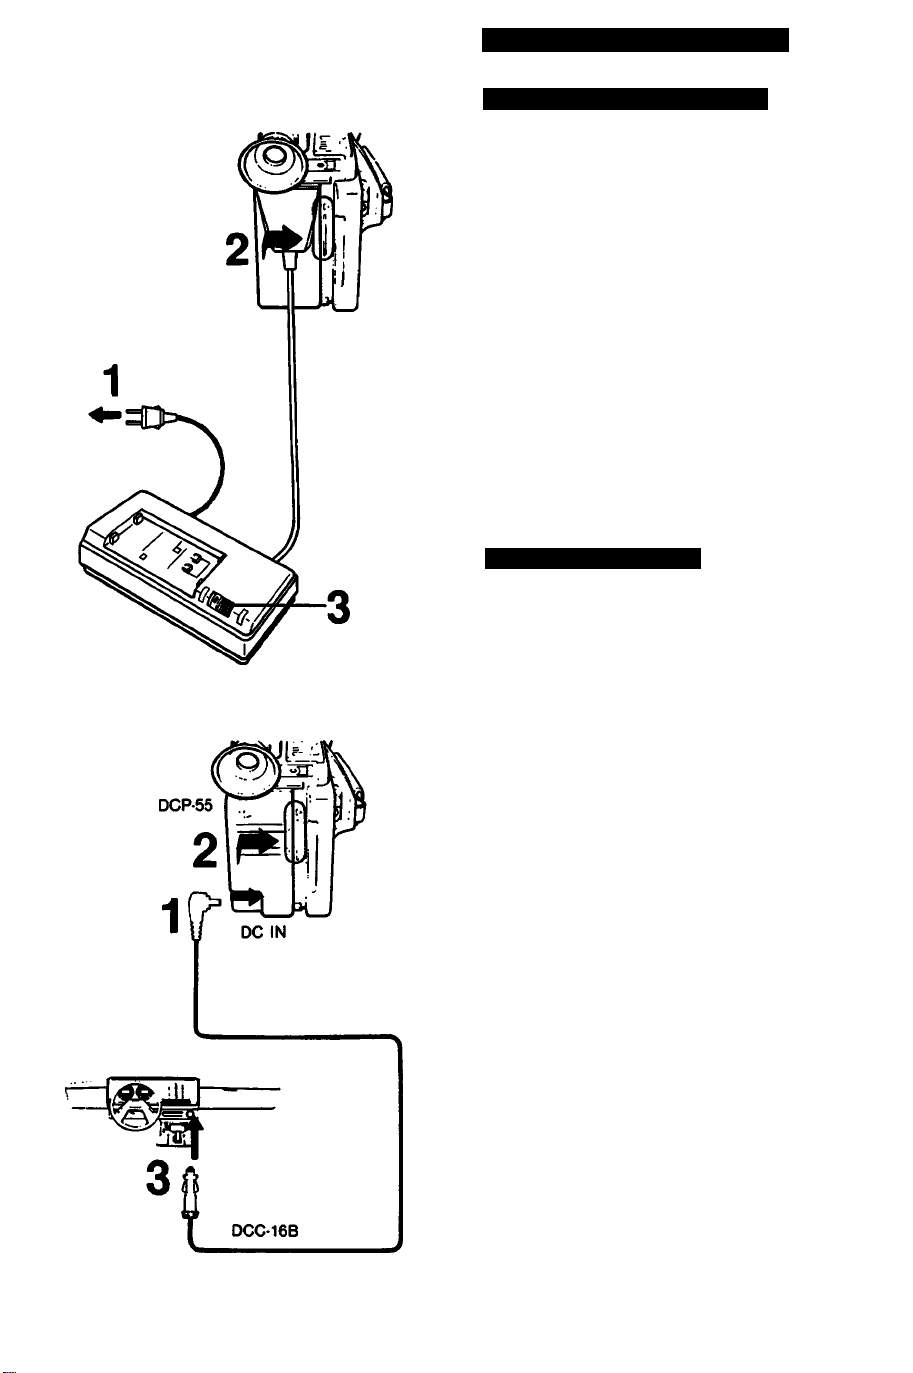
Using the AC Power Adaptor
1 Connect the AC power adaptor to a wall outlet.
2 Align the right side of the connecting plate with
the line on the recorder, and while pressing the
connecting plate, slide it to the right.
3 Set the VTR CHARGE selector of the AC
power adaptor to VTR.
To remove the connecting plate for the AC
power adaptor from the video camera
recorder
While pressing the BATT knob on the recorder,
slide and pull out the connecting plate.
Other options
The AC-V5S or AC-V30 AC power adaptor can also
be used to operate this recorder on house current.
Using the Car Battery
The DCP-55 DC pack (optional) is required.
1 Insert the DCC-16B car battery cord supplied
with the DCP-55 DC pack into the DC IN jack
on the DC pack.
2 Align the right side of the DC pack with the line
on the recorder, and while pressing the DC
pack, slide it to the right.
3 Connect the DCC-16B car battery cord to the
cigarette lighter socket of a car (12 V or 24 V).
12
To remove the DC pack from the video camera
recorder
While pressing the ВАТТ knob on the recorder,
slide and pull out the DC pack.
Other options
The AC-V55 AC power adaptor and the OCC-16AW
car battery cord can also be used to operate this
recorder on a 12 V or 24 V car battery.
Page 13
■^y » ’ r- f-9 if
Setting the Date and Time
C-1
C-2
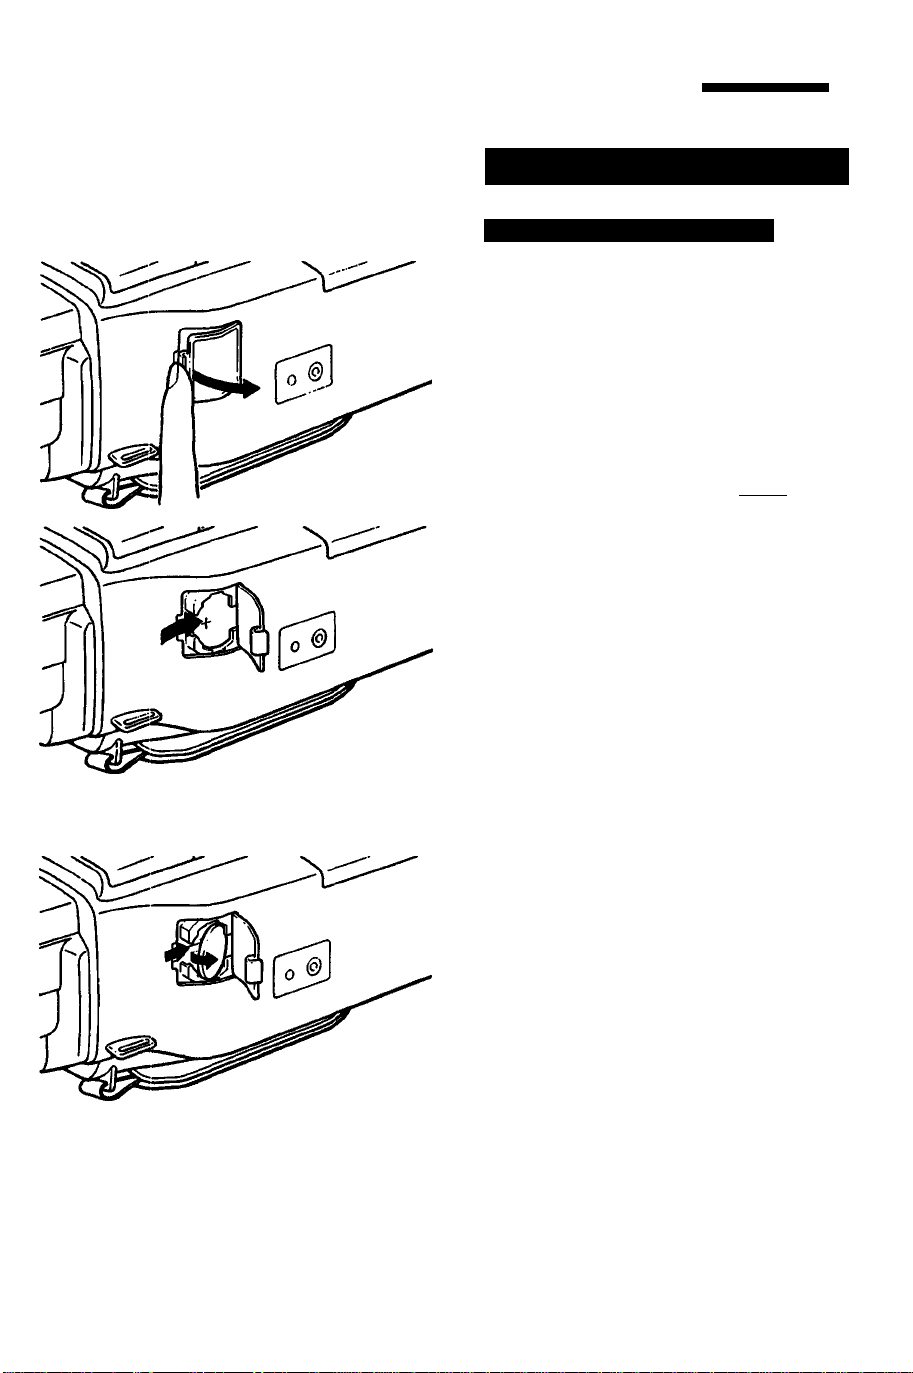
Inserting the Lithium Battery
This unit uses a lithium battery to activate the
clock. Before operating the unit for the first time,
install the supplied lithium battery:
1 Open the cover of the lithium battery
compartment onihe bottom.
2 Install the supplied CR2025 lithium battery \with
the © side facing out.
3 Close the cover.
To remove the lithium battery I C-21
Press the side of the battery in the direction as
indicated for installation.
Lithium battery iife
Approximately 1 year in normal operation.
When the lithium battery becomes weak, the time
indication will blink on the viewfinder screen for
about 5 seconds, whenever the POWER switch is
set to CAMERA.
In this case, replace the battery with a Sony
CR2025 or Duracell DL-2025 lithium battery. Use
of another battery may present a risk of fire or
explosion.
After replacing the battery, readjust the date and
time. (If the battery is replaced with the battery
pack attached, the readjustments are not
necessary.)
Cautions on lithium battery
• Keep the lithium battery out of the reach of
children.
Should the battery be swallowed. Immediately
consult a doctor.
• Wipe the battery with a dry cloth to assure a good
contact.
• Be sure to observe the correct polarity when
Installing the battery.
• Do not hold the battery with metallic tweezers,
otherwise a short-circuit may occur.
WARNING
Battery may explode if mistreated.
Do not recharge, disassemble or dispose it in
fire.
(Continued)
Page 14
Setting the Date and Time
D-1
JAN. 1-1990 r
\ JAN. ^
/1 M I '
Once the date and the current time are adjusted,
the date or time can be recorded together with
the picture.
• Make sure that the fully-charged battery pack
and lithium battery are installed.
• Set the POWER switch to CAMERA, and slide
the STANDBY switch up.
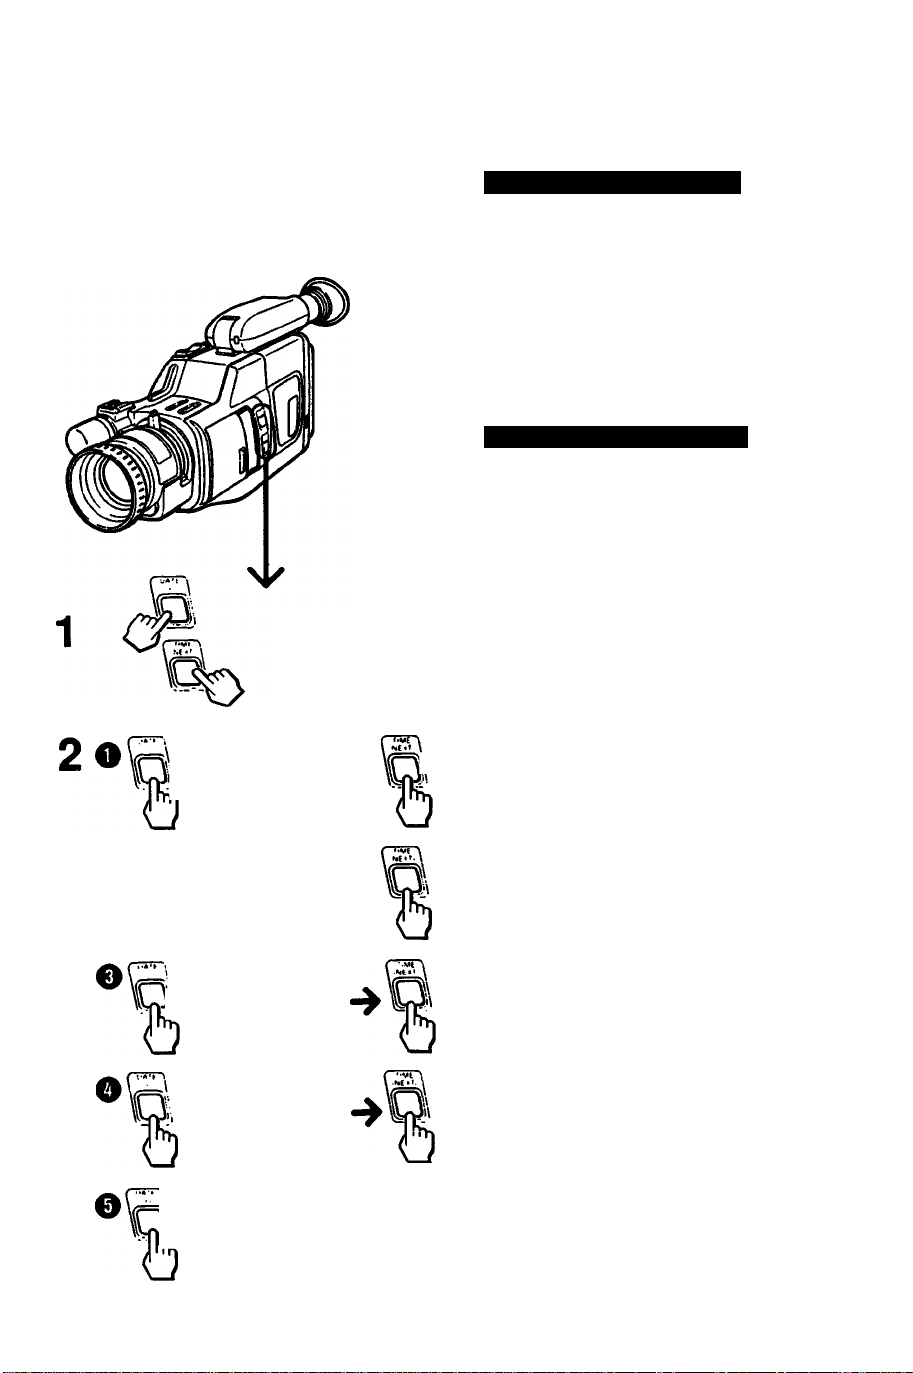
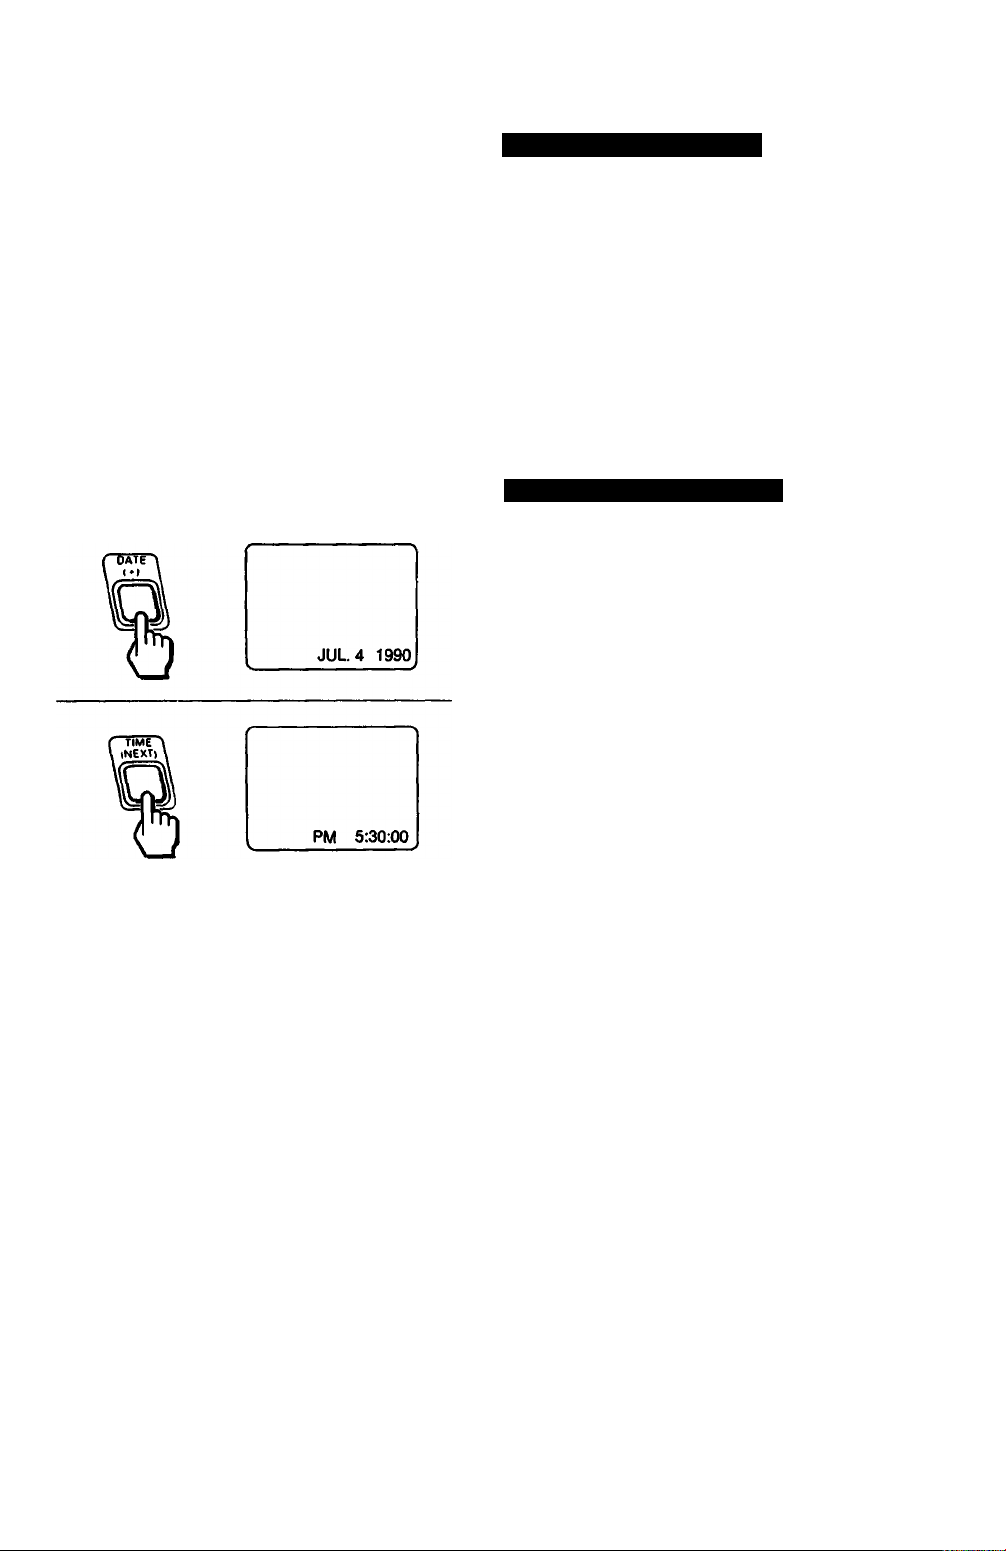
Setting the Date and Time
1 Press the DATE and TIME buttons
simultaneously for more than 3 seconds.
The date indication will appear in the
viewfinder (date/time setting mode).
The DATE button now functions as the +
button and the TIME button functions as the
NEXT button.
2 Adjust the O year, O month, O day, O hour
and 0 minute in sequence, following the
illustration.
First adjust the blinking digits with the + button,
and then press the NEXT button. After
adjusting the minute digits, press the NEXT
button at the same time with an announced
time signal.
'Kii
IW" ’
JULc 1 1990
/iv“ ^
% JUL;^,4^ri990
I PM ^
The clock starts operating. There is no need to
readjust the date and time as long as the lithium
battery remains.
To clear the time Indication from the display
Press the TIME (NEXT) button again.
The button can be pressed in two ways
• When you keep the button pressed, the digits will
advance continuously.
• When you press and immediately release the
button, the digits will advance by one.
Page 15
Setting the Date and Time
To check the preset date and time
Press the DATE or TIME button in the recording
pause mode. When the same button is pressed
again, the indication goes off.
To readjust an incorrect date or time
Set the unit to date/time setting mode and press
the NEXT button repeatedly until the incorrect
digit blinks. Correct it with the -i- button and press
the NEXT button. After adjusting the minute
digits, press the NEXT button at the same time
with an announced time signal.
C-4
Recording the Date or Time
During camera recording or in recording pause
mode, press the DATE or TIME button to display
the date or time on the viewfinder screen.
The date or time being displayed will be recorded
together with the picture.
To stop recording the date or time
Press the DATE or TIME button again. The
picture recording will continue.
15
Page 16
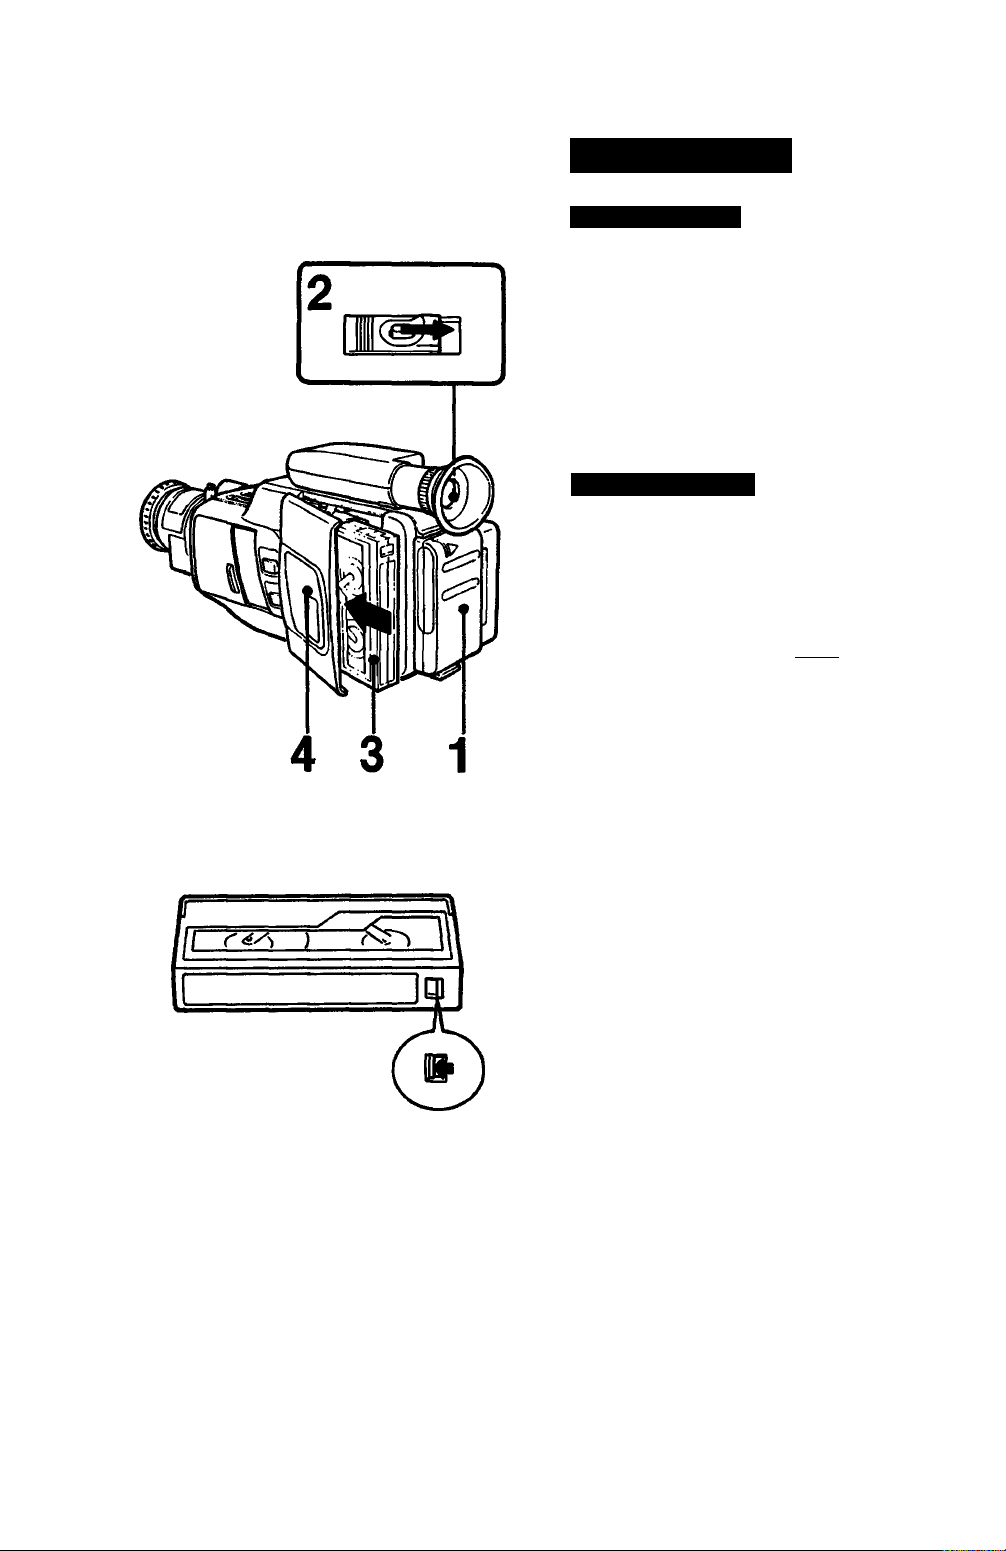
Inserting Tapes
D-1
D-2
Inserting a Tape
1 Connect a power source.
2 Slide the EJECT button while pressing the
center blue button.
The lid of the cassette compartment will open.
3 Insert a cassette with the window facing
outside.
4 Press the PUSH mark to close the cassette
holder.
Ejecting the Tape
1 Make sure that a power source is connected.
2 Slide the EJECT button while pressing the
center blue button.
3 Take out the cassette and press the PUSH
mark to close the cassette holder.
To prevent accidental erasure |p-2|
Slide out the tab on the cassette so that it covers
the opening. (A red mark will appear.)
To re-record on the cassette, slide the tab in to
uncover the opening.
Notes
• When inserting or removing the cassette, stand the
unit upright. Otherwise, the cassette may be
damaged.
• Never insert anything in the smali holes on the rear
of the cassette. These holes are used to sense the
kind of tape, thickness of tape, or if the tab is out or
in, etc.
• To record from the beginning of the tape, run the
video camera recorder for about 15 seconds at the
beginning of a cassette before recording. It will
avoid missing the starting point during playback on
a video cassette recorder.
16
Page 17

Adjusting the Viewfinder
Lens
The position of the viewfinder lens for optimum
0
vision varies depending on the person.
1 Connect a power source.
2 While pressing the small button, set the
POWER switch to CAMERA.
3 Slide the STANDBY switch up.
The unit will enter the recording pause mode.
4 Turn the viewfinder lens adjustment ring so
that the indicator displayed on the viewfinder
screen comes into sharp focus.
Adjustment of the viewfinder lens is necessary
only for your initial use, or for use after someone
else.
Note
If you leave the unit in the recording pause mode for
5 minutes or more, the unit will be automatically
turned off. To resume recording pause mode, slide
the STANDBY switch down once and slide it up
again.
17
Page 18

Selecting the Automatic/Manual
Adjustment
When the AUTO LOCK cover is closed, the white
balance, shutter speed (1/60), and focus are
adjusted automatically. But under certain
circumstances, manual adjustment is better for
effective recording.
When the AUTO LOCK cover is slid open, each
manual function works as follows.
Each push of the button cyclically changes each
function and the indication on the viewfinder
changes.
WHITE
BAUNCE
See page 25.
SHUTTER
SPEED
See page 27.
FOCUS
See page 23.
BACK LIGHT
See page 28.
l-♦No indication -* HOLD -» • -» •«—I
(Auto)
No mdicaMn (I/60M100 (l/tOO|->2SO (t/2S0l-|
4000 (I/4000K-2000 (1^000)»-1000 (t/1000> <-l
t
L> Auto focusing zone -* ■---------------------
(Auto) (Manual)
indication ■
(Back light)
Notes
• Just after the battery pack has been attached to
the recorder, the AUTO LOCK function will work,
even if the AUTO LOCK cover is opened.
• If the AUTO LOCK cover is closed after each
function is adjusted manually, and then opened
again, the previous manual setting will be recalled.
18
Page 19

Recording a Picture Using
the Automatic Adjustments
F-1
Start Recording
1 While pressing the small button, set the
POWER switch to CAMERA.
2 Insert the cassette.
3 Keep the AUTO LOCK cover closed.
4 Slide the STANDBY switch up.
The unit will enter the recording pause mode.
5 Press the START/STOP button.
Recording will start.
Check on the viewfinder screen
STBY: Displayed during recording pause mode.
REC: Displayed during recording.
To stop recording
Press the START/STOP button again.
The unit will enter the recording pause mode.
Avoid rough handling or mechanical shock to the
unit. Otherwise a smooth transition between
scenes may not be made.
Notes on recording
• For “once-only” events, it is strongly recommended
to have a trial run to check that everything is
working perfectly.
• If the POWER switch is moved during recording,
the tape will stop.
• Should you shoot a subject in bright conditions
such as sunlight just after shooting in a dark place,
the picture may not appear on the viewfinder
saeen. In this case, nxwe the camera away from
the subject to resume the normal condition.
• A vertical band may appear when a subject such
as a candle flame or a light is shot against a dark
background.
• During recording with auto focusing, do not turn or
stop the focus ring (lens hood) forcibly.
• Keep the lens clean.
Recording mode
This unit records in the SP mode (approximately
1.43 cm/second) and can play back in the SP mode
and the LP mode (approximately 0.72 cm/second).
The quality of the playback picture in the LP mode,
however, will not be as good as that in the SP mode.
19
Page 20

Recording a Picture Using the
Automatic Adjustments
F-2
F-3
Hold the camera recorder as in the illustration
[fTI
If your nose touches the recorder, adjust the
angle of the viewfinder.
For low position recording I F-3 I
The viewfinder can be turned 90 degrees up.
1 Slide the STANDBY switch up.
2 Press the START/STOP button on the right
front.
To check the last portion of the previous
recording (Recording review) | F-4 I
1 Set the recorder in recording pause mode by
pressing the START/STOP button.
2 Press the 1^” side of the EDITSEARCH
button momentarily.
The last few seconds of the recorded portion are
rewound and then the recorded picture is
monitored on the viewfinder screen. The unit then
enters the recording pause mode.
After using
Slide the STANDBY switch down and set the
POWER switch to OFF. (You need not press the
center button when setting the switch to OFF.)
F-4
Notes on playback on another VCR
• To view the picture which has been recorded on
this unit, set the monitor switch of the recorder for
playback to the STD (standard) position.
• When recording on this unit using a tape on which
PCM stereo sound has previously been recorded,
set the monitor switch of the video cassette
recorder for playback to the STD (standard)
position. Othenwise, the sound may not be heard or
may be distorted.
Note on PCM sound
PCM recording/playback is not possible with this
unit. The PCM sound recorded or after-recorded with
another recorder cannot be played back with this
unit.
Note on copyright
Television programs, films, video tapes and other
materials may be copyrighted.
Unauthorized recording of such material may be
contrary to the provisions of the copyright laws.
20
Page 21

Recording a Picture Using the
Automatic Adjustments
F-5
F-6
Wr
[br
№
3 13
gleo
indications Inside the Viewfinder
Indications for caution
Slow blinking
• The battery is weak.
Fast blinking
• The battery is exhausted.
Slow blinking
• No cassette is inserted.
Slow blinking with &
• The tab on the cassette is out (red).
Fast blinking with ±
• The tape is at its end.
▲
o
-W
iel
□ □
-IS]
ZÜhoMEM
ihl
in
ill
I
ik]
(S
Indications for showing the function in use
[El]
[a]
[b]
[cl
[d]
le]
m
[g]
[hi
[i] ZERO MEM
m
[k]
Blinking
• A fault has occurred in the unit.
See the back cover.
Blinking
• The gap of the video head is clogged.
(Head contamination)
See the back cover.
Blinking
• Moisture has condensed inside the
unit.
See page 47.
The back light function has been
activated.
Indicates the white balance mode.
Indicates the shutter speed.
Indicates the auto focusing zone.
• Lights when the focus function has
been set to manual.
• Blinks when the auto focus function
may not work correctly due to low
light or low contrast. See page 23.
Indicates the playback mode (LP).
In the VTR operation mode, this
indicates the tape transport function.
Indicates the tape counter.
Blinks when the ZERO MEM button
has been pressed.
Indicates the date or time.
• Lights in red during recording.
• Blinks when the battery is weak.
21
Page 22

Recording a Picture Using the
Automatic Adjustments
F-7
Playing Back Your Picture Instantly
You can monitor the picture just recorded on the
viewfinder saeen.
1 While pressing the small button, set the
POWER switch to CAMERA.
2 Slide the STANDBY switch up.
3 Keep pressing the side of the
EDITSEARCH button to view the playback
picture in reverse.
4 Keep pressing the “-t-” side of the
EDITSEARCH button to view the playback
picture.
To monitor the sound while viewing the piayback
picture on the viewfinder screen
Connect an earphone to the • jack.
1 While pressing the small button, set the POWER
switch to VTR.
2 Press the button to rewind the tape.
3 Press the □ button to stop the tape.
4 Press the O button to start playback.
To re-record on a previously recorded
portion during recording
1 Slide the STANDBY switch up.
2 Monitor the picture on the viewfinder screen
and locate the point from which the recording
is to begin again with the EDITSEARCH
button.
Keep pressing the “4-” side of the
EDiTSEARCH button to advance the picture at
a normal playback speed, or the side to
reverse the picture.
3 At the desired point, release the
EDITSEARCH button.
The unit will be set to recording pause mode.
4 Press the START/STOP button to start
recording.
22
Smooth recording can be made even if the
recording is stopped and started again, or even if
the power is turned off and on again, provided
that the cassette is not removed. But, if the
cassette has been removed, proceed as above.
Page 23

Manual Focusing
G-1
G-2
[cl
[d]
□
Ш
n'<f^=r^'n
When the AUTO LOCK cover is closed, correct
focusing is obtained in most cases if the subject
is displayed in the auto focusing zone (illustrated
in blue). I G-11
But manual focusing is recommended in the
following conditions, [a] to [Ц correspond to the
illustrations. lG-21
[a] Insufficient light
[b] Too much bright light behind the subject
[c] Subjects with flat colors and less contrast-
wall, sky, etc.
[d] Finely detailed repetitive patterns
[e] When the distance between subjects at the
center IS extreme (e.g. one subject is close,
the other is away)
[f] Subjects beyond screens, nets, etc. or when
another subject passes across the camera.
[g] Horizontal stripes
[h] Diagonal ol^ect
[i] When there is frosted glass between the
shooting object and the recorder
Q] Bright object or object reflecting tight
[k] When shooting under a fluorescent lamp at
the shutter speed set to 1/250,1/1000,1/2000
or 1/4000
[l] When there is a high contrast background
within the auto focusing zone (The back
ground may be focused.)
• When the white mark inside the viewfinder
blinks
• When using special effect lenses or filters
• When shooting still subjects on a tripod
• To save battery wear
(As long as the AUTO LOCK cover is closed,
the auto focusing operates and the focus ring
moves automatically even in the recording
pause mode. This causes the battery to wear
continuously.)
• For focusing in close-up shooting, see page 30.
[e]
m
• / Ч >\ УЧ. v'
A A A A .
N4/ 1 Л
[k]
О i\\\^
>■
\ w vl*' *W *
[Q
•¡¡¿I
Ш1
23
Page 24

Manual Focusing
G-3
1
~..lra
FOCUS^^l
Notes
Since the auto focusing system of this unit detects
the contrast of the video signal for accurate focusing,
it does not function momentarily in these cases:
• When the shutter speed or the white balance is
changed
• When the back light is being adjusted
• When lighting conditions change quickly
• When the zooming is changed from wide-angle to
telephoto
It may take several seconds to get focus when the
camera is rapidly panned from a distant subject to a
near subject with less contrast. In this case, adjust
the focus manually.
Focusing Manually
1 Slide open the AUTO LOCK cover and press
the FOCUS button.
The white mark (■) will be shown in the
viewfinder.
2 Turn the manual zoom lever to the telephoto
position (51) to make the subject as large as
possible in the viewfinder.
3 Turn the lens hood (focus ring) to achieve
sharp focus.
4 Set the desired shot length using the manual
zoom lever.
Some helpful hints
• When shooting a scene with lots of movement in
bright light, the subject can be kept in good focus
by setting the zoom lever to the wide-angle position
and the focus ring to 2 m, regardless of the
distance between the subject and the recorder.
• When shooting in low light situations such as
indoors, the depth of field in proper focus is very
shallow. For best results, shoot at wide angles,
after focusing in telephoto.
• The figures on the focus ring indicate the distance
between the subject and the 0 mark.
• Recommended illumination of this unit is more than
300 iux (28 footcandles). If shooting is done
indoors or under other circumstances where light is
insufficient, video lights must be used for best
results. Under adequate light condition, the depth
of field in proper focus is wider and a sharper
picture will be recorded.
24
Page 25

[a]
[b]
[e]
( ■ aWIW .
Adjusting the White
Balance
When the AUTO LOCK cover is closed, the auto
white balance function of this unit operates
automatically in most cases. However, if it does
not work correctly in the conditions listed below,
adjust the white balance manually.
Difficult Conditions for Auto White
Balance m
Indication
Conditions
When lighting conditions
[a]
change quickly
When the light source for the
Ibi
subject is different from that
illuminating this unit, such as
when the subject is in a
spotlight, etc.
When shooting a
[c]
monochromatic subject or the
background is monochromatic
When recording under a
[dl
sodium lamp
When recording under a
mercury lamp
When recording under a color
matching fluorescent lamp
[e] When recording outdoors, such
as a night view, neon sign or
fireworks
When recording outdoors, such
m
as scenes after sunset or
scenes before sunrise.
in the
Viewfinder
-A-
A
HOLD
AA
m
Adjusting the White Balance Manually
1 Slide open the AUTO LOCK cover.
2 Select the desired white balance mode by
pressing the WHITE BAL button. Each press
of the WHITE BAL button cyclically changes
the indication inside the viewfinder.
HOLD ^ ■:>: —INo indication (Auto)
t
------
-A- -
25
Page 26

Adjusting the White Balance
What is the HOLD mode?
In the HOLD mode, the recorder adjusts the color
temperature of the subject’s light source
automatically and keeps that temperature during
recording. When recording some subjects with
different color temperatures, use the HOLD mode
to set a color temperature and you can achieve
the recording with natural color without being
affected by environment.
To set into the HOLD mode
1 Set the WHITE BAL button to auto mode (no
indication).
2 Point the recorder to a white, flat object such
as a white wall, paper etc.
3 Press the WHITE BAL button to indicate the
HOLD mark inside the viewfinder. The correct
white balance is memorized.
Color Temperature and White Balance
Color temperature indicates a property of light
and is measured in K (Kelvin). It increases as the
light source gets bluer and decreases as the light
source gets redder. It has no direct relationship
Notes
• When the power is turned off or the light source is
changed, reset the HOLD mode again.
• The white balance is related to back light and
shutter speed adjustment. When the shuKer speed
has been adjusted manually with the AUTO LOCK
cover opened, and then if the recorder is moved
from indoors to outdoors, or vice versa, close the
AUTO LOCK cover and open it again.
• When using the recorder in the automatic
adjustment mode with the AUTO LOCK cover
closed, and then moving from indoors to outdoors,
or vice versa, slide the STANDBY switch up and
point the recorder to a white object for about 10
seconds so that the white balance is adjusted
properly.
with brightness. The recorder automatically
adjusts the white balance within the range shown
below.
White balance ad|ustment
... Outdoor
mode
Auto white
balance range
. Indoor
mode
Color temperature (K) Light source
Clear sky
Slightly overcast
Cloudy, rainy
Direct sunlight
After/betore 1 hr.
After/betore 30 min.
Sunrise/sunset
Fkioresoent lamp (color matching)
Ruoresoent lamp (dtqfllght white)
Fluorescent lamp (white)
Fluorescem lamp (off white)
StucRoiamp
Halogen tamp
Tungsten lamp
Candlelight
Blue
i
White
♦
Yellow
rÈ
10.000
8.000
7.000
6.000
5,000
4.000
3,500
3200
3,000
2.500
2.000
26
Page 27

Setting Shutter Speed
m
When a fast-moving object is recorded at normal
shutter speed, the picture may not be seen
clearly when played backThis can be improved
by increasing the shutter speed. Six shutter
speeds can be selected, 1/60 (normal speed),
1/100,1/250,1/1000,1/2000 or 1/4000 second.
Also, the depth of field in proper focus becomes
shallow at a higher shutter speed. This is
effective to record the main object in good focus
and the surroundings out of focus.
However, when the shutter moves fast, it will not
allow enough light to come into the lens, so the
picture will be dark. Therefore, when recording at
a high shutter speed, record in a brighter place
than usual.
Choose an appropriate shutter speed according
to the place and situation.
See the chart below for examples.
Example use
• On clear days, recording golf
or tennis scenes (To view the
hit ball clearly in the pause
mode, set to 1/4000)
• Recording the skiers
• On overcast days, recording a
moving merry-go-round or jetcoaster
• Recording outdoors from
inside a vehicle (for stable
shooting)
• Instead of the ND2 filter (To
reduce the exposure level to
approx. 1/2)
• Recording indoors (for stable
shooting)
Recommended
shutter speed
1/4000 or1/2000
1/1000 or 1/250
1/100
m
1 Slide open the AUTO LOCK cover.
2 Press the SHUTTER SPEED button
repeatedly until the desired shutter speed
indication appears on the viewfinder screen.
Each time the SHUTTER SPEED button is
pressed, the indication changes:
p>N0 indication (1/60) -» 100 (1/100) -* 250 (1/250)—■
L 4000 (1/4000) «- 2000 (1/2000)«- 1000 (1/1000) «—I
27
Page 28

Setting Shutter Speed
Notes
• A ghost image will appear in still picture mode of
this unit. To view a clear still or slow picture, use
another video with clear still/slow function.
• When shutter speed 1 /250 or faster is selected,
recording must be done under sunlight or video
light.
• When the shutter speed is changed during a
camera recording of a TV screen, the brightness of
the recorded picture may vary.
• When a very bright object is shot at a faster shutter
speed, a light, vertical, belt-like line ("smear”) may
appear on the screen.
• When the recording is done under a light
discharged tube, such as a fluorescent lamp,
sodium lamp, or mercury lamp, in SO Hz areas the
brightness of the recorded picture may vary
(••flicker”).
Shooting a Subject in
Backlight
In this recorder, iris is automatically controlled.
However, when shooting a subject that is backlit,
that is. if the light source is coming in from the
back of the subject, use the BACK LIGHT button.
m
1 Slide open the AUTO LOCK cover.
2 Press the BACK LIGHT button.
The o indication appears on the viewfinder
screen.
After shooting that particular scene, be sure to
press the BACK LIGHT button again to release it.
Otherwise the recorded picture will be too bright.
Note
The function will be released once the POWER
switch is set to OFF.
28
Page 29

Zooming
K-1
The size of the subject in the scene can be
changed.
Power Zooming
—for smooth and constant zooming
Press the T side of the power zoom button for
telephoto and the W side for wide-angle.
The zoom ring will move automatically.
K-2
Zooming Manually
—for creating a dramatic effect
Turn the manual zoom lever upward for telephoto
and downward for wide-angle.
For more zooming effect
The focal length of this unit is 7 mm to 42 mm.
Converted into the focal length of a 35 mm camera,
this means approximately f-48 mm to 288 mm.
29
Page 30
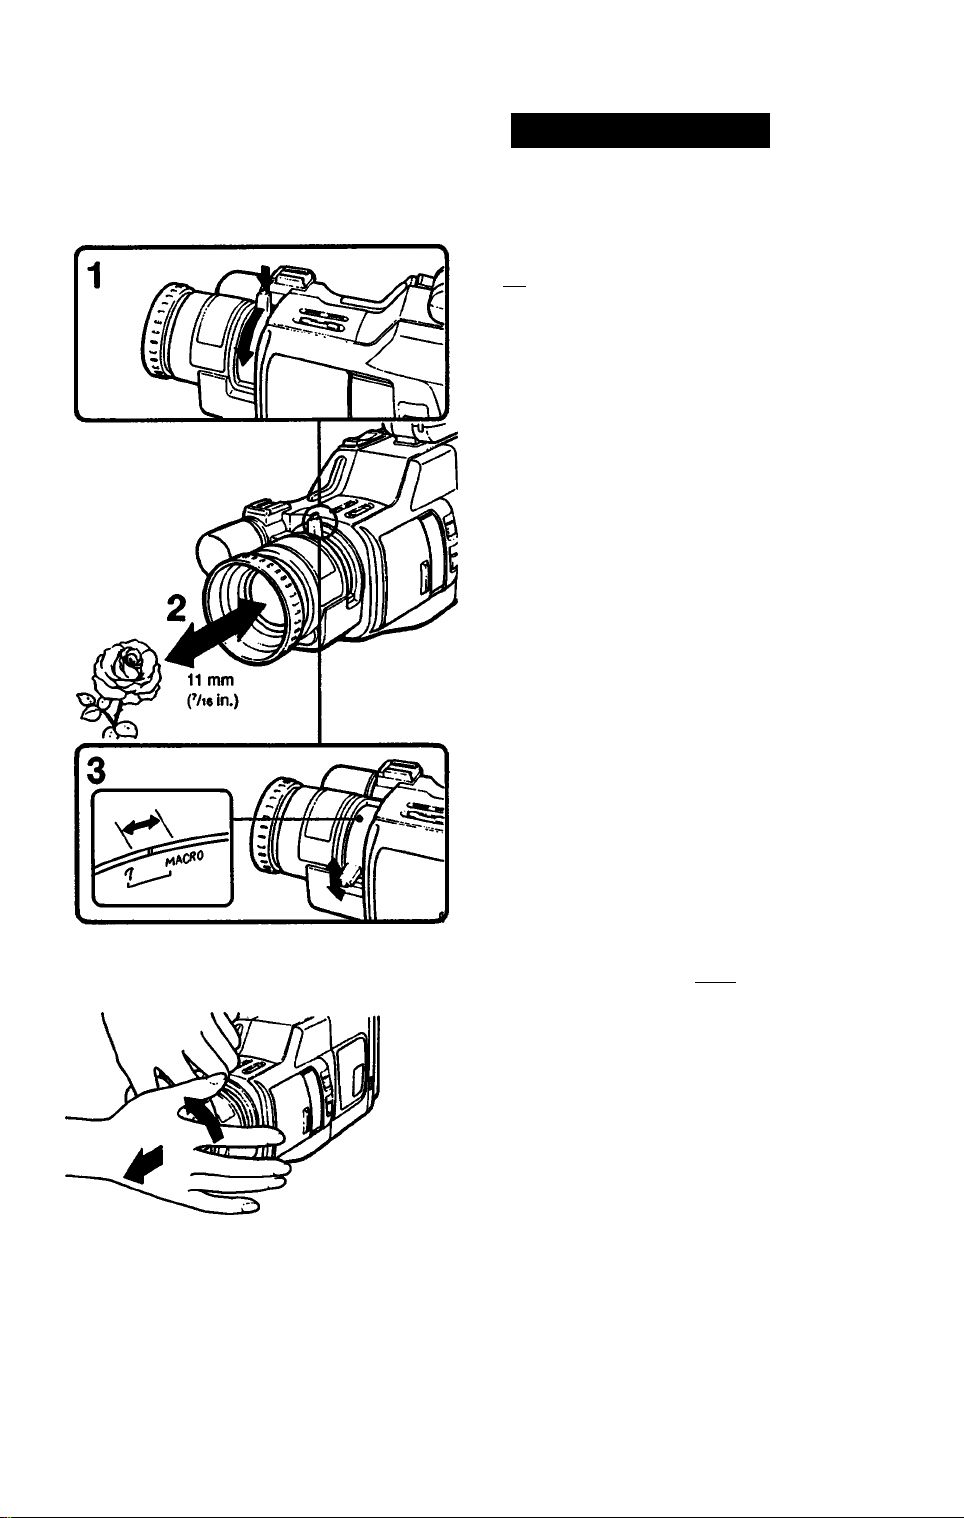
Close-ups (Macro)
L-1
Even tiny objects can literally fill the screen for
dramatic close-up effects.
Remove the lens hood before operation.
[Ml
1 Turn the zoom lever to the MACRO position,
pressing the macro set button.
2 Bring the recorder as close as necessary to
obtain the desired subject size.
The subject can be as close as approximately
11 mm (Vi6 in.) from the lens surface.
3 Turn the zoom lever within the MACRO range
to focus sharply. (The power zoom button can
be used instead of the zoom lever.)
L-2
30
To remove the lens hood I L-2 I
The lens hood also functions as focus ring. To
remove the lens hood, set the POWER switch to
OFF and turn the hood counterclockwise with
your palm.
Notes
• Auto focusing does not function in macro shooting.
• If the subject is closer than 11 mm CM in.) from the
lens, it cannot be brought into focus.
• When shooting in macro, the depth of field is very
shallow, so pay attention to focus. To keep the
subject in focus, use a tripod or monopod.
• Zooming cannot be used in macro shooting when
the zoom lever is in the MACRO range. To change
the subject size in the scene, move the recorder.
Page 31

To re-record a picture in the
middle of a recorded tape
(Insert recording) CJQ
M-1
1 While pressing the small button, set the
POWER switch to CAMERA.
2 Slide the STANDBY switch up to set the unit to
recording pause mode.
3 While looking in the viewfinder, keep pressing
the "+” or side of the EDITSEARCH button
and release the button where you want to end
the insert.
The unit will be set to recording pause mode.
4 Press the COUNTER RESET button.
The counter is set to zero.
5 While looking in the viewfinder, keep pressing
the side of the EDITSEARCH button and
release the button at the point where you want
to start the insert.
6 Press the ZERO MEM button.
The insert ending point is stored in the
memory.
7 Press the START/STOP button.
Insert recording will begin. The insert recording
will stop automatically near the counter zero
point.
To cancel ZERO MEM mode
Press the ZERO MEM button so that the ZERO
MEM indicator disappears.
To change the insert ending point
Press the ZERO MEM button to turn off the
ZERO MEM indicator and repeat steps 3 through
6 above.
Notes
• When recording pause mode lasts for
approximately 5 minutes, pause mode will be
automatically released and the unit will be turned
off.
• When the inserted tape is played back, the picture
may be distorted at the end of the inserted
program.
31
Page 32

Preparation for Playback
N-1
3CH/4CH
channel
selector
When a VCR has been connected to the TV. refer
to the pages 36,37 and 38.
Connecting a TV without audio video
input jacks f?BI
1 Connect the RFU adaptor to this unit.
2 Connect the VHF antenna, this unit and TV to
the antenna selector (supplied with the
RFU-90UC).
Use a 75-ohm coaxial cable for antenna
connection.
On the TV channel for the video camera
recorder
Whenever you view the playback picture, set the
channel selector of the RFU adaptor to either
VHF channel 3 CH or 4 CH and select the same
channel on the TV.
N-2
VMC-910MS/
920MS
AUDIO/VIDEO
IN
ANTENNA
Connecting a TV (or color monitor) with
audio video input jacks iMM
Connect this unit to the TV using the
commercially available audio/video cable (like
Sony VMC-910MS/920MS for stereo
equipment).
Set the TVA/IDEO selector button on the TV
as follows:
For viewing a playback picture -> VIDEO
For viewing TV programs -* TV
32
Page 33

Playing Back a Tape
0-1
0-2
1 1 CAMCHA
Turn on the TV (or color monitor), and select the
channel for viewing a playback picture (or set the
TV/VIDEO selector to VIDEO).
loT
While pressing the small button, set the
POWER switch to VTR.
2 Insert a cassette.
3 Press the > button.
Playback will start.
To stop the tape, press the □ button.
After using, be sure to set the POWER switch
on the recorder to OFF.
To view a still picture 10-21
Press the II button during playback.
To resume playback, press the II button again or
press the > button.
Monitoring a High-Speed Picture
During piayback — Picture search
1
In the playback mode, press the or
button.
The picture will be monitored at high speed as
long as it is kept pressed.
Release the ►► or ■ « button at the desired
point.
Normal playback will resume.
During fast-forward or rewind — Skip scan
1 Press the ► ► button in fast-forward mode or
press the ■ « button in rewind mode.
The picture is displayed while the button is
kept pressed.
Release the ^ or button to resume
normal fast-forward or rewind mode.
Press the > button to play back.
Notes
• If you move the position of the POWER switch
during playback, the tape will stop. When you
move the POWER switch to CAMERA in the
playback pause mode, however, the unit will enter
recording pause mode.
• When the pause mode lasts for 5 minutes or more,
the unit will automatically enter the stop mode.
• Streaks will appear and the sound will be muted in
the high-speed picture.
33
Page 34

Playing Back a Tape
E
Displaying the indication in the
Viewfinder Screen on the TV B
Press the DATA SCREEN button.
The indication on the viewfinder screen is
superimposed on the TV program.
It is convenient to check the indication on the TV
screen when the playback picture is viewed on
the TV or when the video camera recorder is
operated from a distance using the Remote
Commander.
To clear the indication, press the DATA
SCREEN button again.
1 '\*\ V
1™ A \
When you are editing onto another VTR
Press the DATA SCREEN button so that no
indications appear on the TV. If displayed, the
indications on the TV will be recorded with picture.
34
Page 35

Recording a TV Program
The following connections make both TV
program viewing/recording and tape playback
possible.
Combination of the Equipment to be
Used
Case 1 (page 36)
Connecting the TV through a VCR without an
input selector
Case 2 (page 37)
Connecting the TV through a VCR with an input
selector
Case 3 (page 38)
Connecting the TV tuner and color monitor or TV
with the audio/video input and output jacks
Q-1
VMC-710M/720M
VMC-910MS/920MS
Connecting Cables
For antenna cable connections, use 75-ohm
coaxial cables.
For video/audio connection, use an optional
audio/video cable to match the jacks on the
equipment to be connected.
[a] For monaural equipment
phono X 2 phono x 2
like Sony VMC-710M/720M
[b] For stereo equipment
phono X 2 o phono x 3
like Sony VMC-910MS/920MS
35
Page 36

Recording a TV Program
Q-2
VMC-
710M/720M
Case 1-. Connecting the TV through a
VCR without an input selector
Connections
Connect the equipment as shown in the
illustration.
TV program recording
Disconnect the RFU-90UC RFU adaptor, if you
use it.
1
Turn on the VCR and TV.
2
While pressing the small button, set the
POWER switch on this unit to VTR.
3 Select the channel for the VCR on the TV.
4 Select the TV channel to be recorded on the
VCR.
5 Insert a cassette into this unit and slide the
• REC switch.
Recording will start.
To view another TV program while recording
Set the TVATTR select button on the VCR to TV
and select the desired program on the TV.
Playback
The RFU-90UC RFU adaptor is required.
1 Connect the RFU-90UC RFU adaptor.
2 Turn on the TV.
3 While pressing the small button, set the
POWER switch on this unit to VTR.
4 Select the channel for the VCR on the TV.
5 Insert a cassette into this unit and press the
> button.
Playback will start.
36
Page 37

Recording a TV Program
Q-3
VMC-710M/
720M
AUDIO/ T T T T AUDIO/
VIDEO II II VIDEO
IN XX XX OUT
VHF/UHF OUT
AUDIOA^IOEO
IN
VMC-710M/
720M
VHF/UHF
■ A. fl/y
VHF/UHF IN
Case 2: Connecting the TV through a
VCR with an input selector [SBH
Connections
Connect the equipment as shown in the
illustration.
TV program recording
1 Turn on the VCR and TV.
2 While pressing the small button, set the
POWER switch on this unit to VTR.
3 Select the channel for the VCR on the TV.
4 Set the input selector to TUNER, the TV/VTR
select button to VTR and select the TV
channel to be recorded on the VCR.
5 Insert a cassette into this unit and slide the
• REC switch.
Recording will start.
To view another TV program while recording
Set the TV/VTR select button on the VCR to TV
and select the desired program on the TV.
Playback
1 Turn on the VCR and TV.
2 While pressing the small button, set the
POWER switch on this unit to VTR.
3 Set the input selector on the VCR to LINE and
select the channel for the VCR on the TV.
4 Insert a cassette into this unit and press the
> button.
Playback will start.
VHF/UHF IN
37
Page 38

Recording a TV Program
Q-4
AUDIO/VIDEO
OUT
AUDIO/
VIDEO
IN
m u
AUDIOA/IDEO
IN
VMC-
710M/720M
AUDIO/VIDEO
OUT
Case 3: Connecting the TV tuner and
color monitor or TV with audio video
input and output jacks [Sg|
Connections
Connect the equipment as shown in the
illustration.
TV program recording
1 Turn on the TV tuner and color monitor or TV.
2 While pressing the small button, set the
POWER switch on this unit to VTR.
3 Set the input selector on the TV tuner or TV to
TV and select the TV channel to be recorded.
4 Insert a cassette into this unit and slide the
• REC switch.
Recording will start.
Playback
1 Turn on the TV tuner and color monitor or TV.
2 While pressing the small button, set the
POWER switch on this unit to VTR.
3 Set the input selector on the TV tuner or TV to
VIDEO.
4 Insert a cassette into this unit and press the
C> button.
Playback will start.
38
Page 39

1
O I ^ I
fcMIER^
OFf i ^
r VTB
ij"
Insert Recording from the
VCR
You can insert a new scene from the TV or VCR
onto your originally recorded tape.
Before you begin
• Connection is the same as in “Recording a TV
Program”.
• You can see the picture from the VCR in the
viewfinder screen.
Operation
1 While pressing the small button, set the
POWER switch to VTR.
2 Locate the point on the tape where the insert
should end by pressing the or button
during playback.
3 Press the COUNTER RESET button. The
counter is reset to zero.
4 Press the button during playback to
rewind the tape a little further than the point
where the insert should begin.
5 Release the button to resume playback
and press the II button at the insert starting
point.
6 Slide the • REC switch in the arrow direction
to set the unit to recording pause mode.
7 Press the ZERO MEM button.
The insert ending point is stored in the
memory.
8 To start recording, press the II button.
8
ZERO MEM
STBV
^vOlOOII0y
-ZERO MEN;
'Fillin'^
The insert recording will stop automatically near
the counter zero point.
To change the ending point
Press the ZERO MEM button so that the ZERO
MEM indicator disappears, and operate again
from step 2
39
Page 40

COUNTER RESET
u-g-.. I
E
Using the Tape Counter
During recording or playback, the digits on the
counter indicate the actual recording or playback
time.
To Index the Whole Tape
Press the COUNTER RESET button at the
beginning of the tape so that the counter shows
"0:00:00”. By noting the counter reading at a
particular point, you can easily find that point later
by referring to the tape counter.
Notes
• The counter reading and the point of the tape may
not correspond exactly. Use the counter as a
guide. There will be a time lag of several seconds
especially when you repeat fast-forward running/
rewinding and play back the tape recorded in LP
and SP modes mixed.
• The counter does not operate for a blank,
unrecorded portion of a tape.
To Return to a Pre-registered Point
1 During playback, press the COUNTER RESET
button at the point you later want to locate.
2 Press the □ button when the playback has
finished.
3 Press the ZERO MEM button. The "ZERO
MEM" indicator will blink in the display
window.
4 Press the « or ► ► button.
The tape will be rewound or sent forward and
stop automatically when the counter reaches
approximately zero.
40
ZERO MEM
STBV
To cancel ZERO MEM mode
Press the ZERO MEM button so that the ZERO
MEM indicator disappears.
Notes
• The ZERO MEM button does not function during
playback mode.
Be sure to press the ZERO MEM button when the
tape is stopped.
• The ZERO MEM mode is canceled automatically
once the tape is rewound or sent forward to zero.
Page 41

T-2
Tape Editing
To edit a home movie tape, you \will need another
VCR or another video camera recorder.
To Edit from Another VCR to this Unit
While pressing the small button, set the
POWER switch on this unit to VTR and turn on
the other VCR.
Start playback on another VCR.
Slide the • REC switch on this unit.
To Edit from this Unit to Another VCR
1 While pressing the small button, set the
POWER switch on this unit to VTR and turn on
the other VCR.
Slide the EDIT switch on this unit in the
direction of the arrow (ON).
Set the input selector on the VCR to LINE.
Press the II button on this unit during playback
at the point where you want to start recording.
Press the record button on the other VCR,
pressing the II button.
Release the II buttons on both units.
Recording will start.
When the VCR to be used is a stereo type, use
the commercially available audio/video cable (like
Sony VMC-910MS/920MS).
After editing, turn off both units and be sure to
slide the EDIT switch in the reversed direction to
the arrow (OFF).
To cut off an unnecessary portion
Press the II button on the recorder at the beginning
of the unnecessary portion.
Release it where you want to resume recording.
Function of the EDIT switch
Slide this switch in the direction of the arrow (ON)
whenever you edit tapes. Signal loss that results
from tape-to-tape transfer will be reduced, achieving
more accurate signal transfer.
When recording or playing back normally, keep this
switch in the reversed direction to the arrow (OFF).
A^
Page 42

Hints for Better Shooting
U-1
Getting Stable Pictures
Take a good posture for shooting |U-11
For hand-held shots, it is important to hold the
recorder properly.
• Hold the recorder firmly and secure it with the
grip belt so that you can easily manipulate the
recorder with your thumb.
• Place your right elbow firmly against your side.
• Place your left hand under the recorder to
support it. When adjusting the focus manually,
make sure the recorder does not move.
• Stand opposite to the subject and let your feet
take a comfortable stance.
• Place your eye firmly against the viewfinder
eyecup.
• Try to keep both eyes open.
• Breathe gently.
Use a tripod
If you have a tripod for a still camera, it can also
be used with the recorder. If a tripod is not
available, try placing the recorder on a tabletop or
any other flat surface of suitable height.
Keep the horizontal place level |U-2|
The horizontal place can be easily determined by
using the viewfinder frame as a reference.
U-2
Planning Ahead
If you are going to edit the tape after
recording
Shoot the scene a little longer to make the editing
easier.
If you are not going to edit the tape after
recording
First record a title and then use the START/STOP
button to make a smooth recording.
42
Page 43

Hints for Better Shooting
Lighting
Shoot with the sun behind you
When the light source is behind the subject, or in
the following situations, the subject will be
recorded too dark and the background too light.
• The subject is indoors and there is a window
behind the subject.
• Bright sources such as fluorescent or
incandescent lamps are included in the scene.
• You are shooting a person wearing white or
shiny clothes in front of a white background. In
this case, the face will be recorded too dark.
Use video iights in the dark
To get the best colors, a sufficient light level must
be maintained.
Photography lamps or halogen lamps are
recommended. For best results, use of Sony
video lights is recommended since their weight
and low heat output levels allow safe, direct
connection to the recorder.
Do not point the light at the recorder. The high
heat from the light can warp the casing of the
recorder.
For detailed instructions on proper use of the
light, read its instruction manual.
Brightness leveis
Using the following chart as a reference, take a
few minutes to familiarize yourself with brightness
levels to improve your recording technique.
Snow.«eveced mountains
Snow fields
Sandy beach, dear day in summer
Clear day. mid day (100.000)
Clear day. mid-aflamoon (35.000)
Overcast day. mid4lay (32.000)
Overcast day. one hour
aflat sunrise (2.000)
Office Nt by fluoresoeni lamps, near
window (1.000)
(Леаг day, one hour before sunset (1,000)
DepailmenI store counter (500-700)
Station wicket (650)
Office lil by fluorescent lamps
(400-500)
Room lit by two SOW
fluorescent lamps (300)
Subway stalion plallorm (300)
Arcade at night (tSO-200)
Theater lobby (15-35)
Candlelight (10-15)
Unit: lux
100.000
10.000
1.000
500
300
100
10
NO Alter
required
Nonnal
recording
Video light
recom
mended
Video light
required
Page 44

Using the Battery Pack
V-1
V-2
V-3
How to Prepare the Rechargeable
Battery Pack
Have sufficient battery pack power to do 2 or
3 times as much recording than you have
planned. I V-11
“Battery life” as indicated in the instruction
manual or catalogue of the recorder is measured
by the continuous recording time of the recorder,
placed at a room temperature using a fullcharged battery.
Battery life is shorter in a cold climate. I V-21
Battery efficiency is decreased and the battery
will be used up more quickly.
Turn the STANDBY switch of the recorder off
when not recording to save battery power.
El]
A smooth recording can be made even if
recording is stopped and started again. While
positioning the subject or selecting an angle, or
looking through the viewfinder lens, the lens
moves automatically and the battery is used. The
battery is also used when a tape is inserted or
removed.
V-4
When the Rechargeable Battery Pack
should be Replaced
When the ca-mark in the viewfinder changes
from slow blinking to rapid blinking while you
are recording. IV-4I
Turn off the power switch of the recorder and
replace the battery pack. Leave the tape in the
recorder in order to obtain a smooth recording
after the battery pack is replaced.
AA
Page 45

Using the Battery Pack
Notes on Charging
Before using the battery pack, charge it
sufficiently. A brand new battery pack is not
charged.
V-5
Recharge the battery pack only when it is
exhausted. I V-51
• If recording is completed before the Oa mark
appears in the viewfinder, it is recommended
that you remove the tape, set the POWER
switch to CAMERA, slide up the STANDBY
switch, and leave the recorder until the CQ
mark blinks rapidly.
• Repeated charging while some capacity
remains causes a lowering of battery capacity.
However, the original battery capacity can be
recovered if you fully charge and discharge the
battery again.
Recharge the battery pack before using.
If the battery pack is charged fully but not used
for a long time (about 1 year), it is discharged.
Charge it again, but in this case the battery life
will be shorter than normal. After several charging
and discharging cycles, the battery life will
recover its original capacity.
Keep the Terminals Clean
if the terminais (metai parts on the back) are
not ciean, the battery duration will be
shortened.
When the terminals are not clean or when the
battery pack has not been used for a long time,
install and remove the battery pack from time to
time. This will improve the contact condition. Also,
wipe the and - terminals with a soft cloth or
paper.
45
Page 46

Using the Battery Pack
Notes on the Rechargeable Battery
Pack
Why the battery pack heats up
During charging or recording, the battery pack
heats up. This means that energy has been
generated and chemical change has occurred
inside the battery pack and this is not dangerous.
How to care for the battery pack
• Remove the battery pack from the recorder
after using it, and keep it in a cool place.
When the battery pack is in the recorder, a
small amount of current flows to the recorder
even if the POWER switch is turned off. It
causes overdischarging and shortens battery
life.
• The battery pack is always discharging even
when it is not in use after charging.
Thus, it is recommended that you charge the
battery before using.
V-6
Howto use the switch on the battery pack
This switch is provided so that you can remember
the charging condition. Set the switch to the “no
mark” position when charging is completed. Set
the switch to the “red mark" position when the
battery is used up.
How many times can the battery pack be
recharged
It can be fully charged and discharged about 500
times under normal temperatures.
If the 4X1 mark blinks rapidly just after turning on
the recorder with a fully charged battery pack, the
battery pack should be replaced with a new fully
charged one.
Temperatures during charging
Lower temperatures require a longer charging
time. Charging under temperatures ranging from
10®C to 30°C (5*F to 85®F) is recommended.
46
Page 47

Notes and Precautions
W-1
W-2
Notes on Moisture Condensation
If the recorder is brought directly from a cold
place to a warm place, moisture may condense
inside the recorder, on the surface of the tape or
on the lens. In this condition, the tape may stick
to the head drum and be damaged or the unit
may not operate correctly. To prevent possible
damage under these circumstances, the recorder
is furnished with moisture sensors. However, take
the following precautions.
If moisture condenses inside the unit I W-11
Moisture is present inside the recorder when the
B) indicator in the viewfinder blinks. In such
cases, no function except for tape ejection will
work.
Eject the tape, turn off the recorder, and leave
it with the cassette holder open for at least 1
hour.
The recorder can be used again if the IB indicator
does hot appear when the power is turned on
again.
If moisture condenses on the surface of the
tape I w-21
If moisture is present on the surface of the tape
when the tape is inserted and a tape transport
button (>, -4M, etc.) is pressed, the ± indicator
blinks inside the viewfinder. In such a case, no
function except for tape ejection will work.
Eject the tape and let the recorder and the
tape sit for at least 1 hour.
The tape can be used again if the ± indicator
does not appear when the tape is inserted and a
tape transport button is pressed.
If moisture condenses on the iens
No caution indicators will appear, but the picture
becomes dim.
Turn off the power and leave the recorder un
used for at least 1 hour.
A7
Page 48

Notes and Precautions
W-3
[b]
[a]
Notes on Video Head Cleaning
To ensure clear picture, clean the video heads
periodically |W-3|
When playback pictures are noisy or hardly
visible, the video heads may be contaminated.
[a] shows slight contamination.
[bj shows critical contamination.
In such cases:
1 Clean the video heads with the optional Sony
V8-25CLH cleaning cassette referring to the
instructions supplied with it.
2 After cleaning, check if the picture is clear by
recording or playing back with an ordinary
tape.
3 If the picture is still noisy, repeat cleaning. (Do
not repeat cleaning more than 5 times.)
If the V8-25CLH cleaning cassette is not available
in your area, consult your Sony service facility.
Caution
Do not use a commercially available wet-type
cleaning cassette. It may damage the video heads.
48
Page 49

On operation
• Operate the unit on 6.0 V (battery pack), 7.5 V
(AC power adaptor) or 9.0 V DC (alkaline
batteries).
• For DC or AC operation, use the accessories
recommended in this manual.
• Should any solid object or liquid fall into the
cabinet, unplug the unit and have it checked by
qualified personnel before operating it any
further.
• Do not hold the unit by the viewfinder.
• Avoid rough handling of or mechanical shock to
the unit. Be particularly careful of the lens.
• Do not apply excessive force to the
microphone.
• Avoid shooting the same object for a long
period of time (for example, using as a lookout
camera or pointing the camera directly at the
sun or other bright light sources) as this will
damage the color filter inside the camera and
may cause a poor picture quality.
• Remove and store video cassettes after
recording or playback.
• Do not wrap up the unit and operate it because
heat may build up internally.
• Avoid using and storing the recorder in the
following locations.
—Locations susceptible to vibration.
—Locations exposed to strong magnetic fields.
—Locations near TV or radio transmitters
where strong radio waves are generated.
• Do not put the unit on the sand.
On care
• Store cassettes in their cases and keep them in
an upright position to prevent intrusion of dust
and uneven winding.
• When the unit will not be used for a long time,
periodically turn on the power, operate the
camera section and recorder section and play
back a tape for about three minutes.
• Clean the lens with a soft brush to remove
dust. If there are fingerprints on it, remove them
with a soft cloth. Clean the recorder body with a
dry, soft cloth, or a soft cloth lightly moistened
with a mild detergent solution. Do not use any
type of solvent which may damage the finish.
For protection, keep the lens cap on the lens
when not using the camera.
abroad, check the following points.
Power Sources
You can use your recorder in any country with the
supplied AC power adaptor within 100 V - 240 V
AC, 50/60 Hz.
Differences in Color System
You can view the playback picture in the
viewfinder. However, if you want to view the
playback picture on a TV, it must be an NTSCsystem based TV and should have video/audio
inputs.
NTSC system countries
Bahama Islands, Canada, Central America,
Japan, Korea, Mexico, Taiwan, the Philippines,
U.S.A., etc.
PAL system countries
Australia, Austria, Belgium, China, Denmark,
Finland, Great Britain, Holland, Hong Kong,
Italy, Kuwait, New Zealand, Norway, Portugal,
Singapore, Spain, Sweden, Switzerland,
Thailand, West Germany, etc.
SECAM system countries
Bulgaria, France, Hungary, Iran, Iraq, Monaco,
Poland, the Soviet Union, etc.
49
Page 50

Specifications
System
Video recording system
Rotary two heads,
Audio recording system
Video signal
Usable cassette
Tape speed
Recording time
Playback time
Fast fotward/rewind time
Image device
Viewfinder
Lens
Auto focus system
Color temperature
Minimum illumination
Illumination range 4 lux-100,000 lux
Recommended illumination
Aperture correction Automatic
Helical scanning FM system
Rotary head, FM system
NTSC color, EIA standards
8 mm video format cassette
SP: Approx. 1.43 cm/sec.
LP: Approx. 0.72 cm/sec.
(playback only)
SP mode: 2 hours (P6-120)
SP mode: 2 hours (P6-120)
LP mode: 4 hours (P6-120)
Approx. 6.5 min. (P6-120)
CCD (Charge Coupled Device)
Electronic viewfinder
(black and white)
Combined 6 x power zoom lens
f=7-42 mm, FI .4 with macro
Filter diameter: 46 mm
TTL
AUTO
HOLD
INDOOR 3,200 K
OUTDOOR 5,800 K
4 lux
(0.4-9,294 footcandles)
More than 300 lux
(28 footcandles)
Back light adjustment
Display In the viewfinder
Mode and caution indicators
Caution: 0/±mSHaKXi
Mode: REC/STBY/PAUSE4>.
(Editsearch)/^/®/STILL/
PLAY/Ct>/<M/SLOW/II^
LP mode. AM/PM, FOCUS. (3,
WHITE BALANCE. ZERO MEM.
shutter speed, recording/battery
lamp
General
Power requirements
On battery mounting surface
6.0 V (battery pack)
7.5 V (AC power adaptor)
9.0 V (alkaline batteries)
Power consumption
6.9 W (camera recording)
including the viewfinder
Installation Vertically, horizontally
Operating temperature
0‘C to 40"C (32»F to 104»F)
Storage temperature
-20X to +60’C (-4»F to ♦ lAO-'F)
Dimensions Approx. 122 x 153 x 317 mm
(w/h/d)
(47i X 6V» X 12'It in.)
including lens hood
Weight Approx. 1.2 kg (2 lb 10 oz)
excluding the battery and cassette
Microphone Electret condenser microphone.
omni-directional monaural type
Supplied accessories
See page 4.
Input and output connector
Video output Phono jack. 1 Vp-p, 75 ohms
unbalanced, sync negative
Audio output Phono jack. -7.5 dBs. at output
impedance less than 2.2 kilohms
RFU DC OUT Special minijack, 5 V DC
Video input Phono jack, 1 Vp-p, 75 ohms
unbalanced, sync negative
Audio input Phono jack, -7.5 dBs, input
impedance more than 47 kilohms
Earphone jack Minijack, 8-ohm impedance
Remote jack Stereo mini-minijack
MIC jack Minijack, -66 dBs, low impedance
With 2.5-3 V DC output,
impedance 6.8 kilohms
Microphone power output jack
Special minijack, 5 V DC
50
Design and specifications are subject to change without
notice.
Page 51

Trouble Check
If you think you have a problem, double-check before calling the serviceman.
You may have overlooked something relatively simple!
Symptom
The power does not turn
on.
The START/STOP button
does not operate.
The tape does not move
when a tape transport
button is pressed.
The power turns off. While being operated in the CAMERA
A vertical band appears
when a subject such as
lights or a candle flame is
shot against a dark
background.
The battery pack is
quickly discharged.
The cassette cannot be
removed from the
compartment.
The auto focusing
function does not work.
The color of the playback
is not appropriate.
The image on the
viewfinder screen is not
clear.
The playback picture is
not clear.
The battery is not attached. Attach the battery.
The battery is exhausted. Use a new battery.
The AC power adaptor is not connected to
a wall outlet.
The tape is affixed to the drum. Remove the cassette with the cassette
The tape is at its end.
The POWER switch is set to VTR.
The tab on the cassette is out (red).
The POWER switch is set to CAMERA or
OFF.
The tape is at its end. Rewind the tape or use a new one.
mode, the recorder has been in the pause
mode for more than 5 minutes.
The battery is exhausted. Use a charged battery.
The contrast between the subject and
background is too high; the camera is not
malfunctioning.
The ambient temperature is too low.
The battery pack has not been charged
fully.
The battery is exhausted.
The AUTO LOCK cover is opened. Close the AUTO LOCK cover.
Shooting conditions are not suitable for
auto focusing operation. (See page 23.)
The AUTO LOCK cover is opened.
Shooting conditions are not suitable for
auto white balance operation. (See page
25.)
The viewfinder lens is not adjusted.
The EDIT switch is set in the direction of
the arrow.
The channel for the VCR is not adjusted
on the TV.
Cause
Corrective actions
Connect the adaptor to a wall outlet.
eject button.
Rewind the tape or use a new one.
Set it to CAMERA.
Use a new cassette or slide the tab.
Set it to VTR.
Slide down the STANDBY switch, and
slide it up again.
—
—
Charge the battery pack again.
Use the charged battery or the AC power
adaptor.
Open the AUTO LOCK cover and press
the FOCUS button to adjust the focus
manually.
Close the AUTO LOCK cover.
Open the AUTO LOCK cover and press
the WHITE BAL button to adjust the white
balance manually.
Adjust the viewfinder lens.
Set the EDIT switch in the reversed
direction of the arrow.
Adjust the TV.
(Continued)
51
Page 52

Symptom Cause
The picture is noisy.
No function except for
cassette ejection works.
The date indication inside
the viewfinder blinks.
The video heads may be contaminated. Clean the heads using the Sony V8-
25CLH video head cleaning cassette. For
details on cleaning, see page 48.
Moisture condensation has occurred.
(See page 47.)
The lithium battery is not installed.
The lithium battery is exhausted. Use a new battery.
Remove the cassette and leave the unit
for at least an hour.
Install the lithium battery.
Corrective actions
If an indication blinks in the viewfinder screen or a caution lamp on the main unit blinks, check the
following table.
I 1 slow blinking I I fast blinking
Camera operation
VTR operation
Camera operation
Camera operation
VTR operation
Symptom
cXi
Battery lamp
03
Battery lamp
OKS ±
Battery lamp
ES3
Battery lamp
m
Ei!Q ±
DEW lamp
O
Caution lamp
Caution lamp
•0:00:00" blinks for 5
seconds in the viewfinder
after setting the POWER
switch to CAMERA.
The current time blinks for
5 seconds in the viewfinder
after setting the POWER
switch to CAMERA.
Cause
The battery is weak.
The battery is used up. Use a charged battery.
The tape is at its end. Use a new tape.
The tape is near its end. Prepare a new one.
No tape is inserted.
The tab on the tape is out (red).
Moisture condensation has
occurred.
The gap of the head is clogged.
Other troubles may occur.
The lithium battery is not installed.
The lithium battery is exhausted.
The lithium battery is weak.
Corrective actions
Prepare a charged one.
Insert a tape.
Slide the tab.
Remove the tape and
leave the recorder for at
least an hour.
Clean the head using
the Sony V8-25CLH
video head cleaning
tape.
Consult your nearest
Sony dealer.
Install the lithium
battery.
Use a new battery.
Sony Corooration Printed m Jaoan
 Loading...