

Page 1
The software of this player may be updated in the future. To find out details on any
available updates, please visit: http://www.sony.com/bluraysupport/
4-188-208-11(1)
Printed in Malaysia
Operating Instructions
Blu-ray Disc™ / DVD Player
BDP-S1700ES
4-188-208-11(1)
© 2010 Sony Corporation
Page 2
WARNING
To reduce the risk of fire or electric
shock, do not expose this apparatus
to rain or moisture.
To avoid electrical shock, do not
open the cabinet. Refer serv icing to
qualified personnel only.
The AC power cord must be
changed only at a qualified service
shop.
Batteries or batteries installed
apparatus shall not be exposed to
excessive heat such as sunshine,
fire or the like.
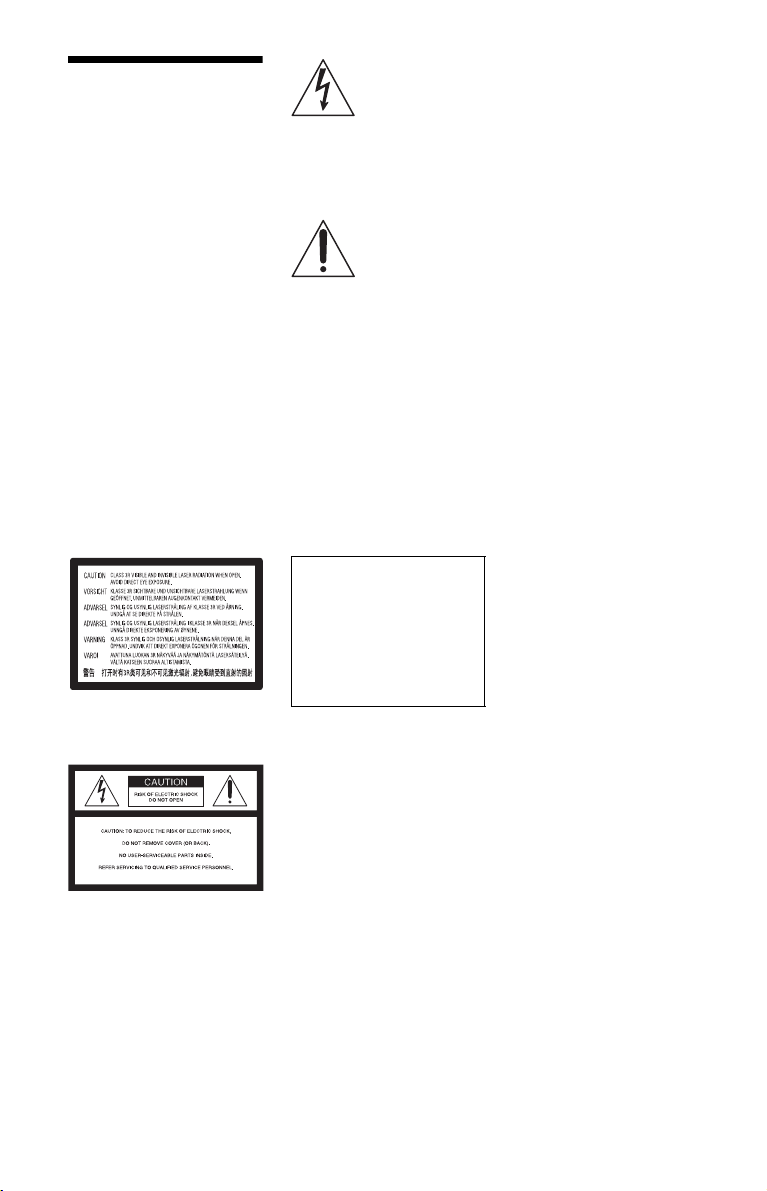
CAUTION
The use of optical instruments with
this product will increase eye
hazard. As the laser beam used in
this Blu-ray Disc/DVD player is
harmful to eyes, do not attempt to
disassemble the cabinet.
Refer servicing to qualified
personnel only.
This label is located on the laser
protective housing inside the
enclosure.
This symbol is
intended to alert the
user to the presence
of uninsulated
within the product’s enclosure that
may be of sufficient magnitude to
constitute a risk of electric shock to
persons.
maintenance (servicing)
instructions in the literature
accompanying the appliance.
“dangerous voltage”
This symbol is
intended to alert the
user to the presence
of important
operating and
Precautions
• To prevent fire or shock hazard,
do not place objects filled with
liquids, such as vases, on the
apparatus.
• Install this unit so that the AC
power cord can be unplugged
from the wall socket
immediately in the event of
trouble.
Operation is subject to the
following two conditions;
(1) this device may not cause
interference, and
(2) this device must accept any
interference received,
including interference that may
cause undesired operation of the
device.
FCC WARNING
You are cautioned that any
changes or modifications not
expressly approved in this
manual could void your
authority to operate this
equipment.
This transmitter must not be colocated or operating in
conjunction with any other
antenna or transmitter.
The shielded Interface cable
(LAN cable) must be used with
the equipment in order to
comply with the limits for a
digital device pursuant to
Subpart B of Part 15 of FCC
Rules.
2
Page 3

b
This equipment has been tested
and found to comply with the
limits for a Class B digital
device, pursuant to Part 15 of the
FCC Rules. These limits are
designed to provide reasonable
protection against harmful
interference in a residential
installation. This equipment
generates, uses, and can radiate
radio frequency energy and, if
not installed and used in
accordance with the instructions,
may cause harmful interference
to radio communications.
However, there is no guarantee
that interference will not occur
in a particular installation. If this
equipment does cause harmful
interference to radio or
television reception, which can
be determined by turning the
equipment off and on, the user is
encouraged to try to correct the
interference by one or more of
the following measures:
– Reorient or relocate the
receiving antenna.
– Increase the separation
between the equipment and
receiver.
– Connect the equipment into an
outlet on a circuit different
from that to which the receiver
is connected.
– Consult the dealer or an
experienced radio/TV
technician for help.
FCC Radiation Exposure
Statement:
This equipment complies with
FCC radiation exposure limits
set forth for uncontrolled
equipment and meets the FCC
radio frequency (RF) Exposure
Guidelines in Supplement C to
OET65. This equipment should
be installed and operated with at
least 20 cm and more between
the radiator and person’s body
(excluding extremities: hands,
wrists, feet and ankles).
When using the unit, use
indoors.
Contains FCC ID :
EW4DWMW034
Owner’s Record
The model and serial numbers are
located at the rear of the unit.
Record the serial number in the
space provided below. Refer to
them whenever you call upon your
Sony dealer regarding this product.
Model No.______________
Serial No.______________
If this product is not working
properly, please call 1-866-909-
7669.
Notes About the Discs
• To keep the disc clean, handle
the disc by its edge. Do not
touch the surface.
Dust, fingerprints, or scratches
on the disc may cause it to
malfunction.
• Do not expose the disc to
direct sunlight or heat sources
such as hot air ducts, or leave it
in a car parked in direct
sunlight as the temperature
may rise considerably inside
the car.
• After playing, store the disc in
its case.
• Clean the disc with a cleaning
cloth. Wipe the disc from the
center out.
• Do not use solvents such as
benzine, thinner,
commercially available disc/
lens cleaners, or anti-static
spray intended for vinyl LPs.
• If you have printed the disc’s
label, dry the label before
playing.
• Do not use the following discs.
– A lens cleaning disc.
– A disc that has a non-
standard shape (e.g., card,
heart).
– A disc with a label or sticker
on it.
– A disc that has cellophane
tape or sticker adhesive on it.
• Do not resurface the playing
side of a disc to remove
surface scratches.
3
Page 4

Precautions
On placement
• Place the player in a location
with adequate ventilation to
prevent heat build-up in the
player.
• Do not place the player on a
soft surface such as a rug that
might block the ventilation
holes.
• Do not install this player in a
confined space, such as a
bookshelf or similar unit.
• Do not place the player in a
location near heat sources, or
in a place subject to direct
sunlight, excessive dust, or
mechanical shock.
• Do not place the player
outdoors, in vehicles , on ships,
or on other vessels.
• If the player is brought directly
from a cold to a warm location,
or is placed in a very damp
room, moisture may condense
on the lenses inside the player.
Should this occur, the player
may not operate properly. In
this case, remove the disc and
leave the player turned on for
about half an hour until the
moisture evaporates.
• Do not install the player in an
inclined position. It is
designed to be operated in a
horizontal position only.
• Do not place metal objects in
front of the front panel. It may
limit reception of radio waves.
• Do not place the player in a
place where medical
equipment is in use. It may
cause a malfunction of
medical instruments.
• If you use a pacemaker or
other medical device, consult
your physician or the
manufacturer of your medical
device before using the
wireless LAN function.
• Do not place heavy or unstable
objects on the player.
• Do not place any objects other
than discs on the disc tray.
Doing so may cause damage to
the player or the object.
• Take out any discs when you
move the player. If you don’t,
the disc may be damaged.
• Disconnect th e AC power cord
and all other cables from the
player when you move the
player.
On power sources
• The player is not dis connected
from the AC power source as
long as it is connected to the
wall outlet, even if the player
itself has been turned off.
• Disconnect th e player from the
wall outlet if you are not going
to use the player for a long
time. To disconnect the AC
power cord, grasp the plug
itself; never pull the cord.
• Observe following points to
prevent the AC power cord
being damaged. Do not use the
AC power cord if it is
damaged, as doing so may
result in an electric shock or
fire.
– Do not pinch the AC power
cord between the player and
wall, shelf, etc.
– Do not put anything heavy
on the AC power cord or pull
on the AC power cord itself.
On adjusting volume
Do not turn up the volume while
listening to a section with very
low level inputs or no audio
signals. If you do, your ears and
the speakers may be damaged
when a peak level section is
played.
On cleaning
Clean the cabinet, panel, and
controls with a soft c loth. Do not
use any type of abrasive pad,
scouring powder or solvent such
as alcohol or benzine.
On cleaning discs, disc/
lens cleaners
Do not use cleaning discs or
disc/lens cleaners (including wet
or spray types). These may cau se
the apparatus to malfunction.
On replacement of parts
In the events that this player is
repaired, repaired parts may be
collected for reuse or recycling
purposes.
4
Page 5
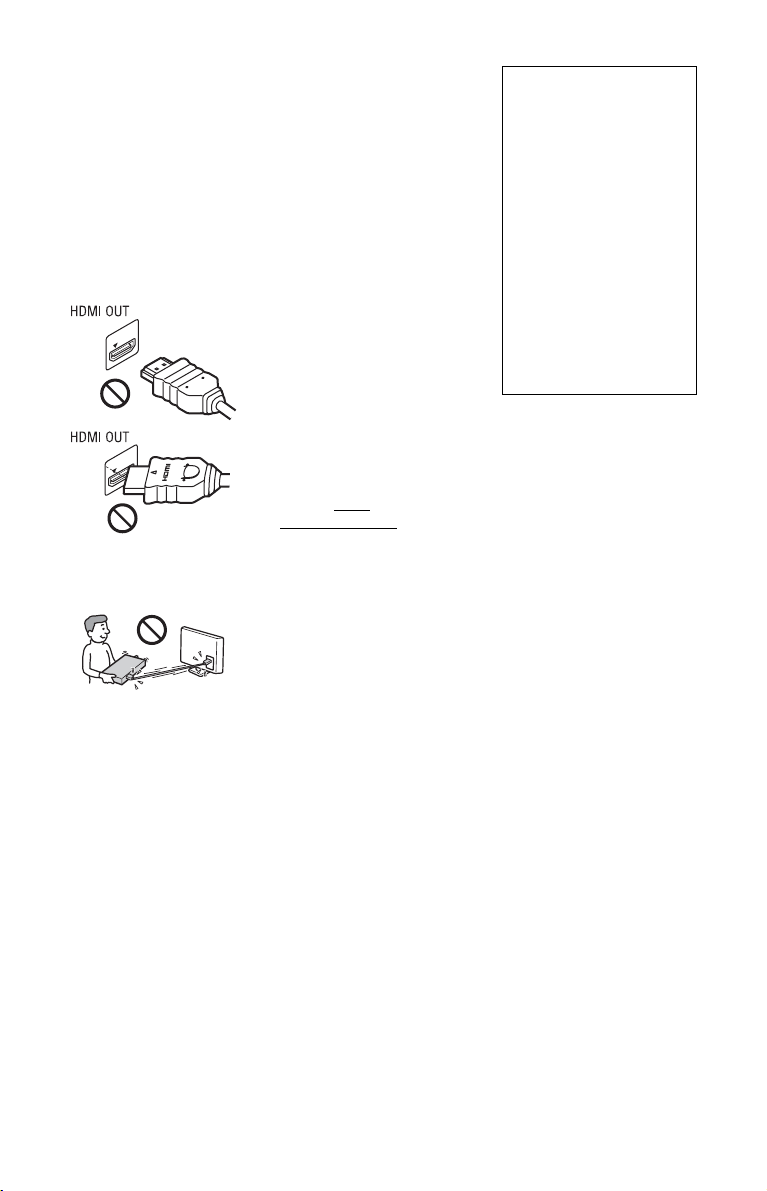
On connecting to the HDMI
OUT jack
Observe the following as
improper handling may damage
the HDMI OUT jack and the
connector.
• Carefully align the HDMI
OUT jack on the rear of the
player and the HDMI
connector by checking their
shapes. Make sure the
connector is not upside down
or tilted.
• Be sure to disconnect the
HDMI cable when moving the
player.
• Hold the HDMI connector
straight when connecting or
disconnecting the HDMI
cable. Do not twist or force the
HDMI connector into the
HDMI OUT jack.
On watching 3D video
images
Some people may experience
discomfort (such as eye strain,
fatigue, or nausea) while
watching 3D video images.
Sony recommends that all
viewers take regular breaks
while watching 3D video
images. The length and
frequency of necessary breaks
will vary from person to person.
You must decide what works
best. If you experience any
discomfort, you should stop
watching the 3D video images
until the discomfort ends;
consult a doctor if you believe
necessary. You should also
review (i) the instru ction manual
and/or the caution message of
any other device used with, or
Blu-ray Disc contents played
with this product and (ii) our
website (http://
esupport.sony.com/) for the
latest information. The vision of
young children (especially those
under six years old) is still under
development. Consult your
doctor (such as a pediatrician or
eye doctor) before allowing
young children to watch 3D
video images.
Adults should supervise young
children to ensure they follow
the recommendations listed
above.
IMPORTANT NOTICE
Caution: This player is
capable of holding a still
video image or on-screen
display image on your
television screen
indefinitely. If you leave the
still video image or onscreen display image
displayed on your TV for an
extended period of time you
risk permanent damage to
your television screen.
Plasma display panel
televisions and projection
televisions are susceptible to
this.
If you have any questions or
problems concerning your
player, please consult your
nearest Sony dealer.
Important Safety
Instructions
1) Read these instructions.
2) Keep these instructions.
3) Heed all warnings.
4) Follow all instructions.
5) Do not use this apparatus near
water.
6) Clean only with dry cloth.
7) Do not block any ventilation
openings. Install in accordance
with the manufacturer’s
instructions.
8) Do not install near any heat
sources such as radiators, heat
registers, stoves, or other
apparatus (including
amplifiers) that produce heat.
9) Do not defeat the safety
purpose of the polarized or
grounding-type plug. A
polarized plug has two blades
with one wider than the other.
A grounding type plug has two
blades and a third grounding
prong. The wide blade or the
third prong are provided for
your safety. If the provided
plug does not fit into your
outlet, consult an electrician for
replacement of the obsolete
outlet.
,continued
5
Page 6

10)Protect the power cord from
being walked on or pinched
particularly at plugs,
convenience receptacles, and
the point where they exit from
the apparatus.
11)Only use attachments/
accessories specified by the
manufacturer.
12)Use only with the cart, stand,
tripod, bracket, or table
specified by the manufacturer,
or sold with the apparatus.
When a cart is used, use caution
when moving the cart/
apparatus combination to avoid
injury from tip-over.
13)Unplug this apparatus during
lightning storms or when
unused for long periods of
time.
14)Refer all servicing to qualified
service personnel. Servicing is
required when the apparatus
has been damaged in any way,
such as power-supply cord or
plug is damaged, liquid has
been spilled or objects have
fallen into the apparatus, the
apparatus has been exposed to
rain or moisture, does not
operate normally, or has been
dropped.
6
Page 7

Table of Contents
WARNING . . . . . . . . . . . . . . . . . . . . . . . . . . . . . . . . . . . . . . . . . . . . . . . . . . . .2
Precautions . . . . . . . . . . . . . . . . . . . . . . . . . . . . . . . . . . . . . . . . . . . . . . . . . . .4
Guide to Parts and Controls . . . . . . . . . . . . . . . . . . . . . . . . . . . . . . . . . . . . . .8
Hookups and Settings
Step 1: Preparing the Player . . . . . . . . . . . . . . . . . . . . . . . . . . . . . . . . . . . . . 12
Step 2: Connecting the Player . . . . . . . . . . . . . . . . . . . . . . . . . . . . . . . . . . . .13
Step 3: Easy Setup . . . . . . . . . . . . . . . . . . . . . . . . . . . . . . . . . . . . . . . . . . . . 15
Connecting to the Network . . . . . . . . . . . . . . . . . . . . . . . . . . . . . . . . . . . . . .16
Playback
Playing a Disc . . . . . . . . . . . . . . . . . . . . . . . . . . . . . . . . . . . . . . . . . . . . . . . .17
Playing from a USB Device . . . . . . . . . . . . . . . . . . . . . . . . . . . . . . . . . . . . . .19
Playing via a Network . . . . . . . . . . . . . . . . . . . . . . . . . . . . . . . . . . . . . . . . . .19
Available Options . . . . . . . . . . . . . . . . . . . . . . . . . . . . . . . . . . . . . . . . . . . . . . 20
Settings and Adjustments
Using the Settings Displays . . . . . . . . . . . . . . . . . . . . . . . . . . . . . . . . . . . . . . 22
Network Update . . . . . . . . . . . . . . . . . . . . . . . . . . . . . . . . . . . . . . . . . . . . . . .23
Screen Settings . . . . . . . . . . . . . . . . . . . . . . . . . . . . . . . . . . . . . . . . . . . . . . . 23
Audio Settings . . . . . . . . . . . . . . . . . . . . . . . . . . . . . . . . . . . . . . . . . . . . . . . . 25
BD/DVD Viewing Settings . . . . . . . . . . . . . . . . . . . . . . . . . . . . . . . . . . . . . . . 26
Parental Control Settings . . . . . . . . . . . . . . . . . . . . . . . . . . . . . . . . . . . . . . . .26
Music Settings . . . . . . . . . . . . . . . . . . . . . . . . . . . . . . . . . . . . . . . . . . . . . . . .27
System Settings . . . . . . . . . . . . . . . . . . . . . . . . . . . . . . . . . . . . . . . . . . . . . . . 27
Network Settings . . . . . . . . . . . . . . . . . . . . . . . . . . . . . . . . . . . . . . . . . . . . . .28
Easy Setup . . . . . . . . . . . . . . . . . . . . . . . . . . . . . . . . . . . . . . . . . . . . . . . . . .28
Resetting . . . . . . . . . . . . . . . . . . . . . . . . . . . . . . . . . . . . . . . . . . . . . . . . . . . . 28
Additional Information
Troubleshooting . . . . . . . . . . . . . . . . . . . . . . . . . . . . . . . . . . . . . . . . . . . . . . .29
Specifications . . . . . . . . . . . . . . . . . . . . . . . . . . . . . . . . . . . . . . . . . . . . . . . . . 33
Index . . . . . . . . . . . . . . . . . . . . . . . . . . . . . . . . . . . . . . . . . . . . . . . . . . . . . . . 39
7
Page 8
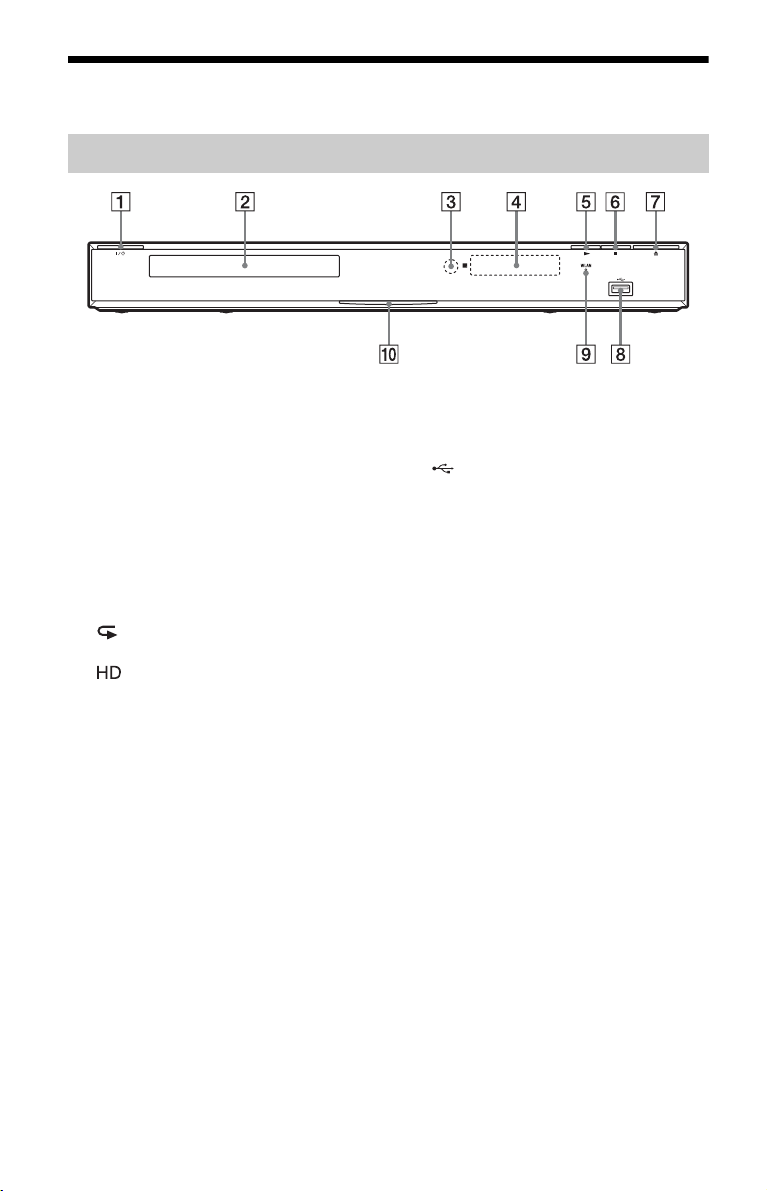
Guide to Parts and Controls
Front panel
z
The N button has a tactile dot. Use the tactile dot as a reference when operating the player.
A [/1 (on/standby)
Turns on the player, or sets to standby
mode.
B Disc tray
C Remote sensor
D Front panel display
N, X: Lights up during playback or
pause.
: Lights up when enabling the repeat
setting.
: Lights up when outputting 720p/
1080i/1080p video signals.
E N (play)
F x (stop)
G Z (open/close)
H (USB) jack
Connect a USB device to this jack.
I WLAN indicator
Lights up when using a wireless LAN.
J Power indicator
Lights up in white when the player is
turned on.
To lock the disc tray (Child Lock)
You can lock the disc tray to prevent it being
opened by mistake.
When the player is turned on, hold down N
on the player for more than 10 seconds. The
disc tray is locked or unlocked.
8
Page 9
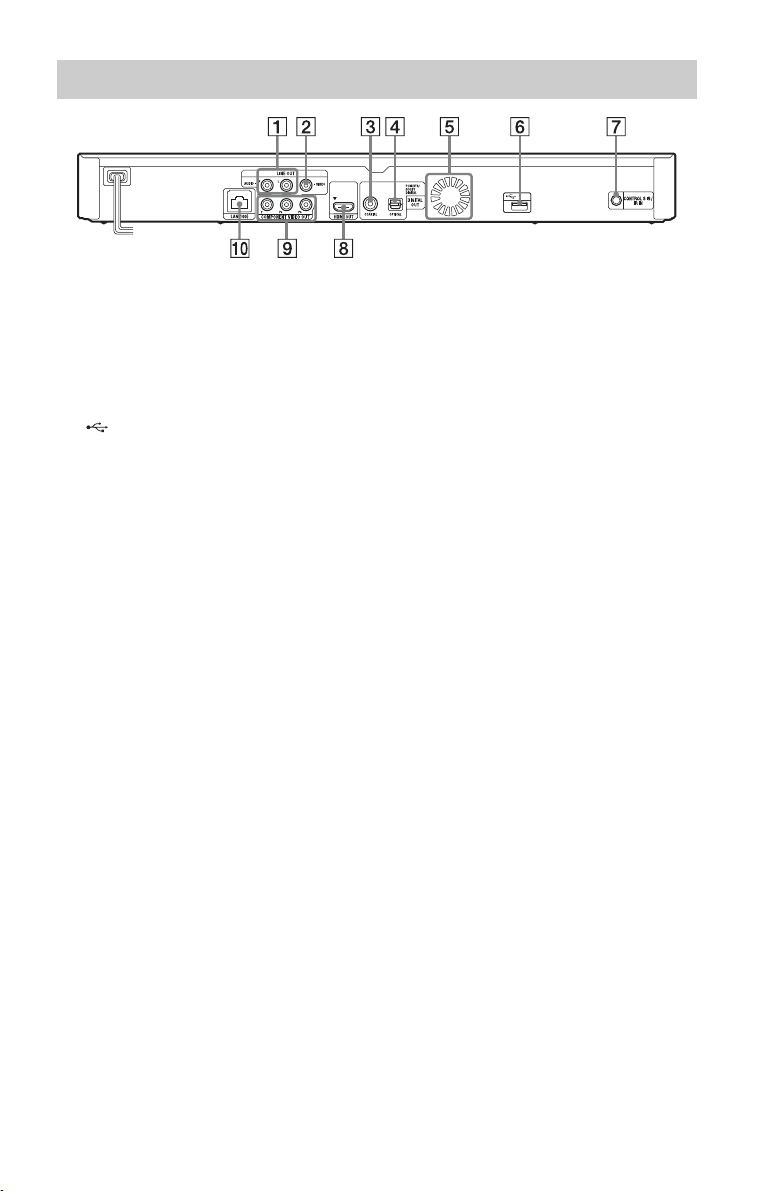
Rear panel
A LINE OUT (R-AUDIO-L) jacks
B LINE OUT (VIDEO) jack
C DIGITAL OUT (COAXIAL) jack
D DIGITAL OUT (OPTICAL) jack
E Ventilation holes
F (USB) jack
G CONTROL S IN / IR IN jack
If you have a CONTROL S-compatible
Sony TV or AV amplifier (receiver), use
a Control S cable (not supplied) to
connect to the Control S (output) jack.
Refer to the instruction manual supplied
with your TV or AV amplifier (receiver).
H HDMI OUT jack
I COMPONENT VIDEO OUT
(Y, PB, PR) jacks
J LAN (100) terminal
,continued
9
Page 10
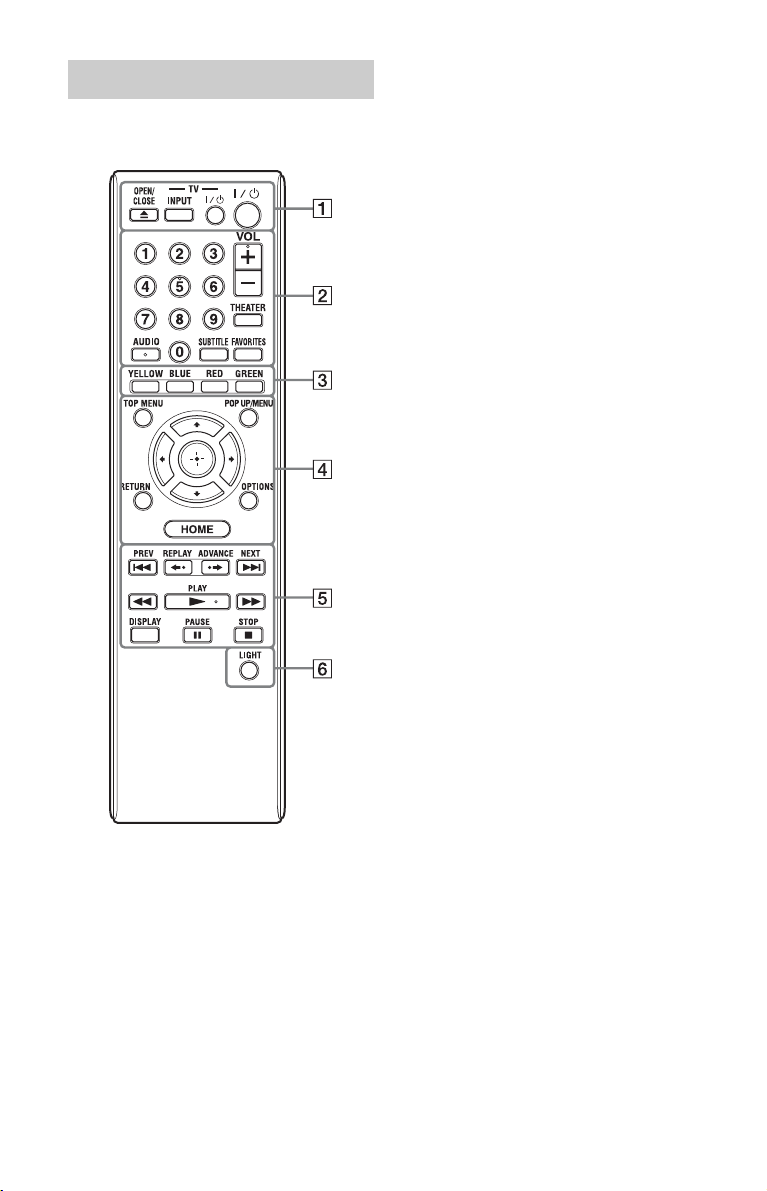
Remote
The available functions of the remote differ
depending on the disc or the situation.
z
Number 5, AUDIO, VOL +, and N PLAY buttons
have a tactile dot. Use the tactile dot as a reference
when operating the player.
The player automatically returns to
standby mode
If any button on the player or remote is not
pressed for more than 30 minutes, the player
automatically returns to standby mode.
A Z OPEN/CLOSE
Opens or closes the disc tray.
-TV- INPUT
Switches between TV and other input
sources.
-TV- [/1 (on/standby)
Turns on the TV, or sets to standby mode.
[/1 (on/standby)
Turns on the player, or sets to standby
mode.
B Number buttons (0 - 9)
Enters the title/chapter numbers, etc.
VOL +/–
Adjusts the TV volume.
THEATER (page 35)
Switches to the optimum video mode for
watching movies automatically.
The THEATER button functions only
when connected to a Sony Theater
Mode-compatible AV amplifier
(receiver) or Sony Theater Modecompatible TV.
AUDIO (page 26)
Selects the language track when multilingual tracks are recorded on BDROMs/DVD VIDEOs.
Selects the sound track on CDs.
SUBTITLE (page 26)
Selects the subtitle language when multilingual subtitles are recorded on BDROMs/DVD VIDEOs.
FAVORITES (page 20)
Displays the Internet content added to the
Favorites List. You can save up to 18 of
your favorite Internet content programs.
C Color buttons (YELLOW/BLUE/
RED/GREEN)
Short cut keys for interactive functions.
D TOP MENU
Opens or closes the BD’s or DVD’s Top
Menu.
POP UP/MENU
Opens or closes the BD-ROM’s Pop-up
Menu, or the DVD’s menu.
OPTIONS (page 20)
The options menu that can be selected
appears on the screen.
10
Page 11

HOME
Enters the player’s home menu.
Displays the wall paper when pressed on
the category icon of the home menu.
RETURN
Returns to the previous display.
</M/m/,
Moves the highlight to select a displayed
item.
Center button (ENTER)
Enters the selected item.
E . PREV/NEXT >
Skips to the previous/next chapter, track,
or file.
REPLAY/ADVANCE
Briefly replays the current scenes for
10 seconds/briefly fast forwards the
current scenes for 15 seconds.
m/M (fast reverse/fast
forward)
• Fast reverses/fast forwards the disc
when pressed during playback. Each
time you press the button during
playback of videos, the search speed
changes.
• Plays in slow motion, when pressed for
more than one second in pause mode.
• Plays one frame at a time, when pressed
briefly in pause mode.
N PLAY
Starts or re-starts playback.
DISPLAY (page 18)
Displays the playback information on the
screen.
X PAUSE
Pauses or re-starts playback.
x STOP
Stops playback and remembers the stop
point (resume point).
The resume point for a title/track is the
last point you played or the last photo for
a photo folder.
F LIGHT
Lights up the 4 and 5 buttons (except
</M/m/, and ENTER) and is useful
for operation in the dark.
Home menu display
The home menu appears when you press
HOME. Select a category using </,.
Select an item using M/m, and press ENTER.
Item Category
(Setup): Adjusts the player settings.
(Photo): Displays photos.
(Music): Plays music.
(Video): Plays videos.
(Network): Displays network items.
11
Page 12

Hookups and
Settings
Step 1: Preparing the Player
Checking the supplied
accessories
Check that you have the following items:
• Audio/video cable (phono plug ×3) (1)
• Remote commander (remote) (1)
• Size AA (R6) batteries (2)
Preparing the remote
Insert two Size AA (R6) batteries by
matching the 3 and # ends on the batteries
to the markings inside the battery
compartment.
12
Page 13

Step 2: Connecting the Player
Do not connect the AC power cord until you have made all the connections.
Connecting to your TV
Select one of the following connection methods according to the input jacks on your TV.
Match the color of the plug to that of the jack when connecting.
High quality
HDMI cable (not supplied)
Audio/video cable (supplied)
Hookups and Settings
Component video cable
(not supplied)
Audio/video cable (supplied)
Standard
quality
,continued
13
Page 14

b
Do not connect the player through a VCR. Video signals fed through VCRs may be affected by copyright
protection systems and the picture will be distorted on the television.
Connecting to your AV amplifier (receiver)
Select one of the following connection methods according to the input jacks on your AV
amplifier (receiver). When you select A or B, make the appropriate settings in the “Audio
Settings” setup (page 25).
HDMI cable
Coaxial digital cable (not supplied)
Optical digital cable (not supplied)
Audio/video cable (supplied)
(not supplied)
t Set “BD Audio MIX Setting” (page 25).
or
t Set “Dolby Digital (Coaxial / Optical)*1” (page 25)
and “DTS (Coaxial / Optical)
HDMI cable
(not supplied)
*2
” (page 25).
14
Page 15

*1
Step 3: Easy Setup
*2
When turned on for the first time
Wait for a short while before the player
turns on and starts “Easy Setup.”
Hookups and Settings
1 Plug the player into the AC outlet.
to AC outlet
2 Press [/1 to turn on the player.
3 Turn on the TV, then switch the input
selector on your TV so that the signal
from the player appears on your TV
screen.
4 Perform “Easy Setup.”
Follow the on-screen instructions to
make the basic settings using </M/m/
, and ENTER on the remote.
</M/m/,
ENTER
15
Page 16

Connecting to the Network
Wired Setup
Use a LAN cable to connect to the LAN (100)
terminal on the player.
LAN cable
(not supplied)
Broadband
router
ADSL modem/
Cable modem
Internet
To set the network settings
Select “Network Settings,” “Internet
Settings,” then “Wired Setup” (page 28), and
follow the on-screen instructions to complete
the setup.
Wireless Setup
Use a wireless LAN that is built into the
player.
LAN cable (not supplied)
Wireless LAN
router
To set the network settings
Select “Network Settings,” “Internet
Settings,” then “Wireless Setup” (page 28),
and follow the on-screen instructions to
complete the setup.
ADSL modem/
Cable modem
Internet
16
Page 17

Playback
Playing a Disc
For playable discs, see “Playable discs”
(page 33).
1 Switch the input selector on your TV so
that the signal from the player
appears on your TV screen.
2 Press Z OPEN/CLOSE, and place a
disc on the disc tray.
Playing side facing down
3 Press Z OPEN/CLOSE to close the
disc tray.
appears on the home menu and
playback starts.
If playback does not start automatically,
select in the (Video), (Music),
or (Photo) category, and press
ENTER.
Playback
Enjoying BONUSVIEW/BD-LIVE
Some BD-ROMs with the “BD-LIVE” logo*
have bonus content and other data that can be
downloaded for enjoyment.
*
1 Prepare for BONUSVIEW/BD-LIVE.
• Connect the player to a network
(page 16).
• Set “BD Internet Connection” to
“Allow” (page 26).
2 Insert a BD-ROM with BONUSVIEW/
BD-LIVE.
The operation method differs depending
on the disc. Refer to the instruction
manual supplied with the disc.
,continued
17
Page 18

z
To delete data in the internal memory or USB
memory, select “Erase BD Data” in the
(Video), and press ENTER. When the USB
memory is used as local storage, all data stored in
the buda/budb folder will be erased.
Displaying the play information
You can check the playback information,
etc., by pressing DISPLAY.
The displayed information differs depending
on the disc type and player status.
Enjoying Blu-ray 3D
You can enjoy a Blu-ray 3D Disc with the
“Blu-ray 3D” logo*.
*
1 Prepare for Blu-ray 3D Disc playback.
• Connect the player to your 3Dcompatible TV using a High Speed
HDMI cable.
• Set “3D Output Setting” and “TV
Screen Size Setting for 3D” in the
“Screen Settings” setup (page 23).
2 Insert a Blu-ray 3D Disc.
The operation method differs depending
on the disc. Refer to the instruction
manual supplied with the disc.
z
Refer also to the instruction manual supplied with
your TV.
Example: when playing a BD-ROM
A Output resolution/Video frequency
B Title number or name
C The currently selected audio setting
D Available functions ( angle,
audio, subtitle)
E Playback information
Displays the Play mode, Playing status
bar, Disc type, Video codec, Bitrate,
and Repeat type.
F Chapter number
G The currently selected angle
18
Page 19

Playing from a USB Device
You can play video/music/photo files on the
connected USB device.
For playable USB devices, see “Playable
types of files” (page 34).
1 Connect the USB device to the USB
jack on the player.
Refer to the instruction manual supplied
with the USB device before connecting.
USB device
2 Select (Video), (Music), or
(Photo) on the home menu using
</,.
3 Select (USB device) using M/m,
and press ENTER.
Playing via a Network
Streaming BRAVIA Internet
Video
Serves as a gateway delivering the selected
Internet content and a variety of on-demand
entertainment straight to your player.
1 Prepare for BRAVIA Internet Video.
Connect the player to a network
(page 16).
2 Select (Video), (Music), or
(Photo) on the home menu using
</,.
3 Select an Internet content provider
icon using M/m, and press ENTER.
When an Internet content list has not
been acquired, an unacquired icon or a
new icon is displayed.
To use the control panel
The control panel appears when the video file
starts playing. The displayed items may differ
depending on Internet content providers.
To display again, press DISPLAY.
Playback
A Control display
Press </M/m/, or ENTER for
playback operations.
B Playing status bar
Status bar, Cursor indicating the
current position, Playing time,
Duration of the video file
C The next video file name
D The currently selected video file name
and rating
,continued
19
Page 20

Playing files on a DLNA server
Plays video/music/photo files on your home
server, such as a DLNA certified PC by
connecting the player to the home network.
1 Prepare for playing files on a DLNA
server.
• Connect the player to a network
(page 16).
• Set “Connection Server Settings”
(page 28).
2 Select (Video), (Music), or
(Photo) on the home menu using
</,.
3 Select a DLNA server using M/m, and
press ENTER.
The file list or folder list appears.
Available Options
Various settings and playback operations are
available by pressing OPTIONS. The
available items differ depending on the
situation.
Common options
Items Details
Playback
History List
Repeat
Setting
Favorites List Displays the Favorites List.
Play/Stop Starts or stops the playback.
Play from
beginning
Information
Display
Search
History
Search
Contents
Add to
Favorites
Remove from
Favorites
Displays a title in playback
history of BD-ROM/DVDROM/CD-DA based on
Gracenote technology.
Sets the repeat mode.
Plays the item from the
beginning.
Displays information on the
BD-ROM/DVD-ROM/CDDA based on Gracenote
technology.
Searches for related
information based on
keywords acquired from
Gracenote on the
“Information Display.”
Searches for BRAVIA
Internet Video content based
on keywords acquired from
Gracenote on the
“Information Display.”
Adds Internet content to the
Favorites List.
Removes Internet content
from the Favorites List.
20
Page 21

(Video) only (Music) only
Items Details
3D Output
Setting
AV SYNC Adjusts the gap between
Video Settings • Picture Quality Mode:
Play/Pause Starts or pauses the
Top Menu Displays the BD’s or DVD’s
Menu/Popup
Menu
Title Search Searches for a title on BD-
Chapter
Search
Angle Switches to other viewing
IP Content
Noise
Reduction
Sets whether or not to output
3D video automatically.
picture and sound, by
delaying the sound output in
relation to the picture output
(0 to 120 milliseconds).
Selects the picture settings
for different lighting
environments.
• FNR: Reduces the random
noise appearing in the
picture.
• BNR: Reduces the mosaiclike block noise in the
picture.
• MNR: Reduces minor
noise around the picture
outlines (mosquito noise).
playback.
Top Menu.
Displays the BD-ROM’s
Pop-up Menu or DVD’s
menu.
ROMs/DVD VIDEOs and
starts playback from the
beginning.
Searches for a chapter and
starts playback from the
beginning.
angles when multi-angles
are recorded on BD-ROMs/
DVD VIDEOs.
Adjusts the picture qu ality of
Internet content.
Items Details
Add
Slideshow
BGM
(Photo) only
Items Details
Slideshow
Speed
Slideshow
Effect
Slideshow
BGM
Slideshow Plays a slideshow.
Rotate Left Rotates the photo
Rotate Right Rotates the photo clockwise
Registers music files in the
USB memory as slideshow
BGM.
Changes the slideshow
speed.
Sets the effect for
slideshows.
• Off: Turns off the
function.
• My Music from USB: Sets
the music files registered
in “Add Slideshow BGM.”
If no music file is
registered, “(Not
registered)” is displayed.
• Play from disc: Sets the
tracks in CD-DAs.
counterclockwise by
90 degrees.
by 90 degrees.
Playback
21
Page 22

Settings and Adjustments
Using the Settings Displays
Select (Setup) on the home menu when
you need to change the settings of the player.
The default settings are underlined.
1 Select (Setup) on the home menu
using </,.
2 Select the setup category icon using
M/m, and press ENTER.
Icon Explanation
Network Update (page 23)
Updates the software of the
player.
Screen Settings (page 23)
Makes the video settings
according to the type of
connecting jacks.
Audio Settings (page 25)
Makes the audio settings
according to the type of
connecting jacks.
BD/DVD Viewing Settings
(page 26)
Makes detailed settings for BD/
DVD playback.
Parental Control Settings
(page 26)
Makes detailed settings for the
Parental Control function.
Music Settings (page 27)
Makes detailed settings for
Super Audio CD playback.
System Settings (page 27)
Makes the player-related
settings.
Network Settings (page 28)
Makes detailed settings for the
Internet and network.
Easy Setup (page 28)
Re-runs the Easy Setup to make
the basic settings.
Resetting (page 28)
Resets the player to the factory
settings.
22
Page 23

Network Update
Screen Settings
Select “OK” to update the player’s software
via the network.
z
• We recommend the network update every 2
months or so.
• For information about update functions, visit the
following website:
http://www.sony.com/bluraysupport/
3D Output Setting
Auto Normally select this.
Off Select this to display all
content in 2D.
TV Screen Size Setting for 3D
Sets the screen size of your 3D-compatible
TV.
TV Type
16:9
4:3 Select this when connecting
Select this when connecting
to a wide-screen TV or a TV
with a wide mode function.
to a 4:3 screen TV without a
wide mode function.
Screen Format
Original
Fixed Aspect
Ratio
Select this when connecting
to a TV with a wide mode
function. Displays a 4:3
screen picture in 16:9 aspect
ratio even on a wide-screen
TV.
Changes the picture size to
fit the screen size with the
original picture aspect ratio.
Settings and Adjustments
DVD Aspect Ratio
Letter Box
Pan & Scan Displays a full-height
Displays a wide picture with
black bands on the top and
bottom.
picture on the entire screen,
with trimmed sides.
,continued
23
Page 24

Cinema Conversion Mode
Auto Normally select this. The
Video The conversion method
player automatically detects
whether the material is
video-based or film-based,
and switches to the
appropriate conversion
method.
suited for video-based
material will always be
selected regardless of the
material.
Output Video Format
HDMI
Component
Video
Video Automatically sets the
z
• When connecting the HDMI OUT jack and other
video output jacks at the same time, select
“Component Video.”
• If no picture appears when setting “HDMI” or
“Component Video” resolution, try another
resolution setting.
Normally select “Auto.”
Select “Original Resolution”
to output the resolution
recorded on the disc. When
the resolution is lower than
the SD resolution, it is scaled
up to the SD resolution.
Select the resolution that
suits your TV.
lowest resolution.
YCbCr/RGB (HDMI)
Auto Automatically detects the
YCbCr (4:2:2) Outputs YCbCr 4:2:2 video
YCbCr (4:4:4) Outputs YCbCr 4:4:4 video
RGB Outputs RGB video signals.
connected TV type, and
switches to the matching
color setting.
signals.
signals.
HDMI Deep Color Output
Auto
12bit Outputs 12bit/10bit video
10bit
Off Select this when the picture
Normally select this.
signals when the connected
TV is compatible with Deep
Color.
is unstable or colors appear
unnatural.
Pause Mode
Auto
Frame Displays static pictures at
Normally select this.
Dynamic moving pictures
appear without blurring.
high resolution.
BD/DVD-ROM 1080/24p Output
Auto
Off Select this when your TV is
Outputs 1920 × 1080p/
24 Hz video signals only
when connecting a 1080/
24p-compatible TV using
the HDMI OUT jack.
not compatible with 1080/
24p video signals.
24
Page 25

Audio Settings
Audio (HDMI)
Auto Normally select this.
PCM Outputs PCM signals from
DSD Output Mode
On Outputs DSD signals from
Off
BD Audio MIX Setting
On
Off Outputs the primary audio
Dolby Digital (Coaxial / Optical)
Downmix
PCM
Dolby Digital
Outputs audio signals
according to the status of the
connected HDMI device.
the HDMI OUT jack.
the HDMI OUT jack when
playing a Super Audio CD.
When “On” is selected, no
signal is output from other
jacks.
Outputs PCM signals from
the HDMI OUT jack when
playing a Super Audio CD.
Outputs the audio obtained
by mixing the interactive
and secondary audio to the
primary audio.
only. Select this to output
HD audio signals to an AV
amplifier (receiver).
Converts to output Linear
PCM signals. Select this
when connecting an audio
device without a built-in
Dolby Digital decoder.
Select this when connecting
an audio device with a builtin Dolby Digital decoder.
DTS Neo:6
Cinema Performs “DTS Neo:6
Music Performs “DTS Neo:6
Off
Cinema” mode decoding. A
source recorded in 2-channel
format is decoded into 7
channels.
Music” mode decoding. A
source recorded in 2-channel
format is decoded into 7
channels. This setting is
ideal for normal stereo
sources such as CDs.
Turns off “DTS Neo:6”
decoding.
Audio DRC
Auto Performs playback at the
Standard Performs playback at a
Wide Range No compression works. A
dynamic range specified by
the disc (BD-ROM only).
Other discs are played back
at the “Standard” level.
standard compression level.
more dynamic sound is
produced.
Downmix
Surround
Stereo Outputs audio signals
Outputs audio signals with
surround effects. Select this
when connecting an audio
device that supports Dolby
Surround (Pro Logic) or
DTS Neo 6.
without surround effects.
Select this when connecting
an audio device that does not
support Dolby Surround
(Pro Logic) or DTS Neo 6.
Settings and Adjustments
DTS (Coaxial / Optical)
Downmix
PCM
DTS
Converts to output Linear
PCM signals. Select this
when connecting to an audio
device without a built-in
DTS decoder.
Select this when connecting
to an audio device with a
built-in DTS decoder.
25
Page 26

BD/DVD Viewing
Parental Control
Settings
BD/DVD Menu
Selects the default menu language for BDROMs or DVD VIDEOs.
When you select “Select Language Code,”
the display for entering the language code
appears. Enter the code for your language by
referring to “Language code list” (page 38).
Audio
Selects the default track language for BDROMs or DVD VIDEOs.
When you select “Original,” the language
given priority in the disc is selected.
When you select “Select Language Code,”
the display for entering the language code
appears. Enter the code for your language by
referring to “Language code list” (page 38).
Subtitle
Selects the default subtitle language for BDROMs or DVD VIDEOs.
When you select “Select Language Code,”
the display for entering the language code
appears. Enter the code for your language by
referring to “Language code list” (page 38).
BD Hybrid Disc Playback Layer
BD Plays BD layer.
DVD/CD Plays DVD or CD layer.
BD Internet Connection
Allow Normally select this.
Do not allow
BD Data Jack Selection
Internal
memory
USB device
(rear)
Prohibits Internet
connection.
Stores the BD data in the
internal memory.
Stores the BD data in the
USB memory connected to
the USB jack (rear).
Settings
Password
Sets or changes the password for the Parental
Control function. A password allows you to
set a restriction on BD-ROM or DVD
VIDEO, and Internet video playback. If
necessary, you can differentiate the
restriction levels for BD-ROMs, DVD
VIDEOs, and Internet videos.
Parental Control Area Code
Playback of some BD-ROMs, DVD
VIDEOs, or Internet videos can be limited
according to the geographic area. Scenes may
be blocked or replaced with different scenes.
Follow the on-screen instructions and enter
your four-digit password.
BD Parental Control
Playback of some BD-ROMs can be limited
according to the age of the users. Scenes may
be blocked or replaced with different scenes.
Follow the on-screen instructions and enter
your four-digit password.
DVD Parental Control
Playback of some DVD VIDEOs can be
limited according to the age of the users.
Scenes may be blocked or replaced with
different scenes. Follow the on-screen
instructions and enter your four-digit
password.
Internet Video Parental Control
Playback of some Internet videos can be
limited according to the age of the users.
Scenes may be blocked or replaced with
different scenes. Follow the on-screen
instructions and enter your four-digit
password.
Internet Video Unrated
Allow Allows the playback of
unrated Internet videos.
Block Blocks the playback of
unrated Internet videos.
26
Page 27

Music Settings
Super Audio CD Playback Layer
Super Audio CDPlays the Super Audio CD
layer.
CD Plays the CD layer.
Screen Saver
On Turns on the screen saver
function. The screen saver
image appears when you do
not use the player for more
than 10 minutes while an onscreen display is displayed.
Off Turns off the function.
Super Audio CD Playback Channel
DSD 2ch Plays the 2ch area.
DSD Multi
Plays the multi-channel area.
System Settings
OSD
Selects your language for the player onscreen displays.
Dimmer
Bright
Dark Low lighting.
Off Turns off the lighting during
Control for HDMI
On
Off Turns off the function.
Quick Start Mode
On Shortens the startup time
Off
Bright lighting.
playback. Low lighting other
than during playback.
Allows you to use the
“Control for HDMI”
function (page 35).
when turning on the player.
Reduces standby power
consumption.
Software Update Notification
On
Off Turns off the function.
Sets the player to inform you
of newer software version
information (page 23).
Gracenote Settings
Auto
Manual Downloads the disc
Automatically downloads
disc information when disc
playback stops. Connect to
the network for
downloading.
information w hen “Playback
History List” or
“Information Display” is
selected in the options menu.
System Information
Displays the player’s software version
information and the MAC address.
Settings and Adjustments
Auto Display
On
Off Displays information only
Automatically displays
information on the screen
when changing the viewing
titles, picture modes, audio
signals, etc.
when you press DISPLAY.
27
Page 28

Network Settings
Easy Setup
Internet Settings
Connect the player to the network
beforehand. For details, see “Connecting to
the Network” (page 16).
View Network
Status
Wired Setup
Wireless
Setup
Displays the current
network status.
Select this when you
connect to a broadband
router directly.
Select this when you use a
wireless LAN router.
For further details, visit the
following website and check
the FAQ contents:
http://www.sony.com/
bluraysupport/
Network Connection Diagnostics
You can run the network diagnostic to check
if the network connection has been made
properly.
Connection Server Settings
Sets whether or not to display the connected
server.
BD Remote Device Registration
Registers your “BD Remote” device.
Re-runs the “Easy Setup” to make the basic
settings. Follow the on-screen instructions.
Resetting
Reset to Factory Default Settings
You can reset the player settings to the
factory default by selecting the group of
settings. All the settings within the group will
be reset.
Initialize Personal Information
You can erase your personal information
stored in the player.
Registered BD Remote Devices
Displays a list of the registered your “BD
Remote” devices.
28
Page 29

Additional
Information
Troubleshooting
If you experience any of the following
difficulties while using the player, use this
troubleshooting guide to help remedy the
problem before requesting repairs. Should
any problem persist, consult your nearest
Sony dealer.
Picture
There is no picture or the picture is not
output correctly.
, Check that all the connecting cables are
securely connected (page 13).
, Switch the input selector on your TV to
display the signal from the player.
, Reset the video output resolution to the
lowest resolution by pressing x on the
player for more than 10 seconds.
, For HDMI connections, try the following:
1Turn the player off and on again. 2Turn
the connected equipment off and on again.
3Disconnect and then reconnect the HDMI
cable.
, The HDMI OUT jack is connected to a DVI
device that does not support copyright
protection technology.
, For HDMI connections, check the “Output
Video Format” settings in the “Screen
Settings” setup (page 24).
, When the analog signals are also output, set
“BD/DVD-ROM 1080/24p Output” to
“Off” in the “Screen Settings” setup
(page 24).
, For BD-ROMs, check the “BD/DVD-ROM
1080/24p Output” setting in the “Screen
Settings” setup (page 24).
Additional Information
The display language on the screen
switches automatically when connected to
the HDMI OUT jack.
, When “Control for HDMI” is set to “On”
(page 27), the display language on the
screen automatically switches according to
the language setting of the connected TV (if
you change the setting on your TV, etc.).
,continued
29
Page 30

Sound Disc
There is no sound or the sound is not
output correctly.
, Check that all the connecting cables are
securely connected (page 13).
, Switch the input selector on your AV
amplifier (receiver) so that the audio signals
of the player are output from your AV
amplifier (receiver).
, If the audio signal does not come through
the DIGITAL OUT (OPTICAL/
COAXIAL)/HDMI OUT jack, check the
audio settings (page 25).
, For HDMI connections, try the following:
1Turn the player off and on again. 2Turn
the connected equipment off and on again.
3Disconnect and the n reconnect the HDMI
cable.
, For HDMI connections, if the player is
connected to a TV through an AV amplifier
(receiver), try connecting the HDMI cable
directly to the TV. Refer also to the
instruction manual supplied with the AV
amplifier (receiver).
, The HDMI OUT jack is connected to a DVI
device (DVI jacks do not accept audio
signals).
, The device connected to the HDMI OUT
jack does not support the audio format of
the player. Check the audio settings
(page 25).
The HD Audio (Dolby Digital Plus, Dolby
TrueHD, DTS-HD High Resolution Audio,
and DTS-HD Master Audio) is not output
by bitstream.
, Set “BD Audio MIX Setting” to “Off” in
the “Audio Settings” setup (page 25).
, Check that the connected AV amplifier
(receiver) is compatible with each HD
Audio format.
The disc does not play.
, The disc is dirty or skewed.
, The disc is upside down. Insert the disc with
the playback side facing down.
, The disc has a format that cannot be played
back by this player (page 33).
, The player cannot play a recorded disc that
is not correctly finalized.
, The region code on the BD or DVD does
not match the player.
USB device
The player does not detect a USB device
connected to the player.
, Make sure that the USB device is securely
connected to the USB jack.
, Check if the USB device or a cable is
damaged.
, Check if the USB device is on.
, If the USB device is connected via a USB
hub, connect the USB device directly to the
player.
BRAVIA Internet Video
The picture/sound is poor/certain
programs display a loss of detail,
especially during fast-motion or dark
scenes.
, Picture/sound quality may be poor
depending on Internet content providers.
, Picture/sound quality may be improved by
changing the connection speed. We
recommend the connection speed of at least
2.5 Mbps for standard definition video
(10 Mbps for high definition video).
, Not all videos will contain sound.
The interactive audio is not output.
, Set “BD Audio MIX Setting” to “On” in the
“Audio Settings” setup (page 25).
30
The picture is small.
, Press M to zoom in.
Page 31

Network connection BRAVIA Sync (“Control for
The player cannot connect to the network.
, Check the network connection (page 16)
and the network settings (page 28).
You cannot connect your PC to the Internet
after “Wi-Fi Protected Setup (WPS)” is
performed.
, The wireless settings of the router may
change automatically if you use the Wi-Fi
Protected Setup function before adjusting
the settings of the router. In this case,
change the wireless settings of your PC
accordingly.
You cannot connect the player to the
wireless LAN router.
, Check if the wireless LAN router is on.
, Depending on the surrounding
environment, such as the wall material,
radio wave receiving con dition, or obstacles
between the player and the wireless LAN
router, the communication distance may be
shortened. Move the player and the wireless
LAN router closer to each other.
, Devices that use a 2.4 GHz frequency band,
such as a microwave, Bluetooth, or digital
cordless device, may interrupt the
communication. Move the player away
from such devices, or turn off such devices.
The desired wireless router is not
detected even if “Scan” is performed.
, Press RETURN to return to the previous
screen, and try “Scan” again. If the desired
wireless router is still not detected, press
RETURN to select “Manual registration.”
HDMI”)
The “Control for HDMI” function does not
work (BRAVIA Sync).
, Check that “Control for HDMI” is set to
“On” (page 27).
, If you change the HDMI connection, turn
the player off and on again.
, If power failure occurs, set “Control for
HDMI” to “Off,” then set “Control for
HDMI” to “On” (page 27).
, Check the following and refer to the
instruction manual supplied with the
component.
– the connected component is compatible
with the “Control for HDMI” function.
– the connected component’s setting for
the “Control for HDMI” function is
correct.
, When you connect the player to a TV
through an AV amplifier (receiver),
– if the AV amplifier (receiver) is not
compatible with the “Control for HDMI”
function, you may be unable to control
the TV from the player.
– if you change the HDMI connection,
disconnect and reconnect the AC power
cord, or a power failure occurs, try the
following:
the AV amplifier (receiver) so that the
picture from the player appears on the
TV screen.
“Off,” then set “Control for HDMI” to
“On” (page 27). Refer to the instruction
manual supplied with the AV amplifier
(receiver).
1Switch the input selector of
2Set “Control for HDMI” to
Additional Information
The message “A new software version has
been found on the network. Perform
update under "Network Update."” appears
on the screen when turning the player on.
, See “Network Update” (page 23) to update
the player to a newer software version.
,continued
31
Page 32

Others
Playback does not start from the
beginning of content.
, Press OPTIONS, and select “Play from
beginning.”
Playback does not start from the resume
point where you last stopped playing.
, The resume point may be cleared from
memory depending on the disc when
– you open the disc tray.
– you disconnect the USB device.
– you play other content.
– you turn off the player.
The disc tray does not open and
“LOCKED” or “TLK ON” appears on the
front panel display.
, When “LOCKED” appears, the player is
locked. To cancel the Child Lock, hold
down N on the player until “UNLOCK”
appears on the front panel display (page 8).
, When “TLK ON” appears, contact your
Sony dealer or local authorized Sony
service facility.
The disc tray does not open and you
cannot remove the disc even after you
press Z.
, Try the following: 1Turn the player off,
and disconnect the AC power cord.
2Reconnect the AC power cord while
pressing down Z on the player.
pressing down Z on the player until the tray
4Remove the disc. 5When
opens.
“OPEN” appears on the front panel display,
hold down [/1 on the player for more than
10 seconds until the player turns off.
3Keep
“Exxxxx” or “FAN ERR” appears on the
front panel display.
, When “Exxxxx” appears, contact your
nearest Sony dealer or local authorized
Sony service facility and give the error
code.
, When “FAN ERR” appears, try the
following: 1Check that the ventilation
holes on the rear of the player are not
blocked. 2Place the player in a location
with adequate ventilation to prevent heat
build-up in the player.
The player does not respond to any button.
, Moisture has condensed inside the player
(page 4).
, Hold down [/1 on the player for more than
10 seconds until the indicators on the front
panel display turn off.
If the player still does not respond to any
button, disconnect then reconnect the AC
power cord.
32
Page 33

Specifications
System
Laser: Semiconductor laser
Inputs and outputs
(Jack name:
Jack type/Output level/Load impedance)
LINE OUT R-AUDIO-L:
Phono jack/2 Vrms/10 kilohms
DIGITAL OUT (OPTICAL):
Optical output jack/–18 dBm
(wave length 660 nm)
DIGITAL OUT (COAXIAL):
Phono jack/0.5 Vp-p/75 ohms
HDMI OUT:
HDMI 19-pin standard connector
COMPONENT VIDEO OUT
LINE OUT VIDEO:
LAN (100):
CONTROL S IN / IR IN:
USB:
Wireless
Wireless LAN standard:
Frequency range:
Modulation:
B, PR):
(Y, P
Phono jack/Y: 1.0 Vp-p/
B, PR: 0.7 Vp-p/75 ohms
P
Phono jack/1.0 Vp-p/75 ohms
100BASE-TX Terminal
Mini jack
USB jack Type A (For connecting a USB
memory, memory card reader, digital still
camera, and digital video camera)
IEEE802.11a/b/g/n
2.4 GHz band: Channels 1-11
5 GHz band: Channels 36-64, 100-140,
149-165
DS-SS Modem and OFDM Modem
General
Power requirements:
120 V AC, 60 Hz
Power consumption:
24 W
Dimensions (approx.):
430 mm × 215 mm × 50 mm
(17 in. × 8
1
/2 in. × 2 in.)
(width/depth/height) incl. projecting parts
Mass (approx.):
2.5 kg (5 lb 8
1
/8 oz)
Operating temperature:
5ºC to 35ºC (41°F to 95°F)
Operating humidity:
25 % to 80 %
Supplied accessories
See page 12.
Specifications and design are subject to
change without notice.
Playable discs
Blu-ray
*1
Disc
*3
DVD
*3
CD
*1
Since the Blu-ray Disc specifications are new
and evolving, some discs may not be playable
depending on the disc type and the version.
The audio output differs depending on the
source, connected output jack, and selected
audio settings.
*2
BD-RE: Ver.2.1
BD-R: Ver.1.1, 1.2, 1.3 including organic
pigment type BD-R (LTH type)
The BD-Rs recorded on a PC cannot be played if
postscripts are recordable.
*3
A CD or DVD disc will no t play if it has not been
correctly finalized. For more information, refer
to the instruction manual supplied with the
recording device.
BD-ROM
BD-R
*2
/BD-RE
*2
DVD-ROM
DVD-R/DVD-RW
DVD+R/DVD+RW
CD-DA (Music CD)
CD-ROM
CD-R/CD-RW
Super Audio CD
Additional Information
,continued
33
Page 34

Discs that cannot be played
• BDs with cartridge
• DVD-RAMs
• HD DVDs
• DVD Audio discs
• PHOTO CDs
• Data part of CD-Extras
• VCDs/Super VCDs
• Audio material side on DualDiscs
• A disc recorded in a color system other than
NTSC, such as PAL (this player conforms
to the NTSC color system).
Note on Discs
This product is designed to playback discs
that conform to the Compact Disc (CD)
standard. DualDiscs and some of the music
discs encoded with copyright protection
technologies do not conform to the Compact
Disc (CD) standard, therefore, these discs
may not be playable by this product.
Note on playback operations of BDs/DVDs
Some playback operations of BDs/DVDs
may be intentionally set by software
producers. Since this player plays BDs/
DVDs according to the disc contents the
software producers designed, some playback
features may not be available.
Note about double-layer BDs/DVDs
The playback pictures and sound may be
momentarily interrupted when the layers
switch.
Region code (BD-ROM/DVD VIDEO only)
Your player has a region code printed on the
rear of the unit and will only play BD-ROMs/
DVD-ROMs labeled with identical region
codes or
ALL
.
Region code
Playable types of files
Video
File format Extensions
MPEG-1 Video/
*1*4
PS
MPEG-2 Video/PS,
*1*5
TS
MPEG-4 AVC
WMV9
AVCHD
*1*4
*1*4
*4 *2
Music
File format Extensions
MP3 (MPEG-1 Audio
Layer III)
*1*3*4
AAC
WMA9
Standard
LPCM “.wav”
*1*3*4
Photo
File format Extensions
JPEG “.jpg,” “.jpeg”
*1
The player does not play coded files such as
DRM.
*2
The player plays AVCHD format files that are
recorded on a digital video camera, etc. The
AVCHD format disc will not play if it has not
been correctly finalized.
*3
The player does not play coded files such as
Lossless.
*4
The player does not play this file format on a
DLNA server.
*5
The player can only play standard definition
video on a DLNA server.
“.mpg,” “.mpeg,”
“.m2ts,” “.mts”
“.mkv,” “.mp4,”
“.m4v,” “.m2ts,”
“.mts”
“.wmv,” “.asf”
“.mp3”
“.m4a”
“.wma”
34
Page 35

b
• Some files may not play depending on the file
format, file encoding, recording condition, or
DLNA server condition.
• Some files edited on a PC may not play.
• The player can recognize the following files or
folders in BDs, DVDs, CDs and USB devices:
– up to folders in the 5th tree
– up to 500 files in a single tree
• The player can recognize the following files or
folders stored in the DLNA server:
– up to folders in the 20th tree
– up to 999 files in a single tree
• Some USB devices may not work with this
player.
• The player can recognize Mass Storage Class
(MSC) devices (such as flash memory or an
HDD) that are FAT-compatible and nonpartitioned, Still Image Capture Device (SICD)
class devices and 101 keyboard (front USB jack
only).
• To avoid data corruption or damage to the USB
memory or devices, turn the player off when
connecting or removing the USB memory or
devices.
• The player may not play high bit rate video files
on DATA CDs smoothly. You are recommended
to play such files using DATA DVDs.
About the BRAVIA Sync
features (for HDMI connections
only)
By connecting Sony components that are
compatible with the “Control for HDMI”
function with an HDMI cable (not supplied),
operation is simplified as below:
• One-Touch Play
With one touch of the following buttons, the
connected TV turns on and the input
selector on the TV is switched to the player
automatically.
– [/1
– HOME: The home menu appears
automatically (page 11, 17, 22).
– N PLAY: Playback starts automatically.
• System Power-Off
When you turn off the TV using -TV- [/1
or the power button on the TV’s remote, the
player and HDMI-compatible components
turn off automatically.
• Theater
When you press THEATER, the player
automatically switches to the optimum
video mode for watching movies. When
connected with a Sony AV amplifier
(receiver) using the HDMI cable, the
speaker output also switches automatically.
When connected with a Theater Modecompatible TV using the HDMI cable, the
TV’s video mode switches to Theater
Mode. Press the button again to return to the
original setting.
• Language Follow
When you change the language for the onscreen display on your TV, the player’s
language for the on-screen display is also
changed after turning the player off and on.
To prepare for the BRAVIA Sync features
Set “Control for HDMI” to “On” in the
“System Settings” setup (page 27).
For details on settings of your TV or other
connected components, refer to the
instruction manual supplied with the TV or
components.
z
• When connecting the Sony TV that is compatible
with the “Control for HDMI” Easy Setting
function using the HDMI cable, the “Control for
HDMI” setting of the player automatically
switches to “On” if the “Control for HDMI”
setting on the connected TV is set to “On.” Refer
to the instruction manual supplied with the TV.
• When connecting the Sony TV that is compatible
with the BRAVIA Sync features using the HDMI
cable, you can control the basic functions of the
player with the TV’s remote if the “Control for
HDMI” setting on the connected TV is set to
“On.” Refer to the instruction manual supplied
with the TV.
b
Depending on the connected component, the
“Control for HDMI” function may not work. Refer
to the instruction manual supplied with the
component.
Additional Information
,continued
35
Page 36

About wireless LAN security Copyrights and Trademarks
Since communication via the wireless LAN
function is established by radio waves, the
wireless signal may be susceptible to
interception. To protect wireless
communication, this player supports various
security functions. Be sure to correctly
configure the security settings in accordance
with your network environment.
No Security
Although you can easily make settings,
anyone can intercept wireless
communication or intrude into your wireless
network, even without any sophisticated
tools. Keep in mind that there is a risk of
unauthorized access or interception of data.
WEP
WEP applies security to communications to
prevent outsiders from intercepting
communications or intruding into your
wireless network. WEP is a legacy security
technology that enables older devices, which
do not support TKIP/AES, to be connected.
WPA-PSK (TKIP), WPA2-PSK (TKIP)
TKIP is a security technology developed to
correct for the deficiencies of WEP. TKIP
assures a higher security level than WEP.
WPA-PSK (AES), WPA2-PSK (AES)
AES is a security technology that uses an
advanced security method that is distinct
from WEP and TKIP.
AES assures a higher security level than
WEP or TKIP.
• “AVCHD” and the “AVCHD” logo are
trademarks of Panasonic Corporation and Sony
Corporation.
• Java and all Java-based trademarks and logos are
trademarks or registered trademarks of Sun
Microsystems, Inc. in the U.S. and other
countries.
• , “XMB,” and “xross media bar” are
trademarks of Sony Corporation and Sony
Computer Entertainment Inc.
• This product incorporates High-Definition
Multimedia Interface (HDMI™) technology.
HDMI, the HDMI logo and High-Definition
Multimedia Interface are t rademarks or reg istered
trademarks of HDMI Licensing LLC.
• “Blu-ray Disc” is a trademark.
• “Blu-ray Disc,” “DVD+RW,” “DVD-RW,”
“DVD+R,” “DVD-R,” “DVD VIDEO,” and
“CD” logos are trademarks.
• “BD-LIVE,” “BD-LIVE” logo, and
“BONUSVIEW” are trademarks of Blu-ray Disc
Association.
• “Blu-ray 3D” and “Blu-ray 3D” logo are
trademarks of Blu-ray Disc Association.
• “x.v.Color” and “x.v.Color” logo are trademarks
of Sony Corporation.
• “BRAVIA” is a trademark of Sony Corporation.
• “PhotoTV HD” and the “PhotoTV HD” logo are
trademarks of Sony Corporation.
• MPEG Layer-3 audio coding technology and
patents licensed from Fraunhofer IIS and
Thomson.
• Windows Media is either a registered trademark
or trademark of Microsoft Corporation in the
United States and/or other countries.
This product is protected by certain intellectual
property rights of Microsoft Corporation. Use or
distribution of such technology outside of this
product is prohibited without a license from
Microsoft or an authorized Microsoft subsidiary.
• This product meets ENERGY STAR
for energy efficiency.
ENERGY STAR and the ENERGY STAR mark
are registered U.S. marks. ENERGY STAR is a
registered mark owned by the U.S. government.
®
guidelines
36
Page 37

• Music and video recognition technology and
related data are provided by Gracenote
Gracenote is the industry standard in music
recognition technology and related content
delivery. For more information, please visit
www.gracenote.com.
CD, DVD, Blu-ray Disc, and music and videorelated data from Gracenote, Inc., copyright ©
2000-present Gracenote. Gracenote Software,
copyright © 2000-present Gracenote. One or
more patents owned by Gracenote apply to this
product and service. See the Gracenote website
for a nonexhaustive list of applicable Gracenote
patents. Gracenote, CDDB, MusicID,
MediaVOCS, the Gracenote logo and logotype,
and the “Powered by Gracenote” logo are either
registered trademarks or trademarks of Gracenote
in the United States and/or other countries.
• The Wi-Fi CERTIFIED™ Logo is a certification
mark of the Wi-Fi Alliance.
• The Wi-Fi Protected Setup™ Mark is a mark of
the Wi-Fi Alliance.
• “Wi-Fi CERTIFIED™” and “Wi-Fi Protected
Setup™” are trademarks of the Wi-Fi Alliance.
®
•DLNA
• Other system and product names are generally
, the DLNA Logo and DLNA
®
CERTIFIED
certification marks of the Digital Living Network
Alliance.
trademarks or registered trademarks of the
manufacturers. ™ and ® marks are not indicated
in this document.
are trademarks, service marks, or
®
.
Code numbers of controllable
TVs
While holding down -TV- [/1, enter the
TV’s manufacturer code using the number
buttons.
If more than one code number is listed, try
entering them one at a time until you find the
one that works with your TV.
Manufacturer Code number
Sony 01 (default)
Daewoo 22
Emerson 14
Funai 23
General Electric 06
Goldstar 03, 04, 17
Hitachi 02
JVC 09
LG 04
Mitsubishi/MGA 13
NEC 04
Panasonic 19
Philips 08, 21
Pioneer 16
Radio Shack 05
RCA 10
Samsung 12, 20
Sanyo 11
Sharp 05, 18
Toshiba 07
Zenith 15
Additional Information
,continued
37
Page 38

Language code list
For details, see “BD/DVD Viewing Settings” (page 26).
The language spellings conform to the ISO 639: 1988 (E/F) standard.
Code Language
Parental control/area code
For details, see “Parental Control Area Code” (page 26).
Number, Area (Code)
2044, Argentina (ar)
2047, Australia (au)
2046, Austria (at)
2057, Belgium (be)
2070, Brazil (br)
2090, Chile (cl)
2092, China (cn)
2093, Colombia (co)
2115, Denmark (dk)
2165, Finland (fi)
2174, France (fr)
2109, Germany (de)
2200, Greece (gr)
2219, Hong Kong (hk)
2248, India (in)
2238, Indonesia (id)
2239, Ireland (ie)
2254, Italy (it)
2276, Japan (jp)
2304, Korea (kr)
2333, Luxembourg (lu)
2363, Malaysia (my)
2362, Mexico (mx)
2376, Netherlands (nl)
2390, New Zealand (nz)
2379, Norway (no)
38
not specified
2427, Pakistan (pk)
2424, Philippines (ph)
2428, Poland (pl)
2436, Portugal (pt)
2489, Russia (ru)
2501, Singapore (sg)
2149, Spain (es)
2499, Sweden (se)
2086, Switzerland (ch)
2543, Taiwan (tw)
2528, Thailand (th)
2184, United Kingdom (gb)
Page 39

Index
Words in quotations appear
in the on-screen displays.
Numerics
3D 18
“3D Output Setting”
A
AUDIO 10
“Audio Settings”
B
Batteries 12
“BD/DVD Viewing
Settings”
BD-LIVE
BD-R
BD-RE
Bitstream
Blu-ray Disc
BONUSVIEW
BRAVIA Internet Video
19
BRAVIA Sync
26
17
33
33
30
C
CD 33
Child Lock
Color buttons
Connecting
“Control for HDMI”
31, 35
8, 32
AV amplifier
(Receiver)
Network
13
TV
23
25
33
17
31, 35
10
14
16
27,
D
Deep Color 24
“Dimmer”
DISPLAY
20, 28
DLNA
Dolby Digital
“DSD Output Mode”
25
DTS
33
DVD
E
“Easy Setup” 15, 28
F
FAVORITES 10
G
“Gracenote Settings” 27
H
HDMI 24, 25
11, 22
HOME
Home menu
I
Internet content 10, 19
“IP Content Noise
Reduction”
L
Language Follow 35
M
MAC address 27
“Music Settings”
N
“Network Settings” 28
“Network Update”
O
One-Touch Play 35
OPTIONS
27
“OSD”
27
11
21
10
22
25
27
23
25
P
Parental Control 26
“Parental Control Settings”
26
Play information
Playable discs
POP UP/MENU
18
33
10
Q
“Quick Start Mode” 27
R
Region code 34
Remote
10, 12
“Resetting”
Resetting the player
Resume
28
28
11, 32
S
“Screen Settings” 23
22
“Setup”
Software update
SUBTITLE
System Power-Off
“System Settings”
23, 27
10
35
27
T
THEATER 10, 35
TOP MENU
Troubleshooting
“TV Screen Size Setting
for 3D”
“TV Type”
10
29
23
23
U
Update 23
19
USB
W
WEP 36
WPA2-PSK (AES)
WPA2-PSK (TKIP)
WPA-PSK (AES)
WPA-PSK (TKIP)
36
36
36
36
39
 Loading...