

Page 1
2-895-765-13(1)
English
Preparation
Connecting to a computer
Cradle
Operating Instructions / Mode d’emploi
BCR-NWU3
© 2006 Sony Corporation Printed in China
A
BCD
E
2
1
F
qf
qs
8
7
qa
qh
qg
9
qd
q;
WARNING
To reduce the risk of fire or electric shock, do not expose this apparatus to rain or
moisture.
Do not install the appliance in a confined space, such as a bookcase or built-in cabinet.
To reduce the risk of fire, do not cover the ventilation of the apparatus with newspapers,
tablecloths, curtains, etc. And do not place lighted candles on the apparatus.
To reduce the risk of fire or electric shock, do not place objects filled with liquids, such
as vases, on the apparatus.
Connect the AC power adaptor to an easily accessible AC outlet. Should you notice an
abnormality in the AC power adaptor, disconnect it from the AC outlet immediately.
For Customers in the USA
This device complies with Part 15 of the FCC Rules. Operation is subject to the
following two conditions: (1) this device may not cause harmful interference, and (2)
this device must accept any interference received, including interference that may
cause undesired operation.
You are cautioned that any changes or modifications not expressly approved in this
manual could void your authority to operate this equipment.
For Customers in Russia
Disposal of Old Electrical & Electronic Equipment (Applicable in the European
Union and other European countries with separate collection systems)
The recycling of materials will help to conserve natural resources. For more detailed
information about recycling of this product, please contact your local Civic Office,
your household waste disposal service or the shop where you purchased the product.
For customers in the USA
Use “LIMITED WARRANTY” card warranted by Sony Electronics Inc.
For customers in Canada
Use “Consumer 1 Year Warranty” card warranted by Sony of Canada Ltd.
Note on installation
If you use the unit in a place subject to static or electromagnetic energy, a track’s
transferred data may be corrupted. This may prevent successful transferring
authorization on your computer.
This symbol on the product or on its packaging indicates that this
product shall not be treated as household waste. Instead it shall be
handed over to the applicable collection point for the recycling of
electrical and electronic equipment. By ensuring this product is
disposed of correctly, you will help prevent potential negative
consequences for the environment and human health, which could
otherwise be caused by inappropriate waste handling of this product.
The validity of the CE marking is restricted to only those countries where
it is legally enforced, mainly in the countries EEA (European Economic
Area).
Notes on use
• Do not subject the unit to:
– Extreme heat or cold – Dust, dirt, or sand
– High humidity – Vibration
– Strong magnetic fields – Mechanical shock
– Direct sunlight (for extended periods)
• Do not set the unit on an unstable surface as it may fall, causing injury or
damage.
• Do not drop the unit.
•
Unplug the AC adapter from the AC outlet if the unit is not to be used for an
extended period. Disconnect the power cord by the plug, never the cord itself.
• Be sure that nothing metallic comes into contact with the metal parts of
this unit as a short circuit may occur and the unit may be damaged.
• Do not operate the unit if it has a damaged cord, or if it has been
dropped or damaged.
• Always keep the metal contacts clean.
• Do not disassemble or modify the unit.
• While the unit is in use, it gets warm. This is normal.
•
Keep the unit away from TV or AM receivers, as it may disturb reception.
Cleaning
Clean the unit with a soft, dry cloth, or a soft cloth lightly moistened with a
mild detergent solution. Do not use any type of solvent, such as alcohol or
benzine, which may damage the finish.
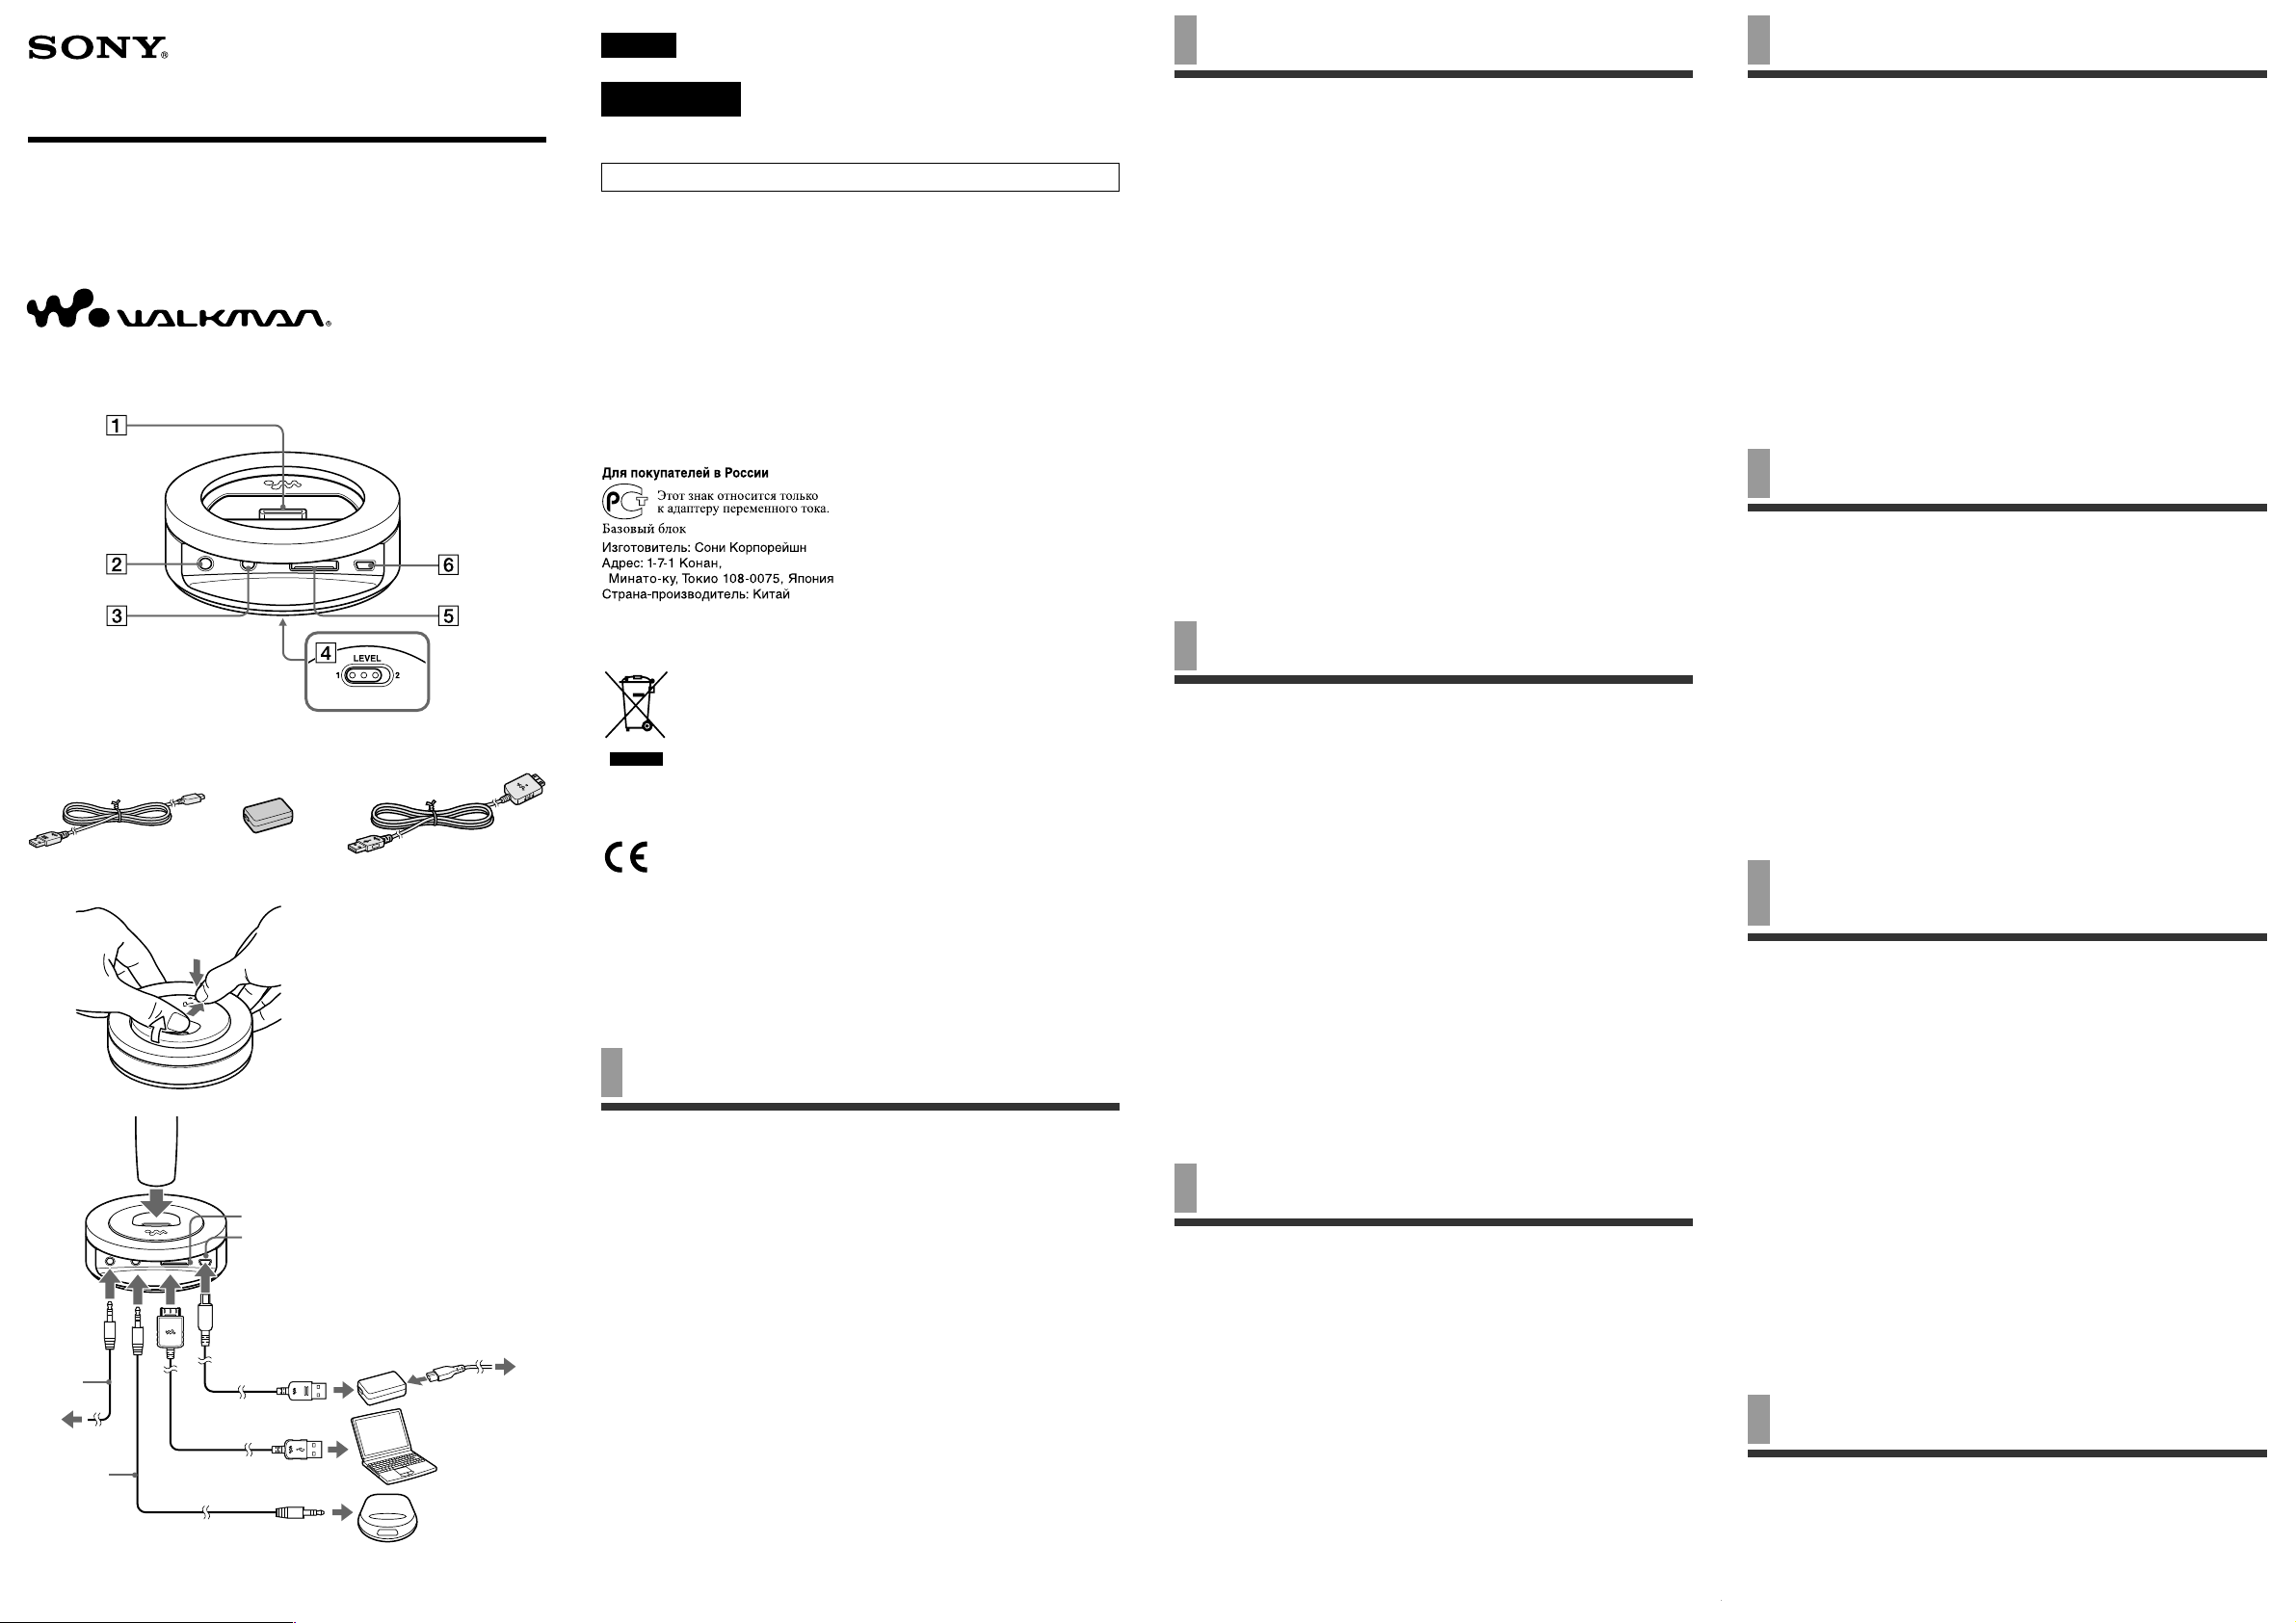
Checking the supplied accessories
• Cradle (1) (A)
• DC charging cord (1) (B)
• AC adaptor (C)
• AC power cord
Checking other components
•Walkman
For details about series Walkman units supported by the cradle, visit:
USA: http://www.sony.com/walkmansupport/
Canada: http://www.sony.ca/ElectronicsSupport/
Europe: http://www.sonydigital-link.com/DNA/
China: http://service.sony.com.cn/KB/
Taiwan: http://www.twsupport.css.ap.sony.com/
Korea: http://scs.sony.co.kr/walkman/
Other countries or areas: http://www.css.ap.sony.com/
• Attachment for a Walkman *
• USB cable * (D)
* The USB cable is required to connect the cradle to your computer. The USB
cable is supplied with the Walkman.
Installing the attachment
When you use the cradle, fit the attachment supplied with your Walkman.
To install the attachment, fit the two tabs near the logo into the holes on the
cradle first, then push the opposite side down into the cradle.
To remove the attachment, push strongly the concave part of attachment
toward the rear of the cradle 1, then push strongly the area indicated by the
mark (aaa) from above 2. (E)
Note
The shape of the attachment may be different, depending on your Walkman model.
Parts and controls
Refer to Illustration A.
1 WM-PORT* connector for Walkman: To connect a Walkman to the
cradle.
2 AUDIO OUT jack: Outputs a line-level signal to a device such as an
active speaker, using an optional audio cable.
3 AUDIO IN jack: Accepts a line-level signal from a music player, such as
a CD player, using an optional audio cable.
4 LEVEL switch: Sets the recording level.
LEVEL[1](recording with the normal volume level): To record from the
line out jack or headphone jack of a device such as a portable music
player.
LEVEL[2](recording with the volume lowered): To record from the line
out jack of a device that has a high sound output level, such as a
component audio system.
(Using LEVEL[1] in this case may result in distortion of the audio signal.)
5 WM-PORT jack for a computer: To connect the cradle to your computer
using the USB cable (supplied with the Walkman).
Note
If a device other than a computer is to be connected, refer to the operating
instructions supplied with the device.
6 DC IN jack: To connect the cradle to the AC adaptor (supplied) using the
DC charging cord to charge the Walkman.
* WM-PORT is a dedicated multiple connector for connecting accessories to
your Walkman.
Charging a Walkman
Refer to Illustration F.
1 Connect the smaller terminal (7) of the DC charging cord
(supplied) to the DC IN jack (8) of the cradle.
2 Connect the larger terminal (9) of the DC charging cord to
the AC adaptor (supplied).
3 Connect the AC power cord (supplied) to the AC adaptor (q;).
4 Connect the AC power cord to the wall outlet (qa).
5 Attach the Walkman to the WM-PORT connector on the top
of the cradle (qf).
Charging starts. Charging time will vary, depending on the model of the
Walkman. For details, refer to the Operation Guide of the Walkman.
Notes
• Place the Walkman firmly into the cradle.
• Do not connect anything to the AUDIO OUT jack of the cradle if you listen to
songs using the headphones of the Walkman while charging. Otherwise, no
sound is output from the headphone jack of the Walkman.
Refer to Illustration F.
1 Connect the WM-PORT of the USB cable (supplied with the
Walkman) to the WM-PORT on the back of the cradle (qs).
2
Connect the other end of the USB cable to your computer (qd).
3 Attach the Walkman to the cradle (qf).
Notes
• Place the Walkman firmly into the cradle.
• If the cradle is connected to a wall outlet, the Walkman will be charged from
the wall outlet.
•
Even if the cradle is not connected to a wall outlet, the Walkman can be charged via
the USB cable. If the cradle is connected to a laptop computer which is not connected
to a wall outlet, the Walkman will deplete the battery of the laptop computer.
•A Walkman will not be recognized by a computer if the cradle is connected to
the computer by the DC charging cord.
•
If the Walkman is disconnected from the cradle while data is being transferred
from the computer, attach the Walkman to the cradle and transfer the data again.
• Do not disconnect the USB cable, DC charging cord and AC power cord while
transferring data from the computer; otherwise the data transfer will be
interrupted. If this occurs, detach the Walkman from the cradle, and transfer
the data after attaching the Walkman to the cradle again.
Recording to a Walkman
Refer to Illustration F.
By connecting a music player, such as a CD player, to the AUDIO IN jack of
the cradle by an optional audio cable (qg), you can record to the Walkman*
attached to the cradle.
* Models that have a WM-PORT and recording functions only
1 Connect the music player to the AUDIO IN jack of the cradle
with a suitable audio cable (sold separately).
2 Attach the Walkman to the cradle.
The recording procedure will vary depending on the model of the
Walkman. For details, see the Operation Guide of the Walkman.
z Hint
Sound levels during recording can be changed by setting the LEVEL switch. For
details, refer to “LEVEL switch” under “Parts and controls”.
Note
If the audio cable is connected to the AUDIO OUT jack, sound during recording
is output from an audio output device, such as an active speaker. If nothing is
connected to the AUDIO OUT jack, sound during recording is output from the
headphone jack of the Walkman.
Connecting to a device such
as a speaker
Refer to Illustration F.
Using an optional audio cable (qh), you can connect the cradle to a device
that outputs audio, such as an active speaker. Be sure to turn off all devices
before connecting them.
1 Connect the device to the AUDIO OUT jack of the cradle with
a suitable audio cable (sold separately).
2 Attach the Walkman to the cradle.
3 Start playback of the Walkman.
Notes
• Connect the audio cable before starting playback on or recording to the
Walkman. If you connect it after starting playback, sound may not be output
from the AUDIO OUT jack. If this occurs, detach the Walkman from the
cradle, and start playback after attaching the Walkman to the cradle again.
•
While the cradle is connected to the computer, sound may not be output from the
AUDIO
OUT jack of the cradle. If this occurs, disconnect the USB cable from the
computer.
• Sound from the computer is not output from the AUDIO OUT jack of the
cradle.
• While the cradle is connected to an audio output device, no sound is output
from the headphone jack of the Walkman.
•
If the recording level of audio data played back on the Walkman is too high, the
output sound quality from the Walkman via the cradle to a device, such as an
active speaker, may not meet the user customized settings, e.g., “Equalizer” etc.
• If you use a Walkman with a built-in FM tuner, you may not be able to hear
the FM broadcast, or reception may be lowered substantially.
Specifications
Te rminals WM-PORT connector (22 pin) (For Walkman)
Switch settings LEVEL 1/2
AC adaptor DC 5V
“WALKMAN” and “WALKMAN” logo are registered trademarks of Sony Corporation.
WM-PORT jack (22 pin) (For a computer)
AUDIO OUT (Stereo mini, 10kΩ)
AUDIO IN (Stereo mini), DC IN 5V
Page 2
A
BCD
E
2
1
F
qf
qs
8
7
qa
9
q;
qh
qd
qg
Français
AVERTISSEMENT
Afin de réduire les risques d’incendie ou de choc électrique, n’exposez pas cet
appareil à la pluie ni à l’humidité.
N’installez pas l’appareil dans un espace confiné comme dans une bibliothèque ou un
meuble encastré.
Pour réduire le risques d’incendie, ne couvrez pas les orifices d’aération de l’appareil
avec des journaux, nappes, rideaux, etc. Ne placez pas non plus de bougies allumées
sur l’appareil.
Pour réduire les risques d’incendie ou d’électrocution, ne placez pas de récipients
remplis de liquides (vases, etc.) sur l’appareil.
Branchez l’adaptateur secteur à une prise secteur aisément accessible. Si vous
remarquez que l’adaptateur secteur ne convient pas, débranchez-le immédiatement de
la prise.
Traitement des appareils électriques et électroniques en fin de vie (Applicable
dans les pays de l’Union Européenne et aux autres pays européens disposant de
systèmes de collecte sélective)
naturelles. Pour toute information supplémentaire au sujet du recyclage de ce produit,
vous pouvez contacter votre municipalité, votre déchetterie ou le magasin où vous
avez acheté le produit.
Pour les clients aux Etats-Unis
Utilisez la carte de garantie limitée fournie par Sony Electronics Inc.
Pour les clients au Canada
Utilisez la carte de garantie de 1 an fournie par Sony of Canada Ltd.
Remarque sur l’installation
Si vous utilisez l’appareil dans un endroit soumis à un rayonnement statique ou
électromagnétique, les données transférées d’une plage risquent d’être corrompues. Le
transfert de ces données sur votre ordinateur pourrait alors ne pas être autorisé.
Ce symbole, apposé sur le produit ou sur son emballage, indique que ce
produit ne doit pas être traité avec les déchets ménagers. Il doit être
remis à un point de collecte approprié pour le recyclage des
équipements électriques et électroniques. En s’assurant que ce produit
est bien mis au rebut de manière appropriée, vous aiderez à prévenir les
conséquences négatives potentielles pour l’environnement et la santé
humaine. Le recyclage des matériaux aidera à préserver les ressources
La validité de la marque CE est limitée aux pays où elle est légalement en
application, notamment dans les pays de l’EEE (Espace économique
européen).
Remarques concernant l’utilisation
• Ne placez pas l’appareil à des endroits :
– Extrêmement chauds ou froids – Sales, poussiéreux, sablonneux
– Extrêmement humides – Soumis à des vibrations
– Soumis à des champs magnétiques – Soumis à des chocs mécaniques
– Exposés au rayonnement direct du soleil (pendant des durées prolongées)
• N’installez pas l’appareil sur une surface instable, car il pourrait chuter
et risquerait d’être endommagé ou de provoquer des blessures.
• Ne laissez pas tomber l’appareil.
• Débranchez l’adaptateur secteur de la prise murale si vous prévoyez de
ne pas utiliser l’appareil pendant une période prolongée. Débranchez le
cordon d’alimentation en tirant sur la fiche et non pas sur le cordon.
•Veillez à ce qu’aucun objet métallique n’entre en contact avec les pièces
métalliques de cet appareil, car cela pourrait provoquer un court-circuit
et endommager l’appareil.
• Cessez d’utiliser l’appareil si le cordon d’alimentation est détérioré ou si
l’appareil est tombé ou endommagé.
• Gardez toujours les contacts métalliques bien propres.
• Ne démontez pas et ne transformez pas l’appareil.
• Pendant son fonctionnement, une augmentation de la chaleur de
l’appareil est normale.
•
Afin d’éviter toute interférence avec vos téléviseurs ou appareils radio,
gardez l’appareil éloigné de ceux-ci.
Nettoyage
Nettoyez l’appareil avec un chiffon doux et sec ou un chiffon légèrement
humidifié à l’aide d’une solution détergente neutre. N’utilisez aucun type
de solvant comme de l’alcool ou du benzène qui risque d’abîmer la finition
du boîtier.
Préparation
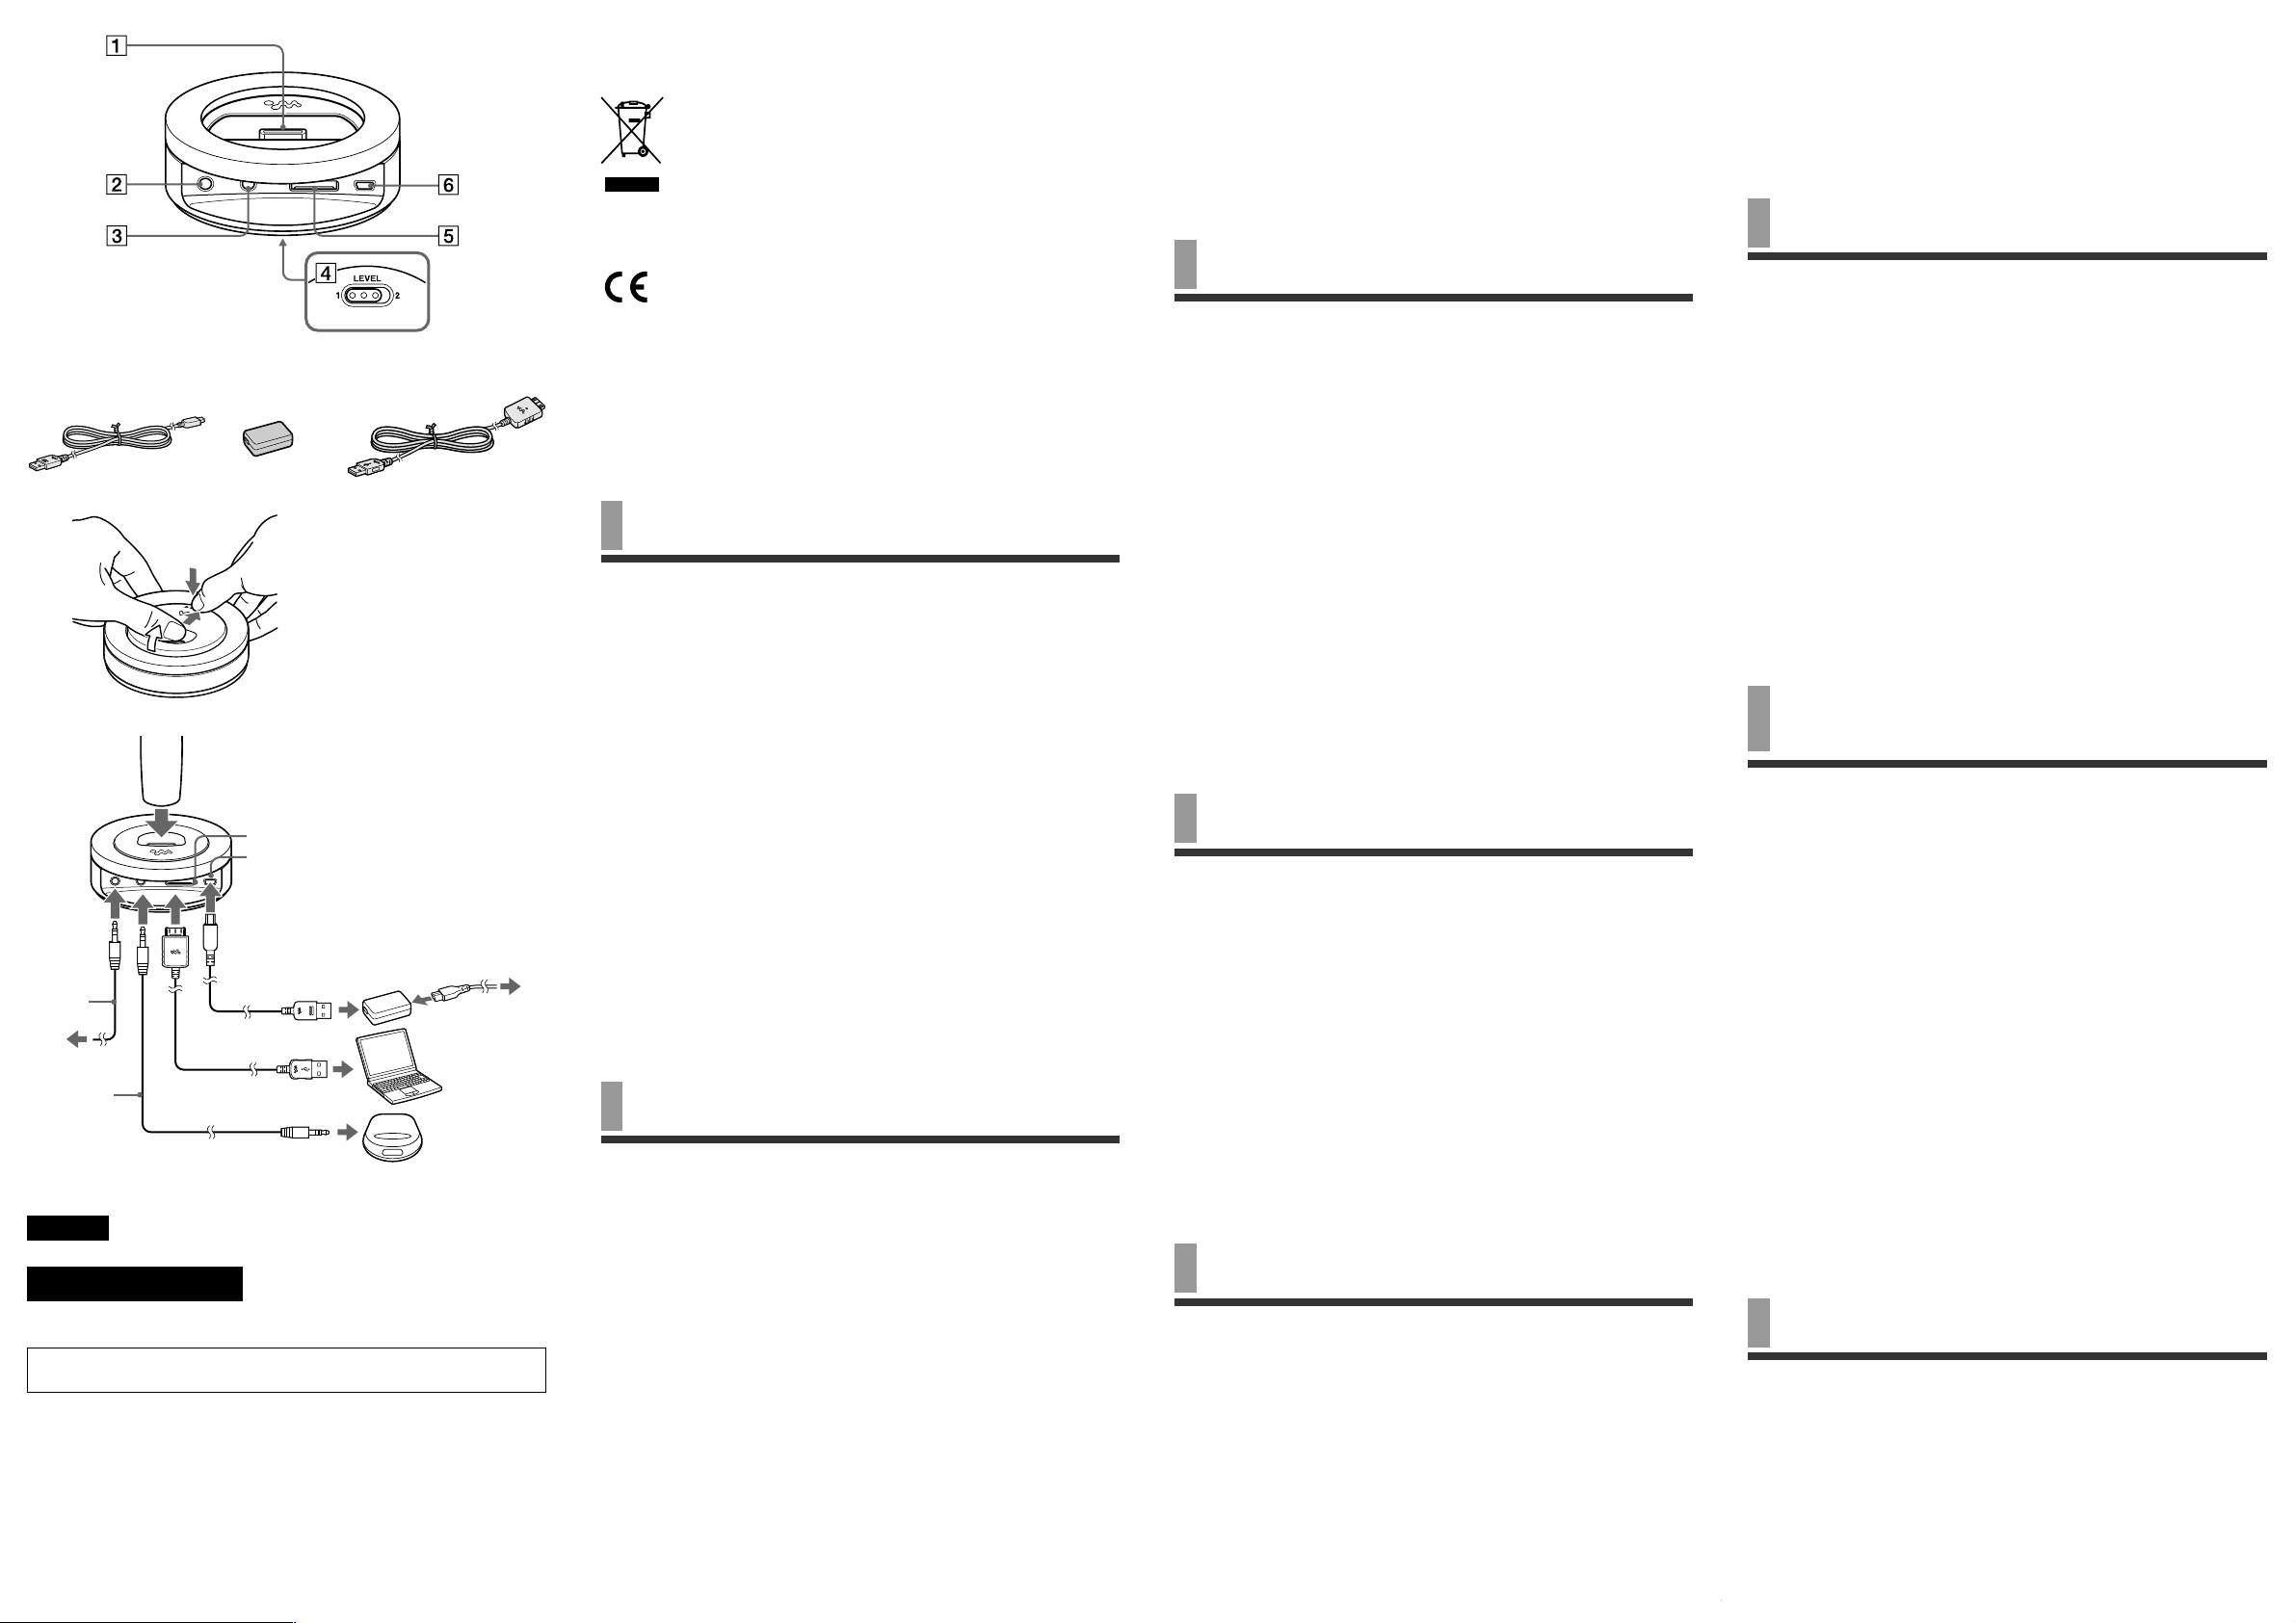
Vérification des accessoires fournis
• Station d’accueil (1) (A)
• Cordon de charge CC (1) (B)
• Adaptateur secteur (C)
• Cordon d’alimentation secteur
Vérification des autres composants
•Walkman
Pour en savoir plus sur les séries de Walkman compatibles avec cette
station d’accueil, consultez nos sites aux adresses suivantes :
Etats-Unis : http://www.sony.com/walkmansupport/
Canada : http://fr.sony.ca/ElectronicsSupport/
Europe : http://www.sonydigital-link.com/DNA/
Chine : http://service.sony.com.cn/KB/
Taiwan : http://www.twsupport.css.ap.sony.com/
Corée : http://scs.sony.co.kr/walkman/
Autres pays ou régions : http://www.css.ap.sony.com/
• Adaptateur pour Walkman*
• Câble USB* (D)
* Le câble USB est nécessaire pour raccorder la station d’accueil à votre
ordinateur. Le câble USB est fourni avec le Walkman.
Installation de l’adaptateur
Lorsque vous utilisez la station d’accueil, vous devez installer l’adaptateur
fourni avec votre Walkman.
Pour installer l’adaptateur, introduisez les deux languettes qui se trouvent à
côté du logo dans les orifices situés sur la station d’accueil, puis appuyez
sur la face opposée pour l’enfoncer dans la station d’accueil.
Pour retirer l’adaptateur, poussez fort la partie incurvée de l’adaptateur
vers l’arrière de la station d’accueil 1, puis appuyez avec force sur la partie
repérée par le symbole (
Remarque
Selon le modèle de Walkman, la forme de l’adaptateur peut varier.
aaa
) 2. (E)
Pièces et commandes
Reportez-vous à l’illustration A.
1 Connecteur WM-PORT* pour Walkman : Pour raccorder un Walkman à
la station d’accueil.
2 Prise AUDIO OUT : Pour envoyer un signal de ligne vers un appareil,
comme un haut-parleur actif, à l’aide d’un câble audio en option.
3 Prise AUDIO IN : Pour recevoir un signal de ligne d’un lecteur de
musique, comme un lecteur de CD, à l’aide d’un câble audio en option.
4 Commutateur LEVEL : Pour régler le niveau d’enregistrement.
LEVEL[1] (enregistrement avec un volume normal) : Pour enregistrer à
partir de la prise de sortie ou de la prise écouteurs d’un appareil tel
qu’un lecteur de musique portable.
LEVEL[2] (enregistrement avec le volume baissé) : Pour enregistrer à
partir de la prise de sortie d’un appareil ayant un niveau de sortie
sonore puissant, telle qu’une chaîne hi-fi.
(L’utilisation du réglage LEVEL[1] dans ce cas risque de déformer le
signal audio.)
5 Prise WM-PORT pour ordinateur : Pour raccorder la station d’accueil à
votre ordinateur à l’aide du câble USB (fourni avec le Walkman).
Remarque
Si vous souhaitez raccorder un appareil autre qu’un ordinateur, reportezvous au mode d’emploi de cet appareil.
6 Prise DC IN : Pour raccorder la station d’accueil à l’adaptateur secteur
(fourni) à l’aide du cordon de charge CC et charger le Walkman.
* Le WM-PORT est un connecteur multiple dédié, qui permet de raccorder des
accessoires à votre Walkman.
Charge du Walkman
Reportez-vous à l’illustration F.
1 Raccordez la petite borne (7) du cordon de charge CC
(fourni) à la prise DC IN (8) de la station d’accueil.
2 Raccordez la borne large (9) du cordon de charge CC à
l’adaptateur secteur (fourni).
3 Raccordez le cordon d’alimentation secteur (fourni) à
l’adaptateur secteur (q;).
4
Raccordez le cordon d’alimentation secteur à la prise murale (qa).
5 Fixez le Walkman au connecteur WM-PORT situé sur la station
d’accueil (qf).
La charge commence. Le temps de charge varie selon le modèle de Walkman.
Pour plus d’informations, reportez-vous au Guide d’utilisation du Walkman.
Remarques
• Positionnez correctement le Walkman sur la station d’accueil.
• Pendant la charge, ne raccordez aucun appareil à la prise AUDIO OUT de la
station d’accueil si vous écoutez de la musique avec les écouteurs du
Walkman. Sinon, aucun son ne sera émis par la prise écouteurs du Walkman.
Raccordement à un ordinateur
Reportez-vous à l’illustration F.
1 Raccordez le port WM-PORT du câble USB (fourni avec le
Walkman) au port WM-PORT situé à l’arrière de la station
d’accueil (qs).
2
Raccordez l’autre extrémité du câble USB à votre ordinateur (qd).
3 Fixez le Walkman sur la station d’accueil (qf).
Remarques
• Positionnez correctement le Walkman sur la station d’accueil.
• Si la station d’accueil est raccordée à une prise murale, le Walkman est alors
chargé par cette prise murale.
• Le Walkman peut être chargé à l’aide du câble USB même si la station
d’accueil n’est pas branchée sur une prise murale. Si la station d’accueil est
raccordée à un ordinateur portable non branché sur une prise murale, le
Walkman consommera la batterie de l’ordinateur portable.
• Le Walkman n’est pas reconnu par l’ordinateur si la station d’accueil est
raccordée à l’ordinateur à l’aide du cordon de charge CC.
•
Si le Walkman est déconnecté de la station d’accueil pendant le transfert des
données depuis l’ordinateur, repositionnez-le correctement et recommencez le
transfert des données.
• Ne débranchez pas le câble USB, le cordon de charge CC ou le cordon
d’alimentation secteur pendant le transfert des données depuis l’ordinateur,
car celui-ci sera interrompu. Si cela se produit, retirez le Walkman de la
station d’accueil et transférez les données une fois le Walkman remis en place
sur la station d’accueil.
Enregistrement sur le Walkman
Reportez-vous à l’illustration F.
Pour enregistrer des données audio sur le Walkman*, positionnez-le sur la station
d’accueil et raccordez un lecteur de musique, comme un lecteur de CD, à la prise
AUDIO IN de la station d’accueil à l’aide d’un câble audio en option (qg).
* Modèles équipés d’un port WM-PORT et de fonctions d’enregistrement
uniquement
1 Raccordez le lecteur de musique à la prise AUDIO IN de la
station d’accueil à l’aide d’un câble audio adapté (vendu
séparément).
2 Positionnez le Walkman sur la station d’accueil.
La procédure d’enregistrement varie selon le modèle de Walkman. Pour
plus d’informations, reportez-vous au Guide d’utilisation du Walkman.
z Conseil
Les niveaux sonores d’enregistrement peuvent être modifiés à l’aide du
commutateur LEVEL. Pour plus d’informations, reportez-vous à « Commutateur
LEVEL » dans la section « Pièces et commandes ».
Remarque
Si le câble audio est raccordé à la prise AUDIO OUT, le son est émis pendant
l’enregistrement par un appareil de sortie audio, comme un haut-parleur actif. Si
aucun câble n’est raccordé à la prise AUDIO OUT, le son est émis pendant
l’enregistrement par la prise écouteur du Walkman.
Raccordement à un appareil
de type haut-parleur
Reportez-vous à l’illustration F.
Vous pouvez raccorder un appareil de sortie audio, comme un haut-parleur
actif, à la station d’accueil en utilisant un câble audio en option (qh). Avant
tout raccordement, veillez à mettre les appareils hors tension.
1
Raccordez l’appareil à la prise AUDIO OUT de la station
d’accueil à l’aide d’un câble audio adapté (vendu séparément).
2 Positionnez le Walkman sur la station d’accueil.
3 Démarrez la lecture du Walkman.
Remarques
• Raccordez le câble audio avant de démarrer la lecture ou l’enregistrement sur
le Walkman. Si vous le raccordez une fois la lecture démarrée, le son ne sera
pas émis par la prise AUDIO OUT. Pour y remédier, retirez le Walkman de la
station d’accueil et démarrez la lecture une fois le Walkman remis en place sur
la station d’accueil.
• Lorsque la station d’accueil est raccordée à l’ordinateur, le son ne peut pas être
émis par la prise AUDIO OUT de la station d’accueil. Pour y remédier,
déconnectez le câble USB de l’ordinateur.
• Le son de l’ordinateur ne peut pas être émis par la prise AUDIO OUT de la
station d’accueil.
• Lorsque la station d’accueil est raccordée à un appareil audio, aucun son n’est
émis par la prise écouteurs du Walkman.
• Si le niveau d’enregistrement des données audio lues sur le Walkman est trop
élevé, la qualité sonore diffusée par le Walkman vers un appareil de type
haut-parleur actif via la station d’accueil risque de ne pas répondre aux
paramètres personnalisés par l’utilisateur, comme « Equalizer », etc.
• Si vous utilisez un Walkman avec un tuner FM intégré, il est possible que la
station FM ne soit pas audible ou que la réception soit considérablement
dégradée.
Spécifications
Bornes Connecteur WM-PORT (22 broches) (pour Walkman)
Réglages du commutateur
Adaptateur secteur
« WALKMAN » et le logo « WALKMAN » sont des marques déposées de Sony
Corporation.
Prise WM-PORT (22 broches) (pour ordinateur)
AUDIO OUT (mini stéréo, 10 kΩ)
AUDIO IN (mini stéréo), DC IN 5V
LEVEL 1/2
DC 5 V
 Loading...