

Page 1
FOR MEASURABLE SUCCESS
BED SCALE 7711
Operating Manual
Medicine, health and wellness
www.soehnle-professional.com
Page 2

ENGLISH
Bed scale 7711
CONTENTS
1. General information p 3
Intended use p 3
CE sign p 3
Classification p 3
Safety instructions p 4
Use of additional devices p 4
Applicator p 4
Operating concept p 4
Maintenance and service p 4
Cleaning p 4
Disposal p 4
Note p 5
Warranty/liability p 5
2. Putting into operation p 7
Installing the scale elements p 7
Power-on p 7
Radio link p 8
Power-on / Power-off p 8
Charging the batteries p 8
3. Input and control p 10
Keypad for input and control p 10
Alphanumeric input p 11
Indicator display p 12
Icons/characters p 12
4. Setting mode p 13
Keypad in Setting mode p 13
Overview of menu navigation p 14
Calling up Setting mode p 15
Inputs in Setting mode p 15
Settings in Setting mode p 15
Settings in "Program Settings" menu p 15
Settings in "Terminal" menu p 15
5. Functions p 17
Power-on zeroing p 17
Manual zeroing p 17
x10 (times 10) display p 17
Weighing and taring p 17
Weighing with measured tare p 17
Weighing with manually entered tare p 18
Weighing with stored tare values p 18
Provisional tare/dialysis function p 20
Error messages when taring p 21
Displaying the tare memory p 21
BMI function p 21
Hold function p 21
Print p 22
Programming the F key p 23
6. Error messages p 24
7. Technical information p 26
Technical data p 26
Other technical data p 26
Instructions for installing the scale p 26
Electronic nameplate
and calibration counter p 27
Explanation of labels and icons p 27
2
Page 3
1. ALLGEMEINE INFORMATIONEN
Thank you for choosing this Soehnle Professional product. All the features of this product were designed to
the state of the art and are optimised for simple and
straightforward use. If you have any queries or experience any problems with your appliance not addressed
in the operating manual, please contact your Soehnle
Professional service partner, or visit us on the web
at www.soehnle-professional.com.
■ Intended use
The appliance is designed for weighing people who
are lying down. The appliance may only be used for
this purpose. Any other use is prohibited. Messages
about errors or defects that could endanger the patient
or operator and errors that could lead to corruption of
the test results must be sent in writing to the manufacturer's medical product adviser (see address below). These operating instructions as well as the
operating instructions for the 3020 Digital Indicator
are component parts of the appliance. They must
be kept near the appliance. Compliance with these
operating instructions is mandatory in order to ensure compliance with the intended use and correct
operation of the appliance. If the appliance fails to
function correctly, the appliance may be damaged.
It is essential that the appliance is then taken to an
authorised Soehnle Professional service centre. Only
genuine spare parts may be used if an authorised
service station carries out repairs. These genuine
parts are described in the service documentation
(Spare Parts List: 470.014.037 Scale / 470.630.273
Digital Indicator / 470.014.038 Weighing Device)
including Order Number.
Soehnle Professional will only assume responsibility
for the safety of the appliance if these instructions
are observed and the appliance is operated in compliance with the operating instructions. The appliance
is a medical device and may only be used by persons
who are capable of handling it correctly as a result
of their training. Before using the appliance, the
user must ensure that the appliance is functional
and in proper working order. The operator must know
how to operate the appliance. The appliance is not
intended for use in medical rooms subject to explosion hazards. Explosion-hazard areas may occur if
flammable anaesthetics, skin cleansing agents and
skin disinfectants are used.
■ CE sign
The product carries the CE sign in accordance with
the following directives:
• 89/336/EEC Electromagnetic Compatibility
• 73/23/EEC Low Voltage Directive
• 90/384/EEC Nonautomatic Weighing Instruments
• 93/42/EEC Medical
Products (Class I
with mea sure ment
function)
Soehnle Professional GmbH & Co. KG.
Manfred-von-Ardenne-Allee 12 71522 Backnang Germany
■ Classification
• Class I medical product with measuring function.
• Electrical Safety Class II
(with double isolated function ground)
• No applicator
• Waterproof to IEC529:IPX2
3
Page 4
ENGLISH
Bed scale 7711
■ Safety instructions
Before putting the appliance into use,
please read with care the information given in the
Operating Instructions. They contain important instructions for installation, intended use and maintenance of the appliance. The manufacturer shall
not be liable if the following instructions are
not observed:
In case the electrical components are used under
increased safety requirements, compliance with the
appropriate regulations is compulsory. Never perform
work on the appliance while the power is switched
on. Improper installation will render the warranty null
and void. Ensure the voltage marked on the power
supply unit matches your mains power supply. The
device is designed for use within buildings. Observe
the permissible ambient temperatures for use (Technical Information). The device meets the requirements
for electromagnetic compatibility. Do not exceed the
maximum values specified in the applicable standards. If you have any problems, contact your local
Soehnle Professional service partner.
Warning: A change of the medicine device is prohibited. This device may not be changed without the
manufacturer's authorisation. If the medicine device
is changed, appropriate analysis and examination
must be undertaken to ensure a safe continued use.
■ Use of additional devices
Only additional appliances (printer, computer) may
be connected to the serial data port if they conform
to European Standard EN 60601-1 or a suitable disconnecting device is connected in series.
■ Applicator
The scale does not have an applicator. No part is intended for direct contact with the patient. Leakage
currents were measured on the weighing devices in
compliance with classification of Type B applicators.
■ Operating concept
The appliance is operated by means of the keypad.
The keys are assigned with different functions depending on the various modes.
■ Maintenance and service
The measuring inspection test was performed during
the initial calibration process in production. Further
regular measuring inspection tests (recalibration) must
be carried out by the calibration authorities responsible in compliance with national regulations. Repairs
may only be carried out by a centre authorised by
Soehnle Professional using genuine spare parts.
The medicine device is equipped with a non-detachable power line. The power line may not be exchanged by maintenance personal.
■ Cleaning
Before cleaning, disconnect the appliance from the
mains by removing the power plug from the wall
socket. Only clean the appliance using a moist cloth.
On no account may water be allowed to enter into
the appliance. Disinfectant may only be applied to
the membrane keyboard for the display. It is prohibited to spray the appliance and the power plug.
The following disinfectants are permitted: methylated spirits, Isopropanol; 2% Kohrsolin, 1% aqueous
Sokrena solution, 5% Sagrotan or 5% Gigasept.
4
Page 5
■ Disposal
According to the present state of the art
the appliance contains no special environmentally harmful substances. This product
is not to be treated as regular house hold
waste, but should be handed in to an electrical/electronic equipment recycling centre. You can obtain
further details from your local council, your municipal waste disposal company or the firm from which
you purchased the product.
Battery disposal: Do not dispose of batteries in the
household rubbish. As consumer you are obliged by
law to return waste batteries. You can hand in your
old batteries as hazardous waste to the public collection centres in your municipality or return them
to the firm where you purchased them. You will find
these labels on batteries containing hazardous substances: Pb = battery contains lead, Cd = battery
contains cadmium, Hg = battery contains mercury.
Lead-gel batteries are used to power the weighing
devices. They must also be disposed of as hazardous waste and returned to the dealer when purchasing new batteries.
sunlight may have an effect on the accuracy of the
scale. The scale is protected to IP 54 protection class.
Therefore, avoid high levels of humidity, vapours,
aggressive liquid media and strong contamination.
■ Warranty/liability
If the appliance is delivered with a fault or defect
which is within Soehnle Professional's scope of responsibility, Soehnle Professional is entitled to either
repair the fault or supply a replacement appliance.
Replaced parts remain the property of Soehnle Professional. Should the fault repairs or replacement
delivery not be successful, the statutory provisions
shall apply. The period of warranty shall be 2 years,
beginning on the day of purchase. Please retain your
receipt as a proof of purchase. If your scale requires
servicing, please contact your dealer or Soehnle Professional Customer Service. Only genuine spare parts
may be used if an authorised service station carries
out repairs. Soehnle will only assume responsibility
for the safety of the appliance if these instructions
are observed and the appliance is operated in compliance with the operating instructions.
■ Note
Interference suppression of the unit corresponds to
the valid EU Directive 89/336/EEC. The display value
may be influenced by extreme electrostatic and electromagnetic interference, e.g. operation of a radio unit
or a mobile phone in the immediate vicinity of the
unit. When electrostatic interference is no longer
present, the appliance can again be used for its intended purpose. You may need to switch it on again.
The appliance is a measuring instrument. Air currents,
vibrations, rapid changes in temperature and direct
No responsibility shall be accepted for damage
caused by any of the following reasons: unsuitable
or improper storage or use, incorrect installation or
putting into operation by the owner or third parties,
natural wear and tear, changes or modifications, incorrect or negligent handling, excessive use, chemical, electrochemical or electrical interference or humidity, unless this is attributable to negligence on the
part of Soehnle Professional. If operating, climatic or
any other influences lead to a major change in conditions or material quality, the warranty for perfect
5
Page 6

ENGLISH
Bed scale 7711
unit functioning shall be rendered null and void. If
Soehnle Professional provides an individual warranty,
this means that the appliance supplied will be free
from faults for the duration of the warranty period.
Always keep the original packaging in case you have
to return the scale.
Soehnle Professional GmbH & Co. KG
Manfred-von-Ardenne-Allee 12 · DE-71522 Backnang
Phone +49 (0) 71 91 / 34 53-0 · Fax -211
www.soehnle-professional.com
6
Page 7

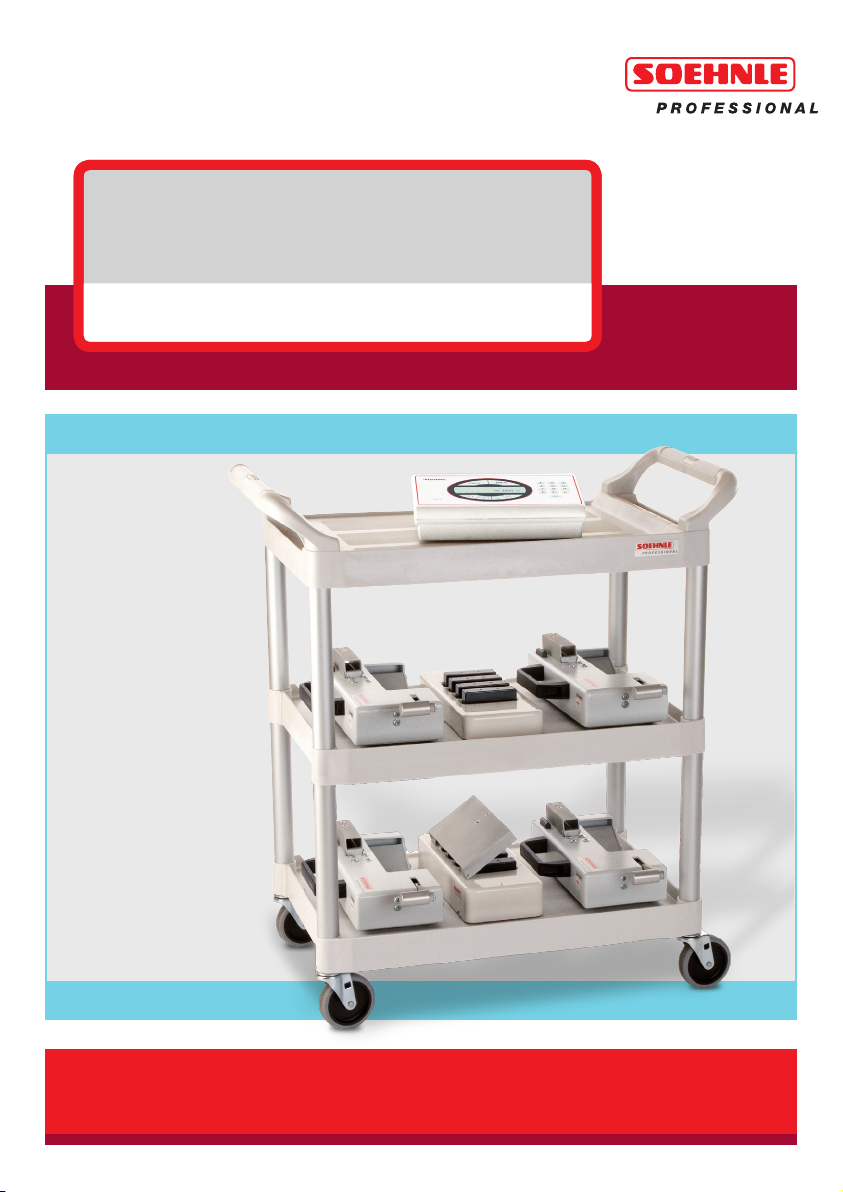
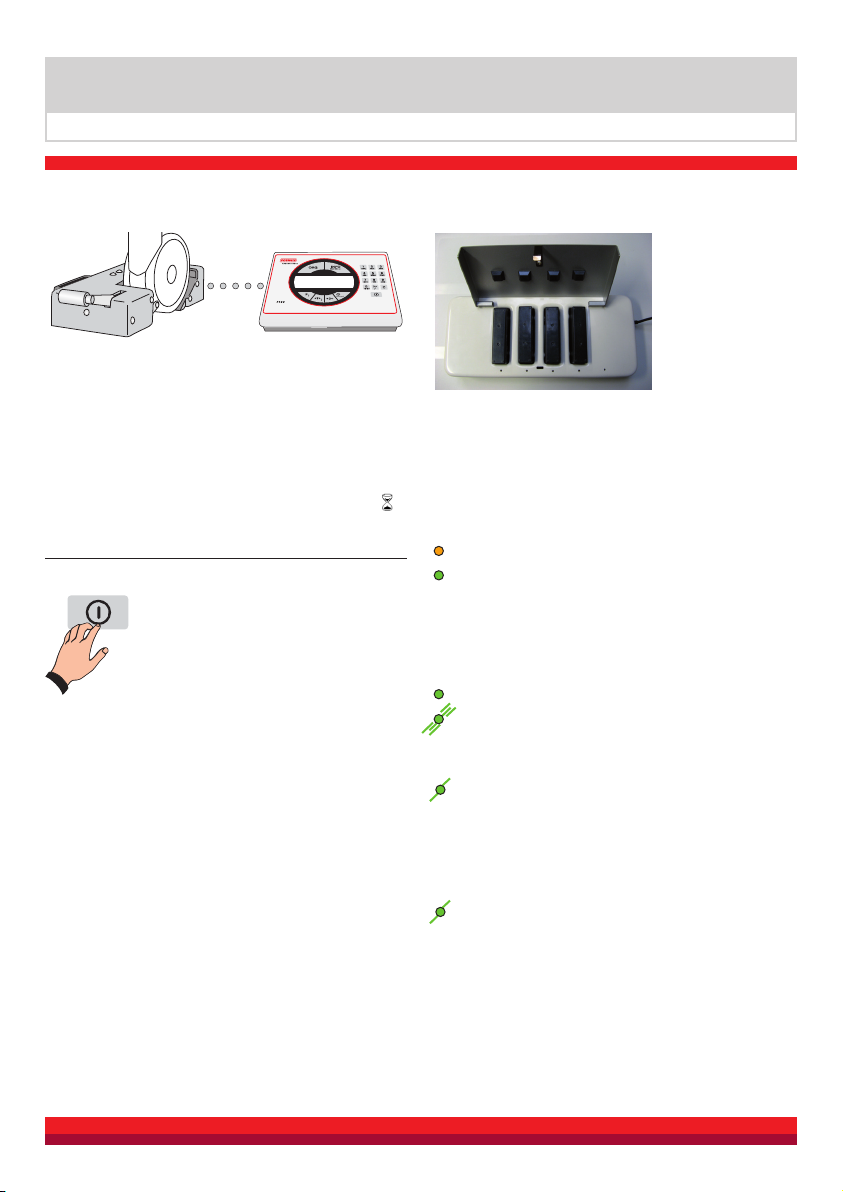
2. PUTTING INTO OPERATION
■ Installing the scale elements
The indicator's placement must allow for a simple
disconnection from the power supply.
Insert rechargeable batteries in all four weighing
devices. When the batteries are fitted, the weighing
devices start to send and attempt to set up a radio
link to the digital indicator.
Caution (Fig 1–4 right):
Before switching on the scale, place the weighing
devices under the four wheels of the hospital bed.
Push the weighing devices as far as the stop under
the wheels. Press the lever down and raise the bed
wheel. (The weighing devices are designed to receive wheel diameters of 130–160 mm. Small diameters are optional.)
The message "SOEHNLE PROFESSIONAL" appears in
the indicator display together with a search icon until
■ Power-on / Power-off
Switch on or off the digital indicator
by pressing the On/off switch.
the radio link is set up to the weighing devices. This
normally takes 20 to 60 seconds.
When the radio link to the weighing devices is set
up, the indicator display shows the current gross
weight value.
1 2
3
4
7
Page 8
ENGLISH
Bed scale 7711
■ Radio link
The Bluetooth radio link operates over a max. radius
of 5m if there is no partition wall between the weighing devices and the digital indicator. After short interruptions (e.g. to replace a battery or caused by the
loss of battery contact due to shocks), the link is
restored automatically within a few seconds. During
connection process appears the following symbol
.
■ Power-off
If the sensors are overloaded or you
have started a menu, the scale swit-
ches off after you press the On/Off
button for 5 seconds.
It is not possible to switch off the sca-
le as long as it is waiting for an input in the editing
section of Setting mode. First exit the editing section
before switching the scale off.
The weighing devices have no on/off switch. They are
only switched off when the batteries are removed.
OFF display
When the scale is switched off but remains connected
to the power supply, the indicator display shows
"OFF" (in accordance with the Medical Equipment
Directive).
■ Charging the batteries
Open the cover of
the battery charger.
The charger has
four compartments
to recharge the four
batteries simultane-
ously. The four LEDs
indicate the charge state for each battery. The fifth
LED on the charger is the mains power indicator for
the charger itself.
LED status indicator on charger (for each charge
compartment):
• LED lights up orange: battery still charging
• LED lights up green: battery charged – trickle
charge
LED status indicator on weighing device:
Digital indicator is switched on (radio link active)
• LED lights up green: battery charged
• LED flashes green, mainly on, off for short
periods: battery still has sufficient capacity
for normal operation
• LED flashes green, normally off, only on for
short period : battery almost empty, battery
must be recharged
Digital indicator is off or in standby mode
• LED lights up green for approx. 2 mins
and then starts to indicate standby mode
by flashing (mainly off)
The charging time for empty batteries is approx. 4
hours. Batteries should be charged and exchanged
in sets. The batteries may remain for any length of
time in the charger when it is on.
8
Page 9
Display of link state:
Press Info key + 1. The following appears in the
indicator display:
Weighing device State Battery voltage
1: 0080025005BB7 OK 6.3 V
2: 0080025005C0D Error
3: 0080025005C70 OK 6.3 V
4: 0080025005ADC OK 6.3 V
Charge run time:
A battery charge is sufficient for approx. 12 hrs continuous duty. When the scale is switched off for most
of the time (90% OFF), the batteries may remain in
the weighing devices for up to 125 hours before they
require a recharge.
Caution: Even when the digital indicator is switched
off, the Bluetooth link is activated at regular intervals. For this reason, the batteries will discharge in
this state and must be recharged at the latest after
125 hours.
Recommendation:
Always remove the batteries from the weighing devices after you switch off the digital indicator and
place them in the battery box of in the charger.
This makes sure that the scale works reliably the
next time it is switched on.
If the bed scale remains without use, remove the
batteries from the weighing devices to prevent
deep discharge. The scope of supply comprises
eight batteries.
9
Page 10

ENGLISH
Bed scale 7711
3. INPUT AND CONTROL
■ Keypad for input and control
ORG key: Calls up
Organisation Data
INFO key: e.g. electronic nameplate containing reference data
KEYPAD: To enter numerical values or alphabetic
characters (alphanumeric
keypad)
0 (zero) key:
Press several
times to display +
(plus), – (minus)
and the blank
character
F key: function key /
10
cursor up /
cursor left
TARE key /
cursor down /
cursor right
ENTER key/
confirmation key
ZEROING key
C key:
Deletes the
last numeral
or character
ON/OFF key
SPECIAL CHARACTER key
Page 11

■ Alphanumeric input
It is possible to make alphanumeric inputs with the
combined numeric and alphabetic character keypad.
Types of input box
• Display fields, read only
• Display/writing fields with numeric input option
• Display/writing fields with alphanumeric input
option
Input procedure
Numeric fields: Type in the numerals 0 to 9 directly
into the KEYPAD. Input is right-flush. A cursor flashes
under the last digit entered. The C key clears the
numeral highlighted by the cursor. The ZEROING key
aborts the input without saving the new input values.
Existing values are retained. The Enter key saves the
value typed in and returns to the application program. The setpoint, whether it is a dot, comma or
no decimal separator, is defined in Setting mode
(Setting mode > Terminal > Display > Decimal separator, see p 14). Only the default number of characters
can be typed into an input box. Any other inputs
are neither displayed nor accepted.
racter pressed is accepted and the cursor moves
on to the next position.
Numerical inputs can be made in direct succession
without any waiting period, as long as the same
number key is not pressed several times in succession. A cursor flashes under the last item entered.
Press the F key and the TARE key to move the cursor
to the left or right. The C key clears the last character
on the left of the cursor or the character with the
cursor flashing underneath it.
The ZEROING key aborts the input without saving
the new input values. Existing values are retained.
The ENTER key saves the value typed in and returns
to the application program. Only the default number
of characters can be typed into an input box. Any
further input overwrites the last character.
Alphanumeric fields: The numeric keys are also assigned by multiple programming to alphanumeric
characters (upper case only) and characters. For
example, the 0 (zero) key is also a +, – and blank
character. The SPECIAL CHARACTER key is also available.
After pressing a numeric key twice within one second, this activates a rolling function to access a
character assigned to this key. If you do not press
the key a second time within one second, the cha-
11
Page 12

ENGLISH
Bed scale 7711
■ Indicator display
The display shows a number of different views depending on the situation. It is divided into display
panes.
Additional display Icon bar
Display panel
Additional display
It displays BMI, Gross, Net, etc. If required, it can be
switched on with the F key according to the program
settings.
Icon bar
Shows information about the status of the active
measuring point.
Display panel
Shows weight value and unit characters.
■ Icons/characters
Icons in the icon bar
Alibi memory capacity 100%
Alibi memory capacity 80%
Alibi memory capacity empty
Keylock
Multirange/Multidivision 1
Multirange/Multidivision 2
Multirange/Multidivision 3
Resolution x10 (10 times)
Zero
Hold function active
Unit character
Symbol for standstill
After placing a load on the scale (bed, patient, etc.),
the scale requires time to finish oscillating. Until it
comes to a standstill the unit character (kg, lb) remains blank. The unit character only appears when
the scale reaches standstill and a stable value is
obtained (clip off).
12
Page 13

4. SETTING MODE
■ Keypad in Setting mode
ORG key:
Exits the Setting
F key: Moves the marking
arrow up the list or moves
the cursor to the left
T key (TARE key):
Moves the marking arrow
down the list or moves the
cursor to the right
mode
PRINT/ENTER key:
Calls up the marked
menu option or saves
an input or change
ZEROING key: Returns
to the next higher level
(back without saving
the change)
KEYPAD
C key:
Clears the
last numeral/
character
ON/OFF key
13
Page 14

ENGLISH
Bed scale 7711
■ Overview of menu navigation
The following setting options are available:
General
Program settings
Weighing + taring
Terminal
Scales
Version (p 14)
Display (p 14)
Keypad (p 14)
Date/Time (p 15)
Organisation data (p 15)
User password (p 15)
Reset terminal (p 15)
Scale parameters (p 26)
Hold mode (p 20)
Fixed tare value (p 17)
Clear fixed tare value (p 19)
Auto standby time
Plausibility check sensor (p 23/Error 12)
Provisional tare (p 19)
F key (p 22)
Calibrated counter status*
approvable*
Filter setting*
Zero tracking*
Zero range at power-on*
Second unit*
Empty message*
Serial number MS*
Software version MS*
Dialysis function (p 19)
Hold mode (p 20)
Second unit (p 14)
BMI function (p 20)
Data Processing
Service
* Only for service personnel authorised by Soehnle Professional
14
Data transfer fixed values (p 18)
Alibi memory (p 11)
Interface 1 (p 21)
Print template (p 21)
I/O port settings*
Barcode*
(password-protected)*
Application
Baud rate*
…*
Printout request
Printout when W+T=O
Decimal separator
Special thousands separator
Hide unit
Consec. no. print key
Factory setting
Page 15

■ Calling up Setting mode
Switch the appliance on. After the
power-on routine, the appliance starts
the last activated application program
automatically. To call
up Setting mode first
press ENTER and then the F key
simultaneously. You are now in
the Setting mode selection menu.
■ Settings in "Terminal" menu
In "Terminal" Setting mode, you will find the following request and setting options.
Version
AZG software version Display only
+
AZG applications software Display only
AZG serial number Display only
CPU board serial number Display only
■ Inputs in Setting mode
In most cases you can select from several different
settings available. With editable values, you can type
in values into the numerical or alphanumeric keypad.
■ Settings in Setting mode
With the parameters in Setting mode, you can
adapt the weighing and taring application program
to your specific requirements.
■ Settings in "Program Settings"
menu
In the "Program Settings" Settings menu, you can
adapt the Application program of your scale to your
specific requirements – the bed scale mainly uses
"Weighing and taring".
Display
Backlight Sets the luminosity, enter
as a percentage into the
numer ical keypad; 0% = dark,
100% = fully luminosity;
factory setting: 80%
Contrast Contrast setting, enter as
a percentage into the numerical keypad; 1% is lowest contrast, 100% is full
contrast; factory setting 50%
Language Deutsch/English/François
Decimal separator Comma, point or none
Factory setting: comma
Second unit g/t/lb/mg/oz (additional
field in display)
Keypad
Keylock Individual, several or all
keys on the keypad can be
locked. Press the key to be
locked to change the status
of the key from "unlocked"
to "locked" and vice versa.
15
Page 16

ENGLISH
Bed scale 7711
To accept, press ENTER for
3 seconds.
Keytone Select "off" or "on". Confir-
mation tone when a key is
pressed. Factory setting: "off"
Validation tone Select "off" or "on" Valida-
tion tone when a function
is executed. factory setting:
"off"
Date/time
Time Enter into numerical key-
pad. Press ENTER to start
clock after confirmation
Date Enter into KEYPAD
Date format Select European or imperial
date; factory setting: Euro-
pean
Organisation data
Description of ORG A Enter the description of the
organisation data mem ory
A; numerals or text entered
into KEYPAD, e.g. "Bed
number", "Room number"
max. 12 characters
Description of ORG B/ Further input options
ORG C/ ORG D for other organisation data
memories, see above
mode is only accessible by
password. If you forget your
password, type in the word
CLEAR to release access.
Clear Clears the password and
releases access
Reset terminal
Do not execute/ "Execute" clears all
Executes all the individual terminal
settings and resets to factory settings
User password
New/change Enter password with up to
8 characters into keypad;
after activation, the Setting
16
Page 17

5. FUNCTIONS
■ Power-on zeroing
During the power-on procedure, the weight values
sent by the weighing devices are zeroed until they
are less than 50% of the max. weighing range. This
tares the empty bed and the weight display goes
to zero.
■ Manual zeroing
Manual zeroing corrects minor deviations from zero, e.g. caused by soiling
on the scale. The following character
appears in the icon bar when the dis-
play indicates zero: >0<.
Zero range approvable and non-approved: 1% to
+3% of the weighing range.
If zeroing is not possible, the error message "Value
above zero range limit" or "Value below zero range
limit" appears for two seconds in the display.
■ x10 (times 10) display
Shows the weight value with
an additional decimal place at
ten times the resolution. Switch
to the x10 display by pressing
+
ENTER and then the ZEROING
key simultaneously. According to the calibration
law, the x10 function may only be activated on approvable scales for a short period of time. For this
reason, it s programmed so that the function is
switched off automatically after 5 seconds. The
message x10 appears in the icon bar as long as the
10-time higher display is selected. When the appliance is switched off, the function is deactivated.
■ Weighing and taring
Display view
■ Weighing with measured tare
Determine and tare a bed weight without patient.
Position the empty bed, including bedding, on the
scale. Press the TARE key. The tare value is saved
and the weight display goes to zero. Now the patient can be laid on the bed. The weight is displayed
with the message "Net".
Displaying the value in the tare memory
Press the INFO key to display the tare memory and
then the TARE key. Press the ZEROING key to terminate the display.
Changing the tare value manually later
Display the tare value by pressing the INFO key and
then the TARE key. Enter the new value into the
KEYPAD. The ZEROING key cancels the input. Existing values are retained or new tare values are saved by pressing the TARE key. Confirm by pressing
ENTER and return to the application program.
17
Page 18

ENGLISH
Bed scale 7711
■ Weighing with manually
entered tare
If the patient is already on the bed and the
bed weight is known, then this can be tared by
manual input.
Enter the known bed weight (tare weight) using
the KEYPAD. The input appears in the display with
the current weight unit. Press the TARE key. The
nput is transferred into the tare memory and the
tare weight is deducted from the weight display.
The patient's weight measured in this way is displayed with the message "Net".
Showing the value in the tare memory
Display the tare memory by pressing the INFO key,
then press the Tare key. Press the ZEROING key to
end the display.
Changing the tare value manually later
Show the tare value by pressing the INFO key and
then the TARE key. Enter the new value into the
KEYPAD. Press the ZEROING key to cancel the input.
The existing value is retained or the new tare value
is saved by pressing the TARE key. Confirm by pressing ENTER and return to the application program.
■ Weighing with stored tare values
Known bed weights can be stored as the tare value
in a power failsafe memory and called up as required
(100 different bed weights are possible).
Each memory location has a:
• Three-digit consecutive number
• Description (text, 18 characters)
• Tare value
Entering tare weights into the fixed tare
value memory
• Call up the input menu
(Setting mode > Program Settings > General
> Fixed tare values)
• Press ENTER and F key simultaneously to access
Setting mode.
• The arrow points to "Program Settings". Confirm
by pressing ENTER.
• Confirm the message "General" by pressing ENTER.
• Press TARE to browse to "Fixed tare values" and
accept by pressing ENTER.
Entering values
• If no tare memory has yet been assigned, the
first free, or otherwise the last, selected fixed
tare value memory is displayed.
• Press ORG followed by ENTER. The input field
for the description of a new tare memory is displayed.
• Enter the description into the KEYPAD and confirm by pressing ENTER.
• The arrow points to "Tare value". Press ENTER.
The input field is displayed to enter the tare value.
• Enter the tare value and confirm by pressing
ENTER.
• Go back by pressing the ZEROING key to select
the tare memory.
• If you want to assign other tare memories, press
the ORG key to select the next free memory location and repeat the procedure as described
above.
• To return to weighing mode, press the ZEROING
key and then the ORG key.
18
Page 19

Transferring fixed tare values from a PC to the
digital indicator
• Here you require a special software. For more
information, please contact the Soehnle Professional Service personnel.
Changing or overwriting a fixed tare value memory
• Call up the Input menu
(Setting mode > Program Settings > General
> Fixed tare values)
• Press ENTER and the F key simultaneously to
access Setting mode.
• The arrow points to "Program Settings". Confirm
by pressing ENTER.
• Confirm the message "General" by pressing ENTER.
• Press the TARE key to browse to "Fixed tare values" and accept by pressing ENTER.
Correcting values
• The last selected fixed tare value memory is displayed. Press the F or TARE key to select the tare
memory to be changed or enter the memory location number and confirm by pressing ENTER.
• Press ENTER. The input field for the tare location
description is displayed.
• Change the description by typing it into the
KEYPAD and confirm by pressing ENTER.
• The arrow points to "Tare value".
• Press ENTER. The input field for the tare value
is displayed.
• Change the tare value by typing it into the KEYPAD and confirm by pressing ENTER.
• Go back to the tare memory selection by pressing
the ZEROING key.
• If you want to change other tare memories,
press the F key of the TARE key to select the
next memory location to be changed and repeat
the procedure as described above.
• To return to weighing mode, press the ZEROING
key and then the ORG key.
Calling up the list of fixed tare value memories
for taring
The tare value from the fixed tare value memory
can be activated with the scale unloaded (i.e. before the weighing operation) or with the scale loaded (during a weighing operation).
• The display pane shows a weight value ≥ 0.000 kg.
• First press ENTER and then the TARE key simultaneously. The fixed tare value memory last used
appears in the display.
• Press the F or TARE key to browse to the required
fixed tare value memory or type in the memory
location number and confirm by pressing ENTER.
• Press ENTER to activate the fixed tare value.
The display shows the gross value minus the
tare value (net).
• Further tare values from the memory are activated
by repeating the procedure described above.
Clearing an existing fixed value
• Call up the input menu
(Setting mode > Program Settings > General
> Fixed tare values)
• Press ENTER and the F key simultaneously to
access Setting mode.
• The arrow points to "Program Settings". Press
ENTER to confirm.
19
Page 20

ENGLISH
Bed scale 7711
• Confirm the message "General" by pressing ENTER.
• Press the TARE key to browse to "Fixed tare values" and accept by pressing ENTER.
Clearing a tare value
• The last selected fixed tare value memory is
displayed. Press the F or TARE key to browse
the required fixed tare value memory or enter
the memory location number and confirm by
pressing ENTER.
• Clear the displayed fixed tare value memory
by pressing the C key.
• The gap in the consecutive number scheme is
closed. The following fixed tare value memories
are given a number reduced by 1.
CAUTION: Under Setting mode > Program Settings > General > Delete fixed tare values, all
fixed values are cleared from the memory!
■ Provisional tare/dialysis function
Setting and using the operating mode
• Setting in Setting mode
(Setting mode > Program Settings > Weighing + Taring > F key > Dialysis function)
• Press ENTER and the F key simultaneously to
access Setting mode.
• The arrow points to "Program Settings". Press
ENTER to confirm.
• Press TARE to browse down to "Weighing + Taring" and press ENTER to confirm.
• Confirm the message "F key" by pressing ENTER.
• Press TARE (down) or the F key (up) to browse
to "Dialysis function" and press ENTER to confirm.
There is an acoustic acknowledgement.
• Exit Setting mode by pressing the ORG key. The
gross value is displayed.
Using the dialysis function
• Press the F key (with a load on the scale). Message: "Place tare". Place the additional tare on
the scale. Confirm by pressing TARE. The additional tare is accepted into the tare memory and
the net value remains unchanged.
• Repeat this procedure for other additional tares.
The weight is displayed with the message "Net".
When the scale is clipped off, the tare weight is
displayed with a negative sign.
• Clear the tare by pressing the ZEROING key.
Displaying the value in the tare memory
To display the tare memory, press the INFO key and
then the TARE key. Press the ZEROING key to exit
the display.
Changing the tare value manually later
Display the tare value by pressing the INFO key and
then the TARE key. Enter the new value into the
KEYPAD. Press the ZEROING key to abort the input.
The existing value is retained or the new tare value
is saved by pressing the TARE key. Confirm by pressing ENTER and return to the application program.
20
Page 21

■ Error message when taring
"Error 06 Taring not possible"
Possible causes:
• Scale empty
• Scale in overload or underload
• Manual tare input with tare value above
maximum load
■ Displaying the tare memory
To display the tare memory, press the INFO key and
then the TARE key. Press the ZEROING key to end
the display.
■ BMI function
The Body Mass Index (BMI) is used to assess whether a person has a normal weight or is overweight.
The BMI is calculated according to the following
formula:
BMI =
The unit for the BMI is therefore kg/m
BMI classification separated according to gender:
Classification m w
Underweight <20 <19
Normal weight 20–25 19–24
Overweight 25–30 24–30
Adiposity 30–40 30–40
Severe adiposity >40 >40
body height (m) x body height (m)
body weight (kg)
2
.
Setting and using the operating mode
• Setting in Setting mode(Setting mode > Program Settings > Weighing + Taring > F key >
BMI function)
• Press ENTER and the F key simultaneously to
access Setting mode.
• The arrow points to "Program Settings". Press
ENTER to confirm.
• Press the TARE key to browse down to "Weighing + Taring" and press ENTER to confirm.
• Confirm the message "F key" by pressing ENTER.
• The arrow points to the last function activated.
• Press the TARE key to browse to "BMI function"
and press ENTER to accept. A beep tone confirms
acceptance.
• Exit Setting mode by pressing the ORG key. The
weight value is displayed.
Using the BMI function
• Press the F key. The following message appears:
"Enter body height". Enter your body height in
metres.
• Confirm by pressing ENTER. Now, parallel to the
person's weight, the BMI value is displayed in
the additional display.
• The BMI display can be switched off by pressing
the F key again.
■ Hold function
• Setting in Setting mode
(Setting mode > Program Settings > General
> Hold mode)
The Hold function "Hold mode" freezes the measured value in the display dependent on the selected
setting. The following settings are possible:
21
Page 22

ENGLISH
Bed scale 7711
not active: Hold mode is off.
Still/Key: Value freezes.
Press the ON/OFF to cancel Hold mode.
Still/Empty: Value freezes.
Clip off the scale to cancel Hold mode.
Max/Key: Max. value freezes (at standstill).
Press the ON/OFF key to cancel Hold mode.
Max/Empty: Max. value freezes (at standstill).
Clip off the scale to cancel Hold mode.
Delay/Key: Max. value freezes (movement).
Press the ON/OFF key to cancel Hold mode.
Delay/Empty: Max. value freezes (movement).
Clip off the scale to cancel Hold mode.
■ Print
The 3020 Digital Indicator can be connected to a
printer via the serial port to print out scale chits. Up
to a max. of 15 print templates can be stored. You
can obtain a service software from Soehnle Professional service centres for the 3020/3030 to design
print templates with customised contents.
The parameters listed in the standard print templates
can be used to design user-defined print templates.
In addition, organisation data (identifiers) and userdefined parameters (such as company names) can
be included. Please contact your Soehnle Professional
service partner about your print template requirements.
Start the print routine either by pressing ENTER or
by pressing another print command, e.g. the F key.
Configuring the printer port
• Setting in Setting mode
(Setting mode > Data Processing > Interface
1 > Application > 2795.11)
• Press ENTER and the F key simultaneously to
access Setting mode.
• The arrow points to "Program Settings". Press
the TARE key to browse to "Data Processing".
Press ENTER.
• The arrow points to "Data transfer". Press the
TARE key to browse to "Interface 1". Press ENTER.
• The arrow points to "Application". Press ENTER.
• The arrow points to "2795.11". Press the TARE
key or the F key to select the printer to be connected.
• Press ENTER to confirm.
Connection options (factory setting):
none
2795.11 (Soehnle Professional printer)
2795.12 (Soehnle Professional printer)
Data Processing (PC)
Barcode (barcode reader)
Large-format
display S302 (monitor)
Info about printer
Soehnle Professional printers are stored as standard.
However, you can also set up other printers using
the 3020/3030 Service Software. Other parameters
(baud rate, data bits, parity and XON/XOFF) can be
assigned as specified in the printer manual. Please
contact service personnel authorised by Soehnle
Professional. The parameters set at the factory are
configured for Soehnle Professional printers.
22
Page 23

Default print templates, factory setting
The print-command keys can be assigned using the
print templates in the service software. In the factory setting, the print template below is already
stored and assigned. In other words, it can be printed out. This default print template is an example
showing what parameters are available.
Date 01.09.08
Time 09:13:28
Scale no. 02
Gross W 0.154 kg
Tare T 0.015 kg
Print-command conditions
The print templates are assigned to print-command
conditions using the service software.
The following conditions can be assigned to
print templates:
• Print key (ENTER)
• Automatic print/data record once immediately
• Automatic print/data record once after weight
change at standstill
• Automatic print/data record after weight
change at standstill
• Automatic print/data record after weight
change at standstill above the empty message
• Automatic print/data record after weight change
at standstill above the empty message if the
active empty message was previously active.
• Continuous transmission
• ENTER/Accept key when ORG A is entered
• ENTER/Accept key when ORG B is entered
• ENTER/Accept key when ORG C is entered
• ENTER/Accept key when ORG D is entered
• Key combination INFO, F and ENTER
(dependent on settings)
• ENTER/Accept key for manual input
• Print alibi memory
■ Programming the F key
The F key is programmable to call up various functions. It assumes different functions depending on
how it is assigned. The current function is selected
in Setting mode.
Access Setting mode by first pressing ENTER and
then the F key simultaneously.
In Setting mode you will find the F key programming options under Program Settings > Weighing +
Taring > F key.
Select the required function by pressing the F or
the TARE key and confirm by pressing ENTER.
The following functions are available:
Provisional tare
Dialysis function
Hold mode
Second unit
BMI function
Exit Setting mode by pressing the ORG key.
23
Page 24

ENGLISH
Bed scale 7711
6. Error messages
■ Error numbers > Cause / Remedy / Info
05 Zeroing not possible
> Deviation from zero point too large
06 Taring no possible
> Empty scale, scale underloaded or overloaded,
manual tare input with tare value above max. load
07 Print not permitted
08 No mass unit switchover
09 Print signal buffer full
10 Load cell signal overflow
11 No measuring point signal
12 Check sensor position
> Incorrect lever setting for at least one
weighing device or no weigh on at least one
weighing device (plausibility check active)
13 Converter failure
15 Measuring point write-protected
23 Print error
24 Print template memory corrupt
25 No print template(s)
26 Printer update cancelled
30 Alibi memory full
33 Alibi memory contents corrupt
34 Alibi memory empty
35 No or defective alibi memory
36 Cannot write alibi
37 Alibi memory unreadable
40 General data format error
41 Input value too small
42 Input value too big
16 No measuring point detected
18 Measuring point not zeroed
20 Print format empty
24
44 Power-off not allowed
50 Value below zero range limit
> Zeroing not possible because measured value
is outside the set zero range limit
Page 25

51 Value above zero range limit
> Zeroing not possible because measured value
is outside the set zero range limit
52 Overload
> Measured value above weighing range
53 Underload
> Measured value below 0 (zero)
55 Place weight on scale
> Scale empty or no clip off setting made
according to set clip off factor
75 Replace backup battery
76 Charge batteries
80 Abort external command
81 Timeout external command
82 Number exists already
> The identification assigned to a fixed value
exists already
90 Fixed value memory occupied / full
> A total of 100 memory locations are available
valid for all programs
98 Wrong barcode
25
Page 26

ENGLISH
Bed scale 7711
7. TECHNICAL INFORMATION
■ Technical data
Weighing range: see nameplate
Division: see nameplate
Min/max load: see nameplate
Max. bed weight: 250 kg
Approval number: D07-09-034-PTB (0102)
Ambient operating temperature:
–10°C to +40°C, rapid
temperature changes, e.g.
in the event of cold draughts, may impair the test
result
Storage temperature: –40°C to +70°C
Humidity: 20%–85% relative humidity,
non condensing
Digital indicator power supply:
power adapter/mains voltage
100–240 V / 50–60 Hz
Weighing device power supply:
From 6 V lead-gel battery,
battery capacity: 1200 mA
continuous duty approx. 12
hours
Transportation conditions:
The appliance may only be
transported in its original
packaging, comply with
storage temperature, avoid
vibrations and shocks
Membrane keyboard: 19 keys, function key freely
programmable
Organisation data memory:
4 memories, alphanumeric
input via the numerical
keypad
Display: Dot matrix 240 x 64 pixels,
dimmable, backlighting
Memory capacity: Fixed value memory for to-
tal of 100 fixed values, valid for all programs, power
failsafe, alibi memory for 2
million inputs optional
Interfaces: 1 x RS 232, other interfaces
optional, Bluetooth Qualification
Materials: Digital Indicator: housing
plastic; weighing devices:
aluminium
Wheels 130–160 mm ø,
max. width 71 mm
■ Other technical data
Diagrams, lists of spare parts, and setting instructions can be requested through the manufacturer's
Customer Service.
■ Instructions for installing
the scale
For design reasons, the scale is designed only for use
on level floors. For installation sites in Germany, this
condition is met when the floor complies with the
tolerance specifications for flat floors to DIN 18202,
Table 3, Row 4. For other countries the applicable
national standards should be taken as a basis.
26
Page 27

■ Electronic nameplate and calibration counter
07
D07-09-034-PTB
07
The appliance has an electronic nameplate.
Display by pressing the INFO key. Exit the display by pressing the INFO key again.
■ Explanations of labels and icons
Weighing ranges
Max
Maximum load of weighing range
D07-09-034-PTB
07
XXXX
Min
Minimum load of weighing range
e=
Calibration value (division)
SNR
Scale serial number (scale type, final number of
year of manufacture, incremental numeral)
(sample display)
D07-09-034-PTB
TYP
XXXX
CE mark of conformity with year of affixing and simultaneous commencement of validity of calibration
Precision class
No. of EU approval
Manufacturer's product number
E.g. 0102, Official Code of "Office Quoted"
(this body performed the initial calibration process)
27
Page 28

ENGLISH
XXXX
07
D07-09-034-PTB
XXXX
07
Bed scale 7711
Load Cell
SN:H2509xx
Typ:SEB46B-300-C3-MR-CC-6L
Soehnle Professional GmbH & Co. KG.
Manfred-von-Ardenne-Allee 12 71522 Backnang Germany
Typ:7711
SN:771110070001 BT:008025005BBF
IP X2 6V 80 mA
Soehnle Professional GmbH & Co. KG
Manfred-von-Ardenne-Allee 12 71522 Backnang Germany
SN
TYP
BT
IPX2
6V DC
80mA
Symbol for EU calibration
The calibrated counter status indicates how often
the scale was calibrated. The stored counter status
must match the calibrated counter status on the
inserted label secured by adhesive label.
Serial number of weighing machine
Product number der Lastaufnehmer
Bluetooth Address
Protection Class
Power Supply
Power Input
28
Attend to user manual, ISO 7010
Equipment for not ionized radiation, IEC 60417
Functional earth, IEC 60417
Page 29

ENGLISH
Bed scale 7711
Soehnle Professional GmbH & Co. KG
Manfred-von-Ardenne-Allee 12
DE-71522 Backnang
Phone +49 (0) 71 91 / 34 53-0
Fax +49 (0) 71 91 / 34 53-211
info@soehnle-professional.com
www.soehnle-professional.com
Scales, System Solutions And Special Developments
29
All rights reserved. © Soehnle Professional GmbH & Co. KG. No publication, reproduction or
07/2010 470.051.103
any form of use or transfer to third parties – whether in part or in revised form – without the
consent of Soehnle Professional GmbH & Co. KG. Subject to technical modifications
 Loading...