

Page 1
M18 KLE
SIP DECT 4-Line Deskset
User Manual
Page 2

User Manual
M18 KLE
SIP DECT 4-Line Deskset
Table of Contents
Copyright, Trademarks, GPL, Legal
Disclaimers 4
Important Safety Information 5
Important safety instructions............... 5
For cUL compliance only 7
Mesures de sécurité importantes 7
Mesures de sécurité importantes ....... 7
FCC part 15 ...................................... 10
Industry Canada ............................... 10
Introduction 11
About this manual ............................. 11
Product overview .............................. 12
Cordless deskset external features .. 13
Cordless deskset external features .. 14
Factory Default Line Key Settings .... 15
Directory card ................................... 15
Deskset Installation 16
Installing the backup battery ............. 16
Battery charging ............................... 17
Installing the deskset ........................ 18
Wall mounting the deskset ...............20
Adding a corded headset.................. 21
Registering the deskset to the base . 22
Deregistering the deskset ................. 23
Locating the Deskset 24
Screen icons 24
Using the Deskset 25
Idle screen ........................................ 25
Making calls ...................................... 25
Answering Incoming calls ................. 26
Multiple Incoming Calls..................... 26
Ending a call ..................................... 26
Speakerphone .................................. 27
Volume..............................................27
Mute.................................................. 27
Call Waiting ......................................27
Ignoring Calls.................................... 27
Dismissing Calls ............................... 28
Missed Calls ..................................... 28
Answering Internal Calls ................... 28
Putting a call on hold ........................ 29
Putting a call on private hold ............ 29
Switching between two calls ............. 30
Paging another handset/desket ........ 30
Receiving a page .............................. 31
About Shared Calls........................... 31
Displaying calls on the Call List ........ 33
Barging In ......................................... 33
Call Privacy....................................... 34
Using Key System Emulation ........... 34
Transferring a call ............................. 37
Setting up a conference call ............. 38
Listening to messages ...................... 40
Using the Directory ........................... 40
Using the Call History ....................... 42
Using Speed Dial .............................. 44
Conguring the Deskset 45
2
Page 3

Setting Do Not Disturb ...................... 45
Setting call forwarding ...................... 45
Blocking anonymous calls ................ 46
Dialing anonymously ........................ 46
Setting missed-call alerts.................. 47
Setting call waiting ............................ 47
Viewing deskset status ..................... 47
Setting the language......................... 48
Setting the date and time.................. 48
Setting the deskset name ................. 48
Conguring the programmable keys 49
Programmable Key Types ................ 50
Line key lights ................................... 52
Setting the screen contrast ............... 53
Backlight ........................................... 53
Setting the ringer tone and volume... 54
Setting audio mode........................... 54
Turning low battery tone on or o ..... 54
Turning key tones on or o ............... 55
Registering or deregistering your
deskset ............................................. 55
WebUI 56
Using the WebUI .............................. 56
System Status .................................. 58
Deskset Status ................................. 59
Call Settings ..................................... 59
User Preferences.............................. 61
Base Directory .................................. 62
Blacklist ............................................ 65
Remote XML .....................................65
Security............................................. 65
Troubleshooting 66
General issues.................................. 66
Technical Specications 67
Special characters 67
Entering special characters .............. 67
Maintenance 68
Taking care of your telephone .......... 68
Appendix - GNU General Public
License 69
3
Page 4

Copyright, Trademarks, GPL, Legal Disclaimers
Copyright © 2019 Snom Technology GmbH
All Rights Reserved.
Snom, the names of Snom products, and Snom logos are trademarks owned by
Snom Technology GmbH. All other product names and names of enterprises are
the property of their respective owners.
Product specications are subject to change without notice.
Snom Technology GmbH reserves the right to revise and change this document
at any time, without being obliged to announce such revisions or changes
beforehand or after the fact.
Texts, images, and illustrations and their arrangement in this document are
subject to the protection of copyrights and other legal rights worldwide. Their
use, reproduction, and transmittal to third parties without express written
permission may result in legal proceedings in the criminal courts as well as civil
courts.
When this document is made available on Snom’s web page, Snom Technology
GmbH gives its permission to download and print copies of its content for the
intended purpose of using it as a manual. No parts of this document may be
altered, modied or used for commercial purposes without the express written
consent of Snom Technology GmbH.
Although due care has been taken in the compilation and presentation of the
information in this document, the data upon which it is based may have changed
in the meantime. Snom therefore disclaims all warranties and liability for the
accurateness, completeness, and currentness of the information published,
except in the case of intention or gross negligence on the part of Snom or where
liability arises due to binding legal provisions.
Our rmware includes some source code that may be used and modied by
anyone and everyone under the GNU Public License (GPL) (see “Appendix GNU General Public License” on page 69), provided they, in turn, make it
available to everyone else with the same licensing agreement. Please go to
https://www.snom.com/footer/source-code-gpl-open-source/ for the original GPL
license and the source code of components licensed under GPL and used in
Snom products.
4
Page 5

Important Safety Information
This symbol is to alert you to important operating or servicing
instructions that may appear on the product or in this user’s manual.
Always follow basic safety precautions when using this product to
reduce the risk of injury, re, or electric shock.
Important safety instructions
When using your telephone equipment, basic safety precautions should always
be followed to reduce the risk of re, electric shock and injury, including the
following:
1. This product should be installed by a qualied technician.
2. This product should only be connected to the host equipment and never
directly to the network such as Public Switch Telephone Network (PSTN) or
Plain Old Telephone Services (POTS).
3. Read and understand all instructions.
4. Follow all warnings and instructions marked on the product.
5. Unplug this product from the wall outlet before cleaning. Do not use liquid or
aerosol cleaners. Use a damp cloth for cleaning.
6. Do not use this product near water such as near a bath tub, wash bowl,
kitchen sink, laundry tub or swimming pool, or in a wet basement or shower.
7. Do not place this product on an unstable table, shelf, stand or other unstable
surfaces.
8. Slots and openings in the back or bottom of the handset are provided for
ventilation. To protect them from overheating, these openings must not be
blocked by placing the product on a soft surface such as a bed, sofa or rug.
This product should never be placed near or over a radiator or heat register.
This product should not be placed in any area where proper ventilation is not
provided.
9. This product should be operated only from the type of power source indicated
on the marking label. If you are not sure of the type of power supplied at the
premises, consult your dealer or local power company.
10. Do not allow anything to rest on the power cord. Do not install this product
where the cord may be walked on.
11. Never push objects of any kind into this product through the slots in the
handset because they may touch dangerous voltage points or create a short
circuit. Never spill liquid of any kind on the product.
12. To reduce the risk of electric shock, do not disassemble this product, but take
it to an authorized service facility. Opening or removing parts of the handset
other than specied access doors may expose you to dangerous voltages
or other risks. Incorrect reassembling can cause electric shock when the
product is subsequently used.
5
Page 6

13. Do not overload wall outlets and extension cords.
14. Unplug this product from the wall outlet and refer servicing to an authorized
service facility under the following conditions:
A. When the power supply cord or plug is damaged or frayed.
B. If liquid has been spilled onto the product.
C. If the product has been exposed to rain or water.
D. If the product does not operate normally by following the operating
instructions. Adjust only those controls that are covered by the
operation instructions. Improper adjustment of other controls may
result in damage and often requires extensive work by an authorized
technician to restore the product to normal operation.
E. If the product has been dropped and the telephone base and/or
handset has been damaged.
F. If the product exhibits a distinct change in performance.
15. Avoid using a telephone (other than cordless) during an electrical storm.
There is a remote risk of electric shock from lightning.
16. Do not use the telephone to report a gas leak in the vicinity of the leak. Under
certain circumstances, a spark may be created when the adapter is plugged
into the power outlet, or when the handset is replaced in its cradle. This is a
common event associated with the closing of any electrical circuit. The user
should not plug the phone into a power outlet, and should not put a charged
handset into the cradle, if the phone is located in an environment containing
concentrations of ammable or ame-supporting gases, unless there is
adequate ventilation. A spark in such an environment could create a re or
explosion. Such environments might include: medical use of oxygen without
adequate ventilation; industrial gases (cleaning solvents; gasoline vapors;
etc.); a leak of natural gas; etc.
17. Only put the handset of your telephone next to your ear when it is in normal
talk mode.
18. The power adapters are intended to be correctly oriented in a vertical or oor
mount position. The prongs are not designed to hold the plug in place if it is
plugged into a ceiling, under-the-table or cabinet outlet.
19. Use only the power cord indicated in this manual.
Power adapter rating: 6.0 Vdc @ 600 mA
20. For pluggable equipment, the socket-outlet shall be installed near the
equipment and shall be easily accessible.
21. In wall mounting position, make sure to mount the telephone base on the wall
by aligning the eyelets with the mounting studs of the wall plate. Then slide
the telephone base down on both mounting studs until it locks into place.
Refer to the full installation instructions in the User Manual.
22. CAUTION: Keep small metallic objects such as pins and staples away from
the handset receiver.
6
Page 7

SAVE THESE INSTRUCTIONS
For cUL compliance only
Mesures de sécurité importantes
Ce symbole vous alertera d’informations importantes ou
d’instructions d’entretien pouvant apparaître dans ce guide
d’utilisation. Respectez toujours les mesures de sécurité et de
sécurité de base lorsque vous utilisez ce produit, an de réduire les
risques de blessures, d’incendie, ou d’électrocution.
Mesures de sécurité importantes
An de réduire les risques d’incendie, de blessures corporelles ou
d’électrocution, suivez toujours ces mesures préventives de base lorsque vous
utilisez votre téléphone
1. Cet appareil doit être installé par un technicien qualié.
2. Cet appareil doit être branché à un équipement hôte et jamais branché à un
réseau, tel qu’un réseau PSTN publique ou un réseau téléphonique standard
(POTS).
3. Lisez et comprenez bien toutes les instructions.
4. Observez toutes les instructions et mises en garde inscrites sur l’appareil.
5. Débranchez ce téléphone de la prise murale avant de le nettoyer. N’utilisez
pas de nettoyeurs liquides ni en aérosol. N’utilisez qu’un chion doux et
légèrement humecté.
6. N’utilisez pas ce produit près de l’eau, tel que près d’un bain, d’un lavabo,
d’un évier de cuisine, d’un bac de lavage ou d’une piscine, ou dans un soussol humide ou sous la douche.
7. Ne déposez pas ce téléphone sur un chariot, support ou table chancelants.
L’appareil pourrait tomber et être sérieusement endommagé.
8. Le boîtier de l’appareil est doté de fentes et d’ouvertures d’aération situées
à l’arrière ou en dessous. An d’empêcher la surchaue, ces ouvertures ne
doivent pas être obstruées en plaçant l’appareil sur un lit, divan, tapis ou
autre surface similaires. Ne placez pas cet appareil à proximité d’un élément
de chauage ni d’une plinthe électrique. De plus, ne l’installez pas dans une
unité murale ou un cabinet fermé qui ne possède pas d’aération adéquate.
9. Ne faites fonctionner cet appareil qu’avec le type d’alimentation indiqué sur
les étiquettes de l’appareil. Si vous ne connaissez pas le voltage de votre
maison, consultez votre marchand ou votre fournisseur d’électricité.
10. Ne déposez rien sur le cordon d’alimentation. Installez cet appareil dans
un endroit sécuritaire, là où personne ne pourra trébucher sur la ligne
d’alimentation ni le cordon téléphonique modulaire.
7
Page 8

11. N’insérez jamais d’objets à travers les fentes et ouvertures de cet
appareil, car ils pourraient toucher à des points de tension dangereux
ou court-circuiter des pièces, ce qui constituerait un risque d’incendie ou
d’électrocution. N’échappez pas de liquides dans l’appareil.
12. An de réduire les risques d’électrocution, ne démontez pas l’appareil, mais
apportez-le plutôt à un centre de service qualié s’il doit être réparé. En
enlevant le couvercle, vous vous exposez à des tensions dangereuses ou
autres dangers similaires. Un remontage inadéquat peut être à l’origine d’une
électrocution lors d’une utilisation ultérieure de l’appareil.
13. Ne surchargez pas les prises de courant ni les rallonges électriques, car ceci
peut constituer un risque d’incendie ou d’électrocution.
14. Débranchez cet appareil de la prise de courant et communiquez avec le
département de service à la clientèle de Snom dans les cas suivants:
A. Lorsque le cordon d’alimentation est endommagé ou écorché.
B. Si du liquide a été échappé dans l’appareil.
C. Si l’appareil a été exposé à une source d’humidité telle que la pluie ou
l’eau.
D. Si l’appareil ne fonctionne pas normalement en suivant les directives
du guide. N’ajustez que les commandes couvertes dans le guide
d’utilisation, car un mauvais réglage de celles-ci peut être à l’origine de
dommages, ce qui nécessiterait des réparations considérables pour
remettre l’appareil à son état de fonctionnement normal.
E. Si l’appareil a été échappé ou son boîtier, endommagé.
F. Si le produit ache une nette diminution de sa performance.
15. Évitez d’utiliser un téléphone (autre qu’un sans l) pendant un orage. Les
éclairs peuvent être à l’origine d’une électrocution.
16. N’utilisez pas le téléphone pour rapporter une fuite de gaz à proximité de
celle-ci. Sous certaines circonstances, une inteincelle pourrait survenir
lorsque l’adaptateur est branché à une prise de courant, ou lorsque le
combiné est déposé sur le combiné. Ceci est un événement commun
associé avec la fermeture d’un circuit électrique. L’utilisateur ne devrait
pas brancher le téléphone dans une prise de courant, et ne devrait pas
déposer le combiné chargé sur le socle, si le téléphone se trouve dans un
environnement ou la concentration de gaz inammables, sans ventilation
adéquate. Une étincelle dans ces endroits pourrait provoquer un incendie ou
une explosion. Ces environnements pourraient être l’utilisation médicale de
l’oxygène sans ventilation adéquate; le gaz industriel (dissolvants, vapeurs
d’essence, etc.); une fuite de gaz naturel, etc.
17. Placez uniquement le combiné de votre appareil près de votre oreille lorsqu’il
est en mode de conversation normal.
18. Les adaptateurs sont conçus pour être orientés en position verticale ou en
position horizontale sur le plancher.
8
Page 9

19. N’utilisez que cordon d’alimentation et les piles indiquées dans ce guide
d’utilisation. Note de l’adaptateur: 6.0 Vdc @ 600 mA
20. Pour les PRODUITS À BRANCHER À UNE PRISE DE COURANT, la prise
de courant doit être installée près du produit, an d’assurer une accessibilité
sécuritaire à la prise de courant.
21. En position de montage mural, assurez-vous de monter le socle du
téléphone sur le mur en alignant les oeillets avec les goujons de xation de
la plaque murale. Ensuite, faites glisser le socle vers le bas sur les deux
goujons de xation jusqu’à ce qu’il se verrouille en place. Reportez-vous aux
instructions complètes dans la section Installation dans ce guide d’utilisation.
22. MISE EN GARDE : Éloignez les petits objets métalliques tels que les
broches de l’écouteur du combiné.
CONSERVEZ CES INSTRUCTIONS
9
Page 10

Compliance
FCC part 15
This device complies with Part 15 of the FCC rules. Operation is subject to the
following two conditions: (1) This device may not cause harmful interference, and
(2) this device must accept any interference received, including interference that
may cause undesired operation.
This equipment has been tested and found to comply with the limits for a
Class A digital device, pursuant to Part 15 of the FCC Rules. These limits are
designed to provide reasonable protection against harmful interference when the
equipment is operated in a commercial environment. This equipment generates,
uses, and can radiate radio frequency energy and, if not installed and used in
accordance with the instruction manual, may cause harmful interference to radio
communications. Operation of this equipment in a residential area is likely to
cause harmful interference in which case the user will be required to correct the
interference at the user’s expense.
Privacy of communications may not be ensured when using this phone.
Warning: Changes or modications to this equipment not expressly approved by
the party responsible for compliance could void the user’s authority to operate
the equipment.
Caution: To maintain the compliance with the FCC’s RF exposure guideline,
place the base unit at least 20 cm from nearby persons.
For body-worn operation, this handset has been tested and meets the FCC RF
exposure guidelines when used with the accessories supplied or designated for
this product. Use of other accessories may not ensure compliance with FCC RF
exposure guidelines.
Industry Canada
This Class A digital apparatus complies with Canadian requirements:
CAN ICES-3 (A)/NMB-3(A). Cet appareil numérique de la classe A est conforme
à la norme CAN ICES-3 (A)/NMB-3(A) du Canada.
This device contains licence-exempt transmitter(s)/receiver(s) that comply with
Innovation, Science and Economic Development Canada’s licence-exempt
RSS(s).
Operation is subject to the following two conditions: (1) this device may not
cause interference, and (2) this device must accept any interference, including
interference that may cause undesired operation of the device.
Privacy of communications may not be ensured when using this telephone.
The term ‘’IC:‘’ before the certication/registration number only signies that the
Industry Canada technical specications were met.
This product meets the applicable Innovation, Science and Economic
Development Canada technical specications.
10
Page 11

Introduction
About this manual
This user manual provides installation and handset conguration instructions,
and detailed instructions for using the M18 KLE SIP DECT 4-Line Deskset with
rmware version 1.0.2.1.
See “Viewing deskset status” on page 47 for instructions on how to check the
software version of your M18 KLE SIP DECT 4-Line Deskset and/or M100 KLE
SIP DECT 4-Line Base Station.
Please read Important Safety Information on page 4 of this user manual.
Please thoroughly read this user manual for all the feature operations and
troubleshooting information necessary to install and operate your handset.
Please refer to the M100 KLE Administrator and Provisioning Manual for
complete conguration instructions.
For customer service or product information, visit our website at
www.snomamericas.com .
11
Page 12

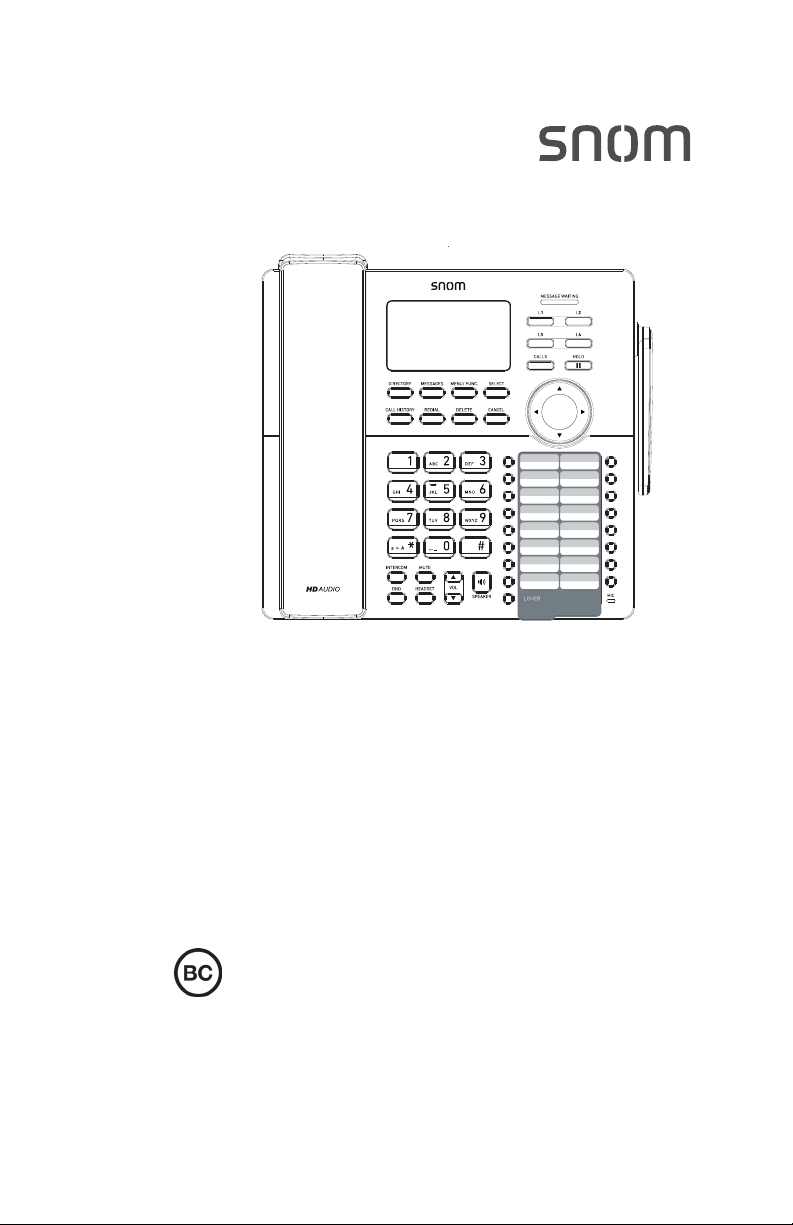
Product overview
The M18 KLE SIP DECT 4-Line Deskset, combined with the M100 KLE SIP
DECT 4-Line Base Station, is a full-featured SIP endpoint business phone
system designed to work with popular hosted IP PBX services and on-premise
SIP PBXs. Once you have ordered and congured your PBX service, the deskset
enables you to make and receive calls as you would with any other business
phone. Up to 10 cordless devices (M18 KLE desksets, M10 KLE handsets, and/
or M10R KLE handsets) can be registered to the base station. Each deskset
provides calling features such as hold, transfer, conferencing, and speakerphone.
The M100 KLE SIP DECT 4-Line Base Station supports shared calls among
multiple cordless handsets/desksets with a single SIP account. With Key System
Emulation, the line keys (L1 to L4) on handsets/desksets can be congured as
KeyLine type, which enables the keys to be used as for making calls, picking up
held calls, and barging in calls.
The M18 KLE SIP DECT 4-Line Deskset features include:
• Backlit Liquid Crystal Display
• Speakerphone, Hold and Mute
• Up to 8 SIP accounts
• Up to 6 concurrent calls across all desksets
• Shared call usage on single SIP account among multiple users
• Key System Emulation
• 4 line keys (L1-L4) with LEDs
• Message waiting alert LED
• 3-way conferencing
• Corded headset support
• 500-entry local directory
• 1,000-entry base directory with entries shared on all registered handsets and
desksets
12
Page 13

Quick Reference Guide
Cordless deskset external features
MESSAGES
Press to display the
Message menu.
DIRECTORY
Press to view directory
information.
CALL HISTORY
Press to view call
history.
MENU/FUNC
Press to display the
main menu or context
menu, OR to dismiss
an incoming call.
SELECT
Press to select a menu
item.
CANCEL
Press to cancel an
operation and leave a
menu, or to ignore an
incoming call.
REDIAL
Press to redial a
number.
DIAL PAD
MUTE
During a call, press
to prevent your voice
from being heard.
INTERCOM
Press to start making
an intercom call to
one device.
DND (Do not disturb)
Press once to turn the
feature on. Press again
to turn o.
HEADSET
Press to make, answer
or hang up a call on a
corded headset.
DELETE
While entering
numbers or letters,
press to delete
previous character.
SPEAKER
Press to turn on the
speakerphone. Press
again to turn it o.
pVOLq
During a call, press
to adjust the listening
volume.
Press to adjust the ringer
volume when in idle mode.
13
Page 14
Quick Reference Guide
Cordless deskset external features
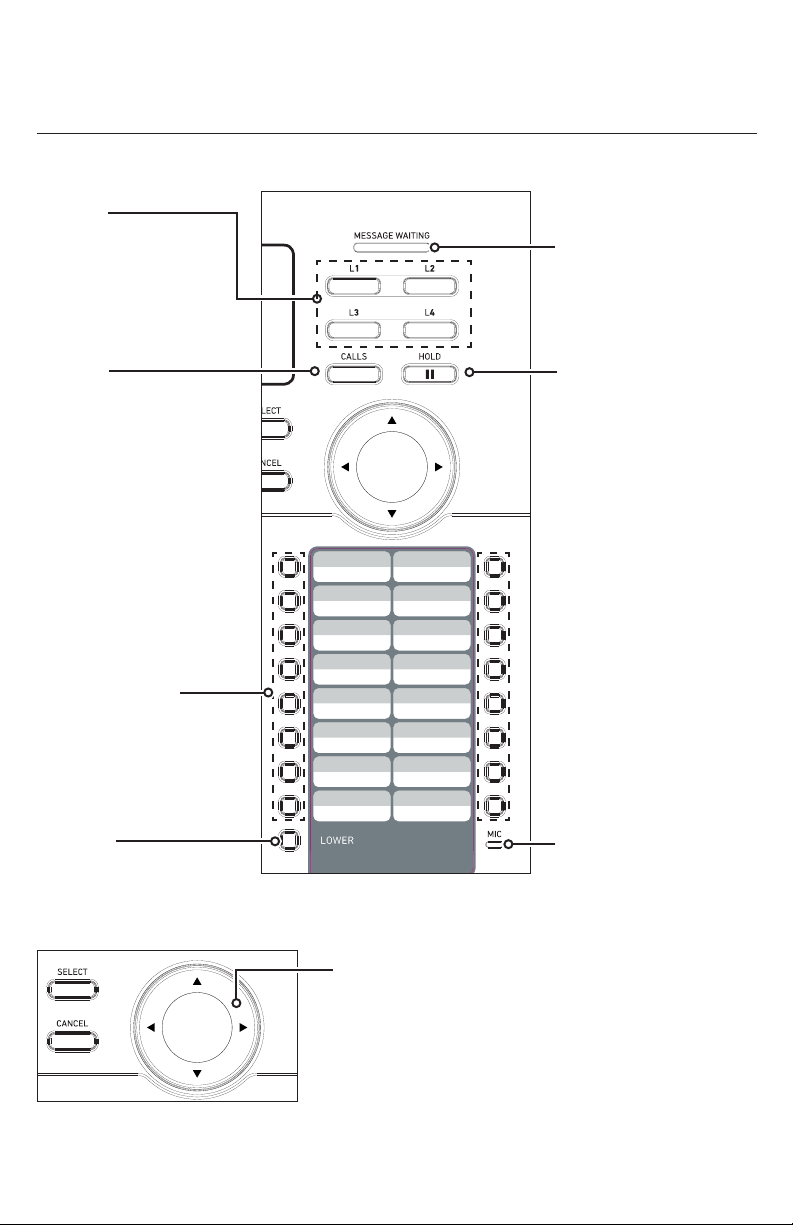
L1 - L4
Line keys with LEDs
for call handling. Can
be reprogrammed
as shortcuts to other
features.
MESSAGE WAITING
indicator
Flashes when an
account has a new
voice message.
CALLS
Press to manage your
own held calls and
shared calls within the
system.
Speed dial keys
Press to dial the desired
speed dial number.
LOWER
Press to switch to the
lower location of a speed
dial key.
HOLD
Press to put the active
call on hold.
MIC
Navigation keys
While in menus, press p or q to scroll through the
menus, highlight items or change settings.
While entering names or numbers, press t or u to
move the cursor to the left or right.
14
Page 15
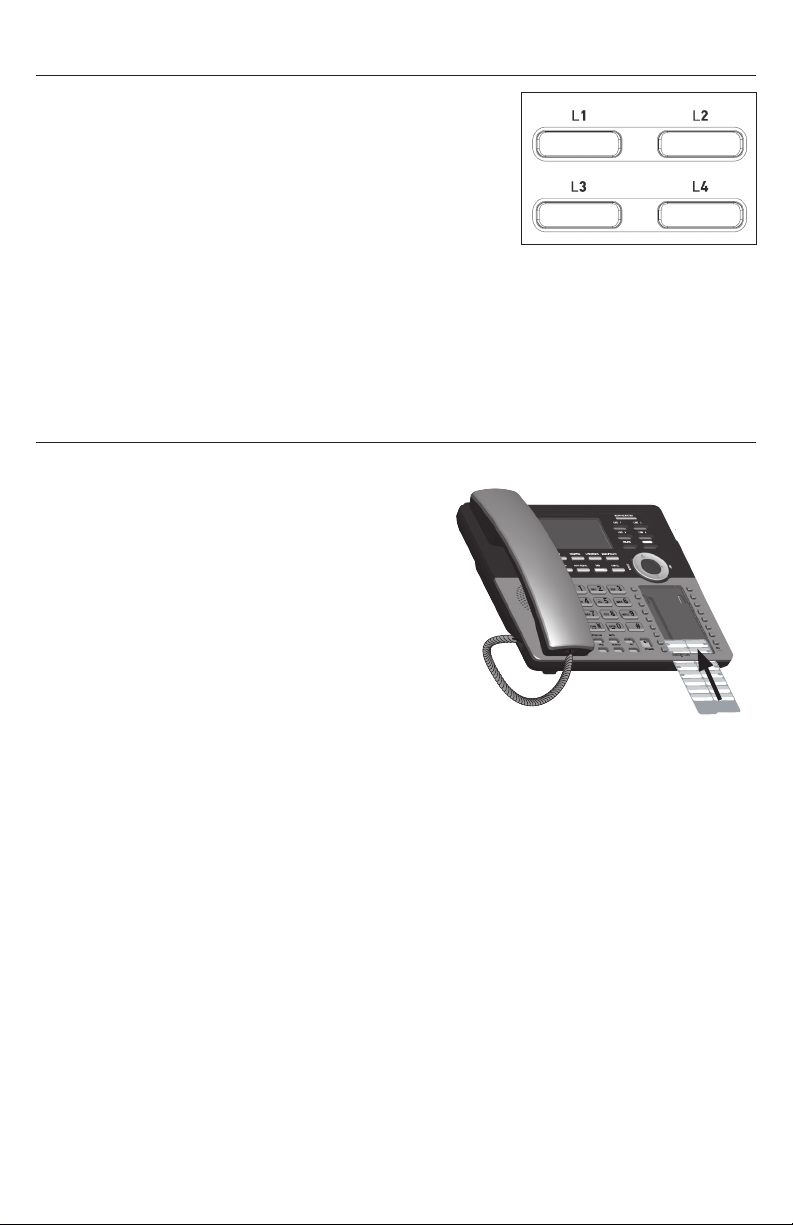
Factory Default Line Key Settings
Your base station and desksets have a factory default
conguration where the line keys (L1 to L4) are set up
to handle a shared line.
• All deskset user can use the shared line via the
line keys (L1 to L4).
• The LEDs on the line keys (L1 to L4) will be on
or ashing to indicate calls in progress across all
desksets.
• A deskset user can make a new call, pick up a held shared call, or barge in a
shared call by pressing the line keys (L1 to L4).
For more information, see “Using Key System Emulation” on page 34.
Directory card
Use the directory card to record the names of the speed dial numbers you stored.
To write names on the directory card:
1. Write the information on the directory
card that comes with the package.
2. Insert the edge of the directory card in
the slot at the front of the deskset, under
the plastic cover.
15
Page 16

Deskset Installation
This section assumes that your network infrastructure is established and that
your IP PBX phone service has been ordered and congured for your location.
Deskset installation involves both the backup battery and the deskset. The deskset
is powered using the supplied power adapter. The deskset can be placed on a at
surface or mounted on a wall.
Avoid placing the deskset too close to:
• Communication devices such as television sets, DVD players, or other
cordless telephones
• Excessive heat sources
• Noise sources such as a window with trac outside, motors, microwave
ovens, refrigerators, or uorescent lighting
• Excessive dust sources such as a workshop or garage
• Excessive moisture
• Extremely low temperature
• Mechanical vibration or shock such as on top of a washing machine or work
bench
Installing the backup battery
Install the backup battery, as shown below. In the event of a power failure, the
charged backup battery allows the deskset to operate. The backup battery will be
charged when you connect the AC power adapter to a wall outlet not controlled
by a wall switch.
1. Squeeze the latch tab to open the battery compartment cover.
16
Page 17

2. Plug the battery connector into the port inside the compartment.
Battery Pack
BT166342/BT263342
2.4V 300mAh Ni-MH
WARNING:DO NOT BURN OR
PUNCTURE BATTERIES
MADE IN CHINA GY1224
3. Place the battery in the compartment. Make sure the supplied battery with
the label THIS SIDE UP faces up, as indicated.
4. Insert the battery compartment cover tabs and then press down until the
cover clicks into place.
MADE IN CHINA GY1224
Battery Pack
BT166342/BT263342
2.4V 300mAh Ni-MH
WARNING:DO NOT BURN OR
PUNCTURE BATTERIES
IMPORTANT INFORMATION
• Use only the supplied rechargeable battery or replacement battery
(model BT266342). To order a replacement battery, visit our website at
www.snomamericas.com .
• If you do not use the deskset for a long time, disconnect and remove the
battery to prevent possible leakage.
Battery charging
Once you have installed the battery, the screen indicates the battery status (see
the table below). The backup battery is fully charged after 16 hours of continuous
charging.
The following table summarizes the battery charge indicators and actions to take.
Battery indicators Battery Status Action
The screen shows and
it ashes.
Full battery icon ( )
appears.
Battery has enough
charge to be used for a
short time.
Battery is charged. To keep the battery
Charge without
interruption (at least 30
minute).
charged, place it in the
charger when not in use.
17
Page 18
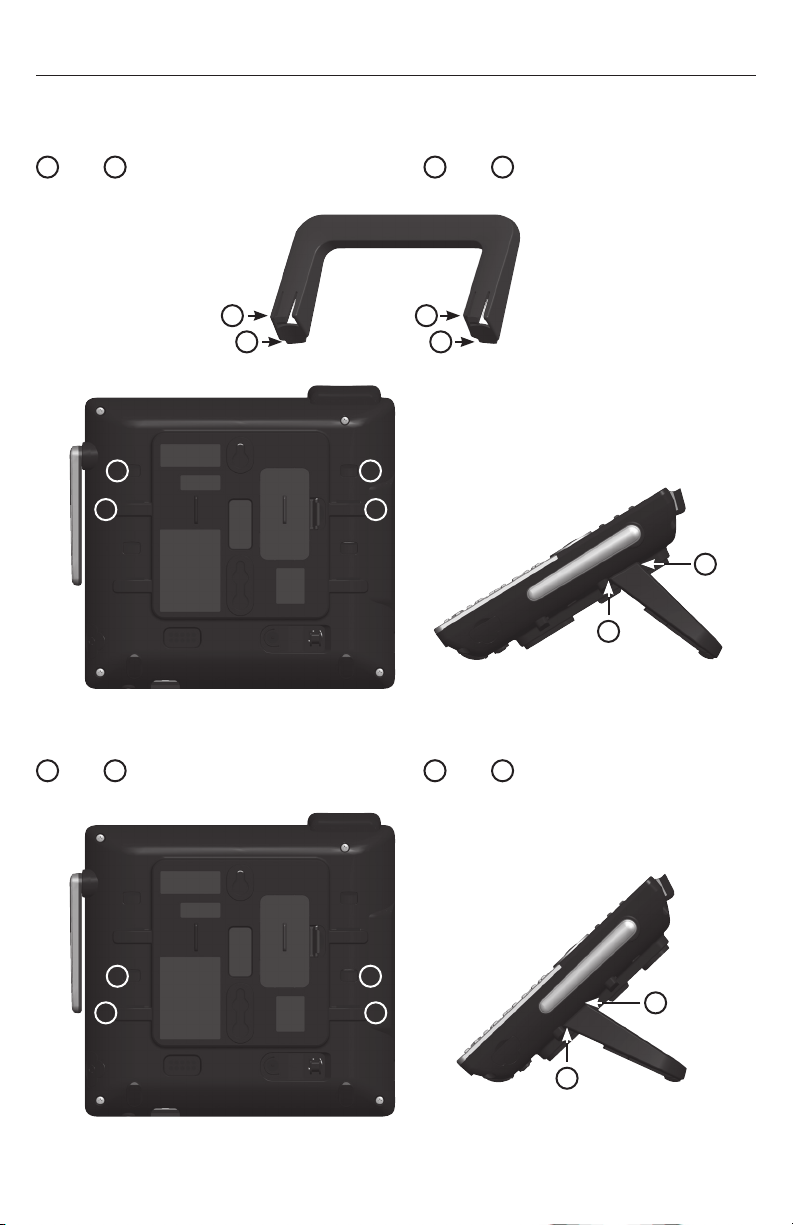
Installing the deskset
1. Install the mounting bracket for tabletop use.
Low tabletop position: Insert the xed tabs of the mounting bracket into slots
A
and B. Press the exible tabs into slots C and D until they click into place.
C D
A B
D
B
C
A
D
B
Low tabletop position
High tabletop position: Insert the xed tabs of the mounting bracket into slots
A
and B. Press the exible tabs into slots C and D until they click into place.
D
B
C
A
D
18
B
High tabletop position
Page 19
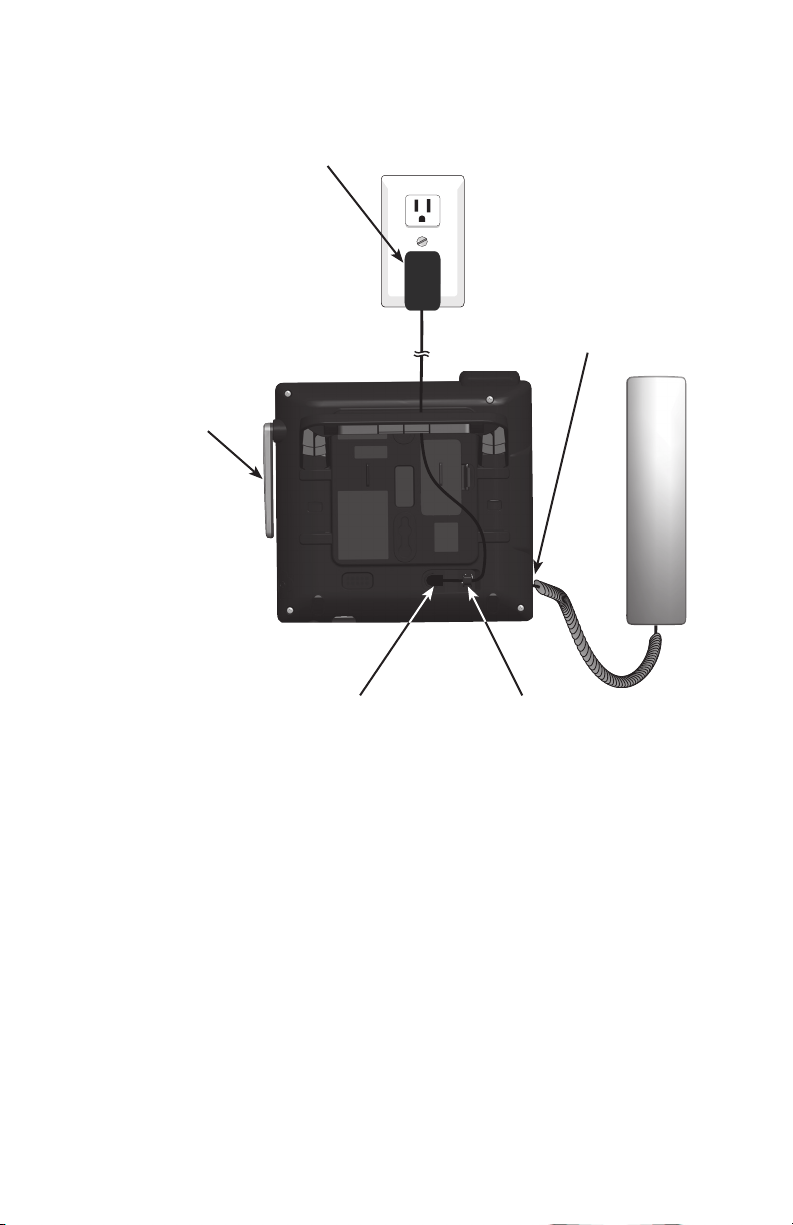
2. Connect the coiled handset and the power cord to the deskset.
Plug the large end of the
power adapter into a power
outlet not controlled by a
wall switch.
Plug the end of the
coiled handset cord into
the jack at the bottom of
the deskset.
Raise the antenna for
optimum wireless range
and performance.
Plug the small end of the
power adapter into the
power jack at the bottom of
the deskset.
Route the power adapter
cord through the slot at the
bottom of the deskset.
IMPORTANT INFORMATION
1. Use only the power adapter supplied with this product.
To order a replacement power adapter, visit our website at
www.snomamericas.com .
2. The power adapter is intended to be correctly oriented in a vertical or oor
mount position. The prongs are not designed to hold the plug in place if it is
plugged into a ceiling, under-the-table or cabinet outlet.
19
Page 20
Wall mounting the deskset
The deskset is ready for tabletop use. If you want to mount the deskset on a wall,
make sure you rst unplug the power adapter from the electrical outlet.
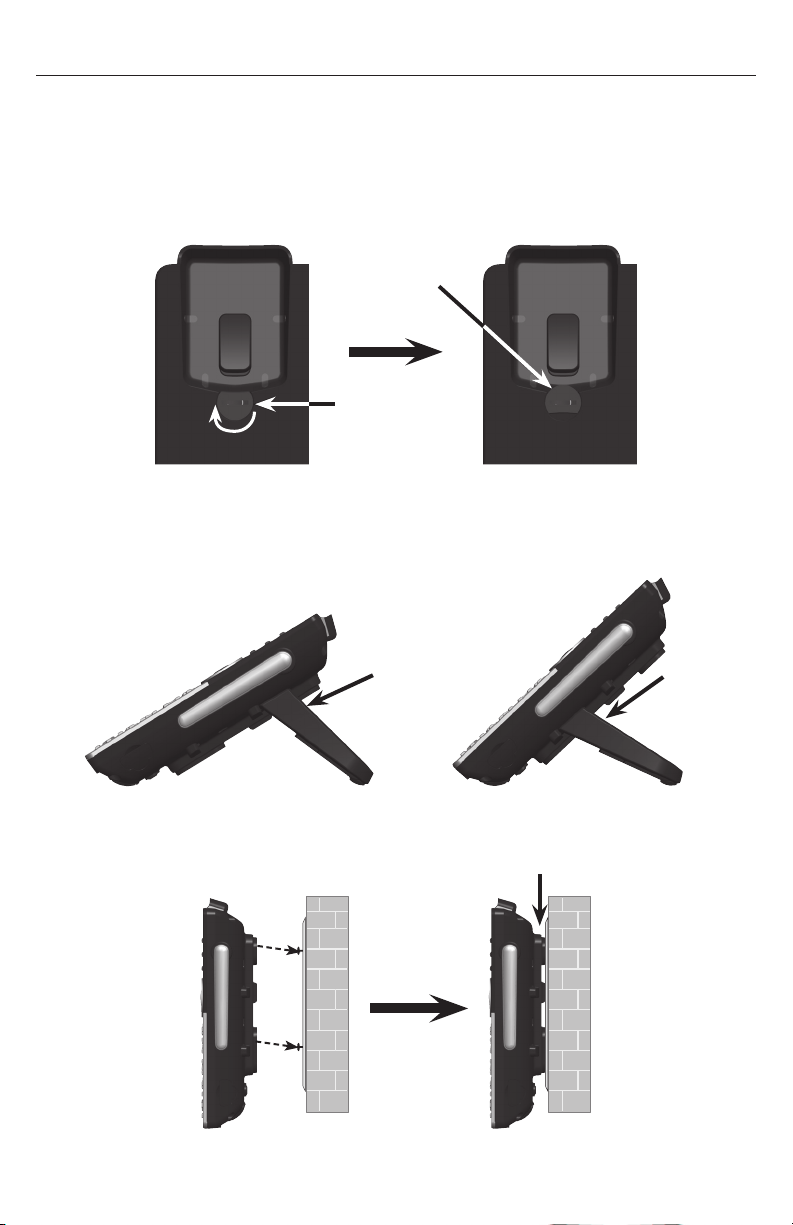
To mount the deskset on the wall:
1. Place your corded handset aside. Use a coin to rotate the handset tab 180
degrees. The protruding edge holds the corded handset when the deskset is
mounted on the wall.
Protruding edge
Handset tab
2. Press in the direction indicated by the arrows to release and remove the
mounting bracket from the deskset.
3. Place the corded handset back to the deskset. Plug the small end of the
power adapter cord into the power jack on the back of the deskset.
Low tabletop position
High tabletop position
4. Align the wall mounting holes on the back of the deskset with the tabs of the
standard wall plate. Push the deskset down until it clicks securely in place.
5. Plug the large end of the power adapter into an electrical outlet not controlled
by a wall switch.
20
Page 21
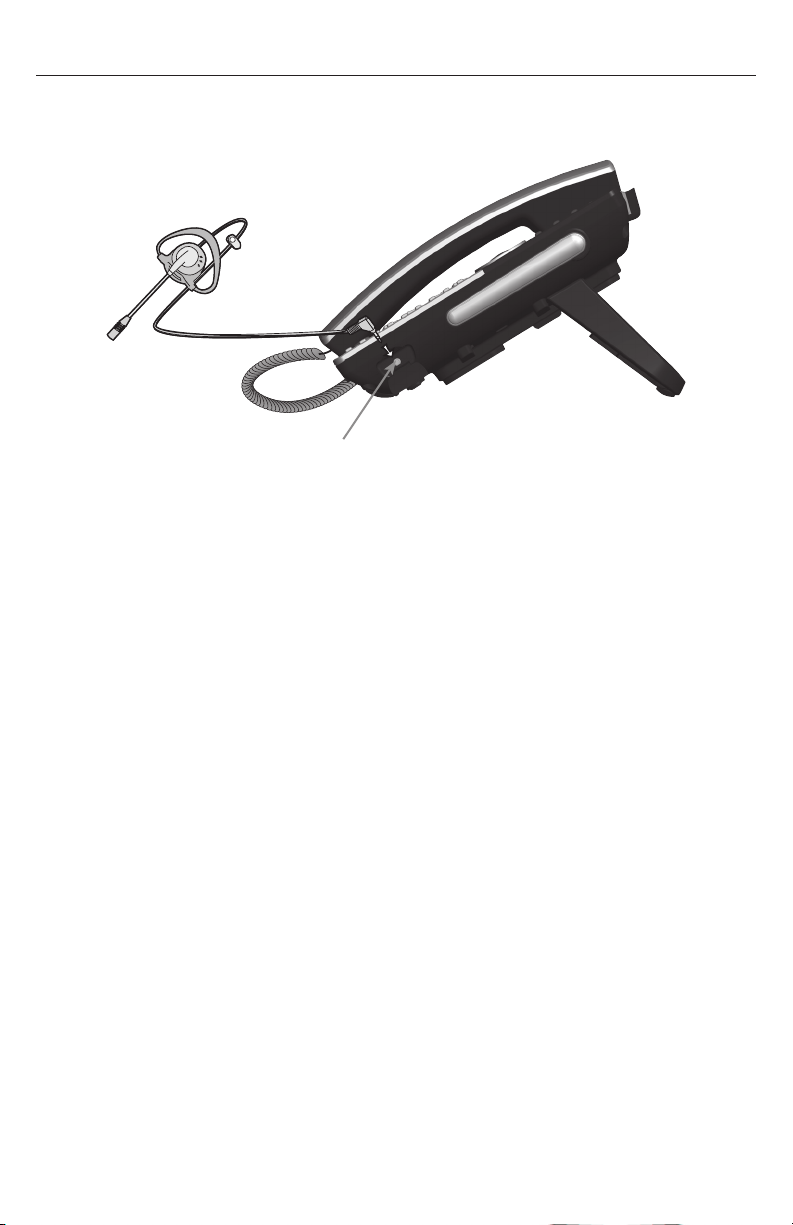
Adding a corded headset
You can use this deskset hands-free when you install any industry-standard
2.5 mm corded telephone headset (purchased separately).
Plug a 2.5 mm headset into
the HEADSET jack on the
side of the handset.
21
Page 22
Registering the deskset to the base
The deskset must be registered to the base station in order to make and receive
calls.
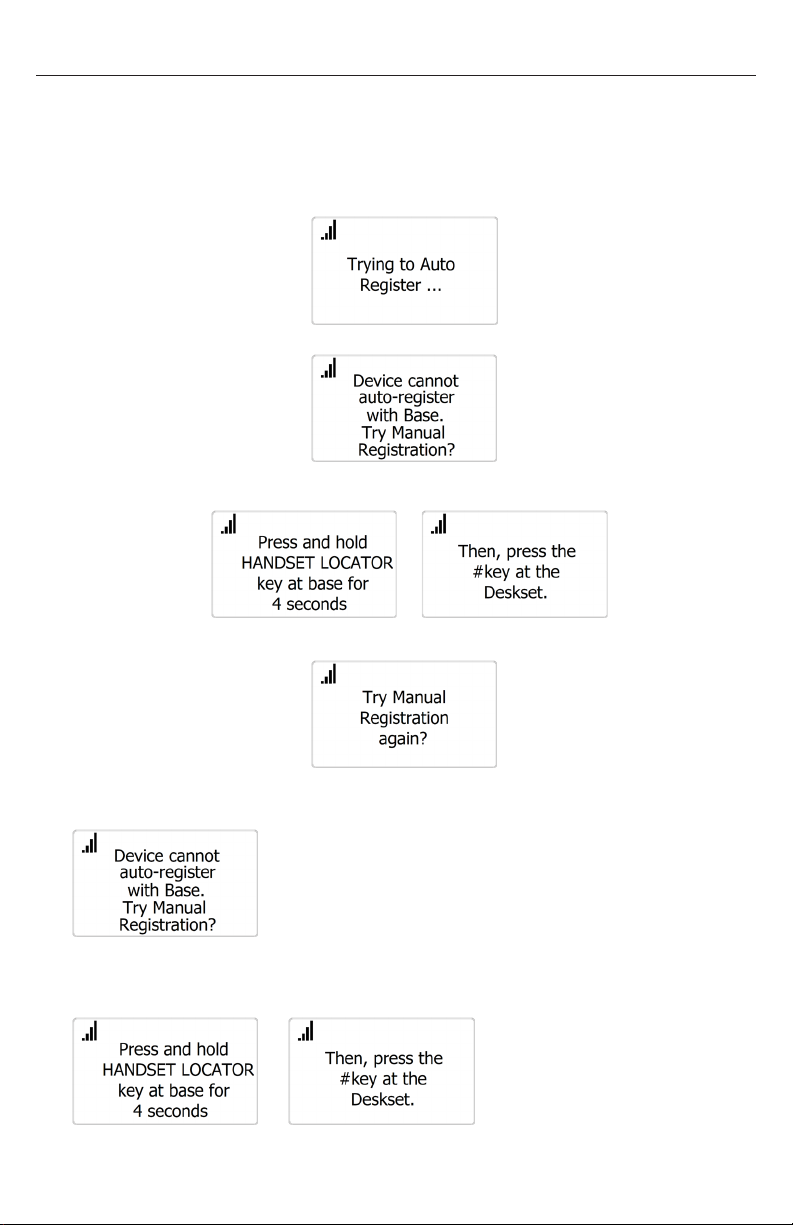
To register the deskset:
1. Make sure the base station is connected to power.
2. If the deskset is displaying go to step 6.
3. If the deskset is displaying go to step 7.
4. If the deskset is displaying
go to step 8.
5. If the deskset is displaying go to step 7.
6. Press CANCEL.
The deskset displays the following message:
7. Press SELECT.
The deskset displays the following message:
22
Page 23

8. On the base station, press the HANDSET LOCATOR button for at least four
seconds, then release the button. Both LEDs on the base station begin to
ash.
9. Press the # key on the deskset to begin registration.
The screen displays “Registering Please wait”.
The process takes up to 10 seconds to complete. When registration is
complete, the deskset beeps and displays “Deskset Registered”.
If the deskset fails to register, it displays “Registration failed. Try again.”
Wait for a few seconds and repeat the registration procedure.
Deregistering the deskset
Before using the deskset with a dierent base station, you must deregister the
deskset from the base station to which it is currently registered.
To deregister the deskset:
1. Press MENU/FUNC. on the deskset. The Main Menu appears.
2. Press q to scroll to User settings and then press SELECT.
3. Press q to scroll to Registration and then press SELECT.
4. Press q to highlight Deregistration and then press SELECT.
The deskset screen displays a list of devices registered to the base.
5. Press q to highlight the name of the deskset you want to deregister, and then
press SELECT.
6. Enter the PIN and then press SELECT to begin deregistration.
The default PIN is 1592.
The deregistration process takes up to 10 seconds to complete. When
the deskset deregisters, it beeps and the screen displays “Handset is
deregistered.”
Note: The deskset enters an energy-saving charging mode after being
deregistered. All cordless telephone functions except deskset-battery charging
are disabled. Energy-saving charging mode is deactivated after the deskset
registers to the base station.
23
Page 24

Locating the Deskset
You can determine which desksets are registered by paging them from the base
station. Press the HANDSET LOCATOR (page) button on the base station to ring
all desksets:
â
• All desksets within range of the base will ring for one minute, even if the
volume is o.
• To end the locator page, press CANCEL.
• To silence the locator page on one deskset only, press MUTE.
Screen icons
The following screen icons indicate your phone’s current status:
Icon Status
Indicates signal strength, from one bar (weak) to four bars (strong). Flashes
when out of range.
Indicates battery strength from 1/3 to 3/3. Flashes when empty.
Indicates the currently displayed call is on hold with your deskset.
This icon is visible when displaying the Call List.
The ringer is o.
Headset—audio is coming through a headset after the HEADSET key was
pressed.
Speakerphone—the speakerphone is active.
Microphone is muted.
24
Page 25
Using the Deskset
This section describes how to use the deskset to make calls and answer calls.
This section also describes how to put calls on hold, transfer calls, and create
conference calls.
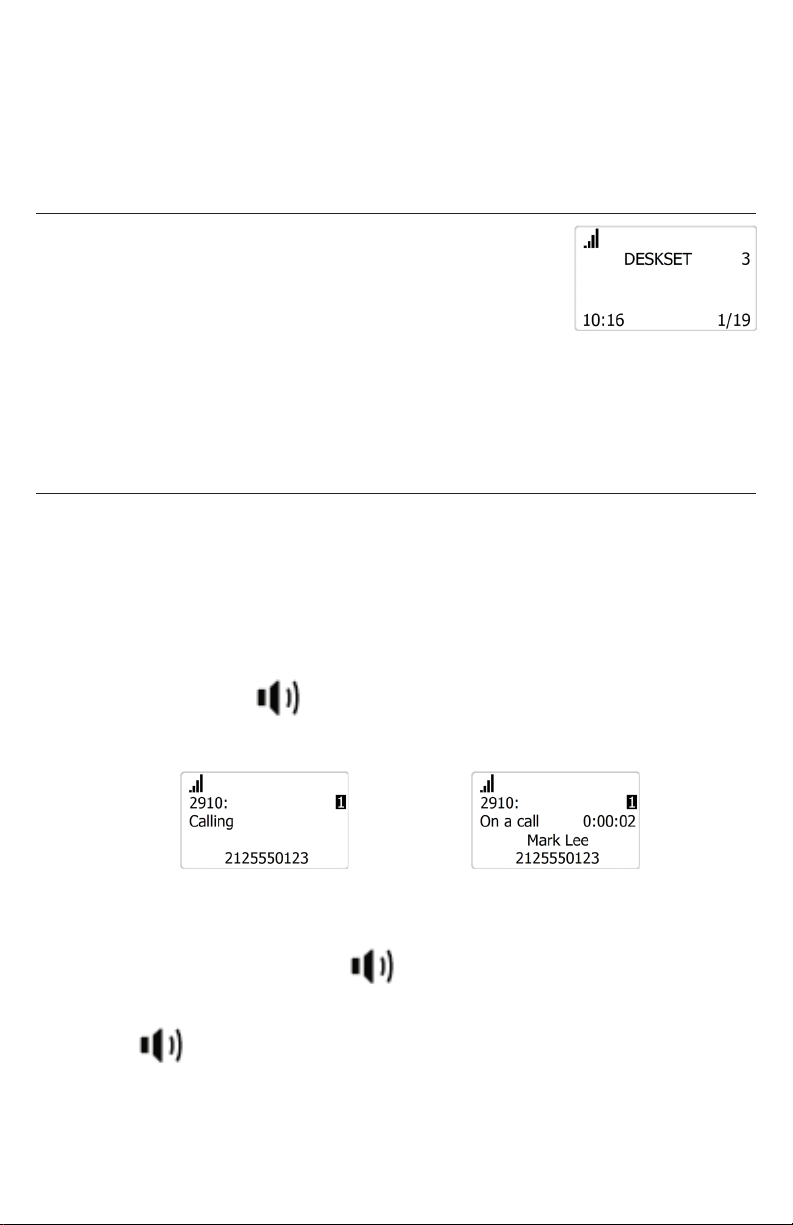
Idle screen
The Idle screen appears after the phone is connected
and congured for your SIP PBX service. The Idle screen
indicates that you have no active or held calls.
From the idle screen, you can press:
• CALLS to view the Call List.
See “Displaying calls on the Call List” on page 33.
• MENU/FUNC. to view the main menu.
See “Conguring the Deskset” on page 45.
Making calls
You can make calls to any phone number (an outside call), or you can call
another deskset (an internal call).
To make an outside call:
1. Use the dial pad to enter the desired number.
• Press DELETE if you enter an incorrect digit.
2. Call the number by lifting the handset, pressing an idle line key (L1 to L4), or
pressing SPEAKER .
When the call is answered, the active call screen appears.
â
3. To end the call, place the handset in the cradle
-OR-
Press CANCEL (or SPEAKER if you are using speakerphone).
Note that you can also live dial a number by lifting the handset or pressing
SPEAKER to go o hook before entering a phone number. The call will dial
automatically when a valid number is entered.
25
Page 26

To make an internal (intercom) call to another handset or deskset:
1. Press INTERCOM.
2. Press p or q to select the handset or deskset you wish to call, and then
press SELECT.
If you select All, then you will be connected to the rst handset to answer.
When the call is answered, the active call screen appears.
SELECT
3. To use the corded handset instead of the speakerphone, pick up the handset.
4. To end the call, press CANCEL (or SPEAKER , if you are on
speakerphone).
-ORPlace the handset in the cradle.
Answering Incoming calls
You can answer a call by lifting the handset, or pressing SELECT or SPEAKER:
SELECT
â
â
Multiple Incoming Calls
If you have multiple incoming calls (as indicated by p):
• Press the ashing line key (L1 to L4) for the call
you want to answer
-OR-
• Press q or p to select the call you want to answer.
Then lift the handset, press SELECT, or press
SPEAKER .
Ending a call
To end a call:
• Place the handset in the cradle
-OR-
Press CANCEL (or SPEAKER , if you are on speakerphone).
26
Page 27

Speakerphone
To turn the speakerphone on/o during a call:
• Press SPEAKER to switch between speakerphone and normal deskset
use.
When the speakerphone is active, the deskset displays the
speakerphone icon at the top of the screen.
Volume
To adjust the listening volume during a call:
• Press VOLUME p or q .
Mute
The mute function enables you to hear the other party, but the other party cannot
hear you.
To mute/unmute your deskset’s microphone during a call:
• Press MUTE.
When your deskset’s microphone is muted, the deskset displays the
mute icon at the top of the screen.
Call Waiting
If you are on a call, and receive an incoming call from an outside number, the
deskset displays the Call Waiting scren. If you answer the call, your active call
will be put on hold.
To answer the incoming call:
• Press SELECT or SPEAKER , OR press the
line key (L1 to L4) that is quickly ashing green.
You can also ignore or dismiss the incoming call.
See “Ignoring Calls” below and “Dismissing Calls” on page 28.
Ignoring Calls
You can ignore an incoming call from an outside number if you don’t want to
answer the call right away, but want to pick up the call later.
• If you ignore the call during an active call, and no other handsets/desksets
answer the ignored call, your deskset will ring again for the ignored call when
you disconnect your call.
• If you ignore the call while your deskset is idle, your deskset will not ring
again for the ignored call.
27
Page 28

To ignore an incoming call:
• Press CANCEL on the “Incoming Call” screen or “Call Waiting” screen.
The ignored call will be shown in the Call List until it is picked up by
another handset/deskset. You can pick up the ignored call from the Call
List - see “To view the Call List:” on page 33.
Dismissing Calls
You can dismiss an incoming call from an outside number if you don’t want to
answer the call, and you don’t want to pick up the call later.
• If you dismiss the call during an active call, the dismissed call will continue to
ring on other handsets/desksets until it is answered or ignored/dismissed by
all handsets/desksets.
• Your deskset will not ring again for the dismissed call.
To dismiss an incoming call during an active call:
1. Press MENU/FUNC on the “Call Waiting” screen.
2. Press SELECT at the prompt,
“Dismiss call? Dismissed call does not ringback.”
Missed Calls
If you don’t respond to an incoming outside call, the deskset displays a missedcall alert on the idle screen:
Answering Internal Calls
You can receive internal calls from another handset or deskset.
To answer an internal call:
• Lift the handset, press SELECT, or press SPEAKER .
SELECT
Intercom calls from another handset or deskset cannot be rejected, but they can
be silenced by pressing MUTE.
28
â
Page 29

Putting a call on hold
You can put an outside call on hold by pressing HOLD. The deskset also puts
calls on hold automatically when you answer another call, transfer a call, or
create a conference. Note that you cannot put an internal call on hold.
HOLD
To take the call o hold:
1. Press CALLS.
2. If you have multiple calls on hold, (as indicated by ), press q or p to
select the call you want to take o hold.
3. Press SELECT.
To make a new call while on hold:
1. When you have a call on hold, use the dial pad to enter the number you wish
to dial.
2. Call the number by pressing an idle line key (L1 to L4), SELECT, or
SPEAKER .
Putting a call on private hold
You can put a shared call on “private hold” to prevent other handsets/desksets
from retrieving your held call from the Call List.
To put a shared call on “private hold,” press and hold the HOLD button.
To resume the call, select it from the Call List.
â
29
Page 30

Switching between two calls
If you are managing two calls, you can switch between them by one of the
following ways:
• Press the ashing line key (L1 to L4) of the call you want to pick up.
SELECT
â
-OR-
• Press CALLS to view the call on hold and then press SELECT.
SELECT
Paging another handset/desket
You can page another handset/deskset, and send one-way audio. The receiving
handset/deskset will play an alert tone, and your voice on its speaker. If a corded
headset is plugged in to the receiving handset/deskset, then audio is played on
the headset.
You cannot hear the person. If you want to have a two-way conversation,
make an internal call instead. For more information, see “To make an internal
(intercom) call to another handset or deskset:” on page 26.
In order for the page to work, both your deskset and the receiving handset/
deskset must be idle.
To page a handset/deskset:
1. Press MENU.
2. Press q to scroll to Paging and press SELECT.
3. Press q or p to select a handset/deskset, and press
SELECT.
Your deskset displays “Paging <device name>”. When a connection is
established, your deskset displays “Broadcasting” with
a timer.
4. Speak into your deskset’s speakerphone.
â
5. To use the corded handset instead of the
speakerphone, pick up the handset.
6. To end the page, press CANCEL (or SPEAKER, if you are on speakerphone)
OR place the handset in the cradle.
The receiving handset/deskset can also end the page.
30
Page 31

The receiving handset/deskset will not receive the page if:
• It is on an active call
• It has an incoming call ringing
• It is o-hook (deskset)
When this occurs, your deskset displays “Broadcasting” for ve seconds, and
then displays “Ended.”
Receiving a page
If you are paged by another handset/deskset, your deskset will play an alert tone
and display the message “Paged by: <device name>.”
When the connection is established, your deskset dislays
“Broadcasting” with a timer, and you will hear the person
paging you. The other person cannot hear you.
To use the corded handset instead of the speakerphone,
pick up the handset.
To end the page:
• Press CANCEL (or SPEAKER , if you are on speakerphone)
-ORPlace the handset in the cradle.
The other person can also end the page.
About Shared Calls
A shared call is a call that can be picked up by any handset/deskset on a shared
line.
Active and held shared calls are shown in the Call List, which can be displayed
by pressing CALLS on your deskset.
Private calls are only visible to the handset/deskset user who makes or answers
the call.
Your system administrator will determine whether or not calls on a SIP account
will be shared among handset/deskset users.
Whether or not calls on a SIP account will be shared among other handset/
deskset users is congured by your system administrator via KeyLine
assignment.
The following examples show how to use the Call List to pick up a held shared
call and barge in an active shared call. Each example shows what the screen
looks like on two dierent desksets.
31
Page 32

Example - picking up a held shared call:
Alice’s deskset Bob’s deskset
1. Alice is on a call.
2. Alice presses HOLD to put
the call on hold.
3. Alice shouts across the room, “Bob, can you pick up line 2?”
4. Bob presses CALLS to
display the Call List, and
presses q to select the call
on Line 2.
5. Bob presses SELECT to
pick up the call.
The call is now on Bob’s deskset.
Example - barging in a shared call:
Alice’s deskset Bob’s deskset
1. Alice is on a call.
2. Alice shouts across the room, “Bob, can you join my call on line 3?”
3. Bob presses CALLS to
display the Call List, and
presses q to select the call
on Line 3.
4. Bob presses SELECT to
barge in the call.
Bob is now in a conference call with Alice and the caller on Line 3.
32
Page 33

Displaying calls on the Call List
The Call List enables you to manage your own held calls and shared calls within
the system.
The Call List displays:
• Shared calls on other handsets/desksets, which can be active, held, or
barged-in calls.
• Calls held by your deskset whether private or shared.
• Calls you ignored calls, which not are yet answered by other handsets/
desksets.
In the call list, a number on the handset display indicates which KeyLine number
is assigned to the call. KeyLine numbers 1-4 usually correspond to the L1-L4
keys on the handset.
To view the Call List:
1. Press CALLS.
2. If there are multiple calls in the Call List, (as indicated by ), press q or p
to select the call you want.
3. To retrieve a call on hold, OR
“barge in” on a shared call, OR
answer a call you previously ignored,
press SELECT.
4. To exit the Call List, press CANCEL.
Barging In
You can “barge in” on a shared call in progress on another handset that shares
the account. Barging in establishes a three-way call with two internal parties.
Only one barge in party is allower per active call.
To barge in on a call:
1. Press CALLS to display the Call List.
2. Press q or p to select the call you want to barge in.
3. Press SELECT.
33
Page 34

Call Privacy
During an active shared call, you can turn on Call privacy in order to prevent
other handsets/desksets from barging in. The handset/deskset attempting to
barge in displays the message “Call is not available at this time.”
If Call privacy is on and your put your call on hold, then your deskset resets Call
privacy to “o”. Other handsets/desksets can then pick up your call from the Call
list, or barge in when you resume the call.
To turn call privacy on/o during an active shared call:
1. Press MENU/FUNC.
2. Press q to scroll to Call privacy and press.
3. Press to q or p to select On or O, then press SELECT.
When Call privacy is on, your handset’s call screen
shows “Private.”
When Call privacy is o, your handset’s call screen
shows
“On a call.”
Using Key System Emulation
Your phone is congured with Key System Emulation,
where four line keys (L1 to L4) enable direct interaction
with shared calls. The line keys (L1 to L4) act like
shortcuts to the calls in the Call List.
Key System Emulation can be useful for small
businesses where incoming calls are answered by a
group of people.
Deskset users can use the line keys to make new calls, answer incoming calls,
pick up calls held by other users, or barge in other users’ calls.
The following examples show how to use the line keys (L1 to L4) to pick up a
held shared call and barge in an active shared call. Each example shows what
the screen and line key LEDs look like on two dierent desksets.
34
Page 35

Example - picking up a held shared call:
Alice’s deskset Bob’s deskset
1. Alice is
on a call.
2. Alice
presses
HOLD to
put the
call on
hold.
3. Alice shouts across the room, “Bob, can you pick up line 2?”
4. Bob
presses
L2 to pick
up the
call.
The call is now on Bob’s deskset.
Example - barging in a shared call:
Alice’s deskset Bob’s deskset
1. Alice is on
a call.
2. Alice shouts across the room, “Bob, can you join my call on line 3?”
3. Bob
presses
L3 to
barge in
the call.
Bob is now in a conference call with Alice and the caller on line 3.
35
Page 36

LEDs on the line keys (L1-L4) indicate the status of calls:
LED light: Indicates: Press key to:
O Line is idle Make a call
Quickly ashing
green
Slowly ashing
green
Steady green Call is active on your
Flashing orange Call is on hold on
Steady orange Shared call is active on
Your phone system has its factory default with SIP Account 1 and its four line
keys (L1-L4) congured to provide a Key System experience. Ask your system
administrator for other modes of operation.
Ringing incoming call Answer the call
Call is on hold on your
deskset
handset
another handset/deskset
another handset/deskset
Retrieve the held call
(Not applicable)
Retrieve the held call
“Barge in” on the shared call
36
Page 37

Transferring a call
You can transfer a call to another party.
If you talk to the transfer recipient before completing the transfer, you are making
an “announced” transfer. However, the transfer recipient does not have to talk to
you before receiving the transferred call. If you do not talk to the transfer recipient
before transferring the call, you are making a “blind” transfer.
You can also transfer a call to a held call. Note that you cannot transfer intercom
calls.
To transfer a call (announced):
1. During a call, press MENU/FUNC.
MENU/
FUNC.
2. Press q to scroll to Transfer and press SELECT.
3. With A call(announce) highlighted, press SELECT.
The call is automatically put on hold.
4. Dial the number to which you want to transfer the call, then press SELECT.
OR
Press DIRECTORY or CALL HISTORY and call a number from a list.
5. When the second caller answers, you can talk to the caller to notify them of
the transfer, then press SELECT to transfer the call.
SELECT
To transfer a call (blind):
1. During a call, press MENU/FUNC.
2. Press q to scroll to Transfer and press SELECT.
3. Press q to scroll to A call(blind), then press SELECT.
â
â
SELECT
4. Dial the number to which you want to transfer the call.
OR
Press DIRECTORY or CALL HISTORY and call a number from a list.
5. Press SELECT to transfer the call. The Call Transferred screen appears.
â
37
Page 38

To transfer a call to a held call:
1. During a call, press MENU/FUNC.
2. Press q to scroll to Transfer and press SELECT.
3. Press q to scroll to A held party, then press SELECT.
4. Press q or p to select a held call to which you want to transfer, then press
SELECT.
SELECT
5. When the second call is established, you can talk to the caller to notify them
of the transfer.
6. Press SELECT to transfer the call.
To transfer a call to another handset / deskset in your system:
1. During a call, press MENU/FUNC.
2. Press q to scroll to Transfer and press SELECT.
3. Press q to scroll to A handset party, then press SELECT.
4. Press q or p to select a handset or deskset, then press SELECT.
5. When the second call is established, you can talk to the caller to notify them
of the transfer.
6. Press MENU/FUNC.
7. With Transfer highlighted, press SELECT to transfer the call.
Setting up a conference call
You can hold a conference call between yourself and two other parties.
To set up a conference call with an outside number:
1. During a call, press MENU/FUNC.
2. Press q to scroll to Conf. and press SELECT.
â
SELECT
3. With A new party highlighted, press SELECT.
The call is automatically put on hold.
â
38
Page 39

4. Dial the second number for the other party you want to join your conference,
then press SELECT.
OR
Press DIRECTORY or CALL HISTORY and call a number from a list.
5. When the second call is established, press SELECT.
The conference begins and the conference screen appears.
SELECT
Press CANCEL to terminate both calls and end the conference.
To create a conference with a held call:
1. If you are on an Active call and also have a call on hold, press MENU/FUNC.
2. Press q to scroll to Conf. and press SELECT.
3. Press q to scroll to A held party, and then press SELECT.
A list of held calls will appear.
4. Press q or p to select a held call you want to conference with, then press
SELECT.
5. Press SELECT on the “[SELECT]” screen.
The conference will begin immediately.
SELECT
Press CANCEL to terminate both calls and end the conference.
To set up a conference call with another handset / deskset in your system:
1. During a call, press MENU/FUNC.
2. Press q to scroll to Conf. and press SELECT.
3. Press q to scroll to A handset party, then press SELECT.
4. Press q or p to select a handset or deskset, then press SELECT.
5. When the second call is established, press MENU and press q to scroll to
Conf. then press SELECT.
The conference begins and the conference screen appears.
Press CANCEL to exit the conference. The two other callers remain
connected to each other.
â
â
39
Page 40

Setting up a Network Conference:
A Network Conference is hosted by your service provider and allows multiple
parties to join a conference. A Network Conference works in a similar way to
the regular conference described above, except you can add as many parties
as your service provider supports. Pressing MENU/FUNC. and selecting
Conference during a conference will allow you to add more parties to the
ongoing conference.
Listening to messages
When you have new messages, the phone displays a new-messages notication
on the idle screen:
To listen to your messages:
1. Press MESSAGES
-ORFrom the deskset Main Menu, with Message highlighted, press SELECT.
SELECT
The Message screen appears. The MESSAGE WAITING light ashes for any
account that has a message.
2. Press q to highlight the desired account and press SELECT.
The deskset dials the voicemail access number.
3. Follow the voice prompts to listen to your messages.
Using the Directory
The deskset has three lists of contacts. The Local directory is only available
on your deskset. The Base directory is usually maintained by your system
administrator, and is available on all desksets and handsets. The Blacklist
contains blocked numbers.
To view a directory:
1. Press DIRECTORY.
OR
From the deskset Main Menu, press q to scroll to
Directory and then press SELECT.
The Directory menu appears.
2. Press q or p to select the directory you wish to view, and then press SELECT.
3. With Review highlighted, press SELECT and then press q or p to browse
through contacts.
â
40
Page 41

To call a contact:
When viewing a directory entry, you can call a contact in the following ways.
1. Dial the phone number in the entry:
a. Press t or u to cycle through work, mobile, and other numbers.
b. Press SELECT to call the contact.
2. Revise the phone number to dial before calling:
a. Press MENU/FUNC.
b. Press q to scroll to Edit dial and press SELECT.
c. Edit the number as required, then press SELECT.
To search a directory:
1. From the deskset Main Menu, press q to scroll to Directory and then press
SELECT.
The Directory menu appears.
2. Press q or p to select the directory to search, and
then press SELECT.
3. Press q to scroll to Search and press SELECT.
4. Enter a name or number, then press SELECT.
To add a new entry:
1. From the deskset Main Menu, press q to scroll to Directory and press
SELECT.
The Directory menu appears.
2. Press q or p to select the directory to add a new entry to, then press
SELECT.
3. Press q to scroll to Add new and press SELECT.
4. Use the dial pad to enter the rst name, last name, work, mobile, and other
phone numbers. Press q after entering each item.
5. Press t or u to choose the ringer tone, then press q.
6. Press t or u to choose the dial line (account).
7. When you are done, press SELECT.
To edit an entry:
1. When viewing the directory entry you wish to edit, press MENU/FUNC.
2. With Edit highlighted, press SELECT.
3. Press q or p to select an item to edit.
4. Use the dial pad to change the rst name, last name,
work, mobile, and other phone numbers.
Press DELETE to delete characters.
5. Press t or u to change the ringer tone and dial line (account).
6. When you are done editing, press SELECT.
41
Page 42

To delete an entry:
1. When viewing the directory entry you wish to delete, press MENU/FUNC.
2. Press q to scroll to Delete and then press SELECT.
3. Press SELECT on the delete conrmation screen.
OR
Press CANCEL to return to the previous screen.
To delete all entries:
1. From the deskset Main Menu, press q to scroll to Directory and then press
SELECT.
The Directory menu appears.
2. Press q or p to select the directory to delete, and then press SELECT.
3. Press q to scroll to Delete all and then press SELECT.
4. Press SELECT on the delete all conrmation screen.
OR
Press CANCEL to return to the previous screen.
Using the Call History
The Call History contains lists of your missed, received, and dialed calls (you can
also view dialed calls by pressing REDIAL). You can view, call and store list entries.
To view the Call History:
1. Press CALL HISTORY.
OR
From the deskset Main Menu, press q to scroll to
Call history and then press SELECT.
The Call History menu appears.
2. Press q or p to highlight the desired list and then press
SELECT.
3. With Review highlighted, press SELECT.
4. Press q or p to view entries.
The Call History entry screen shows the time, date, name and number of the call,
the number of entries in the folder, along with an icon indicating the type of call.
Received call Dialed call Missed call
42
Page 43

To call an entry:
When viewing a Call History entry, you can call the entry in the following ways.
1. Lift the corded handset, or press HEADSET or
SPEAKER to call the phone number in the entry.
2. Revise the phone number to dial before calling:
a. Press MENU/FUNC.
b. With Edit dial highlighted, press SELECT.
c. Edit the number as required. Press DELETE to delete characters.
d. Lift the corded handset, or press HEADSET or SPEAKER .
To save an entry to a directory:
1. Press MENU/FUNC when viewing a Call History entry.
2. Press q to scroll to Save To and then press SELECT.
3. Press q or p to select the directory to save to, and
then press SELECT.
4. Use the dial pad to change the rst name, last name,
work, mobile, and other phone numbers. Press
DELETE to delete characters.
5. Press t or u to change the ringer tone and dial line (account).
6. When you are done editing, press SELECT to return to Call History.
To delete entries:
1. To delete the entry you are viewing, press DELETE.
2. To delete all entries:
a. In the main Call History menu, press q or p to scroll to the list you wish
to delete, and press SELECT.
b. Press q to scroll to Delete all and then press
SELECT.
c. Press SELECT again on the delete all conrmation
screen.
43
Page 44

Using Speed Dial
The speed dial feature allows you to program up to 32 numbers that you dial
frequently. You can access the rst 16 speed dial numbers by pressing the speed
dial buttons. To access the remaining 16 speed dial numbers, press LOWER and
then the speed dial button for the desired location.
To program a Speed Dial number:
1. Press MENU/FUNC.
2. Press q to highlight Speed dial and then press SELECT.
3. Press q or p to select an empty slot, and then press MENU/FUNC.
MENU/FUNC.
4. Use the dial pad to enter a name, and then press q.
5. Use the dial pad to enter a number, and then press q.
6. Press t or u to choose the dial line (account), and then press SELECT.
To edit existing Speed Dial entries:
1. Select the entry in the Speed Dial list then press MENU/FUNC.
2. Press q or p to select an item to edit.
3. Use the dial pad to change the name and number. Press DELETE to delete
characters.
4. Press t or u to change the dial line (account).
5. When you are done editing, press SELECT.
To delete existing Speed Dial entries:
1. Select the entry in the Speed Dial list, and then press DELETE.
2. Press SELECT on the delete conrmation screen.
OR
Press CANCEL to return to the previous screen.
â
44
Page 45

Conguring the Deskset
You can congure the deskset using one of two methods:
1. The Features and User settings menus on the deskset.
2. The WebUI, which you access using your Internet
browser.
This section describes settings you can change using the
menus on your deskset. For information about settings you
can change on the WebUI, see “WebUI” on page 56.
The system administrator can congure additional settings,
including Network settings, Provisioning, and the PIN code
by using the Admin settings menu. For more information about this menu, see
the M100 KLE Administrator and Provisioning Manual.
Setting Do Not Disturb
When Do Not Disturb (DND) is on for an account, calls to that account will be
rejected.
To turn DND on or o:
1. Press MENU/FUNC.
2. Press q to highlight Features and press SELECT.
3. With DND highlighted, press SELECT.
4. Press q or p to select which account DND should
apply to*, and press SELECT.
5. Press q or p to select On or O.
6. Press SELECT to save.
* Note that DND will apply to all desksets and handsets assigned the account.
Setting call forwarding
Calls can be forwarded to another phone number always, only when busy, or
after a set number of rings.
To set call forward:
1. Press MENU/FUNC.
2. Press q to highlight Features and press SELECT.
3. Press q to highlight Call forwarding and press SELECT.
4. Press q or p to select which account Call forward should apply to*, and then
press SELECT.
5. Press q or p to choose the desired option:
• Always
• Busy
• No answer
45
Page 46

6. Press SELECT.
7. On the next screen, with Set On/O highlighted, press SELECT.
8. Press q or p to choose On or O and then press SELECT.
9. Press q to highlight Phone number and then press SELECT.
10. Enter the number to which you would like to forward calls.
11. Press DELETE to move the cursor back and delete the previous number.
12. Press SELECT.
13. If you selected No answer earlier:
a. Press q to scroll to No ans. delay.
b. Press q or p to choose the number of rings
between 1 and 10.
c. Press SELECT.
* Note that Call forward will apply to all desksets/handsets assigned the account.
Blocking anonymous calls
Calls without Caller ID information will be rejected and the deskset will not ring.
To block anonymous callers:
1. Press MENU/FUNC.
2. Press q to highlight Features and press SELECT.
3. Press q to highlight Block anonymous and press
SELECT.
4. Press q or p to select which account Block
anonymous should apply to*, and then press SELECT.
5. Press q or p to choose On or O, and then press
SELECT to save.
* Note that Block anonymous will apply to all desksets/handsets assigned the
account.
Dialing anonymously
When this feature is enabled, your phone will make anonymous outgoing calls.
To dial as an anonymous caller:
1. Press MENU/FUNC.
2. Press q to highlight Features and then press SELECT.
3. Press q to highlight Dial as anonyms and then press
SELECT.
4. Press q or p to select which account Dial as
anonymous should apply to*, and then press SELECT.
5. Press q or p to choose On or O, and then press
SELECT to save.
* Note that Dial as anonymous will apply to all desksets/handsets assigned the
account.
46
Page 47

Setting missed-call alerts
When missed-call alerts are enabled, an alert will display on the idle screen
whenever you do not answer an incoming call.
To turn missed-call alerts on or o:
1. Press MENU/FUNC.
2. Press q to highlight Features and then press SELECT.
3. Press q to highlight Miss call alert and then press
SELECT.
4. Press q or p to choose Show alert or Hide alert.
5. Press SELECT.
Setting call waiting
When call-waiting alerts are enabled, an alert will display on-screen whenever
you receive an incoming call during an active call.
To turn call-waiting alerts on or o:
1. Press MENU/FUNC.
2. Press q to highlight Features and then press SELECT.
3. Press q to highlight Call waiting and then press
SELECT.
4. Press q or p to choose Show alert or Hide alert.
5. Press SELECT.
Viewing deskset status
In the Status menu, you can view information on the LAN network your phone
system is connected to, the registration status of your SIP accounts, or view
the software version of your deskset. You may need this information for
troubleshooting purposes.
To view the Status menu:
1. Press MENU/FUNC.
2. Press q to highlight Status and then press SELECT.
3. Press q to highlight either Network, Line, or Product
Info, and then press SELECT.
To view the software version of your phone:
1. From the Status menu, highlight Product Info and then press SELECT.
2. With Deskset highlighted, press SELECT.
3. Press q to view the software version.
47
Page 48

Setting the language
1. Press MENU/FUNC.
2. Press q to highlight User settings and then press SELECT.
3. With Language highlighted, press SELECT.
4. Press q or p to choose the desired language.
5. Press SELECT to save.
Setting the date and time
1. Press MENU/FUNC.
2. Press q to highlight User settings and then press SELECT.
3. Press q to highlight Set Date/Time and then press SELECT.
4. On the Set date screen, set the values for MM, DD, and YY.
The currently selected value is ashing.
a. Press p or q to select a number, or use the dial
pad to enter a number.
b. Press SELECT to go to the next value.
c. Press CANCEL to go back to the previous value.
5. On the Set time screen, set the values for HH, MM and AM/PM.
The currently selected value is ashing.
a. Press p or q to select a number or AM/PM, or
use the dial pad to enter a number.
b. Press SELECT to go to the next value.
c. Press CANCEL to go back to the previous value.
Setting the deskset name
You can change the deskset name from the default HANDSET.
To change the deskset name:
1. Press MENU/FUNC.
2. Press q to highlight User settings and then press
SELECT.
3. Press q to highlight Phone rename and then press
SELECT.
4. Press DELETE to move the cursor back and delete the previous name.
5. Enter the new name using the dial pad.
6. Press SELECT when complete.
48
Page 49

Conguring the programmable keys
You can congure the Programmable Keys on the deskset.
To congure the line keys (L1-L4):
1. Press MENU/FUNC.
2. Press q to highlight User settings and then press SELECT.
3. Press q to highlight Progrm’able key and then press
SELECT.
4. With Line key highlighted, press SELECT.
5. Press q or p to select a line key and then press
SELECT.
6. Press t or u to choose the Type of key.
For a list of available Types, see “Programmable Key
Types” on page 50.
7. If the key has another setting (as indicated by q),
press q and then press t or u to choose the Value or
Account.
8. Press SELECT.
9. To congure another line key, go to step 5.
To congure the hard keys:
1. Press MENU/FUNC.
2. Press q to highlight User settings and then press SELECT.
3. Press q to highlight Progrm’able key and then press
SELECT.
4. Press q to highlight Hardkey and then press SELECT.
5. Press q or p to select a hard key and then press
SELECT.
6. Press t or u to choose the Type of key.
For a list of available Types, see “Programmable Key
Types” on page 50.
7. If the key has another setting (as indicated by q),
press q and then press t or u to choose the Account.
8. Press SELECT.
9. To congure another hard key, go to step 5.
49
Page 50

Programmable Key Types
You can assign functions to line keys (L1, L2, L3, L4) and hard keys (HOLD, p,
q, INTERCOM, MUTE).
Keys can have identical functions, depending on the “Type” of key. For example,
you can assign keys for Key System Emulation so that you can manage your
own held calls and shared calls within the system. You can also assign several
“Line”-type keys to Account 1 so that you can manage multiple calls on Account
1. For programmable key default settings, see “Factory Default Line Key Settings” on
page 15.
Type Description
N/A Congures the key so it does not have a function.
If you press the key, nothing will happen.
KeyLine* Congures the key for Key System Emulation. You
can manage your own held calls and shared calls
within the system. The key LED will change according
to call activity.
Select the desired line index number.
Line* Congures the key for accessing a line. You can make
calls or answer calls by pressing these keys. The key
LED will change according to call activity.
Select the desired Account number.
Call list Congures the key to access the Call List.
You can then press the key to view the Call List.
Directory Congures the key to access the Directory menu.
You can then press the key to view the Directory
menu.
Call History Congures the key to access the Call History list.
You can then press the key to view the Call History
list.
Redial Congures the key to access the Redial list.
You can then press the key to view the Redial list.
Message Congures the key to access the Message menu.
You can then press the key to view the Message
menu.
Do Not Disturb Congures the key to turn Do Not Disturb on or o.
* This Type is only available for line keys (L1 to L4).
50
Page 51

Type Description
Call Forward All Congures the key to turn Call Forward All on or o.
Select the line for which Call Forward All will apply.
Ensure that you also congure Call Forward settings
on the WebUI Call Settings page.
Call Forward Busy Congures the key to turn Call Forward Busy on or o.
Select the account for which Call Forward Busy will
apply. Ensure that you also congure Call Forward
settings on the WebUI Call Settings page.
Call Forward No
Answer
Congures the key to turn Call Forward No Answer on
or o. Select the account for which Call Forward No
Answer will apply. Ensure that you also congure Call
Forward settings on the WebUI Call Settings page.
51
Page 52

Line key lights
The Line key lights (L1 to L4) indicate call status and other information.
Key Light Activity Description
KeyLine*
Steady GREEN
Quickly ashing GREEN
Slowly ashing GREEN
Steady ORANGE
Flashing ORANGE
Line
Steady GREEN
Quickly ashing GREEN
Slowly ashing GREEN
Steady ORANGE
Do Not Disturb O
Steady ORANGE
Call forward O
Steady ORANGE
Shared Call operation:
On a call or dialing
Ringing incoming call
Shared call is on hold on your
handset
Shared call is active on another
handset/deskset
Shared call is on hold on another
handset/deskset
Private Call operation**:
On a call or dialing
Ringing incoming call
Held call
Cordless Handset in use
DND is o
DND or DND All is on
Call forward All is o
Call forward All is on
* For more information, see “Using Key System Emulation” on page 34.
** Calls made via the Line feature have exactly the same behavior as a KeyLine
call except:
1) Calls are not visible in system devices’ Call list or L1-L4 keys LED.
2) Calls therefore cannot be barged by system devices via the L1-L4
keypress.
52
Page 53

Setting the screen contrast
You can change the contrast of text and graphics on the deskset LCD.
To change the LCD text contrast:
1. Press MENU/FUNC.
2. Press q to highlight User settings and then press
SELECT.
3. Press q to highlight Contrast and then press SELECT.
4. Press q or p to choose a contrast level between 1 and 7.
5. Press SELECT.
Backlight
You can set the deskset LCD backlight to be o when in idle, or set it to turn on
or o continuously.
To set the LCD backlight:
1. Press MENU/FUNC.
2. Press q to highlight User settings and then press
SELECT.
3. Press q to highlight LCD Backlight and then press
SELECT.
4. Press q or p to choose Backlight Time, During idle
or Being triggered*.
• If you select Backlight Time, press q or p to
choose the timeout period between 10 seconds
and 60 seconds.
• If you select During idle or Being triggered,
press q or p to choose On or O.
5. Press SELECT to save.
* Notes:
• If During idle is on but Being triggered is o, the LCD backlight always
lights up.
• If During idle is o but Being triggered is on, the LCD backlight turns o
after being idle for as long as the set timeout period.
• If During idle and Being triggered are both o, the LCD backlight is always
o.
53
Page 54

Setting the ringer tone and volume
TIP: Fast way to set the ringer volume: When the phone is idle, press
VOLUME p or q.
TO set the ringer tone and volume:
1. Press MENU/FUNC.
2. Press q to highlight User settings and press SELECT.
3. Press q to highlight Ringers and press SELECT.
4. To change the ringer volume:
a. Highlight Ringer Volume and then press SELECT.
b. Press q or p to change the volume level as desired.
c. Press SELECT to save.
5. To change the ringer tone:
a. Highlight Ringer Tone and then press SELECT.
b. Press q or p to select an account, and then press
SELECT.
c. Press q or p to select a ringer tone for that
account.
d. Press SELECT to save.
Setting audio mode
You can select speakerphone or headset as the default audio out for speed dials.
To set the audio mode:
1. Press MENU/FUNC.
2. Press q to highlight User settings and then press SELECT.
3. Press q to highlight Audio Mode and then press
SELECT.
4. Press q or p to choose SPEAKER or HEADSET.
5. Press SELECT to save.
Turning low battery tone on or o
1. Press MENU/FUNC.
2. Press q to highlight User settings and then press SELECT.
3. Press q to highlight Low batt tone and then press
SELECT.
4. Press q or p to choose On or O.
5. Press SELECT to save.
54
Page 55

Turning link lost tone on or o
1. Press MENU/FUNC.
2. Press q to highlight User settings and then press SELECT.
3. Press q to highlight Link lost tone and then press
SELECT.
4. Press q or p to choose On or O.
5. Press SELECT to save.
Turning key tones on or o
1. Press MENU/FUNC.
2. Press q to highlight User settings and then press SELECT.
3. Press q to highlight Key Tone and then press
SELECT.
4. Press q or p to choose On or O.
5. Press SELECT to save.
Registering or deregistering your deskset
You can register or deregister your deskset using the deskset menu. Follow
the instructions in “Registering the deskset to the base” on page 22 and
“Deregistering the deskset” on page 23.
55
Page 56

WebUI
Using the WebUI
Use an Internet browser to access the Web User Interface (WebUI) that resides
on your base station. After you log on to the WebUI, you can congure the
following features:
• Call Settings
• User Preferences
• Base Directory
• Blacklist
• User Password
The WebUI also has a System Status and Deskset Status page, where you can
view network status and registration information about your deskset.
To access the WebUI:
1. Ensure that your computer is connected to the same network as your base
station.
2. Find the IP address of your base station:
a. When the phone is idle, press MENU/FUNC.
b. Press q to highlight Status, and then press SELECT.
The Status menu appears:
c. On the Status menu, ensure that Network is highlighted, and then press
SELECT.
The Network screen appears:
d. On the Network screen, note the IP Address.
3. On your computer, open an Internet browser. Depending on your browser,
some of the pages presented here may look dierent and have dierent
controls.
56
Page 57

4. Type the phone IP address in the browser address bar and press ENTER on
your computer keyboard:
A Login window appears.
5. Under User Name, enter user.
6. Under Password, enter user, or your own password, if you have created
one. You can create or change a password after you log on.
7. Click Log In / OK.
The WebUI appears.
Click topics from the navigation bar at the top of the page, and then click the
desired setting on the left side of the WebUI to see the page for that setting.
You view and change settings in two dierent types of elds: drop-down lists and
entry elds into which you type information. For your security, the WebUI times
out after 10 minutes, so if it is idle for that time, you must log on again.
The remaining procedures in this section assume that you have already logged
on to the WebUI.
57
Page 58

System Status
The System Status page shows:
• General information about your phone, including model, MAC address, and
rmware version.
• Account Status information about your SIP account registration.
• IPv4 and IPv6 network information regarding your phone’s network address
and network connection.
The System Status page has no settings that you can change. You may need
some of the status information for troubleshooting purposes.
58
Page 59

Deskset Status
The Handset Status page shows registration information for the cordless
handsets and desksets.
The Handset Status page has no settings that you can change. You may need
some of the status information for troubleshooting purposes.
Call Settings
To view the call settings, click SYSTEM in the WebUI header, and then click Call
Settings in the sidebar. You can congure call settings for each account that is
available to your phone. Click Account 1, Account 2, and so on to select the call
settings page for the desired account.
Call Settings include Do Not Disturb and Call Forward settings. You can also
set Do Not Disturb and Call Forward using the deskset. See “Conguring the
Deskset” on page 45.
When you have nished changing settings on this page, click Save to save them.
59
Page 60

General Call Settings
Setting Description
Anonymous Call Reject Select to block incoming calls that have no caller ID.
Enable Anonymous Call Select to make outgoing calls that remove your own caller
ID information.
Do Not Disturb Settings
Setting Description
Enable DND Turns Do Not Disturb on or o.
Call Forward Settings
Setting Description
Enable Call Forward
Always
Target Number Enter a number to which all calls will be forwarded.
Enable Call Forward
Busy
Target Number Enter a number to which calls will be forwarded when the
Enable Call Forward No
Answer
Target Number Enter a number to which unanswered calls will be forwarded.
Delay Select the number of rings before
Select to enable call forwarding for all calls on that account.
Select to enable call forwarding for calls when you are on
another call on that account.
account is busy.
Select to enable call forwarding for unanswered calls on that
account.
Range: 1 to 10 rings
unanswered calls are forwarded.
Default: 6 rings
60
Page 61

User Preferences
On the User Preferences page, you can congure the WebUI language.
After changing the setting on this page, click Save to save.
General User Settings
Setting Description Range Default
WebUI
Language
Sets the language that
appears on the WebUI.
Any language supported
by your phone. For
example, English,
French, Spanish, etc.
English
61
Page 62

Base Directory
To view the base directory, click CONTACTS in the WebUI header.
On the Base Directory page, you can manage your base directory entries.
You can sort, edit, delete, and add contact information for up to 1,000 entries.
The page also allows you to export your phone’s base directory or import a
base directory le. The export function lets you back up your contacts to your
computer.
The base directory lists entries across multiple pages. Click Next, First, Last, or
a page number to view the desired page of entries.
Note: You can also use the phone menu to manage your base directory entries.
For more information, see “Using the Directory” on page 40.
62
Page 63

Base directory
Click To...
Sort the list by last name.
Sort the list by rst name.
Edit information for an entry.
View the last page of entries.
View the next page of entries.
Delete selected entries from the directory. Click Select All to select
every entry on the page you are viewing.
Add a new directory entry.
Delete all Directory entries
To add a new directory entry:
1. Click Add New Entry.
The Create Local Directory Entry page appears.
2. Enter the required information. At minimum, a rst and last name are
required.
Setting Description Range Default
First Name
Last Name
Ringer Tone Sets a unique ringer tone for calls from
Account Sets the account used when you dial this
Work Number Enter the appropriate numbers in these
Mobile Number
Other Number
Enter the appropriate names in these
elds.
this directory entry.
directory entry.
elds.
N/A N/A
Auto,
Tone 1–10
Default
Account,
Account 1–
Account 8
N/A N/A
Auto
Default
Account
3. Click Save.
63
Page 64

To edit a directory entry:
1. Click Edit for the entry you want to edit.
The Edit Local Directory Entry page appears.
2. Edit or add the desired information.
3. Click Save.
Import Base directory
You can import an existing base directory le. Importing a directory le replaces
all your previous base directory entries. After importing a directory le, you can
add, edit, or delete entries as desired.
Note: Directory les are .xml or .csv les containing contacts and contact
information. For more information about creating or editing a directory le, consult
your system administrator.
To import a base directory le:
1. Click Choose File.
2. In the Choose File to Upload window, navigate to the directory le.
3. Click the le, and then click Open.
4. If you are importing an XML le, click Import XML.
5. If you are importing a comma-separated value (CSV) le:
a. If the rst line of the CSV le is a header line, click the First line is
header, skip checkbox.
a. Click Import CSV.
Export Base directory
You can export the directory and save it as an .xml le on your computer.
To export the base directory:
1. Click Export XML or Export CSV.
2. If prompted by your browser, save the le to the desired location on your
computer.
64
Page 65

Blacklist
To view the Blacklist, click CONTACTS in the WebUI header, and then click
Blacklist in the sidebar.
The Blacklist directory is identical to the Base directory, except that you cannot
congure an incoming ringer tone.
Remote XML
On the Remote XML page, you can congure up to three server-hosted Remote
XML directories to appear on the Directory menu of your deskset.
For more information about conguring Remote XML directories, see the
M100 KLE Administrator and Provisioning Manual.
Security
On the Security page, you can change your User Password.
After changing your password, click Save.
65
Page 66

Troubleshooting
If you have diculty with your deskset, please try the suggestions below.
For customer service, visit our website at www.snomamericas.com .
General issues
Deskset does not work at all (LCD is black)
• Conrm the backup battery is installed and charged correctly.
• Ensure the adapter is securely plugged into an outlet not controlled by a wall
switch.
My caller ID isn’t working.
• Caller ID is a subscription service. Your telephone service provider may
require subscription to this service for this feature to work.
• The caller must be calling from an area that supports caller ID.
• Both your telephone service provider and your caller’s service provider must
use caller ID compatible equipment.
Deskset registration is not working
• Ensure the deskset is within range of the base station.
Cannot make external calls
• Check if your SIP account is registered (Press MENU/FUNC g Status g
Line and select an account. Check that the status reads Registered).
• You might be out of range of the base station. Try moving closer. If you
see an idle screen with no alerts, then your deskset is successfully
communicating with the base station.
Deskset does not receive incoming calls
• Ensure that Do Not Disturb and Call Forward All are turned o.
• Check if your SIP account is registered (Press MENU/FUNC g Status g
Line and select an account. Check that the status reads Registered).
• You might be out of range of the base station. Try moving closer.
Cannot locate deskset using base station
• The deskset may not be registered.
• If the deskset is out of power or the deskset is out of range, the locator tone
will not sound.
66
Page 67

Poor audio quality. Speech is cutting out.
• You may be close to being out of range of the base station. Try moving
closer.
• Other electronic products can cause interference with your deskset. Try
installing the base station far away from devices such as TVs, microwaves,
or other cordless devices, including other desksets.
• If the problem persists, contact your system administrator.
Technical Specications
RF frequency band 1921.536–1928.448 MHz
Channels 5
Operating temperature 32–104 °F (0–40 °C)
Power requirements Base station: 5.0 Vdc @ 800 mA
Deskset: 6.0 Vdc @ 600mA
Backup battery: 2.4V 750mAh Ni-MH battery pack
Special characters
Entering special characters
When entering text using the dial pad, the following special characters are
available. Press the 1, 0, or pound sign (#) keys to enter special characters.
Key Characters
1 ~ ^ ` % ! & - _ + = |1
0
# ( ) [ ] { } < > / \ #
Press (star) to switch between uppercase and lowercase/European
characters.
0 : ; , ? . @ 0
67
Page 68

Maintenance
Taking care of your telephone
• Your base station and deskset contain sophisticated electronic parts, so you
must treat them with care.
• Avoid rough treatment.
• Place the deskset down gently.
• Save the original packing materials to protect your products if you ever need
to ship them.
Avoid water
• You can damage your cordless telephone if it gets wet. Do not handle the
deskset with wet hands. Do not install the base station and deskset near a
sink, bathtub or shower.
Electrical storms
• Electrical storms can sometimes cause power surges harmful to electronic
equipment. For your own safety, take caution when using electric appliances
during storms.
Cleaning your telephone
• Your products have a durable plastic casing that should retain its luster for
many years. Clean it only with a soft cloth slightly dampened with water or a
mild soap.
• Do not use excess water or cleaning solvents of any kind.
Remember that electrical appliances can cause serious injury if used when you
are wet or standing in water. If the telephone base should fall into water, DO NOT
RETRIEVE IT UNTIL YOU UNPLUG THE POWER CORD FROM THE WALL,
then pull the unit out by the unplugged cord.
68
Page 69

Appendix - GNU General Public License
COPYRIGHT NOTICE AND WARRANTY
DISCLAIMER
I.
This Product contains Software applicable to
GNU General Public License, Version 2 which
can be used freely.
II.
Towards the licensor of this Software the
following liability is disclaimed:
This program is distributed in the hope
that it will be useful, but WITHOUT ANY
WARRANTY; without even the implied warranty
of MERCHANTABILITY or FITNESS FOR
A PARTICULAR PURPOSE. See the GNU
General Public License for more details.
III.
The GNU General Public License is as follows:
GNU GENERAL PUBLIC LICENSE
Version 2, June 1991
Public License applies to most of the Free
Software Foundation's software and to any
other program whose authors commit to using
it. (Some other Free Software Foundation
software is covered by the GNU Library
General Public License instead.) You can apply
it to your programs, too.
When we speak of free software, we are
referring to freedom, not price. Our General
Public Licenses are designed to make sure that
you have the freedom to distribute copies of
free software (and charge for this service if you
wish), that you receive source code or can get it
if you want it, that you can change the software
or use pieces of it in new free programs; and
that you know you can do these things.
To protect your rights, we need to make
restrictions that forbid anyone to deny you
these rights or to ask you to surrender the
rights. These restrictions translate to certain
responsibilities for you if you distribute copies of
the software, or if you modify it. For example,
if you distribute copies of such a program,
whether gratis or for a fee, you must give the
recipients all the rights that you have. You must
make sure that they, too, receive or can get the
source code. And you must show them these
terms so they know their rights.
Copyright (C) 1989, 1991
Free Software Foundation, Inc.
59 Temple Place, Suite 330
Boston, MA 02111-1307, USA
Everyone is permitted to copy and distribute
verbatim copies of this license document, but
changing it is not allowed.
Preamble
The licenses for most software are designed to
take away your freedom to share and change
it. By contrast, the GNU General Public License
is intended to guarantee your freedom to share
and change free software--to make sure the
software is free for all its users. This General
We protect your rights with two steps: (1)
copyright the software, and (2) oer you this
license which gives you legal permission to
copy, distribute and/or modify the software.
Also, for each author‘s protection and ours,
we want to make certain that everyone
understands that there is no warranty for this
free software. If the software is modied by
someone else and passed on, we want its
recipients to know that what they have is not
the original, so that any problems introduced
by others will not reect on the original authors'
reputations.
Finally, any free program is threatened
constantly by software patents. We wish to
avoid the danger that redistributors of a free
program will individually obtain patent licenses,
69
Page 70

in eect making the program proprietary. To
prevent this, we have made it clear that any
patent must be licensed for everyone‘s free use
or not licensed at all.
The precise terms and conditions for copying,
distribution and modication follow.
GNU GENERAL PUBLIC LICENSE
TERMS AND CONDITIONS FOR COPYING,
DISTRIBUTION AND MODIFICATION
0. This License applies to any program
or other work which contains a notice placed by
the copyright holder saying it may be distributed
under the terms of this General Public License.
The "Program", below, refers to any such
program or work, and a "work based on the
Program" means either the Program or any
derivative work under copyright law: that is to
say, a work containing the Program or a portion
of it, either verbatim or with modications
and/or translated into another language.
(Hereinafter, translation is included without
limitation in the term "modication".) Each
licensee is addressed as "you".
Activities other than copying, distribution and
modication are not covered by this License;
they are outside its scope. The act of running
the Program is not restricted, and the output
from the Program is covered only if its contents
constitute a work based on the Program
(independent of having been made by running
the Program). Whether that is true depends on
what the Program does.
1. You may copy and distribute verbatim
copies of the Program‘s source code as you
receive it, in any medium, provided that you
conspicuously and appropriately publish on
each copy an appropriate copyright notice
and disclaimer of warranty; keep intact all the
notices that refer to this License and to the
absence of any warranty; and give any other
recipients of the Program a copy of this License
along with the Program.
You may charge a fee for the physical act of
transferring a copy, and you may at your option
oer warranty protection in exchange for a fee.
2. You may modify your copy or copies
of the Program or any portion of it, thus forming
a work based on the Program, and copy and
distribute such modications or work under the
terms of Section 1 above, provided that you
also meet all of these conditions:
a) You must cause the modied les
to carry prominent notices stating that you
changed the les and the date of any change.
b) You must cause any work that you
distribute or publish, that in whole or in part
contains or is derived from the Program or any
part thereof, to be licensed as a whole at no
charge to all third parties under the terms of this
License.
c) If the modied program normally
reads commands interactively when run, you
must cause it, when started running for such
interactive use in the most ordinary way, to
print or display an announcement including
an appropriate copyright notice and a notice
that there is no warranty (or else, saying
that you provide a warranty) and that users
may redistribute the program under these
conditions, and telling the user how to view a
copy of this License. (Exception: if the Program
itself is interactive but does not normally print
such an announcement, your work based
on the Program is not required to print an
announcement.)
These requirements apply to the modied
work as a whole. If identiable sections of that
work are not derived from the Program, and
can be reasonably considered independent
and separate works in themselves, then this
License, and its terms, do not apply to those
sections when you distribute them as separate
works. But when you distribute the same
sections as part of a whole which is a work
based on the Program, the distribution of the
whole must be on the terms of this License,
whose permissions for other licensees extend
to the entire whole, and thus to each and every
part regardless of who wrote it.
Thus, it is not the intent of this section to claim
rights or contest your rights to work written
entirely by you; rather, the intent is to exercise
the right to control the distribution of derivative
or collective works based on the Program. In
addition, mere aggregation of another work
not based on the Program with the Program
(or with a work based on the Program) on a
volume of a storage or distribution medium
does not bring the other work under the scope
of this License.
70
Page 71

3. You may copy and distribute the
Program (or a work based on it, under Section
2) in object code or executable form under the
terms of Sections 1 and 2 above provided that
you also do one of the following:
a) Accompany it with the complete
corresponding machine-readable source
code, which must be distributed under the
terms of Sections 1 and 2 above on a medium
customarily used for software interchange; or,
b) Accompany it with a written oer,
valid for at least three years, to give any third
party, for a charge no more than your cost
of physically performing source distribution,
a complete machine-readable copy of the
corresponding source code, to be distributed
under the terms of Sections 1 and 2 above
on a medium customarily used for software
interchange; or,
4. You may not copy, modify,
sublicense, or distribute the Program except
as expressly provided under this License. Any
attempt otherwise to copy, modify, sublicense
or distribute the Program is void, and will
automatically terminate your rights under this
License. However, parties who have received
copies, or rights, from you under this License
will not have their licenses terminated so long
as such parties remain in full compliance.
5. You are not required to accept
this License, since you have not signed it.
However, nothing else grants you permission to
modify or distribute the Program or its derivative
works. These actions are prohibited by law if
you do not accept this License. Therefore, by
modifying or distributing the Program (or any
work based on the Program), you indicate your
acceptance of this License to do so, and all its
terms and conditions for copying, distributing or
modifying the Program or works based on it.
c) Accompany it with the information
you received as to the oer to distribute
corresponding source code. (This alternative is
allowed only for noncommercial distribution and
only if you received the program in object code
or executable form with such an oer, in accord
with Subsection b above.)
The source code for a work means the
preferred form of the work for making
modications to it. For an executable work,
complete source code means all the source
code for all modules it contains, plus any
associated interface denition les, plus
the scripts used to control compilation and
installation of the executable. However, as a
special exception, the source code distributed
need not include anything that is normally
distributed (in either source or binary form) with
the major components (compiler, kernel, and
so on) of the operating system on which the
executable runs, unless that component itself
accompanies the executable.
If distribution of executable or object code
is made by oering access to copy from a
designated place, then oering equivalent
access to copy the source code from the same
place counts as distribution of the source code,
even though third parties are not compelled to
copy the source along with the object code.
6. Each time you redistribute the
Program (or any work based on the Program),
the recipient automatically receives a license
from the original licensor to copy, distribute or
modify the Program subject to these terms and
conditions. You may not impose any further
restrictions on the recipients'exercise of the
rights granted herein. You are not responsible
for enforcing compliance by third parties to this
License.
7. If, as a consequence of a court
judgment or allegation of patent infringement
or for any other reason (not limited to
patent issues), conditions are imposed on
you (whether by court order, agreement or
otherwise) that contradict the conditions of
this License, they do not excuse you from
the conditions of this License. If you cannot
distribute so as to satisfy simultaneously your
obligations under this License and any other
pertinent obligations, then as a consequence
you may not distribute the Program at all. For
example, if a patent license would not permit
royalty-free redistribution of the Program by all
those who receive copies directly or indirectly
through you, then the only way you could
satisfy both it and this License would be to
refrain entirely from distribution of the Program.
71
Page 72

If any portion of this section is held invalid
or unenforceable under any particular
circumstance, the balance of the section is
intended to apply and the section as a whole is
intended to apply in other circumstances.
It is not the purpose of this section to induce
you to infringe any patents or other property
right claims or to contest validity of any such
claims; this section has the sole purpose of
protecting the integrity of the free software
distribution system, which is implemented by
public license practices. Many people have
made generous contributions to the wide range
of software distributed through that system
in reliance on consistent application of that
system; it is up to the author/donor to decide
if he or she is willing to distribute software
through any other system and a licensee
cannot impose that choice.
This section is intended to make thoroughly
clear what is believed to be a consequence of
the rest of this License.
8. If the distribution and/or use of
the Program is restricted in certain countries
either by patents or by copyrighted interfaces,
the original copyright holder who places the
Program under this License may add an explicit
geographical distribution limitation excluding
those countries, so that distribution is permitted
only in or among countries not thus excluded.
In such case, this License incorporates the
limitation as if written in the body of this
License.
9. The Free Software Foundation
may publish revised and/or new versions of
the General Public License from time to time.
Such new versions will be similar in spirit to
the present version, but may dier in detail to
address new problems or concerns.
Each version is given a distinguishing version
number. If the Program species a version
number of this License which applies to it and
„any later version“, you have the option of
following the terms and conditions either of that
version or of any later version published by the
Free Software Foundation. If the Program does
not specify a version number of this License,
you may choose any version ever published by
the Free Software Foundation.
10. If you wish to incorporate parts of the
Program into other free programs whose
distribution conditions are dierent, write to
the author to ask for permission. For software
which is copyrighted by the Free Software
Foundation, write to the Free Software
Foundation; we sometimes make exceptions
for this. Our decision will be guided by the
two goals of preserving the free status of
all derivatives of our free software and of
promoting the sharing and reuse of software
generally.
NO WARRANTY
11. BECAUSE THE PROGRAM IS
LICENSED FREE OF CHARGE, THERE IS
NO WARRANTY FOR THE PROGRAM, TO
THE EXTENT PERMITTED BY APPLICABLE
LAW. EXCEPT WHEN OTHERWISE STATED
IN WRITING THE COPYRIGHT HOLDERS
AND/OR OTHER PARTIES PROVIDE THE
PROGRAM „AS IS"WITHOUT WARRANTY
OF ANY KIND, EITHER EXPRESSED OR
IMPLIED, INCLUDING, BUT NOT LIMITED
TO, THE IMPLIED WARRANTIES OF
MERCHANTABILITY AND FITNESS FOR A
PARTICULAR PURPOSE. THE ENTIRE RISK
AS TO THE QUALITY AND PERFORMANCE
OF THE PROGRAM IS WITH YOU. SHOULD
THE PROGRAM PROVE DEFECTIVE, YOU
ASSUME THE COST OF ALL NECESSARY
SERVICING, REPAIR OR CORRECTION.
12. IN NO EVENT UNLESS REQUIRED
BY APPLICABLE LAW OR AGREED TO IN
WRITING WILL ANY COPYRIGHT HOLDER,
OR ANY OTHER PARTY WHO MAY MODIFY
AND/OR REDISTRIBUTE THE PROGRAM
AS PERMITTED ABOVE, BE LIABLE TO YOU
FOR DAMAGES, INCLUDING ANY GENERAL,
SPECIAL, INCIDENTAL OR CONSEQUENTIAL
DAMAGES ARISING OUT OF THE USE
OR INABILITY TO USE THE PROGRAM
(INCLUDING BUT NOT LIMITED TO LOSS
OF DATA OR DATA BEING RENDERED
INACCURATE OR LOSSES SUSTAINED BY
YOU OR THIRD PARTIES OR A FAILURE
OF THE PROGRAM TO OPERATE WITH
ANY OTHER PROGRAMS), EVEN IF SUCH
HOLDER OR OTHER PARTY HAS BEEN
ADVISED OF THE POSSIBILITY OF SUCH
DAMAGES.
END OF TERMS AND CONDITIONS
72
Page 73

How to Apply These Terms
to Your New Programs
If you develop a new program, and you want it
to be of the greatest possible use to the public,
the best way to achieve this is to make it free
software which everyone can redistribute and
change under these terms.
To do so, attach the following notices to the
program. It is safest to attach them to the start
of each source le to most eectively convey
the exclusion of warranty; and each le should
have at least the "copyright" line and a pointer
to where the full notice is found.
<one line to give the program‘s name and a
brief idea of what it does>Copyright (C) <year>
<name of author>
This program is free software; you can redistribute
it and/or modify it under the terms of the GNU
General Public License as published by the Free
Software Foundation; either version 2 of the
License, or (at your option) any later version.
This program is distributed in the hope
that it will be useful, but WITHOUT ANY
WARRANTY; without even the implied warranty
of MERCHANTABILITY or FITNESS FOR A
PARTICULAR PURPOSE. See the GNU General
Public License for more details.
V.
For further information see http://www.snom.
com.
You should have received a copy of the GNU
General Public License along with this program;
if not, write to the Free Software Foundation, Inc.,
59 Temple Place, Suite 330, Boston, MA 021111307 USA
IV.
If requested by you, the complete
corresponding source code of the Software
can be sent by Snom Technology GmbH on
a standard data storage medium against the
reimbursement of the manufacturing costs of
EUR 5.- per unit.
The complete corresponding source code of
the Software can also be downloaded from our
web site https://www.snom.com/footer/source-
code-gpl-open-source/.
73
Page 74

VTECH COMMUNICATIONS, INC.
Tigard, Oregon 97223, USA.
Copyright © 2019 Snom Technology GmbH. All Rights Reserved.
v2019004 Version 4, 08/19
 Loading...