

Page 1

M100 KLE
SIP DECT 4-Line Base Station
Administrator and Provisioning Manual
Rev. 1 06/19
Page 2

M100 KLE Administrator and Provisioning Manual
C
ONTENTS
Preface ...................................................................................................... 7
Text Conventions ................................................................................................................ 8
Audience............................................................................................................................. 8
Related Documents ............................................................................................................ 8
Introducing the M100 KLE ....................................................................... 9
About the M100 KLE 4-Line base station ......................................................................... 10
Quick Reference Guide .................................................................................................... 11
Network Requirements ..................................................................................................... 13
M100 KLE Configuration Methods....................................................................................14
Using Shared Calls........................................................................................................... 15
Key System Emulation ..................................................................................................... 18
Configuration Using the Phone Menus ................................................ 20
Viewing the Main Menu .................................................................................................... 21
Using the Status menu......................................................................................... 21
Viewing Line status.............................................................................................. 23
Using the Admin Settings Menu ....................................................................................... 24
Using the Network Setting menu ......................................................................... 25
Using the Security menu...................................................................................... 31
Using the Provisioning menu ............................................................................... 31
Editing the handset PIN code ..............................................................................34
Using the WebUI..................................................................................... 35
Using the Web User Interface (WebUI) ............................................................................36
Status Page ......................................................................................................................38
System Status......................................................................................................38
Handset Status .................................................................................................... 39
System Pages .................................................................................................................. 40
SIP Account Management ................................................................................... 40
General Account Settings ............................................................................. 40
Dial Plan........................................................................................................ 42
SIP Server Settings.......................................................................................43
Registration Settings ..................................................................................... 43
2
Page 3

M100 KLE Administrator and Provisioning Manual
Outbound Proxy Settings ..............................................................................43
Backup Outbound Proxy Settings .................................................................44
Caller Identity Settings .................................................................................. 44
Audio Settings ............................................................................................... 44
Quality of Service ..........................................................................................46
Signaling Settings .........................................................................................46
Voice Settings ............................................................................................... 47
Feature Access Codes Settings.................................................................... 47
Voicemail Settings......................................................................................... 49
NAT Traversal ............................................................................................... 49
Music on Hold Settings .................................................................................50
Network Conference Settings .......................................................................50
Session Timer ............................................................................................... 50
Jitter Buffer....................................................................................................51
Keep Alive .....................................................................................................51
Call Settings......................................................................................................... 53
General Call Settings ....................................................................................53
Do Not Disturb...............................................................................................53
Call Forward.................................................................................................. 53
User Preferences.................................................................................................55
General User Settings................................................................................... 55
Handset Settings ................................................................................................. 55
Account Assignments.................................................................................... 55
KeyLine Assignments.................................................................................... 57
Repeater Mode .............................................................................................59
Handset Name .............................................................................................. 61
Programmable Hard Keys............................................................................. 61
Server Application................................................................................................ 63
Action URI Syntax .........................................................................................63
Action URI ..................................................................................................... 65
XML Push Settings........................................................................................67
Network Pages .................................................................................................................68
Basic Network Settings........................................................................................ 69
Basic Network Settings ................................................................................. 69
Advanced Network Settings.................................................................................71
VLAN.............................................................................................................71
LLDP-MED ....................................................................................................72
802.1x ........................................................................................................... 72
VPN............................................................................................................... 73
Contacts Pages ................................................................................................................74
Base Directory ..................................................................................................... 74
Create Base Directory Entry .........................................................................76
Directory Import/Export ................................................................................. 77
Blacklist .........................................................................................................77
Create Blacklist Entry.................................................................................... 79
Blacklist Import/Export ..................................................................................80
LDAP ................................................................................................................... 81
LDAP Settings............................................................................................... 81
Remote XML.....................................................
...................................................84
3
Page 4

M100 KLE Administrator and Provisioning Manual
Remote XML Directory Format .....................................................................84
Servicing Pages................................................................................................................86
Reboot ................................................................................................................. 86
Time and Date ..................................................................................................... 86
Time and Date Format ..................................................................................87
Network Time Settings .................................................................................. 87
Time Zone and Daylight Savings Settings ....................................................87
Manual Time Settings....................................................................................88
Custom Language ............................................................................................... 89
Firmware Upgrade ...............................................................................................90
Firmware Server Settings.............................................................................. 90
Manual Firmware Update and Upload .......................................................... 92
Updating a Cordless Handset/Deskset .........................................................92
Provisioning ......................................................................................................... 95
Provisioning Server ....................................................................................... 96
Plug-and-Play Settings.................................................................................. 96
DHCP Settings ..............................................................................................97
Resynchronization.........................................................................................97
Import Configuration......................................................................................99
Export Configuration .....................................................................................99
Reset Configuration ....................................................................................100
Security.............................................................................................................. 101
Passwords...................................................................................................101
Web Server ................................................................................................. 102
Trusted Servers...........................................................................................102
Trusted IP.................................................................................................... 103
Certificates......................................................................................................... 104
Device Certificate ........................................................................................104
Trusted Certificate....................................................................................... 105
TR-069 Settings................................................................................................. 106
System Logs ...................................................................................................... 107
Syslog Settings ...........................................................................................107
Network Trace.............................................................................................108
Download Log ............................................................................................. 108
Provisioning Using Configuration Files............................................. 109
The Provisioning Process ............................................................................................... 110
Resynchronization: configuration file checking.................................................. 111
M100 KLE restart............................................................................................... 111
Configuration File Types................................................................................................. 112
Data Files........................................................................................................................ 113
Configuration File Tips and Security............................................................................... 114
Clearing parameters with %NULL in configuration file ...................................... 114
Guidelines for the MAC-Specific configuration file............................................. 114
Securing configuration files with AES encryption .............................................. 115
Configuration File Parameter Guide................................................... 117
"sip_account" Module: SIP Account Settings ................................................................. 119
4
Page 5

M100 KLE Administrator and Provisioning Manual
General configuration file settings ..................................................................... 119
MAC-specific configuration file settings .............................................................129
"hs_settings" Module: Handset Settings......................................................................... 133
General configuration file settings ..................................................................... 133
MAC-specific configuration file settings .............................................................138
“system” Module: System settings.................................................................................. 139
General configuration file settings ..................................................................... 139
MAC-specific configuration file settings .............................................................139
"network" Module: Network Settings............................................................................... 140
General configuration file settings ..................................................................... 140
MAC-specific configuration file settings .............................................................142
"provisioning" Module: Provisioning Settings..................................................................145
General configuration file settings ..................................................................... 145
MAC-specific configuration file settings .............................................................148
"time_date" Module: Time and Date Settings .................................................................150
"log" Module: Log Settings.............................................................................................. 154
"remoteDir" Module: Remote Directory Settings............................................................. 155
"web" Module: Web Settings ..........................................................................................160
“trusted_ip” Module: Trusted IP Settings ........................................................................161
“trusted_servers” Module: Trusted Server Settings ........................................................162
"user_pref" Module: User Preference Settings ............................................................... 163
"call_settings" Module: Call Settings .............................................................................. 164
“audio” Module: Audio Settings ...................................................................................... 166
"file" Module: Imported File Settings............................................................................... 168
General configuration file settings ..................................................................... 168
MAC-specific configuration file settings .............................................................170
“xml_app” Module: XML App Settings ............................................................................171
“tr069” Module: TR-069 Settings .................................................................................... 172
"tone" Module: Tone Definition Settings.......................................................................... 174
"profile" Module: Password Settings...............................................................................178
General configuration file settings ..................................................................... 178
MAC-specific configuration file settings .............................................................179
Troubleshooting ................................................................................... 180
Common Troubleshooting Procedures........................................................................... 180
Appendixes........................................................................................... 182
Appendix A: Maintenance............................................................................................... 182
Appendix B: GNU General Public License ..................................................................... 184
5
Page 6

M100 KLE Administrator and Provisioning Manual
6
Page 7

P
REFACE
Congratulations on your purchase of this Snom product. Please thoroughly read this
manual for all the feature operations and troubleshooting information necessary to install
and operate your new Snom product. You can also visit our website at
www.snomamericas.com.
M100 KLE Administrator and Provisioning Manual
This administrator and provisioning manual contains detailed instructions for installing and
configuring your M100 KLE SIP DECT 4-Line Base Station with software version 1.0.2.1 or
newer. See “Using the Status menu” on page 21 for instructions on checking the software
version on the M100 KLE. Please read this manual before installing the product.
Please print this page and record the following information regarding your product:
Model number: M100 KLE
Type: SIP DECT 4-Line Base Station
Serial number: _______________________________
Purchase date: _______________________________
Place of purchase: ____________________________
Both the model and serial numbers of your Snom product can be found on the bottom of
the device.
Save your sales receipt and original packaging in case it is necessary to return your
telephone for warranty service.
Preface 7 Back to Contents
Page 8
M100 KLE Administrator and Provisioning Manual
CallFwd
Notes provide important information
about a feature or procedure.
A caution means that loss of data or
unintended circumstances may result.
Text Conventions
Table 1 lists text formats and describes how they are used in this guide.
Table 1. Description of Text Conventions
Text Format Description
Screen Identifies text that appears on a device screen or a
WebUI page in a title, menu, or prompt.
HARD KEY or DIAL-PAD KEY Identifies a hard key, including the dial-pad keys.
Identifies a soft key.
Example of a Note.
Example of a Caution.
Audience
This guide is written for installers and system administrators. It assumes that you are
familiar with networks and VoIP, both in theory and in practice. This guide also assumes
that you have ordered your IP PBX equipment or service and selected which PBX features
you want to implement. This guide references specific IP PBX equipment or services only
for features or settings that have been designed for a specific service. Please consult your
equipment supplier or service provider for recommended switches, routers, and firewall
and NAT traversal settings, and so on.
As the M100 KLE SIP DECT 4-Line Base Station becomes certified for IP PBX equipment
or services, Snom may publish interop guides for those specific services. The interop
guides will recommend second-party devices and settings, along with M100 KLE-specific
configurations for optimal performance with those services. For the latest updates, visit our
website at www.snomamericas.com.
Related Documents
The M100 KLE Quick Installation Guide contains a quick reference guide to the M100
KLE external features and brief instructions on connecting the M100 KLE to a working IP
PBX system.
The M100 KLE User manual contains a quick reference guide, full installation instructions,
instructions for making and receiving calls, and a guide to all user-configurable settings.
The documents are available from our website at www.snomamericas.com.
Preface 8 Back to Contents
Page 9

I
NTRODUCING
THE
M100 KLE Administrator and Provisioning Manual
C HAPTER 1
M100 KLE
This administrator and provisioning guide contains detailed instructions for configuring the
M100 KLE SIP DECT 4-Line Base Station. Please read this guide before attempting to
configure the M100 KLE.
Some of the configuration tasks described in this chapter are duplicated in the Web User
Interface (WebUI) described in the next chapter, but if you need to assign static IP
addresses, they must be set at each device.
This chapter covers:
“About the M100 KLE 4-Line base station” on page 10
“Quick Reference Guide” on page 11
“Network Requirements” on page 13
“M100 KLE Configuration Methods” on page 14
Introducing the M100 KLE 9 Back to Contents
Page 10

M100 KLE Administrator and Provisioning Manual
About the M100 KLE 4-Line base station
The Snom M100 KLE SIP DECT 4-Line Base Station with M10 KLE cordless handset is a
cordless business phone system designed to work with popular SIP telephone (IP PBX)
equipment and services. Once you have ordered and configured your SIP equipment or
service, the M100 KLE and cordless accessories enable you to make and receive calls as
you would with any other business phone.
The M100 KLE 4-Line base station features include:
Up to 8 SIP account registrations
Up to 6 active SIP sessions (across all handsets and cordless desksets)
Registration of up to 10 DECT cordless handsets
Shared call usage (held call pick up, call barge in to conference) on single SIP
account among multiple users
Power over Ethernet
Handset locator
1,000-entry base directory with entries shared on all registered handsets and
desksets
The M10 KLE cordless handset features include:
4 dedicated Line keys for Key System experience
Backlit Liquid Crystal Display
Speakerphone, hold, intercom and mute capability
Corded headset jack
3-way conferencing
200-entry call history
500-entry local directory
You can configure the M100 KLE using the menus on the M10 KLE handset, a
browser-based interface called the WebUI, or an automatic provisioning process (see
“Provisioning Using Configuration Files” on page 109). The WebUI enables you to
configure the M100 KLE using a computer that is connected to the same Local Area
Network. The WebUI resides on the M100 KLE, and may get updated with firmware
updates.
Introducing the M100 KLE 10 Back to Contents
Page 11

Quick Reference Guide
Reset button
Press for
15 seconds to
restore factory
defaults. If the reset
is successful, the
slowly.
AC adapter input
Ethernet port
Front Rear
Handset Locator
(Page) button
Press to ring the cordless
accessories
Press and hold to register
cordless accessories.
LED (Power)
Flashes
when joining the
network or when registering/
deregistering a cordless
accessory.
Steady when power is
connected and an
IP address is acquired.
Antenna
LED
Flashes
when registering/
deregistering a cordless
accessory.
Steady when all SIP accounts
are registered.
when a SIP account is not
registered.
The external features of the M100 KLE 4-Line base station and handset are described
below.
M100 KLE Administrator and Provisioning Manual
Introducing the M100 KLE 11 Back to Contents
Page 12
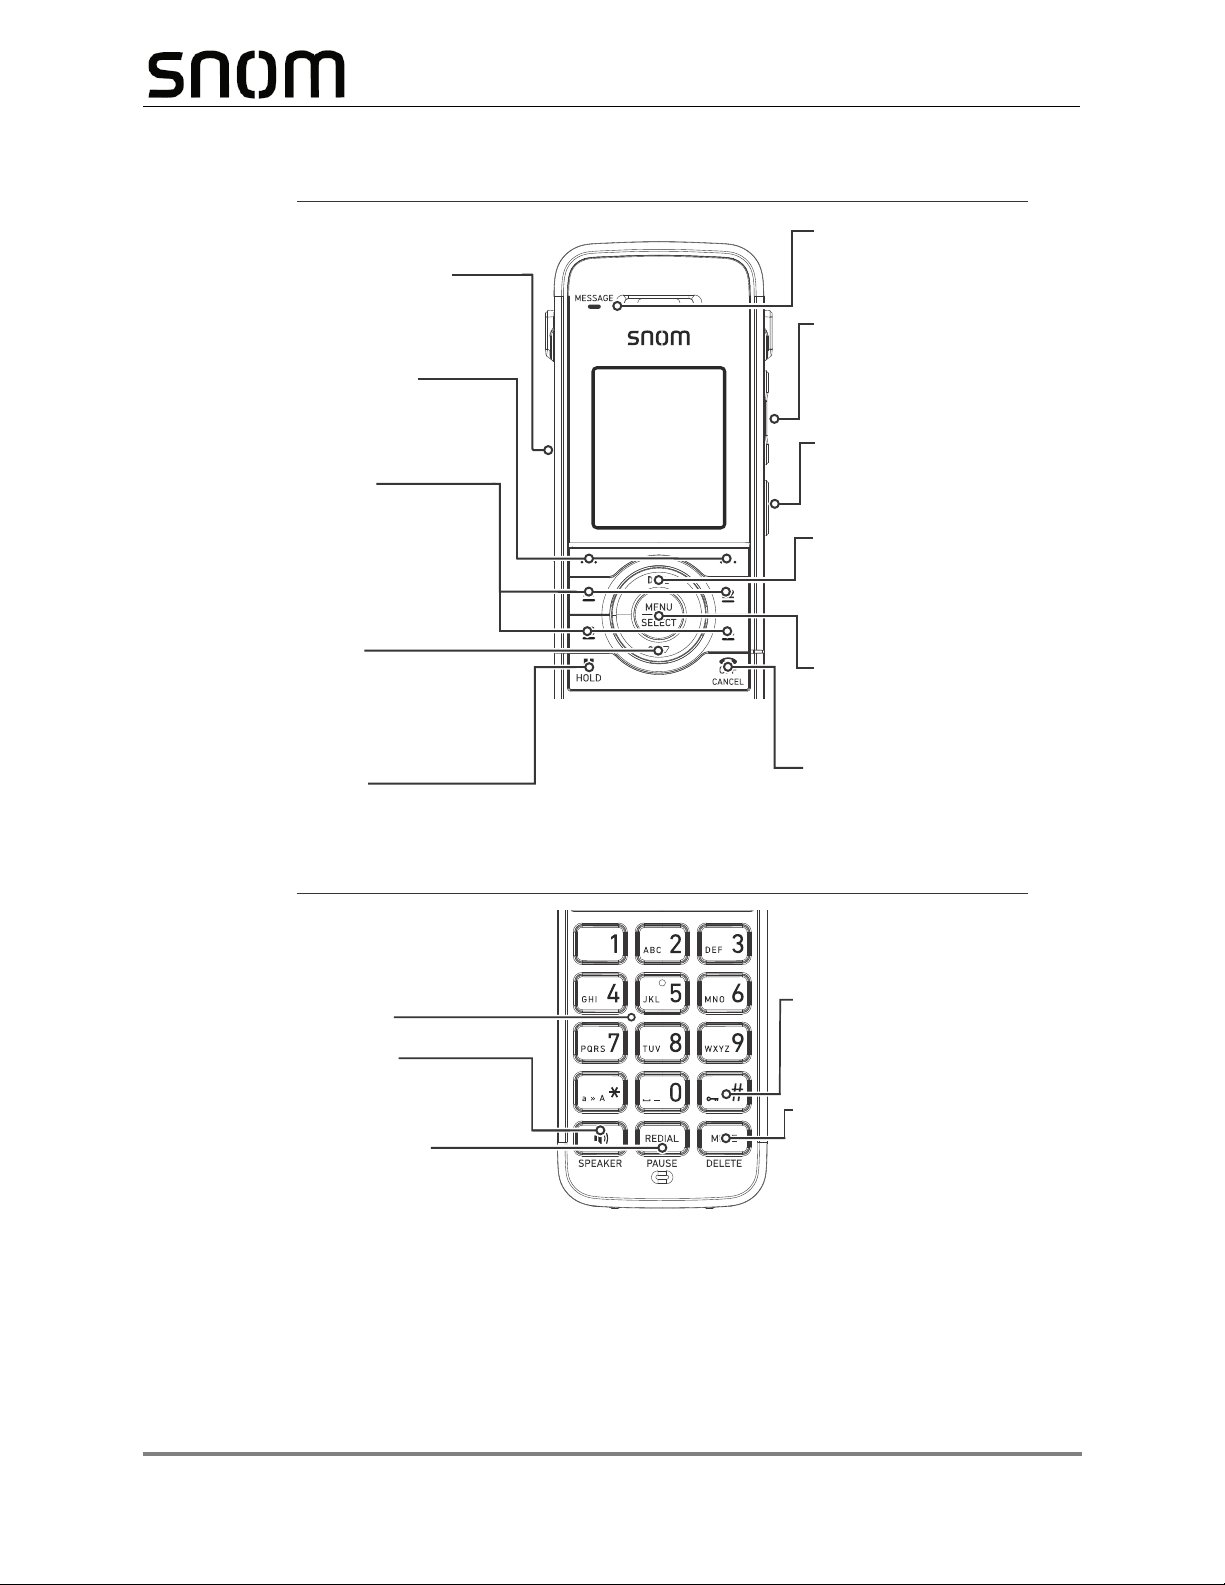
HEADSET JACK
2.5 mm jack for
connecting a corded
headset.
MESSAGES LED
Flashes when a line has
a new voice message.
MENU/SELECT
Press to display the main
menu.
Press to select a menu item.
OFF/CANCEL
Press to end a call.
Press to cancel an operation
and leave a menu.
On back:
• BELT CLIP
• SPEAKER
HOLD
Press to put a call on hold.
CID T
While in menus, press T
to scroll down the menu.
Press to display the Call
history.
DIR S
While in menus, press S
to scroll up the menu.
Press to display the
Directory.
Dial pad and audio controls
DIAL PAD
MUTE/DELETE
During a call, press to prevent
your voice from being heard.
While entering numbers
or letters, press to delete
previous character.
HANDSET LOCK
Press and hold to lock
handset keys and prevent
accidental key presses.
SPEAKER
Press to use the handset
speakerphone.
REDIAL/PAUSE
Press to redial a number
or enter a pause when
programming a phone number.
SOFT KEYS
Perform the actions
indicated by the onscreen labels.
L1 - L4
Programmable
feature keys,
preprogrammed
as line keys for
accessing shared
calls.
– VOLUME +
During a call: increase or
decrease listening volume.
When idle: increase or
decrease ringer volume.
INT
Press to make an internal
(intercom) call to another
handset/deskset.
Cordless handset external features
M100 KLE Administrator and Provisioning Manual
Introducing the M100 KLE 12 Back to Contents
Page 13
Network Requirements
A switched network topology is recommended for your LAN (using standard 10/100
Ethernet switches that carry traffic at a nominal rate of 100 Mbit/s).
The office LAN infrastructure should use Cat.-5/Cat.-5e cable.
The M100 KLE requires a wired connection to the LAN. However, wireless connections
fr om your LAN to other devices (such as laptops) in your off i c e will not impede performance.
A Dynamic Host Configuration Protocol (DHCP) server is recommended and must be on
the same subnet as the M100 KLE 4-Line base stations so that IP addresses can be
auto-assigned. In most cases, your network router will have a DHCP server. By default, the
M100 KLE has DHCP enabled for automatic IP address assignment.
Some DHCP servers have default settings that limit the number of network IP
addresses assigned to devices on the network. You should log in to your server
to confirm that the IP range is sufficient.
If no DHCP server is present, you can assign a static IP to the M100 KLE. You can assign
a static IP address using the M100 KLE menu. To assign a static IP: On the
handset/deskset Main menu, go to Admin settings > Network setting > IPv4 (or IPv6) >
Set static IP.
If you do not have a DHCP server or do not manually assign static IPs, you will not be able
to access the WebUI and/or enable automatic time updates from an NTP server.
M100 KLE Administrator and Provisioning Manual
A DNS server is recommended to resolve the path to the Internet and to a server for
firmware and configuration updates. If necessary, the system administrator can also
download upgrade files and use the WebUI to update the M100 KLE firmware and/or
configuration settings manually
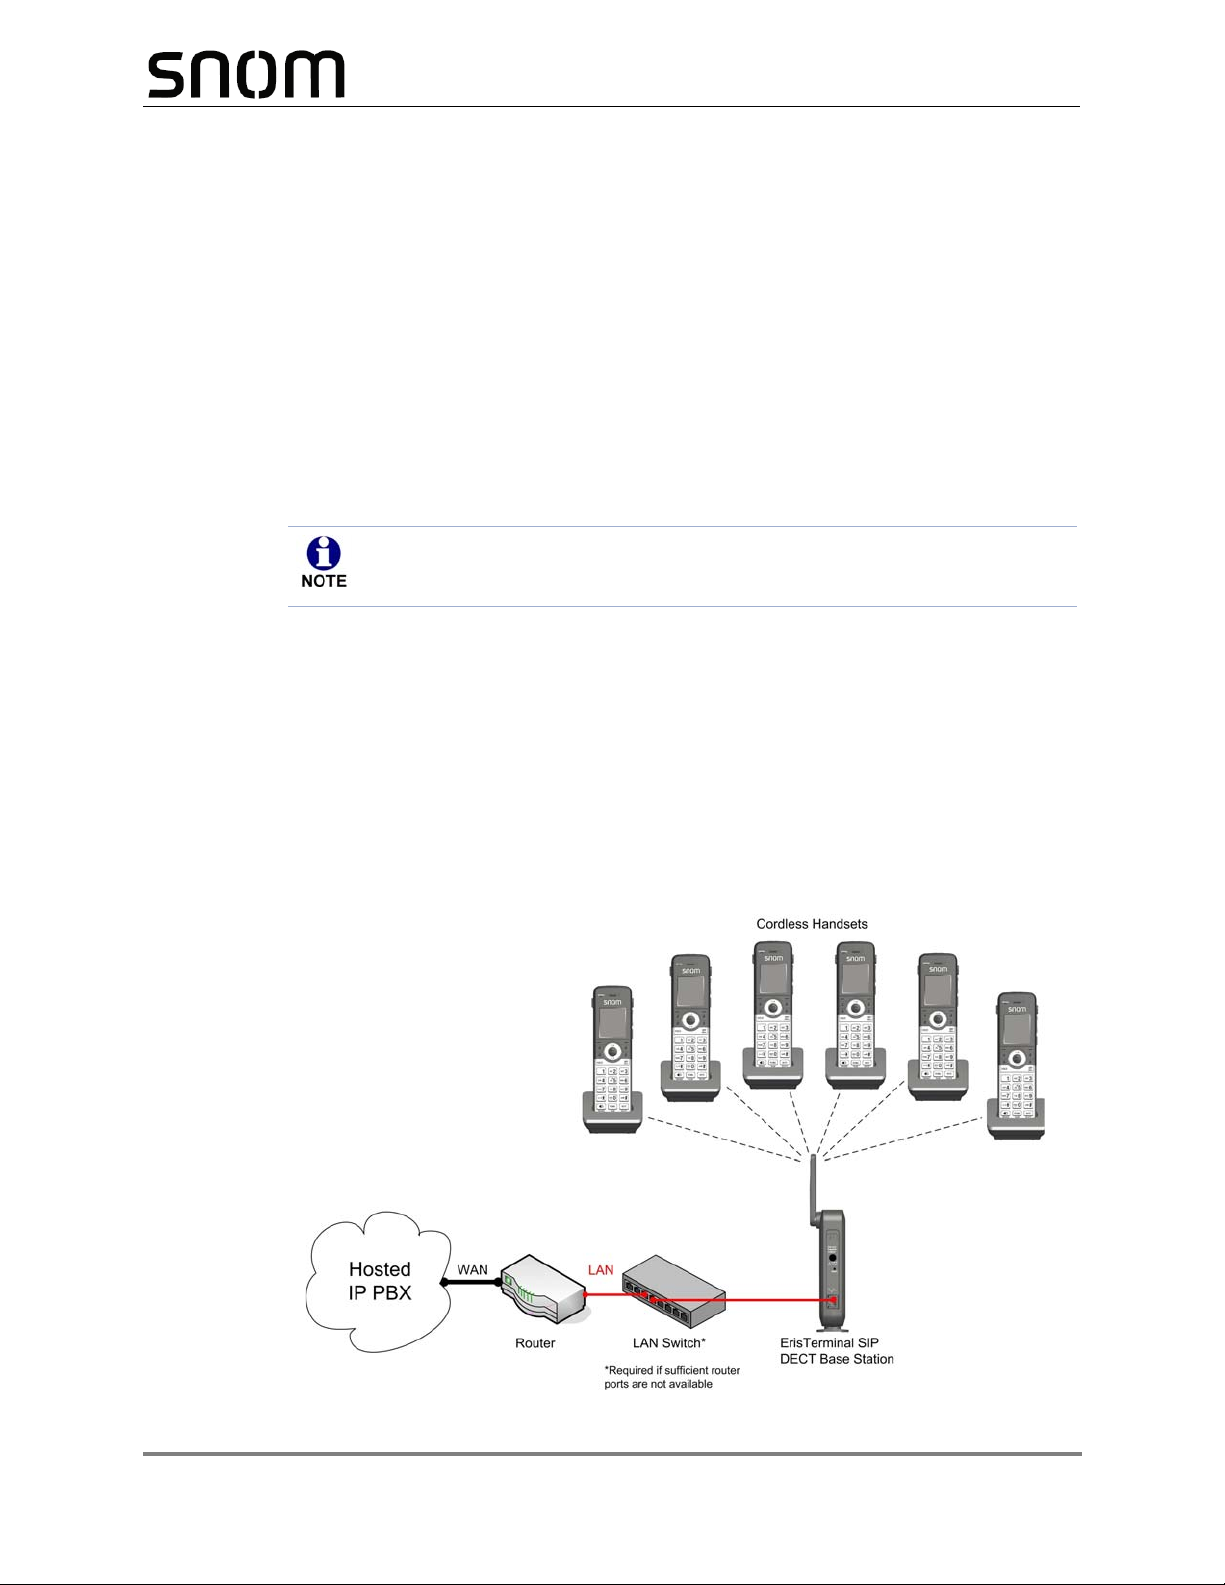
Figure 1. M100 KLE Installation Example
Introducing the M100 KLE 13 Back to Contents
Page 14

M100 KLE Administrator and Provisioning Manual
M100 KLE Configuration Methods
You can configure the M100 KLE using one of the following methods:
From the M10 KLE handset using the handset menus. The M10 KLE menus are
best suited to configuring a few settings, perhaps after the initial setup has been
done. For administrators, the settings available on the M10 KLE menus include
network settings, account settings, and provisioning settings. See “Using the
Admin Settings Menu” on page 24. Many of the settings accessible on the M10
KLE are most useful for end users. Through the menu, they can customize the
screen appearance, sounds, and manage calls. For more information, see the
M100 KLE/M10 KLE User Guide.
The Web User Interface, or WebUI, which you access using your Internet browser.
See “Using the WebUI” on page 35. The browser-based interface is easy to
navigate and best suited to configuring a large number of M100 KLE settings at
once. The WebUI gives you access to every setting required for configuring a
single device. You can enter service provider account settings on the WebUI,
assign accounts to handsets, and set up provisioning, which will allow you to
automatically and remotely update the M100 KLE after initial configuration.
Provisioning using configuration files. Working with configuration files allows you to
configure the device at regular intervals. There are several methods available to
enable the M100 KLE to locate and upload the configuration file. For example, you
can enable the M100 KLE, when it starts up or reboots, to check for the presence
of a configuration file on a provisioning server. If the configuration file is new or has
been modified in any way, the M100 KLE automatically downloads the file and
applies the new settings. For more information, see “Provisioning Using
Configuration Files” on page 109.
Introducing the M100 KLE 14 Back to Contents
Page 15

Using Shared Calls
Your system allows shared calls usage among multiple handset users on a SIP account.
Incoming calls on an account can alert multiple handsets and be answered by any one of
them. Multiple handsets can share an account for outgoing calls. This can be achieved via
Account Assignments. For more details, see “Account Assignments” on page 55.
Typical call sharing operations like held call pick up and barge-in conference among
handset users can be achieved via KeyLine Assignments. For more details, see “KeyLine
Assignments” on page 57.
Each "KeyLine" number, when assigned to a shared call, behaves as a virtual "Line"
number allowing easy, yet unique reference across multiple handset users.
Using our default configuration for KeyLine as an example, any incoming/outgoing call on
account 1 will get assigned a KeyLine number. The lowest unoccupied KeyLine number will
typically be assigned first.
Please see the following scenarios to see how the KeyLine number can be utilized among
users via the Call List.
M100 KLE Administrator and Provisioning Manual
Introducing the M100 KLE 15 Back to Contents
Page 16
M100 KLE Administrator and Provisioning Manual
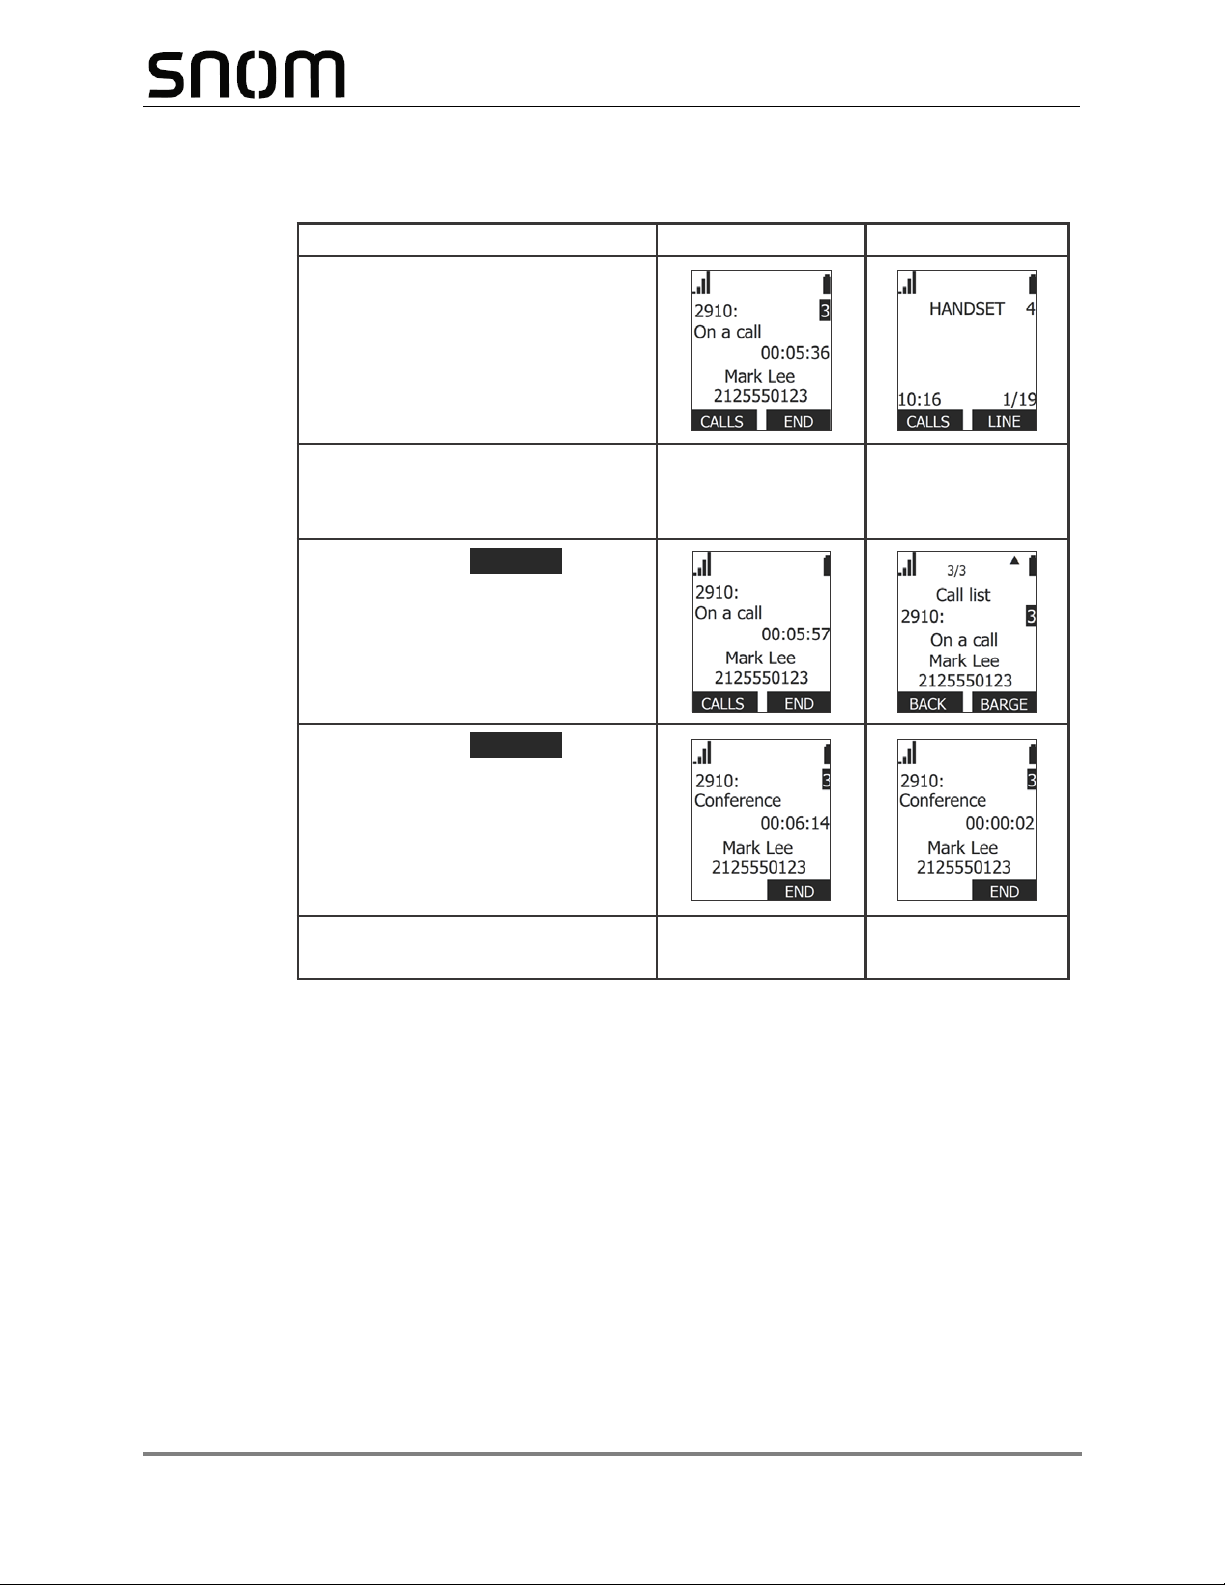
Example - barging in a shared call:
Alice’s handset Bob’s handset
1. Alice is on a call.
2. Alice shouts across the room,
“Bob, can you join my call on
line 3?”
3. Bob presses
CALLS
to
display the Call List, and
presses T to select the call on
line 3.
4. Bob presses
BARGE
to
barge in the call.
Bob is now in a conference call with
Alice and the caller on line 3.
Introducing the M100 KLE 16 Back to Contents
Page 17
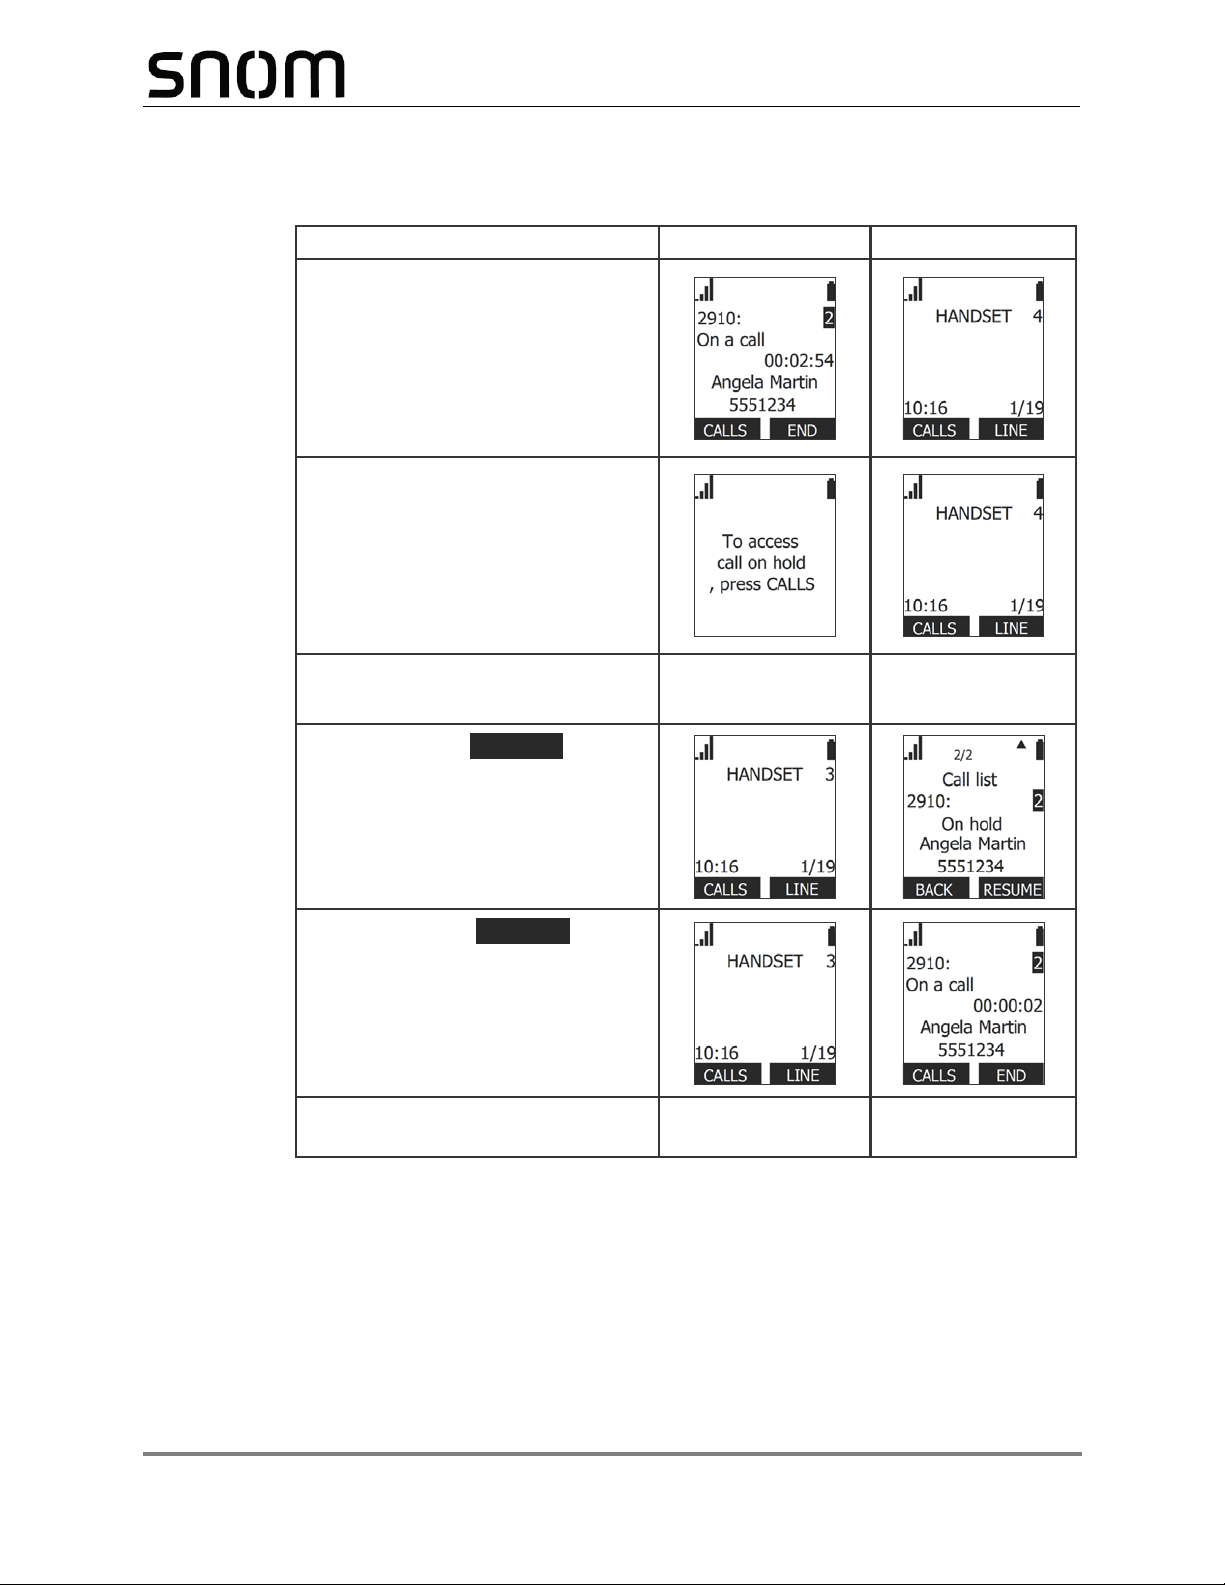
Example - picking up a held shared call:
Alice’s handset Bob’s handset
1. Alice is on a call.
2. Alice presses HOLD to put the
call on hold.
3. Alice shouts across the room,
“Bob, can you pick up line 2?”
4. Bob presses
CALLS
to
display the Call List, and
presses T to select the call on
line 2.
5. Bob presses
RESUME
to pick
up the call.
The call is now on Bob’s handset.
M100 KLE Administrator and Provisioning Manual
Calls made on an account without assigning to any KeyLine number are considered to be
private calls and will not be visible on the Call List of other handsets.
Introducing the M100 KLE 17 Back to Contents
Page 18
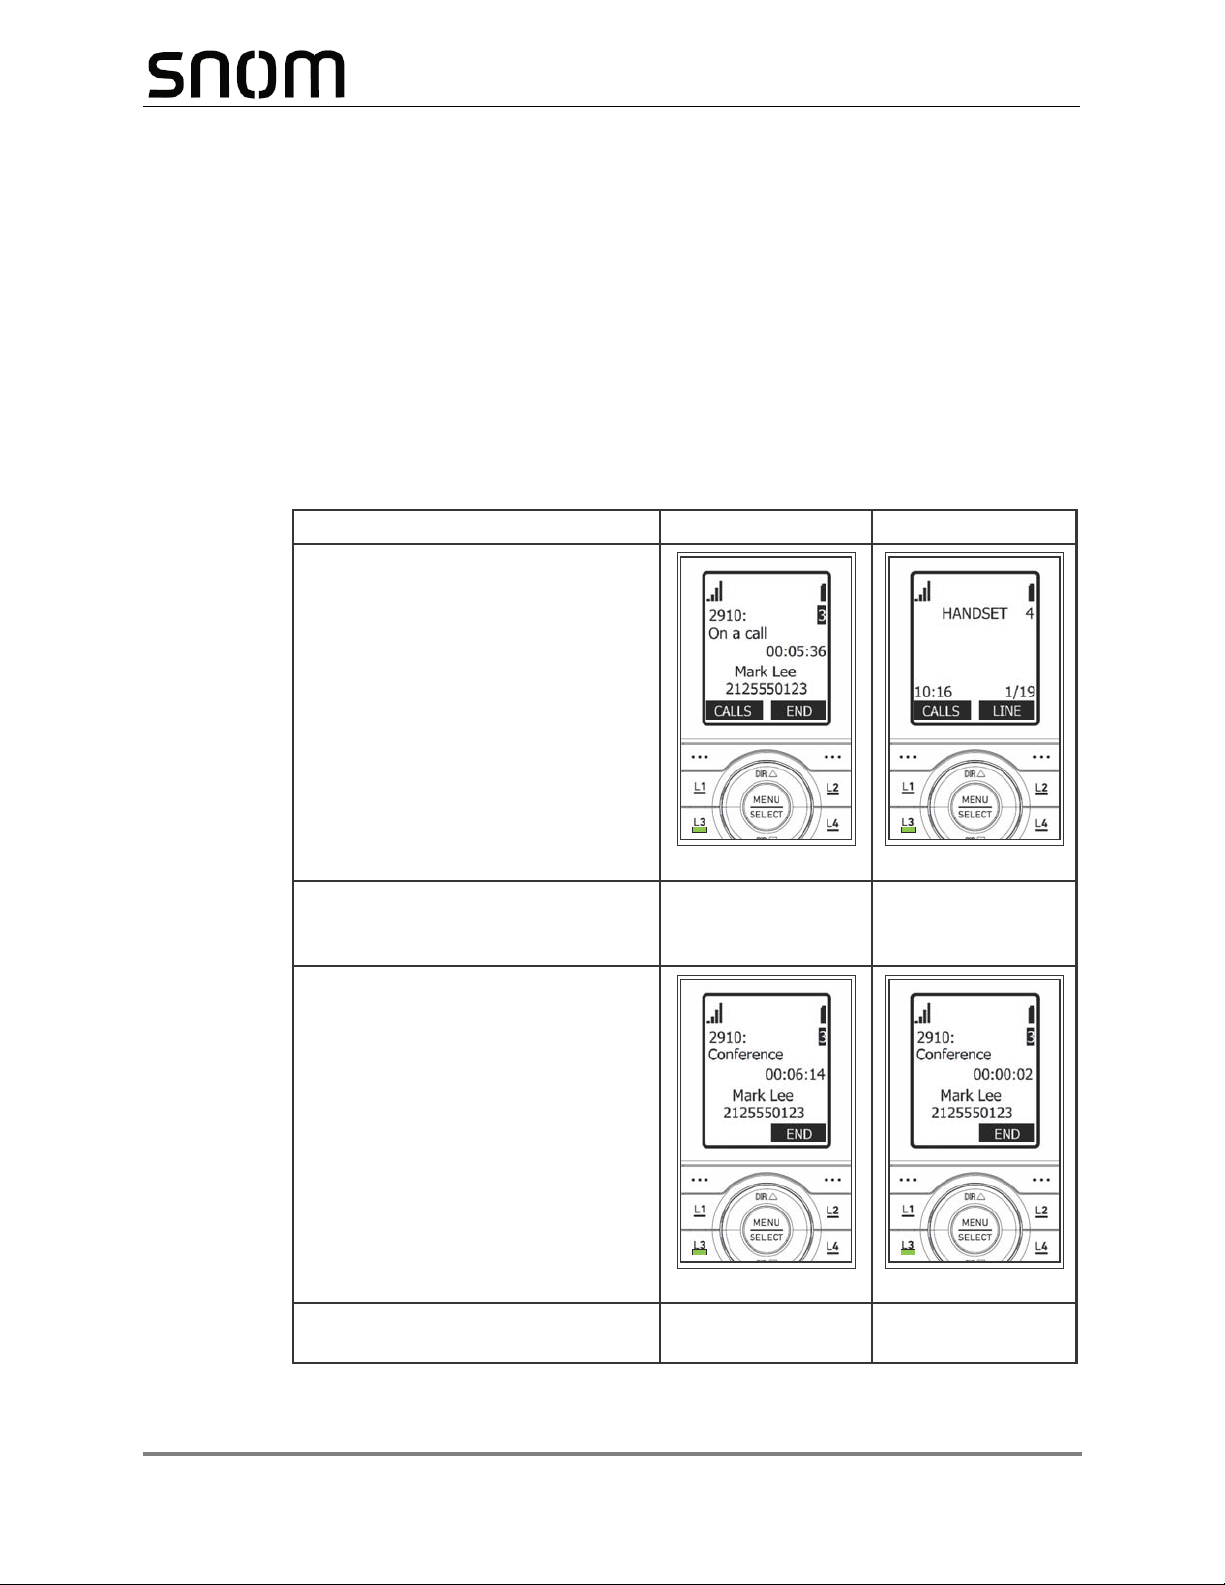
Key System Emulation
Example - barging in a shared call:
Alice’s handset Bob’s handset
1. Alice is on a call.
2. Alice shouts across the room,
“Bob, can you join my call on
line 3?”
3. Bob presses L3 to
barge in the call.
Bob is now in a conference call with
Alice and the caller on line 3.
Each cordless handset or deskset is equipped with four line keys (L1 to L4) to to allow
similar usage experience as a typical Key system.
By assigning each Line key to a KeyLine number as done with our factory setting, the user
can interact directly with shared calls and perform held call and barge-in conference via
pressing the Line key (L1 to L4).
The following scenarios illustrate a Key system experience via direct interactions with the
Line keys.
M100 KLE Administrator and Provisioning Manual
Introducing the M100 KLE 18 Back to Contents
Page 19

Example - picking up a held shared call:
Alice’s handset Bob’s handset
1. Alice is on a call.
2. Alice presses HOLD to put
the call on hold.
3. Alice shouts across the room,
“Bob, can you pick up line 2?”
4. Bob presses L2 to pick up the
call.
The call is now on Bob’s handset.
M100 KLE Administrator and Provisioning Manual
Introducing the M100 KLE 19 Back to Contents
Page 20

C
ONFIGURATION
M
ENUS
M100 KLE Administrator and Provisioning Manual
U
SING THE
C HAPTER 2
P
HONE
The M100 KLE Main Menu has the following sub-menus:
Message—access the voice messages on each account.
Directory—view and dial directory and blacklist entries.
Call history—view missed calls, received calls and dialed calls.
Intercom—call other handsets.
Speed dial—view and edit speed dial entries.
Features—set DND, call forward settings and other calling features.
Status—view the handset and base station network status, account registration
status, and product information.
User settings—allows the user to set the language for the display, configure the
appearance of the display, set date and time, and customize the audio settings.
Admin settings—configure network settings (enter static IP addresses, for
example), account settings and provisioning settings.
This chapter contains instructions for using the Admin Settings menu and for accessing the
Status menu. See the M100 KLE/M10 KLE User Guide for more information about the other
menus.
Configuration Using the Phone Menus 20 Back to Contents
Page 21

Viewing the Main Menu
BACK ENTER
Intercom
Main Menu
Call history
Directory
Message
BACK ENTER
Status
Product info
Line
Network
To use the M10 KLE menu:
When the M10 KLE is idle, press MENU/SELECT.
The Main Menu appears.
M100 KLE Administrator and Provisioning Manual
1. Press
or to highlight the desired sub-menu, and then press MENU/SELECT.
Press SELECT or an appropriate soft key to save changes.
Press OFF/CANCEL to cancel an operation, exit the menu display or return to the
idle screen.
Using the Status menu
Use the Status menu to verify network settings and begin troubleshooting if network
problems or account registration issues affect operation.
You can also find the software version of the M100 KLE on the Product Info screen,
available from the Status menu.
To view the Status menu:
1. When the M10 KLE is idle, press MENU/SELECT.
2. On the Main Menu, press
MENU/SELECT.
The Status menu appears.
3. On the Status menu, press
MENU/SELECT.
The available status menus are listed in Table 2.
Configuration Using the Phone Menus 21 Back to Contents
or to highlight Status, and then press
or to highlight the desired menu, and then press
Page 22

M100 KLE Administrator and Provisioning Manual
Table 2. Status menu summary
Menu Information listed
1. Network IP address
DHCP status (Enabled/Disabled)
Subnet Mask
Gateway IP address
DNS server 1 IP address
DNS server 2 IP address
2. Line Lines and registration status. On the Line menu, highlight
and select the desired line to view detailed line status
information:
Line status (Registered/Not registered)
Account display name
Account User ID
Server IP address
3. Product Info Shows the product info for the handset or base station.
Select Handset or Base to view the:
Model number (handset only)
Serial number (handset only)
Firmware version
V-Series
Hardware version
IPEI (handset only)
Configuration Using the Phone Menus 22 Back to Contents
Page 23

M100 KLE Administrator and Provisioning Manual
BACK ENTER
Ellie 204
Line
Larry 203
Dawn 202
John 201
Viewing Line status
To view line status, from the Status menu, select Line. The Line menu lists the available
lines, along with icons indicating each line's current registration status.
Table 3. Line status icons
Icon Description
Line registered
Line unregistered
To view complete status information for a line:
On the Line menu, press
MENU/SELECT. The full line status screen appears.
or to highlight the desired line, and then press
Configuration Using the Phone Menus 23 Back to Contents
Page 24

Using the Admin Settings Menu
ENTER
To access the Admin Settings menu:
1. When the M10 KLE is idle, press MENU/SELECT.
The Main Menu appears.
M100 KLE Administrator and Provisioning Manual
2. Press
or to highlight Admin settings, and then press MENU/SELECT.
3. Use the dial pad to enter the admin password, and then press . The default
password is admin (press the * key to enable entering lower-case letters).
The Admin settings are listed in Table 4.
Table 4. Admin setting summary
Setting Options
Network setting DHCP (Enable, Disable)
Set static IP
VLAN ID
Others
Security Secure Browsing
Provisioning Server string
Login ID
Login PW
Edit PIN code Edit PIN
Firmware update Select Firmware update to have the handset check
whether a firmware update is available. See “Updating a
Cordless Handset/Deskset” on page 92.
Configuration Using the Phone Menus 24 Back to Contents
Page 25

M100 KLE Administrator and Provisioning Manual
BACK ENTER
Others
Network setting
VLAN ID
Set static IP
DHCP
SET
Using the Network Setting menu
Use the Network setting menu to configure network-related settings for the M100 KLE. For
more information about these settings, see “Basic Network Settings” on page 69 and
“Advanced Network Settings” on page 71.
To use the Network setting menu:
1. From the Admin Settings menu, press
then press MENU/SELECT.
The Network setting menu appears.
2. Press
To enable or disable DHCP:
or to highlight the desired option, and then press MENU/SELECT:
DHCP
Set static IP
VLAN ID
Others (DNS and NTP servers).
or to highlight Network setting, and
1. From the Network setting menu, press
MENU/SELECT.
The DHCP screen appears.
2. Press
DHCP is enabled by default, which means the M100 KLE will get its IP address from the
network. When DHCP is disabled, you must enter a static IP address for the M100 KLE.
Configuration Using the Phone Menus 25 Back to Contents
or to select Enabled or Disabled, and then press .
or to highlight DHCP, and then press
Page 26

M100 KLE Administrator and Provisioning Manual
You must be familiar with TCP/IP principles and protocols to configure static IP
settings.
Configuration Using the Phone Menus 26 Back to Contents
Page 27

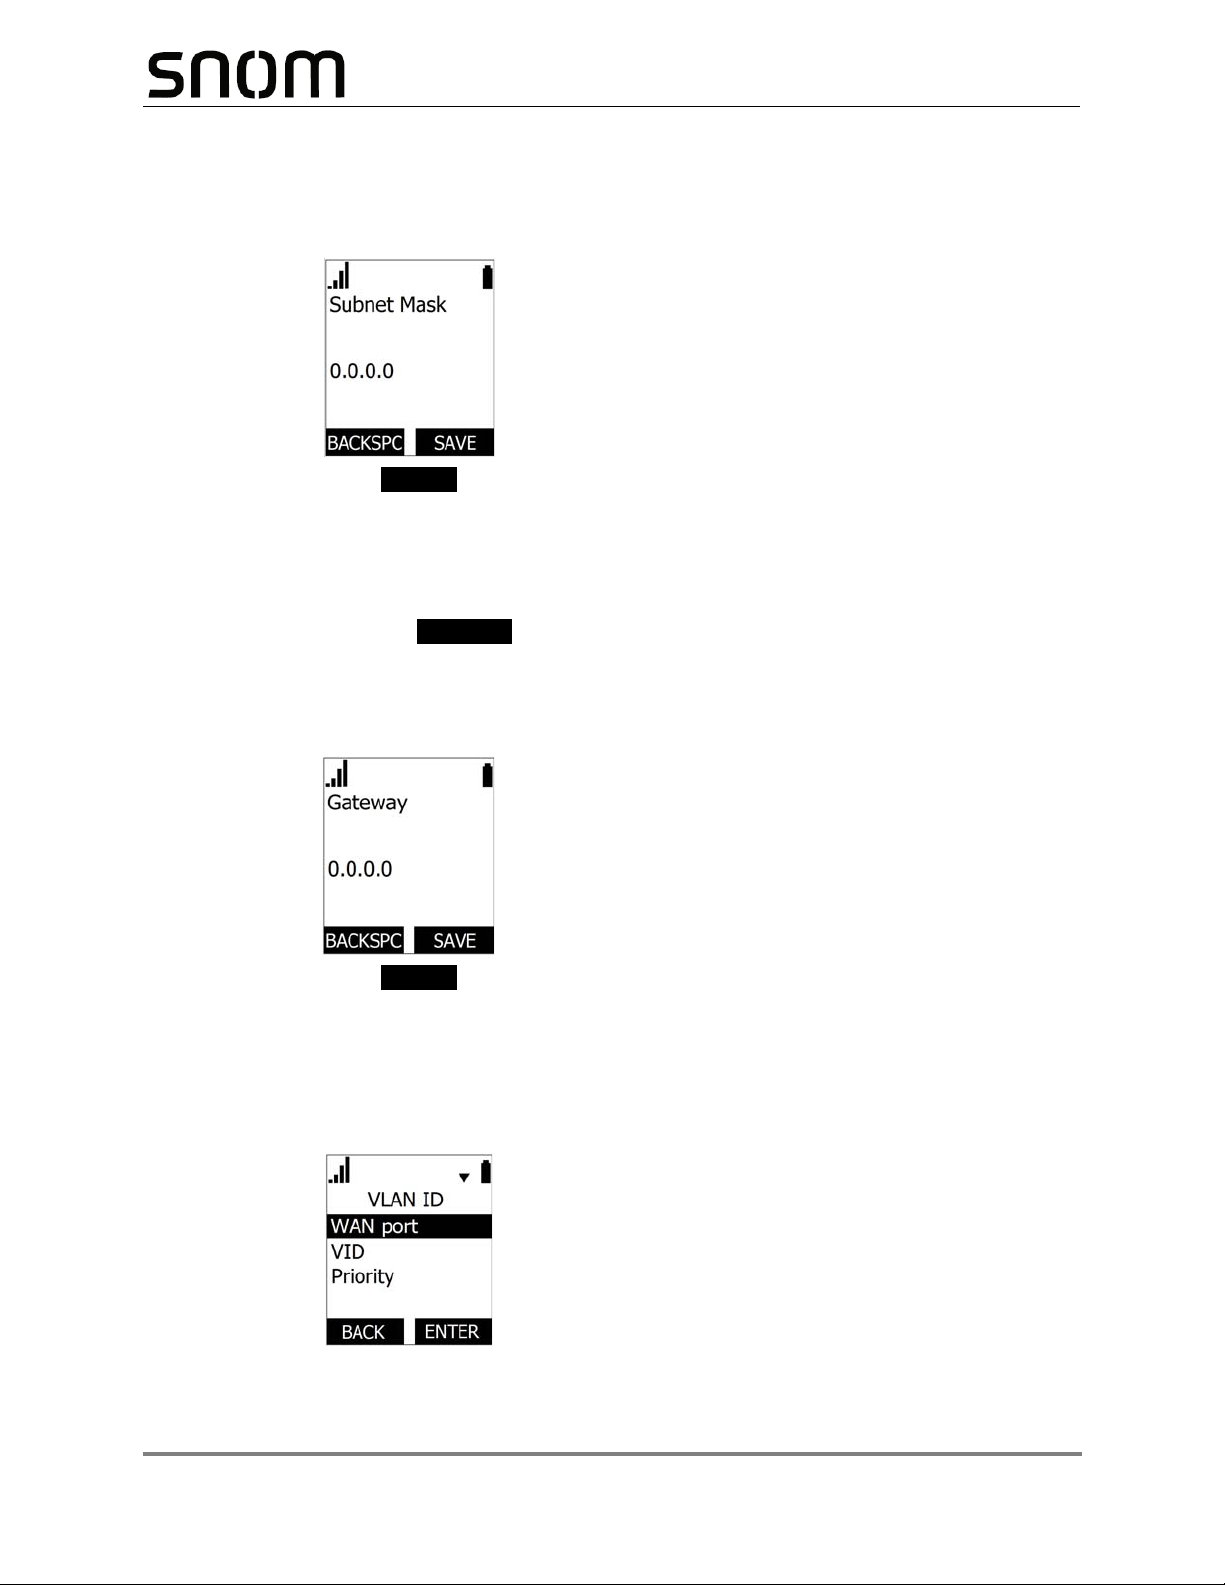
To set static IP for the M100 KLE:
BACKSPC
SAVE
BACKSPC
M100 KLE Administrator and Provisioning Manual
1. From the Network setting menu, press
or to highlight Set static IP, and then
press MENU/SELECT.
If DHCP is disabled, the Set static IP menu appears. If DHCP is enabled, an error
message appears briefly before returning you to the Network setting menu.
2. On the Set static IP menu, with IP Address highlighted, press MENU/SELECT.
3. Enter the Static IP Address.
Press to delete numbers.
Use the dial pad to enter numbers.
To add a period, press the * key.
4. Press .
5. On the Set static IP menu, press
MENU/SELECT.
6. Enter the Subnet Mask.
Press to delete numbers.
or to highlight Subnet Mask, and then press
Configuration Using the Phone Menus 27 Back to Contents
Page 28
Use the dial pad to enter numbers.
SAVE
BACKSPC
SAVE
To add a period, press the * key.
7. Press .
M100 KLE Administrator and Provisioning Manual
8. On the Set static IP menu, press
or to highlight Gateway, and then press
MENU/SELECT.
9. Enter the Gateway.
Press to delete numbers.
Use the dial pad to enter numbers.
To add a period, press the * key.
10. Press .
To set the VLAN ID for the M100 KLE:
1. From the Network setting menu, press
press MENU/SELECT.
or to highlight VLAN ID, and then
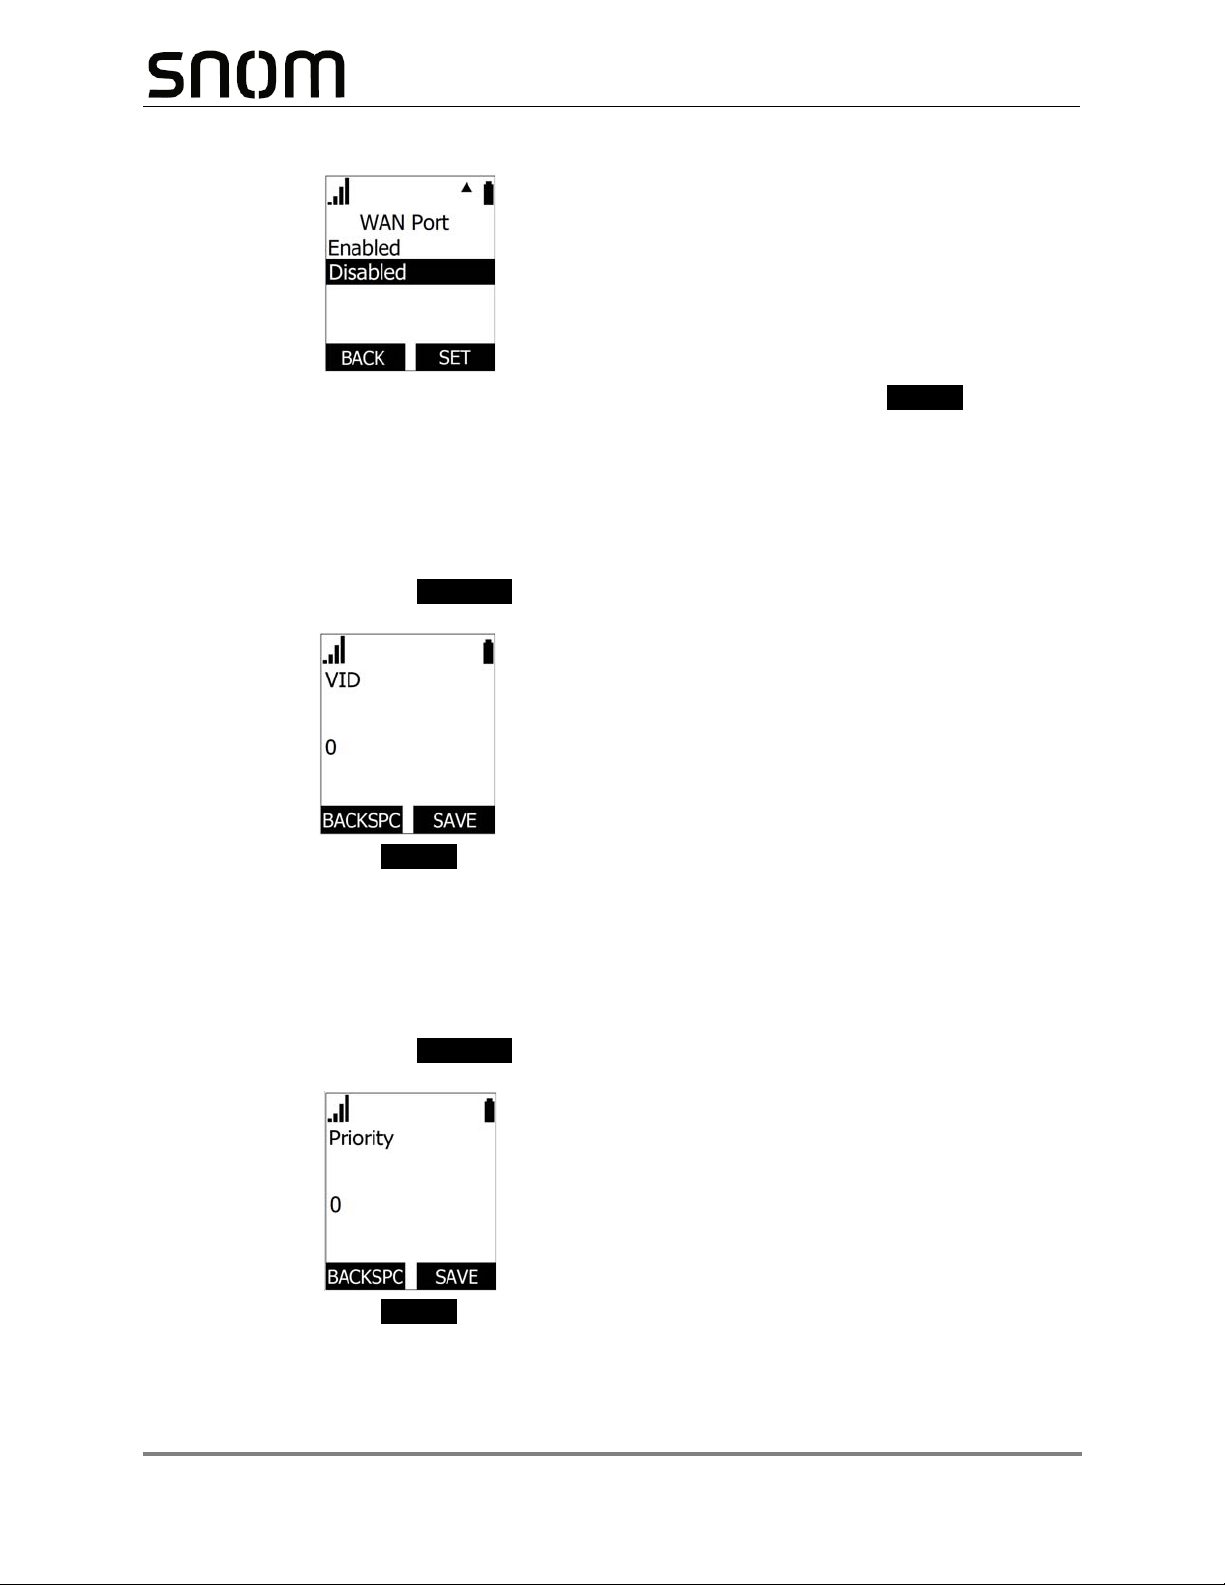
2. On the VLAN ID menu, with WAN port highlighted, press MENU/SELECT.
Configuration Using the Phone Menus 28 Back to Contents
Page 29
M100 KLE Administrator and Provisioning Manual
SET
BACKSPC
SAVE
BACKSPC
SAVE
3. Press or to select Enabled or Disabled, and then press .
4. On the VLAN ID menu, press
or to highlight VID, and then press
MENU/SELECT.
5. Enter the WAN VID. The valid range is 0 to 4095.
Use the dial pad to enter numbers.
Press to delete numbers.
6. Press .
7. On the VLAN ID menu, press
or to highlight Priority, and then press
MENU/SELECT.
8. Enter the WAN Priority. The valid range is 0 to 7.
Use the dial pad to enter numbers.
Press to delete numbers.
9. Press .
Configuration Using the Phone Menus 29 Back to Contents
Page 30

To set other settings (DNS and NTP):
BACKSPC
SAVE
BACKSPC
SAVE
BACKSPC
M100 KLE Administrator and Provisioning Manual
1. From the Network setting menu, press
or to highlight Others, and then press
MENU/SELECT.
2. On the Others menu, with DNS 1 highlighted, press MENU/SELECT.
3. Enter the IP address for the primary DNS server.
Press to delete numbers.
Use the dial pad to enter numbers.
4. Press .
5. On the Others menu, press
or to highlight DNS 2, and then press
MENU/SELECT.
6. En ter the IP addr ess for the sec ondary DNS serv er. The VDP650 uses this server if the
primary server does not respond.
Press to delete numbers.
Use the dial pad to enter numbers.
7. Press .
8. On the Others menu, press
or to highlight NTP, and then press MENU/SELECT.
9. Enter the IP address for the NTP server. If the VDP650 does not use an NTP server,
you must manually enter the time and date settings.
Press to delete numbers.
Use the dial pad to enter numbers.
Configuration Using the Phone Menus 30 Back to Contents
Page 31

M100 KLE Administrator and Provisioning Manual
SAVE
ENTER
ENTER
NO
YES
10. Press .
Using the Security menu
Use the Security menu to configure secure browsing settings.
To turn on/off secure browsing:
1. From the Admin Settings menu, press to highlight Security, and then press
MENU/SELECT.
The Security menu appears.
2. With Secure Browsing selected, press .
3. Press
or to select Enabled or Disabled, and then press .
4. Press or on the message “Reboot Base to apply new Web Server
settings?”
Using the Provisioning menu
Use the Provisioning menu to configure auto-provisioning settings. For more information
about auto-provisioning, see “Provisioning” on page 95 and “Provisioning Using
Configuration Files” on page 109.
On the Provisioning menu you can configure:
Server string—the URL of the provisioning server. The URL can include a complete
path to the configuration file.
Login ID—the username the M100 KLE will use to access the provisioning server.
Login PW—the password the M100 KLE will use to access the provisioning server.
Configuration Using the Phone Menus 31 Back to Contents
Page 32

To use the Provisioning menu:
BACKSPC
SAVE
BACKSPC
M100 KLE Administrator and Provisioning Manual
1. From the Admin Settings menu, press
to highlight Provisioning, and then press
SELECT.
The Provisioning menu appears.
2. On the Provisioning menu, with Server string highlighted, press MENU/SELECT.
3. Enter the URL of the provisioning server.
Press to delete numbers.
Press 1, 0 and # to enter symbols. The period and “@” symbols are available under
the 0 key.
Use the dial pad to enter numbers.
The format of the URL must be RFC 1738 compliant, as follows:
"<schema>://<user>:<password>@<host>:<port>/<url-path>"
"<user>:<password>@" may be empty.
"<port>" can be omitted if you do not need to specify the port number.
4. Press .
5. On the Provisioning menu, press
or to highlight Login ID, and then press
MENU/SELECT.
6. Enter the Login ID for access to the provisioning server if it is not part of the server
string.
Press to delete numbers.
Use the dial pad to enter numbers.
Configuration Using the Phone Menus 32 Back to Contents
Page 33

7. Press .
SAVE
BACKSPC
SAVE
M100 KLE Administrator and Provisioning Manual
8. On the Provisioning menu, press
MENU/SELECT.
9. Enter the Login password.
Press to delete numbers.
Use the dial pad to enter numbers.
10. Press .
or to highlight Login PW, and then press
Configuration Using the Phone Menus 33 Back to Contents
Page 34

M100 KLE Administrator and Provisioning Manual
NEXT
NEXT
NEXT
Editing the handset PIN code
The PIN code is a four-digit code that you use to deregister the handset from the base. The
default PIN is 1592. Changing the PIN on the handset will change the PIN for all registered
handsets.
To edit the PIN code:
1. From the Admin Settings menu, press
SELECT.
The Enter old PIN screen appears.
2. Enter the current PIN using the dial pad keys.
3. Press .
4. Enter the new PIN, and then press .
5. Confirm the new PIN, and then press .
to highlight Edit PIN code, and then press
Configuration Using the Phone Menus 34 Back to Contents
Page 35

U
SING THE
W
EB
M100 KLE Administrator and Provisioning Manual
C HAPTER 3
UI
The WebUI allows you to configure all aspects of M100 KLE 4-Line base station operation,
including account settings, network settings, contact lists, and provisioning settings. The
WebUI is embedded in the M100 KLE operating system. When you access the WebUI, you
are accessing it on the device, not on the Internet.
This chapter describes how to access the WebUI and configure M100 KLE settings. This
chapter covers:
“Using the Web User Interface (WebUI)” on page 36
“Status Page” on page 38
“System Pages” on page 40
“Network Pages” on page 68
“Contacts Pages” on page 74
“Servicing Pages” on page 86.
Using the WebUI 35 Back to Contents
Page 36

M100 KLE Administrator and Provisioning Manual
Using the Web User Interface (WebUI)
The Web User Interface (WebUI) resides on the M100 KLE 4-Line base station. You can
access it using an Internet browser. After you log in to the WebUI, you can configure the
M100 KLE on the following pages:
System Contacts
SIP Account Management (see page 40)
Call Settings (see page 53)
User Preferences (see page 55)
Handset Settings (see page 55)
Server Application (see page 63)
Network
Basic Network Settings (see page 69)
Advanced Network Settings (see page 71)
Base Directory (see page 74)
Blacklist
LDAP (see page 81)
Remote XML (see page 84)
Servicing
Reboot (see page 86)
Time and Date (see page 86)
Firmware Upgrade (see page 90)
Provisioning (see page 95)
Security (see page 101)
Certificates (see page 104)
Tr069 (see page 106)
System Logs (see page 107)
The WebUI also has a System Status and a Handset Status page, where you can view
network status and general information about the M100 KLE and handsets. The information
on the Status page matches the Status menu available on the M10 KLE handset.
Using the WebUI 36 Back to Contents
Page 37

M100 KLE Administrator and Provisioning Manual
BACK OK
Enabled
Network
DHCP:
10.88.51.133
IP Address:
To access the WebUI:
1. Ensure that your computer is connected to the same network as the M100 KLE.
2. Find the IP address of the M100 KLE:
a. On a handset, press MENU/SELECT .
b. Press to highlight Status, and then press MENU/SELECT.
c. With Network highlighted, press MENU/SELECT.
The Network status screen appears.
d. On the Network status screen, note the IP Address.
3. On your computer, open an Internet browser. (Depending on your browser, some of the
pages presented here may look different and have different controls. Ensure that you
are running the latest update of your preferred browser.)
4. Type the M100 KLE IP address in the browser address bar and press ENTER on your
computer keyboard.
The browser displays a window asking for your user name and password.
5. For the user name, enter admin. For the password, enter the default password,
admin. You can change the password later on the WebUI Security page, available
under Servicing.
6. Click OK.
The WebUI appears.
Click topics from the navigation bar along the top of the WebUI, and then click the links
along the left to view individual pages. For your security, the WebUI times out after 10
minutes, so if it is idle for that time, you must log in again.
Most WebUI configuration pages have a button. Click to save changes
you have made on the page. During a configuration session, click before you
move on to the next WebUI page.
The remaining procedures in this section assume that you are already logged into the WebUI.
The settings tables in this section contain settings that appear in the WebUI and
their equivalent settings in the configuration file template. You can use the
configuration file template to create custom configuration files. Configuration files
can be hosted on a provisioning server and used for automatically configuring
phones. For more information, see “Provisioning Using Configuration Files” on
page 109.
Using the WebUI 37 Back to Contents
Page 38

Status Page
On the Status pages, you can view network status and general information about the base
station and handsets. Some of the information on the Status pages is also available on the
Status menu available on the handset.
System Status
The System Status page shows:
M100 KLE Administrator and Provisioning Manual
General information about your device, including model, MAC address, and
firmware version
Account Status information about your SIP account registration
Network information regarding your device’s network address and network
connection
Using the WebUI 38 Back to Contents
Page 39

M100 KLE Administrator and Provisioning Manual
Handset Status
The handset status page shows the name and registration status of cordless handsets. The
page lists the maximum of 10 handsets, even if fewer handsets are registered. If you have
not given the handsets unique names, the default name of “HANDSET” appears.
Using the WebUI 39 Back to Contents
Page 40

System Pages
SIP Account Management
On the SIP Account Management pages, you can configure each account you have
ordered from your service provider.
The SIP Account settings are also available as parameters in the configuration file.
See “"sip_account" Module: SIP Account Settings” on page 119.
M100 KLE Administrator and Provisioning Manual
General Account Settings
Click the link for each setting to see the matching configuration file parameter in
“Configuration File Parameter Guide” on page 117. Default values and ranges are listed
there.
Setting Description
Enable Account Enable or disable the SIP account. Select to enable.
Account label Enter the name that will appear on the M10 KLEdisplay
when account x is selected. The Account Label identifies
the SIP account throughout the WebUI and on the handset
Dialing Line menu.
Display Name
User Identifier Enter the User identifier supplied by your service provider.
Enter the Display Name. The Display Name is the text
portion of the caller ID that is displayed for outgoing calls
using account x.
The User ID, also known as the Account ID, is a SIP URI
field used for SIP registration.
Note
: Do not enter the host name (e.g. "@sipservice.com").
The WebUI automatically adds the default host name.
Using the WebUI 40 Back to Contents
Page 41

M100 KLE Administrator and Provisioning Manual
Reject
Setting Description
Authentication Name If authentication is enabled on the server, enter the
authentication name (or authentication ID) for
authentication with the server.
Authentication Password If authentication is enabled on the server, enter the
authentication password for authentication with the server.
Dial Plan Enter the dial plan, with dialing strings separated by a |
symbol. See “Dial Plan” on page 42.
Inter Digit Timeout (secs) Sets how long the M10 KLEwaits after any "P" (pause) in
the dial string or in the dial plan.
Maximum Number of
Calls
Select the maximum number of concurrent active calls
allowed for that account.
Feature Synchronization Enables the M100 KLE to synchronize with BroadWorks
Application Server. Changes to features such as DND, Call
Forward All, Call Forward No Answer, and Call Forward
Busy on the server side will also update the settings on the
M10 KLEmenu and WebUI. Similarly, changes made using
the M10 KLEor WebUI will update the settings on the
server.
DTMF method Select the default DTMF transmission method. You may
need to adjust this if call quality problems are triggering
unwanted DTMF tones or you have problems sending
DTMF tones in general.
Unregister after reboot Enables the phone to unregister the account(s) after
rebooting-before the account(s) register again as the
phone starts up. If other phones that share the same
account(s) unregister unexpectedly in tandem with the
rebooting M100 KLE, disable this setting.
Call Rejection Response
Code
Select the response code for call rejection. This code
applies to the following call rejection cases:
User presses for an incoming call (except
when Call Forward Busy is enabled)
DND is enabled
Phone rejects a second incoming call with Call
Waiting disabled
Phone rejects an anonymous call with Anonymous
Call Rejection enabled
Phone rejects call when the maximum number of
calls is reached
Using the WebUI 41 Back to Contents
Page 42

M100 KLE Administrator and Provisioning Manual
Dial Plan
The dial plan consists of a series of dialing rules, or strings, that determine whether what
the user has dialed is valid and when the M10 KLEshould dial the number.
Numbers that are dialed when forwarding a call—when the user manually
forwards a call, or a pre-configured number is dialed for Call Forward All, Call
Forward–No Answer, or Call Forward Busy—always bypass the dial plan.
Dialing rules must consist of the elements defined in the table below.
Element Description
x Any dial pad key from 0 to 9, including # and *.
[0-9]
x+ An unlimited series of digits.
, This represents the playing of a secondary dial tone after the user enters the
PX This represents a pause of a defined time; X is the pause duration in
(0:9) This is a substitution rule where the first number is replaced by the second.
| This separator is used to indicate the start of a new pattern. Can be used to
A sample dial plan appears below.
Any two numbers separated by a hyphen, where the second number is
greater than the first. All numbers within the range or valid, excluding # and *.
digit(s) specified or dials an external call prefix before the comma. For
instance, "9,xxxxxxx" means the secondary dial tone is played after the user
dials 9 until any new digit is entered. "9,3xxxxxx" means only when the digit
3 is hit would the secondary dial tone stop playing.
seconds. For instance, "P3" would represent pause duration of 3 seconds.
When "P" only is used, the pause time is the same as the Inter Digit Timeout
(see “SIP Account Management” on page 40).
For example, "(4:723)xxxx" would replace "46789" with "723-6789". If the
substituted number (the first number) is empty, the second number is added
to the number dialed. For example, in "(:1)xxxxxxxxxx", the digit 1 is
appended to any 10-digit number dialed.
add multiple dialing rules to one pattern edit box.
Using the WebUI 42 Back to Contents
Page 43

M100 KLE Administrator and Provisioning Manual
SIP Server Settings
Setting Description
Server address Enter the IP address or domain name for the SIP server.
Port Enter the port number that the SIP server will use.
Registration Settings
Setting Description
Server address Enter the IP address or domain name for the registrar
server.
Port Enter the port number that the registrar server will use.
Expiration (secs) Enter the desired registration expiry time in seconds.
Registration Freq (secs) Enter the desired registration retry frequency in seconds.
If registration using the Primary Outbound Proxy fails, the
Registration Freq setting determines the number of
seconds before a registration attempt is made using the
Backup Outbound Proxy.
Outbound Proxy Settings
Setting Description
Server Address Enter the IP address or domain name for the proxy server.
Port Enter the port number that the proxy server will use.
Using the WebUI 43 Back to Contents
Page 44

M100 KLE Administrator and Provisioning Manual
Backup Outbound Proxy Settings
Setting Description
Server address Enter the IP address or domain name for the backup proxy server.
Port Enter the port number that the backup proxy server will use.
Caller Identity Settings
Setting Description
Source Priority 1 Select the desired caller ID source to be displayed on the incoming
call screen: “From” field, RPID (Remote-Party ID) or PAI
(P-Asserted Identity) header.
Source Priority 2 Select the lower-priority caller ID source.
Source Priority 3 Select the lowest-priority caller ID source.
Audio Settings
Setting Description
Codec priority 1 Select the codec to be used first during a call.
Codec priority 2 Select the codec to be used second during a call if the
previous codec fails.
Codec priority 3 Select the codec to be used third during a call if the
previous codec fails.
Using the WebUI 44 Back to Contents
Page 45

M100 KLE Administrator and Provisioning Manual
Setting Description
Codec priority 4 Select the codec to be used fourth during a call if the
previous codec fails.
Codec priority 5 Select the codec to be used fifth during a call if the previous
codec fails.
Codec priority 6 Select the codec to be used sixth during a call if the
previous codec fails.
Codec priority 7 Select the codec to be used seventh during a call if the
previous codec fails.
Enable voice encryption
Select to enable secure RTP for voice packets.
(SRTP)
Enable G.729 Annex B When G.729a/b is enabled, select to enable G.729
Annex B, with voice activity detection (VAD) and
bandwidth-conserving silence suppression.
Preferred Packetization
Select the packetization interval time.
Time (ms)
DTMF Payload Type Set the DTMF payload type for in-call DTMF from 96–127.
Using the WebUI 45 Back to Contents
Page 46

M100 KLE Administrator and Provisioning Manual
Quality of Service
Setting Description
DSCP (voice) Enter the Differentiated Services Code Point (DSCP) value
from the Quality of Service setting on your router or switch.
DSCP (signalling) Enter the Differentiated Services Code Point (DSCP) value
from the Quality of Service setting on your router or switch.
Signaling Settings
Setting Description
Local SIP port Enter the local SIP port.
Transport Select the SIP transport protocol:
TCP (Transmission Control Protocol) is the most
reliable protocol and includes error checking and
delivery validation.
UDP (User Datagram Protocol) is generally less prone
to latency, but SIP data may be subject to network
congestion.
TLS (Transport Layer Security)—the M100 KLE
supports secured SIP signalling via TLS. Optional server
authentication is supported via user-uploaded
certificates. TLS certificates are uploaded using the
configuration file. See
Settings” on page 168
“"file" Module: Imported File
and consult your service
provider.
Using the WebUI 46 Back to Contents
Page 47

Voice Settings
Setting Description
M100 KLE Administrator and Provisioning Manual
Min Local RTP Port
Max Local RTP Port Enter the upper limit of the RTP port range.
Enter the lower limit of the Real-time Transport Protocol (RTP)
port range. RTP ports specify the minimum and maximum port
values that the phone will use for RTP packets.
Feature Access Codes Settings
If your IP PBX service provider uses feature access codes, then enter the applicable codes
here.
Setting Description
Voicemail Enter the voicemail access code. The code is dialed when
the user selects a line from the Message menu.
DND ON Enter the Do Not Disturb ON access code.
DND OFF Enter the Do Not Disturb OFF access code.
Call Forward All ON Enter the Call Forward All ON access code.
Call Forward All OFF Enter the Call Forward All OFF access code.
Call Forward No Answer ONEnter the Call Forward No Answer ON access code.
Call Forward No Answer
OFF
Call Forward Busy ON
Using the WebUI 47 Back to Contents
Enter the Call Forward No Answer OFF access code.
Enter the Call Forward Busy ON access code.
Page 48

M100 KLE Administrator and Provisioning Manual
Setting Description
Call Forward Busy OFF Enter the Call Forward Busy OFF access code.
Anonymous Call Reject ONEnter the Anonymous Call Reject ON access code.
Anonymous Call Reject
Enter the Anonymous Call Reject OFF access code.
OFF
Anonymous Call ON Enter the Anonymous Call ON access code.
Anonymous Call OFF Enter the Anonymous Call OFF access code.
Using the WebUI 48 Back to Contents
Page 49

Voicemail Settings
Setting Description
M100 KLE Administrator and Provisioning Manual
Enable MWI
Subscription
When enabled, the account subscribes to the "message
summary" event package. The account may use the User
ID or the service provider's "Mailbox ID".
Mailbox ID Enter the URI for the mailbox ID. The phone uses this URI
for the MWI subscription. If left blank, the User ID is used
for the MWI subscription.
Expiration (secs) Enter the MWI subscription expiry time (in seconds) for
account x.
Ignore unsolicited MWI When selected, unsolicited MWI notifications—notifications
in addition to, or instead of SUBSCRIBE and NOTIFY
methods—are ignored for account x. If the M100 KLE
receives unsolicited MWI notifications, the Message
Waiting LED will not light to indicate new messages.
Disable this setting if:
MWI service does not involve a subscription to a
voicemail server. That is, the server supports
unsolicited MWI notifications.
you want the Message Waiting LED to indicate new
messages when the M100 KLE receives unsolicited
MWI notifications.
NAT Traversal
Setting Description
Enable STUN
Using the WebUI 49 Back to Contents
Enables or disables STUN (Simple Traversal of UDP through
NATs) for account x. The Enable STUN setting allows the
M100 KLE to identify its publicly addressable information
behind a NAT via communicating with a STUN server.
Page 50

M100 KLE Administrator and Provisioning Manual
Setting Description
Server Address Enter the STUN server IP address or domain name.
Port Enter the STUN server port.
Enable STUN
Keep-Alive
Keep-Alive Interval
(secs)
Enables or disables UDP keep-alives. Keep-alive packets
are used to maintain connections established through NAT.
Enter the interval (in seconds) for sending UDP keep-alives.
Music on Hold Settings
Setting Description
Enable Local MoH Enables or disables a hold-reminder tone that the user
hears when a far-end caller puts the call on hold.
Network Conference Settings
Setting Description
Enable Network
Conference
Conference URI Enter the URI for the network bridge for conference
Enables or disables network conferencing for account x.
handling on account x.
Session Timer
Setting Description
Enable Session Timer Enables or disables the SIP session timer. The session
timer allows a periodic refreshing of a SIP session using
the RE-INVITE message.
Minimum Value (secs) Sets the session timer minimum value (in seconds) for
account x.
Using the WebUI 50 Back to Contents
Page 51

M100 KLE Administrator and Provisioning Manual
Setting Description
Maximum Value (secs) Sets the session timer maximum value (in seconds) for
account x.
Jitter Buffer
Setting Description
Fixed Enable fixed jitter buffer mode.
Fixed Delay (ms) If Fixed is selected, enter the fixed jitter delay.
Adaptive Enable adaptive jitter buffer mode.
Normal Delay (ms) If Adaptive is selected, enter the normal or “target” delay.
Minimum Delay (ms) Enter the minimum delay.
Maximum Delay (ms) Enter the maximum delay. This time, in milliseconds, must
be at least twice the minimum delay.
Keep Alive
Setting Description
Enable Keep Alive Enable SIP keep alive in service of NAT traversal and as a
heartbeat mechanism to audit the SIP server health status.
Once enabled, OPTIONS traffic should be sent whenever
the account is registered. OPTIONS traffic will occur
periodically according to the keep-alive interval.
Keep Alive interval
(secs)
Using the WebUI 51 Back to Contents
Set the interval at which the OPTIONS for the keep-alive
mechanism are sent.
Page 52

Setting Description
M100 KLE Administrator and Provisioning Manual
Ignore Keep Alive
Failure
Enable the phone to ignore keep-alive failure, if the failure
can trigger account re-registration and re-subscription (and
active calls are dropped).
Using the WebUI 52 Back to Contents
Page 53

M100 KLE Administrator and Provisioning Manual
Call Settings
You can configure call settings for each account. Call Settings include Do Not Disturb and
Call Forward settings.
The call settings are also available as parameters in the configuration file. See
“"call_settings" Module: Call Settings” on page 164.
General Call Settings
Setting Description
Anonymous Call Reject Enables or disables rejecting calls indicated as
"Anonymous."
Enable Anonymous Call Enables or disables outgoing anonymous calls. When
enabled, the caller name and number are indicated as
"Anonymous."
Do Not Disturb
Setting Description
Enable DND Turns Do Not Disturb on or off.
Call Forward
Setting Description
Enable Call Forward
Always
Target Number Enter a number to which all calls will be forwarded.
Enables or disables call forwarding for all calls on that line.
Select to enable.
Using the WebUI 53 Back to Contents
Page 54

Setting Description
M100 KLE Administrator and Provisioning Manual
Enable Call Forward
Busy
Enables or disables forwarding incoming calls to the target
number if:
the number of active calls has reached the maximum
number of calls configured for account x
Call Waiting Off is selected.
Target Number Enter a number to which calls will be forwarded when Call
Forward Busy is enabled.
Enable Call Forward No
Answer
Enables or disables call forwarding for unanswered calls
on that line.
Target Number Enter a number to which unanswered calls will be
forwarded.
Delay Select the number of rings before unanswered calls are
forwarded.
Using the WebUI 54 Back to Contents
Page 55

M100 KLE Administrator and Provisioning Manual
User Preferences
On the User Preferences page, you can set the language that appears on the WebUI. The
User Preferences page is also available to phone users when they log on to the WebUI.
The preference settings are also available as parameters in the configuration file.
See “"user_pref" Module: User Preference Settings” on page 163.
General User Settings
Click the link for each setting to see the matching configuration file parameter in
“Configuration File Parameter Guide” on page 117. Default values and ranges are listed
there.
Setting Description
WebUI Language Sets the language that appears on the WebUI.
Handset Settings
The Handset Settings allow you to configure account assignments and names for the
cordless handsets that are registered to the base station. For more information on
registering cordless handsets, see the M100 KLE/M10 KLE User Guide.
The network settings are also available as parameters in the configuration file. See
“"hs_settings" Module: Handset Settings” on page 133.
Account Assignments
The Account Assignments table lists the maximum of 10 handsets, even if there are
fewer handsets registered. The registration status of currently registered handsets does not
affect what is listed on this table.
The table always displays the maximum eight accounts, even if there are fewer SIP
accounts enabled.
Using the WebUI 55 Back to Contents
Page 56

M100 KLE Administrator and Provisioning Manual
If you have not entered any unique handset names yet, then the default name of
"HANDSET" appears.
On the Account Assignments table, you can select which accounts will be available for both
incoming and outgoing calls on each handset.
The handset will first attempt to use the account you select under Default when going
off-hook.
Using the WebUI 56 Back to Contents
Page 57

M100 KLE Administrator and Provisioning Manual
KeyLine Assignments
On the KeyLine Assignments page, you can assign accounts to KeyLine numbers.
KeyLine assignments apply to all handsets and desksets registered to the M100 KLE SIP
DECT 4-Line Base Station.
The KeyLine number is displayed on the handset/deskset when you are on a call or
displaying calls in the Call List. The KeyLine number identifies the line number of a call.
Because a maximum of six active SIP sessions are supported across all handsets and
desksets, you should only configure a maximum of six KeyLine assignments.
The factory default is set to Account 1 for Keyline 1 to 6.
Setting Description
Keyline 1-12 Select the account you want to assign to the corresponding
KeyLine number.
Default values (1-6): Account 1, (7-12): N/A
To enable a Key System experience for your phone system, you must configure the line
keys (L1 to L4) for each handset and deskset. Such configuration is available via the
WebUI, phone user interface, or the configuration file parameters. Each of these methods
are described on the next page.
Using the WebUI 57 Back to Contents
Page 58

M100 KLE Administrator and Provisioning Manual
Web UI:
Select SYSTEM > Handset Settings > Programmable keys. In the Select Handset
setting, select the handset you want to configure.
Under Line Key Settings, assign the KeyLine numbers that match the KeyLine numbers
you configured in the WebUI KeyLine Assignments.
The default configuration to enable a Key System experience is:
Key: Line Key 1, Typ e: Keyline, Value: 1
Key: Line Key 2, Typ e: Keyline, Value: 2
Key: Line Key 3, Typ e: Keyline, Value: 3
Key: Line Key 4, Typ e: Keyline, Value: 4
For more information, see the “KeyLine*” setting on page 62.
Phone User Interface:
On the handset/deskset, select MENU > User Settings > Progrm’able key > Line key
.
For each line key (L1 to L4), assign the KeyLine number that matches the KeyLine numbers
you configured in the WebUI KeyLine Assignments.
The default configuration to enable a Key System experience is:
L1 Type: KeyLine, L1 Value: Index 1
L2 Type: KeyLine, L2 Value: Index 2
L3 Type: KeyLine, L3 Value: Index 3
L4 Type: KeyLine, L4 Value: Index 4
For more information about configuring the line keys (L1 to L4), see
“Configuring the programmable keys” in the M100 KLE/M10 KLE User Guide.
Configuration parameters:
Import the following parameter values into the M100 KLE with the KeyLine numbers that
match the KeyLine numbers you configured in the WebUI KeyLine Assignments. Replace
the “x” in the parameter name with the handset number you want to configure.
The default configuration to enable a Key System experience is:
Using the WebUI 58 Back to Contents
Page 59

hs_settings.x.pfk.line1.account = 1
hs_settings.x.pfk.line1.feature = keyline
hs_settings.x.pfk.line1.value = 1
hs_settings.x.pfk.line2.account = 1
hs_settings.x.pfk.line2.feature = keyline
hs_settings.x.pfk.line2.value = 2
hs_settings.x.pfk.line3.account = 1
hs_settings.x.pfk.line3.feature = keyline
hs_settings.x.pfk.line3.value = 3
hs_settings.x.pfk.line4.account = 1
hs_settings.x.pfk.line4.feature = keyline
hs_settings.x.pfk.line4.value = 4
M100 KLE Administrator and Provisioning Manual
For more information about these parameters, see “"hs_settings" Module: Handset
Settings” on page 133.
Repeater Mode
On the Repeater Mode page, you can enable a repeater (such as the VSP605 Range
Extender) to be registered to the base station.
Using the WebUI 59 Back to Contents
Page 60

M100 KLE Administrator and Provisioning Manual
Setting Description
Enable Repeater Mode Select this check box to enable a repeater to be registered
to your M100 KLE 4-Line base station. Changing this
setting requires a reboot of the M100 KLE 4-Line base
station.
Using the WebUI 60 Back to Contents
Page 61

M100 KLE Administrator and Provisioning Manual
Handset Name
On the Handset Name page, you can enter a name for each Handset. The Handset Name
will be used throughout the WebUI and will appear on the handset Idle screen.
The Handset Name is limited to a maximum of 11 characters.
The default name is "HANDSET". Blank name fields are not allowed. If you click
when any fields are empty, an error message appears.
Programmable Hard Keys
You can assign additional functions to the Line keys, Hard keys, and Soft keys that are
listed on the Programmable Hard Keys page. The functions that you assign to these keys
apply to each key in idle mode only.
The programmable hard key settings are also available as parameters in the configuration
file. See the parameters named hs_settings.x.pfk.____ in “"hs_settings" Module: Handset
Settings” on page 133.
Using the WebUI 61 Back to Contents
Page 62

M100 KLE Administrator and Provisioning Manual
In the Select Handset setting, select the handset whose keys you want to assign functions.
The following table lists the available selections for Type.
Setting Description
N/A Configures the key so it does not have a function.
If you press the key while the handset is idle, nothing will
happen.
KeyLine* Configures the Line Key (L1-L4) for Key System
Emulation. The phone user can manage his/her own held
calls and shared calls within the system. The key LED will
change according to call activity.
In the Value setting, set the KeyLine number. For example,
1 for Line Key 1, 2 for Line Key 2, etc. For more information
about KeyLine numbers, see “KeyLine Assignments” on
page 57.
Line* Configures the key for accessing a line. The phone user
can make calls or answer calls by pressing these keys.
The key LED will change according to call activity.
In the Account setting, select the desired account number.
Shared Calls Configures the key to access the Call List.
Directory Configures the key to access the Directory menu.
Using the WebUI 62 Back to Contents
Page 63

M100 KLE Administrator and Provisioning Manual
Setting Description
Call History Configures the key to access the Call History list.
Redial Configures the key to access the Redial list.
Messages Configures the key to access the Message menu.
In the Account setting, select the desired account number.
Do Not Disturb Configures the key to turn Do Not Disturb on or off.
In the Account setting, select the desired account number.
Call Forward Busy Configures the key to turn Call Forward Busy on or off.
In the Account setting, select the desired account number
for which Call Forward Busy will apply. Make sure to also
configure Call Forward settings on the Call Settings page.
Call Forward All Configures the key to turn Call Forward All on or off.
In the Account setting, select the desired account number
for which Call Forward All will apply. Make sure to also
configure Call Forward settings on the Call Settings page.
Call Forward No Answer Configures the key to turn Call Forward No Answer on or
off. In the Account setting, select the desired account
number for which Call Forward No Answer will apply.
Make sure to also configure Call Forward settings on the
Call Settings page.
* This Type is only available for Line Key Settings (L1 to L4).
Server Application
On the Server Application page, you can enter Action URIs to allow the M100 KLE to
interact with a server application by using an HTTP GET request. The action URI triggers
a GET request when a specified event occurs. Action URIs allow an external application to
take con trol of the display when an event occurs. These pre-defined events are listed under
“Action URI” on the Server Application page.
Action URIs are typically used in conjunction with the XML Browser, which can be
customised to deliver an appropriate user experience.
The M100 KLE supports both push and pull server applications. Note that Action URI
events are not “push” events as it is the phone that requests a URI when triggered by
certain states. You can enable push server applications under “XML Push Settings”.
Action URI Syntax
To access an XML application, the phone performs an HTTP GET on a URL.
An HTTP GET request may contain a variable name and variable value, which are
separated by "=". Each variable value starts and ends with "$$" in the query part of the URL.
Action URI variables pass dynamic data to the server. The valid URL format is:
http://host[:port]/dir/file name?variable name=$$variable value$$
Using the WebUI 63 Back to Contents
Page 64

M100 KLE Administrator and Provisioning Manual
where:
host is the hostname or IP address of the server supporting the XML application
port is the port number the phones are using for the HTTP request
At the time of the HTTP call, the variable value field is populated with the appropriate data.
For example, the following URL passes the SIP Account User Identifier to the server:
http://10.50.10.140/script.pl?name=$$SIPUSERNAME$$
A GET request then passes along the following information:
http://10.50.10.140/script.pl?name=42512
Assuming that the User Identifier is 42512.
Variable names are defined by the particular XML application being called.
Variable values are predefined and depend on the status of the phone. If the variable has
no meaning in the current status, then the phone sends an empty string.
The table below lists all possible variable values. Note that variables applicable during an
Incoming or Active Call (such as INCOMINGNAME and REMOTENUMBER) are initialised
at the beginning and at the end of the call.
Variable value Description
SIPUSERNAME SIP Account User Identifier
DISPLAYNAME SIP Account Display Name
LOCALIP Phone's local IP Address
INCOMINGNAME Caller ID name of the current Incoming Call
REMOTENUMBER Remote party phone number (Incoming or Outgoing)
REGISTRATIONSTATE Registration state available from the Registration event.
Values a re:
REGISTERED
DEREGISTERED
FAIL
MAC The phone's MAC Address
MODEL The phone's model number: M100 KLE.
Using the WebUI 64 Back to Contents
Page 65

Action URI
End
M100 KLE Administrator and Provisioning Manual
Setting Description
End of boot sequence The End of boot sequence URI is triggered at the end of
the phone boot sequence.
Using the End of boot sequence URI, it is possible to
develop self-provisioning on the phone. For example, an
XML application can identify the phone and generate a
MAC-specific file on the fly.
Successful Registration The Successful Registration URI is triggered the first time
the phone registers successfully to a SIP Account. If the
phone registers to multiple SIP Accounts, then the
Successful Registration URI is triggered for each line.
On Hook The On Hook URI is triggered when the phone transitions
from Active to Idle (or from Paging to Idle). For example,
when:
The user presses the soft keybutton
The user hangs up the handset during a call
A transfer is completed and the user returns to idle
The far end hangs up
The call was not answered
The call fails.
Using the WebUI 65 Back to Contents
Page 66

M100 KLE Administrator and Provisioning Manual
Dial
Setting Description
Off Hook The Off Hook URI is triggered when the user goes to Dial
mode by:
Lifting the handset
Pressing the SPEAKER hard key
Pressing the [New] soft key during a held call.
Note that the Off Hook URI will NOT be triggered when
calling a pre-defined number and going immediately to
Dialling mode—this event triggers the Outgoing Call URI
instead.
Incoming Call
Outgoing Call
Timer Based
Timer Based Interval
Connected
The Incoming Call URI is triggered for each Incoming Ring
event or Call Waiting event. Using the Incoming Call URI, it is
possible to display extra information on the phone for an
Incoming Call. For example, the XML application that is
called when there is an Incoming Call can do a database
lookup and display information on the caller.
Note that this Action URI will not be triggered if DND or Call
Forward All is enabled or if Call Waiting is disabled (i.e., the
call is rejected).
The Outgoing Call URI is triggered each time a SIP INVITE
message is sent (Dialling mode). For example, after:
Pressing the key in Pre-Dial with
populated number
Using the dial pad to speed dial a call
Dialling a Directory number by going off-hook.
The Timer Based URI will be triggered when the configured
timeout expires. The timer starts at the end of the phone boot
sequence.
Enter the interval before the Timer Based URI is triggered.
The Connected URI is triggered each time the phone is in an
Active Call or is Paging.
Registration Event
The Registration Event URI is triggered every time there is a
registration state change. For example:
Registered
Deregistered
Fail (Registration timed out, refused, or expired)
The Registration Event URI is not triggered when the same
event is repeated.
Using the WebUI 66 Back to Contents
Page 67

M100 KLE Administrator and Provisioning Manual
XML Push Settings
Setting Description
Enable HTTP Push Select to enable HTTP push, which enables the phone to
display XML objects that are “pushed” to the phone from
the server via http/https POST or SIP NOTIFY.
Enable Push during call Select to enable the phone to display pushed XML objects
during a call. Otherwise, the XML application is displayed
after the call is over.
Using the WebUI 67 Back to Contents
Page 68

Network Pages
You can set up the M100 KLE for your network configuration on the Network pages. Your
service provider may require you to configure your network to be compatible with its
service, and the M100 KLE settings must match the network settings.
The network settings are grouped into Basic and Advanced Settings. IPv4 and IPv6
protocols are supported.
When both IPv4 and IPv6 are enabled and available, the following guidelines apply when
determining which stack to use:
For outgoing traffic, the IP address (or resolved IP) in the server field—either IPv4
In general, most operations can be associated with one of the servers listed on the
M100 KLE Administrator and Provisioning Manual
or IPv6—will determine which stack to be used.
“Basic Network Settings” page. However, for operations triggered by/dependent
upon network status, the phone must determine which server to use. For example,
a special case like the "Network down" LED indication on the base station can be
ambiguous for server association. Because its primary purpose is to aid in
troubleshooting SIP registration issues, this case will be associated with the SIP
registration server.
DNS entries with both IPv4 and IPv6 settings can be used to resolve FQDN entries.
There are no preferences with the order of the DNS queries.
Pcap should include traffic for both stacks.
Dual stack operations should be transparent to PC port traffic.
PnP is not supported on IPv6.
VPN is not supported in IPv6 or PPPoE.
The network settings are also available as parameters in the configuration file. See
“"network" Module: Network Settings” on page 140.
After entering information on this page, click to save it.
Using the WebUI 68 Back to Contents
Page 69

Basic Network Settings
M100 KLE Administrator and Provisioning Manual
You must be familiar with TCP/IP principles and protocols to configure static IP
settings.
Basic Network Settings
Click the link for each setting to see the matching configuration file parameter in “"network"
Module: Network Settings” on page 140. Default values and ranges are listed there.
IPv4
Setting Description
Disable Disables all related IPv4 settings.
DHCP DHCP is selected (enabled) by default, which means the
M100 KLE will get its IP address, Subnet Mask, Gateway,
and DNS Server(s) from the network. When DHCP is
disabled, you must enter a static IP address for the M100
KLE, as well as addresses for the Subnet Mask, Gateway,
and DNS Server(s).
Using the WebUI 69 Back to Contents
Page 70

M100 KLE Administrator and Provisioning Manual
Setting Description
Static IP When Static IP is selected, you must enter a static IP
address for the M100 KLE, as well as addresses for the
Subnet Mask, Gateway, and DNS Server(s).
IP Address
If DHCP is disabled, enter a static IP address for the M100
KLE.
Subnet Mask Enter the subnet mask.
Gateway Enter the address of the default gateway (in this case, your
router).
PPPoE Select to enable PPPoE (Point-to-Point Protocol over
Ethernet) mode.
Username Enter your PPPoE account username.
Password Enter your PPPoE account password.
Manually Configure DNS
Select to enable manual DNS configuration.
Primary DNS If DHCP is disabled, enter addresses for the primary and
secondary DNS servers.
Secondary DNS
IPv6
Setting Description
Disable Disables all related IPv6 settings.
Auto Configuration
Auto configuration is selected (enabled) by default, which
means the M100 KLE will get its IP address, Gateway, and
DNS Server(s) from the network. When Auto Configuration is
disabled, you must enter a static IP address for the M100
KLE, as well as addresses for the Gateway and DNS
Server(s).
Static IP When Static IP is selected, you must enter a static IP
address for the M100 KLE, as well as an IPv6 address
prefix, Gateway, and DNS Server(s).
IP Address
If Auto Configuration is disabled, enter a static IP address for
the M100 KLE.
Prefix (0–128) Enter the IPv6 address prefix length (0 to 128 bits).
Gateway Enter the address of the default gateway (in this case, your
router).
Manually Configure DNS
Select to enable manual DNS configuration.
Primary DNS If Auto Configuration is disabled, enter addresses for the
Secondary DNS
primary and secondary DNS servers.
Using the WebUI 70 Back to Contents
Page 71

M100 KLE Administrator and Provisioning Manual
Advanced Network Settings
VLAN
You can organize your network and optimize VoIP performance by creating a virtual LAN
for phones and related devices.
Click the link for each setting to see the matching configuration file parameter in “"network"
Module: Network Settings” on page 140. Default values and ranges are listed there.
Setting Description
Enable LAN Port VLAN Enable if the phone is part of a VLAN on your network.
Select to enable.
VID Enter the VLAN ID (vlan 5, for example).
Priority Select the VLAN priority that matches the Quality of
Service (QOS) settings that you have set for that VLAN ID.
Outbound SIP packets will be marked and sent according
to their priority. 7 is the highest priority.
Note: Configuring QOS settings for your router or switch is
a subject outside the scope of this document.
Using the WebUI 71 Back to Contents
Page 72

M100 KLE Administrator and Provisioning Manual
LLDP-MED
Setting Description
Enable LLDP-MED Enables or disables Link Layer Discovery Protocol for
Media Endpoint Devices (LLDP-MED). LLDP-MED is a
standards-based discovery protocol supported on some
network switches. It is required for auto-configuration with
VLAN settings.
Packet Interval (secs) Sets the LLDP-MED packet interval (in seconds).
802.1x
Setting Description
Enable 802.1x Enables or disables the 802.1x authentication protocol.
This protocol allows the phone to attach itself to network
equipment that requires device authentication via 802.1x.
Identity Enter the 802.1x EAPOL identity.
MD5 Password Enter the 802.1x EAPOL MD5 password.
Using the WebUI 72 Back to Contents
Page 73

M100 KLE Administrator and Provisioning Manual
VPN
You can operate the M100 KLE SIP DECT 4-Line Base Station over a Virtual Private
Network (VPN). VPN enables remote users and remote sites to connect to a main
corporate network and SIP server with a high level of performance and security.
Configuring VPN using the WebUI consists of enabling VPN and uploading a VPN
configuration file. The VPN configuration file (openvpn_client.tar) must contain the
following files:
client.conf
a keys folder containing
ca.crt
client.crt
client.key
The filename of the VPN client configuration file and certificates must match the names
provided above. For more information about configuring VPN, visit our website at
www.snomamericas.com.
Ensure that NTP or manual time is configured correctly so that the M100 KLE is
using the correct date and time before VPN setup. Mismatched time between sites
and servers may invalidate the initial TLS handshake.
Setting Description
VPN Enable Enables or disables the phone to connect using the
OpenVPN client.
If VPN is enabled, but not connected, all SIP traffic will
continue to route via the LAN IP.
If VPN is enabled and connected, all SIP traffic will route
via the VPN tunnel. The exception is the web server, which
will still be accessible via the LAN IP.
VPN Config (file upload) Browse to and upload the VPN configuration file
openvpn_client.tar.
Using the WebUI 73 Back to Contents
Page 74

Contacts Pages
Base Directory
On the Base Directory page, you can manage directory entries that will be available on all
handsets. You can sort, edit, delete, and add contact information for up to 200 entries. In
order to back up your contacts or import another local directory file, the page also enables
you to export and import the base directory.
The BaseDirectory lists entries on up to 10 pages, with 20 entries per page. Click ,
, , or a page number to view the desired page of entries.
Each handset also has its own directory. You can add entries to the handset
directory using the handset. For more information, see the M100 KLE/M10 KLE
User Guide.
M100 KLE Administrator and Provisioning Manual
Using the WebUI 74 Back to Contents
Page 75

M100 KLE Administrator and Provisioning Manual
Table 5 describes the buttons available on the BaseDirectory page.
Table 5. BaseDirectory commands
Click To ...
Sort the list by last name.
Edit information for an entry
View the next page of entries.
Using the WebUI 75 Back to Contents
Page 76

Table 5. BaseDirectory commands
Click To ...
View the last page of entries.
View the first page of entries.
Delete selected entries from the directory. Click Select All to
select every entry on the page you are viewing.
Add a new directory entry.
Delete all Directory entries.
Import a directory file.
Export the directory.
M100 KLE Administrator and Provisioning Manual
To add a new directory entr y:
1. Click .
The Create Base Directory Entry page appears.
2. Enter the required information as described in the following table.
Create Base Directory Entry
Setting Description Range Default
First Name Enter the appropriate names in
Last Name
these fields. The maximum length
of the first name and last name
fields is 15 characters.
n/a Blank
Ringer Tone Sets a unique ringer tone for calls
Auto, Tone 1–10 Tone 1
from this directory entry.
Using the WebUI 76 Back to Contents
Page 77

M100 KLE Administrator and Provisioning Manual
Setting Description Range Default
Account Sets the account used when you
dial this directory entry.
Work Number
Enter the appropriate names and
numbers in these fields.
Other Number
Default Account,
Account 1–8
n/a BlankMobile Number
Default
Account
Directory Import/Export
The best way to create a directory file for import is to first export the directory from the
phone. After exporting the file, open it in an .xml editor and add or modify entries.
Importing a directory file adds the imported directory entries to existing entries. Therefore,
it is possible to have duplicate entries after importing a directory file. If you are importing a
"complete" directory file with the aim of replacing the entire current directory, use Select All
and to clear the directory before importing the file.
Using the configuration file, you can set whether an imported directory file adds to
existing entries or replaces existing entries. See “"file" Module: Imported File
Settings” on page 168.
Directory files are .xml files that have the following tags:
Local Directory WebUI field Directory file XML tag
First Name <DIR_ENTRY_NAME_FIRST>
Last Name <DIR_ENTRY_NAME_LAST>
Work Number <DIR_ENTRY_NUMBER_WORK>
Mobile Number <DIR_ENTRY_NUMBER_MOBILE>
Other Number <DIR_ENTRY_NUMBER_OTHER>
Account <DIR_ENTRY_LINE_NUMBER>
Call Block (not on WebUI) <DIR_ENTRY_BLOCK>
Ringer Tone <DIR_ENTRY_RINGER>
Blacklist
On the Blacklist page, you can manage local blacklist entries. The M100 KLE rejects calls
from numbers that match blacklist entries. You can sort, edit, delete, and add up to 200
blacklist entries. In order to back up your blacklist entries or import another local blacklist
file, the page also enables you to export and import the blacklist.
The blacklist lists entries on up to 10 pages, with 20 entries per page. Click ,
, , or a page number to view the desired page of entries.
Using the WebUI 77 Back to Contents
Page 78

M100 KLE Administrator and Provisioning Manual
You can also use the M10 KLE menu to manage blacklist entries. For more
information, see the M100 KLE/M10 KLE User Guide.
Table 6 describes the buttons available on the Blacklist page.
Table 6. Blacklist commands
Click To ...
Sort the list by last name.
Edit information for an entry
View the next page of entries.
View the last page of entries.
View the first page of entries.
Delete selected entries. Click Select All to select every entry on
the page you are viewing.
Add a new entry.
Delete all entries.
Using the WebUI 78 Back to Contents
Page 79

Table 6. Blacklist commands
Click To ...
Import a blacklist file.
Export the blacklist.
To add a new blacklist entry:
1. Click .
The Create Blacklist Entry page appears.
M100 KLE Administrator and Provisioning Manual
2. Enter the required information as described in the following table.
Create Blacklist Entry
Setting Description Range Default
First Name Enter the appropriate names in
Last Name
these fields. The maximum length
of the first name and last name
fields is 15 characters.
Account Sets the account used when you
dial this directory entry.
Work Number
Enter the appropriate names and
numbers in these fields.
Other Number
n/a Blank
Default Account,
Account 1
Account 1–8
n/a BlankMobile Number
Using the WebUI 79 Back to Contents
Page 80

M100 KLE Administrator and Provisioning Manual
Blacklist Import/Export
The best way to create a blacklist file for import is to first export the blacklist from the M100
KLE. After exporting the file, open it in an .xml editor and add or modify entries.
Importing a blacklist file adds the imported blacklist entries to existing entries. Therefore, it
is possible to have duplicate entries after importing a blacklist file. If you are importing a
"complete" blacklist file with the aim of replacing the entire current blacklist, use Select All
and to clear the blacklist before importing the file.
Using the configuration file, you can set whether an imported blacklist file adds to
or replaces existing entries. See “"file" Module: Imported File Settings” on
page 168.
Blacklist files are .xml files that have the following tags:
Blacklist WebUI field Blacklist file XML tag
First Name <BLACKLIST_ENTRY_NAME_FIRST>
Last Name <BLACKLIST_ENTRY_NAME_LAST>
Work Number <BLACKLIST_ENTRY_NUMBER_WORK>
Mobile Number <BLACKLIST_ENTRY_NUMBER_MOBILE>
Other Number <BLACKLIST_ENTRY_NUMBER_OTHER>
Account <BLACKLIST_ENTRY_LINE_NUMBER>
Using the WebUI 80 Back to Contents
Page 81

M100 KLE Administrator and Provisioning Manual
LDAP
The phone supports remote Lightweight Directory Access Protocol (LDAP) directories. An
LDAP directory is hosted on a remote server and may be the central directory for a large
organization spread across several cities, offices, and departments. You can configure the
phone to access the directory and allow users to search the directory for names and
telephone numbers.
The LDAP settings are also available as parameters in the configuration file.
See “"remoteDir" Module: Remote Directory Settings” on page 155.
After entering information on this page, click to save it.
LDAP Settings
Click the link for each setting to see the matching configuration file parameter in
“"remoteDir" Module: Remote Directory Settings” on pag e 155. Default values and ranges
are listed there.
Setting Description
Enable LDAP Enables or disables the phone's access to the LDAP
directory.
Directory name Enter the LDAP directory name.
Using the WebUI 81 Back to Contents
Page 82

M100 KLE Administrator and Provisioning Manual
Setting Description
Server address Enter the LDAP server domain name or IP address.
Port Enter the LDAP server port.
Version Select the LDAP protocol version supported on the phone.
Ensure the protocol value matches the version assigned
on the LDAP server.
Authentication scheme Select the LDAP server authentication scheme.
Authentication name Enter the user name or authentication name for LDAP
server access.
Authentication password Enter the authentication password for LDAP server access.
Base Enter the LDAP search base. This sets where the search
begins in the directory tree structure. Enter one of more
attribute definitions, separated by commas (no spaces).
Your directory may include attributes like "cn" (common
name) or "ou" (organizational unit) or "dc" (domain
component).
For example: ou=accounting,dc=snom,dc=com
Maximum number of
entries
Sets the maximum number of entries returned for an LDAP
search. Limiting the number of hits can conserve network
bandwidth.
Maximum search delay Enter the delay (in seconds) before the phone starts
returning search results.
First name filter Enter the first name attributes for LDAP searching. The
format of the search filter is compliant to the standard string
representations of LDAP search filters (RFC 2254).
Last name filter Enter the last name attributes for LDAP searching. The
format of the search filter is compliant to the standard string
representations of LDAP search filters (RFC 2254).
Phone number filter Enter the number attributes for LDAP searching. The
format of the search filter is compliant to the standard string
representations of LDAP search filters (RFC 2254).
First name attribute Sets the attribute for first name. What you enter here
should match the first name attribute for entries on the
LDAP server (gn for givenName, for example). This helps
ensure that the phone displays LDAP entries in the same
format as the Local Directory.
Last name attribute Sets the attribute for last name. What you enter here
should match the last name attribute for entries on the
LDAP server (sn for surname, for example). This helps
ensure that the phone displays LDAP entries in the same
format as the Local Directory.
Using the WebUI 82 Back to Contents
Page 83

M100 KLE Administrator and Provisioning Manual
Setting Description
Work number attribute Sets the attribute for the work number. What you enter here
should match the work number attribute for entries on the
LDAP server (telephoneNumber, for example). This helps
ensure that the phone displays LDAP entries in the same
format as the Local Directory.
Mobile number attribute Sets the attribute for the mobile number. What you enter
here should match the mobile number attribute for entries
on the LDAP server (mobile, for example). This helps
ensure that the phone displays LDAP entries in the same
format as the Local Directory.
Other number attribute Sets the attribute for the other number. What you enter
here should match the other number attribute for entries on
the LDAP server (otherPhone, for example). This helps
ensure that the phone displays LDAP entries in the same
format as the Local Directory.
Lookup for incoming
calls
Enables or disables LDAP incoming call lookup. If enabled,
the phone searches the LDAP directory for the incoming
call number. If the number is found, the phone uses the
LDAP entry for CID info.
Lookup in dialing mode Enables or disables LDAP outgoing call lookup. If enabled,
numbers entered in pre-dial or live dial are matched
against LDAP entries. If a match is found, the LDAP entry
is displayed for dialing.
Using the WebUI 83 Back to Contents
Page 84

M100 KLE Administrator and Provisioning Manual
<?xml version="1.0" encoding="utf-8"?>
<DIR_ENTRY>
<DIR_ENTRY_NAME_FIRST>John</DIR_ENTRY_NAME_FIRST>
<DIR_ENTRY_NAME_LAST>Smith</DIR_ENTRY_NAME_LAST>
<DIR_ENTRY_NUMBER_OTHER>3333</DIR_ENTRY_NUMBER_OTHER>
<DIR_ENTRY_NUMBER_WORK>1111</DIR_ENTRY_NUMBER_WORK>
<DIR_ENTRY_NUMBER_MOBILE>2222</DIR_ENTRY_NUMBER_MOBILE>
</DIR_ENTRY>
Remote XML
The M100 KLE supports three server-hosted Remote XML directories. A total of 5,000
Remote XML directory entries are supported. The 5,000 entries can be shared across the
three remote XML directories.
When the user selects a remote directory to view, the M100 KLE will sync with the directory
server. The handset will display Sync failed. if any of the following failing conditions is
encountered:
Server not reachable
Remote XML directory file is not available
Invalid XML directory file
Remote XML Directory Format
The following shows a sample single-entry file which can be used in a remote XML
directory. Note that the default tags are the same as those defined for the Local Directory.
Using the WebUI 84 Back to Contents
Page 85

M100 KLE Administrator and Provisioning Manual
Setting Description
Name Sets the name of the directory as it will appear on the M100
KLE Directory list.
The following order applies to the Directory list when
multiple server-based directories are enabled:
1. Local
2. Blacklist
3. LDAP
4. Remote XML directory 1
5. Remote XML directory 2
6. Remote XML directory 3
Any Remote XML directories will move up the list if LDAP
directories are not enabled.
Remote XML URI Enter the location of the XML directory file, from which the
phone will sync and retrieve directory entries.
Enable Incoming/
Outgoing Call Lookup
Enables/disables the call lookup feature for incoming and
outgoing calls.
Using the WebUI 85 Back to Contents
Page 86

Servicing Pages
Reboot
To manually reboot the M100 KLE and apply settings that you have updated, click .
Time and Date
M100 KLE Administrator and Provisioning Manual
On the Time and Date page, you can manually set the time and date, and the time and date
formats. You can also set the system time to follow a Network Time Protocol (NTP) Server
(recommended) or you can set the time and date manually.
The time and date settings are also available as parameters in the configuration file.
See “"time_date" Module: Time and Date Settings” on page 150.
Using the WebUI 86 Back to Contents
Page 87

M100 KLE Administrator and Provisioning Manual
Time and Date Format
Click the link for each setting to see the matching configuration file parameter in
“"time_date" Module: Time and Date Settings” on page 150. Default values and ranges are
listed there.
Setting Description
Date Format Sets the date format.
Time Format Sets the clock to a 24-hour or 12-hour format.
Network Time Settings
Setting Description
Enable Network Time Enables or disables getting time and date information for
your phone from the Internet.
NTP Server If Enable Network Time is selected, enter the URL of your
preferred time server.
Use DHCP (Option 42) If Enable Network Time is selected, select to use DHCP to
locate the time server. Option 42 specifies the NTP server
available to the phone. When enabled, the phone obtains
the time in the following priority:
1. Option 42
2. NTP Server
3. Manual time.
Time Zone and Daylight Savings Settings
Setting Description
Time Zone Select your time zone from the list.
Automatically adjust
clock for Daylight
Savings
User-defined Daylight
Savings Time
Select to adjust the clock for daylight savings time
according to the NTP server and time zone setting. To
disable daylight savings adjustment, disable both this
setting and User-defined Daylight Savings Time.
Select to set your own start and end dates and offset for
Daylight Savings Time. To disable daylight savings
adjustment, disable both this setting and Automatically
adjust clock for Daylight Savings.
Daylight Savings Start:
Month
Week
Day
Hour
If User-defined DST is enabled, set the start date and time
for daylight savings: Month, week, day, and hour.
Using the WebUI 87 Back to Contents
Page 88

Setting Description
M100 KLE Administrator and Provisioning Manual
Daylight Savings End:
Month
Week
Day
Hour
Daylight Savings Offset
(minutes)
If User-defined DST is enabled, set the end date and time
for daylight savings: Month, week, day, and hour.
If User-defined DST is enabled, this specifies the daylight
savings adjustment (in minutes) to be applied when the
current time is between Daylight Savings Start and
Daylight Savings End.
Use DHCP
(Option 2/100/101)
If Enable Network Time is selected, select to use DHCP to
determine the time zone offset. Options 2, 100 and 101
determine time zone information.
Manual Time Settings
If Enable Network Time is disabled or if the time server is not available, use Manual Time
Settings to set the current time.
Setting Description
Date Select the current year, month, and day. Click the Date
field and select the date from the calendar that appears.
Time Sets the current hour, minute, and second. Click the Time
field, and enter the current time. You can also refresh the
page to update the manual time settings.
Click to start the M100 KLE using the manual time settings.
Using the WebUI 88 Back to Contents
Page 89

M100 KLE Administrator and Provisioning Manual
Custom Language
On the Export Translation page, you can export WebUI language strings. After exporting
language strings, you can use the resulting file as the basis for a custom language
translation file (.tpk file).
You can import one custom language for use on the WebUI. The custom language adds to
the existing languages available with the firmware.
Importing a custom language can only be done using the configuration file. See “"file"
Module: Imported File Settings” on page 168.
The available languages for export are identical to the WebUI Language list described in
“User Preferences” on page 55.
The filename of the exported language file will be:
WebUI: <Model Number>-<Display Name>-webui.tpk
Using the WebUI 89 Back to Contents
Page 90

M100 KLE Administrator and Provisioning Manual
Firmware Upgrade
You can update the M100 KLE with new firmware using the following methods:
Retrieving a firmware update file from a remote host computer and accessed via a
URL. This central location may be arranged by you, an authorized dealer, or your
SIP service provider. Enter the URL under Firmware Server Settings.
Using a file located on your computer or local network. No connection to the Internet
is required. Consult your dealer for access to firmware update files. Click
Upgrade
firmware.
The firmware upgrade settings are also available as parameters in the configuration file.
See “"provisioning" Module: Provisioning Settings” on page 145.
to view the page where you can manually upgrade the M100 KLE
Manual
Firmware Server Settings
Click the link for each setting to see the matching configuration file parameter in
“"provisioning" Module: Provisioning Settings” on page 145. Default values and ranges are
listed there.
Setting Description
Base Firmware URL The URL where the M100 KLE Base Station firmware
update file resides. This should be a full path, including the
filename of the firmware file.
Handset Firmware URL The URL where the M10 KLE Cordless Handset firmware
update file resides. This should be a full path, including the
filename of the firmware file.
Installed Handset
Firmware
Using the WebUI 90 Back to Contents
The version number of handset firmware currently
installed.
Page 91

Setting Description
M100 KLE Administrator and Provisioning Manual
Cordless Deskset
Firmware URL
The URL where the VDP658 Deskset Accessory firmware
update file resides. This should be a full path, including the
filename of the firmware file.
Installed Cordless
The version number of deskset firmware currently installed.
Deskset Firmware
Server authentication
Authentication username for the firmware server.
name
Server authentication
Authentication password for the firmware server.
password
To update the firmware immediately:
Click , , or .
You can also configure the M100 KLE to check for firmware updates at regular
intervals. See “Provisioning” on page 95.
Using the WebUI 91 Back to Contents
Page 92

M100 KLE Administrator and Provisioning Manual
Manual Firmware Update and Upload
On the Manual Firmware Update Settings page, you can upgrade the M100 KLE, handset,
and cordless deskset firmware using a file located on your computer or local network.
To update the firmware using a file on your computer or local network:
1. On the Manual Firmware Update page, click to locate and open the
firmware update file.
2. Click , , or .
After clicking the M100 KLE will update its firmware and restart.
If you are updating handset and/or deskset firmware, you must perform one more
procedure after clicking - see “Updating a Cordless Handset/Deskset”,
below.
Updating a Cordless Handset/Deskset
Updating DECT cordless handset/deskset firmware using the WebUI is a two-step process.
First you must download the handset/deskset firmware and install it on the base station.
Second, you must install the handset/deskset firmware on the handset/deskset. The
handset/deskset downloads the firmware over the air from the base station.
To install the handset/deskset firmware on the basestation:
1. To install the handset firmware: Click on the Firmware
Server update page, or on the Manual Firmware update page. The
confirmation dialog box shown below appears.
Using the WebUI 92 Back to Contents
Page 93

M100 KLE Administrator and Provisioning Manual
2. To install the deskset firmware: Click on the Firmware
Server update page, or on the Manual Firmware update page.
The confirmation dialog box shown below appears.
3. To begin installing the handset/deskset firmware, click . The message
Installing handset firmware. Please wait... appears. To cancel the download,
click .
After clicking , the message System update in progress. Please wait...
appears on the handset/deskset.
After a successful update, the message Firmware installation successful appears on
the WebUI.
An error message appears if:
the handset/deskset firmware is aleady up to date.
the handset/deskset firmware URL is incorrect, or the file cannot be retrieved for
any other reason.
the handset/deskset firmware file is corrupted.
the handset/deskset doesn‘t recognize the firmware file. For example, the firmware
file may belong to a different ErisTerminal product.
To install the firmware on the cordless handset/deskset:
Your cordless handset/deskset will automtically initiate the firmware update after a
short period of time, as long as there are no active calls on the base station. If you
wish to manually start the firmware update, perform the steps below.
1. On the handset/deskset, press MENU, and then select Admin settings.
2. Enter the admin password. The default is admin. To switch between entering upper or
lower-case letters, press the * key.
Using the WebUI 93 Back to Contents
Page 94

M100 KLE Administrator and Provisioning Manual
3. On the Admin settings menu, select Firmware update.
The handset/deskset checks for new firmware. If new firmware is found, the
handset/deskset screen asks you to proceed with the update.
Only one handset/deskset at a time can perform a firmware update. The base
LEDs flash to indicate the base is busy and all incoming calls are rejected while
the update is in progress.
Using the WebUI 94 Back to Contents
Page 95

M100 KLE Administrator and Provisioning Manual
Provisioning
Provisioning refers to the process of acquiring and applying new settings for the M100 KLE
using configuration files retrieved from a remote computer. After a M100 KLE is deployed,
subsequent provisioning can update the M100 KLE with new settings; for example, if your
service provider releases new features. See also “Provisioning Using Configuration Files”
on page 109.
With automatic provisioning, you enable the M100 KLE to get its settings
automatically—the process occurs in the background as part of routine system operation.
Automatic provisioning can apply to multiple devices simultaneously.
With manual provisioning on the WebUI, you update the M100 KLE settings (configuration
and/or firmware) yourself via SERVICING > Provisioning > Import Configuration
and/or SERVICING > Firmware Upgrade > Manual Upgrade. Manual provisioning can
only be performed on one M100 KLE at a time.
On the Provisioning page, you can enter settings that will enable the M100 KLE to receive
automatic configuration and firmware updates. The Provisioning page also allows you to
manually update M100 KLE configuration from a locally stored configuration file using an
Import function. You can also export the M100 KLE configuration—either to back it up or
apply the configuration to another M100 KLE in the future—to a file on your computer.
The provisioning process functions according to the Resynchronization settings and
Provisioning Server Settings. The M100 KLE checks for the provisioning URL from the
following sources in the order listed below:
1. PnP—Plug and Play Subscribe and Notify protocol
2. DHCP Options
3. Preconfigured URL—Any M100 KLE updated to the latest firmware release will have the
Redirection Server URL available as the default Provisioning Server URL (see
“
provisioning.server_address
Using the Redirection Service requires contacting the Snom support team for an
account.
If one of these sources is disabled, not available, or has not been configured, the M100 KLE
proceeds to the next source until reaching the end of the list.
The provisioning settings are also available as parameters in the configuration file. See
“"provisioning" Module: Provisioning Settings” on page 145.
” on page 149).
Using the WebUI 95 Back to Contents
Page 96

Provisioning Server
Setting Description
M100 KLE Administrator and Provisioning Manual
Server URL URL of the provisioning file(s). The format of the URL must
be RFC 1738 compliant, as follows:
"<schema>://<user>:<password>@
<host>:<port>/<url-path>"
"<user>:<password>@" may be empty.
"<port>" can be omitted if you do not need to specify the
port number.
Server authentication
name
Server authentication
password
User name for access to the provisioning server
Password for access to the provisioning server
Plug-and-Play Settings
Setting Description
Enable PnP Subscribe Select to enable the M100 KLE to search for the
provisioning URL via a SUBSCRIBE message to a
multicast address (224.0.1.75). The M100 KLE expects the
server to reply with a NOTIFY that includes the
provisioning URL. The process times out after five
attempts.
Using the WebUI 96 Back to Contents
Page 97

M100 KLE Administrator and Provisioning Manual
DHCP Settings
Setting Description
Use DHCP Options Enables the M100 KLE to use DHCP options to locate and
retrieve the configuration file. When selected, the M100
KLE automatically attempts to get a provisioning server
address, and then the configuration file. If DHCP options
do not locate a configuration file, then the server
provisioning string is checked.
Note: Ensure that DHCP is also enabled on the “Basic
Network Settings” page.
DHCP Option Priority 1 If DHCP is enabled, sets the DHCP Option priority. Select
the highest priority option.
DHCP Option Priority 2 If DHCP is enabled, sets the DHCP Option priority. Select
the second highest priority option.
DHCP Option Priority 3 If DHCP is enabled, sets the DHCP Option priority. Select
the third highest priority option.
Vendor Class ID (DHCP
60)
User Class Info (DHCP
77)
DHCP Option 60 is available to send vendor-specific
information to the DHCP Server.
DHCP Option 77 is available to send vendor-specific
information to the DHCP Server.
Resynchronization
On the Resynchronization page, you can select how and when the phone checks for
updated firmware and/or configuration files.
Using the WebUI 97 Back to Contents
Page 98

M100 KLE Administrator and Provisioning Manual
Setting Description
Mode Sets which files for which the M100 KLE checks. It can
check for configuration files, firmware update files (from the
URL entered on the Firmware Server Settings page), or
both.
Note: When checking for both configuration and firmware
files, the firmware URL can be within the config file. This
firmware URL takes take precedence over the URL on the
Firmware Server Settings page. It will also update the URL
on the Firmware Server Settings page. This allows you to
change the firmware URL automatically.
Bootup Check Sets the M100 KLE to check the provisioning URL for new
configuration and/or firmware files upon bootup. The
update is applied as part of the reboot process.
Schedule Check: Disable
Schedule Check: Interval
When selected, disables regularly scheduled file checking.
Sets an interval for checking for updates. After selecting
Interval, enter the interval in minutes between update
checks.
Schedule Check:
Days of the Week
Select to enable weekly checking for updates on one or
more days. After selecting Days of the Week, select the
day(s) on which the M100 KLE checks for updates.
Start Hour
Select the hour of the day on which the M100 KLE checks
for updates.
End Hour
Select the hour of the day on which the M100 KLE stops
checking for updates.
Use encryption for
configuration file
Enables an AES-encrypted configuration file to be
decrypted before being applied to the M100 KLE. Select if
the configuration file has been secured using AES
encryption. See “Securing configuration files with AES
encryption” on page 115.
Passphrase If the configuration file has been secured using AES
encryption, enter the 16-bit key. See “Securing
configuration files with AES encryption” on page 115.
Using the WebUI 98 Back to Contents
Page 99

M100 KLE Administrator and Provisioning Manual
Import Configuration
You can configure the M100 KLE by importing a configuration file from your computer or
your local network. For more information about configuration file types and configuration file
formatting, see “Provisioning Using Configuration Files” on page 109.
To import a configuration file:
1. Click to locate and open the configuration file.
2. Click .
The M100 KLE will update its configuration.
Manually importing a configuration file differs from the auto-provisioning process in that:
The M100 KLE does not check whether the file has been loaded before. The
configuration file is processed whether or not it is different from the current version.
The M100 KLE will restart immediately after importing the configuration file, without
waiting for one minute of inactivity.
Export Configuration
You can export all the settings you have configured on the WebUI and save them as a
configuration file on your computer. You can then use this configuration file as a backup, or
use it to update other phones.
Under Export Configuration, you can also reset the phone to its default configuration.
The exported configuration file will contain the following passwords in plain text:
SIP account authentication password
EAPOL password
Firmware server password
Provisioning server password
Encryption passphrase
LDAP server password
Please ensure that you save the exported configuration file in a secure location.
You can also disable passwords from being exported as plain text. See
“
provisioning.pwd_export_enable
” on page 148.
Using the WebUI 99 Back to Contents
Page 100

M100 KLE Administrator and Provisioning Manual
To export the configuration file:
Click .
The format of the exported file is <model name>_<mac address>.cfg. For example, M100
KLE_0011A0OCF489.cfg.
Exporting a configuration file generates two header lines in the configuration file. These
header lines provide the model number and software version in the following format:
#Model Number = xxxxxxx
#SW Version = xxxxxxx
You can use the exported file as a general configuration file, and duplicate the settings
across multiple units. However, ensure that you edit the file to remove any MAC-specific
SIP account settings before applying the general configuration file to other units.
Reset Configuration
You can reset the phone to its default settings.
To reset the M100 KLE to its default configuration:
1. Under Reset Configuration, click .
2. When the confirmation box appears, click OK.
Using the WebUI 100 Back to Contents
 Loading...