


en de fr it es
IP Phone snom D715
Quick Start Guide

2 1.02
A
Delivery content - Lieferumfang - Contenu de la boîte -
Contenuto della confezione - En la caja
en de fr it es
IP Phone snom D715
Quick Start Guide
B
Attaching the Footstand - Fuß befestigen
Attacher le pied - Fissare il supporto - Montar el soporte
1
2
3
3
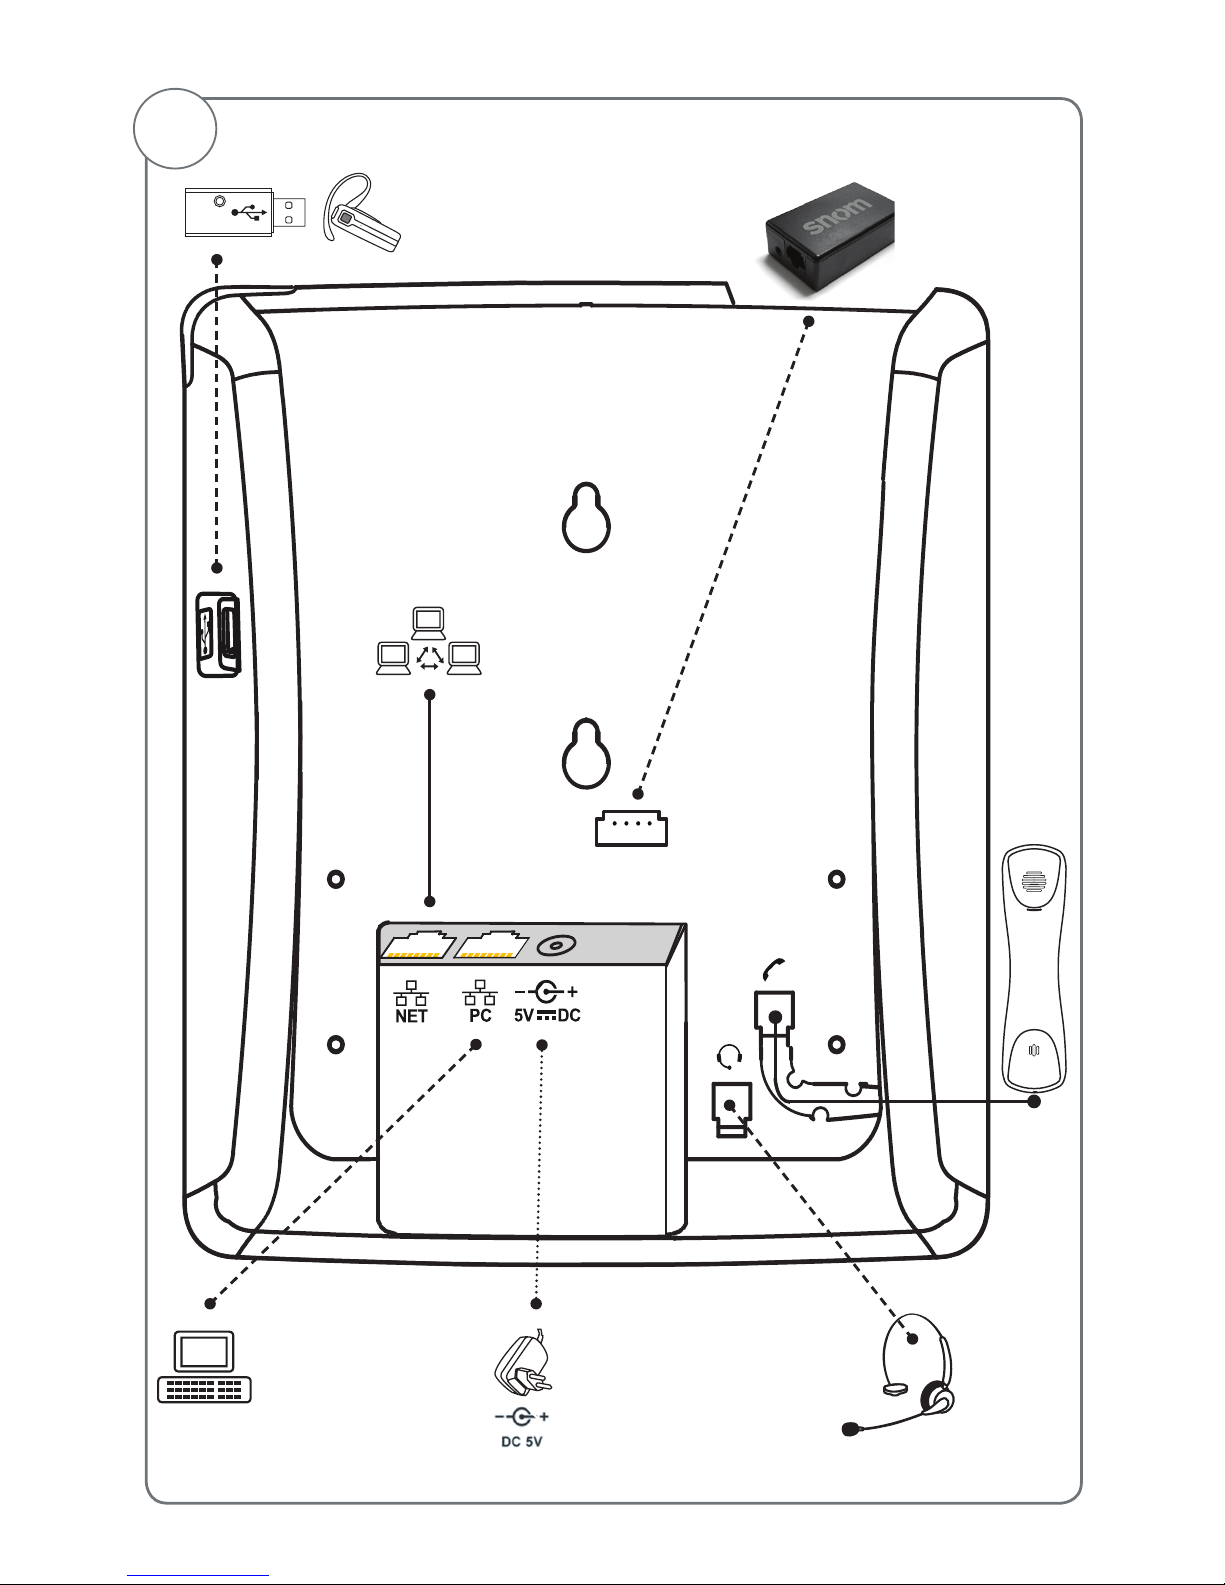
Connecting - Anschließen - Connecter - Collegare - Conectar
C
Optional
Optionnel
Opzionale
Opcional
Optional
Optionnel
Opzionale
Opcional
If no PoE available*
Wenn PoE nicht verfügbar*
S'il n'y a pas de PoE*
Si no se dispone de PoE *
Se non disponibile PoE *
*
Not included in delivery - Nicht im Lieferumfang enthalten - Non inclus - Non incluido - Non incluso
Optional
Optionnel
Opzionale
Opcional
Optional
Optionnel
Opzionale
Opcional
4 1.02
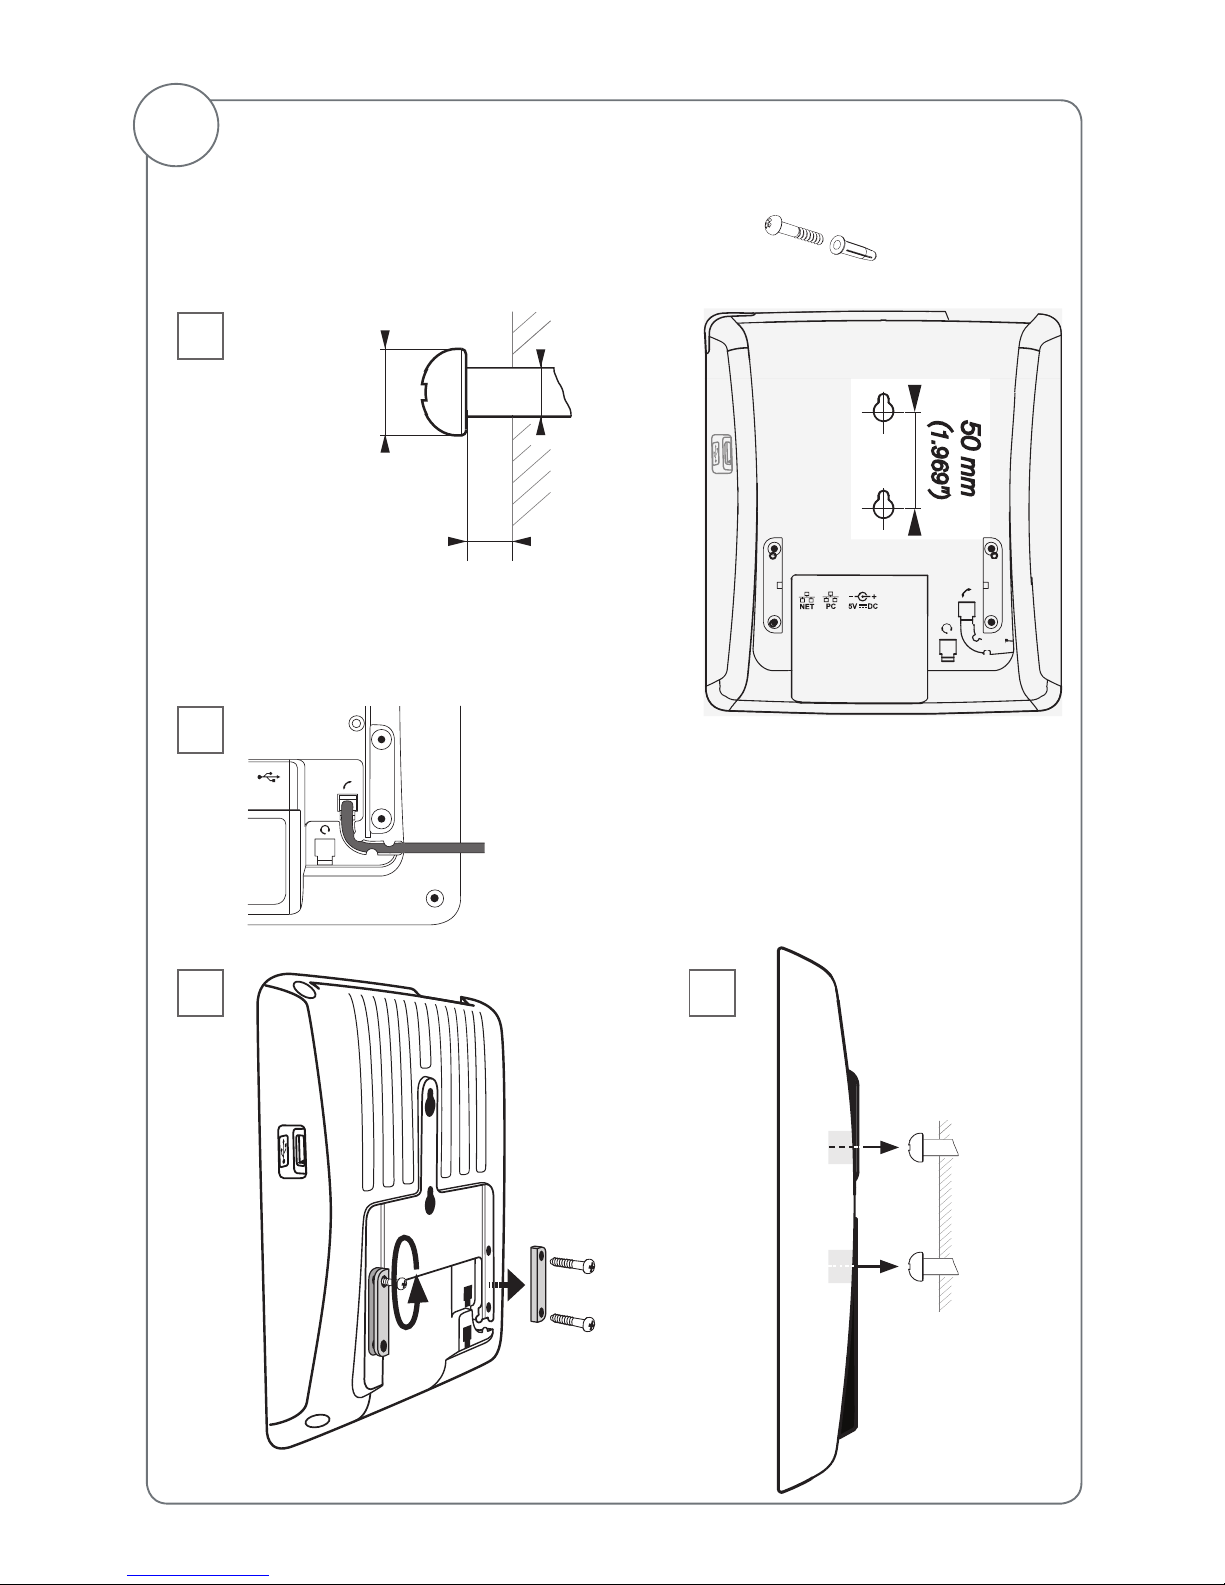
D
Wall Mounting - Wandmontage - Fixation murale -
Montaje en pared - Montaggio a parete - Montagem na parede
2
1
Distance to wall
Abstand zur Wand
Distance au mur
Distanza dalla parete
Distancia a la pared
Distância à parede
∼ 4 mm (0.157")
ø max: 9 mm
(0.354")
ø min: 6 mm
(0.236")
ø max
4,5 mm
(0.177")
50 mm
(1.969")
3
Not included in delivery Nicht im Lieferumfang enthalten:
Non inclus No incluidos Non inclusos:
2 x
4
5
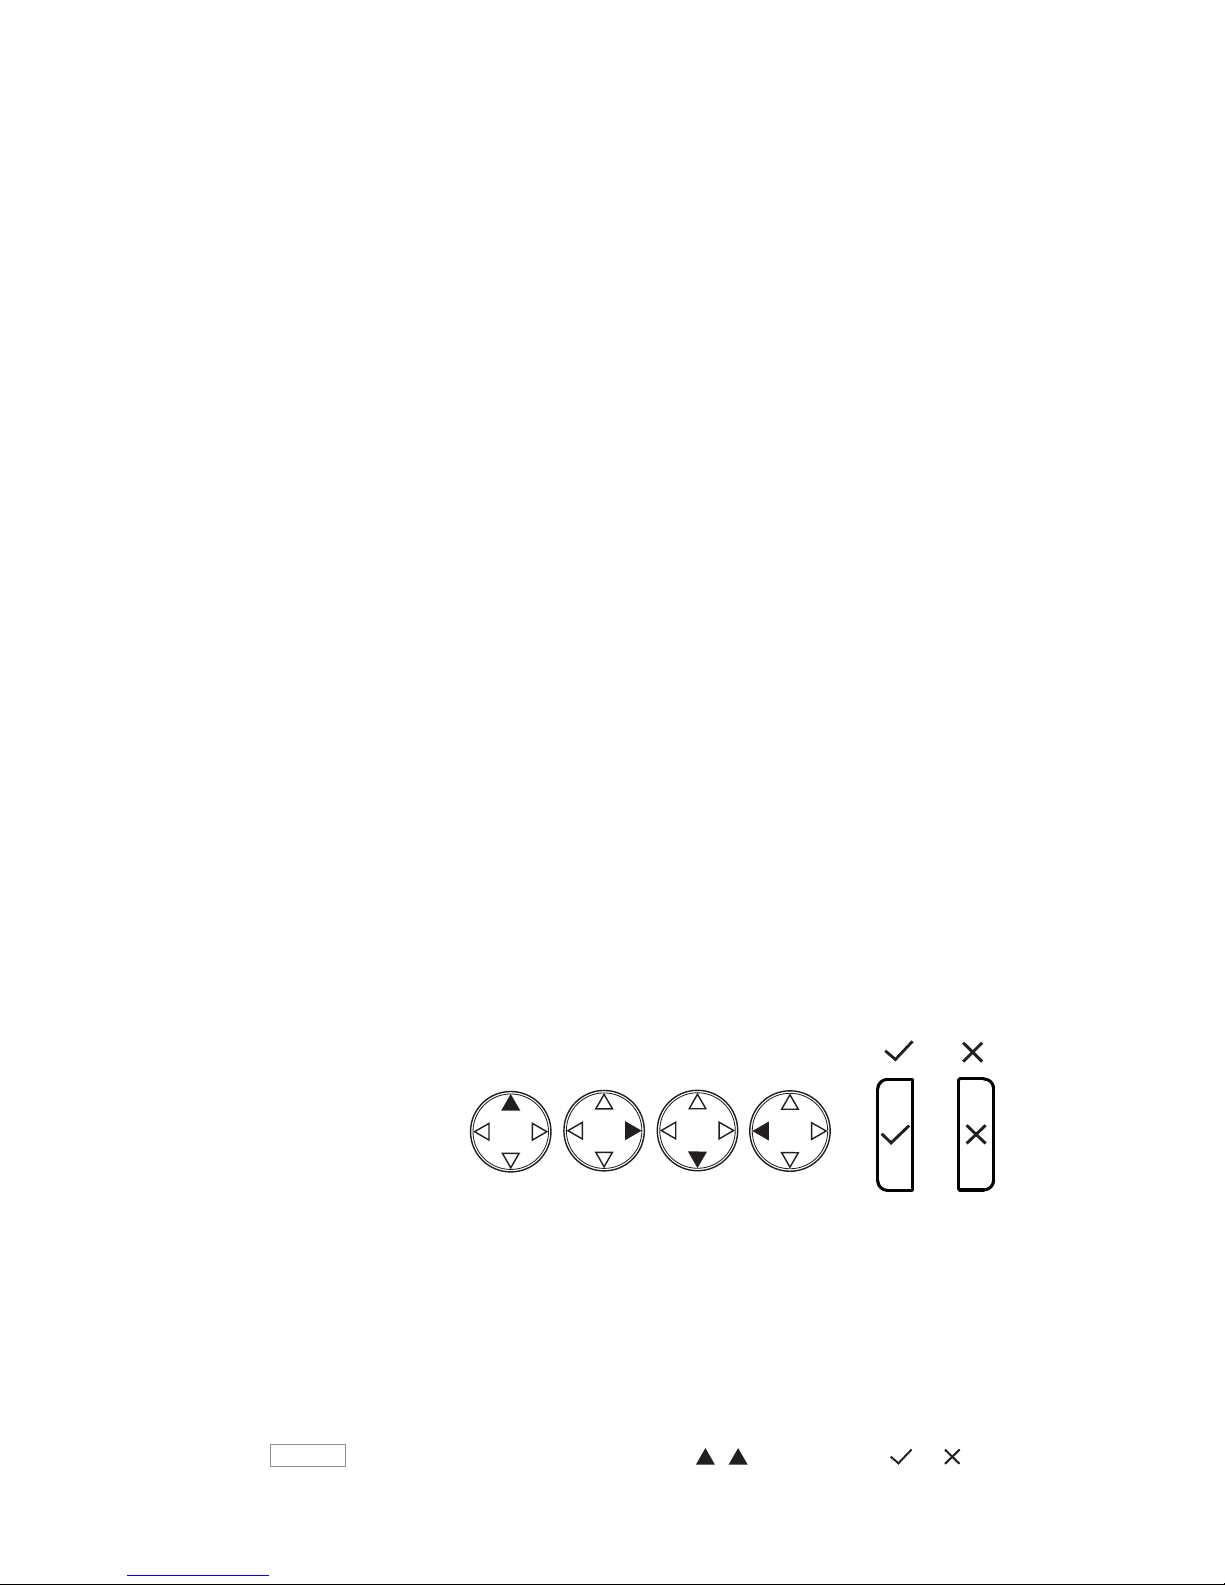
Symbols used in this guide - In dieser Anleitung benutzte Symbole
Symboles utilisés dans ce manuel - Symboli utilizzati in questa
manuale Símbolos usados en este manual
Press the key:
Drücken Sie auf die Taste:
Appuyez sur la touche:
Premere il tasto:
Pulse la tecla:
p
>
• Proceeding to next step, next selection, etc. Example: Setting the phone language
• Nächster Schritt, nächste Auswahl etc. Beispiel: Ändern der Telefonsprache
• Passez à l'étape suivante, à la sélection suivante etc. Exemple: Modifier la langue du
téléphone
• Avanzare allo prossimo passo, alla prossima selezione etc. Esempio: Cambiare la
lingua del telefono
• Avanzar al siguiente paso, al siguiente selección. Ejemplo: Cambiar el idioma del
teléfono
Settin
> 1 Preferences > 4 Language > > Deutsch > >
ENGLISH .........................................................................................
7
DEUTSCH .......................................................................................
17
FRANÇAIS ......................................................................................
29
ITALIANO .........................................................................................
39
ESPAÑOL ........................................................................................
49
APPENDIX ANHANG ANNEXE APENDICE ANEXO
GNU General Public License ..........................................................
59
Table of Contents - Inhaltsverzeichnis
Table des matières - Indice - Índice

6 1.02
snom D715 Quick Start Guide

7
snom D715 Quick Start Guide
E
N
G
L
I
S
H
This quick start guide describes the installation, setup, and operation of the
snom D715. For further information please refer to the manual on our web
page, http://wiki.snom.com.
Copyright, Trademarks, GPL, Legal Disclaimers
© 2014 snom technology Aktiengesellschaft. All Rights Reserved.
snom, the names of snom products, and snom logos are trademarks owned by snom
technology AG. All other product names and names of enterprises are the property of
their respective owners.
snom technology AG reserves the right to revise and change this document at any time,
without being obliged to announce such revisions or changes beforehand or after the
fact.
Texts, images, and illustrations and their arrangement in this document are subject to
the protection of copyrights and other legal rights worldwide. Their use, reproduction,
and transmittal to third parties without express written permission may result in legal
proceedings in the criminal courts as well as civil courts.
Although due care has been taken in the compilation and presentation of the
information in this document, the data upon which it is based may have changed in the
meantime. snom therefore disclaims all warranties and liability for the accurateness,
completeness, and currentness of the information published, except in the case of
intention or gross negligence on the part of snom or where liability arises due to binding
legal provisions.
Our firmware includes some source code that may be used and modified by anyone
and everyone under the GNU Public License (GPL) (see Appendix on page 59),
provided they, in turn, make it available to everyone else with the same licensing
agreement. Please go to http://www.snom.com/en/support/download/gpl-opensource/ for the original GPL license and the source code of components licensed
under GPL and used in snom products.
Important Information
Please read the instructions on safety and disposal and on how to set up and use the
device before using it and also give them to other users to read or inform those users of
their contents. Save this manual and do not give the device to third parties without it.
Safety Instructions
Follow the instructions in this manual and other applicable documentation of the device.
• If the phone is not supplied with power via an Ethernet cable, use only a power
adapter expressly recommended by snom technology. Other power supplies may
damage or destroy the phone, affect its behavior, or induce noise.
• Avoid placing the cables where people may trip over them or where they may be
exposed to mechanical pressure as this may damage them.
• This device is for indoor use only! NOT FOR OUTDOOR USE!

8 1.02
snom D715 Quick Start Guide
E
N
G
L
I
S
H
• Do not install the device in rooms with high humidity (for example, in bathrooms,
laundry rooms, damp basements). Do not immerse the device in water and do not
spill or pour liquids of any kind onto or into the device.
• Do not install the device in surroundings at risk for explosions (paint shops, for
example). Do not use the device if you smell gas or other potentially explosive fumes.
• Do not use the device during thunderstorms. Lightning striking the power grid may
cause electric shocks.
• Warning: The handset contains a magnet, and its earpiece may attract small
dangerous objects such as needles or pins. Please ensure before each use that no
such objects are present.
SELV (Safety Extra Low Voltage) Compliance
Safety status of Input/Output connections comply with SELV requirements.
Warning: To avoid electric shock, do not connect safety extra-low voltage (SELV)
circuits to telephone-network voltage (TNV) circuits. LAN ports contain SELV
circuits, and PSTN ports contain TNV circuits. Some LAN and PSTN ports both use
RJ-45 (8P8C) connectors. Use caution when connecting cables.
Standards conformance
This device complies with the essential health, safety, and environmental
requirements of all relevant European directives. The declaration of conformity
can be requested from snom (address see reverse cover).
This phone is FCC Class B certified and meets US health, safety, and
environmental standards.
Unauthorized opening, changing, or modifying the device will cause the
warranty to lapse and may also result in the loss of CE conformity and
the FCC certification. In case of malfunction contact authorized service
personnel, your seller, or snom.
•
Safety: IEC 60950-1:2007
•
PoE: IEEE 802.3af, Class 2
•
Connectors: RJ45 (Ethernet) - 1 x LAN, 1 x PC; USB 2.0, type A connector
•
Ethernet: 2 x IEEE 802.3/1 Gigabit switch
•
Power: PoE or power adapter PSAC10R-050 (not included - snom PN 00002730)
Disposal of the device
This device is subject to European Directive 2002/96/EC and may not be
disposed of with general household garbage. If you do not know where you
may dispose of the device at the end of its lifespan, contact your municipality,
your local waste management provider, or your seller.
Cleaning
To clean the device, use an anti-static cloth. Please avoid cleaning liquids as they might
damage the surface or internal electronics of the device.
9
snom D715 Quick Start Guide
E
N
G
L
I
S
H
Setting up and connecting the phone
See pages 2 - 3.
Initializing and registering the phone
Please note: You will need the registration information received from your
Internet service provider or your network administrator - normally the phone or
extension number, the password, and the registrar.
After you have set up the phone and connected it to the network as shown on pages
2 - 3, the phone begins to initialize.
Normally the initialization is completely automatic, using DHCP. If your network does not
support DHCP, you must obtain the IP address, netmask, IP gateway, and DNS server
from your Internet service provider or your network administrator and enter them manually
when you are asked to do so on the display.
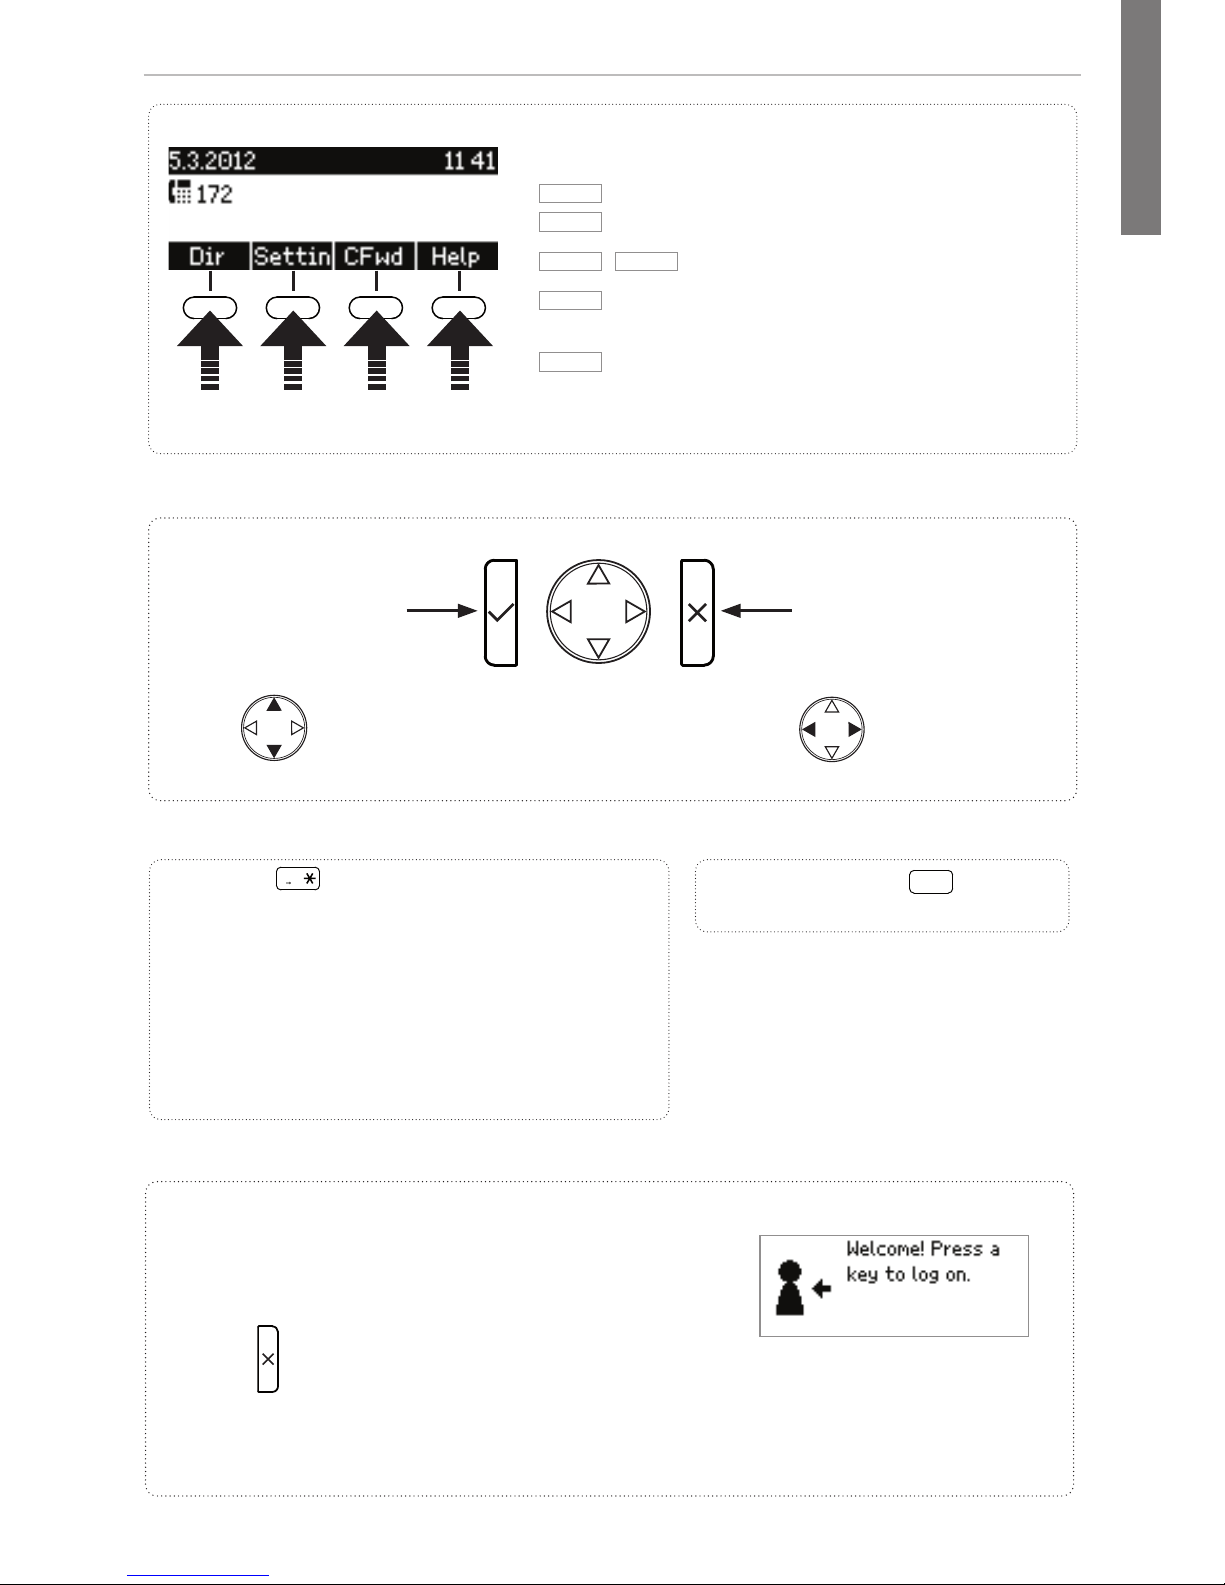
Watch the display and, when asked to, make selections with / and save with .
Press again to continue the registration.
1. Language. The default is English.
2. Time zone
3. Dial tone
4. The display shows the "Welcome" screen. Press any key to log on.
NOTE: To look up the phone's IP address at this stage, see page 11 for the instructions.
5. Enter the account number. Press to save.
6. Enter the registrar. Press
to save.
7. Enter the password received from your Internet service provider or administrator.
Press
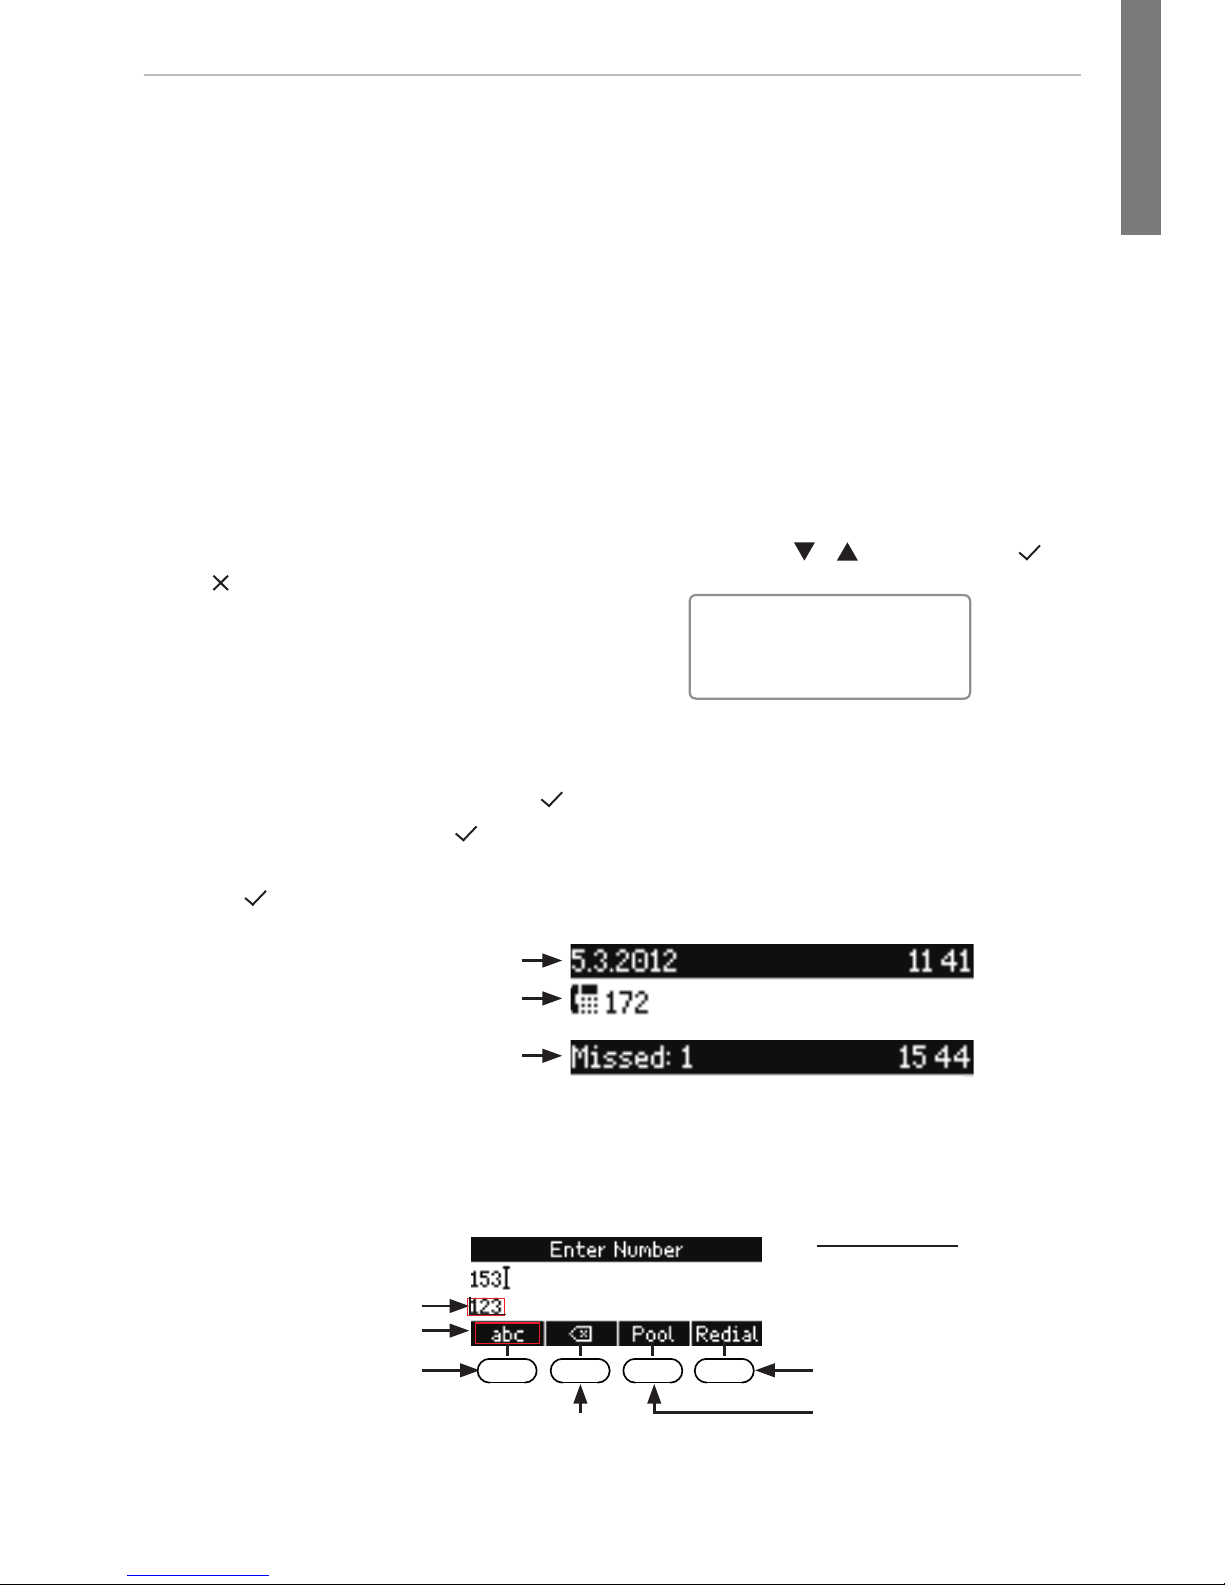
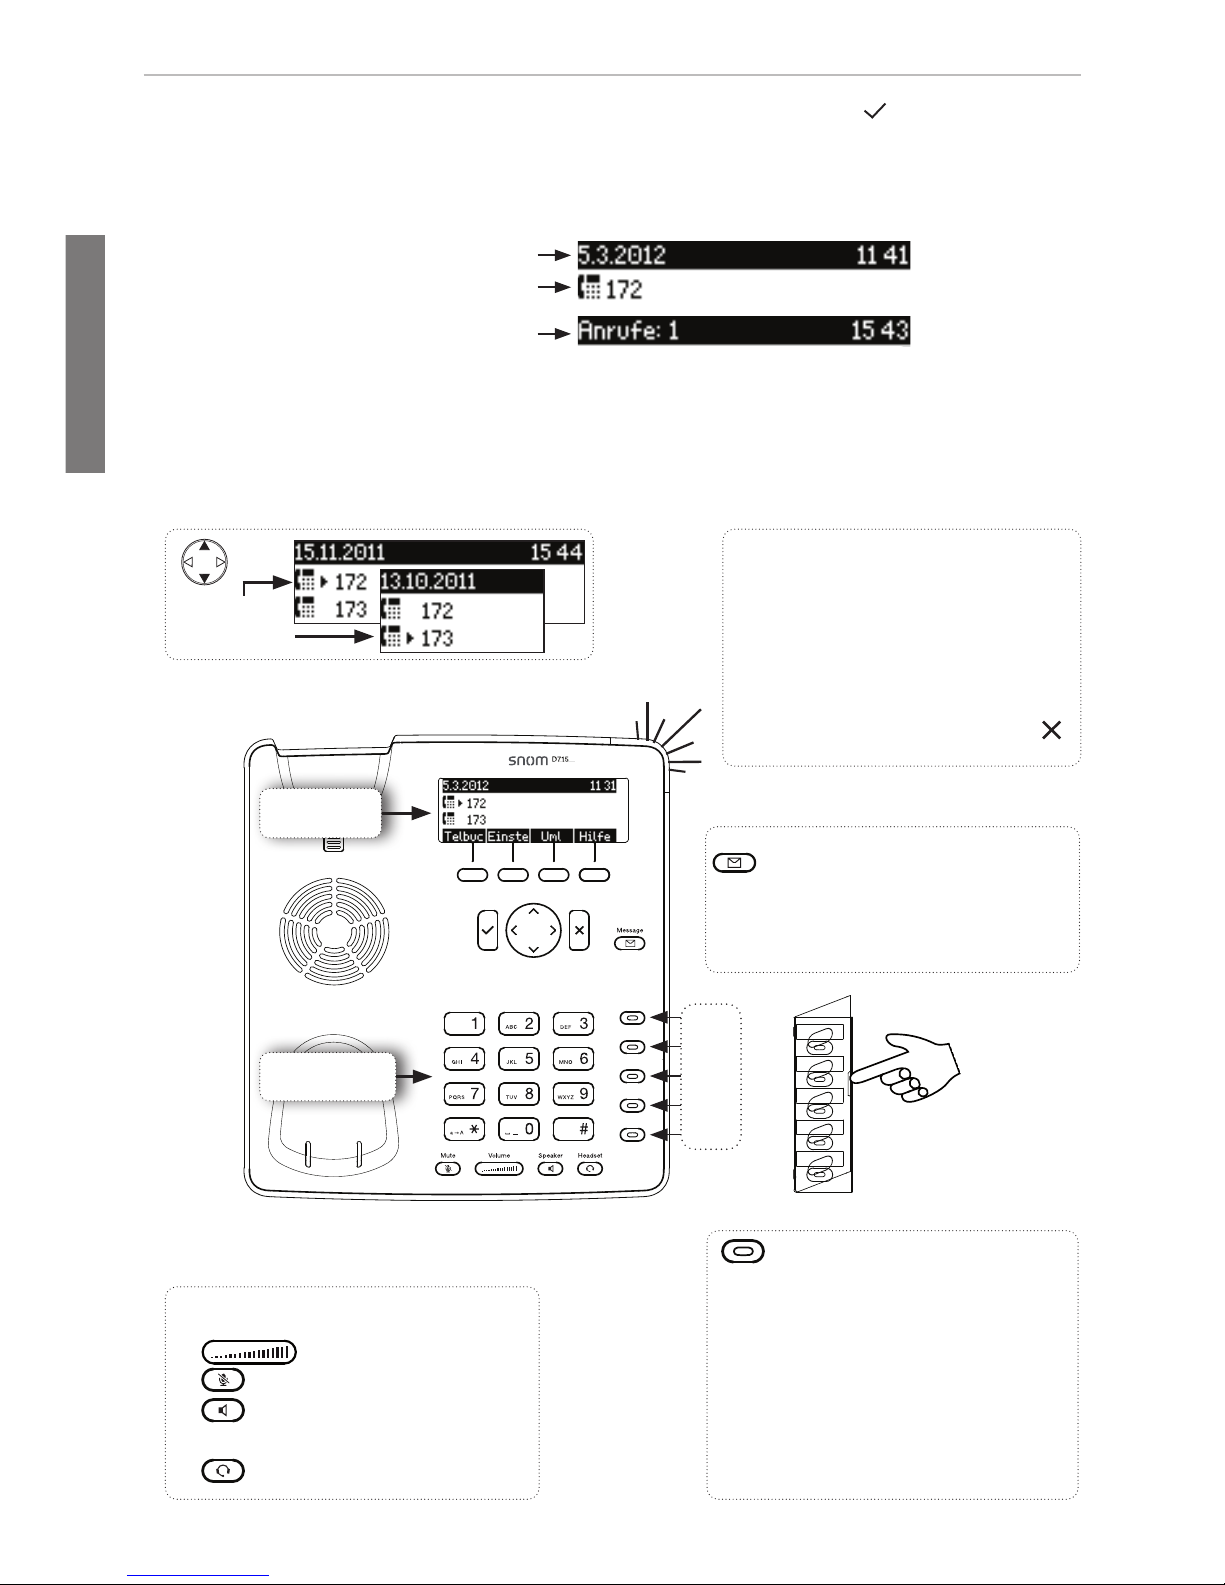
to save. After successful registration you will see:
Infobar with date & time
Infobar with info & time
Identity line
Entering numerals, letters, and special characters
Press any key or pick up handset.
Directories, call lists,
contact list, favorites
Input modes:
123: Numerals
abc: Small letters
ABC: Capital letters
Deleting character to
the left of the cursor
Current input mode:
Next input mode:
Redialing
Moving cursor to the left
Move cursor to the right
:
:
Changing input mode:
Note: You can change settings
1-3 at any time later on,
including more comfortably via
the phone's web interface.

10 1.02
snom D715 Quick Start Guide
E
N
G
L
I
S
H
At a glance
Freely programmable LED
keys P1 - P5
Default setting: Line
• Fast-blinking LED: Incoming
call. Press key or
to accept
• Steadily lit LED: In call
• Slow-blinking LED: Call on
hold
#
Star key
a A
• In editing mode:
- Press for one second to change input
mode (numerals > lower case > upper
case)
- Press briefl y to type *
• On idle screen: Press for 3 seconds to
lock/unlock the keypad
Display -
idle screen
Adjust volume
Mute microphone
Speakerphone on/off
Headset on/off
Audio control keys
Outgoing
identity:
MWI (customizable LED key)
- must be supported by PBX
• Lit when message is waiting on
mailbox
• Press to listen to message(s)
1. After confi rming language, time zone, and dial tone
settings, this screen will appear:
2. Press
for three seconds to open Settings menu.
3. Select 6 Information, then 2 System Info to look up
the IP address.
Looking up phone's IP address during initial logon:
• Confi rming, saving
actions & input
• From idle screen:
Redial
Selecting identity for
outgoing calls
Alphanumeric
keypad
Display idle screen
P1
P2
P3
P4
P
5
Call LED
• Blinking fast: Incoming call
• Steady red light: In call OR
• Missed call. Press to turn
off.
Entering letters, special characters and symbols
In input modes small and capital letters, press the alphanumeric key one or more times
quickly, with a pause after each character.
Special characters and symbols
"0" key": 1x = space ("˽"), 2x = underscore ("_"), 3x = 0
"1" key: . + @ 1 : , ? ! - _ / \ ( ) ; & % * # <=> $ [ ]. Example: 3x = "@".
Letters with accents and umlauts
Keys "2" to "9": Available letters with accents and umlauts depend on the phone's
language setting. Example: If the phone language is German, press key "2" four times
to type "ä".
11
snom D715 Quick Start Guide
E
N
G
L
I
S
H
Pound (hash) key
#
: Rescue
mode for TFTP update
Star key
a A
• In editing mode:
- Press for one second to change input
mode (numerals > lower case > upper
case)
- Press briefl y to type *
• On idle screen: Press for 3 seconds to
lock/unlock the keypad
Context-sensitive, programmable
function symbols and function keys
Dir
Directory
Settin
Settings menu
Cfwd
NoFwd
Forwarding all calls (turn on/off)
Help
Phone's IP address & snom's web address,
replaced by
Info
when status messages are available
1. After confi rming language, time zone, and dial tone
settings, this screen will appear:
2. Press
for three seconds to open Settings menu.
3. Select 6 Information, then 2 System Info to look up
the IP address.
Looking up phone's IP address during initial logon:
• Confi rming, saving
actions & input
• From idle screen:
Redial
• Canceling actions
& input
• Turning off call LED
after missed call
Received
calls
Missed
calls
Selecting identity for
outgoing calls
Press the function key to activate the function, open
the list etc. depicted by the symbol above the key
12 1.02
snom D715 Quick Start Guide
E
N
G
L
I
S
H
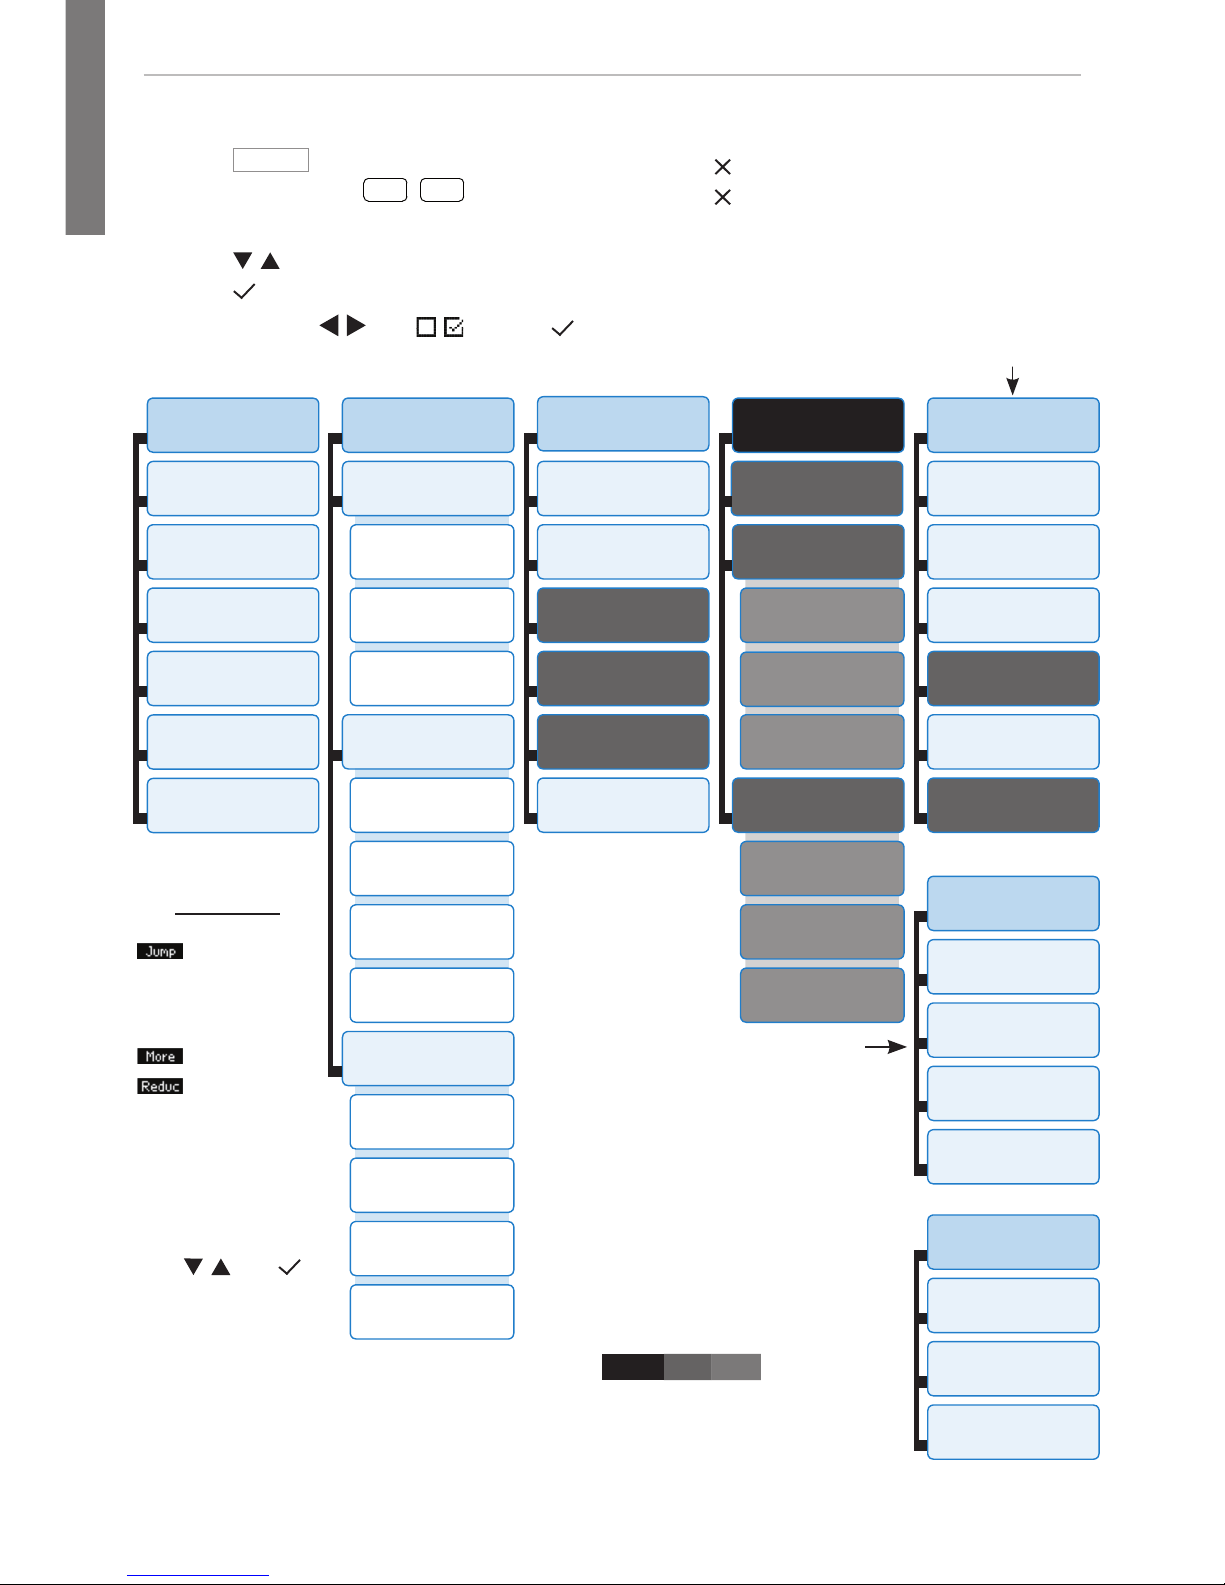
* The submenus and the settings shaded black and gray are not
available when the phone is running in user mode. The factory
setting is administrator mode. The default administrator password
is 0000 (4 x zero).
1
Preferences
1
Time Zone
2
Tone Scheme
3
Ringer
4
Language
5
Display
6
Fkeys
2
Call Features
1
Call Forwarding
1
Forward all
2
When busy
3
On timeout
2
Outgoing Calls
1
Auto Dial
2 Number
Guessing
3
Call Completion
4 Hide own
outgoing ID
3
Incoming Calls
1
Reject anonymous
2
Call Waiting
3 Auto Answer
Indication
4
Auto Answer Type
3 *
Identity
1 Outgoing
Identity
2
Reregister
3
Edit
4
Logoff
5
Logoff all
6
Call Voicemail
4 *
Network
1
IP Setting
2
Webserver
1
Webserver Type
2
HTTP Admin
3
HTTP Password
3
Reset VLAN
3
VLAN
1
VLAN ID (0-4095)
2 VLAN Priority
(0-7)
5 *
Maintenance
1
System Info**
2
User Mode
3
Reboot
5
Change PIN
4
Reset Values
6
Vision
6 (4) *
Information
1
Status Info
2
System Info**
3
Help
3 *
Maintenance
1
System Info**
2 Administrator
Mode
3
Reboot
4
Change PIN
Maintenance menu
in user mode. Press key "2"
to switch to Admin mode.
Admin password required!
• Press
Settin
to open
• Press number key
1
,
2
ABC
, etc. to
open submenus and settings
• Press
/ to select setting
• Press to save selected setting
• Settings with
/ or / : Press
to change and save
• Press briefly to return to previous screen
• Press for 2 seconds to return to the idle
screen
Settings menu
Time zone:
Move to
beginning
of next time
zone
Show all
Show only
countries
where phone
language is
spoken
Select time zone
with / and
The Maintenance
menu in administrator
mode. Pressing key
"2" will switch the
phone to user mode!
** System Info: Firmware version, IP address, MAC address, available + total memory
13
snom D715 Quick Start Guide
E
N
G
L
I
S
H
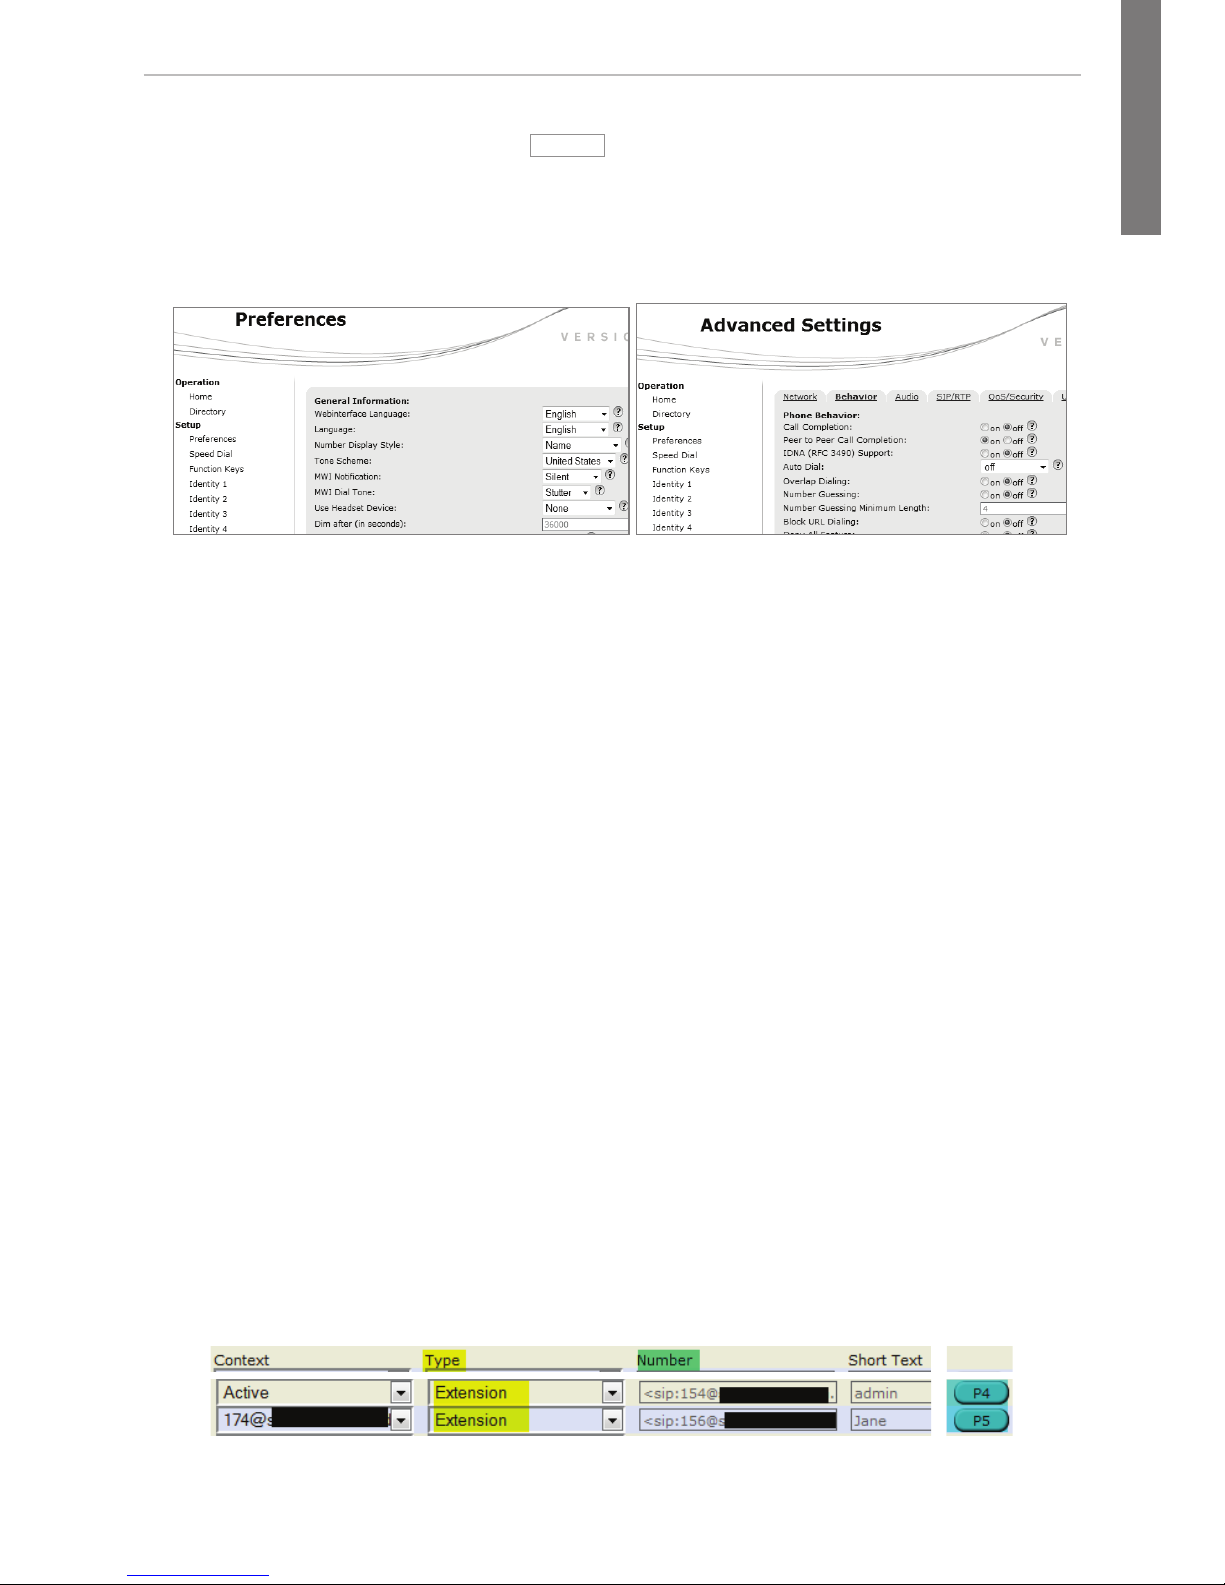
The phone's web interface
1. Look up the phone's IP address:
Settin
> 6 Information > 2 System Info. Example:
http://192.168.10.115.
2. Open a web browser on your PC. Enter the IP address in the address bar and
press ENTER. The "welcome" screen opens.
3. Click on an item in the menu on the left side of the screen to open that window.
4. If a window contains several pages, click on the tab at the top to open the page.
The font weight of the characters on the tab of the visible page is bold.
5. Any changes you make will not take effect until you click on "Apply". Changes
will be lost if you open another page of the web interface or if you close the web
interface without first clicking on "Apply".
6. Whenever you click on "Apply", the "Save" button will appear at the top of the page.
Click on "Save" to save the changes permanently. Changes that have not been
saved will be lost if and when the phone loses power or is disconnected from its
power source.
Clock/time format
Web interface > Preferences > General Information > 24 Hour Clock:
On: 24-hour format, 00:00 to 23:59
Off: 12-hour AM/PM format, 0:00 AM to 11:59 PM
Date format
Web interface > Preferences > General Information > US Date Format (mm/dd).
Example: March 8, 2010
On: 3/8/2010
Off: 8.3.2010
Function keys
Function key mapping: Web interface of phone > Function Keys.
Change settings > Press "Save". Example: Mapping function keys P4 and P5 with
the extension function for extensions 154 and 156, respectively

14 1.02
snom D715 Quick Start Guide
E
N
G
L
I
S
H
Configuring & modifying identities
Web interface > Identity 1-4 > Login. See "Initializing and registering the phone" on
page 9 for required and optional information.
Using the phone
Making calls
• Enter the number on the alphanumeric keypad and pick up the handset or
•
pick up the handset, enter the number, or
• , enter the number,
Speed Dial
Lift the receiver or press
. Type the speed dial number or character on the
alphanumeric keypad and press P.
Setting the speed dial numbers: Web interface > Speed Dial. Type each phone
number with any necessary area code and/or country code etc. without spaces,
hyphens, etc. into one of the textboxes of the table. Do not add any names or other
data. Example: To enter (911) 555-1234, type 9115551234.
Emergency Numbers
These numbers can be called even when the keyboard is locked. The numbers "911",
"112", "110", and "999" are preset.
Change/add numbers: Web interface > Preferences > Lock Keyboard > Emergency
Numbers (space separated). Type each number without spaces, hyphens, etc. between
the digits, separate the individual numbers with one empty space between them.
Example: 911 112 110 999.
Accepting calls
• With the handset: Pick up the handset
• With a headset: Press or blinking line key
• With the speakerphone: Press
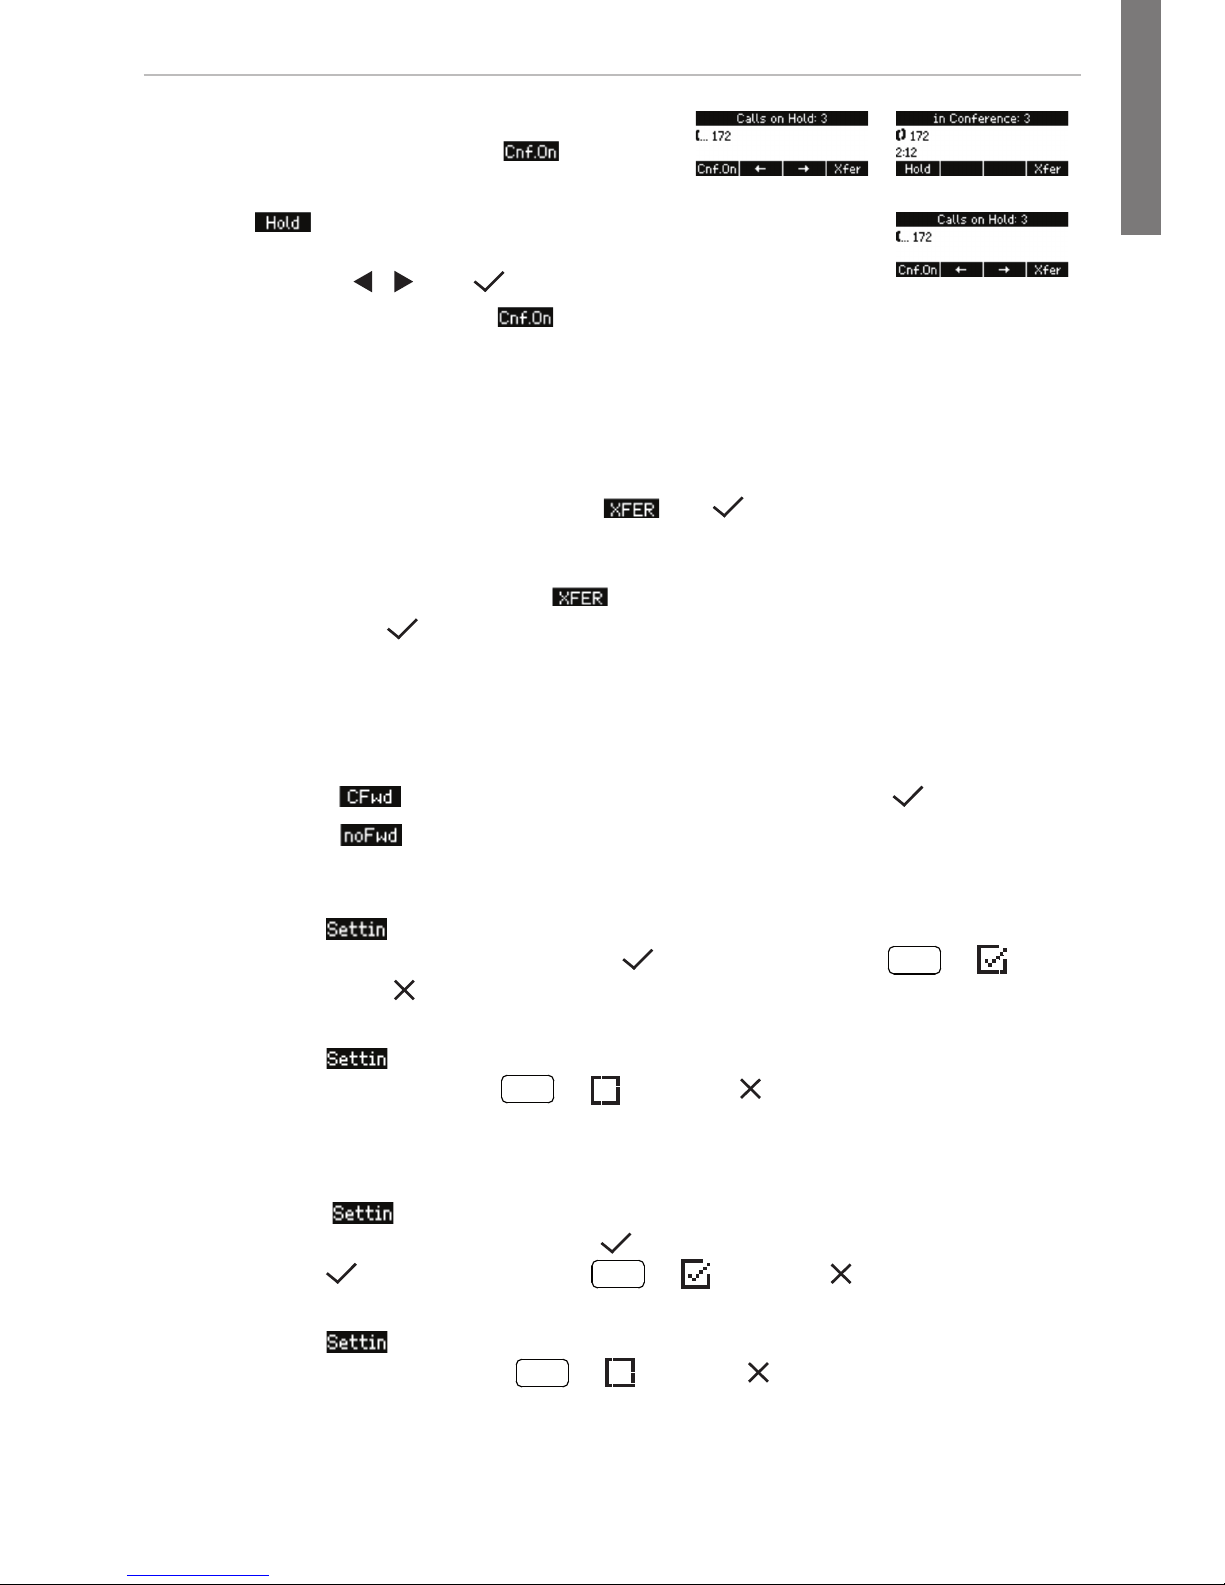
Putting calls on hold
Press the line key of the call. The LED starts to blink
slowly. Press the line key again to resume the call. With
more than one call on hold, select call with / , then
press to resume the call.
Conference (3 participants, including you)
1. Your phone number: 157. Put first party (153) on hold.
15
snom D715 Quick Start Guide
E
N
G
L
I
S
H
2. Call second party (154). Put on hold.
Call third party (172). Press
to start
conference.
3. Press to stop the conference and put all parties on hold.
Talking to one of the parties alone: Press the blinking line key or
select line with / and .
4. Resume conference: Press
.
Call transfer
Attended transfer
Put the call on hold > Dial the number that you wish to transfer the call to > If the
third party wishes to accept the call, press
and .
Blind transfer
With call ringing or on the line: Press
> dial the phone number the call is to be
transferred to > press
.
Call forwarding
1. All incoming calls.
•
Turning on: > Target when forwarding: enter number > .
•
Turning off:
2. When busy.
•
Turning on: > 2 Call Features > 1 Call Forwarding > 2 When busy >
2 Target: enter number >
> 1 Activate: Press
1
>
Press briefly to return to previous screen or for 2 seconds to return
to idle screen
•
Turning off: > 2 Call Features > 1 Call Forwarding > 2 When busy > 1
Activate: Press
1
> Press briefly to return to previous
screen or for 2 seconds to return to idle screen
3. When call is not picked up.
•
Turning on: > 2 Call Features > 1 Call Forwarding > 3 On Timeout > 2
Target: enter number > > 3 Time: enter number of seconds >
> 1 Activate: Press
1
> Press briefly to return to
previous screen or for 2 seconds to return to idle screen
•
Turning off: > 2 Call Features > 1 Call Forwarding > 3 On Timeout >
1 Activate: Press
1
> Press briefly to return to previous
screen or for 2 seconds to return to idle screen
16 1.02
snom D715 Quick Start Guide
E
N
G
L
I
S
H
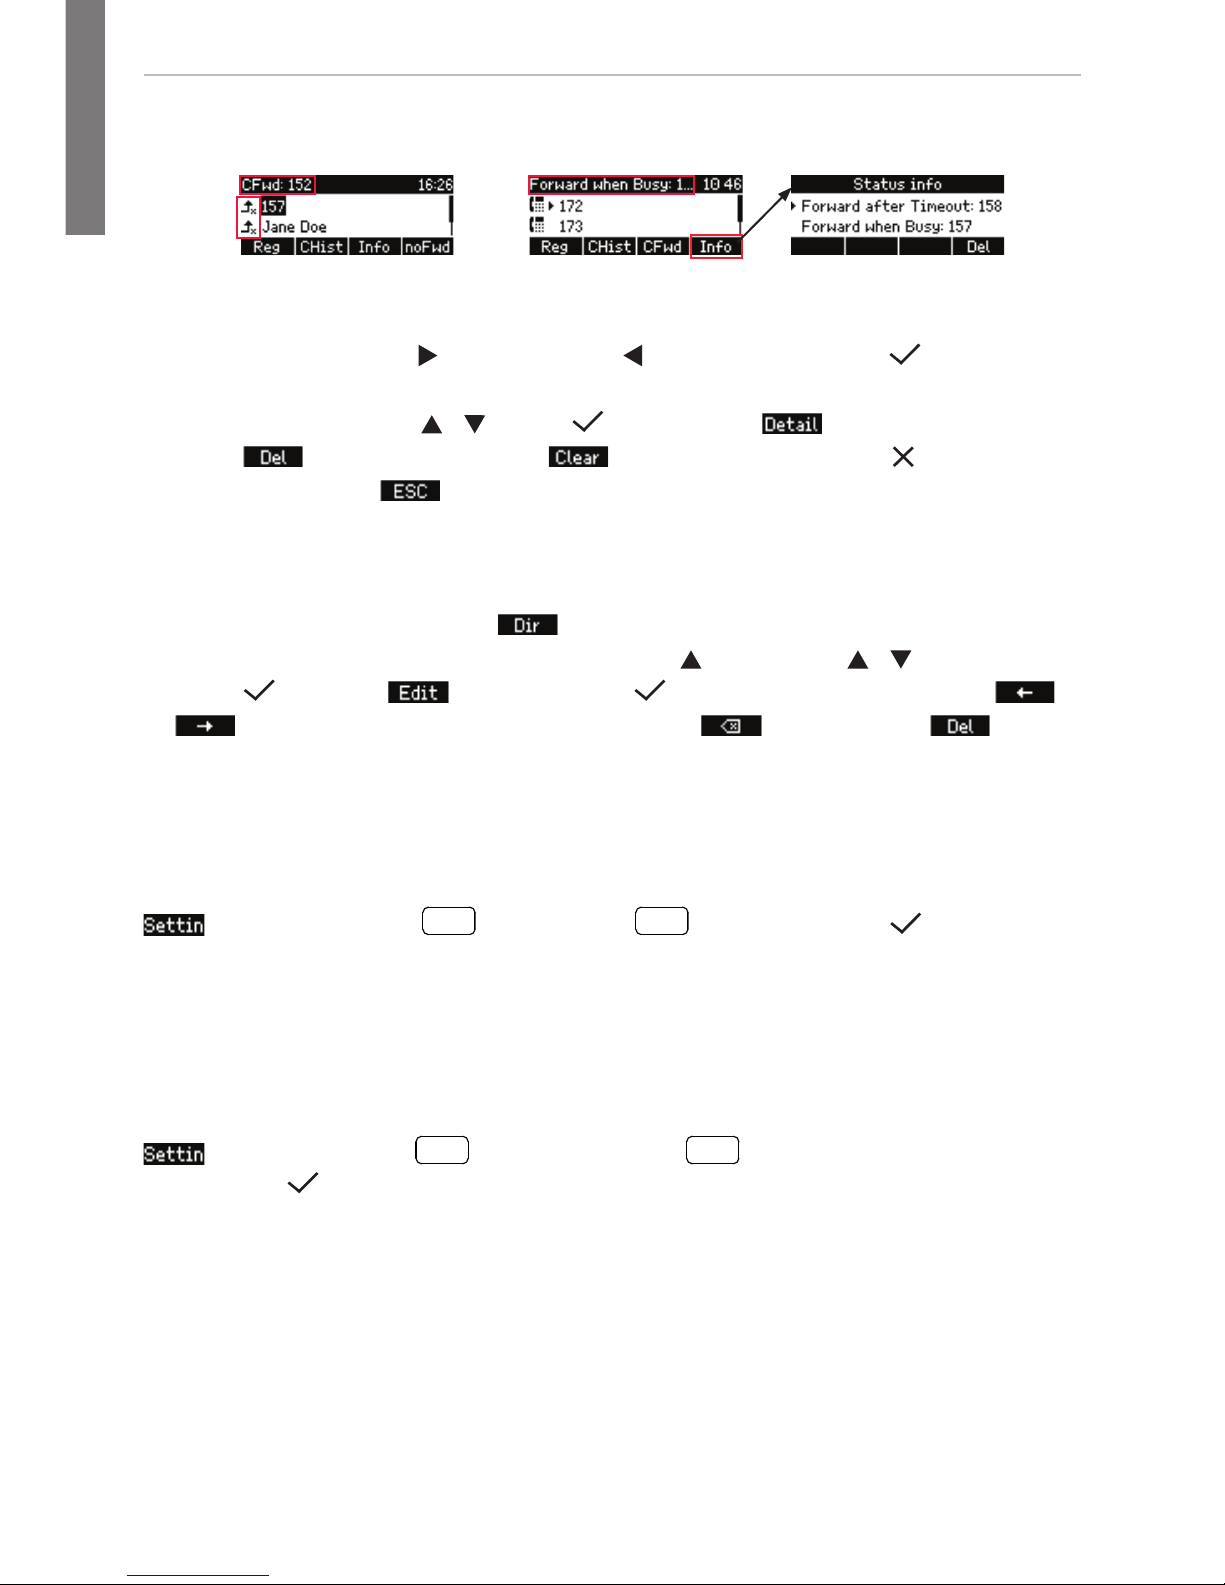
Forwarding when busy or after timeout:
Forwarding all calls:
Call lists
• Select list by pressing for missed calls, for received calls, and for dialed
calls.
• Scroll through list with
/ . Press to dial. Press to show call details.
Press
to delete entry. Press to delete entire list. Press to return to
previous screen or
to return to idle screen.
Directory
• Opening list of names: Press .
• Shortcut to <New Item> at the end of the list:
. Scroll with / .
• Dial:
. Details: . Editing detail: . Spacing backward/forward: /
. Delete character to the left of the cursor: . Delete entry: .
Trouble shooting
Reboot
> 5 Maintenance:
5
JKL
> 3 Reboot:
3
DEF
> "Reboot?" >
Hard reboot
Disconnect power, wait for a few seconds, reconnect.
Never disconnect the power during a firmware update!
Reset to factory values
> 5 Maintenance:
5
JKL
> 4 Reset values:
4
GHI
> enter administrator
password >
All customized settings will be lost!
TFTP Update
When there is no other way to get the phone to work (administrator password lost,
etc.). How it is done: See http://wiki.snom.com/Firmware/Update/TFTP_Update/en.
All customized settings will be lost!

17
snom D715 Quick Start Guide
D
E
U
T
S
C
H
Diese Kurzanleitung beschreibt die Installation, Einrichtung und den Betrieb
des snom D715. Weitere Informationen finden Sie auf unserer Webseite,
http://wiki.snom.com.
Copyright, Markenrechte, GNU Lizenz, Haftung
© 2014 snom technology Aktiengesellschaft. Alle Rechte reserviert.
snom sowie die Namen der snom-Produkte und die snom logos sind gesetzlich
geschützte Marken der snom technology AG. Alle anderen Produkt- und Firmennamen
sind Marken der jeweiligen Inhaber.
snom technology AG behält sich jederzeit das Recht auf Überarbeitung und Änderung
dieses Dokumentes vor, ohne verpflichtet zu sein, die vorgenommenen Änderungen
anzukündigen oder mitzuteilen.
Texte, Bilder, Grafiken und deren Anordnung in diesem Dokument unterliegen weltweit
dem Schutz des Urheberrechts und anderen Schutzgesetzen. Ihre Verwendung,
Reproduktion oder Weitergabe ohne ausdrückliche schriftliche Zustimmung der snom
technology AG können sowohl straf- als auch zivilrechtlich verfolgt werden.
Trotz der angewandten Sorgfalt bei der Zusammenstellung und Präsentation der
Informationen in diesem Dokument können sich Daten zwischenzeitlich geändert
haben. Daher übernimmt snom keine Gewähr für die Richtigkeit, Vollständigkeit oder
Aktualität der zur Verfügung gestellten Informationen. Jegliche Haftung für Schäden ist
ausgeschlossen, sofern diese nicht auf Vorsatz oder grober Fahrlässigkeit auf seiten
von snom beruhen oder sofern die Haftung nicht aufgrund zwingender gesetzlicher
Bestimmungen eintritt.
Unsere Firmware enthält teilweise Quellcodes, die unter der GNU Public License (GPL)
(s. Seite 59) von jedermann genutzt und modifiziert werden dürfen, solange sie
wiederum mit denselben Lizenzbedingen zur allgemeinen Nutzung veröffentlicht werden.
Die Quellcodes der von snom genutzten und der GPL unterliegenden Komponenten
können Sie auf der Supportseite unserer Webseite www.snom.com, den Wortlaut der
GPL auf http://www.snom.com/en/support/download/gpl-open-source/ herunterladen.
Wichtige Hinweise
Lesen Sie bitte vor Inbetriebnahme die Sicherheitshinweise und die Bedienungsanleitung. Lassen Sie sie auch von den Mitbenutzern des Gerätes lesen oder informieren Sie
sie über deren Inhalt. Bewahren Sie diese Bedienungsanleitung auf und geben Sie das
Telefon nur mit der Bedienungsanleitung an Dritte weiter.
Sicherheit
Befolgen Sie die Anweisungen in dieser Bedienungsanleitung und in der sonstigen
Dokumentation des Geräts.
• Falls die Stromversorgung nicht über ein Ethernetkabel erfolgt, verwenden Sie nur
ein von snom ausdrücklich empfohlenes Netzteil. Die Verwendung anderer Netzteile
könnte das Telefon beschädigen oder gar zerstören.

18 1.02
snom D715 Quick Start Guide
D
E
U
T
S
C
H
• Verlegen Sie die Netz- und Stromkabel so, dass sie durch mechanischen Druck nicht
beschädigt werden und Personen nicht darüber stolpern könnten.
• Dieses Gerät ist nur für den Gebrauch in Innenräumen bestimmt - NICHT FÜR DEN
AUSSENBEREICH!
• Stellen Sie das Telefon nicht in Räumen mit hoher Luftfeuchtigkeit wie z.B.
Badezimmern, Waschküchen, feuchten Kellerräumen auf. Tauchen Sie das Telefon
nicht in Wasser und gießen Sie keine Flüssigkeiten auf oder in das Gerät.
• Stellen Sie das Telefon nicht in explosionsgefährdeten Umgebungen (z.B.
Lackiereien) auf. Benutzen Sie das Telefon nicht, wenn Sie Gas oder andere
möglicherweise explosionsgefährliche Dämpfe riechen.
• Telefonieren Sie nicht während eines Gewitters (Stromschlaggefahr bei
Blitzeinschlag ins Netz).
• Warnung: Der Hörer enthält einen Magneten und kann kleine gefährliche Objekte
wie Nadeln anziehen. Bevor Sie ihn ans Ohr halten, vergewissern Sie sich, dass
keine Objekte daran haften.
SELV (Safety Extra Low Voltage) Einhaltung
Die Eingangs-/Ausgangsverbindungen halten die SELV-Richtlinien für Kleinspannungsgeräte ein.
Warnung: Um elektrische Schläge zu vermeiden, verbinden Sie keine SELV-Geräte
mit Geräten, die Fernsprech-Netzspannung (TNV) führen. Nur an LAN-Ports
anschließen! LAN-Ports enthalten SELV-Stromkreise, Festnetz-Anschlüsse dagegen
TNV-Stromkreise. Vorsicht beim Anschließen, da beide Steckverbindungen RJ-45
(8P8C) verwenden könnten.
Normkonformität
Dieses Gerät entspricht den grundlegenden Gesundheits-, Sicherheitsund Umweltanforderungen aller relevanten europäischen Richtlinien.
Die Konformitätserklärung kann bei snom (Anschrift siehe hintere
Umschlagseite) angefordert werden.
Die eigenmächtige Öffnung des Geräts sowie Änderungen und Modifizierungen am Gerät führen zum Erlöschen der Herstellergarantie und können
darüberhinaus zum Erlöschen der Zulassung führen. Wenden Sie sich bei
Betriebsstörungen oder Defekten an authorisiertes Servicepersonal, an
Ihren Verkäufer oder an snom.
•
Sicherheit: IEC 60950-1:2007
•
Zertifikate: FCC Class B
•
Stromspeisung: Über Netzwerk (PoE, IEEE 802.3af, Kl. 2) oder Netzteil
PSAC10R-050 (nicht im Lieferumfang enthalten - snom Art.-Nr. 00002730)
•
Anschlüsse: RJ-45 - 1 x LAN, 1 x PC; USB 2.0 - Buchse Typ A
•
Ethernet: 2 x IEEE 802.3/1 Gigabit-Switch
19
snom D715 Quick Start Guide
D
E
U
T
S
C
H
Reinigung
Benutzen Sie ein antistatisches Tuch. Benutzen Sie kein Wasser und keine
Reinigungsflüssigkeiten, da sie die Oberfläche und die Elektronik des Gerätes
beschädigen könnten.
Entsorgung des Produkts
Dieses Gerät unterliegt der europäischen Richtlinie 2002/96/EG und darf
nicht im Hausmüll entsorgt werden.
Wenn Sie nicht wissen, wo Sie Ihr Altgerät entsorgen können, wenden
Sie sich bitte an Ihre Kommune, Ihren örtlichen Müllentsorger oder Ihren
Fachhändler.
Aufstellen und Anschließen des Telefons
Siehe S. 2 und 3.
Initialisierung und Registrierung des Telefons
Beachten Sie bitte: Sie benötigen die von Ihrem Netzwerkadministrator oder Ihrem
VoIP-Provider erhaltenen Zugangsdaten für die Registrierung und Nutzung Ihres Accounts
(Kontos), normalerweise Telefonnummer, Registrar und Passwort.
Sobald Sie das Telefon - wie auf den Seiten 2 - 3 gezeigt - an das Netzwerk
angeschlossen haben, beginnt es mit der Initialisierung und Registrierung.
Die Initialisierung erfolgt normalerweise automatisch über DHCP. Falls Ihr Netzwork
DHCP nicht unterstützt, benötigen Sie außerdem die IP-Addresse, den IP-Gateway und
den DNS Server, die Sie ebenfalls von Ihrem Netzwerkadministrator oder VoIP-Provider
erhalten, um sie manuell einzugeben, wenn Sie auf dem Display dazu aufgefordert werden.
Treffen Sie bei Aufforderung auf dem Display Ihre Auswahl mit / und speichern
Sie mit
. Drücken Sie die Taste erneut, um zur Anmeldung zurückzukehren.
1. Sprache. Die Einstellung ab Werk ist Englisch.
2. Zeitzone
3. Rufton
4. Auf dem nächsten Bildschirm werden Sie aufgefordert, eine beliebige Taste zu
drücken. Tun Sie es, wenn Sie die Registrierung des ersten Accounts am Telefon
vornehmen möchten.
Hinweis: Anzeigen der IP-Adresse des Telefons, z.B. um die Registrierung im Webbrowser
des Telefons vorzunehmen: Siehe Seite 21.
5. Geben Sie die Account/Telefon-Nummer ein und bestätigen Sie die Eingabe mit .
Eingabe von Zahlen, Buchstaben und Sonderzeichen: Siehe Seite 24.
Hinweis: Sie können die Einstellungen 1-3 später jederzeit
- auch bequem über den Webbrowser des Telefons - ändern.
20 1.02
snom D715 Quick Start Guide
D
E
U
T
S
C
H
Auf einen Blick
• Lautstärkeregelung
• Mikrofon stummschalten
• Freisprecheinrichtung
ein/aus
• Headset ein/aus
Audiotasten
Anruf-LED
• Schnell blinkend: Eingehender
Anruf
• Leuchtend: Im Gespräch
ODER
• Verpasster Anruf. LED ausschalten: Drücken Sie auf .
• Aktionen + Eingaben
bestätigen/speichern
• Am Ruhebildschirm:
Erneut wählen
Identität für ausgehende
Anrufe auswählen
Ausgehende
Identität:
Sternchentaste
a A
• Im Eingabemodus:
- Drücken Sie
a A
eine Sekunde lang, um zwischen Ziffern, Klein- und Groß-
buchstaben zu wechseln
- Kurz drücken, um das Sternchen (*) einzugeben
• Vom Ruhebildschirm aus: Taste drei Sekunden lang drücken, um die Tastatur zu
verriegeln/entriegeln
Rautetaste
#
: Rescuemodus für TFTP-Update
Frei programmierbare
LED-Tasten P1-P5
Standardeinstellung: Leitung
• Schnell blinkend: Eingehender
Anruf
• Leuchtend: Im Gespräch
• Langsam blinkend:
Gehaltener Anruf
Display -
Ruhezustand
Alphanumeri-
sche Tastatur
P1
P2
P3
P4
P
5
LED-Taste "Neue Nachricht"
(programmierbar)
• Leuchtet bei neuer Nachricht
• Zum Abhören Taste drücken
Während der Erstregistrierung die IP-Adresse anzeigen:
1. Nachdem Sie die Sprache, die Zeitzone und den
Rufton ausgewählt haben, sehen Sie diesen Bildschirm:
2. Drücken Sie jetzt drei Sekunden lang auf
3. Wählen Sie nacheinander 6 Information und 2 System aus, um die IP-Adresse anzu-
zeigen.
6. Geben Sie den Registrar ein und bestätigen Sie die Eingabe mit .
7. Falls Sie dazu aufgefordert werden, geben Sie das Passwort ein, dass Sie von Ihrem
VoIP-Provider oder Ihrem Netzwerkadministrator erhalten haben. Bei erfolgreicher
Registrierung sehen Sie:
Infozeile mit Datum & Zeit
Infozeile mit Info & Zeit
Konfi gurierte Identität
 Loading...