

Page 1

CADD®-Solis Send Library to Pump Guide
Table of Contents
EXPORTING A PROTOCOL LIBRARY ................................................................................................ 2
CADD-Solis Database Not on a Server ............................................................................................ 2
CADD-Solis Database on a Server ................................................................................................... 2
IMPORTING A PROTOCOL LIBRARY ................................................................................................. 2
CADD-Solis Database Not on a Server ............................................................................................ 2
CADD-Solis Database on a Server ................................................................................................... 3
SENDING A PROTOCOL LIBRARY TO A PUMP ................................................................................ 3
Library Permissions .............................................................................................................................. 3
USB Cable Connection ........................................................................................................................ 3
Send Library .......................................................................................................................................... 4
Activating a New Protocol Library on the Pump .............................................................................. 4
Verification of Library Sent to Pump .................................................................................................. 6
CADD®-Solis Pump: Protocol Library Summary Report ...................................................... 6
CADD™-Solis Administrator Software Log Reports: Libraries Sent to Pump ....................... 6
For use with the CADD™-Solis Medication Safety Software - Administrator 3.1 and the
CADD®-Solis v3.0 Ambulatory Infusion Pump.
This information is provided to you as a guide. For more detailed information, refer to the
CADD™
‑
Solis Medication Safety Software – Administrator 3.1 help menus and the CADD®-
Solis v3.0 Ambulatory Infusion Pump Operator’s Manual.
Page 1 of 6
Page 2

CADD®-Solis Send Library to Pump Guide
EXPORTING A PROTOCOL LIBRARY
CADD-Solis Database Not on a Server
If the CADD™-Solis Database is not on a server and the computer that will be used to send the library to pumps is
a different computer than the one used to create the Protocol Library, you will need to export the library file and
then import the file into the application of desired computers (e.g. biomed).
1. Ensure that all protocols in the library desired to send to a
pump are Active (viewable on the Specify Protocols tab).
2. From the menu bar, select File > Export Library.
3. Click to select the Protocol Library you want to export.
4. Uncheck all Export Options. Click OK. Note: Protocols
marked as Not Active cannot be sent to a pump.
5. In the Export Library To dialog box, select the Save In
location, enter the file name you wish to create for the
exported library(s), select a location to save the file, and
then click Save. The library is saved as a *.smd file.
6. When the export is complete, you will see a message
informing you that the Export was successful, click OK.
Repeat these steps each time you want to send a
new/updated library file.
CADD-Solis Database on a Server
If the CADD™-Solis Database is connected to your facility’s server, it is not necessary to export the library.
IMPORTING A PROTOCOL LIBRARY
CADD-Solis Database Not on a Server
If the CADD™-Solis Database is not on a server and the computer that will be used to send the library to pumps is
a different computer than the one used to create the Protocol Library, the file will need to be imported into the
application of desired computers (e.g. biomed).
Note: Only users with the System Administrator permission have access to import a library file. If the user does
not have this permission (e.g. biomed is set up with Send Libraries only), a user with System Administrator (e.g.
admin user ID) will need to import the library file.
1. From the menu bar, select File > Import Library. Select Import from File and then click Browse to search
for the correct file that you wish to import into the software (*.smd).
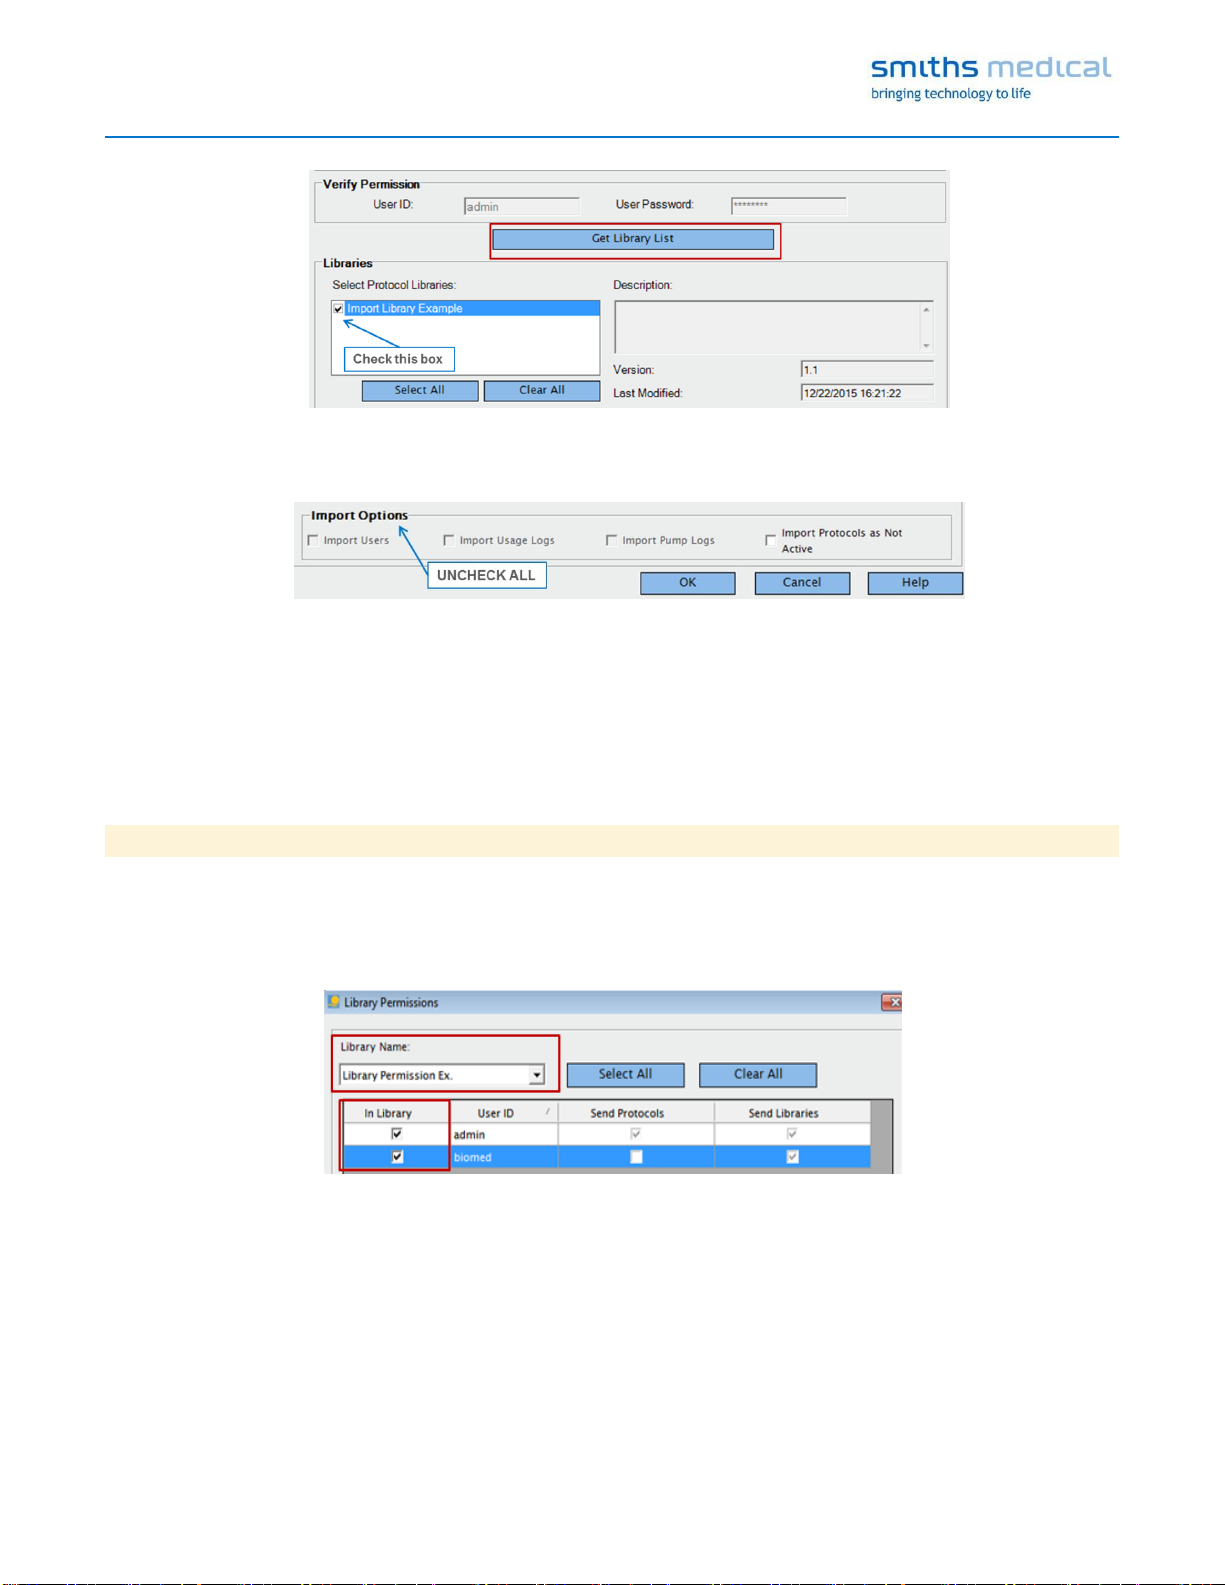
2. If not already logged in, enter a valid User ID and Password in Verify Permissions. Select Get Library List.
Within the Select Protocol Libraries box, add a check in the box next to the libraries you wish to import.
Page 2 of 6
Page 3
CADD®-Solis Send Library to Pump Guide
3. Uncheck all Import Options. Click OK. When the import is complete, you will see a message informing you
that the import was successful, click OK. Repeat these steps to import the library onto each desired computer
that uses the CADD™-Solis Administrator. Note: Protocols marked as Not Active cannot be sent to a pump.
Note: Import options will not be available if the source database file does not contain the applicable data. For
example, if the library was exported with protocols marked as NOT ACTIVE, protocols will not be available to
import as ACTIVE. If this occurs, re-export the library file making sure to UNCHECK all export options.
CADD-Solis Database on a Server
If the CADD™-Solis Database is connected to your facility’s server, it is not necessary to import the library.
SENDING A PROTOCOL LIBRARY TO A PUMP
Library Permissions
Once the library file is imported into the software, the next step is to give library permissions to the User IDs that
will be used to send the library to pumps.
1. Go to Settings > User Accounts > Library Permissions.
2. From the Library Name drop-down list, select the Protocol Library to which you want to grant permission.
3. For each user you want to grant permission, click to check the In Library box then click Save.
USB Cable Connection
When the PC is connected via USB cable to a CADD®-Solis (Model 2100, Model 2110) pump, the CADD™-Solis
Administrator can be used to send a Protocol Library to the pump; it can also be used to get pump history which
allows pump reports to be viewed and stored in the application.
Page 3 of 6
Page 4

CADD®-Solis Send Library to Pump Guide
USB cable requirement: Standard USB cable, Type A to
Mini-B; may be purchased at a computer supply store.
Note: Do not use a cable that is longer than 6.5 feet.
Exceeding this length may increase the pump's
susceptibility to external electromagnetic interference.
Send Library
In order to send a library to a pump, (a) the user MUST be given library permissions to the library and (b) the
library MUST contain at least one active protocol. If these two requirements are not met, the user will not be able
to send a Protocol Library.
1. Connect the pump to the computer and ensure that the
pump is powered on and stopped. Note: The pump must
be on the home screen.
2. Select Pump Communications > CADD®-Solis Pumps >
Send Library. If not already logged in, you are prompted
to enter a User ID and Password to proceed.
3. Select the Protocol Library from the drop down that you
want to send to the pump. Note: Only Protocol Libraries
that contain active protocols that the logged-in user has
permissions to will be available.
4. Click Send to Pump. A message will display in the blueoutlined box letting you know the status of the download.
Note: If Send to Pump is not available to select after the
pump is connected to the computer, try connecting the USB
to a different USB port. If Send to Pump is still not
available, contact Smiths Medical Application Support.
5. As desired, repeat the process for the remaining pumps.
Click Close when finished.
WARNING: Always carefully review the library on the pump after it has been downloaded to verify that the pump
is programmed correctly. Failure to do so could result in undesired programming of the pump and, depending on
the type of Drug being administered, death or serious injury to the patient.
Activating a New Protocol Library on the Pump
After a Protocol Library is downloaded, the previous library will remain on the home screen. To begin using the
NEW library, you must go to Tasks > Start new patient or Start new protocol, same patient.
Page 4 of 6
Page 5

CADD®-Solis Send Library to Pump Guide
1. If the pump remains on, select Tasks > Start new patient. If the pump was powered off after the library was
sent, power on pump and select Yes to the question “Do you want to start a new patient”. Select any
Therapy/Qualifier/Drug. NOTE: You must select a custom protocol, do NOT select Program Manually.
2. Enter one of the three security codes. If no library on the pump = default codes; otherwise see your
pharmacy software administrator for the customized codes. Select Yes to the question “Are these correct”.
Wait for the Programming screen to complete, then on the “Review pump settings” screen, press Review to
get to Review screen, and then press Exit to go to the Home Screen.
3. Press Tasks, and then press Lock Keypad. The pump is now ready for use with the NEW Protocol Library.
Page 5 of 6
Page 6

CADD®-Solis Send Library to Pump Guide
Verification of Library Sent to Pump
CADD®-Solis Pump: Protocol Library Summary Report
Select Reports > Protocol Library Summary. The screen will then display the name of the protocol library, the
version number (revision), and the number of protocols in the library.
CADD™-Solis Administrator Software Log Reports: Libraries Sent to Pump
Log Reports are application-specific reports from the database. Users with the Protocol Administrator permission
may access these reports. The Libraries Sent to Pump report documents Protocol Libraries that were sent to the
CADD®-Solis Pumps and contains User ID, date/time, pump serial number, library name, revision, and the last
modified date.
1. From the menu, select Log Reports > View Log Reports.
2. Use the drop-down menus to select Libraries Sent to Pump.
3. Make filtering selections and then click Show Report. From the View Log Reports window, you can print or
export the report (Microsoft® Excel® or PDF) using the icons on the toolbar.
Page 6 of 6
 Loading...