


OPERATOR’S MANUAL
CADD-Legacyª PLUS
Ambulatory Infusion Pump
Model 6500
CONTINUOUS OR INTERMITTENT
DELIVERY
This Operator’s Manual is for clinician use only. Read the entire Operator’s Manual before operating the pump.
S I M S D E LT E C , I N C .

This manual pertains only to the Deltec CADD-Legacy™ PLUS Model 6500 ambulatory infusion pump. This pump can be programmed to deliver medication at a continuous rate or to deliver a specified amount of drug at a set programmed interval. This manual is intended for clinician use only. Do not permit patients to have access to this manual. The pump has three security levels designed to limit patient access. Do not disclose the pump’s security codes or any other information that would allow inappropriate access to programming and operating functions.
The issue date of this Operator’s Manual is included on the back cover for the clinician’s information. In the event one year has elapsed between the issue date and product use, the clinician should contact SIMS Deltec, Inc. to see if a later revision of this manual is available.
Technical Assistance
If you have comments or questions concerning the operation of the CADD-Legacy™ pump, please call the appropriate number given below. When calling, please specify your pump’s software module. This information is located on the start-up screen.
Our staff at Deltec is available to help clinicians twenty-four hours a day with the programming and operation of the CADD-Legacy™ infusion system.
U.S. Distribution |
European Representative |
SIMS Deltec, Inc. |
SIMS Graseby Ltd. |
1265 Grey Fox Road |
WD2 4LG UK |
St. Paul, Minnesota 55112 U.S.A. |
|
1-800-426-2448 |
+44 (0) 1923 246434 |
CADD, Medication Cassette Reservoir design, CADD-Legacy, and Medication Cassette are SIMS trademarks. (The symbol ® indicates it is registered in the U.S. Patent and Trademark Office and certain other countries.)
DURACELL® is a registered trademark of DURACELL Inc. EVEREADY® ENERGIZER® is a registered trademark of Union Carbide Corp. Super Sani-Cloth® is a registered trademark of Professional Disposables, Inc.
The products described are covered by one or more of the following: U. S. Patent Nos. 4,559,038; 4,565,542; 4,650,469; 5,364,242; 5,531,697; 5,538,399; 5,540,561; 5,564,915; 5,567,119; 5,567,136; 5,647,854; 5,695,473; Japanese Patent No. 2034590; European Patent No. 0182502; other patent(s) pending, foreign patent(s) pending.
ii

Read this entire OperatorÕs Manual before operating the CADD-Legacyª ambulatory infusion pump.
Failure to properly follow warnings, cautions, and instructions could result in death or serious injury to the patient.
Warnings
•This Operator’s Manual should be used by clinicians only. Do not permit patients to have access to this manual, as the information contained would allow the patient complete access to all programming and operating functions. Improper programming could result in death or serious injury to the patient.
•For those patients who are likely to be adversely affected by unintended operations and failures, including interrupted medication or fluid delivery from the device, close supervision and provision for immediate corrective action should be provided.
•If the pump is used to deliver life-sustaining medication, an additional pump must be available.
•The pump is not to be used for delivery of blood or cellular blood products.
•If the pump is dropped or hit, inspect the pump for damage. Do not use a pump that is damaged or is not functioning properly. Contact Customer Service to return a pump for service.
•Use of a syringe with the CADD® Administration Set may result in UNDER-DELIVERY of medication. Syringe function can be adversely affected by variations in plunger dimension and lubricity, which can result in greater force required to move the syringe plunger. A syringe plunger will lose lubrication as it ages and, as a result, the amount of under-delivery will increase which could on occasion, be significant. Therefore, the type of medication and delivery accuracy required must be considered when using a syringe with the CADD® pump.
Clinicians must regularly compare the volume remaining in the
iii

syringe to the pump’s displayed values such as RES VOL and GIVEN in order to determine whether under-delivery of medication is occurring and if necessary, take appropriate action.
•System delivery inaccuracies may occur as a result of back pressure or fluid resistance, which depends upon drug viscosity, catheter size, and extension set tubing (for example, microbore tubing).
•Do not administer drugs to the epidural space or subarachnoid space unless the drug is indicated for administration to those spaces.
•To prevent infusion of drugs that are not indicated for epidural space or subarachnoid space infusion, do not use administration sets that incorporate injection sites.
•If a Medication Cassette™ Reservoir, CADD® Extension Set or CADD® Administration Set is used for drug delivery into the epidural or subarachnoid space, clearly differentiate them from those used for other routes of infusion, for example, by color coding, or other means of identification.
•When the Air Detector is turned off, the pump will not detect air in the fluid path. Periodically inspect the fluid path and remove any air to prevent air embolism.
•You must use a CADD® Extension Set with an Anti-Siphon Valve or a CADD® Administration Set with either an integral or Add On Anti-Siphon Valve to protect against unregulated gravity infusion that can result from an improperly attached cassette.
•When the Upstream Occlusion Sensor is turned off, the pump will not detect occlusions upstream (between pump and fluid container). Periodically inspect the fluid container for decreasing volume, inspect the fluid path for kinks, a closed clamp, or other upstream obstructions. Upstream occlusions could result in underor non-delivery of medications.
iv

•Do not disclose to the patient the pump’s security codes or any other information that would allow the patient complete access to all programming and operating functions.
•Do not use rechargeable NiCad or nickel metal hydride (NiMH) batteries. Do not use carbon zinc (“heavy duty”) batteries. They do not provide sufficient power for the pump to operate properly.
•Always have new batteries available for replacement. If power is lost, non-delivery of drug will occur.
•If the pump is dropped or hit, the battery door tabs may break. Do not use the pump if the battery door or tabs are damaged because the batteries will not be properly secured; this may result in loss of power and non-delivery of drug.
•If a gap is present anywhere between the battery door and the pump housing, the door is not properly latched. If the battery door becomes detached or loose, the batteries will not be properly secured; this could result in loss of power and nondelivery of drug.
•Close the fluid path tubing with the clamp before removing the cassette from the pump to prevent unregulated gravity infusion.
•For detailed instructions and warnings pertaining to Medication Cassette™ Reservoir or CADD® Administration Sets, please refer to the instructions supplied with those products.
•Frozen medication must be thawed at room temperature only. Do not heat the Medication Cassette™ Reservoir in a microwave oven as this may damage the medication, the Medication Cassette™ Reservoir, or cause leakage.
•Attach the cassette (the part of the Medication Cassette™ Reservoir or CADD® Administration Set that attaches to the pump) properly. An improperly attached or detached cassette could result in unregulated gravity infusion of medication from the fluid container or a reflux of blood.
v

•Do not prime the fluid path with the tubing connected to a patient as this could result in overdelivery of medication or air embolism.
•Ensure that the entire fluid path is free of all air bubbles before connecting to the patient to prevent air embolism.
•Prior to starting infusion, inspect the fluid path for kinks, a closed clamp, or other upstream obstructions, and remove any air to prevent air embolism.
Cautions
•Do not operate the pump at temperatures below +2°C (36°F) or above 40°C (104°F).
•Do not store the pump at temperatures below -20°C (-4°F) or above 60°C (140°F). Do not store the pump with the Medication Cassette™ Reservoir or CADD® Administration Set attached. Use the Protective Cassette provided.
•Do not expose the pump to humidity levels below 20% or above 90% relative humidity.
•Do not store the pump for prolonged periods with the batteries installed.
•Do not immerse the pump in cleaning fluid or water or allow solution to soak into the pump, accumulate on the keypad, or enter the battery compartment.
•Do not clean the pump with acetone, other plastic solvents, or abrasive cleaners.
•Do not expose the pump to therapeutic levels of ionizing radiation.
•Do not expose the pump directly to ultrasound.
vi

•Do not use the pump in the vicinity of magnetic resonance imaging (MRI) equipment.
•Do not use the pump near ECG equipment.
•Do not sterilize the pump.
•Do not use the pump in the presence of flammable anesthetics or explosive gases.
•Use only Deltec accessories as using other brands may adversely affect the operation of the pump.
•CADD-Legacy™ pumps are sealed units. A broken or damaged seal will, therefore, be considered conclusive evidence that the pump has been misused and/or altered, which voids any and all warranties. All service and repair of CADD-Legacy™ pumps must be performed by Deltec or its authorized agents.
•Check appropriate medication stability for time and temperature to assure stability with actual pump delivery conditions.
vii

viii

Table of Contents |
|
Warnings |
iii |
Cautions |
vi |
Section 1: General Description |
1 |
Introduction ............................................................................... |
1 |
Indications ................................................................................. |
1 |
Epidural/Subarachnoid Administration ...................................... |
1 |
Symbols ..................................................................................... |
3 |
Pump Diagram ........................................................................... |
4 |
Description of the Keys, Display, and Features .......................... |
5 |
The Main Screen ........................................................................ |
8 |
Lock Levels ................................................................................ |
9 |
Security Codes ........................................................................... |
9 |
Lock Level Table ....................................................................... |
10 |
Section 2: Pump Setup and Programming |
11 |
Installing or Replacing the Batteries ........................................... |
11 |
Watching Power Up ................................................................... |
16 |
Changing to Lock Level 0 (LL0) ............................................... |
17 |
Programming the Pump: General Instructions ............................ |
18 |
Delivery Methods ...................................................................... |
19 |
Programming Screens for Continuous Delivery ......................... |
20 |
Programming Continuous Delivery ........................................... |
22 |
Programming Screens for Intermittent Delivery ........................ |
24 |
Programming in the Intermittent Delivery Mode ....................... |
28 |
Removing a Cassette .................................................................. |
31 |
Attaching a Cassette .................................................................. |
32 |
Priming the Tubing and Connecting to the Patient ..................... |
34 |
Inserting the Tubing into the Air Detector ................................. |
36 |
Setting the Lock Level for the Patient ......................................... |
38 |
CDM: Programming with Upper Limits, Adjusting Rate in |
|
Lock Level 1 ........................................................................... |
39 |
IDM: Stopping the Pump During the Dose ................................ |
40 |
ix

Section 3: Operating the Pump |
43 |
Starting the Pump ...................................................................... |
43 |
Stopping the Pump ..................................................................... |
43 |
Turning the Pump On/Off ......................................................... |
44 |
Resetting Reservoir Volume ...................................................... |
44 |
Section 4: Biomed Functions |
45 |
Overview: Accessing the Biomed Functions ............................... |
45 |
Air Detector On/Off .................................................................. |
46 |
Upstream Sensor On/Off ............................................................ |
47 |
Changing the Delivery Method .................................................. |
48 |
Section 5: Reference |
49 |
Messages and Alarms, Alphabetical List .................................... |
49 |
Cleaning the Pump and Accessories ........................................... |
53 |
Exposure to Radiation, Ultrasound, Magnetic Resonance |
|
Imaging (MRI), or Use near ECG Equipment ......................... |
55 |
Technical Description ................................................................ |
56 |
Specifications (Nominal) ...................................................... |
57 |
Accuracy Test Results .......................................................... |
62 |
Safety Features and Fault Detection ..................................... |
64 |
Software Safety Features ...................................................... |
66 |
Data Handling Software Safety Features .............................. |
67 |
Annual Functional Inspection and Testing Procedures ......... |
68 |
Inspection Procedures .......................................................... |
68 |
Testing Procedures ............................................................... |
69 |
Occlusion Pressure Range Tests ........................................... |
74 |
Accuracy Tests ..................................................................... |
77 |
Index ......................................................................................... |
82 |
Limited Warranty ...................................................................... |
84 |
x
Section 1: General Description
1.0General Description
Introduction
The CADD-Legacy™ PLUS ambulatory infusion pump provides measured drug therapy to patients in hospital or outpatient settings. Therapy should always be overseen by a physician or a certified, licensed healthcare professional. As appropriate to the situation, the patient should be instructed in using and troubleshooting the pump.
Indications
The CADD-Legacy™ PLUS pump is indicated for intravenous, intraarterial, subcutaneous, intraperitoneal, epidural space, or subarachnoid space infusion. The pump is intended for therapies that require a continuous or intermittent rate of infusion.
Epidural/Subarachnoid Administration
The selected drug must be used in accordance with the indications included in the package insert accompanying the drug. Administration of any drug by this pump is limited by any warnings, precautions, or contraindications in the drug labeling.
Analgesics
Administration of analgesics to the epidural space is limited to use with indwelling catheters specifically indicated for either short-or long-term drug delivery.
Administration of analgesics to the subarachnoid space is limited to use with indwelling catheters specifically indicated for short-term drug delivery.
Description |
General |
|
|
1

General |
Description |
Section 1: General Description
Anesthetics
Administration of anesthetics to the epidural space is limited to use with indwelling catheters specifically indicated for short-term drug delivery.
WARNING:
•Do not administer drugs to the epidural space or subarachnoid space unless the drug is indicated for administration to those spaces. Drugs not intended for epidural or subarachnoid space infusion could result in death or serious injury to the patient.
•To prevent the infusion of drugs that are not indicated for epidural space or subarachnoid space infusion, do not use administration sets that incorporate injection sites. The inadvertent use of injection sites for infusion of such drugs could result in death or serious injury to the patient.
•If a Medication Cassette™ Reservoir, CADD® Extension Set or CADD® Administration Set is used for drug delivery into the epidural or subarachnoid space, clearly differentiate them from those used for other routes of infusion, for example, by color coding, or other means of identification. Drugs not intended for epidural or subarachnoid space infusion could result in death or serious injury to the patient.
2

Section 1: General Description
Symbols
~Alternating Current (Power Jack)
OAccessory Jack
!Attention, consult accompanying documents (read Instructions for Use)
KClass II Equipment
JType CF Equipment
ESplashproof – water splashed against pump housing will have no harmful effects (see Cleaning the Pump and Accessories, Section 5, for additional important information)
DDate of Manufacture
REF Catalog (reorder) number
SN Serial Number
Dispose of used batteries in an environmentally safe manner, and according to any regulations which may apply.
Description |
General |
|
|
3
General |
Description |
Section 1: General Description
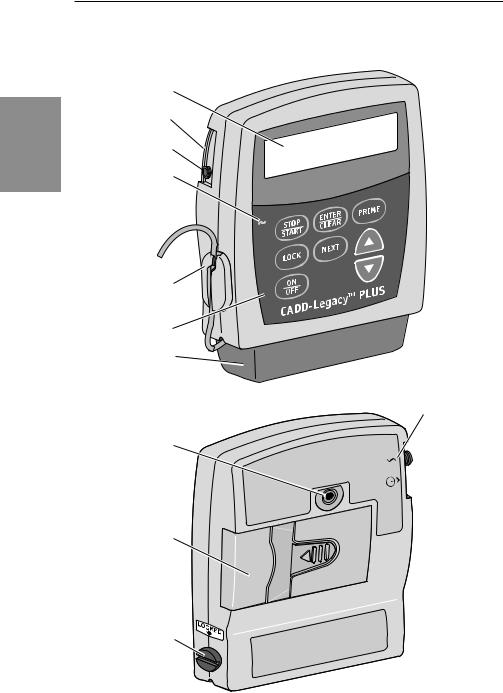
Pump Diagram
Display
Power Jack
Accessory Jack 

AC Indicator
Light
Air Detector
Keypad
Cassette
Threaded
Mounting
Hole
Battery
Compartment
Cassette Lock
Front
View
®
Power Jack symbol
Accessory  Jack symbol
Rear
View
4

Section 1: General Description
Description of the Keys, Display, and Features
AC Indicator Light
The green indicator light is on when you are using the AC adapter to power pump.
Display
The Liquid Crystal Display (LCD) shows programming information and messages. In this manual, the term “display” is synonymous with display panel or LCD.
Keypad
The keys on the keypad are described below. A key beeps when pressed if it is operable in the current lock level.
⁄ starts and stops pump delivery; silences alarms.
¤is used to enter (save) a new value in the pump’s memory when programming pump settings or to clear values from record-keeping screens. It is also used to return from the Biomed Functions to the main screen (Section 4).
‹is used to fill the tubing and to remove air bubbles from the fluid path.
Œis used to view or change the pump’s current lock level. Lock levels are used to limit patient access to certain programming and operating functions. (See Lock Levels, this section.)
„is used to move from one programming screen to the next without changing the setting or value displayed; silences alarms.
´allows you to “scroll up” or increase a value, or scroll through Biomed Function settings.
Îallows you to “scroll down” or decrease a value, or scroll through Biomed Function settings.
Åis used to put the pump into a low power state when not in use or back into full power.
Description |
General |
|
|
5

General |
Description |
Section 1: General Description
Power Jack
You may plug an AC Adapter into the Power jack as an alternate source of power. The indicator light on the front of the pump will illuminate when the AC Adapter is in use.
Accessory Jack
This jack is used for accessory cables. See the Instructions for Use supplied with those accessories.
Air Detector
The Air Detector is on the pump in the area shown in the diagram. If air is detected in the part of the tubing that passes through the Air Detector, an alarm sounds and delivery stops. (See Section 5 for Air Detector specifications.) If an Air Detector is not required, it may be turned off. (See Section 4, Biomed Functions.)
WARNING: When the Air Detector is turned off, the pump will not detect air in the fluid path. Periodically inspect the fluid path and remove any air to prevent air embolism. Air embolism could result in death or serious injury to the patient.
Cassette
The cassette is the portion of the Medication Cassette™ Reservoir or CADD® Administration Set that attaches to the bottom of the pump. The following single-use products are compatible with the CADD-Legacy™ pump:
•Medication Cassette™ Reservoir (50 or 100 ml), used with the CADD® Extension Set with Anti-Siphon Valve
•CADD® Administration Set with integral Anti-Siphon Valve
•CADD® Administration Set with Add On Anti-Siphon Valve
WARNING: You must use a CADD® Extension Set with Anti-Siphon Valve or a CADD® Administration Set with either an integral or an Add On Anti-Siphon Valve to
6

Section 1: General Description
protect against unregulated gravity infusion that can result from an improperly attached cassette. Unregulated gravity infusion could result in death or serious injury to the patient.
Threaded Mounting Hole
The optional Polemount Bracket Adapter attaches to the threaded mounting hole in the back of the pump, allowing you to hang the pump on an IV pole.
Battery Compartment
Two AA batteries fit into the battery compartment. The AA batteries serve as the primary source of power, or as a backup when an AC Adapter is in use.
Cassette Lock
This attaches the cassette (the part of the Medication Cassette™ Reservoir or CADD® Administration Set that attaches to the pump) to the pump. This allows you to secure the cassette to the pump. If the cassette becomes unlocked while the pump is running, delivery will stop and an alarm will occur. If the cassette becomes unlocked while the pump is stopped, an alarm will occur.
Other Features Not Shown
Upstream Occlusion Sensor: The pump contains an upstream occlusion sensor. This feature may be turned on or off. (See Section 4, Biomed Functions.) When the sensor is turned on, and an upstream occlusion (between pump and fluid container) is detected, an alarm will sound, delivery will stop, and the display will show “Upstream Occlusion.”
WARNING: When the Upstream Occlusion Sensor is turned off, the pump will not detect occlusions upstream (between pump and fluid container). Periodically inspect the fluid container for decreasing volume, inspect the fluid path for kinks, a closed clamp, or other upstream obstructions. Upstream occlusions could result in underor non-delivery of medications. If undetected, these
Description |
General |
|
|
7

General |
Description |
Section 1: General Description
occlusions could result in death or serious injury to the patient.
Downstream Occlusion Sensor: The pump contains a downstream occlusion sensor. When a downstream occlusion (between the pump and patient access site) is detected, an alarm will sound, delivery will stop, and the display will show “High Pressure.”
Reservoir Volume Alarm: The Reservoir Volume alarm indicates when the fluid in the fluid container is low or depleted. Each time you change the fluid container, you may reset the Reservoir Volume to the originally programmed volume. Then, as medication is delivered, the Reservoir Volume automatically decreases. When the pump calculates that 5 ml remain in the fluid container, beeps sound and “ResVol Low” appears on the main screen. This alarm recurs at every subsequent decrease of 1 ml until the Reservoir Volume reaches 0 ml, at which point the pump stops and the Reservoir Volume empty alarm sounds.
The Main Screen
The main screen is the starting point for programming or viewing the pump’s settings.
If no keys are pressed for a period of time (2 minutes), the display reverts to the main screen. When the two AA batteries are low, “LowBat” appears on the main screen.
|
|
|
Battery Status |
|
When running: |
|
|
Status of Reservoir |
|
|
RUN |
LowBat |
||
Status of pump |
Volume |
|||
ResVol |
50.0 ml |
|||
Reservoir Volume |
|
|||
|
|
|
When stopped:
Status of pump  STOPPED
8

Section 1: General Description
Lock Levels
Lock levels are used to limit patient access to certain programming and operating functions. The table on the next page lists the functions that are accessible in Lock Level 0 (LL0), Lock Level 1 (LL1), and Lock Level 2 (LL2). When a function is accessible, the key associated with the function beeps when pressed. If a function is not accessible, the pump ignores the key press and a beep does not sound. Section 2, Pump Setup and Programming, describes how to change the lock level.
Security Codes
The following security codes are preset by the manufacturer for the clinician’s use:
•The Lock Level Code, 65 (the first two digits of the pump’s model number), allows you to change the pump’s lock level.
•The Biomed Functions Code, 165 (Lock Level Code + 100), allows access to the Biomed Functions. (See Section 4.)
WARNING: Do not disclose to the patient the pump’s security codes or any other information that would allow the patient complete access to all programming and operating functions. Improper programming could result in death or serious injury to the patient.
Description |
General |
|
|
9

General |
Description |
Section 1: General Description
Lock Level Table
This table lists the operations that are accessible in each lock level while the pump is stopped and running. LL0 permits complete access to all programming and operating functions. LL1 permits limited control of pump programming and operations. LL2 permits only minimal control pump operations.
* Continuous Delivery Mode = CDM; Intermittent Delivery Mode = IDM
Pump Operations |
|
|
Stopped |
|
|
|
Running |
|
|
|
|
|
|
|
|
and Programming |
LL0 |
|
LL1 |
|
|
LL2 |
Any |
|
|
|
|
|
|
|
Lock Level |
Stop/Start the pump |
Yes |
|
Yes |
|
|
Yes |
Yes |
|
|
|
|
|
|
|
|
Reset Reservoir Volume |
Yes |
|
Yes |
|
|
Yes |
No |
Prime |
Yes |
|
Yes |
|
|
No |
No |
Change the lock level |
Yes, w/code |
|
Yes, w/code |
Yes, w/code |
No |
||
Change Continuous Rate |
Yes |
Up to LL0 value |
|
|
No |
|
|
|
|
No |
|||||
(CDM)* |
|
|
|
|
|
|
|
|
|
|
|
|
|
|
|
Clear Given amount |
Yes |
|
Yes |
|
|
No |
No |
(CDM & IDM)* |
|
|
|
|
|
|
|
|
|
|
|
|
|
|
|
Change Dose Volume |
Yes |
|
No |
|
|
No |
No |
(IDM)* |
|
|
|
|
|
|
|
Change Dose Duration |
Yes |
|
No |
|
|
No |
No |
(IDM)* |
|
|
|
|
|
|
|
Change Dose Cycle (IDM)* |
Yes |
|
No |
|
|
No |
No |
Change KVO Rate (IDM)* |
Yes |
|
No |
|
|
No |
No |
Change Dose Starts in |
Yes |
|
Yes |
|
|
No |
No |
delay (IDM)* |
|
|
|
|
|
|
|
|
|
|
|
|
|
|
|
Biomed Functions |
|
|
|
|
|
|
|
Access to Functions |
Yes, w/code |
|
No |
|
|
No |
No |
Air Detector On/Off |
Yes, w/code |
|
View only |
|
View Only |
View Only |
|
|
|
|
|
|
|
|
|
Upstream Occlusion |
|
|
|
|
|
|
|
Sensor On/Off |
Yes, w/code |
|
View only |
|
View Only |
View Only |
|
|
|
|
|
|
|
|
|
Changing the Delivery |
Yes, w/code |
|
View only |
|
View Only |
View Only |
|
Mode |
|
|
|
|
|
|
|
|
|
|
|
|
|
|
|
10
Section 2: Pump Setup and Programming
2.0Pump Setup and Programming
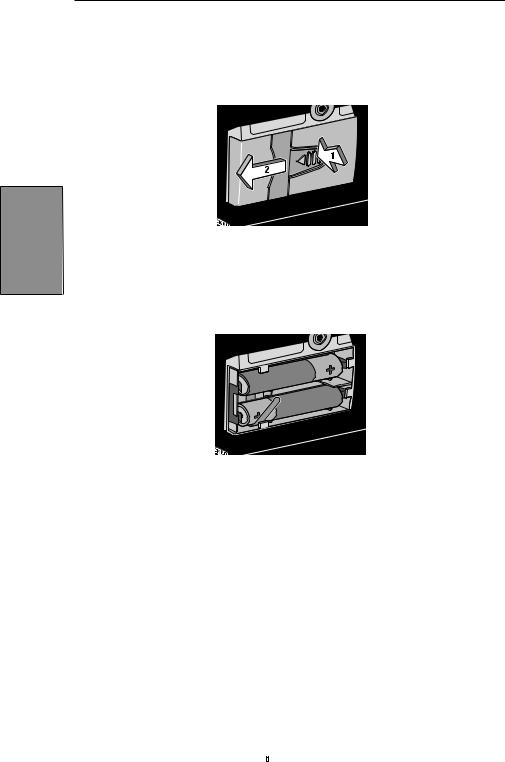
Installing or Replacing the Batteries
Use new, AA alkaline batteries such as DURACELL® or EVEREADY® ENERGIZER® batteries. The pump retains all programmed values while the batteries are removed.
Dispose of used batteries in an environmentally safe manner, and according to any regulations which may apply.
WARNING:
•Do not use rechargeable NiCad or nickel metal hydride (NiMH) batteries. Do not use carbon zinc (“heavy duty”) batteries. They do not provide sufficient power for the pump to operate properly, which could result in death or serious injury to the patient.
•Always have new batteries available for replacement. If power is lost, nondelivery of drug will occur and, depending on the type of drug being administered, could result in death or serious injury to the patient.
•If the pump is dropped or hit, the battery door or tabs may break. Do not use the pump if the battery door or tabs are damaged because the batteries will not be properly secured; this may result in loss of power, nondelivery of drug, and, depending on the type of drug being administered, death or serious injury to the patient.
PumpProgramming
& Setup
11
Programming
Pump Setup &
Section 2: Pump Setup and Programming
In order to install or replace the batteries, be sure the pump is Stopped. Then, follow these steps:
1. Push down and hold the arrow button while sliding the door off.
2.Remove the used batteries. Pulling on the end of the battery strap will make battery removal easier.
3.Install the new batteries in the compartment, making sure the battery strap is positioned correctly under the batteries.
NOTE:
• Be sure to match the polarity markings of the new batteries (+ and –) with those labeled in the battery compartment. If you put the batteries in backwards, the display panel will be blank, and you will not hear a beep.
12

Section 2: Pump Setup and Programming
• Use two new, AA alkaline batteries to power the pump. You may use any alkaline batteries, including DURACELL® Alkaline and EVEREADY® ENERGIZER® Alkaline, for example.
4.Place the battery door over the battery compartment and slide the door closed.
Programming
5.Ensure that the door is latched by trying to remove the door without pressing the arrow button.
NOTE: The power-up sequence will start, the pump will go through an electronic self-test, and the pump will beep six times at the end of the power-up sequence. All of the display indicators, the software revision level, and each parameter will appear briefly.
Setup Pump &
13

Section 2: Pump Setup and Programming
WARNING: If a gap is present anywhere between the battery door and the pump housing, the door is not properly latched. If the battery door becomes detached or loose, the batteries will not be properly secured; this could result in loss of power, nondelivery of drug, and, depending on the type of drug being administered, death or serious injury to the patient.
Programming
Pump Setup &
14

Section 2: Pump Setup and Programming
6.Resume operation of the current program by pressing and holding ⁄to start the pump or proceed to program the pump.
NOTE:
•The life of the batteries is dependent on the amount of medication delivered, delivery rate, battery age, and the temperature.
•At the rate of one 50 ml Medication Cassette™ Reservoir per day, alkaline batteries will usually last about seven days.
•The power of the batteries will be quickly depleted at temperatures below +10°C (50°F).
CAUTION: Do not store the pump for prolonged periods of time with the batteries installed. Battery leakage could damage the pump.
PumpProgramming
& Setup
15

Programming
Pump Setup &
Section 2: Pump Setup and Programming
Watching Power Up
When you install the batteries, the pump will start its power up sequence during which it performs self-tests and displays programmed values. Watch for the following:
•Pump model number and last error code (“LEC”) if any, will appear.
•The software version will appear.
•The display will turn on, showing a series of blocks. Look for any blank areas, which would indicate a faulty display.
•The display will turn off briefly.
•The pump’s program screens will appear, followed by screens showing the Air Detector status, Upstream Occlusion sensor status, and lock level setting. The pump will beep after each screen. If messages appear, see the Messages and Alarms Table in Section 5 of this manual for further explanation and instruction.
•When power up is complete, six beeps will sound, and the pump will be stopped on the main screen.
NOTE: To move quickly through the power-up screens, press „repeatedly. To skip the automatic review entirely, press Î. If you attempt to skip screens before the pump is powered up, it will not respond.
16

Section 2: Pump Setup and Programming
Changing to Lock Level 0 (LL0)
Before programming the pump, make sure the pump is set to LL0. LL0 allows the clinician to access all programming and operating functions.
1.Make sure the pump is stopped. Press Œ. The current lock level will appear. (If the lock level is already LL0, press „to exit.)
2.Press ´or Îuntil “LL0” appears.
3.Press Œagain or ¤. “Code 0” will appear.
4.Press ´or Îuntil the Lock Level Code “65” appears.
WARNING: Do not disclose to the patient the pump’s security codes or any other information that would allow the patient complete access to all programming and operating functions. Improper programming could result in death or serious injury to the patient.
5.Press Œor ¤to set the new lock level.
PumpProgramming
& Setup
17

Programming
Pump Setup &
Section 2: Pump Setup and Programming
Programming the Pump: General Instructions
The procedure for changing a programmed setting is similar for most programming screens.
•Make sure the pump is stopped and in Lock Level 0.
•To begin programming, start at the main screen and press
„.
•To change a setting, press ´or Îuntil the desired setting appears. (Press and hold these keys to change values with increasing speed.)
•Press ¤within 25 seconds to confirm a change or the screen will revert to the previous setting.
•If any key other than ¤is pressed, “Value not saved” will appear. Press „to return to the screen being programmed, scroll to the desired value, and press ¤.
•Press „to advance to the next screen.
•To leave a setting unchanged, press „to go to the next screen.
18

Section 2: Pump Setup and Programming
Delivery Methods
The CADD-Legacy™ PLUS pump has two delivery methods, and provides delivery in milliliters per hour:
•Continuous Delivery Mode (up to 125 ml per hour)
•Intermittent Delivery Mode (up to 125 ml per hour)
The Continuous Delivery Mode (CDM) permits a steady infusion rate. In this mode, you can program the pump to deliver medication at a constant rate in milliliters per hour.
Delivery
Rate (ml/hr)
Time
The Intermittent Delivery Mode (IDM) delivers a specified dose volume over a specified duration. You may repeat the dose in a cycle of up to 96 hours. The KVO feature allows you to deliver a minimal amount of drug between doses to maintain catheter patency. You may also delay the start of dose delivery using the “Dose Starts In” feature.
|
Cycle |
|
(ml) |
Delay |
|
Start |
|
|
Volume |
Period |
Period |
|
|
|
|
KVO |
KVO |
|
Time |
|
PumpProgramming
& Setup
19
 Loading...