

Page 1

CADD™-Solis Administrator Initial Software Setup Guide
Table of Contents
INITIAL SOFTWARE SETUP ................................................................................................................ 2
Establishing a Database Connection ................................................................................................ 2
Change User Password ....................................................................................................................... 3
Pump Selections ................................................................................................................................... 3
Administrator Auto Logout ................................................................................................................... 3
CADD®-Solis Pump Settings .............................................................................................................. 3
MANAGE USER ACCOUNTS ............................................................................................................... 4
Create or Modify User IDs ................................................................................................................... 4
User Permissions ................................................................................................................................. 4
For use with the CADD™-Solis Medication Safety Software Administrator 3.1 and CADD®-Solis 3.0 pumps.
This information is provided to you as a guide. For more detailed information, refer to the CADD™
‑
Solis Medication Safety Software Installation and Technical Manual, the CADD™‑Solis Medication
Safety Software – Administrator 3.1 help menus, and the CADD®-Solis v3.0 Ambulatory Infusion Pump
Operator’s Manual.
Page 1 of 4
Page 2
CADD™-Solis Administrator Initial Software Setup Guide
INITIAL SOFTWARE SETUP
Once you have successfully installed the software, use the following section as a guide for initial setup of the
CADD™-Solis Database and Administrator application NOTE: The database location can only be changed AFTER
installation of the software.
Establishing a Database Connection
The CADD™‑Solis Administrator software requires that a database connection is configured before a user can log
in. This section provides initial setup instructions for entering the database connection settings (on a local pc,
NOT on a facility’s server) and logging into Administrator using the default admin account.
Note: If connecting the database to a server, contact your facility’s system administrator (e.g. IT specialist or
pharmacy/software administrator) to obtain the Server Name and Advanced Connection Settings that you will
need to connect the database to your facility’s server.
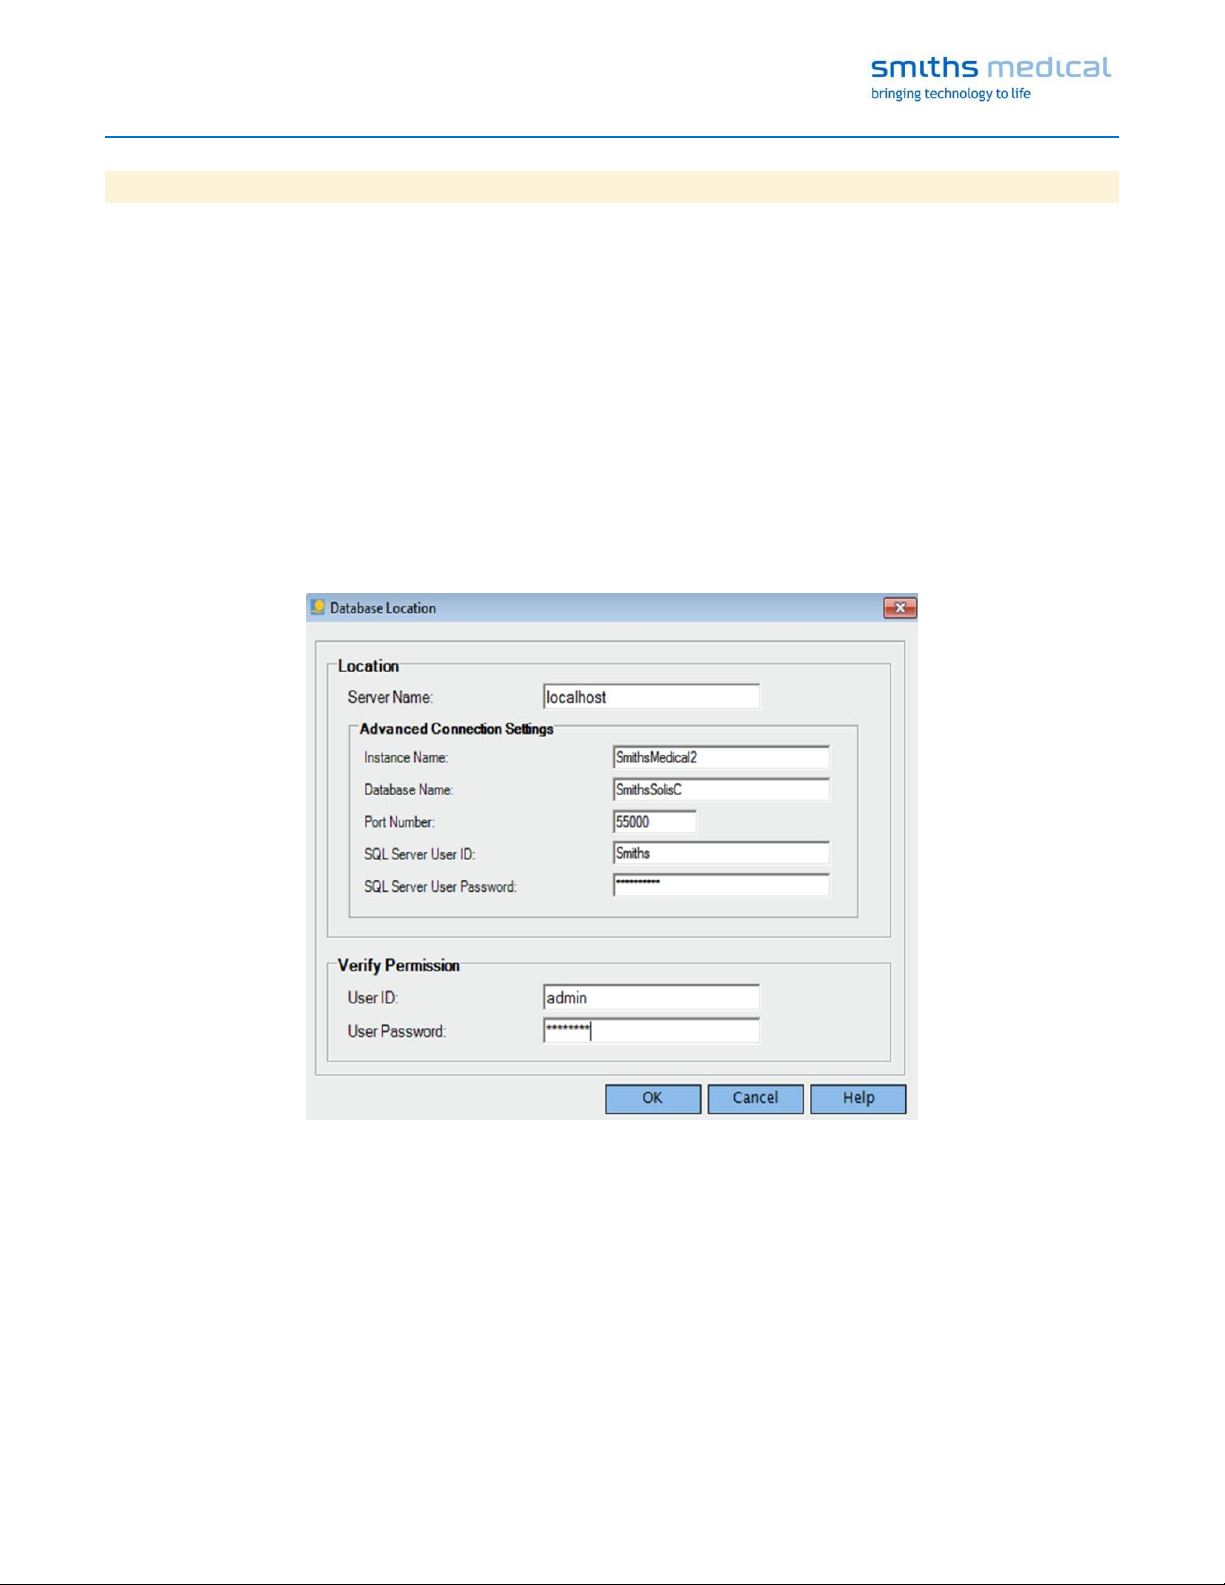
1. Launch the CADD™‑Solis Administrator application and then go to Settings > Database Location.
2. In the Server Name field, type localhost. Note: Please never put localhost in the server name during the
initial installation. Only put the local host computer name or actual server name if there is one. After the install
however, you can enter localhost if the database was installed locally.
3. Default database settings are provided under the Advanced Connection Settings; do not change any of these
settings unless told to by your system administrator (i.e. in order to connect to your facility’s server).
4. Within the Verify Permissions area, enter the default User ID and User Password (admin, password).
5. Click Ok. A message displays to confirm successful database connection. You should now be able to log in
using the default admin account (admin, password).
Page 2 of 4
Page 3

CADD™-Solis Administrator Initial Software Setup Guide
Change User Password
Users do not need to be logged in to change their passwords. Note: There is no password retrieval for the admin
User ID; be sure to store the changed password in a secure location outside of the application.
1. From the menu bar, select Settings > Change User Password.
2. Enter the User ID, old password, new password, and confirm new password.
3. Click OK. A message is displayed to confirm that the password has been changed.
Pump Selections
The pump selections determine for which pumps Protocol Libraries can be created and sent to. Pump selection
are made during the initial software installation, but can be modified after installation by a user with the Protocol
Administrator permission. Note: If the CADD™-Solis Database is connected to your facility’s server, changes
made by the software administrator will carry over.
1. From the menu bar, select Settings > Pump Selections.
2. Verify that only the CADD®-Solis Pump is selected.
3. Click OK to save or Cancel to exit without saving.
Administrator Auto Logout
Users will be logged out of the software application automatically if it has been idle for a specified amount of time.
This setting can be modified by a user with the Protocol Administrator permission. Note: If the CADD™-Solis
Database is connected to your facility’s server, changes made by the software administrator will carry over.
1. On the menu bar, select Settings > Administrator Auto Logout.
2. Select the amount of time (1 – 30 min) the application can be idle before the user is logged out automatically.
3. Click OK to save or Cancel to exit without saving.
IMPORTANT: To prevent unauthorized access to the application and the Protocol Libraries, users should log out
manually when not using the application by clicking the Log Out button.
CADD®-Solis Pump Settings
You can choose to allow the software to set the pump's clock to the local PC date and time during pump
communications (pump MUST be on the home screen during pump communication for this to work). Note: If the
CADD™-Solis Database is connected to your facility’s server, changes made by the software administrator will
carry over.
1. From the menu bar, select Settings > CADD®-Solis Pump Settings.
2. Place a check in the checkbox next to Set pump's clock to PC clock time.
3. Click OK to save or Cancel to exit without saving.
Page 3 of 4
Page 4

Permission
Capabilities
Protocol
Administrator
Select pump applications.
Access log and pump reports.
Manage user accounts and library
permissions.
Export users, Protocol Libraries, and usage
logs.
Create, save, and delete Protocol Libraries.
Update and restore Protocol Libraries.
Set Administrator auto logout.
All Send Protocols and Send Libraries
capabilities (described below).
Send Protocols
Not applicable if using Administrator to send a library to a CADD®-Solis pump.
Send Libraries
Send a Protocol Library to a pump.
Upload pump history from a pump into the
software via Get History.
Access pump reports via Get History.
System
Administrator
Connect to a database/library.
Manage user accounts and library
permissions.
Export and Import users, Protocol Libraries,
and usage logs.
Archive data. Backup and restore
database. Import data from a version 2.0
database.
Get or Send a Pump ID from/to a CADD-
Prizm® PCS II pump.
CADD™-Solis Administrator Initial Software Setup Guide
MANAGE USER ACCOUNTS
Users with System or Protocol Administrator permission can create and administer user accounts and set user
application permissions and access to Protocol Libraries. User accounts can also be removed.
Create or Modify User IDs
1. From the menu bar, select Settings > User Accounts >
Manage User Accounts.
2. To add a new user, click the New User button or to
modify an existing user, select their User ID from the list.
3. If creating a new user, enter the User ID, Password, and
Confirm Password for the user. The User ID and
password must each contain a minimum of three
alphanumeric characters (letters, numbers, or a
combination of both). Users can use the Change User
Password feature later to change their passwords.
4. Place a check next to the permission(s) you wish to
assign to the user account (see section below on User
Permissions).
5. If Protocol Libraries have been created, the list of libraries
is displayed in the Library Permissions box. To grant the
user access (e.g. Biomed) to a Protocol Library, click to
place a check next to the library to which you want to give
the user access.
6. When finished, click Save and then Close.
User Permissions
Page 4 of 4
 Loading...