

Page 1

Graseby Instruction Manuals
This publication has been compiled and approved by Graseby
Medical Ltd for use with their respective products. It is supplied
in this format to permit users to access the text and illustrations
for their own use e.g. training and educational purposes.
Users of the equipment must ensure that they have read and
understood the contents of the complete manual including the
warnings and cautions and have been trained in the correct use
of the product.
Graseby Medical Ltd cannot be held responsible for the
accuracy and any resulting incident arising from information
that has been extracted from this manual and compiled into the
users documentation.
These manuals are subject to revision and it is the users
responsibility to ensure that the correct version of manual/
text/illustration is used in conjunction with the equipment.
Page 2

Model 500
and Micro 505
Volumetric
Infusion
Pump
Instruction
Manual
Page 3

Published by Graseby Medical Limited.
All possible care has been taken in the preparation of this publication, but Graseby
Medical Limited accepts no liability for any inaccuracies that may be found.
Graseby Medical reserves the right to make changes without notice both to this
publication and to the product which it describes.
Copyright © 2002 Graseby Medical Limited
No part of this publication may be reproduced, transmitted, transcribed, or stored in
a retrieval system or translated into any human or computer language in any form or
by any means without the prior permission of Graseby Medical Limited.
GRASEBY MEDICAL LIMITED
Colonial Way,
Watford,
Hertfordshire,
United Kingdom,
WD24 4LG
Telephone: +44 (0)1923 246434
Facsimile: +44 (0)1923 231595
http://www.graseby.co.uk
Registered in England. Company number 995550
Trademarks and acknowledgements:
Graseby and Smiths are registered trademarks of the Smiths Group plc.
All other trademarks are acknowledged as the property of their respective owners.
Page 4

Graseby Medical Ltd.
Warnings
Warnings and Cautions
Warnings tell you about dangerous
conditions, that could lead to death or
serious injury to the user or patient, that
can occur if you do not obey all of the
instructions in this manual.
1. WARNING: You should ensure that the
performance offered by the pump is fit for the
intended purpose. Failure to do so may result
in compromised function of the product,
patient injury or user injury.
2. WARNING: Do not use a faulty pump. If the
pump detects a fault when it is first turned on,
or if it develops a fault during operation then a
continuous system alarm sounds. The pump
must be referred to a suitably qualified
technician or returned to Graseby Medical in
order to have the fault rectified.
3. WARNING: Before using the pump, it should be
inspected for physical damage. The pump
should not be used if damage is evident, and
should be returned to service personnel for
repair before being returned to use. Failure to
do so may result in compromised function of
the product, patient injury or user injury .
4. WARNING: Do not use the pump if you detect
any cracks, chips and loose or bent parts, or
if the buttons do not move in and out freely
when they are pressed. Failure to do so could
cause inadvertent disconnection of the pumps.
5. WARNING: Do not push or pull on the pumps,
or the IV pole may tip over or the pumps fall
to the floor. Do not try to remove modular
connected pumps from the IV pole whilst they
are joined together. Either of these could
cause the administration set to separate from
the fluid container thus spilling the
medication, or the pumps themselves could be
damaged.
6. WARNING: Correct entry of data is essential in
order to ensure that the intended infusion is
performed. Before confirming any displayed
data when setting up an infusion, you should
ensure that it is correct. Failure to do so may
result in compromised function of the product,
patient injury or user injury.
7. WARNING: Dose-rate calculation requires
care in entering data. Refer to specific product
drug labelling for information on appropriate
administration techniques and dosages.
Entering incorrect data may result in patient
injury or death.
8. WARNING: When delivering drugs in the
epidural space, use only those medications
specifically indicated for epidural use.
Epidural administration of other drugs could
result in serious patient injury or death.
9. WARNING: The use of administration sets
incorporating injection sites could lead to an
improper or inappropriate infusion resulting in
serious patient injury or death.
10. WARNING: Failure to clearly identify the pump
and administration sets could lead to an
improper or inappropriate infusion resulting in
serious patient injury or death.
11. WARNING: Remove any air to pre vent air
embolism. The presence of air within the
infusion can result in complications resulting
in patient injury or death.
12. WARNING: T o avoid o ver infusion, do not
prime the infusion line when the administration set is connected to the patient. Over
infusion can result in patient injury or death.
13. WARNING: The Occ lusion alarm level must be
checked before starting an infusion to ensure
that it is appropriate for the infusion. Failure
to do so may result in an unacceptably slow
time to Occlusion alarm, resulting in patient
injury or death.
14. WARNING: Prior to starting an infusion,
inspect the fluid path for kinks, a closed clamp
or other obstructions. Failure to do so may
result in the infusion not being delivered
correctly, resulting in patient injury or death.
15. WARNING: If using a blood pressure cuff above
the patient’s venipuncture site take extra care
in setting the Occlusion alarm pressures.
Failure to do so may result in unnecessary
Occlusion alarms, resulting in patient injury
or death.
16. WARNING: The Occ lusion detection system
measures downline pressure in the administration set, but does not detect infiltration. In
accordance with local protocol, you must
periodically inspect the patient’s infusion site
for signs of infiltration. Failure to do so may
result in an unacceptably slow time to
Occlusion resulting in patient injury or death.
17. WARNING: If an Occlusion alarm occurs,
immediately clamp the line to the patient. Then
inspect the fluid pathway to determine what
has caused the obstruction. An unintentional
bolus of medication can result in patient injury
or death.
Volumetric Infusion Pumps
Page 5

Warnings and Cautions
Graseby Medical Ltd.
18. WARNING: Do not run parallel infusion lines
below the pump. Delivering a Secondary
infusion means running a second line
the pump. Failure to do so may result in an
inaccurate delivery of medication, resulting in
patient injury or death.
19. WARNING: Chec k the Secondary set carefully ,
since an occlusion above the pump on the
Secondary line could cause the Primary fluid
to be delivered instead of the Secondary
infusion. Administering the wrong medication
may cause serious patient injury or death.
20. WARNING: The Secondary volume to be infused
must match the amount of fluid in the
secondary container. Primary flow resumes
when the secondary container is empty. If the
volumes do not correspond, the wrong infusion
may be delivered which could cause serious
patient injury or death.
21. WARNING: Correct management of battery
charging, as described in this documentation
is essential to ensure that the pump can
operate on battery for the time specified.
Failure to do so may result in compromised
function of the product or patient injury.
22. WARNING: If a bac kup alarm sounds, the pump
should be immediately removed from the
patient and sent to be repaired by a Graseby
Medical qualified technician. Failure to do so
may cause patient injury or death.
23. WARNING: F ailure to use the power cord
retainer means that the pump may be
accidentally or erroneously disconnected from
above
the mains. Although there is a battery backup
in case this happens, the battery may not be
charged sufficiently . Consequentl y , there is a
risk of the pump not functioning which could
lead to patient injury or death.
24. WARNING: Do not open the pump housing.
Refer all service faults only to qualified
technical personnel. Opening the pump
housing may cause electric shock leading to
patient or user injury or death.
25. WARNING: When the pump is carrying out an
infusion, to ensure that electrical safety is
maintained, only items of equipment that
conform to EN60950 are to be connected to the
RS232 connector situated at the back of the
pump, otherwise patient safety may be
compromised.
26. WARNING: While Graseb y Medical Limited
have taken all reasonable steps to ensure that
the pump operates correctly while under
remote control, it is the responsibility of the
person who designs and implements the
controlling device to ensure that the resulting
system (pump and controlling device) is fit for
its intended purpose. Failure to do so may
result in compromised function of the product,
patient injury or user injury.
27. WARNING: Use onl y Graseby Medical
administration sets with this product. Failure
to do so may result in compromised system
accuracy leading to complications resulting in
patient injury or death.
Cautions
Cautions tell you about dangerous
conditions that can occur and cause damage
to the pump if you do not obey all of the
instructions in this manual.
1. CAUTION: Refer all service, repair and
calibrations only to qualified technical
personnel. Unauthorised modifications to the
pump must
2. CAUTION: Do not autoclave, steam sterilize,
ETO sterilise or subject the pump to
temperatures in excess of 55° C (131° F).
Excessive temperatures may cause damage to
the pump.
3. CAUTION: T o pre vent serious damage to the
pump it must
exposed to strong organic solvents. Wipe off
spills immediately. Do not allow fluid or
residues to remain on the pump. Additionally ,
not be carried out.
not be immersed in any liquids or
the pump is not designed to allow it to be
sterilised. Failure to observe these cautions
may cause internal damage to the pump.
4. CAUTION: Carry out periodic cleaning
following the detailed instructions in the
Volumetric Infusion Pumps Service Manual
not use unapproved cleaning agents.
5. CAUTION: When turning the pump on, if
screens similar to those illustrated are not
displayed, do not use the pump, and send the
pump to authorised service personnel.
6. CAUTION: Only carry the pump by the handle.
Failure to do so may result in damage to the
pump, or the pump may be dropped which
could cause internal damage to the pump.
7 CAUTION: The bac klight has a limited life and
may , if used constantly, cause the light to dim.
Eventually the message display may then need
to be replaced. T o preserve the life of the
message display , y ou should only turn on the
Message Display Light as described here if it
is specifically required. Misuse of this feature
could lead to both battery and LCD depletion.
. Do
Volumetric Infusion Pumps
Page 6

Graseby Medical Ltd.
Contents
Contents
New features of version 0.71 software..............................................................v
Chapter 1 - Introduction
Introduction to the 500/505 pumps .............................................................1 - 1
Model 500 Volumetric pump...............................................................................1 - 1
Micro 505 Volumetric pump ................................................................................1 - 1
Epidural administration ......................................................................................1 - 2
Pump features ....................................................................................................1 - 3
Chapter 2 - Operating the pump
Introduction.................................................................................................. 2 - 1
Who should read this chapter ............................................................................ 2 - 1
What this chapter covers ....................................................................................2 - 1
Front of the pump ........................................................................................ 2 - 2
Indicators and displays ....................................................................................... 2 - 2
Programming keys .............................................................................................2 - 3
Rear of the pump .........................................................................................2 - 4
Connecting the pumps to an IV pole .......................................................... 2 - 5
Switching on .......................................................................................................2 - 7
Switching the pump on and off................................................................... 2 - 7
Switching off .......................................................................................................2 - 8
Using the pump on battery .................................................................................2 - 8
Sounds on the Volumetric......................................................................... 2 - 10
Audio alarm ......................................................................................................2 - 10
Quiet Pump mode.............................................................................................2 - 11
Alarms and computer control ...........................................................................2 - 11
Types of infusion .......................................................................................2 - 12
Primary .............................................................................................................2 - 12
Primary and Secondary .................................................................................... 2 - 13
Primary and Bolus ............................................................................................ 2 - 14
Ending a Secondary infusion ........................................................................... 2 - 14
Volumetric Infusion Pump Instruction Manual
i
Page 7

Contents
Graseby Medical Ltd.
The effect of Options settings on infusions ............................................. 2 - 15
Infusing with Rate and VTBI limits enabled ......................................................2 - 15
Setting up a Primary Infusion ................................................................... 2 - 16
Prepare the solution ......................................................................................... 2 - 16
Prime the administration set - Example ........................................................... 2 - 17
Load the cassette into the pump ......................................................................2 - 18
Setting the Occlusion Alarm .............................................................................2 - 18
Primary infusion 5 or 6-Step Setup ..................................................................2 - 19
During the infusion .................................................................................... 2 - 20
If the infusion will not start running...................................................................2 - 20
Infusion information displays ............................................................................2 - 21
Running Rate Change (Rate titration) ............................................................. 2 - 21
Security on the pump ........................................................................................2 - 22
Display the Drug Label ..................................................................................... 2 - 23
Stop the infusion...............................................................................................2 - 23
If an occlusion is detected ................................................................................2 - 23
Change the Occlusion alarm setting ................................................................2 - 24
Ending the Primary infusion ..................................................................... 2 - 25
KVO infusion .....................................................................................................2 - 25
About Secondary Infusions .......................................................................2 - 26
Setting up a Secondary infusion ......................................................................2 - 26
Lower the Primary solution container .............................................................. 2 - 27
Prime the Secondary administration set ..........................................................2 - 27
Connect the Secondary to the Primary administration set ...............................2 - 28
About the Secondary Volume to be Infused ..................................................... 2 - 28
Program the Secondary infusion ...................................................................... 2 - 29
Secondary infusion - Bolus enabled ................................................................2 - 30
Running a Bolus infusion..........................................................................2 - 31
Ending a Secondary infusion ........................................................................... 2 - 32
Ending a Bolus infusion ................................................................................... 2 - 32
Checking infusion totals............................................................................ 2 - 33
Total Volume infused ........................................................................................2 - 33
Primary totals ....................................................................................................2 - 34
Secondary totals...............................................................................................2 - 34
Bolus totals .......................................................................................................2 - 34
Re-running infusions at the same rate.............................................................2 - 35
ii
Volumetric Infusion Pump Instruction Manual
Page 8

Graseby Medical Ltd.
Contents
Chapter 3 - Options
Introduction.................................................................................................. 3 - 1
Options available................................................................................................3 - 1
Using options ......................................................................................................3 - 2
1. Standard Message...................................................................................3 - 3
2. Time Remaining......................................................................................3 - 3
3. Message Display Light............................................................................3 - 4
Tur ning the light on and off .................................................................................3 - 4
4. Battery Test ..............................................................................................3 - 5
Using the Battery Test option ..............................................................................3 - 5
5. Quick Rate Change ................................................................................. 3 - 7
Performing Quick Rate Changes........................................................................3 - 7
6. Rate Taper ................................................................................................3 - 8
To enter Rate Taper ............................................................................................3 - 9
To exit Rate Taper ...............................................................................................3 - 9
To program a Rate Taper by ‘Total Time’ ..........................................................3 - 10
To program a Rate Taper by ‘Maximum Rate’..................................................3 - 12
Using the ‘End Early’ feature ............................................................................3 - 14
Resuming, restarting or reprogramming the Rate Taper .................................3 - 15
Programming or reprogramming the Rate Taper with Limits set ..................... 3 - 16
7. V olume Over Time (VOT).......................................................................3 - 17
To use Volume Over Time.................................................................................3 - 18
8. Dose-Rate Calculation........................................................................... 3 - 19
Dose-Rate Calculation Recovery ....................................................................3 - 19
To enter or exit Dose-Rate Calculation ............................................................ 3 - 20
Dose-Rate Calculation steps ...........................................................................3 - 20
Dose-Rate Calculation programming example ...............................................3 - 23
Changing the dosing rate without stopping the infusion .................................3 - 25
Changing the infusion rate without stopping the infusion ............................... 3 - 26
Dose or rate change alarms.............................................................................3 - 27
Programming or reprogramming Dose-Rate Calculation with Limits set........ 3 - 28
Setting Rate and VTBI limits......................................................................3 - 29
Minimum and Maximum Infusion Rates...........................................................3 - 29
To set the minimum and maximum infusion rate.............................................. 3 - 30
Maximum VTBI..................................................................................................3 - 31
Volumetric Infusion Pump Instruction Manual
iii
Page 9

Contents
To set the maximum infusion volume ............................................................... 3 - 31
Programming and running infusions with limits ...............................................3 - 32
Graseby Medical Ltd.
KVO rate......................................................................................................3 - 33
Setting a KVO rate ............................................................................................3 - 33
Drug Label ..................................................................................................3 - 34
Drug Library ......................................................................................................3 - 34
Checking the current drug label....................................................................... 3 - 35
Selecting a new drug label ............................................................................... 3 - 35
Clearing the drug label ..................................................................................... 3 - 36
Chapter 4 - Troubleshooting
Introduction.................................................................................................. 4 - 1
What’s in this chapter.......................................................................................... 4 - 1
Who should read this chapter ............................................................................ 4 - 1
Handling problems with the pump .............................................................4 - 2
Pump Messages ...........................................................................................4 - 3
Pump will not switch on ...................................................................................... 4 - 3
Programming Messages with alarms .................................................................4 - 3
Warning Messages with alarms ......................................................................... 4 - 3
Warning Messages with no alarms .................................................................... 4 - 7
Instrument Care............................................................................................4 - 8
Specifications/Standards
Specifications.............................................................................................. S - 1
Standards .................................................................................................... S - 9
T rumpet curves ......................................................................................... S - 10
Appendix
Nurse-Call Feature....................................................................................... A - 1
Index
iv
Volumetric Infusion Pump Instruction Manual
Page 10

Graseby Medical Ltd.
Contents
New features of version 0.71 software
The information in this section is
intended for technicians and clinicians
already familiar with earlier versions
of the Graseby 500/505 volumetric
pump. It summarises the changes to
the pump that appear with version 0.71
of the pump software:
• new menu,
• new options,
• new features that the menu and
options provide.
To find out the software version of a
particular pump, check the instructions
label on the right side of the pump. If
there are more than eight options
listed, then the software version is 0.71
or later.
For full details on how to use the pump
see the Volumetric Instruction Manual.
For information on configuring the
pump, see the Technical User Manual,
and for more detailed technical
information, obtain a copy of the
Volumetric Service Manual.
New Menu
A Technician Menu has been introduced,
to simplify the configuration of each
pump. Some of the items on the
Technician Menu affect how the pump
behaves; others control the options that
appear to the pump user when they
press the Options button to show the
Options menu. The configurable items
on the new Technician Menu are shown
on page 12 of the Technical User
Manual.
If the Technician Menu settings are left
at their factory defaults, the pump
behaves as the previous version of the
pump.
New Options
The new options (and some of the
previous options) can be enabled on the
Technician Menu. This means that they
can appear when appropriate, but can
be disabled if not required. On the
instruction label on the pump, Options
numbered 1 to 8 are the ones that
appeared in previous versions of the
pump software. The additional new
options shown on the label are:
• Primary infusion Minimum
• Primary infusion Maximum
• Primary Max Volume to be infused
• Secondary/Bolus Minimum
• Secondary/Bolus Maximum
• Secondary/Bolus Max Volume to be
infused
• KVO Rate
• Drug Library to allow selection and
display of a drug label.
New features
The new menu and new options in
version 0.71 software provide a number
of new features. These fall into the
following broad areas:
• Infusion mode features
• Safety features
• Display features
• Servicing features.
Infusion mode features
Using the Technician Menu, the pump
can be configured:
• to stop at the end of a Secondary
infusion, or to continue infusing and
automatically switch to the
programmed Primary rate;
Volumetric Infusion Pump Instruction Manual
v
Page 11

Contents
Graseby Medical Ltd.
• to allow a Bolus infusion to be
programmed where the volume
infused is deducted from the
primary infusion volume to be
infused; to highlight this feature,
the key previously called
“Secondary” is now called
“Secondary/Bolus”
• to allow the user to set a KVO rate
for an infusion, or remain at the
default rate configured for the
particular pump;
• to use the Occlusion Alarm level
specified for an infusion, or remain
at the configured default alarm
level;
• to allow access to a previously
programmed Dose-Rate Calculation
infusion when the pump is switched
on (Dose-Rate Calculation recovery),
or display the standard messages.
Safety features
• a timeout safety feature has been
added. This means that when
messages are not actioned within
the timeout period, for example
setting a value, the pump reverts to
the previous display.
• safety keypad lockout, this feature
is only activated when operating the
pump on AC power. It allows the
user to lockout the keypad after
setting the pump up for use, so that
it can be ready for infusion at a
later time.
Configurable safety features that can be
controlled on the Technician Menu are:
• automatic keypad lock after one
minute, to prevent malicious
tampering, and increase patient
safety;
• preset rate and VTBI limits, so that
Infusion Rate and Volume to be
Infused are limited to a suitable
range; this prevents values being
programmed accidentally which are
inappropriate for infusions in
particular environments (such as
epidural infusions, or paediatric
applications).
Display features
• configured parameters are shown on
the Message Display when the pump
is switched on.
Configurable display features that can be
controlled on the Technician Menu are:
• the backlight may be activated when
the keypad is touched, or kept on
permanently;
• one of 30 preset drug labels may be
selected and viewed as required
during an infusion;
• the display of micrograms (when
programming an infusion using
dose-rate calculation) can be shown
as ‘µg’ or ‘mcg’;
• the time display may include the
suffix GMT, or the suffix can be
suppressed if it is not appropriate.
Servicing features
On the Technician Menu, the pump can
be programmed with a pump ID to suit
the hospital protocol, and a service due
date:
• the ID, for example the serial
number of the pump, or an
alphanumeric pump name, is
displayed each time the pump is
turned on;
• when a Service Date is set, the date
is displayed each time the pump is
switched on. An alarm sounds when
the date is reached.
vi
Volumetric Infusion Pump Instruction Manual
Page 12

Introduction
Chapter 1
Page 13

Graseby Medical Ltd.
Introduction
Introduction to the 500/505 pumps
The Graseby Medical 500 and 505
Volumetric pumps are designed for use
in infusion therapy in both venous and
arterial infusions. They offer both
standard and optional features
bringing accurate fluid delivery to the
patient.
This makes them ideal for use in
general care, home care, and intensive/
critical care areas.
The Model 500 and Micro 505 pumps
are very similar in design. The
differences are in colour, graphics and
in the maximum rate and volume to be
infused that can be programmed for an
infusion.
The main features of the pumps are
described starting on page 1-3. For full
details on the differences between the
500 and 505, see the Specification
section at the end of this manual.
Read the entire contents of this
manual carefully before using the
pump.
Model 500 Volumetric pump
The Model 500 is designed for use in all
areas, as it can be programmed with an
infusion rate of up to 999 millilitres per
hour, and a maximum volume to be
infused of 9999 millilitres.
Micro 505 Volumetric pump
The Micro 505 is designed for use in
paediatric/neonatal environments and
for fluid restricted patients. It can only
be programmed with an infusion rate
below 100 millilitres per hour, and the
maximum volume to be infused is 999.9
millilitres.
Volumetric Infusion Pump Instruction Manual
1 — 1
Page 14

Introduction
Epidural administration
Graseby Medical Ltd.
Both the Model 500 and the Micro
505 pumps may be used for epidural
administration.
Anaesthetics
Epidural administration of
anaesthetics is limited to short-term
(not to exceed 96 hours) infusion, with
indwelling catheters specifically
indicated for short-term delivery of
anaesthetic drugs.
Analgesics
Epidural administration of analgesics
is limited to use with indwelling
catheters that are specifically indicated
for short or long term delivery of
analgesic drugs.
To prevent infusion of drugs not
indicated for epidural use and to avoid
inappropriate delivery rates when
using the pump for epidural
applications:
• use the pump’s Maximum Rate
option, to set a maximum infusion
rate of 20 mL/h on a pump to be
used for epidural administration.
This feature is described fully in
Chapter 3, Options;
• do not use IV administration sets
which contain injection sites;
• differentiate the pump and IV set
being used for epidural delivery from
those being used for other routes of
administration. A yellow Epidural
Label Set for the Volumetric
Infusion Pump (part number TPF-
00306) is available from Graseby
Medical. The labels should be stuck
on the front, top and sides of the
pump to help staff to identify a
pump that is dedicated to epidural
application.
WARNING: When delivering drugs in the
epidural space, use only those
medications specifically indicated for
epidural use. Epidural administration of
other drugs could result in serious patient
injury or death.
1 — 2
Volumetric Infusion Pump Instruction Manual
WARNING: The use of administration sets
incorporating injection sites could lead to
an improper or inappropriate infusion
resulting in serious patient injury or
death.
WARNING: Failure to clearly identify the
pump and administration sets could lead
to an improper or inappropriate infusion
resulting in serious patient injury or
death.
Page 15

Graseby Medical Ltd.
Pump features
Introduction
The main features of the 500 and 505
pumps are listed below:
Easy to use features
The pumps have been designed to be
easy to use:
• they are easy to set up and operate,
yet with all the advanced features
typically associated with the more
complicated infusion systems;
• they have a straightforward keypad
and an easy-to-read message display;
• the unique air-in-line removal
system allows clearing of bubbles in
the line by simply opening and
closing the door: air is prevented
from going beyond the cassette; this
increases patient safety, minimises
the risk of infection and saves
operator time;
• they can be used at the bedside or as
transportable equipment; using the
internal battery which also switches
in automatically if the pump is
being used on mains power and this
is interrupted.
Use of administration sets
The pumps can only be used with
Graseby Medical administration sets.
These administration sets have the
following features:
• all Graseby Medical administration
sets incorporate a safety clip to
prevent accidental free flow when
the administration set is removed
from the pump;
• when used with Graseby Medical
blood administration sets the
pumps deliver blood and blood
products without significant
haemolysis of red blood cells.
Infusion mode features
• accurate (± 2%) fluid delivery;
• the pumps can be configured to stop
at the end of a Secondary infusion,
or automatically switch to infuse at
the programmed Primary rate;
• a Bolus infusion may be
programmed so that the volume
infused is deducted from the
primary infusion volume to be
infused;
• KVO rate may be specified for an
infusion, or remain at the default
rate for a particular pump;
• the pumps offer a quick rate change
feature for complete titration
capability;
• automatic delivery of a secondary
medication (if a secondary infusion
has been set up).
Safety features
The pumps have been designed with a
high emphasis on safety:
• there is an optional automatic
keypad lock which prevents
inadvertent operation and increases
patient safety;
• the keypad can also be locked
manually at any time;
• a pump may be configured so that
its Infusion Rate and Volume to be
Infused are limited to a suitable
range; this prevents values being
entered accidentally which are
inappropriate for infusions in
particular environments (such as
epidural infusions).
• the pumps have indicators that are
lit to show if they are running on
battery or mains;
Volumetric Infusion Pump Instruction Manual
1 — 3
Page 16

Introduction
Graseby Medical Ltd.
• when using the battery, a test is
performed on power-up and the level
is shown on the display; manual
testing is also available;
• the pumps have an RS232 interface
allowing connection to a computer
for external monitoring.
Display features
Apart from the standard display,
pumps can be configured to show extra
information, either as a standard
message display or by pressing a key to
toggle the display.
Standard displays are:
• the volume infused in the current
infusion;
• the infusion rate;
• the Volume to be Infused in the
remainder of the infusion.
Additionally:
• the rate and volume to be infused
displays are automatically adjusted
to make them easy to read in any
light;
• the time remaining in the present
infusion may be viewed;
• the total volume of fluid delivered to
your patient since the totaliser was
last cleared to be viewed; also
displayed with the total volume is
the total time (hours and minutes)
that the pump has been in use since
the totaliser was last cleared;
Using configurable displays:
• the backlight may be activated when
the keypad is touched, or kept on
permanently;
• optionally, one of 30 preset drug
labels may be selected and viewed
as required during an infusion.
Occlusion Pressure features
These features increase safety in
infusing fluid, particularly in critical
care areas such as neonatal and
paediatric care:
• when setting occlusion alarms, three
standard occlusion alarm settings
between 100 and 500 mmHg can be
made; see the Specification section
at the end of this manual for full
details of the occlusion alarm
values;
• the occlusion pressure alarm setting
when the pump switches on is
configurable; you can change the
setting for a particular infusion
using the Occlusion Alarm
Setting key;
• when an occlusion alarm sounds, the
pumping mechanism backs off to
reduce downline back pressure and
bolus potential (bolus potential is
approximately 0.3 mL regardless of
the rate and the administration set
used);
• when an occlusion is detected, the
pump does not give an occlusion
alarm immediately, but only alarms
if the occlusion pressure continues
to exceed the occlusion threshold for
up to 10 seconds; however, if such
temporary occlusions persist, then
the occlusion alarm is generated;
this helps to avoid nuisance
occlusions.
1 — 4
Volumetric Infusion Pump Instruction Manual
Page 17

Graseby Medical Ltd.
Introduction
Special infusion features
The pumps have a number of special
infusion options:
• a Volume over time option allows
the user to set the volume to be
infused and total time for the
infusion, the pump automatically
calculating the infusion rate;
• a Dose-rate calculation option which
allows automatic calculation of the
infusion rate by entering infusion
dose; patient weight (kg or lbs); drug
amount in fluid container (in MG,
Gm or mcg units), and volume of
fluid in the container, in mL;
• a Rate Tapering option allows
automatic tapering of the infusion
rate (either up or down) for
administration of IV nutrition.
Multiple use features
When multiple infusion lines are
required, two or three pumps can be
fitted together:
• modular side rails and hooks mean
that one, two, or three pumps may
be connected to a single IV pole; this
provides space saving;
• the modular connection system has
a safety feature which ensures that
the first pump must be correctly
attached to an IV pole before the
second and third pumps can be
connected.
• special menus are provided to aid in
testing, troubleshooting and service;
• the last 200 events are recorded and
available on these menus;
• downloading of the pump history is
possible using the RS232 port with
a special optional kit (Part no 0150-
0673).
Together with the ability to configure
the pump using the Technician Menu,
these features offers greater
management flexibility.
Instructions for using these functions
appear in the Technical User Guide and
the Volumetric Service Manual.
Optional features
Some pumps are optionally fitted with
a Nurse-Call Feature which allows a
pump to be connected to a hospital
nurse call system and signal alarms
occurring in the pump.
Note: This feature is not available in
all countries.
Servicing features
The pumps have been designed with a
number of features for Biomedical
engineers:
• a Service Due Indicator, allows a
service date to be set, which is
displayed on power-up with an
alarm;
Volumetric Infusion Pump Instruction Manual
1 — 5
Page 18

Introduction
Graseby Medical Ltd.
1 — 6
Volumetric Infusion Pump Instruction Manual
Page 19

Operating the pump
Chapter 2
Page 20

Graseby Medical Ltd.
Introduction
This chapter introduces the Volumetric
pump. It explains all the terminology
that you should understand, and the
techniques that you use to operate the
pump.
Who should read this chapter
This chapter is aimed at all users who
have been trained in how to use the
Volumetric pump.
It is not designed to be used as a selfteach manual, but should be used to
reinforce the best-practice techniques
demonstrated during training sessions.
What this chapter covers
Operating the pump
These sections describe physical
aspects of the Volumetric:
• front of the pump - indicators and
displays
• front of the pump - programming
keys
• rear of the pump
• attaching the pump to an IV pole
• switching the pump on and off
• using the pump on battery
• sounds on the pump.
Volumetric Infusion Pump Instruction Manual
These sections explain how to program
an infusion:
• types of infusion
• setting up a Primary infusion
• about Secondary infusions
• running a Bolus infusion.
This chapter does not cover the types of
infusion that may be run if the pump
has optional features enabled. These
are described in Chapter 3, Options.
2 — 1
Page 21

Operating the pump
Graseby Medical Ltd.
Front of a 500 series pump
Indicators and displays
2 — 2
Volumetric Infusion Pump Instruction Manual
Page 22

Graseby Medical Ltd.
Programming keys
Operating the pump
Volumetric Infusion Pump Instruction Manual
2 — 3
Page 23

Operating the pump
Rear of the pump
Graseby Medical Ltd.
2 — 4
Volumetric Infusion Pump Instruction Manual
Page 24

Graseby Medical Ltd.
Operating the pump
Connecting the pumps to an IV pole
In use, Graseby Medical recommend
that the pump should be connected to a
suitably balanced IV pole using the pole
clamp as illustrated in the diagram on
the opposite page.
The diameter of the pole must be
between 1.2 cm and 3.8 cm (0.5 and 1.5
inches).
To provide maximum stability when
using the modular connection system,
ideally, the IV pole should have 6
wheels and a low centre of gravity. The
base diameter should be 56 cm (22
inches).
Attaching a single pump to an IV
pole
To attach the pump to a suitably
balanced IV pole:
1. Loosen the screw on the pole clamp.
2. Hold the pump by the handle and
slip the arms of the pole clamp onto
the pole.
3. Tighten the screw on the pole clamp
to firmly attach the pump to the
pole.
Attaching more than one pump to
an IV pole
When multiple infusion lines are
required, you can connect up to three
pumps to a single pole using the hooks
and rails that make up the modular
connection system.
As all pumps have connectors on both
sides, you can use any one as the centre,
left, or right pump.
This diagram shows how three pumps
may be connected together using the
Volumetric’s modular connection
system:
Inspecting the modular
connections
Before connecting the pumps, you must
check that the modular connection
parts are all in good condition:
1. Carefully inspect the modular
connection system for damage,
including cracks, chips, loose or bent
parts.
2. Press the disconnect buttons several
times to make certain that the
buttons move in and out freely.
WARNING: Do not use the pump if you
detect any cracks, chips and loose or bent
parts, or if the buttons do not move in
and out freely when they are pressed.
Failure to do so could cause
inadvertent disconnection of the
pumps.
Volumetric Infusion Pump Instruction Manual
2 — 5
Page 25

Operating the pump
Graseby Medical Ltd.
How to connect pumps together
Once you have inspected the modular
connection system as described in the
previous section, connect the pumps as
follows:
1. Clamp the first pump to the IV pole.
This is now the "centre" pump.
Note: As you tighten the screw on the
pole clamp, you automatically adjust
the modular connection hook and
disconnect button. Once the pump is
securely attached to the pole, the hook is
in the correct position to allow you to
connect further pumps.
2. Take the second pump, grasping it
by the handle and hold it so that the
modular connector rails are directly
above or below the connector rails of
the centre pump.
3. Engage the edges of the modular
connector rails and slide the second
pump up or down until it is
connected to the centre pump. When
the connection is secure, you hear a
distinct click.
4. Before releasing the handle of the
second pump, double-check that the
connection is secure by moving the
pump up and down and exerting
pressure on the top of the pump.
To attach a third pump to the other
side of the first pump, repeat steps 2, 3
and 4.
Note: If the connection is loose, or the
pumps seem to wobble, disconnect
then carefully reconnect them,
making sure both edges of the
modular connectors engage. Do not
use pumps where the connection is
loose, but return them to a suitably
qualified technician for repair.
Moving an IV pole with pumps
connected
If you need to move the IV pole once the
pumps are attached, always ensure
that you grasp the IV pole with one
hand and steady the pumps with the
other hand if necessary.
Disconnecting modular
connected pumps
You must always disconnect modular
connected pumps one by one before
removing the centre mounted pump
from the IV pole.
Disconnect the left and right hand
pumps from the centre mounted pump
as follows:
1. Grasp handle of pump to be
removed.
2. Lift the pump slightly.
3. Press the disconnect button and
slide the pump up or down to
disconnect from the centre pump.
4. Place the pump in a location where
it will not be damaged.
WARNING: Do not push or pull on the
pumps, or the IV pole may tip over or
the pumps fall to the floor.
Do not try to remove modular connected
pumps from the IV pole whilst they are
joined together.
Either of these could cause the
administration set to separate from the
fluid container thus spilling the
medication, or the pumps themselves
could be damaged.
2 — 6
Volumetric Infusion Pump Instruction Manual
Page 26

Graseby Medical Ltd.
Operating the pump
Switching the pump on and off
Before switching the pump on, visually
check for any cracks on the case, or
damage to any part of the pump or its
connectors. Plug the AC mains cord into
Switching on
To switch on the pump you can do
either of the following:
• press the On/Off key
• open the front door by lifting the
latch.
Note: If the pump is switched off and
connnected to AC power and the
saftey keypad lockout feature is
active, the pump cannot be switched
on via the keypad, see Safety keypad
lockout, page 2-22.
Switch on in Quiet Pump mode
If you want to use the pump without
any key clicks and also suppress the
non-insistent alarms, you can switch on
in "quiet pump" mode:
1. Press the Silence key and keep it
pressed down.
2. Press the On/Off key.
Note: Quiet Pump operation is
cancelled when you turn off the pump.
Self test
When you switch it on, the pump
carries out a series of tests to ensure
that all components are functioning
correctly. If any electrical or mechanical
problems are detected, or if any
potential problems are detected, then a
an AC mains supply if possible. If
necessary, the pump can be run on its
internal batteries, see Using the pump
on batteries, later in this chapter.
message is displayed and the alarm
sounds. See Chapter 4, Troubleshooting
for more details on handling alarms.
Message Display at Switch on
The messages displayed when you
switch on the pump depend on which
features have been enabled on the
pump and whether or not it is
connected to the AC mains supply.
If all the pump options have been
enabled, the pump displays messages
to provide you with the following
information about itself:
• Pump Identifier
• Drug Label
• Primary Min Rate and Max Rate
• Primary Max VTBI
• Battery gauge (displayed only if the
pump is disconnected from the AC
mains supply)
• Service due date.
After switching on
When the pump has completed its self
tests, it is ready for you to program,
load a cassette (see page 2-18), or start
an infusion. You see a screen something
like this:
Volumetric Infusion Pump Instruction Manual
2 — 7
Page 27

Operating the pump
Switching off
Graseby Medical Ltd.
For safety reasons, the front door must
be properly closed and any infusion
must be on Hold before you switch off
the pump.
• If the pump is running an infusion,
press the Hold key;
• if the front door of the pump is open,
close it with the latch;
• then press the On/Off key.
Using the pump on battery
The pump contains an internal
rechargeable battery. However, in
everyday use, the pump should be
connected by its cord to a suitable AC
mains supply, if one is available. The
battery is then kept fully charged, and
will continue to be charged whilst the
pump is infusing.
The pump automatically uses the battery:
• if you switch on whilst the power
cord is unplugged, or
• if the AC power fails whilst the
pump is operating.
Switching on using the battery
When you switch on the pump, if it is
being powered by internal battery:
• you need to hold down the On/Off
key to turn the pump on. If the pump
is operating on the AC mains
supply, it switches on
instantaneously when you touch the
On/Off key;
• there is a short pause whilst the
pump carries out the Battery Test
and displays the Battery Gauge
screen to indicate the current
battery capacity:
Note: The battery is always tested
when the pump is switched on, even
though the Battery Gauge is not
displayed during Dose-Rate
Calculation, DRC Recovery or Rate
Taper infusion start up.
Testing the battery
At any time when operating on battery,
you can check the battery capacity by
carrying out the Battery Test described
in Chapter 3, Options.
Operating using the battery
During operation of the pump on
battery:
• the yellow Battery indicator is lit
• the Message Display light turns off
if the pump is left on Hold, unless
you have set the ‘Backlight on’
option, described in Chapter 3,
Options.
Low battery
When you switch on the pump, and
during operation, the pump warns you
when the battery capacity is low. If you
see the yellow Battery indicator
flashing whilst the pump is infusing,
you should plug the power cord into the
AC mains supply as soon as possible.
2 — 8
Volumetric Infusion Pump Instruction Manual
Page 28

Graseby Medical Ltd.
Operating the pump
Low battery alarms
When approximately one hour of
operation remains, the pump sounds an
alarm and displays this message:
If you see this message, plug the power
cord into the AC mains supply as soon
as possible.
If you decide that you must continue to
use the pump on battery, another
alarm sounds approximately half an
hour before it is fully discharged.
This message is displayed:
It is essential that the pump is plugged
into the AC mains supply at this point.
Recharging the battery
To charge the battery, plug the power
cord into the AC mains supply.
It takes approximately 10 hours to
recharge a completely depleted battery.
Capacity
A new, fully charged battery will
operate the pump for approximately 6
hours at 100 mL/h (99.9 mL/h on Micro
505).
The battery may discharge more
quickly if the battery has aged and is in
a poor condition even though it was
recently charged.
Pump in storage
You should connect the pump to the AC
mains supply to charge the battery
every three months, even when the
pump is not in service. This helps to
maintain the life of the battery.
WARNING: Correct management of
battery charging, as described in this
documentation is essential to ensure
that the pump can operate on battery for
the time specified. Failure to do so may
result in compromised function of the
product or patient injury .
Volumetric Infusion Pump Instruction Manual
2 — 9
Page 29

Operating the pump
Graseby Medical Ltd.
Sounds on the Volumetric
The Volumetric pump makes a 'click'
sound as you press each key. It also
sounds an audio alarm to alert you to a
condition that requires attention on the
pump: either an insistent (three-tone)
or non-insistent (two-tone) alarm. The
click and non-insistent alarm do not
Audio alarm
When the Volumetric pump requires
attention, it uses an audio alarm to
indicate that there is a problem.
Whilst sounding the alarm, it also
displays a message to explain the
problem. A full list of all the alarm
messages, their possible causes and
how to solve the problem is explained
in Chapter 4, Troubleshooting.
This section explains the different
types of alarm sounds made by the
pump.
You may hear three types of alarm from
the Volumetric:
• insistent
• non-insistent
• continuous (backup alarm).
Insistent alarm
This type of alarm indicates that fluid
delivery has stopped, or cannot be
started. It alerts you to a condition that
must be corrected before the infusion
can be started, or continued, for
example if an occlusion is detected.
The insistent audio alarm consists of
three tones: two high-pitched and one
low-pitched, repeated at two-second
intervals.
sound if the pump is switched on in
Quiet Pump mode. See next page. As a
further safety feature, the Volumetric
emits a high-pitched system alarm to
indicate a problem requiring the
attention of a Graseby Medical
qualified technician.
To silence an insistent alarm, press the
Silence or Hold key. The alarm will
recur unless you correct the problem as
described in Chapter 4, Troubleshooting.
This chapter describes each alarm, its
cause and action to take.
Non-insistent alarm
This type of alarm alerts you to a
condition that needs attention, but has
not caused the infusion to stop. For
example, you hear a non-insistent
alarm if the pump is running on
batteries and the batteries are low, or
if the infusion has switched to a KVO
rate.
The non-insistent audio alarm consists
of two tones, one high-pitched and one
low-pitched, repeated at two-second
intervals. To silence this type of alarm:
• press the Silence or Run key to
silence the alarm without stopping
fluid delivery;
• press the Hold key to silence the
alarm and stop fluid delivery.
Note: In Quiet Pump mode, there is no
audio alert for certain non-insistent
alarms. See the next page for more
details.
2 — 10
Volumetric Infusion Pump Instruction Manual
Page 30

Graseby Medical Ltd.
Operating the pump
Continuous - backup alarm
In addition to the insistent and noninsistent operational alarms, the
Volumetric pump has a fail-safe
backup alarm system. This has a
distinctive high-pitched tone:
• should the audio alarm system fail,
then the pump sounds the backup
alarm, with a 1.5 second pause
between alarm tones;
Quiet Pump mode
In some circumstances, it may be
desirable to operate the Volumetric
without the associated sounds.
For safety reasons, you cannot turn off
the insistent or continuous alarms, but
if necessary you can operate the pump
without the key-press 'click' sound and
certain non-insistent alarms. This is
called a 'Quiet Pump' infusion.
To run a 'Quiet Pump' infusion:
1. Ensure that the pump is turned off.
2. Press Silence and keep it held
down.
3. Turn on the pump with On/Off.
The keypad click and non-insistent
alarm sound is now off. The pump
remains in Quiet Pump mode until you
switch off and then on again.
• should an electromechanical system
failure occur, the pump sounds the
backup alarm continuously.
If you hear the backup alarm sounding,
you should immediately remove the
pump from the patient and have it
repaired by a Graseby Medical
qualified technician.
Silent alarms in Quiet Pump mode
When running the pump in Quiet Pump
mode, certain alarms associated with a
Secondary infusion are silent. The
alarm is silent in the following
circumstances:
• when the pump automatically
switches from Secondary to Primary
when the Secondary infusion is
complete;
• when you program the Secondary
infusion, but press the Primary key
then the Run key without running
the Secondary infusion;
• when you press Run to start the
Secondary infusion with the Volume
to be Infused set to zero.
Alarms and computer control
If a pump is being run under computer
control, you can silence it from the
computer. However, you must resolve
the problem causing the alarm on the
pump.
Volumetric Infusion Pump Instruction Manual
WARNING: If a backup alarm sounds, the
pump should be immediately removed
from the patient and sent to be repaired
by a Graseby Medical qualified technician.
Failure to do so may cause patient injury
or death.
2 — 11
Page 31

Operating the pump
Types of infusion
Graseby Medical Ltd.
Hospital protocols dictate how the
Primary, Secondary and / or Bolus
features are used, and the pump should
be configured to conform with these
protocols.
This section summarises the typical
use of these features of the pump.
Primary
For a Primary infusion, you set up the
pump to deliver solution from a single
container. This diagram shows an
example of how a pump looks when set
up for a Primary infusion using a
Standard administration set (8C-820)
The pump’s Volume to be Infused
Display shows the remaining Volume
to be Infused and on its Message
Display the pump shows the total
infused so far.
For full details on how to set up a
Primary infusion: see Setting up a
Primary Infusion, page 2-16.
Using the pump, you may carry out:
• a Primary infusion
• a Primary and a Secondary infusion
• a Primary and a Bolus infusion.
2 — 12
Volumetric Infusion Pump Instruction Manual
Page 32

Graseby Medical Ltd.
Primary and Secondary
For a Primary and a Secondary
infusion, two containers are used:
• one to deliver the Primary infusion,
for example, a hydration solution;
• a second to deliver an additional
infusion, for example an antibiotic
dose; this is sometimes called a
“piggyback” infusion.
The pump keeps separate totals for the
Primary and Secondary infusions: the
total infused in the Secondary infusion
is not deducted from the Primary
Volume to be Infused.
The pump can be configured to work in
one of two ways at the end of the
Secondary infusion: see Ending a
Secondary infusion, over the page.
For full details on how to set up a
Secondary infusion:
• first follow the steps in Setting up a
Primary Infusion, page 2-19;
• then see About Secondary Infusions,
page 2-26.
Operating the pump
Secondary
Primary
Secondary infusion with Bolus
enabled
The pump can be configured, using the
Technician Menu, to offer a Bolus
infusion as an alternative to the
Secondary infusion. If the Bolus feature
is enabled, you can:
• run a Secondary infusion, where the
volume infused is not deducted from
the Primary Volume to be Infused
or
• run a Bolus infusion, where the
volume infused is deducted from the
Primary Volume to be Infused.
Volumetric Infusion Pump Instruction Manual
2 — 13
Page 33

Operating the pump
Primary and Bolus
Graseby Medical Ltd.
With the pump configured to offer the
Bolus feature, you can carry out a Bolus
infusion as an alternative to the
Secondary infusion.
A Bolus infusion may be administered
at a different rate, with the volume to
be infused entered separately to the
Primary volume, just as for a
Secondary infusion.
However, for a Bolus infusion, the
Volume infused is deducted from the
Primary Volume to be Infused.
At the end of the Bolus, the pump
reverts to the Primary infusion at the
previously programmed Primary rate.
The Secondary Stop feature, if enabled
has no effect at the end of a Bolus.
When the Bolus feature is configured,
each time you press the Secondary/
Bolus key, the Message Display shows:
At this point, you would press 3 to
enter Rate and Volume to be Infused
for the Bolus, or to view the totals for
the Bolus infusion.
For full details on how to administer a
bolus infusion, see Running a Bolus
Infusion on page 2-31.
Ending a Secondary infusion
The Secondary Stop feature in the
Technician Menu controls how the
pump works when the Secondary
infusion is complete.
• With Secondary Stop disabled, the
pump automatically reverts to the
Primary infusion at the previously
programmed rate, so that there is a
continuous flow. When the Primary
infusion starts a non-insistent
alarm sounds.
• With Secondary Stop enabled, the
pump stops and sounds an alarm
until you manually silence it and
start the Primary infusion.
2 — 14
Volumetric Infusion Pump Instruction Manual
Page 34

Graseby Medical Ltd.
Operating the pump
The effect of Options settings on
infusions
Some of the Options settings can affect
the way you program the infusion, what
you can do during the infusion, or the
way the pump behaves. For example, if
the pump has the appropriate Options
enabled on the Technician menu, you
may choose to:
• turn on the Message Display
backlight
• set the KVO rate
• select a Drug Label
• program a Dose-Rate Calculation,
Volume Over Time or Rate Taper
infusion.
Infusing with Rate and VTBI limits enabled
However, the settings which may most
affect the way you program an infusion
are Rate and VTBI limits. Such limits
restrict the values you can use during
an infusion and their use is described
below.
If you need to make any changes to
these Options settings, you must do so
before programming the infusion. See
Chapter 3, Options for full details.
If the features for setting limits are
enabled on the Technician Menu, the
limit values can be set or examined
using the Options key. They can be set
independently for Primary and
Secondary infusions and may not all be
enabled. If Primary Rate or VTBI
limits are enabled, you can also see the
settings displayed after the pump is
switched on.
When limits are enabled, you cannot
run an infusion with a Rate or Volume
to be infused set outside the limits.
Also, you cannot change the rate while
running to go outside the limits. If you
try to do this, or if you program a value
outside the limits and then press the
Run key, you see the message:
Volumetric Infusion Pump Instruction Manual
Wherever possible check or set the
limits before you program the infusion,
especially if you might have to give a
Secondary infusion or a Bolus. The
easiest way to check Primary infusion
settings is to look at the message
display when you switch the pump on.
To check Secondary infusion settings,
you must use the Options key. Setting
limits is described in Setting Rate and
VTBI limits on page 3-29 in Chapter 3,
Options.
Limits are enabled and set for a safety
purpose (for example, where the pump
is used for Epidural administration). If
you are likely to be in a situation where
you have to give an infusion in an
emergency, ensure that when a pump is
switched off, the limits are left with
safe value settings.
2 — 15
Page 35

Operating the pump
Graseby Medical Ltd.
Setting up a Primary Infusion
To set up and run a Primary infusion
the main steps are:
• attach the pump to the IV pole,
described on page 2-5;
• set the Options for the infusion if
appropriate, particularly Rate or
VTBI Limits if they are enabled as
described on page 2-15;
Prepare the solution
Using an aseptic technique, prepare the
solution container and prime the
administration set following the
instructions provided with the set. As a
guide:
1. Remove the solution container from
its packaging and remove the cap
from the fluid outlet.
2. Remove the administration set from
its packaging and close the roller
clamp.
3. Remove the cap from the spike on
the administration set and insert
the spike into the fluid outlet on the
solution container.
4. Hang the container with the
administration set on the IV pole
and ensure that the container is the
correct height above the pump.
• prepare the solution;
• prime the administration set;
• load the administration set into the
pump;
• program the infusion;
• start the infusion.
Height of solution container above
the pump
If necessary, adjust the height of the
pole so that the bottom of the solution
container is between 15 cm and 30 cm
(between 6 inches and 12 inches) above
the top of the pump
On Model 500, 30 cm (12 inches) may be
required for rates over 500 mL/h.
On both Model 500 and Micro 505,
30 cm (12 inches) may be required when
using thick solutions and/or
60 drops/mL sets.
Note: A thick solution in this case may
be certain cytotoxic agents, lipid-based
fluids and other viscous solutions, for
example Total Parenteral Nutrition.
WARNING: Correct entry of data is
essential in order to ensure that the
intended infusion is performed. Before
confirming any displayed data when
setting up an infusion, you should ensure
that it is correct. Failure to do so may
result in compromised function of the
product, patient injury or user injury.
2 — 16
Volumetric Infusion Pump Instruction Manual
Page 36

Graseby Medical Ltd.
Operating the pump
Prime the administration set - Example
You must always follow the Instructions
for Use that accompany the
administration set to be primed. This
section shows an example to explain
the basic priming steps to be carried
out on an administration set without a
bi-directional check valve, filter,
injection site or c-clamp.
1. Squeeze the drip chamber and fill
until it is at least one third full. The
drip chamber may fill completely
during loading and/or an infusion.
This will not adversely affect the
fluid delivery or the operation of the
pump.
2. Hold the cassette inverted, so that
the roller clamp is above the
cassette, as shown here.
3. Slowly open the roller clamp to
allow the solution to flow through
and prime the cassette and the line.
You can control the flow by moving
the roller clamp as necessary.
4. When the entire set is primed, close
the roller clamp.
With the solution container hanging on
the IV pole and the administration set
spike inserted into the container, prime
the administration set as follows:
WARNING: Remove any air to prevent air
embolism. The presence of air within the
infusion can result in complications
resulting in patient injury or death.
WARNING: Use only Graseby Medical
administration sets with this product.
Failure to do so may result in
compromised system accuracy leading to
complications resulting in patient injury
or death.
Volumetric Infusion Pump Instruction Manual
WARNING: To avoid over infusion, do not
prime the infusion line when the
administration set is connected to the
patient. Over infusion can result in patient
injury or death.
2 — 17
Page 37

Operating the pump
Load the cassette into the pump
With the administration set primed
and the solution container hanging on
the IV pole, you can load the cassette
into the pump as follows:
1. Open the door of the pump by
raising the latch.
2. With the flat side of the cassette
towards you, and the roller clamp
below the cassette, match the four
holes in the corners of the cassette
with the four metal pins inside the
pump.
3. Press the cassette into place and
run your finger down the cassette to
ensure that it is flat and correctly
fitted.
4. Slide the safety clip up to the base
The safety clip on the administration
set is marked with arrows to indicate
the correct direction for insertion.
The pump is marked with a diagram
showing the position of the safety clip
slot.
of the cassette and push it fully
inward, into its slot.
5. Close the door, pushing the latch
into place.
Graseby Medical Ltd.
Setting the Occlusion Alarm
When you switch the pump on, the
Occlusion Alarm setting is always the
same, and is defined by the Technician
Menu configuration setting.
Before an infusion, always check, and if
necessary, change the setting to suit
the infusion by pressing the Occlusion
Alarm Setting key. Continue pressing
the key until you see the setting you
want. Never use a Low setting with
high infusion rates.
For full details, see Change the
Occlusion Alarm setting, on page 2-24.
2 — 18
Volumetric Infusion Pump Instruction Manual
See the Specification section at the
end of this manual for details on the
pressure values for High, Medium
and Low settings.
WARNING: The Occlusion alarm level
must be checked before starting an
infusion to ensure that it is appropriate
for the infusion. Failure to do so may
result in an unacceptably slow time to
Occlusion alarm, resulting in patient
injury or death.
Page 38

Graseby Medical Ltd.
Primary infusion setup
Once the solution is ready and the
cassette is loaded into place in the
pump, check that the Primary indicator
is lit. If not, press the Primary key.
Operating the pump
1. If Min and Max Rates and Max
VTBI are enabled on the pump,
ensure they are appropriate for the
infusion by pressing the Options
key. To find out more see page 2-15.
2. If the infusion is for a new patient,
or if you need to clear the totals for
this patient, press Total Volume
then press *.
3. Press the Occlusion Alarm
Setting key to display the current
setting and continue pressing if
necessary to set an appropriate
level.
4. Press the Rate key then use the
keypad to enter the infusion rate in
mL/h.
5. Press the Volume to be Infused key
then use the keypad to enter the
volume in mL.
Ensure that the Rate and Volume to
be infused are correct for this
Primary infusion then open the
roller clamp. Inspect the fluid path
for kinks, a closed clamp, or any
other upstream obstructions.
6. Press the Run key to start the
infusion.
WARNING: The Occlusion alarm level must
be checked before starting an infusion to
ensure that it is appropriate for the infusion.
Failure to do so may result in an
unacceptably slow time to Occlusion alarm,
resulting in patient injury or death.
Volumetric Infusion Pump Instruction Manual
WARNING: Prior to star ting an infusion,
inspect the fluid path for kinks, a closed
clamp or other obstructions. Failure to do
so may result in the infusion not being
delivered correctly, resulting in patient
injury or death.
2 — 19
Page 39

Operating the pump
During the infusion
Graseby Medical Ltd.
This section explains the main
activities you may want to carry out
once you have started the infusion.
When the infusion is running, you can:
• see the progress of the infusion from
the information shown on the
different displays on the pump;
• change the infusion rate;
• lock the keypad to provide security
on the pump;
• display the drug label (if this
feature is enabled);
• stop the infusion.
If you press Hold to stop the infusion,
you can:
• change the occlusion alarm setting
(see page 2-24);
• set up and start a Secondary
infusion (see page 2-26).
If the infusion will not start running
This will only occur if you have one or
more of the following features enabled
on the Technician menu:
• Min and Max Rate;
• Max VTBI.
If you have entered a rate which is
outside the set limits, or a VTBI which
is greater than the maximum, when you
press Run you see the message:
3. Check the prescription.
4. Check the Min and Max Rate and
Max VTBI settings by pressing the
Options key until each is displayed.
5. Make corrections as necessary.
6. Press Run to start the infusion.
and an alarm sounds. The Rate or
VTBI display also changes to the one
used before you programmed the
infusion.
If this happens, you should:
1. Silence the alarm.
2. Check the Rate or VTBI display to
see which has changed to find out
which limit has been exceeded.
2 — 20
Volumetric Infusion Pump Instruction Manual
Page 40

Graseby Medical Ltd.
Infusion information displays
Operating the pump
Message Display
The Message Display starts at zero and
counts up in mL to show the volume
infused so far, for example:
Rate display and Pumping indicator
The Rate display shows the infusion
rate. The Pumping indicator is a
horizontal line located at left of the Rate
display.
the Pumping indicator is
approximately proportional to the
infusion rate.
V olume to be Infused displa y
The Volume to be Infused display
initially shows the programmed
volume. During the infusion, it counts
down to show the volume remaining for
this infusion.
Original volume to be infused
To find out the original programmed
The indicator moves to show that the
solution is being infused. The speed of
Volume to be Infused, add the amount
in the Volume to be Infused display to
the amount in the Message Display.
Running Rate Change (Rate titration)
Whilst the pump is running, you can
change the infusion rate. For example,
you may need to adjust the initial rate
once the infusion is established.
You can also stop the infusion and then
change the rate, but the ability to
change without stopping the delivery of
the solution is especially important
with some drugs, for example,
vasoactive drugs.
You can carry out a running rate change
on Primary or Secondary infusions.
Once the infusion has started, to enter
a running rate change:
1. Press Rate.
2. Enter the new rate using the
numeric keypad.
3. Press Run within 10 seconds.
If you do not complete the rate change
within 10 seconds, an alarm sounds
and the rate reverts to the previous
running rate, followed by a message to
tell you the change has not been
completed.
If rate limits are enabled, and you
enter a rate that is outside those set,
an alarm sounds and you see:
The pump continues at the previous
rate. Silence the alarm and check the
current settings using the Options key.
If you need to change the rate limit, you
must first put the pump on hold.
Volumetric Infusion Pump Instruction Manual
2 — 21
Page 41

Operating the pump
Security on the pump
Graseby Medical Ltd.
To prevent any tampering with the
keypad during the infusion, there are
two ways to secure the keypad:
• manual locking
• automatic locking.
Manual keypad locking
This safety feature is always available
on the pump, whether or not the
automatic keypad locking feature is
enabled.
To lock the keypad during an infusion,
press the grey Keypad lock button on
the rear of the pump. The Message
Display confirms that the keypad is
locked:
If you touch any of the keys on the
keypad once it is locked, the pump redisplays the message.
Safety keypad lockout
The saftey keypad lockout is only active
when operating the pump on AC power.
It allows the user to ‘lockout’ the
keypad, so that after setting up the
pump for use, it is ready for infusion at
a later time.
To set the saftey keypad lockout, switch
the pump off and connect to an AC
power supply. Then press the keypad
lock button once. If you now attempt to
switch the pump on, the keypad is
locked out and the pump inactive. The
pump can only be switched on by:
• pressing the keypad lock once and
then switching the pump on using
the On/Off key
• or by opening the door.
If the AC power supply is removed
during the ‘lockout’, the feature is
abandoned, pressing the On/Off key
switches the pump on. If the AC power
is removed and reconnected without any
user interface with the pump, the
lockout remains active. When the pump
is used on battery power this feature is
inactive.
Automatic keypad locking
Before starting the infusion, you can
enable the Autolock Keypad feature in
the Technician Menu.
With Autolock Keypad enabled, the
keypad locks automatically if you leave
the pump untouched for one minute.
If you touch a key, the Message Display
reminds you that the keypad has been
locked:
Unlocking the keypad
To unlock the keypad once it is locked,
press the grey Keypad lock button on the
rear of the pump:
• for a manually locked keypad, press
the button once;
• for an automatically locked keypad,
press the button twice.
T o silence alarm with keypad locked
If the pump is sounding an alarm whilst
the keypad is locked, you must:
• first unlock the keypad with the
button on the rear of the pump,
• then press the Silence key.
2 — 22
Volumetric Infusion Pump Instruction Manual
Page 42

Graseby Medical Ltd.
Display the Drug Label
Operating the pump
The pump may be configured, in the
Technician Menu, to display the Drug
List.
If the Drug List is enabled, you can
display the Drug Label that was last
selected using the Options key.
To display the Drug label on the
Message Display for two seconds:
• press the * key.
For more information on Drug Labels,
see Chapter 3, Options.
Stop the infusion
To stop the infusion at any time:
• press the Hold key.
If an occlusion is detected
If an occlusion is detected, the Run
light remains lit, but the Pumping
indicator stops. The pump does not give
an occlusion alarm immediately, but
only alarms if the occlusion pressure
continues to exceed the occlusion
threshold for 10 seconds. This helps to
avoid nuisance occlusions.
However, the pump monitors any
temporary occlusions, and if such
occlusions persist, then the occlusion
alarm is generated.
If an occlusion is detected when the
occlusion alarm is set to Low, the pump
alarms immediately.
If an occlusion alarm occurs
If an occlusion alarm occurs,
immediately clamp the line to the
patient. Then inspect the fluid pathway
to determine what has caused the
obstruction.
Volumetric Infusion Pump Instruction Manual
2 — 23
Page 43

Operating the pump
Graseby Medical Ltd.
Change the Occlusion alarm setting
You can check the current occlusion
alarm setting when an infusion is
running if you press the Occlusion
Alarm Setting key. You can change the
setting if you first put the infusion on
Hold, see steps in opposite column.
When you switch the pump on, the
Occlusion Alarm setting is always the
same, and is defined by the Technician
Menu configuration setting. You should
set the alarm to be appropriate for the
infusion before pressing Run.
The occlusion alarm setting determines
the amount of back pressure allowed
before the pump alarms. There are
three possible settings: Low, Medium
or High.
When an occlusion alarm occurs, the
pumping mechanism backs off to
reduce down-line pressure and bolus
potential (bolus potential is
approximately 0.3 mL regardless of
the rate and the administration set
used).
If there is no obvious reason for the
alarm, the message may occur because
you have not selected an appropriate
Occlusion Alarm Setting for the
infusion. If this is the case, you may
want to change the Occlusion Alarm
Setting.
To change the Occlusion Alarm Setting
during an infusion, whether or not an
alarm has occurred:
1. Press Hold to silence the alarm if
necessary, and stop the infusion.
2. Press the Occlusion Alarm
Setting key once to display the
current setting.
3. Press the Occlusion Alarm
Setting key repeatedly to display
the available settings.
4. When the correct setting is
displayed, press Run.
Note: A thick solution may be certain
cytotoxic agents, lipid-based fluids
and other viscous solutions, for
example Total Parenteral Nutrition.
Whilst the pump is infusing,
particularly at higher infusion rates, or
with thick solutions (see Note
opposite), or with small diameter
cannulas, you may see the following
alarm message:
WARNING: If using a blood pressure cuff
above the patient’s venipuncture site take
extra care in setting the Occlusion alarm
pressures. Failure to do so may result in
unnecessary Occlusion alarm s, resulting in
patient injury or death.
2 — 24
Volumetric Infusion Pump Instruction Manual
Approximate Occlusion alarm settings
Low 2 psi, 103 mmHg, 13.5 kPa
Medium 5 psi, 259 mmHg, 34.5 kPa
High 10 psi, 517 mmHg, 68.9 kPa
WARNING: The Occlusion detection
system measures downline back pressure
in the administration set, but does not
detect infiltration. In accordance with
local protocol, you must periodically
inspect the patient’s infusion site for
signs of infiltration. Failure to do so may
result in an unacceptably slow time to
Occlusion resulting in patient injury or
death.
Page 44

Graseby Medical Ltd.
Operating the pump
Ending the Primary infusion
The pump warns you that the infusion
is complete when the Primary Volume
to be Infused reaches zero.
At this moment, the pump sounds a
two-tone alarm. You can decide to:
KVO infusion
If you press Silence to stop the alarm,
the pump continues to infuse at the
KVO (Keep Vein Open) rate. The KVO
rate is shown on the Rate display.
Depending on how the pump is
configured, the KVO rate may be:
• the default KVO rate of 3.0 mL/h,
• the programmed infusion rate if
that was less than 3.0 mL/h;
• the KVO rate specified for this
pump, see Specifying a different KVO
Rate, below.
The Message Display shows “KVO”, as
well as the combined Primary and KVO
volume infused, for example:
• silence the alarm and stop the
infusion - press the Hold key
• silence the alarm and continue to
infuse at the KVO Rate - press the
Silence key (see details below).
Specifying a different KVO rate
If the ‘KVO Rate Entry’ option has been
enabled in the Technician Menu, you can
use the Options key to specify a KVO
rate, before you start the infusion.
When you set the KVO rate you can go
to a maximum of 10 mL/h (on a 500
pump) or 3mL/h (on a 505 pump) or the
Max Primary Rate if one is also enabled
and set below these limits.
If the programmed infusion rate is less
than the set KVO rate, when the pump
goes into KVO, it will continue pumping
at the programmed lower rate.
For full details on how to set the KVO
rate, see Chapter 3, Options.
The pump continues to infuse at the
KVO rate. After six minutes, the two
tone alarm sounds again, as a reminder
that the KVO infusion is still running.
You can decide to:
• silence the alarm and stop the
infusion - press the Hold key
• silence the alarm and continue to
infuse at the KVO Rate - press the
Silence key.
Volumetric Infusion Pump Instruction Manual
2 — 25
Page 45

Operating the pump
Graseby Medical Ltd.
About Secondary infusions
The pump has the facility for you to set
up and run a Secondary infusion, for
example, to:
• administer a dose of antibiotics to a
patient who is already receiving a
Primary infusion;
• administer a loading dose of a drug,
of a different concentration of the
same drug as in the Primary
container.
You use the Secondary/Bolus key to
program a Secondary infusion. The
Secondary volume infused is kept as a
separate total. It is not deducted from
the Primary Volume to be Infused.
Once you have started an infusion from
the Secondary set, the solution from the
Secondary container takes precedence
over the Primary infusion. For details
on what happens if the Volume to be
Infused is less than the contents of the
Secondary container, see page 2-27.
Secondary Rate and VTBI limits may
be set if enabled in the Technician
menu. See page 2-15 for more details.
Bolus feature enabled
If the Bolus feature has been enabled in
the Technician Menu, you can use the
Secondary/Bolus key to:
• run a Secondary infusion, where
the volume infused is not deducted
from the Primary Volume to be
Infused;
or alternatively,
• run a Bolus infusion, where the
volume infused is deducted from
the Primary Volume to be Infused.
Setting up a Secondary infusion
To set up a Secondary infusion, you
need a means of combining a Primary
and Secondary infusion. This may be
the combined Primary/Secondary (8C-
6200) IV Administration set from
Graseby Medical, product code 591.096.
Alternatively, use an administration set
with an injection site or Y-site (as
shown here) plus a Secondary
Administration set (not shown).
The basic steps for setting up a
Secondary infusion are described in the
following sections:
• lower the Primary solution container;
• prime the Secondary administration
set;
• connect the Secondary to the
Primary administration set;
• program the Secondary infusion
(with or without the Bolus feature
enabled);
• start the infusion.
2 — 26
Volumetric Infusion Pump Instruction Manual
Page 46

Graseby Medical Ltd.
Operating the pump
Lower the Primary solution container
Open the packaging around the
Secondary administration set and find
the hanger that looks something like
this:
This should lower the Primary
container by approximately 20 cm
(eight inches). Make sure that the drip
chamber on the Primary container is
still at least 15 cm (six inches) above
the pump.
Take the Primary container from the IV
pole and use the hanger to suspend it
from the IV pole.
Prime the Secondary administration set
You must always follow the Instructions
for Use that accompany the particular
administration set to be primed. Each
set contains specific priming
instructions, and also gives details of
any warnings concerning the use of the
administration set.
WARNING: Do not run parallel infusion
lines below the pump. Delivering a
Secondary infusion means running a
second line
so may result in an inaccurate delivery of
medication, resulting in patient injury or
death.
Volumetric Infusion Pump Instruction Manual
above
the pump. Failure to do
2 — 27
Page 47

Operating the pump
Graseby Medical Ltd.
Connect the Secondary to the Primary
administration set
If you are using the combined Primary/
Secondary (8C-6200) IV
Administration set from Graseby
Medical, product code 591.096, follow
its accompanying Instructions for Use.
If you are using a separate Primary and
3. Check that the roller clamp below
the pump is closed, and go on to
program the Secondary infusion.
The position of the two solution
containers and administration sets is
shown on the diagram on page 2-13.
Secondary set, then go through the
following steps.
1. Insert the needle from the Secondary
set into the injection site on the
Primary set.
2. Keep the Secondary clamps closed
until you are ready to start the
Secondary infusion.
About the Secondary Volume to be Infused
Because the Secondary container hangs
on the IV pole at a higher level than the
Primary, the entire contents of the
Secondary container may be infused at
the end of the Secondary infusion. This
can happen even though the Secondary
Volume to be Infused is zero.
On a pump where Secondary Stop is not
enabled in the Technician Menu, you
must ensure that the amount that you
enter as the Secondary Volume to be
Infused is equal to the volume of fluid
in the Secondary container.
If the Secondary Stop feature is
enabled, the pump stops infusing and
sounds an alarm when the Secondary
infusion is complete and the Secondary
Volume to be Infused has been
delivered. You can then clamp the
Secondary set to prevent any more fluid
from being infused from the Secondary
container.
WARNING: Check the Secondary set
carefully, since an occlusion above the
pump on the Secondary line could cause
the Primary fluid to be delivered instead of
the Secondary infusion. Administering the
wrong medication may cause serious
patient injury or death.
2 — 28
Volumetric Infusion Pump Instruction Manual
WARNING: The Secondary volume to be
infused must match the amount of fluid in
the Secondary container. Primary flow
resumes when the Secondary container is
empty. If the volumes do not correspond,
the wrong infusion may be delivered
which could cause serious patient injury or
death.
Page 48

Graseby Medical Ltd.
Operating the pump
Program the Secondary infusion
This section describes how to program
the Secondary infusion on a pump
where the Bolus feature is disabled
on the Technician Menu.
1. Press the Hold key if the pump is
running.
2. If Secondary Min and Max Rates
and Max Secondary VTBI are
enabled on the pump, ensure that
they are appropriate for the infusion
by pressing the Options key. To
find out more see page 2-15.
3. Press the Secondary/Bolus key.
The yellow Secondary indicator is
lit.
4. The Message Display shows the
volume from the previous Secondary
infusion.
5. The Rate Display shows the last
rate used for a Secondary infusion.
Press the Rate key and enter the
rate for the Secondary infusion, in
mL/h.
6. Press the Volume to be Infused key
and enter the Secondary volume in
mL. This should normally match the
volume in the Secondary container.
7. Verify that the rate and volume to
be infused settings are correctly
displayed. Open the roller clamp on
the Secondary administration set
8. Press the Run key to start the
Secondary infusion. The Message
Display shows the volume infused.
When the infusion is complete, see
Ending a Secondary infusion on page
2-32.
Volumetric Infusion Pump Instruction Manual
2 — 29
Page 49

Operating the pump
Graseby Medical Ltd.
Secondary infusion - Bolus enabled
This section shows the different screens
and the additional step for a Secondary
infusion with the Bolus feature
enabled on the Technician Menu.
1. Press the Hold key if the pump is
running.
2. If Secondary Min and Max Rates
and Max Secondary VTBI are
enabled on the pump, ensure that
they are appropriate for the infusion
by pressing the Options key. To
find out more see page 2-15.
3. Press the Secondary/Bolus key.
With the Bolus feature is enabled,
the Message Display tells you to
press 1 for Secondary or 3 for Bolus.
4. To enter the Secondary rate, press 1.
The Message Display shows the
volume of the previous Secondary or
Bolus infusion. The yellow
Secondary indicator is lit.
2 — 30
5. Press the Rate key and enter the
Secondary infusion rate in mL/h.
6. Press the Volume to be Infused key
to clear the display, and enter the
Secondary volume in mL. This
should normally match the volume
in the Secondary container.
7. Verify that the rate and volume to
be infused settings are correctly
displayed. Open the roller clamp on
the Secondary administration set.
8. Press the Run key to start the
Secondary infusion. The Message
Display shows the volume infused.
When the infusion is complete, see
Ending a Secondary infusion on page
2-32.
Volumetric Infusion Pump Instruction Manual
Page 50

Graseby Medical Ltd.
Running a Bolus infusion
This section shows how to administer a
Bolus with the Bolus feature enabled
on the pump on the Technician Menu.
1. Press the Hold key if the pump is
running.
2. If Secondary Min and Max Rates
and Max Secondary VTBI are
enabled on the pump, ensure that
they are appropriate for the infusion
by pressing the Options key. To
find out more see page 2-15.
3. Press the Secondary/Bolus key.
When the Bolus feature is enabled,
the Message Display tells you to
press 1 for Secondary or 3 for Bolus.
4. To enter the Bolus rate, press 3.
The Message Display shows the
volume of the previous Secondary or
Bolus infusion. The yellow
Secondary indicator is lit.
Operating the pump
5. Press the Rate key and enter the
Bolus rate in mL/h.
6. Press the Volume to be Infused key
to clear the display, and enter the
Bolus volume in mL.
7. Verify that the rate and volume to
be infused settings are correctly
displayed for the Bolus.
8. Press the Run key to start the
Bolus infusion. The Message
Display shows the Bolus volume
infused so far. The volume infused is
deducted from the Primary Volume
to be Infused.
When the infusion is complete, see
Ending a Secondary or Bolus infusion on
the next page.
Volumetric Infusion Pump Instruction Manual
2 — 31
Page 51

Operating the pump
Ending a Secondary infusion
Graseby Medical Ltd.
The pump is configured to work in one
of two ways when the Secondary
infusion is complete, depending on the
Secondary Stop setting in the
Technician Menu.
With Secondary Stop disabled on the
Technician Menu, the pump:
• sounds a non-insistent alarm twice,
and then reverts to the Primary
infusion, running at the previously
programmed Primary rate.
Alternatively, if Secondary Stop is
enabled on the Technician Menu, the
pump:
• stops the at the end of the
Secondary infusion (is put on Hold)
and sounds an insistent alarm,
• displays the message:
Restarting Primary infusion
If Secondary Stop is enabled on the
pump, you restart the Primary infusion
as follows:
1. Press the Silence key.
2. Press the Primary key.
3. Press Run.
Ending a Bolus infusion
At the end of a Bolus infusion, the
pump sounds a non-insistent alarm
twice. It then reverts to the Primary
infusion, running at the previously
programmed Primary rate.
The Secondary Stop feature does not
have any effect on a Bolus infusion.
2 — 32
Volumetric Infusion Pump Instruction Manual
Page 52

Graseby Medical Ltd.
Checking infusion totals
Operating the pump
Before, during or after an infusion, you
can check the fluid volumes that have
been infused, and the volumes
remaining to be infused.
Total Volume infused
To view the combined total volume of
all fluid infused by the pump since the
total was last cleared, for example to
check the fluid balance for a patient:
• press the Total Volume key.
If the pump is running an infusion, the
total volume is displayed on the
Message Display as follows:
The total volume includes the volumes
from any of the following types of
infusion:
• Primary
• Secondary
• Bolus
• KVO
• Rate Taper
• Dose-Rate Calculation.
The pump can display the following
totals:
• Total volume infused
• Primary totals
• Secondary totals
• Bolus totals
The Message Display also shows the
total hours and minutes that the pump
has been in use since the display was
last cleared (higher than 99 hours
reads 100+hrs).
Clearing the Total Volume
To clear the Total Volume on the pump,
for example to reset the pump before
programming an infusion for a new
patient:
• press Hold to stop the infusion, if
the pump is infusing,
• press Total Volume.
The Message Display shows the total
volume as in this example:
• press * to reset the Total Volume
and Time to zero.
Volumetric Infusion Pump Instruction Manual
2 — 33
Page 53
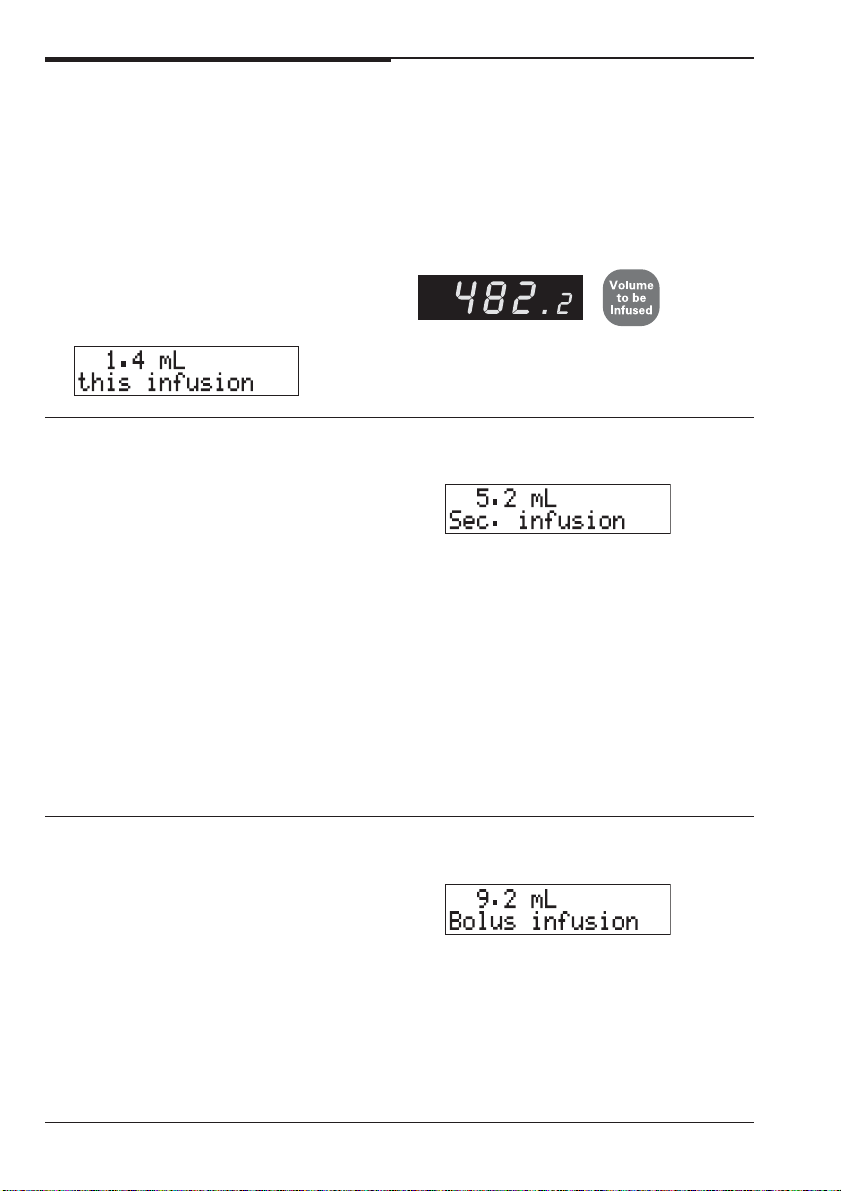
Operating the pump
Primary totals
Graseby Medical Ltd.
Whilst a Primary infusion is running,
the Message and Volume to be Infused
Displays show the volumes for the
Primary infusion.
V olume infused so far
During an infusion, the Message
Display counts up to show the volume
infused so far, for example:
Secondary totals
Whilst a Secondary infusion is running,
the Message and Volume to be Infused
Displays show the volumes for the
Secondary infusion.
To view Secondary volumes after
completing a Secondary infusion:
1. Press the Secondary/Bolus key.
2. If the Bolus feature is enabled,
press 1 to choose the Secondary
volume.
3. The Message Display shows the
infused volume for the Secondary
infusion as shown in this example:
Volume to be Infused
The Volume to be Infused display
counts down to show the remaining
volume to be infused for this infusion,
for example:
At the end of an infusion, the Volume to
be Infused is zero.
The Volume to be Infused display
shows the volume remaining for the
Secondary infusion.
The Secondary volumes are kept
separate from the Primary totals. To
view the combined infusion volume
press Total Volume.
Bolus totals
If you have carried out a Bolus infusion,
you can view the volumes as follows:
1. Press the Secondary/Bolus key.
2. Press 3 to choose the Bolus volume.
3. The Message Display shows the
infused volume for the Bolus
infusion as shown in this example:
2 — 34
Volumetric Infusion Pump Instruction Manual
The Bolus volumes affect the Primary
infusion volumes. The volume that was
infused as a Bolus is added to the
Primary infusion volume infused figure
and deducted from the Primary
infusion Volume to be Infused figure.
Page 54

Graseby Medical Ltd.
Operating the pump
Re-running infusions at the same rate
When an infusion is complete, you may
want to repeat it with the same Rate
and VTBI values. The Rate is still
displayed but you need to bring back
the previous VTBI.
You can either bring back the VTBI and
start the infusion immediately, or bring
back the VTBI to check it before you
start the infusion.
To bring back the VTBI and start the
infusion immediately:
1. Press the Volume to be Infused key
TWO TIMES.
The VTBI is not displayed at this
point.
2. Press the Run key.
When you press Run, the VTBI
value for the previous infusion is
displayed and the infusion starts
immediately.
Alternatively, to bring back the VTBI,
to check it before you start the infusion:
1. Press the Volume to be Infused key
TWO TIMES.
2. Press the Hold key.
When you press Hold, the VTBI
value for the previous infusion is
displayed but the infusion does not
start.
3. To start the infusion, press the Run
key.
Note: You can also bring back the
previous VTBI if you press the Volume
to be Infused key TWO TIMES and
then wait for 10 seconds.
Volumetric Infusion Pump Instruction Manual
2 — 35
Page 55

Operating the pump
Graseby Medical Ltd.
2 — 36
Volumetric Infusion Pump Instruction Manual
Page 56
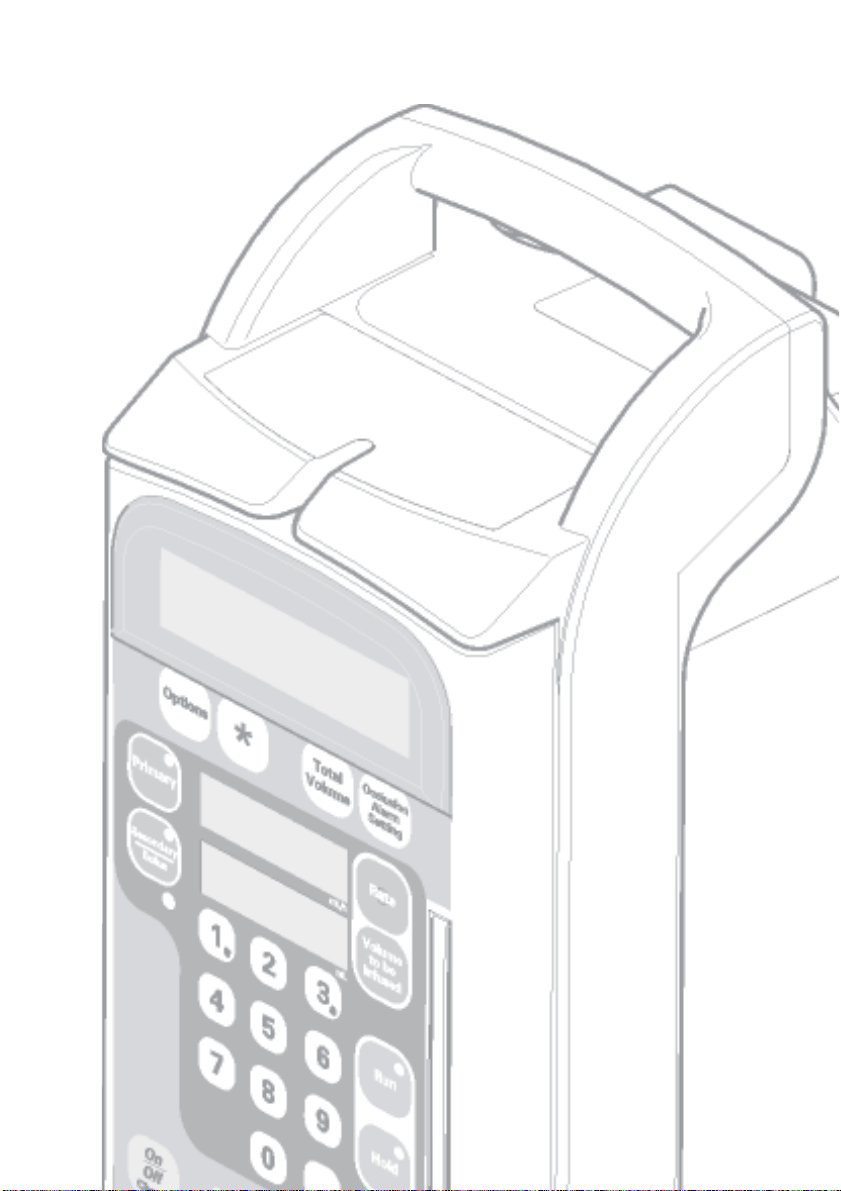
Options
Chapter 3
Page 57

Graseby Medical Ltd.
Introduction
Options
This chapter describes the Options that
are available for the Volumetric pump.
Some of the optional features allow the
pump to meet the requirements of
special clinical situations.
The Options available for the
Volumetric pump are listed on the
“Start-up” instruction label on the side
of the pump. If your pump does not
display the Option you require, return
the pump to your Biomedical
Options available
The first options are:
1. Standard Message
2. Time Remaining
3. Message Display Light (Backlight)
4. Battery Test
The Backlight and all options after
Battery Test only appear in the Option
menu if they have been enabled in the
Technician Menu.
5. Quick Rate Change
6. Rate Taper
7. Volume Over Time
8. Dose-Rate Calculation
The pump can be programmed with
Minimum and Maximum infusion rates
and Maximum VTBI to limit the
Primary and Secondary/Bolus Rate and
Volume to be Infused values. These are
provided by the following options:
WARNING: Before confirming any
displayed data, the user should ensure
that it is correct. Failure to do so may
result in compromised function of the
product, patient injury or user injury.
department to have the feature enabled
by a suitably trained person.
Options 1, 2 and 4 are always available
on the pump, and cannot be disabled.
The other Options listed below can be
enabled or disabled by a suitably
trained person, using the Technician
Menu (see the Technical User Manual).
Do not use any of the Options without
correct training.
• Min Rate
• Max Rate
• Max VTBI
• Min S/B Rate
• Max S/B Rate
• Max S/B VTBI
The final two options appear if they
have been enabled in the Technician
Menu:
• KVO Rate
• Drug List
You can go directly to options with
numbers against them using the
Fast access method described on the
next page.
WARNING: Correct entry of data is
essential in order to ensure that the
intended infusion is performed. Before
confirming any displayed data when
setting up an infusion, you should ensure
that it is correct. Failure to do so may
result in compromised function of the
product, patient injury or user injury.
Volumetric Infusion Pump Instruction Manual
3 — 1
Page 58

Options
Using options
There are two ways to select an Option:
• sequential access to view all
available options;
• fast access to take you to directly to
an option.
You use fast access, as described below,
using a number from 1 to 8 for the
numbered options in the list on the
previous page. The numbers are also
shown in the Options list on the ‘Start
up’ label on the right hand side of the
pump.
Viewing sequentially
To view each available Option, press
the Options key. Each time you press,
it will take you to the next available
option. After the final option, the next
screen is the Standard Message
Display. If you press the Option key
again at the Standard Message, you
re-display the Options.
Options without a number in the list on
the previous page can only be viewed by
using this method.
Fast Access
To go directly to one of the numbered
items, first press the Options key and
then its number on the numeric keypad,
using the one shown in the list on the
previous page or on the side of the
pump. For example, if you press the
Options key and then numeric key 4
you are taken directly to the option to
test the battery.
If a numbered option has been
disabled, nothing will happen. Press
the Options key again to see the next
available option.
Graseby Medical Ltd.
Values in the Message Displa y
When you see a Message Display where
you need to change, enter or confirm a
numerical value, the previous setting
will flash (even if no value previously
been entered). You can either enter a
new value, or accept the existing value
by pressing the * key or by pressing the
Options key again to move onto the
next option.
To enter a new value use the numeric
keypad when the value is flashing and
then press the * key. If you make a
mistake, do not press the Options key,
wait a few seconds and the value will
flash again. You can enter a value
whenever the value is flashing. It will
flash again even though you have
pressed the * key. If you press the
Options key without first pressing *,
any changes you make are discarded.
Using Options while infusing
If you press the Options key while
running a standard infusion, then the
options where you enter values (such as
rate limits) display the current values,
but will not allow you to change them.
Backlight and Quick Rate change
options can be activated. Options for
programming other special types of
infusions (Dose-Rate calculation, Rate
Taper and Volume over Time) will tell
you to place the pump on Hold.
T o leave Options
When you have entered a value or set
an option, use the Options key to move
to the next Option, or start
programming the pump by pressing an
active key, for example, Rate,
Occlusion Alarm Setting or Volume
to be Infused.
3 — 2
Volumetric Infusion Pump Instruction Manual
Page 59

Graseby Medical Ltd.
1. Standard Message
Options
The Standard Message refers to the
pump’s normally displayed message
when an alternative option is not
selected.
2. Time Remaining
This option displays the time
remaining until completion of the
current infusion.
To use the time remaining display
press the Options key and then press
numeric key 2, or press the Options
key until the Message Display shows:
The Standard Message display is
similar to the screen below:
If the pump is on hold, the time
remaining is displayed until another
active key is pressed. If the pump is
running, time remaining is displayed
for 5 seconds.
The time remaining is displayed and
relates to the operating mode the pump
is running in: Primary, Secondary,
Bolus, Rate Taper or Dose-Rate
Calculation (if enabled).
Volumetric Infusion Pump Instruction Manual
3 — 3
Page 60

Options
3. Message Display Light
Graseby Medical Ltd.
The Message Display has a backlight
that normally turns off one minute
after the pump begins running, or if the
pump is left on Hold while using
battery power. It turns on
automatically with any keypress, or if
the alarm sounds.
This option, if enabled on the
Technician Menu, allows you to keep
the Message Display’s backlight on
constantly whilst the pump is in use.
Battery operation and backlight use
When using the pump on battery power,
the backlight normally turns off after
one minute. If you turn the light on as
described here, the backlight remains
on constantly, until you turn the option
(or the pump) off.
You may need to monitor the battery
capacity if you keep the light on, as the
light uses the battery power.
Turning the light on and off
T o turn the light on
Press the Options key then press
numeric key 3, or repeatedly press the
Options key until the Message Display
shows the following:
Press the * key to keep the light on. The
light will remain on until the pump is
turned off, or until it is returned to
normal operation.
T o turn the light off
Press the Options key, then press key
3, or press the Options key until the
Message Display shows the following:
Press the * key to turn the backlight
display off.
CAUTION: The backlight has a limited life
and may, if used constantly, cause the
light to dim. Eventually the message
display may then need to be replaced. To
preserve the life of the message display,
you should only turn on the Message
Display Light as described here if it is
specifically required. Misuse of this
feature could lead to both battery and
LCD depletion.
3 — 4
Volumetric Infusion Pump Instruction Manual
Page 61

Graseby Medical Ltd.
4. Battery Test
Options
The battery is automatically tested as
part of the power on sequence, if the
pump is disconnected from the AC
mains supply when it is switched on.
The Battery Gauge is displayed to
indicate the approximate battery
capacity, unless the pump is in DoseRate Calculation Recovery or Rate
Taper mode.
Using the Battery Test option
The Battery Test option can only be
used if the AC cord is disconnected
from the AC mains supply and the
pump is on Hold.
If the pump is disconnected from the
AC mains supply whilst it is infusing,
it continues to infuse and
automatically switches to use the
internal battery.
In this case, you may use the Battery
Test Option described here to test the
battery. This way, you can find out the
approximate battery capacity, without
switching off the pump.
1. Press Hold and ensure that the
pump is disconnected from the AC
mains supply.
2. Press the Options key and then
press numeric key 4, or press the
Options key until the Message
Display shows the Battery Test
screen.
3. Press the * key to start the Battery
Test.
The pump measures the battery
voltage. After 5 seconds it displays
a Battery Gauge showing the
This would indicate a battery
approximately half charged.
Volumetric Infusion Pump Instruction Manual
approximate battery capacity.
WARNING: Correct management of
battery charging, as described in the
documentation, is essential to ensure that
the pump can operate on batteries for the
time specified. Failure to do so may result
in compromised function of the product
or patient injury.
3 — 5
Page 62

Options
This indicates a fully charged
battery.
Graseby Medical Ltd.
A fully charged battery in good
condition will power the pump for
approximately 6 hours at 100 mL/h
(99.9 mL/h on Micro 505).
4. When the test is complete, you can
press Run to restart the infusion.
If the battery capacity is low, you
must connect the pump to the AC
mains supply to recharge the
battery.
For further information on batteries
see Chapter 2, Operating the pump,
or Specifications.
3 — 6
Volumetric Infusion Pump Instruction Manual
Page 63

Graseby Medical Ltd.
5. Quick Rate Change
Options
The Quick Rate Change option, if
enabled, allows you to change the
infusion rate with single presses of the
keypad while the pump is running. The
option applies while the pump is
running or when on hold, but changes
cannot be made when the pump is in
Rate Taper, Volume Over Time or
Dose-Rate Calculation.
The Quick Rate Change is
automatically discontinued when the
pump is turned off. The next time the
pump is turned on it will display the
Standard Message display.
Any rate limits which are set will
apply. The pump will alarm if you try to
set a rate outside the limits
Performing Quick Rate Changes
1. Press the Options key and then
press numeric key 5, or press the
Options key until the Rate Change
message appears.
2. Press the * key to begin changing the
rate. The Message Display shows
this screen for 10 seconds.
3. Change the rate:
• press the 1 key to decrease the
infusion rate by 1 mL/h, or to
decrease by 0.1 mL/h if the original
rate was set in 10ths mL/h, or
• press the 3 key to increase the
infusion rate by 1 mL/h, or to
increase by 0.1 mL/h if the original
rate was set in 10ths mL/h.
4. After 10 seconds the Message
Display changes to show the volume
infused so far. The arrows are
displayed as a reminder that the
Quick Rate Change option is still
selected. You can repeat step 3 as
required.
5. When you have finished with Quick
Rate Change, to exit and redisplay
the Standard Message:
• press the Options key to display
this screen, then
• press * .
Volumetric Infusion Pump Instruction Manual
3 — 7
Page 64

Options
6. Rate Taper
Graseby Medical Ltd.
This option, if enabled, allows
automatic tapering of the infusion rate,
either up or down for the
administration of Total Parenteral
Nutrition (TPN).
Rate taper is programmed by setting
four infusion variables.
1. Volume
2. Total time or Maximum rate
3. Taper up time
4. Taper down time
The pump then makes the necessary
calculations and performs the rate
changes at the required times.
A Rate Taper infusion can be repeated
exactly as the previous infusion, or
changes can be made if the volume or
time requirements vary from one
infusion to another.
This option cannot be used while the
Quick Rate Change, Volume Over Time
setup, or Dose-Rate Calculation is in
use.
If the pump is switched off whilst in
Rate taper mode, and not connected to
the AC mains supply when it is
switched on again, the automatic
battery test is carried out, but the
Battery Gauge is not displayed. If the
battery is low, the alarm sounds and a
warning message is displayed.
Neither the primary or secondary
indicator lights are lit when in Rate
Taper.
The diagram below shows a typical
Rate Taper infusion and the four
programming variables that must be
set.
3 — 8
Volumetric Infusion Pump Instruction Manual
Page 65

Graseby Medical Ltd.
Options
Rate and volume limits
The highest allowable infusion rate in
Rate Taper is 400 mL/h (99.9 mL/h on
Micro 505).
The highest allowable volume to be
infused in Rate Taper is 4400 mL
(999.9 mL on Micro 505).
Any limits set with options (such as
Rate or VTBI limits) will apply. You
will be able to program Rate Taper
as normally, but you will be
prevented from running the
infusion. For more details, see page
3-16.
To enter Rate Taper
To program an infusion using the Rate
Taper option, the pump must be on
hold.
Rounding in rate steps
If a rate step calculates to less than 1
mL/h it always appears in the display
as 10ths. At 1 mL/h and higher the
pump may calculate a rate step and
deliver in 10ths, however the display
will show a rate which is rounded to the
nearest whole number.
Entering hours and minutes
When programming by total time, for a
total time of less than 10 hours, enter
‘0’ before the hours digit (for example
09h, 00min). The highest allowed
number of minutes is 59. For 60
minutes or higher, enter the time as
hours, or hours and minutes.
1. Press the Options key, then press
numeric key 6, or press the Options
key until you see this screen.
2. Press the * key then follow the steps
given to program by ‘total time’ on
page 3-10, or ‘maximum rate’ on
page 3-12.
To exit Rate Taper
To end a Rate Taper infusion, you must
use the Option key to exit the Rate
Taper and return to the standard
operation:
1. Press the Hold key and then press
the Options key repeatedly until
you see this screen.
2. Press the * key to return to the
Standard Message Display.
Volumetric Infusion Pump Instruction Manual
3 — 9
Page 66

Options
Graseby Medical Ltd.
To program a Rate Taper by ‘Total Time’
If you need to select the exact total time
for the Rate Taper delivery, you should
choose the Total Time Rate Taper
method.
In this example for ‘Total Time’ we
have chosen the following values to
program:
• a volume of 1500 mL to be infused
over a time period of 9 hours and 30
minutes;
• taper up for 1 hour;
• taper down for 45 minutes.
1. Press the Options key and numeric
key 6 or press the Options key
repeatedly until the Message
Display shows the Rate Taper
option, then press the * key to begin.
2. Enter the volume to be infused.
If an error is made while entering
the new volume, press the Volume
to be Infused key and re-enter the
correct setting (or alternatively
press the Volume to be Infused
key twice to return to previous
setting).
When the correct volume is
displayed press the * key.
3 — 10
3. Press numeric key 1 to select ‘total
time’.
4. Enter the hours and minutes
required to complete the infusion.
Enter the leading zero as shown in
this example for numbers less than
10.
If you make an error while entering
the time, press any number key
repeatedly until the first number in
the hour value is flashing, then
enter the correct time.
Volumetric Infusion Pump Instruction Manual
Page 67

Graseby Medical Ltd.
Options
When the infusion time is correct
press the * key.
5. Enter the hours and minutes for the
taper up period (enter zero hours
and minutes if you do not want to
taper up).
When the correct ‘Taper up’ time
period is entered press the * key.
6. Enter the hours and minutes for the
taper down period (enter zero hours
and minutes if you do not want to
taper down).
When the correct ‘Taper down’ time
period is entered press the * key.
7. The pump calculates the maximum
rate that is required to complete the
Rate Taper infusion within the
specified time period.
If the maximum rate is correct for
the patient press the * key.
If you need to change the maximum
rate, press the * key twice to take
you back to step 2 and adjust the
program (a longer total time may be
required).
If * was pressed and this display
appears, then you need to review the
program you have set. You will have
to adjust to the volume, time and/or
maximum rate value. Press the *
key. This takes you back to step 2 to
review the program values.
8. If ready to start the Rate Taper
infusion, press the Run key or press
the * key to review your settings. If
you pressed the * key to review the
settings the display will take you
through steps 2 to 8 again.
9. If you pressed the Run key the Rate
Taper infusion will start. The
display will count up the volume
infused from zero.
Volumetric Infusion Pump Instruction Manual
3 — 11
Page 68
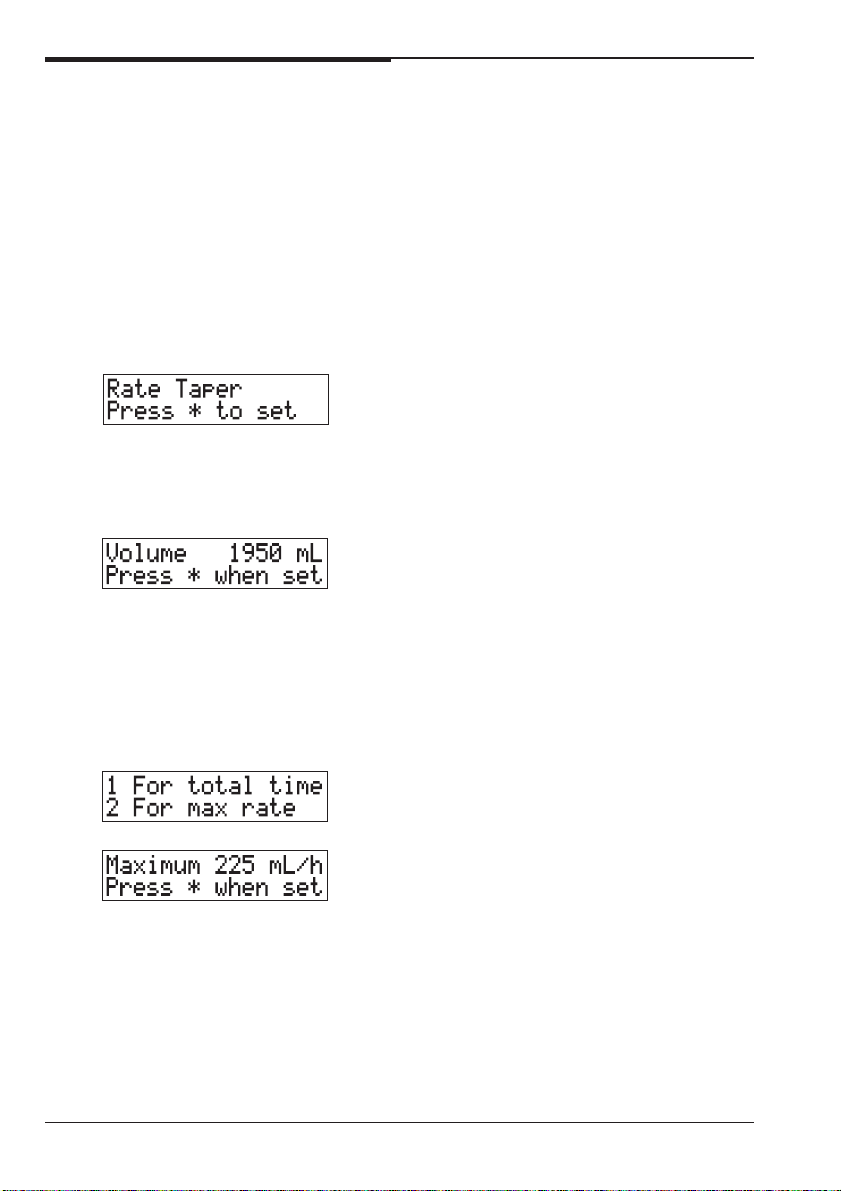
Options
Graseby Medical Ltd.
To program a Rate Taper by ‘Maximum Rate’
If you want to set the maximum rate at
which the pump delivers the Rate Taper
infusion, choose the Maximum Rate
taper method.
In this example for maximum rate we
have chosen the following values to
program:
• a volume of 1950 mL to be infused
at a maximum rate of 225 mL/h,
• taper up time for 1 hour and 30
minutes,
• taper down time for 30 minutes.
1. Press the Options key and numeric
key 6 or press the Options key
repeatedly until the Message
Display shows the Rate Taper
option, then press the * key to
program your settings.
2. Enter the volume to be infused.
If an error is made while entering
the new volume, press the Volume
to be Infused key and re-enter the
correct setting (or alternatively
press the Volume to be Infused key
twice to return to previous setting).
When the correct volume is entered
press the * key.
3 — 12
3. Press numeric key 2 to select
‘maximum rate’.
4. Enter the maximum rate at which
the infusion should be run. If an
error is made while entering the
maximum rate, press the Rate key
and re-enter the correct value (or
alternatively press the Rate key
twice to recall the previous setting).
When the correct maximum rate is
entered, press the * key.
Volumetric Infusion Pump Instruction Manual
Page 69

Graseby Medical Ltd.
Options
5. Enter the hours and minutes for the
taper up period (enter zero hours
and minutes if you do not want to
taper up).
When the correct ‘Taper up’ time
period is entered press the * key.
6. Enter the hours and minutes for the
taper down period (enter zero hours
and minutes if you do not want to
taper down).
When the correct ‘Taper down’ time
period is entered press the * key.
7. The pump calculates the length of
time in hours and minutes required
to complete the infusion with the
maximum rate entered. If the total
time is correct press the * key.
If you need to change the total time,
press the * key twice to take you
back to step 2, and adjust the
program (a higher or lower
maximum rate may be required).
If * was pressed and this display
appears, then you need to review the
program you have set. You will have
to adjust to the volume, time and/or
maximum rate value. Press the *
key. This takes you back to step 2
again to review the program values.
8. If ready to start the Rate Taper
infusion press the Run key or press
the * key to review your settings. If
you pressed the * key to review the
settings the display will take you
through steps 2 to 8 again.
9. If you pressed the Run key the Rate
Taper infusion will start. The
display will count up the volume
infused from 0.
Volumetric Infusion Pump Instruction Manual
3 — 13
Page 70

Options
Using the ‘End Early’ feature
Graseby Medical Ltd.
If it is necessary for a patient’s Rate
Taper infusion to end earlier than
planned, this feature provides an
alternative to stopping the pump
abruptly when it is infusing at a high
flow rate.
If the infusion ends early, the
patient does not receive the full
infusion as initially programmed.
1. With the Rate Taper infusion
running press the Hold key.
2. Press the Options key twice to view
the time remaining for the Rate
Taper.
3. Press the Options key again to
access the “end early” display. This
shows the actual time remaining or
30 minutes, whichever is less.
If the displayed time is acceptable
for the infusion rate to taper down,
press the * key. If you need to
change the time displayed any
number of minutes from 01 to 99
can be entered. Press the * key when
the correct time is displayed.
3 — 14
4. Press the Run key to start tapering
down immediately.
If the early feature is not required
then press the * key to continue the
Rate Taper program as originally
programmed. If the pump is on hold
press the Run key to continue the
infusion.
5. When the rate has tapered down
over the set length of time, the pump
alarms then continues to infuse at
the KVO rate.
Volumetric Infusion Pump Instruction Manual
Page 71

Graseby Medical Ltd.
Options
Resuming, restarting or reprogramming the
Rate T aper
If the pump is turned off when Rate
Taper is selected, the current Rate
Taper program is stored in memory.
You can use this feature of the pump to
set up a program ready for later use.
When the pump is turned on again, the
Message Display depends on whether or
not the Rate Taper has been run.
Rate T aper programmed b ut not run
When the pump is turned on again, if
the Rate Taper was programmed but
not run , the Message Display shows:
Either:
• press Run to start the infusion
using the pre-programmed settings,
or
• press * to review or reprogram the
settings.
Rate T aper run but not completed
When the pump is turned on again, if
the Rate Taper was programmed and
Run, but not completed, the Message
Display shows:
Repeat a completed Rate T aper
After completing a Rate Taper program
you can repeat the program (from its
beginning):
1. Press the Volume to be Infused key
twice. The previous volume to be
infused appears in the display.
2. Press the Run key to start the
infusion using the previous values.
Modify previous Rate Taper volume
If you need to repeat a Rate Taper
program but need to change the Volume:
1. Press the Volume to be Infused key
and enter the new volume. The total
time and/or the maximum rate
changes automatically.
2. Check that the correct volume is
displayed then press the Run key to
start the infusion.
Modify other Rate Taper values
If you need to change any other
programmed Rate Taper values: total
time, maximum rate, taper up time, or
taper down time, you must press the
Options key and follow the steps for
either programming Total time or
Maximum rate in this chapter.
Any limits set with options (such as
• Press the Run key to resume the
infusion, or
• press the Options key then press *
to review or reprogram the Rate
Taper settings.
Volumetric Infusion Pump Instruction Manual
Rate or VTBI limits) will apply. You
will be able to program Rate Taper
as normal, but you will be prevented
from running the infusion. For more
details, see page 3-16.
3 — 15
Page 72

Options
Graseby Medical Ltd.
Programming or reprogramming the Rate Taper
with Limits set
If any limits are set for the Primary
Rate or Max VTBI, then these will
apply when you program the Rate
Taper or if you modify a program.
Setting limits is described on page
3-29.
Before you enter Rate Taper
It is worthwhile checking what values
are set for Min and Max Primary Rate
limits and for Max VTBI before you
enter Rate Taper. If they are
inappropriate for the prescription, you
can then adjust them and not have the
Rate Taper infusion halt as described
below.
If you program outside the limits
The pump tests whether the entered or
calculated values are within the limits
when you press Run. This also applies
if you change values as described on the
previous page.
If the pump detects that the calculated
rate is outside the limits, or the VTBI
is too high, then the alarm sounds and
the Message Display shows this
warning:
Note: This happens when the
calculated rate is valid, but not
acceptable because of the VTBI or
infusion rate limits set on the pump. It
is not the same as the “cannot infuse”
message displayed because the rate
calculation is invalid.
To silence alarm and lea ve Rate T aper
If you see the Preset Limits message
when you are programming or
reprogramming a Rate Taper infusion,
• Press the Silence key to silence the
alarm. The pump automatically
leaves Rate Taper and displays the
Standard Message:
This is so that you can use the Options
key to check and if appropriate, adjust
the preset limits, which you cannot do
when you are in Rate Taper.
Tr oubleshooting Preset Limits error in
Rate Taper program
To find out why the Rate Taper
program exceeds the limits, check the
following:
1. Check the prescription volume
against the Maximum VTBI limit
and adjust the limit if it is
incompatible with the prescription.
2. If the prescription requires that you
enter a Maximum Rate, check this
against the Max Rate limit setting.
3. If the VTBI or Rate limits are
acceptable, note all limits that are
set by using the Options key. Reenter Rate Taper and check if you
have made a mistake in
programming the prescription.
4. Step through the program, look at
the calculated values and compare
them to the limits.
3 — 16
Volumetric Infusion Pump Instruction Manual
Page 73

Graseby Medical Ltd.
7. Volume Over Time (VOT)
Options
This option, if enabled in the
Technician Menu, allows you to set up
an infusion using the volume to be
infused and the total time (with the
pump automatically calculating the
infusion rate). It can be used with
either Primary, Secondary or Bolus
infusions.
Note: If rate limits are enabled and set,
you may be restricted in the values you
enter. Always use the Options key to
check any limits before you enter the
mode. See page 3-30 for more details.
Rounding up calculated rates
If the calculated rate is 99.9 mL/h or
less the rate will be rounded to the
nearest 0.1 of a mL/h. On the Model
500 pump, if the calculated rate is
greater than 100 mL/h, the rate will be
rounded to the nearest 1 mL/h.
V olume and time value rates
If the selected volume and time values
calculate a rate which must be rounded,
the pump calculates a revised time
appropriate to the rounded rate. For
example, if the volume entered is 14
mL and the time entered is 8 hours, the
actual rate calculated will be 1.75, and
then rounded to 1.8. The time then
automatically changes to 7 hours, 47
minutes and the following display
appears:
Press the * key to accept time.
T o enter V olume Over Time
With the pump on hold press the
Options key then press numeric key 7,
or press the Options key until the
Volume Over Time option appears.
T o exit Volume Over Time
To exit Volume Over Time when
programming the volume or time, press
the Options key. The following
Message Display appears:
Press the Options key to exit or press *
to continue setting Volume Over Time.
When the pump is switched off, Volume
Over Time is cancelled. When next
switched on, the pump resumes normal
operation.
Minimum and maximum infusion
time
Infusion time is entered as hours and
minutes.
Minimum infusion time: 00 hrs 01 min
Maximum infusion time: 48 hrs 00 min
For time less than 10 hours, enter ‘0’
before the hours digit (for example
09 h 00 m).
The highest number of minutes that
you can enter is 59. Times of 60
minutes or higher must be entered as
hours, or hours and minutes.
Volumetric Infusion Pump Instruction Manual
3 — 17
Page 74
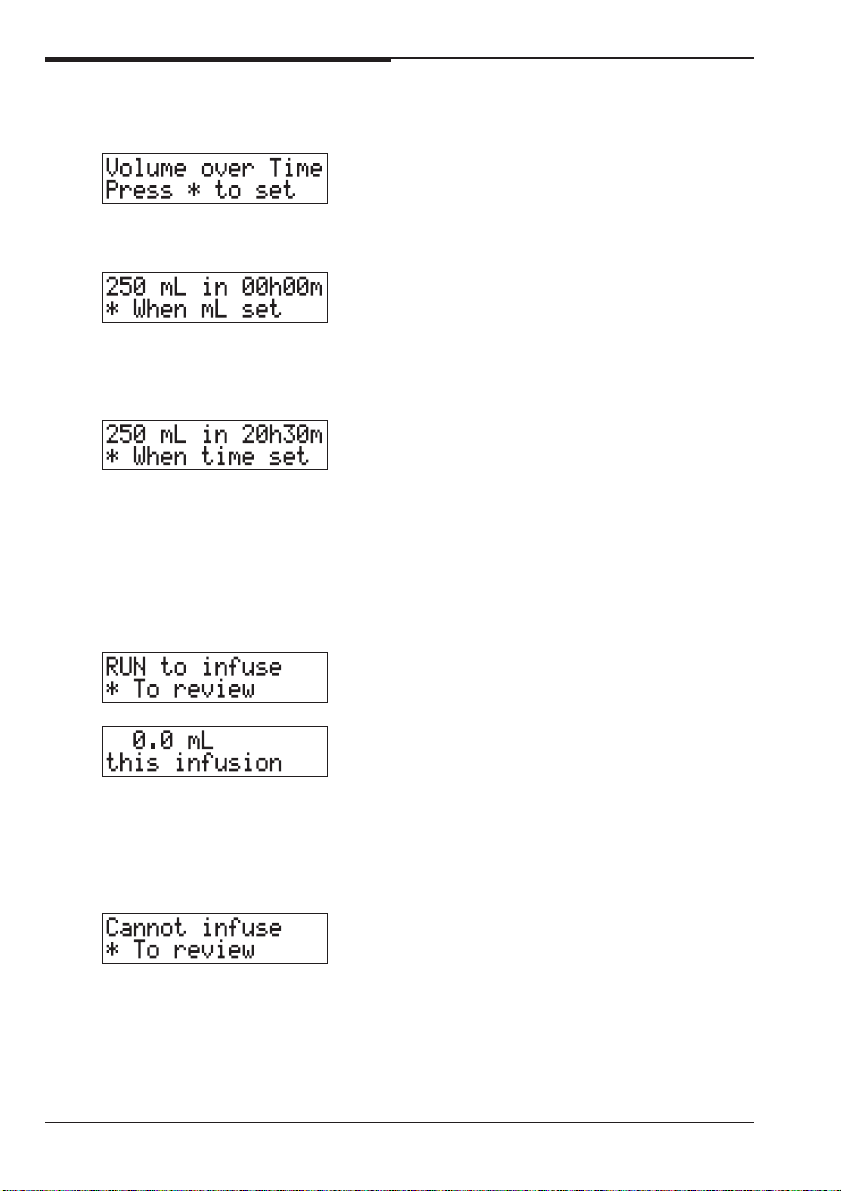
Options
To use Volume Over Time
Graseby Medical Ltd.
1. With the pump on hold, press the
Options key then press numeric key
7, or press the Options key until the
Volume Over Time option appears.
Press the * key to set the program.
2. Enter the volume to be infused.
When the correct volume is
displayed press the * key. If an
incorrect value has been entered
press the Volume to be Infused key
and re-enter the volume.
3. Enter the total infusion time in
hours and minutes. If you make an
error while entering a time value,
press any numeric key until the first
hour digit is flashing, then enter the
correct time value. To start entering
values again from step 2, press the
Volume to be Infused key.
When the correct time is displayed
press the * key.
4. Press the Run key to start the
infusion, or press the * key to review
the settings.
5. When you press Run the Message
Display shows the Standard
Message. When the infusion is
completed, the pump sounds an
alarm, and continues to infuse at
the KVO rate until you press Hold.
3 — 18
Cannot infuse
If you see this message when you press
Run, then you have entered a time/
volume combination that resulted in an
invalid rate.
1. Press the * key to return to step 2
and enter the correct volume and
time values.
2. Press the * key, then press Run.
Volumetric Infusion Pump Instruction Manual
Page 75

Graseby Medical Ltd.
8. Dose-Rate Calculation
Options
This option, if enabled in the Technician
Menu, allows the automatic calculation
of the infusion rate when the following
parameters are set:
• dosing rate (for example mcg/min or
mcg/kg/min),
• patient weight in kg or lbs (if
When in Dose-Rate Calculation mode,
all values for the current infusion are
stored when the pump is switched off.
During a Dose-Rate Calculation
infusion, if the Drug List feature is
enabled, you can press * twice to view
the selected Drug Label.
required in dose mode selected),
• drug amount in fluid container
(MG = milligrams, Gm = grams,
mcg = micrograms, or units),
• volume of fluid in container (mL).
Dose-Rate Calculation can be used with
the pump on hold or while running. It is
only available for a Primary infusion.
Minimum/Maximum Rate or VTBI
limits set in Options apply to a
Dose-Rate Calculation program. For
more details, see page 3-28.
µg may be displayed instead of mcg
in Dose-Rate Calculation displays,
see the Technical User Manual.
Dose-Rate Calculation Recovery
Dose-Rate Calculation Recovery is an
additional feature which can only be
enabled in the Technician Menu. It
enables you to set up a Dose-Rate
Calculation program for later use.
To use Dose-Rate Calculation Recovery:
1. Program the Dose-Rate Calculation
infusion, see page 3-20.
2. Press Run then Hold.
3. Switch off the pump. When it is next
switched on, the pump displays:
WARNING: Correct entry of data is
essential in order to ensure that the
intended infusion is performed. Before
confirming any displayed data when
setting up an infusion, you should ensure
that it is correct. Failure to do so may
result in compromised function of the
product, patient injury or user injury.
You can:
• press Run to restart the previous
Dose-Rate Calculation infusion, or
• press * to review the dose-rate
prescription, or enter new values for
an infusion, or
• press Options then * to leave DoseRate Calculation and return to the
Standard Message display.
Note: When you switch on the pump
with DRC Recovery enabled, no
information screens are displayed in the
self test. However, if there is a problem,
such as low battery, a warning message
is displayed with an alarm sounding.
WARNING: Dose-rate calculation requires
care in entering data. Refer to specific
product drug labelling for information on
appropriate administration techniques
and dosages. Entering incorrect data may
result in patient injury or death.
Volumetric Infusion Pump Instruction Manual
3 — 19
Page 76

Options
Graseby Medical Ltd.
To enter or exit Dose-Rate Calculation
To enter Dose-Rate Calculation
To enter the Dose-Rate Calculation
display press Options and numeric key
8, or press the Options key until you
see the following screen.
Press the * key to program the infusion.
To exit Dose-Rate Calculation
To exit Dose-Rate Calculation, press
the Options key until you see the
following screen:
Press the * key to return to the
Standard Message display.
Dose-Rate Calculation steps
This section looks at each Dose-Rate
Calculation step in programming order.
• Programming the dosing rate
• Programming the body weight
• Programming the drug amount
• Programming the volume.
A complete programming example is
described on page 3-22.
Programming the dosing rate
When you enter the Dose-Rate
Calculation option, you see a display
similar to the following asking you to
confirm the current dosing rate:
You can confirm the current rate by
pressing *, or:
• change the dosing rate mode, or
• enter a new value for the dosing rate.
Changing the dosing rate mode
The pump can be configured in the
Technician Menu to display either µg or
mcg (micrograms).
To change the dosing rate mode (that is
the rate units),
1. Press Options to display this
screen:
2. Press * until the screen shows the
dosing rate mode you want to use for
the infusion.
Dosing rate modes available
The following dosing rate modes are
available:
• mcg/kg/min (micrograms/kilogram/
minute),
• mcg/min (micrograms/minute),
• MG/min (milligrams/minute),
• MG/hour (milligrams/hour),
• units/hr (units/hour),
• MG/kg/hr (milligrams/kilogram/hour),
• mcg/kg/hr (micrograms/kilogram/
hour),
• MG/kg/min (milligrams/kilogram/
minute),
• units/kg/hr (units/kilogram/hour).
3 — 20
Volumetric Infusion Pump Instruction Manual
Page 77

Graseby Medical Ltd.
Options
Enter new value for the dosing rate
When you have the mode you want to
use on the screen, enter the value for
the dosing rate from the keypad. The
screen changes to show that you are
entering a value and not selecting the
mode, as if you had just entered DoseRate Calculation. Press * when you
have done so.
When you enter values, the precision
with which you can enter them depends
on the range:
• 0.01 to 99.99 in increments of 0.01,
• 0.1 to 999.9 in increments of 0.1,
• 1 to 9999 in increments of 1.
If you have chosen one of the following
modes using patient weight (mcg/kg/
min, MG/kg/hr, mcg/kg/hr, MG/kg/min
or units/kg/hr), you are next asked to
enter it as described in Programming
the patient weight below.
For dosing rate modes without the
patient weight, you are next asked to
enter it as described in Programming
the drug amount, opposite.
Programming the patient weight
The Patient’s body weight follows the
dosing rate entry for the following
dosing rate modes:
• mcg/kg/min,
• MG/kg/hr,
• mcg/kg/hr,
• MG/kg/min,
• units/kg/hr.
You need to enter the patient weight
when you see a display similar to the
following:
Press the Options key to change the
weight measurement from kg to lbs or
lbs to kg. The pump recalculates any
value entered into the new weight
units.
If you press the Options key a second
time by mistake, you are taken back to
the beginning of programming. Just
press * to get back to entering and
confirming the patient weight.
Enter the patient weight from the
keypad. When entering the weight, the
precision depends on the units you are
using. See the Specification at the end
of the manual for the increments for
each weight unit.
Press * to set the weight and move on
to the drug amount.
Programming the drug amount
The drug amount entry follows the
dosing rate entry or the patient weight
(if a dosing rate involving weight is
selected).
When you are asked to enter the drug
amount display, you will see a display
similar to the following:
If you need to change from MG drug/bag
(in this example), press the Options
key to enter the change screen:
Press the * key repeatedly to display g,
MG and mcg.
When the display is correct, enter the
drug amount value from the keypad.
Volumetric Infusion Pump Instruction Manual
3 — 21
Page 78
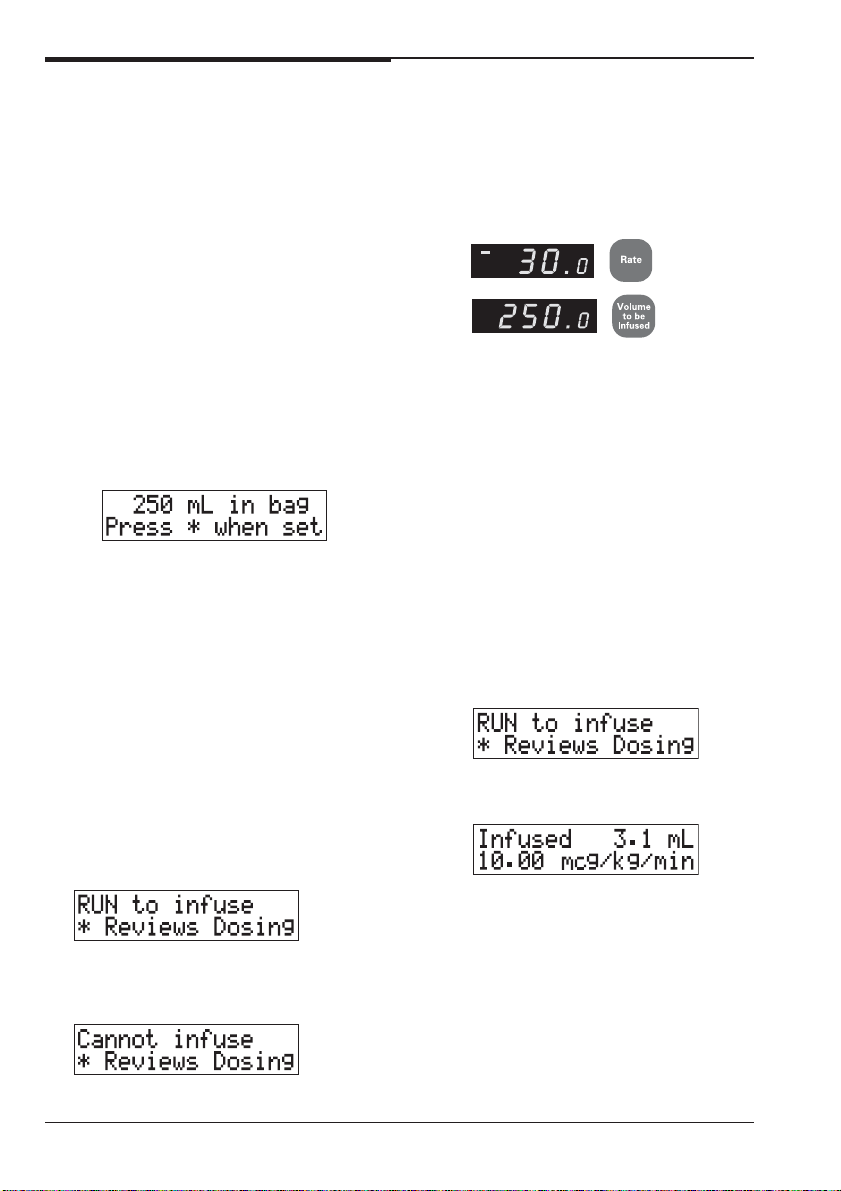
Options
Graseby Medical Ltd.
When entering the amount, the precision
depends on the units you are using. See
the Specification at the end of the manual
for the increments for each range.
When the dosing rate mode selected
requires ‘units’ input, only “units/bag”
appears in the Message Display.
Once you have entered the drug
amount, you are next asked to enter the
volume of the bag. This is used with the
drug amount to calculate the drug
concentration.
Programming the volume
When you enter the volume display, you
see a display similar to the following:
For the range of volumes that can be
entered, see the section on Primary and
Secondary infusion in the Specifications
at the end of this manual.
Enter the number of millilitres in the
fluid container. This must be the
volume when the bag is full. It is
used to calculate the concentration.
As well as the Message Display which
shows the volume infused and the
dosing rate, the programmed volume to
be infused appears in the Volume
display and the calculated infusion rate
appears in the Rate display.
Calculated infusion rates may be
rounded up as follows:
• below 100 mL/h, rounded to the
nearest 0.1 mL/h,
• above 100 mL/h, rounded to the
nearest 1 mL/h.
The pump also back-calculates and
displays the actual dosing rate being
delivered if rounding has occurred.
Changing the volume to be infused
If you do not want the whole bag to be
infused, you can change the volume to
be infused if the pump is on Hold and
the Message Display shows:
When the setup is complete
When the programming steps for the
Dose-Rate Calculation infusion are
completed, the display shows that the
infusion is ready to run or be reviewed:
You will need to review if an invalid
rate is calculated and the Message
Display shows:
3 — 22
Volumetric Infusion Pump Instruction Manual
or when the infusion has been started
and then stopped:
To alter the volume:
• press the Volume to be Infused key
• enter the new volume to be infused
• press Run.
Note: Changing the Volume to be
infused does not affect the programmed
dosing rate or the calculated infusion
rate.
Page 79

Graseby Medical Ltd.
Options
If you do not enter any values when
programming, but accept each
previous value by pressing * at
every option, the VTBI may not be
correct for the infusion. Set it to an
appropriate value before running
the infusion. Changing it will not
affect the calculated rate.
Programming the pump using a
fixed infusion rate
Once you have completed the
programming steps for the Dose-Rate
Calculation infusion, you can change
the infusion rate instead of accepting
the calculated infusion rate. When the
Message Display shows:
• press the Rate key and enter the
desired rate, then
• press the Run key.
The pump will then back-calculate the
dosing rate based on the new infusion
rate that you have entered.
Dose-Rate Calculation programming example
In this example we have chosen the
following values to program:
• dosing rate - 5 mcg/kg/min
• patient weight 73 kg
• drug amount in fluid container - 400
mg
• volume of fluid in container - 250 mL
This example includes patient
weight. Step 5 is not necessary if
you program without it.
1. To enter Dose-Rate Calculation press
Options then numeric key 8, or press
Options until you see this screen.
Press the * key to enter the dosing
rate display.
2. You can either accept the dosing rate
or enter a new dosing rate .
3. If you need to change the dosing rate
mode press the Options key.
Press the * key until the required
mode is displayed, as described in
Programming the dosing rate on page
3-20.
4. Enter the dosing rate value, then
press the * key.
Volumetric Infusion Pump Instruction Manual
3 — 23
Page 80

Options
Graseby Medical Ltd.
5. In this example, because the dosing
rate mode chosen is mcg/kg/min, the
patient weight screen is displayed, as
described in Programming the patient
weight on page 3-21.
The weight is displayed in either kgs
or lbs. Changing the weight
measurement is described in
Programming the patient weight on
page 3-21.
Either accept the patient weight that
is currently shown by pressing *, or
enter the new weight of 73 then press
the * key.
6. The next message asks for the drug
amount in the bag.
If you need to change the entry type,
see Programming the drug amount on
page 3-21.
Enter the correct drug amount in the
bag and press the * key.
3 — 24
7. Next enter the fluid volume of the bag
and press the * key.
8. Before you start the infusion it is
good practice to review your settings.
Press the * key to review the program
and make any necessary changes.
Note: You may also need to review if the
pump finds that the values you have
entered are incompatible.
9. When your program is correct press
Run. As well as the Message Display,
which shows the volume infused and
the dosing rate, the programmed
Volume to be Infused appears in the
Volume display and the calculated
infusion rate appears in the Rate
display.
Volumetric Infusion Pump Instruction Manual
Page 81

Graseby Medical Ltd.
Options
Changing the dosing rate without stopping the
infusion
The pump allows you to change the
dosing rate (thus altering the infusion
rate) without stopping the infusion.
1. To change the dosing rate without
stopping the infusion, press the *
key.
The current dosing rate displayed in
the Message Display starts
flashing, and the infusion Rate
display goes blank. However, the
pump continues to infuse at the
original rate.
2. Enter the new dosing rate value
using the keypad.
3. Within 10 seconds of entering the
new dose, press the Run key.
If a warning appears in the Message
Display and the pump alarms, refer
to Dose or rate change alarms on
page 3-27.
4. The pump calculates the new dosing
rate and new infusion rate. The new
dosing rate is now displayed in the
Message Display and the new
infusion rate in the rate display.
The pump is now infusing at the new
rate.
If a warning appears in the Message
Display and alarms, refer to Dose or
Rate change alarms on page
3-27.
If the calculated rate is rounded up
the pump will back-calculate and
display the actual dosing rate being
infused.
Volumetric Infusion Pump Instruction Manual
3 — 25
Page 82

Options
Graseby Medical Ltd.
Changing the infusion rate without stopping the
infusion
The pump allows the infusion rate to be
changed (thus altering the dosing rate)
without stopping the infusion.
1. To change the infusion rate without
stopping an infusion, press the Rate
key.
The current dosing rate displayed in
the Message Display and the
infusion Rate display goes blank.
However the pump continues to
infuse at the original rate.
2. Enter the new infusion rate using
the keypad.
3. Within 10 seconds of entering the
new rate, press the Run key.
If a warning appears in the Message
Display and the pump alarms, refer
to Dose or rate change alarms on
page 3-27.
4. The pump calculates the new dosing
rate. The new dosing rate is now
displayed in the Message Display
and the new infusion rate in the rate
display. The pump is now infusing
at the new rate.
If a warning appears in the Message
Display and alarms, refer to the
next page Dose or rate change
alarms.
3 — 26
Volumetric Infusion Pump Instruction Manual
Page 83

Graseby Medical Ltd.
Dose or rate change alarms
Options
Dose or rate change not completed
within 10 seconds
If the new dosing rate or infusion rate is
entered, but the Run key is not pressed
within 10 seconds, or if another
function key is pressed, the new rate is
discarded and the Message Display
reverts to the previous values, a non-
insistent alarm sounds and one of the
following displays appear:
Press the Silence key to silence the
alarm.
The pump now continues infusing at
the old rate. If you still need to change
the dosing rate press the * key to take
you back to step 1 of Changing the
dosing rate without stopping the infusion
on page 3-25 or Changing the infusion
rate without stopping the infusion on
page 3-26.
Dose or Rate change not accepted
If the dosing rate or infusion rate is
changed, but the resultant calculated
rate is incorrect, the displays revert to
their previous values, the non-
insistent alarm sounds, and one of the
following displays appear:
Press the Silence key to silence the
alarm.
The pump now continues infusing at
the old rate. If you still need to make a
change, press the * key to take you back
to step 1 of Changing the dosing rate
without stopping the infusion on page 325 or Changing the infusion rate without
stopping the infusion on page 3-26.
Check values you want to change before
entering them to ensure that they will
result in a valid calculated rate/dose.
Volumetric Infusion Pump Instruction Manual
3 — 27
Page 84

Options
Graseby Medical Ltd.
Programming or reprogramming Dose-Rate
Calculation with Limits set
If any Limits are set for the Primary
Rate or Max VTBI, then these will
apply when you program the Dose-Rate
Calculation or if you modify a program.
Setting limits is described on page 3-29.
Before you enter Dose-Rate
Calculation
It is worthwhile checking what values
are set for Min and Max Primary Rate
limits and for Max VTBI before you
enter Dose-Rate Calculation. If they
are inappropriate for the prescription,
you can adjust them and not have the
infusion halt as described below.
If you program outside the limits
The pump tests whether the entered or
calculated values are within the limits
when you press Run.
If the pump detects that the calculated
rate is outside the limits, or the VTBI
is too high, then the alarm sounds and
the Message Display shows:
Note: This happens when the calculated rate is valid, but is outside the
VTBI or infusion rate limits set on the
pump. It is not the same as the “cannot
infuse” message displayed if the
calculation is invalid.
T o silence alarm and leave DRC
If you see the Preset Limits message
when you are programming or
reprogramming a Dose-Rate
Calculation infusion, Press the Silence
key to silence the alarm. The pump
automatically leaves Dose-Rate
Calculation and displays the Standard
Message:
This is so that you can use the Options
key to check and if appropriate, adjust
the preset limits, which you cannot do
when you are in Dose-Rate Calculation.
Tr oubleshooting Limits in a DRC program
To find out why the Dose-Rate
Calculation program exceeds the
limits, check the following:
1. Check the prescription volume (the
volume in the bag) against the VTBI
limit and adjust the limit if it is
incompatible with the prescription.
2. The rate calculated will remain in
the LED display when you are taken
out of Dose-Rate Calculation. Check
this against the Rate limit setting.
3. Check the value for the VTBI since
you may have accepted all values for
a previous Dose-Rate calculation
program and this will not have
updated the VTBI from the bag
volume.
4. If the VTBI or Rate limits are
acceptable, note all limits that are
set by using the Options key. Reenter Dose-Rate Calculation and
check if you have made a mistake in
programming the prescription.
If you change the rate while running
If you change the rate (either the dosing
rate or the pump infusion rate) while
running, and exceed the limits, then
press Run, the pump alarms but
continues at the programmed rate.
3 — 28
Volumetric Infusion Pump Instruction Manual
Page 85

Graseby Medical Ltd.
Setting Rate and VTBI limits
Options
You can limit the infusion Rates and
VTBI (volume to be infused) values for
each pump. When you set up an
infusion, the pump rejects a Rate or
VTBI value that is not within the
Minimum/Maximum rate limits, or is
greater than the maximum VTBI.
For example, you should set a
maximum rate on a pump that is
intended for use in an Epidural
application, or set a maximum VTBI on
a pump to be used in a neonatal
environment. Setting rate limits is also
called Rate Capping.
Rate Taper, Volume Over Time and
Dose-Rate Calculation are also affected
by limit settings.
The following Options are used to limit
the infusion rates and volumes to be
infused on the pump:
For Primary infusions:
• Min Rate, Max Rate, Max VTBI.
For Secondary or Bolus infusions:
• Min S/B Rate, Max S/B Rate,
Max S/B VTBI.
To define the ranges, the items must be
enabled on the Technician Menu, and
then set using the Options key.
See page 3-32 for more details on how
limits affect programming an infusion.
The instructions on the following
pages explain how to set values for
the (Primary) Minimum and
Maximum Rate and Maximum
VTBI. Once you have understood
how to change these values, you
will find that you can set the
Secondary/Bolus minimum and
maximum rates in the same way.
Minimum and Maximum Infusion Rates
If the Primary ‘Min Rate’ and ‘Max
Rate’ are enabled in the Technician
Menu, their current settings are
displayed when you switch on the pump.
If the defaults have not been changed
(on a Model 500), the screen looks like
this:
The Secondary/Bolus Maximum and
Minimum rates are not displayed when
you switch on the pump, even if they are
enabled and set.
Volumetric Infusion Pump Instruction Manual
Entering rates
Rates must be entered as whole
numbers: they cannot include a decimal
point. If the Min Rate is set to zero,
there is no lower limit. The Max Rate
may be set to 999 (on a Model 500) or
99 (on a Micro 505).
Unless the display includes S/B,
the rate being changed is always
the Primary.
3 — 29
Page 86

Options
Graseby Medical Ltd.
To set the minimum and maximum infusion rate
If the Options are enabled, you can
change either or both values. This section
explains how to change both values.
1. Press the Options key repeatedly
until you see the Minimum Rate
display. The current minimum
infusion rate flashes, showing that
you can change this value.
2. Enter a new rate, using the numeric
keypad, then press the * key to
confirm.
If it is correct, to leave the rate
unchanged, just press *.
If the pump finds that the rate is
invalid, the number continues to
flash, so you should repeat this step.
3. With the value for Min Rate static,
press the Options key to display
the flashing Maximum Primary
rate.
4. Enter a new rate then press * to set
the value. Just press * if you want to
leave the maximum rate unchanged.
3 — 30
You can now do one of the following:
• press the Options key once to move
on to the next Option;
• press the Options key repeatedly to
move through all the Options that
have been enabled on the pump. You
can stop when the Standard
Message is displayed on the screen,
indicating that the pump is ready to
be programmed, or carry on until you
reach the Min Rate screen again,
where you can make further changes;
• turn the pump off then on again, to
see the new primary minimum and
maximum values in the messages
displayed in the power up sequence.
Volumetric Infusion Pump Instruction Manual
Page 87
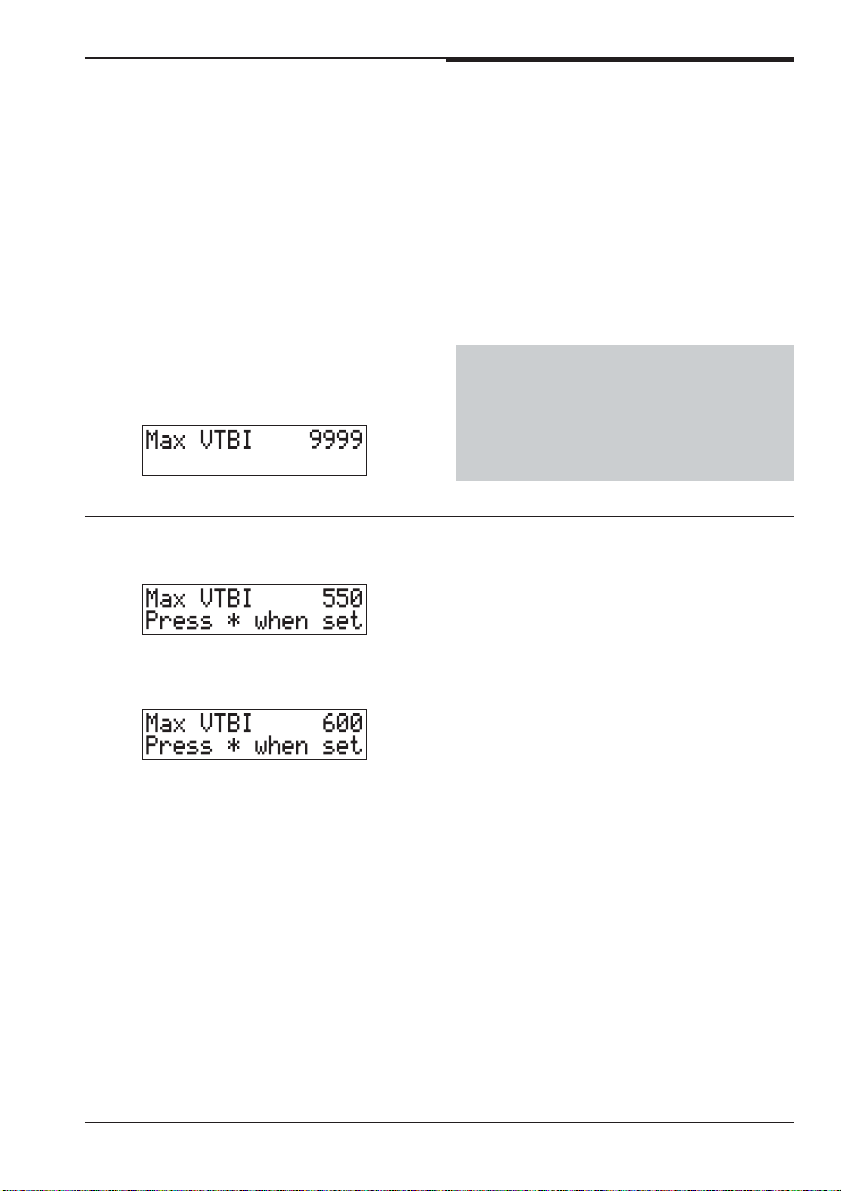
Graseby Medical Ltd.
Maximum VTBI
Options
This Option is to limit the volume that
may be programmed for a single
infusion. The Max VTBI is 9999 (on a
Model 500) or 999 (on a Micro 505),
There is no lower limit for the VTBI.
If the Primary Maximum VTBI is
enabled, the current setting is
displayed when you switch on the
pump.
If the default has not been changed, (on
a Model 500) the screen looks like this:
The Max Secondary/Bolus VTBI is not
displayed, even if it is enabled.
The example here shows how to set
the Maximum VTBI for the Primary
infusion. The process is the same for
setting the Maximum VTBI for the
Secondary/Bolus infusion.
To set the maximum infusion volume
1. Press the Options key repeatedly
until you see the Max VTBI display.
The current maximum VTBI
flashes, showing that you can
change this value.
2. Enter a new VTBI, using the
numeric keypad, then press the *
key to confirm.
If it is correct, to leave the VTBI
unchanged, just press *.
If the pump finds that the rate is
invalid, the number continues to
flash, so you should repeat this
step.
3. Press the Options key to take you
to the next option.
Volumetric Infusion Pump Instruction Manual
3 — 31
Page 88

Options
Graseby Medical Ltd.
Programming and running infusions with limits
If limits are set and you try to run an
infusion, the pump will prevent you
from running with a rate or VTBI value
entered outside the limits. This
includes special infusion modes such as
Volume over Time, Rate Taper and
Dose-Rate calculation. In the latter two
infusion modes, the pump behaves in a
slightly different way.
For Rate Taper, instructions on
programming with limits set are
described on page 3-16.
For Dose-Rate Calculation,
instructions on programming with
limits set are described on page 3-28.
If you change rates while running or put
the pump on hold and change the
volume, the limits are checked when
you press Run. The pump continues to
infuse at the previous rate when an
error is detected during a rate change
while running.
Rate limit settings also affect Quick
Rate changes.
When the pump detects a value which
is outside the set limits it sounds an
alarm and the Message Display shows:
Silence the alarm and enter a value
which is valid for the limits. The
previous value is restored to the LED
display.
If are using Quick Rate change, and try
to move outside the rate limits, the
pump will alarm with the limits
exceeded message, and the rate LED
will show the limit setting. If you are
changing the rate while the pump is
running, the infusion will continue at
the limit rate.
3 — 32
Volumetric Infusion Pump Instruction Manual
Page 89

Graseby Medical Ltd.
KVO rate
Options
The pump automatically switches to a
KVO infusion when the programmed
infusion ends. The default rate for KVO
is 3.0 mL/h, or the programmed
infusion rate if that was less than 3.0
mL/h.
The KVO option, if enabled in the
Technician Menu, allows you to set a
different KVO rate.
The pump remembers the value entered
as described here, and uses it as the
KVO rate. You cannot set the KVO rate
to zero.
The range for the KVO rate must be
within the following limits:
500 0.1 to 10.0 mL/h
Micro 505 0.1 to 3.0 mL/h.
Setting a KVO rate
When you set the KVO rate, if the Max
Primary Rate is also enabled and set
below these limits, then that will define
the maximum KVO value you can enter.
If the programmed infusion rate is less
than the set KVO rate, when the pump
goes into KVO, it will continue pumping
at the programmed lower rate.
KVO rates cannot be changed when an
infusion is running, but if you press the
Options key, the current setting is
displayed.
1. Press the Options key until you see
the KVO rate display. The current
value flashes, showing that you can
enter a new value.
2. Enter the new KVO Rate using the
numeric keypad, then press * to
confirm.
If the rate is correct, press Options
to move on to the next Option.
In the unusual situation that the rate
you enter is not accepted, then the Max
Primary Rate limits are set below the
value you wish to enter. The Min
Primary Rate does not affect the KVO
entry.
Volumetric Infusion Pump Instruction Manual
3 — 33
Page 90

Options
Drug Label
Graseby Medical Ltd.
The Drug List feature, if enabled in the
Technician Menu, allows you to use the
Options key to select a drug label from
a predefined list that is stored in the
pump.
When the Drug List is enabled, the
selected drug label is displayed for two
seconds when you switch on the pump,
for example:
Drug Library
This is a complete alphabetical list of
the drug labels retained in the pump’s
memory. Due to the number of
characters that the pump can display
some of the drug names have been
shortened or abbreviated.
Acetylcysteine
Alfentanil
Aminophylline
Carboplatin
Cisplatin
Cyclophosphamide
Dextrose
Dextrose/Saline
Dobutamine
Dopamine
Doxapram
Doxorubicin
Droperidol
Epidural
Fentanyl/Bupiv
Fluorouracil
Hartmanns
Heparin
Morphine
Nitroglycerine
Nitroprusside
Oxytocin
If no drug label has been selected, the
screen is shown like this:
The selected Drug Label is displayed
for two seconds if you press * when the
pump is on hold, or infusing.
If you press the Options key when an
infusion is running, you will also see
the current label, but will not be able to
change it.
The drug label provides a visual
reminder of the name of the drug,
but it does not control any pump
features.
It is your responsibility to ensure
that the correct drug name is
selected.
Propofol
Prostaglandin
Remifentanil
Ritodrine
Ropivacaine
Saline
Syntocinon
TPN
3 — 34
Volumetric Infusion Pump Instruction Manual
Page 91

Graseby Medical Ltd.
Checking the current drug label
• Switch the pump off and then on, or
• Press * when the pump is on hold, or
infusing.
Selecting a new drug label
1. Press Hold if the pump is infusing.
2. Press the Options key until you see
the Drug Label display. It shows the
name of the drug that is currently
stored in the pump.
3. Press * to change the drug.
4. To select the drug label, press
• the 1 key to scroll down through
the list, or
• the 3 key to scroll up through the
list.
5. When the required drug label is
displayed, press the * key to confirm
the name.
6. This display shows that the selected
drug is now stored in the pump as
the Drug Label. Press the Options
key to take you to the next option.
7. When you see the Standard Message
Display, press * to show the Drug
Label for two seconds.
Options
Volumetric Infusion Pump Instruction Manual
3 — 35
Page 92

Options
Clearing the drug label
Graseby Medical Ltd.
1. Press Hold if the pump is infusing.
2. Press the Options key until you see
the Drug Label display.
3. Press * to display this screen.
4. Press * to clear the label and
display this screen.
5. Press the Options key repeatedly to
return to the Standard Message
Display.
3 — 36
Volumetric Infusion Pump Instruction Manual
Page 93

Troubleshooting
Chapter 4
Page 94

Graseby Medical Ltd.
Introduction
This chapter covers all the error
messages and alarms, displayed by the
Volumetric, that notify you of any
operating problem.
If you cannot solve the problem after
reading this chapter, the pump should
be inspected and repaired by a suitably
qualified technician, or returned to
Graseby Medical at the address on the
back cover of this Instruction Manual,
in order to have the fault rectified.
What’s in this chapter
Troubleshooting
The chapter contains two sections:
• warning messages with alarms,
divided into Continuous (backup)
alarm, Insistent alarms and Noninsistent alarms;
• warning messages with no alarms.
The chapter lists the possible causes
and recommended action to take for
each of the warning messages.
The chapter does not contain details of
the Volumetric pump System errors or
warnings that indicate a problem that
can only be solved by the Biomedical
engineering department, or by returning
to the distributor/factory. These are
described in the Volumetric Service
Manual.
Who should read this chapter
You should read this chapter to find out
how to solve any problems that arise
whilst you are using the Volumetric
pump.
You are likely to be in one of the
following groups:
• Biomedical engineering
department, needing to find out
what alarms may arise during the
normal operation of the pump
• People being trained, who have
access to the Instruction Manual as
additional training material
• People who have been trained, who
need a concise summary to remind
them of the Volumetric pump’s
alarms and a description of what to
do if the pump sounds an alarm.
Volumetric Infusion Pump Instruction Manual
4 — 1
Page 95

Troubleshooting
Graseby Medical Ltd.
Handling problems with the pump
Most problems in using the pump are
signalled by alarms whose
accompanying messages are described
in the rest of this manual.
You should also use your experience in
using the pump to take action if the
pump behaves as if it is faulty. Follow
the warnings and cautions on this page
to take appropriate action to send the
pump to a suitably qualified technician
for checking.
Pump will not switch on
If the pump does not switch on when
the On/Off key is pressed when
connected to an AC power supply.
Check that the keypad lockout feature
is not active, see Safety keypad lockout,
page 2-22.
CAUTION: Refer all service repair and
calibrations only to qualified technical
personnel. Unauthorised modifications to
the pump must not be carried out.
WARNING: You should ensure that the
performance offered by the pump is fit for
the intended purpose. Failure to do so
may result in compromised function of
the product, patient injury or user injury.
WARNING: Do not use a faulty pump. If
the pump detects a fault when it is first
turned on, or if it develops a fault during
operation then a continuous system alarm
sounds. The pump must be referred to a
suitably qualified technician or returned
to Graseby Medical in order to have the
fault rectified.
4 — 2
Volumetric Infusion Pump Instruction Manual
WARNING: Before using the pump, it
should be inspected for physical damage.
The pump should not be used if damage
is evident, and should be returned to
service personnel for repair before being
returned to use. Failure to do so may
result in compromised function of the
product, patient injury or user injury.
WARNING: Do not open the pump
housing. Refer all service faults only to
qualified technical personnel. Opening
the pump housing may cause electric
shock leading to patient or user injury or
death.
Page 96

Graseby Medical Ltd.
Troubleshooting
Pump Messages
Messages are divided into those where an alarm sounds and those which just
display a message.
Programming Messages with alarms
Message display Possible causes Action
Rate or VTBI limits Correct the value or change the
have been set and you limits if appropriate.
are trying to program
a value outside these
limits.
or
You have entered a Correct the value.
Bolus VTBI greater
than the Primary VTBI.
Warning Messages with alarms
Continuous (back up) alarms
When a continuous alarm occurs, the pump automatically stops the fluid delivery.
Message display Possible causes Action
Electrical or Do not use.
mechanical problem. Pump needs to be repaired by
a qualified technician or
returned to Graseby Medical.
Potential pump Turn pump off, then on.
problem detected. If alarm persists, remove
pump from use. Pump needs to
be repaired by a suitably
qualified technician or
returned to Graseby Medical.
Volumetric Infusion Pump Instruction Manual
4 — 3
Page 97

Troubleshooting
Insistent alarms (pump stops infusing)
Message display Possible causes Action
Air detected in the To remove air:
cassette. 1. Close the lower roller clamp.
2. Open the door latch.
3. Wait briefly for the cassette
4. Slowly close the door latch.
5. Repeat if necessary.
or
Cassette loaded Make sure cassette is
backwards. properly loaded (flat side out,
pillow side in).
Battery is depleted. AC power cord must be
plugged in to continue infusion.
Tubing safety clip To load the safety clip:
is not correctly loaded. 1. Close lower roller clamp.
2. Open the door.
3. Place safety clip in the slot.
4. Close the door.
5. Open the lower roller clamp.
Graseby Medical Ltd.
to fill.
4 — 4
Door was opened Always press the Hold key
while the pump and close the roller clamp
was running. before opening the door.
To restart the infusion:
1. Press Silence.
2. Close the door.
3. Press Run.
Problem detected 1. Open the door.
above the pump as 2. Check clamps and tubing
the door was being for any restrictions
closed. 3. Reload cassette if necessary.
4. Close the door.
Volumetric Infusion Pump Instruction Manual
Page 98

Graseby Medical Ltd.
Insistent alarms (continued)
Message display Possible causes Action
Insufficient flow from 1. If the fluid container is
the container to the empty, replace it.
pump. 2. Raise the height of the fluid
3. Open the upper clamp if
4. Replace the admin set if
Pressure below pump Open the lower roller clamp,
exceeds the Occlusion remove any restriction to the
Alarm Setting. lower tubing. Changethe
Occlusion Alarm Setting if
not appropriate for infusion.
Verify patient catheter is
patent.
Troubleshooting
container so that the bottom
of the drip chamber is 15-30
cm (6 to 12 inches) above the
top of the pump.
closed, remove any restriction to the upper tubing.
there is damage to the spike
or other admin set problem.
Pump is on hold for Press the Silence or Hold key
2 minutes with the to silence the alarm.
door closed, Press the Run key to start the
or 6 minutes with the infusion, or turn the pump off
door open. if not in use.
Secondary/Bolus Press the Silence or Hold key
infusion ended and to silence the alarm.
Secondary Stop has Press the Primary key
been enabled on the Press Run to start the Primary
Technician Menu. infusion.
Note: In Medium or High occlusion alarm settings, when downline pressure exceeds
the alarm threshold, the motor pauses, the Run key remains lit and the Pumping
indicator stops. If within 10 seconds the pressure drops back below the threshold,
pumping resumes and the alarm does not sound (if pressure remains high, the
alarm sounds). If repeated pressure spikes occur, causing the pump to enter this
filtering mode for a total of 30 seconds, measured over the last 4 minutes that the
pump was infusing, the alarm sounds. Occlusions detected in the Low occlusion
alarm setting cause an immediate alarm.
Volumetric Infusion Pump Instruction Manual
4 — 5
Page 99

Troubleshooting
Non-insistent alarms (pump continues to infuse)
Message display Possible causes Action
Dose-rate calculation Press the Silence or Run to
program setup silence the alarm, if necessary
started with the re-enter the Dose-rate
pump running; calculation program setup.
dosing parameters
not completed.
Running dosing rate Press the Silence or Run key
change was attempted,to silence the alarm. Re-enter
but not properly the running dose change, see
completed. Chapter 3 Options.
The entered dose Press the Silence or Run key
or calculated rate to silence the alarm. Re-enter
is incorrect. the parameters.
The infusion is Press the Silence or Run key
complete and the to silence the alarm and
pump has switched continue the KVO delivery. The
to KVO rate. pump re-alarms every 6 mins.
or
press the Hold key to silence
the alarm and stop infusing.
Graseby Medical Ltd.
4 — 6
Battery nearly Plug in the AC power cord, if
depleted (1/2 hour or possible,
less remains). or
Press the Silence or Run key
to silence the alarm for 6
minutes and continue running
the infusion.
Infusion rate change Press the Silence or Run key
was attempted, while to silence the alarm. Re-enter
running but not the running rate change, see
completed. Chapter 2 Operating the pump.
Secondary infusion Press Hold then Secondary key,
was programmed but Re enter the VTBI and Rate.
the Primary was run. Press the Run key.
Volumetric Infusion Pump Instruction Manual
Page 100

Graseby Medical Ltd.
Warning Messages with no alarms
Message display Possible causes Action
Keypad Lock/unlock Press the Keypad Lock/unlock
button on rear of the button on the rear of the pump
pump has been to unlock the keypad.
pressed.
Keypad Auto lock Press the Keypad Lock/unlock
button has been button on the rear of the pump,
enabled. twice to unlock the keypad.
Note: The keypad will
automatically lock 1 minute
after the last key is pressed.
Quick rate change See Chapter 3 Options
option has been
selected
The Rate taper See Chapter 3 Options
option has been
selected.
Troubleshooting
The rate taper Infusion values must be
program or changed, see Chapter 3
volume over time Options, Programming a rate
program cannot be taper or Programming volume
infused as entered. over time.
Dose-rate calculation The infusion values must
program cannot be be changed, see Chapter 3
infused as entered. Options, Programming dose
rate calculation).
Volumetric Infusion Pump Instruction Manual
4 — 7
 Loading...