

Page 1
Libretto di Uso
User Manual
Manuel D’utilisation
Gebrauchsanleitung
Gebruiksaanwijzing
Manual De Uso
Livro De Instruções Para Utilização
Руководство По Эксплуатации
Användningshandbok
Brugsvejledning
KSEG90X2 - KSEG120X2
KSEG90VXB - KSEG90VXN
Page 2

INDICE
CONSIGLI E SUGGERIMENTI.............................................................................................................................................. 4
CARATTERISTICHE.............................................................................................................................................................. 5
INSTALLAZIONE ................................................................................................................................................................... 6
USO........................................................................................................................................................................................ 7
MANUTENZIONE .................................................................................................................................................................. 9
IT
INDEX
RECOMMENDATIONS AND SUGGESTIONS ................................................................................................................... 11
CHARACTERISTICS ........................................................................................................................................................... 12
INSTALLATION.................................................................................................................................................................... 13
USE...................................................................................................................................................................................... 14
MAINTENANCE................................................................................................................................................................... 16
EN
SOMMAIRE
CONSEILS ET SUGGESTIONS.......................................................................................................................................... 18
CARACTERISTIQUES......................................................................................................................................................... 19
INSTALLATION.................................................................................................................................................................... 20
UTILISATION .......................................................................................................................................................................21
ENTRETIEN......................................................................................................................................................................... 23
FR
INHALTSVERZEICHNIS
EMPFEHLUNGEN UND HINWEISE ................................................................................................................................... 25
CHARAKTERISTIKEN......................................................................................................................................................... 26
MONTAGE ...........................................................................................................................................................................27
BEDIENUNG........................................................................................................................................................................ 28
WARTUNG........................................................................................................................................................................... 30
DE
INHOUDSOPGAVE
ADVIEZEN EN SUGGESTIES............................................................................................................................................. 32
EIGENSCHAPPEN ..............................................................................................................................................................33
INSTALLATIE....................................................................................................................................................................... 34
GEBRUIK .............................................................................................................................................................................35
ONDERHOUD...................................................................................................................................................................... 37
NL
INDICE
CONSEJOS Y SUGERENCIAS........................................................................................................................................... 39
CARACTERÍSTICAS ........................................................................................................................................................... 40
INSTALACIÓN ..................................................................................................................................................................... 41
USO...................................................................................................................................................................................... 42
MANTENIMIENTO............................................................................................................................................................... 44
ES
2
2
Page 3

ÍNDICE
CONSELHOS E SUGESTÕES............................................................................................................................................ 46
CARACTERÍSTICAS ........................................................................................................................................................... 47
INSTALAÇÃO....................................................................................................................................................................... 48
UTILIZAÇÃO ........................................................................................................................................................................49
MANUTENÇÃO.................................................................................................................................................................... 51
PT
УКАЗАТЕЛЬ
СОВЕТЫ И РЕКОМЕНДАЦИИ .......................................................................................................................................... 53
ХАРАКТЕРИСТИКИ............................................................................................................................................................ 54
УСТАНОВКА........................................................................................................................................................................ 55
ЭКСПЛУАТАЦИЯ................................................................................................................................................................ 56
УХОД.................................................................................................................................................................................... 58
RU
INNEHÅLL
REKOMMENDATIONER OCH TIPS ...................................................................................................................................60
EGENSKAPER..................................................................................................................................................................... 61
INSTALLATION.................................................................................................................................................................... 62
ANVÄNDING........................................................................................................................................................................ 63
UNDERHÅLL........................................................................................................................................................................ 65
SE
INDHOLD
RÅD OG ANVISNINGER .....................................................................................................................................................67
APPARATBESKRIVELSE ................................................................................................................................................... 68
INSTALLATION.................................................................................................................................................................... 69
BRUG................................................................................................................................................................................... 70
VEDLIGEHOLDELSE .......................................................................................................................................................... 72
DK
3
3
Page 4
2°
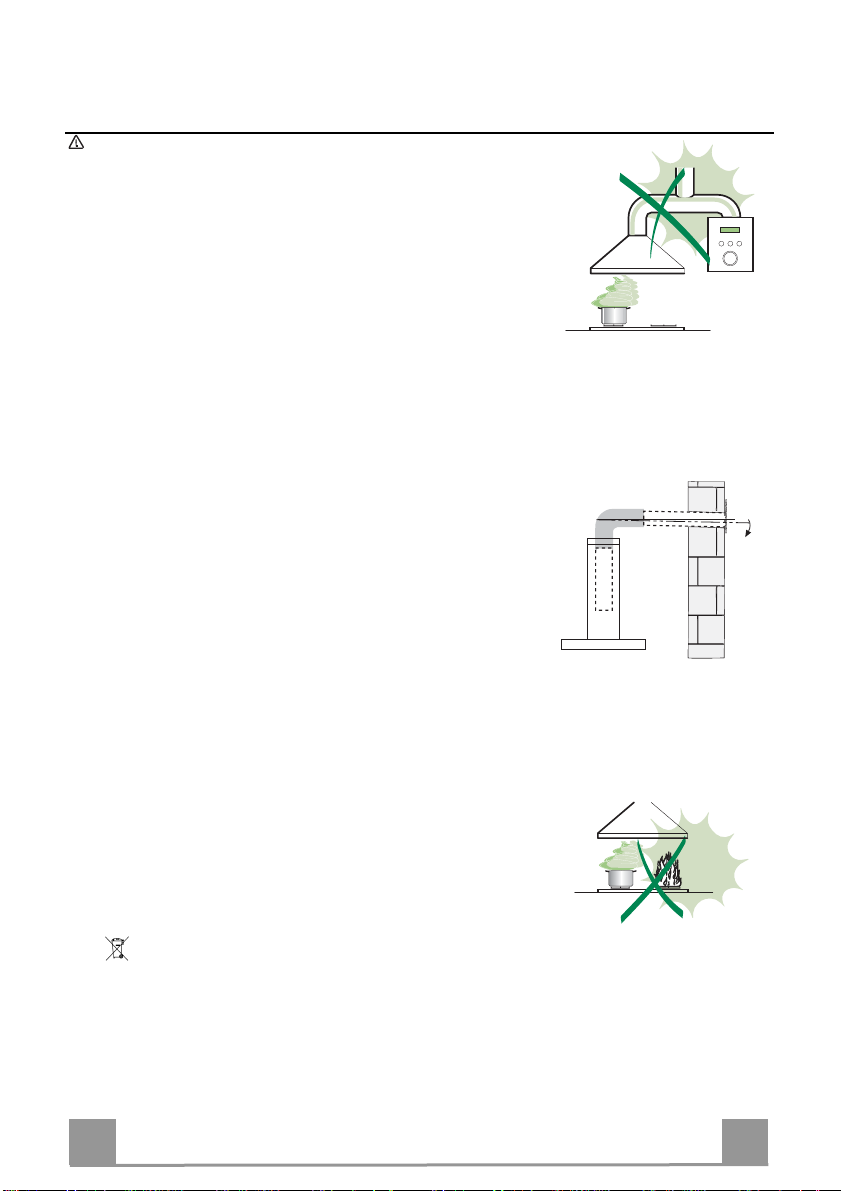
RECOMMENDATIONS AND SUGGESTIONS
The Instructions for Use apply to several versions of this appliance. Accordingly, you may find
descriptions of individual features that do not apply to you r specific appliance.
INSTALLATION
• The manufacturer will not be held liable for any damages resulting from incorrect or improper
installation.
• The minimum safety distance between the cooker top and the extractor hood is 650 mm (some
models can be installed at a lower height, please refer to the paragraphs on working dimensions
and installation).
• Check that the mains voltage corresponds to that indicated on the rating plate fixed to the inside of
the hood.
• For Class I appliances, check that the domestic po wer supply guarantees adequate earthing.
Connect the extractor to the exhaust flue through a pipe of minimum diameter 120 mm. The route
of the flue must be as short as possible.
• Do not connect the extractor hood to exhaust ducts carrying combustion fumes (boilers, fireplaces,
etc.).
• If the extractor is used in conjunction with non-electrical appliances (e.g. gas burning appliances), a
sufficient degree of aeration must be guaranteed in the room in order to prevent the backflow of
exhaust gas. The kitchen must have an opening communicating directly with the open air in order
to guarantee the entry of clean air. When the cooker hood is used in conjunction with appliances
supplied with energy other than electric, the negative pressure in the room must not exceed 0,04
mbar to prevent fumes being drawn back into the room b y the cooker hood.
• In the event of damage to the power cable, it must be replaced by the manufacturer or by the
technical service department, in order to prevent any ri sks.
• If the instructions for installation for the gas hob specify a greater distance specified above, this has
to be taken into account. Regulations concerning the discharge of air have to be fulfilled.
USE
• The extractor hood has been designe d exclusively for domestic use to eliminate kitchen smells.
• Never use the hood for purposes other than for whic h it has been designed.
• Never leave high naked flames under the hood wh en it is in operation.
• Adjust the flame intensity to direct it onto the bottom of the pan only, making sure that it does not
engulf the sides.
• Deep fat fryers must be continuously monitored du ring use: overheated oil can burst into flames.
• Do not flambè under the range hood; risk of fire
• This appliance is not intended for use by persons (including children) with reduced physical, sensory or mental capabilities, or lack of experience and knowledge, unless they have been given supervision or instruction concerning use of the applia nce by a person responsible for their safety.
• Children should be supervised to ensure that they do not play with the appliance.
• “ CAUTION: Accessible parts may become hot when use d with cooking appliances.”.
MAINTENANCE
• Switch off or unplug the appliance from the mains supply before carrying out any maintenance
work.
• Clean and/or replace the Filters after the specified ti me period (Fire hazard).
• Clean the hood using a damp cloth and a neutral liq uid detergent.
The symbol on the product or on its packaging indicates that thi s product may not be treated as household waste. Instead it shall be handed over to the
applicable collection point for the recy cling of electrical and electronic equipment . By ensuring this product is disposed of corre ctly, you will help prevent potential neg ative
consequences for the environment and hu man health, which could otherwise be cau sed by inappropriate waste handling of this prod uct. For more detailed information
about recycling of this product , please contact your local city o ffice, your household waste disp osal service or the shop where you purchased the product
.
EN
1
11
Page 5
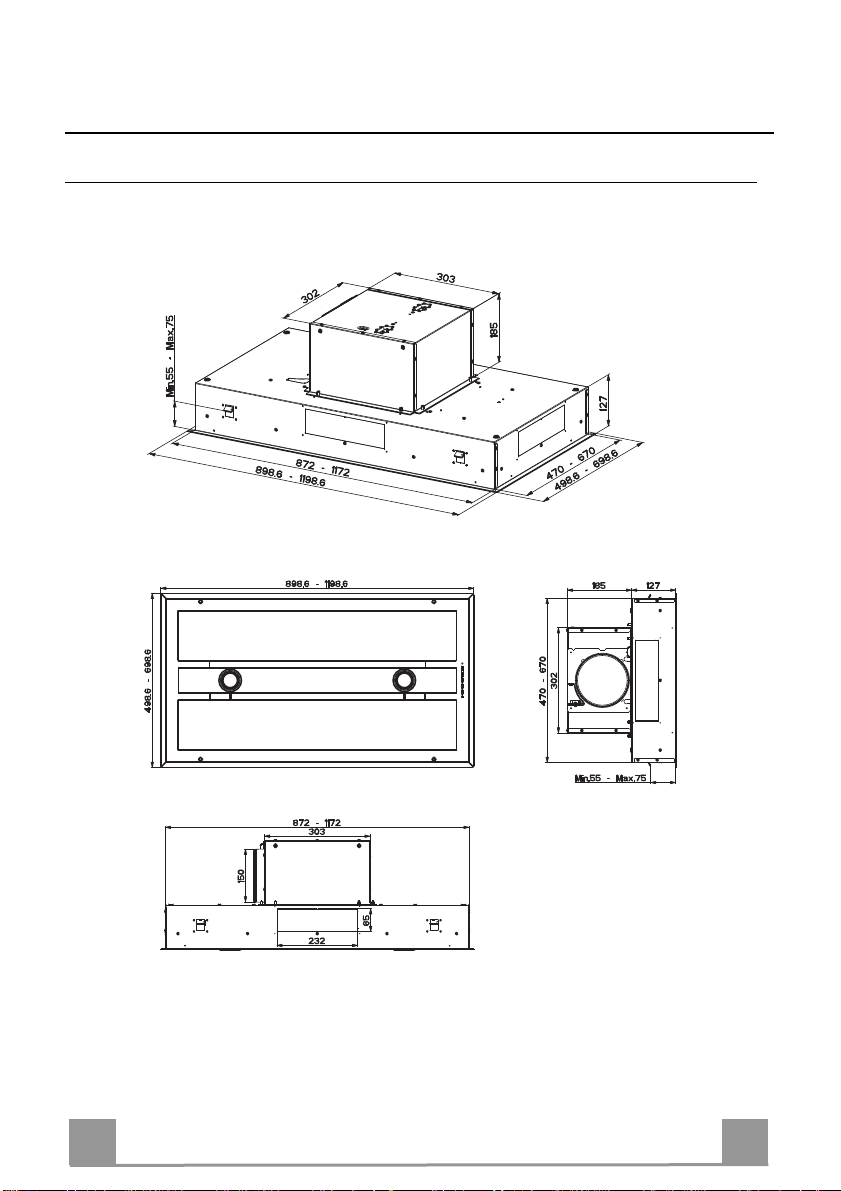
CHARACTERISTICS
Dimensions
EN
1
12
Page 6

INSTALLATION
Fixing the Hood
• In all cases where the ceiling is not strong enough at the suspension point, the installer must
provide strengthening using suitable plates and backing pieces anchored to the structurally
sound parts.
ELECTRICAL CONNECTION
• Connect the hood to the mains through a two-pole switch having a contact gap of at least 3
mm..
EN
1
13
Page 7
S1
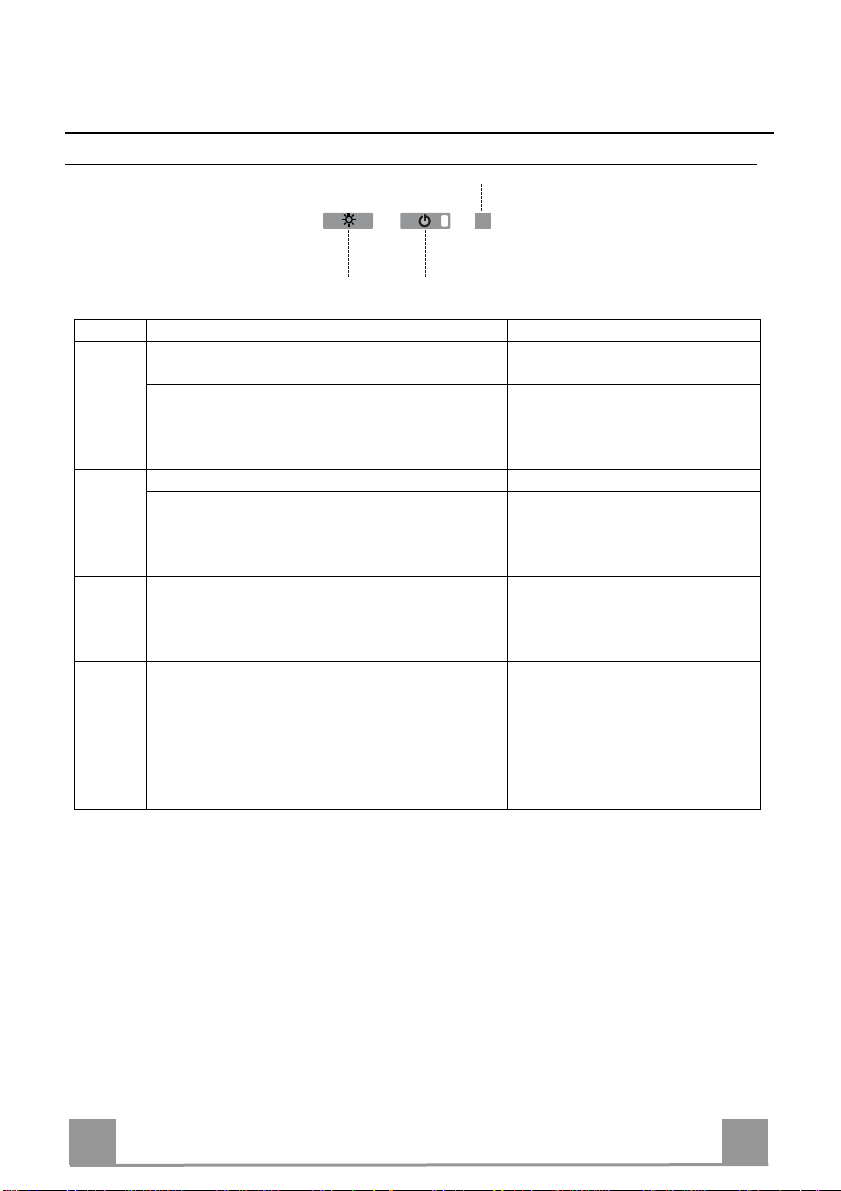
USE
Control panel
L T1
Button Function Led
Turns the lights ON/OFF at maximum
L
intensity.
Press and hold the button for approximately 4
seconds, with all the loads turned off (Motor
and Lights), to turn the Activated Charcoal
Filter alarm on/off.
Turns the motor on/off at speed one. -
T1
Press and hold the button for approximately 2
seconds, with all the loads turned off (Motor
and Lights), to reset the Activated Charcoal
Filter alarm.
Signals the Metal Grease Filter saturation
S1
alarm, indicating that it is necessary to wash the
filters. The alarm is triggered after the Hood
has been in operation for 100 working hours.
When this is activated, it signals the Activated
Charcoal Filter saturation alarm, indicating that
the filter must be changed; the Metal Grease
Filters must also be washed. The Activated
Charcoal Filter saturation alarm comes into
operation after the Hood has been working for
200 hours.
-
LED S1 flashes twice = alarm
ON.
LED S1 flashes once = alarm
OFF.
LED S1 turns OFF (Fixed or
Flashing).
Fixed
Flashing
EN
1
14
Page 8
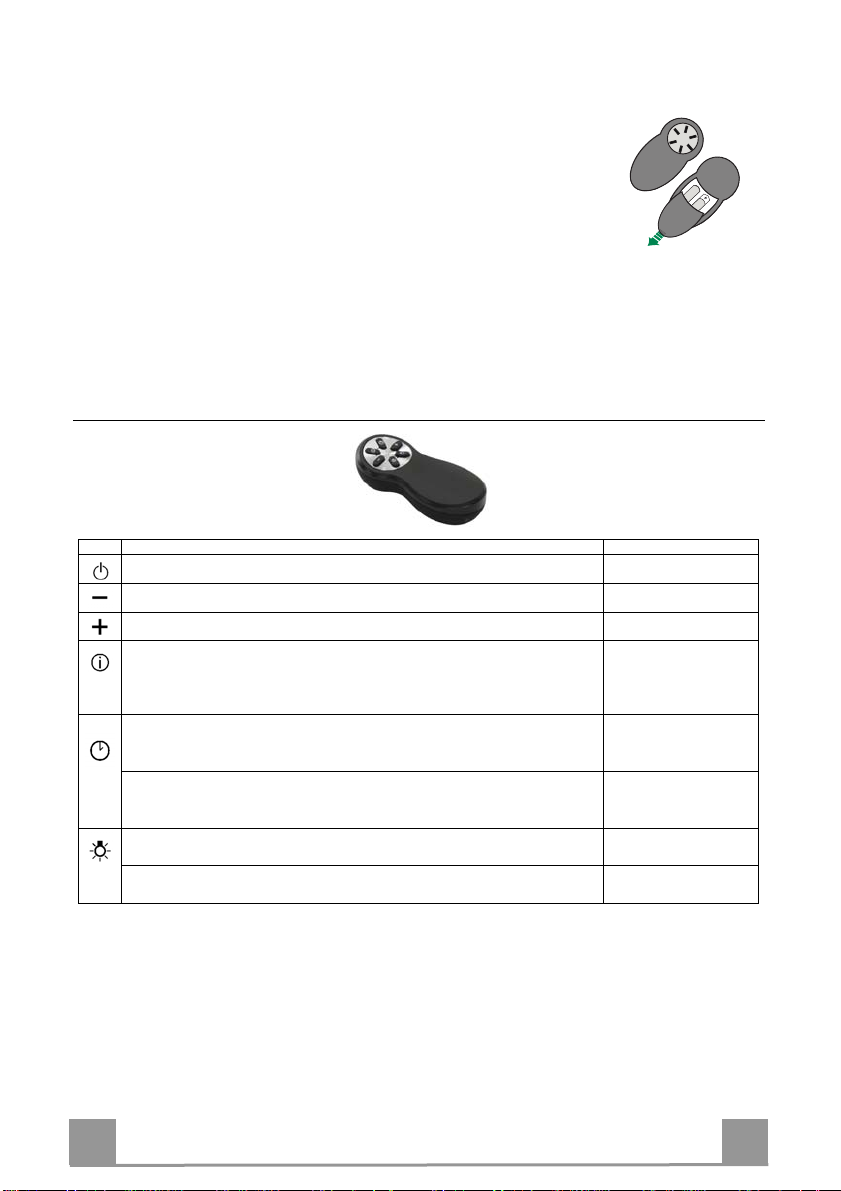
REMOTE CONTROL
The appliance can be controlled using a remote control powered by a
1.5 V carbon-zinc alkaline batteries of the standard LR03-AAA type
(not included).
• Do not place the remote control near to heat sources.
• Used batteries must be disposed of in the proper manner.
Control panel
Button Function Display
Turns the Motor On/Off. -
Decreases the speed of the Motor. -
Increases the speed of the Motor. -
INTENSIVE
- Activates Intensive speed from any other speed.
To disable it, simply press the same button again or turn the motor off.
- Intensive speed is timed to run for 10 minutes. At the end of the 10 minutes the system
automatically returns to the speed set previously.
Press briefly for the De lay Function:
Can only be activated if the Intensive or 24h function is not active.
Activates and deactivates total shutdown of the hood (motor+lights) after 30 minutes:
To disable the Delay, simply press the button again or turn the motor off.
Press and hold for 2sec f or the 24H Function:
Can only be activated if the Intensive or Delay function is not active.
Activates and deactivates the 24H function for 10 minutes every hour, for 24 hours. After this time it
is deactivated.
Turns the Hood lights On/Off at maximum intensity. -
Press and hold for 2sec to turn the Hood lights On/Off at reduced intensit y. -
-
The led on the motor button
(on the hood controls) will
flash once every 0.5 seconds.
The led on the motor button
(on the hood controls) will
flash once every 2 seconds.
EN
1
15
Page 9

MAINTENANCE
Opening Panel
• Open the Panel by pulling it.
• Clean the outside with a damp cloth and neutral detergent.
• Clean the inside using a damp cloth and neutral detergent; do
not use wet cloths or sponges, or jets of water; do not use
abrasive substances.
Grease filters
CLEANING METAL SELF- SUPPORTING GREASE FILTERS
• The filters must be cleaned every 2 months of operation, or
more frequently for particularly heavy usage, and can be
washed in a dishwasher.
• Pull the comfort panels to open them.
• Remove the filters one by one pushing them towards the back
side of the hood unit and simultaneously pulling downwards.
• Any kind of bending of the filters has to be avoided when
washing them. Before fitting them again into the hood make
sure that they are completely dry. (The colour of the filter surface may change throughout the time but this has no influence
to the filter efficiency).
• When fitting the filters into the hood pay attention that they are
mounted in correct position the handle facing outwards.
• Close the comfort panel.
EN
1
16
Page 10

A
B
Activated charcoal filter (Recirculation version)
These filters are not washable and cannot be regenerated, and
must be replaced approximately every 4 months of operation, or
more frequently with heavy usage.
REPLACING THE ACTIVATED CHARCOAL FILTER
• Open the comfort panels pulling them downwards.
• Remove the metal grease filters
• Remove the saturated activated charcoal filter as shown (A).
• Fit the new filters (B).
• Replace the metal grease filters.
• Close the comfort panels.
Lighting unit
Warning: This appliance is fitted with a white LED lamp classed
as 1M according to EN 60825-1: 1994 + A1:2002 + A2:2001
standards; maximum optical power emitted @439nm: 7µW. Do
not look directly at the light through optical devices (binoculars,
magnifying glasses…).
• For replacement contact technical support. ("To purchase contact technical support")
EN
1
17
Page 11

Libretto di Istruzioni
Instructions Manual
Manuel d’Instructions
Bedienungsanleitung
Gebruiksaanwijzing
Manual de instrucciones
Manual de Instruções
Руководство по эксплуатации
Bruksanvisning
Brugsvejledning
KSEG90X2 - KSEG120X2
KSEG90VXB - KSEG90VXN
Page 12

2
EN Warning! Before proceeding with instal- BG
lation, read the Recommendations and
Suggestions in the User Manual.
DE Achtung! Lesen Sie vor Beginn der In- CS
EL
stallation die Sicherheitshinweise in der
Gebrauchsanweisung.
FR Attention! Veuillez lire les consignes de
sécurité que contient la Notice d’utilisa-
tion avant d’installer l’appareil.
ET Hoiatus! Enne paigaldamist lugege läbi
kasutusjuhendis olevad ohutusjuhised.
EN Warning! Before proceeding with instal- BG
EN Warning! Before proceeding with instal- BG
lation, read the Recommendations and
Suggestions in the User Manual.
DE Achtung! Lesen Sie vor Beginn der In- CS
EL
stallation die Sicherheitshinweise in der
Gebrauchsanweisung.
EN Warning! Before proceeding with instal- BG
lation, read the Recommendations and
Suggestions in the User Manual.
CS
EN Warning! Before proceeding with instal- BG
lation, read the Recommendations and
Suggestions in the User Manual.
DE Achtung! Lesen Sie vor Beginn der In- CS
EL
HR
HU
LT
stallation die Sicherheitshinweise in der
Gebrauchsanweisung.
FR Attention! Veuillez lire les consignes de
sécurité que contient la Notice d’utilisa-
tion avant d’installer l’appareil.
ET Hoiatus! Enne paigaldamist lugege läbi
kasutusjuhendis olevad ohutusjuhised.
IT Attenzione! Prima di procedere all’instal-
lazione, leggere le Avvertenze e Suggeri-
menti contenute nel Libretto di Uso.
FI Varoitus! Ennen kuin aloitat asennuksen,
lue käyttöohjeen sisältämät turvallisuuso-
hjeet.
DA Vigtigt! Læs brugsanvisningens instruk-
tioner vedrørende sikkerhed, før instal-
lationen påbegyndes.
sigurnosne informacije u Uputama za
uporabu.
PT Atenção! Antes de continuar a instalação,
leia as informações de segurança no Ma-
nual de Utilizador.
vben.
ES ¡Atención! Antes de realizar la instala-
ción, lea la información de seguridad del
Manual del usuario.
-
-
strukcijoje.
EN Warning! Before proceeding with instal- BG
lation, read the Recommendations and
Suggestions in the User Manual.
DE Achtung! Lesen Sie vor Beginn der In- CS
EL
HR
HU
stallation die Sicherheitshinweise in der
Gebrauchsanweisung.
FR Attention! Veuillez lire les consignes de
sécurité que contient la Notice d’utilisa-
tion avant d’installer l’appareil.
ET Hoiatus! Enne paigaldamist lugege läbi
kasutusjuhendis olevad ohutusjuhised.
IT Attenzione! Prima di procedere all’instal-
lazione, leggere le Avvertenze e Suggeri-
menti contenute nel Libretto di Uso.
FI Varoitus! Ennen kuin aloitat asennuksen,
lue käyttöohjeen sisältämät turvallisuuso-
hjeet.
DA Vigtigt! Læs brugsanvisningens instruk-
tioner vedrørende sikkerhed, før instal-
lationen påbegyndes.
sigurnosne informacije u Uputama za
uporabu.
PT Atenção! Antes de continuar a instalação,
leia as informações de segurança no Ma-
nual de Utilizador.
vben.
EN Warning! Before proceeding with instal- BG
lation, read the Recommendations and
Suggestions in the User Manual.
DE Achtung! Lesen Sie vor Beginn der In- CS
EL
HR
stallation die Sicherheitshinweise in der
Gebrauchsanweisung.
FR Attention! Veuillez lire les consignes de
sécurité que contient la Notice d’utilisa-
tion avant d’installer l’appareil.
ET Hoiatus! Enne paigaldamist lugege läbi
kasutusjuhendis olevad ohutusjuhised.
IT Attenzione! Prima di procedere all’instal-
lazione, leggere le Avvertenze e Suggeri-
menti contenute nel Libretto di Uso.
FI Varoitus! Ennen kuin aloitat asennuksen,
lue käyttöohjeen sisältämät turvallisuuso-
hjeet.
DA Vigtigt! Læs brugsanvisningens instruk-
tioner vedrørende sikkerhed, før instal-
lationen påbegyndes.
sigurnosne informacije u Uputama za
uporabu.
instalação,
EN Warning! Before proceeding with instal- BG
lation, read the Recommendations and
Suggestions in the User Manual.
DE Achtung! Lesen Sie vor Beginn der In- CS
EL
stallation die Sicherheitshinweise in der
Gebrauchsanweisung.
FR Attention! Veuillez lire les consignes de
sécurité que contient la Notice d’utilisa-
tion avant d’installer l’appareil.
ET Hoiatus! Enne paigaldamist lugege läbi
kasutusjuhendis olevad ohutusjuhised.
IT Attenzione! Prima di procedere all’instal-
lazione, leggere le Avvertenze e Suggeri-
menti contenute nel Libretto di Uso.
FI Varoitus! Ennen kuin aloitat asennuksen,
lue käyttöohjeen sisältämät turvallisuuso-
hjeet.
-
TR RU
EL
HR
HU
LT
SL
SQ
SR
ET Hoiatus! Enne paigaldamist lugege läbi
kasutusjuhendis olevad ohutusjuhised.
FI Varoitus! Ennen kuin aloitat asennuksen,
lue käyttöohjeen sisältämät turvallisuuso-
hjeet.
sigurnosne informacije u Uputama za
uporabu.
vben.
-
-
strukcijoje.
IT Attenzione! Prima di procedere all’installazione, leggere le Avvertenze e Suggerimenti contenute nel Libretto di Uso.
lation, read the Recommendations and
Suggestions in the User Manual.
FR Attention! Veuillez lire les consignes de
sécurité que contient la Notice d’utilisation avant d’installer l’appareil.
DE Achtung! Lesen Sie vor Beginn der Installation die Sicherheitshinweise in der
Gebrauchsanweisung.
NL Waarschuwing! Lees de veiligheidsinformatie in de gebruikershandleiding voordat u met de installatie begint.
ES ¡Atención! Antes de realizar la instalación, lea la información de seguridad del
Manual del usuario.
PT Atenção! Antes de continuar a
leia as informações de segurança no Manual de Utilizador.
SV
DA Vigtigt! Læs brugsanvisningens instruk
tioner vedrørende sikkerhed, før installationen påbegyndes.
Page 13

3
Page 14

4
1x ø 120 mm
ø 150 mm
1x
ø 120 mm
ø 150 mm
FP
FP
Page 15

5
Page 16

6
1
Page 17

2
7
Page 18

8
3
4
476
475 - 675
878 - 1178
870
1
Page 19

5
9
6
Page 20

10
Page 21

7
H+10 mm
H
CLICK!
STOP!
11
8
Page 22

12
9
Page 23

10
13
11
Z
Page 24

14
12
W
Page 25

Page 26

991.0307.080_01 - 140127
 Loading...