

Page 1

Montage- und Gebrauchsanweisung
D
Prescriptions de montage et mode d'emploi
F
Instructions on mounting and use
GB
Montage- en gebruiksaanwijzing
NL
Istruzioni di montaggio e d'uso
I
Instrucciones de montaye y para el uso
E
Instalação e manutençao
P
HEX
Vyxbherwvv gj exbfyjdrt v àrxgkefbfwvv
Page 2
2
3
Abb. - Fig.- afb. 1
1
A
A
Abb. - Fig.- afb. 2
Abb. - Fig.- afb. 3
2a
B
2b
A
2c
A
2d
B
2
Page 3
C
E
C
D
F
Abb. - Fig.- afb. 4
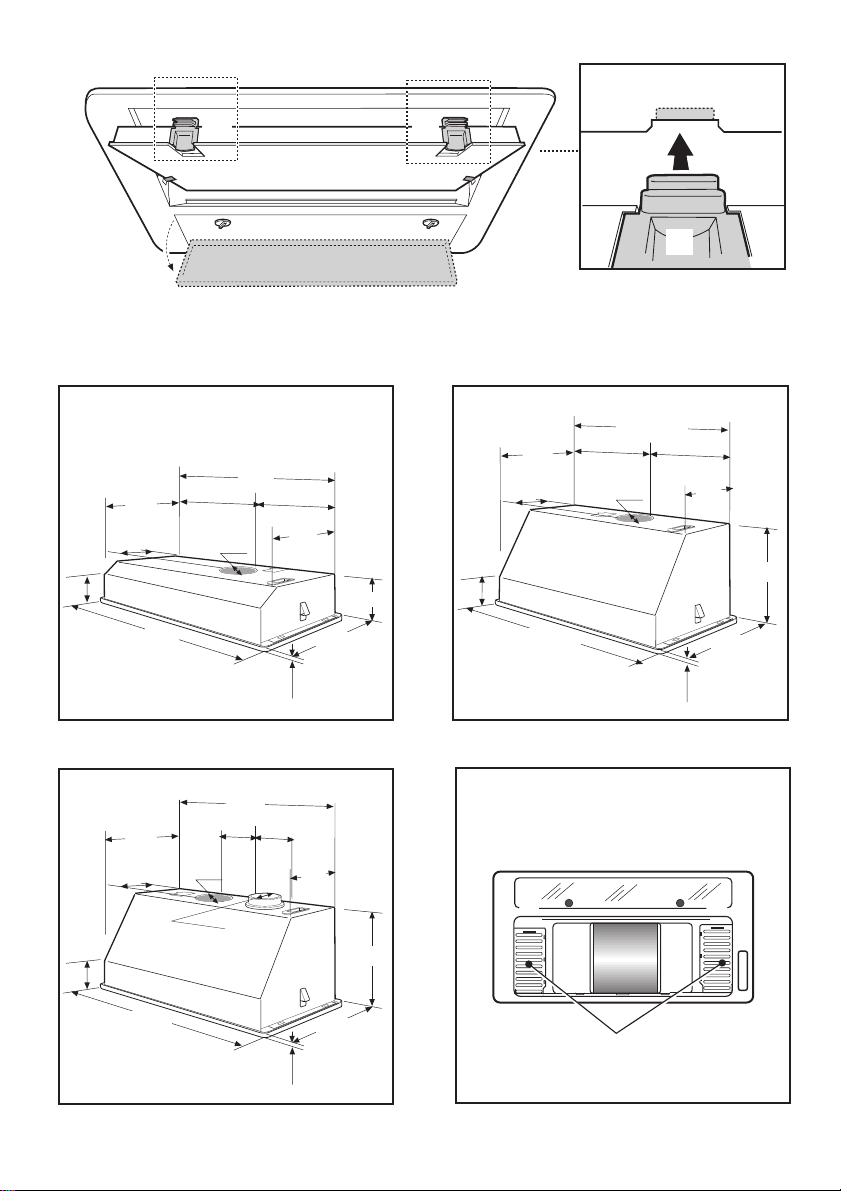
510
285
68
70
548-748
=
120
Abb. - Fig.- afb. 5
4.5
=
261
302
142
D
F
285
68
70
548-748
Abb. - Fig.- afb. 6
510-710
=
119
4.5
C
=
160
302
302
710
285
68
70
748
150
119
119
Abb. - Fig.- afb. 7
150
4.5
160
302
302
Abb. - Fig.- afb. 8
3
G
Page 4

D
E
3-F
D
E
OK!
2-B
7
5-C
6-C
6-C
4
1-A
6-C
5-C
6-C
7
OK!
2-B
1...2...3...4...5...6...7... :
Montage - Installation - Monteren - Montaggio - Fijación - Montagem - Монтаж
A...B...C...D...E... :
Demontage - Démontage - Dismounting - Demonteren - Smontaggio
Desmontaje - Desmontagem - Демонтаж
4
Page 5

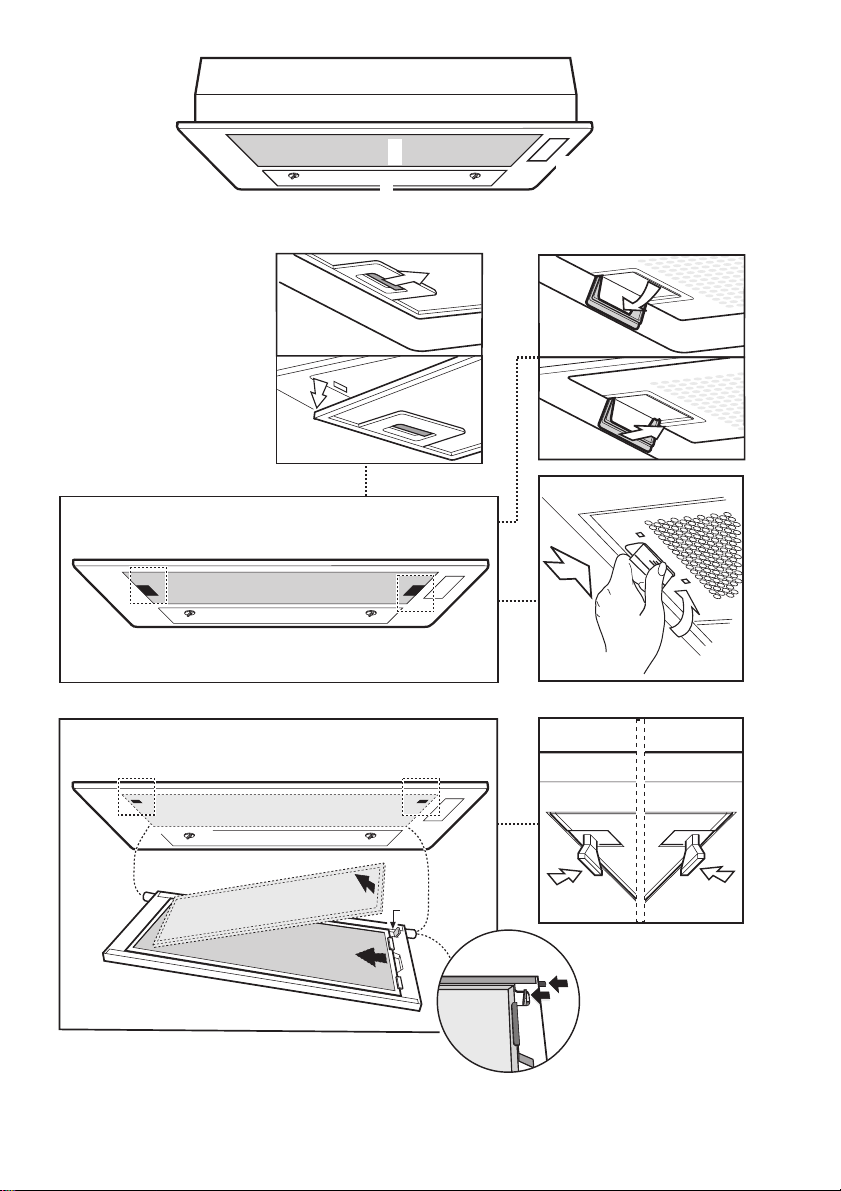
Description of the hood - Fig. 1
1. Control panel
2. Air-inlet surface (with grease filter)
3. Lights
Use of the hood
The hood is fitted with a control panel with
aspiration speed selection control and a light
switch to control cooking area lights.
For the best performance, we recommend
using the low speeds in normal conditions and
the high speeds when strong odour and vapour
concentrations are present.
Light should be switched ON to improve cooking
area visibility.
It is advisable to switch on the extractor hood a
few minutes before starting cooking and then
to leave it running for approximately 5 minutes
afterwards to ensure that all odours are
extracted.
Maintenance
Before performing any maintenance operation,
isolate the hood from the electrical supply by
switching off at the connector and removing the
connector fuse.
Or if the appliance has been connected through
a plug and socket, then the plug must be
removed from the socket.
Metal grease filter
The grease filter serves to trap grease particles
present on cooking fumes.
The metal grease filter lasts forever and must
be washed either by hand or in the dishwasher
(65°C) with suitable detergents.
The grease filters must be washed at least
once a month.
When washed in a dishwasher, the metal grease
filter may discolour. It’s filtering properties will
nevertheless remain unaltered.
Let the filter dry without damaging it before
putting it back into place.
To remove the metal grease filter
(according model you own:Fig. 2-a-b-c-d)
1. Disconnect the hood from the electricity.
2. Push handles A toward the centre
The model with the grill support (see fig. 2d)
has an internal metal filter.
The release the grease filter support from the
hood, pull the release buttons B (Fig. 3) inwards.
To extract the metal grease filter from the
support grill, pull from right to left and extract
the grease filter.
GB
(When washing the grease filter, wash the
support grate as well with warm soapy water).
Carry out the above steps in reverse order to
put the filters back after having washed them,
making sure the entire extraction surface is
covered.
Carbon filter - Fig. 4
(Recirculation mode only)
The carbon filter serves to eliminate odours
that form during the cooking process.
The carbon filter cannot be washed nor
regenerated.
The carbon filter should be replaced every 6
months under normal use.
To dismount the carbon filter:
1. Disconnect the hood from the electricity.
2. Remove the metal filters (or its support).
3. Remove exhausted carbon filter, push
release button C and pull carbon filter
downwards.
To fit the carbon filter:
1. Fit the carbon filter by sliding it OVER the
metal tabs D and hook it into housings E.
Put the metal filter or its support back into
place.
Cleaning
To clean the outside of the hood use a cloth
moistened with denatured alcohol or neutral
liquid detergents. Never use products
containing abrasive.
Wipe brushed stainless steel in the same
direction as the brushing to avoid scratching.
Clean the external surface of the cooker hood
almost once every 10 days.
Attention
Failure to observe the instructions for cleaning
the appliance and changing and cleaning the
filters may cause fires.
Therefore, we recommend observing these
instructions.
Replacing the lamp - Fig. 4
1. Disconnect the hood from the electricity.
2. Open the lamp holder compartment by
turning the clasps F for the protective shield
for the lamps in the counter-clockwise
direction.
3. Replace faulty lamp with one of an equal
rating and kind.
10
Page 6

According the cooker hood you own:
Lamp 40W max (E14) or Neon lamp 14W
max or PL lamp 11W max (model with 1 PL
lamp) or PL lamp 9W max (model with two
PL lamps)
4. Reclose the protective shield for the lamp.
Before calling for repair service because the
hood fails to light up, make sure the lamps are
well inserted.
Warning!
— The hood cannot be connected to flues of
other appliances that run on energy sources
other than electricity.
— When the hood is used at the same time of
other appliances that run on energy sources
other than electricity, provision must be
made for an adequate supply of air.
— No food must be cooked flambé underneath
the hood.
The use of an unprotected flame is
dangerous for the filters and could cause
fires.
Therefore, never use an open flame under
the hood. When frying foods, never leave
the pan alone because the cooking oil could
flare up.
— Please, keep to the provisions of official
directives regarding the question of fume
discharge.
— The manufacturers refuse to accept any
responsibility for damage to the hood or its
catching on fire because of failure to observe
the above instructions.
GB
Installation
These minimum distances between hobs and
grease filter must be observed:
Minimum 650 mm - electric hobs
Minimum 750 mm - gas or mixed hobs.
Electric connection (Not for UK)
Before completing any connection, make sure
the house voltage corresponds with the voltage
indicated on the label affixed inside the hood
It is advisable to call a qualified technician to
make the electrical connection.
Appliance fitted with plug.
Connect it to a socket which conforms with
current regulations.
If you intend to connect it directly to the electric
mains, remove the plug and fit an approved
bipolar switch with a minimum contact opening
of no less than 3mm.
If the plug is not accessible once it has been
inserted in the socket, it will however be
necessary to fit an approved bipolar switch with
a minimum contact opening of no less than
3mm.
Appliance without plug
Fit an approved plug or an approved bipolar
switch with a minimum contact opening of not
less than 3mm.
The manufacturers are not liable for any
problems caused by the user’s failure to
observer the above instructions.
11
Page 7

Electric connection (ONLY for UK)
WARNING:
THIS APPLIANCE MUST BE EARTHED
The mains lead of this appliance is fitted with a
BS 1363 5 amp fused plug.
To change a fuse in this type of plug use an
A.S.T.A. approved fuse to BS1362 type.
1. Remove the fuse cover and fuse .
2. Fit replacement 5A fuse into fuse cover.
3. Refit both into plug.
IMPORTANT: The fuse cover must be refitted
when changing a fuse and if the fuse cover is
lost the plug must not be used until a correct
replacement is fitted.
GB
Systems available
Two systems are available:
Exhaust mode
Vapours are extracted outside through an
exhausting pipe that is affixed to the connection
ring above the hood.
Diameter of the exhausting pipe must be equal
to that of the connection ring.
In the horizontal runs the duct must be slightly
slanted (about 10°) and directed upwards to
vent the air easily from the room to the outside.
Attention!
If the hood is supplied with carbon filter,
then it must be removed.
Correct replacements are identified by the
colour insert or the colour embossed in words
on the base of the plug.
Replacement fuse covers are available from
your local Electricity Board Shop.
HOW TO CONNECT AN ALTERNATIVE PLUG
If the fitted plug is not suitable for your socket
outlet, then it should be cut off and disposed of
in order to avoid a possible shock hazard
should it be inserted into a 5A socket elsewhere.
A suitable alternative plug of at least 5 Amp
rating e.g. 5 Amp round pin to BS 546 should
then be fitted to the cable.
The wires in this mains lead are coloured in
accordance with the following code:BLUE – “NEUTRAL” - “N”
BROWN – “LIVE” - “L”
GREEN AND YELLOW – “EARTH” - “E”
1 The GREEN AND YELLOW wire must be
connected to the terminal in the plug which
is marked with the letter “F” or by the Earth
symbol or coloured green or green and
yellow.
2 The BLUE wire must be connected to the
terminal which is marked with the letter “N”
or coloured black.
3 The BROWN wire must be connected to the
terminal which is marked with the letter “L”
or coloured red.
Filter version
The air is filtered through a carbon filter (for its
installation see paragraph "Carbon filter") and
recirculated into the room.
Attention!
If the hood is not supplied with carbon filter,
then it must be ordered and mounted.
This version is used when there is no exhaust
duct for venting outdoors or when it is impossible
to install one.
Important:
For the 74,8 cm hood (Fig. 6-7)
Before using the hood, ensure that the inside
grids (G-Fig. 8)are open (Exhaust mode) or
closed (Filter version).
12
Page 8

LI1B5A Ed. 02/99
 Loading...