

Page 1
Instructions for Use
Tumble Dryer
Page 2

129530
Thank you for your trust and for buying our tumble
3
dryer. We congratulate you on your wise decision.
This appliance is designed for drying clothes for
home use only.
It dries your laundry quickly, leaving it soft and
tender without affecting its shape.
Our appliances are environmentally friendly:
some of the materials are recyclable while
others are disposed of and destroyed. To protect
the environment, dispose of your appliance by
delivering it to the authorized dealer.
Appliance description....................................... 3
129530
Warnings ............................................................ 4
Installation and connection.............................. 7
Operation ......................................................... 10
Tips for drying and for the economic
use of the dryer ............................................... 20
Cleaning and maintenance............................. 21
Troubles ...........................................................24
Tables ............................................................... 26
2
Page 3
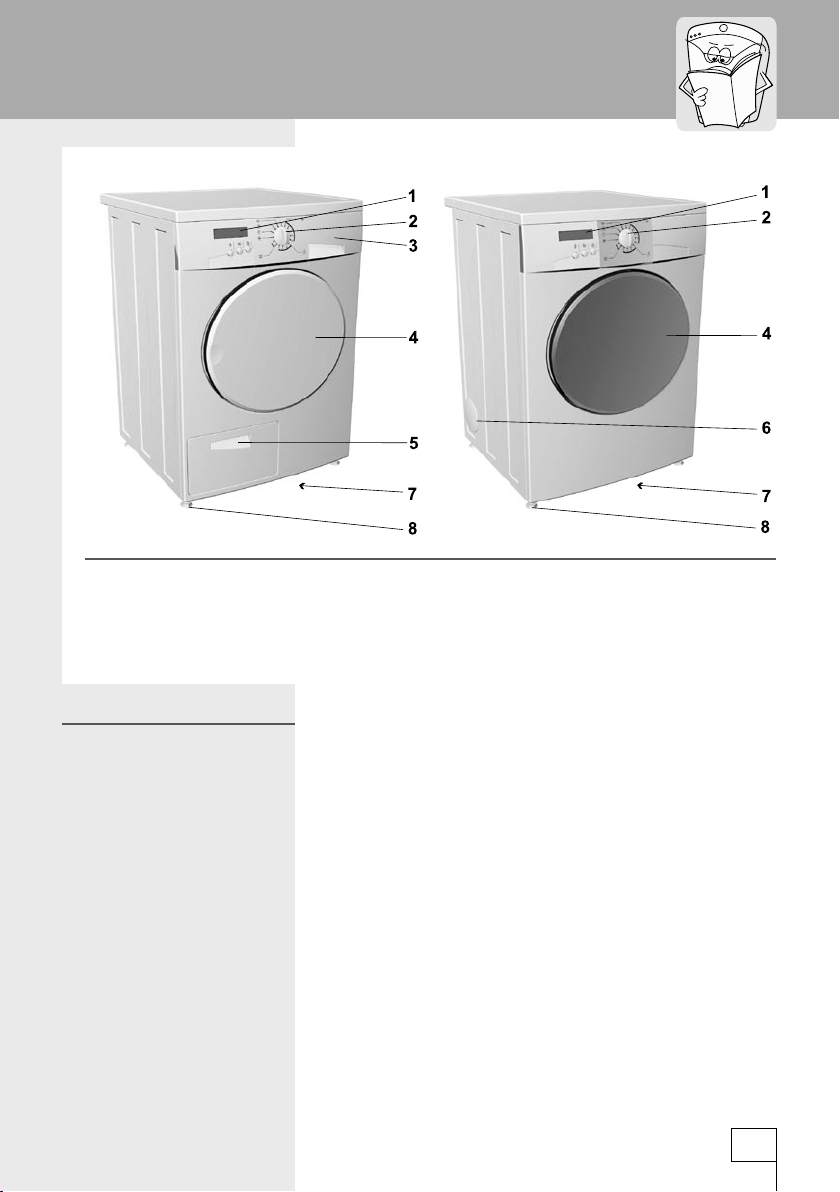
Appliance description
1. Front panel
2. Drying program button
3 Water container
4. Door
Technical data
5. Condenser
6. Evacuation slots
7. Cooling air slot
8. Legs
Dimensions of the appliance (w x d x h):
600 mm x 600 mm x 850 mm
Weight (net):
evacuation dryer 34 kg, condensation dryer 42 kg
Nominal voltage: 230 V, 50 Hz
Connecting power: 2900 W
Max. load: 6 kg
Connection: power cord (230 V, 50 Hz, min 16 A)
Fuse: 16 A
Heater: 2600 W
Name plate with technical information for the appliance is located
under the door frame.
3
129530
Page 4

129530
5
Warnings
129530
In case of condenser dryer it is not
recommended to reduce temperature
or switch off the heater, as the drying
time is thus extended because of poor
condensation of evaporated water.
Use the dryer to dry only the laundry washed with
•
water. Do not attempt to dry the laundry, washed
or cleaned with ammable detergents or solutions
(gasoline, trichloroethylene etc.), as it may cause
explosion.
Do not let the children play with the appliance.
•
Prevent your children or pets to enter the dryer
drum.
When discarding the old appliance remove
•
the power cord and breka the lock, so that the
door can not be locked (safety precautions for
children).
After cleaning replace the condenser to the air
•
channel. Operating the appliance without the
condenser or with a damaged condenser may
cause re.
Rear wall of the appliance may be hot (for
•
condenser drier only) - danger of burns.
Clean lter after each drying. If you pulled the
•
lter out, always reinsert it before the next drying
operation.
After use always turn the appliance off (the
•
program selection jog should be in position “0”)
and unplug the power cord.
Close the dryer door prior pulling out the water
•
container.
Leave all repairs to a qualied technician.
•
Tampering with the appliance or reparations by
an unqualied person may cause accidents or
failures. Call the authorized service department
(see list of authorized service departments).
Name plate with technical information about the
•
appliance is located under the door frame.
4
Page 5
The room must be well aired, surrounding air
•
must not contain dusty particles.
Room where the appliance is located must be well
•
aired to prevent back ow of gasses, released by
open re gas appliances (replace).
To reduce the re hazard, always consider the
following:
Never dry soiled clothes in the tumble dryer.
•
Laundry soiled with substances like cooking oil,
•
acetone, alcohol, petrol, petroleum, stain remover,
turpentine, wax and waxes must be washed in hot
water and detergent prior drying in tumble dryer.
Do not dry objects made of foam (latex), water
•
resistant fabrics, rubber lined fabrics, and clothes
lled with rubber foam in the dryer.
During washing use laundry softeners as
•
instructed by their manufacturers.
Last stage of drying is carried out without heating,
•
to allow laundry to cool down before extracting it
from the drum. If you take the laundry out before it
had cooled down, spread it to allow its cooling.
Before connecting the appliance read
these instructions carefully. Repairing
the failure arising from inappropriate
connections or use of the appliance is not
covered by the guarantee.
The belt can be replaced by a servising
engineer only, who incorporates an
original spare part with the marking
OPTIBELT EPH 1906, code 104265.
129530
5
Page 6
129530
The symbol on the product or on its
7
packaging indicates that this product
may not be treated as household
waste. Instead it shall be handed over
to the applicable collection point for the
recycling of electrical and electronic
equipment. By ensuring this product
is disposed of correctly, you will help
prevent potential negative consequences
for the environment and human health,
which could otherwise be caused
by inappropriate waste handling of
thisproduct. For more detailed information
about recycling of this product, please
contact your local city ofce, your
household waste disposal service or the
shop where you purchased the product.
129530
6
Page 7
Installation and connection
Removing wrapping
Selecting the
appropriate location of
the appliance
Packaging materials are environmentally friendly:
•
they can either be recycled, safely disposed of or
destroyed without any threat to the environment.
To be able to do this effectively all materials are
•
marked accordingly.
Be careful not to damage cabinet of the
appliance with a sharp object when
removing the packaging.
Ventilation slots and openings on the appliance
front and rear wall should not be obstructed.
A - Evacuation dryer
Place the appliance in a well ventilated room with
•
a window or a built-in fan.
Connect the evacuation tube to the pre-prepared
•
opening.
Evacuation must not be connected to air duct
•
used as a chimney for exhaust gasses of
appliances using other combustion material.
B - Condenser dryer
Do not place the appliance in a room where there
•
is danger of freezing.
Location should be adequately ventilated. Room
•
temperature should always be between 0°C and
25°C since frozen water in the condensation
water receptacle or in the pump may damage the
dryer.
Installation
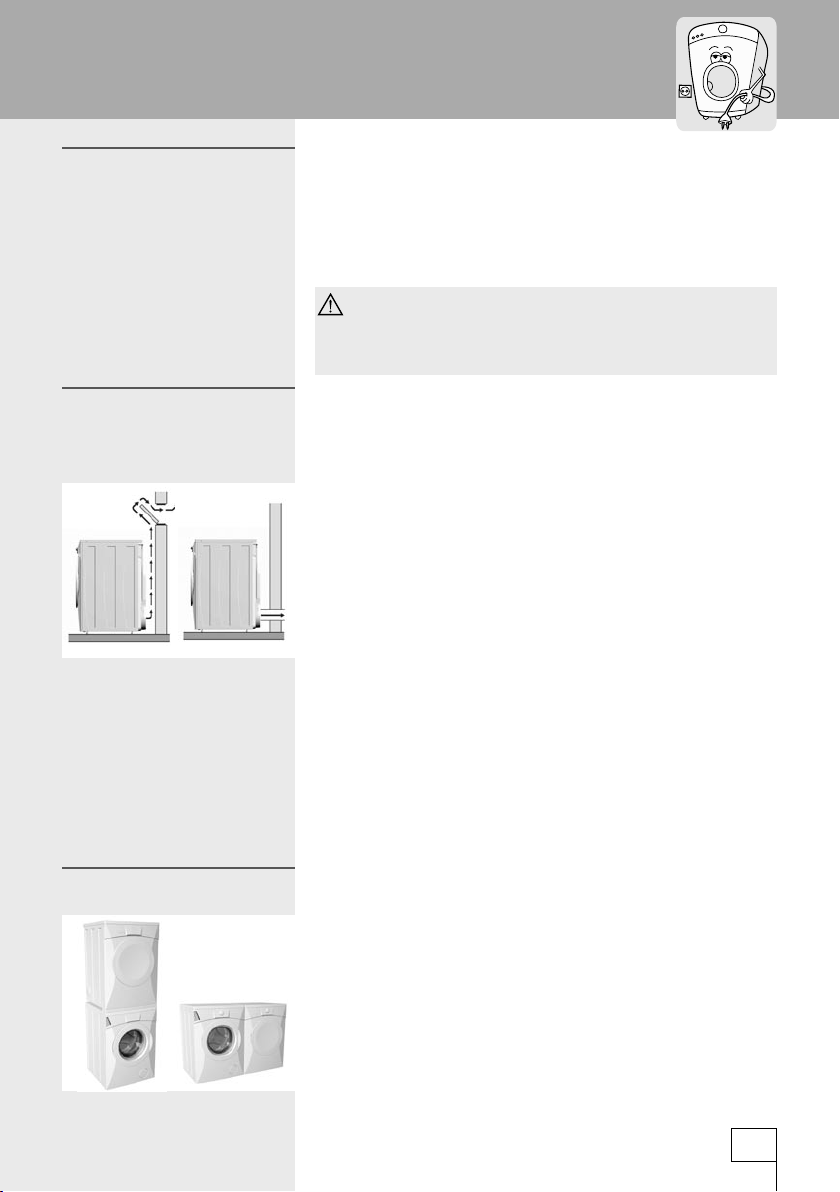
Appliance can either stand on its own or can
•
be placed on top of a washing machine of the
same dimensions - minimum width 517 mm,
depth 476 mm. The surface for placing the dryer
must be clean and at. Use supplied vacuum
feet to prevent sliding of the appliance. Washing
machine hardtop must be wooden or metallic. To
conceal the opening between the two appliances,
decorative plate is available on request against
payment.
129530
7
Page 8
129530
Do not place the appliance behind lockable
9
door, sliding door, and door with hinges on
the opposite side of the appliance.
Place the appliance in the room in such
way to ensure free opening of the drier
door.
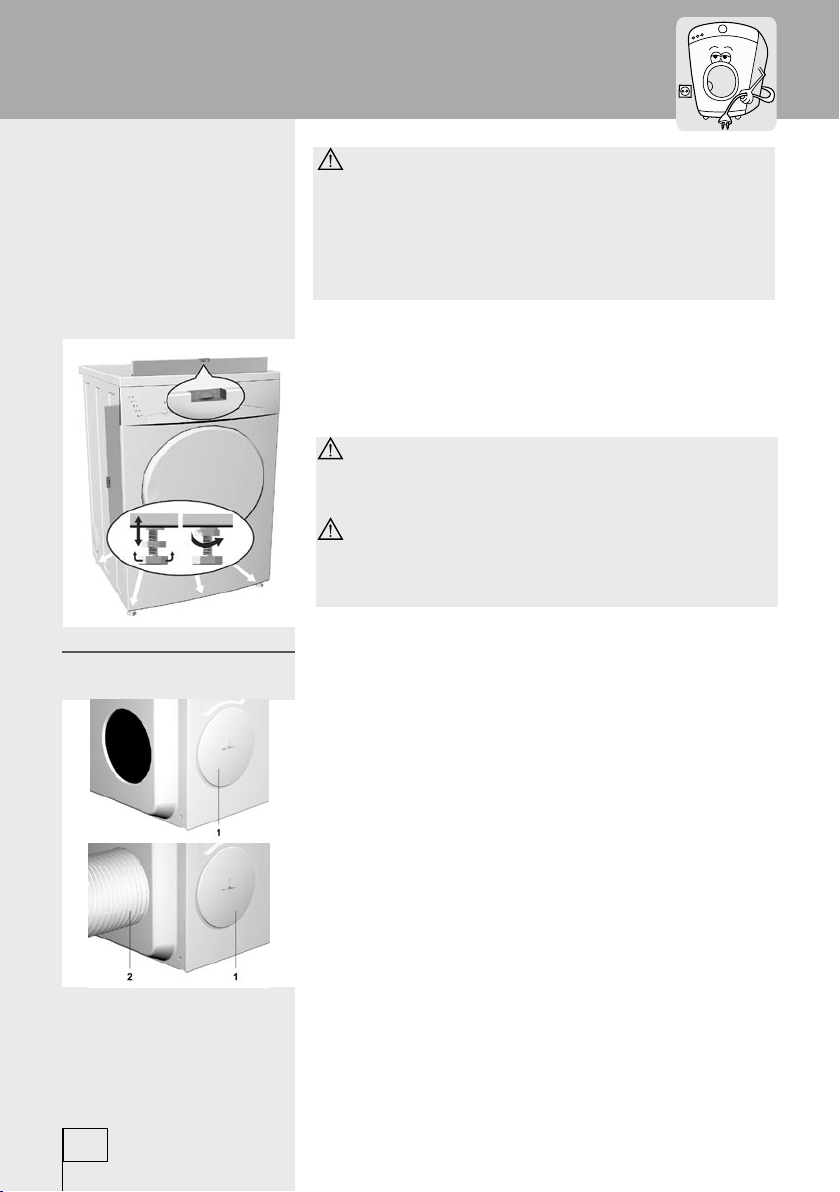
Level the machine longitudinally and transversally
•
by rotating the adjustable feet, thus enabling the
leveling by +/- 1 cm.
The surface beneath the appliance should
be kept dry and clean to prevent sliding of
the appliance.
Do not place the dryer on a thick
carpet since this could obstruct the air
circulation.
Moist air outlet
1 Lid
2 Evacuation tube
129530
8
A - Evacuation dryer
There are two openings for venting out humid air.
•
One of them should be closed with the supplied
lid, while the other should be connected to the
evacuation tube.
Page 9
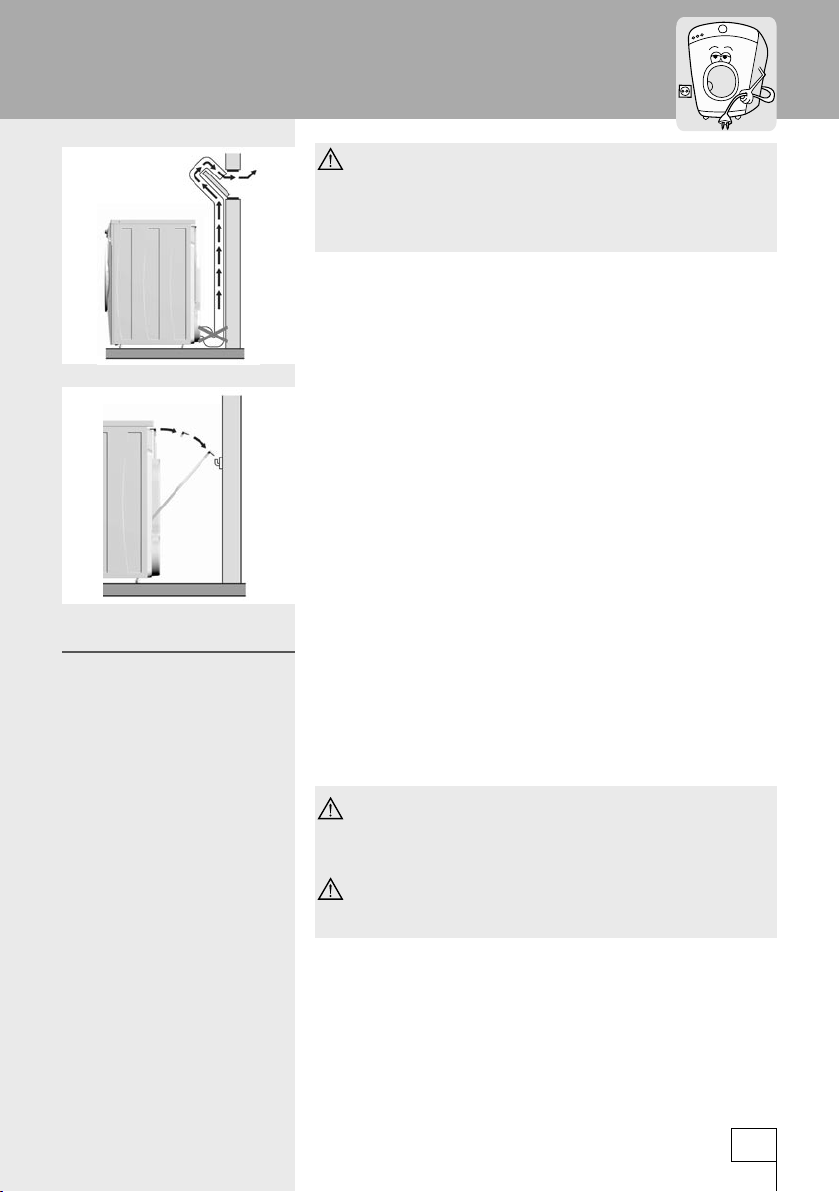
The distance between the dryer and the
moist air outlet (vent shaft, window)
should not exceed 2 meters, otherwise
water can accumulate in the tube.
B - Condenser dryer
Moisture from laundry is extracted in the water
•
condensation device and is either collected in the
receptacle or discharged directly into the drain
(drain height should not exceed 800mm).
Display reads CONTAINER FULL and a beep is
•
heard when the water receptacle is full and should
be emptied, preferably after each drying cycle.
Power connection
Use the power cord to connect the dryer to the
•
power supply via wall socket.
Rated voltage and other characteristics are
•
indicated on the name plate, located under the
door frame of the appliance.
The wall socket should always be within
reach. It has to be earthed according to the
standing regulations.
If the supply cable is damaged it should
only be replaced by a qualied technician.
129530
9
Page 10
129530
11
Operation
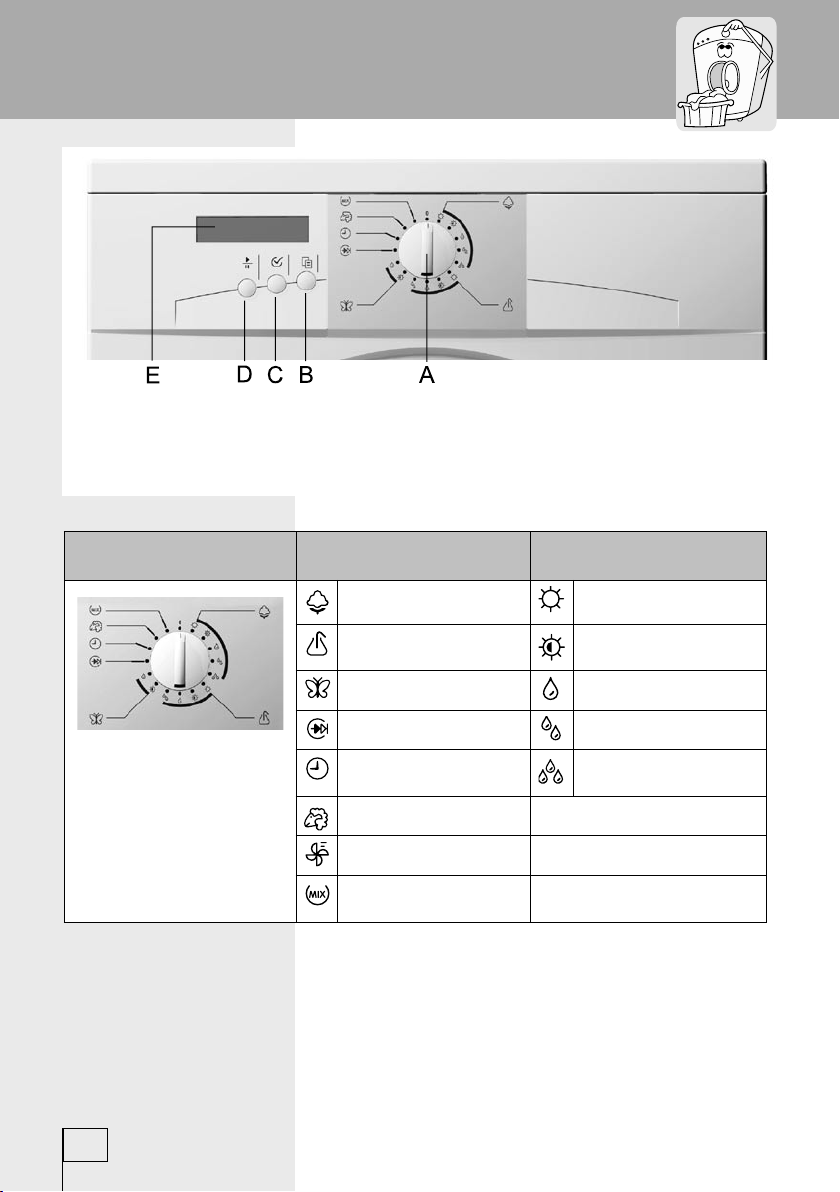
A - program selection jog
B - MENU key
D - START/PAUSE key
E - display
C - SELECTION key
Program selection jog Program symbols Moisture level
cotton very dry
synthetics dry for storage
delicate slightly damp
fast program iron dry
time setting
wool
ventilation
mixed laundry
damp for machine
ironing
Function keys
B key (MENU) - Scrolling within main menu.
C key (SELECTION) - Selecting sub-menu
categories.
129530
D key (START /PAUSE) - Starting, interrupting and
restarting the program.
10
Page 11

Drying procedure
- Open the dryer door by pushing the left-hand
side of the door towards the appliance.
- Sort the laundry according to the type of fabrics.
Do the buttons and zippers, tie the strings
and pull out the pockets.
Very delicate laundry should be put in a
special protective sack.
It is suggested to load the drum with items
of different sizes.
Do not load drip-wet laundry into the dryer
(min. 800 rpm).
Pay attention to the labels on the clothes,
indicating the recommending drying mode
(see table of textile treatment symbols on
the last page).
- Insert the laundry into the drum (prior making
sure that the drum is empty).
- Close the dryer door.
Operating the dryer
- Starting the appliance
1. Name of program, 2. Moisture level, 3. Additional functions
The appliance is switched on by turning the jog
button (A) to the desired program (depending on the
type of laundry, degree of moisture, and/or drying
time). Display is lit and indicates the program,
selected by the jog A (in some models there is a
11
129530
Page 12

129530
signal LED on the A button next to the selected
13
program).
If you fail to do anything within 5 minutes after
starting the appliance, the display will go blank.
During the drying process the display is illuminated
and is switched off after the cooling stage.
- Selecting language
Press button C (SELECTION), and simultaneously
turn the program selector jog A to the rst clockwise
position. Display indicates the default setting of
language. Use button C (SELECTION) to select the
desired language. Last selected language is stored.
Turn the appliance off by turning the program
selector jog A to the position “0”.
- Selecting basic drying programs
For the programs cotton , synthetics and
•
delicate laundry select the nal moisture level
(see program chart). To start drying cycle press
START or select additional settings.
For the time dened program set the
•
preferred drying time. To start drying cycle press
START or select additional settings
129530
12
Mixed laundry program and quick drying
•
program already have one single moisture
level already predetermined. Select only the
additional settings (see program chart). To start
drying cycle press START
Wool program is a separate short time dened
•
program.
- Selection of additional functions
Button B (MENU) moves you within the menu,
button C (SELECTION) serves to select options
(see cf. Selection of additional functions).
Page 13

Only MENU functions available for a particular
program are displayed. When the preferred
additional function is selected, the display indicates
relevant symbol. After the appliance is switched off,
all additional functions, except the sound signal and
child lock, are reset to their original settings.
Delayed start
Default setting does not include delayed start
(display indicates 00:00 hours). Use button C to
select between 0 and 20 hours. For the rst two
hours the sequence may be set at 30 minute
lapses, after that the sequence is 1 hour. When the
preset time elapses, the selected program starts. In
case of power failure prior the end of the countdown
(display ashes POWER FAILURE), press button D
(START).
Reduced temperature
This function is selected if you wish to dry laundry
at lower temperature than the program default (see
Program Chart). By selecting this function the drying
time is longer.
Certain programs do not allow selection of this
function.
After drying is completed, this function
returns to the initial higher temperature.
Anti-crease program
The anti-crease program is set at 1 hour by default.
You may also select either to switch off the program
(0 h) or prolong the program to last 2 hours (2 h).
The anti crease program is stopped if you open the
door of the appliance during the program, or if you
switch the appliance off.
Heater off
Heater may be switched off if you wish to dry laundry
at room temperature; drying time is extended.
13
129530
Page 14

129530
129530
15
Quick program does not allow turning the heater off.
Child protection
Operation of the dryer may be protected against
accidental changes of programs or functions. The
function is activated by pressing the START button.
By pressing any key the sound alarm signals that
child lock is on. Relevant symbol ashes, and the
display reads CHILD LOCK ON.
If you want to set new drying program, or change
additional settings, you must rst remove the
protection.
Switching the function off:
- during drying:
If you want to interrupt the program or change
settings, switch off the function temporarily by
keeping the B button (MENU) pressed for 4
seconds. During this time the program can be
stopped by pressing D button (see cf. Interruptions).
Relevant symbol ashes on the display. The
function is reactivated by pressing the D button
(START).
In case you fail to change anything within 15
seconds, the protection is automatically reactivated.
Even if you stop drying by opening the door
and child lock is temporarily switched off, it is
automatically restarted if the door is closed within
the next 15 seconds.
If you switch off the protection in the menu during
the interruption, it will no longer be active when the
program continues.
- after drying is completed:
By pressing the B button (MENU) for four seconds
after the drying program is completed, the
protection is switched off permanently. This means
that it will remain inactive also the next time you
start the drying procedure. Otherwise the protection
remains active till the next drying process. It is
switched off by a four second pressing of B button
(MENU), while the A button is turned to position “0”,
14
Page 15

so you can select the drying program or additional
functions.
Sound signal (audible warning)
In default setting the sound signal is on.
You may select to switch the sound signal off, or
increase volume.
Legend: sound signal off;
normal sound signal setting;
increased volume setting.
If you switch the sound signal off the display
indicates relevant symbol .
Prior rst drying remove the basket and
any wrappings from the drum.
Drying in a basket (only with some models)
This function may be selected only at time dened
drying. Default setting is off. When this function is
selected, the anti-crease program is switched off.
The basket drying function is used to dry sneakers
or other things which you want to prevent from
tumbling within the drum - max. load: 2,5 kg. Be
careful to avoid things which are being dried to
touch the drum as they may get stuck and thus
damaged. During this function the basket remains
still. Dry only clean sneakers. Wring them after
washing to such extent that they do not drip water
prior inserting into the dryer.
After all functions are selected, move to the main
menu with the MENU button. Display ashes
START. If you agree with all selected functions,
press START for the commencement of drying,
otherwise select any other functions as preferred.
After the machine had been switched off
(program selector jog (A) is at the position “0”),
all additional functions return back to their
15
129530
Page 16

129530
default settings, except for the sound signal and
17
the child lock.
Drying procedure
Drying process is turned on by pressing the
•
START button.
If the preset delayed start was selected, the
•
process will start when the preset time elapses.
Display indicates the program with all
•
selected functions, and the beep signals the
commencement of drying.
The display indicates different drying stages
•
in their sequence, according to the selected
program.
Press the START button to conrm commencement of drying
(program starts when the delayed start time elapsed)
Maximum moisture level of laundry
Laundry has reached ironing moisture level
Laundry has reached the preset moisture level (slightly moist)
129530
16
Cooling down (10 minutes at the end of a particular program)
End of drying. Empty the condenser tank (with condensation
dryer).
Clean the lter.
Page 17

EXAMPLE: Selected program: cotton, slightly
moist, functions selected: delayed start, decreased
temperature, child lock, no sound signal).
- End of drying procedure
At the end of the drying procedure the display
indicates END and CLEAN FILTER, and the beep is
heard.
In case of condenser dryer the display intermittently
ashes CLEAN FILTER - EMPTY CONTAINER.
If the appliance is not switched off and/or the door
is not opened, the anti-crease program switches
on (according to settings from cf. Selection of
additional functions) and the dryer continues with
gentle tumbling.
Pull the power lead from the socket and cut the
power supply from the mains.
Interruptions
By the user
•
Changing the program or the functions
After drying be careful when extracting
laundry from the appliance, as it may be
hot!
Prior any changes child lock must be
deactivated!
By pressing button D (START/PAUSE) the drying
program is paused; display reads PAUSE.
You can now change additional settings or basic
programs.
Press MENU to enter any menu and change
additional settings or select another drying program.
Conrm by pressing D (START/PAUSE).
You can switch the appliance off (turn jog A to the
position “0”) and reset all preferred settings.
17
129530
Page 18

129530
Door opened
19
If the door is opened during the drying process this
will pause the operation; the display reads DOOR
OPEN.
When the door is closed, the drying process
resumes only after the (D) START/PAUSE button
(D) is pressed. The beep reminds you that the
drying process continues.
If you press the START/PAUSE button D when
the door is open, the display indicates the CLOSE
DOOR warning and sound signal beeps.
Power failure
•
After the power supply has been restored the
display intermittently reads POWER FAILURE.
To continue press the START (D) button and the
machine will continue from the point it had been
interrupted, all previous settings remain the same
as before the failure.
If you wish to change settings or originally
selected program, you can do it by simply
pressing MENU or turn the selector jog to the
desired program.
Conrm the selection by pressing START, and
continue as in normal setting procedure.
129530
18
In case of power failure child lock is not
switched off (if it was active prior the
failure).
Water container is full
•
(condenser dryer only)
When the water container is full the drying
program is interrupted. Display reads
CONTAINER FULL and a beep is heard.
After emptying the water from the container,
resume drying by pressing the D button (START/
PAUSE).
Page 19

Special functions
Drum empty
•
At the beginning of drying the appliance detects
moisture level of the laundry. If the appliance
does not detect any laundry in the drum, a beep is
heard and the display reads DRUM EMPTY and
END.
Drum lamp
•
The drum is illuminated when the appliance
door is open. If the door is open for more than
5 minutes and no changes to the settings have
been made, the lamp goes off.
Display illumination
•
Display illuminates when the program selection
jog is turned to any program position.
If you then do nothing for the next 5 minutes (if
you fail to move the program selector or press any
of the function keys), the illumination goes off.
The display is lit during the drying stage and
cooling process. It goes off 5 minutes after the
end of drying, but if you open the door or press
any key, the display illuminates again.
19
129530
Page 20

129530
21
Tips for drying and for the economic
use of the dryer
Drying is economically most effective if you dry
•
the recommended quantity of laundry per one
charge (see Program Chart).
Do not dry the laundry made of especially
•
sensitive bers (wool, silk), which may shrink or
lose shape.
It is not necessary to use a fabric conditioner
•
when washing the laundry, since drying makes it
soft and tender.
Drying time is much shorter and consequently the
•
energy consumption lower if laundry is well spun
prior tumble dring (minimum 1000 spin RPM).
By selecting the most suitable drying program,
•
you will avoid over-drying and defcult ironing.
By cleaning the lter on regular basis drying time
•
is shorter and consumes less energy.
129530
20
Page 21

Cleaning and maintenance
Cleaning the lter
After every drying clean the lter, located in the
•
inner part of the door.
Lift the lter lid (Fig.).
•
Pull your ngers over the lter to remove bers
•
and threads lining. Replace the lter cover (it must
snap in place at the bottom).
If necessary, also clean the lter housing and door
•
sealing.
If the lter is clogged in such way that it needs
washing, pull it out from its bed (Fig.), wash it under
hot water and dry. Be sure that the replaced lter
snaps safely to its position, and only then close the
lter lid.
If the lter is not regularly cleaned, the
airow is obstructed, which causes longer
drying time and danger of overheating.
Cleaning the
condensation dryer
Empty the container and occasionally
clean the water condensation device.
Emptying the water containere
Empty the container after every drying procedure:
pull the container out, pull out the draining nozzle,
pour out the water and replace the container.
Water from condenser tank is not
drinkable! If ltered it may be used for
ironing.
129530
21
Page 22

129530
Strictly switch the appliance off prior
22
23
cleaning (unplug the power cord from the
wall socket, or turn the program selector
jog to the position “0”).
Clean the casing and drum interior with soft cloth
•
and mild detergent.
Cleaning of evacuation
drier
Cleaning the water
condensation device
Periodically clean (vacuum) the interior of air
•
evacuation opening and evacuation tube.
Clean water condenser two to three times a year.
In case of frequent use of the appliance do it
even more often. Certain amount of water may
drip from the condenser when pulled out, so use
absorbing cloth for this operation.
Open the exterior lid of the condenser by grabbing
•
the handle on the lower left part of the appliance
housing and pull it downwards.
Remove interior hatch by rotating the lever
•
vertically down, tilt the hatch towards you and
remove it.
Turn the lock on the condenser upwards and pull
•
the condenser out by pulling the lever.
Clean the device from both sides with lukewarm
•
water and drain it well.
Before replacing it into its slot, clean the air
•
channel in which the device is mounted, and the
gasket at the interior lid.
Lock the condenser into its place.
•
Insert the inner lid to seal well and lock it with a
•
handle.
Push the exterior lid towards the appliance to lock
•
to its place.
129530
Page 23

Replacing the bulb
(only with some models)
Before replacing the bulb disconnect the power
•
cord from the wall socket.
Open the door.
•
Unscrew the cover of the bulb (inside the door
•
opening).
Replace the bulb. The bulb must be of the same
•
type and power as indicated on the bulb and on
the protective cover (max. 10 W).
Reinsert and tightly screw the cover back. Check
•
if it seals well, otherwise moisture may penetrate
the interior and cause short circuit.
23
129530
Page 24

129530
25
Troubles
Interferences from the ambient (for example
electrical wiring) could induce signalization of
different faults. In such cases:
- switch the appliance off, and wait for a few
seconds;
- switch the appliance back on and repeat the
washing program.
If the fault repeats, call authorized service shop.
Trouble Check
Appliance does not
work:
There is current in
the socket, but the
drum is not rolling:
Laundry is not dry: • If the lter is clean.
The condensation is
inadequate:
Unevenly dried
laundry:
129530
• If there is current in the socket and if the fuse is
functioning.
• If the plug is correctly inserted into the socket.
• If the door is closed tightly (press it towards the
appliance).
• If the program runs according to instructions.
• If the container is full (only with condensation
dryer).
• If appropriate drying time is selected.
• If the condensation device is clean (only with
condensation dryer).
• If the room is adequately ventilated.
• If the amount of laundry to be dried is not too big.
• If the evacuation tube is too long (only with
evacuation dryer - max 2 m).
• If the laundry loaded in the drum has not been
spun enough or if appropriate drying time has
been set.
• If the room is too hot (over 25°C, applies for
condensation dryer).
• If the room temperature is too high.
• If the condensation device is clean.
• If the amount of laundry to be dried is not too big.
• If there are only large pieces of laundry (large and
small pieces should be dried together).
• If different fabrics are dried together (group the
laundry according to the type of fabrics).
24
Page 25

In case of certain functional failures the appliance signals it with a beep and
relevant reading is ashing on the display.
If a failure occurs due to incorrect installation or inappropriate use of the
appliance, the guarantee is void, and the repair bill is charged to the user.
In case of F0, F1, F2, F3, F4 failures,
contact your service technician without
hesitation.
25
129530
Page 26

129530
27
Tables
Program
Type of laundry
Example of laundry
COTTON max. load: 6 kg
Very dry
Thick or multiple layer laundry.
Terry cloth, bathrobe
Dry for storage
Uniformly thick laundry, requiring little or
no ironing.
Terry cloth, tricot laundry
Slightly damp
Fine laundry requiring ironing.
Tricot, ne cotton undershirts
Iron dry
Normally thick cotton or ax laundry.
Bed linen, table cloth,
trousers, shirts, undershirts ..
Damp for machine
ironing
Cotton or ax for machine ironing.
Straightening of laundry - following prior
wringing.
Bed linen, table cloth, ...
Laundry to be dried on a
string.
SYNTHETICS max. load: 3 kg
Very dry
Thick or multiple layer synthetic or mixed
fabrics laundry.
Pullovers, dresses, blankets
Dry for storage
Uniformly thick laundry not requiring
ironing.
Shirts, blouses, bed linen,
socks, children clothes
Slightly damp
Fine laundry, requiring little or no ironing.
Tricot laundry, undershirts,
table cloth, shirts, dresses,
sports attires
Iron dry
Laundry for ironing.
Shirts, blouses, bed linen,
table cloth, ...
DELICATE max. load: 2 kg
Dry for closet
Delicate laundry, to be dried at reduced
temperature and requires no ironing.
Blouses, delicate underwear
Slightly damp
Delicate laundry, to be dried at reduced
temperature and requires ironing.
Blouses, delicate underwear
QUICK PROGRAM max. load: 3 kg
Dry for storage
Laundry from temperature resistant
fabrics, to be dried quickly.
Sports attires from cotton or
from mixed fabrics
Program chart
129530
26
Page 27

Program chart /
Program
Type of laundry
Example of laundry
TIME SET PROGRAM max. load: 3 kg
15 to 60 minutes
AERATION
20 minutes
Single pieces of thick laundry that has to
be completely dried, or small amount of
laundry (up to 1 kg), ...
Basket drying (certain models only).
Straightening of laundry - following prior
wringing.
Laundry to be aired quickly (heater off).
Bathrobe, bathing towels,
pullovers, ...
Sports footwear, ...
Worn clothing
WOOL max. load: 2 kg
Finish
Short program for loosening of woolen
products.
Machine washable woolen
clothing.
Extract laundry from the
dryer immediately after
drying and hang it.
MIXED LAUNDRY max. load: 3 kg
Dry for storage
Mixed cotton and combined fabrics
laundry.
Bed linen, table cloth,
clothes
additional functions
Program Additional-functions
Cotton
Synthetics
Delicate
Quick program
Time set program
Wool
Mixed laundry
Delayed
start
l l l l l l
l l l l l l
l l l l l
l l l l l l l
l l l l l l
Lower
tempera-
ture
Anti-
crease
l l l
Heater
Child lock Sound
off
l l l
signal
Drying in
basket
l possible
Remark: Both functions of temperature reduction and of heater
switching-off exclude each other.
129530
27
Page 28

129530
29
Table of consumption
values
For illustration the chart gives values for 6 kg
of testing laundry (measured by the EN61121
standard) on different RPM of nal spin in washing
machine (program dry for storage).
Rounds/ min Remaining
moisture
I % evacuation condensation evacuation condensation
800 4,2 70 105 120 4,0 4,4
1000 3,4 58 88 100 3,3 3,7
1200 3,3 55 83 94 3,1 3,4
1400 3,0 50 75 86 2,8 3,1
1600 2,6 44 65 74 2,5 2,7
Drying time in minutes Power consumption in kWh
Measured values may differ from the actual ones
due to uctuations in the type or quantity of laundry,
spinning, power oscillation as well as ambience
temperature and humidity.
Table of textile symbols
Drying
Drying in dryer not permitted
Drain, hang on washing line and dry
Do not drain, hang wet and dry
129530
28
Drain, lay on a at surface and dry
Machine drying not permitted
Drying at normal temperature
Drying at lower temperature
Page 29

29
129530
Page 30

129530
30
Page 31

Page 32

SP PG3,4 OEM 129530/en (11-05)
 Loading...