

Page 1
CA
US
PV Inverter
SUNNY BOY 3000-US / 3800-US / 4000-US
Installation Manual
SB30-40-US-IA-en-34 | TBUS-SB30_40US | Version 3.4
Page 2

Page 3

SMA America, LLC Legal Restrictions
Copyright © 2013 SMA America,LLC. All rights reserved.
No part of this document may be reproduced, stored in a retrieval system, or transmitted, in any form
or by any means, electronic, mechanical, photographic, magnetic or otherwise, without the prior
written permission of SMA America,LLC.
Neither SMA America,LLC nor SMA Solar Technology Canada Inc. makes representations, express
or implied, with respect to this documentation or any of the equipment and/or software it may
describe, including (with no limitation) any implied warranties of utility, merchantability, or fitness for
any particular purpose. All such warranties are expressly disclaimed. Neither SMA America,LLC nor
its distributors or dealers nor SMA Solar Technology Canada Inc. nor its distributors or dealers shall
be liable for any indirect, incidental, or consequential damages under any circumstances.
(The exclusion of implied warranties may not apply in all cases under some statutes, and thus the
above exclusion may not apply.)
Specifications are subject to change without notice. Every attempt has been made to make this
document complete, accurate and up-to-date. Readers are cautioned, however, that
SMAAmerica,LLC and SMA Solar Technology Canada Inc. reserve the right to make changes
without notice and shall not be responsible for any damages, including indirect, incidental or
consequential damages, caused by reliance on the material presented, including, but not limited to,
omissions, typographical errors, arithmetical errors or listing errors in the content material.
All trademarks are recognized even if these are not marked separately. Missing designations do not
mean that a product or brand is not a registered trademark.
The Bluetooth
®
word mark and logos are registered trademarks owned by Bluetooth SIG, Inc. and
any use of such marks by SMA America,LLC and SMA Solar Technology Canada Inc. is under
license.
SMA America, LLC
3801 N. Havana Street
Denver, CO 80239 U.S.A.
SMA Solar Technology Canada Inc.
2425 Matheson Blvd. E
8th Floor
Mississauga, ON L4W 5K5
Canada
Installation Manual SB30-40-US-IA-en-34 3
Page 4
Important Safety Instructions SMA America, LLC
IMPORTANT SAFETY INSTRUCTIONS
SAVE THESE INSTRUCTIONS
This manual contains important instructions for the following products:
• Sunny Boy 3000-US / 3800-US / 4000-US
This manual must be followed during installation and maintenance.
The product is designed and tested according to international safety requirements, but as with all
electrical and electronic equipment, certain precautions must be observed when installing and/or
operating the product. To reduce the risk of personal injury and to ensure the safe installation and
operation of the product, you must carefully read and follow all instructions, cautions and warnings
in this manual.
Warnings in this document
A warning describes a hazard to equipment or personnel. It calls attention to a procedure or practice,
which, if not correctly performed or adhered to, could result in damage to or destruction of part or all
of the SMA equipment and/or other equipment connected to the SMA equipment or personal injury.
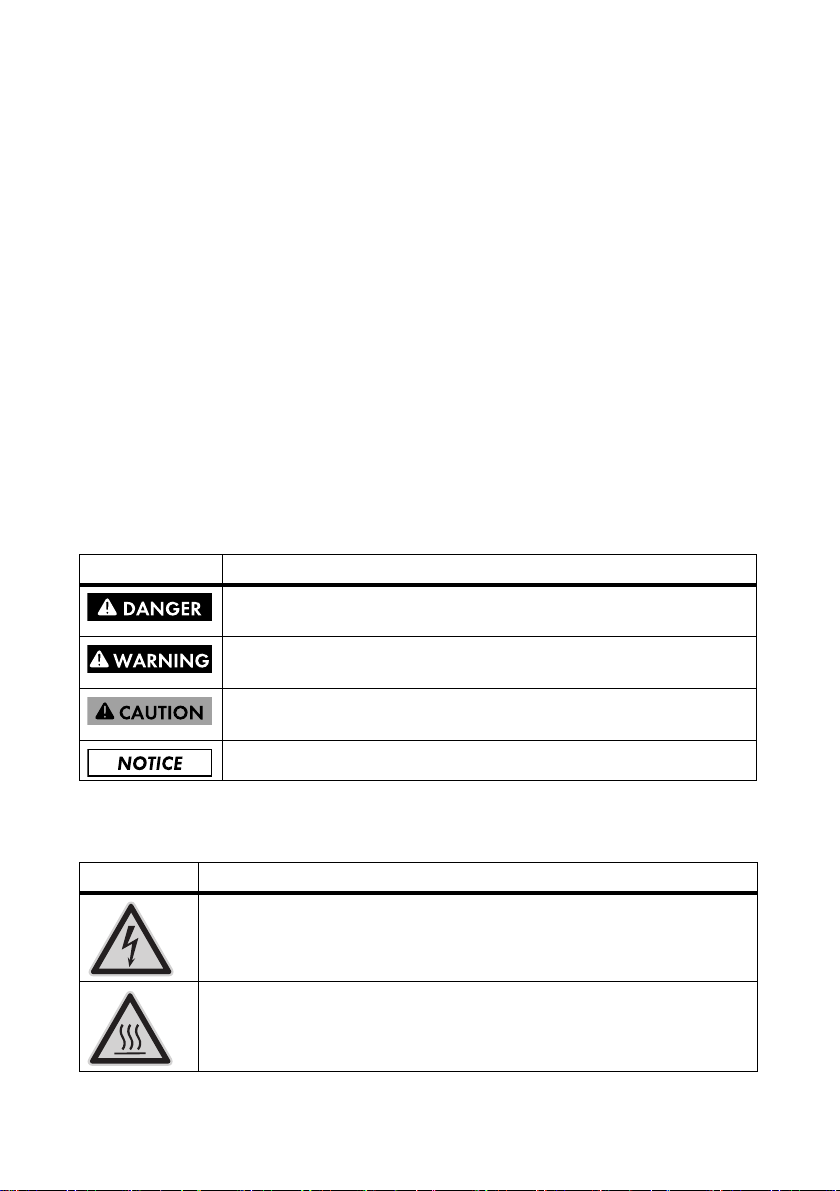
Symbol Description
DANGER indicates a hazardous situation which, if not avoided, will result in
death or serious injury.
WARNING indicates a hazardous situation which, if not avoided, could result
in death or serious injury.
CAUTION indicates a hazardous situation which, if not avoided, could result
in minor or moderate injury.
NOTICE is used to address practices not related to personal injury.
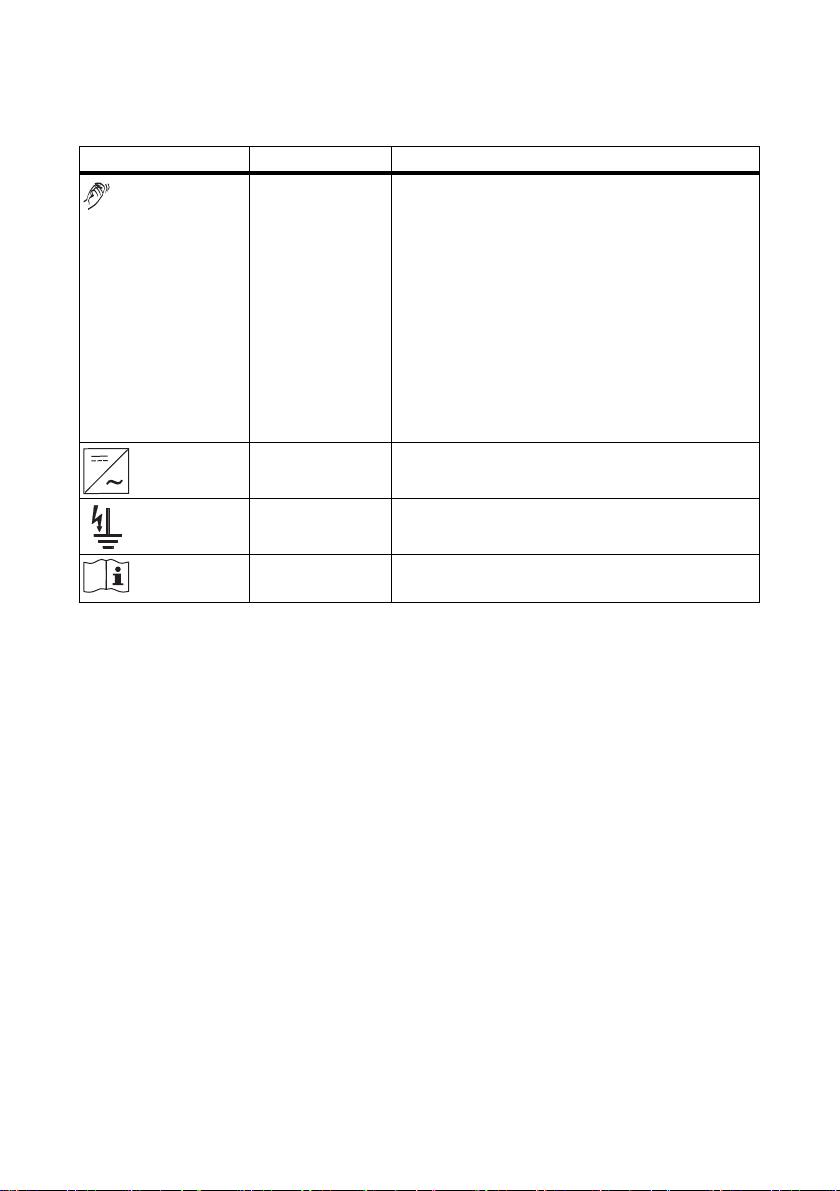
Markings on this product
The following symbols are used as product markings with the following meanings.
Symbol Description
Warning regarding dangerous voltage
The product works with high voltages. All work on the product must only be
performed as described in the documentation of the product.
Beware of hot surface
The product can become hot during operation. Do not touch the product during
operation.
4 SB30-40-US-IA-en-34 Installation Manual
Page 5
SMA America, LLC General Warnings
General Warnings
General Warnings
Al l el ect ric al ins tal lat ions m ust be m ade in acc ord anc e wi th the local and NationalElectrical Code
ANSI/NFPA 70 or the Canadian Electrical Code® CSAC22.1. This document does not and is not
intended to replace any local, state, provincial, federal or national laws, regulation or codes
applicable to the installation and use of the product, including without limitation applicable
electrical safety codes. All installations must conform with the laws, regulations, codes and
standards applicable in the jurisdiction of installation. SMA assumes no responsibility for the
compliance or noncompliance with such laws or codes in connection with the installation of the
product.
The product contains no user-serviceable parts.
For all repair and maintenance, always return the unit to an authorized SMA Service Center.
Before installing or using the product, read all of the instructions, cautions, and warnings in this
manual.
Before connecting the product to the electrical utility grid, contact the local utility company. This
connection must be made only by qualified personnel.
Wiring of the product must be made by qualified personnel only.
®
Installation Manual SB30-40-US-IA-en-34 5
Page 6

General Warnings SMA America, LLC
6 SB30-40-US-IA-en-34 Installation Manual
Page 7

SMA America, LLC Table of Contents
Table of Contents
1 Information on this Document. . . . . . . . . . . . . . . . . . . . . . 11
2 Safety . . . . . . . . . . . . . . . . . . . . . . . . . . . . . . . . . . . . . . . . . 13
2.1 Intended Use. . . . . . . . . . . . . . . . . . . . . . . . . . . . . . . . . . . . . . . 13
2.2 Skills of Electrically Qualified Persons. . . . . . . . . . . . . . . . . . . . 14
2.3 Safety Precaution . . . . . . . . . . . . . . . . . . . . . . . . . . . . . . . . . . . 15
3 Scope of Delivery. . . . . . . . . . . . . . . . . . . . . . . . . . . . . . . . 16
4 Product Description . . . . . . . . . . . . . . . . . . . . . . . . . . . . . . 18
4.1 Sunny Boy. . . . . . . . . . . . . . . . . . . . . . . . . . . . . . . . . . . . . . . . . 18
4.2 Type Labels. . . . . . . . . . . . . . . . . . . . . . . . . . . . . . . . . . . . . . . . 20
4.2.1 Sunny Boy Type Label. . . . . . . . . . . . . . . . . . . . . . . . . . . . . . . . . . . . . . . . . . 20
4.2.2 DC Disconnect Type Labels. . . . . . . . . . . . . . . . . . . . . . . . . . . . . . . . . . . . . . 21
4.3 DC Disconnect . . . . . . . . . . . . . . . . . . . . . . . . . . . . . . . . . . . . . 23
4.4 Communication. . . . . . . . . . . . . . . . . . . . . . . . . . . . . . . . . . . . . 23
4.5 Ground-Fault Protective Device (GFDI). . . . . . . . . . . . . . . . . . . 23
4.6 Arc-Fault Circuit Interrupter (AFCI) . . . . . . . . . . . . . . . . . . . . . . 24
4.7 Anti-Islanding Protection . . . . . . . . . . . . . . . . . . . . . . . . . . . . . . 24
4.8 String Fuses. . . . . . . . . . . . . . . . . . . . . . . . . . . . . . . . . . . . . . . . 24
5 Mounting. . . . . . . . . . . . . . . . . . . . . . . . . . . . . . . . . . . . . . . 25
5.1 Safety during Mounting . . . . . . . . . . . . . . . . . . . . . . . . . . . . . . 25
5.2 Selecting the Mounting Location. . . . . . . . . . . . . . . . . . . . . . . . 26
5.3 Mounting the Wall Mounting Bracket on a Stone Wall . . . . . . 29
5.4 Mounting the Wall Mounting Bracket on a Wooden Wall
with a Stud or a Post. . . . . . . . . . . . . . . . . . . . . . . . . . . . . . . . . 30
5.5 Mounting the Wall Mounting Bracket on a Wooden Wall
with two Studs or on two Posts . . . . . . . . . . . . . . . . . . . . . . . . . 31
Installation Manual SB30-40-US-IA-en-34 7
Page 8

Table of Contents SMA America, LLC
5.6 Mounting the DC Disconnect . . . . . . . . . . . . . . . . . . . . . . . . . . 32
5.6.1 Inserting the DC Varistors . . . . . . . . . . . . . . . . . . . . . . . . . . . . . . . . . . . . . . . 32
5.6.2 Mounting the DC Disconnect on the Wall . . . . . . . . . . . . . . . . . . . . . . . . . . 33
5.7 Mounting the Inverter . . . . . . . . . . . . . . . . . . . . . . . . . . . . . . . . 34
6 Electrical Connection . . . . . . . . . . . . . . . . . . . . . . . . . . . . . 35
6.1 Safety During Electrical Connection . . . . . . . . . . . . . . . . . . . . . 35
6.2 Overview of the Connection Area . . . . . . . . . . . . . . . . . . . . . . 36
6.2.1 Interior Connection Area. . . . . . . . . . . . . . . . . . . . . . . . . . . . . . . . . . . . . . . . 36
6.2.2 Connection Area of the Inverter . . . . . . . . . . . . . . . . . . . . . . . . . . . . . . . . . . 37
6.2.3 Connection Area of the DC Disconnect . . . . . . . . . . . . . . . . . . . . . . . . . . . . 38
6.3 AC Connection . . . . . . . . . . . . . . . . . . . . . . . . . . . . . . . . . . . . . 39
6.3.1 Inserting the AC Cables into the DC Disconnect. . . . . . . . . . . . . . . . . . . . . . 39
6.3.2 Connecting the AC Cables to the DC Disconnect. . . . . . . . . . . . . . . . . . . . . 40
6.3.3 Connecting the AC Cable of the DC Disconnect to the Inverter . . . . . . . . . . 41
6.4 DC Connection . . . . . . . . . . . . . . . . . . . . . . . . . . . . . . . . . . . . . 42
6.4.1 Inserting the DC Cables into the DC Disconnect. . . . . . . . . . . . . . . . . . . . . . 42
6.4.2 Grounding the DC Disconnect . . . . . . . . . . . . . . . . . . . . . . . . . . . . . . . . . . . 43
6.4.3 Grounding the DC Input . . . . . . . . . . . . . . . . . . . . . . . . . . . . . . . . . . . . . . . . 44
6.4.4 Connecting the DC Cables to the DC Disconnect. . . . . . . . . . . . . . . . . . . . . 46
6.4.5 Connecting the DC Cable of the DC Disconnect to the Inverter . . . . . . . . . . 47
6.5 Connecting the Combiner Box to the DC Disconnect . . . . . . . . 49
7 Configuration . . . . . . . . . . . . . . . . . . . . . . . . . . . . . . . . . . . 51
7.1 Automatic Line Voltage Detection. . . . . . . . . . . . . . . . . . . . . . . 51
7.2 Possible Grounding Systems. . . . . . . . . . . . . . . . . . . . . . . . . . . 52
7.3 Jumper Assignments for Grounding Systems . . . . . . . . . . . . . . 53
7.4 Changing the Display Language . . . . . . . . . . . . . . . . . . . . . . . 55
8 Commissioning the Inverter. . . . . . . . . . . . . . . . . . . . . . . . 56
8 SB30-40-US-IA-en-34 Installation Manual
Page 9

SMA America, LLC Table of Contents
9 Opening and Closing. . . . . . . . . . . . . . . . . . . . . . . . . . . . . 57
9.1 Opening the Inverter. . . . . . . . . . . . . . . . . . . . . . . . . . . . . . . . . 57
9.2 Closing the Inverter. . . . . . . . . . . . . . . . . . . . . . . . . . . . . . . . . . 58
9.3 Opening the DC Disconnect. . . . . . . . . . . . . . . . . . . . . . . . . . . 59
9.4 Closing the DC Disconnect . . . . . . . . . . . . . . . . . . . . . . . . . . . . 61
10 Troubleshooting . . . . . . . . . . . . . . . . . . . . . . . . . . . . . . . . . 63
10.1 LED Signals . . . . . . . . . . . . . . . . . . . . . . . . . . . . . . . . . . . . . . . . 63
10.2 Measurement Channels . . . . . . . . . . . . . . . . . . . . . . . . . . . . . . 65
10.3 Operating Parameters . . . . . . . . . . . . . . . . . . . . . . . . . . . . . . . 66
10.4 Display messages . . . . . . . . . . . . . . . . . . . . . . . . . . . . . . . . . . . 73
10.4.1 Status Messages . . . . . . . . . . . . . . . . . . . . . . . . . . . . . . . . . . . . . . . . . . . . . . 73
10.4.2 Error Messages . . . . . . . . . . . . . . . . . . . . . . . . . . . . . . . . . . . . . . . . . . . . . . . 74
10.4.3 Resetting "Error AFCI" Disturbance . . . . . . . . . . . . . . . . . . . . . . . . . . . . . . . . 77
11 Cleaning and Care . . . . . . . . . . . . . . . . . . . . . . . . . . . . . . . 78
11.1 Cleaning the Ventilation Grids . . . . . . . . . . . . . . . . . . . . . . . . . 78
11.2 Cleaning the Fans . . . . . . . . . . . . . . . . . . . . . . . . . . . . . . . . . . . 79
11.3 Checking the Fan . . . . . . . . . . . . . . . . . . . . . . . . . . . . . . . . . . . 81
11.4 Checking the DC Disconnect . . . . . . . . . . . . . . . . . . . . . . . . . . 82
11.5 Checking and Replacing the DC Varistors . . . . . . . . . . . . . . . . 82
11.6 Checking the PV Plant for a ground-fault . . . . . . . . . . . . . . . . . 85
11.7 Replacing the Ground Fuse . . . . . . . . . . . . . . . . . . . . . . . . . . . 86
11.8 Replacing String Fuses . . . . . . . . . . . . . . . . . . . . . . . . . . . . . . . 88
12 Technical Data . . . . . . . . . . . . . . . . . . . . . . . . . . . . . . . . . . 90
12.1 DC⁄AC. . . . . . . . . . . . . . . . . . . . . . . . . . . . . . . . . . . . . . . . . . . . 90
12.1.1 Sunny Boy 3000-US . . . . . . . . . . . . . . . . . . . . . . . . . . . . . . . . . . . . . . . . . . . 90
12.1.2 Sunny Boy 3800-US . . . . . . . . . . . . . . . . . . . . . . . . . . . . . . . . . . . . . . . . . . . 92
12.1.3 Sunny Boy 4000-US . . . . . . . . . . . . . . . . . . . . . . . . . . . . . . . . . . . . . . . . . . . 93
12.2 General Data . . . . . . . . . . . . . . . . . . . . . . . . . . . . . . . . . . . . . . 95
Installation Manual SB30-40-US-IA-en-34 9
Page 10

Table of Contents SMA America, LLC
12.3 Protection Devices. . . . . . . . . . . . . . . . . . . . . . . . . . . . . . . . . . . 96
12.4 DC Disconnect . . . . . . . . . . . . . . . . . . . . . . . . . . . . . . . . . . . . . 96
12.5 Torques and Cable Sizes . . . . . . . . . . . . . . . . . . . . . . . . . . . . . 96
12.6 Tripping Limits/Tripping Times. . . . . . . . . . . . . . . . . . . . . . . . . . 97
13 Accessories . . . . . . . . . . . . . . . . . . . . . . . . . . . . . . . . . . . . . 97
14 Compliance Information . . . . . . . . . . . . . . . . . . . . . . . . . . 98
15 Contact . . . . . . . . . . . . . . . . . . . . . . . . . . . . . . . . . . . . . . . . 99
10 SB30-40-US-IA-en-34 Installation Manual
Page 11
SMA America, LLC 1 Information on this Document
1 Information on this Document
Validity
This document is valid for the following device types:
• SB 3000US • SB 3000US-12
• SB 3800-US-10 • SB 3800-US-12
• SB 4000US • SB 4000-US-12
Target group
This document is for electrically qualified persons. Only skilled workers are allowed to perform the
tasks set forth in this document (see Section 2.2 "Skills of Electrically Qualified Persons", page 14).
Additional information
Additional information is available at www.SMA-America.com.
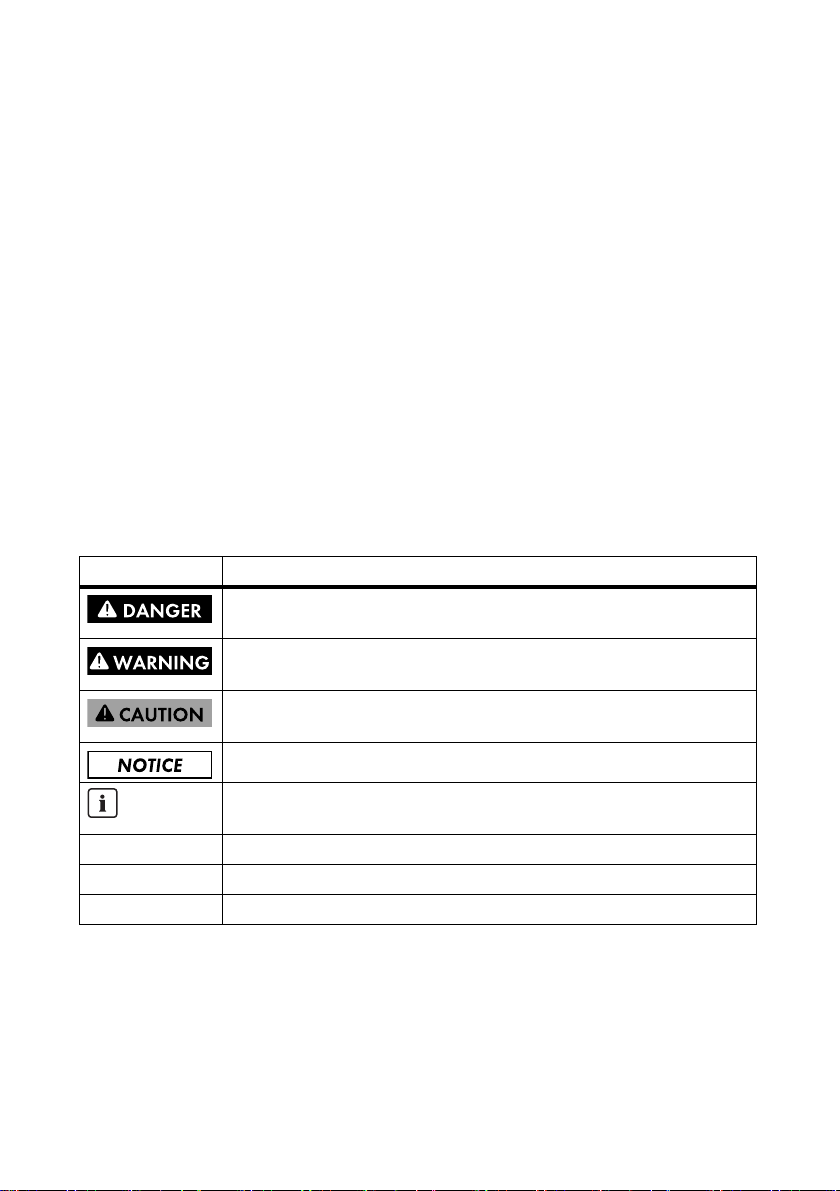
Symbols
Symbols Explanation
DANGER indicates a hazardous situation which, if not avoided, will result in
death or serious injury.
WARNING indicates a hazardous situation which, if not avoided, could result
in death or serious injury.
CAUTION indicates a hazardous situation which, if not avoided, could result
in minor or moderate injury.
NOTICE is used to address practices not related to personal injury.
Indicates information that is important for a specific topic or objective, but is
not safety-relevant.
☐ Indicates a requirement for meeting a specific goal.
☑ Desired result
✖ A problem that could occur
Installation Manual SB30-40-US-IA-en-34 11
Page 12
1 Information on this Document SMA America, LLC
Typography
Typography Usage Example:
"light" • Display messages
• Parameters
• The inverter switches to
"Balanced" mode.
•Terminals
•Slots
bold • Elements to be selected
• Elements to be entered
• Select the parameter FanTest and
set to 1.
Nomenclature
The following nomenclature is used in this document:
Complete designation Designation in this document
SMA America, LLC SMA
SMA Solar Technology Canada Inc. SMA
Sunny Boy 3000-US/3800-US/4000-US Inverter/Sunny Boy
Abbreviations
Abbreviations Designation Explanations
AC Alternating Current -
AFCI Arc-Fault Circuit Interrupter -
CCU Current controlling unit -
DC Direct Current -
EEPROM Electrical Eraseable
Programmable Read Only
Memory
FCC Federal Communications
US agency for communication
Commission
GFDI ground-fault Detection
Interruption
LED Light-Emitting Diode -
MPP Maximum Power Point -
MPPT Maximum Power Point Tracker -
OCU Operational Control Unit -
PV Photovoltaics -
12 SB30-40-US-IA-en-34 Installation Manual
Page 13
SMA America, LLC 2 Safety
2Safety
2.1 Intended Use
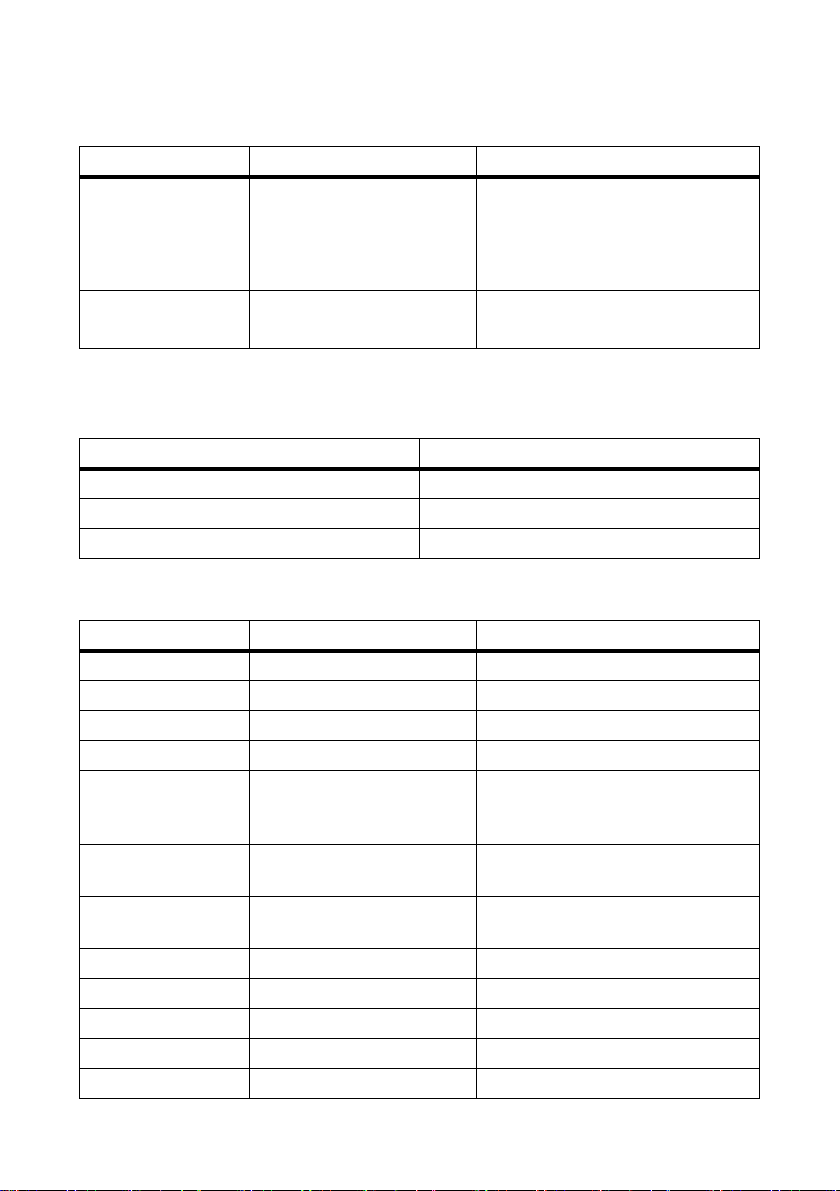
The Sunny Boy is a PV inverter that converts the direct current from the PV array into alternating
current.
Figure 1: Principle of a PV plant with Sunny Boy
Position Designation
APV array
B Sunny Boy with DC Disconnect
CLoad
DEnergy meter
E Power distribution grid
You can use the alternating current generated as follows:
Household grid: Energy flows into the household grid. The loads connected, for example
household devices or lighting, consume the energy. The energy left over is
fed i nto the power dist ribution grid. Wh en the Sunny Boy is no t generating
any energy, e.g. at night, the loads that are connected are supplied by the
power distribution grid. The Sunny Boy does not have its own energy
meter. When energy is being fed into the power distribution grid, the
energy meter runs in reverse.
Power distribution grid: Energy is fed directly into the power distribution grid. The Sunny Boy is
connected to a separate energy meter. Depending on the electric utility
company, you will be remunerated accordingly for the energy generated.
Stand-alone grid: The Sunny Boy is connected to a stand-alone grid. A stand-alone grid is a
grid that is not connected to a power distribution grid. The Sunny Boy
needs a grid-forming generator, for example a Sunny Island, in order to
function. The energy generated is consumed directly on site; surplus
energy can be stored in batteries.
Installation Manual SB30-40-US-IA-en-34 13
Page 14

2 Safety SMA America, LLC
The Sunny Boy is suitable for indoor and outdoor use.
The PV modules used must be suitable for use with the Sunny Boy and must be approved by the
module manufacturer. Do not connect any energy sources other than PV modules to the Sunny Boy.
The corresponding plant design may require the use of protective devices (see
National Electrical Code
®
690.9). For installations in Canada, the installation must be carried out in
accordance with the applicable Canadian standards.
For safety reasons, it is forbidden to modify the product or install components that are not explicitly
recommended or distributed by SMA America, LLC for this product.
Use the Sunny Boy in accordance with the information provided in the enclosed documentation only.
Any other use can result in personal injury or property damage.
The enclosed documentation is an integral part of this product.
• Read and adhere to the documentation.
• Keep the documentation in a convenient place for future reference.
2.2 Skills of Electrically Qualified Persons
The tasks described in this document are intended for skilled persons only. Electrically qualified
persons must have the following skills:
• Knowledge of how an inverter works and is operated
• Training in how to deal with the dangers and risks associated with installing and using electrical
devices and plants
• Training in the installation and commissioning of electrical devices and plants
• Knowledge of all applicable standards and directives
• Knowledge of and adherence to this document and all safety precautions
14 SB30-40-US-IA-en-34 Installation Manual
Page 15

SMA America, LLC 2 Safety
2.3 Safety Precaution
Danger to life due to high voltages in the inverter
High voltages capable of causing electric shocks are present in the conductive components of the
inverter.
• All work on the inverter may be carried out by an electrically qualified person only.
• All work on the inverter should only be carried out as described in this document.
• The performance of work on the inverter is only permitted when the inverter is dead.
• Only commission the inverter when the enclosure lid is closed.
Risk of burns due to hot enclosure parts
Some parts of the enclosure can become hot during operation.
• During operation, touch the enclosure lid only.
Damage to the inverter due to electrostatic discharges
The inverter may be destroyed or damaged by electric discharges due to electronic components
being touched.
• Ground yourself before touching any components.
Installation Manual SB30-40-US-IA-en-34 15
Page 16
3 Scope of Delivery SMA America, LLC
3Scope of Delivery
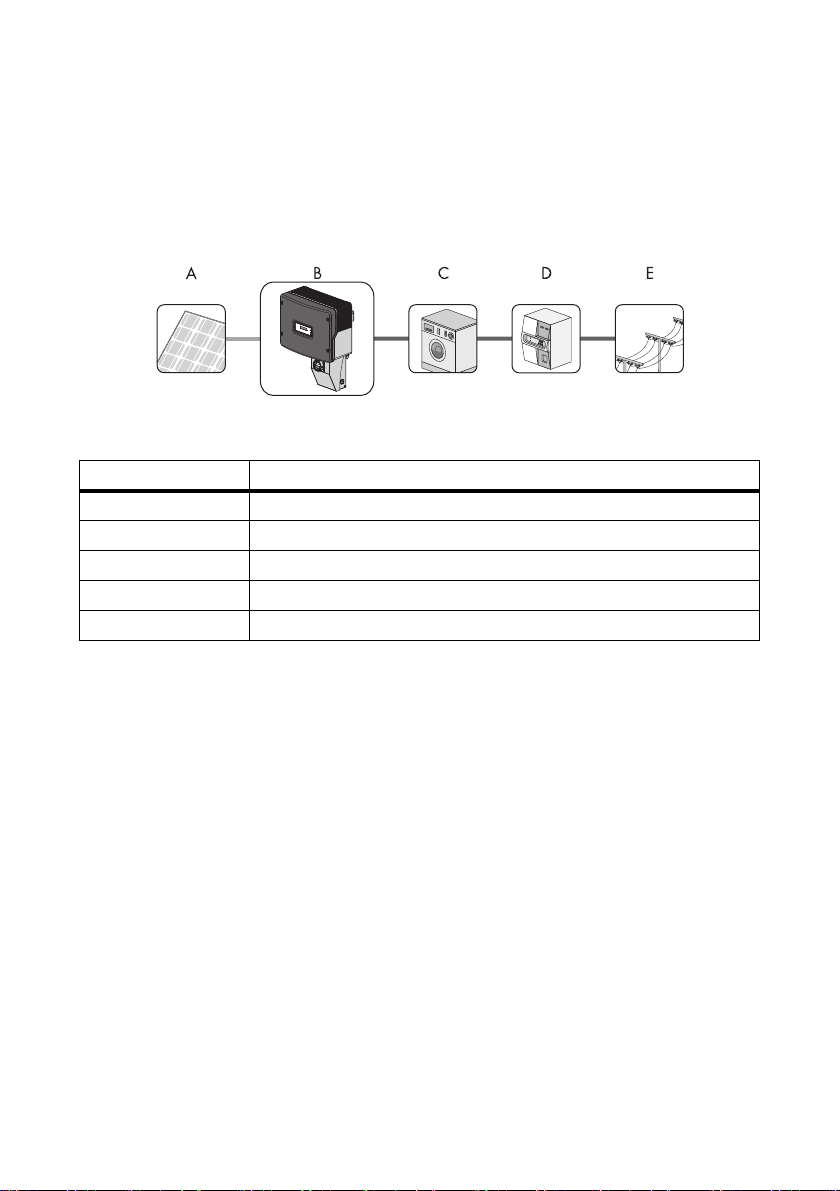
Check the delivery for completeness and any externally visible damage. Contact your specialty
retailer if the delivery is incomplete or damaged.
Figure 2: Components included in delivery
Position Quantity Designation Explanation
A1Sunny Boy ‒
B 2 Ventilation grid For closing the recessed grips
C 1 Wall mounting bracket ‒
D 2 Replacement jumper For the fan test
E1DC Disconnect ‒
F 1 M6x16 cheese-head screw As spare part for closing the enclosure lid
on the Sunny Boy
G 2 M6x10 cheese-head screw For attaching the Sunny Boy to the wall
mounting bracket
2 M6x10 cheese-head screw For attaching the DC Disconnect to the
wall mounting bracket
1 M6x10 cheese-head screw For closing the cover on the DC Disc onnect
16 SB30-40-US-IA-en-34 Installation Manual
Page 17

SMA America, LLC 3 Scope of Delivery
Position Quantity Designation Explanation
H 6 Conical spring washer For M6x10 cheese-head screws and
M6x16 cheese-head screw
I3DC varistor* ‒
K 1 Insertion tool* For DC varistors
L 1 Installation manual, user
‒
manual, document set with
explanations and certificates
* Only applies for SB 3000US-12/SB 3800-US-12/SB 4000US-12
Installation Manual SB30-40-US-IA-en-34 17
Page 18
4 Product Description SMA America, LLC
4 Product Description
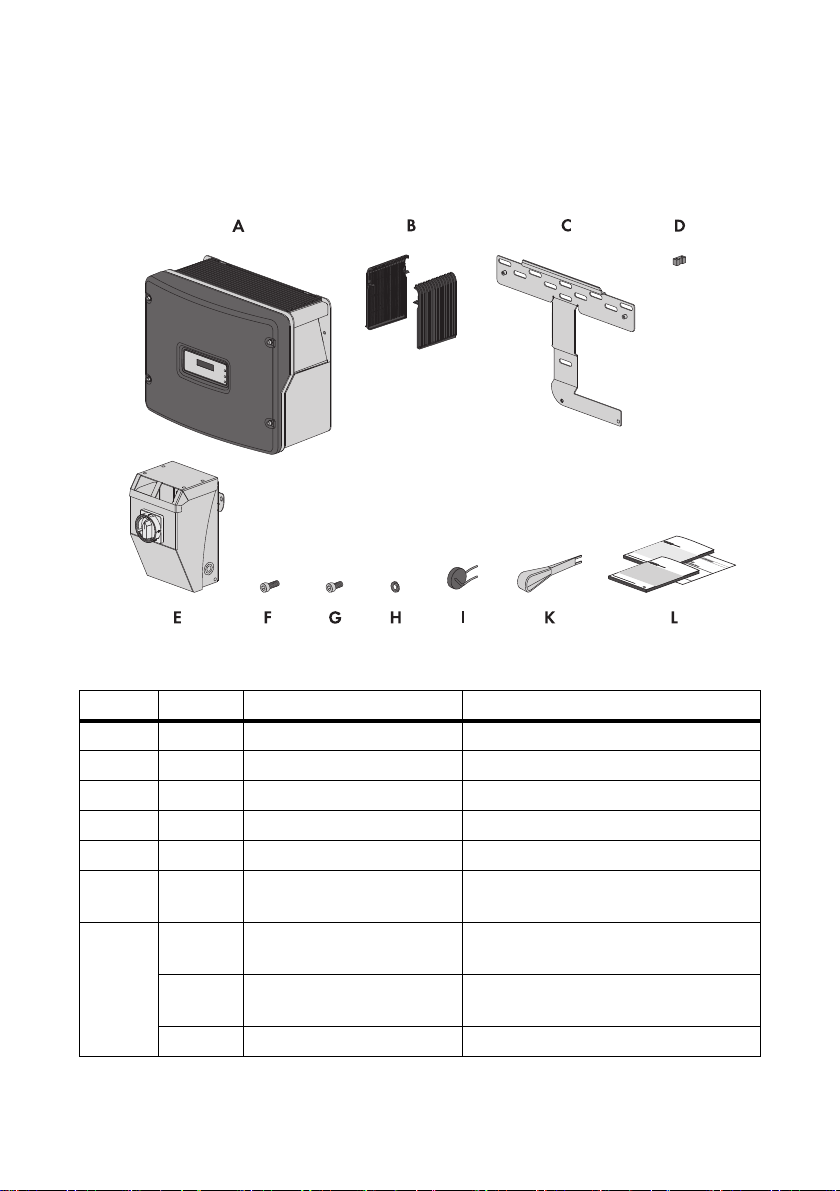
4.1 Sunny Boy
The Sunny Boy is a PV inverter which converts the direct current of the PV array to alternating current
and feeds it into the power distribution grid.
Figure 3: Sunny Boy design
Position Designation
A Ventilation grids (left and right)
B Type labels
CDC Disconnect
DLEDs
EDisplay
FEnclosure lid
18 SB30-40-US-IA-en-34 Installation Manual
Page 19
SMA America, LLC 4 Product Description
Symbols on the Inverter
Symbol Designation Explanation
Tap symbol You can operate the display by tapping on the
enclosure lid:
• To switch on the backlight, tap once.
• To switch to the next displayed message, tap
once.
• To restart the inverter, tap once.*
• To display the serial number and designation of
the inverter, the firmware version, and the status
of the Power Balancer (if activated) one after
the other during operation, tap twice in
succession.*
Green LED Indicates the operating state of the inverter
(see Section 10.1).
Red LED Indicates the status of the grounding fuse
(see Section 10.1).
Yellow LED Indicates a fault or a disturbance
(see Section 10.4.2).
* Applies for SB 3000US-12⁄SB 3800-US-12⁄SB 4000US-12 only
Installation Manual SB30-40-US-IA-en-34 19
Page 20
4 Product Description SMA America, LLC
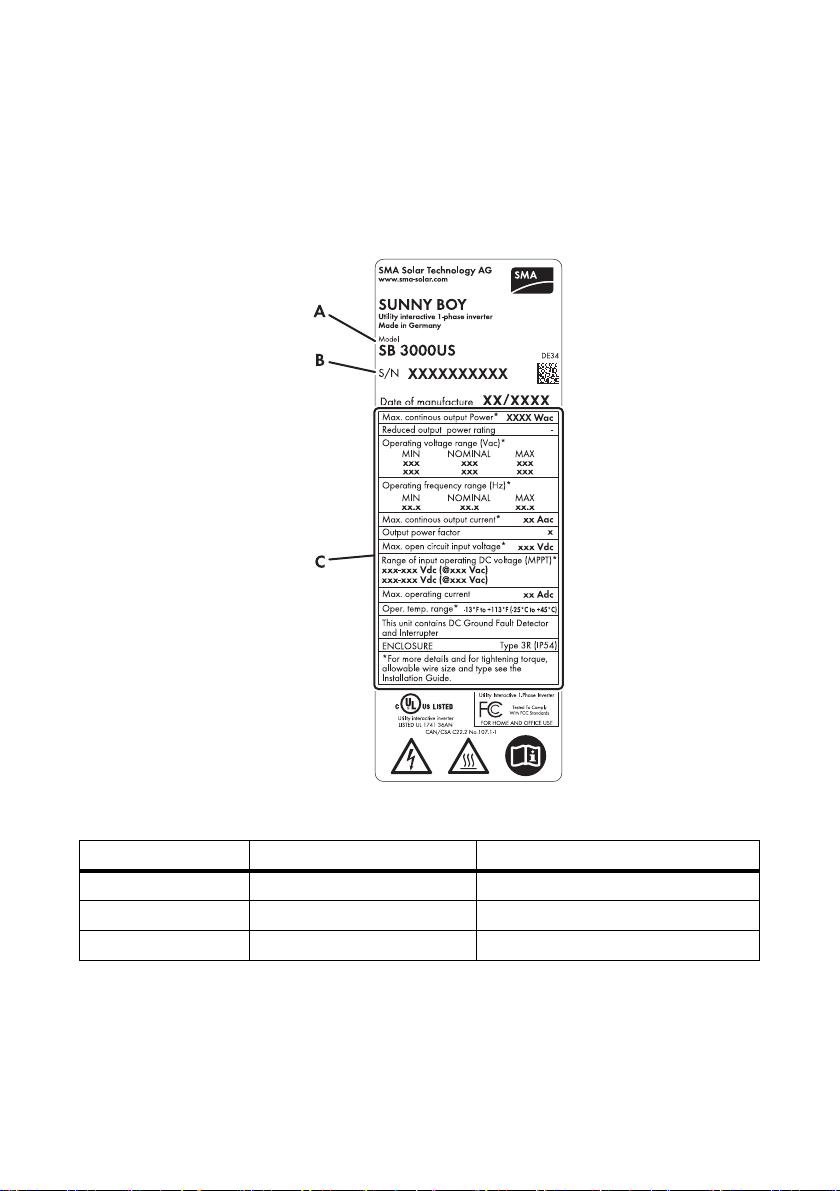
4.2 Type Labels
4.2.1 Sunny Boy Type Label
The type label provides a unique identification of the inverter. The type label is on the right-hand side
of the enclosure.
Figure 4: Layout of the Sunny Boy type label
Position Designation Explanation
AModel Device type
B Serial no. Inverter serial number
C Device-specific characteristics ‒
You require the information on the type label to use the inverter safely and for customer support at the
SMA Service Line. The type label must be permanently affixed to the inverter.
20 SB30-40-US-IA-en-34 Installation Manual
Page 21
SMA America, LLC 4 Product Description
A
B
www.sma-solar.com
Utility interactive inverter
LISTED UL 1741 36AN
DC-Disconnect
DC-DisconU-XX
Item No.l
Date of manufacture
Max. system voltage under all conditions*
SMA Solar Technology AG
Engineered in Germany
DE34
XX/XXXX
XXXX Vdc
CAN/CSA C22.2 No.107.1-1
DC max operating current*
XXXX Adc
Max. string fuse rating*
XXXX Adc
Operating temperature range*
-XX °F to +XXX °F (-XX °C to +XX °C)
ENCLOSURE
Type 3R
SB 3000US / SB 3000US-12 / SB 38000-US-10 /
SB 3800-US-12 / SB 4000US / SB 4000 US-12 /
SB 5000US / SB 5000US-11 / SB 5000US-12 /
SB 6000US / SB 6000US-11 / SB 6000US-12 /
SB 7000US / SB 7000US-11 / SB 7000US-12 /
SB 8000US / SB 8000US-11 / SB 8000US-12
* For mor details and for tightening torque,
allowable wire size and type see the
Installation Guide
AC max voltage and rated current*
XXX V / XX A
This unit is UL approved for use with
PV arrays and the inverter types
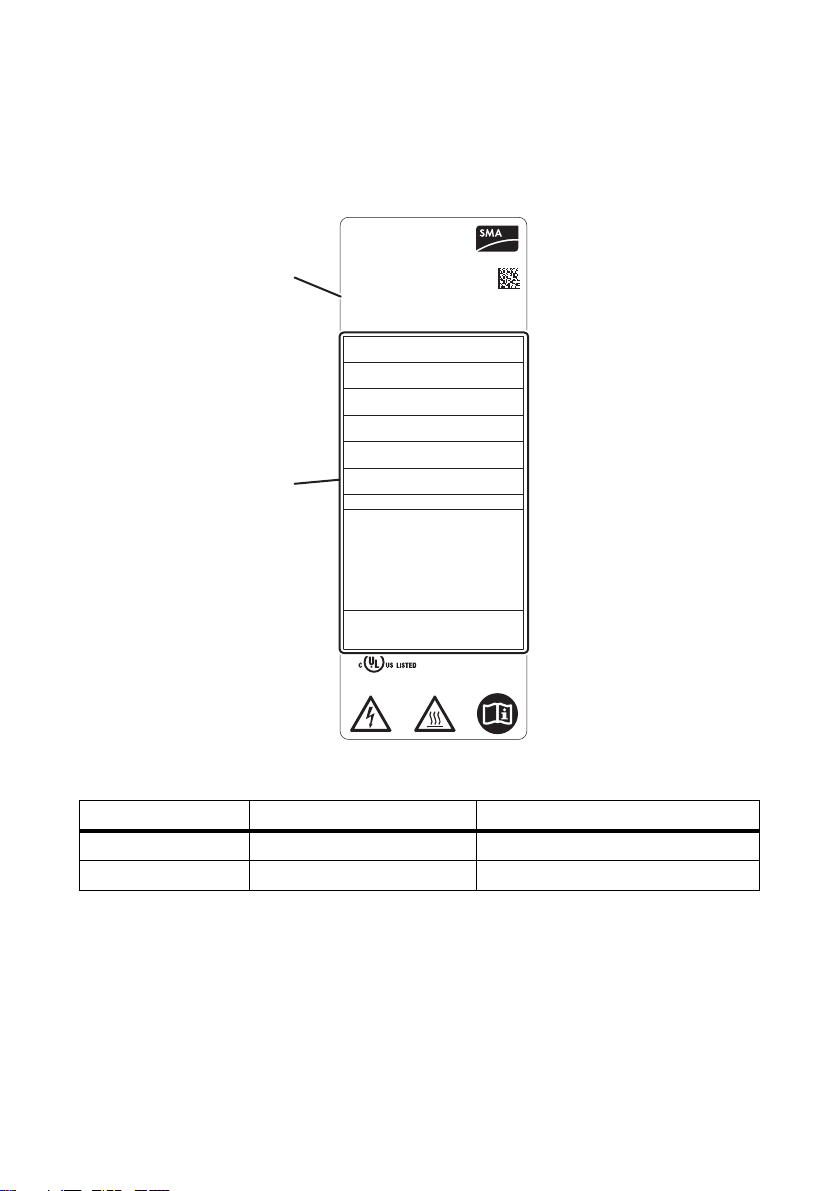
4.2.2 DC Disconnect Type Labels
The type labels provide a unique identification of the DC Disconnect. The type label is on the righthand side of the enclosure.
Figure 5: Layout of the DC Disconnect type label
Position Designation Explanation
AItem No.I Device type
B Device-specific characteristics ‒
Installation Manual SB30-40-US-IA-en-34 21
Page 22
4 Product Description SMA America, LLC
A
www.sma-solar.com
DC-Disconnect
XXXXXXXXXX
Serial No.
SMA Solar Technology AG
Engineered in Germany
DE34
DC-DisconU-XX
Item No.
XXXXXXXX
Date of manfuacture
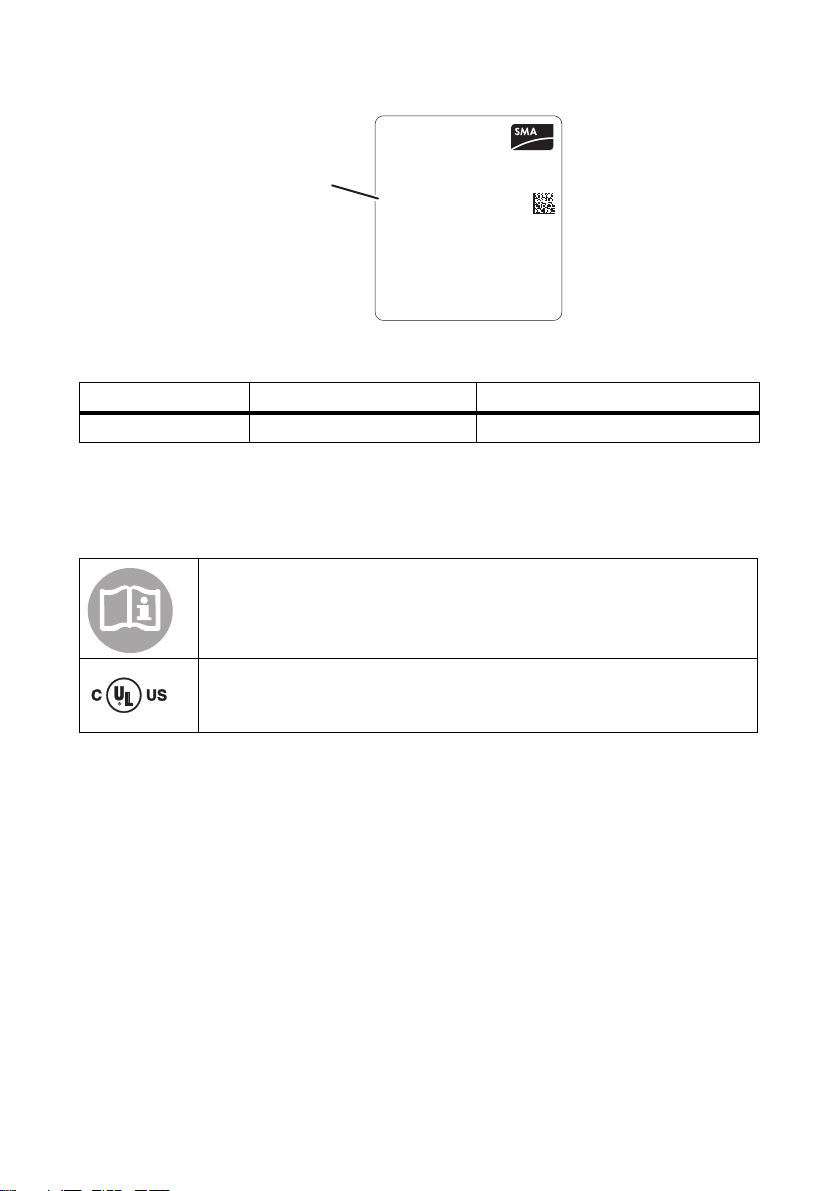
Figure 6: Layout of the DC Disconnect type label
Position Designation Explanation
A Serial no. DC Disconnect serial number
You require the information on the type labels to use the DC Disconnect safely and for customer
support at the SMA Service Line. The type labels must be permanently affixed to the DC Disconnect.
Symbols on the type labels
Observe the operating instructions
Read the relevant documentation before working on the product. Follow all safety
precautions and instructions as described in the documentation.
Evaluated to the requirements of the Underwriters Laboratories Standard for
Safety for Inverters, Converters, Controllers and Interconnection System
Equipment for Use With Distributed Energy Resources, UL 1741.
22 SB30-40-US-IA-en-34 Installation Manual
Page 23
SMA America, LLC 4 Product Description
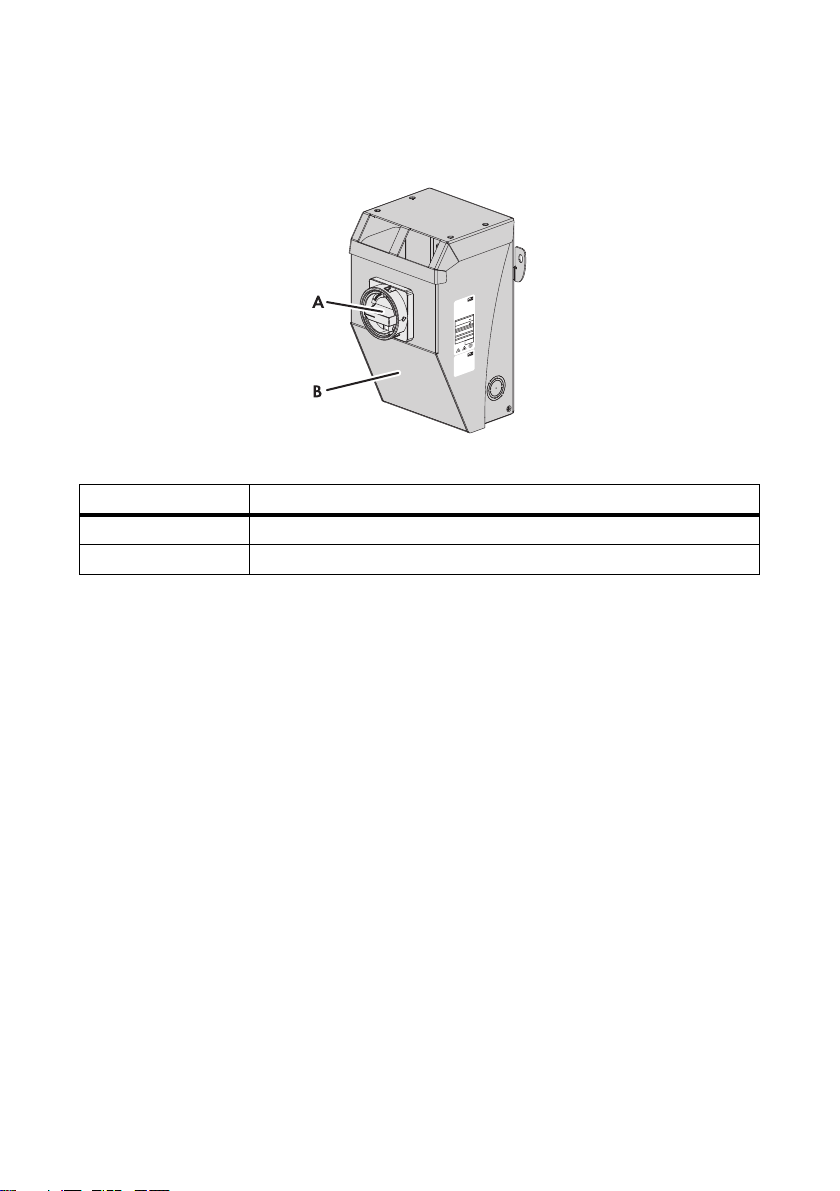
4.3 DC Disconnect
The DC Disconnect safely disconnects the PV array from the inverter.
Figure 7: DC Disconnect design
Position Designation
ARotary Switch
BCover
The DC Disconnect connects the PV array to the inverter. Turning the rotary switch interrupts the flow
of current and the DC cabling can be safely disconnected from the inverter.
4.4 Communication
The inverter can be equipped with a communication module for wired communication with special data
capture devices or a PC with corresponding software (for information on supported communication
products connected to with the communication module, see www.SMA-America.com).
4.5 Ground-Fault Protective Device (GFDI)
According to the National Electrical Code®, Section 690.5, the Sunny Boy has a system for detecting
ground-fault errors in the PV array.
The PV array is operated in a grounded configuration. The grounding of a PV plant is established as
per the specifications of Section 690.41 to 690.47 of the National Electrical Code® ANSI/NFPA
70 and is the responsibility of the electrically qualified person. Installations in Canada must be carried
out in accordance with the applicable Canadian standards.
De pen din g on the pla nt t ype , the cabl e fo r DC + or DC − of t he P V ar ray is c onn ect ed t o the grou ndi ng
system in the Sunny Boy. According to UL 1741, the GFDI is always active when the DC voltage
present is sufficient for switching on the display in the Sunny Boy.
If the ground-fault current exceeds 1 A, the Sunny Boy switches off and displays a disturbance. After
the ground-fault has been located and eliminated, the ground-fault disturbance must be cleared
manually. Following this, the Sunny Boy resumes operation.
Installation Manual SB30-40-US-IA-en-34 23
Page 24

4 Product Description SMA America, LLC
4.6 Arc-Fault Circuit Interrupter (AFCI)
According to the National Electrical Code®, Section 690.11, the Sunny Boy has a system for electric
arc detection and interruption.
An ele ctr ic a rc w ith a po wer of 3 00 W o r gr eat er m ust be i nte rru pted by the AFCI in the time specified
by UL 1699B. A tripped AFCI may only be reset manually.
On ly t he f oll owi ng S unn y Boy devi ce t ype s ar e eq uip ped wit h an automatic arc-fault circuit interrupter
(AFCI):
• SB 3000-US-12
• SB 3800-US-12
• SB 4000-US-12
The 2011 edition of the National Electrical Code
PV plants attached to a building must be fitted with a means of detecting and disconnecting serial
electric arcs on the PV side.
The automatic arc-fault circuit interrupter can be deactivated in the "Installer" mode via the
communication device if this function is not desired.
®
, Section 690.11, stipulates that newly installed
4.7 Anti-Islanding Protection
The Sunny Boy has an active safety algorithm to protect against islanding.
A stand-alone grid occurs when the power distribution grid is switched off and the Sunny Boy attempts
to continue to feed in to the power distribution grid. For this to happen, the remaining load must be
resonant at 60 Hz and exactly match the power of the Sunny Boy. The effect of the safety algorithm
is that, in the event of the power distribution grid being switched off, the PV plant does not supply any
current to a symmetrical load that is resonant at 60 Hz.
4.8 String Fuses
The DC Disconnect is supplied with 4 string fuses (one fuse per string) designed for 15 A and 600 V.
With string fuses, the DC Disconnect can protect the PV modules from potential reverse currents.
24 SB30-40-US-IA-en-34 Installation Manual
Page 25
SMA America, LLC 5 Mounting
5Mounting
5.1 Safety during Mounting
Risk of injury due to inverter falling over
Potential risk of bruising and broken bones due to the heavy weight of the inverter.
• When mounting the inverter, note that it has a weight of 88 lb. (40 kg).
• Use appropriate mounting material for the mounting location of the inverter:
– For mounting on plasterboard, do not use hollow-wall anchors or toggle bolts.
– Wooden supporting studs or posts must be present behind the mounting points on
plasterboard.
• Use suitable lifting device when mounting.
The inverter can become hot during operation
Potential burn injuries when touching the enclosure.
• Install the inverter in such a way that it cannot be touched accidentally.
Installation Manual SB30-40-US-IA-en-34 25
Page 26
5 Mounting SMA America, LLC
5.2 Selecting the Mounting Location
Requirements for the mounting location:
Danger to life due to fire or explosions
With electrical devices, there is always a certain danger that a fire may break out.
• Do not mount the inverter in the vicinity of combustible materials.
• Do not mount the inverter in areas where highly flammable materials are stored.
• Do not mount the inverter in a potentially explosive atmosphere.
☐ The mounting must be on a stable surface, e.g. concrete and other walls.
☐ The mounting location must be suitable for the weight and dimensions of the inverter
(see Section 12 "Technical Data", page 90).
☐ In living areas, make sure that the mounting surface is not made of plasterboard or similar.
The inverter makes noises when in use, which can be perceived as a nuisance in a living area.
☐ Studs must be present behind the mounting points on plasterboard sheets or panels.
☐ The mounting location must be clear and have safe access at all times without the use of
additional aids being necessary (such as scaffolding or lifting pla tfo rms ). N on- ful fil lme nt of t hes e
criteria may restrict servicing.
☐ The mounting location must not be exposed to direct solar irradiation. Direct solar irradiation
can overheat the inverter. As a result, the inverter reduces its power output.
☐ The mounting location must not be exposed to direct sources of water spray such as sprinklers
or gutters.
☐ The ambient temperature must be within a permissible range (see Section 12 "Technical
Data", page 90). This ensures optimal operation of the inverter.
☐ The mounting location must be inaccessible to children.
26 SB30-40-US-IA-en-34 Installation Manual
Page 27
SMA America, LLC 5 Mounting
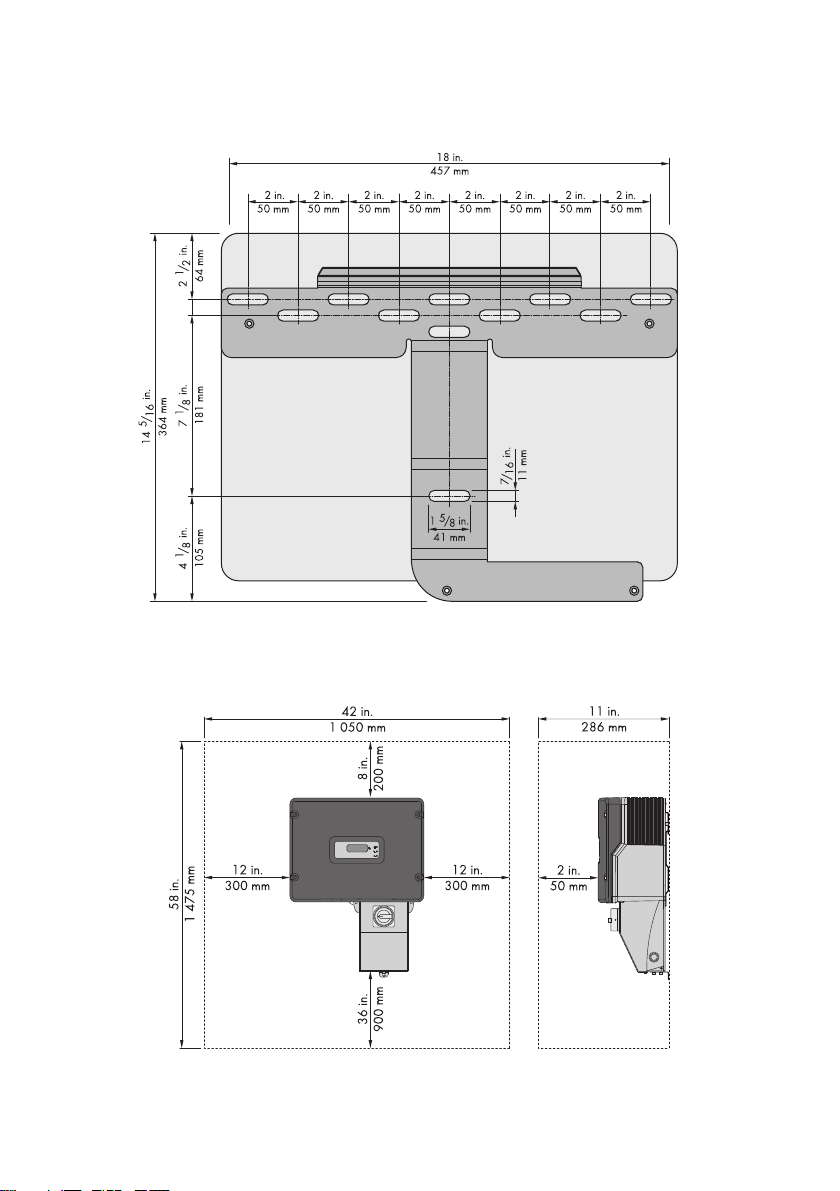
Wall mounting bracket dimensions:
Figure 8: Dimensions of the wall mounting bracket
Observe recommended clearances:
Figure 9: Recommended clearances for mounting the inverter
Installation Manual SB30-40-US-IA-en-34 27
Page 28
5 Mounting SMA America, LLC
• If the inverter is mounted outdoors, the clearance below the inverter must amount to 3 ft. (900 mm).
This prevents the ingress of waterspray into the inverter.
• O bse rve rec omm end ed c lea ran ces to the wal ls a s we ll a s to oth er inverters or objects. Thus, you
will prevent the inverter's power output from being reduced due to excessive temperatures.
• If multiple inverters are mounted in areas with high ambient temperatures, increase the
clearances between the inverters and ensure sufficient fresh-air supply. Thus, you will prevent
the inverter's power output from being reduced due to excessive temperatures.
• Do not mount inverters on top of one another. This prevents the upper inverter from drawing in
the heated air from the lower inverter.
Prescribed clearances
®
Under certain conditions, the National Electrical Code
specifies greater clearances. Ensure
that you adhere to the prescribed clearances according to the National Electrical Code®,
Paragraph 110.26.
Installations in Canada must be carried out in accordance with the applicable Canadian
standards.
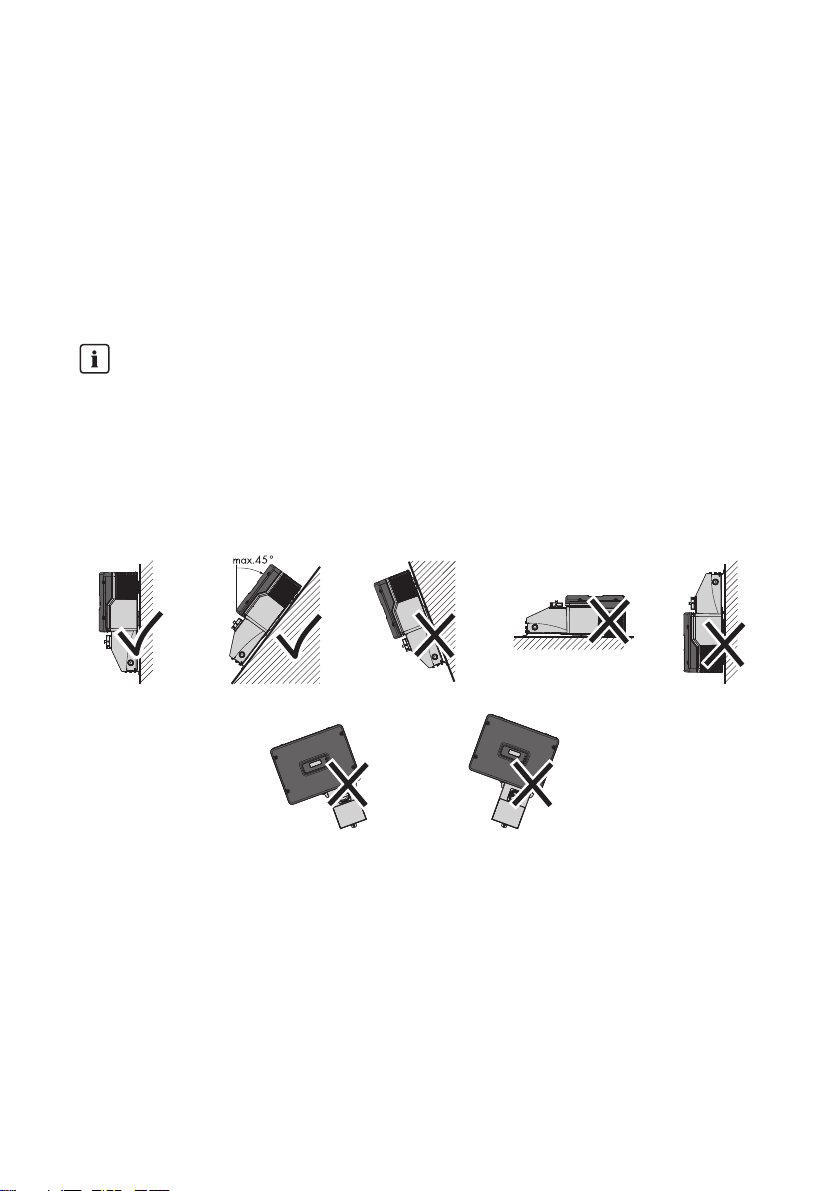
Observe permitted mounting position:
Figure 10: Permitted and prohibited mounting positions
• Mount the inverter in a permitted mounting position at eye level. This ensures that there can be
no ingress of moisture into the inverter and you can read out display messages and LED signals
without any problems.
28 SB30-40-US-IA-en-34 Installation Manual
Page 29
SMA America, LLC 5 Mounting
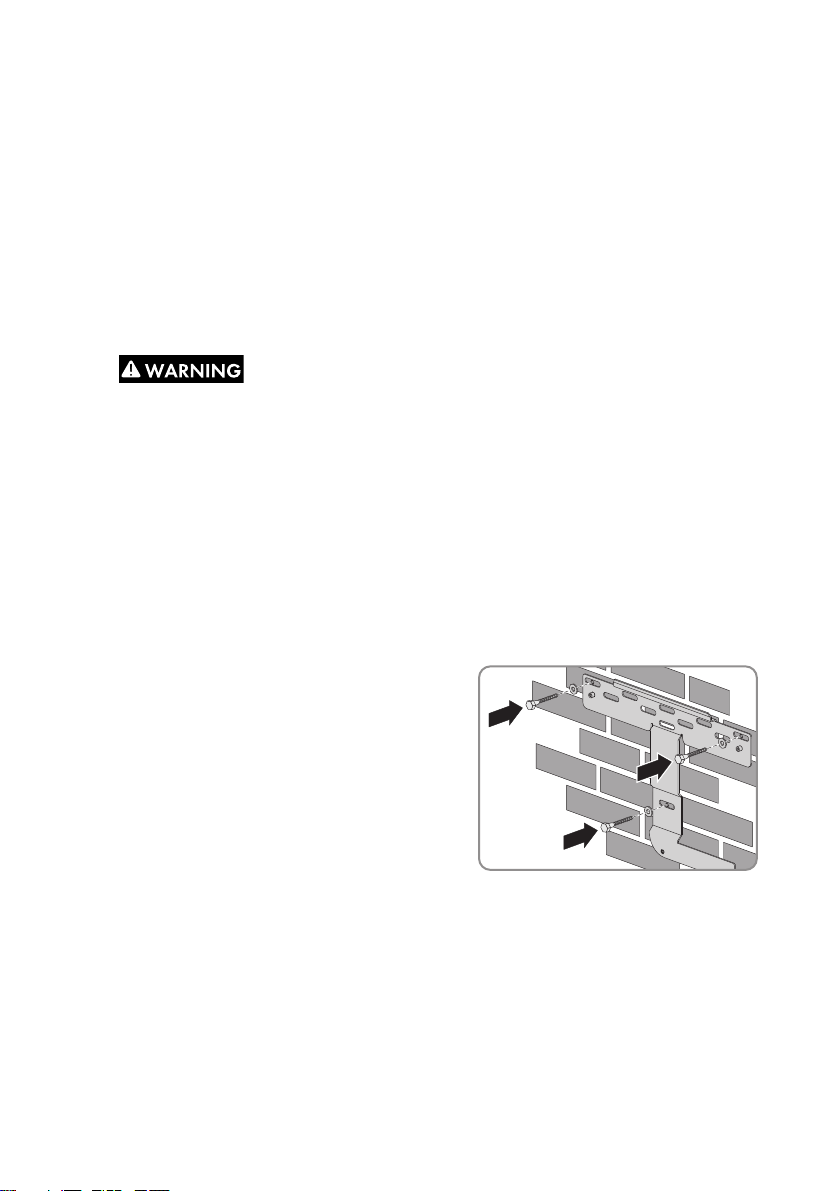
5.3 Mounting the Wall Mounting Bracket on a Stone Wall
Additional required mounting material (not included in the scope of delivery):
☐ 3 screws suitable for the foundation.
☐ 3 washers suitable for the screws.
☐ 3 screw anchors suitable for the foundation and for the screws.
1. Position the wall mounting bracket at the installation location. Tip: The bottom end of the wall
mounting bracket reaches approximately to the bottom corner of the inverter.
2. Align the bracket with a spirit level.
3.
Danger to life from electric shock due to damage to electric lines
Electric lines may be located behind the installation points which can be damaged when
mounting the inverter.
• Ensure that no electric lines are located behind the installation points.
4. Use the wall mounting bracket as a template. For this purpose, mark the oblong holes at the
extreme left and right as well as the lowest oblong hole in the middle of the wall mounting
bracket.
5. Remove the bracket from the wall.
6. Bore drill holes at the markings.
7. Insert suitable screw anchors into the drill holes.
8. Insert screws with washers through the oblong
holes of the wall mounting bracket into drill holes.
9. Tighten the screws. Ensure that no screws are loose.
10. Ensure that the wall mounting bracket is firmly positioned.
Installation Manual SB30-40-US-IA-en-34 29
Page 30
5 Mounting SMA America, LLC
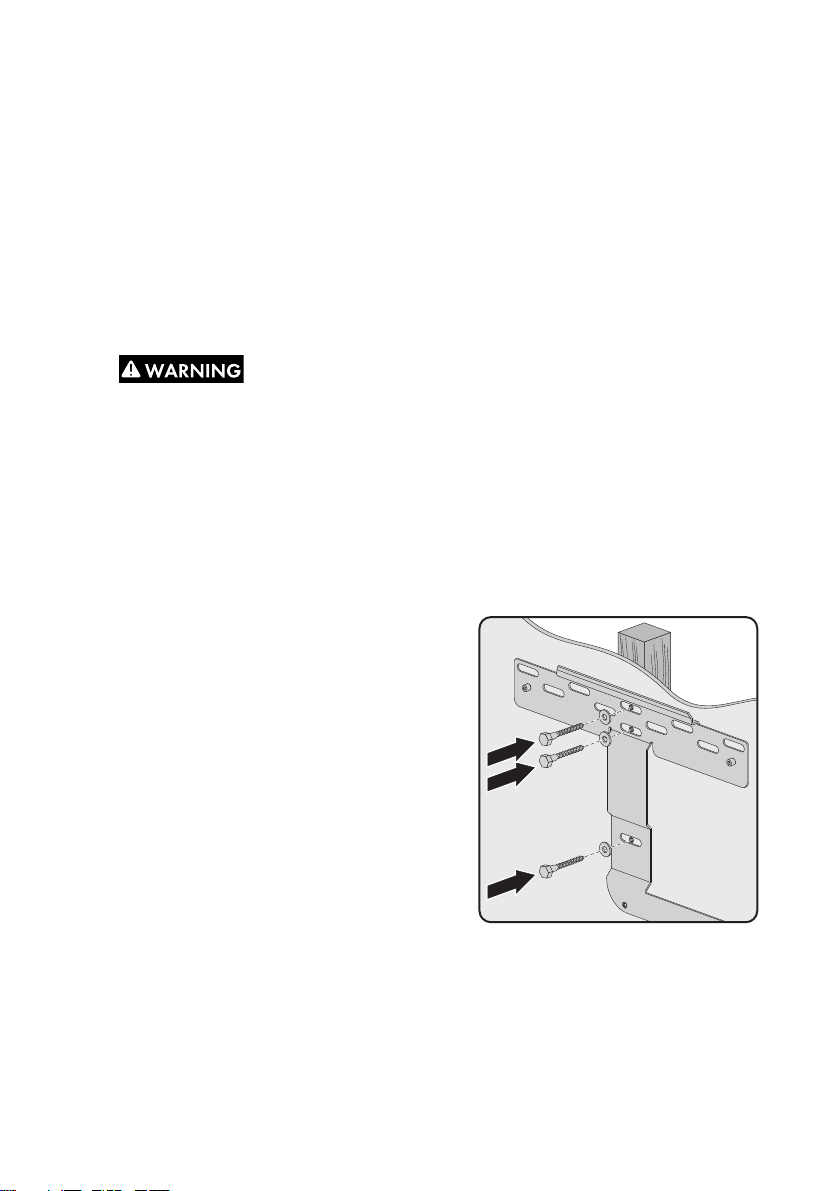
5.4 Mounting the Wall Mounting Bracket on a Wooden Wall with a Stud or a Post
Additional required mounting material (not included in the scope of delivery):
☐ 3 screws suitable for the foundation.
☐ 3 washers suitable for the screws.
1. Position the wall mounting bracket at the installation location. Tip: The bottom end of the wall
mounting bracket reaches approximately to the bottom corner of the inverter.
2. Align the bracket with a spirit level.
3.
Danger to life from electric shock due to damage to electric lines
Electric lines may be located behind the installation points which can be damaged when
mounting the inverter.
• Ensure that no electric lines are located behind the installation points.
4. Use the wall mounting bracket as a template. For this purpose, mark both uppermost oblong
holes and the lowest oblong hole in the center of the wall mounting bracket.
5. Remove the bracket from the wall.
6. Bore drill holes at the markings.
7. Insert screws with washers through the oblong holes
of the wall mounting bracket into drill holes.
8. Tighten the screws. Ensure that no screws are loose.
9. Ensure that the wall mounting bracket is firmly positioned.
30 SB30-40-US-IA-en-34 Installation Manual
Page 31

SMA America, LLC 5 Mounting
5.5 Mounting the Wall Mounting Bracket on a Wooden Wall with two Studs or on two Posts
Additional required mounting material (not included in the scope of delivery):
☐ 2 screws suitable for the foundation.
☐ 2 washers suitable for the screws.
1. Position the wall mounting bracket at the installation location. Tip: The bottom end of the wall
mounting bracket reaches approximately to the bottom corner of the inverter.
2. Align the bracket with a spirit level.
3.
Danger to life from electric shock due to damage to electric lines
Electric lines may be located behind the installation points which can be damaged when
mounting the inverter.
• Ensure that no electric lines are located behind the installation points.
4. Use the wall mounting bracket as a template. For this purpose, use the oblong holes at the
extreme left and right of the wall mounting bracket.
5. Remove the bracket from the wall.
6. Bore drill holes at the markings.
7. Insert screws with washers through the oblong
holes of the wall mounting bracket into drill holes.
8. Tighten the screws. Ensure that no screws are loose.
9. Ensure that the wall mounting bracket is firmly positioned.
Installation Manual SB30-40-US-IA-en-34 31
Page 32

5 Mounting SMA America, LLC
5.6 Mounting the DC Disconnect
5.6.1 Inserting the DC Varistors
To protect inverters with an arc-fault circuit interrupter from overvoltage, the provided DC varistors
must be inserted into the intended terminals prior to mounting the DC Disconnect.
Only the following Sunny Boy device types are equipped with an automatic arc-fault circuit
interrupter (AFCI):
• SB 3000-US-12
• SB 3800-US-12
• SB 4000-US-12
Figure 11: Position of terminals for the DC varistors
Position Designation
A Terminals for DC varistors
1. Open the DC Disconnect (see Section 9.3).
32 SB30-40-US-IA-en-34 Installation Manual
Page 33

SMA America, LLC 5 Mounting
2. Equip the 3 terminals with DC varistors:
• Insert the insertion tool into the rectangular
opening of the terminal.
• Insert the DC varistor into the terminal.
• Pull the insertion tool out of the rectangular
opening of the terminal.
3. Ensure that all DC varistors in the terminals are securely in place.
4. Close the DC Disconnect (see Section 9.4)
5.6.2 Mounting the DC Disconnect on the Wall
1. Position the DC Disconnect on the wall mounting
bracket and insert screws with conical spring
washers through the drill holes of the anchorage
brackets on the DC Disconnect. For this purpose,
the teeth of the conical spring washers mu st point in
the direction of the wall.
2. Tighten the screws (torque: 44 in-lb. (5 Nm)).
Installation Manual SB30-40-US-IA-en-34 33
Page 34

5 Mounting SMA America, LLC
5.7 Mounting the Inverter
1. Transport the inverter using the side handles and
hook the inverter into the wall mounting bracket
from above. Ensure that the inverter is positioned in
the center of the wall mounting bracket.
2. Screw the inverter onto the wall mounting bracket
on both sides using the provided screws with
conical spring washers (torque: 44 in-lb. (5 Nm)).
3. Close the recessed grips with the ventilation grids.
Ensure that the side assignment is correct. Each
ventilation grid is assigned to a side of the
enclosure: Left side "links⁄left" and right side
"rechts⁄right".
34 SB30-40-US-IA-en-34 Installation Manual
Page 35

SMA America, LLC 6 Electrical Connection
6 Electrical Connection
6.1 Safety During Electrical Connection
Danger to life due to high voltages in PV modules that are exposed to light
Death or serious injury due to electric shock as a result of touching a DC cable.
• During the installation of the inverter, cover the PV modules with opaque material.
Risk of damage to the inverter due to moisture penetration
Electronic components in the inverter can be destroyed or damaged as a result of moisture
penetration.
• For conduit hubs, use UL listed raintight, wet location hubs for entry into the enclosure.
Risk of damage to or failure of the inverter due to the use of Wire Nuts
The use of Wire Nuts® may cause gr ound-faults or prohib ited and high-ohm connections, which can
lead to inverter damage or failure.
•Do not use any Wire Nuts
®
for electrical connections in the PV system.
®
Installation Manual SB30-40-US-IA-en-34 35
Page 36

6 Electrical Connection SMA America, LLC
6.2 Overview of the Connection Area
6.2.1 Interior Connection Area
Figure 12: Components and connection areas in the interior of the inverter and the DC Disconnect
Position Designation Explanation
A Pin header For connecting the jumper when grounding the
DC input
B AC connecting terminal plate For connecting the DC Disconnect
C Connecting terminal plate for
protective conductor
D AC connecting terminal plate For connecting the power distribution grid
E DC connecting terminal plates For connecting the PV array
F"COMBINED" spring terminal For connecting a Combiner Box
G DC connecting terminal plate For connecting the DC Disconnect
H Fuse holder For fuse extractor with grounding fuse for
36 SB30-40-US-IA-en-34 Installation Manual
For conne cting the PV protective condu ctor and
the DC protective conductor
grounding the DC input
Page 37

SMA America, LLC 6 Electrical Connection
6.2.2 Connection Area of the Inverter
Figure 13: Terminals on the underside of the inverter
Position Designation Explanation
A Enclosure opening with filler-
plug
B Enclosure opening with rubber
grommet
C Enclosure opening with rubber
grommet
DFan guard‒
For inserting the communication cable
For inserting the DC cable of the
DC Disconnect
For inserting the AC cable of the
DC Disconnect
Installation Manual SB30-40-US-IA-en-34 37
Page 38

6 Electrical Connection SMA America, LLC
6.2.3 Connection Area of the DC Disconnect
Figure 14: Connection Area of the DC Disconnect
Position Designation Explanation
A Knockout For inserting the AC cables of the
power distribution grid
B Knockout For inserting the DC cable of the
PV array
C AC cable of the DC Disconnect For the connection to the inverter
D DC cable of the DC Disconnect For the connection to the inverter
38 SB30-40-US-IA-en-34 Installation Manual
Page 39

SMA America, LLC 6 Electrical Connection
6.3 AC Connection
The AC outputs and the neutral conductors are not bonded to ground
The circuits of the AC input and the AC output are isolated from the enclosure. The electrically
qualified person is responsible for grounding the plant according to Section 250 of the
National Electrical Code ANSI/NFPA 70.
The Sunny Boy must be connected to the AC grounding conductor of the power distribution grid
via the ground terminal of the AC connection terminal.
6.3.1 Inserting the AC Cables into the DC Disconnect
Additional required mounting material (not included in the scope of delivery):
☐ 1 rain-tight or water-tight sleeve (
☐ 1 rigid conduit (3⁄4 in. (19 mm)).
Cable requirements:
☐ The AC cables must be designed for ambient temperatures exceeding +194°F (+90°C).
☐ The maximum cable length, which is dependent on the conductor cross-Section, must be
adhered to.
☐ Conductor material: Copper wire
☐ Conductor cross-Section: AWG 10 to 6 AWG (6 mm
☐ The AC cables must be designed according to the installation requirements applicable on site.
Requirement:
☐ The AC cables must be protected using a switch-disconnector or miniature circuit-breaker
(see National Electrical Code
permissible fuse protection of 30 A.
☐ All electrical installations must be carried out according to all electrical standards applicable on
site and the National Electrical Code® (NE, ANSI/NFPA 70).
☐ Installations in Canada must be carried out in accordance with the applicable Canadian
standards.
3
⁄4 in. (19 mm)).
2
to 16 mm2)
®
, ANSI/NFPA 70). For this purpose, observe the maximum
1. Disconnect the AC miniature circuit-breaker and ensure that it cannot be reconnected.
2. Open the DC Disconnect (see Section 9.3).
3. Break out a suitable knockout on the underside of the DC Disconnect for inserting the AC cable.
Installation Manual SB30-40-US-IA-en-34 39
Page 40

6 Electrical Connection SMA America, LLC
4.
Damage to the DC Disconnect due to penetration of moisture
Electronic components in the inverter can be destroyed or damaged as a result of moisture
penetration.
• Only break out 1 knockout for the connection of the AC cable.
• Do not enlarge the enclosure opening.
5. Insert 1 rain-tight or water-tight sleeve (3⁄4 in. (19 mm)) in the enclosure opening of the
DC Disconnect and tighten from the inside using a counter nut.
6. Install 1 rigid conduit (
3
⁄4 in. (19 mm)) in the enclosure opening.
7. Insert the AC cables of the power distribution grid into the interior of the DC Disconnect through
a rigid conduit.
6.3.2 Connecting the AC Cables to the DC Disconnect
Figure 15: AC connecting terminal plate for connecting the power distribution grid
Position Designation
A Screw terminal "L1"
B Screw terminal "L2"
C Screw terminal "N"
D Screw terminal
1. Connect conductor L1 to screw terminal "L1" (torque: 15 in-lb. (1.7 Nm)).
2. Connect conductor L2 to screw terminal "L2" (torque: 15 in-lb. (1.7 Nm)).
3. Connect conductor N to screw terminal "N" (torque: 15 in-lb. (1.7 Nm)).
4. Connect the AC protective conductor to screw terminal (torque: 15 in-lb. (1.7 Nm)).
5. Ensure that all screw terminals are correctly cabled and that the cables are securely positioned
in the screw terminals.
40 SB30-40-US-IA-en-34 Installation Manual
Page 41

SMA America, LLC 6 Electrical Connection
6.3.3 Connecting the AC Cable of the DC Disconnect to the Inverter
The power distribution grid is connected to the inverter via the DC Disconnect.
Inserting the AC cable of the DC Disconnect into the inverter
1. Open the inverter (see Section 9.1).
2. In order to insert the AC cable of the
DC Disconnect, pierce a hole in the center of the
rubber grommet in the enclosure opening.
Use a screwdriver for this.
3. Insert the AC cable of the DC disconnect into the inverter through the rubber grommet.
4. Pull back the AC cable of the DC Disconnect slightly. This seals the rubber grommet.
Connecting the AC cable of the DC Disconnect to the inverter
Figure 16: AC connecting terminal plate for connecting the AC cable of the DC Disconnect
Position Designation
A Screw terminal "L1"
B Screw terminal "L2"
C Screw terminal "N"
D Screw terminal
Installation Manual SB30-40-US-IA-en-34 41
Page 42

6 Electrical Connection SMA America, LLC
1. Connect the black insulated conductor to screw terminal "L1" (torque: 15 in-lb. (1.7 Nm)).
2. Connect the red insulated conductor to screw terminal "L2" (torque: 15 in-lb. (1.7 Nm)).
3. Connect the white insulated conductor to screw terminal "N" (torque: 15 in-lb. (1.7 Nm)).
4. Connect the green-yellow insulated conductor to screw terminal (torque: 15 in-lb. (1.7 Nm)).
5. Ensure that all screw terminals are correctly cabled and that the cables are securely positioned
in the screw terminals.
6.4 DC Connection
6.4.1 Inserting the DC Cables into the DC Disconnect
Additional required mounting material (not included in the scope of delivery):
☐ 1 rain-tight or water-tight sleeve (
☐ 1 rigid conduit (
3
⁄4 in. (19 mm)).
Cable requirements:
☐ The DC cables must be designed for ambient temperatures exceeding +194°F (+90°C).
☐ The maximum cable length, which is dependent on the conductor cross-Section, must be
adhered to.
☐ Conductor material: Copper wire
☐ Conductor cross-Section: AWG 10 to 6 AWG (6 mm
☐ The DC cables must be designed according to the installation requirements applicable on site.
Requirements:
☐ The DC cables connected to the inverter must be protected via a switch-disconnector.
☐ The DC switch-disconnector for the inverter must be designed for at least 600 V and 30 A.
☐ If additional DC switch-disconnectors outside of the inverter are required by the Authority
Having Jurisdiction (AHJ), these must be present.
☐ The grounding of the PV plant must be established as per the specifications of Paragraph
690.41 to 690.47 of the National Electrical Code
of the installer.
☐ All electrical installations must be carried out in accordance with all electrical standards
applicable on site and the National Electrical Code® (NE, ANSI/NFPA 70)
(see National Electrical Code®, Paragraph 690-64(b) (1 and 2)).
☐ Installations in Canada must be carried out in accordance with the applicable Canadian
standards.
3
⁄4 in. (19 mm)).
2
to 16 mm2)
®
ANSI/NFPA 70 and is the responsibility
42 SB30-40-US-IA-en-34 Installation Manual
Page 43

SMA America, LLC 6 Electrical Connection
1. Disconnect the AC miniature circuit-breaker and ensure that it cannot be reconnected.
2. Open the DC Disconnect (see Section 9.3).
3. Break out a suitable knockout on the underside of the DC Disconnect for inserting the DC cable
of the PV array.
4.
Damage to the DC Disconnect due to penetration of moisture
Electronic components in the inverter can be destroyed or damaged as a result of moisture
penetration.
• Only break out 1 knockout for the connection of the DC cable.
• Do not enlarge the enclosure opening.
5. Insert 1 rain-tight or water-tight sleeve (
3
⁄4 in. (19 mm)) in the enclosure opening of the
DC Disconnect and tighten from the inside using a counter nut.
6. Install 1 rigid conduit (3⁄4 in. (19 mm)) in the enclosure opening.
7. Insert the DC cables of the PV array into the interior of the DC Disconnect through a rigid
conduit.
6.4.2 Grounding the DC Disconnect
The PV protective conductor on the frame of the PV array must be connected to the PV ground
terminal. The cross-Section of the PV protective conductor corresponds to the cross-Section of the
largest conductor in the DC system.
A DC grounding conductor may be required by the Authority Having Jurisdiction (AHJ).
Figure 17: Connecting terminal plate for connecting the protective conductor
Position Designation
A PV ground terminal
B DC ground terminal
Installation Manual SB30-40-US-IA-en-34 43
Page 44

6 Electrical Connection SMA America, LLC
1. Connect the PV ground terminal to the PV protective conductor (torque: 15 in-lb. (1.7 Nm)).
2. If a DC protective conductor is prescribed, connect the DC protective conductor to the
DC ground terminal (torque: 15 in-lb. (1.7 Nm)).
3. Ensure that all ground terminals are correctly connected and that the cables are securely
positioned in the screw terminals.
6.4.3 Grounding the DC Input
The grounding of the PV plant depends on the type of PV module used. At the factory, the inverter is
designed for PV plants with negative grounding of the PV array.
Danger to life due to high voltages in the PV plant
Death or serious injury due to electric shock.
• Only insert ground fuses into the inverter using a fuse extractor.
Figure 18: Position of fuse holder for fuse extractor with ground fuse and pin header for jumper
Position Designation
A Fuse holder For connecting the fuse extractor with
ground fuse
B Pin header For connecting the jumper
44 SB30-40-US-IA-en-34 Installation Manual
Page 45

SMA America, LLC 6 Electrical Connection
• To neg atively ground the D C input, insert the f use extractor w ith ground fuse into the fuse holder
and insert the jumper into the pin header:
• Insert the fuse extractor with ground fuse into the
upper fuse holder.
• Insert the jumper into the upper pin, labeled
"NEG", of the pin header.
• To positively ground the DC input, insert the fuse extractor with ground fuse into the fuse holder
and insert the jumper into the pin header:
• Insert the fuse extractor with ground fuse into the
lower fuse holder.
• Insert the jumper into the lower pin, labeled
"POS", of the pin header.
Installation Manual SB30-40-US-IA-en-34 45
Page 46

6 Electrical Connection SMA America, LLC
6.4.4 Connecting the DC Cables to the DC Disconnect
Depending on the PV modules used in the PV plant, it is necessary to positively or negatively ground
th e PV arr ay. The PV a rra y mu st b e co nne cted to th e DC Dis con nect, taking into account the necessary
type of grounding.
Potential damage to the inverter due to overvoltage
If the DC input voltage of the PV modules exceeds the maximum values of the inverter, the inverter
can be damaged by overvoltage.
• The maximum permissible DC input voltage of the inverter must not be exceeded.
• Check the polarity and the open-circuit voltage of the PV strings before connecting the
DC cables to the DC Disconnect.
•Configure the DC input voltage range accordingly before connecting the PV modules to the
inverter. For this purpose, use the design program "Sunny Design" for string configuration
(see PC Software>Sunny Design at www.SMA-America.com).
Figure 19: DC connecting terminal plates for connecting the PV array
Position Designation
A"UNGROUNDED" screw terminal
B"GROUNDED" screw terminal
46 SB30-40-US-IA-en-34 Installation Manual
Page 47

SMA America, LLC 6 Electrical Connection
1. Ensure that the inverter is grounded as prescribed (see Section 6.4.3 "Grounding the DC
Input", page 44).
2. Ensure that the DC Disconnect is grounded as prescribed (see Section 6.4.2 "Grounding the
DC Disconnect", page 43).
3. To connect the PV array with negative polarity to the DC Disconnect, connect the DC cables:
• Connect the DC+ cables to the "UNGROUNDED" screw terminal (torque: 15 in-lb. (1.7 Nm)).
• Connect the DC − cables to the "GROUNDED" screw terminal (torque: 15 in-lb. (1.7 Nm)).
4. To connect the PV array with positive polarity to the DC Disconnect, connect the DC cables:
• Connect the DC − cables to "UNGROUNDED" screw terminal (torque: 15 in-lb. (1.7 Nm)).
• Connect the DC+ cables to "GROUNDED" screw terminal (torque: 15 in-lb. (1.7 Nm)).
5. Ensure that all screw terminals are correctly connected and that the cables are securely
positioned in the screw terminals.
6.4.5 Connecting the DC Cable of the DC Disconnect to the Inverter
The PV array must be connected to the inverter via the DC Disconnect, taking into account the
necessary type of grounding.
Inserting the DC cable of the DC Disconnect into the inverter
1. Open the inverter (see Section 9.1).
2. In order to connect the DC cable of the DC
Di sco nne ct, pierc e a hol e in the cen ter of the rub ber
grommet in the enclosure opening.
Use a screwdriver for this.
3. Insert the DC cable of the DC Disconnect into the inverter through the rubber grommet.
4. Pull back the DC cable of the DC Disconnect slightly. This seals the rubber grommet.
Installation Manual SB30-40-US-IA-en-34 47
Page 48

6 Electrical Connection SMA America, LLC
Connecting the DC cable of the DC disconnect to the inverter
Figure 20: DC+ and DC − connecting terminal plates for connecting the DC cable of the DC Disconnect
Position Designation
A Screw terminal DC+
B Screw terminal DC −
To connect the PV array with negative polarity to the inverter, connect the DC cables:
• Connect the black insulated conductor to screw terminal DC+ (torque: 15 in-lb. (1.7 Nm)).
• Connect the white insulated conductor to screw terminal DC − (torque: 15 in-lb. (1.7 Nm)).
To connect the PV array with positive polarity to the inverter, connect the DC cables:
• Connect the white insulated conductor to screw terminal DC+ (torque: 15 in-lb. (1.7 Nm)).
• Connect the black insulated conductor to screw terminal DC − (torque: 15 in-lb. (1.7 Nm)).
5. Ensure that all screw terminals are correctly connected and that the cables are securely
positioned in the screw terminals.
6. Close the DC Disconnect (see Section 9.4).
7. Close the inverter (see Section 9.2).
8. Commission the inverter (see Section 8).
48 SB30-40-US-IA-en-34 Installation Manual
Page 49

SMA America, LLC 6 Electrical Connection
6.5 Connecting the Combiner Box to the DC Disconnect
Figure 21: Terminals for the Combiner Box
Position Designation
A"COMBINED" spring terminal
B"GROUNDED" screw terminal
Connecting the DC cable to the "COMBINED" spring terminal
Requirement:
☐ A 3.5 mm x 120 mm insulated screwdriver must be available.
1. Insert a screwdriver into the rectangular opening of
the spring terminal.
Installation Manual SB30-40-US-IA-en-34 49
Page 50

6 Electrical Connection SMA America, LLC
2. Press the insulated screwdriver upward and insert
the stripped cable into the spring terminal.
3. Remove the insulated screwdriver from the spring
terminal.
4. Carefully pull the cable to ensure that it is correctly connected.
Connecting the Combiner Box to the DC Disconnect
1. Open the DC Disconnect (see Section 9.3).
2. To connect the DC cables of the Combiner Box with negative polarity, connect the DC cables:
• Connect the DC+ cable to the "COMBINED" spring terminal of the DC Disconnect.
• Connect the DC − cable to the "GROUNDED" screw terminal of the DC Disconnect
(torque: 15 in-lb. (1.7 Nm)).
3. To connect the DC cables of the Combiner Box with positive polarity, connect the DC cables:
• Connect the DC − cable to the "COMBINED" spring terminal of the DC Disconnect.
• Connect the DC+ cable to the "GROUNDED" screw terminal of the DC Disconnect
(torque: 15 in-lb. (1.7 Nm)).
4. Ensure that all terminals are correctly connected and that the cables are securely positioned in
the terminals.
5. Close the DC Disconnect (see Section 9.4).
6. Commission the inverter (see Section 8).
50 SB30-40-US-IA-en-34 Installation Manual
Page 51

SMA America, LLC 7 Configuration
7 Configuration
7.1 Automatic Line Voltage Detection
The inverter automatically detects the line voltage that it must feed in. Depending on the voltage and
the phase angle between L1-N and L2-N, the inverter determines whether it is connected to a
208 V or 240 V power distribution grid. If the inverter is configured for the wrong grounding system,
the inverter displays an error message.
Limiting values for the voltage and frequency of the AC connection
AC connection Range limit
AC operating voltage range at 208 V nominal value 183 V to 229 V
AC operating voltage range at 240 V nominal value 211 V to 264 V
AC operating frequency range 59.3 Hz to 60.5 Hz
Installation Manual SB30-40-US-IA-en-34 51
Page 52

7 Configuration SMA America, LLC
7.2 Possible Grounding Systems
The image illustrates the permitted and prohibited grounding systems in which the inverter can be
operated.
Tip: When connecting the inverter to the power distribution grid, the phase relationship is not
important, but the voltage must be compatible.
Figure 22: Permitted and prohibited grounding systems
52 SB30-40-US-IA-en-34 Installation Manual
Page 53

SMA America, LLC 7 Configuration
7.3 Jumper Assignments for Grounding Systems
At the factory, the inverter is configured for connection to the power distribution grid via a neutral
conductor. By setting the jumper, the inverter can be configured for various grounding systems. This
means it is possible to connect the inverter to grounding systems without a neutral conductor
(e.g. to a 240 Delta or 208 Delta).
Figure 23: Pin header for setting the jumper
Position Designation Explanation
A Pin header For setting the jumper for various
grounding systems
Possible jumper assignments
Jumper assignment Explanation
Jumper assignment for connection to a 240 V power distribution grid via
a neutral conductor or a 208 V power distribution grid via a neutral
conductor. This setting is configured at the factory.
Jumper assignment for connection to a 208 V power distribution grid
without a neutral conductor.
Jumper assignment for connection to a 240 V power distribution grid
without a neutral conductor.
Jumper assignment for the fan test.
Installation Manual SB30-40-US-IA-en-34 53
Page 54

7 Configuration SMA America, LLC
The inverter is compatible with grounding systems with a 208 V AC output or a 240 V AC output.
Example: Jumper assignment for 240 V Delta: 120 V Stinger
The example shows the jumper assignment for the connection of 3 inv ert ers to a 240 Del ta: 120 V S tin ger pow er
distribution grid. Observe the sequence in which the inverters are connected to the line conductors.
54 SB30-40-US-IA-en-34 Installation Manual
Page 55

SMA America, LLC 7 Configuration
7.4 Changing the Display Language
You can change the display language of the inverter. The language is configured via two switches
that are located on the bottom edge of the display.
Figure 24: Switch for setting the language on the bottom edge of the display
Position Designation
A"S2" switch
B"S1" switch
1. Open the inverter (see Section 9.1).
2. Set the desired language using the two rotary switches:
Language Switch S2 Switch S1
German B B
English B A
French A B
Spanish A A
3. Commission the inverter (see Section 8).
Installation Manual SB30-40-US-IA-en-34 55
Page 56

8 Commissioning the Inverter SMA America, LLC
8 Commissioning the Inverter
Always commission the inverter according to the following procedure.
Requirements:
☐ The AC miniature circuit-breaker must be correctly rated.
☐ All cables must be correctly connected.
☐ The enclosure lid must be closed and correctly grounded.
1. Remove all covers from the PV array.
2. Switch on the AC miniature circuit-breaker.
3. Turn the rotary switch of the DC Disconnect to the
On position.
☑ The start phase begins. The green LED blinks
3 times per second for 10 s.
☑ The green LED glows and the inverter feeds into
the power distribution grid.
✖ Is the green LED not glowing?
• Observe LED signals and error messages in
the display, and rectify errors
(see Section 10 "Troubleshooting", page 63).
56 SB30-40-US-IA-en-34 Installation Manual
Page 57

SMA America, LLC 9 Opening and Closing
9 Opening and Closing
9.1 Opening the Inverter
Danger to life due to high voltages in the inverter
High voltages capable of causing electric shocks are present in the conductive components of the
inverter.
• Only open the inverter as described in this document.
Danger to life due to high voltages
The capacitors in the inverter require 5 minutes to discharge.
• Wait 5 minutes until the LEDs and the display switch off.
Risk of damage to the inverter due to moisture penetration
Electronic components in the inverter can be destroyed or damaged as a result of moisture
penetration. This may result in functional faults or the destruction of the inverter.
• Never open the inverter when it is raining or if there is a high level of humidity ( ˃ 95%).
Damage to the seal of the enclosure lid during frost
When opening the Sunny Boy in the event of frost, the seal of the enclosure lid can be damaged.
There may be an ingress of moisture, which can damage the Sunny Boy.
• Do not open the inverter when the outside temperature is below 23°F ( − 5°C).
1. Disconnect the AC miniature circuit-breaker and secure against re-connection.
2. Turn the rotary switch of the DC Disconnect to the
Off position and secure against re-connection.
3. If additional DC switch-disconnectors are available, switch off the DC switch-disconnectors and
secure against re-connection.
Installation Manual SB30-40-US-IA-en-34 57
Page 58

9 Opening and Closing SMA America, LLC
4. Remove all 4 screws and conical spring washers
from the enclosure lid and remove the enclosure lid
in an upward direction.
5. The enclosure lid, screws, and conical spring washers are to be stored safely.
9.2 Closing the Inverter
Requirements:
☐ All cables are routed correctly and are not jammed when closing the lid.
☐ The seal in the inside of the lid must be undamaged and in the correct position.
☐ The enclosure lid must not exert any pressure on the connections.
☐ The connections and screw connections at knockouts must be correctly tightened.
1. Mount the enclosure lid on the inverter. For this
purpose, align the 4 drill holes in the enclosure lid
with the 4 threaded bores in the enclosure.
58 SB30-40-US-IA-en-34 Installation Manual
Page 59

SMA America, LLC 9 Opening and Closing
2. Attach the enclosure lid to the enclosure using all 4 screws and conical spring washers:
• Attach 1 conical spring washer on each screw.
Here, the grooved side of the conical spring
washer must point to the screw head.
• Tighten the 4 screws with conical spring
washers through the drill holes in the enclosure
lid into the threaded bores of the enclosure
(torque: 53 in-lb. (6 Nm)).
☑ The teeth of the conical sp ring washer press into
the enclosure lid. This grounds the enclosure lid.
3. Ensure that the enclosure lid is supported evenly on the enclosure.
9.3 Opening the DC Disconnect
Danger to life due to high voltages in DC connecting terminal plates with connected
PV modules
Death or serious injury as a result of touching the DC connecting terminal plates of the
DC Disconnect. High voltages that can result in electric shocks are present in the live components
of the DC connecting terminal plates.
• Do not touch the live components of the DC connecting terminal plates.
1. Disconnect the AC miniature circuit-breaker and secure against re-connection.
2. Turn the rotary switch of the DC Disconnect to the
Off position and secure against re-connection.
Installation Manual SB30-40-US-IA-en-34 59
Page 60

9 Opening and Closing SMA America, LLC
3. If additional DC switch-disconnectors are available, switch off the DC switch-disconnectors and
secure against re-connection.
4. Loosen the screw on the rotary switch of the DC
Disconnect. Use a cross-head screwdriver for this.
5. Re mov e th e sc rew and con ica l sp rin g wa she r of the
cover on the underside of the DC Disconnect.
6. Remove the rotary switch of the DC Disconnect in
an upward direction.
60 SB30-40-US-IA-en-34 Installation Manual
Page 61

SMA America, LLC 9 Opening and Closing
7. Remove the cover of the DC Disconnect.
9.4 Closing the DC Disconnect
Always close the DC Disconnect as per the following procedure.
1. If a Combiner Box is not connected, ensure that the fuse extractors with string fuses are securely
positioned in the fuse holders of the DC Disconnect (see Section 11.8 "Replacing String
Fuses", page 88).
2. Mount the cover on the DC Disconnect.
3. Connect the rotary switch.
Installation Manual SB30-40-US-IA-en-34 61
Page 62

9 Opening and Closing SMA America, LLC
4. Turn the rotary switch of the DC Disconnect to the
Off position.
5. Tighten the screw on the right-hand side of the
rotary switch. Use a cross-head screwdriver for this.
6. Attach the conical spring washer on the screw of
the DC Disconnect. Here, the grooved side of the
conical spring washer must point to the screw head.
7. Insert the screw and conical spring washer into the
underside of the DC Disconnect and tighten the
screw (torque: 44 in-lb. (5 Nm)). Ensure that the
toothing of the conical spring washer points
towards the cover.
☑ The teeth of the conical sp ring washer press into
th e cove r of th e DC Disc onn ect. T his gr ounds the
cover.
62 SB30-40-US-IA-en-34 Installation Manual
Page 63

SMA America, LLC 10 Troubleshooting
10 Troubleshooting
10.1 LED Signals
The LEDs represent the current operating state of the inverter clarify the messages in the display by
means of the various blink codes.
Figure 25: Position of the LEDs
Position Designation Status Explanation
A Green LED Glowing Operation
Indicates standard operation of the inverter.
Blinks 3 times per
second
Blinks once per
second
Goes out briefly
once per second
Start
The inverter is calibrating internal systems. The
calibration takes 10 s. Following successful
calibration, the inverter resumes normal
operation.
Stop
The inverter has been manually set to stop
mode.
Waiting
The inverter is monitoring the grid limits and
the DC voltage of the PV array. If both values
meet the feed-in conditions, the inverter begins
feeding into the power distribution grid.
Derating
The inverter reduces the power in order to
protect the internal components from
overheating.
Installation Manual SB30-40-US-IA-en-34 63
Page 64

10 Troubleshooting SMA America, LLC
Position Designation Status Explanation
B Red LED Glowing Tripped ground fuse
Ground fuse was tripped or is not available.
Corrective measures:
• Check the PV plant for ground-faults
(see Section 11.6).
C Yellow LED Glowing Control System Fault
The operation of the inverter is permanently
inhibited. The inverter no longer feeds into the
power distribution grid.
Blinking AFCI self-test
The inverter is carrying out the AFCI self-test.
Glows for 5 s,
goes out for 3 s,
blinks twice
Grid failure
This blink code can be caused by any of the
following conditions:
• Grid undervoltage
•Grid overvoltage
• Grid underfrequency
• Grid overfrequency
• Sudden change in the power frequency
or the line voltage
Corrective measures:
• Monitor the status of the power
distribution grid at the AC connecting
terminal plate of the DC Disconnect and
the AC miniature circuit-breaker
between the inverter and the power
distribution grid.
64 SB30-40-US-IA-en-34 Installation Manual
Page 65

SMA America, LLC 10 Troubleshooting
Position Designation Status Explanation
B + C Red LED +
yellow LED
Glows for 5 s,
goes out for 3 s,
blinks 4 times
Glows for 5 s,
goes out for 3 s,
blinks 5 times
Glowing ground-fault
High DC input voltage
The inverter has detected a DC input voltage
that is too high for safe operation.
Disturbance
The inverter has detected an internal fault that
interrupts normal operation:
The inverter has detected a ground-fault. The
inverter will not restart automatically after
detecting a ground-fault.
Corrective measures:
• Check the PV plant for ground-faults
(see Section 11.6).
A + B + C All LEDs Glowing Initialization
The inverter is initializing. The DC current
available from the PV array is not sufficient for
normal operation. Data transmission is not
possible during initialization.
A + B + C All LEDs Not glowing Standby
The inverter is in standby mode. The DC input
voltage is too low for operation.
10.2 Measurement Channels
In the measurement channels, the measured values of the inverter are shown on the display. In
addition, you can read out a series of measurement channels and messages of the inverter v ia special
communication devices (e.g. Sunny WebBox) or a PC with corresponding software
(e.g. Sunny Explorer).
Measurement channel Explanation
CO2 saved Amount of CO2 saved during operation time
E-total Total energy yield
Error Description of an error
Event-Cnt Number of events
Fac Power frequency
Grid type Type of power distribution grid to which the inverter is connected
h-on Total operating hours
Installation Manual SB30-40-US-IA-en-34 65
Page 66

10 Troubleshooting SMA America, LLC
Measurement channel Explanation
h-Total Total number of feed-in operation hours
I-dif Residual current
Iac Line current
Ipv DC input current
Max Temperature Measured maximum temperature at IGBT module
Max Vpv Maximum DC input voltage
Mode Current operating mode
Pac Power fed into the power distribution grid
Power On Total system start-up counter
Serial Number Inverter serial number
Temperature Temperature measured at IGBT module
Vac Line voltage L1 - L2
Vac L1 Line voltage L1 - N
Vac L2 Line voltage L2 - N
Vfan Fan voltage
Vpv DC input voltage
Vpv-PE DC voltage to ground (for troubleshooting PV ground-faults)
Vpv Setpoint MPPT DC target voltage
10.3 Operating Parameters
Flexible operating parameters
Name Description Value/range Explanation Default
value
AfciIsOn Automatic arc-fault
circuit interrupter (AFCI)
AntiIsland-Ampl* Amplification of the anti-
island process
AntiIsland-Freq* Repetition rate of the anti-
island process
66 SB30-40-US-IA-en-34 Installation Manual
yes yes
no
0 deg to 10 deg 0 deg
0mHzto
500 mHz
2,000 mHz
Page 67

SMA America, LLC 10 Troubleshooting
Name Description Value/range Explanation Default
value
CO2-Fact The inverter assesses the
yield and displays the
0lb./kWhto 2lb./
kWh
1.7 lb./kWh
approximate amount of
CO2 that the inverter has
saved.
The amount of CO2 is
calculated by multiplying
the generated kWh
(E-total) by the factor
defined in the parameter
"CO2".
Default Defines the country
standard for adjusting
country-specific
information. Tip: After
changing one of the
USA/UL1741/
2005
OFF_Grid
NON IEEE1547
USA/
UL1741/
2005
parameters marked with
"*", the parameter
"Default" automatically
changes to adjusted.
E_total Total energy yield of the
inverter.
0kWhto
200,000 kWh
0 kWh
It may be necessary to
change this if you replace
your inverter and want to
use data from the old
device.
Fac-delta–* Maximum permissible
frequency deviation below
the power frequency of
60 Hz before the grid
monitoring disconnects the
device from the power
0.2 Hz to 3.0 Hz 0.69 Hz
(for the
country
setting USA/
UL1741/
2005)
distribution grid. The
standard value is optimal
for plants ˂ 30 kW.
Installation Manual SB30-40-US-IA-en-34 67
Page 68

10 Troubleshooting SMA America, LLC
Name Description Value/range Explanation Default
value
Fac-delta+* Maximum permissible
frequency deviation
above the power
frequency of 60 Hz
before the grid monitoring
disconnects the device
0Hzto 4.5Hz 0.49Hz
(for the
country
setting USA/
UL1741/
2005)
from the power
distribution grid.
The standard value is
optimal for plants
˂30kW.
Fac-MinTripTime* Switch-off time having
0.16 s to 300 s 0.16 s
fallen below power
frequency.
The standard value is
optimal for plants ˂30 kW.
Fan-Test By setting this parameter
to 1, you can check the
function of the fan.
1 The fan is set to
the maximum
speed.
0
0Operating
mode: OptiCool
h_total Total operating hours of
0 h to 200,000 h 0 h
the inverter.
It may be necessary to
change this if you replace
your inverter and want to
use data from the old
device.
68 SB30-40-US-IA-en-34 Installation Manual
Page 69

SMA America, LLC 10 Troubleshooting
Name Description Value/range Explanation Default
value
Memory Function no function no function
Default param. Sets all
parameters to
the standard
value.
Reset Op.Data Sets all
parameters that
are visible on
the user level to
the standard
values.
Reset errors Resets all
permanent
errors that lead
to device
disconnection.
Operating Mode Operating modes of an
inverter
MPP-Operation Sets the inverter
to the operating
MPP
mode "MPP"
Turbine Sets the inverter
to the operating
mode "Turbine"
V-const Sets the inverter
to the operating
mode "V-Const"
Stop Disconnection
from the power
distribution grid,
no operation
T-Max-Fan Temperature at which the
fan reaches the maximum
32°F to 212°F
(0°C to 100°C)
194°F
(90°C)
fan speed.
T-Start Gird monitoring time:
5 s to 1,600 s 10 s
Time during which the
inverter monitors the
power distribution grid
before connecting.
This value defaults to
5 minutes after a grid fault.
Installation Manual SB30-40-US-IA-en-34 69
Page 70

10 Troubleshooting SMA America, LLC
Name Description Value/range Explanation Default
value
T- Sta rt-Fan Fan tur n-o n te mpe ratur e at
minimum speed.
T-Stop Time during which the
32°F to 212°F
(0°C to 100°C)
122°F
(50°C)
1 s to 1,800 s 2 s
inverter waits before
disconnecting from the
power distribution grid if
"Pac" (fed-in power) falls
below the minimum
required "Vpv-Start"
(DC voltage).
T-Stop-Fan Fan turn-off temperature 32°F to 212°F
(0°C to 100°C)
V-Const Setval DC target voltage for the
operating mode "V-Const".
These parameters are
important only if the
parameter
"Operating Mode" is se t to
"V-const".
Vac-Min* The value is used to
SB 3000US:
185 V to 500 V
SB 3800-US:
230 V to 600 V
SB 4000US:
230 V to 600 V
0% to 50% 12%
122°F
(50°C)
SB 3000US:
500 V
SB 3800-US:
600 V
SB 4000US:
600 V
calculate the lower limit of
the permissible AC
voltage.
The standard value is
optimal for plants
˂ 30 kW. The standard
value of 12% results in a
trip value of 88%, as the
list of trip limits shows
(see Section 12.6).
70 SB30-40-US-IA-en-34 Installation Manual
Page 71

SMA America, LLC 10 Troubleshooting
Name Description Value/range Explanation Default
value
Vac-Max* Additional monitoring of
0% to 20% 10%
the AC voltage
The value is used to
calculate the upper limit of
the permissible AC
voltage.
The standard value is
optimal for plants
˂ 30 kW. The standard
value of 10% results in a
trip value of 110%, as the
list of trip limits shows
(see Section 12.6).
Vac-Min-Fast* Additional monitoring of
0% to 50% 50%
the AC voltage
The value is used to
calculate the lower limit of
the permissible AC
voltage. The standard
value is optimal for plants
<30 kW. The standard
value of 50% results in a
trip value of 50%, as the
list of trip limits shows.
Vac-Max-Fast* Additional monitoring of
0% to 20% 20%
the AC voltage
The value is used to
calculate the upper limit of
the permissible AC
voltage. The standard
value is optimal for plants
<30 kW. The standard
value of 20% results in a
trip value of 120%, as the
list of trip limits shows.
Vac-Min-Recnet The value is used to
0% to 50% 11.7%
calculate the lower limit
that is required for
reconnecting to the power
distribution grid after a
grid failure.
Installation Manual SB30-40-US-IA-en-34 71
Page 72

10 Troubleshooting SMA America, LLC
Name Description Value/range Explanation Default
value
Vac-Max-Recnet The value is used to
0% to 20% 5.83%
calculate the upper limit
that is required for
reconnecting to the power
distribution grid after a
grid failure.
Vpv-Start Minimum DC voltage from
which the inverter feeds
into the power distribution
grid.
* Changing the parameters can lead to changes regarding compliance with IEEE 1547 and must be approved by the on-
site electric utility company and/or the Authority Having Jurisdiction (AHJ).
SB 3000US:
166 V to 480 V
SB 3800-US:
208 V to 580 V
SB 4000US:
208 V to 580 V
SB 3000US:
228 V
SB 3800-US:
285 V
SB 4000US:
285 V
Fixed operating parameters
Name Description Default value
Plimit Upper limit for AC output power SB 3000US: 3,050 W
SB 3800-US: 4,050 W
SB 4000US: 4,050 W
SMA-SN Inverter serial number
Software-BFR Firmware version of the operation control unit
Software-SRR Firmware version of the current controlling unit
72 SB30-40-US-IA-en-34 Installation Manual
Page 73

SMA America, LLC 10 Troubleshooting
10.4 Display messages
10.4.1 Status Messages
Message Explanation
Derating Reduction of the power fed into the power distribution grid due to high
heat sink temperatures
Disturbance Displays an error status that concerns the power distribution grid. This error
status resolves itself.
Error Error status that must be rectified
Grid monitoring When the system starts, the inverter performs a synchronization with the
power distribution grid.
MPP The inverter is in MPP mode.
The inverter adjusts the input voltage and the input current from the PV
array in order to achieve the highest possible DC output power.
MPP-Search When the system starts, the inverter tests the MPP tracking range.
Offset When the system starts, the inverter performs an offset calibration of the
electronics.
Stop The inverter has been manually set to system stop.
Turbine The inverter is in turbine mode.
This operating mode is specifically conceived for use with wind turbine
systems.
V-Const The input voltage of the PV array is set at a given target value and the
inverter is not operating in MPP mode.
This operating mode is suitable for using the inverter with fuel cells or small
hydroelectric power plants.
Wait DC voltage is not high enough to start.
Warning Error status that requires an additional inspection
Installation Manual SB30-40-US-IA-en-34 73
Page 74

10 Troubleshooting SMA America, LLC
10.4.2 Error Messages
In the event of an error, the corresponding messages are shown in the display and the backlight is
activated. Each error message is displayed for 5 seconds. After 5 seconds, the display switches
through the regular operating messages. The error message will be displayed in the display sequence
until the fault is rectified.
If the feed-in to the power distribution grid is interrupted either manually or due to a detected AC
failure and then resumed, the inverter waits 5 minutes before resuming grid feed-in. For this purpose,
the DC input voltage must be greater than the DC start voltage of the inverter (see Section
12 "Technical Data", page 90). If the feed-in conditions are not met 3 times in a row, the inverters
waits 10 minutes and then attempts once more to feed into the power distribution grid.
Message Cause and corrective measures
Bfr-Srr Communication between micro-controllers is interrupted.
Corrective measures:
• Contact the SMA Service Line (see Section 15).
Derating The inverter reduces its output power due to excess temperature.
Corrective measures:
• Clean the fan (see Section 11.2).
Error AFCI The inverter has detected an electric arc in the PV system.
Corrective measures:
• Eliminate the disturbance (see Section 10.4.3 "Resetting "Error
AFCI" Disturbance", page 77).
EarthCurMax-B,
EarthCurMax-S
EEPROM Temporary disturbance whilst reading or writing data from the EEPROM.
EEPROM p Data from the EEPROM are defective.
EeRestore One of the duplicate records in the EEPROM is defective and has been
The ground-fault monitoring (GFDI) has detected an excessive residual
current in the PV plant.
Corrective measures:
• Check the PV plant for ground-faults (see Section 11.6).
This data is not essential for safe operation. This message only serves to
inform you and has no effect on the performance of the inverter.
The inverter has switched off, because the loss of data has disabled
important inverter functions.
Corrective measures:
• Contact the SMA Service Line (see Section 15).
reconstructed without loss of data. This message only serves to inform you
and has no effect on the performance of the inverter.
74 SB30-40-US-IA-en-34 Installation Manual
Page 75

SMA America, LLC 10 Troubleshooting
Message Cause and corrective measures
Fac-Bfr, Fac-Srr The AC power frequency exceeds the permissible range. To prevent
islanding, the inverter disconnects from the power distribution grid.
Corrective measures:
• Ensure that the AC cable is correctly connected (see Section 6.3).
• Ensure that the power frequency is within the permissible range.
• If the power frequency is within the permissible range and this
message continues to be displayed, contact SMA Service Line (see
Section 15).
GFDI Fuse Open The ground fuse has tripped.
Corrective measures:
• Check the PV plant for ground-faults (see Section 11.6).
• Replace the ground fuse (see Section 11.7).
Grid-Timeout,
Grid-Fault-S
The grounding system of the power distribution grid could not be detected.
Corrective measures:
• Contact the SMA Service Line (see Section 15).
Imax Overcurrent detected on AC side.
The current to the power distribution grid exceeds the specifications. This
may be caused by a serious system incident.
Corrective measures:
• Ensure that the PV plant is correctly rated.
• Ensure that the grid conditions are maintained.
K1-Close An internal test has failed.
K1-Open, K2-Open
Corrective measures:
• Contact the SMA Service Line (see Section 15).
MSD-FAC, MSD-Idif An internal measurement comparison fault has been detected.
MSD-VAC
Th e me asu red val ues of b oth proce sse s (O CU a nd c urr ent controll ing unit)
deviate too much from one another.
Corrective measures:
• Contact the SMA Service Line (see Section 15).
OFFSET Grid monitoring self-test failed.
Corrective measures:
• If the message occurs frequently, contact the SMA Service Line
(see Section 15).
Installation Manual SB30-40-US-IA-en-34 75
Page 76

10 Troubleshooting SMA America, LLC
Message Cause and corrective measures
ROM Internal test of the inverter control system firmware failed.
Corrective measures:
• If the message occurs frequently, contact the SMA Service Line
(see Section 15).
Shut-Down Overcurrent present at the DC input of the inverter.
The inverter switches off.
Corrective measures:
• If the message occurs frequently, ensure that the design and circuitry
of the PV array are correct.
Vac-Bfr, Vac-Srr The AC line voltage exceeds the permissible range.
This may be caused by disconnection of the power distribution grid or of
an AC c abl e. T o pr eve nt isl and ing , th e in ver ter dis conne cts fro m the power
distribution grid.
Corrective measures:
•If the message "Vac-Bfr" or "Vac-Srr" is displayed, even though the
line voltage is within the permissible range, contact the
SMA Service Line (see Section 15).
VacL1-Ocu, VacL2Ocu, VacL1-Srr,
VacL2-Srr
The DC input voltage is too high or too low on the indicated branch.
Corrective measures:
• Contact the SMA Service Line (see Section 15).
VpvMax The DC input voltage is above the maximum configured limiting value.
!PV Overvoltage!!
Disconnect DC!
Corrective measures:
• Turn the rotary switch of the DC Disconnect to the Off position
immediately.
Watchdog An internal program run fault has been detected.
Corrective measures:
• Contact the SMA Service Line (see Section 15).
XFMR_TEMP_F A high transformer temperature has been detected.
The inverter stops operation and the fan runs at maximum speed.
Corrective measures:
• Ensure sufficient ventilation.
76 SB30-40-US-IA-en-34 Installation Manual
Page 77

SMA America, LLC 10 Troubleshooting
Message Cause and corrective measures
XFMR_TEMP_W After high transformer temperatures are reduced, the inverter restarts feed-
in operation.
Corrective measures:
• Ensure that the fan is functioning correctly (see Section
11.3 "Checking the Fan", page 81).
10.4.3 Resetting "Error AFCI" Disturbance
If the message "Error AFCI" is displayed, an electric arc has been detected in the PV system. The AFCI
is triggered and the operation of the inverter is permanently inhibited.
Danger of fire due to electric arc in the PV plant
Risk of death or serious injury.
•Only test the AFCI for false tripping in the order described below.
• Do not deactivate the AFCI permanently.
1. Turn the rotary switch of the DC Disconnect to the Off position.
2. Wait until the display and all LEDs switch off.
3. Perform troubleshooting in the PV system. Ensure that the correct open-circuit voltage values are
present at all PV strings.
4. Turn the rotary switch of the DC Disconnect to the On position.
☑ The message "Error AFCI. Knock to reset." is displayed.
✖ Is the message "Error AFCI. Knock to reset." not displayed and is the yellow LED flashing?
Possible cause of error: The solar irradiation is insufficient and the AFCI self-test cannot be
performed successfully.
• If the AFCI self-test continues to be unsuccessful, turn the rotary switch of the DC
Disconnect to the Off position and switch off the AC miniature circuit-breaker.
• If the AFCI self-test is consistently unsuccessful, contact the SMA Service Line
(see Section 15 "Contact", page 99).
5. If the message "Error AFCI. Knock to reset." is displayed, tap the enclosure lid within 10 s.
☑ The green LED glows permanently and the inverter feeds into the power distribution grid.
✖ Is the green LED not glowing permanently and is the inverter not feeding into the power
distribution grid?
Possible cause of error: You did not tap the enclosure lid within 10 s of the message
appearing.
• Repeat steps 1 to 5.
Installation Manual SB30-40-US-IA-en-34 77
Page 78

11 Cleaning and Care SMA America, LLC
11 Cleaning and Care
11.1 Cleaning the Ventilation Grids
For optimal heat dissipation of the device, the ventilation grids must be clean.
1. Remove the ventilation grids sideways.
2.
Risk of damage to the inverter due to intrusion of foreign bodies
If the ventilation grid has been removed, foreign bodies (e.g. insects or stones) can intrude into
the inverter and cause damage.
• Mount the ventilation grids after installation and every time you finish cleaning.
• Never operation the inverter without ventilation grids.
3. Clean the ventilation grids with a soft brush or paintbrush.
4. Close the recessed grips with the ventilation grids.
Ensure that the side assignment is correct. Each
ventilation grid is assigned to a side of the
enclosure: Left side "links⁄left" and right side
"rechts⁄right".
78 SB30-40-US-IA-en-34 Installation Manual
Page 79

SMA America, LLC 11 Cleaning and Care
11.2 Cleaning the Fans
If the inverter displays the message "Derating", the fan may be di rty or defectiv e. Always cle an the fan
as per the following procedure.
1. Open the inverter (see Section 9.1).
2. Wait 5 minutes until the fan stops rotating.
3. Check whether the fan guard is dusty or badly clogged.
If the fan guard is dusty, clean the fan guard with a vacuum cleaner.
If the fan guard is badly clogged, remove and clean the fan guard:
• Use a screwdriver to press both catches on the
right edge of the fan guard to the right and
remove from the retainer.
• Carefully remove the fan guard.
• Clean the fan guard with a brush, a paint brush, a cloth, or compressed air.
4. If the fan is soiled, remove the fan:
• Press the fan catches to the center of the fan.
• Slowly remove the fan from the inverter.
Installation Manual SB30-40-US-IA-en-34 79
Page 80

11 Cleaning and Care SMA America, LLC
• Unlock and remove the fan plug.
Damage to the fan due to compressed air
• Clean the fan with a soft brush, a paint brush, or a damp cloth.
5. Insert the fan plug into the jack until it snaps into
place.
6. Insert the fan into the inverter until the fan audibly snaps into place.
7. Press the fan guard into the retainer until it audibly snaps into place.
8. Commission the inverter (see Section 8).
80 SB30-40-US-IA-en-34 Installation Manual
Page 81

SMA America, LLC 11 Cleaning and Care
11.3 Checking the Fan
You can check the fan by configuring a parameter via a communication product or by placing a
jumper on the pin header of the printed circuit board of the inverter. At temperatures below
32°F (0°C), the fan will no longer be controlled and cannot be checked.
Fan test by configuring a parameter
☐ A communication product, data logger, or item of software, which is suitable for the type of
communication used, must be available.
1. Request the installer password from the SMA Service Line (see Section 15 "Contact", page 99).
2. Launch the user interface of the data logger or the software.
3. Enter the installer password.
4. In installer mode, set the parameter "Fan Test" to 1.
5. Check whether air is coming out of the fan guard and whether the fan makes any unusual noise.
If the fan makes an unusual noise or no air is coming out, make sure that the fan is correctly
installed.
If the fan is installed correctly and the problem persists, contact the SMA Service Line.
6. Reset the parameter "Fan Test" to 0.
Fan test by setting the jumpers
Requirement:
☐ Jumpers for fan test must be available.
1. Open the inverter (see Section 9.1).
2. Place the jumpers for the fan test on the printed circuit board. For this purpose, plug jumpers into
the pins on the pin header labeled "200 V" and "150 V" in order to set the jumpers (see Section
7.3 "Jumper Assignments for Grounding Systems", page 53).
3. Close the inverter (see Section 9.2).
4. Commission the inverter (see Section 8).
☑ The fan starts up.
5. Check whether air is coming out of the fan guard and whether the fan makes any unusual noise.
If the fan makes an unusual noise or no air is coming out, make sure that the fan is correctly
installed.
If the fan is installed correctly and the problem persists, contact the SMA Service Line.
Installation Manual SB30-40-US-IA-en-34 81
Page 82

11 Cleaning and Care SMA America, LLC
6. After checking the fan, return the jumpers to the original position:
• Open the inverter (see Section 9.1).
• Place the jumpers on the pin header according to the desired jumper assignment
(see Section 7.3 "Jumper Assignments for Grounding Systems", page 53).
• Close the inverter (see Section 9.2).
• Commission the inverter (see Section 8).
11.4 Checking the DC Disconnect
• Once a year, turn the rotary switch of the DC-Disconnect from the On position to the Off
position 10 times in a row. This cleans the contacts of the rotary switch and extends the service
life of the DC Disconnect.
11.5 Checking and Replacing the DC Varistors
In regions where storms or other DC overvoltages frequently occur, the DC varistors lose their
functionality if the PV plant is not equipped with additional overvoltage protection. In such cases,
SMA recommends replacing DC varistors with new ones after an operating period of 10 years in
order to ensure that the functionality of the DC varistors remains at a constant level.
Destruction of the inverter due to DC overvoltage
If DC varistors are missing, the inverter is no longer protected against DC overvoltages.
• Do not operate the inverter without DC varistors in PV plants with a high risk of DC
overvoltages.
• Replacement DC varistors should be obtained as fast as possible.
• Use the DC varistors by SMA Solar Technology AG only.
• Always replace the entire set of DC varistors.
82 SB30-40-US-IA-en-34 Installation Manual
Page 83

SMA America, LLC 11 Cleaning and Care
Figure 26: Position of the DC varistors and string fuses
Position Designation Explanation
ADC varistors‒
B Fuse holder For connecting 4 fuse extractors with
string fuses
Requirement:
☐ Set with 3 replacement varistors including insertion tool must be available
(see Section 13 "Accessories", page 97).
1. Open the DC Disconnect (see Section 9.3).
2. Check whether the DC varistors are discolored or whether there is any other visible damage.
If DC varistors are visibly discolored or damaged, replace the DC varistors.
3.
Danger to life due to short circuits in the DC varistors
Death or serious injury due to electric shock.
• Check whether current is flowing in the DC cables.
4. Disconnect the DC varistors:
• Disconnect the string connectors of all ungrounded DC cables from the PV array.
• Remove the 4 fuse extractors with string fuses from the fuse holders of the DC Disconnect.
• Remove the 4 string fuses from the fuse extractors.
• Insert the 4 fuse extractors without string fuses into the fuse holder of the DC Disconnect.
5. Ensure that no voltage is present at the DC varistors.
Installation Manual SB30-40-US-IA-en-34 83
Page 84

11 Cleaning and Care SMA America, LLC
If no voltage is present at the DC varistors, replace all DC varistors.
• Insert the insertion tool into the rectangular
opening of the terminal.
• Remove the DC varistor.
• Insert the new DC varistor into the terminal.
• Pull the insertion tool out of the rectangular
opening of the terminal.
6. Ensure that all DC varistors in the terminals are securely in place.
7. Re-insert all string fuses into the DC Disconnect:
• Remove the 4 fuse extractors without string fuses from the fuse holders of the DC Disconnect.
• Equip the 4 fuse extractors with functional string fuses.
• Insert the 4 fuse extractors with string fuses into the fuse holder of the DC Disconnect.
8. Re-connect the string connectors of all ungrounded DC cables to the PV array.
9. Close the DC Disconnect (see Section 9.4).
10. Commission the inverter (see Section 8).
84 SB30-40-US-IA-en-34 Installation Manual
Page 85

SMA America, LLC 11 Cleaning and Care
11.6 Checking the PV Plant for a ground-fault
If the red and yellow LEDs glow, there may be a ground-fault in the PV plant.
Check each string of the PV plant for a ground-fault as per the following procedure:
Danger to life due to electric shock
Death or serious injuries due to high voltages at the PV array.
• Only touch the insulation of the PV array cables.
• Do not connect strings with ground-faults to the inverter.
Risk of electric shock
Normally grounded conductors may be ungrounded and energized when a ground-fault is
indicated by the inverter.
• Check the PV-system for a ground fault and replace the ground fuse as described in this
document.
Destruction of the measuring device due to excessive voltages
•Only use measuring devices with a DC input voltage range of at least 600 V.
1. Open the DC Disconnect (see Section 9.3).
2. Measure the voltages at all PV strings:
• Measure the voltages between the positive terminal and the PV protective conductor.
• Measure the voltages between the negative terminal and the PV protective conductor.
If there is a voltage between the negative terminal of a string and the PV protective conductor
or positive terminal of a string and the PV protective conductor, there is a ground-fault in the
string.
• The approximate position of the ground-fault can be determined from the ratio of the
measured voltages between the positive terminal against the PV protective conductor and
the negative terminal against the PV protective conductor.
• Eliminate the ground-fault.
If there is no ground-fault and the message continues to be displayed, contact the
SMA Service Line.
Installation Manual SB30-40-US-IA-en-34 85
Page 86

11 Cleaning and Care SMA America, LLC
Example: Location of the ground-fault
The example shows a ground-fault between the second and third PV modules.
Figure 27: ground-fault in the PV array
3. Close the DC Disconnect (see Section 9.4).
4. Commission the inverter (see Section 8).
11.7 Replacing the Ground Fuse
If the red LED glows and the inverter displays the error message "GFDI Fuse Open", the ground fuse
may have been tripped.
Danger to life due to high voltages in the PV plant
Death or serious injury due to electric shock.
• Only insert ground fuses into the inverter using a fuse extractor.
Danger of fire due to incorrectly rated fuse
Risk of injury due to fire.
• Only replace faulty ground fuses with ground fuses of the same type and size.
86 SB30-40-US-IA-en-34 Installation Manual
Page 87

SMA America, LLC 11 Cleaning and Care
^
Figure 28: Position of the ground fuse
Position Designation
A Fuse extractor with ground fuse
Additional required mounting material (not included in the scope of delivery):
☐ 1 functional and correctly designed ground fuse must be available
1. Open the inverter (see Section 9.1).
2. Remove the fuse extractor with ground fuse from the
fuse holder.
3. Remove defective ground fuse from the fuse extractor and insert a new ground fuse into the fuse
extractor. Ensure that the ground fuse is functional and is the correct size.
4. Insert the fuse extractor with the new ground fuse
into the fuse holder. Note the type of grounding of
the PV array (see Section 6.4.3 "Grounding the DC
Input", page 44).
5. Close the inverter (see Section 9.2).
6. Commission the inverter (see Section 8).
Installation Manual SB30-40-US-IA-en-34 87
Page 88

11 Cleaning and Care SMA America, LLC
11.8 Replacing String Fuses
Danger to life due to high voltages in the PV plant
Death or serious injury due to electric shock.
• Only replace string fuses in the inverter with fuse extractors.
Danger of fire due to incorrectly rated fuses
Risk of injury due to fire.
• Only replace faulty string fuses with string fuses of the same type and size.
Figure 29: Position of the string fuses
Position Designation Explanation
A Fuse holder For connecting 4 fuse extractors with
string fuses
88 SB30-40-US-IA-en-34 Installation Manual
Page 89

SMA America, LLC 11 Cleaning and Care
Additional required mounting material (not included in the scope of delivery):
☐ 4 functional and correctly rated string fuses must be available.
1. Open the DC Disconnect (see Section 9.3 "Opening the DC Disconnect", page 59).
2. Replace all string fuses:
• Remove the fuse extractor with ground fuse from
the fuse holder.
• Remove the defective string fuse from the fuse extractor and insert the new string fuse into
the fuse extractor.
• Insert the fuse extractor with new string fuse into
the fuse holder.
3. Close the DC Disconnect (see Section 9.4).
4. Commission the inverter (see Section 8).
Installation Manual SB30-40-US-IA-en-34 89
Page 90

12 Technical Data SMA America, LLC
12 Technical Data
12.1 DC⁄AC
12.1.1 Sunny Boy 3000-US
DC input
Maximum MPP voltage at 208 V nominal value 180 V to 400 V
Maximum MPP voltage at 240 V nominal value 200 V to 400 V
Input operating voltage range 200 V to 500 V
Maximum PV array input power 3,750 W
Maximum DC power 3,250 W
DC start voltage 230 V
Maximum DC input current 17 A
Maximum short-circuit current 24 A
DC voltage ripple ˂ 10%
AC output
AC operating voltage range at 208 V nominal value 183 V to 229 V
AC operating voltage range at 240 V nominal value 211 V to 264 V
AC operating frequency range 59.3 Hz to 60.5 Hz
AC frequency, nominal value 60 Hz
Maximum continuous AC output power 3,000 W
Total harmonic factor of the output current with total
harmonic factor of the AC voltage ˂ 2%
and AC power ˃ 50% rated power
Maximum continuous AC output current at 208 V 15 A
Maximum continuous AC output current at 240 V 13 A
Maximum residual output current 30 A
Maximum output overcurrent protection 30 A
Maximum backfeed current from the power distribution
grid to the PV array
Synchronization of inrush current 8 A
Tripping limit accuracy − 2% to +2%
Tripping time accuracy − 0.1% to +0.1%
˂4%
30 A AC
90 SB30-40-US-IA-en-34 Installation Manual
Page 91

SMA America, LLC 12 Technical Data
Efficiency
Power factor at nominal power 1
Inverter peak efficiency 96.8%
CEC efficiency at 208 V nominal value 95.0%
CEC efficiency at 240 V nominal value 95.5%
Figure 30: Efficiency curve SB 3000US/3000US-12
Installation Manual SB30-40-US-IA-en-34 91
Page 92

12 Technical Data SMA America, LLC
12.1.2 Sunny Boy 3800-US
DC input
Maximum MPP voltage at 240 V nominal value 250 V to 480 V
Input operating voltage range 250 V to 600 V
Maximum PV array input power 5,000 W
Maximum DC power 4,250 W
DC starting voltage 285 V
Maximum DC input current 18 A
Maximum short-circuit current 25 A
DC voltage ripple ˂ 10%
AC output
AC operating voltage range at 240 V nominal value 211 V to 264 V
AC operating frequency range 59.3 Hz to 60.5 Hz
AC frequency, nominal value 60 Hz
Maximum continuous AC output power 3,800 W
Total harmonic factor of the output current with total
harmonic factor of the AC voltage ˂ 2%
and AC power ˃ 50% rated power
Maximum continuous AC output current at 240 V 16 A
Maximum residual output current 30 A
Maximum output overcurrent protection 30 A
Maximum backfeed current from the power distribution
grid to the PV array
Synchronization of inrush current 8 A
Tripping limit accuracy − 2% to +2%
Tripping time accuracy − 0.1% to +0.1%
˂4%
30 A AC
Efficiency
Power factor at nominal power 1
Inverter peak efficiency 96.8%
CEC efficiency at 240 V nominal value 96.0%
92 SB30-40-US-IA-en-34 Installation Manual
Page 93

SMA America, LLC 12 Technical Data
Figure 31: Efficiency curve SB 3800-US-10/3800-US-12
12.1.3 Sunny Boy 4000-US
DC input
Maximum MPP voltage at 208 V nominal value 220 V to 480 V
Maximum MPP voltage at 240 V nominal value 250 V to 480 V
Input operating voltage range 250 V to 600 V
Maximum PV array input power 5,000 W
Maximum DC power 4,300 W
DC starting voltage 285 V
Maximum DC-DC input current 18 A
Maximum short-circuit current 25 A
Maximum backfeed current from the power distribution
grid to the PV array
DC voltage ripple ˂ 10%
Installation Manual SB30-40-US-IA-en-34 93
30 A AC
Page 94

12 Technical Data SMA America, LLC
AC output
AC operating voltage range at 208 V nominal value 183 V to 229 V
AC operating voltage range at 240 V nominal value 211 V to 264 V
AC operating frequency range 59.3 Hz to 60.5 Hz
AC frequency, nominal value 60 Hz
Maximum continuous AC output power 4,000 W
Total harmonic factor of the output current with total
˂4%
harmonic factor of the AC voltage ˂ 2%
and AC power ˃ 50% rated power
Maximum continuous AC output current at 208 V 17 A
Maximum continuous AC output current at 240 V 17 A
Maximum residual output current 30 A
Maximum output overcurrent protection 30 A
Synchronization of inrush current 8 A
Tripping limit accuracy − 2% to +2%
Tripping time accuracy − 0.1% to +0.1%
Efficiency
Power factor at nominal power 1
Inverter peak efficiency 96.8%
CEC efficiency at 208 V nominal value 95.5%
CEC efficiency at 240 V nominal value 96.0%
94 SB30-40-US-IA-en-34 Installation Manual
Page 95

SMA America, LLC 12 Technical Data
Figure 32: Efficiency curve SB 4000US/4000US-12
12.2 General Data
Width x height x depth 1751⁄64in. x 1353⁄64in. x 919⁄64in.
(462 mm x 351 mm x 236 mm)
Weight 88 lb. (40 kg)
Inverter technology Low frequency transformer
Ambient temperature range − 13°F to +113°F
( − 25°C to +45°C)
Ambient temperature range*
− 40°F to +113°F
( − 40°C to +45°C)
Electronics degree of protection NEMA 3R
Cooling concept OptiCool, forced active cooling
Noise emission 40 dB(A)
Power loss during night-time operation 0.1 W
* Applies for SB 3000US-12/SB 3800-US-12/SB 4000US-12 only
Installation Manual SB30-40-US-IA-en-34 95
Page 96

12 Technical Data SMA America, LLC
12.3 Protection Devices
DC reverse polarity protection Short-circuit diode
AC short-circuit current capability Software-controlled
AC overcurrent protection Current-controlled
®
Grid monitoring (SMA Grid Guard
2) Yes
12.4 DC Disconnect
Maximum DC input current 30 A
Maximum DC short-circuit current 36 A
Maximum system voltage 600 V
Maximum nominal size for string fuses 20 A
Maximum AC operating current 34 A
7
Dimensions W x H x D 7
⁄8in. x 12 13⁄64in. x 7 31⁄64in.
(200 mm x 310 mm x 190 mm)
Weight 8 lb. (3.5 kg)
Electronics degree of protection NEMA 3R
Specifications subject to change without notice.
12.5 Torques and Cable Sizes
Terminal Torque Cable size
AC & DC connecting terminal plate, inverter 15 in-lb. (1.7 Nm) 10 AWGto6AWG
AC & DC connecting terminal plate,
15 in-lb. (1.7 Nm) 10 AWG to 6 AWG
DC Disconnect
2
to 16 mm2)
(6 mm
(6 mm2to 16 mm2)
"COMBINED" spring terminal, DC Disconnect ‒ 10 AWG to 6 AWG
(6 mm2to 16 mm2)
Ground terminals PV protective conductor/
DC protective conductor, DC Disconnect
Screws for attaching the inverter and the
15 in-lb. (1.7 Nm) 10 AWG to 6 AWG
(6 mm2to 16 mm2)
44 in-lb. (5 Nm) ‒
DC Disconnect to the wall mounting bracket and
closing the DC Disconnect cover
Screws for the enclosure lid of the inverter 53 in-lb. (6 Nm) ‒
96 SB30-40-US-IA-en-34 Installation Manual
Page 97

SMA America, LLC 13 Accessories
12.6 Tripping Limits/Tripping Times
Nominal
frequency
60 Hz ˃ 60.5 Hz 60.45 Hz to 60.55 Hz max. 0.1602 s
Nominal
voltage
208 V 50%
240 V 50%
Tripping limit Tripping frequencies Tripping times
˂ 57.0 Hz to 59.8 Hz
(standard 59.3 Hz)
˂ 57.0 Hz 56.95 Hz to 57.05 Hz max. 0.1602 s
Tripping limit Trip voltages,
conductor-neutral
57.6 V to 62.4 V
88%
110%
120%
88%
110%
120%
103.2 V to 108.0 V
129.6 V to 134.4 V
141.6 V to 146.4 V
57.6 V to 62.4 V
103.2 V to 108.0 V
129.6 V to 134.4 V
141.6 V to 146.4 V
56.95 Hz to 59.85 Hz
(standard
59.25 Hz to 59.35 Hz)
conductor*
Adjustable, 0.16 s to 300 s
(standard max. 0.1602 s)
Trip voltages,
conductor-
conductor*
99.8 V to 108.2 V
178.9 V to 187.2 V
224.6 V to 233.0 V
245.4 V to 253.8 V
115.2 V to 124.8 V
206.4 V to 216.0 V
259.2 V to 268.8 V
283.2 V to 292.8 V
Manufacturer's accuracies
Tripping limit accuracy: ±2% of nominal line voltage
Tripping time accuracy: ±0.1% of nominal tripping time
Tripping frequency accuracy: ±0.1% of nominal frequency
Tripping times
max. 0.1602 s
max. 2.002 s
max. 1.001 s
max. 0.1602 s
max. 0.1602 s
max. 2.002 s
max. 1.001 s
max. 0.1602 s
13 Accessories
You will find the corresponding accessories and spare parts for your product in the following
overview. If required, these can be ordered from SMA or your specialty retailer.
Name Brief descriptionSMA order number
RS485 retrofit kit RS485 interface 485 USPB-NR
Bluetooth retrofit kit Bluetooth communication interface BTPBINV-NR
Replacement varistors Set with 3 DC varistors SB-VDC-US01
Ventilation grid Set with 2 "right and left" ventilation
grids as spare parts
Installation Manual SB30-40-US-IA-en-34 97
45-7202
Page 98

14 Compliance Information SMA America, LLC
14 Compliance Information
FCC Compliance
This device complies with Part 15 of the FCC Rules. Operation is subject to the following conditions:
1. This device must not cause harmful interference, and
2. This device must accept any interference received, including interference that may cause
undesired operation.
NOTE: This equipment has been tested and found to comply with the limits for a Class A & B digital
device, pursuant to Part 15 of the FCC Rules. These limits are designed to provide reasonable
protection against harmful interference in a residential installation. This equipment generates, uses,
and can radiate radio frequency energy and, if not installed and used in accordance with the
instructions, may cause harmful interference to radio communications. However, there is no guarantee
that interference will not occur in a particular installation. If this equipment does cause harmful
interference to radio or television reception, which can be determined by turning the equipment off
and on, the user is encouraged to try to correct the interference by one or more of the following
measures:
• Reorient or relocate the receiving antenna.
• Increase the distance between the equipment and the receiver.
• Connect the equipment into an outlet on a circuit different from that to which the receiver is
connected.
• Consult the dealer or an experienced radio/TV technician for help.
The user is cautioned that changes or modifications not expressly approved by SMA America, Inc.
could void the user’s authority to operate this equipment.
IC Compliance
This device complies with Industry of Canada license-exempt RSS standard(s). Operation is subject to
the following two conditions:
•This device must not cause interference, and
• This device must accept any interference, including interferences that may cause undesired
operation of the device.
98 SB30-40-US-IA-en-34 Installation Manual
Page 99

SMA America, LLC 15 Contact
15 Contact
If you have technical problems concerning our products, contact the SMA Service Line. We require
the following data in order to provide you with the necessary assistance:
•Inverter device type
• Inverter serial number
• Firmware version of the inverter
• Special country-specific settings of the inverter (if applicable)
• Type and number of the PV modules connected
• Mounting location and mounting altitude of the inverter
• Inverter LED signal and display message
• Optional equipment, e.g. communication products
SMA Solar Technology America, LLC
6020 West Oaks Blvd, Ste 300
Rocklin, CA 95765
Tel. +1 916 625 0870
Tel. +1 877-MY SMA TECH
Tel. +1 877 697 6283 (Toll free, available for USA, Canada and Puerto Rico)
Fax +1 916 625 0871
Service@SMA-America.com
www.SMA-America.com
SMA Solar Technology Canada Inc.
2425 Matheson Blvd. E, 8th Floor
Mississauga, ON L4W 5K5
Canada
Tel. +1 877 506 1756 (Toll free, available for Canada)
Service@SMA-Canada.ca
www.SMA-Canada.ca
Installation Manual SB30-40-US-IA-en-34 99
Page 100

XXX4."4PMBSDPN
4."4PMBS5FDIOPMPHZ
4.""NFSJDB--$
XXX4.""NFSJDBDPN
 Loading...