

USER'S GUIDE
Read this manual before starting to work! This information is necessary for the safe and
TEC-F-0548 REV2
07/16/2019
TM
IPT Steri-Trak
ecient operation of the equipment.

Page 2
Distributed by:
US - SKYTRON
5085 Corporate Exchange Blvd. S.E.
Grand Rapids, MI 49512 (616) 656-2900
Manufactured by:
ADCO Circuits
2868 Bond St
Rochester Hills, MI 48309
www.skytron.us
The base language for this document is ENGLISH. Any translations must be from the base language document.
Printed copies are not controlled documents.
Although current at the time of publication, SKYTRON'S policy of continuous development makes this manual subject to
change without notice. If current manuals are required, contact your local SKYTRON representative or contact SKYTRON
directly at the distribution addresses listed above.
IPT Steri-TrakTM User's Guide • REV2

Page 1
TABLE OF CONTENTS
TITLE PAGE
SECTION 1. OVERVIEW ....................................................................................................................3
1-1. Glossary of Terms ...........................................................................................................3
SECTION 2. GETTING STARTED .....................................................................................................4
2-1. Login ...............................................................................................................................4
2-2. Change Facility ...............................................................................................................4
2-3. The Dashboard ...............................................................................................................5
SECTION 3. JOBS ..............................................................................................................................6
3-1. Create/Schedule a Job ...................................................................................................6
3-2. Edit an Existing Job ........................................................................................................7
3-3. Delete an Existing Job ....................................................................................................7
SECTION 4. ORGANIZATIONS .........................................................................................................8
4-1. Create a New Organization .............................................................................................8
4-2. Edit an Existing Organization ..........................................................................................8
4-3. Delete an Organization ...................................................................................................9
SECTION 5. FACILITIES ................................................................................................................... 10
5-1. Add a New Facility .........................................................................................................10
5-2. Edit an Existing Facility .................................................................................................. 11
5-3. Delete an Existing Facility .............................................................................................. 11
SECTION 6. ROOMS .........................................................................................................................12
6-1. Add a Room ...................................................................................................................12
6-2. Import Room List ............................................................................................................13
6-3. Edit an Existing Room ....................................................................................................13
6-4. Delete an Existing Room ...............................................................................................14
SECTION 7. DEVICES ......................................................................................................................15
7-1. Add a Device ..................................................................................................................15
7-2. Edit an Existing Device ..................................................................................................16
7-3. Delete an Existing Device ..............................................................................................16
SECTION 8. REMOTES / HANDHELDS ..........................................................................................17
8-1. Add a Remote ................................................................................................................17
8-2. Edit an Existing Remote .................................................................................................18
8-3. Delete an Existing Remote ............................................................................................18
SECTION 9. REPORTS .....................................................................................................................19
9-1. Search Criteria ...............................................................................................................19
9-2. Search Results ...............................................................................................................19
9-3. Export to Excel/CSV ......................................................................................................20
IPT Steri-TrakTM User's Guide • REV2

Page 2
SECTION 10. USERS ..........................................................................................................................21
10-1. Add a User Account .......................................................................................................21
10-2. Edit a User Account .......................................................................................................22
10-3. Reset a User Password .................................................................................................23
10-4. Delete a User Account ...................................................................................................24
10-5. Generate a Statistical Analysis Report ...........................................................................24
SECTION 11. REVISION HISTORY ...................................................................................................26
IPT Steri-TrakTM User's Guide • REV2

SECTION 1. OVERVIEW
Page 3
The Steri-TrakTM web application is responsible for tracking all conguration information and job data for
the IPT units and remote handhelds. Data is synchronized over the Internet between the Steri-Trak
TM
server and the individual remote handheld units.
There are several components that need to be congured properly to ensure correct operation of the IPT
unit, remote software, and Steri-TrakTM web application.
1-1. Glossary of Terms
Organization
Facility
Room
Device
An organization is the top-level grouping of facilities, rooms, devices, and remotes. An
organization can contain one or more facilities.
A facility is a physical building or location that contains rooms. A facility belongs to an
organization. The postal address and “max AC power” for each facility is stored in Steri-Trak
TM
A physical room within a facility that the IPT could clean. It could be any type of room
(surgical, patient room, closet, waiting room, etc.). Each room has a room number,
an optional alternative reference number, an optional scanner code, and an optional
description. The room number eld in Steri-TrakTM should correspond to the room number
plate that identies the room in the facility, such as 110-W. The alternative reference
number eld in Steri-Trak
TM
could be used to store an architectural room number or some
other room identier that is dierent than the room number. Some facilities have barcodes
next to the room numbers, For those facilities, the scanner code eld in Steri-TrakTM is used
to store the barcode value used to identify that particular room.
A device is an IPT unit and is related to a single facility. Each device in Steri-TrakTM has:
• Model
• Serial #
• Network name / SSID
• IP address
• Port #
• In-service date
• Description
IPT Steri-TrakTM User's Guide • REV2

Page 4
SECTION 2. GETTING STARTED
2-1. Login
Steri-TrakTM is located at: http://steritrak.infectionpreventiontechnologies.com. Log into your Steri-Trak
account using your specied username and password (Figure 1).
djdoe
Figure 1. Login Screen
2-2. Change Facility
TM
Most of the data in Steri-TrakTM is ltered by your current facility. After login, your current facility will be
shown in the upper right of your browser window along with a change facility button (Figure 2).
Figure 2. Current Facility
IPT Steri-TrakTM User's Guide • REV2

Page 5
To work with data from a dierent facility, select the Change Facility button. A list of facilities that have
been congured in Steri-TrakTM will be shown. Only organizational managers are able to view multiple
facilities. Select the facility you wish to view (Figure 3).
Figure 3. Multiple Facilities
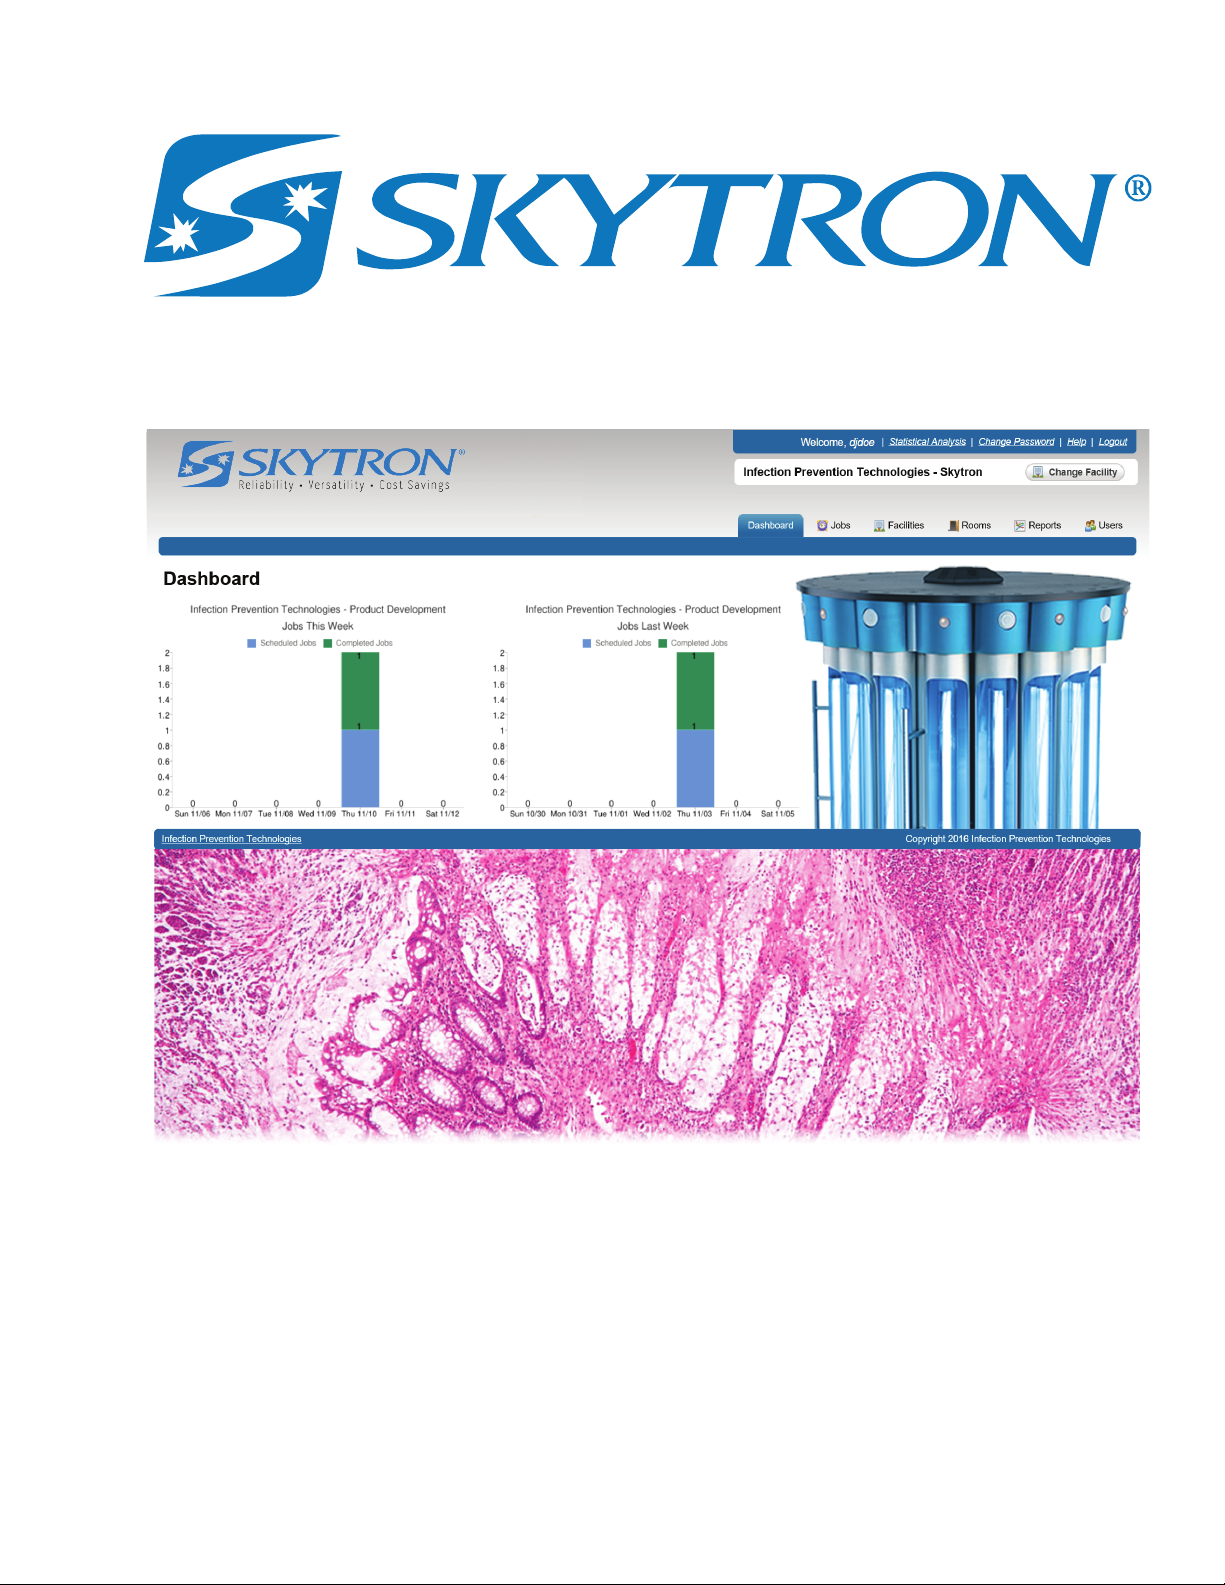
2-3. The Dashboard
The Dashboard tab displays charts showing the number of scheduled and completed jobs in the Steri-TrakTM
system. The charts include the current and previous week jobs for the current facility (Figure 4).
IPT Steri-TrakTM User's Guide • REV2
Figure 4. The Dashboard

Page 6
SECTION 3. JOBS
The Jobs tab will display all jobs in the Steri-TrakTM system and their last known status. Select the column
headers you wish to sort. The column up/down arrow icon will change to indicate the list has been sorted
(Figure 5).
NEW JOB BUTTON
COLUMN HEADERS
EDIT ICON
Figure 5. Jobs Screen
3-1. Create/Schedule a Job
1. From the Jobs screen, select the New Job button (Figure 5).
2. Enter the details for the job (Figure 6). The Facility should be pre-selected based on your current
facility. If necessary click the dropdown arrow to select the appropriate facility.
Figure 6. Creating and Scheduling a Job
IPT Steri-TrakTM User's Guide • REV2

Page 7
3. Type in the room number to be treated.
4. From the dropdown arrow, select the IPT device to perform the job/treatment.
5. From the dropdown arrow, select the type of procedure to be performed.
6. Type in the scheduled start date and time.
7. Assigned To, is an optional eld to assign a job to a specic person at the facility.
8. Any additional information about this Job can be added in the notes eld.
9. Click the Save button to save and schedule the Job.
3-2. Edit an Existing Job
Once a Job is created, you can only change the Scheduled Start Date/Time, Assigned To and Notes
elds.
1. From the Jobs screen (Figure 5), select the edit icon for the job you would like to edit.
2. Update any necessary information as needed and click the Save button to save your changes.
(Figure 6).
3-3. Delete an Existing Job
CAUTION
Once a Job is deleted it cannot be recovered.
1. From the Jobs screen (Figure 5), select the edit icon for the job you would like to delete.
2. Click the Delete button, to permanently delete the Job from Steri-TrakTM (Figure 6).
IPT Steri-TrakTM User's Guide • REV2

Page 8
SECTION 4. ORGANIZATIONS
An Organization is the top-level grouping of all data types in Steri-TrakTM (Facilities, Rooms, Devices,
Remotes, Jobs, and Users). All facilities are related to a single organization. A small hospital with only
one facility will have one organization and one facility in Steri-TrakTM. A large hospital system will have
one organization with multiple facilities in Steri-TrakTM.
4-1. Create a New Organization
1. Select the Organizations tab and click the Add Organization button (Figure 7).
Figure 7. Organizations Screen
2. Enter the name of the new organization and click the Save button (Figure 8).
Enter new organization here.
Figure 8. Save the Organization
4-2. Edit an Existing Organization
1. From the Organizations screen (Figure 7), select the Edit button of the organization you want to edit.
2. Update the name of the organization and click the Save button (Figure 8).
IPT Steri-TrakTM User's Guide • REV2

4-3. Delete an Organization
CAUTION
Deleting an organization will remove all facilities, rooms, devices, remotes and jobs from
Steri-TrakTM. Once an organization has been deleted it cannot be recovered.
1. From the Organizations screen (Figure 7), select the Edit button of the organization you would
like to delete.
2. Click the Delete button (Figure 9).
Infection Prevention Technologies Daedalus
Page 9
Figure 9. Delete an Organization
3. Click Yes to permanently delete the organization from Steri-TrakTM.
IPT Steri-TrakTM User's Guide • REV2

Page 10
SECTION 5. FACILITIES
The Facilities screen shows all the facilities that have been congured in Steri-TrakTM. Each facility in
Steri-TrakTM corresponds to a physical building for a particular hospital or hospital system.
5-1. Add a New Facility
1. Select the Facilities tab and click the Add Facility button (Figure 10).
EDIT BUTTON
Joe Brown
jbrown@skytron.us
Figure 10. Facilities Screen
2. From the dropdown list, select the Organization (Figure 11).
Figure 11. Save the Facility
IPT Steri-TrakTM User's Guide • REV2

Page 11
3. Enter a Facility Name.
4. Enter a Facility Code. The facility code is for future use by Steri-TrakTM and/or IPT remotes.
5. Enter the maximum AC power, in amps, the facility you are adding can handle.
6. Contact name, title, e-mail and phone number is optional.
7. Enter the postal address of the facility.
8. Select YES in the Allow Emulator drop-down eld, to allow the emulator procedure to show in the
in the IPT remote software for the facility. Default is NO.
9. Click the Save button.
5-2. Edit an Existing Facility
1. From the Facilities screen (Figure 10), select the edit button for the facility you want to edit.
2. Update any necessary elds as needed. See Section 5-1 instructions for more information about
each eld.
3. After editing the facility, click the Save button to save your changes.
5-3. Delete an Existing Facility
CAUTION
Once a Facility is deleted it cannot be recovered.
1. From the Facilities screen (Figure 10), select the edit button for the facility you would like to delete.
2. Click the Delete button (Figure 12).
Figure 12. Delete a Facility
3. Click Yes to permanently delete the facility from Steri-TrakTM.
IPT Steri-TrakTM User's Guide • REV2

Page 12
SECTION 6. ROOMS
The Rooms screen displays all rooms in Steri-TrakTM for the current facility.
6-1. Add a Room
1. Select the Rooms tab and, click the Add Room button (Figure 13).
Figure 13. Rooms Screen
2. Room Number (Figure 14). This is a required eld, showing the number that is displayed on the
outside of the actual room at the facility.
Figure 14. Save a Room
3. Alternative Reference Number (optional). A secondary room identier, such as an architectural
room number.
4. Scanner Code (optional). For Facilities having barcodes outside each room. This eld should be
set to the same value as the barcode.
5. Description (optional). A description of what the room is such as: Exam or Recovery Room etc.
6. Click the Save button to save the room.
IPT Steri-TrakTM User's Guide • REV2

Page 13
6-2. Import Room List
The room import screen allows you to add numerous rooms to a facility, fast and eciently. A CSV le
will need to be created using Microsoft Excel, then exported to CSV with the columns/elds required for
each room.
The le MUST HAVE a column/eld named RoomNumber.
If desired additional columns/elds for AltReferenceNumber, ScannerCode, and Description, may be
included.
1. Create your CSV le using Microsoft Excel and save it to a specic location.
2. Make sure the current facility the rooms will be imported to is correct. If not, click the Change
Facility button and choose the correct facility.
3. From the Rooms screen (Figure 13), click the Import Room List button.
4. Click the Browse button and select the CSV le from your computer (Figure 15).
Figure 15. Browse for the CSV File
5. Click the Upload Room List button to upload the list of rooms into the current facility.
6-3. Edit an Existing Room
1. From the Rooms screen (Figure 13), select the Edit button for the room you would like to edit.
2. Update any necessary information as needed and click the Save button to save your changes.
IPT Steri-TrakTM User's Guide • REV2

Page 14
6-4. Delete an Existing Room
CAUTION
Once a Room is deleted it cannot be recovered.
1. From the Rooms screen (Figure 13), select the Edit button for the room you would like to delete.
2. Click the Delete button (Figure 16).
Figure 16. Delete a Room
3. Click Yes to permanently delete the room from Steri-TrakTM.
IPT Steri-TrakTM User's Guide • REV2

SECTION 7. DEVICES
EDIT BUTTON
REMOTE BUTTON
1
The Devices screen displays all devices (IPT units) in Steri-TrakTM for the current facility.
7-1. Add a Device
1. Select the Devices tab and click the Add Device button (Figure 17).
Page 15
Figure 17. Devices Screen
2. Facility (Figure 18). Choose the facility for the device from the dropdown.
Figure 18. Add a Device
3. Model: Enter the device model type. For example, IRS 3200M.
4. Serial #: Enter the device serial number. For example, 10003.
5. Network Name: The SSID or network name that the unit is broadcasting is IPT. For example,
IPT10003.
IPT Steri-TrakTM User's Guide • REV2

Page 16
6. IP Address: The IP address that has been congured for the IPT unit is 10.0.0.X where the X is
the last 1 or 2 digits of the Serial #. The IP address is meant to mimic the Serial number. For example,
IP address 10.0.0.3 for an IRS with Serial # 10003.
7. Port #: The communication Port #, should be kept at 80.
8. In-Service Date: The date the IPT unit was put into service.
9. UV Scale Factor: Normal default value is 1.125.
10. Description: Human readable description of this IPT unit.
11. Click the Save button to add the IPT unit.
7-2. Edit an Existing Device
1. From the Devices screen (Figure 17), select the Edit button for the device you would like to edit.
2. Update any necessary information as needed and click the Save button to save your changes.
7-3. Delete an Existing Device
CAUTION
Once a Device is deleted it cannot be recovered.
1. From the Devices screen (Figure 17), select the Edit button for the device you would like to delete.
2. Click the Delete button (Figure 19).
Figure 19. Delete a Device
3. Click Yes to permanently delete the device from Steri-TrakTM.
IPT Steri-TrakTM User's Guide • REV2

Page 17
EDIT BUTTON
SECTION 8. REMOTES / HANDHELDS
Remotes are managed from the Devices screen. The number of remotes congured for a particular device
is shown next to the icon.
8-1. Add a Remote
1. From the Device screen (Figure 17), select the Remote button for the device you would like to
manage.
2. To add a new remote, click the Add Remote button on the remotes screen (Figure 20).
Figure 20. Remote Screen
3. Serial Number: (Figure 21). Enter the device serial number. The serial number is the letter "R"
followed by the serial number of the device the remote will be controlling. For example: R10003 for
the remote controlling device number 10003.
Figure 21. Add a Remote
4. Description: Enter a Human-readable description for the remote.
5. IP Address: Enter the IP address for the remote. It is the same IP address for the device the
remote will be controlling, plus 1.
Example: Device IP address = 192.168.10.182
Remote IP address = 192.168.10.183
Subnet Mask: Should be left at the default 255.255.0.0
6. Software Version: N/A (Not applicable).
IPT Steri-TrakTM User's Guide • REV2

Page 18
7. Hardware Model #: N/A (Not applicable).
8. Click the Save button to add the Remote.
8-2. Edit an Existing Remote
1. From the Remotes screen (Figure 20), select the Edit button for the remote you would like to edit.
2. Update any necessary information as needed and click the Save button to save your changes.
8-3. Delete an Existing Remote
CAUTION
Once a Remote is deleted it cannot be recovered.
1. From the Remotes screen (Figure 20), select the Edit button for the device you would like to delete.
2. Click the Delete button (Figure 22).
Figure 22. Delete a Remote
3. Click Yes to permanently delete the remote from Steri-TrakTM.
IPT Steri-TrakTM User's Guide • REV2

Page 19
SECTION 9. REPORTS
The Reports screen allows you to search and lter Jobs. A Job Report can be generated as an Excel/
CSV le.
9-1. Search Criteria
1. Select the Reports tab and Specify the search criteria (Figure 23).
Figure 23. Reports Screen
2. Click the Search button to see the results, or click the Export to Excel/CSV button to download
the results as an Excel/CSV le.
9-2. Search Results
The search results list (Figure 24), can be sorted in ascending or descending order by clicking on the
column headers. The arrow icon will change to indicate the sort that is applied.
IPT Steri-TrakTM User's Guide • REV2
Figure 24. Search Results List

Page 20
9-3. Export to Excel/CSV
1. From either the reports screen (Figure 23) or search results list (Figure 24), click the Export to
Excel/CSV button to download the results as an Excel/CSV le.
2. Choose Open to view the Excel document (Figure 25).
Figure 25. Excel Reports Document
3. Save the Excel document to a specic location.
IPT Steri-TrakTM User's Guide • REV2

SECTION 10. USERS
Page 21
The Users screen displays all user accounts in Steri-TrakTM. A user account provides access to the
Steri-Trak
TM
web system. Each user account can be congured with individual security permissions that
control which areas of Steri-TrakTM they can view and edit.
The user accounts for each Organization and Facility consist of:
• Organization Administrator user account has full permission to manage everything for their organization only.
• Facility Administrator user account(s) which have full permission to manage everything for a specic
facility in the organization.
• Facility User user account(s) only have permission to run the IPT device and operate the IPT Remote
software to run jobs/treatments. These accounts are created for the day-to-day operators of the IPT
devices at the hospital facility.
Steri-TrakTM has a exible security permissions system that allows multiple users having dierent levels
of access permissions within their facility.
10-1. Add a User Account
1. Select the Users tab and click the New User button (Figure 26).
Figure 26. Users Screen
EDIT ICON
IPT Steri-TrakTM User's Guide • REV2

Page 22
2. Username (Figure 27). Create a unique user name to login to Steri-TrakTM. DO NOT use capitals,
spaces or special characters when creating a username.
Figure 27. Add a User
3. Password: Create a unique user password with a MINIMUM length of seven characters. DO NOT
use capitals, spaces, or special characters when creating a password.
4. E-mail: Enter the new users e-mail.
5. PIN: Enter the PIN code the user will enter in the IPT remote software to run jobs/treatments. The
PIN must be unique to the facility.
6. Locked Out: By checking this box, users will be prevented from logging-in to Steri-TrakTM.
7. Approved: By checking this box, users NOT approved will be prevented from logging-in to
Steri-TrakTM and operating device. This check box can be used to un-approve users no longer with
the hospital.
8. Permissions: From the Organizations pulldown, select the organization the user will be associated
with.
9. Facilities: Select the Facilities the user will access to. The list will populate when the Organization
is selected.
10-2. Edit a User Account
1. From the Users screen (Figure 26), select the Edit icon for the user you would like to edit.
2. Update any necessary information as needed and click the Save button to save your changes.
IPT Steri-TrakTM User's Guide • REV2

Page 23
10-3. Reset a User Password
1. From the Users screen (Figure 26), select the Edit icon for the user whose password you would
like to reset.
2. Click the Reset Password button (Figure 28).
NOTICE
Passwords are reset to a system-generated password and e-mailed to the user. User passwords
cannot be reset to a specic password on the user’s behalf.
bsmith
bsmith@skytron.com
MDP
Figure 28. Password Reset
3. Click YES and an e-mail will be sent to the user with their new password.
IPT Steri-TrakTM User's Guide • REV2

Page 24
10-4. Delete a User Account
CAUTION
Once a User Account is deleted it cannot be recovered.
1. From the Users screen (Figure 26), select the Edit button for the user you would like to delete.
2. Click the Delete button (Figure 29).
bsmith
bsmith@skytron.com
MDP
Figure 29. Delete a User Account
3. Click Yes to permanently delete the user from Steri-TrakTM.
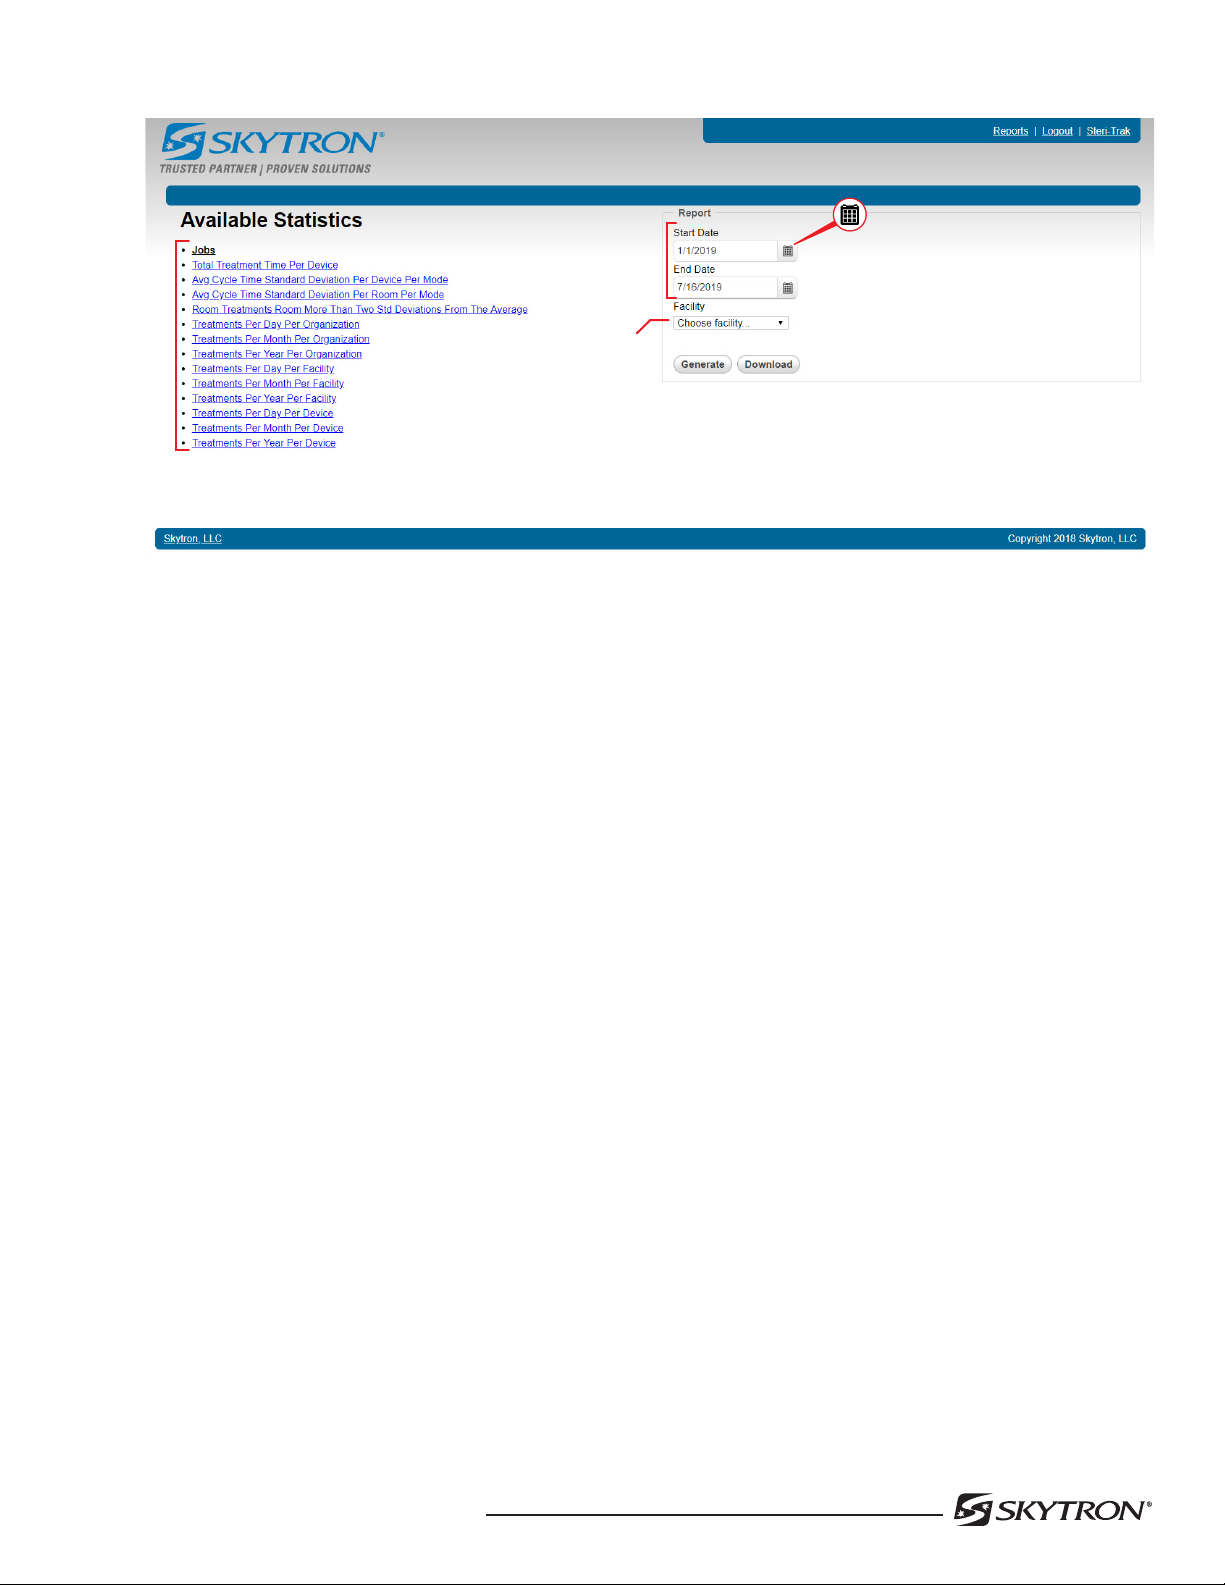
10-5. Generate a Statistical Analysis Report
1. Click Statistical Analysis (Figure 30) in the top right tool bar. You may be asked to re-enter login
credentials. If so, enter them and click Login.
STATISTICAL ANALYSIS
Figure 30. Statistical Analysis
2. Select a date range for the report (Figure 31). Click the calendar symbol in the Start Date and End
Date elds and select the start and end dates. Or type the dates using the mm/dd/yyyy format.
3. Click the Facility drop down menu (Figure 31) and select the facility for which you want to generate a report.
4. Under the Available Statistics list (Figure 31), select the desired statistical data.
5. Click Generate to show the report on the screen, or click Download to generate and download the
report as an Excel spreadsheet (Figure 31).
IPT Steri-TrakTM User's Guide • REV2
AVAILABLE STATISTICS LIST
Page 25
CALENDAR
START AND
END DATE
FACILITY
MENU
Figure 31. Generate Statistics
IPT Steri-TrakTM User's Guide • REV2

Page 26
SECTION 11. REVISION HISTORY
Date Released Revision Revision History
02/10/2017 0 Initial Release
12/12/2 1 Pg 24 - Corrected typo in step 3, added minimum password length
of seven characters
07/16/2019 2 Pg 3 - Removed UV scale factor from the Device portion of the
glossary of terms table.
Removed FacilityWi-Fi Networks section.
Pg 24 Added the section "Generate a Statistical Analysis Report"
IPT Steri-TrakTM User's Guide • REV2

NOTES
Page 27
IPT Steri-TrakTM User's Guide • REV2

5085 Corporate Exchange Blvd. S.E.
Grand Rapids, MI 49512 • 616.656.2900
 Loading...