


Instruction Manual/Manual De Instrucción/Manuel D’instruction
Compact Disc + Graphics with Built-In Disco Light Karaok Center
CD+Dise os con Centro de Karaok con Luces de Discoteca
Compact Disque + Graphiques |
avec Centre de Lumi re Disco |
Karaok encastre |
WARNINGS
ENGLISH |
|
|
WARNING: TO REDUCE THE RISK OF |
||
|
||
|
FIRE OR SHOCK HAZARD, DO NOT EXPOSE |
|
|
THIS PRODUCT TO RAIN OR MOISTURE. |
|
|
|
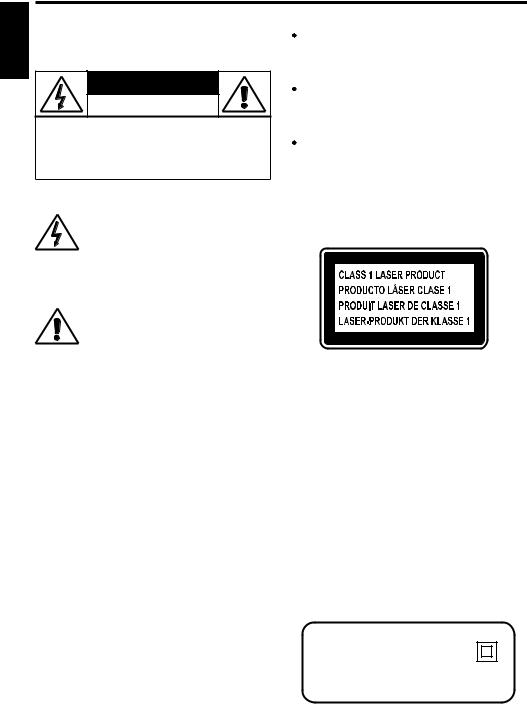
CAUTION
RISK OF ELECTRIC SHOCK
DO NOT OPEN
CAUTION: TO PREVENT THE RISK OF ELECTRIC SHOCK, DO NOT REMOVE COVER OR BACK. NO USER-SERVICEABLE PARTS INSIDE. REFER SERVICING TO QUALIFIED PERSONNEL.
The CAUTION marking is located on the rear panel.
This symbol is intended to alert you
to the presence of uninsulated dangerous voltage within the
product's enclosure that might be of sufficient magnitude to constitute a risk of electric shock. Do not open the product's case.
This symbol is intended to inform you that important operating and maintenance instructions are i n c l u d e d i n t h e l i t e r a t u r e accompanying this product.
DRIPPING WARNING
The product shall not be exposed to dripping or splashing and that no objects filled with liquids, such as vases, shall be placed on the product.
VENTILATION WARNING
The normal ventilation of the product shall not be impeded for intended use.
Warning: Changes or modifications to this unit not expressly approved by the party responsible for compliance could void the user’s authority to operate the equipment.
SAFETY CERTIFICATION
This device is made and tested to meet safety standards of the FCC, requirements and compliance with safety performance of the U.S. Department of Health and Human Services, and also with FDA Radiation Performance Standards 21 CFR Subchapter J.
Main plug is used as disconnect device and it should remain readily operable during intended use. In order to disconnect the apparatus from the mains completely, the main plug should be disconnected from the main socket outlet completely.
Warnings:
This CD player employs a laser light beam. Only a qualified service person should remove the cover or attempt to service this device, due to possible eye injury.
The use of controls, adjustments, or procedures other than those specified herein might result in hazardous radiation exposure.
The apparatus shall be used in an open area.
CAUTION
This compact disc player is classified as a CLASS 1 LASER product.
The CLASS 1 LASER PRODUCT label is located on the rear panel.
CAUTION!
Invisible laser radiation when open and inter locks defeated.Avoid exposure to beam.
FCC IMPORTANT
Since CD circuitry may cause interference to other radio tuners nearby, switch this unit off when not in use or move it away from the affected radio tuner.
This device complies with part 15 of the FCC rules, operation is subject to the following two conditions: (1) this device may not cause harmful interference, and (2) this device must accept any interference received, including interference that may cause undesired operation.
CAN ICES-3(B)/NMB-3(B)
Class II equipment symbol
This symbol indicates that the unit has a double insulation system.
E1

WARNINGS
NOTE: This digital apparatus does not exceed the Class B limits for radio noise emissions from digital apparatus as set out in the Radio Interference Regulations of Industry Canada. These limits are designed to provide reasonable protection against harmful interference in a residential installation. This equipment generates, uses and can radiate radio frequency energy and, if not installed and used in accordance with the instructions, may cause harmful interference to radio communications. However, there is no guarantee that interference will not occur in a particular installation. If this equipment does cause harmful interference to radio or television (which can be determined by turning the equipment off), the user is encouraged to try to correct the interference by one or more of the following measures:
Reorient or relocate the receiving antenna.
Increase the separation between the equipment and receiver.
Connect the equipment into an outlet on a circuit different from that to which the receiver is connected. Consult the dealer or an experienced radio / TV technician for help.
IMPORTANT SAFETY INSTRUCTIONS
1.Read these instructions.
2.Keep these instructions.
3.Heed all warnings.
4.Follow all instructions.
5.Do not use this apparatus near water.
6.Clean only with dry cloth.
7.Do not block any ventilation openings. Install in accordance with the manufacturer's instructions.
8.Do not install near any heat sources such as radiators, heat registers, stoves, or other apparatus (including amplifiers) that produce heat.
9.Do not defeat the safety purpose of the polarized or grounding-type plug. A polarized plug has two blades with one wider than the other. A grounding type plug has two blades and a third grounding prong. The wide blade or the third prong are provided for your safety. If the provided plug does not fit into your outlet, consult an electrician for replacement of the obsolete outlet.
10.Protect the power cord from being walked on or pinched particularly at plugs, convenience receptacles, and the point where they exit from the apparatus.
11.Only use attachments/accessories specified by the manufacturer.
12.Use only with the cart, stand, tripod, bracket, or table specified by the manufacturer, or sold with the apparatus. When a cart is used, use
caution when moving the cart/apparatus combination to avoid injury 
 from tip-over.
13.Unplug this apparatus during lightning storms or when unused for long 
 periods of time.
14.Refer all servicing to qualified service personnel. Servicing is required when the apparatus has been damaged in any way, such as power-supply cord or plug is damaged, liquid has been spilled or objects have fallen into the apparatus, the apparatus has been exposed to rain or moisture, does not operate normally, or has been dropped.
ENGLISH
E2
ENGLISH |
CONTROL LOCATIONS |
|
|
|
|
|
|
|
1 |
2 |
3 |
4 |
5 |
6 |
7 8 |
||
|
||||||||
|
9 |
|
|
|
|
|
19 |
|
|
|
|
|
|
|
20 |
||
|
10 |
|
|
|
|
|
||
|
|
|
|
|
|
21 |
||
|
11 |
|
|
|
|
|
||
|
12 |
|
|
|
|
|
22 |
|
|
|
|
|
|
|
|
||
|
13 |
|
|
|
|
|
23 |
|
|
14 |
|
|
|
|
|
24 |
|
|
15 |
|
|
|
|
|
25 |
|
|
16 |
|
|
|
|
|
26 |
|
|
17 |
|
|
|
|
|
27 |
|
|
18 |
|
|
|
|
|
28 |
|
|
|
|
|
|
|
|
29 |
|
|
|
|
|
|
|
|
30 |
|
|
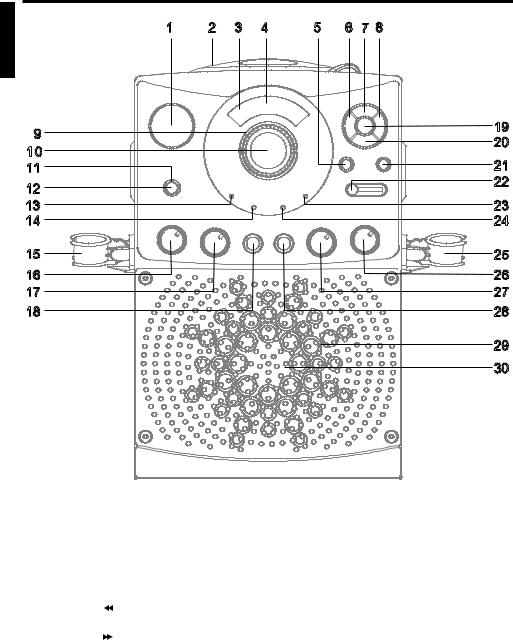
FRONT VIEW |
|
|
|
|
|
|
1. |
LED Display |
12. ON/OFF Button |
22. DISCO LIGHT Slide |
||||
2. |
CD Door |
13. PLAY/PAUSE LED |
Button |
||||
3. |
Master Volume Display |
14. CDG LED |
23. PROGRAM LED |
||||
4. |
Master Volume Indicator |
15. Mic Holder |
24. REPEAT LED |
||||
5. |
REPEAT Button |
16. Auto Voice Control |
25. Mic Holder |
||||
6. SKIP Button |
|
|
|
|
17. BALANCE Control |
26. MIC Volume Control |
|
|
|||||||
7. PLAY/PAUSE Button |
18. MIC 1 Jack |
27. ECHO Control |
|||||
8. SKIP Button |
|
|
19. RANDOM Button |
28. MIC 2 Jack |
|||
|
|||||||
|
|||||||
9. Disco Light |
20. STOP Button |
29. Disco Light |
|||||
10. MASTER VOLUME Control |
21. PROGRAM Button |
30. Loudspeaker |
|||||
11. ON/OFF LED
E3

ENGLISH
31 |
33 |
32 |
34 |
|
35 |
REAR VIEW
31.VIDEO OUT Jack
32.AUX IN Jack
33.AUX OUT Jack (R)
34.DC Jack (DC 5.8V)
35.AUX OUT Jack (L)
E4

ENGLISH
MAKING THE CONNECTIONS
CONNECTING POWER
unit. You can power the system from a standardAC outlet by using the supplied Power Adapter (The adapter operates on AC 100V- 240V/50Hz-60Hz 

 ).
).
CAUTION: - The included AC adaptor is for use with this unit only. Do not
use it with other equipment.
- When the adaptor is plugged in, the apparatus is not completely disconnected from the main, even when the power is turned off.
CONNECTING TOYOUR TV OR DVD PLAYER
Your Singing Machine is designed to connect to your TV the same way you would connect most video cameras, DVD players or video game consoles.
We have provided RCA cables to connect your unit to a TV, DVD player, video device or an external audio/sound system. The RCA cables have three connections at each end (white and red are for left and right audio connections and the yellow is for video connection).
Please follow the steps below to display CD+G lyrics on the TV screen:
(1)Locate the multi-colored patch cables
(2)Connect video cable (yellow) to the video out of the back of the Singing Machine
(3)Connect the other end of the video cable (yellow) to the video input on your TV or DVD Player.
REAR VIEW OF TV
|
VIDEO |
AUDIO |
|
REAR VIEW OF |
INPUT |
INPUT |
|
R |
L |
||
SINGING MACHINE |
|||
|
|
VIDEO INPUT
(Yellow Jack)
VIDEO OUTPUT
(Yellow Jack)
SELECTINGYOUR SINGING MACHINEASYOUR SOURCE/INPUT
Selecting your Singing Machine as a source/input on your TV is very similar to connecting a DVD player or Satellite system.
We’ve listed below the most common ways of selecting the source from your TV or DVD Player:
(1)In the set up menu of the TV or DVD player there may be an option for “Input Select” where you can choose between “Cable/Ant., Video 1, Video 2, etc.” as the input source.
(2)Look for a TV channel between the highest and lowest on your TV or DVD player (i.e. AUX, EXT, LINE 1 or LINE IN)
(3)Your remote control for either your TV or DVD player may have source input selections as well as detailed below:
“VIDEO, VIDEO 1, GAME, AUX, EXT or LINE-IN.“ Choosing one of those in most cases should display the lyrics from your Singing Machine as well.
E5

MAKING THE CONNECTIONS
AUDIO CONNECTION
Please follow the steps below to connect the unit to your TV or home stereo system:
(1) Locate the multicolored patch cords.
(2)Connect audio xcables (White and Red) to the Audio Out ( White-Left and Red-Right) of the back of the Singing Machine.
(3)Connect the other end of the audio cables to the audio/auxiliary input on your TV or home stereo system.
ENGLISH
REAR VIEW OF SINGING MACHINE
REAR VIEW OF TV
OR HOME STEREO SYSTEM
VIDEO AUDIO
INPUT INPUT
R |
L |
Home Stereo System
AUX OUTPUT |
AUX OUTPUT |
|
AUX INPUT |
AUX INPUT |
||
R |
L |
|
R |
L |
||
(Red Jack) |
(White Jack) |
|
(Red Jack) |
(White Jack) |
||
|
|
|
|
|
|
|
E6

CD OR CD+G OPERATION
ENGLISH
This unit is designed to play CDs and CD+Gs bearing the identification logo respectively. If the disc does not conform to the standard, it may not play properly.
TURNING POWER ON/OFF
To turn on the unit, press the ON/OFF button, the ON/OFF LED Indicator will light up.  To turn it off, press the ON/OFF button again, the ON/OFF LED Indicator will turn off.
LOADINGADISC
Open the CD door, place a CD or CD+G disc in the compartment with the printed side facing upward and the shiny side facing down.
Gently close the CD door. The unit will start to play the first track automatically. (If no disc is loaded, it will display “


 ”. If a CDG is loaded, the CDG indicator will light up.)
Note: - Never place anything except a compact disc in the disc tray. Foreign objects can damage the unit. - Only place one disc on the disc tray at a time.
(Refer to the Trouble Shooting Guide if a disc is loaded but the total tracks do not appear.)
PLAY/PAUSE
Adjust MASTER VOLUME control on your unit, TV or audio system to a comfortable level.
To start playing, press the PLAY/PAUSE button. The first track [ 

 ] and the PLAY/PAUSE LED will be lit. To temporarily stop playing, press the PLAY/PAUSE button. The PLAY/PAUSE LED Indicator will flash.
 To resume play, press this button again.
Note: - Pressing pause repeatedly when a CD+G is playing may cause distorted lyrics on your TV screen. Any distortion will remain on the TV screen until it is refreshed either during an instrumental break or the song is stopped and/or the song is started from the beginning.
STOP
If the STOP button is pressed in the course of playing, the disc will cease to play. (The total number of tracks will be shown on the LED window.)
MASTER VOLUME
Rotate to the MASTER VOLUME control to obtain the desired sound level.
Note: The MIC Volume must be adjusted simultaneously with the master volume level.
SKIP (For both CD and CDG discs)
During STOP mode, you can skip forward or back to your desired track number by pressing the
SKIP buttons( |
- SKIP - |
). |
 To resume playing the selected song, press PLAY/PAUSE button.
SEARCH (For audio CD disc only)
When playing any audio CD, press and hold the SKIP button ( 
 -SKIP-
 ). The CD will search at high speed in the forward or backward direction. Normal play will continue when you release the button.
REPEAT
To repeat the track currently playing, press the REPEAT button once. The REPEAT LED will start to flash. To repeat all tracks, press the REPEAT button twice. The REPEAT LED will light up and stay lit. Press the PLAY/PAUSE button to begin.
 To clear the REPEAT function, press the REPEAT button again. The REPEAT LED will turn off.
E7

CD OR CD+G OPERATION
PROGRAM
Use this button to program and play back songs in a preselected order.
Step 1: Programming should be done in the stop mode only. Press the PROGRAM button until the PROGRAM LED flashes, the track will read [
 ].
].
Step 2: Press the SKIP buttons ( 
 SKIP -
 ) to select a desired track.
Step 3: Press PROGRAM button to confirm entry. You can repeat the same steps up to a maximum of 20 tracks.
Step 4: Press PLAY button when you have completed programming and you are ready to start singing.  Press the STOP button to clear all the programmed entries.
RANDOM
During STOP mode, press the RANDOM button and PLAY button to start the random play function. During playback, press the RANDOM button to activate the random play function and it will be started after the current track.
 Press the STOP button to clear the random function.
DISCO LIGHT OPERATION
To illuminate the disco light and get your desired lighting effect, slide the Disco Light slide button from the OFF position to your desired level.
KARAOKE FUNCTIONS
Sing along with the music by plugging in the provided microphone into either one of the microphone jacks on the unit.
Warning - Tapping or dropping the microphone while it is on can permanently damage your microphone. Resist the urge to swing the microphone around by the cord!
MIC VOLUME
Adjust the MIC VOLUME control to a desired level and obtain the best performance.
 Warning - To avoid Microphone feedback please avoid being too close to the speaker.
ECHO
Adjust the ECHO control to enhance your voice for a concert hall effect.
BALANCE
Adjust the BALANCE control between the prerecorded singer’s voice and the music when using a multiplex karaoke disc. (Please see Glossary of term to learn more about multiplex on our website.)
AUTO VOICE CONTROL
AUTO VOICE CONTROL can be activated by rotating the Auto Voice Control. The vocals on the multiplex recording will be muted when the singer starts to sing through the microphone. When the singer stops to sing, the vocals will resume to normal.
AUX IN OPERATION
Your Singing Machine is designed to connect your favorite Digital Music device (e.g. iPod/MP3 player, etc.) You can connect your device by using an appropriate cable ( 3.5mm audio cable not included).
AUX IN function can always be switched ON once the audio cable is plugged.
Note: Monitor will be turned off when the audio cable is plugged.
MASTER VOLUME
Rotate to the MASTER VOLUME control to obtain the desired sound level.
Warning - To avoid the over-burst amplified volume output or possible over-tuned sound crack, you are recommended to adjust the Digital Music device volume to one third or lower at the beginning.
ENGLISH
E8

ENGLISH
TROUBLE SHOOTING GUIDE
If you have followed the instructions and are having difficulty operating the unit, locate the PROBLEM in the left column below. Check the corresponding POSSIBLE CAUSE column to locate and remedy the problem.
PROBLEM |
POSSIBLE CAUSE |
SOLUTION |
||
|
|
|
|
|
No power when |
No power plug connection at |
Insert the power plug into the AC |
||
POWER is on. |
theAC outlet. |
outlet. |
||
|
|
|
|
|
No power when plugged |
The AC outlet may not have |
Check the outlet with a working |
||
in. |
power. |
lamp or other electrical appliance. |
||
|
|
|
|
|
|
|
Volume control is set to |
Turn up the volume. |
|
|
|
minimum. |
|
|
|
|
|
|
|
|
|
Volume control on TV set/PA |
Turn up the volume at TV/PA |
|
No sound. |
system is set to minimum. |
system. |
||
|
|
|||
TV set/PA system power is |
Turn on the power at TV/PAsystem. |
|||
|
|
|||
|
|
OFF. |
|
|
|
|
A U X O U T j a c k s n o t |
F o l l o w d i r e c t i o n s ‘ A u d i o |
|
|
|
connected. |
Connection’page. |
|
|
|
|
|
|
|
|
Disc is inserted upside down. |
Insert disc correctly. |
|
|
|
|
|
|
|
|
Disc is dirty. |
Wipe clean with soft cloth. |
|
|
|
|
|
|
|
|
Disc is scratched. |
Use a new disc. |
|
|
|
|
|
|
CD PLAYER |
Disc is warped. |
Use a new disc. |
||
|
|
|||
Cannot work normally or |
|
A nonstandard disc is |
Only use discs bearing standard |
|
“aai”, “aa”, or “aaa” are |
||||
displayed. |
inserted. |
logo. |
||
|
|
|||
|
|
Lens is dirty. |
Use a CD lens cleaner. |
|
|
|
|
|
|
|
|
Moisture has formed inside |
Wait about 20 to 30 minutes to let it |
|
|
|
the CD deck. |
dry out. |
|
|
|
|
|
|
|
|
Singing Machine needs to be |
Disconnect the machine from |
|
|
|
reset. |
power source for 30 seconds. |
|
|
|
|
|
|
E9
TROUBLE SHOOTING GUIDE
PROBLEM |
POSSIBLE CAUSE |
SOLUTION |
|
|
|
|
|
|
Source Selection on your TV |
Select AUX IN as the source for |
|
No sound - If audio is |
or home stereo is not set |
your TV or home stereo. |
|
properly. |
|||
|
|||
going through TVor |
|
|
|
|
Follow direction on ‘Audio |
||
home stereo. |
Improper Connection to |
||
|
stereo system or PA. |
Connection’ page for connecting to |
|
|
a home stereo system. |
||
|
|
||
|
|
|
|
|
Video cable is not connected |
Connect the video cable to the |
|
|
Singing Machine’s VIDEO OUT |
||
|
properly to the TV. |
and to the TV VIDEO IN. |
|
|
|
||
|
Source selector on TV is not |
Using your TV Remote to select |
|
|
set to VIDEO. |
VIDEO input. |
|
|
|
|
|
|
|
Connect from VIDEO OUT of the |
|
No song lyrics appear |
|
system to the VIDEO IN on your |
|
on the TV screen. |
TV does not have video line |
RF Modulator and then to the TV |
|
|
input. |
cable input. Check the disc to |
|
|
be sure it is a CDG. |
||
|
|
||
|
|
|
|
|
A CDG is loaded but the |
Check disc to be sure it is clean. |
|
|
CDG indicator is not lit. |
||
|
|
||
|
|
|
|
|
|
Adjust mic volume to max, and |
|
|
Mic volume control. |
then re-adjust to a comfortable |
|
No sound from mic. |
|
level. |
|
|
Mic is off. |
Turn on mic with the ON/OFF |
|
|
switch located on the microphone. |
||
|
|
||
|
|
|
ENGLISH
E10

ENGLISH
3.5 


3
4 |
AUX IN SECTION |
.5mm stereo headphone jack |
4 


7.2 lbs / 3.3 kgs
E11
 Loading...