

Page 1

SMI440-ENG-SPA v1_Layout 1 7/15/13 12:54 PM Page 1
SMI440BT
INSTRUCTION MANUAL
MANUAL DE INSTRUCCIONES
Distributed by SMC Global®
Distribuido por SMC Global®
SMC Global® is a registered trademark or The Singing Machine Co., Inc.
SMC Global® es marca registrada de The Singing Machine Co., Inc.
Page 2
SMI440-ENG-SPA v1_Layout 1 7/15/13 12:54 PM Page 2
Warnings
CAUTION
RISK OF ELECTRIC SHOCK
DO NOT OPEN
CAUTION: TO REDUCE THE RISK OF ELECTRIC SHOCK, DO NOT
EMOVE COVER (OR BACK). NO USER-SERVICEABLE PARTS
R
INSIDE. REFER SERVICING TO QUALIFIED SERVICE PERSONNEL.
The Caution marking is located on the bottom panel.
ANGEROUS VOLTAGE: The lightning flash with arrowhead
D
symbol within an equilateral triangle is intended to alert the
user to the presence of uninsulated dangerous voltage
ithin the product’s enclosure that may be of sufficient
w
magnitude to constitute a risk of electric shock to persons.
TTENTION: The exclamation point within an equilateral
A
triangle is intended to alert the user to the presence of
important operating and maintenance (servicing)
nstructions in the literature accompanying this product.
i
FCC WARNING:
This device complies with part 15 of the FCC Rules. Operation is subject
to the following two conditions: (1) This device may not cause harmful
interference, and (2) this device must accept any interference received,
including interference that may cause undesired operation.
Warning: Changes or modifications to this unit not expressly approved
by the party responsible for compliance could void the user’s authority
to operate the equipment.
ARNING: TO PREVENT FIRE OR SHOCK HAZARD, DO NOT EXPOSE
W
THIS UNIT TO RAIN OR MOISTURE.
CAUTION: TO PREVENT ELECTRIC SHOCK, MATCH WIDE BLADE OF
PLUG TO WIDE SLOT AND FULLY INSERT.
NOTE: This equipment has been tested and found to comply with the
imits for a Class B digital device, pursuant to part 15 of the FCC Rules.
l
These limits are designed to provide reasonable protection against
harmful interference in a residential installation. This equipment
enerates, uses and can radiate radio frequency energy and, if not
g
installed and used in accordance with the instructions, may cause harmful
interference to radio communications. However, there is no guarantee
hat interference will not occur in a particular installation. If this
t
equipment does cause harmful interference to radio or television
reception, which can be determined by turning the equipment off and
n, the user is encouraged to try to correct the interference by one or
o
more of the following measures:
• Reorient or relocate the receiving antenna.
Increase the separation between the equipment and receiver.
•
• Connect the equipment into an outlet on a circuit different from that
to which the receiver is connected.
Consult the dealer or an experienced radio/TV technician for help.
•
• The rating information is located at the bottom of the unit.
INDUSTRY CANADA NOTICE:
This device complies with Industry Canada Iicense-exempt RSS standard(s).
Operation is subject to the following two conditions:
1. This device may not cause interference, and
2. This device must accept any interference, including interference that
may cause undesired operation of the device.
CAN ICES-3(B)/NMB-3(B)
Important Safety Information
1. Read these Instructions.
2. Keep these Instructions.
3. Heed all Warnings.
4. Follow all Instructions.
5. Do not use this apparatus near water.
6. Clean only with a dry cloth.
7. Do not block any of the ventilation openings. Install in
accordance with the Manufacturer’s instructions.
8. Do not install near any heat sources such as radiators,
heat registers, stoves, or other apparatus (including
amplifiers) that produce heat.
9. Do not defeat the safety purpose of the polarized or
grounding-type plug. A polarized plug has two blades
with one wider than the other. A grounding type plug has
two blades and a third grounding prong. The wide blade
or the third prong are provided for your safety. When the
provided plug does not fit into your outlet, consult an
electrician for replacement of the obsolete outlet.
10. Protect the power cord from being walked on or pinched
particularly at plugs, convenience receptacles, and the
point where they exit from the apparatus.
11. Only use attachments/accessories specified by the
manufacturer.
12. Use only with a cart, stand, tripod, bracket, or table
specified by the manufacturer, or sold with the apparatus.
When a cart is used, use caution when moving the
cart/apparatus combination to avoid injury from tip-over.
13. Unplug this apparatus during lightning storms or when
unused for long periods of time.
14. Refer all servicing to qualified service personnel. Servicing
is required when the apparatus has been damaged in any
way, such as power-supply cord or plug is damaged,
liquid has been spilled or objects have fallen into the
apparatus, the apparatus has been exposed to rain or
moisture, does not operate normally, or has been
dropped.
15. WARNING: To reduce the risk of fire or electric shock, do
not expose this apparatus to rain or moisture. Do not
place objects filled with water, such as a vase, on the
apparatus.
16. The AC mains plug is used as the power disconnect
device and it should remain readily accessible and
operable during intended use. In order to completely
disconnect the apparatus from power, the mains plug
should be completely removed from the AC outlet
socket.
17. CAUTION: To reduce the risk of fire or explosion, do not
expose batteries to excessive heat such as sunshine, fire
or other heat sources.
1
Page 3
654
14
8
9
3
7
2
10
1 1
11
13
12
SMI440-ENG-SPA v1_Layout 1 7/15/13 12:54 PM Page 3
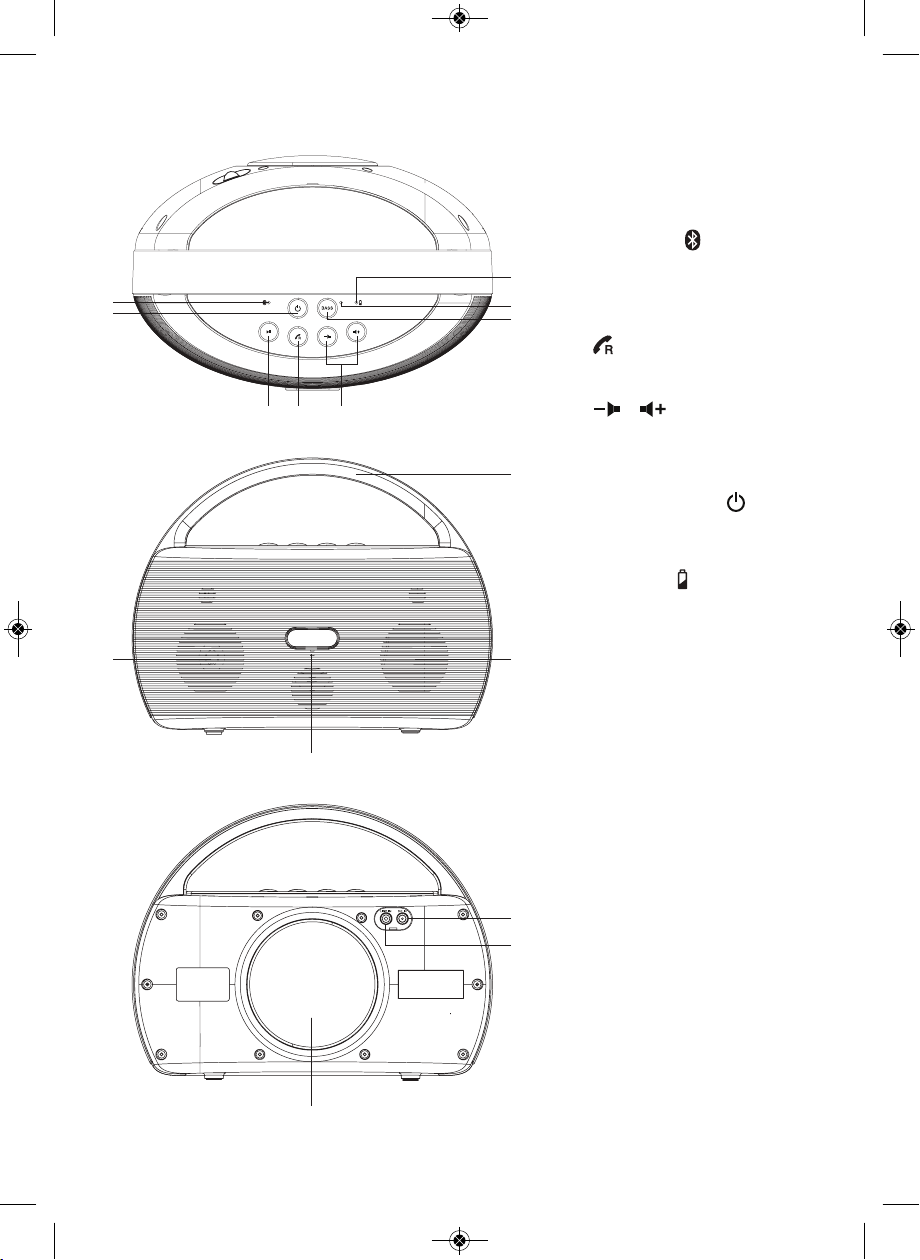
Location of Controls
1. Main Speakers
2. Microphone for calls
3. Bluetooth Indicator
4. Bluetooth Pairing/
Play/Pause4;Button
5. Receive Call/Transfer
Call/Redial Call/End Call
6. / Volume (For
Bluetooth Mode)
Buttons
7. Power On/Off Button
8. BASS Button
9. Charging Indicator
(Red for charging; Green
for fully charged)
10. Carrying Handle
11. Subwoofer
12. LINE IN Jack
13. DC IN Jack
14. BASS Indicator
2
Page 4
u
SMI440-ENG-SPA v1_Layout 1 7/15/13 12:54 PM Page 4
Installation
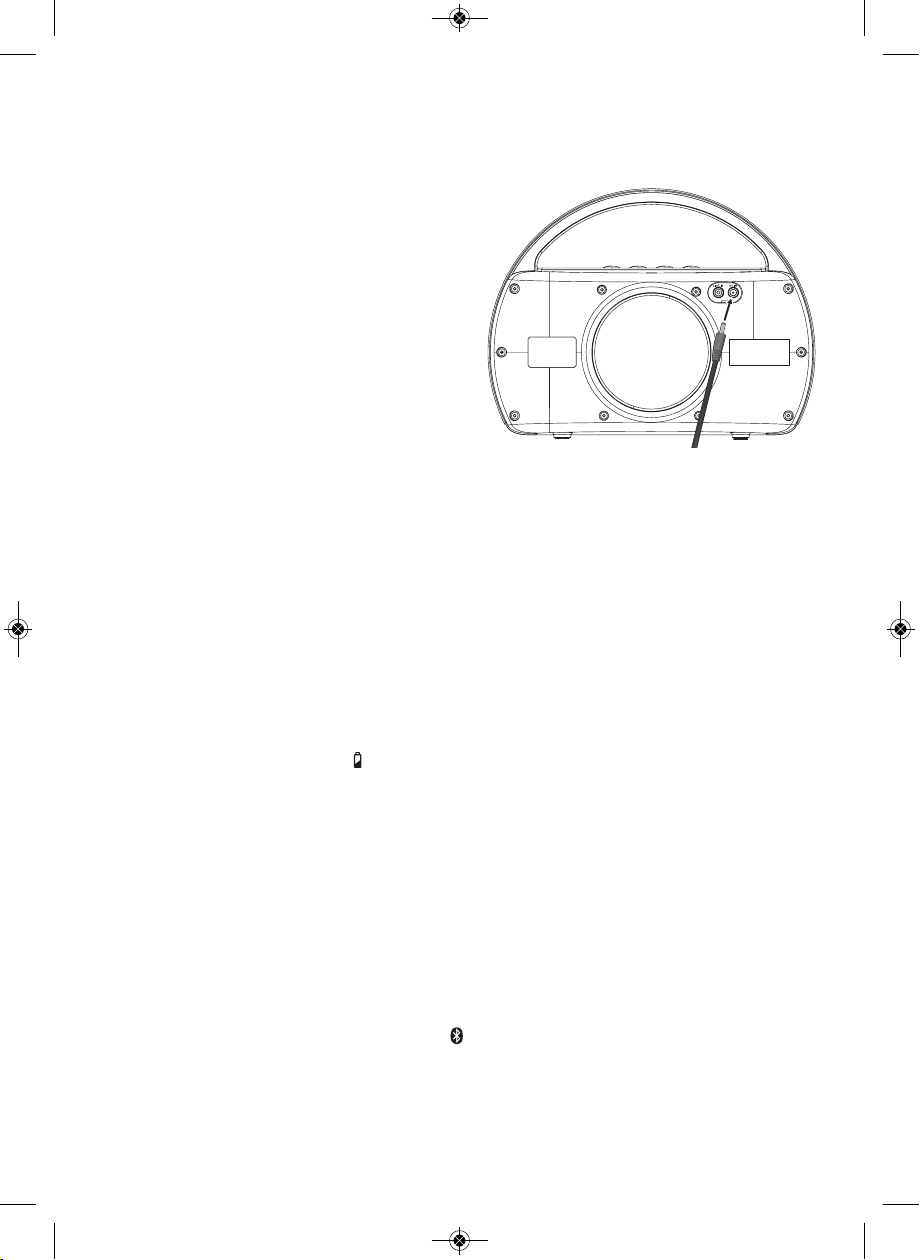
Plugging the Unit In/Recharging the Battery
Insert the small end of the AC
1
adapter into the DC IN jack on the
rear of the unit. Insert the other
end (with the 2 blades) into a
conveniently located AC outlet
having 110-240V AC, 50/60Hz.
Notes:
• Only use the supplied AC adapter. Failure
to do so may cause a fire or damage the
unit.
• The AC adapter included with this unit is
for its use only. Do not use it with other
equipment.
• Turn off the unit before unplugging the AC adapter from the unit so as to avoid the
unit being damaged.
• When the unit is not going to be used for a long time, disconnect the AC adapter
from the AC outlet.
• If the unit acts erratically or malfunctions, unplug the unit, wait 20 seconds and plug
it back in.
• Never use an AC adapter that is damaged. Route power lead in a safe manner and
make sure it is not subjected to trapping or pinching. If the power lead is damaged,
refer to a qualified service agent.
The unit has a built-in rechargeable battery (lithium-polymer). With the unit OFF,
2
charge the built-in battery for at least four hours before using the device for the
first time. The Charging indicator will turn from red to green when the built-in
battery becomes fully charged.
Notes:
• The built-in battery can only be recharged when the unit is off.
• While using the built-in battery, the environmental temperature should be 5°C
(41°F) to 35°C (95°F).
• To get the longest service life from the built-in battery, charge at indoor temperature.
• The built-in battery in this device may present a risk of fire or chemical burn if
mistreated. Do not disassemble, heat above 100°C (212°F), or incinerate.
• The battery should not be exposed to excessive heat such as sunshine, fire or the like.
Do not throw batteries in fire!
• Before throwing away any batteries, consult your local community for specific recycling.
• When the battery is low, the Bluetooth indicator will blink yellow. The unit will
switch to Standby mode automatically when the battery is low.
CAUTION: Danger of explosion if battery is incorrectly replaced. Replace only with the
same or equivalent type.
3
Page 5
u
w
SMI440-ENG-SPA v1_Layout 1 7/15/13 12:54 PM Page 5
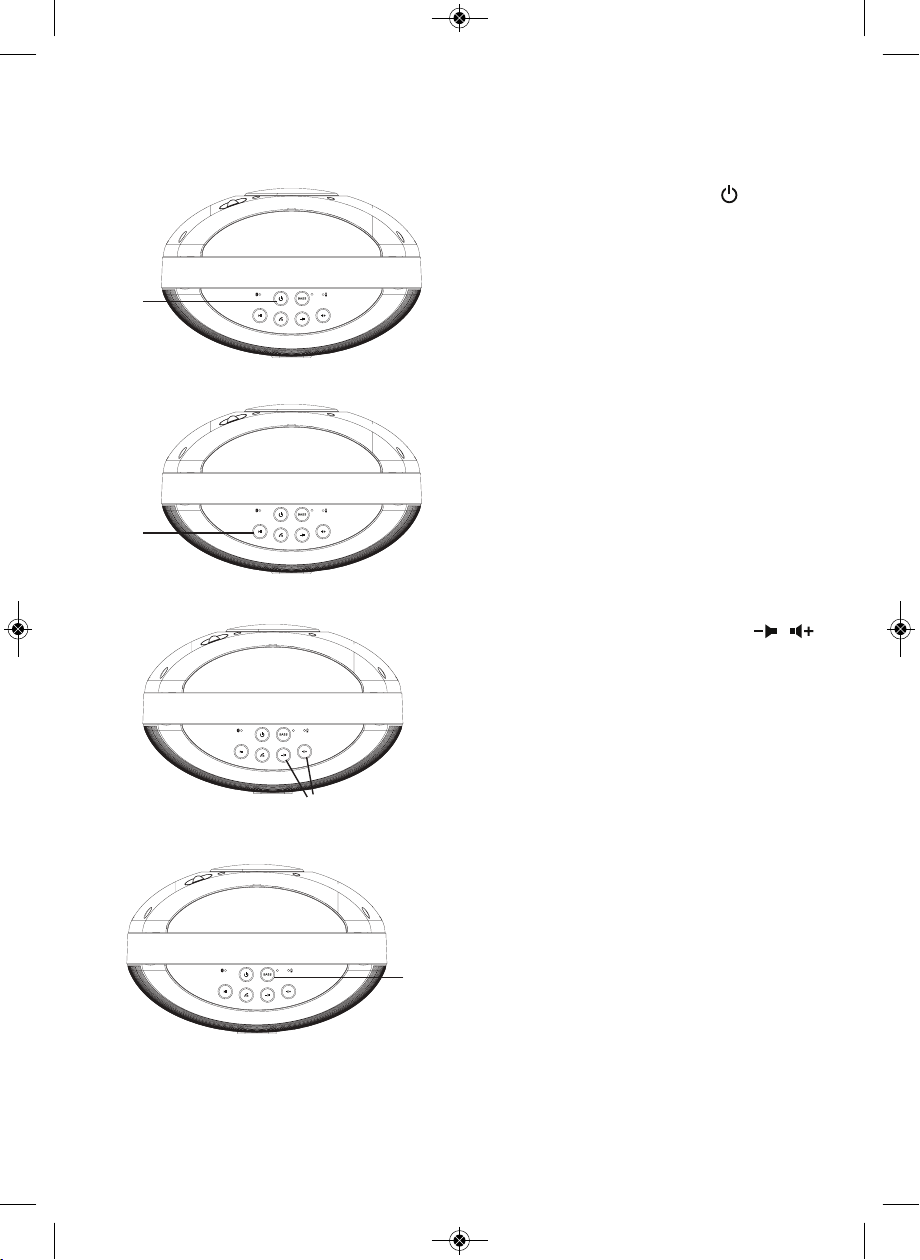
Operation
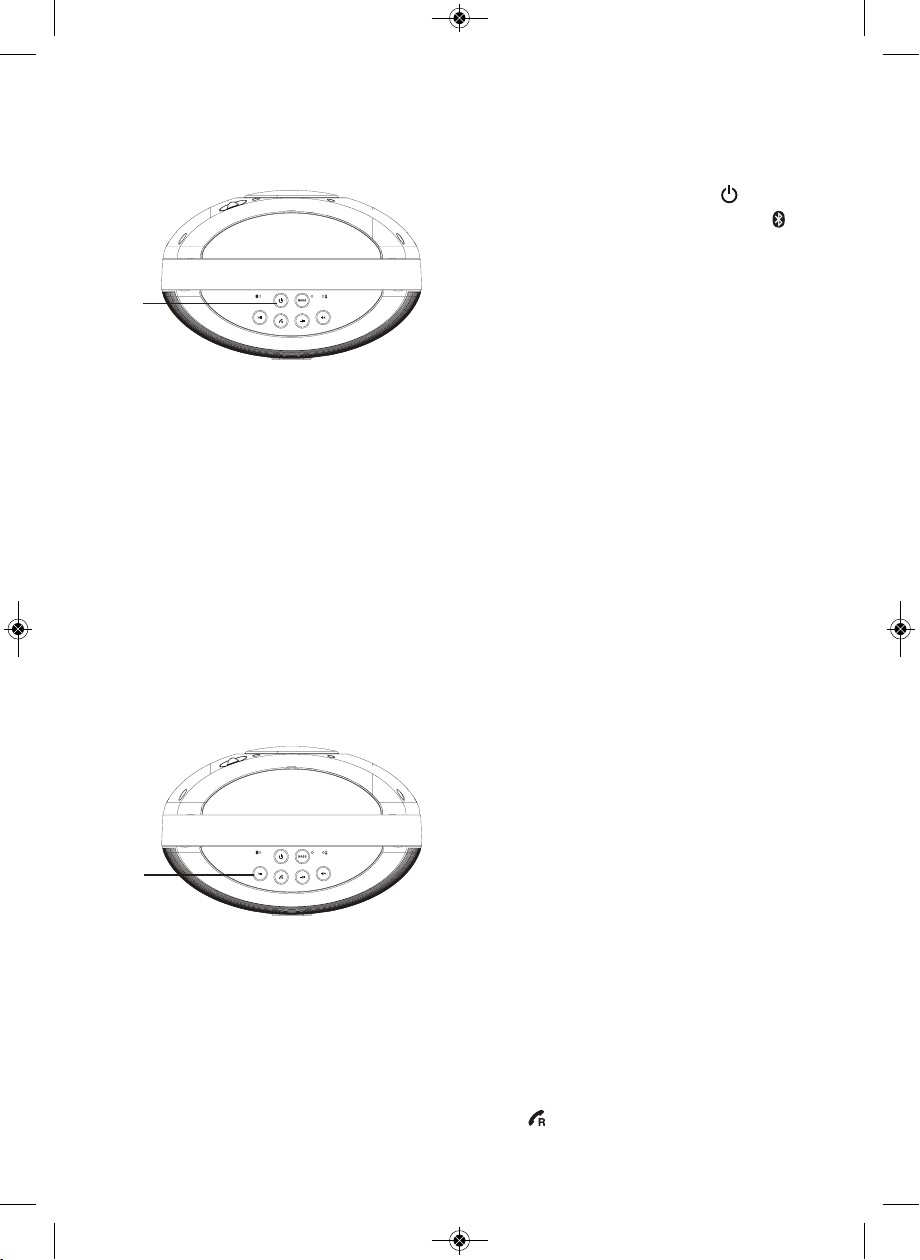
Pairing a Bluetooth Device
1
Tip: If you want to connect your
Bluetooth speaker to another Bluetooth
audio device, you need to disconnect
current device first and follow the steps
at right to make a new connection.
2
Press the Power On/Off button to
turn the unit on; the Bluetooth
indicator will blink yellow. After four
seconds, it will slowly blink blue, and
then after six seconds, it will start
blinking rapidly to indicate it is in
Pairing mode.
On the Bluetooth device, enable
Bluetooth and select “OUTDOOR
SPEAKER” from the Device List.
(Refer to the user manual of the
device to be connected for detailed
operations.) Press the Bluetooth
Pairing/Play/Pause4;button to
initiate pairing. If the Bluetooth
device prompts for a passcode, use
“0000”. Some Bluetooth devices will
ask you to accept the connection. If
the units are paired properly, the
speaker will beep twice. If it failed, the
Bluetooth indicator will blink slowly.
If the pairing fails, perform the following:
Press and hold the Bluetooth Pairing/
Play/Pause4;button until the
3
Bluetooth indicator blinks quickly to
enter the Pairing mode. On the
Bluetooth device, enable Bluetooth
and select “OUTDOOR SPEAKER” from
the Device List (see step 2 above).
On some devices such as computers, once paired you must select the unit from the
Bluetooth menu and choose “Use as Audio Device (stereo)” or similar. Pairing remains
intact when the unit and/or your Bluetooth device is taken out of communication range.
An active connection will be re-established when your Bluetooth device returns within
range. When the Bluetooth function of your Bluetooth enabled device is turned on
again, reconnection can be achieved by pressing the button.
4
Page 6
u
v
w
x
SMI440-ENG-SPA v1_Layout 1 7/15/13 12:54 PM Page 6
Operation
U
s
i
n
g
a
B
l
u
e
t
o
o
t
h
D
e
v
i
c
e
1
2
Press the Power On/Off button to
turn the SMI440BT on. With a unit
paired (see previous section),
operate your Bluetooth device and
its sound will be heard through the
SMI440BT’s speakers.
Press the Bluetooth Pairing/Play/
Pause4;button to pause playback.
Press again to resume playback.
3
4
5
Adjust the volume using the
Volume buttons. You can also adjust
the volume on the device to which
you are paired.
Enhance the bass sound by pressing
the BASS button.
/
Page 7
SMI440-ENG-SPA v1_Layout 1 7/15/13 12:54 PM Page 7
Operation
R
e
c
e
i
v
i
n
g
/
D
i
a
l
i
n
g
a
P
h
o
n
e
C
a
l
l
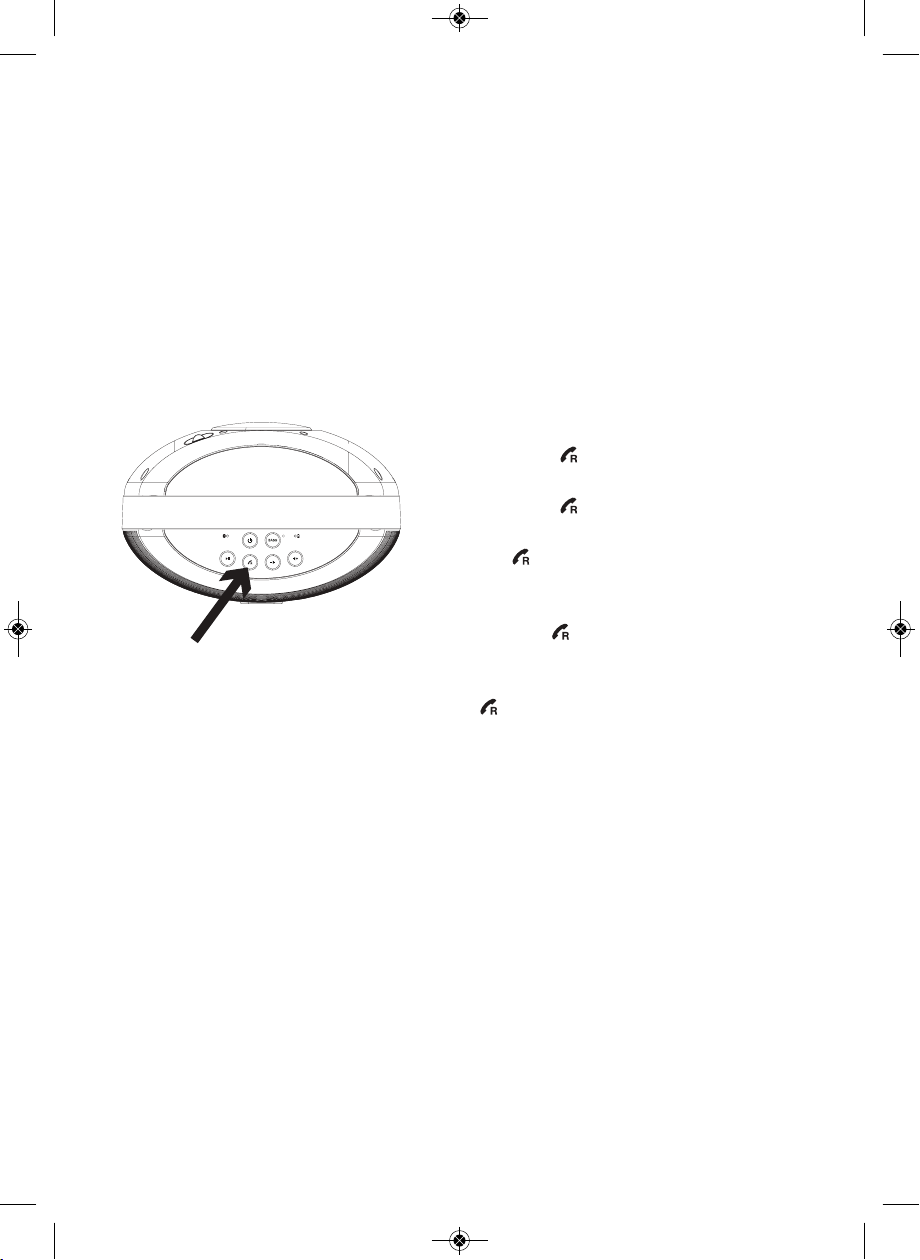
This unit is equipped with a built-in
microphone (located below the brand plate
on front panel), which allows you to make
or end calls of a connected mobile phone
through this unit. Make sure your Bluetoothenabled mobile phone is paired with the
unit. When there is an incoming call to the
connected mobile phone, you will hear an
incoming call alert tone from the unit.
To Use This Feature:
1. Press the button to answer the
2. Press the button again to end call.
3. To reject the incoming call, press and hold
4. To transfer the sound between the
5. To redial the last number retained in the
incoming call.
the button.
mobile phone and the unit, press and
hold the button during a call.
memory of the mobile phone, press the
button twice.
Notes:
• Re-dialing function is unavailable if there
is no dial record feature in your mobile
phone.
• This unit will not operate or may operate
improperly with some Bluetooth mobile
phones/audio players.
• If the conversation is not clear, try to
move closer to the microphone (located
below the brand plate on front panel).
6
Page 8

u
v
w
x
SMI440-ENG-SPA v1_Layout 1 7/15/13 12:54 PM Page 8
Operation
U
s
i
n
g
t
h
e
L
i
n
e
I
n
J
a
c
k
1
2
Press the Power On/Off button to
turn the SMI440BT on.
Insert one end of an audio cable
(not included) into the LINE OUT or
Headphone jack on your external
audio unit and the other end into the
LINE IN jack on the rear of the
SMI440BT; the unit will automatically
switch to Line In mode. The Bluetooth
indicator’s color will change to
yellow, indicating that the unit is in
Line In mode.
3
4
5
7
Start playback of the external unit
and the external audio unit’s output
sound will be heard through the
SMI440BT’s speakers.
The
used in the Line-in mode. To adjust
volume, use the volume control on
the external audio unit.
Enhance the bass sound by pressing
the BASS button.
To stop playback, disconnect the line
in cable from the Line In jack; the
unit will switch to Bluetooth mode
automatically. The Bluetooth indicator
will light solid blue.
Volume buttons are not
/
Page 9

SMI440-ENG-SPA v1_Layout 1 7/15/13 12:54 PM Page 9
Troubleshooting Guide
Should this unit exhibit a problem, check the following before seeking service:
No Power
• Power is not on; press the Power On/Off button to turn the power on.
• Make sure unit is connected to AC power.
• Make sure the batteries are recharged (if not connected to AC power).
No Sound – General
• External device’s volume is set to minimum; raise volume.
• The SMI440BT’s volume is set to minimum; raise volume.
• The audio cable is plugged in. Unplug cable if not using Line In function.
The Bluetooth device cannot pair or connect with the unit.
• You have not activated the Bluetooth function of your device. Refer to the user
manual of your device to activate Bluetooth function.
• The unit is not in pairing mode. Press and hold the Bluetooth Pairing/Play/Pause4;
button until the Bluetooth indicator blinks fast.
• The unit is already connected with another Bluetooth device; disconnect that device
and then try again.
Unit acts erratically or does not react when buttons are pressed.
• Remove AC adapter, wait 20 seconds and reconnect. Then turn on the unit again.
8
Page 10

SMI440-ENG-SPA v1_Layout 1 7/15/13 12:54 PM Page 10
Specifications
GENERAL
Power......................................................................................................... 110-240V AC, 50/60Hz
Power Output..................................................................................................................... DC 15V 2A
Max. Output Power.............................................................. 2x5 W (Main) + 20W (Subwoofer)
Dimensions ............................................... 13.11 x 8.46 x 9.88 inches (33 x 21.5 x 25.1 cm)
Weight........................................................................................................................ 4.84 lbs (2.2 kg)
RECHARGEABLE BATTERY
Battery Type ............................................................. 11.1V 1700mAh Lithium Polymer Battery
Charging Voltage ...................................................................................................................... 15V DC
Operating Time........................................ Approx. 4 hours at 50% volume after fully charged
Charging Time ........................................................................................................ Approx. 3.5 hours
BLUETOOTH
Bluetooth Version ................................................................................................................ V2.1+EDR
Working Distance....................................................... Up to 10 meters measured in open space
.......................................................................... (wall and structures may affect range of device)
Specifications are subject to change without notice.
9
Page 11

SMI440-ENG-SPA v1_Layout 1 7/15/13 12:54 PM Page 11
10
Page 12

SMI440-ENG-SPA v1_Layout 1 7/15/13 12:54 PM Page 12
Advertencias
PRECAUCIÓN
RIESGO DE DESCARGA ELÉCTRICA
NO ABRIR
PRECAUCIÓN: PARA REDUCIR EL RIESGO DE DESCARGAS ELÉCTRICAS, NO
QUITE LA CUBIERTA (NI LA TAPA POSTERIOR) NO HAY PIEZAS REPARABLES
OR EL USUARIO DENTRO. DERIVE LAS REPARACIONES A PERSONAL DE
P
SERVICIO CALIFICADO
AVISO DE LA FCC:
Este aparato cumple con la parte 15 de las Normas de la FCC. El
funcionamiento está sujeto a las dos condiciones que figuran a
continuación: (1) Es probable que no cause interferencia perjudicial y (2)
deberá aceptar cualquier interferencia recibida, incluyendo la interferencia
que pueda llegar a causar un funcionamiento indeseado.
Advertencia: Los cambios y modificaciones a esta unidad que no estén
aprobados expresamente por la parte responsable del cumplimiento
podrían anular la autorización del usuario para utilizar el equipo.
Las marcas de Precaución se ubican en el panel inferior.
.
ENSIÓN PELIGROSA: La luz intermitente con símbolo de flecha
T
dentro de un triángulo pretende alertar al usuario de la presencia
e tensión peligrosa no aislada, dentro del paquete del producto,
d
que puede ser de magnitud suficiente para constituir un riesgo
de descarga eléctrica para las personas.
ATENCIÓN: El signo de exclamació n dentro de un triángulo
pretende alertar al usuar io de la presencia de instru cciones
mportantes de operación y mantenimiento (reparaciones) en el
i
material que acompaña a este producto.
N
establecidos para los dispositivos digitales Clase B, de acuerdo con el
Apartado 15 de las normas de la FCC. Estos límites fueron pensados para
p
instalación residencial. Este equipo genera, usa y puede emitir energía
de radio frecuencia y, si no se lo instala y utiliza de conformidad con las
i
radiales. No obstante, no existe ninguna garantía de que no se produzca
interferencia en una instalación en particular. Si este equipo provoca
i
determinarse apagando y encendiendo el equipo, el usuario puede
intentar corregir la interferencia de alguna/s de las siguientes maneras:
•
• Aumente la distancia entre el equipo y el receptor.
• Conecte el equipo a un tomacorriente de un circuito distinto al que
• Consulte al distribuidor o a un técnico experimentado de radio y
•
Este dispositivo cumple con las normas industriales RSS exentas de
licencia de Canadá. La operación está sujeta a las dos condiciones
siguientes:
1. Este dispositivo no puede causar interferencias perjudiciales y
2. Este dispositivo debe aceptar cualquier interferencia recibida,
CAN ICES-3(B)/NMB-3(B)
DVERTENCIA: PARA EVITAR INCENDIOS O PELIGROS DE DESCARGA, NO
A
EXPONGA ESTA UNIDAD A LA LLUVIA O HUMEDAD.
RECAUCIÓN: PARA EVITAR DESCARGAS ELÉCTRICAS, INSERTE
P
OMPLETAMENTE UNA HOJA ANCHA DEL ENCHUFE A LA RANURA ANCHA.
C
OTA: Este equipo fue probado y se concluyó que cumple con los límites
roporcionar protección razonable ante la interferencia perjudicial en una
nstrucciones, puede causar interferencia perjudicial a las comunicaciones
nterferencia perjudicial a la recepción de radio o televisión, lo cual puede
Reoriente la antena receptora o ubíquela en otro lugar.
stá conectado el receptor.
e
televisión para que lo asesore.
La información de clasificación está ubicada en la parte inferior de la
unidad.
incluidas aquellas que puedan provocar un funcionamiento no
deseado.
Información importante sobre seguridad
1. Lea estas instrucciones.
2. Conserve estas instrucciones.
3. Preste atención a todas las advertencias.
4. Siga todas las instrucciones.
5. No utilice este artefacto cerca del agua.
6. Límpielo únicamente con un paño seco.
7. No obstruya las aberturas para ventilación. Instálelo de
acuerdo con las instrucciones del fabricante.
8. No instale cerca de fuentes de calor, como radiadores, rejillas
de calefacción, estufas u otros aparatos (incluso amplificadores)
que produzcan calor.
9. No desafíe el fin de seguridad del enchufe polarizado o de
conexión a tierra. Un enchufe polarizado tiene dos clavijas y una
es más ancha que la otra. El enchufe de conexión a tierra tiene
dos clavijas, y una tercera punta a tierra. La clavija ancha o la
tercera punta se suministran para su seguridad. Si el enchufe
suministrado no coincide con su tomacorriente, consulte con
un electricista para reemplazar el tomacorriente obsoleto.
10. Evite pisar o apretar el cable de alimentación, especialmente
en los enchufes, tomacorrientes y en el punto por donde salen
del artefacto.
11. Utilice sólo los complementos y accesorios especificados por
el fabricante.
12. Utilice la unidad sólo con el carro, soporte,
trípode, repisa o mesa recomendados por el
fabricante, o que se vendan junto con el
producto. Cuando se utiliza un carro, tenga cuidado cuando
mueva el carro y artefacto junto a para evitar lesiones
producidas por la caída del producto.
13. Desenchufe este artefacto durante las tormentas eléctricas o
cuando no se lo utilice durante períodos prolongados.
14. Derive todas las reparaciones al personal de reparaciones
calificado. Es necesario reparar el artefacto cuando se
encuentra dañado; por ejemplo, cuando el cable de suministro
de energía o el enchufe están dañados, cuando se derrama
líquido sobre la unidad o caen objetos dentro del mismo,
cuando el producto ha estado expuesto a la lluvia o a la
humedad, cuando no funciona con normalidad o cuando se ha
caído.
15. ADVERTENCIA: Para reducir el riesgo de incendio o descarga
eléctrica, no exponga este artefacto a la lluvia o la humedad.
No coloque objetos llenos de agua, como jarrones, sobre el
aparato.
16. El enchufe de conexión de CA se utiliza como dispositivo de
desconexión eléctrica y deberá estar siempre accesible y en
funcionamiento durante el uso previsto. Para desconectar
completamente el aparato de la electricidad, el enchufe de
conexión deberá quitarse por completo del tomacorriente de CA.
17. PRECAUCIÓN: Para reducir el riesgo de incendio o explosión
no exponga las baterías al calor excesivo, como al rayo del sol,
fuego u otras fuentes de calor.
11
Page 13

654
14
8
9
3
7
2
10
1 1
11
13
12
SMI440-ENG-SPA v1_Layout 1 7/15/13 12:54 PM Page 13
Ubicación de controles
1. Altavoces principales
2. Micrófono para llamadas
3. Indicador de Bluetooth
4. Botón Emparejamiento de
Bluetooth/Reproducir/
Pausar (Bluetooth Pairing/
Play/Pause)
5. Recibir llamada/
Transferir llamada/
Remarcar llamada/
Finalizar llamada
6. / Volumen (Para
modo Bluetooth)
7. Botón de Encendido/
Apagado (On/Off)
8. Botón de graves (BASS)
9. Indicador de carga (El
rojo indica la carga en curso;
el verde carga completa)
10. Manija para transportar
11. Parlante auxiliar de graves
12. ENTRADA DE LÍNEA
13. ENTRADA DE CC
12
14. Indicador de GRAVES (BASS)
Page 14

u
SMI440-ENG-SPA v1_Layout 1 7/15/13 12:54 PM Page 14
Instalación
Enchufar la unidad/Recargar las pilas
Coloque el extremo pequeño del
adaptador de CA en la ENTRADA DE CC
1
en la parte trasera de la unidad.
Introduzca el otro extremo (con 2
clavijas) en un tomacorriente con CA,
correctamente ubicado, y que posea
110-240V de CA, 50/60Hz.
Nota:
• Sólo utilice el adaptador de CA provisto. Si no
lo hace puede causar un incendio o que la
unidad se dañe.
• El adaptador de CA que viene con esta
unidad sólo se provee para uso. No lo utilice
con otro equipo.
• Apague la unidad antes de desenchufar el adaptador de CA para evitar que se dañe la misma.
• Cuando la unidad no se vaya a utilizar por un largo periodo de tiempo, desconecte el adaptador
de CA del tomacorriente de CA.
• Si la unidad funciona incorrectamente o tiene mal funcionamiento, desconecte la unidad, espere
20 segundos y enchúfela nuevamente.
• Nunca utilice un adaptador de CA que esté dañado. Oriente el cable de alimentación de manera
segura y asegúrese de que no esté enredado o aplastado. Si el cable de alimentación está
dañado, consulte con un agente de reparaciones calificado.
La unidad posee pilas recargables incorporadas (Polímeros de Litio). Cuando la unidad está
APAGADA, cargue las pilas incorporadas por al menos cuatro horas antes de utilizar el
2
dispositivo por primera vez. El indicador de carga cambiará de rojo a verde cuando las
pilas incorporadas se carguen completamente.
Nota:
• Las pilas incorporadas sólo se pueden cargar cuando la unidad está apagada.
• Mientras utilice las pilas incorporadas, la temperatura ambiente debe ser de 5°C (41°F) a
35°C (95°F).
• Para lograr que las pilas incorporadas duren más tiempo, cárguelas a temperatura interior.
• Las pilas incorporadas en este dispositivo pueden presentar un riesgo de incendio o quemadura
química si no se utilizan correctamente. No desarme, caliente a más de 100° (212°F) o
incinere.
• La pila no deberá exponerse a calor excesivo como luz solar, fuego o fuentes similares. No
arroje las pilas al fuego.
• Antes de tirar las pilas a la basura, consulte con su comunidad local para el reciclado específico.
• Cuando las pilas tengan poca carga, el indicador de Bluetooth parpadeará en color amarillo.
La unidad cambiará a modo En Espera (Standby) automáticamente cuando las pilas tengan
poca carga.
PRECAUCIÓN: Peligro de explosión si la pila se reemplaza incorrectamente. Reemplace las pilas
con otras del mismo tipo o similares.
13
Page 15

u
w
SMI440-ENG-SPA v1_Layout 1 7/15/13 12:54 PM Page 15
Funcionamiento
Emparejar un dispositivo Bluetooth
1
2
Consejo: Si desea conectar su altavoz
Bluetooth a otro dispositivo de audio
Bluetooth, deberá desconectar el
dispositivo actual primero y luego seguir
los pasos que figuran a la derecha para
realizar una nueva conexión.
Oprima el botón Encendido/Apagado
(On/Off) para encender la unidad; el
indicador de Bluetooth parpadeará en
color amarillo. Luego de cuatro segundos,
lentamente parpadeará en color azul, y
luego de seis segundos, comenzará a
parpadear rápidamente para indicar que se
encuentra en el modo de Emparejamiento.
En el dispositivo Bluetooth, habilite
Bluetooth y seleccione “ALTAVOZ
EXTERIOR” de la lista de dispositivos. (Para
obtener el detalle de operaciones para
conectarse, consulte el manual de usuario
del dispositivo). Oprima el botón Emparejar
Bluetooth/Reproducir/Pausar (Bluetooth
Pairing/Play/Pause)4; para iniciar el
emparejamiento. Si el dispositivo Bluetooth
le solicita una contraseña de acceso, utilice
“0000”. Algunos dispositivos Bluetooth le
indicarán que acepte la conexión. Si las
unidades está emparejadas correctamente,
el altavoz emitirá dos pitidos. Si falló, el
indicador de Bluetooth parpadeará
lentamente.
Si el emparejamiento falla, realice lo siguiente:
Mantenga presionado el botón Emparejar
Bluetooth/Reproducir/Pausar (Bluetooth
3
Pairing/ Play/Pause)4;, hasta que el
indicador de Bluetooth parpadee
lentamente para ingresar al modo de
emparejamiento. En el dispositivo
Bluetooth, habilite Bluetooth y seleccione
“ALTAVOZ EXTERIOR” de la lista de
dispositivos (ver el paso 2 más arriba).
En algunos dispositivos como computadoras, una vez realizado el emparejamiento, debe
seleccionar la unidad del menú Bluetooth y elegir "utilizar como dispositivo de audio (estéreo) o
similar" (Use as Audio Device (stereo) or similar). El emparejamiento permanece intacto cuando la
unidad y/o su dispositivo Bluetooth sale del rango de comunicación. Se restablecerá una conexión
activa cuando su dispositivo Bluetooth vuelva dentro del rango. Cuando la función Bluetooth de su
dispositivo Bluetooth se vuelve a encender, se podrá volver a conectar presionando el botón .
14
Page 16

u
v
w
x
SMI440-ENG-SPA v1_Layout 1 7/15/13 12:54 PM Page 16
Funcionamiento
U
t
i
l
i
z
a
r
u
n
d
i
s
p
o
s
i
t
i
v
o
B
l
u
e
t
o
o
t
h
1
2
Oprima el botón de Encendido/
Apagado (On/Off) para encender
el SMI440BT. Con alguna unidad
emparejada (ver la sección anterior),
haga funcionar su dispositivo
Bluetooth. El sonido se escuchará a
través de los altavoces SMI440BT.
Oprima el botón Emparejar
Bluetooth/Reproducir/Pausar
(Bluetooth Pairing/Play/Pause)4;
para pausar la reproducción.
Presione nuevamente para retomar
la reproducción.
15
Ajuste el volumen con los botones de
3
Volumen
ajustar el volumen en el dispositivo
con el cual está emparejado.
Mejore el sonido grave presionado el
4
botón GRAVES (BASS).
. También puede
/
Page 17

SMI440-ENG-SPA v1_Layout 1 7/15/13 12:54 PM Page 17
Funcionamiento
R
e
c
i
b
i
r
/
R
e
a
l
i
z
a
r
u
n
a
l
l
a
m
a
d
a
t
e
l
e
f
ó
n
i
c
a
Esta unidad está equipada con un micrófono
incorporado (ubicado debajo de la placa de
marca en el panel frontal), que le permite
realizar o finalizar llamadas desde un teléfono
celular conectado a través de esta unidad.
Asegúrese de que el Bluetooth de su teléfono
celular esté emparejado con la unidad. Cuando
hay una llamada entrante al teléfono celular
conectado, escuchará un tono de alerta de
llamada entrante de la unidad.
Para utilizar esta función:
1. Oprima el botón para contestar la
2. Oprima el botón nuevamente para
3. Para rechazar la llamada entrante,
4. Para transferir el sonido entre el teléfono
5. Para marcar el ultimo número de teléfono
llamada entrante.
finalizar la llamada.
mantenga presionado el botón .
celular y la unidad, mantenga presionado el
botón durante una llamada.
guardado en la memoria del teléfono
celular, oprima el botón dos veces.
Nota:
• La función de rellamada no está disponible si
no hay función de grabación de marcado en
su teléfono celular.
• Esta unidad no funcionará o funcionará
incorrectamente con algunos teléfonos
celulares con Bluetooth/reproductores de
audio.
• Si la conversación no es clara, intente
acercarse más al micrófono (ubicado debajo
de la placa de marca en el panel frontal).
16
Page 18

u
v
w
x
SMI440-ENG-SPA v1_Layout 1 7/15/13 12:54 PM Page 18
Funcionamiento
U
t
i
l
i
z
a
c
i
ó
n
d
e
l
a
E
n
t
r
a
d
a
d
e
L
í
n
e
a
(
L
i
n
e
I
n
1
2
J
a
c
k
)
Oprima el botón de Encendido/
Apagado (On/Off) para encender
el SMI440BT.
Introduzca uno de los extremos del
cable de audio (no incluido) en la
SALIDA DE LINEA (LINE OUT) o en la
entrada para auriculares en la unidad
de audio externa y el otro extremo en
la ENTRADA de LÍNEA (LINE IN) en la
parte trasera del SMI440BT; la unidad
automáticamente cambiará al modo
Entrada de Línea (Line In). El color del
indicador de Bluetooth cambiará a
amarillo, indicando que la unidad está
en el modo Entrada de Línea.
17
Comience la reproducción de la unidad
3
de audio externa; el sonido de salida de
dicha unidad se escuchará a través de
los altavoces del SMI440BT.
Los botones de Volumen
se utilizan en el modo Entrada de línea
(Line-in). Para ajustar el volumen,
utilice el control de volumen de la
unidad de audio externa.
Mejore el sonido grave presionado el
4
botón GRAVES (BASS).
Para detener la reproducción,
5
desconecte el cable de entrada de
línea del conector; la unidad cambiará
automáticamente al modo Bluetooth.
El indicador de Bluetooth se iluminará
en color azul.
no
/
Page 19

SMI440-ENG-SPA v1_Layout 1 7/15/13 12:54 PM Page 19
Guía de Resolución de Problemas
Si esta unidad presentara un problema, lea el siguiente cuadro antes de llamar al
servicio técnico:
No hay energía
• La unidad no está encendida, presione el botón de Encendido/Apagado (On/Off)
para encenderla.
• Asegúrese de que la unidad esté conectada a la alimentación de CA.
• Asegúrese de que las pilas estén recargadas (si no está conectado a la alimentación
de CA ).
No hay sonido (General)
• El volumen del dispositivo externo está fijado en mínimo; suba el volumen.
• El volumen del SMI440BT está fijado en mínimo; suba el volumen.
• El cable de audio está enchufado. Desenchufe el cable si no está utilizando la función
de Entrada de Línea (Line In).
El dispositivo Bluetooth no puede emparejarse o conectarse con la unidad.
• No activó la función Bluetooth de su dispositivo. Consulte el manual de usuario de su
dispositivo para activar la función Bluetooth
• La unidad no está en modo de emparejamiento. Mantenga presionado el botón
Emparejar Bluetooth/Reproducir/Pausar (Bluetooth Pairing/Play/Pause) hasta que el
indicador de Bluetooth parpadee rápidamente
• La unidad ya está conectada con otro dispositivo Bluetooth; desconecte dicho
dispositivo y luego inténtelo nuevamente
La unidad funciona incorrectamente o no reacciona cuando se oprimen los botones.
• Quite el adaptador de CA, espere 20 segundos y vuelva a conectar. Luego encienda
la unidad nuevamente.
18
Page 20

SMI440-ENG-SPA v1_Layout 1 7/15/13 12:55 PM Page 20
Especificaciones
GENERAL
Energía....................................................................................................... 110-240V AC, 50/60Hz
Potencia de salida .............................................................................................................. DC 15V 2A
Máxima potencia de salida.................................... 2x5 W (Principal) + 20W (parlante auxiliar
Dimensiones........................................ 13,11 x 8,46 x 9,88 pulgadas (33 x 21,5 x 25,1 cm)
Peso........................................................................................................................ 4,84 libras (2,2 kg)
PILAS RECARGABLES
Tipo de pilas..........................................................Pilas de Polímero de litio de 11,1V 1700mAh
Voltaje de carga......................................................................................................................... 15V CC
Tiempo de funcionamiento.................................Aproximadamente 4 horas con el volumen al
.............................................................................50% luego de haberlas cargado completamente
Tiempo de carga................................................................................. Aproximadamente 3,5 horas
BLUETOOTH
Versión Bluetooth................................................................................................................ V2.1+EDR
Distancia de rendimiento ..........................Hasta 10 m (33 pies) medidos en espacio abierto
..........................................(la pared y las estructuras pueden afectar el rango del dispositivo)
Las especificaciones están sujetas a cambios sin previo aviso.
19
Page 21

SMI440-ENG-SPA v1_Layout 1 7/15/13 12:55 PM Page 21
Garantía limitada y Servicio
SINGING MACHINE COMPANY, INC. garantiza que este producto no posee defectos en
sus materiales ni de fábrica por un período de noventa (90) días desde la fecha de venta
al comprador consumidor original. El producto se reparará o reemplazará por uno nuevo
o por un producto reacondicionado sin costo alguno en caso de demostrarse alguna falla
dentro del período de noventa (90) días cuando dicho producto se devuelva a cargo del
cliente dentro del periodo de garantía. ESTA GARANTÍA NO CUBRE NINGÚN GASTO
INCURRIDO EN EL RETIRO O REINSTALACIÓN DE ESTE PRODUCTO.
Esta garantía no se aplica a ningún producto dañado por accidente, mal uso, abuso,
voltaje inapropiado, fuego, agua, relámpagos u otros hechos fortuitos, ni a partes o
servicios suministrados por terceros. La garantía no cubre cajas de cartón, estuches,
pilas, muebles rotos o dañados, o cualquier otro ítem utilizado en relación al producto; ni
daño incidental debido a un defecto en el producto. Esta garantía no cubre productos
vendidos “TAL COMO ESTÁN” o unidades fabricadas nuevamente o vendidas fuera del
canal de distribución de SMC.
TODAS LAS GARANTÍAS IMPLÍCITAS ESTÁN LIMITADAS A LA DURACIÓN DE LA
PRESENTE GARANTÍA. LA PRESENTE ES LA GARANTÍA EN SU TOTALIDAD Y NINGUNA
OTRA GARANTÍA EXPRESA ES VÁLIDA. ALGUNOS ESTADOS NO PERMITEN
LIMITACIONES RESPECTO DE LA DURACIÓN DE UNA GARANTÍA IMPLÍCITA O UNA
EXCLUSIÓN O LIMITACIÓN DE DAÑOS INCIDENTALES O INDIRECTOS, DE MANERA TAL
QUE LAS LIMITACIONES O EXCLUSIONES MENCIONADAS ANTERIORMENTE PUEDEN
NO APLICARSE A USTED. La presente garantía le otorga derechos específicos y usted
puede gozar asimismo de otros derechos, que pueden diferir de estado en estado.
SI LA UNIDAD SE ENCUENTRA FUERA DEL PERIODO DE GARANTÍA,
comuníquese primero al (866) 670-6888 o envíe un correo electrónico a
customerservice@singingmachine.com.
SERVICIO TÉCNICO: THE SINGING MACHINE COMPANY
4060 E. Jurupa Street, Unit B
Ontario, CA 91761
USA
Visite nuestro sitio Web www.singingmachine.com
20
Page 22

SMI440-ENG-SPA v1_Layout 1 7/15/13 12:55 PM Page 22
SMC Logistics
4060 E. Jurupa Street, Unit B
Ontario, CA 91761
PRINTED IN CHINA
IMPRESO EN CHINA
440-1306-EBG01
 Loading...