

Page 1
TM
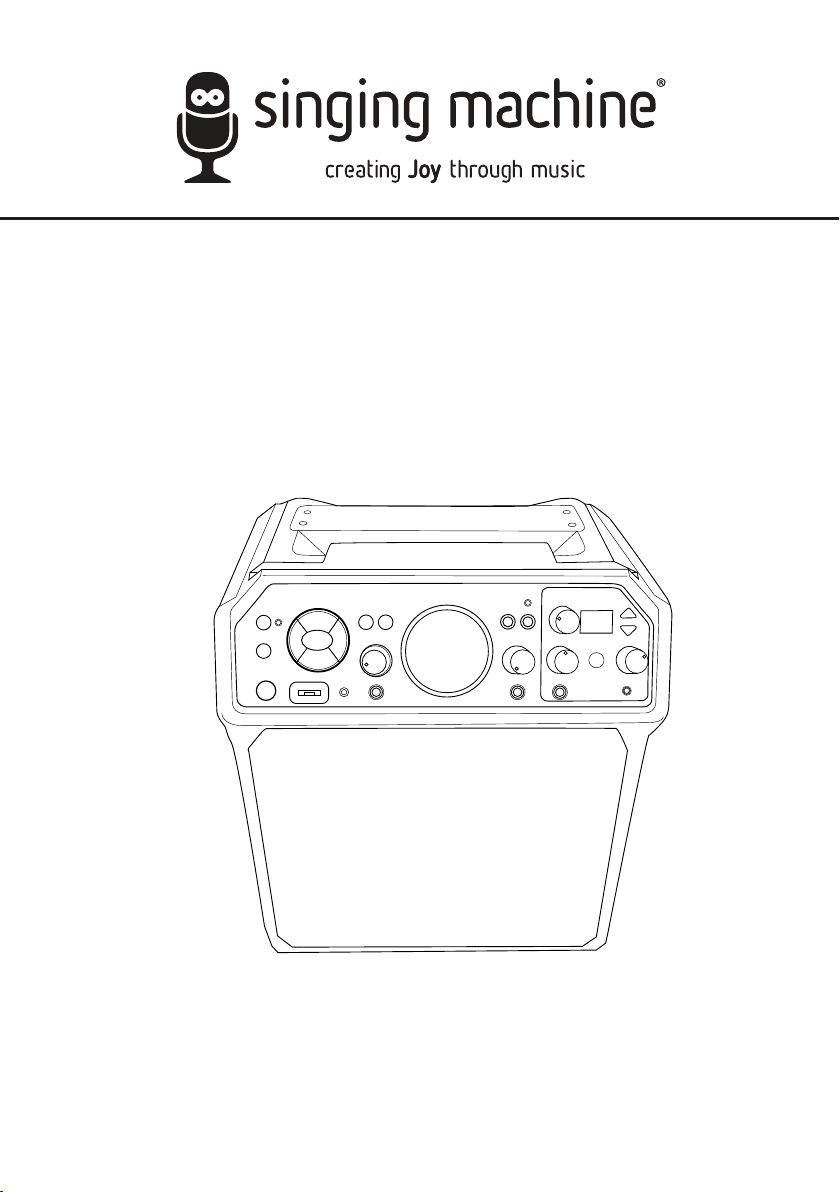
SDL2093 STUDIO
INSTRUCTION MANUAL
www.singingmachine.com
The Singing Machine® is a registered trademark of The Singing Machine Co., Inc.
Page 2

Contents
Warnings and Important Safety Information ..............................................................................1
Included .................................................................................................................................................2
Location of Controls ....................................................................................................................3-5
Connection ...........................................................................................................................................6
Connecting the Microphone(s) .............................................................................................6
Connecting the Unit to a TV ..................................................................................................6
Connecting to AC Power ........................................................................................................7
Connecting Headphones .........................................................................................................7
Changing the Interactive Microphone’s Battery ..............................................................8
Rechargeable Battery ........................................................................................................................9
Singing Machine USB Flash Drive ................................................................................................10
Operation ..........................................................................................................................................11
Microphone Remote Operation .........................................................................................11
Light Mode ..............................................................................................................................12
Function Indicator ..................................................................................................................12
Auto-Tune® ..................................................................................................................... 13-14
Auto-Tune® Advanced Settings ................................................................................15-16
Playing Songs from the USB .......................................................................................17-23
Using a Bluetooth Device ............................................................................................. 24-26
Playing Songs from the Recorded Files .................................................................... 27-28
Using the LINE IN Jack ..................................................................................................29-30
Using the EXTERNAL INPUT Jack .......................................................................................31
Troubleshooting Guide...................................................................................................................32
Updating the Firmware .................................................................................................................. 33
Specifications ..........................................................................................................................33
Page 3
Warnings
CAUTION
RISK OF ELECTRIC SHOCK
DO NOT OPEN
CAUTION: TO REDUCE THE RISK OF ELECTRIC SHOCK, DO NOT
REMOVE COVER (OR BACK). NO USER-SERVICEABLE PARTS
INSIDE. REFER SERVICING TO QUALIFIED SERVICE PERSONNEL.
The Caution marking is located on the bottom panel.
DANGEROUS VOLTAGE: The lightning flash with arrowhead
symbol within an equilateral triangle is intended to alert the
user to the presence of uninsulated dangerous voltage within
the product’s enclosure that may be of sufficient magnitude to
constitute a risk of electric shock to persons.
ATTENTION: The exclamation point within an equilateral
triangle is intended to alert the user to the presence of
important operating and maintenance (servicing) instructions
in the literature accompanying this product.
DRIPPING WARNING: This product shall not be exposed to dripping or
splashing, and no objects filled with liquids, such as vases, shall be placed
on the product.
VENTILATION WARNING: The normal ventilation of the product shall not be
impeded for intended use.
CAUTION: TO PREVENT ELECTRIC SHOCK, MATCH WIDE BLADE OF
PLUG TO WIDE SLOT AND FULLY INSERT.
Le présent appareil est conforme aux CNR d’Industrie Canada applicables
aux appareils radio exempts de licence. L’exploitation est autorisée aux deux
conditions suivantes:
(1) l’appareil ne doit pas produire de brouillage, et
(2) l’utilisateur de l’appareil doit accepter tout brouillage radioélectriqu subi,
même si le brouillage est susceptible d’encompromettre le fonctionnement.
Cet équipement doit être installé et utilisé à une distance minimale de 20
cm entre le radiateur et votre corps.
WARNING: TO PREVENT FIRE OR SHOCK HAZARD, DO NOT EXPOSE
THIS UNIT TO RAIN OR MOISTURE.
FCC WARNING: This equipment may generate or use radio frequency
energy. Changes or modifications to this equipment may cause harmful
interference unless the modifications are expressly approved in the
instruction manual. The user could lose the authority to operate this
equipment if an unauthorized change or modification is made.
This device complies with part 15 of the FCC Rules. Operation is subject
to the following two conditions: (1) This device may not cause harmful
interference, and (2) this device must accept any interference received,
including interference that may cause undesired operation.
NOTE: This equipment has been tested and found to comply with the
limits for a Class B digital device, pursuant to part 15 of the FCC Rules.
These limits are designed to provide reasonable protection against harmful
interference in a residential installation. This equipment generates, uses
and can radiate radio frequency energy and, if not installed and used in
accordance with the instructions, may cause harmful interference to radio
communications. However, there is no guarantee that interference will
not occur in a particular installation. If this equipment does cause harmful
interference to radio or television reception, which can be determined by
turning the equipment off and on, the user is encouraged to try to correct
the interference by one or more of the following measures:
• Reorient or relocate the receiving antenna.
• Increase the separation between the equipment and receiver.
• Connect the equipment into an outlet on a circuit different from that to
which the receiver is connected.
• Consult the dealer or an experienced radio/TV technician for help.
The rating information is located at the back of the unit.
INDUSTRY CANADA NOTICE:
This device complies with Industry Canada license-exempt RSS standard(s).
Operation is subject to the following two conditions: (1) This device may
not cause interference, and (2) This device must accept any interference,
including interference that may cause undesired operation of the device.
This equipment should be installed and operated with a minimum distance
of 20 cm between the radiator and your body.
CAN ICES-3(B)/NMB-3(B)
Important Safety Information
1. Read these Instructions.
2. Keep these Instructions.
3. Heed all Warnings.
4. Follow all Instructions.
5. Do not use this apparatus near water.
6. Clean only with a dry cloth.
7. Do not block any of the ventilation openings. Install in accordance
with the Manufacturer’s instructions.
8. Do not install near any heat sources such as radiators, heat
registers, stoves, or other apparatus (including amplifiers) that
produce heat.
9. Do not defeat the safety purpose of the polarized or groundingtype plug. A polarized plug has two blades with one wider than
the other. A grounding type plug has two blades and a third
grounding prong. The wide blade or the third prong are provided
for your safety. When the provided plug does not fit into your
outlet, consult an electrician for replacement of the obsolete
outlet.
10. Protect the power cord from being walked on or pinched
particularly at plugs, convenience receptacles, and the point
where they exit from the apparatus.
11. Only use attachments/accessories specified by the manufacturer.
12. Use only with a cart, stand, tripod, bracket,
or table specified by the manufacturer, or
sold with the apparatus. When a cart is
used, use caution when moving the cart/
apparatus combination to avoid injury from
tip-over.
13. Unplug this apparatus during lightning
storms or when unused for long periods of
time.
14. Refer all servicing to qualified service personnel. Servicing is
required when the apparatus has been damaged in any way, such
as power-supply cord or plug is damaged, liquid has been spilled
or objects have fallen into the apparatus, the apparatus has been
exposed to rain or moisture, does not operate normally, or has
been dropped.
15. WARNING: To reduce the risk of fire or electric shock, do not
expose this apparatus to rain or moisture. Do not place objects
filled with water, such as a vase, on the apparatus.
16. The AC mains plug is used as the power disconnect device and
it should remain readily accessible and operable during intended
use. In order to completely disconnect the apparatus from
power, the mains plug should be completely removed from the
AC outlet socket.
17. CAUTION: To reduce the risk of fire or explosion, do not expose
batteries to excessive heat such as sunshine, fire or other
— 1 —
heat sources.
Page 4
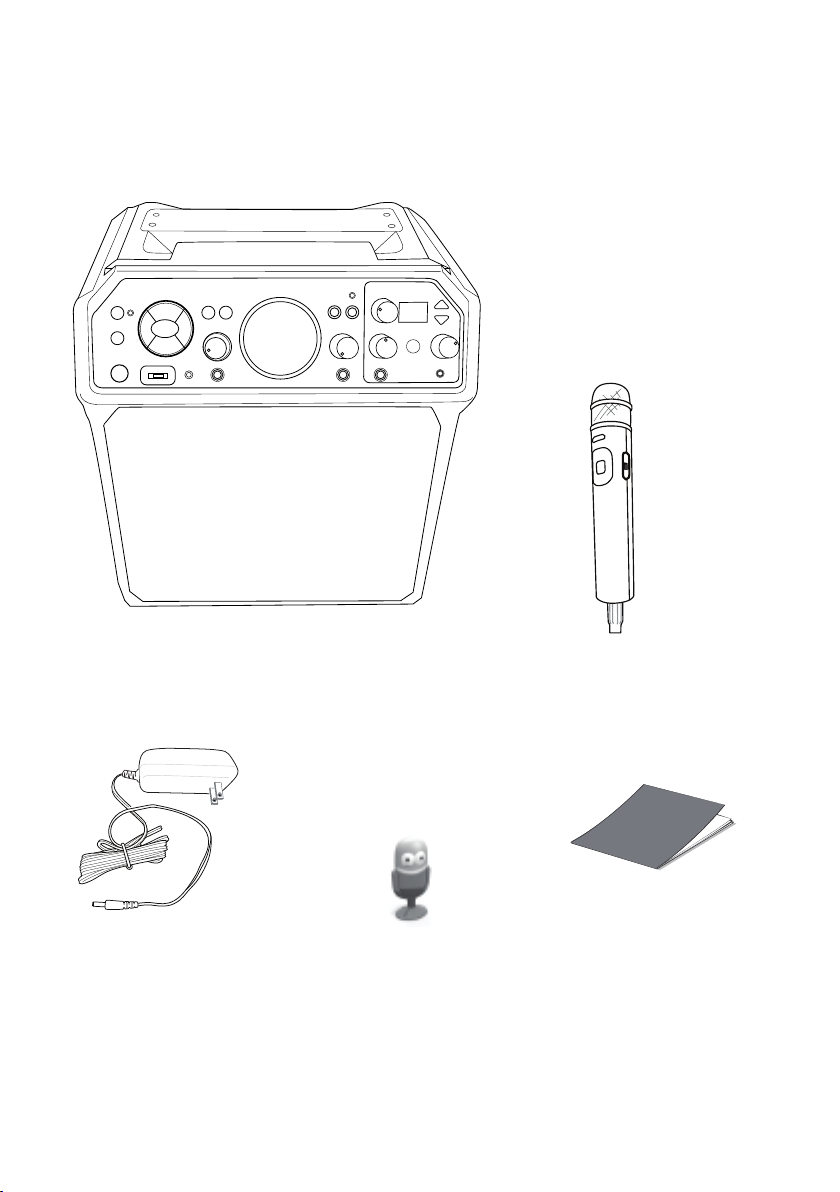
Included
Please make sure the following items are included.
AC Adapter
Main Unit
Wired Interactive Microphone
Manual
Singing Machine Flash Drive
— 2 —
Page 5
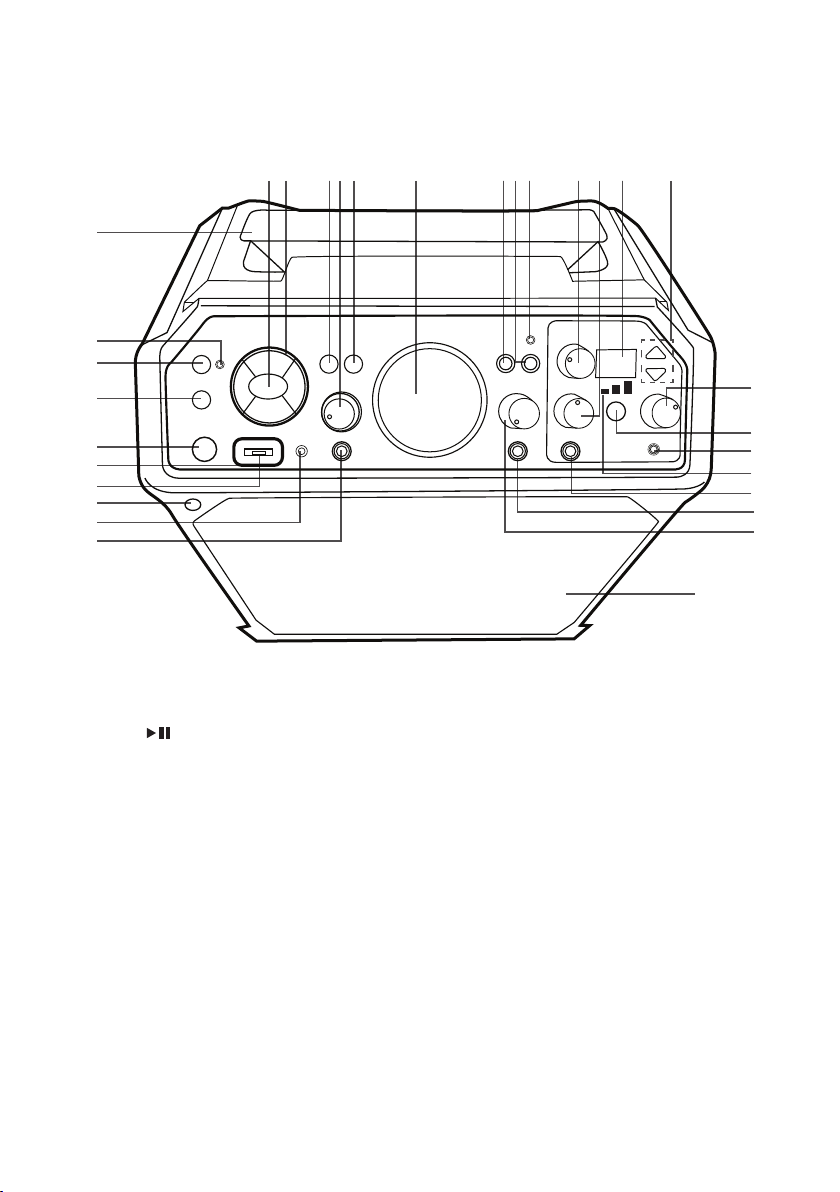
Location of Controls (Front)
22
23
24
25
26
27
28
29
30
31
1. ENTER/ Button
2. Navigation Buttons (Up
5, Right , Down ,
Left Button)
3. FUNCTION Button
4. EXT INPUT VOLUME
Control
5. MENU Button
6. MASTER VOLUME
Control
7. LEAD VOCAL Button
8. RECORD Button
9. RECORD Indicator
53 7 8 96
1
42
10. KEY SELECT/FX LEVEL
Control
11. MIC 1 VOLUME Control
12. Display
13. EFFECTS Up/Down
Buttons
14. HEADPHONES VOLUME
Control
15. AUTO-TUNE® Control
16. Headphones Jack
17. Auto-Tune® Level
18. MIC 1 Jack
19. MIC 2 Jack
10 11
12 13
14
15
16
17
18
19
20
21
20. MIC 2 VOLUME Control
21. Speaker
22. Handle/Cradle
23. Pair Indicator
24. PAIR Button
25. LIGHT MODES Button
26. STANDBY/ON Button
27. Function Indicator
28. USB Port
29. Remote Sensor
30. LINE INPUT Jack
31. EXT INPUT Jack
— 3 —
Page 6
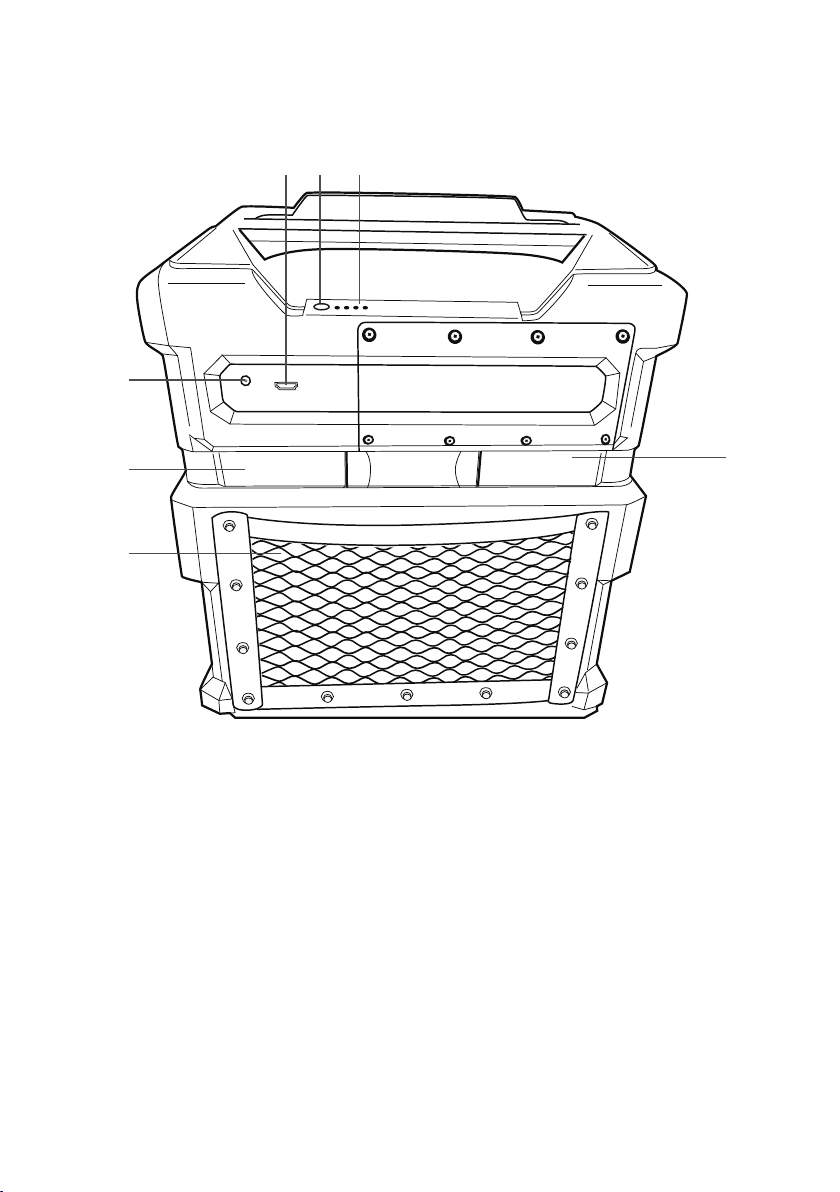
Location of Controls (Rear/Top)
3
21
5
6
7
1. HDMI Jack
2. Battery Level Button
3. Battery Level Indicators
4. Mic Holder (Slides out)
5. DC IN Jack
6. Mic Holder (Slides out)
7. Accessory Storage
4
— 4 —
Page 7
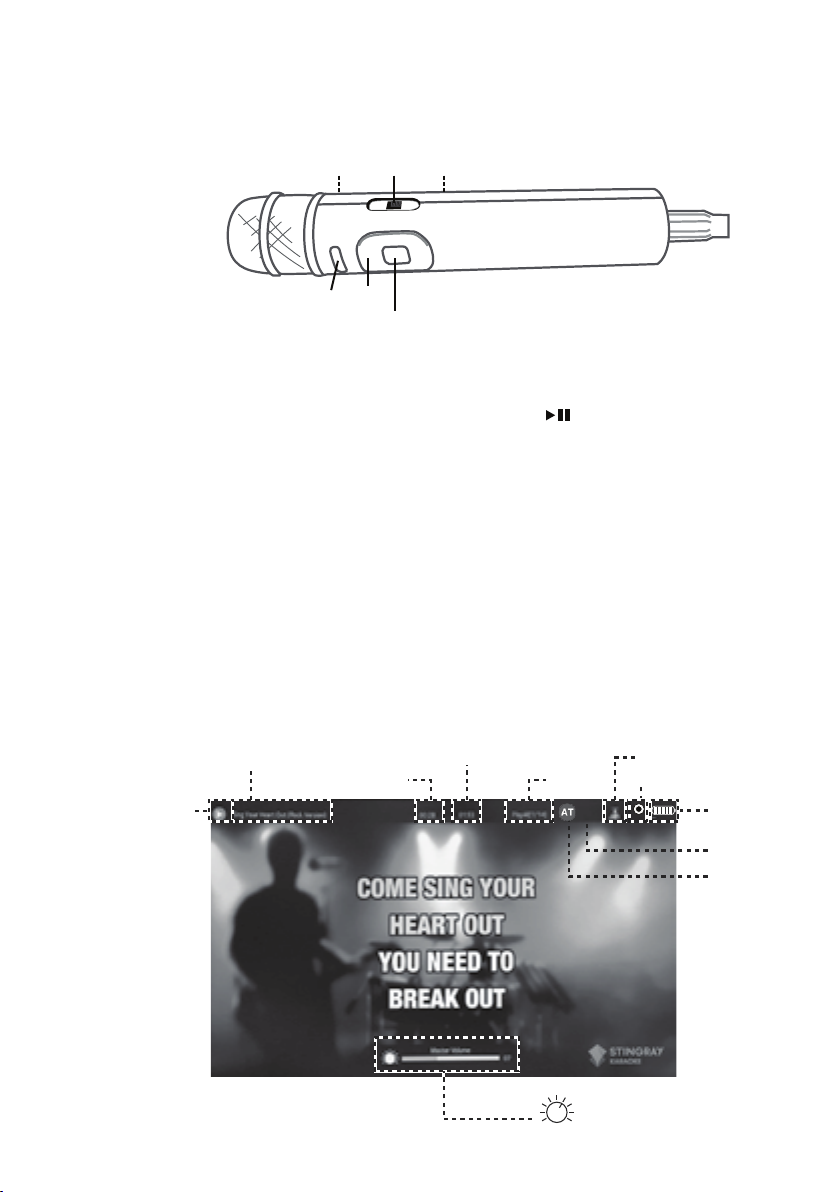
Location of Controls (Mic)
Interactive Microphone
u
y U
w
v
x
1. Mic ON/OFF Switch
2. MENU Button
3. Navigation Buttons
4. ENTER/
5. Remote Transmitter (Rear)
6. Battery Compartment (Rear)
Button
Location of Controls (Playback Display)
Song
Playback Status
Song Title
Song
Elapsed Time
Total Time
Current
Playlist
Lead Vocal Status
Record Status
F
Battery
Status
Key
AutoTune®
— 5 —
Master Volume: 0-20
Page 8
Connection
2
Connecting the Microphone(s)
2
Connecting the Unit to a TV
Microphones:
Connect a microphone into MIC 1 Jack u
as well as MIC 2 Jack v (when desired).
Note:
Do not drop or tap the Mic as damage to
1
the Mic or speakers may occur. Do not
twirl the microphone by the cord as it will
cause damage to the encased wiring.
To output the video, lyrics
and audio to your TV,
perform the following
steps:
HDMI Jack (Out)
Plug the HDMI cable (not
included) into the HDMI
Rear of External TV
HDMI Jack (In)
HDMI IN 1
Jack on the back of the
unit. Plug the other end of
the HDMI cable into the
HDMI input on your TV.
Notes:
• This unit can be used
HDMI Cable
with or without a TV, but
it is highly recommended
to use a TV in order to
utilize all the features.
• Also refer to the TV’s
or external unit’s User
Guide.
— 6 —
Page 9
HDMI Cable
Rear of External TV
HDMI Jack (In)
HDMI IN 1
2
HDMI Jack (Out)
Connection
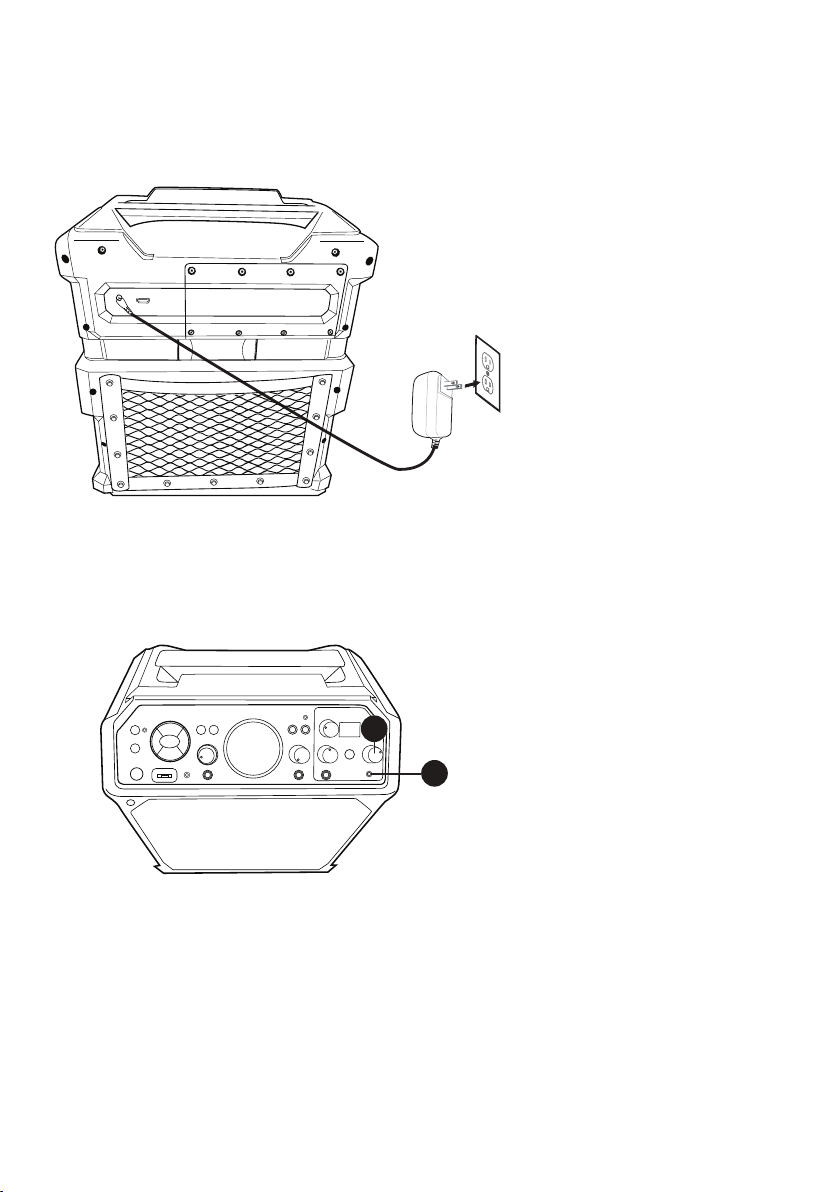
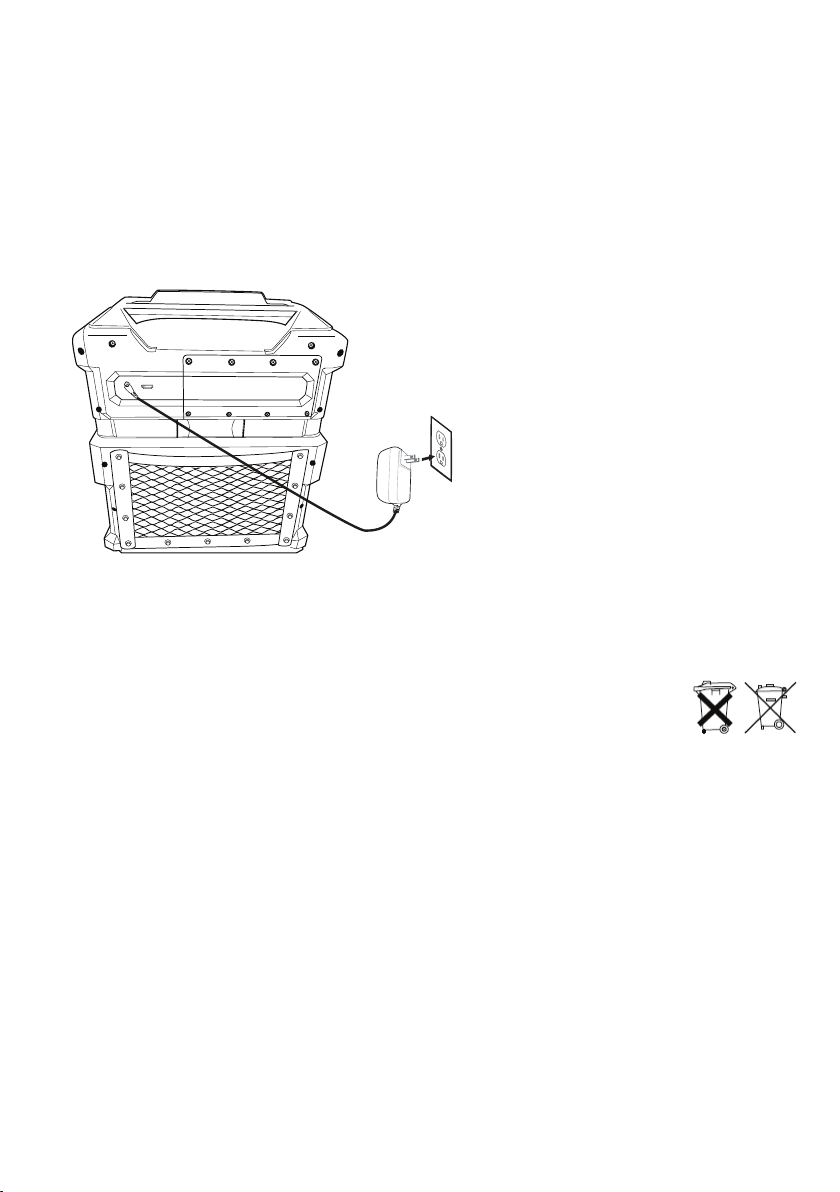
Connecting to AC Power
Connecting Headphones
2
1
Insert the small end of the AC
adapter into the DC IN Jack on
the rear of the unit. Insert the
other end (with the 2 blades)
into a conveniently located AC
outlet having 120V AC, 60Hz.
Note:
Make all connections before
connecting to AC power.
For private listening or to monitor
singing, use headphones (not
included). Insert headphones
into the Headphones jack u. The
headphones have a dedicated
Volume control so rotate the
HEADPHONE VOLUME control
v as desired.
The Headphones jack can also be
used as an audio out to connect
to another audio system using a
3.5mm Auxiliary Audio cable (not
included).
— 7 —
Page 10

Connection
Changing the Interactive Microphone’s Battery
When performance suffers,
change the batteries as follows:
Unscrew the Battery
1
Compartment screw and
remove the door.
CR2032
BATTERY PRECAUTIONS:
Follow these precautions when using batteries in this device:
1. Warning – Danger of explosion if battery is incorrectly replaced. Replace only with the same or equivalent type.
2. Use only the size and type of batteries specified.
3. Be sure to follow the correct polarity when installing the batteries as indicated in the battery compartment. A reversed battery
may cause damage to the device.
4. If the device is not to be used for a long period of time, remove the batteries to prevent damage or injur y from possible battery
leakage.
5. Do not try to recharge a battery not intended to be recharged; it can overheat and rupture. (Follow battery manufacturer’s
directions.)
6. Remove batteries promptly if consumed.
Replace battery with
2
CR2032 button cell battery.
Replace Battery
3
Compartment and screw.
— 8 —
Page 11
Rechargeable Battery
HDMI Cable
Rear of External TV
HDMI Jack (In)
HDMI IN 1
2
HDMI Jack (Out)
This unit comes with a built-in rechargeable battery pack that will allow the unit to be used
without being connected to AC power. The Battery indicator (top of the unit) will show the
battery charge remaining, indicated by the amount of bars.
not user-replaceable.
We recommend to charge the unit once a month so as to keep the battery in the best
condition. When the battery icon turns red and flashing, recharge the unit by following below:
Attention: The sound volume will adjust automatically when the battery is not full.
Note: If you experience battery issues, contact customer service.
Recycling and Disposal Information:
• Do not dispose of electronic devices or any of their components
(especially batteries and LCD displays) in your municipal trash collection.
• Consult your local waste management authority or a recycling
organization like Earth911.com to find an electronics recycling facility in your area.
CAUTION: Rechargeable batteries must be recycled or disposed of properly.
The rechargeable battery pack is
Insert the AC power cord into a
1
conveniently located AC outlet
having 120V AC, 60Hz .
Allow the unit to charge for
2
approximately twelve hours for
a full charge.
Disconnect the AC cord and the
3
fully charged unit is now ready
for use. Battery life can last
up to 25 hours depending on
playback operations.
Lead Acid Battery Warning
• This equipment contains a rechargeable valve-regulated lead acid battery.
• Do not charge the battery in temperatures below 32° F (0° C) or higher than 122° F
(50° C).
• Do not open or mutilate the battery.
• The rechargeable batteries contained in this equipment may explode if disposed of in
a fire.
• Do not short-circuit the battery.
• Do not charge the rechargeable battery pack used in this equipment with any charger
other than the one designed to charge this battery pack, as specified in the owner’s
manual. Using another charger may damage the battery pack or cause the battery pack
to explode.
— 9 —
Page 12

Singing Machine USB Flash Drive
Included with the system is an
8GB Singing Machine USB
Flash Drive which is used for
storing Karaoke songs as well as
recordings from this unit.
There are two songs included on
the Singing Machine USB Flash
Drive but you can access the
Karaoke Store for many more
songs. See Welcome Kit for more
information.
Inserting the USB Flash Drive
Before you insert the Singing
Machine USB Flash Drive, make
sure to remove it from its stand
which will reveal the USB plug.
— 10 —
Insert it into the USB slot on the
unit with the face towards the
top of the unit.
Page 13

Operation
Microphone Remote Operation
The Microphone is also a remote control that can be used to control the unit. See below for
instructions on using the Microphone Remote.
It is very important to point the remote’s sensor at the unit’s remote sensor (see illustration).
This Microphone Remote’s buttons will operate the same way as the main unit’s ENTER,
Navigation and MENU buttons. When a step says to press one of these buttons, you can
use either the unit or the Microphone Remote.
To turn the Microphone On, slide the ON/OFF switch u to the ON position.
u
— 11 —
Page 14

Operation
Light Mode
There are three Light modes.
1
Repeatedly press the LIGHT MODES
button to select a mode as follows:
1
Function Indicator
1
Light Mode 1: The unit will synchronize
to the music being played.
Light Mode 2: The unit will light up with
random colors and patterns.
Light Mode 3: The light effects will be
turned off.
The Function indicator (around
1
the USB port) will change colors
depending on the mode selected as
follows:
Blue: Bluetooth
Green: Line-In
Orange: USB
Purple:
Auto-Tune Advanced Settings
— 12 —
Red: Recordings
Page 15

Operation
Auto Tune®
The Auto Tune® feature is shown in a dedicated area at the front (top right) of the unit.
This will allow you to Auto-Tune® your voice like the professionals.
With the unit on, press the AUTO-TUNE®
1
control button once to activate; the first
Auto-Tune® Level indicator will light. This is
the Natural Auto-Tune® setting and what is
commonly used in the music industry to level
1
out and fix a singer’s voice behind the scenes.
It’s subtle and is meant to provide a natural
fix to a singer’s voice.
Press the AUTO-TUNE® control button
again; the second Auto-Tune® Level
indicator will light. This is a medium level, a
bit stronger than natural but not full intensity
of Auto-Tune®.
Press the AUTO-TUNE® control button
again; the third Auto-Tune® Level indicator
will light. This is the extreme level which is
the iconic sound that has made Auto-Tune®
famous in pop and hip-hop.
Note: Plug mic into mic 1 jack. Auto-Tune®
feature is only available through mic 1 jack.
2
3
— 13 —
The Auto-Tune® default key is set to C. To
2
change, press the KEY SELECT/FX LEVEL
control and the current key will appear.
Rotate the KEY SELECT/FX LEVEL control
to select the desired key, the respective
key tone will sound and be selected.
Press the EFFECTS Up or Down button to
3
select a desired effect. See top of next page
for Effects. Have fun experimenting with the
effect to find the best results for individual
songs.
Page 16

Operation
Auto Tune® (Continued)
Name Display Effect Description
None -- No Vocal Effects
Studio Pop P1 Short ‘n fast echo followed by clean ‘n bright studio plate reverb
80’s Pop P2 A familiar 80’s-style long echo with vocal chorusing
Live Pop P3 Live pop show performance in a large auditorium
Rap H1 School gym echo with a fast & short echo
Hip/Hop H2 Grungy & fast lo-fi echo
Old School MC H3 “Springy” reverb with lots of reflective echoes
Rock Star R1 Big & dramatic reverb for arena-rock legends
Rock Club R2 Rocking out in a small club
Alternative Doubling
Alternative Tape Echo
Concert Hall Co Clean symphony hall reverb with short pre-echo
Lo-Fi Grunge G1 Distorted & filtered megaphone / transistor radio
Garage G2 Primitive yet vintage analog echo effects pedal
Nashville Country CT Classic slapback echo with a twangy reverb
A1 Classic & versatile studio phasing / flanging / doubling effect
A2 Vintage, lo-fi tape echo effect
Rotate the KEY SELECT/FX LEVEL
4
control to set the desired effect
level.
4
5
5
— 14 —
To monitor your singing, use
5
headphones (not included). Insert
headphones into the Headphone jack.
The headphones have a dedicated
Volume control so rotate the
HEADPHONE’S VOLUME control as
desired.
The Headphones jack can also be
used as an audio out to connect to
another audio system using a 3.5mm
auxiliary audio cable (not included).
Page 17

Operation
Auto Tune® Advanced Settings
The Auto Tune® Advanced Settings will allow you to create custom presets and make
adjustments as desired.
Connect the unit to a TV as described
1
previously. Press the STANDBY/ON
button to turn the unit ON.
1
2 2 2
2
Auto-Tune®
AUTO-TUNE®
KEY
SCALE
AUTO-TUNE® LEVEL
Natural Extreme
SAVE AS PRESET
Major
Press the
2
Left
Navigation Right or
button to select the Auto-Tune®
Advanced Settings, then press the
ENTER button; the Function
indicator will light purple. You can also
repeatedly press the FUNCTION
button or press and hold the AUTO-
TUNE® control button to select the
Auto-Tune® Advanced Settings.
You can also press and hold the
microphone’s MENU button to go into
AT advanced settings menu.
While on this screen you can make
3
adjustments to the following AutoTune® and Vocal Effect Settings using
the
Navigation
and ENTER buttons
(see note on next page for more control
options)
:
AUTO-TUNE®: Turn on or off.
KEY/SCALE: When Auto-Tune® is turned
on, set the desired key.
Off
C
MIX LEVEL
ROOM SIZE
MIC 2 EFFECTS
DELAY FX
MIX LEVEL
DELAY
FEEDBACK
BEATS PER MINUTE
Off
ADELETE PRESET
Vocal Effects
REVERB
10050 150 200
Off
None
Off
AUTO-TUNE® LEVEL: Set the slider
for a more Natural or Extreme sound or
anywhere in between.
REVERB: Select from available reverb
options or turn off.
50
MIX LEVEL, ROOMS SIZE: When Reverb is
on, set sliders as desired.
MIC 2 EFFECTS: Set the desired effect for
microphone 2.
DELAY FX: Select from available Delay
options or turn off.
MIX LEVEL, DELAY, FEEDBACK: When
Delay Fx is turned on, set sliders as desired.
BEATS PER MINUTE: Set the slider for the
desired beats per minute.
— 15 —
Page 18

Operation
Auto Tune® Advanced Settings (Continued)
4 4
4
5
Note:
The previous steps showed how to adjust
the settings using the
ENTER buttons on the main unit. You
can also use the following controls:
•
Navigation
the mic’s remote.
•
KEY EFFECT/FX LEVEL
rotated and pressed.
To save a preset (you can save two
presets, names A and B), use the
4
Navigation
PRESET, then press the ENTER
button. Use the Navigation Right
or Left button to select a desired
preset (A or B), then press the ENTER
button to save.
The saved preset (A or B) will be
5
shown on the unit’s display. To
manually select it, press the EFFECTS
Up or Down button to cycle through
the options. The presets will now be
one of the available vocal effects and
machine display with show custom
preset as A or B.
Navigation
and ENTER buttons on
buttons to select SAVE AS
and
control can be
6 6
6
— 16 —
To delete a preset, use the
buttons to select DELETE PRESET,
6
then press the ENTER button.
Use the Navigation Right or
Left button to select the preset to
delete, then press the ENTER
button to delete.
Navigation
Page 19

Operation
Playing Songs from the USB
1
3
Connect the unit as described
1
previously. Press the STANDBY/ON
button to turn the unit ON.
Remove the provided Singing
2
Machine flash
drive from its
stand to reveal
the USB plug.
Insert it into the USB slot on the unit
so it faces upward.
Note:
The Singing Machine flash drive has an
8GB capacity (the actual capacity may
vary slightly).
The USB mode will be selected by
3
default; press the ENTER button
to enter the USB mode; the Function
indicator will light orange. You can
also repeatedly press the FUNCTION
button until the Function indicator
lights orange to select the USB mode.
3
BLUETOOTH®
— 17 —
to Music
RECORDINGS
Listen
Play your
Recordings
USB
Sing your
Karaoke Songs
• A loading icon will appear on
the TV when the system is loading the
songs.
• The USB mode cannot be accessed
until a flash drive is inserted.
• Unit must be connected to a TV to
access the USB song list. Songs will not
display on this unit’s mini display.
LINE-IN
Playback
your Music
AUTO-TUNE®
Advanced
Settings
Page 20

Operation
Playing Songs from the USB (Continued)
4
5
V
6 8
Use the Navigation 5 Up and
4
Down buttons to navigate through
the list of songs that you have
previously downloaded on your USB.
Press the ENTER button to start
5
the playback. The HD karaoke video
will play on the TV. Press the ENTER
button during playback to pause
the song. Press the MENU button
at any time to go back to the USB
menu.
Adjust the volume to a comfortable
6
level using the MASTER VOLUME
control.
Note:
• If connected to a TV, you can also
control the TV’s volume with the TV’s
volume control.
8
— 18 —
Connect the microphone(s). Slide
7
the Mic’s ON/OFF switch to the ON
position.
Adjust the MIC VOLUME 1 or 2
8
control as desired. Increasing this will
increase the volume of the respective
microphone.
Page 21

Operation
Playing Songs from the USB (Continued)
10
11
9
12 12
LEAD VOCAL: To sing with the lead singer
9
on the recording press the LEAD VOCAL
button; “ ” will appear at the top right
of the TV screen). To listen to music only,
press the LEAD VOCAL button again; “ ”
will appear over the Lead Vocal Status icon.
Note:
The song must be recorded with separate
vocals that is downloaded (aka multiplex
recording) in order to utilize the Lead Vocal
function.
SKIP: Advance or go back one
10
11
track (not video) by pressing the
Navigation Right or Left button.
TO ADVANCE ON THE TRACK:
During playback, press and hold the
Navigation Right or Left button
to move forward or backward through
the song. When you release the
button, normal playback will resume.
12
12
— 19 —
AUTO-TUNE®: See pages 13 to 16
for more details. Press the AUTO-
TUNE® control button once to
activate; the first Auto-Tune® Level
indicator will light, this is Natural
Auto-Tune®, it will give a singer’s
voice a subtle enhancement to stay
on key. Press a second time for a
stronger enhancement and a third
time for Extreme Auto-Tune® effect.
Press the EFFECTS Up or Down
button to select a desired effect (see
page 14). Rotate the KEY SELECT/
FX LEVEL control to select the
desired level which will be indicated
temporarily on the display.
Page 22

Operation
13
Playing Songs from the USB (Continued)
13
RECORDING YOUR SINGING:
13
To record your singing as well as the
music, press the Record button;
recording will begin and the record
indicator will light.
When done recording, press the
Record button again; the Record
indicator will turn off.
Notes:
• The recorded audio file will record onto the
USB drive.
• The recorded audio file will be named
starting with the Karaoke song title.
• See “Playing Songs from the Recorded
Files” section on page 27 to play back your
recorded files.
SEARCHING BY ARTIST OR TITLE:
14
Note:
• You can search up to six letters; after the
While in the USB menu, select Search
using the Navigation Left and
Right buttons, then press the
ENTER button. The alphabet
will appear at the bottom of the TV
screen. Select the desired starting
letter using the MASTER VOLUME
control, then press the ENTER
button to select it. A list of songs
that meet the criteria will appear. Use
the Navigation 5 Up and Down
buttons to navigate through the list
of songs, then press the ENTER
button to play your selection, or
select the next letter the same way.
sixth letter the search will reset.
— 20 —
Page 23

Operation
Playing Songs from the USB (Continued)
SEARCHING BY GENRE, ARTIST
15
Note:
• You can search up to six letters; after the
or TITLE:
or Title
Title
and right buttons, then press the
ENTER button. The alphabet
will appear at the bottom of the TV
screen; select the desired starting
letter using the MASTER VOLUME
control, then press the ENTER
button to select it. A list of songs
that meet the criteria will appear. Use
the Navigation 5 Up and Down
buttons to navigate through the list
of songs then press the ENTER
button to play your selection, or
select the next letter the same way.
sixth letter the search will reset.
To filter by Genre, Artist
, select
using the Navigation left
the Genre, Artist, or
Add Added
CREATING THE PLAYLIST: To create a
16
Notes:
• The personalized Playlist will be kept even if
• You can always edit your Playlist after you
— 21 —
personalized playlist, select a song using
the Navigation 5 Up and Down
buttons, then scroll to the Playlist
column (Add) using the Navigation
Right or Left button. Press the
ENTER button
operation; “Added” will appear. Repeat
this step to add more songs.
the unit is turned on or off.
create it by selecting a song that was added
and pressing the
“Added” will change to “Add”.
ENTER button
to confirm the
again;
Page 24

Operation
Playing Songs from the USB (Continued)
USING THE PLAYLIST:
17
TO PLAY ALL:
PRIORITY:
a. Select priority and then navigate down
b. Press the Navigation Right button
c. After setting all songs on your priority
d. Use the Navigation Down button
e. To change the Priority list, navigate up
RM ALL: To remove the whole Playlist,
— 22 —
previously created playlist, select Playlist
using the Navigation Right and
Left buttons, then press the
button; the row under Playlist will be
highlighted. Select the desired selection
using the
Left buttons
press the
back all of the Playlist songs. (See next
page to add favorites.)
to the song you want to prioritize.
and the numbers will change to 0001,
0002 etc. According to the numbers
displayed the songs will be listed in that
order from top to bottom.
list press the MENU button then the play
list will be highlighted.
to select the first song and press the
ENTER button
of all songs on the play list
and down to select the songs you want
to play in the order you desire.
REMOVE:
select a song to remove using
Navigation 5 Up and Down buttons.
Press the ENTER button; the song
will be deleted from the playlist.
select RM ALL and then
ENTER button; the whole Playlist
will be deleted.
Navigation Right and
as follows:
Select Play All and then
ENTER button
Select Remove and then
To play your
ENTER
to play
to start the playback
the
press the
Page 25

Operation
Playing Songs from the USB (Continued)
<PLAY ALL> <PRIORITY>
CREATING FAVORITES: To create a
18
Notes:
• The Favorites will be stored even if the unit is
• You can always edit Favorites after you create
favorite playlist, select a song using
the Navigation 5 Up and Down
buttons, then scroll to the Favorite
column using the Navigation Right
or Left button. Press the
button
to confirm the operation; the
icon will turn from white to blue. Repeat
this step to add more songs.
turned on or off.
them by selecting a song that was added and
pressing the
icon will change from blue to white.
ENTER button
ENTER
again; the
<RM ALL> <REMOVE>
20
USING THE FAVORITES PLAYLIST:
19
20
Note:
When in the Menu screen, press the MENU
button to go back and change categories;
i.e. while in the Playlist column press the
MENU button to go back and then select
the Artist column, etc.
— 23 —
To play or edit your previously created
Favorite playlist, you can use the
Navigation Right and Left
buttons to select the Favorite tag.
Then press the
show the favorites list. Perform the
same steps as shown in the USING THE
PLAYLIST section on the previous page
to play and edit the Favorite playlist.
Press the STANDBY/ON button to
turn the unit off.
ENTER button
to
Page 26

Operation
Please connect your Music Device
Your Music Device is connected
Using a Bluetooth Device
2
2
1
Please connect your Music Device
Your Music Device is connected
Connect the unit as described previously.
Press the STANDBY/ON button to turn the
1
unit on.
Press the
2
button to select the Bluetooth mode, then
press the ENTER button; the Function
indicator will light blue.
Note: Bluetooth pairing mode can be entered
at anytime by pressing the PAIR button.
You can also repeatedly press the
FUNCTION button to select the Bluetooth
mode. The Bluetooth indicator will blink to
show the unit is ready to pair and “Please
connect your Music Device” will appear in
the monitor.
Turn on your device’s Bluetooth option in
3
settings to search for a discoverable device
with a Bluetooth signal. Select “Singing
Machine STUDIO” from the device results
on the Bluetooth menu.
Notes:
• Always refer to the user manual of your
Bluetooth device for detailed instructions.
• You can also press the PAIR button to
disconnect any paired devices in order to pair
another device.
Navigation Right or Left
3
The Bluetooth indicator will light solid and
4
the monitor will display ”Your Music Device
is connected”.
Notes:
• If your Bluetooth device prompts you for a
passcode during the pairing process, please
enter “0000” to connect.
• On some Bluetooth devices, once pairing is
complete, select your Bluetooth device as
“Use as Audio Device” or similar.
4
• If connection is lost after successful pairing,
check to make sure the distance between
speaker and Bluetooth-enabled device does
not exceed 30 ft/10 meters.
— 24 —
Page 27

Operation
Using a Bluetooth Device (Continued)
Note: You can view the lyrics on your mobile device/tablet and get more songs by
downloading the “The Singing Machine Mobile Karaoke App”; refer to the Welcome Kit for
more information.
5 6
V
9
10
10
You can control your Bluetooth device
5
to start the music playback OR press the
ENTER button to start playback.
Press the ENTER button during
playback to pause the song.
Adjust the volume to a comfortable level
6
using the MASTER VOLUME control on
this unit as well as the Volume on your
Bluetooth device.
Note:
If connected to a TV, you can adjust the TV’s
volume as well.
Connect the microphone(s). Slide the
7
Mic’s ON/OFF switch to the ON position.
Adjust the MIC VOLUME 1 or 2 control
8
as desired. Increasing this will increase the
volume of the respective microphone.
SKIP: Advance or go back one track by
9
pressing the Navigation Right or
Left button.
8 8
10
— 25 —
A
UTO-TUNE®: See pages 13 to 16
10
for more details. Press the AUTO-
TUNE® control button once to
activate; the first Auto-Tune® Level
indicator will light, this is Natural AutoTune®, it will give a singer’s voice a
subtle enhancement to stay on key.
Press a second time for a stronger
enhancement and a third time for
Extreme Auto-Tune® effect. Press the
EFFECTS Up or Down button to select
Page 28

Operation
11
Using a Bluetooth Device (Continued)
a desired effect (see page 14). Rotate
the KEY SELECT/FX LEVEL control to
select the desired level which will be
indicated temporarily o
n the display.
11
RECORDING YOUR SINGING:
11
To record your singing as well
as the music, press the Record
button; recording will begin and the
Record indicator will light.
When done recording, press the
Record button again; the Record
indicator will turn off.
Notes:
• The recorded audio file will record onto
the USB drive.
• The recorded audio file will be named
with the “BT” prefix.
• See “Playing Songs from the Recorded
Files” section on page 27 to play back
your recorded files.
Press the STANDBY/ON button to
12
turn the unit off.
12
— 26 —
Page 29

Operation
Playing Songs from the Recorded Files
2
2
Connect the unit as described previously
and make sure a USB drive is inserted
1
into the USB port. Press the STANDBY/
ON button to turn the unit on.
Press the
2
Left
1
3
4
5
mode and press the ENTER button
to continue; the Function indicator
will light red. You can also repeatedly
press the FUNCTION button until the
Function indicator lights red to select
the Recordings mode.
Notes:
• The Recording mode cannot be entered
unless a USB flash drive is inserted.
• A loading icon
system is loading the files.
Use the Navigation 5 Up and Down
3
buttons to navigate through the list of
recorded files that you have previously
recorded on your USB drive.
Navigation Right or
button to select the Recordings
will appear when the
4
5
— 27 —
Press the ENTER button to start
the recorded audio file playback. Press
the ENTER button during playback
to pause the file.
Adjust the volume to a comfortable
level using the MASTER VOLUME
control.
Page 30

Operation
Playing Songs from the Recorded Files (Continued)
U
You can sing along with your
6
previously recorded song. Simply
connect the microphone(s). Slide
the Mic’s ON/OFF switch to the ON
position.
Adjust the MIC VOLUME 1 or 2
7
control as desired. Increasing this will
increase the volume of respective
microphone.
7
Notes:
7
• You can search for a title using the same
procedure as shown on page 20.
• You can set and play a Playlist or
Favorite using the same procedure as
shown on pages 21 to 23.
— 28 —
Page 31

Operation
Using the LINE IN Jack
1
2
3 4
3
Connect the unit as described
previously. Press the STANDBY/ON
1
button to turn the unit on.
Connect the external unit to the LINE
2
INPUT Jack using a 3.5mm auxiliary
audio cable (not included). Connecting
an external unit will allow the audio
to be played through your Singing
Machine.
Notes:
• It is highly recommended to set the
volume on the auxiliary unit to 1/3 or
lower to avoid distortion.
• Skipping files/tracks is not possible in this
unit when using an external device.
Press the
3
Left
and press the ENTER button to
continue; the Function indicator will
light green. You can also repeatedly
press the FUNCTION button until
the Function indicator lights green to
select the Line In mode.
Navigation Right or
button to select the Line In mode
y
4
5
— 29 —
Adjust the volume using the MASTER
VOLUME control on this unit or
external device.
Connect the microphone(s). Slide
the Mic’s ON/OFF switch to the ON
position.
Page 32

Operation
Using the LINE IN Jack (Continued)
Adjust the MIC VOLUME 1 or 2
6
control as desired. Increasing this will
increase the volume of the respective
microphone.
6
6
7 7
7
8
9
AUTO-TUNE®: See pages 13 to 16
7
for more details. Press the AUTO-
TUNE® control button once to
activate; the first Auto-Tune® Level
indicator will light, this is Natural AutoTune®, it will give a singer’s voice a
subtle enhancement to stay on key.
Press a second time for a stronger
enhancement and a third time for
Extreme Auto-Tune® effect. Press
the EFFECTS Up or Down button to
select a desired effect (see page 14).
Rotate the KEY SELECT/FX LEVEL
control to select the desired level
which will be indicated temporarily on
the display.
To record your singing as well as the
8
music, press the Record button;
recording will begin and the Record
indicator will light.
When done recording, press the Record
button again; the Record indicator will
turn off..
Notes:
• The recorded audio file will record onto
the USB drive.
• The recorded audio file will be named
with the “LINEIN” prefix.
• See “Playing Songs from the Recorded
Files” section on page 27 to play back
your recorded files.
9
— 30 —
Press the STANDBY/ON button to
turn the unit off.
Page 33

Operation
Using the EXTERNAL INPUT Jack
2
1
2
Connect the unit as described
previously. Press the STANDBY/ON
1
button to turn the unit on.
Connect the external unit to the
2
EXTERNAL INPUT jack using a 6.3mm
cable (not included). Connecting an
external unit will allow the audio to be
played through your Singing Machine.
Adjust the external input’s volume
using the EXT INPUT VOLUME
control.
Notes:
• It is highly recommended to set the
volume on the auxiliary unit to 1/3 and
the EXT INPUT VOLUME control on this
unit to 1/3 as well to avoid distortion.
• Skipping files/tracks is not possible in this
unit when using an external device.
3
— 31 —
Play the device connected to the
EXTERNAL INPUT jack and it will play
through this unit regardless of the
function selected.
Page 34

Troubleshooting Guide
Should this unit exhibit a problem, check the following before seeking service:
No Power
• Power is not on; press the STANDBY/ON button to turn power ON.
• Make sure the unit is connected to AC power
• Confirm the AC adapter is connected securely to the back of the unit.
• Connect the unit to a different outlet.
No Sound – General
• Master Volume is set to minimum; raise volume.
• Correct Function was not selected; select using the Navigation buttons or by pressing
the FUNCTION button.
No Sound – If connected to a TV
• Volume on the TV is muted or too low.
• Correct source (usually HDMI) was not selected on the TV’s menu.
Lyrics do not appear on the TV screen (if connected)
• If connected to a TV, HDMI plug is not connected properly; see page 6.
• If connected to a TV, select the correct source on the TV (usually HDMI).
• The file/track being played is not a track recorded with lyrics. These are the only files
that allow you to view the lyrics on the TV screen.
No sound from the microphone
• Make sure the microphone is firmly connected to the MIC 1 or MIC 2 Jack.
• Make sure the Mic’s ON/OFF switch on the Mic is set to the ON position.
• Make sure the microphone volume is not on the lowest setting.
• MASTER VOLUME control is set to minimum; raise volume.
File(s) on USB are not playing
• The file is corrupted; replace the file.
• The file is not in a format this unit will play.
• The connected USB device is not supported by the product.
The Bluetooth device cannot be paired or connected with the unit
• Ensure any other Bluetooth devices are turned off to avoid accidental pairing.
• You have not activated the Bluetooth function of your device; see page 24 or refer to
the Bluetooth device user’s manual.
• The system is not in pairing mode; press the PAIR button to restart pairing.
The Music is not available on the unit after successfully connecting the Bluetooth
• Ensure your Bluetooth device can support the A2DP Bluetooth profile.
• The volume on the external Bluetooth device is set to low or muted; raise as desired.
— 32 —
Page 35

Updating the Firmware
Make sure the Singing Machine USB Flash Drive, is securely plugged into the USB slot
before running the update. DO NOT interrupt the update. If interrupted during the update
process; the software can become corrupted and the unit will no longer function properly.
1. Create a folder on the Singing Machine USB Flash Drive named “user_updata”
2. Download the latest software (e.g xxxxxx.img) from www.singingmachine.com/
softwareupdates and save it into this folder.
3. Plug the Singing Machine USB Flash Drive into the USB jack on the unit and turn the
unit on.
4. The unit will update automatically.
Specifications
AUDIO
Output Power .................................................................................................................50 Watts (RMS)
Output Impedance ........................................................................................................................ 4 Ohms
BLUETOOTH
Bluetooth Version ..................................................................................................................... V2.1+EDR
Working Distance ...........................................Up to 30 feet/10 meters measured in open space
USB
Format .................................................................................................................................................FAT32
Maximum Compatibility ..................................................................................................................32GB
RECORDED FILE
MP3 Encoding ..............................................................................................................................128kbps
JACK
Microphone .......................................................................................... 6.3 mm Microphone Jacks (2)
GENERAL
Power ............................................................................................................ AC 100-240V, 50-60 Hz
Dimensions - Main Unit ........................................................................................xxx inches (xxx cm)
Weight - Main Unit ............................................................................................................xxxlbs xxx Kg
Microphone ........................-74 dB 600 Ohms impedance with 6.3 mm Dynamic Microphone
Specifications are subject to change without notice.
— 33 —
Page 36

Visit Our Website: www.singingmachine.com
Copyright © 2018 - All Rights Reserved.
The Singing Machine Company, Inc.
4060 E Jurupa Street, Unit B
Ontario, CA 91761-1413 USA
— 34 —
PRINTED IN CHINA
xxxxxxx
 Loading...